

Page 1

Data Protector Express
User’s Guide
tc330–96002
art number: *TC330–96002*
P
First edition: October 2010
Page 2

Legal and notice information
© Copyright 1999, 2010 Hewlett-Packard Development Company, L.P.
Under copyright laws, the contents of this document may not be copied, photocopied, reproduced, translated or reduced to any
electronic medium or machine-readable form, in whole or in part, without prior written consent of Hewlett-Packard Limited. All
rights reserved.
Windows™ and Windows NT™ are registered trademarks of Microsoft Corporation.
Linux™ is a registered trademark of Linus Torvalds. Red Hat™ is a registered trademark of Red Hat, Inc. SuSE™ is a registered
trademark of SuSE Linux Products G m bH, a Novell business.
Printed in the US.
Page 3

Contents
Beforeyoubegin ......................... 9
Intendedaudience..................................... 9
Editions ......................................... 9
Relateddocumentation................................... 9
Documentconventionsandsymbols ............................. 9
Releasenotes....................................... 10
HPtechnicalsupport.................................... 10
1Overview ........................... 13
Concepts......................................... 13
ASimple,ImmediateBackup ................................ 15
RestoretoaDifferentLocation................................ 16
2 Administering Backup ...................... 19
UsingtheAdministrator................................... 19
DataProtectorExpressAdministrator ........................... 19
Propertypages .................................... 20
Openingpropertypages.............................. 20
Missingfeatures.................................... 20
UsingQuickAccessfromTaskbar .............................. 21
ViewingDataProtectorExpressstatus........................... 21
AccessingDataProtectorExpressfunctions ........................ 22
Jobs....................................... 22
Alerts ...................................... 22
Logs....................................... 22
SettingsandOtherCommands ............................. 23
Settings ..................................... 23
OtherCommands ................................. 23
AbouttheDataProtectorExpressService ........................... 24
MicrosoftWindowsandtheDataProtectorExpressService ................. 24
LinuxandtheDataProtectorExpressDaemon ....................... 24
3BackupJobs .......................... 25
SelectingFiles....................................... 25
Marking files ..................................... 25
SelectingDevices ..................................... 26
Encryption ........................................ 26
Configuration....................................... 26
ScheduleSettings ................................... 26
Scheduletype................................... 26
Starttime..................................... 26
RotationtypeandSets ............................... 27
Type of fixedrotation................................ 27
ModeSettings..................................... 27
Backupmode................................... 27
AutoVerifymode ................................. 28
Writemode.................................... 28
SplitFile ..................................... 28
ScheduledDates.................................... 29
User’s Guide
3
Page 4

IntervalSettings .................................... 29
Mediatobeused ................................... 29
Autoformat...................................... 29
Autoformatmode................................. 29
Newmedialocation................................ 30
Movemediatonewmedialocationonoverwrite.................... 30
Renamemediatonewmedianameonoverwrite.................... 30
NewMediaName ................................ 30
AdvancedSettings..................................... 30
AdvancedOptions................................... 30
Settingsforallplatforms .............................. 31
SettingsforWindows................................ 31
LogOptions ..................................... 31
Execution....................................... 31
BarcodeFilter..................................... 32
CopyPolicies ..................................... 32
4RestoreandVerifyJobs...................... 33
SelectingFiles....................................... 33
SelectingFiles..................................... 33
SelectingVersions................................... 33
Restoring folders compared with restoring files..................... 34
RestoringFileswithNewNamesandLocations....................... 34
Restoring a filewithanewname........................... 34
Restoring filesandfolderstoadifferentfolder ..................... 35
SelectingDevices ..................................... 35
Configuration....................................... 35
AdvancedSettings..................................... 35
AdvancedOptions................................... 35
AdvancedRestoreOptions ............................. 35
AdvancedVerifyOptions.............................. 36
LogOptions ..................................... 37
Execution....................................... 37
BarcodeFilter..................................... 37
5WorkingWithDevices . ..................... 39
SelectingDevicesinJobs.................................. 39
DeviceProperties ..................................... 39
DeviceCommands..................................... 40
SharingstoragedevicesonaSAN.............................. 43
6WorkingwithTapeLibraries ................... 45
Installation and Configuration................................ 45
BarcodesandMIC(memoryincartridge)........................... 46
BarcodeFilters ...................................... 46
InitializationProcess .................................... 46
MediaManagement.................................... 47
7Scheduling,Rotations,andMediaManagement........... 49
BackupScheduleConsiderations............................... 50
SchedulingConcepts.................................... 50
MediaSets...................................... 50
Intervals ....................................... 50
ImplicationsforRestoringData............................ 51
MediaRotationTypes ................................... 52
NoRotationType ................................... 52
FixedRotationTypes .................................. 52
4
Page 5

DailyAppend..................................... 52
SimpleandGFSRotationTypes ............................. 53
Custom........................................ 53
Comparingrotationtypes................................ 53
RunningJobswithRotations................................. 53
8EncryptionandCompression ................... 55
Encryption ........................................ 55
CryptographicAlgorithms................................ 55
Passphrase ...................................... 56
EncryptionOptions .................................. 56
Compression ....................................... 57
KeyManagement ..................................... 57
9WorkingwithThird-PartyApplications ............... 59
MicrosoftExchangeServer ................................. 59
ConfiguringaMicrosoftExchangeServer ......................... 59
BackingupMicrosoftExchangeServer .......................... 60
RestoringMicrosoftExchangeDatabases ......................... 61
DisasterRecoverywithMicrosoftExchangeServer ..................... 62
WorkingwithMicrosoftSQLServer.............................. 64
MicrosoftSQLserverconcepts.............................. 64
ConfiguringtheMicrosoftSQLServer........................... 65
BackupingupMicrosoftSQLServer............................ 66
MicrosoftSQLServerDatabasesandthebackupmode ................. 66
UsingDataProtectorExpresswithSQLServer’sBackupRoutine.............. 66
RestoringMicrosoftSQLServer ............................. 67
RestoringMicrosoftSQLServeruserdatabases....................... 67
RestoringMicrosoftSQLServermasterdatabases...................... 69
ProtectingMicrosoftWindowsSharePointServices ....................... 69
WindowsSharePointServicesprotectionconcepts ..................... 69
ProtectingWindowsSharePointServices ......................... 69
RestoringSharePointServices .............................. 70
UsingDisasterRecoverywithWindowsSharePointServices ................. 71
Working with CertificateServices .............................. 71
10 Disast er Re cove ry ....................... 73
Bootabledevices ..................................... 73
Importantguidelines .................................... 74
Media........................................ 74
Replacinghardware .................................. 74
CreatetheDisasterRecoveryBackup............................. 74
Createfullbackup................................... 75
Createbootablemedia................................. 75
Whentocreatenewbootablemedia........................... 76
TestingDisasterRecoveryMedia............................... 76
RecoveringFromaDisaster ................................. 77
DisasterrecoveryforolderWindowsandLinux....................... 77
DisasterRecoverywithLibraries ........................... 79
RecoverSystemState(Windowsonly)......................... 79
RecoverWindowsActiveDirectory(Windowsonly)................... 80
DisasterrecoveryfornewerWindows........................... 80
Limitations ........................................ 82
11AdvancedJobOptions ..................... 83
JobLogoptions ...................................... 83
LogType....................................... 83
User’s Guide
5
Page 6

Log fileformats .................................... 83
Save log to a file ................................... 83
E-maillog ...................................... 84
Auditing ....................................... 84
Execution......................................... 84
PreExecutionCommands................................ 84
PostExecutionCommands................................ 84
Logs......................................... 85
DomainLevelBarcodeFilters ................................ 85
Filterrules ...................................... 85
12 B a cku p D o main C o nfiguration .................. 87
E-mailSettings....................................... 87
ExecutionOptions..................................... 87
BarcodeFilter....................................... 87
PerformanceSettings.................................... 87
AlertSettings ....................................... 88
ClientUpgradeSettings .................................. 88
DomainSecurity...................................... 88
Options ....................................... 88
SettingaUserPassword ................................ 88
Index .............................. 91
6
Page 7

Figures
1
BasicArchitecture................................ 13
User’s Guide
7
Page 8

Tables
1
Iconviewingstatus ............................... 21
2
Creatingjobs ................................. 22
3
Elementstatus ................................. 40
4
Log fileformats................................. 83
8
Page 9

Before you begin
Intended audience
This guide is intended for new and experienced users of Data Protector Express and Data Protector
Express Basic. For new users, chapter 1 introduces the concepts and architecture of Data Protector
Express and Chapter 2 demonstrates the process of completing the first backup job and first restore job.
Subsequent chapters explain the more advanced features of D ata Protector Express.
Editions
This guide de
feature edit
Data Protector Express Basic.
NOTE:
Data Protector Express Basic can be upgraded to Data Protector Express with the purchase of the
appropriate license key from your HP partner.
Related documentation
scribes the features of Data Protector Express. Data Protector Express Basic is a reduced
ion of Data Protector Express. Not all of the features described in this guide are available in
The /doc directory on the Data Protector Express CD-ROM contains the following printable
documentation:
• AShortGuidetoSuccessfulTapeBackup
• ESD and Webware License Mangement Guide
NOTE:
To view or print this documentation, Adobe Acrobat Reader (version 4.0 or higher) must be installed on
your Windows or X Window (Linux) computer. If not currently installed, you can install it from the Adobe
Acrobat Reader website at h
You can find these documents from the Storage Software pag e of the HP Business Support Center website:
ttp://www.hp.com/support/manuals
h
ttp://www. adobe.com.
Document conventions and symbols
Convention
Blue text: Document conventions and symbols Cross-reference links and e-mail a ddresses
Blue, underlined text: http://www.website.com
Bold text
Element
Website addresses
• Keys that are pressed
• Text typed into a GUI element, such as a box
• GUI elements that are clicked or selected, such as
menuandlistitems,buttons,tabs,andcheckboxes
User’s Guide
9
Page 10

Convention
Italic text Text emphasis
Monospace text
Element
• File and directory names
• System output
• Code
• Commands, their arguments, and argument values
Monospace, italic text
WARNING!
Indicates that failure to follow directions could result in data loss.
CAUTION:
Indicates that failure to follow directions could result in damage to equipment or data.
IMPORTANT:
Provides clarifying information or specific instructions.
NOTE:
Provides additional information.
TIP:
Provides helpful hints and shortcuts.
• Code variables
• Command variables
Release notes
Release notes are included with every release and service pa ck. Before using Data Protector Express,
please read the release notes for additional information. The release notes are available in HTML format
in the root directory of the Data Protector Express CD-ROM.
HP technical support
For worldwide technical support information, see the HP support website:
h
ttp://www.hp.com/support
Before contacting HP, collect the following information:
• Product model names and numbers
• Technical support registration number (if applicable)
• Product serial numbers
• Error messages
10
Before you begin
Page 11

• Operating system type and revision level
• Detailed questions
User’s Guide
11
Page 12

12
Before you begin
Page 13
1Overview
In this chapter
•Concepts
• A Simple, Immediate Backup
• Restore to a Different Location
WARNING!
Data Protector Express security is disabled at installation to simplify the evaluation process. When
installing the product in a production environment we recommend, at a minimum, that you set a user
password for the Admin user. Doing so will result in the Administrator prompting the user for a password
before starting. See Setting a User Password for details.
Concepts
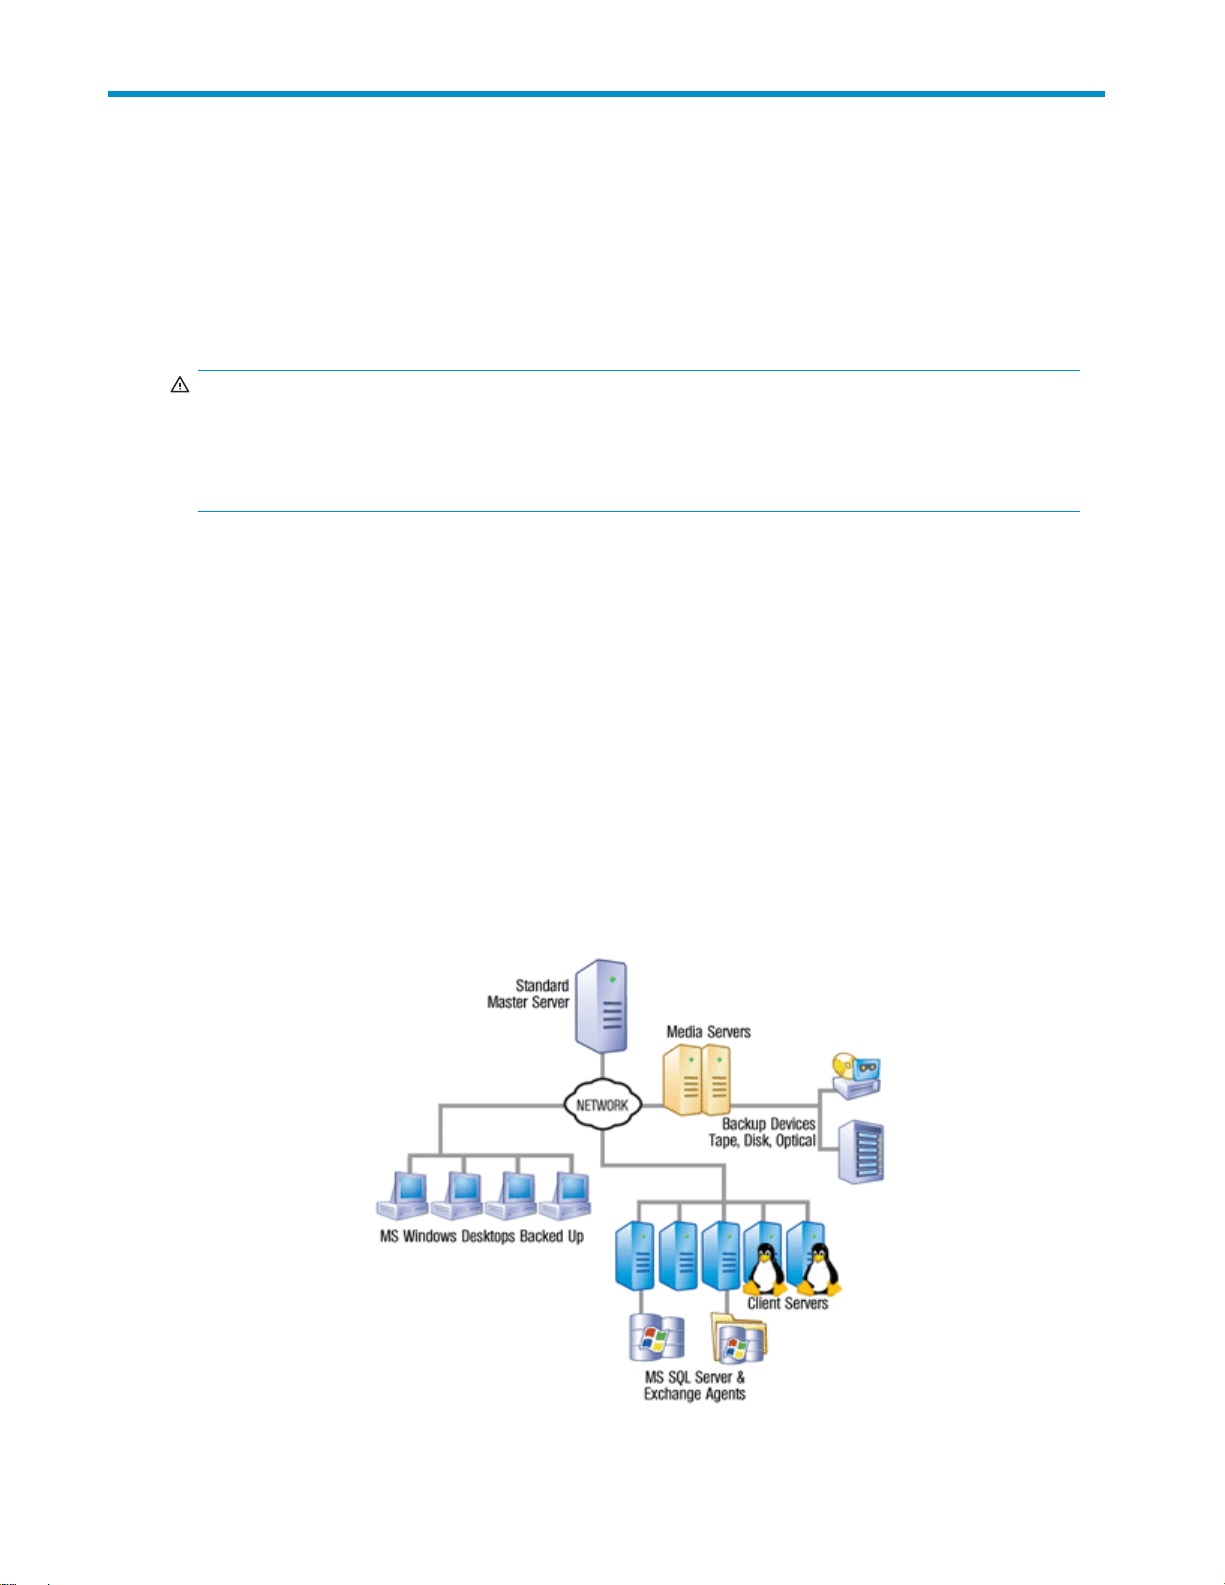
Data Protector Express is designed to operate within your existing network to protect your vital data.
Each machine that will be protected must have Data Protector Express installed. One machine acts as the
Backup Server which houses the catalog andestablishesaBackupDomain. Othermachinesbecome
clients of the Backup Domain by identifying themselves as clients of the Backup Server during installation.
DataProtectorExpresscanbackupdatafromclientsoveranetworktoabackupdeviceattachedtoa
remove machine. A client with an attached device acts as a Media Server.
When a machine is being backed up or restored it is operating the client role. When it is providing
access to a backup device it is operating as a Media Server. And when a machine is hosting the catalog
it is operating as the Backup Server. A single machine can operate in one or more roles at the same time.
Data on client machines is read and written with agents such as the File System, Windows System State,
Microsoft SQL, and Microsoft Exchange agents. The configuration of agents is done on a client by
client basis.
A typical installation of Data Protector Express may look like Figure 1 below.
User’s Guide
13
Page 14

Terminology
The following terminology is used throughout this document ...
• Clients—Aclie
Server. This includes file servers, application servers, and user PCs (desktops and laptops). All
client computers must have Data Protector Express installed. For licensing purposes, clients are
classified as being server or workstation class machines. All clients are considered to be server
class client
• Backup Domain— A Backup Domain is a collection of computers and backup devices that is
managed together as a group. A Backup Domain can encompass an entire company or ea ch
department c
resources i
centrally managed from a single Data Protector Express interface. Each file server, application
server, user PC, and attached peripherals such as backup devices can be the member of only one
Backup Domain. Each Backup Domain has one and only one Backup Server.
NOTE:
A Backup Domain is completely independent of any Windows Active Directory domain.
The Data Protector Express administrator can administer more than one Backup Domain from
asinglecomputer. However,theDataProtectorExpressinterfacecannotmanagemorethan
one Backup Domain at the same time. The administrator must log off of one Backup Domain
and log into another.
• Backup Server— Each Backup Domain has one and only one Backup Server. The Backup Server
is responsible for coordinating the backup activities of all other machines in the Backup Domain.
All license information is also contained on the Backup Server.
• Catalog— A catalog is a special-purpose database that c ontains all the information about a
Backup Domain. There is one and only one catalog for each Backup Domain. The catalog
must reside on the Backup Server machine.
• Job— A job is an object stored in the catalog that represents the settings for a task the user has
configured. Jobs come in one of four types: backup, restore, verify, and copy media.
• Backup devices— A backup device is any device to which files can be backed up. This includes
tape drives, tape libraries, hard disks (as virtual tape libraries), and Network Attached Storage
(NAS) appliances. Backup devices are attached to media servers. Each Backup Domain must
have at least one backup device, such as a tape device, tape library, virtual library, or CD device.
This backup device can belong to only one Backup Domain; it cannot be shared among multiple
domains. However, a Backup Domain could have multiple backup devices.
• Media Server— A media server is any machine in the Backup Domain to which a backup device
is attached. Any machine in the Backup Domain can act as a m edia server. There can be
multiple media servers in a Backup Domain. The media server allows its attached backup devices
to be shared by all the machines in the same Backup Domain
• Media—Backedupfiles are written to media. Media can be a physical tape or a virtual “tape”
in a virtual tape library on a disk drive. Media cannot be used in another Backup Doma in without
importing the media into the other Backup Domain.
• Media Rotation — Rotations are a means of efficiently using you available media to maintain
data history. When using a rotation your backups alternate among a set of multiple media,
reusing older media when necessary. The type of media rotation you select is based on how
often you want to back up your data, how long you want to retain the data, and the number
of media you want to use.
• Disaster Recovery (D R) — Disaster Recovery is the process of restoring a machine that has suffered
a catastrophic failure such as hardware failure or critical system data loss. The recovery process
entails reformatting the affected system’s hard drive and restoring the operating system, system
settings, applications, and data from a backup. This feature replaces the traditional tedious task
Figure 1 Basic Architecture
nt is any computer (or Machine) in the Backup Domain other than the Backup
s unless they are running Windows XP, Vista, or Windows 7.
ould be a separate domain, even though they are all on the same network. All
n a Backup Domain can be accessed by all members of the Backup Domain and
14
Overview
Page 15

of finding installation disks, installing operating systems and applications, patching them and
restoring data with a simple restore process directly from backups.
• Full System Recovery — Full system recovery is the process of recovering all of the data on a
machine. ItdiffersfromDRinthatafullsystemrecoverydoesnotreformatthedisksprior
to restoring the data.
A Simple, Immediate Backup
We will do a simple backup of selected files to a local backup device. This will illustrate many of the
backup featu
this may be all that is needed. Organizations with more complex needs can use this simple backup as a
starting point for exploring the other capabilities of Data Protector Express.
1. Make sure the device is powered up and insert a blank piece of media. You do not need to format
the media. Data Protector Express will do that, if necessary, when it runs the job.
2. Start the A
Backup icon to start creating a backup job.
3. Enter a job name, such as “My First Backup” and click OK. The job name is simply a friendly
name used to identify each job.
4. Now you ar
and file sy
to be backed up. By checking the box next to a folder we are selecting all its subfolders and the
files in them.
res available in Data Protector Express. For many organizations, a simple backup such as
dministrator. The initial view will show a list of tasks to choose from. Double-click the
e ready to select folders and files for backup. Navigate down the network, machine
stem to locate the files that you wish to back up. Check the box to select the files/folders
TIP:
The top l
tasks av
values s
5. Now you need to select your device for backup. Click on the Devices link in the Task bar.
You can click on the + to the left of a device type (e.g., Tape Devices) to display all available devices
of that type. If not already selected, select the device you want to use for this backup by clicking the
associated checkbox. The D evice View allows you to locate and select devices by type, regardless of
where they are in the network. The Network view allows you to locate select devices on specific
machines. Select a class of decide, like Tape Devices, will configure the job to use all tape devices
available when the job runs even in the drive was not available when the job was created.
6. Click on the Encryption link in the Task bar if you want to change the default encryption or
compression settings. By default, encryption is off and compression is on. For more information,
see Chapter 8.
NOTE:
This option should be used with care. It requires an encryption passphrase. If you lose the passphrase, you
will not be able to recover your data.
eft section of the property page is called the Task bar. It shows the different configuration
ailable to fully configure a job. Default values are supplied for many of the configuration
o you don’t have to visit all of them. Your current position is highlighted by a bold label.
7. Click on the Configuration link to see the job settings, the media that the job will use and how the
media will be formatted. For this example, accept the default settings. For more information on
backup job options, see Configuration.
8. You may ignore the Advanced options for this example.
9. Click OK to complete the backup job configuration. Click Yes at the prompt to see the new job
(command) in your Home folder.
User’s Guide
15
Page 16

10. Select the new job object and click the Run button on the Command bar to start the job. Hold the
cursor over the Data Protector Express icon (the Quick Access program) in the Windows System tray,
normally in the bottom right corner of your screen. You can see that the job is running.
NOTE:
During execution of the job you may notice a flashingredbuttoninthelowerrightportionofthescreen.
This indicates an that requires your intervention. Click the button to open the alert details and resolve the
issue.
NOTE:
The Quick Access program is installed and available on all clients but it only runs automatically on
the Backup Server.
11. The status of th
Alternately, click on the Status and Logs link in the top left hand area — the Navigation bar.For
more detailed information click on Status in the Command bar. The job’s property page will o pen
and show the status of the running job.
12. It is a good practice to check the logs after a job runs to ensure that there were no problems. Click
Status and Logs in the Navigation bar. Locate your job in the list, click on the + sign to expand the
job and select the most recent run. The property pane will show the firs page of the job log. To see
theentirel
13. Select the l
that every
when you ha
14. You h ave n
Once you have created your backup (or any) job, it can be quickly and easily located again in your
Home folder.
NOTE:
With the settings in this tutorial, this job will overwrite the media when you run it again. If you do not
wish this to happen, you need to select a Write Mode of Append to all media in the Modes section of
the Configuration page.
e job is visible in the lower left hand pane, the Info bar, of the Administrator.
og, click the View Log button in the Command bar.
og entry for the backup job and double-click to open it. Scroll through the log to check
thing is O K. If the Next button is bold, there are additional pages to check. Click Close
ve finished reading the log.
ow created and run your firsttapebackupjob.
Restore to a Different Location
We will do a simple restore of selected files from the backup media we created in the previous step. This
will illustrate many of the restore features available in Data Protector Express.
1. Makesurethedeviceispoweredupandinsertthebackupmediaintoit.
2. Select Tasks in the Navigation bar and double click the Restore icon.
3. Enter a name for the restore job, such as “My First Restore” and click OK.
4. Now you are ready to select folders and files for restore.
Navigate down the network, machine and file system to locate the files that you included in your first
backup. In this view, only files and folders that have b een backed up will appear. Check the b ox
to select the files/folders to be restored. By checking the box next to a folder, we are selecting all
its subfolders and the files in them.
16 O ver vi ew
Page 17

5. For this first restore job, we want to restore the files to a different location. This will allow you to
compare the original files with the restored files.
To do this task, we need the m ove functionality. Click on the Move icon in the Tool bar.
We recommend that you create a new folder to hold the restored files. In the Select destination for
move operation dialog, select the C: drive, click on the New command, enter a name for your
newly restored folder and click OK.
Select the new folder as the destination for the move operation a nd click OK.
Your new folder is now visible under the C: drive. Expand the folder to see how the files will be
visible af ter the restore job is finished. You can refine the restore selection by clicking in the boxes to
select or deselect the required folders and fi les. Only the selected folders and files will be restored.
Asyounavigatetherestoreviewyouwillseealistoffile and folder versions at the bottom of the
view. That list represents each backup that the selected object was backed up in. When multiple
versions of a file have been backed up, they will appear in this list and can be selected. If you don’t
select an item in the version list, the most recently backed up version will be restored.
6. Selectthedevicecontainingyourbackup. ClickontheDevices link in the Task bar as in the
configuration of the backup job.
7. You may ignore the Configuration and Advanced links for this example.
8. Click OK to complete the job configuration. Click Yes attheprompttoseethenewjob(command)
in your Home folder.
9. Select the new job object and click the Run b utton on the Command bar to start the job. If you have
installed the Quick Access Control, hold the cursor over the Data Protector Express icon in the
Windows System tray, normally in the bottom right corner of your screen. You can see that the
job is running.
NOTE:
During execution of the job you may notice a flashingredbuttoninthelowerrightportionofthescreen.
This indicates an that requires your intervention. Click the button to open the alert details and resolve the
issue.
10. The status of the job is visible in the lower left hand pane, the Info bar, of the Administrator.
Alternately, click on the Status and Logs link in the top left hand area — the Navigation bar.For
more detailed information click on Status in the Command bar. The job’s property page will open
and show the status of the running job.
11. It is a good practice to check the logs after a job runs to ensure that there were no problems. Click
Status and Logs in the Navigation bar. Locate your job in the list, click on the + sign to expand the
job and select the most recent run. The property pane will show the first page of the job log. To see
theentirelog,clicktheView Log button in the Command bar.
12. Select the log entry for the restore job and double-click to open it. Scroll through the log to check that
everything is OK. If the Next button is bold, there are additional pages to check. Click Close when
you have finished reading the log.
13. You have now created and ru n you r first restore job.
User’s Guide
17
Page 18

18 O ve rv i ew
Page 19

2 Administering Backup
In this chapter
• Using the Administrator
• Using Quick Access from Taskbar
• About the Data Protector Express Service
The entire Backup Domain can be managed and monitored centrally. The Administrator is the primary
interface for administering the Backup Domain. The program displays a n icon in the system taskbar and
gives you a quicker way to perform the most comm on administrative operations.
Using the Administrator
Data Protector Express is designed to be easy to use. This section will familiarize you with the Data
Protector Express user interface and service.
Data Protector Express Administrator
The Data Protector Express Administrator is a graphical user interface that manages and monitors your
backups. The Administrator can be run on any machine on the same network as the machines in the
Backup Domain. All machines in the Backup Domain are managed centrally from the Administrator.
The Administrator window consists of a...
1. Menu bar — The menu bar is located at the top of the screen and contains several menus
that group together similar comm a nds. To invoke a command from a menu, open the menu
and then select a command.
2. Command bar — The command bar is a context sensitive set of command buttons running along
the top of the window below the menu bar. As the selected o bject changes the commands in
the command bar will change to reflect the current selection.
3. Navigation Bar — The navigation bar is located in the top section of the left hand column of the
Administrator. It contains links to the major views of the product:
a. Tasks View —thisviewcontainsshortcutsforcreatingjobsandothercommontasks.
b. Jobs and Media View — this view shows the User’s Home folder which contains all of
his configured jobs and the media associated with them as well as media that has been
imported or formatted. From this view you can run the jobs, modify their settings, and
view their logs.
c. Status and Logs View — this view contains a listing tasks and jobs that have happened in
the Backup Domain
d. Devices View — this view provides a view of all the devices in the Backup Domain. To
perform media operations like identifying or importing media, use this view to navigate
to the device containing the media in question and select the command you want from
the command bar.
e. Advanced Views — the Advanced link contains links to the more advanced views explained
later in this document.
4. Info bar — the info bar contains a summary of the object’s most important properties like current
status. It also contains command and control links for runnable jobs.
5. View Pane —Themainpartofthescreenisthedetailarea. Thelayoutofthispanewillvary
based on the view selected from the navigation bar.
User’s Guide
19
Page 20

a. Object Layout —withthislayout,theviewpanecontainsasetofobjectsdisplayedaslarge
icons. This view typically contains command objects as in the case of the Tasks View or
objectsasinthecaseoftheAdvancedSecurityView.
b. Object Detail Layout — with this layout, the panel is divided into a top and bottom portion.
The top portion contains a list of objects. The bottom contains detailed information relevant
to the object selected in the top portion. An example of this layout is the Status and Logs
View.
c. Tree View Layout — with this layout the panel is divided into a left and a right section. The
left hand side contains a tree view showing an organizational folder hierarchy and the right
side contains a list of objects in the currently selected folder. Examples of this layout are the
Jobs and Media View and the Devices View.
6. Status bar — The Status bar displays the current user’s name, the Backup Domain to which the
user is logged in, and the name of the m achine at which the user is working. An Alert button
appears in the lower right corner of the status bar when alerts are generated. This button flashes
when there is an issue that requires attention.
Property pages
Every object in the Data Protector Express catalog has a set of property pages associated with it. Use
these property pages to modify settings for an object and to view logs, messages, diagnostics or
information that Data Protector Express generates.
Opening property pages
Displaying the property page of an object can be accomplished several ways:
• Selecttheobjectwiththemouseorkeyboard,andthenclickProperties on the Command task
pane.
• Right-click the object to display a context menu, then select Properties.
• Select the object, and then select Properties from the File menu.
• With the object selected, type Alt-Enter.
TIP:
Opening the property page for an object will open a non-modal dialog. You can leave property pages
open when you return to working in the main Data Protector Express window and you can have several
property pages open at once.
The Property window consists of a...
1. Navigation bar — The navigation bar is located in the top section of the left hand column of
window. It contains links to the various groups of properties of the object.
2. Info bar — the info bar contains a summa ry of the object’s most important properties like current
status. It also contains command and control links for runnable jobs.
3. Property pane — the property pane contains the actual properties that belong to the property
group selected by the navigation bar.
4. Command bar — the command bar runs along the bottom of the dialog and contains the
buttons for committing or cancelling changes made to the object and for dismissing the dialog.
Missing features
If an option is not listed on a screen, for example Disaster Recovery or the SQL Agent, it may be for one of
the following reasons ...
20
Administering Backup
Page 21

• The evaluation license for the option has expired. Optional features are installed automatically
when you install Data Protector Express. Once the evaluation license expires, you can no longer
use an optional feature without purchasing and installing a license.
• The option is not available in the edition of Data Protector Express you have installed.
• An error occurred when starting Data Protector Express. Review the alerts to see if an option
failed to start properly when you started the application.
Using Quick Ac
The Data Prot
Protector Express. Typically, though, only a subset of these features are used. The Quick Access taskbar
icon allows fast access to these most commonly used features without needing to open the Administrator.
The Q uick Access application displays an icon in the system tray, usually at the bottom right of the screen.
You can mouse over the icon to display status information or right click it to display a menu.
With the Quick Access right-click menu, you can ...
• Manage job
• Manage media
• View alerts
• View logs
• Open the Administrator
The Quick Access starts automatically on the Backup Server. On other client machines, it is installed but
does not s
start aut
tart automatically. You can launch through the system star t menu. It can also be configured to
omatically on a client machine if desired.
cess from Taskbar
ector Express Administrator is very powerful and allows access to all the features of Data
s
Viewing Data Protector Express status
The appearance of the Quick Access icon changes to indicate the state of Data Protector Express, thus
providing continuous feedback. Two or more states can occur at the same time, such as a job in progress
and a pending alert. The icon can indicate only one state at a time, so it follows this order of precedence
in which items earlier in the list take precedence over items later in the list:
Table 1 Icon viewing status
Icon
Overlay
No overlay Idle
When you mouse over the Quick Access icon, a tool tip is displayed that contains additional status
information.
Meaning
Disconnected
Job failure
Pen ding aler ts
Job in progress
User’s Guide
21
Page 22

Accessing Data Protector Express functions
When you right-click the Quick Access icon, a menu is displayed.
Jobs
Click the Jobs menu item to create a new job or to view a list of the jobs that you have currently defined.
If there are more jobs that aren’t displayed, More is displayed below the list. Click More to open the
Administrator to the Jobs and Media View, which contains the jobs and folders that you have defined.
In the Settings window, you can set the maximum number of jobs that you see in the list. For more
information, see Maximum number of menu items for Jobs, Alerts, or Logs submenus
Creating jobs
When you selec
Table 2 Creating jobs
Choice
Backup Create a job to back up files.
Restore
Verify
Monitoring jo
Foreachjobthatyouselect,youcan:
• View and change the job’s properties
• View the job’
• Run, pause, or stop the job, depending on the job’s status
Alerts
Click the Alerts menu item to view a list of unhandled Data Protector Express aler ts. If there are more
alerts that aren’t displayed, the More menu item is displayed below the list. Click More or the Open Alerts
Window menu item to view all alerts. Selecting a n alert will open a dialog with the alert details. Click the
Clear Evaluation Alerts menu item to remove all alerts having to do with the use of an evaluation license.
ttheNew menu item, you can create the following types of jobs:
Description
Create a job to restore specific files.
Create a job to compare a fileonaPCorservertothebacked-up
versions of the file.
bs
sstatus
Logs
In the Settings window, you can set the maximum number of alerts that you see in the list. For more
information, see Maximum number of menu items for Jobs, Alerts, or Logs submenus
Select the
menu item is displayed below the list. Click More or the Open Logs Window menu item to view all logs.
Thelogsinthelistcanbefrommultiplejobs. Thelogsinthelistarenamedusingthedateoftherunand
thenameofthejob.Toviewthelogsforaspecific job, go to the Data Protector Express Administrator,
open the job, and select the Logs page.
In the Settings window, you can set the maximum number of logs that you see in the list. For more
information, see Maximum number of menu items for Jobs, Alerts, or Logs submenus
22
Logs m enu item to view a list of recent logs. If there are more logs that aren’t displayed, the More
Administering Backup
Page 23

Settings and Oth
er Commands
Settings
Click the Settings menu item to change the settings for the Quick Access taskbar icon or for the Data
Protector Express service.
Login information
Use the Hostname field to change the Backup Server to use. Enter the hostname or IP address of the server.
Use the User name and Password fields to log in under a different user name.
Icon appearance
The tray icon will show a flashing overlay in the following situations:
• When alerts are pending
• When a job is running
• When a job has failed.
DeselecttheboxforeachsituationwhichyoudonotwanttheQuickAccessicontofl ash.
Automatically start this application when the operating system starts
Deselect this check box if you want to manually start the Quick Access application.
To manually start the Quick Access application, switch to the Data Protector Express installation directory,
and run dpwin
from the star
gqa for Windows or dplingqa for Linux. Or on Windows, select the Quick Access link
tmenu.
Automatically log in on startup
Deselect this check box if you do not want to automatically log into the application, using the user name
and password provided here. A logon window will appear at startup if this box is deselected.
Maximum num
Service settings
ber of menu items for Jobs, Alerts, or Logs submenus
Select the m
Use the Service Settings window to manage the Data Protector Express service on the local machine.
These settings have the same meaning as those found in the operating system’s service manager
program. The Manual choice is not available on Linux.
aximum number of jobs, alerts, or logs that you want to see.
Other Commands
Click the O
using the logon information from the Quick Access application.
Click the Logout menu item to log out from the Quick Access app lication. The application will disconnect
from Data Protector Express. Click Login to log back into the application.
Click the Exit menu item to exit the Quick Access application. If the Data Protector Express service is
still running, the application will continue to run. To restart the application, access the application in
the Star
pen Administrator menu item to open the main Data Protector Express Administrator window
t menu.
User’s Guide
23
Page 24

About the Data Protector Express Service
The Data Protec
Administrator can be closed, enhancing security. The service makes sure your scheduled backup jobs run
even when the machine reboots after a power loss.
NOTE:
The Data Protector Express Service runs as a service on Windows and as a daemon on Linux platforms.
tor Express Service lets you run backup jobs automatically and unattended. The
Microsoft Windows and the Data Protector Express Service
You can manage the Data Protector Express service from the Windows Services screen. For an
explanation of managing Windows services, please refer to the Microsoft documentation for the Service
Control Manager
CAUTION:
Changing the Startup type for the Data Protector Express service to Manual or Disabled means that
other machines will not have access to this machine to perform backups unless Data Protector Express
is actually running. This m eans that filesonthismachinewillnotbebackedupduringroutinebackups
for this machine. Before disabling the service, you should evaluate the impact that this decision will have
on your company’s backup and restore policies
LinuxandtheDataProtectorExpressDaemon
On Linux platforms, the Data Protector Express service, or daemon, is designed to run automatically each
time the system is restarted.
The daemon program (dplinsvc) is located in the Data Protector Express directory. To access the
service in the default installation directory you would
typecd /usr/local/hp/dpx/ dplinsvc
and press Enter.
If you have disabled this automatic startup of the service, you can use one of the following commands
to manage the service:
Install service type ./dplinsvc –I
and press Enter to start the Data Protector Express service automatically when your computer starts up.
Your selection takes effect the next time your computer starts up.
Tostartorstoptheserviceifitisalreadyinstalled,useoneofthefollowingcommandstomanage
the service:
Start service type ./dplinsvc –s
and press Enter to start the Data Protector Express service.
Stop service type ./dplinsvc –x
and press Enter to stop the Data Protector Express service.
24
Administering Backup
Page 25

3BackupJobs
In this chapter
•SelectingFilesforBackupJobs
•SelectingDevices
•Encryption
•Configuration
• Advanced Settings
Backup jobs can be created from the Tasks view or the Jobs and M edia view using the New command.
When a new job is created the Administrator will open the job’s Property page to allow configuration of
the job. The Property page can be reopened at any time, even when the job is running. If the job is
running the settings pages will not be editable.
Selecting
You use the
provides p
update your selection when the job is run.
Marking files
Files, folders, and other containers (e.g., volumes and computers) are displayed in a tree view on the
Selection page. All containers act similarly regarding selection, so any discussion about folders applies
equally to any other container unless otherwise noted.
You can select or deselect a file or folder by checking or clearing the selection box next to the folder.
When you select a folder or other container, you automatically select everything within it including
all files within all subfolders. If the checkbox for a folder is clear, no files and subfolders within that
folder are selected. If the checkbox for a folder is shaded, some, but not all, of the files or subfolders
within it are selected.
You can select the contents of a folder in one of two ways: either by individually checking each file in that
folder one-by-one or by checking the folder itself. Which method you choose is important because it
affects which files Data Protector Express included in the selection list after changes have been made to
that folder.
CAUTION:
If you select each file in the folder individually , when new files are added to the folder, Data Protector
Express automatically selected for backup. However, if you select the folder
created in that folder, they are automatically selected for backup.
Files
Selection property page of a job to select the files to be backed up. Da ta Protector Express
owerful selection filters that allow you to select exactly the files you want and to automatically
itself
,whennewfiles are
In general, when selecting files for backup, especially for jobs designed for disaster protection, begin by
selecting containers at the top of the hierarchy. Then deselect containers or files lower in the hierarchy
that you do not need to back up.
For example, you could begin by selecting the network icon at the top of the hierarchy. This will
automatically select all of the machines on the network and all of the volumes on those machines.
If there are machines, volumes or folders you do not want backed up, clear their check boxes. When
new machines or volumes are added to the network (that is to the current Backup Domain), these new
machines and volumes will automatically be selected for backup.
User’s Guide
25
Page 26

By default, Data Protector Express backs up all volumes, folders and files that have been marked for the
job. Selection filters let you identify specific criteria for excluding one or more of these marked objects.
The filter criteria is applied when the job runs, in effect unmarking any objects that do not meet the
criteria. Selection filters are optional. If no selection filter is specified, all of the files and folder that have
been marked will be backed up per the job configuration settings. For further information, see the
Data Protector Express Technical Reference Guide.
Data Protector Express can be configured to include mapped drives during backup. By default they
are excluded. Once configured, these drives will appear on the Selec tion page of a job. For further
information, see the Data Protector Express Technical Reference Guide.
Selecting D
Selecting this link displays the Device view and allows you to select the device(s) to use in the job. See
Selecting Devices for Jobs for more information about using the Device view.
evices
Encryption
This step is optional. Data is neither encrypted nor compressed by default. If you would like to change
these options, see Chapter 8.
Configuration
In th is sec tion
•Schedule
• Mode Settings
• Media to be used
•Autofor
Schedule Settings
The Schedule Settings box contains several settings that control when jobs are run and how the jobs
use media.
mat
Settings
Schedu
le type
Start time
tting is the first step in choosing when the job will run. Once scheduled, the Data Protector
This se
s service will ensure the job is started. If one or more job runs are missed because the service is
Expres
not running at the scheduled time, the service will determine the backup mode with the largest interval
setting (Daily, Weekly, Monthly, Yearly) that was missed and run it.
heduled
Not sc
Runonselecteddays The job will run only on a selected day (or days) at a specified time. When this
option is selected an additional setting, Sch eduled Dates, will appear.
peatedly
Run re
ion. When this option is selected an additional set of options, Interval Settings, will appear. For
rotat
nformation see Chapter 7.
more i
This setting is only visible for jobs that will be run on a schedule. It specifies the time of day that the
job should start. For jobs that are scheduled to run more than once, all runs will happen at the same
time of day.
26
Backup Jobs
bwillberunmanuallybytheuserwhendesired.
The jo
b will run on a regular interval. Use this setting to set up a job with media
The jo
Page 27

Rotation type and Sets
This setting is
controls allow
case. It unloc
about setting up rotations, see Chapter 7.
Type of fixed rotation
This setting is only available when creating a custom rotation. For more information about setting up
rotations, see Chapter 7.
Mode Setting
The Mode box c
performed,
Man of these set tings are set automatically when a schedule rotation is in effect. When a rotation controls
theses settings they become disabled in the Administrator.
s
how used media will be treated, and what to do when a file won’t fit on the current m edia.
Backup mode
Data Protector Express supports the back modes listed below. For scheduled automatic rotation jobs,
Data Protector Express uses the backup mode for each backup set as indicated on the Sc hedule page; for
unscheduled or manual jobs, Data Protector Express uses the settings set by the user.
Full This setting instructs Data Protector Express to back up all selected files.
Differential This setting instructs Data Protector Express to back up all selected files that have changed
since the last full backup.
Incremental This setting instructs Data Protector Express to back up all selected files that have changed
since the last full, differential, or incremental backup.
only available when the job is scheduled to run repeatedly. The Rotation type and Sets
you to specify a set of preconfigured rotations. The Custom Rotation type is a special
ks the user interface to allow the user to configure his own rotation. For more information
ontains several settings the control the type of backup and automatic verify that will b e
Copy This setting instructs Data Protector Express to back up all selected files,butithasnoeffectonany
future scheduled job. Use this op tion when you wish to make a record of files or systems at a particular
time, but do not wish to disrupt the normal backup schedule.
CAUTION:
Incremental jobs are the shortest and smallest jobs to run, but they present some issues related to full data
recovery. The difference between an incremental and a differential backup is important -- incremental
backup jobs back up only files that have changed since the last full, differential or incremental backup,
full
while differential backup jobs back up all files changed since the last
media sets are overwritten or recycled before another full backup is performed, this can create a gap in
available data if you need to recover files from the overwritten media.
Exclusive use of incremental backup jobs to ensure full data recovery after a disaster is not recommended,
backup. If incremental backup
unless you are using a schedule that retains one full backup and all subsequent incremental backups
before overwriting any media. However, to ensure successful data recovery with incremental jobs, follow
these guidelines:
Have at le ast as many incremental media as there are days between full or differential backup jobs. For
example, if you run full backup jobs every five days, have at least four incremental media; if you run full
backup jobs every seven days, have at least six incremental media.
Never recycle incremental media between differential or full backup jobs. If you run more than one
incremental job in a row, be certain to not recycle any of the media used during this string of incremental
jobs.
User’s Guide
27
Page 28

Auto Verify mod
e
After Data Prot
Data Protector Express reads the files from the media and performs the selected verification type. If any
discrepancies between the two files are found, the file is reported in the job log.
Full Verify This setting instructs Data Protector Express to compare every selected file stored on the media
with the original file from the PC desktop or file or application server. If the file has changed since it was
backed up, the full verify process will report that the file on the media do es not match the file on disk.
This does not
Quick Verify This setting instructs Data Protector Express to be certain that every filebackedupontothe
media is in readable condition. It does not verify that the data matches the file, only that the data stored
on the media can be read.
No Verify This setting
TIP:
Verifying th
program. Al
Write mode
For automatic rotation jobs, Data Protector Express overwrites all media. For other jobs, Data Protector
Express uses the write m od e settings set by the user. This mode determines whether the old data on
the media is overwritten with new data or whether the new data is appended to the end of the old
data. When media is overwritten, all of the data previously stored on it is lost. Appending data will
preserve the old data.
ector Express backs up a set of data, it can verify that the data was backed up correctly.
mean that the backup was unsuccessful.
instructs Data Protector Express to skip the verification step. It is not recommended.
at data has be en correctly written to the media is an essential part of a comprehensive backup
so, verifying the files ensures that the media and the media drive are working correctly.
Split File
Append to all media This setting instructs Data Protector Express to append all data to the end of the
media. No data is overwritten. Select this setting for permanent storage.
Append to first media, overwrite others This setting instructs Data Protector Express to ap pend data to
the end of the first media, but to overwrite all media that follows. For example, Data Protector Express will
not overwrite the first media inserted, but will overwrite the second, third and later media. This setting is
useful if you have a set of media with old data you no longer need. By selecting this option, Data Protector
Express preserves your most recent data on the first media, but overwrites older, unneeded media.
Overwrite all media This setting instructs Data Protector Express to overwrite all media. All data on
media that is overwritten is lost. Use this option for media that are going to be recycled.
The Split File mode determines how Data Protector Express will handle a file if the file is too large to fit
on the current media. Selecting this option to instruct Data Protector Express to split a file across two
media if it will not fit on the current backup media. If this option is not selected then file that don’t fiton
the media will be restarted on the next media.
WARNING!
If you use the split file option, files that span two media will require both media for restore. If one is
lost then the file cannot be recovered.
28
Backup Jobs
Page 29

WARNING!
Files protected with split file mode cannot be restored during Disaster Recovery. They must be restored
after the DR process has completed.
Scheduled Dates
This setting is only visible when the schedule type is set to run on selected days. It consists of a list of
selected days to run the job. To add days to or remove days from the schedule, click the Calendar...
button to open the schedule calendar. To schedule the job to run on a day, right-click on the day in the
calendar and select Daily. To unschedule a day, right-click on it and select None.
Interval Settings
This setting is only visible when the job is scheduled to be run repeatedly. It contains controls for
specifying which types of jobs (full, incremental, or differential) will be run on which intervals and the
number of media sets that will be used. You can use the Calendar... button to view of the schedule. The
calendar will show when daily, weekly, monthly and yearly backups will be run. Clicking a day will
display a message along the bottom of the dialog explaining the type of job that will be run, the name of
the media that will be created, and whether the media will be appended to or overwrit ten. To override
the schedule on a an individual day, right-click on the day and select the new backup type or deselect the
day to stop the backup on that day. For more information see Chapter 7.
TIP:
It’s a good idea to deselect holidays from you schedule if you don’t have a tape library or if nobody will
be available to put the correct media into the device.
Media to be used
Selectthefolderinwhichthejobwilllookforexistingmediathatitcanreuse. Notethatthedefaultfolder
is the current Job folder. If you wish to use m edia from another folder, specify which folder by clicking the
Add button to open a catalog browser and navigating to the desired folder.
Auto format
Auto format mode
Before data can be written to media, the media must be formatted. When m ed ia is formatted, any data
on it is lost and all record of the media is removed from the catalog.
No auto format Instructs Data Protector Express to send an alert to the alert window if it encounters
media that needs to be formatted (either blank or unrecognized media). While waiting for a user reply,
Data Protector Express scans the network for devices with the media it was expecting.
Auto format blank media only Instructs Data Protector Express to automatically format all new or blank
media. However, if Data Protector Express encounters unrecognized media, it sends an alert to the alert
window and then scans the network for the media it was expecting. This setting can help p revent data
from being accidentally destroyed by formatting, while not needlessly querying the user before formatting
ablankmedia.
Auto format all media Instructs Data Protector Express to automatically format all of the media inserted
into the tape drive which require formatting. With this setting selected, Data Protector Express will
automatically format all new or blank media and all unrecognized media.
User’s Guide
29
Page 30

New media locati
Specifies the folder in which Data Protector Express will store any new media created while the job is
run. By default, Data Protector Express stores m edia under the backup job to ensure the media isn’t
used by another
the Browse dialog box.
When Data Protector Express runs any scheduled automatic rotation job, it automatically creates media
folders for the
in that job.
on
backup job. To change the default, click the Browse but ton and select the folder from
job. Thefoldersareorganizedbythenameofthejobandthevariousrotationsets
Move m edia to new media location on overwrite
Setting this checkbox moves media from the Media to be used folder to the New media location folder
when it is used.
WARNING!
Ifthisoptionisturnedoffitispossibleforajobtoexhaustitssetofavailablemediatouseandstoprunning.
Rename media to new media name on overwrite
Setting this checkbox renames existing media being overwritten to the name which would have been
used had it been freshly formatted. When this is off, previously formatted media used by this job will
retainthenameitwasgivenwhenitwasusedpreviously.
New Media Name
Enter the name Data Protector Express gives to any new media it creates while running the job. For
scheduled automatic rotation jobs, Data Protector Express automatically updates this setting to match the
media’s place in the rotation schedule and this setting has no effect.
For manual rotation and unscheduled jobs, Data Protector Express assigns any new media it creates
thenamelistedinthisfield. This is also true for automatic rotation jobs that are “forced” to run. If the
job creates more than one media, the job will use this setting as a template to create a unique media
name containing this setting.
Advanced Settings
In th is sec tion
• Advanced Options
•JobLogOptions
• Job Pre-Post Execution Commands
• Barcode Filters for Jobs
•CopyPolicies
Advanced Options
In general, the default values should be used. These o ptions are provided only for advanced users who
need to customize their b ackup jobs for unique circumstances.
30
Backup Jobs
Page 31

CAUTION:
Unless you have specific needs that require changes to the advanced options, leave the default values
unchanged.
Settings for all platforms
Eject media a f ter use When this o p tion is checked, Data Protector Express automatically ejects the
media at the end of the backup job. This feature only works on devices that support software eject.
Auto Retension When this option is checked, Data Protector Express automatically re-tensions the media
at the b eginning of the backup job. This feature winds the tape cartridge end-to-end, applying equal
tension to the entire media for maximum media life and data integrity. Your device must support auto
re-tension to use this feature.
Create DR bootable media Check this option to write DR system information to the backup media. This
option is only useful when the backup media is bootable as in the case of OBDR tapes or optical media.
However, leaving this option checked does not hurt the backup.
Update DR information on selected machine Check this option to generate DR system information for
the selected machines. The generated system information will be saved on the Backup Server and can be
used later to create DR media even after a failure of the original machine.
Native data streams format Different operating systems transmit data across the network to Data
Protector Express in different formats. If you plan to restore files to a different operating system than they
werecreated,thedatashouldbestoredonmediainacommondataformat,notinthenativedata
streams format.
Settings for Windows
Enable snapshots By default, the backup job creates a temporary snapshot before backing up the
selected file. Deselect this checkbox to disable snapshots.
A snapshot freezes the volume data at a point in time. Any changes after that point in time will not be
backed up until the next backup job. The temporary snapshots are deleted af ter the job has finished.
If this option is off, files open during backup may not be backed up. Failure to back up open files
willbenotedinthejoblogs.
Snapshots are currently implements only on Windows platforms. On Windows, the snapshots are created
using Microsoft Volume Shadow Copy Services (VSS) for those operating system editions that suppor t VSS.
Reparse points Check this option to back up the reparse point data. When this option is deselected,
Data Protector Express will back up the object as if it were a normal file or directory.
Mount Points When checked, Data Protector Express includes the mount point information in the
backup. If this option is not checked, Data Protector Express treats the object as a directory.
Optimize backup order by size Will mix backing up large and small filesinanattempttomaintain
consistent throughput to the backup devices.
Volume restrictions When enabled, volume quota information will be backed up.
Log Options
These set tings control how the results of the job are reported to the user. See Job Log Options for details.
Execution
These settings allow the user to execute external programs before and after backing up objects on a
client. For example, this feature can be used to shut down a custom database before backup and restart
User’s Guide
31
Page 32

it upon completion. to ensure the files are quiescent during the backup. See Job Pre-Post Execution
Commands for details.
Barcode Filter
These settings
This feature i
for details.
Copy P olicies
Copypoliciesareusedtoscheduleajobtomakeacopyofthemediacreatedbythecurrentjob.They
are discussed in detail in the Da ta Protector Express Advanced User Guide.
control which media can be used by the job by specifying the acceptable barcodes.
s designed for use with tape libraries that support barcodes. See Barcode Filters for Jobs
32
Backup Jobs
Page 33

4 Restore and Verify Jobs
In this chapter
•SelectingFiles
•SelectingDevices
•Configuration
• Advanced Settings
Restore jobs and verify jobs are similar in that they involve reading files that have been backed up.
Whereas a restore job actually copies backed up files, verify job reads the backed up files and compares
them to the current files at the original backup location on disk. Because of their similarities, they will
be discussed together in this chapter.
RestoreandVerifyjobscanbecreatedfromtheTasks view or the Jobs and Media view using the New
command. When a new job is created the Administrator will open the job’s Propery page to allow
configuration of the job. The Property page can be reopened at any time, even when the job is running.
If the job is running the settings pages will not be editable. .
Selecting Files
Selecting Files
You select files to be restored the same way you select files to be backed up. However besides selecting
which files you wish to restore, you must specify which version of the file you wish to restore. When you
select a file to restore, the most recent version is selected by default. You can also change the name of
the restored file or restore it to a new location.
To select files for restore and verify jobs
1. View the properties of the restore job and click on the Selection page.
2. Check the selection boxes next to the files, folders or other containers you wish to restore.
3. To select a specific version of the folder or file or folder you selected, highlight it and select the
4. Optionally, click the Selection filters button on the tool bar and specify filter selection criteria. Filters
5. The selected files will be restored to or compared with their original locations.
cting Versions
Sele
Each
on different media created by different backup jobs. Data Protector Express keeps track of all the versions
of each file in its catalog and the media on which each version is stored. When media is overwritten or
deleted, Data Protector Express deletes those versions from its catalog as well.
When you select an object (file, folder, database, etc.) for restoring, Data Protector Express automatically
selects the latest version. If you want to select a version other than the latest version, select the desired
ver
the object and the m edia on which those versions are stored and details about the object including the
its backup date and its modify da te.
version from the list in the bottom part of the window. If you don’t specifically select a version
then the most recent version will be restored.
are described in more detail in the D a ta Protector Express Technical Reference Guide.
time a file is backed up, a version of that file is created. There may be several versions of files stored
sion from the version list below the object selection tree. The version list shows all of the versions of
User’s Guide
33
Page 34

When you select a folder, Data Protector Express automatically selects the latest version for that folder
and for every file within that folder. If you wish to restore as of another date, select the desired version
from the version list. The version list shows all of the versions of the folder and the media on which those
versions are stored. The selected folder version is used to the select files contained within that folder.
Specifically, a file is selected for restoring only if a file version matches the folder version.
NOTE:
When you spe cify a version date for a folder, volume or other container, files stored in that container are
only selected when they have a version date that matches the version date of the container
files will not have version dates that match the dates of the containers where they are stored.
For example, when you select a version date from an incrementalordifferentialbackupjob,youmustselectthe
latest version available for that container to be sure you recover all of the files inside that container.
In general, if you want to restore a specificversionofthefile, you must select that file directly and specify
which version you wish to restore in the Versions of window.
Restoring folders compared with restoring files
You can select the contents of the folder in one of two ways: either by individually marking the selection
box of each object in that folder one-by-one or by m arking the selection box of the folder itself. Which
method you choose is important because it affects which filesDataProtectorExpressincludesinthe
selection list af ter changes have been made to that folder.
.Manytimes,
For example, if you select a folder for restoring by marking its selection box, all of the contents of that
folder are restored. If a new backup job is run before the restore job is run, Data Protector Express selects
files for restoring using the new folder’s contents. So, for example, if a new file is created in that folder,
Data Protector Express will also restore that file. Additionally, if you have selected a latest version of
the folder, Data Protector Express will use the latest version of each file in its catalog. These files may
be newer than the files you originally selected.
Restoring Files with New Names and Locations
When you restore a file, you may wish to restore the file with a new name or in a new location. If you
restore a file to its original location using its original name, and that file currently exists there, D ata
Protector E xpress overwrites the current file with the restored file.
You can avoid overwri ting current files by giving the file a new name or by restoring the file to a new
directory.
Restoring a file with a new name
After a file has been selected for restoring, you can rename the file. When you rename the file, Data
Protector Express restores the file with the new name. This can be useful for not overwriting versions
of the file that currently exist on disk.
To rename a file, right click the file name on the Selection page of the restore job, select Rename from the
context menu and type the new nam e. Once you run the job the renamed file will be restored to the
directory in which the original file was located.
NOTE:
only
When you rename a version, you are
particular restore job.
a new restore job, you will see the file displayed with its original name. Similarly, the Catalog view always
displays files with the names they had when they were backed up.
Only the current restore job will assign the new name to that file
renaming that file for the purposes of restoring it with this
.Whenyoucreate
34
Restore and Verify Jobs
Page 35

Restoring files
andfolderstoadifferentfolder
You can also res
object, it creates it in the new location. This is useful in order to prevent overwriting files and folders that
currently exist on disk.
To restore to a d
page of the res
for move opera
destination
You can also r
them and are restored, along with the folder or volume, in the new location.
NOTE:
WhenyoumoveaversionontheSelection page of a restore job, the changes you make are only recorded
for that restore job. Only the current restore job will assign the file or folder the new location. When you
create a new restore job, you will see the files and folders in their original locations. Likewise, the Catalog
view will continue to display files in their original locations.
tore files and folders to different folders. When Data Protector Express restores the
ifferent folder (also known as a move restore), right-click the file name on the Selection
tore job and select Move command from the command bar. In the S el e ct destination
tion window, select a target location. Data Protector Express will move the file to the
you select. If the destination folder doesn’t exist, you can create it directly from the dialog.
estore folders and volumes in new locations. The contents of these containers move with
Selecting Devices
Selecting this link displays the Device view and allows you to select the device(s) to use in the job. See
Selecting Devices for Jobs for more information about using the Device view.
Configuration
Restore Job Settings To schedule a restore job to happen at a particular time, change the Schedule Type
to Runonspecificdayand then set the start time and date. The service will ensure that the restore
will happen at that time.
Verify Job Settings Like the restore job, you can schedule a verify to happen on a particular time as
well. Additionally, you can specify whether the job is a Full or a Quick verify. A full verify will compare
the contents of the backup media with the source files on disk. A quick verify will only validate that the
media can be read from end to end.
Advanced Settings
In this section
• Advanced Options
• Log Options
•Execution
• Barcode Filter
Advanced Options
Advanced Restore Options
These options apply to all restore jobs regardless of the operating system.
Eject media a f ter use When this o p tion is checked, Data Protector Express automatically ejects the
media at the end of the job. This feature only works on devices that support software eject.
Auto Retension When this option is checked, Data Protector Express automatically re-tensions the
media at the beginning of the job. This feature winds the tape cartridge end-to-end, applying equal
User’s Guide
35
Page 36

tension to the entire media for maximum media life and data integrity. Your device must support auto
re-tension to use this feature.
Restore files that are in use The Restore files which are in use option tells Data Protector Express what to
do when files to be restored are in use.
Select this option to restore the backup copy of the open file. (On Windows platforms, you can access
the restored file after you restart the computer.) If you select this option, the restored file will replace your
open file. As a result, your current changes may be lost.
Deselect this option to skip over all selected files that are in use. This is useful if the open files are
more current than the backed up files.
Omit security information This will remove any security information associated with the files and folders
which were par t of the backup. The files and folders will be restored as if they were freshly created,
inheriting whatever permissions would belong to new files.
Advanced Windows Restore Options
The following settings are available for restore jobs on Windows operating systems.
Reparse pointsCheck this opt
Data Protector Express will restore the object as a file or folder rather than as a reparse point.
Mount Points When checked, Data Protector Express includes the mount point information in the restore.
If this optio
Volume restrictions When enabled, volume quota information will be restored.
Finalize recovery of Microsoft SQL and Exchange Ser ver databases Check this option to process
database tra
Restore all registry keys / Restore hardware registry keys Controls whether/how Data Protector Express
will restore the described objects. These setting only applies if you are restoring the Registry System
State object.
Restore DFS
or FRS share is being restore d. Only check it if you want an authoritative restore. See the Microsoft
documentationformoreinformationonauthoritativerestores.
n is not checked, Data Protector Express restores the object as a directory.
nsactions when the last incremental restore is complete.
/FRS shares as primary replica (authoritative restore)
ion to restore the reparse point data. When this option is deselected,
Use this opt
ion to control how a DFS
NOTE:
Data filters, such as security information and directory attributes, cannot restore data that was not
originally backed up to the media. For example, if you did not select Volume restrictions for the backup
job, Data Protector Express cannot restore this information because it was never stored on the media.
Advanced V erify Options
The following advanced options are available for Verify jobs
Eject media after use When this option is checked, Data Protector Express automatically ejects the
media at the end of the job. This feature only works on devices that support software eject.
Auto Retension When this option is checked, Data Protector Express automatically re-tensions the
media at the beginning of the job. This feature winds the tape cartridge end-to-end, applying equal
tension to the entire media for maximum media life and data integrity. Your device must support auto
re-tension to use this feature.
Native data streams format When this option is selected, Data Protector Express will compare the data
in native format. When unselected, only the data portion of the file will be verified. This must match the
mode used during backup.
36
Restore and Verify Jobs
Page 37

Advanced Windows Verify Options
Enable snapshotsBy default, the v
file. Deselect t
Reparse points Check this option to verify the reparse point data. When this option is deselected, Data
Protector Express will verify the object as a file or folder rather than as a reparse point.
Mount Points When checked, D
If this option is not checked, Data Protector Express will verify the object as a directory.
Volume restrictions When enabled, volume quota information will be verified.
his checkbox to disable snapshots.
Log Options
These set tings control how the results of the job are reported to the user. See Job Log Options for details.
Execution
These setting
client. For e
it upon completion. to ensure the files are quiescent during the backup. . See Job Pre-Post Execution
Commands for details.
s allow the user to execute external programs before and after backing up objects on a
xample,thisfeaturecanbeusedtoshutdownacustomdatabasebeforebackupandrestart
Barcode Filter
These settings control which media can be used by the job by specifying the acceptable barcodes.
This feature is designed for use with tape libraries that support barcodes. See Barcode Filters for Jobs
for details.
erify job creates a temporary snapshot before verifying the selected
ata Protector Express includes the mount point information in the restore.
User’s Guide
37
Page 38

38
Restore and Verify Jobs
Page 39

5WorkingWithDevices
In this chapter
•SelectingDevicesforJobs
•DeviceProperties
• Device Commands
• Sharing storage devices on a SAN
Data Protector Express recognizes any installed device that is part of the Data Protector Express
management domain and displays them on the Devices view. You can use the Devices view to perform
operations on any physical or virtual device.
Selecting D
The Device p
devices as y
You can view the available devices by either a Device view or by Network view by selecting the
appropriate tab.
TheDevicev
Data Protector Express can read and write CDs and DVDs (optical media) a large domain may have
dozens of devices, many of which are optical devices. This view make it simple to locate the tape drives
or libraries in your network. Each class of device is represented as a node at the top of a tree hierarchy.
By checkin
of that cl
to add additional devices to your network and to your jobs without having to reconfigure your jobs. If
you expand the class by clicking the + next to the class name you will see the names of each device
of that class. Expanding the name will show you which machine the d evice is attached to. Selecting a
specificdevicewillensurethatonlythatdevicewillbeusedinthejob.
The Network view presents the same map of your devices but from a different perspective. At the top of
the hier
suppor
use all tape drives in the network at the time the job runs. Under the Network you will see machines.
Selecting a class of devices next to a machine will limit the job to use only that class of device on that
machin
a checkbox in the column appropriate for the class of device. Checking that box will select just that
device for use with the job.
archy is the Network. Next to e ach element in this list is a set of checkboxes representing the
ted classes of devices. Selecting the Tape Devices box next to the Network configure the job to
e. Finally, when the machine is expanded, all connected devices are displayed. There will be
evices in Jobs
ageofajob’spropertiesletsyouselectthedevicesthatwillbeused.Youmayselectasmany
ou wish for use in a job and Data Protector Express will use the devices as efficiently as it can.
iew allows you to locate devices according to their class — for example, tape drives. Since
gtheboxnexttoaclassofdeviceyouaretellingDataProtectorExpresstouseanydevice
ass it can find available when the job runs. This is a powerful concept because it allows you
NOTE:
New devices added to the network after a job has started running will not be available to the job until
xt run.
the ne
Device Properties
When you select a specificdeviceintheDevices view and click Properties, you are able to perform
the following configu ration.
User’s Guide
39
Page 40

Status The Status page displays the current status information for the selected device. For example,
it shows the current operation, if any, being performed on the device. It also shows the last time a
write and read was done on the device.
TIP:
Data Protector Express tracks the contents of devices and libraries while it is running. However, there may
be times when someone changes media in a device or a library when Data Protector Express is not
running. The Probably qualification on element status indicates that Data Protector Express has restarted
and is operating under its previous understanding of the current element status but that the understanding
may be incorrect. When Probably appears before an element status, the element’s actual status will
be determined the next time the element is used.
Table 3 Elemen t status
Valid The slot is known to hold media that is in the current catalog.
Probably Valid
Invalid The slot holds media that is definitely not in the current catalog.
Probably Invalid
Empty
Probably Empty
Unknown The status of the slot is not known, usually because it has not been used yet.
Cleaning Tape
Probably Cleaning Tape
Reserved
The slot held valid media previously. Data Protector Express verifies that the media is valid
before using it. When you exit and restart Data Protector Express, media marked Valid is
reset to Probably Valid.
Theslotholdsmediathatmaynotbeinthecurrentcatalog. WhenyouexitandrestartData
Protector Express, media marked Invalid is reset to Probably Invalid.
The slot is either known to be empty or a user changed its status to Empty.
The slot was empty previously. When you exit an d restart Data Protector Express, slots marked
Empty are reset to Probably Empty.
A user marked the slot as holding a cleaning cartridge. The number of remaining cleaning
cycles also appears. Data Protector Express does not verify that a cleaning cartridge was, in
fact, inserted into this slot.
Theslotpreviouslycontainedacleaningtape. WhenyouexitandrestartDataProtectorExpress,
slots marked Cleaning Tape are reset to Probably Cleaning Tape.
The slot was disabled by a user. Data Protector Express will ignore it during any job. You can
only change the status of a reserved slot. Data Protector Express changes the status of all
other slots during normal operations.
Configuration You can set the size of the I/O buffer to be used for this device. Usually, you do not
need to change the default. However, for some devices, you may be able to increase performance by
adjusting the size of the I/O buffer.
Diagnostics The Diagnostics page displays diagnostic information about the device. This includes
information about the d river, the inquiry information, device statistics, and bu ffer statistics. Often this
information can assist in troubleshooting problems. The diagnostics can be saved to a file or emailed
directly from the diagnostic screen.
Device Commands
There are several physical operations that can be performed on a selected device. Some of these
operations affect the device itself, while others affect the current media in the device.
40
Working With Devices
Page 41

NOTE:
Not all operations are available on all devices. For example, an optical device does not support the
Rewind command. Check your hardware documentation to determine which of the following commands
are supported by your device. Only supported commands will appear on the context menu and the
command bar.
Identify Use this command to get the name of the media currently loaded in the device. Data Protector
Express tries to identify the tape or other media that is currently loaded in the device. If Data Protector
Express cannot identify the media, it reads the media header, a process that may take up to several
minutes. The name of the media appears on the log file for the media job and in the M edia column
ofthedevicelist.
Import This command allows you to use data on media that was created in another Data Protector
Express management domain. To use media that was not created in the current catalog, you must
import that media into the current catalog.
You might import media in one the following situa tions:
• To use media created by an earlier version of Data Protector Express.
• To use media created in a different Data Protector Express management domain.
• To use media accidentally deleted from the catalog.
When you select the Import command a property page will open and prompt you for the media
password and the encryption passphase. The media password is only applicable to media created with
older version of Data Protector Express and can usually be left empty.
An encryption passphrase is only required for encrypted media. If the sup plied passphrase is not correct,
the job log will present you with the hint supplied at the time of the media’s creation.
Format Use this command to format media currently loaded in the selected device.
When you format new media, Data Protector Express opens the Format Media dialog box. Use this
dialog box to name the media and select a media folder in which to store the media. Data Protector
Express will format the media currently loaded in the device you select. If you select a library, select the
storage slot that holds the media you want to use. When you format media, you can also set your choice
of encryption levels. Any backup job that uses media pre formatted with encryption must specify the
same encryption parameters.
NOTE:
Data Protector Express i s designed to manage your media for you. This command should only be used by
knowledgeable users and only after determining that the built in media management does not provide
the desired effects.
Erase This command erases the me dia currently loaded in the selected device. It has the following
options:
• The Quick Erase option erases the first block a nd then writes an end of data marker to that first
block. Theotherblocksofthetapearenoterased,butwhenthattapeisread,DataProtector
Express
treats it as if it were blank because it encounters the end of data marker in the first block.
• The Secure Erase option erases every block on the tape. This operation can be very time
consuming, lasting several hours. However, it will physically erase every block on the tape. If you
want to d
estroy sensitive data, use this command.
Some devices support both options; some support only one of the two erase options. Only options
supported by the selected device will be available.
Retensi
on Media
Occasio
nally when a tape is repeatedly fast-forwarded and rewound for only short
distances, tension differences develop in the tape that cause the tape drive to falsely believe it has
reached the end or beginning of the tape. You can use this command fast-forwards the tape to the end of
User’s Guide
41
Page 42

the tape and then rewinds it to the beginning. This command can be useful in some circumstances. By
retensioning on the tape, you can sometimes make an otherwise unusable tape operational again.
NOTE:
If you need to retension tapes regularly to use them, consider servicing your tape drive or replacing
your tapes.
Eject You can use this command to eject m edia from the selected device or eject the media magazines
fromtheselectedlibrary. Somedevicemagazineswillnotbeejectable.
Restore Catalog The Restore Catalog command provides a quick method of restoring your current
catalog, for example in case it has been corrupted. For example, you might use this command if the
Data Protector Express Backup Ser ver has crashed. Use this command only when your current set of
media is intact. .
The Restore Catalog command differs significantly from the Import Media command in that it command
replaces the current catalog with the last known good catalog on that media. The Import Media
command, on the other hand, does not replace the current catalog; it only adds additional da ta to it.
The advantage of the Restore Catalog command is that it provides a quick and easy way to replace a lost
or corrupted Data Protector Express catalog. You could use the Import Media command to restore a
corrupted catalog, but this process requires importing all of your media rather than simply reading the
media containing the catalog.
TIP:
It’sagoodideatomakearegularbackupoftheDataProtectorExpresscatalog. Itwillbeincluded
automatically in any full backup of the Backup Domain
NOTE:
All informat
ion in the current Data Protector Express catalog will be lost when you use the Restore Catalog
command. This command does not append data to the current catalog; it replaces the current catalog
with the last known good catalog on that media.
NOTE:
You will be prompted stop and restart the service. Use the Data Protector Express Service Control Manager
to start and stop the Data Protector Express service.
Clean Device The Clean Device command will run the backup device through a cleaning cycle.
This command is supported only by libraries. If a device in a library provides notification that it needs
cleaning and the library has a cleaning cartridge available, a cleaning cycle will be performed
automatically at the start of a backup job. If you are using a device that is not a library, you must
manually clean the device at the manufacturer’s suggested intervals.
To clean a device in a library, highlight the device and select Clean Device from the Command bar. Data
Protector Express will check to see if one of the slots holds a cleaning car tridge. If it does, the cleaning
cycle will be performed in the background; if not, an error message is shown.
If the Clean Device command is missing, it is not available for your backup device. In this case, a
cleaning cycle can often be performed by manually inserting a cleaning cartridge into the backup device.
Start, Stop and Rescan
42
Working With Devices
Page 43

Sometimes you will need to restart a device that has, for some reason, failed to initialize properly. A
device may have stopped for any number of reasons, such as a power failure or a connecting cable
malfunction. Virtual devices on a network appear disabled if the network connection has failed.
When a device is not initialized, it appears with a yellow warning icon. Some devices may take some
time to initialize, during which the warning icon will continue to appear. If a device shows the warning
icon after it is initialized, press F5 to refresh the device display.
If you don’t see a device that you expect to see connected to a m achine, select the Device folder under
the machine and click the Rescan for New Devices command.
If there is some other problem with the device or the controller, the warning icon will not disappear. You
must identify and correct the problem yourself. Then you must restart both Data Protector Express and
the Data Protector Express service. When Data Protector Express restarts, it will initialize the device
driver again. Check the Devices view to see that the devices are now properly working and that they
no longer display the warning icon. Any duplicate or old devices that are offline can be deleted from
the Catalog view .
Sharing storage devices on a SAN
Backup jobs
use). In a SAN environment, Data Protector Express automatically recognizes that a s ingle backup device
attached to a SAN may be accessible from two or more servers, and treats the device as a single device.
NOTE:
AllmachinesthatneedaccesstoaSANservermustbeincludedinthesameDataProtectorExpress
management domain.
automatically select devices to use based on their availability (whether or not they are in
User’s Guide
43
Page 44

44
Working With D evices
Page 45

6 Working with Tape Libraries
In this chapter
• Installation and Configuration
• Barcodes and MIC (memory in cartridge)
• Barcode Filters
• Initialization Process
•MediaManagement
Tape libraries automate tape media handling which, in conjunction with the Data Protector Express
backup schedules, allows hands-off backup operations. A tape library contains one or more tape drives,
some number of storage slots for tape media, and, in some cases, import/export slots to add or remove
media from the library.
Data Protector Express support for tape libraries allows you to automate and consolidate backup in
network environments and manage media efficiently. Data Protector Express has a built in m e dia rotation
schemes to help take advantage of the features of your library. Data Protector Express tape library
support includes managing media using barcodes, using the on-board memory in some tape cartridges,
such as Ultrium Memory in Cartridge, and user-configurable tape media load por ts (mail slots).
NOTE:
Always manage your tape media from the Data Protector Express interface. Your tape library may provide
a front panel that allows you to carry out various media management tasks but if you use this for media
operations the Data Protector Express catalog will not have the up-to-date media location information.
For this reason, front panel media operations will require time-consuming inventory processes to update
the catalog.
NOTE:
If your library supports multiple tape devices and you want to use a specific device, you must select
that device to use it. If you select the library , Data Protector Express will use the first available device
in the library it finds.
Installation and Configuration
If the tape library is installed correctly, Data P rotector Express will automatically detect the tape library.
When detected the tape library is added as an available device to the Data Protector Express catalog.
Once you have installed Data Protector Express, expand the Devices view to locate the tape library. Note
how the components of the tape library are displayed so that you can see how many devices (tape
drives), impor t-export Slots (mail slots) and storage slots are associated with the library.
Devices The tape drives in a tape library are viewed and managed in the same way as stand-alone
tape drives.
Storage Slots The Storage Slots folder displays the number of available slots. Each slot may contain
blank (new) media, media containing Data Protector Express data, or media containing unknown
(non-Data Protector Express) data. Data Protector Express inventories the media in the slots and displays
the information about the media and its status in the view. This allows you to view all kinds of media,
not just the media used by Data Protector Express, but you will not be able to select non-Data Protector
Express media for a backup or restore job.
User’s Guide
45
Page 46

NOTE:
It can take a long time to inventory the tape media in a tape library, which is why Data Protector Express
usually performs a "light inventory" rather than running an identify job on all the slots in a loader. See the
"Inventory Process" section below for more information.
Additional media slot configuration is accessed via the Element Status dialog for that slot, which is
accessed by a right click on the desired slot. For example, you can use this to disable slots (using the
‘Reserve’ option) and identify a cleaning cartridge.
Import/Export Slots Some library devices provide special import/export mail slots an operator uses to
enter or eject media to or from the device without removing the whole media repository or magazine.
Depending on the device, more than one import/export slot can be provided. In case of a single
mail slot, media are inserted one by one, while in case of multiple mail slots, a particular number of
slots can be used in one enter/eject operation.
Barcodes and MIC (memory in cartridge)
If the tape library supports barcode and/or MIC (memory in cartridge), the details are added to the Data
Protector Express catalog. The barcode information is hidden by default; to display this detail, right-click
anywhere in the column title row to see available column headings and click on Media barcode to make
the barcode information visible in the slots view.
Barcode and MIC (memory in cartridge) technologies are used to reduce the time spent organizing
and managing media in a library or an autoloader. In these devices, each medium is identified with
a unique barcode or, where MIC is used, a chip is embedded in the tape cartridge which holds a
unique identifier (as well as other information).
Barcodes and MIC enable Data Protector Express to significantly reduce m edia recognition, labeling and
cleaning tape detection times.
• Scanning the barcode or MIC of the media is faster than reading the medium header, because
Data Protector Express does not need to actually load the media into a tape.
• A barcode or MIC is a unique identifier for media in the Data Protector Express catalog. You
shouldnothaveduplicatebarcodesinyourenvironment.
Barcode Filters
The barcode filter allows users to control access to media by barcode. The user can specify ranges,
wildcards, or explicit b arcodes that either include or exclude media for use by the product. This property
only applies to libraries. Stand alone devices are not restricted in any way by it.
The filter rules may be set for the whole domain and will be applied automatically to all tasks. Or,
they may be set and applied at job level. Any filter rules applied at job level overwrite the default
domain settings.
For more information on setting barcode filters, see Barcode Filter.
Initialization Process
The traditional loader inventory mechanism is accomplished by running an identify job on all the slots
in a library. This complete inventory can take a very long tim e, so Data Protector Express uses a "light
inventory" process, which is known as an initialization process. This initialization process consists of ...
• Checking that the loader is ready for use. If the magazine door is open, this step will fail, and
initialization will fail as a result.
• Querying the number of physical storage, import/export and device elements that the library
contains. (These elements will be displayed in the Tape Library view.)
46
Working with Tape Libraries
Page 47

• Binding the loader to its physical devices. This ensures that the devices are associated with the
library in the Data Protector Express catalog.
• Updating the status for each element in the loader. Barcodes are read at this time, and are
associated with each element regardless of status (i.e. both Invalid and Valid elements get a
barcode shown in the loader status pane).
Initialization occurs when the library driver starts (at service startup or when the driver is manually
started), when the user selects the Initialize command on the loader object or when Data Protector
Express detects that a user has changed the state of the loader (either by opening the front door or by
using the front panel).
During initialization, the library will attempt to perform barcode based identification of media. If a match
is found, the loader will set that element’s status to Probably Valid. This means that if a user is using
barcodes with their tape library, they will almost never need to run an identification job.
When the job loads the tape it makes sure that the tape is really what the catalog says it is and, if
necessary, updates the catalog to indicate what is really there. If the tape is, in fact, not usable because
of the supplied media rules, the tape is re-stowed and another m e dia is tried.
TIP:
An Identify job will always physically mount media, and reassociate media to barcodes. This provides a
mechanism for users to update barcodes on their media, should they ever need to. It also handles the case
where barcodes are added to media after they have been used without barcodes.
Media M anagement
One benefit of using Data Protector Express with tape libraries is the ease with which you can schedule
different backups for different days of the week/month/year. There are no specificmediatasksthatmust
be carried out before you run a backup job. As long as the library has valid media loaded in it, Data
Protector Express will automatically use it automatically.
NOTE:
Media i s invalid if it has been used by another backup product, is dirty or has been corrupted, or simply
has not been identified.
Similarly, if you are restoring data from media that is already within the Data Protector Express catalog,
there are no m edia m anag em ent tasks. However, if you are restoring media from a different dom ain, you
must first import it so that Data Protector Express can add the media to the database and associate all
data objects on the tape with that media.
For a detailed description of all media management jobs, please refer to Device Commands.
User’s Guide
47
Page 48

48
Working with Tape Libraries
Page 49

7 Scheduling, Rotations, and Medi a
Management
In this chapter
• Backup Schedule Considerations
•SchedulingConcepts
• Media Rotation Types
• Running Jobs with Rotations
Ensuring that you have all the files needed to restore your system is a complex task. Typically, it is not
practical — from either a time or a media perspective — to create a full backup every day. The solution
involves running different types of jobs (full, incremental, differential or copy) on predefined schedule
intervals using predefined numbers of m edia sets that get reused over time. The process of reusing m e dia
is referred to as media rotation. The media rotation t ype determines how and when each media set is
used, how long it is retained once it contains data, and the granularity of your backup history.
Arotationdefines the times it will run (see Intervals)andhowmanysets it will use (see Media Sets).
When a job is configured to use a rotation in its schedule, the rotation set folders are created immediately.
This allows the user to see what media sets the job will be requesting. If the rotation type is changed, the
set folders are updated to reflect the new rotation type. When the job runs, it will look for media with
specific names in specific folders. If it does not findtheprecisemediaitislookingfor,itwillformatany
available media according to the auto format rules or will prompt you to insert media into your device
before it continues. When the number of rotation runs has been reached, the next backup run will
select the oldest set in the interval to overwrite.
Data Protector Express provides several built in media rotation types. In many cases, the name of the
rotation t ype indicates the number media sets used in the rotation. For example, the Simple 4 rotation
type will use four media sets (at least four individual tapes) to complete the rotation. The media set names
can be based either on the scheduled interval or on the type of fixed rotation.
TIP:
It is strongly recommended that you let Data Protector Express format your media. In most cases there is
never a need to pre-format media using the Format command and doing so will, if used improperly, make
your media unavailable to your jobs.
The Jobs and M edia view displays jobs, media and folders in the Data Protector Express catalog. When
you first open the Jobs and Media view you will see a listing of your Home folder. Your Home folder is
where Data Protector Express stores the jobs you create and the media created by those jobs.
TIP:
When viewing the Jobs and Media view, clicking the Folders command will display a tree view of the
Home folder hierarch that can be helpful in understanding the organization of media within jobs.
CAUTION:
When you delete media, Data Protector Express deletes information about that media from its catalog. This
includes any versions of files stored on that tape, which are also deleted from the catalog. Deleting media
does not physically erase the media. The media remains unchanged; only the catalog is changed. You can
still import that tape to another catalog or, if necessary, back into the original catalog.
User’s Guide
49
Page 50

Backup Schedule Considerations
Data Protector Express lets you set up jobs that run automatically on regular schedules. To determine
which type of backup job you should create, ask yourself these questions:
• How many days of data can you afford to lose?
• How large will a full backup job be?
• How much does your data change on a day to day basis?
• How many media does your budget allow?
• How much data can the backup media hold?
• If you have a library, how many tapes does it hold?
• Are there times when your tape drive will be unavailable?
• Will the amount of traffic on your network require that backup jobs be scheduled to run during
non-peak periods?
• Are there certain days of the week when running lengthy jobs will interfere with other uses of
your network?
As you review the following sections, keep these questions in mind to help you determine which backup
job schedule to select for any particular job.
Scheduling Concepts
One of the greatest values of a data protection solution like Data Protector Express is the ability to define
data retention policies. Retention policies allow you to balance your data protection and historical
retention needs with the economic realities of media material and management costs.
Media Sets
Data Protector Express organizes media into sets b ased on the rotation type and schedule interval.
Whether the job requires several or only one physical media to complete, they are identified in the Data
Protector Express catalog as a set. When more than one physical media is required for a job, Data
Protector Express will create a unique name for each media in the set.
When planning scheduled backup jobs, it is important to know whether one or several physical media
will be required to complete a backup job. This can usually be estimated by comparing the size of the
backup selection to the capacity of the selected media. If you do not want Data Protector Express to use
more than one media for a backup job, then you must select fewer files to back up.
NOTE:
The terms media can be used to refer to both physical media, like an LTO tape, or to the catalog object
Data Protector Express uses to keep track of file versions that have been backed up.
Intervals
Job schedules are defined using the Intervals Daily, Weekly, Monthly,andYearly .Intervalsareused
to defined which days a job will run, what t ype of backup (full, incremental, differential, or copy) will
be done
the amount of time between runs of that interval.
When the Run repeatedly schedule type is chosen the job Configuration page will show an additional
sectio
, and how many sets of media are dedicated to the interval. The size of an interval refers to
n, Interval settings, that control the schedule parameters. Each interval type is listed along with
50
Scheduling, Rotations, and Media Man agement
Page 51

a textual description of its current setting. To customize the settings for an interval , click on one of the
interval buttons. Most schedules are defined in terms of the following intervals:
Daily — run on sequential weekdays.
Weekly — run once per week on the d ay specified by the user, for example, Friday.
Monthly — run once per month on a day specified by the user such as the first day, the last day, the first
Monday, and others. You can also specify how many months should elapse between monthlies. Setting
the monthly interval to every 3 months will create a backup every quarter.
Yearly —runonceperyearonaspecified day of the year. By increasing the interval you can also
schedule a job to run once every so many years.
NOTE:
There are also Hourly and Minutely intervals that are less commonly used. The concepts behind using
them are similar to those of the intervals discussed above.
For all intervals there is a setting that controls the number of sets. This settings determines how many sets of
that backup interval will be created before Data Protector Express goes back and overwrites the first. For
example, if your schedule starts in January and calls for three monthly sets, you will have a set for January,
a set for February, and a set for March. In April, the job will overwrite the set from January.
When configuring a rotation the Calendar view displays the schedule graphically. The interval type for
each day is displayed in the calendar. Clicking on a day in the calendar will display the type of backup,
thewritemode,andthenameofthemediathatwillbeusedonthatday.
TIP:
You can change the interval for a given day of a schedule by right-clicking on the day in the calendar
and selecting the desired type.
You can prevent the job from running on a given day. This is helpful for times when you know the job won’t
completebecauseyouwon’tbeabletosupplytherightmediaforthejob—asinthecaseofholidays.
You can enable or disable jobs from running on specified days of the week by clicking the name of the day
in the heading of the calendar view. For example, if you want daily backups on Saturdays.
Implications for Restoring Data
Intervals also define the granularity of the data you can restore. Rotations are set up to capture more
granularity in the recent past and less granularity as data gets older. Larger intervals, like Yearly and
Monthly, produce lower granularity data history. Smaller intervals, like Daily, produce higher granularity
history. Take, for example, a rotation with three full monthly backup sets on the last day of ea ch month,
four full weekly backup sets created on each Friday, and four incremental daily backup sets created
Monday through Thursday. Now suppose you have a critical file that changes daily. On Wednesday,
you are asked to retrieve the file as of a specific date. With this rotation you can roll back to the Monday
and Tuesday versions of the fi le in the current week and the Wednesday, Thursday, and Friday versions of
the file in the previous week. Beyond that, you will only h ave the versions of the file as they existed on
Friday for the previous four weeks previous to the current week. And beyond that you will only have the
versions of the file that existed on the last day of the month for the previous three months.
The catalog keeps track of the files and versions that have been ba cked up so you don’t have to
remember what media they are on. This knowledge makes the restoration process very simple. You only
need to specify the files you want restored and Data Protector Express will prompt you for the media
it needs restore the files. Full reconstruction of data may require multiple media sets. For example, to
reconstruct the data for a Wednesday from a GFS 20 set rotation type, you will require the full backup
media set from the previous end of week and all of the incremental media sets from that week (that is,
Mondays, Tuesdays and Wednesdays). In some circu mstances, the preceding full backup media set
User’s Guide
51
Page 52

will be a monthly or yearly job and not a weekly job. As long as none of these media sets has been
overwritten, full data recovery is possible.
NOTE:
When a full backup media set is reused, any incremental or differential backups relative to that full backup
will no longer be usable for full system restores. However, files on those media are still recoverable.
NOTE:
Yearly backups only provide you with access to files present on your computer or network on that one
day e ach year. No copy exists for files that were created after the oldest yearly backup and then deleted
before the most recent yearly backup. It is the responsibility of the user to manage the retention of media
containing critical business data.
Media Rotation Types
Data Protector Express provides several default media rotation types. These type can be used as is or as
examples for creating custom rotations.
NOTE:
Each media set may contain more than one tape or media. Several factors determine how much media
you will need: the type of backup being performed (for example full, differential, incremental), the amount
of data to be backed up during a full backup, and the med ia’s storage capacity. If the total size of a full
backup is larger than the capacity of the tape, additional tapes are required. Your historical usage is the
best guide to determining how many tapes these jobs will require.
No Rotation Type
When no rotation type is selected the user may schedule the days to run on but Data Protector Express
will not manage the media. The user must supply the desire tapes each time the job runs and will
manage the reuse of older media him self.
Fixed Rotation Types
Media sets are named for the interval that has been run. They follow the form [Interval ] Set [ number ].
Fixed by day of week for example of a daily media set is “1st Monday.”
Fixed by week of month for example of a weekly media set is “1st Week of the Month.”
Fixed by day of month for example of a monthly media set is “1st Month.” An example of a yearly
media set is “Yearly 1.”
Fixed by day of year forexampleofayearlymediasetis“FirstDayofYear1.”
Daily Append
This is a special rotation designed for users with a single backup d evice. It is the only rotation that
appends data to media. It will perform a full backup on the specified day followed by daily incrementals
on the remaining weekdays. At the end of the rotation, the user must insert new media for the job to use.
This rotation assumes that an entire week of backups will fitonasinglemedia.
52
Scheduling, Rotations, and Media Man agement
Page 53

Simple and GFS Ro
tation Types
These rotation types specify combinations of full and incremental backups that efficiently use a specific
number of media
sets. The main difference between the Simple and the GFS rotations are that only the
GFS rotations specify Yearly backups.
Custom
Select this option to create your own rotation.
TIP:
You can select a rotation similar to the desired rotation prior to selecting the custom rotation type and the
values from the previously selected rotation will remain as a starting place. The Calendar view is very
helpful when creating custom rotations.
Comparing rotation types
Data Protector Express provides a variety of media rotation types to select from. Or, you can define
your own media rotation.
The following table compares the historical backups and full data recovery capabilities of each of the
rotation types provided in Data Protector Express.
Rotation Type
Simple
Simple
Simple
Simple
Simple
Daily Append
GFS 20
GFS 25
GFS 30
#ofSets
4
6
10
11
12
N(def. 4) Nfull
Yearly Sets Monthly Sets Weekly Sets Daily Sets
2 full 6 full 6 full 6 incrementa
2full 7full 8full
2full 8full 8fill
Running Jobs with Rotations
The info bar displays the Current rotation set and the Next rotation set in the Rotation Details section
of the info bar. B efore the job is run the first time, both fields have the same value. Once the job runs
successfully, the current rotation set field will display the media that has just been used and the next
rotation set field displays the media that will be used next.
Initial run The initial run of a rotation job is uses the largest schedule interval in the rotation. For
example, suppose a job is configured to use a GFS 20 rotation starting on a Thursday, October 28th,
2010.EventhoughaThursdayinthemiddleofamonthwouldnormallybeclassified as a Daily backup,
the first time the job is run, a Yearly backup will be performed.
1full 1full 2full
2full 1full 3full
3full 3full
3 full 4 full 4 incrementa
4full 4full
4 incremental
4 incremental
4 incremental appends
8 incremental
12 incremental
l
l
Missed jobs If, for some reason, a run of the job was missed — for example, because the Backup
Server was turned off at the scheduled run time — the scheduler will determine the largest interval missed
and run it automatically a few minutes after Data Protector Express starts a g a in.
User’s Guide
53
Page 54

Failed jobs If a job fails, it will not automatically be run again. However, you can manually rerun by
clicking the Run command in the command bar.
Pausing and continuing a schedule You can stop a scheduled job from running for a period of time by
clicking the Pause Schedule command in the command bar. To turn the scheduled job back on, click the
Continue Schedule command in the c ommand bar. As with the initial and skipped jobs, the scheduler
will start again with the largest schedule interval that was skipped.
Forcing a run At times it may be desirable to start a job before it’s scheduled time. Clicking the Run next
schedule command in the command bar will cause the next scheduled interval to be run immediately. The
job will not be run again when it’s originally scheduled time arrives. And forcing a run to start ahead of
schedule will not affect the scheduling of subsequent runs. They will run at their normally scheduled time.
54
Scheduling, Rotations, and Media Man agement
Page 55

8 Encr yption and Comp ression
In this chapter
•EncryptionforBackupJobs
• Compression
•KeyManagement
Encryption
Encryption i
protecting
encryption is required.
For example, it may be mandatory for company confidential and financial data, but not for personal data.
Company pol
The current version of Data Protector Express provides the user with the ability to encrypt the data that is
written to t
and software encryption.
• Hardware encryption is supported on some backup devices, such as HP LTO-4 tape drives. It is
faster tha
strength is determined by the backup device. HP LTO-4 tape drives always provide strong AES-256
encryption. This feature can be managed by a backup application that supports hardware
encryption, such as Data Protector Express.
• Software
user selects an encryption strength: Low 56 bit, Medium 128-bit or High 256-bit. Each encryption
key size causes the algorithm to behave slightly differently. Increasing software encryption strength
makes the data more secure, but requires more processing power.
If your business requires you to use encryption, Data Protector Express allows you to set the required
encrypt
s the process of changing data into a form that cannot be read until it is deciphered,
the data from unauthorized access and use. Company policy normally determines when
icy will also define how encryption keys should be generated and managed.
he media and fully implements the Advanced Encryption Standard (AES) for both hardware
n software encryption and requires no processing on the backup server. The encryption
encryption uses the encryption algorithms available within Data Protector Express. The
ion types and levels. This chapter contains important information about data encryption.
Cryptographic Algorithms
Cryptographic algorithms are the basic components of cryptographic applications. It is important to
understand that as you increase the complexity of the encryption the information gets closer to impossible
to read and the load on your machine, for software-based encryption, will increase.
Software Three cryptographic algorithms are provided. These three settings provide three levels of
resistance which require progressively more CPU time to convert the same amount of data. The three
options are for the software encryption mode only.
• Low – DES 56-bit
• Medium – AES 128-bit
• High – AES 256-bit
Hardware The cryptographic algorithm provided by hardware devices that provide this feature is not
under Data P rotector Express control. The hardware provides configuration and operating parameters
via a special encryption command. The device driver adjusts its crypto session settings from this input.
Hardware encryption is an on/off feature, you do not have the ability to adjust the encryption level
through the Data Protector Express interface. By default Data Protector Express will attempt to use the
highest encryption a lgorithm supported on the device, if the device supports multiple algorithms. If the
User’s Guide
55
Page 56

device does not support encryption, the user will be prompted with an alert telling them that the device
cannot be used since it does not support hardware encryption.
Passphrase
The passphrase is a series of characters that must be provided by the user for input to the cryptographic
key generatio
• Passphrases must be no less than 8 logical characters. They may be created by the user or
• If created by
• The passphrase is one of the components Data Protector Express uses to generate the encryption
• To aid the user in remembering the passphrase, the user may enter a hint message. The use of
• If a ba ckup
Passphrases for the media are stored in the Data Protector Express catalog. This me ans the user is able to
read and append to the encrypted media without being prompted for a passphrase as long as it is being
accessed by the instance of Data Protector Express that first encrypted it
Once a media is deleted or exported from the Data Protector Express catalog the passphrase is also
deleted.
• When importing the media to another machine or another instance of Data Protector Express
• During disaster recovery
nprocess.
randomly generated by a separate application.
theuser,thepassphraseshouldbedifficult to guess and should contain a mix of
lowercase/u
key. A longer or random passphrase will increase the strength of the encryption key even more.
this field is optional and provided to the user as prompt for remembering the passphrase.
ppercase letters, digits and special characters.
jobspansmultiplemedia,thesamepassphrasewillbeusedforallmediaintheset.
There are two instances when the user n e eds to know the passphrase:
CAUTION:
Managing the passphrase is a critical component of any encryption system. Data may be stored for
months or
of encryption passphrases and store them in a secure place separate from the computer running Data
Protector Express. If the user is unable to supply the passphrase when requested to do so, neither the user
nor Data Protector Express Support will be able to access the encrypted data.
years, so passphrases must be archived securely. The user should keep a record or backup
Encryption Options
Encryption is enabled on the job’s Encryption page.
Off Both ha rdware and software encryption are disabled.
Automatic This selection will use hardware encryption, if it is available from the device; otherwise,
software encryption will be used
Software Software encryption will be used. When Software is selected, the user can choose the
strength of software encryption
Hardware Hardware encryption will be used, if the device supports it. If it does not support encryption
and this option is selected, the user will be prompted with an alert stating that the device cannot be used
since it does not supp ort hardware encryption.
Software Strength Options for the software encryption strength are listed below as three selections, low,
medium and high. Low is the easiest method to decipher by outside methods, High is the hardest method
to decipher by outside methods. As you progress from low to high, the encryption algorithm requires
more CPU computations for ea ch block of data to be encrypted, which may slow down the data stream
to the device and will increase CPU loading on the Media Server.
Encryption passphrase / Verify Passphrase The user supplied portion of the encryption key. Data
Protector Express will use this value, along with other information it generates, to calculate an encryption
key for the media. The passphrase must be entered twice to minimize the change of making a mistake
while typing.
56
Encryption and Compression
Page 57

Hint The text entered here will be added to the log file of an impor t job if the media later needs to be
imported and the incorrect passphrase is supplied. Use this fi eld to create a reminder of the passphrase
as Data Protector Express cannot recover a lost passphrase.
Compression
Software encr yption disables hardware compression, although you will still be able to select Software
compression.
If the backup d
compression is used, and that there is little to no benefit of having both enabled. Enabling software
compression in this circumstance will reduce performance.
If Hardware encryption is selected, we recommend that Enable hardware compression is also selected.
Hardware enc
drive without any loss of backup speed.
evice has hardware compression then performance will be better if only hardware
ryption and hardware comp ression can be used on devices, such as the HP LTO -4 tape
Key Management
Data Protector Express has adopted a very simple key management strategy. A media is encrypted
originally by configuring the job that creates it according to the parameters described above. From tha t
point on, the media is known to the catalog. As long as the media is known, restore jobs m ay use the
media without entering the passphrase aga in. If a media is unknown — because it was deleted from the
catalog or b ec ause it came from a different catalog — you must import the media to make it known to the
catalog again. The import process required you to supply the passphrase to complete the import. If the
passphrase supplied does not match that used to encrypt the media, then the hint supplied at encryption
time will be shown in the job log so you can try the import again.
When media is encrypted the media is depicted on the Jobs and M edia view with a lock on it. The
Platinum colored lock indicates hardware, whereas the gold lock indicates software encryption. The
Media details window shows the type of encryption used.
User’s Guide
57
Page 58

58
Encryption and Compression
Page 59

9WorkingwithThird-Party
Applications
Data Protector Express provides agents for protecting a number of popular third-party applications.
These agents protect the applications using the application specific backup interfaces provided by the
application vendors to ensure complete protection of your data.
Microsoft Exchange Server
In this section
•Configuring
• Backing up Microsoft Exchange Server
• Restoring Microsoft Exchange D atabases
•DisasterRe
Supported Platforms
The Data Protector Express Agent for Microsoft Exchange supports backup and restore operations for
Microsoft Exchange 2000 Server, Microsoft Exchange Server 2003, Microsoft Exchange Server 2007
and restoring from Microsoft Exchange Server 5.5 (if backed up with a previous version of D a ta Protector
Express)
Some editions of Data Protector Express d o not provid e a license to backup Exchange data. By default,
an evaluation version of the Data Protector Express agent for Microsoft Exchange is installed automatically
when you install Data Protector Express on a Windows server machine that is running Microsoft
Exchange. You can use this evaluation license for 60 days. To c ontinue using the agent, contact your
sales representative to purchase an edition of Data Protector Expressthat supports Application agents.
aMicrosoftExchangeServer
covery with Microsoft Exchange Server
Configuring a Microsoft Exchange Server
As with any other objects that are configurable in Data Protector Express, you can configure the Microsoft
ExchangeServerforbackupsifyouhavethecorrectpermissions.
1. Open the Administration desk bar and select Catalog view.
2. Select Network, then locate and select the Microsoft Exchange Server on your system.
TIP:
Switch to the Folders view to display a hierarchical tree of the Data Protector Express
management domain.
3. Right-click the server and select the Configuration command.
Update the following settings that control how D ata Protector Express works with Microsoft Exchange
Server.
Force Modes As explained in the next section, the Backup mode setting of a backup job affects
Microsoft Exchange Server databases differently than file types. The Force modes settings control how
Data Protector Express backs up the databases.
User’s Guide
59
Page 60

NOTE:
The settings here are only applicable to Microsoft Exchange Server databases; all other file types are
backed up in the job’s default mode.
For example, if the Backup mode of a job is set to Incremental and the Force modes setting for incremental
jobs is set to Full, Data Protector Express will b ack up the Exchange Server databases in Full mode, but
all other file types in Incremental mode.
TIP:
You can use this feature to ensure that the databases are always backed up in full mode, but that other
objects are only backed up when changed. This guarantees the greatest security for the most crucial files
(that is, the Exchange Server databases), while not making jobs unnecessarily large by not backing up
theentirenetwork(thatis,bybackinguponlythechangedfi les).
Full When the Backup mode of a job is set to Full, Data Protector Express checks this setting to see how
the job should be run with Microsoft Exchange Server databases. Full is the only possible setting, so the
databases will be backed up in this mode. In this case, both the database files and the transaction logs
are backed up.
Differential
setting to see how the job should be run with Exchange databases. By default, Data Protector Express
runs the job as an incremental job and so only the transaction logs are backed up.
When the Backup mode of a job is set to Differential, Data Protector Express checks this
If you want jobs with a Differential backup mode to back up both the database files and the transaction
logs, change
databases as
Incremental
setting to see how the job should be run with Exchange databases. By default, Data Protector Express
runs the job as an incremental job and so only the transaction logs are backed up.
If you want jobs with an Incremental backup mode to back up both the database files and the transaction
logs, chang
databases
this setting to Full. In this case, Data Protector Express will treat the Exchange Server
if it were running a job in Full backup mode.
When the Bac kup mode of a job is set to Inc remental, Data Protector Express checks this
e this setting to Full . In this case, Data Protector Express will treat the Exchange Server
as if it were running a job in Full backup mode.
Backing up Microsoft Exchange Server
When you use Data Protector Express to back up and restore Microsoft Exchange Server databases, you
must pay special attention to the role Windows NT security serves in Microsoft Exchange and the backup
mode of the Data Protector Express backup jobs.
Microsoft Exchange and Windows NT Microsoft Exchange uses Windows NT security information
for authentication and thus when planning a comprehensive backup program, you must consider the
Windows NT operating system as well. Be certain to include backup and restoration of the Windows NT
operating system as part of your Microsoft Exchange disaster recovery plan.
Backup modes You can use the Options tabofajobtosettheBac kup mode for any type of backup
jobs: full, incremental, differential or copy. For scheduled automatic rotation jobs, Data Protector Express
automatically updates this job setting to the value indicated on the Schedule tab of the job.
When the Backup mode is set to Full,allfiles selected are backed up, including the entire information
store a nd directory databases. Transaction logs are also backed up and then purged.
When the Backup mode is set to Incremental, only changes that have occurred since the last backup job
are backed up. In particular, for databases, only the .log files are included in the backup job.
60
Working with Third-Party Applications
Page 61

CAUTION:
These .log files are then purged.
When the Backup mode is set to Differential, for databases, only the .log files are included in the
backup job, but these files are not purged.
When the Backup mode is set to Copy, Data Protector Express runs the job similar to full backup.
However, the transaction logs are not purged at then of a job run in Copy mode.
Backup modes and circular logging
Microsoft Exchange Server supports database circular logging. Circular transaction logs differ from
normal logs in that only a few log files are maintained. These files are purged automatically as new log
files are created. When the transactions in the circular log files are recorded in the database, the log files
are then deleted. New transactions are recorded in newly created lo g files.
If circular logging is enabled, you cannot do incremental or differential b a ckups. These backup modes
rely upon past transaction logs and thus are not available when circular logging in enabled. When
circular logging in enabled, Data Protector Express will revert to full backup mode.
You can check to see if circular log g ing in enabled for a particular server by examining the Advanced
tab of that server’s Properties window. If you turn circular logging off, Microsoft Exchange Server will
stop the database service and restart it after making the changes.
Restoring Microsoft Exchange Databases
To restore the Microsoft Exchange Server databases, you must restore the database files and all of the log
files created since the last full backup job. To do so, you either (1) restore the databases from the last
full backup if the last backup (the previous day’s) was a full backup; (2) restore the databases from the
most recent full backup and the last differential backup if the last backup was a differential backup; or
(3) restore the databases from the last full backup and all of the incremental backups made between
that day and the present day.
To restore a Microsoft Exchange server, see Disaster Recovery with Microsoft Exchange Server.
NOTE:
When you restore the databases, you must create and run a separate job for each set of transaction logs
youneedtorestore. Youcannotskipanylogsandthelogsmustberestoredinsequentialorder. Thus,
when recreating the databases, you must first restore the actual databases (created by a backup job
full
running in
separate jobs. No log can be skipped when restoring.
For example, if you did a full backup on Monday and incremental backups each day Tuesday through
Friday, in order to restore the databases to their state at the close of business Friday, you must run
five separate jobs: one restoring the actual databases from Monday’s full backup job and then four
additional separate jobs restoring each transaction log in sequential order, beginning Tuesday and
continuing with each log sequentially until Friday.
To restore the Microsoft Exchange Server Databases
1. Find the date of the last full backup of the databases.
2. Create a restore job.
3. On the Selection property page, locate and select the Microsoft Exchange Server storage group.
backup mode). Next, you must restore the transaction logs in the order created
and
in
4. In the Versions of window, click the Details button.
User’s Guide
61
Page 62

5. Sequentially move through the versions in the Available versions list by date until you find the most
recent full backup of the storage group. This version will be selected for restoring when it is selected
in the Available versions list.
6. Click OK to restore that version.
7. If the most recent backup was a full backup, skip the rest of these steps and restart the Microsoft
Exchange Server storage group. As the service is restarted, it automatically restores all of the
transactions from the transaction logs.
8. If the most recent backup job was a differential job and you have performed no incremental jobs
between the date of the last full backup and the most recent backup, then create and run a new
restore job, selecting the latest version of the storage group. Then restart the Microsoft Exchange
Server storage group. As the service is restarted, it automatically restores all of the transaction from
the transaction logs.
NOTE:
If you have performed any incremental jobs since the date of the last full backup, continue
with the next step.
9. If you have run an incremental backup job after the m ost recent full backup job, you must create and
run a separate restore job for each backup performed after the most recent full backup. Sequentially
select versions of the storage group from the Available versions field in the Versions of window of the
storage group. Run and complete each restore job before creating and running a new restore job.
10. Continue to create and run restore jobs until you have restored the latest version of the storage group.
Then restart the Microsoft Exchange Server storage group. As the service is restarted, it automatically
restores all of the transaction from the transaction logs.
Disaster Recovery with Microsoft Exchange Server
The Data Protector Express Agent for Microsoft Exchange lets you work with databases instead of
individual information stores. Each storage group is identifiedasasingleobject,whichyoucanback
up and restore.
To recover from a disaster , first perform a general system-level d isaster recovery to restore the basic
system. See Disaster Recovery. Then perform the following steps.
System-level Disaster Recovery
A Microsoft Exchange Server requires the Windows Active Directory to be restored. Microsoft
recommends restoring the entire Windows Active Directory system state. Follow the steps below to
restore the Windows Active Directory.
1. When Windows restarts the first time after the recovery, the Starting Windows screen appears
during startup. Press F8.
2. Select Directory Services Restore Mode and press Enter.
3. Log in to the system.
4. Start Data Protector Express.
5. Create a restore job.
6. Select Active Directory Database for the restore job from the list on the Selection page.
7. Run the restore job.
8. Exit Data Protector Express.
Preparing to Restore the Microsoft Exchange Server
1. Restart the computer, lettin
g Windows load normally.
2. Verify that the various Micro
3. From the Windows Start menu,
62
Working with Third-Party Applications
soft Exchange services are load ed and running.
select Microsoft Exchange, System Manager.
Page 63

4. For each storage group to be restored, dismount and change the properties for each store with a
storage group:
a. Right-click the store within the storage group. A pop-up menu appears.
b. Select Properties.TheProperties screen appears.
c. Select the Database tab.
d. Select This database can be overwritten by a restore.
e. Click OK.
f. Right-click the store again. A pop-up menu appears.
g. Select Dismount Store, if the option is available.
h. Click Yes to confi rm. The store is dismounted, which means it can be restored.
i. Exit the System Manager.
5. Access the Exchange Server subdirectory on the computer, for example, c:\Program
Files\Exchsrvr\mdbdata.
6. Delete all storage group and log files associated with each storage group to be restored.
CAUTION:
Do NOT delete the actual subdirectories.
7. If you do not have a default installation, use the Exchange system manager to locate the following
files and then delete them:
a. Log file (.LOG) for each storage group.
b. Exchange database (.EDB) for each store in the storage group.
c. Exchange streaming database (.STM) for each store in the storage group.
Restoring the Microsoft Exchange MTA Database
1. Restore the Microsoft Exchange MTA (Message Transfer Agent) database.
a. Access Data Protector Express.
b. Create a restore job.
c. Click the Microsoft Exchange Server in the Folders panel to display the MTA database, Queued
Messages (MTA),inthelistintheName colum n to the right of the Folders panel.
d. Select Que ued Messages (MTA) from the list in the Name column to the right of the Folders panel.
e. Run the restore job.
f. Exit Data Protector Express.
2. Start the MTA service:
a. Right-click My Computer on the desktop. A pop-up menu appears.
b. Select Manage.TheComputer Management screen appears.
c. Expand the Services and Applications folder.
d. Scroll down and right-click on Microsoft Exchange MTA Stacks. A pop-up menu app ears.
e. Select Start.
f. Close the Computer Management screen.
Restoring Microsoft Exchange Databases
1. Restore the appropriate Exchange databases:
a. Access Data Protector Express.
User’s Guide
63
Page 64

b. Create a restore job.
c. Click the Microsoft Exchange Server in the Folders panel to display the storage groups in the list
in the Name column to the right of the Folders panel.
d. Select the storage groups you want to include in the restore job from the list in the Name column
to the right of the Folders panel.
e. Run the restore job.
f. Exit Data Protector Express.
2. Mount the Exchange databases for each storage group that you restored:
a. From the Start menu, select M icrosoft Exchange, System Manager.
b. Right-click the database within the storage group. A pop-up menu appears.
c. Select Mount. The system mounts the database.
d. Click OK.
e. Exit the System Manager.
Working wi
In th is sec tion
•MicrosoftSQLserverconcepts
•Configuri
• Backuping up Microsoft SQL Server
• Restoring Microsoft SQL Server
•Restori
• Restoring Microsoft SQL Server master databases
This section contains important information pertaining to backing up and restoring Microsoft SQL Server
database instances. If you are using Data Protector Express to back up and restore SQL Server database
instances, be sure read these instructions carefully.
th Microsoft SQL Server
ng the Microsoft SQL Server
ng Microsoft SQL Server user databases
Supported platforms
The Data Protector Express Agent for Microsoft SQL Server supports Microsoft SQL Server 2005,
2008, and 2008 R2.
Some editions of Data Protector Express do not provide a license to backup Microsoft SQL data. By
default, an evaluation version of the Data Protector Express agent is installed automatically when you
install Data Protector Express on each Windows server. You can use this evaluation license for 60 days.
To continue using the agent, contact your sales representative to purchase an edition of Data Protector
Expressthat supports Application agents.
Microsoft SQL server concepts
Microsoft SQL Server environments are frequently mission-critical and must be maintained 24 hours a
day, seven days a week. Procedures and plans must b e in place to ensure the quick recovery of data i n
vent of data loss.
the e
Using the transaction logs associated with each database, you can quickly recover your databases.
Transactions that were not committed can be rolled back, while transactions that were committed can
ritten to disk.
be w
While transaction logs assure that only committed transactions are written and restored, in order to
use them correctly, you must have a comprehensive backup plan that regularly backs up these logs.
Additionally, when you reconstruct a database, you must restore the database files and logs using only
procedures set out below.
the
64
Working with Third-Party Applications
Page 65

Configuring the Microsoft SQL Server
You c a n configure any Data Protector Express feature by selecting the object from the Catalog view
and updating information on its property pages.
1. Select the Admi
nistration desk bar and open the Catalog view.
2. Select Networ
3. Expand the object until you see a list of database instances.
TIP:
Switch to the F
management domain.
4. Right-click the database instance and display its property pages.
5. Select the Configuration command to display the Configuration page.
NOTE:
We recommend that you use the default values on the Configuration page.
User name Data Protector Express sends this name to Microsoft SQL Server whenever the SQL
administrator user name is required. Type the Microsoft SQL a dministrator name in this field. The default
is sa.
Password Da ta Protector Express sends this SQL administrator password to Microsoft SQL Server with the
SQL administrator’s user name whenever required. There is no default value.
Force Modes As explained in the next section, the Backup mode setting of a backup job affects Microsoft
SQL Server database instances differently than file types. The Force modes settings control how Data
Protector Express backs up the database instances.
k, then select the Microsoft SQL Server on your system.
olders view to display a hierarchical tree of the Data Protector Express
NOTE:
The settings here are only applicable to Microsoft SQL Server database instances; all other file types are
backed up in the job’s default mode.
For example, if the Backup mode of a job is set to Incremental and the Force modes setting for incremental
jobs is set to Full , Data Protector Express will back up the SQL Server database instance in Full mode, but
all other file types in Incremental mode
.
TIP:
You can use this feature to ensure that the databases in the instance are always backed up in full mode,
but that other files are only backed up when changed. This guarantees the greatest security for the most
crucial files that is, the SQL Server database instances, while not making jobs unnecessarily large by not
backing up the entire network that is, by backing up only the changed files.
Full When the
job should be run with SQL database instances. Full is the only possible setting, so the database instances
will be backed up in this mode. In this case, both the databases and the transaction logs are backed up.
Differential When the Backup mode of a job is set to Differential, Data Protector Express checks this
setting to s
runs the jobs as an incremental job and so only the transaction logs are backed up.
Backup mode of a job is set to Full,DataProtectorExpresschecksthissettingtoseehowthe
ee how the job should be run with SQL database instances. By default, Data Protector Express
User’s Guide
65
Page 66

NOTE:
There is no distinct Differential job mode for SQL Sever database instances.
If you want jobs with a Differential ba ckup mode to back up both the database and the transaction
logs, change this setting to Full. In this case, Data Protector Express will treat the SQL Server database
instances as if it were running a job in Full backup mode.
Incremental When the Backup mode of a job is set to Incremental , Data Protector Express checks this
setting to see how the job should be run with SQL databases. By default, Data Protector Express runs the
jobs as an incremental job and so only the transaction logs are backed up.
If you want jobs with an Incremental backup mode to back up both the database and the transaction
logs, change this setting to Full. In this case, Data Protector Express will treat the SQL Server database
files as if it were running a job in Full backup mode.
Backuping up Microsoft SQL Server
Two additional concerns are present when you back up SQL Server database instances: setting the
Backup mode of a job to either Full, Incremental
to work with SQL Server’s default backup routine.
NOTE:
Anytime Data Protector Express returns an error message that is greater than 10000, a Microsoft SQL or
Exchange error has occurred. Refer to your Microsoft documentation for more information as this is a
Microsoft error code.
,
or Differential;andconfiguring Data Protector Express
Microsoft SQL Server Databases and the backup mode
The Backup mode on the Option s tab of a job that backs up SQL Server database instances is especially
critical.
Backup modes When the Full set ting is selected, all files selected for backup are backed up, including
SQL Server database instances and databases. However, when either the Increm e n tal or Differential
option is selected, Data Protector Express backs up only the transaction logs for e ach d atabase.
CAUTION:
There is no difference between Incremental and Differential jobs for SQL Server databases.
When the Backup mode is set to Copy, Data Protector Express a creates a full backup of the database
but d oes not truncate the logs.
Additional Conditions Master, Model, MSDB and Pubs databases support only full backups. The
Backup mode option is automatically set to Full when backing up these databases.
IfyousetajobtorunineitherIncremental or Differential modeandthejobcanonlyrunasafullbackup
(as a result of the provision above), the job will fail to run on each of its initial passes, but will run
in Full backup mode on its final pass.
Using Data Protector Express with SQL Server’s Backup Routine
Microsoft SQL Server has default utilities a nd commands for backing up data. When you use Data
Protector Express to back up SQL Server databases, you can still use these default SQL Server utilities
and commands.
66
Working with Third-Party Applications
Page 67

For example, you can use the DUMP command to dump transaction logs to the dump device (preferably, a
separate disk drive). You can set this up to o ccur at regular intervals, such as every 15 minutes or every hour.
Next, you can create a backup job that backs up these transaction logs onto archival media every day.
In general, when you implement Data Protector Express to back up your SQL Server databases, continue
to use SQL Server’s internal comma nds to duplicate and back up transaction logs. Set up a separate
Data Protector Express backup job to write these duplicated transaction logs to archival media.
Restoring Mic
When restoring SQL Server databases, you must:
1. Restore a full backup of the SQL Server database.
2. Restorethelogsintheordercreated.
3. Follow special procedures when renaming databases (if you rename d atabases).
NOTE:
Any time Data Protector Express returns an error message that is greater than 10000, a
Microsoft SQL or Exchange error has occurred. Refer to your Microsoft documentation for more
informationasthisisaMicrosofterrorcode.
Restoring Microsoft SQL Server databases and transaction logs When recreating a database, you must
first restore the whole database (created by a backup job running in full backup mode) .
Next, you must restore the transaction logs in the order created and in separate jobs. No log can
be skipped when restoring.
For example, if you did a full backup on Monday and incremental backups each day Tuesday through
Friday, you must run five separate jobs: one restoring the database from Monday’s full backup job and then
four additional separate jobs restoring each transaction log in sequential order, beginning Tuesday and
continuing with each log sequentially until Friday.
rosoft SQL Server
You do not have to follow these procedures when restoring databases backed up with full backup jobs.
(Full backup jobs back up the entire d atabase, while Incremental and Differential jobs only back up the
database logs.)
Restoring Micr osoft SQL Server user databases
Torestoreadatabase,beginbyrestoringthemostrecentfull backup of the database, followed by all the
database logs, that is, backups made with the Backup mode set to either incremental or differential.
When a database is restored, if the database does not yet exist, Data Protector Express will create the
database where the database was originally located.
To restore a lost or damaged database
1. If the transaction log of the damaged or inaccessible user database is on an undamaged device,
make a backup of the transactions before proceeding. (This lets you preserve up to the minute
transact
You may use either a DUMP TRANSACTION statement on the SQL server or use a Da ta Protector
Express Incremental backup job to back up only the transactions logs.
2. If you are restoring the database because the data in the database is no longer needed or is
incorrect, skip to step 3. The following instructions are for recreating database devices and the
databas
ions that are not included on the backup tape.)
e which had existed previously.
User’s Guide
67
Page 68

During the restore processes, Data Protector Express will recreate the database and all segments
exactly as they existed when the backup was performed.
To do this, Data Protector Express first determines if the database exists. If the database does exist,
Data Protector Express will use the database as is without any further processing or changes.
3. If the database does not exist, Data Protector Express next identifies the database devices on which
the database was originally located. If the appropriate database device already exists, Data
ProtectorExpresswillusethatdeviceasiswithoutfurtherprocessing.
If the database device does not exist, D ata Protector Express recreates the database device at its
original location and with its original size. After all the d atabase devices are created, Data Protector
Express then creates the database with all the original options at the original locations.
TIP:
Thismethodmakesdisasterrecoverysimple. TheusersimplycreatearestorejobandallowsData
Protector Express to recreate whatever is needed in order to successfully restore the database.
NOTE:
If a disk drive fails and is not replaced, Data Protector Express will be unable to restore your
database because it will be unable to recreate a database device.
For example, if a segment of your database resides on a database named ‘DATA’ at
D:\MSSQL\DATA\DATA.DAT,ifD: is lost and not replaced, when Data Protector Express attempts
to recreate the database device, it will fail, since D: no longer exists.
Toavoidthisproblem,manuallyrecreatethedatabasedeviceatsomeothervalidlocation. Itmustbe
at least as lar
ge as the original database device since Data Protector Express will attempt to create a
database segment on it the same size as the original da tabase.
An alternative method is to manually create the entire database itself. Thus, when Data Protector
Express attempts to restore the database, since the database already exists, it will use that preexisting
database. Th
is allows you to restore a database in a new location, since Data Protector Express
does not check to see if it is the original device before restoring the database, because the database
already exists.
NOTE:
An al ternative method is to manually create the entire database itself. Thus, when Data Protector
Express attempts to restore the database, since the database already exists, it will use that
preexistin
Protector E
g database. This allows you to restore a database in a new location, since Data
xpress does not check to see if it is the original device before restoring the database,
because the database already exists.
Using Data Protector Express, create a restore job and run the job to restore the database. You must
start with a full backup version of the database to restore which was created using a Full backup job.
4. Create additional restore jobs to restore each transaction log backed up after the full database you
restored. You must create and run a separate restore job for each transaction log.
For example, if you ran a full backup on Friday and incremental jobs (that is, jobs that backed up only the
transaction logs) on the following Monday and Tuesday, you must first restore the database using Friday’s
version of the database. Next, create a run and restore job that restores Monday’s version (Monday’s
transaction log). Finally, create and run a job that restores Tuesday’s version (Tuesday’s transaction log).
68
Working with Third-Party Applications
Page 69

In the last incremental restore job, click the Advanced Options button and select the Finalize recovery
of MS SQL databases check box. If you do not select this check box, the database will be offline.
Restoring Micr
A damaged maste
input/output
media failure
The procedure used to recover a damaged master d atabase is different from the procedure used to
recover user databases. If the master database becomes unusable, it must be restored from a previous
dump. All changes made to the master database after the last dump are lost when the dump is reloaded
and therefore must be reapplied.
It is strongl
accomplish
aware of the
Studio, th
Please refer to the documentation for Microsoft SQL Server for i nformation on the proper way to restore
the m aster databases.
osoft SQL Server master databases
r database is evident by the failure of the SQL Server to start, by segmentation faults or
errorsorbyareportfromDBCC.Anexampleofanerrormightbedamagecausedby
in the area in which master database is stored.
y recommended that the master database be backed up each time it is changed. This is best
ed by prohibiting the creation of user-defined objects in the master database and by being
statements and system procedures, and the equivalent actions in SQL Server Management
at modify it.
Protecting Microsoft Windows SharePoint Services
In this section
• Windows SharePoint Services protection concepts
• Protecting Windows SharePoint Services
• Restoring SharePoint Services
• Using Disaster Recovery with Windows SharePoint Services
Overview
This sec
tion contains information for the backup and restore of Windows SharePoint Services.
Windows SharePoint Services protection concepts
Microsoft Windows SharePoint Services is a free component of certain Windows Server operating
systems. Microsoft SharePoint Portal Server is a web-based collaboration application that runs on
Microsoft Windows and uses SharePoint Services. SharePoint Services uses a Microsoft SQL Server
database for storing data and metadata. The version of SQL Server depends upon the installation and
whether SharePoint Portal Server is installed. Windows SharePoint Services uses a special version of
MSDE, known as SQL Server 2000 Desktop Engine (Windows) or WMSDE. If SharePoint P ortal Server is
installed, SQL Server 2000 Desktop Engine (MSDE) or SQL Server 2000 is used instead.
Data Protector Express will automatically discover all SharePoint Services databases and manage them for
backup and recovery as separate objects. Backing up an entire system will also include those databases.
If you are using Microsoft SharePoint Portal Server or Microsoft Office SharePoint Server, you need to use
the Data Protector Express Agent for Microsoft SQL Server to protect the SQL Server database.
Protecting Windows SharePoint Services
Data Protector Express is designed specifically to protect the databases of Windows SharePoint Services.
These databases will appear in the Data Protector Express Administrator GUI with the name of the
database instance. This name will depend on the version of SharePoint Services that is installed.
n using SharePoint 2.0 “SHAREPOINT” is the default name. When using SharePoint Services 3.0,
Whe
crosoft ##SSEE” is the default name. In addition to storing Web site content in a WMSDE/SSEE
“Mi
Ldatabase,WindowsSharePointServicesstorescertainfiles including Windows SharePoint Services
SQ
User’s Guide
69
Page 70

virtual server configuration, style sheets (CSS), themes, and customization information for site definitions
are stored in the SharePoint installation directory on the file system.
Regular backups of the “SHAREPOINT” databases in conjunction with File System backup will ensure
protection and integrity of SharePoint Services virtual servers, the document repository, users, security
settings, and permissions.
IMPORTANT:
It is recommended that the user enable Microsoft Windows Volume Shadow Copy Service (VSS) option for
backup jobs when creating DR backup sets. Enabling the VSS option will ensure that the user can restore
all WSS components in a consistent state during the disaster recovery process.
NOTE:
The instructions for the additional steps are outlined in the Disaster Recovery section of this appendix.
To allow a consistent restore the backup set for WSS must include the following components (if you select
the entire system for backup, these components are all included):
1.
WSS Installation directory This directory and its sub directories, %BootVolume%\program
files\Common Files\Microsoft Common Shared\web server extensions\12,
contain WSS i
customizati
2.
Microsoft Internet Information Server (IIS) Virtual Servers WSS uses one or more virtual servers to
host Web sites. Unlike ASP.NET, it does not configure ea ch Web site using an IIS virtual directory.
Alternately, WSS tracks all configuration information for WSS Web sites inside the configuration
database and content databases. This implies that a backup of th e configuration database will be
required to ensure the protection of all SharePoint extended virtual servers.
nstallation and configuration files including binaries, site templates, style sheets,
on information for site definitions, etc.
3.
WSS Databases By default, WSS installs a WMSDE/SSEE instance called SHAREPOINT or
Microsoft ##SSEE and creates databases including a configuration database and a content
database
the Data Protector Express Administrator GUI.
4.
Usage An
being us
usage i
NOTE:
This pat
5. Select the Windows SharePoint SQL Databases icon in the selection tree and expand the tree.
6. Select the server that houses Windows SharePoint Services and expand the tree until you are able to
select the Sh arePoint database.
. The SHAREPOINT database instance can be backed up by selecting the instance in
alysis logs
ed. If usage analysis logging process is enabled, WSS log files are created daily to track
nformation. These log files are stored in %WinDir%\system32\LogFiles\STS directory.
h can be customized. In this case, one should add the appropriate path to the backup selection list.
Usage an
Restoring SharePoint Services
To restore Windows SharePoint Services you will need to select the following:
1.
WSS Installation directory This directory and its sub directories, %BootVolume%\program
files\Common Files\Microsoft Common Shared\web server extensions\12,
contain WSS installation and configuration files including binaries, site templates, st yle sheets,
customization information for site definitions, etc.
alysis for WSS allows one to track how Web sites on your server are
70
Working with Third-Party Applications
Page 71

2.
Microsoft Internet Information Server (IIS) Virtual Servers WSS uses one or more virtual servers to
hostWebsites.UnlikeASP.NET,itdoesnotconfigure each Web site using an IIS virtual directory.
Alternately, WSS tracks all configuration information for WSS Web sites inside the configuration
database and content databases. This implies that a backup of the con figuration database will be
required to ensure the protection of all SharePoint extended virtual servers.
3.
WSS Databases By default, WSS installs a WMSDE/SSEE instance called SHAREPOINT or
Microsoft ##SSEE and creates databases including a configuration database and a content
database. The SHAREPOINT database instance can be backed up by selecting the instance in
the Data Protector Express Administrator GUI.
4.
Usage Analysis logs Usage analysis for WSS allows one to track how Web sites on your server are
being used. If usage analysis logging process is enabled, WSS log files are created daily to track
usage information. These log files are stored in %WinDir%\system32\LogFiles\STS directory.
NOTE:
This path can be customized. In this case, one should add the appropriate path to the backup selection list.
5. Select the desired databases to restore
Using Disaster Recovery with Windows SharePoint Services
There are two ways to recover a SharePoint Services installation after a system d isaster.
1. If you have a successful full backup of the system with VSS enabled, the disaster recovery process
will restore the entire system including the SharePoint Services. Your SharePoint sites should be
functional after the DR process is complete. It is recommended that you enable VSS for your DR
backup set to take advantage of this feature.
2. If a full ba ckup of the system was performed with the VSS option disabled, the WSS database
is not restored, since the files were open at backup. You will n eed to take further steps to
complete the WSS recovery. Complete the following operations after the initial DR process
has completed successfully.
a. Re-install the Windows Sha rePoint Services component on your system. This will rebuild the
master WMSDE/SSEE database. The master database is required to restore the SharePoint
databases including configuration a nd content databases.
NOTE:
You may have to uninstall and reinstall SharePoint services to restore the SharePoint installation.
b. Open Data Protector Express and create a restore job to restore the WSS database.
Working with Certificate Services
You can override the backup modes that jobs specify for backing up cer tificate services.
Force modes Set the modes to use when a job specifies Full, Differential,andIncremental modes For
le, if you specify Full for the Incremental mode, Data Protector Express will run a full backup even
examp
though a backup job specifies an incremental mode.
NOTE:
This is only applicable for backing up a server that has certificate services in stalled, e.g., Certificate
Authority installed on Windows.
User’s Guide
71
Page 72

72
Working with Third-Party Applications
Page 73

10 Disaster Recovery
In this chapter
• Bootable devices
• Important guidelines
•CreatetheDisasterRecoveryBackup
• Testing Disaster Recovery Media
• Recovering From a Disaster
• Disaster Recovery with Libraries
• Recover Windows Active Directory (Windows only)
•Limitations
Bare Metal D isaster Recovery (DR) is a Data Protector Express agent that performs disaster recovery
operations as automatically as possible during initial preparation and recovery. It allows you to create
bootable media which you use to recover your system configuration, software and data following a
system or disk failure.
If you create a full backup to any removable device that suppor ts bootable media, that media will
be bootable and can be used for bare-metal recovery. Devices that support bootable media include
removable cartridge disk drives, any external disk drive connected via USB or Firewire, and any tape
drive that supports One-Button Disaster Recovery (OBDR). If you use other backup devices, you must
create bootable media as a separate step after running your backup job.
Disaster Recovery (DR) operates without the benefit of the Data Protector Express catalog. When it
restores data it restores the entire contents of each media provided. The media can be supplied in any
order but if there are incremental or differential backups on the media set along with the full backup,
objects will be restored in the order they are found on media and the results may not contain the most
current versions of the backed-up data.
Data Protector Express do not support the Disaster Recovery feature. If your edition does not support
Disaster Recovery, any job that attempts to use the feature will report that the feature is not licensed.
If you need this feature, contact your reseller to purchase an edition of Data Protector Express that
supports Disaster Recovery.
NOTE:
You will only be able to perform bare-metal recovery to the same or an nearly-identical computer.
Bootable devices
Backup devices that support bootable media and bare-metal recovery include ...
• removable cartridge disk drives and
• tape drives that support O ne-But ton Disaster Recovery.
Your computer must be able to boot from a device before it can be used for disaster recovery. Please
refer to the computer manufacturer’s documentation on how to boot from a removable device.
One-Button Disaster Recovery (OBDR) is a firmware feature that is supported on some tape drives which
enablesthetapedrivetoactlikeabootableCD-ROMwhenitisputintoDisasterRecoverymode. When
you create a full backup on an OBDR tape drive, Data Protector Express product automatically makes the
mediabootable. WhenyourunOne-ButtonDisasterRecovery,(normallybyacombinationofpower
User’s Guide
73
Page 74

cycling with the Eject button held down), your tape drive goes into a special Disaster Recovery mode that
enables it to restore your operating system and reboot from the most recent backup cartridge.
With bootable devices, you only need the device and the last full backup media for Disaster Recovery.
The whole backup c an often be run from a single piece of media, making the restore much simpler to run.
All drivers for the bootable device are configured and loaded from the bootable media With a CD or DVD
you usually need multiple CD/DVDs, because the full backups are too big for a single piece of media.
The bootable device must be attached to the system at the time when the full backup is created for Data
Protector Express to make the media bootable. If you create the backup on a non-bootable device, you
cannot make the media bootable later in the same way that you can create a bootable CD or DVD
from the Data P rotector Express wizard.
Important guidelines
Media
The Data Protector Express disaster recovery agent can be prepared using CD or DVD media and other
devices, depending on your computer configuration. To make your disaster recovery process as easy
as possible, please note the following:
• Data Protector Express rewrites most system configuration information to the media each time it
overwrites the media during backup jobs. Therefore, when making a full backup to be used for
disaster recovery, you should select Overwrite all media on the backup job’s Options page.
• Recovering from a disaster works best with full backups, in which all disks on your system fiton
a single media. If the total amount of data on your system requires more than one media, Data
Protector Express will prompt you to change media during recovery. You can also use incremental
and differential jobs for recovery purposes, but you must insert the recovery media in the correct
chronological order.
• If you have a library, make sure the most recent backup media is loaded in slot 1. For more
information, see Disaster Recovery with Libraries.
Replacing hardware
Data Pr
on the t
• You may change your video adapter as long as the new video adapter is VGA compatible.
• Youmayincreasethesizeofyourharddisk,butthegeometryoftheharddiskshouldremainthe
• Your SCSI, ATAPI, Fibre Channel or USB tape drive and adapter mustbethesameorusethe
• You m ay change network cards, USB ports and USB peripherals, except tape drives, without
• You
otector Express assumes that major changes to your hardware have not occurred. The hardware
argetsystemmustbenearlyidentical to the source system with the following exceptions:
same. That is, the new hard disk must have the same number of sectors per track and heads
old disk. However, the actual number of cylinders can be larger. If the geometry has
as the
changed, Data Protector Express will still use the new disk, but the recovered operating system
may not function correctly.
driver as it did when the disaster recovery media was created.
same
restriction.
may not perform disaster recovery to a USB hard drive or to Fibre Channel devices .
Create the Disaster Recovery Backup
Preparing for disaster recovery consists of the following steps:
1. Create a full backup of your system, as described below.
2. Createthebootablemedia.SeeCreate bootable media later in this section. If you are using a
bootable device, you automatically create bootable media when you run a full backup.
74
Disaster Recovery
Page 75

3. Testthebootablemediatomakesureyouhavecreateditproperly. See
Testing Disaster Recovery Media later in this section.
NOTE:
We recommend that you create at least one extra set of bootable media in case the first set fails during
disaster recovery.
Create full backup
Data Protector Express automatically creates disaster recovery media whenever you run a full backup
with the Overwrite all media job option unless you have specifically deselected the option in the
advanced job settings.
To create your disaster recovery media
1. Insert the first disaster recovery media.
2. Create a backup job and open its property page.
3. Select the machine to backup.
4. On the Configuration page set the Write mode to Overwrite all media.,
5. Save and Run the job, inserting additional media as required.
NOTE:
If you have a bootable device, Data Protector Express makes each media bootable. For example,
if the full backup uses three media, all three media are bootable.
6. Once the backup job is complete, check the log page. You will be able to see that Disaster Recovery
has completed. The Summary section of this page will also tell you if any items have failed. It is
very important to check log files on a regular basis. If files have not been backed up, they cannot
be restored.
7. We recommend that you test the disaster recovery media on a test computer. See
Testing D isaster Recovery Media.
8. After the test is successful, store the disaster recovery media. If you have backed up to a tape or
removable cartridge, be sure to write protect the car tridge.
Create bootable media
After you make a full backup of your system, you must create bootable disaster recovery media.
Dependin
allows yo
availab
appropriate media as soon as possible. Be sure to use a third-party utilit y that supports the facility to burn
ISO images, visit h
NOTE:
If you have a bootable backup device, Data Protector Express automatically creates bootable media when
you crea
still create a bootable CD or DVD as a precaution.
Users can create bootable CD or DVD media from the Administrator as follows:
1. Log in to Data Protector Express.
g on your platform, Data Protector Express lets you create bo otable CD or DVD media. It also
u to save the Disaster Recovery image to a file, if you do not have facilities for writing media
le on the local machine. If you use this option, you should ensure that the file is written to the
ttp://www.hp.com/go/dataprotectorexpress for more details.
te the disaster recovery backup. See Create the Disaster Recovery Backup.However,youshould
2. Double-click Create Bootable CD-DVD from the Tasks view to launch the wizard.
User’s Guide
75
Page 76

3. Select the machine for which to prepare the bootable CD/DVD. The bootable CD/DVD is customized
for that machines specific operating system and device drivers.
4. Select the a CD drive or writable DVD drive available to create the bootable CD/DVD.
5. Click the Start Recording to create the bootable CD/DVD. During the creation, which can take some
time, the status information a nd a progress bar is displayed in the Status Information area the screen.
NOTE:
IfyouhavetroublecreatingthebootablemediadirectlyfromDataProtectorExpressyoucansavethe
boot image to a file and burn it to optical media using another burning program by checking the Save
the Disaste r Recovery imag e to file box instead.
6. As soon as you create the media, we recommend that you test the disaster recovery media on a test
computer see Testing Disaster Recovery Media.Afterthetestissuccessful,storetheCDorDVD.
If you have several machines connected to the Data Protector Express manag em ent domain, create a
bootable CD or DVD for each machine.
TIP:
Consider making duplicate bootable media for use in case the primary bootable media is unavailable or
damaged.
When to create new bootable media
Your bootable media may become obsolete whenever any of the following occurs:
1. You update your operating system by installing a service pack, update or other software.
2. You add or remove hardware from your computer.
3. You change the configuration of your disk drives, for example, adding or removing volumes or
partitions.
Therefore, we recommend that you create new bootable media anytime you change the environment.
Testing Disaster Recovery Media
We recommend that you test your disaster recovery media before you have to rely on it following a
disaster. We also recommend that you create additional bootable media in case your new hardware
configura
For examp
or DVD, yo
To test your disaster recovery media, perform the following steps. You will not lose any data on your
system. This procedure is completely safe.
1. Make a fu
2. Shut down your system as normal.
3. If you are using a bootable CD or DVD:
tion does not support your original bootable media.
le, if you create a bootable CD or DVD, but your new hardware does not support booting from CD
ushouldalsocreateanalternatesetofbootablemedialikeaREVstoragedeviceorothermedia.
ll backup of your system and create bootable media as directed in Create full backup.
a. Insert
b. Turn on your computer.
c. Perform any special steps for booting your computer from CD or DVD. (Refer to your system
the disaster recovery CD or DVD into your computer.
docume
ntation.)
76
Disaster Recovery
Page 77

d. The system boots from the CD or DVD.
4. If you are using a bootable tape:
a. Remove all media from all tape drives and/or library magazine slots.
b. Insert the first bootable media:
i. If you are using a single tape drive, insert the first bootable media into the drive.
ii. If you are using a library, insert the first (or only) bootable media into slot 1 of the
magazine. If the full backup used two or more media, insert the rest of the full backup
media into the library magazine in their proper order.
c. Perform any special steps for booting your computer from the tape drive. (Refer to your system
documentation.) Most bootable drives use a combination of power cycling and pressing the
Eject button on the front p anel. Many also require that you update the computer BIOS.
d. The system boots from the tape.
5. If your system boots and displays either the Disaster Recovery character screen or the Disaster
Recovery Wizard screen, your b ootable media should function correctly during disaster recovery.
6. If you are using a bootable device and your system hangs during star tup or your operating system
does not boot from the device, you must use a bootable CD or DVD to perform disaster recovery.
Your device is not compatible with the bootable media.
7. Select Exit and press Enter on the Disaster Recovery character screen or click Cancel on the Disaster
Recover Wizard screen.
8. Remove the bootable media and restart your computer. This completes the disaster recovery test.
Recove
ring From a Disaster
ster strikes and you are unable to boot your system using your normal boot procedure, use one of
If disa
lowingprocedurestorecoveryoursystem.
the fol
NOTE:
Do not restore incremental or differential backup media until after you complete disaster recovery.
There are several phases to disaster recovery and your system will be rebooted at various points in the
process. At all times, information is displayed to advise you of what is happening. The machine may
reboot on its own several times during the course of the recovery. This is normal behavior required by the
operating system to complete certain recovery steps. Normally, you are not required to take any action
other than inserting media if prompted to do so.
When recovering your system, Data P rotector Express gives you the option to recover your whole system
or just the hard disk that your system boots from. If the volumes on your boot hard disk are split among
multiple physical hard disks, you should recover the entire system and not just the boot disk. Otherwise,
some system data may not be restored.
Disaster recovery for older Windows a nd Linux
This section is applicable to ...
• Windows XP,
• Windows Server 2003, and
• Linux.
User’s Guide
77
Page 78

To perform Disaster Recovery for one of the operating system listed above, do the following:
1. Remove all media from all cartridge disk drives, tape drives and/or library magazine slots.
2. Insert the first bootable media:
a. If you are using a single tape or removable disk drive, insert the first bootable media into
the drive.
b. If you are using a library, insert the first (or only) bootable media into slot 1 of the magazine. If
the full backup used two or more media, insert the rest of the full backup media into the library
magazine in their proper order. See Disaster Recovery with Libraries below.
3. Perform any special steps for booting your computer from the bo otable device (refer to your device
and system documentation). Most bootable drives use a combination of power cycling and pressing
the Eject button on the front panel. Many also require that you update the computer BIOS.
NOTE:
For disaster recovery, use only full backup media that were created with the Overwrite all media
option. After disaster recovery is complete and your system has restarted, use the standard Data
Protector Express options to restore any incremental or differential media to your system. The
standard Data Protector Express restore procedure optimizes restoration and restores incremental
and differential media faster than the disaster recovery process.
4. When the Disaster Recovery (Phase 2) screen appears, select one of the following options:
a. Recover Boot Disk. Select this o p tion to only recover the boot disk. Use it if your boot disk
is corrupt or if you replaced the boot disk.
NOTE:
It is a good practice to disconnect any drives you do not want modified during the recovery
process to protect yourself from inadvertently overwriting them by selecting an undesired option.
b. Recover Entire System. Select this option to recover data to multiple h ard disks, including the
boot disk. Use this option if you replaced one or more hard disks.
NOTE:
If you are
restoring a LINUX system, the only option is to Recover Entire System, there is no
option to Recover Boot Disk.
5. Press Enter.
6. If a warning screen appears, read it and then press F10.
7. Read through each information screen. Press F10 to advance to the next screen.
8. When the first confirmation message appears “Are you sure?”,selecttheappropriateYes option
and press Enter.
9. When the second confirmation message appears, select Yes , Perform the Recovery and press Enter.
Thesystemdoesnotrequireanyinputfromyouuntilitfinishes restoring the first media to your system.
Restoring the first media can take from minutes to two or three hours, depending on the amount of
data on the media, the speed and capabilities of the device and whether you are recovering the
entire system or just the boot disk.
10. After the system has restored the media, it asks for the next media to restore. Select Ye s or press
F10 to restore another media.
11. After restoring the last media, remove the disaster recovery CD or DVD so that you can boot from the
hard disk in subsequent steps.
78
Disaster Recovery
Page 79

12. Press Esc. A message screen appears.
13. Press F10. D ata Protector Express restarts your computer. After your computer has rebooted, log in.
14. For Linux users, Disaster Recovery is now complete and they can use Data Protector Express to restore
the data from incremental and differential backup media, if needed.
15. For Windows users, additional Restore jobs are required to finish the recovery of their system.
a. The system state must be restored to the last backup. See Recover System State (Windows only) be-
low
b. TheWindowsActiveDirectorymustberestored. See
Recover Windows Active Directory (Windows only) below.
c. Any databases, such as Exchange and SQL, must be restored.
Disaster Recovery with Libraries
When using Disaster Recovery with a library, remember the following:
1. Make sure the most recent full backup media is loaded into slot 1 of the library. Data Protector
Express wi
Overwrite all media option.
2. Data Protector Express will restore all media that are contained in the library during the final
recovery process. Therefore, make sure that you only load media in the library that you will need
to restor
ll only boot from the tape in slot 1. Make sure the med ia was created using the
eduringrecovery.
For examp
differe
disaster recovery with the latest full backup. After your system has been recovered, use the standard
Data Protector Express restore p rocedures to recover any other changes from the differential backups.
3. Remove all media not associated with the recovery from the library. If the full backup spans more
than one media, put the additional full backup media into additional slots. Data Protector
Express
NOTE:
Slot 1 must contain the fi rst (or only) bootable media from the most recent full backup. When you use
the Over
le, if you are using the Simple 4-tape schedule, Data Protector Express will have four daily
ntial backups, two weekly full backups and two monthly full backups. You should only perform
will then restore these media along with the slot 1 media.
write all med ia option, Data Protector Express makes each media bootable.
Recover Sys tem State (Windows only)
To recover their system to the state of the last backup, all Windows users must create and run
an ad ditional Restore job. (This is not necessary on Linux systems.) On a system with Windows
Active Directory, this additional step should be carried out in Safe Mode, as described in
Recover Windows Active Directory (Windows only) below.
1. Once your system has restarted, log in to Data Protector Express.
2. Create a restore job and give it a meaningful name, such as “System State Restore”.
3. Select System State from the Selection page.
4. Run the restore job.
5. Exit Data Protector Express.
6. Restart the computer, letting Windows load n ormally.
Any databases such as SQL and Exchange which were backed up as part of an agent must also be
restored.
User’s Guide
79
Page 80

If you had incremental and d ifferential backup media since the last full backup, now use Data Protector
Express to restore the data from your incremental and differential backup media.
Recover Windows Active Directory (Windows only)
When performing disaster recovery on a system with Windows Active Directory, use the following
general steps:
1. Perform the general system-level disaster recovery to restore the basic system data.
2. When the Start
3. Select Directory Services Restore Mode and press Enter.
4. Log in to the system.
5. Log in to Data
6. Create a restore job.
7. Select WindowsActiveDirectoryfor the restore job from the Select ion page.
8. Run the res
9. Exit Data Protector Express.
10. Restart the computer, letting Windows load normally.
11. Verify that Windows active directory is running properly.
ing Windows screen appears during system startup, press F8.
Protector Express.
tore job.
Disaster recovery for newer Windows
This section is applicable to ...
• Windows Vista and newer
• Windows Server 2008 and newer.
To perform Disaster Recovery for one of the operating system listed above, do the following:
1. Insert the first bootable media into a drive or, if using a library, into any slot that can be booted from.
2. Perform any special steps for booting your computer from the bootable device. (Refer to your device
and system documentation.) Most bootable drives use a combination of power cycling and pressing
the Eject button on the front panel. Many also require that you update the computer BIOS.
NOTE:
For disaster recovery, use only full backup media that were created with the Overwrite all media
option. After disaster recovery is complete and your system has restarted, use the standard Data
Protector Express options to restore any incremental or differential media to your system. The
standard Data Protector Express restore procedure optimizes restoration and restores incremental
and differential media faster than the disaster recovery process.
NOTE:
One-Button Disaster Recovery (OBDR) may take several minutes to boot to a screen which
indicates progress. During this time, the screen will appear blank.
3. When the computer boots from the recovery media, the Disaster Recovery Wizard welcome screen
appears. Click the Continue button.
4. The Di
80
saster Recovery Wizard starts up the skeleton operating system and the recovery m a nager.
Disaster Recovery
Page 81

5. Once the recovery manager has been started, the Disaster Recovery Wizard displays a list of
source and target devices available on the system.
a. In the top list, select one or more source devices that you want to restore data from by placing
a checkmark next to them.
b. In the bottom list, select one or more of the target hard drives that you want to restore. This is
useful if you have multiple hard drives and you do not want to restore to all of them.
NOTE:
You must select at least one source device and at least on target device.
6. If you have a tape loader as a source device , you can select it and choose which slots to want to
restore data from. By default, all slots are selected.
7. Ifyoudon’tseeallofthedevicesinthelistthatyouwouldexpect,youcanloadadriverorrescan
for devices.
a. To load a driver, click the Load a driver link and then browse to the driver file for the device. The
driver must be Vista or Server 2008 compatible in order to be loaded.
b. To rescan for devices, click the Refresh link. This is useful if you plug in a new SCSI device or
some other device that is not plug and play compatible.
8. After clicking Next, you will be shown a list of all the volumes that were mounted when the backup
wasmade. Eachofthesevolumesisclassified as being critical or not critical, and a list of their
mount points are shown as children to each volume.
If a volume is classified as critical, you cannot deselect it. However, if the volume is not critical, you
can deselect it and the recovery manager will not restore it or any files from that volume. These files
will show up as skipped in the recovery status page.
Click the Next button to start the recovery.
9. The status of the recovery is displayed while it is in progress.
Each selected device will be processed asynchronously. If a device detects an error, you will be
shown the error and prompted as to the action to take.
If the backup media is encrypted or password protected, you will be prompted for the
passphrase/password . You must enter the correct passphrase/password or the recovery to proceed.
10. When the recovery finishes or is cancelled, you will be shown a summary of what happened.
If all the important objects were not restored, you will be warned and each important, unrestored
object will be listed.
11. Once the recover has successfully completed, you will need to click the Reboot button to restart your
system. After reboot, your system should be ready to login and use.
12. The machine will have different credentials after the Disaster Recovery restore on Windows Vista
or Windows Server 2008. If the machine is not a member of the domain, there will be no issue
and you may skip these steps. If the machine is a member of a domain, the new credentials break
the trust relationship between the computer and the domain. This will generate an e ntry in the
Event Log with System event ID: 5721:
The session setup to the Windows NT or Windows 2000 Domain Controller
[domain controller] for the domain [domain] failed because the Domain
Controller did not have an account [account] needed to set up the
session by this computer [computer name].
To resolve this issue you will have to:
1. 1. L ea ve t he D om ai n
a. a. Logon locally to the machine as a domain administrator.
b. b. Verify there is a local administrator account with a known password. The system will not
be configurable if there is no local administrator account!
User’s Guide
81
Page 82

c. c. Go to the system properties of this machine (right click on “Computer” and go to
properties or open the System Control panel)
d. d. Click on “Computer Name” and click on “Change…”.
e. e. Change “Member of” from “Domain” to “Workgroup”.
f. f. Restart your computer.
2. 2. Re-join the Domain
a. a. Logon locally to the machine as a domain administrator.
b. b. Go to the system properties of this machine (right click on “Computer” and go to
properties or open the System Control panel)
c. c. Click on “Computer Name” and click on “Change…”.
d. d. Change “Member of” from “Workgroup” to “Domain”.
e. e. Restart your computer.
NOTE:
Once the recovery is complete, it may be necessary to restore additional incremental backups from other
media. Also, SQL data and Exchange data from prior to Exchange 2010 will also need to be restored
inaseparatestepusingastandardRestorejob.
Limitations
DR does not currently support split spanning of objects. Any objects that are split spanned on the b ackup
media will not be restorable during the DR process but must be restore d after the DR process has
completed. If the split objects are critical to the functioning of the system, your system may not function
after the recovery process. Since there is not an easy way to know which objects are split across m edia, it
is best to not use the default, restarts spanning mode, when creating a DR backup.
Some data requires that a system service be running to successfully recover it. Those objects are skipped
during the DR restore process and must be restored in a separate restore job once disaster recovery is
complete.
DR recovers: directories, files, Windows Registry files, volume quotas, windows event log, the Data
Protector Express catalog, linux character and block special devices, linux FIFOs, symbolic links, linux
sockets, and mount p oints. All other objects must be restored separately.
82
Disaster Recovery
Page 83

11 A d v a n c e d J o b O p t i o n s
The options in this chapter are common to backup, restore, verify and copy jobs. In most cases these
settingscanbeleftattheirdefaultvalues.
Job Log option
Data Protecto
the job log fr
designated e
Log Type
Data Protector Express has several different levels of logging control to communicate what was protected
in a job.
Log only failed (default) This setting will log only filesthatcouldnotbebackedupbecauseofsome
failure.
Log only failed and not attempted This setting is log files that could not be backed up because of a
failure or because the machine hosting the file was offline or because the job was cancelled.
Log only completed This setting logs only the files that were successfully protected.
Log all This setting will log all files the job works on. Using this setting will generate a lot of log entries
and can affect the length of the backup process.
None This setting is not recommended. However, using it can speed up the backup process.
Log file form ats
Data Protector Express can generate several file types. Select the log format that works best for you
Table 4 Log file formats
rExpresskeepsalogofwhichfiles it processes while running a job. In addition to viewing
om the Status and Logs view, you can configure the job to e-mail it automatically to a
-mail address or save the log to a file for later viewing.
s
Save log
Log format
HTML
XML
Excel CSV
Plain Text Choose this file type to save the log files in a format that can be read by any text editor.
Choose this file type to save log filesasfullyformattedHTMLfiles. These files can be
read by most Internet browsers.
Choose th
read by mo
Choose this file type to save the log files in a format that can be opened in Microsoft
Excel. CSV stands for Comma Separated Value. The information saved to a file
formatted for Excel CSV will display in columns and rows.
is file to save the log files as well-formed XML documents. These files can be
st Internet browsers.
to a file
Log FormatChoose a
Log will
Click t
catalog in addition to the settings you choose here.
be saved to this file
he Browse button to select a file. Data Protector Express always saves a copy of the log in the
format from the drop down list.
Data Pro
tector Express lets you select a file in which to store the job logs.
User’s Guide
83
Page 84

E-mail log
Log Format Choose a format
Log will be sent to... Data Protector Express lets you e-mail logs to one or more recipients. Enter a list
of recipients separated by semicolons.
Auditing
In some cases, you may want positive confirmation that an object — like a database — was backed up
but you don’t want to wade through the log file generated by selecting Log All. You can accomplish this
by setting the Audit property on the object when you select if for backup. Simply locate the object in the
Selection page of the job properties, right-click on the object and select Properties, and check the Enable
Audit box on the property page. By default, all Exchange and SQL databases are audited.
Execution
In th is sec tion
• Pre Execution Commands
•PostExecut
You can define commands to b e executed before the backup job runs and after the backup job runs.
They are often used to perform custom OS-specificorapplication-specific tasks, such as to stop/start a
database. C
Pre Execution Commands
The pre execution tab on jobs controls the command to be executed before the job is run, either on
multiple hosts, or just the Backup Server. In addition there are options to control whether the job should
stop, or whether the job should continue based on the outcome of the command.
Command path Specifies a full path or relative path, to a shell command, including command
parameters. For instance cmd.exe /c explorer.exe,orc:\windows\explorer.exe.Amacro
syntax is also supported in this field, for many different uses. See the Data Protector Express Technical
Reference Guide for m ore information.
ion Commands
ommands are defined on the Execution page of a backup job.
from the drop down list.
Post E
Run command on all hosts selected in job, as well as the Backup Server When checked, processes the
command on all machines selected in job. When unchecked, only runs the command on the Backup
Server.
Number of minutes to wait for command completion This value in minutes specifies how long the
application should wait for the command to return. By default, it is set to Forever, meaning the application
will wait for as long as possible for the command to complete. If set to something other then Forever, the
application will terminate the command forcefully if it does not return in time.
Stop job if command fails to be executed When checked, causes the job to be stopped if the pre
command is fails to be executed, such as if the command does not exist or the operating system cannot
property determine how to execute the command.
Stop job if command returns error code When checked, causes the job to be stopped if the pre
command executes but returns a non-zero code. When checked, enables the additional options beneath it.
Do not stop job if the following error code range is returned When checked, a range of error codes
must be specified which are treated as warnings. If the return code is zero or is within the specified
range, the job c ontinues. H owever, if the return code is non-zero a nd outside of the specified range,
the job to be stopped.
xecution Commands
The post execution job property controls what shell command s should be executed af ter the job completes
with no error or with error.
84
Advanced Job Options
Page 85

Logs
Command to execute if job completes with no error This command will execute if the job completes
with no final error. A job can complete with no error, even if all hosts are offline. This does not mean
that anything was backed up, it just means that the job was not cancelled, or there wasn’t some other
major problem executing the job.
Command to execute if job completes with error This command will execute if the job completes with
an error, such as no specified devices, or operator cancelled. This does not mean if any of the objects
selected by the job fail to be backed up/restored/ or verified.
Command path Specifies a full path or relative path, to a shell command, including command
parameters. For instance cmd.exe /c explorer.exe or c:\windows\explorer.exe.Amacro
syntax is also supported in this field, for many different uses. See the Data Protector Express Technical
Reference Guide for more information.
Run command on all hosts selected in job, as well as the Backup Server When checked, processes the
command on all machines selected in job. When unchecked, only runs the command on the Backup
Server.
Number of minutes to wait for command completion This value in minutes specifies how long the
application should wait for the command to return. By default, it is set to Forever, meaning the application
will wait for as long as possible for the command to complete. If set to something other than Forever,the
application will terminate the command forcefully if it does not return in time.
The pre/po
was added to the job log, where all commands executed by the job are logged.
• Command type: Indicates what kind of command this was, whether a pre job/post job/fail job,
or pre obje
• Command path: The fully macro expanded command path sent to the operating system for
execution.
• Host atte
• Time executed: The start time when the command was attempted.
• Time completed: The end time when the command either timed out and was killed, or when it
complet
• Execution result: The result of the execution, either the execution failed, or the execution
succeeded. If the execution succeeded, then the return code of the command will be log g ed here.
If no return code is logged, then success is logged here.
st commands add detailed logs to the jobs which executed them. A new execution section
ct/post object/fail object command.
mpted on: The host name where the command was attempted on.
ed on its own accord.
Domain Level Barcode Filters
Many tape libraries support the use of barcodes to identify media. Each piece of physical media has a
unique barcode that the tape library can read.
The Barcode Filter page allows you to define barcode filters for a job. The filter rules may be set for
the whole dom ain and will be applied automatically to all jobs. Or, they may be set and applied a t
job level, using this page. Any filter rules applied at job level overwrite the default domain settings. All
options will be grayed out initially. Deselecting Inherit settings from domain will enable the editing
buttons and allow you to create job-specific filters.
Filter rules
There
Add an
exclusion. Up to 8 characters may be specified in this filter; the first6relatetothevolumeidentifier and
the last 2 relate to the media identifier. Wildcards may be used to increase the number of barcodes
sele
are three ways of assigning barcode filters.
individual barcode
cted by the filter.
ption allows you to specify an individual barcode for inclusion or
This o
User’s Guide
85
Page 86

Add a range of barcodes This filter allows you to specify a range of volume identifiers and m edia
identifiers to include. (Any media without a barcode or outside of the specifiedrangewillbeexcluded.)
ThefollowingexamplewouldincludeLTO-3(L3)media that fall within the volume range 791000
to 791044.
Add barcodes from media present in the library This filter displays a list of all libraries and their
elements. Select the required barcodes from the list and click either the Exclude or the Include button,
as appropriate.
86
Advanced Job Options
Page 87

12 B ac ku p Do m ai n C on figuration
In this chapter
• E-mail Settings
• Execution Options
• Barcode Filter
•PerformanceSettings
•AlertSettings
• Client Upgrade Settings
•DomainSecurity
To configure the Backup Server, select Domain Configuration command in the menu bar. This displays
the Properties window for the domain. Select the particular property page you want to con figure from
the tasks list.
E-mail Settings
You can con figure e-mail information for the Data Protector Express m anagement domain. Jobs can be
configured to automatically e-mail log to the job owner upon completion. Before Data Protector Express
can send logs by email, the service must be configured to use an email server.
Server address Enter the address of the mail server
Server port Enter the appropriate SMTP port. The default is 25, which is usually the correct value. If you
are using
a proxy server, you may have to enter a different port.
From addr
address must be valid.
ess
Enter the
e-mail address to be used in the From field for each job log e-mail. This e-mail
Execution Options
To limit pre- and post-commands to those in the script directory, you can check the box next to Prevent
execution of commands outsid e of script directory. You might choose to do this for security reasons by
tightly controlling the commands that are available in the script directory.
For more information on pre/post commands, see Job Pre-Post Execution Commands.
Barcode
Filter
You c a n define ranges of media barcodes that are available to a ny job within the Backup Domain.
Barcode ranges defined for a particular job are only available within that single job.
For more information on the use of barcode filters, see Barcode Filters for Jobs.
Performance Settings
The performance settings control the number of active clients (hosts) on the network and the number of
active selection lists on the database. There are two pa rameters that can be configured to optimize
resourcesconsumedbyDataProtectorExpress.
Max number of active hosts This numb er controls how ma ny clients can be started for all active backup
jobs in the Backup Domain. This option is used to prevent packet loss from occurring if d ata is transmitted
over a network with limited available bandwidth.
User’s Guide
87
Page 88

Max number of active selection lists This number controls how many hosts can build their selection list
for all active backup jobs in the Backup Domain. This is used to limit use of the d atabase and keep
it responsive for active jobs.
Alert Settings
You can control the types of alerts that are logged in the operating system’s event log by checking the
boxes next to Error, Warning, Information,orLicense. We strongly recommend you always select the
logging of Error and Warning alerts. By default, all alerts are logged.
Client Upgrade Settings
When the Backup Domain is updated to a new version, the executables for all supported platforms are
stored on the Backup Domain. This allows members of the Backup Domain to be upgraded automatically
whenever the Backup Ser ver is upgraded to a new revision of Data Protector Express. For installations
withmanyclients,thisfeaturecanbeahugetimeandlaborsaver.
Enable automatic upgrade When this option is enabled, clients will detect when a new version is
available and automatically update themselves. During an automatic client upgrade, the installer will
close any running Data Protector Express Administrator and Quick Access. The client is marked as offline
during the upgrade process. If an automatic client upgrade fails, the upgrade will not be retried again
unless the service is restarted. An upgrade might fail if there are running processes that cannot be killed
or there are permission restrictions on the client.
Allow downgrade If you want the client to downgrade to an earlier version, you must explicitly select
this option. Otherwise, the client will only automatically upgrade to a newer version.
Max number of active upgrade downloads Use this parameter to throttle how many clients will attempt
to download a new version at one tim e.
Domain Security
Data Pro
describ
installed, these features are disabled. The Administrator will not require a password to log in.
WARNING!
When security is disabled, anyone using the Administrator can gain access to your data. We recommend
you turn security on and set a password for the Admin user.
Options
Enable Advanced Domain Security When enabled, the Administrator will present the user with a login
screen at startup and all object property pages will have an additional page, Permissions,andtheLogon
Controls properties of Users and Groups will be enabled.
Setting a User Password
When security is enabled, a new view, Security, will appear und er the Advanced link in the Navigation
bar. Clicking it will display a list of Users and Groups. The system comes preconfigured with one User,
Admin,andoneGroup,Everyone. To set a password for a user, select the user and click the Change
Password command in the command bar. For many users, simply setting a password on the Admin
user will be sufficienttomeettheirsecurityneeds.
For more details about the logon control properties, see the Data Protector Express Advanced Reference
Guide.
tector Express supports rich user, group and permission based security policies which are
ed in the Data Protector Express Advanced Reference Guide. When Data Protector Express is first
88
Backup Domain Configuration
Page 89

89
Backup Dom ain Configuration
Page 90

90
Backup Dom ain Configuration
Page 91

Index
A
Active Directory
disaster recovery and,80
Advanced options
backup jobs,30
restore jobs, 35, 35
Alerts, viewing with the Quick Access
application,22
audience,9
Auto eject, 31, 35, 36
Auto format mode,29
Auto retention,31,35,36
Auto verify mode
backup jobs,28
B
Backup job options
span mode,27
split file,28
Backup jobs
advanced options,30
media rotation,49
selecting a schedule,50
working with mapped drives,26
Backup mode
and Microsof t Exchange Server,60
and Microsoft SQL server,66
backup job options,27
Device view,39
Devices
element status,40
restarting failed,43
Disaster recovery
bootable media, creating,75
bootable media, when to create,76
Create DR bootable option,31
creating a DR backup,74
creating a fullbackup,75
libraries, DR requirements with,79
Microsoft Exchange Server,62
overview,74
recovering from a disaster,77
update DR information on selected machine,
31
Windows Active Directory,80
document
conventions,9
related documentation,9
documentation
HP website,9
E
Eject media,42
Erase quick,41
Erase secure,41
C
Catalog
restoring,42
CD or DVD devices
disaster recovery and,74
Clean device,42
Configuration
physical devices,39
conventions
document,9
text symbols,10
Create DR bootable media,31
Creating jobs
with the Quick Access application,22
D
Deleting media,50
Device command
clean device,42
Device commands
identify media,41
F
Force Modes
Microsoft SQL Server,65
Force modes
and Microsoft Exchange server,59
Format media window,41
H
help
obtaining,10
HP
technical support,10
I
Identify media,41
Import media,41
Incremental jobs
and data recover period,27
Installation
Microsoft Exchange Server option,59
Microsoft SQL Server option,64
User’s Guide
91
Page 92

J
Job
restore,33
Job status
viewing,21
Jobs
creating with Quick Access application,22
with the Quick Access application,22
Jobs and Media view,49
L
Libraries
clean device command,42
disaster recovery,79
element status,40
Log option
backup jobs,83
Logs
viewing with the Q uick Access application,
22
Microsoft SQL Server
and backup modes,66
backups in conjunction with Data Protector
Express,66
configuring,65
force modes,65
master databases, restoring,69
overview,64
restoring databases,67
supported platforms,64
user databases, restoring,67
working with,64
Monitoring jobs
with the Quick Access application,22
Mount points, 31, 36, 37
N
Native data streams format, 31, 36
New media location,30
New media name,30
M
Mapped drives
selecting files for backup,26
Media
backup job settings,29
deleting,50
formatting,41
identifying,41
importing,41
number required, rotation jobs,49
Media commands
eject media,42
erase media,41
format media,41
identify media,41
import media,41
restore catalog,42
retension commands,41
Media rotation,49
Media rotation types,52
Microsoft Exchange Server
and backup modes,60
configuring,59
disaster recovery,62
notes for working with,60
restoring storage groups,61
supported platforms,59
O
Options
verify jobs,36
P
Properties
property pages,20
Property pages
opening,20
Q
Quick Access aplication
monitoring jobs,22
Quick Access application
accessing Data Protector Express functions,
22
creating jobs,22
icon,21
settings,23
viewing alerts,22
viewing logs,22
Quick erase,41
R
related documentation,9
Renaming files
during a restore job,34
during restore job,34
Reparse points,31,36,37
Restore catalog command,42
Restore files in use option
restore jobs,36
Restore job,33
92
Page 93

Restore jobs
advanced options, 35, 35
assinging new names,34
concepts,33
files to new folders,35
Microsoft Exchange database,61
Microsoft SQL databases,67
redirected store,34
selecting files,33
to a new or different folder,34
Retension,41
Rotation types
built-in schedules compared,53
Running the software as a daemon,24
S
SAN Media Server
sharing devices across servers,43
Schedules
concepts, for backup jobs,50
Secure erase,41
Selecting files
files vs. folders, restore jobs,34
Selection filters,26
Service
running as service on Windows,24
Snapshot
enabling, 31, 37
Span mode
backup job options,28
Storage Area Network
see SAN Media Server,43
Supported platforms
Microsoft Exchange Server,59
Microsoft SQL Server,64
symbols in text,10
T
technical support
HP,10
text symbols,10
U
Update DR information on selected machine,
31
V
Verify jobs
options,36
Versions
latest version,33
Versions window,33
Viewing Alerts
with the Quick Access application,22
Viewing Data Protector Express,21
Viewing logs
with the Quick Access application,22
VSS
enabling snapshot, 31, 37
W
websites
product manuals,9
Write mode
backup job options,28
User’s Guide
93
 Loading...