

Page 1

HP Data Protector Media Operations
A.06.11
User guide
B6960-90170
Part number: B6960–90170
First edition: September 2009
Page 2

Legal and notice information
© Copyright 2009 Hewlett-Packard Development Company, L.P.
Confidential computer software. Valid license from HP required for possession, use or copying. Consistent
with FAR 12.211 and 12.212, Commercial Computer Software, Computer Software Documentation, and
Technical Data for Commercial Items are licensed to the U.S. Government under vendor's standard
commercial license.
The information contained herein is subject to change without notice. The only warranties for HP products
and services are set forth in the express warranty statements accompanying such products and services.
Nothing herein should be construed as constituting an additional warranty. HP shall not be liable for
technical or editorial errors or omissions contained herein.
Intel, Itanium, Pentium, Intel Inside, and the Intel Inside logo are trademarks or registered trademarks of
Intel Corporation or its subsidiaries in the United States and other countries.
Microsoft, Windows, Windows XP, and Windows NT are U.S. registered trademarks of Microsoft
Corporation.
Adobe and Acrobat are trademarks of Adobe Systems Incorporated.
Java is a US trademark of Sun Microsystems, Inc.
Oracle is a registered US trademark of Oracle Corporation, Redwood City, California.
UNIX is a registered trademark of The Open Group.
Printed in the US
Page 3

Contents
About this guide ................................................................. 13
Intended audience ............................................................................................. 13
Related documentation ....................................................................................... 13
Document conventions and symbols ..................................................................... 14
General Information ........................................................................................... 15
HP technical support .......................................................................................... 15
Subscription service ........................................................................................... 15
HP websites ...................................................................................................... 16
Documentation feedback .................................................................................... 16
1 Media Operations overview ............................................. 17
In this chapter ................................................................................................... 17
Media Operations concepts ............................................................................... 17
Media lifecycle ........................................................................................... 18
Components ............................................................................................... 19
Integration with backup manager ................................................................. 20
Logging on to Media Operations ........................................................................ 21
Connecting to a server ................................................................................ 21
Using Media Operations graphical user interface ........................................... 22
Windows client .................................................................................... 22
Web client .......................................................................................... 23
Using the CLI .............................................................................................. 23
Environmental requirements ................................................................................ 24
Platform support .......................................................................................... 24
Barcode scanner support ............................................................................. 25
Barcode printer support ............................................................................... 26
Offsite vendor support ................................................................................. 26
Supported languages .................................................................................. 26
2 Installing and licensing .................................................... 29
Installing Media Operations ............................................................................... 29
Installing Media Operations Server ............................................................... 30
User guide 3
Page 4

Installing XML Gateway ............................................................................... 31
Installing XML Gateway on Windows ...................................................... 32
Installing XML Gateway on Unix ............................................................. 32
Stopping Gateway Services on UNIX ...................................................... 34
Uninstalling XML Gateway ..................................................................... 34
Installing Media Operations Manager (optional) ............................................. 35
Upgrading to Media Operations A.06.11 ............................................................ 35
Upgrading Media Operations Server and Manager to A.06.11 ....................... 36
Upgrading Media Operations XML Gateway to A.06.11 ................................. 37
Upgrading on Windows ........................................................................ 37
Upgrading on HP-UX ............................................................................ 37
Upgrading on Solaris: .......................................................................... 38
Upgrading on Linux .............................................................................. 38
Licensing Media Operations ............................................................................... 38
Viewing licenses ......................................................................................... 40
3 Configuring Media Operations ......................................... 41
In this chapter ................................................................................................... 41
Site management .............................................................................................. 41
Adding a new site ...................................................................................... 44
Editing an existing site ................................................................................. 52
Info .................................................................................................... 52
DNS ................................................................................................... 53
Vaults ................................................................................................. 53
Data centers ........................................................................................ 54
Vaulting policies ................................................................................... 55
Offsite vendors ..................................................................................... 56
Users .................................................................................................. 59
Remote accounts .................................................................................. 60
Import data ......................................................................................... 60
Deleting a site ............................................................................................ 61
Security management ........................................................................................ 61
Product administrators and operators ............................................................. 62
Remote accounts ......................................................................................... 63
Configuring backup processes and objects ........................................................... 63
Automatic backup ....................................................................................... 64
Manual backup .......................................................................................... 66
Implementing the backup process ........................................................... 67
Backup managers ....................................................................................... 68
XML Gateway interface ......................................................................... 68
XML file import directory ....................................................................... 71
Adding backup managers ..................................................................... 72
4
Page 5

Editing a backup manager .................................................................... 75
Deleting backup manager objects .......................................................... 78
Media Operations database backup ............................................................. 79
Tuning backup objects ....................................................................................... 80
Refining physical locations ........................................................................... 80
Refining media compressions ........................................................................ 80
Adding and modifying media types .............................................................. 81
Defining media policies ...................................................................................... 81
Configuring media vaulting policies .............................................................. 81
Media vaulting policy hierarchy ............................................................. 82
Basic vaulting policy concepts ................................................................ 83
Vaulting templates ................................................................................ 83
Active vaulting policies .......................................................................... 84
Defining barcode labeling policies ......................................................... 86
Configuring scratch media policies ................................................................ 87
Configuring premount jobs .................................................................... 87
Tuning scratch media levels .................................................................... 88
Reactive mount requests ........................................................................ 89
Server parameters ....................................................................................... 89
Vaulting jobs ....................................................................................... 91
Scratch bin maintenance ....................................................................... 91
Premount jobs ...................................................................................... 91
Audit history ........................................................................................ 91
Setting up offsite transfer of media ....................................................................... 91
Setting up the receiving server ...................................................................... 92
Setting up the sending server ........................................................................ 92
4 Performing daily Media Operations ................................... 95
Overview ......................................................................................................... 95
Running jobs through the CLI .............................................................................. 95
Job status indicators ........................................................................................... 97
Premount jobs ................................................................................................... 97
Viewing Premount Jobs: ............................................................................... 98
Silo-type libraries ........................................................................................ 99
Free/scratch pool handling .................................................................. 100
Vaulting jobs .................................................................................................. 101
Listing vaulting jobs ................................................................................... 101
Confirming vaulting jobs ............................................................................ 102
Library unload tab .............................................................................. 104
Verifying media ........................................................................................ 105
Containers ............................................................................................... 105
Multiple users ........................................................................................... 106
User guide 5
Page 6

Multiple sites ............................................................................................ 107
Scratch media jobs .......................................................................................... 107
Listing scratch jobs .................................................................................... 108
Confirming scratch bin jobs ........................................................................ 109
Containers ......................................................................................... 110
Multiple users .................................................................................... 111
Multiple sites ..................................................................................... 111
Initializing scratch media ........................................................................... 111
Media order jobs ...................................................................................... 113
Checkout requests (CORs) ................................................................................ 116
Submitting checkout requests ...................................................................... 116
Listing checkout requests ............................................................................ 117
Confirming checkout requests ..................................................................... 118
Containers ......................................................................................... 119
Multiple users .................................................................................... 119
Multiple sites ..................................................................................... 119
Exceptions ...................................................................................................... 119
Mount requests ............................................................................................... 120
Listing mount requests ................................................................................ 120
Confirming mount request jobs ................................................................... 121
Manual vaulting jobs ....................................................................................... 121
Viewing job history .......................................................................................... 122
Web interface ................................................................................................. 123
5 Status and reporting interfaces ........................................ 125
Overview ....................................................................................................... 125
Viewing current SLA status ................................................................................ 125
SLA status configuration ................................................................................... 126
Resetting current SLA status ............................................................................... 128
Viewing alerts ................................................................................................. 128
Reports .......................................................................................................... 129
Additional reports ..................................................................................... 130
Notifications ................................................................................................... 131
Configuring notification interfaces ............................................................... 131
E-mail interface configuration .............................................................. 131
Operations Manager interface configuration ......................................... 132
Configuring notification triggers .................................................................. 133
Metric report description ............................................................................ 135
Media location summary ..................................................................... 135
Job status .......................................................................................... 135
Job metrics ........................................................................................ 136
Pool health metrics .............................................................................. 136
6
Page 7

Premount metrics ................................................................................ 136
Vaulting metrics .................................................................................. 137
Scratch metrics ................................................................................... 137
Remote metrics ................................................................................... 137
Vendor metrics ................................................................................... 137
Vault metrics ...................................................................................... 137
Location metrics ................................................................................. 137
Location audits ................................................................................................ 137
View ....................................................................................................... 140
Query ............................................................................................... 140
Print .................................................................................................. 141
Reset audit flags ................................................................................. 141
Audit highlighted ................................................................................ 141
Import/export ........................................................................................... 141
Export remote account report ............................................................... 142
Import offsite vendor file ...................................................................... 142
Import audit list .................................................................................. 142
A External interfaces ......................................................... 143
Overview ....................................................................................................... 143
XML file import interface ................................................................................... 143
File import ............................................................................................... 143
Usage ..................................................................................................... 144
XML import file format ............................................................................... 144
XML offsite vendor interface .............................................................................. 145
Usage ..................................................................................................... 145
Generic input parameters for all request types ........................................ 145
Media transit requests ......................................................................... 146
Request and receive audit requests ........................................................ 147
Status checking requests ...................................................................... 147
XML offsite vendor file format ..................................................................... 148
Reactive mount request utility ............................................................... 148
Bulk configuration file import ............................................................................. 154
B Diagnostics and tuning ................................................... 157
Overview ....................................................................................................... 157
Media Operations logs .................................................................................... 157
XML Gateway configuration, logs, and tuning ..................................................... 158
Configuration ........................................................................................... 158
Example XML Gateway configuration file ............................................... 158
Cleanup ............................................................................................ 158
File locations ..................................................................................... 159
User guide 7
Page 8

Logging ............................................................................................ 159
Threading ................................................................................................ 159
Polling ..................................................................................................... 160
Logs ........................................................................................................ 160
Log levels .......................................................................................... 161
Kernel tuning for XML Gateway on HP-UX .................................................... 161
Data management communications ................................................................... 161
Service logs ............................................................................................. 162
Changing the logging level ................................................................. 162
Log file locations ................................................................................ 163
Changing communications port numbers ..................................................... 163
Holiday list configuration .................................................................................. 164
Manager-of-Managers configuration .................................................................. 164
C Application managers ................................................... 165
Overview ....................................................................................................... 165
Glossary ......................................................................... 169
Index .............................................................................. 175
8
Page 9

Figures
Media lifecycle ............................................................................... 191
Components ................................................................................... 202
Media Operations GUI .................................................................... 223
Indexes .......................................................................................... 304
AutoPass license key ........................................................................ 395
AutoPass report licenses ................................................................... 406
Creating default vaulting policy ......................................................... 447
Vaulting cycle ................................................................................. 458
Vaulting cycle action ........................................................................ 459
Vendor account definition - Media Operations vendor .......................... 4710
Vendor account definition—Iron Mountain vendor ............................... 4811
Vendor account definition—generic vendor ......................................... 4912
Onsite vault management—layout ..................................................... 5113
Site properties ................................................................................. 5214
Site definition—info ......................................................................... 5315
Onsite vault management—info ........................................................ 5416
Data center definition ....................................................................... 5517
Vaulting cycle implementation—info ................................................... 5618
Vendor account definition—generic vendor ......................................... 5819
Adding a user ................................................................................. 5920
Remote access account—info ............................................................ 6021
Site definition—import data .............................................................. 6022
Media Operations deployment options with Data Protector ................... 6523
Server parameters - XML Gateways .................................................... 6924
User guide 9
Page 10

Setting scheduling options ................................................................ 7325
XML Gateway ................................................................................. 7426
Backup managers ............................................................................ 7527
Backup manager - info ..................................................................... 7628
Backup manager - sites .................................................................... 7729
Backup manager - polling ................................................................. 7830
Server parameters - info ................................................................... 8931
Job status indicators ......................................................................... 9732
Scratch media movement .................................................................. 9833
Premount job - scratch listing ............................................................. 9834
Vaulting jobs media movement ........................................................ 10135
Vaulting job listing ........................................................................ 10236
Media vaulting confirmation ........................................................... 10337
Media vaulting confirmation - library unload ..................................... 10538
Scratch media movement ................................................................ 10839
Scratch bin jobs ............................................................................ 10840
Scratch bin confirmation ................................................................. 10941
Scratch init job confirmation ............................................................ 11242
Site definition - blank bins ............................................................... 11443
Media order ................................................................................. 11544
Checkout request ........................................................................... 11645
Checkout request job listing ............................................................ 11746
Vaulting exceptions ........................................................................ 12047
Reactive mount requests .................................................................. 12048
Interactive mount requests ............................................................... 12149
Manual media vaulting .................................................................. 12250
Media vaulting - history .................................................................. 12351
Web interface ............................................................................... 12352
Site SLA status ............................................................................... 12653
10
Page 11

SLA threshold configuration ............................................................ 12654
Alert history - global ...................................................................... 12955
Backup media - history ................................................................... 13056
Server parameters - notifications ...................................................... 13157
Notifications ................................................................................. 13358
Alert notification - add/edit ............................................................ 13359
Media location summary (daily average) .......................................... 13560
Open job summary ........................................................................ 13661
Media location audit ..................................................................... 13862
Media location audit - device/vault screen ........................................ 13963
Media location audit - select starting point screen .............................. 13964
Media location audit - view ............................................................ 14065
Filter media .................................................................................. 14166
User guide 11
Page 12

Tables
Document conventions ...................................................................... 141
Platform support .............................................................................. 242
Supported languages ....................................................................... 263
Supported languages—intersite transfers ............................................ 274
Application matrix ......................................................................... 1655
12
Page 13

About this guide
This guide provides information about:
• planning and preparing for a disaster
• testing a disaster recovery procedure
• successfully performing a disaster recovery
Intended audience
This guide is intended for users of HP Data Protector Media Operations, with
knowledge of:
• Data Protector concepts
Related documentation
HP Media Operations provides three guides, together with context-sensitive (F1) Help
and Help Topics for Windows platforms. The guides are available printed and in
PDF format. The PDF files are installed during the Media Operations setup procedure
on Windows. Once installed, the manuals reside in the Media_Operations_home\
docs directory on Windows.
You can also find these documents from the Manuals page of the HP Business Support
Center website:
http://www.hp.com/support/manuals
In the Storage section, click Storage Software and then select your product.
There are three guides specific to Media Operations:
• HP Data Protector Media Operations getting started guide—containing a pre-in-
stallation checklist, a ten-minute installation guide and a fifteen-minute configuration
guide
• HP Data Protector Media Operations user guide—this guide
User guide 13
Page 14

• HP Data Protector Media Operations product announcements, software notes,
and references—containing a list of resolved issues, late breaking news and
other information
Document conventions and symbols
Table 1 Document conventions
ElementConvention
Cross-reference links and e-mail addressesBlue text: Table 1 on page 14
website addressesBlue, underlined text: h
ttp://www.hp.com
• Keys that are pressed
• Text typed into a GUI element, such as a box
• GUI elements that are clicked or selected, such as menu
and list items, buttons, tabs, and check boxes
Bold text
Text emphasisItalic text
• File and directory names
• System output
• Code
• Commands, their arguments, and argument values
Monospace text
• Code variables
• Command variables
Monospace, italic text
Emphasized monospace text
Monospace, bold text
CAUTION:
Indicates that failure to follow directions could result in damage to equipment or
data.
IMPORTANT:
Provides clarifying information or specific instructions.
About this guide14
Page 15

NOTE:
Provides additional information.
TIP:
Provides helpful hints and shortcuts.
General Information
General information about DPNE can be found at http://www.hp.com/go/
dataprotector
HP technical support
For worldwide technical support information, see the HP support website:
http://www.hp.com/support
Before contacting HP, collect the following information:
• Product model names and numbers
• Technical support registration number (if applicable)
• Product serial numbers
• Error messages
• Operating system type and revision level
• Detailed questions
Subscription service
HP recommends that you register your product at the Subscriber’s Choice for Business
website:
http://www.hp.com/go/e-updates
After registering, you will receive e-mail notification of product enhancements, new
driver versions, firmware updates, and other product resources.
User guide 15
Page 16

HP websites
For additional information, see the following HP websites:
•http://www.hp.com
•http://www.hp.com/go/storage
•http://www.hp.com/support/manuals
•http://www.hp.com/support/downloads
Documentation feedback
HP welcomes your feedback.
To make comments and suggestions about product documentation, please send a
message to DP.DocFeedback@hp.com. All submissions become the property of HP.
About this guide16
Page 17

1 Media Operations overview
In this chapter
This chapter describes the general principles on how Media Operations works. It is
organized as follows:
• “Media Operations concepts” on page 17
• “Logging on to Media Operations” on page 21
• “Environmental requirements” on page 24
Media Operations concepts
Media Operations tracks and manages online, offline, and offsite storage media,
such as magnetic tapes. The result is reliable backups, fast data recovery, improved
staff efficiency, and reduced costs. Major benefits are as follows:
• Scalable and Highly Flexible Architecture
Media Operations can be used in environments from a single system to thousands
of systems on different sites.
• Easy Central Administration
Through its easy-to-use graphical user interface (GUI), you can administer your
environment from a single system. The GUI can be installed on various systems
to allow multiple administrators to access Media Operations.
• High Performance
You can track thousands of removable media regardless of their location, including
creating daily task lists, organizing tapes for logical data center walk-throughs,
and controlling tape libraries, barcode scanners, and media label printers.
• Integration with Backup Applications
Media Operations integrates with leading backup applications, including HP
Data Protector and Symantec NetBackup.
• Cost-efficiency
User guide 17
Page 18

Media Operations eliminates the cost of supporting homegrown tools for less
than 3% of your total media bill.
• Automated Operation
Media Operations enforces data retention and media recycling policies. Through
it, you can control removable backup devices for tape loads and ejects.
Additionally, it automates data exchange with backup applications, offsite
vaulting services, and removable media suppliers.
• Monitoring, Reporting and Notification
Service Level Agreement (SLA) Status/Reporting functionality allows you to check
whether SLAs are being met. You can monitor configuration errors and generate
reports, view SLA status and alerts, and run reports at both global and site level.
Additionally, you can configure automatic notification by e-mail or to Operations
Manager (OM) for key events such as alerts, job creation, and SLA warnings.
Media lifecycle
Media Operations allows lifecycle management of removable media (see
“Media lifecycle” on page 19), which includes:
• Moving live media from backup/restore devices (tape libraries and standalone
tape drives) to onsite/offsite tape vaults for disaster protection.
• Moving scratch media from scratch bins into backup/restore devices to provide
usable media for upcoming backup jobs. Scratch media are generated by moving
expired media from tape vaults to scratch bins and by creating new scratch media
when necessary.
• Moving live media from onsite/offsite tape vaults to backup/restore devices to
meet recovery requests.
NOTE:
Media Operations does not control the data held on a medium; this is the
responsibility of the Backup Manager.
Media Operations overview18
Page 19
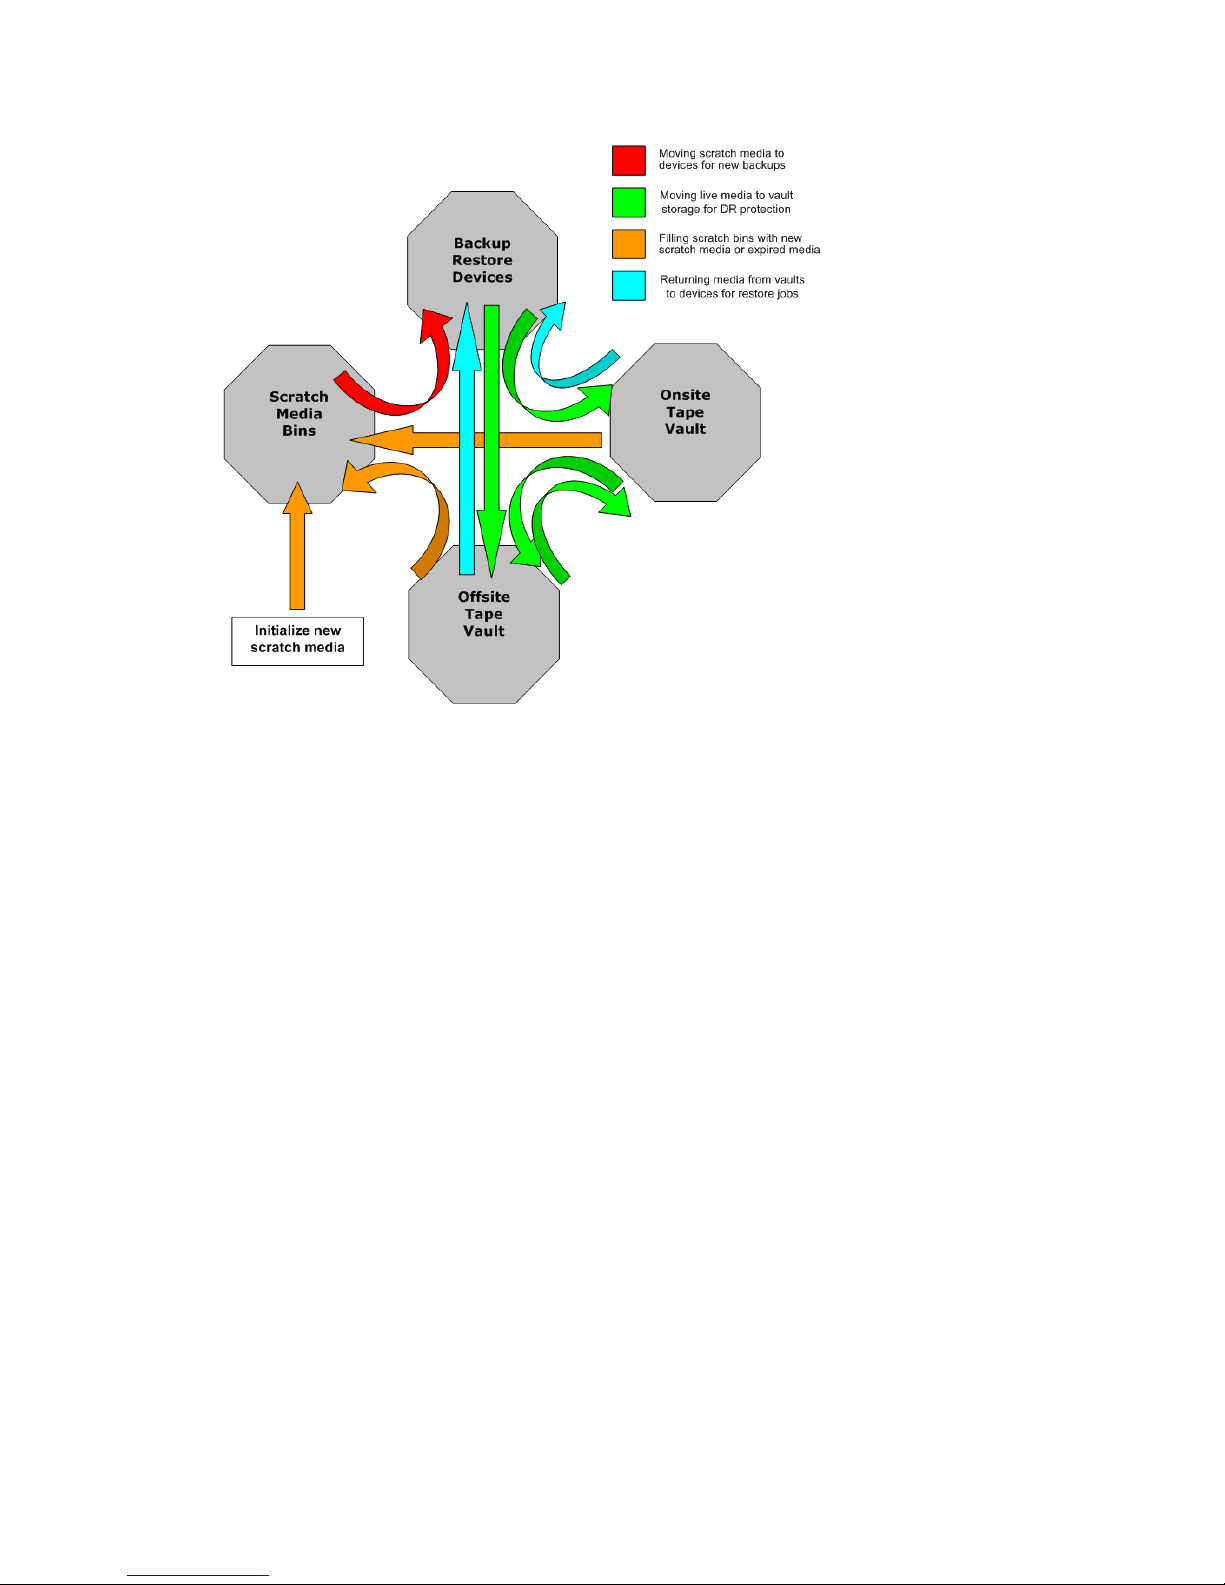
Figure 1 Media lifecycle
.
Components
Major Media Operations components are:
• Media Operations Server, containing:
• a database of data objects (such as devices, media, media pools) and their
attributes,
• business logic to process administrator-defined vaulting and scratch policies,
and lists of tape movements to be performed,
• scheduling and SLA monitoring functions.
• Media Operations Manager—a graphical interface used to remotely configure,
monitor, and run your media vaulting and scratch media policies. There are
Windows and web-based versions. You can also attach a barcode scanner to
the client system to input barcodes from large numbers of media as they are
moved between locations.
• XML Gateway—providing integration between Media Operations and Backup
Managers. For details of versions of HP Data Protector and Symantec NetBackup
supported by Media Operations A.06.11, see
User guide 19
Page 20

“Installing XML Gateway” on page 31. The XML file import interface facilitates
integration of Backup Managers not currently supported by XML Gateway.
• Backup Manager—such as HP Data Protector, controlling backup functions. Media
Operations interacts with Backup Managers to track and provide medium use.
After installing Media Operations on Media Operations Server, you can track
media from a variety of Backup Managers.
Figure 2 Components
.
Integration with backup manager
Media Operations integrates with the Backup Manager via:
• XML Gateway
• XML file import, allowing integration with Backup Servers not supported by XML
Gateway
Media Operations uses these to extract configuration information from the Backup
Manager, which autoconfigures devices, media pools, systems, and backup
specifications. It also extracts current media information. XML Gateway interface
allows Media Operations to trigger barcode and media scans in any of the Backup
Server’s tape libraries/devices. This provides up-to-date information on the contents
of these devices.
For more information about supported interfaces, see “Backup managers” on page 68.
Media Operations overview20
Page 21

Logging on to Media Operations
Connecting to a server
To launch the Media Operations Manager, double-click the Media Operations
Manager icon that is now on your desktop. The 4D Server Connection window
appears, containing the following tabs:
• Recent Tab
Lists all Media Operations Servers used recently. The list is sorted alphabetically.
To connect to a server from this list, double-click its name, or select it and click
OK.
To remove a server from the list, select it and press Delete or Backspace.
• TCP/IP Tab
Lists the names of the server databases over the network. The list is sorted alphabetically. To connect to a server from this list, double-click its name, or select it
and click OK.
• Custom Tab
Assigns a published server on the network using its IP address and attribute a
customized name to it.
If your Media Operations Manager is in a different network subnet from the Media
Operations Server, your network router connecting two subnets may be configured
to block TCP/IP broadcasts. In this case, the Media Operations Server name will not
appear under the TCP/IP tab. However, if you know the IP address of the server
whose name is not broadcast, you can type its IP address.
• Database name—type the name of the server database, which is used under the
Recent tab when referring to the database.
• Network address—type the IP address of the machine where the server was
launched.
By default, the publishing port of the server is 19813.
NOTE:
If a database was selected under the Recent or TCP/IP tab when you clicked the
Custom tab, the two fields display the corresponding information.
User guide 21
Page 22
Once this tab assigns a server, click OK to connect to the server. The server is then
listed under the Recent tab.
Using Media Operations graphical user interface
Media Operations provides GUIs available from the client system (Windows client)
and from the internet (web client).
Windows client
Windows GUI allows you to administer the complete media lifecycle environment
from a single system. It can be used from the Server or a desktop system.
You can also install the GUI on several systems, allowing multiple users to access
Media Operations via locally installed consoles.
Figure 3 Media Operations GUI
.
To start the Media Operations GUI:
1. Click Start on the Windows desktop and select Media Operations Manager.
2. In the 4D Server Connection window, select the server to which you want to
connect from the list of recently used servers, the TCP/IP address, or a custom
server. The User Log In screen appears. Type your username and password,
and click Sign In. The Media Operations GUI is started.
Media Operations overview22
Page 23

NOTE:
If you are running Media Operations in “demo” mode and you have media
configured, an alert tells you how many days are left before the product switches to
“expired” mode (see “Licensing Media Operations” on page 38).
Web client
The web-based GUI provides operator functions only. You must perform site
configuration functions from the Windows client.
To log to Media Operations web GUI:
1. Start Media Operations.
2. From another computer, launch a web browser (such as Netscape or Microsoft
Internet Explorer).
3. Type the network name or IP address of your Media Operations Server in the
Location area. The web version of Media Operations appears.
4. Type your login name and password on the web browser.
IMPORTANT:
If the Media Operations Server is running on a system that hosts another web server,
type the network name or IP address followed by “:3612”. For example:
http://worker.xyz.ab.com:3612
Using the CLI
You can start Media Operations jobs through the command line interface (CLI). See
“Running jobs through the CLI” on page 95 for the syntax.
User guide 23
Page 24
Environmental requirements
Platform support
NOTE:
Combinations of Media Operations component and operating system/processor
platforms are only supported where the operating system version is still supported
by its vendor.
The basis for the Media Operations Server and Media Operations Manager
components is a product called 4D version 6.8 from 4D, Inc. The functionality of
Media Operations is limited to the features that 4D offers. Limitations apply for
support for clusters and also support for 64-bit processor architectures and 64-bit
versions of the Microsoft Windows operating systems. The Media Operations Server
and Manager are therefore supported only on 32-bit processor architectures and
32-bit versions of Microsoft Windows operating systems.
Table 2 Platform support
Supported Processor
Platforms
1
Operating System Platforms
1
Host
x86Windows 2000 Advanced Server
nl
Windows Server 2003
2
Media Operations
Server
x86Windows 98 (2nd edition)
nl
Windows Server/Professional 2000
nl
Windows 2003
2
nl
Windows XP
Media Operations
Manager (Client GUI)
x86, x86_64, ItaniumInternet Explorer v5.x and above
nl
nl
Mozilla Firefox 2.0 and above
Netscape Navigator v7.0 and above
Media Operations
Web Client
PA-RISC
HP/UX v11.113, v11.233 and v11.31
3
XML Gateway
Itanium
HP/UX v11.23
3
and v11.31
3
Media Operations overview24
Page 25

Supported Processor
Platforms
1
Operating System Platforms
1
Host
x86Windows 2000 Server and Advanced
Server
x86, x86_64, ItaniumWindows Server 2003 (32–bit and
64–bit)
4
x86_64
Windows Server 2008 (64-bit)
5
SPARC systemsSolaris 8, 9 and 10
x86_64SUSE Linux Enterprise Server 9, 10 and
11 (64-bit)
x86_64
RedHat Enterprise Linux (RHEL) 4.x and
5.x (64-bit)
1
Media Operations Server and Manager are supported only on 32-bit processor
architecture and 32-bit Windows operating systems.
2
Includes support for Windows 2003 R2.
3
HP-UX 11.11 is HP-UX 11i version 1.0, HP-UX 11.23 is HP-UX 11i version 2.0,
HP-UX 11.31 is HP-UX 11i version 3.0.
4
Includes support for Windows Server 2003 R2, Windows Storage Server 2003 R2
and Windows Unified Data Storage Server where applicable.
5
Includes support for Windows Server 2008 Standard Edition, Enterprise Edition
and Datacenter Edition.
Barcode scanner support
Barcode scanners are supported on the Media Operations Server, Media Operations
Manager Client, and the Media Operations GUI on a server running IE or Netscape,
provided that the scanner behaves like a keyboard and emulates Enter (not carriage
return) after scanning.
User guide 25
Page 26

Barcode printer support
Media Operations Server supports any Zebra 300 dpi label printer.
These printers are also supported when attached to a supported Media Operations
Manager.
Media Operations Server supports the following tape libraries for use with the barcode
labels it prints:
• HP SureStore 2/20, 4/40, 6/60, 10/100, 6/140, 10/180, and 20/700 lib-
raries
• HP StorageWorks SSL, MSL, and ESL libraries
See “Defining barcode labeling policies” on page 86 for more information about
barcode support.
Offsite vendor support
Media Operations supports electronic links to offsite vendors. This allows electronic
verification of media being shipped to offsite storage, and provides electronic requests
to return media from offsite storage to the data center (for recovery jobs).
Offsite vendor types are Media Operations, Generic, and Iron Mountain. For
descriptions, see “Site management” on page 41.
Supported languages
Media Operations Clients and Servers in languages that use Western European
character sets (such as ISO extended ASCII) can communicate with one another with
no issues. Media Operations Clients and Servers in languages that use double-byte
character sets can communicate successfully only with another Media Operations
installation using the same character set. This means Japanese clients must link to
Japanese servers, Korean to Korean, and so on.
Table 3 Supported languages
Server LocaleClient Locale
Shift JIS (Japanese)Shift JIS (Japanese)
EUC-KR (Korean)EUC-KR (Korean)
Media Operations overview26
Page 27

Server LocaleClient Locale
Western/USWestern/US
The following matrix applies to intersite transfers between two Media Operations
Servers where one server acts as an offsite location to the other server
Table 4 Supported languages—intersite transfers
Server LocaleClient Locale
Shift JIS (Japanese)Shift JIS (Japanese)
EUC-KR (Korean)EUC-KR (Korean)
Western/USWestern/US
Shift JIS (Japanese)Western/US
EUC-KR (Korean)Western/US
User guide 27
Page 28

Media Operations overview28
Page 29

2 Installing and licensing
Installing Media Operations
This chapter tells you how to install the following Media Operations components
manually from the installation DVD or CD:
• Media Operations Server
• XML Gateway
• Media Operations Manager (optional)
Prerequisites
• Minimum requirements for the Media Operations Server: 500 MHz Pentium III
CPU (or above), 256 MB RAM, and 500 MB free disk capacity. A dual processor
machine is highly recommended. Installation checks that sufficient disk space is
available.
• The unlicensed version of the product is a fully functional demo version (see
“Licensing Media Operations” on page 38). The administrator installs license
keys after the product is installed.
• It is recommended to install Media Operations Server onto a tape backup product
client, as it provides a tape backup mechanism for the Media Operations Server
data.
• Media Operations Server installation includes a built-in web server that provides
the web-based Media Operations GUI. The server installation package detects
any existing web server on the system, and warns you that another port (3612)
will be used for Media Operations Web Server (so that it can co-exist with the
existing web server).
• To install the Media Operations Server successfully, you need a local printer. If
no local printer is connected to your system, configure a local printer in your
operating system, even if the printer is not attached.
• Media Operations Clients and Servers in languages that use Western European
character sets (such as ISO extended ASCII) can communicate without issues.
Media Operations Clients and Servers in languages that use double-byte character
User guide 29
Page 30

sets (only SJIS and EUC-KR are supported) can communicate successfully only
with another Media Operations installation using that character set. This means
Japanese clients must link to Japanese servers, Korean to Korean, and so on. See
the HP Data Protector Media Operations product announcements, software notes,
and references for more information.
• When installing Media Operations in a double-byte language environment, the
following screen gives you an option to cancel or re-index. Click Re-index within
30 seconds to avoid timing out.
Figure 4 Indexes
.
Installing Media Operations Server
NOTE:
Media Operations server is not supported in a Windows cluster environment.
If a Backup Manager is installed on a cluster environment, while adding this Backup
Manager in Media Operations, you must specify the virtual name of the cluster as
the Backup Manager name.
To install the Media Operations Server:
1. Insert the installation DVD or CD and run setup.exe from the server directory.
2. Click Next.
3. Read the license agreement and click Yes to accept it.
4. Enter the destination for the files. The default location is C:\Hewlett-Packard\
DataMgt\MediaOps. To install to a different location, click Browse to select
the location. Click Next.
Note: Media Operations Server database files are located in the same destination
directory as the Media Operations Server. Because database files can grow to
a large size, select a destination location for the Media Operations Server that
can accommodate this growth.
Installing and licensing30
Page 31

5. Select the location for data management communication service files.
Communications service is a common component that can be used by other
Data Management applications. To install to a folder other than the default, click
Browse to select the destination. Click Next.
6. Type an initial top-level administrator username and password. Make a note of
the username and password; they are the only way to log in until you create
additional users.
NOTE:
The password has a maximum length of 10 characters.
7. Go back to review your settings, or proceed with the installation.
8. Read the ReadMe file, or click Finish to exit the installation wizard.
Installation is now complete. You should see the server console window for the Media
Operations Server.
Installing XML Gateway
There are standalone installation packages that support installing XML Gateway on
Microsoft Windows, HP-UX, Linux, and Solaris. Media Operations A.06.11 XML
Gateway integrates with the following supported Backup Managers:
• HP Data Protector A.06.11, A.06.10, and A.06.00
• Symantec NetBackup Server 6.0
• Symantec Enterprise Server 6.0
You can install XML Gateway on the same system as your Backup Manager (such
as Data Protector Cell Manager), on another system with the same firewall zone as
the Backup Manager, or on the Media Operations Server system. There must be a
dual processor system for this configuration.
NOTE:
For NetBackup, XML Gateway
must
reside on the NetBackup Master server.
If you are installing XML Gateway in a cluster environment, it must be installed on
both active and passive nodes. If you want to use the XML Gateway that is installed
on a cluster configuration, specify the virtual name of the cluster as the XML Gateway
name while adding the Backup Manager in Media Operations.
User guide 31
Page 32

Installing XML Gateway on Windows
NOTE:
If you are installing the XML Gateway after installing a Media Operations server,
to avoid having to restart, stop the DMComms in between the installations.
To install XML Gateway:
1. Insert the installation DVD or CD and run setup.exe from the \xmlgw\
windows directory.
2. Click Next.
3. Read the license agreement and click Yes to accept it.
4. Enter the destination for the XML Gateway files. The default location is C:\
Hewlett-Packard\DataMgt\DPXMLGW. To install to a different location,
click Browse to select the destination. Click Next.
5. If you have already installed the Media Operations Server, this step is skipped.
Select the location for the data management communication service files.
Communications service is a common component that can be used by other
data management applications. To install to a folder other than the default, click
Browse to select the destination. Click Next.
6. Go back to review your settings, or proceed with the installation.
7. Read the ReadMe file, or click Finish to exit the installation wizard.
Installing XML Gateway on Unix
Prerequisites
• Make sure you have root access or an account with root capabilities.
• A Unix system that will become your future XML Gateway host must have:
• supported Unix version installed,
• sufficient disk space for the XML Gateway,
• port numbers 25555 and 25556 free,
• TCP/IP protocol installed and running (able to resolve hostnames).
Installing and licensing32
Page 33

To install on HP-UX:
1. Insert the installation DVD or CD and mount it.
2. Using the standard swinstall procedure, type the path, for example: swinstall
-s taz:/cdrom/xmlgw/hpux/HPMedOps.depot HPMedOps
3. Check the max_thread_proc parameter of the HP-UX kernel is set to at least
512 (the maximum number of threads allowed per process). For more details,
see “Kernel tuning” on page 161.
See HP-UX documentation for additional information on swinstall.
To install on Solaris:
1. Mount the installation DVD or CD to the directory: <cdrom_mount_point>/
xmlgw/solaris.
2. Type:
pkgadd -d and press Enter,
HPMedOps.pkg and press Enter, and
HPdpxmlgw and press Enter.
3. You are now asked:
Do you want to continue with the installation of
<HPdpxmlgw> [y,n,?]
Type y to continue.
4. Start the gateway services:
/opt/hpdmcomms/sbin/start_hpdmcomms nl /opt/hpdpxmlgw/sbin/
start_hpdpxmlgw
NOTE:
When upgrading from the existing XML Gateway version to A.06.11, if the directory
/opt/hpdmcomms still remains after uninstalling the existing version, remove the
directory manually (using the command rmf/opt/hpdmcomms) to avoid any
conflicts.
User guide 33
Page 34

To install on Linux:
1. Insert the installation DVD or CD and mount it.
2. Execute the following command:
rpm -ivh <rpmpath> /HPMedOps.rpm
This installs the XML Gateway on the Linux machine and also starts the Java services.
NOTE:
When upgrading from the existing XML Gateway version to A.06.11, if the directory
/opt/hpdmcomms still remains after uninstalling the existing version, remove the
directory manually to avoid any conflicts.
NOTE:
If the RPM installation fails with the error “Failed dependencies”, you need to install
the dependent libraries before installing the RPM.
Stopping Gateway Services on UNIX
To stop Gateway Services on UNIX, run the following commands:
/opt/hpdmcomms/sbin/stop_hpdmcomms nl /opt/hpdpxmlgw/sbin/
stop_hpdpxmlgw
Uninstalling XML Gateway
To remove the XML Gateway:
HP-UX: type swremove HPMedOps.
Solaris: type pkgrm HPdpxmlgw.
Linux: type rpm -e HPMedOps.
Installing and licensing34
Page 35

Installing Media Operations Manager (optional)
Media Operations Manager provides the GUI to Media Operations. Install it to
provide Media Operations for a local site when Media Operations Server is located
on another site.
NOTE:
Media Operations Manager copy is included with the Media Operations Server, so
you do not need to install the Media Operations Manager on the Server System.
To install Media Operations Manager:
1. Insert the installation DVD or CD and run setup.exe from the client directory.
2. Click Next.
3. Read the license agreement and click Yes to accept it.
4. Enter the destination for the files. The default location is C:\Hewlett-Packard\
DataMgt\MediaOps. To install to a different location, click Browse to select
the location. Click Next.
5. Go back to review your settings or proceed with the installation.
6. Read the ReadMe file, or click Finish to exit the installation wizard.
Installation is now complete. You should see the Media Operations Manager icon
on the desktop and a Media Operations option in your Start menu.
Upgrading to Media Operations A.06.11
The following upgrade paths are supported:
• Media Operations 6.0 to Media Operations 6.11
• Media Operations 6.0 (with patch) to Media Operations 6.11
• Media Operations 6.10 to Media Operations 6.11
Before upgrading an existing product version to Media Operations release A.06.11,
consider the following:
• Refer to the HP Data Protector Media Operations product announcements, software
notes, and references for information about supported and discontinued platforms
and versions.
User guide 35
Page 36

• After the upgrade, the Media Operations Server and all XML Gateways must
have Media Operations version A.06.11 installed.
• If you have a permanent license for Media Operations A.05.50, A.06.00, or
A.06.10, you can use it with Media Operations A.06.11.
For details about licensing, see “Licensing Media Operations” on page 38.
Before you begin
Back up the existing Media Operations Server system and the Media Operations
database.
NOTE:
It is mandatory to back up the Media Operations database. You can manually save
the data files available in the location <MediaOperations_install_dir>\
MediaOps\DBServer\MediaDB to a temporary location. After upgrading the
Media Operations Server version, copy back the saved data files to
<MediaOperations_install_dir>\MediaOps\DBServer\MediaDB. (This
backup procedure helps in restoring data files in cases where the upgrade fails and
you have to reinstall the product).
Upgrading Media Operations Server and Manager to A.06.11
Use the following procedure if Media Operations Server version A.06.00 or A.06.10
is installed on your system.
NOTE:
If the services are manually stopped before the upgrade, you must ensure that the
Services window is closed before starting the upgrade, otherwise the upgrade will
fail.
NOTE:
If the Media Operations Server and XML Gateway are installed on the same system,
stop all Media Operations services before starting the upgrade. This avoids re-starting
the system when the upgrade is complete.
Installing and licensing36
Page 37

1. Run setup.exe for the Server version A.06.11. This starts the upgrade wizard
for Media Operations Server installation. The upgrade process stops all the
running A.06.00 or A.06.10 server services and copies the new files onto them.
2. If XML Gateway is installed on the same system as the server, upgrade the
gateway manually to the newer version.
Upgrading Media Operations XML Gateway to A.06.11
Use the following procedure if XML Gateway version A.06.00 or A.06.10 is installed
on your system.
Upgrading on Windows
NOTE:
If the Media Operations Server and the XML Gateway are installed on the same
system, stop all Media Operations services before starting the upgrade. This will
avoid re-starting the system once the upgrade is completed.
1. Run setup.exe for the XML Gateway version A.06.11. This starts the upgrade
wizard for the XML Gateway installation. The upgrade process stops the running
XML Gateway on the system and copies the new files onto the existing ones.
2. After a successful upgrade, the XML Gateway services start up.
Upgrading on HP-UX
NOTE:
You must have root permission to perform the upgrade.
Install the new version of XML Gateway by executing the command:
swinstall –s <A.06.11_depot_location> /HPMedOps.depot
HPMedOps
For more details, see “Installing XML Gateway on Unix” on page 32.
User guide 37
Page 38

Upgrading on Solaris:
On Solaris, you need to remove the older version of the XML Gateway before installing
a new version.
NOTE:
You must have root permission to perform the upgrade.
1. Remove the older version of the XML Gateway, using the command:
nl
pkgrm HPdpxmlgw
2. Install the new version:
pkgadd –d <A.06.11_package_location> /HPMedOps.pkg
HPdpxmlgw
For more details, see “Installing XML Gateway on Unix” on page 32.
Upgrading on Linux
On Linux, you need to remove the older version of the XML Gateway before installing
a new version.
NOTE:
You must have root permission to perform the upgrade.
Remove the previous version of the XML Gateway, using the command: rpm -e
HPMedOps Install the new version: rpm -ivh A.06.11_package_location/
HPMedOps.rpm
For more details, see “Installing XML Gateway on Unix” on page 32.
Licensing Media Operations
When you first install Media Operations, it has no license key and is acting as a
demo product (with a 60-day time limit and unlimited media license). While the
product is in “demo” mode, a message is displayed every time you log in showing
how many demo days remain.
Installing and licensing38
Page 39

The product is fully usable until the 60 days expire. After that, the product switches
to “expired” mode; you cannot run any daily media movement jobs, except checkout
request jobs, and the web GUI is disabled. Every time you log in, an error dialog
prompts you to install the appropriate number of licenses.
Although you cannot use the product in expired mode, the server continues to run
any scheduled activities, such as polling for new information from the Backup
Managers or making database backups. Any new media detected on the Backup
Managers are added into the Media Operations database. This ensures the product
is kept in sync with the environment—when it switches to a normal licensed mode,
it is still up to date. To enable full product use with no time limits, go to Utilities ->
Add License. This option is only available if you log in via the Media Operations
Manager running on the Media Operations Server. The Add License command
launches the AutoPass License Key application in a separate window. Use this to
install new license keys.
NOTE:
The Media Operations Server system must have JRE 1.4.2 or higher version installed
in order to use AutoPass for Media Operations licensing.
Figure 5 AutoPass license key
.
Each key allows an increment of either 2000 or 10,000 to the maximum managed
media limit (the increment is encoded in the license key). You can also buy a license
to manage unlimited number of media.
User guide 39
Page 40

When a new license key is entered using this option, it is checked to ensure that it
is different from any existing license key, and that it is a valid Media Operations
license key.
If the new key is unique and valid, the media license is extended by either 2000,
10,000, or unlimited media depending on the key.
After installing sufficient licenses to cover your expected managed media, the product
becomes fully operational.
If you do not install sufficient licenses to cover the current media or you exceed your
license as the amount of managed media increases over time, the product switches
to “license exception” mode. In this mode, you have 60 days to install sufficient new
licenses. During this period, Media Operations remains fully operational. If you have
not installed sufficient licenses by the end of 60 days, Media Operations switches
into “expired” mode; you cannot run daily operations, except checkout requests,
and you cannot use the web GUI. You can return the product to full operation from
expired mode by installing sufficient licenses to cover the amount of managed media.
Viewing licenses
On the Utilities menu of the Media Operations Server, click View Licenses to view
your current license configuration.
Figure 6 AutoPass report licenses
.
Installing and licensing40
Page 41

3 Configuring Media Operations
In this chapter
This chapter includes information on the following:
• “Site management” on page 41
• “Security management” on page 61
• “Configuring backup processes and objects” on page 63
• “Tuning backup objects” on page 80
• “Defining media policies” on page 81
Site management
A site is a geographic location with one or more data centers and a common set of
operators. Media Operations allows you to configure and manage multiple physical
sites with different service level agreements (SLAs).
Each site's configuration defines the physical layout of devices and available onsite
and offsite vault locations.
A site consists of the following:
• Vaults
Vaults reflect the physical layout of secure media storage in a site. They consist
of cabinets, drawers, rows, and slots created in that order.
Vaults have no capacity until you create rows and slots. When creating a row,
define what media type will fit into the slots. If you add a new media type that
does not fit into the defined vault slot types, you need to add a new slot-type
definition, and then define the rows that accept this media type. See
“Adding and modifying media types” on page 81 for more information.
You can create vaults either manually or automatically (if your vault has a structured addressing scheme for its components).
User guide 41
Page 42

You can edit vaults from the Site Configuration window provided you have permissions to edit sites. If you delete a vault, all media in the vault are moved to
the holding bin for the deleted vault site.
Vaulting Policy
Vaulting policies are rules defining what happens to the medium after the backup.
Every site has a default vaulting policy assigned when new media pools are
created/added.
Either create your own vaulting policy, or use one of the pre-defined templates.
See “Configuring media vaulting policies” on page 81 for more information.
Vault Priorities
When you configure vaulting policies, Media Operations puts the media into the
most appropriate vault in the destination site. Vault selection depends on whether
the vaults support the media's vault-slot type, whether there are free slots, the
vault's onsite and offsite priorities, and the reserved slots configuration.
You can assign onsite and offsite priority to each vault to define which vault is
the preferred recipient of the local site (online priority) or the offsite (offline priority)
media.
Reserving Slots
To control media allocation, you can reserve slots for exclusive use with a specified
media pool. Media from the pool can only be stored in the reserved slots. You
can apply this configuration at row, drawer, or cabinet level.
To view a list of reserved slots, click the Reserved Slots tab on the Onsite Vault
Management window.
• Offsite Storage Vendors
Offsite vendors are secure media locations not controlled by the Media Operations
Server, such as other Media Operations Servers within your own company or
external vendors.
You can manually add offsite storage vendors and accounts, and select them as
part of media vaulting policies.
NOTE:
Once defined, offsite vendors can be used for any site. Each site, however, has
its own unique account with the offsite vendor, identifying the owner of each
medium.
Media Operations supports electronic links to offsite vendors. This enables electronic verification of media shipped to offsite storage. It also enables electronic
requests to return the media from offsite storage back to the data center (for ex-
Configuring Media Operations42
Page 43

ample, for data recovery). For more information about electronic link interfaces,
see “External interfaces” on page 143.
Three offsite vendor types are:
• Media Operations
This is used when your offsite storage location is another Media Operations
Server. An electronic link between the two servers automatically creates jobs
on the offsite server for outgoing and returning media, and provides status
information on the offsite jobs. In addition, there are auditing options for
synchronizing two Media Operations Servers if they get out of sync.
• Generic
This is used when there is not another Media Operations Server at your offsite
storage location. If the offsite vendor has their own proprietary electronic interface, customized scripts convert information from Media Operations into
the vendor's electronic link protocol.
• Iron Mountain
This is used when your offsite vendor is Iron Mountain and an Iron Mountain
FTP electronic link (SecureBase) is used. If you are not using the FTP link, use
the Generic vendor.
• Data Centers
Data centers are collections of systems and backup devices within a site. If your
site has several buildings on the same campus, each building may have its own
data center.
A default data center is automatically created in each site. You cannot delete it
because it is the default repository for any device or system created without a
specified data center (such as automatically created devices and systems). You
can change the data center assignment if you have additional data centers. See
“Refining physical locations” on page 80 for details.
Configuring data centers helps you optimize premount jobs. Premount jobs are
faster and more efficient if the premount walk-through is grouped in a logical order
by physical location (when the shortest/quickest path from device to device is
used).
Data Center Grids
You can further optimize the device walk-though order by creating data center
grids to be assigned to systems and devices. Each data center grid represents a
physical location (such as a grid tile) and has a unique walk-through order key
defining the order in which operators proceed during premount jobs.
You can add or edit grids:
• When adding or editing a data center
User guide 43
Page 44

• When adding or editing a site definition (see
“Bulk configuration file import” on page 154)
Adding a new site
You can add sites from Global Configuration Options -> Site Management provided
you have top-level administrator permissions. If you have no sites configured, you
are automatically taken to Add Site Wizard when you log in:
1. Type a site name, site address, and primary contact. Click Next to proceed.
2. Enter a name for the default vaulting policy to be applied to all media in the
site.
Figure 7 Creating default vaulting policy
.
3. Specify a vaulting policy for the new site. Select a policy template from the
drop-down list or click Add Template to define your own policy.
Configuring Media Operations44
Page 45

4. Edit the vaulting cycles as instructed to ensure you have the correct destination
site selected and the destination site has vaults configured.
Figure 8 Vaulting cycle
.
To edit the location type and location destination, double-click Location Type or
Location Destination, or click Edit.
NOTE:
Clicking Next without editing vaulting cycles produces an alert message.
To proceed, edit the vaulting cycle referred to in the alert by either
double-clicking the cycle, or selecting it and clicking Edit.
5. Type the day number. Select the destination location and the destination site.
To select the days for the cycle to occur, select the appropriate Vaulting Days
check boxes.
Figure 9 Vaulting cycle action
.
6. If the vaulting cycle has an offline vendor destination, select an offsite vendor
and an offsite vendor account. As you are adding a new site, there are no offsite
vendors defined. Click Add Offsite Vendor.
User guide 45
Page 46

7. In the Offsite Storage Vendor Definition page, specify the vendor name and
type, and enter the vendor description. See “Site management” on page 41 for
information about vendor types.
Click Add to create accounts in the new offsite vendor. You are taken to Vendor
Account Definition.
Configuring Media Operations46
Page 47

8. Which Vendor Account Definition window is displayed depends on the offsite
vendor type you have selected:
• Media Operations Vendor
Enter:
• Unique vendor account ID
• Hostname of the system on which the offsite Media Operations system
resides
•Password
Account ID and password must match a remote account on the offsite Media
Operations Server.
Figure 10 Vendor account definition - Media Operations vendor
.
• Iron Mountain Vendor
Enter:
• Account ID
• Hostname defining the system name of the Iron Mountain Server used to
store the offsite media
• FTP account name
• FTP password
• If the connection to your offsite Iron Mountain Server passes through a
firewall, type the proxy settings for this connection.
User guide 47
Page 48

Figure 11 Vendor account definition—Iron Mountain vendor
.
Configuring Media Operations48
Page 49

• Generic Vendor
Enter:
• Unique account ID
• If the offsite vendor has the proprietary electronic link interface, specify
optional configuration settings
Figure 12 Vendor account definition—generic vendor
.
When configuring offsite accounts for a Generic vendor, you can create
scripts to take the information from Media Operations and convert it to the
offsite vendors electronic link protocol.
• Select the Enabled check box for Outgoing/Return Media command line
script if the vendor supports an interface to manage outgoing and returning media. Type the script/utility command to link Media Operations to
the vendor.
• Select the Enabled check box for Status Verification command line script
if the vendor supports an interface to notify that previously submitted
outgoing and returning media jobs are complete. Type the script/utility
command to link Media Operations to the vendor.
• Select the Enabled check box for Audit Management command line script
if the vendor supports an interface to audit stored media. Type the
script/utility command to link Media Operations to the vendor.
•Use Vaulting Days check boxes to define the days the vendor will accept
offsite shipments. Vaulting Days on this screen takes precedence over
vaulting days set in vaulting policies (see “Vaulting policies” on page 55).
User guide 49
Page 50

When you have configured your offsite vendor account, click OKto return to
the Offsite Storage Vendor Definition window. Click OK to save the new
offsite vendor and its accounts and return to Vaulting Cycle Action.
9. Specify the destination offsite vendor and its account. Click OK to save the
vaulting policy cycle. You are now back to Vaulting Cycle.
NOTE:
If you click Next without editing the vaulting cycles, you receive an alert
message. To proceed, edit the vaulting cycle referred to in the alert by either
double-clicking that cycle, or selecting the cycle and clicking Edit.
10. Click Add Vault to create vault capacity in the destination site. If your destination
is another site, select the correct destination site.
Configuring Media Operations50
Page 51

11. In the Onsite Vault Management window (theInfo tab), type a vault name as
well as other required information. Click the Layout tab to define the vault
configuration and capacity.
Figure 13 Onsite vault management—layout
.
Adding cabinets
You now need to create cabinets manually by clicking Add Cabinets or
automatically by clicking Auto-Create Layout.
To create a cabinet manually:
1. In the Create Cabinets page, enter a unique cabinet name, and click Add
Drawers or Auto-Create Drawers.
2. To add drawers manually, type the name of the first drawer, and click Add
Rows.
3. In the Create Rows page, type the name of the first row in the drawer,
starting and ending slot numbers, and specify the number and type of media.
Repeat until all rows are created, then click Cancel to return to the Create
Drawers window. Create all the new drawers you need, and then click
Cancel to return to Create Cabinets. Create all the cabinets you need for
that vault, and then click Cancel to return to Onsite Vault Management.
Click the Reserved Slots tab for a list of all slots reserved for single media pools
(as opposed to general slots).
Click the Contents tab for a list of the media storage locations contained in the
onsite vault and a list of media contained in those vault slots.
12. When you have configured your vault, click OK to save the new vault and return
to Vaulting Cycle Action.
Click OK to save the vaulting policy cycle. You are now back to Vaulting Cycle.
Click Finishto save your new site configuration.
User guide 51
Page 52

Editing an existing site
When you have added a site, you can modify the physical layout of its devices and
the available onsite and offsite vault locations from:
• Global Configuration Options -> Site Management (top-level administrators)
• Global Configuration Options -> Server Parameters under the Sites tab (top-
level administrators)
• The Site Configuration option under each site in the shortcut bar (top-level and
site-level administrators)
To update an existing site, change its properties under the appropriate tab in the
Site Definition window.
Figure 14 Site properties
.
Site properties are described in detail below.
Info
The Info tab shows the geographical location containing data centers for a site. Each
site has a unique site name and default vaulting policy. It has at least one default
data center, but you can define additional data centers and onsite vaults.
Configuring Media Operations52
Page 53

Figure 15 Site definition—info
.
NOTE:
If you exit this screen without defining a vaulting policy, you receive an alert message.
When you click Create, you need to:
• type the name of the vaulting policy,
• select a template to use,
• type site-specific vaulting location information (for example, if you have a vaulting
cycle implementation with an offsite vendor destination),
• select the offsite vendor and the offsite vendor account.
DNS
The DNS tab allows you to associate the site with a set of DNS suffixes (such as
*.fc.hp.com). The system objects added to the Media Operations configuration
are automatically assigned to the appropriate sites based on their DNS name. Click
Edit to view or edit an existing DNS suffix, or Add to create a new one.
Vaults
The Vaults tab defines the onsite vaults in the site. To view or edit a vault, double-click
it. To add a new vault, click Add or Add Many. The Add New Onsite Vault wizard
is displayed.
User guide 53
Page 54

Figure 16 Onsite vault management—info
.
1. Under the Info tab of the Add New Onsite Vault wizard, enter the vault name,
as well as other required information.
2. Under the Layout tab, define the vault configuration and capacity. You can add
cabinets manually by clicking Add Cabinets, or automatically by clicking
Auto-Create Layout. For instructions, see “Adding cabinets” on page ?.
The Reserved Slots tab displays a list of all slots reserved for single media pools (as
opposed to general slots).
The Contents tab displays a list of all media storage locations contained in the onsite
vault together with the media belonging to those vault slots.
Data centers
The Data Centers tab defines the physical grouping of backup/restore devices and
systems. To add new data centers, click Add or Add Many, and follow these steps:
Configuring Media Operations54
Page 55

1. Type a unique name for the data center and its description.
Figure 17 Data center definition
.
Data center grids define the data center physical layout and the grid walk-through
order. You can assign locations to systems and devices in that data center to
optimize the walk-through order of devices during premount jobs.
In addition, you can add grids manually, or import a grid definition file. See
“Import data” on page 60 for import instructions.
2. Enter the grid name and the order key for the walk-through order. For example,
the first grid location in the data center is key number 1 and the second grid
location (in the walk-through order) is key number 2.
After you have finished adding grids, click Cancel to exit. Click Cancel again to
return to Site Definition.
Vaulting policies
The Vaulting Policies window defines active vaulting policies used by objects in this
site. You can create your own vaulting policy, or use one of the pre-defined templates.
See “Vaulting templates” on page 83 for templates' description.
To view or edit a defined vaulting policy, double-click it or click Edit. To add a new
vaulting policy, click Add or Add Many, and follow this procedure:
User guide 55
Page 56

1. Enter a name for a new vaulting policy. Select a template, and type the minimum
number of protection days.
Figure 18 Vaulting cycle implementation—info
.
2. Click the Policy tab. Click Add to add a new or Edit to edit an existing vaulting
cycle.
3. Type the day number. Select the destination location and the destination site.
To specify the days for the cycle to occur, select the appropriate Vaulting Days
check boxes.
Click OK to return to the previous window, then click OK to return to Site
Definition.
Offsite vendors
The Offsite Storage Vendor Definition window defines locations used to store the
media offsite.
1. Enter a unique vendor name to define a vendor location. The offsite vendor type
can be Media Operations, Iron Mountain, or Generic. The Contact Details field
is used to enter unique information about that vendor.
NOTE:
One vendor can be used by multiple sites. Each site must have at least one
account name unique to that vendor.
Configuring Media Operations56
Page 57

2. Use Vaulting Days check boxes to define the days the vendor will accept offsite
shipments. Vaulting days on this screen takes precedence over vaulting days set
in vaulting policies (see “Vaulting policies” on page 55).
Then, depending on the vendor type you selected, proceed as follows:
Media Operations Vendor
Enter:
• Unique vendor account ID
• Hostname of the system on which the offsite Media Operations system resides
• The password
Account ID and password must match a remote account on the offsite Media
Operations Server.
Iron Mountain Vendor
Enter:
• Account ID
• Hostname defining the system name of the Iron Mountain Server used to store
the offsite media
• FTP account name
• FTP password
• If the connection to your offsite Iron Mountain Server passes through a firewall, type the proxy settings for this connection.
Use the media link Filename Format if you need to provide FTP files to Iron
Mountain using the old MediaLink file name format. FTP contents are always in
SecureBase format, so this only affects the file name.
Generic Vendor
Enter a unique account ID. If the offsite vendor has the proprietary electronic
link interface, specify optional configuration settings.
User guide 57
Page 58

Figure 19 Vendor account definition—generic vendor
.
When configuring offsite accounts for a Generic vendor type, you can create
scripts to take information from Media Operations and convert it to the offsite
vendors electronic link protocol.
• Select the Enabled check box for Outgoing/Return Media command line
script if the vendor supports an interface to manage outgoing and returning
media. Type the script/utility command to link Media Operations to the
vendor.
• Select the Enabled check box for Status Verification command line script if
the vendor supports an interface to notify when previously submitted outgoing
and returning media jobs are complete. Type the script/utility command to
link Media Operations to the vendor.
• Select the Enabled check box for Audit Management command line script if
the vendor supports an interface to audit stored media. Type the script/utility
command to link Media Operations to the vendor.
• Select Disable Electronic Link Check to disable the check for an electronic
link interface to the offsite vendor account.
3. Click OK to complete the operation and return to Offsite Storage Vendor
Definition. Click OK when you finished adding offsite vendors to return to Site
Definition.
Configuring Media Operations58
Page 59

Users
The Users window defines site-level users. Top-level administrators are not listed as
they have full access to every site.
To edit or view an existing user, click Edit. To add a new user, click Add and perform
these steps:
1. Type the username, login name, and password for the new user. Select the
Change Password at Logon check box if you want the user to change the
password at the first logon.
NOTE:
The password has a maximum length of 10 characters.
Figure 20 Adding a user
.
Select the Top Level Administrator check box if the new user will be a top-level
administrator.
2. If the new user will not be a top-level administrator, assign a role for this user
by first clicking the Roles tab, and then clicking Add.
After you have finished, click Cancel to return to the Authorized User window,
and then OK to return to Site Definition.
For more information about users, refer to “Security management” on page 61.
User guide 59
Page 60

Remote accounts
The Remote Accounts window defines accounts used by other Media Operations
Servers that can store the media in this site. These accounts must match the vendor
account records on remote Server.
To view or edit an existing account, double-click it or click Edit. To add a new remote
account, click Add or Add Many. Type the remote account name and the password,
then verify the password.
Figure 21 Remote access account—info
.
After finishing, click OK to return to Site Definition.
Import data
The Import Data window allows you to perform bulk loads of configuration information
for data center grids, system grid locations, media locations, device definitions, and
manual media.
Figure 22 Site definition—import data
.
Configuring Media Operations60
Page 61

For field values for importing different information types, and for importing examples,
see “Bulk configuration file import” on page 154.
Deleting a site
If you delete a site, you also delete vaults, offsite vendor accounts, data centers, and
site-level user roles associated with that site. Any manually added backup objects
created within the site are deleted as well. Any backup objects automatically created
within the site by a Backup Manager specific to the site are either moved to another
site (if you specify one) or the Backup Manager is deleted with the site. If the Backup
Manager is not specific to the site (spread across multiple sites), its objects are moved
to another Backup Manager site.
When deleting a site, consider the following:
• You cannot delete a site unless you delete or move Backup Managers that use
the site (for example, Backup Managers that have the site as their home site).
• Sites that contain remote devices or systems (devices or systems on a Backup
Manager that have a home site in a different site) are automatically moved to the
home site of their Backup Manager, including copying vaulting policies and
premount job schedules.
• Manually created objects are deleted when the site is deleted. You receive a
warning before the deletion, so you can manually move manual pools, devices,
systems, backup specifications via Global Object Lists.
NOTE:
Modifying site details (name, description, address and so on) has no effect on Backup
Servers or objects.
Security management
Security management is based on user roles. There are two basic types of users:
• Product administrators and operators
• Remote accounts
You can access users from:
• Global Configuration Options -> Security Management or Users/Remote Accounts
tabs from Global Configurations Options -> Server Parameters. From these win-
User guide 61
Page 62

dows, you can view or create top-level administrators. You can also edit the initial
top-level administrator defined during the installation.
• The Users/Remote Accounts tabs of the Site Configuration window give you site-
level access to users for the current site. You cannot view or add top-level administrators from these tabs.
Product administrators and operators
NOTE:
A single user cannot have multiple roles for the same site but can have multiple roles
for different sites.
Product administrators include:
• Top-level administrators, who have permissions to:
• perform any operation for any site,
• access Global Configuration Options and Global Objects and make additions,
modifications, and deletions,
• create other top-level administrators,
• map unassigned devices to a site in a multi-site Backup Server configuration.
NOTE:
There must be at least one top-level administrator for a site.
• Site-level administrators, who have permissions to:
• perform site-level operations for a particular site,
• assign site-level, super operator-level, and operator-level administrator roles
for new/existing Media Operations users.
• Super operator-level administrators, who have permissions to perform site-level
daily Media Operations. These include:
• premount, vaulting, scratch bin maintenance, checkout request, exception list,
and mount request functions,
• modifying media-level vaulting policies,
• overriding media locations,
• manually adding new media into manual media pools,
Configuring Media Operations62
Page 63

• reassigning systems/devices between data centers in the same site.
Super operator-level administrators have read-only access to some site-level in-
formation but not to site-specific configuration options.
• Operator-level administrators, who can:
• perform site-level daily operations, including premount jobs, vaulting jobs,
scratch bin maintenance, checkout requests, exception list actions, and mount
requests,
• have read-only access to some site-level information.
Operator-level administrators do not have access to site-specific configuration
options.
Remote accounts
Remote accounts are users set up to give secure access to the current Media
Operations Server from another Media Operations Server. Another Media Operations
Server can link to this server electronically using the current server as an offsite vendor.
An offsite vendor account (configured with the name of the current Media Operations
Server, account ID, and password) on another server must match a remote user
account on the current server. This ensures that any external transit requests (requests
to use the current server as offsite storage and retrieve previously stored media)
received by this server are secure.
When creating the remote account, define the site to be used to store the media from
another server. The vaults configured on the designated site are used to store the
remote account media.
Each remote account has its own media pools created automatically when media
are received. A media pool is created for each different media type. For example,
if the remote account name is KLAXON, the pool for LTO media will be KLAXON-LTO.
This allows you to audit media you are currently storing.
You can view media pools information from global or site level for the site associated
with that account, or from Media/Pools tabs on the Remote Accounts window.
Configuring backup processes and objects
Media Operations deals with media lifecycle components (media, media pools,
backup specifications, devices, and systems) either controlled and automatically
created by Backup Managers, or media existing outside the Backup Manager.
User guide 63
Page 64

Automatic backup
Automatic backup processes and objects are configured through integration with
supported Backup Managers. Automatic copy processes (such as scheduled copy
jobs) and objects are configured through integration with those Backup Managers
that support copy operation.
NOTE:
Currently, the XML Gateway supports copy operation available on HP Data Protector
A.06.00, A.06.10, and A.06.11, and the Inline copy feature of Symantec NetBackup
6.0.
There are two ways of integrating with Backup Managers:
• Through XML Gateway, linking Media Operations directly with a supported
Backup Manager. This interface provides fast response time and does not require
any complex communication path setup. It runs over a standard HTTPS connection,
which normally passes through firewalls without any special configuration. XML
Gateway passes requests to Backup Managers and receives responses from them.
This allows it to initiate device actions (such as device scans, media initialization,
library load/eject of media) through the Backup Manager.
XML Gateway requires no configuration because Media Operations specifies the
Backup Manager to connect to and all required security parameters.
If XML Gateway supports remote connectivity, you can install it directly on the
Backup Manager, on the Media Operations Server, or on another server.
The following diagram shows the various deployment options for the XML Gateway
with a Media Operations Server managing media from multiple site locations
(each site with its own firewall).
Configuring Media Operations64
Page 65

Figure 23 Media Operations deployment options with Data Protector
.
NOTE:
Communication between XML Gateway and Data Protector does not normally
pass through firewalls, so XML Gateway running on the Media Operations Server
or another server can only communicate with a Backup Manager within the same
firewall zone. If XML Gateway and Data Protector Cell Manager are behind a
firewall, Media Operations Server must communicate with XML Gateway by
passing requests to XML Gateway via a Proxy Server (such as SOCKS).
NOTE:
Symantec NetBackup master server commands must be executed locally on the
master system. Therefore, XML Gateway must be installed on the Symantec
NetBackup master server system.
User guide 65
Page 66

• Through the XML file import interface, allowing integration with other types of
Backup Servers not supported by XML Gateway.
This file-import interface uses files formatted in HTTP/XML protocol, such as:
• Backup/Restore Device Information
• Media Pool Information
• Backup Specification Information
• Backup Manager Configuration Information
• Media Information
• Used Media Information
See “External interfaces” on page 143 for details.
NOTE:
Automatically created backup components cannot be deleted from Media Operations
while they still exist in the Backup Manager. Also, the attributes generated by the
Backup Manager cannot be edited.
Manual backup
You model the manual backup environment separately for each system (or its part,
such as directory or volume), so each has its own manually created backup
specification.
The manual backup flow consists of the following:
1. Create media resources:
a. Create a media pool using Global Objects -> Media Pools (top-level
administrators) or the site-level Media Pools list (site-level administrators).
Specify media characteristics of the pool: media type (such as LTO), media
compression type (such as LTO-1), and, optionally, barcode labelling policy.
b. Create media within the pool from the Media tab of the Media Pools
Add/Edit window. Created media acquire characteristics of their parent
media pool.
Configuring Media Operations66
Page 67

2. Configure a backup:
a. Create the system (if the system has not been created by a Backup Manager)
using Global Objects -> Systems (top-level administrators) or the site-level
Systems list (site-level administrators). Specify characteristics of the system,
such as data center and grid location (in the site to which the system is
assigned).
b. Create devices (if the devices have not been created by a Backup Manager)
from Global Objects -> Backup\Restore Devices (top-level administrators)
or the site-level Backup\Restore Devices list (site-level administrators).
Specify device properties, such as host system (manually created devices
can be associated with automatically created systems), media pool, and
device type. Device type must match a manual pool in the same site.
For SAN-connected devices that may be visible to multiple device hosts,
you can configure separate drives to represent different logical device views.
If there are multiple drives configured for a device, the device host is based
on the drive flagged as master.
c. Create a backup specification specifying the system, drives and media
pools, as well as media retention/protection period from Global Objects ->
Backup Specifications (top-level administrators) or the site-level Backup
Specifications list (site-level administrators).
When creating the backup specification from the site level, ensure the drives
associated with the specification are in the same site as the specification.
When creating the backup specification from the global level, the
specification site is set based on the first drive associated with the
specification. All drives thereafter must be from the same site. Pools
associated with the drives must be manual pools matching the drive media
type and located in the same site.
Implementing the backup process
A medium goes from being scratch to being used for backup. There are two ways
of managing this part of the manual media lifecycle:
• When editing manual media, click Mark as Used to specify date of use and the
relevant backup specification, and Mark as Scratch to force a used manual medium
to return to scratch status. This is done under the Vaulting tab on the Media win-
dow.
• Use the Reactive Mount command-line utility to create a reactive mount job
for a manual backup specification. When you mark the job as complete, selected
media are marked as used.
User guide 67
Page 68

NOTE:
Manual backup specifications are not supported by scheduled premount jobs.
Backup managers
Backup Managers control backup functions. Media Operations interacts with them
to track and provide media use in two ways:
• Via XML Gateway (available for supported Backup Managers)
• Via XML file import (Backup Manager type “Other”)
XML Gateway interface
Install XML Gateways before you configure Backup Manager. Consider your
environment carefully before deploying XML Gateway. See Figure 23 on page 65
for a representation of deployment options. XML Gateway can be installed on a
variety of server platforms, such as Windows, HP-UX, Linux, or Solaris.
For optimal Media Operations performance, install XML Gateway on each Backup
Manager System. If this causes Backup Manager performance issues, put XML
Gateway on other, preferably dedicated, servers. In this configuration, you can group
XML Gateways allowing Media Operations to dynamically balance the request load
and failover transparently to a working XML Gateway should an XML Gateway fail.
The failed XML Gateway is re-integrated in the group when it returns online.
Also, you can install XML Gateway on the Media Operations Server. This is
recommended only if the server is a multiprocessor system or for small configurations.
NOTE:
With NetBackup, the gateway should always be present on the Master server.
If you use HP Data Protector Manager-of-Managers (MoM) configuration and you
add a Backup Manager Server that is part of MoM, the Backup Manager and all
systems in its corresponding Media Management Database (MMDB) cluster are
added automatically. See “Manager-of-Managers configuration” on page 164 for
more information.
Configuring Media Operations68
Page 69

Monitoring XML Gateway
When you add a Backup Manager, a baseline synchronization runs, during which
any communications problems between XML Gateway and the Backup Manager are
noted on screen and/or in the log.
NOTE:
Errors occurring while parsing the XML received from XML Gateway are written to
alert logs. See “Viewing alerts” on page 128 for more information.
• To test synchronization or force an update, click Manually Synchronize under the
Polling tab on the Backup Manager window.
• To view a list of all previous communications from the Backup Server to XML
Gateway, click History. This shows whether the request from the Media Operations
Server has reached successfully. Use this to diagnose communications problems
between Media Operations Server and its XML Gateways.
• To monitor the XML Gateway job queue, click the XML Gateways tab on the
Server Parameters window. You can view active and pending jobs and cancel
pending jobs if needed.
Figure 24 Server parameters - XML Gateways
.
XML Gateway groups
If XML Gateway is installed elsewhere than on the Backup Manager, configure XML
Gateway groups. Create or edit XML Gateway groups from the Info tab on the
User guide 69
Page 70

Add/Edit Backup Manager window or the XML Gateways tab on Global Parameters
-> Server Parameters.
NOTE:
Add several XML Gateways to a group to activate load balancing and failover.
Media Operations can communicate with the XML Gateway group using proxy
settings defined for that group. Backup Manager, its XML Gateway, and the Media
Operations Server can then be in different networks separated by a firewall.
Media Operations supports the following proxy types:
• SOCKS4 basic
• SOCKS4 with username/password
• SOCKS5 with username/password
• HTTPS Web Proxy
These proxy parameters are used for all communications to the XML Gateway group.
TIP:
If you install XML Gateway on the Backup Manager and select
Use Backup Manager as XML Gateway, you need not create an XML Gateway
group. However, an XML Gateway group is required to support a proxy connection
from the Media Operations Server to XML Gateway.
Polling schedule
The polling schedule defines when configuration information needs to be extracted
from the Backup Manager through configured XML Gateways. You can create or
edit a polling schedule from the Polling tab on the Add/Edit Backup Manager window
if you have XML Gateway selected as the interface type.
The polling schedule is used to synchronize the Media Operations configuration with
the Backup Manager, so you need to tune the schedules to match your backup
processes.
Media Operations polls for four reports:
• Configuration Report containing the Backup Manager, media pools, devices,
and backup specific information. There must be at least one configuration report
defined in the Backup Server polling schedule.
Configuring Media Operations70
Page 71

• Device Scan scanning the media contents of all devices on the Backup Server. It
performs library barcode scans for every barcode-capable tape library on the
Backup Server and media scans on all standalone tape drives, library slots (except
cleaning slots) in non-barcode capable libraries, and slots containing “blank” or
“unknown” media in barcode-enabled libraries. Run this scan:
• before the premount calculation process starts (see the Info tab on the Global
Configuration -> Server Parameters window for this time), so it can accurately
determine the required scratch media and what media to unload,
• after premount jobs have finished, so that Backup Manager is aware of new
scratch media.
• Full Media Information, listing all media in a Cell Manager. At least one full media
information event must be defined in the Backup Server polling schedule.
• Incremental Media Information, listing all media in a Cell Manager used since
the last full or incremental media information event. This report includes usage
information on backup specifications that used the media. It allows Media Operations to associate media with backup specifications and the systems protected
by the specifications.
XML file import directory
If the Backup Manager type is Other and the XML Gateway group is set to None -
File Polling, the Backup Server definition includes a Polling tab for setting a unique
directory on the Data Protector Server. This directory is used for the XML File Import
interface for the specified Backup Server. Data Protector monitors this directory for
any new incoming files and imports each new file. It automatically updates the Data
Protector Database using information in the file.
To change the polling frequency, go to Global Configuration Options > Server
Parameters.
NOTE:
If the XML format of the incoming files is incorrect (for example, tag ordering in the
DTD is ignored by the external interface provider) or if the Backup Server name
encoded in incoming files does not match the defined Backup Server name for that
file-passing directory, the incoming file is ignored.
Errors occurring while parsing the XML are written to alert logs. See
“Viewing alerts” on page 128 for details.
User guide 71
Page 72

Adding backup managers
Launch Add Backup Manager Wizard from either the Add Site Wizard window or
Global Configuration Options -> Backup Managers, and proceed as follows:
1. Select the Backup Manager type.
2. Type the network name of the Backup Manager system. If this is different from
the primary network name of its host system (for example, if the host system has
multiple network interfaces), select the host system primary network name from
a list of current systems in Media Operations by clicking the Backup Manager
Host System arrow.
Select the operating system and locale of the backup manager.
Click Next.
3. If you have more than one site configured, specify the home site for the Backup
Manager. Otherwise, this step is skipped.
4. Specify security settings for connecting to the Backup Manager. You can also
enter the port number if you changed the default value.
Configuring Media Operations72
Page 73

5. Set scheduling options by checking the appropriate boxes.
Figure 25 Setting scheduling options
.
Scheduled events keep Media Operations in sync with the Backup Manager:
• Config Report collects clients on the Backup Manager, MMDB configuration,
media pools, devices, and backup specifications.
• Device Scan scans all devices to determine media loaded in them.
• Full Media retrieves all media from the Backup Manager.
• Incr Media retrieves all media modified in the past hour plus their usage in-
formation.
6. Check Enable Location Updates if you want requests to change a media location
in Media Operations to be automatically copied back to the Backup Manager
media location. Click Next.
User guide 73
Page 74

7. Select a radio button to indicate whether you will create a new XML Gateway
configuration or use an existing one.
Figure 26 XML Gateway
.
NOTE:
NetBackup gateway must always be present on the Master server. If you
are using Data Protector Manager-of-Managers (MoM) configuration, the
gateway must be present on the MoM server. See
“Manager-of-Managers configuration” on page 164 for more information.
If a user is using HP Data Protector as the backup manager and it runs in
a locale other than English, you must install the gateway on a system for
which the default encoding is same as the backup manager system.
8. If you are creating a new XML Gateway configuration, type the full network
name of the system the XML Gateway is running on. After clicking Next, you
are taken to Proxy Settings (if you selected Proxy Required) or to Save Backup
Manager.
9. Type details of the Proxy Server used to connect the Media Operations Server
and XML Gateway. Click Next.
10. Click Finish to save the Backup Manager and perform the initial configuration.
A window shows the configuration progress. When it completes, click OK.
What's next?
You have successfully configured a site and added a Backup Manager to it. To tune
the configuration further:
Configuring Media Operations74
Page 75

• Add additional vaulting policies to the site and apply them to pools, backup
specifications, or systems if you want a different policy from the default site-level
policy.
• Edit media pools and set the correct media compression. For example, an LTO
pool can contain LTO1 or LTO2 media. You need to set which one, so that premount jobs calculate the required media for this pool based on the correct media
capacity.
Editing a backup manager
To access a list of Backup Managers managed by the Storage Media Operations
Server, click Backup Managers under Global Configuration Options.
Figure 27 Backup managers
.
To view or edit an existing Backup Manager, double-click it or click Edit. Properties
for the selected Backup Manager are displayed.
Info
The Info tab displays the Backup Manager configuration information.
Select the primary network name of the host system running the Backup Manager. If
the Backup Manager does not appear in the drop-down list, either type it in the
Backup Manager Name field and select <Use Backup Manager Name> in the
drop-down list of host system, or add it manually under Global Objects -> Systems.
Select the Backup Manager type from the list of supported Backup Managers. If your
Backup Manager is not included, select Other to use the XML file import interface.
User guide 75
Page 76

Figure 28 Backup manager - info
.
If your Backup Manager is supported by XML Gateway, either install XML Gateway
onto the tape Backup Manager system or use the XML Gateway group to communicate
with the Backup Manager.
NOTE:
NetBackup gateway must always be present on the Master server.
Click Add to add a new XML Gateway group. If the Cell Manager has the XMLGW
installed but you will not use an XMLGW group, check the Use Backup Manager as
XML Gateway box. The drop-down list and Add buttons are disabled.
Type the name of the XML Gateway group made up of one or more XML Gateways.
Media Operations automatically load balances communications across all XML
Gateways in the group. Enter proxy settings and then click Add.
Type the hostname and click OK to return to the XML Gateway window. Click OK to
return to Backup Manager - Info.
Configuring Media Operations76
Page 77

Sites
The Sites tab shows the sites containing objects from a Backup Manager. Each Backup
Manager has a home site where its media and pools are located and where its
systems, devices, and backup specifications are placed by default if there is other
appropriate site to locate them (if the sites have DNS suffixes defined). When a
device or system associated with a Backup Manager is moved to another site, a list
of used sites is shown on the Backup Manager - Sites window.
Figure 29 Backup manager - sites
.
If you change the home site for a Backup Manager, all Backup Manager objects in
the original home site are moved to the new site. Any vaulting policies (plus any
associated offsite vendor accounts) and premount job schedules associated with
moved objects are automatically copied to the new site. If a policy exists in the new
home site that has the same name as the policy being copied but different rules, the
copied policy name is made unique by applying the original home site name to it.
This also applies to premount job schedules.
Polling
If the Backup Manager XML interface is set to one of the XML Gateway groups or to
Backup Manager as XML Gateway, the Backup Manager - Polling window is
displayed.
User guide 77
Page 78

Figure 30 Backup manager - polling
.
To synchronize configuration information from the Backup Manager (pools, media
devices, systems, and backup specifications) immediately, click Manually Synchronize.
Scheduled events are used to keep Media Operations in sync with the Backup
Manager:
• Config Report collects the clients on the Backup Manager, MMDB configuration,
media pools, devices, and backup specifications.
• Device Scan scans all devices to determine media loaded in them.
• Full Media retrieves all media from the Backup Manager.
• Incr Media retrieves all media modified in the past hour along with their usage
information.
If the Backup Manager type is Other, you need to configure a directory path for
Media Operations to import XML configuration files.
Deleting backup manager objects
You cannot delete Backup Manager objects (media, pools, devices, systems, and
backup specifications) from the Media Operations GUI, because they are
automatically synchronized with the Backup Manager. You can however delete
manually created objects.
Configuring Media Operations78
Page 79

A Backup Manager object is automatically deleted from Media Operations when it
is deleted from the Backup Manager. Media Operations detects deleted objects
during the Config Report and Full Media scheduled polling events, so there is a delay
between deleting the object in the Backup Manager and in Media Operations.
The following objects are not immediately deleted from Media Operations:
• Medium is not immediately deleted; instead it is set to pending delete and added
to a blank media vaulting job the next time vaulting jobs are created. The blank
media vaulting job retrieves the deleted medium from its current storage locations
and returns it back to the blank media bin for reuse or destruction. The medium
is fully deleted from Media Operations once it has been added to a blank media
vaulting job.
• Media pools containing the pending delete media are retained until the media
are fully deleted.
• If a medium is deleted from a Backup Manager and added to a blank media
vaulting job, and the vaulting job retrieves the deleted medium from another
Media Operations Server acting as an offsite vendor, the medium is automatically
deleted from the offsite server after it is retrieved.
• Backup specifications deleted from the Backup Manager are not deleted from
Media Operations if there are media present in the Backup Manager containing
backups from that backup specification. This allows you to locate media for a
checkout request based on the backup specification even though they are no
longer running in the Backup Manager. In this case, the backup specification is
shown as disabled in the Media Operations GUI.
Media Operations database backup
The Media Operations Server must be protected by backup against loss of database
information in a disaster.
Use the Media Operations Server console to configure and schedule backups of the
server database. See the server online help for instructions.
IMPORTANT:
The server backup process creates a copy of the server database files. HP strongly
recommended you include server backup files in your tape backup scheme.
User guide 79
Page 80

Tuning backup objects
This section discusses methods of optimizing backup objects performance.
Refining physical locations
Configuring data centers helps you optimize premount jobs. Premount jobs are faster
and more efficient if the premount walk-through is grouped in a logical order by
physical location (to use the shortest/quickest path from device to device).
By default, any system or device is placed in the default data center. You can change
the data center assignment if you have additional data centers in your site. Also, if
you created data center grid locations and assigned a system or device to the data
center, you can also specify its grid location.
Modify locations for systems and devices from Global Objects -> Backup/Restore
Devices, Global Objects -> Systems, or Backup/Restore Devices and Systems at the
site level.
If systems and devices are assigned to a Backup Manager, you can edit them from
Devices and Hosts tabs in the Edit Backup Manager window.
Finally, you can import system grid locations from the Import tab on the Site
Configuration window. Any devices attached to those systems automatically inherit
the host system grid location.
Refining media compressions
All devices and media have a media compression attribute (such as LTO-1 for a basic
LTO media type). By default, the smallest media compression is set in all automatically
created pools and devices.
NOTE:
The media compression attribute is essential when estimating scratch media needs
during premount jobs. Leaving a default attribute may result in overestimating the
number of media.
To modify compressions for pools, go to Global Objects -> Media Pools or Media
Pools at the site level. If pools are assigned to a Backup Manager, you can also edit
them from Pools in the Edit Backup Manager window.
Configuring Media Operations80
Page 81

To modify compressions for devices, go to Global Objects -> Backup/Restore Devices
or Backup/Restore Devices at the site level. You can not modify the compression of
a device if it belongs to any backup manager.
Adding and modifying media types
Media Operations contains a set of predefined media types and compressions for
most current tape technologies., which you may add to or modify.
If you add a new media type and you use a supported Backup Manager or XML File
Import interface, Media Operations automatically creates the basic media type. You
must also create compression types for the media. If the new media type does not
match an existing vault slot type, configure a new vault slot type using Global
Configuration Options -> Media Types and Compressions.
Defining media policies
There are three basic types of media policies:
• Media Vaulting Policies, defining how long a medium is retained in a device,
onsite and offsite vault locations.
• Scratch Media Policies, defining premount jobs that manage loading new scratch
media into backup/restore devices and removal of media to be vaulted from the
devices (based on the vaulting policies).
• Server Parameters, defining schedule settings that indicate when vaulting, scratch,
and premount jobs run.
Configuring media vaulting policies
Vaulting policies configured in each site are built on global vaulting policy templates.
You can deploy these policies in a site at various levels to control which media in
that site they affect.
If you modify a template, the changes immediately apply to every vaulting policy to
which the template was originally applied. This saves you modifying the policy
multiple times. Every vaulting policy template is defined in terms of:
• “Media vaulting policy hierarchy” on page 82
• “Basic vaulting policy concepts” on page 83
• “Vaulting templates” on page 83
• “Active vaulting policies” on page 84
• “Defining barcode labeling policies” on page 86
User guide 81
Page 82

Media vaulting policy hierarchy
• Default Site-Wide Vaulting Policy. When creating a new site, configure a default
vaulting policy for all new media pools created in that site using the Site Config-
uration window.
• Create onsite vaults or offsite vendor locations for use in the site-wide vaulting
policy before you apply this policy.
• If you modify a policy, you can apply the changes to any media pools that
use the old default policy. You can also apply the new policy to any media
in those media pools (by default, policy change only applies to new media).
• The site-wide vaulting policy cannot be deleted.
• Media Pools. Each pool has a vaulting policy that applies to all media in the pool.
This policy is configured in the Edit Media Pools window. If you modify a pool-
level vaulting policy, you can apply the changes to all media in that pool.
• Backup Specifications. You can define a vaulting policy that applies to a specific
backup specification (and all media used by that backup specification). Use this
to define vaulting policies for media that contain critical data (based on the
backup specification used to back up critical data) and require specific vaulting
policies. Configure this policy via the Edit Backup Specification window.
• Any policy set at this level overrides pool-level policies.
• If you modify a backup-level vaulting policy, you can apply the changes to
all media used by the backup specification.
• If a backup specification uses devices in multiple sites, you cannot set a backup-
level policy for that backup specification.
• Systems. Vaulting policies that apply to a system (and all media used by the
backup specifications that reference that system) are configured via the Edit Sys-
tems window.
• A policy set at this level overrides backup-level and pool-level policies.
• If you modify a system-level vaulting policy, you can apply this change to all
media associated with that system.
• Vaulting Policies for Copy Media. For any media belonging to Backup Managers
that support copy operations (such as Data Protector A.06.00, A.06.10, and
A.06.11), you can define different vaulting policies (at site, pool, backup specification, and system levels of the policy hierarchy).
For example, in pool AB_PROD, you can set Policy1 as the primary policy for
that pool, and Policy2 as the policy for copy media. Media used for backups
then have Policy1, and copy media have Policy2. If you do not define a
copy policy to an object in the hierarchy, the primary policy is applied to copies.
Configuring Media Operations82
Page 83

• Vaulting Policies for Consolidation Media. For any media belonging to Backup
Managers that support consolidation operations (such as Data Protector A.06.11),
you can define different vaulting policies (at site, pool, backup specification, and
system levels of the policy hierarchy).
For example, in pool AB_PROD, you can set Policy1 as the primary policy for
that pool, and Policy2 as the policy for consolidation media. Media used for
backups then have Policy1, and consolidation media have Policy2. If you
do not define a consolidation policy to an object in the hierarchy, the primary
policy is applied to consolidations.
• Single Pieces of Medium. In the Edit Media window, you can override the vaulting
policy set by the hierarchy. While that override is in place, media are protected
from any policy changes.
Basic vaulting policy concepts
Vaulting policies consist of a series of vaulting cycles. Each cycle defines when and
where to move used media. Vaulting cycles then combine in a time-based scheme
controlling media progress through scheduled vaulting locations.
Typical vaulting locations include a vault in the media home site, a vault in another
site on the same server, or an offsite vendor location. Select a location based on
how secure and protected against a disaster media should be and how quickly you
may need to retrieve them.
Vaulting templates
Media Operations uses templates as a framework for creating active vaulting policies
in each site. Templates define one or more vaulting cycles, but locations inside each
cycle are not final because these are site-specific. For example, a vaulting cycle in
a template that defines the media to be moved to an offsite vendor does not have
the offsite vendor and account defined because these are different for each site.
The following vaulting templates are pre-defined:
• No Vaulting, Low Media Security: Medium stays in the device until it is scratched.
• Onsite Vaulting, Low Media Security: Medium stays in the device for seven days
and is also kept in an onsite vault until it expires.
• Onsite Vaulting, Medium Media Security: Medium is not retained in the device.
It is kept in an onsite vault until it expires.
• Fast Recovery Access, Low Media Security: Medium is retained in the device and
in an onsite vault for seven days. It is kept in an offsite vault until it expires.
User guide 83
Page 84

• Medium Recovery Access, Medium Media Security: Medium is not retained in the
device. It is kept in an onsite vault for seven days and in an offsite vault until it
expires.
• Slow Recovery Access, High Media Security: Medium is not retained in the device
nor in an onsite vault. It is kept in an offsite vault until it expires.
You can modify pre-defined or create your own templates using Global Objects ->
Vaulting Templates.
Active vaulting policies
To apply an active policy, first add it to the site using Add/Edit Pools, Add/Edit
Backup Specs, or Add/Edit Systems, or through the Vaulting Policies tab on the Site
Configuration window.
Adding a Policy
1. Choose a policy name and a template.
Configuring Media Operations84
Page 85

2. Edit the vaulting cycles to complete their configuration:
a. If the vaulting policy destination is an offsite vendor, choose the offsite
vendor and offsite vendor accounts.
b. If the vaulting policy destination is a vault, leave it at the default destination
or specify another site on your Media Operations Server.
c. Optionally, alter Day Number, representing the number of days before you
move your policy to destination in this vaulting cycle.
d. If the No Later Than day number is zero, but your backup jobs straddle two
days, vaulting job service level agreements (SLAs) may not be achievable
(for example, media are only available from the backup after the shipment
for the offsite vendor). In this case, set Day Number to 2 and use No Later
Than to keep in compliance with SLA.
This option allows some flexibility: for example, if media are not available
in time for the first day's shipment to the destination vault, they can be
manually checked into the onsite vault by clicking Manual Vaulting. When
the next day's vaulting job is created, it automatically asks you to move the
media from the onsite vault to the destination. The Optional tab on the
Vaulting Job Confirmation window lists all media not yet sent to their
destination, which are within their No Later Than window.
e. If the Vault When Full day number is set to zero, but your backup job is
configured to append the current day’s incremental backups to the previous
day’s incremental media, the appending scheme will not work, because
the media will be vaulted immediately after backups. In this case, set Vault
When Full, which will vault the media when they have reached their vaulting
day if the media contain a full backup or the media are physically full. For
example, if you set Day Number to five and enable Vault When Full,
incremental media remain in the device until they are full or more than five
days old. The Optional tab on the Vaulting Job Confirmation window lists
all media not yet sent to their destination, with the Vault When Full policy
enabled and having become full since the vaulting job was created.
f. Use Container Storage to enforce container-based media movements when
moving media to and from offsite locations (if your offsite vendor requires
you to send media in locked containers). You can create container objects
using the global or site-level Media Containers list by clicking Add. You can
also create containers in your media movement jobs (vaulting, scratch bin,
and checkout request jobs).
g. Use Vaulting Days to define which days to ship media to their destination
location.
User guide 85
Page 86

Selecting a Policy
IMPORTANT:
If multiple vaulting policies are applied at the same level (such as backupspec, or
system), the recently created vaulting policy is applied to the qualified media.
After adding the policy, select it from the Vaulting Policy list for the object to which
the policy needs to be applied.
If the new policy changes the object from a previous policy, the change is implemented
only when you save it by clicking OK. If there are media associated with the old
vaulting policy, you are prompted to apply the policy to existing and new media, or
to new media only.
Viewing a Policy
Backup objects list the vaulting policies currently configured for them. You can edit
the policy and view the information listed under Pools, Systems, Backup Specs, and
Media tabs.
Defining barcode labeling policies
If you print your own barcode labels, you can define barcode labeling policies to
improve identification of media from different media pools. Edit Media Pools ->
Barcode Policies allows you to define a barcode labeling scheme for a specific media
pool.
Barcode Labeling allows you to set a prefix code and number range for a barcode
string from 6-9 characters (default: 6). You can set a character prefix (up to “barcode
length -1”), a number range (barcode length minus prefix length), and a suffix
representing the compression of the media type. How many prefix characters you
use depends on how many pieces of medium you expect to label in the selected
media pool (or group of pools). The number range can be defined as Barcode
Labeling, Mixed Numeric/Characters, and Extended Numeric.
Example
You can set a 6-character barcode policy for media pool DATABASE to have a DB
prefix and to be numbered as Number Only from 0000-9999.
You could add to this a suffix such as L1 for LTO-Ultrium type tapes.
Configuring Media Operations86
Page 87

Printing barcodes
If you have a supported barcode printer attached to the Media Operations Manager,
you can print a range of barcodes from Barcode Policies and reprint a single barcode
from Edit Media. Additionally, you can save the list of barcodes to a file (from Barcode
Policy) for easy export to the third-party barcode label printing software.
When new barcode labels are printed for a specific media pool or free pool group,
they comply with the barcode labeling policy for that media pool and start new labels
from the next available number.
Configuring scratch media policies
Scratch media policies are based on premount jobs, which calculate the number of
scratch media required in a device and the time needed for a specified backup job.
You can define a single default premount job, which calculates how many scratch
media are needed in every device for all backup jobs in a site or multiple custom
premount jobs, to split your scratch media operations across multiple sets of backup
jobs. Premount jobs to load scratch media into devices are used to dismount media
from those devices for vaulting.
To edit scratch bin schedules, go to Global Objects -> Scratch bin schedules or Scratch
bin levels at site level.
Configuring premount jobs
Every premount job defined in the Media Operations Server is specific to a single
site and has a set of backup/copy/consolidation specifications assigned to it. Every
automatic backup/copy/consolidation specification in a site is assigned to a premount
job in the same site; you cannot assign a specification to multiple premount jobs in
the same site.
To edit/add premount job schedules, go to Global Objects -> Premount Schedules
or Premount Schedules at the site level.
To assign backup specifications to premount jobs, go to Edit Backup Specifications;
to assign copy/consolidation specifications to premount jobs, go to Edit
Copy/Consolidation Specifications. You can also bulk assign multiple backup
specifications to a specific premount schedule by clicking Assign to Premount on the
Backup Specifications window. You can bulk assign multiple copy/consolidation
specifications to a specific premount schedule by clicking Assign to Premount on the
Copy/Consolidations Specifications window.
User guide 87
Page 88

NOTE:
Media Operations does not support manually created backup specifications in
premount jobs. You can either mark manual media as used or scratched through
Edit Media, or use reactive mount jobs.
Premount jobs manage scratch premount processes for every
backup/copy/consolidation specification assigned to them. Premount processes are
arranged around backup/copy/consolidation specification objects (rather than
devices), because a backup/copy/consolidation job can use multiple tape libraries
or standalone drives that need the appropriate scratch media loaded before the job
starts. Otherwise, the job fails.
Each site has a default premount job that cannot be deleted, to which all
backup/copy/consolidation specifications in the site are assigned. You can create
additional premount jobs to segment the scratch media load across data centers or
times of day.
Each premount job has a schedule that applies to all backup/copy/consolidation
specifications assigned to that job. The schedule specifies when to run mount and
dismount, as well as start, warning, and due times. You can configure a premount
job to dismount media to be vaulted from devices even if there are no mount
operations on that day.
Tuning scratch media levels
Media Operations automatically calculates required scratch media levels for each
premount job, based on backup specification schedules, backup sizes, and media
compressions defined for the pools in the backup specification. If the Backup Manager
does not provide history, you can set the schedule manually together with average
backup sizes. These values are overwritten if the Backup Server starts to provide
historical average size data.
You can optimize scratch media levels by editing the backup specifications and,
under the Drives tab, configuring the percentage allocation of scratch media for each
drive in the specification. Normally, scratch media are distributed equally across all
drives (for example, if there are two drives, each gets 50 percent). However, if your
backup jobs consistently require more media than the premount job is providing (for
example, if the rate of data growth outstrips the historical data), you can adjust
allocation numbers. You can also adjust the balance across multiple libraries within
the same backup specification.
Configuring Media Operations88
Page 89

Reactive mount requests
An ad hoc mount request is triggered by a Media Operations utility (using a
command-line program). These jobs react to an unforeseen demand for backup media
by loading scratch media into a specified drive. See “External interfaces” on page
143 for details.
Server parameters
The Server Parameters window allows you to tune start times of daily Media
Operations, define how much audit history is retained in your database, and define
maximum numbers for scheduled Backup Manager synchronization jobs.
Figure 31 Server parameters - info
.
Under the Info tab, you can adjust the following values:
• Default Vaulting Job Start—the time when the vaulting job is performed.
Click the Start Now button to start the job immediately.
User guide 89
Page 90

Disable check box: In this and the next three parameters, check the disable boxes
to prevents jobs starting by default.
• Default Premount Job Start—the time when the premount job is performed (when
the contents of the days premounts is calculated).
• Default Scratch Job Start—the time when the scratch job is performed.
• Daily Metrics Start—the time when activity metrics are performed.
• Additional Scratch Buffer—the additional scratch buffer percentage defining a
global adjustment to all premount job calculations.
• Consolidate Scratch Bin Jobs—whether scratch bin media jobs consolidate all
sources of scratch media to be returned to a site into a single job (option checked),
or whether each source of scratch media has its own scratch bin job.
• XML Gateway Job History Retention Period (Days)—how long entries in the XML
Gateway job history log are retained, from 1–180 days.
• Media Job History Retention Period (Days)—how long entries in the media transit
job history log are retained, from 1 to 730 days.
• Min Media Audit History Movements—the minimum number of media movements
to be retained in the media audit history.
• Alert Log Retention Period (Days)—how long entries in the alert history log are
retained, from 1–180 days.
• File Polling Frequency (Mins)—the frequency of checking for new files (in minutes).
• Max Debug Log Size (MB)—the level of message to be entered into the debug
log.
• Debug Log Level—select All for all messages, Warning for all except normal
messages, Serious for serious and critical messages, and Critical for only critical
messages.
• Maximum Concurrent XML Gateway Requests (5-30)—the maximum number of
XMLGW report jobs (such as config info, media info) that can run concurrently,
and the maximum number of XMLGW device jobs (such as device scans) that
can run concurrently.
• Exclude all Backup Specs with Names that Start with—for filtering backup spe-
cifications.
• Maximum Blank Media Scan jobs per device—the maximum number of blank
media scan jobs that can run concurrently.
• Enable Holiday List—if enabled, the holiday list prevents Media Operations from
starting jobs on holidays. For more information about holiday lists, see
“Holiday list configuration” on page 164.
Configuring Media Operations90
Page 91

Vaulting jobs
The vaulting job start time defines when vaulting jobs are created across all sites in
the Media Operations Server. This is also the start time on which SLA measurements
are based.
Scratch bin maintenance
The scratch bin start time defines when scratch bin and scratch initialization jobs are
created across all sites in the Media Operations Server. This is also the start time on
which SLA measurements are based.
Premount jobs
The premount start time defines when premount jobs are processed and created
across all sites in the Media Operations Server. The job creation time is not the start
time; the SLA measurements are based on the defined start time for each premount
job schedule.
When scheduling and optimizing premount jobs, ensure that:
• Start times in the premount schedule are after the premount processing start time.
• The device scan, if any, scheduled before the premount, runs before the premount
processing start time (so that the scan happens before premount needs are calculated).
Audit history
You can adjust the following settings for the audit history:
• How long entries in the XML Gateway job history log are retained (1–180 days)
• How long entries in the media transit job history log are retained (1–730 days)
• How long entries in the alert history log are retained (1–180 days)
• The minimum number of media movements to be retained in the media audit
history.
Setting up offsite transfer of media
To transfer media offsite using Media Operations, you need to set up both the
receiving server (server A) and the sending server (server B):
User guide 91
Page 92

Setting up the receiving server
1. Create a new site on server A.
2. For the vaulting policy template, select Onsite Vaulting, Medium Security.
3. Edit the first policy cycle entry on the vaulting cycle and click the Add Vault
button.
4. Type a name for the vault.
5. Select the Layout tab and click Auto-Create Layout.
6. In the Starting Slot and Ending Slot fields, type valid numbers depending on
your site layout.
7. Select the correct media slot type and click Create.
8. When the site has been created, edit it and click the Remote Accounts tab.
9. Click Add to add a new remote account.
10. Type in a valid username and password. Remember these because you will
need them when you configure the second server.
Setting up the sending server
1. Create a new site on server B.
2. For the vaulting policy template select Slow Recovery Access, High Security.
3. Edit the first policy cycle entry on the vaulting cycle and click the Add On Site
Vendor button.
4. Type a name for the new vendor.
5. Add a new offsite vendor account.
6. In the account ID field enter the account username you specified on the receiving
server (server A).
7. In the Hostname field, enter the TCP/IP hostname of the receiving server.
8. In the account password field, enter the password you specified on the receiving
server.
9. Perform a backup on a backup server to create some protected media that will
need to be vaulted.
10. Add the backup server to this site.
Configuring Media Operations92
Page 93

11. After the polling is done for the backup server, open the Server Parameters
window.
This should trigger communication between the two servers. The vaulting job will
show up on the receiving server and should work in a similar fashion to onsite vaulting
jobs.
NOTE:
Even after the media is confirmed on the source server and the job is
Marked as Complete, the job remains open. A vaulting job gets created automatically
on the destination server. The media then needs to be vaulted on the destination site
and the job should be marked as complete at the destination. Once this is done, the
job is automatically closed in the source site as well.
User guide 93
Page 94

Configuring Media Operations94
Page 95

4 Performing daily Media Operations
Overview
NOTE:
To perform daily Media Operations for a particular site, you must have appropriate
user rights.
This chapter describes the following:
• “Running jobs through the CLI” on page 95
• “Job status indicators” on page 97
• “Premount jobs” on page 97
• “Vaulting jobs” on page 101
• “Scratch media jobs” on page 107
• “Checkout requests” on page 116
• “Exceptions” on page 119
• “Mount requests” on page 120
• “Manual vaulting jobs” on page 121
• “Viewing job history” on page 122
• “Web interface” on page 123
Running jobs through the CLI
The daily operation of Media Operations can be started using startjob on the
command line interface (CLI).
startjob is a java-based command-line utility that starts Media Operations jobs
from any client system. The utility can be used to start any premount, vaulting, scratch
bin or daily metrics job.
User guide 95
Page 96

To start the utility, you can use startjob.bat, available in the
<MediaOperations_install_dir>\MediaOps\Client and the
<MediaOperations_install_dir>\MediaOps\DBServer folders.
By default, the installation directory is c:\Program Files\Hewlett-Packard\
DataMgt.
Syntax:
startjob servername username password jobname
Parameters:
Name of the Media Operations Server on which the job is to be started.servername
Valid username for the Media Operations Server.username
Valid password for the Media Operations Server.password
Name of the job to be started on the Media Operations Server. Valid
job names are:
jobname
Vault
nl
Premount
nl
Scratch
nl
DailyMetrics
Example:
startjob server.india.hp.com foobar foobar Vault
NOTE:
The startjob utility only triggers the command to start the job. The actual starting
of the job depends completely on the policy set for individual jobs on the Media
Operations Server.
To run the utility on a system on which only the Media Operations client is installed,
Java (v.1.2 or higher) must be installed.
On the Media Operations Server installation, the utility uses the Java runtime
environment available by default in the DMComms module.
Performing daily Media Operations96
Page 97

Job status indicators
Status indicators show the overall vaulting status (green - OK, yellow - warning, red
- critical) and the status for each job category based on SLA status settings for each
active job in that category. For example, if one job in a category are red while all
others are green, the whole category is marked red.
Figure 32 Job status indicators
.
Premount jobs
NOTE:
Media Operations does not support daily premount jobs on file devices, RISS devices,
Virtual Tape Library (VTL) and file libraries.
Premount jobs preload scratch media into backup devices to minimize the number
of media used and prevent mount requests with scheduled backup jobs. A job:
• Retrieves sufficient scratch media from the scratch bin,
• Confirms that the media are scratch and of good quality,
• Loads the media into the assigned devices,
• Dismounts media, needed for daily vaulting jobs, from the devices.
Mount and dismount listings are ordered in the defined data center grid key for the
device. This enables you to make a single pass per job, and not search for devices
in the data center or on mount/dismount lists.
User guide 97
Page 98

Figure 33 Scratch media movement
.
Viewing Premount Jobs:
To view a list of active premount jobs, double-click Premount Jobs on the Daily
Operations menu on the shortcut bar. Double-click a job or click Edit to get the
premount job properties.
Displays the total number of media required from each scratch
bin to complete the mount process.
Figure 34 Premount job - scratch listing
.
Scratch Listing tab
Performing daily Media Operations98
Page 99

Assigns scratch media to the specified device in the grid ordering
for the data center. The process also confirms that the media
entered are scratch and of good quality.
To verify the medium, either barcode scan or type a medium
description, and click Verify. To skip the medium, click Skip.
Confirm (by clicking Verify or Skip) all required scratch media
before clicking Mark As Complete.
NOTE:
Click Print Unknown Media to print a list of all unknown,
foreign and blank media.
Poor quality media cannot be used for confirming Scratch
Bin jobs.
Confirmation tab
Displays devices requiring media, the type and quantity of media.Mount Listing tab
Displays the media that need to be removed and placed into the
holding bin for manual checking, or for that current day’s vaulting
jobs.
Dismount Listing tab
Moves the media into/out of the cartridge access port (CAP) for
library devices in the mount/dismount lists.
To run the mount cycle, click Run Mount Cycle (note that this
functionality is not supported for GRAU and DAS devices with
this release). The first time, only a dismount cycle is performed
(which uploads the CAP with the number of media listed on
Premount Job - Dismount Listing). This dismount cycle unloads
from all libraries listed on Premount Job - Load/Eject Media. After
the dismount verification, removed media are marked off. The
second and subsequent cycles involve selecting the libraries from
the list that had their CAPs replaced with scratch media. The
cycle then loads the contents of the CAP, verifies the media
loaded, and ejects any additional dismount media until the CAP
is either full or all dismount media are removed.
Load/Eject Media tab
Silo-type libraries
NOTE:
Run Mount Cycle functionality is not supported for GRAU and DAS devices with this
release.
User guide 99
Page 100

When performing load/eject operations for silo-type libraries (such as ACSLS or
DAS), consider the following:
• When you click Run Mount Cycle for the first time , silo libraries eject all media
listed on Premount Job - Dismount Listing during this first cycle (on non-silo libraries, it only ejects one CAP’s worth of media). To eject the media from a silo library:
1. Wait for the CAP to be filled and unlocked. Open the CAP and remove all
media from it.
2. Close the CAP. Note that on some silo libraries, you must totally empty the
CAP before closing it, otherwise the library will not register that the CAP has
been emptied and will not proceed.
3. If there are more media to be ejected, repeat this sequence.
• You cannot put scratch media into the silo CAP until after you have clicked Run
Mount Cycle for the second and any subsequent times. Therefore, after performing
the initial eject cycle, proceed as follows:
1. Select the silo library from Premount Job - Load/Eject Media. Click Run Mount
Cycle.
2. Go to the silo library and wait for the CAP to unlock. Open the CAP and
load the required scratch media into it.
3. Close the CAP. The load starts.
4. After all media in the CAP are loaded, any media to be dismounted are
automatically unloaded into the CAP. This occurs only if there has been a
problem in the first mount cycle.
5. Wait for the unload to complete and the CAP to unlock. Open the CAP and
remove media from it.
6. Close the CAP to complete the load/eject cycle.
Free/scratch pool handling
A free/scratch pool is an auxiliary source of media when there are no scratch media
available in the regular pool. If a media pool, required for a premount job, is able
to use media from a dedicated free/scratch pool, you can select the scratch media
from either regular or free/scratch pool.
Performing daily Media Operations100
 Loading...