

Page 1

HP StoreOnce
D2D Backup System rack models
nl
service and maintenance guide
Abstract
This guide is intended for users who maintain the following rack-mounted models of the HP StoreOnce D2D Backup System:
• HP D2D4324 G2 (12–disk)
• HP D2D4312 G2 (12–disk)
• HP D2D4112 and HP D2D4106 G2 (12–disk)
• HP D2D2502 and 2504 G2 (4–disk)
• HP D2D4112 G1 (12–disk)
• HP D2D4004 G1 (6–disk)
• HP D2D4009 G1 (12–disk)
• HP D2D2502, 2503 and 2504 G1 (4–disk)
The architecture of these D2D Backup Systems is based upon established HP ProLiant and HP Smart Array RAID controller
products, which have their own user and service and maintenance guides. This document provides information on only those
aspects that are not covered in the existing guides.
Please note that there is a separate document for Gen2E products that were introduced after March 2012. This document is
called: HP StoreOnce D2D Backup System maintenance and service guide Addendum for Gen2E models.
HP Part Number: EH985-90937
Published: April 2012
Edition: Sixth
Page 2

© Copyright 2009–2012 Hewlett-Packard Development Company, L.P.
Confidential computer software. Valid license from HP required for possession, use or copying. Consistent with FAR 12.211 and 12.212, Commercial
Computer Software, Computer Software Documentation, and Technical Data for Commercial Items are licensed to the U.S. Government under
vendor's standard commercial license.
The information contained herein is subject to change without notice. The only warranties for HP products and services are set forth in the express
warranty statements accompanying such products and services. Nothing herein should be construed as constituting an additional warranty. HP shall
not be liable for technical or editorial errors or omissions contained herein.
Microsoft, Windows, Windows NT, and Windows XP are U.S. registered trademarks of Microsoft Corporation.
Page 3

Contents
1 Introduction...............................................................................................5
Performance best practices.........................................................................................................5
HP D2D and HP ProLiant...........................................................................................................5
How do I tell whether I have a G1 or G2 product?...................................................................6
Using the ProLiant Guide with HP D2D4324 G2 models...........................................................7
Using the ProLiant Guide with HP D2D4312 G2 models............................................................8
Using the ProLiant Guide with HP D2D4106/4112 G2 models....................................................9
Using the ProLiant Guide with HP D2D2502/2504 G2 models..................................................9
Using the ProLiant Guide with HP D2D4112 G1 models...........................................................10
Using the ProLiant Guide with HP D2D4004 and 4009 G1 models..........................................11
Using the ProLiant Guide with HP D2D2502 G1 models ........................................................12
Using the ProLiant Guide with HP D2D2503 G1 models.........................................................13
Using the ProLiant Guide with HP D2D2504 G1 models.........................................................14
POST messages and troubleshooting.........................................................................................14
Tasks that are unique to the HP D2D.........................................................................................14
Software upgrades.................................................................................................................14
2 The flash memory module..........................................................................15
Overview..............................................................................................................................15
Part number......................................................................................................................15
Identifying a flash memory module failure..................................................................................15
Troubleshooting procedure..................................................................................................15
Replacing the memory module, G2 HP D2D Backup Systems only.................................................15
Replacing the memory module, G1 HP D2D Backup Systems........................................................17
3 Replacing the system motherboard .............................................................19
Motherboard part numbers......................................................................................................19
Before replacing the motherboard— a note about licenses...........................................................19
iLO2 licenses.....................................................................................................................19
SAAP licence (HP D2D4324 and D2D4312)..........................................................................19
J27 settings (HP D2D4106/4112 G2 and HP D2D2502/2504 G2)...............................................20
After replacing the motherboard...............................................................................................21
G2 products......................................................................................................................21
G1 products......................................................................................................................22
4 Battery/Flash Backed Write Cache (BBWC or FBWC) module failures.............23
Part numbers..........................................................................................................................23
Identifying the battery/flash capacitor module failure..................................................................23
HP D2D4324, D2D4312, D2D4106 and D2D4112.................................................................23
HP D2D4004,/4009 and D2D2502/3/4 G1 and G2..........................................................24
Replacing the battery/flash capacitor module............................................................................24
Battery/flash capacitor module location................................................................................24
HP D2D4324...............................................................................................................24
HP D2D4312................................................................................................................25
HP D2D4106/4112 G2..................................................................................................25
HP D2D2502/2504 G2................................................................................................26
HP D2D4004/4009 and HP D2D2502/3/4 G1.............................................................26
HP D2D4112 G1...........................................................................................................27
Procedure.........................................................................................................................27
5 The HP SmartArray P410i and P812/P411 RAID controllers and HP SAS
expander card (HP D2D4324 and 4312)........................................................29
Overview..............................................................................................................................29
Contents 3
Page 4

HP D2D4324....................................................................................................................29
HP D2D4312.....................................................................................................................29
Part numbers.....................................................................................................................30
Identifying a RAID contoller failure............................................................................................30
Before replacing a RAID controller — a note about licenses.........................................................30
P410i controller failure (HP D2D4324 and D2D4312)..................................................................31
P411 controller failure (HP D2D4312).........................................................................................31
P812 controller failure (HP D2D4324)........................................................................................32
HP SAS expander card (HP D2D4324 and D2D4312).................................................................32
6 The HP SmartArray P212 RAID controller (HP D2D2502 G2, 2504 G2, 4106
G2, 4112 G2).............................................................................................34
Overview..............................................................................................................................34
Part numbers.....................................................................................................................34
Identifying a RAID contoller failure............................................................................................34
Before replacing a RAID controller — a note about licenses.........................................................35
Replacing the HP Smart Array P212 controller.............................................................................35
7 The HP SmartArray P400 RAID controller (D2D4004/4009/2500 G1)...........37
Overview..............................................................................................................................37
Part numbers.....................................................................................................................37
P400 controller failure.............................................................................................................38
Identifying a P400 card failure............................................................................................38
Replacing the HP Smart Array P400 controller............................................................................38
8 The HP SmartArray P800 RAID controller (HP D2D4112 G1 only)....................40
Overview..............................................................................................................................40
Part numbers.....................................................................................................................40
P800 controller failure.............................................................................................................40
Identifying a P800 card failure............................................................................................40
Replacing the HP Smart Array P800 controller............................................................................41
Support and other resources.........................................................................42
Related documentation............................................................................................................42
Document conventions and symbols..........................................................................................42
HP technical support...............................................................................................................43
Customer self repair................................................................................................................43
Subscription service................................................................................................................43
HP websites...........................................................................................................................43
Documentation feedback.........................................................................................................43
4 Contents
Page 5

1 Introduction
This is the Service and Maintenance Guide for the following rack-mounted models of the HP D2D
Backup System:
G2 models:
• HP D2D4324 G2 (12–disk)
• HP D2D4312 G2 (12–disk)
• HP D2D4112 and HP D2D4106 G2 (12–disk)
• HP D2D2502 and HP D2D2504 G2 (4–disk)
G1 models:
• HP D2D4112 (12–disk)
• HP D2D4004 (6–disk)
• HP D2D4009 (12–disk)
• HP D2D2500 series (4–disk)
The hardware for the HP D2D4324, the HP D2D4312/4112 and the HP D2D4106 Capacity
Upgrade Kits are not described in this guide. Further information about these kits can be found in
the Installation Instructions supplied with the kit.
NOTE: The tower or desktop version of the HP D2D Backup System uses a different system
architecture and has a different service and maintenance model. It is not described in this guide.
Performance best practices
HP recommends that you review the Best Practices for Perfomance Optimization White Paper,
describing simple steps that can be performed to ensure that your HP D2D Backup System is
optimized as efficiently as possible.
You can view this white paper from http://www.hp.com/support/manuals. Search for "D2D" and
your specific product. The white papers are shown under the 'White paper' section.
HP D2D and HP ProLiant
The information in the appropriate ProLiant Maintenance and Service Guide should be the primary
reference source for hardware issues on the related D2D Backup System. Spare part numbers are
available in the ProLiant guides. This guide contains only information that is not included in the
ProLiant documentation.
Table 1 Identifying the correct server guide
G2 products
HP ProLiant serverHP D2D Backup System
HP ProLiant DL370 G6 serverHP D2D4324/4312 G2 Backup System
HP ProLiant DL180se G6 serverHP D2D4106/4112 G2 Backup System
HP ProLiant DL160se G6 serverHP D2D2502/2504 G2 Backup System
G1 products
HP ProLiant DL185 G5 serverHP D2D4112 G1 Backup System
HP ProLiant DL185 G5 serverHP D2D4004/4009 G1 Backup Systems
HP ProLiant DL165 G5 serverHP D2D2502/2503/2504 G1 Backup Systems
Performance best practices 5
Page 6
NOTE: The software and, in some cases, the BIOS are unique to the HP D2D Backup System; it
does not use the same software (nor, in some cases, BIOS) as the ProLiant server.
There are a number of ways of accessing the ProLiant documentation on the HP web. A quick
method is to:
1. Go to http://www.hp.com/support/manuals.
2. Search on the ProLiant server name, as shown in Table 1.
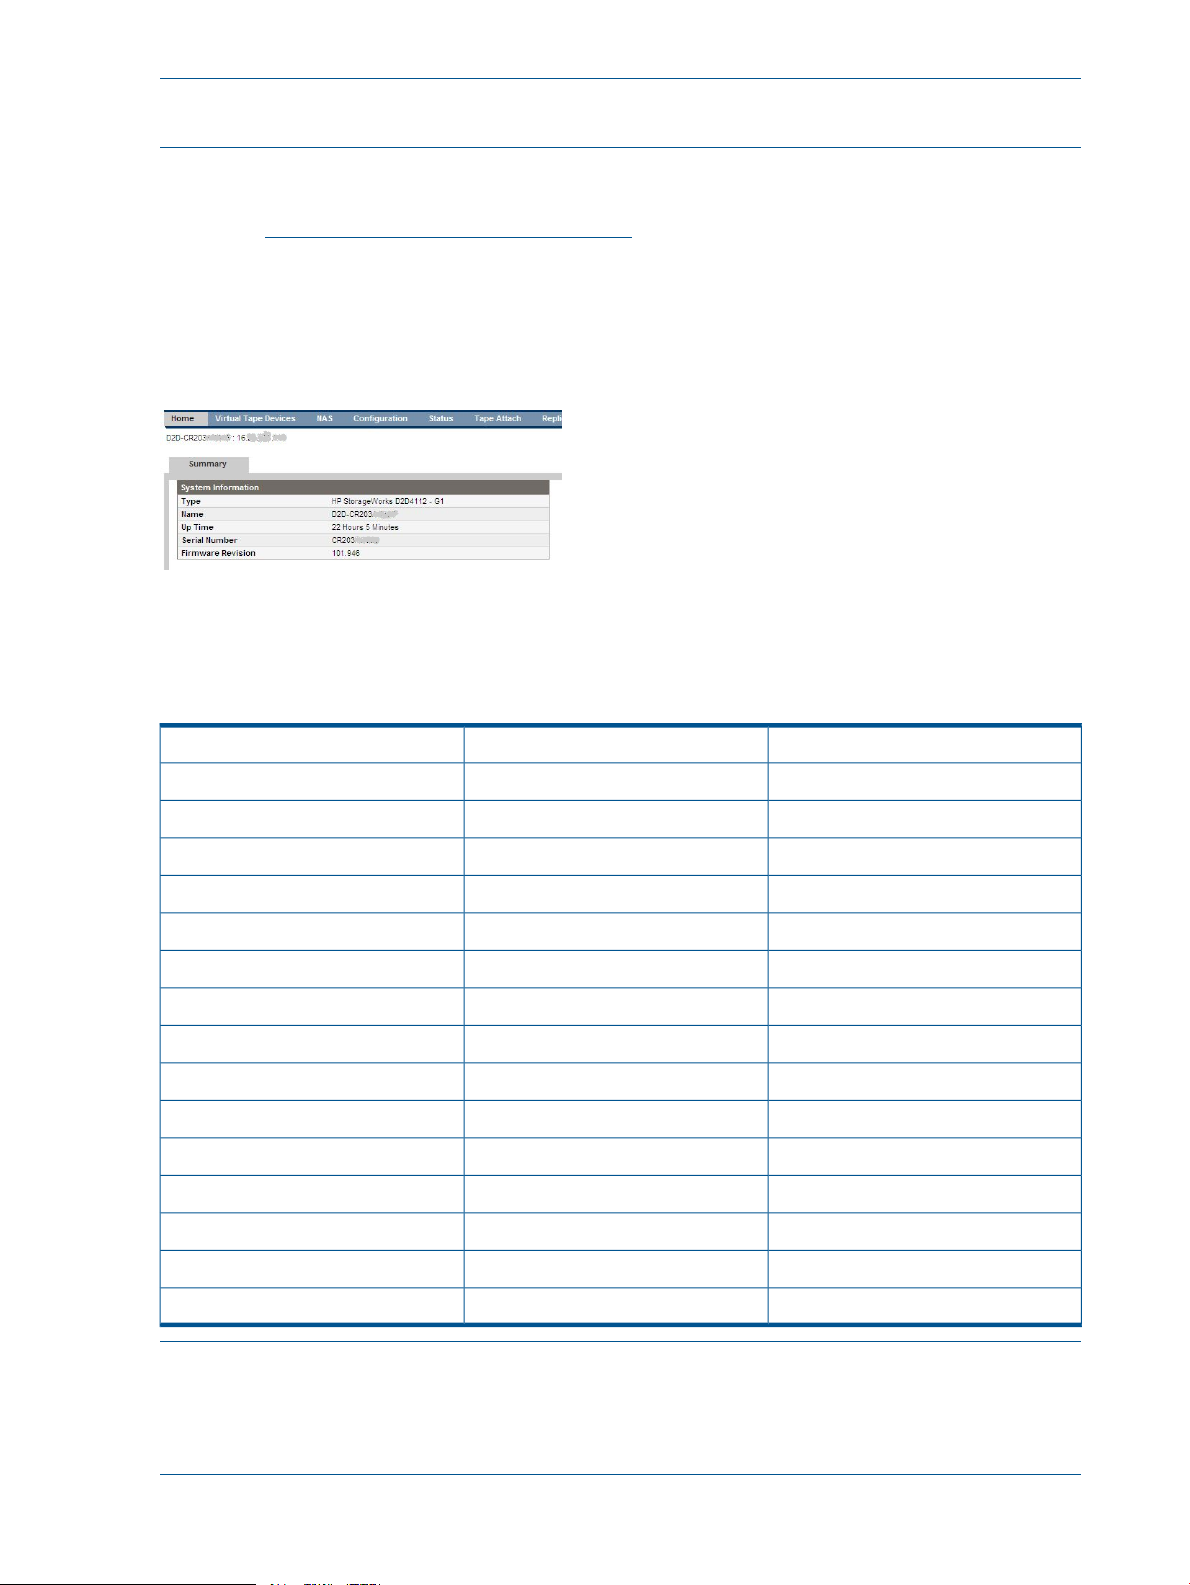
How do I tell whether I have a G1 or G2 product?
In later revisions of D2D software, the Summary Page of the Web Management Interface will tell
you the Type of product".
The product model number also identifies whether it is a G1 or a G2 product. This number can
be found on the product label (you may need to remove the product from the rack to locate the
label).
Table 2 Identifying G1 and G2 products from the product model number
G1 or G2ModelHP D2D Backup System
G2EH985AHP D2D4324 Backup System
G2EH983AHP D2D4312 Backup System
G2EH996AHP D2D4106i Backup System
G2EH998AHP D2D4106fc Backup System
G2EH993BHP D2D4112 Backup System
G1EH993AHP D2D4112 Backup System
G2EJ001BHP D2D2502i Backup System
G2EJ002BHP D2D2504i Backup System
G1EJ001AHP D2D2502i Backup Systems
G1EH945AHP D2D2503i Backup Systems
G1EJ002AHP D2D2504i Backup Systems
G1EH938AHP D2D4004i Backup Systems
G1EH941AHP D2D4004fc Backup Systems
G1EH939AHP D2D4009i Backup Systems
NOTE: The Smart Buy versions of the HP D2D2500 series Backup System are all G1 products.
NOTE: There is a separate document for Gen2E products that were introduced after March
2012. This document is called: HP StoreOnce D2D Backup System maintenance and service guide
Addendum for Gen2E models.
6 Introduction
G1EH942AHP D2D4009fc Backup Systems
Page 7
Using the ProLiant Guide with HP D2D4324 G2 models
When using the HP ProLiant DL370 G6 guide, be aware of the following HP D2D-specific
information:
• The CPU is Intel Xeon W5680 (Kit part number 601315-B21 includes Heatsink) – there are
two per system.
• The HP D2D has 12 removable hard disks. The 12th disk is an online spare disk. If one of
the other disks fails, the online spare disk immediately takes its place.
• The system comes with four RAID controller cards — the HP Smart Array P410i (integrated
into the Motherboard and with FBWC) and three HP Smart Array P812 cards (each with
1024MB cache module and FBWC). The P812 cards are installed in PCI-e Slots 4, 5 and 6.
Part numbers for the P812 card are as follows:
◦ HP Smart Array P812/1024 MB with FBWC Controller: 487204-B21
◦ FBWC: 534562-B21 (this comprises the 1024 cache, capacitor and cable assembly)
For more information about the HP Smart Array cards, search on http://www.hp.com/support/
manuals.
• The configuration of the system memory is 96 GB (12 x 8 GB DIMMs, 6 per processor). The
part number for each 8 GB DIMM is 500662-B21.
• The system has an HP 8Gb Dual Channel PCI-e to Fibre Channel Host Bus Adapter, part
number AJ764A.
• The system has either an HP NC550SFP Dual Port 10GbE Server Adapter, part number
581201-B21, or an HP NC522SFP Dual Port 10GbE Server Adapter, part number
614203-B21.
• The system has an HP SAS Expander Card, part number 468406-B21, in PCI-e Slot 1.
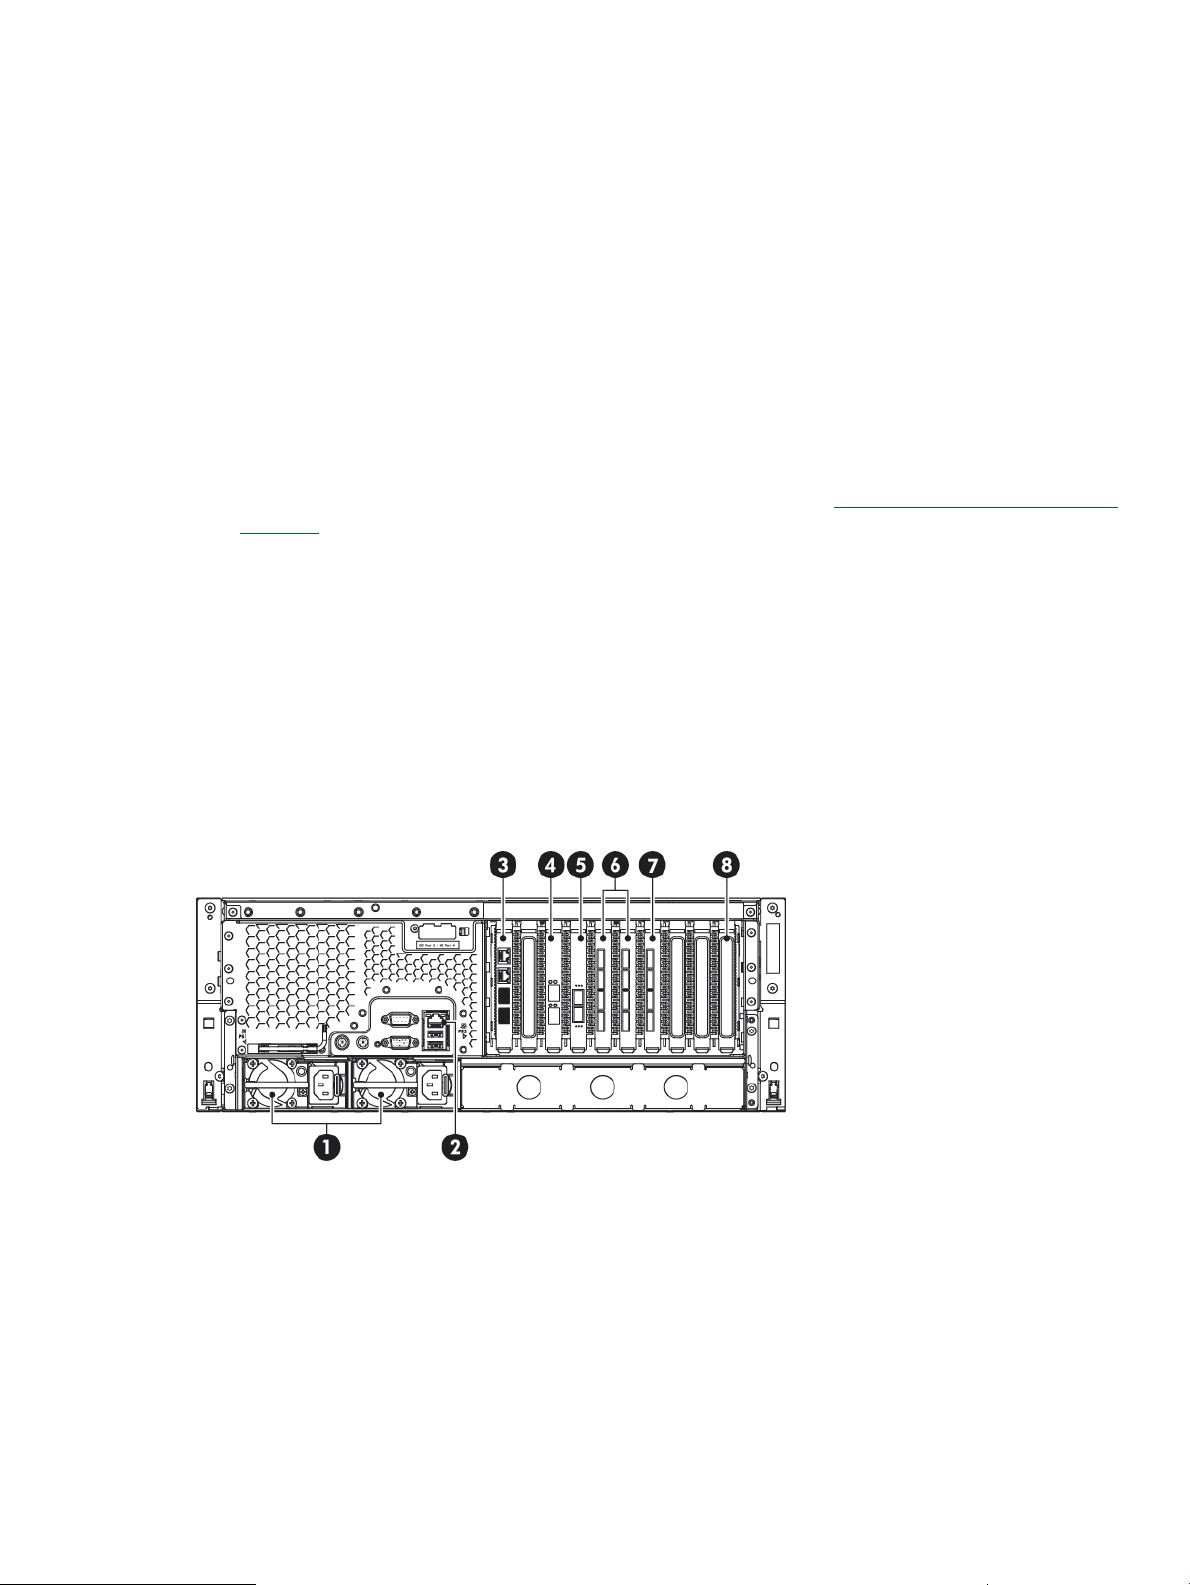
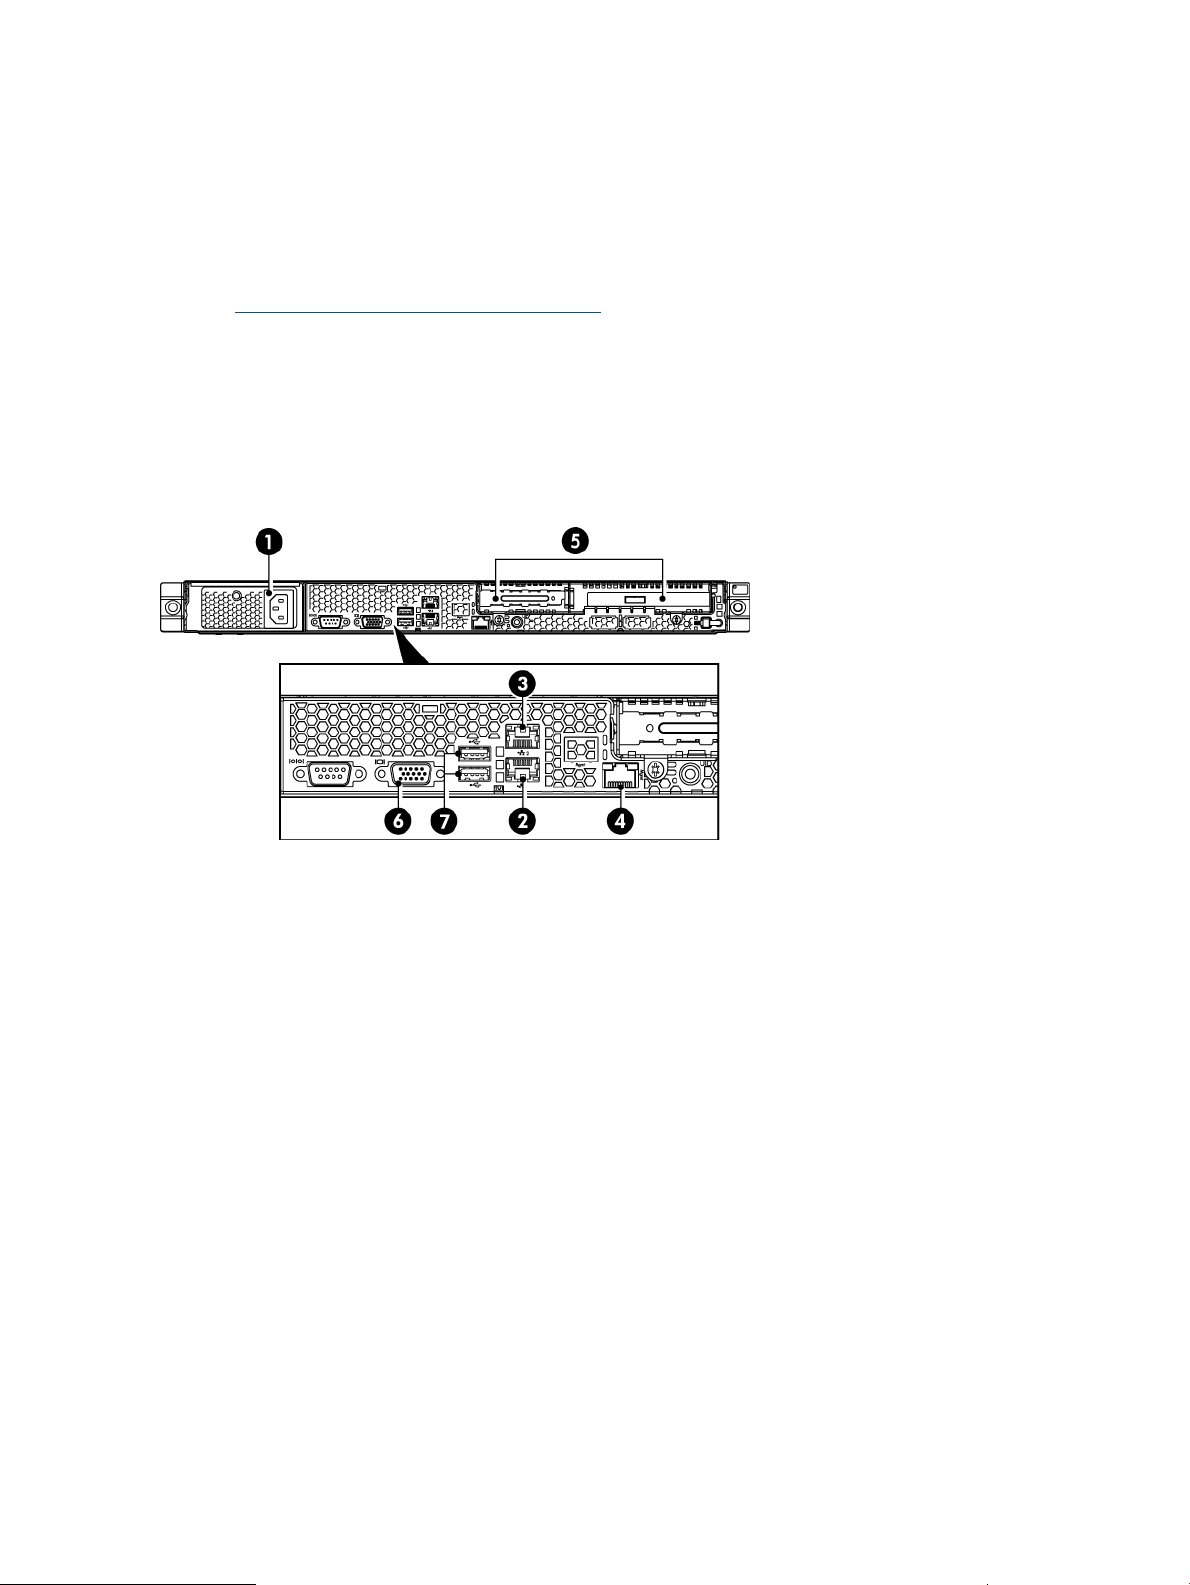
Figure 1 Rear view of the HP D2D4324
5. Fibre Channel card1. Power supplies (two)
6 and 7. RAID cards2. iLO2 Management port (do not use for data)
8. HP SAS expander card3. LAN ports 3 (required connection) and 4
4. 10–Gb Ethernet card with two ports
HP D2D and HP ProLiant 7
Page 8
Using the ProLiant Guide with HP D2D4312 G2 models
When using the HP ProLiant DL370 G6 guide, be aware of the following HP D2D-specific
information:
• The CPU is Intel Xeon W5580 (Kit part number 495928-B21 includes Heatsink) – there are
two per system.
• The HP D2D has 12 removable hard disks. The 12th disk is an online spare disk. If one of
the other disks fails, the online spare disk immediately takes its place.
• The system comes with three RAID controller cards — the HP Smart Array P410i (integrated
into the Motherboard and with BBWC) and two HP Smart Array P411 cards (each with 512MB
cache module and BBWC). The P411 cards are installed in PCI-e Slots 5 and 6. Part numbers
for the P411 card are as follows:
◦ HP Smart Array P411/512 MB with BBWC Controller: 462832-B21
◦ 512 MB memory: 462975-001
◦ BBWC: 462976-001
For more information about the HP Smart Array cards, search on http://www.hp.com/support/
manuals.
• The configuration of the system memory is 96 GB (12 x 8 GB DIMMs, 6 per processor). The
part number for each 8 GB DIMM is 500662-B21.
• The system has an HP 8Gb Dual Channel PCI-e to Fibre Channel Host Bus Adapter, part
number AJ764A.
• The system has an HP NC550SFP Dual Port 10GbE Server Adapter, part number 581201-B21.
• The system has an HP SAS Expander Card, part number 468406-B21, in PCI-e Slot 1.
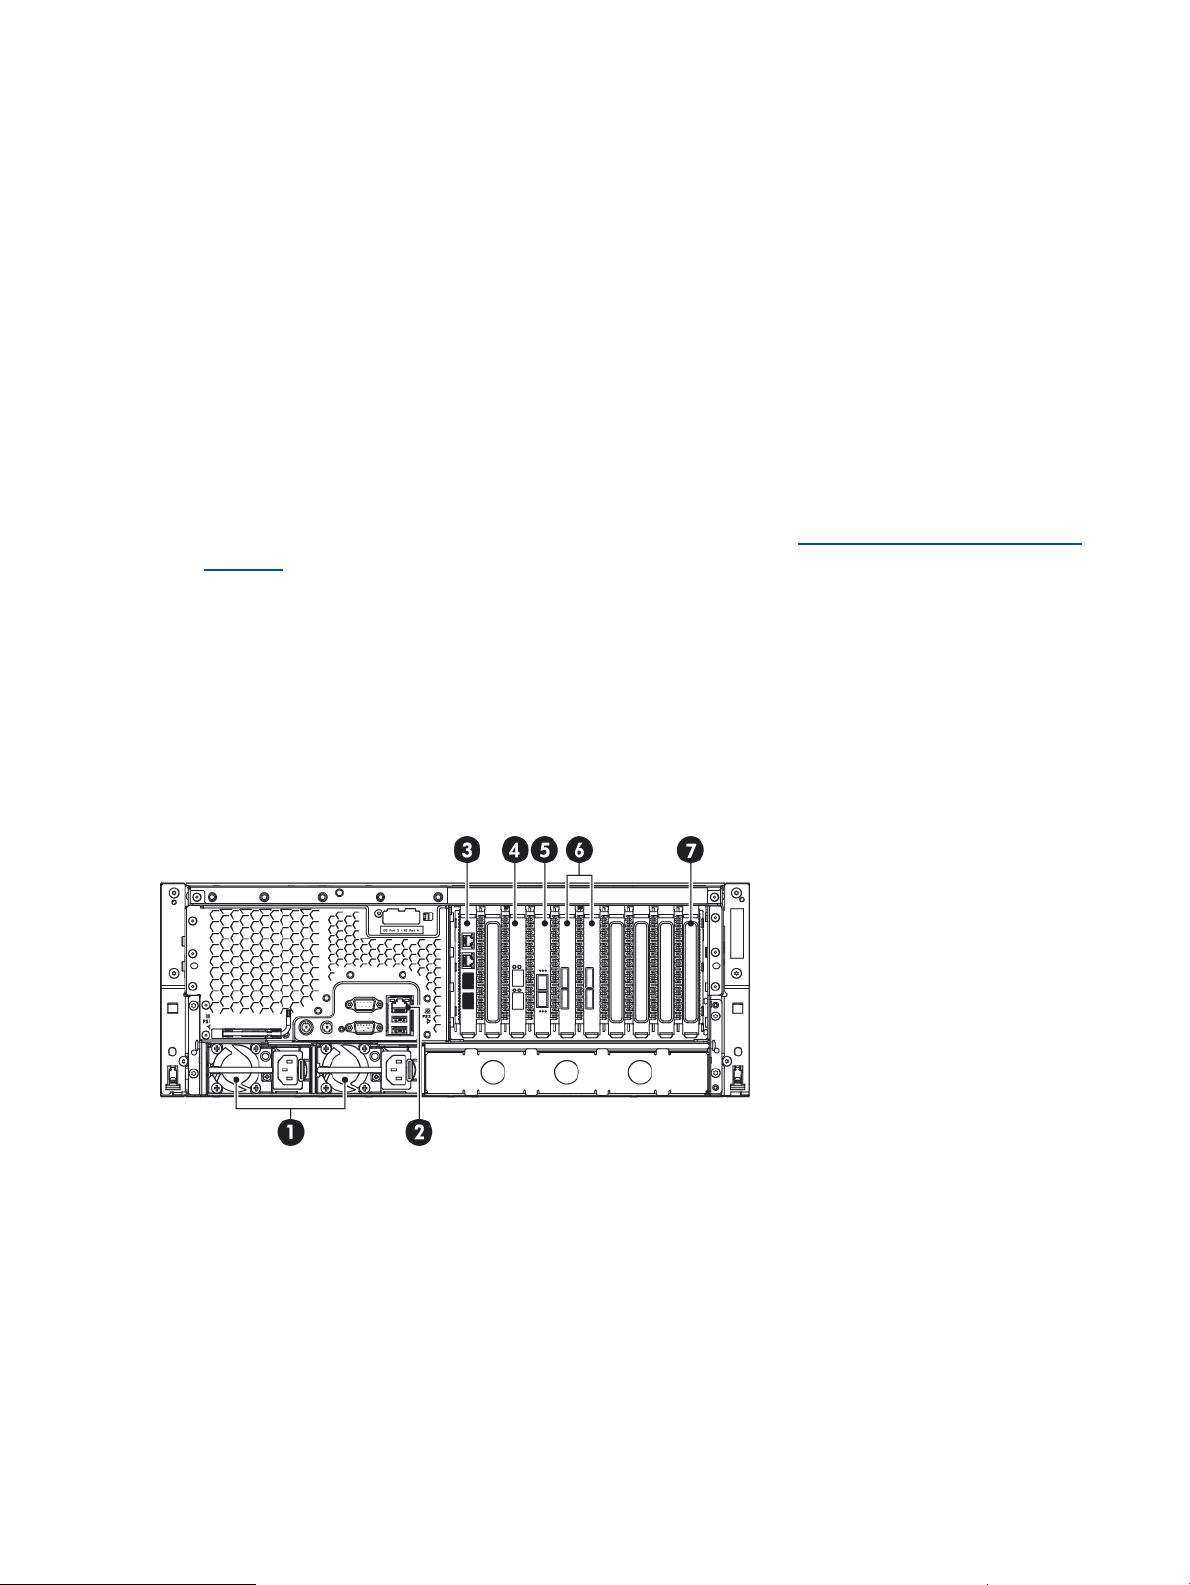
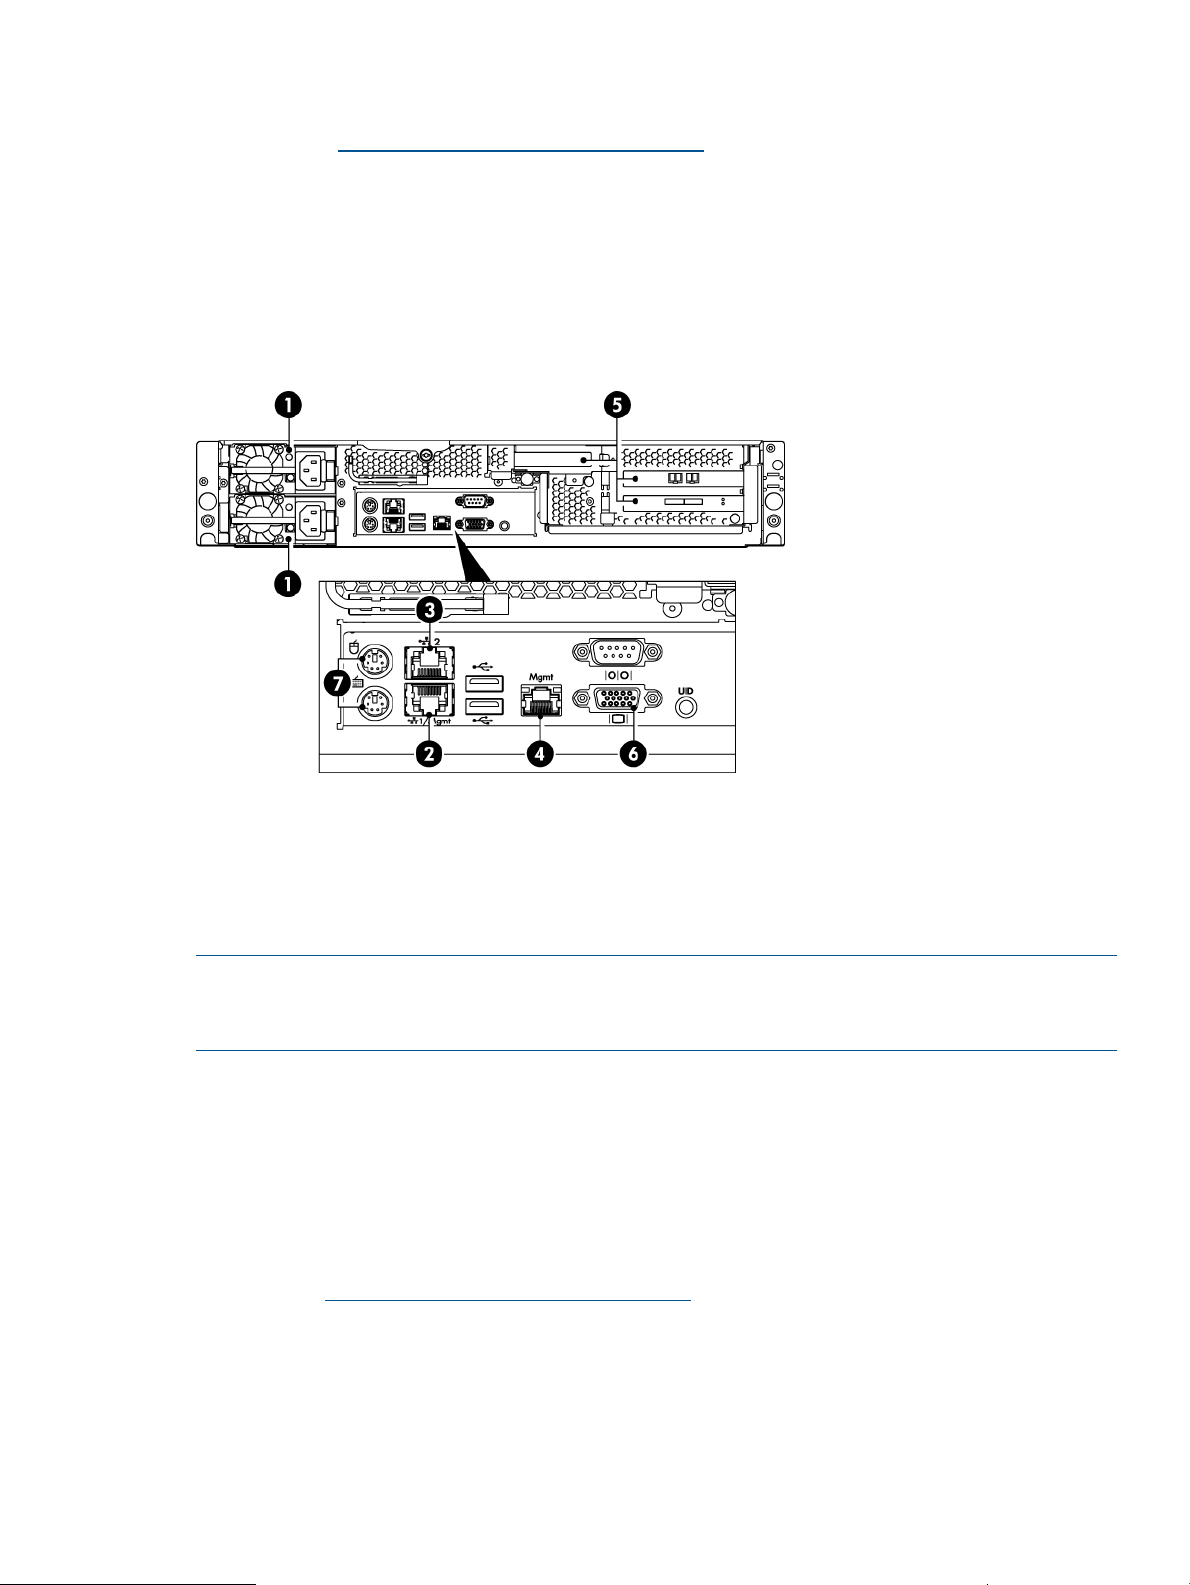
Figure 2 Rear view of the HP D2D4312
5. Fibre Channel card1. Power supplies (two)
6. RAID cards2. iLO2 Management port (do not use for data)
7. HP SAS expander card3. LAN ports 3 (required connection) and 4
4. 10–Gb Ethernet card with two ports
8 Introduction
Page 9
Using the ProLiant Guide with HP D2D4106/4112 G2 models
When using the HP ProLiant DL180se G6 guide, be aware of the following HP D2D-specific
information:
• The CPU is Intel Xeon X5550 (Spare P/N 490070-001) – there are two per system
• The HP D2D has 12 removable hard disks. The 12th disk is an online spare disk. If one of
the other disks fails, the online spare disk immediately takes its place. (The HP D2D4106 has
12 x 500 GB hard disks; the HP D2D4112 has 12 x 1 TB hard disks.)
• The configuration of the system memory is 72 GB (9 x 8 GB DIMMs; 5 for the first processor,
4 for the second). The part number for each 8 GB DIMM is 500662-B21.
• The HP D2D is supplied with an HP Smart Array P212/Zero Memory Controller (with 512
MB and BBWC) pre-installed in one of the full-height PCI-e slots. For more information about
this card, search on http://www.hp.com/support/manuals. Part numbers are as follows:
◦ HP Smart Array P212/Zero Memory Controller: 462828-B21
◦ 512MB BBWC -Cache and BBWC: 462967-B21
◦ 512 MB memory: 462975-001
◦ BBWC: 462976-001
• The system has an HP Dual Channel 4Gb PCIe Fibre Channel Host Bus Adapter, part number
AE312A, which is installed in a full-height slot
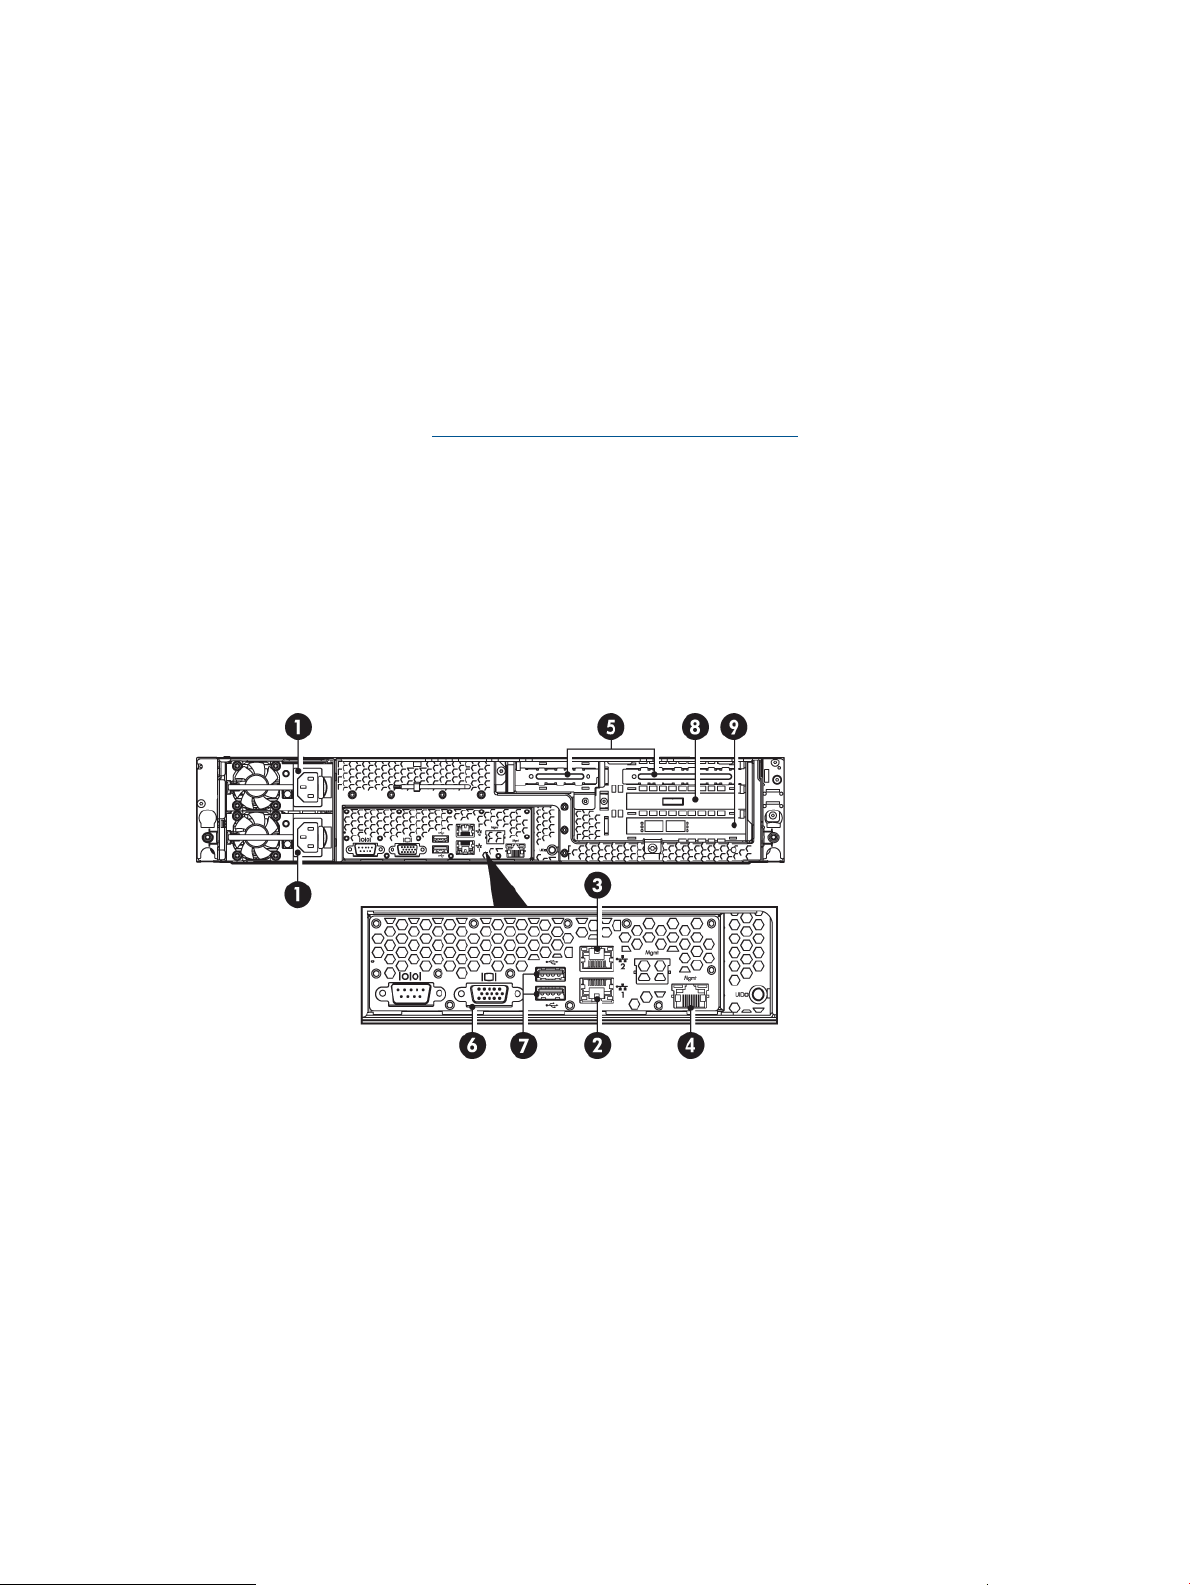
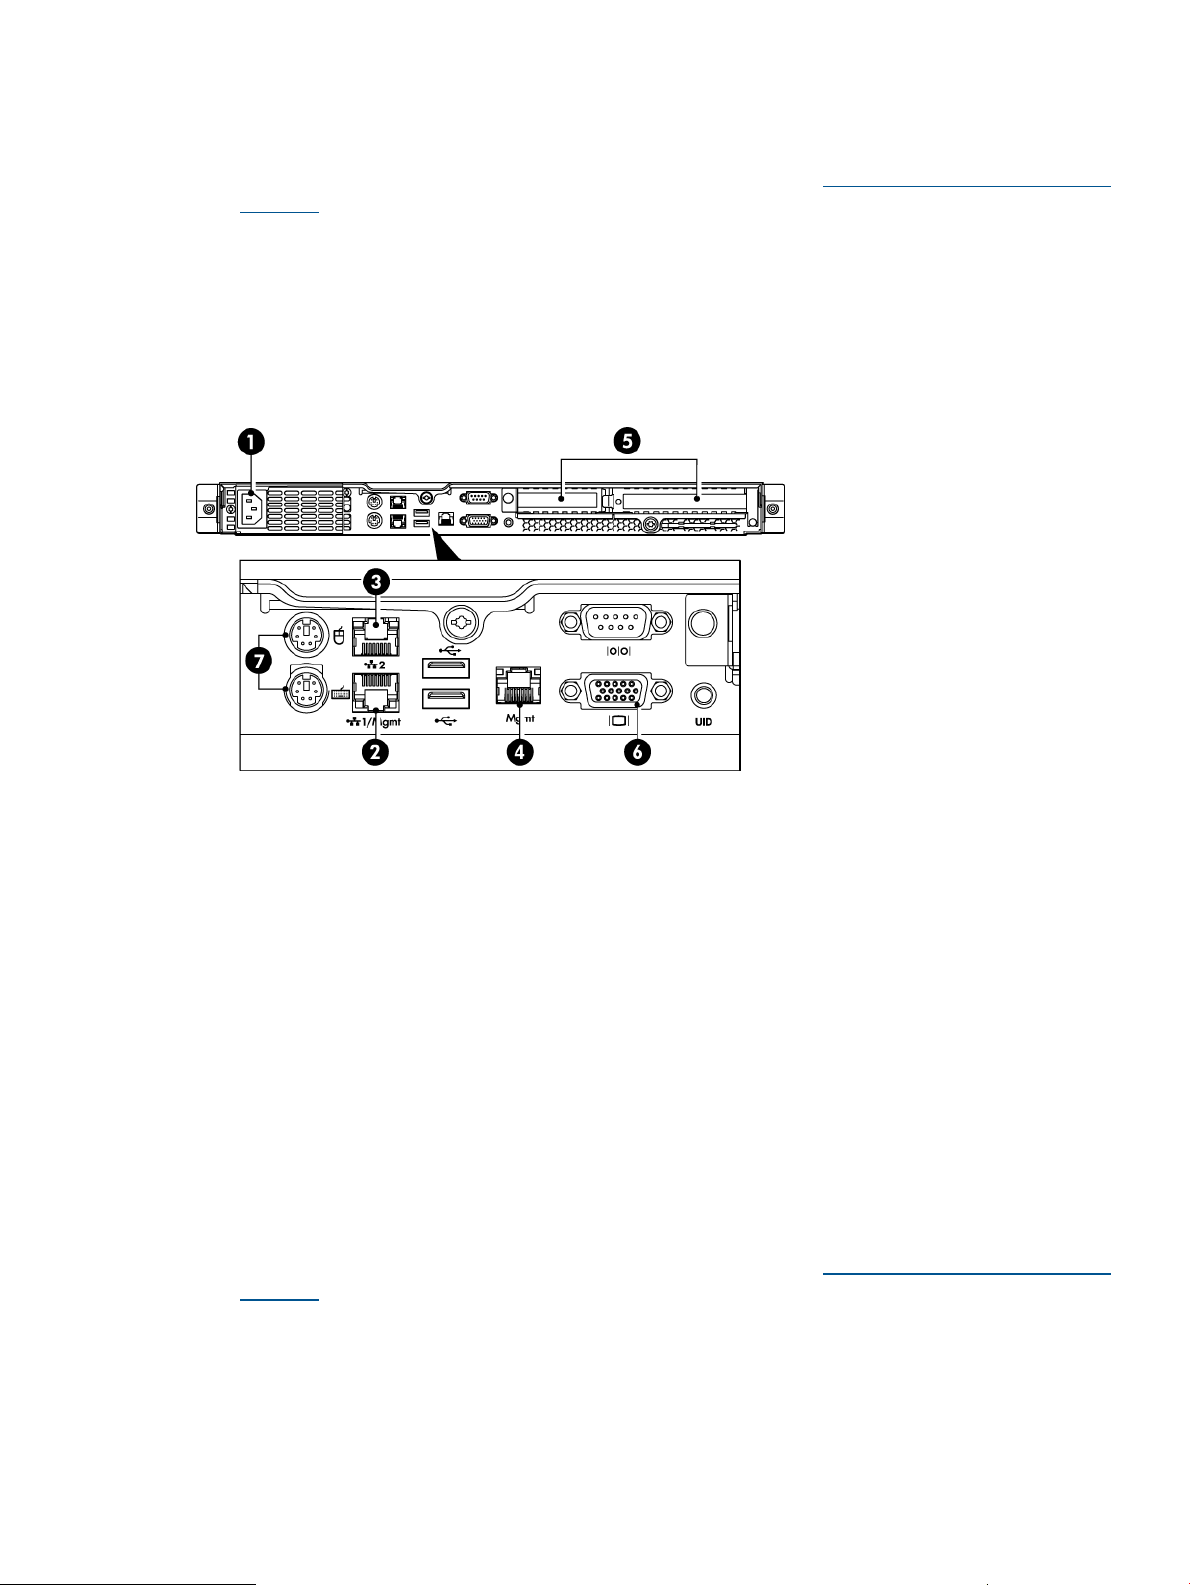
Figure 3 Rear view of the HP D2D4106/4112 G2
5. PCI-e slots
6. VGA port for system console monitor1. Power supply cable sockets (two)
7. USB ports for system console keyboard and mouse2. LAN port 1 (always used for data connection)
8. RAID controller3. LAN port 2
9. Fibre Channel card (HP D2D4106fc/4112)4. Management LAN port (Do not use for data)
Using the ProLiant Guide with HP D2D2502/2504 G2 models
When using the HP ProLiant DL160se G6 guide, be aware of the following HP D2D-specific
information:
• The CPU is the Intel Xeon E5520, part number 506013-001. There is one per system.
• The HP D2D has four removable hard disks.
• There is no optical media storage.
HP D2D and HP ProLiant 9
Page 10
• HP D2D2502 Backup System: The configuration of the system memory is 24 GB (3 x 8 GB
DIMMs) for the HP D2D2502 Backup System.
HP D2D2504 Backup System: The configuration of the system memory is 32 GB (4 x 8 GB
DIMMs).
The part number for each 8 GB DIMM is 500662-B21.
• The HP D2D is supplied with an HP Smart Array P212 controller (with 512 MB and BBWC)
pre-installed in one of the full-height PCI-e slots. For more information about this card, search
on http://www.hp.com/support/manuals. Part numbers are as follows:
◦ HP Smart Array P212/Zero Memory Controller: 462828-B21
◦ 512MB BBWC -Cache and BBWC: 462967-B21
◦ 512 MB memory: 462975-001
◦ BBWC: 462976-001
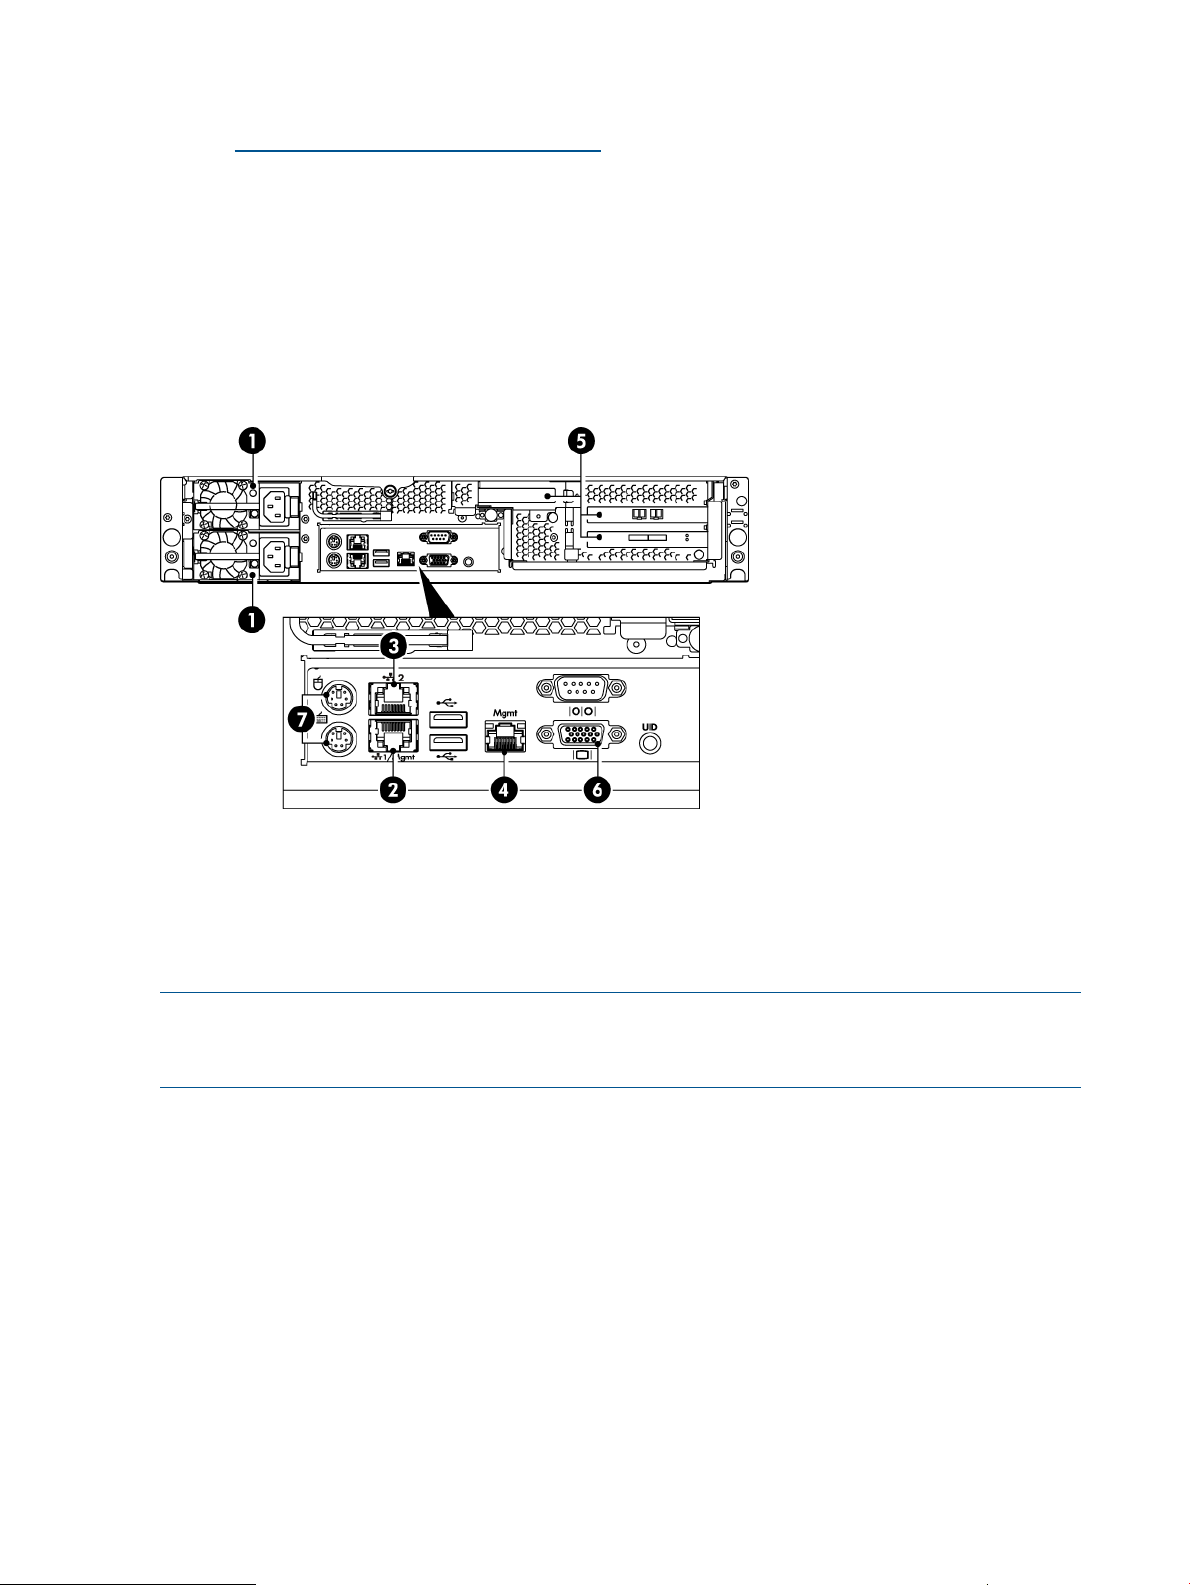
Figure 4 Rear view of the HP D2D2502/2504 G2
5. PCIe slots (one full and one low profile)1. Power supply cable socket
6. VGA port for system console monitor2. LAN port 1 (always used for data connection)
7. USB ports for system console keyboard and mouse3. LAN port 2
4. iLO2 Management port (Do not use for data)
Using the ProLiant Guide with HP D2D4112 G1 models
When using the HP ProLiant DL185 G5 guide, be aware of the following HP D2D-specific
information:
• The system components are illustrated in the 12HDD server diagram and the Opteron 2384,
part number 495643-005, is the only processor that is supported.
• The HP D2D has 12 removable hard disks. The 12th disk is an online spare disk. If one of
the other disks fails, the online spare disk immediately takes its place.
• There is no optical media storage.
• The configuration of the system memory is 16 GB (8 x 2 GB DIMMs). The part number for
each 2 GB DIMM is 499276-061.
10 Introduction
Page 11
• The HP D2D is supplied with an HP Smart Array P800 controller (with 512 MB and two
BBWCs) pre-installed in one of the full-height PCI-e slots. For more information about this card,
search on http://www.hp.com/support/manuals. Part numbers are as follows:
◦ P800 card: 398647–001
◦ 512 MB memory: 398645–001
◦ BBWC: 398648–001
• The system has an HP Dual Channel 4Gb PCIe Fibre Channel Host Bus Adapter, part number
AE312A
Figure 5 Rear view of the HP D2D4112 G1
5. PCI-e slots (two full and one low profile)1. Power supply cable sockets (two)
6. VGA port for system console monitor2. LAN port 1 (always used for data connection)
7. Ports for system console keyboard and mouse3. LAN port 2
4. Management LAN port (Do not use for data))
NOTE: One full PCIe slot has a SmartArray RAID controller card pre-installed. The other full PCIe
slot is used for the FC card. You must install the Tape Attach card (SAS or SCSI) in the low profile
slot.
Using the ProLiant Guide with HP D2D4004 and 4009 G1 models
When using the HP ProLiant DL185 G5 guide, be aware of the following HP D2D-specific
information:
• The system components are illustrated in the 12HDD server diagram. Two processors are
supported - Opteron 2222, part number 451810–001, and Opteron 2384, part number
495643-005. If you need to replace a processor, please refer to the document EH938-90942
Replacing processor in HP D2D400x, which can be found on the Manuals page of the HP
web site http://www.hp.com/support/manuals.
• The HP D2D has removable hard disks, either 6 or 12.
• There is no optical media storage.
• The configuration of the system memory is 8 GB (8 x 1 GB DIMMs). The part number for each
1 GB DIMM is 416356-001.
HP D2D and HP ProLiant 11
Page 12
• The HP D2D is supplied with an HP Smart Array P400 controller (with 512 MB and BBWC)
pre-installed in one of the full-height PCI-e slots. For more information about this card, search
on http://www.hp.com/support/manuals. Part numbers are as follows:
◦ P400 card: 441823–001
◦ 512 MB memory: 405835–001
◦ BBWC: 398648–001
◦ BBWC cable assembly: 409125–001
• The FC model has an HP Dual Channel 4Gb PCIe Fibre Channel Host Bus Adapter, part
number AE312A
Figure 6 Rear view of the HP D2D4004/4009
5. PCIe slots (two full and one low profile)1. Power supply cable sockets (two)
6. VGA port for system console monitor2. LAN port 1 (always used for data connection)
7. PS/2 ports for system console keyboard and mouse3. LAN port 2
4. Management LAN port (Do not connect to this port)
NOTE: One full PCIe slot has a SmartArray RAID controller card pre-installed. The other full PCIe
slot is used for the FC card. You must install the Tape Attach card (SAS or SCSI) in the low profile
slot.
Using the ProLiant Guide with HP D2D2502 G1 models
When using the HP ProLiant DL165 G5 guide, be aware of the following HP D2D-specific
information:
• The AMD Opteron 2376 2.3GHz (75W), part number 495643-003, is the only processor
that is supported.
• The HP D2D has four fixed hard disks.
• There is no optical media storage.
12 Introduction
Page 13
• The configuration of the system memory is 8 GB (4 x 2 GB DIMMS PC2-6400). The part
number for each 2 GB DIMM is 499276-061.
• The HP D2D is supplied with an HP Smart Array P400 controller (with 512 MB and BBWC)
pre-installed. For more information about this card, search on http://www.hp.com/support/
manuals.
◦ P400 card: 441823–001
◦ 512 MB memory: 405835–001
◦ BBWC: 398648–001
◦ BBWC cable assembly: 409125–001
Figure 7 Rear view of the HP D2D2502/2503/2504 G1
5. PCIe slots (one full and one low profile)1. Power supply cable socket
6. VGA port for system console monitor2. LAN port 1 (always used for data connection)
7. PS/2 ports for system console keyboard and mouse3. LAN port 2
4. Management port (Do not use for data)
Using the ProLiant Guide with HP D2D2503 G1 models
When using the HP ProLiant DL165 G5 guide, be aware of the following HP D2D-specific
information:
• The Opteron 2218, part number 419480-001, is the only processor that is supported.
• The HP D2D has four fixed hard disks.
• There is no optical media storage.
• The configuration of the system memory is 4 GB (4 x 1 GB DIMMs). The part number for each
1 GB DIMM is 416356-001.
• The HP D2D is supplied with an HP Smart Array P400 controller (with 512 MB and BBWC)
pre-installed. For more information about this card, search on http://www.hp.com/support/
manuals.
◦ P400 card: 441823–001
◦ 512 MB memory: 405835–001
◦ BBWC: 398648–001
◦ BBWC cable assembly: 409125–001
HP D2D and HP ProLiant 13
Page 14

Using the ProLiant Guide with HP D2D2504 G1 models
When using the HP ProLiant DL165 G5 guide, be aware of the following HP D2D-specific
information:
• The AMD Opteron 2384 2.7GHz (75W), part number 495643-005, is the only processor
that is supported.
• The HP D2D has four removable hard disks.
• There is no optical media storage.
• The configuration of the system memory is 8 GB (4 x 2 GB DIMMS PC2-6400). The part
number for each 2 GB DIMM is 499276-061.
• The HP D2D is supplied with an HP Smart Array P400 controller (with 512 MB and BBWC)
pre-installed. For more information about this card, search on http://www.hp.com/support/
manuals.
◦ P400 card: 441823–001
◦ 512 MB memory: 405835–001
◦ BBWC: 398648–001
◦ BBWC cable assembly: 409125–001
POST messages and troubleshooting
The HP D2D Web Management Interface is the primary source of troubleshooting information.
However, it is not able to capture power-on self-test hardware-related issues. Always refer to the
appropriate Maintenance and Service Guide for Power-On Self-Test (POST) information. To view
POST messages you will need a system console attached to the HP D2D. Please see the HP D2D
Backup System User Guide for more information about connecting and using the system console.
Tasks that are unique to the HP D2D
The following tasks are described in this guide:
• How to replace the flash memory module
• How to replace the motherboard
• How to replace the HP Smart Array RAID controller
Software upgrades
The Web Management Interface is used to upgrade software and also has a link to the HP Support
website from where the software must be downloaded. Language Pack upgrades are also available
to ensure all updates to screen messages and help text are displayed correctly in all languages.
For more information about the upgrade process and how to use the Web Management Interface,
please refer to the Software (Administration) section of the Web Management Interface chapter
in the HP D2D Backup System User Guide. See also Related documentation (page 42).
14 Introduction
Page 15

2 The flash memory module
Overview
The flash memory module is required to boot up the HP D2D Backup System.
• With HP D2D4324/4312 Backup Systems, this consists of a USB flash stick that plugs into
the system board.
• With all other HP D2D Backup Systems, this consists of a USB flash stick and cable.
• There are different memory sticks for G2 and G1 products. Make sure you are using the
correct one. See Identifying G1 and G2 products (page 6).
Part number
Each software revision has its own part number. Please refer to http://www.hp.com or contact
HP Support to find out which part number is required.
Identifying a flash memory module failure
Symptoms of problems with the memory module are:
• The system hangs
• Hosts cannot connect to the HP D2D Backup System via the Web Management Interface
Troubleshooting procedure
1. If it is not already connected, connect the system console to the HP D2D Backup System.
2. Power cycle the HP D2D Backup System.
3. The HP D2D will attempt to boot from the flash memory module. The flash memory module is
at fault, if the reboot fails with the following message: “Cannot find any bootable media” or
if the system fails to boot completely or if it attempts to PXE boot.
4. Power off the system, remove the cover and check the cabling on the flash memory module.
If this does not remedy the problem, replace the flash memory module.
Replacing the memory module, G2 HP D2D Backup Systems only
NOTE: The memory module for the HP D2D4324 and HP D2D4312 model consists of a USB
flash stick. The memory module for the other G2 models consists of a flash stick with cable. It is
normally sufficient to replace only the USB stick, leaving the existing cable in place.
See the next section, if you are replacing the memory model in a G1 product.
1. Power off the system and remove the cover from the HP D2D, as described in the appropriate
HP ProLiant Maintenance and Service guide. Locate the memory module (labeled 1 on the
diagrams below).
2. Pull the failed memory module out of the USB connector (1) and simply plug in the replacement
module.
3. HP D2D4112/4106 and HP D2D2502/2504 models only: If you need to replace the cable
as well, first unscrew the bracket (2) holding the USB connector and then disconnect the cable
from the motherboard (3). Replace the whole cable and tighten the screw on the bracket.
Make sure both ends of the cable are connected securely.
NOTE: The memory module for the HP D2D4324/4312 model does not have a cable.
Overview 15
Page 16

4. Be sure to update the HP D2D software to the latest version. This is done from the Web
Management Interface (Settings/Software page), as described in the HP StoreOnce D2D
Backup System User Guide.
IMPORTANT: If your replacement flash stick is at a lower revision than the one it replaces,
you may experience a message of “Devices Starting” or “Initialising". This message will also
occur, if the D2D Backup System did not shutdown correctly. In this case, please wait a
minimum of 12 hours before updating software.
Figure 8 HP D2D4324 and D2D4312 G2 Series flash memory module
Figure 9 HP D2D4106 or HP D2D4112 G2 flash memory module
16 The flash memory module
Page 17

Figure 10 HP D2D2502 and HP D2D2504 G2 Series flash memory module
location of the memory module and USB connector1
screw and bracket securing USB cable connector (not HP D2D4324/4312)2
cable and connector to the motherboard (not HP D2D4324/4312)3
Replacing the memory module, G1 HP D2D Backup Systems
NOTE: It is normally sufficient to replace the USB stick, leaving the existing cable in place.
See the previous section, if you are replacing the memory model in a G2 product.
1. Power off and remove the cover from the HP D2D, as described in the appropriate HP ProLiant
Maintenance and Service guide, and locate the memory module (labeled 4 on the diagram).
2. Pull the failed memory module out of the USB connector (1) and simply plug in the replacement
module.
3. If you need to replace the cable as well, first unscrew the bracket (2) holding the USB connector
and then disconnect the cable from the motherboard (3). Replace the whole cable and tighten
the screw on the bracket. Make sure both ends of the cable are connected securely.
4. Be sure to update the HP D2D software to the latest version. This is done from the Web
Management Interface (Settings/Software page), as described in the HP StoreOnce D2D
Backup System User Guide.
IMPORTANT: If your replacement flash stick is at a lower revision than the one it replaces,
you may experience a message of “Devices Starting” or “Initialising". This message will also
occur, if the D2D Backup System did not shutdown correctly. In this case, please wait a
minimum of 12 hours before updating software.
Replacing the memory module, G1 HP D2D Backup Systems 17
Page 18

Figure 11 HP D2D 4112, HP D2D4004 or HP D2D4009 G1 flash memory module
Figure 12 HP D2D2500 G1 Series flash memory module
cable and USB connector to the memory module1
screw and bracket securing USB cable connector2
cable and connector to the motherboard3
flash memory module4
18 The flash memory module
Page 19

3 Replacing the system motherboard
For all products, G1 and G2, refer to the appropriate Maintenance and Server Guide for detailed
instructions on replacing the motherboard. This chapter describes the following tasks that are
specific to HP D2D Backup Systems:
• Set the J27 jumper on HP D2D4106/4112 G2 and HP D2D2502/2504 G2 products.
• Update BIOS IDs on all products.
• Reinstate iLO2 licences on all G2 products
• Reinstate the RAID 6 license for the integral RAID controller on HP D2D4324/4312 products
IMPORTANT: When replacing the motherboard (or individual cards) be sure to always replace
cards into the same slot from which they were removed. See also the rear view drawings in Chapter
1.
Motherboard part numbers
• HP D2D4324/4312 G2 Backup Systems: The motherboard for the HP D2D4324/4312
Backup System is the standard DL370 G6 motherboard. Please refer to DL370 G6 Maintenance
and Service Guide for details of how to replace it.
IMPORTANT: Please ensure that the system maintenance switch SW1, S3 setting is set to
ON - to ensure that the motherboard is seen as a DL370 and not an ML370.
• HP D2D4106/4112 G2 and HP D2D2502/2504 G2 Backup Systems: The motherboard for
both the HP D2D4106/4112 Backup System and the HP D2D2502/2504 Backup System is
part number: 583724-001.
• All G1 HP D2D Backup Systems: The motherboard for all G1 products is the standard
motherboard.
Before replacing the motherboard— a note about licenses
iLO2 licenses
All G2 products are shipped with paper copies of the iLO2 licenses. If you no longer have these
licenses and the board is still working for the iLO2 GUI connection via its management Ethernet
port, make a note of the license before you remove the motherboard. (If it is not working, contact
HP Support.)
1. Log on to the iLO2 GUI.
2. Select the Administration Tab.
3. Select Licensing and make a note of the License Key.
NOTE: G1 products do not support iLO2.
SAAP licence (HP D2D4324 and D2D4312)
The Smart Array Advanced Pack (SAAP) is required to enable RAID 6 support. You must reinstate
the SAAP license, if you replace the motherboard on an HP D2D4324 or D2D4312 product,
Motherboard part numbers 19
Page 20

because it has an integral P410i card. If you do not, the system will experience one of the following
symptoms :
• Very slow product performance (Running as RAID5 access to the disks, if the arrays had not
failed themselves)
• Refusal to create the storage (if the storage arrays have failed and need to be rebuilt from
scratch)
The units are shipped with paper copies of the SAAP license. If you no longer have this license
and the board is still working, make a note of the license before you replace the motherboard.
1. Reboot the system.
2. During the POST screen, when advised, hit any key to see further messages.
3. Enter the Smart Array POST ORCA utility by pressing [F8] when advised during the POST
messages.
4. Select the Manage Licenses option in the Smart Array menu, and then select View Licenses.
5. Make a note of the licence key reported. This key is unique to the system and can be used
for any replacement Smart Array card (or HP D2D4312 motherboard).
J27 settings (HP D2D4106/4112 G2 and HP D2D2502/2504 G2)
NOTE: This section is not relevant for HP D2D4324/4312 models.
The following diagram shows the location of the J27 jumper on the motherboard.
Figure 13 Location of the J27 jumper
J27 jumper1
When replacing the motherboard on HP D2D4106/4112 G2 models or on HP D2D2502/2504
G2 models, set the jumper as follows.
20 Replacing the system motherboard
Page 21

Table 3 J27 jumper settings
D2D Backup System
HP D2D4106/4112 G2:
Remove all jumpers
HP D2D2502/2504 G2:
Jumper should be set on pins 1 and 2
After replacing the motherboard
G2 products
For all G2 products you must:
1. Install the latest BIOS revision from the relevant product site. All BIOS revisions can be found
at http://www.hp.com/support/downloads (under Storage — Disk Storage Systems — Disk
to disk Backup — HP D2D Backup Systems).
2. Reboot the system. During the system BIOS boot process, when the prompt to Press F9 is
visible, press the F9 key to enter the RBSU (ROM-based Setup Utility) or BIOS Setup. This is
so that you can change.
3. Change the Performance options, as shown in the following table.
NOTE: Unless noted otherwise, the settings apply to all G2 products.
Table 4 RBSU settings
Advanced Options
(HP D2D4324/4312
only)
Options
Advanced
Performance Tuning
Options
Service Options
HP Power ProfilePower Management
HP Power Regulator
Memory Speed with
2 DIMMs per
Channel
warning displayed)
Maximum
M/B defaultProduct Id (ignore
Balanced Power and
Performance
HP Dynamic Power
Savings Mode
4. Change the BIOS ID, as shown in the following table.
Table 5 BIOS IDs for G2 products
BIOS ID numberModel
Change to...CurrentSub-sub-settingSub-settingRBSU setting
1333 MHz Maximum1066 MHz
Appropriate Product
ID for G2 shown in
table below
Increased CoolingOptimal CoolingThermal ConfigurationAdvanced Options
Maximum
Performance
HP Static High
Performance Mode
596141-B21D2D2502i G2
After replacing the motherboard 21
Page 22

Table 5 BIOS IDs for G2 products (continued)
596142-B21D2D2504i G2
595249-B21D2D4106i G2
595882-B21D2D4106fc G2
595248-B21D2D4112 G2
581971-B21D2D4312 G2
635236-B21D2D4324 G2
5. Exit RBSU and add the iLO2 license.
a. Log on to the iLO2 GUI.
b. Select the Administration Tab.
c. Select Licensing and enter the recorded licence key in the section marked Enter License
Activation Key.
6. HP D2D4324/4312 only: Add the SAAP license for the integral P410i RAID card.
a. Reboot the system.
b. During the POST screen, when advised, hit any key to see further messages.
c. Enter the Smart Array POST ORCA utility by pressing [F8] when advised during the POST
messages.
d. Select the Manage Licenses option in the Smart Array menu, and then select Install Licenses.
e. Enter the licence key previously noted.
G1 products
All G1 products require a BIOS ID, but there are no other settings (or licenses). There is a special
utility that allows you to edit the BIOS ID. It is called Setsys Utility for HP D2D Backup Systems (for
USB Key-Media).
1. Download Setsys Utility for HP D2D Backup Systems (for USB Key-Media) from the relevant
product site at http://www.hp.com/support/downloads (under Storage — Disk Storage
Systems — Disk to disk Backup — HP D2D Backup Systems).
2. Follow the instructions in the Release Notes to run the utility and change the BIOS ID, as shown
in the following table.
Table 6 BIOS IDs for G1 products
BIOS ID numberModel
539194-B21D2D2502i G1 (and Smart Buy)
482301-B21D2D2503i (and Smart Buy)
539195-B21D2D2504i G1 (and Smart Buy)
482302–B21D2D4004i and D2D4009i
482303-B21D2D4004fc and D2D4009fc
512768-B21D2D4112 G1
22 Replacing the system motherboard
Page 23

4 Battery/Flash Backed Write Cache (BBWC or FBWC)
module failures
Part numbers
Part numbers for a replacement cache modules are as follows:
• G1 products: BBWC = 398648–001
• G2 products apart from HP D2D4324: BBWC = 462976–001
• HP D2D4324 G2: FBWC = 534562-B21
If replacing this module does not resolve the problem, it may be necessary to replace the RAID
controller card. See the appropriate chapter for your RAID card for more information about
replacement procedures and part numbers.
Identifying the battery/flash capacitor module failure
Module failures are reported in the Log and, if you have email alerts set up, you will be notified
of any failure. The following example illustrates an alert for a failed RAID battery:
******************************************************************************
This is a system generated message from your HP StoreOnce D2D Backup System
Email Notification From AB4032
6-Jun-2008 8:08:15 : The RAID battery backup has failed
For further information please browse to
https://AB4032.emea.hpqcorp.net (https://16.26.9.92)
Please do not reply to this email.
******************************************************************************
HP D2D4324, D2D4312, D2D4106 and D2D4112
The status of the cache module is also reported on the Summary and Storage-RAID pages of the
Web Management Interface.
The HP D2D4112 (G2) and the HP D2D4106 have one battery only. (The HP D2D4112 G1 has
two batteries, both on the one controller.)
The HP D2D4324 has four flash capacitor modules and the HP D2D4312 has three batteries; one
for each RAID card. The Summary page shows that there is a flash capacitor module or RAID
battery failure, but does not identify the card to which it belongs. Look at the Storage-RAID page
to identify the card. The P410i card is identified as internal; the three P812 (HP D2D4324) and
two P411 (HP D2D4312) cards are identified by their slot location.
Figure 14 Example HP D2D4312 Summary page showing battery failure
Part numbers 23
Page 24

Figure 15 Example HP D2D4312 Storage—RAID page showing battery failure
HP D2D4004,/4009 and D2D2502/3/4 G1 and G2
The status of the battery is reported on the Summary and Status-RAID pages of the Web Management
Interface.
Figure 16 Summary page showing a failed RAID battery
Figure 17 RAID page showing a failed RAID battery (HP D2D2502/2504)
Replacing the battery/flash capacitor module
Battery/flash capacitor module location
HP D2D4324
There are four FBWC (flash backed write cache) modules, one for each Smart Array Controller.
Each FBWC has a capacitor pack to ensure cache contents are maintained after a loss of power.
Each P812 controller has an integral capacitor pack, whilst the P410i controller’s capacitor pack
is located in the holder in the centre of the HP D2D4324 Backup System. Each FBWC module has
two single-color LEDs (green and amber). The LEDs are duplicated on the reverse side of the cache
module to facilitate status viewing. See the HP Smart Array Controllers for HP ProLiant Servers User
Guide for more information.
24 Battery/Flash Backed Write Cache (BBWC or FBWC) module failures
Page 25

Figure 18 FBWC module LEDs
HP D2D4312
There are three BBWC batteries, one for each Smart Array controller (P410i and two P411
controllers), and they are located in the holder in the center of the HP D2D4312 Backup System.
See the HP Smart Array Controllers for HP ProLiant Servers User Guide for more information.
NOTE: Follow the cable back to identify to which card the battery belongs.
Figure 19 Battery pack LEDs
HP D2D4106/4112 G2
The P212 card has only one BBWC, but it may be located in either of the locations shown on the
following diagram. Always replace the BBWC in the same location from which you removed it.
Replacing the battery/flash capacitor module 25
Page 26
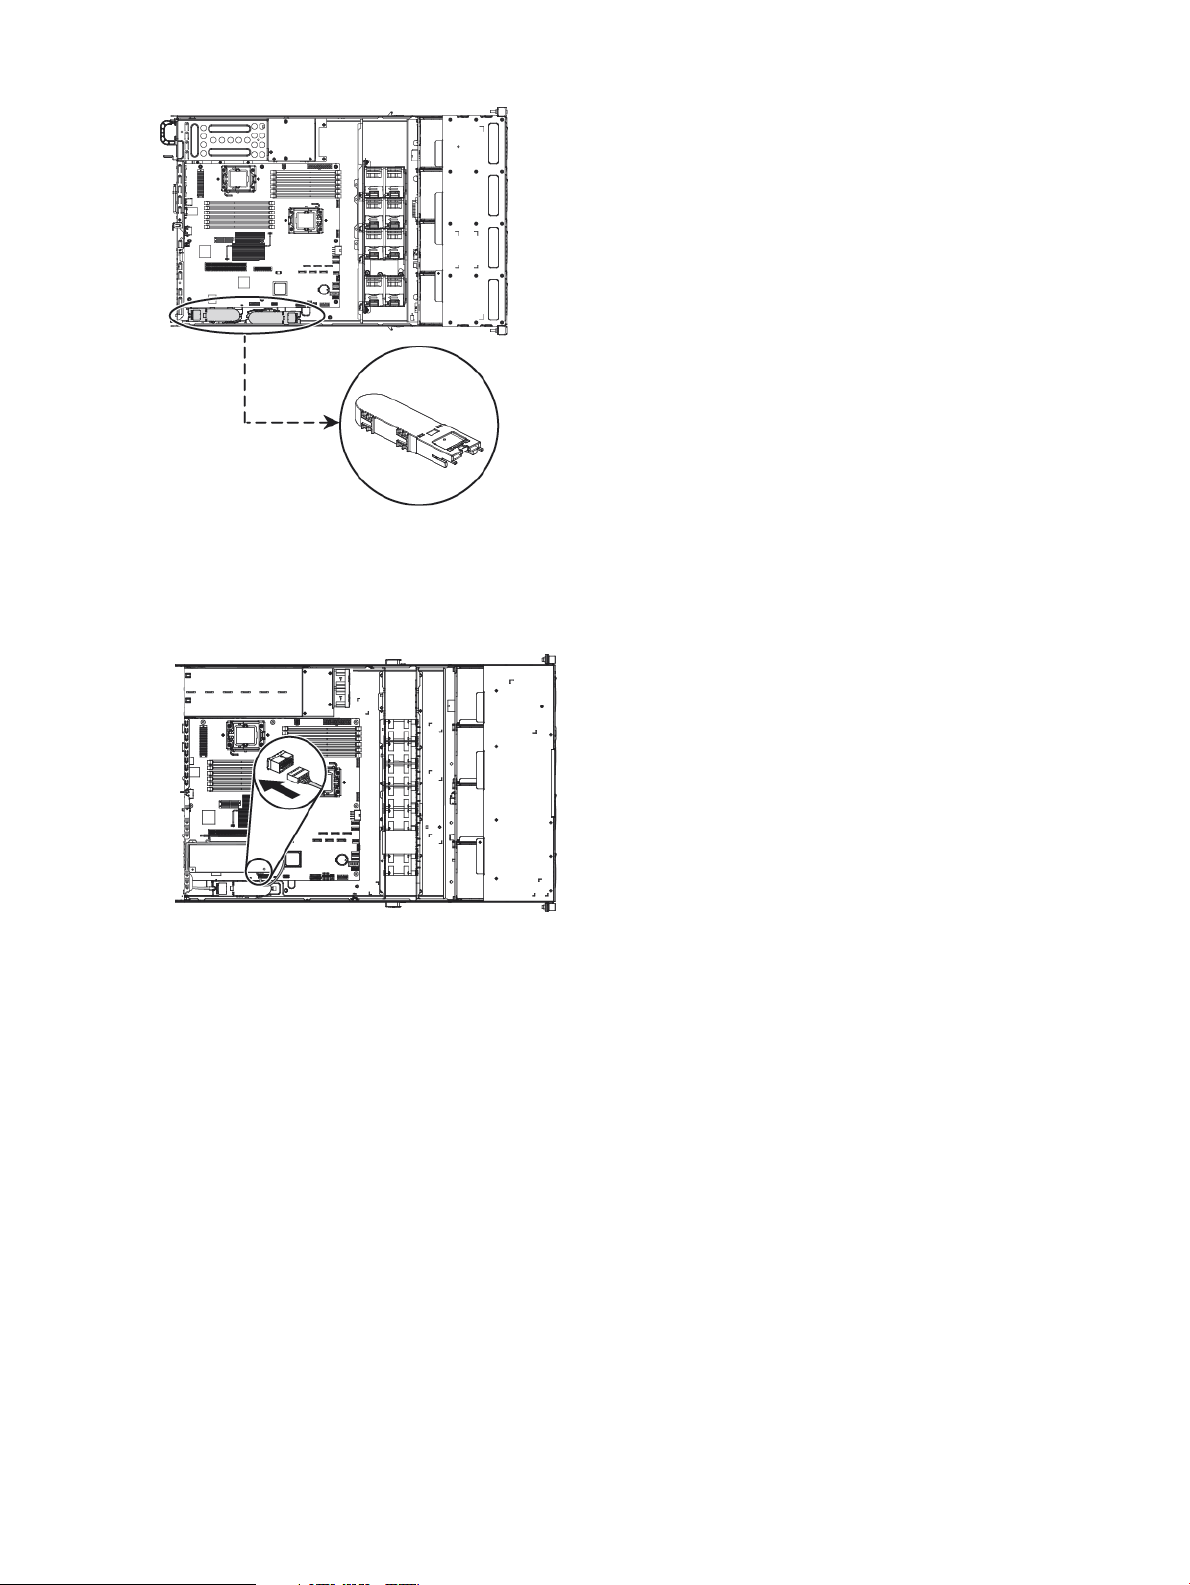
Figure 20 BBWC battery and P212 card, HP D2D4106/4112 G2
HP D2D2502/2504 G2
The P212 card has one BBWC.
Figure 21 BBWC battery and P212 card, HP D2D2502/2504 G2
HP D2D4004/4009 and HP D2D2502/3/4 G1
The P400 card has one BBWC.
26 Battery/Flash Backed Write Cache (BBWC or FBWC) module failures
Page 27

Figure 22 BBWC battery and P400 card
BBWC1
cable that connects the BBWC to the P400 controller2
HP D2D4112 G1
The P800 RAID controller is fitted with two batteries. The two BBWCs are aligned as a single unit
in the battery clip.
IMPORTANT: Refer to the HP Smart Arrays for HP ProLiant Servers User Guide for the latest,
detailed instructions on replacing a P800 cache battery and carefully follow the Caution and
Warning advice.
Figure 23 BBWC battery and P800 card
BBWCs1
Procedure
1. Remove the cover from the HP D2D Backup System, as described in the appropriate HP ProLiant
Maintenance and Service guide, and locate the battery (see previous section).
2. Look at the LEDs on the battery. If LED 3 is steady, the battery must be replaced. It may also
need replacing if it is blinking amber and there is no activity on LED 4.
Replacing the battery/flash capacitor module 27
Page 28

Figure 24 Location of LEDS on the BBWC
NOTE: For a detailed description of the LEDs, refer to the “HP Smart Arrays for HP ProLiant
Servers user guide”.
3. Follow the instructions in the “HP Smart Arrays for HP ProLiant Servers user guide” to remove
and dispose of the old battery and to replace it with the new one.
4. Replace the cover and power up the HP D2D. Check the status of the battery on the Summary
page. If the system does not power up, the associated RAID card may need replacing.
28 Battery/Flash Backed Write Cache (BBWC or FBWC) module failures
Page 29

5 The HP SmartArray P410i and P812/P411 RAID
controllers and HP SAS expander card (HP D2D4324
and 4312)
Overview
HP D2D4324
The HP D2D4324 has four RAID controllers.
• The P410i RAID controller is integral to the DL370G6 motherboard and is used to control the
12 hard disk drives internal to the HP D2D4324 via the HP SAS Expander card in slot 1. The
RAID controller is fitted with I GB RAM and one FBWC (flash backed write cache).
• The three P812 cards are used to connect the external storage shelves to the HP D2D4324
and are located in PCI-e slots 4, 5 and 6. Each card is fitted with 1024 MB RAM and one
FBWC (flash backed write cache).
NOTE: If you replace a motherboard with integral P410i card, you must add the RAID 6 license
for the card, as described in the relevant sections below.
Figure 25 HP D2D4324, location of the P812 controller and HP SAS expander card
WARNING! To reduce the risk of personal injury or damage to the equipment, consult the safety
information and user documentation provided with the server and RAID controllers before attempting
the installation.
HP D2D4312
The HP D2D4312 has three RAID controllers.
• The P410i RAID controller is integral to the DL370G6 motherboard and is used to control the
12 hard disk drives internal to the HP D2D4312 via the HP SAS Expander card in slot 1. The
RAID controller is fitted with 512 MB RAM and one BBWC (battery backed write cache).
• The two P411 cards are used to connect the external storage shelves to the D2D 4312 and
are located in PCI-e slots 5 and 6. Each card is fitted with 512 MB RAM and one BBWC
(battery backed write cache).
NOTE: If you replace a motherboard with integral P410i card, or a P411 card, you must add
the RAID 6 license for the card, as described in the relevant sections below.
2 HP SAS expander card1 P812 RAID controllers
Overview 29
Page 30

Figure 26 HP D2D4312, location of the P411 controller and HP SAS expander card
WARNING! To reduce the risk of personal injury or damage to the equipment, consult the safety
information and user documentation provided with the server and RAID controllers before attempting
the installation.
Part numbers
The P410i card is integral to the motherboard, which is the standard motherboard.
The required part for the P812 card is: HP Smart Array P812/1024 MB with FBWC Controller:
487204-B21
The required part for the P411 card is: HP Smart Array P411/512 MB with BBWC Controller:
462832-B21
3 HP SAS expander card1 and 2 P411 RAID controllers
Identifying a RAID contoller failure
RAID card failures are reported in the Log and in email alerts, if you have set them up. For example:
cache module failure.
You can identify which card has failed by looking at the Storage-RAID pages of the Web
Management Interface. The P410i card is identified as “internal”; the P812 or P411 cards are
identified by their slot number in the Controllers section. Any issues with logical units on this page
also indicate a problem.
If the HP SAS expander card is at fault, disks will not be visible on the Storage-Shelves tab
NOTE: If RAID fails and the HP D2D Backup System is still functioning, you can also get
information, including license keys, by generating a Support ticket (from the Administration-Support
web page).
Before replacing a RAID controller — a note about licenses
The Smart Array Advanced Pack (SAAP) is required to enable RAID 6 support. You must reinstate
the SAAP license, if you replace the motherboard/P410i on the HP D2D4324 or HP D2D4312
products or if you replace one of the P411 cards on an HP D2D4312 product. (You do not need
to reinstate the license, if you replace one of the P812 cards on an HP D2D4324 product.)
If you do not reinstate the license, the system will experience one of the following symptoms :
• Very slow product performance (Running as RAID 5 access to the disks, if the arrays had not
failed themselves)
• Refusal to create the storage (if the storage arrays have failed and need to be rebuilt from
scratch)
NOTE: It is not necessary to reinstate the license with the P812 card.
30 The HP SmartArray P410i and P812/P411 RAID controllers and HP SAS expander card (HP D2D4324 and 4312)
Page 31

The units are shipped with paper copies of the SAAP license. If you no longer have this license
and the board is still working, make a note of the license before you replace the motherboard. If
it is not working, contact HP Support.
1. Reboot the system.
2. During the POST screen, when advised, hit any key to see further messages.
3. Enter the Smart Array POST ORCA utility by pressing [F8] when advised during the POST
messages.
4. Select the Manage Licenses option in the Smart Array menu, and then select View Licenses.
5. Make a note of the licence key reported. This key is unique to the system and can be used
for any replacement Smart Array card (or HP D2D4312 motherboard).
P410i controller failure (HP D2D4324 and D2D4312)
If the P410i card fails, you must replace the motherboard.
IMPORTANT: When replacing the motherboard/P410i controller be sure to always replace cards
into the same slot from which they were removed. See also the rear view drawings in Chapter 1.
Make sure the card is connected to its cache module. (Follow the cables back to identify to which
card each battery is connected.)
Replace the P410i card as described in the appropriate Maintenance and Service guide and then
reinstate the SAAP license.
1. Reboot the system.
2. During the POST screen, when advised, hit any key to see further messages.
3. Enter the Smart Array POST ORCA utility by pressing [F8] when details for the P410i card
are displayed.
4. Select the Manage Licenses option in the Smart Array menu, and then select Install Licenses.
5. Enter the licence key previously noted.
P411 controller failure (HP D2D4312)
IMPORTANT: When replacing the P411 controller be sure to always replace cards into the same
slot from which they were removed. See also the rear view drawings in Chapter 1. Make sure the
card is connected to the BBWC. (Follow the cables back to identify to which card each battery is
connected.)
1. Power off the HP D2D Backup System. Remove the cover from the HP D2D, as described in
the appropriate HP ProLiant Maintenance and Service guide, and locate the P411 controllers
in PCI-e slots 5 and 6.
NOTE: The LEDs on the P411 controller card provide diagnostic information when the unit
is powered on. For a detailed description of these LEDs, refer to the “HP Smart Arrays for HP
ProLiant Servers user guide”.
2. Unclip the blue PCIe card retaining latch and remove the PCIe card.
3. Install the new P411 card and check that it is seated properly. Close the blue PCIe card
retaining latch.
4. Replace the cover, as described in the appropriate HP ProLiant Maintenance and Service
guide, and power on the HP D2D Backup System.
P410i controller failure (HP D2D4324 and D2D4312) 31
Page 32

5. Install the SAAP license.
a. Reboot the system.
b. During the POST screen, when advised, hit any key to see further messages.
c. Enter the Smart Array POST ORCA utility by pressing [F8] when details for the P411 card
are displayed during the POST messages.
d. Select the Manage Licenses option in the Smart Array menu, and then select Install Licenses.
e. Enter the licence key previously noted.
P812 controller failure (HP D2D4324)
IMPORTANT: When replacing the P812 controller be sure to always replace cards into the same
slot from which they were removed. See also the rear view drawings in Chapter 1. The FBWC is
an integral part of the card.
1. Power off the HP D2D Backup System. Remove the cover from the HP D2D, as described in
the appropriate HP ProLiant Maintenance and Service guide, and locate the P812 controllers
in PCI-e slots 4, 5 and 6.
NOTE: The LEDs on the P812 controller card provide diagnostic information when the unit
is powered on. For a detailed description of these LEDs, refer to the “HP Smart Arrays for HP
ProLiant Servers user guide”.
2. Unclip the blue PCIe card retaining latch and remove the PCIe card.
3. Install the new P812 card and check that it is seated properly. Close the blue PCIe card
retaining latch.
4. Replace the cover, as described in the appropriate HP ProLiant Maintenance and Service
guide, and power on the HP D2D Backup System.
HP SAS expander card (HP D2D4324 and D2D4312)
If no disks are showing on the Storage-Shelves page of the D2D Web Management Interface, there
may be a problem with the HP SAS expander card.
The part number for a replacement card is: 468405–001. It must be installed in PCI-e slot 1.
Mini-SAS cables (part numbers 493228–005 and 493228–006) connect the expander card to
the hard disk drive backplane, as described in the following table. SAS cables are also connected
from the motherboard to the SAS expander card
NOTE: Tuck the mini-SAS cables to be routed to the backplane into the side of the chassis. Loop
the SAS cables to connect to the motherboard in the void.
Table 7 Cabling to HP SAS expander card (HP D2D4312)
Port 2C on SAS expander card493228–006 mini-SAS cable1
Port 4C on SAS expander card493228–005 mini-SAS cable3
SAS cable5
motherboard
ToFrom.Connect
Bottom right HDD backplane
connector
Top right HDD backplane connectorPort 3C on SAS expander card493228–006 mini-SAS cable2
Bottom left HDD backplane
connector
Top left HDD backplane connectorPort 5C on SAS expander card493228–005 mini-SAS cable4
Port 8C on the SAS expander cardConnector A (left) on the
SAS cable6
motherboard
32 The HP SmartArray P410i and P812/P411 RAID controllers and HP SAS expander card (HP D2D4324 and 4312)
Port 9C on the SAS expander cardConnector B (right) on the
Page 33

Figure 27 Cabling showing the SAS expander card
Figure 28 Cabling showing the backplanes
HP SAS expander card (HP D2D4324 and D2D4312) 33
Page 34

6 The HP SmartArray P212 RAID controller (HP D2D2502
G2, 2504 G2, 4106 G2, 4112 G2)
Overview
The following G2 HP D2D Backup Systems use the HP SmartArray P212 RAID controller fitted with
512 MB RAM and BBWC (battery backed write cache).
• HP D2D2502 G2
• HP D2D2504 G2
• HP D2D4106 G2
• HP D2D4112 G2
NOTE: If you replace a P212 card in an HP D2D4106/4112, you must also add the RAID 6
license for the new card, as described in the relevant sections below.
Figure 29 HP D2D4106/4112 G2 models, location of the P212 controller
1 RAID controller
Figure 30 HP D2D2502/2504 G2 models, location of the P212 controller
1 RAID controller
WARNING! To reduce the risk of personal injury or damage to the equipment, consult the safety
information and user documentation provided with the server and P212 controller before attempting
the installation.
Part numbers
The required parts are:
• HP Smart Array P212/Zero Memory Controller, part number 462828-B21
• 512 MB BBWC -Cache and BBWC, part number 462967-B21
Identifying a RAID contoller failure
NOTE: There are eight LEDs on the P212 controller card that provide diagnostic information
when the unit is powered on. For a detailed description of these LEDs, refer to the “HP Smart Arrays
for HP ProLiant Servers user guide”.
34 The HP SmartArray P212 RAID controller (HP D2D2502 G2, 2504 G2, 4106 G2, 4112 G2)
Page 35

P212 card failures are likely to occur only during power down or power up. Failure means that
the P212 card is unable to mount the RAID array. Status messages on the Web Management
Interface will advise that:
• Summary page: RAID catastrophically failed
• Storage—RAID page (HP D2D4106/4112): RAID device is not available. Any
issues with logical units on this page also indicate a problem.
• RAID page (HP D2D2502/2504): RAID device is not available
RAID card failures are also reported in the Log and in email alerts, if you have set them up. For
example: cache module failure.
NOTE: If RAID fails and the HP D2D Backup System is still functioning, you can also get
information, including license keys, by generating a Support ticket (from the Administration-Support
web page).
Before replacing a RAID controller — a note about licenses
NOTE: HP D2D2502/2504 G2 products do not require the SAAP license, since they operate
in RAID 5 mode.
The Smart Array Advanced Pack (SAAP) is required to enable RAID 6 support. You must reinstate
the SAAP license, if you replace the P212 cards on an HP D2D4106/4112 G2 product. If you
do not, the system will experience one of the following symptoms :
• Very slow product performance (Running as RAID 5 access to the disks, if the arrays had not
failed themselves)
• Refusal to create the storage (if the storage arrays have failed and need to be rebuilt from
scratch)
The units are shipped with paper copies of the SAAP license. If you no longer have this license
and the board is still working, make a note of the license before you replace the faulty SmartArray
card. If it is not working, contact HP Support.
1. Reboot the system.
2. During the POST screen, when advised, hit any key to see further messages.
3. Enter the Smart Array POST ORCA utility by pressing [F8] when the details for the RAID
controller are displayed during the POST messages.
4. Select the Manage Licenses option in the Smart Array menu, and then select View Licenses.
5. Make a note of the licence key reported. This key is unique to the system and can be used
for any replacement Smart Array card.
Replacing the HP Smart Array P212 controller
IMPORTANT: When replacing the P212 controller be sure to always replace the card into the
same full-height slot from which it was removed. Make sure the card is connected to the BBWC.
1. Check first that the P212 controller is seated properly and the cable to the BBWC is secure.
2. Make sure the HP D2D is powered off and, observing the safety and antistatic procedures
documented in the HP ProLiant and HP Smart Arrays for HP ProLiant Servers user guides,
remove the cover and PCI cage from the HP D2D and disconnect the failed card from the
cable. Replace it with the new card (1) and secure it to the bracket (2).
Before replacing a RAID controller — a note about licenses 35
Page 36

Figure 31 Inserting a P212 card into an HP D2D4106/4112
Figure 32 Inserting a P212 card into an HP D2D2502/2504
3. Reconnect the card to the existing BBWC cable. (If preferred, replace the BBWC cable with
the one supplied with the replacement card.)
4. Check that the P212 controller is seated properly and the cable to the BBWC is secure.
5. Replace the PCI cage and cover, as described in the appropriate HP ProLiant Maintenance
and Service guide, and power on the HP D2D Backup System.
6. HP D2D4106/4112 Backup Systems only: Reinstate the SAAP license.
a. Reboot the system.
b. During the POST screen, when advised, hit any key to see further messages.
c. Enter the Smart Array POST ORCA utility by pressing [F8] when details for the P212 card
are displayed during the POST messages.
d. Select the Manage Licenses option in the Smart Array menu, and then select Install Licenses.
e. Enter the licence key previously noted.
36 The HP SmartArray P212 RAID controller (HP D2D2502 G2, 2504 G2, 4106 G2, 4112 G2)
Page 37

7 The HP SmartArray P400 RAID controller
(D2D4004/4009/2500 G1)
Overview
The following HP D2D Backup Systems use the HP SmartArray P400 RAID controller fitted with
512 MB RAM and one BBWC (battery backed write cache).
• HP StoreOnce D2D4004 and D2D4009 G1
• HP StoreOnce D2D2500 series (HP D2D2502/3/4) G1
IMPORTANT: The HP D2D4112 G1 Backup System uses the HP SmartArray P800 RAID controller
and has two RAID batteries. It is described in The HP SmartArray P800 RAID Controller (page 40).
Figure 33 HP D2D4004 and HP D2D4009, location of the P400 controller
1 RAID controller
2 optional Tape Attach SAS or SCSI card
3 Fibre Channel card (if fitted)
Figure 34 HP D2D2500 series, location of the RAID controller
1 RAID controller
2 optional Tape Attach SAS or SCSI card
WARNING! To reduce the risk of personal injury or damage to the equipment, consult the safety
information and user documentation provided with the server and P400 controller before attempting
the installation.
Part numbers
The component parts have the following part numbers:
• P400 card: 441823–001
• 512 MB memory: 405835–001
• BBWC: 398648–001
• BBWC cable assembly: 409125–001
Overview 37
Page 38

P400 controller failure
Identifying a P400 card failure
P400 card failures are likely to occur only during power down or power up. Failure means that
the P400 card is unable to mount the RAID array. Status messages on the Web Management
Interface will advise that:
• Summary page: RAID catastrophically failed
• RAID page: RAID device is not available
Replacing the HP Smart Array P400 controller
Replacement cards are supplied with a cable to connect the P400 controller to the BBWC, but this
cable is too short for use in the HP D2D. It is normally sufficient to replace the P400 controller
and/or battery, leaving the existing cable that connects the card to the BBWC in place. If the
existing cable is damaged (for example, bent pins), you must order a separate replacement cable.
1. Power off the HP D2D backup System. Remove the cover and PCI cage from the HP D2D, as
described in the appropriate HP ProLiant Maintenance and Service guide, and locate the
P400 controller.
2. Check that the P400 controller is seated properly and the cable to the BBWC is secure.
NOTE: There are eight LEDs on the P400 controller card that provide diagnostic information
when the unit is powered on. For a detailed description of these LEDs, refer to the “HP Smart
Arrays for HP ProLiant Servers user guide”.
Figure 35 Location of LEDs on the P400 controller card
3. Make sure the HP D2D is powered off and, observing the safety and antistatic procedures
documented in the HP ProLiant and HP Smart Arrays for HP ProLiant Servers user guides,
disconnect the failed card from the cable. Replace it with the new card (1) and secure it to
the bracket (2).
38 The HP SmartArray P400 RAID controller (D2D4004/4009/2500 G1)
Page 39

Figure 36 Inserting a P400 card
4. Reconnect the card to the existing BBWC cable. Do not use the cable supplied with the
replacement card. It is not long enough to connect to the BBWC.
5. Replace the PCI cage and cover, as described in the appropriate HP ProLiant Maintenance
and Service guide, and power on the HP D2D Backup System.
Replacing the HP Smart Array P400 controller 39
Page 40

8 The HP SmartArray P800 RAID controller (HP D2D4112
G1 only)
Overview
The HP StoreOnce D2D4112 G1 Backup System uses the HP SmartArray P800 RAID controller
fitted with 512 MB RAM and two BBWCs (battery backed write cache).
IMPORTANT: The HP D2D4004, 4009 and 2500 Series G1 Backup Systems use the HP
SmartArray P400 RAID controller and have one RAID battery. They are described in The HP
SmartArray P400 RAID Controller (page 37).
Figure 37 HP D2D4112 G1, location of the P800 controller
1 RAID controller
2 optional Tape Attach SAS or SCSI card
3 Fibre Channel card
WARNING! To reduce the risk of personal injury or damage to the equipment, consult the safety
information and user documentation provided with the server and P800 controller before attempting
the installation.
Part numbers
The replacement kit has a part number of 381513–B21. The component parts have the following
part numbers:
• P800 card: 398647-001
• 512 MB memory: 398645–001
• BBWC: 398648–001
P800 controller failure
Identifying a P800 card failure
P800 card failures are likely to occur only during power down or power up. Failure means that
the P800 card is unable to mount the RAID array. Status messages on the Web Management
Interface will advise that:
• Summary page: RAID catastrophically failed
• Storage page, RAID tab: RAID device is not available
40 The HP SmartArray P800 RAID controller (HP D2D4112 G1 only)
Page 41

Replacing the HP Smart Array P800 controller
For detailed instructions on replacing the P800 controller, refer to “HP Smart Arrays for HP ProLiant
Servers User Guide”. The replacement P800 controller is supplied without the BBWC batteries.
The BBWCs must be removed from the failed board and installed on the replacement board.
Instructions for doing this are also provided in the user guide.
NOTE: There are ten LEDs on the P800 controller card that provide diagnostic information when
the unit is powered on. For a detailed description of these LEDs, refer to “HP Smart Arrays for HP
ProLiant Servers User Guide”.
Figure 38 Location of LEDs on the P800 controller card
Replacing the HP Smart Array P800 controller 41
Page 42

Support and other resources
Related documentation
In addition to this guide, the following documents provide related information:
• ‘Start here' poster for an overview of the HP D2D (available in English, French, German and
Japanese)
• HP D2D Backup System user guide
• HP D2D Backup System concepts guide
• HP D2D Backup System installation and configuration guide
• HP Smart Arrays for HP ProLiant user guide
• HP ProLiant DL370 G6 Maintenance and Service guides
• HP ProLiant DL180 G6 and DL160 G6 Maintenance and Service guides
• HP ProLiant DL185 G5 and DL165 G5 Maintenance and Service guides
• HP D2D4100 Series and D2D4300 Series Backup System Capacity Upgrade Kit Installation
Instructions
• HP StoreOnce D2D Backup System Best Practices for Performance Optimization
You can find these documents from the Manuals page of the HP Business Support Center website:
http://www.hp.com/support/manuals
In the Storage section, click Storage Solutions and then select your product.
Document conventions and symbols
Bold text
Monospace text
WARNING! Indicates that failure to follow directions could result in bodily harm or death.
ElementConvention
Cross-reference links and e-mail addressesBlue text: ???
Website addressesBlue, underlined text: http://www.hp.com
• Keys that are pressed
• Text typed into a GUI element, such as a box
• GUI elements that are clicked or selected, such as menu
and list items, buttons, tabs, and check boxes
Text emphasisItalic text
• File and directory names
• System output
• Code
• Commands, their arguments, and argument values
42
CAUTION: Indicates that failure to follow directions could result in damage to equipment or data.
IMPORTANT: Provides clarifying information or specific instructions.
NOTE: Provides additional information.
Page 43

HP technical support
For worldwide technical support information, see the HP support website:
http://www.hp.com/support
Before contacting HP, collect the following information:
• Product model names and numbers
• Technical support registration number (if applicable)
• Product serial numbers
• Error messages
• Operating system type and revision level
• Detailed questions
Customer self repair
HP customer self repair (CSR) programs allow you to repair your HP product. If a CSR part needs
replacing, HP ships the part directly to you so that you can install it at your convenience. Some
parts do not qualify for CSR. Your HP-authorized service provider will determine whether a repair
can be accomplished by CSR.
For more information about CSR, contact your local service provider, or see the CSR website:
http://www.hp.com/go/selfrepair
Subscription service
HP recommends that you register your product at the Subscriber's Choice for Business website:
http://www.hp.com/go/e-updates
After registering, you will receive e-mail notification of product enhancements, new driver versions,
software updates, and other product resources.
HP websites
For additional information, see the following HP websites:
• http://www.hp.com
• http://www.hp.com/go/storage
• http://www.hp.com/go/connect
• http://www.hp.com/go/ebs
• http://www.hp.com/service_locator
• http://www.hp.com/support/manuals
Documentation feedback
HP welcomes your feedback.
To make comments and suggestions about product documentation, please send a message to
storagedocsFeedback@hp.com. All submissions become the property of HP.
HP technical support 43
 Loading...