

Page 1

HP StorageWorks
HP D2D4100 Series and D2D4300 Series
Backup System Capacity Upgrade Kit
Installation Instructions
*EH986-90901*
HP Part Number: EH986-90901
Published: February 2011
Edition: Third
Page 2

© Copyright 2011 Hewlett-Packard Development Company, L.P.
The information contained herein is subject to change without notice. The only warranties for HP products and services are set forth in the express
warranty statements accompanying such products and services. Nothing herein should be construed as constituting an additional warranty. HP shall
not be liable for technical or editorial errors or omissions contained herein.
Printed in the US.
Page 3

Contents
1 Capacity Upgrade......................................................................................4
Introduction..............................................................................................................................4
Planning for the Capacity Upgrade.............................................................................................5
An overview of the capacity upgrade process..........................................................................5
Front and rear views of the Capacity Upgrade Kit.........................................................................6
2 Installing and connecting the Capacity Upgrade Kit........................................7
Installing the rails and the Capacity Upgrade Kit..........................................................................7
Connecting the Capacity Upgrade Kit to the HP D2D Backup System..............................................8
HP D2D4100 Series.............................................................................................................8
HP D2D4300 Series.............................................................................................................9
3 Applying the license and completing the RAID expansion..............................11
Applying the LTU....................................................................................................................11
Completing the RAID expansion...............................................................................................12
What happens during the expansion process?.......................................................................12
Troubleshooting......................................................................................................................13
Contents 3
Page 4
1 Capacity Upgrade
Introduction
The Capacity Upgrade Kit increases the storage capacity of your HP D2D Backup System. Three
Capacity Upgrade Kits are available. Be sure to order the correct kit for your system:
• HP D2D4324 Backup System Capacity Upgrade Kit: This consists of an enclosure with 12 x 2
TB disks and two cables, and is for use with the HP D2D4324 Backup System. The second
cable is a longer cable that is suitable for connecting to an HP D2D4324 that already has
upgrade kits installed.
• HP D2D4112/D2D4312 Backup System Capacity Upgrade Kit: This consists of an enclosure
with 12 x 1 TB disks and two cables, and is for use with both the HP D2D4112 and the HP
D2D4312 Backup System. The second cable is a longer cable that is suitable for connecting
to an HP D2D4312 that already has upgrade kits installed.
• HP D2D4106 Backup System Capacity Upgrade Kit: This kit consists of an enclosure with 12
x 500 GB disks and one cable, and is for use with the HP D2D4106 Backup System only.
NOTE: A maximum of three Capacity Upgrade Kits may be installed with the HP D2D4300
Series (HP D2D4312 and HP D2D4324 Backup System); only one Capacity Upgrade Kit may be
installed with the HP D2D4100 Series (HP D2D4106 and HP D2D4112 Backup System).
The Capacity Upgrade Kit is installed on rails as a separate shelf immediately above or below the
HP D2D Backup System. Shelf is used as a term within the D2D Web Management Interface to
identify the 12–disk physical storage space provided by the HP D2D Backup System (Shelf 0 or
Internal) and the Capacity Upgrade Kit (Shelf 1 with the HP D2D4100 Series or Shelves 1/2/3
with the HP D2D4300 Series). This is also displayed pictorially on the Summary page of the Web
Management Interface.
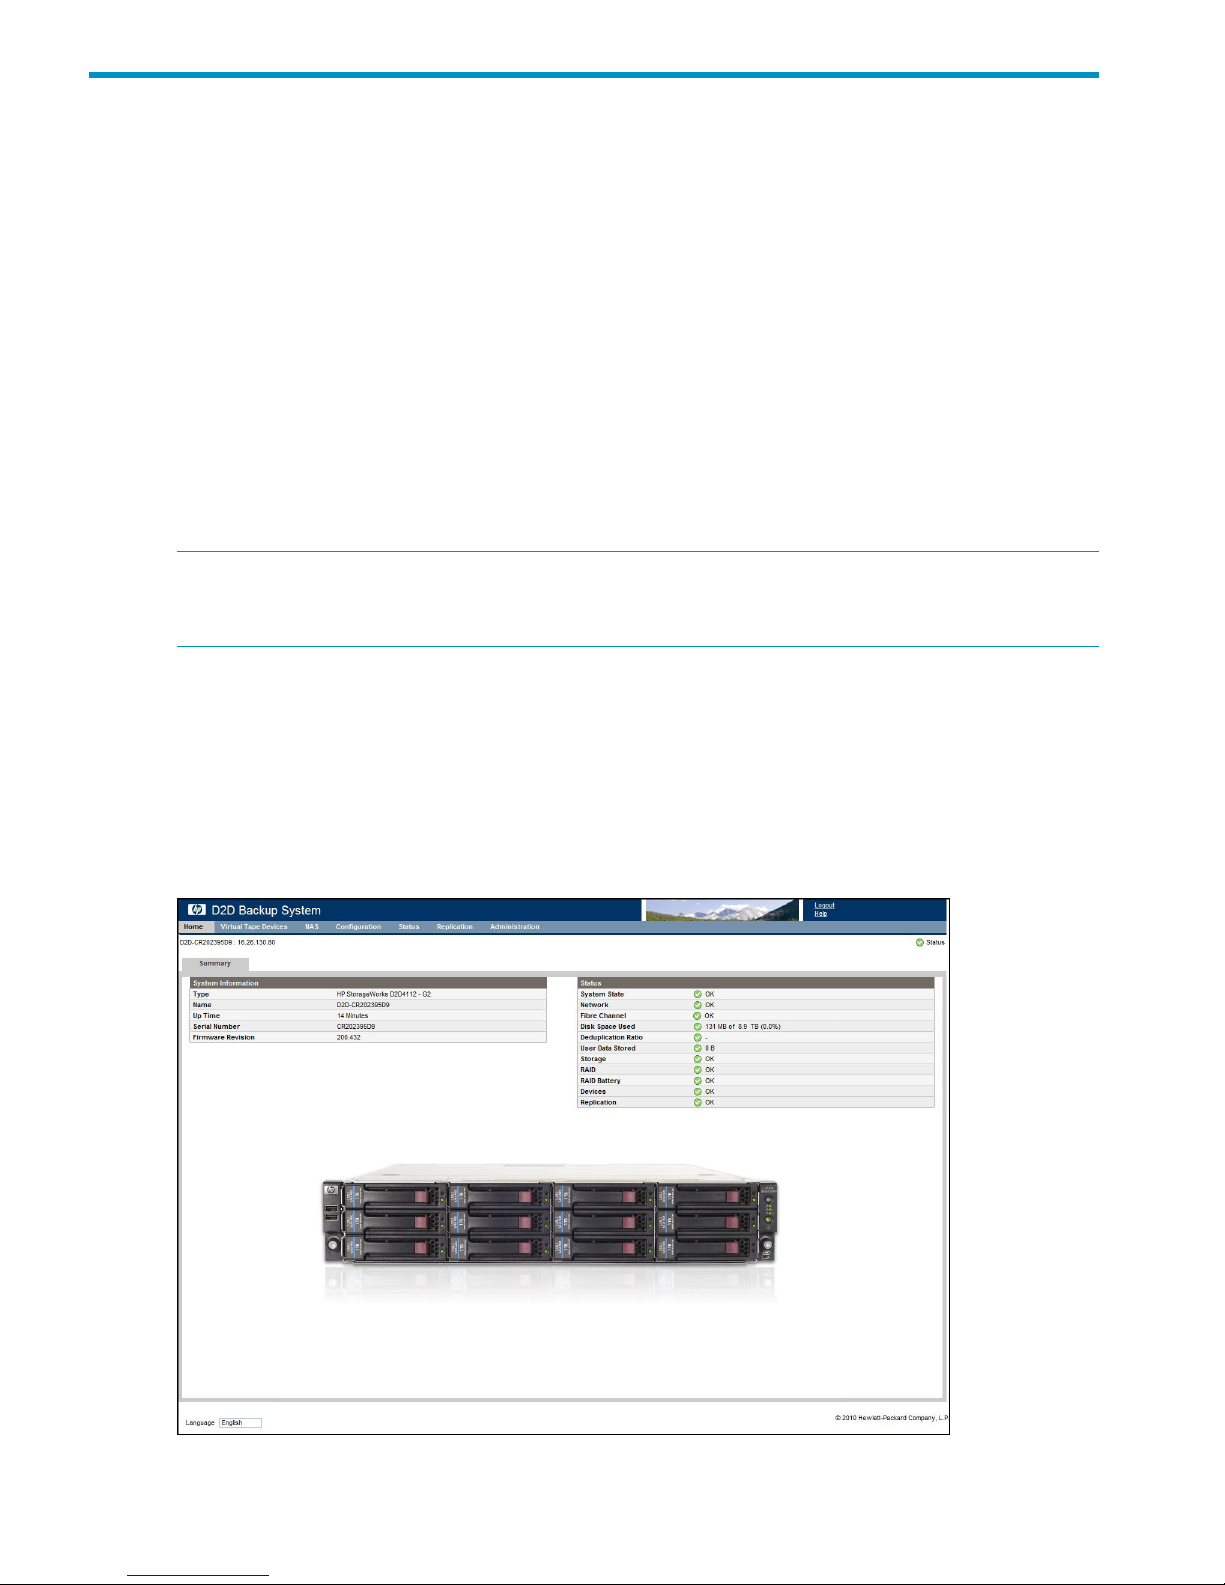
The following example shows the Summary screen for an HP D2D4112 Backup System that has
a single shelf with 12 disks.
4 Capacity Upgrade
Page 5

The following example shows the Summary screen after the Capacity Upgrade Kit has been installed
and the HP D2D Backup System has two shelves with 24 disks.
Planning for the Capacity Upgrade
IMPORTANT: The HP D2D Backup System will be offline while the Capacity Upgrade Kit is
installed and the expansion process is completed to expand to the increased shelf capacity. This
means that the HP D2D Backup System cannot be used for backup or replication during the
expansion process.
It is important to allow sufficient downtime for the expansion process to complete. Depending upon
the amount of data on the original system, this can take from 5 minutes to more than 12 hours to
complete with the HP D2D4100 Series. With the HP D2D4300 Series, it could be considerably
longer (up to 36 hours) depending upon the shelf configuration and the amount of data.
Make sure that host users are aware that the system will not be available for backup and restore
and check to see how any scheduled jobs, such as replication and tape backup, may be affected.
An overview of the capacity upgrade process
1. Install the rails for the Capacity Upgrade Kit, which should be located directly below or above
the HP D2D Backup System (Shelf 0 or Internal), see Chapter 2.
2. Install the Capacity Upgrade Kit (HP D2D4100 Series: Shelf 1 or HP D2D4300 Seies: Shelf
1/2/3), see Chapter 2.
3. Connect the Capacity Upgrade Kit (HP D2D4100 Series: Shelf 1 or HP D2D4300 Series:
Shelf 1/2/3) to the HP D2D Backup System (Shelf 0 or Internal), see Chapter 2.
4. Power on the Capacity Upgrade Kit, see Chapter 2.
5. Make sure you know both the HP entitlement order number (supplied with the Capacity Upgrade
Kit) and the HP D2D serial number (found on the label on the top of the unit). Obtain a License
To Use (LTU) from the HP Licensing website, see Chapter 3. If you are installing several upgrade
kits with an HP D2D4300 Series Backup System, be sure to obtain all LTUs before step 6.
6. Using the HP D2D Web Management Interface, as described in Chapter 3:
Planning for the Capacity Upgrade 5
Page 6

Add the license(s)•
• Expand the capacity of the HP D2D Backup System
IMPORTANT: When connecting multiple upgrade kits to an HP D2D4300 Series Backup System,
add all licenses before expanding the capacity of the HP D2D. This ensures that the expansion
process occurs once only and reduces the amount of time that the system is unavailable for backup
and restore.
Front and rear views of the Capacity Upgrade Kit
Figure 1 Front view of the Capacity Upgrade Kit
3. UID push button and LED1. Rack-mounting thumbscrews
4. Enclosure status LEDs2. Disk drive (in bay 4)
Figure 2 Rear view of the Capacity Upgrade Kit
3. P1 connector (connects to RAID card)1. I/O module A
2. I/O module B
6 Capacity Upgrade
Page 7

2 Installing and connecting the Capacity Upgrade Kit
Installing the rails and the Capacity Upgrade Kit
The Capacity Upgrade Kit should be installed directly below or above the HP D2D Backup System.
The HP 2U Rack Rail Kit installation instructions (shipped with the rail kit) details the process of
racking a disk enclosure.
Sections include:
• Installation guidelines with warnings and safety information
• Installation procedures
IMPORTANT: Be sure to read the installation guidelines on the poster carefully before installing
the rails and the Capacity Upgrade Kit. They provide important safety information.
WARNING! Ensure that sufficient personnel are on hand to support the product(s) during the
installation process. Use of the appropriate lifting device is recommended as an installation aid.
1. Position left and right rack rails at the desired 'U' position in the rack, adjusting the rails to fit
the rack, as needed (1).
2. Secure rack rails to the front and back rack columns using screws. Make sure that the shoulders
of the screws fit inside the square or round holes of the rack (2).
NOTE: If installing rails in a square hole rack, use larger-sized shoulder screws and pins for
mounting. If installing rails in a round hole rack, use smaller-sized shoulder screws and pins
for mounting.
3. Slide the device into position on the rails (1) and then tighten the thumbscrews (2) on the front
of the device to secure the device to the rack. It should be immediately above or immediately
below the HP D2D Backup System.
Installing the rails and the Capacity Upgrade Kit 7
Page 8

NOTE: The rear ends of the rails have a bracket that must engage the device chassis to
secure the rear of the chassis to the rails.
4. When cabling the device, use holes provided in the rear rack rails, install tie wraps, and route
external cable as required.
Connecting the Capacity Upgrade Kit to the HP D2D Backup System
HP D2D4100 Series
1. To ensure correct keying, first connect the supplied cable to the P1 connector on the top I/O
module (I/O-A) on the rear of the Capacity Upgrade Kit.
NOTE: Always use the P1 connector; do not use the P2 connector.
2. Connect the other end of the cable to the port labeled "Port 1E" on the RAID PCI-e card on
the rear of the HP D2D Backup System.
3. Use the supplied power cords to connect the Capacity Upgrade Kit to the mains power supply.
Figure 3 Cabling the Capacity Upgrade Kit to the HP D2D4112 Backup System
2. P1 connector (on I/O-A)1. Power connectors
4. Port 1E connector3. Power on/off button
4. Power on the Capacity Upgrade Kit. You may need to hold down the power on button for a
few seconds.
8 Installing and connecting the Capacity Upgrade Kit
Page 9

HP D2D4300 Series
WARNING! Daisy-chaining Capacity Upgrade Kits is not supported. Each Capacity Upgrade
Kit must be directly connected to one of the RAID cards on the HP D2D4300 Backup System. Each
kit is supplied with two cables; the longer cable is suitable for connecting lower shelves as shown
in the figure below.
1. To ensure correct keying, first connect the supplied cable to the P1 connector on the top I/O
module (I/O-A) on the rear of the Capacity Upgrade Kit.
NOTE: Always use the P1 connector; do not use the P2 connector.
2. Connect the other end of each cable to the connector on the RAID card.
HP D2D4324 Backup System
This product has three RAID cards and there are four connectors on each card. Always use
the top connector (port 1E) and never connect more than one shelf to the RAID card. Only
three expansion shelves may be connected.
Figure 4 Cabling the Capacity Upgrade Kit to the HP D2D4324 Backup System
2. P1 connector (on I/O-A)1. Power connectors
4. Port connector on RAID card3. Power on/off button
HP D2D4312 Backup System
This product has two RAID cards and there are two connectors on each card. It does not matter
which connectors are used, but only three expansion shelves may be connected.
Connecting the Capacity Upgrade Kit to the HP D2D Backup System 9
Page 10

Figure 5 Cabling the Capacity Upgrade Kit to the HP D2D4312 Backup System
2. P1 connector (on I/O-A)1. Power connectors
4. Port connector on RAID card3. Power on/off button
3. Use the supplied power cords to connect the Capacity Upgrade Kit(s) to the mains power
supply.
4. Power on the Capacity Upgrade Kit(s). You may need to hold down the power on button on
each installed shelf for a few seconds.
10 Installing and connecting the Capacity Upgrade Kit
Page 11

3 Applying the license and completing the RAID expansion
Applying the LTU
To increase the capacity of your HP D2D Backup System with the Capacity Upgrade Kit you must
first obtain a permanent License To Use (LTU) from the HP Licensing website and then use the HP
D2D’s Web Management Interface to apply the LTU, activate the additional capacity and complete
the licensing process. Go to the HP Licensing website at http://www.webware.hp.com and follow
the instructions to obtain the LTU. You will also find instructions in the License pack.
IMPORTANT: When connecting multiple upgrade kits to an HP D2D4300 Series appliance, add
all licenses before expanding the capacity of the HP D2D. This ensures that the expansion process
occurs once only and reduces the amount of time that the system is unavailable for backup and
restore.
To apply the LTU(s):
1. Log on to the Web Management Interface and select the Licenses web page from
Administration.
2. If you have saved the LTU as a .DAT file, click Upload license file and use the Browse option
to locate the file. Click Upload.
If you used email or a temporary file, cut and paste the string exactly as you obtained it from
the HP Licensing website and click Enter LTU string. It is not advised to try and key in the LTU
manually.
3. The second shelf is now licensed and enabled, but the RAID has not yet been expanded.
4. HP D2D4300 Series only: If you have connected multiple shelves, repeat this process to add
all licenses.
Applying the LTU 11
Page 12

Completing the RAID expansion
NOTE: HP D2D4300 Series only: All shelves that have been licensed are included in the expansion
process. Be sure to apply the licenses for all shelves before running the expansion process.
1. Go to the Status-Storage page on the HP D2D’s Web Management Interface and select the
Storage Pool tab.
2. Click Add in the Configured Shelves section. A warning is displayed that all devices on the
HP D2D Backup System will be temporarily offline. Click OK to continue. All existing libraries
and data are preserved during the expansion process.
IMPORTANT: It can take from 5 minutes up to 12 hours to complete the expansion process,
depending upon the amount of data on the HP D2D Backup System. (HP D2D4300 Series
systems with multiple shelves may require considerably longer, up to 36 hours, depending
upon existing shelf configuration and the amount of data.) The devices remain offline during
the expansion process. No backup, replication or tape attach scheduled jobs can occur.
What happens during the expansion process?
There are a number of stages to the expansion process and these are clearly reported on the
Summary page (in the Storage and RAID fields in the Status section) and all the Storage pages.
1. The HP D2D Backup System prepares the additional storage.
2. The storage goes offline.
3. The HP D2D Backup System transfers data to the additional storage.
4. The HP D2D Backup System expands the original storage.
5. The HP D2D Backup System reboots.
6. The HP D2D Backup System starts the storage.
7. The RAID is optimized.
12 Applying the license and completing the RAID expansion
Page 13

NOTE: At this point the storage is available and the devices on the HP D2D are back online,
they may be used for backup, replication and tape attach. However, performance is reduced
until the RAID is fully optimized. You will see a message, “RAID operational but not
yet optimised”, if you look at the Storage Pool, RAID or Shelves page. The RAID page
also provides details for the logical units and a % completion value. See the “HP D2D Backup
System User Guide” for more information about these fields.
8. Once the optimization has completed, the new shelf or new shelves (HP D2D4300 Series
only) are shown as configured on all the Storage pages.
Troubleshooting
If the D2D Backup System cannot see the newly-connected shelf(ves), use the Discover button on
the Storage–Storage Pool tab to scan for new shelves. This refreshes the D2D Backup System
storage information and is useful both if hot-plug shelves have been added, or if the D2D Backup
System was switched off and powered on again before the shelves were powered on.
If the shelves still cannot be seen:
1. Is the shelf powered on?
2. Are the cables connected correctly and seated securely in the sockets?
3. Are the cables connected to the correct card on the HP D2D Backup System? See Connecting
the Capacity Upgrade Kit.
Troubleshooting 13
 Loading...