

Page 1

HP StoreOnce
Backup System
Installation and Configuration Guide
Abstract
This document describes how to install and configure the HP StoreOnce Backup System.
IMPORTANT: The localized versions of this guide have been produced prior to launch. The English version that is available
on the web at launch may have later updates. Always check http://www.hp.com/support/manuals for the most up-to-date
documentation for your product.
HP Part Number: EH985-90923
Published: February 2011
Edition: First
Page 2

© Copyright 2011 Hewlett-Packard Development Company, L.P.
Confidential computer software. Valid license from HP required for possession, use or copying. Consistent with FAR 12.211 and 12.212, Commercial
Computer Software, Computer Software Documentation, and Technical Data for Commercial Items are licensed to the U.S. Government under
vendor's standard commercial license.
The information contained herein is subject to change without notice. The only warranties for HP products and services are set forth in the express
warranty statements accompanying such products and services. Nothing herein should be construed as constituting an additional warranty. HP shall
not be liable for technical or editorial errors or omissions contained herein.
WARRANTY STATEMENT: To obtain a copy of the warranty for this product, see the warranty information website:
http://www.hp.com/go/storagewarranty
Linear Tape-Open, LTO, LTO Logo, Ultrium and Ultrium Logo are trademarks of Quantum Corp, HP and IBM in the US, other countries or both.
Microsoft, Windows, Windows NT, and Windows XP are U.S. registered trademarks of Microsoft Corporation.
Intel and Itanium are trademarks or registered trademarks of Intel Corporation or its subsidiaries in the United States and other countries.
AMD is a registered trademark of Advanced Micro Devices, Inc.
Page 3

Contents
1 Installation checklist....................................................................................5
2 Before you start..........................................................................................6
Introduction..............................................................................................................................6
What is the HP StoreOnce Backup System?..................................................................................6
Software and hardware requirements..........................................................................................6
Supported Ethernet configurations...............................................................................................7
Supported Fibre Channel connections.........................................................................................7
Recommended web browser settings...........................................................................................8
Internet Explorer 8.X and 7.X ................................................................................................8
Internet Explorer 6.X.............................................................................................................8
Mozilla Firefox 1.5, Firefox 2.X and Firefox 3.X........................................................................8
3 The HP StoreOnce D2D Backup System.........................................................9
Front and rear view of the HP D2D4324/4312 Backup System........................................................9
Front and rear view of the HP D2D4106/4112 Backup System.......................................................10
Front and rear view of the HP D2D2502/2504 Backup System.....................................................11
4 Connecting and installing the HP StoreOnce Backup System..........................13
Installing the rail kit.................................................................................................................13
Mounting the HP StoreOnce Backup System...............................................................................13
Connecting the hardware........................................................................................................15
Connecting the HP D2D4300 Series Backup System...............................................................15
Connecting the HP D2D4100 Series Backup System................................................................16
Connecting the HP D2D2500 Series Backup System...............................................................16
Connecting to the Capacity Upgrade Kit (optional).....................................................................16
HP D2D4300 Series Backup System.....................................................................................17
HP D2D4100 Series Backup System......................................................................................19
Powering on the HP StoreOnce Backup System...........................................................................20
5 Installation wizard (for Windows hosts)........................................................22
General................................................................................................................................22
Wizard overview....................................................................................................................23
Step 1: Discovering your StoreOnce Backup System (mandatory)...................................................24
Step 2: Installing drivers (optional)............................................................................................26
Step 3: Microsoft iSCSI initiator (optional)..................................................................................27
6 Advanced installation...............................................................................28
Discovering the HP StoreOnce Backup System (mandatory)..........................................................28
Using DHCP (IPv4 only)......................................................................................................28
Using the Discovery Engine (IPv4 only).................................................................................28
Using the system console (IPv4 and IPv6)..............................................................................30
Using the iLO2 port............................................................................................................31
HP Integrated Lights-Out 2 (iLO2) and HP StoreOnce Backup Systems..................................32
Manual driver installation (optional, VTL only)............................................................................33
iSCSI Initiator (optional, VTL only).............................................................................................34
Manual iSCSI initiator installation........................................................................................35
Contents 3
Page 4

The iSCSI Initiator and Authentication...................................................................................36
The Microsoft iSCSI Initiator ................................................................................................36
Fibre Channel configuration.....................................................................................................41
Fibre Channel connection...................................................................................................41
Zoning.............................................................................................................................41
Network configuration.............................................................................................................42
To configure the LACP configuration.....................................................................................43
7 Understanding LEDs..................................................................................44
HP D2D4324/4312 Backup System...........................................................................................44
HP D2D4112/4106 Backup System............................................................................................45
HP D2D2502/2504 Backup System..........................................................................................46
Hot-plug drive LEDs.................................................................................................................47
Fibre Channel card LEDs.........................................................................................................48
Capacity upgrade kit LEDs.......................................................................................................48
8 Troubleshooting........................................................................................50
Connecting the hardware........................................................................................................50
Connecting to the HP StoreOnce Backup System from the backup application.................................50
Connecting to the network.......................................................................................................50
Using the 10Gb ports (HP D2D4300 Series only).......................................................................51
Performance...........................................................................................................................51
Power On/Off Problems..........................................................................................................52
Cannot connect to Web Management Interface..........................................................................53
Cannot connect to a NAS share...............................................................................................53
Cannot access a storage shelf (HP D2D4300 Series and D2D4100 Series)....................................53
About this guide..........................................................................................54
Intended audience..................................................................................................................54
Related documentation............................................................................................................54
Document conventions and symbols..........................................................................................54
HP technical support...............................................................................................................55
Customer self repair................................................................................................................55
Registering your HP StoreOnce Backup System...........................................................................55
Subscription service................................................................................................................55
HP websites...........................................................................................................................56
Documentation feedback.........................................................................................................56
Index.........................................................................................................57
4 Contents
Page 5

1 Installation checklist
Before installing the unit you need the following information
• What is the network configuration: DHCP or static, IPv4 or IPv6?
• A 1Gb Ethernet network is required to connect to the Web Management Interface. If supported
on your appliance, will you be using other interfaces for data traffic, 10Gb Ethernet or FC?
• What devices are you planning on using for backup (VTL and/or NAS) and will you be using
a Fibre Channel interface for VTL.
• Are you planning to replicate and what is the replication strategy?
• License information for replication and additional storage (unless this has been pre-configured)
Installation and Configuration checklist
Unpack the appliance and, for D2D4100 and D2D4300 Series, any expansion shelves that you are installing at
the same time.
Connect the appliance to the 1Gb network and power supply, and switch on the unit and any expansion shelves.
Discover the appliance IP address or configure static addressing.
If backing up to iSCSI VTL devices, install tape and library drivers and install iSCSI on the host.
Set up the Management network ports and configure any other interfaces you wish to use. If using 10Gb Ethernet
(HP D2D4300 Series only), configure and enable the 10Gb network ports. If using Fibre Channel, configure the
FC connection.
Enter licensing information on the Web Management Interface: for replication and additional storage, as required.
Use the Web Management Interface to check that the box has up-to-date software.
Use the Web Management Interface to configure appliance settings, such as date/time, email recipients, web
security SSL certificate, GUI password.
On the Web Management Interface create and configure the required VTL devices and NAS shares that will be
used for backup.
Configure your backup application to use these devices.
Configure replication on the Web Management Interface.
If required, configure housekeeping and replication blackout windows on the Web Management Interface.
At the end of configuration, use the Web Management Interface to save a copy of the configuration file.
You can access the iLO2 interface for further remote management capabilities. Ensure that the iLO2 port on the
rear of your StoreOnce Backup System is connected to the network and use the network address and
username/password on the supplied brown tag to access iLO2.
5
Page 6

2 Before you start
In this chapter:
• Introduction
• What is the HP StoreOnce Backup System?
• Software and hardware requirements
• Supported Ethernet configurations
• Supported Fibre Channel connections
• Web browser settings
Introduction
This guide describes how to install and carry out the initial configuration of your HP StoreOnce
Backup System. The following documents are also available at http://www.hp.com/support/
manuals:
• HP StoreOnce Backup System Concepts Guide: If you are new to the HP StoreOnce Backup
System, it is a good idea to read this guide before you configure your system. It describes the
StoreOnce technology.
• HP StoreOnce Backup System User Guide: This guide contains detailed information on using
the Web Management Interface. It also contains troubleshooting information, including details
on replacing failed or failing hard disks.
• D2D Best Practices for VTL, NAS and Replication implementations: This white paper advises
how to plan the workload being placed on the HP StoreOnce Backup System in order to
optimize performance and minimize the impact of deduplication, replication and housekeeping
operations competing for resources. It is regularly updated.
What is the HP StoreOnce Backup System?
The HP StoreOnce Backup System is a disk-based storage appliance for backing up host network
servers or PCs to target devices on the appliance. These devices are configured as either
Network-Attached Storage (NAS) or Virtual Tape Library (VTL) targets for backup applications.
The total number of backup targets provided by an HP StoreOnce Backup System is split between
VTL and NAS devices.
These devices may be all VTL, all NAS or any combination of NAS and VTL devices. All HP
StoreOnce devices that are configured for NAS or VTL automatically make use of HP deduplication,
ensuring efficient and cost-effective use of disk space.
See the HP StoreOnce Backup System Concepts Guide for a more detailed discussion about VTL
and NAS.
Software and hardware requirements
Refer to http://www.hp.com/go/connect or http://www.hp.com/go/ebs for the latest connectivity
and compatibility information.
• All HP StoreOnce Backup Systems must be connected to a 1Gb Ethernet network for installation
and discovery.
• HP D2D2500 Series and D2D4100 Series models should be connected to a 1Gb network
for all backup and replication activities. 100 Base-T Ethernet will limit performance; 10 Base-T
Ethernet will severely limit performance.
6 Before you start
Page 7

• The HP D2D4300 Series Backup System also has two 10Gb Ethernet ports and, after installation
and discovery, is normally connected to a 10Gb network for backup and replication activities.
(The 1Gb network connection is still required for the Web Management Interface.) On no
account should an HP D2D4300 Series be connected to a 100 or 10 Base-T Ethernet
connection.
• When connecting to a Fibre Channel network, the HP StoreOnce Backup System is supplied
with the correct FC card pre-installed. Cables are not supplied.
• For backup and restore to Virtual Tape Library targets you need software that supports tape
libraries and autoloaders. This software resides on the host, not the HP StoreOnce Backup
System. The device may be used with the major backup applications from HP, Symantec,
EMC, Computer Associates and others.
Supported Ethernet configurations
The HP StoreOnce Backup System supports both IPv4 and IPv6.
The HP StoreOnce Backup System should be connected to a spare port on an existing 1Gb network
switch. This may be your main network, which is also used to connect a number of different types
of devices, such as PCs, servers, workstations and printers, or a dedicated backup network that is
used solely for clients that need to be backed up.
The HP StoreOnce Backup System should be on the same logical and physical network as the host
machine connecting to it. The 1Gb LAN port must always be connected, even if you are using the
FC ports to back up and restore data to the HP StoreOnce Backup System, because the Web
Management Interface requires a 1Gb Ethernet connection to set up devices.
HP D2D4300 Series only
The HP StoreOnce D2D4300 Series Backup System has two 1Gb ports and two 10Gb ports. You
must connect to the 1Gb port (labelled LAN port 3) to run the Installation Wizard and discover
the HP StoreOnce Backup System on your network. This is also the recommended port for running
the Web Management Interface.
The 10Gb ports are available for backup and replication traffic. They must be configured separately,
after installation on the Network (Configuration) page of the Web Management Interface.
Supported Fibre Channel connections
NOTE: Fibre Channel is not supported on models in the HP D2D2500 Series or the HP D2D4106i
Backup System.
The HP StoreOnce Backup System supports both switched fabric and direct attach (private loop)
topologies. A direct attach (point-point) topology is not supported.
A switched fabric topology utilizes one or more fabric switches to provide a flexible configuration
between several Fibre Channel hosts and Fibre Channel targets such as HP StoreOnce Backup
Systems.
Switched fabric configurations are implemented with Fibre Channel switches. Switches may be
cascaded or meshed together to form larger fabrics.
A direct attach topology is implemented by connecting the HP StoreOnce Backup System directly
to a Host Bus Adapter (HBA). In this configuration the Fibre Channel private loop protocol must
be used.
The preferred topology for the HP StoreOnce Backup System is switched fabric using NPIV (N_Port
ID Virtualisation).
Supported Ethernet configurations 7
Page 8

NOTE: Please refer to http://www.hp.com/go/connect or http://www.hp.com/go/ebs for the
latest information.
Recommended web browser settings
The web browser used to communicate with the HP StoreOnce Backup System must have Active
Scripting or JavaScript enabled. If it does not, some of the browser buttons may not be displayed.
Internet Explorer 8.X and 7.X
1. Click on the Tools button located in the upper right part of the screen (next to the gear icon).
2. Select Internet Options.
3. Click on the Security tab.
4. Click on the Custom Level... button.
5. Set the option Active scripting to Enable and click OK.
6. Click Yes.
7. Refresh the page.
Internet Explorer 6.X
1. Select Tools from the top menu.
2. Select Internet Options.
3. Click on the Security tab.
4. Click on the Custom Level.
5. Scroll down until you see the section labeled Scripting.
6. Under Active scripting select Enable and click OK.
Mozilla Firefox 1.5, Firefox 2.X and Firefox 3.X
1. Select Options from the Tools menu.
2. Click on Content.
3. Check the box next to Enable JavaScript.
4. Click OK.
5. Refresh the page.
8 Before you start
Page 9
3 The HP StoreOnce D2D Backup System
In this chapter:
• Front and rear view of the HP D2D4324/4312 Backup System
• Front and rear view of the HP D2D4112/4106 Backup System
• Front and rear view of the HP D2D2504/2502 Backup System
Front and rear view of the HP D2D4324/4312 Backup System
The HP D2D4300 Series is available in two models:
• HP D2D4324 Backup System which has 12 x 2 TB disks
• HP D2D4312 Backup System which has 12 x 1 TB disks
Both models support connection of up to three expansion shelves (Capacity Upgrade Kits), which
quadruples physical storage capacity.
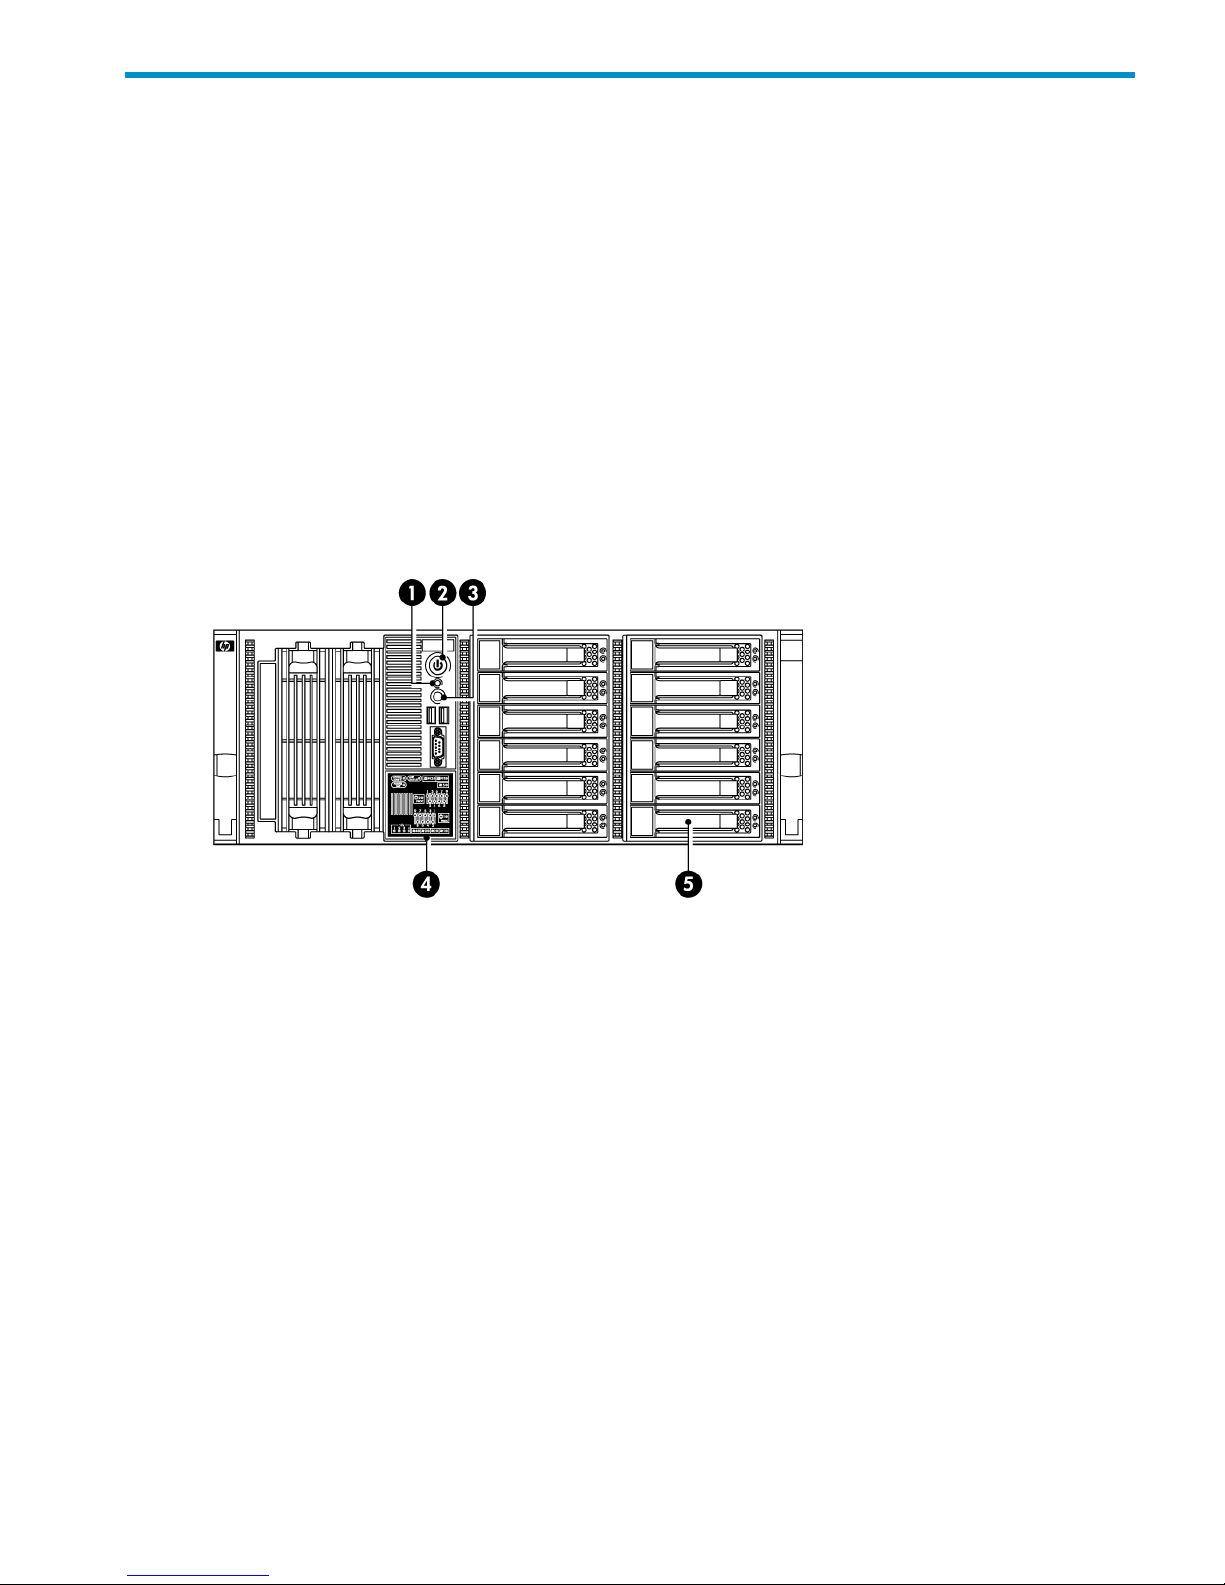
Figure 1 Front view of the HP D2D4324/4312 model
2. Power On button/LED1. System health LED
4. System Insight Display3. HP D2D beacon LED
5. Hot plug drives
Front and rear view of the HP D2D4324/4312 Backup System 9
Page 10
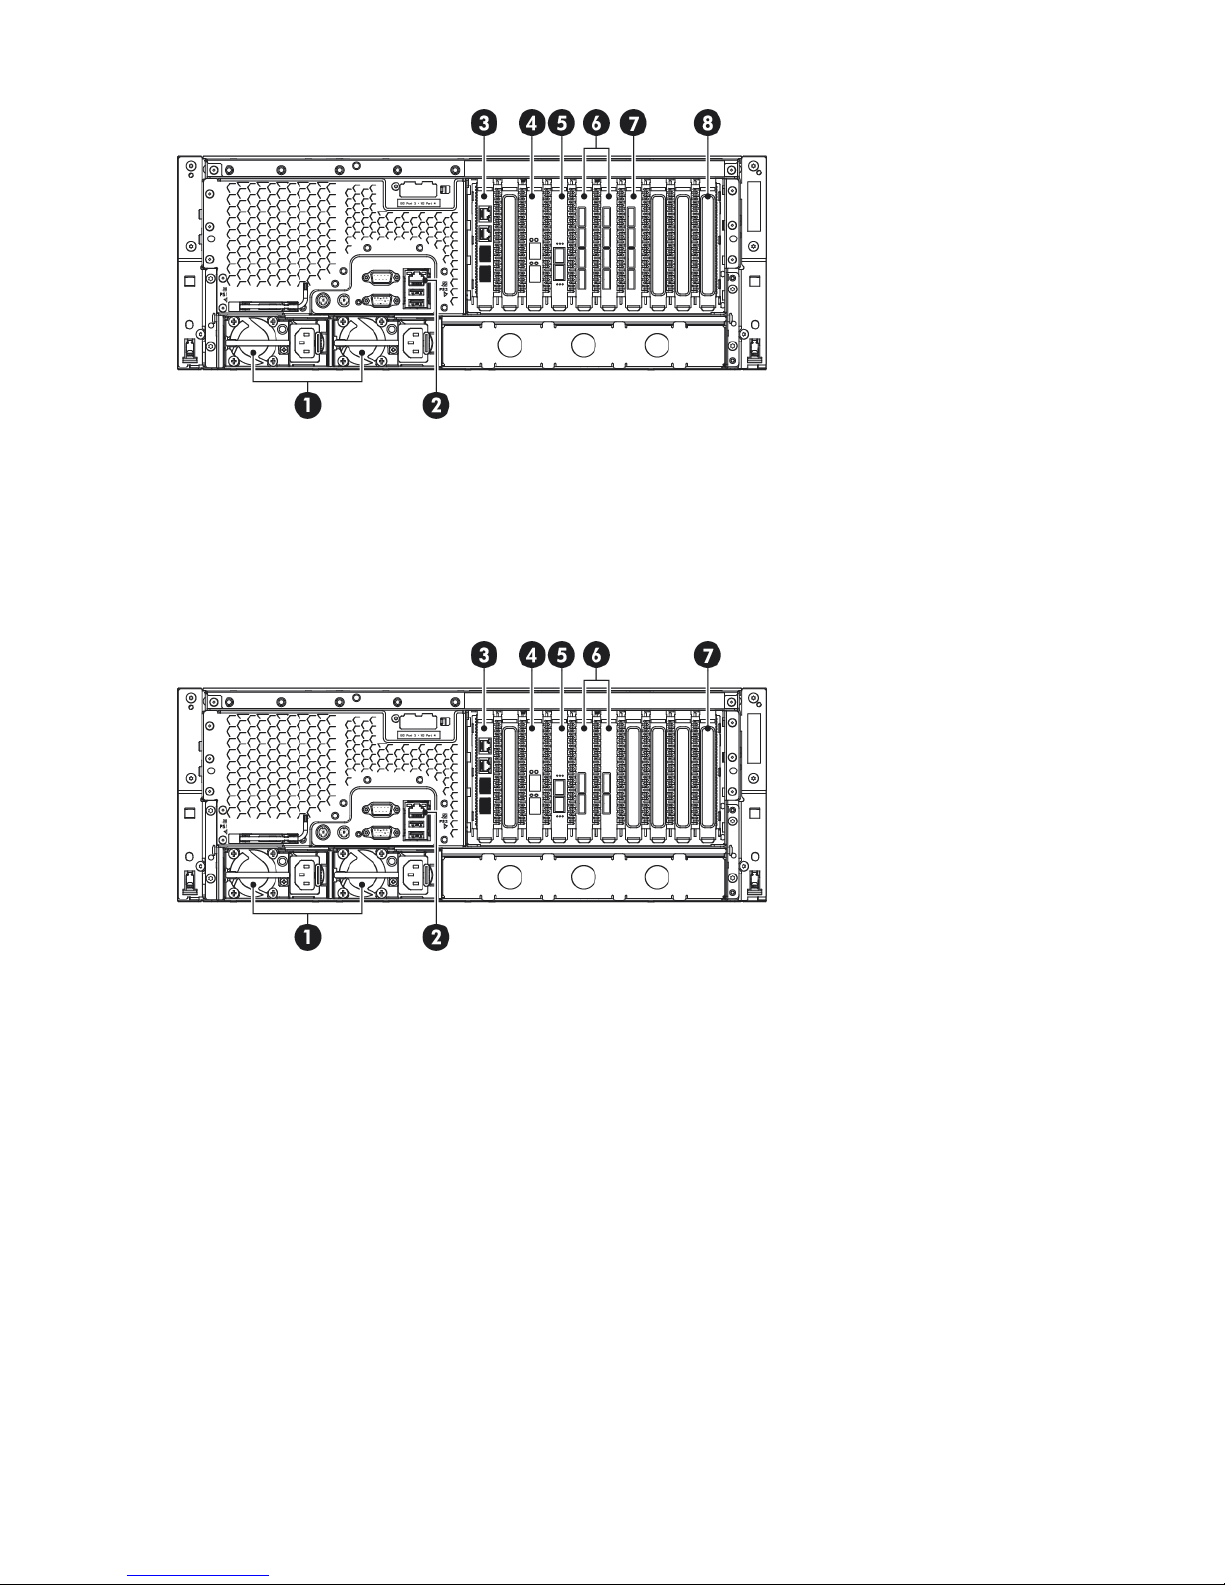
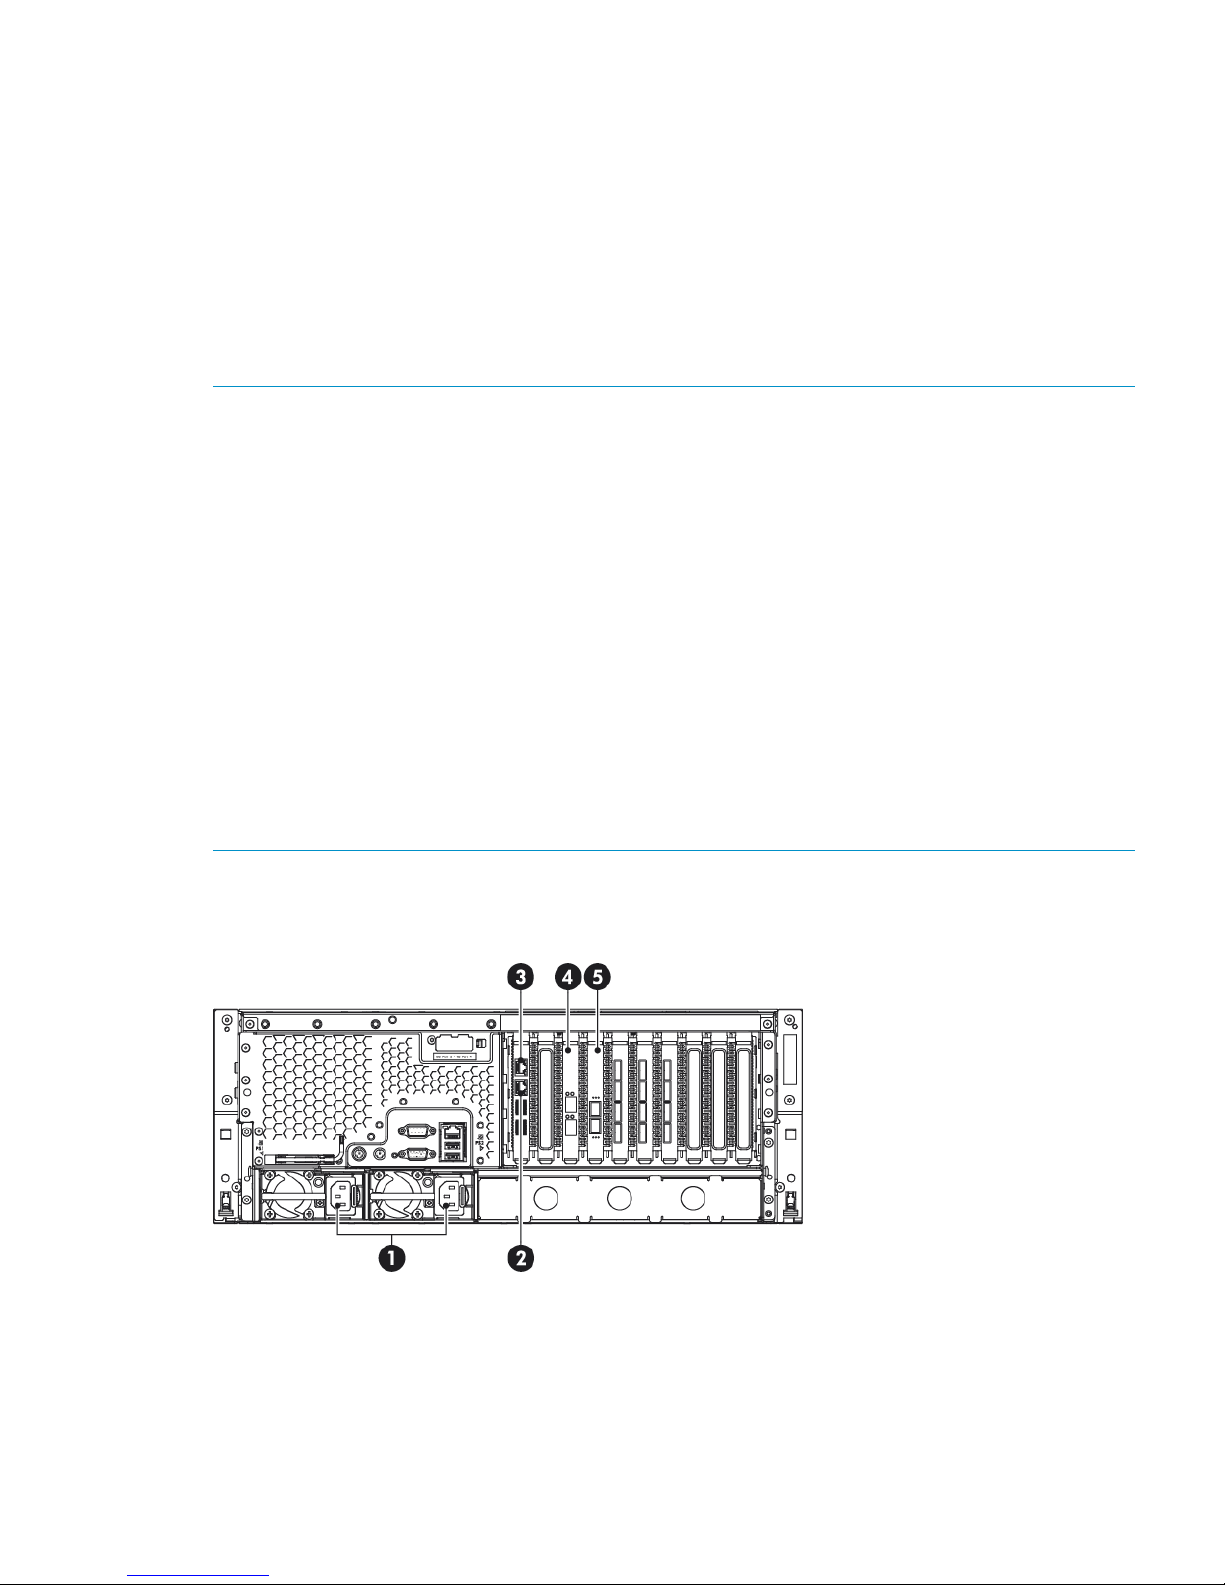
Figure 2 Rear view of the HP D2D4324 model
4. 10Gb Ethernet card with two ports1. Power supply cable sockets (two)
5. 8GB Fibre Channel card2. iLO2 Management port (do not use for data)
6 and 7. RAID cards (with 4 ports)3. 1Gb LAN ports 3 (top, required connection) and 4
8. SAS expander card
Figure 3 Rear view of the HP D2D4312 model
4. 10Gb Ethernet card with two ports1. Power supply cable sockets (two)
5. 8GB Fibre Channel card2. iLO2 Management port (do not use for data)
6. RAID cards (with 2 ports)3. 1Gb LAN ports 3 (top, required connection) and 4
7. SAS expander card
Front and rear view of the HP D2D4106/4112 Backup System
The HP D2D4100 Series is available in two models:
• HP D2D4112 Backup System which has 12 x 1 TB disks
• HP D2D4106 Backup System which has 12 x 500 GB disks
Both models support connection of a single expansion shelf (Capacity Upgrade Kit), which doubles
physical storage capacity.
10 The HP StoreOnce D2D Backup System
Page 11
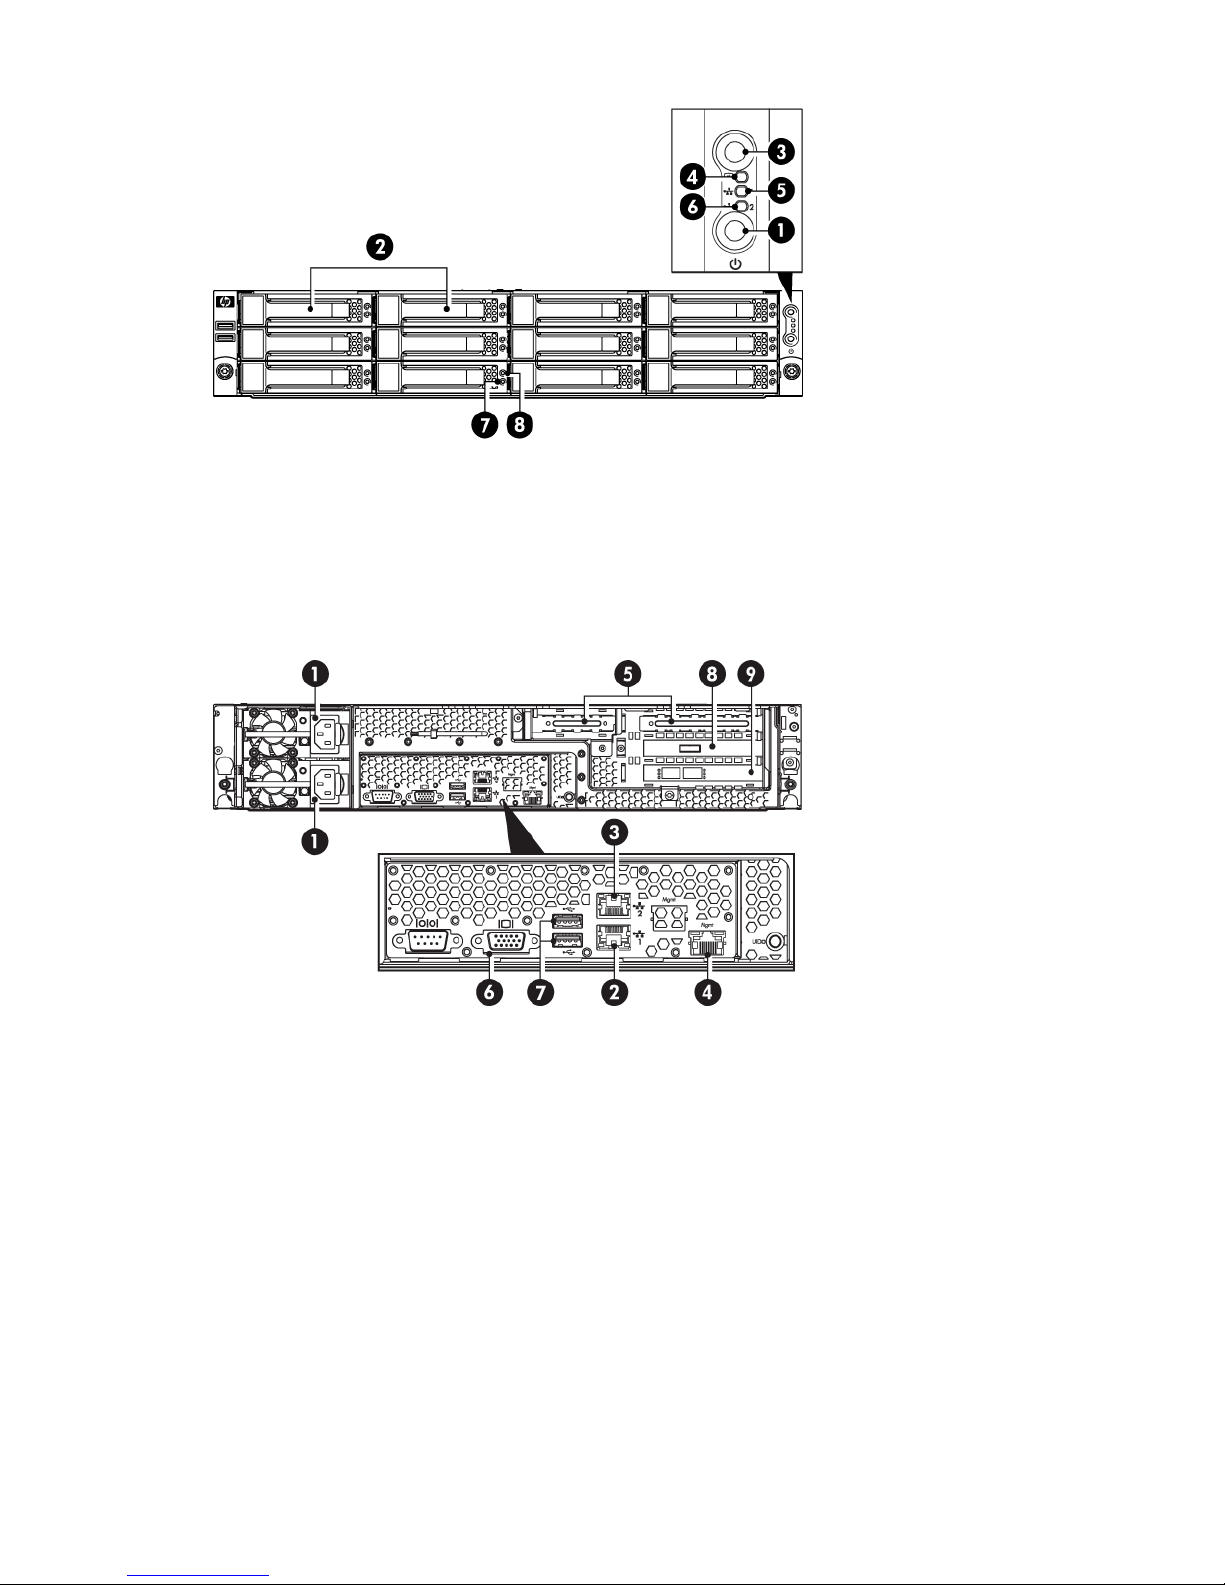
Figure 4 Front view of the HP D2D4112/4106 model
5. LAN Port 1 LED1. Power On button/LED
6. LAN Port 2 LED2. Hot plug drives
7. Disk Beacon LED3. HP D2D Beacon LED
8. Disk Online LED4. System Health LED
Figure 5 Rear view of the HP D2D4112/4106 model
6. VGA port for system console monitor1. Power supply cable sockets (two)
7. PS/2 ports for system console keyboard and mouse2. LAN port 1 (always used for data connection)
8. RAID controller3. LAN port 2
9. Fibre Channel card (not HP D2D4106i)4. iLO2 Management LAN port (Do not use for data)
5. PCI-e slots
Front and rear view of the HP D2D2502/2504 Backup System
The HP D2D2500 Series is available in two models:
• HP D2D2504 Backup System which has 4 x 1 TB disks
• HP D2D2502 Backup System which has 4 x 750 GB disks
Neither model supports connection of an expansion shelf (Capacity Upgrade Kit).
Front and rear view of the HP D2D2502/2504 Backup System 11
Page 12
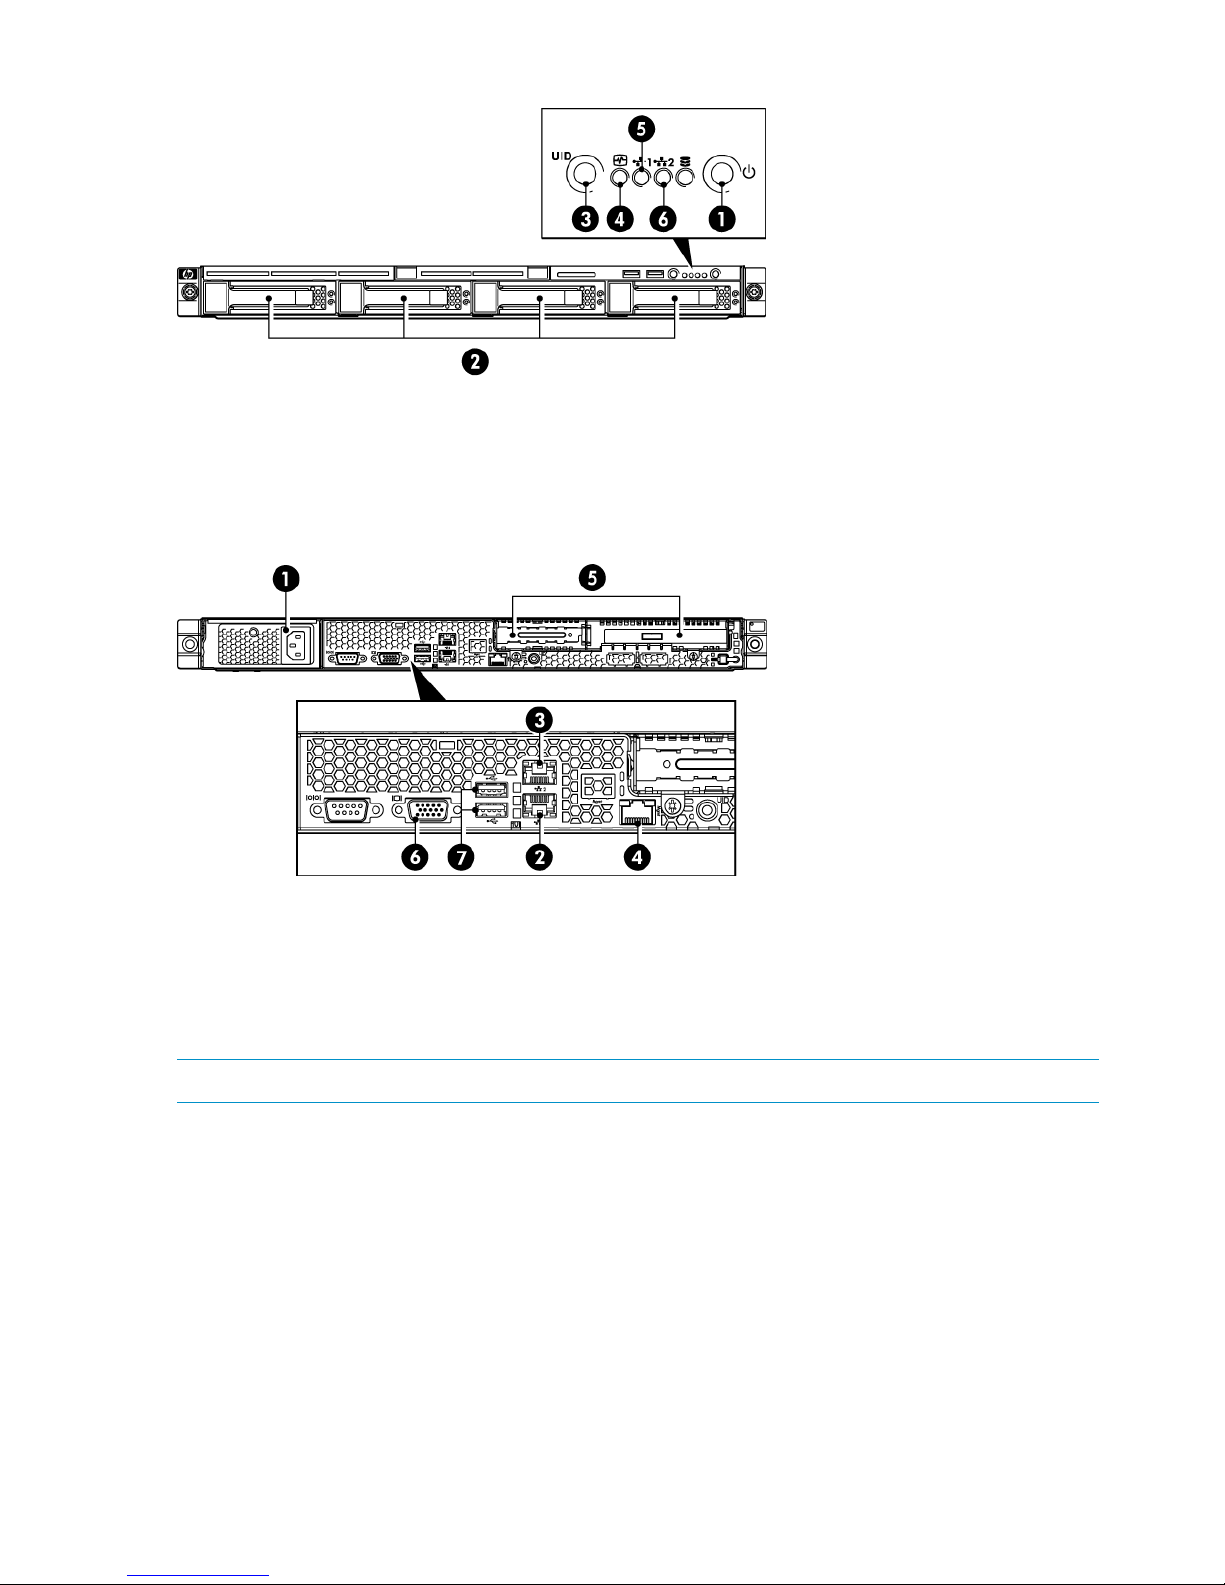
Figure 6 Front view of the HP D2D2502/2504 model
4. System health LED1. Power On button/LED
5. LAN port 1 LED2. Hot plug drives
6. LAN port 2 LED3. HP D2D Beacon LED
Figure 7 Rear view of the HP D2D2502/2504 model
5. PCIe slots (one full and one low profile)1. Power supply cable socket
6. VGA port for system console monitor2. LAN port 1 (always used for data connection)
7. Ports for system console keyboard and mouse3. LAN port 2
4. iLO2 Management port (Do not use for data)
NOTE: The full PCIe slot has a SmartArray RAID controller card pre-installed.
12 The HP StoreOnce D2D Backup System
Page 13

4 Connecting and installing the HP StoreOnce Backup
System
In this chapter:
• Installing the rail kit
• Mounting the HP StoreOnce Backup System
• Connecting the hardware
• Connecting to the Capacity Upgrade Kit (optional)
• Powering on the HP StoreOnce Backup System
IMPORTANT: See also the Safety Booklet on the HP StoreOnce Backup System CD-ROM.
Installing the rail kit
The supplied rail kits allow you to install the HP StoreOnce Backup System into square and round
hole racks for 1U and 2U servers. If mounting the HP StoreOnce Backup System into threaded hole
or telco racks, please refer to http://www.racksolutions.com to purchase the required mounting
hardware.
This installation is to be performed by qualified individuals who have knowledge of the procedures,
precautions, and hazards associated with equipment containing hazardous electrical circuits.
WARNING! These rails, when installed, form only a shelf for the server to rest on. The server is
not attached to the rail by any other means. Use extreme caution when pulling the server out from
the rack; it can slip and fall, causing damage to the server or injury. HP is not responsible for any
damage or injury caused by the mishandling of the server.
WARNING! Ensure that the rack is level and stable before working on the rack. Be sure the
leveling jacks (feet) extend to the floor and that the full weight of the rack rests firmly on the floor.
WARNING! Ensure that the rack has anti-tip measures in place. Such measures may include
floor-bolting, anti-tip feet, ballast, or a combination of these as specified by the rack manufacturer
and applicable codes.
WARNING! Ensure that sufficient personnel are on hand to support the product(s) during the
installation process. Use of the appropriate lifting device is recommended as an installation aid.
WARNING! Always load the rack from the bottom up. Load the heaviest items in the rack first.
This makes the rack bottom-heavy and helps prevent it from becoming unstable.
WARNING! Do not overload the branch circuit that provides power to the rack. The total rack
load should not exceed 80 percent of the branch circuit rating.
Mounting the HP StoreOnce Backup System
WARNING! Ensure that sufficient personnel are on hand to support the product(s) during the
installation process. Use of the appropriate lifting device is recommended as an installation aid.
1. Install the rails in the rack, as required. Follow the instructions provided separately with the
rail kits.
Installing the rail kit 13
Page 14
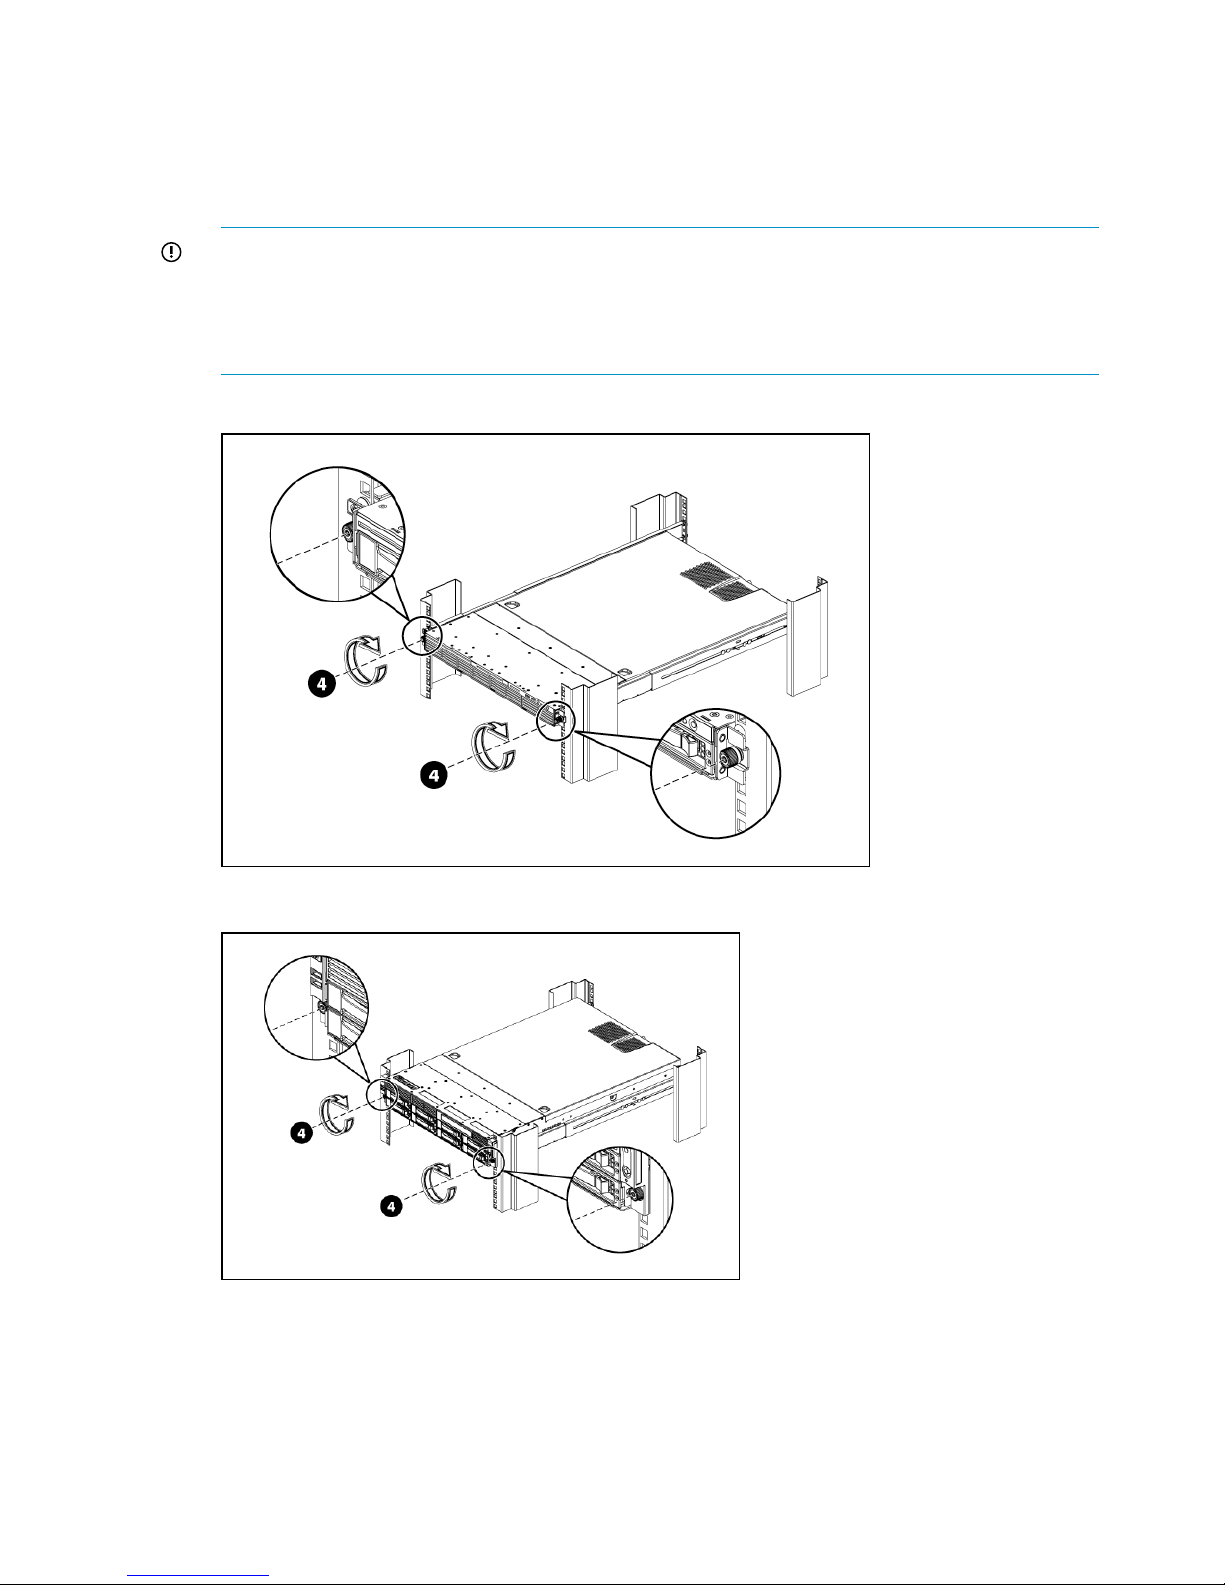
2. Slide the HP StoreOnce Backup System into position in the rack and secure it to the rack rails.
• HP D2D4300 Series: Ensure it clicks into place with the retaining latches on the unit's
front bezel.
• HP D2D4100 and 2500 Series: Secure it to the rack rails using thumbscrews on the unit's
front bezel.
IMPORTANT: The label on the top of the HP StoreOnce Backup System contains useful
identity information, such as the MAC address and default network name. Make a note of
this information before you install the HP StoreOnce Backup System in the rack. On HP
D2D2500 Series products there is also a pull-out strip in the front panel with the serial number
and port ID.
Figure 8 Secure the HP D2D2500 Series Backup System to the rack
Figure 9 Secure the HP D2D4100 Series Backup System to the rack
14 Connecting and installing the HP StoreOnce Backup System
Page 15
Connecting the hardware
1. Use the supplied power cord(s) to connect the HP StoreOnce Backup System to the main power
supply. This HP-approved cord is appropriate for your specific geographic region.
HP D2D4300 and 4100 Series Backup Systems have a redundant power supply. Make sure
that both power cords are connected.
For detailed safety information, see the Safety Guide on the HP StoreOnce Backup System
CD-ROM.
2. Use any CAT-5E network cable (also supplied with the product) to connect to a 1Gb network
switch. 100 Base-T Ethernet will limit performance; 10 Base-T Ethernet will severely limit
performance. See also Supported Ethernet configurations.
NOTE: The Web Management Interface is used to configure devices and it requires a 1Gb
Ethernet connection, even if you are using the FC ports (or 10Gb ports on the HP D2D4300 Series)
to back up and restore data to the HP StoreOnce Backup System.
• The HP D2D4300 Series Backup System has two 1Gb ports and two 10Gb ports. You must
connect to the 1Gb port (labeled LAN port 3) to run the Installation Wizard and discover the
HP StoreOnce Backup System on your network. This is also the recommended port for running
the Web Management Interface. The 10Gb ports are available for backup and replication
traffic and are configured after installation using the Web Management Interface. Take care
if configuring with DHCP because Linux only supports one gateway address.
• All other HP StoreOnce Backup System models must be connected to LAN Port 1 (the lower
LAN port on the rear of the unit) to run the Installation Wizard and discover the HP StoreOnce
Backup System on your network. The second 1Gb port may subsequently be used for backup
and replication.
NOTE: The HP StoreOnce Backup System also supports direct connection of a monitor and
keyboard and iLO2. Please refer to Using the system console (IPv4 and IPv6) and Using the iLO2
port for more information about this.
Connecting the HP D2D4300 Series Backup System
Figure 10 Network and power connectors, HP D2D4324 Backup System
Connecting the hardware 15
Page 16
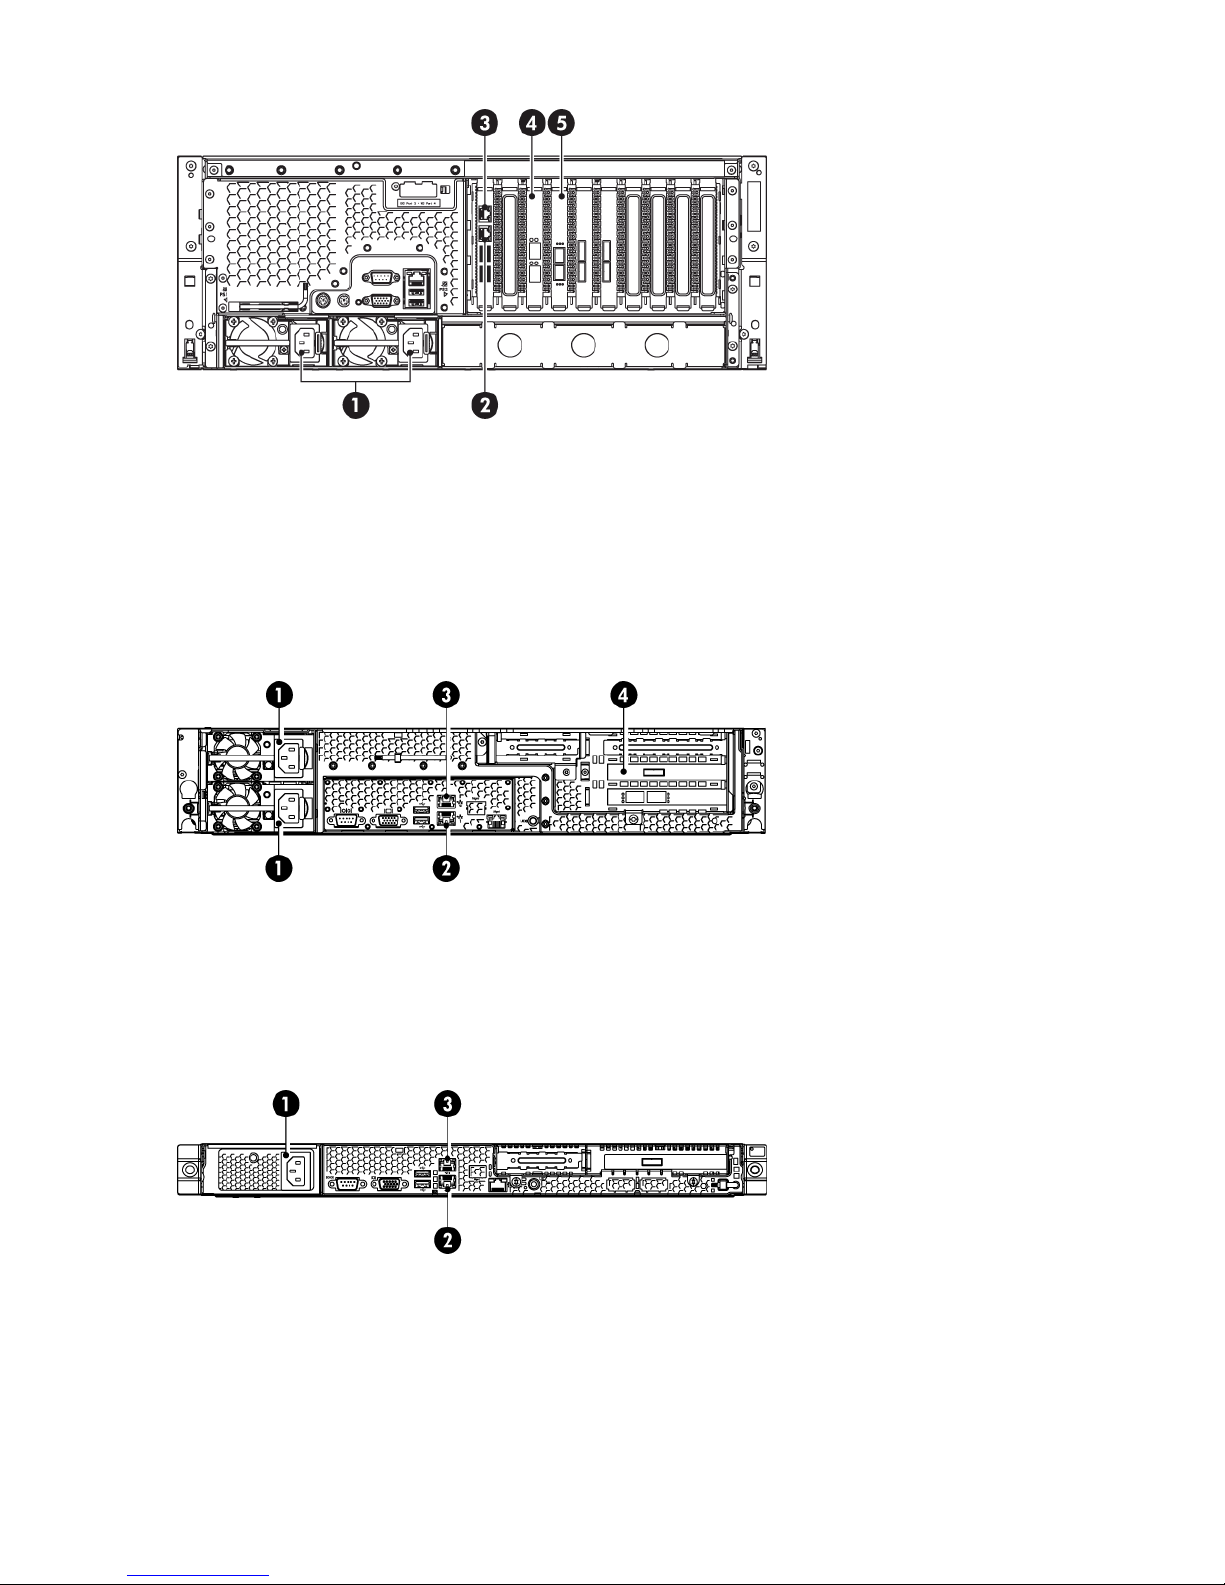
Figure 11 Network and power connectors, HP D2D4312 Backup System
2. Ethernet card with two 1Gb ports, LAN port 3 connector,
must be connected
1. Power connectors
4. Ethernet card with two 10Gb ports3. LAN port 4 connector
5. Fibre Channel card with optical ports
Connecting the HP D2D4100 Series Backup System
Figure 12 Network and power connectors, HP D2D4100 Series Backup System
2. LAN port 1 connector, must be connected1. Power connectors
4. Fibre Channel card with optical ports3. LAN port 2 connector
Connecting the HP D2D2500 Series Backup System
Figure 13 Network and power connectors, HP D2D2500 Series Backup System
2. LAN port 1 connector, must be connected1. Power connector
3. LAN port 2 connector
Connecting to the Capacity Upgrade Kit (optional)
Install the rail kit and expansion module(s) immediately below or above the HP StoreOnce Backup
System, as described in the Capacity Upgrade Installation guide supplied with the expansion
module.
16 Connecting and installing the HP StoreOnce Backup System
Page 17

• HP D2D4300 Series Backup System: Up to three expansion shelves may be connected. It is
recommended that the configuration shown below is followed. The user is advised to make a
record of which shelf serial number is connected to which RAID card and its port for future
reference.
• HP D2D4100 Series Backup System: Only one expansion shelf may be connected.
• HP D2D2500 Series Backup System: This model does not support connection of an expansion
shelf.
HP D2D4300 Series Backup System
WARNING! Daisy-chaining Capacity Upgrade Kits is not supported. Each Capacity Upgrade
Kit must be directly connected to one of the RAID cards on the HP D2D4300 Series Backup System.
Each kit is supplied with two cables; the longer cable is suitable for connecting lower shelves as
shown in the figures below.
Make sure you have the correct Capacity Upgrade Kit for your HP StoreOnce Backup System.
• HP D2D4324 Backup System Capacity Upgrade Kit: This kit consists of an enclosure with 12
x 2 TB disks and two cables, and is for use with the HP D2D4324 Backup System only.
• HP D2D4312/4112 Backup System Capacity Upgrade Kit: This consists of an enclosure with
12 x 1 TB disks and two cables, and is for use with both the HP D2D4112 and the HP
D2D4312 Backup System.
1. To ensure correct keying, first connect the supplied cable to the P1 connector on the top I/O
module (I/O-A) on the rear of the Capacity Upgrade Kit.
NOTE: Always use the P1 connector; do not use the P2 connector.
2. Connect the other end of each cable to the connector on the RAID card.
HP D2D4324 Backup System
This product has three RAID cards and there are four connectors on each card. Always use
the top connector (port 1E) and never connect more than one shelf to the RAID card. Only
three expansion shelves may be connected.
Connecting to the Capacity Upgrade Kit (optional) 17
Page 18
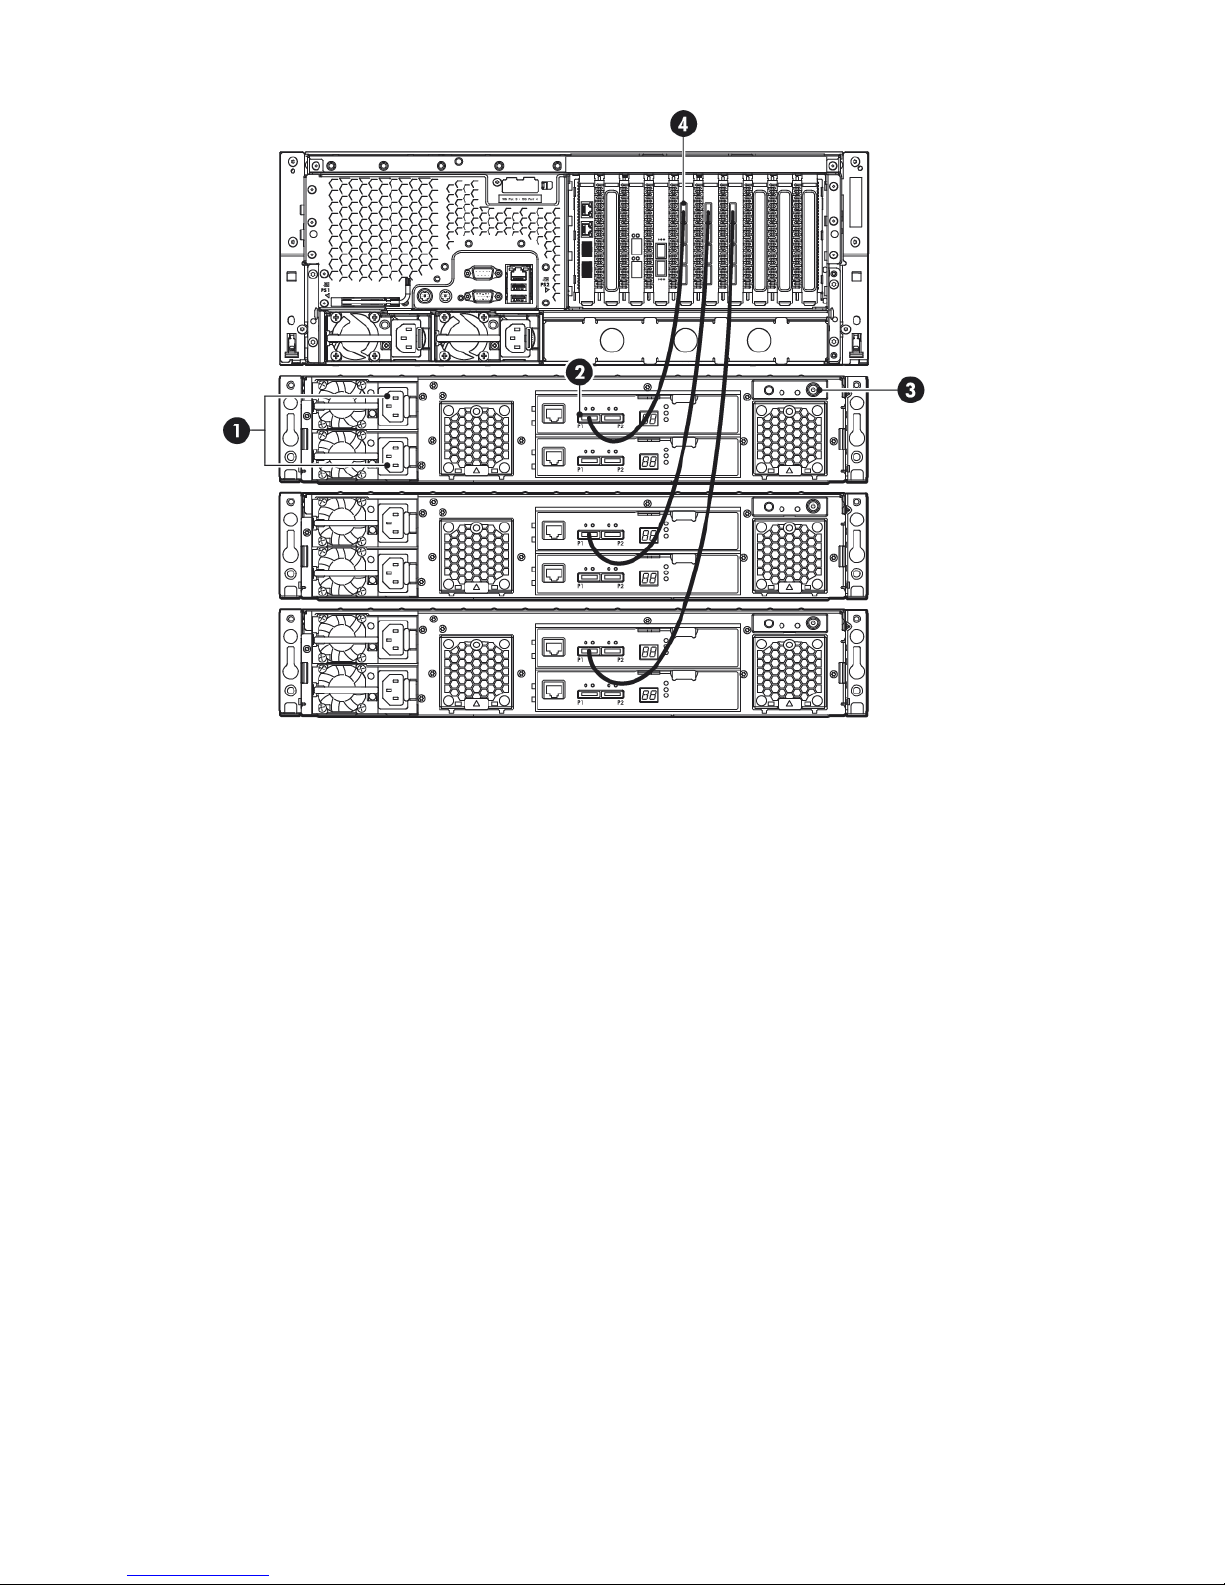
Figure 14 Cabling the Capacity Upgrade Kit to the HP D2D4324 Backup System
2. P1 connector (on I/O-A)1. Power connectors
4. Port connector on RAID card3. Power on/off button
HP D2D4312 Backup System
This product has two RAID cards and there are two connectors on each card. It does not matter
which connectors are used, but only three expansion shelves may be connected.
18 Connecting and installing the HP StoreOnce Backup System
Page 19

Figure 15 Cabling the Capacity Upgrade Kit to the HP D2D4312 Backup System
2. P1 connector (on I/O-A)1. Power connectors
4. Port connector on RAID card3. Power on/off button
3. Use the supplied power cords to connect the Capacity Upgrade Kit(s) to the mains power
supply.
4. Power on the Capacity Upgrade Kit(s). You may need to hold down the power on button on
each installed shelf for a few seconds.
HP D2D4100 Series Backup System
Make sure you have the correct Capacity Upgrade Kit for your HP StoreOnce Backup System.
• HP D2D4312/4112 Backup System Capacity Upgrade Kit: This consists of an enclosure with
12 x 1 TB disks and two cables, and is for use with both the HP D2D4112 and the HP
D2D4312 Backup System. The second cable is a longer cable that is suitable for connecting
to an HP D2D4312 that already has upgrade kits installed.
• HP D2D4106 Backup System Capacity Upgrade Kit: This kit consists of an enclosure with 12
x 500 GB disks and one cable, and is for use with the HP D2D4106 Backup System only.
1. To ensure correct keying, first connect the supplied cable to the P1 connector on the top I/O
module (I/O-A) on the rear of the Capacity Upgrade Kit.
NOTE: Always use the P1 connector; do not use the P2 connector.
2. Connect the other end of the cable to the port labeled "Port 1E" on the RAID PCI-e card on
the rear of the HP StoreOnce Backup System.
3. Use the supplied power cords to connect the Capacity Upgrade Kit to the mains power supply.
Connecting to the Capacity Upgrade Kit (optional) 19
Page 20

Figure 16 Cabling the Capacity Upgrade Kit to the HP D2D4100 Series Backup System
2. P1 connector (on I/O-A)1. Power connectors
4. Port 1E connector3. Power on/off button
4. Power on the Capacity Upgrade Kit. You may need to hold down the power on button for a
few seconds.
Powering on the HP StoreOnce Backup System
NOTE: Ensure that any expansion shelves attached to the system are powered on before pressing
the Power button. You may need to hold down the power on button (on the rear of each unit) for
a few seconds.
Press the Power on button on the front of your HP StoreOnce Backup System. The normal boot
sequence takes approximately 2 minutes (5 minutes for the HP D2D4300 Series Backup System).
On power up the HP StoreOnce Backup System runs its fans at high speed for approximately 10
seconds before returning to normal speed.
Figure 17 Powering on the HP D2D4300 Series Backup System
Figure 18 Powering on the HP D2D4100 Series Backup System
20 Connecting and installing the HP StoreOnce Backup System
Page 21

Figure 19 Powering on the HP D2D2500 Series Backup System
1. Power On button
Powering on the HP StoreOnce Backup System 21
Page 22

5 Installation wizard (for Windows hosts)
In this chapter:
• General
• Overview
• Step 1: Discovering your StoreOnce Backup System
• Step 2: Installing drivers
• Step 3: Microsoft iSCSI initiator
General
The CD contains the following:
• Installation Wizard
• Documentation
• Useful links
UNIX and Linux users should download the latest patches for their operating system and refer to
the Linux and UNIX Configuration Guideon the HP StoreOnce Backup System CD-ROM for
configuration instructions.
For Windows users, the recommended way to set up the HP StoreOnce Backup System network
is to run the Installation wizard from the HP StoreOnce Backup System CD-ROM.
Installation Wizard
Even for the experienced user, the Installation Wizard is by far the easiest way to get up and
running, particularly if you are configuring the host machine for the first time.
If you plan to use iSCSI Virtual Tape Library devices on the StoreOnce Backup System, the Installation
Wizard will discover the HP StoreOnce Backup System and also load Tape drivers and create an
iSCSI device for you when you run the Installation Wizard on a host machine. Fibre Channel
library devices can only be created and configured after installation using the Web Management
Interface.
If you plan to use only NAS devices on the D2D, then only the Discovery step is required - driver
installation and iSCSI setup can be skipped.
NOTE: The Installation Wizard will only create an iSCSI Virtual Tape Library device for a particular
host once, and only if an iSCSI connection is made. If the Installation Wizard has already been
run once on a particular host machine, an additional device will not be created the second time
it is run.
Additional devices can only be created using the Web Management Interface on the HP StoreOnce
Backup System.
Documentation
The HP StoreOnce Backup System product ships with a printed ‘Start Here’ poster. Full product
documentation in the form of a User Guide is supplied electronically on the CD in .pdf format.
Useful Links
Useful Links will take you to the HP website to find out further information about your product.
22 Installation wizard (for Windows hosts)
Page 23

Wizard overview
The Installation Wizard will automatically configure all the software components required for setup,
connection and use of the HP StoreOnce Backup System.
There are three main phases to the process:
• Discovery (mandatory)
• Install drivers (optional)
• iSCSI installation and configuration (optional)
Discovery (mandatory)
This step must be completed regardless of whether you plan to utilize Virtual Tape Library or NAS
devices on the StoreOnce Backup System. It will allow you to locate your HP StoreOnce Backup
System on the network and configure network settings.
DHCP is enabled by default on the HP StoreOnce Backup System. You can use DHCP to
automatically assign network settings to the device, or you can manually configure IP address and
other parameters. If your network does not support DHCP and you plan to manually set network
parameters, you should have this information ready before proceeding.
When assigning settings manually, the required information is:
• Hostname for the device e.g. D2DSystem1
• An IP Address for the device e.g. 192.168.1.50
• Subnet Mask e.g. 255.255.255.0
• Default Gateway (address of the server or router which provides external network connection)
e.g. 192.168.1.1
Optional information is:
• Domain Name (domain extension for the device) e.g. hp.com
• DNS server addresses (address of the server which translates hostnames to IP addresses) e.g
192.168.1.1
Install drivers (optional)
This step can be skipped if you plan to only use NAS targets for Backup on the StoreOnce Backup
System.
These drivers will allow your system to recognize the Tape Drives within Virtual Tape Library devices
created on the HP StoreOnce Backup System. These drivers are the same as those provided for
HP StorageWorks Ultrium tape drives. The installer will replace any previously installed drivers
and may overwrite any drivers supplied by backup software that is already installed. In this case
other drivers must be reinstalled manually once the Installation Wizard has completed.
iSCSI installation and configuration (optional)
If required, this step allows you to download the Microsoft iSCSI initiator from the Microsoft website.
(Download is only required for versions of Windows up to and including XP/2003, beyond this
the iSCSI initiator ships with the OS).
If an iSCSI connection is made, a default device will be created on the StoreOnce Backup System.
This functionality (Auto device creation on connection) can be turned off using the Web Management
Interface.
Once it has been assigned network settings, the HP StoreOnce Backup System is ready to use.
All the required software components will be installed on this host machine - not the HP StoreOnce
Backup System.
Wizard overview 23
Page 24

Use the Web Management Interface to manage the HP StoreOnce Backup
System
Devices can be modified or deleted, additional VTL and NAS devices can be created, and the
StoreOnce Backup System itself can be managed and monitored using this interface.
Simply type either the IP Address or the Network Name of the HP StoreOnce Backup System into
the address bar of your web browser to access this interface. The default Network Name is shown
on a label on the top (or side) of the HP StoreOnce Backup System.
Step 1: Discovering your StoreOnce Backup System (mandatory)
The Discovery process is important because it locates your HP StoreOnce Backup System on your
network and assigns important network settings, such as the IP address.
By default, DHCP is enabled on the HP StoreOnce Backup System.
• If DHCP is supported on your network, all the required parameters will be configured
automatically.
• If your network infrastructure does not support DHCP, it must be turned off on the StoreOnce
Backup System using the Discovery step of the Wizard. In this case key network settings must
be assigned manually.
NOTE: When installing the HP StoreOnce Backup System for the first time and DHCP is not
supported on your network, the Discovery step of the Wizard must be completed successfully before
the Installation process can succeed.
If DHCP is supported, it is recommended that once an IP address has been assigned, the System
Administrator should permanently associate that IP address with the StoreOnce Backup System.
This will avoid any problems with the IP address of the device changing over reboots.
The Installation Wizard connects to the StoreOnce Backup System using IP address rather than
name, so if the IP address is changed subsequently (by DHCP), the connection will be broken and
will have to be manually re-established using the Web Management Interface on the device and
the iSCSI initiator on the host machine.
If DHCP is not supported on your network, there are three cases where use of the Discovery feature
is the only way to locate and configure the HP StoreOnce Backup System on your network.
1. The HP StoreOnce Backup System is new and is, therefore, unconfigured.
2. The HP StoreOnce Backup System has been wrongly configured and cannot be seen by the
Web Management interface.
3. The HP StoreOnce Backup System has been moved to a new subnet, or network infrastructure
changes have occurred without first updating the HP StoreOnce Backup System network
settings. The device is no longer visible to the Web Management Interface.
In these cases, the Discovery feature can be run as a stand-alone step from the main menu of the
CD-ROM.
NOTE: You may need to disable any firewall software temporarily in order for Discovery to work.
NOTE: Where the HP StoreOnce Backup System has multiple network ports, LAN port 3 (HP
D2D4300 Series only) or LAN port 1 (all other HP StoreOnce Backup Systems) should be connected
to your network when carrying out discovery. Using discovery for re-configuration of an HP
StoreOnce Backup System will result in the unit dropping into Single Port mode.
There are four methods of configuring the HP StoreOnce Backup System on the network.
• IPv4 Discovery
• IPv6 Discovery
24 Installation wizard (for Windows hosts)
Page 25

• Console
• iLO–2 port
IPv4 Discovery
This can only be done via the Installation Wizard.
The Wizard will poll to the network using the IPv4 protocol in an attempt to find all HP StoreOnce
Backup Systems attached to the local subnet.
This method will succeed in the vast majority of cases, but if it fails there will be two main reasons.
1. The network is set up to be IPv6 only, in which case IPv6 Discovery must be used, see below.
2. The network supports IPv4, but there is a problem with the network setup. Check the following:
• The HP StoreOnce Backup System is powered on.
• The HP StoreOnce Backup System is connected to a live Ethernet port and there is activity.
• This host machine is connected to a live Ethernet port.
• The HP StoreOnce Backup System has multiple network ports, ensure that LAN Port 3 on
the HP D2D4300 Series or LAN Port 1 on all other HP StoreOnce Backup Systems is
being used (even if the product supports Fibre Channel connection).
• The HP StoreOnce Backup System must be connected to the same subnet as this machine.
To ensure that this is the case, connect both devices to the same network switch.
IPv6 Discovery
This can only be done via the Installation Wizard.
The MAC address of Network Port 1 is clearly displayed on a label on the top of the HP StoreOnce
Backup System.
This information must be entered into the Wizard.
The Wizard can combine this information with other network parameters to try to determine the
unique IPv6 address of the HP StoreOnce Backup System.
This method should be required only when the HP StoreOnce Backup System is connected to an
IPv6 only network. If the network environment is mixed - both IPv4 and IPv6 - the IPv4 method
should be used.
Apart from checking you have correctly entered the MAC address into the Wizard, there are no
additional troubleshooting steps that can be taken with IPv6 discovery.
If both IPv4 and IPv6 discovery fail to locate the HP StoreOnce Backup System, the console method,
below, can be used as a last resort.
Console
A monitor and keyboard can be connected to the standard ports on the rear of the unit. A console
screen is then presented that can be used to configure network parameters.
Use of this screen is intuitive, but more details can be found in the User Guide, if required.
Step 1: Discovering your StoreOnce Backup System (mandatory) 25
Page 26

iLO2 port
The iLO2 port on the rear of the HP StoreOnce Backup System provides an alternative means of
connecting a keyboard and monitor to the system.
• The default Name, Administrator Login Name and Password for iLO2 access are provided
on the StoreOnce Backup System and on a toe tag attached to it. Make a note of these.
• A separate network connection is required to the iLO2 network port on the rear of the HP
StoreOnce Backup System.
• DHCP is the default network setting for iLO2 web page access. If a static address is required,
this must be done via a keyboard and monitor connection when the HP StoreOnce Backup
System is booted up. If DHCP is supported, but not preferred, iLO2 access may be configured
via its own web interface.
See Using the iLO2 port for more details.
Step 2: Installing drivers (optional)
The HP StoreOnce Backup System presents Virtual Tape Libraries and NAS shares for use as backup
targets. Tape and changer (loader) drivers are only required, if you plan to configure Virtual Tape
Libraries as backup targets. This works in exactly the same way that it would for a directly attached
SCSI Tape Library.
NOTE: No drivers are required to connect to NAS shares on the HP StoreOnce Backup System,
so this step of the wizard can be skipped if you plan to use only NAS targets.
The driver installation step installs the HP LTO tape driver to allow your systems to recognize the
Ultrium Tape devices created by the HP StoreOnce Backup System.
No specific changer drivers are installed. HP does provide these drivers - available from the HP
website - however, your backup software will contain changer drivers, so you should use these.
Once the installation process is complete, the tape drives within any Virtual Tape Library devices
should be visible in Device Manager as directly attached SCSI devices.
NOTE:
Certain backup applications have their own drivers for both the Tape device and Changer. If it is
required by the software to use their own drivers, these must be installed manually once the
Installation Wizard has completed.
Troubleshooting
NOTE:
If this step fails, the other steps on the Wizard can still complete successfully. The device created
for you by the Wizard will still work correctly, it will just not be recognized by Windows (it will
show up as an unknown device in Device Manager).
Tape drivers can be installed later by one of the two methods described below.
If this step fails for any reason, there are two possible courses of action:
1. Manually install HP LTO tape drivers after the wizard completes. These can be found both on
the CD and on the HP website.
2. Use the Tape drivers supplied with your backup software. For many applications these will
be installed automatically during the software installation process. If the backup software is
already installed, you may need to manually initiate an update of the drivers to overwrite the
ones installed by the Installation Wizard.
26 Installation wizard (for Windows hosts)
Page 27

Step 3: Microsoft iSCSI initiator (optional)
This step only applies to Virtual Tape Libraries, if you plan to use Fibre Channel Tape Libraries or
only NAS targets for backup on your D2D Backup System, this step can be skipped.
The Microsoft iSCSI initiator is required to connect to any Virtual Tape Libraries created on the HP
StoreOnce Backup System.
The iSCSI initiator ships with later versions of Microsoft Windows, but not with XP/2003 or earlier.
NOTE: With some versions of Windows the iSCSI initiator service is not started by default. This
component must be configured manually by the user to run on startup. Do this through the Control
Panel.
HP is not permitted to include the iSCSI initiator on the CD. So, if required, it must be retrieved
from the Microsoft website. This is best done by carrying out a search for "iSCSI initiator" on the
Microsoft website, selecting the required OS version and choosing "Run" rather than "Save" when
presented with download options. ( There is a different version of the iSCSI initiator for the three
different versions of Windows; x86, ia-64, and amd64 (or Intel EM64T). )
When running the iSCSI initiator installation process, accept all the default settings.
Without the Microsoft iSCSI initiator a host machine will not be able to connect to the HP StoreOnce
Backup System and perform backups to Virtual Tape Libraries.
If the Installation Wizard is unable to connect to the HP StoreOnce Backup System via the iSCSI
initiator, check the following.
1. Check that the HP StoreOnce Backup System and this host machine are still connected to the
network.
2. Check that the iSCSI initiator installed correctly. An icon should have been placed on your
desktop.
Refer to The Microsoft iSCSI Initiator for more information.
Step 3: Microsoft iSCSI initiator (optional) 27
Page 28

6 Advanced installation
The Installation wizard is the recommended way to install the HP StoreOnce Backup System, but
it is possible to install it manually. You may also need to run phases independently when
troubleshooting. This section describes:
• Discovering the HP StoreOnce Backup System (mandatory)
• Manual driver installation (VTL only)
• iSCSI Initiator (VTL only)
Discovering the HP StoreOnce Backup System (mandatory)
Using DHCP (IPv4 only)
NOTE: DHCP discovery is only supported if you are installing the HP StoreOnce Backup System
as an IPv4 iSCSI network device. If you are installing the unit as an IPv6–only iSCSI network device,
DHCP discovery is not supported.
If you are connecting the HP StoreOnce Backup System to an IPv4 network that has a DHCP server,
DHCP addressing is enabled by default. The IP address and other network settings are assigned
automatically when you connect the HP StoreOnce Backup System to the network. You only need
to know the name of the HP StoreOnce Backup System to complete the installation and create a
base library configuration. The name is in the format HP-<serial number> and can be found on
the label on the front of the unit.
In the web browser type in: HP-<serial number>
NOTE: Depending on network settings, you may need to enter the full domain path.
Once the HP StoreOnce Backup System has been discovered on the network, you must configure
an iSCSI Initiator on the host, so that the library devices on the device are visible to the backup
application. See also The Microsoft iSCSI Initiator.
Using the Discovery Engine (IPv4 only)
If your network does not have a DHCP server, the Discovery Engine allows you to locate the HP
StoreOnce Backup System on your network and assign network settings, such as the IP address.
It is the recommended way to locate and configure the HP StoreOnce Backup System on your
network, if you are using static IP addressing for an IPv4 iSCSI network device. It also allows you
to select your required base configuration and specify the number of slots for an iSCSI library.
The Discovery Engine can be run as part of the Installation wizard or as a standalone utility from
the HP StoreOnce Backup System CD-ROM.
28 Advanced installation
Page 29

NOTE: If the Discovery process does not find your appliance and you are accessing through a
firewall, you may need to temporarily disable the firewall or open UDP ports 8105 and 8106 and
retry.
Beacon mode
The HP StoreOnce Backup System supports a Beacon LED sequence, which helps a user identify
which unit is being configured, if several are connected to the network. See also Understanding
LEDs.
If the HP StoreOnce Backup System is new and not yet configured
When installing the HP StoreOnce Backup System for the first time, this step must be completed
successfully before you can connect from your host. Select the appropriate HP StoreOnce Backup
System from the list and make a note of its IP address because you will need this when you configure
the iSCSI Initiator, see also Discovery tab.
If the HP StoreOnce Backup System has been configured incorrectly
If you cannot connect to the HP StoreOnce Backup System using the Web Management interface,
it may have been configured incorrectly. Run the Discovery Engine to check the IP address of the
HP StoreOnce Backup System and, if necessary, select it again from the list of available HP
StoreOnce Backup Systems. If you still cannot connect to it, check that you have configured the
iSCSI Initiator correctly, see also Discovery tab.
If the network setup has been changed
If the network infrastructure changes, you may need to update the HP StoreOnce Backup System
network settings to allow hosts to continue to connect. Run the Discovery Engine and change the
network settings in accordance with your new infrastructure.
You can also use the Web Management Interface to modify these settings directly on the HP
StoreOnce Backup System, as long as this is done before the infrastructure changes are made.
Once the network settings of the HP StoreOnce Backup System have been changed, you must also
change the iSCSI Initiator for each host.
Discovering the HP StoreOnce Backup System (mandatory) 29
Page 30

Using the system console (IPv4 and IPv6)
If you do not use the Installation Wizard or your network configuration prevents the HP StoreOnce
Backup System from being discovered, you can connect the system console directly to the unit in
order to find out the IP address.
NOTE: The system console is password protected. It uses the same password as the HP StoreOnce
Backup System. Any changes you make to the password on the Web Management Interface also
apply to the password on the system console.
To connect the system console:
1. Connect the monitor cable to the VGA port on the rear of the unit.
2. Connect the keyboard and mouse cables to the appropriate ports on the rear of the unit.
Figure 20 System console connections on the HP D2D4300 Series (D2D4312 shown)
Figure 21 System console connections on the HP D2D4106/4112 Backup System
Figure 22 System console connections on the HP D2D2502/2504 Backup System
2 and 3. Ports for system console keyboard1 and 2. VGA port for system console monitorand mouse
3. Power on the HP StoreOnce Backup System and allow it to boot up until the console screen
is displayed. Select the Network... option from the left-hand Menu. (Enter the password when
requested to do so; this is the Admin password for the HP StoreOnce Backup System.)
30 Advanced installation
Page 31

Figure 23 System console screen (example shows HP D2D4106/4112)
4. Locate the IP address for the port(s) and make a note of it.
5. In the web browser on the host machine, type in the IP address of the HP StoreOnce Backup
System to connect to it.
Using the iLO2 port
This feature is supported on all HP StoreOnce Backup Systems, which are G2 products (it is not
supported on older G1 HP StorageWorks products).The HP StoreOnce Backup System is supplied
with the iLO2 Advanced Pack enabled.
• The default Name, Administrator Login Name and Password for iLO2 access are provided
on the HP StoreOnce Backup System and on a toe tag attached to it. Make a note of these;
you will need them to log on to iLO2.
• A separate network connection is required to the iLO2 network port on the rear of the HP
StoreOnce Backup System (item 1 on the drawings below). This should be used to connect
the HP StoreOnce Backup System to the same network as the host that is running the iLO2
management application.
• DHCP is the default network setting for iLO2 web page access. If a static address is required,
this must be done via a keyboard and monitor connection when the HP StoreOnce Backup
System is booted up. (This is done using the POST F8 option. You may need to press a key
to see the prompt.) If DHCP is supported, but not preferred, iLO2 access may be configured
via the web interface.
Discovering the HP StoreOnce Backup System (mandatory) 31
Page 32

Figure 24 iLO2 connector on the HP D2D4300 Series (D2D4324 shown)
Figure 25 iLO2 connector on the HP D2D4100 Series
Figure 26 iLO2 connector on the HP D2D2500 Series
HP Integrated Lights-Out 2 (iLO2) and HP StoreOnce Backup Systems
The HP iLO2 System is well documented and online help is available from the application. However,
the HP StoreOnce Backup System implementation does not run Smart Agents and there are certain
features that it is not advisable to use. The recommended uses for iLO2 are the monitoring function
on the System Console page and the remote access function, if the D2D Web Management Interface
fails to operate.
Please review the information in this section carefully before using iLO2.
32 Advanced installation
Page 33

IMPORTANT: There are various places on the iLO2 pages that allow you to power off/on and
reboot the HP StoreOnce Backup System remotely. In most instances you should not use this feature.
The preferred option is always to power off the StoreOnce Backup System cleanly and in a controlled
manner from the Web Management Interface to ensure that users and jobs are not interrupted.
(The only instances where iLO2 should be used for power management is after a power outage,
or if the Web Management Interface and system console fail to operate.)
Table 1 Using iLO2 with the HP StoreOnce Backup System
The server name is made up of the serial name and the ProLiant model upon which the
StoreOnce Backup System is based.
• For the HP D2D4300 Series Backup System this is the ProLiant DL370 G6. Information
for this ProLiant model is readily available on http://www.hp.com.
• For the HP D2D4100 Series this is the SE 1220 server; for the HP D2D2500 Series
this is the SE 1120 server. These are special configurations of ProLiant servers and
you will not find specific information about them on the HP ProLiant web pages.
If you change the server name on the iLO2 pages, these changes will not be reflected
automatically in the HP StoreOnce Backup System Web Management Interface. Similarly,
if you change the server name in the Web Management Interface, these changes will
not be reflected automatically in the iLO2 pages.
IMPORTANT: Do not use the Power Management button on this page.
System Status — Summary
page
The navigation pane on the left provides several options. System Information, iLO2 Log
and Integrated Management Log, all provide information that may be useful, particularly
if making a support call. Do not use Diagnostics, and the information on iLO2 User Tips
and Insight Agent is not relevant to HP StoreOnce Backup Systems.
System Status — other
pages
This is the main purpose of iLO2 with HP StoreOnce Backup Systems. It requires a user
name and password, which should be the same password as the HP StoreOnce Backup
System. Any changes you make to the password on the Web Management Interface
also apply to the password on the iLO2 Remote Console.
Remote Console
This is not supported. Do not use.Virtual Media
Do not use the power off button. You will power off the D2D Backup System untidily and
may disrupt backup and restore and replication jobs. Similarly, the Power Regulator for
ProLiant setting should always be in HP Static High Performance Mode. If you change
this, you may affect performance.
Power Management
If required, use this option to set up and manage iLO2 users; it does not affect users of
the StoreOnce Backup System. Do not use the software upgrade function on these pages.
StoreOnce Backup System software upgrades should not be carried out across a network.
Always use the Web Management Interface and follow the instructions in the software
release notes on how to upgrade using the software Management CD and USB Key
media.
Administration
Manual driver installation (optional, VTL only)
If you intend to create Virtual Tape Devices on the HP StoreOnce Backup System, two drivers are
required; an HP LTO Tape driver and a medium changer driver.
NOTE: Certain backup applications require you to use their own drivers for both the tape device
and medium changer. For many applications these will be installed automatically during the
software installation process. If the backup software is already installed, you may need to manually
update the drivers after installing the HP StoreOnce Backup System.
HP LTO Tape driver
The HP LTO Tape driver must be installed to allow your system to recognize the Ultrium tape devices
created by the HP StoreOnce Backup System.
Manual driver installation (optional, VTL only) 33
Page 34

Tape drivers can be installed from the drivers directory on the HP StoreOnce Backup System
CD-ROM, where they are supplied as an installer application and as driver files for manual
installation. Also check the HP website for driver updates at http://www.hp.com/support.
The tape drive is configurable as an LTO-2, LTO-3, LTO-4 or LTO-5 device. This is the default
behavior of the tape drive and there is no need and no way to change it on the HP StoreOnce
Backup System. It is important not to confuse emulation type with cartridge size. Emulation type is
totally independent from cartridge size. The HP StoreOnce Backup System allows you to pick
whatever cartridge size you like (up to 3.2 TB).
Medium changer driver
No additional medium changer driver is required because Microsoft Windows provides a suitable
generic driver and all backup applications provide their own changer drivers.
Device Manager
After installation, the HP StoreOnce Backup System does not appear as a device under My Computer
and it is not mapped to a drive letter. You must always use a backup application on the host
machine to back up and restore data. However, if you have installed drivers, it can be seen as a
tape drive (1) and medium changer (2) from Device Manager.
NOTE: For a Fibre Channel Backup System, a new “unknown” device will be discovered in
Device Manager. This device is required only to ensure that a Fibre Channel target exists as LUN
0 in the SAN. No functionality is provided by this device and no driver is required.
iSCSI Initiator (optional, VTL only)
This section is not relevant if you are configuring only FC library devices or NAS shares on your
HP StoreOnce Backup System.
34 Advanced installation
Page 35

NOTE: FC products may be configured with a mixture of FC and iSCSI Virtual Tape Devices. If
you are configuring your HP StoreOnce Backup System to have iSCSI Virtual Tape Devices (for
hosts attached via the LAN ports), this section is relevant. However, if you are configuring it to
have only FC devices (attached via the FC ports), it is not necessary; you must use the Web
Management interface to create FC library devices, see the HP StoreOnce Backup System user
guide.
iSCSI is a protocol for sending SCSI commands via Ethernet. It defines how SCSI packets are
translated to Ethernet packets and connects to the required devices. An iSCSI initiator may be
hardware or software and should be running on each host. If the host does not have an iSCSI
initiator, it will not be able to connect to the library configured on the HP StoreOnce Backup System
and will not be able to perform backups.
For Linux and UNIX operating systems an iSCSI initiator is embedded in the operating system.
Please refer to the Linux and UNIX Configuration Guide on the HP StoreOnce Backup System
CD-ROM for further information. Make sure that you have downloaded the latest operating system
patches before you configure your system.
For Windows systems the Microsoft iSCSI initiator is required to connect to any Virtual Tape Libraries
created on the HP StoreOnce Backup System. The iSCSI initiator ships with later versions of Microsoft
Windows, but not with XP/2003 or earlier. HP is not permitted to include the iSCSI initiator on
the CD. So, if required, it must be retrieved from the Microsoft website.
NOTE: With some versions of Windows the iSCSI initiator service is not started by default. This
component must be configured manually by the user to run on startup. Do this through the Control
Panel.
Figure 27 iSCSI Initiator download page for Windows
Use with ia-64 processors, such as Itanium and HP Integrity.1,ia 64
Use with x86-64 processors, such as AMD64 and Intel 642, x 64
Use with 32-bit processors or 64-bit processors running 32-bit Windows, such as Windows
XP and Server 2003.
3, x86
If you download the wrong version, it will not install. The simplest way of ensuring you download
the correct version is to run the Installation wizard from the HP StoreOnce Backup System CD-ROM
because it automatically checks which is the appropriate version for your host.
NOTE: Microsoft operating systems released since Windows Server 2008 and Windows Vista
include the Microsoft iSCSI initiator. It can be run from the Control Panel in Classic Mode.
Manual iSCSI initiator installation
1. On a machine that supports an external internet connection, go to the Microsoft website and
search on iSCSI initiator.
iSCSI Initiator (optional, VTL only) 35
Page 36

2. Select the result that takes you to the Download page and choose the download that is
appropriate for your host.
3. Download the iSCSI initiator and install it on the host, accepting all the default settings.
The iSCSI Initiator and Authentication
Authentication is not required for the HP StoreOnce Backup System, but it is supported for those
companies that have an IT policy that requires them to use authentication. If this is the case, you
will need to configure the necessary fields on the iSCSI Initiator and also ensure that the
corresponding information is supplied in the Web Management Interface. This enables the Initiator
to log into the target device on the HP D2D and the target device to log into the Initiator.
The authentication method supported on StoreOnce products is CHAP. It relies on a "secret" known
only to the target and initiator. The size of the CHAP secret is between 12 and 16 characters, and
must be entered in exactly the same format in both the Web Management Interface and the iSCSI
initiator. An 'Authentication Failure' message will occur if the same 'secret' and 'user name'
information are not entered into the iSCSI Initiator screen and the Web Management Interface.
Further details on authentication and CHAP can be found within standard iSCSI protocol
documentation.
The recommended process if you wish to enable authentication is:
1. Create the devices on the Web Management Interface.
2. Set up the Targets in the iSCSI Initiator.
3. Connect to the devices using the CHAP user name and secret that you configured on the
Targets tab.
The Microsoft iSCSI Initiator
The Microsoft iSCSI initiator contains a number of tabs. This section describes the information that
must be provided in order to connect the host to a device on the HP StoreOnce Backup System. It
does not provide a comprehensive description of all the tabs; please download the “User Guide”
from the Microsoft website for more information.
NOTE: The screenshots below may not be correct for your operating system. The iSCSI Initiator
on Windows 7 and Windows Server 2008 operating systems has a slightly different interface.
General tab
You do not normally need to make any changes on the General tab. The Initiator Node Name is
generated automatically, which guarantees that it will be unique on your network.
36 Advanced installation
Page 37

Figure 28 General tab (iSCSI)
NOTE: When you use the Web Management Interface to create an additional device for your
host, you must provide the iSCSI Initiator Name. This is the Initiator Node Name found on the
General tab.
Authentication
If you wish to use mutual authentication (where target authentication is also required), click Secret
on the General tab and enter the appropriate string at the prompt.
NOTE: IPSec Tunnel Mode is not currently supported on HP D2D products.
Figure 29 CHAP secret
The CHAP secret may be between 12 and 16 alphanumeric characters and should be exactly the
same string as you enter on the Web Management interface in the Target CHAP Secret field on
the Devices page on the Web Management Interface. See the HP StoreOnce Backup System user
guide for more information.
iSCSI Initiator (optional, VTL only) 37
Page 38

Discovery tab
Figure 30 Discovery tab (iSCSI)
Click Add to enter target portals that will enable discovery of the device.
Figure 31 Add target portal
You must enter the IP address or fully qualified domain name of the HP StoreOnce Backup System
(for example, myhpd2d.mydomain.com) to add it as a target portal for the host on the Discovery
tab. Do not change the Port; it should be 3260.
Targets tab
This tab contains a list of all available devices.
• If this is the first time that the iSCSI Initiator has been configured and the Installation wizard
has not been run, it will automatically create a library with the appropriate number of target
devices (the default is one loader and one tape drive).
• If target devices have already been configured for the host in the past, they appear in the list;
no more are created.
When you run the iSCSI Initiator manually, new devices have a status of Inactive. You must log on
to the appropriate targets for your host. Remember that each library has at least two devices and
you must log onto each one separately. If the emulation type you have selected allows more drives,
there will be a target device for each drive.
38 Advanced installation
Page 39

NOTE:
If you are using mutual CHAP authentication, you set up the details when you log on to the target.
If you are using a dual port configuration, there will be two IP addresses in separate subnets for
each device. The iSCSI initiator will return both IP addresses as possible login addresses. If the
default choice does not work you can select a specific port. High Availability dual ports return a
single IP address. See also Understanding LEDs.
Figure 32 Targets tab (iSCSI)
We recommend that you also select the Automatically restore this connection when the system
boots option in the Log On... dialog.
Authentication
When the Log On to Target prompt is displayed click on Advanced...
Enable CHAP logon information and enter the secret in the Target Secret box. This should be the
same string as you entered for the Initiator CHAP Secret on the Devices page of the Web
Management Interface. The User Name should match the Initiator CHAP User Name on the Devices
page.
iSCSI Initiator (optional, VTL only) 39
Page 40

Figure 33 Advanced settings CHAP
If you want to use mutual authentication, which means that the target must also log on to the Initiator,
make sure that the Perform mutual authentication box is checked. You must also provide the Target
User Name and Secret on the Devices page in the Web Management Interface.
Persistent Targets tab
The Persistent Targets tab shows the targets that have been configured to restore automatically on
reboot. During initial configuration, it is for information only. However, if you want to stop the host
automatically connecting to a device, you must select the device on this tab and Remove it. To
disconnect the device without rebooting, go back to the Targets tab, select the device, click Details
and log off.
Figure 34 Persistent Targets tab (iSCSI)
40 Advanced installation
Page 41

Bound Volumes/Devices tab
No configuration is required on the Bound Volumes/Devices tab.
Fibre Channel configuration
Backup and restore is supported over both Ethernet networks and Fibre Channel SAN. However,
the Web Management Interface always requires an Ethernet connection. When using FC to back
up hosts, you should still run the Installation wizard to connect to and discover your HP StoreOnce
Backup System and must still connect to:
• HP D2D4300 Series: LAN port 3
• HP D2D4100 Series: LAN port 1
Fibre Channel connection
The HP StoreOnce Backup System is supplied with the correct FC card pre-installed. It does not
include FC cables.
1. Connect to the appropriate LAN port.
2. Use a FC Multimode 50/125 (preferred) or 62.5/125 cable to connect the port(s) on the FC
card in the HP StoreOnce Backup System to the Fibre Channel Switch.
3. The switch must have a multi-mode transceiver that supports speeds of:
• HP D2D4300 Series: 8Gbs (preferred), 4Gbs or 2Gbs
• HP D2D4100 Series: 4Gbs (preferred) or 2Gbs
4. Run the Installation wizard , as described in this guide.
5. Run the Web Management Interface and create at least one library device. Be sure to select
one of the FC ports in the Port drop-down. For information about the other fields, see the HP
StoreOnce Backup System User Guide or online Help.
6. Configure zones on the FC Fabric/Switch, if required. (See next section.)
7. The library device(s) should now be visible to the host. It may be necessary to perform a system
re-scan.
Zoning
Zoning is only required if a switched fabric topology is used.
Fibre Channel configuration 41
Page 42

Due to complexities in multi-hosting tape devices on SANs, it is best to make use of zoning tools
to help keep the backup/restore environment simple and less susceptible to the effects of changing
or problematic SANs.
Zoning provides a way for servers, disk arrays, and tape libraries to only see what hosts and
targets they need to see and use. The benefits of zoning include but are not limited to:
• Limiting unnecessary discoveries on the HP StoreOnce Backup System
• Reducing stress on the HP StoreOnce Backup System and its library devices by polling agents
• Reducing the time it takes to debug and resolve anomalies in the backup/restore environment
• Reducing the potential for conflict with untested third-party products
Zoning may not always be required for configurations that are already small or simple. Typically
the bigger the SAN is, the more zoning is needed. HP recommends the following for determining
how and when to use zoning.
• Small fabric (16 ports or less)—may not need zoning.
• Small to medium fabric (16 - 128 ports)—use host-centric zoning. Host-centric zoning is
implemented by creating a specific zone for each server or host, and adding only those storage
elements to be utilized by that host. Host-centric zoning prevents a server from detecting any
other devices on the SAN or including other servers, and it simplifies the device discovery
process.
• Disk and tape on the same pair of HBAs is supported along with the coexistence of array
multipath software (no multipath to tape or library devices on the HP StoreOnce Backup System,
but coexistence of the multipath software and tape devices).
• Large fabric (128 ports or more)—use host-centric zoning and split disk and tape targets.
Splitting disk and tape targets into separate zones will help to keep the HP StoreOnce Backup
System free from discovering disk controllers which it doesn't need to see. For optimal
performance, where practical, dedicate HBAs for disk and tape.
NOTE: Overlapping zones are supported.
Network configuration
Single port configuration is the default mode, but it may easily be changed from the Web
Management Interface.
The two physical network ports provide four network configuration modes (on the HP D2D4300
Series, each pair of same speed physical network ports provide four network configuration modes).
• Single Port Configuration: The HP StoreOnce Backup System is connected to one network
only; only one network port is used.
• Dual Port Configuration: The HP StoreOnce Backup System is connected to two different
networks. Both network ports are used. The networks must be on different sub-nets.
• High Availability (Port Failover) Configuration: This creates a bonded network port to provide
failover, if one port on the switch or HP StoreOnce Backup System fails or if a network cable
fails. To configure this mode both ports must be connected to the same switch (or two multiple
switches which are configured as a single stack using an inter-switch link). This bonding mode
will work with most switches (that support the tool) with no switch configuration required. In
this mode the link will failover if one path is lost, this may still result in the failure of any data
transfer (backup/restore) currently in progress, if the link recovery time results in a backup
application time-out.
• High Availability (Link Aggregation) Configuration: This creates a bonded network port to
provide failover and bandwidth aggregation, and it can improve the overall network bandwidth
available. To configure this mode both ports much be connected to the same switch, and the
switch must support and be configured to use “Link Aggregation Control Protocol” (LACP).
42 Advanced installation
Page 43

NOTE: If you select a bonded network mode, all reporting and status information is shown for
the bonded port and not for individual ports. (For example, you will not see a green OK status for
both ports.) If using a bonded network mode with the HP D2D4300 Backup System, be aware
that the bonded ports must be of the same speed.
To configure the LACP configuration
For all switches the following commands must be issued to the switch:
[manager]
<password>
config
<Create a trunk in LACP mode >
<Tag the new trunk to a specific Vlan >
The exact command line may vary from one switch to the other, and also depending on the Vlans
configured on each switch. Here are some examples:
For HP Procurve switches with no vlans configured:
[manager]
<password>
config
trunk <ports,> trk<n> lacp
vlan <vlan id> untagged trk<n>
For HP Procurve with a number of vlans configured:
[manager]
<password>
config
trunk <ports,> trk<n> lacp
vlan <vlan id> tag trk<n>
In this command we tag the new created trunk to our required Vlan.
For Cisco switches:
Switch
Switch <enable>
Switch#configure terminal
Switch(config)#interface range fastEthernet < slot/port number >
Switch(config-if-range)#channel-protocol lacp
Switch(config-if-range)#channel-group <number> mode active
If there is a number of Vlans configured on the switch, assign the channel- group to the appropriate
vlan in order to have a correct connection.
Network configuration 43
Page 44
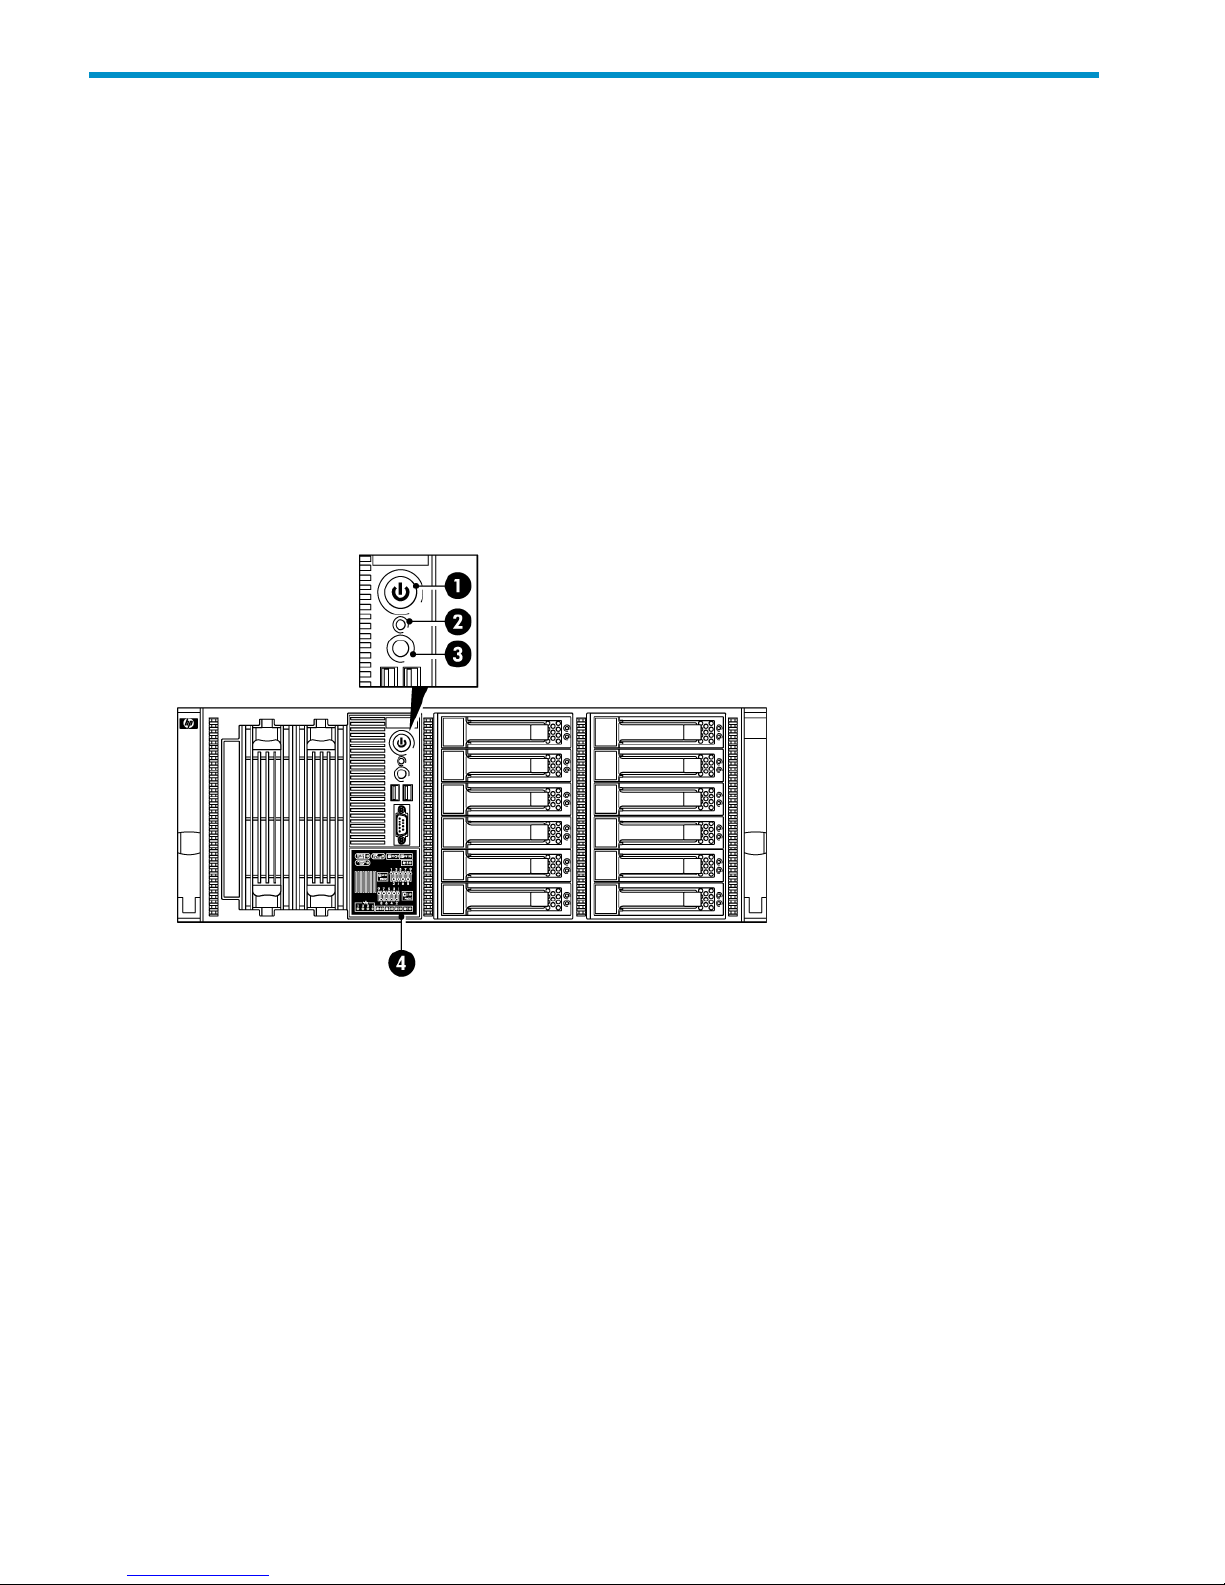
7 Understanding LEDs
• HP D2D4324/4312 Backup System
• HP D2D4112/4106 Backup System
• HP D2D2502/2504 Backup System
• Drive LEDs
• Fibre Channel card LEDs
• Capacity upgrade kit LEDs
HP D2D4324/4312 Backup System
Front view of the HP D2D4324/4312 Backup System
Figure 35 Front view of the HP D2D4324/4312 Backup System
Steady green: Power connected, device ready to use1. Power On button/LED
Steady amber: Device switched off or in hibernation with
power connected
Off: No power connected
Steady green: Hardware is performing correctly2. System Health LED
Flashing amber: degraded condition
Flashing red: critical condition, such as power supply or
fan failure
Steady blue: identifies the unit3. Beacon LED
Amber: Power off or system hardware fault
The HP Systems Insight Display LEDs represent the system
board layout and may be useful for troubleshooting. See
the “Maintenance and Service Guide” for more details.
4. System Insight Display
44 Understanding LEDs
Page 45

Rear view of the HP D2D4324/4312 Backup System
Figure 36 HP D2D4312 rear panel LEDs
Steady green: The LAN connection is using 10 Mbps/100
Mbps link.
1. LAN network speed LED indicator
Steady amber: The LAN connection is using a GbE link.
Off: No connection.
Flashing green: Ongoing network data activity.2. LAN activity status LED indicator
Off: No network data activity or no connection.
HP D2D4112/4106 Backup System
Front view of the HP D2D4112/4106 Backup System
Figure 37 Front view of the HP D2D4112/4106 Backup System
Steady blue: identifies the unit1. Beacon LED
Amber: Power off or system hardware fault
Steady green: Hardware is performing correctly2. System Health LED
HP D2D4112/4106 Backup System 45
Page 46

Flashing amber: degraded condition
Flashing red: critical condition, such as power supply or
fan failure
Flashing green: network connection3. and 4. LAN port LEDS
Off: no network connection or network not configured
Steady green: Power connected, device ready to use5. Power On button/LED
Steady amber: Device switched off or in hibernation with
power connected
Off: No power connected
Rear view of the HP D2D4112/4106 Backup System
Figure 38 HP D2D4112/4106 Backup System rear panel LEDs
Steady green: The LAN connection is using 10 Mbps/100
Mbps link.
1. LAN network speed LED indicator
Steady amber: The LAN connection is using a GbE link.
Off: No connection.
Flashing green: Ongoing network data activity.2. LAN activity status LED indicator
Off: No network data activity or no connection.
HP D2D2502/2504 Backup System
Front view of the HP D2D2502/2504 Backup System
Figure 39 Front view of the HP D2D2502/2504 Backup System
Steady blue: identifies the unit1. HP D2D Beacon LED
Steady green: Hardware is performing correctly2. System Health LED
46 Understanding LEDs
Page 47

Flashing amber: degraded condition
Flashing red: critical condition, such as power supply or
fan failure
Flashing green: network connection3. and 4. LAN port LEDS
Off: no network connection or network not configured
Steady green: Power connected, device ready to use5. Power On button/LED
Steady amber: Device switched off or in hibernation with
power connected
Off: No power connected
Rear view of the HP D2D2502/2504 Backup System
Figure 40 HP D2D2502/2504 Backup System rear panel LEDs
Steady green: The LAN connection is using 10 Mbps/100
Mbps link.
1. LAN network speed LED indicator
Steady amber: The LAN connection is using a GbE link.
Off: No connection.
Flashing green: Ongoing network data activity.2. LAN activity status LED indicator
Off: No network data activity or no connection.
Hot-plug drive LEDs
The status of hot-plug hard drives installed in the server is indicated by the drive activity LED indicator
located on the front panel of the server.
Figure 41 Drive LEDs
Steady green: Online, no activity1. Disk Online LED
Flashing green: Ongoing disk activity
Steady amber: Disk has failed
Flashing amber: Predictive disk failure
Hot-plug drive LEDs 47
Page 48

Off: The disk is not a part of RAID
Steady blue: identifies a specific disk within the unit2. Disk beacon LED
Beacon mode
The HP StoreOnce Backup System supports a Beacon LED sequence, which helps a user identify
which unit is being configured, if several are connected to the network. There is also a Beacon
LED on the individual disks so that you can identify a specific disk within the HP D2D.
Use the Network page of the Web Management Interface to turn Beacon Mode on and off for the
HP StoreOnce Backup System. This turns the Beacon LED on the front and the rear of the HP D2D
solid blue. If you do not switch off Beacon Mode, it will continue for 5 minutes. You can also switch
Beacon mode on and off by pressing the LED on the front panel.
Fibre Channel card LEDs
If you have a Fibre Channel version of the HP StoreOnce Backup System, there are three LEDs
adjacent to each FC port.
Table 2 FC card LEDs
ActivityAmber LEDGreen LEDYellow LED
Power Off (OK)OffOffOff
Power on before or after software initialization.
Awaiting HBA software initialization.
OnOnOn
Power on after software initialization. Link not
initialized.
FlashingFlashingFlashing
software fault (OK)Alternately flashingAlternately flashingAlternately flashing
Connected at: 2 (HP D2D4300 Series only) or
1 (all other FC systems) Gb/s
OnOffOff
Activity at 2 (HP D2D4300 Series only) or 1
(all other FC systems) Gb/s (OK)
FlashingOffOff
Connected at 4 (HP D2D4300 Series only) or
2 (all other FC systems) Gb/s
OffOnOff
Activity at 4 (HP D2D4300 Series only) or 2
(all other FC systems) Gb/s (OK)
OffFlashingOff
Connected at 8 (HP D2D4300 Series only) or
4 (all other FC systems) Gb/s
OffOffOn
Activity at 8 (HP D2D4300 Series only) or 4
(all other FC systems) Gb/s
OffOffFlashing
Capacity upgrade kit LEDs
There are three LEDs on the front of the Capacity Upgrade Kit.
48 Understanding LEDs
Page 49

Figure 42 Capacity Upgrade LEDs
Green: System activity1. Health LED
Off: No system activity
Amber: Fault condition2. Fault LED
Off: No fault condition
Blue: Identified3. UID button/LED
Flashing blue: Active remote management
Off: No remote management
Capacity upgrade kit LEDs 49
Page 50

8 Troubleshooting
Use the information in this chapter to troubleshoot problems. More detailed troubleshooting
information can be found at http://www.hp.com/support.
This chapter provides troubleshooting information on:
• Connecting the hardware
• Connecting to the HP StoreOnce Backup System from the backup application
• Connecting to the network
• Using the 10Gb ports
• Performance
• Power On/Off problems
• Cannot connect to Web Management Interface
• Cannot connect to NAS share
• Cannot access a storage shelf
Connecting the hardware
Please see http://www.hp.com/go/connect or http://www.hp.com/go/ebs for supported network
cards, cables and physical tape drives.
Connecting to the HP StoreOnce Backup System from the backup
application
Make sure you have the latest version or software patches for the backup application. Please see
http://www.hp.com/go/connect or http://www.hp.com/go/ebs for supported applications.
Stop and restart the backup application services after the backup device has been discovered. If
you still cannot access the device, check Device Manager to make sure it is accessible from the
host.
• Make sure that the iSCSI initiator is connected to the devices and log on to them, if they are
not, see Targets tab.
• If it is not accessible, rerun Discovery.
NOTE: There are practical limitations on the number of devices that each host and FC switch or
HBA can access. It is possible to configure more drive and library devices than a host can access.
See the D2D Best Practices for VTL, NAS and Replication implementations for maximum and
recommended values.
Connecting to the network
NOTE: If you have selected the Link aggregation mode, ensure that switch is configured correctly
at the other end.
If you cannot access your device on the network, please check the following:
1. Regardless of the network configuration mode and interface type, please ensure that there is
a CAT-5E (or above) Ethernet cable connected to network port 1 (HP D2D4100 Series and
HP D2D2500 Series) or network port 3 (HP D2D4300 Series). This is the primary port for
communication to the Web Management Interface and, on SCSI models, the primary port for
50 Troubleshooting
Page 51

data communications (apart from HP D2D4300 models, which normally use the 10Gb ports
for data communications.)
2. Check that the LEDs are flashing on the LAN Port 1 (LAN Port 3 for the HP D2D4300 Series)
LED on the front panel. (See also Understanding LEDs.)
• If no LEDs are flashing, you do not have a network connection – check your Ethernet
cable or consult your network administrator.
• If LEDs are flashing, check that you have the correct IP address for your HP StoreOnce
Backup System. Are you using DHCP or Static IP addressing for your HP StoreOnce
Backup System? If you are unsure of your settings, please use the System Console to
confirm the settings that have been configured on your unit (see Using the system console
(IPv4 and IPv6)).
3. Is your network running IPv4 or IPv6 mode?
• Your HP StoreOnce Backup System will operate and automatically detect both modes of
operation.
• Ensure that you have selected the correct IP Address for the network you are using.
• At this time, the HP StoreOnce Backup System does not support DHCPv6.
4. Try to PING / PINGv6 the IP address of the HP StoreOnce Backup System. If PING is successful,
there is network communication between the host and the HP StoreOnce Backup System.
5. If you still cannot access the HP StoreOnce Backup System, use the standalone Discovery tool.
Discovery is run as part of the Installation wizard; it is also installed as a standalone utility on
your desktop. Run the Discovery tool and check that the HP StoreOnce Backup System appears
in the list of devices for selection.
• Use the Beacon option to identify a particular HP StoreOnce Backup System on the
network.
• If Discovery cannot find the device, check whether there is a Firewall. You may need to
temporarily disable it. It can be re-enabled as soon as the device is configured. Or, the
HP StoreOnce Backup System may be on a different subnet.
Using the 10Gb ports (HP D2D4300 Series only)
Although a warning will be displayed, it is possible to disable network ports.
• If you cannot use the Web Management Interface, check that the 1Gb ports are enabled on
the Network (Configuration) page.
• If data transfer seems slow, check that the 10Gb ports are enabled on the Network
(Configuration) page. Also, make sure that the hosts are configured correctly to select the
10Gb network for data transfer. The LEDs on the 10Gb card (at the rear of the HP StoreOnce
Backup System) also help identify network activity. Or use iLO2 to monitor the network ports.
Performance
Your HP StoreOnce Backup System is designed for high performance backup and restore operations
according to the specification documented.
There are many reasons why you may not see the performance you expected from your HP
StoreOnce Backup System.
• Your own network speed or disk access is not fast enough to allow streaming of data.
• Your backup application is not optimized.
• Your HP StoreOnce Backup System is not optimized for your network and application.
Using the 10Gb ports (HP D2D4300 Series only) 51
Page 52

Network
For iSCSI devices the HP StoreOnce Backup System is designed to be run on a 1Gb (or 10–Gigabit
for HP D2D4300 Series) network. Performance will be reduced if a 10/100BaseT network is used.
The LEDs on the front panel (1Gb ports only) and on the network ports and also warnings on the
Web Management Interface will indicate the network speeds at which the device is operating.
For more information
See the D2D Best Practices for VTL, NAS and Replication implementations.
Power On/Off Problems
The normal boot sequence takes approximately 2 (or 5 for HP D2D4300 Series) minutes. On
power up the HP StoreOnce Backup System runs its fans at high speed for approximately 10
seconds before returning to normal speed. When powering off the HP StoreOnce Backup System
make sure no backup or restore jobs are running or scheduled to run while the HP StoreOnce
Backup System is out of action.
HP StoreOnce Backup System shuts down automatically
The HP StoreOnce Backup System has found a problem with the internal hardware which requires
the device to shutdown to avoid further hardware problems. The System Health LED on the front
panel will probably be flashing RED.
Connect to the iLO-2 port on the rear of your system, check for errors in the event and IML logs.
HP StoreOnce Backup System does not boot up correctly
Check the Power LED on the front panel.
If the Power LED is OFF:
• Check power is connected to the HP StoreOnce Backup System and is on.
• The PSU may be faulty.
If the Power LED is AMBER:
• Power on the HP StoreOnce Backup System using the Power button.
• If it shuts down again, see HP StoreOnce Backup System shuts down automatically.
If the Power LED is GREEN:
• Plug in a monitor and keyboard directly to the back of the HP StoreOnce Backup System (see
Using the system console (IPv4 and IPv6)) and watch for errors on boot up or on the System
Console screen.
• If all the LEDs turn on except for the hard disk drive LEDs, the SmartArray RAID controller in
one of the PCIe slots may be at fault. On the System Console screen, the Smart Array status
normally shown at boot time will not display. No hard disk drive LEDs will turn on. Please
refer to SmartArray RAID information on http://www.hp.com/support.
• If the System Console screen is not seen:
The HP StoreOnce Backup System operating system may not be seen or recognized.
Check the flash memory module inside the unit for correct seating. (To locate the flash
memory module, refer to the schematic on the hood label.)
◦
◦ Check for hardware errors as the HP StoreOnce Backup System boots up.
System Health LED is flashing RED (HP D2D4300 and D2D4100 Series)
One of the two power supplies is faulty or not connected to power at power on time, causing a
warning condition. Check the LED on the PSU to ensure it is not faulty (it should be green). Ensure
52 Troubleshooting
Page 53

both power supplies are connected and reboot to clear this LED. The HP StoreOnce Backup System
will work satisfactorily with one power supply, but without any redundancy. It is recommended to
power on the second power supply or replace the power supply as soon as possible.
HP StoreOnce Backup System boots up correctly, but cannot be seen on the
network
See Connecting to the network.
Cannot connect to Web Management Interface
HP StoreOnce Backup System is not visible on the network
See Connecting to the network.
Cannot log in to the Web Management Interface
The password is case-sensitive, please make sure you know whether CAPS LOCK is on or off.
If you cannot find the password to the Web Management Interface login screen, it can be reset to
factory value.
1. Ensure that there are no backup or restore jobs in progress to the device.
2. Press the Power On button on the front of the HP StoreOnce Backup System three times in
quick succession to reset it.
3. After approximately 5 seconds, the HP StoreOnce Backup System will begin its reboot
sequence.
4. The HP StoreOnce Backup System will be reset to factory networking settings and the
Administrator password will be reset to Admin. No user data will be lost but you will need to
re-configure your network settings, because they may be reset by this action.
Cannot connect to a NAS share
The following sequence will cause problems when connecting to a NAS share.
1. Create an NFS share and mount it on a Linux box.
2. Delete the share on the HP StoreOnce Backup System without unmounting it from the Linux
box.
3. Recreate the share again with the same name.
In this scenario, the Linux client will assign a new set of inodes to the new share, but when trying
to access the old mount point it will use the previous set of inodes and will therefore not manage
to connect.
Reboot the host Linux system and the connection will work again.
Cannot access a storage shelf (HP D2D4300 Series and D2D4100 Series)
If you disconnect a storage shelf, you must reconnect it to the same port to which it was originally
connected. Do not daisy chain storage shelves.
Cannot connect to Web Management Interface 53
Page 54

About this guide
This guide provides information about:
• Installing the HP StoreOnce Backup System
• Using the HP StoreOnce Backup System
• Troubleshooting the HP StoreOnce Backup System
Intended audience
This guide is intended for users who install, operate and maintain the HP StoreOnce Backup System.
Related documentation
In addition to this guide, the following document provides related information:
• ‘Start here' poster for an overview of the installation information in this guide (available in
English, French, German and Japanese)
• HP StoreOnce Backup System Concepts guide
• HP StoreOnce Backup System User guide
You can find these documents from the Manuals page of the HP Business Support Center website:
http://www.hp.com/support/manuals
In the Storage section, click Storage Solutions and then select your product.
Document conventions and symbols
Table 3 Document conventions
ElementConvention
Cross-reference links and e-mail addressesBlue text: Table 3 (page 54)
website addressesBlue, underlined text: http://www.hp.com
• Keys that are pressed
• Text typed into a GUI element, such as a box
• GUI elements that are clicked or selected, such as menu
and list items, buttons, tabs, and check boxes
Bold text
Text emphasisItalic text
• File and directory names
• System output
• Code
• Commands, their arguments, and argument values
Monospace text
• Code variables
• Command variables
Monospace, italic text
Emphasized monospace textMonospace, bold text
54
Page 55

WARNING! Indicates that failure to follow directions could result in bodily harm or death.
CAUTION: Indicates that failure to follow directions could result in damage to equipment or data.
IMPORTANT: Provides clarifying information or specific instructions.
NOTE: Provides additional information.
HP technical support
For worldwide technical support information, see the HP support website:
http://www.hp.com/support
Before contacting HP, collect the following information:
• Product model names and numbers
• Technical support registration number (if applicable)
• Product serial numbers
• Error messages
• Operating system type and revision level
• Detailed questions
Customer self repair
HP customer self repair (CSR) programs allow you to repair your StorageWorks product. If a CSR
part needs replacing, HP ships the part directly to you so that you can install it at your convenience.
Some parts do not qualify for CSR. Your HP-authorized service provider will determine whether a
repair can be accomplished by CSR.
For more information about CSR, contact your local service provider. For North America, see the
CSR website:
http://www.hp.com/go/selfrepair
Registering your HP StoreOnce Backup System
Once you have installed and tested your HP StoreOnce Backup System please take a few minutes
to register your product. You can register via the web (http://www.register.hp.com).
To ensure your registration is complete, there are a number of questions on the electronic form that
are mandatory. Other questions are optional. However, the more you feel able to complete, the
better HP can meet your needs.
Subscription service
HP recommends that you register your product at the Subscriber's Choice for Business website:
http://www.hp.com/go/e-updates
After registering, you will receive e-mail notification of product enhancements, new driver versions,
software updates, and other product resources.
HP technical support 55
Page 56

HP websites
For additional information, see the following HP websites:
• http://www.hp.com
• http://www.hp.com/go/ebs
• http://www.hp.com/go/connect
• http://www.hp.com/go/storage
• http://www.hp.com/service_locator
• http://www.hp.com/support/manuals
• http://www.hp.com/support/downloads
Documentation feedback
HP welcomes your feedback.
To make comments and suggestions about product documentation, please send a message to
storagedocs.feedback@hp.com. All submissions become the property of HP.
56
Page 57

Index
Symbols
10Gb ports
troubleshooting, 51
1GB LAN LEDs, 45
A
add target portal, 38
audience, 54
authentication, 36
iSCSI initiator, 37
Target tab, 39
B
backup application
troubleshooting, 50
backup applications
drivers, 26
beacon mode, 29, 48
boot up
troubleshooting, 52
Bound Volumes/Devices tab
iSCSI initiator, 41
C
capacity upgrade kit
LEDs, 48
Capacity UpgradeKit, 16
CD-ROM
contents, 22
changer driver, 26, 34
CHAP secret, 36
iSCSI initiator, 37
checklist, 5
connecting
power, 15
power cord, 15
to FC SAN, 41
to network, 15
console discovery, 25
conventions
document, 54
text symbols, 55
customer self repair, 55
D
D2D configured incorrectly
discovery, 29
D2D2502/2504 Backup System
front and rear view, 11
storage capacity, 11
D2D4106/4112 Backup System
front and rear view, 10
storage capacity, 10
D2D4324/4312 Backup System
front and rear view, 9
storage capacity, 9
devices
fibre channel, 41
DHCP, 23, 24, 28
discovery, 23, 28
beacon mode, 29
D2D configured incorrectly, 29
iLO2 port, 26, 31
installation wizard, 24
network setup changed, 29
new, not yet configured D2D, 29
system console, 30
using standalone, 24
discovery IPv4
troubleshooting, 25
discovery IPv6
troubleshooting, 25
Discovery tab
iSCSI initiator, 38
document
conventions, 54
related documentation, 54
documentation
HP website, 54
providing feedback, 56
download
iSCSI, 35
drivers, 23
backup applications, 26
installation wizard, 26
installing manually, 33
troubleshooting, 26
Dual Port configuration, 42
E
ethernet configurations, 7
F
Fibre Channel
connection , 41
creating devices, 41
LEDs, 48
fibre channel
and iSCSI, 34
topologies, 7
zoning, 41
Fibre Channel connections, 7
front view
D2D2502/2504 Backup System, 11
D2D4106/4112 Backup System, 10
D2D4324/4312 Backup System, 9
G
General tab
iSCSI initiator, 36
57
Page 58

H
hardware
troubleshooting, 50
hardware connections, 15
hardware requirements, 6
help
obtaining, 55
High Availability (Link Aggregation) configuration, 42
High Availability (Port Failover) configuration, 42
hot-plug drive
LEDs, 47
HP
technical support, 55
HP D2D2502/2504 Backup System
LEDs, 46
HP D2D4100 Series installation
upgrade kit, 19
HP D2D4112/4106 Backup System
LEDs, 45
HP D2D4300 Series installation
upgrade kit, 17
HP D2D4324/4312 Backup System
LEDs, 44
HP LTO driver, 26, 33
I
iLO2 port, 26, 31
inactive connection, 38
installation
Capacity UpgradeKit, 16
discovery, 24
drivers, 26
iSCSI initiator, 27
mounting Backup System, 13
rail kit, 13
safety warnings, 13
installation checklist, 5
installation wizard, 22
overview, 23
steps, 23
IPv4 discovery, 25
IPv6 discovery, 25
iSCSI
and authentication, 36
configuring manually, 36
download, 35
iSCSI initiator, 34
downloading, 35
installation wizard, 27
Linux and UNIX, 35
iSCSI installation, 23
L
LACP configuration, 43
LEDs, 44
1Gb LAN, 45
capacity upgrade kit, 48
Fibre Channel, 48
hot-plug drive, 47
HP D2D2502/2504 Backup System, 46
HP D2D4112/4106 Backup System, 45
HP D2D4324/4312 Backup System, 44
Linux
iSCSI initiator, 35
locating D2D, 24
logging on, 24
M
MAC address, 25
manual installation
information required, 23
mounting
Backup System, 13
mutual CHAP authentication, 39
N
NAS shares, 26, 27
network
troubleshooting, 50, 52
network configuration, 42
network settings
for installation, 23
iLO2 port, 26, 31
system console, 30
network setup changed
discovery, 29
new D2D
discovery, 29
nfs share
cannot connect, 53
O
other sources of information, 6
overview
installation wizard, 23
P
performance, 51
troubleshooting, 51
Persistent Targets tab
iSCSI initiator, 40
power cord, 15
Power LED
troubleshooting, 52
power on button, 20
Power On button LED, 44
power on/off
troubleshooting, 52
R
rear view
D2D2502/2504 Backup System, 11
D2D4106/4112 Backup System, 10
D2D4324/4312 Backup System, 9
related documentation, 54
S
shutdown
58 Index
Page 59

troubleshooting, 52
Single Port configuration, 42
software installation
drivers, 33
manual, 28
using DHCP, 28
using Discovery, 28
using iSCSI, 35
software requirements, 6
standalone discovery, 24
storage shelf
cannot connect, 53
StoreOnce Backup System
definition, 6
Subscriber's Choice, HP, 55
symbols in text, 55
system console, 30
System Health LED, 44
troubleshooting, 52
System Insight Display, 44
T
target authentication, 37
Targets tab
iSCSI initiator, 38
technical support
HP, 55
service locator website, 56
text symbols, 55
topologies
fibre channel, 7
troubleshoot
10Gb ports, 51
backup application, 50
boot up, 52
hardware, 50
network, 50, 52
performance, 51
Power LED, 52
power on/off, 52
shutdown, 52
System Health LED, 52
Web Management Interface, 53
U
UNIX
iSCSI initiator, 35
upgrade kit
installing on HP D2D4100 Series, 19
installing on HP D2D4300 Series, 17
V
Virtual Tape Libraries, 26, 27
VTL
iSCSI initiator, 34
W
web browser
recommended settings, 8
Web Management Interface
troubleshooting, 53
websites
customer self repair, 55
HP , 56
HP Subscriber's Choice for Business, 55
product manuals, 54
Windows
iSCSI initiator, 34
wizard
troubleshooting, 25, 26
Z
zoning, 41
59
 Loading...