

Page 1

Administrator’s Guide
Linux-based HP Compaq t5125,
t5515, t5525 Thin Clients
For the following image versions:
- L1ST3149 (t5125)
- L3ST3149 (t5515) - 128MB model only
- L4ST3149 (t5525)
Document Part Number: 395346-003
October 2005
This guide provides network administrators with basic instructions
for configuring Linux-based thin clients.
Page 2

© Copyright 2005 Hewlett-Packard Development Company, L.P.
The information contained herein is subject to change without notice.
Microsoft, MS-DOS, Windows, and Windows NT are trademarks of Microsoft
Corporation in the U.S. and other countries.
Adobe, Acrobat, and Acrobat Reader are trademarks or registered trademarks of
Adobe Systems Incorporated.
The only warranties for HP products and services are set forth in the express
warranty statements accompanying such products and services. Nothing herein
should be construed as constituting an additional warranty. HP shall not be liable
for technical or editorial errors or omissions contained herein.
This document contains proprietary information that is protected by copyright.
No part of this document may be photocopied, reproduced, or translated to
another language without the prior written consent of Hewlett-Packard
Company.
WARNING: Text set off in this manner indicates that failure to follow
Å
directions could result in bodily harm or loss of life.
CAUTION: Text set off in this manner indicates that failure to follow
Ä
directions could result in damage to equipment or loss of information.
Administrator’s Guide
Linux-based HP Compaq t5125, t5515, t5525 Thin Clients
- L1ST3149 (t5125)
- L3ST3149 (t5515) - 128MB model only
- L4ST3149 (t5525)
Third Edition (October 2005)
Document Part Number: 395346-003
Page 3

Contents
1 Introduction
Thin client image. . . . . . . . . . . . . . . . . . . . . . . . . . . . . . . . . . . . . . . . . . . . . . . . . . . . . . 1–2
Desktop . . . . . . . . . . . . . . . . . . . . . . . . . . . . . . . . . . . . . . . . . . . . . . . . . . . . . . . . . . . . . 1–2
t5125 Desktop . . . . . . . . . . . . . . . . . . . . . . . . . . . . . . . . . . . . . . . . . . . . . . . . . . . . . 1–2
t5515/t5525 Desktop. . . . . . . . . . . . . . . . . . . . . . . . . . . . . . . . . . . . . . . . . . . . . . . . 1–3
Desktop Options . . . . . . . . . . . . . . . . . . . . . . . . . . . . . . . . . . . . . . . . . . . . . . . . . . . . . . 1–3
Taskbar . . . . . . . . . . . . . . . . . . . . . . . . . . . . . . . . . . . . . . . . . . . . . . . . . . . . . . . . . . 1–3
XFce Panel Bar - t5515 & t5525 only . . . . . . . . . . . . . . . . . . . . . . . . . . . . . . . . . . 1–4
Desktop menu . . . . . . . . . . . . . . . . . . . . . . . . . . . . . . . . . . . . . . . . . . . . . . . . . . . . . 1–5
HP Compaq t5125 Thin Client. . . . . . . . . . . . . . . . . . . . . . . . . . . . . . . . . . . . . 1–5
HP Compaq t5515/t5525 Thin Client. . . . . . . . . . . . . . . . . . . . . . . . . . . . . . . . 1–5
Programs . . . . . . . . . . . . . . . . . . . . . . . . . . . . . . . . . . . . . . . . . . . . . . . . . . . . . . . . . . . . 1–6
Console . . . . . . . . . . . . . . . . . . . . . . . . . . . . . . . . . . . . . . . . . . . . . . . . . . . . . . . . . . 1–6
Using shell commands . . . . . . . . . . . . . . . . . . . . . . . . . . . . . . . . . . . . . . . . . . . 1–6
Web browser . . . . . . . . . . . . . . . . . . . . . . . . . . . . . . . . . . . . . . . . . . . . . . . . . . . . . . 1–7
Citrix . . . . . . . . . . . . . . . . . . . . . . . . . . . . . . . . . . . . . . . . . . . . . . . . . . . . . . . . . . . . 1–7
HP Connection Administrator . . . . . . . . . . . . . . . . . . . . . . . . . . . . . . . . . . . . . . . . 1–7
VNC viewer . . . . . . . . . . . . . . . . . . . . . . . . . . . . . . . . . . . . . . . . . . . . . . . . . . . . . . 1–7
VNC server . . . . . . . . . . . . . . . . . . . . . . . . . . . . . . . . . . . . . . . . . . . . . . . . . . . . . . . 1–8
XFce Settings Manager. . . . . . . . . . . . . . . . . . . . . . . . . . . . . . . . . . . . . . . . . . . . . . 1–8
HP Desktop Options . . . . . . . . . . . . . . . . . . . . . . . . . . . . . . . . . . . . . . . . . . . . . . . . . . . 1–8
Linux image. . . . . . . . . . . . . . . . . . . . . . . . . . . . . . . . . . . . . . . . . . . . . . . . . . . . . . . . . 1–10
Image location. . . . . . . . . . . . . . . . . . . . . . . . . . . . . . . . . . . . . . . . . . . . . . . . . . . . 1–11
Administrator’s Guide www.hp.com iii
Page 4

Contents
2 HP Connection Administrator
HP Connection Administrator window . . . . . . . . . . . . . . . . . . . . . . . . . . . . . . . . . . . . . 2–1
Advanced Configuration utility . . . . . . . . . . . . . . . . . . . . . . . . . . . . . . . . . . . . . . . 2–3
Configuring available connections . . . . . . . . . . . . . . . . . . . . . . . . . . . . . . . . 2–3
Configuring user connections. . . . . . . . . . . . . . . . . . . . . . . . . . . . . . . . . . . . . . 2–4
Configuring Global UI Kiosk settings . . . . . . . . . . . . . . . . . . . . . . . . . . . . . . . 2–8
Setting Citrix global settings . . . . . . . . . . . . . . . . . . . . . . . . . . . . . . . . . . . . . . 2–9
Adding, editing, and deleting connections . . . . . . . . . . . . . . . . . . . . . . . . . . . . . . 2–12
Connection types . . . . . . . . . . . . . . . . . . . . . . . . . . . . . . . . . . . . . . . . . . . . . . 2–13
3 Citrix
Introduction . . . . . . . . . . . . . . . . . . . . . . . . . . . . . . . . . . . . . . . . . . . . . . . . . . . . . . . . . . 3–1
Citrix (ICA) . . . . . . . . . . . . . . . . . . . . . . . . . . . . . . . . . . . . . . . . . . . . . . . . . . . . . . . . . . 3–2
ICA Client Settings. . . . . . . . . . . . . . . . . . . . . . . . . . . . . . . . . . . . . . . . . . . . . . . . . 3–2
Preferences . . . . . . . . . . . . . . . . . . . . . . . . . . . . . . . . . . . . . . . . . . . . . . . . . . . . 3–2
Connection View . . . . . . . . . . . . . . . . . . . . . . . . . . . . . . . . . . . . . . . . . . . . . . . 3–2
Program Neighborhood Agent (PNAgent). . . . . . . . . . . . . . . . . . . . . . . . . . . . 3–2
4 XFce Settings Manager
Date/Time . . . . . . . . . . . . . . . . . . . . . . . . . . . . . . . . . . . . . . . . . . . . . . . . . . . . . . . . . . . 4–3
Enabling Network Time Protocol . . . . . . . . . . . . . . . . . . . . . . . . . . . . . . . . . . . . . . 4–3
Configuring the system hardware clock from BIOS . . . . . . . . . . . . . . . . . . . . . . . 4–4
Desktop: backdrop. . . . . . . . . . . . . . . . . . . . . . . . . . . . . . . . . . . . . . . . . . . . . . . . . . . . . 4–4
Using an image for your background . . . . . . . . . . . . . . . . . . . . . . . . . . . . . . . . . . . 4–5
Changing background color . . . . . . . . . . . . . . . . . . . . . . . . . . . . . . . . . . . . . . . . . . 4–5
HP Desktop Options . . . . . . . . . . . . . . . . . . . . . . . . . . . . . . . . . . . . . . . . . . . . . . . . . . . 4–5
VNC Shadow . . . . . . . . . . . . . . . . . . . . . . . . . . . . . . . . . . . . . . . . . . . . . . . . . . . . . 4–6
TouchScreen . . . . . . . . . . . . . . . . . . . . . . . . . . . . . . . . . . . . . . . . . . . . . . . . . . . . . . 4–7
USB Storage . . . . . . . . . . . . . . . . . . . . . . . . . . . . . . . . . . . . . . . . . . . . . . . . . . . . . . 4–7
FTP Updates . . . . . . . . . . . . . . . . . . . . . . . . . . . . . . . . . . . . . . . . . . . . . . . . . . . . . . 4–8
Display. . . . . . . . . . . . . . . . . . . . . . . . . . . . . . . . . . . . . . . . . . . . . . . . . . . . . . . . . . . . . . 4–9
Screen saver . . . . . . . . . . . . . . . . . . . . . . . . . . . . . . . . . . . . . . . . . . . . . . . . . . . . . 4–11
Keyboard . . . . . . . . . . . . . . . . . . . . . . . . . . . . . . . . . . . . . . . . . . . . . . . . . . . . . . . . . . . 4–12
Mouse . . . . . . . . . . . . . . . . . . . . . . . . . . . . . . . . . . . . . . . . . . . . . . . . . . . . . . . . . . . . . 4–13
Network Management . . . . . . . . . . . . . . . . . . . . . . . . . . . . . . . . . . . . . . . . . . . . . . . . . 4–14
Printer Manager. . . . . . . . . . . . . . . . . . . . . . . . . . . . . . . . . . . . . . . . . . . . . . . . . . . . . . 4–15
iv www.hp.com Administrator’s Guide
Page 5

Contents
Security . . . . . . . . . . . . . . . . . . . . . . . . . . . . . . . . . . . . . . . . . . . . . . . . . . . . . . . . . . . . 4–16
Sound. . . . . . . . . . . . . . . . . . . . . . . . . . . . . . . . . . . . . . . . . . . . . . . . . . . . . . . . . . . . . . 4–17
System . . . . . . . . . . . . . . . . . . . . . . . . . . . . . . . . . . . . . . . . . . . . . . . . . . . . . . . . . . . . . 4–17
General tab . . . . . . . . . . . . . . . . . . . . . . . . . . . . . . . . . . . . . . . . . . . . . . . . . . . . . . 4–17
Network tab. . . . . . . . . . . . . . . . . . . . . . . . . . . . . . . . . . . . . . . . . . . . . . . . . . . . . . 4–18
Copyrights tab. . . . . . . . . . . . . . . . . . . . . . . . . . . . . . . . . . . . . . . . . . . . . . . . . . . . 4–19
About tab. . . . . . . . . . . . . . . . . . . . . . . . . . . . . . . . . . . . . . . . . . . . . . . . . . . . . . . . 4–19
Taskbar . . . . . . . . . . . . . . . . . . . . . . . . . . . . . . . . . . . . . . . . . . . . . . . . . . . . . . . . . . . . 4–19
User Management . . . . . . . . . . . . . . . . . . . . . . . . . . . . . . . . . . . . . . . . . . . . . . . . . . . . 4–20
Managing a user account . . . . . . . . . . . . . . . . . . . . . . . . . . . . . . . . . . . . . . . . . . . 4–21
Add a user. . . . . . . . . . . . . . . . . . . . . . . . . . . . . . . . . . . . . . . . . . . . . . . . . . . . 4–21
Modify a user account . . . . . . . . . . . . . . . . . . . . . . . . . . . . . . . . . . . . . . . . . . 4–22
Delete a user . . . . . . . . . . . . . . . . . . . . . . . . . . . . . . . . . . . . . . . . . . . . . . . . . . 4–22
Permissions. . . . . . . . . . . . . . . . . . . . . . . . . . . . . . . . . . . . . . . . . . . . . . . . . . . 4–23
User options . . . . . . . . . . . . . . . . . . . . . . . . . . . . . . . . . . . . . . . . . . . . . . . . . . 4–24
Managing a group . . . . . . . . . . . . . . . . . . . . . . . . . . . . . . . . . . . . . . . . . . . . . . . . . 4–25
Adding a group. . . . . . . . . . . . . . . . . . . . . . . . . . . . . . . . . . . . . . . . . . . . . . . . 4–25
Modifying a group . . . . . . . . . . . . . . . . . . . . . . . . . . . . . . . . . . . . . . . . . . . . . 4–26
Deleting a group . . . . . . . . . . . . . . . . . . . . . . . . . . . . . . . . . . . . . . . . . . . . . . . 4–26
Adding a user to a group manually . . . . . . . . . . . . . . . . . . . . . . . . . . . . . . . . 4–27
Window Manager . . . . . . . . . . . . . . . . . . . . . . . . . . . . . . . . . . . . . . . . . . . . . . . . . . . . 4–27
Decoration style . . . . . . . . . . . . . . . . . . . . . . . . . . . . . . . . . . . . . . . . . . . . . . . . . . 4–28
Keyboard and focus . . . . . . . . . . . . . . . . . . . . . . . . . . . . . . . . . . . . . . . . . . . . . . . 4–29
Advanced . . . . . . . . . . . . . . . . . . . . . . . . . . . . . . . . . . . . . . . . . . . . . . . . . . . . . . . 4–30
XFce Panel . . . . . . . . . . . . . . . . . . . . . . . . . . . . . . . . . . . . . . . . . . . . . . . . . . . . . . . . . 4–31
5 Support
Hardware warranty . . . . . . . . . . . . . . . . . . . . . . . . . . . . . . . . . . . . . . . . . . . . . . . . . . . . 5–1
Software warranty . . . . . . . . . . . . . . . . . . . . . . . . . . . . . . . . . . . . . . . . . . . . . . . . . . . . . 5–1
Image updates and add-ons . . . . . . . . . . . . . . . . . . . . . . . . . . . . . . . . . . . . . . . . . . . . . . 5–2
Custom image requests . . . . . . . . . . . . . . . . . . . . . . . . . . . . . . . . . . . . . . . . . . . . . . . . . 5–2
HP-developed images . . . . . . . . . . . . . . . . . . . . . . . . . . . . . . . . . . . . . . . . . . . . . . . 5–2
Custom-developed images . . . . . . . . . . . . . . . . . . . . . . . . . . . . . . . . . . . . . . . . . . . 5–2
Availability of Linux open source code . . . . . . . . . . . . . . . . . . . . . . . . . . . . . . . . . . . . 5–3
Additional Linux resources on the Web . . . . . . . . . . . . . . . . . . . . . . . . . . . . . . . . . . . . 5–3
Administrator’s Guide www.hp.com v
Page 6

Contents
6 Frequently Asked Questions
Linux operating system . . . . . . . . . . . . . . . . . . . . . . . . . . . . . . . . . . . . . . . . . . . . . . . . . 6–1
System Administrator . . . . . . . . . . . . . . . . . . . . . . . . . . . . . . . . . . . . . . . . . . . . . . . . . . 6–2
System Management . . . . . . . . . . . . . . . . . . . . . . . . . . . . . . . . . . . . . . . . . . . . . . . . . . . 6–3
VNC. . . . . . . . . . . . . . . . . . . . . . . . . . . . . . . . . . . . . . . . . . . . . . . . . . . . . . . . . . . . . . . . 6–5
General . . . . . . . . . . . . . . . . . . . . . . . . . . . . . . . . . . . . . . . . . . . . . . . . . . . . . . . . . . . . . 6–6
Manageability . . . . . . . . . . . . . . . . . . . . . . . . . . . . . . . . . . . . . . . . . . . . . . . . . . . . . . . . 6–8
7 Troubleshooting
Index
vi www.hp.com Administrator’s Guide
Page 7

Introduction
This guide provides the network administrator with instructions for
local and remote configuration of the Linux-based thin client and
explains the various configuration utilities. This guide provides
instructions for both the HP Compaq t5125, t5515, and t5525 thin
client.
Not all features described in this guide are available in all
✎
Linux-based terminal models.
Typically, you configure a terminal locally and then use it as a
template for other terminals, which you can then configure using
remote administration tools. You can create server and application
connections through the XFce Settings Manager Network
management interface.
Chapters in this guide are specific to the desktop interface and
programs in the XFce Settings Manager, which is the control panel
for the Linux-based image.
1
A default user account is pre-installed with the following settings:
✎
User name: root
Password: root
This default account is also the Administrator “rights” account for
Linux. Therefore, HP recommends that you change the password and
create a new separate user account for non-administrator users.
Administrator’s Guide www.hp.com 1-1
Page 8
Introduction
Thin client image
HP developed this Linux image especially for thin client use by
integrating a comprehensive set of open source, commercial, and
custom-developed components. You can use the Altiris client to
provide remote management of the thin client and to upgrade the
Linux image with feature enhancements, device drivers, and
maintenance updates.
Desktop
The desktop of the HP Compaq t5125 differs from that of the t5515
and the t5525, as shown in the following images.
t5125 Desktop
The following image provides an example of the default t5125
desktop:
t5125 desktop
1-2 www.hp.com Administrator’s Guide
Page 9

t5515/t5525 Desktop
The following image provides an example of the default t5515 and a
t5525 desktop:
Introduction
t5125 desktop
Desktop Options
The following sections describe the function of the desktops of the
HP Compaq t5125, t5515, and HP Compaq t5525 thin clients. The
layout of the desktop, as well as connectivity options, are determined
by the selection in HP Desktop Options. For more information, see
“HP Desktop Options” on page 1-8.
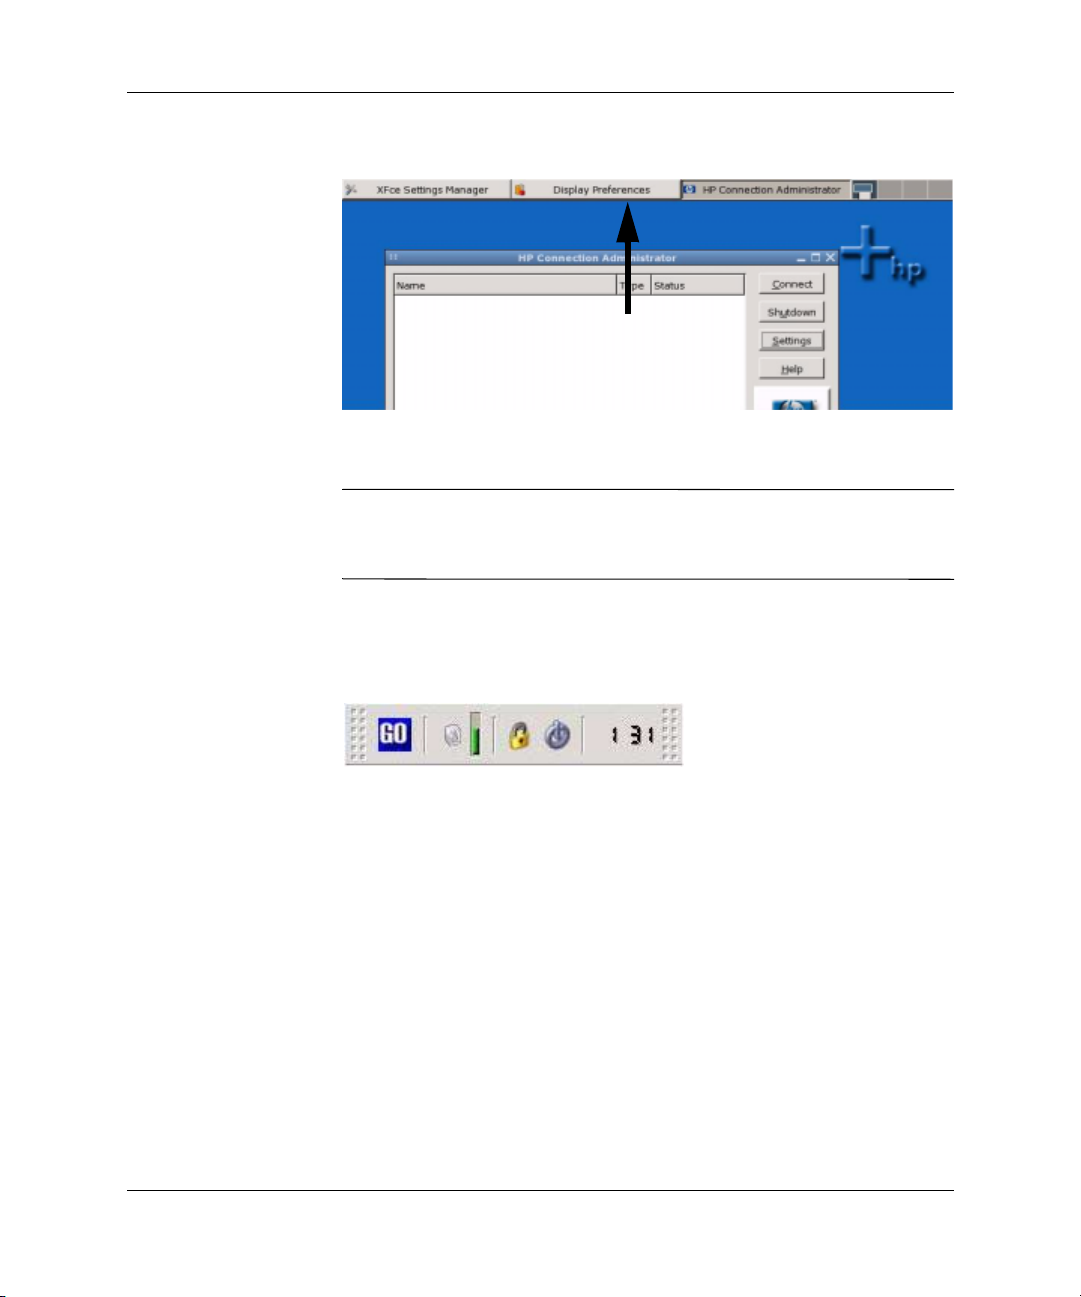
Taskbar
You can work in multiple workspaces or applications on the thin
client. As you open software, the taskbar indicates what is open in a
workspace. The taskbar contains four separate workspace icons that
you can use to toggle between sessions. Click an icon to open its
workspace. Each workspace can have different programs running. By
default, the taskbar automatically displays at the top of the screen.
Administrator’s Guide www.hp.com 1-3
Page 10
Introduction
The taskbar is shown in the following illustration:
taskbar
Taskbar
For more information, see “Taskbar” on page 4-19.
You can also access the XFce Settings Manager from the HP
✎
Connection Administrator, or by right-clicking on the desktop and
selecting Settings.
XFce Panel Bar - t5515 & t5525 only
By default, the XFce Panel Bar displays at the bottom of the screen.
XFce Panel Bar
The XFce Panel Bar includes the following default features:
■ GO button - displays the GO menu.
■ audio icons - allow you to adjust volume.
■ lock icon - locks the screen.
■ exit icon - allows you to quit the current session, reboot, or turn
off the computer.
■ clock - you can configure to display time, day, month, and year.
You can configure the appearance and behavior of the XFce Panel
Bar. For more information, see “XFce Panel” on page 4-31.
1-4 www.hp.com Administrator’s Guide
Page 11

Desktop menu
The programs available vary by thin client. For more information
about these programs, see “Programs” on page 1-6
The Linux-based thin client does not support desktop icons.
✎
HP Compaq t5125 Thin Client
Right-click on the t5125 desktop to display the following software:
■ Console
■ VNCviewer
■ Settings
HP Compaq t5515/t5525 Thin Client
You can access software on the t5515/t5525 thin client using either of
the following methods:
■ Clicking the GO button on the XFce Panel bar.
Introduction
.
■ Right-clicking anywhere on the desktop.
The t5515/t5525 provides the following software and utilities:
■ Console
■ Web Browser
■ Citrix
■ HP Connection Administrator
■ Vncviewer
■ Vncserver
■ Settings
■ Shutdown
Administrator’s Guide www.hp.com 1-5
Page 12

Introduction
Programs
Console
The following sections describe the programs available on the
desktop. Program access depends on your thin client. You can
configure the thin client so that the user will have access to these
programs through HP Connection Administrator or Citrix.
The Console provides a dialog box with a prompt # for entry of
various shell commands. To start the Console, right-click anywhere
on the desktop and select Console.
The suite of commands provided come from the BusyBox suite. You
can determine the specific commands currently supported once you
invoke the Console dialog box. For a list of supported commands,
type
busybox in the Console dialog box. You can find complete
documentation on command syntax at
www.busybox.net.
BusyBox combines scaled down versions of many common UNIX
utilities into a single executable. The utilities in BusyBox generally
have fewer options than their full-featured GNU counterparts;
however, the options that are included in BusyBox provide the
expected functionality and behave very much like their GNU
counterparts. Most BusyBox commands support the
-h option to
provide a terse runtime description of their behavior.
Using shell commands
Shell commands provide for administration of user management. Use
the Console dialog box for this purpose. User management shell
commands include:
■ addgroup
■ adduser
■ chgrp
■ delgroup
■ deluser
■ passwd
■ chown
■ su
1-6 www.hp.com Administrator’s Guide
Page 13

Web browser
The HP Compaq t5515/t5525 thin client image includes the Firefox
Web browser with JRE (Java Runtime Environment). For more
information about creating a Firefox connection, see “Firefox
connection” on page 2-15.
HP also includes an integrated Adobe Acrobat reader for viewing
PDF files on the t5515/t5525.
Citrix
The Citrix (ICA) program allows you to set up and configure Citrix
ICA client connections.
For more information about creating Citrix connections, see
Chapter 3, “Citrix.”
HP Connection Administrator
HP Connection Administrator allows you to manage server and
application connections by setting up Web, RDP, XDM, ICA, and
other types of connections, setting up user accounts, and assigning
connections to users.
Introduction
For information about setting up connections, see Chapter 2, “HP
Connection Administrator.”
VNC viewer
The VNC viewer dialog box provides connection to a VNC server.
The VNC viewer allows control of the desktop environment of
another thin client, PC, or server that has VNC service running. For
information about allowing control of the thin client by another unit,
see “VNC Shadow” on page 4-6.
Administrator’s Guide www.hp.com 1-7
Page 14

Introduction
VNC server
the VNC server is available only on the t5515 and t5525.
✎
Virtual Network Computing (VNC) is a remote control program that
allows you to view and interact with one computer (the “server”)
using a simple program (the “viewer”) on another computer anywhere
on the Internet. The VNC Server runs as a service and therefore is
available even when the user is logged off the thin client.
The system stores the VNC server password in encrypted form in a
hidden directory named “.vnc” in the user’s home directory. For
example, the system stores the password for user “fred” at:
/home/fred/.vnc/passwd.
If you delete the passwd file to reset the password, the system
prompts the user for a new password the next time the VNC server is
started. The password must be six to eight characters long.
Additional information about VNC server features is available at:
http://www.tightvnc.org
XFce Settings Manager
The thin client includes a control panel called XFce Settings
Manager. You can access a wide variety of utilities from the settings
manager. For more information, see Chapter 4, “XFce Settings
Manager.”
HP Desktop Options
The thin client features different desktop interface options. These
options provide different ways for you to manage your connections,
and as well as determine the appearance of your desktop. Your
selection in this utility determines what your thin client looks like and
how it communicates.
1-8 www.hp.com Administrator’s Guide
Page 15
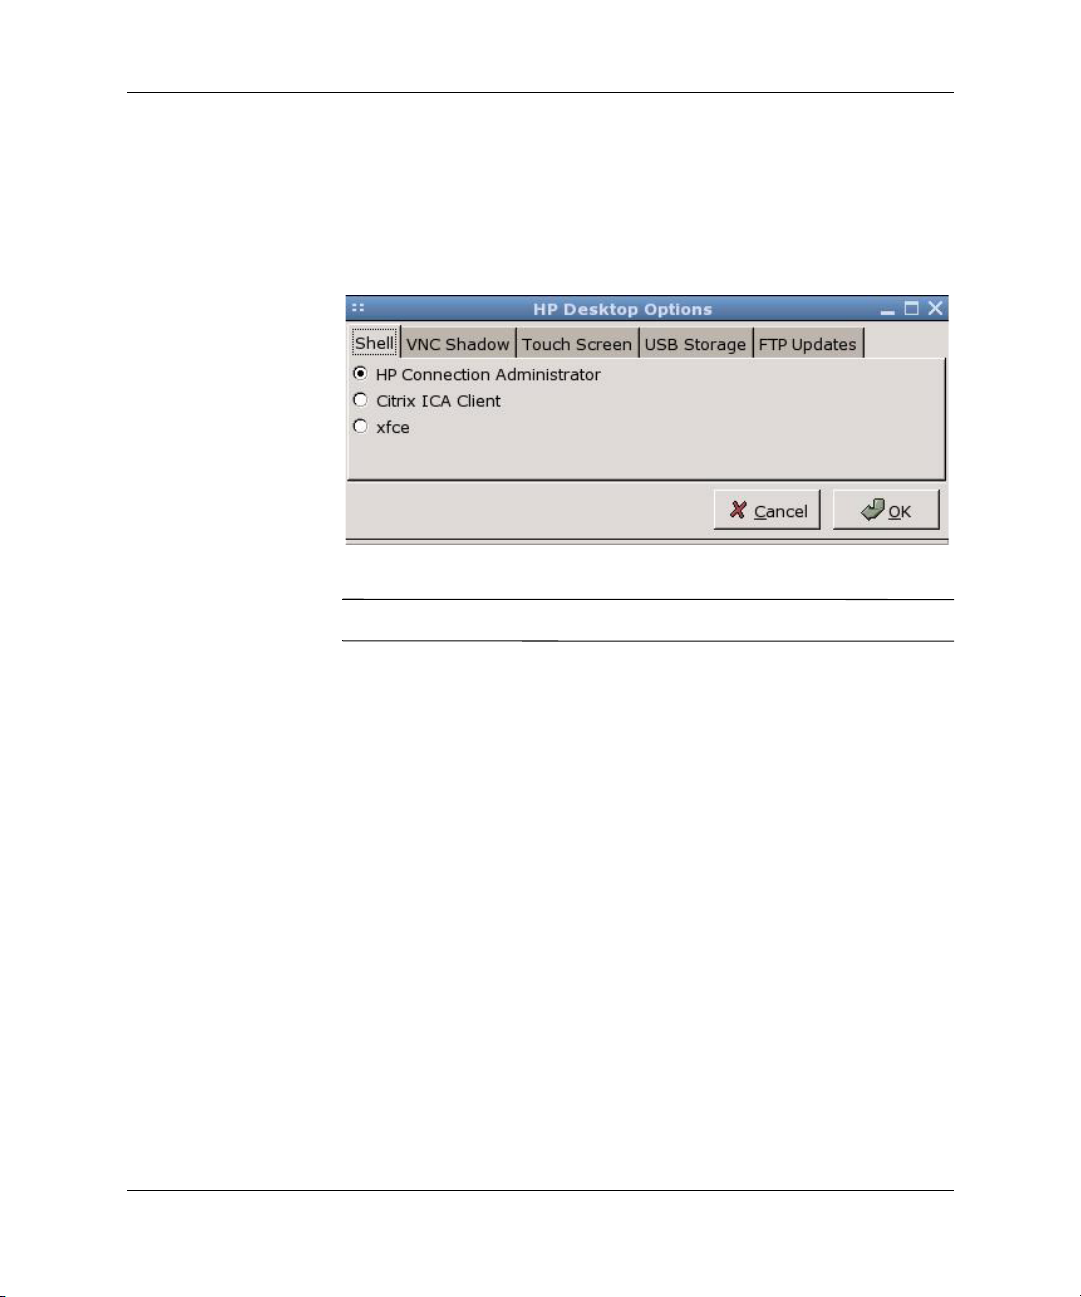
Available desktop options include:
■ HP Connection Administrator
■ Citrix ICA Client
■ xfce (t5515/t5525 only)
HP Desktop Options
The xfce option is only available on the t5515/t5525.
✎
Introduction
HP Connection Administrator is the default interface.
To determine which interface displays on the user’s desktop:
1. Right-click on the desktop and select Settings to open the XFce
Settings Manager.
2. From the XFce Settings Manager window, select HP Desktop
Options.
3. Select the interface you want to use.
4. Click OK. The new interface will launch at reboot.
For instructions about configuring HP Connection Administrator, see
Chapter 2, “HP Connection Administrator.” For instructions about
configuring Citrix ICA Client, see Chapter 3, “Citrix.”
Administrator’s Guide www.hp.com 1-9
Page 16
Introduction
Linux image
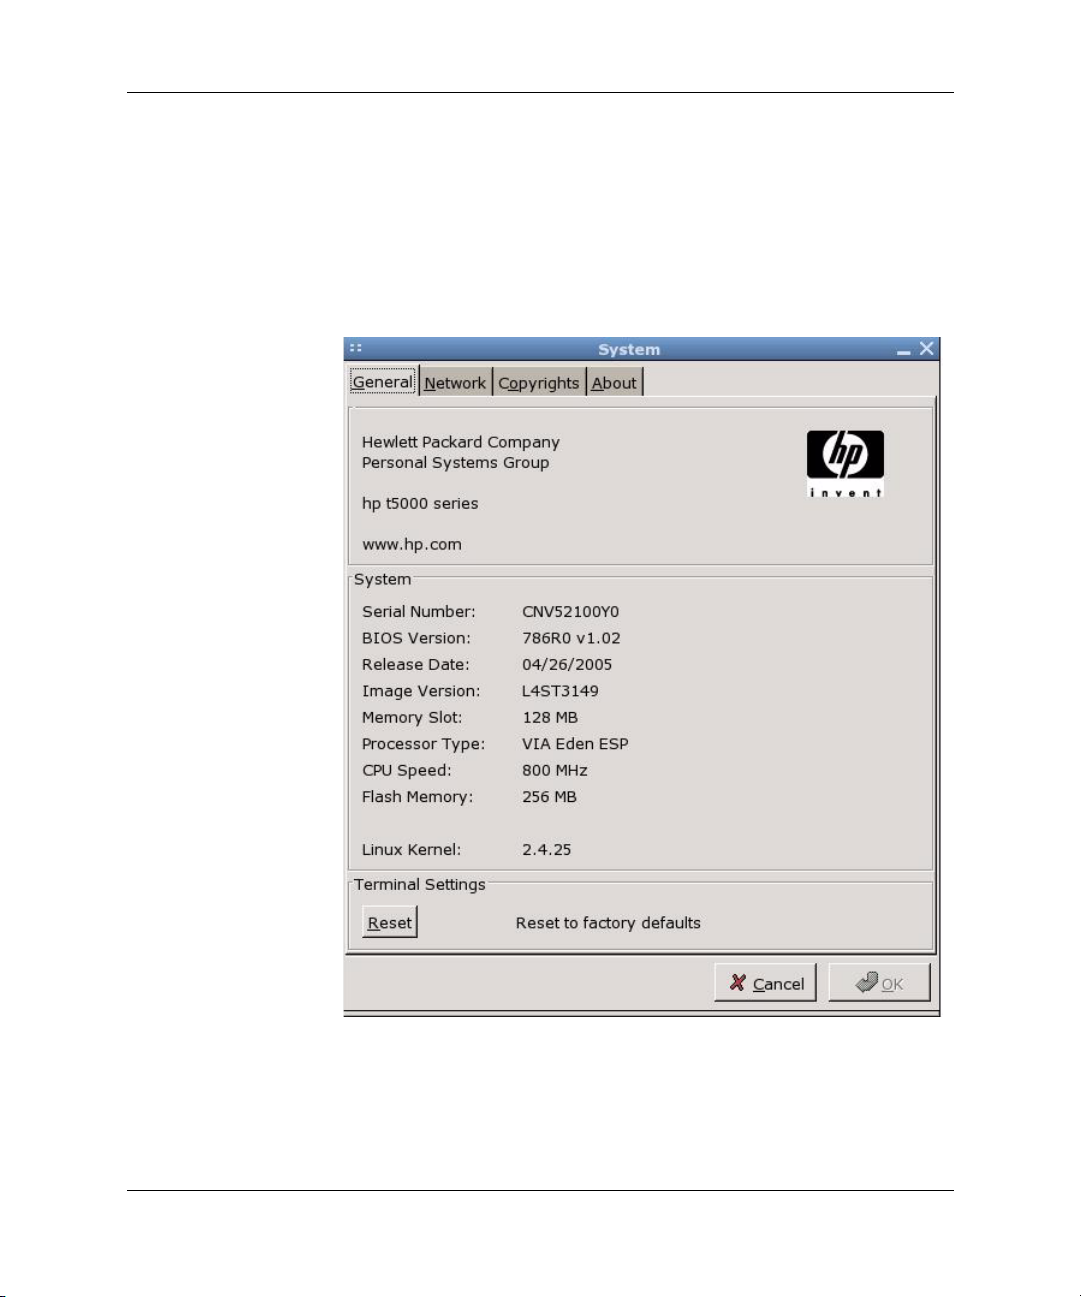
To locate the Linux image version:
1. Click GO > Settings > System.
2. Click the General tab.
The image version is displayed in the System area of the screen.
Linux image version - System
For more information, see “System” on page 4-17.
1-10 www.hp.com Administrator’s Guide
Page 17

Image location
Introduction
The image is stored in various formats. The bootup process
decompresses and loads certain portions of the image in RAM. Some
features and aspects of the image are not loaded until they are needed.
The image is stored in three partitions as follows:
■ /dev/hda1 - ext2 - boot loader
■ /dev/hda2 - cramfs - majority of the image
■ /dev/hda3 - ext2 - optional components and home directories
Administrator’s Guide www.hp.com 1-11
Page 18

Introduction
1-12 www.hp.com Administrator’s Guide
Page 19
HP Connection Administrator
HP Connection Administrator allows you to manage server and
application connections by setting up Web, RDP, XDM, ICA, and
other types of connections, setting up user accounts, and assigning
connections to users.
The Web browser is only available in the HP Compaq t5515 and
✎
t5525 thin client images.
To access all HP Connection Administrator functionality, you must
log in with root permissions as a member of the root group.
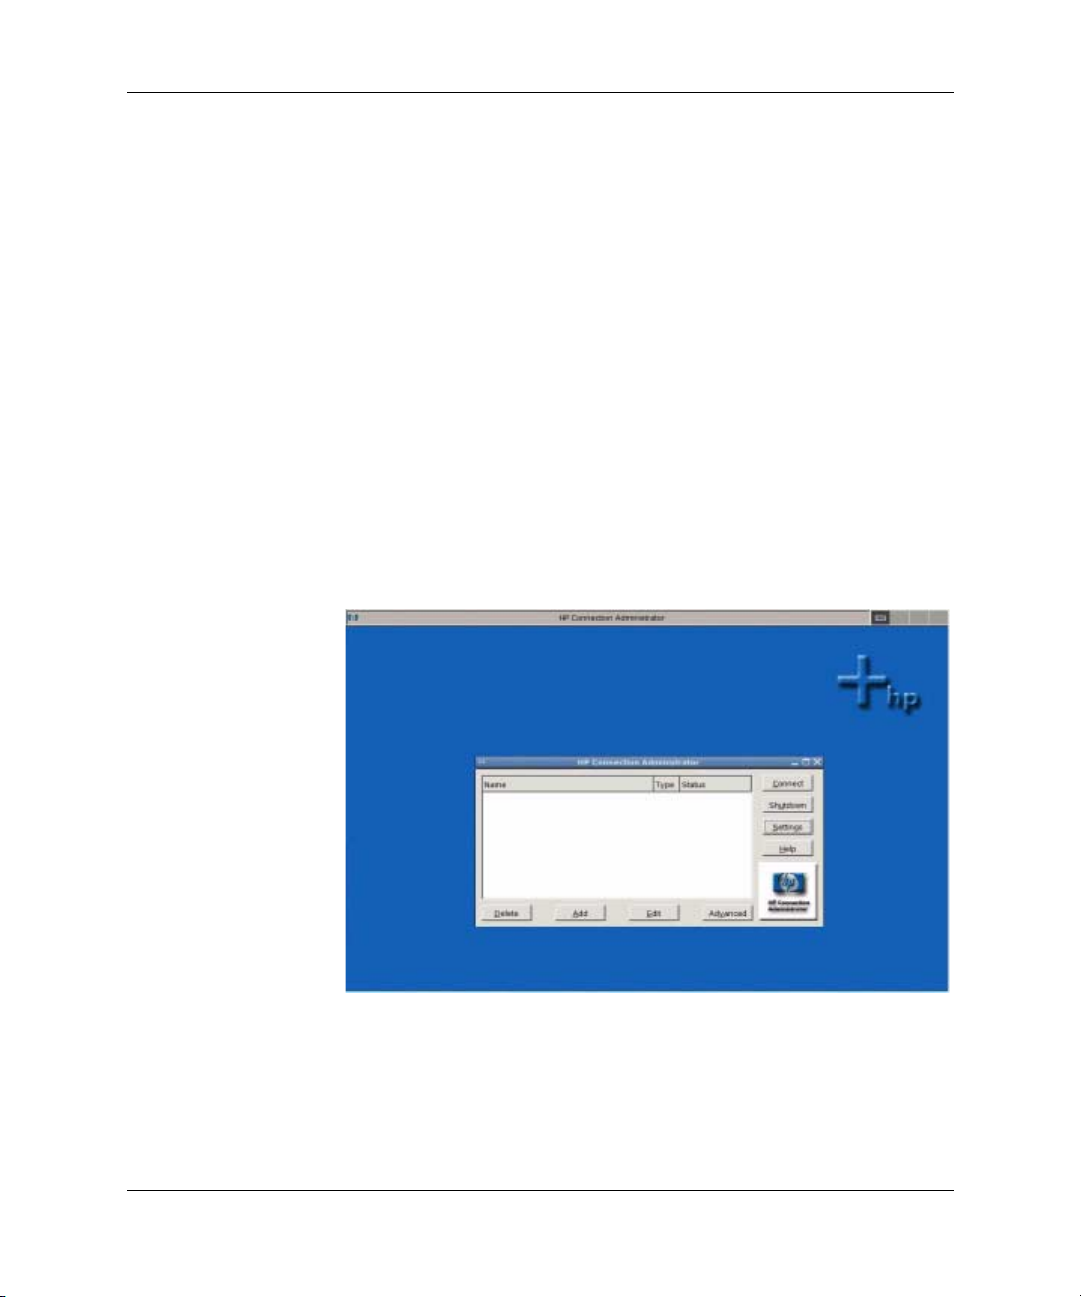
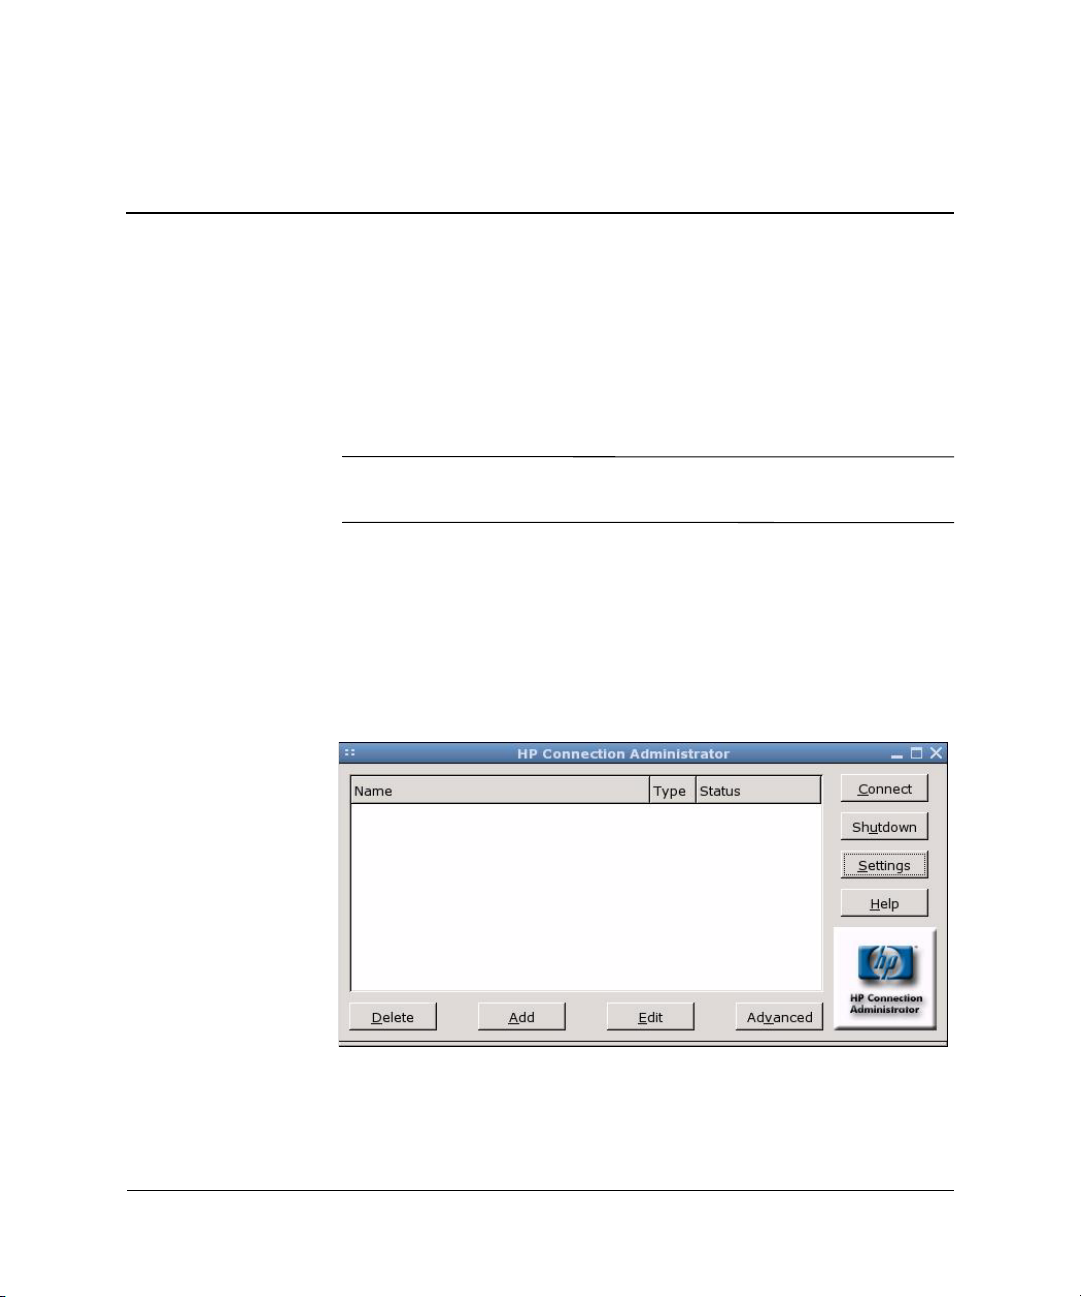
HP Connection Administrator window
Launching HP Connection Administrator allows you to start, add,
edit, and delete connections.
2
HP Connection Administrator
Administrator’s Guide www.hp.com 2-1
Page 20

HP Connection Administrator
✎
You must log in with root permissions to access all components of the
HP Connection Administrator window.
The HP Connection Administrator features the following:
■ Connections Display: Lists all server and/or application
connections assigned to the user currently logged on to the
terminal. For each connection, the display shows the name, type,
and status of the connection.
■ Connect: Click to activate a selected connection.
■ Shutdown: Click to exit HP Connection Administrator if the
terminal is not in Kiosk mode. If the terminal is in Kiosk mode,
click this button to end the session. If you are a member of the
turn off or reboot groups, the thin client displays options to turn
off or reboot the terminal. For information about Kiosk mode, see
“Configuring Global UI Kiosk settings” on page 2-8.
■ Settings: Click to access the XFce Settings Manager.
■ Delete: Click to delete a selected connection. The connection is
deleted from the list of connections available to all users, not just
the user currently logged on to the terminal.
■ Add: Click to create a new connection and add it to the list of
connections assigned to the user currently logged on to the
terminal. You can assign the new connection to other users in the
Advanced Configuration utility. For more information, see
“Adding, editing, and deleting connections” on page 2-12.
■ Edit: Click to edit the selected connection. For more information,
see “Adding, editing, and deleting connections” on page 2-12.
■ Advanced Configuration: Click to access the Advanced
Configuration utility, where you can configure and assign
connections and configure the terminal user interface. For more
information, see “Advanced Configuration utility” on page 2-3.
2-2 www.hp.com Administrator’s Guide
Page 21
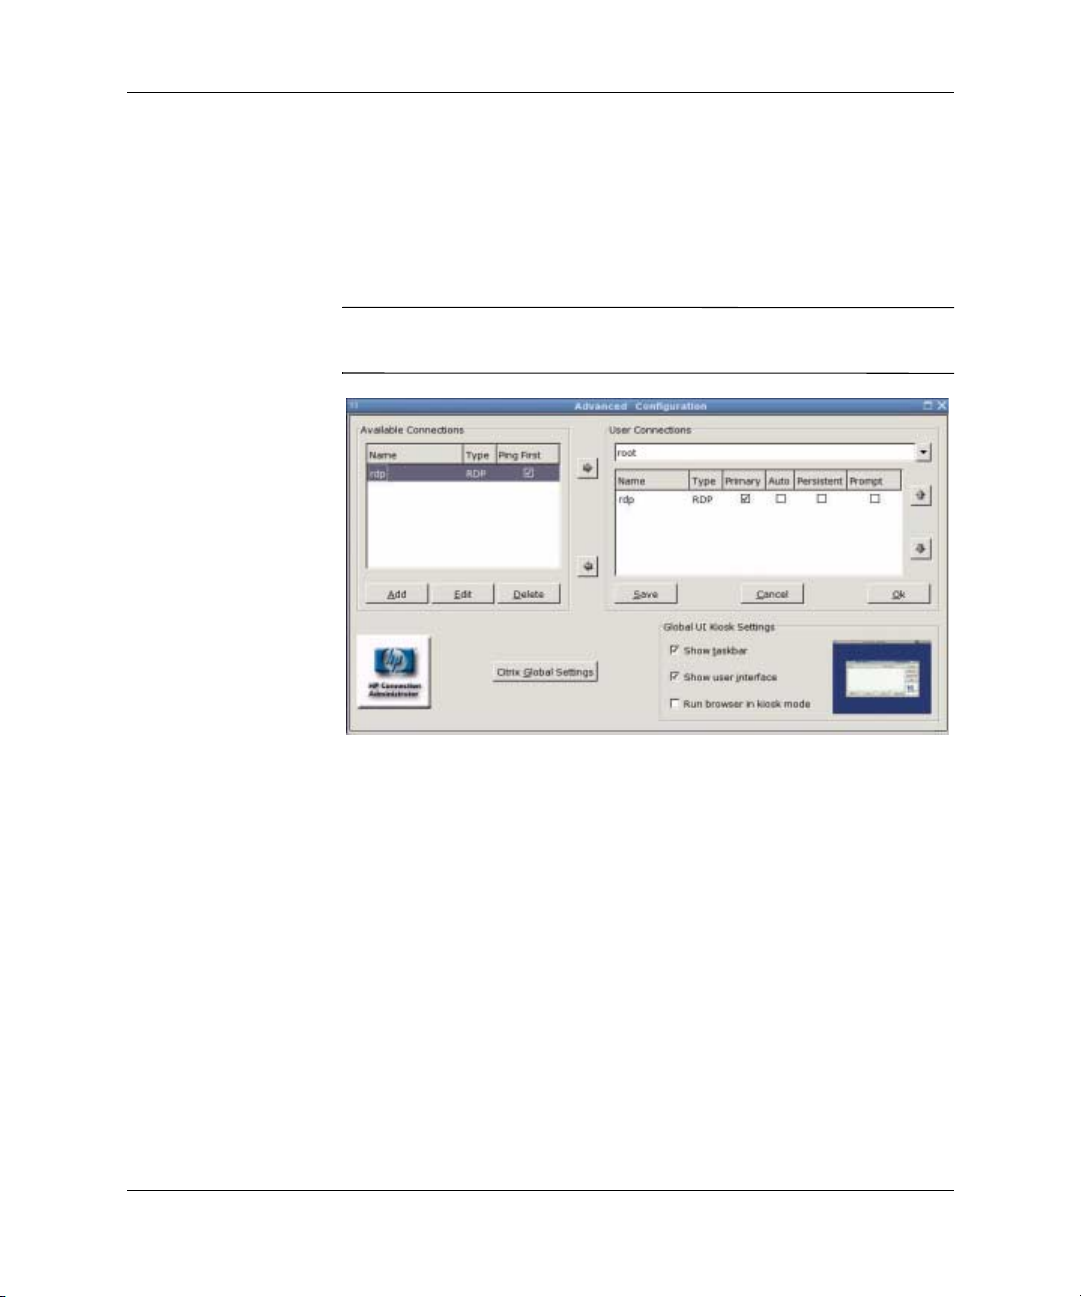
Advanced Configuration utility
You can configure and assign connections and configure the user
interface for the terminal in the Advanced Configuration utility. To
access the utility, click the Advanced button on the HP Connection
Administrator window.
You must log in with root permissions to access the Advanced
✎
Configuration utility.
HP Connection Administrator
Advanced Configuration utility
Configuring available connections
The Available Connections area lists all connections that you can
assign to users. Use the following features to modify, add, or delete
connections:
■ Ping First: Allows you to enable Connection Administrator to
ping the server before attempting a connection. If the server name
fails to resolve or the server fails to respond to the ping, the thin
client aborts the connection attempt.
■ Delete: Click to delete a selected connection. The connection is
deleted from the lists of connections assigned to all users. For
more information, see “Adding, editing, and deleting
connections” on page 2-12.
Administrator’s Guide www.hp.com 2-3
Page 22

HP Connection Administrator
■ Add: Click to create a new connection and add it to the list of
available connections in the current user's connection list. For
more information, see “Adding, editing, and deleting
connections” on page 2-12.
■ Edit: Click to edit a selected connection. For more information,
see “Adding, editing, and deleting connections” on page 2-12.
Configuring user connections
The User Connections area displays all connections currently
assigned to the user selected from the drop-down list at the top of the
window. Select a user from the list and use the following features to
configure connections for the user:
■ Name: Displays the name of the connection. You cannot change
the connection name.
■ Ty pe: Displays the type of connection (Web, RDP, XDM, ICA, or
other). You cannot change the connection type from this column.
■ Primary: Select to designate a connection as primary. The thin
client attempts secondary connections if the primary connection
fails. If more than one secondary connection is associated with a
primary connection, the thin client prioritizes the secondary
connections starting with the first connection in the group.
■ Auto: Select to designate whether a user is automatically logged
on when HP Connection Administrator starts up. To prevent a
user from being logged on that is set to auto logon, press the left
Shift key as soon as the log in screen displays.
■ Persistent: Select to designate whether the system will attempt to
reconnect when a connection fails. You can only make primary
connections persistent.
■ Prompt: Select to configure the system to determine whether a
user is still using the thin client after a group of connections fails.
Clear this check box to allow the system to continue to cycle
through the connections in the group.
The user must quit the current session to disable automatic
✎
connection.
2-4 www.hp.com Administrator’s Guide
Page 23

HP Connection Administrator
■ >: Click to add a selected Available Connection (left list box) to
the selected user’s connection list (right list box).
■ <: Select a connection from the list of connections assigned to the
user and click this button to remove the connection from the
user's connections list.
■ Up arrow: Click to move a selected user connection up in the list.
■ Down arrow: Click to move a selected user connection down in
the list.
■ Save: Click to save changes made to user connections and user
interface settings.
■ Cancel: Click to cancel unsaved changes made to user
connections and user interface settings and exit the Advanced
Configuration utility.
■ OK: Click to save changes made to user connections and user
interface settings and exit the Advanced Configuration utility.
Assigning connections to users
After creating a connection, you can assign it to users.
To assign a connection to users:
1. In the HP Connection Administrator, click the Advanced button
to access the Advanced Configuration utility. For more
information, see “Advanced Configuration utility” on page 2-3.
2. Under User Connections, select the appropriate user.
3. Under Available Connections, select the connection in the list of
available connections, and then click the > button to copy the
connection to the list of connections for the user.
4. Click Save to save the updated list of connections for the user.
Administrator’s Guide www.hp.com 2-5
Page 24

HP Connection Administrator
Configuring connections as primary, secondary,
or to auto connect
Use the following procedure to configure connections in the
Advanced Configuration utility.
■ You can designate connections as primary or secondary. A
primary connection is the first attempted in a group of
connections. Secondary connections are attempted if the primary
connection fails, and attempt to connect in their listed order. You
can assign several primary connections, each with several
associated secondary connections.
■ You can set primary connections to automatically connect when
HP Connection Administrator starts up.
■ You can set primary connections to automatically reconnect if the
connection is lost.
To configure connections:
1. In the HP Connection Administrator, click the Advanced button
to access the Advanced Configuration utility.
2. Under User Connections, select the appropriate user.
3. Select the connection in the user's connection list that you want to
modify.
4. If you want to make a connection a primary connection:
a. In the Primary column, select the check box.
b. To assign a secondary connection to the primary connection,
clear the check box in the Primary column that you want to
be the secondary connection. The connection becomes a
secondary connection to the first primary connection directly
above the secondary connection in the list.
c. To arrange the connections in the order that you want them to
connect, select a connection and click the Up and Down
buttons to move the connection. Secondary connections are
always associated with the first primary connection above
them in the list.
d. Click Save to save your changes.
2-6 www.hp.com Administrator’s Guide
Page 25

HP Connection Administrator
Since each secondary connection must have an associated primary
✎
connection listed above it, the connection at the top of the list must be
a primary connection.
5. If you want to set automatic connections:
a. In the Auto column, select the check box.
b. Click Save to save your changes.
You can set only primary connections to automatically connect when
✎
HP Connection Administrator is launched.
6. If you want to set automatic reconnections:
a. In the Persistent column, select the check box.
You cannot disable automatic connection unless the user quits the
✎
current session.
b. Click Save to save your changes.
You can set only primary connections to automatically reconnect.
✎
Administrator’s Guide www.hp.com 2-7
Page 26
HP Connection Administrator
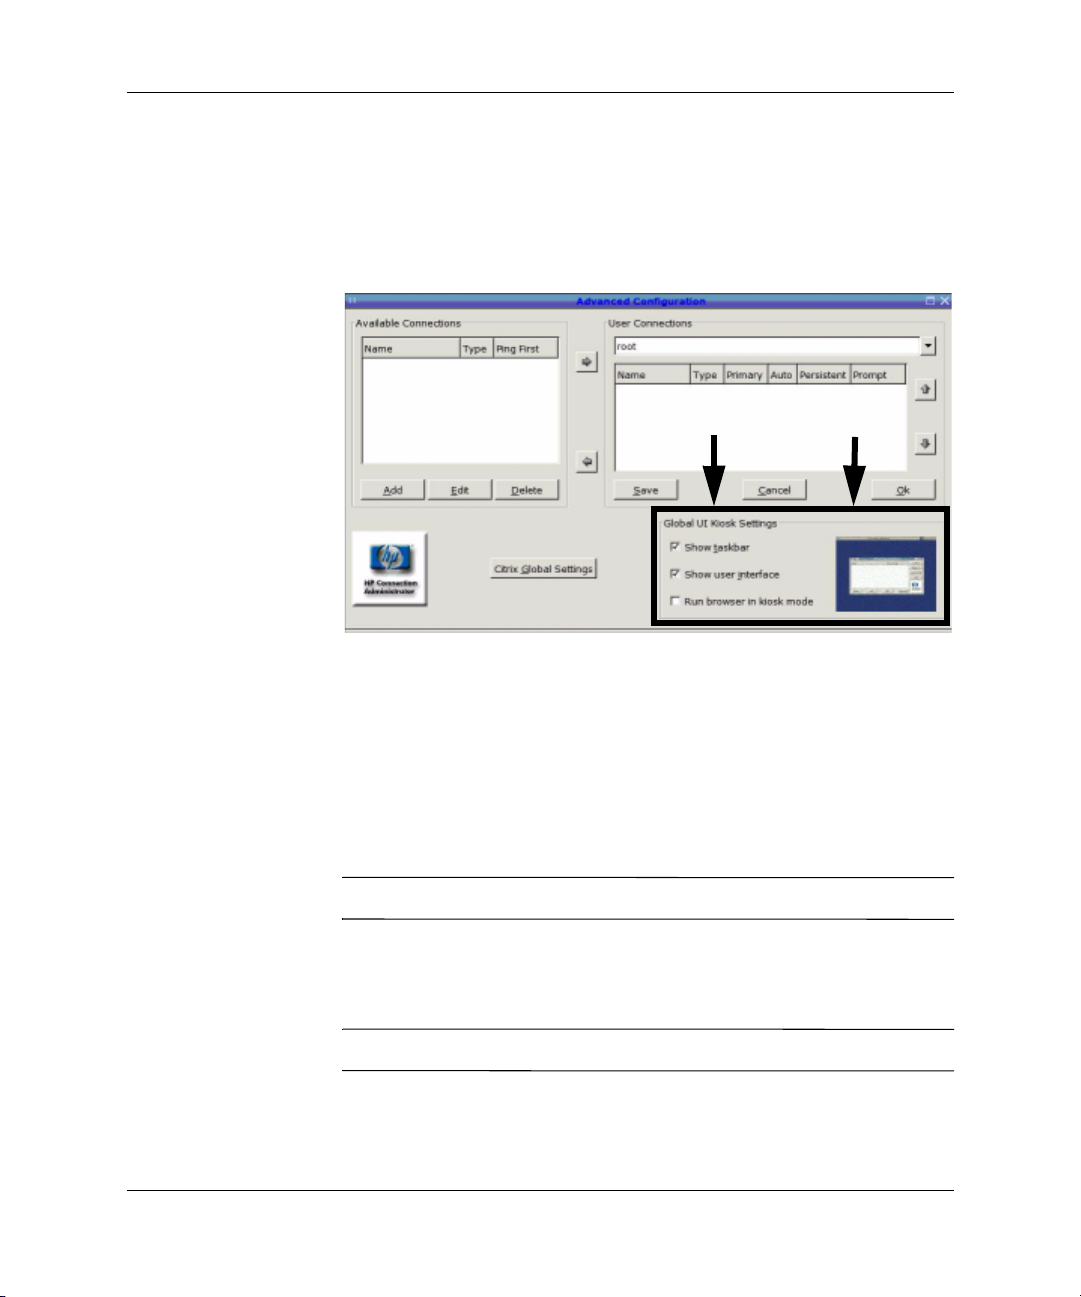
Configuring Global UI Kiosk settings
Global UI Kiosk Settings allow you to change the way the user
interface displays. The preview pane to the right of the check boxes
indicates how the user interface will display based on which check
boxes you select.
Global UI Kiosk Settings for the t5515/t5525
Show Taskbar: Select to display the taskbar at the top of the desktop.
Show User Interface: Select to display the HP Connection
Administrator. Clear this box to further lock down the terminal by
hiding the HP Connection Administrator window for users who are
not in the root group. You can use this feature for connections set to
automatically start at boot up where the HP Connection
Administrator window is not needed.
The user interface is always shown for users in the root group.
✎
Run Browser In Kiosk Mode (t5515/t5525 only): Select to remove
the address, search, tool bar, menu bar, and status bar from the
browser. Changing this setting does not affect the preview pane.
You must reboot the terminal for changes to take effect.
✎
2-8 www.hp.com Administrator’s Guide
Page 27
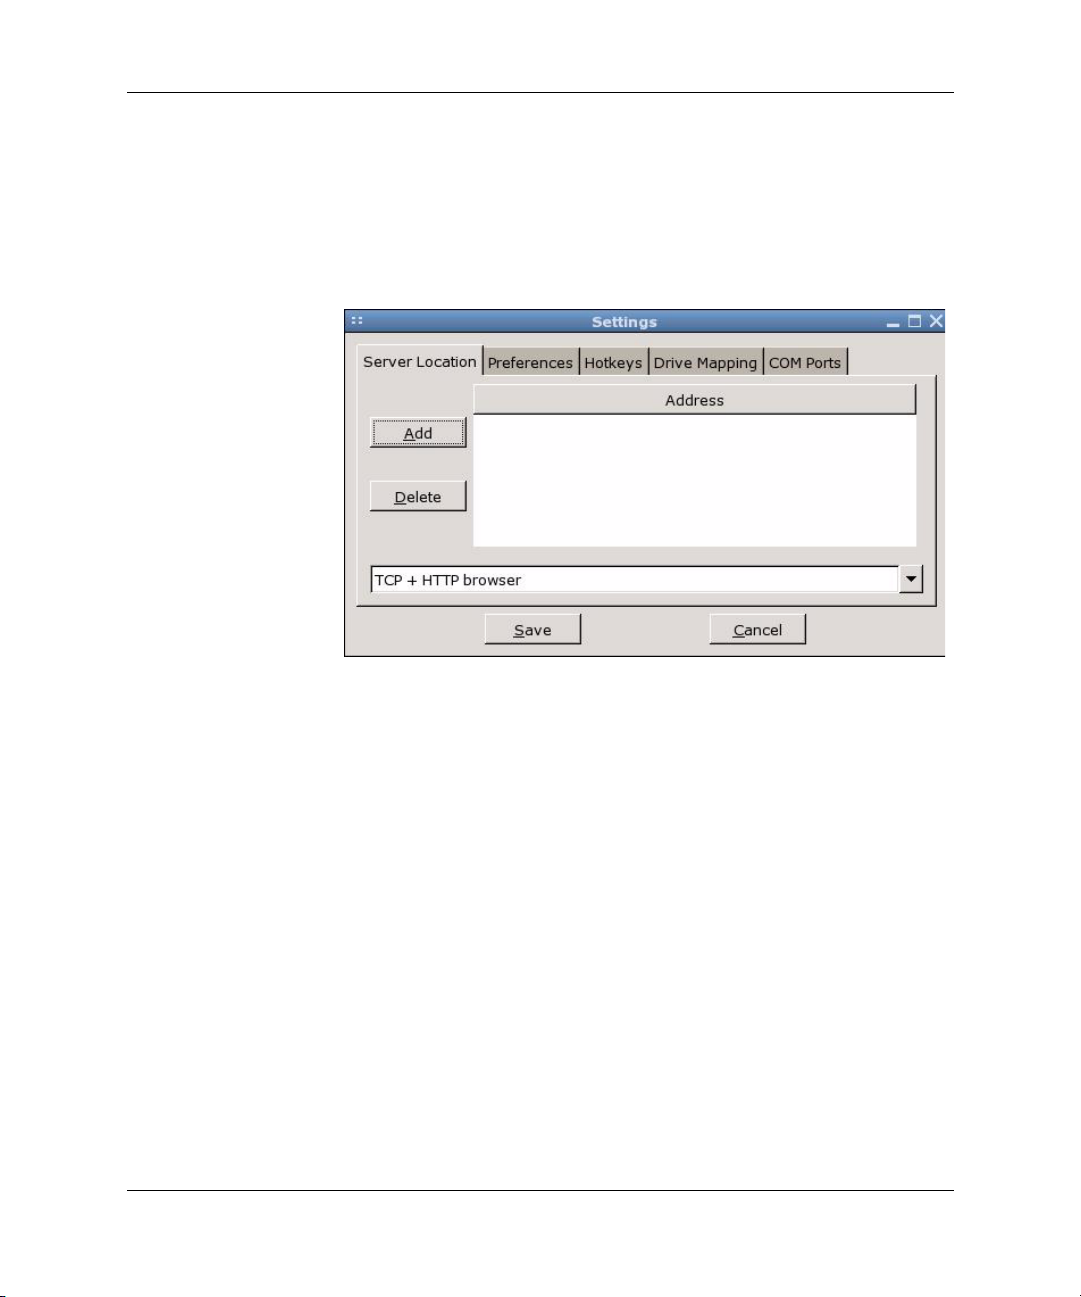
Setting Citrix global settings
Click this button to configure global Citrix settings.
Server Location
Use this tab to add or modify Citrix servers.
HP Connection Administrator
Global Citrix Settings - Server Location tab
To add a server:
1. Select the browser type from the list in the box at the bottom of
the dialog box.
2. Click Add.
3. Type the server address and port number.
4. Click OK.
Administrator’s Guide www.hp.com 2-9
Page 28
HP Connection Administrator
Preferences
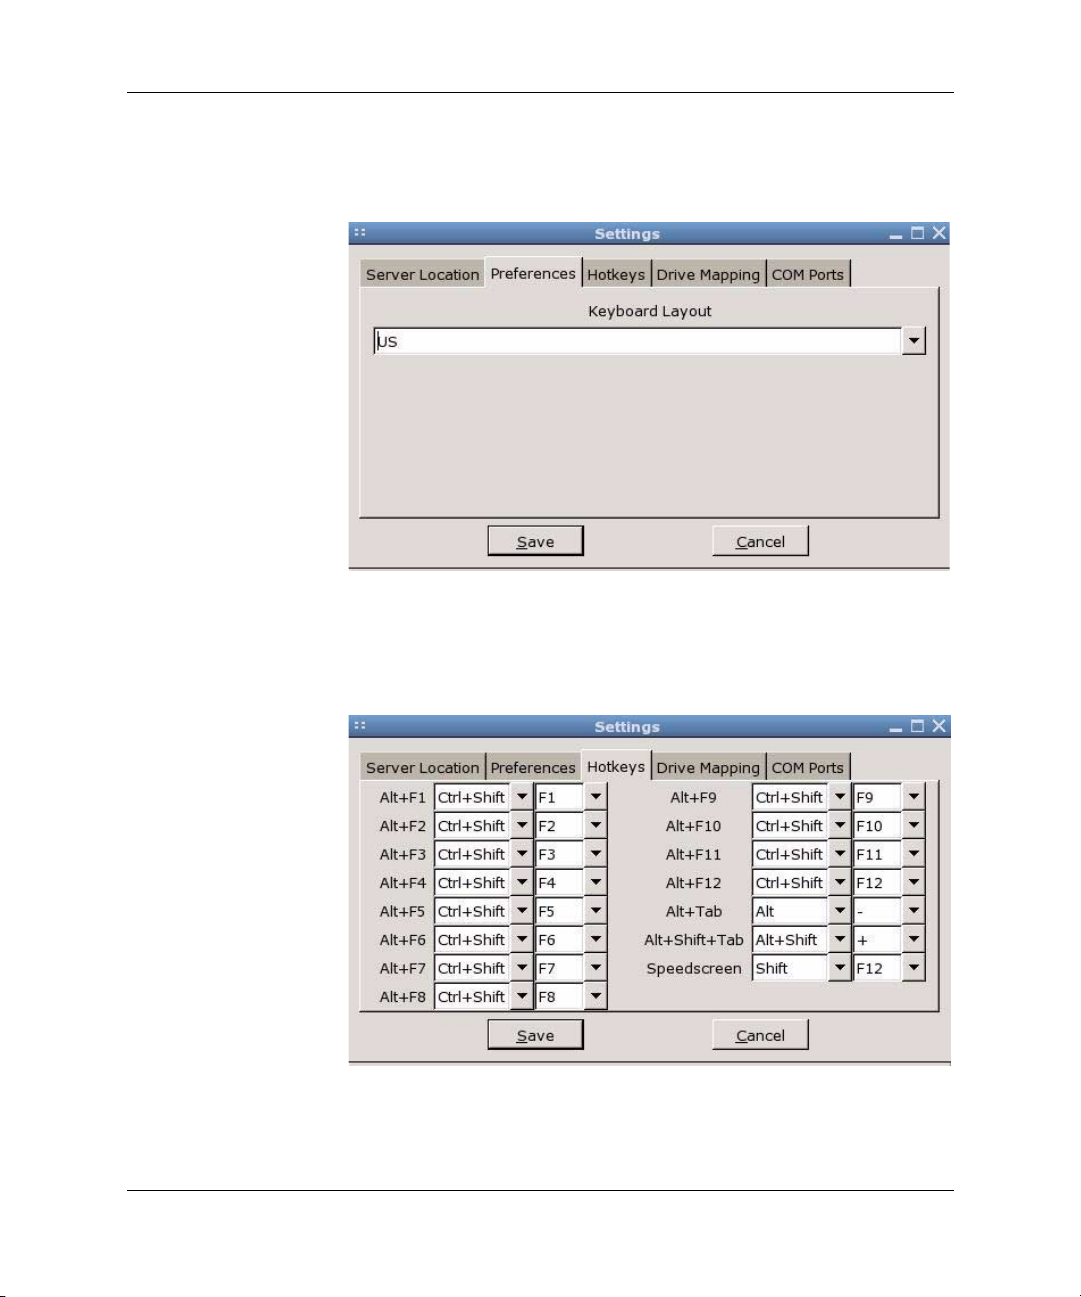
Use this tab to select the keyboard language.
Global Citrix Settings - Preferences tab
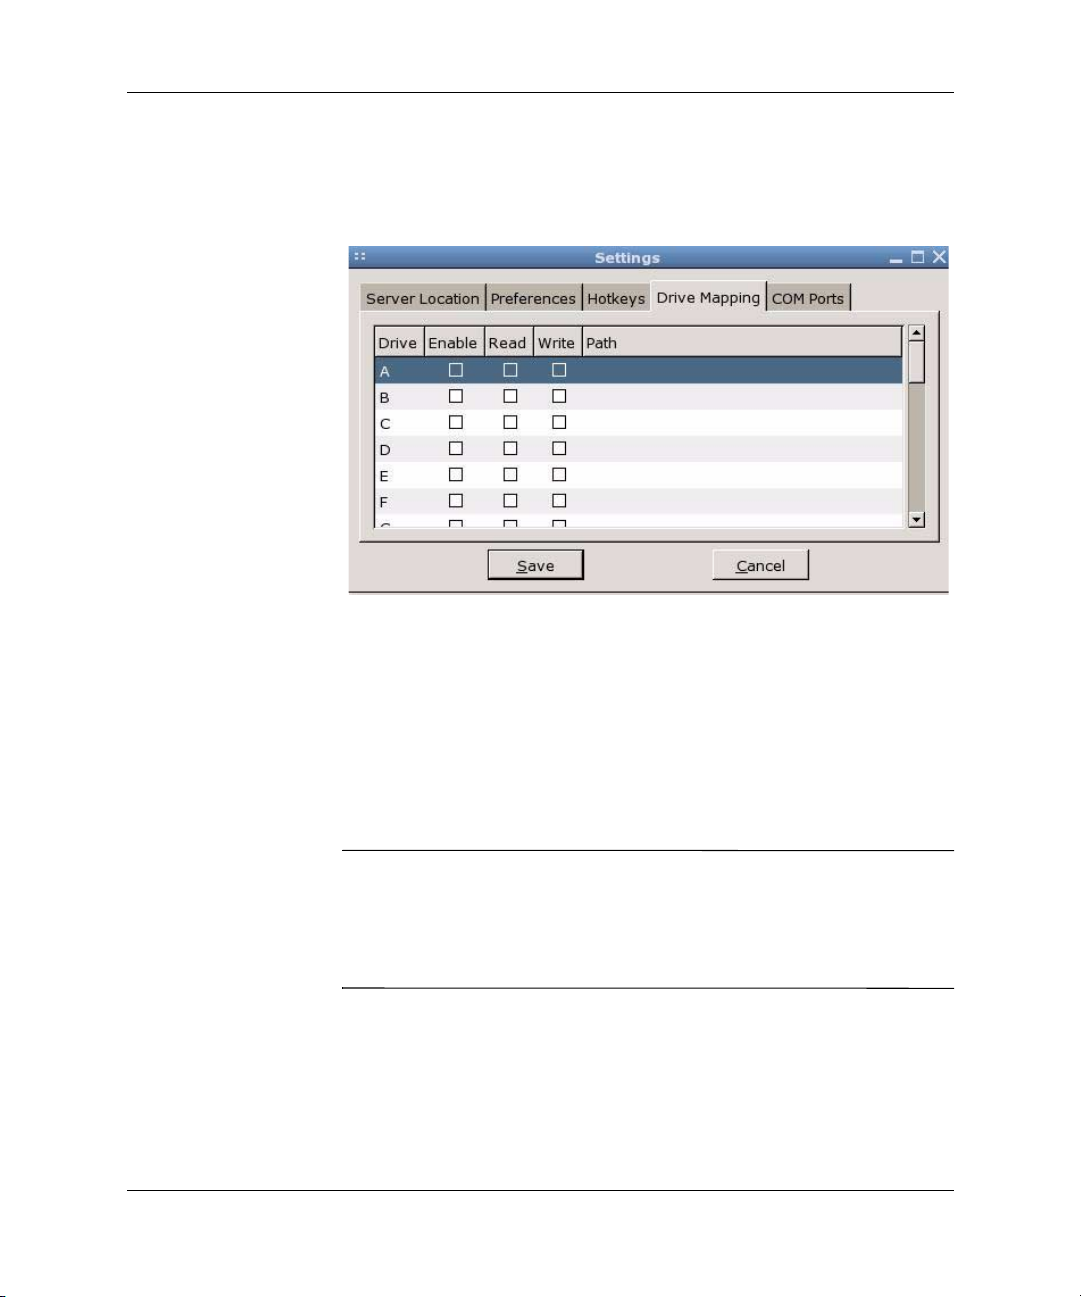
Hotkeys
Use this tab to configure thin client hotkeys.
Global Citrix Settings - Hotkeys tab
2-10 www.hp.com Administrator’s Guide
Page 29
HP Connection Administrator
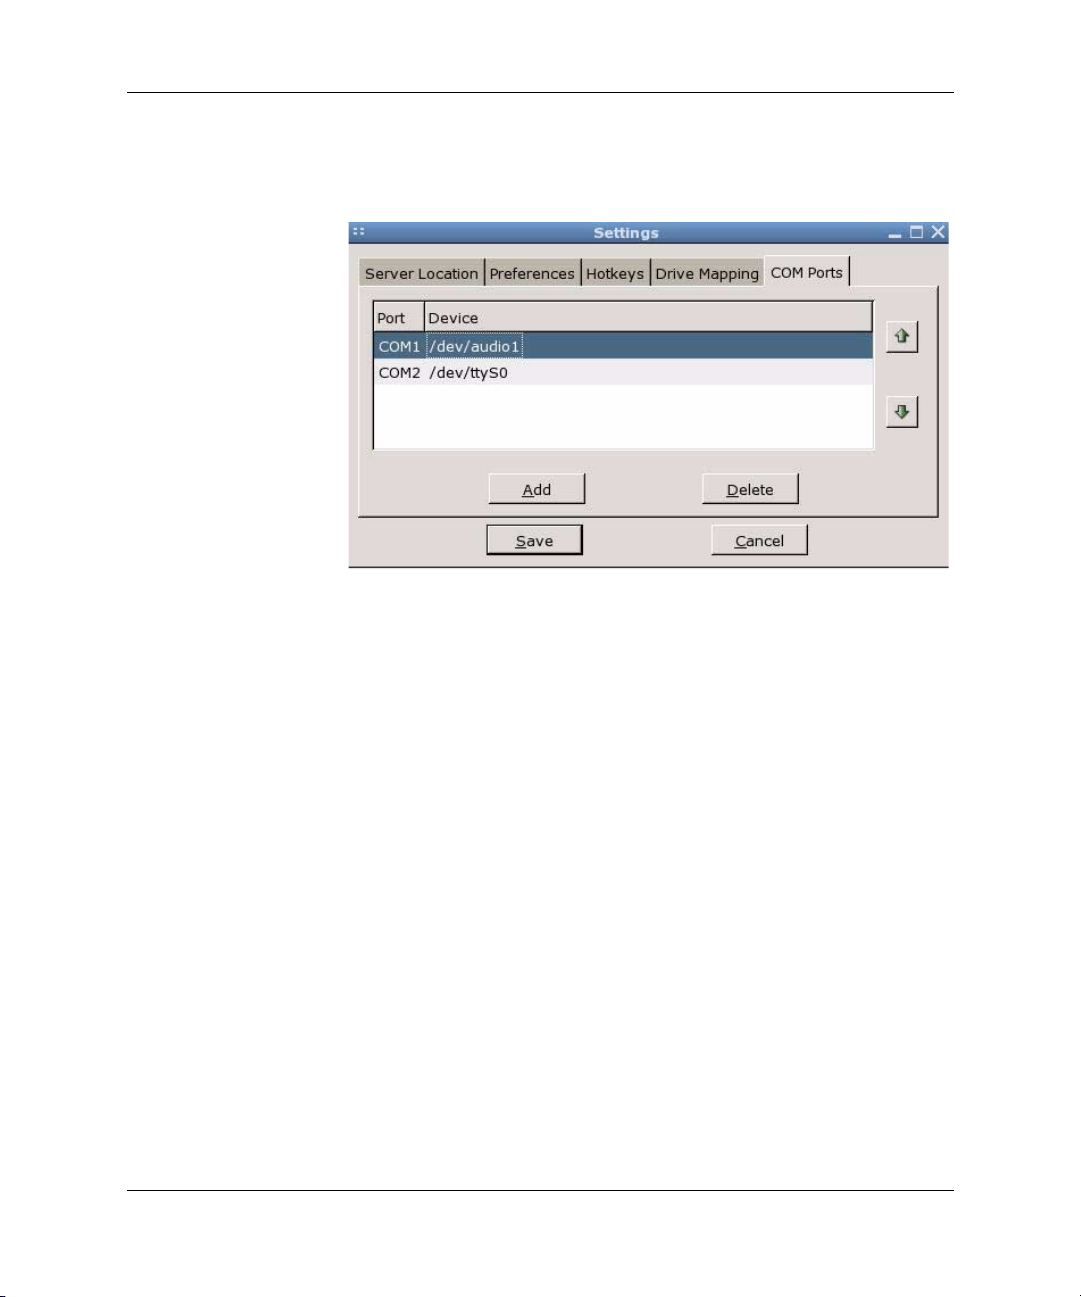
Drive Mapping
Use this tab to assign drive numbers to drives and configure whether
th drive is enabled, readable, and writeable.
Global Citrix Settings - Drive Mapping tab
To configure a drive:
1. Click the drive letter to configure.
2. Select Enable, Read, or Write to assign those characteristics to
the drive.
3. With the drive letter selected, click in the Path column.
4. Type the drive path.
The preferred method of forwarding in Citrix connections, with the
✎
HP Linux image, is to redirect from /tmp/shared/ for HD and DOK.
As devices are added and removed, links are automatically created in
this location. For USB CD-ROM drives, redirect from /mnt/cdrom/.
This setting will be in place for all Citrix connections from this unit.
Administrator’s Guide www.hp.com 2-11
Page 30
HP Connection Administrator
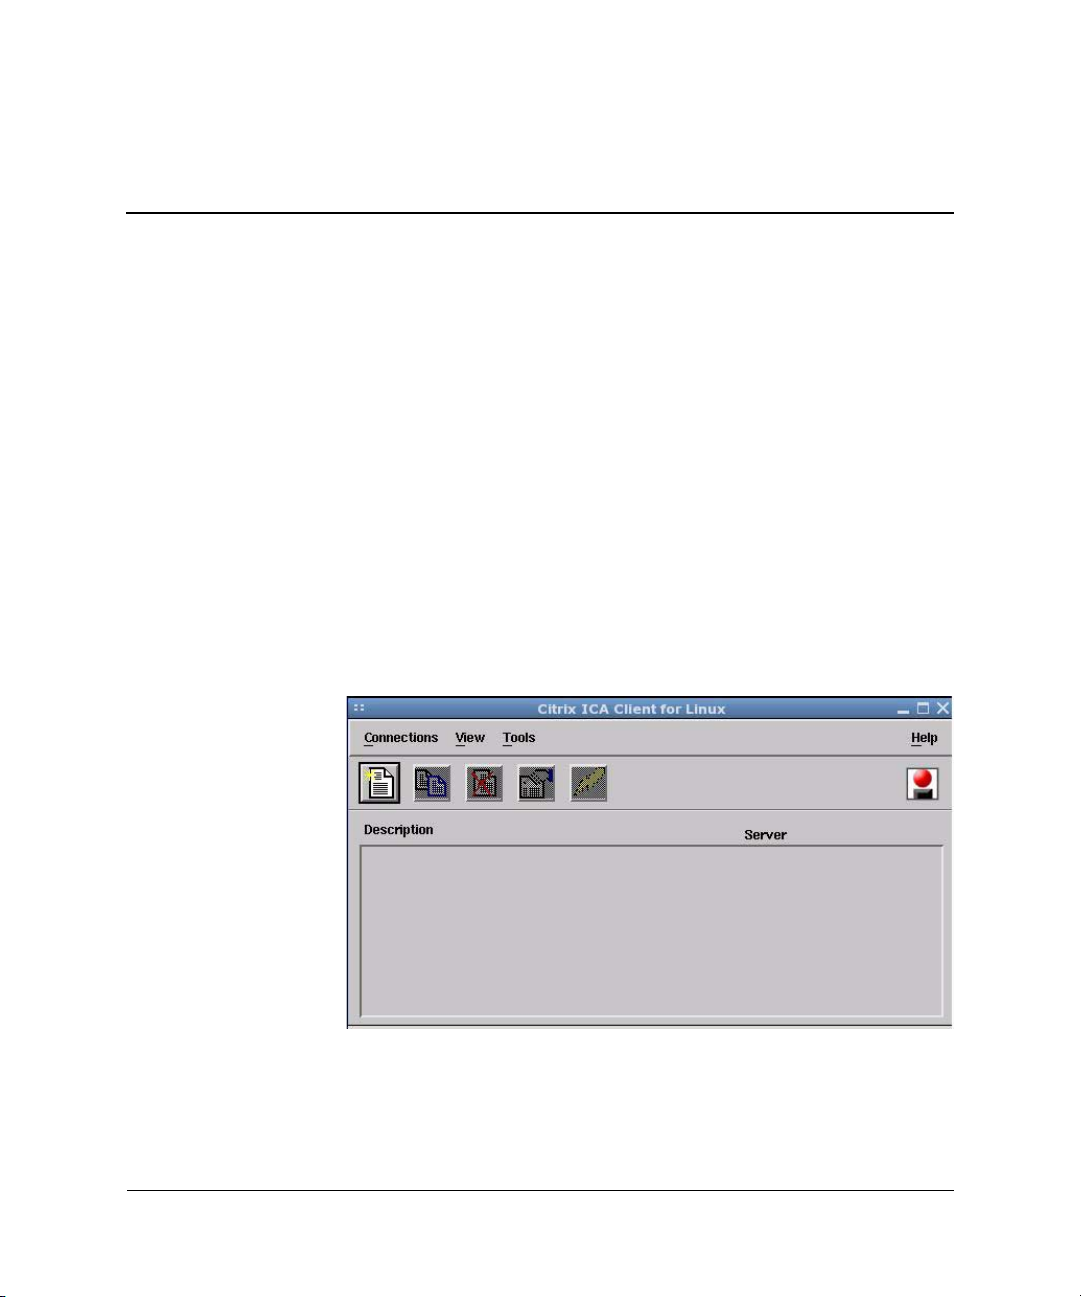
COM ports
Use this tab to map devices to communication ports.
Global Citrix Settings - COM Ports tab
To map devices:
1. Click Add.
2. Under Folders, select the location of the device.
3. Under Files, select the device.
4. Fill in the Selection: /dev box.
Adding, editing, and deleting connections
You can add, edit, or delete connections in the HP Connection
Administrator or in the Advanced Configuration utility. However, you
need to note the important difference based on where you add
connections, as follows:
■ Adding a connection in the HP Connection Administrator adds it
to the list of connections assigned to the user currently logged on
to the terminal.
■ Adding a connection in the Advanced Configuration utility
automatically adds the connection to the currently selected user.
The new connection will also be available in the Advanced
Configuration utility for assignment to other users.
2-12 www.hp.com Administrator’s Guide
Page 31

HP Connection Administrator
For more information about the different types of connections, see the
related sections later in this chapter.
To add, edit, or delete a connection:
1. Click Add. The system displays the Add Connection dialog box,
which lists the connection types registered with the system.
The Web browser is only available in the image for the t5515/t5525.
✎
2. Select the type of connection you want to create and click OK.
For more information, see “Connection types” on page 2-13.
3. Follow the on-screen instructions to add the connection to the
user's connections list and to the list of available connections that
you can assign to other users in the Advanced Configuration
utility.
4. To edit the connection, select the connection and click Edit.
5. To delete the connection, select the connection and click Delete.
The connection is deleted from all user connection lists.
You can configure connections created in the HP Connection
✎
Administrator in the Advanced Configuration utility.
Connection types
You can use the HP Connection Administrator to create the following
types of connections:
■ Citrix ICA
■ Firefox (t5515/t5525 thin client only)
■ rdesktop
■ XDM
■ Other
Administrator’s Guide www.hp.com 2-13
Page 32

HP Connection Administrator
Citrix ICA
Use the following tabs to configure a Citrix ICA connection:
■ Server: Allows you to choose or add a server and to configure
server location settings.
■ Applications: Allows you to select applications by entering a
command line.
■ Logon: Allows you to specify logon information for connecting
to a remote application.
■ Window: Allows you to specify how the application window size
and color.
■ Options: Allows you to configure the following options:
❏ Compress data stream
❏ Use disk cache for bitmaps
❏ Enable sound and adjust sound quality
❏ Enable microphone input
❏ Enable Speedscreen
❏ Enable mouse click feedback
❏ Local text echo
❏ Configure encryption level
■ Firewall Settings: Allows you to configure the proxy address and
port.
2-14 www.hp.com Administrator’s Guide
Page 33

HP Connection Administrator
Firefox connection
Firefox Web connection
The Firefox connection allows you to create a browser connection.
Web browser is available only for the HP Compaq t5515/t5525 thin
✎
client.
You must complete the following settings to configure this
connection:
■ Name this connection: Type a name to associate with this
connection.
■ Start Page: Enter the Web address to launch with this
connection.
rdesktop connection
This connection allows you to set up a remote desktop connection.
rdesktop is an open source client capable of speaking Remote
Desktop Protocol (RDP). Unlike Citrix ICA, rdesktop requires no
server extensions.
You can configure the rdesktop connection using the following tabs:
Administrator’s Guide www.hp.com 2-15
Page 34

HP Connection Administrator
General
Allows you to select a remote computer and provide the logon
credentials for accessing this computer.
General tab
To select a computer:
1. Type the computer name or select a computer from the
drop-down menu.
2. Enter the username and password.
3. Enter the domain (optional).
4. In the Client Hostname box, type the hostname for the terminal
services session. This entry allows you to dictate what is
displayed when viewed shared resources.
5. In Connection Settings section, type a name for the connection.
2-16 www.hp.com Administrator’s Guide
Page 35

HP Connection Administrator
Display
Allows you to configure the size and color of the remote desktop.
Display tab
Administrator’s Guide www.hp.com 2-17
Page 36

HP Connection Administrator
Local Resources
Allows you to configure local devices.
Local Resources tab
This window allows you to configure the following:
■ Remote computer sound and the keyboard language. You can
play the remote computer’s sound on your thin client, play no
sound at all, or leave the sound at the remote computer.
■ The desired keyboard language.
2-18 www.hp.com Administrator’s Guide
Page 37

HP Connection Administrator
■ Connection to the following local devices:
❏ disk drives - Type the path or symbolic link.
❏ printers - Type the path to the printer.
❏ parallel ports - Type the location of the physical device. The
default is
❏ serial ports - Type the location of the physical device. The
default is
/dev/lp0.
/dev/tty50.
For more information, type the
To forward rdesktop connections, HP recommends redirecting from
✎
/tmp/shared/ for hard drives and disks-on-key. As you add and remove
devices, the system automatically creates links in this location.
This setting is valid only for the session during which it was created.
CD-ROM forwarding is not supported.
rdesktop command in the console.
✎
Administrator’s Guide www.hp.com 2-19
Page 38

HP Connection Administrator
Programs
Allows you to launch programs through the remote desktop
connection.
Programs tab
To launch a program:
1. Select Start the following program on connection.
2. Type the program path and file name.
3. Type the folder from which you want the program to launch.
4. Click Save.
2-20 www.hp.com Administrator’s Guide
Page 39

HP Connection Administrator
Experience
Allows you to configure the thin client desktop and performance
factors.
Experience tab
You can configure the following:
■ Choose your connection speed: Select the speed at which the
thin client connects.
■ Desktop background: Select to allow a desktop background to
display.
■ Show contents of window while dragging: Select to allow the
contents of windows to display when you drag the window.
Administrator’s Guide www.hp.com 2-21
Page 40

HP Connection Administrator
✎
✎
■ Menu and window animation: Select to allow menu and
window animation.
■ Themes: Select to allow themes.
■ Bitmap caching: Select to allow bitmap caching, which places
commonly used bitmaps in a file on the thin client. This process
improves performance by minimizing the amount of display
information that must be passed over a connection.
Depending upon connection configuration, selecting Bitmap caching
may or may not improve performance.
■ Use persistent bitmap caching: Select to allow persistent bitmap
caching, which stores bitmaps that are sent from the server on
permanent media, such as a hard disk. Upon connection, the thin
client informs the server of the bitmaps it has so that the server
does not have to resend them.
Depending upon connection configuration, selecting use persistent
itmap caching may or may not improve performance.
■ Use protocol compression: Select to enable protocol
compression, which makes commumication between computers
faster.
■ Use BackingStore of X server if available: Select to enable
BackingStore. A BackingStore contains the set of operations that
can be performed on a JNDI Attributes. Java Naming and
Directory Interface (JDNI) is a programming interface (API) that
allows you to connect Java programs to naming and directory
services such as DNS, LDAP, and NDS.
■ Use these additional options: Select and populate to use
additional rdesktop options.
For additional information, please visit the rdesktop Web site at:
http://www.rdesktop.org
2-22 www.hp.com Administrator’s Guide
Page 41

HP Connection Administrator
XDM connection
The X Display Manager (XDM) connection window allows you to
create and configure an XDM connection.
XDM Connection window
The following is a list of configuration options:
■ Hostname: Type the XDM server name or server IP address. For
example,
■
Display: Select the Linux display setting for this XDM
corp-suse or 150.0.0.30.
connection to utilize. The display number determines which
display to use. To switch displays, press
Ctrl+Alt+Function key
for the desired display. For example, press Ctrl+Alt+F3 for
display 3.
■ Keymap: Select whether to use the language based on the local
thin client settings, the server settings, or select a specific
language.
Administrator’s Guide www.hp.com 2-23
Page 42

HP Connection Administrator
✎
■ Query Mode: Select the type of XDM connection:
❏ Broadcast: Uses the first host that replies.
❏ Indirect: Provides a list of available hosts.
❏ Direct: Uses a single host.
■ Name this connection: Type a name to associate with this XDM
connection.
Other
The Other connection dialog box allows you to run a command to
create a connection.
If you are using HP Connection Administrator, you need to use a
command such as
available in the xterm.
xterm -hold -e ls, so the commands output is
Other connection window
2-24 www.hp.com Administrator’s Guide
Page 43
Introduction
3
Citrix
This chapter provides an overview of the Citrix (ICA) program. For
more detailed help in configuring the Citrix client, see the Clients for
UNIX Administrator’s Guide at:
The HP Linux thin client allows for the loading of different startup
shells or user interfaces when the thin client boots. One of these shells
is the Citrix ICA client.
You set the Citrix ICA client as the default shell for a variety of
reasons. For example, you may require access to features, such as
Citrix ICA PNAgent capability, that are not accessible from HP
Connection Administrator.
http://support.citrix.com/docs/
Citrix ICA Client for Linux window
Administrator’s Guide www.hp.com 3-1
Page 44

Citrix
Citrix (ICA)
The Citrix (ICA) program allows you to set up and configure Citrix
ICA client connections.
ICA Client Settings
To view or set the preferences for ICA, select Tools > Settings. From
the Settings window, you can select keyboard layouts and types,
enable or disable sounds, configure audio input, and allow automatic
client updates.
Preferences
From the Settings window, you can configure Window color and size,
determine server location, configure hotkeys, configure or clear disk
cache, map drives, add COM ports, configure firewall, enable auto
reconnect, and configure PNA.
Connection View
In Connection View, you can create, modify, or launch connections,
and begin a session on a Citrix server. To access Connection View,
click View > Connection View.
Program Neighborhood Agent (PNAgent)
In PNAgent View, you can view and activate the applications that
have been published in the “neighborhood” on a Citrix server or
server farm. To access PNAgent View, click View > PNAgent View.
3-2 www.hp.com Administrator’s Guide
Page 45

4
XFce Settings Manager
This chapter provides an overview of the utilities in the XFce Settings
Manager, which is the control panel for the Linux-based thin client
image. You can use the utilities in the settings manager for local and
remote administration.
You can open the XFce Settings Manager in any of the following
ways:
■ Click the Settings button on the HP Connection Administrator
window.
■ Click GO, and then select Settings (t5515/t5525 only).
■ Right-click on the desktop and select Settings.
Administrator’s Guide www.hp.com 4-1
Page 46

XFce Settings Manager
XFce Settings Manager
Icons in XFCE Settings Manager vary depending on whether the
✎
current user is logged in a root account. In addition, some icons
require root user access.
4-2 www.hp.com Administrator’s Guide
Page 47

Date/Time
XFce Settings Manager
The Date/Time Properties utility allows you to set the date and
current time, select the appropriate time zone, and enable NTP
(Network Time Protocol).
Date/Time Properties
Use the values in the Date, Time, and Time Zone areas to select the
appropriate date and time information. Select Monday First to
configure the monthly calendar show Monday as the first day of the
week.
Enabling Network Time Protocol
NTP is a protocol designed to synchronize the clocks of computers
over a network. There are numerous servers available on the Internet
that are synchronized to Coordinated Universal Time (UTC).
To enable NTP:
1. Select Enable Network Time Protocol.
2. In the NTP Server box, type the IP address of the NTP server
you want to use to set the time on the thin client. For NTP to
function properly, the date on the thin client must match the date
on the server.
3. Click Apply.
Administrator’s Guide www.hp.com 4-3
Page 48
XFce Settings Manager
Configuring the system hardware clock from BIOS
You can set the system hardware clock to your local date and time
using the BIOS setup utility as follows:
1. Reboot the system and press F10.
2. After the Setup utility displays, press Esc.
3. Select the standard CMOS features option, and then press Enter.
4. Set the date and time using the Page Up and Page Down keys.
5. To save the changes, press F10, and then press Enter.
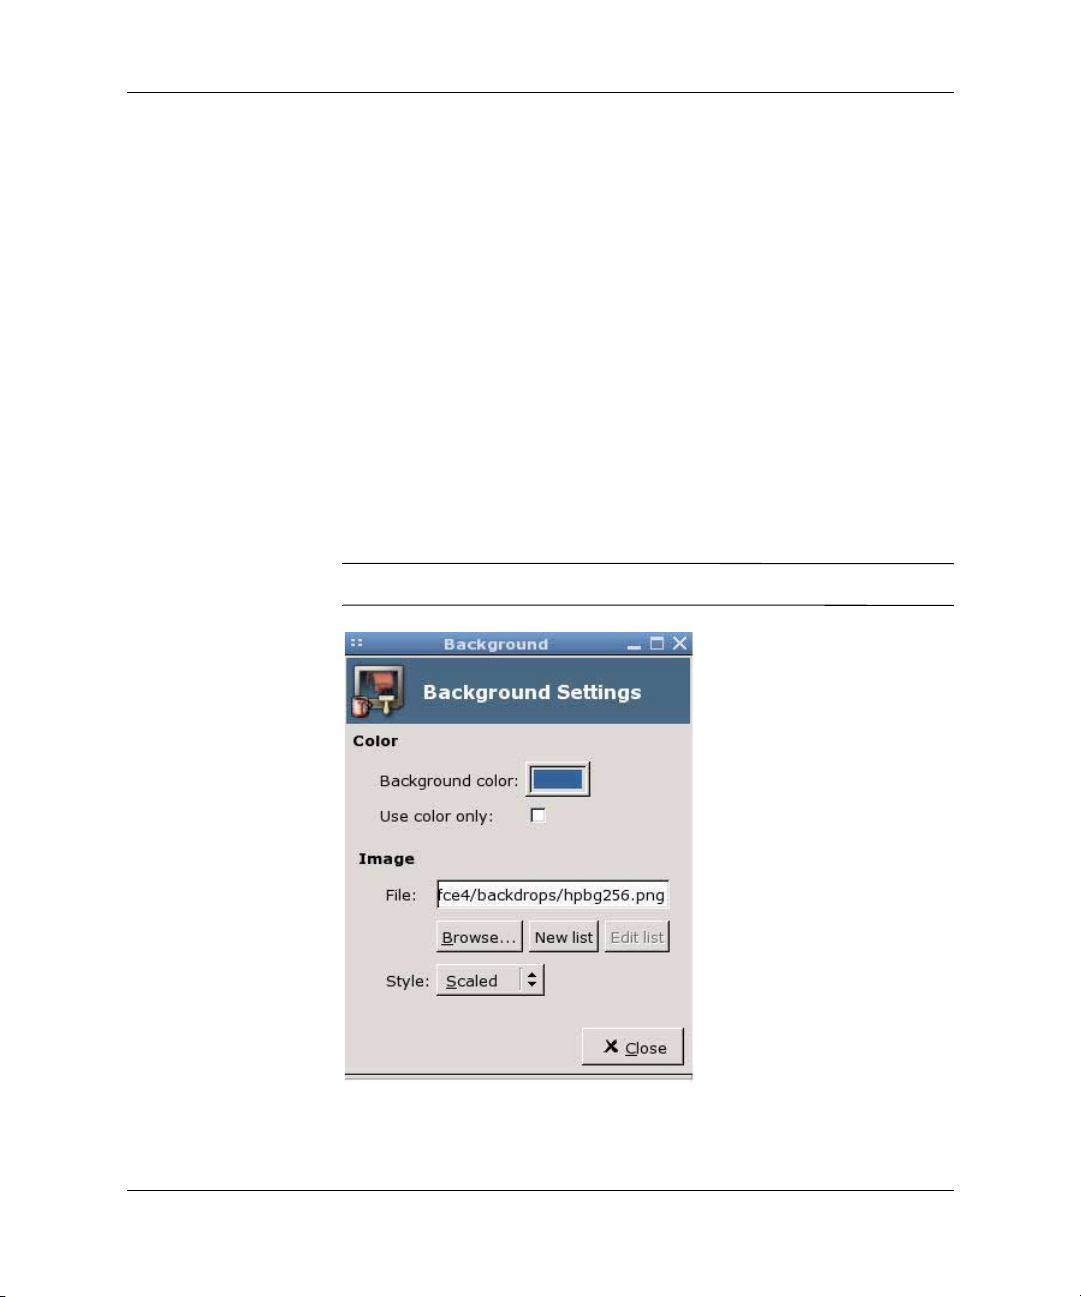
Desktop: backdrop
You can use the Background Settings utility to change the backdrop
color or to browse for an image to use as the desktop’s backdrop.
You can change the background image to any .jpg or .png image.
✎
Background Settings
4-4 www.hp.com Administrator’s Guide
Page 49

Using an image for your background
To change the background image:
1. From the XFce Settings Manager, click Desktop: backdrop.
2. Click Browse.
3. Locate and select a .jpg or .png image.
4. Click OK.
Changing background color
To change the background color:
1. From the XFce Settings Manager, click Desktop: backdrop.
2. Click Background color.
3. Select the desired color, and then click OK.
4. Select Use color only.
HP Desktop Options
XFce Settings Manager
The Linux-based image features the following desktop interface
options:
■ HP Connection Administrator
■ Citrix ICA Client
■ xfce (t5515/t5525 only)
HP Connection Administrator is the default interface. Desktop
Options includes the features in the following sections.
Administrator’s Guide www.hp.com 4-5
Page 50

XFce Settings Manager
VNC Shadow
VNC Shadow allows the administrator to remotely observe or take
control of the user’s desktop.
HP Desktop Options
VNC Shadow: Select to enable remote access to the thin client.
■
■ Read Only Mode: Select to prevent the remote access session
from making changes to the unit.
■ Advise User of Monitoring: Select to display a message that
informs the logged on user that their session is about to be
monitored. You can customize the message by typing text in the
box. The user can click okay to allow monitoring, or close the
dialog box to disallow monitoring.
■ Password Protect: Select to require a password to remotely
access the thin client.
The VNC Shadow password must be at least six characters long.
✎
4-6 www.hp.com Administrator’s Guide
Page 51

TouchScreen
USB Storage
XFce Settings Manager
Select Enable EloTouch to enable support for an Elo touch screen.
Touch Screen tab
Select Enable USB Storage to enable USB automounting and
redirection on the thin client. USB automounting allows the thin
client to automatically recognize USB devices plugged in to the USB
port. USB redirection allows a remote session to access devices that
you plug into your local thin client USB ports.
The thin client supports a maximum of five USB storage devices per
session with the following mix:
Up to four simultaneous disk-on-key devices or hard drives and one
CD-ROM. The thin client recognizes only the first partition of a USB
hard drive. You can mount only one CD-ROM drive per session.
The thin client supports up to four USB devices; however, you can
✎
use a USB hub to access additional USB devices.
To view the files on the USB drive key, use the
To copy files to/from the USB drive key, use the
Examples:
■ cp /mnt/dok/printcap.txt /etc/printcap
■ cp printcap /mnt/dok/printcap.1
Administrator’s Guide www.hp.com 4-7
ls command.
cp command.
Page 52

XFce Settings Manager
FTP Updates
Use this window to enable automatic FTP updates as an alternative to
Altiris Deployment Solution. Enabling this feature allows you to
configure the thin client to check a specific ftp location for a newer
image or package upon reboot.
If your network has an DHCP server that is configured to provide the
following, then you only need to select Enable Automatic FTP
Update:
■ ftp server name
■ path on server where the newer image is placed
■ username and password that the unit can automatically log in to
the ftp server to download the new image
If your network does not provide this information, along with
selecting Enable Automatic FTP Update, you must fill in all the
valid information in the FTP Updates dialog box.
FTP Updates tab
4-8 www.hp.com Administrator’s Guide
Page 53

Display
XFce Settings Manager
The Display Preferences utility allows you to configure the monitor’s
screen resolution, color quality, and refresh frequency.
Display Preferences
You must reboot the terminal or restart the session for the changes to
take effect.
After you change display settings, the thin client allows you to test the
settings. If the settings do not provide the desired results, you can
cancel them to revert to the previous settings.
The default resolution is 800x600x16@60Hz.
Administrator’s Guide www.hp.com 4-9
Page 54

XFce Settings Manager
✎
✎
The following table provides all available screen resolutions:
Mode Refresh Rate Color Depth
640 x 480 60, 75, or 85 Hz 8-, 16-, or 24-bit
800 x 600 60, 75, or 85 Hz 8-, 16-, or 24-bit
1024 x 768 60, 75, or 85 Hz 8-, 16-, or 24-bit
1280 x 1024 60, 75, or 85 Hz 8-, 16-, or 24-bit
If you select 32-bit resolution, the setting defaults to 24-bit.
If you configure the display settings out of range, you can reset to
factory defaults by right-clicking the desktop, selecting Settings >
System, and clicking the Reset button. This resets all configuration
settings and connections.
4-10 www.hp.com Administrator’s Guide
Page 55

Screen saver
XFce Settings Manager
Select Screen Saver to enable and configure the screen saver. If you
select Password Protected, the thin client uses your logon password
as the screen saver password.
Screen saver
Administrator’s Guide www.hp.com 4-11
Page 56

XFce Settings Manager
Keyboard
The Keyboard Preferences utility allows you to select a keyboard
language, keyboard character repeat parameters, and the Numlock
setting.
Keyboard Preferences
Changes to the keyboard language apply locally as well as on the
remote computer.
Drivers for the various languages do not transfer to the remote
✎
computer; therefore, you must also install the drivers for the selected
language on the remote computer.
4-12 www.hp.com Administrator’s Guide
Page 57

Mouse
XFce Settings Manager
The Mouse Preferences utility allows you to set the mouse
double-click sensitivity, speed, and drag and drop setting. You can
also configure the mouse buttons for right-handed or left-handed
users.
Mouse Preferences
Administrator’s Guide www.hp.com 4-13
Page 58

XFce Settings Manager
Network Management
The Network Management utility allows you to configure
connectivity between the terminal and the Internet, a network, or a
computer.
Network Management utility
You can configure the following items in the Network Management
utility:
■ Ethernet
■ To ken R ing
■ Modem
4-14 www.hp.com Administrator’s Guide
Page 59

Printer Manager
The Printer Manager allows you to add a new printer and modify
printer settings.
The pre-installed image includes only a generic printer device driver.
✎
You can add other printer device drivers. The Linux image provides
for generic text support and postscript support. Other printers may be
compatible and should be tested for initial compatibility prior to
usage. For full printer feature support, you must install the
appropriate printer device driver.
XFce Settings Manager
Printer Settings window
To add a printer:
1. Select Printer Manager from XFce Settings Manager.
2. Click Add Printer.
3. Select the printer type, and then click Next.
4. Type the printer location, and then click Next.
Administrator’s Guide www.hp.com 4-15
Page 60

XFce Settings Manager
Security
5. Configure the printer using the dialog box specific to the chosen
printer type, and then click Next.
6. Type the printer name, alias, and description. All three fields
provide different names you can use for the same printer.
7. Select Do Local Filtering and type the location of the local filter
to convert files to the appropriate format for the printer.
8. At your discretion, click Test P r i ntin g to send a sample job to the
printer.
9. Click OK to save changes.
The Security utility allows you to set a user to automatically log on at
reboot.
Security utility
To enable automatic logon for a user:
1. Select Automatic Log On.
2. In the User Name box, type the user name for which to set
automatic log on at reboot.
To halt the automatic logon process so that you can enter a new
✎
username, repeatedly press the left
logon process.
4-16 www.hp.com Administrator’s Guide
Shift key at the beginning of the
Page 61

Sound
System
General tab
XFce Settings Manager
The Sound dialog box allows you to set the volume and microphone
input volume for the thin client.
The System utility allows you to view thin client manufacturer and
product information, network settings, and copyright information.
You can also reset the terminal to the default factory settings, adjust
the memory allocated for storage and running programs, and enter a
device name for network identification purposes.
The General tab provides basic information about the client.
System window
Administrator’s Guide www.hp.com 4-17
Page 62

XFce Settings Manager
Network tab
You can reset to factory defaults by clicking Reset under Terminal
Settings. Restoring factory defaults restores only the system level
default settings. It does not reset any user account settings. You can
manually reset user account settings using Console shell commands
to clear user files in the “/home” folder.
The Network tab provides network identification and settings
information.
Network tab
You can add a description for the thin client in the Device
Description field. to add a description, type the description and click
OK.
4-18 www.hp.com Administrator’s Guide
Page 63

Copyrights tab
About tab
Taskbar
XFce Settings Manager
The Copyrights tab provides HP and Altiris copyright information.
The About tab provides information on open source software package
licenses.
The taskbar contains the four separate workspace icons. each
workspace can have different programs running. Click one of these
icons to open a workspace (or session). The Taskbar utility allows you
to change the position and size of the taskbar.
Taskbar window
You can configure the taskbar as follows:
■ To display on either the top or the bottom of the screen, select the
appropriate radio button under Position.
■ To display all open tasks in the taskbar, select Show tasks from
all workspaces.
■ To display an icon that allows you to click each workspace
(session), select Show pager in taskbar.
Administrator’s Guide www.hp.com 4-19
Page 64
XFce Settings Manager
■ To change the width of the taskbar, drag the bar left or right under
Size.
■ To hide the taskbar, select Auto hide taskbar. To display a
hidden taskbar, move the mouse to the area of the screen where
the taskbar is configured to display.
You can add or remove workspace icons from the taskbar by pressing
the middle mouse button (scroll wheel) anywhere on the desktop. If
you do not have a middle mouse button, you can add a workspace by
pressing
When the taskbar is hidden, you can press the middle mouse button
✎
anywhere on the desktop to see the list of tasks that are running.
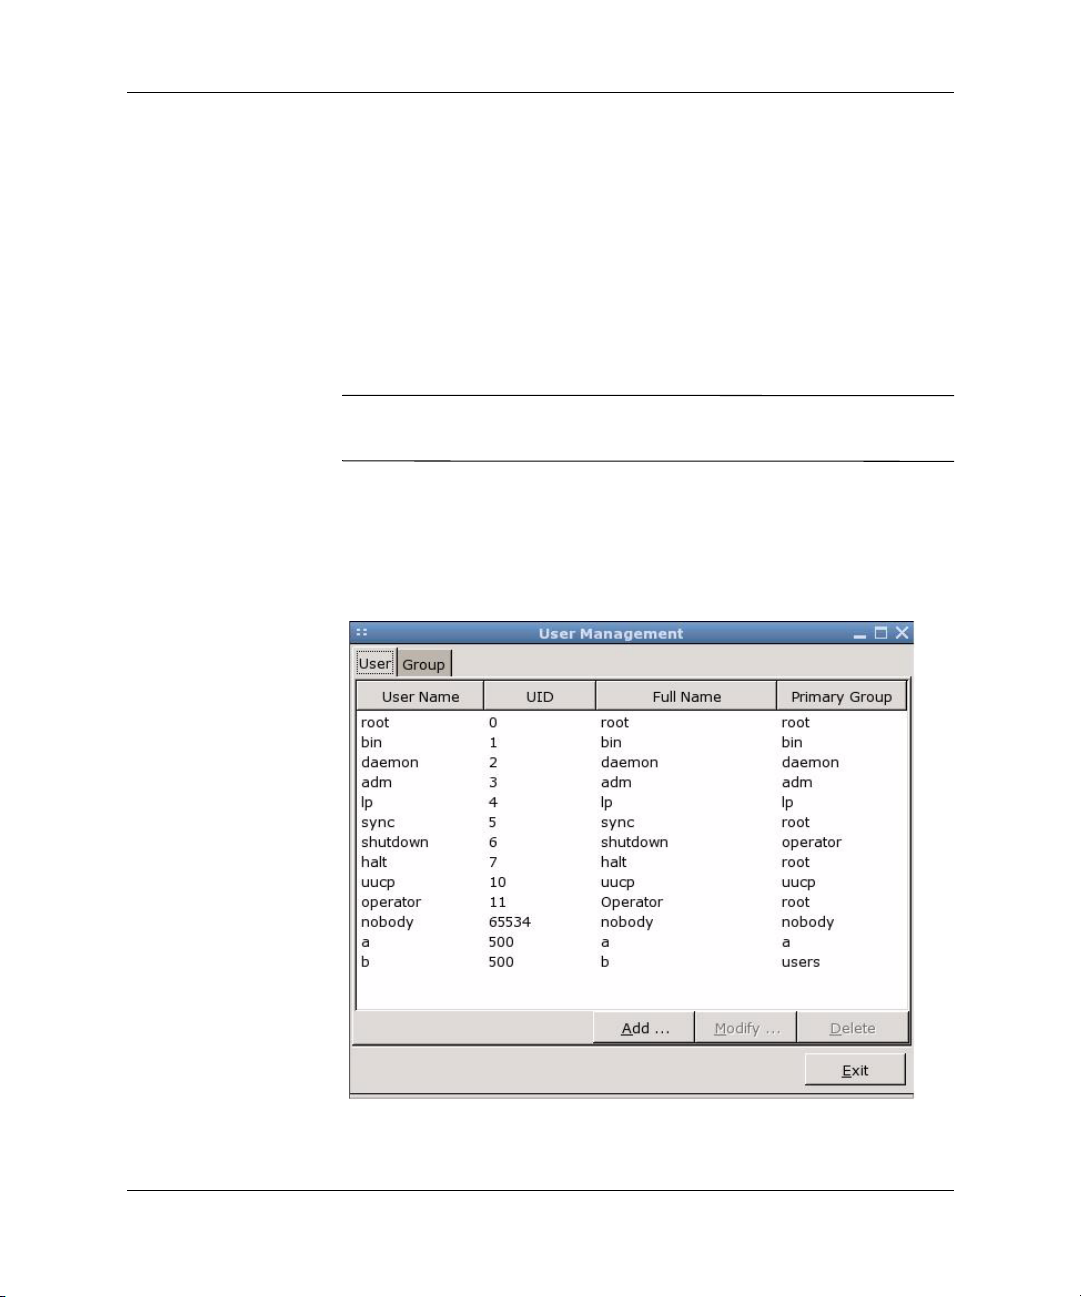
User Management
The User Management utility allows you to create and modify user
accounts and groups.
Alt+Insert or remove a workspace by pressing Alt+Delete.
User Management
4-20 www.hp.com Administrator’s Guide
Page 65

Managing a user account
The following sections include instructions for adding, modifying,
and deleting a user account.
Add a user
To add a new user:
1. In the User Management window, click User.
2. Click Add, and then click the User tab.
XFce Settings Manager
User Properties window
3. Type a user name and the associated user's full name.
4. If you want to manually specify a user ID, select Specify user ID
manually and type or select the user ID in the UID box.
Administrator’s Guide www.hp.com 4-21
Page 66

XFce Settings Manager
5. If you want the system to automatically assign a user ID, clear
Specify user ID manually.
6. To lock the account, select User account is locked.
7. Type a password for the account in the Password and Confirm
Password boxes.
8. To add the user to an existing group, type or select a group name
in the Primary Group box.
9. Select Create a private group for user to place the user in a
individual group specific to that user. Private groups provide an
easy way to manage user settings.
10. Click OK to save changes.
Modify a user account
To change user access:
1. In the User Management screen, select a user.
2. Click Modify. The User Properties dialog box opens. You may
lock the user account, enable an account expiration date, or set a
password.
3. Click OK to save changes.
Delete a user
To delete a user:
1. In the User Management screen, select a user.
2. Click Delete, and then click OK to save changes.
4-22 www.hp.com Administrator’s Guide
Page 67

Permissions
XFce Settings Manager
Click the Permissions tab to grant permissions to users.
Permissions window
To grant permissions to a user:
1. In User Management, click the User tab.
2. Select the user to modify.
3. Click Modify.
4. Click the Permissions tab.
Administrator’s Guide www.hp.com 4-23
Page 68

XFce Settings Manager
5. In Choose group type, select the group that includes the
permission you want to add to the user.
User options
6. Click the permission.
Yes displays in the Selected column to
indicate the user has that permission.
7. Click OK.
The “/etc” directory and the “passwd” file contain a list of defined
users. You can use the
adduser [OPTIONS] user_name
Option Definition
“-h DIR Assign home directory DIR
“-g GECOS Assign gecos field GECOS
“-s SHELL Assign login shell SHELL
“-G Add the user to existing group GROUP
“-S Create a system user (ignored)
“-D Do not assign a password (logins still
“-H Do not create the home directory
adduser command to perform the following:
possible using ssh)
4-24 www.hp.com Administrator’s Guide
Page 69

Managing a group
The following sections include instructions for adding, modifying,
and deleting a group.
Adding a group
To add a new group:
1. In the User Management screen, click the Group tab.
2. Click Add.
XFce Settings Manager
User Properties window
3. In the Group Name box, type a group name.
4. If you want to manually specify a group ID, select Specify group
ID manually and type or select the group ID in the GID box.
5. If you want the system to automatically assign a group ID, clear
Specify group ID manually.
Administrator’s Guide www.hp.com 4-25
Page 70

XFce Settings Manager
Modifying a group
To change user access:
6. To add users to this group, select a user from the other users list,
and then click Add >>.
7. To remove users from the group, select the user from the users of
group list, and then click << Remove.
8. Click OK to save changes.
1. In the User Management screen, click the Group tab.
2. Type or select a group, and then click Modify.
3. To change the group ID, type or select a new ID in the GID box.
4. To add users to this group, select a user from the other users list,
and then click Add >>.
5. To remove users from the group, select the user from the users of
group list, and then click << Remove.
6. Click OK to save changes
Deleting a group
You must delete all users from a group before you can delete the
✎
group.
To delete a group:
1. From the User Management screen, click the Group tab.
2. Select the group to delete, and then click Delete.
3. Click Ye s to confirm.
4-26 www.hp.com Administrator’s Guide
Page 71

Adding a user to a group manually
BusyBox does not include a utility similar to usermod. As a result,
you must edit the “passwd” file and correct the user's group id, as
shown in the following steps:
XFce Settings Manager
1. Execute the
2. Note the user id and group id displayed by the
3. Change the directory to
4. Open the group file using the editor
5. Find the group in the list and note its id number.
6. Close the editor using
7. Open the passwd file using the editor
8. Find the user id and changes its group id to match the desired
group.
9. Save the edited file by using
10. Close the edited file using
Window Manager
The Window Manager Preferences utility allows you to configure
preferences for windows that are opened on the desktop. The dialog
box has three tabs:
■ Decoration style
■ Keyboard and focus
id command using the user name.
id command.
/etc cd /etc.
vi group.
:q!.
vi passwd.
:w.
:q.
■ Advanced
Administrator’s Guide www.hp.com 4-27
Page 72

XFce Settings Manager
Decoration style
The Decoration style tab allows you to configure title font, title
alignment, application skin, and button layout.
Decoration Style tab
Do not select all items as hidden.
✎
4-28 www.hp.com Administrator’s Guide
Page 73

Keyboard and focus
The Keyboard and focus tab allows you to set the focus for new
windows. Focus refers to the component currently receiving input.
For example, if focus follows the mouse, then if you move the mouse
pointer over a window, the window receives the input.
XFce Settings Manager
Keyboard and Focus tab
Administrator’s Guide www.hp.com 4-29
Page 74

XFce Settings Manager
Advanced
The Advanced tab allows you to configure windows snapping and
workspace wrapping.
Window Manager Advanced tab
4-30 www.hp.com Administrator’s Guide
Page 75

XFce Panel
✎
XFce Settings Manager
The XFce Panel utility allows you to configure the appearance of the
XFce Panel Bar, which is the desktop controller.
XFce Panel Bar
Panel bar item configuration
You can add and remove items from the panel bar, as well as
configure the items displayed. Use the right mouse button to access
the menus that allow you to configure menu bar items.
XFce Panel Settings window
To remove an item from the panel bar:
» To remove an item, right-click the item and select Remove.
To add an item to the panel bar:
1. Right-click in the location on the panel bar in which you want to
add the item, and then click Add new item.
2. Select the item to add to the panel bar.
3. Configure the item in the displayed configuration screen.
If the Autohide check box is selected, move the pointer to the bottom
✎
of the screen to display the XFce Panel Bar.
Administrator’s Guide www.hp.com 4-31
Page 76

XFce Settings Manager
4-32 www.hp.com Administrator’s Guide
Page 77

5
Support
If you require support for your Linux-based thin client, contact your
region’s HP Technical Support Center. While HP provides support for
Linux-based thin clients, HP does not provide technical support for
the Linux operating system or application components that are
obtained from the open source community.
Support contact information is available at the
HP homepage or at:
http://welcome.hp.com/country/us/en/contact_us.html
Hardware warranty
The hardware warranty is three years limited coverage and is
upgradeable through the purchase of an optional HP Care Pack.
Software warranty
The software warranty covers several features, including:
■ Altiris Remote Management Client
■ Citrix Client
■ Network Management Applet
Note that Altiris is supported directly by Altiris, Inc. All other
services and features are from open source community packages and
are not supported by HP.
Contact HP link on the
Administrator’s Guide www.hp.com 5-1
Page 78

Support
Image updates and add-ons
HP provides periodic updates to the image, as well as add-ons. Check
the HP support site for important documentation that provides
specific information for your image version and for installing
add-ons. You can find support documentation at:
www.hp.com/support/
To search for support documentation, enter your country and product
name, and then click Manuals.
Custom image requests
There are two methods for obtaining a custom image. You can use a
custom image from HP, or you can develop your own image using a
tool kit.
HP-developed images
Contact your HP Account Team, which will work through the HP
Specials Process to understand the opportunity, image requirements,
schedule, and costs involved.
Custom-developed images
HP has a partnership with Metrowerks, which uses an
industry-recognized tool kit Platform Creation Suite (PCS) to develop
and build images. PCS is a fee-based licensed product that you can
obtain directly from the following Metrowerks Web site:
http://www.metrowerks.com/MW/Develop/Embedded/Linux/hpthin
client.htm
To assist you with starting a baseline code set, HP provides a Board
Support Package (BSP) that contains all code packages that comprise
the Linux image. The majority of the code packages are provided as
open source, while a few of the packages are in object form due to
their proprietary licensed nature. You can also get the HPBSP directly
from the Metrowerks Web site upon registration. PCS tool kit sales,
fulfillment, support, and maintenance is provided by Metrowerks.
5-2 www.hp.com Administrator’s Guide
Page 79

Availability of Linux open source code
If your HP thin client shipped with Linux, you can get the source code
using one of the following methods:
■ Internet download at:
http://www.metrowerks.com/MW/Develop/Embedded/Linux/hp
thinclient.htm
You must register prior to downloading the source code.
✎
■ On media by mail:
Source code is available only on recordable media. To obtain the
media, contact your local HP Customer Support Center. HP may
charge a nominal fee for the media.
Additional Linux resources on the Web
Busy Box: www.busybox.net
Linux Online: www.linux.org
Support
Linux.com: www.linux.com
Linux on Laptops: www.linux-laptop.net
Linux Security: www.linuxsecurity.com
Linux Journal: www.linuxjournal.com
Linux Gazette: www.linuxgazette.com
XFCE: www.xfce.org
HP white papers: www.hp.com/support/. To search for white papers,
enter your country, product name, and click Manuals.
Administrator’s Guide www.hp.com 5-3
Page 80

Support
5-4 www.hp.com Administrator’s Guide
Page 81

Frequently Asked Questions
Linux operating system
How do I tell what the Linux image
version/build number is?
To obtain the Linux image version, click GO > Settings > System >
General or right-click on the desktop and select Settings >
System/General. The General dialog box provides system
information, including the image version. The image designation
format is as follows:
■ L4ST31xx : is the 256MB flash memory image and includes the
Firefox browser.
■ L3ST31xx : is the 128MB flash memory image and includes the
Firefox browser.
■ L1ST31xx : is the 32 MB flash memory image on the t5125.
6
where xx represents the image build number. The original factory
image is L1ST3138.
How and where is the Linux image stored in
flash memory?
The image is stored in various formats. The boot up process
decompresses and loads certain portions of the image in RAM. Some
features and aspects of the image are not loaded until they are needed.
The image is stored in the following three partitions:
/dev/hda1 - ext2 - boot loader
/dev/hda2 - cramfs - majority of the image
/dev/hda3 - ext2 - optional components and home directories
Administrator’s Guide www.hp.com 6-1
Page 82

Frequently Asked Questions
System Administrator
How are users managed?
A System Administrator creates new user accounts and assigns users
to groups. The image provides the System Administrator with two
different methods to manage users:
■ The User management utility, accessible by clicking Settings >
User management.
■ Standard command-line tools to manage users - all from the
Console command shell’s BusyBox. Letter case matters when
using command line names and option switches.
How do you prevent a user account that is set to
auto logon from being logged in?
Press the left Shift key as soon as the login screen displays.
How are groups created using BusyBox?
The System Administrator uses the addgroup command to create a
new group on the t5525.
The /etc directory and the “group” file contain a list of defined
groups. The
addgroup [-g GID] group_name [user_name]
“-g GID specify Group ID (gid)
addgroup command overview follows:
How are file permissions handled using
BusyBox?
The Linux operating system uses file permissions as its basis for
security. A Linux operating system considers all resources and
directories as files within the security structure. File permissions
determine each file’s read, write, and execute permissions for all users
and groups on the system. Under Linux permissions, these are in
three groups - owner, group, and others. Each group has three
permission options - read, write, and execute.
6-2 www.hp.com Administrator’s Guide
Page 83

Frequently Asked Questions
How do you change file permissions using
BusyBox?
To change the permission options the System Administrator uses the
chmod command. An overview of the chmod command follows.
chmod [-R] MODE[,MODE]... FILE...
Each MODE is one or more of the letters ugoa, one of the symbols
+ or -=, and one or more of the letters rwxst”=. You can also set the
permissions using an octal numeric based code, where 4 equals read,
ex
2 equals write, and 1 equals
ecute permissions.
Options:
-R Changes files and directories recursively.
How is changing ownership handled using
BusyBox?
The system administrator uses the chgrp command to assign group
ownership to a file or resource. An overview of the
follows.
chgrp [OPTION]... GROUP FILE...
Change the group membership of each file to group.
chgrp command
Options:
-R Changes files and directories recursively.
System Management
How do you configure the system hardware
clock?
Set the system hardware clock using the BIOS setup utility:
1. Reboot the system and press
2. After the Setup utility displays, press
3. Select the standard CMOS features option and press
4. Set the date and time using
5. To save the changes, press
Administrator’s Guide www.hp.com 6-3
F10.
Esc.
Enter.
Page Up and Page Down.
F10 and Enter.
Page 84

Frequently Asked Questions
How do you configure the date and time?
The Date and Time management GUI applet provides an easy method
for managing the date and time. You can configure the date, time,
time zone, and network time protocol (NTP). The Applet is launched
by clicking GO > Settings > Date/Time.
How do you change the boot order?
Run the BootOrder utility to alter the order of the boot up device. The
utility is installed with the standard image.
To run the BootOrder utility, perform the following steps:
1. Right click on the desktop and select Console.
2. To use the BootOrder utility, execute
/hpbootorder (without parameters) and follow the listed
.
options. To use the RepSet utility, execute
cd /opt/hp/, then type
./hprepset (without
parameters) and follow the listed options.
How do you synchronize the BIOS and system
time?
To synchronize the BIOS and system time, use the hwclock
command. This command allows you to either synchronize the BIOS
time to the system time, or synchronize from system time to BIOS
time. This command without any parameters displays the current date
and time.
hwclock [-r|--show] [-s|--hctosys] [-w|--systohc]
[-l|--localtime] [-u|--utc]
Query and set the hardware clock (RTC).
6-4 www.hp.com Administrator’s Guide
Page 85

VNC
Frequently Asked Questions
Options:
Options Description
-r Read hardware clock and print result
-s Set the system time from the hardware clock
-w Set the hardware clock to the current system time
-u The hardware clock is kept in coordinated universal time
-l The hardware clock is kept in local time
How is the VNC password reset?
The system stores the VNC server password in encrypted form in a
hidden directory named “.vnc” in the user’s home directory. For
example, the system stores the password for user “fred” at:
/home/fred/.vnc/passwd.
If you delete the passwd file to reset the password, the system
prompts the user for a new password the next time the VNC server is
started. The password must be six to eight characters long.
Administrator’s Guide www.hp.com 6-5
Page 86

Frequently Asked Questions
General
Are there any hotkeys?
Yes, see the following table:
Key Combination Action
Ctrl+Alt+Backspace Logs off the current session and displays the login dialog.
If the client is set to auto logon, the auto logon completes.
Ctrl+Alt+Delete Locks the screen. Entering any character displays the
locked screen dialog and requests the password for the
user that locked the screen.
Ctrl+Alt+Home Switches virtual desktop workspace. The desktop focus is
moved through the four workspaces. Clicking on an open
area of the desktop and using the wheel on a wheel
mouse causes the same action.
Alt+Tab Switches the active application focus.
Alt+F1 Launches the Firefox browser for HP Help.
(Available only for the L3ST20xx 128MB flash memory
image)
Alt+F2 Launches the Run program dialog. This dialog is similar
to the Run dialog in Windows. Enter the desired command line and click Run.
(Requires models with browser.)
Alt+F4 Terminates the current application.
Alt+F5 Toggles an application between full screen display and
standard display modes.
Alt+F6 Maximizes vertical on screen.
Alt-F7 Maximizes horizontal on screen.
Alt-F8 Minimizes panel on screen.
6-6 www.hp.com Administrator’s Guide
Page 87

Frequently Asked Questions
Are the Function keys operational?
Yes, they are operational during the pre-boot process as follows:
Ctrl+Alt+Backspace Logs off the current session and displays the login dialog.
If the client is set to auto logon, the auto logon completes.
Ctrl+Alt+Delete Locks the screen. Entering any character displays the
locked screen dialog and requests the password for the
user that locked the screen.
Ctrl+Alt+Home Switches virtual desktop workspace. The desktop focus is
moved through the four workspaces. Clicking on an open
area of the desktop and using the wheel on a wheel
mouse causes the same action.
F1 No action
F2 No action
F3 Three separate results dependent on when in the boot
process
Break out of auto logon: Press
after the logon prompt displays to break out of an automatic logon during boot. The logon process stops and the
dialog waits for a user name and password.
Full screen X Terminal: Press and hold F3 during the
boot process to prevent the launch of the Linux desktop
GUI and display a full screen xterm window. Use
ing the boot when you want to launch a dedicated X terminal session.
Display boot process messages: Press
splash screen displays to escape out of the splash screen.
The boot messages and progress indicators display.
F3 is pressed:
F3 within 1-2 second
F3 dur-
F3 after the
F4 No action
F5 No action
F6 No action
F7 No action
F8 No action
F9 No action
Administrator’s Guide www.hp.com 6-7
Page 88

Frequently Asked Questions
Ctrl+Alt+Backspace Logs off the current session and displays the login dialog.
F10 Invokes the BIOS Setup utility during the boot process.
F11 No action
Ctrl+Alt+Backspace Logs off the current session and displays the login dialog.
The wrong characters display when I use the
keyboard?
Click GO > Settings > Keyboard. Make sure the correct keyboard is
selected under Keyboard Layout.
Manageability
Are there any updates necessary for Altiris
Deployment Server to work on an HP Compaq
t5125/t5515/t5525 thin client?
If the client is set to auto logon, the auto logon completes.
If the client is set to auto logon, the auto logon completes.
Yes. There is a hotfix available from Altiris which includes updates to
the imaging process and the DOS agent Bootwork.exe. This hotfix
includes a sample script that allows capture and deployment of
images using Rdeployt.exe, as well as a new Bootwork.exe file that
recognizes the bootloader in the image. This hotfix is available from
the Altiris Web site support page.
6-8 www.hp.com Administrator’s Guide
Page 89

Frequently Asked Questions
What are the steps to capture and deploy an
image on an HP Compaq t5125/t5515/t5525
thin client?
The t5525 supports the Linux version of the Altiris Remote
Management Client. Altiris management software allows you to
remotely capture and deploy Linux images. You can use the Altiris
Rdeployt tool, a text-base utility, to perform this function.
Capturing an Image:
HP Compaq Thin Client Actions (Required)
1. Reboot the client and launch the F10 System Configuration Setup
Screen.
2. Select the Advanced BIOS Features option and press Enter.
3. Select the First Boot Device option and press Enter.
4. Select the Network option and press Enter.
5. Press F10 to save the configuration.
6. Press Enter to save and exit.
Altiris Deployment Server Console Actions
1. Double-click the Deployment Server Console icon from the
desktop to open the Deployment Server Console.
2. Right-click on the lower left window and select New Job.
3. In the empty box, type Image Capture and press
4. From the upper right window, click
5. From the drop-down menu, select Run Script.
6. In the Run this Script window, type the following command:
rdeployt -mu -raw -f.\images\test.img
test.img is used for this example. You may select any name for the
✎
.img file.
Administrator’s Guide www.hp.com 6-9
Add.
Enter.
Page 90

Frequently Asked Questions
7. Select the DOS radio button from In which OS would you like
to run this script?
8. Click Finish.
You can drag and drop this job to any Linux unit to capture its
image.
How is an image deployed using Altiris?
An image can be deployed by performing the following steps:
HP Compaq Thin Client Actions (Required)
1. Reboot the client and launch the F10 System Configuration Setup
Screen.
2. Select the Advanced BIOS Features option and press
3. Select the First Boot Device option and press
4. Press
5. Press
Altiris Deployment Server Console Actions
1. Double-click the Deployment Server Console icon from the
2. Right-click the lower left window and select New Job.
3. From the empty box, type Image Deployment and press
4. From the upper right window, click Add.
5. From the drop-down menu, select Run Script.
6. From the Run this Script window, type the following command:
test.img is used for this example. You may select any name for the
✎
.img file.
F10 to save your configuration
Enter to save and exit.
desktop to open the Deployment Server Console.
Enter.
rdeployt -md -raw -f.\images\test.img
Enter.
Enter.
6-10 www.hp.com Administrator’s Guide
Page 91

Frequently Asked Questions
7. Select the DOS radio button from In which OS would you like
to run this script?
8. Click Finish.
9. To deploy an image, you can drag and drop this job to any HP
Compaq Linux thin client.
How can a factory image be restored locally?
A factory image can be restored locally using USB drive key or USB
CD-ROM. Instructions for this procedure are available on the HP
Compaq Thin Client Linux Image SoftPaq.
Can you capture and deploy settings separately
from an image?
Yes. HP has developed custom scripts for Altiris that capture system
settings and defined HP Connection Administrator connections from
a source HP Compaq Linux thin client system through the Altiris
deployment console. You can then deploy these captured system
settings and connections out to a target HP Compaq Linux thin client
system through the Altiris deployment console. For more
information, see the white paper entitled, “Altiris Manageability
Scripts for HP Compaq Linux Thin Clients” at
http://h20000.www2.hp.com/bc/docs/support/SupportManual/c0
0448511/c00448511.pdf
Are there other management methods available
from HP to manage HP Linux thin clients?
Yes. Beginning with Linux image verson L1ST3149, L3ST3149,
L4ST3149, you may update images using new HP FTP image update
and DHCP image update for HP Linux thin clients. For more
information, see the white paper entitled, "FTP/DHCP Image Update
for HP Linux Thin Clients" available on the
support site.
Administrator’s Guide www.hp.com 6-11
www.hp.com product
Page 92

Frequently Asked Questions
6-12 www.hp.com Administrator’s Guide
Page 93

7
Troubleshooting
Review the solutions to the following issues that may arise on the thin
client.
Issue
You add a rdesktop connection with the default settings, and then
change the video size to 200 percent or to full screen on Media Player,
and no video displays.
Solution
1. In HP Connection Administrator, select the connection, and then
click Edit.
2. Click the Experience tab.
3. Clear Bitmap caching and Use persistent bitmap caching.
Issue
You cannot print a large job to local printers in rdesktop sessions.
Solution
This issue may occur if a large volume of documents or an
individually large document is sent to the local printer. Try to send
large documents to a printer that is not connected locally to the thin
client. If you want to print multiple documents, allow the print queue
to clear before submitting the documents.
Administrator’s Guide www.hp.com 7-1
Page 94

Troubleshooting
Issue
You cannot print large jobs to local printers from an ICA session.
Solution
This issue may occur if a large volume of documents or an
individually large document is sent to the local printer. Try to send
large documents to a printer that is not connected locally to the thin
client. If you want to print multiple documents, allow the print queue
to clear before submitting the documents.
7-2 www.hp.com Administrator’s Guide
Page 95

Index
A
adding
connections 2–12
groups 4–25
groups using BusyBox 6–2
printer 4–15
users 4–21
users to a group manually 4–27
Advanced Configuration utility 2–3
Altiris
deploying images 6–10
FTP alternative 4–8
hotfix 6–8
remote image capture 6–9
remote image deployment 6–9
remote management 1–2
warranty 5–1
animation, menu and window 2–22
assigning connections to users
Auto check box
automatic connections
automatic logon
automounting
2–4
2–4, 2–6
4–16
4–7
2–5
B
backdrop 4–4
background
color 4–5
desktop 2–21
image 4–5
settings 4–4
BackingStore 2–22
BIOS version
bitmap caching
Board Support Package
boot order
changing 6–4
BSP 5–2
BusyBox
changing file permissions 6–3
changing ownership 6–3
file permissions handling 6–2
Web site 5–3
4–17
2–22
5–2
1–6
C
capturing images 6–9
changing
boot order 6–4
ownership 6–3
Citrix 1–7, 2–9, 2–14, 3–1
Citrix settings
COM ports 2–12
drive mapping 2–11
firewall settings 2–14
hotkeys 2–10
keyboard 2–10
server location 2–9
COM ports 2–12
configuring
automatic connections 2–6
automatic logon 4–16
available connections 2–3
Administrator’s Guide www.hp.com Index-1
Page 96

Index
Citrix connections 2–14
Citrix settings 2–9
COM ports 2–12
connections 2–1, 2–6
date and time 6–4
disk drives 2–19
display 4–9
drives 2–11
Firefox 2–15
global UI Kiosk settings 2–8
groups 4–20
hotkeys 2–10
keyboard 4–12
keyboard preferences 2–10
mouse 4–13
network 4–14
other connection types 2–24
parallel ports 2–19
primary connections 2–6
printer manager 4–15
printers 2–19
rdesktop connections 2–15
secondary connections 2–6
serial ports 2–19
sound 4–17
system hardware clock 4–4, 6–3
taskbar 4–19
USB storage 4–7
user accounts 4–20
user connections 2–4
Window Manager 4–27
XDM 2–23
XFce panel 4–31
connection types 2–13
Citrix ICA 2–14
Firefox 2–15
other 2–24
rdesktop 2–15
XDM 2–23
connections
adding, editing, deleting 2–12
assigning to users 2–5
automatic 2–6
configuring available 2–3
configuring user 2–4
primary 2–6
secondary 2–6
Console 1–6
CPU speed
custom-developed images
4–17
D
date and time 4–3
configuring 6–4
Network Time Protocol 4–3
decoration style 4–28
default
domain 4–18
password 1–1
user account 1–1
deleting
connections 2–12
groups 4–26
users 4–22
deploying images 6–9
Altiris 6–10
desktop 4–4
device name
DHCP
disk drive configuration
display
DNS server
drive mapping
4–18
4–18
2–19
4–9
4–18
2–11
E
EloTouch 4–7
enabling USB
4–7
5–2
Index-2 www.hp.com Administrator’s Guide
Page 97

Index
F
FAQs 6–1
general 6–6
Linux operating system 6–1
manageability 6–8
system administrator 6–2
system management 6–3
VNC 6–5
file permissions 6–2, 6–3
filtering
Firefox
flash memory
focus
forwarding rdesktop connections
frequently asked questions
FTP updates
function keys
4–16
1–7, 2–15
4–17
4–29
6–1
4–8
6–7
G
gateway 4–18
general FAQs
global Citrix settings
global UI Kiosk settings
GO button
granting user permissions
group ID
4–25
groups
adding 4–25
adding users 4–27
adding using BusyBox 6–2
deleting 4–26
modifying 4–26
6–6
2–9
2–8
1–4
4–23
4–25
H
hardware warranty 5–1
hotkeys
HP Connection Administrator
HP Desktop Options
HP-developed images
2–10, 6–6
1–7, 2–1
1–8, 4–5
5–2
2–19
I
ICA 1–7
ICA Client Settings
1–10
image
capturing 6–9
custom-developed 5–2
deploying 6–9
HP-developed 5–2
location 1–10, 1–11
restoring locally 6–11
version 4–17
input volume 4–17
IP address
4–18
3–2
K
keyboard 4–12, 4–29
keyboard preferences
keymap
Kiosk
2–23
2–8
2–10
L
launching programs thru rdesktop 2–20
Linux
image 1–10
image location 6–1
kernal 4–17
operating system FAQs 6–1
source code 5–3
version/build number 6–1
Web sites 5–3
list of
available connections 2–3
connections for user 2–2
rdesktop commands 2–19
user connections 2–4
locking user accounts 4–22
Ad mi n istr a to r ’s Gui d e www.hp.com Index-3
Page 98

Index
M
MAC address 4–18
manageability FAQs
managing
memory 4–17
Metrowerks
microphone volume
modifying
monitoring, VNC 4–6
mouse
4–25
groups 4–25
users 6–2
5–2
background color 4–5
connections 2–12
groups 4–26
users 4–22
4–13
6–8
4–17
N
network management 4–14
network settings and information
Network Time Protocol
4–3
NTP
4–3
O
opening Settings Manager 4–1
ownership
changing 6–3
P
parallel port configuration 2–19
password
default 1–1
resetting VNC 6–5
screen saver 4–11
PCS 5–2
persistent bitmap caching
Persistent check box
Ping First check box
Platform Creation Suite
PNAgent
3–2
2–22
2–4
2–3
5–2
4–18
Primary check box
primary connections
printer
filtering 4–16
printer configuration 2–19
printer manager
printer, adding
printing large jobs
processor type
Program Neighborhood Agent
Prompt check box
protocol compression
2–4
2–6
4–15
4–15
7–1
4–17
3–2
2–4
2–22
Q
Query Mode check box 2–24
R
rdesktop 2–15
connection settings 2–21
display settings 2–21
launching programs 2–20
list of commands 2–19
Web site 2–22
redirection 4–7
release date
resetting VNC password
restoring factory image
Run Browser In Kiosk Mode check box
4–17
6–5
6–11
S
screen resolutions 4–10
screen saver
secondary connections
security
configuring security 4–16
Linux Web site 5–3
serial number 4–17
serial port configuration
Settings Manager
shell commands
4–11
2–6
2–19
4–1
1–6
2–8
Index-4 www.hp.com Administrator’s Guide
Page 99

Index
Show Taskbar check box 2–8
Show User Interface check box
software warranty
4–17
sound
source code
subnet mask
support
synchronizing BIOS and system time
system administrator FAQs
system hardware clock, configuring
system management FAQs
system utility
5–1
5–1
5–3
4–18
4–17
2–8
6–2
6–3
T
taskbar 1–3, 4–19
themes
time
touchscreen 4–7
troubleshooting
2–22
4–3
setting 4–3
synchronizing with BIOS 6–4
7–1
U
USB
storage 4–7
user connection list 2–2
user ID
user management
user permissions
users
4–22
4–20
4–23
adding 4–21
deleting 4–22
locking 4–22
modifying 4–22
options 4–24
permissions 4–23
6–4
6–3
V
VNC
FAQs 6–5
monitoring text box 4–6
password reset 6–5
server 1–8
shadow 4–6
shadow password 4–6
viewer 1–7
VNC shadow check box 4–6
W
warranty
hardware 5–1
software 5–1
Web browser 1–7
Window Manager
workspace icons
4–27
1–3
X
XDM 2–23
XFce panel
XFce Panel Bar
XFce Settings Manager
opening 4–1
XFCE Web site 5–3
4–31
1–4
1–8, 4–1
Administrator’s Guide www.hp.com Index-5
Page 100

Index
Index-6 www.hp.com Administrator’s Guide
 Loading...