

Page 1

b
Quick Reference Guide
Compaq Evo Thin Client T20 and
Compaq Thin Client T1010 NT
Embedded Terminals
Document Part Number: 243495-001
June 2001
Page 2

© 2001 Compaq Computer Corporation
Compaq, the Compaq logo, Armada, Deskpro Registered in U. S. Patent and
Trademark Office. Evo is a trademark of Compaq Information Technologies
Group, L.P. in the United States and other countries.
ICA is a registered trademark and MetaFrame is a trademark of Citrix
Systems, Inc.
Microsoft, MS-DOS, Windows, Windows NT are trademarks of Microsoft
Corporation in the United States and other countries.
All other product names mentioned herein may be trademarks of their respective
companies.
Compaq shall not be liable for technical or editorial errors or omissions
contained herein. The information in this document is provided “as is” without
warranty of any kind and is subject to change without notice. The warranties for
Compaq products are set forth in the express limited warranty statements
accompanying such products. Nothing herein should be construed as
constituting an additional warranty.
Compaq service tool software, including associated documentation, is the
property of and contains confidential technology of Compaq Computer
Corporation. Service customer is hereby licensed to use the software only for
activities directly relating to the delivery of, and only during the term of, the
applicable services delivered by Compaq or its authorized service provider.
Customer may not modify or reverse engineer, remove, or transfer the software
or make the software or any resultant diagnosis or system management data
available to other parties without Compaq’s or its authorized service provider’s
consent. Upon termination of the services, customer will, at Compaq’s or its
service provider’s option, destroy or return the software and associated
documentation in its possession.
Ä
Å
CAUTION: Text set off in this manner indicates that failure to follow
directions could result in damage to equipment or loss of
information.
WARNING: Text set off in this manner indicates that failure to follow
directions could result in bodily harm or loss of life.
Printed in the U.S.A.
Quick Reference Guide
First Edition (June 2001)
Document Part Number: 243495-001
Page 3

Contents
1 Introduction
Introducing the Compaq Evo Thin Client T20 and Compaq
Thin Client T1010 Terminals. . . . . . . . . . . . . . . . . . . . . . 1–1
About This Book . . . . . . . . . . . . . . . . . . . . . . . . . . . . . . . 1–1
2 Evo Thin Client T20
Evo Thin Client T20 Features . . . . . . . . . . . . . . . . . . . . . 2–2
3 Thin Client T1010
Thin Client T1010 Features . . . . . . . . . . . . . . . . . . . . . . . 3–2
4 Extended Windows NT Embedded Features
Extended Control Panel Features . . . . . . . . . . . . . . . . . . . 4–1
Extended Program Features . . . . . . . . . . . . . . . . . . . . . . . 4–3
5 Using Your System
Logging On . . . . . . . . . . . . . . . . . . . . . . . . . . . . . . . . . . . 5–1
Time Synchronization . . . . . . . . . . . . . . . . . . . . . . . . 5–2
Joining A Domain . . . . . . . . . . . . . . . . . . . . . . . . . . . . . . 5–2
Shutting Down . . . . . . . . . . . . . . . . . . . . . . . . . . . . . . . . . 5–2
6 The Windows NT Embedded Desktop
Users Desktop . . . . . . . . . . . . . . . . . . . . . . . . . . . . . . . . . 6–1
Administrators Desktop . . . . . . . . . . . . . . . . . . . . . . . . . . 6–2
Quick Reference Guide iii
Page 4

7 About Dialog Box
8 Application Notes
Drive Z: RAM . . . . . . . . . . . . . . . . . . . . . . . . . . . . . . . . . 8–1
Drive C: Flash ROM . . . . . . . . . . . . . . . . . . . . . . . . . . . . 8–1
Saving Files . . . . . . . . . . . . . . . . . . . . . . . . . . . . . . . . . . . 8–1
Upgrading Firmware . . . . . . . . . . . . . . . . . . . . . . . . . . . . 8–2
Mapping Network Drives. . . . . . . . . . . . . . . . . . . . . . . . . 8–4
Domain Participation . . . . . . . . . . . . . . . . . . . . . . . . . . . . 8–5
Setting Keyboard Languages . . . . . . . . . . . . . . . . . . . . . . 8–5
Remote Administrator Support . . . . . . . . . . . . . . . . . . . . 8–6
Shadowing . . . . . . . . . . . . . . . . . . . . . . . . . . . . . . . . . 8–6
iv Quick Reference Guide
Page 5

1
Introduction
Introducing the Compaq
Evo
Thin
Client T20 and Compaq Thin Client T1010
Terminals
Compaq Evo Thin Client T20 and Compaq Thin Client T1010
terminals use the Windows NT® Embedded operating system to
display windows rather than the classic text-based display. These
computers are designed to connect to Windows Terminal Server
(WTS) and Windows 2000 servers via Remote Desktop Protocol
(RDP) and Independent Computing Architecture (ICA). RDP is
the Microsoft presentation service protocol for connecting to
Windows terminal servers. ICA is the Citrix presentation service
protocol for Windows NT servers. Both allow an application’s
user interface to execute on a NT Embedded-based terminal while
the application’s logic executes on the server.
About This Book
This publication is a supplement to the standard Windows NT
Embedded documentation supplied by Microsoft Corporation,
which is also available on the Microsoft web site at
http://www.microsoft.com/windows/embedded/nt/
explains the differences, enhancements, and additional features
provided by Compaq with the thin client. No attempt has been
made in this publication to document the standard NT features
found in this product.
Quick Reference Guide 1–1
. This document
Page 6

2
Evo
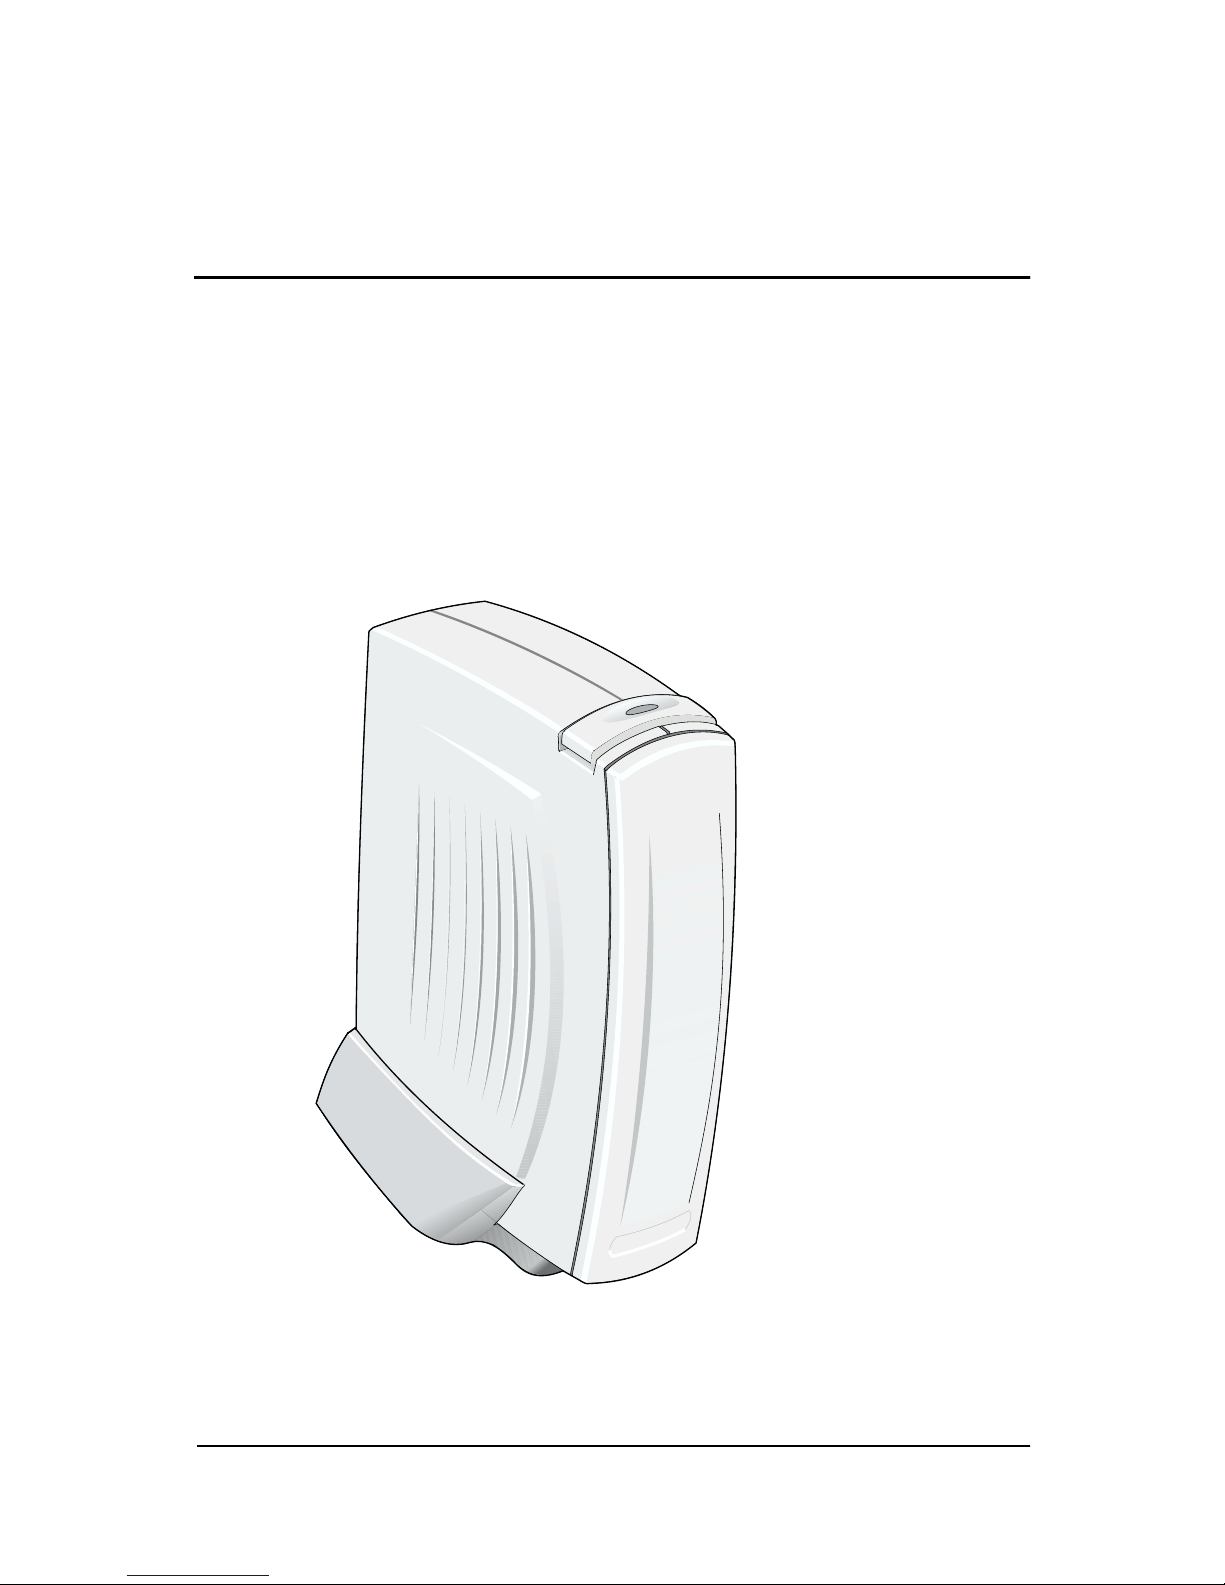
The Compaq Evo Thin Client T20 terminal is a small footprint,
low profile, modular NT Embedded-based terminal. The
connections for monitor, network and USB I/O devices are on the
back panel of the terminal. Figure 1 shows the Evo Thin Client
T20 terminal. The Evo Thin Client T20 supports only USB
devices. Keyboard and mouse connections are accomplished
using the USB ports on the back of the terminal.
Thin Client T20
Figure 1: Evo Thin Client T20
Quick Reference Guide 2–1
Page 7

Evo Thin Client T20
Evo
Thin Client T20 Features
The following list outlines the key features of the Evo Thin Client
T20 terminal:
Windows 3.1, Windows 95, Windows 98, and Windows NT
■
applications via Windows 2000 or Windows Terminal Server
RDP and ICA application compliant
■
10/100 Base-T network communications
■
Four USB ports
■
Extended color support up to 16 bits
■
Support for monochrome or color monitor
■
The following items are provided with Evo Thin Client T20
terminals:
Power cord and power supply
■
Keyboard and mouse
■
Installation and user information
■
2–2 Quick Reference Guide
Page 8
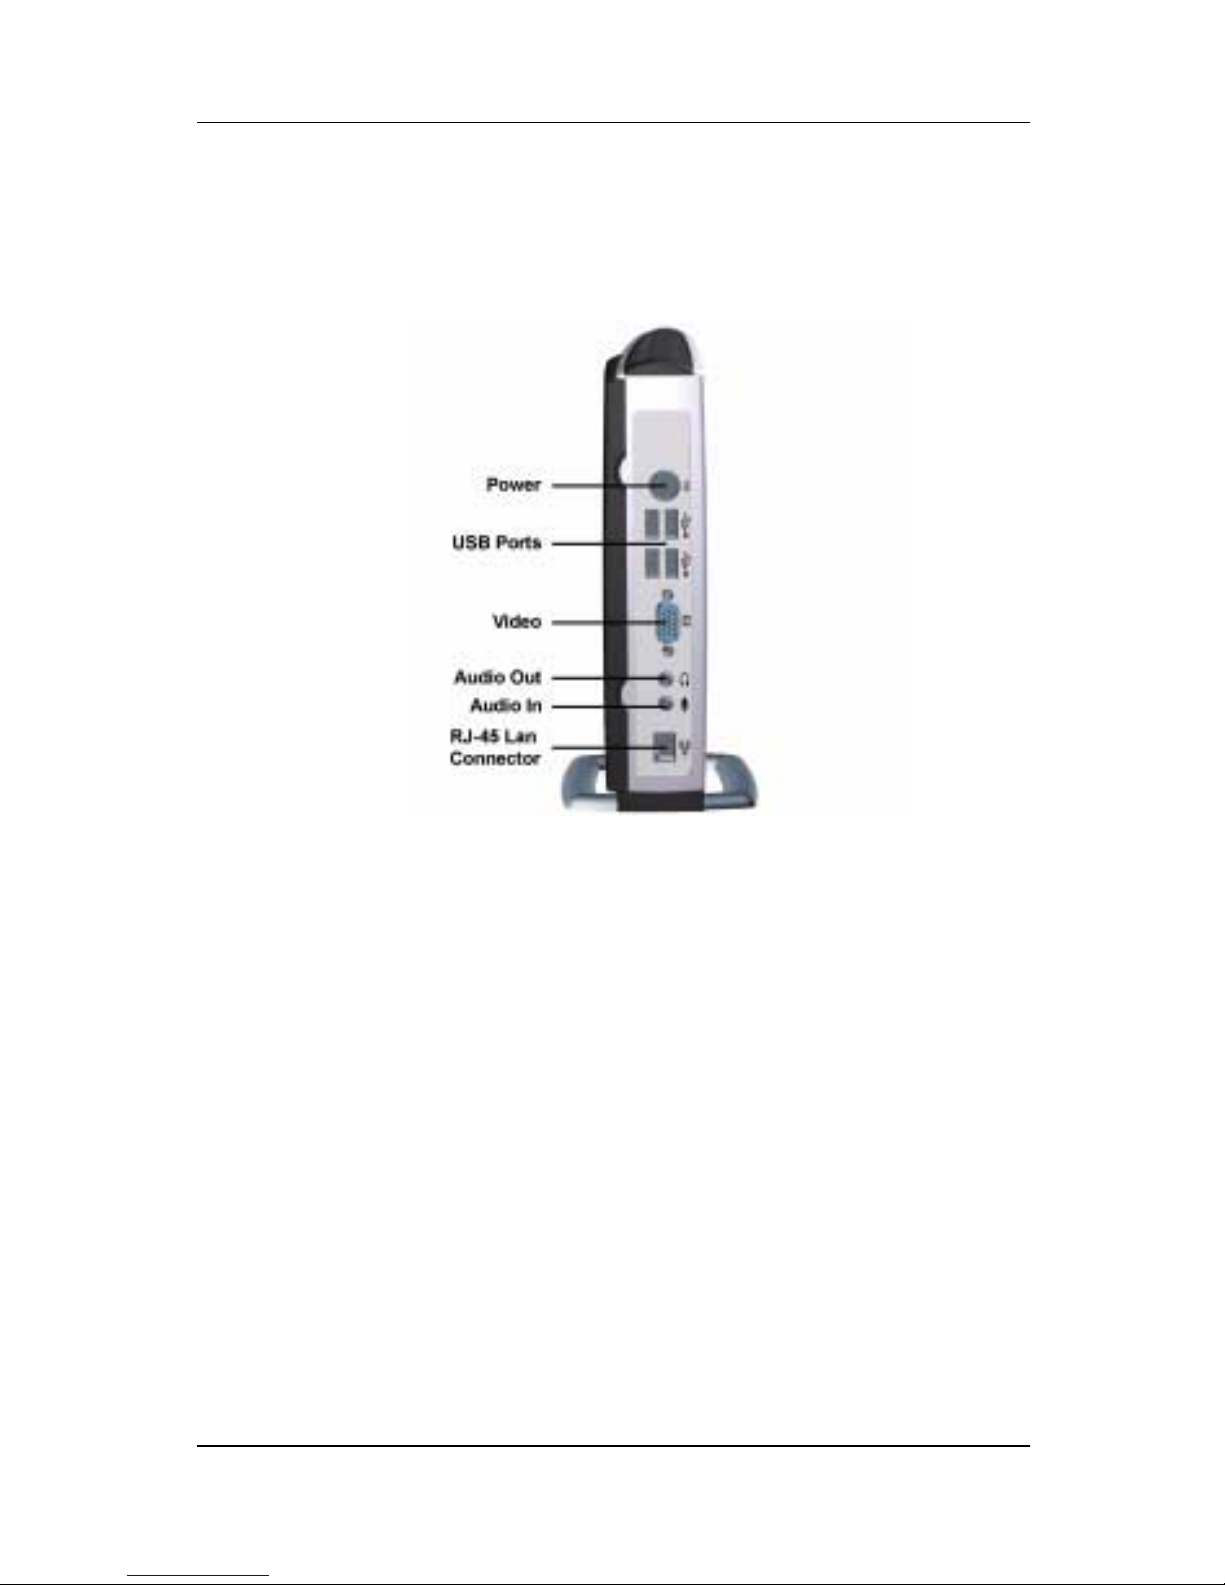
Evo Thin Client T20
Use Figure 2 to connect power supply/power cord, monitor,
keyboard, mouse, ethernet, and other external devices such as
headphones to your terminal.
Figure 2: Evo Thin Client T20 Back Panel
Quick Reference Guide 2–3
Page 9
3
Thin Client T1010
The Compaq Thin Client T1010 terminal is a modular-type NT
Embedded-based terminal. The connections for its peripherals
such as the monitor, keyboard, and mouse are on the back panel
of the thin client. Figure 1 shows the Thin Client T1010.
Figure 1: Thin Client T1010
Quick Reference Guide 3–1
Page 10

Thin Client T1010
Thin Client T1010 Features
The following list outlines the key features of the Thin Client
T1010 terminal:
Windows 3.1, Windows 95, Windows 98, and Windows NT
■
applications via Windows 2000 or Windows Terminal Server
RDP and ICA application compliant
■
10/100 Base-T network communications
■
Dual high-speed serial ports
■
Parallel printer port
■
USB port (See Note)
■
Extended color support up to 16 bits
■
✎
Support for monochrome or color monitor
■
Desktop housing
■
A variety of PC cards are supported via the option card slot. USB
will be supported in future releases.
The following items are provided with the Thin ClientT1010:
Power cord and power supply
■
Keyboard and mouse
■
Installation and user information
■
3–2 Quick Reference Guide
Page 11

Thin Client T1010
Use Figure 2 to connect power supply/power cord, monitor,
keyboard, mouse, network (ethernet), and other external devices
such as headphones to your terminal.
PowerNetwork
Mouse
Keyboard
COM 1
COM 2
Option
Video
USB
Parallel
Headphone
Microphone
Figure 2: Thin Client T1010 Back Panel
Quick Reference Guide 3–3
Page 12

Extended Windows NT
Embedded Features
The NT Embedded based terminal’s operating system has
extended features not found in standard Windows NT. With the
exception of Microsoft Client Connection Manager and Citrix
Program Neighborhood, extended NT Embedded features are
only available through Administrator logon accounts.
Extended Control Panel Features
Ramdisk
■
4
The Ramdisk is volatile memory space set aside for
temporary user data storage. Use the Ramdisk
Configuration dialog box to configure the Ramdisk size. See
the following figure.
Figure 1: Ramdisk Configuration Dialog Box
Quick Reference Guide 4–1
Page 13

Extended Windows NT Embedded Features
Time Sync
■
Synchronize the terminal’s time to the server’s time.
Winlog
■
Use the Specify Logon Information dialog box to
enter logon information:
Enable Autologon
■
Default User Name
■
Default Password
■
Default Domain
■
See the following figure:
Figure 2: Specify Logon Information Dialog Box
4–2 Quick Reference Guide
Page 14

Extended Windows NT Embedded Features
Extended Program Features
Terminal Services Client
■
Client Connection Manager
❏
Use this feature to create shortcuts to terminal servers.
See Microsoft Windows/Windows NT documentation for
a detailed explanation and instructions on how to use the
Client Connection Manager. It is available on the web at
http://www.microsoft.com/windows/embedded/nt/.
Terminal Services Client
❏
Use this feature to connect to available servers.
See Microsoft Windows/Windows NT documentation for
a detailed explanation and instructions on how to use the
Terminal Services Client. It is also available on the web
at
http://www.microsoft.com/windows/embedded/nt/.
Image Upgrade
■
Upgrade individual terminals using the Image Upgrade
dialog box. For information about this dialog box see the
“Application Notes” later in this guide.
WinVNC
■
The WinVNC application is available only to administrators
and allows them to remotely log on and control a terminal.
This is a freeware product and the documentation may be
found on the web at
http://www.uk.research.att.com/vnc.
Quick Reference Guide 4–3
Page 15

Logging On
The Auto Logon feature is enabled as a factory default. Use the
Specify Logon Information dialog box to:
Change the Default User Name
■
Change the Default Password
■
Enable or disable Auto Logon
■
The Specify Logon Information dialog may be accessed with
the following special key sequence:
5
Using Your System
Tab, Home, End
,
←←←←, →→→→
.
✎
After completing this key sequence, the next dialog box to
display will be the Specify Logon Information dialog box. Make
one of the following choices:
As an Administrator, enter Administrator in both the User
■
Name and Password fields.
As a User, enter User in both the User Name and Password
■
fields.
The default for the Logon Information dialog box is User.
The passwords are case sensitive. The administrator’s password is
uppercase A followed by all lowercase characters. The user’s
password is uppercase U followed by all lowercase characters.
Passwords can be changed using
For security purposes it is recommended that the administrator
default password be changed.
Ctrl+Alt+Del
| Change Password.
Quick Reference Guide 5–1
Page 16

Using Your System
Time Synchronization
The Dimension 4 time sync application automatically launches
each time the terminal is started. It searches pre-configured time
servers in sequence until it connects and sets the time on the
terminal. The application then automatically exits. If the
application cannot connect with a time server within
approximately 15 seconds it will time-out and close. The time on
the terminal will not be accurate, and will need to be set
manually.
Joining A Domain
If you are joining a domain you must have a unique system ID
✎
(SID). All terminals are shipped from the factory with identical
SIDs. Therefore, before joining a domain with your unit, change
the SID.
Contact your System Administrator to have this done.
System Administrators: If you do not already have the
✎
appropriate utility to change the SID, contact your software
supplier.
Shutting Down
Shutting down the NT Embedded-based Evo Thin Client T20
or the Thin Client T1010 varies slightly from standard
Microsoft Windows and Windows NT based equipment. To shut
down, Restart, or Logoff, simply click the Start button in the
Task Bar and select the appropriate action from the Start pop-up
menu. (See the following figure).
You may also logoff by using the
✎
Ctrl+Alt+Del
key combination.
5–2 Quick Reference Guide
Page 17

Using Your System
Figure 1: User and Administrator Start Menus
Quick Reference Guide 5–3
Page 18

When you log on as an administrator, a dialog box displays over
the desktop for a short period of time. This dialog box shows the
current time as its title. When this occurs, the terminal is
synchronizing its local time with the server’s local time. You can
invoke and use this dialog box again using Start | Settings |
Control Panel | Time Sync.
Users Desktop
When you first turn on your terminal and log on as a user, the
desktop in Figure 1 will display. The Start menu for the user
contains the following top-level items:
6
The Windows NT
Embedded Desktop
About
■
Citrix Program Neighborhood
■
Client Connection Manager
■
Internet Explorer
■
Logoff
■
Restart
■
Shut Down & Power Off
■
Programs
■
Documents
■
Help
■
Quick Reference Guide 6–1
Page 19

The Windows NT Embedded Desktop
For information about the functionality of the menu items, refer
✎
✎
to Microsoft or third-party documentation, as appropriate.
If you have a custom firmware image in your Compaq terminal, it
may have more or fewer top-level items and Start menu options.
Figure 1: Users Desktop
Administrators Desktop
When you first turn on your terminal and log on as administrator,
the desktop in Figure 2 will display. The Start menu for the
administrator contains the following top- and secondary-level
items:
About
■
Logoff
■
Restart
■
6–2 Quick Reference Guide
Page 20

✎
The Windows NT Embedded Desktop
Shut Down & Power Off
■
Programs, including Citrix Program Neighborhood,
■
Internet Explorer, winvnc, Startup, Terminal Services
Client, Command Prompt, Image Upgrade, and Windows
Explorer.
Documents
■
Settings, including Control Panel, Printers, and Taskbar.
■
Find
■
Help
■
Run
■
For information pertaining to the functionality of the menu items,
refer to Microsoft or third-party documentation, as appropriate.
✎
If you have a custom firmware image in your Compaq terminal, it
may have more or fewer top-level items and Start menu options.
Figure 2: Administrators Desktop
Quick Reference Guide 6–3
Page 21

7
About Dialog Box
Click About in the Start menu to display the About dialog box
for general information about the Compaq terminal.
Quick Reference Guide 7–1
Page 22

Drive Z: RAM
Drive Z: is onboard volatile memory (Ms-ramdrive) on the logic
board of the terminal. Because drive
recommend that you do not save data that you want to keep on
this drive.
Drive C: Flash ROM
Drive C: is onboard non-volatile Flash (memory) on the logic
board of the terminal. It is recommended that you do not write to
C:
drive
size is reduced to 3 megabytes, the terminal becomes unstable. If
Flash size is reduced to 2 megabytes, the terminal’s image is
irreparably damaged.
. Writing to C: reduces the size of the Flash. If the Flash
8
Application Notes
Z:
is volatile memory, we
Items that are written to Flash during normal operations are:
Favorites
■
Created connections
■
Delete/edit connections
■
History
■
Saving Files
Save files that you want to keep on a server rather than on your
terminal.
Quick Reference Guide 8–1
Page 23

Application Notes
Upgrading Firmware
There are three methods for upgrading the firmware:
1. For remote upgrades use Rapport
2. For single local upgrades, use Image Upgrade. Use this
method to upgrade one terminal at a time. Invoke the function
using Start | Programs | Image Upgrade. The Image
Upgrade dialog box shown in Figure 1 displays.
a. Type the Shared Drive Path to the directory where the
upgrade can be found. (See Figure 1.)
b. Type the User Name.
c. Type the Password.
™
Administrative Software.
d. Type the Domain Name for which the user name and
password you entered in steps b and c are valid.
8–2 Quick Reference Guide
Page 24

Application Notes
Figure 1: Image Upgrade Dialog Box
3. For local multiple upgrades, use the AT command. Use this
method to automatically upgrade several terminals in your
local network. Invoke the command line using Start |
Programs | Command Prompt. The command line displays.
Quick Reference Guide 8–3
Page 25

Application Notes
Enter the AT command and command parameters that are
appropriate. The complete syntax follows:
Where:
AT [\\computer name] [[id] [/DELETE] | /DELETE [/YES]]
AT [\\computer name] time [/INTERACTIVE]
[/EVERY:date[,...] | /NEXT:date[,...]] “command”
\\computer name
id
is an identification number assigned to a scheduled
is the remote terminal.
command.
/DELETE
/YES
cancels a scheduled command.
is used with the cancel all jobs command when no
further confirmation is required.
time/INTERACTIVE
allows the job to interact with the desktop
of the user who is logged on at the time.
/EVERY:date[,...]
/NEXT:date[,...]
runs the command on the specified day(s).
runs the command on the next occurrence of
the day.
“command”
is a Windows NT command to run a batch
program.
Example:
at 12:00 /every:m,t,w,th,f,sa,su upgrade.exe
Time should be in 24-hour format (i.e., 0300, 2300). Use these
✎
parameters in a batch program to automatically upgrade
terminals.
Mapping Network Drives
You can map network drives if you log on as an Administrator.
You can not map network drives if you log on as a User. The
mappings are retained if the terminal is rebooted.
8–4 Quick Reference Guide
Page 26

Domain Participation
Application Notes
Write roaming profiles to
size and will not be retained if the terminal is rebooted.
Z:
. The profiles need to be limited in
Setting Keyboard Languages
Keyboard languages may be set only by an administrator. Setting
the language comprises two actions with several steps.
The first action is getting the region for the desired language to
appear in the Keyboard Properties dialog box (and for it to be
retained after you close the box).
1. Click on Start | Settings | Control Panel.
2. Double-click on the Regional Settings icon.
3. Click on the Regional Settings tab.
4. Select the region appropriate to the keyboard language.
5. Click on the Input Locales tab.
6. Select the appropriate language from the list.
7. Click on the Set as Default button.
8. Click Apply.
9. Click OK.
The second action applies to changing to a language other than
the one you just selected in the steps above.
The following steps apply to regions that now appear in the
Keyboard Properties box:
1. Click Start | Settings | Control Panel.
2. In the Control Panel window, double-click Keyboard. The
Keyboard Properties dialog box appears.
Quick Reference Guide 8–5
Page 27

Application Notes
3. Click the Input Locales tab. The Language appears in the
list. Use the procedure outlined above to add regions to
this list.
4. Select the desired language from the list.
5. Click Set as Default.
6. Click Apply.
7. Click OK.
The terminal must be shut down and restarted for the changes to
✎
take effect.
Remote Administrator Support
Microsoft Windows NT Embedded on windows-based terminals
now supports Remote Administrator software functions.
Remote Administrator software allows a system administrator to
observe terminal use (shadowing), accomplish software updates
remotely, and perform other administrative and maintenance
activities without physically touching the client terminal.
Shadowing
Shadowing must be enabled from the client terminal. It is used
primarily for troubleshooting purposes, allowing the system
administrator to observe user actions and the results of those
actions. It is also possible for the shadower to take control of the
terminal.
Enabling Shadowing
Shadowing is enabled by starting the WinVNC client. WinVNC is
only available when logged in as a terminal administrator.
Shadowing may also be enabled remotely on the terminal using
the Remote Administrator Software.
8–6 Quick Reference Guide
 Loading...