

Hp COMPAQ PROSIGNIA 200, COMPAQ PROSIGNIA 740, COMPAQ PROSIGNIA 720, COMPAQ PROLIANT 5500, COMPAQ PROLIANT 2000 PCI Hot Plug Expand and Fibre Channel Migration in Novell NetWare Environments
...Page 1

Integration Note
October 1998
ECG1040998
PCI Hot Plug Expand and Fibre
Prepared by Novell Integration
Compaq Computer Corporation
Contents
Growing Storage at the
Speed of Light............................3
Outline of the Procedure ...........4
Detailed Procedure..................... 5
Hardware Installation and
Configuration............................5
Data Migration........................11
Array Expansion.....................14
Addition of New Space............16
Conclusion...............................19
Channel Migration in Novell
NetWare Environments
Abstract: The rate at which data storage requirements are increasing
demands innovative products and procedures that guarantee an
investment’s longevity. Compaq and Novell have brought NetWare
users a revolutionary environment in which storage systems can be
repaired, replaced, or augmented without interrupting client access to
the server.
By combining Fibre Channel (FC) technology with PCI Hot Plug,
Compaq servers increase availability and provide plenty of room for
your data storage to grow. In terms of expandability, Fibre Channel
allows up to 1.6 TB per FC Adapter. With PCI Hot Plug, new
adapters can be added without interrupting access and allowing your
network to meet storage demands without downing the server. In
terms of performance, Fibre Channel provides 100 MB/s of
bandwidth with up to 10km between the FC Arrays and your server.
This paper illustrates using PCI Hot Plug Expand to migrate an
existing Smart-2 Array to a new Fibre Channel Array, without
disruption to clients.
Help us improve our technical communication. Let us know what you think
about the technical information in this document. Your feedback is valuable
and will help us structure future communications. Please send your
comments to: Novell.Feedback@Compaq.com
Page 2

PCI Hot Plug Expand and Fibre Channel Migration in Novell NetWare Environments 2
Notice
The information in this publication is subject to change without notice and is provided “AS IS” WITHOUT
WARRANTY OF ANY KIND. THE ENTIRE RISK ARISING OUT OF THE USE OF THIS
INFORMATION REMAINS WITH RECIPIENT. IN NO EVENT SHALL COMPAQ BE LIABLE FOR
ANY DIRECT, CONSEQUENTIAL, INCIDENTAL, SPECIAL, PUNITIVE OR OTHER DAMAGES
WHATSOEVER (INCLUDING WITHOUT LIMITATION, DAMAGES FOR LOSS OF BUSINESS
PROFITS, BUSINESS INTERRUPTION OR LOSS OF BUSINESS INFORMATION), EVEN IF
COMPAQ HAS BEEN ADVISED OF THE POSSIBILITY OF SUCH DAMAGES.
The limited warranties for Compaq products are exclusively set forth in the documentation accompanying
such products. Nothing herein should be construed as constituting a further or additional warranty.
This publication does not constitute an endorsement of the product or products that were tested. The
configuration or configurations tested or described may or may not be the only available solution. This test
is not a determination or product quality or correctness, nor does it ensure compliance with any federal
state or local requirements.
Product names mentioned herein may be trademarks and/or registered trademarks of their respective
companies.
Compaq, Contura, Deskpro, Fastart, Compaq Insight Manager, LTE, PageMarq, Systempro, Systempro/LT,
ProLiant, TwinTray, ROMPaq, LicensePaq, QVision, SLT, ProLinea, SmartStart, NetFlex, DirectPlus,
QuickFind, RemotePaq, BackPaq, TechPaq, SpeedPaq, QuickBack, PaqFax, Presario, SilentCool,
CompaqCare (design), Aero, SmartStation, MiniStation, and PaqRap, registered United States Patent and
Trademark Office.
Netelligent, Armada, Cruiser, Concerto, QuickChoice, ProSignia, Systempro/XL, Net1, LTE Elite,
Vocalyst, PageMate, SoftPaq, FirstPaq, SolutionPaq, EasyPoint, EZ Help, MaxLight, MultiLock,
QuickBlank, QuickLock, UltraView, Innovate logo, Wonder Tools logo in black/white and color, and
Compaq PC Card Solution logo are trademarks and/or service marks of Compaq Computer Corporation.
Microsoft, Windows, Windows NT, Windows NT Server and Workstation, Microsoft SQL Server for
Windows NT are trademarks and/or registered trademarks of Microsoft Corporation.
NetWare and Novell are registered trademarks and intraNetWare, NDS, and Novell Directory Services are
trademarks of Novell, Inc.
Pentium is a registered trademark of Intel Corporation.
Copyright ©1998 Compaq Computer Corporation. All rights reserved. Printed in the U.S.A.
PCI Hot Plug Expand and Fibre Channel Migration in Novell NetWare Environments
Integration Note prepared by Novell Integration
First Edition (October 1998)
Document Number ECG1040998
ECG1040998
Page 3

PCI Hot Plug Expand and Fibre Channel Migration in Novell NetWare Environments 3
Growing Storage at the Speed of Light
Invariably, servers outgrow their storage systems, not only in terms of size, but also performance.
Compaq Fibre Channel (FC) Arrays solve performance problems by harnessing high-bandwidth
Fiber Optic technology and allow for storage growth by taking advantage of PCI Hot Plug on-thefly upgrading. This culmination of Compaq and Novell efforts provides NetWare users with highavailability networks that are more robust than ever before.
Shedding Light on Fibre Channel
Each Compaq FC Array chassis can house eight 1.6” drives or twelve 1” disks. Using 18.2-GB
drives a single FC Array can scale to 145.6 GB. By adding a Fibre Channel Storage Hub, each
Fibre Channel Host Adapter can support up to eleven FC Array chassis allowing you to scale to
1.6 TB per server slot. A storage capacity of 9.6 TB can be reached by installing six FC Host
Adapters attached to 66 FC Arrays. For maximum performance in all RAID configurations, Fibre
Channel Arrays are equipped with Compaq SMART-2 RAID accelerator technology and two
independent Wide-Ultra SCSI-3 buses. These SCSI buses then feed data into the server through a
high-speed Fibre Channel cable. By using Fibre Channel and SMART-2 technology, Fibre Arrays
allow
• More devices – By allowing additional drives, data may be striped across more spindles. As a
result, the disk transfer time is reduced. In addition, since each array uses its own independent
controller – each with two SCSI buses – Fibre Channel Arrays can perform more
simultaneous transfers than conventional single-channel SCSI buses.
• Greater distance – Fibre Channel systems can maintain data integrity over an amazing 10km
between Fibre Channel elements. This allows server growth to conform to the space available
as well as offsite data warehousing.
• Additional caching – With 16-MB, ECC-protected read cache plus 16-MB, battery-backed,
ECC-protected, user-selectable read/write cache in each Fibre Channel Array, frequently used
data will be available instantly without having to access the disk drives.
• Fastest data transfers – Fiber Optics provide massive bandwidth, transmitting up to 100 MB/s
data at the speed of light up to 10km (6.21 miles).
Making the Connection with PCI Hot Plug
Since Fibre Channel Adapters are PCI Hot Plug compatible, you can expand your storage without
interrupting user access. PCI Hot Plug allows you to remove and insert PCI adapters, such as
Network Interface Controllers (NIC), storage adapters, and Fibre Channel Array Controllers,
without powering-down the server. Because NetWare 4.11 and later supports PCI Hot Plug, you
can not only add, but also replace PCI devices on-the fly. In NetWare environments, migrating
your PCI Hot Plug compatible server to Fibre Channel Array technology enables you to add
drives, drive arrays, and even increase the space available on an existing volume without
interrupting client access to the data. By combining PCI Hot Plug and Fibre Channel
technologies, server downtime can become a thing of the past.
ECG1040998
This document illustrates features of Fibre Channel and PCI Hot Plug by migrating data storage
from the non-Fibre Channel SCSI storage to a remote Fibre Channel Array.
Page 4

PCI Hot Plug Expand and Fibre Channel Migration in Novell NetWare Environments 4
This procedure is accomplished in the following simple steps:
• Bringing the new Fibre Channel Array storage array on-line.
• Replicating the data onto the new FC Array.
• Decommissioning the old array.
• Migrating the old disks into the new FC Array.
• Expanding the array to include the older drives.
• Making the additional space available to the users.
In order to complete the migration, you will use three utilities:
• Compaq Online Configuration Manager, CPQONLIN.NLM
Compaq Online Configuration Manager handles all array configuration and RAID
implementation.
• Novell Configuration Manager Console, NCMCON.NLM
Novell Configuration Manager Console provides real-time monitoring and status indicators
for the server’s PCI bus.
• Novell Server Installation Utility, INSTALL.NLM
The Novell Server Installation Utility allows easy, menu-driven configuration of your
NetWare server. In this document, INSTALL is used to manage disk partitions and mirroring.
Outline of the Procedure
The migration process is relatively simple and can be divided into four main parts:
• Hardware Installation and Configuration
Installing a new adapter.
Configuring the RAID level and creating a logical drive on the array.
Creating a NetWare partition on the new drive.
• Data Migration
Mirroring the old data onto the new partition.
Removing the old partition from the mirror.
Deleting the old array and logical drive.
• Array Expansion
Physically removing the old drives and moving them into the new Fibre Channel Array.
Expanding the array to include the old physical drives.
ECG1040998
• Addition of New Space
Creating new a logical drive and NetWare partition on the remaining space.
Linking the new logical drive to the existing volume.
Page 5
PCI Hot Plug Expand and Fibre Channel Migration in Novell NetWare Environments 5
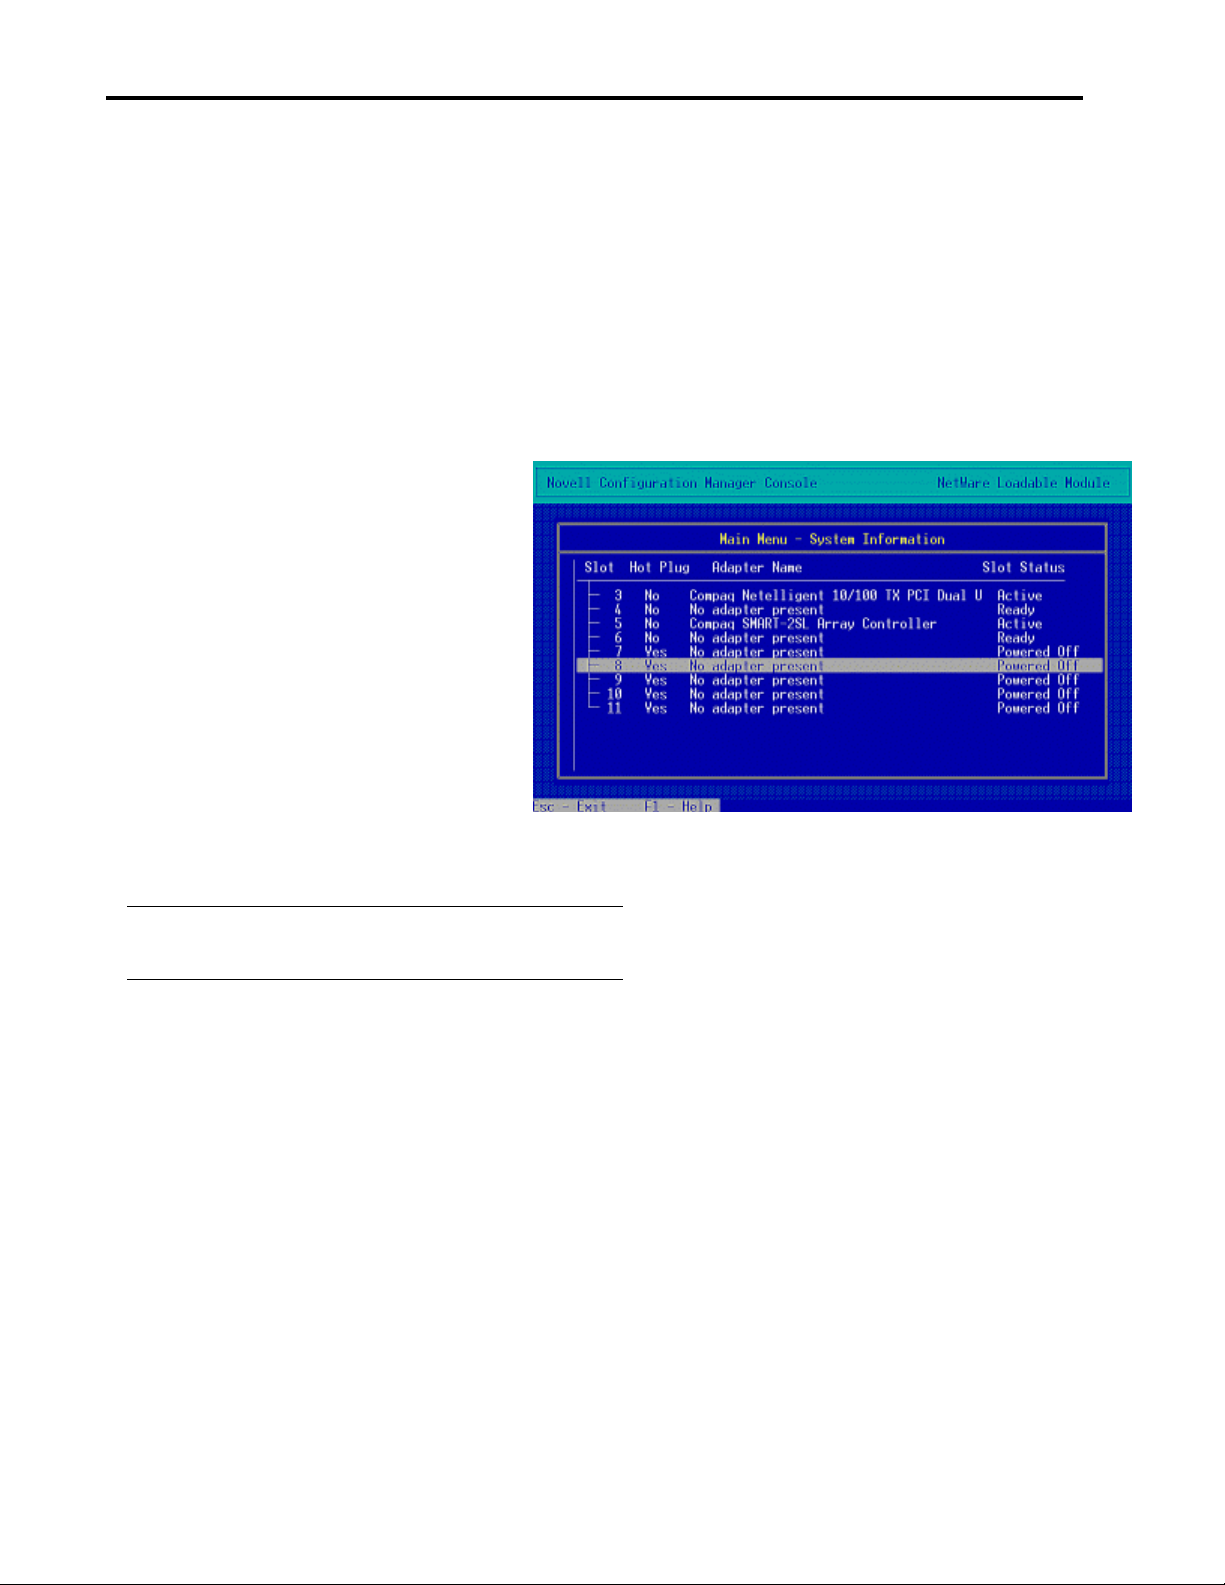
Figure 1 - Novell Configuration Manager - Main Menu
Detailed Procedure
The steps involved in migrating a SMART-2SL disk array system to a Fibre Channel Array are
straightforward and easily performed. While this paper shows the migration from a SMART-2SL,
this migration is possible with any array device. The details below illustrate the procedure
outlined above in depth, showing all important screens and menus. The screens that follow were
taken from a server running NetWare 4.11 with NWPA drivers. With NetWare 5, some screens
and steps may vary slightly. For example, INSTALL.NLM in NetWare 5 becomes
NWCONFIG.NLM.
Hardware Installation and Configuration
The first step is to insert the
new storage adapter, in this
case, the Fibre Channel
controller.
Begin by loading the Novell
Configuration Manager Console
(NCM), NCMCON.NLM.
When NCM is first launched, you
will see the screen in Figure 1,
indicating that power to
unpopulated slots is off and no
adapters are present. In order to
insert any PCI Hot Plug device,
you must open the lever that
covers the screw-tab of the free
PCI slot.
Note: In order to perform this procedure you must have a
server that supports PCI Hot Plug.
If you are removing or replacing an adapter, Compaq recommends that you unload the
driver and remove the power from the slot before opening the lever.
There have been two generations of Compaq servers with PCI Hot Plug technology. One of the
differences in the second generation is the service request button. The service request button is
located just above the slot lever that holds the PCI card in place. If you have a second-generation
PCI Hot Plug server, pressing the service request button for a slot that is powered on will signal
to NetWare that the driver for the device should be unloaded and the slot should be powered off
for service. When power needs to be reapplied, pressing the service request button again will
indicate that power can be reapplied. On the first generation servers without the service request
button, NCMCON.NLM should be used to unload the driver and power off the slot. Highlighting
an adapter and pressing Enter gives the option Remove Adapter. The Remove Adapter command
will unload the driver and power off the slot, making it safe to remove the PCI card. Failure to
follow this procedure could result in ABnormal ENDs (ABEND).
The LEDs above the adapter slot provide visual indication of the power status of the slot. As long
as the green LED is illuminated, there is power to the slot and the switch lever cover should not
be opened. When power is removed from that PCI slot and the green LED is no longer
illuminated, it is safe to open this switch and insert any PCI Hot Plug adapters.
ECG1040998
Page 6
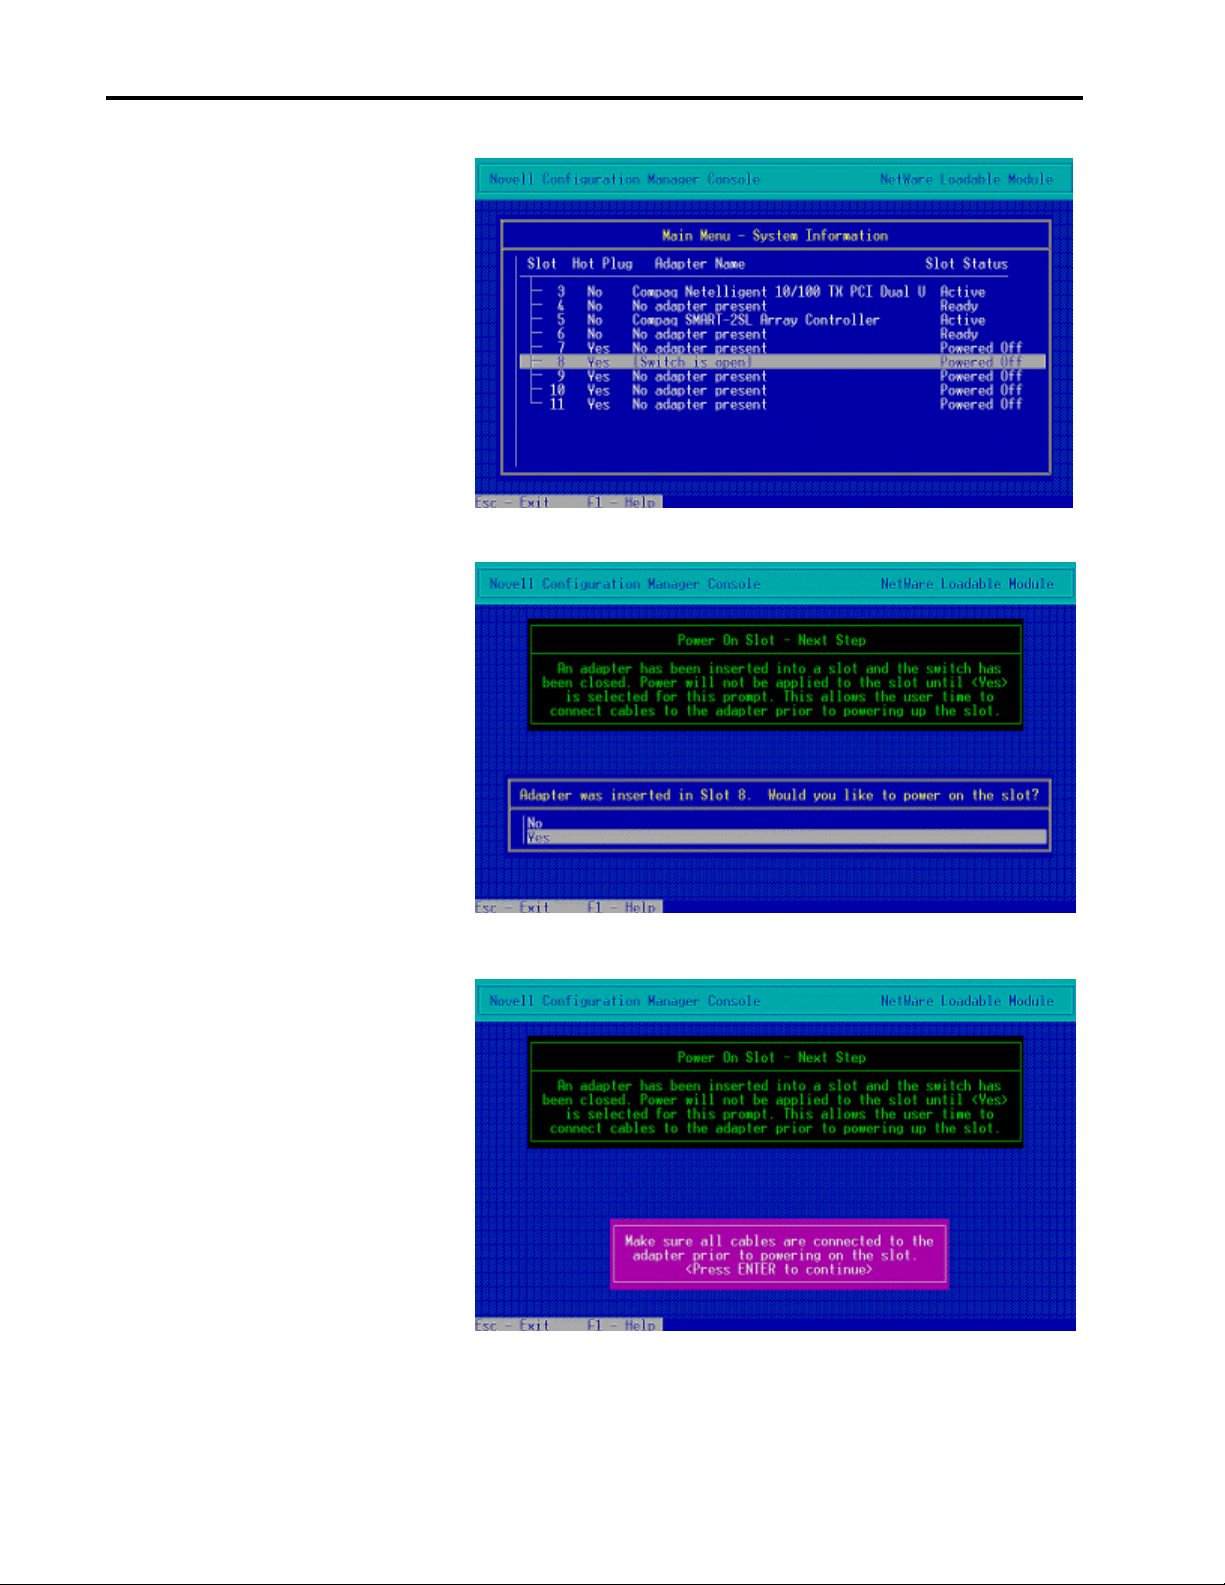
PCI Hot Plug Expand and Fibre Channel Migration in Novell NetWare Environments 6
Figure 4 - Novell Configuration Manager – Connect Cables
Figure 2 - Novell Configuration Manager - Switch Open
Figure 3 - Novell Configuration Manager – Power-on Slot
NCM Console will detect
the opened switch and
display the status, as in
Figure 2.
Now, insert the Fibre
Channel Adapter into a
PCI Hot Plug slot. Once
the card is seated properly,
you may close the switch.
If you did not load the
NCM earlier, it will now
start automatically and
display Figure 3.
Before you apply power to
the slot, please ensure that
all Fibre Channel Arrays
are connected properly and
powered on. Refer to your
specific Fibre Channel
documentation for
appropriate connection and
installation details. See
Figures 3 and 4.
ECG1040998
Page 7

PCI Hot Plug Expand and Fibre Channel Migration in Novell NetWare Environments 7
Figure 5 - Novell Configuration Manager – Hardware Detected
Figure 6 - Novell Configuration Manager – New Hardware Active
When you have completed
the previous steps, the
server displays Figure 5.
The system will detect the
new hardware, identify the
adapter, locate the correct
driver, and load the driver.
During this period of time,
you will be presented with
a series of rapidly flashing
screens, as the system
progresses through these
steps. No action is
required.
When the driver is
installed and the new
hardware is functioning,
you should see the new
device listed in the main
menu, as in Figure 6. This
shows the newly added
device in PCI slot 8.
ECG1040998
Page 8

PCI Hot Plug Expand and Fibre Channel Migration in Novell NetWare Environments 8
Figure 7 - Compaq Online Configuration - Main Menu
Figure 8 – Compaq Online Configuration – Select Controller
Figure 9 – Compaq Online Configuration – Proposed Configuration
With the hardware physically installed and drivers loaded, you can configure the drives
attached to the storage adapter into an array.
Configuration of arrays is
handled by the Compaq
Online Configuration
Manager
(CPQONLIN.NLM).
If you have not yet loaded
CPQONLIN, do so now. If
you have, press and hold
Ctrl while pressing Esc to
bring up the Task Manager
and select Compaq Online
Configuration.
Figure 7 shows the main
menu of CPQONLIN.
Highlight and select the
Array Configuration
Utility.
You will be prompted to
select your controller
(Figure 8) and, if
applicable, the host slot on
your Compaq Fibre
Channel Storage Hub.
A warning that no drives
have been configured on
this array may also be
displayed.
CPQONLIN then shows
you a default
configuration, as seen in
Figure 9.
Select your desired RAID
configuration. CPQONLIN
creates the array and a
logical drive associated
with it.
ECG1040998
Page 9

PCI Hot Plug Expand and Fibre Channel Migration in Novell NetWare Environments 9
Figure 10 – Compaq Online Configuration – Logical Configuration
Figure 11 – NetWare Server Installation – Main Menu
Figure 12 – NetWare Server Installation – Available Drives
Figure 10 shows the array
with the attached devices
set as logical drive 1, with
RAID level 5.
You have installed the hardware, created an array and a logical drive. Now, you need to
prepare the new logical drive for NetWare data by making a NetWare partition.
In order to manage
partitions, you must use the
Novell Server Installation
Utility, INSTALL.NLM.
Once again, if you have not
launched this application, do
so now, otherwise, press
Ctrl+Esc and select Novell
Server Installation.
Under the Disk Options
menu, highlighted in Figure
11, you will find a Modify
disk partitions and Hot Fix
option. Selecting this option
will show a list of logical
drives available.
Figure 12 shows the list of
drives. When you select the
newly created logical drive,
INSTALL will recognize the
drive only as “free space.”
ECG1040998
Page 10

PCI Hot Plug Expand and Fibre Channel Migration in Novell NetWare Environments 10
Figure 13 – NetWare Server Installation – Create a Partition
As shown by Figure 13,
select Create NetWare disk
partition.
Next, you must set the
amount of disk space to be
used by the NetWare
partition. Pressing Esc or
F10 will accept the proposed
partition size and ask for
confirmation.
Before you go any further, let us summarize what you have done thus far and look ahead to what
you are about to do.
You have:
ü Installed a new storage adapter.
ü Configured the RAID level and created a logical drive on the array.
ü Created a NetWare partition on the new drive.
You are about to:
œ Mirror the old data onto the new drive.
œ Remove the old drive from the mirror.
œ Delete the old array and logical drive.
œ Physically remove the old drives and add them to the new array.
œ Expand the array to include the new physical drives.
œ Create new a logical drive and NetWare partition on the remaining space.
œ Link the new logical drive to the existing volume.
ECG1040998
Page 11

PCI Hot Plug Expand and Fibre Channel Migration in Novell NetWare Environments 11
Figure 14 – NetWare Server Installation– Mirror Status
Figure 15 – NetWare Server Installation– Available Partitions
Data Migration
With the new partition
created, you need to set up
mirroring onto the new
drive partition from the old
one.
Under the Disk Options
menu, shown in Figure 11,
select Mirror/Unmirror
disk partitions.
Select the partition that
contains the data that you
wish to migrate to the new
array.
With the device to be
mirrored highlighted, as in
Figure 14, press Enter to
view the mirror status.
Figure 15 shows the list of
partitions suitable for
mirroring with the
previously selected
partition.
After you select the newly
added partition that will
receive data, the server
will begin mirroring.
Creating the image of the
data on the new array will
span a period from a few
minutes to several hours
depending on the size of
your array and the load on
the server.
When this process has
finished, you will have
created an exact duplicate
of your server's data on the
new array.
ECG1040998
Page 12

PCI Hot Plug Expand and Fibre Channel Migration in Novell NetWare Environments 12
Figure 17 – NetWare Server Installation – Data Loss Warning
Figure 16 – NetWare Server Installation – Mirrored Partitions
Now, in order to protect your previous investment, you would like to remove the older
drives and add them to the newer Fibre Channel Array. But, before you can physically
move the older drives, you must eliminate the mirror link, delete the NetWare partition that
exists on the older drives, and delete the array that they comprise.
Begin by viewing the status
of the mirror that you just
created, as in Figure 16.
Note: Before proceeding,
insure the synchronization
of the data is complete.
Highlight the older partition
that you previously mirrored
and remove it from the
mirroring by pressing Del.
Figure 17 shows warning
indicating that this device
contains data that may be
affected by removing it from
the mirror.
Immediately after the
warning, you are asked if
you want to salvage the
volume information. Since
you have made a copy of the
data on this drive by
mirroring it onto the array, you do not need to salvage the volume information.
Now that the mirror link is broken, select Disk Options from the main menu of the NetWare
Server Installation Utility, then select Modify Disk Partitions and Hot Fix. Here you should
highlight the original logical drive, whose data has already been mirrored, press Enter to select,
then choose to Delete any disk partition. After asking for confirmation, this will convert what was
a NetWare partition into free space on a logical drive.
The final step that must be done before you can safely remove the older disks is to delete the
array.
ECG1040998
Page 13

PCI Hot Plug Expand and Fibre Channel Migration in Novell NetWare Environments 13
Figure 18 – Compaq Online Configuration – Deleting an Array
As mentioned before, all
array configuration is
handled within the Compaq
Online Configuration
Manager
(CPQONLIN.NLM).
Therefore, use Ctrl+Esc to
bring up the CPQONLIN
window and select, as
before, the Array
Configuration Utility.
Also as before, you will
need to select the older
controller that contains the
array you need to delete.
Figure 18 illustrates deleting an array. In CPQONLIN, highlight the array and to the right, in the
Array Options box, select Delete Entire Array by highlighting it and pressing Enter. As usual
you will be prompted for confirmation before the array is deleted.
At this point, it is safe to remove any hot-swappable drives and insert them into the Fibre Channel
Array chassis. When all the older drives have physically been moved, you are ready to use the
expand feature to distribute the data and reclaim the old drives.
For the sake of clarity, lets review the steps you have taken and what will follow.
You have:
ü Installed a new adapter.
ü Configured the RAID level and created a logical drive on the array.
ü Created a NetWare partition on the new drive.
ü Mirrored the old data onto the new partition.
ü Removed the old partition from the mirror.
ü Deleted the old array and logical drive.
ü Physically removed the old drives and moved them into the new Fibre Channel Array.
You are about to:
œ Expand the array to include the old physical drives.
œ Create new a logical drive and NetWare partition on the remaining space.
œ Link the new logical drive to the existing volume.
ECG1040998
Page 14

PCI Hot Plug Expand and Fibre Channel Migration in Novell NetWare Environments 14
Figure 19 – Compaq Online Configuration – Logical Configuration
Figure 20 – Compaq Online Configuration – Expand Array
Figure 21 – Compaq Online Configuration – Add Drives to an Array
Array Expansion
When the older drives have
been inserted into the Fibre
Channel Array chassis,
select once again the Array
Configuration Utility option
from the main menu of the
Compaq Online
Configuration program,
CPQONLIN.
Select the newer FC
Adapter and you should see
the drives you just added to
the FC Array listed as
Unassigned, as in Figure 19.
Highlight the existing array
and press Enter to access
the Array Options menu.
Figure 20 shows the Array
Options menu and the
Expand Array option
highlighted.
At this point, we will expand
the array. If expanding your
array to include your
original drive would mix
slower drives with newer,
faster drives, you may not
want to expand the array.
You could perform the
migration by simply moving
the original drives to the
Fibre Channel chassis and
creating a separate array.
If you would like to expand
the array to include the
original drives, you should
highlight Expand Array and
press Enter.
When presented the menu
shown in Figure 21, select
Assign Drive to Existing
Array, then highlight a drive
from the list and press
Enter.
Continue this process until
all drives have been added to the existing array, then accept the changes.
ECG1040998
Page 15

PCI Hot Plug Expand and Fibre Channel Migration in Novell NetWare Environments 15
Figure 22 – Compaq Online Configuration – Create Logical Drive
Figure 23 – Compaq Online Configuration – Expanding Array
You should see Figure 22,
and then a confirmation
screen to create the new
logical drive.
Upon accepting the new
drive, return to the logical
configuration view where a
new logical drive will be
listed and the array status
will display EXPANDING.
See Figure 23.
When the array is finished
expanding, your data will be
distributed across all of the
drives in the Fibre Channel
Array chassis. At this point,
a part of each drive in the
physical array contains some
of the data from the volume
that had existed on the
original server.
The remaining space on
each drive is not yet
available to the server.
As before, when you created
the new logical drive for the
FC array, you must make a
NetWare partition and
assign the partition as a
volume or add to an existing
volume.
ECG1040998
Page 16

PCI Hot Plug Expand and Fibre Channel Migration in Novell NetWare Environments 16
Figure 24 – NetWare Server Installation – Available Drives
Figure 25 – NetWare Server Installation – Initialize Partition
Figure 26 – NetWare Server Installation – Partition Information
Addition of New Space
With the new logical drive
created from the expansion,
return to the NetWare Server
Installation Utility,
INSTALL.NLM.
The steps here are the same
as before, when you created
a NetWare partition.
From the INSTALL main
menu, select Disk Options
then Modify disk partitions
and Hot Fix.
This time, you should see
another drive listed in the
Available Drives list, as in
Figure 24.
Selecting the new drive
should bring a warning that
the drive has no partition
table. Pressing Enter shows
the confirmation that is
illustrated in Figure 25.
You should choose Yes to
initialize the partition table.
Doing so will make the
logical drive available as
free space.
In order to make the drive
space available to the
system, you need to create a
NetWare partition.
Select Create a NetWare
disk partition from the Disk
partition Options menu.
Figure 26 shows the Disk
Partition Information screen
where you can set the size of
the partition. If you would
like to use all of the space
available, press F10 or Esc.
ECG1040998
Page 17

PCI Hot Plug Expand and Fibre Channel Migration in Novell NetWare Environments 17
Figure 27 – NetWare Server Installation – Main Menu
Figure 28 – NetWare Server Installation – Volume Options
Figure 29 – NetWare Server Installation – Volume Segment List
After you confirm your
selection, INSTALL will
create the NetWare partition.
Return to the previous menu
and select Volume Options.
Figures 27 and 28 show the
main menu and the Volume
Options menus.
In the Volume Options
menu, highlight the volume
to which you would like to
add the additional storage
space.
As indicated by Figure 28,
you should press Ins to
display the list of available
volume segments shown in
Figure 29.
ECG1040998
Page 18

PCI Hot Plug Expand and Fibre Channel Migration in Novell NetWare Environments 18
Figure 31 – NetWare Server Installation – Select Volume
Figure 32 – NetWare Server Installation – Mount Volumes
Highlight the volume
assigned as free space, press
Enter, and from the menu
that appears, shown in
Figure 30, select Make this
segment part of an existing
volume.
Figure 30 – NetWare Server Installation – Combining Segments
Pressing Enter will bring up
Figure 31 that shows a list of
possible partitions to which
the free space can be added.
Highlight and select the
volume to which you want
to attach the free space. You
will then be returned to list
of available partitions. To
leave this menu and save
your changes, press F10 or
Esc. Once again, press Esc
to save volume changes and
return to Available Disk
Options.
After you accept the volume
changes, you will be
presented with one last set
of options. Figure 32 shows
the last options screen in the
procedure. Select Mount all
volumes.
At this point, your migration
is complete. You can exit
CPQONLIN and INSTALL.
You have successfully
installed new hardware and
increased available space on
a volume without downing
the server or interrupting user access.
ECG1040998
Page 19

PCI Hot Plug Expand and Fibre Channel Migration in Novell NetWare Environments 19
Conclusion
By migrating to the Fibre Channel Array, you have enhanced the performance, expandability, and
flexibility of your data storage and – thanks to PCI Hot Plug – you have not interrupted access to
the server’s data.
By taking advantage of PCI Hot Plug, you were able to complete the entire migration on the fly.
In the future, you can add an additional Fibre Channel Adapter at any time to increase the storage
potential by another 1.6 TB. In fact, by following the procedure used to hot plug the FC Adapter
you can add additional NICs and SCSI controllers to scale your server to your growing needs.
When new PCI Hot Plug adapters are released, you can expect integrating these new devices to
be just as seamless.
With the addition of the Fibre Channel technology, your Compaq server is already equipped to
respond to future storage demands. In this example, you have even protected a prior investment
by incorporating the older drives into the new FC Array and, at the same time, made data access
faster by distributing the data which decreases access time. The savings do not end at migration,
however. The distance between server and drives afforded by Fibre Channel allows you to make
more efficient use of available space without having to reconfigure layouts to accommodate the
relatively short SCSI cables. As a result, you will spend less time finding new space and
decommissioning your server to be relocated.
With these cost-effective features, Fibre Channel and PCI Hot Plug enable NetWare to offer your
growing network a well-paved migration path for the needs of tomorrow.
ECG1040998
 Loading...