

HP Compaq Presario SR1010Z, Compaq Presario SR1020T, Compaq Presario SR1020V, Compaq Presario SR1400AN, Compaq Presario SR1400CF Getting Started Guide
...Page 1

Getting Started Guide
Page 2

The only warranties for HP products and services are set forth in the express statements
accompanying such products and services. Nothing herein should be construed as
constituting an additional warranty. HP shall not be liable for technical or editorial errors or
omissions contained herein.
HP assumes no responsibility for the use or reliability of its software on equipment that is not
furnished by HP.
This document contains proprietary information that is protected by copyright. No part of this
document may be photocopied, reproduced, or translated to another language without the
prior written consent of HP.
Hewlett-Packard Company
P.O. Box 4010
Cupertino, CA 95015-4010
USA
Copyright © 2000, 2003-2005 Hewlett-Packard Development Company, L.P.
This product incorporates copyright protection technology that is protected by method claims
of certain U.S. patents and other intellectual property rights owned by Macrovision
Corporation and other rights owners. Use of this copyright-protection technology must be
authorized by Macrovision Corporation and is intended for home and other limited viewing
uses only unless otherwise authorized by Macrovision Corporation. Reverse engineering
or disassembly is prohibited. Apparatus Claims of U.S. Patent Nos. 4,631,603, 4,577,216,
4,819,098, and 4,907,093 licensed for limited viewing uses only.
Microsoft and Windows are U.S. registered trademarks of Microsoft Corporation.
Apple, iTunes, FireWire, the FireWire symbol, and iPod are trademarks of Apple Computer,
Inc., registered in the U.S. and other countries.
HP supports lawful use of technology and does not endorse or encourage the use of our
products for purposes other than those permitted by copyright law.
The information in this document is subject to change without notice.
Page 3

Table of Contents
Setting Up Your PC ......................................................................... 1
Putting Your PC Together............................................................................... 1
Connecting to the PC ...............................................................................2
Turning On Your PC for the First Time .............................................................3
Setting Up and Connecting to Your Internet Account ......................................... 4
Transferring your old PC information and files to your new PC ......................5
Using Desktop Icons...................................................................................... 6
Using Compaq Organize software ............................................................6
Using the Keyboard ....................................................................... 7
Customizing the keyboard buttons ............................................................. 9
Setting Up Sound ......................................................................... 11
Using Speakers .......................................................................................... 11
Setting up 3-connector sound ....................................................................... 12
Configuring multi-channel audio output for the DVD player .........................13
Setting up 6-connector sound ....................................................................... 14
Configuring the Sound Effect Manager (6-connector) ................................. 15
Configuring sound for recording with the
Sound Effect Manager (6-connector) ........................................................16
Using the Sound Effect Manager (6-connector) ..........................................17
Using the Memory Card Reader ................................................... 19
Working with the Safely Remove Hardware utility ..........................................20
Using the memory card reader..................................................................... 20
Table of Contents iii
Page 4

Using a TV as a Monitor............................................................... 23
Identifying Cables You May Need ............................................................... 23
Connecting to a TV Set ............................................................................... 23
Viewing the PC Image on Your TV Screen ..................................................... 24
nView tab............................................................................................. 25
Displays tab.......................................................................................... 26
Disabling the TV Option.............................................................................. 26
nView tab (disabling)............................................................................. 27
Ge Force tab (disabling) ........................................................................ 27
Displays tab (disabling).......................................................................... 27
Disconnecting the TV .................................................................................. 28
Using the HP Personal Media Drive .............................................. 29
Connecting the Drive .................................................................................. 29
Inserting the Drive ...................................................................................... 30
Locating the Drive and Assigning a Drive Letter.............................................. 31
Using the Drive .......................................................................................... 32
Disconnecting the Drive............................................................................... 33
Working with Digital Images........................................................ 35
Working with Digital Images ....................................................................... 35
Playing CDs and DVDs ................................................................. 37
Playing Music CDs with iTunes..................................................................... 37
Playing CDs and DVDs with Windows Media Player ...................................... 38
Playing DVD Movies with InterVideo WinDVD ............................................... 38
Using country/region codes ................................................................... 40
Playing Video CDs (VCD) with InterVideo WinDVD ........................................ 40
Playing Video CDs (VCD) with Windows Media Player 9................................ 41
iv Getting Started Guide
Creating CDs and DVDs ................................................................ 43
Using the Software Quick Reference Table .................................................... 44
Creating Music CDs with iTunes................................................................... 46
Creating Music CDs with Windows Media Player .......................................... 47
Creating Data CDs Using Windows XP......................................................... 47
Creating CDs with RecordNow! ................................................................... 48
Creating Music CDs with RecordNow!.......................................................... 48
Tips .......................................................................................................... 48
Creating CDs to Play in Your Car or Home CD Players with RecordNow! ......... 49
Creating CDs to Play on Your PC ................................................................. 50
Storing Files on a DVD or CD ...................................................................... 51
Storing Data Files on Disc ........................................................................... 52
Page 5

Copying a DVD or CD ................................................................................ 52
Erasing a DVD or CD.................................................................................. 53
Removing Files in RecordNow!..................................................................... 53
Removing Files from a Recorded Data Disc.................................................... 53
Archiving Files on a DVD or CD ................................................................... 54
Creating an Image File................................................................................ 54
Saving an Image........................................................................................ 55
Burning an Image.......................................................................................55
Using Disc Labels .......................................................................................55
Disc Labeling with LightScribe ...................................................................... 56
Lightscribe requirements .........................................................................56
Burning a label on a LightScribe media disc ............................................. 56
Creating a LightScribe label after burning a disc with iTunes....................... 58
Setting Automatic Recording Options............................................................ 58
Using Compatibility Information ...................................................................60
Identifying Compatible File Formats .............................................................. 60
Using the Disc Quick Reference Tables.......................................................... 61
Using double-layer DVD+R discs.............................................................. 61
Using DVD+R and DVD-R discs................................................................ 61
Using DVD+RW and DVD-RW discs......................................................... 61
Using CD-R discs ................................................................................... 62
Using CD-RW discs................................................................................ 62
Creating Movies Using WinDVD Creator ....................................... 65
Getting started ...................................................................................... 65
Using the Preview window......................................................................66
Using the Media Library ......................................................................... 66
Using the Storyboard ............................................................................. 66
Identifying requirements for capturing video.............................................. 66
Capturing digital camcorder video ..........................................................67
Capturing analog video ......................................................................... 68
Capturing a still image........................................................................... 68
Editing video files in WinDVD Creator .....................................................68
Adding images ..................................................................................... 69
Adding audio effects.............................................................................. 69
Adding transition effects ......................................................................... 70
Adding title effects................................................................................. 70
Adding video filters ............................................................................... 70
Adding a menu ..................................................................................... 70
Making a movie .................................................................................... 71
Recording VHS analog video direct to DVD (select models only)..................72
Converting recorded TV to MPEG-2 format (Europe only)............................ 72
Table of Contents v
Page 6

Getting Help ................................................................................ 73
Finding Onscreen Guides............................................................................ 73
Finding Guides on the Web ........................................................................ 73
Using the Onscreen Help and Support Center................................................ 74
Using Instant Support.................................................................................. 74
Using Compaq Connections ........................................................................ 75
Getting messages.................................................................................. 75
Turning off messages ............................................................................. 75
Re-enabling messages............................................................................ 76
Using PC Help & Tools................................................................................ 76
Index........................................................................................... 77
vi Getting Started Guide
Page 7
Setting Up Your PC
WARNING: Please read “Safety Information” in the Warranty
and Support Guide before installing and connecting your PC to
the electrical power system.
WARNING: The power supply is preset for the country/region in
which you purchased your PC. If you move, please check the voltage
requirements before plugging your PC into an AC power outlet.
Putting Your PC Together
Follow the steps on the quick setup poster to set up your PC.
Look in the PC box for printed details or updates regarding your model PC.
After assembling your PC, but before you begin using it, arrange the PC and your
work area to maintain your comfort and productivity. Refer to the Safety & Comfort
Guide for important ergonomic information.
WARNING: To reduce the risk of serious injury, read the Safety &
Comfort Guide. It describes proper workstation setup, posture, and
health and work habits for computer users. It also provides
important electrical and mechanical safety information.
To view the Safety & Comfort Guide:
• Click Start, choose All Programs, choose Documentation, and then click
Safety & Comfort Guide.
Or
• Type
http://www.hp.com/ergo/
into your Web browser address box, and then press Enter on the keyboard.
Setting Up Your PC 1
Page 8
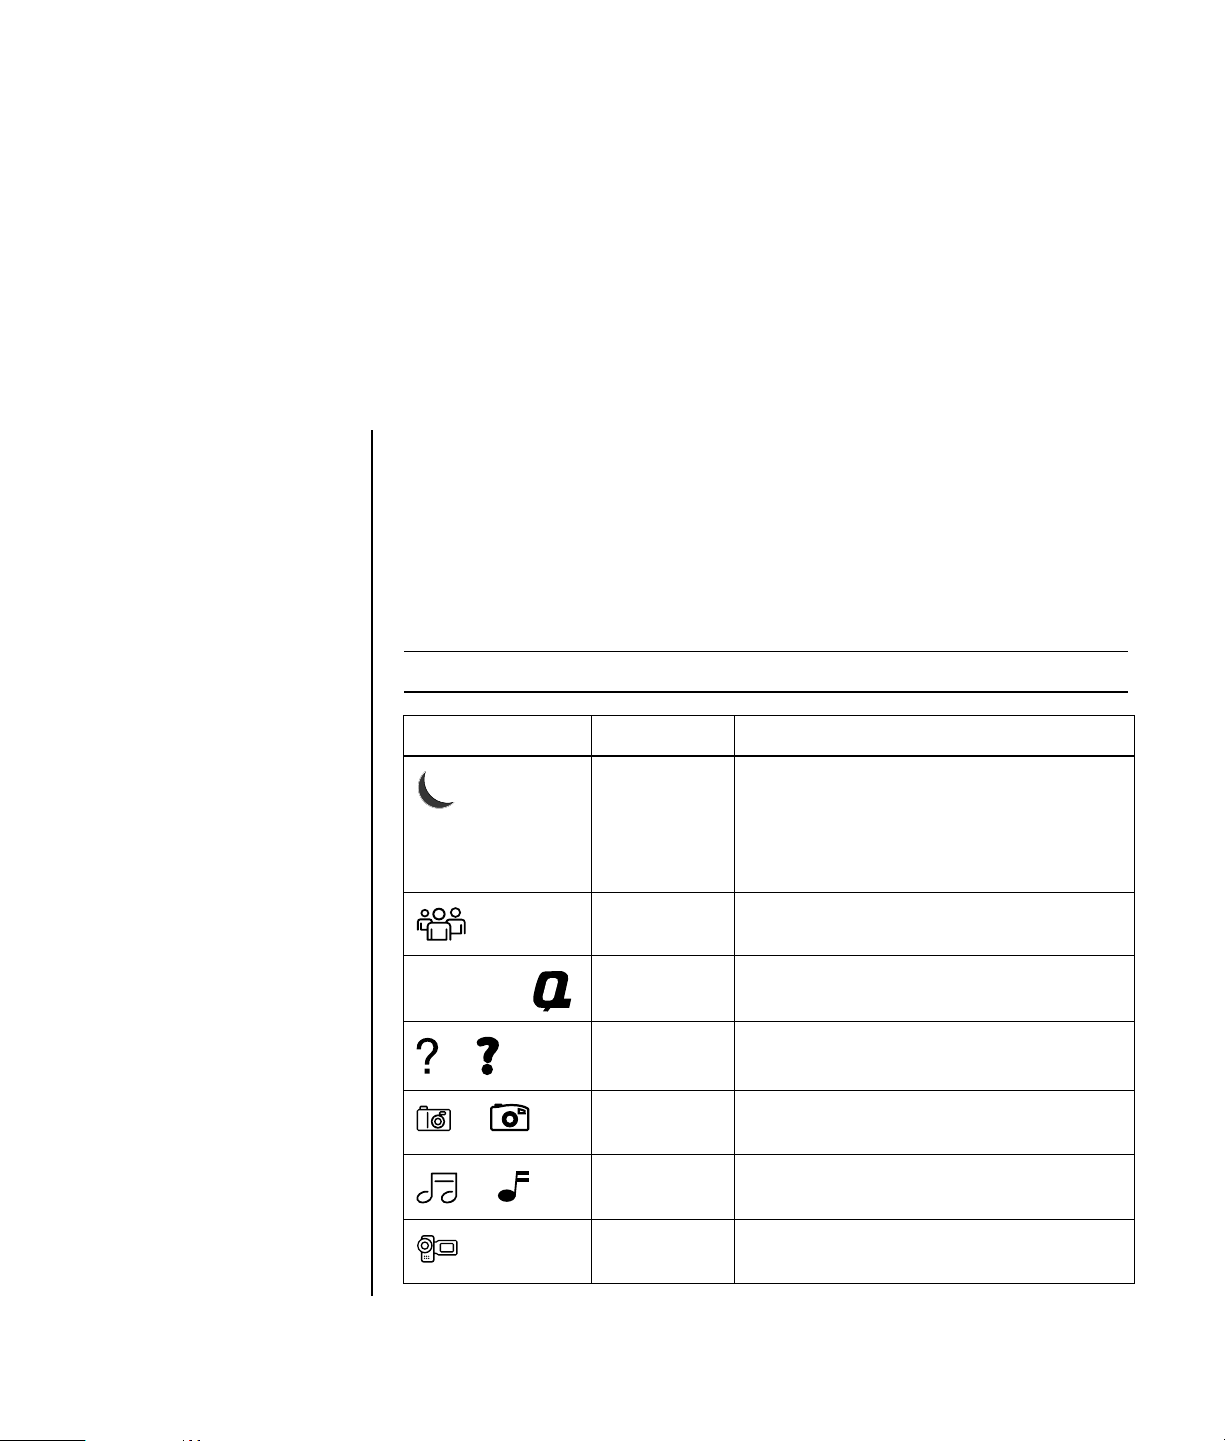
Connecting to the PC
Your PC features and
location, availability,
and number of
connectors may vary.
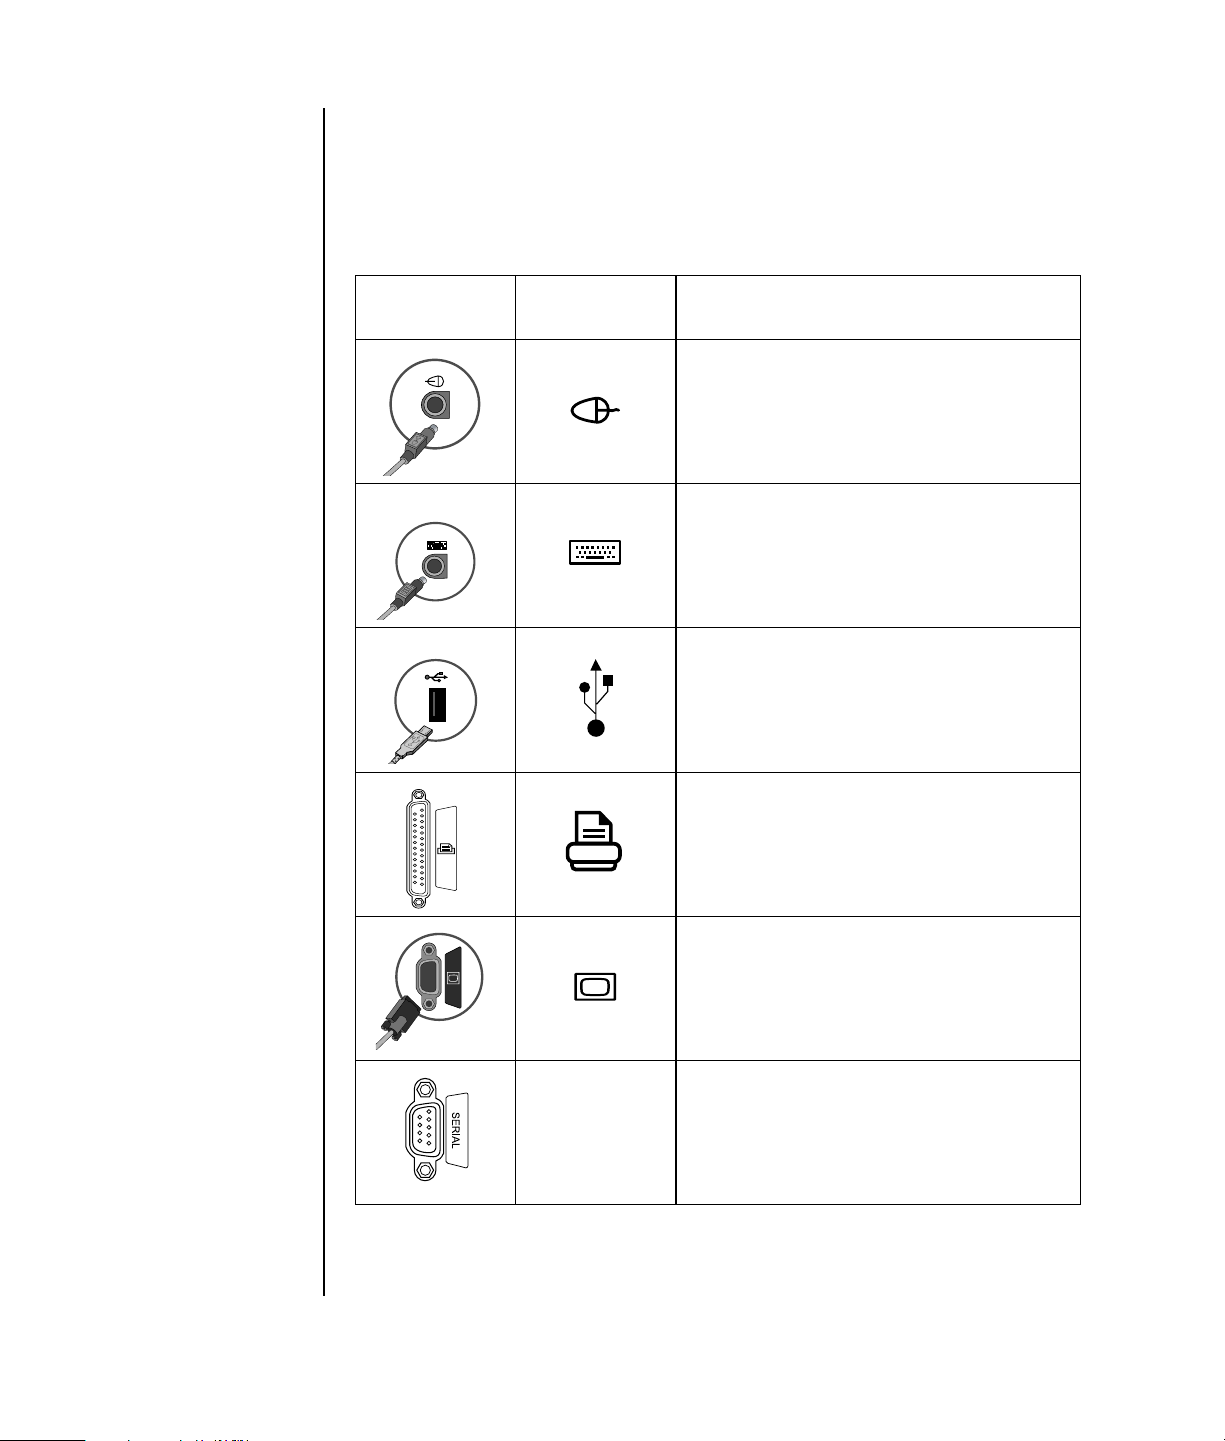
Connect your main hardware devices like the monitor, keyboard, and mouse to the
back of the PC. Other peripheral devices like a printer, scanner, camera, or other
equipment also plug into connectors on the back of your computer. Some PC models
also have connectors on the front of the PC. The table does not show all connectors.
Connector Connector
symbol
Description
Mouse (PS/2 connector)
Keyboard (PS/2 connector)
Universal Serial Bus (USB) for mouse,
keyboard, digital cameras, or other devices
with USB connectors
2 Getting Started Guide
Printer (parallel)
Monitor
Serial port for some digital cameras or
other serial devices
Serial
Page 9
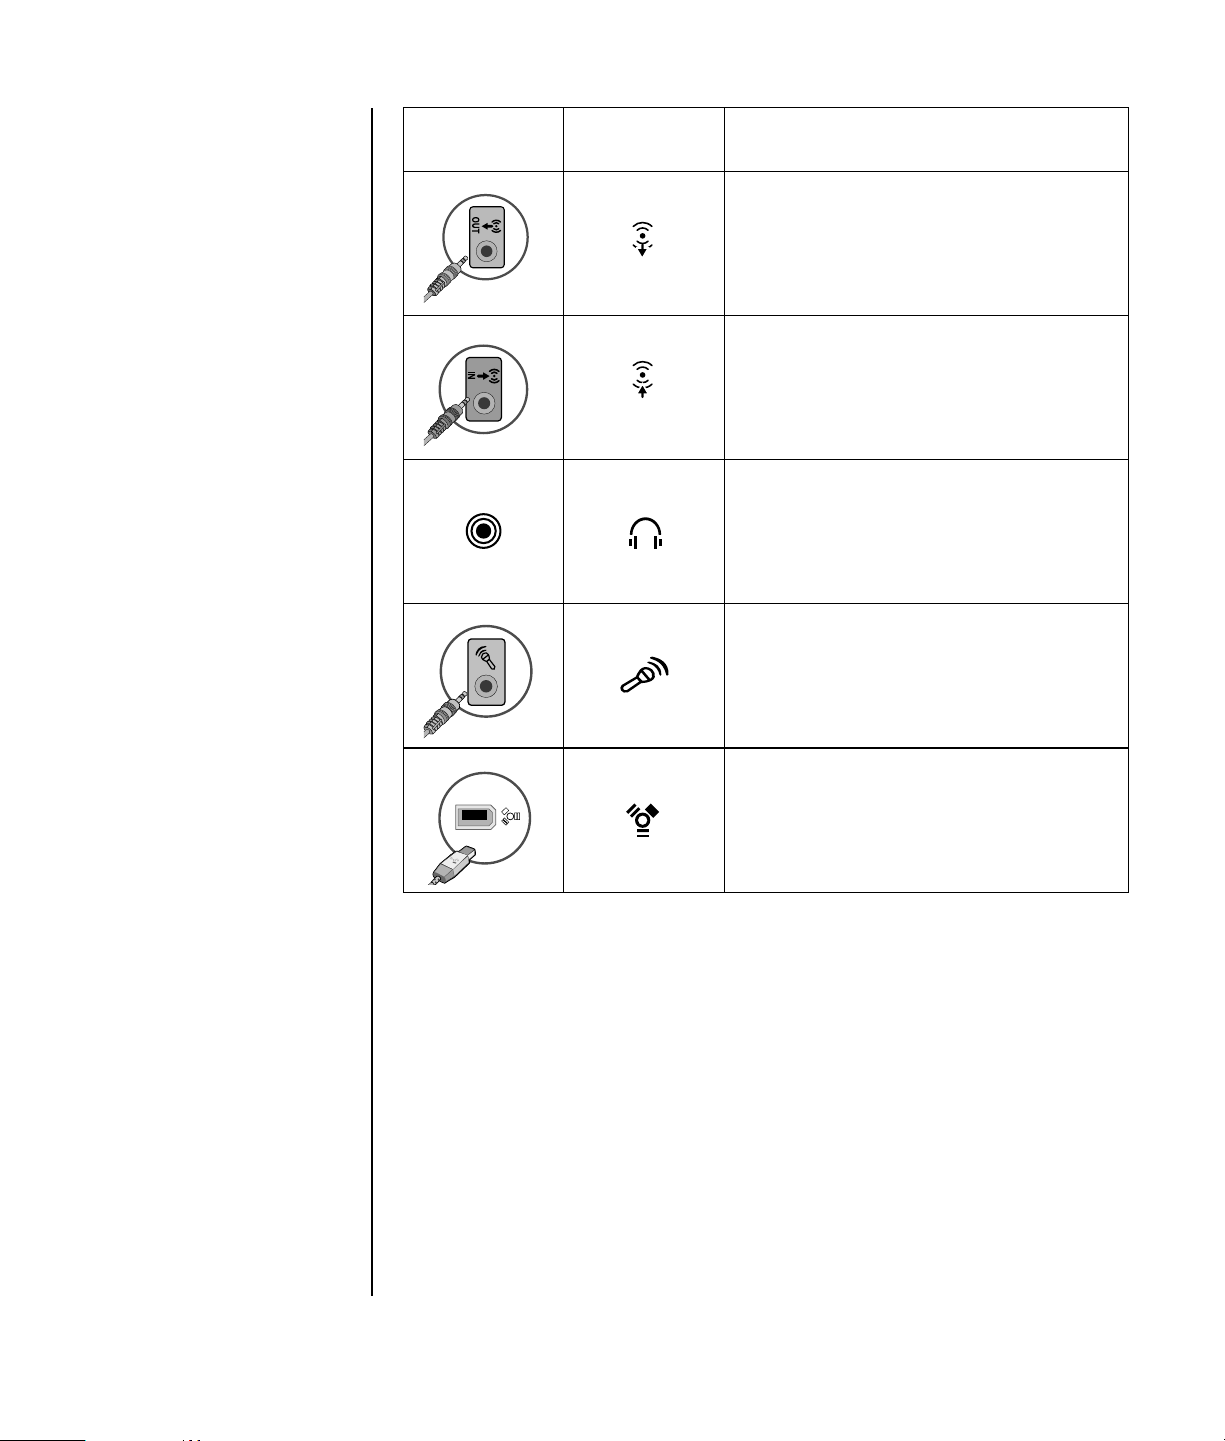
Connector Connector
symbol
OUT
IN
Description
Audio Line Out (powered speakers)
Audio Line In
Headphones
Microphone
®
FireWire
(IEEE 1394) for video cameras
or other devices with very fast transfer rates
Turning On Your PC for the First Time
After you have completed the steps on the quick setup poster, you are ready to turn
on your PC.
1 Press the Power button on the monitor.
2 Press the On button on the front of the PC.
3 Turn on the speakers, if they are present.
4 Click an option to select your language (if applicable for your model). Click
OK, and then confirm your selection by clicking Yes. Wait until the PC makes
preparations. (It may take up to 30 minutes for this one-time language setup on
the PC.)
5 Set up Microsoft
®
Windows® by following the onscreen instructions.
Setting Up Your PC 3
Page 10

6 Double-click the large Internet Access icon, if it is present on your desktop.
Wait until the PC displays the Easy Internet Sign-up window, and then follow the
onscreen instructions.
7 Register your PC.
Setting Up and Connecting to Your Internet Account
Before you can connect to the Internet, you must sign up with an Internet service
provider (ISP). HP has made arrangements with leading ISPs to help you sign up for
Internet service using Easy Internet Sign-up (available on select models only).
NOTE: You may use any other ISP of your choice, or transfer your existing ISP
account to this PC.
Use Easy Internet Sign-up to sign up for a new or transfer an existing ISP account
(select ISPs only). The software programs for available ISPs are part of your PC. If
you decide to subscribe to high-speed broadband, cable or digital subscriber line
(DSL), contact your ISP for any specific software and hardware you may need.
1 Make sure the modem or other Internet access cable is connected.
NOTE: Easy Internet Sign-up finds and obtains updated information about ISP
services by temporarily connecting to the Internet. The PC uses either the PC
modem connected to an active telephone service line or an active broadband
(cable or DSL) connection.
2 Choose an ISP using Easy Internet Sign-up. To open Easy Internet Sign-up:
a Double-click the Easy Internet Sign-up icon on the desktop.
Or
Click Start on the taskbar, choose All Programs, choose
Online Services, and then click Easy Internet Sign-up.
b Follow the onscreen instructions.
NOTE: The folder called Online Services includes icons for accessing various
online services, but they may not be present in all countries/regions.
3 Connect to your ISP and the Internet (after you established your ISP account on
this PC).
Use one of these methods:
• Double-click the ISP-provided icon on the desktop.
Or
• Press the Connect (or Internet) button on the keyboard (select
models only).
Or
4 Getting Started Guide
Page 11

• If your PC is always connected to your ISP, open your browser program,
such as Internet Explorer: Click Start, choose All Programs, choose
Online Services, and click Internet Explorer.
NOTE: If you are using MSN, AOL, or others and have questions, contact the ISP
directly.
Installing Software and Hardware Devices
After you turn on the PC the first time, you can install any software programs that
came on CDs or DVDs included in the PC box (select models only).
You may wish to install additional software programs or hardware devices on your
PC. Before installation, make a restore point using the Microsoft System Restore
program, and then restart the PC after installation. By using System Restore, you
insure you have a point to return to before an issue occurred. For information about
System Restore, refer to the Microsoft Web site at:
http://www.microsoft.com/worldwide/
Choose software that is compatible with your PC — check the operating system,
memory, and other requirements listed for the new software for compatibility with
your PC.
NOTE: Only use original licensed software. Installing copied software may be
illegal or may infect your PC with a virus.
Install the new software according to the directions provided by the software
manufacturer. Check the manufacturer’s documentation or customer service
information for help if you need it.
For antivirus software, uninstall the existing software program before reinstalling it
or installing a new antivirus program.
Transferring your old PC information and files to your new PC
See the built-in Microsoft Windows Help and Support Center; search for transfer
wizard, and select the overview article, “Files and Settings Transfer Wizard
overview.” This information describes a Microsoft solution for moving your files
onto your new PC.
Setting Up Your PC 5
Page 12
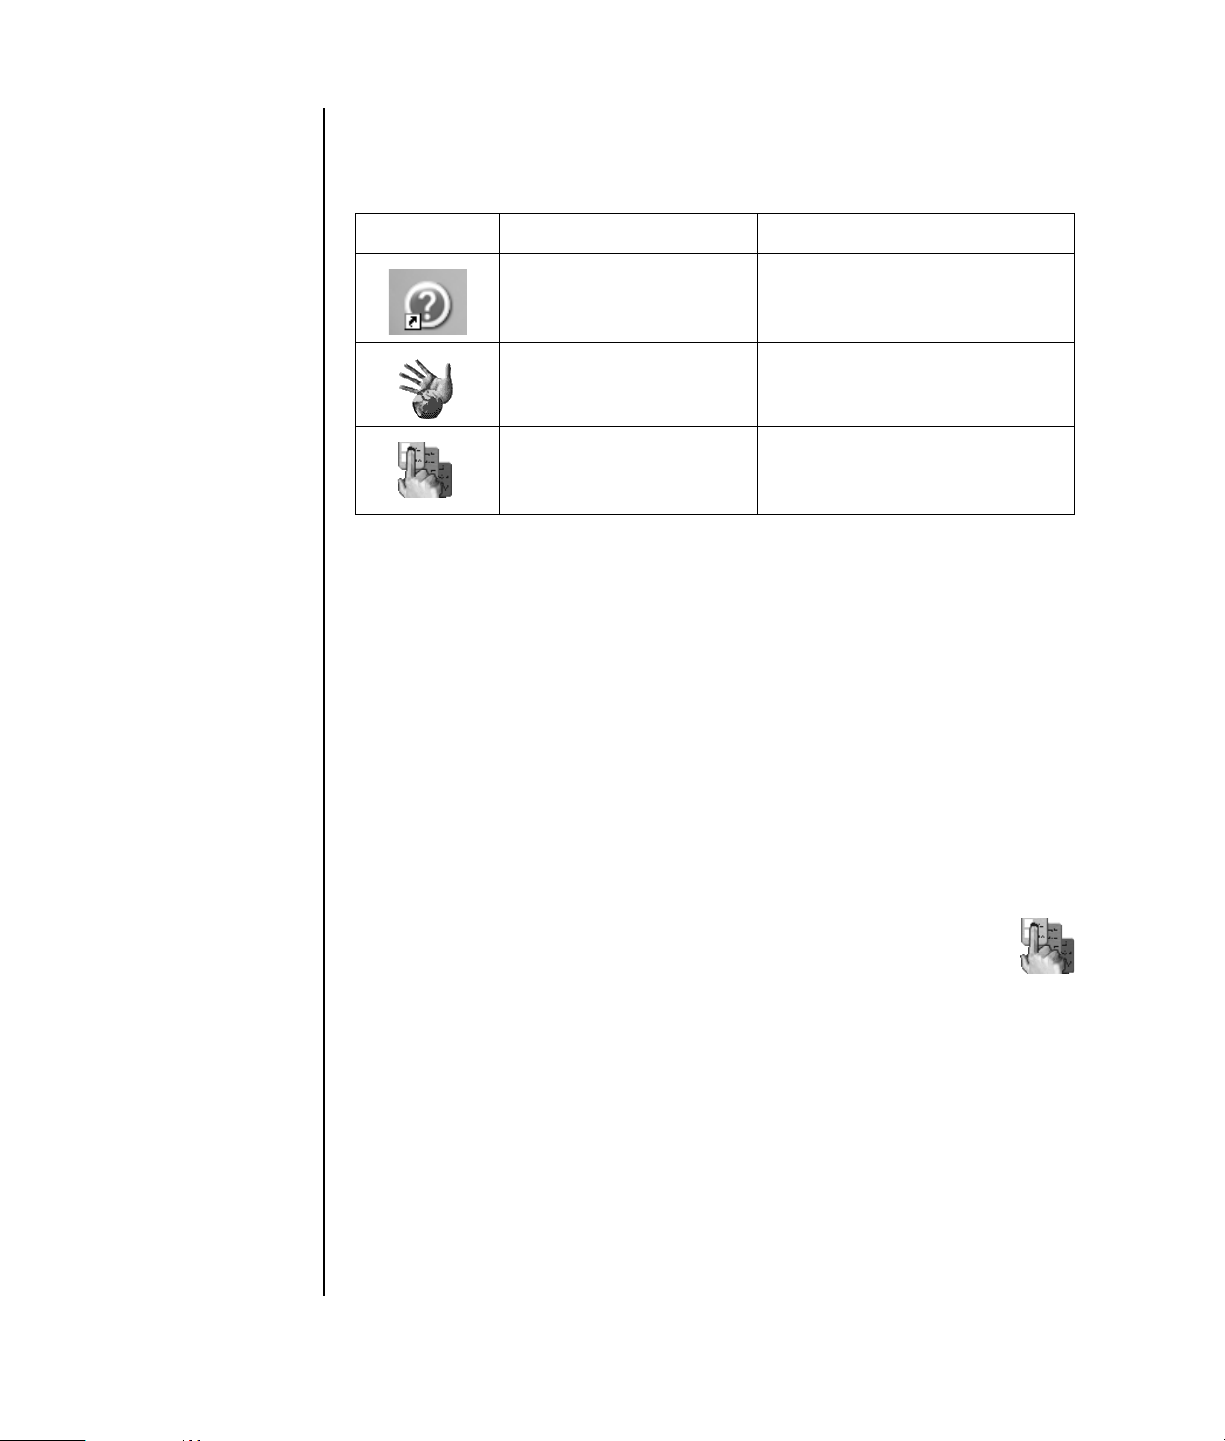
Using Desktop Icons
The desktop has shortcut icons that make it easy to find the things you need.
Icon Opens Use it to
Help and Support (select
models only)
Easy Internet Sign-up Set up a new or an existing
Compaq Organize (select
models only)
View onscreen Help information
about your PC.
Internet account.
Organize your PC shortcuts and
your favorite Internet destination
links.
Using Compaq Organize software
Compaq Organize software (select models only) is a desktop tool you use to
organize both your PC shortcuts and your favorite Internet destination links. You use
it to organize the important things you do on the PC and the Internet, and to
arrange them the way you want. Compaq Organize makes all your information
available with just a few mouse clicks.
Compaq Organize looks like a window with multiple category frames. Each
category has links to Internet destinations or shortcuts to software programs or files
on your PC. Use the player area for viewing pictures, for listening to your MP3
music files stored on your computer, or for watching video clips. For searching,
there is a search bar at the top of Compaq Organize where you can select the
search engine you want to use.
6 Getting Started Guide
To open Compaq Organize:
Double-click the desktop icon.
Or
1 Click Start on the taskbar.
2 Choose All Programs.
3 Click Compaq Organize.
Page 13
Using the Keyboard
Your keyboard has an arrangement of standard keys, indicator lights, and special
buttons (select models only).
Identifying Special Keyboard Buttons
There are special buttons (select models only) at the top of the keyboard. (Some
models have some of these special buttons on the left side of the main keys.) These
buttons operate a CD or DVD player, connect you to the Internet, or provide quick
access to specific functions.
NOTE: The number, location, and labeling of buttons vary by keyboard model.
Icon Feature Description
Standby Puts PC into power-saving mode (screen is
blank but PC is still on). To make screen
reappear, press the Esc key, or press
Standby again. May take 10–30 seconds
before screen reappears.
Compaq or
or
or
or
User Switches between the PC users.
Compaq
My Presario
Help Opens the Help and Support Center.
Pictures
(Photos)
Music Starts iTunes or Windows Media Player.
Video Opens video software program. Can be
Links to Compaq Web site.
Opens an imaging software program. Can
be reconfigured.
Can be reconfigured.
reconfigured.
Using the Keyboard 7
Page 14
Icon Feature Description
Shopping
, or
Sports
or
Finance
or
Connect
, or
, or
or
or
Internet
Search Goes to popular Web sites. Can be
reconfigured to open a site or software
program.
Chat
E-Mail
Entertainment
Offers
Calculator Opens the calculator. Can be reconfigured.
A
B
C
D
E
F
Media
controls (CD/
DVD/MP3)
Operates a disc player.
A Open and close disc tray
B Record
C Play or pause
D Stop
E Skip to the previous track
F Skip to the next track
8 Getting Started Guide
Page 15
Icon Feature Description
Volume
or
, or
NOTE: The number, location, and labeling of buttons vary by keyboard model.
control
(Volume knob
or Volume Up
and Volume
Down
buttons)
Mute Turns speaker sound on and off.
Volume knob: Increases speaker volume
when turned clockwise and decreases
volume when turned counterclockwise. It
can be turned indefinitely, even after
maximum sound has been reached.
Volume Up and Down buttons: Press the
Volume Up button to increase volume
and the Volume Down button to
decrease volume.
Customizing the keyboard buttons
You can customize some of the special buttons on the keyboard (select models only)
to open different programs or files or to connect to favorite Web sites:
1 Click Start on the taskbar.
2 Choose Control Panel.
3 Click Printers and Other Hardware, if it is present.
4 Double-click Keyboard.
5 On the Buttons tab, double-click the button you want to change.
6 For the Button configuration, click the Down arrow to the right of the list and
choose the button capability, such as Simple web page with label.
7 Enter a display label and the address information. For a Web page, enter
the URL.
8 Click OK.
9 On the Buttons tab, click Apply.
10 Repeat steps 5 through 9 for each button you want to customize.
11 Click OK to finish.
NOTE: Clicking the Restore Defaults button on the Button tab restores all of the
Internet buttons to the factory settings.
Using the Keyboard 9
Page 16

10 Getting Started Guide
Page 17
Setting Up Sound
Using Speakers
Speakers are included with the monitor (select models only) or are sold separately.
Your PC supports only an active (powered) speaker system; the speaker system must
have its own power cord.
NOTE: A stereo speaker set is a left-right, two-channel speaker system. A multi-
channel audio speaker system is a system with more than two channels, and it may
include a subwoofer. For example, 7.1 channels, referred to as an eight-speaker
mode, uses two front speakers (left-right), two side speakers (left-right), two rear
speakers (left-right), a center speaker, and a subwoofer.
The PC supports a variety of sound options and speaker configurations. You may set
NOTE: If your PC
includes a sound
card (select models
only), refer to the
documentation that came
with the sound card.
up your PC for two stereo speakers or for multi-channel audio speaker systems.
Connect your speaker system to the PC, and then configure the audio software for
sound output. For details on connecting stereo speakers to the PC, see the quick
setup poster. Location, availability, and number of connectors may vary.
• If your PC model includes three sound connectors (select models only) on the
back of the PC, see “Setting up 3-connector sound” on page 12.
IN
OUT
• If your PC model includes six sound connectors (select models only) on the back
of the PC, see “Setting up 6-connector sound” on page 14.
Setting Up Sound 11
Page 18

Setting up 3-connector sound
PC models that include three sound connectors (select models only) on the back of
the PC support up to six channels of sound (5.1 speaker output) and use the
Multi-channel Sound Manager to configure the software settings.
Connecting the speaker system to the PC (3-connector)
The 3-connector audio speaker system uses the Audio In, Audio Out, and Mic
connectors on the back or front of the PC. Refer to the quick setup poster for the
location of the connectors.
1 With the speaker system off, assemble the speakers and, if used, the subwoofer.
Refer to the speaker documentation.
2 Turn off the PC.
3 Connect the three audio cable plugs from the speaker system to the connectors
on the back of the PC. (See the following table.)
Connect speaker plugs for:
4/4.1
2 Speaker
Mode
Front
speakers
Not used for
speakers
Not used for
speakers
4 Turn on the PC.
5 Turn on the speaker system.
6 Configure the audio output for this 3-connector multi-channel speaker system by
performing the following procedure.
Speaker
Mode
Front
speakers
Rear speakers Rear speakers Audio In
Not used for
speakers
6/5.1
Speaker
Mode
Front
speakers
Center/
subwoofer
speakers
To PC
connector
Audio Out
(lime green)
(blue)
Mic-1 (pink)
Connector
icon
OUT
IN
Configuring the Multi-Channel Sound Manager
(3-connector)
1 Click Start on the taskbar.
2 Choose All Programs.
12 Getting Started Guide
Page 19

3 Click Multi-channel Sound Manager. The Multi-channel Audio
Configuration window opens.
NOTE: If you do not see the Speaker Configuration tab, your PC does not have
the multi-channel capability. However, it still has two-channel (stereo) output.
4 Click the Speaker Configuration tab.
5 Select the option describing the number of speakers in your system, for
example, 6/5.1 speaker mode. You can click the Speaker Test tab and
then click a speaker icon to test it.
6 Click OK.
To use a microphone for recording, see “Using the microphone with the MultiChannel Sound Manager (3-connector)” on page 13.
To hear DVD movies recorded with multi-channel audio from all speakers, change
the audio properties for WinDVD to match your speaker configuration (if your
InterVideo WinDVD program supports more than two channels). Refer to
“Configuring multi-channel audio output for the DVD player” on page 13.
Using the microphone with the Multi-Channel Sound
Manager (3-connector)
The 3-connector multi-channel speaker system (select models only) connects to the
PC using the Microphone, Audio (Line) In, and Audio (Line) Out connectors on the
back of the PC. Your PC may have a second microphone connector on the front of
the PC. If present, this microphone connector is ready to use and does not affect the
use of the multi-channel audio speaker system.
To use the microphone connector on the back of the PC with a 3-connector multichannel audio speaker system, you must disconnect the cables for the multi-channel
speakers and change the audio configuration to a two-channel audio system. Refer
to “Configuring the Multi-Channel Sound Manager (3-connector)” on page 12 to set
the audio configuration.
Configuring multi-channel audio output for the DVD player
The InterVideo WinDVD program (select models only) is set up for two-speaker
(stereo) output. To hear all speakers from DVD movies recorded with multi-channel
audio, change the audio properties for WinDVD to match your speaker
configuration (if your InterVideo WinDVD program supports more than two
channels):
1 Insert a DVD, or start InterVideo WinDVD. (Click Start, choose All
Programs, choose InterVideo WinDVD, select InterVideo WinDVD
Player, and then click InterVideo WinDVD.) The WinDVD video window
opens.
2 Right-click anywhere in the WinDVD video window, and then click Setup. The
Setup window opens.
Setting Up Sound 13
Page 20
3 Click the Audio tab.
A
4 Click the option for the number of speakers to match your multi-channel speaker
system.
NOTE: When using the digital out connector for sound (6-connector, select
models only), select Digital (S/PDIF) out to External Processor.
5 Click Apply.
NOTE: To test the speakers (multi-channel speakers only), click the Test button.
The WinDVD control panel shows the speaker number being used. Click Stop.
6 Click OK.
NOTE: If you want to play a stereo DVD, change the audio properties of WinDVD to
match the recorded DVD audio output.
Setting up 6-connector sound
PC models that include six sound connectors (select models only) on the back of the
PC, support up to eight channels of sound (7.1 speaker output) and use the Sound
Effect Manager to configure the software settings.
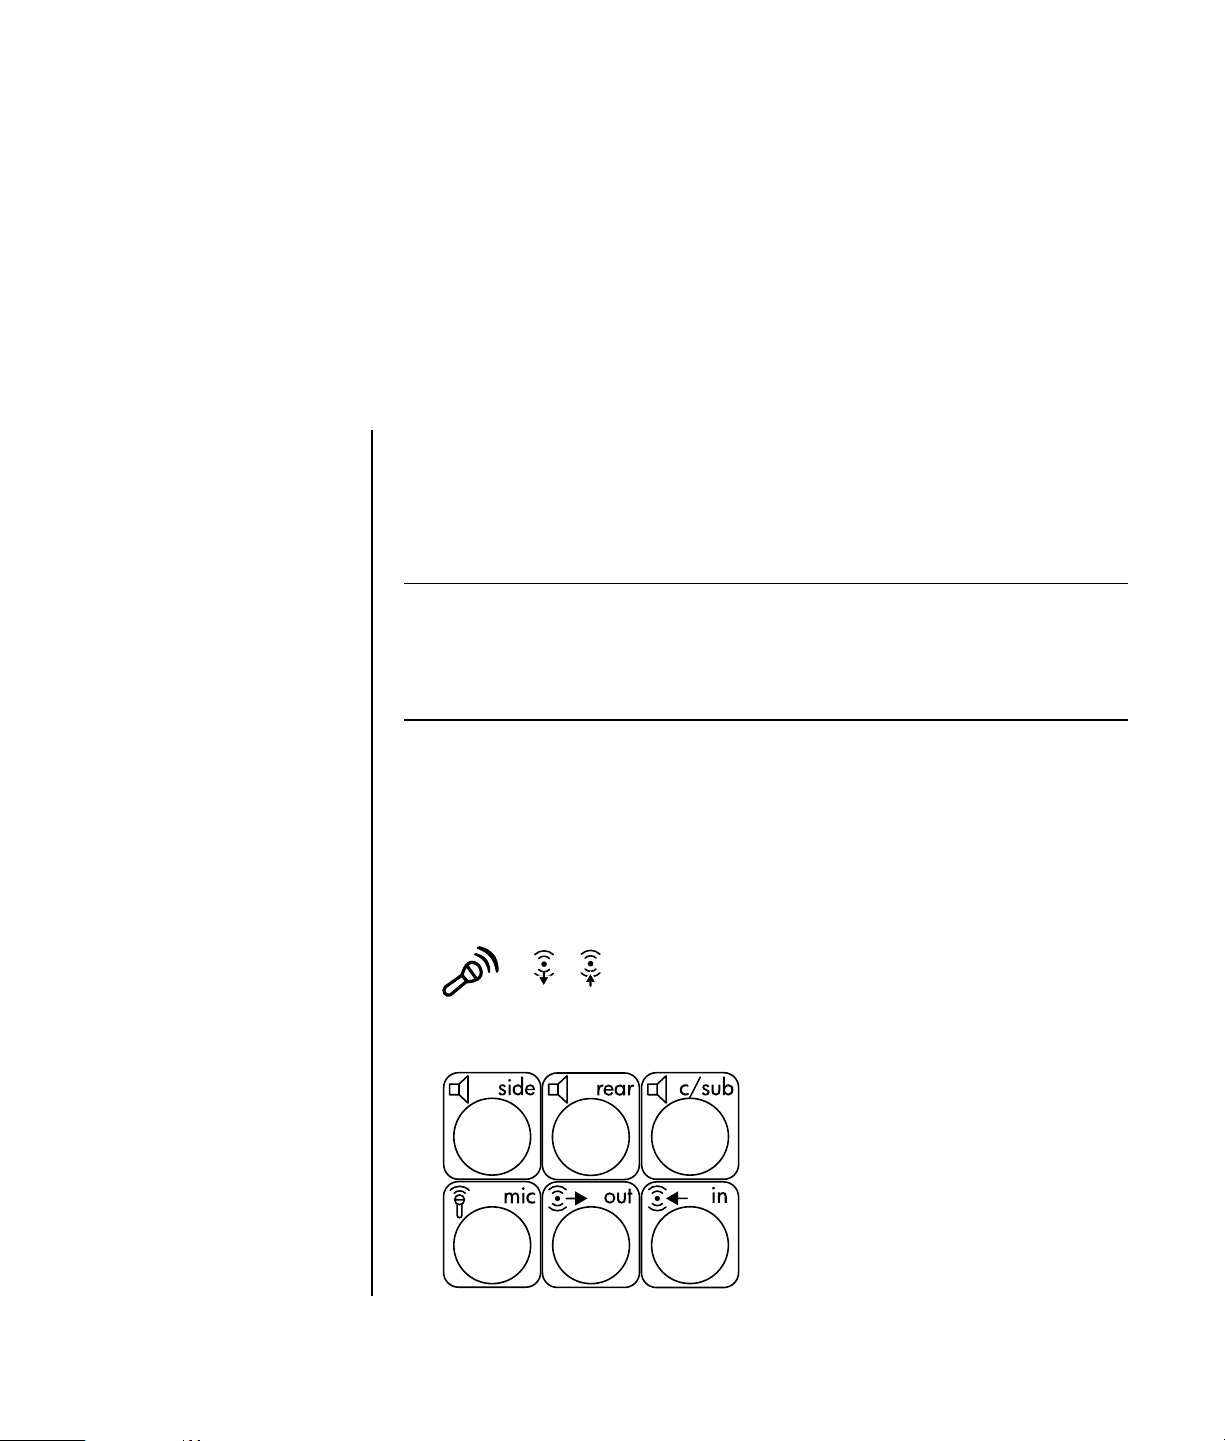
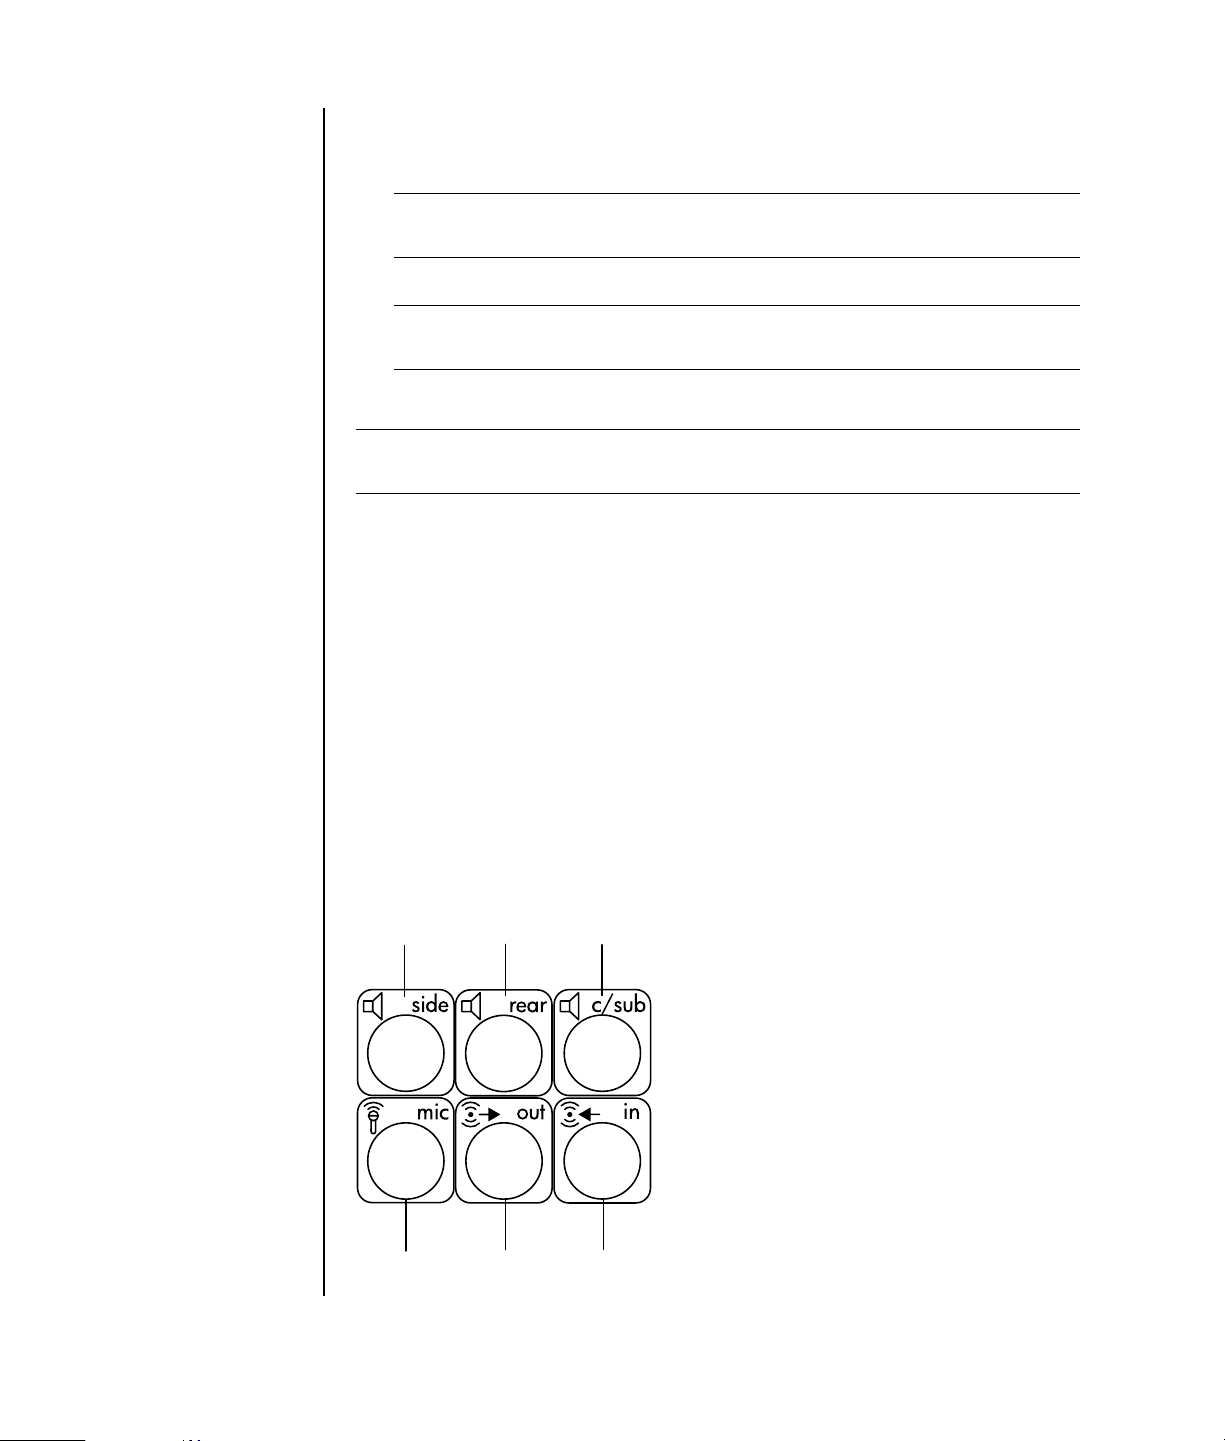
Identifying the audio connectors (6-connector)
The PC supports a maximum of eight speakers in a multi-channel speaker system by
using four of the six audio connectors on the back of the PC.
This PC also has digital audio out and digital audio in connectors for digital sound
devices such as a DVD recorder or a digital stereo receiver/amplifier.
The four connectors (A, B, C, and E) for the 6-connector multi-channel speaker
Side speaker port
(side)
B Rear speaker port
(rear)
C Center speaker/
subwoofer port
(c/sub)
D Microphone (mic)
E Audio line out (out) for
front speakers
F Audio line in (in)
system are on the back of the PC.
A
D
B C
E F
14 Getting Started Guide
Page 21

The previous figure shows the six audio connectors arranged on the back of the PC:
the four connectors (A, B, C, and E) used for eight-channel audio and the
connectors for the microphone (D, mic) and the audio line in (F, in).
Connecting the speaker system to the PC (6-connector)
1 With the speaker system off, assemble the speakers and, if used, the subwoofer.
Refer to the speaker documentation.
2 Turn off the PC.
3 Connect the audio cable plugs from the speaker system subwoofer to the
connectors on the back of the PC. (See the following table.)
Connect speaker cable (plug) for: To PC port (label, name,
color):
Front speakers (or two stereo speakers) Audio line out (E, out, lime green)
Side speakers Side speaker (A, side, gray)
Rear speakers Rear speaker (B, rear, black)
Center speaker/subwoofer Center speaker/subwoofer
(C, c/sub, gold)
4 Turn on the PC.
5 Turn on the speaker system.
6 Configure the audio output for this 6-connector multi-channel speaker system by
performing the following procedure.
Configuring the Sound Effect Manager (6-connector)
1 Click Start on the taskbar.
2 Choose Control Panel.
3 If it is present, click Sounds, Speech, and Audio Devices.
4 Click Sound Effect Manager. The window opens.
5 Click the Speaker Configuration button.
6 Select the option describing the number of speakers in your system, for
example, 7.1 speakers.
A connector with no descriptive text in the Connection Guide indicates that the
connector is not used for the selected speaker configuration.
NOTE: You can click the Speaker Test button to test the speakers.
7 Click OK.
Setting Up Sound 15
Page 22

To hear DVD movies recorded with multi-channel audio from all speakers, change
the audio properties for WinDVD to match your speaker configuration (if your
InterVideo WinDVD program supports more than two channels). Refer to
“Configuring multi-channel audio output for the DVD player” on page 13.
To use a microphone or set up the PC for recording, see “Configuring sound for
recording with the Sound Effect Manager (6-connector)” on page 16.
To use the other features of the Sound Effect Manager, see “Using the Sound Effect
Manager (6-connector)” on page 17.
Configuring sound for recording with the Sound Effect Manager (6-connector)
The microphone connector on the front of the 6-connector audio PC is ready to use
for recording sound. If you want to use another connector for recording, such as the
digital audio in connector, use these steps to select it.
NOTE: The pink and green connectors on the front of a PC with 6-connector
sound can be retasked to perform other audio functions; refer to “Using the Audio
Wizard in the Sound Effect Manager (6-connector)” on page 18.
1 Click Start on the taskbar.
2 Choose Control Panel.
3 If it is present, click Sounds, Speech, and Audio Devices.
4 Click Sounds and Audio Devices.
5 Click the Audio tab.
6 In Sound recording select the default device from the drop-down list. Choose:
• RealTek HD Front Pink Jack to use the microphone connector on the
front of the PC.
• RealTek HD Digital Input to use the digital audio in connector on the
back of the PC.
• RealTek HD Front Green Jack to use the green connector on the front
of the PC.
• Back Line in/Mic, Front Line in to use the audio line in (in) or the
microphone (mic) connectors on the back of the PC, or to use the audio line
in connector on the front of the PC.
16 Getting Started Guide
NOTE: For this selection, the audio line in connector is ready to use. To use
the back mic connector, follow the steps in “Selecting the Back Line in/Mic,
Front Line in connectors for recording (6-connector)” that follows this
procedure.
7 Click Apply, and then click OK to close the window.
Page 23

Selecting the Back Line in/Mic, Front Line in connectors for
recording (6-connector)
Perform these steps when you select Back Line in/Mic, Front Line in for the
sound recording in step 6 of the previous procedure.
NOTE: If you want to record from the mic connector on the back of the PC, you must
perform these steps.
1 Click Start on the taskbar.
2 Choose Control Panel.
3 If it is present, click Sounds, Speech, and Audio Devices.
4 Click Sounds and Audio Devices.
5 On the Volume tab, in the Device volume area click the Advanced button. The
Master Volume window opens.
6 Click Options and choose Properties.
7 In the Mixer device area, select Back Line in/Mic, Front Line in from the
drop-down list. Click OK.
8 The recording control window opens and shows Line In 1 or 2 selected. The line
in connector you plug into is used. However, to use the mic connector on the
back of the PC, click the Select check box under Microphone so a check mark
appears in the box.
Using the Sound Effect Manager (6-connector)
The Sound Effect Manager has four buttons that display its control screens.
To open the Sound Effect Manager:
1 Click Start on the taskbar.
2 Choose Control Panel.
3 If it is present, click Sounds, Speech, and Audio Devices.
4 Click Sound Effect Manager. The window opens.
5 Click a button near the top of the window to see that control screen.
The Sound Effect Manager control screens:
• Sound Effect — selects the Environment and the Equalizer settings. You can
select an Environment, such as Under Water or Auditorium. To use the
Equalizer, click the Power button in the center of the circular equalizer control to
turn on the Equalizer. You can click a preset button, such as Pop or Live, or
manually adjust the settings and then save them for easy selection later.
• Speaker Configuration — selects the number of speakers, shows the
Connection Guide, and has the Speaker Test button to test the speakers. A
connector with no descriptive text in the Connector Guide indicates that the
connector is not used for the selected speaker configuration.
Setting Up Sound 17
Page 24
• Digital Audio — selects the digital audio output and digital audio frequency
for the digital audio connectors on the PC.
•Audio Wizard — opens a window that shows the connector panel on the
front of the PC. To close the window without enabling the wizard, click OK.
To enable the Audio Wizard:
Make sure the Enable auto detection check box is selected to enable the
wizard. Click OK to close the window.
Using the Audio Wizard in the Sound Effect Manager
(6-connector)
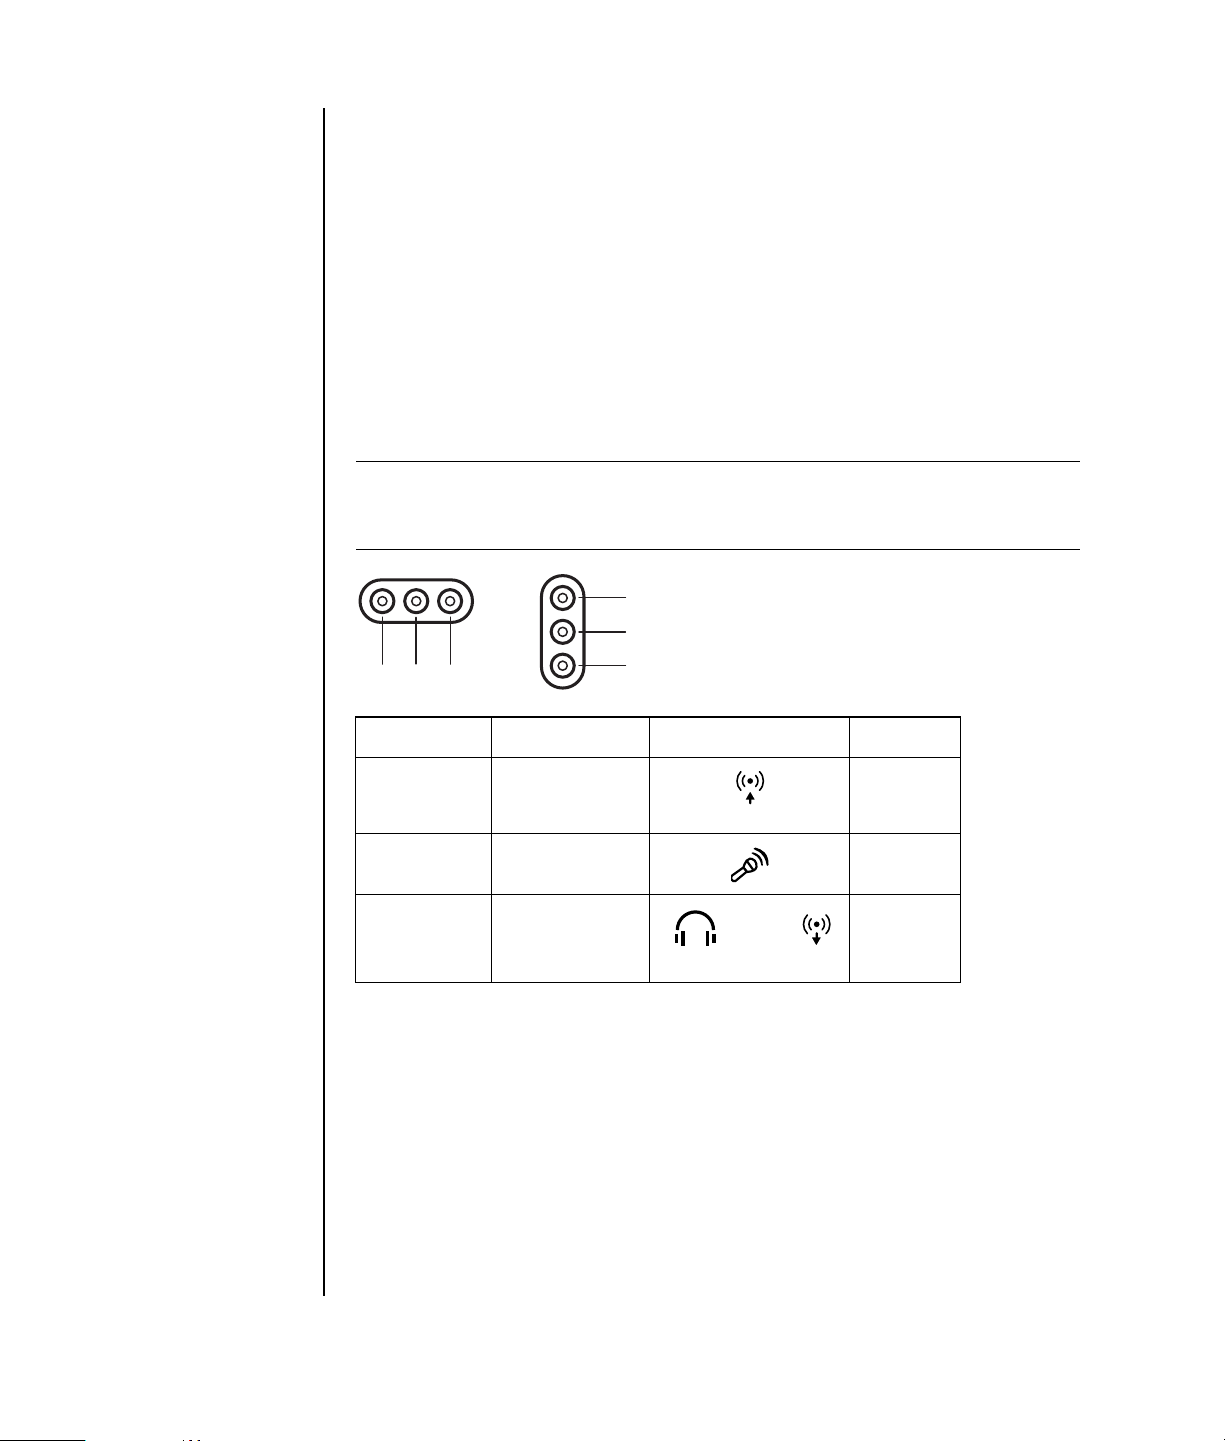
When you click the Audio Wizard button, a window opens that shows the three
audio connectors on the front of the PC.
NOTE: The connectors on the front of your PC may be of a different type or may be
in a different arrangement; look for the connector icon and color. Location,
availability, and number of connectors may vary.
/
A B C
C
A
B
Connector Name Icon Color
A Audio Line In Light blue
IN
B Microphone Pink
C Headphones
Or
Audio Line Out
Or
OUT
Lime
green
Retasking using the Audio Wizard (6-connector)
With the Audio Wizard enabled, both the microphone connector (B) and the
headphones connector (C) on the front of the PC can be retasked to perform a
different audio function. These two connectors are universal audio jacks. When you
plug in a cable, the Wizard asks you to select the function for the cable from a list,
and then it sets the universal audio jack to perform as the selected function. The
functions are:
18 Getting Started Guide
• Stereo speaker (out)
• Microphone (in)
• Headphone (out)
• Audio line in
Page 25

Using the Memory Card Reader
Digital cameras and other digital imaging devices use memory cards, or media,
to store digital picture files. The optional memory card reader (select models only)
can read and write to a variety of types of memory cards and the IBM Microdrive
disk drive.
The card reader is accessible directly on the front of the PC. It has four horizontal
card slots, which accept the memory cards and the Microdrive disk drive.
Card 4-slot reader
CompactFlash Type I media Lower-left slot
CompactFlash Type II media Lower-left slot
IBM Microdrive disk drive Lower-left slot
Secure Digital (SD) Memory Card Upper-right slot
MultiMediaCard (MMC) Upper-right slot
Memory Stick (MS) Memory Card Lower-right slot
Memory Stick (MS-Pro) Memory Card Lower-right slot
SmartMedia (SM) Memory Card Upper-left slot
xD media Upper-left slot
You can place media in one or more of the card slots and use each media
independently. Place only one piece of media in a slot at one time.
Each card slot has its own drive letter and icon. When you insert media, the display
label may change to the title of the media, if the title is present.
Using the Memory Card Reader 19
Page 26
Working with the Safely Remove Hardware utility
CAUTION: Do not click Stop in the Safely Remove Hardware window
with the USB Mass Storage Device selected. Doing so removes the
operating system recognition of the memory card reader from your
PC; you must restart the PC to see your memory card reader again.
If you open the Safely Remove Hardware window by mistake, click Close.
Using the memory card reader
NOTE:
CompactFlash and Microdrive are keyed and cannot be inserted incorrectly.
Insert the receptacle edge (holes) of this media into the slot.
1 Insert the media into the card slot until it stops. The activity light (A) on the
memory card reader lights, and the PC automatically detects the media.
2 The PC opens a window so you can use the media contents. You can copy files
from or to the media.
3 When you are finished, right-click the drive icon, select Eject, check that the
activity light is on but not blinking, and then remove the media. A steady
activity light indicates that the PC is not reading or writing the media.
WARNING: Do not try to remove media when the activity light is
blinking; doing so may cause loss of data.
20 Getting Started Guide
Page 27

Memory card reader
A Activi
ty light
B Upper-left slot
C Lower-left slot
D Upper-right slot
E Lower-right slot
A
B
C
Card Insert Into reader slot
CompactFlash Type I media Receptacle edge (holes) C (lower-left)
CompactFlash Type II media Receptacle edge (holes) C (lower-left)
IBM Microdrive disk drive Receptacle edge (holes) C (lower-left)
Secure Digital (SD)
Facing up D (upper-right)
Memory Card
MultiMediaCard (MMC) Facing up D (upper-right)
Memory Stick (MS)
Facing up E (lower-right)
Memory Card
Memory Stick (MS-Pro)
Facing up E (lower-right)
Memory Card
D
E
SmartMedia (SM)
Facing up B (upper-left)
Memory Card
xD media Facing up B (upper-left)
Using the Memory Card Reader 21
Page 28

22 Getting Started Guide
Page 29

Using a TV as a Monitor
A
Your PC may have TV-out (select models only) capability, which means you can
connect it to a television to view the computer image on a TV screen. With the
TV-out feature, you can view the computer image, watch DVD movies (if you have
a DVD player), or play games on your TV.
Identifying Cables You May Need
To connect a TV to the PC, you may need a video cable and an audio cable (not
provided; purchase separately). The type of video cable you need depends on
your TV:
• If your TV has an S-video jack, you need an S-video cable.
• If your TV has a composite video jack, you need a composite video cable and,
depending on the jacks on the back of your PC, you may also need an S-video
adapter cable.
Connecting to a TV Set
To use your TV as a PC screen:
1 Turn off the PC.
2 Connect the TV cable using one of the following arrangements, depending on
the connection jacks on your TV:
• If your TV has an S-video jack, connect an S-video cable from the S-video In
S-video cable
B S-video jack
C Back of PC
jack on the TV to the S-video jack on the back of the PC.
B
A
Using a TV as a Monitor 23
C
Page 30
D Composite video cable
E Composite jack
C Back of PC
• If your TV has a composite video jack and your PC has a composite video
jack, connect a composite video cable to the Video In jack on the TV to the
composite video jack on the back of the PC.
E
D Composite video cable
F S-video adapter cable
B S-video jack
C Back of PC
D
C
• If your TV has a composite video jack and your PC has only an S-video
jack, connect a composite video cable to the Video In jack on the TV and to
an S-video adapter cable. Connect the S-video adapter cable to the S-video
jack on the back of the PC.
B
D
NOTE: The S-video adapter cable is only needed if there is no composite video jack
F
C
on the back of the PC.
24 Getting Started Guide
3 To have sound come from your TV instead of from your PC, plug an audio cable
into the audio input jack (Audio Line In) on the TV and plug the other end of the
audio cable into the Audio Out jack (green connector) on the back of the PC.
Viewing the PC Image on Your TV Screen
NOTE: The type of video card on your PC determines how the PC selects the TV-out
option. Some options and menus in this procedure may be different for your PC.
1 Make sure the video and audio cables are connected before you turn on the TV
and the PC.
2 Turn on the TV. Press the Video/TV button on your remote control to select the
Video setting, not the TV setting.
Page 31

3 Turn on your PC.
4 When the Windows desktop appears, right-click an empty area of the desktop
and choose Properties. The Display Properties window opens.
5 Click the Settings tab.
6 Click the Advanced button.
7 Look at the tabs, and follow the steps that apply to your PC:
• If you see the nView tab, continue with “nView tab.”
• If you see the Ge Force FX xxxx tab, continue with “Ge Force tab.” (FX xxxx
is the video card number.)
• If you see the Displays tab, continue with “Displays tab.”
nView tab
1 Click the nView tab.
2 To view the computer image on your PC monitor and your TV simultaneously, in
the nView Display Mode area select Clone.
Or
To view the PC image on just the TV, in the nView Display Mode area, select
Standard [Dualview], click the Device Settings button, choose Select
Output Device, and then select the TV option.
3 Click the OK button.
4 When the PC image appears on the TV screen, click Yes to keep the setting.
You have 15 seconds to accept this new setting before it reverts to the previous
setting.
5 Click the OK button to save changes, and then click OK again to close the
Display Properties window.
Ge Force tab
1 Click the Ge Force FX xxxx tab.
2 To view the computer image on your PC monitor and your TV simultaneously, in
the nView Modes area select Clone from the drop-down list.
Or
To view the PC image on just the TV, in the nView Modes area select Single
display from the drop-down list, and then, if necessary, in the Current display
area select TV from the drop-down list.
3 Click the Apply button.
4 When the PC image appears on the TV screen, click Yes to keep the setting.
You have 15 seconds to accept this new setting before it reverts to the previous
setting.
5 Click the OK button to save changes, and then click OK again to close the
Display Properties window.
Using a TV as a Monitor 25
Page 32

Displays tab
1 Click the Displays tab. This tab shows a monitor and a TV. Some PCs (select
models only) show a TV for standard television and an HDTV for high-definition
television. The upper-left corner of each display icon is a button and a status
indicator. A red corner indicates an inactive display; a green corner indicates
an active display.
NOTE: Your TV must be connected to the PC to change the display.
2 To view the computer image on your PC monitor and your TV simultaneously,
click the upper-left corner of the TV icon so that it is green. Click Apply.
Or
To view the PC image on just the TV, click the TV corner so it is green, and then
click the monitor corner so it is red. Click Apply.
3 When the PC image appears on the TV screen, click Yes to keep the setting.
You have 15 seconds to accept this new setting before it reverts to the previous
setting.
4 Click the OK button to save changes, and then click OK again to close the
Display Properties window.
NOTE: Some PC models can connect more than one display device (CRT
monitor, flat panel monitor, TV, and so on) to the PC. You can change where the
PC desktop appears by pressing Alt+F5. (Press the Alt key and the F5 key on
the keyboard at the same time.) Each time you press the Alt+F5 key
combination, the PC desktop appears on the next device. If Alt+F5 does not
work, restart the PC and try again.
26 Getting Started Guide
Disabling the TV Option
When you want to disconnect the TV from your PC, you may need to disable the TV
option to return your PC display to its original resolution.
1 Right-click an empty area of the screen, and choose Properties. The Display
Properties window opens.
2 Click the Settings tab.
3 Click the Advanced button.
4 Look at the tabs, and follow the steps that apply to your PC:
• If you see the nView tab, continue with “nView tab (disabling).”
• If you see the Ge Force FX xxxx tab, continue with “Ge Force tab
(disabling).”
• If you see the Displays tab, continue with “Displays tab (disabling).”
Page 33

nView tab (disabling)
1 Click the nView tab.
2 If you viewed the computer image on your PC monitor and your TV
simultaneously, select nView Display Mode in the list on the left, and then select
the Standard [Dualview] option.
Or
If you viewed the PC image on just the TV, select nView Display Mode in the list
on the left, select Standard [Dualview], click the Device Settings button,
choose Select Output Device, and then select the Analog Display option.
3 Click the OK button.
4 When the PC image appears on the monitor screen, click Yes to keep the
setting. You have 15 seconds to accept this new setting before it reverts to the
previous setting.
5 Click the OK button to save changes, and then click OK again to close the
Display Properties window.
Ge Force tab (disabling)
1 Click the Ge Force FX xxxx tab.
2 In the nView Modes area select Single display from the drop-down list. In the
Current display area select Analog Display or Digital Display.
3 Click the Apply button.
4 When the PC image appears on the monitor screen, click Yes to keep the
setting. You have 15 seconds to accept this new setting before it reverts to the
previous setting.
5 Click the OK button to save changes, and then click OK again to close the
Display Properties window.
Displays tab (disabling)
1 Click the Displays tab. This tab shows a monitor and a TV. (Select models
show a monitor, a standard TV, and an HDTV.) The upper-left corner of each
display icon is a button and a status indicator. A red corner indicates an
inactive display; a green corner indicates an active display.
2 Click the upper-left corner of the TV icon so it is red, and then click the upper-left
corner of the monitor icon so it is green. Click the Apply button.
3 When the PC image appears on the monitor screen, click Yes to keep the
setting. You have 15 seconds to accept this new setting before it reverts to the
previous setting.
4 Click the OK button to save changes, and then click OK again to close the
Display Properties window.
Using a TV as a Monitor 27
Page 34

Disconnecting the TV
1 Disable the TV option. See the previous procedure.
2 Turn off the TV and the PC.
3 Remove the video cable from the TV and the PC.
4 Remove the audio cable from the TV and the PC.
5 Reconnect your PC speaker cable to the Line Out jack (lime-green connector)
on the back of the computer.
28 Getting Started Guide
Page 35

Using the HP Personal Media Drive
The HP Personal Media Drive (sold separately) can be used as an internal or
external USB hard disk drive designed to quickly and easily increase your storage
capacity and to transfer media files such as digital photos, music, videos, and other
important files. You can also use the HP Personal Media Drive to back up other
drives on your PC.
NOTE: Before starting the System Recovery Program, remove the HP Personal
Media Drive. See your System Recovery documentation.
Connecting the Drive
As an external drive, the HP Personal Media Drive connects and disconnects easily
from a USB 2.0 connector on the front or the back of most PCs. The drive comes
with software, an external USB cable, and an external power cord and power
adapter. For information about connecting and using the HP Personal Media Drive
as an external drive, refer to the documentation that came with the HP Personal
Media Drive.
Using the HP Personal Media Drive 29
Page 36

For some PCs (select models only), the HP Personal Media Drive is designed to fit
w
inside a horizontal or vertical drive bay.
This special drive bay includes an internal USB port and power cable that connect
to the drive when it is inserted.
NOTE: The drive can be
easily inserted and
removed from the bay
without turning off the
PC. This feature is
sometimes referred to as
arm swappable.
The drive turns on when it is plugged into an active USB port. If the PC is turned on
with the drive connected, the drive automatically turns on. When the USB cable for
the drive is not plugged in or when the USB power from the PC is turned off, the
drive automatically turns off. When the PC is in standby mode (a reduced power
state), the drive remains turned on.
WARNING: Do not move the PC with the HP Personal Media Drive
inserted in the bay or connected to a USB port on the PC. This can
cause damage to the drive and cause data loss.
Inserting the Drive
1 Turn on the PC.
2 Line up the ridges on the bottom of the drive with the two slots on the side or the
bottom of the PC drive bay. Do not force the drive into the bay; it should slide
easily into the bay.
30 Getting Started Guide
Page 37

A
Drive activity indicator
d
light
B Power on indicator
light
C HP Personal Media
Drive guide ridges
3 Slide the drive all the way into the drive bay until the drive is firmly connected
to the internal power and USB port. With the PC turned on, the power indicator
(B) on the front of the drive is lit when the drive is inserted correctly.
B
A
C
Locating the Drive and Assigning a Drive Letter
After you insert the drive into the PC, you can find the drive in My Computer. The
operating system automatically assigns a letter to the drive. The assigned letter
depends on the other storage devices connected to the PC.
To locate the drive:
NOTE: To av oi
hard disk drives using the
same drive letter, when
connecting and removing
the drives, assign the
letter Z to the HP Personal
Media Drive.
multiple
1 Click Start on the taskbar.
2 Click My Computer.
3 Select the drive under Hard Disk Drives. The default name is HP Personal Media
Drive.
You can permanently assign a drive letter to avoid the letter changing when you
connect and disconnect this drive and other devices. Also, it is easier for a software
program to locate the files on the HP Personal Media Drive if a drive letter is
assigned. Some programs may not be able to find files if the drive has a new drive
letter.
It is best to always remove your drive safely to avoid errors. See “Disconnecting the
Drive” on page 33.
Using the HP Personal Media Drive 31
Page 38

To assign a drive letter:
1 Click Start on the taskbar.
2 Right-click My Computer.
3 Select Manage and then click Disk Management.
4 Right-click the HP Personal Media Drive.
5 Select Change Drive Letter and Paths.
6 Click Change and select a letter, and then apply the changes by clicking OK.
The default volume label of this drive is HP Personal Media Drive. You can rename
the drive in the My Computer window by right-clicking the drive, selecting
Rename, and then typing a new name. Rename the drive if you have more than
one HP Personal Media Drive.
Using the Drive
To store files:
The best way to transfer files to the HP Personal Media Drive is to drag them from
your local hard disk drive. This allows you to place files in specific folders. Refer to
the following procedures for more detailed instructions about creating linked folders.
To play media files:
You can play media from an HP Personal Media Drive.
1 Click Start on the taskbar.
2 Click My Computer.
3 Double-click the HP Personal Media Drive icon to locate your media file.
4 Double-click the file. Most media files open in Windows Media Player.
To play music files:
You can play music files that are stored on the HP Personal Media Drive:
1 Click Start on the taskbar, click My Computer, and then double-click the
HP Personal Media Drive icon.
2 Create a personal music folder by right-clicking the drive window and choosing
New and then Folder. Type a name for your personal music folder.
3 Drag or copy your music files into this created folder.
4 Open Windows Media Player by clicking Start, All Programs, and then
clicking Windows Media Player.
5 In the Windows Media Player window, click Tools, select Options, and then
select the Media Library tab.
6 Click the Monitor Folders button.
7 Click Add to add a pathway to your HP Personal Media Drive.
8 Browse to locate your created music file folder on your HP Personal Media
Drive, and then click OK.
32 Getting Started Guide
Page 39

9 Click OK, and then OK again to close the Options window. Now your music
files on your HP Personal Media Drive appear in the Windows Media Player
library when your drive is connected to the PC.
When you disconnect the drive, your music files may still appear in the Windows
Media Player Library. To refresh your PC, open and close Windows Media Player. If
that doesn’t work, restart the PC.
Disconnecting the Drive
You can safely remove the drive when it is not active. When the amber activity light
is blinking, the drive is active saving or transferring data. Removing the drive while
the light is blinking may cause data loss or damaged files.
To disconnect the HP Personal Media Drive safely:
1 Close all programs that may be accessing your HP Personal Media Drive. Make
sure that the activity light on the drive is off.
2 Double-click the Safely Remove Hardware icon in the system tray
(on the Start taskbar). If this icon is hidden, click the arrows on the
taskbar to display it. The Safely Remove Hardware window opens.
3 Double-click USB Mass Storage Device to locate your HP Personal Media
Drive. USB Mass Storage Device may be listed twice. One may contain a
memory card reader or other mass storage drive.
4 Select the HP Personal Media Drive, and then click OK. The name of the
drive may be different if you renamed it, or it may appear as Generic Volume
followed by the assigned drive letter.
A Safe to Remove Hardware message appears in the system tray, letting you
know that the device is safe to disconnect.
5 Click Close.
6 Disconnect the drive by removing it from the drive bay.
Using the HP Personal Media Drive 33
Page 40

34 Getting Started Guide
Page 41

Working with Digital Images
Working with Digital Images
You can connect a digital image source, such as a digital camera or a digital video
camera, directly to the PC or through a docking station. Digital picture files you
copy or download from the device appear in the My Pictures folder. You can copy
digital picture files from the memory cards used by digital cameras and other digital
imaging devices by using the memory card reader (select models only). Refer to
“Using the Memory Card Reader” on page 19.
Working with Digital Images 35
Page 42

36 Getting Started Guide
Page 43

Playing CDs and DVDs
Your PC includes software that lets you play music CDs and DVD movies (select
models only). This section describes how to:
• Play music CDs using Windows Media Player, or play music CDs or DVDs
with iTunes.
• Play DVD movies using Windows Media Player or InterVideo WinDVD (select
models only).
• Play video CDs (VCD) with InterVideo WinDVD or Windows Media Player.
Playing Music CDs with iTunes
You must have either a CD or DVD drive.
1 Insert the music CD into your CD or DVD drive.
• The iTunes window opens. If the Audio CD wizard window opens, choose
Play Audio CD using iTunes from the list. You may have to scroll down
in the window to see iTunes.
Or
• If the iTunes window does not automatically open, click Start on the
taskbar, choose All Programs, click iTunes, and then click iTunes.
2 The music CD automatically begins to play.
Or
Click the CD in the source list, and then click the Play button in the upper-left
corner of the iTunes window. To play a particular song, double-click the song
name (or track number).
NOTE: If you do not have an Internet connection, your CD is listed as Audio CD
on the source list and your song names are listed as track numbers.
For more information on using iTunes, click the Help menu in the iTunes menu bar.
For help on line, go to:
http://www.hp.com/music/
Playing CDs and DVDs 37
Page 44

Playing CDs and DVDs with Windows Media Player
Your PC must have a DVD drive to play DVD movies.
1 Insert the music CD or DVD movie into the drive.
• The Windows Media Player window opens. If the wizard window opens,
select Windows Media Player from the list. You may have to scroll
down in the window to see Windows Media Player.
Or
• If the Windows Media Player window does not automatically open, click
Start on the taskbar, choose All Programs, and then click Windows
Media Player.
2 To play the CD or DVD, use the playback buttons in the Windows Media Player
window. To play a particular track, double-click the title (or track number) in the
Playlist. You can also control playback by using the media control buttons on
the keyboard (select models).
For more information on using Windows Media Player, click the Help menu in
the Windows Media Player menu bar. If necessary, first display the menu bar by
clicking the up arrow icon in the upper-left corner of the Windows Media Player
window.
Playing DVD Movies with InterVideo WinDVD
The InterVideo WinDVD program uses a DVD drive (select models only) to play DVD
movies.
NOTE: Most DVD movies are localized to geographical countries/regions. See
“Using country/region codes” on page 40.
1 Insert a DVD disc into the DVD drive.
NOTE: On a double-sided DVD, read the text around the inner hole of the
disc to determine which side (A versus B or Standard versus Widescreen) to
play. Place the disc in the tray with the label facing up for the side you want
to play.
38 Getting Started Guide
Page 45

2 Close the disc tray by gently pushing the tray into the PC.
The movie plays in its own resizable video window, and the WinDVD control
panel appears. If the Play DVD movie wizard window opens, select Play DVD
movie using InterVideo WinDVD from the list. You may have to scroll
down in the window to see it.
Or
If the program does not automatically open:
a Click Start, choose All Programs, choose InterVideo WinDVD, select
InterVideo WinDVD Player, and then click InterVideo WinDVD.
b Use the playback buttons on the control panel to view the movie.
NOTE: To see what a button does on the control panel, place the mouse pointer
on the button; the button title appears onscreen.
NOTE: If you are playing a movie full screen and the WinDVD control panel is
hidden, you can redisplay it by clicking anywhere in the video window.
To use the WinDVD control panel:
• To move the WinDVD control panel, place the mouse pointer on the panel (but
not on a button), and drag it to the desired location on the screen.
• To resize the video window when it is not full screen, place the mouse pointer
on a window corner and drag the border.
Or
Click the Full Screen button in the upper-right corner of the WinDVD
control panel.
• For information on the InterVideo WinDVD software, refer to the online
Help within the program by clicking the ? (question mark) icon in the WinDVD
control panel.
Playing CDs and DVDs 39
Page 46

Using country/region codes
Most DVD discs have country/region codes embedded in the disc data that limit
where the DVD movie can be played.
The country/region number is usually placed over a world globe printed on the
DVD packaging and disc. DVDs without country/region codes play on any player
or drive in any country/region.
WARNING: You can change countries/regions only five times before
the country/region code locks and becomes permanent. Once the
code locks, you can play DVDs from that country/region only. If the
country/region code locks, and you need help, contact Support.
WinDVD is not preset to a particular country/region — the country/region code of
the first DVD movie you play determines your DVD country/region.
For example, if you play a DVD with a country/region 1 code, WinDVD sets the
current country/region of your DVD player to 1. If you later play a DVD that is
coded for a different country/region, WinDVD asks if you want to set this as the
current country/region.
Playing Video CDs (VCD) with InterVideo WinDVD
1 Insert your video CD (VCD) into a DVD or CD drive.
2 Select Play DVD movie using InterVideo WinDVD, and click OK.
Or
If the program doesn’t open, click Start, choose All Programs, choose
InterVideo WinDVD, select InterVideo WinDVD Player, and then click
InterVideo WinDVD.
3 If you have a dual-language VCD, the sound of one language comes
out of the left speaker and the other language comes out of the right
speaker. Double-click the Volume icon on the taskbar.
4 Under Volume Control Balance, move the slider bar all the way to the right
or to the left, depending on which language you want to hear.
5 Close the Volume Control window.
40 Getting Started Guide
Page 47

Playing Video CDs (VCD) with Windows Media Player 9
1 Insert your video CD (VCD) into a DVD or CD drive.
2 Select Play DVD movie using Windows Media Player, and click OK.
Or
If the program doesn’t open, click Start, choose All Programs, and
Windows Media Player.
3 Click File on the menu bar at the top, and click Open. (If you do not see the
menu bar, click the small circle with the up/down arrows in the upper-left corner
of the window.)
4 Click the Look In drop-down arrow and select the drive that has the Video CD.
5 Double-click the MPEGAV folder.
6 Select Any File (*.*) from the Files of type drop-down list.
7 Select the file, and click Open.
8 If you have a dual-language VCD, the sound of one language comes out of the
left speaker and the other language comes out of the right speaker. Click View
on the menu bar, choose Enhancements, and select Graphic Equalizer.
9 Move the Balance slider bar all the way to the left or to the right, depending
on which language you want to hear.
10 Close the Graphic Equalizer window.
Playing CDs and DVDs 41
Page 48

42 Getting Started Guide
Page 49

Creating CDs and DVDs
NOTE: Burn is an industry term used to describe the recording of information onto a
DVD or CD. Optical recording uses a laser beam to place information onto the disc,
thus the term burning.
NOTE: If your recording fails, manually select a slower recording speed (if
available) each time you make a recording. Refer to the Help menu in your selected
software program or your troubleshooting documentation for more information
about selecting a slower recording speed.
NOTE: HP supports lawful use of technology and does not endorse or encourage the
use of its products for purposes other than those permitted by copyright law.
If your PC has a CD-RW or DVD Writer (select models only), your PC has recording
software and you can make your own music or data CDs.
Your PC has four recording software programs: iTunes, Windows Media Player,
RecordNow!, and Windows XP. You copy or download music to their libraries and
can then organize or copy the music files. You can copy Windows Media files that
have a .wma extension, .mp3 files, or .wav files to a CD by using a CD Writer or
DVD Writer drive. You can also use iTunes or Windows Media Player to copy music
files to a portable device or memory card.
Use a CD-R disc if you are going to play the disc in a CD player, CD-ROM, CD-RW,
DVD-ROM, or DVD+RW/+R, DVD-RW/-R, or double-layer DVD+R drive. CD-R discs
are compatible with more players than CD-RW discs.
Creating CDs and DVDs 43
Page 50

Using the Software Quick Reference Table
To open the DVD Writer/CD Writer software programs, click Start on the taskbar,
choose All Programs, select the program folder, and then click the program to
open the software. Refer to the following table to determine the best programs for
the tasks you want to do.
NOTE: You may have a software update CD included with your PC. You may need
to install this CD before using the DVD Writer/CD Writer drive. To do this, follow the
installation instructions that came with the CD.
Your PC comes with the following software programs. Use this table to find out what
you can do within each program.
NOTE: Some programs listed below may not be included with your PC model.
Software With this program you can
iTunes • Play music CDs, MP3s, and other audio files.
• Record music files.
• Record a copy of an existing music or data CD to use on
the PC.
• Organize digital files into a library for recording or
listening.
44 Getting Started Guide
Windows Media
Player
RealOne Player • Play music CDs, MP3s, and other audio files.
• Play music CDs, MP3s, and other audio files.
• Play DVD movies. (Windows Media Player can play
DVDs only if another DVD player program, such as
InterVideo WinDVD, is installed.)
• Play Windows Movie Maker files.
• Record music files.
• Organize digital files into a library for recording or
listening.
• Play DVD movies. (RealOne Player can play DVDs only
if another DVD player program, such as InterVideo
WinDVD, is installed.)
• Play video CDs.
• Record music files.
• Organize digital files into a library for recording or
listening.
Page 51

Software With this program you can
Windows
Movie Maker 2.0
• Import audio, video, and other media files from a
videotape, an audiotape, a Web camera, or a television
broadcast.
• Record audio and video files to create a video project
that becomes a Windows Media source file with a .wmv
extension.
• Edit and preview files.
• Send movie in an e-mail or to a Web server.
• Add music files (.mp3).
• Import audio files such as .mp3, .asf, or .wma; video
files such as .wmv, .asf, .avi, or .mpg; or image files
such as .jpg or .gif.
• Can create .avi and .wmv (Windows Media Video)
files.
InterVideo
• Play DVD movies and video CDs (VCD).
WinDVD
RecordNow! • Record data and music files.
• Record a copy of an existing music or data CD to use on
the PC.
• Create customized music CDs from CDs in your
collection, or from .wav, .mp3, or .wma files. These CDs
can be played in your home or car stereo.
• Copy and share data files.
• Copy short video files.
NOTE: Video files recorded with RecordNow! can be
viewed on a PC, but not on home DVD video players.
Creating CDs and DVDs 45
Page 52

Software With this program you can
InterVideo
WinDVD Creator
muvee
autoProducer
• Capture digital and analog video files directly from a
digital video (DV) camera, VCR, or other analog capture
device.
NOTE: Your PC may not include an analog capture device.
• Assemble movies by capturing video clips and scenes
into a video project.
• Edit your movies. Cut scenes and add music and sound
effects, still images, text, video transitions, and voiceovers.
• Preview movies during editing and before recording
final files.
• Create video files, export them to your hard disk drive
or your digital video camera, and then play them on
your PC.
• Create video files, record them to DVDs and CDs, and
then play them on some set-top DVD players.
• Record video files to seven different formats.
• Capture digital video files directly from a digital video
(DV) camera.
• Assemble movies that include your video clips and
pictures.
• Add your favorite music to the background.
• Add captions to the beginning and end of your movie.
• Choose from a variety of styles to give your movie a
unique look.
46 Getting Started Guide
Creating Music CDs with iTunes
To create a music CD using iTunes:
1 Click Start on the taskbar, choose All Programs, select iTunes, and then
click iTunes.
2 Click the Edit menu, and select Preferences.
3 Click the Burning tab, and choose Audio CD as the Disc Format.
4 Click the Use Sound Check check box if you would like all songs on the CD
to play at the same volume level, and click OK.
5 Click the File pull-down menu, and select New Playlist.
6 Enter a name for your new playlist, and an empty playlist window opens.
7 Drag and drop selected songs from your source to your new playlist.
8 Click the Burn Disc button in the upper-right corner.
Page 53

9 Insert a blank disc into your drive. Do not use a double-layer DVD+R disc, they
are not compatible with this program.
10 Click OK.
For more information on using iTunes, click the Help menu in the iTunes menu bar
or refer to your iPod Warranty and Support Guide.
Creating Music CDs with Windows Media Player
1 Click Start on the taskbar, choose All Programs, and then click Windows
Media Player.
2 Click Copy to CD or Device.
3 Click the drop-down arrow in the Items to Copy field, and select the songs
you want to burn to a CD.
If there are not any songs listed, insert a CD into your drive, and click Copy
from CD. Follow the onscreen instructions.
4 Click the Copy button in the upper-right corner.
For more information on using Windows Media Player, click the Help menu in the
Windows Media Player menu bar. If necessary, first display the menu bar by
clicking the Up arrow icon in the upper-left corner of the Windows Media Player
window.
Creating Data CDs Using Windows XP
Your PC has recording software to record data files, such as text files or digital
pictures, onto CDs.
1 Click Start on the taskbar, and choose My Documents or the folder that has
the files you want to copy.
2 Select the file or files you want to copy.
3 Click Copy to CD in the Tasks list.
4 Click My Computer in the Other Places list, and then double-click the disc
drive you want to use.
5 Insert a blank disc into the drive.
6 Click Write these files to CD in the CD Writing Tasks list. The CD Writing
Wizard window appears.
7 Click Next.
8 Click Finish.
Creating CDs and DVDs 47
Page 54

Creating CDs with RecordNow!
NOTE: For more information about recording CDs, refer to the Help menu in the
RecordNow! software program.
NOTE: The CD-RW, DVD Writer, or Double-Layer drive is available on select
models only.
1 Click Start on the taskbar.
2 Choose All Programs.
3 Click Sonic RecordNow!, and then click RecordNow! again.
4 If you need to erase a disc (CD-RW, DVD+RW, or DVD-RW): Insert the disc, and
select the Home Screen Tab, and then select Erase Disc.
Creating Music CDs with RecordNow!
RecordNow! creates closed session music CDs, which means you must record all
music files on one CD in one recording session. Music files can be recorded
repeatedly on a rewritable CD-RW disc, but all previously recorded files must be
erased first. CD-R discs cannot be erased.
NOTE: CD-R discs play in most home and car stereos. CD-RW discs play only in
some stereos.
IMPORTANT: HP supports the lawful use of technology and does not endorse or
encourage the use of its products for purposes other than those permitted by
copyright law.
Tips
You can use RecordNow! to create audio CDs to play in your car, on your home CD
player, or on your PC.
When recording music files, it is important to note that:
• To play your music CD in a home or car stereo, it needs to be recorded as a
music CD in CD Audio (CDA) format, not as a data CD.
• You must record all music files in one recording session because RecordNow!
closes the CD after recording is complete. Music files can be recorded
repeatedly onto a rewritable (CD-RW) disc, but all previously recorded music
files must be erased first.
48 Getting Started Guide
Page 55

• As you add music files in the recording session, RecordNow! calculates and
displays the amount of recording time available to record additional music files.
• You can’t record song titles unless you make an exact copy of a music CD in
your collection.
• If you try to record more than a standard CD can hold, RecordNow! displays a
message warning you that all the tracks may not fit on your disc.
Creating CDs to Play in Your Car or Home CD Players with RecordNow!
1 Click Start, choose All Programs, Sonic RecordNow!, and then click
RecordNow!.
2 Select the Audio Projects tab.
3 Select Audio CD for Car or Home CD Player.
4 Insert a music CD to view the tracks on your CD. Select View if you would like
to look at another optical drive.
Or
Click Find, and then click either Scan for Music or Browse to find music
files on your hard disk drive that you want to record.
5 Select the tracks you want to record, and then click Add.
NOTE: Press and hold Ctrl on your keyboard to select more than one track.
6 Click the Burn icon when you have added all the audio files to your
music CD project.
7 Click Yes.
8 When prompted, insert a blank CD-R or CD-RW disc.
9 Click OK. It is best not to use the PC while recording.
10 Click Done when recording is complete.
Click the Help icon, and then select RecordNow! Help for more information
about recording music CDs with the RecordNow! program.
Creating CDs and DVDs 49
Page 56

Creating CDs to Play on Your PC
1 Click Start, choose All Programs, Sonic RecordNow!, and then click
RecordNow!.
2 Click the Audio Projects tab.
3 Select Jukebox CD.
4 Insert a music CD to view the tracks on your CD.
Or
Click Find, and then click either Scan for Music or Browse to find music
files on your hard disk drive that you want to record.
NOTE: RecordNow! scans for all audio files, even the sounds from your
operating system. If you don’t want to display some of these sounds,
you can select the Options icon (wrench), and then select Audio.
Select Hide audio files shorter than (in seconds), type the
number of seconds, and click OK.
5 Select the tracks you want to record, and then click Add.
NOTE: Press and hold the Ctrl key to select more than one track.
6 Click the Burn icon when you have added all the audio files to your
music CD project.
7 Click Yes.
8 When prompted, insert a blank CD-R or CD-RW disc. If the CD-RW disc is not
blank, RecordNow! prompts you to erase it and then automatically begins
writing to it when it is erased.
50 Getting Started Guide
NOTE: If you want to play your music CD in your home or car stereo, use a
CD-R disc. CD-RW discs may not play in some stereos.
9 Click OK. It is best not to use the PC while recording.
10 Click Done when recording is complete.
Click the Help icon, and then select RecordNow! Help for more information
about recording music CDs with the RecordNow! program.
Page 57

Storing Files on a DVD or CD
Unlike music CDs, data DVDs and CDs can be recorded in multiple sessions.
1 Click Start, choose All Programs, Sonic RecordNow!, and then click
RecordNow!.
2 Select the Data Projects tab.
3 Insert a blank or appendable CD-R, CD-RW, DVD+R, DVD+RW,
DVD-R, DVD-RW, or Double-Layer DVD+R (select models) disc into
your drive, and then click Data Disc.
• If the disc is blank, follow the onscreen instructions.
Or
• If the disc is full, insert a blank or another appendable disc.
Or
• If you are adding files to a disc, follow the onscreen instructions.
NOTE: An appendable disc means additional files can be added to it, if there is
disc space available. Recorded audio CDs are closed session discs, which are
not appendable.
4 To name your disc, select Volume Label, and then type a name over it.
RecordNow! assigns a name based on the recording date if you don’t type
aname.
5 Add your data files to the file selection window:
• Click the Add Files and Folders button, find and select your folders and
files, and then click Add. Repeat this step until all files are added.
Or
Creating CDs and DVDs 51
Page 58

• Drag your file from your desktop or from anywhere in Windows Explorer
into the file selection window. Repeat this step until all files are added.
NOTE: You can rename your files in the file selection window by selecting and
typing over the current name. This does not affect the original files on your hard
disk drive.
6 Click the Burn icon when all of your files have been added.
7 Click Done when recording is complete.
Click the Help icon, and then click RecordNow! Help for more
information about recording data files with the RecordNow! program.
Storing Data Files on Disc
When storing data files on a disc, it is important to note that:
• You can add new data files to a CD-R, DVD+R, and a DVD-R in a later
recording session, until the disc is full. With DVD+R and DVD-R discs,
you need to select the correct setting in RecordNow! to record files in
a later session. To do this, insert your recorded DVD, open
RecordNow!, click the Options icon (wrench), click Data, select the
recording option you want, and then click OK.
• When you record files that have the same name as previously recorded
files, RecordNow! updates the file and the previous version is overwritten.
• RecordNow! allows you to change file names and titles of files you want to
record and names of files that were previously recorded.
• As you select data files to record to your disc, RecordNow! calculates and
displays the amount of recording space used on your disc.
52 Getting Started Guide
Copying a DVD or CD
IMPORTANT: HP supports the lawful use of technology and does not endorse or
encourage the use of our products for purposes other than those permitted by
copyright law.
RecordNow! allows you to make a copy of a music or data disc from your
collection. You can’t copy commercial DVDs because they are protected by
copyright laws and are encoded to prevent illegal duplication.
To make a copy of a music or data disc from your collection:
1 Click Start, choose All Programs, Sonic RecordNow!, and then click
RecordNow!.
2 Select the Data Projects tab.
3 Select Exact Copy.
4 Insert the CD or DVD you want to copy.
Page 59

5 Click the Copy icon.
6 Insert a blank DVD or CD into the drive, and then click OK.
7 Click Done when the recording is complete.
Erasing a DVD or CD
You can use RecordNow! to erase music, data, or video files from rewritable DVDs
and CDs, leaving almost all the disc space available for new recordings.
If you try to record a video or music file to a rewritable disc that has files on it, the
recording program prompts you to erase the disc first.
1 Click Start, choose All Programs, Sonic RecordNow!, and then click
RecordNow!.
2 Insert the DVD+RW, DVD-RW, or CD-RW you want to erase. If an Auto Play
window opens, click Cancel.
3 Select the Home Screen tab and then Erase Disc.
4 Click Yes to confirm that you want to erase the disc.
Removing Files in RecordNow!
When removing files in RecordNow!, it is important to note:
• When you remove a recorded file from a data DVD+R, DVD-R, or CD-R, the
disc space is lost and can’t be used for new recordings.
• You can’t remove music files from previously recorded music CDs, but you can
remove music files from the File Selection window in RecordNow! before you
record the files to your disc.
• If you delete files from the File Selection window in RecordNow! before the disc
is recorded, available disc space is not affected. If you remove a file from a
DVD+R, DVD-R, or CD-R after the disc is recorded, available disc space is lost.
Removing Files from a Recorded Data Disc
RecordNow! can’t erase files from recordable (record once) DVDs or CDs, but files
that have been previously recorded can be removed. When you remove a recorded
file from a data DVD+R, DVD-R, or CD-R, the disc space is lost and can’t be used for
new recordings.
Creating CDs and DVDs 53
Page 60

To remove data files from a recorded DVD or CD:
1 Click Start, choose All Programs, Sonic RecordNow!, and then click
RecordNow!.
2 Select the Data Projects tab.
3 Insert the disc from which you want to remove files. If an Auto Play
window opens, click Cancel.
4 Click Data Disc.
5 You must have at least one file on your data disc to re-record it. Select
the file you want to remove, and then click the Remove icon in the
upper-right corner.
6 Click Yes.
7 Click the Burn icon to save your data disc without the files you
removed.
8 Click Done when the recording is complete.
Archiving Files on a DVD or CD
1 Click Start, choose All Programs, Sonic RecordNow!, and then click
RecordNow!.
2 Select the Backup Projects tab.
3 Select File Archive.
4 Insert a blank CD or DVD into the drive.
5 Place a check mark in the Changed since box to limit the scan to files that
have been changed since the last time you completed a File Archive.
6 Add your files to the Archive window:
• Select one or more categories from the list on the left, and click Scan.
RecordNow! scans your hard disk for files related to the category and
moves them to the Archive window on the right.
Or
• Drag files from the Windows Explorer to the Archive window.
7 Click the Burn icon when all of your files have been added.
If the files do not fit on one disc, File Archive asks you for
additional discs.
8 Click Done when recording is complete.
54 Getting Started Guide
Creating an Image File
RecordNow! can take all the files from a CD or DVD and convert them into a single
file called an image file. You can use the image file to reproduce the original disc.
This is often used when you need to make multiple copies of the same disc.
Page 61

Saving an Image
1 Click Start, choose All Programs, Sonic RecordNow!, and then click
RecordNow!.
2 Select the Backup Projects tab.
3 Select Save Image.
4 Insert the source disc into the drive.
5 Click Browse to set the destination and name of the image file.
6 Click the Save icon to create the image file.
Burning an Image
1 Click Start, choose All Programs, Sonic RecordNow!, and then click
RecordNow!.
2 Select the Backup Projects tab.
3 Select Burn Image.
4 Click the Browse button to locate your saved image file.
5 Click the Burn icon.
6 Insert a blank recordable CD or DVD into the drive.
7 Click Done when recording is complete.
Recording Video Files
Video quality depends on the quality of the source files, the PC speed, and its
graphics processing ability. Refer to the “Recording VHS analog video direct to DVD
(select models only)” section of this guide.
NOTE: Your DVD Writer or CD Writer drive will not copy commercially available
DVD movies. Most commercial DVDs are encoded to prevent unauthorized
duplication.
Using Disc Labels
WARNING: When labeling your DVDs, do not use sticky labels. They
can cause the DVD to play erratically. Instead, write on the DVD with
a felt-tip pen to label it.
Creating CDs and DVDs 55
Page 62

Disc Labeling with LightScribe
LightScribe (select models only) is a direct disc labeling technology providing you a
simple way to burn precise, silk-screen quality labels. It combines the CD or DVD
drive of your PC with specially coated discs (sold separately) and enhanced disclabeling software.
A LightScribe-enabled CD or DVD disc drive uses the optical laser in the drive to
burn a label onto a thin dye coating on the label side of the disc. There is no ink to
smear or paper to curl, and there are no adhesives to loosen.
LightScribe media is identified by the LightScribe logo on the retail packaging and
on the inner hub area of the disc itself. Your PC comes ready to work with many
versions of LightScribe media; however, as new media versions are introduced you
will need to update the driver software for your LightScribe-enabled CD or DVD
drive. Get driver updates from the HP Support Web site.
Lightscribe requirements
Burning a label with LightScribe requires three things:
• LightScribe-enabled DVD drive
• LightScribe software
• LightScribe discs (sold separately)
Burning a label on a LightScribe media disc
You can burn the label before or after you burn the disc with data, music, or picture
files. Labels can be a simple title and contents list or you can get more creative by
adding backgrounds and images.
You can design and burn the label with InterVideo Disc Label or Sonic Express
Labeler.
1 Click Start, All Programs, InterVideo DiscLabel, and then click
InterVideo DiscLabel again.
2 Select a template style from the Template menu, and click Apply.
3 Double-click the title text box, if present, or click Add Text.
4 Type the text into the Rich Text Edit window, and then click OK.
5 With the text box selected (click the box once), use the Text toolbar to modify
the font, color, and other text properties.
6 Double-click the list text box, if present, or click Add List to add a list of
contents to the label.
7 Click Add to add a row to the list.
8 Move the cursor over a list row item (Title, Artist, Length), and double-click to
edit the item.
9 Click OK when you are finished with the list.
56 Getting Started Guide
Page 63

10 Click Edit Background, and then click Change Background to add a
background image to the label.
11 Follow the onscreen instructions to browse to and select an image file.
InterVideo Disc Label supports .jpg, .bmp, and .png image files.
NOTE: LightScribe creates a grayscale (monochrome) image similar to a black
and white photograph.
12 Click Add Image and follow the onscreen instructions to browse to and select
an image file. InterVideo Disc Label supports .jpg, .bmp, and .png image files.
13 Click and drag the image to the area you want it to appear on the label. You
can resize the image by clicking and dragging the sides or corners of the
image.
NOTE: To remove an image from the label, click the image, and then press
Delete on your keyboard.
14 When you are satisfied with the appearance of your label design, click
LightScribe Print. Click Print, insert the LightScribe media (label side down)
in the disc tray, and then click OK.
To burn a label with Sonic Express Labeler:
1 Click Start, All Programs, Sonic RecordNow!, and then click Express
Labeler.
NOTE: You can open the Express Labeler from within RecordNow! by clicking
Label Disc.
2 Select the Project area and make sure that Disc Label is selected.
3 Click Text, and then enter text for the Title and Subtitle.
4 For each line of content description, click New and enter text for the
information you want to include, and then click OK.
5 Select a label template by clicking Layout and choosing a layout.
6 Select a background, if desired, by clicking Background. Select one of the
provided backgrounds, or click More to find one of your own images to use as
a background.
NOTE: LightScribe creates a grayscale (monochrome) image similar to a black
and white photograph.
7 When you are satisfied with the appearance of your label, insert the
LightScribe media disc (label side down) into the disc drive tray, and then click
Print.
8 From the Disc Label menu, select LightScribe 12cm Disc.
9 Select a Contrast Level, and then click OK to begin burning the label.
Creating CDs and DVDs 57
Page 64

Creating a LightScribe label after burning a disc with iTunes
iTunes works with Sonic Express Labeler to allow you to burn labels on a data CD or
audio CD. The playlist you create in iTunes to burn a disc is automatically imported
into Express Labeler so that this information is available for you to use on your
LightScribe label. To use Express Labeler from iTunes, the data or music tracks in the
playlist you are using must fit on a single CD.
1 Click Start, All Programs, iTunes, and then click iTunes again.
2 Burn a data or audio CD with iTunes. When the burning process is complete,
click Yes on the Create LightScribe Label window.
3 In the Step 1: Select Project area, make sure that Disc Label is selected.
4 Select a label template by clicking Layout and choosing a layout. The various
layouts show different amounts of playlist information. Some show only the
playlist title and others show the playlist title and track names. You can edit
playlist information by clicking Text to open the Edit Text window.
5 Select a background, if desired, by clicking Background. Select one of the
provided backgrounds or click More to find one of your own images to use as
a background.
NOTE: LightScribe creates a grayscale (monochrome) image similar to a black
and white photograph.
6 When you are satisfied with the appearance of your label design, insert the
LightScribe disc (label side down) into the disc drive tray and then click Print.
7 From the Disc Label menu, select LightScribe 12cm Disc.
8 Select a Contrast Level and then click OK to begin burning the label.
The estimated time to complete the label displays, along with a progress bar to
show you the time remaining. You can continue to work on your PC while
LightScribe is burning the label.
Setting Automatic Recording Options
When you first insert a blank CD into your DVD Writer or CD Writer drive, you may
see options for the type of disc you insert.
NOTE: When you insert a blank DVD into your DVD Writer/CD Writer drive, an
options window does not appear. You must open the program you want to use with
your DVD, and then perform an action.
58 Getting Started Guide
Page 65

For example, if you insert a blank CD-RW disc, you see options such as:
• Open writable CD folder using Windows Explorer.
• Create a disc using RecordNow!.
• Take no ac tion .
The options displayed depend on what software is on the PC.
You can choose to have a specific action occur automatically each time you insert a
blank CD by selecting the Always do the selected action check box.
If you later decide that you want to change the option you have set:
1 Click Start.
2 Click My Computer.
3 Right-click the DVD Writer or CD Writer drive icon (may be labeled
DVD/CD-RW), and select Properties.
4 Click the AutoPlay tab.
5 Click Select an action to perform, select an action, and then click OK.
Or
Click Prompt me each time to choose an action, and then click OK.
If this window of options does not appear, you can click Start, My Computer,
right-click the DVD Writer or CD Writer drive icon (may be labeled
DVD/CD-RW), and then select one of the available options.
You can also open a program before you insert a disc. After the program is opened,
select an action and follow the onscreen instructions within the program.
If the option you want is not listed, you can select Take no action, and then click
OK. The window closes, and you can then manually select a different option
through the Start menu on the desktop.
Creating CDs and DVDs 59
Page 66

Here are some of the other options you can choose to view the files on the disc you
inserted:
• Click Start, My Computer, and then right-click the DVD Writer/
CD Writer drive icon and choose Explore.
• Click Start, My Computer, and then double-click the DVD Writer/
CD Writer drive icon.
Using Compatibility Information
An important feature of a DVD Writer/CD Writer drive is its high level of
compatibility with other optical drives and CD and DVD players.
• The CDs that you create play in most home and car stereos and in most
computer DVD-ROM and CD-ROM drives.
NOTE: CD-R discs are compatible with more home and car stereos than
CD-RW discs.
• The DVDs that you create are compatible with some DVD video players and
with most computer DVD-ROM drives.
Your DVD Writer/CD Writer drive is able to read from and record to almost every
type of optical disc. Writing speed rates for the DVD Writer/CD Writer drive allow
quick recording times.
Identifying Compatible File Formats
Your DVD Writer/CD Writer drive can read and record the following audio formats:
• WAV, MP3, WMA, and CDA for CDs
• WAV, MPEG-1, MPEG-2, WMA, and Layer 2 files for DVDs
Your DVD Writer/CD Writer drive can read and record the following video formats:
• MPEG-1 and MPEG-2
• AVI an d WMV
60 Getting Started Guide
Page 67

Using the Disc Quick Reference Tables
You can use DVD+RW, DVD+R, DVD-R (select models only), DVD-RW (select models
only), double-layer DVD+R, CD-RW, and CD-R discs in the DVD Writer/CD Writer
drive.
NOTE: Some PCs come with the Double-Layer DVD-Writer drive support single-layer
and double-layer DVD media. Double-Layer technology gives you greater capacity
and allows you to store up to 8.5GB* of data on double-layer DVD+R media.
Double-layer is a new technology. The double-layer media created may not work
with some home DVD players and computer DVD-ROM drives.
*GB is defined as 1 billion bytes.
For the latest disc compatibility information for your PC, check the following Web
site: http://www.hp.com
Using double-layer DVD+R discs
• Can only be written to with a Double-Layer DVD-Writer drive (select
models only).
• Can’t be erased or written to again.
• Hold up to 8.5GB — the equivalent of 12 CDs.
• Record up to 4 hours of video files, depending on the quality of the recording.
• Can be used to back up your hard disk drive files.
Using DVD+R and DVD-R discs
• Can’t be erased or written to again. Some programs, like RecordNow!, allow
you to record data in multiple sessions until the disc is full.
• Can’t edit a DVD+R or DVD-R that has been recorded as a DVD movie.
• Hold up to 4.7GB — the equivalent of seven CDs.
• Record up to 2 hours of video files, depending on the quality of the recording.
• Compatible with more DVD drives and players than a DVD+RW or
DVD-RW disc.
• Can be used to back up your hard disk drive files.
Using DVD+RW and DVD-RW discs
• Can be erased and rewritten.
• Can hold up to 4.7GB — equivalent of seven CDs.
• Record up to 2 hours of video files, depending on the quality of the recording.
• Can be used to back up hard disk drive files that you can update periodically.
Creating CDs and DVDs 61
Page 68

Using CD-R discs
• Can’t be erased or written to again. Some programs, like RecordNow!, allow
you to record data in multiple sessions until the disc is full.
• Can hold up to 80 minutes of music files, or up to 99 tracks.
• Can hold up to 700MB of data, depending on the CD.
• Can be used to create storage discs for your hard disk drive files.
Using CD-RW discs
• Can be erased or rewritten.
• Can hold up to 80 minutes of music files, or up to 99 tracks.
• Can hold up to 700MB of data, depending on the CD.
• Can be used to create storage discs for your hard disk drive files.
Video recording length
Disc type
8.5GB Double-Layer
DVD+R
4.7GB DVD+RW,
DVD+R, DVD--RW,
DVD-R
700MB CD-RW, CD-R 27 minutes 18 minutes 9 minutes
650MB CD-RW, CD-R 24 minutes 16 minutes 8 minutes
NOTE: CD-R discs are compatible with more home and car stereos than
CD-RW discs.
Video quality setting
Good Better Best
325 minutes 217 minutes 108 minutes
180 minutes 120 minutes 60 minutes
62 Getting Started Guide
Page 69

Disc feature and compatibility
Disc File type Can be
recorded
onto
Plays
in PC
Plays in
home or
car stereo
Plays in
home
DVD
player
CD-ROM Data No Yes No No
Music No Yes Yes Varies by
player
CD-R Data Yes Yes No No
MP3 Music Yes Yes Varies by
player
Varies by
player
CD-RW Data Yes Yes No No
MP3 Music Yes Yes Varies by
player
Varies by
player
DVD-ROM Data No Yes No No
DVD movie No Yes No Yes
DVD+R
Data Yes Yes No No
and
DVD-R
DVD movie Yes Yes No Varies by
player
DoubleLayer
DVD+R
DVD+RW
and
DVD-RW
Data Yes Varies by
player
DVD movie Yes Varies by
player
Data Yes Yes No No
DVD movie Yes Yes No Varies by
No Varies by
player
No Varies by
player
player
VCD DVD movie No Yes No Varies by
player
Creating CDs and DVDs 63
Page 70

Optical drive quick reference
Optical
drive can
Read CDs,
CD-Rs, and
CD-RWs
Read
DVDs
Read data
on a CD
Play music
Record
data or
music to
disc for
storage or
backup
View DVD
movies
Record
DVD
movies
CDROM
CD-RWDVD-
ROM
DVD+RW/+R
DVD-RW/–R
DoubleLayer
Combo
CD-RW/
DVD
64 Getting Started Guide
Play PC
games
Page 71

Creating Movies Using WinDVD Creator
WinDVD Creator allows you to capture (copy), edit, and record your home movies
in four easy steps by using the InterVideo WinDVD Creator software program (select
models only).
Capture: Take videos and pictures from digital camcorders, analog video devices,
and Webcams, and then save them to your hard disk drive.
Edit: Arrange and trim your files. Add titles, transition effects, images, and audio.
Add menu: Add a menu with chapters to your DVD.
Make Movie: Finalize your project by burning your movie to a DVD.
For more information on WinDVD Creator, click the Help menu in the
WinDVD Creator menu bar.
Getting started
1 Click Start, choose All Programs, InterVideo WinDVD, InterVideo
WinDVD Creator, and then click InterVideo WinDVD Creator again.
2 Select one of the menu options:
• Start New Project: Opens the Edit section for you to begin creating a
new project.
• Open existing project: Opens the Open window for you to select an
existing project.
• Archive Video to DVD: Opens a wizard for you to bypass the hard disk
drive and record directly from your camera to a recordable DVD or CD.
• Edit Existing Video File: Opens the Import Media Files window for you
to select an existing video clip.
• Record to Video File: Opens the Capture section for you to capture
media.
• CD Labeling: Opens the InterVideo Disc Label program for you to design
and create your own disc labels.
Creating Movies Using WinDVD Creator 65
Page 72

Using the Preview window
The Preview window is located in the upper-left corner. It behaves differently for
each task.
Capture: Displays what your capture device is viewing.
Edit: Plays back the selected video or displays the selected image.
Add Menu: Displays what your menu and buttons look like.
Using the Media Library
The Media Library contains your video clips, images, and audio tracks. To import
existing media files from your hard disk or CDs into your Media Library, click the
Drag and Drop button.
Capture: Located in bottom-right corner. Contains your video clips, images, and
audio tracks.
Edit: Located in upper-right corner. Contains your video clips, images, and audio
tracks.
Add Menu: Located in upper-right corner. Contains menu themes, video
backgrounds, audio tracks, images, buttons, chapter layouts, and chapter
thumbnails.
Using the Storyboard
The Storyboard is located on the bottom of the Edit and Add Menu area. The
Storyboard can be displayed in either Menu Picker or Timeline mode. Use the
Storyboard to organize your media and add special effects such as titles, transition
effects, audio tracks, and video filters.
Identifying requirements for capturing video
You can copy (capture) video files to your hard disk drive by using the
WinDVD Creator program. Among the devices supported by WinDVD Creator are
analog video devices, digital camcorders, and Web cameras. Use your composite
or S-video inputs to capture video from a VCR, or an analog video camera.
To capture video files, you need to:
• Connect your video source device properly.
• Turn your device on and set it to playback mode.
• Make sure the program you want to use can detect your digital or analog
device. In the WinDVD Creator capture screen, click your input source, click the
Wrench icon, select the Device Control tab, and select your source from the
Video Source drop-down menu.
66 Getting Started Guide
Page 73

NOTE: You may need to turn your device off and on again for the program to
detect it.
If your PC has multiple video devices connected, they all appear on the Capture
screen. Select the video source you would like to use.
Capturing digital camcorder video
1 Click Start, choose All Programs, InterVideo WinDVD, InterVideo
WinDVD Creator, and then click InterVideo WinDVD Creator again.
2 Click the Record to Video File button.
3 Connect your digital camcorder to your PC.
4 Make sure the output from your digital camcorder appears in the Preview
window. If it does not, double-check your connections and make sure your
camera is in playback mode.
5 Click the Play button to preview your video file before you record it.
6 Find your starting point in the video, and click the Pause button.
7 Click the Record button.
8 Enter a file name, click Save, and recording begins.
9 Click the Stop button to stop capturing your video file. Your video file is
processed and automatically saved to the My Videos folder on your hard disk
drive. The video clip appears in the Media Library portion of the screen.
10 To play back your captured video, click the file in the Media Library, and click
the Play button in the Preview window.
Capturing Web camera video
1 Click Start, choose All Programs, InterVideo WinDVD, InterVideo
WinDVD Creator, and then click InterVideo WinDVD Creator again.
2 Click the Record to Video File button.
3 Connect your Web camera to your PC.
4 Make sure the output from your Web camera appears in the Preview window.
If it does not, double-check your connections.
5 Click the Record button.
6 Enter a file name, click Save, and recording begins.
7 Click the Stop button to stop capturing your video file. Your video file is
processed and automatically saved to the My Videos folder on your hard disk
drive. The video clip appears in the Media Library portion of the screen.
8 To play back your captured video, click the file in the Media Library, and click
the Play button in the Preview window.
Creating Movies Using WinDVD Creator 67
Page 74

Capturing analog video
1 Click Start, choose All Programs, InterVideo WinDVD, InterVideo
WinDVD Creator, and then click InterVideo WinDVD Creator again.
2 Click the Record to Video File button.
3 Connect your VCR, television, or other input device to your composite or
S-video inputs.
4 Click your input source, click the Wrench icon, and select the Device
Control tab.
5 Select your composite or S-video source in the Video Source drop-down menu.
Click OK.
6 Click the Record button.
7 Enter a file name, click Save, and recording begins.
8 Click the Stop button to stop capturing your video file. Your video file is
processed and automatically saved to the My Videos folder on your hard disk
drive. The video clip appears in the Media Library portion of the screen.
9 To play back your captured video, click the file in the Media Library and click
the Play button in the Preview window.
Capturing a still image
1 Pause your input device on the position for which you would like an image.
2 Click the Capture Still Image button under the Preview window.
3 The image is saved to the My Pictures folder on your hard disk drive.
68 Getting Started Guide
Editing video files in WinDVD Creator
After you capture video files, use the WinDVD Creator Edit module to create your
customized video file. In Edit mode you can add:
• Video files
• Still images
• Audio and music tracks
• Transition effects
• Title effects
• Video filters
To edi t you r vid eo fi les:
1 If your project is already open, click the Edit button, and skip to step 4.
2 Click Start, choose All Programs, InterVideo WinDVD, InterVideo
WinDVD Creator, and then click InterVideo WinDVD Creator again.
3 Open a project by selecting either the Start New Project or the Open
Existing Project button.
Page 75

4 If you have already captured video for this project, drag and drop the video
files from the Media Library to the Storyboard. If you have video files on your
hard disk drive you would like to add to this project, click the Drag and Drop
button.
5 If you do not like the sequence of the video files, drag and drop the files in the
Storyboard to change the sequence.
Adding images
1 Click the Image Library icon.
2 Click the Drag and Drop button to open the My Pictures folder on
your hard disk drive.
3 Select the images from your hard disk you would like to add to your Image
Library, and click Open.
4 Drag and drop images from the Image Library to your Storyboard.
Click the following icons to edit still images and video files:
Storyboard icons
Group Groups multiple images into one on the Storyboard.
Expand Expands grouped images so they are all displayed on the
Storyboard.
Save Movie Records output directly to a DV camcorder. Or writes
output to a file in your selected format.
Edit Clip Trims a video clip:
1 Double-click a video clip on the Storyboard.
2 Adjust the sliders to cut off video at the beginning or
the end.
Merge Clip Merges a clip with the next clip.
Split Clip Splits a video clip:
1 Click the video clip you want to split.
2 Click the Play button in the Preview window.
3 Click the Split Clip icon at the point of the clip you
want split.
Adding audio effects
1 Click the Audio Library icon.
2 Click the Drag and Drop button to open the My Music folder on your
hard disk drive.
Creating Movies Using WinDVD Creator 69
Page 76

3 Select the audio files from your hard disk you want to add to your audio library,
and click Open.
4 Drag and drop the audio files from the Audio Library to the video file of your
choice.
5 A musical note icon appears in the bottom right corner of the video file to which
the audio track was assigned.
6 To keep the audio track running for more than one video file, switch from
Storyboard mode to Timeline mode. Drag the music track across more than one
video file.
Adding transition effects
1 Click the Transition Effects icon.
2 Drag and drop a transition effect between the two video files you
would like the effect to appear.
Adding title effects
1 Click the Title Effects icon.
2 Drag and drop a title effect either in between video files or to a video
file on the Storyboard.
3 Type the text you would like to appear on your title screen.
4 If you inserted the title effect in between video clips, click on the Image
Setting icon to adjust the length of time you want the title clip to appear.
A capital T appears in the bottom-right corner of the title clip on the Storyboard.
Adding video filters
1 Click the Video Filters icon.
2 Drag and drop a video filter to the video of your choice.
Adding a menu
The Add Menu section turns your project interactive. It creates a menu theme and
breaks your project into chapters. The menu theme can be your own images and
music or a custom theme that comes with WinDVD Creator.
1 If your project is already open, click the Add Menu button.
2 Click Start, choose All Programs, InterVideo WinDVD, InterVideo
WinDVD Creator, and then click InterVideo WinDVD Creator again.
70 Getting Started Guide
Page 77

3 Select the Open existing project button, and select your project.
4 Click the Add Menu button.
5 Click the Media Library icons to add a menu theme, chapters, buttons, audio
tracks, and images to your DVD.
6 Click the Storyboard icons to edit the chapters and menu items.
Making a movie
This is the final step of your DVD project. You select a format, the type of TV system,
and volume name.
1 If your project is already open, click the Make Movie button, and skip to
step 5.
2 Click Start, choose All Programs, InterVideo WinDVD, InterVideo
WinDVD Creator, and then click InterVideo WinDVD Creator again.
3 Select the Open existing project button, and select your project.
4 Click the Make Movie button.
5 Insert a blank recordable DVD or CD into your drive.
6 Choose one from each of the following sections (order of selections may differ):
Select To:
Burn to Disc Select where you would like the file to be recorded:
• Burn to Disc: Use this to burn directly to a DVD or CD.
• Write content to hard disk for later burning: Use
this to create the file on your hard disk drive.
Select
Device
Burning
Speed
Format Select one of the formats to record your project.
TV System Select either NTSC or PAL for your TV system. The NTSC
Volume
Name
of Disc
7 Click Start.
8 Click OK.
Select the device that contains the blank recordable DVD
or CD.
Select the speed to use when recording your project.
format is used in North America, and the PAL format is used in
European and Asian countries/regions.
Enter a volume name for your disc (optional).
Creating Movies Using WinDVD Creator 71
Page 78

Recording VHS analog video direct to DVD (select models only)
To record VHS analog video direct to DVDs:
1 Connect your VCR or other analog video source to your composite or
S-video input.
2 Insert a blank recordable DVD or CD.
3 Click Start, choose All Programs, InterVideo WinDVD, InterVideo
WinDVD Creator, and then click InterVideo WinDVD Creator again.
4 Select the Archive Video to DVD button, and follow the onscreen
instructions.
Converting recorded TV to MPEG-2 format (Europe only)
1 If your project is already open, click the Edit button, and skip to step 4.
2 Click Start, choose All Programs, InterVideo WinDVD, InterVideo
WinDVD Creator, and then click InterVideo WinDVD Creator again.
3 Open a project by selecting either the Start New Project or the Open
Existing Project button.
4 Click the Save Movie icon, and select Output to File.
5 Select a GQ, HQ, SP, LP, or EP format, and click OK.
6 Enter a file name and click Save.
72 Getting Started Guide
Page 79

Getting Help
Finding Onscreen Guides
The Documentation folder (select models only) in the All Programs menu contains
any onscreen guides included with your PC.
To see the items in the Documentation folder:
1 Click Start on the taskbar.
2 Choose All Programs.
3 Choose Documentation.
4 Click an item to view it or use it.
NOTE: If there are no guide titles listed in the folder, your PC has no onscreen
guides.
Finding Guides on the Web
You can find guides and information for your PC using the Internet to access a
Support Web site.
To view information for your PC, go to the Support Web address listed in the
Warranty and Support Guide, and search for your product name and number.
The product number is on the lower front of the PC chassis.
NOTE: Information and guides are associated with specific PC model numbers.
Some models do not have guides or manuals available on the Web site.
Getting Help 73
Page 80

Using the Onscreen Help and Support Center
Information about your PC is in the onscreen Help and Support Center (select
models only). Here you can find links to driver updates, access to technical support
options, and information about commonly asked questions.
To open the Help and Support Center:
• Press the Help button (select models only) on your keyboard.
Or
• Click Start on the taskbar, and choose Help and Support.
Using Instant Support
When you need assistance to solve a PC-related problem, use Instant Support (select
models only). With Instant Support you can run tests or submit a problem for help
over the Internet. When you submit a problem, you communicate over the Internet
with a Support analyst who works with you on solving the problem.
To start Instant Support:
1 Click Start on the taskbar.
2 Click Help and Support.
3 Click Connect to Customer Support.
4 Click Start a New Request.
5 Follow the onscreen instructions to run a test or submit a problem. (Your PC must
be connected to the Internet to submit a request.)
74 Getting Started Guide
Page 81

Using Compaq Connections
Compaq Connections (select models only) is an Internet-based service that brings
you important information for your PC:
• Product notices
• System updates
• Tips
• Special offers for your PC
Messages arrive while you’re connected to the Internet and may display an alert or
a notice on your desktop. View messages as they arrive or read them later.
Most Support updates delivered by Compaq Connections messages are also
available to you through the Support Web site under the information for your PC
model.
Getting messages
After you view or close a message, it will not automatically display again.
To read a previously received message, open Compaq Connections:
1 Click Start on the taskbar.
2 Choose All Programs.
3 Choose PC Help & Tools.
4 Choose Compaq Connections.
5 Click Compaq Connections again.
Compaq Connections opens and lists the message titles. To read a message,
double-click the message title in the window. You can close this window, and
Compaq Connections remains active.
Turning off messages
NOTE: You cannot receive Compaq Connections messages, including important
Support messages that may be critical to the operation of your PC, while the service
is off.
To turn off the Compaq Connections Service:
1 Click Start on the taskbar.
2 Choose All Programs.
3 Choose PC Help & Tools.
4 Choose Compaq Connections.
5 Click Disable Compaq Connections.
The service is turned off until you re-enable it.
Getting Help 75
Page 82

Re-enabling messages
When you re-enable the Compaq Connections Service, the service runs whenever
you are connected to the Internet, and you automatically receive messages as they
become available.
To turn on the service:
Double-click the Re-enable Compaq Connections icon on the desktop.
Or
1 Click Start on the taskbar.
2 Choose All Programs.
3 Choose PC Help & Tools.
4 Choose Compaq Connections.
5 Click Re-enable Compaq Connections.
Using PC Help & Tools
The PC Help & Tools folder (select models only) in the All Programs menu contains
special utilities for PC owners such as support information and programs.
To see the items in the PC Help & Tools folder:
1 Click Start on the taskbar.
2 Choose All Programs.
3 Choose PC Help & Tools.
4 Click an item to view it or use it.
76 Getting Started Guide
Page 83

Index
A
adding a menu 70
adding images 69
antivirus, installing program 5
appendable disc 51
audio wizard 18
automatic recording options
58
setting
B
burning CDs 43
buttons
Compaq
customizing 9
E-Mail 8
Help 7
Mute 9
On 3
Power 3
Search 8
special keys 7
Standby 7
user 7
7
C
cables, for connecting a TV 23
capturing
requirements
video and images 65
card reader, memory 19
carpal tunnel syndrome 1
chassis, symbols 2
Compaq Connections, using 75
Compaq keyboard button 7
Compaq Organize 6
components 3
66
connecting
23
a TV
multi-channel speakers
3-connectors
multi-channel speakers
6-connectors
connectors
PC back
symbols on chassis 2
converting recorded TV 72
copying a DVD or CD 52
country/region codes 40
creating CDs 43
customizing keyboard buttons 9
12
15
2
D
desktop 6
digital picture 19, 35
disc
62
CD-R
CD-RW 62
compatible file formats 60
double-layer DVD+R 61
DVD+R 61
DVD+RW 61
DVD-R 61
DVD-RW 61
feature and compatibility 63
quick reference 60
disc and drive compatibility
information
disc labels 55
disconnecting TV 28
Documentation folder 73
double-layer DVD+R discs 61
double-sided DVD 38
60
Index 77
Page 84

drive
HP Personal Media Drive
DVD player, multi-channel audio 13
29, 32
E
edit
video files
e-mail
keyboard button
equalizer
Sound Effect Manager
(6-connector)
erasing a DVD or CD 53
68
8
17
F
file formats 60
H
hard disk drive
connecting an HP Personal Media
Drive to the PC
Help
onscreen Help and Support
Help and Support 74
Help and Support Center 5
Help button 7
HP Personal Media Drive 29
activity and power lights 31
automatic on and off feature 30
disconnecting the drive 33
inserting a drive 30
location and drive letter 31
storing files 32
30
74
I
image files 54
adding 69
installing software programs 5
Internet
finding an ISP
keyboard button 8
organizing destinations 6
signing up with an ISP 4
iTunes 46
creating music CD 46
features 44
playing music CDs 37
4
K
keyboard
customizing buttons
types of buttons 7
using 7
9
L
LightScribe 56
InterVideo DiscLabel 56
iTunes 58
requirements 56
Sonic Express Labeler 57
M
manuals, on the Web 73
memory card reader
card types
using 19
microphone
6-connector, using
using with multi-channel speakers 13
monitor 3
Multi-channel Sound Manager 12
multi-channel speakers 11
connecting 3-connectors 12
connecting 6-connectors 15
selecting for 3-connector PC 12
selecting for 6-connector PC 15
using a microphone 13
music
about burning a music CD
burning CD 46
playing with iTunes 37
playing with Windows Media
Player
music button 7
Mute button 9
19
17
48
38
O
online manuals 73
onscreen guides 73
optical drive quick reference 64
organizing Internet links and the PC 6
78 Getting Started Guide
Page 85

P
PC
organizing information
running tests 74
setting it up 1
transferring files and settings to
new PC
turning on 3
viewing PC image on TV 24
PC Help & Tools 76
peripherals 3
Pictures (Photos) button 7
product notices 75
5
6
R
RealOne Player
features
recording VHS files direct to DVD 72
RecordNow! 48
copying a DVD or CD 52
creating music CDs 48
erasing a DVD or CD 53
features 45
image files 54
removing files 53
storing files on a DVD or CD 51
removing files 53
repetitive strain injury (RSI) 1
retasking
audio connectors
44
18
S
Safety & Comfort Guide 1
safety warnings 1
setting up PC 1
shortcut icons 6
software
installing
software quick reference 44
sound connectors 11
3-connectors PC 12
6-connectors PC 14
Sound Effect Manager 17
audio wizard 18
retasking connectors 18
sound manager, multi-channel,
3-connectors
sound manager, multi-channel,
6-connectors
speaker system 11
5
12
17
speakers 11
multi-channel 11
special offers 75
Standby button 7
storing files
about storing data files
Support
messages
symbols on chassis 2
system updates 75
75
52
T
television, viewing PC image on a TV 23
tips 75
transferring information to your new PC 5
turning on PC
first time
TV
connecting
disconnecting 28
TV-out 23
cables 23
connecting a TV set 23
disabling TV option 26
viewing PC image on TV 24
3
23
U
updating, system 75
USB
connecting an HP Personal Media
Drive to the PC
User button 7
29
V
VCD
playing with Windows Media
Player
41
playing with WinDVD 40
VHS, recording to DVD 72
video button 7
Video CDs
playing with Windows Media
Player
41
playing with WinDVD 40
video files
recording
video recording length 62
viewing onscreen guides 73
volume
controls
55
9
Index 79
Page 86

W
Web
73
guides
Windows Media Player
creating music CDs
features 44
play music CDs 38
playing video CDs 41
Windows Movie Maker 2.0
features
Windows XP
creating data CDs
WinDVD 13
control panel 39
features 45
playing DVD movies 38
playing video CDs 40
45
47
47
WinDVD Creator
adding a menu
adding audio effects 69
adding images 69
adding title effects 70
adding transition effects 70
capture 65
edit 65
editing video files 68
features 46
help 65
making movie 71
media library 66
preview window 66
recording VHS video files direct
to DVD
storyboard 66
wizard
audio for Sound Effect Manager
working in comfort 1
70
72
Part Number: 5991-1990
18
80 Getting Started Guide
 Loading...