

HP Compaq Presario 3008CL, Compaq Presario 3005US, Compaq Presario 3015CA, Compaq Presario 3015US, Compaq Presario 3016US Software Guide
...Page 1

b
Software Guide
Compaq Notebook Series
Document Part Number: 307501-002
March 2003
This guide explains how to manage notebook power, use optical
drive software, and update or restore system software. It also
provides instructions for using the Setup and support utilities.
Page 2

© 2003 Hewlett-Packard Development Company, L.P.
Microsoft and Windows are trademarks of Microsoft Corporation in the
U.S. and/or other countries. All other product names mentioned herein may
be trademarks of their respective companies.
HP shall not be liable for technical or editorial errors or omissions
contained herein or for incidental or consequential damages in connection
with the furnishing, performance, or use of this material. The information
in this document is provided "as is" without warranty of any kind, and is
subject to change without notice. The warranties for HP products are set
forth in the express limited warranty statements accompanying such
products. Nothing herein should be construed as constituting an additional
warranty.
Software Guide
Second Edition March 2003
First Edition October 2002
Document Part Number: 307501-002
Page 3

Contents
1 Power
Understanding Standby and Hibernation . . . . . . . . . . . . . 1–1
Enabling or Disabling Hibernation . . . . . . . . . . . . . . . . . 1–2
Choosing Standby, Hibernation or Shutdown . . . . . . . . . 1–3
When You Leave Your Work . . . . . . . . . . . . . . . . . . 1–3
When the Power Supply Is Uncertain . . . . . . . . . . . . 1–3
When Using Infrared or Drive Media . . . . . . . . . . . . 1–4
Standby, Hibernation and Shutdown Procedures. . . . . . . 1–5
Identifying Power Controls and Indicators . . . . . . . . 1–5
Using the Default Power Settings . . . . . . . . . . . . . . . 1–6
Using Emergency Shutdown Procedures . . . . . . . . . 1–8
Using the Power Meter Icon . . . . . . . . . . . . . . . . . . . . . . 1–9
Setting Power Preferences . . . . . . . . . . . . . . . . . . . . . . . 1–10
Changing Power Control Functions . . . . . . . . . . . . 1–10
Setting a Standby Password. . . . . . . . . . . . . . . . . . . 1–11
Selecting, Creating or Changing a Power Scheme . 1–11
2 CD and DVD Software
Using CDs and DVDs . . . . . . . . . . . . . . . . . . . . . . . . . . . 2–1
Protecting Playback . . . . . . . . . . . . . . . . . . . . . . . . . . 2–1
Using the CD and DVD Hotkeys . . . . . . . . . . . . . . . 2–2
Copyright Warning . . . . . . . . . . . . . . . . . . . . . . . . . . 2–3
Using Windows Media Player . . . . . . . . . . . . . . . . . . . . . 2–3
Using WinDVD . . . . . . . . . . . . . . . . . . . . . . . . . . . . . . . . 2–3
Playing a DVD or Video CD. . . . . . . . . . . . . . . . . . . 2–4
Managing DVD Region Settings. . . . . . . . . . . . . . . . 2–4
Software Guide iii
Page 4

Contents
Using Easy CD Creator . . . . . . . . . . . . . . . . . . . . . . . . . . 2–5
Understanding Easy CD Creator Features. . . . . . . . . 2–6
Installing Easy CD Creator . . . . . . . . . . . . . . . . . . . . 2–6
Preparing to Use Easy CD Creator . . . . . . . . . . . . . . 2–8
Selecting Easy CD Creator Settings . . . . . . . . . . . . 2–10
Accessing Easy CD Creator Help . . . . . . . . . . . . . . 2–11
Starting Up from the Optical Drive . . . . . . . . . . . . . . . . 2–12
3 Software Updates and Restorations
Updating Software . . . . . . . . . . . . . . . . . . . . . . . . . . . . . . 3–1
Preparing for a Software Update . . . . . . . . . . . . . . . . . . . 3–2
Accessing Notebook Product Information . . . . . . . . 3–2
Accessing Notebook ROM Information . . . . . . . . . . 3–2
Obtaining Software from the Internet . . . . . . . . . . . . . . . 3–3
Downloading and Installing a System ROM Update 3–4
Downloading and Installing a Non-ROM SoftPaq . . 3–5
Restoring Software. . . . . . . . . . . . . . . . . . . . . . . . . . . . . . 3–7
Installing a Retail Version of an Operating System. . . . . 3–8
4 Setup and Support Utilities
Using the Setup Utility. . . . . . . . . . . . . . . . . . . . . . . . . . . 4–1
Opening the Setup Utility . . . . . . . . . . . . . . . . . . . . . 4–1
Navigating and Selecting in the Setup Utility . . . . . . 4–1
Restoring Setup Utility Default Settings . . . . . . . . . . 4–2
Exiting the Setup Utility . . . . . . . . . . . . . . . . . . . . . . 4–2
Using the Compaq Support Utilities . . . . . . . . . . . . . . . . 4–3
Using Compaq Help & Support. . . . . . . . . . . . . . . . . 4–3
Obtaining Support Telephone Numbers . . . . . . . . . . 4–3
Preparing to Call Technical Support . . . . . . . . . . . . . 4–3
Index
iv Software Guide
Page 5

Power
Understanding Standby and Hibernation
Standby and Hibernation are energy-saving features that conserve
power and reduce startup time. In general, Hibernation shuts
down most notebook functions, while Standby simply reduces
notebook activity. Standby uses more power than Hibernation, but
you can resume more quickly from Standby.
■ Standby reduces power to system components that are not in
use. When Standby is initiated, your work is saved in random
access memory (RAM) and the screen is cleared. When you
resume from Standby, your work returns to the screen where
you left off.
■ Hibernation saves system memory to the hard drive, takes a
snapshot of the notebook image, and shuts down the
notebook. When you resume from Hibernation, your work
returns to the screen exactly as you left it.
1
When possible, save your work before initiating Hibernation to
prevent loss of data. Do not change the notebook configuration
during Hibernation.
CAUTION: If the configuration of the notebook system is changed during
Hibernation, resumption from Hibernation may not be possible. When the
Ä
notebook is in Hibernation:
■ Do not add or remove memory modules.
■ Do not connect or disconnect external devices.
■ Do not insert or remove CDs or DVDs.
■ Do not insert or remove a CardBus PC Card.
Software Guide 1–1
Page 6

Power
If you cannot resume from Hibernation when power is restored to
the system, you are prompted to delete the restoration data and
proceed with system boot. Unsaved data is lost.
If you have assigned a start-up function to a password set in the
Setup utility, that password must be entered to resume from
Hibernation.
Enabling or Disabling Hibernation
CAUTION: If Hibernation is disabled, the system cannot save the
Ä
system memory if the notebook reaches a critical low-battery
condition. (For information about low-battery conditions, refer to the
“Battery Packs” chapter in the
Hibernation is enabled by default. Compaq recommends that you
use the notebook with Hibernation disabled only while you are
calibrating a battery pack. For calibration information, refer to the
“Battery Packs” chapter in the Hardware Guide on this CD.
To verify that Hibernation is enabled, select Start > Control
Panel > Performance and Maintenance > Power Options icon >
Hibernate tab. If Hibernation is enabled, the Enable Hibernation
check box is selected.
Hardware Guide
on this CD.)
1–2 Software Guide
Page 7

Choosing Standby, Hibernation or Shutdown
When You Leave Your Work
The amount of time a battery pack can support Standby or
Hibernation or hold a charge varies by notebook configuration
and the condition of the battery pack.
If you plan to resume shortly: Initiate Standby for shorter times
and Hibernation for longer times or power conservation.
■ Initiating Standby clears the screen, uses less power than
leaving the notebook on, and your work returns quickly to the
screen when you resume from Standby.
■ Initiating Hibernation clears the screen, saves your work
to the hard drive, and uses much less power than Standby.
Returning to work saved in Hibernation takes longer
than returning to work saved in Standby, but is faster than
returning to your place manually after restarting the
notebook.
Power
If you plan to resume within 2 weeks: Shut down the notebook. If
possible, connect the notebook to external power to keep the
battery pack fully charged.
If the notebook will be disconnected from external power for more
than 2 weeks: To extend the life of the battery pack, shut down
the notebook and remove and store the battery pack. For
information about removing and storing a battery pack, refer to
the “Battery Packs” chapter in the Hardware Guide on this CD.
When the Power Supply Is Uncertain
Verify that Hibernation is enabled: Select Start > Control Panel >
Performance and Maintenance > Power Options icon > Hibernate
tab. If Hibernation is enabled, the Enable Hibernation check box
is selected.
Software Guide 1–3
Page 8

Power
If the battery pack reaches a critical low-battery condition (one
percent of a full charge) while Hibernation is enabled, the system
initiates Hibernation, saves the system memory to the hard drive,
then shuts down the notebook. If the battery pack reaches a
critical low-battery condition while Hibernation is disabled, the
notebook cannot save the system memory.
If the notebook is running on external power, power may be
interrupted by an uncertain power supply or an electrical storm. If
you pause your work when the power supply is uncertain,
Compaq recommends that you save your work, then initiate
Hibernation or shut down the notebook.
When Using Infrared or Drive Media
CAUTION: Initiating Standby or Hibernation while playing a drive
Ä
medium may stop the play or diminish the quality of the play.
Standby and Hibernation interfere with the use of infrared
communication and drive media.
■ If the notebook is in Standby or Hibernation, you cannot
initiate an infrared transmission.
■ If Standby or Hibernation is accidentally initiated while a
drive medium is in use:
❏ If you see the warning message “Putting the computer
into Hibernation or Standby may stop the playback. Do
you want to continue?” select No. (Audio and video may
resume or you may need to restart the drive medium.)
❏ If Standby or Hibernation initiates and no warning
message is displayed, resume from Standby or
Hibernation by briefly pressing the power button.
1–4 Software Guide
Page 9
Standby, Hibernation and Shutdown Procedures
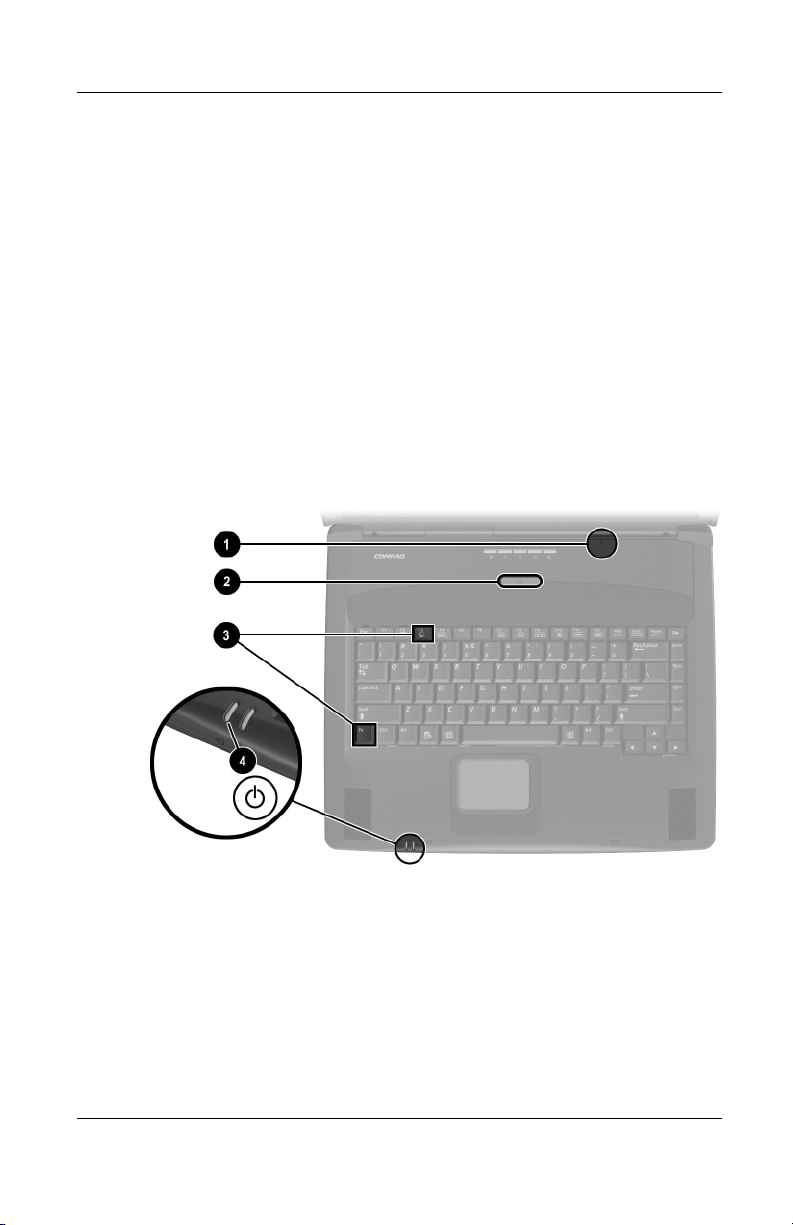
Identifying Power Controls and Indicators
Standby, Hibernation, and shutdown procedures use the following
controls and indicators:
1 Display switch
2 Power button
3
Fn+F3 hotkeys (to initiate Standby)
4 Power/standby light
Power
Identifying power controls and indicators (Key locations vary
by region and model.)
Software Guide 1–5
Page 10

Power
Using the Default Power Settings
The following tables describe the default procedures for turning
on or shutting down the notebook and for initiating or resuming
from Standby and Hibernation.
For information about changing the functions of the power button
or the display switch, see “Setting Power Preferences” later in
this chapter.
Turning the Notebook and Display On or Off
Task Procedure Results
Turn on the
notebook.
Shut down the
notebook.*
Turn off the
display when
the notebook is
closed.
*If the system is unresponsive, and you are unable to shut down the notebook
with this procedure, see “Using Emergency Shutdown Procedures,” later in this
section.
Press the power button.
Pressing the power
✎
button turns on the
notebook from Standby,
Hibernation, or
shutdown.
Select Start > Turn Off
Computer > Turn Off.
Close the notebook. When the notebook is
■ Power/standby light
turns on.
■ Operating system
loads.
■ Power/standby light
turns off.
■ Operating system
shuts down.
■ Notebook turns off.
closed, the display
presses the display switch,
which then turns off the
display.
1–6 Software Guide
Page 11

Initiating or Resuming from Hibernation
Task Procedure Result
User-initiated
Hibernation
System-initiated
Hibernation
Resume from
user-initiated or
system-initiated
Hibernation.
With the notebook on:
■ Briefly press the power
button, or
■ Select Start > Shut Down
> Hibernate. (If the
Hibernate option is not
displayed, press and
hold
shift.)
If the notebook is in
✎
Standby, you must
resume from Standby
before you can initiate
Hibernation.
If the notebook is running on
external power, the system
does not initiate Hibernation.
If the notebook is running on
battery power, the system
initiates Hibernation after
30 minutes of notebook
inactivity.
Press the power button.
If Hibernation
✎
was initiated by a critical
low-battery condition,
connect external power
or insert a charged
battery pack to resume.
■ Power/standby light
■ Screen clears.
■ Power/standby light
■ Screen clears.
■ Power/standby light
■ Your work returns to
Power
turns off.
turns off.
turns on.
the screen.
Software Guide 1–7
Page 12

Power
Initiating or Resuming from Standby
Task Procedure Result
User-initiated
Standby
System-initiated
Standby
Resume from
user-initiated or
system-initiated
Standby.
With the notebook on:
■ Press Fn+F3, or
■ Select Start > Turn off
Computer > Stand by.
If the notebook is running on
external power, the system
does not initiate Standby.
If the notebook is running on
battery power, the system
initiates Standby after 10
minutes of notebook
inactivity.
■ Briefly press the power
button, or move (or click
any button on) an
optional external USB
mouse.
■ If the display was closed
while the notebook was
in Standby, open the
display.
■ Power/standby light
■ Screen clears.
■ Power/standby light
■ Screen clears.
■ Power/standby light
■ Your work returns to
flashes.
flashes.
turns on.
the screen.
Using Emergency Shutdown Procedures
If the notebook does not respond to the Windows shutdown
procedure (Start > Turn Off Computer > Turn Off), try the
following emergency shutdown procedures:
■ Press and hold down the power button for at least 5 seconds.
■ If the notebook remains unresponsive, press Fn+power button.
■ If the notebook still remains unresponsive, disconnect the
notebook from external power and remove the battery pack.
1–8 Software Guide
Page 13

Using the Power Meter Icon
When the Power Meter icon is displayed in the system tray, the
icon changes shape to indicate whether the notebook is running
on battery power or external power.
■ To show or hide the Power Meter icon:
1. Select Start > Control Panel > Performance and
Maintenance icon > Power Options icon > Advanced tab.
2. Select or clear the Always Show Icon On The Task Bar
check box.
3. Select the OK button.
4. If the icon is not displayed, select in the system tray the
icon for Show Hidden Icons.
■ To change the current power scheme, double-click the icon,
then select a power scheme. For more information about
using power schemes, see “Selecting, Creating, or Changing
a Power Scheme,” later in this chapter.
Power
■ To display battery charge information, select the icon, then
select Open Power Meter. For more information about
displaying battery charge information, refer on this CD to the
Hardware Guide, “Battery Packs” chapter.
■ To display the Power Options Properties window, right-click
the icon, then select Adjust Power Properties.
Software Guide 1–9
Page 14

Power
Setting Power Preferences
Changing Power Control Functions
By default, when the notebook is on:
■ Pressing the power button initiates Hibernation.
■ Pressing the Fn+F3 hotkeys, called the “sleep button” in the
operating system, initiates Standby.
■ The display switch turns off the display. The display switch is
activated by closing the display. (At default and all custom
settings, the display switch also turns on the notebook if the
display is opened while the notebook is in Standby.)
To change the function of the power button, the
Fn+F3 hotkeys, or
the display switch:
1. Select Start > Control Panel > Performance and
Maintenance icon > Power Options icon > Advanced tab.
❏ To change the power button function, select a function
from the drop-down list for When I Press The Power
Button On My Computer.
❏ To change the function of the Fn+F3 hotkeys, select a
function from the drop-down list for When I Press The
Sleep Button On My Computer.
❏ To change the display switch function, select a function
from the drop-down list for When I Close The Lid Of My
Portable Computer.
2. Select the OK button.
The Hibernate function is available in the power button, sleep
button, and display switch drop-down lists only if Hibernation is
enabled. Hibernation is enabled by default. To verify that
Hibernation is enabled, select the Hibernate tab in the Power
Options Properties window. If Hibernation is enabled, the Enable
Hibernation check box is selected.
1–10 Software Guide
Page 15

Setting a Standby Password
To set the notebook to prompt for a password when exiting
Standby:
1. Select Start > Control Panel > Performance and
Maintenance icon > Power Options icon > Advanced tab.
2. Select the check box for Prompt for Password When
Computer Resumes From Standby.
3. Select the OK button.
At the password prompt that is displayed when resuming from
Standby, enter a password that was set in the operating system,
not a password that was set in the Setup utility. Passwords set in
the operating system and passwords set in the Setup utility can be
the same.
Selecting, Creating or Changing a Power Scheme
A Windows power scheme assigns power levels to system
components.
Power
Power schemes are typically used to set an optimal balance
between performance and power conservation, based on how you
use the notebook.
Some settings, such as setting the notebook to turn off the display
after a time interval you specify, also provide privacy.
Selecting a Preset Power Scheme
To change the current power scheme to a default or previously set
power scheme, use either of the following procedures:
■ Double-click the Power Meter icon in the taskbar, then select
any displayed power scheme.
■ Select Start > Control Panel > Performance and
Maintenance icon > Power Options icon > Power Schemes
tab, select a power scheme from the power schemes list, then
select the OK button.
Software Guide 1–11
Page 16

Power
Creating or Changing a Power Scheme
To set or change a power scheme:
1. Select Start > Control Panel > Performance and
Maintenance icon > Power Options icon > Power Schemes
tab. Then:
❏ To set a new power scheme, select the Save As button,
type a name for the new scheme in the field for Save This
Power Scheme As, then select the OK button. (The new
scheme is displayed in the Power Schemes field on the
Power Schemes tab.) You can now select settings for
the new power scheme from the Settings lists.
❏ To change the settings in an existing power scheme,
select the Power Scheme from the Power Schemes list,
then select settings from the Settings lists.
2. Select the OK button.
1–12 Software Guide
Page 17

CD and DVD Software
Using CDs and DVDs
The Windows Media Player section of this chapter explains how
to play audio CDs, the WinDVD section explains how to play
DVDs and video CDs, and the Easy CD Creator section explains
how to create and copy CDs. Before proceeding to those sections,
Compaq strongly recommends that you read the following general
information about using CDs or DVDs with any software.
The availability of CD and DVD drive software varies by notebook
model and the type of internal optical drive.
Protecting Playback
CAUTION: Inserting or removing any device while running any
Ä
multimedia application may pause or stop the play.
CAUTION: Initiating Standby or Hibernation while playing a drive
Ä
medium may stop the play or diminish the quality of the play.
2
If Standby or Hibernation is accidentally initiated during playback:
■ If you see the warning message “Putting the computer into
Hibernation or Standby may stop the playback. Do you want
to continue?” select No. (Audio and video may resume or you
may need to restart the drive medium.)
■ If Standby or Hibernation initiates and no warning message is
displayed, resume from Hibernation or Standby by briefly
pressing the power button, then restart the medium.
For more information about Standby and Hibernation, see the
“Power” chapter.
Software Guide 2–1
Page 18

CD and DVD Software
Using the CD and DVD Hotkeys
Four of the hotkeys on your keyboard perform many of the
same tasks as on-screen controls in Windows Media Player or
WinDVD. These hotkeys are combinations of the
F9 through F12 function keys 2.
the
Fn key 1 and
All audio CDs and DVDs respond to
Fn+F9 through Fn+F12 hotkey
commands, but video CDs (VCDs) may not.
■ To play, pause, or resume an audio CD or DVD, press the
Fn+F9 hotkeys.
■ To stop an audio CD or DVD, press the Fn+F10 hotkeys.
■ To play the previous track of an audio CD or DVD, press
Fn+F11 hotkeys.
the
■ To play the next track of an audio CD or DVD, press the
Fn+F12 hotkeys.
For more information about hotkeys, refer on this CD to the
Hardware Guide, “Pointing Device and Keyboard” chapter.
Identifying the Fn key and the F9 through F12 function keys
(Key locations vary by region and model.)
2–2 Software Guide
Page 19

Copyright Warning
It is a criminal offense, under applicable copyright laws, to make
unauthorized copies of copyright-protected material, including
computer programs, films, broadcasts, and sound recordings.
This notebook should not be used for such purposes.
Using Windows Media Player
Use Windows Media Player primarily for playing audio CDs.
Although video CDs can be played using Windows Media Player,
InterVideo WinDVD provides higher playback quality.
To open Windows Media Player, insert a CD into the optical
drive, then close the tray. Wait several seconds. If Windows
Media Player does not open, select Start > All Programs >
Windows Media Player.
To play or stop the CD, use the on-screen Play button or Stop
button, or use the media hotkeys described in “Using the CD and
DVD Hotkeys,” earlier in this chapter.
CD and DVD Software
Using WinDVD
WinDVD is an application that enables you to play DVD movies
or video CDs. If WinDVD is included with your notebook, the
application is preinstalled.
Software Guide 2–3
Page 20

CD and DVD Software
Playing a DVD or Video CD
For best playback quality, save your files and close all open
applications before playing a DVD.
If a DVD displays a Playback Of Content From This Region Is
Not Permitted error message, stop the DVD, change the region
setting, then restart the DVD. For information about changing the
region setting, see “Managing DVD Region Settings,” next in this
chapter.
To play a DVD or video CD:
1. Insert the DVD or video CD into the optical drive.
2. If WinDVD does not open after a short pause, select Start >
All Programs > InterVideo WinDVD > InterVideo WinDVD.
3. Follow the instructions on the screen.
Managing DVD Region Settings
Most DVDs that contain copyrighted files also contain region
codes. The region codes help protect copyrights internationally.
You can play a DVD containing a region code only if the region
code on the DVD matches the region setting on your DVD drive.
If the region code on a DVD does not match the region setting
on your drive, a Playback Of Content From This Region Is Not
Permitted message is displayed when you insert the DVD. To
play the DVD, you must change the region setting on your
DVD drive.
CAUTION: The region setting on your DVD drive can be changed only
5times.
Ä
■ The region setting you select the fifth time becomes the
permanent region setting on the drive.
■ The number of allowable region changes remaining on the drive
is displayed in the Remaining Times Until Permanent field in the
WinDVD window. The number in the field includes the fifth and
permanent change.
2–4 Software Guide
Page 21

To change the region setting on drive media:
1. Insert the DVD into the optical drive.
2. If WinDVD does not open after a short pause, select Start >
All Programs > InterVideo WinDVD > InterVideo WinDVD.
3. Select the Properties icon in the lower right corner of the
window.
4. Select the General tab.
5. Select the button for the region.
6. Select the OK button.
Using Easy CD Creator
This section provides procedures for creating and copying CDs
and DVDs with Easy CD Creator. If Easy CD Creator is included
with your notebook, the Easy CD Creator software is provided on
the Easy CD Creator Basic CD.
CD and DVD Software
Software Guide 2–5
Page 22

CD and DVD Software
Understanding Easy CD Creator Features
Easy CD Creator is a transfer utility that enables you to create or
duplicate optical drive media.
Easy CD Creator includes 2 applications: DirectCD and Easy CD
Creator. The Easy CD Creator application includes CD Copier.
■ Use DirectCD with Windows Explorer to drag-and-drop data
files between your hard drive and a CD or between your hard
drive and a network drive. DirectCD is often used to back up
data files or to share them with other people. Although
DirectCD can be used with most application data files,
including Microsoft Office data files, it cannot be used with
audio files such as MP3 files.
■ Use Easy CD Creator, which includes CD Copier, to copy
either data files such as Microsoft Office files, or audio files
such as MP3 files, to a CD.
❏ Use Easy CD Creator to copy individual audio files to a
CD, for example, to create a CD containing only your
favorites.
❏ Use CD Copier to duplicate a CD.
Installing Easy CD Creator
If Easy CD Creator software is included with the notebook, it is
provided on a CD.
Installing the Software
CAUTION: To prevent file corruption and damage to components, do not
Ä
install the software while the notebook is running on battery power or
when the external power supply is uncertain.
To install Easy CD Creator software from a CD:
1. Save and close any open files or applications.
2–6 Software Guide
Page 23

CD and DVD Software
2. Insert the Easy CD Creator Basic CD into the optical drive,
then close the tray. If AutoPlay is enabled, an installation
menu is displayed. If the installation menu does not display,
select Start > Run. Then type:
x:\setup.exe
(where X is your optical drive designation)
A drive designation is a letter of the alphabet that the notebook
✎
uses to identify the drive. To display the drive designation of
every drive in the system, double-click the My Computer icon on
the desktop.
3. Select the OK button.
4. On the installation menu, Compaq recommends that you
select the Complete installation. To do so, select the
Complete button, then follow the instructions on the screen.
5. When installation is complete and you are prompted to restart
the notebook, select Yes.
Software Guide 2–7
Page 24

CD and DVD Software
Enabling Auto Insert Notification
When the notebook restarts after the installation is complete, you
may be prompted to enable Auto Insert Notification.
Auto Insert Notification is an operating system option that turns
AutoPlay on or off. AutoPlay can run a program on a data
medium or open an audio or video medium as soon as the
medium is inserted into a drive and the drive tray is closed.
You cannot use DirectCD unless Auto Insert Notification is
enabled.
Compaq recommends that you enable Auto Insert Notification:
1. Select Yes at the Auto Insert Notification prompt.
2. Follow the instructions on the screen.
3. When the procedure displayed on the screen is complete,
restart the notebook.
Auto Insert Notification is enabled when the notebook restarts.
Preparing to Use Easy CD Creator
CAUTION: To prevent loss of work and damage to a CD:
Ä
■ Before writing to a CD, connect the notebook to a reliable
external power source.
■ Before writing to a CD, close all open applications (including
screen savers and antivirus software) except Easy CD Creator
Basic.
■ Do not copy directly from a CD to another CD or from a network
drive to a CD. Instead, copy from a CD or a network drive to
your hard drive, then copy from your hard drive to the CD.
■ Do not type on the notebook keyboard or move the notebook
while the notebook is writing to a CD. The write process is
sensitive to vibration.
2–8 Software Guide
Page 25

CD and DVD Software
Planning Your Source and Destination Drives
If you plan to use a network drive during a copying procedure, do
not copy directly from the source drive (the drive you are copying
from) to the destination drive (the drive you are copying to).
Instead, copy from the source drive to your hard drive. Then copy
from your hard drive to the destination drive.
Choosing Recording Media
Compaq recommends using high-quality media that correspond
to the maximum speed of the optical drive.
The notebook can write or copy to CD-Rs (which provide
one-time, non-erasable recording) or to CD-RWs (which provide
erasable recording.)
Responding to the UDF Prompt
The first time you insert a CD-RW into an optical drive, you may
be prompted to install Universal Disk Format (UDF) Reader.
When UDF Reader is installed, a CD created with DirectCD on
your notebook can be used in another computer on which
DirectCD is not installed.
Compaq recommends that you install UDF Reader.
Even if UDF Reader is installed on your notebook, a CD-R
✎
created with DirectCD software can be used in a compatible
CD-ROM drive only if you select the Rearrange the Files option
as you create the CD-R.
Software Guide 2–9
Page 26

CD and DVD Software
Formatting Recording Media
You can purchase optical drive media that either are or are not
formatted for DirectCD.
■ To use DirectCD, use a CD formatted for DirectCD.
■ To use Easy CD Creator or CD Copier, do not use a CD
formatted for DirectCD.
To erase DirectCD formatting from a CD-RW so the CD-RW can
be used with Easy CD Creator or CD Copier:
1. Insert the CD into the optical drive. (If you are prompted to
install UDF Reader, see “Responding to the UDF Prompt,”
earlier in this section.)
2. Select Start > All Programs > Easy CD Creator Basic >
CD-RW Eraser.
3. Select the Erase button.
4. Select the OK button.
Selecting Easy CD Creator Settings
To use DirectCD, Easy CD Creator, or CD Copier, the settings
shown in the following table must be selected. These settings are
compatible, for example, the settings for DirectCD do not conflict
with the settings for CD Copier.
The Easy CD Creator software installs with all of these settings
selected. Before beginning any copying procedure, you may want
to confirm that these settings have not been changed.
Application Required Settings
DirectCD Enable Auto Insert Notification
Easy CD Creator Disable Disk-at-Once
and
Enable Track-at-Once
CD Copier Disable Disk-at-Once
2–10 Software Guide
Page 27

Enabling Auto Insert Notification
Auto Insert Notification settings are selected through the
operating system. To verify or change Auto Insert Notification
settings, see the “Installing Easy CD Creator” section, “Enabling
Auto Insert Notification.”
Disabling Disk-at-Once
Disk-at-once settings are in Easy CD Copier. To select them:
1. Select Start > All Programs > Roxio Easy CD Creator 5 >
Applications > CD Copier.
2. Select the Advanced tab.
3. Clear the Disk-at-Once check box.
4. Select the Set as Default button.
Enabling Track-at-Once
Track-at-once settings are in Easy CD Creator. To select them:
1. Select Start > All Programs > Roxio Easy CD Creator 5.
CD and DVD Software
2. The fourth item on the status bar at the lower edge of the
CD Project window indicates whether Track-at-Once or
Disk-at-Once is selected.
❏ If Track-at-Once is displayed on the status bar,
Track-at-Once is already enabled.
❏ If Disk-at-Once is selected, double-click Disk-at-Once to
enable Track-at-Once.
Accessing Easy CD Creator Help
To access the procedures for using DirectCD, Easy CD Creator,
and CD Copier, select Start > All Programs > Roxio Easy CD
Creator 5 > Project Selector > Help radio button.
Software Guide 2–11
Page 28

CD and DVD Software
Starting Up from the Optical Drive
By default, the notebook starts up from the internal hard drive.
You can set the notebook to start up from a bootable CD or DVD
in the optical drive. A bootable CD or DVD contains files needed
by the notebook to start up and operate properly. On some
models, you can also start up from a hard drive or a bootable
medium in a removable storage drive connected to the notebook
by USB.
Startup preferences are set in the Setup utility. The Setup utility is
not a Windows utility and does not support the TouchPad.
To open the Setup utility, turn on or restart the notebook, then
press
F10 before Windows opens and while the F10 = ROM Based
Setup prompt is displayed in the lower left corner of the screen.
For more information about using the Setup utility, see the “Setup
and Support Utilities” chapter.
2–12 Software Guide
Page 29

Software Updates and
Updating Software
For optimal notebook performance and to make sure your
notebook remains compatible with changing technologies,
Compaq recommends that you install the latest versions
of Compaq software as they become available.
To update Compaq software:
1. Prepare for any update by identifying your notebook type,
series or family, and model. Prepare for a ROM (read-only
memory) update by identifying the ROM version currently
installed on the notebook.
2. Access the updates on your local Compaq Web site.
3. Download and install the updates.
3
Restorations
The notebook ROM stores the BIOS (basic input-output system).
✎
The BIOS determines how the notebook hardware interacts with
the operating system and external devices and also supports such
notebook services as time and date.
Software Guide 3–1
Page 30

Software Updates and Restorations
Preparing for a Software Update
If your notebook connects to a network, Compaq recommends
that you consult with your network administrator before installing
any software updates, particularly a ROM update.
Accessing Notebook Product Information
To access the updates for your notebook, you will need the
following information:
■ The product category is Notebook.
■ The product family name and series number are printed in the
bottom of the display bezel.
■ More complete model information is provided on the serial
number label on the underside of the notebook.
The product name, notebook model, and notebook serial number
are also displayed in the same section of the Setup utility that
displays ROM information.
Accessing Notebook ROM Information
To determine whether an available ROM update is a later
ROM version than the ROM version currently installed on the
notebook, you need to know the version of the currently
installed ROM.
ROM information is displayed in the Setup utility. The Setup
utility is a non-Windows utility that does not support the
TouchPad. For complete information about using the Setup
utility, see the “Setup and Support Utilities” chapter.
1. To open the Setup utility, turn on or restart the notebook.
2. Before Windows opens and while the F10 = ROM Based
Setup prompt is displayed in the lower left section of the
screen, press
3. Use the arrow keys to select the Exit menu, then press enter.
3–2 Software Guide
F10.
Page 31

Software Updates and Restorations
4. Use the down arrow key to select System Info, then press
enter. (The ROM version and date are displayed in the System
BIOS Version field.)
5. To close the System Info window and exit the Setup utility
without changing any settings:
a. Press
enter to close the window.
b. Use the arrow keys to select the Exit menu, then
press
enter.
c. Use the arrow keys to select Exit (No Save), then
enter.
press
Obtaining Software from the Internet
Most software at the Compaq Web site is packaged in a
compressed file called a SoftPaq. Some ROM updates may be
packaged in a compressed file called a RomPaq. Other ROM
updates may be provided as a CPQFlash SoftPaq.
Most download packages contain a file named Readme.txt. A
Readme.txt file contains detailed descriptive, installation, and
troubleshooting information about the download. The Readme.txt
files included with RomPaqs are English only.
The following sections provide instructions for downloading and
installing:
■ A ROM update.
■ A SoftPaq containing an update other than a ROM update.
Software Guide 3–3
Page 32

Software Updates and Restorations
Downloading and Installing a System ROM Update
CAUTION: To prevent serious damage to the notebook or an
Ä
unsuccessful installation, download and install a ROM update only while
the notebook is connected to reliable external power using the AC
adapter or a DC cable. (Do not download or install a ROM update while
the notebook is running on battery power.) During the download and
installation:
■ Do not unplug the notebook from the electrical outlet.
■ Do not shut down the notebook.
Downloading a ROM Update:
1. Access the page at the Compaq Web site that provides
software for your notebook: Select Start > Help and Support,
then select a software update link. Or, visit the Compaq
Web Site at:
http://www.compaq.com/athome/support/
2. Follow the instructions on the screen to identify your
notebook and access the ROM update you want to download.
3. At the download area:
a. Record the date, name, or other identifier of any ROM
update that is later than the ROM currently installed on
your notebook. (You may need to identify the update
later, after it has been downloaded to the hard drive.)
b. Record the default or custom location on the hard drive to
which the ROM package will download. (You may need
to access the ROM package after it has been
downloaded.)
c. Follow the online instructions to download your selection
to the hard drive.
3–4 Software Guide
Page 33

Installing a ROM Update
ROM installation procedures vary. Follow any instructions that
are displayed on the screen after the download is complete. If no
instructions are displayed:
1. Open Windows Explorer. To open Windows Explorer from
the Start button, select Start > All Programs > Accessories >
Windows Explorer.
2. In the left pane of the Windows Explorer window, select My
Computer > your hard drive designation, which is typically
Local Disk (C:). Then follow the path you recorded earlier to
the folder on your hard drive containing the update.
3. To begin the installation, double-click the folder. Or, open the
folder, then double-click the file with an .exe extension, for
example, Filename.exe. (The ROM update installation
begins.)
4. To complete the installation, follow the instructions on the
screen.
After a message on the screen reports a successful installation,
✎
you can delete the downloaded file from the destination folder.
Software Updates and Restorations
Downloading and Installing a Non-ROM SoftPaq
To update software other than a ROM update:
1. Access the page at the Compaq Web site that provides
software for your notebook: Select Start > Help and Support,
then select a software update link. Or, visit the Compaq
Web site at:
http://www.compaq.com/athome/support/
2. Follow the instructions on the screen to identify your
notebook and access the SoftPaq you want to download.
Software Guide 3–5
Page 34

Software Updates and Restorations
3. At the download area:
a. Write down the date, name, or other identifier of the
SoftPaq you plan to download. (You will need to identify
the update later, after it has been downloaded to the hard
drive.)
b. Follow the online instructions to download the SoftPaq to
the hard drive.
4. When the download is complete, open Windows Explorer. To
open Windows Explorer from the Start button, select Start >
All Programs > Accessories > Windows Explorer.
5. In the left pane of the Windows Explorer window, select My
Computer > your hard drive designation, which is typically
Local Disk (C:) > Compaq.
6. In the Compaq folder, select the name or number of the
software package you have downloaded.
7. Select the file that includes an .exe extension, for example,
Filename.exe. (The installation begins.)
8. To complete the installation, follow the instructions on the
screen.
After a message on the screen reports a successful installation,
✎
you can delete the downloaded file from the Compaq folder.
3–6 Software Guide
Page 35

Restoring Software
A Compaq QuickRestore CD included with the notebook
provides all the software that was preinstalled or preloaded on
your notebook and instructions for restoring it.
Use QuickRestore to restore the notebook factory image. The
factory image is the original software on your notebook when it
was shipped.
■ When you restore the factory image:
❏ The notebook reverts to the original factory settings.
❏ Software you installed after the initial software setup,
including drivers, applications, or utilities, is erased.
■ To reinstall applications and utilities that are preloaded but
not preinstalled on the factory image:
1. Restore the factory image as instructed on the
documentation included with the QuickRestore CD.
2. Select Start > All Programs > Software Setup.
3. Select the software you want to install, then follow the
instructions on the screen.
Software Updates and Restorations
■ For information about using a QuickRestore CD to start up
the notebook, refer to the documentation included with and
on the QuickRestore CD.
CAUTION: To prevent an unsuccessful restoration, use a QuickRestore
CD only while the notebook is connected to reliable external power using
Ä
the AC adapter or a DC cable. Do not use a QuickRestore CD during an
electrical storm or while the notebook is running on battery power.
During a restoration:
■ Do not unplug the notebook from the electrical outlet.
■ Do not shut down the notebook.
■ Do not initiate Standby or Hibernation.
Software Guide 3–7
Page 36

Software Updates and Restorations
Installing a Retail Version of an Operating System
The Windows operating system provided on the notebook or on a
Compaq QuickRestore CD is enhanced by Compaq. The Compaq
enhancements add power and security features and provide
supplementary support for external devices such as drives and
PC Cards.
CAUTION: Replacing an operating system enhanced by Compaq
Ä
with a retail version of an operating system will result in the loss of
all Compaq enhancements. In some cases, the loss of these
enhancements may result in an unresponsive system or the loss of
complete USB support.
3–8 Software Guide
Page 37

Setup and Support Utilities
Using the Setup Utility
The Setup utility is a preinstalled, ROM-based information and
customization utility that can be used even when your operating
system is not working or will not load.
The utility reports information about the notebook and provides
settings for startup, Compaq password, port, Setup utility
appearance, and other preferences.
Opening the Setup Utility
To access most settings:
1. Start up or restart the notebook.
2. Before Windows opens and while the F10 = ROM Based
Setup prompt is displayed in the lower left corner of the
screen, press
F10.
4
On some models, you must start up (not restart) the notebook to
access the settings for a hard drive password.
Navigating and Selecting in the Setup Utility
Because the Setup utility is not Windows-based, it does not
support the TouchPad. Navigation and selection is by keystroke.
■ To navigate, use the up and down arrow keys or tab.
■ To select an item, use the arrow keys to select the item, then
press
enter or an on-screen OK button.
■ To close a display but remain in the Setup utility, press esc.
Software Guide 4–1
Page 38

Setup and Support Utilities
An on-screen guide to navigation and selection is displayed at the
lower edge of most Setup utility submenu screens. To minimize
keystrokes by using the <Alt> Key Activates Accelerators
feature:
1. Press and hold
alt. (A letter or number in most on-screen
items is highlighted.)
2. Press the keyboard key corresponding to the highlighted
letter or number in the item you want to select.
For example, to select an on-screen OK button, press
When the “O” in OK is highlighted, press
O.
Restoring Setup Utility Default Settings
To return all Setup utility settings to default values, select Exit
menu > Default Settings. (Identification information, including
ROM version information, is retained.)
Exiting the Setup Utility
The Setup Utility exit options are on the Exit menu. When you
select either option, Windows opens after the Setup utility closes.
■ To close the utility and save your changes from the current
session, select Save and Exit.
■ To close the utility without saving changes from the current
session, select Exit (No Save).
alt.
4–2 Software Guide
Page 39

Setup and Support Utilities
Using the Compaq Support Utilities
If you cannot solve a notebook problem by using the
documentation on this CD, you may need to contact Compaq.
Using Compaq Help & Support
To access Compaq Help & Support, select Start > Help and
Support. In the Compaq Help & Support pane of the Help
and Support Center window are links to support features within
the notebook and to support areas of the Compaq Web site.
Obtaining Support Telephone Numbers
To obtain a list of worldwide Technical Support telephone
numbers, use either of the following methods:
■ Select Start > Control Panel > Performance and Maintenance
icon > System icon. Then, near the lower edge of the System
Properties window, select the Support Information button.
■ Refer to the printed Worldwide Telephone Numbers booklet
included with the notebook in English only.
Preparing to Call Technical Support
To provide the fastest possible resolution of your problem, have
the notebook and the following information available when
you call:
■ Serial number and model description, which are provided on
the product identification label on the underside of the
notebook.
■ Purchase date on the invoice.
■ Conditions under which the problem occurred.
■ Error messages that have been displayed.
■ Operating system version number and registration number.
Software Guide 4–3
Page 40

Setup and Support Utilities
■ To display the operating system version number and
registration number, select Start > Control Panel >
Performance and Maintenance icon > System icon >
General tab.
■ Brand and model of an optional printer.
4–4 Software Guide
Page 41

Index
A
applications. See software;
software updates
audio CD. See CDs
AutoPlay
responding to prompt
settings required by
DirectCD
2–8
2–8
B
battery pack
causing CD or DVD write
corruption
monitoring charge in
when to remove
BIOS (basic input output
system)
boot order
2–8
1–9
1–3
3–1
2–12
C
CD(s)
booting from
CD-R vs. CD-RW
choosing, for use with
notebook
Compaq QuickRestore
copying
creating
Easy CD Creator Basic CD
2–7
2–12
2–9
2–9
2–5
2–5
3–7
playing, with media
hotkeys
playing, with Windows
Media Player
playing, with WinDVD
2–4
Compaq customer support
Compaq Help and Support
Compaq QuickRestore CDs
3–7
Compaq Web site,
downloading software from
3–1
CPQFlash file, downloading
3–3
customer support
2–2
4–3
D
display switch
function, changing
function, default
location
drive
avoiding Standby and
boot order
designations
DVD
booting from a
1–5
Hibernation while using
2–1
optical
2–12
2–7
2–3
4–3
4–3
1–10
1–6
2–12
Software Guide Index–1
Page 42

Index
playing, with media
hotkeys
playing, with WinDVD
2–4
region settings
2–2
2–4
E
Easy CD Creator
accessing Help file
CD Copier, when to use
2–6
DirectCD, when to use
Easy CD Creator Basic CD
2–7
features
formats
installing
obtaining
preparing to use
prompt, auto insert
prompt, UDF
settings
source drive vs. destination
emergency shutdown
procedures
2–6
2–10
2–6
2–5
notification
2–10
2–9
drive
1–8
2–11
2–8
2–8
2–9
H
Hibernation
avoiding when playing
2–1
media
avoiding when using
infrared
changing configuration
during
defined
1–4
1–1
1–1
2–6
enabling/disabling
initiating
resuming from
setting preferences
when to use
hotkeys
changing function of
Fn+F3
entering media commands
with
initiating Standby with
I
infrared, affected by Standby
and Hibernation
Internet, updating Compaq
software from
InterVideo WinDVD
error message
managing region settings
2–4
playing video CDs and
DVDs
1–7
1–7
1–1
1–10
2–2
1–4
3–3
2–4
2–3
L
locked system
emergency shutdown
procedures
restoring software
1–8
M
Media Player, Windows 2–3
Media Player. See Windows
Media Player
model, identifying notebook
3–2
1–2
1–10
1–8
3–7
Index–2 Software Guide
Page 43

Index
N
notebook model, family, type,
and serial number
3–2
O
operating system
installing retail version of
3–8
loading
reinstalling
shutting down
optical disc. See CD(s); DVD
optical drive
avoiding Standby and
boot order
designation
1–6
3–7
1–6, 1–8
Hibernation while using
2–1
2–12
2–7
P
password(s)
Compaq
Standby
Windows
power
conservation
controls
emergency shutdown
procedures
Hibernation procedures
1–2, 1–7
icon
scheme (Windows)
setting preferences
shutting down
4–1
1–11
1–11
1–1
1–5
1–8
1–9
1–11
1–10
1–6
Standby password
(Windows)
Standby procedures
turning on
power button
function, changing
function, default
location
power/standby light
1–11
1–6
1–5
Q
QuickRestore 3–7
R
region settings for DVDs 2–4
reset procedures (emergency
shutdown procedures)
ROM
defined
determining current
downloading and installing
obtaining updates
RomPaq, downloading
3–1
version of
3–4
3–2
S
serial number, notebook 3–2
series, notebook
Setup utility
shutting down notebook
sleep button
Sleep. See Standby
SoftPaq
described
downloading and installing
3–5
3–2
4–1
1–10
3–3
1–8
1–10
1–6
1–5
1–8
3–3
3–3
1–6
Software Guide Index–3
Page 44

Index
software
AutoPlay
Compaq Help & Support
4–3
CPQFlash SoftPaq
Easy CD Creator
reinstalling
restoring
RomPaq
Setup utility
SoftPaq
UDF Reader
updating Compaq software
3–1
Windows Media Player
2–3
WinDVD
software updates
downloading and installing
3–4, 3–5
obtaining
preparing for
Standby
avoiding when playing
media
defined
hotkeys
initiating
2–8
2–5
3–7
3–7
3–3
4–1
3–3
2–9
2–3
3–3
3–2
2–1
1–1
1–5
1–8
3–3
interfering with infrared or
1–4
1–11
1–8
1–10
1–1
1–8
3–7
system lock-up
drive media
password (Windows)
resuming from
setting preferences
when to use
emergency shutdown
procedures
restoring software
T
technical support 4–3
telephone numbers, Compaq
4–3
turning off notebook
emergency shutdown
procedures
Windows procedure
turning on notebook
1–8
1–6
1–6
U
UDF Reader 2–9
unresponsive system
emergency shutdown
procedures
restoring software
utilities. See software
1–8
3–7
V
video CDs, DVDs. See CD(s);
Index–4 Software Guide
Page 45

Index
W
Windows Media Player
accessing with Digital
Audio button
using with audio CDs
Windows passwords
WinDVD
2–3
1–11
error message
managing region settings
2–4
playing video CDs and
DVDs
Worldwide Telephone Num-
bers booklet
2–4
2–3
4–3
Software Guide Index–5
 Loading...