

Page 1

Contents
CHAPTER 1
Using this Guide
Text Conventions...................................................................................................................1-1
Special Messages .................................................................................................................1-2
Locating Help........................................................................................................................1-2
Glossary ........................................................................................................................1-2
Index .............................................................................................................................1-2
Troubleshooting.............................................................................................................1-2
Understanding Your Service and Support Options ..........................................................1-3
Comments about this Guide ..................................................................................................1-3
CHAPTER 2
Introducing Your Internet PC
Using the TouchPad ..............................................................................................................2-1
Setting the Tapping and Double-Tapping Feature...........................................................2-1
Table of Contents
i
Setting the Edge Motion Feature....................................................................................2-2
Identifying Your Storage Drives..............................................................................................2-3
Using Your Diskette Drive......................................................................................................2-3
Identifying Your Hard Drive Size ............................................................................................2-4
Securing Your Mobile Internet PC ..........................................................................................2-4
Using the Security Slot...................................................................................................2-4
Setting a Power-On Password .......................................................................................2-5
Removing a Power-On Password...................................................................................2-6
Page 2

ii
Table of Contents
CHAPTER 3
Using Your CD or DVD Drive
Inserting and Removing a Disc.............................................................................................. 3-1
Inserting a Disc ............................................................................................................. 3-1
Removing a Disc ........................................................................................................... 3-2
Manually Ejecting a Disc ...............................................................................................3-2
Playing an Audio CD .............................................................................................................3-3
Playing a non DVD Video CD .................................................................................................3-3
Using the DVD Player (available on select models) ................................................................3-4
Using a “Regionalized” DVD.......................................................................................... 3-5
Identifying Your Region Setting...................................................................................... 3-5
Changing a Region Setting ............................................................................................ 3-5
Play Settings................................................................................................................. 3-6
Display Options..................................................................................................................... 3-7
Viewing and Hiding the DVD Player Panel ...................................................................... 3-7
Enlarging and Reducing the View ..................................................................................3-7
Hiding the Taskbar........................................................................................................ 3-7
On-Screen Control Buttons ...................................................................................................3-8
CHAPTER 4
Identifying and Removing Computer Viruses
Recognizing a Computer Virus .............................................................................................. 4-1
Using McAfee Anti-Virus Software......................................................................................... 4-1
Scanning for Viruses .....................................................................................................4-2
Creating an Anti-Virus Emergency Diskette ................................................................... 4-3
Using an Anti-Virus Emergency Diskette........................................................................ 4-4
Keeping Your Anti-Virus Software Current............................................................................. 4-5
Page 3

CHAPTER 5
Introducing Microsoft Windows 98
Customizing the Windows Desktop........................................................................................5-1
Arranging Icons .............................................................................................................5-2
Selecting a Background.................................................................................................5-2
Adding a Screen Saver ..................................................................................................5-3
Finding Help..........................................................................................................................5-4
Windows Help................................................................................................................5-4
Running Microsoft Windows (available on select models)...............................................5-4
Microsoft Windows Starts Here (available on select models) ..........................................5-4
Searching for Files ................................................................................................................5-5
Creating New Folders............................................................................................................5-5
Deleting Files and Folders .....................................................................................................5-6
Creating Shortcuts ................................................................................................................5-6
Using Microsoft Windows Accessories...................................................................................5-7
Installing Additional Software ................................................................................................5-8
Table of Contents
iii
CHAPTER 6
Surfing the Internet
Internet Addresses (URLs) .....................................................................................................6-1
Understanding the World Wide Web ......................................................................................6-2
Choosing an Internet Service Provider ...................................................................................6-2
Using a Web Browser............................................................................................................6-3
Surfing Tips ..........................................................................................................................6-4
Installing Software from a CD or Diskette.......................................................................5-8
Installing a Downloaded Program File ............................................................................5-9
Microsoft Internet Explorer.............................................................................................6-3
Accessing a Search Engine............................................................................................6-4
Using a Search Engine...................................................................................................6-5
Page 4

iv
Table of Contents
CHAPTER 7
Sending and Receiving Faxes
Using RingCentral Fax...........................................................................................................7-1
Setting Up RingCentral Fax............................................................................................7-1
Sending a Fax ............................................................................................................... 7-2
Receiving a Fax.............................................................................................................7-2
CHAPTER 8
Saving Energy with Sleep and Power Management
What are Sleep and Hibernation?.......................................................................................... 8-1
The Importance of Hibernation Mode.............................................................................8-2
Putting Your Computer into Sleep Mode ........................................................................8-3
Resuming from Sleep or Hibernation Mode.................................................................... 8-3
Adjusting Power Settings...................................................................................................... 8-3
Changing Your Power Management Settings in Microsoft Windows ............................... 8-3
Power Schemes Tab .....................................................................................................8-4
Alarms Tab ................................................................................................................... 8-5
Turning Off Sleep Mode................................................................................................. 8-5
Changing Your Power Management Settings in DOS...................................................... 8-6
Recovering from a Loss of Electrical Power........................................................................... 8-7
Power Surges and Sags ................................................................................................8-7
Using a Surge Suppressor............................................................................................. 8-7
Restarting Your Computer After a Power Failure ............................................................ 8-7
Electrical Storms........................................................................................................... 8-8
Creating a Personal Power Scheme ......................................................................................8-8
Page 5

CHAPTER 9
Maintaining Your Internet PC
Battery Overview...................................................................................................................9-1
Battery Power................................................................................................................9-1
Battery Operating Time..................................................................................................9-1
Storing the Battery.........................................................................................................9-2
Recycling the Battery.....................................................................................................9-2
Calibrating the Battery...........................................................................................................9-3
Maximizing Battery Operating Time.......................................................................................9-5
Correcting a Low Battery Condition................................................................................9-6
Cleaning Your Internet PC......................................................................................................9-7
Using System Maintenance Features.....................................................................................9-8
Backing Up Your System Using SystemSave..........................................................................9-8
CHAPTER 10
Understanding Your Service and Support Options
Table of Contents
v
Compaq Support .................................................................................................................10-1
Compaq Remote Support (available in select regions)..........................................................10-2
Using Compaq Diagnostics..................................................................................................10-3
Testing Equipment.......................................................................................................10-4
System Record....................................................................................................................10-5
Compaq Service Connection................................................................................................10-6
Overview .....................................................................................................................10-6
Turning Compaq Service Connection On and Off..........................................................10-6
How it Works ...............................................................................................................10-7
Compaq Service Connection Privacy and Data Security Statement...............................10-7
Internet Support ..................................................................................................................10-8
Page 6

v
i
Table of Contents
QuickRestore...................................................................................................................... 10-9
Full Restore................................................................................................................. 10-9
System Restore.........................................................................................................10-10
Selective Restore ......................................................................................................10-11
SystemSave.............................................................................................................. 10-12
Creating a QuickRestore Emergency Recovery Boot Diskette..................................... 10-13
Using the QuickRestore Emergency Recovery Boot Diskette ......................................10-14
Drivers.............................................................................................................................. 10-15
Installing Drivers for New Hardware ..........................................................................10-15
Reinstalling Deleted Drivers....................................................................................... 10-15
CHAPTER 11
Troubleshooting Guide
Helpful Hints....................................................................................................................... 11-1
Understanding This Guide................................................................................................... 11-1
Contacting a Compaq Authorized Service Provider ............................................................ 11-17
CHAPTER 12
Safety and Comfort
Promoting a Safe and Comfortable Work Environment ........................................................12-2
Key Principles.....................................................................................................................12-3
Finding Your Comfort Zone .................................................................................................12-4
Important Choices....................................................................................................... 12-2
Take Action for Safety and Comfort ............................................................................. 12-2
A Range of Positions ...................................................................................................12-4
Feet, Knees, and Legs.................................................................................................12-6
Back ...........................................................................................................................12-7
Forearms, Wrists, and Hands ...................................................................................... 12-8
Shoulders and Elbows................................................................................................. 12-9
Eyes.......................................................................................................................... 12-10
Page 7

Table of Contents
Arranging Your Work Area.................................................................................................12-11
Monitor......................................................................................................................12-11
Keyboard and Pointing Device....................................................................................12-13
Arm Supports and a Palm Rest ..................................................................................12-15
Papers and Books......................................................................................................12-16
Phone........................................................................................................................12-17
Working in Comfort ...........................................................................................................12-18
Using a Notebook Computer ......................................................................................12-18
Typing Style...............................................................................................................12-19
Pointing Style ............................................................................................................12-21
Using a Keyboard on a Sofa .......................................................................................12-22
Taking Breaks and Varying Your Tasks ......................................................................12-23
Monitoring Your Health Habits and Exercise...............................................................12-25
Organizing Your Adjustments ............................................................................................12-26
From the Ground Up ..................................................................................................12-26
From the Top Down ...................................................................................................12-26
vii
Self-Check........................................................................................................................12-27
Seated Position..........................................................................................................12-27
Shoulders, Arms, Wrists, and Hands ..........................................................................12-27
Eyes ..........................................................................................................................12-28
Typing Style...............................................................................................................12-28
Keyboard and Pointing Device....................................................................................12-28
Monitor......................................................................................................................12-29
Notebook Computing .................................................................................................12-29
General Prevention ....................................................................................................12-30
Page 8

v
iii
Table of Contents
Electrical and Mechanical Safety Information.................................................................... 12-31
Introduction............................................................................................................... 12-31
Product Safety Policy and General Practice................................................................ 12-31
Installation Requirements.......................................................................................... 12-32
General Precautions for Compaq Products................................................................. 12-33
Precautions for Portable Computer Products.............................................................. 12-38
Precautions for Server and Network Products............................................................ 12-38
Precautions for Products with External Television Antenna Connectors..................... 12-40
Antenna Grounding ................................................................................................... 12-42
Precautions for Products with Modems, Telecommunications, or
Local Area Network Options ...................................................................................... 12-43
Precautions for Products with Laser Devices ............................................................. 12-44
Laser Information...................................................................................................... 12-45
For More Information ........................................................................................................ 12-46
CHAPTER 13
Government Approvals
European Union Notice ....................................................................................................... 13-1
Federal Communications Commission Notice...................................................................... 13-2
Modifications ..............................................................................................................13-2
Cables......................................................................................................................... 13-2
Declaration of Conformity for Products Marked with the FCC Logo (United States Only)....... 13-3
Canadian Notice..........................................................................................................13-3
Avis Canadien .............................................................................................................13-3
Japanese Notice ......................................................................................................... 13-3
Telecom Network Approvals ...............................................................................................13-4
U.S. Regulations Governing the Use of Modems.................................................................. 13-4
Ringer Equivalence Number (REN)...............................................................................13-5
Telephone Consumer Protection Act of 1991 ...................................................................... 13-6
Canadian Regulations Governing the Use of Modems..........................................................13-6
Page 9

Table of Contents
U.K. BABT Users Notice.......................................................................................................13-7
Telephone Network Connection ...................................................................................13-7
Auto Dialing with the Modem.......................................................................................13-9
Benutzerhinweise für besondere Bestimmungen in Österreich ..........................................13-10
Hinweis für die Benutzung in Österreich ....................................................................13-10
Wahlsperre................................................................................................................13-10
Benutzerhinweise für besondere Bestimmungen in Deutschland .......................................13-10
Hinweis für die Benutzung in der Bundesrepublik Deutschland ..................................13-10
Brugerinstruktioner i overensstemmelse med danske krav................................................13-11
Opkaldskoder P og T..................................................................................................13-11
Speciale gebruiksinstructies voor Nederland .....................................................................13-11
Aansluitfactor ............................................................................................................13-11
Wachten op kiestoon .................................................................................................13-11
Handenvrij bellen.......................................................................................................13-11
Användarinstruktioner i överensstämmelse med svenska krav ..........................................13-12
Uppringningskod P och T...........................................................................................13-12
ix
New Zealand Modem Statements......................................................................................13-12
Safety ...............................................................................................................................13-14
Batteries....................................................................................................................13-14
Power Cords..............................................................................................................13-15
Laser Assemblies ......................................................................................................13-15
CDRH Regulations......................................................................................................13-15
Using the Computer...................................................................................................13-17
German Ergonomics Notice........................................................................................13-17
Mobile Products – German Ergonomics Notice...........................................................13-17
Locating the Regulatory Compliance Markings Labels................................................13-18
Energy Compliance ...........................................................................................................13-20
Glossary
Index
Page 10

x
Table of Contents
Page 11

Chapter 1
Using this Guide
Thank you for buying a Compaq Internet PC. This Reference Guide will help you
to familiarize yourself with your Internet PC, as well as safety and government
approval information.
Please take a moment to familiarize yourself with the special text and messages
used throughout this guide.
Text Conventions
The examples below explain the specially formatted text used in this guide.
Using this Guide
1-1
• Keyboard key names appear in bold type:
• Keyboard keys that must be pressed at the same time to perform a task appear
in bold type with a plus (+) between the key names:
• Drives appear as capital letters: drive C
• Folder names appear with initial capital letters: Favorites
• File names appear in italics with an initial capital letter: Setup.exe
• Command line statements appear in lower case bold type: a:\install
• Names of icons appear in bold type followed by a picture of the icon:
My Computer
• Menu items appear in bold type: Programs, Accessories
G icon
Home, End, Backspace, Tab
Ctrl+Home
Page 12

1
-2
Using this Guide
Special Messages
The following words and symbols have special meaning in this guide.
Helpful hints that will make using your computer easier and faster.
HINT:
*
Important information concerning the operation of your Internet PC.
NOTE:
+
Failure to follow directions may result in equipment damage or loss of
Failure to follow directions may result in bodily harm or loss of life.
`
CAUTION:
data.
WARNING:
a
Locating Help
Compaq provides you with several resources to help you learn about your Internet
PC. These resources include the following:
Glossary
Computer terms that may be unfamiliar to you are identified in the glossary.
Index
The index is a comprehensive list of the topics covered in this guide.
Troubleshooting
The Troubleshooting section shows how to fix many common computer-related
issues.
Page 13

Using this Guide
Understanding Your Service and Support Options
Your Internet PC is equipped with several helpful programs that will aid you in
identifying and solving common computer problems.
If you need further technical support, visit the Compaq Web site at:
www.compaq.com
Compaq Technical Support telephone numbers are listed in the Limited Warranty
Statement.
Locate the model and serial numbers for your computer before you call
NOTE:
+
Purchase Date
Store Name
Computer Model Number
Computer Serial Number
technical support. Write these numbers down for future use.
Computer Information
1-3
Monitor Model Number
Monitor Serial Number
Comments about this Guide
Compaq Computer Corporation welcomes comments and suggestions you may
have concerning this guide. Send correspondence to the following address:
COMPAQ COMPUTER CORP
ATTN: DOCUMENTATION PROGRAM MANAGER
MAIL CODE 060504
20555 SH 249
HOUSTON TX 77070
This address is for comments and suggestions only. It is not for the purpose
NOTE:
+
of obtaining techinical assistance.
Page 14

1
-4
Using this Guide
Page 15

Chapter 2
Introducing Your Internet PC
Using the TouchPad
The TouchPad lets you use your finger to draw lines or point to items on the
Windows desktop.
To simulate a mouse-click, press the left TouchPad button. It is located directly
below the TouchPad. The left TouchPad button works as the select or drag button.
To double-click an item, move the pointer over the item and press the left
TouchPad button twice. The right TouchPad button works as the context menu or
special drag button.
Setting the Tapping and Double-Tapping Feature
Your TouchPad has a tapping and double-tapping feature that works like a left
mouse button. If this feature is turned on, you can tap once on the TouchPad to
select an object and tap twice to double-click.
Introducing Your Internet PC
2-1
The default setting of the tapping feature is turned off.
NOTE:
+
To turn on the tapping feature, complete the following steps:
1.
From the Windows desktop, click
Panel
.
2.
Double-click the
3.
Select the
4.
Click the
5.
Click the OK button to apply the changes.
Tap to Click
Touch
Mouse
tab.
Z
icon.
checkbox to turn on the tapping feature.
Start
, point to
Settings
, then click
Control
Page 16

2
-2
Introducing Your Internet PC
Setting the Edge Motion Feature
The Edge Motion feature allows you to continue to scroll once your finger reaches
the edge of the TouchPad. When this feature is turned on, the window continues to
scroll until you lift your finger.
To turn on the Edge Motion feature, complete the following steps:
1.
From the Windows desktop, click
Panel
.
2.
Double-click the
3.
Click the
4.
Select
Motion feature.
5.
Click the OK button to apply the changes.
To get additional help for setting advanced TouchPad features, click the
or select
For tips on keeping your TouchPad clean, refer to the Cleaning the Exterior
Surfaces of Your Internet PC section in this guide.
Edge Motion
When Dragging, Always
Help
Mouse
from the Mouse Properties window.
Z
tab.
icon.
Start
, point to
When Scrolling
, and
Settings
, then click
to turn on the Edge
Control
™
button
Page 17

Introducing Your Internet PC
Identifying Your Storage Drives
Your diskette drive, hard drive, CD or DVD, and SuperDisk drive are designated
with letters of the alphabet, as well as with icons.
To determine your drive letters, complete the following steps:
2-3
1.
From the Windows desktop, double-click the
icons for your drives will be displayed in the My Computer window. The drive
letters are found next to the corresponding icons.
2.
Use the icons below to identify your drive.
H
3 ½ Floppy Drive ________
Standard Diskette Drive or
SuperDisk Drive
My Computer
Q
Drive ________
Hard Drive
MMMM
icon. The
ž
Drive ________
CD or DVD Drive
The CD or DVD drive and the SuperDisk drive are available only on select
NOTE:
+
Using Your Diskette Drive
models.
To insert a diskette into the diskette drive, hold the diskette with the label facing up
and the arrow on the diskette pointing towards the drive, and gently push the
diskette into the drive.
To remove a diskette, press the
Removing a diskette when the drive is reading from or writing to the
`
CAUTION:
diskette can damage the diskette or damage the information stored on it. Wait until
the diskette drive activity is complete before removing a diskette.
Eject
button on the diskette drive.
Page 18

2
-4
Introducing Your Internet PC
Identifying Your Hard Drive Size
To determine the size of your hard drive, complete the following steps:
1.
From the Windows desktop, double-click the
2.
In the My Computer window, right-click the
3.
Click the
General
Properties
tab.
menu option. The size of the hard drive is found under the
My Computer
hard drive
Q icon.
M icon.
Securing Your Mobile Internet PC
Using the Security Slot
To use the security slot found on your Internet PC, complete the following steps:
1.
Insert the locking device (such as a Kensington lock) into the security slot.
2.
Turn the locking device clockwise 90 degrees.
To remove the locking device, turn the locking device counter-clockwise
90 degrees and remove the locking device from the security slot.
Page 19

Introducing Your Internet PC
2-5
Setting a Power-On Password
You can set a power-on password that will secure the information you store on
your Internet PC. When turning on your computer, this password must be entered
before your computer will start and you can access your files. To set this password,
complete the following steps:
1.
When you start your computer, the Compaq logo appears on your display. For
a few seconds, there will be a cursor flashing in the upper right hand corner.
When this cursor appears, press the
F10
key.
CAUTION:
`
+
2.
3.
4.
`
5.
6.
7.
8.
your computer may not restart. Pressing the F9 key at any point within the setup
returns your computer to the default settings.
NOTE:
TouchPad to move around the screen. You must use the arrow keys or the + and –
keys.
Using your arrow keys, select the
Move to
Set your personalized password and press the
confirm the password and press the
CAUTION:
power-on password, a Compaq service technician will have to reset your computer
for you to access your files.
Move to
Using your arrow keys, select
Make sure that
Yes
Select
F10 setup is for experienced users only. If you change any other settings,
While in the F10 setup mode, you will not be able to use your mouse or
Security
Set Supervisor Password
Write your password down in a secure location. If you forget or lose your
Password on boot
Exit Saving Changes
to save your changes and exit.
and use the + or – key to select
. Press the
Enter
Exit
from the menubar.
option from the menubar.
Enter
key.
Enter
key. You will have to
key again.
is selected. Press the
Enable
Enter
.
key.
Your power-on password is now set. Every time you turn on your computer or
access F10 setup, you will have to enter this password.
Page 20

2
-6
Introducing Your Internet PC
Removing a Power-On Password
To remove a power-on password, complete the following steps:
1.
When you start your computer, the Compaq logo appears on your display. For
a few seconds, there will be a cursor flashing in the upper right hand corner.
When this cursor appears, press the
2.
Using your arrow keys, select the
3.
Move to
4.
Enter your current password. In the spaces to enter your new password and
confirm your new password, press the
exit the screen.
5.
Move to
6.
Using your arrow keys, select
7.
Make sure that
8.
Select
Set Supervisor Password
Password on boot
Exit Saving Changes
Yes
to save your changes and exit.
and use the + or – key to select
F10
key.
Security
Exit
from the menubar.
option from the menubar.
. Press the
Enter
is selected. Press the
key. Press the
Enter
key.
Enter
Disable
Enter
key again to
.
key.
Page 21
Chapter 3
Using Your CD or DVD Drive
Inserting and Removing a Disc
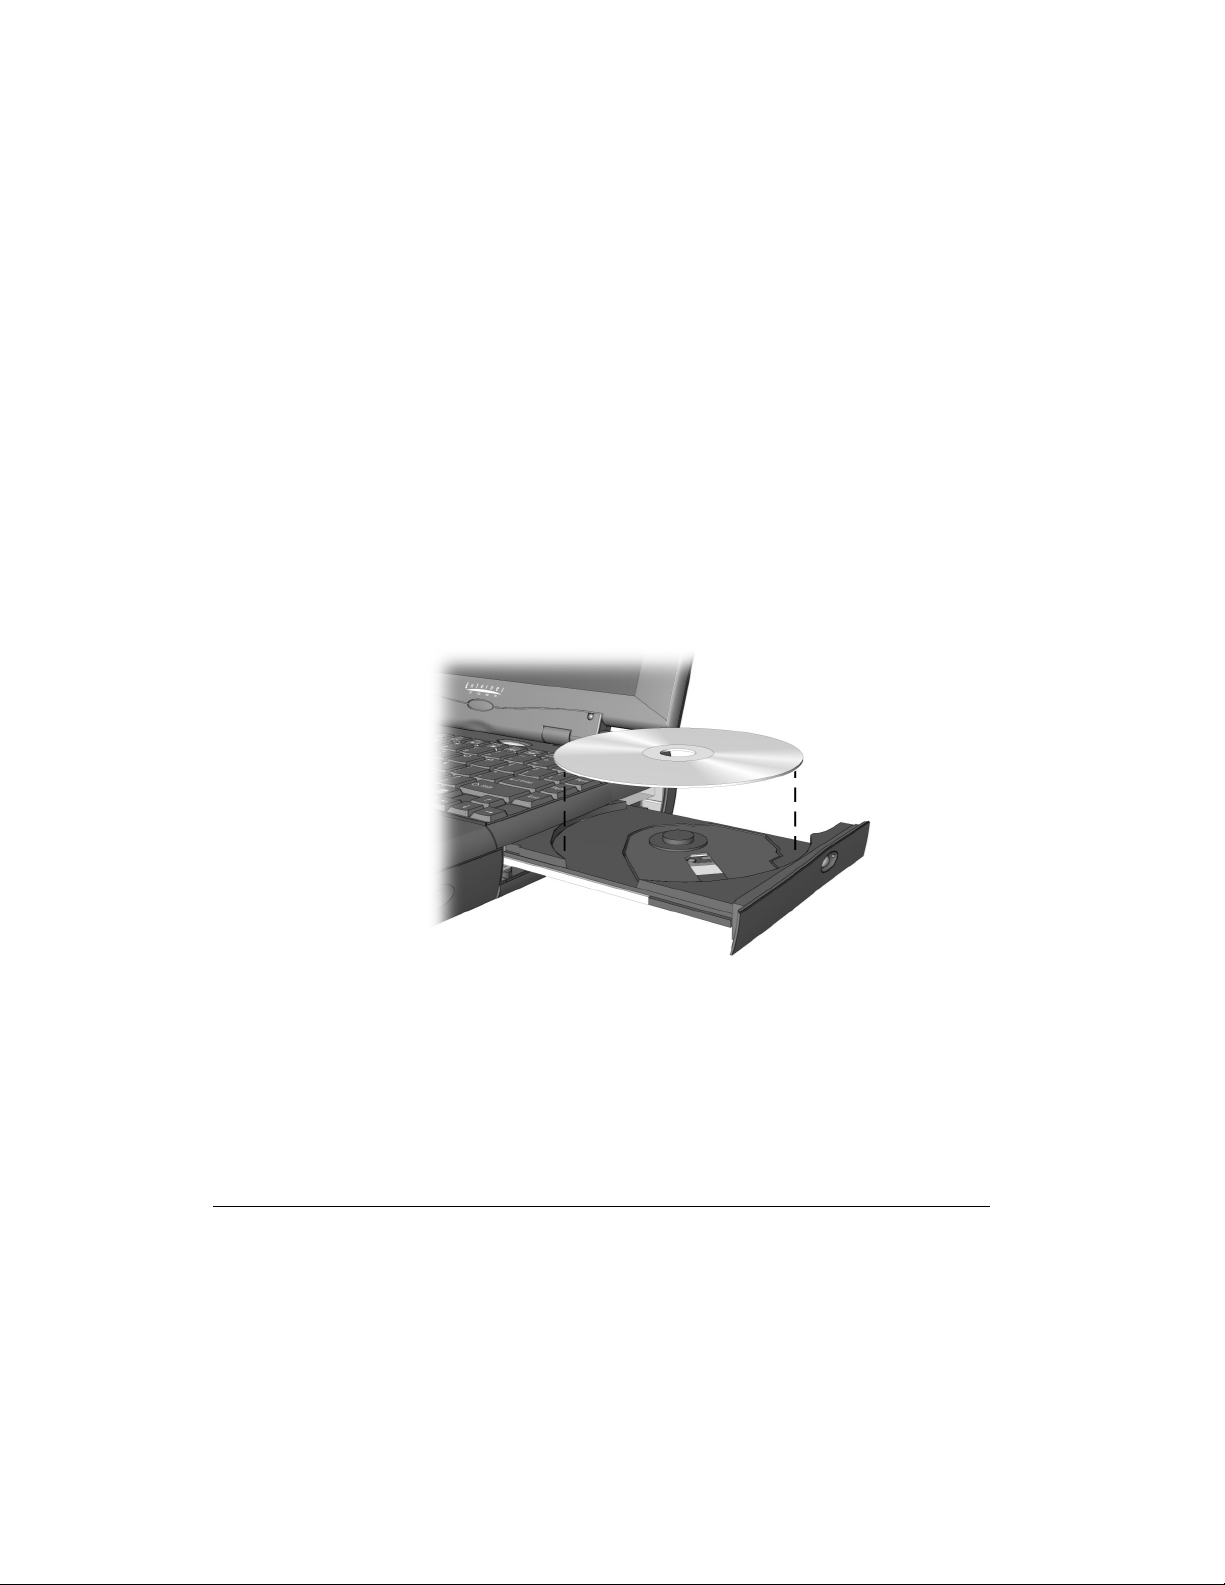
Inserting a Disc
To load a disc into your computer's drive, complete the following steps:
Using Your CD or DVD Drive
3-1
1.
Press the
2.
Remove a disc from its protective case, holding the disc by its center hole and
outer edge to avoid touching the surface.
3.
Place the disc into the round area of the tray. The side you want to play should
face down in the tray. Gently push down on the disc over the center spindle of
the tray until the disc snaps into place.
4.
Push the tray back into the drive until the drive locks into place.
Eject ’
Inserting a Disc into the Drive
button located on the front the drive.
`
CAUTION:
the disc tray until the disc snaps into place. You can damage the disc or your
computer if the disc is not installed properly.
When inserting a disc, be sure to press the disc over the center spindle on
Page 22

3
-2
Using Your CD or DVD Drive
Removing a Disc
To remove a disc from the drive, complete the following steps:
1.
Press the
2.
Remove a disc from the tray, gently pushing down on the center spindle while
pulling up on the outer edges. Avoid touching the surface of the disc.
3.
Push the tray back into the drive until it locks into place.
Eject
’ button on the drive.
Manually Ejecting a Disc
If you need to eject a disc when the power is off, complete the following steps to
manually eject the disc:
1.
Make sure the power is off and any external power sources are disconnected.
2.
Insert a metal rod, such as a paper clip (approximately 1/16 inch in diameter
and at least 3/8 inch in length) into the Manual Eject hole and push firmly as
shown in the figure below. The tray slides should slide out.
Manually Ejecting a Disc
3.
Push the tray back into the drive until it locks into place.
Page 23

Using Your CD or DVD Drive
3-3
Playing an Audio CD
To play a self-starting audio CD, insert the disc into the CD or DVD drive. After a
few seconds, the disc automatically starts playing.
To play a non self-starting audio, press the
or complete the following steps:
1.
Click the
2.
In the Start menu, point first to
Entertainment
3.
Click
4.
Click the
Click the
To remove a disc from the drive, click the
Start
button from the Windows Taskbar.
.
CD Player
Play
Stop
. The CD Player window is displayed.
button. The CD begins playing.
button to stop playing the CD.
Programs,
Play
button on your Internet keyboard
then to
Eject
Accessories
’ button.
, and then to
Playing a non DVD Video CD
For a video CD to play automatically, insert the CD into the CD or DVD drive and
playback begins.
To manually play a video CD, complete the following steps:
1.
Click the
2.
Select
Player
3.
Select
4.
Go to
5.
Double-click the
folders. CD movies are usually stored in a file folder that begins with the letters
MPEG.
6.
Double-click the folder that contains the CD movie files.
7.
Select a movie file and click the
displayed.
8.
Click the
Start
button on the Windows Taskbar.
Programs
. The Media Player opens.
Device
, then
Select CD Disc
Play
button on the window and the movie begins to play.
Accessories
, then
Active Movie
.
CD Drive
ž
Entertainment
, then
from the menu.
icon. You should see a list of files and file
Open
button. A view window for the movie is
, and then
Media
+
It may take a moment for the CD or DVD drive to read the disc when you use
NOTE:
the
Play, Pause, Next Track,
and
Previous Track
buttons.
Page 24
3
-4
Using Your CD or DVD Drive
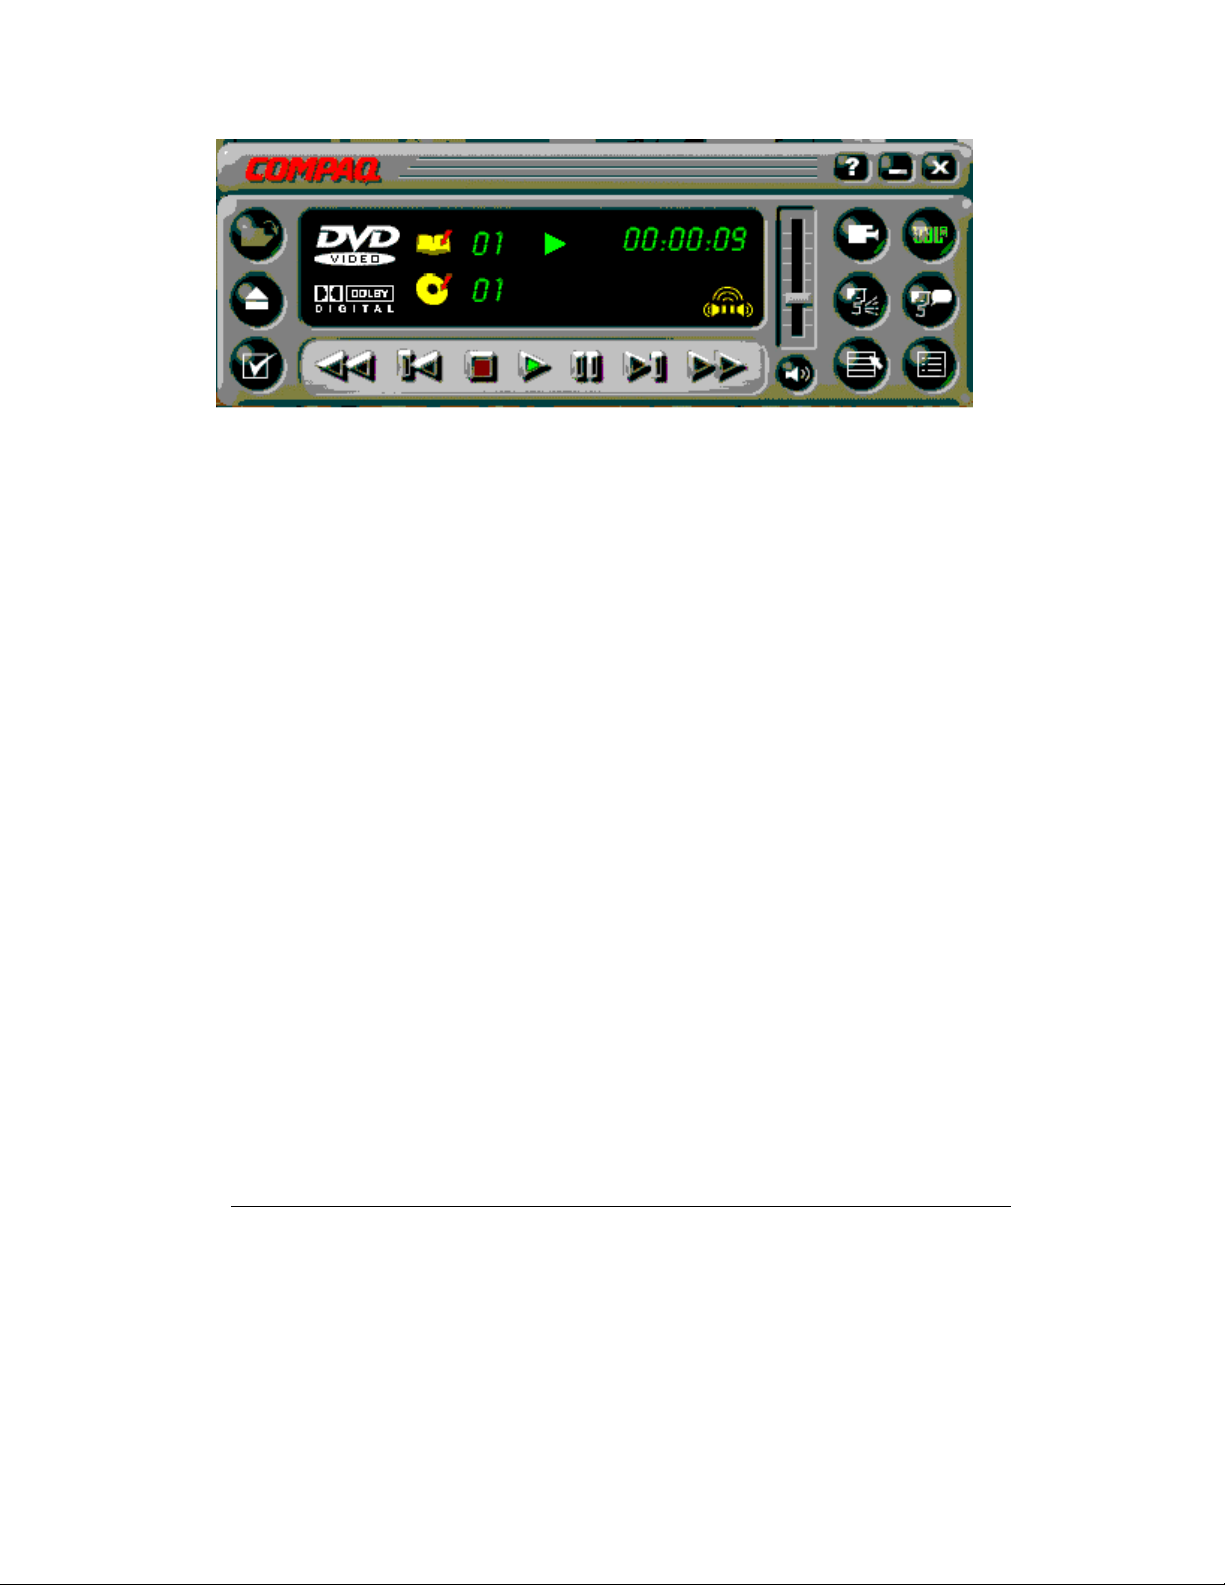
Compaq DVD Player Control Panel
Using the DVD Player
To start your DVD Player program, double-click the
Windows desktop.
Alternatively, you may execute the following steps:
1.
Click the
2.
Point to
3.
Click
+
Start
button on the Windows Taskbar.
Programs
DVD Player
NOTE:
while playing a DVD
.
and follow the directions on the window.
For the best playback quality, close all other applications in the background
(available on select models)
.
DVD Player
·
icon on your
Page 25

Using Your CD or DVD Drive
3-5
Using a “Regionalized” DVD
Some models have a “regionalized” feature that limits the playback of discs to
specific geographical regions.
If your computer has this feature, the region code on your DVD drive must match
the region code on the disc.
Though the computer’s region code is set at the factory, some DVD drives
(depending on the make and model) offer an option to change the region code. If
your computer has this feature, you can change the region code for a maximum of
five times. The fifth setting change you make will become the permanent region on
your player.
Identifying Your Region Setting
If your computer offers the option to change region settings, complete the
following steps:
1.
Insert a DVD into the CD or DVD drive. The DVD Options window opens.
The selected radio button under the Select DVD Region tab indicates your
computer’s current region setting.
2.
Click the OK button if your drive’s region setting matches the disc’s region
setting.
Changing a Region Setting
To change the drive region, complete the following steps:
1.
Insert a DVD into the CD or DVD drive. The Select DVD Region window
opens.
2.
Select another DVD region from the displayed map or from the radio buttons
so that your drive’s region setting matches the disc’s region. After you make a
change to your drive’s region setting, the remaining number of changes
allowed on your drive is displayed.
3.
Click the OK button.
Page 26

3
-6
Using Your CD or DVD Drive
Play Settings
The DVD player has two modes or play settings. The DVD mode and the File
mode. Use the DVD mode to play a standard DVD. Use the File mode to play
MPEG file type.
To play content from the File mode, complete the following steps:
1.
Point and click the
on your computer window. The list of files is displayed.
2.
Select the file you want to view.
3.
Click the
Not all of the following features are available on all DVDs:
• If the DVD player is in the File mode, the Subtitle button is disabled.
• If the DVD player is in the DVD mode and your disc does not have Subtitle
language options, the subtitle button is disabled.
• If the DVD player is in the DVD mode and your DVD has Subtitle language
options, the Subtitle button is enabled.
When a DVD is inserted into the CD or DVD drive, the features available on your
DVD player are displayed. When a particular feature is not available, the
respective button does not respond when clicked.
Open
Open
ò icon on the DVD player control panel displayed
button. The content begins playing.
Page 27

Using Your CD or DVD Drive
3-7
Display Options
You can choose how the controls and DVD content is displayed on your computer.
Viewing and Hiding the DVD Player Panel
To view the DVD Player panel when the DVD Content Picture window is set to
full-window size, right-click anywhere on the picture.
To hide the DVD Player panel, click anywhere outside the DVD panel.
Enlarging and Reducing the View
To enlarge the DVD Content Picture window to full-window size, double-click the
window’s title bar.
To return to a smaller window, double-click anywhere on the picture.
Hiding the Taskbar
To hide the Windows Taskbar while you view DVD content in full-screen mode,
complete the following steps:
1.
Click the
2.
Point to
displayed.
3.
To enable an option, click the checkbox. To disable an option, clear the
checkbox.
4.
Deselect the
5.
Check the
Start
button on the Windows Taskbar.
Settings,
Always on top
Auto hide
then click
Taskbar
checkbox.
checkbox.
. The Taskbar Options window is
Page 28

3
-8
Using Your CD or DVD Drive
On-Screen Control Buttons
Button Title Description
ò
’
6
Ž
Š
•
‰
¬
•
•
)
D
Open Displays a list of files for playback.
Eject Opens the DVD drive to load or remove discs.
DVD Options
Previous Moves to the previous track and resumes playback.
Rewind
Stop
Play Begins playback of selected content.
Pause
Fast Forward
Next Skips to the beginning of the next track.
Root Menu/
Resume
Change Subtitle
Displays the
Display
Rewinds the content. Press
Stops content playback and returns to the start of the
content file.
Pauses playback. Press
playback.
Advances to a selected location. Press
playback.
Shows what is available on the DVD for playback.
Displays or changes subtitles viewed on the window. This
feature is allowed only for DVD content with subtitles.
This feature is available only when the content allows
changes to the audio track.
DVD Options
and
Parental Controls
menu for selecting
.
to resume playback.
Play
or
Pause
Play
to resume
Play
Video
to resume
C
\
Change Audio
Title Menu/
Resume
Changes the playing audio track to another audio track
located on the DVD. Most commonly used with multilanguage content to change the spoken/heard language.
This feature is available only when the content allows
changes to the audio track.
Displays the main title menu to select content.
Page 29

Using Your CD or DVD Drive
Button Title Description
3-9
]
¨
(
õ
ª
š
¼
™
Change Camera
Angle
Karaoke mode
3D Audio Activates the 3D Audio feature for virtual surround sound.
Volume
Mute
Close Player Closes the program.
Minimize Minimizes the size of the Display window of the program.
Help Shows the Help file.
Changes the camera angle of content being played. This
feature is allowed only for DVD content created using
multiple cameras and camera angles.
Toggles between left channel, right channel, and stereo
(dual mode). During left or right modes, the program
turns the microphone on. Left mode selects the left
channel and feeds it to both speakers. Right mode
behaves in a similar fashion. The stereo mode enables
left and right channels to be played through left and right
speakers, respectively.
Increases the volume level when the bar is moved up and
decreases the volume level when the bar is moved down.
Turns off the audio. Press the
button to resume audio.
Mute
or
Volume Control
Page 30

3
-10
Using Your CD or DVD Drive
Page 31

Identifying and Removing Computer Viruses
Chapter 4
Identifying and Removing Computer Viruses
Recognizing a Computer Virus
A computer virus is a program that damages or erases files or programs. Your
computer can become “infected” with a virus when you open a contaminated
program or file. Some signs that your computer may be infected include:
• Strange characters or crude statements suddenly appearing on your screen
• Hard drive, memory, or software error messages
• Damage to files or directories for no apparent reason
• Strange responses to commands
• Sharp decrease in system performance or program speed
Using McAfee Anti-Virus Software
Your Internet PC is equipped with anti-virus software. Scanning your computer for
viruses is an important part of keeping your files safe from becoming infected with
computer viruses. However, hundreds of new viruses are created each month, so
you should update the anti-virus tool often.
4-1
Page 32

4
-2
Identifying and Removing Computer Viruses
Scanning for Viruses
To configure and perform a virus scan of your diskettes, your local hard drive, or a
network drive, complete the following steps:
1.
From the Windows desktop, double-click the
2.
Double-click the
displayed.
3.
4.
5.
6.
7.
+
Scan
Click
perform an Advanced Scan, refer to the Perform an Advanced On-Demand
Scan in the McAfee on-line Help.
Select the
default. If you want to scan a different drive, click
drive letter.
Select the
Select one of the following options:
• Scan All Files
• Program Files Only
If you select
extensions that VirusScan will scan. You can edit the list.
Select the
compression utilities. For more information on Scanning Compressed Files,
refer to the McAfee on-line Help.
NOTE:
for viruses, this option can increase the time it takes to complete a scan.
McAfee VirusScan
. The McAfee VirusScan window is displayed. If you want to
Where & What
Include Subfolders
Program Files Only
Compressed Files
Because VirusScan decompresses these file types in memory before checking
tab. The C:\ drive, your local hard drive, is the
option to include files created with file
ö
option, if you want to scan the subfolders.
, click
Compaq Support
icon. The VirusScan Launcher is
Browse
Extensions
to view a list of file
$
and select another
icon.
8.
Determine if you want to start scanning immediately or to continue
customizing your scan. To start VirusScan immediately, click
you want to continue configuring your scan, select one of the following tabs:
• Action tab
• Report tab
9.
Stop
Click
new scan and change your configuration choices to the VirusScan defaults.
to halt a VirusScan after it has started, or click
Scan Now
New Scan
to start a
. If
Page 33

Identifying and Removing Computer Viruses
4-3
Creating an Anti-Virus Emergency Diskette
Having an Anti-Virus Emergency Diskette available to use is an essential part of an
effective virus prevention program. If your system becomes infected, you may not
be able to access your hard drive or start Windows. The Emergency Diskette will,
at a minimum, diagnose and resolve infections on your hard drive, enabling you to
start your computer from a virus-free environment.
Use VirusScan’s Emergency Diskette utility to create an Emergency Diskette. If
you ever need to start your computer from the Emergency Diskette, we recommend
you perform a scan of your computer and its contents immediately after starting
your computer.
To create an Emergency Diskette, complete the following steps:
1.
Get a blank, formatted 3.5-inch, high-density diskette.
2.
From the Windows desktop, double-click the
3.
Double-click the
displayed.
4.
5.
6.
7.
8.
9.
Tools
Click
Emergency Disk
Click
If you have inserted a formatted diskette, click the
Next
. You are instructed to insert the diskette into your computer’s diskette
drive.
Insert the diskette and click
diskette for viruses and copies the files necessary to scan your system for
viruses. A window informs you when the process is complete.
Finish
Click
Remove the diskette from the diskette drive, label it “
Diskette
,” and store it in a safe place.
McAfee VirusScan
. The Utility Toolbox is displayed.
. The Emergency Disk Wizard is displayed.
Next
.
ö
. The Emergency Disk Utility scans the
Compaq Support
icon. The VirusScan Launcher is
Don't Format
VirusScan Emergency
$
icon.
option. Click
You will now have a diskette that contains the system files necessary to start your
computer.
Page 34

4
-4
Identifying and Removing Computer Viruses
Using an Anti-Virus Emergency Diskette
If you need to use the emergency diskette, complete the following steps:
1.
Shut down your computer using the
Do not use the Restart command from the Start menu. Do not use your
NOTE:
+
2.
3.
4.
+
computer Reset button.
Insert the emergency diskette into the diskette drive.
Turn on the computer and follow the on-screen instructions.
When the scan is complete, press
The emergency disk scans your computer for viruses in the MS-DOS mode,
NOTE:
not the Windows mode. Scanning takes about 15 to 20 minutes. However, the length
of time depends on the size of your hard drive and the number of files to be scanned.
Main Power
Ctrl+Alt+Del
button.
to restart your computer.
Page 35

Identifying and Removing Computer Viruses
Keeping Your Anti-Virus Software Current
By registering with McAfee Anti-Virus, you can receive free anti-virus software
updates for one year. Once you have registered, you will be able to simply
download the updates at any time. To register and begin downloading updates,
complete the following steps:
4-5
1.
From the Windows desktop, double-click the
2.
Double-click the
Launcher will display.
NOTE:
+
3.
4.
5.
6.
7.
Once the download is complete, your anti-virus software will be prepared to detect
the latest viruses. It is recommended that you download updates at least once a
month.
the last update.
Click the
displayed. Read the information on the screen.
Click the
window will display. Select
if you do not have an Internet connection.
Click
Enter your information in the User Identification and Additional Information
areas.
Click the
of the download.
Update
Update
Next
Next
McAfee VirusScan
The McAfee VirusScan Launcher shows how many days have elapsed since
button. The Welcome to McAfee VirusScan! window is
button. The Welcome to McAfee SecureCast Online!
Yes
. The User Registration Information window is displayed.
button. The Online Activity Status window displays the status
ö
if you have access to the Internet, or select
Compaq Support
icon. The McAfee VirusScan
$
icon.
No
Page 36

4
-6
Identifying and Removing Computer Viruses
Page 37

Introducing Microsoft Windows 98
Chapter 5
Introducing Microsoft Windows 98
Customizing the Windows Desktop
The Windows desktop is the screen you see when the Windows startup is
complete. You can arrange your desktop just the way you want it.
Windows Desktop
5-1
represent files, folders,
Icons
1
programs, and other objects that you
use.
Windows desktop
2
Windows work area.
is the basic
Components
3
4
button displays a menu of
Start
commands for starting programs,
changing system settings, locating files,
updating your system, and getting help.
Windows Taskbar
organize your programs and files, and
navigate between files.
provides a way to
Page 38

5
-2
Introducing Microsoft Windows 98
Arranging Icons
You can arrange the icons on your desktop for quick and easy access to frequently
used items.
To arrange icons, complete the following steps:
1.
Right-click anywhere on the Windows desktop.
2.
From the Shortcut menu, select
3.
Choose the method by which you want to arrange the icons. You can arrange
icons in the following ways:
• By Name (alphabetically)
• By Type (file extension)
• By Size (size of the file)
• By Date (date the file was created or edited)
• AutoArrange (automatic icon arrangement)
You can also arrange your icons in organized rows. Right-click the Windows
desktop and choose
Line Up Icons
Arrange Icons
from the Shortcut menu.
.
Selecting a Background
To change the background on your desktop, complete the following steps:
1.
Right-click the
menu.
2.
Select the
3.
From the Patterns list, choose the background you prefer.
4.
Click OK.
Windows desktop
Background
and select
tab and click
Pattern
Properties
.
from the Shortcut
Page 39

Introducing Microsoft Windows 98
Adding a Screen Saver
To add a screen saver, complete the following steps:
5-3
1.
Right-click the
menu.
2.
Select the
3.
From the Screen Saver drop-down menu, choose the design you prefer.
4.
Click the
example, you can set the length of time you want the computer to be inactive
before the screen saver begins.
5.
6.
7.
For more information on customizing your desktop, refer to Microsoft Windows
Help.
Microsoft Windows is the latest innovation in PC operating system technology.
An operating system is the software that gives your computer the ability to run
programs, display your work, and connect to printers, keyboards, and other
devices.
The Windows operating system allows you to perform tasks by clicking menu
items and small pictures (called icons). Windows also allows more than one
program to run at a time, and each program to share information with other
programs.
Preview
Click
Once you have the screen saver you prefer, click
Click OK.
Windows desktop
Screen Saver
Settings
to view the screen saver.
tab.
button to choose the options for your screen saver. For
and select
Properties
Apply
from the Shortcut
.
Before you can begin using your Compaq Internet PC, you must complete the
Microsoft Windows setup process and register your new computer. When you turn
on your computer for the first time, the Microsoft Windows setup begins
automatically.
Page 40

5
-4
Introducing Microsoft Windows 98
Finding Help
If you are not familiar with the many features of Microsoft Windows, you have the
following tools that have been included with your computer.
Windows Help
Windows Help is a valuable tool that can provide answers to many of your
questions about Microsoft Windows.
To search for information in Windows Help, complete the following steps:
1.
Click the
2.
Select the
Running Microsoft Windows
The electronic version of the Microsoft Press publication Running Microsoft
Windows 98 is installed on your computer. From the Windows desktop, double-
Running Microsoft Windows
click
Microsoft Windows Starts Here
Another Microsoft Press publication, Microsoft Windows 98 Starts Here, is also
loaded on your computer. From the Windows desktop, double-click
Windows Starts Here
Microsoft Windows 98 Starts Here is a tutorial designed to help you master the
basic concepts of the Microsoft Windows operating system. The following topics
can be found in this tutorial:
Introducing Windows 98
•
they can help you complete daily tasks.
Communicating and Collaborating
•
the communication tools in Windows.
Keeping Your Computer Healthy
•
your computer performing efficiently.
Start
button, then click
Content, Index, or Find
.
provides information on Windows features and how
Help
.
tab for help.
(available on select models)
.
(available on select models)
Microsoft
contains information about how to use
shows you how to use Windows to keep
These tools can provide answers to your questions as you use Microsoft Windows.
Page 41

Introducing Microsoft Windows 98
Searching for Files
In Windows you can search for files or folders by entering a complete or partial
name, the date the file was created, or the file type or size.
To search for a file or folder, complete the following steps:
5-5
1.
From the Windows Taskbar, click the
2.
Point to
3.
From the Name & Location tab, type the name of the file or folder, or as much
as you can remember, in the Named box.
4.
From the Look in box, select the location to be searched.
5.
Click the
6.
From the Date tab, you can specify
time frame in which the file was created or modified.
7.
From the Advanced tab, you can specify the type of document to search for or
the size of the document.
8.
Click
Find
and choose
Include subfolders
Find Now
.
File or Folders
checkbox.
Start
.
All Files
button.
Find all files
, or
and provide a
Creating New Folders
Microsoft Windows allows you to create folders to organize your files. For
example, you can create a folder and name it Budget99. In this folder you could
store all of your files related to expenses, profits, taxes, and so forth.
To create a folder, complete the following steps:
1.
Right-click the
open Windows Explorer.
2.
From Windows Explorer, click the drive where you want to place the new
folder so that it is selected.
3.
Right-click in Explorer and choose
4.
Choose
5.
Type a name for the new folder and press
Folder
Start
button and choose
.
Explore
New
from the Shortcut menu.
from the Shortcut menu to
Enter
.
Page 42

5
-6
Introducing Microsoft Windows 98
Deleting Files and Folders
To delete a file or folder, complete the following steps:
1.
Click the file or folder you want to delete.
2.
3.
Delete
Press
Bin?” is displayed.
Click
the file or folder click No or
. The message “Are you sure you want to send to the Recycle
Yes
if you want to delete the file or folder. If you do not want to delete
Cancel
.
Creating Shortcuts
Shortcuts are used to open files and programs without having to select them from
the Start menu or from their permanent location on the hard drive. If you frequently
use a certain file or folder, you can place a shortcut for it on your desktop as an
icon or on the Start menu for quick access.
To create a shortcut to a file or folder, complete the following steps:
1.
Right-click the
open Windows Explorer.
2.
From Windows Explorer, locate the file or folder you want to use to create the
shortcut.
3.
Click the file or folder to select it.
4.
Right-click the selected file or folder and choose
Shortcut menu.
5.
Right-click and drag the shortcut to any of the following areas:
• on the Windows desktop
• in a particular folder
6.
When Windows prompts you with a Shortcut menu, choose
Here
.
To use the shortcut, double-click the new shortcut icon.
Start
button and choose
Explore
from the Shortcut menu to
Create Shortcut
from the
Create Shortcut
Page 43

Introducing Microsoft Windows 98
5-7
Using Microsoft Windows Accessories
Microsoft Windows is equipped with a number of accessories. Brief descriptions of
the accessories available to you are provided as follows:
Accessibility
•
mobility needs.
Communications
•
Dial-Up Networking
–
network.
Direct Cable Connection
–
direct serial or parallel cable connection between two computers.
HyperTerminal
•
receive files, and connect to computer bulletin boards or similar information
services.
Phone Dialer
•
list of your calls for you to review as needed.
Entertainment
•
ActiveMovie Control
–
encountered on the Web.
CD Player
–
in other programs.
Media Player
–
in these formats: .wav, .mid, .rmi, .avi, and .mpg.
Sound Recorder
–
sounds using a microphone attached to your computer.
Volume Control
–
control the balance between your left and right speakers, change the
volume, and mute certain devices.
Games
•
System Tools
•
Viewer, Disk Cleanup, Disk Defragmenter, and ScanDisk.
Calculator
•
Imaging
•
Notepad
•
allows you to configure Windows for your vision, hearing, and
offers the following features:
enables you to connect to another computer or to a
enables you to quickly and easily establish a
enables you to connect to a remote computer, send and
enables you to place calls using your computer. It also stores a
offers the following features:
provides a way to view ActiveMovie files, usually
allows you to play audio CDs in your CD drive while you work
allows you to play multimedia files (audio and video) saved
allows you to play audio files. You can also record
provides the power to control Windows sound. You can
provides several activities for your entertainment.
offers various utilities for your system, including Clipboard
provides a means to perform simple and complex calculations.
allows you to view, zoom, rotate, and print a previewed image.
offers a place to work with unformatted text.
Page 44

5
-8
Introducing Microsoft Windows 98
Paint
•
•
To use any one of these accessories, complete the following steps:
allows you to create and edit graphics.
WordPad
provides basic word processing features.
1.
From the Windows Taskbar, click the
2.
Click
Accessories
and choose the feature you want to use.
Start
button, then point to
Programs
.
Installing Additional Software
Once you have become accustomed to using your Internet PC and have explored
the pre-installed software, you may wish to purchase and install additional
software. When selecting software for your Internet PC, make sure it states on the
packaging that it is compatible with your Microsoft Windows operating system.
If the software documentation contains installation instructions, use those
HINT:
*
Software can be installed from a CD, a diskette, or downloaded from a Web site.
Many software CDs automatically begin the installation process when placed in the
CD drive. If you have a software CD that does not automatically begin the
installation process, you can install the software by using the Microsoft Windows
Add/Remove Programs utility.
Installing Software from a CD or Diskette
To install software from a CD that does not automatically install, or from a
diskette, complete the following steps:
instructions. If not, you can complete the following steps for installing software from
a CD or diskette.
1.
Close all open programs.
2.
From the Windows Taskbar, click the
Control Panel
click
3.
Double-click the
Programs Properties window is displayed. Click
4.
Insert the CD or diskette into the proper drive and click
Microsoft Windows will find the CD or diskette and begin the installation process.
.
Add/Remove Programs
Start
button, point to
»»»»
icon. The Add/Remove
Install
.
Next
Settings
.
, and then
Page 45

Introducing Microsoft Windows 98
Installing a Downloaded Program File
If you choose to download software from a Web site, follow the installation
HINT:
*
To install a program file that you have downloaded from the Internet to your hard
drive, complete the following steps:
1.
2.
3.
4.
5.
6.
instructions that may be included on the Web page. If installation instructions are not
available, complete the steps below.
Terminate your Internet connection.
Close all open programs.
Install.exe
or
Start
button, point to
»»»»
icon. The Add/Remove
Install
Browse
file for the downloaded software.
From the Windows Taskbar, click the
Control Panel
click
Double-click the
Programs Properties window is displayed. Click
from Floppy Disk or CD-ROM window is displayed. Click
Installation Program window is displayed. Click
Locate and select the
Open
Click
to begin the installation process.
.
Add/Remove Programs
Setup.exe
Settings
. The Install Program
Next
.
, and then
. The Run
5-9
Page 46

5
-10
Introducing Microsoft Windows 98
Page 47

Chapter 6
Surfing the Internet
The Internet is a worldwide network of computer networks. Computer networks
are two or more computers linked or connected together by cables or phone lines.
These computers are linked together to provide seemingly endless amounts of
information for research, education, commerce, and entertainment purposes.
This information is stored on computers called Web servers. Web servers are set up
exclusively for Internet users to access this information.
The graphic below illustrates how a Web site stored on a Web server in North
America can be viewed all around the world.
Surfing the Internet
6-1
The Internet
When you “surf” the Internet, you are accessing these millions of computers and
reviewing the information that they have stored on their Web servers.
Internet Addresses (URLs)
Surfing the Internet is made possible by the addresses assigned to these linked
computers. The Web address (also called the Uniform Resource Locator, or URL)
allows other computers to view the information as Web pages. For example, the
Compaq Web site address is www.compaq.com. When you access this address, the
Compaq Web site and all associated Web pages can be viewed on your Internet
PC.
Page 48

6
-2
Surfing the Internet
Understanding the World Wide Web
The World Wide Web, also known as the Web, is a popular format that has been
set up on the Internet specifically for publishing and accessing information.
This information is formatted into attractive pages in the form of text, graphics,
animation, audio, and video called Web sites. Web sites also contain hyperlinks to
other Web sites so you can easily follow a path of associated ideas. Hyperlinks
provide a means for moving from page to page, computer to computer, and idea to
idea on the Web.
To begin surfing the Internet, you must have the following:
• A physical connection to the Internet, such as a modem through a telephone
line – a modem is the hardware that your computer uses to send and receive
information on the Internet through standard telephone lines.
• An active Internet Service Provider (ISP) account – an Internet service
provider serves as your entry point to the Internet and to the Web.
• A Web browser installed on your computer – a Web browser is a software
program that allows you to view Web sites.
Choosing an Internet Service Provider
Compaq makes it easy to connect to the Internet by offering Compaq Easy Internet
Access, but if you choose to install a third party ISP account, refer to their
documentation for setup instructions. Any ISP of your choice can be installed at
anytime; however, it is recommended that you first complete the initial system
registration process.
Page 49

Surfing the Internet
Using a Web Browser
A Web browser is a program that allows you to see Web sites on the Internet.
Your Internet PC comes preinstalled with Microsoft Internet Explorer and
Netscape Navigator browsers.
Microsoft Internet Explorer
To begin surfing the Internet with Internet Explorer, complete one of the
following:
6-3
• From the Windows desktop, double-click the Internet Explorer
• From the Windows Taskbar, click the Start button, point to Programs, and
then click the Internet Explorer
For America Online users, you must start AOL and log on before starting
NOTE:
+
Internet Explorer.
! icon.
! icon.
Page 50

6
-4
Surfing the Internet
Surfing Tips
After you have set up an Internet connection with your ISP and you log on to the
Internet, you are ready to surf. To help your surfing experience be productive, we
have provided a few tips, after a quick review on the Internet.
To begin surfing the Internet you must use a Web browser, such as Internet
Explorer or Netscape Navigator. However, some ISPs, such as America Online,
require you to log on to their service before you can use a Web browser.
There are two ways to connect to the Internet:
• By starting the ISP program.
• By starting the Web browser program.
If you start the ISP first, there are two ways to begin surfing the Internet:
• By using the ISP connection to the Internet (usually an icon on the task menu).
• By minimizing the ISP program and starting the Web browser from the
Windows desktop.
Each of the browsers has a default “home” page. The home page is the first page
displayed as the browser launches. Compaq has configured the browser to launch a
Compaq-recommended Web site, which you can customize to your own taste. Of
course you can change this home page if you want to start at another Web site.
Look in the browser Help files for instructions on resetting the default home page.
Accessing a Search Engine
Once you access the Internet, your can begin searching for information using a
search engine.
A search engine is a type of program found on various Web sites that allows you to
search the Internet for keywords you type in. The search engine will return a list of
Web pages that have your keywords in them.
There are many search engines to choose from on the Internet, such as AltaVista.
To go to one of these search engines, type in the URL, such as www.altavista.com
in the Address box. This will take you to the AltaVista home page.
The browsers have a Search button that will automatically take you to their
recommended search engine, and your Internet PC comes with a button that takes
you to a search engine.
Page 51

Surfing the Internet
6-5
Using a Search Engine
The following points are additional tips on how to find information on the Internet
using a search engine:
• When entering keywords, you can enter an entire sentence to limit the search to
a more specific topic. For example, for information on carving a turkey, type
carving a turkey in the keyword box instead of just turkey.
• After entering a keyword search, the search engine that you are using will
return a list of all Web sites that contain your keywords. You must click the
link to a Web site to find more detailed information.
• Some Web sites are connected to other Web sites with hyperlinks often
appearing as colored, underlined text. When you click a hyperlink, you access
the Web page associated with that link. The new Web page may be from the
same Web site or a Web site in another country.
For practice, search for the Compaq Web site by typing the following URL into the
Address box of your Web browser:
www.compaq.com/athome/exploration
Page 52

6
-6
Surfing the Internet
Page 53

Chapter 7
Sending and Receiving Faxes
Your computer comes with the ability to send and receive faxes. Before you try to
send or receive faxes, you must have your modem connected to a telephone line
and have the software running. For more information on connecting your modem,
refer to the Compaq Hardware and Software Setup poster that came with your
computer.
Sending and Receiving Faxes
7-1
Using RingCentral Fax
Your computer comes with the RingCentral Fax program. RingCentral Fax is used
to send and receive faxes. Refer to the online Help in RingCentral Fax for detailed
instructions on using the software.
(Available in select models)
Setting Up RingCentral Fax
The first time you use RingCentral Fax, the program will prompt you through a
setup process. The setup process is simple and takes approximately three to five
minutes to complete.
To start the RingCentral Fax setup, complete the following steps:
1. 'RXEOHðFOLFNýWKHý5LQJ&HQWUDOý)D[ý¥ýLFRQýORFDWHGýRQý\RXUýGHVNWRSýRUýFOLFN
WKHý6WDUWýEXWWRQýIURPýWKHý:LQGRZVý7DVNEDUñýSRLQWýWRý3URJUDPVï
2. 6HOHFWý5LQJ&HQWUDOý)D[ýIURPýWKHýPHQXïý7KHý5LQJ&HQWUDOý)D[ý6HWXSý:L]DUG
ZLQGRZýLVýGLVSOD\HGï
3. &OLFNýWKHý1H[WýEXWWRQýDQGýIROORZýWKHýLQVWUXFWLRQVýLQýWKHý5LQJ&HQWUDOý)D[ý6HWXS
:L]DUGýZLQGRZýXQWLOýWKHýVHWXSýSURFHVVýLVýFRPSOHWHï
Page 54

7
-2
Sending and Receiving Faxes
Sending a Fax
To send a fax using RingCentral Fax, complete the following steps:
'RXEOHðFOLFNýWKHý5LQJ&HQWUDOý)D[ý
ìï
WKHý6WDUWýEXWWRQýIURPýWKHý:LQGRZVý7DVNEDUñýSRLQWýWRý3URJUDPVï
4. 6HOHFWý5LQJ&HQWUDOý)D[ýIURPýWKHýPHQXïý7KHý5LQJ&HQWUDOý)D[ýZLQGRZýLV
GLVSOD\HGï
5. &OLFNýWKHý6HQGý)D[ýWDEýRQýWKHý5LQJ&HQWUDOý)D[ý7DVNEDUïý7KHý6HQGý)D[
ZLQGRZýLVýGLVSOD\HGï
6. &RPSOHWHýWKHýLQIRUPDWLRQýLQýWKHý5HFLSLHQWVýSRUWLRQýRIýWKHýZLQGRZïý7KHýID[
QXPEHUýILHOGýPXVWýEHýILOOHGýLQýRUý5LQJ&HQWUDOý)D[ýZLOOýQRWýEHýDEOHýWRýGHOLYHUýWKH
PHVVDJHï
7. 7\SHý\RXUýPHVVDJHýLQVLGHýWKHý1RWHýWH[WýER[ï
8. &OLFNýWKHý6HQGý)D[ý1RZýEXWWRQï
You can also fax an existing document and add an attachment to it. For more
HINT:
*
information, refer to the online Help included in the RingCentral Fax program.
¥ýLFRQýORFDWHGýRQý\RXUýGHVNWRSýRUýFOLFN
Receiving a Fax
If the RingCentral Fax program is open, you are set to automatically receive any
fax sent to you. A message indicating a fax is being delivered will be displayed.
To disable the automatic-receipt feature in RingCentral Fax and receive faxes
manually, complete the following steps:
&OLFNýWKHý6WDUWýEXWWRQýIURPýWKHý:LQGRZVý7DVNEDUýDQGýSRLQWýWRý3URJUDPVï
ìï
9. 6HOHFWý5LQJ&HQWUDOý)D[ýIURPýWKHýPHQXïý7KHý5LQJ&HQWUDOý)D[ýZLQGRZýLV
GLVSOD\HGï
&OLFNý0HQXýIURPýWKHý5LQJ&HQWUDOý)D[ýZLQGRZýDQGýSRLQWýWRý&RPPDQGVï
10.
&OLFNý0DQXDOý)D[ý5HFHLYHï
11.
&OLFNý9LHZý)D[HVýWRýFKHFNýLIý\RXýKDYHýUHFHLYHGýDýQHZýID[ï
12.
,Iý\RXýKDYHýUHFHLYHGýID[HVñýSRLQWýWRýWKHýQHZýID[HVýDQGýFOLFNý2SHQï
13.
&OLFNý&ORVHýEXWWRQýWRýH[LWýIURPýWKHý9LHZý)D[HVýZLQGRZï
14.
Incoming faxes cannot exceed 100 pages.
NOTE:
+
Page 55

Sending and Receiving Faxes
7-3
Page 56

Saving Energy with Sleep and Power Management
Chapter 8
Saving Energy with Sleep and Power Management
Your Compaq Internet PC is equipped with power management features. These
power-saving settings are preset for optimal performance. For more information
about power management, refer to the Windows Help.
What are Sleep and Hibernation?
Compaq Internet PCs have two levels of power management: Hibernation and
Sleep.
8-1
Hibernation mode occurs by pressing the Power
› button once. Your computer
saves the content of your computer memory to the hard drive. This is followed by
your computer turning off.
Sleep mode is a low-power mode, also referred to as Standby mode. It occurs by
pressing the
function key or by clicking the Start button, then Shutdown,
Fn+F4
then Standby.
The following table shows the conditions and indicators for getting in and out of
the various power modes: Sleep, Hibernation, and Off.
Sleep and Hibernation Functions
Mode To Start To End Indicators
Sleep
–
Manual
combination or click the
button on the Windows
Taskbar, then point to
Shutdown
.
Standby
Time-Out Default
minutes if using battery
power. Computer will not
automatically enter Sleep
mode if on AC power.
key
Fn+F4
, then click
– 15
Start
Press any key.
Flashing
light*
*Moon n icon appears
on status display
(1800 Series only)
Power
›
Page 57

8
-2
Saving Energy with Sleep and Power Management
Sleep and Hibernation Functions
Mode To Start To End Indicators
– Press
Hibernation
Manual
button once.
Time-Out Default
battery is low or after 1 hour
of Sleep. Computer will not
automatically enter
Hibernation mode if on AC
power.
Power
– If your
›
light is off,
Power
screen is blank*
Press
button once.
Power
›
*Power
not appear on status
display (1800 Series
only)
icon does
›
– Perform normal
button on the Windows
* – Press and hold
button for
›
Power
is not recommended unless
the Standard shutdown mode
does not work.
Press
Power
button once.
›
No
icon), screen is blank.
Power
light (or
Off
Standard
Windows shutdown using the
Start
Taskbar.
Manual
down the
4 seconds.
*The Manual shutdown mode
The Importance of Hibernation Mode
Hibernation mode conserves battery life and protects your data. Hibernation can be
a routine power-saving event or the result of a low battery. As your computer
enters Hibernation, it automatically saves the content of your computer memory to
the hard drive before it turns off.
Your computer will automatically enter Hibernation mode when the battery has
little power left or when your computer (operating on battery power) has been in
Sleep mode for more than one hour. You can also activate Hibernation mode by
pressing the Power button once.
To restart your computer, press the Power button once. While your computer
enters or wakes from Hibernation mode, it displays a Progress window.
If you are using battery power, your computer will automatically enter
NOTE:
+
Hibernation mode after one hour in Sleep mode.
Page 58

Saving Energy with Sleep and Power Management
Putting Your Computer into Sleep Mode
You may put your computer into Sleep mode manually by pressing the
simultaneously.
Another way to put your computer into Sleep mode manually is to click Start,
point to the Shut Down option, and click Standby from the list of choices.
Fn+F4
8-3
keys
While in Sleep mode, your computer will maintain system information and
`
CAUTION:
open files. Unsaved information is lost if you turn off your computer before you end
Sleep mode.
Resuming from Sleep or Hibernation Mode
To begin using your computer from Sleep or Hibernation mode, complete one of
the following steps:
• From Sleep – Press the spacebar.
• From Hibernation – Press the Power button.
Adjusting Power Settings
You can create different power settings, or power schemes, under which your
computer will go into Sleep mode. The optional settings are Home/Office Desk,
Portable/Laptop, and Always On. These default settings will work for most users.
You can adjust the settings for your work habits. You are able to change the
following:
• when your computer goes into Sleep (Standby) mode
• when the screen times out and goes blank
• when the hard drive goes into low power mode
Changing Your Power Management Settings in Microsoft Windows
To change the power management settings, complete the following steps:
1.
Click the
2.
Point to
3.
Click
Control Panel
4.
Double-click the
button from the Windows Taskbar.
Start
Settings
.
.
Power Management
æ
icon.
Page 59

8
-4
Saving Energy with Sleep and Power Management
Power Schemes Tab
1.
Click the
2.
Using the
power or on battery that you want your computer to wait before initiating
Standby.
+
3.
Select the
monitor turns off.
4.
Select the
before the hard disk goes into low power mode.
Power Schemes
System Standby
If you are connected to a network, Compaq recommends you set
NOTE:
to
Standby
NOTE:
Never
Turn off Monitor
Turn off Hard Disk
These options are available for both AC power and battery power.
tab.
dropdown menu, select the length of time on AC
.
+
5.
Click
Save As
settings OR click
and type in the name for your personal power management
to activate your new setting.
Apply
System
dropdown list to set the time allowed before the
dropdown list to adjust the length of idle time
Your personal power settings are now turned on.
Page 60

Alarms Tab
Saving Energy with Sleep and Power Management
8-5
CAUTION:
`
For the recommended settings, make sure the following values are set:
• For low battery alarm:
• For critical battery alarm:
at its best. Changing any of these settings could cause your computer to function
improperly. It is recommended that these settings be left at their default values.
– Make sure
checked.
– Power level gauge is set to 10%.
Alarm action = Notification: Text Action: No Action
– Make sure
checked.
– Power level gauge is set to 0%.
Alarm action = Notification: Text Action: No Action
The settings on the Alarms tab have been preset for your computer to run
Set off low battery alarm when power level reaches 10%
Set off low battery alarm when power level reaches 0%
Turning Off Sleep Mode
To turn off Sleep mode, complete the following steps:
is
is
1.
Click the
2.
Point to
3.
Click
Control Panel
4.
Double-click the
5.
Click the
6.
From the
7.
From the
8.
Click the OK button to apply the changes.
NOTE:
+
computer will not enter Sleep mode.
button from the Windows Taskbar.
Start
Settings
.
.
Power Management
Power Schemes
Power Scheme
System Standby
If you change these settings, the computer display will turn off but your
tab.
dropdown menu, select
dropdown menu, select
æ
icon.
Portable/Laptop
.
Never
.
Page 61

8
-6
Saving Energy with Sleep and Power Management
Changing Your Power Management Settings in DOS
If you are working in DOS mode, your Windows power management settings will
not be in effect. However, there are preset power management settings while you
are working in DOS. To change these settings, complete the following steps.
1.
When you start your computer, the Compaq logo appears on your display. For
a few seconds, there will be a cursor flashing in the upper right hand corner.
When this cursor appears, press the
F10
key.
CAUTION:
`
+
2.
3.
4.
5.
6.
7.
8.
your computer may not restart. Pressing the F9 key at any point within the setup
returns your computer to the default settings.
NOTE:
mouse or touchpad to move around the screen. You must use the arrow keys or the
+ and – keys.
Using your arrow keys, select the
Move to
Customized
choose your selection.
Move to
arrow keys to make a selection and press
Move to
arrow keys to make a selection and press
Using your arrow keys, select
Make sure that
Select
Yes
F10 setup is for experienced users only. If you change any other settings,
After you have entered the F10 setup mode, you will not be able to use your
Power Savings
or press
Sleep Timeout
Hard Disk Timeout
Exit Saving Changes
to save your changes and exit.
. Use the + or – key to change the setting to
to see the available options. Use the arrow keys to
Enter
and press
and press
Exit
DOS Power
Enter
from the menubar.
is selected. Press the
option from the menubar.
to display your choices. Use the
.
Enter
to display your choices. Use the
Enter
.
Enter
Enter
key.
+
These settings only apply when you are working in DOS mode. If you are
NOTE:
working in Windows, the Windows power management settings will apply.
Page 62

Saving Energy with Sleep and Power Management
8-7
Recovering from a Loss of Electrical Power
Loss of electrical power will cause your Internet PC to automatically turn off. This
may cause loss of data because the Microsoft Windows operating system is not
able to properly close all files and programs. To protect your data, learn to save
your work frequently.
Loss of power may be caused by one of the following:
• Electrical power service is interrupted.
• Power cord is accidentally disconnected.
Power Surges and Sags
If power surges or sags, the display and status lights may flicker and the computer
may automatically restart. If an improper shutdown occurs, ScanDisk, a Microsoft
Windows utility program, will automatically run once power is restored to the
computer. ScanDisk will determine if the improper shutdown caused any errors on
the hard disk. These errors may occur if the Microsoft Windows operating system
was not able to properly close all files before the shutdown. If no errors are found,
the restart process will continue. If ScanDisk does detect errors, follow the
instructions shown to continue the restart process. Work that was not saved prior to
the lockup may be lost.
Using a Surge Suppressor
Use of a surge suppressor, line conditioner, or uninterruptible power supply (UPS),
may help to protect your computer from damage that may be caused by power
surges or sags.
Restarting Your Computer After a Power Failure
If a power failure occurs or you accidentally disconnect the power cord while the
computer is turned on, turn off the computer until you are sure normal service has
been restored. The next time you turn on the computer, ScanDisk may run to check
the hard disk for errors that may have been caused by the improper shutdown.
Page 63

8
-8
Saving Energy with Sleep and Power Management
Electrical Storms
If you are expecting an electrical storm to pass through your area, it is a good idea
to ensure that your Internet PC is turned off. You should disconnect the modem
line from the telephone wall jack and remove all the computer power cords from
electrical outlets.
Creating a Personal Power Scheme
If you find that the preset power management schemes do not fit your work habits,
you can create a personal power scheme.
To create your own personal power scheme, complete the following steps:
1.
From the Windows Taskbar, click
Control Panel
2.
Click the
3.
Complete the following steps in the Power Management Properties window:
a. Ensure the Portables/Laptop power scheme is selected.
b. Click the down arrow next to System standby and select the amount of
time that passes before the computer goes into Sleep mode.
c. Click the down arrow next to Turn off monitor and select the amount of
time that passes before the monitor goes into Sleep mode.
d. Click the down arrow next to Turn off hard disks and select the amount
of time that passes before the hard drive goes into Sleep mode.
4.
Click
Save As
5.
Click OK. Your personal power scheme is now activated.
.
æ
Power Management
and type in a name for your personal power scheme.
Start
icon.
, point to
Settings
, and then click
Page 64

Chapter 9
Maintaining Your Internet PC
Battery Overview
The following is information on the features of the battery for your Internet PC, as
well as instructions for storing and disposing of the battery.
Battery Power
To determine the amount of remaining battery power, double-click the Battery
Charge
your battery or the status panel gauge, depending on what series computer you
have. For the features that apply to your computer, see the table below.
è icon located on the Windows Taskbar. You can also check the lights on
Battery Gauges
Series Number Taskbar Icon Battery Lights Display Gauge
1200
Yes Yes No
Maintaining Your Internet PC
9-1
1600
1800
1900
Yes Yes No
Yes Yes Yes
Yes No No
Battery Operating Time
The battery operating time depends on your power management settings. The
system components, the options, and the applications you use also affect operating
time.
For safety reasons, when operating under AC power, Compaq recommends
NOTE:
+
that you keep a battery installed. This will also ensure that you have a charged
battery when you need it.
Page 65

9
-2
Maintaining Your Internet PC
Storing the Battery
Refer to the following battery storage requirements:
NiMH Battery – If your computer uses a NiMH (nickel-metal-hydride) battery
and you will not be using your computer for a long period of time (more than two
weeks), use your computer until the battery is drained completely, then remove it
from your computer and store it separately.
Li-Ion Battery – If your computer uses a Li-Ion (lithium-ion) battery and you will
not be using your computer for a long period of time (more than two weeks), use
your computer until the battery is drained to 50 percent, then remove it from your
computer and store it separately.
You may store the battery at the following temperature range: 32° Fahrenheit to
113° Fahrenheit (0° Celsius to 45° Celsius). To extend its operating life, store it in
a cool, dry place.
Temperature plays an important role when recharging your battery. To gain
maximum capacity, allow both the battery and your computer to cool to 68°
Fahrenheit (20° Celsius), which is room temperature, before recharging.
Recycling the Battery
Refer to Safety in the Government Approvals section of this guide for information
on recycling your used batteries.
Page 66

Maintaining Your Internet PC
9-3
Calibrating the Battery
All batteries lose their charge if they have not been used for a long period of time.
You may notice the battery gauge does not correctly display the battery charge
level when you first receive your computer or if you have not used your computer
for a long period of time. If the battery gauge becomes inaccurate, you must
recalibrate the battery. To do this, fully charge the battery, then drain it to 0 percent
(your computer will enter Hibernation mode automatically).
Fully drain and recharge the battery at least every 60 days.
NOTE:
+
You can check the battery gauge (battery meter) by double-clicking the
HINT:
icon located on the Windows Taskbar.
*
To recalibrate the battery, complete the following steps:
1.
2.
3.
èèèè
Plug in the AC adapter. Allow the battery to charge until the battery charge
light or icon turns off, showing that the battery is fully charged.
After the battery charge light or icon turns off, unplug the AC adapter.
Turn on or restart your computer.
Battery
Steps 4 through 9 prevent your computer from entering Sleep mode. These steps
allow the battery to drain faster.
4.
Click
5.
Point to
6.
Click
7.
Click the
8.
Click the
.
Start
Settings
Control Panel
Power Management
.
.
Power Schemes
æ icon on the
tab.
Control Panel
.
Page 67

9
-4
Maintaining Your Internet PC
9.
From the
+
a. In the System Standby drop down menu, select Never.
b. In the Turn off Monitor dropdown menu, select Never.
c. In the Turn off Hard Disks dropdown menu, select Never.
10. Let the battery drain until your computer reaches Hibernation and turns off. Do
not plug in the AC adapter during this process or you will need to start over
with Step 1. See the Saving Energy with Sleep and Power Management section
for more information on Hibernation.
Running on Batteries
Please make note of the System Standby, Turn off Monitor and Turn off Hard
NOTE:
Disks settings so that you can change them back after you have calibrated your
battery.
You may use your computer while the battery is draining.
NOTE:
column:
+
11. Plug in the AC adapter. Restart your computer.
12. Return to the Power Management window under
your Power Savings settings to the desired levels.
Control Panel
and re-enter
The battery is now calibrated.
Over time, all batteries will reduce their maximum capacity and at some point, you
will have to replace the battery. To purchase a new battery, contact your Compaqauthorized dealer, reseller, or service provider.
Page 68

Maintaining Your Internet PC
9-5
Maximizing Battery Operating Time
The display, the processor, the CD or DVD drive, and the hard drive components
use the most battery power. The battery operating time changes depending on your
power management settings, the system components, the options, and the
applications you use.
You can increase battery operating time by changing computer energy
requirements. To learn about computer power management features, refer to the
Saving Energy with Sleep and Power Management section of this guide for more
information.
To maximize the battery operating time, perform one or more of the following
actions:
• Reduce display brightness and select a short wait setting for your screen saver.
• Select a screen saver that does not generate a lot of graphics or motion.
• Reduce audio volume or use headphones.
• Exit modem programs whenever you are not using them.
• Remove PC Cards when you are not using them.
• Remove CDs or DVDs when you are not using them.
• Use Sleep or Hibernation mode or turn off your computer when you are not
using it.
*
To change your screen saver settings, click
HINT:
Control Panel
variety of screen savers for your computer. For additional information about screen
savers, look in your
. Double-click
Microsoft Windows 98 Getting Started
Display
, then click the
, point to
Start
Screen Saver
Settings
tab. Choose from a
guide and Microsoft Help.
, then click
Page 69

9
-6
Maintaining Your Internet PC
Correcting a Low Battery Condition
A low battery condition exists when the battery has less than 10 percent of its
power remaining. You should resolve the low battery condition before your
computer loses all battery power.
When your computer loses all battery power, it begins Hibernation, a process that
cannot be interrupted. If Hibernation has begun, you must wait for your computer
to finish saving your information and turning off automatically before trying to
correct the low battery condition. Once your computer has entered Hibernation
mode it cannot be used; however, you can only use it again by plugging it into an
AC adapter or replacing the drained battery with a charged one.
Your situation (such as availability of an AC wall outlet) will determine which
solution to use to correct a low battery condition. Use one of the following options:
• Connect the AC adapter – This solution allows you to continue working
without being interrupted and simultaneously charges the drained battery. You
do not have to turn off your computer before connecting the AC adapter. Your
computer automatically switches to AC power once you connect the AC
adapter.
• Replace the drained battery with a charged one – If you cannot connect the
AC adapter but you have a charged battery, you can change the battery and
continue working.
a. Save your work.
b. Turn off your computer (or initiate Hibernation).
c. Replace the drained battery with the charged one.
d. Press the Power button to turn on your computer.
e. Resume your work.
When AC power becomes available, repeat these same steps but insert the
drained battery and charge it by plugging in the AC adapter.
• Suspend your work – If you cannot plug in the AC adapter and you do not
have a charged replacement battery, start Hibernation by pressing the Power
button. When a power source (AC or battery) becomes available, press the
Power button to turn on your computer and resume your work.
Refer to the Saving Energy with Sleep and Power Management section in this
guide for more information about Hibernation.
Page 70

Maintaining Your Internet PC
Cleaning Your Internet PC
To clean the computer exterior surfaces wipe the surfaces with a slightly damp
cloth. Wipe the surface until clean.
9-7
CAUTION:
`
For recommendations on how to clean the display, keyboard, and TouchPad, refer
to the following table.
Display
Keyboard
TouchPad
wiping it with a damp cloth.
Surface How to…
To avoid causing damage to your computer, turn off the power before
Cleaning Your Internet PC
To clean the display, moisten a soft, clean cloth with water and wipe
your display until clean. Do not use benzene, thinner, ammonia, or any
volatile substance to clean the display or bezel. These chemicals may
damage the display.
If the display requires any additional cleaning, use any antistatic
screen cleaner.
To clean your computer keyboard, gently wipe the surfaces with a
soft, clean cloth. Wipe the surface until clean.
Grease and dirt on the TouchPad can cause your cursor to jump
around on the display. Clean the computer TouchPad with a damp
cloth.
Page 71

9
-8
Maintaining Your Internet PC
Using System Maintenance Features
Optimize your system by using the System Maintenance features offered in
Microsoft Windows. You can use the Maintenance Wizard to check your hard
drive for problems, manage your hard drive space, and delete unnecessary files.
The Maintenance Wizard is a one-step feature that combines ScanDisk, Disk
Defragmenter, Disk Cleanup, Compression Agent, and many other tools. Setting
up a regular maintenance schedule will ensure your programs run faster, you utilize
more hard drive space, and your system performs at its best.
To run the Maintenance Wizard, complete the following steps:
1.
From the
2.
Click
System Tools
When the Maintenance Wizard window is displayed, complete the instructions
provided.
menu, click
Start
Programs
, then choose
, then choose
Maintenance Wizard
Accessories
.
.
Backing Up Your System Using SystemSave
SystemSave is a Compaq-unique feature that allows you to back up your personal
files and data. SystemSave is already installed on your hard drive. SystemSave
allows you to back up all information and files on your hard drive, and store it to a
separate partition on your drive for later use. This feature will allow you to restore
all the drivers, applications, and data saved on your computer.
You should perform a SystemSave at least once a month. For instructions on how
to back up your Internet PC using SystemSave, refer to the Understanding Your
Service and Support Options section of this guide.
Page 72

Understanding Your Service and Support Options
Chapter 10
Understanding Your Service and Support Options
Your Internet PC has many tools to make computing easier. If you have a computer
problem or question, check the following resources for answers:
• Review the Troubleshooting section in this guide for suggestions on how to fix
the problem.
• Review the tools in this section to find answers.
• Look in the Compaq Warranty Statement (included with your computer) or
Service and Support Card to find your regional Compaq Service telephone
number.
Compaq Support
Double-clicking the Compaq Support $ icon located on the Windows desktop
provides access to the following tools:
Compaq Support Tools
Tool Description
Compaq Remote
Support (not
available in all
locations)
Allows most of your computer problems to be remotely diagnosed and
cured by a Compaq technician. With this tool, technicians can talk to
you at the same time they are resolving your computer issue.
10-1
Compaq Diagnostics
System Record
Compaq Service
Connection
Internet Support
Diagnoses problems with your Internet PC. This software provides an
easy way to check attributes of your Internet PC.
Reports all of the devices that came with your Internet PC and all of
the devices you have added or changed since you purchased your
Internet PC.
Provides automated software updates and general information on
using your Internet PC.
Allows you to access the Compaq Service and Support Web page for
your country. Compaq's Service and Support Web page provides you
with software updates, maintenance tips, and tools to help make using
your Internet PC easier.
Page 73

1
0-2
Understanding Your Service and Support Options
Compaq Support Tools
Tool Description
Allows you to perform a Full, Selective, or System Restore. These
QuickRestore
options allow you to either restore your Internet PC to its original
factory condition, to your last System Save, or selectively restore
certain drivers and applications.
SystemSave
McAfee Anti-Virus
Recovery Boot
Diskette
Compaq Remote Support
Provides you with a quick and easy method of backing up your
personal files and data.
Provides anti-virus scanning and free software updates for one year
through the Internet. For more information on computer viruses and
how to run McAfee Anti-Virus software, refer to the Identifying and
Removing Computer Viruses section of this guide.
When created, this tool allows System Saved files and last saved
personal files to be restored should Windows not start.
(available in select regions)
If you ever need answers to your computing problems, Compaq Remote Support
allows you to connect directly to a support technician using your computer modem.
These technicians can remotely diagnose and cure most of your computer
problems. You can watch your monitor and talk directly to the service technician
on the telephone while they are resolving your issue.
To use Compaq Remote Support, complete the following steps:
1.
When you experience a problem not addressed in this guide, call the Compaq
Customer Support number for your region. The number is listed in the
Warranty Statement
Service and Support Card
or the
that came with your
Compaq
computer.
2.
The service representative will ask you to double-click the
Compaq Support
icon from the Windows desktop.
3.
Click the
Compaq Remote Support
icon. A Compaq/Carbon Copy banner
will display explaining the Compaq Remote Support application.
4.
Click the OK button. The message,
call,”
displays and explains that the Compaq Support technician is dialing into
“Compaq Remote Support is waiting for a
your computer.
$
Page 74

Understanding Your Service and Support Options
5.
Do not answer the telephone when it rings. Compaq Remote Support will
connect with your computer on the second ring. If for any reason you need to
exit the application, click
6.
Once a connection has been established, the Compaq Legal Disclaimer window
will display. After reading the terms and conditions, click
support technician to remotely diagnose your computer.
If for any reason the support technician cannot connect to your computer, you
NOTE:
+
will receive an error message notifying you of the failed connection. If this happens,
the technician will call you back. Make sure you answer your telephone.
Cancel
.
to allow the
Agree
10-3
Using Compaq Diagnostics
Compaq Diagnostics provides an easy way to perform system checks and diagnose
problems. When you double-click the Compaq Diagnostics
Compaq Support
while the application analyzes your Internet PC for information about its
components. After approximately one minute, a Summary window with the
component information is displayed.
$ folder on the Windows desktop, a progress bar is displayed
û icon located in the
A row of icons is located at the top of the window. Clicking these icons displays
information about the components being tested. Refer to the following table for
descriptions of the tabs.
Compaq Diagnostics
Tab Description
Overview Contains information about your computer
Test Selects the devices you want tested
Status Shows progress of tests and faults detected
Log Shows a record of all device tests and detailed results
Error Reports details of errors detected
Page 75

1
0-4
Understanding Your Service and Support Options
Testing Equipment
You may conduct a Quick, Complete, or Custom test. If you choose the Quick test,
it can be run in either the Interactive or Unattended mode.
Complete or Custom tests are completed only in the interactive mode, since they
test the audio and video components of your Internet PC. You must be present to
confirm the test results. Complete testing takes about 10 minutes.
The Test tab has the following main regions: Type of Test, Test Mode, an
Information Window, and a Component List (under the Type of Test box). The
Component List resembles Windows Explorer: Click the + to open a component
folder, then the component to get information about it. The information window
may show further tests that can be performed on certain components. You can
request any or all of these subtests.
To run a test, complete the following steps:
1.
Click the
2.
Choose the type of test:
need to check the boxes in the Component List for each test you want.
3.
Select
Interactive Mode
Test
tab.
Quick, Complete
or
Unattended Mode
, or
Custom
.
. In Custom, you will
You can select
HINT:
select
*
4.
Click the
automatically replace the Test tab on your window. You can follow the
progress of individual tests on this window.
When the tests are complete, the progress bar in the Status window will be green if
the test was successful and red if the test failed. The lower part of this tab gives
details of the tests that have been completed.
The Log tab lists all the tests and also gives information about the number of times
each test was run, the time taken for the test, and the number of errors detected.
You can save this information by clicking the Save button at the bottom of the
window.
The Error tab provides details about the errors detected, including error codes. This
code is useful information for a Compaq technician, who can advise you on how to
fix your computer.
Interactive Mode
Begin Test
button at the bottom of the window. The Status tab will
or
Quick
Complete
, stay with your computer for the interactive test portions.
as a starting point for a Custom test. If you
Page 76

Understanding Your Service and Support Options
10-5
System Record
System Record reports all of the devices that came with your computer and all of
the devices you have added or changed since you purchased your computer.
System Record highlights these changes in red. This allows you to isolate and
diagnose possible problems with your computer.
To access System Record, complete the following steps:
1.
From the Windows desktop, double-click the
2.
Double-click the
The System Record tab displays the Base.log, all of the devices that came with
your computer, and the Now.log, which displays all of the devices you have added
or changed. The changes you have made to your computer are highlighted in red.
For example, if your computer came with 64 megabytes (MB) of memory and you
upgrade it to 96 MB of memory, your Base.log displays 64 MB of memory and the
Now.log displays 96 MB. The memory line in the Base.log and the memory line in
the Now.log are noted in red lettering, which indicates a change has been made to
your computer's original amount of memory.
System Record
¢ icon.
Compaq Support
$ icon.
Page 77

1
0-6
Understanding Your Service and Support Options
Compaq Service Connection
Overview
The Compaq Service Connection software installed on your computer is an
innovative way of correcting problems before they begin. The service
automatically sends you free software updates that will keep your computer in peak
operating condition. You decide when to install the updates.
A small notice, displayed as a rotating $
of the Windows desktop when an update is available.
will appear on the bottom-right corner
,
Turning Compaq Service Connection On and Off
If you wish to manually turn on Compaq Service Connection, complete the
following steps:
1.
Double-click the
2.
Double-click the
NOTE:
+
The Compaq Service Connection will remain active and will be ready to perform
updates when you log on the Internet.
To turn off Compaq Service Connection, complete the following steps:
1.
2.
service is already active.
Right-click the
Select
Shutdown Compaq Service Connection
Compaq Support
Service Connection
If the
Service Connection $
Service Connection
$ icon on the Windows desktop.
$ icon.
icon is visible in the Windows Taskbar, the
$ icon on the Windows Taskbar.
.
Page 78

Understanding Your Service and Support Options
How it Works
The Compaq Service Connection software operates in the background while you
are performing other tasks on your computer. You will only be aware that it is
working when a Notice is displayed.
If you are actively using your modem when the Compaq Service Connection
software initiates an update, it waits until the modem is idle before downloading
any information. You will not be interrupted while using your Web browser or
e-mail programs.
When a Notice is displayed, complete the following steps to obtain the update:
1.
Double-click the Notice, usually displayed as a rotating $, to reveal the update
identification.
2.
Install, postpone, or delete the download by clicking the appropriate button.
• If you ignore the Notice, it will disappear after a minute or two. However,
the update will still be available for you to download at any time during the
next 10 days.
• If you have not downloaded the update within 10 days, it will automatically
be cancelled.
To view the updates you have downloaded and the updates that are still available,
double-click the Compaq Support
click the Service Connection
highlights in bold the updates that have not yet been accepted.
$ icon on the Windows desktop, then double-
$ icon. The window displays a list of updates and
10-7
Compaq Service Connection Privacy and Data Security Statement
Compaq Service Connection is committed to providing you with beneficial
software updates and information. To provide you with these updates and
information, non-personal information limited to your computer model number,
serial number, and software ID files is communicated to the Compaq server. Files
sent to your PC are protected by a personalized security number, similar to a
Personal Identification Number (PIN), to ensure that you receive the correct
information. Compaq Service Connection does not access, share, or send any
personal information, files, or data on your system over the Internet.
If you no longer wish to receive updates from Compaq Service Connection, you
can turn it off at any time.
Page 79

1
0-8
Understanding Your Service and Support Options
Internet Support
The Internet Support § icon allows you to access the Compaq Service and
Support Web page for your country. The Compaq Service and Support Web page
provides you with tools and information to help make using your Internet PC easier
than ever.
To access the Service and Support Web page, complete the following steps:
1.
Make sure your computer is connected to the Internet.
2.
From the Windows desktop, double-click the
3.
Double-click the
representing flags of various countries.
NOTE:
+
4.
Service and Support Web page.
Click on the icon that represents your country’s flag. You will be connected to
your country’s specific Service and Support web page.
Internet Support
In the United States, double-clicking this icon will connect you directly to the
§ icon. A window will display icons
Compaq Support
$ icon.
*
You can also access Internet Support through the
HINT:
(available on select models) on your keyboard.
We recommend that you access the Service and Support Web page regularly,
HINT:
to find the latest updated information for support for your Internet PC.
Instant Answer
button
Page 80

Understanding Your Service and Support Options
10-9
QuickRestore
Compaq provides you with the ability to restore your system at any time with
QuickRestore. QuickRestore has three types of restore options: Full Restore,
Selective Restore, or System Restore. The following table describes each type of
QuickRestore.
QuickRestore
Restore Description
Full Restore
System Restore Restores your hard drive from your last SystemSave.
Selective Restore
NOTE:
+
because you are periodically required to enter information. If you do not enter the
required information, your computer may not complete the QuickRestore process.
Reformats your hard drive and returns your computer to its original
factory-installed software state.
Allows you to select certain Compaq drivers or applications you want
to re-install without reformatting your hard drive.
Do not leave your computer unattended while QuickRestore is running,
Full Restore
Full Restore returns your computer to its original factory-installed software state.
It reformats your hard drive and removes all data from your computer.
CAUTION:
computer's hard drive. If you have added personal files, software, or data since you
`
To perform a Full Restore on your computer, complete the following steps:
1.
2.
3.
`
purchased your computer, copy this data to diskettes, back up the data by either
performing a SystemSave, or save the data to an external device before proceeding.
From the Windows desktop, double-click the
Click the
Click the
CAUTION:
data onto diskettes, they will be permanently deleted when you click Start!
Full Restore deletes all the information and data stored on your
Compaq Support
QuickRestore
Full Restore
If you have not copied or backed up your personal files, software, or other
ô icon. The QuickRestore main menu is displayed.
button. The Full Restore menu is displayed.
$ icon.
Page 81

1
0-10
Understanding Your Service and Support Options
4.
Click the
restarts. Once your computer restarts in DOS mode, a Progress window is
displayed. During the Full Restore process, a progress bar shows the
percentage of the software restored to the hard drive.
5.
After the system is finished the Full Restore process, press
restart the computer.
Once the Full Restore is complete, you will need to provide the startup information
again to re-install Windows. This information includes the Product Key number
from the cover of the Microsoft Windows 98 Getting Started guide, your time zone,
and the time and date.
button to begin the Full Restore. Your computer automatically
Start
Ctrl+Alt+Del
System Restore
System Restore allows you to restore your system using your last SystemSave.
You will not need to perform a System Restore if you have never performed a
System Save. To perform a SystemSave, refer to SystemSave in this guide.
To perform a System Restore, complete the following steps:
1.
From the Windows desktop, double-click the
2.
Double-click the
displayed.
3.
Click the
4.
Click the
displayed. During the System Restore process, a progress bar shows the
percentage of software loaded on the hard drive.
5.
Once the System Restore is finished, press
computer.
System Restore
Start
QuickRestore
button to begin the System Restore. A progress window is
ô icon. The QuickRestore main menu is
button. The System Restore menu is displayed.
Compaq Support
Ctrl+Alt+Del
to restart your
$ icon.
to
Page 82

Understanding Your Service and Support Options
10-11
Selective Restore
Selective Restore allows you to select certain Compaq drivers or applications you
want to re-install without reformatting your hard drive. To perform a Selective
Restore on your computer, complete the following steps:
1.
From the Windows desktop, double-click the
2.
Double-click the
displayed.
3.
Click the
From the Selective Restore menu, you can choose from several drivers or
applications.
4.
Click the icon representing the application or driver you want to reinstall. A
progress bar indicates that the software is installing.
5.
A Restart window is displayed. Click the OK button.
6.
Repeat this procedure to re-install as many drivers or applications as you need.
7.
Once you have installed all the drivers or applications you need, restart your
computer by pressing
Selective Restore
QuickRestore
Ctrl+Alt+Del
ô
icon. The QuickRestore main menu is
button. The Selective Restore menu is displayed.
.
Compaq Support
$
icon.
Page 83

1
0-12
Understanding Your Service and Support Options
SystemSave
SystemSave allows you to back up all information and files on your hard drive, and
store it to a separate partition on your drive for later use. For more information on
SystemSave, refer to the Maintaining Your Internet PC section of this guide.
To backup your files by performing a SystemSave, complete the following steps:
1.
From the Windows desktop, double-click the
2.
Double-click the
displayed.
3.
Click the
4.
Click the
SystemSave partition.
5.
Once the SystemSave is complete, press
SystemSave
Continue
NOTE:
SystemSave partition size is not large enough to complete a SystemSave:
+
If the partition size is not large enough, you are able to increase the partition size
unless your hard drive is completely full.
QuickRestore
button.
button .The computer will begin backing up the files to the
If you begin a SystemSave and the following message displays, the
QuickRestore has detected that drive D: may not have enough space
for the SystemSave image file. Choose one of the options below to
save your system or press Cancel to return to the QuickRestore
Menu.
ô
icon. The QuickRestore main menu is
Compaq Support
Ctrl+Alt+Del
to restart your computer.
$
icon.
Increasing the Size of the SystemSave Partition
To increase the size of the partition, click the OK button when asked if you would
like to resize your SystemSave partition. The Resize SystemSave option is the
default option. The computer will automatically begin resizing the SystemSave
partition and will complete the SystemSave. Once SystemSave is complete, the
computer will automatically restart.
CAUTION:
not press any keys or turn off your computer while increasing the size of the
`
partition. If you restart your computer while resizing your partition, you can or lose
damage important files.
Increasing the size of your SystemSave partition may take some time. Do
Page 84

Understanding Your Service and Support Options
Creating a QuickRestore Emergency Recovery Boot Diskette
QuickRestore is installed on your hard drive. However, you will need to create a
QuickRestore emergency diskette in case you are ever unable to start your
computer properly.
To create a QuickRestore emergency recovery boot diskette, complete the
following steps:
10-13
1.
From the Windows desktop, double-click the
2.
Double-click the
menu is displayed.
3.
Click the
4.
Click the
diskette drive.
5.
Insert a 3.5-inch, high-density formatted diskette into the diskette drive and
click OK. QuickRestore will begin creating the emergency diskette for you.
6.
When QuickRestore has finished creating the emergency diskette, store the
QuickRestore emergency diskette in a safe place for emergency use.
System Utilities
Recovery Boot
QuickRestore
ô
icon in this folder. The QuickRestore main
button. The Utilities menu is displayed.
button. You are prompted to insert a diskette into the
Compaq Support
$
icon.
Page 85

1
0-14
Understanding Your Service and Support Options
Using the QuickRestore Emergency Recovery Boot Diskette
The QuickRestore emergency diskette is used if you are unable to start your
computer. The diskette will help your computer get up and running again.
To run the QuickRestore emergency diskette, complete the following steps:
1.
Make sure your computer is turned off. Insert the QuickRestore emergency
diskette you previously created into the diskette drive.
2.
Turn on your computer. A Caution window is displayed.
3.
4.
5.
6.
Enter
Press
following QuickRestore options:
• Full restore – Reformats your hard drive and returns your computer to its
• Typical restore – Restores your hard drive from your last SystemSave.
• Exit to DOS – Allows you to exit the QuickRestore menu and return to a
Press
QuickRestore you selected.
After the restore finishes, a window is displayed notifying you that your
computer has been restored.
Remove the diskette from the diskette drive and restart your computer by
pressing
. The QuickRestore Recovery menu is displayed. Select one of the
original factory-installed software state.
DOS command prompt.
Enter
. If possible, the system will restore itself according to the type of
Ctrl+Alt+Del
.
Page 86

Understanding Your Service and Support Options
10-15
Drivers
Installing Drivers for New Hardware
If you add new hardware such as a printer or a gamepad to your computer, you
may be prompted to insert the Windows Installation CD or diskettes. If this occurs,
complete the following steps:
1.
At the Add New Hardware Wizard, click
and files necessary to make the new hardware work.
2.
Select the
and click
3.
Select the
not displayed in the drop-down box, either select it from the drop-down menu
or type it in the box and click
installing the necessary files and drivers for the new hardware.
4.
When the Add New Hardware Wizard completes installing the files and
drivers, click the
You may need to restart your computer for the new hardware to be recognized by
your computer.
Search for the best driver for your device (Recommended)
.
Next
button.
option. If
. The Add New Hardware Wizard will begin
Next
Specify a location
Finish
to begin installing the drivers
Next
option
C:\WINDOWS\OPTIONS\CABS
is
Reinstalling Deleted Drivers
If a driver is accidentally deleted or the operating system is reinstalled, the driver
subdirectory allows you to restore individual drivers rather than restoring all the
original software. The drivers you can restore are Audio, Video, TouchPad,
Display, Modem, and CD-ROM.
To reinstall a driver, complete the following steps:
1.
From the Windows Taskbar, click
Windows Explorer
2.
Navigate to the
3.
Find the folder of the device you wish to reinstall and double-click it.
4.
Double-click the setup program for the driver you wish to reinstall.
5.
Follow the on-screen instructions.
Drivers may also be reinstalled by selecting the Selective Restore option from
QuickRestore. Refer to QuickRestore for more information on how to reinstall
drivers using the Selective Restore option.
.
CPQDRV
, point to
Start
folder on the hard drive and double-click it.
Programs
, and click
Page 87

1
0-16
Understanding Your Service and Support Options
Page 88

Chapter 11
Troubleshooting Guide
This guide provides useful information on how to identify and correct common
problems that may occur with your Internet PC.
Helpful Hints
If you encounter minor problems with your Internet PC, monitor, or software, refer
to the following list of general suggestions before taking further action:
• Check that the computer is plugged into the AC adapter and that the adapter is
plugged into a working electrical outlet.
• Check to see that the computer is turned on and the green power light or Power
›
icon is lit.
• Turn up the brightness and contrast controls of the display. Note that contrast
controls are functional only with HPA displays.
• Remove the diskette from the diskette drive before turning on your Internet PC.
Troubleshooting Guide
11-1
Understanding This Guide
This guide has been divided into three columns: Symptom, Problem, and Solution.
The Symptom column describes the symptom or warning that made you realize
you had a problem. The Problem column identifies one or more reasons why the
symptom has occurred, and the Solution column describes what you should do to
try to fix the problem.
If a solution does not fix your problem, try all solutions for the symptom or try the
solution a second time.
If a problem persists and you are unable to resolve it yourself, please review
Understanding Your Service and Support Options in the Reference Guide or
contact a Compaq Authorized Service Provider. Refer to your Warranty Statement
for details.
Page 89

1
1-2
Troubleshooting Guide
Audio
Symptom Problem Solution
No sound.
Volume has been muted.
On the Taskbar, click the
icon and clear the
Mute
Volume
check box.
¶
Sound is too low.
Sound is distorted.
Audio CD or DVD
does not play.
¶¶¶¶
Volume
missing from
Windows Taskbar.
icon is
Internet PC is in Sleep mode.
This is identified when the Power
light is flashing (on some models
the
the flashing Power light).
Volume has been set too low.
Volume is too high.
See CD or DVD in this section.
The Show Volume Control on
Taskbar option has not been
selected.
Sleep
n
icon is lit instead of
Press the spacebar to wake your
Internet PC.
Click the
Taskbar, and click the
bar and then drag it up, or press the
Volume Up
Click the
Taskbar, and click the
bar and drag it down, or press the
Volume Down
Volume
button.
Volume
1.
On the Taskbar, click the
button, and point to
2.
Click
Control Panel
3.
Double-click
4.
Select the
on taskbar
icon on the
¶
slider
Volume
¶ icon on the
slider
Volume
button.
Start
.
Settings
.
Multimedia
Show volume control
option, and click OK.
.
Page 90

Battery
Symptom Problem Solution
Battery gauge is not
accurate.
Battery needs calibrating. Calibrate the battery. Refer to
Calibrating the Battery in the Reference
Guide for details.
Troubleshooting Guide
11-3
Battery charging
indicator does not
appear and battery
does not charge.
Battery charge does
not last as long as
expected.
Internet PC has
entered Low Battery,
but it did not beep.
Battery was exposed to
temperature extremes.
Battery is at the end of its life. Replace the battery. Refer to Recycling
Battery is not fully draining. Calibrate the battery. Refer to
Battery is being exposed to
extreme temperatures.
Battery has partially selfdischarged.
Power Management is disabled. Set a power management level. Refer to
Battery is at the end of its life. Replace the battery. Refer to Recycling
Volume is set too low to hear the
warning beep, or a CD is playing
and the computer will not
interrupt play to issue a warning
beep.
Allow time for the battery to return to
room temperature.
the Battery in the Reference Guide for
battery recycling information.
Calibrating the Battery in the Reference
Guide.
Keep the battery within the
recommended temperature ranges.
Refer to Maintaining the Battery in the
Reference Guide.
Recharge the battery.
Saving Energy with Sleep and Power
Management in the Reference Guide.
the Battery in the Reference Guide for
battery recycling information.
Adjust volume if necessary.
Page 91

1
1-4
Troubleshooting Guide
Battery
Symptom Problem Solution
Internet PC is
beeping and the Low
Battery warning
appears or the
battery gauge is
below 10%.
Computer has entered a Low
Battery stage.
If possible, immediately connect your
computer to AC power. If connecting to
AC power is not possible, you have the
following choices:
• Save your files, perform a normal
Windows shut down.
• Initiate Hibernation by pressing the
power button.
• Let the computer go into
Hibernation automatically (if
enabled).
CD or DVD
Symptom Problem Solution
CD or DVD drive
cannot read a disc or
takes too long to
start.
CD has been inserted improperly. Reinsert the CD with the label facing up
and verify the disc is securely snapped
down on the spindle.
The DVD drive will take longer to
start because it must determine
the type of media being played
before it can start.
Wait at least 30 seconds to let the DVD
drive determine the type of media being
played. If disc still does not start, refer
to the solution for related problems.
DVD performance is
poor when running
other programs
simultaneously.
Cannot eject CD or
DVD.
Display is corrupted
when playing some
DVD movies.
CD or DVD is dirty. Clean CD or DVD with a CD cleaning kit
available in most computer stores.
DVD playback requires large
amounts of processing power;
therefore, the system cannot
process other tasks
simultaneously at maximum
performance.
Power is not on. Manually eject the disc (see Using Your
Copyright material at beginning
of movie causes momentary
corruption.
To provide maximum performance,
close all other programs while playing
DVD media. It may also be necessary to
restart Windows to free all resources.
CD or DVD in the Reference Guide) or
turn on your Internet PC.
Wait a few seconds for video corruption
to clear up. If it does not clear up, then
stop and restart the DVD movie.
Page 92

Diskette Drive and SuperDisk (available on select models) Drive
Symptom Problem Solution
Not reading drive:
“Abort, Retry, Fail?”
message appears.
A non-formatted diskette has
been inserted.
Diskette is damaged. Replace the diskette with a new one.
Format the diskette using the following
steps:
1.
Double-click the
icon on the desktop.
2.
Select the
3.
Click
4.
Select desired options, and click
Start
diskette.
Troubleshooting Guide
My Computer
3 1/2 Floppy (A:)
and point to
File
to begin formatting the
Format
G
drive.
.
11-5
Diskette drive is
continually active.
Diskette drive
cannot read a
diskette.
Diskette has been improperly
inserted.
Diskette is damaged. Replace the diskette with a new one.
Diskette is not formatted. Format the diskette by following these
The wrong diskette type is being
used.
Remove the diskette and reinsert the
diskette as follows:
1.
Insert the edge with the sliding
cover into the drive and facing up.
2.
Push the diskette all the way into
the drive until the diskette stops.
steps:
1.
From the desktop, double-click the
My Computer
2.
Select the
3.
Click
File
4.
Select desired options, and click
to begin formatting the
Start
diskette.
Check the type of drive you have and
use the correct diskette type.
G icon.
3 1/2 Floppy (A:)
, and point to
Format
drive.
.
Page 93

1
1-6
Troubleshooting Guide
Diskette Drive and SuperDisk (available on select models) Drive
Symptom Problem Solution
Diskette drive
cannot save
information to
diskette.
Diskette is not formatted. Format the diskette by following these
steps:
1.
From the desktop, double-click the
My Computer
2.
Select the
3.
Click
4.
Select desired options, and click
Start
diskette.
5.
Once the format is complete, you
should be able to save your
information.
Diskette is write-protected. Slide the write-protection tab to the
unlocked position on the diskette.
Diskette is full or file is too big. Use another diskette or compress the
file to reduce the file size.
G
icon.
3 1/2 Floppy (A:)
and point to
File
to begin formatting the
Format
drive.
.
SuperDisk drive
(available on select
models) cannot read
or write to a
diskette.
Cannot copy
SuperDisk (available
on select models)
diskette using Disk
Copy.
File save command was not
properly executed.
Diskette is damaged. Replace the damaged diskette.
Wrong diskette is being used. Verify that the disk is a SuperDisk,
Disk Copy command does not
support 120MB disks.
When saving information to the diskette
drive, verify you are using the correct
drive. Refer to Storing Your Data in the
Reference Guide.
720K, or 1.44 MB diskette.
Use the SuperDisk Copy Disk program
included on the SuperDisk Tools Kit to
copy the SuperDisk.
Page 94

Diskette Drive and SuperDisk (available on select models) Drive
Symptom Problem Solution
SuperDisk (available
on select models)
performance is slow.
SuperDisk Accelerator and
Staging Enabled are not enabled.
Enable the SuperDisk Accelerator and
the Staging Enabled. Refer to SuperDisk
Accelerator in the Feature Guide for
details.
Troubleshooting Guide
11-7
Cannot eject the
SuperDisk (available
on select models).
“Disk Full” message
is displayed when
copying files to
SuperDisk (available
on select models).
Power is not on. Manually eject the disk (see SuperDisk
in the Reference Guide for details) or
turn the power on.
After copying files to the
SuperDisk, the Performance
Accelerator (PA) is enabled. The
PA locks the drive until the copy
process is complete.
SuperDisk capacity of 120MB
has been reached.
Root directory of SuperDisk is
full.
Wait for the copy process to complete,
and then try to eject the SuperDisk.
Copy files to a new SuperDisk, or verify
information on SuperDisk is not critical
and consider deleting files to create
space on SuperDisk for new files.
Create new folders on the disk, and
copy the files into the folders.
Page 95

1
1-8
Troubleshooting Guide
Display
Symptom Problem Solution
Screen is blank.
Screen saver is enabled. Press the spacebar or click the
TouchPad.
Display is too faint.
Display only fills part
of the screen.
Garbled characters
display or the
display flashes when
the computer is
connected to an
external monitor.
Internet PC is in Sleep mode.
This is identified when the Power
light is flashing (on some models
the
the flashing Power light).
The external monitor display is
selected.
Brightness and contrast controls,
functional on HPA displays only,
are not set properly.
Your resolution settings are not
set properly.
The external monitor’s resolution
is set too high for your Internet
PC.
Sleep
n
icon is lit instead of
Press the spacebar to wake your
Internet PC.
Press the
between the LCD display, external
monitor, TV Out (available on select
models), or simultaneous display.
Turn up the brightness or contrast
controls on your display. Note that
contrast controls are functional only
with HPA displays. Refer to Using Your
Mobile Internet PC for details.
1.
On the Taskbar, click the
button and point to
2.
Click Control Panel.
3.
Double-click
4.
Click the
5.
In the
resolution slider
desired resolution.
6.
Click OK to accept the new
settings, then close the Control
Panel window.
Restart your Internet PC and reset the
Display settings for a lower resolution.
Refer to the solution for “Display only
fills part of the screen” for more details.
Fn+F3
Settings
Screen
keys to switch
Settings
.
Display
tab.
area, click
and drag it to the
Start
.
the
Page 96

Fax Modem
Symptom Problem Solution
Cannot send or
receive faxes.
Telephone connections are not
connected properly.
Reconnect the fax modem, verifying the
following connections: Telephone Line
to Telephone (for external phone sets)
and Telephone Line to Wall Jack (from
Internet PC to wall outlet).
Troubleshooting Guide
11-9
Fax starts to send
but quits before the
transmission is
complete.
Connection has
failed.
Fax modem line is not connected
properly.
Fax software is not active. Start your fax modem software.
Line fails to connect. Redial the fax number to send fax
Call waiting enabled on line. Refer to third-party software for
Third-party fax software is
conflicting with another program.
Ten-digit phone number is not
properly entered or number
being dialed is not a fax number.
Internet PC is turned off or thirdparty program is closed.
Reconnect the fax modem, verifying the
wall jack connection. Refer to the
Hardware and Software Setup
again.
instructions on how to disable call
waiting, or contact your local telephone
company.
Close all programs, except the fax
software, and redial the fax number.
Verify whether mandatory area code is
included in number being dialed or
correct fax number is being dialed.
Some third-party fax software can only
be used to receive faxes when the
program is open.
Games
Symptom Problem Solution
Game crashes
frequently.
Minimum hardware or software
requirements set by
manufacturer have not been met.
Review the game packaging or call the
game’s manufacturer to verify the
minimum hardware and software
requirements.
Compaq
poster.
Game was not set up properly
when installed.
Reinstall the program, noting any
settings and default selections that
pertain to your Internet PC, and restart
the game.
Page 97

1
1-10
Troubleshooting Guide
Hard Drive
Symptom Problem Solution
Hard drive error
message is
displayed.
“Non-system disk or
disk error” message
is displayed.
Part of hard drive has failed. Attempt to repair the drive with the
ScanDisk utility. You must be using AC
power to run ScanDisk.
1.
Click the
2.
Point to Programs, then
Accessories, then System Tools,
and click ScanDisk.
3.
In the ScanDisk window, select the
drive letter for your hard drive and
other options.
4.
Click the
repairing your drive. Refer to
Maintaining Your Internet PC in the
Reference Guide for details.
A diskette that does not contain
system files needed to start your
Internet PC has been inserted in
drive.
When drive activity stops, remove the
diskette and press the spacebar. The
system will start up.
button.
Start
button to begin
Start
System files have been
damaged.
Insert a startup disk that has been
created for your operating system in the
diskette drive. For more details refer to
Understanding Your Service and
Support Options in the Reference Guide.
1.
Restart your Internet PC.
2.
At the A:\ prompt, type
press the
message will be displayed:
‘SYSTEM TRANSFERRED’. This task
will restore the system files to your
hard drive.
3.
Restart your Internet PC.
key. The following
Enter
SYS C:
and
Page 98

Internet
Symptom Problem Solution
Cannot connect to
the Internet.
Internet service provider (ISP)
account is not set up properly.
Modem is not set up properly. Reconnect the modem, verifying the
Verify Internet settings, or contact your
Internet service provider (ISP) for
assistance.
Telephone Line to Wall Jack connection.
Refer to the
Software Setup
Troubleshooting Guide
Compaq Hardware and
poster.
11-11
Instant Internet Zone
buttons do not
respond.
Web browser is not set up
properly.
If no dial tone is found, another
telephone handset on the same
line is not on the receiver.
Messages have not been cleared
from answering service.
ISP connection has not been
established.
Verify your Web browser is installed and
set up to work with your ISP.
Verify all telephone handsets on the
same line are on the receiver.
If you use an answering service that
modifies your telephone’s dial tone to
inform you of messages, clear all
messages and try your call again.
Connect to your ISP and retry the
Instant Internet Zone buttons.
Page 99

1
1-12
Troubleshooting Guide
Keyboard or TouchPad
Symptom Problem Solution
Keyboard commands
or keystrokes are
not recognized by
your Internet PC.
Fn+Num Lock or
Shift+Num Lock will
not turn the internal
NumLock on.
Program in use has stopped
responding to commands.
The internal keyboard Num Lock
is disabled when an external
PS/2 keyboard or keypad is
present.
Turn off your Internet PC using your
TouchPad.
1.
On the Taskbar, click the Start
button.
2.
Click Shut Down...
3.
Select the Shut down option, and
click OK.
4.
After the shutdown is complete,
restart your Internet PC.
If your computer does not shut down,
press the
seconds to shut down your Internet PC.
Use keypad on the external keyboard, or
unplug the external keyboard to use
internal keypad feature.
button for 4 or more
Power
When typing, some
of the letter keys
return numbers to
the screen.
+
The Num Lock feature is turned
on.
1200 and 1600 series computers use Shift+Num Lock, while 1800 and 1900
NOTE:
series use Fn+Num Lock
Press the
the
off.
Fn or Shift
Num Lock
key while pressing
key to turn Num Lock
Page 100

Keyboard or TouchPad
Symptom Problem Solution
Cursor jumps to a
different location
while typing.
TouchPad needs to be cleaned. Wipe the TouchPad with a damp cloth
and wipe it dry. Refer to Cleaning Your
Internet PC for details.
Troubleshooting Guide
11-13
Cursor does not
respond.
Cursor movement is
erratic or hard to
control.
TouchPad needs to be cleaned. Wipe the TouchPad with a damp cloth
and wipe it dry. Refer to Cleaning Your
Internet PC for details.
Program in use has stopped
responding to commands.
TouchPad needs to be cleaned. Wipe the TouchPad with a damp cloth
The TouchPad sensitivity settings
may need adjustment.
Turn off your Internet PC using your
keyboard.
1.
Press the
simultaneously.
2.
From the Windows
the arrow keys to select
Down...,
3.
Select the
may need to use the arrow keys to
select it), and press the
4.
After the shutdown is complete,
restart your Internet PC.
If your computer does not shut down,
press the
seconds to shut down your Internet PC.
and wipe it dry. Refer to Cleaning Your
Internet PC for details.
Restore default TouchPad settings.
1.
On the Taskbar, click the
button and point to
2.
Click
click
3.
Click the
Defaults
4.
Click OK, and close the Control
Panel window.
and
Ctrl
and press the
Shut down
button for 4 or more
Power
Control Panel
.
Mouse
tab and select the
Touch
option.
keys
Esc
menu, use
Start
Shut
Enter
option (you
Enter
Start
Settings
and double-
key.
key.
.
 Loading...