

HP Compaq NC6140, Compaq NC6220, Compaq NC6230, Compaq NC8230, Compaq NX4300 Getting Started Manual
...
Getting Started
HP Compaq Notebook Series
Document Part Number: 372369-001
February 2005
This guide explains how to set up your hardware and software
and begin using your notebook.
Enhanced for Accessibility.

Contents
1 Hardware Setup
Step 1: Identify the Hardware Required for Setup. . . . . . 1–3
Step 2: Insert the Battery Pack . . . . . . . . . . . . . . . . . . . . . 1–5
Step 3: Connect the Modem . . . . . . . . . . . . . . . . . . . . . . . 1–6
Connecting the Modem to an RJ-11 Jack . . . . . . . . . 1–7
Connecting the Modem with an Adapter. . . . . . . . . . 1–8
Step 4: Connect the Notebook to External Power . . . . . . 1–9
Step 5: Charge the Battery Pack. . . . . . . . . . . . . . . . . . . 1–10
Step 6: Open the Notebook . . . . . . . . . . . . . . . . . . . . . . 1–11
Step 7: Turn On the Notebook . . . . . . . . . . . . . . . . . . . . 1–12
2 Software Setup
Welcome to Windows . . . . . . . . . . . . . . . . . . . . . . . . . . . 2–2
Select Your Regional Preferences . . . . . . . . . . . . . . . . . . 2–4
Accept the License Agreements. . . . . . . . . . . . . . . . . . . . 2–5
Help Protect Your Notebook . . . . . . . . . . . . . . . . . . . . . . 2–6
Name Your Notebook . . . . . . . . . . . . . . . . . . . . . . . . . . . 2–6
Register Online. . . . . . . . . . . . . . . . . . . . . . . . . . . . . . . . . 2–7
Create User Accounts. . . . . . . . . . . . . . . . . . . . . . . . . . . . 2–8
Press the Finish Button. . . . . . . . . . . . . . . . . . . . . . . . . . . 2–8
Getting Started iii

Contents
3 Next Steps
Protect Your Notebook . . . . . . . . . . . . . . . . . . . . . . . . . . 3–1
Protect the Notebook from Viruses . . . . . . . . . . . . . . 3–2
Protect the Notebook from Power Surges . . . . . . . . . 3–3
Protect Your Privacy . . . . . . . . . . . . . . . . . . . . . . . . . 3–3
Use the Notebook Safely . . . . . . . . . . . . . . . . . . . . . . 3–5
Turn Off the Notebook Properly . . . . . . . . . . . . . . . . 3–6
4 Notebook Tour
Top Components . . . . . . . . . . . . . . . . . . . . . . . . . . . . . . . 4–2
Front, Rear, Left-Side and Right-Side Components . . . . 4–4
Bottom Components. . . . . . . . . . . . . . . . . . . . . . . . . . . . . 4–6
A Troubleshooting
Quick Troubleshooting. . . . . . . . . . . . . . . . . . . . . . . . . . . A–2
Power Features . . . . . . . . . . . . . . . . . . . . . . . . . . . . . A–2
Is the Notebook Unable to Start Up?. . . . . . . . . . . . . A–3
Is the Notebook Screen Blank? . . . . . . . . . . . . . . . . . A–4
Is Software Functioning Abnormally? . . . . . . . . . . . A–5
Is the Notebook Unresponsive? . . . . . . . . . . . . . . . . . A–6
Is the Notebook Overheating? . . . . . . . . . . . . . . . . . . A–7
Is an External Device Not Working?. . . . . . . . . . . . . A–7
Help and Support Center . . . . . . . . . . . . . . . . . . . . . . . . . A–8
Contact Customer Care . . . . . . . . . . . . . . . . . . . . . . . . . . A–9
Preparing to Call Customer Care. . . . . . . . . . . . . . . . A–9
Contacting Customer Care by E-mail
or Telephone
Taking the Notebook to a Service Partner. . . . . . . . A–10
. . . . . . . . . . . . . . . . . . . . . . . . . . . . . . A–10
Getting Started iv

B System Restore
Safeguarding Your Data. . . . . . . . . . . . . . . . . . . . . . . . . . B–1
Altiris Local Recovery . . . . . . . . . . . . . . . . . . . . . . . . . . . B–2
System Restore Points . . . . . . . . . . . . . . . . . . . . . . . . . . . B–3
Setting a Restore Point . . . . . . . . . . . . . . . . . . . . . . . B–4
Restoring to a Restore Point . . . . . . . . . . . . . . . . . . . B–4
Repairing or Reinstalling Applications . . . . . . . . . . . . . . B–5
Reinstalling Applications from Your Hard
Drive
Reinstalling Applications from Discs . . . . . . . . . . . . B–6
Repairing the Operating System . . . . . . . . . . . . . . . . . . . B–7
Reinstalling the Operating System. . . . . . . . . . . . . . . . . . B–8
Reinstalling Device Drivers and Other Software. . . . . . B–10
Updating Reinstalled Software . . . . . . . . . . . . . . . . . . . B–10
. . . . . . . . . . . . . . . . . . . . . . . . . . . . . . . . . . . . . B–6
Contents
Index
Getting Started v

Å
Ä
1
Hardware Setup
WARNING: This notebook is designed to run demanding applications
at full power. As a result of increased power consumption, it is normal
for the notebook to feel warm or hot when used continuously. To avoid
potential discomfort or burns, do not block the air vents or use the
notebook on your lap for extended periods. The notebook complies
the user-accessible surface temperature limits defined by the
with
International Standard for Safety of Information Technology Equipment
(IEC 60950).
CAUTION: To prevent file corruption and to ensure that the correct drivers
are installed:
■ Do not set up the notebook for the first time while the notebook is
docked in an optional docking device.
✎
■ During the hardware and software setup procedures:
❏ Do not unplug the notebook from external power.
❏ Do not shut down the notebook or initiate standby or
hibernation.
For governmental agency and safety information, refer to the
Regulatory and Safety Notices guide on the Notebook
Documentation CD.
Getting Started 1–1

Hardware Setup
During hardware setup, you will
1. Identify the hardware you need to set up the notebook.
2. Insert the battery pack into the notebook.
3. Connect the modem, so you can register the notebook and
operating system during software setup.
4. Connect the notebook to external power.
5. Allow the battery pack to charge.
6. Open the notebook.
7. Turn on the notebook.
When the notebook is turned on, you will be prompted to
begin software setup.
1–2 Getting Started
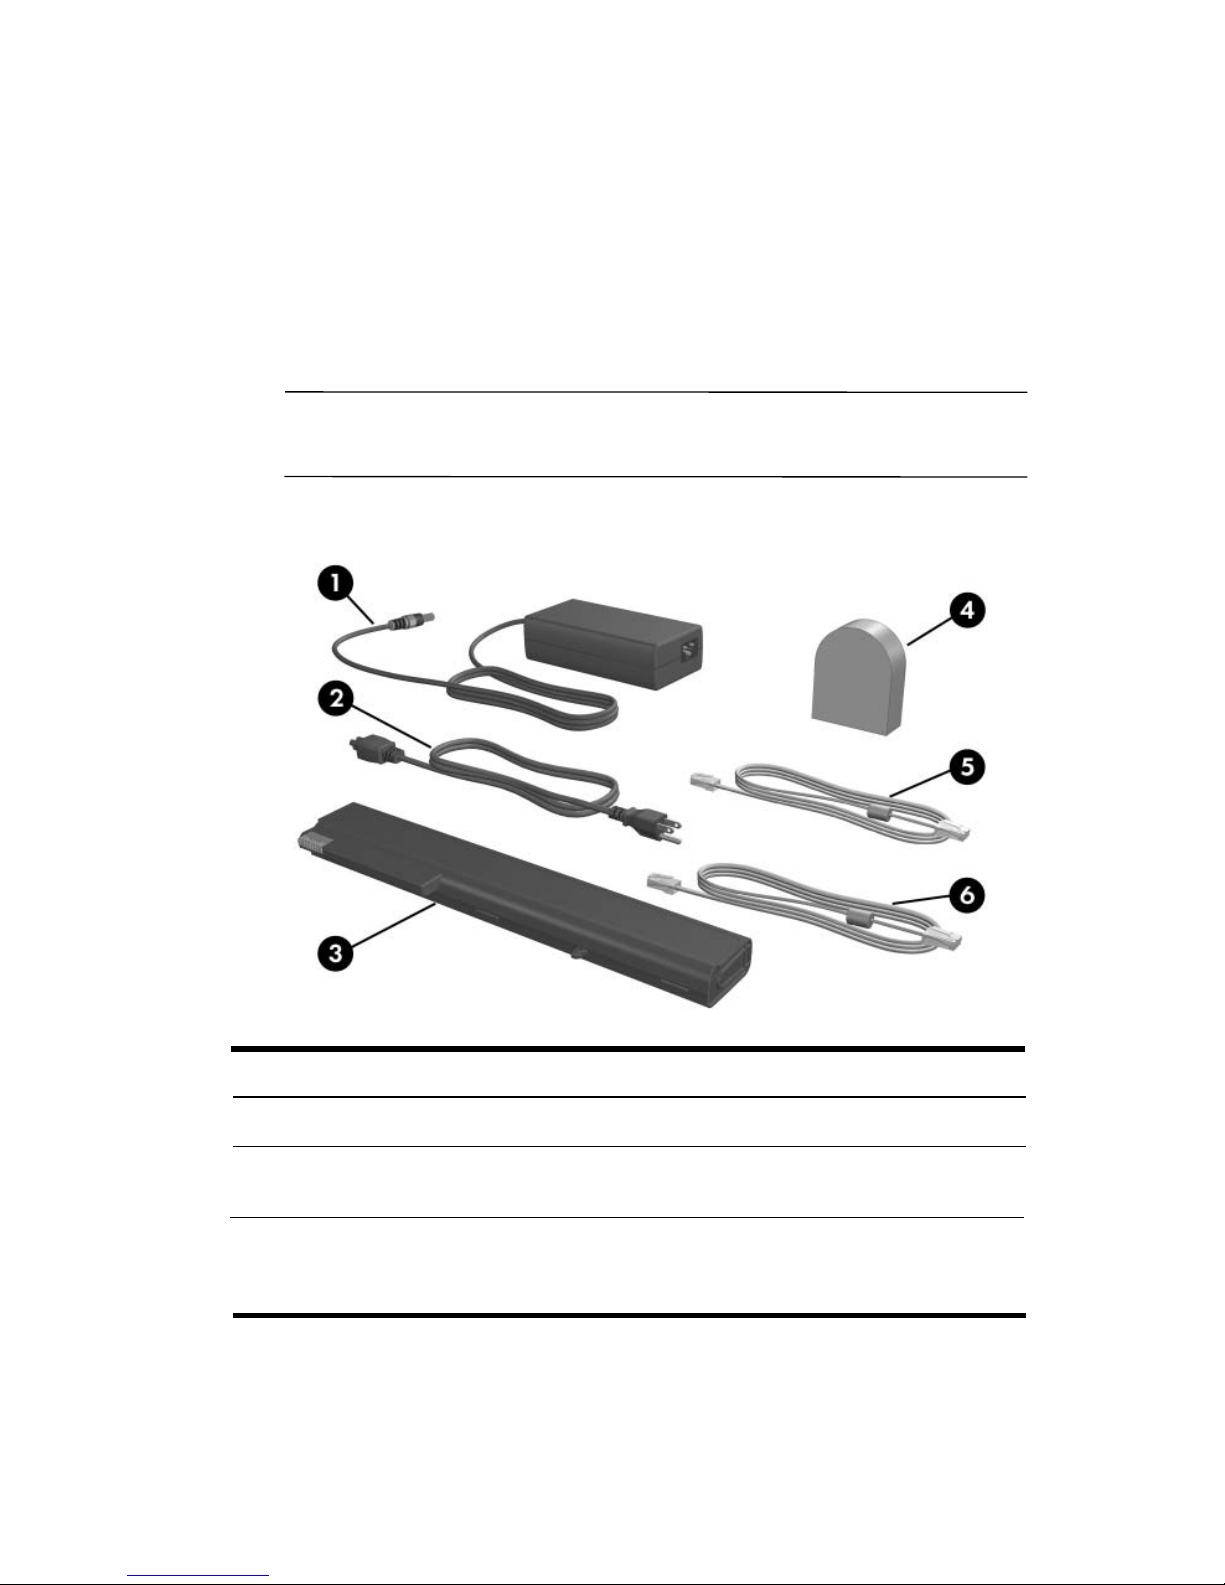
Step 1: Identify the Hardware
Required for Setup
To set up the notebook for the first time, you need the notebook
and the components listed in the following table.
Power cords, AC adapters, modem cables, and modem adapters
✎
may vary in appearance.
Hardware Setup
Component Description
AC adapter Converts AC power to DC power.
1
Power cord Connects the AC adapter to an
2
Battery pack Provides power to the notebook when
3
Getting Started 1–3
outlet.
AC
the notebook is not connected to
external power.
(Continued)

Hardware Setup
Component Description
Country-specific modem Adapts the modem cable to
4
adapter (included by region a
as required)
Modem cable (included with Connects the notebook to a telephone
5
select models) jack or to a country-specific modem
non-RJ-11 telephone jack.
adapter.
✎
Network cable (not included) Connects the notebook to a
6
network
✎
A modem cable has a 6-pin
RJ-11 telephone connector at
each end.
jack.
A network cable has an 8-pin
RJ-45 network connector at
end.
each
1–4 Getting Started
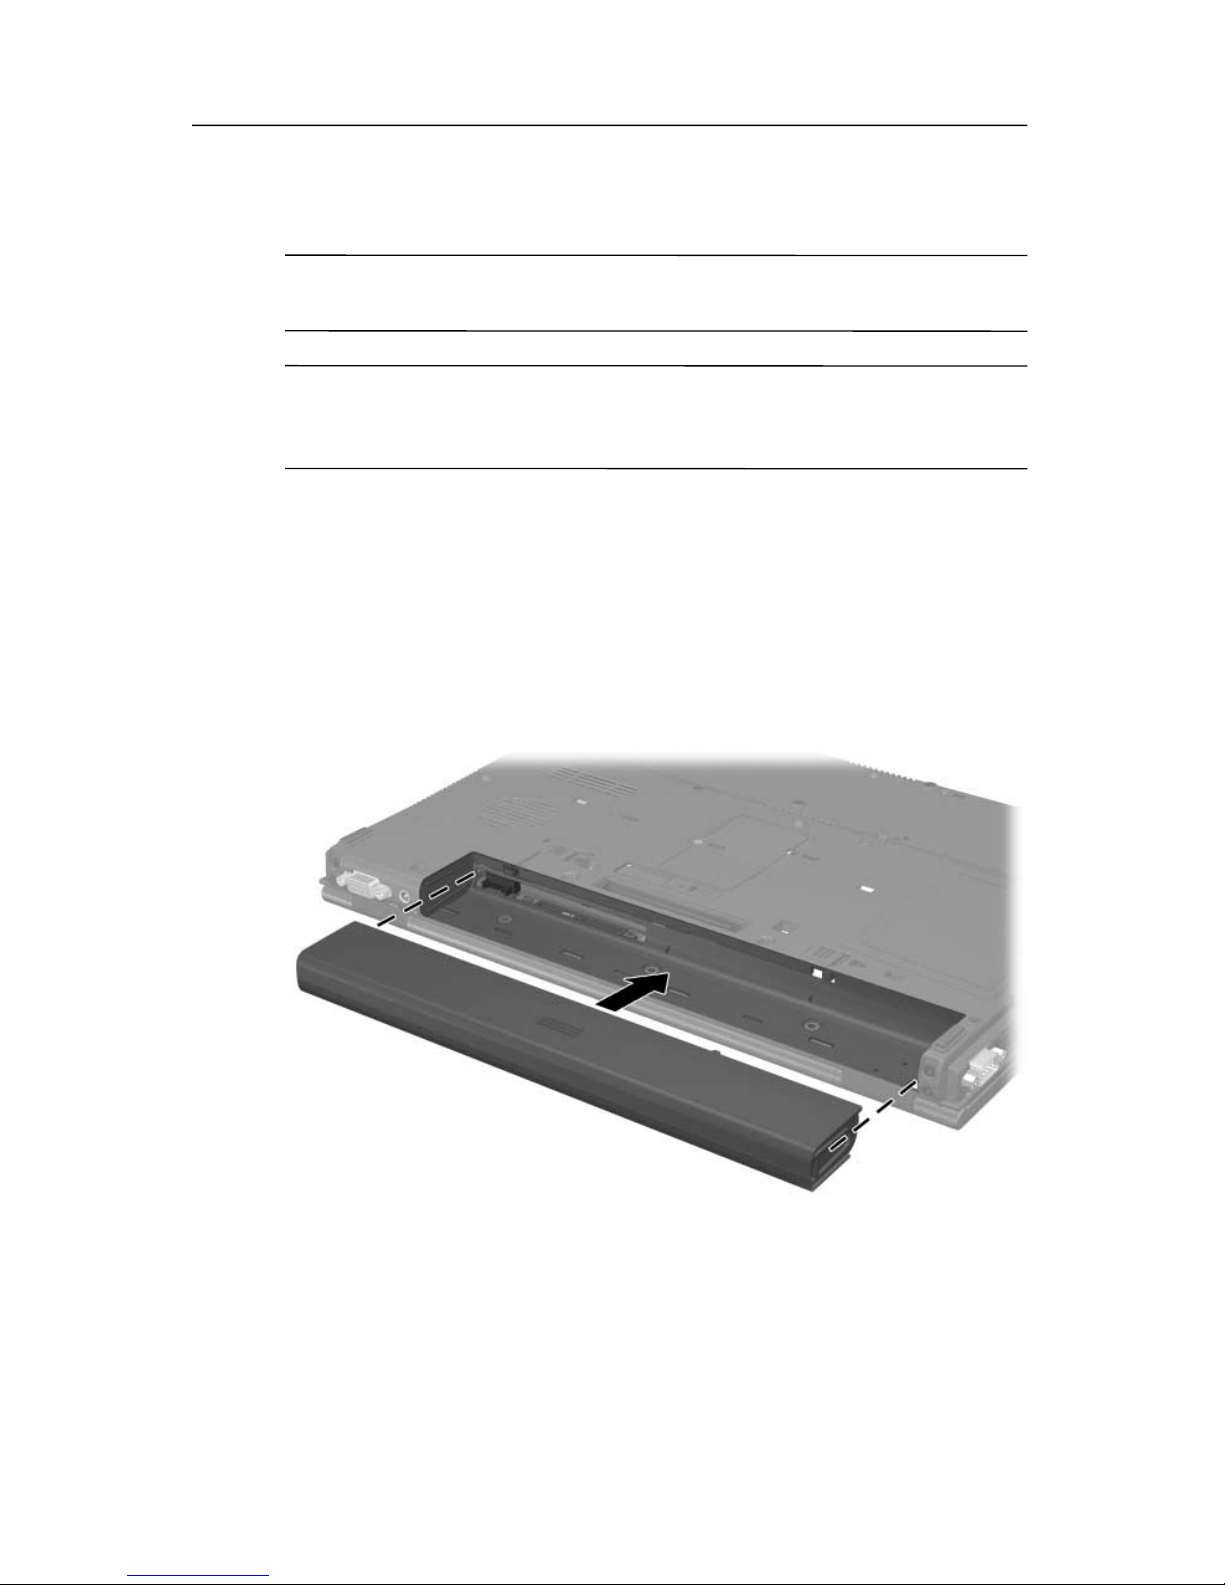
Step 2: Insert the Battery Pack
CAUTION: To prevent a lack of response when you turn on the
Ä
Ä
notebook, make sure the battery pack is firmly seated.
CAUTION: To ensure that the correct drivers load and to prevent file
corruption or damage to components, do not remove the battery pack
until the notebook has been connected to external power.
To insert the battery pack:
1. Turn the notebook upside down with the primary battery bay
facing you.
2. Slide the battery pack into the battery bay until it locks into
place.
Hardware Setup
Getting Started 1–5

Hardware Setup
Step 3: Connect the Modem
WARNING: To reduce the risk of electric shock, disconnect the
Å
modem
compartment of the notebook. Internal compartments include the
memory compartment, the battery bay, and the hard drive bay.
To connect the modem so that you can register your notebook
and operating system during software setup:
■ Follow the instructions in this section for connecting the
– or –
■ Follow the instructions provided by your Internet service
from the telephone network before accessing an internal
modem to an analog telephone line.
provider (ISP) to connect the notebook to the Internet through
a DSL (Digital Subscriber Line) modem, cable modem, or
network connection.
✎
For more information about DSL, cable, and network
connections, select Start > Help and Support. The Help and
Support utility provides hardware and software information,
instructions, tutorials, and wizards that can help you set up or
troubleshoot a variety of connections.
It may be easier to connect your modem to a telephone line
now and set up another Internet connection later, after you have
completed software setup.
Wall jacks for analog telephone lines vary by country.
■ If you are connecting the modem to a telephone line in
a country where RJ-11 telephone jacks are standard, refer
to the following section, “Connecting the Modem to an
RJ-11 Jack.”
■ If you are connecting the modem to a telephone line in a
country where RJ-11 telephone jacks are not standard, refer
to the section
in this chapter.
“Connecting the Modem with an Adapter,” later
1–6 Getting Started
Hardware Setup
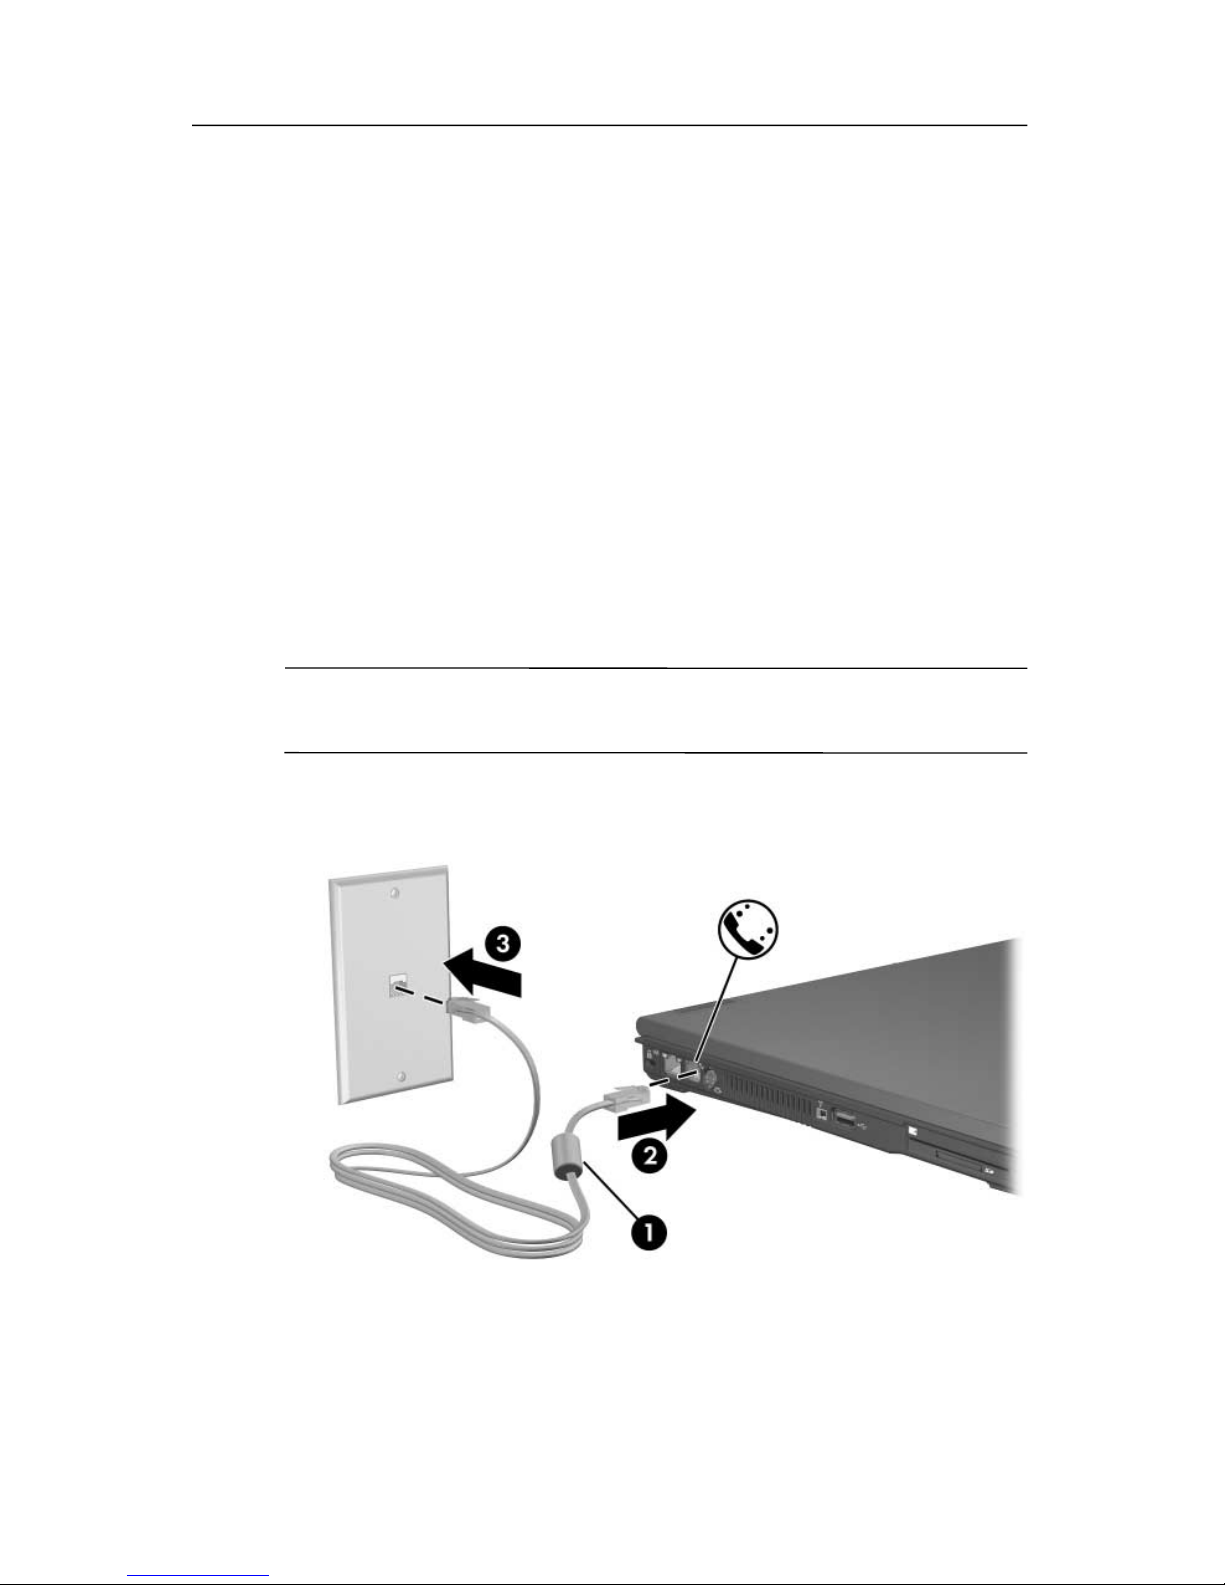
Connecting the Modem to an RJ-11 Jack
To connect the modem to an analog telephone line that has an
RJ-11 telephone jack:
1. Turn the notebook display-side up on a flat surface near an
RJ-11 telephone wall jack.
2. If your modem cable has noise suppression circuitry 1,
which prevents interference with TV and radio reception,
place the circuitry end of the cable near the notebook.
3. Plug the modem cable into the RJ-11 (modem) jack on the
notebook 2.
4. Plug the other end of the modem cable into the RJ-11
telephone wall jack 3.
✎
Telephone wall jacks and modem cables vary in appearance by
region and country.
Getting Started 1–7
Hardware Setup
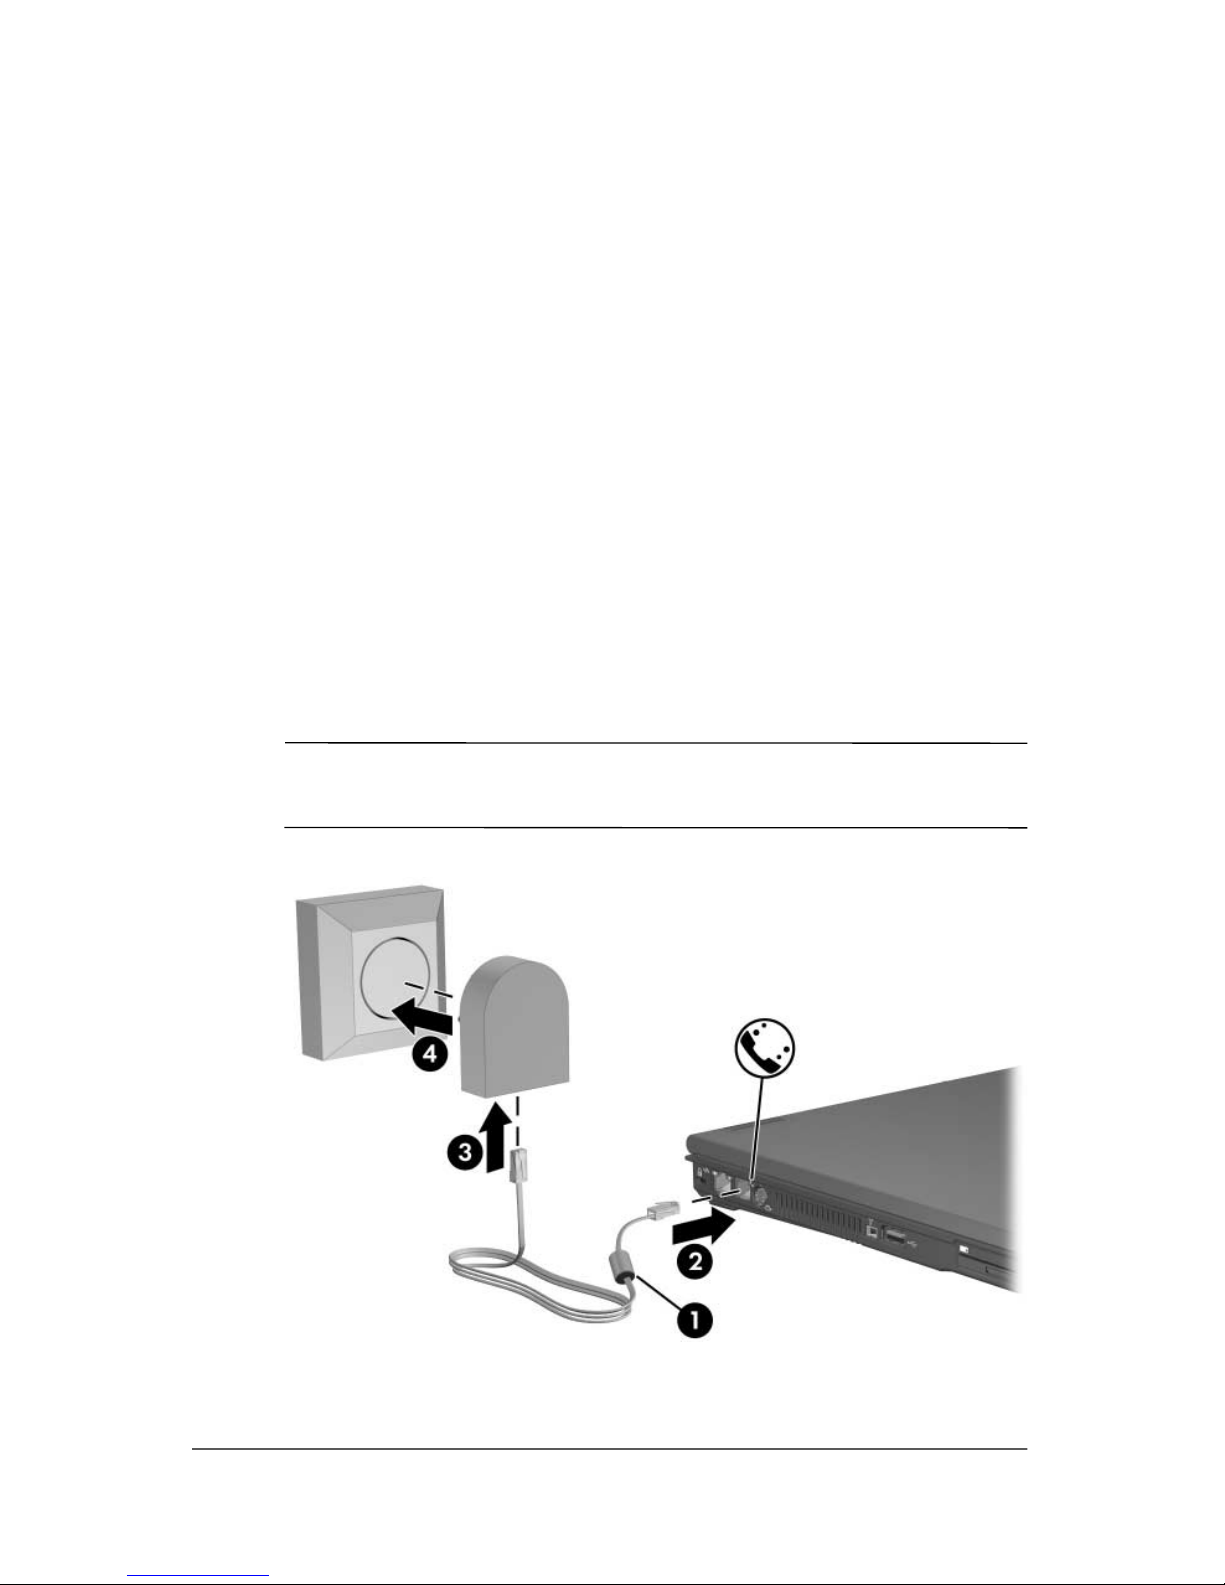
Connecting the Modem with an Adapter
To connect the modem to an analog telephone line that does
not have an RJ-11 telephone wall jack:
1. Turn the notebook display-side up on a flat surface near a
telephone wall jack.
2. If your modem cable has noise suppression circuitry 1,
which prevents interference with TV and radio reception,
place the circuitry end of the cable near the notebook.
3. Plug the modem cable into the RJ-11 (modem) jack on the
notebook 2.
4. Plug the other end of the modem cable into the
country-specific modem adapter 3.
5. Plug the country-specific modem adapter into the telephone
jack 4.
✎
Telephone wall jacks, modem adapters, and modem cables
vary in appearance by region and country.
1–8 Getting Started
Hardware Setup
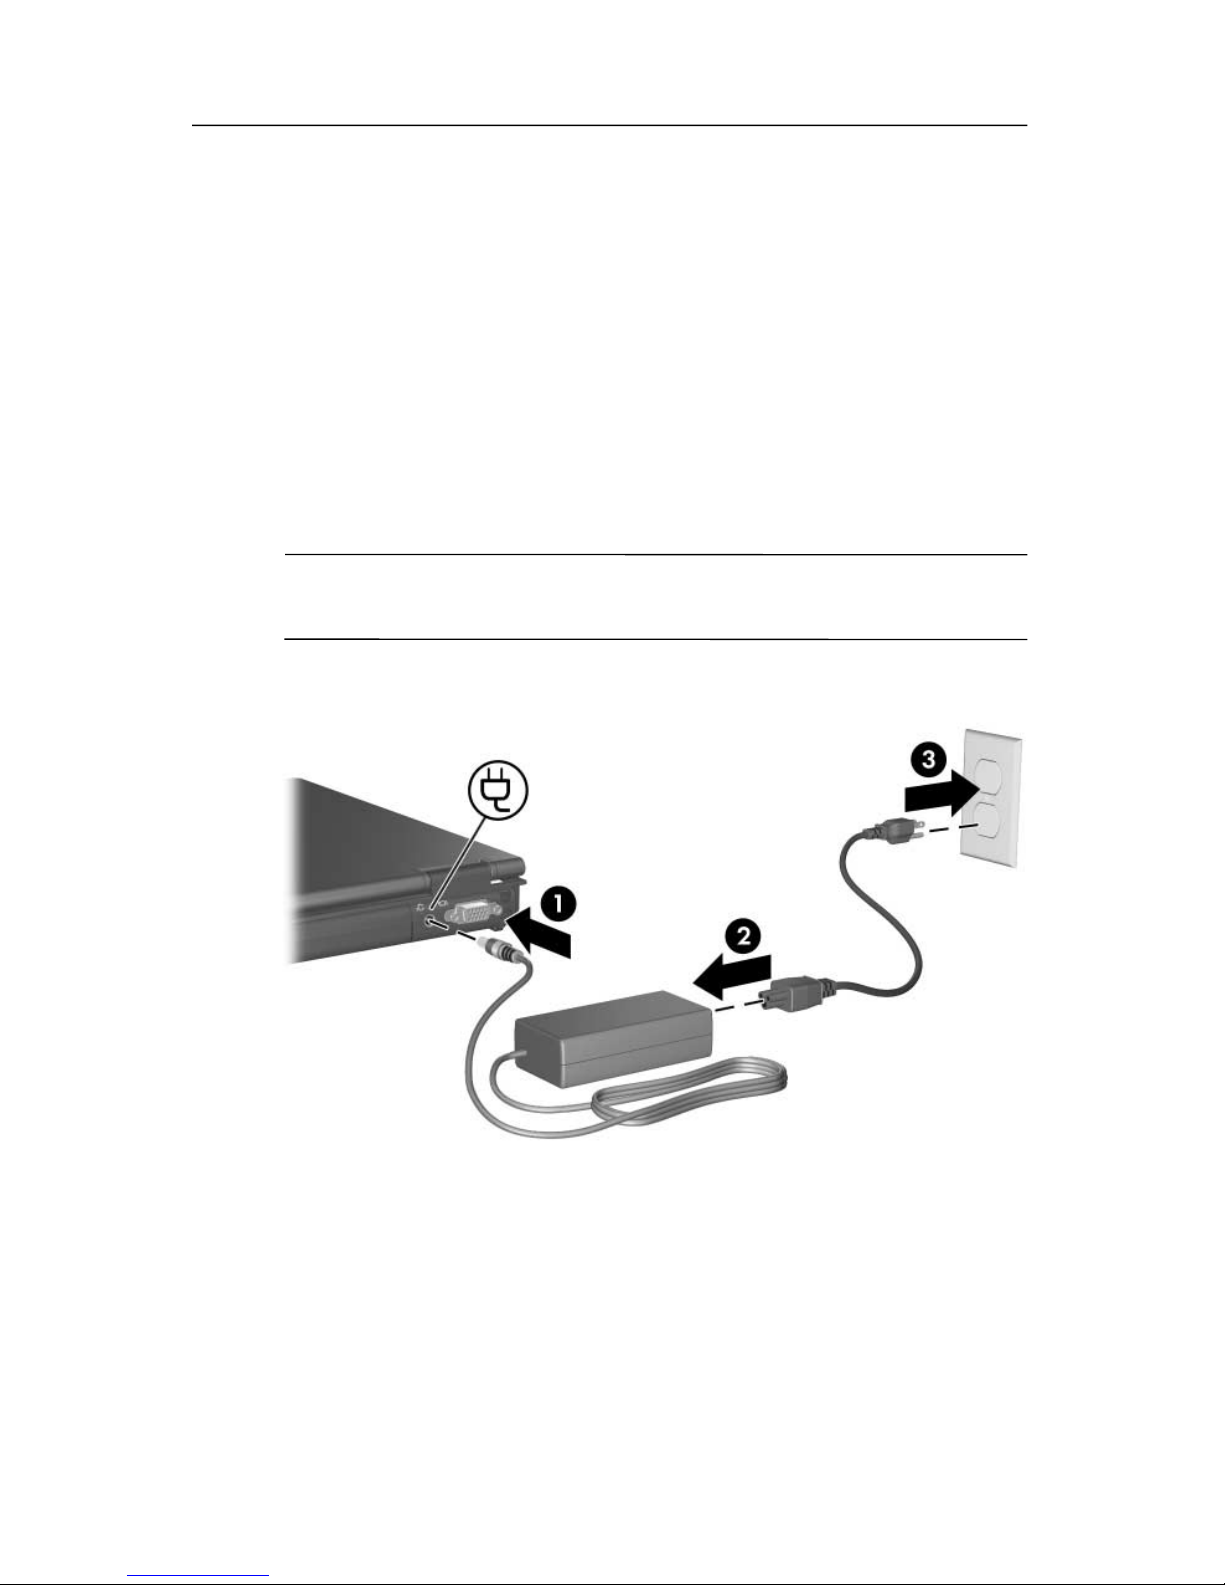
Step 4: Connect the Notebook to
External Power
To connect the notebook to external power:
1. Plug the AC adapter into the power connector 1.
2. Plug the power cord into the AC adapter 2, and then into
an electrical outlet 3.
The battery light is turned on and the battery pack begins to
charge.
Power cords and electrical outlets vary in appearance by region
✎
and country.
Getting Started 1–9
Hardware Setup
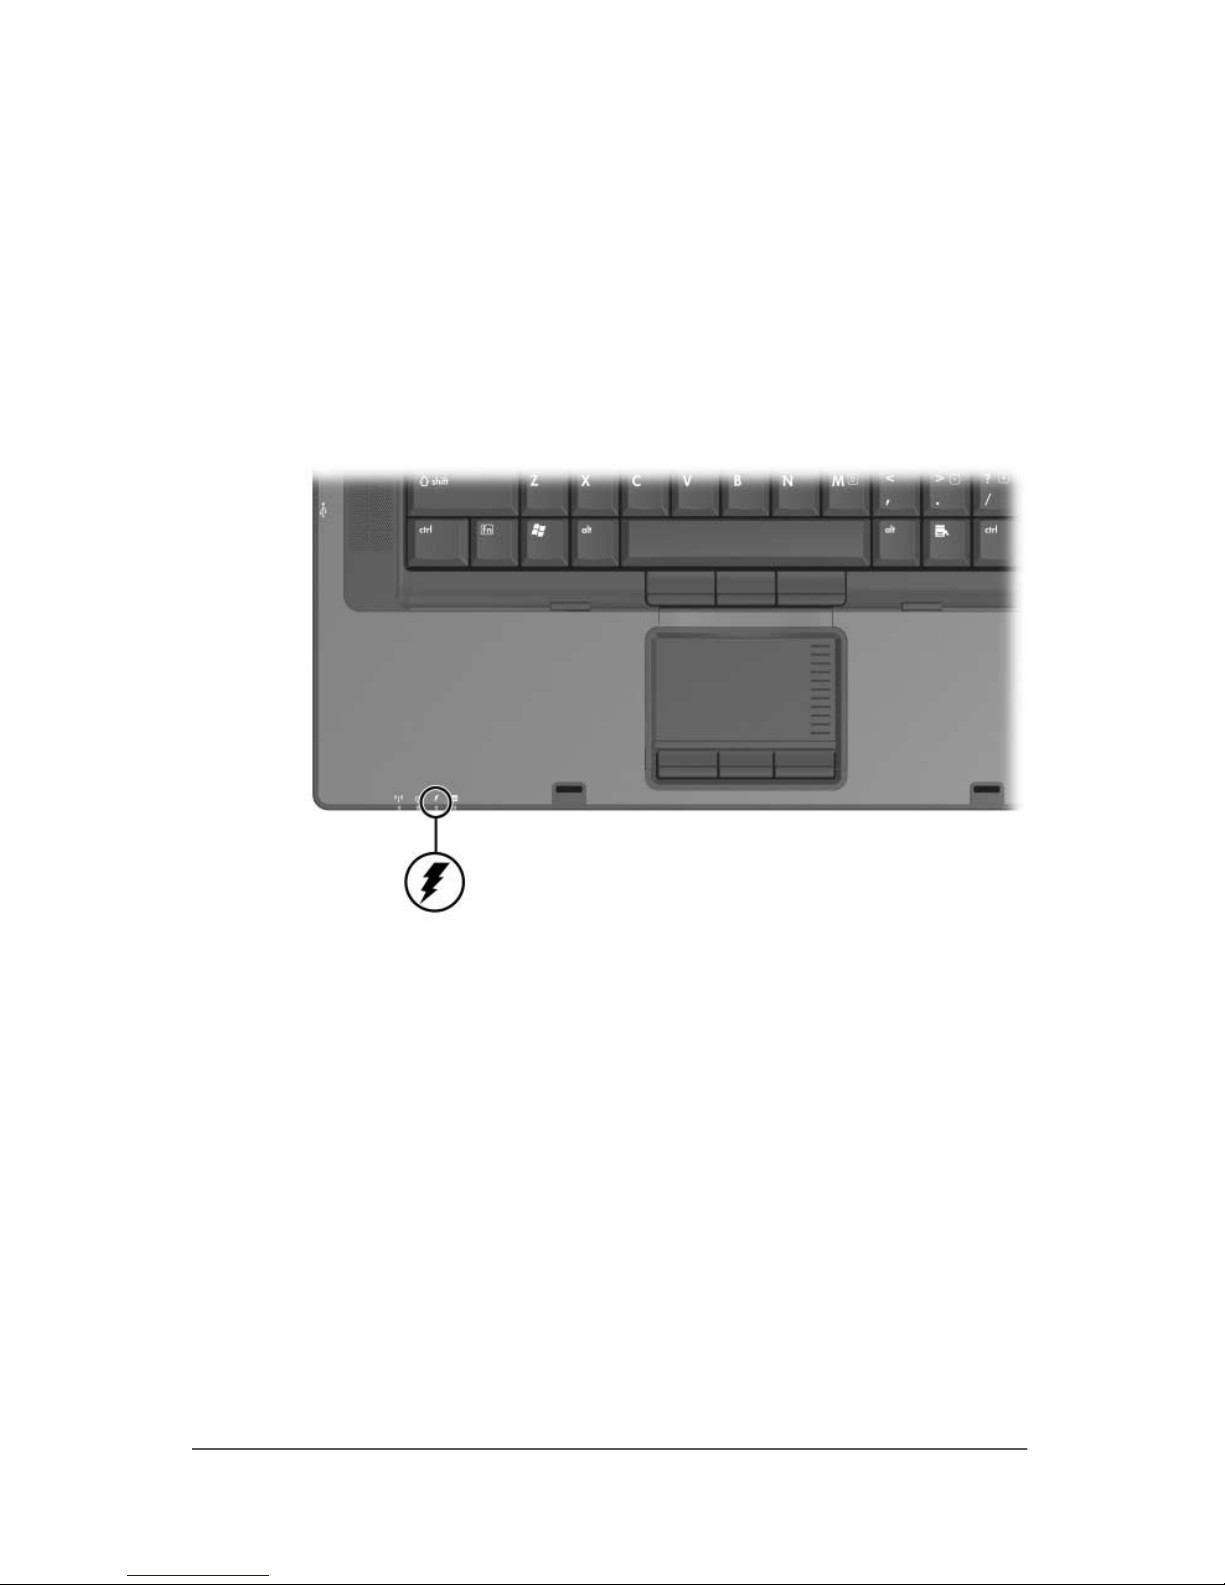
Step 5: Charge the Battery Pack
The battery pack begins to charge as soon as the notebook is
connected to external power. Charge status is indicated by the
battery light.
The battery light is on while the battery pack is charging.
It is recommended that you leave the notebook connected to
external power until the battery pack is fully charged and the
battery light is turned off.
A partially charged new battery pack can run the notebook,
battery charge displays will not be accurate until the new
but
battery
1–10 Getting Started
pack has been fully charged.
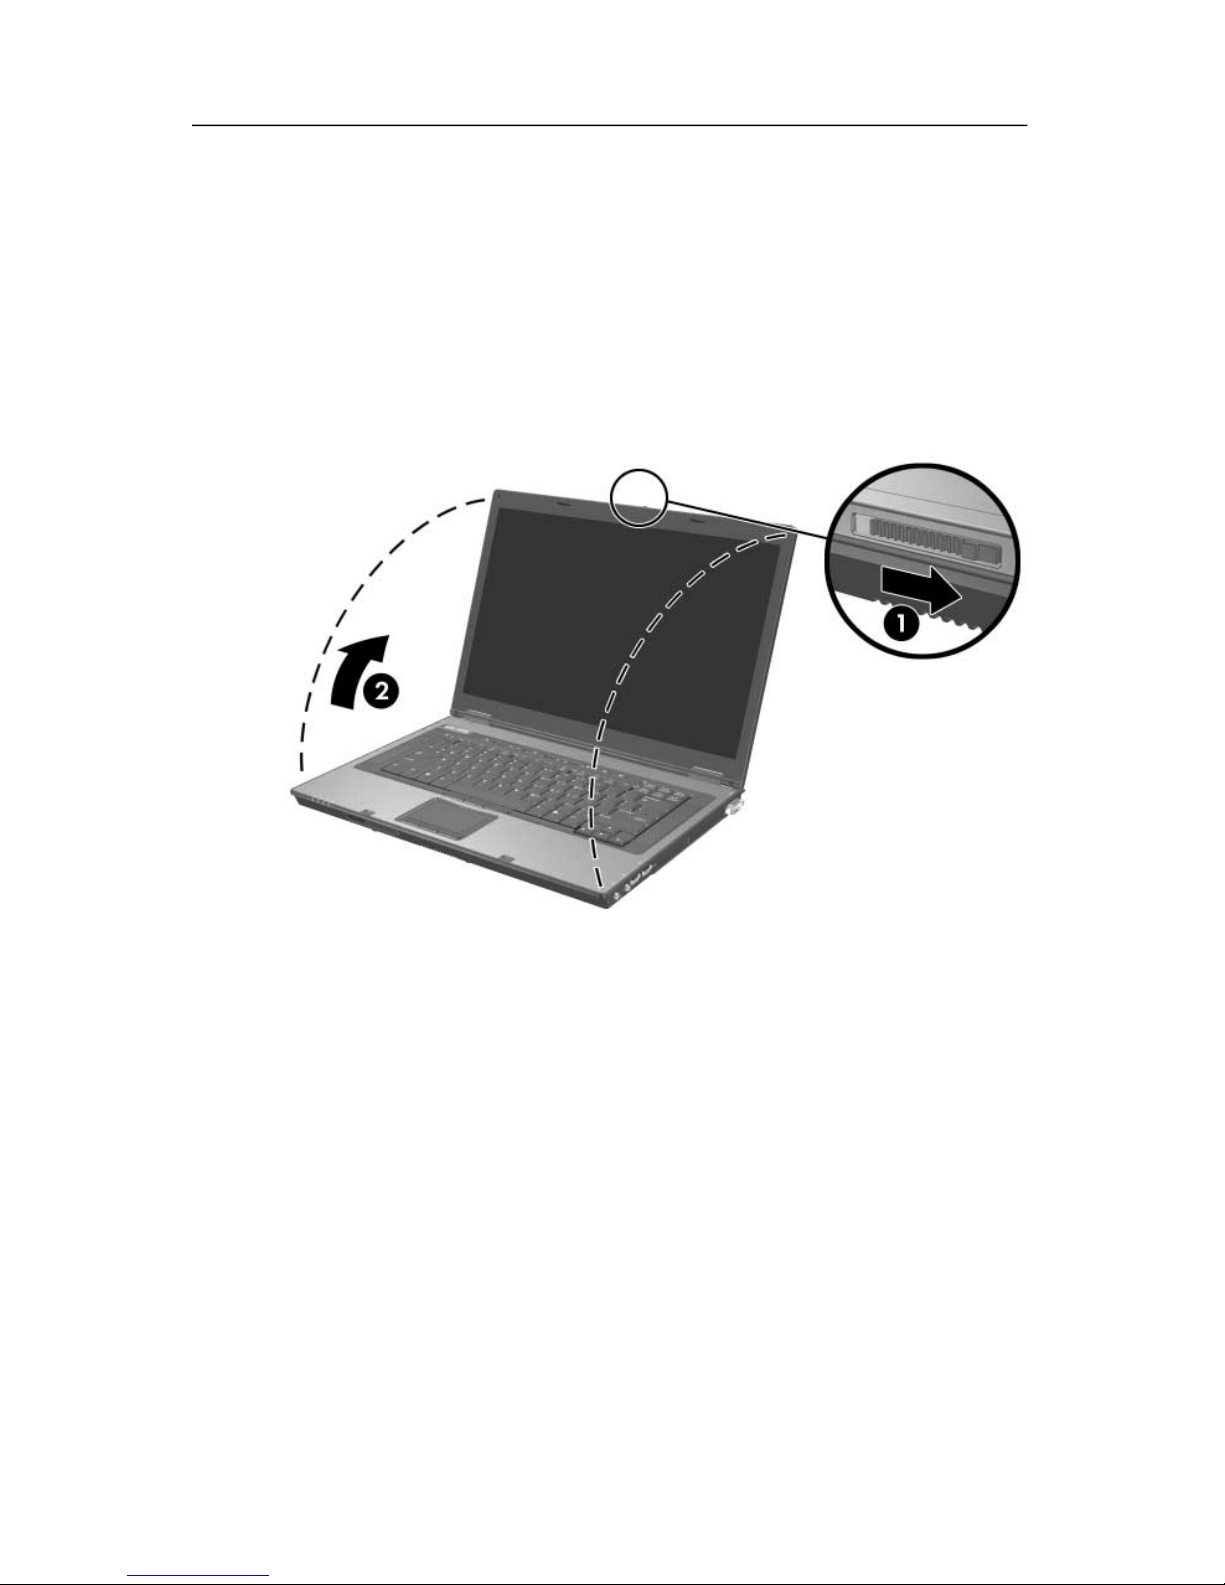
Step 6: Open the Notebook
To open the notebook:
1. Slide the display release latch 1 to release the display.
2. Raise the display 2.
Hardware Setup
Getting Started 1–11
Hardware Setup
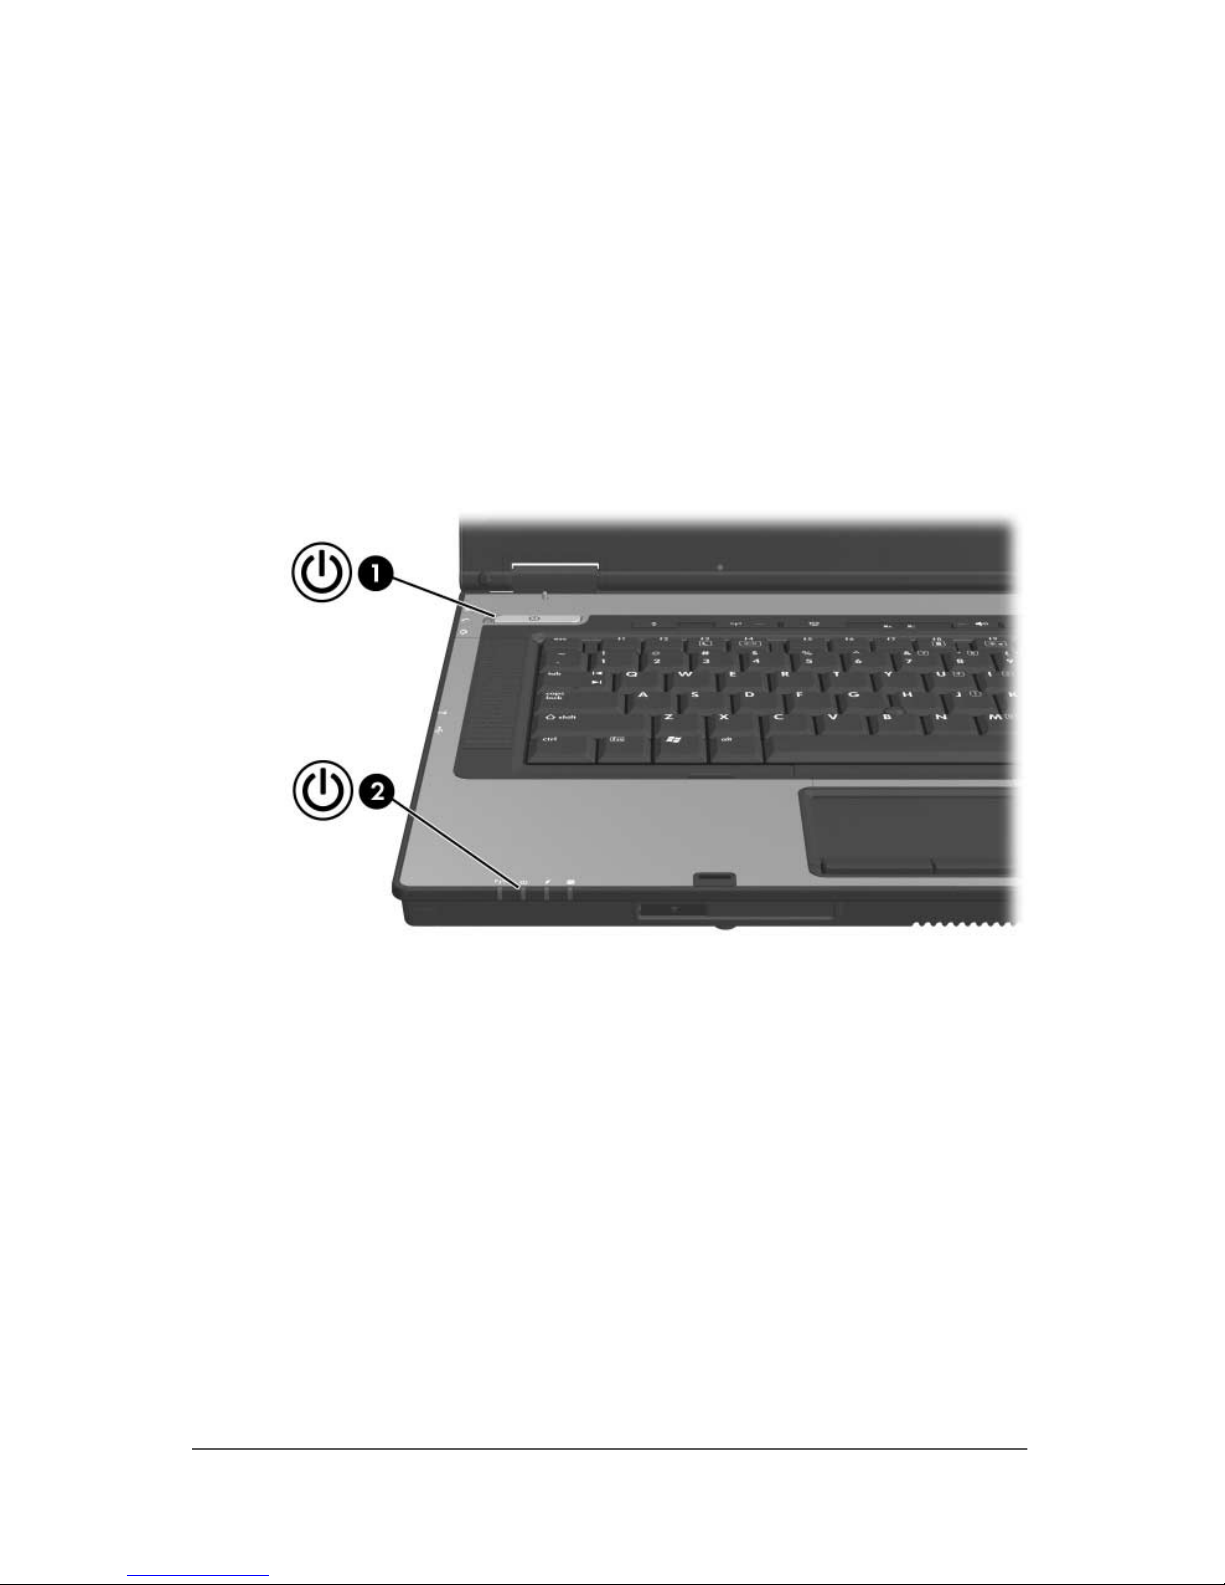
Step 7: Turn On the Notebook
To turn on the notebook:
» Press the power/standby button 1.
The power/standby light next to the power/standby button 1
and the power/standby light on the front of the notebook 2
are turned on, and you are prompted to begin software
setup.
If the notebook does not power up:
■ Make sure the AC adapter is securely plugged into the
notebook and an electrical outlet.
■ Make sure the electrical outlet is providing power. (To
confirm that the outlet is providing power, plug another
device into the outlet.)
■ If you have installed a battery pack, make sure the
battery pack is firmly seated.
■ Refer to the Worldwide Telephone Numbers booklet (English
only) included with the notebook to contact Customer Care.
1–12 Getting Started

✎
2
Software Setup
Read the information below before you begin the software setup
wizard. After you respond to the setup prompt, you must
complete the entire setup process without interruption. Setup time
varies.
During software setup you can
■ Select regional preferences.
■ Accept license agreements.
■ Name your notebook.
■ Register online.
■ Create user accounts.
If you prefer not to register your notebook during software setup,
you can do so at any time after software setup is complete. You
can also change or add any settings you select or skip during the
setup process. For instructions, refer to Chapter 2, “Managing
Your Software,” in the printed Help and Support Guide included
with your notebook. Although you can register and set
preferences later, it is usually easier and faster to complete these
tasks during software setup.
Getting Started 2–1

Software Setup
Software setup begins when you respond to the setup prompt on
the notebook screen.
CAUTION: If you are prompted to select an operating system language
Ä
before the Welcome to Windows Wizard is displayed, choose carefully.
On some models, the languages that you do not choose are deleted
from the system and cannot be restored during software setup.
■ After you respond to the setup prompt, you must complete
the entire setup process without interruption. Setup time
varies.
■ During software setup, it is normal for some notebook
models to pause occasionally for several minutes. These
normal pauses are indicated by an hourglass icon.
Welcome to Windows
The first window in the Welcome to Windows Wizard welcomes
you to your Microsoft® Windows® operating system and
introduces you to software setup navigation:
■ To display additional information about the text in any
setup window:
Select the question mark icon in the lower-right section of
the window or press the
■ To continue to the next window:
Select the Next button in the lower-right corner of the
window.
■ To return to the previous window:
Select the Back button in the lower-left corner of the window.
(This button is unavailable on the first window of the
Welc ome to Windows Wizard.)
■ To skip a window without entering a preference:
f1 key on your keyboard.
Select the Skip button in the lower-right corner of the
window. (This button is unavailable on some windows.)
2–2 Getting Started
Software Setup
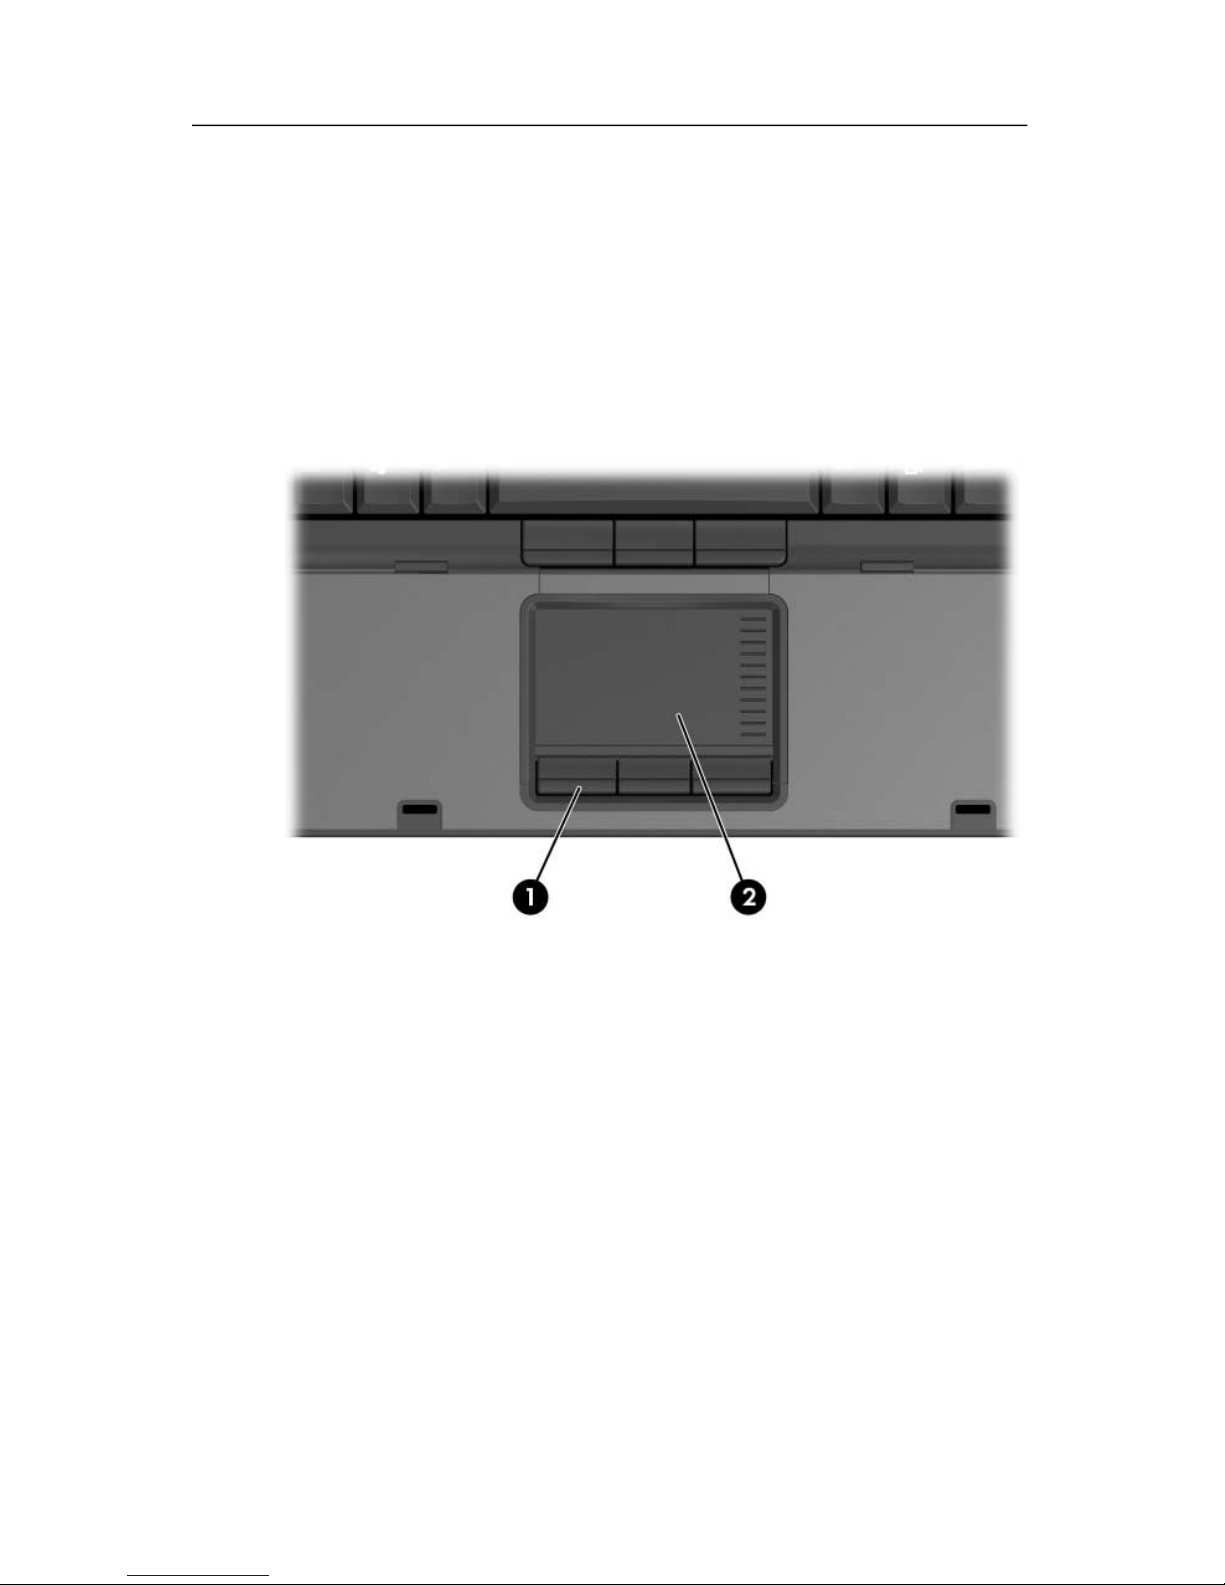
To navigate in a window:
» Slide your finger on the TouchPad 2 in the direction that you
want to move the pointer.
To select an item:
» Move the pointer over the item, and press the left TouchPad
button 1.
Getting Started 2–3
 Loading...