

Page 1

Integrated Smart Array Controller
User Guide
First Edition (September 1999)
Part Number 153236-001
Compaq Computer Corporation
Page 2

Notice
The information in this publication is subject to change without notice.
COMPAQ COMPUTER CORPORATION SHALL NOT BE LIABLE FOR TECHNICAL OR
EDITORIAL ERRORS OR OMISSIONS CONTAINED HEREIN, NOR FOR INCIDENTAL OR
CONSEQUENTIAL DAMAGES RESULTING FROM THE FURNISHING, PERFORMANCE, OR
USE OF THIS MATERIAL. THIS INFORMATION IS PROVIDED “AS IS” AND COMPAQ
COMPUTER CORPORATION DISCLAIMS ANY WARRANTIES, EXPRESS, IMPLIED OR
STATUTORY AND EXPRESSLY DISCLAIMS THE IMPLIED WARRANTIES OF
MERCHANTABILITY, FITNESS FOR PARTICULAR PURPOSE, GOOD TITLE AND AGAINST
INFRINGEMENT.
This publication contains information protected by copyright. No part of this publication may be
photocopied or reproduced in any form without prior written consent from Compaq Computer
Corporation.
© 1999 Compaq Computer Corporation.
All rights reserved. Printed in the U.S.A.
The software described in this guide is furnished under a license agreement or nondisclosure agreement.
The software may be used or copied only in accordance with the terms of the agreement.
Microsoft, MS-DOS, Windows, Windows NT, and Windows 2000 are registered trademarks of
Microsoft Corporation.
Compaq, Compaq Insight Manager, ProLiant, ROMPaq, SmartStart, PaqFax, Netelligent, SoftPaq, are
trademarks, registered, or service marks of Compaq Computer Corporation.
Other product names mentioned herein may be trademarks and/or registered trademarks of their
respective companies.
Compaq Integrated Smart Array Controller User Guide
First Edition (September 1999)
Part Number 153236-001
Page 3

Contents
About This Guide
Text Conventions .................................................................................................. ix
Symbols in Text ..................................................................................................... x
Symbols on Equipment........................................................................................... x
Rack Stability........................................................................................................ xi
Server Warnings and Precautions........................................................................... xi
Getting Help......................................................................................................... xii
Compaq Technical Support............................................................................ xii
Compaq Website ..........................................................................................xiii
Compaq Authorized Reseller ........................................................................ xiii
Chapter 1
Controller Features
Standard Features................................................................................................ 1-1
Controller Interface....................................................................................... 1-2
Drive Array Technology ............................................................................... 1-3
Fault Tolerance............................................................................................. 1-4
Drive Movement...........................................................................................1-4
Read-Cache Memory .................................................................................... 1-4
Expanding and Extending Capacity............................................................... 1-5
Online RAID Level and Stripe Size Migration ..............................................1-5
Wide Ultra2 SCSI Technology...................................................................... 1-5
Wide Ultra2 SCSI Compatibility................................................................... 1-5
Wide-Ultra SCSI-3 Compatibility ................................................................. 1-6
Configuration Utilities......................................................................................... 1-6
Option ROM Configuration for Arrays Features............................................ 1-7
Array Configuration Utility Features............................................................. 1-7
Installing the Integrated Smart Array Controller................................................... 1-9
Page 4

iv Compaq Integrated Smart Array Controller User Guide
Chapter 2
External Cabling
External SCSI Connectors ................................................................................... 2-1
External Cables ...................................................................................................2-2
Cabling External Storage Systems ....................................................................... 2-2
Preparing the Server ..................................................................................... 2-2
Connecting SCSI Cables............................................................................... 2-2
StorageWorks Enclosure Model 4214 ........................................................... 2-4
Configuring the Controller............................................................................ 2-4
Chapter 3
Updating Firmware
ROMPaq Diskettes.............................................................................................. 3-2
Materials Needed.......................................................................................... 3-2
Creating Diskettes ........................................................................................ 3-2
Running System ROMPaq................................................................................... 3-3
Running Options ROMPaq.................................................................................. 3-5
Chapter 4
Option ROM Configuration for Arrays Utility
Requirements...................................................................................................... 4-1
Initial Start Screen............................................................................................... 4-2
Create Logical Drive Screen................................................................................ 4-3
Confirmation Screen..................................................................................... 4-4
View/Delete Logical Drive Screen....................................................................... 4-5
Confirmation Screen..................................................................................... 4-6
Chapter 5
Installing the Operating System Drivers
Before Installing Drivers ..................................................................................... 5-2
Materials Needed ................................................................................................ 5-2
Creating Installation Diskettes............................................................................. 5-2
Creating Installation Diskettes for Common Operating Systems .................... 5-3
Creating Banyan VINES Peripheral Adapter Support (PAS) Diskettes........... 5-4
Novell NetWare .................................................................................................. 5-6
Latest Information ........................................................................................ 5-6
Installation Procedure ................................................................................... 5-7
Compaq Online Array Configuration Utility for NetWare (CPQONLIN) ....... 5-7
Optimizing Array Controller Performance..................................................... 5-8
Page 5

Installing the Operating System Drivers
continued
Microsoft Windows NT 4.0 ................................................................................. 5-9
Materials Needed.......................................................................................... 5-9
Additional Information ................................................................................. 5-9
General Installation Procedures................................................................... 5-10
Installing the Integrated Smart Array Controller Driver During Windows
Installation.................................................................................................. 5-11
Installing the Integrated Smart Array Controller Driver After Windows
Installation.................................................................................................. 5-12
Removing the Integrated Smart Array Controller Driver.............................. 5-13
Microsoft Windows 2000 .................................................................................. 5-14
Locating the Driver and Installation Information ......................................... 5-14
Installing the Driver.................................................................................... 5-14
Linux ................................................................................................................ 5-15
Locating the Driver and Installation Information ......................................... 5-15
Installing the Driver.................................................................................... 5-16
Locating Additional Information................................................................. 5-16
SCO OpenServer 5............................................................................................ 5-17
Locating the Driver and Installation Information ......................................... 5-17
Installing the Driver.................................................................................... 5-17
SCO UnixWare 2.1 or Later............................................................................... 5-19
Locating the Driver and Installation Information ......................................... 5-19
Installing the Driver.................................................................................... 5-19
IBM OS/2 ......................................................................................................... 5-20
Locating the Driver and Installation Information ......................................... 5-20
Installing the Driver.................................................................................... 5-21
Controller Ordering .................................................................................... 5-22
Partitioning................................................................................................. 5-23
Booting OS/2 from a Integrated Smart Array Controller Drive .................... 5-23
Command Line Switches ............................................................................ 5-24
Banyan VINES 7.0 or Later............................................................................... 5-26
Installing the Driver.................................................................................... 5-26
Additional Information ............................................................................... 5-26
Installation Procedures................................................................................ 5-26
Updating the Compaq Insight Manager Agents .................................................. 5-27
Contents v
Chapter 6
Compaq Array Configuration Utility
Before You Begin................................................................................................ 6-2
Running the Compaq Array Configuration Utility................................................ 6-2
SmartStart and Support Software CD ............................................................ 6-2
ACU Online ................................................................................................. 6-3
Microsoft Windows NT................................................................................ 6-3
Novell NetWare............................................................................................ 6-3
Page 6

vi Compaq Integrated Smart Array Controller User Guide
Compaq Array Configuration Utility
continued
Configuration Wizards ........................................................................................6-4
Online Help......................................................................................................... 6-4
Array Configuration Utility Screens..................................................................... 6-5
Main Configuration Screen........................................................................... 6-5
Novell NetWare Online Array Configuration Utility ................................... 6-14
Drive Rebuild, Expand Priority and Accelerator Ratio................................. 6-17
Configuration Procedures .................................................................................. 6-22
Creating a New Array ................................................................................. 6-22
Choosing a Controller for the Array ............................................................ 6-23
Grouping Physical Drives of the Same Size into an Array ........................... 6-24
Creating Logical Drives Across Physical Drives.......................................... 6-27
Expanding Capacity.................................................................................... 6-29
Capacity Extension..................................................................................... 6-32
Online Migration........................................................................................ 6-34
Errors and Warnings.......................................................................................... 6-36
Appendix A
Electrostatic Discharge
Preventing Electrostatic Damage ........................................................................ A-1
Grounding Methods............................................................................................ A-2
Appendix B
Understanding Drive Arrays
What is a Drive Array?........................................................................................B-1
Drive Arrays.................................................................................................B-4
Logical Drives..............................................................................................B-4
Drive Array Benefits ...........................................................................................B-5
Data Protection.............................................................................................B-5
Performance Enhancement..........................................................................B-10
Adding Storage Capacity ............................................................................B-13
Online Capacity Expansion or Extension.....................................................B-15
Data Reliability ..........................................................................................B-16
Software-Based Drive Mirroring........................................................................B-20
Recovering from Drive Failure ..........................................................................B-20
Recognizing a Drive Failure ..............................................................................B-21
Fault Tolerance and Drive Failure......................................................................B-22
A RAID 0 (Non-Fault-Tolerant) Logical Drive ...........................................B-22
A RAID 1 (Mirroring) Logical Drive ..........................................................B-22
A RAID 5 (Distributed Data Guarding) Logical Drive.................................B-23
Spare Drives...............................................................................................B-23
Page 7

Understanding Drive Arrays
continued
Replacing a Failed Drive ...................................................................................B-23
Automatic Data Recovery...........................................................................B-24
Automatic Data Recovery Failure ...............................................................B-25
Compromised Fault Tolerance ...........................................................................B-25
Appendix C
Questions and Answers
Index
Contents vii
Page 8

Page 9

This guide is designed to be used as step-by-step instructions for installation
and as a reference for operation, troubleshooting, and future upgrades.
Text Conventions
This document uses the following conventions to distinguish elements of text:
Keys Keys appear in boldface. A plus sign (+) between
About This Guide
two keys indicates that they should be pressed
simultaneously.
USER INPUT
FILENAMES File names appear in uppercase italics.
Menu Options,
Command Names,
Dialog Box Names
COMMANDS,
DIRECTORY NAMES,
and DRIVE NAMES
Type When you are instructed to type information, type
Enter
User input appears in a different typeface and in
uppercase.
These elements appear in initial capital letters.
These elements appear in uppercase.
the information without pressing Enter.
When you are instructed to enter information, type
the information and then press Enter.
Page 10
x Compaq Integrated Smart Array Controller User Guide
Symbols in Text
These symbols may be found in the text of this guide. They have the following
meanings.
WARNING: Text set off in this manner indicates that failure to follow directions
in the warning could result in bodily harm or loss of life.
CAUTION: Text set off in this manner indicates that failure to follow directions
could result in damage to equipment or loss of information.
IMPORTANT: Text set off in this manner presents clarifying information or specific
instructions.
NOTE: Text set off in this manner presents commentary, sidelights, or interesting points
of information.
Symbols on Equipment
These icons may be located on equipment in areas where hazardous conditions
may exist.
Any surface or area of the equipment marked with these symbols
indicates the presence of electrical shock hazards. Enclosed area
contains no operator serviceable parts.
WARNING: To reduce the risk of injury from electrical shock hazards,
do not open this enclosure.
Any RJ-45 receptacle marked with these symbols indicates a Network
Interface Connection.
WARNING: To reduce the risk of electrical shock, fire, or damage to
the equipment, do not plug telephone or telecommunications
connectors into this receptacle.
Page 11
Rack Stability
About This Guide xi
Any surface or area of the equipment marked with these symbols
indicates the presence of a hot surface or hot component. If this
surface is contacted, the potential for injury exists.
WARNING: To reduce the risk of injury from a hot component, allow
the surface to cool before touching.
Power supplies or systems marked with these symbols indicate
the equipment is supplied by multiple sources of power.
WARNING: To reduce the risk of injury from electrical shock,
remove all power cords to completely disconnect power from
the system.
WARNING: To reduce the risk of personal injury or damage to the equipment,
be sure that:
■ The leveling jacks are extended to the floor.
■ The full weight of the rack rests on the leveling jacks.
■ The stabilizing feet are attached to the rack if it is a single rack installation.
■ The racks are coupled together in multiple rack installations.
■ Only one component is extended at a time. A rack may become unstable if
more than one component is extended for any reason.
Server Warnings and Precautions
WARNING: Any product or assembly marked with these symbols
indicates that the component exceeds the recommended weight for
22.6 kg
50 lb
one individual to handle safely.
WARNING: To reduce the risk of personal injury or damage to the
equipment, observe local occupational health and safety requirements
and guidelines for manual material handling.
Page 12

xii Compaq Integrated Smart Array Controller User Guide
Getting Help
If you have a problem and have exhausted the information in this guide, you
can get further information and other help in the following locations.
Compaq Technical Support
In North America, call the Compaq Technical Phone Support Center at
1-800-OK-COMPAQ
1
. This service is available 24 hours a day, 7 days a week.
Outside North America, call the nearest Compaq Technical Support Phone
Center. Telephone numbers for worldwide Technical Support Centers are
listed on the Compaq website. Access the Compaq website by logging on to
the Internet:
http://www.compaq.com
Be sure to have the following information available before you call Compaq:
■ Technical support registration number (if applicable)
■ Product serial numbers
■ Product model names and numbers
■ Applicable error messages
■ Add-on boards or hardware
■ Third-party hardware or software
■ Operating system type and revision level
■ Detailed, specific questions
1
For continuous quality improvement, calls may be recorded or monitored.
Page 13

Compaq Website
The Compaq website has information on this product as well as the latest
drivers and Flash ROM images. You can access the Compaq website by
logging on to the Internet:
http://www.compaq.com
Compaq Authorized Reseller
For the name of your nearest Compaq authorized reseller:
■ In the United States, call 1-800-345-1518.
■ In Canada, call 1-800-263-5868.
■ Elsewhere, see the Compaq website for locations and telephone
numbers.
About This Guide xiii
Page 14

Page 15

Chapter 1
Controller Features
The Compaq Integrated Smart Array Controller is a dual-channel, 32-bit PCI
controller supporting RAID technology. It also supports Wide Ultra2 SCSI
technology for faster data transfer rates and is backward compatible with
Wide-Ultra SCSI-3 devices. The Integrated Smart Array Controller supports
SCSI drives either through the external Wide-SCSI connector or the internal
68-pin Wide-SCSI connector, with a maximum of two supported channels.
Configuring the server to use two separate SCSI ports provides maximum
internal and external drive support without having to commit the resources of
an expansion slot.
Standard Features
Features of the Compaq Integrated Smart Array Controller include:
■ Support for RAID 0, RAID 1, RAID 0+1, and RAID 5
■ Support for Wide Ultra2 SCSI technology and an improved data transfer
rate maximum of 80 MB/s
■ Backward compatible with Wide-Ultra SCSI-3 hard drives
■ Support for offline drive and array movement
■ Dual Wide Ultra2 SCSI channels supporting up to 15 drives on each
channel
■ Performance monitoring with Compaq Insight Manager
■ Automatic and manual performance tuning
■ Pre-Failure Warranty and Pre-Failure Notification for Compaq drives
Page 16

1-2 Compaq Integrated Smart Array Controller User Guide
Tagged command queuing
■
■ Multiple logical drives and drive arrays
■ 32-bit PCI Bus Master interface
■ 16-MB total memory; 8-MB read-ahead cache
■ Array transfer capability to the Compaq Smart Array 3200, 4200, or
5300 Controllers
■ Online capacity expansion
■ Logical drive extension
■ RAID level migration
■ Stripe-size migration
■ Easy-to-use Array Configuration Utility (ACU)
■ Option ROM Configuration for Arrays Utility
NOTE: If higher performance, higher availability, or higher capacity is required, arrays can
be moved from the Integrated Smart Array Controller to a higher performance array
controller without requiring a backup-and-restore procedure, but only if relative drive
order is maintained. If relative drive order is changed, or if no data backup exists, perform
a full backup before moving any array to another controller.
Controller Interface
The Integrated Smart Array Controller server interface is a Peripheral
Component Interface (PCI) bus. The PCI bus is a high-performance, 32-bit bus
with multiplexed address and data lines. It includes a parity signal and
provides a high-speed path (up to 132 MB/s) between the system board and
the array controller. The Integrated Smart Array Controller is a PCI Bus
Master device and conforms to PCI Local Bus Specification, Revision 2.2.
Page 17
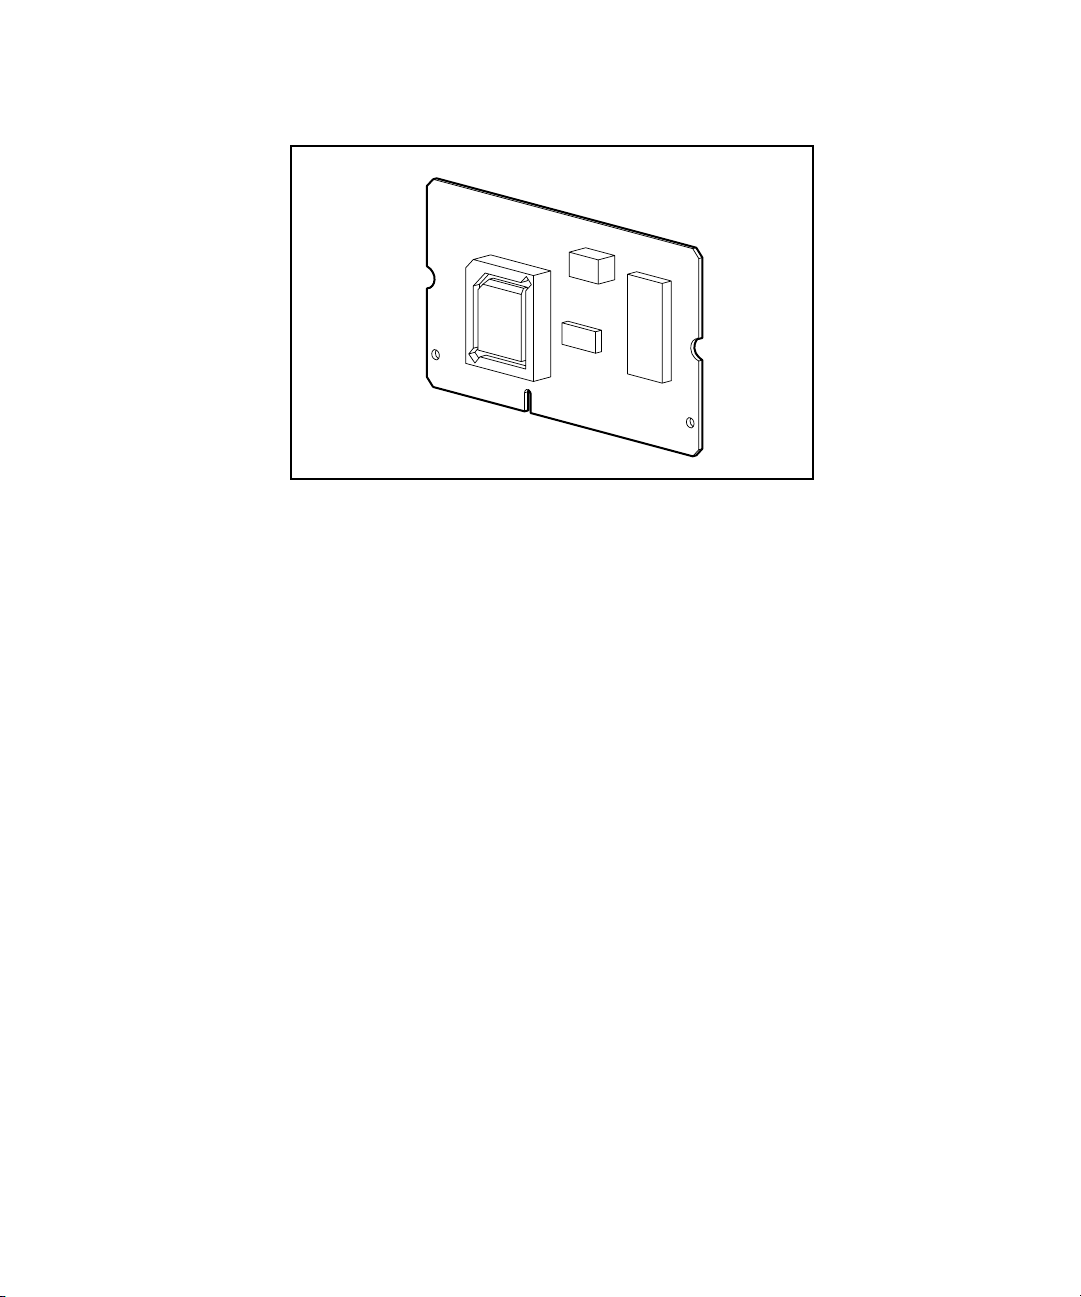
Figure 1-1. Integrated Smart Array Controller
Drive Array Technology
Drive array technology distributes data across a series of hard drives to unite
physical drives into one or more logical drives. Distributing data allows
concurrent access to data from multiple drives in the array, yielding faster
input/output rates than nonarrayed drives. Each logical drive in the array may
be set to a different fault-tolerant configuration and the Integrated Smart Array
Controller manages the drive array independent of the host processor.
Controller Features 1-3
The Compaq Array Configuration Utility found on the SmartStart and Support
Software CD guides you through configuring the hardware in the way that best
suits your needs.
Refer to the material in Appendix B for general information about drive
arrays. Chapter 4 contains information about configuring your Integrated
Smart Array Controller with Option ROM Configuration for Arrays utility,
and Chapter 6 contains information about configuring hard drives and drive
arrays with the Compaq Array Configuration Utility.
Page 18

1-4 Compaq Integrated Smart Array Controller User Guide
Fault Tolerance
Fault tolerance relies on various methods for protecting data from loss in the
event of a hardware failure somewhere in the storage system. Each method has
its advantages, so choosing one requires careful planning for your particular
requirements.
Fault-tolerance methods supported by the Integrated Smart Array Controller
and the Compaq Array Configuration Utility include:
■ Distributed data guarding (RAID 5)
■ Drive mirroring (RAID 1)
■ Drive striping and mirroring (RAID 0+1)
■ No-fault tolerance (RAID 0)
■ Further data protection achieved by assigning an online spare to any
RAID 0+1, RAID 1, or RAID 5 configuration
See Appendix B for more information on fault-tolerance methods supported by
the Integrated Smart Array Controller. Chapter 6, “Compaq Array
Configuration Utility,” contains information on configuring your system for
each of the fault-tolerance methods.
Drive Movement
An array of drives can be moved from one system to another as long as the
relative order of the drives is maintained. However, when the relative order of
the drives is changed, or if a new array controller is installed or reconfigured,
all data stored on the drives are affected. For more information, refer to
Chapter 6 in this guide.
Read-Cache Memory
The Integrated Smart Array Controller has 16 MB of total memory, with 8 MB
dedicated for read-ahead cache.
Page 19

Expanding and Extending Capacity
The Compaq Array Configuration Utility (ACU) makes changing your storage
configuration simple, even in fault-tolerant configurations, without requiring a
data backup-and-restore cycle. If you are using Microsoft Windows NT or
Novell NetWare operating systems with hot-plug drives, storage expansion or
extension can be performed online without shutting down the server or exiting
the operating system.
The Compaq ACU supports two important utilities:
■ Capacity expansion–Adding capacity and creating new drives
■ Capacity extension–Enlarging existing logical drives
Online RAID Level and Stripe Size Migration
The Array Configuration Utility allows you to reconfigure a currently
configured logical drive for a new fault-tolerance (RAID) level or move an
existing logical drive’s stripe size to a new stripe size online without
disruption to system operations and without loss of data. For more information
about online RAID level and stripe size migration, refer to Chapter 6.
Controller Features 1-5
Wide Ultra2 SCSI Technology
The Integrated Smart Array Controller uses Wide Ultra2 SCSI technology for
improved performance. Wide Ultra2 SCSI technology uses Low Voltage
Differential (LVD) signaling to allow maximum burst rates on the Ultra2 SCSI
bus of up to 80 MB/s. LVD signaling doubles the maximum burst rates
available in Wide-Ultra SCSI-3 devices.
NOTE: The maximum burst rate of up to 80 MB/s provided by Wide Ultra2 SCSI (LVD)
signaling is achieved only when the array contains Wide Ultra2 SCSI (LVD) devices
exclusively.
Wide Ultra2 SCSI Compatibility
The Integrated Smart Array Controller is compatible with your existing SCSI
devices. Wide Ultra2 SCSI works with devices that respond at transfer rates of
up to 80 MB/s. Connected peripherals are limited to response times no faster
than the transfer rate of the slowest device in the array.
Page 20

1-6 Compaq Integrated Smart Array Controller User Guide
Wide-Ultra SCSI-3 Compatibility
In addition to using Wide Ultra2 SCSI technology, the Integrated Smart Array
Controller complies with ANSI SCSI-3 standards and can support 16-bit
Wide-Ultra SCSI-3 devices.
Configuration Utilities
Compaq offers a choice of tools for drive array configuration including:
■ OptionROM Configuration for Arrays−a basic utility run during the
POST process that allows you to configure the first array and logical
drive where you will install an operating system.
■ Array Configuration Utility−a full-featured utility, run from the
SmartStart and Support Software CD, that allows you to configure
arrays and logical drives to suit your system needs.
■ Online versions of the Array Configuration Utility−advanced utilities
(one each for Novell NetWare and Microsoft NT) that allow you to
configure arrays and logical drives while your server is up and running.
The following general procedure explains the order and usage of utilities:
1. Backup your existing data, if any.
2. Install the Integrated Smart Array Controller.
3. Run the Option ROM Configuration for Arrays utility to configure the
first array and logical drive on your server.
4. Restore data that were backed up in Step 1, if any.
5. Install your operating system.
NOTE: For detailed instructions on installing operating systems, refer to the instructions
in Chapter 5.
6. Run Array Configuration Utility tools to configure and manage server
storage with the Integrated Smart Array Controller.
Page 21
Option ROM Configuration for Arrays Features
Use the Option ROM Configuration for Arrays utility to create your first
logical drive before installing your operating system.
CAUTION: Back up all data stored on existing drives before installing the
Integrated Smart Array Controller. All data stored on nonarray drives will be
destroyed when the new array controller is installed.
The Option ROM Configuration for Arrays utility supports the following
items:
■ Up to six physical drives and one logical drive
■ RAID 0, RAID 1, RAID 0+1, and RAID 5 configurations
■ Online spare (hot-spare) configurations
■ Functionality for configuring one logical drive that is used as the boot
device, viewing the current logical drive configuration, and deleting the
current logical drive configuration
Chapter 4 provides detailed instructions for using the Option ROM
Configuration for Arrays utility features.
Controller Features 1-7
Array Configuration Utility Features
The Compaq Array Configuration Utility (ACU) is an easy-to-use, graphical
configuration utility designed to help you set up and change drive array
configurations.
You can run this utility by booting your server from the SmartStart and
Support Software CD. Online versions of ACU for Microsoft NT and Novell
NetWare do not require you to reboot the server.
Compaq ACU has the following features:
■ Provides graphical views of Compaq drive array configurations
■ Helps optimize array configurations with configuration wizards*
■ Provides express or custom initial configurations*
■ Supports RAID 0, RAID 1, RAID 0+1, and RAID 5 configurations
■ Sets drive rebuild priorities
■ Supports online spare (hot-spare) configurations
Page 22

1-8 Compaq Integrated Smart Array Controller User Guide
Supports separate fault-tolerance configurations on an individual logical
■
drive basis
■ Supports easy capacity expansion and logical drive extension
■ Supports RAID and stripe-size migration
NOTE: Items with asterisks (*) are not supported in the NetWare online version of ACU.
Chapter 6 provides detailed instructions for using ACU features.
Page 23

Installing the Integrated Smart Array Controller
If you purchased the Integrated Smart Array Controller as an option for your
server, you must install the controller before performing any configuration
operations.
For additional information about installing hardware options in your server,
refer to the user documents provided on the Documentation CD provided with
your server.
CAUTION: Back up all data stored on existing drives before installing the
controller. All data stored on nonarray drives will be destroyed when the new
controller is installed.
IMPORTANT: Before installing the Integrated Smart Array Controller, update the firmware
with the latest version, available from the Compaq website
http://www.compaq.com
Use the following procedure to install the controller on the system board:
1. Backupalldatastoredonexistingdrives.
Controller Features 1-9
2. Put the server in Standby mode by turning off power from the power
switch.
3. Disconnect the power cord and all external devices.
4. Open the system access panel as indicated in your server’s setup and
installation guide.
5. Locate the Integrated Smart Array Controller slot on the system board.
Consult your server documentation or hood label for controller location.
Page 24
1-10 Compaq Integrated Smart Array Controller User Guide
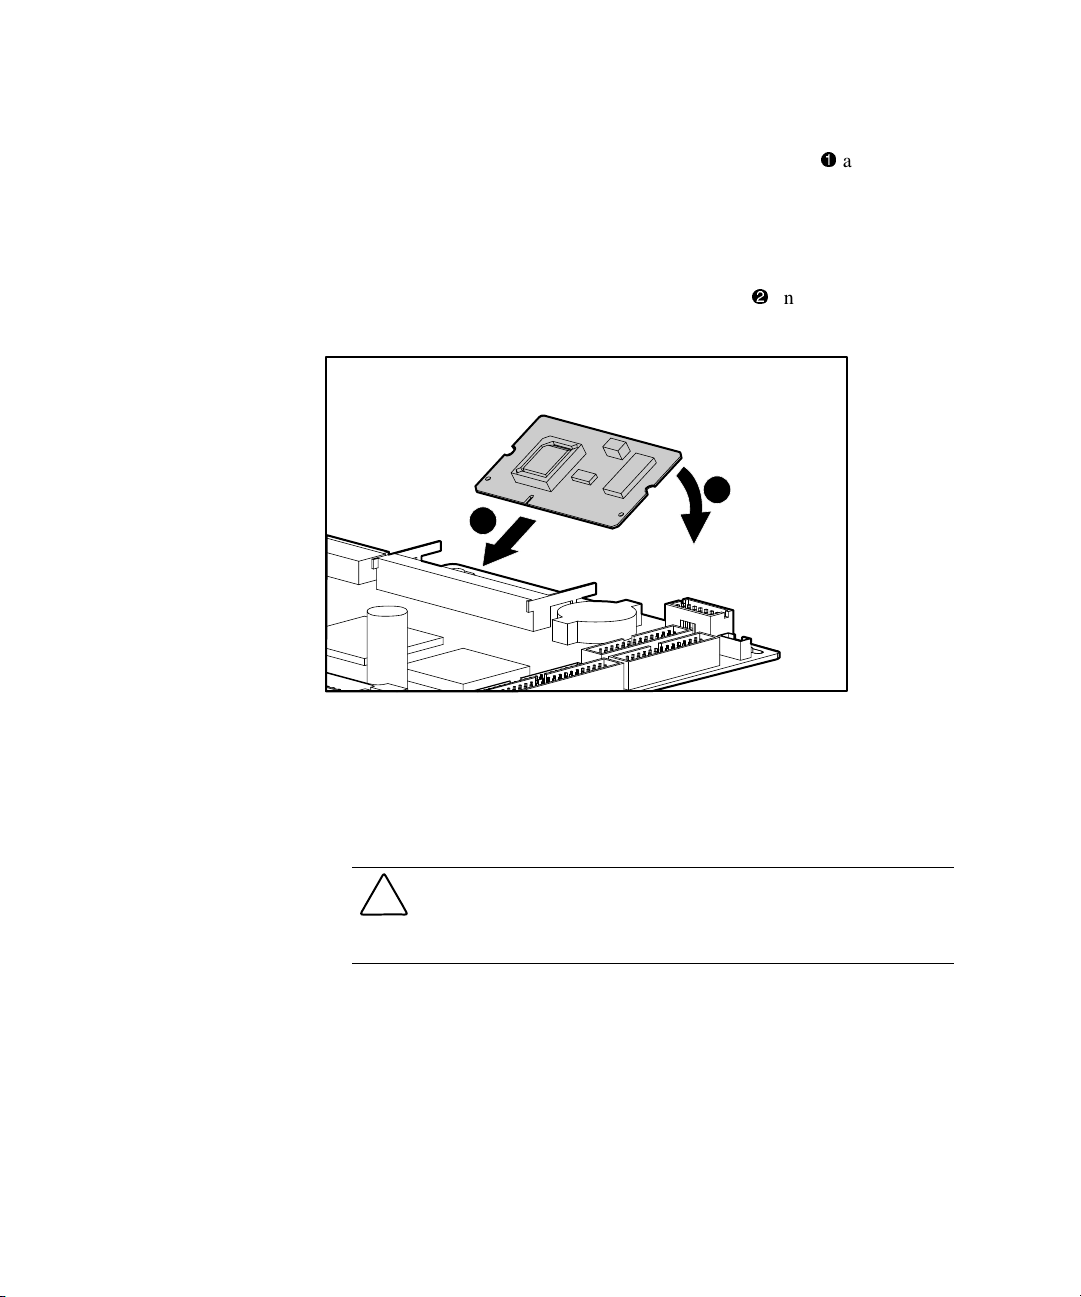
6. Insert the tab end of the controller into the slot at an angleas shown
below.
NOTE: The controller is keyed to fit the controller slot with the notch toward the bracket
wall. If the controller does not snap into place, check the direction of the notch.
7. Press down evenly on both sides of the controlleruntil it clicks into
place.
1
2
Figure 1-2. Inserting the controller into the system board
NOTE: Your system board may look different.
8. Close the server and reconnect the power cord.
9. Power on the server; let the system detect and configure the controller.
CAUTION: You are required to restore all data stored on the server after
installing the optional Integrated Smart Array Controller. Any information that
was not backed up before installation is permanently deleted when the system
is powered on.
10. Restore any data that was backed up before controller installation.
NOTE: After the controller is installed in your server, continue to update your firmware as
needed and configure the controller to manage hard drives and drive arrays.
Page 25

This chapter provides instructions for cabling an external storage system to
your server with the Integrated Smart Array Controller. The cabling guidelines
provided below use Compaq storage systems. For additional cabling and setup
information, refer to the documentation provided with your external storage
system.
External SCSI Connectors
Use the external SCSI cables provided with the system to ensure a proper
connection from the Integrated Smart Array Controller to an external storage
system. Compaq Storage Systems configured with external SCSI connectors
may include:
■ ProLiant Storage System Model U1 (single bus)
Chapter 2
External Cabling
■ ProLiant Storage System Model U2 (dual bus)
■ ProLiant Storage System Model UE (high-capacity single bus)
■ StorageWorks Enclosure Model 4214R and 4214T (Ultra2 high density
and capacity)
Page 26

2-2 Compaq Integrated Smart Array Controller User Guide
External Cables
Cables provided with these Compaq storage systems are equipped with
external 68-pin Wide SCSI connectors requiring a 6-foot or 12-foot
VHDCI-to-Wide SCSI cable, depending on the configuration for your system.
In Compaq systems:
■ Rack models of the U1, U2, and UE and the Models 4214R and 4214T
use a 12-foot VHDCI-to-Wide SCSI cable.
■ Tower models of the U1, U2, and UE use the 6-foot VHDCI-to-Wide
SCSI cable.
■ An optional 39-foot VHDCI-to-Wide SCSI cable is available for use
with Enclosure Models 4214R and 4214T.
Cabling External Storage Systems
Preparing the Server
Prevent data loss by backing up all data stored on your server’s hard drives.
Press the power switch on the front panel of the server to place it in
Off/Standby mode. If the server remains unopened, it is not necessary to
disconnect power and peripheral cables when you install an external SCSI
connection.
Consult the user documentation provided with your storage system for exact
cabling instructions and warnings.
IMPORTANT: Before connecting an external SCSI device to the external SCSI connector
on the rear panel of the server, disconnect all devices from the internal SCSI port of the
same channel, including the terminated SCSI cable. See your server documentation for
specific cabling guidelines.
Connecting SCSI Cables
Optional mass storage SCSI devices such as Compaq ProLiant Storage
Systems can be connected to the server with the external SCSI connector on
the back of the unit. To connect your server to an external storage device, refer
to the installation documentation provided with the external storage device and
your server.
Page 27
External Cabling 2-3
Use the following general procedure to connect your server to a mass storage
SCSI device:
1. Place the server in Standby mode and disconnect the AC cords.
2. Remove the access panel.
3. Disconnect all devices, including the terminated SCSI cables (if any)
from the internal SCSI port that is located on the same SCSI channel as
the external SCSI port. (To remove the cable, see your server
installation documentation on SCSI channel configuration procedures.)
4. Replace the access panel.
5. Use the cable provided with your storage system to attach the external
SCSI connector (on the rear panel of the server) to the external SCSI
connector (on the rear panel of the storage system).
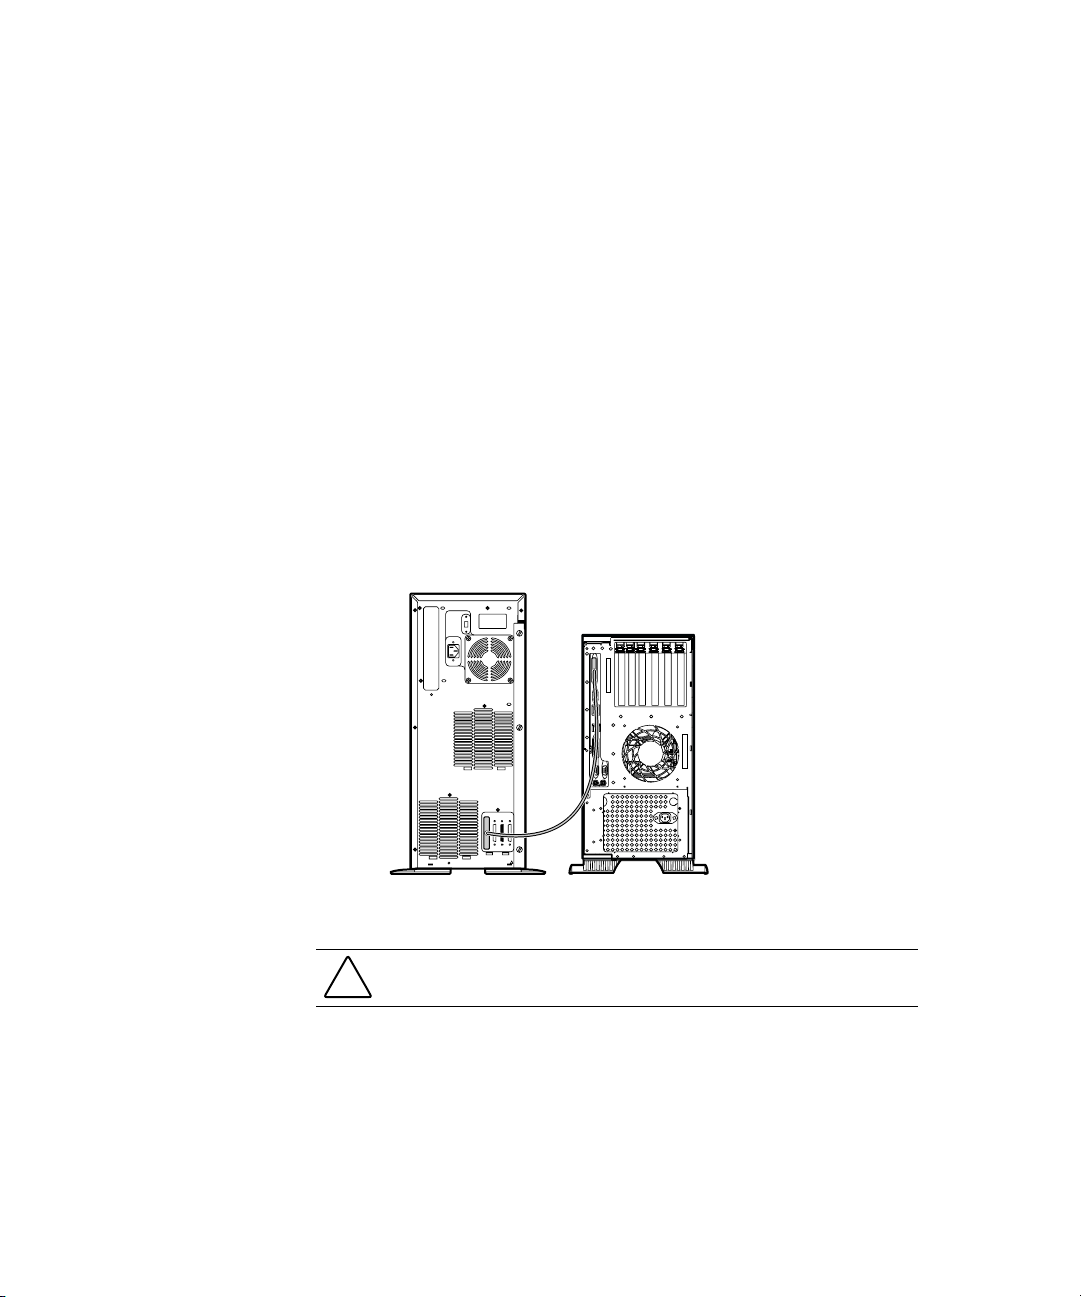
The illustration below shows a typical configuration for a tower-to-tower
external SCSI connection to a storage system.
Figure 2-1. Connecting a tower model server to a tower model storage device
CAUTION: Failure to connect external drives to the correct port or controller will
result in loss of data.
The external SCSI connector on the rear panel of the server is dedicated for
use with external SCSI devices only, and the internal SCSI port of the same
channel is dedicated for use with internal SCSI devices only. The SCSI port of
the same channel cannot be used for both internal and external devices at the
same time.
Page 28
2-4 Compaq Integrated Smart Array Controller User Guide
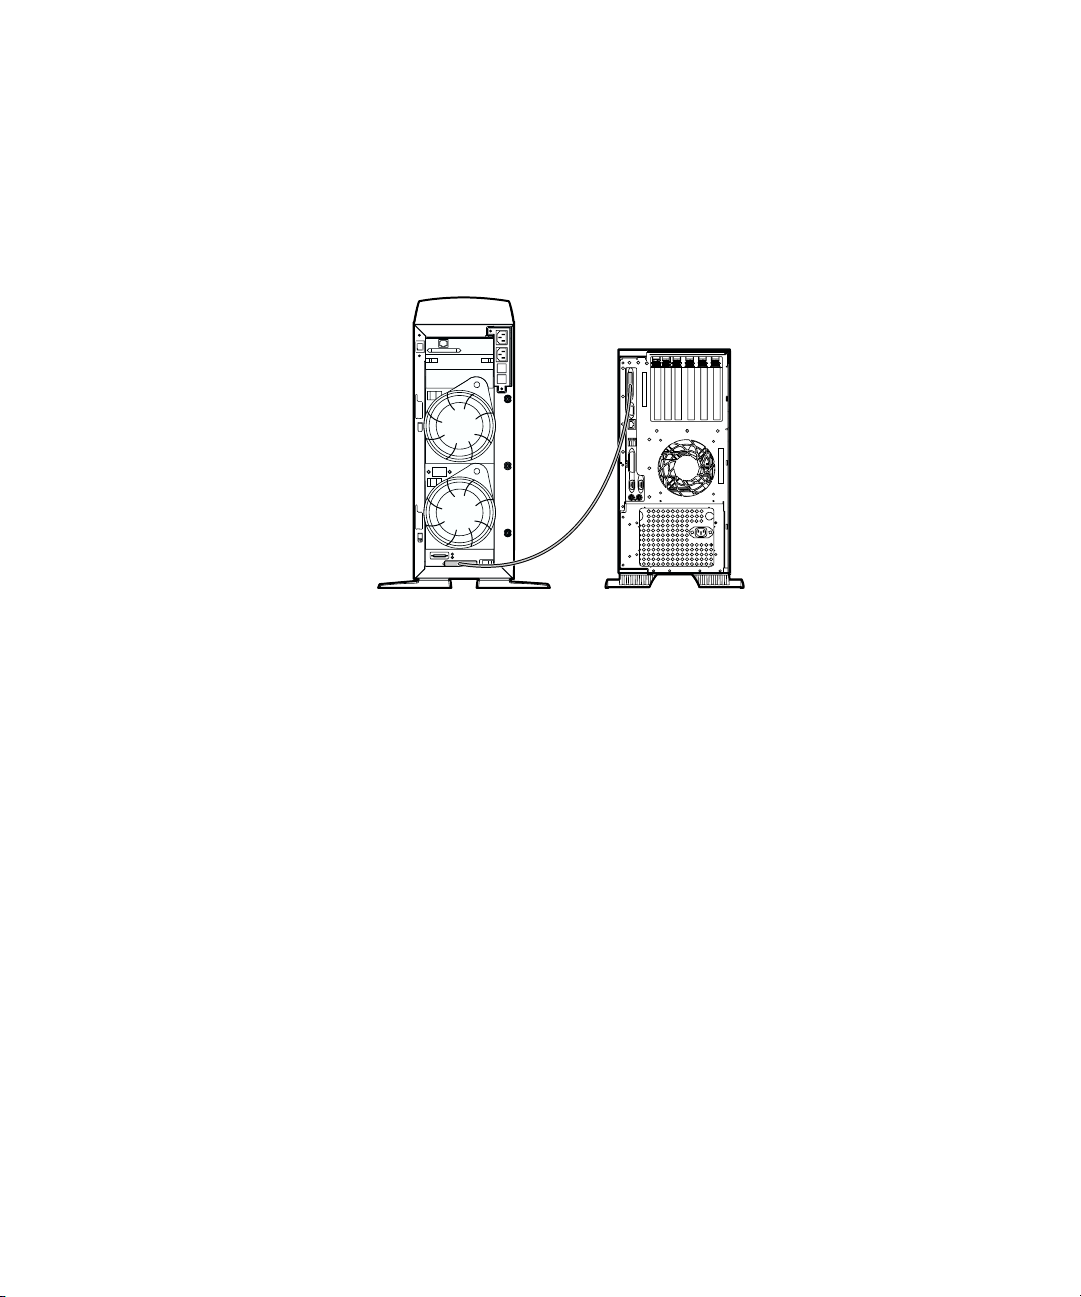
StorageWorks Enclosure Model 4214
External storage systems available from Compaq authorized resellers include
the StorageWorks Enclosure Model 4214. The external cabling configuration
for the Model 4214 is shown in the illustration below.
Figure 2-2. Connecting the external SCSI connector to a StorageWorks
Enclosure Model 4214
Configuring the Controller
After external connections to the storage system are secure, power up the
server. The system detects the installed external storage system and prompts
you to configure the Integrated Smart Array Controller for additional physical
drives. Refer to Chapter 4, “Option ROM Configuration for Arrays Utility,”
for detailed instructions on configuring the Integrated Smart Array Controller.
Page 29

Chapter 3
Updating Firmware
The ROMs on all Compaq servers and most Compaq options can be updated
easily by flashing the ROM. To flash a ROM, Compaq ROMPaq replaces the
existing contents of the ROM with an updated version stored in a disk file.
This method is a convenient way to distribute new firmware and to keep
Compaq products up-to-date with the latest capabilities.
There are two ROMPaq utilities:
■ System ROMPaq
Update the system ROM in all Compaq servers supporting Flash ROM.
Use System ROMPaq when you install a new Integrated Smart Array
Controller in a Compaq server to be sure that the server utilizes the full
range of capabilities available from the Integrated Smart Array
Controller.
■ Options ROMPaq
Update the onboard ROM on all Compaq options supporting Flash
ROM. Use Option ROMPaq when new versions of the Integrated Smart
Array Controller firmware or SCSI drive firmware become available to
take advantage of expanded capabilities.
IMPORTANT: Before you install the new Integrated Smart Array Controller in your server,
update the system firmware by running the System ROMPaq utility. This process ensures
that you have the latest ROM on your system.
Use the instructions in the following section to create diskettes with the latest
version of System ROMPaq from the Compaq SmartStart and Support
Software CD.
Page 30

3-2 Compaq Integrated Smart Array Controller User Guide
ROMPaq Diskettes
The latest version of ROMPaq is stored on the SmartStart and Support
Software CD and should be used to create the diskettes for ROMPaq utilities
to support the Integrated Smart Array Controller.
The latest ROMPaqs may also be downloaded from the Compaq website:
http://www.compaq.com
At the website, locate your software in the Support area.
Materials Needed
Use the following items to create ROMPaq utility diskettes:
■ Compaq SmartStart and Support Software CD
■ 3 to 5 blank diskettes for System ROMPaq or 10 to 15 blank diskettes
for Options ROMPaq
■ Access to a server or workstation with a bootable CD-ROM drive or any
system running in a Microsoft Windows-based environment that has an
installed CD-ROM drive. This may be the system in which you are
installing the Integrated Smart Array Controller.
Creating Diskettes
UsethefollowingproceduretocreateROMPaqdiskettes:
1. Open SmartStart either of the following ways:
G
Boot the server from the Compaq SmartStart and Support Software
CD. In Windows, the Diskette Builder utility loads automatically.
G
Run Diskette Builder from any Windows-based PC.
NOTE: It is not necessary to perform a SmartStart installation. Select Diskette Builder and
disregard any screen prompts to perform a full installation.
2. From the Compaq Diskette Builder screen, select Create Software
Diskettes from CD Only.
Page 31

3. From the Diskette Builder screen, scroll through the list and select one
of the following ROMPaq options:
NOTE: Click on the small + symbol to open the Compaq folder.
G
System ROMPaq Firmware Upgrade Diskette for your server
G
Options ROMPaq
4. Once you have chosen the diskette set you want to create, select the
Next button in the lower right-hand corner of your screen.
5. Follow the instructions displayed on the screen to create ROMPaq
diskettes.
Running System ROMPaq
System ROMPaq is a utility that updates the firmware in Compaq servers
including the enhanced drive array capabilities available from the Integrated
Smart Array Controller. To update all devices and maximize the capabilities of
the controller, Compaq recommends that you run the latest System ROMPaq
when installing or upgrading your new Integrated Smart Array Controller. The
latest ROMPaq can also be downloaded from the Compaq website:
http://www.compaq.com
Updating Firmware 3-3
At the website, locate your software in the Support area.
If you purchased your server with the Integrated Smart Array Controller
already installed, you do not need to run System ROMPaq at the time of server
installation.
CAUTION: If you are upgrading from an existing Integrated Dual Channel Wide
Ultra2 SCSI Controller to the Integrated Smart Array Controller, you must back
up all data stored on hard drives before you make the upgrade. Installing the
Integrated Smart Array Controller destroys all stored data on existing drives.
Run System ROMPaq:
1. Use the power switch on the front of the server to turn off power and
place the system in Standby mode.
2. Place the System ROMPaq diskette that you created from the Compaq
SmartStart and Support Software CD in the server diskette drive.
3. Start the server from the power switch on the front of the server.
4. Press Enter at the Welcome screen.
Page 32

3-4 Compaq Integrated Smart Array Controller User Guide
5. At the Select A Device screen, select the server from the list of the
programmable devices. There may be only one item in the list.
6. Press Enter.
7. At the Select An Image screen, the following is displayed:
Device to reprogram: your server
Current ROM revision: date of existing ROM version
Select Firmware Images: date of latest ROM version
8. Press Enter.
9. Review the information on the Caution screen:
Device to reprogram: your server
Current ROM revision: date of existing ROM version
Selected ROM revision: date of ROM version to be installed
10. Perform one of the following steps:
G
Press Esc to discontinue reprogramming and return to the Select An
Image screen.
OR
G
Press Enter to reprogram the system ROM.
The message “Reprogramming Firmware” indicates that the system
ROM is being reprogrammed.
CAUTION: Do not interrupt this cycle. Interrupting the ROM reprogramming
leaves the firmware in an unknown state and you may not be able to boot the
server. You will be notified when reprogramming is completed.
11. When ROMPaq is finished reprogramming the system ROM, press Esc
to exit the System ROMPaq Utility.
12. Remove the System ROMPaq diskette and restart the server by cycling
the power or by performing a cold start.
After ROMPaq has updated all of your firmware, install the Integrated Smart
Array Controller in the array controller slot on your server board. Refer to
Chapter 1 and your server documentation for detailed instructions on installing
the Integrated Smart Array Controller.
Page 33

Running Options ROMPaq
Options ROMPaq is used to update the firmware on Compaq options including
Integrated Smart Array Controller. Use this utility to update the controller and
drives whenever updated versions become available. Because it is difficult to
determine when to update the firmware, keep current with the latest revisions
through the Compaq website:
http://www.compaq.com
At the website, click Support and navigate the options for software.
The Integrated Smart Array Controller firmware version included on the
Compaq SmartStart and Support Software CD has already been installed on
the controller, so you do not need to update it immediately. However, if you
use an older array controller or other Compaq options, you may want to create
the Options ROMPaq diskettes to ensure that your firmware is up-to-date.
Use the following procedure to run Options ROMPaq:
1. If the server is on, power down the server.
2. Place the Options ROMPaq diskette 1 into the server diskette drive.
3. Start the server by turning on the power from the power switch on the
front of the server.
Updating Firmware 3-5
4. Press Enter at the Welcome screen.
5. At the Select A Device screen, select Compaq Integrated Smart Array
Controller from the list of programmable devices.
6. Press Enter.
7. If the ROM firmware for the Integrated Smart Array Controller is older
than the firmware on the Options ROMPaq diskette, the Select An
Image screen displays:
Device to reprogram: COMPAQ Integrated Smart Array Controller
Current ROM revision: COMPAQ Integrated Smart Array Controller x.xx
Select Firmware Images: COMPAQ Integrated Smart Array Controller y.yy
8. Press Enter.
NOTE: If the ROM firmware for the Integrated Smart Array Controller is the same or
newer than the firmware on the Options ROMPaq diskette, you see the following
message: “The ROM image files found for the device selected are not older than the
current ROM image.”
Press Enter to accept and proceed to Step 9.
Page 34

3-6 Compaq Integrated Smart Array Controller User Guide
9. Review the information on the Caution screen:
Device to reprogram: COMPAQ Integrated Smart Array Controller
Current ROM revision: COMPAQ Integrated Smart Array Controller x.xx
Selected ROM revision: COMPAQ Integrated Smart Array Controller y.yy
10. Perform one of the following steps:
G
Press Esc to discontinue the reprogramming and return to the Select
An Image screen.
OR
G
Press Enter to reprogram the Integrated Smart Array Controller
ROM. The following onscreen message indicates that the Integrated
Smart Array Controller ROM is being reprogrammed.
CAUTION: Do not interrupt the reprogramming cycle. Interrupting the ROM
reprogramming will leave the firmware in an unknown state. If this happens,
you may not be able to reprogram the ROM, and the Integrated Smart Array
Controller ROM may have to be replaced. You will be notified when
reprogramming is completed.
11. When the Options ROMPaq has finished reprogramming the Integrated
Smart Array Controller ROM, do one of the following:
G
Press Enter to reprogram another Compaq option, and repeat
steps 5 through 10.
OR
G
Press Esc to exit the ROMPaq Utility.
12. After exiting the ROMPaq Utility, remove the Options ROMPaq
diskette and restart the server by cycling the power or performing a cold
start.
The Integrated Smart Array Controller ROM is now reprogrammed and allows
you to take advantage of new or increased capabilities available with the new
firmware.
Page 35

After installing the Integrated Smart Array Controller, you must configure the
controller before configuring the first array and logical drive. The Option
ROM Configuration for Arrays utility supports only controllers that require a
single-boot device.
Requirements
The Option ROM Configuration for Arrays utility streamlines the controller
software’s complex functions and its interaction with other configuration
utilities. The utility limits operation to the following functions:
■ The software configures only one logical drive that is used as the boot
device. Additional logical drives can be configured with the online
Array Configuration Utility (ACU) or with the ACU version provided
on the SmartStart and Support Software CD.
Chapter 4
Option ROM Configuration
for Arrays Utility
NOTE: Novell NetWare and Windows NT operating systems are supported by the online
Array Configuration Utility. Other operating systems, including IBM OS/2, SCO OpenServer,
Banyan VINES, and others, can be run from the Compaq SmartStart and Support Software
CD. Chapter 6 explains how to run the ACU for various operating systems.
■ The software supports functionality for configuring a single logical
drive, viewing the current logical drive configuration, and deleting the
current logical drive configuration.
Page 36

4-2 Compaq Integrated Smart Array Controller User Guide
The software runs only when six or fewer physical drives (total) are
■
attached to the supported SCSI buses and only one logical drive is
configured.
■ The software is available in an English language version only.
■ The software does not support any input devices, such as the mouse or
trackball.
Initial Start Screen
The Initial Start screen appears when:
■ Not more than one logical drive is configured
■ No more than six physical drives are attached to all of the supported
SCSI buses
The screen text is appended to any current display on the video adapter, and it
will not erase any previous Power-On Self-Test (POST) or boot information.
The message has a 15-second timer when no logical drives are configured, and
it has a 5-second timer when a logical drive is configured. When the timed
message expires, the utility is skipped.
Compaq Integrated Smart Array Controller (ver x.xx)
Press <F10> to run the Option ROM Configuration for Arrays utility
Press <Esc> to skip configuration and continue
Figure 4-1. Initial Start screen
NOTE: The version number displayed in the Initial Start screen you see reflects the actual
version available on your machine.
Page 37

Option ROM Configuration for Arrays Utility 4-3
Create Logical Drive Screen
The Create Logical Drive screen allows you to select the new configuration.
This screen appears when no logical drives are configured. The number of
available physical drives is shown in the menu box.
Option ROM Configuration for Arrays, version x.x
Copyright 1999, COMPAQ Computer Corporation
Integrated Smart Array Controller
Detected Physical Drives
SCSI Port 2: ID 00, COMPAQ AB00911790 4.3GB Drive
SCSI Port 2: ID 01, COMPAQ AB00911790 4.3GB Drive
SCSI Port 2: ID 02, COMPAQ AB00911790 4.3GB Drive
SCSI Port 2: ID 03, COMPAQ AB00411792 4.3GB Drive
Please select the logical drive configuration
[ ] 12.9GB RAID 5 drive, parity, fault tolerant, no online spare
[X] 8.6GB RAID 5 drive, parity, fault tolerant, with online spare
[ ] 8.6GB RAID 1 drive, mirrored, fault tolerant, no online spare
[ ] 4.3GB RAID 1 drive, mirrored, fault tolerant, with online spare
[ ] 17.2GB RAID 0 drive, no fault tolerance
Press the arrow keys to select an item
Press <F10> to accept the selection and continue
Press <Esc> to cancel and return to the previous screen
Figure 4-2. Create Logical Drive screen
IMPORTANT: If the logical drive configuration selection you need is not shown on the
Create Logical Drive screen, you must run the Array Configuration Utility (ACU) for your
operating system as described in Chapter 6.
NOTE: The logical drive configuration choices shown on your Create Logical Drive screen
reflect the actual drives available on your system.
Page 38

4-4 Compaq Integrated Smart Array Controller User Guide
Confirmation Screen
After you select a logical-drive configuration, the Confirmation screen appears
as a pop-up panel on top of the screen.
You have selected a logical drive with a total
data size of 8.6GB and RAID 5 fault tolerance.
An Online Spare has also been selected.
Press <F10> to save the configuration and exit
Press <Esc> to cancel
Figure 4-3. Create logical drive confirmation screen
Pressing F10 saves your logical drive selection for the Integrated Smart Array
Controller and continues with the operating system installation.
Page 39

Option ROM Configuration for Arrays Utility 4-5
View/Delete Logical Drive Screen
The View/Delete Logical Drive screen allows you to delete the logical drive.
This screen appears when only one logical drive is configured.
Option ROM Configuration for Arrays, version x.x
Copyright 1999, COMPAQ Computer Corporation
Compaq Integrated Smart Array Controller
Detected Logical Drive Configuration
8.6GB RAID 5 drive, fault tolerant with online spare
Physical Drives Assigned
SCSI Port 2: ID 00, COMPAQ AB00911790 4.3GB Drive
SCSI Port 2: ID 01, COMPAQ AB00911790 4.3GB Drive
SCSI Port 2: ID 02, COMPAQ AB00911790 4.3GB Drive
Online Spare
SCSI Port 2: ID 03, COMPAQ AB00411792 4.3GB Drive
Press <F3> to delete the logical drive configuration
Press <Esc> to exit
Figure 4-4. View/Delete Logical Drive screen
NOTE: The logical drive configuration shown on your View/Delete Logical Drive screen
reflects the actual drives that are available on your system.
Pressing F3 deletes all settings, exits the Option ROM Configuration for
Arrays utility, and continues the POST and reboot process. To reconfigure the
Integrated Smart Array Controller, start the Option ROM process from the
beginning or initiate the Array Configuration Utility according to the
instructions for your operating system listed in Chapter 6 of this guide.
Page 40

4-6 Compaq Integrated Smart Array Controller User Guide
Confirmation Screen
After you select a logical drive to delete, another confirmation screen appears
as a pop-up panel on top of the screen.
You have selected to delete the configured
logical drive. This will result in complete
data loss for this logical drive.
Press <F3> to delete the logical drive
Press <Esc> to cancel
Figure 4-5. View/Delete Logical Drive confirmation screen
Page 41

Chapter 5
Installing the Operating System Drivers
This chapter outlines the driver installation steps to set up the Integrated Smart
Array Controller in an existing server running the following operating
systems:
■ Novell NetWare 3.2, 4.2, and 5.0
■ Microsoft Windows NT 4.0 and Windows 2000
■ Linux
■ SCO OpenServer 5.0.4 and 5.0.5
■ SCO UnixWare 2.X and 7.X
■ IBMOS/2WarpServerFamily
■ Banyan VINES 7.X and later versions
If you are setting up a new system, use the SmartStart and Support Software
CD supplied with the server to install both the operating system and the
required drivers for the Integrated Smart Array Controller.
If you install the operating system software from the SmartStart and Support
Software CD, all of the software, including device drivers, is automatically
installed and configured for the Integrated Smart Array Controller. Drivers and
configuration information for the Integrated Smart Array Controller are
provided on the SmartStart and Support Software CD. Refer to the
documentation provided with your server for installation instructions.
Page 42

5-2 Compaq Integrated Smart Array Controller User Guide
Before Installing Drivers
Before installing the drivers, you should have:
■ Updated your system firmware by running System ROMPaq
■ Installed the Integrated Smart Array Controller
■ Configured the hardware by running the System Configuration Utility
■ Used an array configuration utility to configure at least one drive array
Materials Needed
If you did not use SmartStart to install your operating system, assemble the
following materials before installing controller drivers:
■ Compaq SmartStart and Support Software CD
■ Blank diskettes
■ Any server or workstation with a bootable CD-ROM drive or any
workstation running Windows 95, 98, or NT with an available
CD-ROM drive
Creating Installation Diskettes
Some operating systems, including IBM OS/2, SCO OpenServer, UnixWare,
Banyan VINES, and others, are not supported by the online Array
Configuration Utility (ACU). These systems require you to create installation
disks before using the configuration utilities stored on the SmartStart and
Support Software CD.
Use the instructions in the following sections to create the installation disks for
your operating system. Although Novell NetWare and Microsoft Windows NT
systems are supported by online ACU, instructions for setting up install disks
are provided below as an option. For additional information about loading
drivers with your operating system, refer to the documentation provided by the
manufacturer.
Page 43

Creating Installation Diskettes for Common Operating Systems
Use the following general procedure to create installation diskettes with
drivers for the following operating systems:
■ Novell NetWare (driver CPQARRAY.HAM, version 2.05 or later)
■ Microsoft Windows NT and Windows 2000
■ Linux
■ SCO OpenServer 5 and UnixWare
■ IBM OS/2
NOTE: If you are using the Banyan VINES operating system, proceed to the next section
to create installation diskettes.
To install the driver, create the diskettes for your operating system. These
diskettes contain the latest drivers and documentation for using Compaq
equipment in your operating system’s environment.
Create the diskettes:
1. Run the SmartStart and Support Software CD in one of the following
ways:
Installing the Operating System Drivers 5-3
G
From a local CD-ROM on a workstation running Windows 95/98
NOTE: If the AutoRun function is enabled, the CD will start automatically. If AutoRun is not
enabled, browse to or type in the name of the program file on your CD-ROM drive.
G
By booting the server from the CD-ROM
2. At the Compaq System Utilities screen, select the option to create
support software.
3. At the Diskette Builder screen, select the option to create support
software diskettes from the CD only.
4. Scroll through the list and select the appropriate operating system.
5. Follow the instructions for creating and labeling the diskettes.
NOTE: For Linux users, specific information pertaining to your distribution will be present
in a README file on the Linux support diskette.
Page 44

5-4 Compaq Integrated Smart Array Controller User Guide
Creating Banyan VINES Peripheral Adapter Support (PAS) Diskettes
The Banyan VINES, version 7.0 or later, driver for the Integrated Smart Array
Controller is located on the Compaq SmartStart and Support Software CD. To
install the driver, create the Compaq installation for Banyan VINES diskettes.
These diskettes contain the latest drivers and documentation for using Compaq
equipment in a Banyan VINES environment.
If you do not have the SmartStart CD, create the installation diskettes by
downloading files from the SoftPaq technical assistance area on the Compaq
website:
http://www.compaq.com
At the website, locate your software in the Support area.
Creating Banyan VINES PAS Diskettes from the
SmartStart and Support Software CD
Create the PAS diskettes from the SmartStart CD:
Create the diskettes:
1. Run the SmartStart and Support Software CD in one of the following
ways.
G
From a local CD-ROM on a workstation running Windows 95/98
NOTE: If the AutoRun function is enabled, the CD will start automatically. If AutoRun is not
enabled, browse to or type in the name of the program file on your CD-ROM drive.
G
By booting the server from the CD-ROM
2. Select Create Support Software from the Compaq System Utilities
screen.
3. Select Create Support Software Diskettes from CD Only from the
Diskette Builder screen.
4. Scroll down the list and select Peripheral Adapter Support Software for
VINES 7.0.
5. Follow the instructions on the screen to create the diskettes.
Page 45

Installing the Operating System Drivers 5-5
Creating Banyan VINES PAS Diskettes
from SoftPaq
If you do not have access to the Compaq SmartStart and Support Software CD,
create Banyan VINES installation diskettes as follows:
1. Obtain two formatted 1.44-MB diskettes.
2. Locate and download the SoftPaq file called SPXXX.EXE to your hard
drive.
3. Run the downloaded file from your hard drive by typing the following:
C:\DIR\SPXXXX.exe
where C:\dir\ is the directory path on your hard drive. Executing this file
places several new files on your machine, including the program file
QRST5.EXE.
4. Run the QRST5.EXE file and follow the on-screen instructions to insert
DOS-formatted diskettes for creating the SSD diskettes.
5. After the SSD diskettes are created, delete any downloaded file from
SoftPaq.
6. Insert the documentation diskette (diskette 2) into the diskette drive and
view the installation instructions in either of two ways:
G
Type the file path and name from the DOS prompt:
A:\README
G
Boot the system with the documentation diskette in the diskette
drive.
NOTE: New SoftPaqs are available on the Compaq website
http://www.compaq.com
Page 46

5-6 Compaq Integrated Smart Array Controller User Guide
Novell NetWare
Use the instructions in this section to install the driver for the new Integrated
Smart Array Controller or to upgrade the driver in an existing Novell NetWare
server. If you did not use SmartStart to install the NetWare operating system
and drivers, create the Novell SSD diskettes as described in the section in this
chapter called “Creating Installation Diskettes for Common Operating
Systems.”
Latest Information
Readme files containing the latest information about using Compaq options in
a NetWare environment, including the driver installation procedure, are
included on the Novell SSD diskettes. Locate the Readme files to familiarize
yourself with this procedure. If the procedure differs from the one described
below, use the procedure on the SSD diskette.
To read the Readme files, you need a server with a DOS partition or a
workstation running a current version of MS-DOS or Microsoft
Windows 95/98/NT:
1. Place the Novell SSD diskette in the floppy drive.
2. From the DOS prompt, type:
A:\README
or
Select Start
A:\README.COM
3. Select the files to read or print. Some files that should be of particular
importance:
G
READ1ST.RDM
G
DRIVERS.RDM
G
STORAGE.RDM
→ Run from Windows, then enter:
Page 47

Installation Procedure
The following steps outline the procedure to install the Integrated Smart Array
Controller driver for Novell NetWare on your server.
1. If the server is not running, start the server from the boot hard drive.
2. Insert the Novell SSD diskette three created from SmartStart into the
diskette drive.
3. Copy CPQARRAY.HAM, CPQARRAY.DDI,andCPQSHD.CDM from
the Novell SSD diskette to C:\NWSERVER.
NOTE: The boot hard drive containing the primary DOS partition is usually the C drive. If
your primary DOS partition is located on a different drive, type the letter for that drive in
place of the letter C in the example above.
4. Edit the STARTUP.NCF file so that the driver is loaded automatically at
system startup.
5. Reboot the server.
6. Refer to your NetWare installation documentation for information about
installing and mounting volumes associated with your new disk
subsystem.
Installing the Operating System Drivers 5-7
Compaq Online Array Configuration Utility for NetWare (CPQONLIN)
The Compaq Online Array Configuration Utility for NetWare,
CPQONLIN.NLM, version 2.30A or later, is an NLM that allows you to
configure your drive arrays without shutting down your NetWare server. The
CPQONLIN.NLM is located on diskette 4 in the \ONLINE directory of the
Novell SSD diskettes you created from the SmartStart CD. Load the NLM and
follow the instructions on the screen to use this online utility to configure your
drive arrays.
The Compaq Online Array Configuration for NetWare utility cannot be used
until after the driver, CPQARRAY.HAM, is installed, either with the latest
version of SmartStart or manually as described in this chapter.
Chapter 6 provides detailed instructions about running the Compaq Online
Array Configuration Utility.
Page 48

5-8 Compaq Integrated Smart Array Controller User Guide
Optimizing Array Controller Performance
To increase the performance of your disk subsystems under Novell NetWare
versions 3.2, 4.2, and 5.0, perform the following steps before installing
NetWare volumes or partitions:
■ If you selected a fault-tolerance option, such as mirroring or distributed
data guarding when using the Compaq System Configuration Utility, do
not select mirroring while using NetWare INSTALL.NLM.The
fault-tolerance capabilities of the Integrated Smart Array Controller
provide performance improvements and automatic data recovery
features.
■ Novell recommends that you create volumes with a 64-kb block size and
that you use the Block Sub-Allocation feature of Novell NetWare. Using
a large block size decreases the amount of RAM required to mount the
volume, while Block Sub-Allocation allows NetWare to allocate disk
space more efficiently.
■ Linear memory configuration provides the best performance in a
Novell NetWare environment. When you use the Compaq
System Configuration Utility to configure your server with NetWare,
the memory options default to linear memory. To verify the setting, run
the Compaq System Configuration Utility and view the Compaq
Memory settings. Make sure that the linear option is selected under the
Base Memory option.
Page 49

Microsoft Windows NT 4.0
This section includes instructions for installing the initial driver for a first-time
Integrated Smart Array Controller installation or for upgrading the driver for
an installed Smart Array Controller in an existing Windows NT server.
If you used SmartStart to install Windows NT and drivers on a new server,
you do not need to make the Support Server Diskette (SSD) utility diskettes
and can continue with the procedure below. Before proceeding, if you did not
use SmartStart to install Windows NT, create the installation diskettes as
described earlier in this chapter in the section called “Creating Installation
Diskettes for Common Operating Systems.”
Materials Needed
To install the Integrated Smart Array Controller Windows NT driver on your
server, you will need:
■ Compaq SmartStart and Support Software CD
■ Access to a server or workstation with a bootable CD-ROM drive or any
system running Windows 95, 98, or NT with an available CD-ROM
drive
Installing the Operating System Drivers 5-9
■ Compaq SSD for Windows NT installation diskettes, if required
■ Your Microsoft operating system CD or media
Additional Information
AfilecalledNTREADME.HLP on the Compaq SSD for Windows NT
diskettes contains the latest information about Windows NT, including the
driver installation procedure. Review this information and, where different
from the instructions shown here, use the instructions provided in
NTREADME.HLP file.
Page 50

5-10 Compaq Integrated Smart Array Controller User Guide
To read the NTREADME.HLP file, you need a server running Microsoft
Windows NT or a workstation running Windows. Perform the following steps:
1. Insert the Compaq SSD for Windows NT diskettes, beginning with
diskette 1, into the diskette drive.
2. At a command prompt, make A: the current drive and type:
README.BAT
or
From the File pull-down menu in Windows Program Manager, select
Run and type:
A:\README.BAT
3. Select help topics to read or print. Important help topics include:
G
Compaq SSD for Windows NT installation methods
G
Using the Compaq SSD for Windows NT Setup program
G
Windows NT device driver specifics
G
Compaq SCSI controller support
G
Compaq drive array support
G
Installing the Compaq drive array driver during Windows NT
installation
G
Installing the Compaq drive array driver after Windows NT
installation
G
Updating the Compaq drive array driver
G
Removing the Compaq drive array driver
General Installation Procedures
Sources for installing device drivers on a Windows NT server include:
■ Compaq SSD for Windows NT Setup program installation
■ Standard Windows NT device driver installation during initial
installation of the Windows NT operating system
If you are installing the driver after installing Windows NT, use the Compaq
SSD for Windows NT installation method. If you install the driver during the
initial Windows NT installation, you must use the standard Windows NT
device driver installation method. Both methods are outlined in this chapter.
Page 51

Installing the Operating System Drivers 5-11
Installing the Integrated Smart Array Controller Driver During Windows Installation
This section describes how to install the Smart Array driver during the initial
installation of the Windows NT 4.0 operating system. The driver can be
installed from files on the Compaq SSD for Windows NT diskettes.
Instructions for creating these diskettes are provided earlier in this chapter in
“Creating Installation Diskettes for Common Operating Systems.” For
instructions on installing the driver after Windows NT has been installed, see
the section titled “Installing the Integrated Smart Array Controller Driver After
Windows Installation” later in this chapter.
Initial Windows NT 4.0 Installation
1. Begin the Windows NT 4.0 installation process.
2. Setup automatically detects mass storage devices. When prompted to
specify additional mass storage devices, press S.
3. From the displayed list, highlight “Other (Requires disk provided by
manufacturer)” and press Enter.
4. As prompted, insert the Compaq SSD for Windows NT 4.0 diskette 1
and press Enter.
5. Select Compaq Integrated Smart Array Controller for Windows NT 4.0
from the list of displayed controllers and press Enter.
6. Press Enter and continue installation of windows NT 4.0.
7. Reinsert the Compaq SSD for Windows NT 4.0 diskette when
prompted. Setup copies the drivers to the system.
Updating the Integrated Smart Array Controller
Driver
Updating the Integrated Smart Array Controller driver is usually a two-step
process in which you remove the driver and then re-add the driver. When you
update with the new Compaq SSD for Windows NT setup program, you can
skip the remove-and-add steps and proceed as follows:
1. Start Windows NT and log in to an account with administrative
privileges.
2. Insert Compaq SSD diskette 1 into the diskette drive.
3. Start the Setup utility by typing the file name in the Start, Run area:
A:\SETUP
Page 52

5-12 Compaq Integrated Smart Array Controller User Guide
NOTE: For the command line, the letter A denotes the diskette drive. The letter for the
diskette drive on your server may be different.
4. Select Custom Setup.
5. Select the Integrated Smart Array Controller as your device.
6. Click Update.
7. The setup program updates the driver on your system from the Compaq
SSD diskettes.
8. Select Close to exit the setup program or select other components to
install, update, or remove drivers.
9. Remove the Compaq SSD diskette.
10. Shut down Windows NT and restart the system to load the driver.
Installing the Integrated Smart Array Controller Driver After Windows Installation
Device drivers are located on the Compaq SSD for Windows NT diskettes and
are installed from the Windows Setup utility. Setup identifies hardware
components that are physically installed on the system and recommends
device drivers that you should install or update.
Existing Windows NT 4.0 Installation
Install the Integrated Smart Array Controller through the Windows Setup
utility:
1. Start Windows NT on the system and logon to an account with
administrative privileges.
2. Insert the Compaq SSD for Windows NT diskette 1 into the diskette
drive.
3. From the Program Manager, select File, then Run.
4. Type in the file name:
A:\SETUP
NOTE: For the command line, A: denotes letter for a diskette drive. The letter for the
diskette drive on your server may be different.
5. Select Custom.
Page 53

Installing the Operating System Drivers 5-13
6. Select the Compaq Integrated Smart Array Controller component. If you
have previously installed this driver on your system, Setup prompts you
to update the driver.
a. Select Install.
b. Insert the SSD diskettes as needed.
c. When the driver is updated, exit and return to the Setup menu.
7. Install other components through Setup, or select Close to exit.
8. Restart the system with the diskette in the diskette drive to load the
newly installed or updated driver.
Removing the Integrated Smart Array Controller Driver
Compaq drivers can be removed only with utilities available in the Windows
Control Panel.
IMPORTANT: Do not remove the driver if the system is booting from a device attached to
the Integrated Smart Array Controller. You will get a dialog box stating that the selected
controller is marked as a boot device. Removing the driver in this case may cause the
system to fail at start.
1. Start Windows NT and log in to an account with administrative
privileges.
2. From the Control Panel, launch the SCSI Adapter Utility.
3. Select the Drivers tab.
4. Select Compaq Integrated Smart Array Controller and click Remove.
5. After the driver is removed, select OK. You must restart the server for
the removal to take effect.
Page 54

5-14 Compaq Integrated Smart Array Controller User Guide
Microsoft Windows 2000
This section provides instructions for retrieving the latest files and information
necessary to install the initial driver for a new Integrated Smart Array
Controller or to upgrade the driver in an existing Microsoft Windows 2000
environment with an installed integrated array controller. Consult your
software user documentation for additional Windows 2000 installation
guidelines.
Locating the Driver and Installation Information
When you use SmartStart to install Windows 2000 and device drivers on a
new server, you do not need to create the Compaq SSD for Windows 2000
installation diskettes and can continue with the procedure below. If you did not
use SmartStart to install Windows 2000, use the procedure described in
“Creating Installation Diskettes for Common Operating Systems” to create the
installation diskettes before proceeding.
Installing the Driver
When prompted, use the Compaq SSD for Windows NT installation diskettes
to install the controller driver for Windows 2000:
1. Begin the Windows 2000 installation process as described in the
operating system documentation.
2. Press F6 to load media devices and drivers.
3. Press S when prompted to specify additional mass storage devices.
4. Insert the Compaq SSD for Windows 2000 diskette 1 into the floppy
drive and press Enter.
5. Select Compaq Integrated Smart Array Controller for Windows 2000
from the list of displayed controllers and press Enter.
6. Press Enter to continue installing Windows 2000.
7. Insert additional Windows NT installation diskettes as needed to
complete device setup.
8. When setup for media devices is complete, press Enter to continue
installing Windows 2000.
Page 55

Installing the Operating System Drivers 5-15
Linux
Consult your software user documentation for additional Linux installation
guidelines.
Locating the Driver and Installation Information
This section provides instructions for retrieving the latest files and information
to do the following:
■ Install the initial driver for a new Integrated Smart Array Controller
■ Upgrade the driver in an existing Linux environment with a newly
installed Integrated Smart Array Controller
SmartStart
The latest drivers, support files, and driver installation instructions for Linux
are located on the Compaq SmartStart and Support Software CD supplied with
your server or options kit. To install these files, create a set of Compaq Linux
Support diskettes from the Compaq SmartStart and Support Software CD.
Refer to the section “Creating Installation Diskettes for Common Operating
Systems” earlier in this chapter for additional information.
The Internet
The latest drivers, sources, support files, and driver installation instructions for
Linux are also located on Compaq’s FTP server. Linux support diskettes for
several distributions are also available on the FTP server
ftp://ftp.compaq.com/pub/linux
The Linux Smart Array driver is also present in Linux kernels 2.2.11 and
newer, available on the Internet
http://www.kernel.org
Page 56

5-16 Compaq Integrated Smart Array Controller User Guide
Installing the Driver
Driver installation procedures vary between Linux distributions. For specific
instructions about your distribution, read the README file on the support
diskette.
Locating Additional Information
Additional information about installing, using, and tuning Linux on Compaq
products can be found on Compaq’s ActiveAnswers website:
http://www.compaq.com/activeanswers
Page 57

Installing the Operating System Drivers 5-17
SCO OpenServer 5
This section does not contain the information for setting up the Integrated
Smart Array Controller in a server running SCO OpenServer 5, but it outlines
the procedure to get the required information. If your system has an older SCO
operating system or if you are setting up a new system with
SCO OpenServer 5, you are encouraged to use SmartStart to upgrade your
operating system. SmartStart is supplied with the server or may be obtained
from your local Compaq authorized reseller or Compaq authorized service
provider.
Consult your software user documentation for additional OpenServer
installation guidelines.
Locating the Driver and Installation Information
This section provides instructions for retrieving the latest files and information
necessary to install the initial driver for a new Integrated Smart Array
Controller or to upgrade the driver in an existing SCO OpenServer 5
environment with an installed integrated array controller. If you use SmartStart
to install the SCO OpenServer 5 operating system and drivers on a new server,
or to upgrade an existing server, you do not need to create the Extended
Feature Supplement (EFS) diskettes.
The latest drivers and support files for SCO OpenServer 5, as well as
information about installing the driver, are located on the Compaq SmartStart
and Support Software CD supplied with your server or options kit. To install
these files, create a set of Compaq EFS for OpenServer 5 installation diskettes
from the Compaq SmartStart and Support Software CD. Refer to the section
“Creating Installation Diskettes for Common Operating Systems” earlier in
this chapter for additional information.
Installing the Driver
Driver installation procedures for Compaq SCO OpenServer 5 and
SCO OpenServer 5 (non-Compaq) are different. Choose the appropriate
procedure for your operating system.
Page 58

5-18 Compaq Integrated Smart Array Controller User Guide
Compaq SCO OpenServer 5
To access the driver installation information for systems running Compaq
SCO OpenServer 5:
1. Place the diskette labeled SCO Installation Notes for Compaq Servers
into the diskette drive of a server or workstation capable of reading a
DOS text file.
2. Use a text editor or other DOS utility to read the INSTALL.TXT file on
the diskette.
3. Follow the instructions in this file to install the Integrated Smart Array
Controller driver in a server running in an existing Compaq
SCO OpenServer 5 environment.
4. Proceedtothelastsectioninthischapter,“Updating the Compaq
Insight Management Agents.”
SCO OpenServer 5 (Non-Compaq)
To access the driver installation information for systems running
SCO OpenServer 5 (non-Compaq):
1. Place the diskette labeled Documentation Diskette into the diskette drive
of a server or workstation capable of reading a DOS text file.
2. Shut down and restart the system.
3. Locate the file named INSTALL.TXT, and press Enter to view the file,
or press F7 to print the file.
NOTE: To print the file, the server you are configuring must be connected to a printer.
4. Follow the instructions in the file to install the Integrated Smart Array
Controller driver in a server running non-Compaq version of
SCO OpenServer 5.
5. Proceedtothelastsectioninthischapter,“Updating the Compaq
Insight Management Agents.”
Page 59

Installing the Operating System Drivers 5-19
SCO UnixWare 2.1 or Later
Locating the Driver and Installation Information
This section provides instructions for retrieving the latest files and information
necessary to install the initial driver for a new Integrated Smart Array
Controller or to upgrade the driver in an existing SCO UnixWare environment
with an installed integrated array controller. If you use SmartStart to install the
SCO UnixWare operating system and drivers on a new server, or to upgrade
an existing server, you do not need to create the Extended Feature Supplement
(EFS) diskettes. Consult your software user documentation for additional
UnixWare installation guidelines.
The latest drivers and support files for SCO UnixWare as well as information
about installing the driver are located on the Compaq SmartStart and Support
Software CD supplied with your server or option kit. To install these files,
create a set of Compaq EFS for SCO UnixWare diskettes from the Compaq
SmartStart and Support Software CD. Refer to the section “Creating
Installation Diskettes for Common Operating Systems” for additional
information.
Installing the Driver
Install the Integrated Smart Array Controller driver:
1. Place the diskette labeled Documentation Diskette into the diskette drive
of a server or workstation.
2. Reboot the system.
3. Select the file named README.HBA to view or print.
NOTE: To print the file, the server you are configuring must be connected to a printer.
4. Follow the instructions in this file to install the Integrated Smart Array
Controller driver in server running the SCO UnixWare operating
system, version 2.1 or later.
5. Proceedtothelastsectioninthischapter,“Updating the Compaq
Insight Management Agents.”
Page 60

5-20 Compaq Integrated Smart Array Controller User Guide
IBM OS/2
Locating the Driver and Installation Information
This section provides instructions for retrieving the latest files and information
necessary to install the initial driver for a new Integrated Smart Array
Controller or to upgrade the driver in an existing IBM OS/2 environment with
an installed integrated array controller. If you use SmartStart to install the
OS/2 operating system and drivers on a new server, or to upgrade an existing
server, you do not need to create the Compaq SSD for IBM OS/2 installation
diskettes. Consult your software user documentation for additional OS/2
installation guidelines.
Text, or Readme, files containing the latest Compaq information for the
IBM OS/2 operating systems, including driver installation procedures, are
provided on the Compaq SSD for IBM OS/2 diskette. Locate and read these
procedures. If the installation procedures differ from the instructions below,
use the procedures on the SSD diskette.
View or print the Readme files:
1. When prompted, insert Compaq SSD for IBM OS/2 installation
diskettes into the diskette drive.
2. From the OS/2 prompt, type:
A:\VIEWME
3. Use the HTML links to navigate the documentation or press F7 to print.
NOTE: To print the file, the server you are configuring must be connected to a printer.
Page 61

Installing the Driver
Install the driver file to the OS/2 directory on your boot drive:
1. Place the Compaq SSD for IBM OS/2 installation diskette labeled
System and Storage Drivers into the diskette drive.
2. From the OS/2 command prompt, type:
A: Ddinstal
3. Click Change to change the source directory to A:/ADD.
4. Select Compaq Array Driver for OS/2 from the list of drivers.
5. Click OK to continue.
The CPQARRAY.ADD driver file is copied to the x:\os2 directory
(where x is the boot drive) and the CONFIG.SYS file is updated to load
the driver first at startup. In other words, the drive on this controller is
the boot drive.
IMPORTANT: To boot from a drive attached to the integrated SCSI controller, or other
drive, change the CONFIG.SYS file before you reboot the server. Edit the CONFIG.SYS file
to reorder the BASEDEV=CPQARRAY.ADD statement so that it appears after the BASEDEV
statement corresponding to the boot driver.
Installing the Operating System Drivers 5-21
6. Save the updated CONFIG.SYS file and exit the editor.
7. Perform a normal system shutdown and restart the server to load the
new driver.
8. Proceedtothelastsectioninthischapter,“Updating the Compaq
Insight Management Agents.”
Page 62

5-22 Compaq Integrated Smart Array Controller User Guide
Controller Ordering
Two factors determine controller ordering in a system operating in an
IBM OS/2 environment:
■ The order of ADD drivers specified in the CONFIG.SYS file determines
the order of types of controllers relative to other types of controllers.
A single ADD driver groups all of the controllers in its array together.
Among a group of ADD drivers, the first ADD driver to appear in the
CONFIG.SYS file has its controllers ordered first, the second ADD
driver has its controllers ordered after the first driver controller, and so
on.
Only the order shown in CONFIG.SYS affects the order. The slot in
which the controller is installed does not affect the loading order.
■ Each ADD driver developed by Compaq orders its controllers in
ascending order based on the controller order assigned by the Compaq
System Configuration Utility.
Use the following rules to ensure proper controller functioning and ordered
interaction with other storage controllers in the system.
NOTE: The Compaq System Configuration Utility does not automatically enforce the
recommended array configuration rules. Follow these rules carefully when you manually
configure the system.
■ Compaq array controllers should be stored in consecutive order as a
group.
■ When you boot from the Compaq Integrated Smart Array Controller, the
statement BASEDEV = CPQARRAY.ADD must be present in
CONFIG.SYS.
Page 63

Partitioning
Observe the following limitations for IBM OS/2 on any computer system:
■ The maximum allowed partition size on FAT is 2 GB (2048 MB).
■ It is recommended that you do not exceed 8 GB for an HPFS boot
partition. If you exceed this size, the disk may run out of working room
for the OS/2 system files and prevent the ROM from loading system
files on start up.
■ This driver has been tested with HPFS partition sizes of up to 40 GB.
Do not create partitions exceeding 40 GB on any of the RAID volumes
in an OS/2 environment.
The IBM OS/2 operating system may allow the creation of partitions beyond
these specified boundaries, but you should adhere to the functional limits
outlined above to ensure proper functionality.
Booting OS/2 from a Integrated Smart Array Controller Drive
This section describes additional information for starting OS/2 from a Compaq
Integrated Smart Array Controller.
Installing the Operating System Drivers 5-23
The CPQARRAY.ADD driver must always be present when booting from the
Integrated Smart Array Controller. If the controller is the primary disk
controller, edit the CONFIG.SYS file to ensure that the first BASEDEV entry
present is:
BASEDEV=CPQARRAY.ADD
This ordering guarantees that the CPQARRAY.ADD driver is the first ADD
driver loaded and that the operating system assigns the first hard drive on the
Integrated Smart Array Controller as the boot drive. For example:
BASEDEV=CPQARRAY.ADD
BASEDEV=CPQ53CX.ADD
If OS/2 boots from another controller, order the other controller first:
BASEDEV=AMSI02.ADD
BASEDEV=CPQARRAY.ADD
Page 64

5-24 Compaq Integrated Smart Array Controller User Guide
Command Line Switches
There are several command line switches available for modifying the standard
behavior of the Compaq ADD driver. The syntax for command line switches
is:
■ /V
The Verbose Mode command line switch is a standard command line
switch that instructs the driver to print information to the screen as it
loads. The screen displays the current driver name and version number
along with information about associated adapters and drives. Adapter
information includes IRQ assignment, slot number, and configuration
order number. Drive information includes physical drive count, logical
drive count, and geometry information for each logical drive.
Verbose Mode command line may be written as:
BASEDEV=CPQARRAY.ADD /V
■ /A:[adapter index] [unit parameters]
This is a standard command line switch that instructs the driver to
modify its behavior toward adapters.
G
The [adapter index] is the number that identifies a controller. The
index is based on ‘0’ for the lowest controller order number
associated with the adapter controlled by this ADD. The index
number is incremented by one for each controller in the system as
you move up the controller configuration order.
The table below shows a system with three adapters controlled by
the CPQARRAY.ADD. The lowest configured adapter is the
secondary controller.
Table 5-1
Controller Order and Adapter Index
Controller Order Adapter Index
20
31
52
G
[unit parameters] This ADD only supports the /I parameter
containing the command to ignore a controller.
Page 65

Installing the Operating System Drivers 5-25
/I Ignore
■
The Ignore command line instructs the controller to ignore the specified
adapter, bypass controlling the adapter with the specified drive, or
prevent the ADD driver from recognizing the specified adapter. Use this
command to allow another driver to control the specified adapter.
CAUTION: Do not use this command line to ignore the primary, or boot,
controller. If the boot controller is ignored, your server will not start.
Ignore command line example:
The following statement prevents the ADD driver from claiming
adapter 2:
BASEDEV=CPQARRAY.ADD /A:2 /I
This example applies when you are running NetWare on your OS/2 2.x
system and you want a NetWare NLM to control adapter 2 instead of
configuring the ADD driver to control adapter 2.
Page 66

5-26 Compaq Integrated Smart Array Controller User Guide
Banyan VINES 7.0 or Later
Installing the Driver
Use the instructions in this section to install the initial driver for a new
Integrated Smart Array Controller installation or to upgrade the driver in an
existing Banyan VINES 7.0 or later version server with an installed Integrated
Smart Array Controller. Consult your software user documentation for
additional Banyan VINES installation guidelines.
Additional Information
The last Peripheral Adapter Support Software diskette for installing the
controller driver is created from the SmartStart CD or from SoftPaq and is a
bootable DOS documentation diskette. The README.SSD file on this diskette
contains a short description of the drivers and includes a procedure for
installing the Integrated Smart Array Controller driver. If you need to create
installation diskettes, refer to the section called, “Creating Banyan VINES
Peripheral Adapter Support (PAS) Diskettes.”
Installation Procedures
To install the Integrated Smart Array Controller driver for Banyan VINES
version 7.0 or later, follow the installation procedures specified in the
README.SSD file.
When installation of the Integrated Smart Array Controller and driver is
complete, restart the server to load the driver. Refer to “Updating the Compaq
Insight Management Agents” for additional information.
Page 67

Installing the Operating System Drivers 5-27
Updating the Compaq Insight Manager Agents
If you are using Compaq Insight Manager, update the Insight Agents to
support the new Integrated Smart Array Controller. If you used SmartStart 4.4
or later to install the operating system on a new Integrated Smart Array
Controller installation or to upgrade your driver for an existing installation, the
agents were updated for you automatically by SmartStart and do not have to be
manually updated.
The correct agents can be obtained from your local Compaq authorized
reseller or Compaq authorized service provider. Refer to the documentation
included with Compaq Insight Manager for the correct procedure for updating
agents.
Installation of the Compaq Integrated Smart Array Controller is now complete.
Reboot the server to begin using the array controller.
Page 68

Page 69

Chapter 6
Compaq Array Configuration Utility
This section provides instructions for using the Compaq Array Configuration
Utility (ACU) and describes methods or wizards you can use to configure your
controller quickly and easily. This section is divided into seven subsections,
listed below. Read the first five subsections and use the last two as reference
material when needed.
■ Before You Begin
■ Running the Compaq Array Configuration Utility
■ Configuration Wizards
■ Online Help
■ Array Configuration Utility Screens
■ Configuration Procedures
■ Errors and Warnings
The Array Configuration Utility, located on the SmartStart and Support
Software CD, is a graphics-based application that helps you configure the
Compaq Integrated Smart Array Controller. You can use the Array
Configuration Utility to configure or reconfigure the Integrated Smart Array
Controller.
Page 70

6-2 Compaq Integrated Smart Array Controller User Guide
The Array Configuration Utility provides the following configuration benefits:
■ Easy-to-understand graphical format for controller configuration
■ Descriptions of various configuration errors
■ Configuration wizards that walk you through the configuration process
■ Prompts for optimal configuration and fault-tolerance profiles for
unconfigured controllers
Before You Begin
Complete the following tasks during a first-time installation and configuration
of the Integrated Smart Array Controller:
■ Install the Integrated Smart Array Controller board.
■ Update the system ROM with System ROMPaq, if needed. See
Chapter 3, “Updating Firmware,” for additional information.
■ Run Option ROMPaq to update the controller firmware, option ROM,
and drive firmware, if needed.
■ Run the System Configuration Utility to verify the controller order
settings.
■ Decide which fault-tolerance method and array configuration you want
to use.
Running the Compaq Array Configuration Utility
The Array Configuration Utility can be run either online or from the
SmartStart and Support Software CD provided with your server.
SmartStart and Support Software CD
Run the Array Configuration Utility directly from the SmartStart and Support
Software CD on any CD-bootable server:
1. Insert the SmartStart and Support Software CD into the CD-ROM drive
and power up the server.
2. From the display screen, select the Array Configuration Utility.
Page 71

3. Follow the onscreen instructions to configure the Integrated Smart Array
Controller.
4. After completing configuration, remove the CD from the CD-ROM
drive and restart the server.
ACU Online
If the server you are configuring is running Microsoft Windows NT or Novell
NetWare, you can install and run the Array Configuration Utility online. For
other operating systems, use the Array Configuration Utility provided on the
SmartStart and Support Software CD or follow the instructions for your
operating system specified in this chapter.
Microsoft Windows NT
When you run the Compaq SSD for Windows NT Diskette, you are prompted
to insert the Array Configuration Utility diskettes to install the utility. Select
the program icon to run the Array Configuration Utility. The Windows NT
online Array Configuration Utility requires that at least one logical drive be
previously configured offline.
Compaq Array Configuration Utility 6-3
Novell NetWare
The Compaq Array Configuration Utility for Novell NetWare
(CPQONLIN.NLM) is available on the Support Software for Novell Products
(NSSD) diskettes in the \ONLINE directory. Generate the NSSD diskettes
using the Diskette Builder feature in SmartStart. The NSSD diskettes have an
ARRAY.RDM Readme file to access instructions on loading and using
CPQONLIN.NLM.
Page 72

6-4 Compaq Integrated Smart Array Controller User Guide
Configuration Wizards
When you start the Array Configuration Utility, the software checks the
configuration of the Integrated Smart Array Controller board and its drive
arrays.
If the arrays are unconfigured or if the configuration is less than optimal, the
configuration wizard takes over to guide you through the configuration
process. The configuration wizard recognizes the following conditions:
■ Unconfigured controller
When the Array Configuration Utility detects an unconfigured
controller, the configuration wizard steps you through the controller
configuration process.
■ Unused physical drives
When the Array Configuration Utility detects unused physical drives,
the configuration wizard provides an easy way to create a new array.
The capacity expansion capability of the Integrated Smart Array
Controller allows the ACU to add new physical drives to an existing
array without destroying data on the existing logical drives.
■ Unused space on an array
Online Help
Press F1 or select the Help button to activate context-sensitive help for each
screen. A status bar at the bottom of the screen also provides immediate help
messages describing the current selection.
If the Array Configuration Utility detects unused capacity in an array,
the configuration wizard steps you through the process of configuring
the space into one or more logical drives.
Page 73

Array Configuration Utility Screens
This section discusses the various screens and options you can use to navigate
the Compaq Array Configuration Utility.
Main Configuration Screen
The main configuration screen is the first screen displayed after the
configuration wizards have been completed. As you select certain items, some
areas are highlighted while others appear gray. You cannot select grayed-out
areas until you select an item in the list frame that provides that option.
Compaq Array Configuration Utility 6-5
Figure 6-1. Main configuration screen
Elements of the main configuration screen include:
■ Menu bar
■ Controller Selection frame
■ Logical/Physical Configuration View frame
■ More Information bar
■ Drive View buttons
■ Controller buttons
Page 74

6-6 Compaq Integrated Smart Array Controller User Guide
Array buttons
■
■ Logical Drive button
Menu Bar
The menu bar contains the following pull-down menus:
■ Controller
G
Select a controller
G
Save a configuration
G
Create an array
G
Exit the program
■ Array
G
Delete the capacity of an array
G
Change the capacity of an array
G
Create logical drives
■ Drive
G
Delete logical drives
G
Modify logical drives
G
Extend logical drives
G
Migrate RAID/Stripe Size of a logical drive
G
View drive information
■ View
G
Physical Drive View
G
Logical Drive View
■ Help
G
Help contents
G
Search
G
Other online help
Page 75
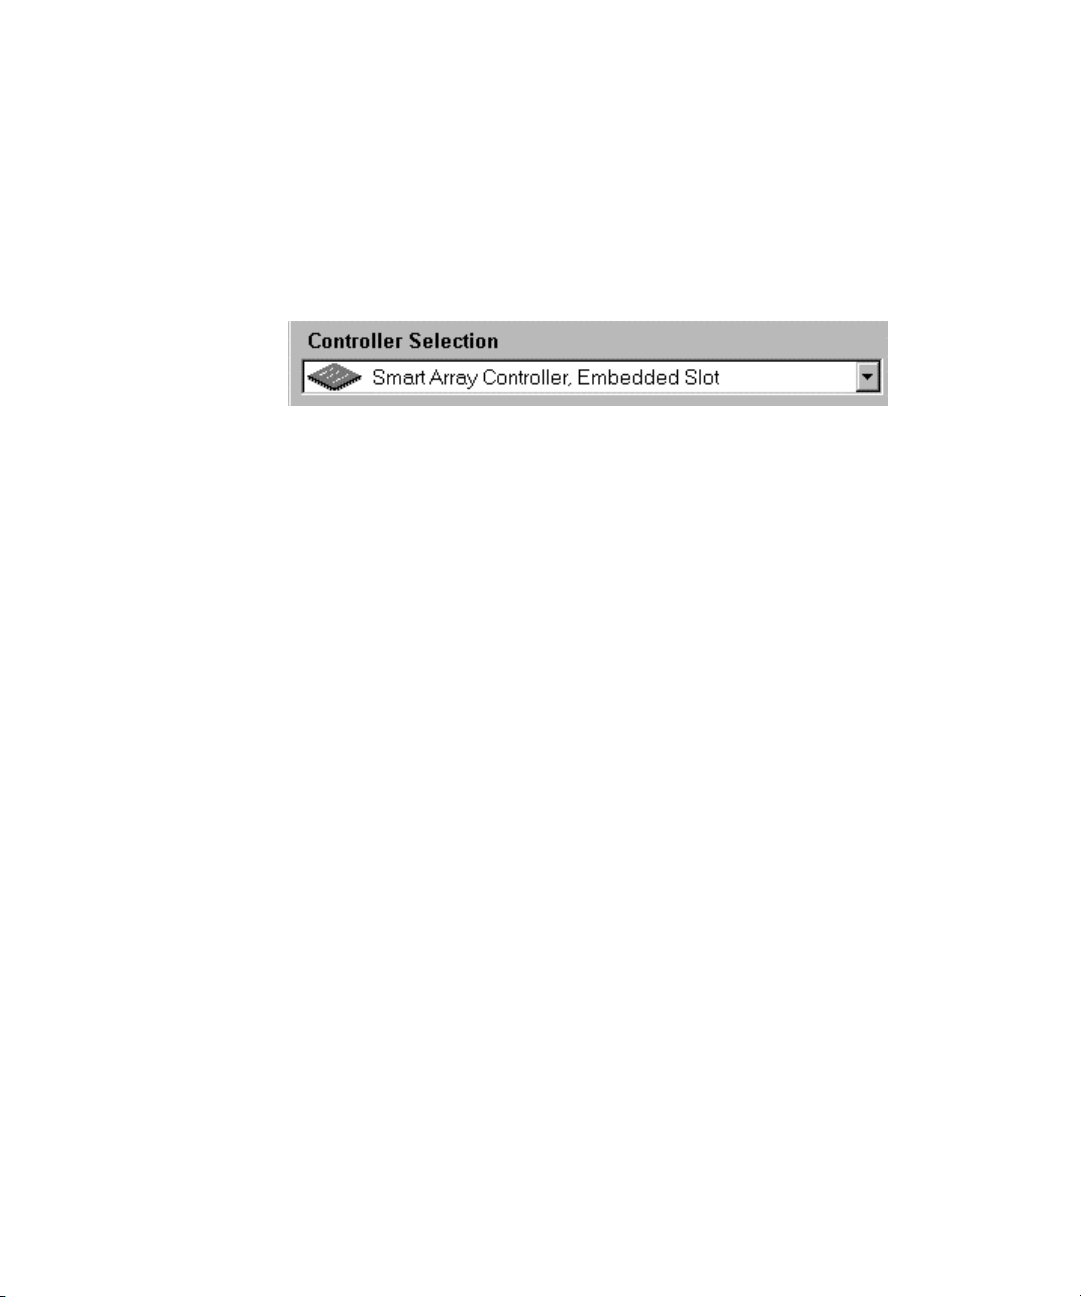
Compaq Array Configuration Utility 6-7
Controller Selection Frame
The Controller Selection frame is located in the upper left corner of the Main
Configuration screen. A drop-down menu lists all the controllers that are
installed in the present system and available to view or configure. Highlighting
the controller you want to view or configure activates the option buttons on the
right side of the screen.
Figure 6-2. Controller Selection frame
Logical/Physical Configuration View Screen
The Logical/Physical Configuration View provides a graphical representation
of all the drives and arrays associated with the selected controller. Located
next to each controller icon is the name of the controller and the slot in which
it is installed.
For each controller, the drive arrays, logical drives, and physical drives
associated with that controller are listed. Use the Drive View buttons, located
below the Logical/Physical Configuration View frame, to select either the
logical or physical viewing option.
The figure below shows an example of the Physical Drive View screen for an
Integrated Smart Array Controller in the Array Configuration Utility. This
controller has two drive arrays; Array A contains one 9.1-GB hard drive, and
Array B contains one 4.3-GB hard drive. The port allocations and ID numbers
for each physical drive are also shown in this view option.
Page 76

6-8 Compaq Integrated Smart Array Controller User Guide
Figure 6-3. Physical Configuration View screen
More Information Bar
The More Information bar is located at the lower right side of the screen.
Select this option to display a list of the controller, drive, and array
configuration details available for the selected items.
Drive View Buttons
This area, shown below, is located at the lower left side of the screen. The
Drive View frame lets you switch between logical and physical drive views.
Select the representation you would like to see in the Configuration view
frame.
Figure 6-4. Drive View buttons
Controller Buttons
The Controller frame in the upper right corner of the screen becomes active
when you select a controller in the Controller Selection frame.
Page 77

Compaq Array Configuration Utility 6-9
Figure 6-5. Controller buttons
Select the Settings button to display the Controller Settings screen. Select the
Create Array button to display the Create Array screen. Detailed information
about the two controller option screens is provided later in this chapter.
Array Buttons
The Array frame is located on the right side of the screen, under the Controller
frame. It becomes active after you select an array in the Physical
Configuration View frame. Array buttons allow you to modify, expand, or
create a logical drive by reconfiguring existing drive space.
Figure 6-6. Array buttons
Logical Drive Button
This frame is located on the right side under the Array frame. It becomes
active when you select a logical drive in the Logical Configuration View
frame. The Logical Drive button allows you to modify a selected logical drive
without rewriting the array configuration.
Figure 6-7. Logical Drive button
Page 78
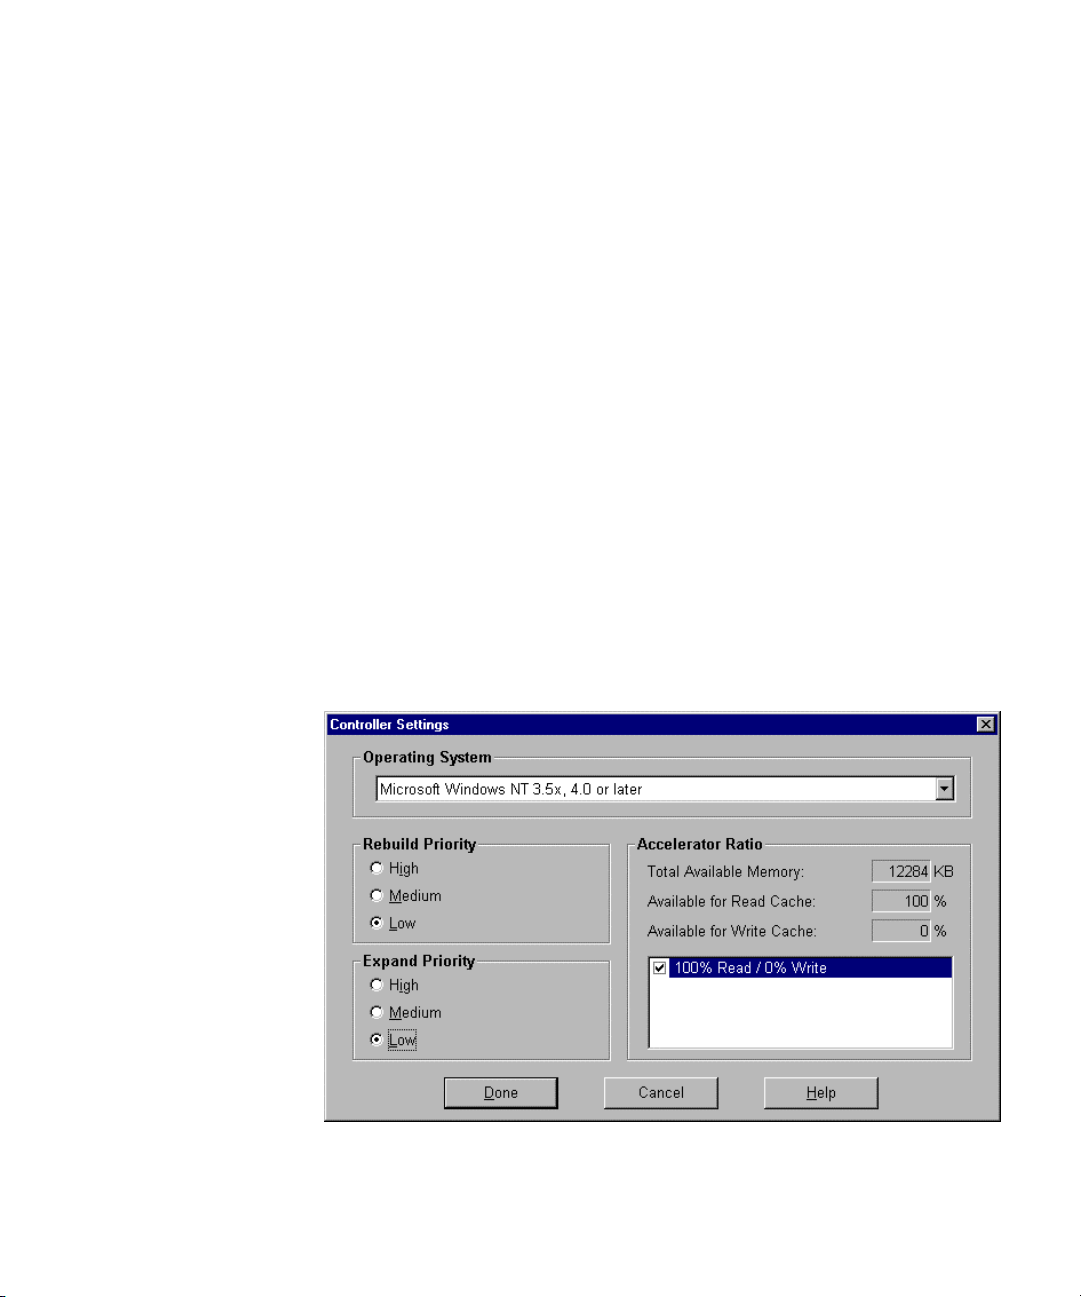
6-10 Compaq Integrated Smart Array Controller User Guide
Controller Settings Screen
The Controller Settings screen contains three configuration elements:
■ Operating System
■ Rebuild Priority
■ Accelerator Ratio
If you have installed and configured your operating system with SmartStart or
manufacturer software, the current operating system is shown in the Operating
System frame. Use the pull-down menu to load a different operating system.
Select your rebuild priority with the High, Medium, and Low buttons.
Rebuild Priority selections have no impact on an idle system but will affect
performance on a busy system.
The Rebuild Priority affects the amount of time the controller spends
rebuilding data after a failed drive has been replaced. Select High if rebuilding
data should take precedence over handling requests from the operating system.
Select Low if the controller should rebuild data only when it is idle.
The Accelerator Ratio frame displays the amount of read-and-write cache
available on the controller. The Integrated Smart Array Controller contains
read cache space only. The ratio shown will always be 100% read to 0% write.
Figure 6-8. Controller Settings screen
Page 79
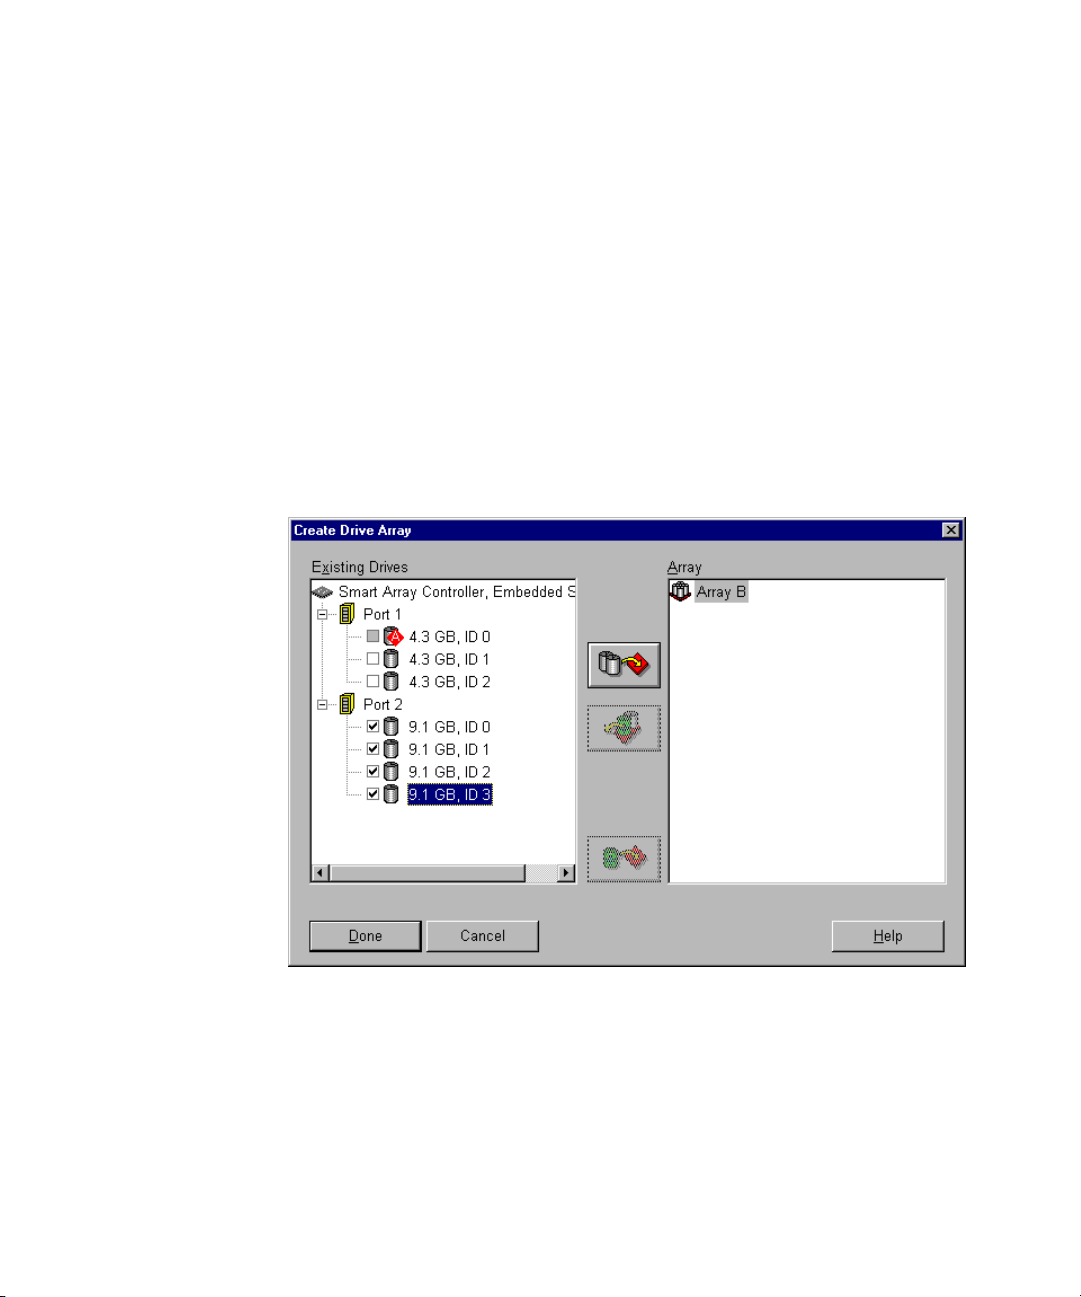
Compaq Array Configuration Utility 6-11
Create Drive Array Screen
In the Create Drive Array screen, all available drives attached to the selected
controller are listed in the left window and drives assigned to the current array
appear in the right window. A port number and SCSI ID identify each drive.
To create an array, select the logical drives from the drive frame to use in the
array and move them into the array frame by selecting the Assign Drive to
Array button in the center of the screen. You can also select a drive and drag it
to the array window. To assign a spare, select the drive to be the spare and
then select the Assign Spare to Array button at the bottom of the screen.
Always group physical drives of the same size together. If you mix drive sizes,
the Integrated Smart Array Controller treats all the drives as the same size as
the smallest drive in the array, which results in wasted capacity in the larger
drives.
Figure 6-9. Create Drive Array screen
Page 80

6-12 Compaq Integrated Smart Array Controller User Guide
Create Logical Drive Screen
From the Create Logical Drive screen, you can select the fault-tolerance
method, enable or disable the array accelerator, set the logical drive size, and
set the stripe size.
The Integrated Smart Array Controller supports four fault-tolerance levels:
■ RAID 5
■ RAID 1
■ RAID 0+1
■ RAID 0
The Fault Tolerance frame allows you to select the appropriate RAID level.
Figure 6-10. Create Logical Drive screen
The Logical Drive Size area shows a scale marked with the amount of drive
capacity available for the logical drive selected from the main configuration
screen. The utility does not allow you to create a logical drive larger than the
maximum supported by the operating system.
Page 81

Compaq Array Configuration Utility 6-13
The purple (left) band on the scale indicates the fraction of the total that is
available for data. The striped red (right) band indicates the fraction required
for storing the parity or mirrored information depending on the fault-tolerance
method used. The red (right) band is only needed for RAID 1, RAID 0+1, or
RAID 5.
This area displays the maximum-sized logical drive that can be created for
your drive array. You can reduce this amount if you want to create more than
one logical drive on the array. To reduce the size, type the number in or drag
the pointer to the left. Fine-tune the size with the arrow buttons to the left of
the scale.
Array Accelerator Frame
The Integrated Smart Array Controller offers an 8-MB read cache option. The
Array Accelerator frame allows you to disable this function.
Figure 6-11. Array Accelerator frame
Stripe Size
Stripe size refers to the amount of data stored on each physical drive in one
stripe of a logical drive. Each RAID level has a default value plus a range of
supported sizes. The default values shown in the following table provide
optimum performance for that RAID level in many applications. However,
your application may benefit from setting the stripe size to a different value.
To select a stripe size other than the default, select the down arrow next to the
current stripe size and select from the sizes available.
Page 82

6-14 Compaq Integrated Smart Array Controller User Guide
Stripe Size Fault Tolerance
Fault-Tolerance Level Default (KB) Valid Stripe Sizes (KB)
Raid 0 128 8, 16, 32, 64, 128, 256
RAID 1/RAID 0+1 128 8, 16, 32, 64, 128, 256
RAID 5 16 8, 16, 32, 64*
* RAID 5 does not support stripe sizes larger than 64KB per drive.
Online RAID Level and Stripe Size Migration
To change the RAID level and stripe size without loss of data or system
disruption, use the Online RAID Level and Stripe Size Migration screen. From
this screen you can reconfigure a currently configured logical drive to a new
fault-tolerance (RAID) level or a new stripe size.
Novell NetWare Online Array Configuration Utility
Table 6-1
The Novell NetWare Online Array Configuration Utility, also called
CPQONLIN, is an NLM for configuring your drive arrays without shutting
down your server. CPQONLIN also provides information about the status of
drives attached to the Integrated Smart Array Controller. This utility indicates
drive failure, expansion, or waiting for expansion or rebuild (queued). Before
loading CPQONLIN.NLM, you must load the appropriate device
CPQARRAY.HAM. CPQONLIN.NLM is located in the ONLINE
driver
directory of Novell SSD Disk 4. See driver installation information in the
NetWare section of Chapter 5.
Autoconfiguration
If no logical drives are configured, a CPQONLIN autoconfiguration wizard,
shown in the following figure, appears and prompts you to select faulttolerance information. CPQONLIN then configures arrays optimally for the
selected fault tolerance.
Page 83

Compaq Array Configuration Utility 6-15
Figure 6-12. NetWare autoconfiguration wizard using RAID 1 fault tolerance
Custom Configuration
Custom configuration allows you to create arrays and to assign fault tolerance
one array at a time. To custom configure an array, make selections from the
main configuration screen. Highlight the controller, array, or logical drive you
want to configure. Make a selection from the Options menu located on the
right side of the screen. The figure below shows the main configuration screen
with the controller highlighted on the left side of the screen and controller
options on the right side of the screen.
Page 84

6-16 Compaq Integrated Smart Array Controller User Guide
Figure 6-13. NetWare Main Configuration screen
Use online help for instructions to complete configurations. The following
sections discuss CPQONLIN functions.
Page 85

Drive Rebuild, Expand Priority and Accelerator Ratio
To set the drive rebuild priority, expand priority, or accelerator ratio for a
controller, highlight the controller at the main configuration screen and select
the Controller Settings option listed below Controller Options.
Compaq Array Configuration Utility 6-17
Figure 6-14. NetWare Controller Settings screen
NOTE: The figures in this section represent typical NetWare screen displays. Different
versions of the software may present slightly different server displays.
Drive Rebuild
Drive rebuild is required after a physical drive fails and is replaced. Only
logical drives configured for a fault-tolerance level (RAID 5, RAID 1,
RAID 0+1, or RAID 0) on the array with the failed physical drive can be
rebuilt.
Page 86

6-18 Compaq Integrated Smart Array Controller User Guide
Priority Settings
To set the drive rebuild priority, highlight the Integrated Smart Array
Controller in Controller Options frame and select Controller Settings. If you
choose low priority for a drive rebuild, drive rebuilding takes place when the
drive is idle. If you choose high priority, drive rebuilding takes place while the
drive is active, at the expense of normal I/O operations. Choosing high priority
for drive rebuilding protects the array, but the array is vulnerable to additional
drive failures while a drive is both in operation and being rebuilt.
Accelerator Ratio
The Integrated Smart Array Controller onboard cache only performs
read-ahead caching. Therefore, the ratio is always 100% read to 0% write.
This read cache option can be disabled in the Array Accelerator frame on the
Create Logical Drive screen.
Expand an Array
Overall server performance may be slightly degraded during an array
expansion procedure. In most cases, degradation can be offset with additional
physical drives.
■ To further minimize performance degradation, perform the capacity
expansion process during periods of low server use. If you must expand
during peak periods, the Array Configuration Utility for NetWare allows
you to set the priority of the expansion. Setting a low priority affects
performance the least, but it takes longer for the new space to become
available.
■ For expansion purposes, avoid using drives that have a greater capacity
than the smallest drive in the array. Adding larger drives wastes space
because only the space that is equal to the smallest drive size can be
used.
Add or Configure Spare Drives
When adding a spare drive to an array, you must have an unassigned drive or a
drive already assigned as a spare on another array. You can assign a single
spare to as many arrays as you want, or assign separate spares. When you
select Assign Spare Drive, only drives that qualify will appear. For example,
only those spares that are large enough will appear. If drives that you expect to
see do not appear, switch to the physical drive view and check the size of the
drives. The spare must be as large as the smallest drive in the array.
Page 87

Compaq Array Configuration Utility 6-19
Online RAID and Stripe Migration
Using CPQONLIN, you can modify both the RAID level and stripe size of an
existing logical drive while online. To migrate a drive, select the drive setting
option under the logical drive menu for the drive you wish to modify. Select
the new RAID level and/or stripe size from the choices presented to you. If the
new settings are valid, the migration begins when you save your changes.
Failed Drives or Interim Recovery Mode
If a drive fails and hardware fault tolerance is enabled, system operations
continue. Replace the drive as soon as possible. To recover a drive and use the
failed drive in the interim, select a logical drive and press F3 to monitor the
status of drive recovery, as shown in the figure below.
Figure 6-15. Logical Drive Information screen
■ Interim Recovery
The logical drive is operating, but a failed drive has not been replaced.
Replace the failed drive as soon as possible.
■ Ready for Recovery
The logical drives are queued for recovery. This status is displayed
when another logical drive is already rebuilding or expanding.
Page 88

6-20 Compaq Integrated Smart Array Controller User Guide
Rebuilding
■
The array is operating and rebuilding a replacement drive or an online
spare, if one was assigned.
■ Logical Drive Failed
If you have one or more logical drives in an array that are not protected
by fault tolerance, the data on those logical drives are lost. The Array
Configuration Utility status window shows the logical drives as Failed.
After drive replacement, fault-tolerant logical drives rebuild and the
logical drives that were not protected become available for data (the
devices are reactivated automatically). After drive recovery and
replacement is complete for the whole array, restore lost data from your
backup data set.
If you do not replace the failed drive, the Array Configuration Utility requires
you to delete the affected logical drives.
CAUTION: Deleting failed logical drives results in a loss of all data stored on the
drive.
NOTE: Drive failure can occur on drives protected by fault tolerance if two or more
physical drives fail concurrently.
Some status indicators activate without pressing F3. For example, on the Main
Configuration menu, a FAILED status message appears beside the failed
logical drive. EXPANDING and REBUILDING messages appear next to the
array in which the corresponding activity occurs.
Handling Disk Drive Failures
If you configured your Integrated Smart Array Controller with hardware fault
tolerance, complete the following steps after a physical disk drive failure:
1. Determine which physical drive failed. On hot-plug drives in a ProLiant
server or storage system, an amber Drive Failure LED on each drive tray
indicates failure.
2. If the unit containing the failed drive does not support hot-plug drives,
perform a normal system shutdown.
Page 89

Compaq Array Configuration Utility 6-21
3. Remove the failed drive and replace it with a drive that is of the same
capacity. For hot-plug drives, after you secure the drive in the bay, the
LEDs on the drive each light once in an alternating pattern to indicate
that the connection was successful. The online LED blinks, indicating
that the controller recognized the drive replacement and began the
recovery process.
4. Ensure that server power is on. If you shut down the server in Step 2,
power the server back up.
5. The Integrated Smart Array Controller firmware reconstructs the
information on the new drive based on information from the remaining
physical drives in the logical drive. While reconstructing the data on
hot-plug drives, the online indicator blinks. When drive rebuild is
complete, the online indicator stays lighted.
6. NetWare cannot detect a physical drive failure when using
hardware-based fault tolerance; NetWare determines that the data is still
valid and accessible during the rebuilding process. However, the driver
does know that a physical drive has failed. A message will be printed on
the console notifying the user a physical drive is in a degraded state.
CPQONLIN will also show the drive has failed.
Optimizing Array Controller Performance
for Novell Systems
To improve system performance, keep these tips in mind before creating
NetWare volumes or partitions:
■ If you selected a fault-tolerance option during configuration, such as
mirroring or distributed data guarding, do not select mirroring while
using INSTALL.NLM or NWCONFIG.NLM. The fault-tolerance
capabilities of the Integrated Smart Array Controller already provide
performance improvements and automatic data recovery features.
■ Novell recommends that you create volumes with a 64-KB block size
and that you use the Block Sub-Allocation feature of NetWare. The
large block size decreases the amount of RAM required to mount the
volume, and suballocation allows NetWare to allocate disk space more
efficiently.
■ Using linear memory provides the best drive performance in a NetWare
environment. When you use the Compaq System Configuration Utility
to configure your server with NetWare, the memory options default so
that linear memory is used. To verify the setting, run the Compaq
System Configuration Utility and view the memory settings. Make sure
that a linear option is selected under the Base Memory option.
Page 90

6-22 Compaq Integrated Smart Array Controller User Guide
Configuration Procedures
Creating a New Array
This section provides instructions for creating or modifying new arrays after
you have installed your operating system. If you are configuring a new array,
the configuration wizard leads you through the process. If you want to bypass
the wizard, use the following procedures to create your array.
Creating a new array involves the following general steps:
■ Choosing a controller for the array
■ Grouping physical drives of the same size into an array
■ Subdividing the array into one or more logical drives
The following example illustrates how to use the Array Configuration Utility
to create a new array.
For this example, make the following assumptions:
■ Array A contains at least one physical drive that has been configured as
a logical drive and contains the operating system.
CAUTION: Do not modify the logical drive that contains the operating system.
Modifying this drive can result in loss of data.
■ Four 9.1-GB drives and two 4.3-GB drives are connected to the
Integrated Smart Array Controller. The operating system is not installed
on any of these drives.
■ Two new arrays will be configured. Array B consists of three 9.1-GB
drives with the fourth 9.1-GB drive used as a spare. Array C contains
the two 4.3-GB drives.
■ The fault-tolerance method for all logical drives on Array B is RAID 5,
Distributed Data Guarding. The fault-tolerance method for all logical
drives on Array C is RAID 1, Drive Mirroring.
Page 91
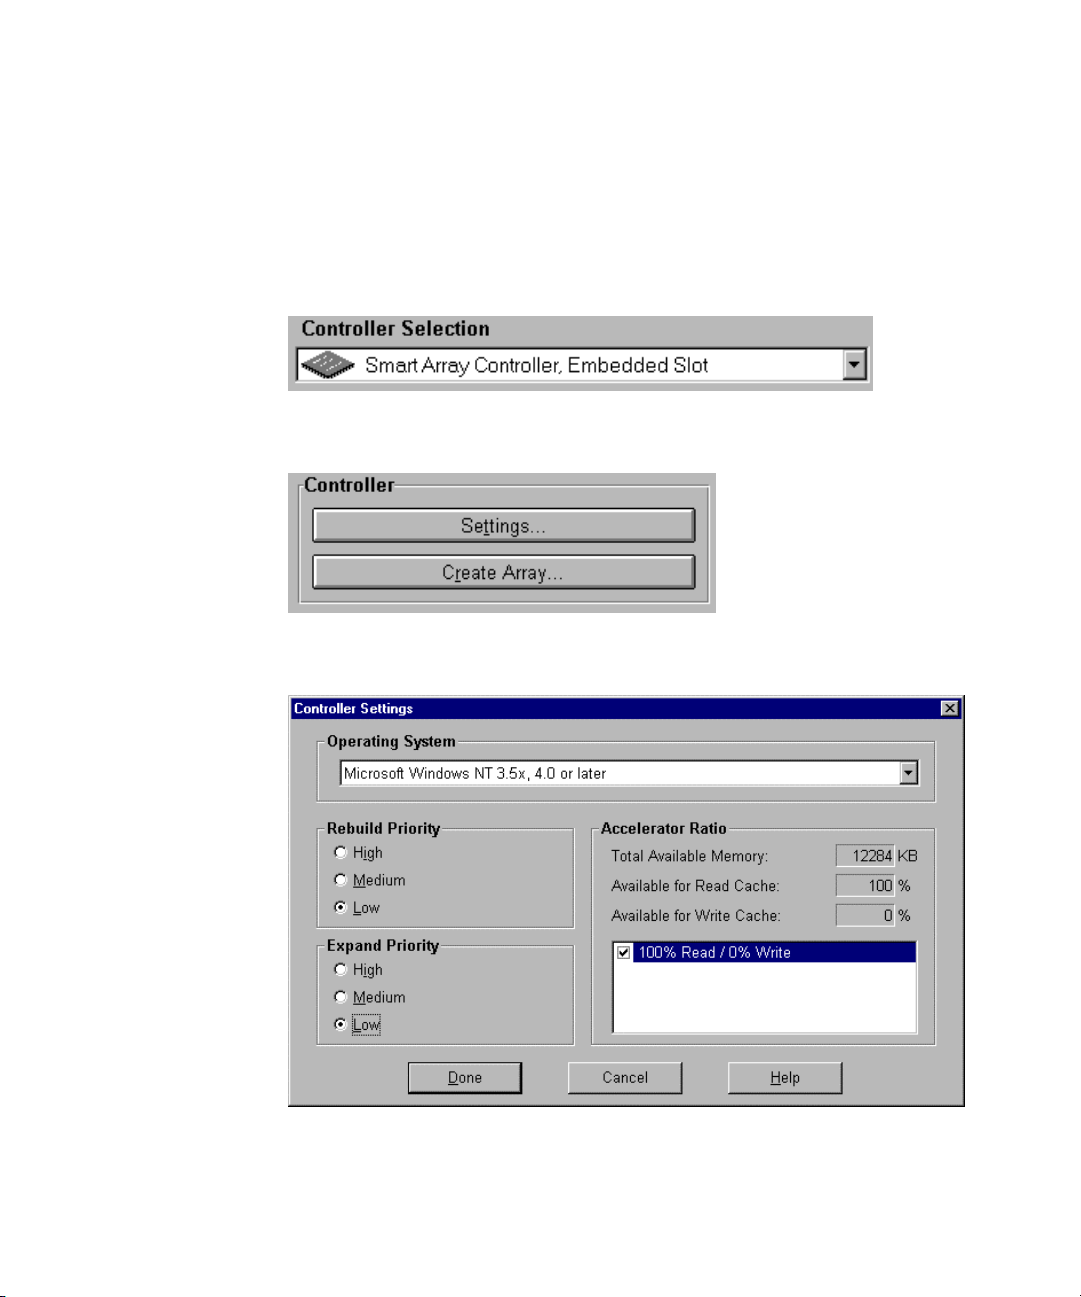
Choosing a Controller for the Array
Start the Array Configuration Utility from the SmartStart and Support
Software CD. From the Main Configuration Screen, select the Controller
Selection frame. You can also select Controller/Select from the main menu.
1. Select one of the controllers listed in the Controller Selection frame.
Figure 6-16. Controller Selection frame
2. Select the Settings button shown below.
Figure 6-17. Controller buttons
3. At the Controller Settings screen, select your operating system.
Compaq Array Configuration Utility 6-23
Figure 6-18. Controller Settings screen
4. Select the Done button to save settings and exit.
Page 92

6-24 Compaq Integrated Smart Array Controller User Guide
Grouping Physical Drives of the Same Size into an Array
This procedure creates two new arrays: Array B and Array C. Array A
contains the operating system and will not be used or modified.
1. In the Controller Selection frame, select the Smart Array Controller,
Embedded Slot.
2. Select the Create Array button. The Create Drive Array screen is
displayed.
Figure 6-19. Create Drive Array screen
3. Select the four 9.1-GB drives you want to use in array B from the drives
listed in the Existing Drives frame.
NOTE: Always group physical drives of the same size. The Integrated Smart Array
Controller treats all the drives as the same size as the smallest drive in the same array. If
you mix drive sizes, the capacity of the largest drive is wasted.
For this example select the following drives:
Port 2:SCSI ID 0
Port 2:SCSI ID 1
Port 2:SCSI ID 2
Page 93

Compaq Array Configuration Utility 6-25
4. Select the Assign Drive(s) to Array button.
5. Select the drive at Port 2:SCSI ID 3 and select the Assign Spare to
Array button. The right side of the Create Array screen should now look
similar to the figure below.
Figure 6-20. Example Array B
NOTE: The same spare drive may be assigned to multiple arrays. However, spare drives
must have the same or greater capacity as the drives in the array.
Page 94
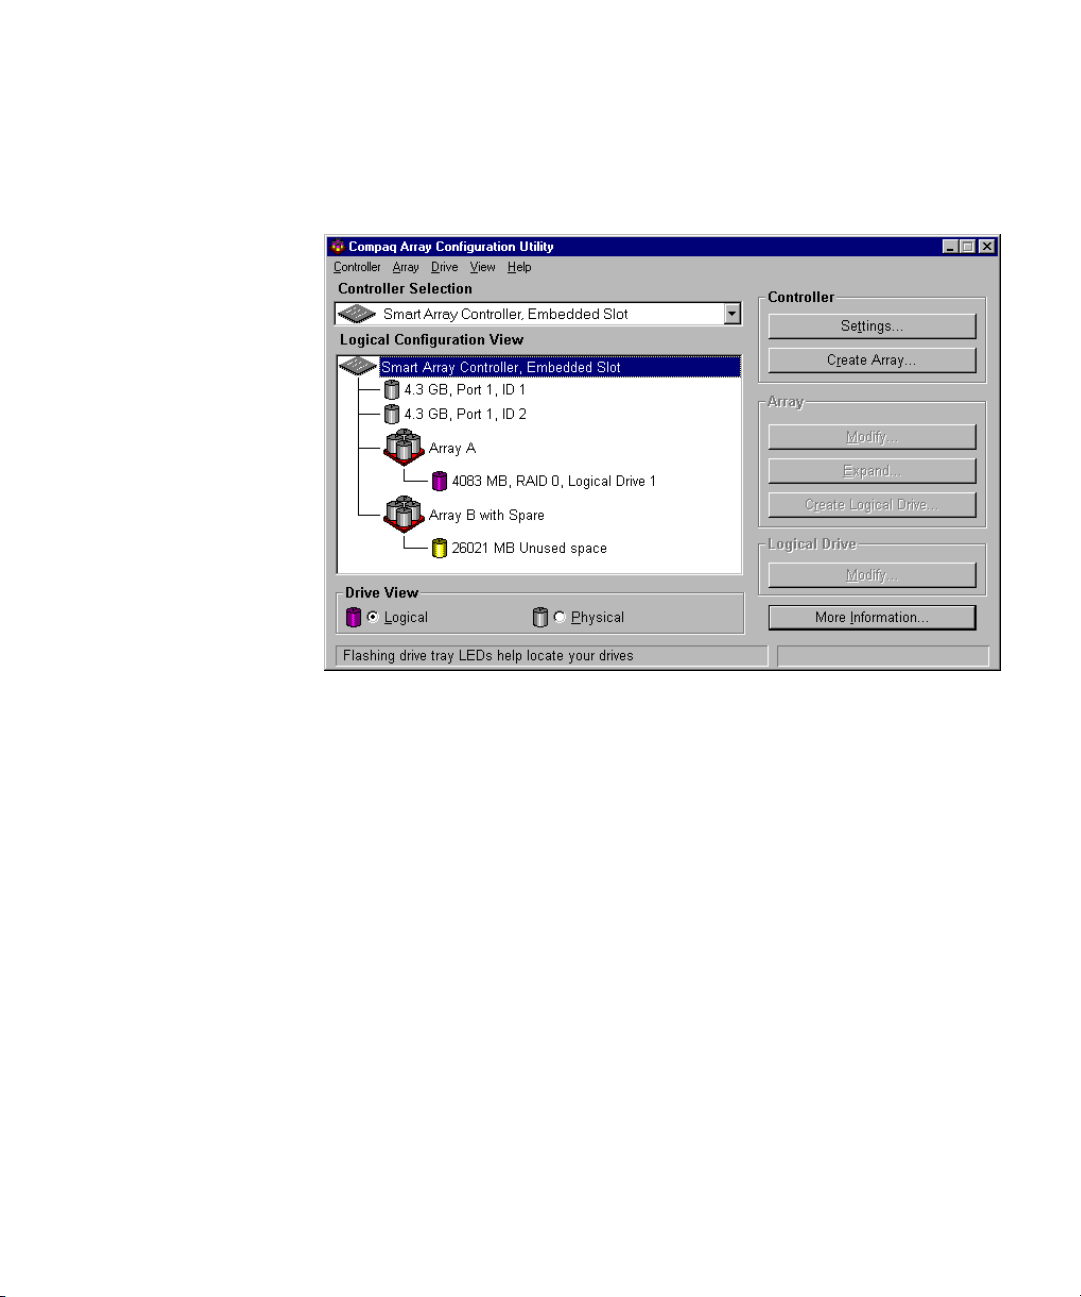
6-26 Compaq Integrated Smart Array Controller User Guide
6. Select the Done button to return to the main configuration screen. The
Logical Configuration View frame should now look similar to the
following figure.
Figure 6-21. Logical Configuration View frame with one configured array
7. Select your controller from the pull-down menu in the Controller
Selection frame.
8. Select the Create Array button to create Array C.
9. Assign both 4.3-GB drives to the array.
10. Select the Done button to save the array and exit.
Page 95

Creating Logical Drives Across Physical Drives
When creating a logical drive, you can select a fault-tolerance (RAID level)
option and provide information regarding the drive size and array accelerator.
1. Select Array B or the Unused Space icon under Array B in the Logical
Configuration View.
2. Select the Create Logical Drive button. A screen similar to the following
figure displays.
Compaq Array Configuration Utility 6-27
Figure 6-22. Create Logical Drive screen
3. In the Fault Tolerance frame, select the Distributed Data Guarding
(RAID 5) option.
4. The Logical Drive Size area shows a graphical representation of the
storage capacity available. To create a single logical drive across this
array, accept the default values. Refer to the section titled “Create
Logical Drive Screen” later in this chapter for a detailed description of
this procedure.
Page 96

6-28 Compaq Integrated Smart Array Controller User Guide
NOTE: Because the size of the logical drive depends on the number and size of drives
used in the array, there is no right or wrong logical drive size.
5. Select the Done button.
6. Select Array C or the Unused spare icon under Array C in the Logical
Configuration View.
7. Repeat Steps 2 through 5 to create a single logical drive across Array C,
this time selecting the RAID 1 fault-tolerance option.
8. The Logical Configuration View screen appears as shown in the figure
below.
Figure 6-23. Logical Configuration View window showing three arrays with
different RAID assignments
9. At the main screen, pull down the Controller menu, then select Save
Configuration. This saves the new settings for logical drive 2 and
logical drive 3.
Page 97

Expanding Capacity
Expanding array capacity involves adding storage capacity to an array that has
already been configured without disturbing the existing data by adding new
physical drives to the array.
When you run the Array Configuration Utility, the program checks the drive
hardware and configuration. If the Array Configuration Utility discovers a
physical drive that is not used, the configuration wizard leads you through the
steps for adding the drive to the array.
Expanding Array Capacity
To expand your array manually:
1. Install the new physical drives.
NOTE: Always group physical drives of the same size. If you mix drive sizes, the capacity
of the larger drives is wasted.
2. Assign the new physical drives to an existing array. Existing logical
drives will automatically expand across the physical drives, including
the newly added ones.
Compaq Array Configuration Utility 6-29
Page 98

6-30 Compaq Integrated Smart Array Controller User Guide
3. Create a new logical drive to use the extra space on the expanded array.
For this example, assume a configuration similar to the previous
example, except that the fourth 9.1-GB drive is added later and Array B
does not have a spare. Expand Array B to include the fourth drive. In the
following figure, a single 9.1-GB drive is shown as unassigned in the
main configuration screen.
Figure 6-24. Logical Configuration View screen
To expand the capacity of Array B and create logical drive 2:
1. Select Array B.
2. Select the Expand button.
3. Select the unassigned 9.1-GB drive.
4. Select the Assign Drives to Array button.
Page 99

Compaq Array Configuration Utility 6-31
5. Select the Next button at the bottom of the screen to advance to the
Create Logical Drives screen, as shown below.
Figure 6-25. Create Logical Drives screen
6. Select the Create Logical Drive button.
7. Set the fault tolerance, array accelerator, stripe size, and size for the new
logical drive.
8. Select the Done button to return to the main configuration screen.
9. At the main screen, pull down the Controller menu, the select Save
Configuration from the menu bar. This saves the new settings and starts
the capacity expansion process.
NOTE: The new logical drive will not be accessible until the capacity expansion process
has been completed on the existing logical drive.
Page 100

6-32 Compaq Integrated Smart Array Controller User Guide
Capacity Extension
Logical drive extension allows you to increase the size of existing logical
drives without disturbing the data on those logical drives. If an existing logical
drive is full of data, you can extend the logical drive when there is free space
on the array. If there is no free space on the array, you can add drives to the
array and proceed to extend the logical drive.
IMPORTANT: Logical drive extension is not supported by all operating systems. You can
only extend logical drives that are used with an operating system supporting capacity
extension.
Operating Systems
The following operating systems support logical drive extension:
■ Microsoft Windows NT 4.0 and Windows 2000
■ Novell NetWare 5.0
■ IBM OS/2 Warp 4.0, WarpConnect, WarpServer, WarpServer
(Advanced), and WarpServer SMP
■ SCO OpenServer 5, UnixWare 7, and UnixWare 2
If your operating system is not listed, check your operating system
documentation or contact your operating system vendor before extending
logical drives.
 Loading...