

Page 1

User’s Guide
Page 2

First Edition (April 1999)
The information in this guide is subject to change without notice.
COMPAQ COMPUTER CORPORATION SHALL NOT BE LIABLE FOR TECHNICAL OR EDITORIAL
ERRORS OR OMISSIONS CONTAINED HEREIN; NOR FOR INCIDENTAL OR CONSEQUENTIAL
DAMAGES RESULTING FROM THE FURNISHING, PERFORMANCE, OR USE OF THIS MATERIAL.
This guide contains information protected by copyright. No part of this guide may be photocopied or
reproduced in any form without prior written consent from Compaq Computer Corporation.
Compaq and Presario are registered in the U.S. Patent and Trademark office.
Microsoft, MS-DOS, and Windows are registered trademarks of the Microsoft Corporation.
© Copyright 1999 Compaq Computer Corporation.
All rights reserved.
®
is a registered trademark of the Hewlett-Packard Company. PCL 3 is Hewlett-Packard Company's
PCL
designation of a set of printer commands (language) and functions included in its printer products. This printer
is intended by Compaq Corporation to be compatible with the PCL 3 language. This means the printer
recognizes PCL 3 commands used in various application programs, and that the printer emulates the functions
corresponding to the commands.
The software described in this guide is furnished under a license agreement or nondisclosure agreement. The
software may be used or copied only in accordance with the terms of the agreement.
Product names mentioned herein may be trademarks and/or registered trademarks of their respective
companies.
UNITED STATES GOVERNMENT RESTRICTED RIGHTS
This software and documentation are provided with RESTRICTED RIGHTS. Use, duplication or disclosure
by the Government is subject to restrictions as set forth in subparagraph (c)(1)(ii) of the Rights in Technical
Data and Computer Software clause at DFARS 252.227-7013 and in applicable FAR provisions: Compaq
Computer Corporation, Houston, TX 77070.
Page 3

Contents
1
Understanding your printer . . . . . . . . 1
Using the parts of the printer. . . . . . . . . . . . . . . . . . . . . . . . . 2
Using the buttons. . . . . . . . . . . . . . . . . . . . . . . . . . . . . . . . . . 4
Understanding the lights . . . . . . . . . . . . . . . . . . . . . . . . . . . 5
2
Using the printer software . . . . . . . . . 7
Using the Printer Properties . . . . . . . . . . . . . . . . . . . . . . . . . 8
Using the Control Program . . . . . . . . . . . . . . . . . . . . . . . . . 11
3
Printing on paper and other media . 13
Printing on plain paper . . . . . . . . . . . . . . . . . . . . . . . . . . . . 13
Printing on specialty media. . . . . . . . . . . . . . . . . . . . . . . . . 15
Printing transparencies . . . . . . . . . . . . . . . . . . . . . . . . . . . . 16
Printing envelopes or card stock . . . . . . . . . . . . . . . . . . . . 17
Printing on customized paper sizes. . . . . . . . . . . . . . . . . . . 18
Printing greeting cards . . . . . . . . . . . . . . . . . . . . . . . . . . . . 20
Printing iron-on transfers . . . . . . . . . . . . . . . . . . . . . . . . . . 21
Printing banners. . . . . . . . . . . . . . . . . . . . . . . . . . . . . . . . . . 22
Printing photos . . . . . . . . . . . . . . . . . . . . . . . . . . . . . . . . . . 24
Printing specialty media from the manual feeder . . . . . . . . 28
Contents
iii
Page 4

4
Caring for your print cartridges . . . . .29
Installing or replacing print cartridges . . . . . . . . . . . . . . . . 30
Improving print quality . . . . . . . . . . . . . . . . . . . . . . . . . . . . 32
Appendix . . . . . . . . . . . . . . . . . . . . . . . . .41
Installing the printer software . . . . . . . . . . . . . . . . . . . . . . . . . 41
Printing from Windows 3.1 or 3.11 . . . . . . . . . . . . . . . . . . . . 41
Printing from Windows NT 4.0 . . . . . . . . . . . . . . . . . . . . . . . 42
Printing from DOS . . . . . . . . . . . . . . . . . . . . . . . . . . . . . . . . . 43
Limited Warranty Statement . . . . . . . . . . . . . . . . . . . . . . . . . . 44
Federal Communications Commission (FCC) Compliance
Information Statement . . . . . . . . . . . . . . . . . . . . . . . . . . . . . . . 46
Notices . . . . . . . . . . . . . . . . . . . . . . . . . . . . . . . . . . . . . . . . . . . 47
Power supply replacement . . . . . . . . . . . . . . . . . . . . . . . . . . . . 47
Safety information . . . . . . . . . . . . . . . . . . . . . . . . . . . . . . . . . . 47
iv
Index . . . . . . . . . . . . . . . . . . . . . . . . . . . . .49
Contents
Page 5

Chapter 1
Understanding
your printer
Your printer is a general purpose color inkjet printer that provides high quality
text and graphics.
For information about: See page:
Using the parts of the printer 2
Using the buttons 4
Understanding the lights 5
Glossary
Inkjet
A non-impact printing
technology that creates
characters and graphics with
programmed patterns of ink.
Understanding your printer
1
Page 6
Quick Fix
Printer has missing
or damaged parts
Contact your point of
purchase.
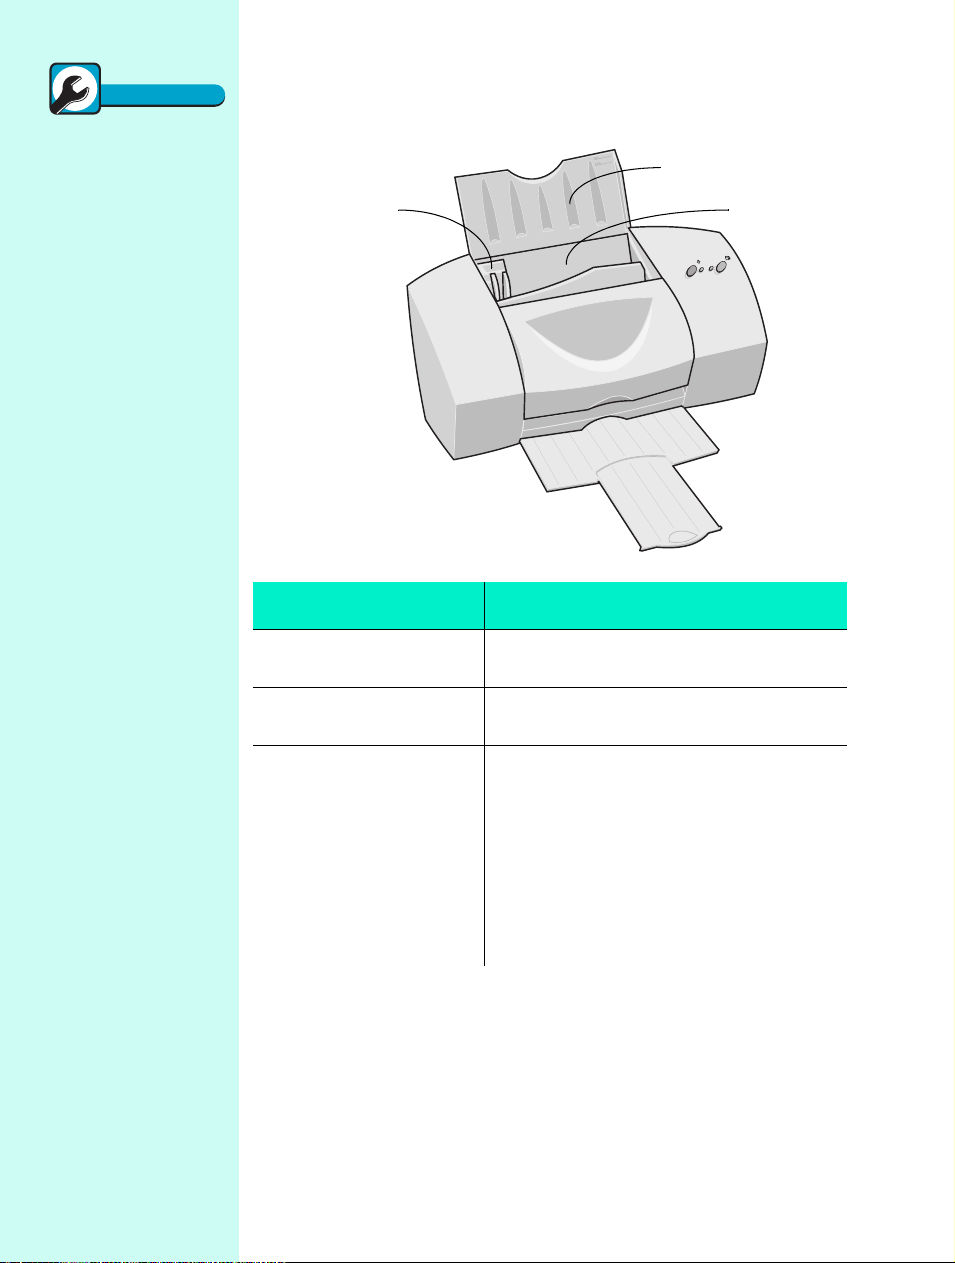
Using the parts of the printer
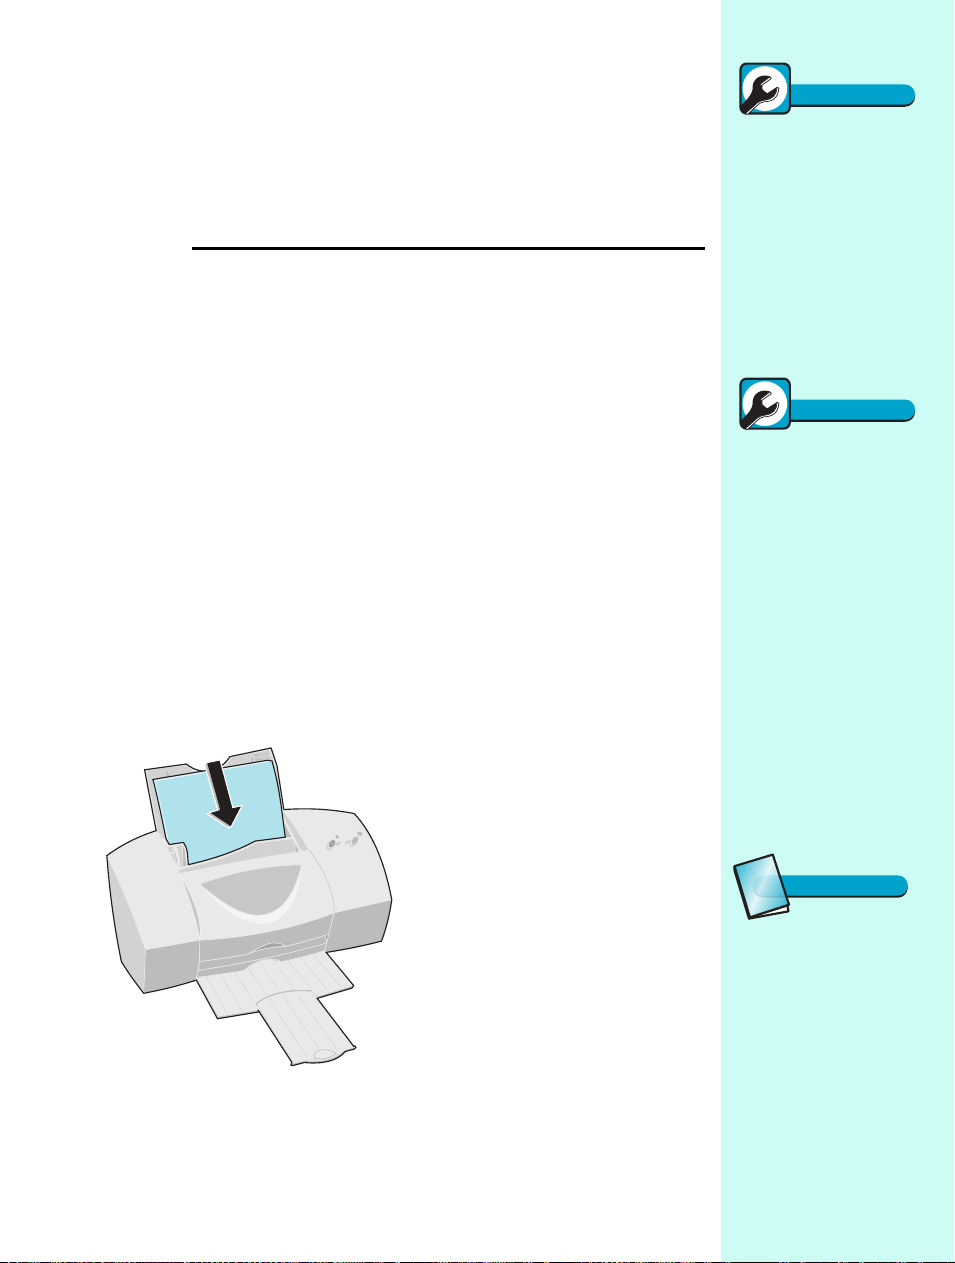
This illustration shows the front of the printer and its parts.
B
A
Use the: When you want to:
A
Paper guide Make sure paper feeds correctly into the
printer.
C
2
B
Paper support Keep paper and specialty media straight in
C
Automatic feeder Automatically load paper and specialty
the automatic feeder.
media. The automatic feeder holds up to:
• 100 sheets of paper
• 10 transparencies
• 25 sheets of photo paper or glossy film
• 25 iron-on transfers
• 25 sheets of labels
• 10 envelopes, greeting cards, postcards,
or index cards
Chapter 1
Page 7
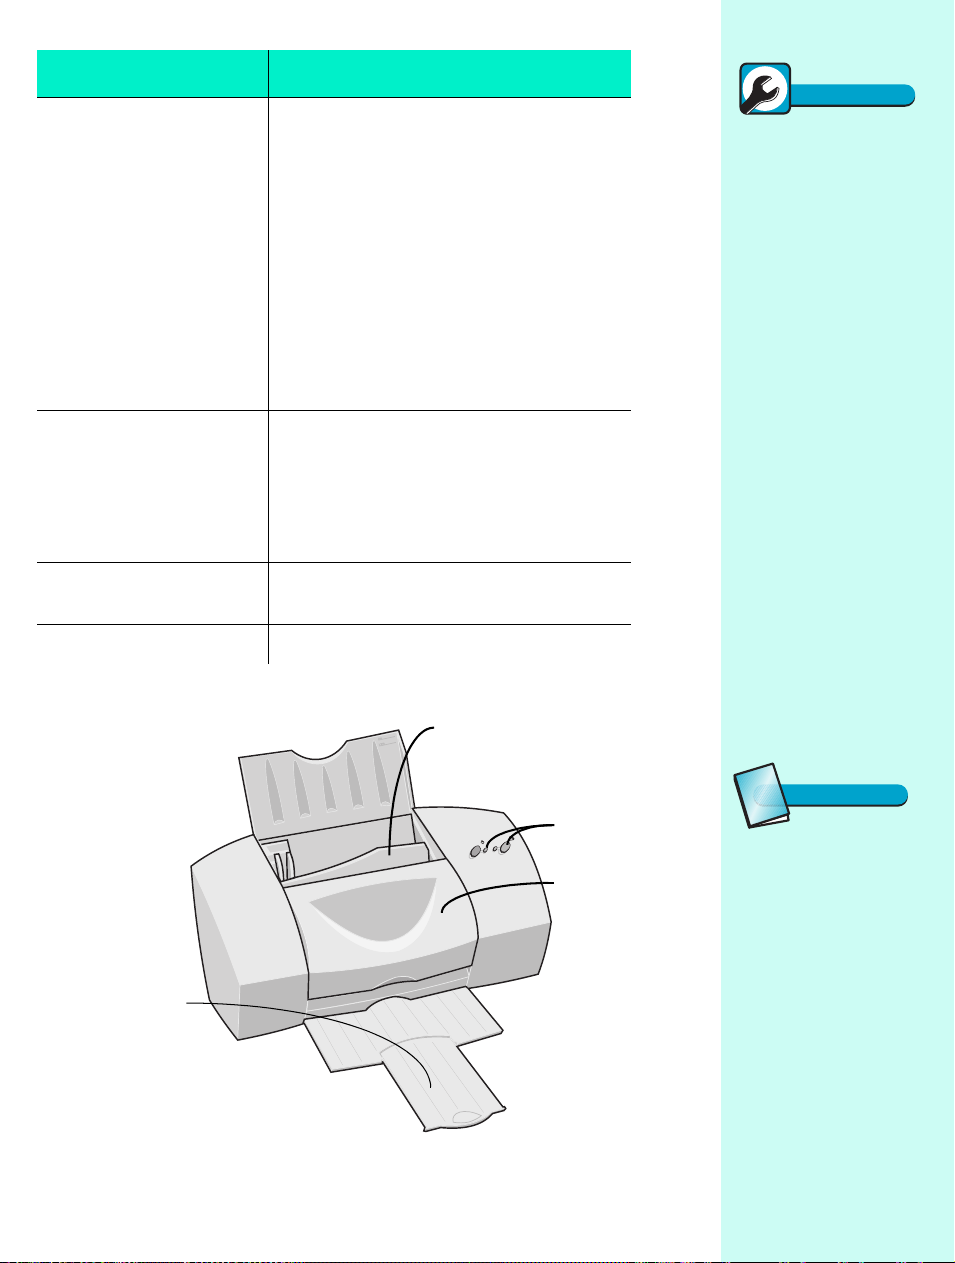
Use the: When you want to:
D
Manual feeder Manually load paper and specialty media
one sheet at a time. You can also use the
manual feeder when:
• You have one type of media already
loaded in the automatic feeder , and you
want to print one sheet of a different
size or type.
For example, you may hav e plain paper
loaded in the automatic feeder, but you
need to print an envelope or
transparency.
• Paper feeds incorrectly from the
automatic feeder.
E
Buttons and lights • Check the printer status.
• Turn the printer on or off.
• Eject paper from the printer.
For more information, see “Using the
buttons” on page 5 and “Understanding the
lights” on page 6.
F
Front cover • Install or change print cartridges.
• Clear paper jams.
G
Paper exit tray Stack paper after printing.
D
Quick Fix
Communications
problems
If you are not using the
correct parallel cable or the
cable is not securely
connected, you may
experience problems
communicating with your
printer.
If you get a “Parallel cable
interface problems” error, or
if your printer stops and
starts during a print job, you
can access help information
from an application by
clicking:
1
File.
2
Print, Print Setup, or
Printer Setup.
3The Properties, Options,
or Setup button.
4The Help button.
5
Help Topics.
6
Troubleshooting.
7
Bidirectional communications problems.
Glossary
E
Interface
F
G
Understanding your printer
A device such as a parallel
cable that allows
communication between the
printer and the computer.
3
Page 8
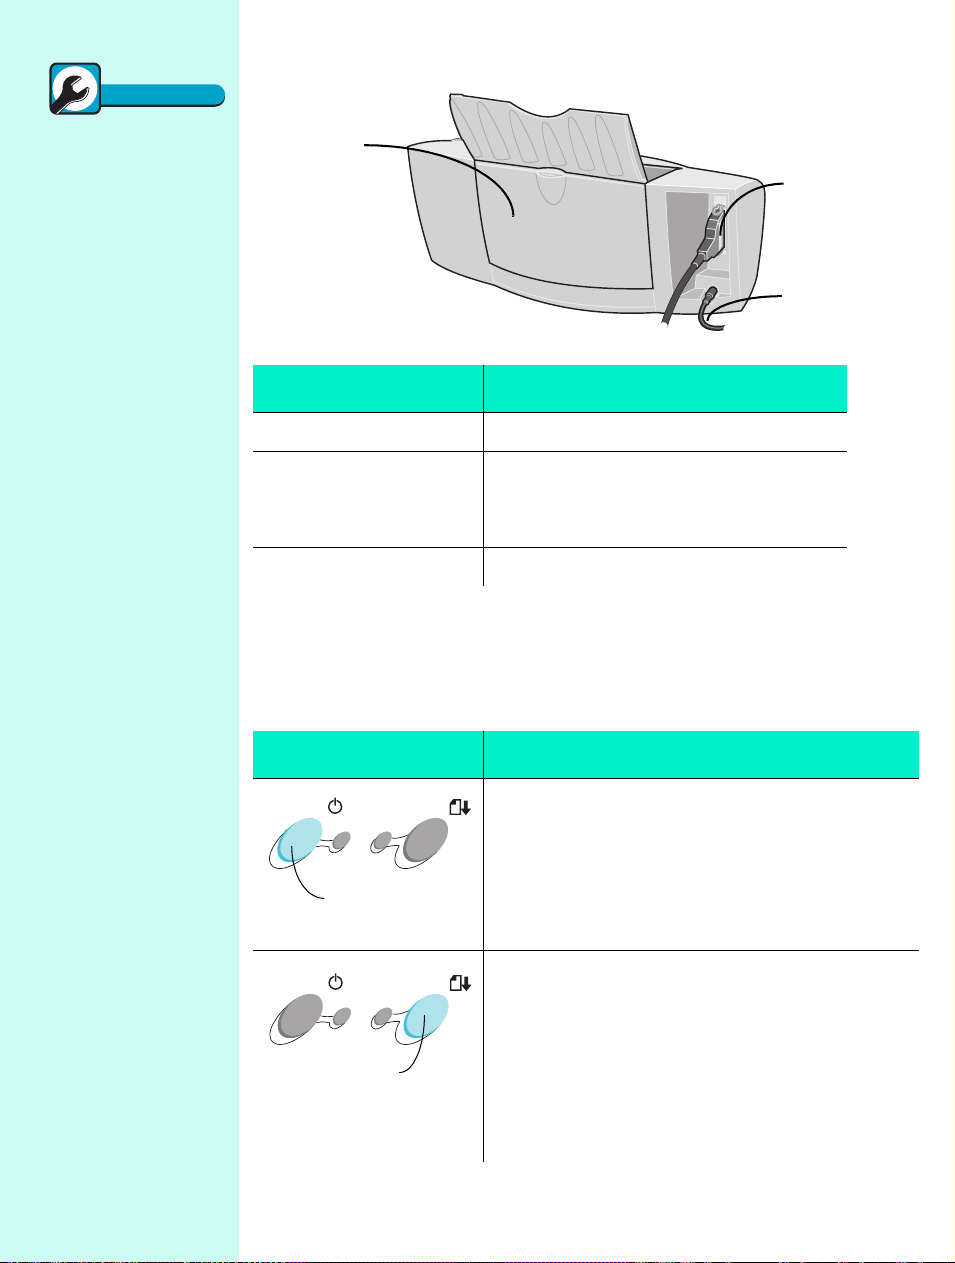
The following illustration shows the back parts of the printer
Quick Fix
:
The Power light is on
and the Paper Feed
light is blinking
The printer may be out of
paper or have a paper jam.
Check your screen for any
error messages.
If the printer is out of paper:
Load paper.
1
Press the Paper Feed but-
2
ton.
If the printer has a paper
jam:
Press the Power button to
1
turn the printer off.
Pull firmly on the paper to
2
remove it. If you cannot
reach the paper because it
is too far inside the
printer, raise the front
cover and pull the paper
out from the front of the
printer.
Close the front cover.
3
Press the Power button to
4
turn the printer back on.
Resend your document.
5
If the problem persists, you
may be using the wrong
cable or one that is damaged.
For help, see “Bidirectional
Communications problems”
in the Printer Properties
help. To access this from an
application, click:
File.
1
Print (or Printer) Setup.
2
The Properties, Options,
3
or Setup button.
The Help button.
4
Help Topics.
5
Troubleshooting.
6
Bidirectional communica-
7
tions problems.
H
Use the: When you want to:
H
Banner paper holder Print on banner or continuous form paper.
I
Parallel cable
(not supplied)
Connect the printer to the computer for
bidirectional communication. (For bidirectional communication, you must use an
IEEE 1284 compliant cable.)
J
Power supply Supply power to the printer.
Using the buttons
Your printer has a Power button and a Paper Feed button.
Use the: When you want to:
Turn the printer on or
Power button
• Eject paper from the printer.
• Advance a sheet of paper into the automatic sheet
feeder when the printer has run out of paper
during a print job.
Paper Feed button
off
.
I
J
4
Chapter 1
Page 9
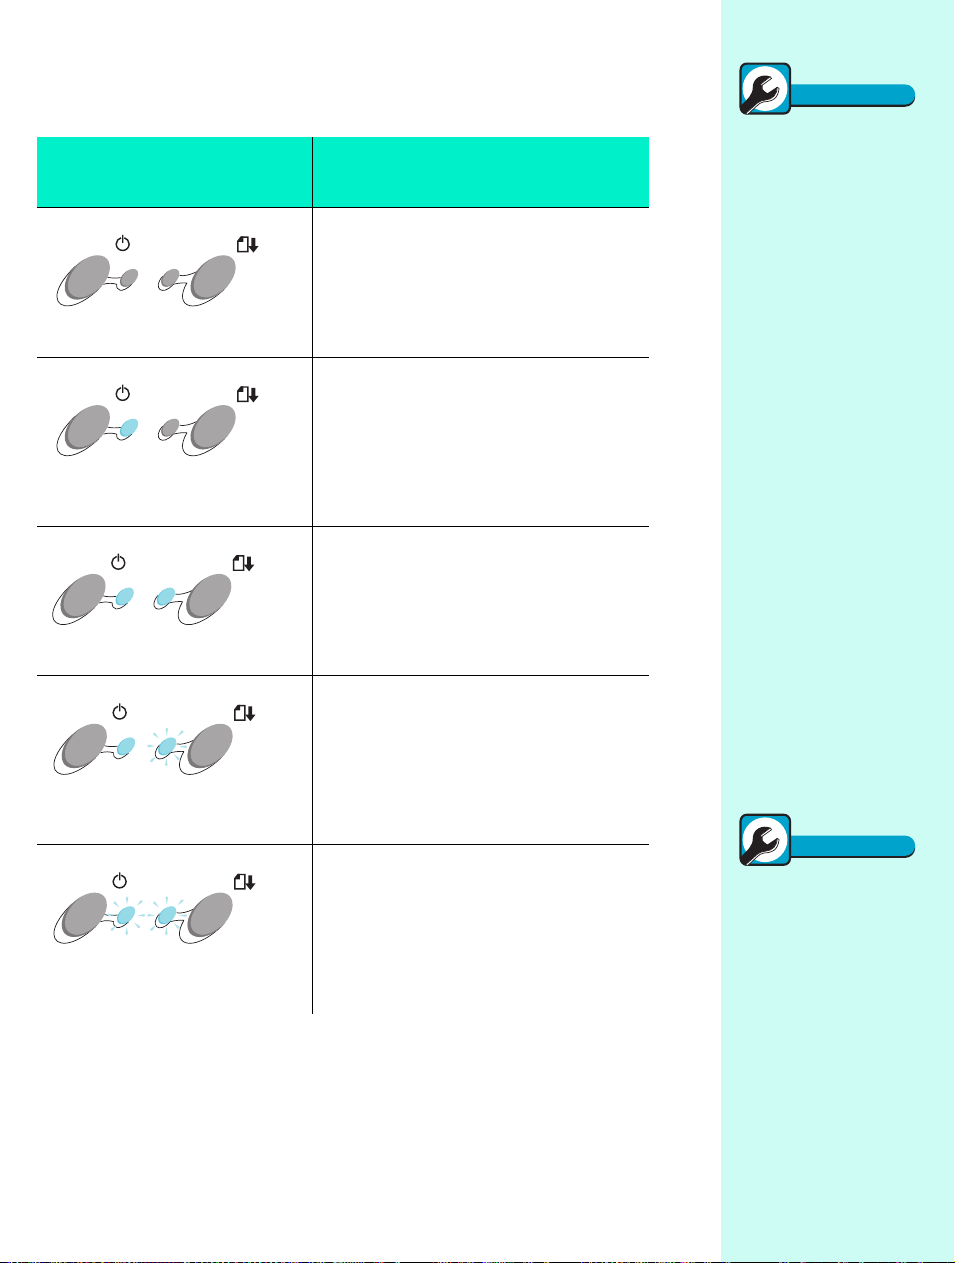
Understanding the lights
Your printer has a Power light and a Paper Feed light.
If your printer lights look
like this:
Both lights are
Power light is
Paper Feed light is
Both lights are
Power light is
Paper Feed light is
Power light is
Paper Feed light
Off
On
Off
On
On
blinking
blinking
blinks twice
Then the printer:
Is
.
Off
Is On and ready to print.
Is
printing
.
May be out of paper or have a paper jam.
For help, see the “Quick Fix” topics on
this page.
Has an error. For help, see the “Quick
Fix” topics on this page.
Quick Fix
The Power light is
blinking and the
Paper Feed light
blinks twice
The print cartridge carrier
has stalled or you have a
paper jam. Check your
screen for any error
messages.
If the print cartridge carrier
has stalled:
Turn the printer off.
1
After waiting a few sec-
2
onds, turn the printer back
on.
If the printer has a paper
jam:
Press the Power button to
1
turn the printer off.
Pull firmly on the paper to
2
remove it. If the paper is
too far inside the printer,
raise the front cover and
pull the paper out from the
front of the printer.
Close the front cover.
3
Press the Power button to
4
turn the printer back on.
Resend your document.
5
Quick Fix
Both lights are on,
but the printer is not
printing
If your paper is loaded, your
cable connections may not
be secure.
Unplug the power supply
1
from the electrical outlet.
Make sure all cable con-
2
nections are secure.
Reconnect the power sup-
3
ply.
Understanding your printer
5
Page 10

6
Chapter 1
Page 11

Using the printer
software
Chapter 2
This chapter describes how to use your printer software in Windows 95 and 98.
For help using your printer software in Windows 3.1, 3.11 or NT 4.0, see the
appendix, starting on page 41.
When you installed your printer, several software applications were installed on
your computer. These applications allow you to perform printing tasks with the
best printing results.
For information about
using this application:
Printer Properties Windows 95, 98 8
Control Program Windows 95, 98 11
On this operating
system:
See page:
Glossary
Software application
Any program loaded on your
computer used to perform a
specific task, such as a word
processor, spreadsheet, or
database.
Using the printer software
7
Page 12
Tip
To open the Printer
Glossary
Glossary
Glossary
Properties from a
Windows application,
click:
File.
1
Print, Print Setup, or
2
Printer Setup.
The Properties, Options,
3
or Setup button.
Page orientation
Indicates the direction of
print placement, and is
identified as:
- The longer side of
Portrait
the paper is vertical.
Landscape
side of the paper is
horizontal.
- The longer
Using the Printer Properties
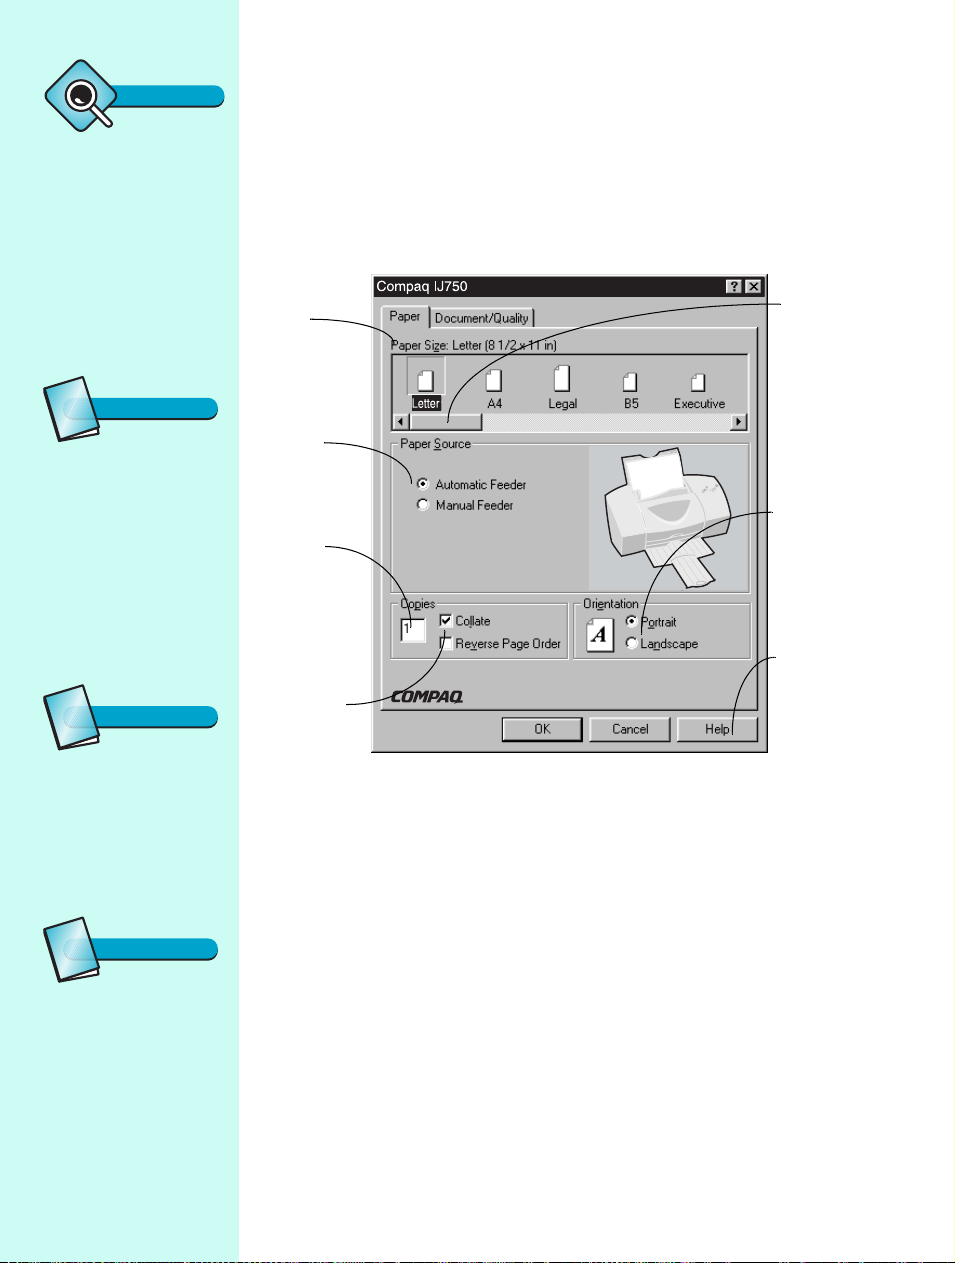
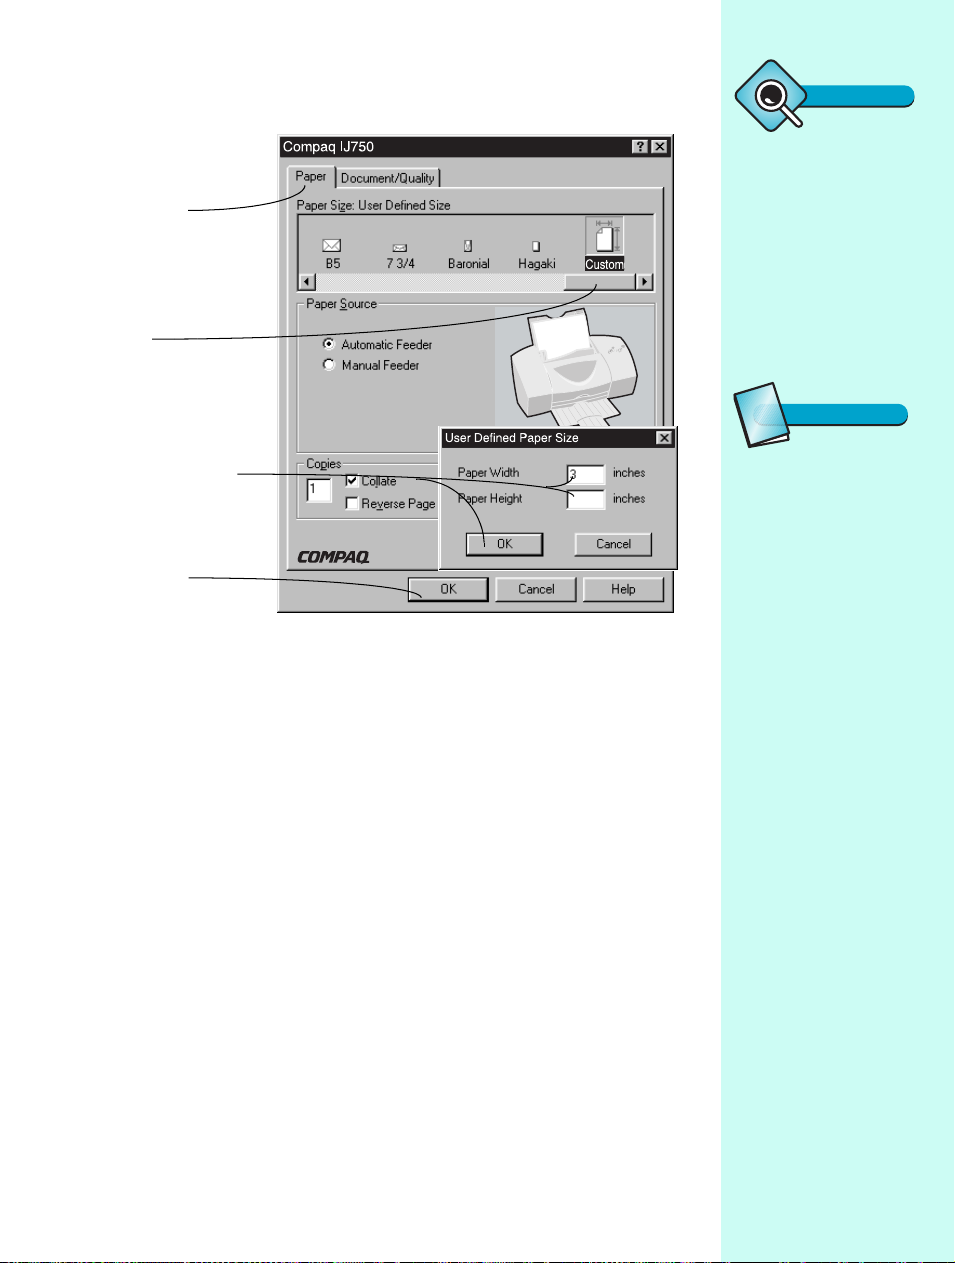
The Printer Properties includes several tabs. You can use the Paper and
Document/Quality tabs to change your printer settings. For information on
opening the Printer Properties, see the “Tip” in the margin.
The Paper tab
Choose
your paper
size.
Choose
automatic
or manual
feeder.
Choose the
number of
copies.
You may
also collate
or reverse
page order.
Move the slide
bar to the left or
right to view
more paper
sizes.
Choose a page
orientation.
To learn more
about printer
setting
options, click
here.
Reverse page order
Since printed pages emerge
from the printer face up, this
option allows you to print a
document so that the first
page is on top.
Collate
Select this option when you
are printing multiple copies
of a document and want all
the pages of one document
to print before the next copy
begins printing.
8
Chapter 2
Page 13
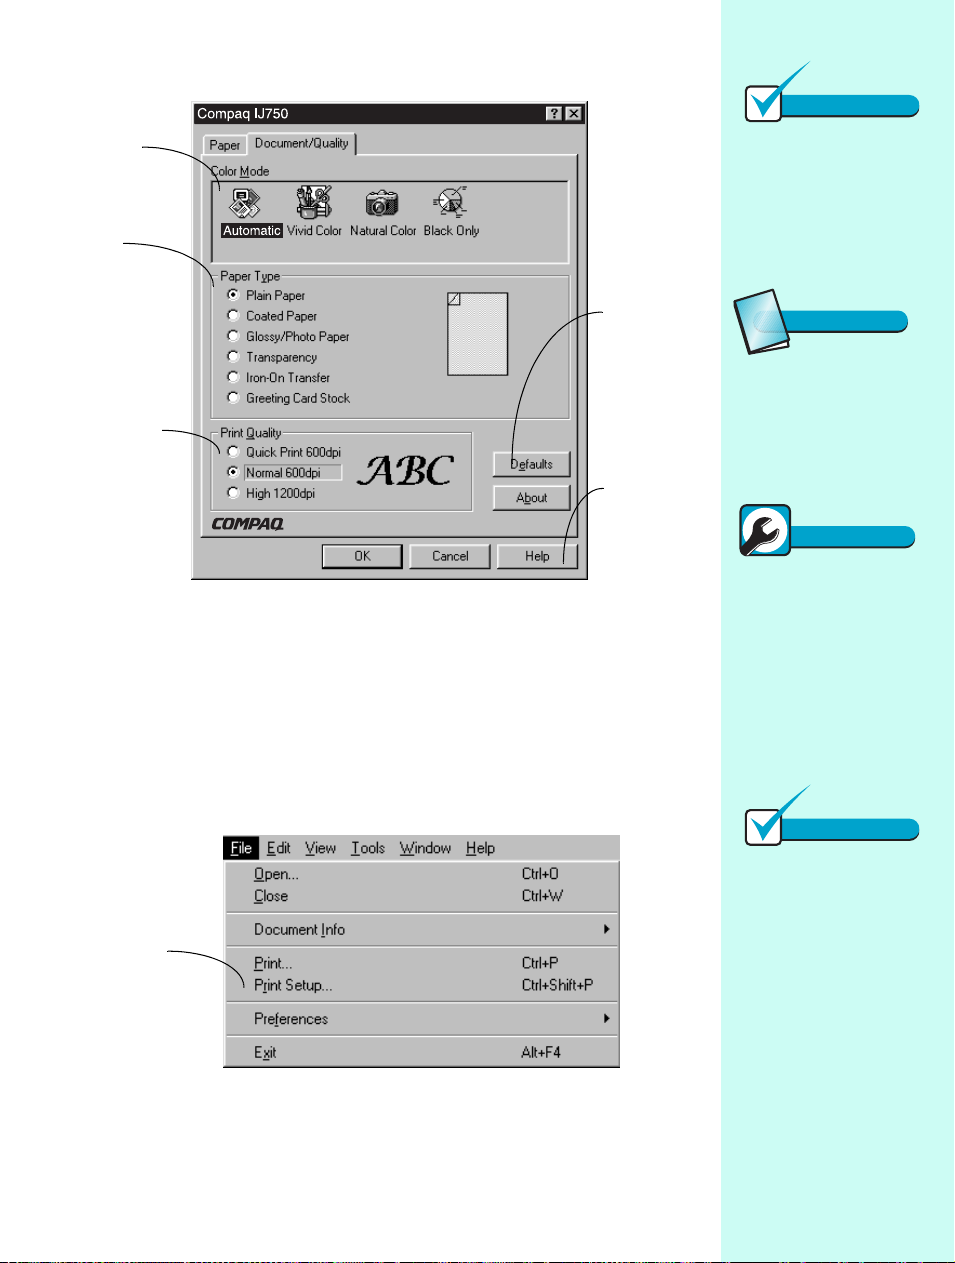
The Document/Quality tab
Change the
color mode
here.
Use this
section to tell
the printer
what type of
paper you’re
using.
Adjust your print
quality and print
speed here.
You can
also reset
your
software to
factory
defaults.
Click here
if you need
any
additional
help.
Opening Printer Properties from an application
You can open the Printer Properties from almost any application. This allows
you to change printer settings ONLY for the document you will be printing. To
open the Printer Properties:
Note
Overrides
Some software applications
may override the Paper
Source, Paper Size, and
Orientation settings in your
printer software.
Glossary
Printer driver
A program that converts the
data in a software
application to a format used
by the printer.
Quick Fix
Printer software
settings not in effect
If the printer settings you
chose in the printer software
are not in effect, check the
settings in the software
application you are using.
1
Open the application's File menu.
2
Select Print, Print Setup or Printer Setup. Your application may have
a slightly different menu than the one shown below.
Print
Click
Setup
.
Using the printer software
Note
Windows 3.1 and 3.11
For information on opening
the Printer Properties or
using the Spool Manager
from Windows 3.1 or 3.11,
see the appendix.
9
Page 14
3
In the Print Setup dialog box, click the Properties, Options, or Setup
button (depending on the application). Your application may have a
slightly different dialog box than the one shown below.
Properties
4
Change settings as needed.
Click the
button.
Opening Printer Properties from Windows
Opening the Printer Properties from the Windows 95 or 98 desktop allows you
to make changes to your printer settings that will apply to ALL documents you
print.
1
From the Start menu, select Settings, then select Printers.
Select
Printers
.
10
2
From the Printers folder, right-click the printer icon for your printer.
Right-click the
printer icon.
Chapter 2
Select
Properties
from the
sidebar menu.
Page 15
3
Select Properties from the sidebar menu.
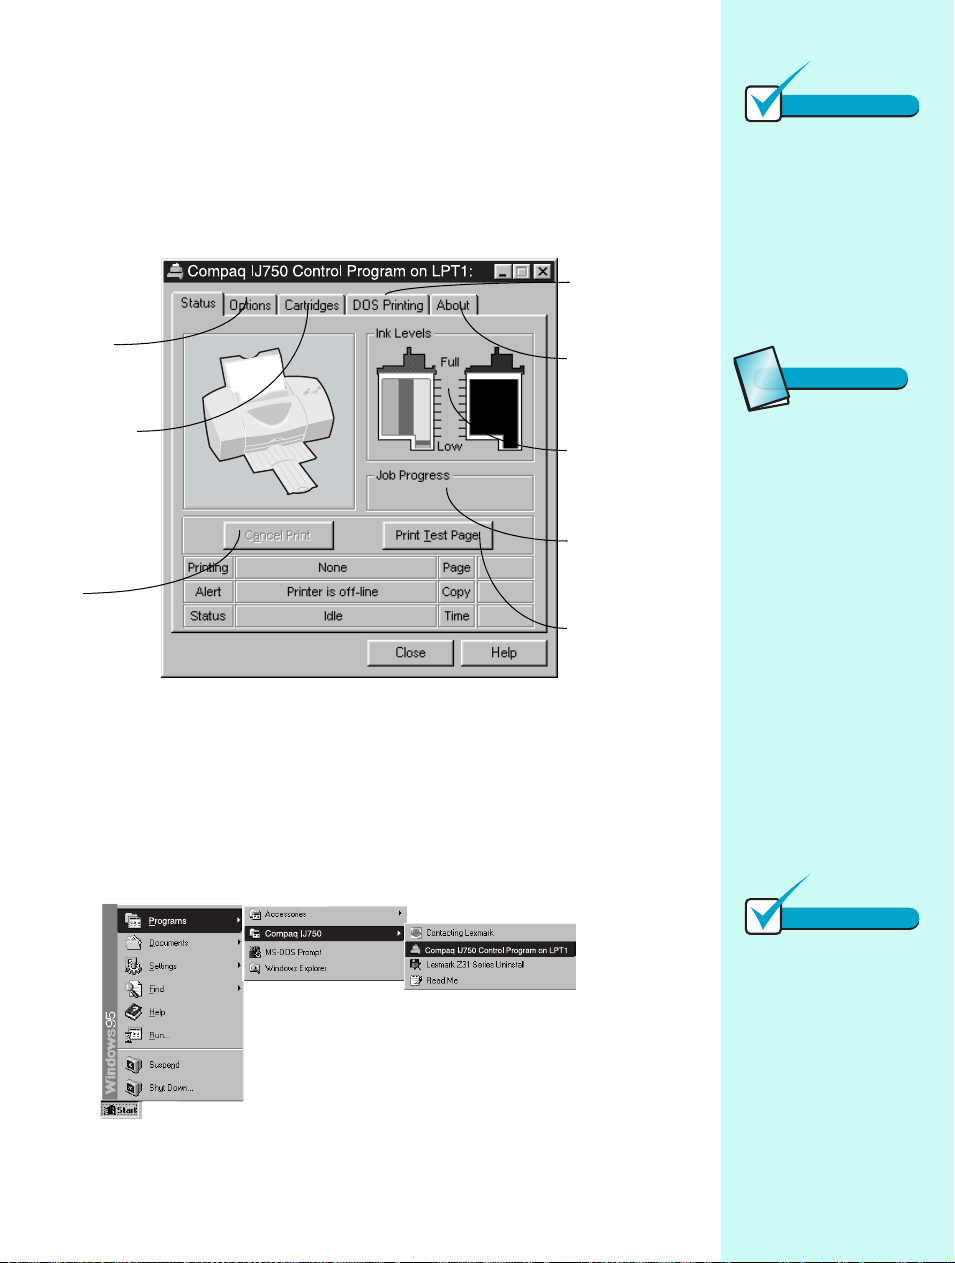
Using the Control Program
The Control Program includes five tabs: Status, Options, Cartridges, DOS
Printing, and About. Each tab contains settings relating to the operation of your
printer and its software.
Control when
and how the
Control Program
appears.
Change or
care for print
cartridges.
Cancel a print
job.
Opening the Control Program
Change settings
for DOS
printing.
View
information
about the
software.
View print
cartridge
ink levels.
Monitor
document
print status.
Print a
test page.
Note
Windows 3.1 and 3.11
In Windows 3.1 or 3.11, the
Control Program has a sixth
tab for Windows printing.
You can use this tab to open
Printer Properties or Spool
Manager.
Glossary
Run minimized
An option that allows the
Control Program to run in
the background rather than
appearing on your screen
each time you send a job to
print.
To set the Control Program
to run minimized:
Open the Control Pro-
1
gram. (See instructions for
opening the Control Program on this page.)
Click the Options tab.
2
Select Run Minimized.
3
1
From the Start menu, click Programs.
2
Click Compaq IJ750 Series.
3
Click Compaq IJ750 Control Program on LPTx.
Using the printer software
Note
Windows 3.1 and 3.11
See the appendix for
information about opening
the Control Program in
Windows 3.1 or 3.11.
11
Page 16

12
Chapter 2
Page 17
Printing on paper
and other media
Chapter 3
Printing on plain paper
Printing with your Compaq IJ750 Color Inkjet Printer is as simple as:
One - Loading your print media
Two - Selecting printer settings
Three - Sending your document to print
Step One - Loading your print media
You can load up to 100 sheets of print media (depending on thickness and
media type) into the printer. To load regular paper:
1
Place the paper against the right side of the automatic feeder, with the
print side facing you.
Quick Fix
Automatic feeder
loads multiple sheets
at one time
•Make sure the paper is
aligned against the right
side of the automatic
feeder.
•Make sure the media guide
is against the left edge of
the paper.
Quick Fix
Paper fails to feed
Align the paper against the
1
right side of the automatic
feeder.
Make sure no more than
2
100 sheets of plain paper
are loaded in the automatic feeder.
Slide the paper guide
3
against the left edge of the
paper.
Raise the front cover.
4
Remove any obstructions
5
from inside the printer.
Close the front cover.
6
Press the Paper Feed
7
button.
Printing on paper and other media
Glossary
Print media
General term for anything
you can print with your
Compaq IJ750 Color Inkjet
Printer. This includes paper,
envelopes, iron-on transfers,
glossy or photo paper,
cardstock, and
transparencies.
13
Page 18
Quick Fix
Paper jams
Tip
Press the Power button to
1
turn the printer off.
Pull firmly on the paper to
2
remove it. If you cannot
reach the paper because it
is too far inside the
printer, raise the front
cover and pull the paper
out from the front of the
printer.
Close the front cover.
3
Press the Power button to
4
turn the printer on.
Resend your document.
5
2
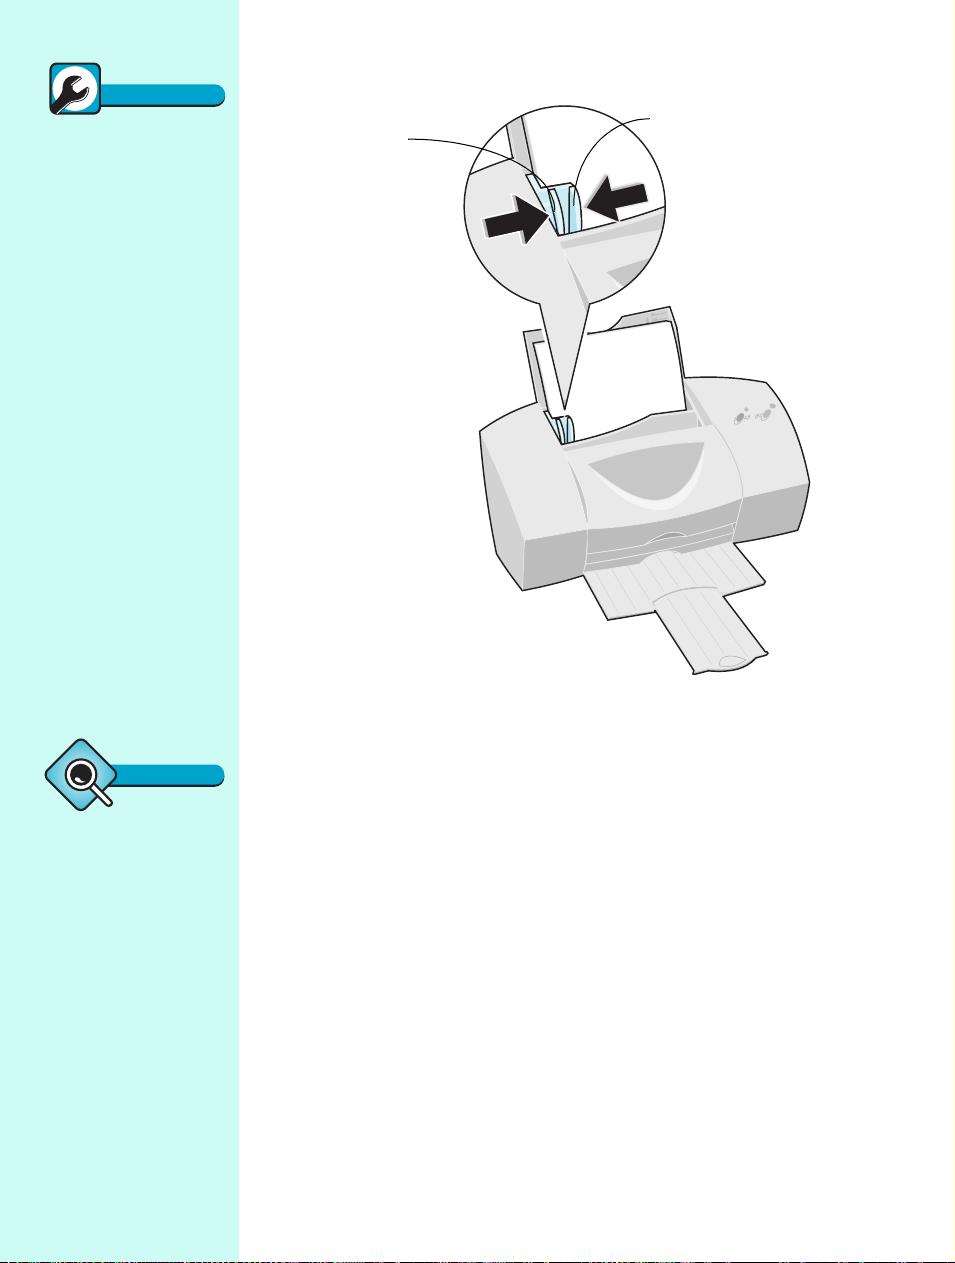
Squeeze the release tab and the paper guide together and slide the paper
guide to the edge of the paper.
Release tab
Paper guide
Printer settings
When you change the printer
settings from your
applications, the settings
only apply to that document.
To make your changes apply
to all documents, see
“Opening Printer Properties
from Windows” on page 10.
14
Step Two - Selecting printer settings
If you are using plain, letter-sized paper, and you want normal print quality and
speed, no adjustment to printer settings is necessary. The printer software is
already set for this type of document.
To change paper size or to print on specialty media (such as photo paper,
transparencies, or iron-on transfers) adjust the printer settings for maximum
performance.
To check your printer settings each time you print:
1
Open your application's File menu.
2
Choose Print, Print Setup or Printer Setup.
3
In the Printer Setup dialog box, click the Properties, Options, or Setup
button (depending on the application).
4
Change setting(s) as needed.
Chapter 3
Page 19
Step Three - Sending a document to print
To print your document:
1
Open your application’s File menu.
2
Choose Print.
3
When the Print Document dialog box appears, click the Print button.
Printing on specialty media
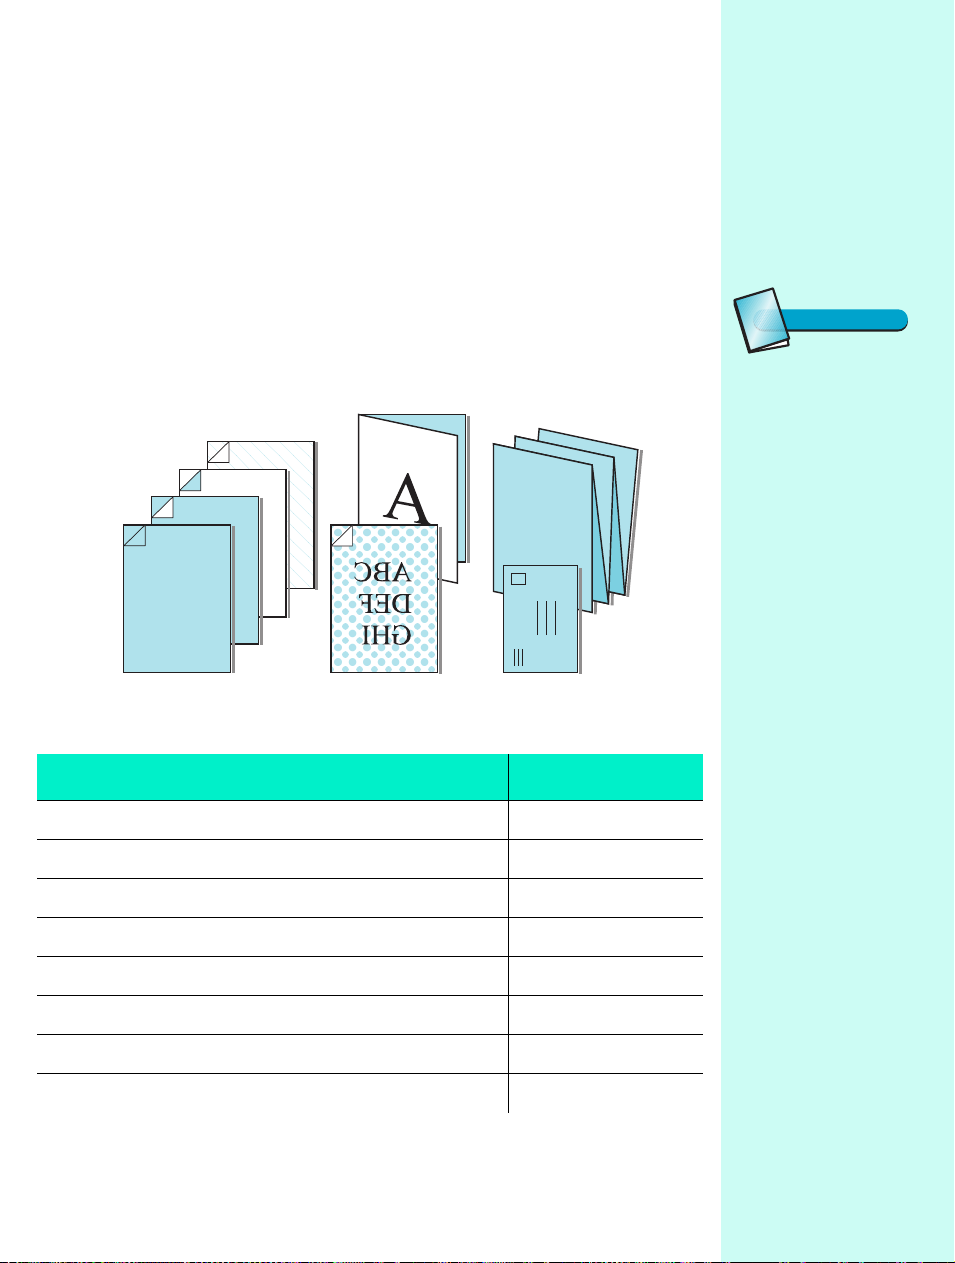
In addition to printing on regular paper, you can also print on a variety of
specialty media, such as envelopes, photo paper, transparencies, iron-on
transfers, and greeting cards.
Here’s where you’ll find step-by-step information for your specialized printing
needs:
For information about printing: See page:
Transparencies 16
Envelopes, index cards, or postcards 17
Glossary
Specialty media
Print media that, because of
size or type, requires
temporary modification to
your printer settings. This
would include, for example,
envelopes, glossy/photo
paper, and banner paper.
On customized paper sizes 18
Greeting cards 20
Iron-on transfers 21
Banners 22
Photos 24
Specialty media from the manual feeder 28
Printing on paper and other media
15
Page 20

Quick Fix
Transparencies stick
Tip
Quick Fix
together
To keep transparencies from
sticking together:
• Remove each
transparency as it exits the
printer and allow it to dry
before stacking.
• Use a transparency
designed for an inkjet
printer.
• Make sure the print side
faces up.
To open the Printer
Properties from an
application, click:
File.
1
Print, Print Setup or
2
Printer Setup.
The Properties, Options or
3
Setup button.
Printing transparencies
1
Load up to 25 transparencies against the right side of the automatic
feeder.
Insert transparencies with the
print side facing up (the
removable stripe away from you
and pointing down).
2
Customize the Printer Properties for printing transparencies. For
instructions on opening the Printer Properties, see the “Tip” in the
margin.
Click the
Quality
Document/
tab.
Squeeze the release tab and the media
guide together, and slide the media
guide to the edge of the transparencies.
Solid black areas
contain white streaks
•Try using a different fill
pattern in your software
application.
•Open Printer Properties and
select High 1200dpi from
the Document/Quality tab.
16
Select
Select
Select
600dpi
Click OK.
3
Print your transparencies
Chapter 3
Automatic
Transparency
Normal
.
.
.
.
Page 21

Printing envelopes or card stock
1
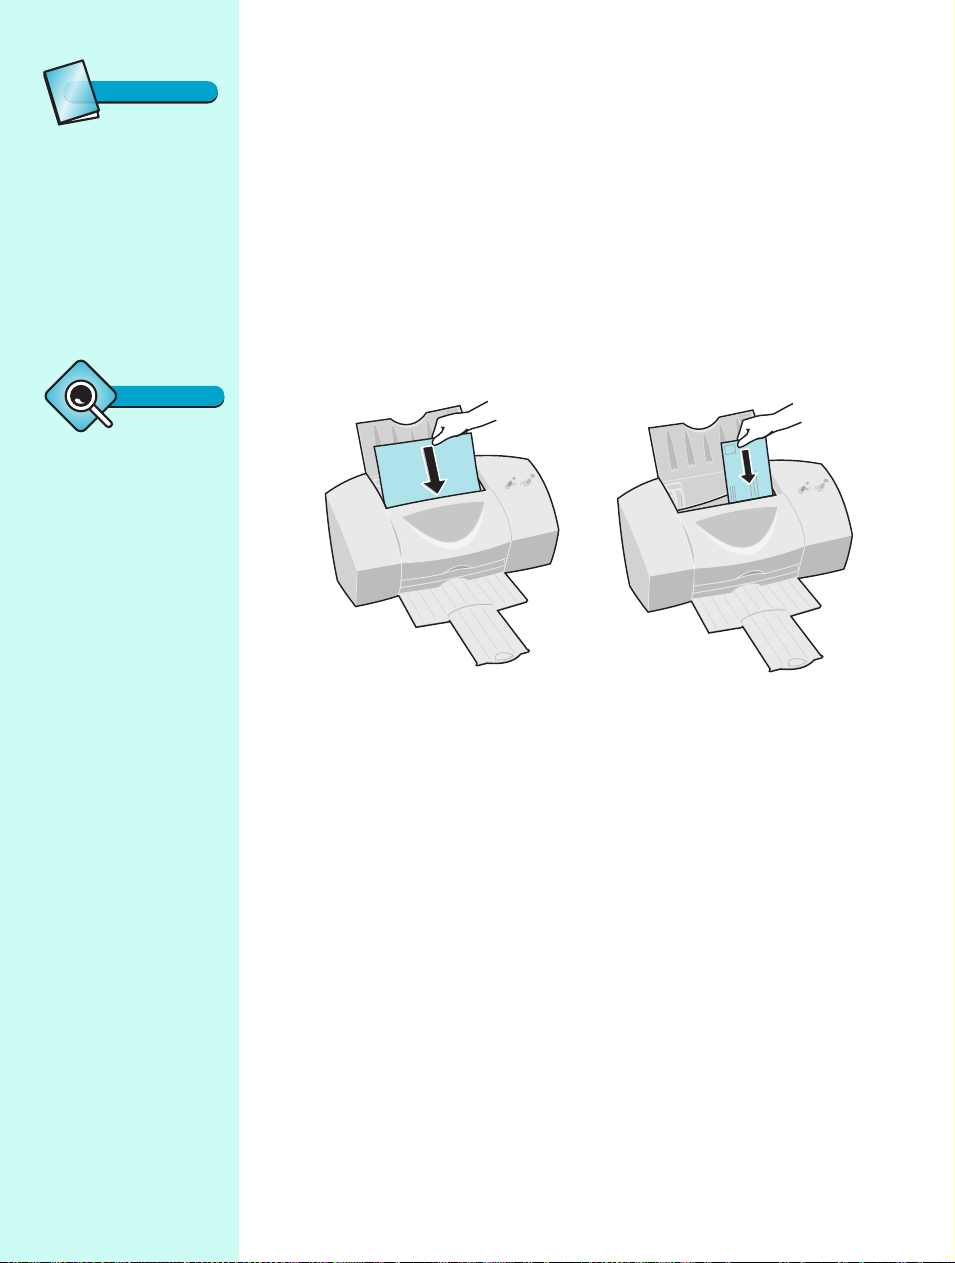
Load up to 10 env elopes, index cards, or postcards vertically against the
right side of the automatic feeder.
Insert the envelopes, index cards, or
postcards with print side facing you
and stamp location in the upper left
corner.
2
Customize the Printer Properties for printing envelopes or card stock.
Squeeze the release tab and the
media guide together, and slide the
media guide to the edge of the
envelopes, index cards, or postcards.
For information on opening the Printer Pr operties, see the “T ip” in
the margin.
Click the
Use the scroll bar
to select the
correct envelope or
card size.
Select
when printing
envelopes.
Click OK.
Paper
tab.
Landscape
Note
DOS Printing
When printing envelopes
from a DOS application, the
recommended envelope
orientation is reversed. In
DOS, the envelope should
be positioned so that the
stamp is in the lower right
corner.
Tip
Envelope settings
For best print quality near
envelope edges, use these
minimum margin settings in
your application for all
envelope sizes:
• Set the l
• Set the
• Set the
• Set the
eft margin
least 1.7mm (0.067 in.).
right margin
least 19.05mm (0.75 in.).
top margin
least 1.7mm (0.067 in.).
bottom margin
at least 3.37mm
(0.133 in.).
to at
to at
to at
to
Tip
To open the Printer
Properties from an
application, click:
File.
1
Print, Print Setup or
2
Printer Setup.
The Properties, Options,
3
or Setup button.
3
Print your envelopes, index cards, or postcards.
Printing on paper and other media
17
Page 22

Printing on customized paper
Tip
Tip
sizes
Printing near paper
edges
For the best print quality
near paper edges, use these
minimum margin settings in
your application:
• Set the left and right
margin settings to at least
6.35mm (0.25 in.) each for
all paper sizes except A4.
• For A4 paper sizes, set the
left and right margin
settings to at least 3.37mm
(0.133 in.) each.
• Set the
• Set the
top margin
least 1.7mm (0.067 in.).
bottom margin
for all paper sizes to
12.7mm (0.5 in.) for black
printing and 19.5mm
(0.75 in.) for color
printing.
to at
1
Load up to 25 sheets of specialty media or up to 100 sheets of plain
paper against the right side of the automatic feeder.
Load the specialty media or plain
paper with the print side facing
you.
Squeeze the release tab and the
paper guide together, and slide the
paper guide to the edge of the
paper.
Paper dimensions
You can use any paper size
that fits within these
dimensions:
Width
76.2 mm - 215.9 mm
3.0 inches - 8.5 inches
Height
127.0 mm - 431.8 mm
5.0 inches - 17.0 inches
18
Chapter 3
Page 23
2
Customize the Printer Properties for printing special paper sizes. For
information on opening the Printer Properties, see the “Tip” in the
margin.
Click the
Paper
tab.
Use the scroll bar to
Custom
select
size.
paper
Tip
To open Printer
Properties from an
application, click:
File.
1
Print, Print Setup, or
2
Printer Setup.
The Properties, Options,
3
or Setup button.
Glossary
Enter the
dimensions for the
paper size you are
using and click OK.
Click OK.
3
Print your customized document.
Letter/A4
Letter size refers to a sheet
of paper measuring 216mm
x 279.4mm (8.5 in. x 11 in.).
A4 is a standard paper size
and refers to a sheet of paper
measuring 210mm x 297mm
(8.25 in. x 11.7 in.).
Printing on paper and other media
19
Page 24

Tip
To open the Printer
Note
Properties from an
application, click:
File.
1
Print, Print Setup, or
2
Printer Setup.
The Properties, Options,
3
or Setup button.
Printing greeting cards
1
Load up to 10 greeting cards against the right side of the automatic
feeder.
Insert greeting cards with the
print side facing you.
2
Customize the Printer Properties to print greeting cards. For
information on opening Printer Properties, see the “Tip” in the
margin.
Click the
Quality
Select
Card Stock
Document/
tab.
Greeting
.
Squeeze the release tab an d the
paper guide together, and slide the
paper guide to the edge of the
greeting cards.
Software settings
override
The settings in your greeting
card application may
override the printer software
settings. Check the
documentation that came
with your application for
more information.
20
Click OK.
3
Print your greeting card.
Chapter 3
Page 25

Printing iron-on transfers
1
Load up to 10 transfers against the right side of the automatic feeder.
Insert the iron-on transfers with
the print side facing you (blank
side facing up).
2
Customize the Printer Properties to print iron-on transfers. For
information on opening Printer Properties, see the “Tip” in the
margin.
Squeeze the release tab and the paper
guide together, and slide the paper guide
to the edge of the iron-on transfers.
Tip
Print a sample first
Many software applications
create iron-on transfers
differently. We recommend
printing a sample on plain
paper before printing it on
an iron-on transfer. When
the document prints to your
satisfaction, load the iron-on
transfer(s) into the automatic
feeder.
Tip
To open the Printer
Properties from an
application, click:
File.
1
Print, Print Setup or
2
Printer Setup.
The Properties, Options,
3
or Setup button.
Click the
Document/
Quality
tab.
Iron-On
Select
Transfer
Click OK.
3
Print your iron-on transfer.
.
Printing on paper and other media
Note
Image reversal
Some software applications
allow you to reverse the
image you intend to print.
Since your printer driver
automatically reverses the
image when printing iron-on
transfers, you do not need to
select this option in your
application.
21
Page 26

Tip
Inkjet banner paper
Use banner paper
recommended for inkjets.
We do not recommend using
the type of continuous form
paper intended for dot
matrix printers. This kind of
continuous form paper is
designed for use with a
different kind of ink.
Printing banners
1
Remove any paper from the automatic feeder.
2
Load the number of sheets required to print your banner (up to 20).
a Open the banner paper holder on
the back of the printer.
c
Insert banner paper into the banner
paper holder.
b Pull the banner paper support up.
22
Chapter 3
Page 27

d
Insert the unattached edge of the
first page into the automatic feeder.
e
Squeeze the release tab and the
paper guide together and slide
the paper guide to the edge of
the banner.
3
Customize the Printer Properties for printing banners. F or inf ormation
on opening the Printer Properties, see the “Tip” in the margin.
Click the
Paper
tab.
Use the scroll bar to
Banner
select
Banner A4
size.
Click OK.
4
Print your banner.
or
paper
Tip
To open the Printer
Properties from an
application, click:
File.
1
Print, Print Setup, or
2
Printer Setup.
The Properties, Options,
3
or Setup button.
Tip
Removing extra
banner paper
If you loaded more paper
than you needed:
Tear off your banner.
1
Press the Paper Feed but-
2
ton to remove extra paper
from the automatic feeder.
Printing on paper and other media
23
Page 28
Quick Fix
Photo papers stick
Quick Fix
Quick Fix
together
•Use a glossy/photo paper
designed for an inkjet
printer.
•Remove each sheet of
glossy/photo paper as it
exits the printer.
White streaks appear
in photos
Clean the print cartridge
nozzles. For help, see
“Cleaning print nozzles” on
page 35.
Printing photos
1
To print high-quality photos, you will need to replace the black
cartridge in your printer with a photo cartridge.
a
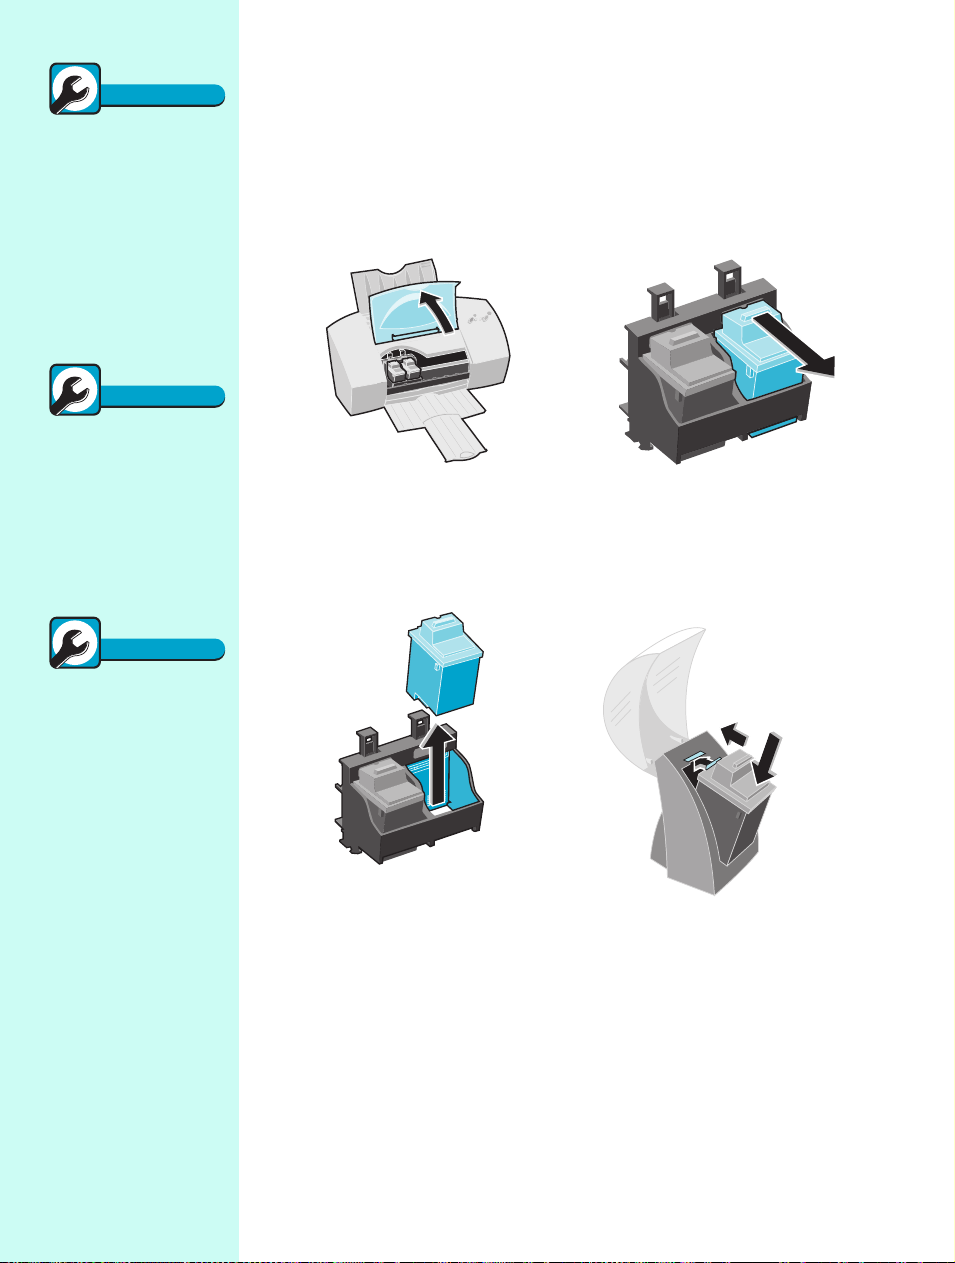
Raise the front cover. The
print cartridge carrier moves
to the loading position (unless
printer is busy).
c Remove the black
cartridge from the
cartridge carrier.
Snap
b
the black cartridge
out of place.
d Store the black cartridge
temporarily in the print
cartridge storage unit that
came with your photo
cartridge.
Printer appears to be
printing, but nothing
appears on the page
Remove sticker and tape
from the gold contact area of
the cartridge.
24
Chapter 3
Page 29

e
Remove the sticker and
tape covering the gold
contact area of the photo
print cartr idge.
Complete the cartridge installation by updating th e control program.
2
For information on opening the Control Program, see the “Tip” in
the margin
Click the
tab.
Install/Change
Click
Cartridge
.
Cartridges
.
f
Insert the photo
cartridge.
Snap
g
the photo
cartridge into place.
Cartridge handling
Do NOT touch the gold
contact area on the print
cartridge! Microscopic
particles may clog the print
nozzles.
Photo cartridge
P/N 337711-001
To open the Control
Program, click:
Start.
1
Programs.
2
Compaq IJ750 Series.
3
Compaq IJ750 Control
4
Program on LPTx.
Warning
Supplies
Tip
Follow the instructions on the Change Cartridge screen to install a new
3
or an old photo cartridge.
If your printer software prompts you to align your cartridges, insert a
4
sheet of plain paper into the automatic feeder and follow the
instructions on your screen.
Place up to 25 sheets of photo paper against the right side of the
5
automatic feeder.
Printing on paper and other media
Tip
Photo paper
Although you can use plain
paper to print photos, for the
best print quality, we
recommend using photo
paper designed for inkjet
printers.
25
Page 30

Tip
4x6 photo paper
Tip
Tip
Tip
If you’re printing on 4x6
photo cards, you will need to
insert the cards into the
printer vertically. For help,
see “Printing envelopes or
card stock” on page 17.
Allow photos to dry
Remove each sheet as it
exits the printer and allow it
to dry before stacking.
Insert the photo paper with
the print side facing you.
6
Customize the Printer Properties for printing photos. For information
Squeeze the release tab and
the paper guide together, and
slide the paper guide to the
edge of the photo paper.
on opening the Printer Properties, see the “Tip” in the margin.
To open the Printer
Properties from an
application, click:
File.
1
Print, Print Setup, or
2
Printer Setup.
The Properties, Options,
3
or Setup button.
After printing photos
For best results, remember
to replace the photo
cartridge with a black
cartridge before you print
text files. For help, see
“Installing or changing a
print cartridge” on page 30.
Click the
Quality
Select
Automatic
Select
Photo Paper
Select
1200dpi
Document/
tab.
Glossy/
High
.
.
.
26
Chapter 3
Page 31

7
Click the paper tab and use the scroll bar to select the correct size of
photo paper. For information on opening the Printer Properties, see
the “Tip” in the margin.
Click the
tab.
Use the scroll
bar to select the
correct size of
photo paper.
Click OK.
8
Print your photo.
Paper
Replace the photo cartridge with the black cartridge before you print text files.
For help, see “Installing or Changing a Print Cartridge” on page 30.
Tip
To open the Printer
Properties from an
application, click:
File.
1
Print, Print Setup, or
2
Printer Setup.
The Properties, Options,
3
or Setup button.
Quick Fix
Printer prints slowly
•Decrease the print quality.
•If you are printing a text
document, make sure you
are using a black print
cartridge and not a photo
cartridge.
•Consider purchasing more
memory (RAM) for your
computer.
•Check the document you
are printing. If you are
using several graphics, it
may take longer to print
than regular text.
Printing on paper and other media
27
Page 32
Glossary
Specialty media
Tip
Print media that, because of
size or type, requires
temporary modification to
your printer settings. This
would include, for example,
envelopes, glossy/photo
paper, and banner paper.
Load envelopes or
card stock
Load an envelope or card
stock
vertically
right side of the manual
feeder.
against the
Printing specialty media from the manual feeder
You can load only one sheet of specialty media into the manual feeder. To load
specialty media:
1
Place the specialty media against the right side of the manual feeder,
with the print side facing you.
When printing large media, load
one sheet at a time, m aking sure
your paper rests against the right
side of the manual feeder.
When printing envelopes or card
stock, make sure yo ur envelope
or card is inserted vertically as
shown, and rests against the right
side of the manual feeder.
28
2
Push the specialty media down until the printer automatically loads it.
Chapter 3
Page 33

Chapter 4
Caring for your
print cartridges
Glossary
This chapter describes how to install, replace, and care for your print cartridges.
For information about: See page:
Installing or replacing print cartridges 30
Removing a print cartridge from the printer 30
Installing or changing a print cartridge 30
Completing the cartridge installation 31
Improving print quality 32
Aligning print cartridges 32
Cleaning print nozzles 35
Wiping print nozzles and contacts 37
Cleaning print cartridge carrier contacts 39
Preserving print cartridges 40
Print cartridge
The ink reservoir and
printhead unit.
Caring for your print cartridges
29
Page 34

Supplies
Black cartridge
Note
Note
Warning
337709-001
Color cartridge
337710-001
Photo cartridge
337711-001
Storing an extra
print cartridge
Use the print cartridge
storage unit that came with
your photo cartridge to keep
your extra print cartridge
fresh when you are not using
it.
Installing or replacing print cartridges
If you are replacing a print cartridge, begin with “Removing a print cartridge
from the printer.”
If you are installing a print cartridge for the first time, see “Installing or
changing a print cartridge.”
Removing a print cartridge from the printer
1
Make sure the Power light is on.
2
If you need to remove a print cartridge before you install a different
one, follow these steps:
a
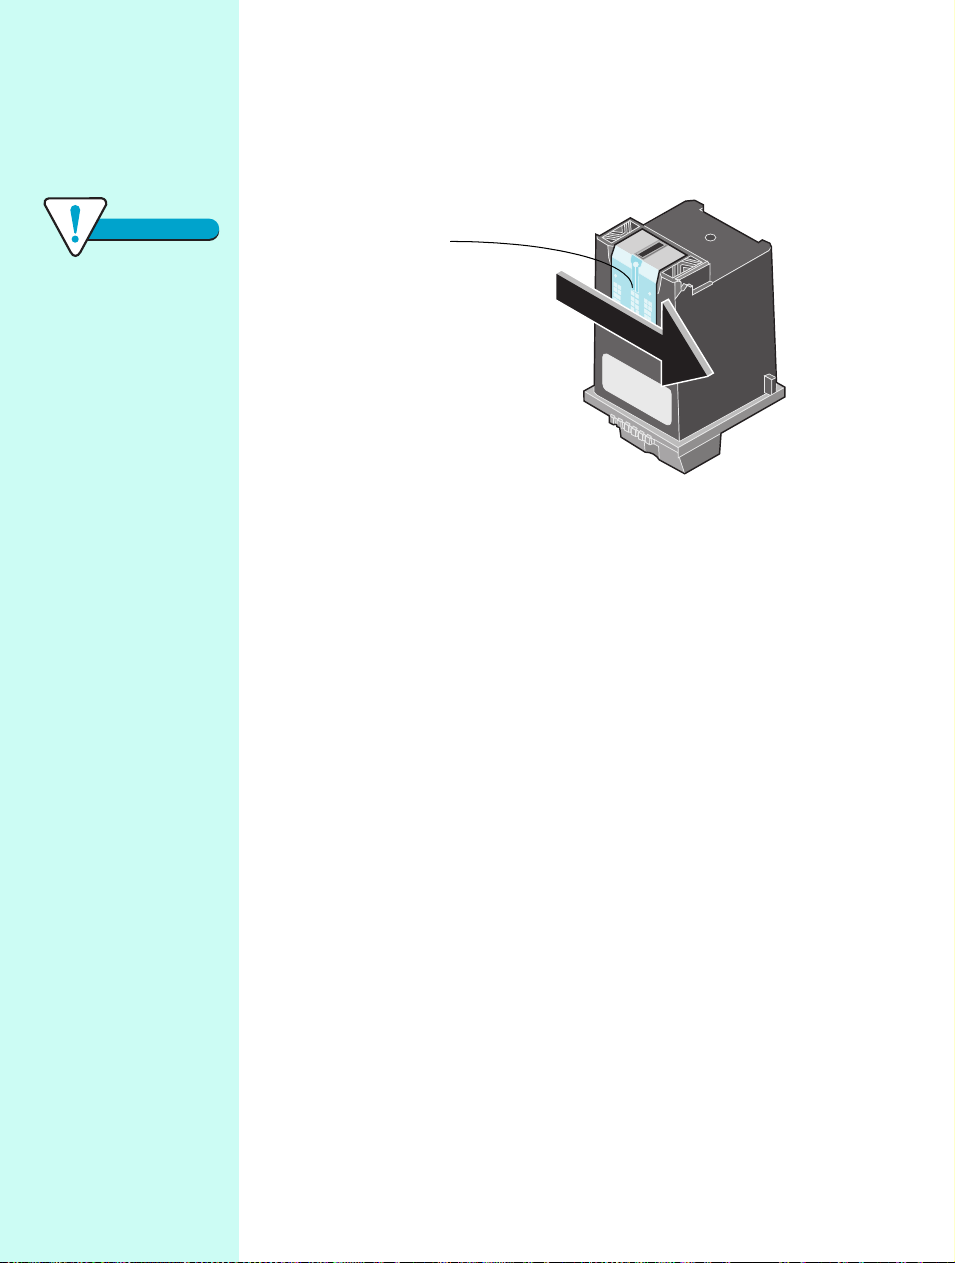
Raise the front cover.
The print cartridge
carrier moves to the
loading position unless
the printer is busy.
b
Pull the handle
of the print
cartridge you
are replacing
toward you
until you hear a
snap
.
c Remove the
print cartridge
by lifting it up
and out of the
printer.
Cartridge disposal
Do not shake a used print
cartridge. The remaining ink
can leak. Before discarding
the used print cartridge,
place it in a leak-proof bag.
Cartridge Handling
Do NOT touch the gold
contact area on the print
cartridge. Microscopic
particles may clog the print
nozzle.
30
3
Store or dispose of the print cartridge you remove.
4
Continue with “Installing or changing a print cartridge.”
Installing or changing a print cartridge
For the best print quality, you must install the print cartridge in the printer and
update the printer software to reflect the changes you made.
Chapter 4
Page 35

If necessary, follow the steps for “Removing a print cartridge from the printer”
on page 30 before proceeding.
1
To install the cartridge in the printer:
a If you are installing a
new cartridge, remove
the sticker and tape
covering the gold
contact area of the print
cartridge.
2
Close the front cover.
3
IMPORTANT: Continue with “Completing the cartridge installation.”
b Insert the
replacement print
cartridge into the
print cartridge
carrier.
c Push
back
firmly on
the cartridge until it
snaps
securely into
place.
Quick Fix
Print cartridge is
loose
If the print cartridge seems
loose and moves freely in its
carrier, it is not locked into
place. Make sure the
cartridge snaps into place
and is properly secured.
Note
Ink Low message
If the Ink Low message
appears, you may want to
install a new print cartridge
to avoid diminished print
quality during a printing job.
Completing the cartridge installation
To complete your cartridge installation, you must update your printer software
by indicating the cartridge change you made in the printer. Updating the printer
software ensures the best print quality and an updated ink level image in the
Control Program.
Caring for your print cartridges
31
Page 36

Tip
To open the Control
Tip
Tip
Tip
Program, click:
Start.
1
Programs.
2
Compaq IJ750 Series.
3
Compaq IJ750 Control
4
Program on LPTx.
Text printing
For normal text printing,
make sure you have a black
cartridge installed instead of
a photo cartridge.
Ink levels
To view ink levels, check
the Cartridges tab. The ink
level image shows you how
much ink is left in your print
cartridges.
To complete the cartridge installation:
1
Use the Control Program to update the printer software. For
information on opening the Control Program, see the “Tip” in the
margin.
Click the
tab.
Click
Cartridge
2
Follow the instructions on the Change Cartridge screen to install a new
Cartridges
Install/Change
.
standard or high yield cartridge or an old cartridge.
Make sure the print cartridges are installed correctly. For help, see
“Installing or changing a print cartridge” on page 30.
3
If you installed a new print cartridge, align the print cartridges for the
best print quality. For help, see “Aligning print cartridges.”
Cartridges in correct
positions?
Make sure your print
cartridges are in their correct
positions and snapped into
place. The black cartridge
goes in the right carrier
position and the color
cartridge goes in the left.
32
Improving print quality
You can improve print quality through periodic cartridge maintenance. A
simple cartridge alignment may improve your print quality. However, if your
printer still is not printing to your satisfaction, you may need to clean the print
nozzles.
Aligning print cartridges
Normally, you only align the print cartridges after you have installed a new
print cartridge. However, if the black portions of a graphic or text do not align
properly with the color portions, you need to realign the print cartridges.
Chapter 4
Page 37

The following illustrations show a sample result of aligned and misaligned
print cartridges:
Aligned Misaligned
1
Use the Control Program to begin alignment. For information on
opening the Control Program, see the “Tip” in the margin.
Tip
Cartridge alignment
Align the print cartridges
when:
•Characters are not aligned
correctly at left margin.
•The black portions of a
graphic or text do not align
properly with the color
portions.
•Vertical lines appear
“wavy.”
Click the
tab.
Select the
Cartridges
Cartridges
Align
button.
To open the Control
Program, click:
Start.
1
Programs.
2
Compaq IJ750 Series.
3
Compaq IJ750 Control
4
Program on LPTx.
Tip
Caring for your print cartridges
33
Page 38
Note
Alignment page
Tip
Quick Fix
The alignment page that you
print may look different
from the example shown
here.
Print quality
suggestions
•Make sure you are using a
paper designed especially
for inkjet printing.
•If you are using specialty
media, make sure the print
side is facing you.
The Align Cartridge dialog box appears on your screen. Depending on
the cartridge combination you have installed in your p rinter, a test page
with one or more alignment patterns is printed. Each pattern has a
number under it.
The test page looks similar to the one shown:
Sample group A,
pattern 4.
2
From each alignment group on the test page, locate the number under
the alignment pattern that comes closest to forming a perfectly straight
line.
For example, select 4 from Group A, since it comes closest to forming a
straight line.
3
In the Align Cartridges dialog box, enter the numbers from the printed
test page of the appropriate alignment settings.
If print is smudged or
too dark:
•Make sure the Paper Type
setting in the printer
software matches the paper
type loaded in the printer.
•Make sure the paper is
straight and in good
condition.
•Let the ink dry before
handling the paper.
•Clean the print cartridge
nozzles. For help, see
“Cleaning print nozzles” on
page 35.
34
For example,
select 4 from A
Horizontal.
4
After you have entered a number for all of the patterns, click OK.
Chapter 4
Page 39

Cleaning print nozzles
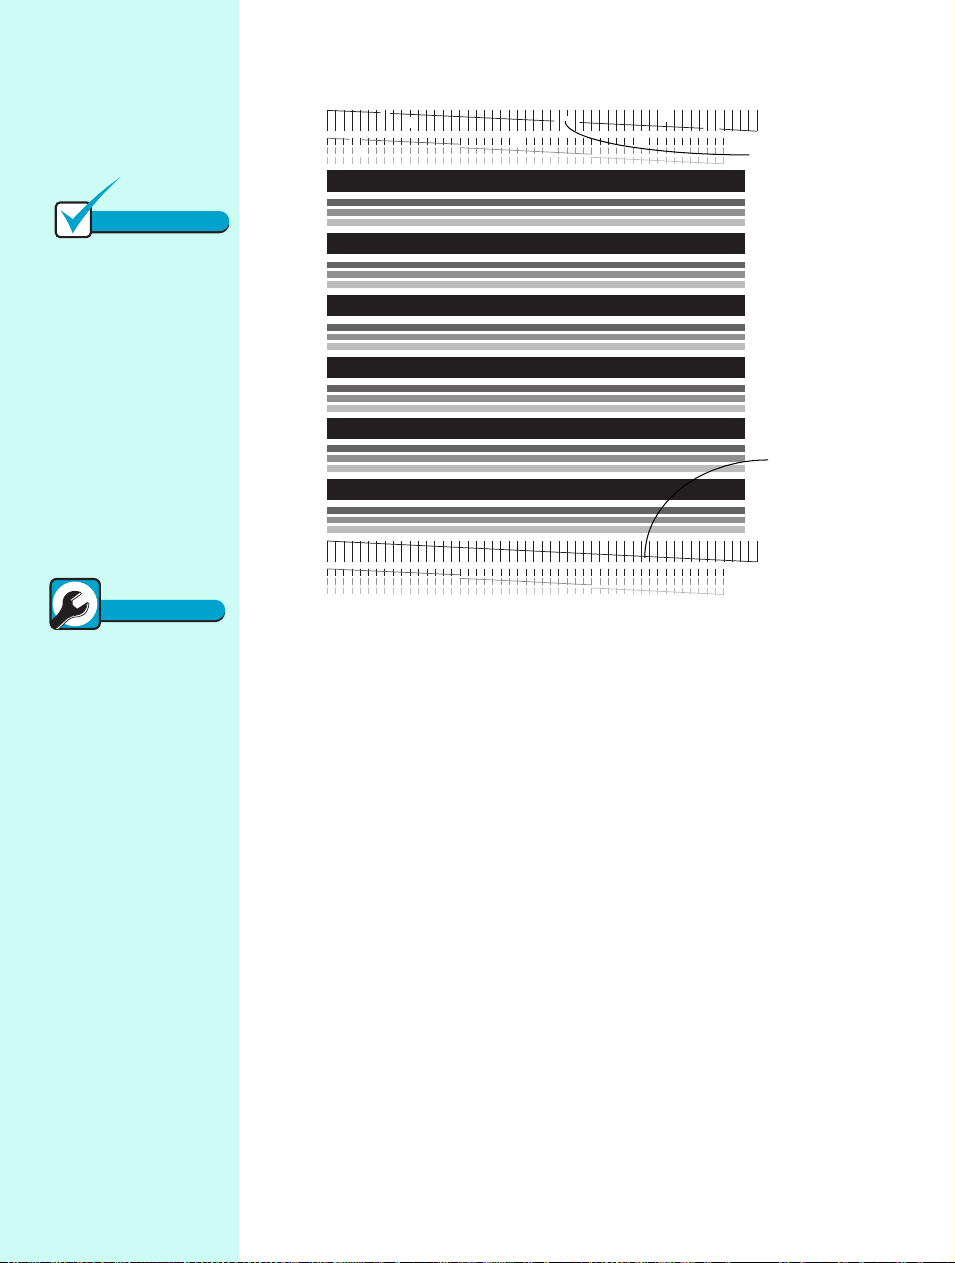
The print cartridge nozzle test helps you pinpoint any clogged nozzles. The
nozzle test also cleans the print cartridge by cleaning the nozzles. A test line
prints so you can see if the cleaning process was successful.
Clean the print nozzles when you suspect the nozzles are clogged or when
characters are not printing completely.
1
Make sure plain paper is loaded in the printer.
2
Use the Control Program to run the nozzle test. For information on
opening the Control Program, see the “Tip” in the margin.
Click the
Cartridges
Click the
Nozzles
tab.
Clean Print
button.
Tip
To open the Control
Program, click:
Start.
1
Programs.
2
Compaq IJ750 Series.
3
Compaq IJ750 Control
4
Program on LPTx.
Caring for your print cartridges
35
Page 40
Note
Clean the print
Quick Fix
nozzles when:
•Characters are not printing
completely.
•Characters print with white
lines.
•White dashes appear in
graphics.
•Print is smudged or too
dark.
Poor print quality
Make sure you have
installed your cartridges in
their appropriate positions.
The black cartridge goes in
the right carrier position and
the color cartridge goes in
the left.
The printer feeds a sheet of paper and prints a nozzle test pattern,
similar to the one shown:
Broken lines
indicate
clogged
nozzles.
Unbroken
lines indicate
clean nozzles.
3
Examine the test pattern.
4
Compare the diagonal lines above the printed bars to the diagonal lines
below the printed bars.
Look for breaks in the diagonal lines above the printed bars. Broken
lines indicate clogged nozzles.
• If the bottom line still has breaks, run the te st tw o mo re times. If t he
print quality is satisfactory after running the test three times, the
print nozzles are clean. You do not need to complete the remaining
steps.
• If the print quality of both lines is not satisfactory after running the
test three times, go to step 5.
5
Remove and reinstall the print cartridge.
6
Repeat the nozzle test.
7
If the lines are still broken, wipe the print cartridge nozzles. For help,
see “Wiping print nozzles and contacts” on page 37.
36
Chapter 4
Page 41

Wiping print nozzles and contacts
If print quality does not improve after cleaning the print nozzles (see “Cleaning
print nozzles” on page 35), the problem may be caused by dried ink on the prin t
cartridge nozzles.
1
Wipe the print cartridge nozzles:
a
Remove the print cartridge from the printer. For help, see
“Removing a print cartridge from the printer” on page 30.
b
Dampen a clean cloth with water and gently wipe the entire
gold-colored area, including the nozzles.
When cleaning the color cartridge, wipe the nozzles in one
direction so the colors do not mix.
Nozzles
Quick Fix
Printer prints
unexpected or
missing characters
•Make sure your Compaq
Color Inkjet printer driver
is set as the default printer.
•Your printer may have
bidirectional
communication problems.
For help, see Bidirectional
communications problems
in the Printer Properties
Help. To open Help from
inside an application, click:
File.
1
Print, Print Setup or
2
Printer Setup.
The Properties,
3
Options, or Setup
button.
The Help button.
4
Help Topics.
5
Troubleshooting.
6
Bidirectional communi-
7
cations problems.
c
T o dissolve dried ink, hold the damp cloth against the nozzles for
about three seconds. Gently blot and wipe dry.
2
Allow the gold-colored area to dry.
Caring for your print cartridges
Warning
Cartridge handling
Do NOT wipe the nozzles
and contacts with the same
section of cloth.
Microscopic particles may
clog the print nozzles.
37
Page 42
Warning
Cartridge handling
Do NOT wipe the nozzles
and contacts with the same
section of cloth.
Microscopic particles may
clog the print nozzles.
3
Wipe the print cartridge contacts:
a
Dampen another section of clean cloth with water and gently
wipe the entire gold-colored area, including the contacts.
When cleaning the color cartridge, wipe the contacts in one
direction.
Contacts
b
To dissolve dried ink, hold the damp cloth against the contacts
for about three seconds. Gently blot and wipe dry.
4
Allow the gold-colored area to dry.
5
Reinstall the print cartridge and repeat the nozzle test. For help, see
“Cleaning print nozzles” on page 35.
6
If the nozzle test line is still broken, clean the print cartridge carrier
contacts. For help, see “Cleaning print cartridge carrier contacts” on
page 39.
38
Chapter 4
Page 43

Cleaning print cartridge carrier contacts
Clean the print cartridge carrier contacts only if you have cleaned and wiped
the print nozzles and print quality is still unsatisfactory.
To clean the print cartridge carrier contacts:
1
Remove both print cartridges. For help, see “Removing a print cartridge
from the printer” on page 30.
2
Unplug the power supply from the electrical outlet.
3
Use a clean, dry cloth to clean the cartridge carrier contacts inside the
printer.
Carrier contacts
4
Replace the print cartridges. For help, see “Installing or changing a
print cartridge” on page 30.
5
Close the front cover.
6
Plug the printer power supply into an electrical outlet.
Note
Cartridge carrier
positioning
Unplugging the power
supply forces the cartridge
carrier to remain in the
loading position.
Quick Fix
Ink smears on the
page
•If the ink on a page is
smeared by the next page
exiting the printer, the ink
may still be damp when a
page finishes printing.
Remove the pages as they
exit the printer and allow
them to dry before
stacking.
•Select a higher print quality
setting from the Document/
Quality tab in the Printer
Properties.
•Select the Natural Color
setting from the Document/
Quality tab in the Printer
Properties.
If the print quality has not improved after this cleaning process, replace your
print cartridge. If print quality still does not improve, your printer may require
service.
Caring for your print cartridges
39
Page 44

Preserving print cartridges
To ensure the longest life from your print cartridge and optimum performance
from your printer:
• Keep a print cartridge in its packaging until you are ready to
install it.
• Do not remove a print cartridge from the printer except to replace,
clean, or store it in a print cartridge storage unit. The print cartridge will
not print correctly if removed from the printer and left exposed for an
extended period of time.
• If a print cartridge runs out of ink, leave the empty cartridge in the
printer until you are ready to replace it. Printing with one of the print
cartridge carriers empty may cause printer problems.
• Do not refill print cartridges. Refilling empty print cartridges may
invalidate your warranty. Incompatible inks can cause damage to the
printhead or to the printer. For best results, use Compaq supplies with
the printer.
40
Chapter 4
Page 45

Appendix
In this section, you can find
information about:
• Installing the printer software
• Printing from Windows 3.1,
3.11, or NT 4.0
• Printing from DOS
• Limited Warranty Statement
• Federal Communications
Commission (FCC) Compliance
Information Statement
• Notices
• Safety information
Installing the printer
software
You can obtain the printer software
from the CD-ROM, diskettes, or
World Wide Web.
Using the CD-ROM
If your computer has a CD-ROM
drive, follow the steps in the Getting
Started booklet to install your printer
software.
If your computer does not have a
CD-ROM drive, you can create
driver diskettes using another
computer with a CD-ROM drive.
Using diskettes
Follow the instructions for your
operating system to install the printer
software from diskettes.
Windows 95 or 98
IMPORTANT: If Windows
displays a message indicating your
printer has been found, select
Cancel. If the update Device Driver
Wizard appears, select Cancel.
1 Make sure your computer is on
and Windows is running.
2 Insert Setup Disk 1 into your
disk drive.
3 From the Start menu, choose
Run.
4 In the command-line text box,
type the letter of your disk
drive, followed by
:\setup (for example,
a:\setup), and then click OK.
5 When prompted by the printer
software, insert the appropriate
disks into your disk drive and
click OK.
6 Follow the instructions on the
screen.
Windows 3.1 or 3.11
1 Make sure your computer is on
and Windows is running.
2 Insert Setup Disk 1 into your
disk drive.
3 From the Windows Program
Manager menu bar, choose
File, and then choose Run.
4 In the command-line text box,
type the letter of your disk
drive, followed by
:\setup (for example,
a:\setup), and then click OK.
5 When prompted by the printer
software, insert the appropriate
disks into your disk drive and
click OK.
6 Follow the instructions on the
screen.
Using a downloaded
printer driver
If your computer does not have a
CD-ROM drive, you can download a
driver from Compaq’s World Wide
Web site at www.compaq.com/
athome.
1 From Compaq’s web page,
select the appropriate driver for
your operating system.
2 Select Save to Disk.
3 Select a location on your hard
disk drive.
4 Double-click the ex ecutable
(.exe) file to open it.
The WinZip Self-Extractor
window opens.
5 Follo w t he i nst ructi ons on your
screen.
Printing from
Windows 3.1 or 3.11
When you installed the software for
your printer, several applications
were installed on your computer.
The printer software applications
allow you to perform printing tasks
with the best printing results. You
can also use the printer software to
care for your printer.
Using the Control
Program
Use the Control Program when you
want to:
• Align print cartridges for best
print quality
• Clean print nozzles
Appendix
41
Page 46

• Change settings for DOS
printing
• Control when and how the
Control Program appears
• Install or replace print cartridges
• Monitor print jobs and print
cartridge ink levels
• Print a test page
• Cancel a print job
Opening the Control Program
From the Compaq IJ750 program
group, double-click the Control
Program icon.
Using the Printer
Properties
Use the Printer Properties when you
want to:
• Adjust print quality / print speed
• Choose different sizes and types
of media
• Choose page orientation
• Reset document defaults
Opening the Printer
Properties from your
application
You can open the Printer Properties
from almost any application. This
allows you to change printer settings
for each document you print. To
open the Printer Properties from
your application:
1 Open the application’s File
menu.
2 Choose Print (or Printer)
Setup.
3 In the Printer Setup dialog box,
click the Properties, Options
or Setup button (depending on
the application).
4 Change settings as needed.
Opening Printer Properties
from Windows
To make your changes apply to all
documents, open the Printer
Properties from Windows.
1 Open the Compaq IJ750
Control Program.
2 Click the Windows Printing
tab.
3 Click the Windows Driver
Setup button.
Using the Spool Manager
in Windows 3.1 or 3.11
The Spool Manager automatically
runs each time you send a document
to print through Windows. To open
the Spool Manager from the Control
Program:
1 From the Compaq IJ750
program group, double-click
the Control Program icon.
2 Click the Windows Printing
tab.
3 Click the Spool Manager
button.
Printing from
Windows NT 4.0
Using the Control
Program
The Control Program appears each
time you send a job to print. Use the
Control Program when you want to:
• Cancel a print job
• Enable Control Program options
• Monitor print jobs and print
cartridge ink levels
• View the job progress.
• Align print cartridges
• Clean print nozzles
• Print a test page
• Install or replace print cartridges
Opening the Control
Program
1 From the Start menu, click
Programs.
2 Click the Compaq IJ750
program group
3
Click Control Program.
Using the Printer
Properties.
Use the Printer Properties when you
want to:
• Adjust the quality of print jobs
• Change document settings
• Choose different sizes and types
of media
• Choose page orientation
Opening the Printer
Properties
When you open the Printer
Properties from an application, the
settings apply only to the document
you are currently creating.
To open the Printer Properties:
1 Open the application’s File
menu.
2 Choose Print, Print Setup or
Printer Setup (depending on
the application).
3 In the Printer Setup dialog box,
click the Properties, Options
or Setup button (depending on
the application).
4 Change settings as needed.
You can also open Printer Properties
from the Windows NT 4.0 desktop
and adjust the settings to apply to all
documents.
To open Printer Properties from the
Windows NT 4.0 desktop:
1 From the Start menu, click
Settings.
2 Click Printers.
42
Appendix
Page 47

3 Right-click on the Compaq
IJ750 printer icon.
4 A sidebar menu appears. Click
Document Defaults.
5 Change settings as needed.
Learn more about your
printer software
To learn more about the printer
setting options, click the Help button
at the bottom of each tab in the
printer software.
Printing from DOS
You must install the following
before you can print from DOS
applications:
• Compaq IJ750 printer software
• PCL 3 printer driver for each
DOS application
Appropriate drivers in order of
preference are:
– HP DeskJet 500C
– HP DeskJet 500
You must use the HP DeskJet 500C
for color print jobs. If your
application does not include drivers
for the HP DeskJet 500C or the HP
DeskJet 500, contact the software
manufacturer for a compatible driver
replacement.
Printing from a DOS
application in Windows
Use these instructions only if your
application runs from the DOS
prompt in Windows.
When you print from a DOS
application, your printer uses PCL 3
emulation. You must install a printer
driver for PCL 3 emulation in each
DOS application.
In Windows 3.1or 3.11, avoid
switching from your DOS
application to another application
while your job is printing. See the
Readme file for your Compaq printer
for more information.
Follow the steps to enab l e D O S
printing:
1 Make sure you are in W indo ws,
not native DOS.
2 From the Control Program,
click the Options tab.
3 For help opening the Control
Program, see “Using the Printer
Properties” on page 8.
4 Make sure Disable DOS
Printing is not checked.
5 Start your application from
DOS.
6 For help, see your Windows
documentation.
7 Install the HP DeskJet 500C as
the current printer in the DOS
application from which you are
printing.
Some applications offer a color
or black (mono) version of the
HP DeskJet 500C driver.
Choose the black (mono)
version if you are printing in
black only. Choose the color
version if you are printing in
color and black.
Changing print settings
for DOS applications
If possible, use options in your DOS
application to change printer
settings. Use the following steps
only if you want to change a printer
setting that does not exist in your
DOS application. Settings in your
DOS application override settings in
the driver.
1 From the Control Program,
click the DOS Printing tab.
For help opening the Control
Program, see “Using the Printer
Properties” on page 8.
2 Change settings as needed.
Note:
When you make changes on
the DOS Printing tab, they
apply to DOS print jobs
only. When you make
changes on other tabs, they
apply to all print jobs.
Printing to a file
To print a document that has been
processed by the driver and stored in
a file (that is, printed to file):
1 Make sure you are in W indows,
not native DOS.
2 Start your application from
DOS.
3 For help, see your Windows
documentation.
4 Create a print file using the
“Print to File” function of your
application. For help on
printing to a file, see your
application’s user's
documentation.
5 Use this DOS command to
copy the print file to the port
where the printer is connected:
copy filename lptn /b
In the command example:
–copy is the DOS copy com-
mand.
– filename is the name of the
print file you created.
–lptn is the port where your
printer is connected. For
example, lpt1 or lpt2.
–/b instructs the computer to
send the data in binary
form.
Note:
Avoid using the DOS Print
command to send a job to
the printer port. The Print
command causes printing
delays.
Appendix
43
Page 48

Printing from nonWindows DOS
applications
Follow these steps if your
application runs from the native
DOS prompt, but does not run from
the DOS prompt in Windows.
1 From the printer's Control
Program, click the Options tab.
For help opening the Control
Program, see “Using the Printer
Properties” on page 8.
2 Make sure Disable DOS
Printing is not checked.
3 Exit Windows.
4 Start your DOS application.
5 Install the HP DeskJet 500C as
the current printer in the DOS
application from which you are
printing.
Some applications offer a color
or black (mono) version of the
HP DeskJet 500C driver.
Choose the black (mono)
version if you are printing in
black only. Choose the color
version if you are printing in
color and black.
If your application does not
offer the HP DeskJet 500C
printer driver, install the HP
DeskJet 500 printer driver. You
will not be able to print in color
with the HP DeskJet 500
printer driver.
For help installing a printer, see
your application user's
documentation.
6 Create a print fil e using the
“Print T o File” function of your
application. For help on
printing to a file, see your
application’s documentation.
7 Exit the DOS application.
8 Start Windows.
9 Double-click the MS-DOS icon
in the Main group of Windows.
10 Use this DOS command to
copy the print file to the port
where the printer is connected:
copy filename lptn /b
In the command example:
–copy is the DOS copy com-
mand.
– filename is the name of the
print file you created.
–lptn is the port where your
printer is connected. For
example, lpt1 or lpt2.
–/b instructs the computer to
send the data in binary
form.
Note:
Avoid using the DOS Print
command to send a job to
the printer port. The Print
command causes printing
delays and may corrupt the
print job.
Quick fixes for DOS
printing problems
Problem: DOS print job takes too
long to print
What to do...
• If you attempt to print a DOS
file by sending it to the port to
which the printer is connected,
use the DOS Copy command.
• Avoid using the DOS Print
command. It causes print delays.
Problem: DOS print job does not
print
What to do...
Check the following items:
• Make sure the Power light is on.
• Follow the steps for your
operating system to make sure
you select the DOS Printing
option:
1 From the printer’s Control
Program, click the Options
tab.
2 Make sure Disable DOS
Printing is not checked.
Limited Warranty
Statement
What is the warranty for
my Compaq Inkjet
Printer?
Your Compaq Inkjet Printer is
covered by a Compaq One Year
Limited Warranty. You are entitled
to warranty service if a hardware
repair is required on your Compaq
Inkjet Printer within the warranty
period. This limited warranty is valid
only within the United States or
Canada, and only within the country
in which it was purchased.
What are the terms of this
limited warranty?
Compaq warrants that the printer
you have purchased from Compaq or
from a Compaq authorized reseller is
free from defects in materials or
workmanship under normal use
during the warranty period. The
warranty period commences on the
date of purchase. Your dated sales
receipt is your proof of the date of
purchase. This warranty extends
only to you, the original purchaser.
You cannot transfer the warranty to
anyone who purchases the product
from you.
How do I obtain warranty
service?
Call Compaq’s Technical Support
Center at 1-281-927-5272. Compaq's
highly trained technicians will first
try to resolve the problem by phone.
If your problems cannot be resolved
by phone, Compaq will ship an
exchange printer to you. Upon
44
Appendix
Page 49

receipt of the exchange printer, pack
the defective printer (in the carton
which contained the exchange
printer) and make it available for
pickup by a Compaq representative.
If you fail to return the defective
printer within 5 business days, you
will be responsible for the full
amount of the replacement printer.
How do I obtain online
support?
Compaq offers free technical support
via the Internet at http://
www.compaq.com/athome/ web site.
You may also visit our technical
support chat site at
forum.compaq.com and quickly
receive answers to your Compaq
Inkjet Printer questions.
What is not covered by
this limited warranty?
• Product purchased from anyone
other than Compaq or a Compaq
authorized reseller
• Product purchased outside the
United States or Canada
• Software products except for
obligations specified in the
software program license
agreement
• Routine cleaning, or normal
cosmetic and mechanical wear
• Damage from misuse, abuse, or
neglect
• Damage from use outside the
product’s usage parameters
• Damage from use of parts not
manufactured or sold by Compaq
• Damage from modification or
incorporation into other products
• Damage from repair or
replacement of warranted parts by
other than a Compaq authorized
service provider
• Damage to or loss of any programs
or data
• Damage resulting from an act of
God
Hardware Products
Covered and Duration of
Warranty
This Limited Warranty applies in the
United States and Canada to
Hardware Products manufactured or
distributed by Compaq Computer
Corporation (Compaq) under the
Compaq brand name. A Compaq
Hardware Product is defined as
Compaq IJ200, IJ700, IJ900, IJ300,
IJ750 Inkjet Printer.
Contact your Compaq authorized
reseller or Compaq if you have any
questions about this Limited
Warranty.
Compaq’s obligations with respect
to Software distributed by Compaq
under the Compaq brand name are
set forth in the applicable end-user
license agreement. Compaq has no
other obligation to repair or replace
software under this limited warranty.
Non-Compaq Hardware and
Software Products are provided on
an "AS IS" basis. However, nonCompaq manufacturers, suppliers, or
publishers may provide their own
warranties.
Terms of the Warranty
Compaq warrants that the Hardware
Product you have purchased from
Compaq or from a Compaq
authorized reseller is free from
defects in materials or workmanship
under normal use during the
warranty period. The warranty
period commences on the date of
purchase. Your sales receipt,
showing the date of purchase of the
Hardware Product, is your proof of
the date of purchase. This warranty
extends only to you, the original
Purchaser. It is not transferable to
anyone who subsequently purchases
the Hardware Product from you. It
excludes expendable parts.
During the warranty period, Compaq
will, at no additional charge, replace
defective IJ300 printers with new, or
at the option of Compaq, refurbished
printers that are equivalent or
superior to new parts in
performance.
All exchanged Products replaced
under this warranty will become the
property of Compaq. If, after
repeated efforts, Compaq is unable
to restore the Product to good
working order, you are entitled to a
refund of the purchase price.
If the Hardware Product is replaced
by Compaq, and you fail to return
the defective Hardware Product
within 5 business days, you will be
responsible for the full amount of the
replacement printer.
This Limited Warranty is valid only
within the United States or Canada,
and within the country in which the
Hardware Product was purchased.
This Limited Warranty extends only
to Products purchased from Compaq
or from a Compaq authorized
reseller. This Limited Warranty also
does not extend to any Product that
has been damaged or rendered
defective (a) as a result of accident,
misuse, or abuse; (b) as a result of an
act of God; (c) by operation outside
the usage parameters stated in the
Product’s User’s Guide; (d) by the
use of parts not manufactured or sold
by Compaq; (e) by modification of
the Product; or (f) as a result of
service by anyone other than
Compaq, a Compaq authorized
reseller, or a Compaq authorized
service provider. Compaq is not
responsible for damage to or loss of
any programs or data. Contact your
local Compaq authorized service
Appendix
45
Page 50

provider for geographic restrictions,
proof-of-purchase requirements,
response time commitments and
other specific on-site service
requirements.
EXCEPT AS EXPRESSLY SET
FORTH IN THIS WARRANTY,
COMPAQ MAKES NO OTHER
WARRANTIES, EXPRESSED OR
IMPLIED, INCLUDING ANY
IMPLIED WARRANTIES OF
MERCHANTABILITY AND
FITNESS FOR A PARTICULAR
PURPOSE. COMPAQ
EXPRESSLY DISCLAIMS ALL
WARRANTIES NOT STATED IN
THIS LIMITED WARRANTY.
ANY IMPLIED WARRANTIES
THAT MAY BE IMPOSED BY
LAW ARE LIMITED TO THE
TERMS OF THIS EXPRESS
LIMITED WARRANTY.
Limitation of Remedy
Compaq is not liable for any
damages caused by the Product or
the failure of the Product to perform,
including any lost profits, lost
savings, incidental damages, or
consequential damages. Compaq is
not liable for any claim made by a
third party or made by you for a third
party. This limitation applies
whether damages are sought, or a
claim made, under this warranty or
as a tort claim (including negligence
and strict product liability), a
contract claim, or any other claim.
This limitation cannot be waived or
amended by any person.
This limitation of liability will be
effective even if Compaq or an
authorized representative of Compaq
has been advised by you of the
possibility of any such damages.
This limitation of liability, however,
will not apply to claims for personal
injury.
U.S.A. State Laws
Some states do not allow limitation
on how long an implied warranty
lasts. In such states, the limitations
or exclusions of this Limited
Warranty may not apply to you.
Some states do not allow the
exclusion or limitation in incidental
or consequential damages for
consumer products. In such states,
the exclusion or limitation of this
Limited Warranty may not apply to
you. This Limited Warranty gives
you specific legal rights. You may
also have other rights that may vary
from state to state. You are advised
to consult applicable state laws for a
full determination of your rights.
Federal
Communications
Commission (FCC)
Compliance
Information
Statement
This equipment has been tested and
found to comply with the limits for a
Class B digital device, pursuant to
Part 15 of the FCC Rules. Operation
is subject to the following two
conditions: (1) this device may not
cause harmful interference, and (2)
this device must accept any
interference received, including
interference that may cause
undesired operation.
The FCC Class B limits are designed
to provide reasonable protection
against harmful interference in a
residential installation. This
equipment generates, uses and can
radiate radio frequency energy and,
if not installed and used in
accordance with the instructions,
may cause harmful interference to
radio communications. However,
there is no guarantee that
interference will not occur in a
particular installation. If this
equipment does cause harmful
interference to radio or television
reception, which can be determined
by turning the equipment off and on,
the user is encouraged to tr y to
correct the interference by one or
more of the following measures:
• Reorient or relocate the receiving
antenna.
• Increase the separation between
the equipment and receiver.
• Connect the equipment into an
outlet on a circuit different from
that to which the receiver is
connected.
• Consult your point of purchase or
service representative for
additional suggestions.
The manufacturer is not responsible
for any radio or television
interference caused by using other
than recommended cables or by
unauthorized changes or
modifications to this equipment.
Unauthorized changes or
modifications could void the user's
authority to operate this equipment.
To assure compliance with FCC
regulations on electromagnetic
interference for a Class B computing
device, use a properly shielded and
grounded cable. Use of a substitute
cable not properly shielded and
grounded may result in a violation of
FCC regulations.
Any questions regarding this
compliance information statement
should be directed to:
Compaq Computer Corporation
P. O. Box 692000, Mail Stop 510101
Houston, Texas 77269-2000
Or, call (281) 514-3333
46
Appendix
Page 51

Notices
Industry Canada
Compliance Statement
This Class B digital apparatus meets
all requirements of the Canadian
Interference-Causing Equipment
Regulations.
Avis de conformité aux
normes d’Industrie
Canada
Cet appareil numérique de la classe
B respecte toutes les exigences du
Règlement sur le matériel brouilleur
du Canada.
is near the product and easily
accessible.
• Refer service or repairs, other
than those described in the operating instructions, to a professional service person.
• This product is designed, tested
and approved to meet strict global
safety standards with the use of
specific authorized components.
The safety features of some parts
may not always be obvious. The
printer manufacturer is not
responsible for the use of other
replacement parts.
Power supply
replacement
If your power supply fails, replace it
with the Compaq replacement part or
other UL LISTED Direct Plug-In
Power Unit marked “Class 2" and
rated 30 Vdc at 500 mA to 830mA.
Safety information
• If your product is NOT marked
with this symbol , it MUST be
connected to an electrical outlet
that is properly grounded.
• The power supply must be connected to an electrical outlet that
Appendix
47
Page 52

48
Appendix
Page 53

Index
A
A4 paper size
aligning print cartridges
alignment test page
appendix
application, definition
automatic feeder
locating
using
19
32
34
41
7
2
2
B
banner paper holder
locating
using
banner paper support
locating
using
banners
recommended paper
selecting in printer
banners, printing
bidirectional communications
problems
black cartridge
installing
replacing
blinking lights
stalled cartridge carrier
buttons
locating
power button
using
4
4
4
4
properties
23
22
intermittent printing
3
parallel cable
30
30
3, 4
4
3, 4
22
3
5
C
card stock
printing
selecting from printer
cards
greeting
index
cards, greeting
printing
selecting in printer
software overrides
carrier contacts, cleaning
cartridge carrier, print
contact, cleaning
loading position
cartridge, print
aligning
caring for
definition
disposal
handling
ink levels
installing
order
ordering
preserving
removing
replacing
replacing black cartridge
storing
CD-ROM, installing printer
software
characters
missing
17
properties
20
17
20
properties
33
30
25, 30, 37, 38
30
photo
30
30
with photo cartridge
30
41
37
17
20
29
29
32
25
40
30
20
39
39
39
25
unexpected
cleaning print nozzles
collate, definition
color cartridge
installing
replacing
completing the cartridge
installation
contacts, print cartridge
warning
continuous form paper
selecting in printer
properties
Control Program
opening in Windows 95, 98
37
35, 36
8
30
30
31
37, 38
23
11
control program
opening
in Windows 3.1 or
3.11
11
in Windows 95 or 98
11
using
11
customized paper sized
dimensions
customized paper sizes
printing
selecting in printer
properties
18
18
19
D
damaged parts
diskettes, installing
printer software
DOS printing
changing print settings
envelopes
2
41
43
17
43
Index
49
Page 54

from native DOS
in Windows
to file
43
43
E
envelopes
printing
envelopes, printing
error lights
paper jam
printer not printing
stalled print cartridge
exit tray
locating
using
in DOS
carrier
3
28
17
5
5
3
F
FCC statement
foils
see transparencies
front cover
locating
using
46
3
3
G
glossary items
A4/Letter
inkjet
interface
page orientation
print cartridge
print media
printer driver
run minimized
software application
specialty media
greeting cards
printing
selecting in printer
19
1
3
13
9
20
44
17
5
16
8
29
11
15, 28
7
properties
software overrides
20
20
H
handling print cartridges
38
37,
I
improving print quality
index cards, printing
Industry Canada Compliance
Statement
ink levels, checking
ink low message
inkjet, definition
installing a print cartridge
interface, definition
iron-on transfers
ordering
printing
selecting in printer
properties
47
21
21
21
32
17
32
31
1
30
3
L
letter size paper
lights
blinking
error
locating
paper feed
paper feed light
pattern
patterns
power
power light
understanding
using
19
4, 5
paper jam
printer not printing
stalled print cartridge
carrier
5
5
3
4
5
4
4, 5
4
5
5
3, 5
5
loading paper
13
M
manual feeder
locating
printing from
using
margin settings
envelope
paper (minimum)
media support
see paper support
message, ink low
missing characters
missing parts
3
28
3
17
18
2
31
37
2
N
non-standard paper sizes
dimensions
printing
selecting in printer
properties
Notices
notices
Industry Canada
Compliance Statement
18
18
19
47
47
nozzles
cleaning
wiping
nozzles, print
cleaning
nozzle test
warning
37
37
35, 36
35, 36
37, 38
O
opening
Control Program in
Windows 95, 98
Printer Properties in
Windows 95, 98
11
10
50
Index
Page 55

ordering supplies
photo cartridge
print cartridge
transparencies
orientation
overrides
definition
8
25
30
16
9
P
page orientation
defining
selecting
paper
continuous form
error lights
jams
loading
printing
recommended
paper exit tray
locating
using
paper feed
problems
paper feed button
locating
using
paper feed light
error
understanding
paper feeder, automatic
paper feeder, manual
paper guide
locating
using
paper support
locating
8
8
22
4
14
13
13
banner
22
photo
25
3
3
multiple sheets
paper fails to feed
paper jam
paper jams
5
14
4
4
4
5
4, 5
5
3
2
2
2
13
2
13
using
2
paper tab, using
parallel cable
using
parallel cable interface
problems
parts of the printer
parts, missing or damaged
parts, printer
photo cartridge
installing
replacing
photos
printing
problems
8
4
3
2
2
30
30
24
paper sticks together
24
white streaks
recommended paper
selecting in printer
properties
postcards, printing
power button
locating
using
power light
error
understanding
power supply
locating
using
print cartridge
aligning
caring for
definition
disposal
handling
ink levels
ink low message
ordering
preserving
replacing black cartridge
storing
4
4
4, 5
4
4
33
29
29
30
25, 30, 37, 38
32
photo
40
with photo cartridge
30
24
25
25
17
5
31
25
2
25
print cartridge carrier
cleaning contacts
error lights
loading position
stalled
5
print cartridge contacts
warning
print cartridge storage unit
using
30
print cartridge, ordering
print cartridges
aligning
changing
cleaning
cleaning carrier contacts
39
installing
removing
replacing
print cartridge
wiping nozzles and contacts
37
print contacts
wiping
37
print media
definition
loading
13
print nozzles
cleaning
testing
35, 36
warning
wiping
37
print quality
alignment page
improving
setting
8
wavy lines
printer driver, using
Printer Properties
opening in Windows 95, 98
10
printer properties
document/quality tab
opening
39
5
39
37, 38
30
32
30
35, 36
30
30
removing 30
13
35, 36
37, 38
34
32, 33
33
9
9
Index
51
Page 56

from application
from Windows 3.1 or
3.11
9
from Windows 95 or
98
9
paper tab
using
printer settings
changing
checking
printer software
Control Program
control program
Printer Properties
printer properties
updating
using
printing
banners
card stock
continuous forms
customized paper sizes
envelopes
from the manual feeder
from Windows 3.1 or 3.11
8
9
14
14
8
11
31
7, 9
22
17
17, 28
41
greeting cards
iron-on transfers
photos
allowing to dry
plain paper
specialty media
text
32
transparencies
problems
dark print
DOS printing
job takes too long to
error lights
out of paper
paper jam
paper jams
printer not printing
stalled printer
24
print
20
21
13
15
16
34
44
5
4
8
9
22
4
9
18
28
26
5
cartridge carrier
general
2, 3, 9, 24, 27,
31, 34, 36, 37, 39
nothing prints
incomplete characters
ink smears
missing or damaged parts
39
2
paper feed
multiple sheets
paper fails to feed
paper jams
paper feeding
paper jam
parallel cable interface
photos
paper sticks together
24
white streaks
print cartridge is loose
print too dark
printer prints slowly
smudged print
software settings not in
effect
9
transparencies
contain white streaks
16
solid black areas
stick together
unexpected or missing
characters
white dashes
white lines
36
R
removing print cartridges
replacing a print cartridge
replacing print cartridges
reverse page order, definition
8
run minimized, definition
14
5
36
34, 36
37
36
24
13
24
27
16
5
36
13
3
31
16
30
30
30
11
S
safety information
settings, margin
envelope
paper (minimum)
settings, printer
changing
checking
software application, definition
17
14
14
7
software overrides
software, printer
control program
printer properties
printer properties
using
specialty media
definition
printing
spool manager
using
storage unit, print cartridge
using
supplies, ordering
photo cartridge
print cartridge
transparencies
opening
7
15, 28
15
41, 42
30
T
text, printing
transfers, iron-on
transparencies
ordering
printing
selecting in printer
printing
problems
32
21
21
properties
16
contain white streaks
16
help
30
16
21
47
18
9
11
9
25
52
Index
Page 57

solid black areas
stick together
troubleshooting
dark print
DOS printing
error lights
general
34
job does not print
job takes too long to
print
44
out of paper
paper jam
paper jams
printer not printing
stalled printer
5
4
cartridge carrier
2, 3, 9, 24, 27,
31, 34, 36, 37, 39
nothing prints
incomplete characters
intermittent printing
missing or damaged parts
2
paper feed
multiple sheets
paper fails to feed
paper jams
paper feeding
paper jam
parallel cable interface
problems
photos
paper sticks together
14
5
3
24
white streaks
print cartridge is loose
print smears
print too dark
printer prints slowly
smudged print
software settings not in
effect
transparencies
39
36
34, 36
9
contain white streaks
16
solid black areas
16
4
24
16
24
36
3
13
27
16
44
5
5
13
31
unexpected or missing
characters
white dashes
white lines
W
Windows 3.1 or 3.11
printing from
Windows NT 4.0
stick together
37
36
36
41
42
16
41, 42
Index
53
 Loading...