

Page 1
HP CM8060/CM8050 Color MFP
with Edgeline Technology
Quick Reference Guide
Key features . . . . . . . . . . . . . . . . . . . . . . . . . . . . . . . . . . . . . . . . . . . . . . . .
Product walkaround . . . . . . . . . . . . . . . . . . . . . . . . . . . . . . . . . . . . . . . . . . .
Copy . . . . . . . . . . . . . . . . . . . . . . . . . . . . . . . . . . . . . . . . . . . . . . . . . . . .
Digital send . . . . . . . . . . . . . . . . . . . . . . . . . . . . . . . . . . . . . . . . . . . . . . . .
Print from the PC . . . . . . . . . . . . . . . . . . . . . . . . . . . . . . . . . . . . . . . . . . . .
Check job status and use the job queue . . . . . . . . . . . . . . . . . . . . . . . . . . .
Turn the device on and off . . . . . . . . . . . . . . . . . . . . . . . . . . . . . . . . . . . . . .
Replace ink cartridges . . . . . . . . . . . . . . . . . . . . . . . . . . . . . . . . . . . . . . . . .
Replace staple cartridges. . . . . . . . . . . . . . . . . . . . . . . . . . . . . . . . . . . . . . .
Load trays . . . . . . . . . . . . . . . . . . . . . . . . . . . . . . . . . . . . . . . . . . . . . . . . .
Supported paper types for each tray . . . . . . . . . . . . . . . . . . . . . . . . . . . . . .
Resources . . . . . . . . . . . . . . . . . . . . . . . . . . . . . . . . . . . . . . . . . . . . . . . . . .
ii
ii
1
5
7
11
12
12
13
14
17
18
Page 2
Key features
Functionality
• Copy from the automated document feeder (ADF) or scanner glass
• Print from your PC
• Fax (if enabled)
• Scan and send to e-mail
• Scan and send to a network folder
• Job storage and retrieval
Edgeline technology
• Edgeline inkjet technology uses six printheads to lay down ink across the page width
• Five ink cartridges (cyan, magenta, yellow, black, bonding agent)
• Bonding agent improves image sharpness and durability
• Prints pages at different speeds, depending on the page content
• Printed pages are cool to the touch
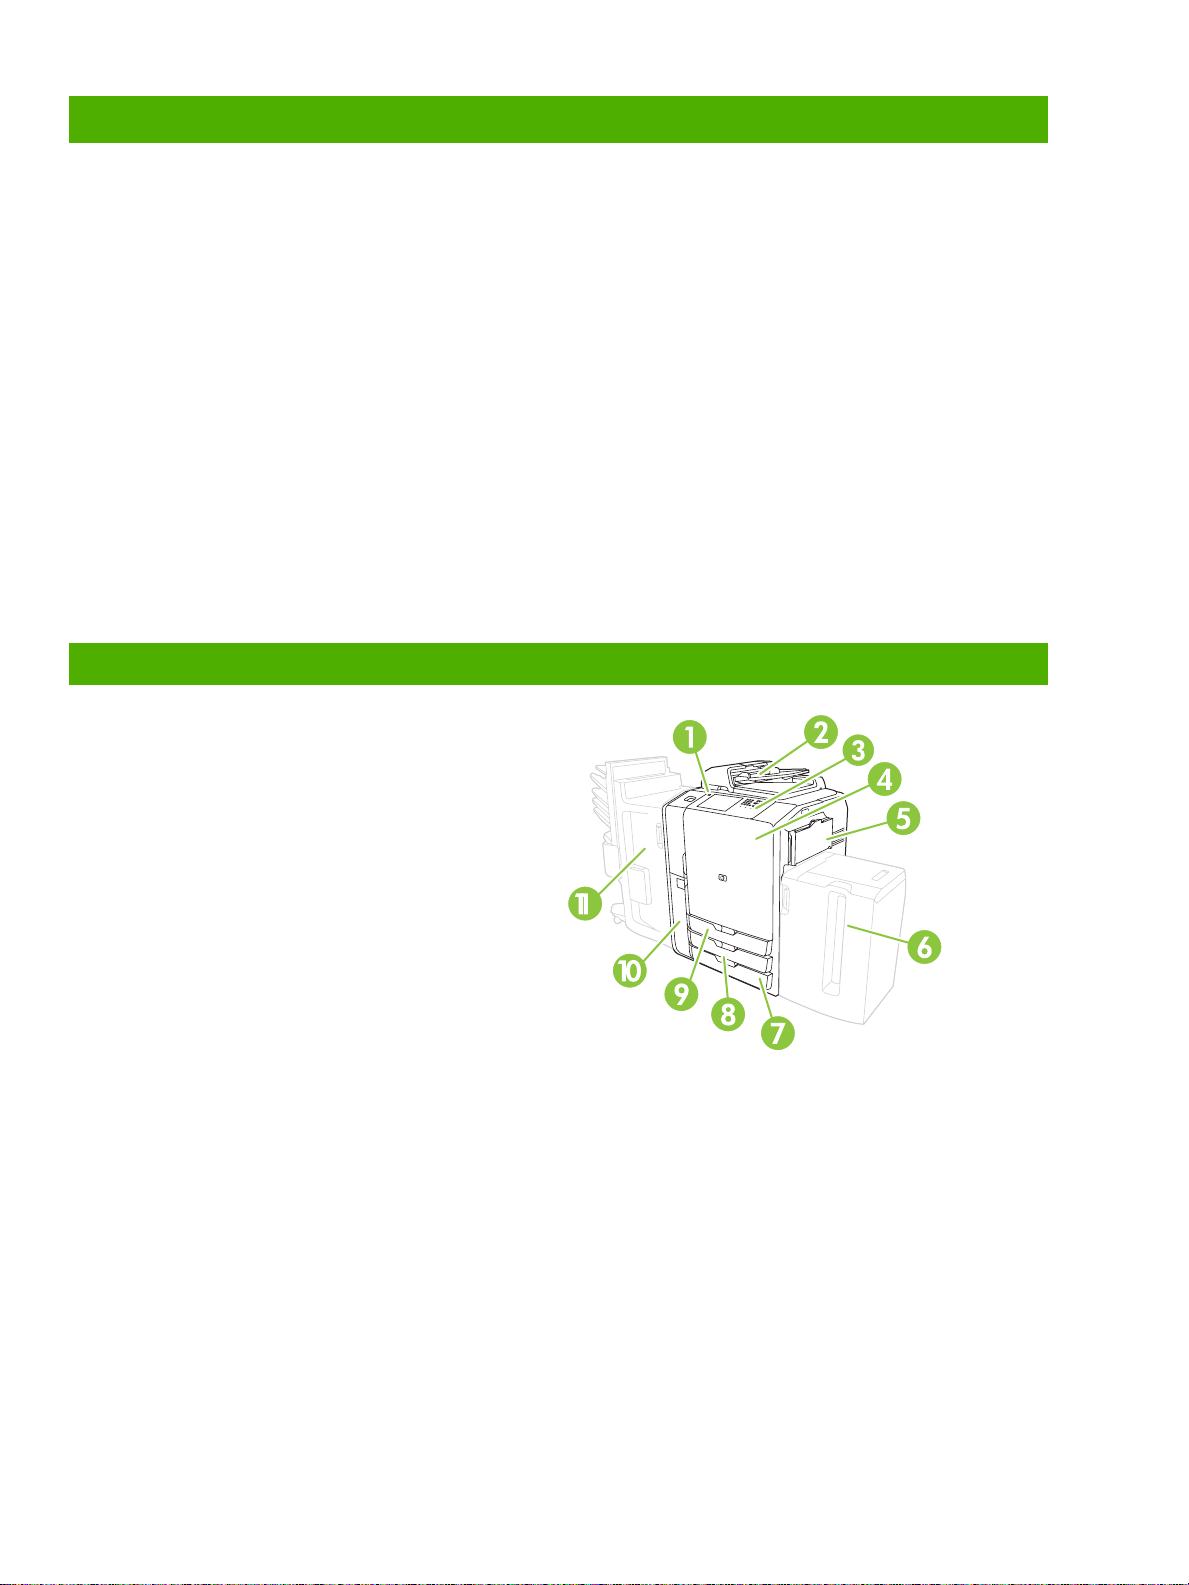
Product walkaround
1 On/off button
2 Document feeder
3 HP Easy Select Control panel
4 Front door
5 Tray 1 (manual feed; holds 80 sheets of standard
paper)
6 Tray 5 (optional high-capacity tray; holds 4,000
sheets of standard paper)
7 Tray 4 (holds 500 sheets of standard paper)
8 Tray 3 (holds 500 sheets of standard paper)
9 ndard paper)
Tray 2 (holds 500 sheets of sta
10 Ink cartridge door
11
Optional finisher
○ Bin 1 (holds 400 sheets of standard paper)
○ Bin 2 (holds 400 sheets of standard paper)
○ Bin 3 (holds 200 sheets of standard paper)
○ Bin 4 (holds 200 sheets of standard paper)
○ Bin 5 (holds 2500 sheets of standard paper)
ii
www.hp.com
Page 3
Copy
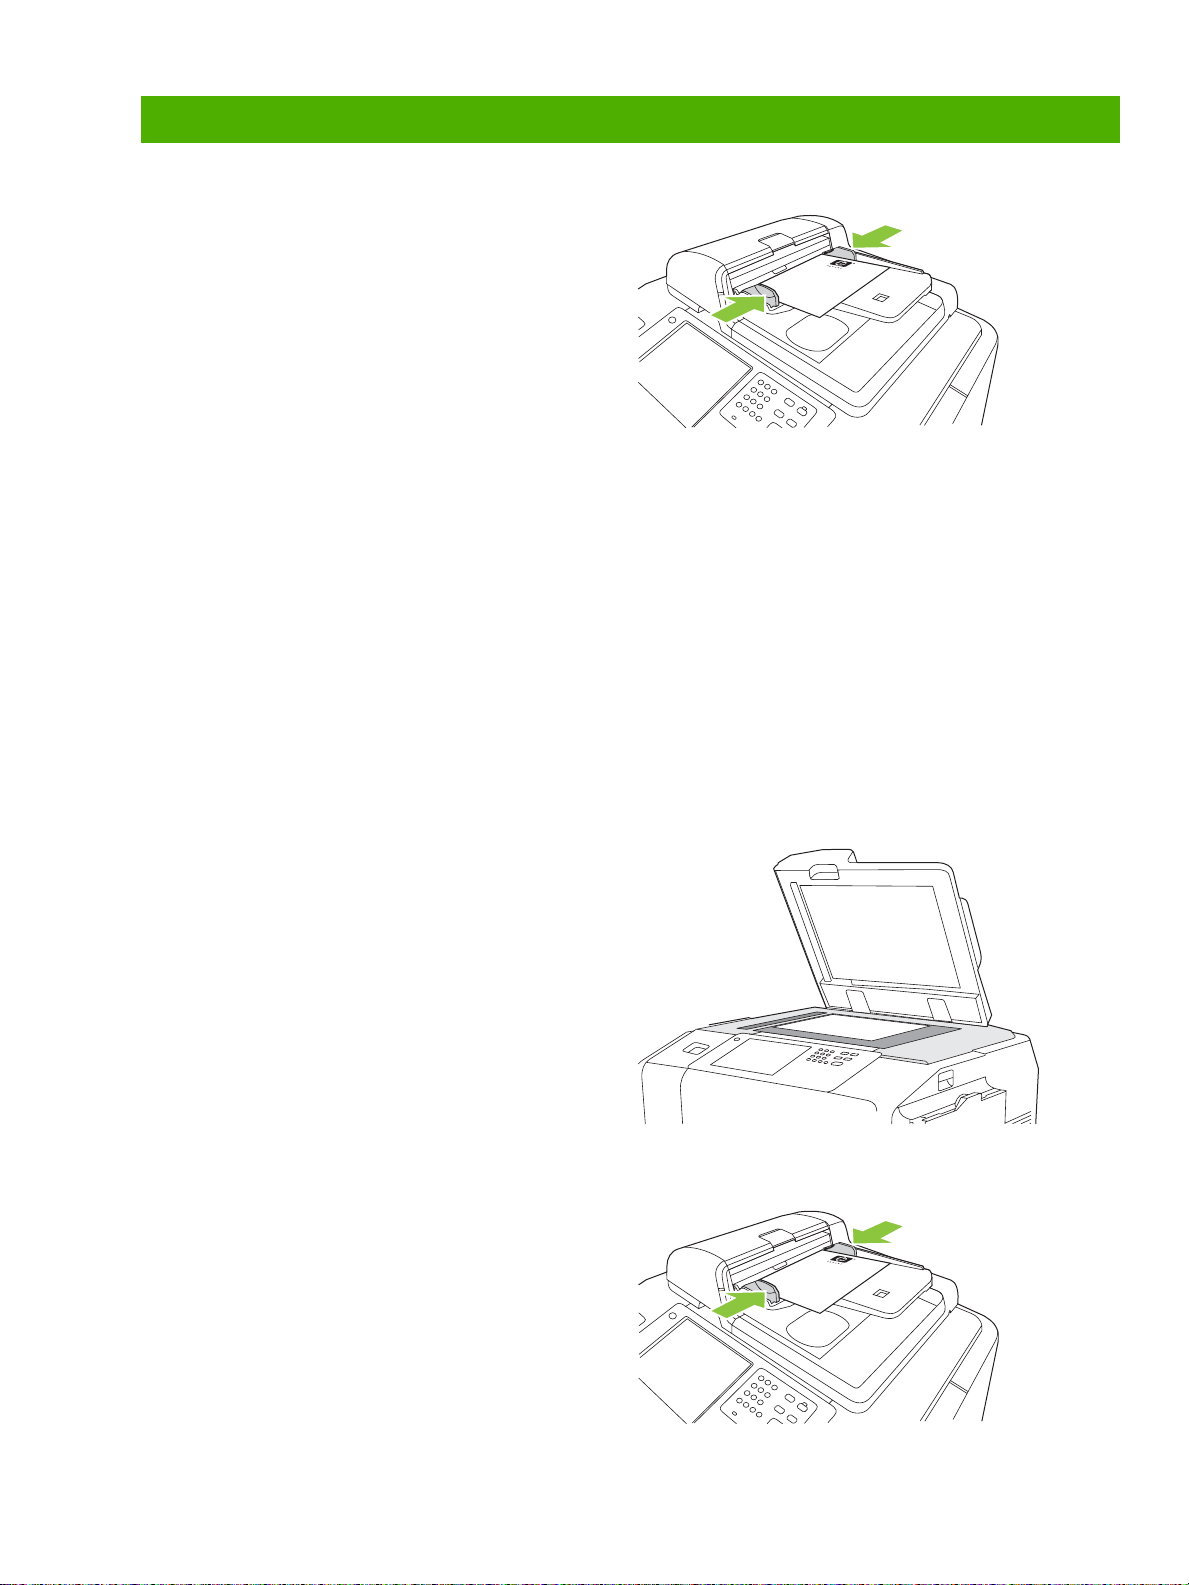
Copy from the document feeder
The document feeder holds a maximum of 100 sheets of
paper.
Place the original document face-up in the document feeder,
with the top edge of the document toward the rear of the
document feeder or feeding first into the input slot. For twosided originals, place the first side of the original face-up.
NOTE: The document feeder beeps and illuminates a green
light when an original is properly loaded.
Adjust the paper guides so that they are touching the
original document.
NOTE: For the fastest performance when using Letter or A4size paper, place the short edge of the document toward the
rear of the document feeder.
To use the default copy options, use the numeric keypad on the control panel to select the number of copies, and press
Start.
To use customized settings, touch
NOTE: You can use either the hard Start button on the control panel or the Start Copy button on the touchscreen.
Retrieve the original document from the output bin that is under the document feeder input-tray. Retrieve the copies from the
output bin that is on the left side of the device.
Copy. Specify the settings, and then press Start.
Copy from the glass
1 Place the original document face-down on the glass.
2 Align the corner of the original with the upper-left
corner of the glass.
To make copies by using the default copy options, use the
numeric keypad on the control panel to select the number of
copies, and press
To use customized settings, touch Copy. Specify the settings,
and then press
NOTE: You can use either the hard Start button on the
control panel or the Start Copy button on the touchscreen.
Start.
Start.
Copy mixed-size originals
You can copy original documents that are printed on
different sizes of paper as long as the sheets of paper have
one common dimension, and that dimension is not greater
than 297 mm (11.7 inches). For example, you could
combine Letter and Legal sizes, or you could combine A4
and A5 sizes.
1 Arrange the sheets in the original document so they
all have the same width.
2 Place the sheets face-up into feeder, and adjust the
www.hp.com
1
Page 4
paper-width guides against the docum
ent.
3 From the Home screen, to
uch Copy.
4 Touch More Options.
5 Touch Original Size.
6 Select Mixed Sizes (of sa
touch OK.
me width), and then
7 Touch Start Copy.
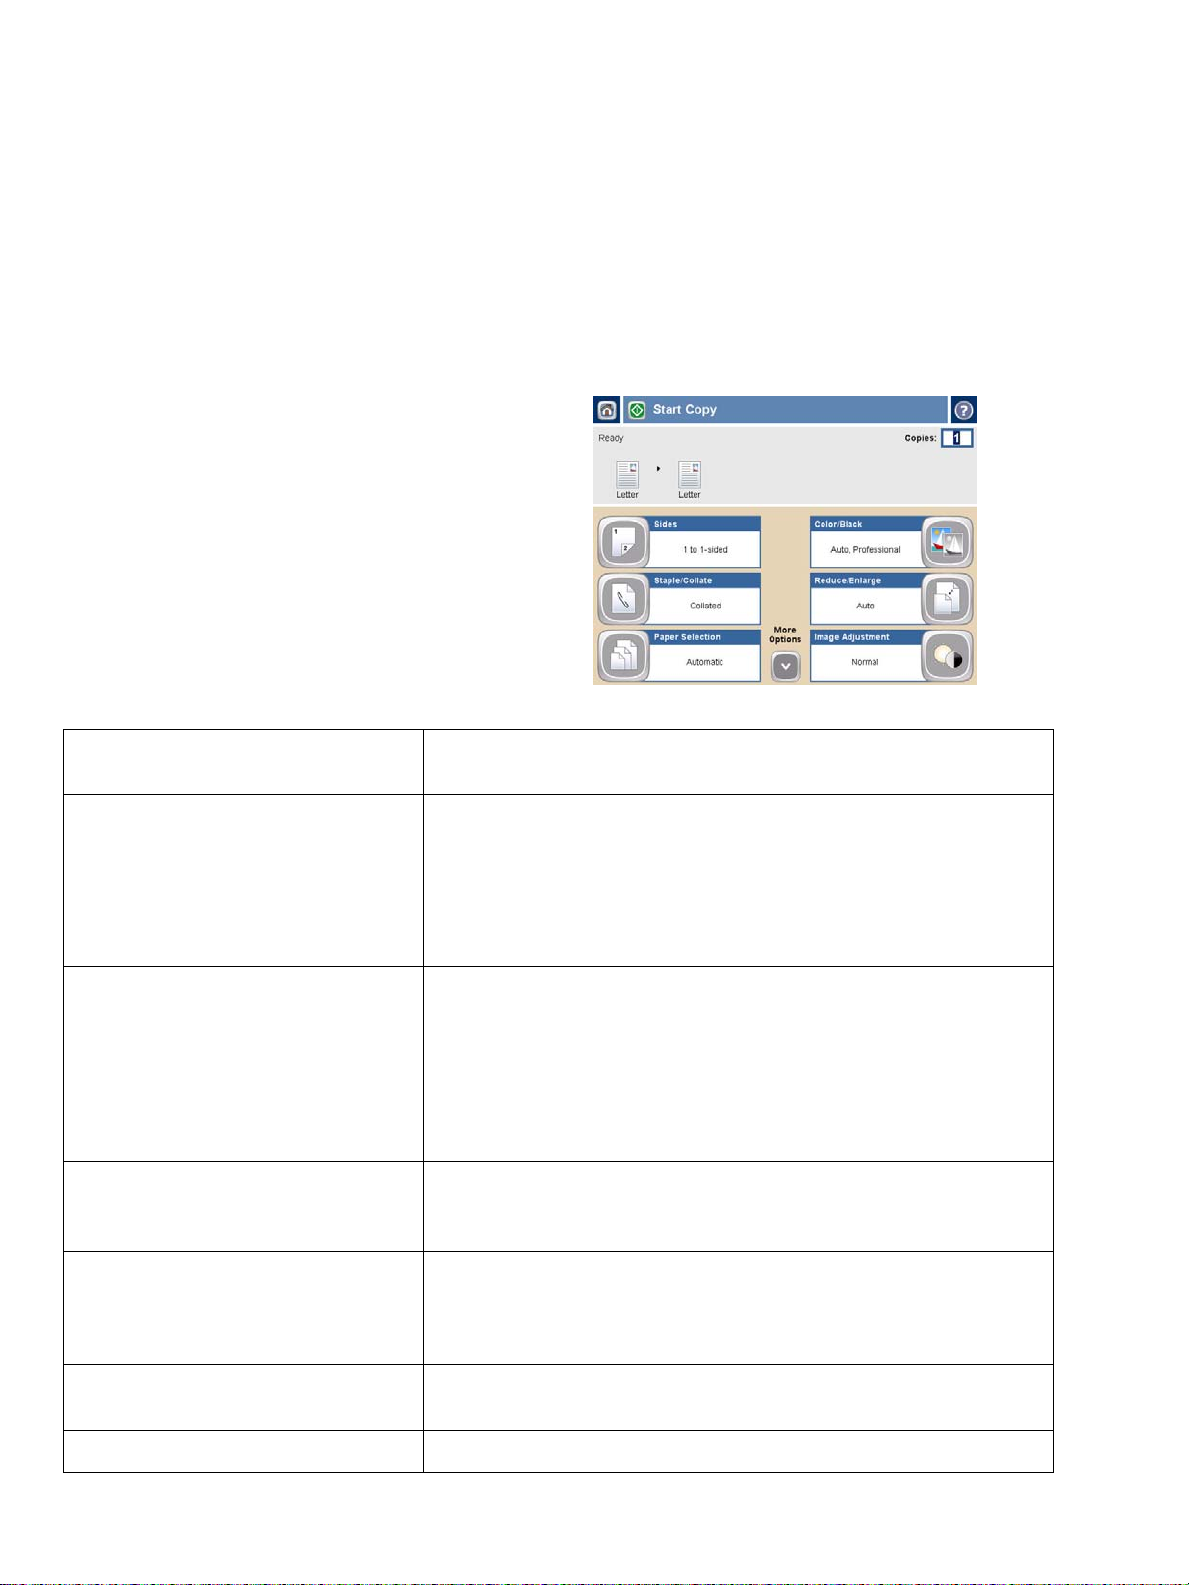
Adjust the copy settings
The device offers several features so you can optimize copied
output. These features are all available on the
The
Copy screen (see above) consists of several pages. Fro
the first p
Then touch the up or down arrow buttons to scroll to other
pages.
For deta
then touch the help button in the upper-right corner of the
screen.
The following table provides an overview of the most frequently
used copy options.
age, touch More Options to go to the next page.
ils about how to use an option, touch the option, and
Copy screen.
m
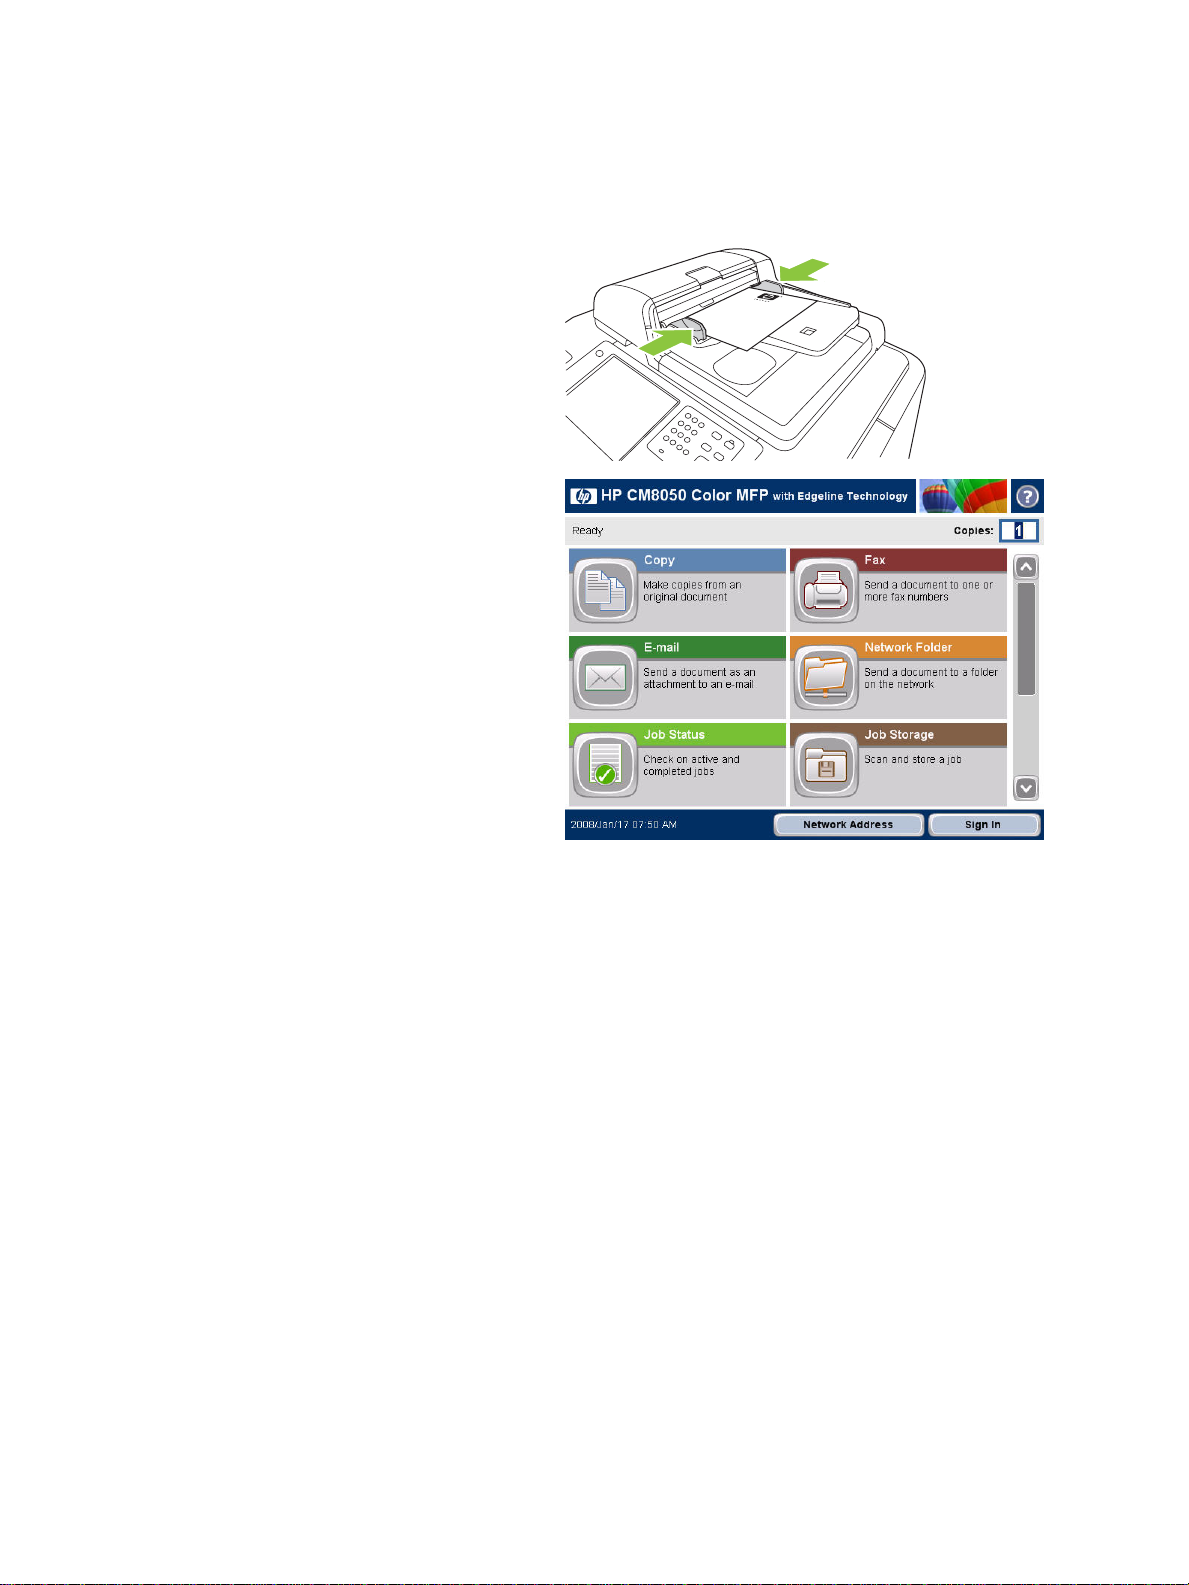
Sides
Color/Black
Staple/Collate or Collate Staple/Collate
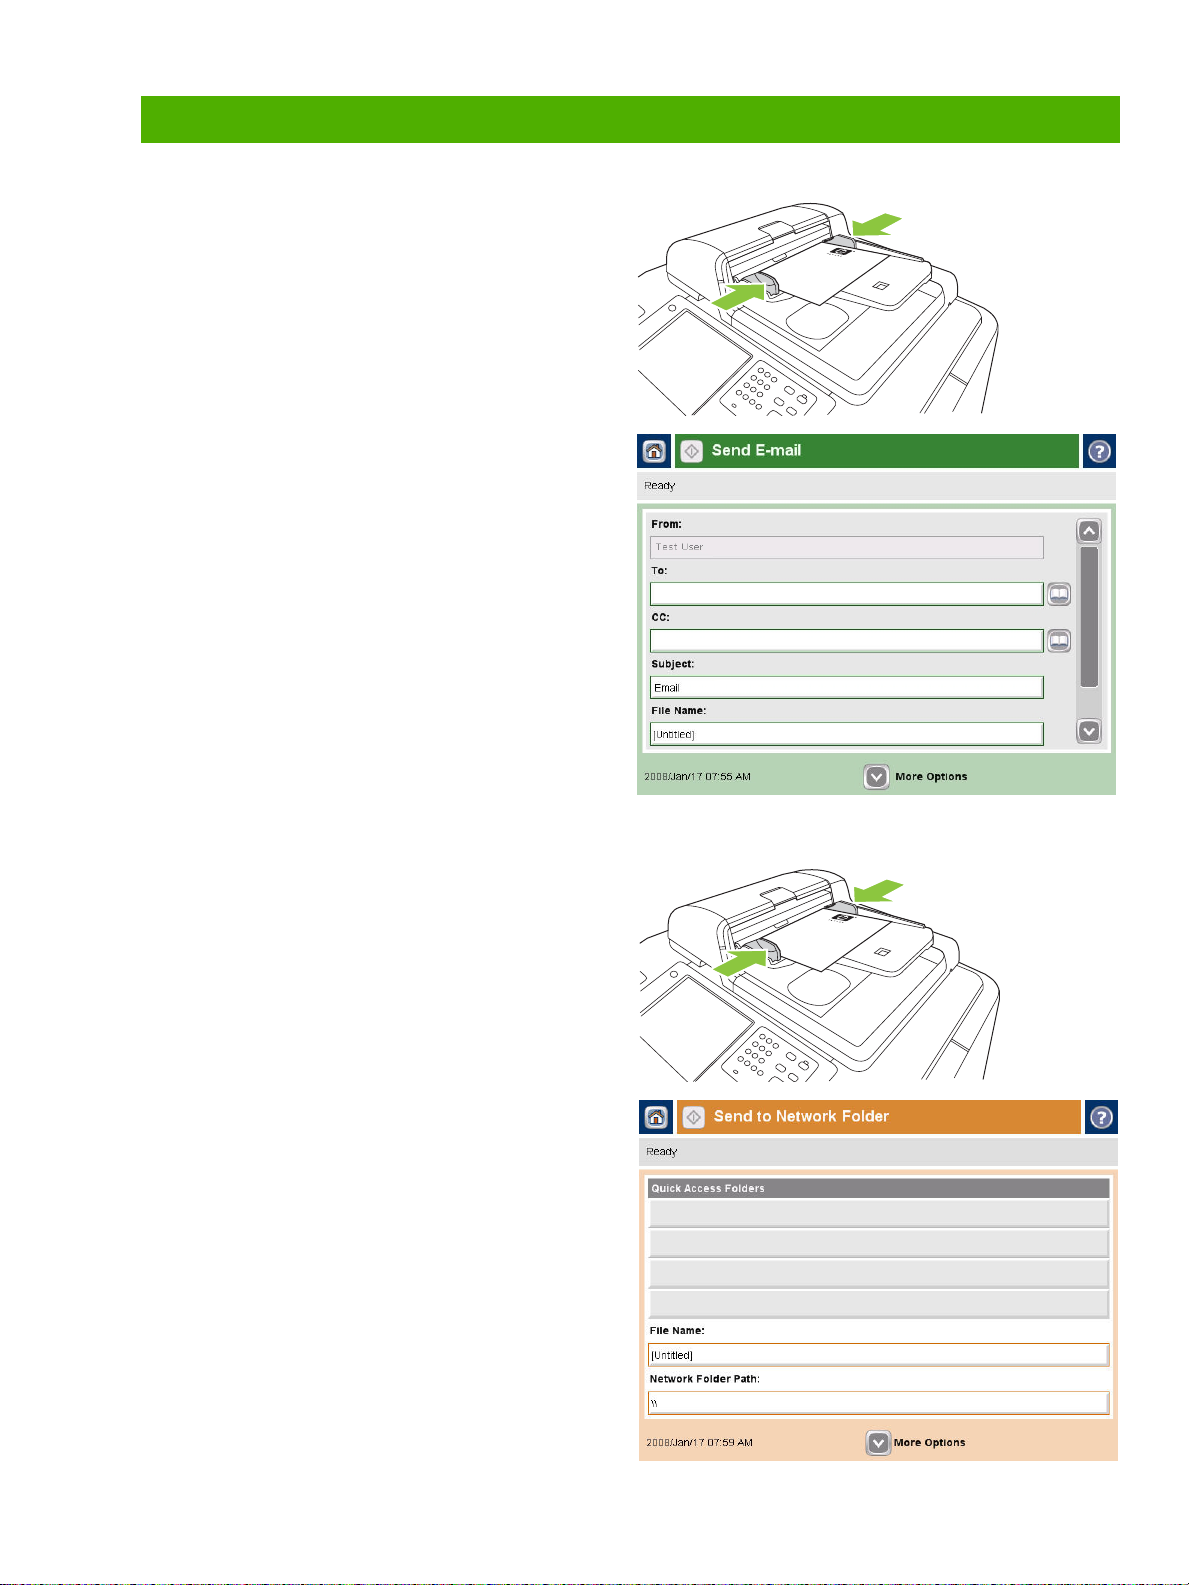
Reduce/Enlarge
Image Adjustment
Use this feature to indicate whether the original document is printed on one or
both sides, and whether the copies should be printed on one or both sides.
Use this feature to select whether copies are printed in black & white or in
color. Select Auto detect to automatically detect whether each page of the
original is in black & white or color, and produce copies that are the same.
If you select
Choose either General Office or Professional. For some paper types, the
color quality can only be set to
If the optional HP Multifunction Finisher is attached, the
option is available. Use this feature to set up options for stapling and
assembling the pages in sets of copies.
If the optional HP Multifunction Finisher is not attached, the Collate option is
available. Use this feature to assemble each set
order as the original document (123, 123, etc.), or assemble sets that contain
copies of each original page (111, 222, etc.).
Use this feature to reduce or enlarge the copied image. Touch the box below
Scaling: to specify a custom percentage. To reduce the image, select a value
smaller than 100%. To enlarge the image, select a value larger than 100%.
Use this feature to improve the overall quality of the copy. For example, you
can adjust the
Background Cleanup setting to remove faint images from the background
or to remove a light background color.
Color or Auto detect, you can als
Professional.
Darkness, Sharpness, and
o select the Color Quality.
of copied pages in the same
Contrast, and you can use the
Paper Selection
Original Size
2
Use this feature to select the tray that holds the size and type of paper that you
want to use.
Use this feature to describe the page size of the original document.
www.hp.com
Page 5
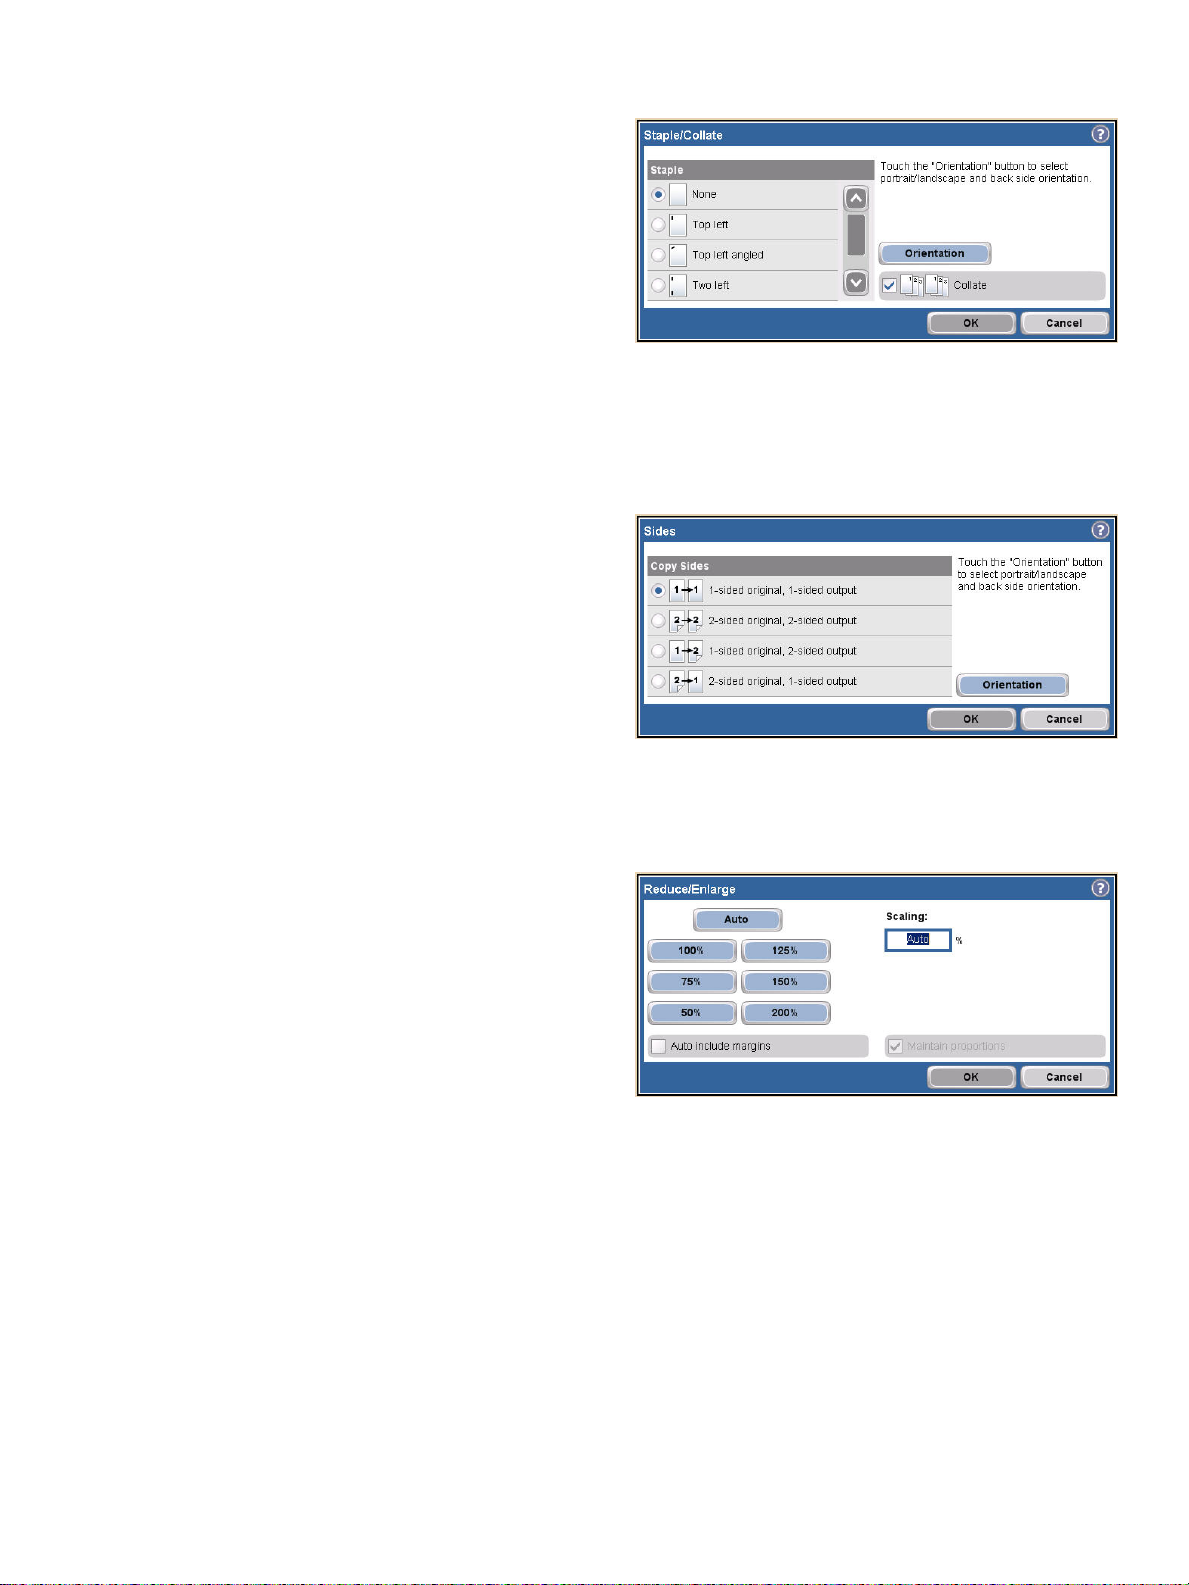
Staple a copy job
1 Touch Copy.
2 Touch Staple/Collate.
3 Touch a staple option --- None, Top left, Top left
angled
, Two left, or Three left.
4 Touch OK.
5 Touch Start Copy.
6 Control panel messages help you track your job’s
status. When the copy has finished processing, the
copier will return to the Ready state.
7 Touch the Home icon to return to the main menu.
Duplex a copy job
1 Touch . Copy
2
Touch Sides.
3
Select the button for the desire
Sides
window. Touch OK
d output in the Copy
.
4 Touch Start Copy.
5
Control panel messages help you track your job’s
status. When the copy has finished pr
copier will return to the Ready state.
ocessing, the
6 Touch the Home icon to return to the main menu.
R uce and eed nlarge copies
1 Touch Copy.
2 Touch Reduce/Enlarge.
3 a preset
Touch inside the
reduction or enlargement percentage.
Using the keypad, enter the number for the desired
4
percentage
touch
OK.
5 Touch OK to save the
6 Touch Start Copy.
7 k your job’s
Control panel messages help you trac
status. When the copy has finished processing, the
copier will return to the Ready state.
Scaling box or touch
for reducing or enlarging the copy and
setting.
8 Touch the Home icon to return to the main menu.
www.hp.com
3
Page 6
Use the job build feature
Use the Job Build option to divide a complex job into smaller segments. This is useful when you are copying
or digitally sending an original document that has more pages than the document feeder can hold, or when you
want to combine pages that have different sizes into one job, so you can make multiple copies.
NOTE: The Job Build option is available for the Copy, E-mail and Network Folder features.
1 Place the first segment of the job into the document
feeder or onto the scanner glass.
NOTE: When you are scanning from the glass, each
scanned page is a separate job segment.
Touch Copy, E-mail, or Network Folder, and
2
then set the options that you want to use.
3 Touch Job Build and then select Job Build on.
Touch
OK.
4 Press Start to scan the first segment.
5 The device prompts you to load the next segment.
• If you want to apply different options to this
segment, or modify settings that apply to the
whole job, touch
• If you have more segments to scan, touch
Scan.
• If you have finished scanning all the segments,
Finish.
touch
• If you need to start over, touch Cancel Job.
Options.
6 When you select Finish, your job will begin
processing.
4
www.hp.com
Page 7
Digital send
Send to email
1 Place the document face-down on the scanner glass
or face-up in the ADF.
2 From the Home screen, touch E-mail.
3 If prompted, type your user name and password.
4 Touch on a field to open the keyboard popup.
5 Complete the From:, To:, and Subject: fields.
Scroll down and complete the
Message fields if appropriate (you will need to
scroll to see all the fields). Your user name or other
default information might appear in the
If so, you might not be able to change it.
CC:, BCC:, and
From: field.
6 Press Start to begin sending.
Scan to a folder
1 Place the document face-down on the scanner glass
or face-up in the ADF.
From the Home screen, touch Network Folder.
2
3 Select a folder from the Quick Access Folders list
or touch the
folder to save the document.
4 Touch the File Name field to open the keyboard
pop-up screen, and then type the file name.
5 Touch Start.
Network Folder Path: field to enter a
www.hp.com
5
Page 8
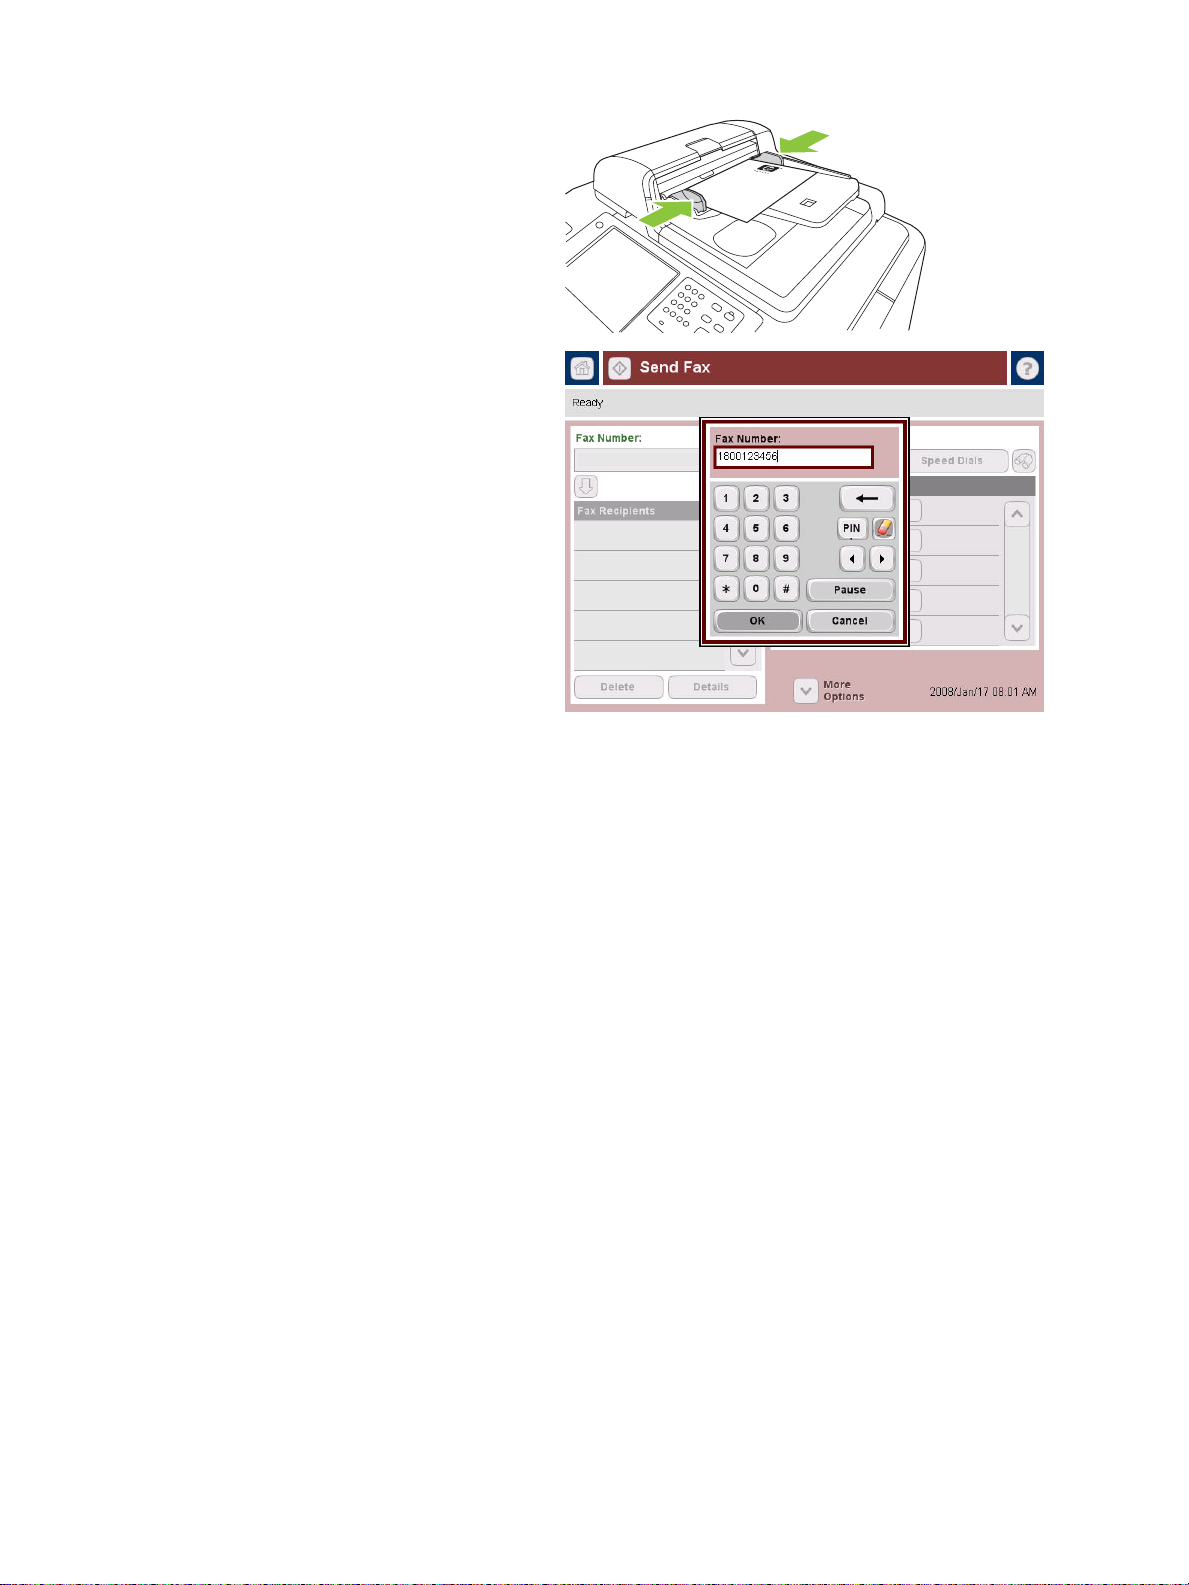
Send a fax by entering numbers manually
1 Place the document face-down on the scanner glass
or face-up in the ADF.
2
From the main screen, touch the Fax icon. You may
be prompted to type a user name and password.
3 Touch More Options to adjust the scan settings.
4 Touch More Options followed by the Image
Adjustment
and sharpness of the fax you are sending.
5 Use the hard keys, or touch the Fax Number text
box and use the popup keypad, to enter the fax
number. Press the down arrow button to add more
than one fax number
button to adjust the brightness, contrast
.
6 Touch the Fax icon on the touchscreen or press the
green Start button on the control panel.
6
www.hp.com
Page 9

Print from the PC
Print on both sides (Duplex)
1 Click File, Print in your application, and then
choose
Properties.
2 Click the Finishing tab, and then click Print on
Both Sides. If you will bind the document along the
top, click Flip Pages Up.
Select a page size
1 Click File, Print in your application, and then
choose
2 Click the Paper/Quality tab, and then click the
Paper size drop-down menu, then select a paper
size. Click Custom if the paper size you want is not
in the menu.
Properties.
2
2
www.hp.com
7
Page 10

Select a paper type
1 Click File, Print in your application, and then
choose
Properties.
2 Click the Paper/Quality tab.
3 Click the Paper Type drop-down menu, then select
a paper type.
Select an output bin for print jobs
1 Click File, Print in your application, and then
choose
2 Click the Output tab.
3 Use the Output Bin Options to determine where
the print job should exit the device. The available
output bin options depend on the accessory output
bin or optional finisher installed on the device.
Properties.
2
3
2
3
8
www.hp.com
Page 11

Select staple output options
1 Click File, Print in your application, and then
choose
Properties.
2 Click the Output tab.
3 Use the Output Options drop-down menu to
determine whether the print job should be stapled.
The available output options depend on the
accessory output bin or optional finisher installed on
the device.
Store a print job
1 Click File, Print in your application, and then
choose
2 Click the Job Storage tab.
3 Select the job storage mode and options that you
want to use.
Properties.
2
3
2
3
4 To make a job private, select the PIN to Print box,
then type a four-digit PIN number in the box
provided. The stored job is sent to the device, where
the user must type the four-digit PIN on the control
panel to retrieve the stored job.
5 Click OK.
4
5
www.hp.com
9
Page 12

Retrieve stored jobs
1 From the Home screen, touch Job Storage to open
the
Job Storage feature. Select the Retrieve tab.
2 From the list on the left side of the screen, select the
folder in which the job is stored. A list of stored jobs
appears.
3 Select the job from the list. If the job is private, touch
the box below
PIN: and type the correct PIN.
4 Touch the Retrieve Stored Job button to print the
job.
Use a printing shortcut
1 Click File, Print in your application, and then
choose
Properties.
2 Click the Printing Shortcuts tab. Select one of the
defined shortcuts or custom printing shortcuts, and
then click
driver settings.
NOTE: A Printing Shortcut is a collection of print settings
you can select with a single click. When you select a
printing shortcut, any other print settings you have selected
may be changed by the shortcut.
OK to print the job with the specific printer-
NOTE: You can save a custom shortcut for settings you use
frequently. Select the print settings you want, then click on
'Save As...'. You can then name your custom printing
shortcut and save for future use.
2
10
www.hp.com
Page 13

Check job status and use the job queue
1 From the Home screen, scroll to and touch Job
. The job queue opens.
Status
2 The Active tab shows jobs that are currently
processing. From the drop-down menu, select a job
category, and then select the name of the job.
○ Touch
○ Touch
○ Touch
○ Touch
Pause All to stop all active jobs. To resume
the jobs, touch
Cancel Job to cancel the selected job and
remove it from the job queue.
Details to see the information about the
selected job.
Promote to move the selected job forward in
the job queue so it can be completed as soon as
possible.
Resume All.
3 The Job Log tab lists all the completed jobs. From
the drop-down menu, select a job category, and then
select the name of the job. Touch
information about the selected job.
button to only show jobs for the signed in user.
Jobs
Press the
user's.
All Jobs button to show jobs by other
Details to see the
Touch the My
4 The Stop button pauses the device and opens the
Job Status screen at the Active tab. Any of the
actions listed above can be performed here.
Resume ALL must be touched to print any incoming
jobs after pausing the device.
www.hp.com
11
Page 14

Turn the device on and off
To turn the device on and off, press the on/off button on the
device control panel.
WARNING! Do not use the master power switch or unplug
the device unless you have already turned the device off by
using the on/off button on the control panel.
Replace ink cartridges
1 Open the ink-cartridge door.
2 Push the cartridge back and then up to
release it, then pull the cartridge straight
out.
3 Push the new cartridge straight in until it
locks into place.
4 Please return your genuine HP supplies
for recycling to Hewlett-Packard.
12
www.hp.com
Page 15

Replace staple cartridges
1 Open the stapler door.
To remove the staple cassette, pull forward on the
2
green lever that is on the front of the staple cassette,
and then pull the staple cassette straight out.
To remove the staple cartridge from the cassette,
3
push in at the arrow on each side and then pull up to
release the cartridge.
Insert the new staple cartridge into the staple
4
cassette. Push the cartridge straight down until it
snaps into place.
www.hp.com
13
Page 16

5 Push the staple cassette straight into the slot.
Rotate the green lever up until it snaps into place.
6
7 Close the stapler door.
Load trays
Load Tray 1 (manual feed tray)
Load standard or custom-sized paper into this tray. It holds up to 80 sheets of 75 g/m2 (20 lb bond) paper.
Also use this tray for heavier paper, such as cardstock, HP Edgeline Glossy, or brochure papers.
1 Slide the tray support up, pull it out, and then pull
out the extension.
14
www.hp.com
Page 17

2 Move the guide outward.
3 Load the paper. Always load the paper with the
short edge first.
○ Load letterhead or preprinted paper with the printed
side face-down and the top edge to the right.
NOTE: For duplex printing, load letterhead or
preprinted paper with the printed side facing up and
the top edge feeding first.
○ Load prepunched paper with the side that has holes
toward the front of the device.
○ Load labels with the front side facing down.
○ When loading HP Edgeline Glossy paper, fan the
paper stack to separate the sheets before placing
them in the tray. This helps prevent the sheets from
sticking together.
4 Adjust the guide so that it touches the paper.
5 Configure the tray for the type and size of paper.
a. From the Home screen, touch
b. Touch the
c. If the size and type that are listed for the tray are not correct, touch the name of the tray, and then touch
Trays tab.
Supplies Status.
Modify.
d. Select the correct paper size and type, and then touch
-or-
If you are loading a custom paper size, touch
return to the
e. Touch OK to save the settings.
Modify Tray screen.
OK.
Custom. Type the dimensions of the paper, and then touch OK to
www.hp.com
15
Page 18

Load Trays 2, 3, and 4
1 Open Tray 2, 3, or 4.
2
Load the paper, whole reams at a time. Always place
the long edge along the front side of the tray.
○ Load letterhead or preprinted paper with the printed
side face-up and the top edge to the left.
NOTE: For duplex printing, load letterhead or
preprinted paper with the printed side face-down and
the top edge to the right.
○ Load prepunched paper with the edge that has the
holes along the front side of the tray.
3 Adjust both guides so that they click into the position
that is marked for the paper size.
4
Slide the tray into the device.
Configure the tray for the type of paper by responding to the pop-up message that appears on the touchscreen when
5
you close the tray. Or, follow these steps:
a. From the Home screen, touch Supplies Status.
b. Touch the
c. If the type that is listed for the tray is not correct, touch the name of the tray, and then touch
d. Select the correct paper type, and then touch OK.
Trays tab.
16
www.hp.com
Modify.
Page 19

Supported paper types for each tray
When you select a paper type, you are instructing the device to use a group of predefined settings to create the best
possible print quality for that type of paper.
NOTE: Selecting a paper type that does not match the type of paper that is loaded in the tray can damage the device.
Paper type that is
listed in the printer
driver or on the
control panel
Plain
HP Matte Premium
120g
HP Matte Brochure
180g
HP Matte Cover 200g Use only for this HP-brand paper. X
HP Glossy Edgeline
180g
Cardstock
Cardstock
Description Tray 1 Trays 2, 3,
and 4
Plain, uncoated paper that is less
than 150 g/m
2
(40 lb bond)
Use only for HP Premium
Presentation Matte Paper, 120 g/m
Use only for HP Brochure and Flyer
Paper Matte, 180 g/m
2
X X X
X
2
X
Use only for HP Glossy for Edgeline
Paper, 180 g/m
Plain, uncoated paper that is from
160 to 220 g/m
Plain, uncoated paper that is from
160 to 180 g/m
2
2
(60 to 80 lb cover)
2
(60 to 67 lb cover)
X
X
X X X
Tray 5
Matte Plain, uncoated paper. X X X
Matte Brochure Plain, uncoated paper. X X X
Matte Cover
Plain, uncoated paper that is from
160 to 220 g/m
2
(60 to 80 lb cover)
Labels Uncoated, non-glossy labels X
Letterhead
Preprinted
Prepunched
Fine, uncoated paper that is less
than 150 g/m
Plain, uncoated paper that is less
than 150 g/m
2
(40 lb bond)
2
(40 lb bond)
Letter (3-hole) or A4 (2- or 4-hole)
size paper that is less than 150 g/m
X
X X X
X X X
X X X
2
(40 lb bond)
Colored
Bond
Recycled
Plain, uncoated paper that is less
than 150 g/m
Fine, uncoated paper that is less than
150 g/m
Plain, uncoated paper that is less
than 150 g/m
2
(40 lb bond)
2
(40 lb bond)
2
(40 lb bond)
X X X
X X X
X X X
www.hp.com
17
Page 20

Resources
Product support information available at www.hp.com:
• Wall poster
• User Guide
• System Administrator Guide
Manuals on HP’s Business Support Center site:
• www.hp.com/support/cm8060edgeline
Edgeline MFP simulations on HP’s Use My MFP site:
• www.hp.com/go/usemymfp
© 2008 Hewlett-Packard Development Company, L.P.
18
www.hp.com
Page 21

Page 22

Page 23

Page 24

© 2008 Hewlett-Packard Development Company, L.P.
www.hp.com
*C5956-90257*
*C5956-90257*
C5956-90257
 Loading...