

Page 1

ClusterPack
Index of Tutorial Sections
Index
Administrators Guide
|
Administrators Guide
1.0 ClusterPack Install QuickStart
1.1 ClusterPack General Overview
1.2 Comprehensive Install Instructions
1.3 Installation and Configuration of Optional Components
1.4 Software Upgrades and Reinstalls
1.5 Golden Image Tasks
1.6 System Maintenance Tasks
1.7 System Monitoring Tasks
1.8 Workload Management Tasks
1.9 System Troubleshooting Tasks
Users Guide
2.1 Job Management Tasks
2.2 File Transfer Tasks
2.3 Miscellaneous Tasks
Users Guide
|
Tool Overview
|
Related Documents
|
Dictionary
|
Tool Overview
3.1 Cluster Management Utility Zone Overview
3.2 Service ControlManager (SCM) Overview
3.3 System Inventory Manager Overview
3.4 Application ReStart (AppRS) Overview
3.5 Cluster Management Utility (CMU) Overview
3.6 NAT/IPFilter Overview
3.7 Platform Computing Clusterware Pro V5.1 Overview
3.8 Management Processor (MP) Card Interface Overview
3.9 HP Systems Insight Manager (HPSIM) Overview
Related Documents
4.1 Related Documents
Page 2

Dictionary of Cluster Terms
Back to Top
Index
Administrators Guide
|
Users Guide
|
Tool Overview
|
Related Documents
|
Copyright 1994-2004 hewlett-packard company
Dictionary
|
Page 3

ClusterPack Install QuickStart
ClusterPack Install QuickStart
ClusterPack
Index
1.0.1 How Can I Get My HP-UX Cluster Running?
Step Q1 Fill Out the ClusterPack Installation Worksheet
Step Q2 Install Prerequisites
Step Q3 Allocate File System Space
Step Q4 Obtain a License File
Step Q5 Prepare Hardware Access
Step Q6 Power Up the Management Server
Step Q7 Configure the ProCurve Switch
Step Q8 Copy the License Files to the Management Server
Step Q9 Install ClusterPack on the Management Server
Step Q10 Run manager_config on the Management Server
Step Q11 Run mp_register on the Management Server
Step Q12 Power up the Compute Nodes
Step Q13 Run compute_config on the Management Server
Step Q14 Run finalize_config on the Management Server
Administrators Guide
|
Users Guide
|
Tool Overview
|
Related Documents
|
1.0.1 How Can I Get My HP-UX Cluster Running?
Dictionary
|
If you have installed ClusterPack before, follow the instructions in this section as a quick
reminder. You can refer to the detailed instructions for any given step via the links provided.
If you have not installed ClusterPack before, use the Comprehensive Install Instructions
section instead. This QuickStart Guide does NOT cover the use of Golden Images. If you
wish to use Golden Images, use the Comprehensive Install Instructions section instead.
Note:
If you do the installation steps out of order or omit steps, your installation
will leave your systems in an unknown and non-deterministic state.
Back to Top
Page 4

Step Q1 Fill Out the ClusterPack Installation Worksheet
N
Print out this form and fill out all information for each node in your cluster.
Installation Worksheet (pdf)
Note:
You will not be able to complete the following steps if you have not
collected all of this information.
For more information, see the Comprehensive Instructions for this step.
References:
z
Step 1 Fill Out the ClusterPack Installation Worksheet
Back to Top
Step Q2 Install Prerequisites
Install the following software on the Management Server.
z
HP-UX 11i Ignite-UX
z
HP-UX 11i V2.0 TCOE
Install the following software on each Compute Node.
z
HP-UX 11i Ignite-UX
z
HP-UX 11i V2.0 TCOE
Allow the default choices to install.
ClusterPack requires a homogeneous operating system environment. That is, all Compute
odes and the Management Server must have the same release of HP-UX installed as well
as the same operating environment.
The Management Server requires at least one LAN connection. The manager must be able
to contact all the compute nodes using a "management network" that will ve configured by
Clusterpack. In addition, the management server must be able to connect to all the MP cards
on the compute nodes. No network connections need to be configured before installing
Clusterpack, the console interface can be used for all installation and configuration steps.
Page 5

The Compute Nodes must have Management Processor (MP) cards.
ClusterPack depends on certain open source software which is normally installed as a part
of the operating environment. The minimum release versions required are:
z
MySQL Version 3.23.58 or higher
z
Perl Version 5.8 or higher
For more information, see the Comprehensive Instructions for this step.
References:
z
Step 2 Install Prerequisites
Back to Top
Step Q3 Allocate File System Space
Allocate file system space on the Management Server. Minimum requirements are listed
below.
z
/var - 4GB
z
/opt - 4GB
z
/share - 500MB (Clusterware edition only)
For more information, see the Comprehensive Instructions for this step.
References:
z
Step 3 Allocate File System Space
Back to Top
Step Q4 Obtain a License File
z
Get the Host ID number of the Management Server.
z
Contact Hewlett-Packard Licensing Services to redeem your license
certificates.
z
If you purchased the ClusterPack Base Edition, redeem the Base Edition
license certificate.
z
If you purchased the ClusterPack ClusterWare Edition, redeem the Base
Edition certificate and the ClusterWare edition certificate
Page 6

Note:
It may take up to 24 hours to receive the license file. Plan accordingly.
For more information, see the Comprehensive Instructions for this step.
References:
z
Step 4 Obtain a License File
Back to Top
Step Q5 Prepare Hardware Access
Get a serial console cable long enough to reach all the Compute Nodes from the
Management Server.
Note:
If you are installing ClusterPack on Compute Nodes for the first time, DO
NOT power up the systems, ClusterPack will do that for you automatically.
If you do accidentally power the compute nodes, DO NOT answer the HPUX boot questions.
For more information, see the Comprehensive Instructions for this step.
References:
z
Step 5 Prepare Hardware Access
Back to Top
Step Q6 Power Up the Management Server
Perform a normal first boot for the Management Server.
For more information, see the Comprehensive Instructions for this step.
References:
z
Step 6 Power Up the Management Server
Back to Top
Page 7

Step Q7 Configure the ProCurve Switch
z
Select an IP address from the same IP subnet that will be used for the
Compute Nodes.
z
Connect a console to the switch
z
Log onto the switch through the console
z
Type 'set-up'
z
Select IP Config and select the "manual" option
z
Select the IP address field and enter the IP address to be used for the
switch
For more information, see the Comprehensive Instructions for this step.
References:
z
Step 7 Configure the ProCurve Switch
Back to Top
Step Q8 Copy the License Files to the Management Server
Put the files in any convenient directory on the Management Server (e.g. /tmp).
For more information, see the Comprehensive Instructions for this step.
References:
z
Step 8 Copy the License Files to the Management Server
Back to Top
Step Q9 Install ClusterPack on the Management Server
z
Mount and register the ClusterPack DVD as a software depot.
z
Install the ClusterPack Manager software (CPACK-MGR) using
swinstall.
z
Leave the DVD in the DVD drive for the next step.
For more information, see the Comprehensive Instructions for this step.
Page 8

References:
z
Step 9 Install ClusterPack on the Management Server
Back to Top
Step Q10 Run manager_config on the Management Server
Provide the following information to the manager_config program:
z
The path to the license file(s),
z
The DNS domain and optional NIS domain for the cluster,
z
The host name of the manager and the name of the cluster,
z
The management LAN interface on the Management Server,
z
The IP address(es) of the Compute Node(s),
z
Whether to mount a home directory,
z
Whether to configure SCM / SysInvMgr or HP SIM software ,
z
The LSF admin password. (Clusterware edition only)
For more information, see the Comprehensive Instructions for this step.
References:
z
Step 10 Run manager_config on the Management Server
Back to Top
Step Q11 Run mp_register on the Management Server
Provide the following information to the mp_register program about each Management
Processor card that is connected to a Compute Node:
z
IP address,
z
netmask,
z
gateway IP address.
The information can be provided to mp_register in a file. See the mp_register(1) man page
for the file format.
For more information, see the Comprehensive Instructions for this step.
References:
Page 9

z
Step 11 Run mp_register on the Management Server
Back to Top
Step Q12 Power up the Compute Nodes
Use the clbootnodes program to power up all Compute Nodes that have a connected
Management Processor that you specified in the previous step. The clbootnodes program
will provide the following information to the Compute Nodes:
z
Language to use,
z
Host name,
z
Time and time zone settings,
z
Network configuration,
z
Root password.
For more information, see the Comprehensive Instructions for this step.
References:
z
Step 12 Power up the Compute Nodes
Back to Top
Step Q13 Run compute_config on the Management Server
The compute_config program will register the nodes with various programs.
For more information, see the Comprehensive Instructions for this step.
References:
z
Step 13 Run compute_config on the Management Server
Back to Top
Step Q14 Run finalize_config on the Management Server
This program completes the installation and configuration process, verifies the Cluster
Management Software, and validates the installation. If it reports diagnostic error messages,
Page 10

repeat the installation process, performing all steps in the order specified.
For more information, see the Comprehensive Instructions for this step.
References:
z
Step 14 Set up HyperFabric (optional)
Back to Top
Index
Administrators Guide
|
Users Guide
|
Tool Overview
|
Related Documents
|
Copyright 1994-2004 hewlett-packard company
Dictionary
|
Page 11

ClusterPack General Overview
p
ClusterPack General Overview
ClusterPack
Index
Administrators Guide
|
Users Guide
|
Tool Overview
|
Related Documents
|
Dictionary
|
1.1.1 ClusterPack Overview
1.1.2 Who should use the material in this tutorial?
1.1.3 What is the best order to review the material in the tutorial?
1.1.4 Operating System and Operating Environment Requirements
1.1.5 System Requirements
1.1.1 ClusterPack Overview
Compute Cluster
A cluster is a set of independent computers combined into a unified system through system
software and networking technologies. Compute clusters are important options for a
growing number of technical and commercial customers. The primary driver for clustering
of compute workstations and servers is that it provides a low cost alternative to
supercomputers. It also has the following key benefits:
z
horizontally scalable by adding more nodes
z
vertically scalable by using larger SMP nodes
z
fault-isolation - failure of a single Compute Node will not shutdown the
entire cluster system
z
asymmetry: mix and match of different nodes in a cluster
z
configuration flexibility: nodes, interconnect
z
re-deployable nodes
A compute cluster consists of Compute Nodes that incorporate multiple processors in a
symmetric multiprocessor configuration. These nodes are connected through interconnection
network(s) and are supervised within a single administrative domain. A compute cluster
usually resides in a single machine room and is managed as a single computer system. The
interconnection network employs standard local area network (LAN) and/or high
erformance interconnect technologies based on the application requirements. A compute
cluster has to support both time-to-solution jobs and throughput jobs. HP high performance
technical computing cluster is available on HP Integrity servers with interconnection options
Page 12

of Gigabit Ethernet or Infiniband. The common components of a cluster are:
p
p
p
z
Head Node - provides user access to the cluster. In smaller clusters, the
Head Node may also serve as a Management Server.
z
Management Server - server that provides single point of management for
all system components in the cluster
z
Management LAN/switch - usually an Ethernet network used to monitor
and control all the major system components. May also handle traffic to
the file server.
z
Interconnect switch - provides high speed connectivity between Compute
Nodes. Used for message passing and remote memory access capabilities
for parallel applications.
z
Storage - includes both local disk space on each Compute Node and
optionally an independent storage unit accessible to the Compute Nodes
(See NAS below).
z
Cluster management software - ClusterPack for system administrators
and end-users.
z
Management Processor (MP) - controls the system console, reset and
power management functions of a server.
z
Console LAN - network for remote management of consoles (ex. using
the Management Processor LAN).
z
Network Attached Storage (NAS) - attach directly to Ethernet networks,
providing easy installation, low maintenance, and high uptime.
Compute Nodes
Compute Nodes in a cluster are normal compute servers that provide system computing
resource and storage capability. A ClusterPack cluster is built with HP Integrity servers: 2way or 4-way server platforms based on Intel Itanium 2-based processors and HP's zx1
chipset technologies.
The HP Integrity rx2600 server, powered by Intel Itanium 2-based processors, is the
industry's first dual-processor Itanium 2-based server. The rx2600 dramatically improves
rice/performance for technical applications and gives customers a cost-effective yet
owerful entry into a technology with tremendous growth potential. Its 2U rack density is
ideal for clustering solutions.
HP's extensive Itanium 2-based systems experience and co-developer insights have resulted
in premium performance through the development of the HP Scalable Processor Chipset
zx1. Invented by HP, the HP zx1 chipset fully unleashes the power of Intel Itanium 2-based
rocessors by lowering memory latencies and increasing memory and I/O subsystem
scalability. With the HP zx1 chipset, HP Integrity servers and Itanium 2-based servers
achieve even better performance and memory expandability.
Interconnection Networks
An ClusterPack cluster is built with the industry standard Gigabit Ethernet. This
interconnect network is capable of transferring data packets between Compute Nodes for
both file serving and inter-node communication for applications. When applications benefit
from lower latency, HP's Infiniband can be configured into the cluster to provide lower
Page 13

latency and higher bandwidth. A cluster LAN is also configured to separate the system
management traffic from application message passing and file serving traffics.
Management Software and Head Node
The ability to manage and use a cluster as easily as a single compute system is critical to the
success of any cluster solution. To facilitate ease of use for both system administrators and
end-users, HP has created a software package called ClusterPack. The ClusterPack cluster
can be managed and used just as easily as a single server platform.
The ClusterPack is an integrated solution that offers the following key features:
Installation and configuration
z
automated cluster setup
z
network services setup (NFS, NTP, NIS, Ignite-UX)
z
remote power-on
z
network configuration
System administration
z
single point of administration
z
role-based management
z
software and patch management
z
user account maintenance
z
resource control
z
cluster health monitoring
z
cluster troubleshooting
z
cluster tuning
z
golden image creation and distribution
z
cluster reconfiguration
z
cluster system hardware and software inventory management
z
cluster server nodes consistency checking
Distributed resource management
z
cluster resource scheduling
z
policy based queues and multiple queue management
z
job submission, monitor, and control
z
user specified job priority
z
Application ReStart file migration
The ClusterPack integrates HP's enterprise system management solution, HP System Insight
Manager (HP SIM), and Platform Computing's Clusterware. HP SIM has been widely used
in large-scale data centers for managing hundreds of HP systems through a single point of
control. Its multi-system management capabilities, such as group operations and role-based
management, enable customers to achieve optimal IT resource efficiency. Platform
Computing's Clusterware is based on the industry distributed resource management solution,
Load Sharing Facility (LSF), and is specially designed for cluster management and ease-ofuse for both system administrators and end-users. ClusterPack is available on HP-UX 11i
Page 14

Version 2.0. The ClusterPack has a server component that runs on a Management Server,
N
j
and client agents that run on the managed Integrity compute servers.
NAS 8000
AS 8000 High Availability Cluster was designed to significantly reduce downtime and
maximize the availability of storage by providing heterogeneous file-sharing and fileserving functionality across a wide variety of application areas, including content delivery
and distribution, consolidated storage management, technical computing, and Web serving.
It allows capacity without server downtime so additions can be made without losing access
to valuable data. The HP NAS 8000 series provides interoperability with other applications.
It also provides storage flexibility.
The critical need for more accessible data, and more reliable storage, is met with a NAS
solution.
Back to Top
1.1.2 Who should use the material in this tutorial?
This tutorial is divided into four main sections:
z
Administrators Guide
z
Users Guide
z
Tool Overview
z
Related Documents
z
Data Dictionary
The Administrators Guide is intended for the system administrators who will be responsible
for the initial setup and continuing operation of the cluster. The Administrators section of
the tutorial covers a range of topics including: installation and setup of the ClusterPack
software on the cluster, creating and managing golden images, system maintenance tasks,
adding users to the cluster, adding third party software to the cluster, system monitoring
tasks, and basic troubleshooting of the ClusterPack software.
The Users Guide is intended for users who will be using the ClusterPack software to submit
obs to the cluster. The Users section of the tutorial covers a range of topics including: basic
user account setup and access, the layout of the cluster, submitting jobs to the cluster,
monitoring jobs currently running on the cluster, collecting data in a central location, and
general troubleshooting of the ClusterPack software.
The Tool Overview is a general overview of each major software component of the
ClusterPack solution. For each tool, a basic functional overview is presented. This section
includes information that is useful for both system administrators and end users.
The Related Documents gives the location of additional information for components of
ClusterPack and HP Integrity clusters.
Page 15

The Data Dictionary contains definitions for common terms that are used through the
j
tutorial.
Back to Top
1.1.3 What is the best order to review the material in the tutorial?
System Administrators
Initial installation and configuration of the cluster requires a complete understanding of the
steps involved and the information required. Before installing a new cluster, the system
administrator should read and understand all of the steps involved before beginning the
actual installation. It is assumed that anyone setting up a cluster is familiar with Unix system
administration, HP-UX OS installation, the Management Processor interface and network
setup and configuration. Before installing a cluster for the first time, read and understand the
following material:
z
Section 1.2 Initial Installation and Set-Up
z
Section 1.3 Installation and Configuration of Optional Components
z
Section 1.4 Software Upgrades and Reinstalls
z
Section 1.5 Golden Image Tasks
It is helpful prior to installation to review and be familiar with several additional sections of
the tutorial. This material does not need to be completely reviewed, but should be read and
available during the initial testing of the new cluster:
z
Section 1.6 System Maintenance Tasks
z
Section 1.7 System Monitoring Tasks
z
Section 1.8 Workload Management Tasks
z
Section 1.9 System Troubleshooting Tasks
z
Tool Overview
Users
Before beginning to use the cluster for daily tasks, it is helpful to review several sections in
order to be familiar with the tools that are provided on the cluster to submit and monitor
obs. This material should be kept readily available for reference.
z
Section 2.1 Job Management Tasks
z
Section 2.2 File Transfer Tasks
z
Section 2.3 Miscellaneous Tasks
z
Tool Overview
Is the Online Tutorial available in a single printable file?
The Online Tutorial is available in a single file. From the Master Index of Sections, there is
Page 16

a link to the printable version at the bottom of the page.
References:
z
Printable Version
Back to Top
1.1.4 Operating System and Operating Environment Requirements
The key components of the HP Integrity Server Technical Cluster are:
z
Management Server: HP Integrity server with HP-UX 11i Version 2.0
TCOE
z
Compute Nodes: HP Integrity servers with HP-UX 11i Version 2.0
TCOE
z
Cluster Management Software: ClusterPack V2.4
The following prerequisites are assumed:
z
HP-UX 11i V2.0 TCOE installed on the Management Server
z
HP-UX 11i V2.0 TCOE installed on each Compute Node
The following software components must be installed for all features of ClusterPack V2.4 to
function effectively:
z
HP-UX 11i Ignite-UX on the Management Server
z
HP-UX 11i Ignite-UX on each Compute Node
Back to Top
1.1.5 System Requirements
In order to install the ClusterPack solution, the Management Server must have access to a
DVD drive.
The Management Server hard drive must be partitioned to allow sufficient disc space for the
following directories:
z
/var - 4 GB
z
/opt - 4 GB
z
/share - 500 MB
Page 17

Back to Top
Index
Administrators Guide
|
Users Guide
|
Tool Overview
|
Related Documents
|
Copyright 1994-2004 hewlett-packard company
Dictionary
|
Page 18

Comprehensive Install Instructions
ClusterPack
Comprehensive Install Instructions
Index
1.2.1 Comprehensive Installation Overview
Step 1 Fill Out the ClusterPack Installation Worksheet
Step 2 Install Prerequisites
Step 3 Allocate File System Space
Step 4 Obtain a License File
Step 5 Prepare Hardware Access
Step 6 Power Up the Management Server
Step 7 Configure the ProCurve Switch
Step 8 Copy the License Files to the Management Server
Step 9 Install ClusterPack on the Management Server
Step 10 Run manager_config on the Management Server
Step 11 Run mp_register on the Management Server
Step 12 Power up the Compute Nodes
Step 13 Run compute_config on the Management Server
Step 14 Set up HyperFabric (optional)
Step 15 Set up InfiniBand (optional)
Step 16 Run finalize_config on the Management Server
Step 17 Create a Golden Image of a Compute Node from the Management Server
Step 18 Add nodes to the cluster that will receive the Golden Image
Step 19 Distribute the Golden Image to the remaining Compute Nodes
Step 20 Install and Configure the remaining Compute Nodes
Step 21 Verify the final cluster configuration
Administrators Guide
|
Users Guide
|
Tool Overview
|
Related Documents
|
Dictionary
|
1.2.1 Comprehensive Installation Overview
ClusterPack uses a two-stage process for setting up an HP-UX Cluster:
z
Create a base configuration with a Management Server and one Compute Node
{
Prepare for installation.
{
Install and configure the Management Server.
{
Install and configure the initial Compute Node and its Management
Page 19

Processor.
g
w
u
X
b
Y
{
Verify the Management Server and the initial Compute Node.
z
Configure the remaining Compute Nodes with a Golden Image.
{
Create a Golden Image.
{
Add nodes to the configuration that will receive the Golden Image.
{
Distribute the Golden Image to remaining nodes.
{
Install and configure the Compute Nodes that received the Golden
Image.
{
Verify the final cluster configuration.
These processes are further broken down into a number of discrete steps. Each step contains the followin
sections:
z
Background
z
Overview
z
Details
The background section explains why this step is necessary and what will be done for you. The overvie
section tells you what this step entails in general terms. The details section gives the exact commands yo
must enter.
Note:
The steps in this section have to be followed in the specified order to ensure that
everything works correctly. Please read all of the following steps BEFORE beginning the
installation process.
Back to Top
Step 1 Fill Out the ClusterPack Installation Worksheet
Background
ClusterPack simplifies the creation and administration of a cluster of HP Integrity Servers running HP-U
y automating the collection, recording, and distribution of information about the systems in a network.
the system administrator, must still make decisions about how to identify and secure those network
components. You can record all of your decisions on a form that you can keep nearby as you execute the
steps of the installation process.
Overview
Print out this form and fill out all information for each node in your cluster.
Installation Worksheet (pdf)
Page 20

Note:
v
a
s
p
You will not be able to complete the following steps if you have not collected all of this
information.
Details
At various points during the configuration you will be queried for the following information:
z
DNS Domain name [ex. domain.com]
z
NIS Domain name [ex. hpcluster]
z
Network Connectivity:
{
Information on which network cards in each Compute Node connect to
the Management Server
{
Information on which network card in the Management Server
connects to the Compute Nodes.
z
MySQL root password (You will be asked to set it).
z
HP SIM Administrator password (You will be asked to set it).
z
LSF Administrator password (You will be asked to set it).
Back to Top
Step 2 Install Prerequisites
Background
ClusterPack works on HP Integrity Servers running HP-UX. In order to install ClusterPack, you must ha
the Technical Computing Operating Environment (TCOE) version of HP-UX installed. You must also h
the Ignite-UX software, which is used for installation. Installing Ignite-UX on the Compute Nodes make
ossible to create and distribute "golden images" from the Compute Nodes.
ClusterPack requires a homogeneous operating system environment. That is, all Compute Nodes and the
Management Server must have the same release of HP-UX installed as well as the same operating
environment.
Overview
Install the following software on the Management Server.
z
HP-UX 11i Ignite-UX
z
HP-UX 11i V2.0 TCOE
Install the following software on each Compute Node.
Page 21

z
n
r
p
N
HP-UX 11i Ignite-UX
z
HP-UX 11i V2.0 TCOE
ClusterPack depends on certain open source software which is normally installed as a part of the operati
environment. The minimum release versions required are:
z
MySQL Version 3.23.58 or higher
z
Perl Version 5.8 or higher
The Management Server requires a minimum of two LAN connections. One connection must be configu
rior to installing ClusterPack.
The Compute Nodes must have Management Processor (MP) cards.
Details
Install these items when you do a fresh install of HP-UX. on the Management Server and the Compute
odes. Or, you can install Ignite-UX after rebooting by the following method.
z
Using the HP-UX 11i V2.0 TCOE DVD, mount and register the DVD as a software
depot.
z
Install the Ignite-UX software on the Management Server using swinstall.
On the Management Server:
% /usr/sbin/swinstall -s <source_machine>:/mnt/dvdrom IgniteUX
Note:
Allow the default choices to install.
Back to Top
Step 3 Allocate File System Space
Background
ClusterPack installs software in the /opt and /share file systems. It stores data in the /var file system. You
must allocate sufficient space in these file systems if it is to operate correctly.
Overview
Allocate file system space on the Management Server. Minimum requirements are listed below.
z
/opt - 4GB
Page 22

z
/var - 4GB
z
/share - 500MB (Clusterware edition only)
Details
Allocate space for these file systems when you do a fresh install of HP-UX on the Management Server.
To resize /opt
1. Go to single user mode.
# /usr/sbin/shutdown -r now
%
2. Interrupt auto boot.
3. Select the EFI shell.
4. Select the appropriate file system. (Should be fs0: but may be fs1:)
% Shell> fs0:
5. Boot HP-UX.
fs0:\>hpux
%
6. Interrupt auto boot.
7. Boot to single user mode.
HPUX> boot vmunix -is
%
8. Determine the lvol of /opt.
% cat /etc/fstab
9. Look for the lvol that corresponds to /opt.
10. Extend the file system. (Use lvol from Step 2.)
% # lvextend -L 4096 /dev/vg00/lvol4
(May not be lvol4.)
# umount /dev/vg00/lvol4
%
(This should fail.)
% # extendfs /dev/vg00/lvol4
% # mount /dev/vg00/lvol4
11. Repeat 8 through 10 for /var.
Back to Top
Page 23

Step 4 Obtain a License File
(
d
o
D
Background
For ClusterPack Base Edition, please refer to the Base Edition License certificate for instructions on
redeeming your license.
For ClusterPack Clusterware Edition, you will need to redeem BOTH the Base Edition license certificate
AND the Clusterware Edition license certificate. You will need TWO license files in order to run
manager_config.
As part of the normal installation and configuration process, you will be asked to provide the license key
ClusterPack will install the license files in the correct location(s), and all licensing services will be starte
Overview
z
Get the Host ID number of the Management Server.
z
Contact Hewlett-Packard Licensing Services to redeem your license certificates.
z
If you purchased the ClusterPack Base Edition, redeem the Base Edition license
certificate.
z
If you purchased the ClusterPack Clusterware Edition, redeem the Base Edition certificate
and the Clusterware edition certificate
Note:
It may take up to 24 hours to receive license file. Plan accordingly.
Details
You will need to contact HP licensing to redeem your license certificates. You can call, E-mail, or fax y
request to Hewlett-Packard Software Licensing Services. Refer to your Software License Certificate for
contact information. Prior to installing ClusterPack V2.4, you can request a key by providing the Host I
number of the Management Server. The Host ID can be found using the 'uname' command:
% /bin/uname -i
The number returned by this command must be proceeded by a # when making your request. For exampl
'uname -i' returns 2005771344, provide the number as #2005771344 in your key request.
Back to Top
Step 5 Prepare Hardware Access
Page 24

Background
p
v
s
b
r
This document does not cover hardware details. It is necessary, however, to make certain hardware
reparations in order to run the software.
Overview
Get a serial console cable long enough to reach all the Compute Nodes from the Management Server.
Details
To allow the Management Server to aid in configuring the Management Processors, it is necessary to ha
serial console cable to connect the serial port on the Management Server to the console port on the
Management Processor to be configured. Be sure that the serial cable is long enough to reach all of the
Compute Nodes. It is also possible to configure the Management Processors manually by connecting a
console to each card.
Note:
If you are installing ClusterPack on Compute Nodes for the first time, DO NOT power up
the systems, ClusterPack will do that for you automatically. If you do accidentally power
the compute nodes, DO NOT answer the HP-UX boot questions.
Back to Top
Step 6 Power Up the Management Server
Background
This is the first step in actually configuring your system.
Overview
Perform a normal boot process for the Management Server.
Note:
If you are using DHCP for IP assignment, DO NOT boot the Compute Nodes at this time.
Details
If you use DHCP to assign the host names and IP addresses to the Compute Nodes, the DHCP server mu
e running on the Management Server before the Compute Nodes are booted. The manager_config prog
will set up the DHCP server.
Page 25

% /opt/clusterpack/bin/manager_config
e
Back to Top
Step 7 Configure the ProCurve Switch
Background
The ProCurve Switch is used for the management network of the cluster.
Overview
The IP address for the ProCurve Switch should be selected from the same IP subnet that will be used for
Compute Nodes.
Details
z
Select an IP address from the same IP subnet that will be used for the Compute Nodes.
z
Connect a console to the switch
z
Log onto the switch through the console
z
Type 'set-up'
z
Select IP Config and select the "manual" option
z
Select the IP address field and enter the IP address to be used for the switch
Back to Top
Step 8 Copy the License Files to the Management Server
Background
Copy the license files onto the Management Server. The license files can be placed in any convenient
directory that is accessable to the Management Server. During the invocation of the manager_config tool
you will be asked to provide a path to the license files. As part of manager_config the license files will b
installed into the correct locations on the machine, and all licensing services will be started.
Overview
Put the files in any convenient directory on the Management Server.
Details
/usr/bin/ftp your_host
%
% > cd your_home
Page 26

% > lcd /tmp
% > get cpack.lic
> bye
%
Back to Top
Step 9 Install ClusterPack on the Management Server
Background
The ClusterPack software is delivered on a DVD.
Overview
z
Mount and register the ClusterPack DVD as a software depot.
z
Install the ClusterPack Manager software (CPACK-MGR) using swinstall.
z
Leave the DVD in the DVD drive for the next step.
Details
How to mount a DVD on a remote system to a local directory
On the system with the DVD drive (i.e. remote system):
1. Mount the DVD.
% mount /dev/dsk/xxx /mnt/dvdrom
2. Edit the /etc/exports file. DVDs must be mounted read only ('ro'), and if required, can give
root permission to other machines mounting the filesystem
("root=<machine_foo:machine_bar:machine_baz>"). Add a line to /etc/exports:
% /mnt/dvdrom -ro,root=<local_system>
3. Export the file system, using all the directives found in /etc/exports
% exportfs -a
4. Check to be sure that the line you added is actually exported.
exportfs
%
On the local machine:
5. Mount the DVD to an existing directory.
% /etc/mount <remote_system>:/mnt/dvdrom /mnt/dvdrom
Page 27

Note:
e
e
You cannot be in the /mnt/dvdrom directory when you try to mount. You
will get a file busy error.
When you are finished, on the local machine:
6. Unmount the DVD file system.
/etc/umount /mnt/dvdrom
%
On the remote system:
7. Unexport the DVD file system.
% exportfs -u -i /mnt/dvdrom
8. Unmount the DVD
/etc/umount /mnt/dvdrom
%
How to enable a DVD as a software depot
During the installation process, two DVDs will be required. Generic instructions for making a DVD
accessible as a software depot for installation onto the Management Server are provided here. Please ref
the steps that follow for the specific DVDs that are required.
The steps to mount a DVD for use as a software depot are:
z
Insert DVD into the drive
z
Mount the DVD drive locally on that system
z
Register the depot on the DVD using swreg
z
Check the contents of the DVD using swlist
These commands can only be executed as the super user (i.e. root).
A DVD drive installed in the Management Server can be used for software installations. If the Managem
Server does not include a DVD drive, use one of these two methods:
1. Connect a portable DVD drive to the Management Server
2. Use a HP-UX system with a DVD drive, which is network accessible from the
Management Server, as a source for installation.
For example, to mount the device /dev/dvdrom to the directory /mnt/dvdrom, execute the following
commands on the "source machine" with the DVD drive
/sbin/mount -r /dev/dsk/xxx /mnt/dvdrom
%
% /usr/sbin/swreg -l depot /mnt/dvdrom
% /usr/sbin/swlist @ /mnt/dvdrom
Page 28

z
Using the ClusterPack DVD, mount and register the DVD as a software depot.
z
Install the ClusterPack Manager software (CPACK-MGR) on the Management Server
using swinstall.
On the Management Server:
% /usr/sbin/swinstall -s <source_machine>:/mnt/dvdrom CPACKMGR
z
The ClusterPack DVD will be referenced again in the installation process. Please leave it
in the DVD drive until the "Invoke /opt/clusterpack/bin/manager_config on Management
Server" step has completed.
Back to Top
Step 10 Run manager_config on the Management Server
Background
This program is the main installation and configuration driver. It should be executed on the Management
Server.
Some of the steps are:
z
Install the appropriate license files (i.e. ONE Base Edition license file or TWO
Clusterware Edition license files), and start the licensing services
z
Assign DNS domain name and NIS domain name based on inputs provided
z
Select and configure the cluster LAN interface on the Management Server that interfaces
with the Compute Nodes
z
Specify how many Compute Nodes are in the cluster and the starting IP address of the
first Compute Node. This information is used to assign names and IP addresses when
Compute Nodes are brought up. The first 5 characters of the Management Server's
hostname are used for a base for the Compute Nodes. For example, if the starting IP
address is 10.1.1.1, and there are 16 Compute Nodes, and the name of the Management
Server is hpnode, then the first Compute Node will be called hpnod001 with address
10.1.1.1, the next hpnod002 with address 10.1.1.2, and so on. If the tool is invoked with
the -f option, the input file will be the source for this information.
z
Set up the Management Server as NTP server, NIS server, NFS server, Ignite-UX server,
and Web server.
z
Install all of the dependent software components from the ClusterPack DVD:
{
This step looks for the source of the CPACK-MGR install and queries
for an alternate source, if the source is not found. A local depot is
setup. All of the agent components are copied. Other dependent
software pieces in the Management Server are validated and installed.
z
Modify configuration files on the Management Server to enable auto-startup of the
Page 29

Cluster Management Software components after reboots.
z
Configure Cluster Management Software tools. The Management Server components of
HP System Management Tools (HP Systems Insight Manager) is also configured if
selected.
z
Print a PASS diagnostic message if all of the configuration steps are successful.
Overview
Provide the following information to the manager_config program:
z
The path to the license file(s),
z
Whether to store passwords,
z
The DNS domain and NIS domain for the cluster,
z
The host name of the manager and the name of the cluster,
z
The cluster LAN interface on the Management Server,
z
The count and starting IP address of the Compute Nodes,
z
Whether to mount a home directory,
z
The SCM admin password if SCM is configured.
z
The LSF admin password. (Clusterware edition only)
Details
This tool can be invoked in two ways, based on your specific requirements:
z
If you want manager_config to drive the allocation of hostnames and IP addresses of the
Compute Nodes in the cluster (based on some basic queries),
invoke /opt/clusterpack/bin/manager_config with no arguments:
% /opt/clusterpack/bin/manager_config
z
If you want manager_config to assign specific hostnames and IP addresses to the
Compute Nodes in the cluster, supply an input file in the same format as /etc/hosts, and
invoke the tool as follows:
/opt/clusterpack/bin/manager_config -f input_file
%
After this step, the ClusterPack DVD is no longer required during installation. On the source machine,
unmount the DVD drive and remove the DVD.
/sbin/umount /mnt/dvdrom
%
Page 30
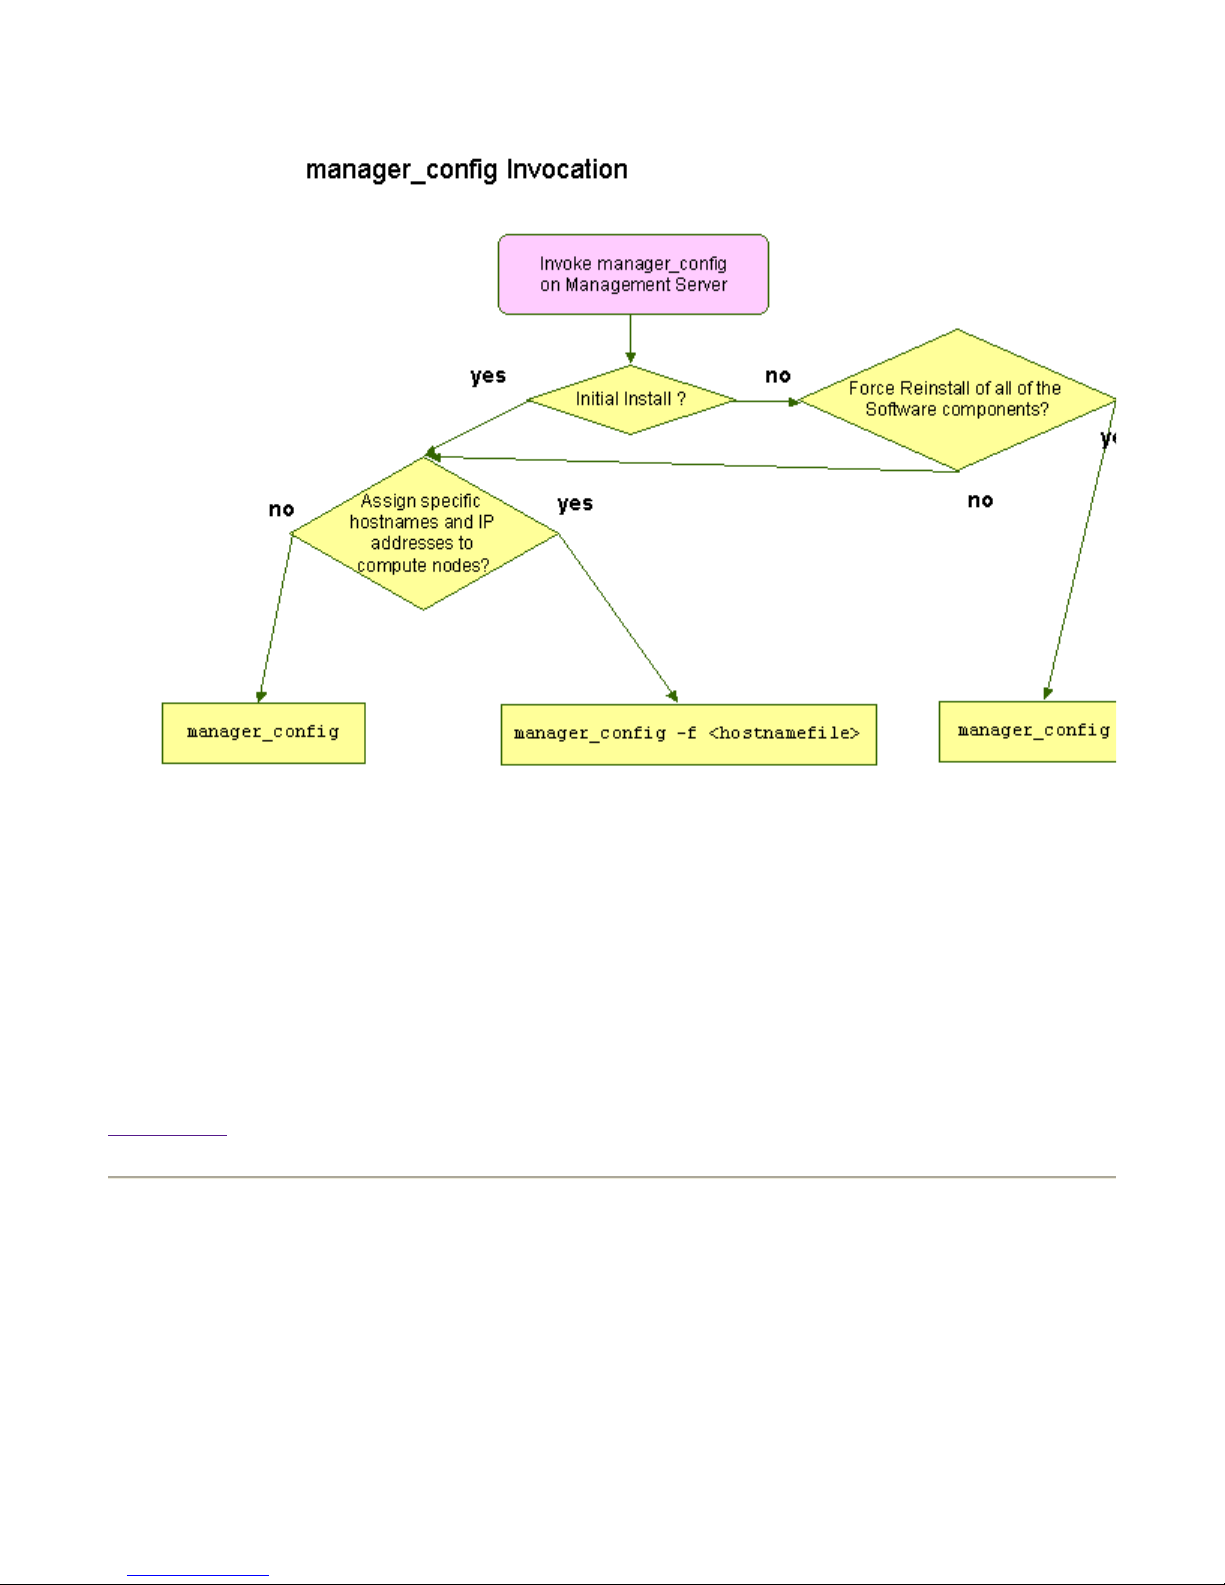
manager_config Invocation
a
manager_config is an interactive tool that configures the Management Server based on some simple quer
(most of the queries have default values assigned, and you just need to press RETURN to assign those
default values).
Back to Top
Step 11 Run mp_register on the Management Server
Background
A Management Processor (MP) allows you to remotely monitor and control the state of a Compute Node
configuring and registering the MP cards for each Compute Node, clbootnodes can be used to automatic
answer the first boot questions for each Compute Node.
Page 31

When you telnet to an MP, you will initially access the console of the associated server. Other options su
e
l
a
p
t
u
w
h
e
m
as remote console access, power management, remote re-boot operations, and temperature monitoring ar
available by typing control-B from the console mode. It is also possible to access the MP as a web conso
However, before it is possible to access the MP remotely it is first necessary to assign an IP address to e
MP. This is normally achieved by connecting a serial console device to the serial port on the MP and
erforming a series of configuration steps. This can be quite tedious and time consuming for moderate to
large clusters. To ease the effort, mp_register can perform the configuration for you by issuing the
commands via a serial cable.
mp_register maintains a database of knowledge about the MP cards in the system. The database is restric
to nodes that have been added to the cluster with manager_config. Likewise, nodes removed from the cl
are removed from the MP database. The utility is generally designed for single use when setting up the
cluster for the first time. However, it can be run multiple times to make changes to MP designations or
nodes are added to the cluster.
Note:
It is important to note that the configuration step does not configure accounts for the MP.
By default, anyone can access the MP without a password. Leaving the cards without
configured users is a severe security risk. Users can freely access the card and shut down
the node or gain root access through the console. The configuration step configures the MP
for telnet or web access only to make future modifications, such as adding users simpler to
perform.
mp_register will add each MP and associated IP address to the /etc/hosts file on the Management Server.
This file will later get propagated to the Compute Nodes. Each MP is assigned a name during the
configuration step which is also placed in the /etc/hosts file. This name is derived as the name of the
associated host appended with '-mp' (for Management Processor). For example, the MP associated with t
host foo will be named foo-mp.
Overview
Provide the following information to the mp_register program about each MP card that is connected to a
Compute Node. It will configure all MPs automatically, instead of requiring you to manually connect th
to a serial console device.
z
IP address,
z
Netmask,
z
Gateway IP address.
Details
For each node, the program will ask you if you want to establish an MP for that machine. It will also ask
the MP is already configured. If it is not already configured, you will be prompted to connect a serial cab
from the serial port of the Management Server to the serial port of the MP to be configured. The progra
will then use the information you entered about the card to configure it. Each MP can be configured in tu
MPs which have been previously configured can be added to the database without being configured.
Before invoking mp_register to initially configure the MP cards on each Compute Node, obtain a serial c
long enough to connect from the serial console port on the back of the Management Server to the serial
Page 32

console port on the MP card of each Compute Node.
e
p
e
w
r
t
When you are ready to run mp_register, use this command:
% /opt/clusterpack/bin/mp_register
Back to Top
Step 12 Power up the Compute Nodes
Background
The clbootnodes utility is intended to ease the task of booting Compute Nodes for the first time. To use
clbootnodes, the nodes' MP cards must have been registered and/or configured with mp_register.
Note:
clbootnodes can only be used to boot nodes to the language specification: English
The first time that HP-UX is booted after installation, it asks a series of questions:
z
What language to use
z
Hostname
z
Time and Timezone settings
z
Networking Configuration
z
Root password
Booting each node in a medium to large cluster can be a long and tedious task. clbootnodes automates th
rocesses to make it much faster and relatively free of user interaction. It is also possible to boot only
specified nodes using clbootnodes.
clbootnodes will gain console access by using telnet to reach the MP. clbootnodes uses a library called
Expect to produce the input needed to gain access to the console and step through the boot processes. Th
are times when human intervention is necessary. In these cases, a message will be displayed explaining
control is being returned to the user. The user can then interact with the MP/console and then return cont
to clbootnodes by pressing '~'. Control may be given to the user for the following reasons:
z
The MP is password protected
z
A LAN card choice was not specified to clbootnodes
z
The utility could not determine the state of the console
clbootnodes is intended to boot a node or nodes through the first boot sequence. It can generally be run a
any time to ensure that a node is booted and can usually recognize if the console represents an already
booted node. However, because a user can leave the console in any state, it is not always possible to
determine the state that a console is in. Because of this, use clbootnodes for booting nodes which are kno
to be in a "first boot" condition.
Page 33

When booting a node, clbootnodes will answer the first boot questions rather than having to answer the
m
e
n
o
w
b
A
manually. The questions are answered using the following information:
z
Language selection: All language selection options are set to English.
z
Keyboard selection: The keyboard selection is US English
z
Timezone: The time zone information is determined based on the setting of the
Management Server
z
Time: The current time is accepted. The time will later be synchronized to the
Management Server using NTP.
z
Networking: The LAN card specified will be configured to the IP address specified to
manager_config.
z
Hostname: The hostname will be set to the name specified through manager_config.
z
Root password: The root password will be queried before the nodes are booted.
Overview
Use the clbootnodes program to power up all Compute Nodes that have a connected MP that you specifi
the previous step. It will answer the first boot questions for all nodes automatically.
Provide the following information to the clbootnodes program:
z
Language to use,
z
Host name,
z
Time and time zone settings,
z
Network configuration,
z
Root password.
Details
To run clbootnodes, use the following command:
/opt/clusterpack/bin/clbootnodes
%
Before booting the nodes, clbootnodes will ask you for the root password to set on the Compute Nodes a
the LAN card to configure for networking for each host. The LAN card choice for each host will be set t
IP address specified earlier via manager_config.
To boot the node using DHCP, invoke the program as follows:
% /opt/clusterpack/bin/clbootnodes <list_of_node_names>
You can omit the argument list, in which all nodes in the cluster will be processed. The IP address used
e the one that you provided previously. The program will interact with you to obtain the name of the L
card to use.
Back to Top
Step 13 Run compute_config on the Management Server
Page 34

s
p
i
i
a
Background
This tool is the driver that installs and configures appropriate components on every Compute Node.
z
Registers Compute Nodes with HP Systems Insight Manager or SCM on the Management
Server.
z
Pushes agent components to all Compute Nodes.
z
Sets up each Compute Node as NTP client, NIS client, and NFS client.
z
Starts necessary agents in each of the Compute Nodes.
z
Modifies configuration files on all Compute Nodes to enable auto-startup of agents after
reboots.
z
Allows for the configuration of additional networks with clnetworks
z
Prints a PASS diagnostic message if all configuration steps are successful.
clnetworks
Each Compute Node is known to the Management Server through the IP address and specified to
manager_config. These interfaces are collectively known as the Cluster Network. This term can be
somewhat confusing when a cluster consists of both private nodes and public nodes. This is possible, for
example, when an initial set of Compute Nodes is created on a private network and then additional node
outside the private network are added using -a. The IP address of each Compute Node known by the
Management Server makes up the Cluster Network.
ClusterPack includes a utility to configure additional networks on all of the Compute Nodes. These
networks, like the Cluster Network, refer to a logical collection of interfaces/IP addresses and not to a
hysical network. However, they must share a common netmask. The concept of a network is defined as:
z
A name (for reference only)
z
A subset of the nodes in the cluster
z
A network interface for each node in the subset
z
An IP address for each interface
z
A name extension that is added to the hostname of each machine and associated with each
host's interface.
z
A netmask
To define additional networks, use the command clnetworks. This tool is also called from compute_conf
clnetworks provides a text-based interface for selecting nodes, network interfaces and IP addresses. It gu
the user through the creation of a network. It is also possible to modify an existing network. When you h
finished creating or updating networks, clnetworks will ensure that each interface specified is configured
correctly and ensure the proper entries in each host's /etc/hosts file.
Overview
The compute_config program will register the nodes with various programs.
Details
Page 35

Execute the following command.
m
b
h
N
% /opt/clusterpack/bin/compute_config
Back to Top
Step 14 Set up HyperFabric (optional)
Background
The utility clnetworks assists in setting up a HyperFabric network within a cluster. For clnetworks to
recognize the HyperFabric (clic) interface, it is necessary to first install the drivers and/or kernel patches
are needed.
Once the clic interface is recognized by lanscan, clnetworks can be used to set (or change) the IP address
configure the card.
The HyperFabric interfaces can be grouped into a network entity using clnetworks. The network entity
e assigned an extension that forms the aliases to use for the HyperFabric interfaces. Use these names w
you want to explicitly communicate over the HyperFabric network. For example, if node002 has a
HyperFabric interface with the extension "hyp", ftp through this network can be achieved using:
% /usr/bin/ftp node002-hyp
otice that this command will only work from a node that has a HyperFabric interface.
Overview
Install the HyperFabric drivers and kernel patches.
Details
Use the swinstall command to install the following bundle:
z
HyprFabrc-00
Follow the installation instructions delivered to you with your HyperFabric installation kit.
Back to Top
Step 15 Set up InfiniBand (optional)
Background
Page 36

ClusterPack can configures IP over InfiniBand (IPoIB) if the appropriate InfiniBand drivers are installed
n
n
a
n
p
the systems.
Overview
If the InfiniBand IPoIB drivers are installed prior to running compute_config, the InfiniBand HCA is
detected and the administrator is given a chance to configure them.
The administrator can also configure the InfiniBand HCA with IP addresses by
invoking /opt/clusterpack/bin/clnetworks. See the man pages for clnetworks for usage instructions.
Known Issues
The is a known issue that IB drivers are not correctly configured following a Golden Image installation o
compute node.
compute_config can be used to install IB drivers on compute nodes following a Golden Image installatio
This re-installation of the drivers will allow them to work properly. To use the function, the IB dirver bu
(i.e. IB4X-00) must be swcopy'd into /var/opt/clusterpack/depot on the management server:
/usr/sbin/swcopy -x enfoce_dependencies=false -s <IB driver source> \*
%
@ /var/opt/clusterpack/depot
At the end of compute_config, if the IB drivers are found in /var/opt/clusterpack/depot, an option to inst
the IB drivers on the compute nodes will be given. If you choose to install the IB drivers on the compute
nodes, a second option will be presented: The IB drivers can be installed on only those compute nodes th
already have the driver software installed, or the IB drivers can be installed on all the compute nodes.
Installing the IB drivers requires the compute nodes to reboot. This erboot is done automatically by
compute_config as part of the installation.
Note:
If the IB drivers are installed on a compute node that does not have IB cards installed, the
MPI test in finalize_config will fail.
Back to Top
Step 16 Run finalize_config on the Management Server
Background
This step performs verification checks on the Cluster Management Software, and validates the installatio
rints out diagnostic error messages if the installation is not successful.
Note:
Page 37

The finalize_config tool can be run at any time to validate the cluster configuration and to
p
N
a
e
/
e
f
r
s
N
determine if there are any errors in the ClusterPack software suite.
Overview
This program verifies the Cluster Management Software, and validates the installation of the single Com
ode. If it reports diagnostic error messages, repeat the installation process up to this point, performing
steps in the order specified.
Details
Finalize and validate the installation and configuration of the ClusterPack software.
/opt/clusterpack/bin/finalize_config
%
Back to Top
Step 17 Create a Golden Image of a Compute Node from the Management Server
Background
A system image is an archive of a computer's file system. Capturing the file system of a computer captur
the basic state of a computer system. An image does not generally include all files however. By default,
and other temporary files, network directories and host specific configuration files are not included.
A system image may be referred to as a golden image or a recovery image. The different names used to r
to the image reflect the different reasons for creating it. Administrators may create a "recovery" image o
node in the event that the node experiences hardware failure or the file system is accidentally removed o
corrupted. Administrators may also create a "golden" image for the purpose of installing it on other node
insure that each node in their cluster is configured exactly the way they want.
Overview
z
Clean up anything on the system that shouldn't be in the image.
z
Ensure that the system isn't being used.
z
Run sysimage_create to create the Golden Image.
Details
z
Log into the Compute Node to be archived.
z
Perform general file system cleanup/maintenance. For example, it may be desirable to
search for and remove core files.
ext, from the Management Server:
z
Ensure that the system is not being used. It is advisable that the system stop accepting new
Page 38

LSF jobs while the archive is being made:
% badmin hclose <hostname>
z
In addition, you should either wait until all running jobs complete, or suspend them:
bstop -a -u all -m <hostname>
%
z
Execute sysimage_create on the Management Server and pass the name of the file from
which you would like the image to be made. For example:
/opt/clusterpack/bin/sysimage_create <hostname>
%
z
Monitor the output for possible error conditions. The image will be stored
in /var/opt/ignite/archives/<hostname>
After the image creation is complete, the Compute Node should be opened for accepting Clusterware job
badmin hopen <hostname>
%
Back to Top
Step 18 Add nodes to the cluster that will receive the Golden Image
Background
This command adds the new node with the specified host name and IP address to the cluster. It also
reconfigures all of the components of ClusterPack to accommodate the newly added node.
Details
Invoke /opt/clusterpack/bin/manager_config with the "add node" option (-a). You can include multiple
host:ip pairs if you need to.
% /opt/clusterpack/bin/manager_config -a <new_node_name>:<new_node_ip_addr>
Back to Top
Step 19 Distribute the Golden Image to the remaining Compute Nodes
Background
This is the step that actually installs the Golden Image on the Compute Nodes.
Page 39

Overview
e
g
i
z
Register the image.
z
Distribute the image to selected nodes.
Details
To distribute a Golden Image to a set of Compute Nodes, you need to first register the image. To register
image, use the command:
% /opt/clusterpack/bin/sysimage_register <full path of image>
If the image was created with sysimage_create, the full path of the image was displayed by sysimage_cr
Images are stored in the directory:
/var/opt/ignite/archives/<hostname>
To distribute the Golden Image to the Compute Nodes, use the command:
/opt/clusterpack/bin/sysimage_distribute <full path of image> [ hostname |
%
all ]
The keyword "all" can be used to distribute the image to all of the Compute Nodes in the cluster, or a sin
hostname can be specified. sysimage_distribute will reboot each Compute Node for installation with the
specified image.
Back to Top
Step 20 Install and Configure the remaining Compute Nodes
Background
This tool is the driver that installs and configures appropriate components on every Compute Node.
Overview
Perform this process in the same way as configuring the first Compute Node.
References:
z
1.2.1 Comprehensive Installation Overview
Details
Use the following command to install and configure a Compute Node that received the Golden Image.
Perform this for all nodes. You can specify multiple nodes on the command line. You must place the opt
Page 40

"-a" in front of each node name.
e
c
p
% /opt/clusterpack/bin/compute_config -a <node name>
Back to Top
Step 21 Verify the final cluster configuration
Background
This step completes the installation and configuration process, performs verification checks on the Clust
Management Software, and validates the installation. It prints out diagnostic error messages if the
installation is not successful.
Overview
This program completes the installation and configuration process, verifies the Cluster Management
Software, and validates the installation. If it reports diagnostic error messages, repeat the installation pro
erforming all steps in the order specified.
Details
Finalize and validate the installation and configuration of the ClusterPack software.
/opt/clusterpack/bin/finalize_config
%
Back to Top
Index
|
Administrators Guide
Users Guide
|
Tool Overview
|
Related Documents
|
Copyright 1994-2004 hewlett-packard company
Dictionary
|
Page 41

Installation and Configuration of Optional Components
N
s
ClusterPack
Installation and Configuration of Optional
Components
Index
1.3.1 HP-UX IPFilter
1.3.2 External /home File Server
1.3.3 Adding Head Nodes to an ClusterPack cluster
1.3.4 Set up TCP-CONTROL
Administrators Guide
|
Users Guide
|
Tool Overview
|
Related Documents
|
Dictionary
|
1.3.1 HP-UX IPFilter
Introduction to NAT (Network Address Translation)
etwork Address Translation (NAT) or IP aliasing provides a mechanism to configure multiple IP addre
in the cluster to be presented as a single image view with a single external IP address.
The importance of this is two-fold:
1. Single point of "controlled" access to all of the cluster nodes.
Network Address Translation allows communications from inside the cluster to get out,
without allowing connections from outside to get in. NAT rewrites the IP headers of
internal packets going out, making it appear that they all came from a single IP address
(which is the external IP address of the entire cluster). Reply packets coming back are
translated back, and forwarded to the appropriate Compute Node. Thus, the Compute
Nodes are allowed to connect to the outside world, if needed. However, outside machines
cannot initiate any connection to individual Compute Nodes, since they are exposed only
to the "translated" IP address of the entire cluster.
2. Simplified network administration.
The administrator can add or delete nodes to/from the cluster Compute Nodes without any
impact to the external world. Further, the administrator can have the all the Compute
Page 42
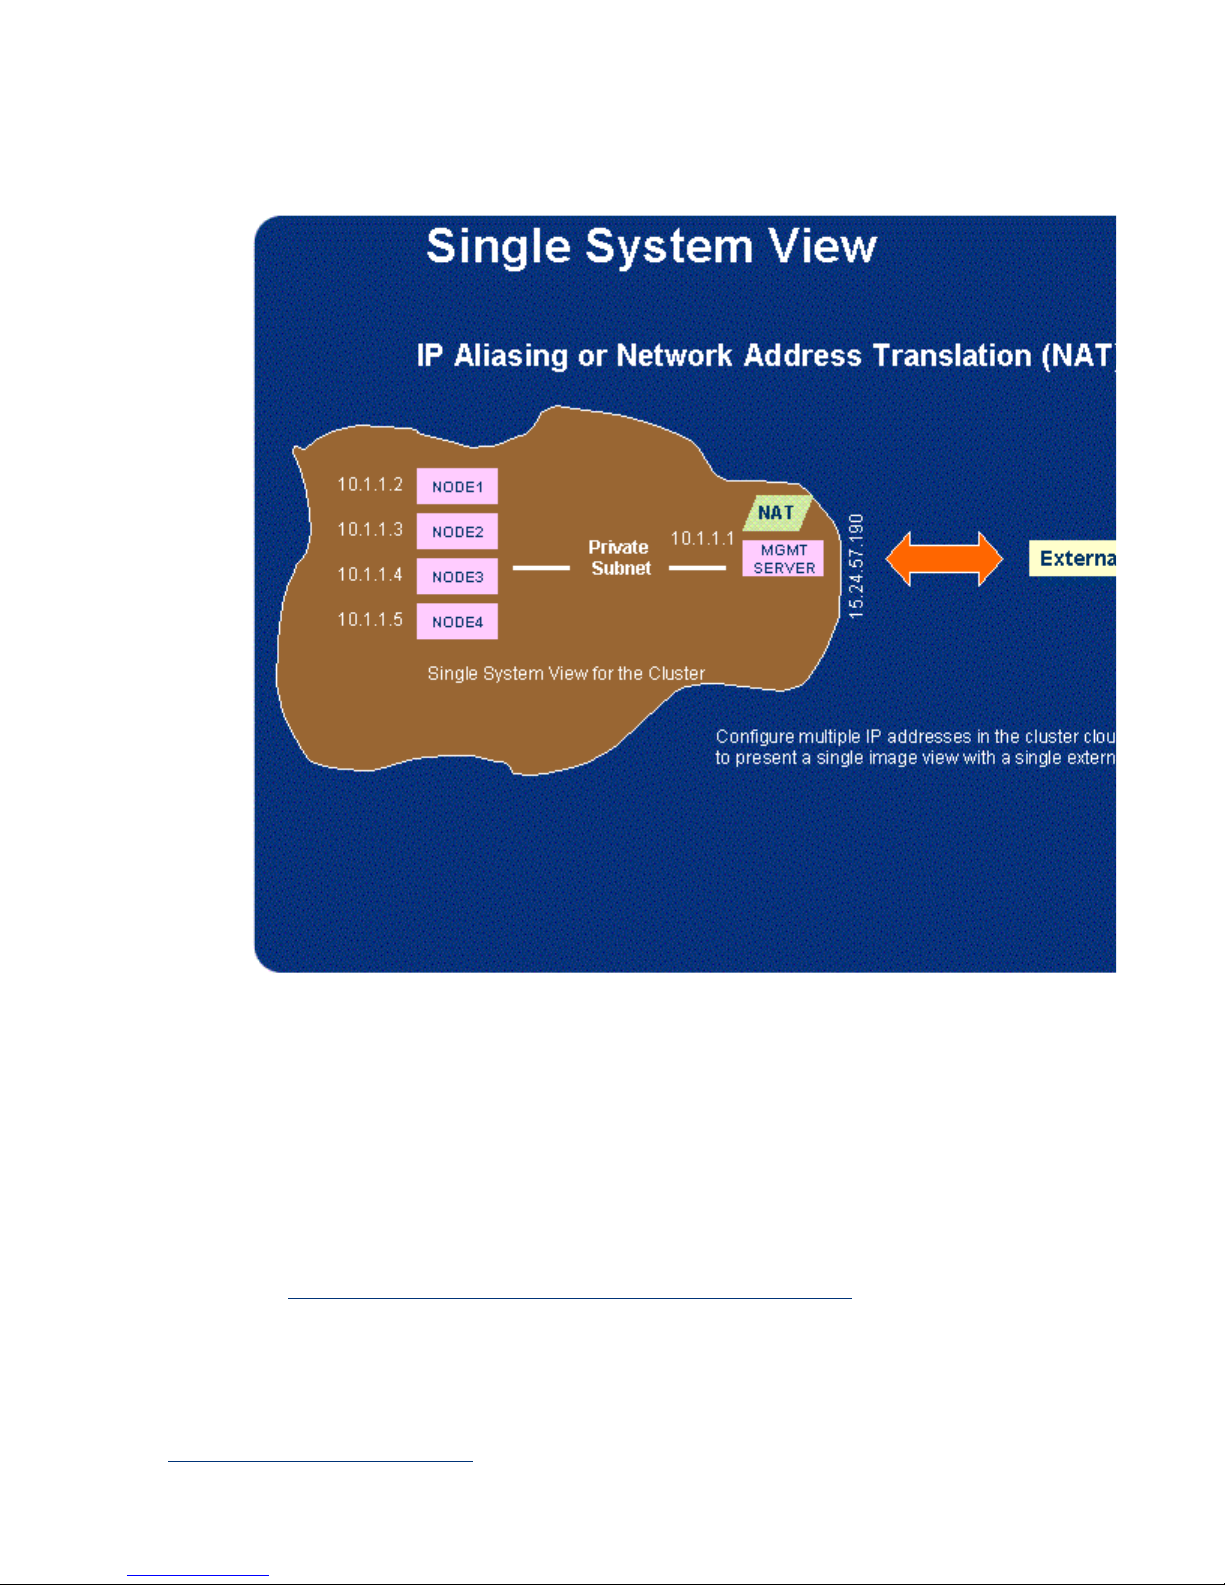
Nodes in a private IP sub-net (10.x.y.z range, 192.168.p.q range), which also alleviates the
need for numerous public IP addresses.
ClusterPack comes with HP-UX IPFilter, a software component with powerful packet
filtering and firewalling capabilities. One of the features that it supports is Network
Address Translation.
For your information on HP-UX IPFilter, please refer to the HP-UX IPFilter manual and
release notes at docs.hp.com:
http://docs.hp.com/hpux/internet/index.html#IPFilter/9000
For information on NAT features of HP-UX IPFilter refer to the public domain how-to document. No
guarantee can be made about the correctness, completeness or applicability of this or any third party
information.
http://www.obfuscation.org/ipf/
IP Aliasing or Network Address Translation (NAT)
Page 43

HP-UX IPFilter Validation
n
t
HP-UX IPFilter is installed with the default HP-UX 11i V2 TCOE bundle. To validate its installation, ru
the following command:
swverify B9901AA
%
Automatic setup of HP-UX IPFilter rules
ClusterPack V2.4 provides a utility called nat.server to automatically set up the NAT rules, based on the
cluster configuration. This tool can be invoked as follows:
/opt/clusterpack/lbin/nat.server
%
Manually setting up the HP-UX IPFilter and NAT rules
Setup the HP-UX IPFilter filtering rules
In this section, we will walk through the steps of setting up HP-UX IPFilter pass through all of the packe
For more complicated filtering rules, please refer to the HP-UX IPFilter documentation.
z
Create a file with pass-through rules
% cat << EOF > /tmp/filter.rules
pass in all
pass out all
EOF
% cat /tmp/filter.rules
pass in all
pass out all
To create more complicated rules, please refer to the HP-UX IPFilter documentation.
http://docs.hp.com/hpux/internet/index.html#IPFilter/9000
z
Enable filtering based on this rule set
% ipf -f /tmp/filter.rules
Note:
If there is an existing rule set, a new rule set can be loaded using:
ipf -Fa -f /tmp/filter.rules
%
z
For more complicated manipulations of the rule sets, refer to the ipf(5) and ipf(8) man
pages.
man 5 ipf
%
Page 44

% man 8 ipf
n
z
List the input output filter rules
% ipfstat -hio
Setup the NAT rules
In this section, we will walk through the steps of setting up HP-UX IPFilter that translate the source IP
addresses of all packets from the compute private subnet to the IP address of the gateway node. For addi
more sophisticated NAT rules, please refer to the IPFilter documentation.
1. Create a file with NAT rules.
Example 1: Map packets from all Compute Nodes in the 192.168.0.x subnet to a single IP
address 15.99.84.23
cat << EOF > /tmp/nat.rules
%
# lan0 -- interface to the external network
# NAT IP interface: 15.99.84.23
map lan0 192.168.0.0/24 -> 15.99.84.23/32 portmap tcp/udp
40000:60000
map lan0 192.168.0.0/24 -> 15.99.84.23/32
EOF
cat /tmp/nat.rules
%
# lan0 -- interface to the external network
# NAT IP interface: 15.99.84.23
map lan0 192.168.0.0/24 -> 15.99.84.23/32 portmap tcp/udp
40000:60000
map lan0 192.168.0.0/24 -> 15.99.84.23/32
Example 2: Map packets from specific Compute Nodes (192.168.0.3 and 192.168.0.4) to
a single IP address 15.99.84.23
cat << EOF > /tmp/nat.rules
%
# lan0 -- interface to the external network
# NAT IP interface: 15.99.84.23
map lan0 192.168.0.3/32 -> 15.99.84.23/32 portmap tcp/udp
40000:60000
map lan0 192.168.0.3/32 -> 15.99.84.23/32
map lan0 192.168.0.4/32 -> 15.99.84.23/32 portmap tcp/udp
40000:60000
map lan0 192.168.0.4/32 -> 15.99.84.23/32
EOF
% cat /tmp/nat.rules
# lan0 -- interface to the external network
# NAT IP interface: 15.99.84.23
map lan0 192.168.0.3/32 -> 15.99.84.23/32 portmap tcp/udp
40000:60000
map lan0 192.168.0.3/32 -> 15.99.84.23/32
Page 45

map lan0 192.168.0.4/32 -> 15.99.84.23/32 portmap tcp/udp
h
e
40000:60000
map lan0 192.168.0.4/32 -> 15.99.84.23/32
EOF
More examples of NAT and other IPFilter rules are available at /opt/ipf/examples.
2. Enable NAT based on this rule set
% ipnat -f /tmp/nat.rules
Note: If there are existing NAT rules that you want to replace, you must flush and delete
that rule set before loading the new rules:
% ipnat -FC -f /tmp/nat.rules
For more complicated manipulations of the rules, refer to ipnat man pages.
Enable NAT in the Compute Nodes
Configure the routing table in each Compute Node to route packets that cannot be directly delivered to t
Management Server, which serves as the gateway node. This will normally be done automatically by
compute_config.
Example: In this example, lan1 is the private subnet of the Compute Nodes, and the Management Server'
lan1 interface is 192.168.0.1. The following steps should be performed to configure the routing tables in
each Compute Node:
z
On each Compute Node, issue the command:
% /usr/sbin/route add default 192.168.0.1 1
z
On each Compute Node, add or modify the default route in /etc/rc.config.d/netconf. For
example:
ROUTE_DESTINATION[0]=default
ROUTE_MASK[0]=""
ROUTE_GATEWAY[0]="192.168.0.1"
ROUTE_COUNT[0]=""
ROUTE_ARGS[0]=""
Verify the NAT installation
To verify that the HP-UX IPFilter NAT configuration works, select any Compute Node that has its addr
translated, and perform the following tests:
z
Ping test
On the Compute Node, contact a machine that is not part of the cluster using the 'ping'
command. For example:
% ping 15.99.22.42
Page 46

If there is no packet loss, then NAT is enabled.
I
z
DISPLAY Server Interaction Test
1. On the Compute Node, set the DISPLAY variable to a display server
that is not part of the cluster, for instance your local desktop.
setenv DISPLAY 15.99.22.42:0.0 (if it is csh)
%
2. Try to bring up an xterm on the DISPLAY server:
% xterm &
If the xterm is brought up in the DISPLAY server, then NAT is
enabled.
References:
z
3.6.1 Introduction to NAT (Network Address Translation)
Back to Top
1.3.2 External /home File Server
During the installation, manager_config presents the option to mount a /home directory to all of the node
the cluster. The default is to use /home on the Management Server as the home directory for the cluster.
alternate mount point is used, it is necessary to perform the following steps before starting the
"Invoke /opt/clusterpack/bin/manager_config on Management Server" step:
z
If it is not already setup, configure the file server to export the directory you intend to
mount as /home.
z
Connect the file server to the ProCurve 5308xl switch. The file server's connection to the
switch should use the same subnet mask as the rest of the Compute Nodes. This may
require adding and/or configuring an addition network card on the file server.
z
When manager_config prompts you for the mount location of /home, use the IP address of
the file server that is accessible to the ProCurve 5308xl switch.
References:
z
Step 8 Copy the License Files to the Management Server
Back to Top
1.3.3 Adding Head Nodes to an ClusterPack cluster
Page 47

h
n
e
T
p
r
j
s
t
n
t
The default use model of an ClusterPack cluster is that end users will submit jobs remotely through the
ClusterWare GUI or by using the ClusterWare CLI from the Management Node. Cluster administrators
generally discourage users from logging into the Compute Nodes directly. Users are encouraged to use t
Management Server for accessing files and performing routine tasks. When it is desirable to add additio
nodes for this purpose, or for more intense computational tasks such as job pre or post processing and
compilation, additional "head nodes" can be used. In this document, the term "head node" refers to such
user-accessible nodes that allow for interactive use. Head nodes can be included in an ClusterPack Clust
using the following approach:
z
The head nodes should include an additional network card to allow the node to be
accessible to the wider area network.
z
Head nodes should be added to the cluster using the same approach as Compute Nodes.
They can be included in the initial cluster definition or added at a later time using the '-a'
option to manager_config and compute_config.
z
Administrators may choose to close these nodes from running ClusterWare jobs or only
make them accessible only to particular queues. (See ClusterWare documentation for
more information).
z
It may be convenient to use the clgroup command to create groups to represent the head
node(s) and the remaining Compute Nodes.
z
Use compute_config to configure the additional network cards to allow the head node(s)
to be accessible outside of the cluster. Assign the available network cards publicly
accessible IP addresses as appropriate to your local networking configuration.
Back to Top
1.3.4 Set up TCP-CONTROL
ClusterPack delivers a package to allow some control of TCP services coming into the Compute Nodes.
ackage, called TCP-CONTROL, can be used to limit users from accessing the Compute Nodes directly,
should be used with great care due to several restrictions. TCP-CONTROL can be used to force users to
obs through ClusterWare Pro™ only. It accomplishes this by disabling telnet and remsh access to the
Compute Nodes from the manager. However, this will also cause several important telnet- and remsh-ba
applications to fail for non-root users. The tools affected are the multi-system aware tools (clsh, clps, etc.
and the AppRS utilities (apprs_ls, apprs_clean, etc.).
Note:
Enabling TCP-CONTROL by setting the /etc/hosts.deny file will prevent users' access to
multi-system aware tools and AppRS utilities.
By default, the TCP-CONTROL package is installed on the Compute Nodes, but is not configured to res
access in any way. TCP control is restricted by the settings in /etc/hosts.allow and /etc/hosts.deny files o
each Compute Node. The /etc/hosts.deny file is initially configured with no entries, but has two commen
lines that can be uncommented to prevent users from accessing the Compute Nodes:
ALL:ALL@<Management Server name>
Page 48

ALL:ALL@<Management Server private IP address>
c
u
By uncommenting these lines, all users from the Management Server will be denied access. There is also
a /etc/hosts.allow file that explicitly permits access to some users. It is configured, by default, to allow a
to root and lsfadmin:
ALL:root@ALL
ALL:lsfadmin@ALL
Although the hosts.deny file disallows all access, the entries in hosts.allow override the settings of
hosts.deny. The hosts.deny file also does not prevent users from accessing telnet and remsh between
Compute Nodes. This allows MPI-based applications to run when submitted to a ClusterWare Pro™ que
More information about the settings in hosts.deny and hosts.allow can be found in the man pages:
man tcpd
%
% man hosts_access
Back to Top
Index
Administrators Guide
|
Users Guide
|
Tool Overview
|
Related Documents
|
Copyright 1994-2004 hewlett-packard company
Dictionary
|
Page 49

Software Upgrades and Reinstalls
p
f
ClusterPack
Software Upgrades and Reinstalls
Index
1.4.1 Software Upgrades and Reinstalls Overview
1.4.2 Prerequisites for Software Upgrades and Reinstalls
1.4.3 Reinstallation and Configuration Steps
1.4.4 Upgrading from Base Edition to Clusterware Edition
Reinstall Step 1 Obtain New license key(s)
Reinstall Step 2 Invoke /opt/clusterpack/bin/manager_config on Management Server
Reinstall Step 3 Invoke /opt/clusterpack/bin/compute_config on Management Server
Reinstall Step 4 Invoke /opt/clusterpack/bin/finalize_config on Management Server
1.4.5 Upgrading from V2.2 to V2.4
1.4.6 Upgrading from V2.3 to V2.4
Administrators Guide
|
Users Guide
|
Tool Overview
|
Related Documents
|
Dictionary
|
1.4.1 Software Upgrades and Reinstalls Overview
Overview
It is very important to read this entire section before beginning the upgrade or reinstallation
rocess.
As with the installation, ClusterPack uses a three-stage process for reinstalling and configuring
an ClusterPack managed cluster.
z
Installation and configuration of the Management Server
z
Installation and configuration of the Compute Nodes
z
Verification of the Management Server and Compute Nodes
In the steps below, it is assumed that the nodes are in a booted state and the MP cards have been
configured. It is possible to run mp_register at any time to make changes to the MP interfaces o
the nodes currently registered with manager_config. clbootnodes can also be used at any time to
ensure that nodes with registered MPs are in a fully booted state.
The Reinstall/Upgrade steps suggested in this section cannot be used to modify the cluster LAN
interface addresses or hostnames of the Management Server or Compute Nodes. Changes of this
Page 50

nature can only be accomplished by a complete re-configuration of the cluster (See Initial
Installation and Setup). The reinstallation path is only meant to ensure that all of the
ClusterPack software is correctly installed and the cluster layout described by earlier
invocations of manager_config is configured correctly.
References:
z
1.2.1 Comprehensive Installation Overview
ClusterPack V2.4 supports an upgrade path from ClusterPack V2.3 and ClusterPack V2.2
Back to Top
1.4.2 Prerequisites for Software Upgrades and Reinstalls
Prerequisites
The key components of the HP-UX Technical Clusters are:
z
Management Server: HP Integrity server with HP-UX 11i Version 2.0 TCOE
z
Compute Nodes: HP Integrity servers with HP-UX 11i Version 2.0 TCOE
z
Cluster Management Software: ClusterPack V2.4
The following prerequisites are assumed:
z
HP-UX 11i v2.0 TCOE is installed on the Management Server
z
HP-UX 11i v2.0 TCOE is installed on each Compute Node
z
HP-UX 11i Ignite-UX on the Management Server
z
HP-UX 11i Ignite-UX on each Compute Node
z
Host names and IP addresses are assigned to all Compute Nodes
z
All Compute Nodes are reachable from the Management Server
Back to Top
1.4.3 Reinstallation and Configuration Steps
The steps in this section have to be followed in the specified order to ensure that everything
works correctly. The finalize_config tools will be run at the end to validate the installation and
configuration steps.
Back to Top
Page 51

1.4.4 Upgrading from Base Edition to Clusterware Edition
Upgrading from Base Edition to Clusterware Edition is done using the "forced reinstall" path
that is documented below. During manager_config you will be given an opportunity to provide
a valid Clusterware License key. If you have a key, Clusterware will be installed and integrated
into the remaining ClusterPack tools.
Please obtain your Clusterware licnese key BEFORE reinstalling the ClusterPack software.
Back to Top
Reinstall Step 1 Obtain New license key(s)
You will be given the option to use the existing license file(s) for the reinstalled cluster. If you
wish to retain the current license file(s), nothing more is required.
Upgrading from Base Edition to Clusterware Edition
If you are upgrading from Base Edition to Clusterware Edition, you will need to redeem your
Clusterware Edition license certificate using the instructions in 1.2.3 Pre-Install Checklist. You
can reuse the ClusterPack license file, and specify a location for the Clusterware license file.
Increasing the size of an existing cluster
If you are performing the forced reinstallation as part of adding more compute nodes to your
cluster, you will need to obtain new license files using the instruction on your new license
certificates.
During manager_config, please do not reuse the existing license files. Instead provide the
location of the new license files, and they will be automatically installed into the correct
locations.
References:
z
z
Back to Top
Reinstall Step 2 Invoke /opt/clusterpack/bin/manager_config on Management
Server
Page 52

This tool is the main installation and configuration driver. Invoke this tool with "force install"
N
option -F:
/opt/clusterpack/bin/manager_config -F
%
Note:
manager_config will ask for the same software depot that was used the last
time the cluster was installed. If you are using the ClusterPack V2.4 DVD as
the source, please mount the DVD and have it accessable to the Management
server BEFORE invoking manager_config -F
References:
z
Step 3 Allocate File System Space
z
Step 4 Obtain a License File
Back to Top
Reinstall Step 3 Invoke /opt/clusterpack/bin/compute_config on Management
Server
This tool is the driver that installs and configures appropriate components on every Compute
ode. It is invoked with the "force install" option -F as follows:
% /opt/clusterpack/bin/compute_config -F
Back to Top
Reinstall Step 4 Invoke /opt/clusterpack/bin/finalize_config on Management
Server
Finalize and validate the installation and configuration of the ClusterPack software.
% /opt/clusterpack/bin/finalize_config
This step completes the installation and configuration process, does verification checks on the
Cluster Management Software, and validates the installation. It prints out diagnostic error
messages if the installation is not successful.
Back to Top
Page 53

1.4.5 Upgrading from V2.2 to V2.4
ClusterPack V2.4 supports an upgrade path from ClusterPack V2.2. Customers that currently
deploy ClusterPack V2.2 on HP Integrity servers use HP-UX 11i Version 2.0 TCOE.
ClusterPack V2.4 provides a mechanism for the use of the majority of V2.2 configuration
settings for the V2.4 configuration.
Before starting the upgrade, it is important to have all of your Compute Nodes in good working
order. All Compute Nodes and MP cards should be accessible. The LSF queues (if in use)
should be empty of all jobs, and the nodes should be idle.
Instructions for upgrading from V2.2 to V2.4:
z
Backup the cluster user-level data.
z
Install the V2.4 backup utilities.
% swinstall -s <depot_with_V2.4> CPACK-BACKUP
z
Take a backup of the cluster information.
/opt/clusterpack/bin/clbackup -f
%
<backup_file_name>
z
Copy the backup file to another system for safe keeping.
z
Remove the TCP wrappers on your Compute Nodes.
clsh /usr/bin/perl -p -i -e
%
"'s^ /usr/lbin/tcpd^^;'" /etc/inetd.conf
z
Remove the Compute Nodes from the Systems Inventory Manager database.
% /opt/sysinvmgr/bin/simdevice -r
' /opt/sysinvmgr/bin/simdevice -l | egrep ^Name: |
awk '{print "-n", $2}' | grep \.'
z
Install the new ClusterPack manager software.
% swinstall -s <depot_with_V2.4> CPACK-MGR
z
Run manager_config in upgrade mode using the file you created in Step 3.
/opt/clusterpack/bin/manager_config -u
%
<backup_file_name>
z
Register your MP cards. (To save time, check out the new -f option to
compute_config.)
% /opt/clusterpack/bin/mp_register
z
Install the new software on the Compute Nodes. (The -u is important.)
Page 54

% /opt/clusterpack/bin/compute_config -u
z
Verify that everything is working as expected.
% /opt/clusterpack/bin/finalize_config
Back to Top
1.4.6 Upgrading from V2.3 to V2.4
ClusterPack V2.4 supports an upgrade path from ClusterPack V2.3. Customers that currently
deploy ClusterPack V2.3 on HP Integrity servers use HP-UX 11i Version 2.0 TCOE.
ClusterPack V2.4 provides a mechanism for the use of the majority of V2.3 configuration
settings for the V2.4 configuration.
Before starting the upgrade, it is important to have all of your Compute Nodes in good working
order. All Compute Nodes and MP cards should be accessible. The LSF queues (if in use)
should be empty of all jobs, and the nodes should be idle.
Instructions for upgrading from V2.3 to V2.4:
z
Backup the cluster user-level data.
z
Install the V2.4 backup utilities.
swinstall -s <depot_with_V2.4> CPACK-BACKUP
%
z
Take a backup of the cluster information.
% /opt/clusterpack/bin/clbackup -f
<backup_file_name>
z
Copy the backup file to another system for safe keeping.
z
Install the new ClusterPack manager software.
% swinstall -s <depot_with_V2.4> CPACK-MGR
z
Run manager_config in upgrade mode using the file you created in Step 3.
/opt/clusterpack/bin/manager_config -u
%
<backup_file_name>
z
Register your MP cards. (To save time, check out the new -f option to
compute_config.)
% /opt/clusterpack/bin/mp_register
z
Install the new software on the Compute Nodes. (The -u is important.)
% /opt/clusterpack/bin/compute_config -u
Page 55

z
Back to Top
Verify that everything is working as expected.
% /opt/clusterpack/bin/finalize_config
Index
Administrators Guide
|
Users Guide
|
Tool Overview
|
Related Documents
|
Copyright 1994-2004 hewlett-packard company
Dictionary
|
Page 56

Golden Image Tasks
N
ClusterPack
Golden Image Tasks
Index
1.5.1 Create a Golden Image of a Compute Node from the Management Server
1.5.2 Distribute Golden Image to a set of Compute Nodes
1.5.3 Managing system files on the compute nodes
1.5.4 Adding software bundles to Golden Images
Administrators Guide
|
Users Guide
|
Tool Overview
|
Related Documents
|
Dictionary
|
1.5.1 Create a Golden Image of a Compute Node from the Management
Server
A system image is an archive of a computer's file system. Capturing the file system of a
computer captures the basic state of a computer system. An image does not generally include
all files however. By default, /tmp and other temporary files, network directories and host
specific configuration files are not included.
A system image may be referred to as a golden image or a recovery image. The different names
used to refer to the image reflect the different reasons for creating it. Administrators may create
a "recovery" image of a node in the event that the node experiences hardware failure or the file
system is accidentally removed or corrupted. Administrators may also create a "golden" image
for the purpose of installing it on other nodes to insure that each node in their cluster is
configured exactly the way they want.
The HP Technical Cluster includes a tool to simplify the process of creating images:
/opt/clusterpack/bin/sysimage_create
%
The recommended procedure for creating a golden image of a Compute Node is:
z
Log into the Compute Node to be archived.
z
Perform general file system cleanup/maintenance. For example, it may be
desirable to search for and remove core files.
ext, from the Management Server:
Page 57

z
Ensure that the system is not being used. It is advisable that the system stop
accepting new LSF jobs while the archive is being made:
badmin hclose <hostname>
%
z
In addition, you should either wait until all running jobs complete, or
suspend them:
bstop -a -u all -m <hostname>
%
z
Execute sysimage_create on the Management Server and pass the name of
the file from which you would like the image to be made. For example:
/opt/clusterpack/bin/sysimage_create <hostname>
%
z
Monitor the output for possible error conditions. The image will be stored
in /var/opt/ignite/archives/<hostname>
After the image creation is complete, the Compute Node should be opened for accepting
Clusterware jobs.:
% badmin hopen <hostname>
If the system you want to archive was not installed as part of the HP Technical Cluster, it will
not contain the sysimage_create tool. In this case, the make_sys_command should be used
directly to create the golden image. Verify that Ignite-UX is installed on the system:
% swlist -l product Ignite-UX
If it is not, you will need to obtain and install this product first.
http://software.hp.com
Read the man pages for make_sys_image(1m) to find out more about creating system images.
The user can control what files are included in an image through the use of the -l, -g and -f
arguments to make_sys_image. See the man pages for make_sys_image(1m) for more
information. By default, files in /tmp and most files in /var/adm and /var/tmp are excluded.
More importantly, many of the system configuration files in /etc are replaced by "newconfig"
versions. The reasoning behind this is that the archive may be used on a different system where
the settings from the "golden" machine will be incorrect. A complete list of files which will be
excluded from an image can be viewed by using the command:
% /opt/ignite/data/scripts/make_sys_image -x -s local
Users may wish to exclude additional files by using the -f option to make_sys_image. If the
archive is only intended to reinstall the machine where it was made, make_sys_image -l may be
used to include all configuration files in their current state.
Back to Top
Page 58

1.5.2 Distribute Golden Image to a set of Compute Nodes
To distribute a golden image to a set of Compute Nodes, you need to first register the image. To
register the image, use the command:
/opt/clusterpack/bin/sysimage_register <full path of image>
%
If the image was created with sysimage_create, the full path of the image was displayed by
sysimage_create. Images are stored in the directory:
/var/opt/ignite/archives/<hostname>
To distribute the golden image to the Compute Nodes, use the command:
% /opt/clusterpack/bin/sysimage_distribute <full path of image>
[ hostname | all ]
The keyword "all" can be used distribute the image to all of the Compute Nodes in the cluster,
or a single hostname can be specified. sysimage_distribute will reboot each Compute Node for
installation with the specified image.
If the image was sent to a node that was already part of the cluster, that node must have the
Compute Node software reconfigured. For more information see the "Software Upgrades and
Reinstalls" section.
% compute_config -a <node name>
If the image was sent to a node that will be added to the cluster, please see the "Add Node(s) to
the Cluster" use case.
References:
z
1.4.1 Software Upgrades and Reinstalls Overview
z
1.6.1 Add Node(s) to the Cluster
Back to Top
1.5.3 Managing system files on the compute nodes
Managing individual files on the compute nodes following an image push can require a lot of
time. The clsysfile tool was created to allow the system administrator to bundle inidividual files
for installation and depolyment on the compute nodes. This allows certain files to be
customized or altered on the compute nodes after a Golden Image is created.
Page 59

clsysfile creates an SD bundle CPACK-FILES. This bundle of files can be used to customize
the files on the compute nodes. The revision number of the bundle is automatically incremented
each time clsysfile is run.
On the management server, clsysfile uses the working directory:
/var/opt/clusterpack/sysfiles
clsysfile builds the SD control files required to create a SD bundles of files. Three controls files
are created by clsysfile: SysFile.psf, SysFile.configure, and Sysfile.unconfigure. The files that
are included in the bundle must be created in:
/var/opt/clusterpack/sysfiles/src
The files under the toplevel "src" directory on the management server, including the required
directories, will be included in the bundle. The files will be installed, indriectly, on the compute
nodes treating the toplevel directory as the root file system (i.e. "/").
During installation on a compute node, the files are installed
under /var/opt/clusterpack/sysfiles/src. During instalation, the software bundle will be
configured automatically. The configure step will copy the files from that top level directory
into the corresponding location in the "/" root file system on the machine. If an existing file on
the compute node would be overwritten, that file will be moved
to /var/opt/clusterpack/sysfiles/save to preserve the file. If the CPACK-FILES bundle is
unconfigred, the origional files will be restored to their origional location.
clsysfile can be invoked with no options. The files that will be included in the bundle will be
shown, and the CPACK-FILES revision number will also be listed:
% /opt/clusterpack/bin/clsysfile
clsysfile creates three SD control files in the /var/opt/clusterpack/sysfiles directory: SysFile.psf,
SysFile.configure, and Sysfile.unconfigure. It is possible to customize these files, and to add
additional SD controls files to the bundle. clsyfile will stop after the SD control files are created
by using the "-build" option:
clsysfile -build
%
Please refer to the man pages for swpackage(1M), sd(4), and sd(5) for imformation about the
SD control files.
To package the CPACK-FILES bundles after any local modifactions have been made, use the
"-package" option
% clsysfile -package
A list of all the CPACK-FILES bundles that are in /var/opt/clusterpack/depot can be found
using the "-l" list option to clsysfile.
% clsysfile -l
Page 60

To install a CPACK-FILES bundle on an individual compute node, or group of compute nodes,
the clsh utility can be used:
/opt/clusterpack/bin/clsh -C <node(s)> "/usr/sbin/swinstall -s
%
<manager_ip>:/var/opt/clusterpack/depot <CPACK-FILES bundle
version>"
References:
z
3.1.5 clsh - Runs commands on one, some, or all nodes in the cluster.
z
1.5.4 Adding software bundles to Golden Images
Back to Top
1.5.4 Adding software bundles to Golden Images
Software bundles created with SD can be asociated with a Golden Image, and will be installed
on the compute nodes following an installation with that image. The software bundles should
be swcopy'd to /var/opt/clusterpack/depot. A list of all the bundels that are available in the
depot can be found using:e
% /usr/sbin/swlist -l bundle @ /var/opt/clusterpack/depot
The bundles are associated with an image using the sysimage_register command:
% /opt/clusterpack/bin/sysimage_register -i <image> -b <bundle>
The "-b bundle" option can be repeated on the command line to associate additional SD bundles
to the image. The bundles will remain associated with the image until sysimage_register is run
again. The bundle should include the full revision of the bundle (i.e. bundle,r=revision), to
avoid conflicts during installation.
Back to Top
Index
Administrators Guide
|
Users Guide
|
Tool Overview
|
Related Documents
|
Copyright 1994-2004 hewlett-packard company
Dictionary
|
Page 61

System Maintenance Tasks
System Maintenance Tasks
ClusterPack
Index
1.6.1 Add Node(s) to the Cluster
1.6.2 Remove Node(s) from the Cluster
1.6.3 Install Software in Compute Nodes
1.6.4 Remove Software from Compute Nodes
1.6.5 Update Software in Compute Nodes
1.6.6 Add Users to Compute Nodes
1.6.7 Remove Users from Compute Nodes
1.6.8 Change System Parameters in Compute Nodes
1.6.9 Define Compute Node Inventory Data Collection for Consistency checks
1.6.10 Define Consistency Check Timetables on Compute Node Inventories
1.6.11 Compare the Inventories of a Set of Nodes
1.6.12 Execute remote commands on one or more nodes
1.6.13 Copy files within nodes in a cluster
1.6.14 List a user's process status on one or more cluster nodes
1.6.15 Kill a user's process (or all of the user's processes) on some/all Cluster Nodes
1.6.16 Create a Cluster Group
1.6.17 Remove a Cluster Group
1.6.18 Add Nodes to a Cluster Group
1.6.19 Remove Nodes from a Cluster Group
1.6.20 Add File Systems to Compute Nodes
1.6.21 Remove File systems from Compute Nodes
1.6.22 How is the the ClusterPack license server managed?
Administrators Guide
|
Users Guide
|
Tool Overview
|
Related Documents
|
|
Dictionary
1.6.1 Add Node(s) to the Cluster
Compute Nodes are added to ClusterPack by using the three stage process that is used for
installation.
z
Installation and configuration of the Management Server
z
Installation and configuration of the Compute Nodes
z
Verification of the Management Server and Compute Nodes
Page 62

The steps in this section have to be followed in the specified order to ensure that everything
works correctly.
Step 1 Invoke /opt/clusterpack/bin/manager_config on Management Server
Invoke /opt/clusterpack/bin/manager_config with a "add node" option -a.
/opt/clusterpack/bin/manager_config -a
%
<new_node_name>:<new_node_ip_addr>
This command adds the new node with the specified hostname and IP address to the cluster. It
also reconfigures all of the components of ClusterPack to accommodate the new addition.
The '-a' option can include multiple host:ip pairs if more than one node needs to be added to the
system.
If a large number of changes will be made to the cluster membership, the '-m' option can be used
with a file.
For more information on the use of manager_config, refer to the man pages.
% man manager_config
Step 2 Invoke mp_register on Management Server
If the host being added to the cluster has an MP interface, it should be registered and possibly
configured with mp_register:
% /opt/clusterpack/bin/mp_register -a <new_node_name>
The '-a' option can be repeated when adding multiple hosts at one time.
The mp_register utility will prompt you for information to configure and/or register an MP card
for the host being added.
The '-f' option can be used to provide a file containing all the MP card information required by
mp_register.
Step 3 Invoke clbootnodes on Management Server
Boot the node. To assist in booting the node, you may use clbootnodes. If the node is already
booted, ensure that it has the IP address you indicated when running manager_config. Nodes can
be booted from a "first boot" state or an image of another compute node can be installed on any
new node(s). To boot a single node which has HP-UX installed on it, use:
clbootnodes <new_node_name>
%
To boot multiple nodes, use:
% clbootnodes
Page 63

In the later case, the utility will prompt you (for each node in the cluster) whether to boot it or
N
skip it.
To boot a compute node with a system image, use the "-i" option to clbootnodes and specify the
image. The image must have been created by sysimage_create and registered with
sysimage_register. You can see a list of registered images by executing:
The full path of the image must be given to clbootnodes:
Note:
After installing an image with clbootnodes -i, it may be necessary to wait several
minutes after clbootnodes returns before running compute_config as the
daemons may need time to start and stablize
Step 4 Invoke /opt/clusterpack/bin/compute_config on Management Server
This tool is the driver that installs and configures appropriate components on every Compute
ode. It is invoked with the "add node" option -a as follows:
/opt/clusterpack/bin/compute_config -a <new_node_name>
%
This command configures the new node with the specified hostname to serve as a Compute Node
in the cluster.
The '-a' option can be repeated if more than one node needs to be added to the system.
For more information on the usage of compute_config, refer to the man pages.
man compute_config
%
Step 5 Invoke /opt/clusterpack/bin/finalize_config on Management Server
Finalize and validate the addition of the new node to ClusterPack:
% /opt/clusterpack/bin/finalize_config
This step completes the configuration process, does verification checks on the Cluster
Management Software, and validates the addition of the new node.
Back to Top
1.6.2 Remove Node(s) from the Cluster
Compute Nodes are removed from ClusterPack by using the three stage process that is used for
installation:
Page 64

z
N
Installation and configuration of the Management Server
z
Installation and configuration of the Compute Nodes
z
Verification of the Management Server and Compute Nodes
The steps in this section must be followed in the specified order to ensure that everything works
correctly.
Step 1 Invoke /opt/clusterpack/bin/manager_config on Management Server
Invoke /opt/clusterpack/bin/manager_config with a "remove node" option -r.
% /opt/clusterpack/bin/manager_config -r <node_name>
This command removes the node with the specified hostname from the cluster. It also
reconfigures all of the components of ClusterPack to accommodate the removal of the node.
The '-r' option can be repeated if more than one node needs to be removed from the system.
For more information on the usage of manager_config, refer to the man pages.
% man manager_config
Step 2 Invoke /opt/clusterpack/bin/compute_config on Management Server
This tool is the driver that installs and configures appropriate components on every Compute
ode. It is invoked with the "remove node" option -r as follows:
% /opt/clusterpack/bin/compute_config -r <node_name>
The '-r' option can be repeated if more than one node needs to be removed from the system.
For more information on the usage of compute_config, refer to the man pages.
man compute_config
%
Step 3 Invoke /opt/clusterpack/bin/finalize_config on Management Server
Finalize and validate the removal of the node to ClusterPack:
% /opt/clusterpack/bin/finalize_config
This step does verification checks on the Cluster Management Software, and validates the
removal of the node.
Back to Top
1.6.3 Install Software in Compute Nodes
Page 65

Using CLI
Software can also be installed on Compute Nodes using the /opt/clusterpack/bin/clsh tool to run
the swinstall command. However, this may not work in a guarded cluster.
z
To install product PROD1 on all Compute Nodes
% /opt/clusterpack/bin/clsh /usr/sbin/swinstall -s
<depot> PROD1
z
To install product PROD1 on just the Compute Node group "cae"
/opt/clusterpack/bin/clsh -C
%
cae /usr/sbin/swinstall -s <depot> PROD1
Using the HPSIM GUI
To add additional software to Compute Nodes using HPSIM GUI, do the following:
z
Select "Deploy", "Software Distributor", and then click on "Install Software".
z
Select the node(s) and/or node group to install on.
z
This will bring up the swinstall GUI, from which you can specify the software
source and select the software to be installed.
References:
z
3.9.4 How to run HPSIM Web-based GUI
Using the SCM GUI
To add additional software to Compute Nodes using SCM GUI, do the following:
z
Under "Tools", select "Software Management", and then double-click on
"Install Software".
z
Select the node(s) and/or node group to install on.
z
This will bring up the swinstall GUI, from which you can specify the software
source and select the software to be installed.
References:
z
3.2.3 How to Run SCM Web-based GUI
Back to Top
1.6.4 Remove Software from Compute Nodes
Page 66

Using the CLI
Software can also be removed from Compute Nodes using the /opt/clusterpack/bin/clsh tool to
run the swremove command:
z
To remove product PROD1 on all Compute Nodes
/opt/clusterpack/bin/clsh /usr/sbin/swremove PROD1
%
z
To install product PROD1 on just the Compute Node group "cae"
% /opt/clusterpack/bin/clsh -C cae /usr/sbin/remove
PROD1
Using the HPSIM GUI
To remove software to Compute Nodes using HPSIM GUI, do the following:
z
Select "Deploy", "Software Distributor", and then click on "Remove
Software".
z
Select the node(s) and/or node group to install on.
z
This will bring up the swinstall GUI, from which you can specify the software
source and select the software to be installed.
References:
z
3.9.4 How to run HPSIM Web-based GUI
Using the SCM GUI
To remove software to Compute Nodes using SCM GUI, do the following:
z
Under "Tools", select "Software Management", and then double-click on
"Uninstall Software".
z
Select the node(s) and/or node group to install on.
z
This will bring up the swremove GUI, from which you can specify the
software source and select the software to be removed.
References:
z
3.2.3 How to Run SCM Web-based GUI
Back to Top
1.6.5 Update Software in Compute Nodes
Page 67

The process for updating software is the same as for installing software. (See "Install Software in
Compute Nodes"). swinstall will verify that the software you are installing is a newer version than
what is already present. For patches, and software in non-depot format, it will be necessary to
follow the specific directions given with the patch/update.
References:
z
1.6.3 Install Software in Compute Nodes
Back to Top
1.6.6 Add Users to Compute Nodes
Using the CLI
To add users to the Compute Nodes, first add the user to the Management Server with the useradd
command. (man useradd(1M) for more information).
% useradd
Use ypmake to push the new user's account information to the Compute Nodes:
/var/yp/ypmake
%
Using the HPSIM GUI
To add users to the cluster, do the following:
z
Select "Configure", "HP-UX Configuration", and then double-click on
"Accounts for Users and Groups".
z
Select the node(s) and/or node group to install on.
z
This will bring up the user account GUI, where you can specify the user
account parameters to use in creating the account.
References:
z
3.9.4 How to run HPSIM Web-based GUI
Using the SCM GUI
To add users to the cluster, do the following:
z
Select the Management Server.
z
Under "Tools", select "System Administration", and then click on "Accounts
for Users and Groups".
z
This will bring up the user account GUI, where you can specify the user
Page 68

account parameters to use in creating the account.
If NIS is configured in the cluster, all user accounts are administered from the Management
Server. Any changes to a user's account will be pushed to all the Compute Nodes using NIS.
References:
z
3.2.3 How to Run SCM Web-based GUI
Back to Top
1.6.7 Remove Users from Compute Nodes
Using the CLI
User accounts should be removed from the Management Server as normal with userdel (man
userdel(1M) for more information).
% userdel
After removing the user, use ypmake to push this change to the Compute Nodes.
/var/yp/ypmake
%
Using the HPSIM GUI
To remove users from the cluster, do the following:
z
Select "Configure", "HP-UX Configuration", and then double-click on
"Accounts for Users and Groups".
z
Select the node(s) and/or node group to install on.
z
This will bring up the user account GUI, where you can specify the user
account to remove.
References:
z
3.9.4 How to run HPSIM Web-based GUI
Using the SCM GUI
To remove users from the cluster, do the following:
z
Select the Management Server.
z
Under "Tools", select "System Administration", and then click on "Accounts
for Users and Groups".
z
This will bring up the user account GUI, where you can specify the user
Page 69

account to remove.
N
All user accounts are administered from the Management Server. Any changes to a users account
will be pushed to all the Compute Nodes using NIS.
References:
z
3.2.3 How to Run SCM Web-based GUI
Back to Top
1.6.8 Change System Parameters in Compute Nodes
Using the HPSIM GUI
To change System Parameters in Compute Nodes using HPSIM GUI, do the following:
z
Select "Configure", "HP-UX Configuration", and then double-click on "Kernel
Configuration - kcweb".
z
Select the node(s) and/or node group to install on.
z
This will bring up the kcweb GUI, from which you can specify the parameters
to change.
References:
z
3.9.4 How to run HPSIM Web-based GUI
z
1.5.1 Create a Golden Image of a Compute Node from the Management Server
z
1.5.2 Distribute Golden Image to a set of Compute Nodes
Using the SCM GUI:
z
Select one or more nodes.
z
Under "Tools", select "System Administration", and then click on "System
Properties".
z
A SAM System Properties window will appear for each node selected.
For greater efficiency and consistency, perform this operation only on a single Compute Node,
and then a golden image be created from that Compute Node and pushed to the other Compute
odes.
References:
z
3.2.3 How to Run SCM Web-based GUI
z
1.5.1 Create a Golden Image of a Compute Node from the Management Server
z
1.5.2 Distribute Golden Image to a set of Compute Nodes
Page 70

Back to Top
1.6.9 Define Compute Node Inventory Data Collection for Consistency checks
Scheduling Data Collection tasks are done using the HP System Management Tools:
Using the HPSIM GUI
To create a Data Collection task using HPSIM GUI, do the following:
z
Select "Options", then click on "Data Collection". The Data Collection page
appears.
z
Select the node(s) and/or node group to install on.
z
Specify how to save data after data collection.
z
Select one of the following options to execute the task:
{
Click [Schedule] to schedule when the task should run.
{
Click [Run Now] to run the task now.
References:
z
3.9.4 How to run HPSIM Web-based GUI
Using the SCM GUI:
To define Compute Node inventories for consistency checks, use the SCM GUI to access the
Systems Inventory Manager GUI.
z
Select one or more nodes.
z
Under "Tools", select "System Inventory", and then click "SysInvMgr portal".
z
This launches the Systems Inventory Manager GUI.
z
Using the Systems Inventory Manager GUI:
{
Log in as "admin".
{
Select the "Filter" folder.
{
Click on "Create Filter".
{
Select a name to uniquely identify the inventory filter.
{
Enter an optional description.
{
Select one or more categories (e.g. System, Memory, I/O
Devices).
{
Select one or more Groups from the selected categories (e.g.
BundleContents, LogicalMemory).
{
For fine control over inventory collection, use "Advanced
Settings" to select or unselect specific items.
References:
Page 71

z
3.2.3 How to Run SCM Web-based GUI
Back to Top
1.6.10 Define Consistency Check Timetables on Compute Node Inventories
Scheduling Data Collection tasks are done using the HP System Management Tools:
Using the HPSIM GUI
To create a Data Collection task using HPSIM GUI, do the following:
z
Select "Options", then click on "Data Collection". The Data Collection page
appears.
z
Select the node(s) and/or node group to install on.
z
Specify how to save data after data collection.
z
Select one of the following options to execute the task:
{
Click [Schedule] to schedule when the task should run.
{
Click [Run Now] to run the task now.
References:
z
3.9.4 How to run HPSIM Web-based GUI
Using the SCM GUI:
To define Compute Node inventories for consistency checks, use the SCM GUI to access the
Systems Inventory Manager GUI.
z
Select one or more nodes.
z
Under "Tools", select "System Inventory", and then click "SysInvMgr portal".
z
This launches the Systems Inventory Manager GUI.
z
Using the Systems Inventory Manager GUI:
{
Log in as "admin".
{
Select the "Schedule" folder.
{
Click on "Create Schedule".
{
Select a name to uniquely identify the inventory schedule.
{
Enter an optional description.
{
Enter a start date.
{
Enter an end date.
{
Enter a collection frequency.
References:
Page 72

z
3.2.3 How to Run SCM Web-based GUI
Back to Top
1.6.11 Compare the Inventories of a Set of Nodes
Comparing the results of Data Collection tasks is done using the HP System Management Tools:
Using the HPSIM GUI
To create a Data Collection task using HPSIM GUI, do the following:
z
Select "Reports", then click on "Snapshot Comparison". The Snapshot
Comparison window appears.
z
Select the target node(s).
z
Select between two and four snapshots for the systems from the Select
Snapshots page.
z
Click [Run Reports].
References:
z
3.9.4 How to run HPSIM Web-based GUI
Using the SCM GUI:
To define Compute Node inventories for consistency checks, use the SCM GUI to access the
Systems Inventory Manager GUI.
z
Select one or more nodes.
z
Under "Tools", select "System Inventory", and then click "SysInvMgr portal".
z
This launches the Systems Inventory Manager GUI.
z
Using the Systems Inventory Manager GUI:
{
Log in as "admin".
{
Select the "Filter" folder.
{
Click "Create Filter".
{
Enter a name to uniquely identify the inventory filter.
{
Enter an optional description.
{
Select one or more categories (e.g. System, Memory, I/O
Devices).
{
Select one or more Groups from the selected categories (e.g.
BundleContents, LogicalMemory).
{
For fine control over inventory collection, use "Advanced
Settings" to select or unselect specific items.
References:
Page 73

z
3.2.3 How to Run SCM Web-based GUI
Back to Top
1.6.12 Execute remote commands on one or more nodes
A remote command can be executed on one or more nodes in the cluster from any node by using
the 'clsh' command in /opt/clusterpack/bin.
Some examples of clsh usage are:
z
Invoke 'uname -a' on all cluster nodes
% clsh uname -a
z
Invoke 'uname -a' on node1
% clsh -C node1 uname -a
z
Invoke 'uname -a' on all nodes in the cluster group 'sub1'
% clsh -C sub1 uname -a
z
Invoke 'uname -a' on node1 and node3
% clsh -C node1+node3 uname -a
For more details on the usage of clsh, invoke the command.
% man clsh
Back to Top
1.6.13 Copy files within nodes in a cluster
The 'clcp' command in /opt/clusterpack/bin is used to copy files between cluster nodes. Each file
or directory argument is either a remote file name of the form "%h:path" or "cluster:path" or a
local file name (containing no ':' characters).
Some examples of clcp usage are:
z
Update /etc/checklist on all nodes with the local /etc/checklist
clcp /etc/checklist %h:/etc/checklist
%
clcp /etc/checklist cluster:/etc/checklist
%
Page 74

z
Update /etc/checklist on node1, node3 and node5 with the local /etc/checklist
% clcp -C node1+node3+node5 /etc/checklist %
h:/etc/checklist
z
Copy multiple local files to all nodes
clcp a.txt b.txt c.txt %h:/tmp
%
z
Copy multiple remote files to multiple local files
% clcp %h:/tmp/a.txt /tmp/a.%h.txt
For more details on the usage of clcp, invoke:
man clcp
%
Back to Top
1.6.14 List a user's process status on one or more cluster nodes
The 'clps' command in /opt/clusterpack/bin is used to produce a 'ps' output that includes the host
name. A clps command with no arguments lists all the processes associated with the user
invoking the command on all Compute Nodes.
Some examples of clps usage are:
z
List all processes belonging to user 'joeuser'
clps -u joeuser
%
z
List all processes on node3 and node4
% clps -C node3+node4 -a
For more details on the usage of clps, invoke the command:
% man clps
Back to Top
1.6.15 Kill a user's process (or all of the user's processes) on some/all Cluster
Nodes
The 'clkill' command in /opt/clusterpack/bin is used to kill processes on Cluster Nodes. Since
Page 75

using PIDs on a cluster is not feasible given there will be different PIDs on different hosts, clkill
can kill processes by name.
Some examples of clps usage:
z
Kill all processes belonging to user 'joeuser'
clkill -u joeuser
%
z
Interactively kill all processes named 'view_server'
% clkill -i -r view_server
will result in a session like:
node0 2260 user1 ? 0:00 view_server
Kill (y/n)? n
node1 8070 user1 ? 0:04 view_server
Kill (y/n)? y
z
Kill a process with PID 2260 on node1
% clkill -C node1 -p 2260
For more details on the usage of clkill, invoke the command:
Back to Top
1.6.16 Create a Cluster Group
Groups of Compute Nodes can be created, and added to all tools in ClusterPack
using /opt/clusterpack/bin/clgroup.
The following example creates a node group "cae" containing compute cluster nodes "lucky000",
"lucky001", and "lucky002":
% /opt/clusterpack/bin/clgroup -a cae lucky000 lucky001 lucky002
clgroup can also form groups from existing groups. For more details on the usage of clgroup,
invoke the command:
% man clgroup
Back to Top
1.6.17 Remove a Cluster Group
Page 76

Groups of Compute Nodes can be removed from ClusterPack using /opt/clusterpack/bin/clgroup.
N
The following example removes the node group "cae":
% /opt/clusterpack/bin/clgroup -r cae
ote that the above-mentioned command just removes the group; the nodes are still part of the
cluster, and users can submit jobs to the nodes.
For more details on the usage of clgroup, invoke the command:
% man clgroup
Back to Top
1.6.18 Add Nodes to a Cluster Group
Compute Nodes can be added to existing groups in ClusterPack
using /opt/clusterpack/bin/clgroup.
The following example adds nodes "lucky006" and "lucky008" to the node group "cae" :
% /opt/clusterpack/bin/clgroup -a cae lucky006 lucky008
Groups can also be created or extended using the name of a pre-existing group. For more details
on the usage of clgroup, invoke the command:
% man clgroup
Back to Top
1.6.19 Remove Nodes from a Cluster Group
Compute Nodes can be removed from existing groups in ClusterPack
using /opt/clusterpack/bin/clgroup.
The following example removes node "lucky006" from the node group "cae" :
/opt/clusterpack/bin/clgroup -r cae lucky006
%
Groups can also have entire groups of nodes removed by using the name of a pre-existing group.
For more details on the usage of clgroup, invoke the command:
man clgroup
%
Page 77

Back to Top
N
1.6.20 Add File Systems to Compute Nodes
The file system for Compute Nodes can be defined using System Administration Manager
(SAM). Invoke SAM from the command line or from within HP System Management tools and
select "Disks and File Systems". Invoke SAM from the command line or from within SCM and
select "Disks and File Systems". Select "Actions->Add Local File System->Using the Logical
Volume Manager" and enter the required information. Repeat this operation for each Compute
ode.
Back to Top
1.6.21 Remove File systems from Compute Nodes
Removing file systems can be done in a similar fashion as adding file systems (See "Add File
Systems to Compute Nodes"). From SAM, select the file system you want to remove and select
"Actions->Remove". Do this for each node in the cluster.
References:
z
1.6.20 Add File Systems to Compute Nodes
Back to Top
1.6.22 How is the the ClusterPack license server managed?
ClusterPack Base Edition
The ClusterPack Base Edition license server is based on FlexLM licensing technology.
The Base Edition license server is installed and configured by the manager_config tool. The
license server is started by manager_config, and it is installed to start during a normal system
boot.
To manually start the ClusterPack license server:
% /sbin/init.d/cpack.server start
To manually stop the ClusterPack license server:
Page 78

% /sbin/init.d/cpack.server stop
ClusterPack Clusterware Edition
Every installation of ClusterPack Clusterware Edition includes a fully functional Base Edition
license manager. All Base Edition license server functions should be used to manage that portion
of the license server.
Platform Computing's Clusterware Pro V5.1 uses a proprietary licensing scheme. For more
information on managing the Clusterware Pro license functionality, Please see the "Platform
Computing Clusterware Pro V5.1 Overview"
References:
z
3.7.5 How do I start and stop the Clusterware Pro V5.1 daemons?
Back to Top
Index
Administrators Guide
|
Users Guide
|
Tool Overview
|
Related Documents
|
Copyright 1994-2004 hewlett-packard company
Dictionary
|
Page 79

System Monitoring Tasks
p
System Monitoring Tasks
ClusterPack
Index
1.7.1 Get an Overview of Cluster Health
1.7.2 Get an Overview of the Job Queue Status
1.7.3 Get details on health of specific Compute Nodes
1.7.4 View Usage of Resources in Compute Node(s)
1.7.5 Monitor Compute Nodes based on resource thresholds
Administrators Guide
|
Users Guide
|
Tool Overview
|
Related Documents
|
Dictionary
|
1.7.1 Get an Overview of Cluster Health
Using finalize_config
The best way to determine the overall health of the cluster is to run:
% finalize_config
Finalize_config performs a series of tests to determine the overall health of the individual
components of the cluster that have been automatically setup and administered by
ClusterPack. Finalize_config can be run repeatedly without side effects.
The health of the cluster for accepting and running jobs can also be determined using tools
rovided as part of Clusterware Pro.
Using the Clusterware Pro V5.1 Web Interface:
The Hosts Tab, on the left hand side of the screen, contains a table showing information
about your hosts' resources. The "Detailed View" shows the current State and Batch State.
The Detailed View is accessed by selecting:
View->Details
%
There are two different indications of health and status: State, and Batch State.
Page 80

z
N
State refers to the state of the host.
z
Batch State refers to the state of the host, and the state of the daemons
running on that host. A detailed list of batch states is shown below.
For more information, select the online help:
z
Select Help->Platform Help
z
Select "View" under the "Hosts" section in the left hand pane.
z
Select "Change your hostview" to see a description of the icons.
Using the Clusterware Pro V5.1 CLI:
Status of each node is available using the CLI on the Management Server:
% bhosts
STATUS shows the current status of the host and the SBD daemon. Batch jobs can only be
dispatched to hosts with an ok status. A more detailed list of STATUS is available in the
long report:
% bhosts -l
or
bhosts -l <hostname>
%
The lsload command provides an instantaneous view of the load state of the Compute
odes.
lsload
%
A more detailed list of the load information is available in the long report:
% lsload -l
or
% lsload -l <hostname>
Common Terms
Both the Web interface and the CLI use the same terms for the health and status of the
individual Compute Nodes. These terms are used to define the Batch State of an individual
node.
z
ok - The host is up
z
closed_Adm - The host is not accepting new jobs. It has been closed by
the administrator
z
closed_Lock - The host is not accepting jobs and all jobs running on it
have been suspended. It has been locked by the administrator.
z
closed_Busy - The host is not accepting new jobs. Some load indices
Page 81

have exceeded their thresholds.
p
z
closed_Excl - The host is not accepting jobs until the exclusive job
running on it completes.
z
closed_Full - The host is not accepting new jobs. The configured
maximum number of jobs that can run on it has been reached.
z
closed_Wind - The host is not accepting jobs. The dispatch window that
has been defined for it is closed.
z
unlicensed - The host is not accepting jobs. It does not have a valid LSF
license for sbatchd and LIM is down.
z
closed_Lim - The LIM on the host is unreachable, but sbatchd is running.
z
unavail - The LIM on the host is not responding and sbatchd is down.
z
unreach - The sbatchd is down.
z
unreach - The sbatchd is down and LIM is unreachable
References:
z
3.7.8 How do I access the Clusterware Pro V5.1 Web Interface?
z
3.7.9 How do I access the Clusterware Pro V5.1 Command Line Interface?
Back to Top
1.7.2 Get an Overview of the Job Queue Status
Using the Clusterware Pro V5.1 Web Interface:
Select the Queues tab. An overview of available job queues is displayed. The following
details are displayed:
z
State - The state of the queue. Any queue with an "Open:Active" state
can accept new jobs.
z
Jobs Pending - The number of jobs pending in that queue.
z
Jobs Running - The number of jobs running in that queue.
z
Priority - The relative priority of the queue.
Using the Clusterware Pro V5.1 CLI:
From the CLI issue the following command.
% bqueues
By default bqueues returns the following information about all queues: queue name, queue
riority, queue status, job slot statistics, and job state statistics.
Additional information is available for all hosts in the cluster, or for a single hostname.
% bqueues -l
Page 82

or
% bqueues -l <hostname>
For more information, see the man page:
man bqueues
%
Common Terms
Both the Web interface and the CLI use the same terms for the health and status of the job
submission queues. These terms are used to define the State of an individual queue.
z
Open - The queue is able to accept jobs.
z
Closed - The queue is not able to accept jobs.
z
Active - Jobs in the queue may be started.
z
Inactive - Jobs in the queue cannot be started for the time being.
References:
z
3.7.8 How do I access the Clusterware Pro V5.1 Web Interface?
z
3.7.9 How do I access the Clusterware Pro V5.1 Command Line Interface?
Back to Top
1.7.3 Get details on health of specific Compute Nodes
Using the Clusterware Pro V5.1 Web Interface:
The Hosts Tab, located on the left hand side of the screen, contains a table showing
information about your hosts' resources. The "Detailed View" shows the current Stage and
Batch State. The Detailed View is accessed by selecting:
View->Details
%
There are two different indications of health and status: State, and Batch State.
z
State refers to the state of the host.
z
Batch State refers to the state of the host, and the state of the daemons
running on that host. A detailed list of batch states is shown below.
For more information, select the online help:
Help->Platform Help
Using the Clusterware Pro V5.1 CLI:
Page 83

Default status from each node is available using:
% bhosts <hostname>
STATUS shows the current status of the host and the SBD daemon. Batch jobs can only be
dispatched to hosts with an ok status. A more detailed list of STATUS is available in the
long report:
bhosts -l <hostname>
%
Detailed information for the specific host can be received from most of the CLI tools:
% lshosts -l <hostname>
% lsload -l <hostname>
Common Terms
Both the Web interface and the CLI use the same terms for the health and status of the
individual Compute Nodes. These terms are used to define the Batch State of an individual
node.
z
ok - The host is up
z
closed_Adm - The host is not accepting new jobs. It has been closed by
the administrator
z
closed_Lock - The host is not accepting jobs and all jobs running on it
have been suspended. It has been locked by the administrator.
z
closed_Busy - The host is not accepting new jobs. Some load indices
have exceeded their thresholds.
z
closed_Excl - The host is not accepting jobs until the exclusive job
running on it completes.
z
closed_Full - The host is not accepting new jobs. The configured
maximum number of jobs that can run on it has been reached.
z
closed_Wind - The host is not accepting jobs. The dispatch window that
has been defined for it is closed.
z
unlicensed - The host is not accepting jobs. It does not have a valid LSF
license for sbatchd and LIM is down.
z
closed_Lim - The LIM on the host is unreachable, but sbatchd is running.
z
unavail - The LIM on the host is not responding and sbatchd is down.
z
unreach - The sbatchd is down.
References:
z
1.7.1 Get an Overview of Cluster Health
z
3.7.8 How do I access the Clusterware Pro V5.1 Web Interface?
z
3.7.9 How do I access the Clusterware Pro V5.1 Command Line Interface?
Back to Top
Page 84

1.7.4 View Usage of Resources in Compute Node(s)
Using the Clusterware Pro V5.1 Web Interface:
From the Hosts Tab:
z
Select the host to be monitored using the checkbox next to each host.
More than one host can be selected.
z
From the menu select Host->Monitor
z
A new window will open that displays the current resource usage of one
of the selected hosts. Four resources are displayed: total system memory,
CPU Utilization, swap space available, and /tmp space available.
z
If more than one host was selected, you can change between hosts using
the Monitor Selected Hosts menu.
z
The individual resources are samples every 60 seconds. It may be several
minutes before the graphs show any information for a given node.
Using the Clusterware Pro V5.1 CLI:
Resources available for job scheduling can be seen using the following command:
bhosts
%
This will display a report for all the Compute Nodes in the cluster. To get the resource usage
for an individual Compute Node, specify the name of the node on the command line:
bhosts -l <hostname>
%
For more information, see the man page:
% man bhosts
Static resources of the node can be seen using the following command:
lshosts
%
This will display a report for all the Compute Nodes in the cluster. To get the static resource
information for an individual Compute Node, specify the name of the node on the command
line:
% lshosts -l <hostname>
For more information, see the man page:
man lshosts
%
References:
z
3.7.8 How do I access the Clusterware Pro V5.1 Web Interface?
Page 85

z
p
3.7.9 How do I access the Clusterware Pro V5.1 Command Line Interface?
Back to Top
1.7.5 Monitor Compute Nodes based on resource thresholds
Using the Clusterware Pro V5.1 Web Interface:
From the Hosts Tab
z
From the View menu select View->Choose Columns
z
Add the Available Column resource to the Displayed Columns list.
z
Click OK
z
The new resource to be monitored will be displayed on the Host tab
screen.
Using the Clusterware Pro V5.1 CLI:
Using the lshosts command, a resource can be specified. Only hosts that meet the resource
requirement will be displayed.
% lshosts [-R res_req] [hostname]
For example, to find all the hosts with at least 4096MB of available memory:
lshosts -R mem=4096
%
Membership in logical groups defined with the clgroup command can also be given as a
resource.
lshosts -R <group_name>
%
For a full list of currently defined resources, use the lsinfo command:
% lsinfo
See the lshosts man page for more information.
% man lshosts
References:
z
3.7.8 How do I access the Clusterware Pro V5.1 Web Interface?
z
3.7.9 How do I access the Clusterware Pro V5.1 Command Line Interface?
Back to To
Page 86

Index
Administrators Guide
|
Users Guide
|
Tool Overview
|
Related Documents
|
Copyright 1994-2004 hewlett-packard company
Dictionary
|
Page 87

Workload Management Tasks
Workload Management Tasks
ClusterPack
Index
1.8.1 Add new Job Submission Queues
1.8.2 Remove Queues
1.8.3 Restrict user access to specific queues
1.8.4 Add resource constraints to specified queues
1.8.5 Change priority of specified queues
1.8.6 Add pre/post run scripts to specified queues
1.8.7 Kill a job in a queue
1.8.8 Kill all jobs owned by a user
1.8.9 Kill all jobs in a queue
1.8.10 Suspend a job in a queue
1.8.11 Suspend all jobs owned by a user
1.8.12 Suspend all jobs in a queue
1.8.13 Resume a suspended job in a queue
1.8.14 Resume all suspended jobs owned by a user
1.8.15 Resume all suspended jobs in a queue
Administrators Guide
|
Users Guide
|
Tool Overview
|
1.8.1 Add new Job Submission Queues
Related Documents
|
Dictionary
|
A new queue can be added to the cluster by editing the
file: /share/platform/clusterware/conf/lsbatch/<clustername>/configdir/lsb.queues
The name of your cluster can be determined by using the Clusterware Pro V5.1 CLI:
lsid
%
This above file should contain several initial queues that can be copied and modified as desired.
The top of the lsb.queues file contains comments about the fields of a queue description.
If the queue you are adding is for AppRS, several fields in the queue description must be
carefully set to the values required by AppRS. An example AppRS queue definition can be
found in /opt/apprs/examples/example_queue.
Page 88

After adding, removing or modifying queues, it is necessary to reconfigure LSF to read the new
queue information. This is done from the Management Server using the Clusterware Pro V5.1
CLI:
% badmin reconfig
Verify the queue has been added by using the Clusterware Pro V5.1 CLI:
bqueues -l <queue_name>
%
References:
z
3.7.9 How do I access the Clusterware Pro V5.1 Command Line Interface?
Back to Top
1.8.2 Remove Queues
A queue can be removed from the cluster by editing the
file: /share/platform/clusterware/conf/lsbatch/<clustername>/configdir/lsb.queues
The name of your cluster can be determined by using the Clusterware Pro V5.1 CLI:
lsid
%
Before removing a queue, it should be closed using the Clusterware Pro V5.1 CLI:
% badmin qclose <queue name>
Jobs still executing can be killed or allowed to run to completion before removing the queue.
Delete or comment out the queue definitions that you want to remove.
After adding, removing or modifying queues, it is necessary to reconfigure LSF to read the new
queue information. This is done from the Management Server using the Clusterware Pro V5.1
CLI:
badmin reconfig
%
Verify the queue has been removed by using the Clusterware Pro V5.1 CLI:
% bqueues -l <queue_name>
References:
z
1.8.1 Add new Job Submission Queues
z
3.7.9 How do I access the Clusterware Pro V5.1 Command Line Interface?
Page 89

Back to Top
1.8.3 Restrict user access to specific queues
Using the Clusterware Pro V5.1 CLI:
The file /share/platform/clusterware/conf/lsbatch/<clustername>/configdir/lsb.queues controls
which users can submit to a specific queue.
The name of your cluster can be determined by using the Clusterware Pro V5.1 CLI:
lsid
%
Edit the lsb.queues file and look for a USERS line for the queue you wish to restrict. If a
USERS line exists, you can add or remove users from it. Otherwise, add a line of the form:
USERS = <keyword all or a list of userid's>
to the queue definition.
After adding, removing or modifying queues, it is necessary to reconfigure LSF to read the new
queue information. This is done from the Management Server using the Clusterware Pro V5.1
CLI:
% badmin reconfig
Verify the queue has been modified by using the Clusterware Pro V5.1 CLI:
% bqueues -l <queue_name>
References:
z
1.8.1 Add new Job Submission Queues
z
3.7.9 How do I access the Clusterware Pro V5.1 Command Line Interface?
Back to Top
1.8.4 Add resource constraints to specified queues
To add resource constraints to a queue, edit the
file /share/platform/clusterware/conf/lsbatch/<clustername>/configdir/lsb.queues.
The name of your cluster can be determined by using the Clusterware Pro V5.1 CLI:
Page 90

% lsid
Find the queue definition you wish to modify. The following entries for maximum resource
usage can be modified or added for each queue definition:
z
CPULIMIT = minutes on a host
z
FILELIMIT = file size limit
z
MEMLIMIT = bytes per job
z
DATALIMIT = bytes for data segment
z
STACKLIMIT = bytes for stack
z
CORELIMIT = bytes for core files
z
PROCLIMIT = processes per job
RES_REQ is a resource requirement string specifying the condition for dispatching a job to a
host. Resource reservation and locality can also be specified in this string.
Groups of Compute Nodes created using clgroup are treated as resource requirements in
Clusterware Pro. If a group name is added as a RES_REQ to a queue, jobs submitted to that
queue will only run on nodes that are members of that group.
After adding, removing or modifying queues, it is necessary to reconfigure LSF to read the new
queue information. This is done from the Management Server using the Clusterware Pro V5.1
CLI:
% badmin reconfig
Verify the queue has been modified by using the Clusterware Pro V5.1 CLI:
% bqueues -l <queue_name>
References:
z
3.7.9 How do I access the Clusterware Pro V5.1 Command Line Interface?
Back to Top
1.8.5 Change priority of specified queues
The file /share/platform/clusterware/conf/lsbatch/<clustername>/configdir/lsb.queues controls
the priority of each queue.
The name of your cluster can be determined by using the Clusterware Pro V5.1 CLI:
lsid
%
Edit the lsb.queues file and look for a PRIORITY line for the queue you wish to change. If a
PRIORITY line exists, you can change the value specified. Otherwise, add a line of the form:
Page 91

PRIORITY = <integer value>
to the queue definition. Queues with higher priority values are searched first during scheduling.
After adding, removing or modifying queues, it is necessary to reconfigure LSF to read the new
queue information. This is done from the Management Server using the Clusterware Pro V5.1
CLI:
badmin reconfig
%
Verify the queue has been modified by using the Clusterware Pro V5.1 CLI:
% bqueues -l <queue_name>
References:
z
1.8.1 Add new Job Submission Queues
z
3.7.9 How do I access the Clusterware Pro V5.1 Command Line Interface?
Back to Top
1.8.6 Add pre/post run scripts to specified queues
The file /share/platform/clusterware/conf/lsbatch/<clustername>/configdir/lsb.queues controls
the pre and post commands associated with each queue.
The name of your cluster can be determined by using the Clusterware Pro V5.1 CLI:
lsid
%
Pre-execution commands are executed before a job is run from the queue. Post-execution
commands are executed when a job successfully completes execution from the queue. This can
be useful for acquiring and releasing special resources such as access to hardware devices or
software licenses.
Note:
Application Restart already makes use of these pre and post execution
commands. Therefore, AppRS queues cannot have their PRE_EXEC and
POST_EXEC values modified.
Edit the lsb.queues file and look for PRE_EXEC or POST_EXEC lines for the queue you wish
to change. If such lines exist, you can change the values specified. Otherwise, add lines of the
form:
PRE_EXEC = <command or full path to a script>
POST_EXEC = <command or full path to a script>
Page 92

to the queue definition. The command or tool should be accessible and runnable on all nodes
that the queue services.
After adding, removing or modifying queues, it is necessary to reconfigure LSF to read the new
queue information. This is done from the Management Server using the Clusterware Pro V5.1
CLI:
badmin reconfig
%
Verify the queue has been modified by using the Clusterware Pro V5.1 CLI:
% bqueues -l <queue_name>
References:
z
1.8.1 Add new Job Submission Queues
Back to Top
1.8.7 Kill a job in a queue
Using the Clusterware Pro V5.1 CLI:
Jobs can be killed using the bkill command:
% bkill <jobid>
Users can kill their own jobs. Queue administrators can kill jobs associated with a particular
queue.
References:
z
3.7.9 How do I access the Clusterware Pro V5.1 Command Line Interface?
Back to Top
1.8.8 Kill all jobs owned by a user
Using the Clusterware Pro V5.1 CLI:
All of a user's jobs can be killed by using the bkill on the special job id 0:
% bkill -u <username> 0
Page 93

Users can kill their own jobs. Queue administrators can kill jobs associated with a particular
p
queue.
References:
z
3.7.9 How do I access the Clusterware Pro V5.1 Command Line Interface?
Back to Top
1.8.9 Kill all jobs in a queue
Using the Clusterware Pro V5.1 CLI:
All of the jobs in a queue can be killed by using the bkill command with the -q option:
% bkill -q <queue name> -u all 0
Users can kill their own jobs. Queue administrators can kill jobs associated with a particular
queue.
References:
z
3.7.9 How do I access the Clusterware Pro V5.1 Command Line Interface?
Back to Top
1.8.10 Suspend a job in a queue
Using the Clusterware Pro V5.1 CLI:
% bstop <jobid>
Users can suspend their own jobs. Queue administrators can suspend jobs associated with a
articular queue.
References:
z
3.7.9 How do I access the Clusterware Pro V5.1 Command Line Interface?
Back to Top
Page 94

1.8.11 Suspend all jobs owned by a user
p
p
Using the Clusterware Pro V5.1 CLI:
All of a user's jobs can be suspended using the special 0 job id:
% bstop -u <userid> 0
Users can suspend their own jobs. Queue administrators can suspend jobs associated with a
articular queue.
References:
z
3.7.9 How do I access the Clusterware Pro V5.1 Command Line Interface?
Back to Top
1.8.12 Suspend all jobs in a queue
Using the Clusterware Pro V5.1 CLI:
All of the jobs in a queue can be suspended by a queue administrator using the special 0 job id:
% bstop -q <queue name> -u all 0
References:
z
3.7.9 How do I access the Clusterware Pro V5.1 Command Line Interface?
Back to Top
1.8.13 Resume a suspended job in a queue
Using the Clusterware Pro V5.1 CLI:
% bresume <jobid>
Users can resume their own jobs. Queue administrators can resume jobs associated with a
articular queue.
References:
Page 95

z
j
p
3.7.9 How do I access the Clusterware Pro V5.1 Command Line Interface?
Back to Top
1.8.14 Resume all suspended jobs owned by a user
Using the Clusterware Pro V5.1 CLI:
All of a user's jobs can be resumed using the Clusterware Pro V5.1 CLI by using the special 0
ob id:
bresume -u <userid> 0
%
Users can resume their own jobs. Queue administrators can resume jobs associated with a
articular queue.
References:
z
3.7.9 How do I access the Clusterware Pro V5.1 Command Line Interface?
Back to Top
1.8.15 Resume all suspended jobs in a queue
Using the Clusterware Pro V5.1 CLI:
All of the jobs in a queue can be resumed by a queue administrator using the special 0 job id:
bresume -q <queue name> -u all 0
%
References:
z
3.7.9 How do I access the Clusterware Pro V5.1 Command Line Interface?
Back to Top
Index
Administrators Guide
|
Users Guide
|
Tool Overview
|
Related Documents
|
Dictionary
|
Copyright 1994-2004 hewlett-packard company
Page 96

System Troubleshooting Tasks
System Troubleshooting Tasks
ClusterPack
Index
1.9.1 Locate a Compute Node that is down
1.9.2 Get to the console of a Compute Node that is down
1.9.3 Bring up a Compute Node with a recovery image
1.9.4 View system logs for cause of a crash
1.9.5 Bring up the Management Server from a crash
1.9.6 Troubleshoot SCM problems
1.9.7 Replace a Compute Node that has failed with a new machine
Administrators Guide
|
Users Guide
|
Tool Overview
|
Related Documents
|
Dictionary
|
1.9.1 Locate a Compute Node that is down
Any node that shows a state of "unavail" or "unreach" is potentially down and should be
checked by a system administrator. In order to determine the state of nodes on the cluster, the
tools should be used.
Using the Clusterware Pro V5.1 Web Interface
The default hosts view is a table showing information about your hosts' resources. The default
view is accessed from:
View->Details
There are two different indications of health and status: State, and Batch State.
z
State refers to the state of the host.
z
Batch State refers to the state of the host, and the state of the daemons
running on that host.
Using the Clusterware Pro V5.1 CLI
An overview of a nodes health can be obtained by looking at the Clusterware Pro status and
batch states of that node.
Page 97

% lshosts -l <hostname>
% bhosts -l <hostname>
References:
z
1.7.1 Get an Overview of Cluster Health
z
1.7.3 Get details on health of specific Compute Nodes
z
3.7.8 How do I access the Clusterware Pro V5.1 Web Interface?
z
3.7.9 How do I access the Clusterware Pro V5.1 Command Line Interface?
Back to Top
1.9.2 Get to the console of a Compute Node that is down
If a Compute Node is unreachable using the Management Server LAN within the cluster, it
may be necessary to use the MP card to access the console of the node.
z
Telnet to the remote MP-console of the Compute Node
% telnet <node1-mp>
z
Use the MP interface to view any diagnostic messages from the Compute
Node.
References:
z
3.7.1 What is Clusterware Pro?
Back to Top
1.9.3 Bring up a Compute Node with a recovery image
Recovery images created with /opt/clusterpack/bin/sysimage_create are stored
in /var/opt/ignite/archives/<hostname>, where <hostname> is the name of the node from
which the image was taken. The images are stored in files based on the time in which the
image was created. To distribute such an image to a Compute Node, use the
tool /opt/clusterpack/bin/sysimage_register to register the image with Ignite-UX:
% /opt/clusterpack/bin/sysimage_register <full path of image>
To bring up a Compute Node using this image, you should use the sysimage_distribute script:
% /opt/clusterpack/bin/sysimage_distribute <full path of image>
<hostname>
Page 98

This will reboot the machine, hostname, and cause the machine to install from the golden
image you specified.
References:
z
1.5.2 Distribute Golden Image to a set of Compute Nodes
Back to Top
1.9.4 View system logs for cause of a crash
The system logs are located in /var/admin/syslog/syslog.log
The crash logs are stored in /var/adm/crash
The installation and configuration logs for ClusterPack are stored in /var/opt/clusterpack/log
Back to Top
1.9.5 Bring up the Management Server from a crash
After a crash, the Management Server state can be checked by running:
% /opt/clusterpack/bin/finalize_config
Back to Top
1.9.6 Troubleshoot SCM problems
There are two common problems that are discussed here. For any additional troubleshooting
help, please see:
z
Planning, installing, and updating ServiceControl Manager 3.0
http://docs.hp.com/en/5990-8540/index.html
z
ServiceControl Manager 3.0 Troubleshooting Guide
http://docs.hp.com/en/5187
-4198/index.html
Page 99

Problem: When I try to add a node, I get "Properties file for <xyz> doesn't exist."
Solution:
z
Make sure that the hostname is fully qualified in /etc/hosts on both the
Management Server and the managed node, if it exists in /etc/hosts, and
that any shortened host names are aliases instead of primary names. For
example:
{
10.1.2.3 cluster.abc.com cluster
z
should be used instead of:
{
10.1.2.3 cluster
z
Make sure that AgentConfig is installed on the managed node, and that
mxrmi and mxagent are running.
z
ps -ef | grep mx should produce something like this:
root 23332 1 0 15:42:17 ?
1:08 /opt/mx/lbin/mxagent
root 23334 1 0 15:42:17 ? 0:59 /opt/mx/lbin/mxrmi
root 24269 24252 1 01:30:51 pts/0 0:00 grep mx
z
If AgentConfig is installed and running, uninstall it and then reinstall it:
% /usr/sbin/swremove AgentConfig
z
To install AgentConfig, type;
% /usr/sbin/swinstall -s <CMS>:/var/opt/mx/depot11
AgentConfig
z
where <CMS> is the hostname of the Management Server.
Problem: scmgr prints "out of memory" errors.
Solution:
z
On the Management Server, using SAM or kmtune, make sure that the
Kernel Configurable Parameter max_thread_proc is at least 256, and that
nkthread is at least 1000.
Back to Top
1.9.7 Replace a Compute Node that has failed with a new machine
If a Compute Node fails due to a hardware problem, and must be replaced, the new node can
Page 100

be added to the cluster using the IP address and hostname of the failed node or can be added
with a new name and IP address.
Replacing with a new hostname and IP address
In this case, the replacement node is handled simply by removing the failed node and adding
the new node. Remove the failed node from the cluster using the following commands:
% manager_config -r <bad_node_name>
% compute_config -r <bad_node_name>
The nodes MP will automatically be removed from the MP register database. Add the
replacement node to the cluster using the same approach as adding a new node to the cluster:
% manager_config -a <new_node_name>:<new_node_ip_addr>
% mp_register -a <new_node_name>
clbootnodes <new_node_name>
%
compute_config -a <new_node_name>
%
% Add the new node into groups as appropriate using clgroups
Replacing with the same hostname and IP address
If the hostname and IP Address from the failed node will be assigned to the replacement node
do NOT remove the failed node from the cluster using the '-r' option. This will remove the
node from any groups that have been setup, and it will remove any automated Systems
Inventory Manager information collections that refer to that node.
The replacement node should be installed, and connected to the cluster. Use mp_register to
configure the MP card on the new host and/or register the MP card's IP address:
% mp_register -a <new_node_name>
Boot the node using clbootnodes
clbootnodes <new_node_name>
%
Finally, run compute_config to update this new node:
% compute_config -a <new_node_name>
References:
z
Step 10 Run manager_config on the Management Server
z
Step 11 Run mp_register on the Management Server
z
Step 12 Power up the Compute Nodes
z
Step 13 Run compute_config on the Management Server
Back to Top
Index
Administrators Guide
|
Users Guide
|
Tool Overview
|
Related Documents
|
Dictionary
|
 Loading...