

Page 1

Cisco Network Access Control
for HP Thin Clients and CCI
Introduction......................................................................................................................................... 2
The Components.................................................................................................................................. 2
HP PC Client Computing Solutions ..................................................................................................... 2
Network Access Control ................................................................................................................... 3
Cisco Network Admission Control...................................................................................................... 3
Implementation Prerequisites ................................................................................................................. 4
The Implementation.............................................................................................................................. 4
NAC Installation .............................................................................................................................. 4
Configuring Policy Settings................................................................................................................ 5
Testing Methods ........................................................................................................................... 5
Thin Client Policy.......................................................................................................................... 5
Blade PC Policy.......................................................................................................................... 12
End-Point Configuration .................................................................................................................. 17
Thin Client Firewall Exceptions ..................................................................................................... 17
Policy Enforcement using Clean Access Agent ................................................................................... 23
Thin Client Policy Enforcement ..................................................................................................... 24
Special Thin Client Consideration: Committing Image Changes ....................................................... 27
Blade PC Policy Enforcement ....................................................................................................... 32
Closing Observations......................................................................................................................... 39
Appendix A – CISCO 3560 Switch Configuration................................................................................. 40
For more information.......................................................................................................................... 42
HP Links: ....................................................................................................................................... 42
CISCO NAC Links:......................................................................................................................... 42
General NAC Links ........................................................................................................................ 42
Page 2

Introduction
This white paper provides a reference implementation of layered security policy enforcement created
by integrating HP thin clients and Consolidated Client Infrastructure (CCI) blade PCs with Network
Admission Control (NAC) solutions from Cisco. The combination of HP thin clients and Consolidated
Client Infrastructure (CCI) blade PCs provides a very robust, secure, and cost-effective computing
solution that can be applied to any network. Like any other networked component, it is important to
examine security issues associated with their operation. This paper addresses the use of network
policy enforcement services with HP thin clients and blade PCs linked to Cisco Clean Access Manager
and Clean Access Server NAC appliance built from HP ProLiant DL140 and DL360 serves
respectively. This configuration provides strong network policy enforcement to ensure client devices on
the network are properly configured; otherwise these clients can be quarantined and/or remediated.
Overviews of NAC, as well as usage models and known working implementations, are provided.
The Components
HP PC Client Computing Solutions
HP PC client computing solutions consist of two major components: thin clients and blade PCs. A thin
client is a computing device without a hard drive that provides display and input/output for
applications running on remotely located servers or blade PCs. A basic thin client consists of a
processor, flash memory for storing the embedded operating system, local RAM, a network adapter,
and standard input/output for the display and other select peripherals. HP thin clients have no moving
parts, offering higher reliability than a PC, lower ownership costs, enhanced security, and extended
product life. These small, robust devices consume significantly less energy than a desktop PC, put out
less heat into your office spaces, are made with much less material than a desktop, and are
practically silent.
HP offers thin clients based on three operating systems: Windows XPe, Debian Linux, and Windows
CE. Each operating system provides protection for the OS image housed within the flash device while
creating a partition on that flash device to act as a virtual hard drive. Only an account with
administrator privileges can make changes to the base image to add applications or operating system
patches. With the Windows XPe operating system, HP also includes a Sygate firewall on the base
image that locks down all ports except those necessary for typical Microsoft Remote Desktop Protocol
(RDP) and Citrix-level connections and general Web browsing. The Sygate settings must be edited to
unlock any additional ports on the thin client.
Consolidated Client Infrastructure (CCI) is the enterprise/data center computing architecture through
which blade PCs can be allocated to end-users connecting on thin clients. The blade PCs are stored
and managed in a centralized location, and are accessed through HP Remote Graphics Software
(RGS) or RDP. A remote user can present credentials to the HP Session Allocation Management (SAM)
service and be connected to a computing session on a blade PC with access to network resources
such as applications and data. Unlike Terminal Services-, Citrix-, or VDI-hosted computing sessions,
CCI computing sessions typically match up a connected user onto a blade PC that is not shared,
which provides a stable computing experience that does not change as additional users are added to
the array of blade PCs.
Although CCI blade PCs are housed in the data center for security, they are full-blooded PC systems
running the latest operating systems. As such, it is assumed in this paper that images for blades are
configured with a firewall and virus scanning software as a security baseline. For the usage models
presented here, the blades were configured to use the native Windows XP firewall, as well as antimalware software.
2
Page 3

Network Access Control
Advancements in computer networking have significantly changed the way people and organizations
communicate and access information. Networks have become critical resources in many
organizations, providing real-time communications and access, through both the Internet and
enterprise intranets. Much of the data available on internal business networks needs to be protected,
either to follow data privacy regulations or to protect valuable information assets. As such, the need to
provide reliable and secure network access has become a key challenge facing today’s Information
Technology (IT) organizations.
As organizations take advantage of the benefits of making information available, they also need to
consider the security implications. They must protect valuable proprietary information. They also might
be responsible for complying with government regulations related to data privacy. This leads to two
business objectives that many IT organizations are striving to maximize: data availability and data
security. While addressing each of these objectives individually can be straightforward, the methods
used to address one often conflict with the other. Therefore, it is important for organizations to
address these objectives together.
To meet these needs adequately requires a layered security approach, often defined as Defense in
Depth. NAC is one component of such an approach, and should not be considered in isolation. The
high level role of NAC is to protect the network and its resources from harmful users and devices or
systems. It does this by restricting network access based on certain criteria and business policies. The
policies may be quite simple, such as allowing access to a set of known users or devices while
denying all others. Or, in order to model more intricate business policies, the policies may be much
more complex.
NAC works together with other network security layers such as firewalls, Intrusion Detection and
Prevention Systems (IDPS), endpoint security, and so forth to build a defensive posture in your
environment. NAC should be used to minimize the risk associated with unauthorized, infected, or
improperly configured devices trying to connect to your network.
In its most basic form, NAC allows a network administrator to restrict network access to authorized
users and/or devices. However, many organizations have the need to provide, or can benefit from
providing, different levels of access depending on the role of the user. For example, employees have
access to internal network resources and the Internet while guest users are only provided access to the
external Internet.
There is also a need for protection from malicious software, which is accomplished by evaluating the
security posture of devices connecting to the network. The security posture required is defined by
organizational policies and is based on checking for things such as operating system versions and
patches, security software (antivirus, anti-spam, firewalls, etc.), security settings on common software,
and other required or prohibited software.
There are many aspects to a complete network security implementation. This white paper addresses
use of the Cisco Clean Access Network Admission Control (NAC) appliances and software as
applied to HP thin clients and blade PCs to control their access to a production network and the
information available on that network. We note here that the NAC acronym for Cisco products
denotes “Network Admission Control” which in this paper is synonymous with “Network Access
Control.”
Cisco Network Admission Control
Cisco Clean Access NAC appliances provides an easily managed way to implement Network Access
Control on any network. The NAC Appliance is made up of three components: The Clean Access
Manager (CAM), the Clean Access Server (CAS), and the Clean Access Agents (CAA). The CAM
serves a Web console allowing configuration of the CAS and CAA components. The CAS actively
protects and enforces policy on the network.
3
Page 4

Cisco Clean Access NAC appliance can function in Real-IP Gateway mode or Virtual-IP Gateway
mode. This reference implementation uses the Virtual-IP Gateway mode of operation. A full description
of all the possible choices is beyond the scope of this white paper. For detailed information on
implementation choices, refer to detailed Clean Access documentation on the CISCO web site:
http://www.cisco.com/en/US/netsol/ns466/networking_solutions_package.html
Implementation Prerequisites
For the purpose of this white paper, we assume a basic network infrastructure is already in place. The
reference implementation consists of HP BladeSystem bc1500, bc2000 and bc2500 Blade PCs
running Windows XP. HP
access devices.
The network topology for this reference implementation consists of a flat Class-A network setup with
topology: 10.xxx.yyy.zzz/24, see Table 1 below.
Compaq t5720 Thin Clients (t5720) running Windows XPe are used as
Component Operating
System
CAM Server
HP Proliant DL140
CAS Server
HP Proliant DL360
Thin Client (t5720) Windows XPe hptc1.cisco.com 10.6.6.x
Blade PC (bc1500,
bc2000, & bc2500)
Table 1 -- Procurve NAC Reference Solution -- Network Topology
A CISCO 3560 layer-3 network switch is used so that 10.6.6.x addresses can be initially configured
to a quarantined VLAN and then switched via SNMP upon successfully validating platform to CAS.
Linux cam.cisco.com 10.3.3.3
Linux cas.cisco.com 10.4.4.4
Windows XP hpbpc1.cisco.com 10.6.6.x
Host Name IP
Address
The Implementation
NAC Installation
This section covers use of a CISCO CAM and CAS appliances in conjunction with a CISCO layer 3
switch to ensure that thin clients and blade PCs meet configuration policy prior to connection with the
trusted network segment. The network topology used in this reference implementation is found in
Figure 1 below.
4
Page 5

SERIES
Catalyst 3560
1X
SYST
RPS
STAT
DUPLX
SPEED
POE
2X
MODE
11 12 13 14 15 16 17 18 19 20 21 22 23 24 25 26 27 28 29 30 31 32 33 34 35 36 37 38 39 40 41 42 43 44 45 46 47 481 2 3 4 5 6 7 8 9 10
17X
15X 31X
18X
16X
CISCO 3560 Switch
33X 47X
32X34X
48X
1
2 4
PoE-48
3
CAM Appliance
VPN information
VPN Group Name – cisco
VPN Group Password – cisco
VPN Username – jeremy
VPN Password – cisco123
CAM console to switch port 3
HP clients to switch
ports 5 & 6
Trusted interface to
switch port 1(trunk)
HP Compaq t5720
Thin Clients
HP CCI Blade System
CAS Appliance
Untrusted interface to switch port 4
IP Addresses
VPN Private – 10.2.2.1
VPN Public – 10.1.1.1
Switch VLAN 2 – 10.2.2.2
Switch VLAN 3 – 10.3.3.2
Switch VLAN 4 – 10.4.4.2
Switch VLAN 5 – 10.5.5.2
Switch VLAN 6 – 10.6.6.2
CAM – 10.3.3.3
CAS Untrusted – 10.4.4.4
CAS trusted – 10.4.4.4
Client VPN – 10.1.1.2
Thin Client – 10.5.5.5
Figure 1 - Reference network topology
The Cisco 3560 switch is configured with VLANs assigned to ports 1 to 5, as shown in Figure 1
above. Full switch configuration settings can be found in Appendix A – CISCO 3560 Switch
Configuration.
Configuring Policy Settings
As we are focusing on the integration of NAC into a CCI and thin client network, we are exploring
only the network policy enforcement settings that are pertinent to thin clients and blade PCs. This does
not exhaust all the features of the Cisco NAC solution. Likewise, in a production environment, you
may wish to validate many more OS configuration components than are discussed in this reference
white paper.
Testing Methods
Tests for compliance are configured in stages via the CAM console for CAS to enforce. First we
define checks, each of a single Windows registry setting, service status, program run state, etc. We
then define rules as a combination of checks using AND/OR logical operators. We then construct
requirements assigned to user roles and encompassing any or all rules we’ve defined.
Thin Client Policy
1. Use the Web browser to connect to the Clean Access Manager console at https://10.3.3.3
.
2. Click Clean Access under Device Management in the left panel.
3. Click the Clean Access Agent tab, and then click Rules.
5
Page 6

4. On the figure below, we have defined three checks on thin clients:
o Status of Sygate Firewall service (Sygate_Service_Check)
o Sygate Engine actively enabled (Sygate_Engine_Enabled)
o Status of Enhanced Write Filter service (EWF_Service_Check)
5. To add a Windows program/service/registry check, click New Check.
6
Page 7

6. Select Category and Type of check from the respective drop-down menus. In the following
illustration, we’ve selected Registry Check and Registry Value in order to validate that the
Sygate Engine is Enabled.
NOTE: This is in addition to another setting we’ll define later to ensure that the service is
running. Our goal is to ensure that Sygate is both running and enabled in order to access the
network.
7. For this reference implementation, ensure that the option for creating rules based on this check
is not selected. Click Save Check.
7
Page 8

8. Repeat steps 5 – 7 to add a check for Enhanced Write Filter (EWF) Service and Sygate
Firewall Service. The EWF final selections are indicated in the following illustration.
Next, set rules comprising the AND and OR policies of individual checks. For this white paper,
we’ll set an AND policy comprising all three checks defined so far: Sygate service running,
Sygate service active, and EWF service running.
9. To set a Rule, click New Rule.
8
Page 9

10. Type the Rule Name (HP_TC_Rule, in this example) and select the operating system. Enter
the Rule Expression by leveraging the checks shown (copy and paste the text).
NOTE: You can form complex expressions of AND/OR policies using parentheses. Refer to
Blade PC Policy
11. Now, build a requirement from the Rules called TC_Requirements by clicking Clean
Access Agent/Requirements/New Requirements.
later in this document for an example.
9
Page 10

12. Name this new rule TC_Requirements and type a description in the Rule Description field.
In the following example, we’re making the rule available for All Windows versions, although
in this specific case, the t5720 thin client runs Windows XPe and is identified by CAS as XP
Pro/Home.
13. Click Requirement Rules.
14. In the Requirement Name list, click TC_Requirements.
10
Page 11

15. Select the HP_TC_Rule check box to associate the thin client rule to the TC Requirement entry.
16. Ensure that the Requirements entry is indeed listed. If multiple requirements exist, click on the
appropriate arrow in the Move column to order the requirements, as seen in the following
illustration.
17. Next, we choose what user roles we want to assign the thin client requirement to. Click the
Clean Access Agent tab, then click Role-Requirements.
11
Page 12

18. Select Employee from the User Role selection list. Click the TC_Requirements check box
in the Select column. This requires all users in the Employee role to be tested for
TC_Requirements, as defined above.
19. Click Update.
We’re finished with thin client policy settings!
Blade PC Policy
The blade PC policy setting closely follows the steps previously covered for thin client, though different
rules and policies are checked. In many illustrations, the HP blade PC policies/settings are shown
together, since they are simultaneously selected. Also, several detail illustrations for settings (like
registry checks) have been left out of this section, as they follow the same process previously
documented for thin clients.
1. Use the Web browser to connect to the Clean Access Manager console at https://10.3.3.3
2. Click Clean Access under Device Management in the left panel.
3. Click the Clean Access Agent tab, and then click Rules.
.
12
Page 13

4. On the figure below we have added the following checks for blade PCs based on Windows
Service names for each of the following:
o Status of Windows Firewall service
(WindowsXP_Firewall_Check and Vista_Firewall_Check)
o Status of HP Watchdog Timer service (HP_Watchdog_Timer_Check)
o Status of Altiris service for active patching (Altiris_Service_Check)
o Status of HP SAM (Session Allocation Manager) service (SAM_Service_Check)
5. To add an additional Windows program/service/registry check, click New Check.
13
Page 14
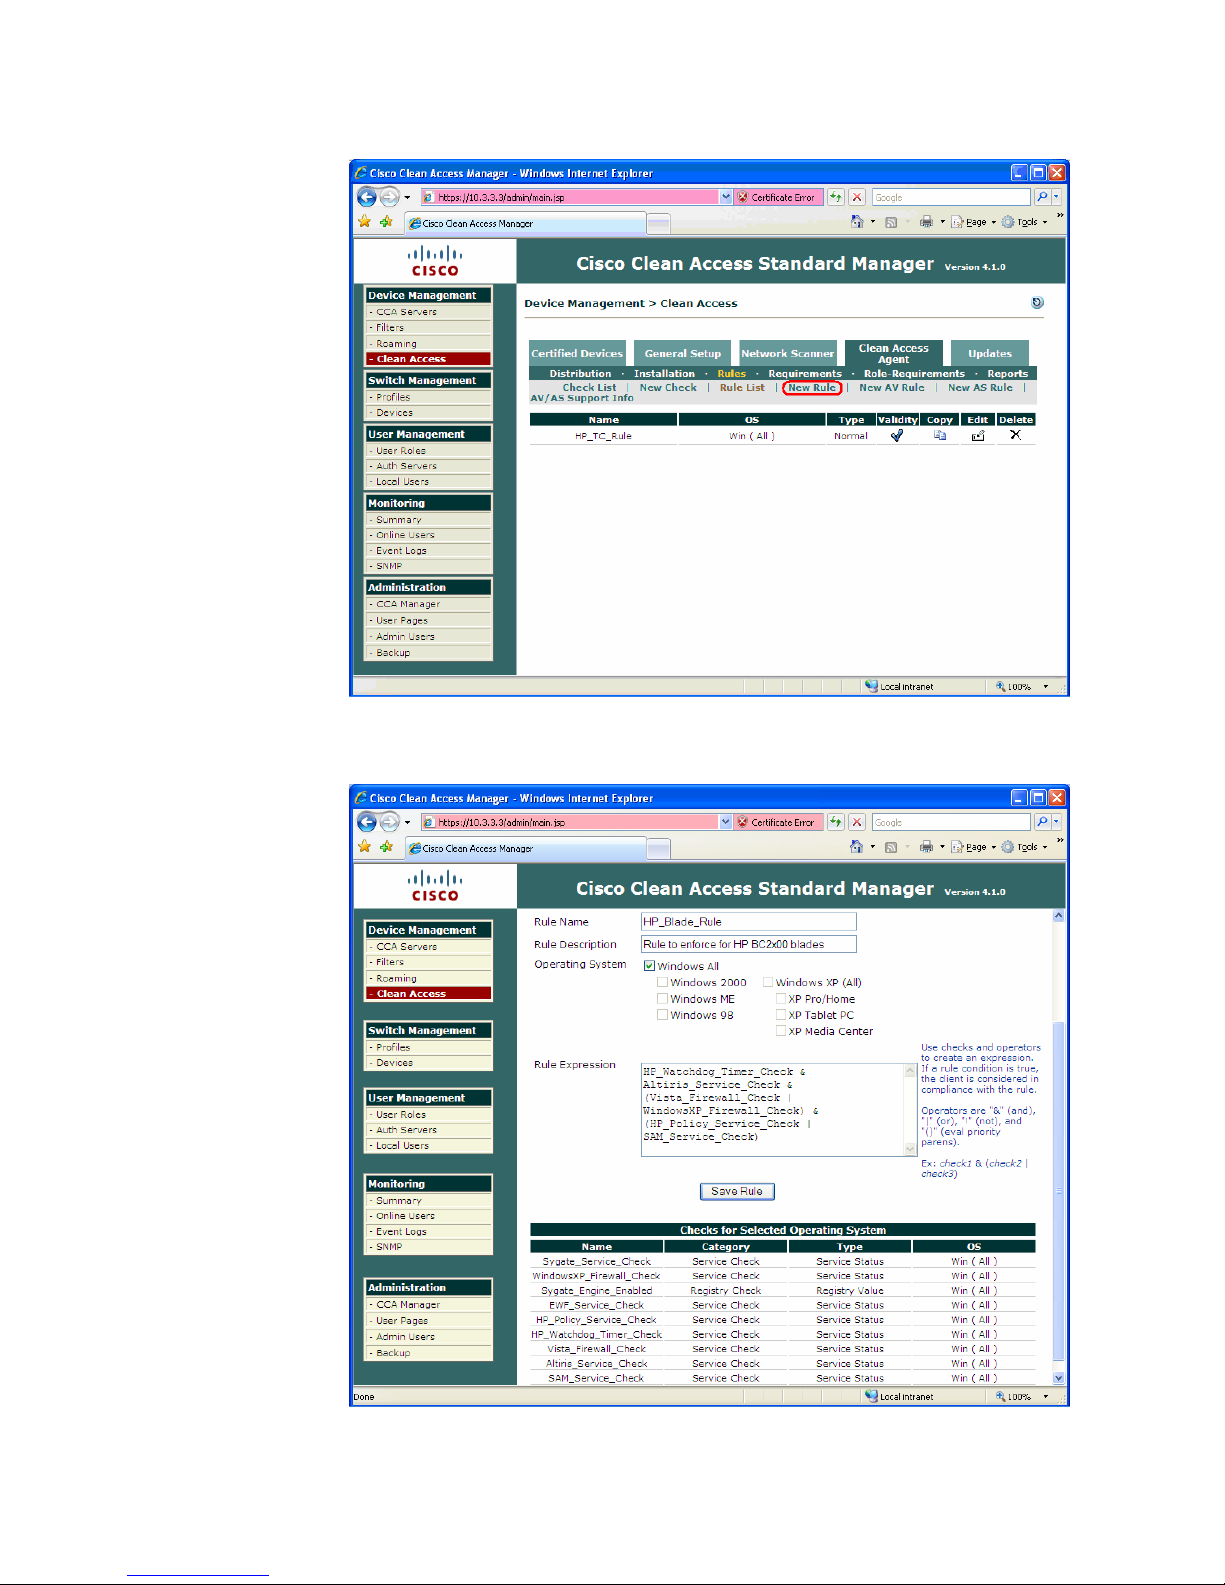
6. Next, create and set rules based on the AND and OR policies of individual checks previously
defined.
7. To set a Rule, click New Rule.
14
Page 15
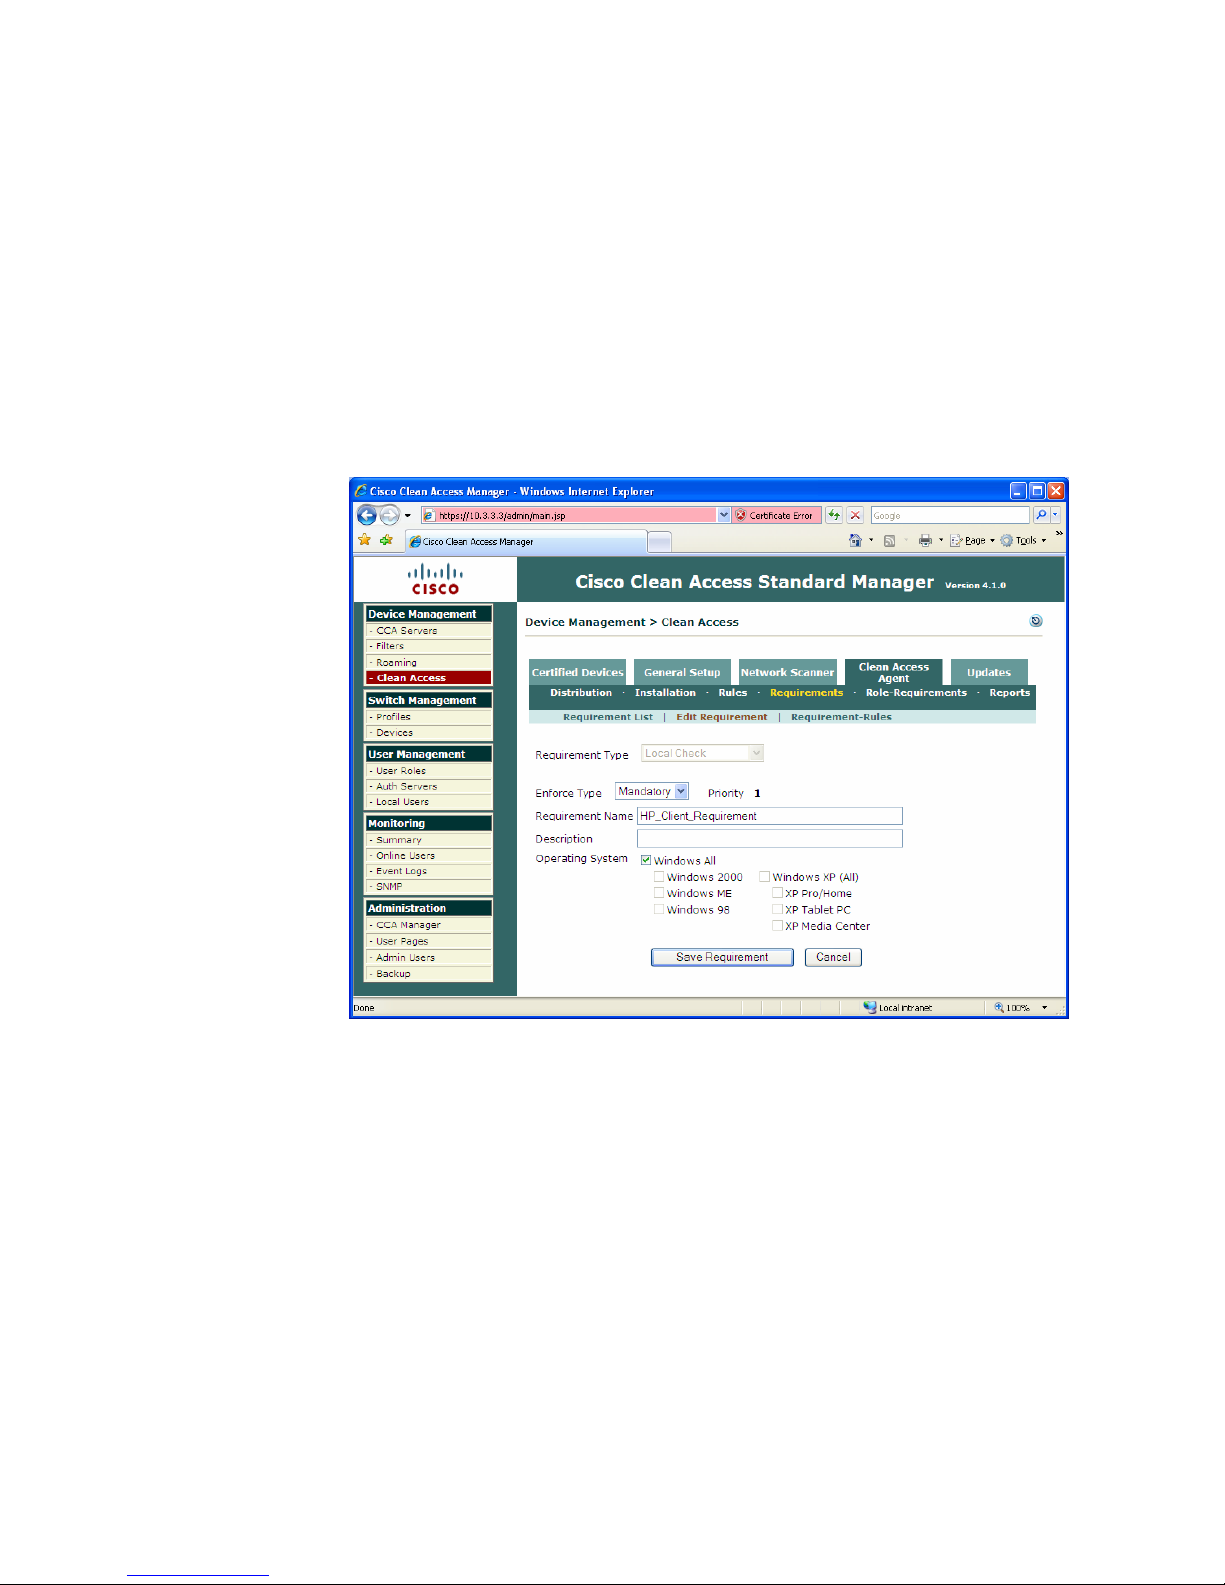
8. Type the Rule Name (HP_Blade_Rule, in this example) and select the operating system. Enter the
Rule Expression by leveraging the checks shown (copy and paste the text). The policy for this
reference implementation is to require:
HP Watchdog Timer Service running AND
Altiris Service running AND
(Windows XP OR Vista Firewall service running) AND
(HP Policy Service OR SAM Service running)
9. In building a requirement from these Rules, we see that we have the opportunity to have a
single ’common’ Requirement that includes both thin client and blade PC rules. Therefore, let’s
delete the existing TC_Requirements entry and create a new requirement to encompass all
available client rules. Click Clean Access Agent/Requirements/New Requirements.
10. Name this new rule HP_Client_Requirements and type a description in the Rule
Description field.
11. Click Requirement Rules.
12. In the Requirement Name list, click HP_Client_Requirements.
15
Page 16
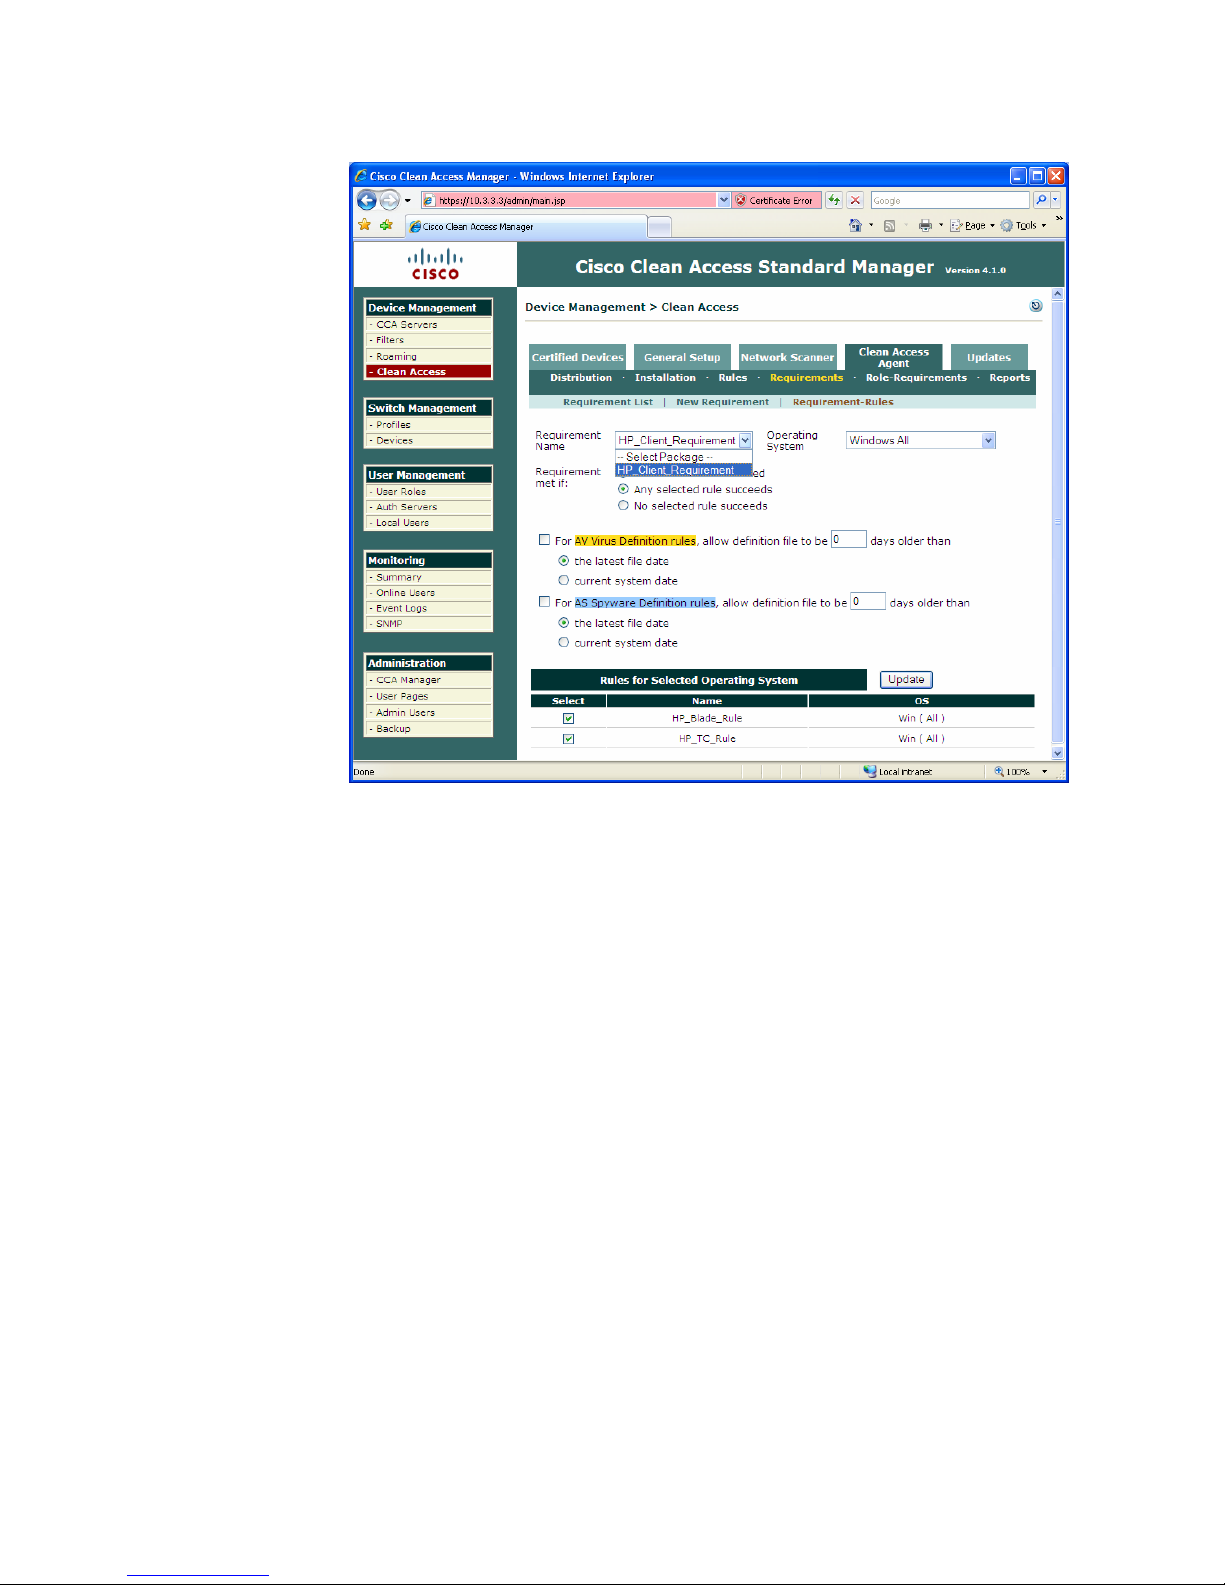
13. Select both the HP_Blade_Rule and HP_TC_Rule check boxes to associate the thin client and
blade rules and fulfill HP client requirements.
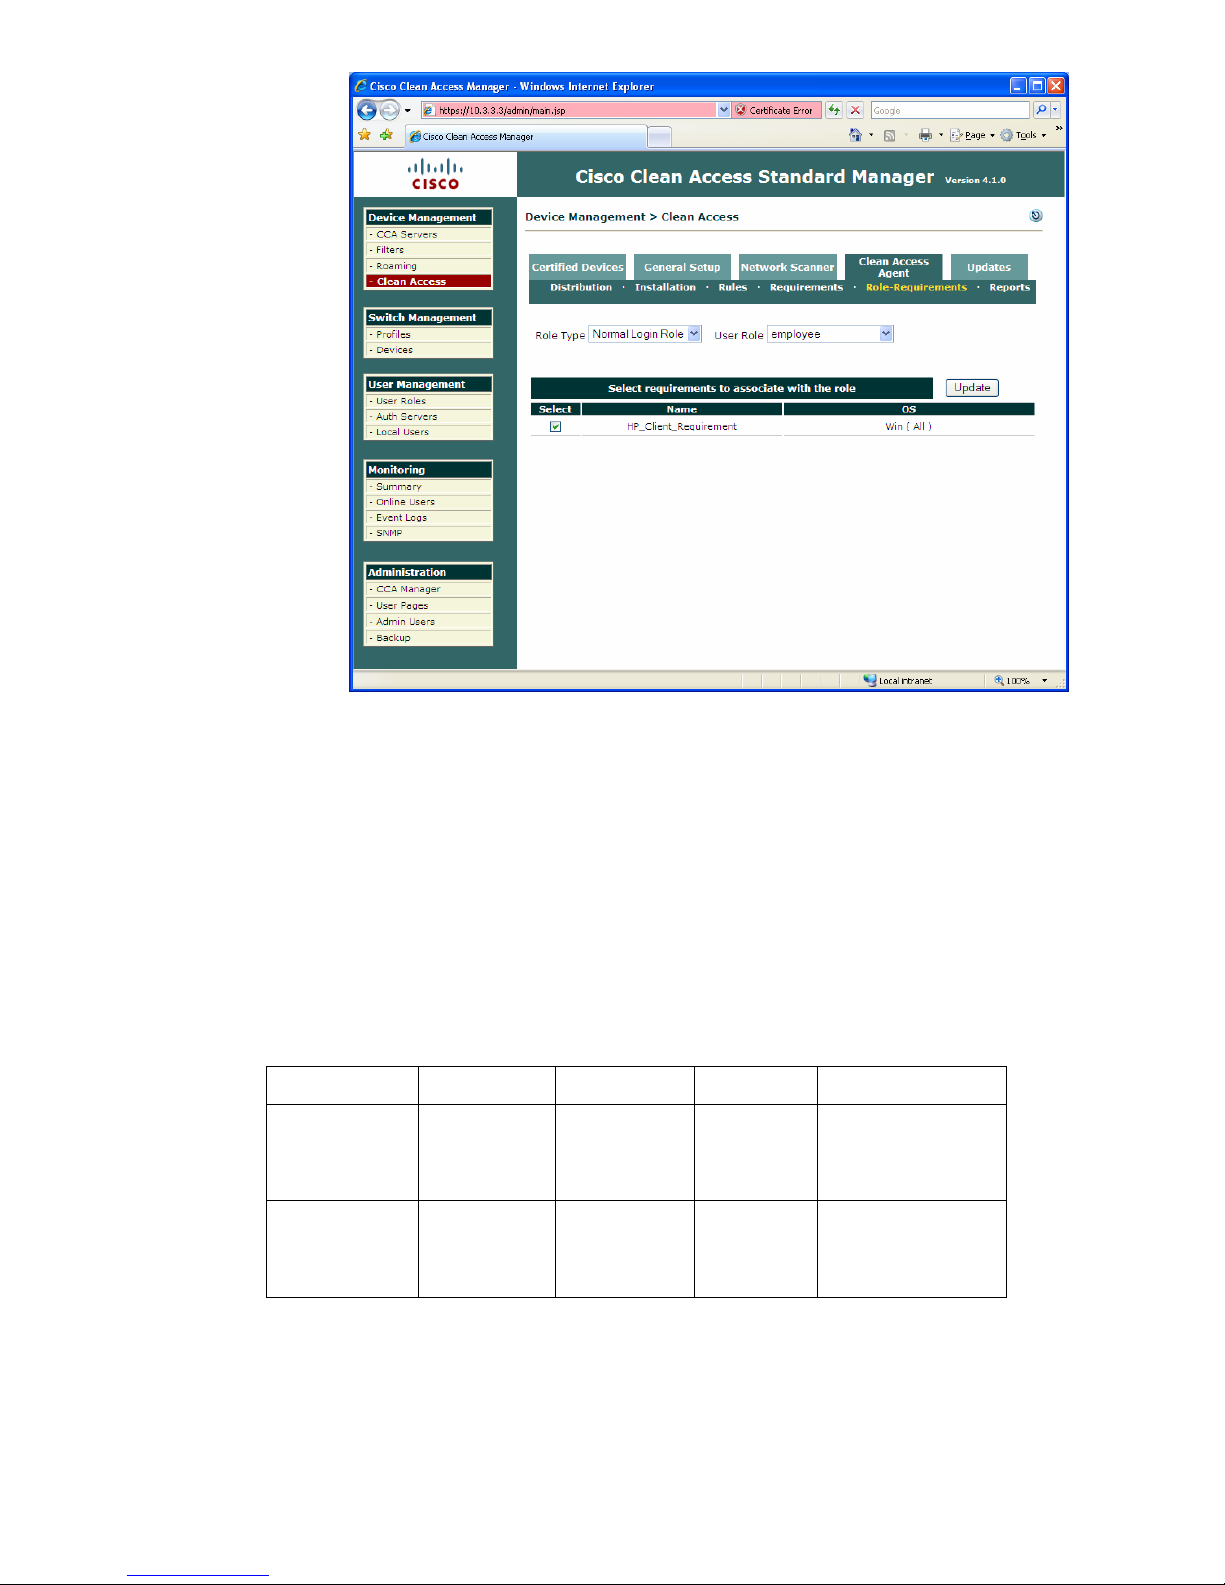
14. Finally, click Role-Requirements. Select employee from the User Role selection list.
15. Ensure that the HP_Client_Requirements check box is selected.
16. Click Update.
16
Page 17
We’re finished with both blade and thin client policy settings!
End-Point Configuration
Thin Client Firewall Exceptions
The HP t5720 XPe-based Thin Client is configured by default with the Sygate firewall actively blocking
all ports except those required for basic Web browsing and RDP connections. The t5720 thin clients
used in this white paper also had firewall port exceptions added for RGS, which accelerates graphics
in a manner superior to RDP.
In order to properly communicate with the NAC 800 and allow scans to the t5720, the Sygate
firewall must be modified as follows:
Description IP Address Remote Ports Local Ports Incoming/Outgoing
Allow NAC UDP 10.6.6.2
Allow NAC TCP 10.6.6.2
Set this firewall configuration as follows:
1. Reboot the HP t5720 thin client and log on using an account with administrator privileges.
This ensures that the thin client is in a known, clean OS state.
2. In the System Tray, right-click the Sygate icon.
3. Select Advanced Rules.
8905,8906 Both
10.3.3.3
10.4.4.4
443 Both
10.3.3.3
10.4.4.4
17
Page 18
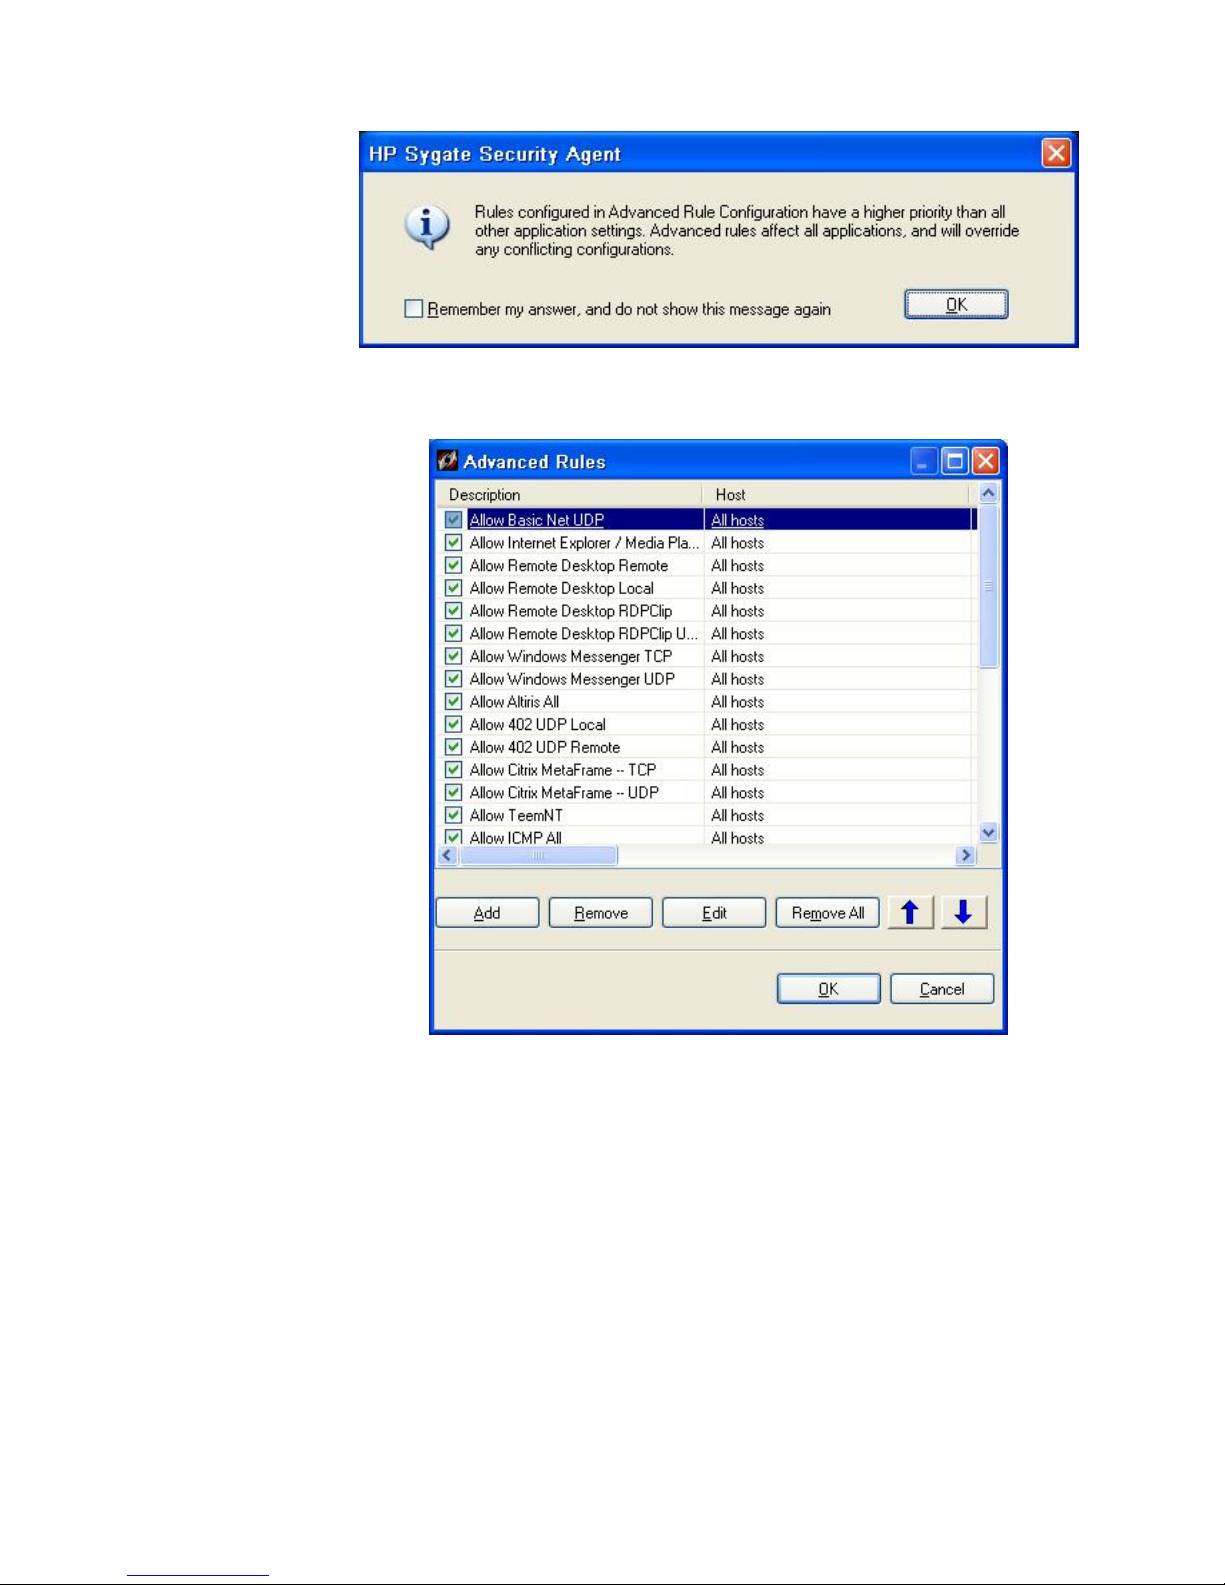
4. Read the warning notification and click OK.
5. In the Advanced Rules window, click Add.
6. On the General tab, type NAC UDP in the Rule Description field.
7. Select Allow this traffic.
18
Page 19
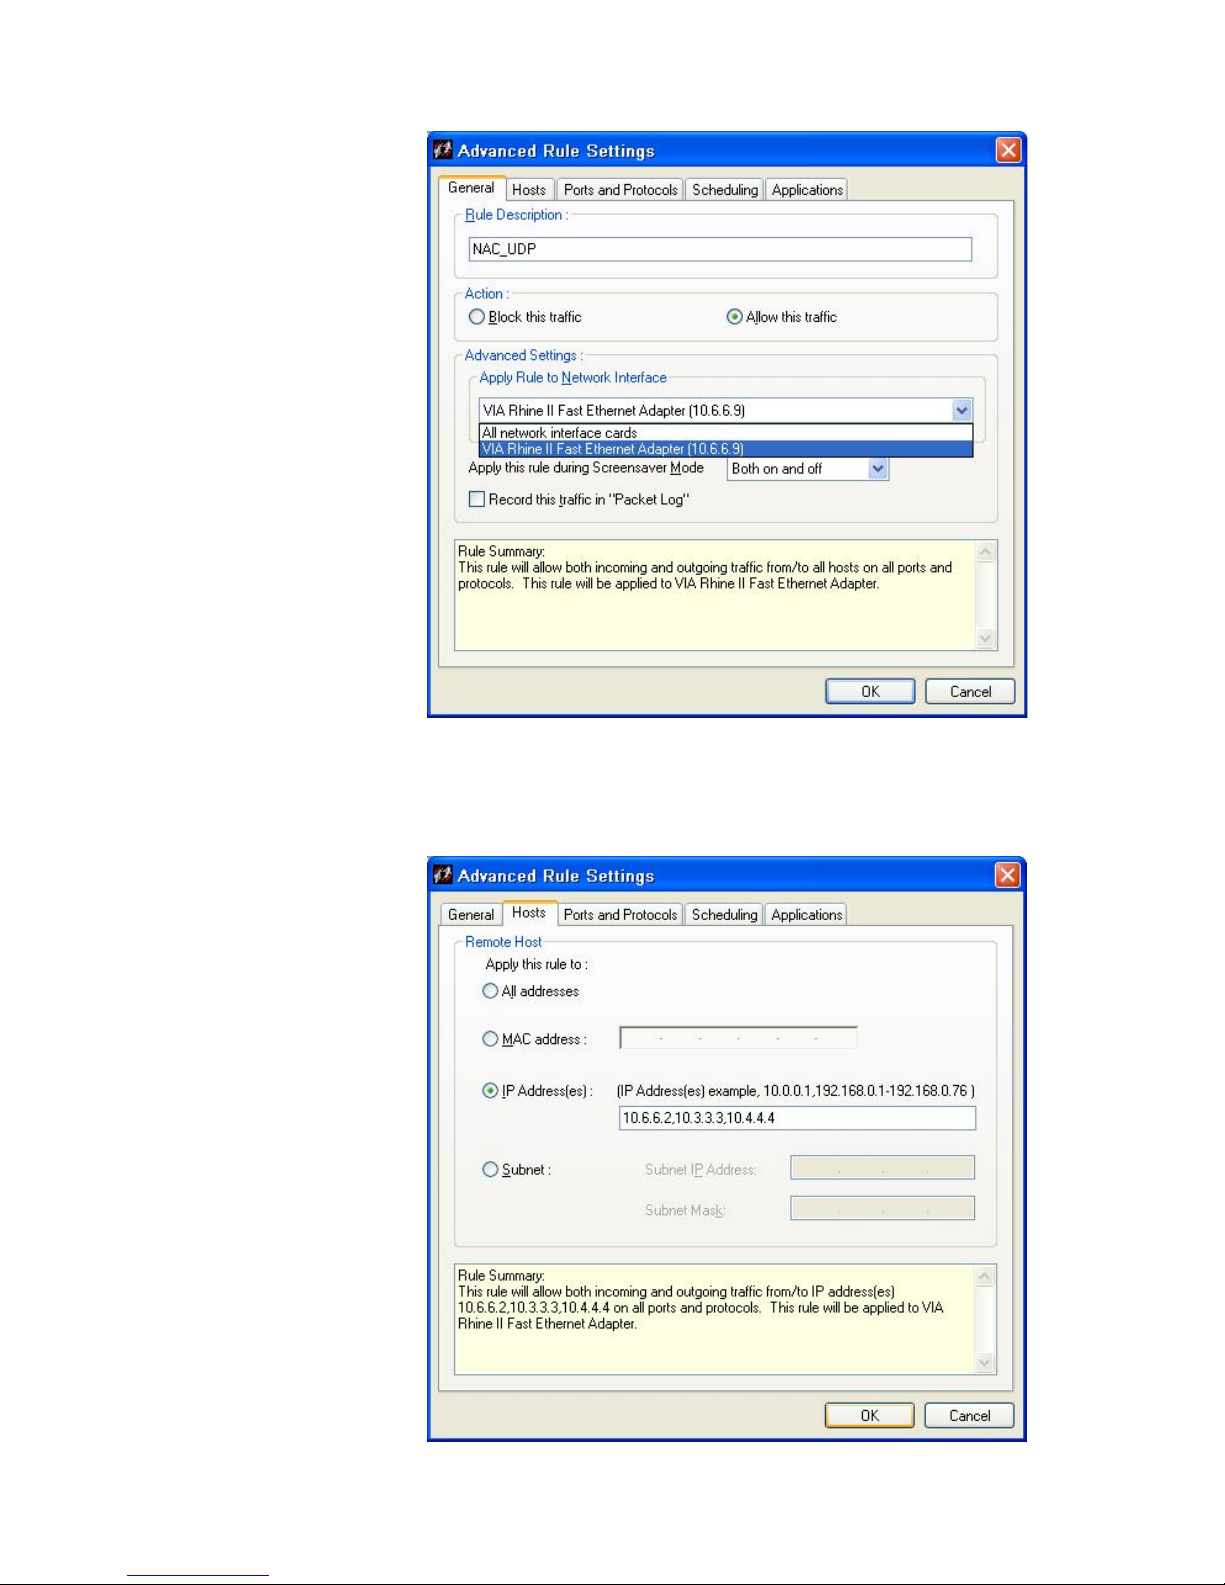
8. Select a specific network interface card or the default, All network interface cards.
9. On the Hosts tab, select IP Addresses and then type the IP address of the 3960 internal
switch port and CAM/CAS server addresses (10.6.6.2, 10.3.3.3, and 10.4.4.4,
respectively).
19
Page 20
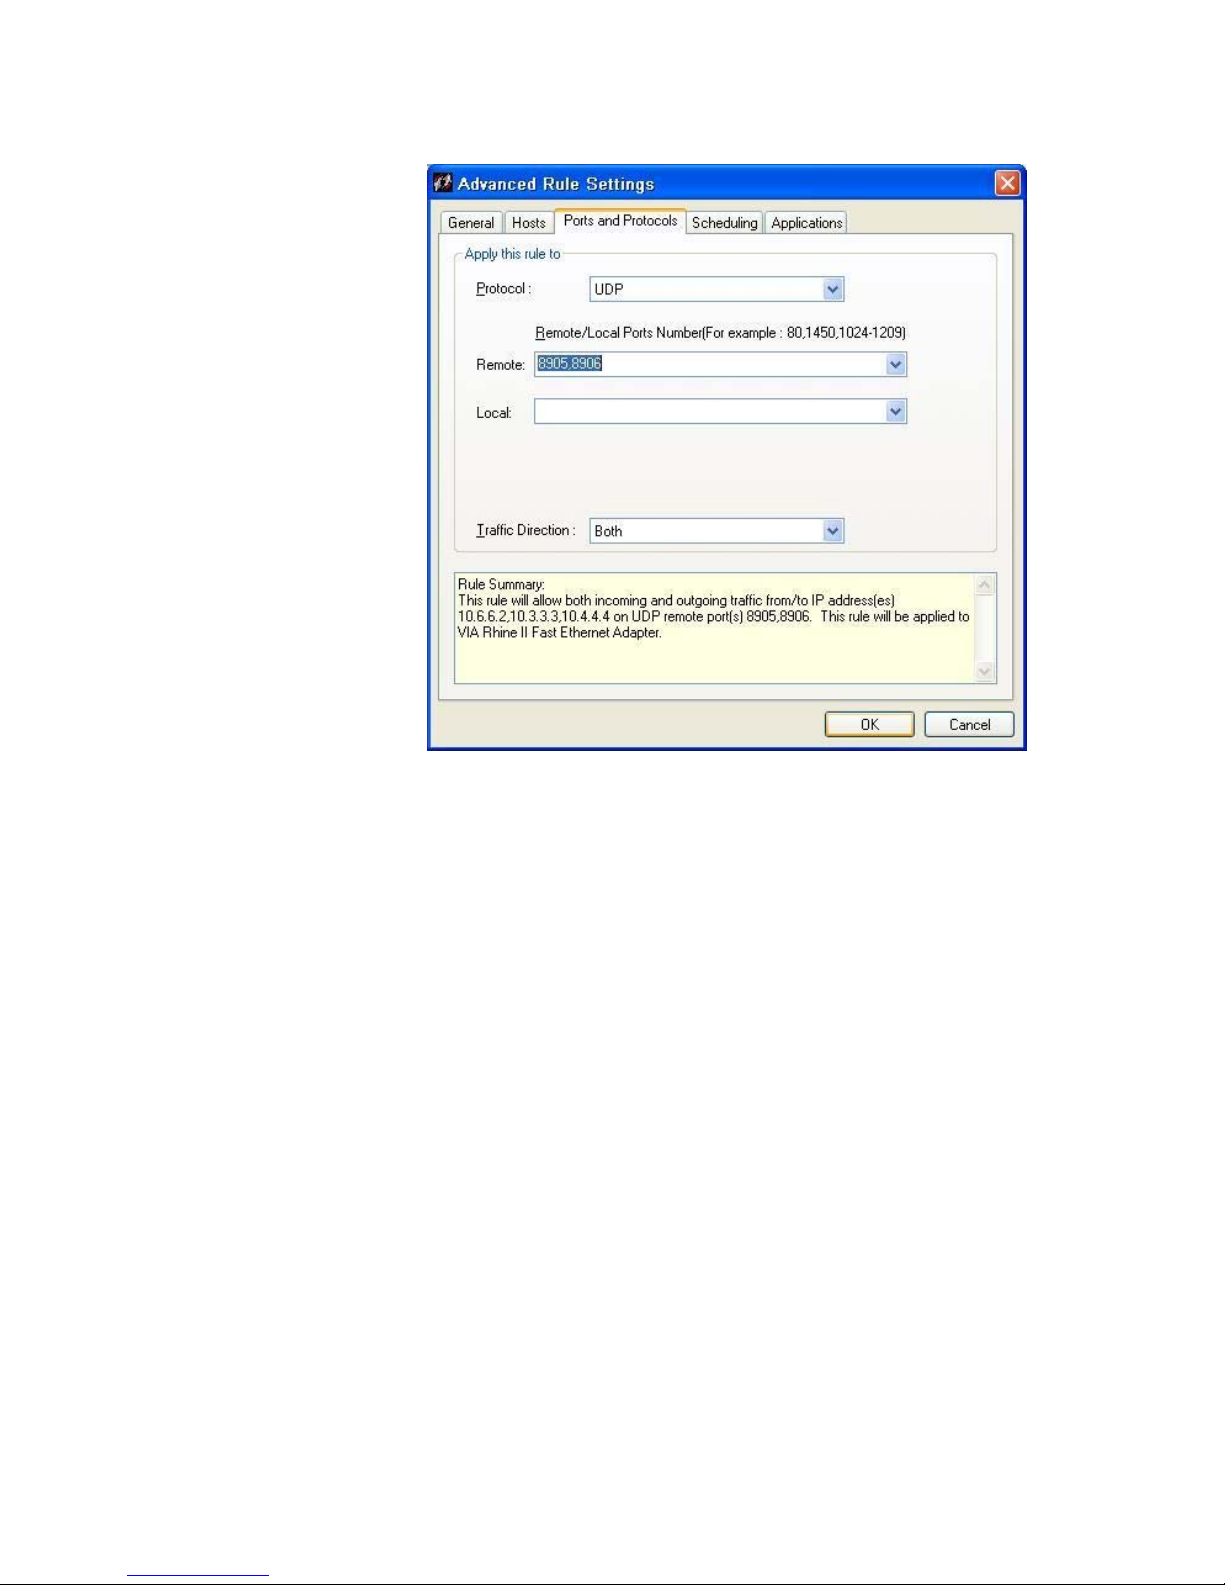
10. On the Ports and Protocols tab in the Protocol list, click UDP.
11. In the Local field, type 8905,8906.
12. In the Traffic Direction list, click Both.
13. Click OK.
14. Next, to add a rule for TCP traffic, click Add in the Advanced Rules window.
15. In the Advanced Rule Settings dialog box on the General tab, type NAC TCP in the Rule
Description field.
16. In the Action area, select Allow this traffic.
20
Page 21
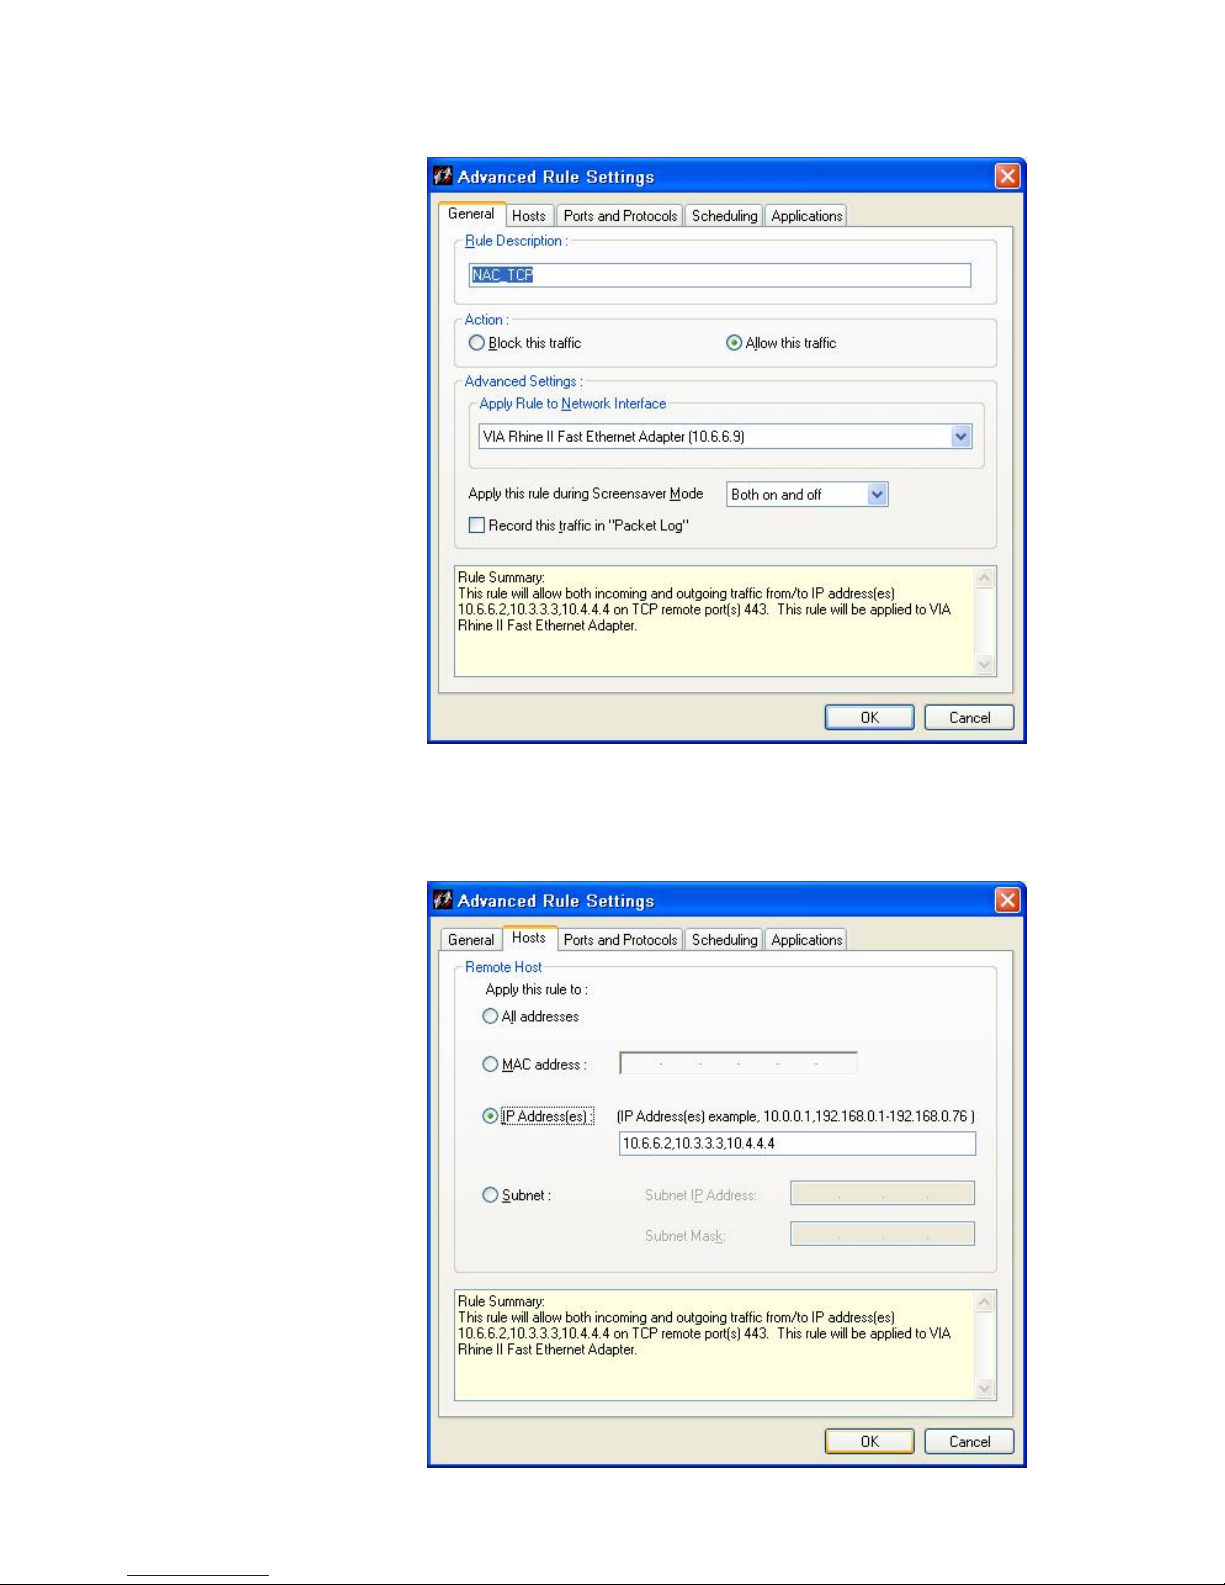
17. In the Apply Rule to Network Interface field, ensure that the proper network interface
card is selected.
18. On the Hosts tab, select IP Addresses and type the IP address of the 3960 internal switch
port and CAM/CAS server addresses in the field (10.6.6.2, 10.3.3.3, and 10.4.4.4,
respectively).
21
Page 22
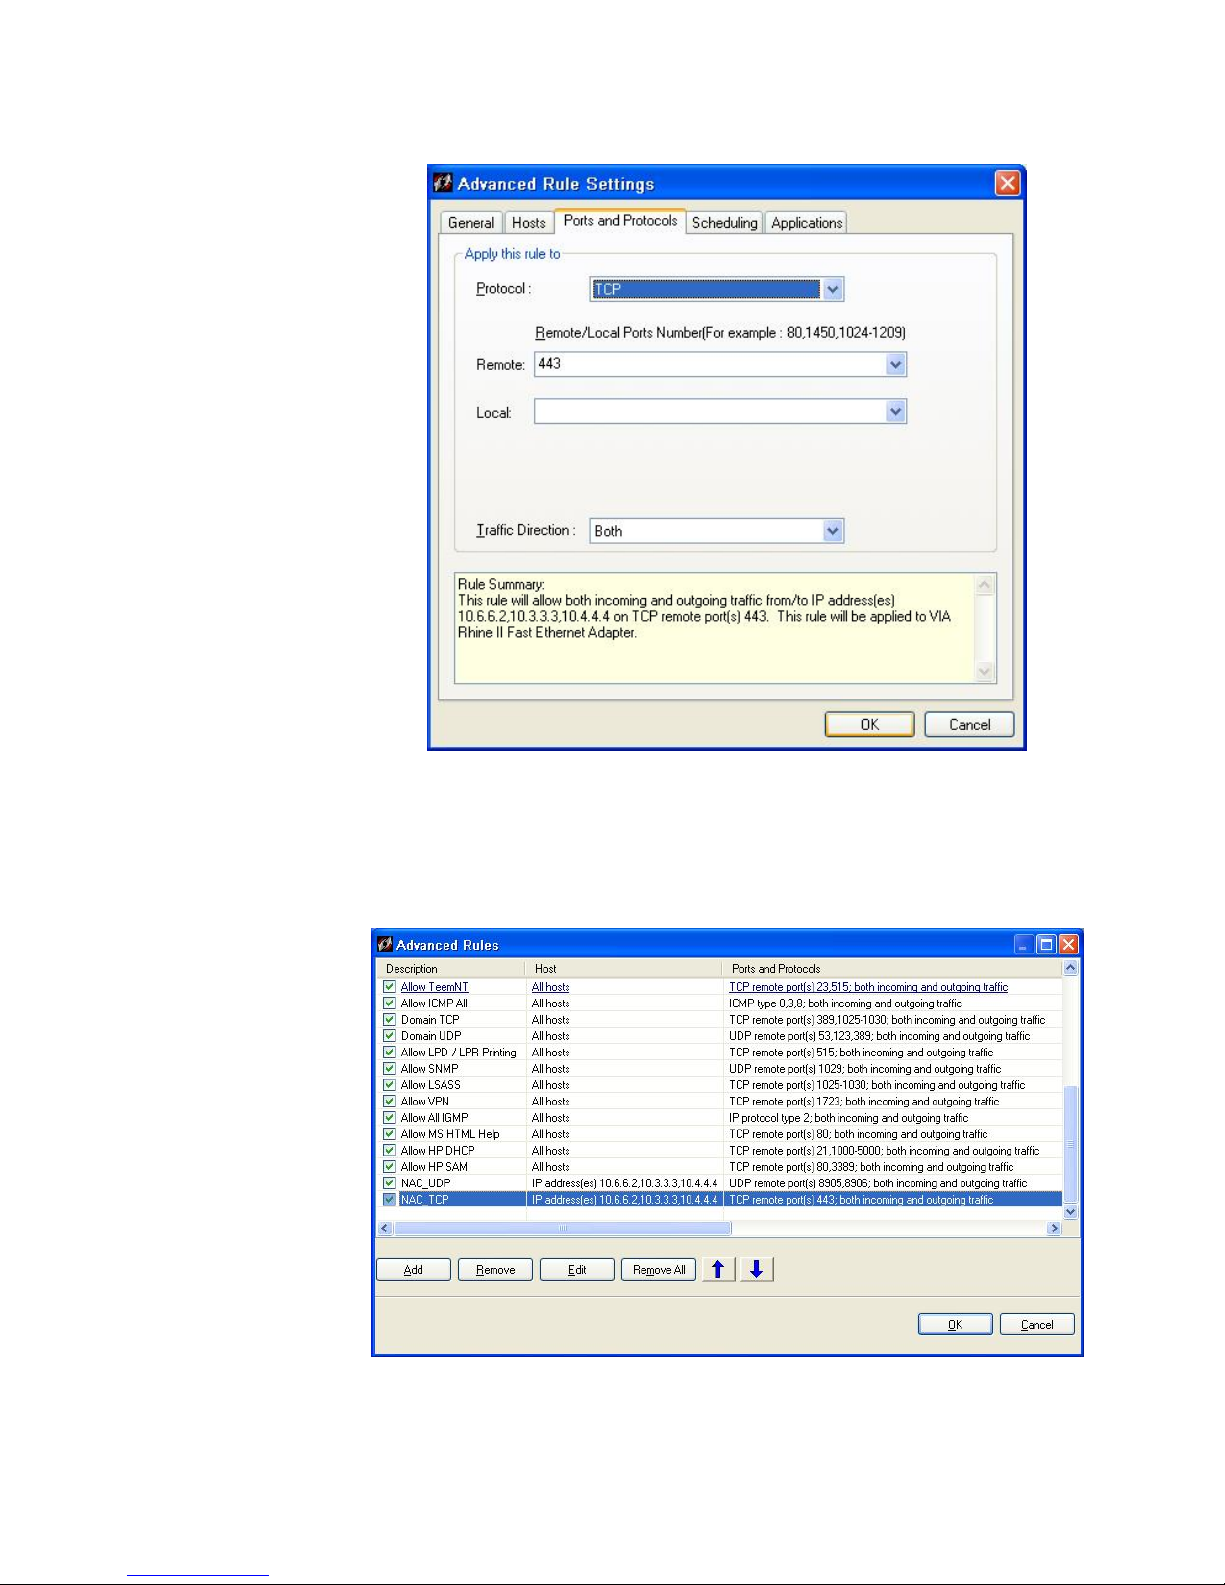
19. On the Ports and Protocols tab in the Protocol list, select TCP.
20. Type 443 in the Local field.
21. In the Traffic Direction list, select Both.
22. Click OK.
23. At this point, scroll down in the Sygate Advanced Rules window and ensure that the two
new NAC policies are defined and active.
22
Page 23
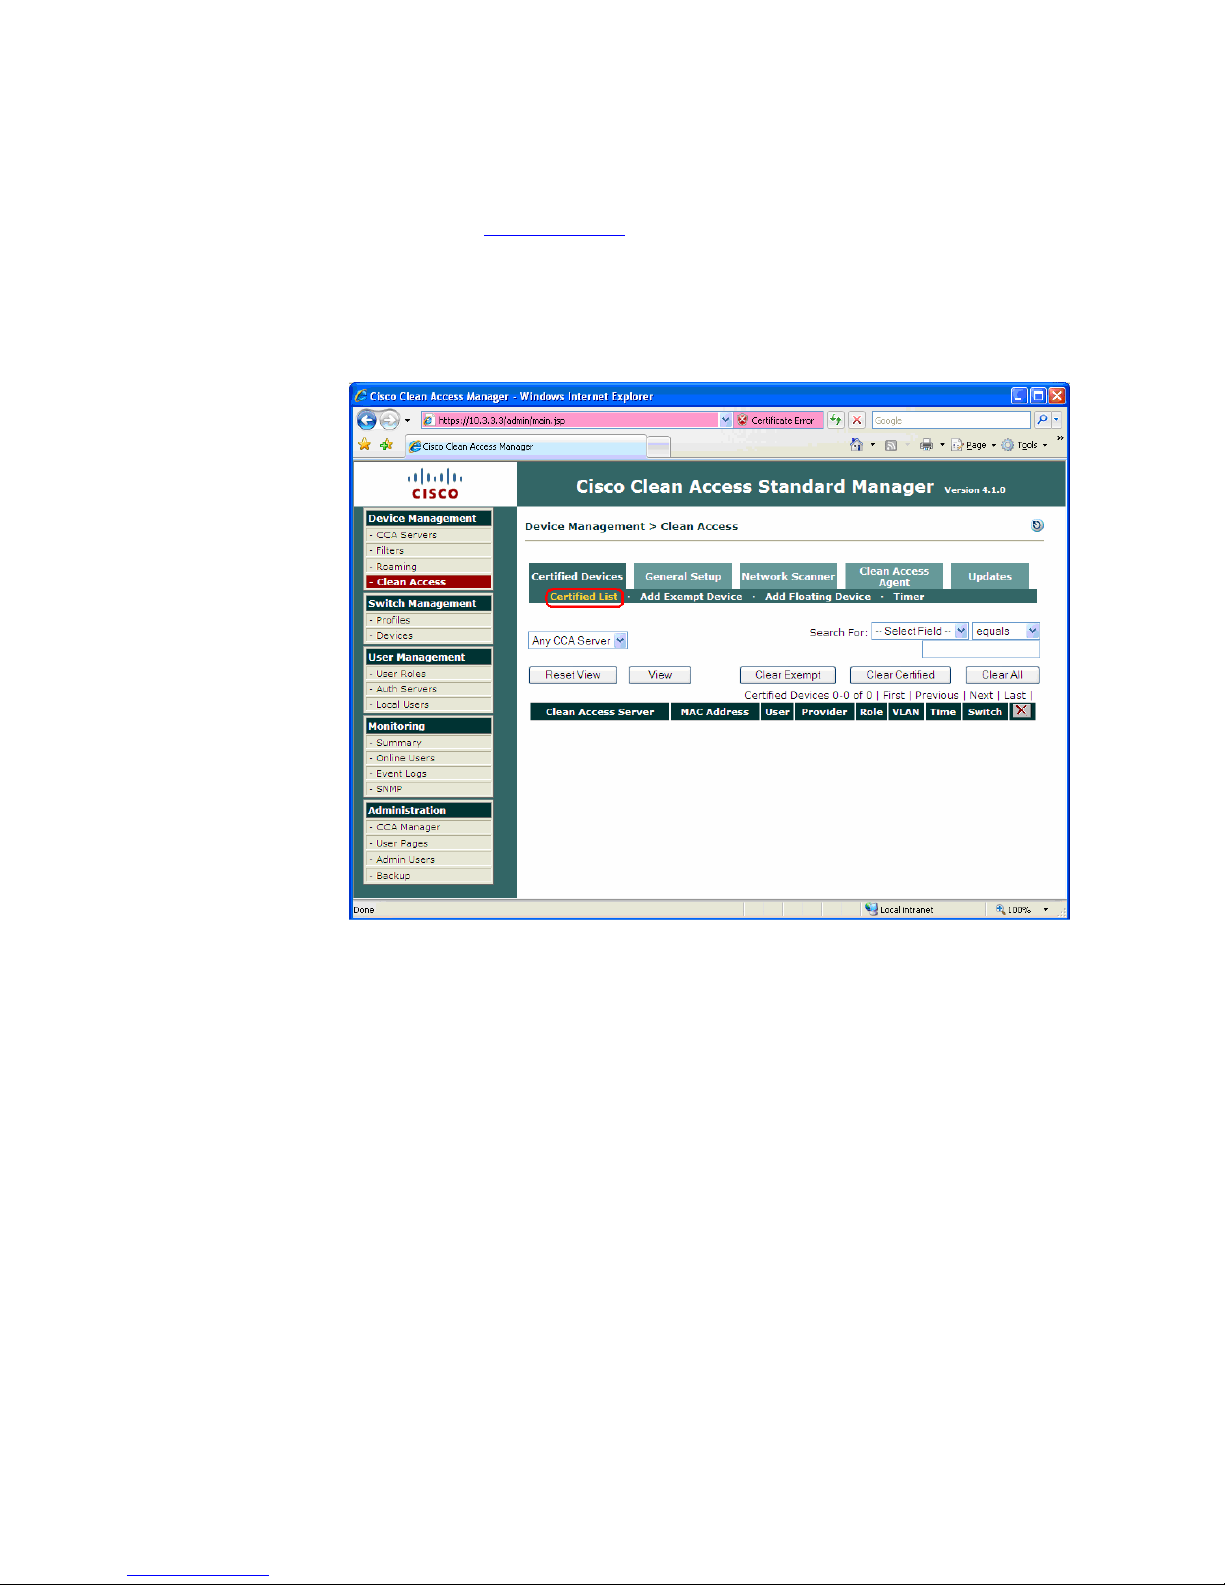
Policy Enforcement Using Clean Access Agent
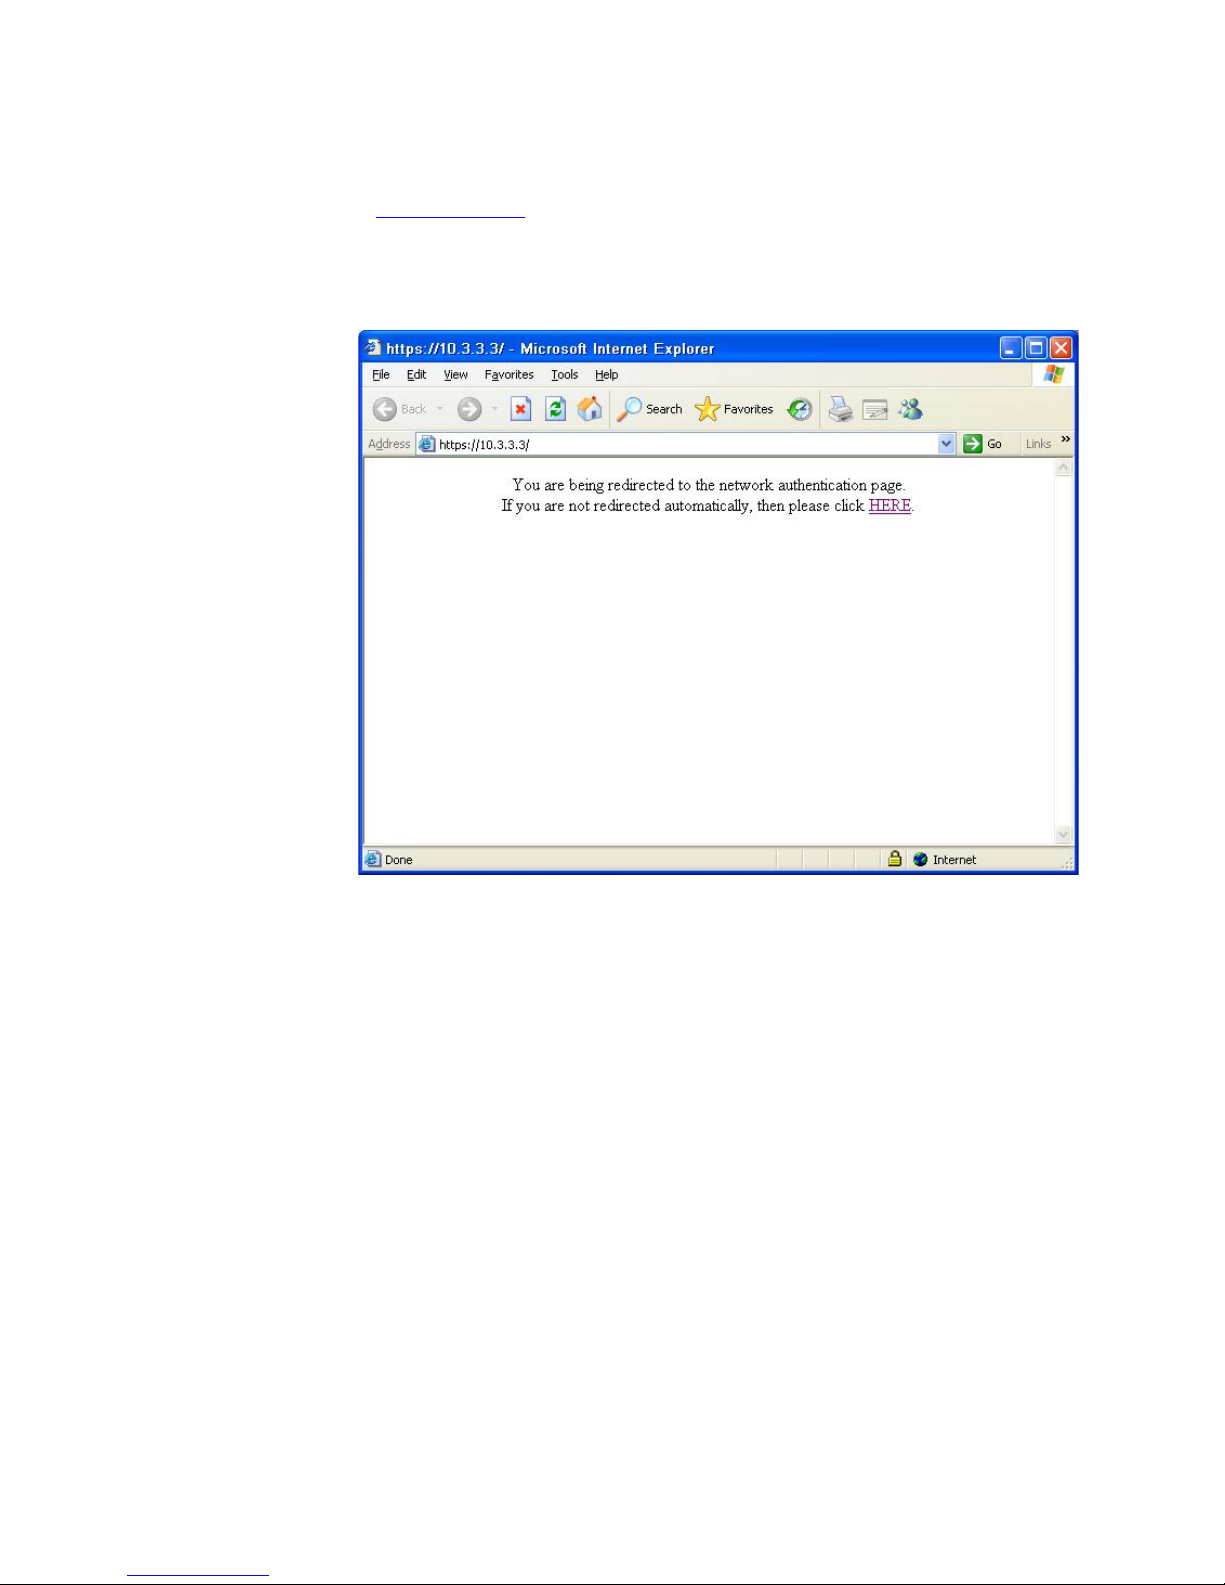
Now that the Clean Access and thin client firewall policies are defined, we will demonstrate policy
enforcement for both thin client and HP blade PCs using Cicso Clean Access Agent. We begin by
ensuring that none of the blades or thin clients being tested is on the list of certified clients.
Open the CAM console (http://10.3.3.3
Click Clean Access under Device Management in the left panel. Click the Certified Devices
tab, and then click Certified List. Click Clear Certified to ensure the system is checked upon clean
access agent connection to the network. The following illustration shows the default configuration after
clearing system entries.
on your Web browser, in this reference implementation).
23
Page 24
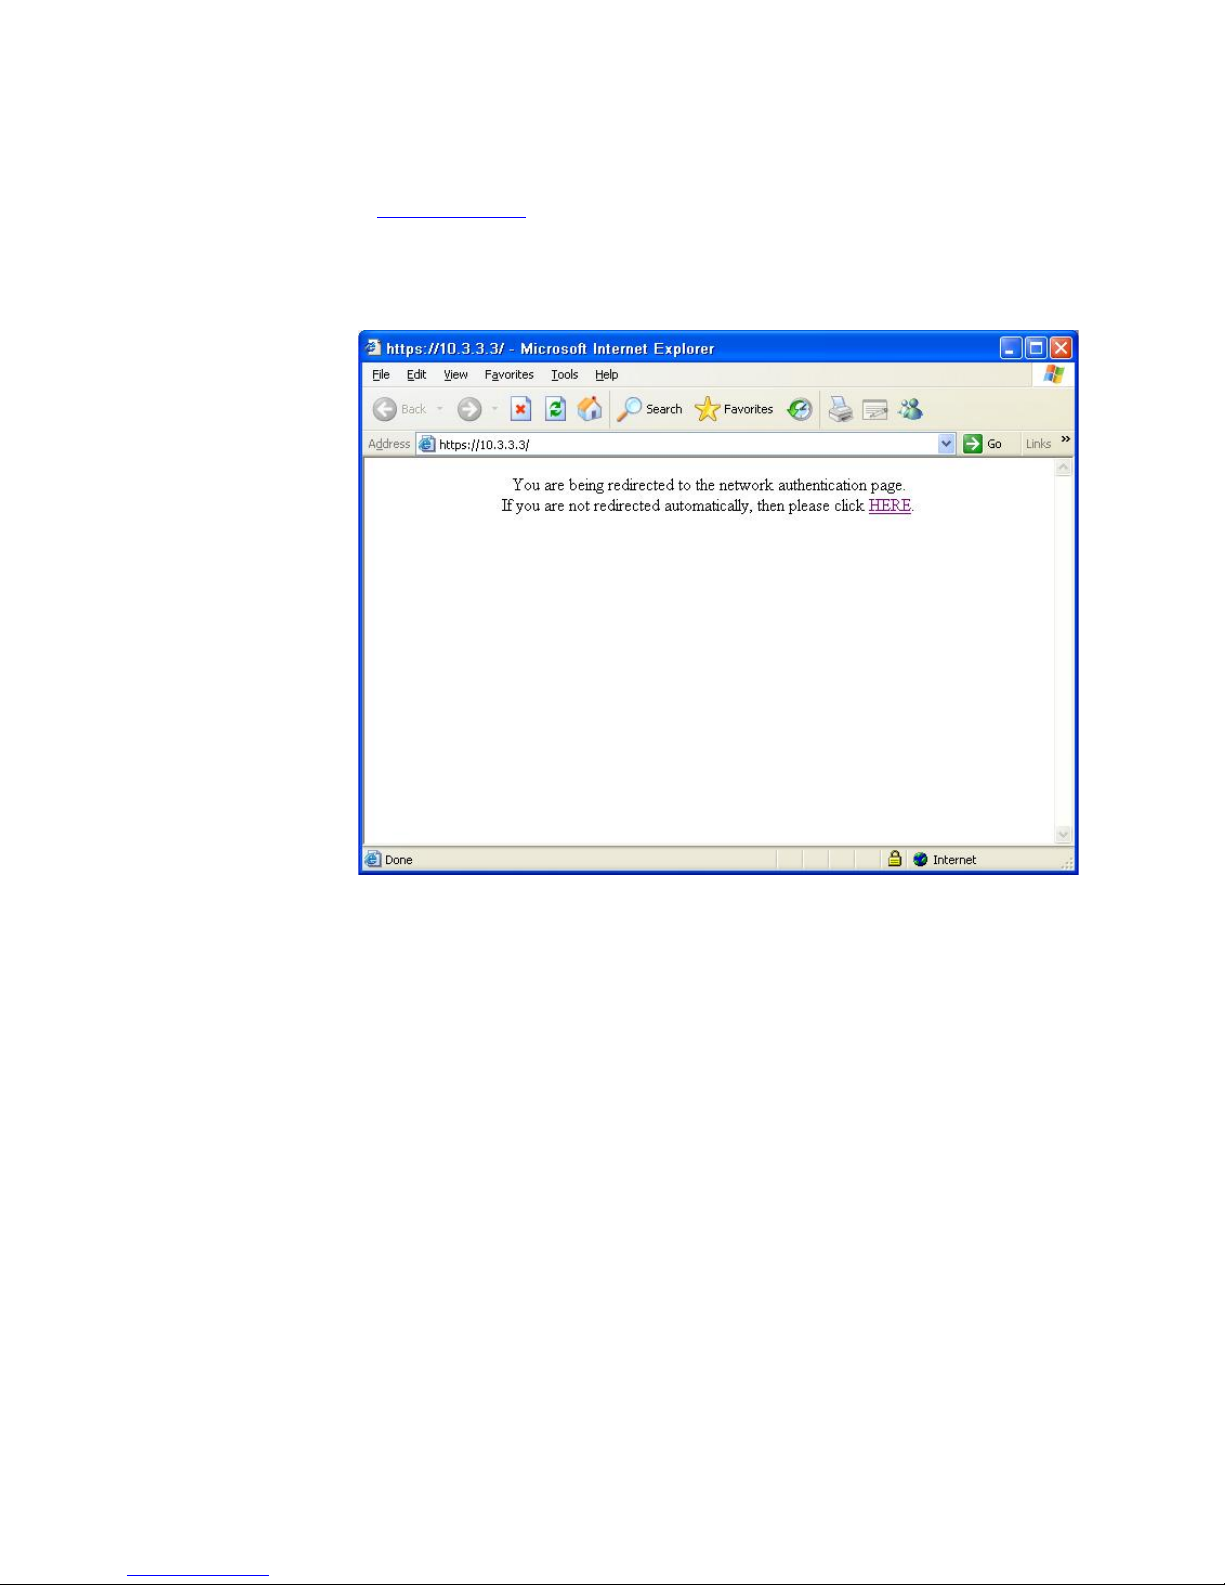
Thin Client Policy Enforcement
1. Turn on the thin client connected to switch port 10 or 11; these ports are configured to start up
in quarantine vlan6.
2. Ensure that the firewall and write filters are running.
3. Go to https://10.3.3.3
of the network. The CAS server attempts to connect to CISCO Clean Access Agent and to
validate the platform. If Clean Access Agent is not present or not started, you are redirected to
a Web site hosted on the CAS.
on your browser; this is the CAM configuration site on the trusted side
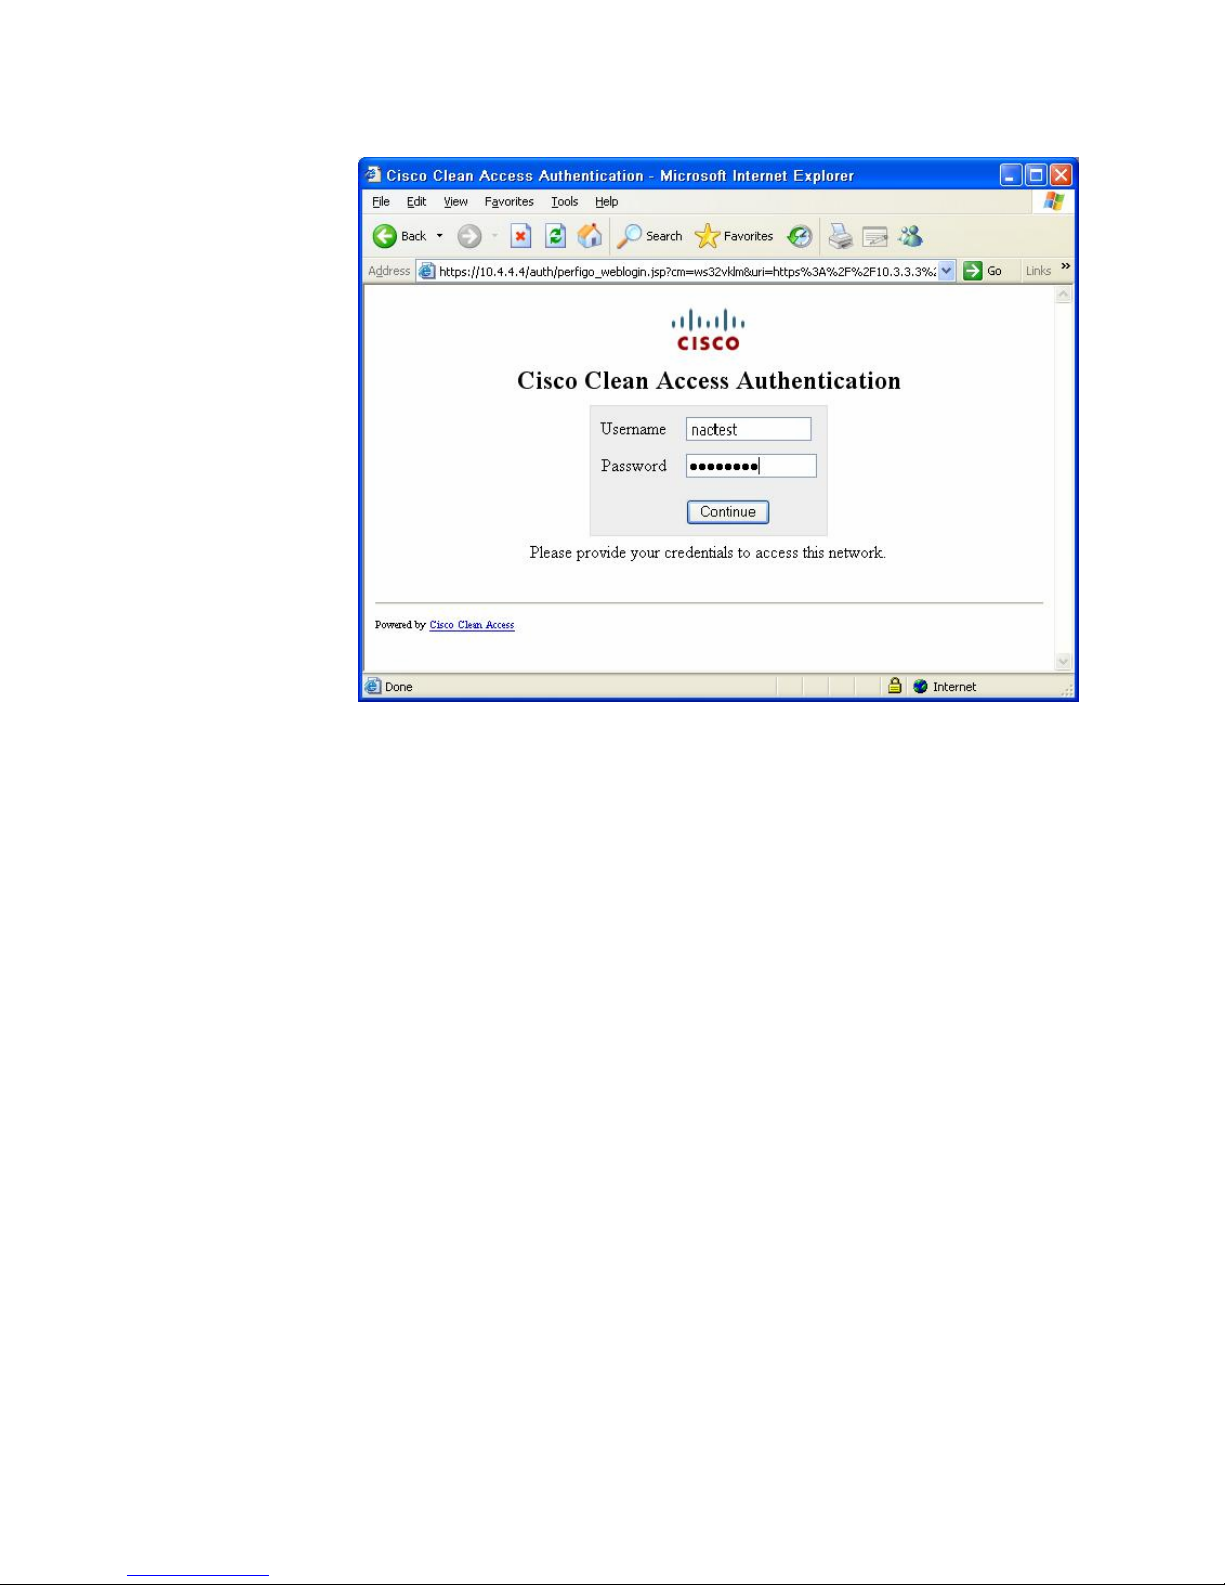
4. In this case, the thin client is not yet configured with Clean Access Agent and the platform is not
already listed on the Clean Access list of approved platforms. The URL is then intercepted by
CAS and redirected automatically after several seconds, or you can click HERE to initiate
redirection.
24
Page 25
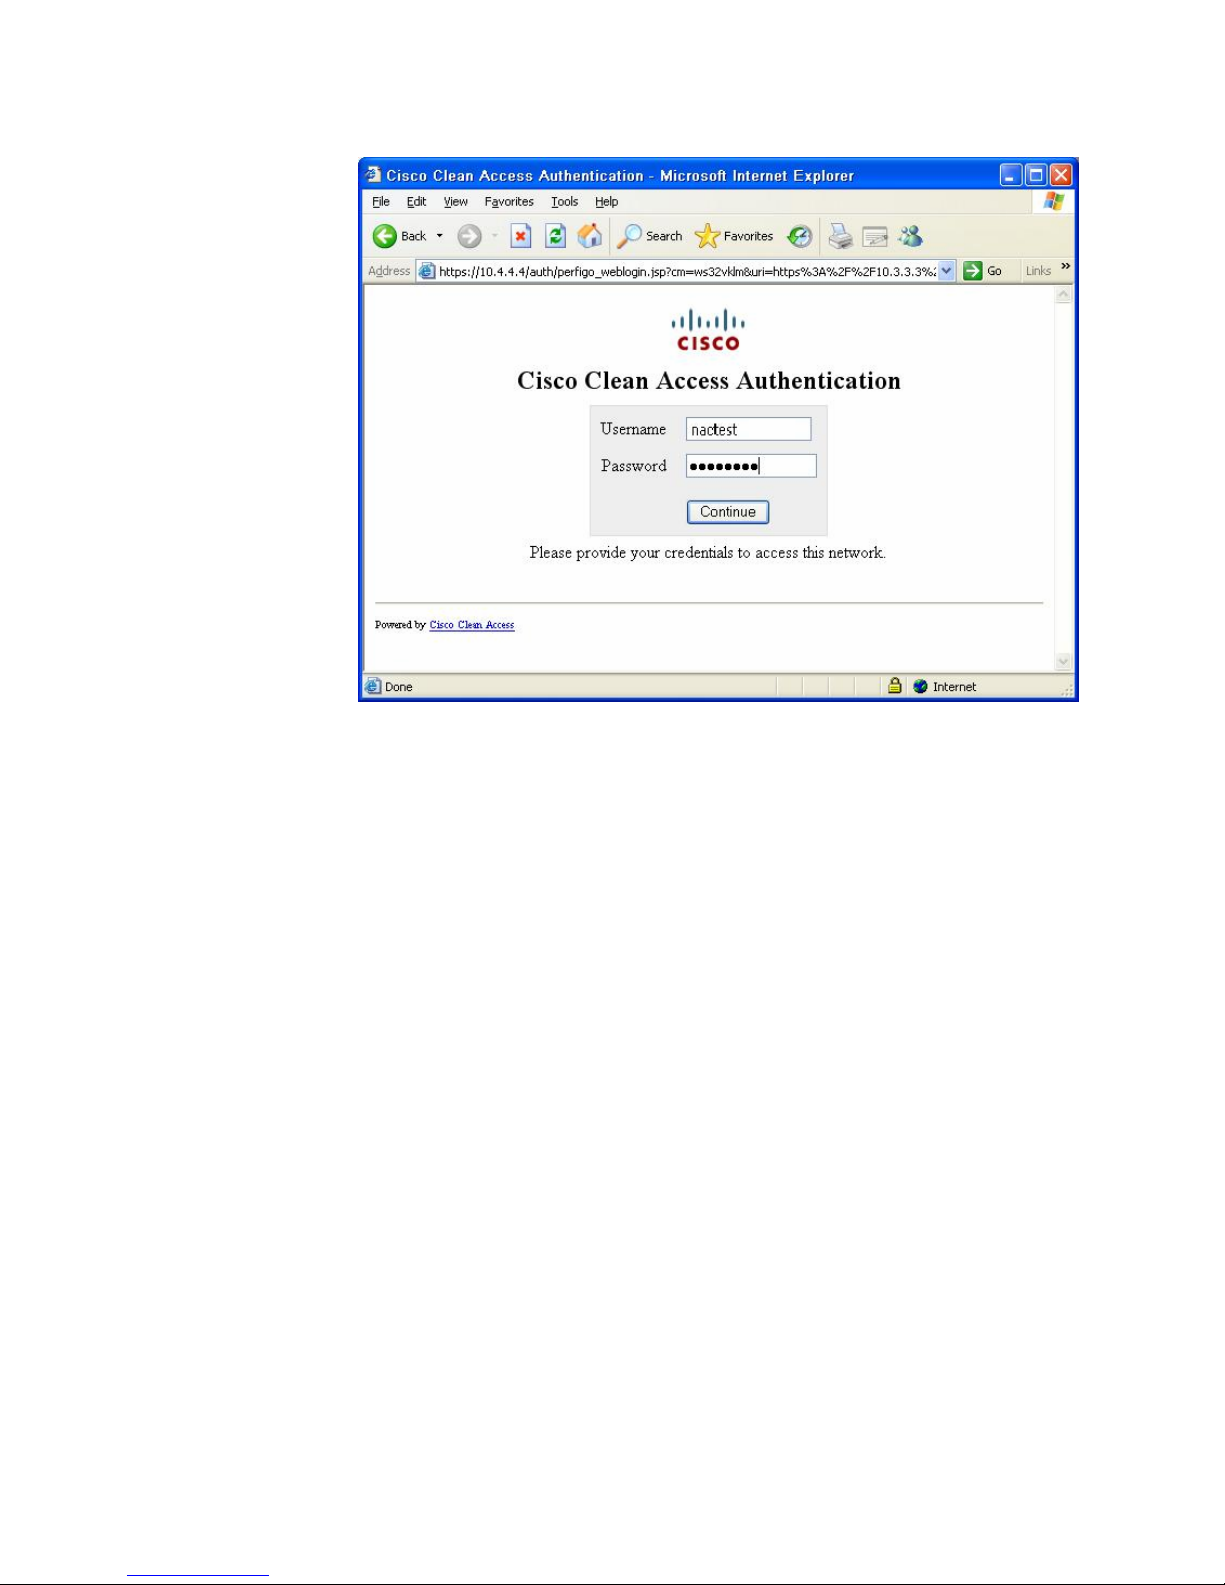
5. Since the user authentication policy was selected during the initial NAC setup, you can type a
valid username and password, and then press Enter or click Continue.
Upon successful user authentication, a Network Security Notice appears to inform you that
either Clean Access Agent is not already loaded on the target platform or the user has not
authenticated through the agent.
25
Page 26
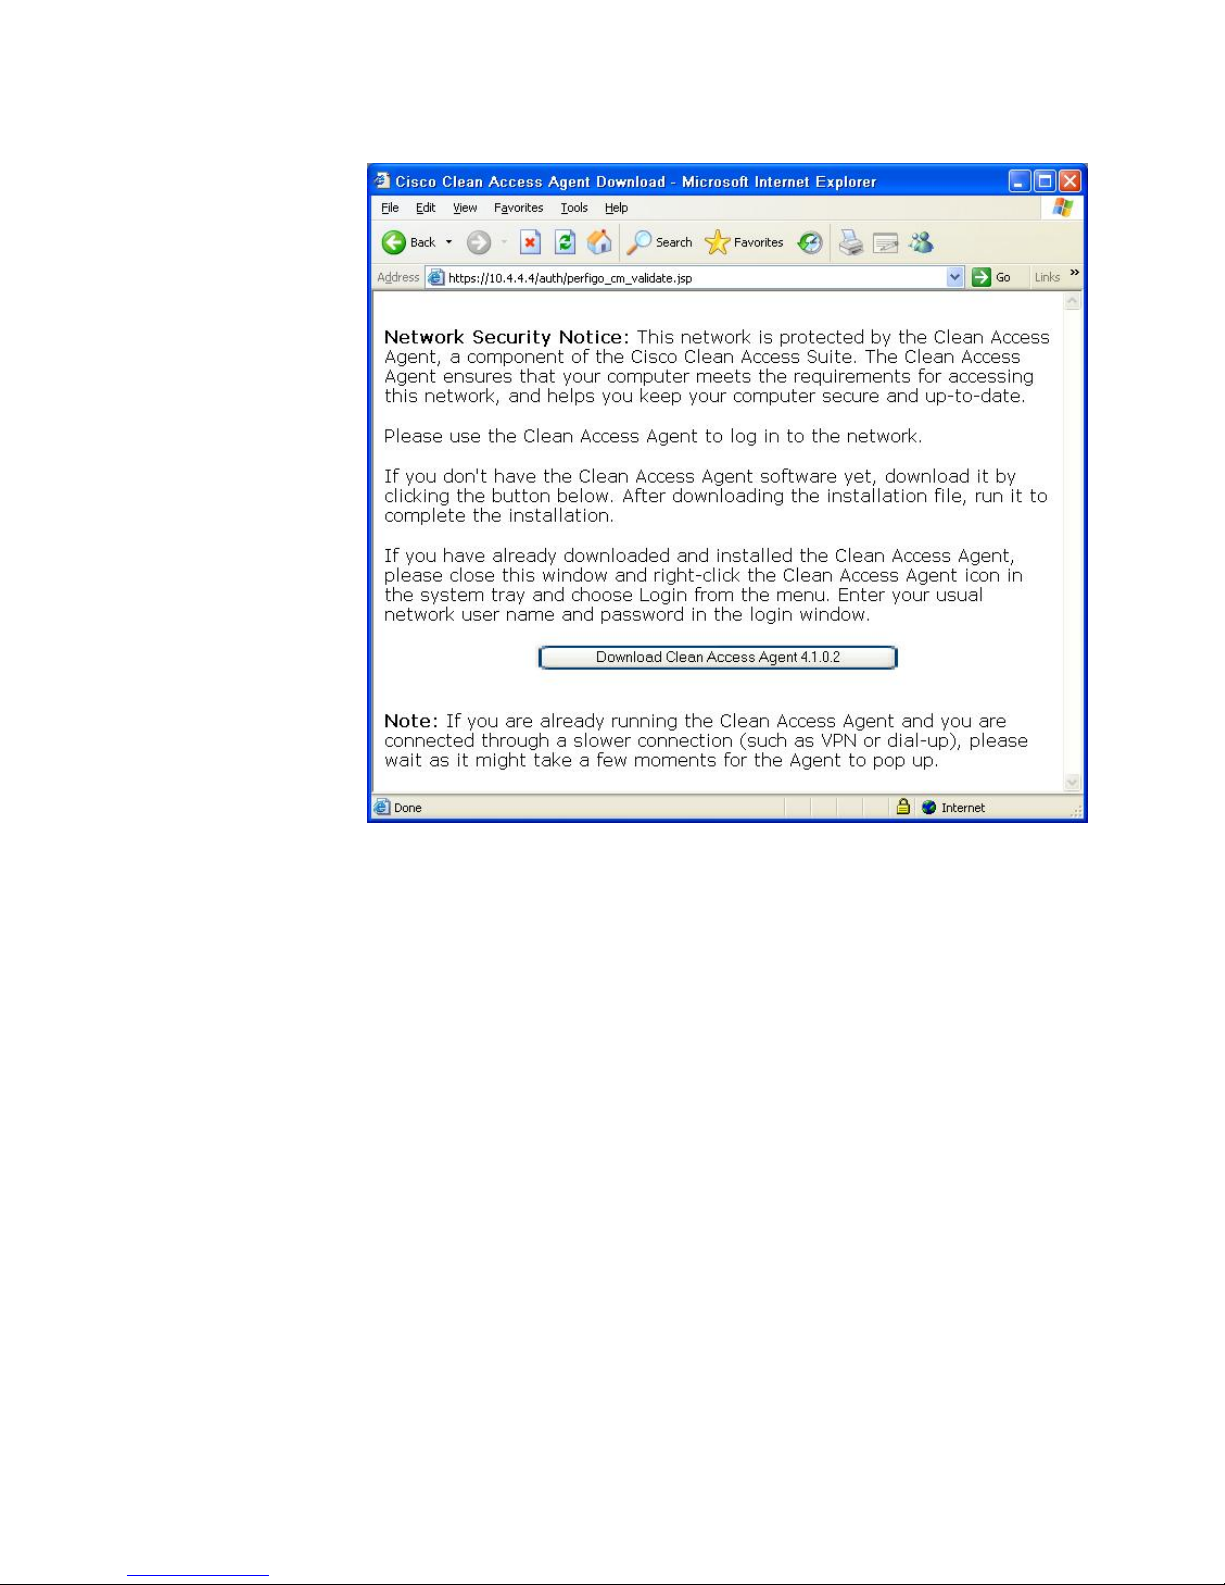
6. For this reference solution, the agent has not been pre-populated on the thin client. Click
Download Clean Access Agent 4.1.0.2.
7. Click Run when prompted to Save (download) or Run the clean access agent if the
following window indicates that the wizard is ready to install the agent.
8. Depending on the certificates installed on your thin client, you may receive another warning.
Click Run and the InstallShield wizard opens the Clean Access Agent Installer.
26
Page 27
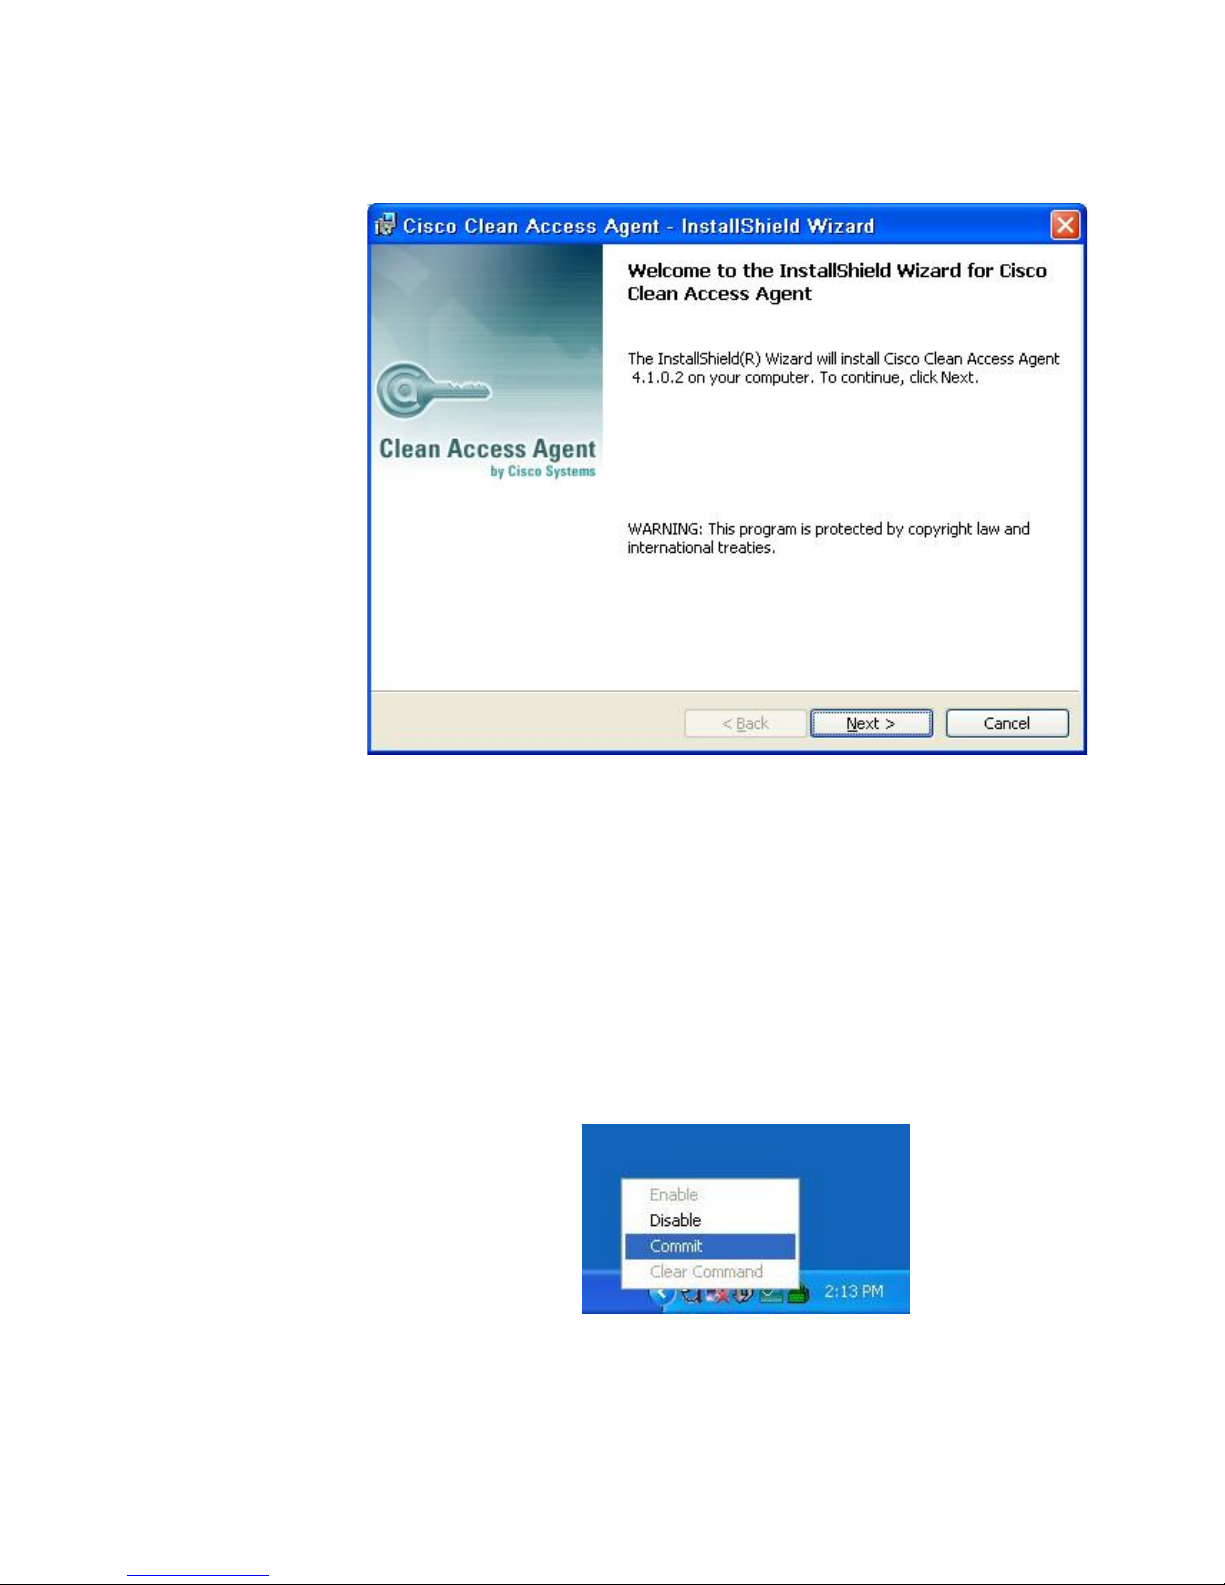
9. Click Next when prompted to install the version 4.1.0.2 Clean Access Agent.
NOTE: Ensure that the version of the Clean Access Agent matches the version of the CAS
software. For purposes of this white paper, the CAS server was version 4.1.0.
10. Click Next to accept the default installation directory.
11. Click Install to install the agent.
12. Click Finish to complete the installation.
Special Thin Client Consideration: Committing Image Changes
At this point, the Clean Access Agent is installed on the HP t5720 Thin Client. Note, however,
that these image changes are not permanent. If you wish to permanently enable the agent on
the thin client, please select Commit on the EWF taskbar icon or in the Control Panel EWF
applet.
After restarting the thin client, the changes are permanent. The Clean Access Agent can now
authenticate the user for network access and scan the user’s device for software configuration
compliance.
Upon installation, Clean Access Agent is added to the Startup folder automatically.
27
Page 28
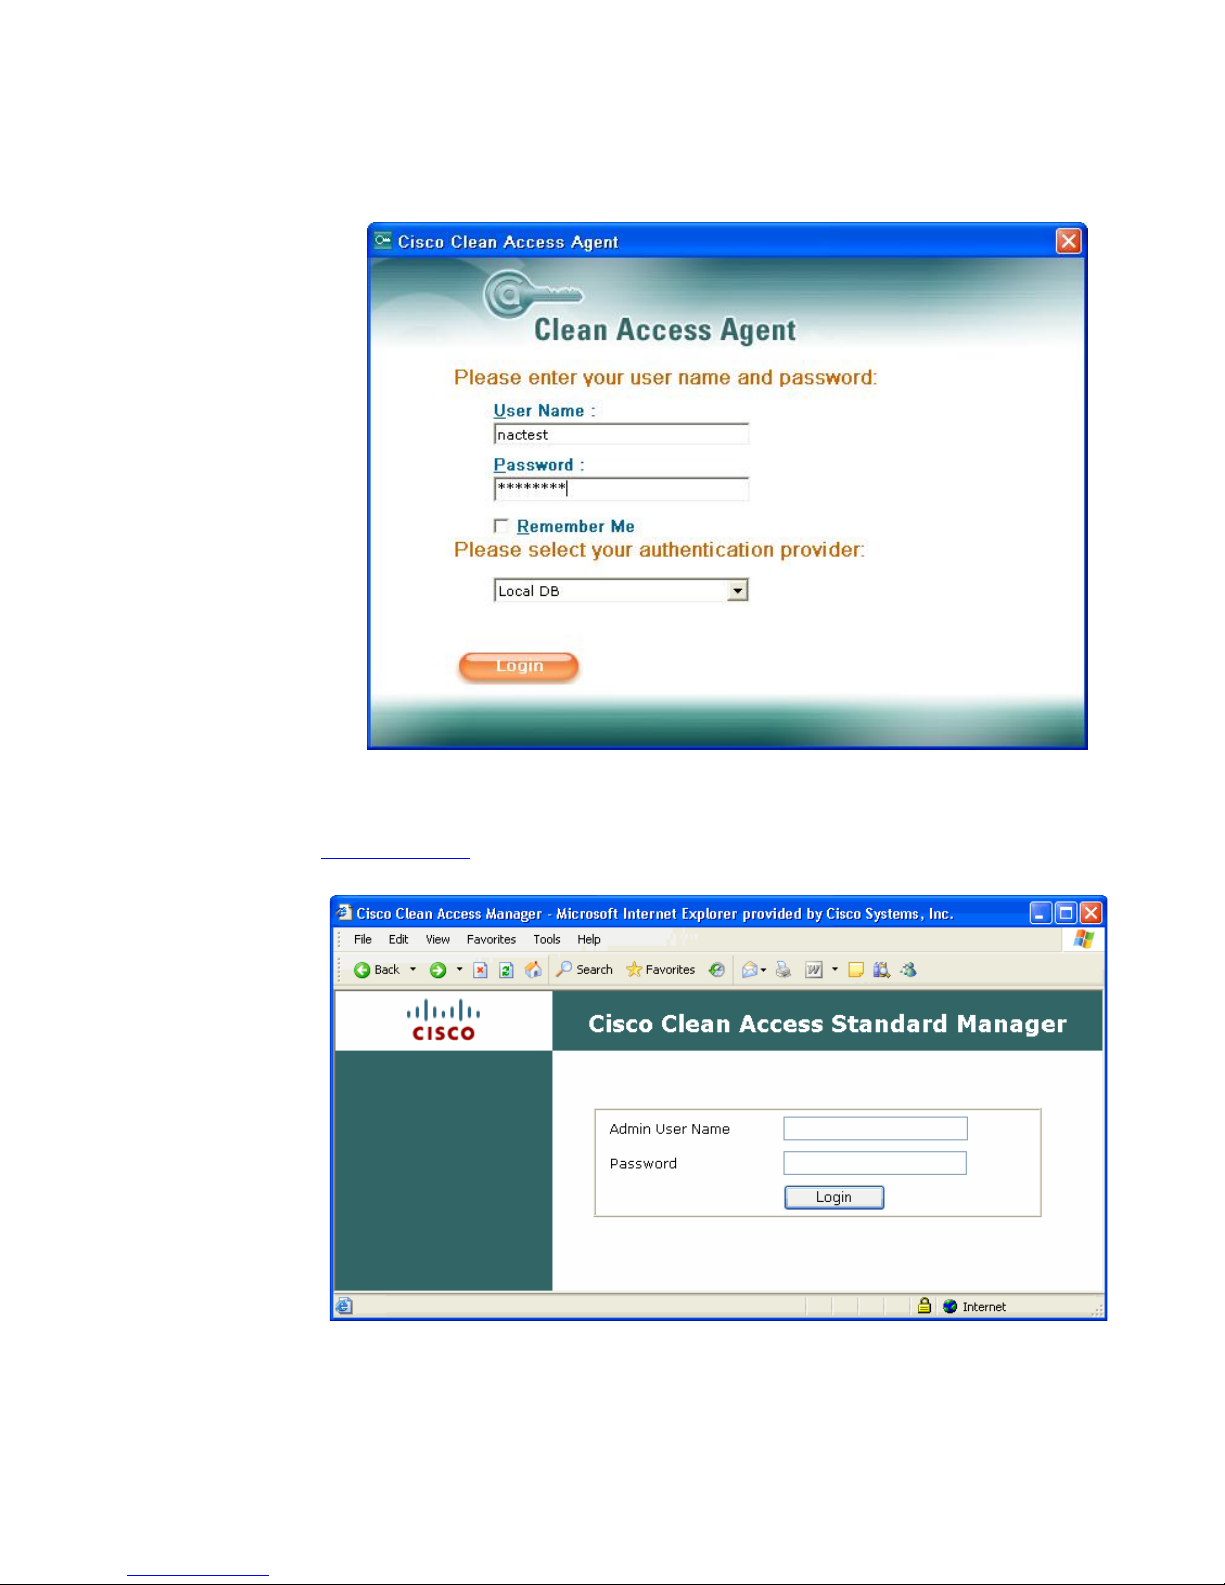
13. To test Clean Access Agent operation, log on to the thin client, complete user authentication,
and click Login. For this reference implementation, log on using the “nactest” account that has
the employee role assigned. Logging on in this role requires Clean Access Agent to verify
compliance with the requirements we set previously.
14. We can validate that network connection is successful by once again attempting to connect to
any device on the network, or in this case, we’ll connect again to the CAM Web site (at
https://10.3.3.3
Now, let’s defeat one of the thin client requirements to force a failure of the clean access policy
check.
), which should now be resolved without redirection.
15. Right-click My Computer.
16. Click Manage.
28
Page 29
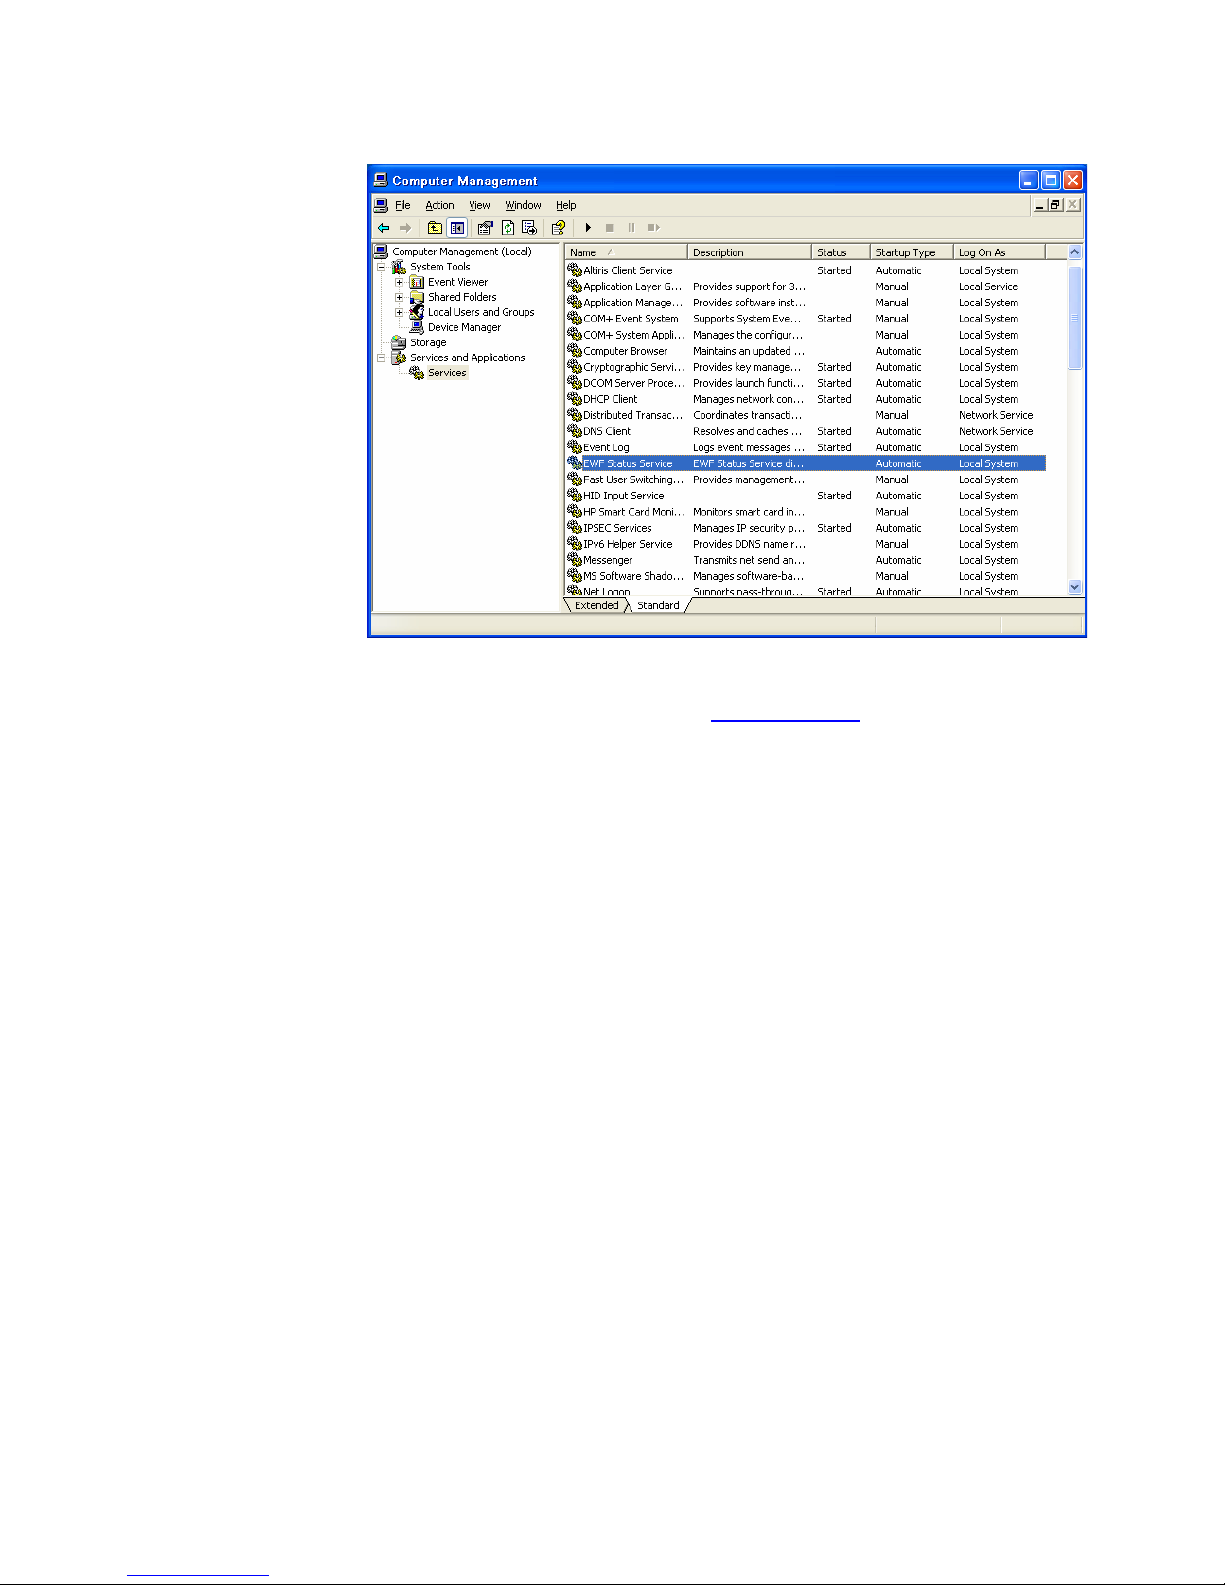
17. Click Services and Applications.
18. Click Services.
19. Disable EWF Status Service by right-clicking on the entry and selecting Stop.
20. Log on again (through the CAM Web site at https://10.3.3.3
“nactest” account.
) with user credentials for
29
Page 30
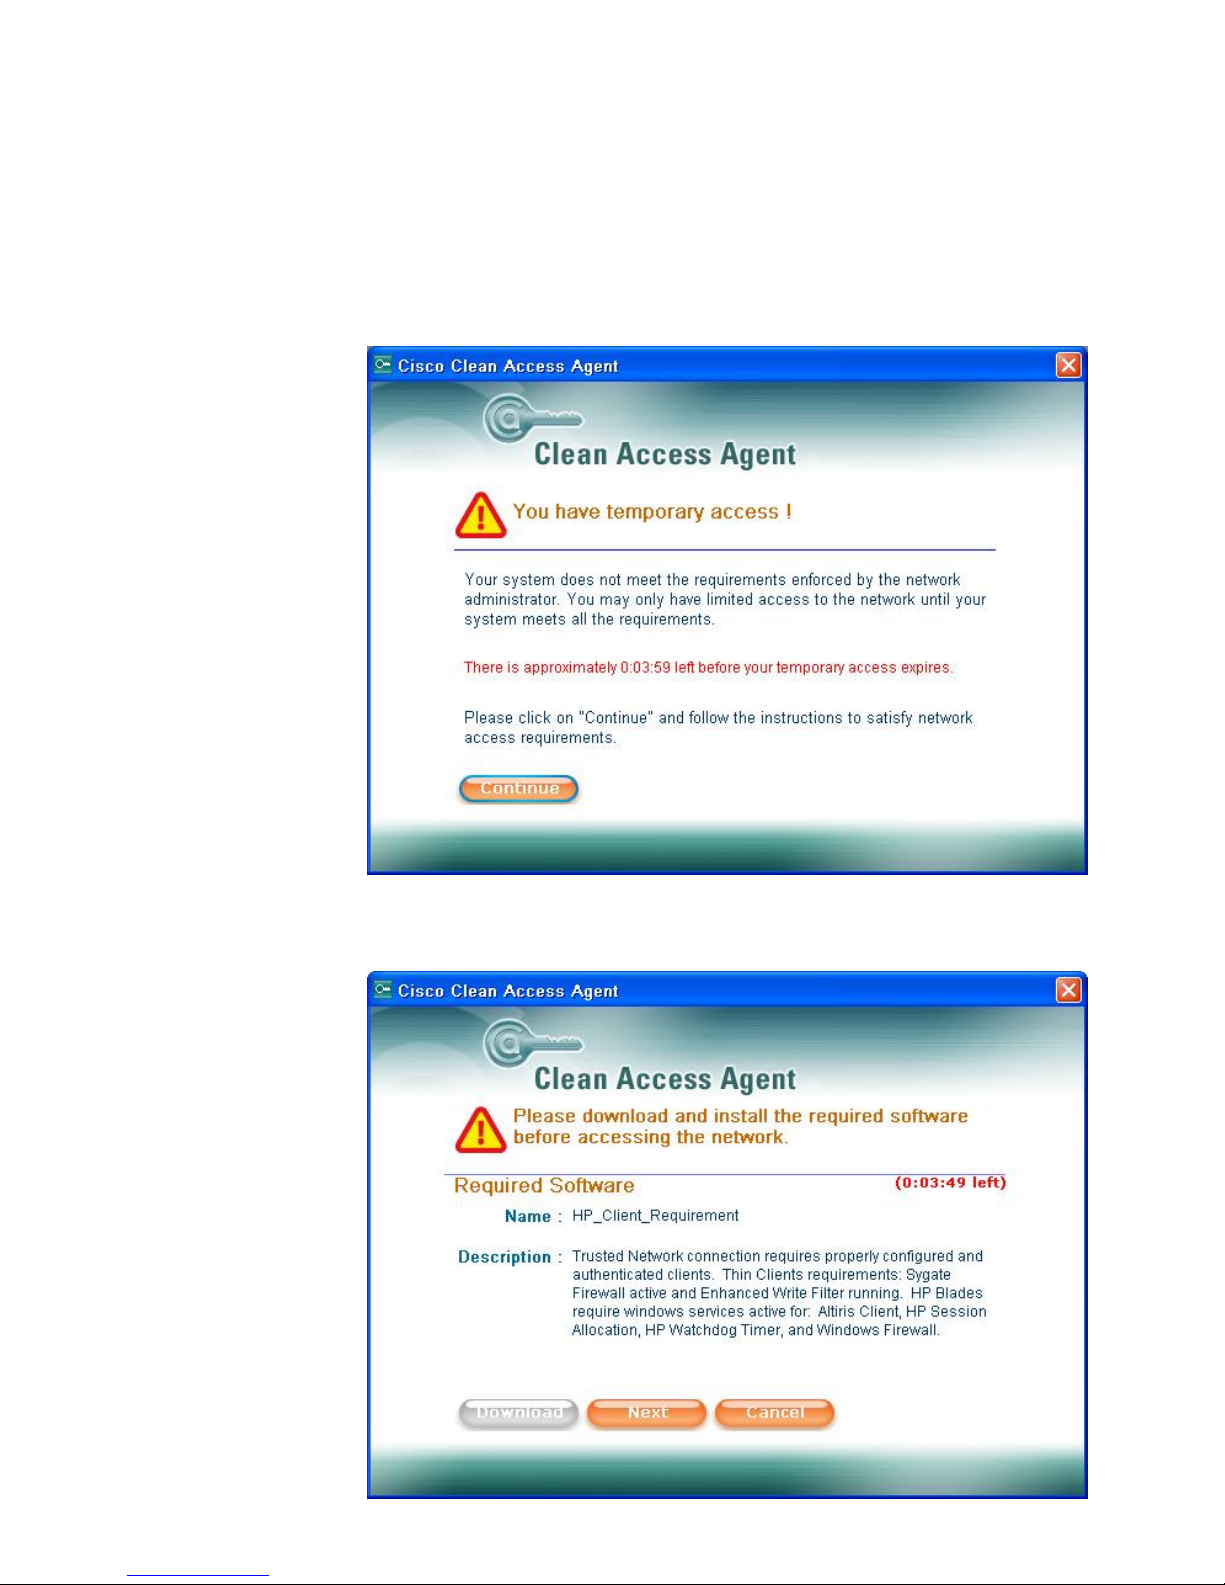
21. The Clean Access Agent test should now find the machine out of policy. The machine is either
kept in quarantine LAN or temporary access can be granted to the trusted LAN (if required for
remediation). For purposes of this reference implementation, we have configured a temporarily
network access of 4 minutes to allow any required access to any remediation resources that
may exist on the trusted network and to demonstrate the flexibility of clean access enforcement.
NOTE: This is a configurable policy and there are security consequences in allowing any
temporary access to the trusted/production network. If remediation servers are present on the
untrusted LAN, there is no need to grant temporary access.
22. Click Continue to see more information on the missing requirements.
30
Page 31
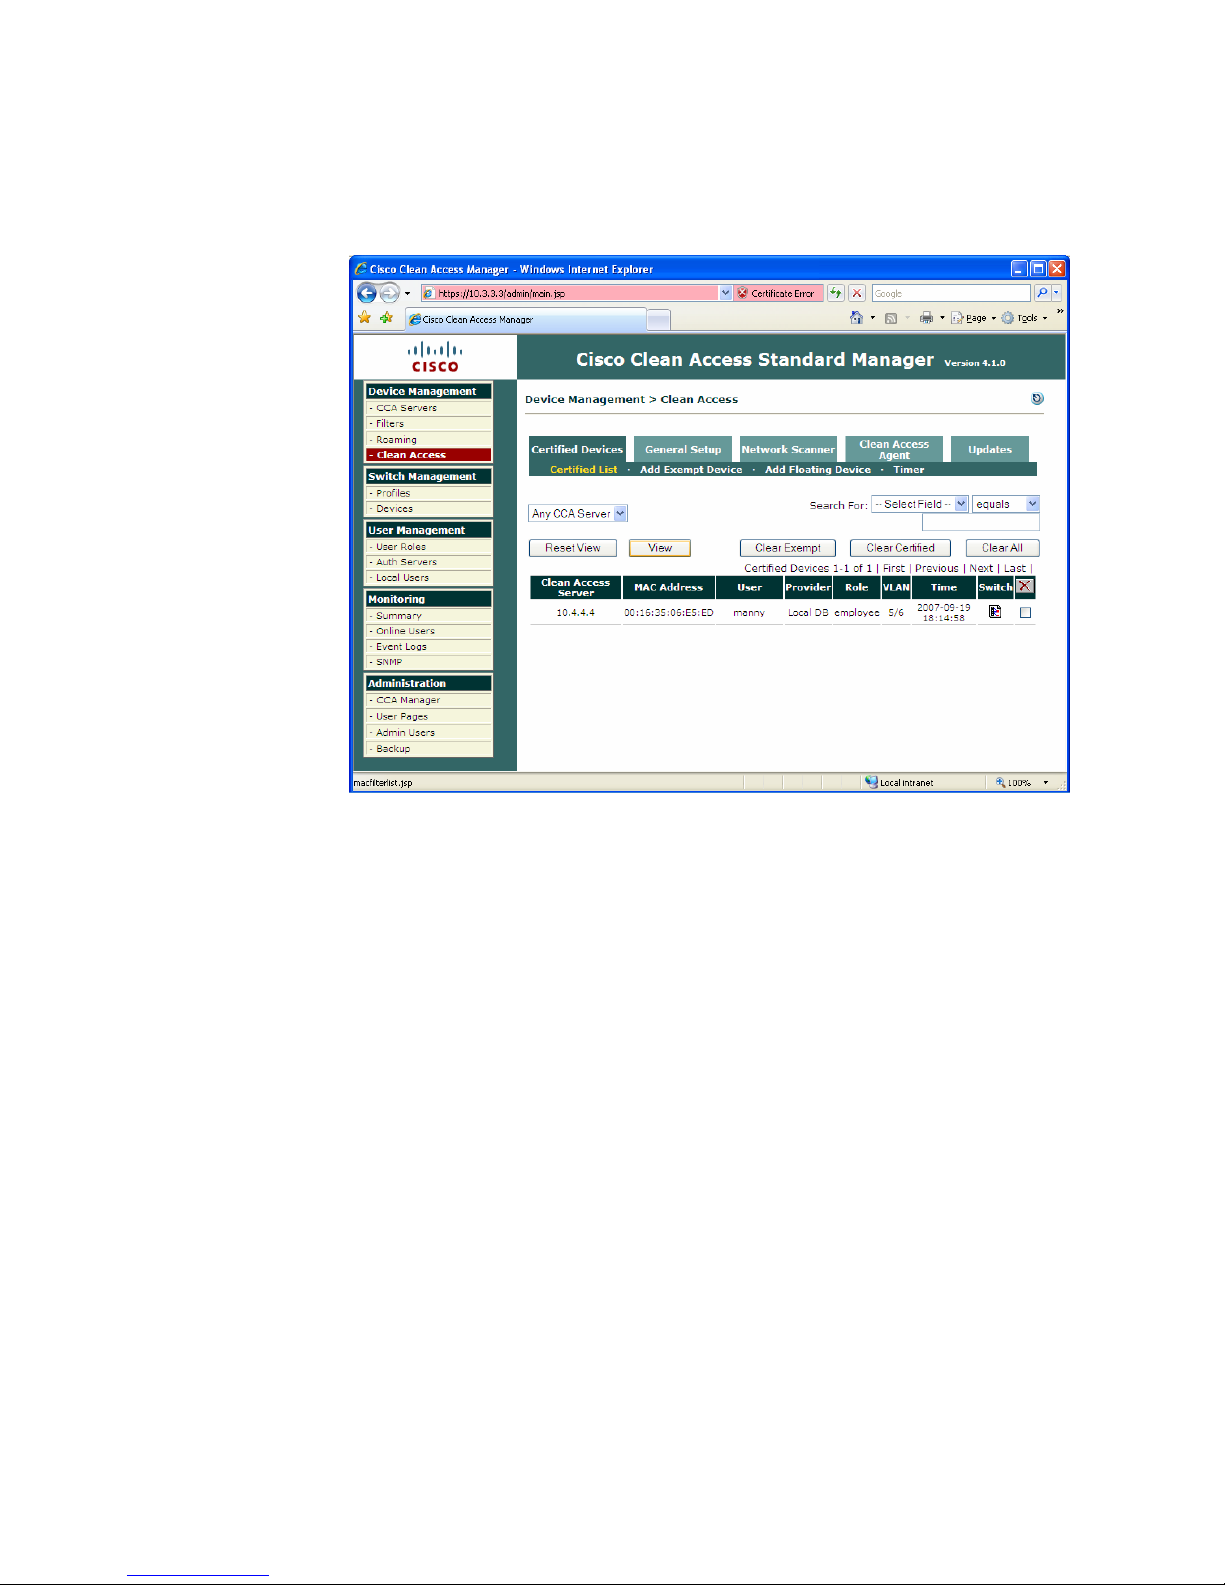
23. Click Next to re-scan. Clean Access Agent displays information on the missing requirements
after each re-scan until the policy requirements are corrected. Click Cancel to close this screen
and end the temporary access.
24. For purposes of our example, if you re-enable EWF service and click Next within the time limit,
the scan succeeds and full access is granted to the trusted network VLAN.
31
Page 32
Blade PC Policy Enforcement
1. Turn on a PC Blade connected via CISCO 3560 switch port 10 or 11; these ports are
configured to start up in quarantine vlan6.
2. Ensure that the firewall and write filters are running.
3. Go to https://10.3.3.3
of the network. The CAS server attempts to connect to CISCO Clean Access Agent and validate
the platform. If the agent is not present or not started, you are redirected to a Web site hosted
on the CAS.
on your browser. This is the CAM configuration site on the trusted side
4. In this case the blade PC is not yet configured with Clean Access Agent and the platform is not
already listed on the Clean Access list of approved platforms. The URL is then intercepted by
CAS and redirected automatically after several seconds to CAS at 10.4.4.4, or you can click
HERE to initiate redirection.
32
Page 33
5. Since the user authentication policy was selected during the initial NAC setup, you can type a
valid username and password, and then press Enter or click Continue.
Upon successful user authentication, a Network Security Notice appears to inform you that
either Clean Access Agent is not already loaded on the target platform or the user has not
authenticated through the agent.
33
Page 34
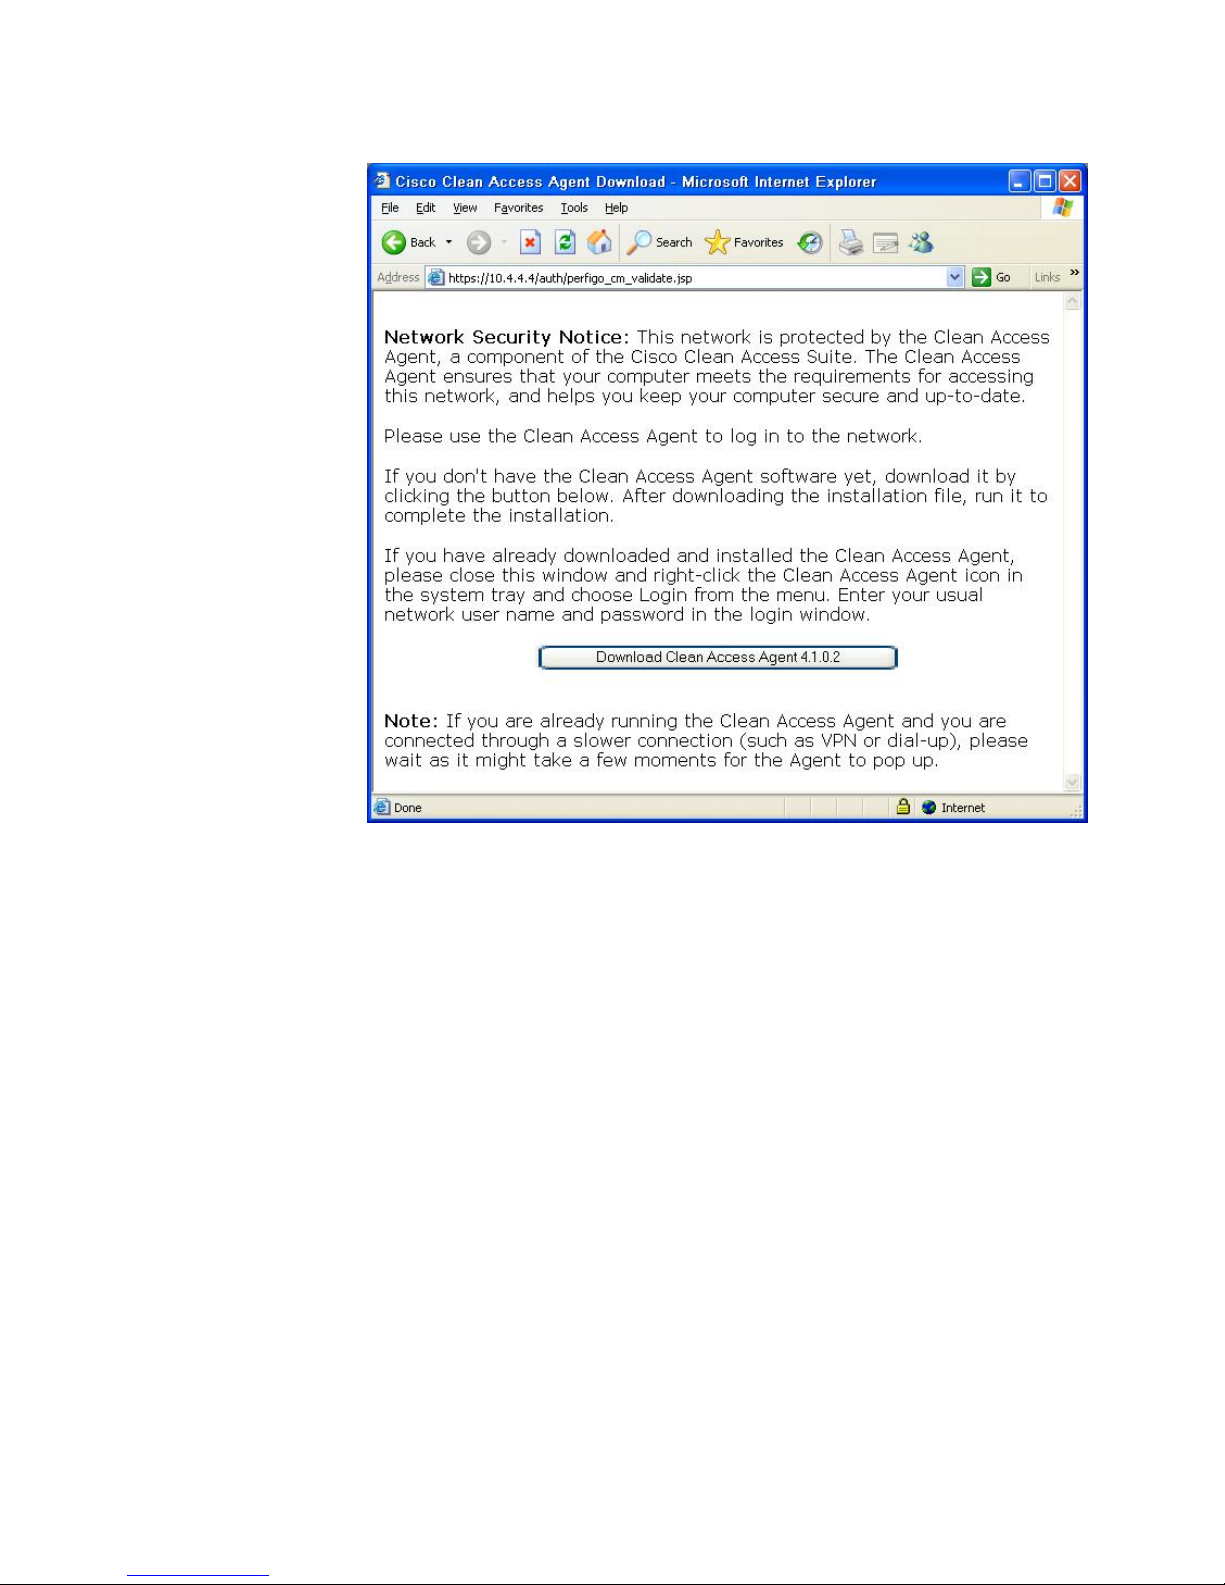
6. For this reference solution, the agent has not been pre-populated on the thin client. Click
Download Clean Access Agent 4.1.0.2.
7. Click Run when prompted to Save (download) or Run the clean access agent if the
following window indicates that the wizard is ready to install the agent.
8. Depending on the certificates installed on your thin client, you may receive another warning.
Click Run and the InstallShield wizard opens the Clean Access Agent Installer.
34
Page 35
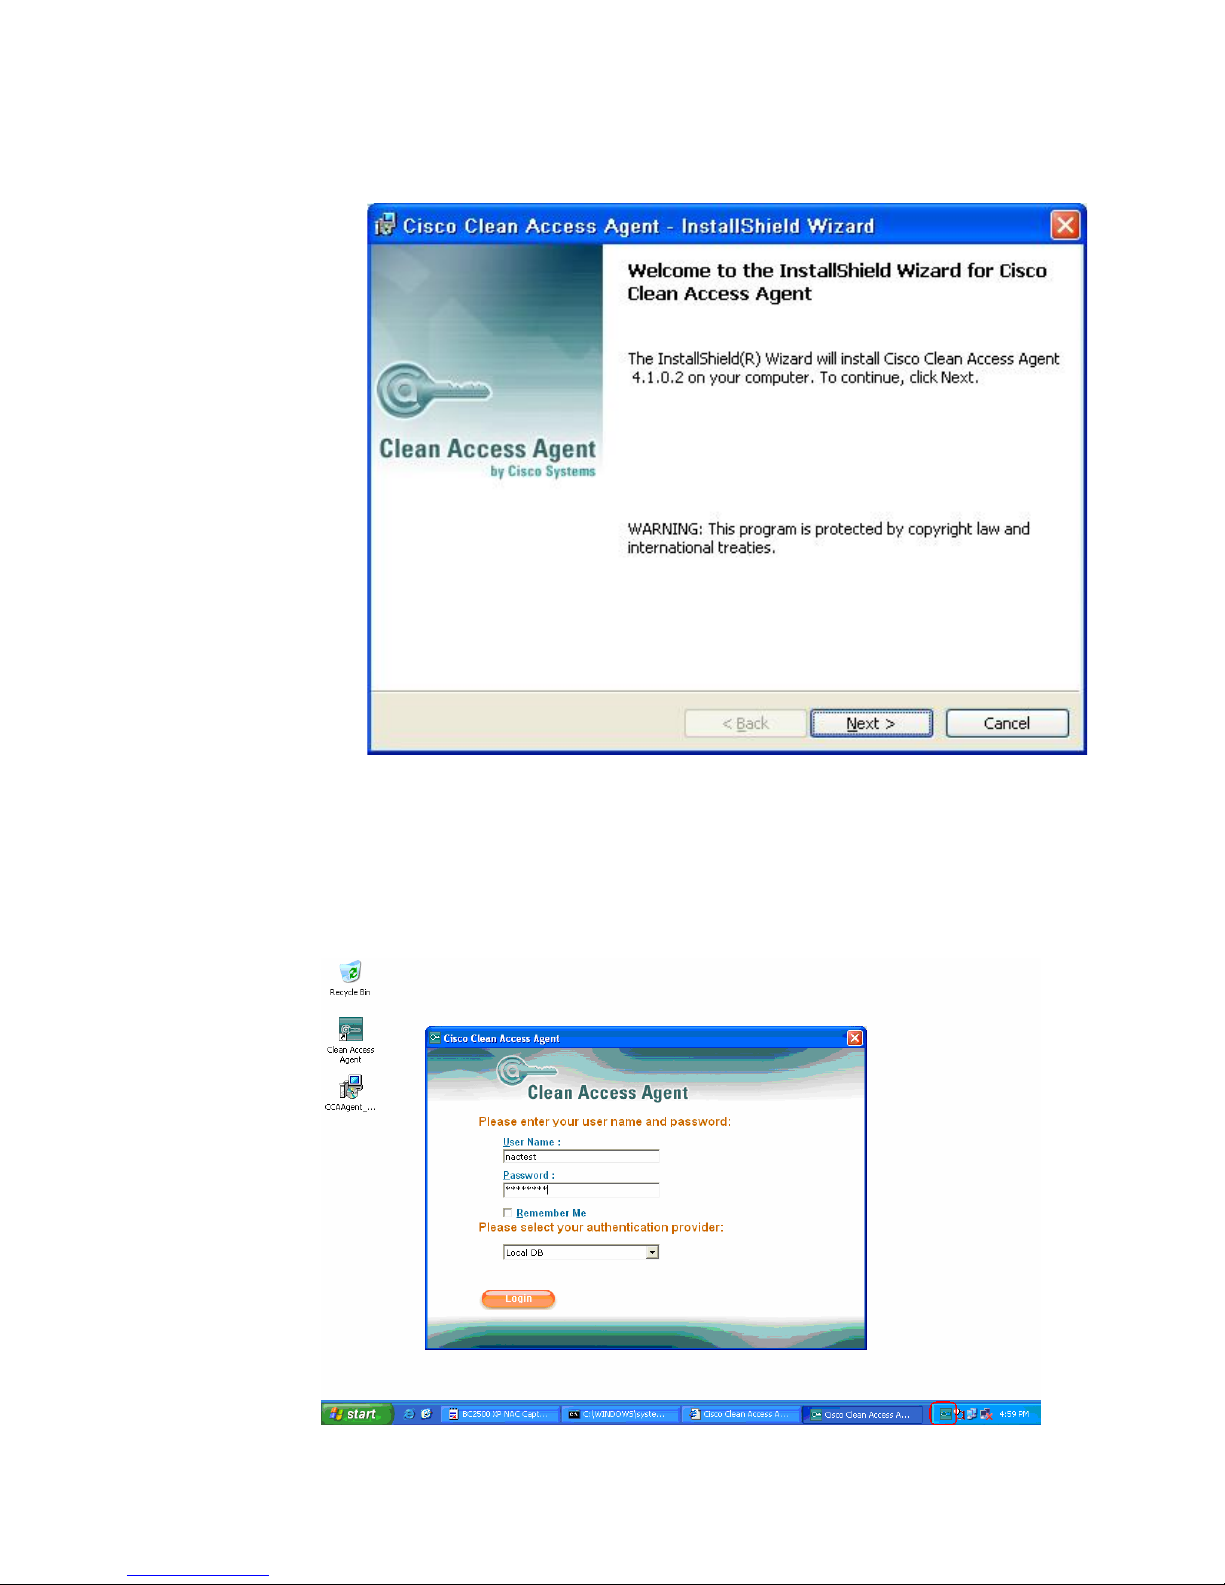
9. Click Next when prompted to install the version 4.1.0.2 Clean Access Agent.
NOTE: Ensure that the version of the Clean Access Agent matches the version of the CAS
software. For purposes of this white paper, the CAS server was version 4.1.0.
10. Click Next to accept the default installation directory.
11. Click Install to install the agent.
12. Click Finish to complete the installation.
The Clean Access Agent should automatically start after a short time and the icon should be
visible on the task bar.
35
Page 36
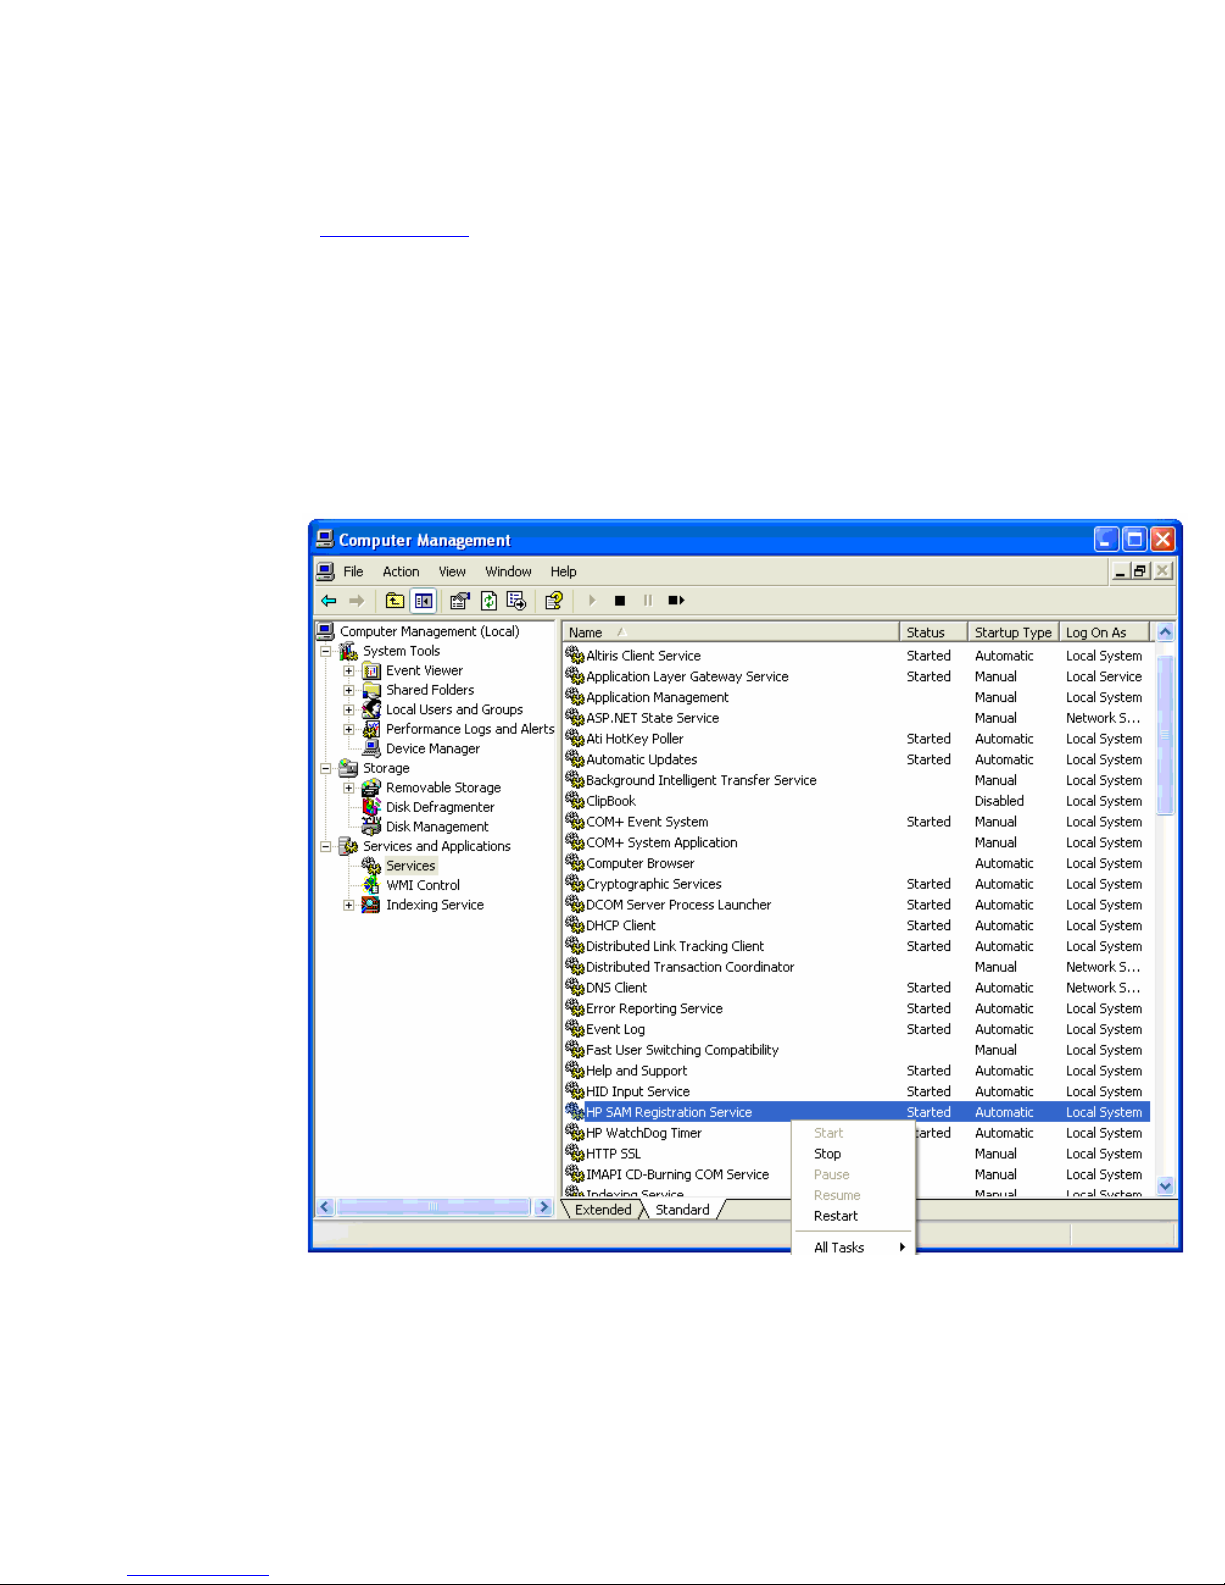
NOTE: you may get a certificate warning message. Continue to log on.
A successful logon notification appears.
13. We can validate that network connection is successful by once again attempting to connect to
any device on the network, or in this case, we’ll connect again to the CAM Web site (at
https://10.3.3.3
Next, let’s defeat one of the blade pc client requirements to force a failure of the clean access
policy check.
14. Log out of the Clean Access Session by right-clicking the CCA icon in the taskbar.
15. Click Manage.
16. Click Services and Applications.
17. Click Services.
), which should now be resolved without redirection.
18. Disable HP SAM Registration Service by right-clicking on the entry and selecting Stop.
36
Page 37
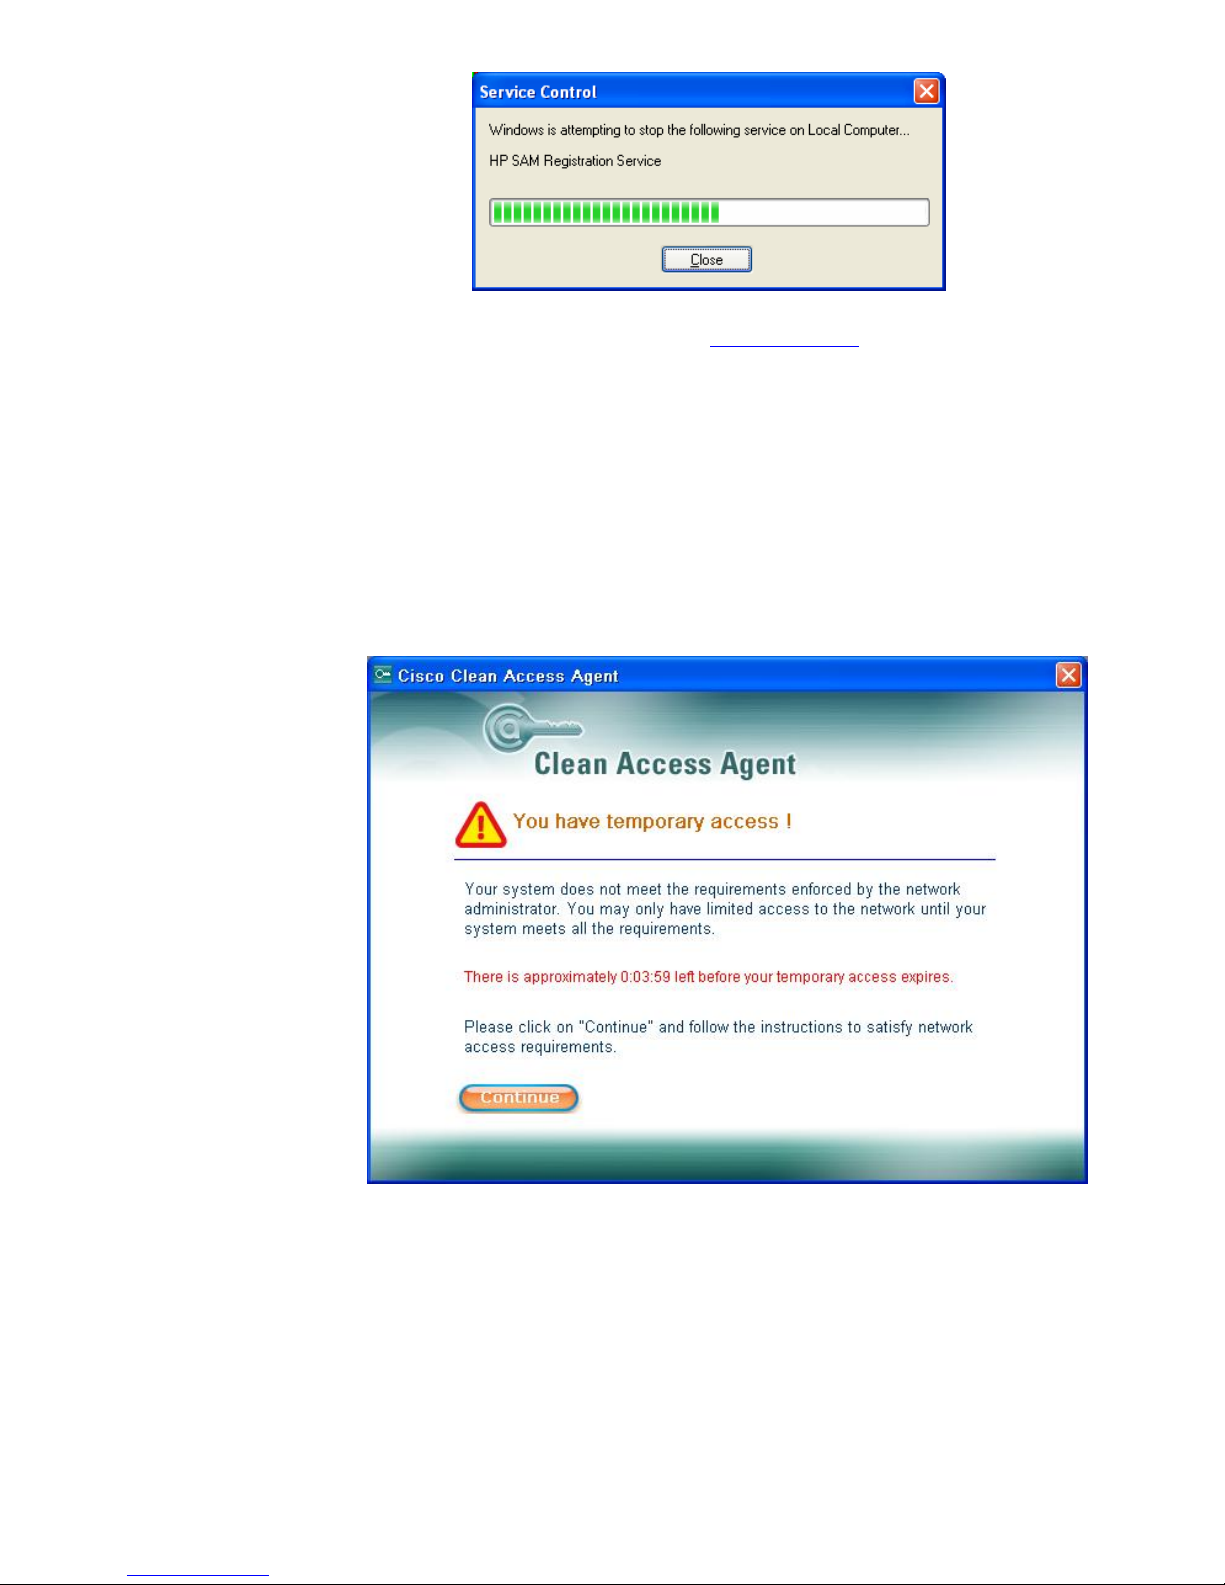
19. Log on again (through the CAM Web site at https://10.3.3.3
“nactest” account.
20. The Clean Access Agent test should now find the machine out of policy. The machine is either
kept in quarantine LAN or temporary access can be granted to the trusted LAN (if required for
remediation). For purposes of this reference implementation, we have configured a temporarily
network access of 4 minutes to allow any required access to any remediation resources that
may exist on the trusted network and to demonstrate the flexibility of clean access enforcement.
NOTE: This is a configurable policy and there are security consequences in allowing any
temporary access to the trusted/production network. If remediation servers are present on the
untrusted LAN, there is no need to grant temporary access.
) with user credentials for the
21. Click Continue to see more information on the missing requirements.
37
Page 38
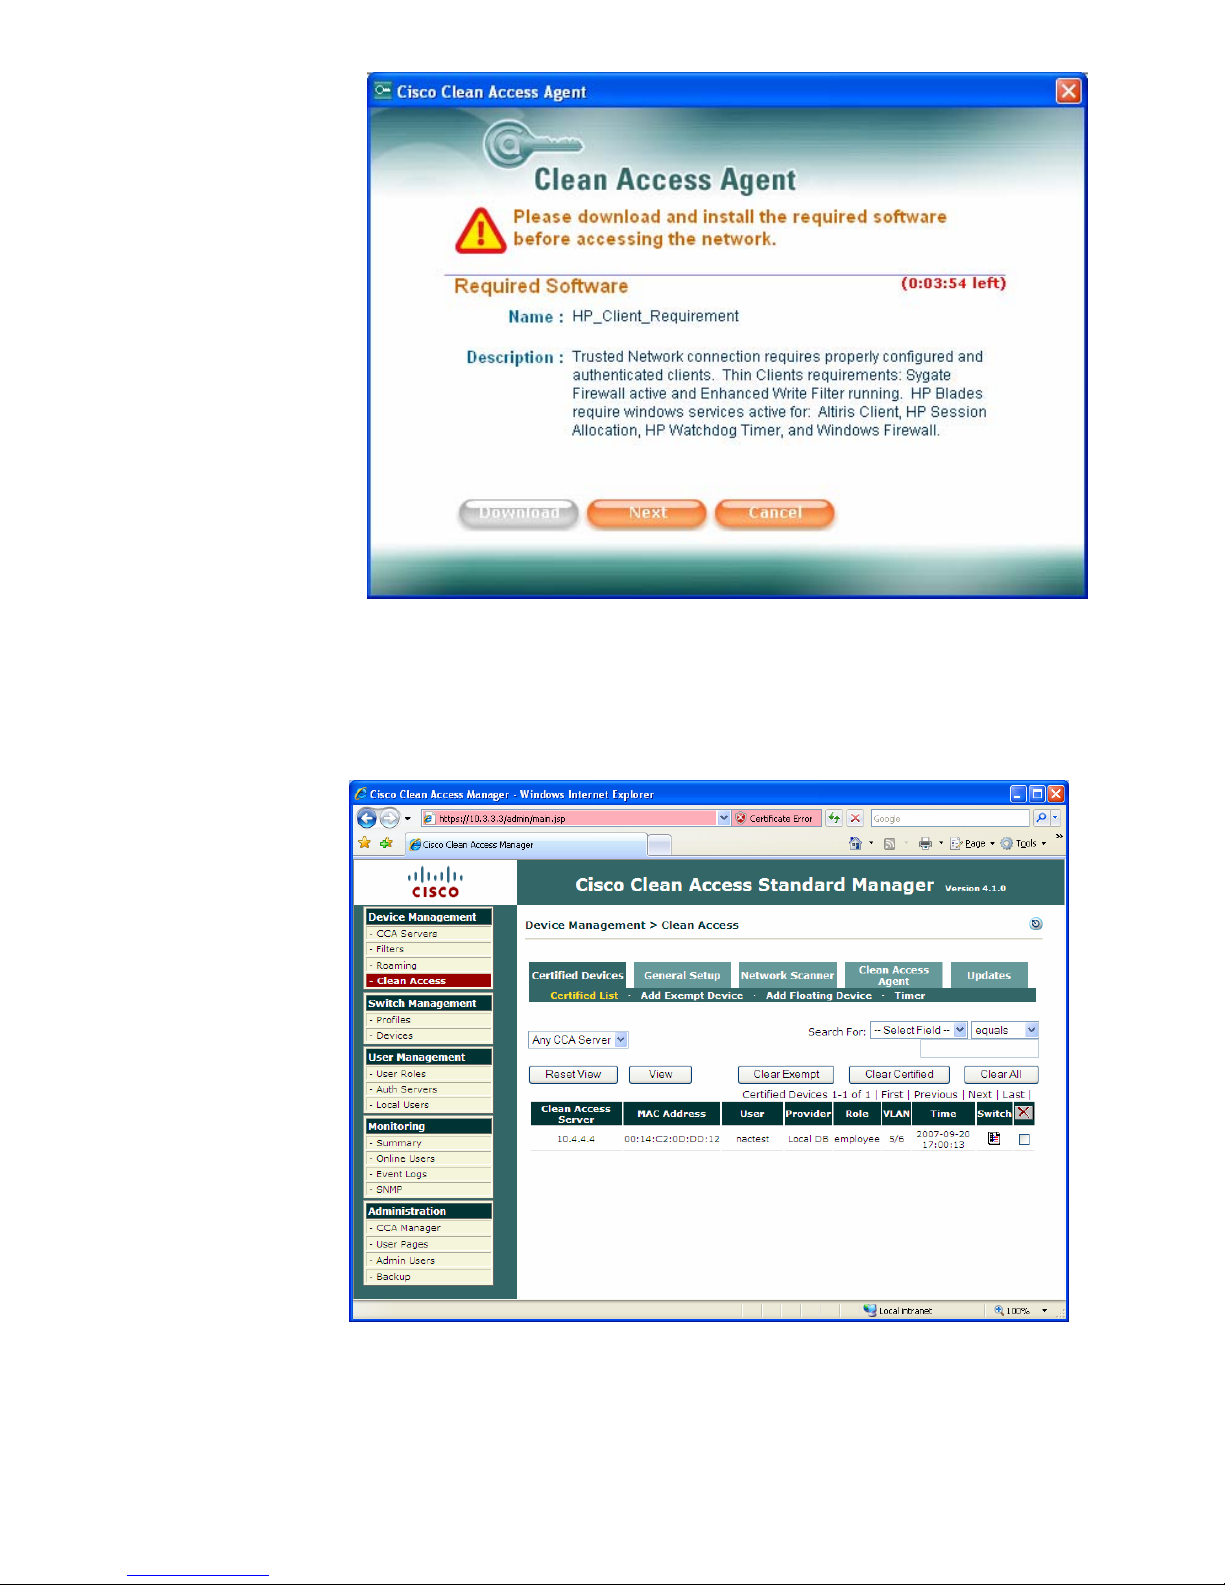
22. Click Next to re-scan. Clean Access Agent displays information on the missing requirements
after each re-scan until the policy requirements are corrected. Click Cancel to close this screen
and end the temporary access.
23. For purposes of our example, if you re-enable HP SAM Registration Service and click Next
within the time limit, the scan succeeds and full access is granted to the trusted network VLAN.
38
Page 39

Closing Observations
In this reference implementation, CISCO Clean Access NAC appliance has been used to gate access
of HP t5720 Thin Clients and Blade HP blade PCs. We have used NAC agents on each client device
to validate device configuration and user access to the network. In effect, the CAS bridges the
production and quarantine networks and works along with CAS agents on client devices to ensure
that configuration policy is met and that users are authorized to access the network.
In this example, we’ve used a Cisco 3560 Layer 3 switch and set policies to move client ports (ports
10 and 11, in this implementation) from quarantine VLAN as a default startup state to the production
VLAN. The switchover is accomplished (per settings in
(controlled by CAS policy) to the 3560 switch.
HP blade PCs did not require special handling prior to loading Clean Access Agent. In the case of
t5720 thin clients, the default Sygate firewall is provided by HP in a locked-down mode and ports
must be opened to allow traffic between CAS/CAM server appliances and the thin clients. We have
walked through the Firewall setup and committing write changes via the EWF.
Appendix A) by sending SNMP messages
39
Page 40

Appendix A – CISCO 3560 Switch Configuration
Switch#show configuration
Using 4021 out of 524288 bytes
!
version 12.2
no service pad
service timestamps debug uptime
service timestamps log uptime
no service password-encryption
!
hostname Switch
!
no aaa new-model
vtp mode transparent
ip subnet-zero
ip routing
ip dhcp excluded-address 10.5.5.1 10.5.5.5
ip dhcp excluded-address 10.6.6.1 10.6.6.5
!
ip dhcp pool DHCP
network 10.5.5.0 255.255.255.0
default-router 10.5.5.2
!
ip dhcp pool DHCP6
network 10.6.6.0 255.255.255.0
default-router 10.6.6.2
!
no file verify auto
spanning-tree mode pvst
spanning-tree extend system-id
!
vlan internal allocation policy ascending
!
vlan 2
name Vlan2
!
vlan 3
name Vlan3
!
vlan 4
name Vlan4
!
vlan 5
name Vlan5
!
vlan 6,100,200
!
interface FastEthernet0/1
description **TRUSTED INTERFACE ON CAS**
switchport trunk encapsulation dot1q
switchport trunk native vlan 100
switchport trunk allowed vlan 4,6,100
switchport mode trunk
!
interface FastEthernet0/2
switchport access vlan 2
spanning-tree portfast
!
interface FastEthernet0/3
switchport access vlan 3
spanning-tree portfast
!
interface FastEthernet0/4
description **UNTRUSTED INTERFACE ON CAS**
switchport trunk encapsulation dot1q
switchport trunk native vlan 200
switchport trunk allowed vlan 5,200
switchport mode trunk
spanning-tree portfast
!
interface FastEthernet0/5
switchport access vlan 5
spanning-tree portfast
!
interface FastEthernet0/6
switchport access vlan 6
40
Page 41

spanning-tree portfast
!
interface FastEthernet0/10
description **CAS CLIENT INTERFACE**
switchport access vlan 5
snmp trap mac-notification added
spanning-tree portfast
!
interface FastEthernet0/11
switchport access vlan 6
switchport mode access
snmp trap mac-notification added
spanning-tree portfast
!
interface Vlan1
no ip address
!
interface Vlan2
ip address 10.2.2.2 255.255.255.0
!
interface Vlan3
ip address 10.3.3.2 255.255.255.0
!
interface Vlan4
ip address 10.4.4.2 255.255.255.0
!
interface Vlan6
ip address 10.6.6.2 255.255.255.0
!
interface Vlan100
no ip address
!
interface Vlan200
no ip address
!
ip classless
ip http server
!
access-list 101 permit udp any any
access-list 101 permit ip any host 10.4.4.4
snmp-server community public RO
snmp-server community private RW
snmp-server trap-source Vlan4
snmp-server enable traps snmp linkdown linkup
snmp-server enable traps mac-notification
snmp-server enable traps stpx root-inconsistency loop-inconsistency
snmp-server host 10.3.3.3 public mac-notification snmp
!
end
41
Page 42

For more information
V
For more information about the HP thin clients or any other HP product, contact your HP Authorized
Reseller or visit these online locations to learn more about HP products, services, and support:
HP Links:
• HP home page: www.hp.com/sbso/busproducts.html
• HP desktop, blade PC, or thin client information: www.hp.com/desktops
• HP workstations information: www.hp.com/workstations
• HP notebook information: www.hp.com/notebooks
• HP security: www.hp.com/go/security
• HP Proliant and Integrity Server information www.hp.com/servers
• HP notebooks options information: www.hp.com/notebooks/options
• HP desktop options information: www.hp.com/desktops/options
• HP Services: www.hp.com/go/services
• HP support: www.hp.com/go/support
• HP Care Pack: www.hp.com/hps/carepack
• “How to buy”: www.hp.com/buy/howtobuy
CISCO NAC Links:
• Network Admission Control At-a-Glance
http://www.cisco.com/en/US/netsol/ns466/networking_solutions_package.html
• Cisco Security Agent (CSA)
http://www.cisco.com/en/US/products/sw/secursw/ps5057/index.html
• Clean Access Appliance Configuration Guide
http://www.cisco.com/en/US/docs/security/nac/appliance/configuration_guide/413/ca
m/cam413ug.pdf
General NAC Links
• Introduction to Network Access Protection
http://www.microsoft.com/technet/network/nap/napoverview.mspx
• Thin Client Product Overview
http://h20202.www2.hp.com/Hpsub/downloads/t5000%20PO_Jan06_clean-emea.pdf
© 2008 Hewlett-Packard Development Company, L.P. The information contained
herein is subject to change without notice. The only warranties for HP products and
services are set forth in the express warranty statements accompanying such
products and services. Nothing herein should be construed as constituting an
additional warranty. HP shall not be liable for technical or editorial errors or
omissions contained herein.
Linux is a U.S. registered trademark of Linus Torvalds. Microsoft, Windows, and
ista are U.S. registered trademarks of Microsoft Corporation.
466208-001, January 2008
42
 Loading...