

Page 1
EN
Start Here
1
2
DE
EN
DE
Erste Schritte
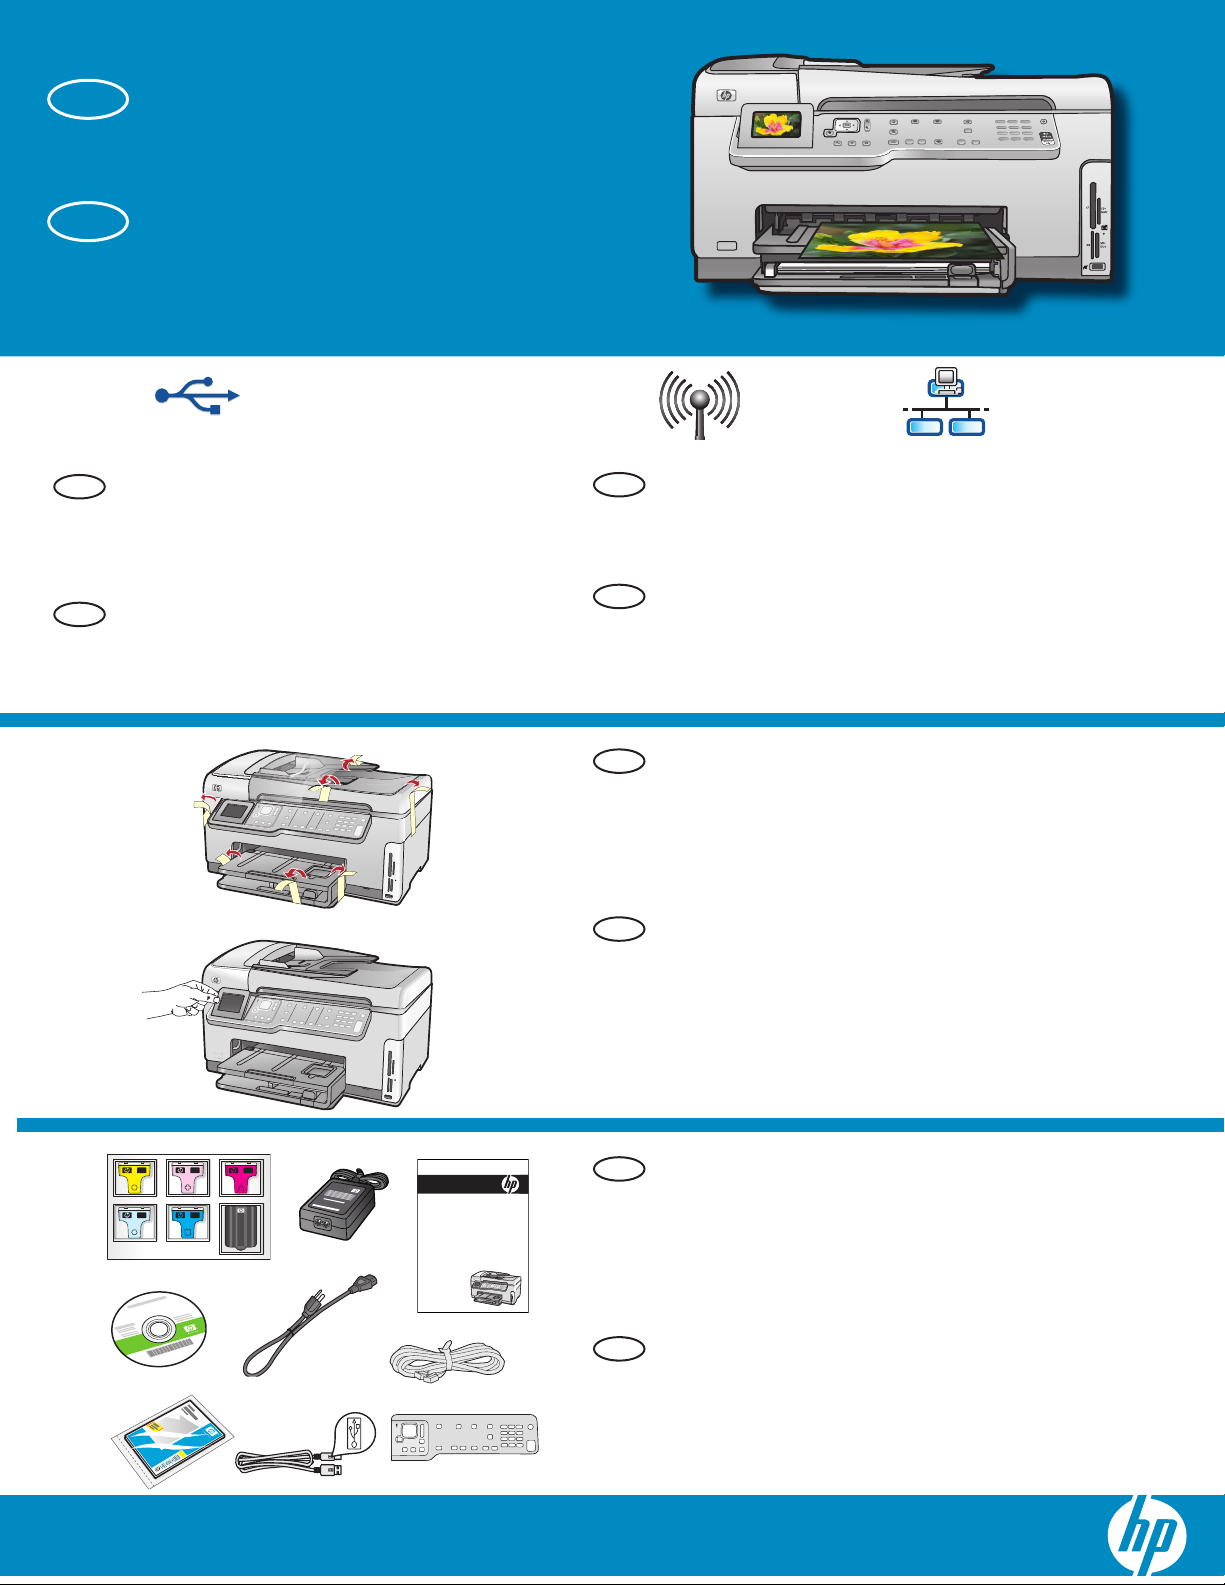
USB cable users: Do not connect the USB cable
until Section A .
Bei Anschluss über USB-Kabel: Schließen Sie
das USB-Kabel erst in Abschnitt A an.
a
802.11 EthernetUSB
Wireless (802.11) or wired (Ethernet) network users:
EN
you must follow the instructions in this setup guide
to be successful adding the HP All-in-One to your
network.
Benutzer von drahtlosen (802.11) oder
DE
drahtgebundenen (Ethernet) Netzwerken: Befolgen
Sie die Anweisungen in diesem Setup-Handbuch,
um das HP All-in-One erfolgreich in Ihr Netzwerk
einzubinden.
Remove all tape and protective fi lm from the lid
a.
EN
and from the front and back of the device.
b.
Lift the color graphics display and remove the
protective fi lm. You can adjust the angle of the
display to a position suitable for viewing.
3
Entfernen Sie sämtliche Klebebänder und die
a.
DE
b
HP Photosmart C7200 All-in-One series
Basics Guide
*
* *
EN
DE
Schutzfolie am Gerätedeckel sowie an der
Vorder- und Rückseite des Geräts.
Klappen Sie die Farbanzeige auf, und entfernen
b.
Sie die Schutzfolie. Den Winkel des Displays
können Sie in die für Sie optimale Sichtposition
einstellen.
Verify the box contents. The contents of your box
may differ.
*May be included
Überprüfen Sie den Packungsinhalt. Der Lieferumfang
ist nicht bei allen Modellen identisch.
*Möglicherweise enthalten
HP Photosmart C7280 HP All-in-One series
Page 2
4
5
EN
DE
EN
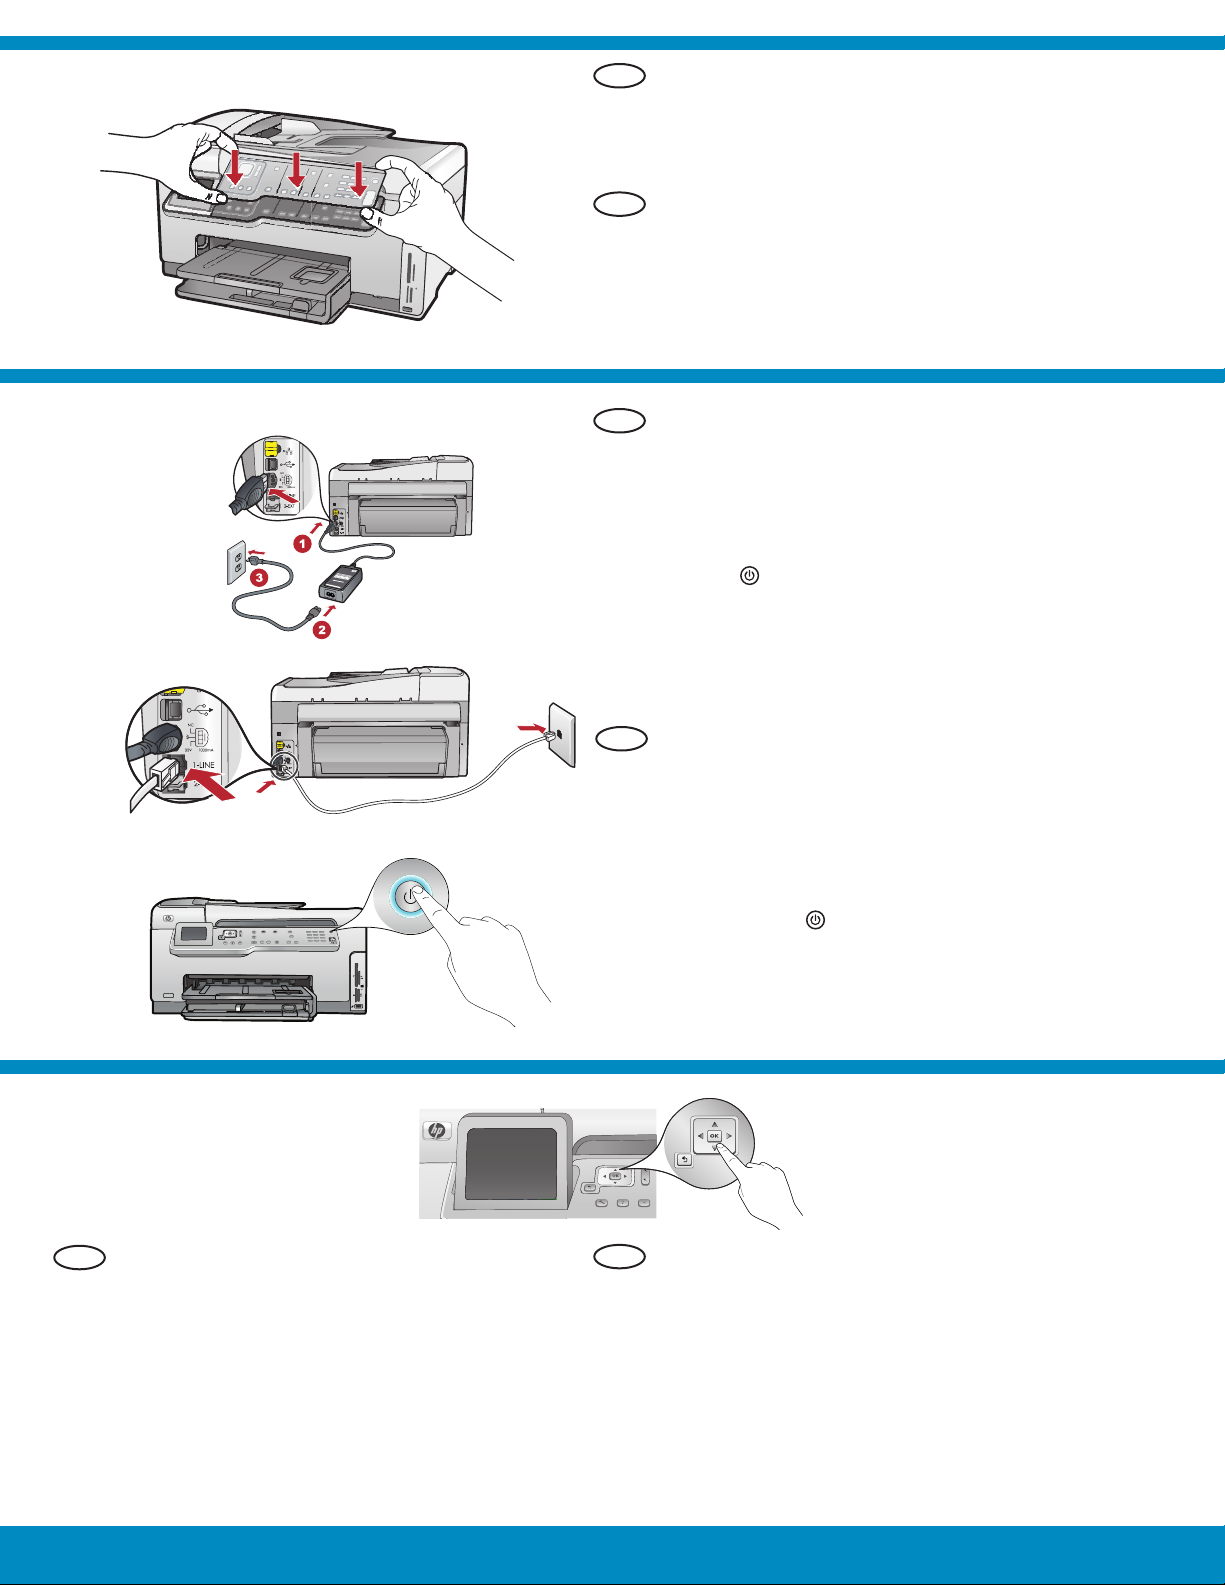
If the control panel faceplate is not already
a.
attached, position it over the buttons on the device.
Press down fi rmly on all edges of the faceplate
b.
until it snaps into place. Make sure all buttons are
visible and not blocked.
Wenn die Bedienfeldschablone noch nicht
a.
angebracht ist, legen Sie sie über die Tasten auf
dem Gerät.
Drücken Sie alle Kanten der Bedienfeldschablone
b.
fest nach unten, bis sie einrastet . Vergewissern Sie
sich, dass alle Bedienelemente sichtbar sind und
nicht behindert werden.
a.
Connect the power cord and adapter.
b.
Connect one end of the supplied phone cord to
the port labelled 1-LINE and the other to a wall
jack.
See the Basics Guide if you want help with other
fax setup options.
c.
Press
NOTE: Pay attention to the helpful messages and
animations in the display during the setup process.
to turn on the HP All-in-One.
6
EN
Do one of the following:
If a prompt appears asking you to set
•
the language and country/region, use
the arrows to select your language from
the list of up to 25 languages, press OK ,
and confi rm. Select your country/region,
press OK and confi rm.
If a prompt appears asking to install print
•
cartridges, go to the next step in this
guide.
DE
DE
Schließen Sie das Netzkabel und das Netzteil an.
a.
Verbinden Sie das eine Ende des mitgelieferten
b.
Telefonkabels mit dem Telefonanschluss 1-LINE
des Geräts und das andere Ende mit einer
Telefonanschlussbuchse.
Hilfe zu anderen Faxeinrichtungsoptionen fi nden
Sie im Grundlagenhandbuch.
Drücken Sie , um das HP All-in-One.
c.
einzuschalten.
HINWEIS: Beachten Sie während der Einrichtung
die Meldungen und Animationen auf der Anzeige.
Führen Sie einen der folgenden Schritte aus:
Wenn Sie dazu aufgefordert werden, Ihre Sprache
•
und das Land/die Region einzustellen, verwenden
Sie die Pfeiltasten, um Ihre Sprache aus der Liste
mit bis zu 25 Sprachen auszuwählen, drücken Sie
OK , und bestätigen Sie Ihre Auswahl. Wählen Sie
Ihr Land/Ihre Region aus, drücken Sie OK , und
bestätigen Sie Ihre Auswahl.
Wenn Sie aufgefordert werden, Tintenpatronen
•
einzusetzen, fahren Sie mit dem nächsten Schritt
dieses Handbuchs fort.
2 • HP Photosmart C7280 HP All-in-One series
Page 3
7
EN
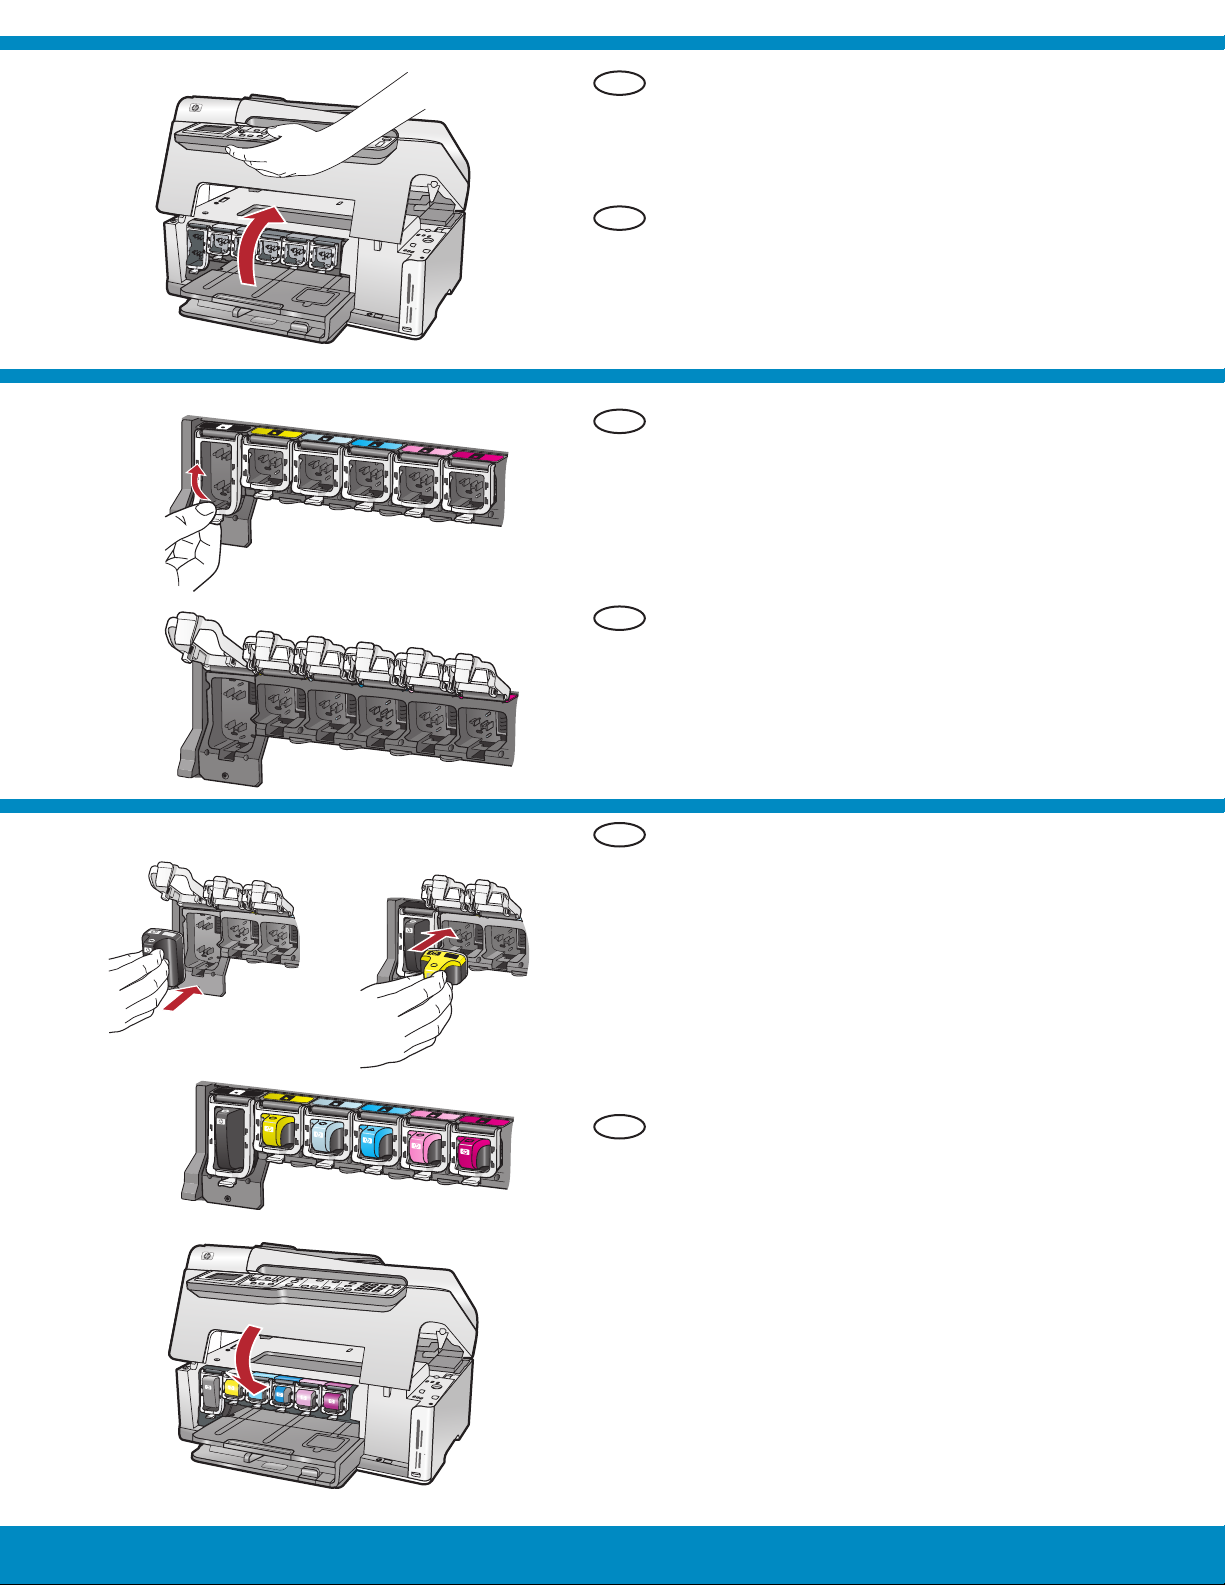
Open the access door.
8
DE
Öffnen Sie die Zugangsklappe.
a
EN
DE
b
Squeeze the bottom of each latch to release it, and
a.
then lift the latch.
Lift all six latches.
b.
Drücken Sie unten auf die Arretierungen, um sie zu
a.
lösen, und heben Sie sie dann an.
Heben Sie alle sechs Arretierungen an.
b.
9
ab
c
e
EN
DE
Match the color and pattern of the ink cartridge to
a.
the color and pattern above the latches.
Push the black ink cartridge in to the fi rst slot on
b.
the left. Close the latch.
Repeat with each of the color ink cartridges.
c.
Make sure each latch is secure.
d.
Note: Use only the ink cartridges that came with
the printer. The ink in these cartridges is specially
formulated to mix with the ink in the print head
assembly at fi rst-time setup.
Close the access door.
e.
Farbe und Muster der Tintenpatrone müssen
a.
mit Farbe und Muster über der Arretierung
übereinstimmen.
Drücken Sie die schwarze Tintenpatrone in
b.
den ersten Steckplatz links. Schließen Sie die
Arretierung.
c.
Wiederholen Sie diesen Vorgang für jede der
Farbpatronen.
d.
Vergewissern Sie sich, dass die Arretierungen
eingerastet sind.
Hinweis: Verwenden Sie nur die im Lieferumfang
des Druckers enthaltenen Tintenpatronen. Die
Tinte dieser Patronen ist speziell für die Mischung
mit der Tinte in der Druckkopfbaugruppe bei der
Erstinbetriebnahme des Druckers vorgesehen.
e.
Schließen Sie die Zugangsklappe.
HP Photosmart C7280 HP All-in-One series • 3
Page 4
10
a
b
EN
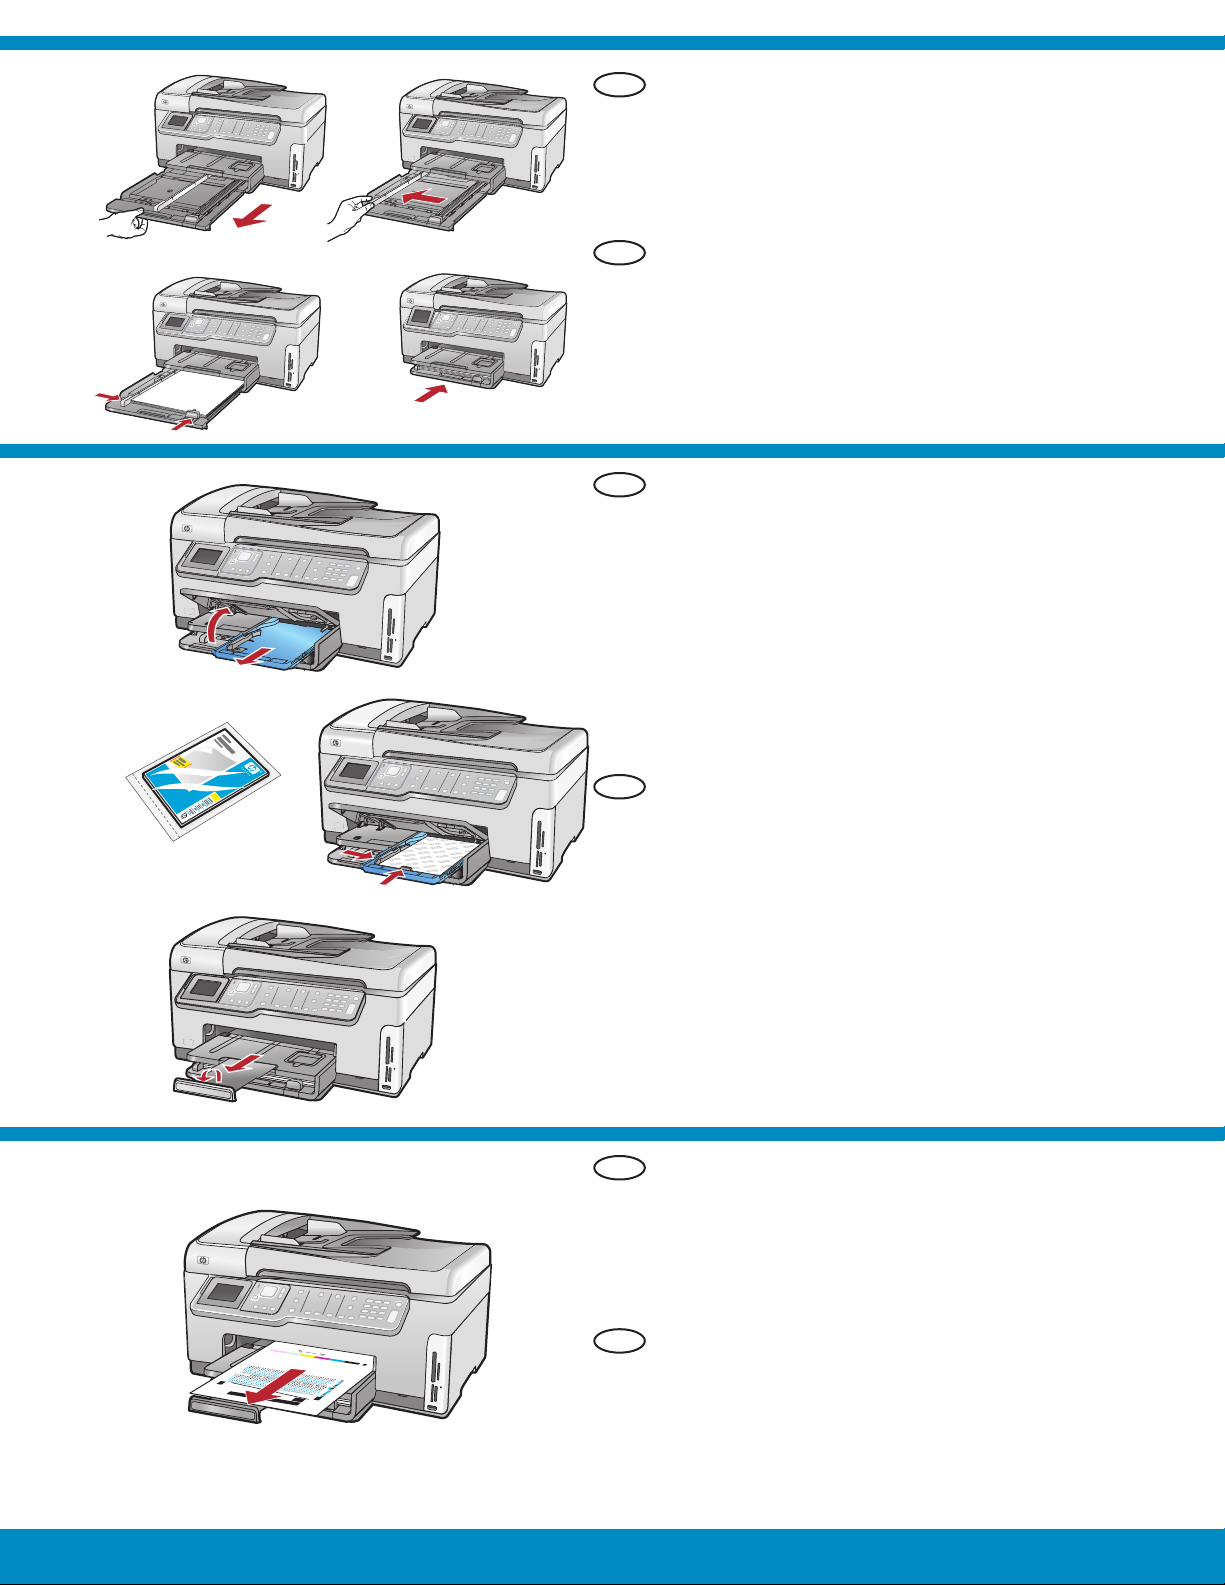
Pull out the paper tray.
a.
Slide the paper-width guide to the left.
b.
Insert plain white paper into the main tray and
c.
adjust the paper guides.
d.
Push in the paper tray and press OK .
11
DE
c
a
b
d
d
EN
DE
Ziehen Sie das Papierfach heraus.
a.
Schieben Sie die Papierquerführung nach links.
b.
Legen Sie weißes Papier in das Hauptfach ein,
c.
und schieben Sie die Papierführungen an das
Papier heran.
Schieben Sie das Hauptfach zurück ins Gerät, und
d.
drücken Sie OK .
After you load plain paper, you can also load photo
paper into the photo tray. If you do not have photo
paper, continue to the next step.
Lift the photo tray lid and pull out the photo tray.
a.
Load photo paper with the glossy side down in
b.
the photo tray. Slide the paper guides against the
photo paper.
Push the photo tray in, and lower the photo tray
c.
lid.
Pull out the tray extender and lift up the paper
d.
catch.
Nachdem Sie weißes Papier eingelegt haben,
können Sie auch Fotopapier in das Fotofach
einlegen. Anderenfalls fahren Sie mit dem nächsten
Schritt fort.
Heben Sie die Abdeckung des Fotofachs an und
a.
ziehen Sie das Fotofach heraus.
Legen Sie das Fotopapier mit der glänzenden Seite
b.
nach unten in das Fotofach ein. Schieben Sie die
Papierführungen bis an die Papierkanten.
Schieben Sie das Fotofach zurück ins Gerät, und
c.
schließen Sie den Deckel des Fotofachs.
Ziehen Sie die Fachverlängerung heraus, und
d.
heben Sie die Auffangvorrichtung an.
12
4 • HP Photosmart C7280 HP All-in-One series
EN
DE
Press the OK button after you have loaded paper
a.
in the tray, then wait a few minutes while the
alignment page is printed.
Press the OK button after the alignment page is
b.
printed.
When the page is printed, alignment is complete.
Drücken Sie nach dem Einlegen des Papiers in das
a.
Fach OK , und warten Sie einige Minuten, bis die
Ausrichtungsseite gedruckt ist.
Drücken Sie nach dem Druck der Ausrichtungsseite
b.
OK .
Nach dem Druck der Seite ist die Ausrichtung
abgeschlossen.
Page 5
13
EN
DE
A - USB
A - USB C - EthernetB - 802.11
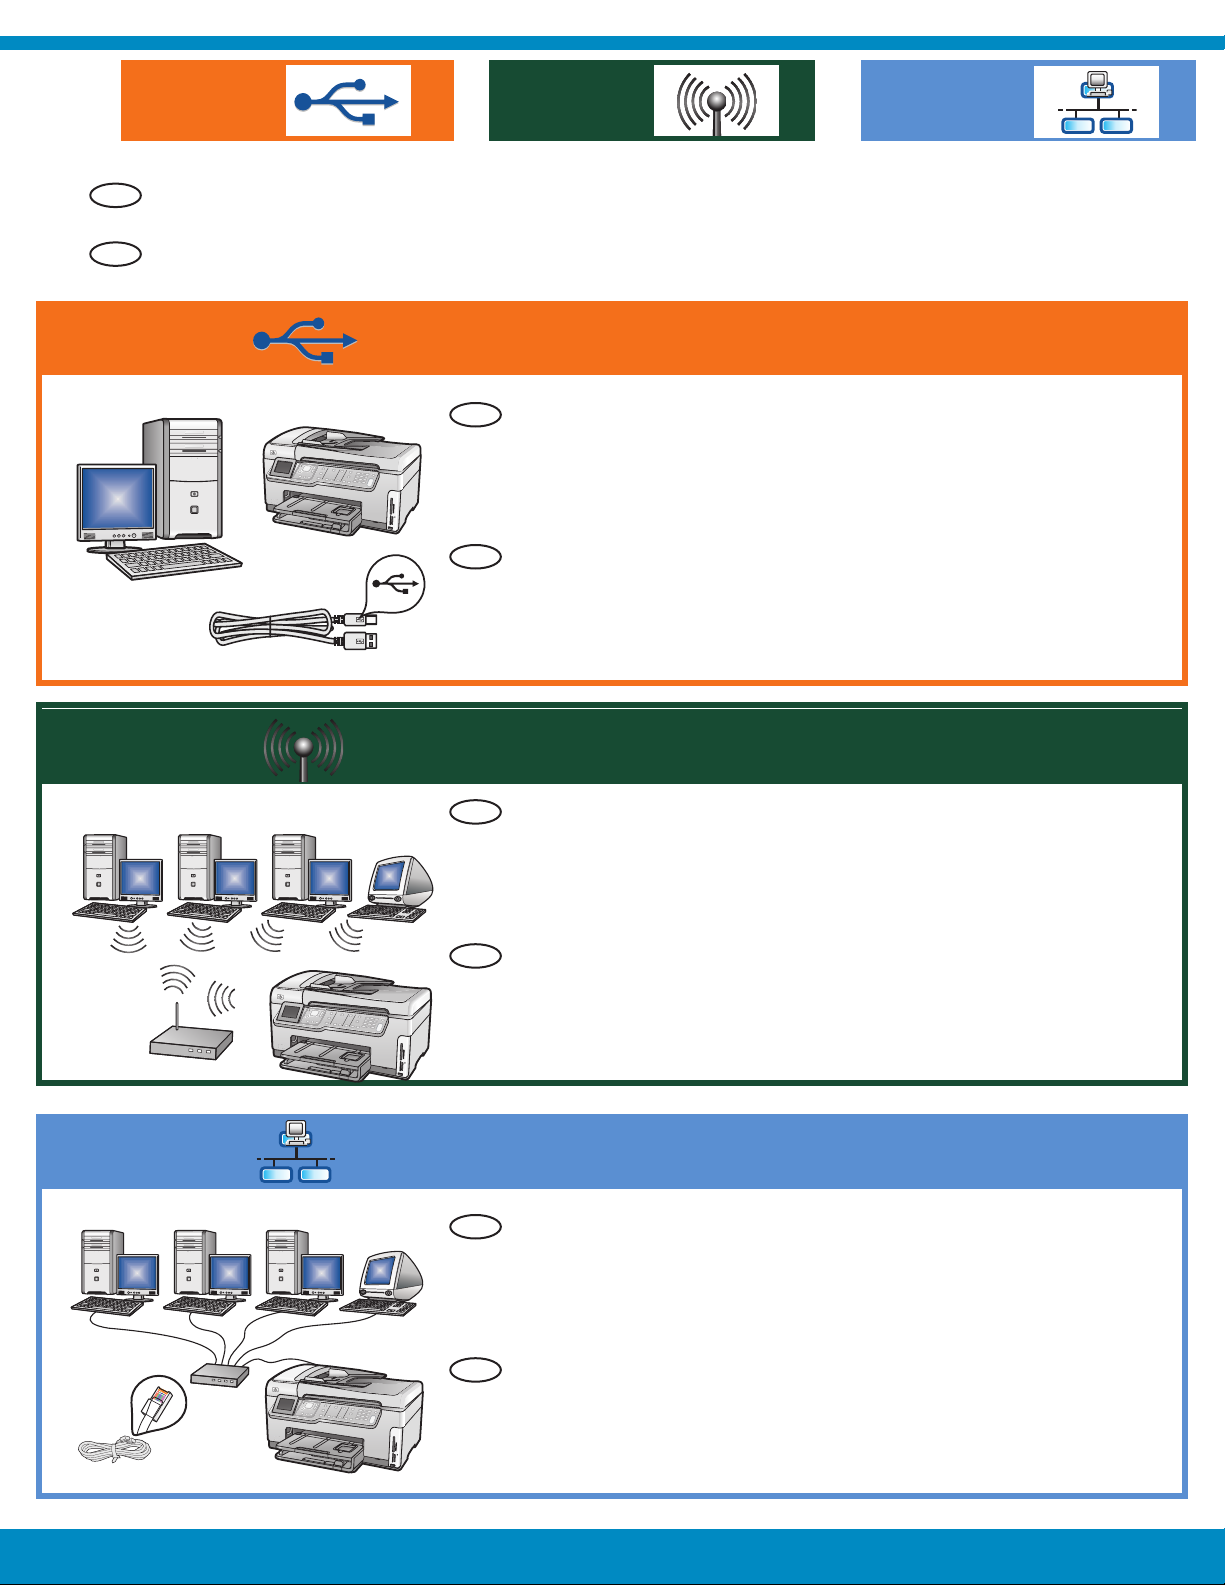
Choose only ONE connection type (A - USB, B - 802.11/Wireless, or C - Ethernet/Wired)
Wählen Sie nur EINEN Verbindungstyp aus
(A – USB, B – 802.11/drahtlos oder C – Ethernet/drahtgebunden)
EN
Use the instructions in Section A if you want to connect the
HP All-in-One directly to one computer. (Do not connect the USB
cable until step b) . Equipment needed: USB cable.
DE
Befolgen Sie die Anweisungen in Abschnitt A , wenn Sie das
HP All-in-One direkt an einen Computer anschließen möchten.
(Schließen Sie das USB-Kabel erst in Schritt B an.) Benötigte
Ausrüstung: USB-Kabel.
B - 802.11
C - Ethernet
EN
Use the instructions in Section B if you want a wireless (802.11b or
802.11g) connection between the HP All-in-One and your network.
Equipment needed: wireless router.
DE
Befolgen Sie die Anweisungen in Abschnitt B , wenn Sie das
HP All-in-One über eine drahtlose Verbindung (802.11b oder
802.11g) mit Ihrem Netzwerk verbinden möchten. Benötigte
Ausrüstung: drahtloser Router.
EN
Use the instructions in Section C if you want an Ethernet cable
connection between the HP All-in-One and your network. Equipment
needed: router and Ethernet cable.
DE
Befolgen Sie die Anweisungen in Abschnitt C , wenn Sie das
HP All-in-One über eine Ethernet-Kabelverbindung mit Ihrem
Netzwerk verbinden möchten. Benötigte Ausrüstung: Router und
Ethernet-Kabel.
HP Photosmart C7280 HP All-in-One series • 5
Page 6

A - USB
EN
DE
Windows:
a.
Turn on your computer, login if necessary, and then
wait for the desktop to appear. Insert the green CD
and follow the onscreen instructions.
IMPORTANT: If the startup screen does not appear,
double-click My Computer , double-click the
CD-ROM icon with the HP logo, and then
double-click setup.exe .
Schalten Sie den Computer ein, melden Sie sich
a.
ggf. an, und warten Sie, bis der Desktop angezeigt
wird. Legen Sie die grüne CD ein, und folgen Sie
den Anweisungen auf dem Bildschirm.
WICHTIG: Wenn die CD nach dem Einlegen nicht
automatisch gestartet wird, doppelklicken Sie auf
Arbeitsplatz , dann auf das Symbol der CD-ROM
mit dem HP Logo und zuletzt auf die Datei
setup.exe .
Mac:
EN
IMPORTANT: Purchase a USB cable
separately if it is not included.
Connect the USB cable to the port on the
a.
back of the HP All-in-One, and then to any
USB port on the computer.
DE
WICHTIG: Erwerben Sie ein separates
USB-Kabel, wenn es im Lieferumfang nicht
enthalten ist.
Verbinden Sie das USB-Kabel mit dem
a.
USB-Anschluss auf der Rückseite des
HP All-in-One und anschließend mit einem
freien USB-Anschluss des Computers.
EN
IMPORTANT: Purchase a USB cable separately if it is
not included.
Once the USB prompt appears, connect the USB
b.
cable to the port on the back of the HP All-in-One,
and then to any USB port on the computer.
Follow the onscreen instructions to complete the
c.
software installation.
Go to page 14 to explore your HP All-in-One.
d.
DE
WICHTIG: Erwerben Sie ein separates USB-Kabel,
wenn es im Lieferumfang nicht enthalten ist.
Sobald die USB-Aufforderung angezeigt wird,
b.
schließen Sie das USB-Kabel an den Anschluss auf
der Rückseite des HP All-in-One und anschließend
an einen beliebigen USB-Anschluss des
Computers an.
Folgen Sie den Anweisungen auf dem Bildschirm,
c.
um die Softwareinstallation abzuschließen.
Gehen Sie nun zu Seite 14, um das HP All-in-One
d.
zu erkunden.
6 • HP Photosmart C7280 HP All-in-One series
EN
Insert the green CD.
b.
Double-click the HP Photosmart CD icon on
c.
the desktop.
Double-click the HP All-in-One Installer
d.
icon. Follow the onscreen instructions.
Complete the Setup Assistant screen.
e.
When you are fi nished, go to page 14 to
f.
explore your HP All-in-One.
DE
Legen Sie die grüne CD ein.
b.
Doppelklicken Sie auf dem Desktop auf
c.
das HP Photosmart CD-Symbol.
Doppelklicken Sie auf das Symbol für den
d.
HP All-in-One Installer . Folgen Sie den
Anweisungen auf dem Bildschirm.
Schließen Sie den Bildschirm
e.
Einrichtungsassistent ab.
Gehen Sie nun zu Seite 14, um das
f.
HP All-in-One zu erkunden.
Page 7

EN DE
USB Troubleshooting
EN
Problem: (Windows) The Microsoft Add Hardware screen appears.
Action: Cancel all screens. Unplug the USB cable, and then insert the
green HP All-in-One CD. Refer to Section A .
DE
Problem: (Windows) Der Hardware-Assistent von Microsoft wird
geöffnet.
Lösung: Schließen Sie alle Fenster. Ziehen Sie das USB-Kabel ab, und
legen Sie anschließend die grüne HP All-in-One CD ein. Lesen Sie die
Anweisungen in Abschnitt A .
EN
Problem: (Windows only) You did not see the screen prompting you to
connect the USB cable.
Action: Cancel all screens. Remove, and then re-insert the green
HP All-in-One CD. Refer to Section A .
USB-Fehlerbehebung
www.hp.com/support
DE
Problem: (Nur Windows) Sie haben die Aufforderung zum Anschließen
des USB-Kabels nicht gesehen.
Lösung: Schließen Sie alle Fenster. Entfernen Sie die grüne
HP All-in-One CD, und legen Sie sie erneut ein. Lesen Sie die
Anweisungen in Abschnitt A .
EN
Problem: (Windows only) The Device Setup Has Failed To Complete
screen appears.
Action: Unplug the device and plug it in again. Check all connections.
Make sure the USB cable is plugged into the computer. Do not plug
the USB cable into a keyboard or a non-powered USB hub. Refer to
Section A .
DE
Problem: (Nur Windows) Auf dem Bildschirm wird die Meldung
Geräteinstallation konnte nicht abgeschlossen werden angezeigt.
Lösung: Ziehen Sie das Kabel vom Gerät ab, und schließen Sie es
wieder an. Überprüfen Sie alle Verbindungen. Vergewissern Sie
sich, dass das USB-Kabel am Computer angeschlossen ist. Schließen
Sie das USB-Kabel nicht an eine Tastatur oder einen USB-Hub ohne
Stromversorgung an. Lesen Sie die Anweisungen in Abschnitt A .
HP Photosmart C7280 HP All-in-One series • 7
Page 8

B1 - 802.11
EN
Locate and write down your wireless router settings:
a.
Network Name (also called SSID) :_________________________________________
WEP key/WPA Passphrase (if needed) :_____________________________________
IMPORTANT :You must have this information available to continue with your wireless setup. HP provides
a web-based tool called the Wireless Network Assistant [URL: www.hp.com/go/networksetup (English
only)] that can help retrieve this information for some systems. If the Wireless Network Assistant is unable
to retrieve your network information, you must consult the documentation for your wireless router, the router
manufacturer, or the person who originally setup your wireless network.
DE
Ermitteln Sie die Einstellungen Ihres drahtlosen Routers und tragen Sie sie hier ein :
a.
Netzwerkname (auch „SSID“ genannt):____________________________________________
WEP-Schlüssel/WPA-Kennwortschlüssel (falls erforderlich):_____________________________
WICHTIG : Sie benötigen diese Informationen für die Einrichtung der drahtlosen Verbindung. HP stellt das
webbasierte Tool „Wireless Network Assistant“ [URL: www.hp.com/go/networksetup (nur in englischer
Sprache)] bereit, das diese Informationen bei einigen Systemen für Sie abrufen kann. Falls Wireless
Network Assistant Ihre Netzwerkinformationen nicht abrufen kann, konsultieren Sie die Dokumentation Ihres
drahtlosen Routers, den Router-Hersteller oder die Person, die Ihr drahtloses Netzwerk eingerichtet hat.
EN
b.
Press the Setup button on the HP All-in-One.
c.
Press
Press until Wireless Setup Wizard is highlighted, and then press OK . In a few moments, a list of detected
d.
until Network is highlighted, and then press OK . The Network Menu appears.
networks appears on the display. The network with the strongest signal appears fi rst.
DE
Drücken Sie Einrichten auf dem HP All-in-One.
b.
Drücken Sie
c.
, bis Netzwerk ausgewählt ist, und drücken Sie dann die Taste OK . Das Menü „Netzwerk“
wird eingeblendet.
Drücken Sie
d.
, bis Einrichtungsassistent für kabellose Netzwerke ausgewählt ist, und drücken Sie dann die
Taste OK . Nach einem kurzen Augenblick wird auf dem Display eine Liste der erkannten Netzwerke
angezeigt. Das Netzwerk mit dem stärksten Signal erscheint zuerst.
8 • HP Photosmart C7280 HP All-in-One series
Page 9

B2 - 802.11
EN
e.
Do one of the following:
•
Press
If the network name that you wrote down does not appear in the list, you can enter it manually. Press
•
until Enter New Network Name (SSID) is highlighted, and then press OK . Then use the visual keyboard to
enter the network name. Use the Visual Keyboard Tips that follow if necessary.
If your network uses security, a prompt appears for the WEP key or WPA passphrase. Both are case
f.
sensitive. Use the visual keyboard to enter the WEP key or WPA passphrase, as requested.
Note : If your router provides 4 WEP keys, make sure you use the fi rst one.
Follow the prompts on the display to complete the network setup.
g.
to highlight the name of the network that you wrote down earlier.
DE
Führen Sie einen der folgenden Schritte aus:
e.
Drücken Sie
•
Falls der Netzwerkname nicht angezeigt wird, können Sie ihn manuell eingeben. Drücken Sie
•
Neuen Netzwerknamen (SSID) eingeben ausgewählt ist, und drücken Sie dann die Taste OK . Verwenden
Sie dann die Bildschirmtastatur, um den Netzwerknamen einzugeben. Falls Sie bei der Eingabe Hilfe
benötigen, lesen Sie die nachfolgenden Tipps zur Bildschirmtastatur.
Falls für Ihr Netzwerk Sicherheitsfunktionen eingerichtet sind, werden Sie nun aufgefordert, den WEP-
f.
Schlüssel oder den WPA-Kennwortschlüssel einzugeben. Achten Sie bei der Eingabe auf die Groß- und
Kleinschreibung. Geben Sie den WEP-Schlüssel bzw. den WPA-Kennwortschlüssel nach Aufforderung über
die Bildschirmtastatur ein.
Hinweis : Falls Ihr Router vier WEP-Schlüssel bereitstellt, verwenden Sie den ersten Schlüssel.
Befolgen Sie nun die Anweisungen auf dem Display, um die Netzwerkeinrichtung abzuschließen.
g.
ABCDEFGH
IJKLMNOP
QRSTUVWX
YZ
abc
, um den Namen des Netzwerks zu markieren, das Sie zuvor notiert haben.
EN
Visual keyboard tips:
To Select: use Arrow keys to highlight, and then press OK .
•
For mistakes: Select Clear .
•
For lowercase: Select abc
•
For numbers: Select 123
•
For symbols: Select .@!
•
When you are fi nished: Highlight Done , and then press OK .
•
DE
Tipps zur Bildschirmtastatur:
Eingabe: Verwenden Sie die Pfeiltasten zur Markierung, und
•
123
CLR
.@!
Done
drücken Sie dann OK .
Bei Fehlern: Wählen Sie Entf.
•
Für Kleinbuchstaben: Wählen Sie abc
•
Für Zahlen: Berühren Sie 123
•
Für Symbole: Berühren Sie .@!
•
Wenn Sie fertig sind: Markieren Sie Fertig , und drücken Sie
•
dann OK .
, bis
EN
DE
Go to Section D of this Setup Guide to install your software. h.
Installieren Sie die Software nach den Anweisungen in
h.
Abschnitt D dieses Einrichtungshandbuchs.
HP Photosmart C7280 HP All-in-One series • 9
Page 10

C - Ethernet
b
EN
Locate the Ethernet cable.
a.
Remove the yellow plug from the back of the
b.
device.
Connect one end of the Ethernet cable to the
c.
Ethernet port on the back of the device.
Connect the other end of the Ethernet cable to the
d.
router.
Go to Section D of this Setup Guide to install your
e.
software.
c
Important: Your computer and the HP All-in-One must be on
the same active, working network.
If you are using a DSL or cable modem, make sure you do not
connect the Ethernet cable from the HP All-in-One to the cable
modem. Connect it to the router only.
d
DE
Suchen Sie das Ethernet-Kabel.
a.
Ziehen Sie den gelben Stecker aus dem
b.
Netzwerkanschluss auf der Rückseite des Geräts.
Verbinden Sie ein Ende des Ethernet-Kabels mit
c.
dem Ethernet-Anschluss auf der Rückseite des
Geräts.
Verbinden Sie das andere Ende des Ethernet-
d.
Kabels mit dem Router.
Installieren Sie die Software nach den
e.
Anweisungen in Abschnitt D dieses
Einrichtungshandbuchs.
Wichtig: Ihr Computer und das HP All-in-One müssen sich in
demselben aktiven Netzwerk befi nden.
Wenn Sie ein DSL- oder Kabelmodem verwenden, sollten
Sie sich vergewissern, dass Sie nicht das Ethernet-Kabel des
HP All-in-One mit dem Kabelmodem verbinden. Das Kabel
muss am Router angeschlossen werden.
10 • HP Photosmart C7280 HP All-in-One series
Page 11

D1 - Ethernet/ 802.11
/
Windows: Mac:
EN
DE
Turn on your computer, login if necessary, and
a.
then wait for the desktop to appear. Insert the
green CD and follow the onscreen instructions.
IMPORTANT: If the startup screen does not
appear, double-click My Computer , double-click
the CD-ROM icon with the HP logo, and then
double-click setup.exe .
On the Connection Type screen, make sure to
b.
select through the network .
Your fi rewall software may provide prompts
c.
warning you that HP software is attempting to
access your network. You should respond so that
access is always allowed. Then continue with the
HP software installation.
Note : Anti-virus and anti-spyware applications
may block software installation and may need
to be disabled. Remember to turn them back on
again following installation.
Schalten Sie den Computer ein, melden Sie
a.
sich ggf. an, und warten Sie, bis der Desktop
angezeigt wird. Legen Sie die grüne CD ein,
und folgen Sie den Anweisungen auf dem
Bildschirm.
WICHTIG: Wenn die CD nach dem Einlegen
nicht automatisch gestartet wird, doppelklicken
Sie auf
CD-ROM mit dem HP Logo und zuletzt auf die
Datei setup.exe .
Wählen Sie im Bildschirm Verbindungstyp die
b.
Option Über das Netzwerk aus.
Eventuell werden Sie von Ihrer Firewall-Software
c.
gewarnt, dass HP Software versucht, auf das
Netzwerk zuzugreifen. Sie sollten diesen Zugriff
immer zulassen . Fahren Sie danach mit der
Installation der HP Software fort.
Hinweis : Die Softwareinstallation kann durch
Virenschutz- und Anti-Spyware-Programme
verhindert werden. Sollte dies der Fall sein,
müssen Sie diese Programme deaktivieren.
Vergessen Sie nicht, die Programme nach der
Installation wieder zu aktivieren.
Arbeitsplatz , dann auf das Symbol der
EN
DE
Turn on your computer, login if necessary,
a.
and then wait for the desktop to appear.
Insert the green CD.
b.
Double-click the HP Photosmart CD icon on
c.
the desktop.
Double-click the HP All-in-One Installer
d.
icon. Follow the onscreen instructions.
Complete the Setup Assistant Screen.
e.
Schalten Sie den Computer ein, melden
a.
Sie sich ggf. an, und warten Sie, bis der
Desktop angezeigt wird.
Legen Sie die grüne CD ein.
b.
Doppelklicken Sie auf dem Desktop auf
c.
das HP Photosmart CD-Symbol.
Doppelklicken Sie auf das Symbol für den
d.
HP All-in-One Installer . Folgen Sie den
Anweisungen auf dem Bildschirm.
Schließen Sie den Bildschirm
e.
Einrichtungsassistent ab.
HP Photosmart C7280 HP All-in-One series • 11
Page 12

D2 - Ethernet/ 802.11
/
EN DE
If you have additional computers on your
network, install the HP All-in-One software on
each computer.
Follow the onscreen instructions. Make sure that
you choose the connection types between the
network and your HP All-in-One (not between
your computer and the network).
EN DE
Network Troubleshooting
EN
Problem: You see the error message Invalid WEP key or Invalid WPA passphrase when you run the Wireless
Setup Wizard.
Action:
You may have typed the WEP key or WPA passphrase incorrectly. These security keys are case sensitive
•
and must be typed exactly. Make sure you have not accidentally inserted blank spaces at the beginning
or end.
If you are using the default network name (SSID) provided by your wireless router manufacturer, your
•
HP All-in-One may be trying to connect to another wireless router in your neighborhood that uses the
same network name. Make sure your network name is unique.
Wenn Sie weitere Computer in Ihr Netzwerk
eingebunden haben, müssen Sie die HP All-in-OneSoftware auf jedem dieser Computer installieren.
Folgen Sie den Anweisungen auf dem Bildschirm.
Wählen Sie als Verbindungstypen die Verbindung
zwischen Netzwerk und HP All-in-One (nicht
zwischen Computer und Netzwerk) aus.
Netzwerkfehlerbehebung
DE
Problem: Bei der Ausführung des Wireless-Einrichtungsassistenten wird die Fehlermeldung Ungültiger
WEP-Schlüssel oder Ungültiger WPA-Kennwortschlüssel angezeigt.
Lösung:
Möglicherweise haben Sie den WEP-Schlüssel oder den WPA-Kennwortschlüssel falsch eingegeben. Bei
•
der Eingabe dieser Sicherheitsschlüssel ist auf die Groß- und Kleinschreibung zu achten. Überprüfen Sie,
ob Sie am Anfang oder Ende des Schlüssels versehentlich Leerzeichen eingegeben haben.
Falls Sie den vom Hersteller Ihres drahtlosen Routers bereitgestellten Standardnetzwerknamen (SSID)
•
verwenden, versucht das HP All-in-One möglicherweise, eine Verbindung mit einem anderen drahtlosen
Router in Ihrer Umgebung herzustellen, der den gleichen Netzwerknamen verwendet. Stellen Sie sicher,
dass der Netzwerkname eindeutig ist.
12 • HP Photosmart C7280 HP All-in-One series
Page 13

www.hp.com/support
EN
Problem: After you run the Wireless Setup Wizard from the HP All-in-One control panel, the HP All-in-One
cannot connect to the network.
Action:
You can print a diagnostic report that may help identify the problem. Run the Wireless Network Test from
•
the HP All-in-One control panel Network Menu.
If you entered your network name (SSID) manually using the Wireless setup Wizard , you may have not
•
typed the name correctly. Run the Wireless Setup Wizard again, and make sure you type the network
name correctly.
If you are using the default network name (SSID) provided by your wireless router manufacturer, your
•
HP All-in-One may be trying to connect to another wireless router in your neighborhood that uses the
same network name. Make sure your network name is unique.
The signal between your HP All-in-One and your wireless router may be weak. Try moving the
•
HP All-in-One closer to your wireless router and avoid obstructions such as walls or large metal cabinets.
There may be inference from other devices preventing the HP All-in-One from connecting. Any wireless
•
device that uses 2.4GHZ can cause interference (including microwaves). Make sure these devices are not
in use during the HP All-in-One installation.
Your wireless router may need to be reset. Turn off your wireless router for 30 seconds and then turn it
•
back on. Then run the Wireless Setup Wizard on your HP All-in-One.
DE
Problem: Nach der Ausführung des Wireless-Einrichtungsassistenten über das Bedienfeld des HP All-in-One
kann das HP All-in-One keine Verbindung mit dem Netzwerk herstellen.
Lösung:
Drucken Sie einen Diagnosebericht aus, der Ihnen eventuell bei der Identifi zierung der Fehlerursache hilft.
•
Führen Sie am Bedienfeld des HP Photosmart aus dem Menü „Netzwerk“ den Wireless-Netzwerktest aus.
Vielleicht haben Sie sich bei der manuellen Eingabe des Netzwerknamens (SSID) im
•
Wireless-Einrichtungsassistenten verschrieben. Führen Sie den Wireless-Einrichtungsassistenten erneut
aus, und stellen Sie dabei sicher, dass Sie den Netzwerknamen richtig eingeben.
Falls Sie den vom Hersteller Ihres drahtlosen Routers bereitgestellten Standardnetzwerknamen (SSID)
•
verwenden, versucht das HP All-in-One möglicherweise, eine Verbindung mit einem anderen drahtlosen
Router in Ihrer Umgebung herzustellen, der den gleichen Netzwerknamen verwendet. Stellen Sie sicher,
dass der Netzwerkname eindeutig ist.
Eventuell ist das Signal zwischen dem HP All-in-One und Ihrem drahtlosen Router nur schwach. Versuchen
•
Sie, das HP All-in-One näher am drahtlosen Router aufzustellen. Achten Sie besonders auch darauf, dass
das Signal keine Hindernisse wie Wände oder große Metallschränke zu überwinden hat.
Möglicherweise verhindern Störsignale anderer Geräte den Verbindungsaufbau. Jedes drahtlose
•
Gerät, das auf der Frequenz 2,4 GHz läuft, kann Störungen verursachen (hierzu gehören auch
Mikrowellengeräte). Stellen Sie sicher, dass diese Geräte während der Installation des HP All-in-One nicht
in Betrieb sind.
Eventuell muss der drahtlose Router zurückgesetzt werden. Schalten Sie den drahtlosen Router aus, und
•
warten Sie etwa 30 Sekunden, bis Sie ihn wieder einschalten. Führen Sie danach den
Wireless-Einrichtungsassistenten auf dem HP All-in-One aus.
HP Photosmart C7280 HP All-in-One series • 13
Page 14

EN
Problem: While you install the HP All-in-One software, you see the error message Printer Not Found .
Action:
The HP All-in-One may not be connected to your network. For a wireless connection, make sure you have
•
run the Wireless Setup Wizard from the control panel before continuing with the software installation. For
a wired Ethernet connection, check all cable connections between the HP All-in-One, the router, and your
PC.
Try temporarily disabling any fi rewall, anti-spyware, or anti-virus software you may be currently running
•
on your PC.
DE
Problem: Während der Installation der HP All-in-One Software wird die Fehlermeldung Drucker nicht
gefunden angezeigt.
Lösung:
Das HP All-in-One ist eventuell nicht mit dem Netzwerk verbunden. Stellen Sie bei einer drahtlosen
•
Verbindung sicher, dass Sie vor der Softwareinstallation über das Bedienfeld den WirelessEinrichtungsassistenten ausgeführt haben. Überprüfen Sie bei einer drahtgebundenen Ethernet-Verbindung
die Kabelverbindungen zwischen dem HP All-in-One, dem Router und dem Computer.
Deaktivieren Sie vorübergehend die auf dem Computer installierte Firewall oder die Anti-Spyware- und
•
Virenschutz-Software, um festzustellen, ob das Problem dadurch verursacht wird.
EN DE
Explore the features
EN DE
Now that your HP Photosmart software
program is installed on your computer, you can
try out one of the features on the HP All-in-One.
EN DE
Print a 4 x 6 inch photo
EN
a
Erkunden der Funktionen
Jetzt ist das HP Photosmart-Softwareprogramm auf
Ihrem Computer installiert, und Sie können bereits
die erste Funktion des HP All-in-One ausprobieren.
Drucken eines Fotos im Format
10 x 15 cm
If you have not already done so, load photo paper
a.
in the photo tray. (See step 11 .)
Insert the memory card from your camera into the
b.
appropriate memory card slot.
b
14 • HP Photosmart C7280 HP All-in-One series
DE
Legen Sie Fotopapier in das Fotofach ein, falls Sie
a.
dies nicht bereits getan haben. (Siehe Schritt 11 .)
Setzen Sie die Speicherkarte Ihrer Kamera in den
b.
entsprechenden Speicherkartensteckplatz ein.
Page 15

c. d.
Photosmart Express
View
Print Create Share Save
e. f. g.
EN
When the Photosmart Express menu appears
c.
in the color graphics display, press OK to
select View .
Press the arrow buttons to view the desired
d.
photo, then press OK to display the selected
photo.
Press OK to display photo options.
e.
Press OK to preview the selected photo.
f.
Press OK to print the photo.
g.
DE
Wenn das Photosmart Express-Menü in der
c.
Farbanzeige erscheint, drücken Sie OK , um
Anzeigen auszuwählen.
Drücken Sie die Pfeilschaltfl ächen, um das
d.
gewünschte Foto anzuzeigen, und drücken Sie
dann OK , um das ausgewählte Foto anzuzeigen.
Drücken Sie OK , um Fotooptionen anzuzeigen.
e.
Drücken Sie OK , um eine Vorschau des
f.
ausgewählten Fotos anzuzeigen.
Drücken Sie die Taste OK , um das Foto zu
g.
drucken.
HP Photosmart C7280 HP All-in-One series • 15
Page 16

EN DE
Explore more features
Erkunden weiterer Funktionen
EN
Printable School Papers : Did you know you can
print school papers from your HP All-in-One? Print
notebook paper, graph paper, task checklists, or
even music paper from the control panel. Press
(Setup) to access Printable School Papers.
DE
Druckbare Schulunterlagen : Wussten Sie, dass
Sie an Ihrem HP All-in-One Schulunterlagen
drucken können? Über das Bedienfeld können Sie
Notizpapier, Diagrammpapier, Checklisten und
sogar Notenpapier drucken. Drücken Sie
(Einrichtung) , um auf „Druckbare Schulunterlagen“
zuzugreifen.
EN DE
For more information, see the HP Photosmart
C7280 All-in-One series Basics Guide, as
well as the onscreen help, which provides
detailed instructions on using all features of the
HP All-in-One.
© 2007 Hewlett-Packard Development Company, L.P.
Printed in ()
Weitere Informationen zu dieser Funktion fi nden
Sie im HP Photosmart C7280 All-in-One seriesGrundlagenhandbuch wie auch in der OnlineHilfe des Produkts, in der sämtliche Funktionen von
HP All-in-One ausführlich beschrieben werden.
*CC564-90044*
*CC564-90044*
CC564-90044
 Loading...