

Page 1
HP Photosmart C4400 All-in-One series
1
從此處開始
시작
从这里开始
Start Here
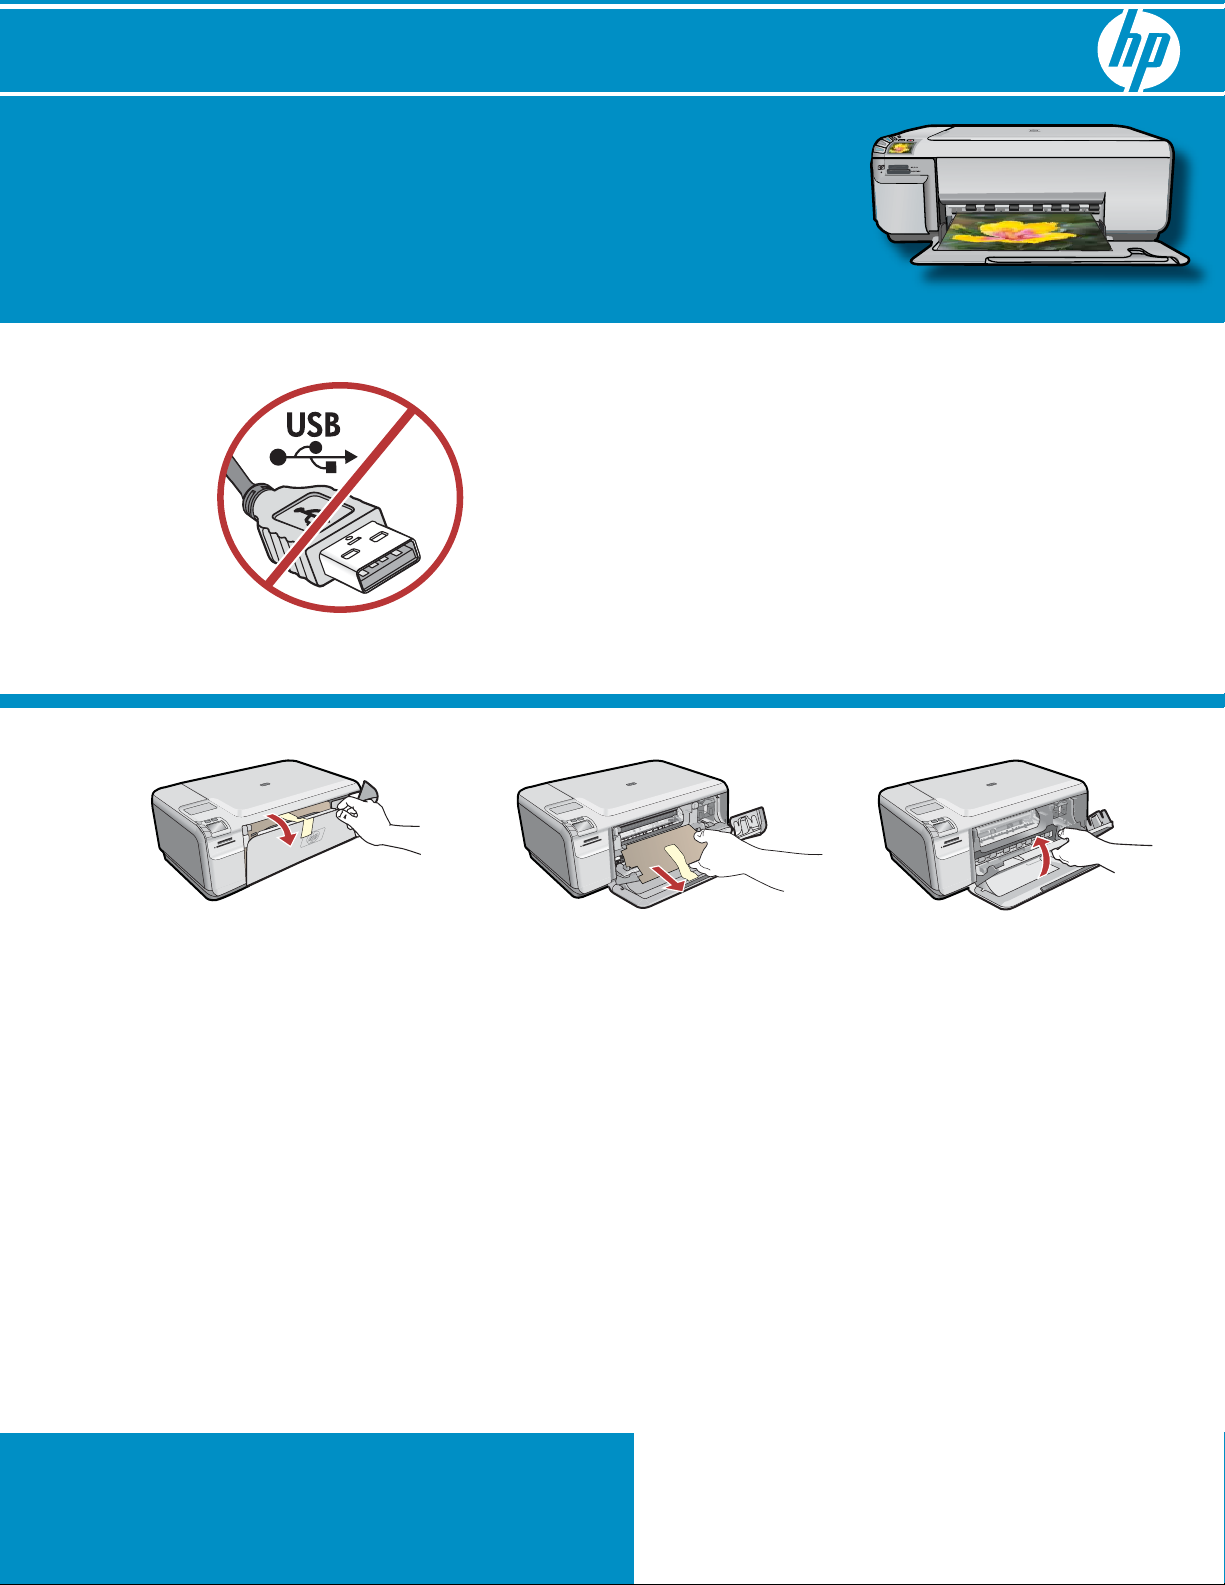
重要事項: 請勿連接 USB 纜線,除非進行到
第 11 步 時系統出現提示。
중요: 스텝 11 이 시작되기 전에는 USB
케이블의 연결을 해제하지 마십시오.
注意: 请勿连接 USB 线,除非进行到 第 11 步
时系统出现提示。
IMPORTANT: Do not connect the USB cable
until prompted in Step 11 .
2
abc
放下纸盒和墨盒门。
放下紙匣和列印墨匣門。
a.
拆掉裝置的所有包裝材料並撕掉保護膜。
b.
如果彩色圖形顯示器上貼有貼紙,
請將其撕掉。
關閉列印墨匣門。
c.
용지함 및 잉크 카트리지 덮개를 모두
a.
내립니다.
장치에서 모든 포장재와 보호 필름을
b.
제거합니다. 컬러 그래픽 화면에 스티커가
있으면, 제거하십시오.
잉크 카트리지 덮개를 닫습니다.
c.
a.
取下设备上的所有包装材料及保护膜。
b.
如果彩色图形显示屏上贴有标签,
请撕下该标签。
关闭墨盒门。
c.
Lower both the paper tray and the print
a.
cartridge door.
Remove all packing material and protective
b.
fi lm from the device. If there is a sticker on
the color graphics display, remove it.
Close the print cartridge door.
c.
*Q8383-90062*
*Q8383-90062*
Q8383-90062
Page 2
3
4
HP Photosmart C4400 series
Basics Guide
*
a
*
檢查包裝盒中的物品。其中的物品可能有所不同。
*可能包含
상자의 내용물을 확인합니다. 상자의 내용물이 다를
수 있습니다.
*포함되어 있을 수도 있습니다.
检查包装盒内的物品。包装盒内的物品可能有所不同。
*可能包含
Verify the box contents. The contents of your box
may differ.
*May be included
接上電源線與轉接器。
a.
按
b.
a.
b.
開啟 HP All-in-One。
注意︰ 安裝過程中,請注意顯示器上出現的有
用訊息。
전원 코드와 어댑터를 연결합니다.
를 눌러 HP All-in-One을 켭니다.
참고: 설치 과정 중 화면에 나타나는 도움
메시지에 주의를 기울이십시오.
5
b
如果系統提示您設定語言和國家/地區,
•
請使用方向鍵從語言清單中選取您的語言,
然後按 「OK」 進行確認。選取您所在的
國家/地區,按 「OK」 進行確認。
如果系統提示您安裝列印墨匣,請轉至本
•
指南中的下一步。
언어 및 국가/지역을 설정하라는 메시지가
•
나타나면, 화살표를 이용하여 언어 목록에
서 언어를 선택한 후, OK(확인) 를 눌러 확인
합니다. 국가/지역을 선택한 후 OK(확인) 를
눌러 확인합니다.
잉크 카트리지를 설치하라는 메시지가 나타
•
나면, 이 지침의 다음 단계로 넘어갑니다.
a.
连接电源线和适配器。
b.
a.
b.
•
•
•
•
启动 HP All-in-One。
按
注: 安装过程中,请注意显示屏上出现的有
用信息。
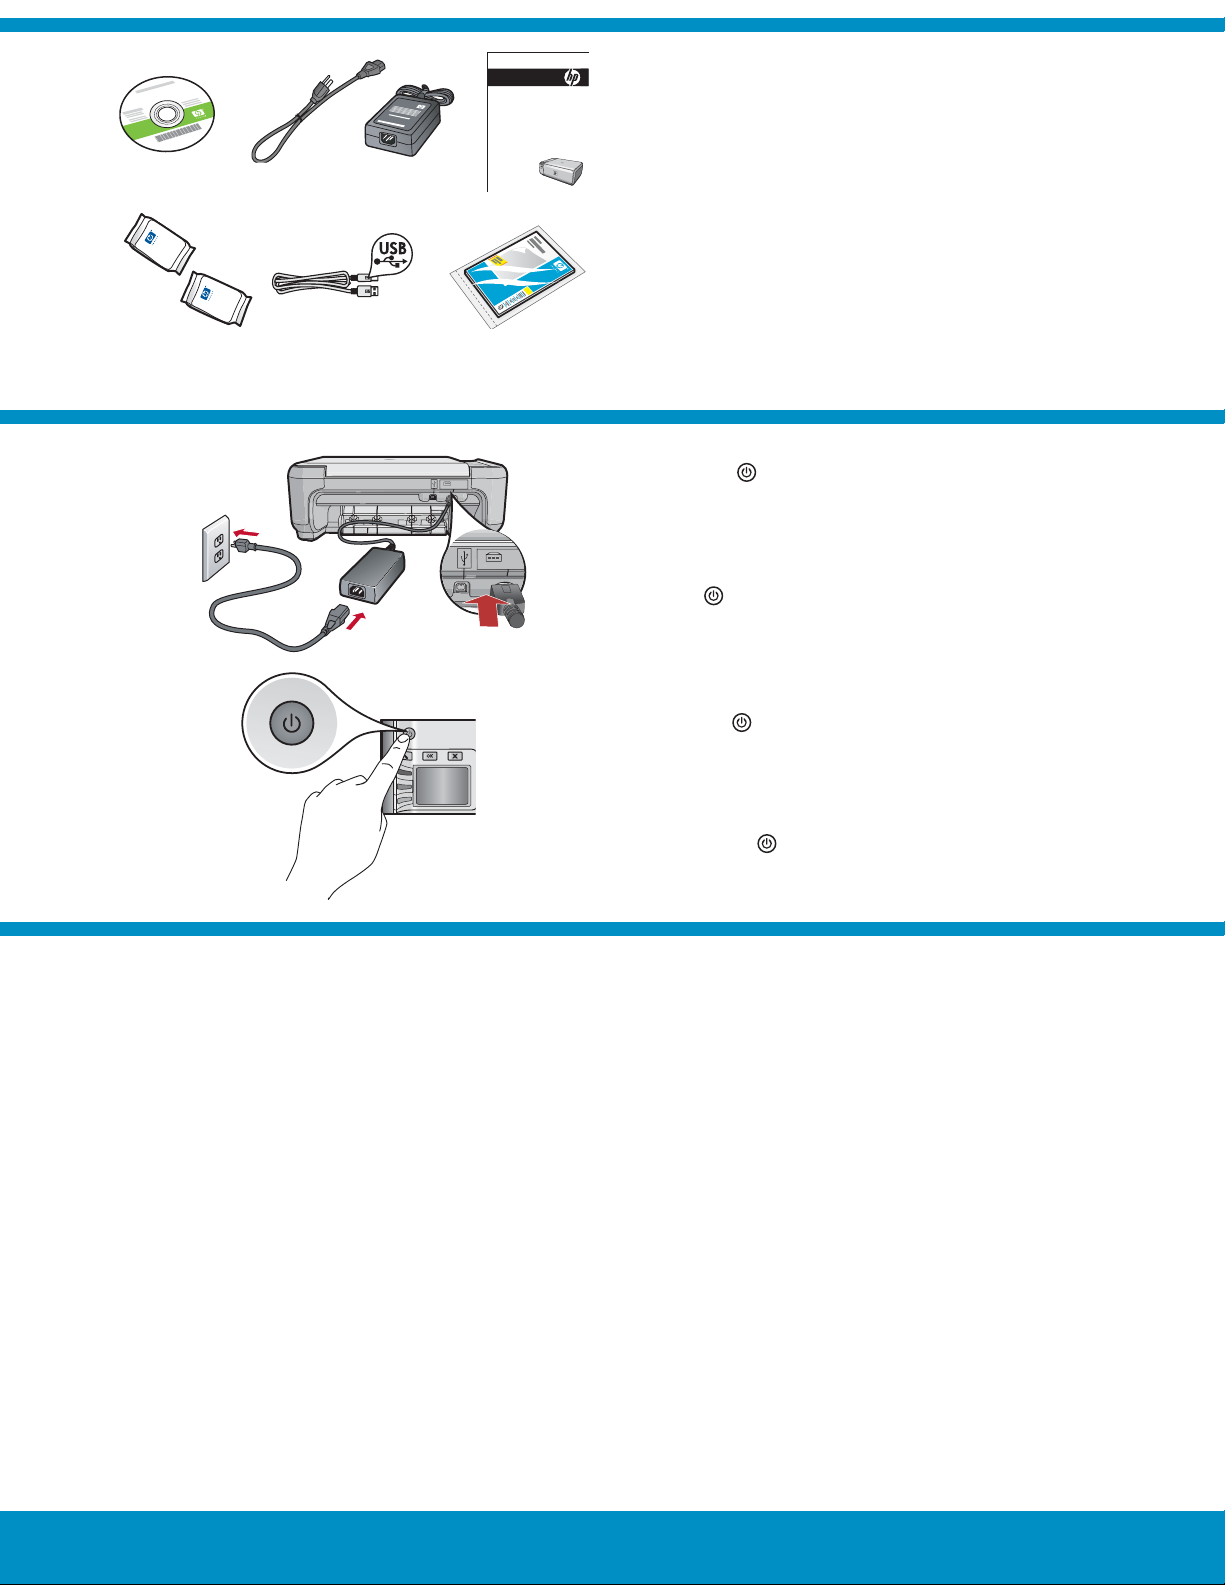
Connect the power cord and adapter.
Press to turn on the HP All-in-One.
NOTE: Pay attention to the helpful messages in the
display during the setup process.
如果系统提示您设置语言和国家/地区,
请使用箭头从语言列表中选择所需要的语言,
然后按“ OK ”进行确认。选择国家/地区,
按“ OK ”确认。
如果系统提示您安装墨盒,请转至本手册的
下一步。
If a prompt appears asking you to set the
language and country/region, use the arrows to
select your language from the list of languages,
press OK to confi rm. Select your country/region,
press OK to confi rm.
If a prompt appears asking you to install print
cartridges, go to the next step in this guide.
2 • HP Photosmart C4400 All-in-One series
Page 3
6
打開列印墨匣門,確定列印滑動架移到右側。
如果未移到右側,請關閉裝置,然後再重新開啟。
重要事項: 必須開啟裝置電源,才能插入墨匣。
잉크 카트리지 덮개를 엽니다. 인쇄 캐리지가 오른
쪽으로 움직이는지 확인합니다. 오른쪽으로 움직
이지 않으면 장치 전원을 끈 다음 다시 켭니다.
중요: 카트리지를 넣으려면 장치 전원을 켜야
합니다.
打开墨盒门,确保墨盒托架移到右侧。如果墨盒托
架未移到右侧,请关闭设备,然后再将其打开。
注意: 必须打开电源才能放入墨盒。
7
Open the print cartridge door. Make sure the print
carriage moves to the right. If it does not move to the
right, turn the device off, then turn it back on again.
IMPORTANT: The device must be turned on to insert
cartridges.
撕掉兩個墨匣上的膠帶。
注意: 請勿接觸銅色的接點或將膠帶重新貼回墨匣。
양쪽 카트리지에서 테이프를 제거합니다.
주의: 구리판을 만지거나 카트리지에 테이프를
다시 붙이지 마십시오.
将两个墨盒上的胶带取下。
警告: 请勿触摸铜色触点或将胶带重新贴回墨盒上。
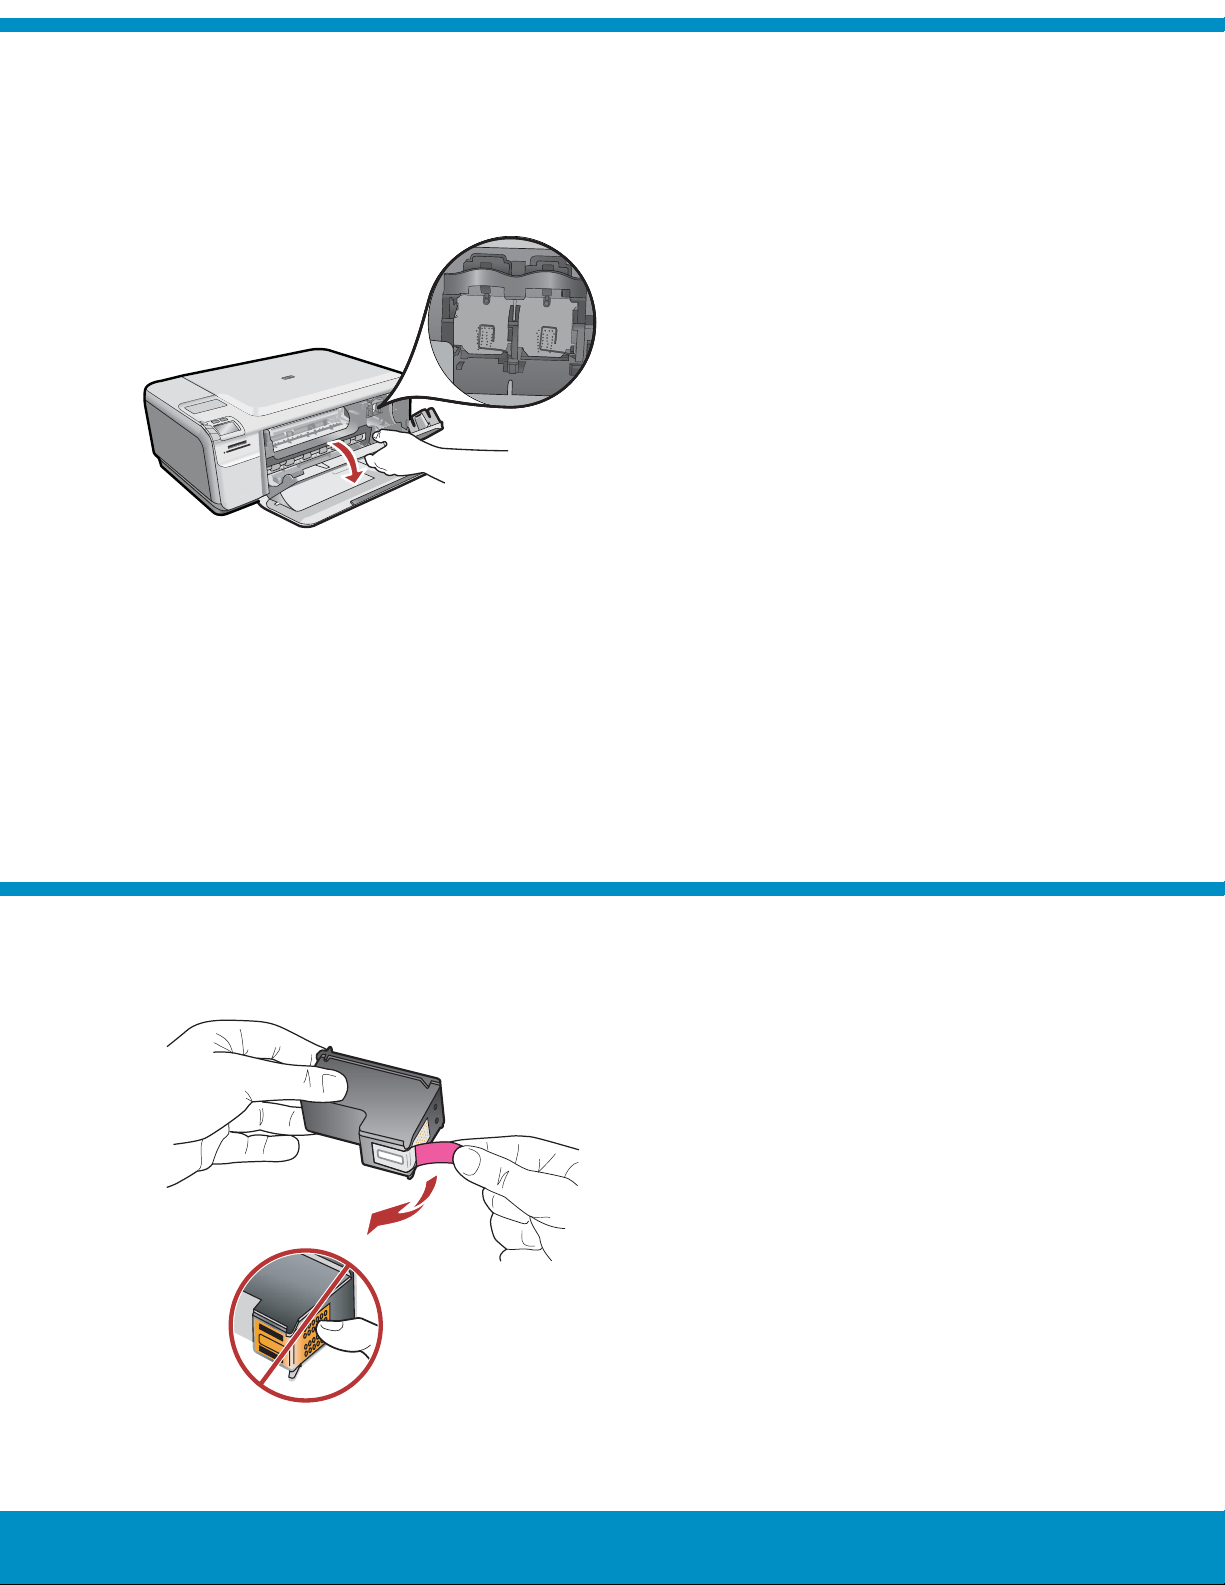
Remove the tape from both cartridges.
CAUTION: Do not touch the copper-colored contacts
or re-tape the cartridges.
HP Photosmart C4400 All-in-One series • 3
Page 4

8
使 HP 標誌朝上,握住墨匣。
a.
將 三色 墨匣插入 左側墨匣插槽 ,而將 黑色 墨匣插入
b.
右側墨匣插槽 。
確定將墨匣 穩固地 推入插槽,直到 固定 為止。
c.
關閉列印墨匣門。
d.
當系統提示您確認安裝原廠 HP 列印墨匣時,
e.
按 「OK」 。
HP 로고를 위쪽으로 오게 하여 카트리지를
a.
잡습니다.
컬러 카트리지를 왼쪽 카트리지 슬롯 에 끼우고
b.
흑백 카트리지를 오른쪽 카트리지 슬롯 에
끼웁니다.
카트리지를 슬롯 안으로 견고히 밀어 넣어
c.
제자리에 장착 합니다.
잉크 카트리지 덮개를 닫습니다.
d.
HP 정품 잉크 카트리지를 설치하는 것을 확인하면,
e.
OK(확인
) 를 누릅니다.
使 HP 徽标朝上,握住墨盒。
a.
将 三色 墨盒放入 左侧墨盒插槽 ,而将 黑色 墨盒放入
b.
右侧墨盒插槽 。
务必 用力 推入墨盒,直到其 卡入到位 。
c.
关闭墨盒门。
d.
系统提示您确认安装原装 HP 墨盒时,按“ OK ”。
e.
Hold the cartridges with the HP logo on top.
a.
Insert the tri-color cartridge in the left cartridge slot
b.
and the black cartridge in the right cartridge slot .
Make sure you push the cartridges in fi rmly until
c.
they snap into place .
Close the print cartridge door.
d.
Press OK when prompted to confi rm the installation
e.
of genuine HP print cartridges.
4 • HP Photosmart C4400 All-in-One series
Page 5

9
拉出紙匣延伸架,並放入普通白紙。按 「OK」 。
용지함 확장대를 당긴 후 일반 용지를 넣습니다.
OK(확인) 를 누릅니다.
拉出纸盒延长板,然后放入普通白纸。按“ OK ”。
Pull out the tray extender, and then load plain
white paper. Press OK .
10
請依照顯示器上的指示列印校正頁。
a.
抬起蓋板。將校正頁正面向下放在玻璃
b.
板上,使紙張頂部貼近右前角。合上蓋板。
按 「OK」 。
c.
화면의 지침을 따라 정렬 페이지를
a.
인쇄합니다.
덮개를 들어올립니다. 정렬 페이지의 윗
b.
부분이 유리의 앞쪽 오른쪽 모서리와 마주
보도록 배치합니다. 덮개를 닫습니다.
OK(확인) 를 누릅니다.
c.
按照显示屏上的提示打印校准页。
a.
打开盖子。将校准页正面朝下,顶部贴着玻璃板
b.
的右前角,放在玻璃板上。盖上盖子。
按“ OK ”。
c.
Follow the instructions on the display to print the
a.
alignment page.
Lift the lid. Place the top of the alignment page
b.
face down in the front right corner of the glass.
Close the lid.
Press OK .
c.
HP Photosmart C4400 All-in-One series • 5
Page 6

11 - Windows
A B
注意︰ 在系統出現提示之前,請勿連接 USB 纜線。
打開電腦的電源,必要時請登入,接著等候桌面
出現。插入 綠色 CD,並依照螢幕上的指示進行。
重要事項: 如果啟動畫面沒有出現,請連按兩下
「我的電腦」 ,再連按兩下有 HP 標誌的 「CD-ROM」
圖示,然後連按兩下 「setup.exe」 。
참고: 메시지가 나타날 때까지 USB 케이블의
연결을 해제하지 마십시오.
컴퓨터의 전원을 켜고 필요한 경우 로그인한
후 바탕 화면이 나타날 때까지 기다립니다.
녹색 CD를 넣고 화면의 지침에 따릅니다.
중요: 시작 화면이 나타나지 않으면 내 컴퓨터 ,
HP 로고가 있는 CD-ROM 아이콘 및 setup.exe 를
차례로 두 번씩 누릅니다.
注: 请勿连接 USB 线,除非系统出现提示。
启动计算机,登录(如有必要),然后等待桌
面出现。放入 绿色 CD,然后按照屏幕说明进
行操作。
注意: 如果没有出现启动屏幕,请依次双击
“ 我的电脑 ”,带 HP 徽标的“ CD-ROM ”图标和
“ setup.exe ”。
出現 USB 提示時,將 USB 纜線一頭連接到
a.
HP All-in-One 後方的連接埠,然後將另一頭
連接到電腦上的任何一個 USB 連接埠。
依照螢幕上的指示完成軟體安裝。
b.
USB 연결 메시지가 나타나면 USB 케이블을
a.
HP All-in-One 뒷면의 포트와 컴퓨터의 USB
포트에 차례로 연결합니다.
화면의 지시에 따라 소프트웨어 설치를
b.
완료합니다.
出现 USB 提示后,请将 USB 线的一端连接到
a.
HP All-in-One 背面的端口,然后将另一端连
接到计算机的任意一个 USB 端口。
按照屏幕上的说明完成软件安装。
b.
NOTE: Do not connect the USB cable until
prompted.
Turn on your computer, login if necessary, and
then wait for the desktop to appear. Insert the
green CD and follow the onscreen instructions.
IMPORTANT: If the startup screen does not
appear, double-click My Computer , double-click
the CD-ROM icon with the HP logo, and then
double-click setup.exe .
6 • HP Photosmart C4400 All-in-One series
Once the USB prompt appears, connect
a.
the USB cable to the port on the back of the
HP All-in-One, and then to any USB port on
the computer.
Follow the onscreen instructions to complete
b.
the software installation.
Page 7

11 - Mac
A
將 USB 纜線一頭連接到 HP All-in-One 後方的
連接埠,然後將另一頭連接到電腦上的任何一個
USB 連接埠。
USB 케이블을 HP All-in-One의 뒷면 포트와
컴퓨터의 USB 포트에 차례로 연결합니다.
B
插入 綠色 CD。
a.
連按兩下桌面上的 HP Photosmart CD 圖示。
b.
連按兩下
c.
圖示,依照螢幕上的指示進行。
完成 「Setup Assistant」 (安裝小幫手) 畫面上
d.
的所有操作。
녹색 CD를 넣습니다.
a.
데스크탑의 HP Photosmart CD 아이콘을
b.
더블클릭합니다.
HP Installer 아이콘을 더블클릭합니다.
c.
화면의 지시에 따릅니다.
Setup Assistant(설치 길잡이) 화면을
d.
완료합니다.
「HP Installer」 (HP 安裝程式)
将 USB 线的一端连接到 HP All-in-One 背面的
端口,然后将另一端连接到计算机的任意一个
USB 端口。
Connect the USB cable to the port on the back
of the HP All-in-One, and then to any USB port
on the computer.
放入 绿色 CD。
a.
双击桌面上的 HP Photosmart CD 图标。
b.
双击“ HP Installer ”图标,按照屏幕上的说明
c.
进行操作。
完成“ 安装助手 ”屏幕上的所有操作。
d.
Insert the green CD.
a.
Double-click the HP Photosmart CD icon on
b.
the desktop.
Double-click the HP Installer icon. Follow the
c.
onscreen instructions.
Complete the Setup Assistant screen.
d.
HP Photosmart C4400 All-in-One series • 7
Page 8

疑難排解
疑难排解
문제 해결
Troubleshooting
www.hp.com/support
問題: (Windows) 顯示 Microsoft「新增硬體」畫面。
動作: 關閉所有畫面。拔掉 USB 纜線,再插入綠色
HP All-in-One CD。
문제: (Windows) Microsoft 하드웨어 추가 화면이 나타납니다.
해결: 모든 화면을 취소합니다. USB 케이블을 뽑고 녹색
HP All-in-One CD를 넣습니다.
问题: (Windows) 显示 Microsoft“添加硬件”屏幕。
解决办法: 取消所有屏幕操作。拔掉 USB 线,然后放入绿色
HP All-in-One CD。
Problem: (Windows) The Microsoft Add Hardware screen appears.
Action: Cancel all screens. Unplug the USB cable, and then insert
the green HP All-in-One CD.
問題: (僅適用 Windows) 顯示 「裝置安裝無法順利完成」 畫面。
動作: 拔掉裝置插頭再重新插上。檢查所有連線,確定 USB 纜線已插
到電腦。請勿將 USB 纜線插到鍵盤或是未開啟電源的 USB 集線器。
문제: (Windows만 해당) 장치 설치를 완료할 수 없습니다 화면이
표시됩니다.
해결: 장치의 전원 코드를 뽑았다가 다시 꽂습니다. 모든 연결을 확인
합니다. 특히 USB 케이블이 컴퓨터에 연결되어 있는지 확인합니다.
USB 케이블을 키보드나 전원이 들어오지 않은 USB 허브에 연결하지
마십시오.
问题: (仅适用于 Windows)显示“ 设备安装失败 ”屏幕。
解决办法: 断开设备连接,然后再重新连接。检查所有连接,确保 USB
线已插入计算机。请不要将 USB 线插在键盘或无源 USB 集线器上。
Problem: (Windows only) The Device Setup Has Failed To Complete
screen appears.
Action: Unplug the device and plug it in again. Check all connections.
Make sure the USB cable is plugged into the computer. Do not plug the
USB cable into a keyboard or a non-powered USB hub.
© 2007 Hewlett-Packard Development Company, L.P.
Printed in () Printed in ()
Printed in ()
 Loading...