

Page 1

HP SureStore
CD-Writer Plus
User’s Guide
for your internal drive
Hewlett-Packard Company, 800 S. Taft Ave., Loveland, CO 80537
C4392-90100
Copyright 1998. Hewlett-Packard Company. All rights reserved.
Hewlett-Packard is a registered trademark of the Hewlett-Packard Company. Microsoft and Windows are U.S. registered
trademarks of Microsoft Corporation. Pentium is a U.S. registered trademark of Intel Corp. Names of products mentioned
herein are used for identification purposes only and may be trademarks and/or registered trademarks of their respective
company.
Printed in USA.
Page 2

ii
Table of Contents
Chapter 1: Installing CD-Writer Plus and Software
What’s in the Package . . . . . . . . . . . . . . . . . . . . . . . . . . . . . . . . . . . . . . 1-1
Tools You’ll Need. . . . . . . . . . . . . . . . . . . . . . . . . . . . . . . . . . . . . . . . . . 1-2
Before You Begin . . . . . . . . . . . . . . . . . . . . . . . . . . . . . . . . . . . . . . . . . . 1-2
Installing a CD-Writer Plus in an Empty Drive Bay . . . . . . . . . . . . . . . 1-3
Replacing an Existing CD-ROM Drive With a CD-Writer Plus . . . . . . 1-20
Installing Software: Windows 95, Windows 98, or Windows NT 4.0. 1-34
Uninstalling the Software . . . . . . . . . . . . . . . . . . . . . . . . . . . . . . . . . . 1-34
If You Have Problems. . . . . . . . . . . . . . . . . . . . . . . . . . . . . . . . . . . . . . 1-35
Chapter 2: Using Your CD-Writer Plus
Using CDs. . . . . . . . . . . . . . . . . . . . . . . . . . . . . . . . . . . . . . . . . . . . . . . . 2-1
Maintenance . . . . . . . . . . . . . . . . . . . . . . . . . . . . . . . . . . . . . . . . . . . . . 2-4
Identifying CD-Writer Plus’s Drive Letter . . . . . . . . . . . . . . . . . . . . . . . 2-4
Chapter 3: Problem Solving
Things to Try First . . . . . . . . . . . . . . . . . . . . . . . . . . . . . . . . . . . . . . . . . 3-1
Common Symptoms . . . . . . . . . . . . . . . . . . . . . . . . . . . . . . . . . . . . . . . 3-2
Solutions to Some Common Symptoms . . . . . . . . . . . . . . . . . . . . . . . . 3-3
Chapter 4: Sharing Your CDs
Varying Formats. . . . . . . . . . . . . . . . . . . . . . . . . . . . . . . . . . . . . . . . . . . 4-1
Sharing CDs across Different Formats. . . . . . . . . . . . . . . . . . . . . . . . . . 4-1
Chapter 5: Making Data CDs
Making Data CDs to Use on Your Own Computer. . . . . . . . . . . . . . . . 5-1
Making Data CDs to Use on Different Types of Computers . . . . . . . . . 5-6
Getting Help. . . . . . . . . . . . . . . . . . . . . . . . . . . . . . . . . . . . . . . . . . . . . . 5-8
Page 3

Chapter 6: Making Music CDs
Starting EasyCDCreator . . . . . . . . . . . . . . . . . . . . . . . . . . . . . . . . . . . . 6-1
Making a Music CD . . . . . . . . . . . . . . . . . . . . . . . . . . . . . . . . . . . . . . . . 6-2
Modifying Your CD Layout . . . . . . . . . . . . . . . . . . . . . . . . . . . . . . . . . . 6-8
Playing Music CDs. . . . . . . . . . . . . . . . . . . . . . . . . . . . . . . . . . . . . . . . . 6-9
Getting Help. . . . . . . . . . . . . . . . . . . . . . . . . . . . . . . . . . . . . . . . . . . . . 6-10
Chapter 7: Making Inserts and Labels
How to Make a Jewel Case Insert or a Label . . . . . . . . . . . . . . . . . . . . . 7-2
Getting Help. . . . . . . . . . . . . . . . . . . . . . . . . . . . . . . . . . . . . . . . . . . . . . 7-9
Chapter 8: Copying CDs
What Types of CDs Can I Copy?. . . . . . . . . . . . . . . . . . . . . . . . . . . . . . 8-1
Starting CDCopier. . . . . . . . . . . . . . . . . . . . . . . . . . . . . . . . . . . . . . . . . 8-2
Making a Copy of a CD . . . . . . . . . . . . . . . . . . . . . . . . . . . . . . . . . . . . . 8-3
Getting Help. . . . . . . . . . . . . . . . . . . . . . . . . . . . . . . . . . . . . . . . . . . . . . 8-5
iii
Chapter 9: HP Simple Trax
Welcome to HP Simple Trax . . . . . . . . . . . . . . . . . . . . . . . . . . . . . . . . . 9-1
Protecting Files and Folders Immediately . . . . . . . . . . . . . . . . . . . . . . . 9-2
Creating a Protection List . . . . . . . . . . . . . . . . . . . . . . . . . . . . . . . . . . . 9-3
Scheduling a Protection Session to Run Automatically . . . . . . . . . . . . 9-4
Retrieving Protected Files and Folders. . . . . . . . . . . . . . . . . . . . . . . . . . 9-6
Searching the HP Simple Trax Information Vault . . . . . . . . . . . . . . . . . 9-9
Reconstructing the HP Simple Trax Information Vault . . . . . . . . . . . 9-11
Importing CDs into HP Simple Trax . . . . . . . . . . . . . . . . . . . . . . . . . . 9-11
HP Simple Trax Control Panel Overview. . . . . . . . . . . . . . . . . . . . . . . 9-12
Chapter 10: HP Disaster Recovery
Getting Started. . . . . . . . . . . . . . . . . . . . . . . . . . . . . . . . . . . . . . . . . . . 10-1
Testing your Disaster Recovery Set . . . . . . . . . . . . . . . . . . . . . . . . . . . 10-3
Recovering Your Data . . . . . . . . . . . . . . . . . . . . . . . . . . . . . . . . . . . . . 10-4
HP Disaster Recovery Glossary. . . . . . . . . . . . . . . . . . . . . . . . . . . . . . . 10-8
Page 4

iv
Appendix A: Technical Information
Minimum System Requirements . . . . . . . . . . . . . . . . . . . . . . . . . . . . . . A-1
What Affects System Performance. . . . . . . . . . . . . . . . . . . . . . . . . . . . . A-2
Drive Specifications . . . . . . . . . . . . . . . . . . . . . . . . . . . . . . . . . . . . . . . . A-3
Appendix B: Customer Support
Before You Call HP. . . . . . . . . . . . . . . . . . . . . . . . . . . . . . . . . . . . . . . . . B-1
HP Customer Support . . . . . . . . . . . . . . . . . . . . . . . . . . . . . . . . . . . . . . B-5
Returning a Drive. . . . . . . . . . . . . . . . . . . . . . . . . . . . . . . . . . . . . . . . . . B-8
Page 5

v
Product Certifications
UL, cUL, TÜV, CE, C-Tick, meets or exceeds FCC Class B Requirements
Laser: CDRH
Laser Safety
This unit employs a laser. Do not remove the cover or attempt to service this device when
connected due to the possibility of eye damage.
Laser-Sicherheit
In das Gerät ist ein Laser eingebaut. Nehmen Sie die Abdeckung nicht ab und versuchen Sie
nicht, das Gerät zu reparieren, solange es angeschlossen ist. Es besteht die Gefahr einer
Augenverletzung.
CAUTION
Use of controls or adjustments or performance of procedures other than those specified herein
may result in hazardous laser radiation exposure.
WARNUNG
Die Vornahme von Regelungen oder Einstellungen oder die Durchführung von Verfahren, die
nicht in diesem Dokument angegeben sind, kann eine gefährliche Einwirkung von
Laserstrahlung zur Folge haben.
Class 1 Laser Product
Klass 1 Laserapparat
Luokan 1 Laserlaite
Klasse 1 Laser-Produkt
DANGER: INVISIBLE LASER RADIATION WHEN OPEN. AVOID DIRECT EXPOSURE TO BEAM.
DANGER: RADIATIONS INVISIBLES DU LASER EN CAS D’OUVERTURE. EVITER TOUT
EXPOSITION DIRECTE AU FAISCEAU.
VORSICHT: UNSICHTBARE LASERSTRAHLUNG, WENN ABDECKUNG GEÖFFNET. NICHT
DEM STRAHL AUSSETZEN.
ADVARSEL: USYNLIG LASERSTRÅLING VED ÅBNING. UNDGÅ UDS/ETTELSE FOR STRÅLING.
ADVARSEL: USYNLIG LASERSTRÅLING NÅR DEKSEL ÅPNES. UNNGÅ EKSPONERING FOR
STRÅLEN.
VARNING: OSYNLIG LASERSTRÅLNING NÄR DENNA DEL ÄR ÖPPNAD. STRÅLEN ÄR FARLIG.
VARO! NÄKYMÄTÖN AVATTAESSA OLET ALTTIINA LASERSÄTEILYLLE. ÄLÄ KATSO SÄTEESEN.
Laser
Type: Semiconductor laser GaAlAs
Wave length: 778~787 nm (at 25°C)
Output power: 2.5 mW (read), 35 mW (write)
Beam divergence: 60 degrees
Notice
Europe: This drive shall be installed only with an EN60950 (IEC950) approved power supply.
USA/Canada: This drive is for use only with IBM compatible UL listed personal computers,
weighing less than 18 kg.
Page 6

vi
Federal Communications Commission R.F. Interference Statement
WARNING: This equipment has been tested and found to comply with the limits for a Class B
digital device, pursuant to Part 15 of the FCC Rules. These limits are designed to provide
reasonable protection against harmful interference in a residential installation. This equipment
generates, uses and can radiate radio frequency energy and, if not installed and used in
accordance with the instructions, may cause harmful interference to radio communications.
However, there is no guarantee that interference will not occur in a particular installation. If this
equipment does cause harmful interference to radio or television reception, which can be
determined by turning the equipment off and on, the user is encouraged to try to correct the
interference by one or more of the following measures:
■ Reorient or relocate the receiving antenna.
■ Increase the separation between the equipment and receiver.
■ Connect the equipment into an outlet on a circuit different from that to
which the receiver is connected.
■ Consult the dealer or an experienced radio/TV technician for help.
CAUTION: Changes or modifications to this equipment not expressly approved by HewlettPackard could result in violation of Part 15 of the FCC rules.
DECLARATION OF CONFORMITY
according to ISO/IEC Guide 22 and EN 45014
Manufacturer’s Name:
Hewlett-Packard Company
Colorado Memory Systems Division
Manufacturer’s Address:
declares that the product:
Product Name:
Product Number:
Product Options:
conforms to the following Product Specifications:
Safety:
EMC:
Supplementary Information
The product herewith complies with the requirements of the EMC Directive 89/336/EEC and carries
the “CE” mark accordingly.
July 01, 1998 Nicholas Balogh, Manufacturing Manager
European contact: Your local Hewlett-Packard Sales and Service Office or Hewlett-Packard GmbH,
Department HQ-TRE, Herrenberger Stra
800 S. Taft Ave.
Loveland, Colorado 80537
HP SureStore CD-Writer Plus 8100i
C4392-56000, C4400-56000
All
EN60950 A3:1995
EN60825-1:1994
CISPR 22:1993/EN 55022:1994 Class B
EN 50082-1:1992
IEC 801-2:1991 - 4kV CD, 8kV AD
IEC 801-3:1984 - 3V/m
IEC 801-4:1988
1kV Power Lines
0.5kV Signal Lines
ENV 50140:1993 - 3V/m
FCC Part 15 Class B
AS/NZS 3548: 1995
IEC 555-2
βe 130, D-71034 Böblingen (FAX: +49-7031-143143).
Page 7
vii
FCC Declaration of Conformity
According to 47CFR, Parts 2 and 15, Class B Computer Peripherals:
This device complies with Part 15 of the FCC Rules. Operation is subject to the following two
conditions: (1) this device may not cause harmful interference (2)this device must accept any
interference received including interference that may cause undesired operations. This applies to
all product options.
Hewlett-Packard Company
Colorado Memory Systems Division
800 S. Taft Ave.
Loveland, Colorado 80537
USA
Telephone 970-635-1500
July 1, 1998
Nicholas Balogh, Manufacturing Manager
Canadian Standards Association Information Statement
INSTRUCTION TO USER:
WARNING: This component is only considered to be approved when installed in CSA certified
equipment evaluated to the standards C22.2 No. 220-M1986 or C22.2 No. 950-M89. The
operator accessibility into the end use enclosure is defined with strict accordance in the
operator's manual for the installation of components into the equipment.
BAPT Statement
Diese Ausrüstung erfüllt die Europäischen EMC-Bestimmungen für die Verwendung in folgender
/ folgenden Umgebung(en):
(Diese Ausrüstung erfüllt die Bestimmungen der Norm EN55022, Klasse B.)
■ Wohngegenden
■ Gewerbegebiete
■ Leichtindustriegebiete
Korean RRL Statement
Copyright notice for Denmark:
VIGTIGT!
Copyright ved brug af CD-Writer 8100i/e enheder solgt i Danmark
I henhold til gældende dansk lov om ophavsret er det forbudt at foretage digital kopiering af et
digitalt værk. CD-RW brænderen må derfor IKKE anvendes til at kopiere en musik-CD. CD-RW
brænderen må desuden kun benyttes til at kopiere et digitalt EDB-program, når en sådan
kopiering tjener til at fremstille et sikkerhedseksemplar af programmet eller hvor kopiering er
nødvendig, for at programmet kan anvendes efter dets formål. Hvis De selv har ophavsretten til
værket, har De også retten til at foretage digital kopiering med CD-RW brænderen.
Page 8

Hewlett-Packard Limited Warranty Statement
HP SureStore CD-Writer Plus Drive
DURATION OF LIMITED WARRANTY Hardware - 1 year Software - 90 days
1. HP warrants to you, the end-user customer, that HP hardware, accessories and
supplies will be free from defects in materials and workmanship after the date of
purchase, for the period specified above. If HP receives notice of such defects
during the warranty period, HP will, at its option, either repair or replace products
which prove to be defective. Replacement products may be either new or like-new.
2. HP warrants to you that HP software will not fail to execute its programming
instructions after the date of purchase, for the period specified above, due to
defects in material and workmanship when properly installed and used. If HP
receives notice of such defects during the warranty period, HP will replace
software media which does not execute its programming instructions due to such
defects.
3. HP does not warrant that the operation of HP products will be uninterrupted
or error free. If HP is unable, within a reasonable time, to repair or replace any
product to a condition as warranted, you will be entitled to a refund of the
purchase price upon prompt return of the product.
4. HP products may contain remanufactured parts equivalent to new in
performance or may have been subject to incidental use.
5. Warranty does not apply to defects resulting from (a) improper or inadequate
maintenance or calibration, (b) software, interfacing, parts or supplies not
supplied by HP, (c) unauthorized modification or misuse, (d) operation outside of
the published environmental specifications for the product, or (e) improper site
preparation or maintenance.
6. HP MAKES NO OTHER EXPRESS WARRANTY OR CONDITION WHETHER
WRITTEN OR ORAL. TO THE EXTENT ALLOWED BY LOCAL LAW, ANY IMPLIED
WARRANTY OR CONDITION OF MERCHANTABILITY, SATISFACTORY QUALITY,
OR FITNESS FOR A PARTICULAR PURPOSE IS LIMITED TO THE DURATION OF
THE EXPRESS WARRANTY SET FORTH ABOVE. Some countries, states or provinces
do not allow limitations on the duration of an implied warranty, so the above
limitation or exclusion might not apply to you. This warranty gives you specific
legal rights and you might also have other rights that vary from country to
country, state to state, or province to province.
viii
7. TO THE EXTENT ALLOWED BY LOCAL LAW, THE REMEDIES IN THIS
WARRANTY STATEMENT ARE YOUR SOLE AND EXCLUSIVE REMEDIES. EXCEPT
AS INDICATED ABOVE, IN NO EVENT WILL HP OR ITS SUPPLIERS BE LIABLE
FOR LOSS OF DATA OR FOR DIRECT, SPECIAL, INCIDENTAL, CONSEQUENTIAL
(INCLUDING LOST PROFIT OR DATA), OR OTHER DAMAGE, WHETHER BASED
IN CONTRACT, TORT, OR OTHERWISE. Some countries, States or provinces do
not allow the exclusion or limitation of incidental or consequential damages, so
the above limitation or exclusion may not apply to you.
FOR CONSUMER TRANSACTIONS IN AUSTRALIA AND NEW ZEALAND: THE
WARRANTY TERMS CONTAINED IN THIS STATEMENT, EXCEPT TO THE EXTENT
LAWFULLY PERMITTED, DO NOT EXCLUDE, RESTRICT OR MODIFY AND ARE IN
ADDITION TO THE MANDATORY STATUTORY RIGHTS APPLICABLE TO THE
SALE OF THIS PRODUCT TO YOU.
Page 9

ix
HP Software License Agreement
ATTENTION: USE OF THE SOFTWARE IS SUBJECT TO THE HP SOFTWARE LICENSE TERMS SET
FORTH BELOW. USING THE SOFTWARE INDICATES YOUR ACCEPTANCE OF THESE LICENSE
TERMS. IF YOU DO NOT ACCEPT THESE LICENSE TERMS, YOU MAY RETURN THE SOFTWARE
FOR A FULL REFUND. IF THE SOFTWARE IS BUNDLED WITH ANOTHER PRODUCT, YOU MAY
RETURN THE ENTIRE UNUSED PRODUCT FOR A FULL REFUND.
HP SOFTWARE LICENSE TERMS
License Grant. HP grants you a license to Use one copy of the Software. “Use” means storing,
loading, installing, executing or displaying the Software. You may not modify the Software or
disable any licensing or control features of the Software.
Ownership. The Software is owned and copyrighted by HP or its third party suppliers. Your
license confers no title or ownership in the Software and is not a sale of any rights in the
Software. HP's third party suppliers may protect their rights in the event of any violation of these
License Terms.
Copies and Adaptations. You may only make copies or adaptations of the Software for archival
purposes or when copying or adaptation is an essential step in the authorized Use of the
Software. You must reproduce all copyright notices in the original Software on all copies or
adaptations. You may not copy the Software onto any bulletin board or similar system.
No Disassembly or Decryption. You may not disassemble or decompile the Software unless HP's
prior written consent is obtained. In some jurisdictions, HP's consent may not be required for
limited disassembly or decompilation. Upon request, you will provide HP with reasonably
detailed information regarding any disassembly or decompilation. You may not decrypt the
Software unless decryption is a necessary part of the operation of the Software.
Transfer. Your license will automatically terminate upon any transfer of the Software. Upon
transfer, you must deliver the Software, including any copies and related documentation, to the
transferee. The transferee must accept these License Terms as a condition to the transfer.
Termination. HP may terminate your license upon notice for failure to comply with any of these
License Terms. Upon termination, you must immediately destroy the Software, together with all
copies, adaptations and merged portions in any form.
Export Requirements. You may not export or re-export the Software or any copy or adaptation
in violation of any applicable laws or regulations.
U.S. Government Restricted Rights. The Software and any accompanying documentation have
been developed entirely at private expense. They are delivered and licensed as “commercial
computer software” as defined in DFARS 252.227-7013 (Oct 1988), DFARS 252.211-7015 (May
1991) or DFARS 252.227-7014 (Jun 1995), as a “commercial item” as defined in FAR 2.101(a), or
as “Restricted computer software” as defined in FAR 52.227-19 (Jun 1987)(or any equivalent
agency regulation or contract clause), whichever is applicable. You have only those rights
provided for such Software and any accompanying documentation by the applicable FAR or
DFARS clause or the HP standard software agreement for the product involved.
Page 10
Chapter 1: Installing CD-
Writer Plus and Software
Chapter 1:
Installing CD-Writer
Plus and Software
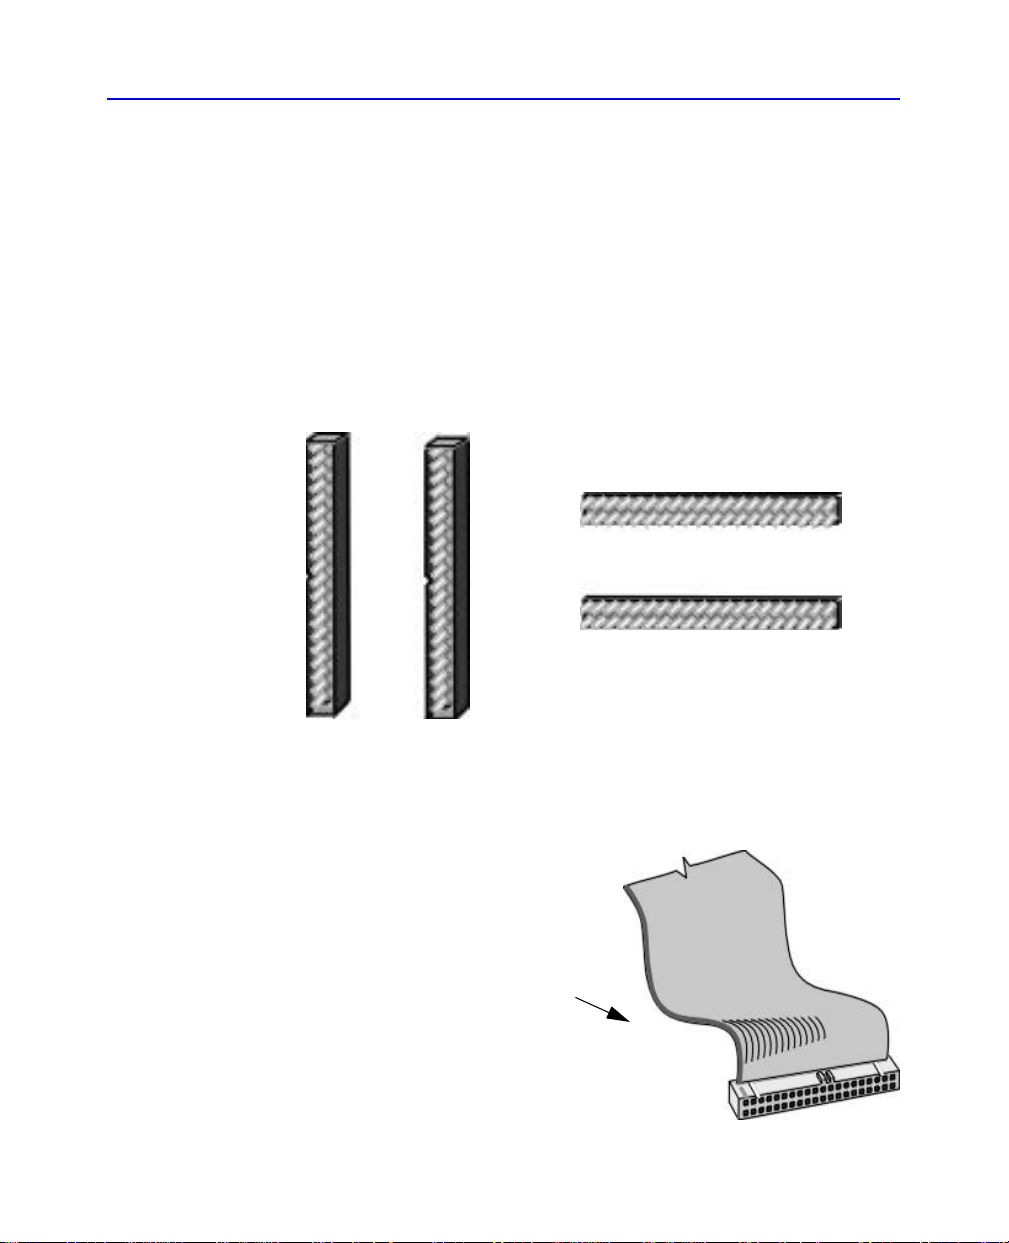
What’s in the Package
Make sure you have the items shown below. (Keep the packaging in case
you need to transport the CD-Writer Plus drive.)
Disaster Recovery
Storage Pack
Audio
Cable
NOTE: You may not need the data cable and the audio cable depending on your
computer’s configuration.
User’s
Guide
Blank
Recordable
CD
Data cable
Screws
Blank
ReWritable
CD
HP SureStore CD-Writer Plus drive
Software
installation CDs
Page 11
1-2 Tools You’ll Need
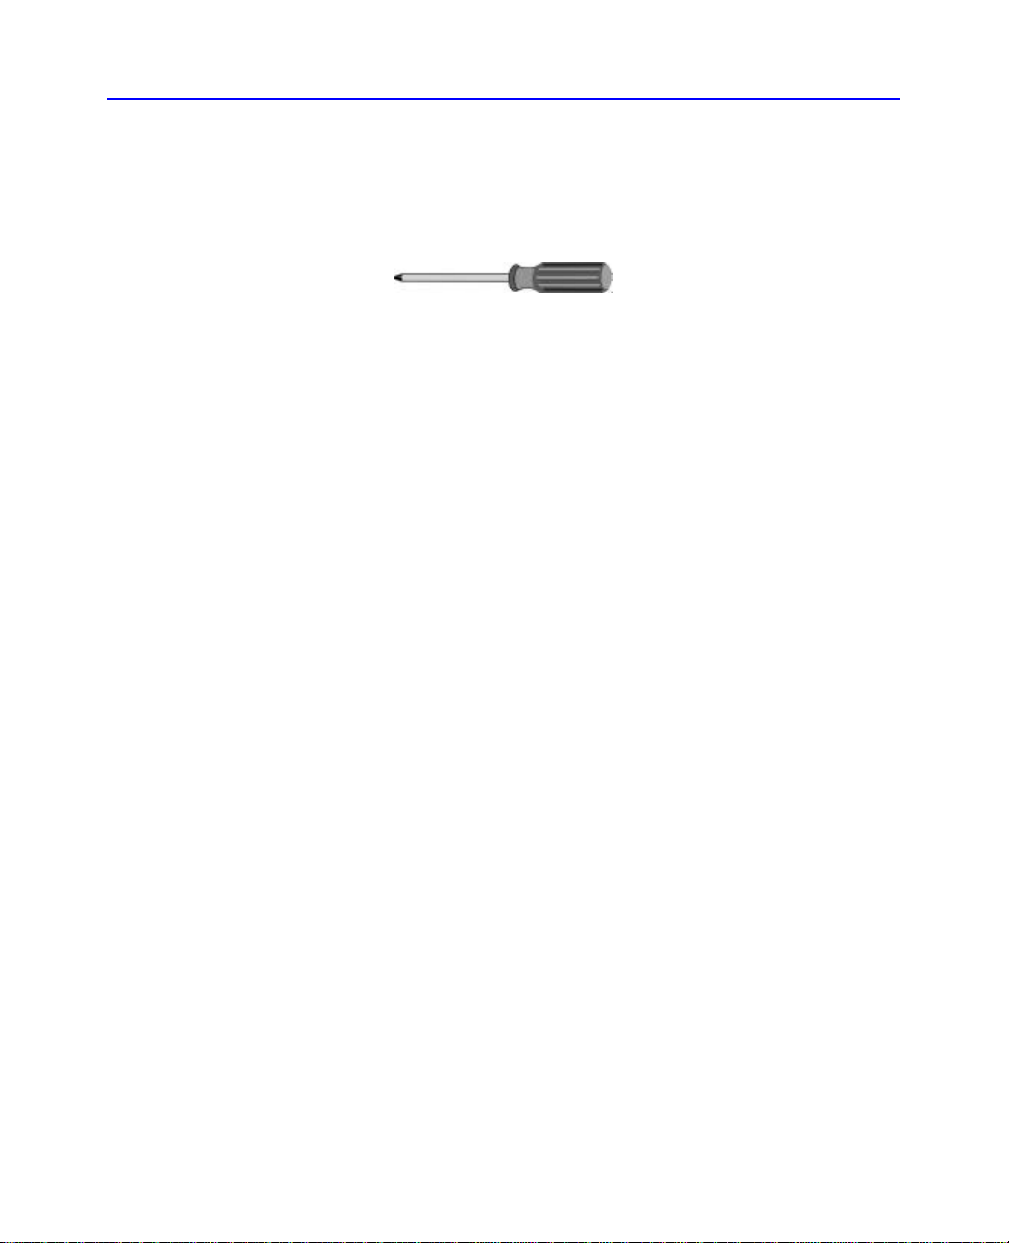
Tools You’ll Need
Locate the following items, before you begin to install the drive:
■ A medium-size Phillips screwdriver
■ Your computer system’s manual (you may need to look up
information about the location of your IDE connectors)
Before You Begin
Before you begin the installation you need to decide whether you will be
installing the CD-Writer Plus in an empty drive bay, or whether you will
be replacing an existing CD-ROM with the CD-Writer Plus drive. To
install the CD-Writer Plus:
■ In an empty drive bay, see page 1-3.
■ As a replacement for an existing CD-ROM, see page 1-20.
NOTE: In the Toshiba Infinita and IBM Aptiva computers, install the CDWriter Plus in an empty drive bay, and not as a replacement for an existing CDROM drive. Because of the fit between the CD-Writer Plus and these computers
it may not be possible to replace the CD-ROM drive with the CD-Writer Plus
drive.
Page 12

Installing a CD-Writer Plus in an Empty Drive Bay 1-3
Chapter 1: Installing CD-
Writer Plus and Software
Installing a CD-Writer Plus in an Empty Drive Bay
Follow the instructions in this section if you will be adding a CD-Writer
Plus to your computer (not replacing a CD-ROM).
Watching the Installation Video
1. Insert the CD labeled Software Disc 1 into your CD-ROM drive (not the
CD-Writer Plus drive). The main menu appears:
If the main menu does not appear automatically, click on the Start
button on the task bar, select Run, type
drive’s letter), then click on OK.
If your computer does not have a CD-ROM drive, see page A-1.
D:\SETUP (where D: is your CD
Page 13
1-4 Installing a CD-Writer Plus in an Empty Drive Bay
Watch Installation
2. Watch the installation video (about 6 minutes). To do this, click on the
Before You Install icon and then click on the Watch Installation Video
icon.
Before You
Install icon
Video icon
If you would like to, explore some of the other information options that
appear on the screen.
Getting an Install Recommendation
CD-Writer Plus’ installation program will analyze your computer and
make a recommendation about connecting the CD-Writer Plus hardware.
This recommendation is specific to your computer and is the first step in
successfully installing CD-Writer Plus.
1. Go back to the main menu and click on the Install CD-Writer Plus icon.
Install CD-Writer Plus icon
2. Follow the instructions on the screen.
3. When the CD-Writer Plus Install Recommendation screen appears, click
Print. Or, if you don’t have a printer, copy the information by hand.
You’ll need this information in the next section.
Page 14

Installing a CD-Writer Plus in an Empty Drive Bay 1-5
Chapter 1: Installing CD-
Writer Plus and Software
Installing the Hardware
CAUTION: The discharge of static electricity can damage electronic circuitry.
You can avoid static discharge by touching a grounded metal object such as
your computer’s case before and during installation of hardware inside your
computer or by wearing a grounding strap connected to ground.
1A. After getting the Install Recommendation (see the previous section) you
will be prompted to shut down Windows. Click the Shutdown button
and wait until it is safe to turn off your computer. Proceed to turn OFF
your computer, monitor, and other devices.
2A. Unplug the power cords from the wall outlet or from the power strip, if
you use one.
3A. Remove the cover from your computer
CAUTION: Be careful of any sharp edges that may be present inside your
computer.
Computer OFF
See your computer’s
manual if you need help
removing the cover.
Page 15
1-6 Installing a CD-Writer Plus in an Empty Drive Bay
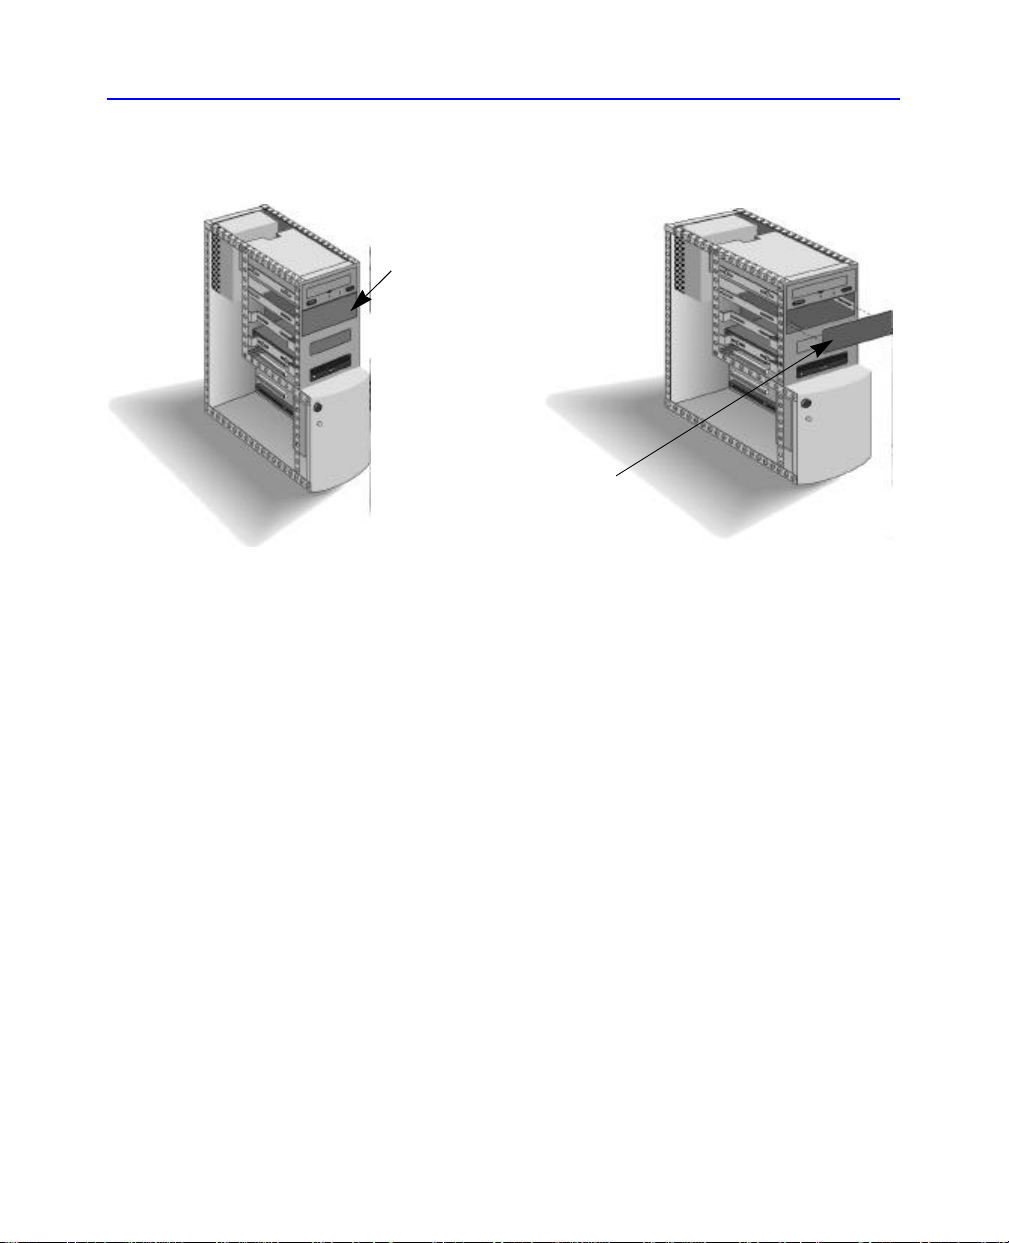
4A. Remove the cover plate from a larger half-height drive bay.
Available half-height drive bay
(approx. 6” x 1.75”/15cm x 4.5 cm)
See your computer’s
manual if you need help
removing the drive bay cover.
5A. Look at the other drives that are installed in your computer to see if your
computer’s case requires rails or mounting brackets to hold a drive in
place. If it does, use an extra set of rails that came with your computer
and attach them to the sides of CD-Writer Plus. If you do not have an
extra set, contact your computer’s manufacturer to obtain rails.
Page 16
Installing a CD-Writer Plus in an Empty Drive Bay 1-7
Chapter 1: Installing CD-
Writer Plus and Software
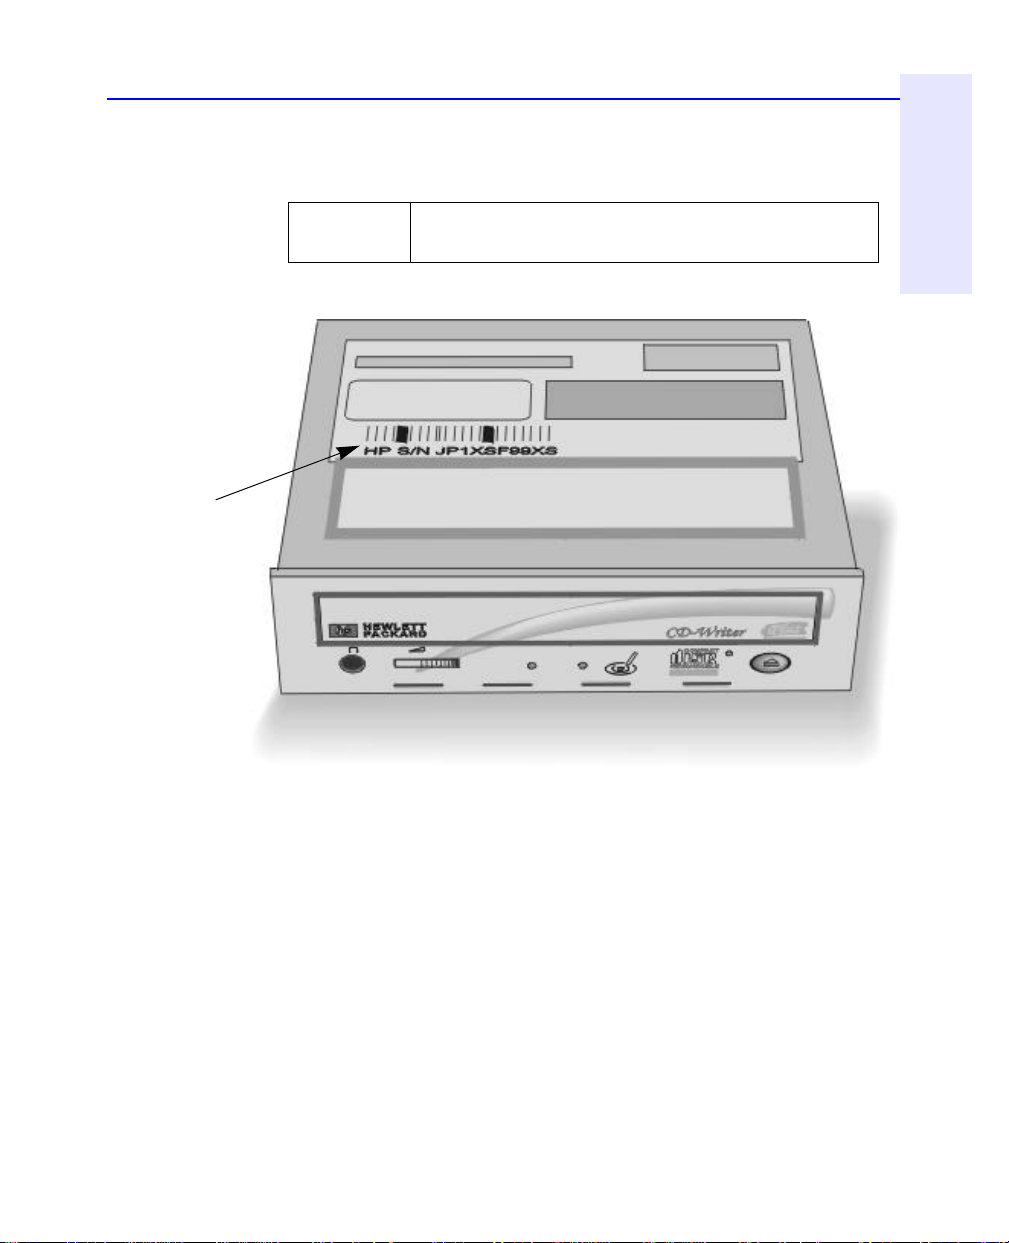
6A. Write down the CD-Writer Plus’ serial number in the space below. The
serial number is on the main label on the top of the drive.
Serial
number:
Drive’s serial number
7A. Read the Install Recommendation you printed earlier (see page 1-4). The
Install Recommendation tells you whether the jumper on the CD-Writer
Plus should be set as Master or Slave for your computer.
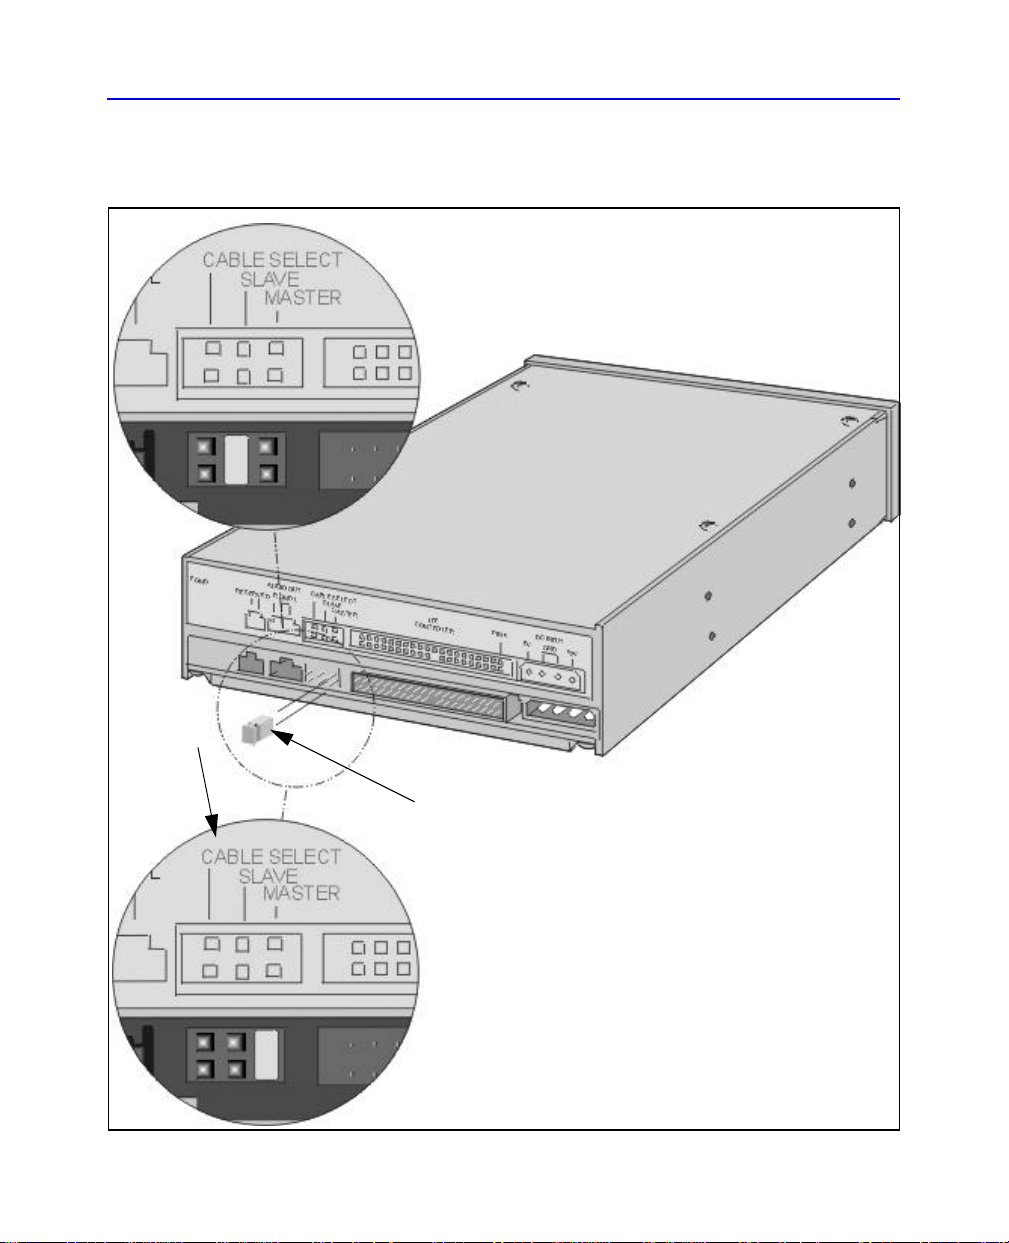
8A. Find the pairs of pins labeled Master, Slave, and Cable Select on the back
of the CD-Writer Plus. Notice that one pair of pins has a small plastic cap
or jumper. This jumper can be pulled off using your fingers, tweezers, or
needlenose pliers, and placed on a different pair of pins to change the
setting.
Page 17
1-8 Installing a CD-Writer Plus in an Empty Drive Bay
9A. Set the jumper on the CD-Writer Plus as advised in the Install
Recommendation Printout for your computer (page 1-4).
Slave
Check the back of the new drive and
make sure the jumper is on the center
location (Slave).
Don’t use
Cable Select
This is a jumper. You can pull
it off and place it on another
pair of pins to change the setting.
or Master
Check the back of the new drive and
make sure the jumper is on the right-
hand location (Master).
Page 18
Installing a CD-Writer Plus in an Empty Drive Bay 1-9
Chapter 1: Installing CD-
Writer Plus and Software
10A. Insert the drive into the selected drive bay. Be careful not to dislodge any
cables inside your computer as you do this.
11A. Look at the Install Recommendation Printout (see page 1-4) again and
find whether the data cable should be connected to the primary or
secondary IDE controller on your computer.
TIP (for Two Devices connected to the data cable): If the Install
Recommendation states that your CD-Writer Plus drive will share the data
cable with another device (such as a CD-ROM drive), follow the cable already
attached to the other device down to the circuit board in order to locate the IDE
controller that you need. If you find an extra connector along that cable, simply
attach that connector to the CD-Writer Plus drive.
Page 19
1-10 Installing a CD-Writer Plus in an Empty Drive Bay
12A. Locate the recommended 40-pin IDE controller (primary or secondary)
on your computer’s motherboard.
The IDE connectors are on the motherboard, which is the largest circuit
board in your computer, taking up most of the bottom of a desktop
computer or the side of a tower computer.
IDE connectors are usually found in pairs and may look like any of the
following:
IDE connectors
(Actual size)
See your computer’s
manual if you need
help finding the
IDE connector
You will see a variety of connectors
inside your computer that look similar
to the 40-pin connector but have more
or fewer pins. Find the connectors that
are the correct size to fit the cable that
came in the box with your drive.
Page 20

Installing a CD-Writer Plus in an Empty Drive Bay 1-11
Chapter 1: Installing CD-
Writer Plus and Software
The IDE connectors may be hidden by some of the computer’s cables or
may be behind a drive.
Many computers have an IDE hard drive or CD-ROM that connects to
the motherboard through an IDE controller. The data cables on these
drives have the same width as the data cable included with your CDWriter Plus. If your computer has an IDE hard drive or CD-ROM drive,
you can follow the data cable from the back of one of those drives and
find the IDE controller that connects it to the motherboard.
Computer manufacturers use a wide variety of labels for IDE connectors!
Look on your computer’s circuit boards for printing identifying the
primary and secondary connectors, such as:
- PRI and SEC
- IDE-0 and IDE-1
- IDE-1 and IDE-2
- HD and CD-ROM (most common devices to be attached)
- PCI-IDE and ISA-IDE
13A. Refer to the Install Recommendation Printout (see page 1-4) to see if you
will have one or two devices connected to the data cable.
On page 1-13 you can see what a One Device installation looks like
compared to a Two Device installation.
14A. Make the necessary data cable connections for your system.
CAUTION: Do not attach the CD-Writer Plus drive to a sound board’s IDE
controller.
Most data cable connectors are keyed to fit only one way. If your
connector is not keyed to fit only one way make sure the cable’s colored
edge is aligned with PIN-1 where it connects to the CD-Writer Plus drive
and where it connects to the IDE controller on the motherboard. Among
the labels you may find that identify PIN-1 on the motherboard are PIN1,
1 or a small triangle pointing to the pin.
CAUTION: Make sure that you are attaching the cable correctly! You must
locate PIN-1 on each connector and attach the cable so that the edge with the
color stripe is aligned with PIN-1. If the cable is attached incorrectly, your
computer may not boot up.
Page 21

1-12 Installing a CD-Writer Plus in an Empty Drive Bay
PIN-1
Look for a label identifying PIN-1 on
your computer. The data cable’s
colored edge is aligned with PIN-1 of
the IDE connector. This illustration
shows a specific computer. Yours may
look different. PIN-1 could be on
either side of the IDE connector.
colored stripe on
the data cable
Colored stripe on
the data cable
PIN-1
The cable’s colored edge is aligned
with PIN-1 on the CD-Writer Plus
drive.
Page 22
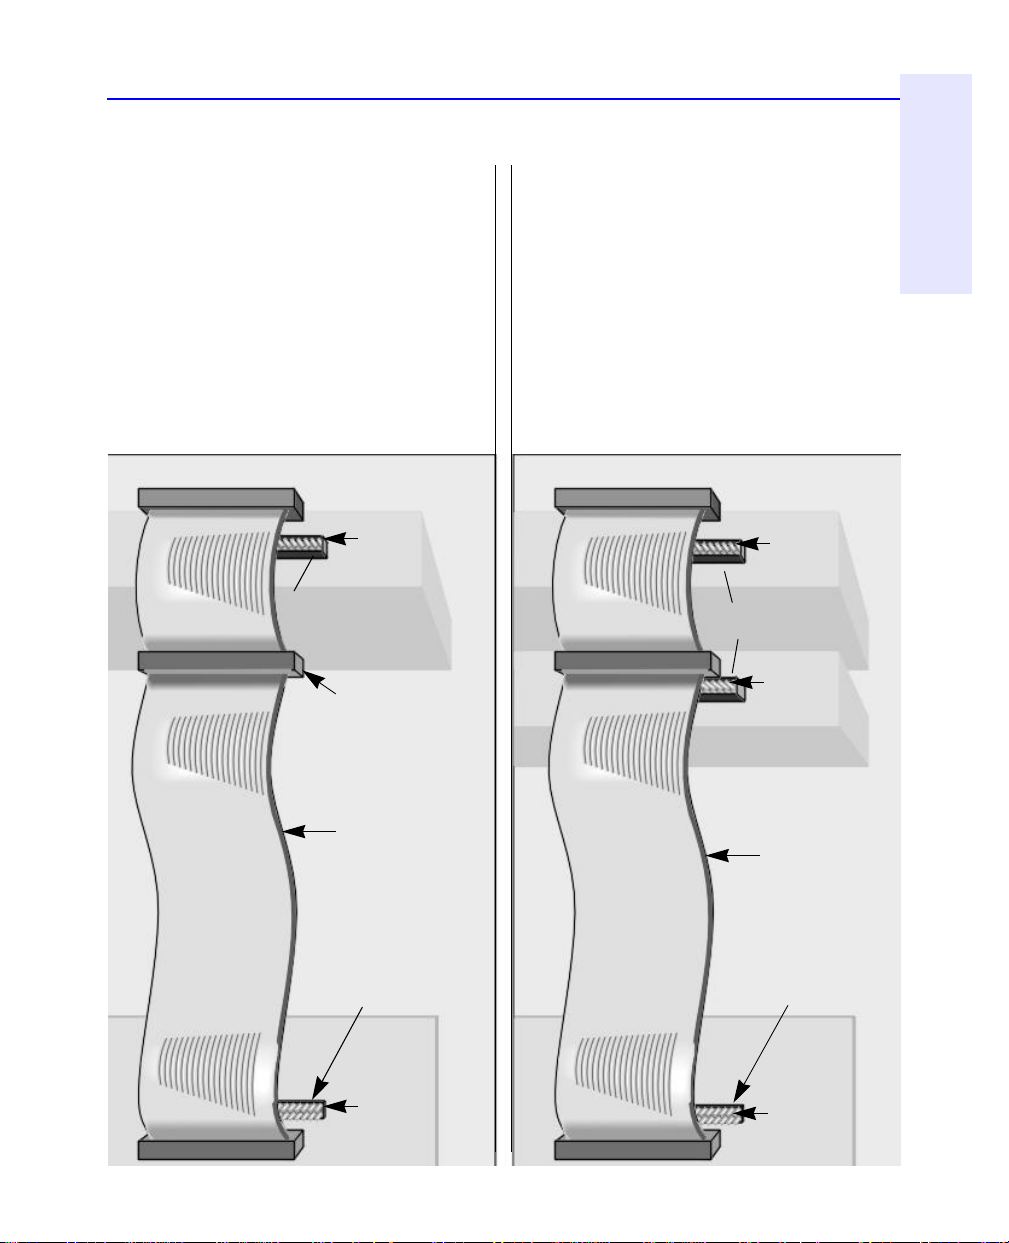
Installing a CD-Writer Plus in an Empty Drive Bay 1-13
Chapter 1: Installing CD-
Writer Plus and Software
One Device
The OPTIONAL data cable that came with the
CD-Writer Plus drive is only used if there is no
cable already attached to the recommended
IDE controller in your computer system or
the cable supplied with your computer is not
long enough.
Use the connectors at the two ends of the
cable.
PIN-1
CD-Writer Plus
drive (on end connector)
Unused connector
Two Devices
Attach the CD-Writer Plus to whichever
connector is not in use (center or end) on the
data cable already installed in your computer
(DO NOT swap connectors).
The OPTIONAL data cable that came with the
CD-Writer Plus is only used if there is no spare
connector for the CD-Writer Plus on your
cable or your cable is not long enough.
PIN-1
DriveDrive
CD-Writer Plus
drive (either location
not in use)
PIN-1
Drive
Colored stripe
aligned with
each PIN-1
IDE controller
located inside
your computer
PIN-1
Motherboard
Follow the
data cable
already
attached to the
other IDE device
in your
computer to
locate the IDE
controller.
Colored stripe
aligns with
each PIN-1
IDE controller
located inside
your computer
PIN-1
Motherboard
Page 23
1-14 Installing a CD-Writer Plus in an Empty Drive Bay
edge
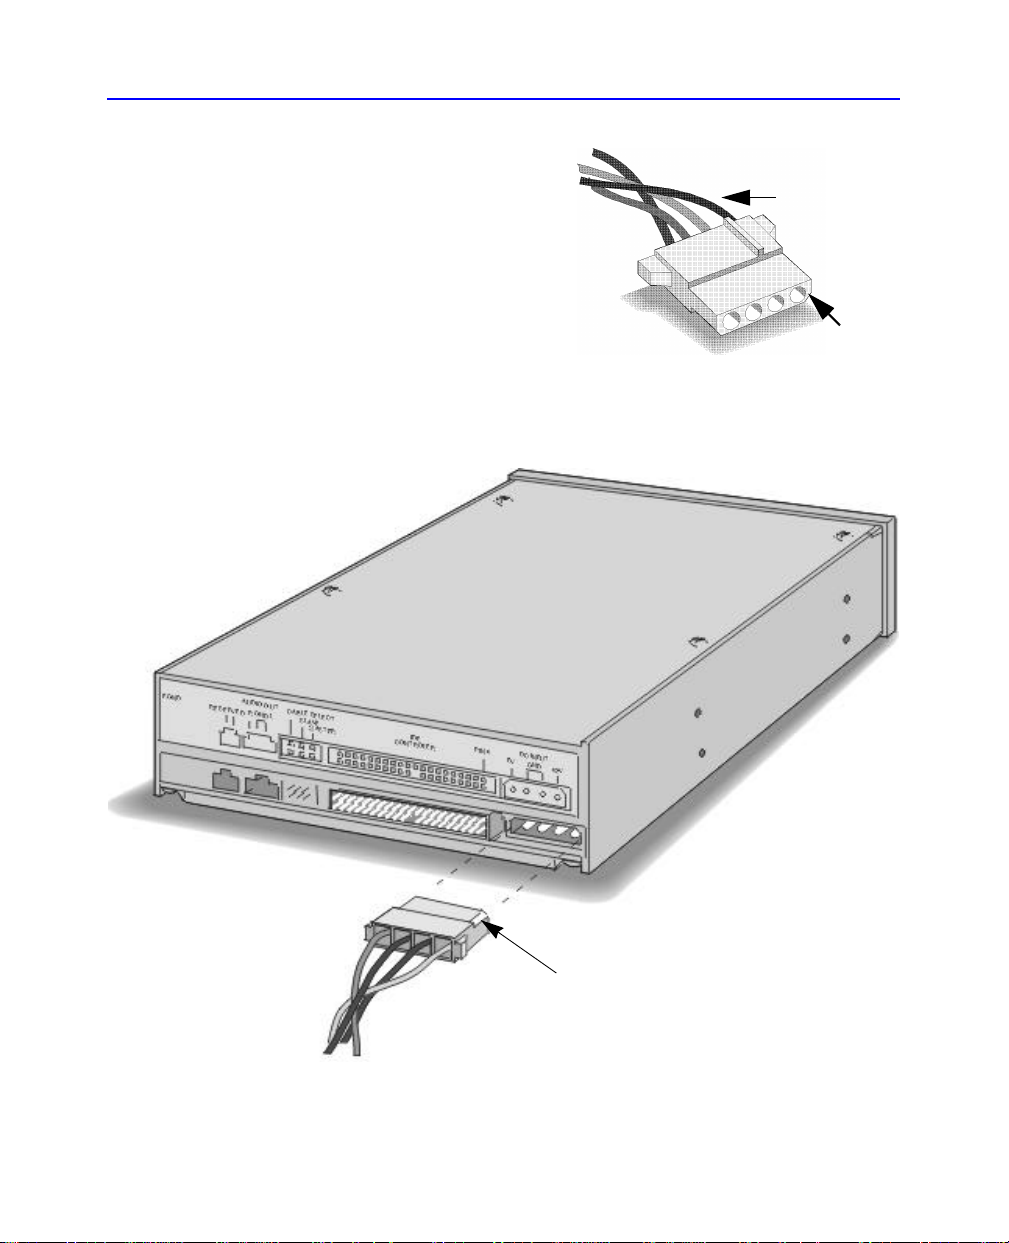
15A. Find an unused power cable inside
Power cable
your computer. There are a few
unused power cables like the one
shown inside most computers.
Red, yellow,
and black wires
NOTE: If you do not have an
available power connector, you will
need to purchase a Y-power cable that
expands one power connector into
Beveled
two. Call your local computer
hardware vendor to purchase one.
16A. Plug the power cable into the back of the drive, with the beveled edge up.
Beveled edge up
Page 24

Installing a CD-Writer Plus in an Empty Drive Bay 1-15
Chapter 1: Installing CD-
Writer Plus and Software
17A. If you do not have a sound board or only want to
listen to music discs using headphones or speakers
MPC-2 connector
attached to the front of the CD-Writer Plus, skip
this step and go to step 18A.
You do not need an audio cable to record music.
The audio cable is used only for listening to music
Audio
cable
CDs through your computer’s sound system.
When the CD-Writer Plus drive records music or data, it uses the data
cable, not the audio cable.
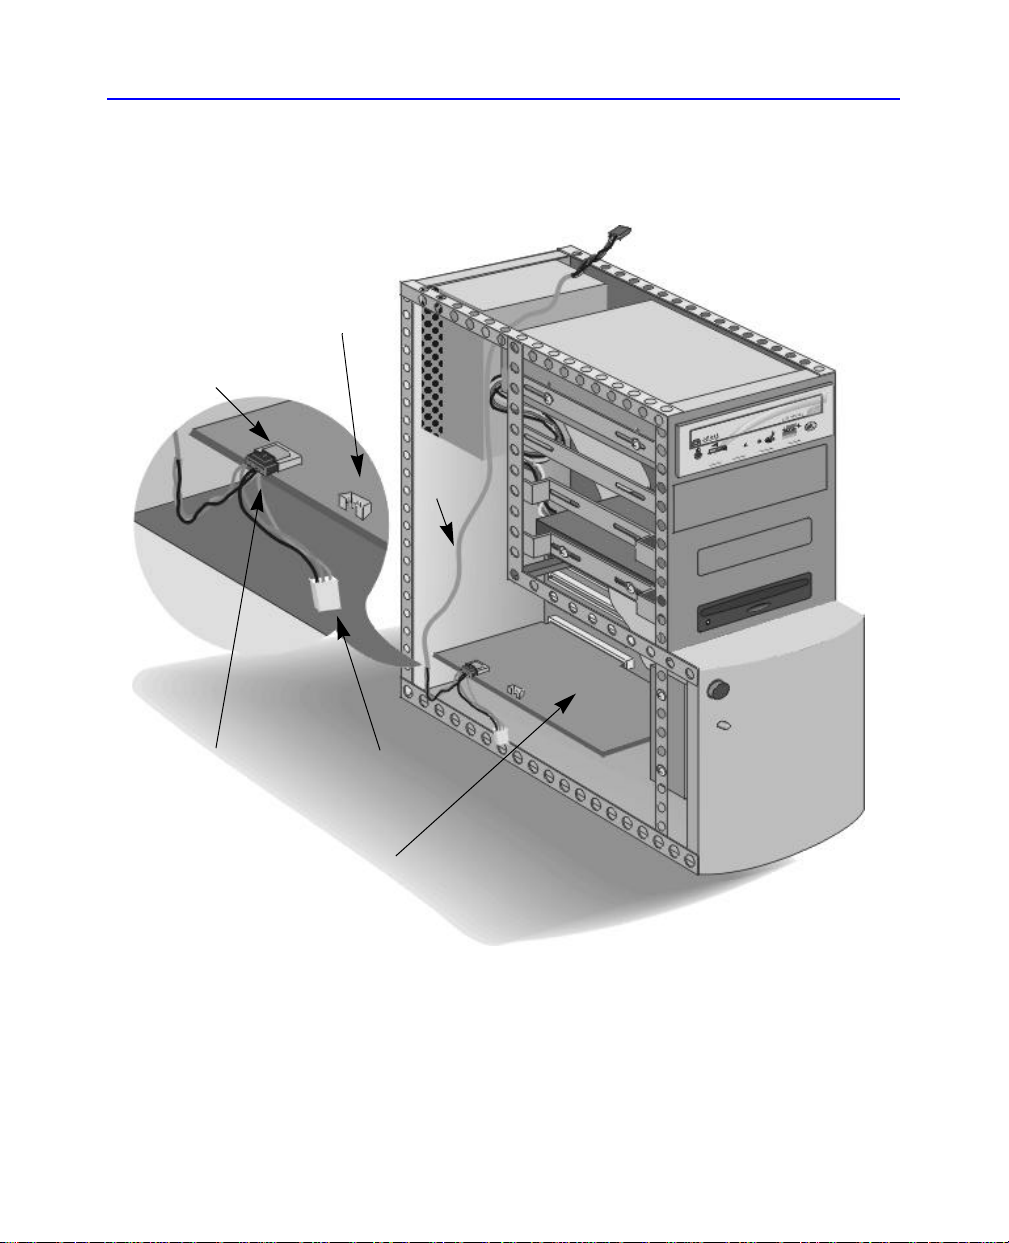
Using an existing audio cable
If your sound board already has a spare audio cable with an MPC-2
connector (shown above), plug the MPC-2 connector it into the Audio
Out opening on the back of the CD-Writer Plus drive.
Using the audio cable provided with your CD-Writer Plus
To use the audio cable that came with your CD-Writer Plus, first plug the
end with only one connector to the Audio Out opening on the back of
the CD-Writer Plus drive.
Page 25
1-16 Installing a CD-Writer Plus in an Empty Drive Bay
Next, connect the other end of the audio cable to the sound board inside
your computer.
“CD-IN” vertical
connector
“CD-IN” horizontal
connector
Audio
cable
The large connector or the small connector
may be the one that works for your
sound board. Use only one connector.
Sound board
Tips for connecting the audio cable to the sound board
■ Identify the sound board.
To identify the sound board look for microphone connectors on the back
of your computer. The circuit board inside the computer attached to the
microphone connectors is the sound board.
Page 26

Installing a CD-Writer Plus in an Empty Drive Bay 1-17
Chapter 1: Installing CD-
Writer Plus and Software
■ Identify the audio connectors on the sound board.
The audio connectors have four prongs and are often on the outer edge
of the sound board. On many sound boards the connectors for the audio
cable are labeled CD IN.
■ Select the connector on the audio cable that fits your sound board.
The audio cable has two connectors in order to work with most sound
boards. Try to match one of them to a connector on your sound board.
The audio cable may connect horizontally or vertically to the sound
board. The connectors only fit one way. If a connector doesn’t fit, try
turning it around.
Use only one of the two connectors on this end of the audio cable.
Simply leave the connector you don’t use unattached.
■ Some sound boards have more than one audio cable connector. If when
you turn your computer back on you get no sound, try using a different
connector on your sound board.
NOTE: The audio cable provided with CD-Writer Plus will work with most
sound boards. If you need to purchase a different audio cable, contact your local
computer hardware vendor. Be sure to identify the type of sound board you have
and specify that you require an MPC-2 connector at the drive.
Page 27

1-18 Installing a CD-Writer Plus in an Empty Drive Bay
18A. Secure the drive into the bay, using the screws included with your drive
or any M3x0.5x6mm metric screw. (Do not use a screw longer than 6
mm.)
If your computer uses rails or mounting brackets (see step 5) you may not
need screws to secure the rails in the bay.
Use all four screws
3
4
1
2
Page 28
Installing a CD-Writer Plus in an Empty Drive Bay 1-19
Chapter 1: Installing CD-
Writer Plus and Software
19A. Replace your computer's cover.
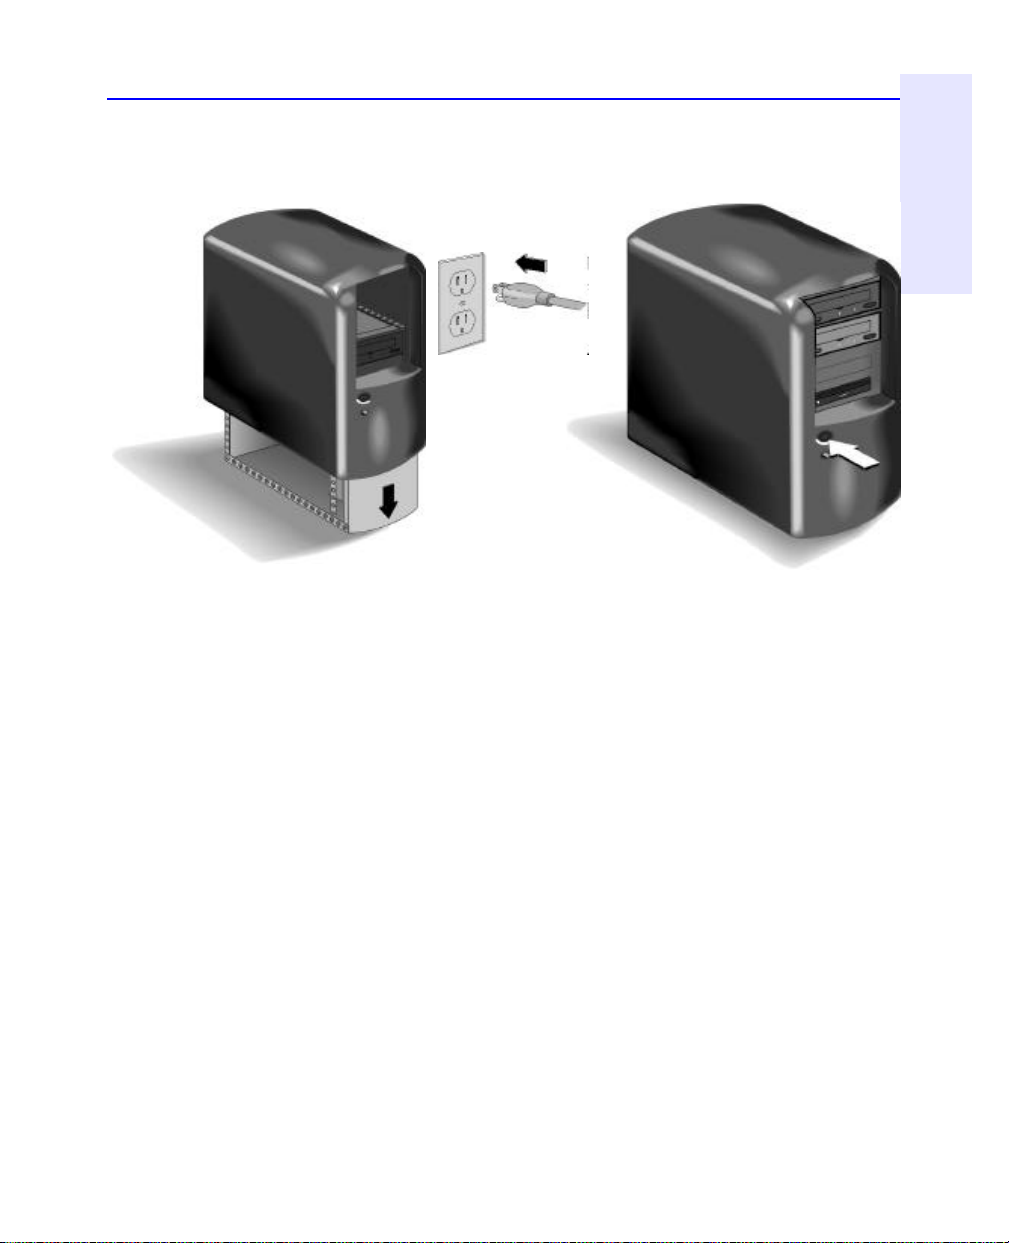
Computer ON
20A. Plug your computer, monitor, and other devices into a wall outlet or
power strip, and turn ON your computer. (The power plug and outlet
may look different in your country. The U.S. version is shown.)
Page 29

1-20 Replacing an Existing CD-ROM Drive With a CD-Writer Plus
Replacing an Existing CD-ROM Drive With a CD-Writer Plus
Follow the instructions in this section if you will be removing a CD-ROM
drive from your computer before installing the CD-Writer Plus.
Watching the Installation Video
1. Insert the CD labeled Software Disc 1 into your CD-ROM drive (not the
CD-Writer Plus drive). The main menu appears:
If the main menu does not appear automatically, click on the Start
button on the task bar, select Run, type
drive’s letter), then click on OK.
If your computer does not have a CD-ROM drive, see page A-1.
D:\SETUP (where D: is your CD
Page 30
Replacing an Existing CD-ROM Drive With a CD-Writer Plus 1-21
Chapter 1: Installing CD-
Writer Plus and Software
Watch Installation
2. Watch the installation video (about 4 minutes long). To do this, click on
the Before You Install icon and then click on the Watch Installation
Video icon.
Before You
Install icon
Video icon
If you would like to, explore some of the other information options that
appear on the screen.
Getting an Install Recommendation
CD-Writer Plus’ installation program will analyze your computer and tell
you what jumper setting the CD-Writer Plus should use to work correctly
on your computer. Jumper settings are explained on page 1-25. Getting
this install recommendation is the first step in successfully installing
your CD-Writer Plus.
1. Go back to the main menu and click on the Install CD-Writer Plus icon.
Install CD-Writer Plus icon
Follow the instructions on the screen.
2. When the CD-Writer Plus Install Recommendation screen appears, click
Print. Or, if you don’t have a printer, copy the information by hand.
You’ll need this information in the next section.
Page 31

1-22 Replacing an Existing CD-ROM Drive With a CD-Writer Plus
Installing the Hardware
CAUTION: The discharge of static electricity can damage electronic circuitry.
You can avoid static discharge by touching a grounded metal object such as
your computer’s case before and during installation of hardware inside your
computer or by wearing a grounding strap connected to ground.
1B. REMOVE the CD labeled Software Disc 1 from your CD-ROM
drive.
2B. After getting the Install Recommendation (see the previous section) you
will be prompted to shut down Windows. Click the Shutdown button
and wait until it is safe to turn off your computer. Proceed to turn OFF
your computer, monitor, and other devices.
3B. Unplug the power cords from the wall outlet or from the power strip, if
you use one.
4B. Remove the cover from your computer.
CAUTION: Be careful of any sharp edges that may be present inside your
computer.
Computer OFF
See your computer’s
manual if you need help
removing the cover.
Page 32

Replacing an Existing CD-ROM Drive With a CD-Writer Plus 1-23
Chapter 1: Installing CD-
Writer Plus and Software
5B. Remove the CD-ROM drive from your computer. To do this, remove all
screws holding the CD-ROM drive in the bay and unplug all cables from
the back of the CD-ROM drive. As you unplug them, lay the cables aside
so they will be easy to find, since you will be plugging them into the CDWriter Plus drive later on. Then pull the drive out of the drive bay.
NOTE: You will not need to use the data cable that came with your CD-Writer
Plus drive. If you already have an audio cable to connect the drive to the sound
card, you will not need the one that came with the CD-Writer Plus.
6B. Look at the sides of the CD-ROM drive you removed. If it has rails or
mounting brackets attached to the sides, remove them from the CDROM drive and attach them to the CD-Writer Plus.
Page 33

1-24 Replacing an Existing CD-ROM Drive With a CD-Writer Plus
7B. Write down the CD-Writer Plus’ serial number in the space below. The
serial number is on the main label on the top of the drive.
Serial
number:
Drive’s serial number
8B. Read the Install Recommendation you printed earlier (see page 1-21). The
Install Recommendation tells you whether the jumper on the CD-Writer
Plus should be set as Master or Slave for your computer.
9B. Find the pairs of pins labeled Master, Slave, and Cable Select on the back
of your CD-Writer Plus. Notice that one pair of pins has a small plastic
cap or jumper. This jumper can be pulled off using your fingers, tweezers,
or needlenose pliers, and placed on a different pair of pins to change the
setting.
Page 34

Replacing an Existing CD-ROM Drive With a CD-Writer Plus 1-25
Chapter 1: Installing CD-
Writer Plus and Software
10B. Set the jumper on the CD-Writer Plus as advised in the Install
Recommendation Printout for your computer. (see page 1-21)
Slave
Check the back of the new drive and
make sure the jumper is on the center
location (Slave).
Don’t use
Cable Select
This is a jumper. You can pull
it off and place it on another
pair of pins to change the setting.
or Master
Check the back of the new drive and
make sure the jumper is on the right-
hand location (Master).
Page 35

1-26 Replacing an Existing CD-ROM Drive With a CD-Writer Plus
11B. Insert your CD-Writer Plus into the drive bay previously occupied by
your CD-ROM drive.
Page 36

Replacing an Existing CD-ROM Drive With a CD-Writer Plus 1-27
Chapter 1: Installing CD-
Writer Plus and Software
12B. The wide, flat cable that you previously unplugged from the CD-ROM
drive is the data cable. Plug the data cable into CD-Writer Plus. Most
connectors are keyed so that they only fit one way. If your connector is
not keyed to fit only one way, make sure the cable’s colored edge is
aligned with PIN-1, which is clearly marked on the CD-Writer Plus drive.
PIN-1
The cable’s colored edge is aligned
with PIN-1 on the CD-Writer Plus
drive.
Colored stripe on
the data cable
CAUTION: Make sure that you are attaching the cable correctly! You must
locate PIN-1 on each connector and attach the cable so that the edge with the
color stripe is aligned with PIN-1. If the cable is attached incorrectly, your
computer may not boot up.
Page 37

1-28 Replacing an Existing CD-ROM Drive With a CD-Writer Plus
13B. Plug the power cable into the back of the CD-Writer Plus, with the
beveled edge up.
Beveled edge up
Page 38

Replacing an Existing CD-ROM Drive With a CD-Writer Plus 1-29
Chapter 1: Installing CD-
Writer Plus and Software
14B. If you do not have a sound board or only want to
listen to music discs using headphones or speakers
MPC-2 connector
attached to the front of the CD-Writer Plus, skip
this step and go to step 15B.
You do not need an audio cable to record music.
The audio cable is used only for listening to music
Audio
cable
CDs through your computer’s sound system.
When the CD-Writer Plus drive records music or data, it uses the data
cable, not the audio cable.
Using an existing audio cable
If your sound board already has a spare audio cable with an MPC-2
connector (shown above), plug the MPC-2 connector it into the Audio
Out opening on the back of the CD-Writer Plus drive.
Using the audio cable provided with your CD-Writer Plus
To use the audio cable that came with your CD-Writer Plus, first plug the
end with only one connector to the Audio Out opening on the back of
the CD-Writer Plus drive.
Page 39

1-30 Replacing an Existing CD-ROM Drive With a CD-Writer Plus
Next, connect the other end of the audio cable to the sound board inside
your computer.
“CD-IN” vertical
connector
“CD-IN” horizontal
connector
Audio
cable
The large connector or the small connector
may be the one that works for your
sound board. Use only one connector.
Sound board
Tips for connecting the audio cable to the sound board
■ Identify the sound board.
To identify the sound board look for microphone connectors on the back
of your computer. The circuit board inside the computer attached to the
microphone connectors is the sound board.
Page 40

Replacing an Existing CD-ROM Drive With a CD-Writer Plus 1-31
Chapter 1: Installing CD-
Writer Plus and Software
■ Identify the audio connectors on the sound board.
The audio connectors have four prongs and are often on the outer edge
of the sound board. On many sound boards the connectors for the audio
cable are labeled CD IN.
■ Select the connector on the audio cable that fits your sound board.
The audio cable has two connectors in order to work with most sound
boards. Try to match one of them to a connector on your sound board.
The audio cable may connect horizontally or vertically to the sound
board. The connectors only fit one way. If a connector doesn’t fit, try
turning it around.
Use only one of the two connectors on this end of the audio cable.
Simply leave the connector you don’t use unattached.
■ Some sound boards have more than one audio cable connector. If when
you turn your computer back on you get no sound, try using a different
connector on your sound board.
NOTE: The audio cable provided with CD-Writer Plus will work with most
sound boards. If you need to purchase a different audio cable, contact your local
computer hardware vendor. Be sure to identify the type of sound board you have
and specify that you require an MPC-2 connector at the drive.
Page 41

1-32 Replacing an Existing CD-ROM Drive With a CD-Writer Plus
15B. Secure the drive into the bay using the screws included with your drive or
any M3x0.5x6mm metric screw. (Do not use a screw longer than 6 mm.)
If your computer uses rails or mounting brackets (see step 6) you may not
need screws to secure the rails in the bay.
Use all four screws
3
1
2
4
Page 42

Replacing an Existing CD-ROM Drive With a CD-Writer Plus 1-33
Chapter 1: Installing CD-
Writer Plus and Software
16B. Replace your computer's cover.
Computer ON
17B. Plug your computer, monitor, and other devices into a wall outlet or
power strip and turn ON your computer. (The power plug and outlet may
look different in your country. The U.S. version is shown.)
18B. Go to page 1-34 for instructions on how to install the software.
Page 43

1-34 Installing Software: Windows 95, Windows 98, or Windows NT 4.0
Installing Software: Windows 95, Windows 98, or Windows NT 4.0
1. When you have turned your computer back on and it has started up, the
CD-Writer Plus software will search for the new drive and make sure that
it is communicating properly. You will be prompted to insert the CD
labeled Software Disc 1 if it is not already in the drive.
2. Software installation will automatically continue. Follow the instructions
on the screen to install the software you want.
Uninstalling the Software
You can remove all CD-Writer Plus programs or individual programs.
CAUTION: If you want to reinstall any software, be sure to uninstall the
original program.
To remove CD-Writer Plus programs:
1. Click the Start button.
■ Point to Programs
■ Point to HP CD-Writer Plus
■ Point to Tools & Information
■ Point to Utilities
■ Click Uninstall
2. Select the programs that you wish to remove.
3. Click the Finish button.
The software is removed, including all related entries in your system
registry.
Page 44

If You Have Problems 1-35
Chapter 1: Installing CD-
Writer Plus and Software
If You Have Problems
Did you read the Install Recommendation? (see page 1-4 if you
installed in an empty drive bay, or page 1-21 if you replaced a
CD-ROM)
There are many factors that need to be taken into consideration when
installing an IDE device. By reading the Install Recommendation, you
will know how to install successfully without needing to evaluate the
technical details.
Can’t find the IDE controller in your computer?
Check the manual that came with your computer or call the computer
manufacturer for assistance. The IDE controller may be located on the
motherboard or a daughter board. It may be hard to find because it is
behind some other component inside your computer such as the power
supply. Or, your computer may not have a connector attached for access
to the IDE controller. DO NOT ATTACH THE CD-WRITER PLUS DRIVE
TO A SOUND BOARD’S IDE CONTROLLER. Do not use the Colorado IDE
Adapter board as an alternate IDE controller for the CD-Writer Plus.
Now your computer won’t boot up!
■ Turn your computer off and then back on.
■ Turn off and unplug your computer. Double-check each connector
along the data cable and straighten any bent pins. The connectors are
inserted properly when all pins are covered and the colored stripe on
the side of the data cable lines up with PIN-1 of each connector.
■ Is the power cable attached correctly to each device?
■ If you are sharing the IDE data cable between the CD-Writer Plus
drive and another device, did you change the data-cable (middle/end)
connector attached to the device that was already inside your
computer? Did you follow the Install Recommendation’s instructions
for determining the jumper setting on page 1-4 (installation in an
empty drive bay) or page 1-21 (CD-ROM replacement)?
If you changed the data-cable connector location, change it back to
the original position. The other device may be jumpered to Cableselect rather than Master or Slave. If this is true, the location of the
data-cable connector (middle/end) is very important.
Page 45

1-36 If You Have Problems
The CD-Writer Plus drive doesn’t show up in My Computer or
Explorer.
■ If you cannot find the CD-Writer Plus drive in Explorer, restart your
computer, or shut it down and then turn it on again.
■ Is the CD-Writer Plus drive receiving power? (Test this by opening and
closing the tray by pressing the eject button on the front of the drive.)
■ Turn off and unplug your computer.
Double-check each connector along the data cable. The connectors
are inserted properly when all pins are covered and the colored stripe
on the side of the data cable lines up with PIN-1 of each connector.
■ If you are sharing the IDE data cable between the CD-Writer Plus
drive and another device, did you change the data-cable (middle/end)
connector attached to the device that was already inside your
computer? Did you follow the Install Recommendation Printout’s
instructions for the jumper setting on page 1-4 (installation in an
empty drive bay) or page 1-21 (CD-ROM replacement)?
If you switched the data cable connector on the other device, change
it back to the original position. A device attached to the end
connector of the data cable to begin with, should be attached to the
end connector after installing the new drive. If it was originally
attached to the middle connector, it should remain attached to the
middle connector. The other device may be jumpered to Cable-select
rather than Master or Slave. If this is true, the location of the datacable connector (middle/end) is very important.
Not sure which drive letter was assigned to the CD-Writer
Plus?
The CD-Writer Plus drive will have a drive icon just like a CD-ROM drive
icon. You can determine which icon is your CD-ROM drive and which
icon is your CD-Writer Plus drive by double-clicking on the My
Computer icon, right-clicking on the CD drive’s icon, and selecting
Eject. The tray of the selected drive will open.
The device that is sharing the IDE data cable with my CDWriter Plus drive doesn’t show up in Explorer or doesn’t work
any more.
■ Turn off and unplug your computer.
■ Make sure that the power cables are securely attached to both devices.
Page 46

If You Have Problems 1-37
Chapter 1: Installing CD-
Writer Plus and Software
■ If you are sharing the IDE data cable between the CD-Writer Plus
drive and another device, did you change the data-cable (middle/end)
connector attached to the device that was already inside your
computer?
If yes, change the data-cable connector location back to the original
position. The other device may be jumpered to Cable-select rather
than Master or Slave. If this is true, the location of the data-cable
connector (middle/end) is very important.
■ For Sony and Goldstar CD-ROMs, try configuring the CD-Writer Plus
as Master and the CD-ROM as Slave.
Does your computer meet the minimum system requirements.
See Minimum System Requirements on page A-1.
Error message when I double-click on the CD-Writer Plus icon.
■ There is no CD in the CD-Writer Plus drive. Insert a CD and try again.
■ After inserting a CD, you need to wait a moment to let the CD-Writer
Plus drive read the disc information (wait until the light on the front
of the drive stops flashing and stays green), then click on the CDWriter Plus drive’s icon again.
■ The CD may be in the tray upside-down or a little off-center; try
reinserting the CD. The label should be facing up.
■ You are trying to read from a blank recordable CD. Try again after
copying some information to the CD.
I already placed Software Disc 1 in the CD-Writer Plus but it
continues to prompt me to insert the CD.
■ Make sure the jumper on the CD-Writer Plus is set as advised in the
Install Recommendation Printout for your computer (see page 1-21
and page 1-25).
■ Check the data cable and make sure the cable’s colored edge is aligned
with PIN-1 on the CD-Writer Plus drive (see page 1-27).
Page 47

Chapter 2: Using Your CD-
Writer Plus
Chapter 2:
Using Your CD-Writer
Plus
This chapter describes how to use, purchase, and care for CDs, how to
take care of your drive, and how to find out its drive letter.
Using CDs
Inserting a CD
1. Press the eject button on the CD-Writer Plus front panel.
2. Set the CD in the tray with the labeled side up.
Eject button
Page 48

2-2 Using CDs
3. Press the eject button again or push gently on the front of the tray to
shut the tray.
When you access the CD-Writer Plus drive from within a program, you
should be able to read the files on the inserted CD. If you have problems:
■ The CD may be in the tray upside-down or a little off-center; try
reinserting the CD. The label should be facing up.
■ After inserting a CD, you need to wait a moment to let the CD-Writer
Plus drive read the disc information (wait until the light on the front
of the drive stops flashing and stays green), then click on the CDWriter Plus drive’s icon again.
■ Are you trying to read from a blank recordable CD? Try again after
copying some information to the CD.
Removing a CD
1. Press the eject button on the CD-Writer Plus front panel.
2. Remove the CD from the tray.
3. Press the eject button again or push gently on the front of the tray to
shut the front panel.
Choosing CDs for Your CD-Writer
For best results, use Hewlett-Packard CD-RW (ReWritable) or CD-R
(Recordable or write-once) media, available from your local vendor.
When to Use CD-RW
Ideas for using CD-RW (ReWritable) discs which can only be used in CDReWritable drives or newer MultiRead CD-ROMs:
■ Use as if it were a large-capacity floppy disk
■ Copy your important files each week
■ Free up disk space on your hard drive
■ Transport files to and from work/home
■ Hold large complex files as you develop them
Page 49

Using CDs 2-3
Chapter 2: Using Your CD-
Writer Plus
■ Create personalized presentations
■ E-mail storage
NOTE: MultiRead CD-ROMs may require a UDF reader to read CD-RW discs,
depending on the application used to write them.
When to Use CD-RW
Ideas for using CD-R (Recordable or write-once) discs which can be read
in most CD-ROM or CD-Recordable drives:
■ Permanently save large project files
■ Share non-editable presentations
■ Permanently store home records
■ Share memories with family and friends
■ Copy your music onto CD for personal use
■ Make copies of music you created for record company demos
■ Permanently archive files
Purchase HP CD-RW (ReWritable) media (C4404A)
Available from your local vendor, these CDs can be recorded or read in
CD-ReWritable drives and read in newer MultiRead CD-ROMs.
Purchase HP CD-R (Recordable or write-once) media (C4403A)
Available from your local vendor, these CDs can be read by most CDROM, CD-Recordable, and CD-ReWritable drives (use this type of media
if you want to listen to your music CDs in a stereo).
CD Care and Other Tips
■ Protect recording surfaces from scratches, fingerprints, and dirt.
■ Hold CDs by the outer edge or by the center hole.
■ You can clean a CD with a soft, dry cloth. Commercial CD cleaner or
ethyl alcohol can also be used
■ Write by hand only on the “white” premarked label side using an oil
based felt tip marker. Do not use a ballpoint pen.
■ Do not leave a CD in direct sunlight or in a hot, humid location.
Page 50

2-4 Maintenance
■ If you ever lose power to the computer or have to press CTRL-ALT-
DEL while writing to a CD, do not open the CD tray. You may still be
able to salvage your CD. For instructions on how to do this read the
pertinent section on page 3-5.
■ Do not mix audio and data files on the same CD, since they require
different formats, unless you are creating Mixed Mode or CD-Extra
CDs. For more information on Mixed Mode and CD-Extra CDs see the
Easy-CD Creator online help.
Maintenance
The CD-Writer Plus drive requires no maintenance or cleaning. If you
simply keep your CDs clean, you will prevent most problems.
CAUTION: DO NOT use the CD-ROM cleaning CDs that rely on a small brush
to sweep dirt off the laser. DO NOT use high-pressure air to clean the inside of
the drive. These cleaning techniques will damage the CD-Writer Plus drive.
Identifying CD-Writer Plus’s Drive Letter
Not sure which drive letter was assigned to the CD-Writer Plus
drive?
The CD-Writer Plus drive will have a drive icon just like a CD-ROM drive
icon. You can determine which icon is your CD-ROM drive and which
icon is your CD-Writer Plus drive by double-clicking on the My
Computer icon, right-clicking on the CD drive icon, and selecting Eject.
The tray of the selected drive will open.
Page 51

Chapter 3: Problem Solving
Chapter 3:
Problem Solving
Read this section if you run into trouble with your CD-Writer Plus drive.
If after reviewing the section you need further assistance, call the phone
numbers listed in ”Appendix B: Customer Support”.
Gather the information on page B-1 before calling for assistance. Having
this information ready will greatly facilitate your call.
Things to Try First
These are some basic steps to take when you run into trouble. If the
problem persists, see the “Common Symptoms and Solutions” section.
■ Does your computer meet the minimum system requirements (see
Minimum System Requirements on page A-1)?
■ Make sure the computer is plugged in and that each device has power.
■ Turn off the computer’s power, wait 20 seconds, then turn it on again.
■ Try the operation with a different CD.
■ Make sure that you are using the right type of CD (See “Choosing CDs
for Your CD-Writer” on page 2-2.)
■ Check the Readme file that came with the CD-Writer Plus drive.
■ Check the free online information resources listed on page B-5.
■ If your computer has a power-management feature, disable it (see the
manual that came with your computer).
Page 52

3-2 Common Symptoms
Common Symptoms
■ Now your computer won’t boot up! (see page 1-35)
■ Not sure which drive letter was assigned to the CD-Writer Plus? (see
page 1-36)
■ The CD-Writer Plus drive doesn’t show up in My Computer or
Explorer. (see page 1-36)
■ The device that is sharing the IDE data cable with my CD-Writer Plus
drive doesn’t show up in Explorer or doesn’t work any more. (see page
1-36)
■ The computer is trying to boot up from the CD-Writer Plus drive or
receiving “Invalid Media” error message. (see page 3-3)
■ Copying directly from one CD to another doesn’t work. (see page 3-3)
■ Audio sounds poor. (see page 3-3)
■ Video is choppy. (see page 3-4)
■ Applications cannot locate the CD in the CD-Writer Plus drive. (see
page 3-4)
■ Unable to see the CD label or all the sessions/files on the CD in
Windows Explorer. (see page 3-5)
■ Lost power to the computer or had to press CTRL-ALT-DEL while
writing to the CD! (see page 3-5)
■ Buffer underrun error messages. (see page 3-6)
■ Hard Drive compression software. (see page 3-6)
■ Achieving optimal performance. (see page 3-6)
■ Known compatibility problems. (see page 3-7)
■ Checking for resource conflicts. (see page 3-7)
Page 53

Solutions to Some Common Symptoms 3-3
Chapter 3: Problem Solving
Solutions to Some Common Symptoms
The computer is trying to boot up from the CD-Writer Plus
drive or receiving “Invalid Media” error message.
■ If the computer is trying to boot up the operating system from the
CD-Writer Plus drive, simply remove the CD from the drive tray when
starting up your computer.
■ If you do not want your computer to boot from the CD-Writer Plus
drive, you need to change the “boot order” settings in your CMOS
program. To learn how, see the documentation that came with your
computer or call the computer manufacturer.
Copying directly from one CD to another doesn’t work.
WARNING: Only reproduce material for which you own the copyright or have
obtained permission to copy from the copyright owner. Unless you own the
copyright or have permission to copy from the copyright owner, you may be
violating copyright law and be subject to payment of damages and other
remedies. If you are uncertain about your rights, contact your legal advisor.
■ Some CD-ROMs will not allow direct copying to the CD-Writer Plus
drive or are not capable of digital audio extraction.
■ You must have either a SCSI 2 CD-ROM drive (see the drive’s guide for
information) or a supported ATAPI CD-ROM drive to use as your
source.
■ Some CDs have a copy prevention feature or other features that do
not allow a CD-to-CD copy.
Audio sounds poor.
■ Make sure the audio cable is completely plugged into the sound card
and into the CD-Writer Plus drive.
■ Make sure that you do not have a sound-muting feature turned on
through the monitor or in software.
■ Check the sound from the CD-Writer Plus drive by plugging
earphones or speakers to the audio connector on the front of the CDWriter Plus drive. If the sound quality is good, the problem is
probably with the sound board, speakers, or audio cable. See the
documentation that came with your sound board and speakers for
help. If you are not already doing so, try using the audio cable that
came with the CD-Writer Plus drive.
Page 54

3-4 Solutions to Some Common Symptoms
■ If you copied wave files from the hard drive to a CD, try listening to
the wave files on your hard drive to see if they sounded poor before
copying them to CD. (You can use the Media Player program found
under Multimedia in Windows’ Accessories.)
Video is choppy.
This can result from the same situations that cause buffer underruns
(explained on page 3-6) or can happen if your video card is slow. Try the
following:
■ Try the solutions for buffer underruns (page 3-6).
■ Reduce the size of the video window and close any other programs
that are running.
■ If the previous suggestions don’t work you may want to consider
upgrading your video card.
Unable to see a second session reading from a CD-ROM drive.
■ Eject the CD and reinsert it.
■ Refresh the screen. To do this select the My Computer icon in
Windows Explorer and press F5.
■ CD-RW (ReWritable) discs can only be used in CD-ReWritable drives
or newer MultiRead CD-ROMs.
■ If you are trying to read your CD from Windows 3.x: Multi-session CDs
created with Direct CD cannot be read in DOS or Windows 3.x. If
your multi-session CD was created using some other program, verify
that you are using version 2.23 of the MSCDEX.EXE file. First, restart
your computer and when you see “Starting MS-DOS...” appear on
your monitor, press F8. Each line in your CONFIG.SYS and
AUTOEXEC.BAT file will load one at a time. Press “Y” until you see a
line containing “MSCDEX.EXE”. Then press “Y” and the version
number of your MSCDEX file will display. The number must be 2.23
or greater. Call Microsoft for an updated file if you need it.
■ See if the CD-Writer Plus drive or other CD-ROM drives can read the
CD. If so, the problem is probably with the CD-ROM drive. Contact
the manufacturer of this drive for updated drivers.
Applications cannot locate the CD in the CD-Writer Plus drive.
Some programs (CD-ROM games, etc.) look only for the first logical drive
letter assigned to a CD-ROM drive or CD-Writer Plus drive. For example,
if your CD-ROM drive is assigned drive D:\ and the CD-Writer Plus drive
Page 55

Solutions to Some Common Symptoms 3-5
Chapter 3: Problem Solving
is assigned drive E:\, the program is looking for the CD only in drive D:\
and will not see the CD in drive E:\. If you want to use the CD-Writer
Plus drive with these programs, reassign the drive letters, making the CDWriter Plus drive come before the CD-ROM drive, as follows:
■ In Windows 95,click on Start/Settings/Control Panel and double-
click on the System icon. Display the Device Manager and doubleclick on CDROM. Double-click on the CD-ROM drive, and then click
on the Settings tab. Under Reserved drive letters, select the drive
letter after the existing letter (for both start and end drive letter) and
click on OK. Then double-click on the CD-Writer Plus drive, and then
click on the Settings tab. Under Reserved drive letters, select the drive
letter before the current one and click on OK.
■ In Windows NT, click on Start/Programs/Administrative
Tools(common). Choose Disk Administrator. Right-click on the
drive letter you wish to change. Select Assign Drive Letter. Change
the drive letter.
Unable to see the CD label or all the sessions/files on the CD in
Windows Explorer.
Refresh the screen. To do this select the My Computer icon in Windows
Explorer and press F5.
Lost power to the computer or had to press CTRL-ALT-DEL
while writing to the CD!
If you lose power while writing to your CD (the CD-Writer Plus drive's
red light is on) OR if you exit an application or press CTRL-ALT-DEL
while writing to CD...
You may be able to salvage your CD, but ONLY if you:
1. LEAVE YOUR CD IN THE DRIVE, DO NOT OPEN THE CD TRAY
2. Turn your machine off
3. Turn it back on
4. Then re-enter the application you were using
Once the application tries to access the CD-Writer Plus drive, the
recovery operation will make it appear that the last session is there.
However, in reality, only a part of the CD's directory may be there. Your
recordable CD is still usable if you can read the directory. Repeat the
entire copy operation to make sure that your files are copied to the
recordable or ReWritable CD.
Page 56

3-6 Solutions to Some Common Symptoms
Hard Drive compression software.
We do not recommend using hard drive compression software. If you use
hard drive compression software, it estimates free hard drive space based
upon a compression ratio (often user selectable). Programs may check
your hard drive for space needed and may think you have the necessary
free space. However, depending on the type of files you are copying, you
may in fact not have enough hard drive space.
Achieving optimal performance.
Run SCANDISK.EXE and DEFRAG.EXE on your hard drive before using
your CD-Writer Plus drive for the first time (see your Windows manual
for more information). Then run them periodically after that. These
programs improve access times to the hard drive, which will help
improve system performance while writing to and reading from the CDWriter Plus drive.
Buffer underrun error messages.
CD recordable devices require an uninterrupted data stream from the
hard drive in order to write successfully to a CD. A buffer underrun
message appears when for some reason the data stream is interrupted.
This can occur, for example, if another application interrupts the writing
process, or if the CD-Writer Plus drive’s write speed is set too high for the
speed at which the hard drive can accesses and transfer data.
When using Easy-CD Creator or Disc Copier:
■ Make sure you use the Test option in the software to ensure that the
write speed is appropriate for your computer. For more information
see the application’s online help.
■ Make sure your system meets the minimum system requirements, see
Minimum System Requirements on page A-1.
■ Buffer underrun may be caused by hard drive compression software
(see page 3-6).
■ NEVER write to the recordable CD while other applications are
running that could interrupt the writing-to-CD process. Log off any
networks, disable any fax modem, email, screen saver, or other
programs (such as TSRs, terminate-and-stay-resident programs) that
may automatically send messages to your computer while writing
data to the CD. If the interruption is long enough, you could ruin a
write-once CD to which you are writing.
■ Exit any other programs before writing data to the CD.
Page 57

Solutions to Some Common Symptoms 3-7
Chapter 3: Problem Solving
■ If your computer has a power-management feature, disable it (see the
manual that came with your computer).
■ Run SCANDISK.EXE and DEFRAG.EXE periodically on your hard
drive (see your Windows manual for more information). These
programs improve access times to the hard drive, which will help
improve system performance while writing to and reading from the
CD-Writer Plus drive.
■ A small number of older hard drives are designed with a built-in
interrupt loop that may cause a buffer underrun. If you are unable to
resolve buffer underruns by any other means, contact your hard drive
manufacturer to find out if this is the case for your hard drive.
Known compatibility problems.
■ Check the Readme file that came with the CD-Writer Plus drive for
additional information.
■ Check the web site listed on page B-5 for the most recent information.
Checking for resource conflicts.
In rare cases, your computer’s IDE controller may be having a resource
conflict where another device is trying to use the IDE controller’s I/O
base address or interrupt request channel (IRQ). To check for this type of
conflict:
■ In Windows 95, right-click on the My Computer icon, select
Properties, select the Device Manager tab, and double-click on CDROM, if the list is not already expanded. A yellow exclamation mark
over the controller’s icon confirms that the controller has the same or
conflicting settings as another device installed on your system.
Resolve this conflict by assigning a unique IRQ and I/O base address
to the other device.
■ In Windows NT, if this type of conflict is present, you will see an error
message when you start up Windows NT. Follow the directions in the
error message box.
Page 58

Chapter 4: Sharing Your CDs
Chapter 4:
Sharing Your CDs
How you write your data to CD and the type of CDs that you use will
determine who else can read the data from your discs. This chapter
briefly explains some of the options you have in creating CDs that can be
shared with others using different computer and CD setups.
Varying Formats
CD technology has progressed rapidly over the last few years from CDROM to writable CD, and on to the technology you now own in your
rewritable CD-Writer Plus. One of the results of these developments is
that data can be written in several formats and on different types of CDs.
Sharing CDs across Different Formats
Using CD-RW Discs
When should I use CD-RW discs?
CD-RW media is the ideal solution if you need more storage space on
your computer. Your CD-Writer Plus drive, coupled with CD-RW media,
can function as an extension of your hard drive.You can write, erase, and
rewrite data easily from applications and from the Windows Explorer.
Use CD-RW media:
■ To save work in progress like presentations, documents, etc.
■ Make weekly archives of files on your hard drive.
■ Shuttle files between the office and home if you have a CD-Writer
Plus at each location, or have an external CD-Writer Plus to use on
both computers.
Page 59

4-2 Sharing CDs across Different Formats
Can I share a CD-RW disc?
Yes. You can share a CD-RW disc directly with someone owning another
CD-RW drive or with someone that has a MultiRead CD-ROM drive and
UDF reader software. MultiRead CD-ROM drives are a recent innovation
to CD-ROM technology, so while not all CD-ROMs are MultiRead, they
are available to users world wide.
How do I know if a CD-ROM is MultiRead?
Look for the MultiRead certification logo on the CD-ROM’s packaging or
users guide. The drive will be described as MultiRead certified or will list
CD-RW as supported media. You can also put a CD-RW disc in your CDROM and see if it can read it.
What if I want to share with users that have standard CD-ROM
drives? (In Windows 95, Windows 98, and Windows NT 4.0)
In general, you must copy your information to a CD-R disc to share it
with users that have standard CD-ROM drives. To accomplish this:
1. Insert your CD-RW disc in your CD-Writer Plus drive.
2. Copy all the information from the CD-RW disc to a unique location on
your hard drive.
3. Replace the CD-RW disc in your CD-Writer Plus with a blank CD-R disc.
4. Copy the information from your hard drive to the CD-R media using
DirectCD.
5. When you eject the disc, DirectCD prompts you to either leave the disc
as it is, or organize the disc so it can be read in most standard CD-ROM
drives. Select the option to organize the CD so it can be read in most
standard CD-ROM drives.
NOTE: For additional information on sharing CDs with Windows 3.x and
DOS users, see “CD-R discs created with DirectCD.” on page 4-3.
Can I play an audio disc I made on a CD-RW disc in my car or
home CD player?
Probably not. Most car and home CD players are not capable of reading
information off of CD-RW media. You must record your audio on CD-R
discs to play them on most conventional CD players. There are however
some newly released auto and home CD players that can read the CD-RW
media.
Page 60

Sharing CDs across Different Formats 4-3
Chapter 4: Sharing Your CDs
Using CD-R Discs
When should I use CD-R discs?
The data you put on a CD-R can’t be erased. Use CD-R discs:
■ When you want to protect your data so that it cannot be erased
■ If you want to share your CD with users that have standard CD-ROM
drives
■ For audio CDs
Can I automatically share a CD-R with anyone?
Not necessarily. The software application you use will determine with
whom you can easily share the CD.
CD-R discs created with DirectCD.
Use DirectCD when you want to create data CDs to use on your own
computer. For instructions on how to use DirectCD go to “Making Data
CDs to Use on Your Own Computer” on page 5-1.
When you eject the disc from the drive, DirectCD will prompt you to
either leave the disc as it is so you can add more data later, or organize it
so it can be read in most standard CD-ROM drives under Windows 95 or
Windows NT 4.0 Service Pack 3. If you intend to share the disc with other
users, then you must select the option to organize it so it can be read in
most standard CD-ROMs.
■ Windows 95, Windows 98, and Windows NT 4.0. Your CD-R
organized to be read in most standard CD-ROMs is now ready to be
shared with Windows 95, Windows 98, and Windows NT 4.0 users.
There may be some CD-ROMs that can’t read the CD-R. If you have
problems try turning off the “Read Ahead” on your CD-ROM. Refer to
your operating system documentation on how to do this. Another
option is to use CD Copier to create a disc copy of your original CD-R
disc. A description of how to do this can be found in the section
“Making a Copy of a CD” on page 8-3.
■ Windows 3.x and DOS. Your CD-R organized to be read in most
standard CD-ROMs under Windows 95 and Windows NT cannot
automatically be read in Windows 3.x or DOS. Some additional steps
are required if you want to share this disc with Windows 3.x or DOS
users. You will need to create a copy of your original CD-R disc on
another piece of CD-R media using the CD Copier application. This
Page 61

4-4 Sharing CDs across Different Formats
will write a disc in the proper format for Windows 3.x and DOS users.
Follow the instructions given in the section “Making a Copy of a CD”
on page 8-3 to accomplish this task.
NOTE: CDs created with CD Copier will display long filenames when viewed in
Windows 95, 98, and NT. When viewed in Windows 3.x and DOS, file names
are shortened to the DOS standard of eight characters with a three-character
extension. Files and executables that expect a specific file name may not
function as anticipated in Windows 3.x and DOS.
CD-R discs created with Easy-CD Creator (Audio).
This application automatically writes the audio format understood by
millions of car and home CD players in existence today. You will be able
to share this disc with virtually any user.
CD-R discs created with Easy-CD Creator (Data).
Use Easy-CD Creator (Data) when you want to create data CDs you can
share with other users, for example if you want to send the CD to your
co-workers. For instructions on how to use Easy-CD Creator (Data) go to
“Making Data CDs to Use on Different Types of Computers” on page 5-6
Easy-CD Creator is called a mastering application since, when used with
CD-R media, it is capable of directly writing discs using a format that can
be read by virtually all CD-ROM drives and operating systems
(Windows95, Windows NT, Windows 3.x, and DOS).
Interchange Summary
The following table is a brief summary of which CD drives can read discs
created with certain application/media combinations.
Application
used to make
a CD
DirectCD CD-RW MultiRead CD-ROM with UDF
CD Copier CD-RW MultiRead CD-ROM
Type of CD
used
CD-R
(closed)
CD-R Any CD-ROM
Drives that can read the CD
reader
Windows 95, 98, and NT 4.0
*Most CD-ROMs
Windows 95, 98, and NT 4.0
Page 62

Sharing CDs across Different Formats 4-5
Chapter 4: Sharing Your CDs
Application
used to make
a CD
Easy-CD
Creator
(Audio)
Easy-CD
Creator
(Data)
Type of CD
used
CD-RW MultiRead CD-ROM
CD-R Any CD-ROM, home or car CD
CD-RW MultiRead CD-ROM
CD-R Any CD-ROM
Drives that can read the CD
player
* Your CD-ROM drive must be capable of reading packet-written CDs. Most CD-ROM drives
are packet tolerant. If you have problems, check your drive’s documentation or consult the
drive’s manufacturer.
Page 63

Chapter 5: Making Data CDs
Chapter 5:
Making Data CDs
You can make data CDs with DirectCD™ and with EasyCDCreator™. You
can copy data to both CD-Recordable (CD-R) and CD-ReWritable
(CD-RW) discs. DirectCD and EasyCDCreator make data CDs in a
slightly different way for different purposes. The correct program is
launched automatically when you decide what kind of data CD you want
to make.
■ If you want to make a data CD to use on your own computer, follow
the instructions in “Making Data CDs to Use on Your Own
Computer” below.
■ If you want to make a data CD to use on your own computer or on
different types of computers (for example, computers running under
DOS or Windows3.x) that do not have DirectCD, follow the
instructions in “Making Data CDs to Use on Different Types of
Computers” on page 5-6.
Making Data CDs to Use on Your Own Computer
DirectCD enables you to write files directly to a CD-Recordable (CD-R) or
CD-ReWritable (CD-RW) disc, in much the same way you would write
them to a floppy diskette or a removable media drive. This is especially
handy for making data discs to use with your own computer. For
example, you might want to
■ Archive data and then remove it from your hard drive
■ Back up the files on your hard drive
Page 64

5-2 Making Data CDs to Use on Your Own Computer
■ Transfer a large number of files from the computer you use at work to
the computer you use at home
NOTE: Other people may be able to read data discs you create with DirectCD
on their computers if their CD-related hardware and software is set up the same
as it is on your computer. However, it is more likely that your data discs will be
usable on other computers if you create them with EasyCDCreator, as
described in “Making Data CDs to Use on Different Types of Computers” on
page 5-6.
DirectCD lets you read and write files directly to your CD with any
software application that can read from and write to a drive letter. Some
examples include:
■ Software applications such as Microsoft Word, when you use the
Save or Save As commands
■ Windows Explorer, when you drag and drop files
■ Windows 95
■ MS-DOS, when you use command prompts from within
Windows95/NT
DirectCD provides a file system based on UDF v1.5 specifications and
writes data to the CD-R or CD-RW disc using packet-writing technology.
This technology, together with the file system, gives you drive letter
access to your CD-Writer Plus. A DirectCD wizard guides you step-by-step
through the process of preparing and ejecting CD-R and CD-RW discs.
®
/NT, when you use the Send To command
Preparing a Data CD
Follow these steps to start DirectCD and prepare a blank CD-R or CD-RW
disc for reading and writing data. (If you want to write more data to a
disc that you already formatted in DirectCD, see “Writing More Data to a
DirectCD Disc” on page 5-5.)
1. Start up your computer.
2. Insert a blank CD-R or CD-RW disc in the CD-Writer Plus. After a few
seconds a screen will appear which asks you to “Please select the type of
CD you wish to create.” (If the DirectCD Disc Ready window appears, the
disc has already been prepared, and you can start writing data to it.)
Page 65

Making Data CDs to Use on Your Own Computer 5-3
Chapter 5: Making Data CDs
NOTE: If no screen appears after about 15seconds, the disc may not be blank,
or it may have an unreadable format. (See “Fixing an Unreadable Disc” on
page 5-6 for more information.) Or the “Auto insert notification” option may be
disabled (this applies to Windows95 only). To check this, click Start, move the
mouse pointer over Settings, and click Control Panel. In Control Panel,
double-click System and select the Device Manager tab. Double-click the
CD-Writer Plus icon, then select the Settings tab. Click Auto insert
notification if it does not have a check mark next to it, and click OK. Click
OK on the System Properties dialog box. Then close the Control Panel.
3. Select the first option: Click here to create a data CD that will be
accessible through a drive letter, i.e. as you would use a floppy drive.
The Format Disc screen appears. If you are formatting a CD-R disc,
continue with the next step. If you are formatting a CD-RW disc, skip to
step #5.
4. If you are formatting a CD-R disc, click Next on the Format Disc screen
and skip to step #6.
5. If you are formatting a CD-RW disc, you can choose between two
formatting options. To do this, click the Advanced button that appears
on the Format Disc screen. When the next screen appears, select either
Fast Format or Full Format and click OK.
We recommend that you select HPfast format, which lets you start
writing to the CD-RW disc almost immediately while the disc is
formatted in the background. A Full Format requires you to wait about
an hour until the formatting is complete before you can write to the disc.
Click the Help button for more information about the formatting
options.
NOTE: Data is safe if you write it to the disc while HPfast format takes place
in the background. HPfast format will NOT overwrite this data, because the
data is written to sections of the disc that have already been formatted.
6. When the Name Your Disc screen appears, type a name for the disc and
click Finish. Disc formatting begins.
When the DirectCD Disc Ready window appears, the formatting is
complete.
NOTE: Formatted CD-RW discs have about 530 MB of available space, while
formatted CD-R discs can store up to 618 MB of data.
7. Click OK.
The DirectCD disc is ready for you to write data to it.
Page 66

5-4 Making Data CDs to Use on Your Own Computer
Writing Data to a DirectCD Disc
Once your CD is formatted as a DirectCD disc, you can write data to it in
several different ways:
■ Drag and drop files from Windows Explorer onto the CD-Writer Plus
icon.
■ Select Save As from a Windows 95/NT application File menu and
select the drive letter of your CD-Writer Plus.
■ Use the Send To command.
■ Use MS-DOS command prompts from a DOS window in
Windows 95/NT.
Ejecting a DirectCD Disc
DirectCD gives you various formatting options when you eject a
DirectCD disc from the CD-Writer Plus. The options depend on what
kind of disc DirectCD detects in the drive and how you want to use the
disc. To eject a DirectCD disc, follow these steps:
1. Push the eject button on the front of the CD-Writer Plus, or
Right-click on the CD icon on the taskbar and select Eject from the
drop-down list box.
The Eject Disc screen appears.
2. Carefully read the text that appears on the screen and, if options are
presented, select the option you want.
3. Click Finish to eject the disc from the CD-Writer Plus.
NOTE: If you are using a CD-RW disc, see “Chapter 4: Sharing Your CDs” for
more information about making CDs readable on different types of computers.
Page 67

Making Data CDs to Use on Your Own Computer 5-5
Chapter 5: Making Data CDs
Writing More Data to a DirectCD Disc
If you previously formatted a blank disc for DirectCD use, you can add
more data to the disc until it is full. To do so, follow these steps:
1. Insert the DirectCD disc into your CD-Writer Plus.
2. Wait for the DirectCD Disc Ready window to appear. (If the Make Disc
Writable screen appears, simply follow the on-screen directions to make
the disc writable.)
3. Click OK and continue writing more data to the disc.
Erasing a DirectCD Disc
If you are using CD-RW discs in your CD-Writer Plus, you can actually
erase files from the disc and use the recovered space to write new files.
However, if you “delete” files from a CD-R disc, the files become invisible
to the file system (such as Windows Explorer) but the space they occupy
is not made available for other files. Thus, “deleting” files from a CD-R
disc will not increase the available free space on the disc.
To erase the contents on a DirectCD disc, follow these steps:
1. While in Windows Explorer, select the file(s) you want to erase.
2. Select Delete from the File menu.
3. Click Yes to confirm that you want to erase the files from the disc.
DirectCD erases the selected file(s) from the disc.
Page 68

5-6 Making Data CDs to Use on Different Types of Computers
Fixing an Unreadable Disc
If no window appears on the screen after about 15seconds when you
insert a disc in the CD-Writer Plus, the disc may have an unreadable
format. DirectCD has a ScanDisc application that may be able to recover
data on the disc and allow you to write to it and read from it again.
Follow these steps to use ScanDisc:
1. Double-click the CD icon on the right side of the Windows taskbar.
If the disc is unreadable, the ScanDisc window will appear.
2. Read the text in the window, then click the ScanDisc button.
3. Wait while ScanDisc repairs the disc. A message will appear on the screen
when ScanDisc is finished.
NOTE: You can also start ScanDisc through the Start menu. To do this, click
Start on the Windows taskbar. Move the mouse pointer over Programs, HP
CD-Writer Plus, Tools and Information, and Utilities. Then select ScanDisc.
Making Data CDs to Use on Different Types of Computers
Adaptec EasyCDCreator enables you to write files directly to a
CD-Recordable (CD-R) or CD-ReWritable* (CD-RW) disc in a format that
can be read by different types of computers. This is handy if, for example,
you want to create a CD for someone who has a computer running under
DOS or Windows3.x.
Follow these steps to start EasyCDCreator and copy data files to a blank
CD-R or CD-RW disc:
1. Start up your computer.
2. Insert a blank CD-R or CD-RW disc in the CD-Writer Plus. After a few
seconds a screen will appear which asks you to “Please select the type of
CD you wish to create.”
* CD-RW discs can only be read in a MultiRead CD-ROM drive or in another
CD-RW drive.
Page 69

Making Data CDs to Use on Different Types of Computers 5-7
Chapter 5: Making Data CDs
NOTE: If the screen does not appear after about 15seconds, you may have
inserted a disc that is already formatted. Remove the disc and insert a blank
disc. Or the “Auto insert notification” option may be disabled (this applies to
Windows95 only). To check this, click Start, move the mouse pointer over
Settings, and click Control Panel. In Control Panel, double-click System and
select the Device Manager tab. Double-click the icon for the CD-Writer Plus,
then select the Settings tab. Click Auto insert notification if it does not have
a check mark next to it, and click OK. Click OK on the System Properties dialog
box. Then close the Control Panel.
3. Select the second option: Click here to create a data CD for
distribution among different types of computers. The EasyCDCreator
Wizard appears.
4. Leave the Data CD radio button selected, and click Next.
5. When the next screen appears, select the files and folders you want to
copy to the disc and click Add Now. The graph bar in the lower part of
the screen indicates how much space is left on the disc.
6. When you are done adding files, click Next. The Test Before Writing
window appears.
7. Click Next, then click Finish on the Ready to Create CD window to
create the CD. The testing and copying process may take a long time if
you are copying many folders and files.
8. When the testing and copying process is completed, eject the CD from
the drive.
NOTE: These instructions describe the simplest, most direct way to create a
data disc with EasyCDCreator. Other options are also available, such as rearranging the folder/file structure after you have selected the files to copy to the
CD. See the EasyCDCreator online help for more information.
Page 70

5-8 Getting Help
Getting Help
For setup and connection problems with your CD-Writer Plus, refer to
the Troubleshooting section of the user’s guide.
For information about EasyCDCreator and DirectCD, refer to the
appropriate topics in the online Help. To access the online Help, select
Help Topics from the Help menu of either program.
Technical information, including product literature, answers to
commonly asked questions, information on software upgrades and other
topics is available electronically through the following:
■ Adaptec World Wide Web (WWW) site at http://www.adaptec.com.
■ The Adaptec Software Products Group can be found on several
CD-ROM, CD-R, and CD publishing newsgroups and lists on the
Internet.
For customer support information, refer to Appendix B, “Customer
Support.”
Page 71

Chapter 6: Making Music
CDs
Chapter 6:
Making Music CDs
A music CD is a compact disc (CD) containing digital audio tracks
recorded in the Compact Disc-Digital Audio (CD-DA) format.
Music CDs can store up to 74 minutes of music and may contain up to 99
tracks, each usually representing a separate piece of music. Music CDs
can be played back from a home or car CD player or from a CD-ROM
drive through speakers or headphones attached to the drive’s output jack.
You can use EasyCDCreator to:
■ Compile audio CDs of your favorite music
■ Make CDs from Wave (.wav) files on your hard drive
Starting EasyCDCreator
1. Start up your computer.
2. Insert a blank CD-R or CD-RW disc in the CD-Writer Plus. After a few
seconds a screen will appear which asks you to “Please select the type of
CD you wish to create.”
NOTE: If no screen appears after about 15 seconds, you may have inserted a
disc that is already formatted. Remove the disc and insert a blank disc. Or the
“Auto insert notification” option may be disabled (this applies to Windows95
only). To check this, click Start, move the mouse pointer over Settings, and
click Control Panel. In Control Panel, double-click System and select the
Device Manager tab. Double-click the icon for the CD-Writer Plus, then select
the Settings tab. Click Auto insert notification if it does not have a check
mark next to it, and click OK. Click OK on the System Properties dialog box.
Then close the Control Panel.
Page 72

6-2 Making a Music CD
3. Select the third option: Click here to create an audio CD that will be
playable in any CD player. The Adaptec EasyCDCreator Wizard
window appears.
Making a Music CD
You can make a music CD by recording songs from:
■ Tracks on an existing CD
■ Wave files stored on your hard drive (*.wav is a standard Windows
format for sound files.)
■ A combination of Wave files and tracks
This section explains how you can make a simple music CD with the
EasyCDCreator Wizard. It also explains how to do other tasks like
recording audio tracks from an existing music CD and recording Wave
files stored on your hard drive.
NOTE: EasyCDCreator is designed to assist you in reproducing material in
which you own the copyright or have obtained permission to copy from the
copyright owner. Unless you own the copyright or have permission to copy from
the copyright owner, you may be violating copyright law and be subject to
payment of damages and other remedies. If you are uncertain about your rights,
contact your legal advisor.
Page 73

Making a Music CD 6-3
Chapter 6: Making Music
CDs
Using the Wizard
The easiest way to make a music CD is to use the EasyCDCreator
Wizard, which appears when you first start EasyCDCreator. The Wizard
guides you step-by-step in making a simple music CD. Follow these steps
to make a music CD with the Wizard:
1. Start EasyCDCreator if it is not already running (see “Starting
EasyCDCreator” on page 6-1.) The Adaptec EasyCDCreator Wizard
appears, as shown here:
2. Follow the on-screen instructions in the Wizard windows.
As you add tracks to write to the CD, a list of these tracks will appear in
the main EasyCDCreator window at the bottom of the screen. A final
message box notifies you when the recording is complete.
Recording Audio Tracks from an Existing Music CD
To record songs (audio tracks) from an existing music CD, you need to
first create a CD layout— a file that contains the list of songs and the
order in which they will be recorded—then record the layout to a blank
CD. To do so, follow these steps:
1. Start EasyCDCreator, if it is not already running.
Page 74

6-4 Making a Music CD
Windows Explorer Audio CD Layout Window
2. Select New CD Layout from the File menu or open an existing CD
layout.
3. Click the Audio CD Layout tab:
The top part of the window is Windows Explorer, where you can select
the songs you want to record. The bottom part is the Audio CD Layout
window, which allows you to view the contents of the CD layout. To
make changes to the list of tracks in the Audio CD Layout tab, see
“Changing the Order of Your Songs” on page 6-8.
4. Insert the source CD, which contains the songs you want to record, in
your CD-Writer Plus.
NOTE: You can record directly from a CD-ROM drive only if it supports digital
audio extraction. See “Recording from a CD-ROM Drive” in the
EasyCDCreator Online Help.
5. In the Windows Explorer section of the window, select the drive where
the source CD is located to view the list of songs on the original CD.
6. Drag the songs that you want to record from Windows Explorer to the
Audio CD Layout window.
To change the name of a song, see “Renaming Songs in Your CD Layout”
on page 6-8.
Page 75

Making a Music CD 6-5
Chapter 6: Making Music
CDs
7. Repeat steps 4, 5, and 6 for each existing music CD from which you want
to record songs.
8. Select Create CD from the File menu when you have placed all of the
songs that you want to record into the Audio CD Layout window.
The CD Creation Setup box appears.
9. Make changes, if any, to the CD Creation Setup settings (see “CD
Creation Setup Settings” in the EasyCDCreator Online Help for
descriptions) and click OK.
EasyCDCreator needs a blank CD before it can begin recording your CD
layout. Insert a blank CD when prompted. A final message box notifies
you when the recording is complete.
NOTE: To make a jewel case insert that lists the artist, CD title, and songs, see
“Chapter 7: Making Inserts and Labels”.
Recording Wave Files Stored on Your Hard Drive
To record a music CD using Wave files (*.wav), the Wave files must be
stored on your hard drive at 11, 22, 44.1 KHz, 8- or 16-bit, mono or
stereo. To make a Wave file from an existing CD, see “Pre-recording
Audio Tracks to Wave Files” on page 6-6.
NOTE: For best results, record your .wav files at 44.1KHz, 16-bit stereo. For
more information, see the documentation for your Wave editor program.
To record Wave files stored on your hard drive to a blank CD, follow
these steps:
1. Insert a blank CD in your CD-Writer Plus.
2. Select New CD Layout from the File menu, or open an existing layout.
3. Click the Audio CD Layout tab.
4. Select the Wave files you want to record from Explorer and drag them to
the Audio CD Layout window.
5. To change the name of the song(s), see “Renaming Songs in Your CD
Layout” on page 6-8.
Page 76

6-6 Making a Music CD
6. Select Create CD from the File menu when you have finished adding all
of the songs you want to record to your CD layout. The CD Creation
Setup box appears.
7. Make changes, if any, to the CD Creation Setup settings (see “CD
Creation Setup Settings” in the EasyCDCreator Online Help for
descriptions) and click OK.
EasyCDCreator will begin recording your CD layout to the blank CD.
An on-screen message notifies you when the recording is complete.
NOTE: To make a jewel case insert that lists the artist, CD title, and songs, see
“Chapter 7: Making Inserts and Labels.”
Pre-recording Audio Tracks to Wave Files
Pre-recording audio tracks to Wave files on your hard drive is a way to:
■ Minimize swapping CDs in and out of your drive if you want to make
more than one copy, or if you have only a CD-Writer Plus drive
■ Add sound effects to customize any song on the CD (using a third-
party sound editor)
■ Improve the sound quality if your CD recording system is less than
optimal
You can pre-record one Wave file at a time. To pre-record a Wave file from
an existing CD, follow these steps:
1. Insert the source CD, which contains the song you want to pre-record to
your hard drive, into your CD-Writer Plus.
2. Click the Audio CD Layout tab in EasyCDCreator.
3. Select the audio track you want to pre-record from Explorer and drag it
into the Audio CD Layout window.
4. Highlight the audio track in the Audio CD Layout window.
5. Select Pre-record to WAV file from the Track menu.
NOTE: Pre-recording audio tracks to Wave files requires approximately 10MB
of space on your hard drive for one minute of music.
Page 77

Making a Music CD 6-7
Chapter 6: Making Music
CDs
6. Type in a file name for the Wave file and choose a different location on
your hard drive if you do not want to record your Wave file to your Temp
directory.
7. Click Save.
EasyCDCreator pre-records your Wave file to your hard drive. An on-
screen message notifies you when the recording is complete.
Combining Both Audio Tracks and Wave Files
You can make a music CD that contains songs both from pre-recorded
Wave files stored on your hard drive and from audio tracks on an existing
music CD. To do so, follow the steps outlined in “Recording Audio Tracks
from an Existing Music CD” on page 6-3 and “Recording Wave Files
Stored on Your Hard Drive” on page 6-5, depending on the type of songs
you want to record. When you have added all of the audio tracks and
Wave files you want to record to your CD layout, select Create CD from
the File menu.
Page 78

6-8 Modifying Your CD Layout
Modifying Your CD Layout
The following sections describe how to make changes to your CD layout.
Changing the Order of Your Songs
Once you have added more than one song to your CD layout, you can
change the order of the songs at any time before creating the CD.
To change the order of the songs, follow these steps:
1. Select the song whose order you want to change in the CD layout.
2. Drag the song to the position where you want it to appear in the Audio
CD Layout window.
Removing Songs from Your CD Layout
You can remove any song you have added to a CD layout at any time
before you create a CD. To remove a song from your CD layout, follow
these steps:
1. Select the song you want to remove in the Audio CD Layout window.
2. Select Cut from the Edit menu.
Renaming Songs in Your CD Layout
To rename a song listed in your CD Layout, follow these steps:
1. Select the song you want to rename in the Audio CD Layout window.
2. Select Rename in the Track menu.
3. Type the new name in the text box.
Page 79

Playing Music CDs 6-9
Chapter 6: Making Music
CDs
Saving a CD Layout
You can create a CD layout, save it, then use it to record a CD later. To
save a CD layout, follow these steps:
1. Select Save As from the File menu.
2. Type in the File name.
3. Select the location where you want to store the file.
Opening an Existing CD Layout
To open a CD layout you have previously saved:
■ Select Open CD Layout from the File menu.
EasyCDCreator displays the contents of the layout.
Playing Music CDs
Use the Windows CD Player to listen to music CDs. To do this, follow
these steps:
1. Insert the music CD in your computer’s CD-ROM drive.
2. Click the Start button on the Windows taskbar, then move the mouse
pointer over Programs, Accessories, and Multimedia.
3. Select CD Player. The CD Player window appears.
4. Click the start button to start playing the music CD.
Page 80

6-10 Getting Help
Getting Help
For setup and connection problems with your CD-Writer Plus, refer to
the Troubleshooting section of the user’s guide.
For information about EasyCDCreator, refer to the appropriate topics in
the online Help. To access the EasyCDCreator online Help, select Help
Topics from the Help menu.
Technical information, including product literature, answers to
commonly asked questions, information on software upgrades and other
topics is available electronically through the following:
■ Adaptec World Wide Web (WWW) site at http://www.adaptec.com.
■ The Adaptec Software Products Group can be found on several
CD-ROM, CD-R, and CD publishing newsgroups and lists on the
Internet.
For customer support information, refer to Appendix B, “Customer
Support.”
Page 81

Chapter 7: Making Inserts
and Labels
Chapter 7:
Making Inserts and
Labels
A jewel case insert is a cover you can print and insert in the CD’s jewel
case—the plastic case that holds the CD—to display the title and contents
of your CD.
The cover is printed on one side of a sheet of paper and then folded. One
side lists the files or tracks; the other side shows the title and may also
contain graphics.
EasyCDCreator allows you to customize your own jewel case insert.
Once you have edited the jewel case insert, you can preview it, print it,
cut it to size, and insert it in the case. You can also design and print a
label for the top of the CD. You can print the label on a standard printer
if you use special paper designed for disc labels.
Page 82

7-2 How to Make a Jewel Case Insert or a Label
How to Make a Jewel Case Insert or a Label
When you make a music CD, EasyCDCreator uses the CD layout
information to create a basic jewel case insert, including the CD title,
artist name, and list of songs. You can then click the Jewel Case Layout
tab to modify and customize that information, such as changing font
styles and adding graphics.
Creating custom jewel case inserts involves three basic tasks:
■ Editing inserts
■ Adding text and graphics
■ Printing
Creating CD labels involves the second and third steps; EasyCDCreator
does not automatically create any text for the label. The following
sections explain how to view and edit jewel case inserts and CD labels,
add text and graphics, and print the inserts and labels.
Editing Inserts and Labels
The following sections describe the different ways you can view and edit
jewel case inserts and labels before printing them.
Viewing Inserts and Labels
To view the different parts (pages) of the jewel case insert or CD label,
follow these steps:
1. Click the Jewel Case Layout tab in EasyCDCreator.
2. From the Page menu, select the item you want to view:
■ Jewel Front—to view the Inside Jacket and Front Cover
■ Jewel Back—to view the Back Cover
■ Disc Printer—to view the Compact Disc label
EasyCDCreator displays the view.
Page 83

How to Make a Jewel Case Insert or a Label 7-3
Chapter 7: Making Inserts
and Labels
Zooming
To view a section of an insert page or label in greater detail, you can
magnify the view. To change the magnification of the page, follow these
steps:
1. Select Zoom from the Page menu.
2. Select the zoom level you want to apply.
3. Click OK.
EasyCDCreator changes the magnification level.
Using Rulers and Grids
You can use rulers and grids to position text and graphics on the jewel
case insert or the label. See “Setting Insert Layout Options” in the
EasyCDCreator online Help for more information on how to do this.
Using Rulers
Rulers are displayed along the perimeter of the Jewel Case Layout
window and help you to measure the insert or label and its objects.
To display or hide the rulers, do the following:
■ Select the Ruler option from the View menu to view rulers.
■ Deselect the Ruler option from the View menu to hide rulers.
Page 84

7-4 How to Make a Jewel Case Insert or a Label
Using Grids
Grids help you to more precisely position objects with respect to other
objects on the insert or label.
To snap objects to a grid—meaning the objects are automatically moved
to the grid line—do the following:
1. Select Grid from the Layout menu.
2. Select Snap to Grid from the Layout menu.
The objects snap to the nearest grid marker when you move them around
on the page.
To display or hide the grids, do the following:
■ Select the Grid option from the Layout menu to view grids.
■ Deselect the Grid option from the Layout menu to hide grids.
Positioning Inserts
You can position the insert or CD label at any location on the physical
page. For an approximate position, use the box at the intersection
of the two rulers.
To position the insert or label, follow these steps:
■ Drag the box at the intersection of the ruler to the position on the
page where you want the upper left corner of the insert or label to be
located.
For more precise control over the position of the insert or label, use the
Origin settings in the preferences. See “Setting Insert Layout Options” in
the EasyCDCreator online Help.
Page 85

How to Make a Jewel Case Insert or a Label 7-5
Chapter 7: Making Inserts
and Labels
Adding Text
You can add as much text as you like to the jewel case insert or CD label.
When you add text, you can define some attributes, such as font style,
color, and background fill color.
To add text, follow these steps:
1. Select Insert Text from the Edit menu.
2. Type the text in the Text box.
3. Select the text attributes you want by clicking the Fill Color, Text Color,
or Font buttons:
Attribute Description
Fill Color Select the color you want surrounding the
text.
NOTE: When text is marked Transparent—
meaning that you can see the background
behind the text— you cannot define a fill
color
.
Text Color Select the color of the text.
Font Select the font, style, and size of the text.
4. Click OK.
The text is added where the cursor is located on the Jewel Case Layout
window.
Page 86

7-6 How to Make a Jewel Case Insert or a Label
Editing Text Objects
To change the attributes of any text object, follow these steps:
1. Double-click the text object you want to edit.
2. Select the text attributes you want to change. (See “Adding Text” on page
7-5.)
3. Click OK.
Adding Graphics
The graphics used in EasyCDCreator are called OLE objects. OLE is a
Windows feature that maintains associations with objects across different
applications. For example, if you add an OLE object to a jewel case insert
or CD label, you can double-click the object to open the associated
application so you can edit the object.
To create and insert an OLE object, follow these steps:
1. Select Insert and New Object from the Edit menu. A list of Object Types
appears.
2. Select the Create New option to the left of the Object Types list.
Select Create From File instead if you want to import an existing graphics
file—for example, a piece of computer “clip art.”
3. Select from the Object Type list the application you will use to create the
graphic. For example, select Bitmap Image if you want to create a
graphic with Windows Paintbrush.
4. Click OK.
5. Create (or select) the graphic. The way in which you do this depends on
which application you selected. For example:
If you select Bitmap Image a small window will appear in the middle of
the Jewel Case Layout window. Create the bitmap image in this window,
using the Windows Paintbrush tools that appear on the screen. When
you are finished, click outside the small window to “paste” the image
into the jewel case insert or CD label.
Page 87

How to Make a Jewel Case Insert or a Label 7-7
Chapter 7: Making Inserts
and Labels
If you select Microsoft Clipart Gallery, you will see a window with small
images of the available graphics. Select the graphic you want and click
Insert.
6. Move or resize the graphic, as required.
NOTE: See the “Adding Graphics” topic in EasyCDCreator online Help for
information on editing and moving objects.
Arranging Track Titles
Information about tracks listed in the Audio CD Layout is automatically
added to the Jewel Case Layout window. If you delete tracks while
making an audio CD, the associated information is automatically
updated in the Jewel Case Layout tab.
Deleting tracks while preparing to make an audio CD may cause blank
rows to appear in the tracks list of the Jewel Case Layout tab. Therefore, if
you make changes to the track list that affect the position of the tracks
on the Jewel Case Layout window, EasyCDCreator asks if you want the
tracks automatically repositioned.
The Jewel Case Layout tab provides some commands that let you create
columns of track information, display the length and number of each
track, and automatically position tracks on the layout.
The following sections describe different ways you can arrange the tracks
in the Jewel Case Layout.
Creating Track Column Lists
You can arrange the track information boxes:
■ Randomly by dragging them to new positions in the Jewel Case
Layout window, or
■ In a linear list with one or two columns.
To create a track list:
■ Select One Column or Two Column from the Text menu.
Page 88

7-8 How to Make a Jewel Case Insert or a Label
Displaying Track Numbers and Duration Times
EasyCDCreator includes the track number and duration time for each
audio track. The track number indicates the order in which the audio
tracks are recorded. The duration time is shown in minutes and seconds.
To display the track numbers:
■ Select Display Track Number from the Text menu.
To display track duration times:
■ Select Display Track Time from the Text menu.
Fitting Tracks on a Page
Fitting tracks means all the track information is centered on each page
and aligned along the first character of each track.
You can move track titles from the inside jacket and the back cover to the
front cover. However, Best Fit will move tracks back to their original
location.
To fit the tracks on the page as described above:
■ Select Best Fit from the Arrange menu.
Printing Jewel Case Inserts and CD Labels
You can print a jewel case insert or a CD label while the Jewel Case
Layout tab is open. The commands and options available for printing
depend on the type of printer connected to your computer. For
information about these options, see your printer’s guide.
To print a jewel case insert or a disc label, follow these steps:
1. Select Print from the File menu.
2. Click OK.
To preview an insert or label before printing it:
1. Select Print Preview from the File menu.
2. Click OK.
Page 89

Getting Help 7-9
Chapter 7: Making Inserts
and Labels
Getting Help
For setup and connection problems with your CD-Writer Plus, refer to
the Troubleshooting section of the user’s guide.
For information about EasyCDCreator, refer to the appropriate topics in
the online Help. To access the EasyCDCreator online Help, select Help
Topics from the Help menu.
Technical information, including product literature, answers to
commonly asked questions, information on software upgrades and other
topics is available electronically through the following:
■ Adaptec World Wide Web (WWW) site at http://www.adaptec.com.
■ The Adaptec Software Products Group can be found on several
CD-ROM, CD-R, and CD publishing newsgroups and lists on the
Internet.
For customer support information, refer to Appendix B, “Customer
Support.”
Page 90

Chapter 8: Copying CDs
Chapter 8:
Copying CDs
CDCopier is a convenient tool for making copies of your CDs. The most
common reason for making a copy of a CD is to create a working copy of
a CD and archive the original in a safe place.
NOTE: CDCopier is designed to assist you in reproducing material in which
you own the copyright or have obtained permission to copy from the copyright
owner. Unless you own the copyright or have permission to copy from the
copyright owner, you may be violating copyright law and be subject to payment
of damages and other remedies. If you are uncertain about your rights, contact
your legal advisor.
What Types of CDs Can I Copy?
You can use CDCopier to make backup copies of almost any type of CD.
The following table lists the types of CDs that can be copied and includes
some notes about making backup copies:
Type of CD Notes
Audio or
CDExtra
If you are using a drive other than a CD-Writer Plus,
you need a source CD-ROM drive capable of reading
audio digitally. Not all drives support digital audio
extraction. See “Testing Your System Configuration” in
the CDCopier online help. (CDCopier tests your drive
to determine its capabilities when the source CD is
inserted.)
NOTE: CDCopier supports copying CDs in Track-at-Once
mode. This means that there will be two seconds of silence
between tracks.
Page 91

8-2 Starting CDCopier
Type of CD Notes
Data CD Some CD-ROM drives may not be able to read a
DirectCD data disc. If you have a true MultiRead
CD-ROM drive, there should be no problems.
Mixed-Mode Mixed results. Some CDs copy perfectly; others do not,
possibly because the CD is formatted to circumvent
copying or because some CDs do not follow the
standard specifications.
Photo CD Requires a source CD-ROM drive that can read
CD-ROM XA. Most current drives support this.
Video CD Requires a source CD-ROM drive that can read
CD-ROM XA. Most current drives support this.
Starting CDCopier
Follow these steps to start CDCopier:
1. Start up your computer.
2. Insert a blank CD-R or CD-RW disc in the CD-Writer Plus. After a few
seconds a screen will appear which asks you to “Please select the type of
CD you wish to create.”
NOTE: If no screen appears after about 15 seconds, you may have inserted a
disc that is already formatted. Remove the disc and insert a blank disc. Or the
“Auto insert notification” option may be disabled (this applies to Windows95
only). To check this, click Start, move the mouse pointer over Settings, and
click Control Panel. In Control Panel, double-click System and select the
Device Manager tab. Double-click the icon for the CD-Writer Plus, then select
the Settings tab. Click Auto insert notification if it does not have a check
mark next to it, and click OK. Click OK on the System Properties dialog box.
Then close the Control Panel.
Page 92

Making a Copy of a CD 8-3
Chapter 8: Copying CDs
3. Select Click here to create a duplicate of an existing audio CD or data
CD. The CDCopier Source and Destination tab appears.
NOTE: You can also start CDCopier by clicking the Windows Start button
(located on the left side of the taskbar), selecting Programs, pointing to HP
CD-Writer Plus, and selecting Copy CDs.
Making a Copy of a CD
To make a backup copy of a CD, follow these steps:
1. Select the source drive from which you want to copy the CD. This can be
your CD-R, CD-RW, or CD-ROM drive. See “Source CD-ROM Drives for
CD-to-CD Copying” in the CDCopier online Help if you are going to
copy directly from a CD-ROM drive.
2. Select the destination drive that contains the blank CD. This is your
CD-Writer Plus.
3. Make changes, if any, in the Advanced tab settings. See “CDCopier
Advanced Tab Settings” on page 8-4.
4. Select one of the following options:
■ Test—Select this option to perform a test in which the files to be
recorded are passed to the CD recorder. No information is recorded to
the CD. Use this option if you have made any changes to your CD
recorder setup.
Page 93

8-4 Making a Copy of a CD
■ Test & Copy—Select this option to perform a test in which the files to
be recorded are passed to the CD recorder. Recording begins after a
successful test.
■ Copy—Select this option when you do not want to perform the test.
Use this option if you have successfully recorded a number of similar
CDs and you have not made any changes to your CD recorder setup.
5. Select the number of copies you want to make.
6. Click Copy to begin recording a copy of your CD.
7. Follow the on-screen instructions and insert a blank CD when prompted
(if you did not already insert one earlier).
CDCopier begins copying the files and folders from your source to a
blank CD. A final message box notifies you when the copying is
complete.
CDCopier Advanced Tab Settings
Setting Description
Current CD
Recorder Speed
Disc Copy Select this option to copy the source CD to your
Select Location To make a disc copy, type in a different location
Select the speed at which you want to create the
backup copy of the CD. For greater certainty,
record at 1x.
hard drive first to speed up the recording process
if you are making more than one copy of a CD.
Once the source has been copied to your hard
drive, CDCopier records the disc copy to the CD.
to store the image file if you do not want to use
the Temp directory.
Page 94

Getting Help 8-5
Chapter 8: Copying CDs
Getting Help
For setup and connection problems with your CD-Writer Plus, refer to
the Troubleshooting section of the user’s guide.
For information about CDCopier, refer to the appropriate topics in the
online Help. To access the CDCopier online Help, select Help Topics
from the Help menu.
Technical information, including product literature, answers to
commonly asked questions, information on software upgrades and other
topics is available electronically through the following:
■ Adaptec World Wide Web (WWW) site at http://www.adaptec.com.
■ The Adaptec Software Products Group can be found on several
CD-ROM, CD-R, and CD publishing newsgroups and lists on the
Internet.
For customer support information, refer to Appendix B, “Customer
Support.”
Page 95

Chapter 9: HP Simple Trax
Chapter 9:
HP Simple Trax
Use Simple Trax to index the contents of your CDs. Locate stored files
without inserting a single CD.
Welcome to HP Simple Trax
HP Simple Trax protects your data by copying files and folders to a CD
and saving information about them in the Simple Trax information vault
on your hard drive. This makes it easy for you to find and retrieve any
protected version of a file you need.
HP Simple Trax is designed to work just the way your Windows Explorer
works. You can drag and drop items or use the menus. You can also click
on items with the right mouse button to use the popup menus. Use your
favorite method or try a new one.
The installation program will place the HP Simple Trax icon on the
desktop and under My Computer. When you open or explore the Simple
Trax icon, instead of folders, you see icons representing all the CDs you
have used to protect your files with HP Simple Trax. You can see which
files and folders are in each CD without putting a CD in your CD-Writer.
Retrieving one or more files or folders from a CD is a snap — just treat
the Simple Trax folder as a regular CD drive and copy the files using HP
Simple Trax's handy popup menus. HP Simple Trax asks you for the
correct CD(s) as needed to retrieve the selected files.
You don’t have to log or track what is stored on your CDs, HP Simple
Trax does it for you automatically. You can create a list of important files
or folders that you want to protect regularly and even schedule
protection to take place automatically when you are not using your
computer. It's that easy to protect all your important information!
With HP Simple Trax, your important files are secure and easy to retrieve.
You can even retrieve older versions of files, allowing you to undo major
revisions or changes. HP Simple Trax also helps you find the file(s) you
want to retrieve, including specific versions of a file, with its search
option.
Page 96

9-2 Protecting Files and Folders Immediately
HP Simple Trax is installed along with your other CD-Writer Plus
software. No special installation or configuration is necessary. All you
need to do before using HP Simple Trax is to prepare a CD for writing
with your CD-Writer Plus. The method to prepare a CD can be found in
“Making Data CDs to Use on Your Own Computer” on page 5-1.
This chapter shows you how to:
■ Protect files and folders on CD
■ Create a Protection List
■ Schedule a protection session to run automatically
■ Retrieve protected files and folders
■ Search the HP Simple Trax information vault
■ Reconstruct the HP Simple Trax information vault
■ Import a CD into HP Simple Trax
■ Use the HP Simple Trax Control Panel
For more complete information on any topic see the on-line help.
Protecting Files and Folders Immediately
To protect files and folders immediately:
1. Place the CD you want to use to protect information into your CD-Writer
Plus.
2. Run Explorer by clicking the Start button, pointing to Programs, and
clicking Windows Explorer.
3. Click the file or folder you want to protect with the right mouse button.
A popup menu appears.
To select multiple files or folders within a single folder, press and hold
the
CTRL key while clicking the desired items with the left mouse button.
Then release the
CTRL key and click with the right mouse button.
Page 97

Creating a Protection List 9-3
Chapter 9: HP Simple Trax
4. Point to HP Simple Trax and click Protect... from the HP Simple Trax
menu.
The View Versions option only appears if you have selected a single file.
HP Simple Trax copies the selected file(s) and folder(s) to the CD in your
CD-Writer Plus and places information about the protected files into its
information vault.
If the CD you placed in your CD-Writer Plus has not been used with HP
Simple Trax before, the program prompts you to type a name to identify
the CD. This name is used only in the HP Simple Trax information vault.
Be sure to write the same name on the CD label.
NOTE: When you use Direct CD to write to your CD-Writer Plus directly, as
described in chapter 5, HP Simple Trax does not save any information about
this operation in its information vault. For HP Simple Trax to save information
about the files you are protecting you must use the HP Simple Trax popup
menus as described above, drag and drop to the HP Simple Trax icon, or copy
and paste on the HP Simple Trax icon.
Creating a Protection List
The HP Simple Trax Protection List contains all files and folders you have
designated for protection. You can then schedule a protection session to
copy all items in the Protection List to a CD at once. This is a much more
efficient method of protecting your important information because it
copies all designated files and folders in one operation, saving you time
and effort.
To add files and folders to the Protection List:
1. Run Explorer by clicking the Start button, pointing to Programs, and
clicking Windows Explorer.
Page 98

9-4 Scheduling a Protection Session to Run Automatically
2. Click the file or folder you want to protect with the right mouse button.
A popup menu appears.
To select multiple files or folders within a single folder, press and hold
the
CTRL key while clicking the desired items with the left mouse button.
Then release the
3. Point to HP Simple Trax and click Add to Protection List from the HP
Simple Trax menu.
The View Versions option only appears if you have selected a single file.
HP Simple Trax places the selected file(s) and folder(s) in the Protection
List.
4. Repeat steps 2 and 3 for any other files or folders that you want to add to
the Protection List.
CTRL key and click with the right mouse button.
To protect the files and folders in the Protection List, use the HP Simple
Trax Control Panel Schedule Setup tab. See the next section or the HP
Simple Trax Control Panel section later in this chapter for more
information.
Scheduling a Protection Session to Run Automatically
HP Simple Trax allows you to schedule a protection session to run at a
specified time on selected days. Scheduled sessions automatically protect
all files and folders in the Protection List so you don't have to remember
to do so. You can even schedule a protection session to run in the middle
of the night or any other time your computer is on but not in use.
Page 99

Scheduling a Protection Session to Run Automatically 9-5
Chapter 9: HP Simple Trax
For a scheduled protection session to run unattended you will need to
have a CD that already has a name for use in HP Simple Trax. If it is the
first time you use the CD in HP Simple Trax the software will prompt you
to type a name to identify the CD when the session begins.
To schedule a protection session:
1. Double-click the HP Simple Trax Control Panel shortcut on your
desktop or click the Start button and point to Programs, then to HP CD-
Writer Plus, then to HP Simple Trax, and select Control Panel from the
HP Simple Trax menu.
2. Click the Schedule Setup tab. The following screen appears:
3. Use the row of buttons along the top of this tab to select the day(s) to
perform a scheduled protection session. Click the desired day button(s).
4. Set the time you want the scheduled protection session to start on the
selected day(s).
5. Select the desired protection option:
Page 100

9-6 Retrieving Protected Files and Folders
■ All files in the list: Protects every item in your Protection List,
whether changed or not.
■ Only changed files: Protects only those items in your Protection List
that have changed since the last protection session.
6. Click OK to schedule the protection session.
Be sure to place the desired CD in your CD-Writer Plus before the
scheduled protection session is set to begin. Since the first time you use a
CD in HP Simple Trax the program prompts you to type a name to
identify the CD, make sure you have already used the CD in HP Simple
Trax for the scheduled protection session to run unattended.
Leave your computer on so the scheduled protection session can run.
Click Run Now if you want to protect the items on your Protection List
immediately. The protection session will still run as scheduled.
Retrieving Protected Files and Folders
Retrieving protected files and folders using HP Simple Trax is very quick
and easy. You don’t need to insert a CD into your CD-Writer Plus before
the retrieval actually begins. HP Simple Trax shows you all the files and
folders you have protected on all CDs and prompts you for the correct
CD(s) during the retrieval process. Since HP Simple Trax automatically
gives you the most recent version available of a file you may have to
insert a CD you didn’t expect to.
To retrieve protected files and folders:
1. Run Explorer by clicking the Start button, pointing to Programs, and
clicking Windows Explorer.
2. Double-click the Simple Trax icon.
 Loading...