

Page 1
Getting Started
http://www.hp.com/go/brio
1
1
2
2
Choosing a Comfortable Work Space
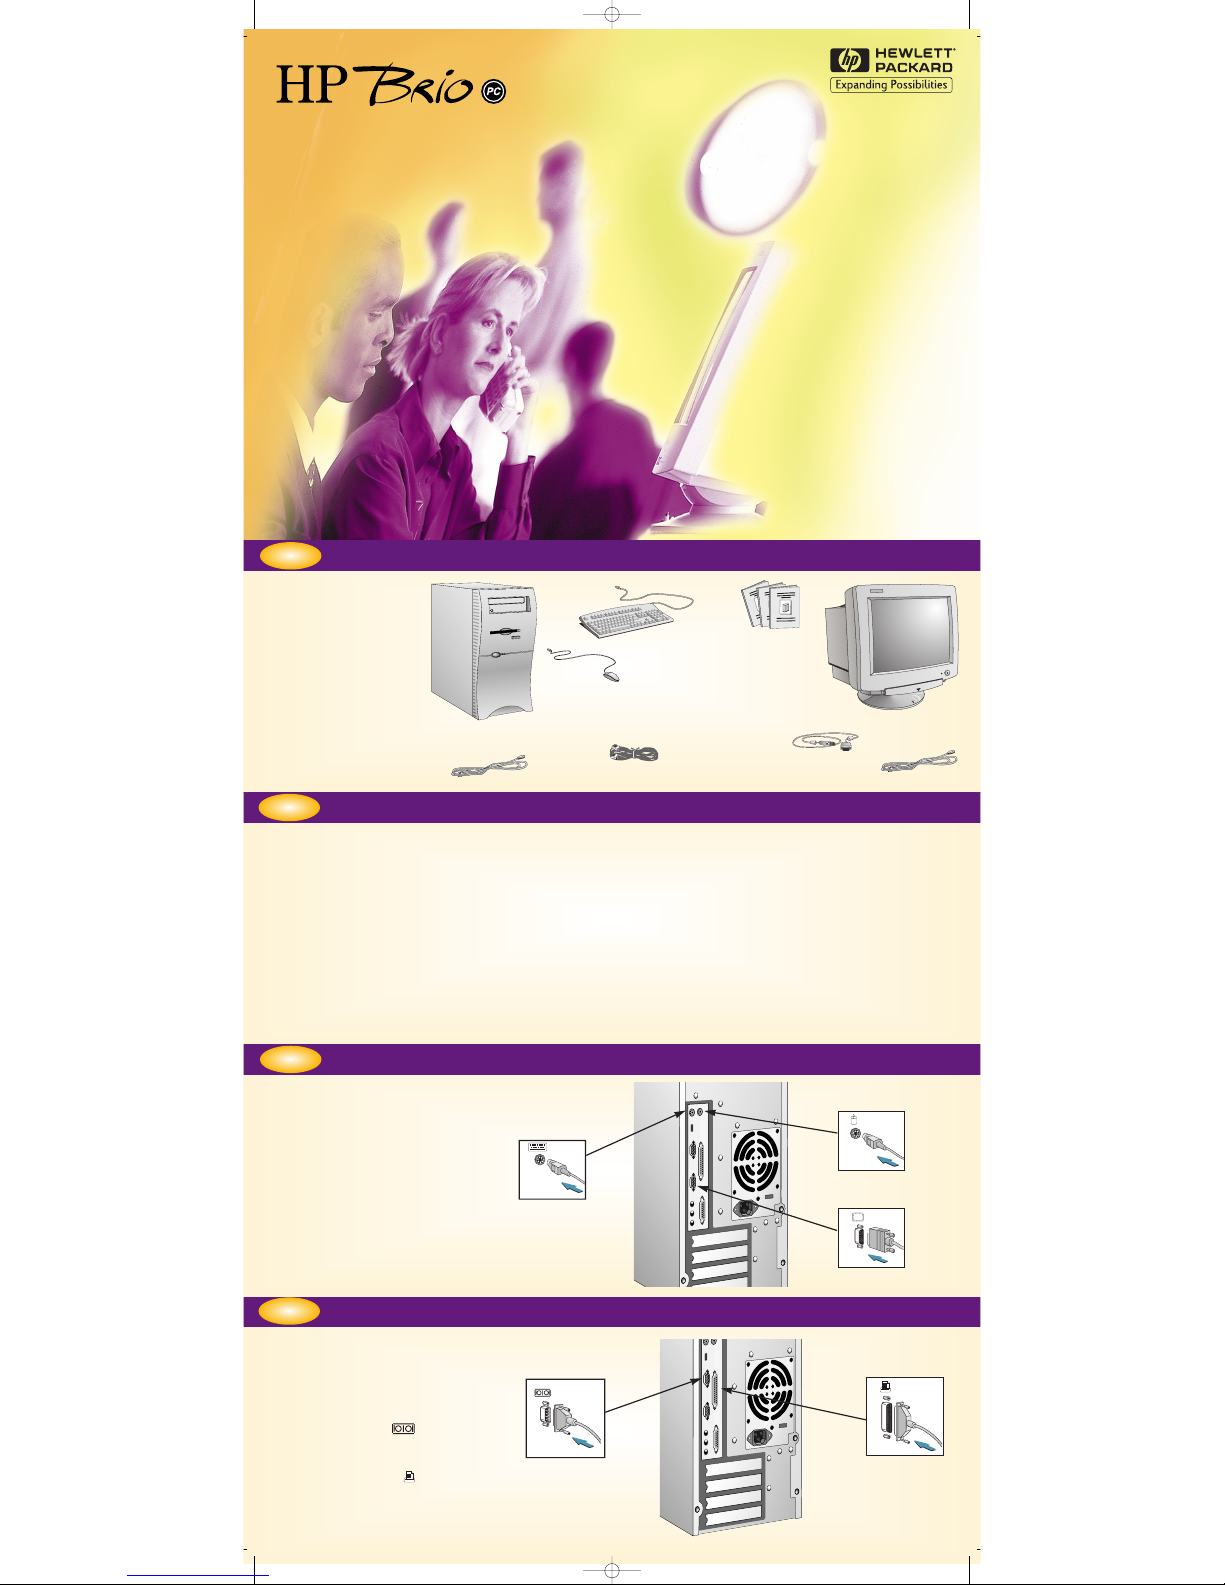
Unpacking the Computer & Display
Remove the computer
and the display from
their shipping boxes.
When you have
completely unpacked
the boxes, you will find
the items shown here.
DOCUMENTATION
DISPLAY
MOUSE
KEYBOARD
POWER CORD
COMPUTER
POWER CORD
TELEPHONE CABLE
CCOMMUNIC
OMMUNICAA
TIONS OPTION ONL
TIONS OPTION ONLYY
SAFETY W
SAFETY W
ARNING
ARNING
REGULA
REGULATT
ORY
ORY
, W
, W
ARR
ARR
ANTY AND SOFTW
ANTY AND SOFTW
ARE LICENSE INFORMA
ARE LICENSE INFORMA
TION
TION
If you are in any doubt about whether you can lift the equipment safely, do not try to move it without help.
Please read carefully the relevant sections in your HP Brio PC’s documentation for safety instructions relating to:
unpacking and setting up your display, electrical connections and/or telephone connections.
Please read carefully the relevant sections in your HP Brio PC’s documentation.
Choose a work space for your computer near a grounded electrical wall outlet.
If you have a tilt-swivel, attach it to the display as described in the display manual. Refer to your display documentation to make
sure it is firmly attached.
Position the display on your desk.
Position the computer to allow proper ventilation and access to the cables.
DISPLAY CABLE
Connecting Mouse, Display & Keyboard
3
3
4
4
Insert the display connector into the
back of the computer, as shown. You
may also have to connect the display
cable to the display, depending on your
model.
Please note that all connectors are
shaped to go in one way only.
Insert the mouse and keyboard
connectors into the back of the
computer, as shown in the illustration.
Connecting Your Printer (optional)
Insert the printer connector into the
back of the computer, as shown in
the illustration.
If you have a serial printer, connect it
to the socket labelled
If you have a parallel printer, connect
it to the socket labelled
KEYBOARD
MOUSE
DISPLAY
PARALLEL
SERIAL
dep_vega.qxd 16-07-98 2:28 PM Page 1
Page 2
5
5
Connecting Your Audio Equipment
(optional)
6
6
Connecting to Your Telephone Socket
(optional)
LINE IN
HEADPHONES
MICROPHONE
Connect the telephone cable to the modem on the back of your computer, using the most appropriate configuration.
W
A
L
L
P
H
O
N
E
If you want to use a microphone with
your HP Brio PC, plug it into the
socket.
Connect other audio line in sources
into the socket.
If you have headphones, plug them
into the socket of your HP Brio
PC.
Connecting to a LAN (optional)
7
7
8
8
Connecting the Power Cords
CChheecckk tthhaatt tthhee vvoollttaaggee ooff yyoouurr ccoommppuutteerr iiss
sseett ttoo tthhee ccoorrrreecctt vvaalluuee ffoorr tthhee ccoouunnttrryy tthhaatt
yyoouu aarree iinn..
The voltage is displayed on the back of the
computer, close to the computer power
socket.
Connect the power cords to the computer
and display as shown in the illustration.
Plug both cords into grounded electrical
outlets.
VOLTAGE SELECTOR
Connect the LAN cable to the back of your
computer. The exact position of the LAN
card may differ from the one shown.
Connect the other end of the LAN cable to
your LAN.
TO LAN
Welcome to Your Computer (only models with HP Brio Center)
Starting up the Computer for the First Time
9
9
10
10
Once you have started up your computer, double-click on the HP Brio
shortcut on the desktop to launch the HP Brio Center.
Turn on the display first, and then
the computer. This is to ensure that
the computer can detect the display
and adjust itself to the best settings.
1. TURN ON THE DISPLAY
The HP Brio Center lets you get the most out of your PC,
quickly and efficiently. Depending on your region, here are
some of the things you can do from your HP Brio Center:
register your HP Brio PC
take a guided tour of your HP Brio PC
view on-line help
communicate & share resources
perform troubleshooting
2. TURN ON THE COMPUTER
MMaannuuaall PPaarrtt NNuummbbeerr 55996677--00336699--EENN
VV11
PPrriinntteedd iinn EE..UU..
PPaappeerr nnoott bblleeaacchheedd wwiitthh CChhlloorriinnee
dep_vega.qxd 16-07-98 2:28 PM Page 2
 Loading...