

Page 1

Instructions
hp StorageWorks Enterprise
Virtual Array Updating
Product Software
VCS Product Version: 3.020 Command View EVA Version:3.2
Sixth Edition
(July 2004)
Part Number:AA-RS29F-TE
This document contains the necessary procedures to update the product software for the HP StorageWorks
Enterprise Virtual Array. This document outlines the proper upgrade process and includes detailed installation
instructions for Enterprise Virtual Array product software, such as HP OpenView Storage Management Appliance
software, HP StorageWorks Command View EVA, and HP StorageWorks Virtual Controller Software. For the latest
version of these Instructions and other Enterprise Virtual Array documentation, access the HP storage website at
http://h18006.www1.hp.com/products/storageworks/enterprise/documentation.html
Page 2

Copyright © 1998-2004 Hewlett-Packard Development Company, L.P.
Hewlett-Packard Company makes no warranty of any kind with regard to this material, including, but not limited to, the implied warranties of
merchantability and fitness for a particular purpose. Hewlett-Packard shall not be liable for errors contained herein or for incidental or consequential
damages in c
This documen
or translated into another language without the prior written consent of Hewlett-Packard. The information contained in this document is subject to
change without notice.
Compaq Computer Corporation is a wholly-owned subsidiary of Hewlett-Packard Company.
Microsoft®, MS-DOS®, MS Windows®, Windows®, Windows NT®, and Windows Server® are U.S. registered trademarks of Microsoft Corporation.
UNIX® is a registered trademark of The Open Group.
Java™ and Solaris™ are trademarks of Sun Microsystems, Inc.
Red Hat® and Red Hat® Enterprise Linux are registered trademarks of Red Hat, Inc.
Linux® is a registered trademark of Linus Torvalds.
Symantec Norton AntiVirus™ is a trademark of Symantec Corporation.
McAfee® and NetShield® are registered trademarks of Network Associates, Inc. VirusScan™ is a trademark of Network Associates, Inc.
Trend Micro™ and ServerProtect™ are trademarks of Trend Micro, Inc.
eTrust™ and InoculateIT™ are trademarks of Computer Associates International, Inc.
Hewlett-Packard Company shall not be liable for technical or editorial errors or omissions contained herein. The information is provided “as is” without
warranty of an
warranty statements for such products. Nothing herein should be construed as constituting an additional warranty.
Printed in the U.S.A.
onnection with the furnishing, performance, or use of this material.
t contains proprietary information, which is protected by copyright. No part of this document may be photocopied, reproduced,
y kind and is subject to change without notice. The warranties for Hewlett-Packard Company products are set forth in the express limited
hp StorageWorks Enterprise Virtual Array Updating Product Software Instructions
Sixth Edition
(July 2004)
Part Number:A
A-RS29F-TE
Page 3

Table of Contents
About this G
Conventions ...................................10
Rack stability . . . . . . . . . . . . . . . . . . . . . . . . . . . . . . . . . . . 12
Getting help . . . . . . . . . . . . . . . . . . . . . . . . . . . . . . . . . . . 1
1. Getting Started . . . . . . . . . . . . . . . . . . . . . . . . . . . . . . . . . . . 15
Intendedaudience .................................16
Prerequisites ...................................1
2. Software Compatibility Matrices . . . . . . . . . . . . . . . . . . . . . . . . . . . . 25
3.UpgradingtheEnterpriseVirtualArraytov3.020......................29
Step 1: Checking th
Step2:Redeeminglicensekeys............................40
Step3:UpgradingtheStorageManagementAppliance ..................40
Step 4: Upgrading hos
Step5:ClearingthepasswordsontheHSVcontrollers ..................48
Step 6: Upgrading Com
Step7:Loadingtheadd-onlicenses..........................70
Step8:UpgradingtheVCS/StorageSystemSoftwaretov3.020...............73
Step 9: Adding password
Step 10: Installing SMI-S EVA (optional) . . . . . . . . . . . . . . . . . . . . . . . . 84
uide.................................... 9
Documentconventions.............................10
Text symbols
Equipmentsymbols ..............................11
HPtechnicalsupport..............................13
HPstoragewebsite ..............................13
HP authorized r
Requiredkits.................................18
RecommendedbrowsersandJava™RuntimeEnvironments ..............20
Required license
SMI-SEVAprerequisites............................21
Antivirussoftware...............................21
Reference docume
Changing the defaul
Upgrading the Storage Management Appliance Software from v2.0 to v2.1 . . . . . . . . 41
VerifyingtheStorageManagementApplianceSoftwareversion.............45
DisablingpasswordaccessinCommandViewEVA .................48
UpgradingtoCommandViewEVAv3.2......................51
Installing Command View EVA from the CD-ROM drive on the Storage Management
Appliance................................57
Installing Command View EVA from an FTP server . . . . . . . . . . . . . . . 62
Installing Command View EVA from a local disk on the Storage Management Appliance 64
Verifying the Command
EnablingpasswordaccessinCommandViewEVA..................82
.................................10
3
eseller .............................13
8
s ...............................20
ntation............................22
ehealthoftheEnterpriseVirtualArray.................31
tmaximumlogsize ......................40
tservers............................47
mandViewEVA ........................51
ViewEVAversion.....................67
stotheHSVcontrollers(optional) ................82
Page 4

Uninstalling SMI-S EVA . . . . . . . . . . . . . . . . . . . . . . . . . . . . 84
Installing SMI-S EVA on the Storage Management Appliance . . . . . . . . . . . . . 85
Installing from a CD-ROM . . . . . . . . . . . . . . . . . . . . . . . . . 86
Installing from a local disk on the Storage Management Appliance . . . . . . . . . 87
VerifyingSMI-SEVAinstallation.........................89
ConfiguringSMI-SEVA ............................89
Postinstallationsteps ...........................89
EVAprovider.properties ..........................91
Cim.propertiesfile ............................91
UserAccountsManager.bat .........................92
ConfiguringEventandHostNotifications ...................93
SSLsupport .................................94
Portoccupation..............................95
EnablingSSL ..............................95
Viewingcertificatesusingthekeytoolcommand.................96
Viewingallcertificatesusingthekeytoolcommand ...............96
Step11:UpgradingBusinessCopyEVA(ifinstalled)...................97
Step12:UpgradingContinuousAccessEVA(ifinstalled) .................98
Step13:MigratingNetworkViewtoStorageAreaManager ................98
Step 14: Installing Storage Node Manager (optional) . . . . . . . . . . . . . . . . . . . 98
Step15:DisablingSNMPnotificationtothePRShost...................99
4.DowngradingtheEnterpriseVirtualArray........................ 101
DowngradingtheEnterpriseVirtualArraytov3.01x .................. 101
DowngradingtheEnterpriseVirtualArraytov2.00xorv3.00x .............. 103
A.SoftwareUpgradeFlowchart............................. 105
B.SoftwareVersionWorksheet............................. 115
C.TroubleshootingSMI-SEVA............................. 117
StartingandstoppingSMI-SEVA.......................... 117
TroubleshootingSMI-SEVA............................ 118
D.StorageNetworkingIndustryAssociationPublicLicense ................. 119
Glossary...................................... 127
Index ....................................... 133
Page 5

List of Figures
3.1. Command View EVA—Hardware folder in the Navigation pane . . . . . . . . . . . . . . . 32
3.2.CommandViewEVA—HardwareFolderPropertiespage..................32
3.3. Command View EVA—Disk Enclosure Properties page—checking operational states . . . . . . . 33
3.4. Command View EVA—Disk Enclosure Properties page—checking the firmware version . . . . . 34
3.5.CommandViewEVA—ViewEventspage........................35
3.6. Command View EVA—Controller Events (Initialized system) page . . . . . . . . . . . . . . 35
3.7.CommandViewEVA—DiskGroupPropertiespage....................36
3.8. Command View EVA—Disk Group Properties page—checking free capacity . . . . . . . . . . 37
3.9.CommandViewEVA—VdiskFolderPropertiespage ...................38
3.10.CommandViewEVA—VdiskFamilyPropertiespage...................38
3.11.CommandViewEVA—VdiskActiveMemberPropertiespage ...............39
3.12. Storage Management Appliance software—Settings page . . . . . . . . . . . . . . . . . 42
3.13. Storage Management Appliance software—Maintenance page . . . . . . . . . . . . . . . 42
3.14. Storage Management Appliance software—Installation Wizard . . . . . . . . . . . . . . . 43
3.15. Storage Management Appliance software—Installation Wizard—installation types . . . . . . . 44
3.16.StorageManagementApplianceOnlineHelp ......................46
3.17. Command View EVA—Management Agent Options page . . . . . . . . . . . . . . . . . 49
3.18.CommandViewEVA—StorageSystemPasswordAccesspage ...............49
3.19. Command View EVA—Disable Password AccesstoStorageSystempage...........50
3.20.CommandViewEVA—Disablepasswordaccessmessagebox ...............50
3.21.StorageManagementAppliancesoftware—Homepage ..................52
3.22. Storage Management Appliance software—Settings page . . . . . . . . . . . . . . . . . 53
3.23. Storage Management Appliance software—Manage Tools page . . . . . . . . . . . . . . . 54
3.24. Storage Management Appliance software—Stop Applications wizard . . . . . . . . . . . . 55
3.25. Storage Management Appliance software—Stop Applications wizard—successful message . . . . 56
3.26. Storage Management Appliance software—Maintenance page . . . . . . . . . . . . . . . 57
3.27. Storage Management Appliance software—Installation Wizard . . . . . . . . . . . . . . . 58
3.28. Storage Management Appliance software—Installation Wizard—installation types . . . . . . . 59
3.29. Storage Management Appliance software—Installation Wizard—installation in progress message . 60
3.30. Storage Management Appliance software—Installation Wizard—installation complete . . . . . . 61
3.31.StorageManagementAppliancesoftware—Devicespage .................62
3.32. Storage Management Appliance software—Installation Wizard—FTP server installation . . . . . 63
3.33.StorageManagementAppliancesoftware—Devicespage .................64
3.34. Storage Management Appliance software—Installation Wizard—local disk installation . . . . . 65
3.35. Storage Management Appliance software—Installation Wizard—select file . . . . . . . . . . 66
3.36.StorageManagementAppliancesoftware—Devicespage .................67
3.37.CommandViewEVA—HSVStorageNetworkPropertiespage...............68
3.38.CommandViewEVAOnlineHelp ..........................68
3.39.CommandViewEVAHelp—Aboutpage........................69
3.40. Command View EVA—Management Agent Options page . . . . . . . . . . . . . . . . . 70
3.41.CommandViewEVA—LicensingOptionspage ....................71
3.42.CommandViewEVA—Addalicensepage.......................71
Page 6

3.43. Command View EVA—Initialized Storage System Properties page . . . . . . . . . . . . . 75
3.44.CommandViewEVA—firstcodeloadconfirmationmessage................76
3.45.CommandViewEVA—CodeLoadStorageSystem-Page1.................77
3.46.CommandViewEVA—CodeLoadStorageSystem-Page2.................78
3.47.CommandViewEVA—fileconfirmationmessage ....................78
3.48.CommandViewEVA—upgradeconfirmationmessage ..................79
3.49.CommandViewEVA—commandinprogressmessage ..................79
3.50.CommandViewEVA—CodeLoadStorageSystem-Page3.................80
3.51.CommandViewEVA—EMUfirmwareupdatemessage..................81
3.52. Command View EVA—Initialized Storage System Properties page . . . . . . . . . . . . . 81
3.53. Command View EVA—Enable Password Access to a Storage System page . . . . . . . . . . 83
Page 7

List of Tabl es
1. Document
1.1.RelatedDocumentation ...............................17
1.2.RecommendedBrowsersandJREs...........................20
1.3. Referen
2.1. Element Manager Software and Storage System Software Compatibility . . . . . . . . . . . . 26
2.2. Enterprise Virtual Array Type and VCS Compatibility . . . . . . . . . . . . . . . . . . . 27
2.3. Element M
2.4. Element Manager Software and Add-on Licenses Compatibility . . . . . . . . . . . . . . . 28
3.1.StorageManagementApplianceSoftwareUpgradePaths..................40
3.2. Time Estim
3.3.CommandViewEVAUpgradePaths..........................51
3.4.VCS/StorageSystemSoftwareUpgradePaths ......................73
3.5. Configurat
3.6.Evaprovider.properties................................91
3.7.Cim.propertiesFile.................................92
B.1. Software Ver
C.1.TroubleshootingTipsforSMI-SEVA ........................ 118
Conventions ................................10
ceDocuments................................22
anager Software and Storage Management Appliance Software Compatibility . . . . . 27
atesforHostServerUpgrades........................47
ionFiles.................................90
sionWorksheet ............................ 115
Page 8

Page 9

About this
This guide provides information to help you:
• Upgrade the Storage Management Appliance software, Command View EVA, and Virtual
Controller Software.
• Downgrade the Virtual Controller Software.
This guide does not provide information about upgrading or changing the Enterprise Virtual
Array hardware.
“About this Guide” topics include:
• Conventions
• Rack stability
• Getting help
Guide
9
hp StorageWorks Enterprise Virtual Array Updating Product
Software Instructions
Page 10
Conventions
Conventions consist of the following:
• Document conventions
• Text symbols
• Equipment symbols
Document conventions
The document conventions included in Table 1 apply in most cases.
Table 1. Document Conventions
About this Guide
Element
Cross-refer
Key and field names, menu
items, butto
titles
File names, application names,
and text emphasis
User input, command and
directory n
system responses (output
and messages)
Variables
Website addresses
Text symbo
ence link s
ns, and dialog box
ames, and
ls
The follow
meanings:
Convention
Blue text: Figure 1
Bold
Italics
Monospace f
COMMAND NAMES are uppercase
monospace font unless they are
case sensit
<monospace, italic font>
Blue sans serif font text:
http://www.hp.com
ont
ive
ing symbols may be found in the text of this guide. They have the following
10
Note
Text set
Warning
Text set off in this manner indicates that failure to follow directions in the warning could
result in
Caution
Text set off in this manner indicates that failure to follow directions could result in damage
to equipment or data.
off in this manner presents commentary , sidelights, or interesting points of information.
bodily harm or death.
hp StorageWorks Enterprise Virtual Array Up da ting Product
Software Instructions
Page 11
About this Guide
Equipment symbols
The following equipment symbols may be found on hardware to which this guide pertains.
They have the following meanings:
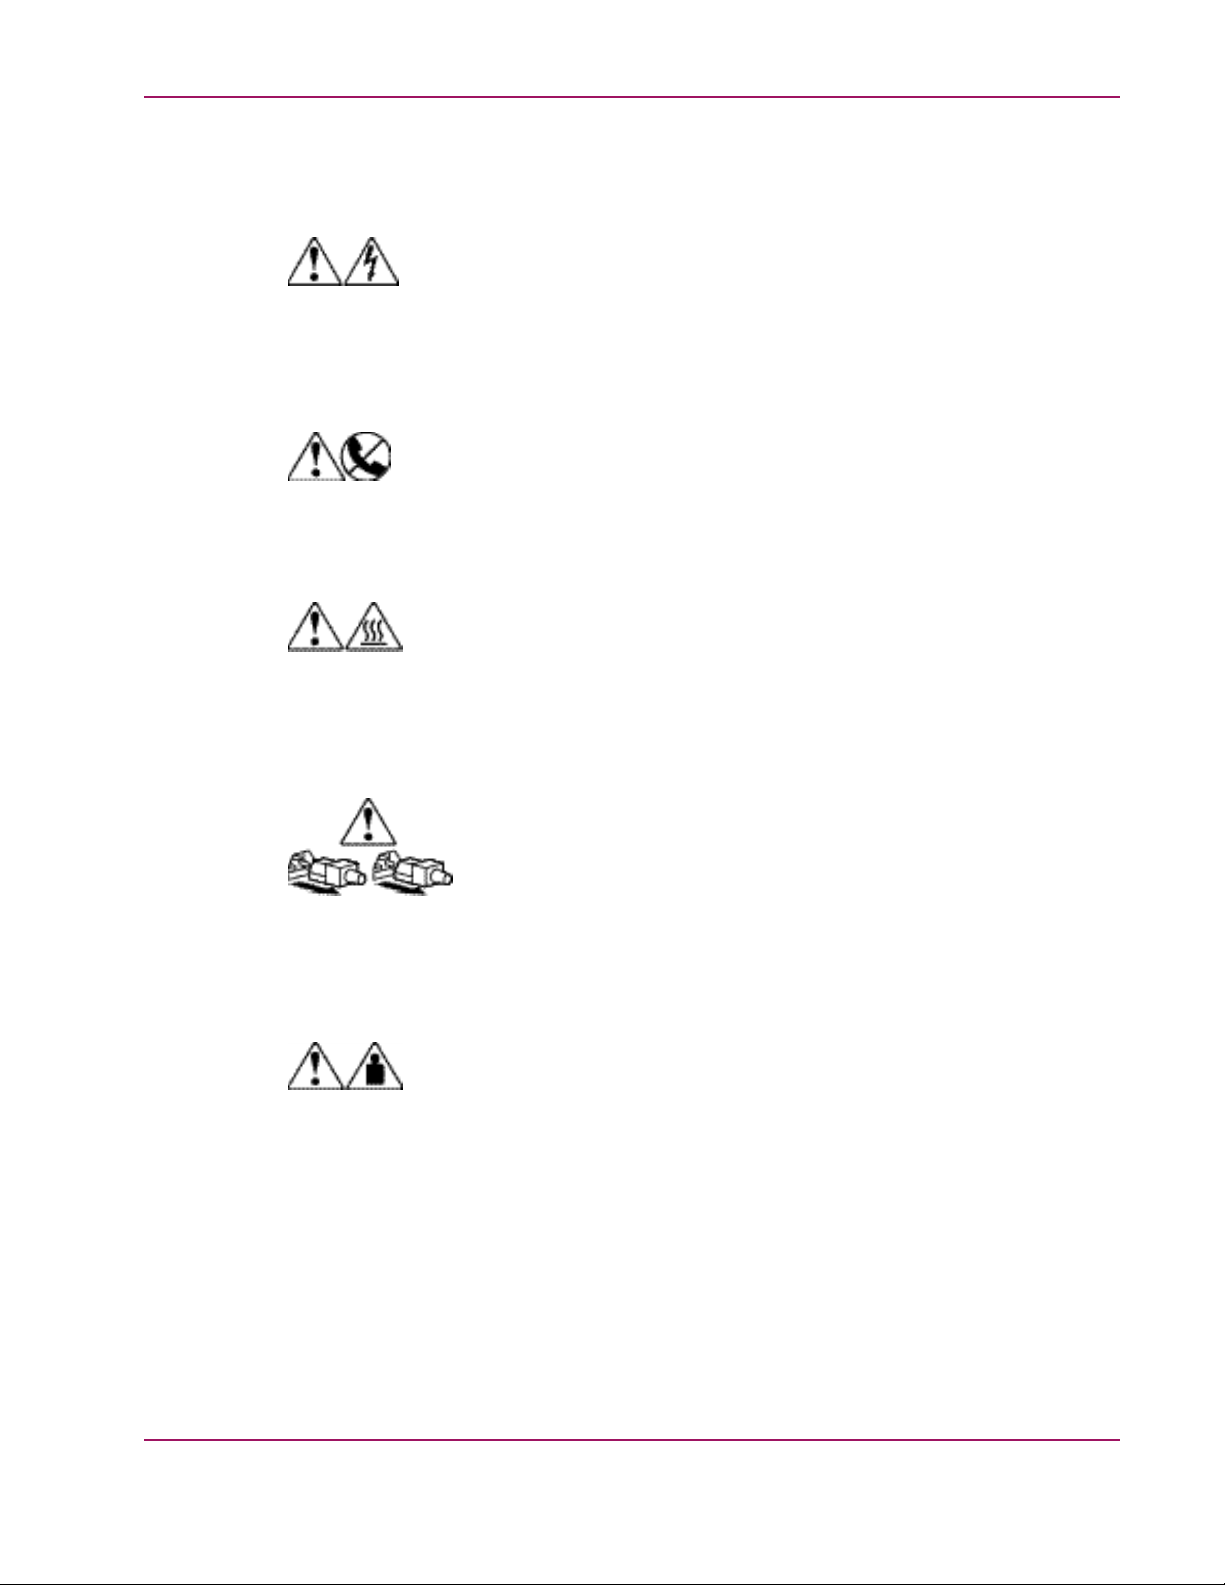
These symbols m
ark an enclosed surface or area of the equipment and indicate the presence of
electrical shock hazards. The enclosed area contains no operator serviceable parts
WARNING: To reduce the risk of personal injury from electrical shock hazards, do not
open this enclosure.
These symbols indicate that the marked RJ-45 receptacle is a network interface connection.
WARNING: To reduce the risk of electrical shock, fire, or damage to the equipment, do not
plug telephone or telecommunications connectors into this receptacle.
These symbols i
ndicate that the marked surface or area of equipment has a hot surface or hot
component. Contact with this surface could result in injury.
WARNING: To reduce the risk of personal injury from a hot component, allow the surface
to cool before touching.
These symbols mark power supplies and systems and indicate the presence of multiple
sources of power.
WARNING: To reduce the risk of personal injury from electrical shock, remove all power
cords to compl
etely disconnect power from the power supplies and systems.
These symbols indicate that the component exceeds the recommended weight for one
individual to
WARNING: To re
handle safely.
duce the risk of personal injury or damage to the equipment, observe local
occupational health and safety requirements and guidelines for manually handling material.
hp StorageWorks Enterprise Virtual Array Updating Product
Software Instructions
11
Page 12

Rack stability
Rack stability protects personnel and equipment.
About this Guide
Warning
To reduce the risk of personal injury or damage to the equipment, be sure that:
• The leveling jacks are extended to the floor.
• The full weight of the rack rests on the leveling jacks.
• In single rack installations, the stabilizing feet are attached to the rack.
• In multiple rack installations, the racks are coupled.
• Only one rack component is extended at any time. A rack may become unstable if more
than one rac
k component is extended for any reason.
12
hp StorageWorks Enterprise Virtual Array Up da ting Product
Software Instructions
Page 13

About this Guide
Getting help
If you still have a question after reading this guide, contact an HP authorized service provider
or access our website: http://h18006.www1.hp.com/products/storageworks/enterprise/
documentation
.html
HP technical su
pport
Telephone numb
http://www.hp.com/support/. From this website, select the country of origin.
Note
For continuou
Be sure to have the following information available before calling:
• Technical support registration number (if applicable)
• Product serial numbers
• Product model names and numbers
• Applicable error messages
• Operating system type and revision level
• Detailed, specific questions
HP storage website
ers for worldwide technical support are listed on the following HP website:
s quality improvement, calls may be recorded or monitored.
The HP website has the latest information on this product, as well as the latest drivers. Access
storage at:
http://www.hp.com/country/us/eng/prodserv/storage.html. From this website,
select the appropriate product or solution.
HP authorized reseller
For the name of your nearest HP authorized reseller:
• In the United States, call 1-800-345-1518
• In Canada, call 1-800-263-5868
• Elsewhere, see the HP website for locations and telephone numbers: http://www.hp.com
hp StorageWorks Enterprise Virtual Array Updating Product
Software Instructions
13
Page 14

Page 15

Chapter 1.
This chapter provides information about the intended audience, required kits, and reference
document
the required materials, before you begin the installation procedures outlined in this guide.
This chapter includes the following topics:
• Intended audience
• Prerequisites
Note
Use Appe
through this guide and perform the procedures.
Getting Started
ation. Please ensure that you have met the outlined requirements and possess all of
ndix B: Software Version Worksheet to collect important version information as you read
15
hp StorageWorks Enterprise Virtual Array Updating Product
Software Instructions
Page 16

Intended audience
This document is intended for customers who need to upgrade the StorageWorks Enterprise
Virtual Array (EVA) from v2.006 (or later) to v3.020.
Note
You should read the entire guide before beginning any procedure.
Chapter 1. Getting Started
Before perfor
•HPStorageWor
•SANsandstora
•HPStorageWo
•HPOpenViewS
ming the procedures in this guide, you should be familiar with the following:
ks Enterprise Virtual Arrays
ge systems
rks Command View EVA
torage Management Appliance and HP OpenView Storage Management
Appliance software
Note
HP recommen
various hardware and software components.
ds that you review the documentation listed in Table 1.1 to familiarize yourself with the
For the latest version of these Instructions and other Enterprise Virtual Array
5000 (EVA5000) documentation, access the EVA5000 documentation website at:
http://h1
For the late
8006.www1.hp.com/products/storageworks/enterprise/documentation.html.
st version of Enterprise Virtual Array 3000 (EVA3000) documentation, access the
EVA3000 website at http://h18006.www1.hp.com/products/storageworks/eva3000/index.html
and click technical documentation.
During the upgrade process, you install software on the Storage Management Appliance
and the HSV
controllers. You will be using the Storage Management Appliance software,
Command View EVA, and the Operator Control Panel (OCP) on the HSV controller.
16
hp StorageWorks Enterprise Virtual Array Up da ting Product
Software Instructions
Page 17

Chapter 1. Getting Started
HP recommends that you review the documentation listed in Table 1 .1 to familiarize yourself
with the various hardware and software components.
Table 1.1. Related Documentation
To Read About..
HSV110 controller
HSV100 contro
Storage M anagement
Appliancesoftwarev2.1
Command View EVA
v3.2
.
ller
Refer To...
HP StorageWorks Enterprise
Virtual Array
(EK-E2USR-UA.D01)
HP OpenView St
User Guide
orage
Management Appliance
Software User Guide
(AA-RS0AD-TE)
HP StorageWorks Command
View EVA Gett
(AA-RQZBF-TE)
Guide
Command Vie
EVA Interactive Help
File(AA-RPKKF-TE)
ing Started
w
Location
http://h18006.www1.hp.com/
products/storageworks/
enterprise/index.html and
click Technic
OR
Documentation for Enterprise
Virtual Array
http://h18006.www1.hp.com/
products/sa
managementappliance/
documentation.html
http://h18006.www1.hp.com/
products/storage/software/
som/index.html and click
Technical d
Installed w
EVA application.
al documentation.
v3.020 CD
nworks/
ocumentation.
ith the Command View
hp StorageWorks Enterprise Virtual Array Updating Product
Software Instructions
17
Page 18

Prerequisites
Chapter 1. Getting Started
This section lists the required tools for successful upgrades and downgrades of the software
in the Enterprise Virtual Array.
This section includes the following topics:
• Required kits
• Recommended browsers and Java Runtime Envrionemnts
• Required licenses
• SMI-S EVA prerequisites
• Antivirus software
• Reference documentation
For information about software compatibility, please see Chapter 2: Software Compatibility
Matrices.
Note
Before you can perform an online upgrade to Virtual Controller Software (VCS) v3.020, you must be
running VCS v2.006 (or later) on the HSV controllers. If you need assistance in upgrading to VCS
v2.006, please contact an HP Authorized Service Representative.
Required kits
Before you begin the Enterprise V
irtual Array v3.020 upgrade procedure, you must have
the following kits:
•
HP StorageWorks Virtual Controller Software Media Kit v3.0a for Dual HSV100
Controllers (T3589A)
Note
Use this kit with an EVA3000 (HSV100) storage system.
In addition to documentation, this kit contains the following:
• HP StorageWorks Enterprise Virtual Array System Software Version 3.020 CD
This CD contains the following:
• VCS v3.020
• VCS v3.014
• VCS v2.006
•
HP StorageWorks Virtual Controller Software Media Kit 3.0c for Dual HSV110
Controllers (T3588A)
18
Note
Use this kit for an EVA5000 (HSV110) storage system.
hp StorageWorks Enterprise Virtual Array Up da ting Product
Software Instructions
Page 19

Chapter 1. Getting Started
In addition to documentation, this kit contains the following:
• HP StorageWorks Enterprise Virtual Array System Software Version 3.020 CD
•
HP OpenView Storage Management Appliance Software v2.1 kit (222799-B26)
In addition to documentation, this kit contains the following:
• HP OpenView Storage Management Appliance Software v2.1 CD
•
HP OpenView Storage Operations Manager v1.1 Media and Documentation kit
(T2538BA) or HP OpenView Storage Operations Manager v1.1 Migration Media and
Documentation Kit (T2543BA)
In addition to documentation, this kit contains the following:
• HP StorageWorks Command View EVA v3.2 CD
This CD contains the following:
• VCS v3.020
• VCS v3.014
• VCS v2.006
This CD can also be obtained from the following website: http://h18000.www1.hp.com/
products/sanworks/softwaredrivers/managementappliance/index.html
This CD contains the following:
• Command View EVA v3.2
• HP StorageWorks SMI-S EVA v3.2
• HP OpenView Storage Area Manager v3.2 Software CD
This CD contains HP OpenView Storage Node Manager.
Note
Storage Node Manager is part of the HP OpenView Storage Area M anager (OV
SAM) product suite. The HP OpenView Storage Operations Manager v1.1 Media and
Documentation kit contains an evaluation copy of Storage Area Manager v3.2.
•
HP StorageWorks Command View EVA v3.2 CD
• Host server kits
Depending on your host platforms, you might require one or more of the following kits:
• HP StorageWorks HP-UX K
• HP StorageWorks IBM AIX Kit V3.0E for Enterp
it V3.0E for Enterprise Virtual Array
rise Virtual Array
• HP StorageWorks Linux Kit V3.0E for Enterprise Virtual Array
• HP StorageWorks Novell NetWare Kit V3.0E for Enterprise Virtual Array
• HP StorageWorks OpenVMS Kit V3.0E for Enterprise Virtual Array
• HP StorageWorks Sun Solaris Kit V3.0E for Enterprise Virtual Array
• HP StorageWorks Tru64 Kit V3.0E for Enterprise Virtual Array
• HP StorageWorks Windows Kit V3.0E for Enterprise Virtual Array
You can download the appropriate host server ki
http://www.hp.com/go/evaplatformkit/
hp StorageWorks Enterprise Virtual Array Updating Product
Software Instructions
ts from the following website:
19
Page 20

Recommended browsers and Java™ Runtime Environments
Table 1.2 lists the recommended browsers for running Storage Management Appliance
software v2.1 and Command View EVA v3.2.
Note
You should update your Internet browser version on your remote computers after you have upgraded
to Storage Management Appliance software v2.1 and Command View EVA v3.2.
If you use browser and JRE versions that are not listed in Table 1.2, the Storage Management
Appliance software v2.1 and Command View EVA v3.2 applications may not work correctly
in your browser.
Table 1.2. Recommended Browsers and JREs
Chapter 1. Getting Started
Operating System
HP-UX 11.11,
11.23,
Red Hat
Enterprise Linux
AS 2.1 (32-bit)
Sun Solaris™8, 9
Windows® 2000
Server and
Advanced Server
SP3
Windows NT®
v4.0 SP6a
Windows Server
2003 (IA32)
Required licenses
Internet Browser
Java Runtime Environment
Netscape Navigator 7.0 1.4.1_02
1.4.1_04
Netscape Navigator
7.0 2
1.4.1_03
1.4.1_04
Netscape Navigator 7.0 1.4.1_03
1.4.1_04
Internet Explorer 6.0
SP1
Internet Explorer 6.0
SP1
Internet Explorer 6.0
v6.00.3790.000
1.4.1_03
1.4.1_04
1.4.1_03
1.4.1_04
1.4.1_03
1.4.1_04
(JRE)
20
Depending on the functionality you require and your Enterprise Virtual Array type, Command
View EVA v3.2 might require the following licenses:
• HP StorageWorks Business Copy EVA5000 v2.2
• HP StorageWorks Business Copy EVA3000 v2.2
• HP StorageWorks Continuous Access EVA5000 v1.1
• HP StorageWorks Continuous Access EVA3000 v1.1
See Tab le 2.4 for more information about element manager software and add-on license
compatibility.
If you intend to use either Business Copy EVA v2.2 or Continuous Access EVA v1.1 after you
have upgraded to Command View EVA v3.2, you must obtain the appropriate licenses. You
hp StorageWorks Enterprise Virtual Array Up da ting Product
Software Instructions
Page 21

Chapter 1. Getting Started
must obtain the appropriate licenses before you begin the upgrade procedure described in
Chapter 3: Upgrading the Enterprise Virtual Array to v3.020.
See the HP StorageWorks Business Copy EVA License Instructions and the HP StorageWorks
Continuous Acc
licenses for Business Copy EVA v2.2 and Continuous Access EVA v1.1, respectively.
Note
Redeeming lic
SMI-S EVA prerequisites
The following are prerequisites for installing SMI-S EVA v3.2:
• Command View EVA 3.2 release must be installed prior to SMI-S EVA installation.
• No Service Location Protocol (SLP) versions should be installed or running in port 427
prior to inst
service. SLP service is uninstalled when SMI-S EVA is uninstalled.
• Previous versions of SMI-S EVA should be uninstalled before installing SMI-S EVA v3.2.
ess EVA V1.1 Getting Started Guide for more information about obtaining
enses can take between 1 and 48 hours. Please plan accordingly.
alling SMI-S EVA. Upon installation of SMI-S EVA, SLP is installed as a
• SMI-S EVA v3.2 is supported on Windows®2000 SP3 or above.
Antivirus software
After you upgrade to Storage Management Appliance software v2.1, you can install an
antivirus application. HP supports the use of the following antivirus programs:
• Symantec Norton AntiVirus™ v7.6 and v8.0—Corporate Edition
• McAfee® NetShield® v4.5
• McAfee® VirusScan™ Enterprise v7.0
• Trend Micro™ ServerProtect™ v5.31 and v 5.5
• eTrust™ InoculateIT™ v6.0
Please refer to OpenView HP Storage Management Appliance Software Using AntiVirus
Software A
the above antivirus applications.
pplication Notes. This document provides instructions for using current versions of
hp StorageWorks Enterprise Virtual Array Updating Product
Software Instructions
21
Page 22

Chapter 1. Getting Started
Reference docu
mentation
Table 1. 3 lists
the documents to which you might refer during the upgrade and downgrade
processes. The listed URL is the best place to obtain the latest version of each document.
Table 1.3. Reference Documents
Title
HP OpenView Migrating Storage
Resource Manager, Storage
Allocation Reporter, and Network
View to Storage Area Ma nager
Application Notes
HP OpenView Storage Area
Manager 3.0 Installation Guide
HP OpenView Storage Area
Manager EVA Device Plug-In
Installation Instructions
HP OpenView Storage Management
Appliance Software Update
Installation Card
HP OpenView Storage Management
Appliance Software Using AntiVirus
Software Application Notes
(AA-RTD3B-TE)
(AA-RTDPA-TE)
(AV-RNE9K-TE)
Location
http://h71025.www7.hp.com/support/reference_library/
viewdocument.asp?countrycode=1000&prodid=117&source=AARTDPA-TE.xml&dt=14&docid=17125Then, click Download.
http://h18006.www1.hp.com/products/storage/software/sam/
documentation.html
http://openview.hp.com/products/dpi/install_guides/
HP_HSVdpi_03_00_E.pdf
ttp://h18006.www1.hp.com/products/sanworks/
managementappliance/documentation.html
ttp://h18006.www1.hp.com/products/sanworks/
managementappliance/documentation.html
HP StorageWorks Business Copy EVA
License Instructions
(AV-RVJGA-TE)
HP StorageWorks Business Copy
EVA/MA/EMA Host Agent v2.2
for HP OpenVMS Installation
(AA-RUQPA-TE)
Guide
HP StorageWorks Business Copy
EVA/MA/EMA Host Agent v2.2
for HP Tru64 UNIX Installation
Guide
(T3032-96103)
HP StorageWorks Business Copy
EVA/MA/EMA Host Agent
v2.2 for HP-UX Installation
Guide
(T3032-96104)
HP StorageWorks Business Copy
EVA/MA/EMA Host Agent
v2.2 for IBM AIX Installation
(T3032-96105)
Guide
HP StorageWorks Business Copy
EVA/MA/EMA Host Agent
v2.2 for Sun Solaris Installation
Guide
(T3032-96106)
Available in the Business Copy EVA license kits.
http://h18006.www1.hp.com/products/storage/software/
bizcopyeva/index.htmlThen, click Technical documentation.
http://h18006.www1.hp.com/products/storage/software/
bizcopyeva/index.htmlThen, click Technical documentation.
http://h18006.www1.hp.com/products/storage/software/
bizcopyeva/index.htmlThen, click Technical documentation.
http://h18006.www1.hp.com/products/storage/software/
bizcopyeva/index.htmlThen, click Technical documentation.
http://h18006.www1.hp.com/products/storage/software/
bizcopyeva/index.htmlThen, click Technical documentation.
22
hp StorageWorks Enterprise Virtual Array Up da ting Product
Software Instructions
Page 23

Chapter 1. Getting Started
Title
HP StorageWorks Business Copy
EVA/MA/EMA Host Agent
v2.2 for Windows Installation
Guide
(T3032-96107)
HP StorageWorks Business Copy
EVA/MA/EMA Server v2.2
Installation Guide
(T3032-96102)
HP StorageWorks Business Copy
EVA/MA/EMA v2.2 Using BC with
Continuous Access EVA and Data
Replication Manager Application
(T3032–96108)
Notes
HP StorageWorks Continuous Access
EVA V1.1 Getting Started Guide
T3031-96201)
(
HP StorageWorks Continuous Access
User Interface V1.1a Installation
Guide
HP StorageWorks HP-UX Kit
V3.0B for Enterprise Virtual Array
Installation and Configuration Guide
(AA-RUHKB-TE)
Location
http://h18006.www1.hp.com/products/storage/software/
bizcopyeva/index.htmlThen, click Technical documentation.
http://h18006.www1.hp.com/products/storage/software/
bizcopyeva/index.htmlThen, click Technical documentation.
http://h18006.www1.hp.com/products/storage/software/
bizcopyeva/index.htmlThen, click Technical documentation.
http://h18006.www1.hp.com/products/storage/software/
conaccesseva/index.htmlThen, click technical documentation.
http://h18006.www1.hp.com/products/storage/software/
conaccesseva/index.htmlThen, click technical documentation.
Host Server Documentation
http://h18006.www1.hp.com/products/storageworks/enterprise/
documentation.html
HP StorageWorks HP-UX Kit V3.0E
for E nterprise Virtual Array Release
(AV-RUHND-TE)
Notes
HP StorageWorks IBM AIX Kit
V3.0B for Enterprise Virtual Array
Installation and Configuration Guide
(AA-RUHAB-TE)
HP StorageWorks IBM AIX Kit V3.0E
for E nterprise Virtual Array Release
(AV-RUHDD-TE)
Notes
HP StorageWorks Linux Kit V3.0E
for Enterprise Virtual Array
Installation and Configuration Guide
(AA-RUHVD-TE)
HP StorageWorks Linux Kit V3.0E
for E nterprise Virtual Array Release
(AV-RUHYF-TE)
Notes
HP StorageWorks Novell NetWare
Kit V3.0C for Enterprise Virtual
Array Installation and Configuration
Guide
(AA-RUHQC-TE)
HP StorageWorks Novell NetWare
Kit V3.0E for Enterprise Virtual Array
Release Notes
(AV-RUHTD-TE)
http://h18006.www1.hp.com/products/storageworks/enterprise/
documentation.html
http://h18006.www1.hp.com/products/storageworks/enterprise/
documentation.html
http://h18006.www1.hp.com/products/storageworks/enterprise/
documentation.html
http://h18006.www1.hp.com/products/storageworks/enterprise/
documentation.html
http://h18006.www1.hp.com/products/storageworks/enterprise/
documentation.html
http://h18006.www1.hp.com/products/storageworks/enterprise/
documentation.html
http://h18006.www1.hp.com/products/storageworks/enterprise/
documentation.html
hp StorageWorks Enterprise Virtual Array Updating Product
Software Instructions
23
Page 24

Chapter 1. Getting Started
Title
HP StorageWorks OpenVMS Kit
V3.0E for Enterprise Virtual Array
Installation and Configuration Guide
(AA-RUGUC-TE)
HP StorageWorks OpenVMS Kit
V3.0E for Enterprise Virtual Array
Release Notes
(AV-RUGXD-TE)
HP StorageWorks Sun Solaris Kit
V3.0B for Enterprise Virtual Array
Installation and Configuration Guide
(AA-RUH4B-TE)
HP StorageWorks Sun Solaris Kit
V3.0E for Enterprise Virtual Array
Release Notes
(AV-RUH7E-TE)
HP StorageWorks Tru64 Kit
V3.0B for Enterprise Virtual Array
Installation and Configuration Guide
(AA-RUGPB-TE)
HP StorageWorks Tru64 Kit V3.0E
for Enterprise Virtual Array Release
Notes
(AV-RUGSD-TE)
Location
http://h18006.www1.hp.com/products/storageworks/enterprise/
documentation.html
http://h18006.www1.hp.com/products/storageworks/enterprise/
documentation.html
http://h18006.www1.hp.com/products/storageworks/enterprise/
documentation.html
http://h18006.www1.hp.com/products/storageworks/enterprise/
documentation.html
http://h18006.www1.hp.com/products/storageworks/enterprise/
documentation.html
http://h18006.www1.hp.com/products/storageworks/enterprise/
documentation.html
HP StorageWorks Windows Kit
V3.0B for Enterprise Virtual Array
Installation and Configuration Guide
(AA-RUGZB-TE)
HP StorageWorks Windows Kit
V3.0E for Enterprise Virtual Array
Release Notes
(AV-RUH2D-TE)
http://h18006.www1.hp.com/products/storageworks/enterprise/
documentation.html
http://h18006.www1.hp.com/products/storageworks/enterprise/
documentation.html
24
hp StorageWorks Enterprise Virtual Array Up da ting Product
Software Instructions
Page 25

Chapter 2.
The Enterprise Virtual Array uses various software that work with each other to manage the
storage s
software and firmware versions are compatible.
This section provides tables that summarize which versions of software are compatible with
each other. Use Ta ble 2.1, Ta bl e 2.2 , Tab le 2. 3,andTable 2.4 to ensure that you are using
compatible software versions.
Note
Use Appendix B: Software Version Worksheet to collect important version information as you read
through this manual and perform the procedures.
The HP StorageWorks Command View EVA v3.2 software is compatible with the following:
Software
Software Compatibilit y Matrices
olution. When you are considering an upgrade, it is important to ensure that all of the
25
• HP StorageWorks Virtual Controller Software (VCS) v3.020 (recommended version)
• HP OpenView Storage Management Appliance software v2.1 (required)
Hardware
• HP OpenView Storage Management Appliance I, II, or III
• HSV110 controller (EVA5000)
• HSV100 controller (EVA3000)
Note
Refer to the release notes for the host operating system to determine which version of HP
StorageWorks Secure Path (and service packs) you should use. (See Table 1.3 for a list of host
server documents.)
hp StorageWorks Enterprise Virtual Array Updating Product
Software Instructions
Page 26
Chapter 2. Software Compatibility Matrices
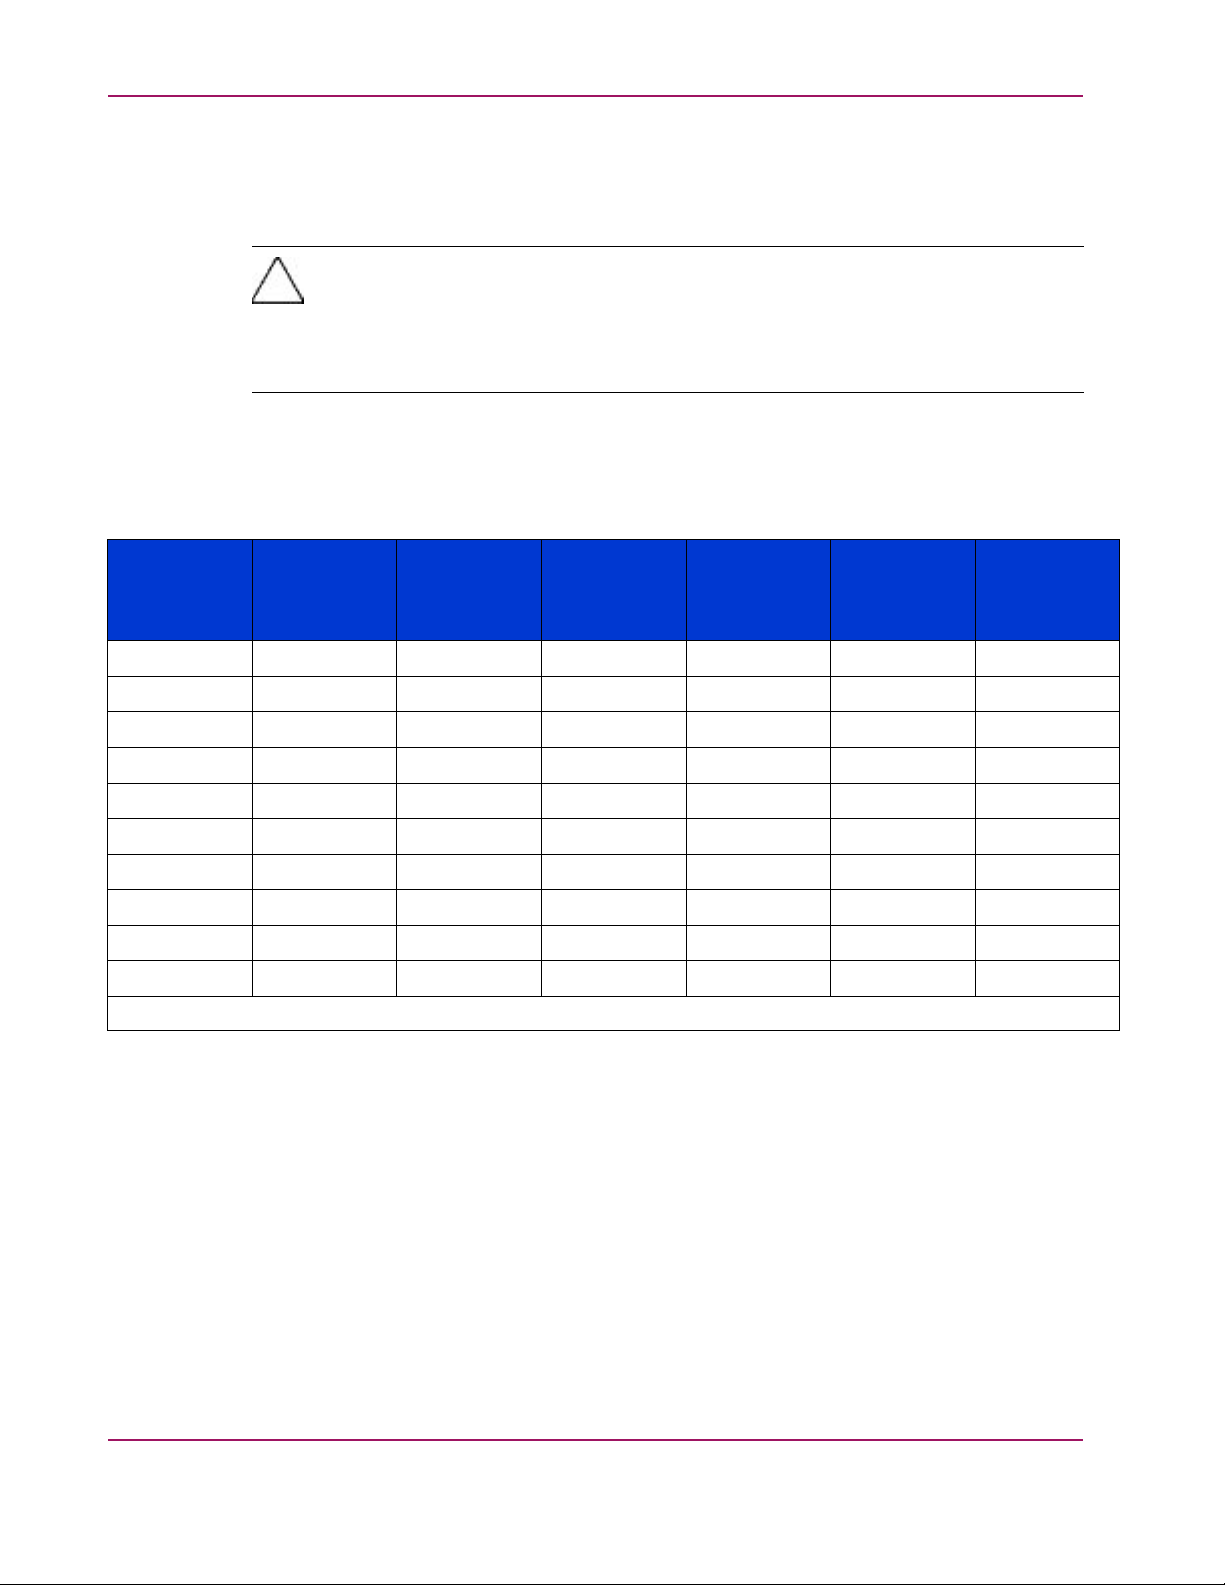
Table 2 .1 indicates the compatible versions of element manager software and storage system
software. Command View EVA v3.2 is compatible with several versions of VCS; however, the
recommended VC
S version is VCS v3.020. If you are running a version of VCS that is not
listed in this table (for instance, VCS v1.01), you should upgrade to a later version of VCS.
Caution
After you have
the initializ
system, you wi
existing dat
upgraded a storage system to v3.020 (or later), you should not downgrade
ed storage system to v2.xxx. If you attempt to downgrade an initialized storage
ll lose any configuration information or data in that storage system. All
a will be destroyed when you downgrade from v3.xxx to v2.00x.
See Table 3 .4 for a description of the proper storage system software upgrade paths.
Table 2.1. Element Manager Software and Storage System Software
Compatibility
Storage
System
Software
HSV Element
Manager
v2.0a
Command
View EVA v2.1
Command
View EVA v3.0
Command
View EVA
v3.0a
Command
View EVA v3.1
Command
View EVA v3.2
Version
VCS v2.002
VCS v2.003
VCS v2.004 No
VCS v2.005
VCS v2.006
VCS v3.000
VCS v3.001
VCS v3.01
VCSv3.014NoNoNoNo
VCS v3.020
Yes Yes Yes Yes Yes Yes
No
No
No
No No
No No
0
No No No
Yes Yes Yes Yes Yes
Yes Yes
a
Yes
a
Yes
a
Yes Yes Yes Yes Yes
Yes Yes Yes Yes Yes
Yes
b
Yes
b
Yes
b
Yes Yes Yes Yes
c
No
c
Yes Yes
Yes Yes
No No No No No
Yes
Yes
Yes
b
abc
a
VCS v2.
b
VCS v3.000 cannot be used on an EVA3000 system.
c
While Command View EVA v3.0 and v3.0a can manage controllers running VCS v3.010, you will not have access to any v3.010-specific
featur
004 is compatible only with EVA3000.
es. HP requires that you upgrade to Command View EVA v3.1.
26
hp StorageWorks Enterprise Virtual Array Up da ting Product
Software Instructions
Page 27
Chapter 2. Software Compatibility Matrices
Table 2.2 indicates the compatible versions of VCS and Enterprise Virtual Array. The
EVA3000 storage system uses the HSV100 controller, and the EVA5000 storage system uses
the HSV110 cont
roller.
Table 2.2. Enterprise Virtual Array Type and VCS Compatibility
EVA3000 EVA5000
VCS v2.002
VCS v2.003
VCS v2.004
VCS v2.005
VCS v2.006
VCS v3.000
VCS v3.001
VCS v3.010
VCS v3.014
VCS v3.020
No
No
Yes
Yes Yes
Yes Yes
No
No
Yes Yes
Yes Yes
Yes Yes
Yes
Yes
No
Yes
Yes
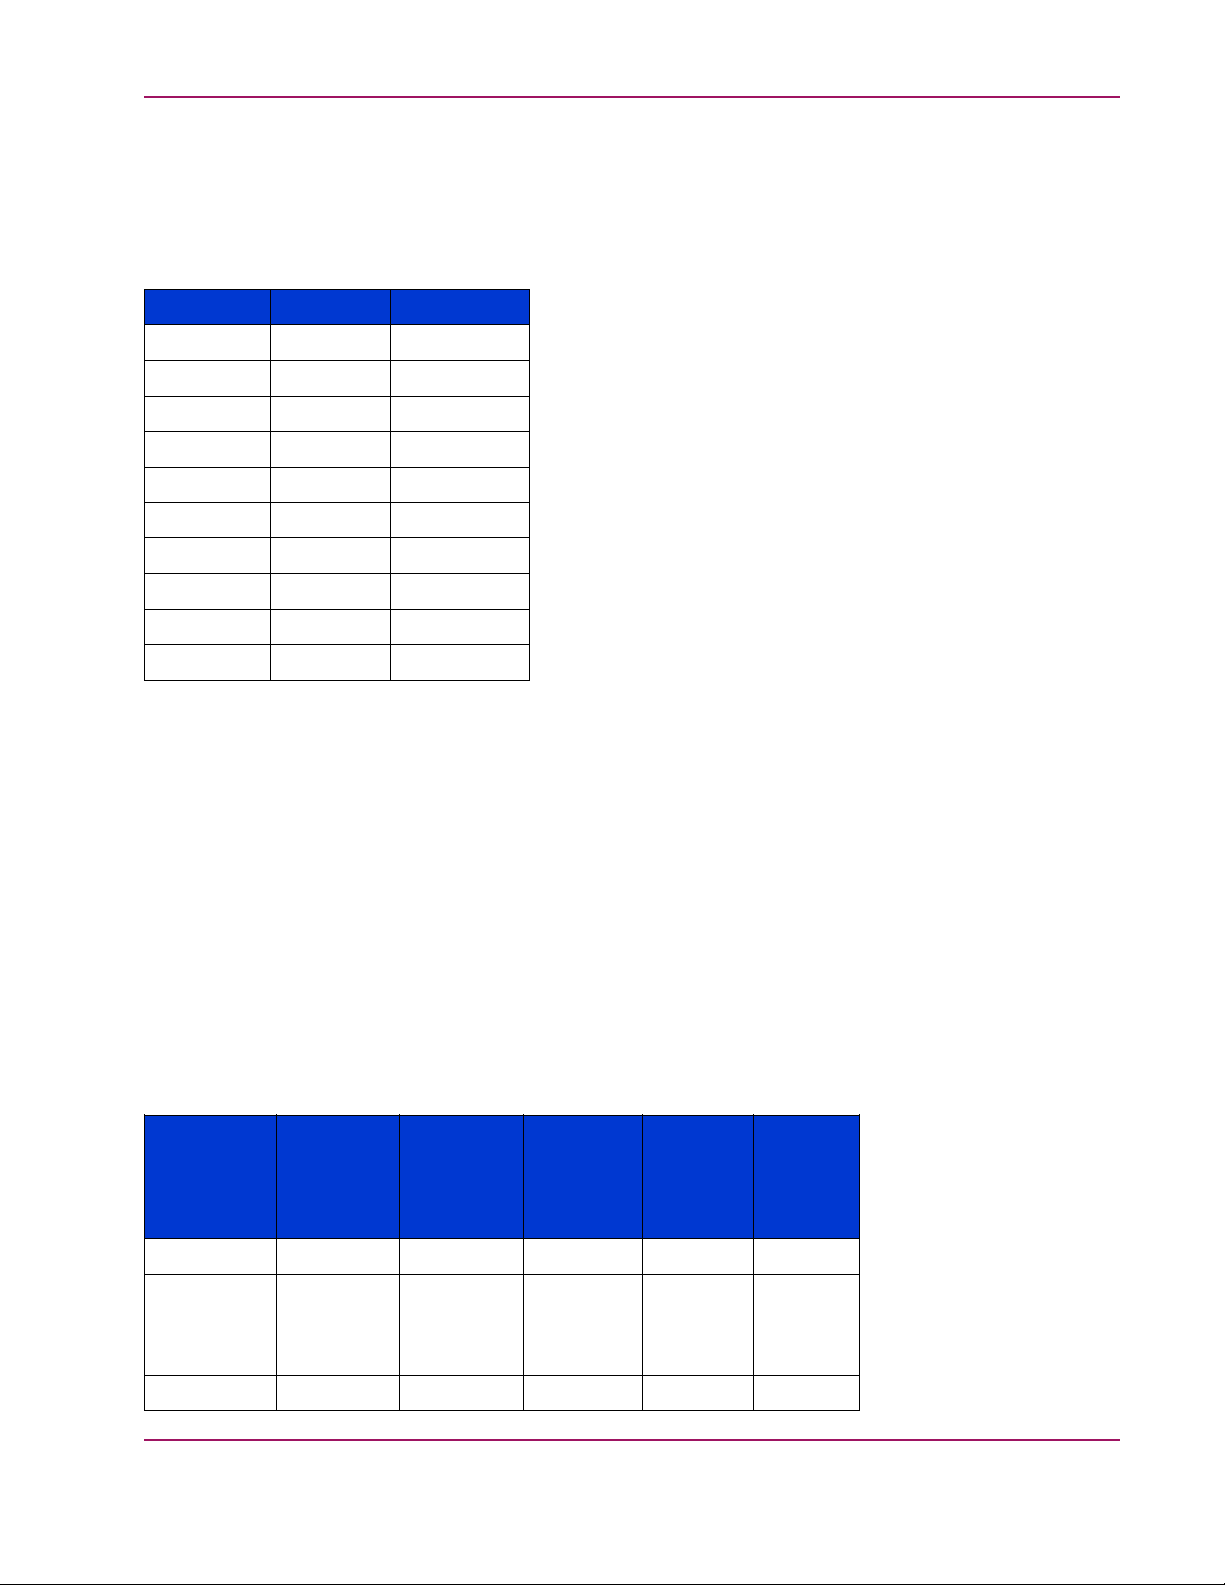
Table 2.3 indicates the compatible versions of element manager software and Storage
Management Appliance software. Command View EVA v3.2 is compatible with the Storage
Management Appliance software v2.1. If you are running Storage Management Appliance
software v1.0c or Storage Management Appliance software v2.0, you must upgrade the
Storage Management Appliance software to v2.1.
See Step 3: Upgrading the Storage Management Appliance for a description of the proper
upgrade paths.
Table 2.3. Element Manager Software and Storage Management Appliance
Software Compatibility
Storage
Manage-
ment Appli-
ance Soft-
ware
v1.0C
v2.0
v2.1
hp StorageWorks Enterprise Virtual Array Updating Product
Software Instructions
HSV
Element
Manager
v2.0a
Yes
Yes Yes
No No No
Command
View EVA
v2.1
No No No No
*requires
Service Pack
1a.
Command
View EVA
Yes
*requires
Service
Pack 3.
v3.0
Command
View EVA
v3.0a
Yes
*requires
Service
Pack 4
Yes Yes
View EVA
No
Com-
mand
v3.1,
v3.2
27
Page 28

Chapter 2. Software Compatibility Matrices
Table 2.4 indicates the compatible versions of the element manager software and add-on
licenses such as, Business Copy EVA and Continuous Access EVA. Business Copy EVA and
Continuous Acc
ess EVA add data management functionality.
Business Copy
eva5000 v2.1a
Business Copy
eva5000 v2.2
Business Copy
eva3000 v2.1
Business Copy
eva3000 v2.1
Business Cop
y
eva3000 v2.2
Continuous
Access
eva5000 v1.
0
Continuous
Access
eva5000 v1.1
Tabl e 2 .4 . E le m
Command View
EVA v2.1
ent Manager Software and Add-on Licenses Compatibility
Command
View EVA
v3.0
Yes Yes
a
No
Yes
No
Yes
No No No
Yes
a
No No
No
Yes Yes
No No No
Command
View EV A
Command
View EVA
v3.0a
No No
a
Yes
Yes
No No
Yes Yes
No
Yes
v3.1,
v3.2
a
Continuous
No No No
Yes
Access
eva3000 v1.1
a
a
Business Copy eva5000 v2.2 is compatible only with VCS v2.003, VCS v2.005, VCS v3.000, VCS v3.010, and VCS v3.020.
28
hp StorageWorks Enterprise Virtual Array Up da ting Product
Software Instructions
Page 29

Chapter 3.
Upgrading the Enterprise Vir tual
Array to v
Upgrading from Enterprise Virtual Array v3.0xx to v3.020 involves several steps, which
must be d
appropriate order, you may not be able to manage the Enterprise Virtual Array storage system
using Command View EVA.
Note
Refer to Appendix A: Software Upgrade Flowchart for a graphical overview of the upgrade process.
Use Appendix B: Software Version Worksheet to collect important version information as you read
through this manual and perform the procedures.
HP high
upgrade process may cause a fully configured HSV controller to exceed application-specific
timeout values. During the VCS upgrade, both HSV controllers reboot at the same time.
Note
Before you can perform an online upgrade to VCS v3.020, you must be running VCS v3.010 (or
later) on the HSV controllers. If you need assistance, contact an HP Authorized Service Representative.
3.020
one in the prescribed order. If you do not perform the upgrade process in the
ly recommends that you perform this upgrade procedure during off-peak hours. The
29
pgrade procedure contains the following steps:
The u
hp StorageWorks Enterprise Virtual Array Updating Product
Software Instructions
Page 30

Chapter 3. Upgrading the Enterprise Virtual Array to v3.020
• Step 1: Checking the health of the Enterprise Virtual Array
• Step 2: Redeeming license keys
• Step 3: Upgrading the Storage Management Appliance
• Step 4: Upgrading host servers
• Step 5: Clearing the passwords on the HSV controllers
• Step 6: Upgrading Command View EVA
• Step 7: Loading the add-on licenses
• Step 8: Upgrading the VCS/Storage System Software to v3.020
Caution
After you hav
not downgra
downgrade a
informati
when you do
e upgraded a storage system to v3.020 (or later), you should
de the initialized storage system to v2.xxx. If you attempt to
n initialized storage system, you will lose any configuration
on or data in that storage system. All existing data will be destroyed
wngrade from v3.xxx to v2.00x.
• Step 9: Ad
• Step 10: I
• Step 11: U
• Step 12:
• Step 13:
• Step 14:
• Step 15:
Upgrading Continuous Access EVA (if installed)
Migrating Network View to Storage Area Manager
Installing Storage Node Manager (optional)
Disabling SNMP notification to the PRS host
ding passwords to the HSV controllers (optional)
nstalling SMI-S EVA (optional)
pgrading Business Copy EVA (if installed)
30
hp StorageWorks Enterprise Virtual Array Up da ting Product
Software Instructions
Page 31

Chapter 3. Upgrading the Enterprise Virtual Array to v3.020
Step 1: Checkin
Estimated Time to Complete
1 hour
Before you upgrade your Enterprise Virtual Array to v3.020, you should check the condition
of your storage system. Perform the following steps to determine if your Enterprise Virtual
Array is in good condition and ready to upgrade.
1. Check the displays and LEDs on the Enterprise Virtual Array. (Refer to HP StorageWorks
g the health of the Enterprise Virtual Array
Enterprise Virtual Array User Guide for information and illustrations related to displays
and LEDs.)
Note
If you are performing the upgrade process remotely, you do not have to do this step. However,
it is very important that you check the state of your hardware elements. You can do this
remotely through Command View EVA. See step 2 for more information.
a. Verify that the Operator Control Panels (OCPs) on the HSV controllers are properly
displaying the WWNs and stora
ge system names.
b. Verify that there are no fault LEDs on the drive enclosures.
c. Verify that the Power LEDs are on, and the Activity LEDs are flashing on the
disk drives.
d. Verify that there are no errors on the Environmental Monitoring Unit (EMU)
displays.
e. Verify that each I/O module is displaying two green LEDs (
Note
If your Enterprise Virtual Array does not use FC loop switches, verify that there are
three green LEDs.
viewed from rear).
f. Verify that the power supplies and blowers are operating correctly.
g. Check the back of each HSV controller. Verify that all of the LEDs are green
and not blinking.
2. Launch Command View EVA and click the icon of the storage system you want to
upgrade. Check for hardware errors.
a. Look at the Hardware folder in the Navigation pane. If there are any hardware
ion or warning conditions, Command View EVA displays the appropriate
caut
icon over the folder.
hp StorageWorks Enterprise Virtual Array Updating Product
Software Instructions
31
Page 32

Chapter 3. Upgrading the Enterprise Virtual Array to v3.020
Figure 3.1. Command View EVA—Hardware folder in
the Navigation pane
b. Click the Hardware folder to expand the navigation tree.
The Hardware Folder Properties page displays. The Operational State field also
indicates if there is a hardware problem.
Figure 3.2. Command View EVA—Hardware Folder
Properties page
32
c. Continue to expand the navigation tree under the Hardware folder, until you see a
hardware component icon with an attention or warning icon on it.
hp StorageWorks Enterprise Virtual Array Up da ting Product
Software Instructions
Page 33

Chapter 3. Upgrading the Enterprise Virtual Array to v3.020
d.
Click the component icon to display the properties page. The Operational state
field indicates if there is a hardware error.
Figure 3.3. Command View EVA—Disk Enclosure
Properties page—checking operational states
3. Record the Environmental Monitoring Unit (EMU) firmware version.
a. Click the storage system icon in the Navigation pane.
The Initialized Storage System page displays.
b. Click the Hardware folder in the Navigation pane.
The Hardware Folder Properties page displays.
c. Expand the navigation tree under the Rack icon.
d. Click the Disk Enclosure icon in the Navigation pane.
The Disk Enclosure Properties page displays.
hp StorageWorks Enterprise Virtual Array Updating Product
Software Instructions
33
Page 34

Chapter 3. Upgrading the Enterprise Virtual Array to v3.020
Figure 3.4. Command View EVA—Disk Enclosure
Properties page—checking the firmware version
e.
In the EMU group, record the number listed in the Firmware version field.
f. Repeat step d and step e for each disk enclosure in the rack. If there is more than
one rack in the storage system, record the firmware version for each disk enclosure
in the storage system.
4. Verify that there are no hardware components in the Unmappable Hardware folder.
a. Expand the navigation tree under the Hardware folder in the Navigation pane.
b. Click the Unmappable Hardware folder.
Hardware components can be placed in the Unmappable Hardware folder for several
reasons. For example, hardware components can be placed in the Unmappable
Hardware folder, when the I/O modules on a disk enclosure are not working,
the controllers restart, or there is a hardware failure. If there are any hardware
components listed under this folder, determine why they are listed there and fix the
problems.
5. Using Command View EVA, examine the controller event log. Verify that no Critical
events occurred in the last 48 hours.
a. Click a storage system icon in the Navigation pane.
34
b.
Click View Events.
The View Events page displays.
hp StorageWorks Enterprise Virtual Array Up da ting Product
Software Instructions
Page 35

Chapter 3. Upgrading the Enterprise Virtual Array to v3.020
Figure 3.5. Command View EVA—View Events page
c.
Click Controller Event Log.
The Controller Events page displays in a new browser window.
Figure 3.6. Command View EVA—Controller Events
(Initialized system) page
d. Verify that no unexpected Critical events have occurred in the past 48 hours.
e. If Critical events have occurred in the past 48 hours, perform the steps outlined
in the corrective action codes to correct the problems. In some cases, it might be
necessary to call your HP authorized representative to fix the problem.
6. Verify that the hosts can see the Vdisks.
7. Verify that each disk group contains a minimum of eight disk drives.
hp StorageWorks Enterprise Virtual Array Updating Product
Software Instructions
35
Page 36

Chapter 3. Upgrading the Enterprise Virtual Array to v3.020
a. In Command View EVA, click the Disk Group folder in the Navigation pane.
The Disk Group Folder Properties page displays.
b. Click a disk group icon.
The Disk Group Properties page displays.
c.
Check the To tal di sk s fieldintheDiskGroupPropertiespage.
36
Figure 3.7. Command View EVA—Disk Group Properties
page
d. If each disk group does not contain a minimum of eight disk drives, correct your
disk group configuration.
8. Verify that there is at least 5% free space in all disk groups.
a. In Command View EVA, click the Disk Group folder in the Navigation pane.
The Disk Group Folder Properties page displays.
b. ClickadiskgroupiconintheNavigationpane.
The Disk Group Properties page displays.
c.
Compare the Capacity to the Occupancy data in the Disk Group Properties page to
determine how much free space there is in the disk group.
hp StorageWorks Enterprise Virtual Array Up da ting Product
Software Instructions
Page 37

Chapter 3. Upgrading the Enterprise Virtual Array to v3.020
Figure 3.8. Command View EVA—Disk Group Properties
page—checking free capacity
9. Check the Vraid levels for each Vdisk.
a. In Command View EVA, click the Virtual Disks folder in the Navigation pane.
The Vdisk Folder Properties page displays.
hp StorageWorks Enterprise Virtual Array Updating Product
Software Instructions
37
Page 38

Chapter 3. Upgrading the Enterprise Virtual Array to v3.020
Figure 3.9. Command View EVA—Vdisk Folder
Properties page
Note
If you are using virtual disk subfolders, expand the subfolders to view the Vdisk family
icons.
b. Click a Vdisk family icon.
The Vdisk Family Properties page displays.
Figure 3.10. Command View EVA—Vdisk Family
Properties page
38
c. Click the ACTIVE icon.
The Vdisk Active Member Properties page displays.
hp StorageWorks Enterprise Virtual Array Up da ting Product
Software Instructions
Page 39

Chapter 3. Upgrading the Enterprise Virtual Array to v3.020
Figure 3.11. Command View EVA—Vdisk Active Member
Properties page
d.
Check the Redundancy field.
If any Vdisks use Vraid0 protection, you might want to consider changing your
Vdisk configuration. Vraid0 provides no data protection.
10. Verify that there are no configuration changes in progress. For instance, Command View
EVA should not be in the process of creating a Vdisk.
If there are configuration changes in progress, wait 48 hours after configuration changes
have been made before upgrading. Check the controller event log for unwanted events.
11. Back up the data in the Enterprise Virtual Array.
Caution
Always back up your data before performing major operations such as
software upgrades.
hp StorageWorks Enterprise Virtual Array Updating Product
Software Instructions
39
Page 40

Step 2: Redeeming license keys
Estimated Time to Complete
1to48hours
Chapter 3. Upgrading the Enterprise Virtual Array to v3.020
Verify that you have the appropriate add-on licenses. See Required kits for more infor
Step 3: Upgrading the Storage Management Appliance
Estimated Time to Complete
1.5 to 2.5 hours
This section contains the following procedures:
• Changing the default maximum log size
• Upgrading the Storage Management Appliance Software from v2.0 to v2.1
• Verifying the Storage Management Appliance Sofrware version
You must upgrade the Storage Management Appliance software to v2.1. Please use the
Storage Management Appliance software v2.1 CD, and refer to the instructions in the HP
OpenView Storage Management Appliance Software Update Installation Card.
If the Storage Management Appliance is running Storage Management Appliance software
v1.0C or later, you can upgrade to Storage Management Appliance software v2.1. You do
not have to install any of the v2.0 service packs. Version 2.1 of the Storage Management
Appliance software includes all of the necessary components. Table 3 .1 describes the proper
upgrade paths to Storage Management Appliance software v2.1.
mation.
Table 3.1. Storage Management Appliance Software Upgrade Paths
Current Storage Management
ApplianceSoftwareVersion
Storage Management Appliance
software v1.0C
Storage Management Appliance
software v2.0
Storage Management Appliance
software v2.0, Service Pack1a
Storage Management Appliance
software v2.0, Service Pack 3
Storage Management Appliance
software v2.0, Service Pack 4
Upgrade directly to Storage
Management Appliance software
v2.1
Changing the default maximum log size
The default maximum log file size for the Storage Management Appliance software v2.1 is
16 MB for the Event log and 8 MB for the Audit log. Previously in v2.0, the maximum log file
size was 512 MB for both logs.
40
Upgrade Path
hp StorageWorks Enterprise Virtual Array Up da ting Product
Software Instructions
Page 41

Chapter 3. Upgrading the Enterprise Virtual Array to v3.020
Caution
IfyouhaveAuditorEventlogfilesthatarelargerthanthenewmaximumsizes,andyou
want to retain them, back up the logs before you upgrade the Storage Management
Appliance software from v2.0 to v2.1. The Storage Management Appliance software will
delete the log files if they exceed the default maximum sizes.
Upgrading the Storage Management Appliance Software from v2.0 to v2.1
If you are running Storage Management Appliance software v1.0C, please refer to the
nstructions in the HP OpenView Storage Management Appliance Software Update Installation
i
Card.
If you are running Storage Management Appliance software v2.0 (or later), perform the
following steps to upgrade to v2.1:
Caution
You cannot update the Storage M anagement Appliance software using a Terminal Services
session. You must log in to the Storage Management Appliance software using a remote
browser.
1. From a client computer, launch a Web browser and browse to the Storage Management
Appliance, using the following format:
http://<appliance_name>/
Note
ThedefaultappliancenameforaStorageManagementAppliance(hardwareversion1.0)
swma
begins with
If the Storage Management Appliance software was restored u
v2.0, then the default appliance name begins with
appliance serial number.
The default appliance name for a Storage Ma nagement Appliance II begins with
includes all 12 characters of the appliance serial number.
ThedefaultappliancenameforaStorageManagementApplianceIIIbeginswith
includes all 10 characters of the appliance serial number
The serial number is displayed on a sticker which is usually pasted to the lower right side of
theappliance(whenviewedfromthefront).
and includes the last 6 characters of the appliance serial number.
singtheQuickRestoreCD
sma
cludes all 12 characters of the
and in
sma
sma
and
and
2. Log in to the Storage Management Appliance software using a valid username and
password.
Note
You must have administrator privileges.
3. Insert the Storage Management Appliance software v2.1 Update CD-ROM in to the
CD-ROM drive of the Storage Management Appliance.
4.
Click Settings in the
tool bar.
The Settings page displays.
hp StorageWorks Enterprise Virtual Array Updating Product
Software Instructions
41
Page 42

Chapter 3. Upgrading the Enterprise Virtual Array to v3.020
Figure 3.12. Storage Management Appliance software—Settings page
5.
Click Maintenance in the tool bar.
The Maintenance page displays.
42
Figure 3.13. Storage Management Appliance software—Maintenance page
6.
Click Install Software.
An Installation Wizard page displays.
hp StorageWorks Enterprise Virtual Array Up da ting Product
Software Instructions
Page 43

Chapter 3. Upgrading the Enterprise Virtual Array to v3.020
Figure 3.14. Storage Management Appliance software—Installation Wizard
7.
Click Next at the bottom of the page.
hp StorageWorks Enterprise Virtual Array Updating Product
Software Instructions
43
Page 44

Chapter 3. Upgrading the Enterprise Virtual Array to v3.020
Figure 3.15. Storage Management Appliance software—Installation
Wizard—installation types
8.
Choose CD-ROM Drive on the Storage Management Appliance.
Note
The FTP Server and Loca l Disk on the Storage Management Appliance options cannot be used
for upgrading from v2.0 to v2.1.
9.
Click Next at the bottom of the page.
10. Verify that the appliance name and IP address are correct.
11.
Click Next at the bottom of the page.
12.
Select Storage Management Appliance v2.1 from the drop-down list.
13.
Click Next at the bottom of the page.
The installation process begins. A status bar displays.
Note
The installation process can last one hour. Wait until the installation completes before you
perform any other actions in the Storage Management Appliance software.
44
hp StorageWorks Enterprise Virtual Array Up da ting Product
Software Instructions
Page 45

Chapter 3. Upgrading the Enterprise Virtual Array to v3.020
When the installation finishes, the Storage Management Appliance reboots and the
Storage Management Appliance software v2.1 starts up automatically.
Verifying the Storage Management Appliance Software version
1. From a client computer, launch a Web browser and browse to the Storage Management
Appliance, usi
ng the following format:
http://<appl
Note
ThedefaultappliancenameforaStorageManagementAppliance(hardwareversion1.0)
begins with
If the Storag
v2.0, then th
appliance serial number.
The default appliance name for a Storage Ma nagement Appliance II begins with
includes all 12 characters of the appliance serial number.
ThedefaultappliancenameforaStorageManagementApplianceIIIbeginswith
includes all 10 characters of the appliance serial number
The serial number is displayed on a sticker which is usually pasted to the lower right side of
theappliance(whenviewedfromthefront).
iance_name>/
swma
and includes the last 6 characters of the appliance serial number.
e Management Appliance software was restored using the Quick Restore CD
edefaultappliancenamebeginswith
sma
and includes all 12 characters of the
sma
sma
2. Log in to the Storage Management Appliance software using a valid username and
password.
Note
You must have administrator privileges.
and
and
3.
Click Help in the tool bar.
The welcome page of online help for the Storage Management Appliance software
displays the current version of the software.
hp StorageWorks Enterprise Virtual Array Updating Product
Software Instructions
45
Page 46

Chapter 3. Upgrading the Enterprise Virtual Array to v3.020
Figure 3.16. Storage Management Appliance Online Help
46
hp StorageWorks Enterprise Virtual Array Up da ting Product
Software Instructions
Page 47

Chapter 3. Upgrading the Enterprise Virtual Array to v3.020
Step 4: Upgrading host servers
Estimated Time to Complete
varies by host type (see Ta bl e 3. 2)
After you have upgraded the Storage Management Appliance software, you can upgrade the
platform kits on your host servers.
Please refer to the platform-specific installation documentation for detailed upgrade
instructions.
See Tab le 1.3 for a list of host server documentation.
The Windows, No
vell Netware, Linux, Sun Solaris, and IBM AIX host server kits contain
FCA drivers, enabling scripts, utilities, Storage System Scripting Utility (SSSU), and
documentation.
In the HP-UX, Tru64, and OpenVMS host server kits, the FCA drivers are embedded in
the operating s
ystem. Therefore, the kits contain enabling scripts, utilities, SSSU, and
documentation.
Note
Users of Windo
Management function that may send Queue Full responses to SCSI commands before the maximum
allowable Queue Depth of 2048 has been reached for a Fabric Port. Windows NT 4.0 does not
properly handle these queue full responses and I/O errors may result.
TheCriticalResourceManagementfeaturecanbedisabledbyselectingaCustomHostModefor
Windows NT 4.0 hosts. Enter the value 00000004 1F80B8A8 into the Custom mode number field
in the Add a Ho
BecausedisablingtheCriticalResourceManagementfeatureaffectstheentireEnterpriseVirtual
Array, users
recommended to run homogeneous Windows NT 4.0 environments and not mix Windows NT 4.0
hosts with hosts running other operating systems on a given EVA subsystem.
ws NT 4.0 should be aware that VCS v3.020 incorporates a new Critical Resource
st page of Command View EVA.
connecting with Windows NT 4.0 and using this Custom Host Mode are strongly
Table 3.2. Time Estimates for Host Server Upgrades
Host OS
Windows 1 to 3 hours
Novell Net
Sun Solari
IBM AIX
Tru64
OpenVMS
HP-UX 15 minutes
hp StorageWorks Enterprise Virtual Array Updating Product
Software Instructions
ware
s
Estimated Time for
Upgrade pe
1to3hours
15 minutes
15 minutes
30 minutes
30 minutes
rhostserver
47
Page 48

Chapter 3. Upgrading the Enterprise Virtual Array to v3.020
Step 5: Clearing the passwords on the HSV controllers
Estimated Time to Complete
15 minutes
If you are using passwords on your HSV controllers, you must clear the passwords, before
you upgrade Command View EVA. You can add passwords to your storage system after you
complete the Command View EVA upgrade (see Step 9: Adding passwords to the HSV
controllers (optional)). Use the following procedure to clear the storage system passwords
on the HSV controllers.
Note
When you clear a system password on the controller, you must disable password access from any
Command View EVA with access to this storage system.
Using the Operator Control Panel (OCP) on the HSV Controller:
1. Press
2. Press
3. Press
4. Press
5. Press
to leave the default display.
four times to scroll to System Password.
to select System Password.
to display Clear Password
.
to select Clear Password.
The OCP displays Clear Password No?
6. Press
.
The OCP displays CLEAR PASSWORD Yes?
7. Press
to clear the password.
The password is cleared. The system automatically returns to the default display
(WWID).
8. Disable password access to this storage system in Command View EVA.
Disabling password access in Command View EVA
Estimated Time to Complete
48
10 minutes
To disable password access to a storage system in Command View EVA, perform the
following steps:
1. Launch Command View EVA in your browser.
2.
Click Agent Options in the Session pane.
The Management Agent Options page displays.
hp StorageWorks Enterprise Virtual Array Up da ting Product
Software Instructions
Page 49

Chapter 3. Upgrading the Enterprise Virtual Array to v3.020
Figure 3.17. Command View EVA—Management Agent Options page
3.
Click Storage system password access.
The Storage System Pas
sword Access page displays.
Figure 3.18. Command View EVA—Storage System Password Access page
4.
Click Disable.
The Disable Password Access to Storage System page displays.
hp StorageWorks Enterprise Virtual Array Updating Product
Software Instructions
49
Page 50

Chapter 3. Upgrading the Enterprise Virtual Array to v3.020
Figure 3.19. Command View EVA—Disable Password Access to Storage
System page
5. Select the s
Note
MakesureyouselectthestoragesystemfromwhichyouclearedpasswordsusingtheOCPon
the HSV controller.
6.
Click Disable Password.
A message box displays.
torage system World Wide Node Name from the drop-down list.
50
Figure 3.20. Command View EVA—Disable password access message box
7.
Click Ye s to disable the password for the selected storage system.
hp StorageWorks Enterprise Virtual Array Up da ting Product
Software Instructions
Page 51

Chapter 3. Upgrading the Enterprise Virtual Array to v3.020
Step 6: Upgrading Command View EVA
Estimated Time to Complete
45 minutes
This section contains the following procedures:
• Upgrading to Command View EVA v3.2
• Verifying the Command View EVA version
You must upgrade to Storage Management Appliance software v2.1, before you upgrade to
Command View EVA v3.2. (See “Step 3: Upgrading the Storage Management Appliance”for
more information.)
You must be running HSV Element Manager v2.0 or later to upgrade to Command View
EVA v3.2. You cannot upgrade from HSV Element Manager v1.0 to Command View EVA
v3.2. To upgrade from HSV Element Manager v1.0 to HSV Element Manager v2.0, please
refer to SANworks by Compaq Upgrade Instructions for Enterprise Virtual Array. Table 3 .3
describes the proper upgrade paths to Command View EVA v3.2.
Table 3.3. Command View EVA Upgrade Paths
Current Command View
EVA Version
HSV Element Manager v2.0
HSV Element Manager v2.0a
Command View EVA v2.1
Command View EVA v3.0
Command View EVA v3.0a
Command View EVA v3.1 Upgrade to Command View EVA v3.2.
1. Upgrade to Command View EVA v3.1
2. Upgrade to Command View EVA
v3.2.
Upgrade Path
The installation of Storage Management Appliance software v2.1 automatically installed
Command View EVA v3.0a over your previous element manager version.
To verify which version of Command View EVA you are using, see Verifying the Command
View EVA version for assistance.
Upgrading to Command View EVA v3.2
Note
Remember to remove the passwords from the HSV controllers and Command View E VA (or HSV
Element Manager) before you upgrade to Command View EVA v3.2 (See Step 5: Clearing the
passwords on the HSV controllers).
To upgrade to Command View EVA v3.2:, perform the following steps:
1. Close all browser windows, Microsoft® Management Console (MMC) sessions,
Terminal Services sessions, and Java applets that are open to and on the Storage
Management Appliance.
hp StorageWorks Enterprise Virtual Array Updating Product
Software Instructions
51
Page 52

Chapter 3. Upgrading the Enterprise Virtual Array to v3.020
2. From a client computer, launch a Web browser and browse to the Storage Management
Appliance, using the following format:
http://<appliance_name>/
Note
The default appliance name for a Storage Management Appliance (hardware version 1.0)
swma
begins with
If the Storage Management Appliance software was res
v2.0, then the default appliance name begins with
appliance serial number.
ThedefaultappliancenameforaStorageManagementApplianceIIbeginswith
includes all 12 characters of the appliance serial number.
The default appliance name for a Storage Management Appliance III begins with
includes all 10 characters of the appliance serial number
The serial number is displayed on a sticker which is usually pasted to the lower right side of
theappliance(whenviewedfromthefront).
and includes the last 6 characters of the appliance serial number.
tored using the Quick Restore CD
a
and includes all 12 characters of the
sm
sma
sma
and
and
3. Log in to the Storage Management Appliance software using a valid username and
password.
TheHomepagedisplays.
Note
You must
have administrator privileges.
52
Figure 3.21. Storage Management Appliance software—Home page
4.
Click Settings in the tool bar.
The Settings page displays.
hp StorageWorks Enterprise Virtual Array Up da ting Product
Software Instructions
Page 53

Chapter 3. Upgrading the Enterprise Virtual Array to v3.020
Figure 3.22. Storage Management Appliance software—Settings page
5.
Click Manage Tools.
The Manage Tools page displays.
hp StorageWorks Enterprise Virtual Array Updating Product
Software Instructions
53
Page 54

Chapter 3. Upgrading the Enterprise Virtual Array to v3.020
Figure 3.23. Storage Management Appliance software—Manage Tools page
6.
Select the command view eva checkbox.
Note
Thepagecontentvariesdependingonthecurrentelementmanagerversionyouareusing. If
you are using Command View EVA 2.1 or earlier, the page displays
If you are using Command View EVA v3.0 or later, the page displays
Depending on your current product version, please select the appropriate element manager.
7.
Click Stop in the Ta sk s column.
The Stop Applications wizard displays.
HSV Element Manager
command view eva
.
.
54
hp StorageWorks Enterprise Virtual Array Up da ting Product
Software Instructions
Page 55

Chapter 3. Upgrading the Enterprise Virtual Array to v3.020
Figure 3.
24. Storage Management Appliance software—Stop Applications
wizard
8.
Click Next.
A message displays when the appliance has successfully stopped the application.
hp StorageWorks Enterprise Virtual Array Updating Product
Software Instructions
55
Page 56

Chapter 3. Upgrading the Enterprise Virtual Array to v3.020
Figure 3.25. Storage Management Appliance software—Stop Applications
wizard—successful message
9.
Click Finish.
The Manage Tools page displays.
10. Verify that the state of the command view eva application is stopped.
11. Repeat step 5 through step 10 to stop the following applications, if they are installed:
Storage Provisioner, Continuous Access EVA user interface, and Business Copy EVA.
Caution
Stopping Business Copy EVA (the BC server) stops any Business Copy jobs that
are running or undoing, which causes the jobs to fail. HP recommends that
you allow jobs that are running or undoing to complete before stopping the
BC server. You can use the Jobs page in the Business copy GUI to determine
the status of any jobs.
56
12.
Click Maintenance in the tool bar.
The Maintenance page displays.
hp StorageWorks Enterprise Virtual Array Up da ting Product
Software Instructions
Page 57

Chapter 3. Upgrading the Enterprise Virtual Array to v3.020
Figure 3.26. Storage Management Appliance software—Maintenance page
13. Determine the installation method to use from the following list and continue in the
appropriate section of this procedure:
• CD-ROM Drive on the Storage Management Appliance Installation (Perform the
steps in Installing Command View EVA from the CD-ROM drive on the Storage
Managerment Appliance.)
• FTP Server Installation (Perform the steps in Installing Command View EVA from
an FTP server.)
Use this option only if the SWP file has been saved to an FTP server.
• Local Disk on the Storage Management Appliance Installation (Perform the steps
in Installing Command view EVA from a local disk on the Storage management
Appliance.)
Use this option to install an SWP file from the Storage Management Appliance hard
disk installation kits directory.
Installing Command View EVA from the C D-ROM drive on the Storage Management Appliance
To install Command View EVA from the CD-ROM Drive, perform the following steps:
1. Insert the Command View EVA v3.2 CD-ROM into the CD-ROM drive on the Storage
Management Appliance.
2.
Click Install Software.
An Installation Wizard page displays.
hp StorageWorks Enterprise Virtual Array Updating Product
Software Instructions
57
Page 58

Chapter 3. Upgrading the Enterprise Virtual Array to v3.020
Figure 3.27. Storage Management Appliance software—Installation Wizard
3.
Click Next at the bottom of the page.
58
hp StorageWorks Enterprise Virtual Array Up da ting Product
Software Instructions
Page 59

Chapter 3. Upgrading the Enterprise Virtual Array to v3.020
Figure 3.28. Storage Management Appliance software—Installation
Wizard—installation types
4.
Choose CD-ROM Drive on the Storage Management Appliance.
5.
Click Next at the bottom of the page.
6. Verify that the appliance name and IP address are correct.
7.
Click Next at the bottom of the page.
8.
Select Command View EVA V3.2 from the drop-down list.
9.
k Next.
Clic
nstallation process begins. A status bar displays.
The i
hp StorageWorks Enterprise Virtual Array Updating Product
Software Instructions
59
Page 60

Chapter 3. Upgrading the Enterprise Virtual Array to v3.020
Figure 3.29. Storage Management Appliance software—Installation
Wizard—installation in progress message
When the installation completes, the wizard displays the message Installation
is comp
lete.
60
hp StorageWorks Enterprise Virtual Array Up da ting Product
Software Instructions
Page 61

Chapter 3. Upgrading the Enterprise Virtual Array to v3.020
Figure 3.30. Storage Management Appliance software—Installation
Wizard—installation complete
10.
Click Finish.
The management appliance returns to the Maintenance page.
11.
Click Devices in the tool bar.
The Devices page displays.
hp StorageWorks Enterprise Virtual Array Updating Product
Software Instructions
61
Page 62

Chapter 3. Upgrading the Enterprise Virtual Array to v3.020
Figure 3.31. Storage Management Appliance software—Devices page
12.
Verify that a command view eva entryexistsontheDevicespage.
Does an entry exist?
•Yes.GotoVerifying the Command View EVA version.
• No. Return to step 4 to repeat the installation.
Installing Command View EVA from an FTP server
To install Command View EVA from an FTP server, perform the following steps:
1.
Click the Install Software option.
An Installation Wizard page displays.
2.
Click Next at the bottom of the page.
3.
Choose FTP Server.
4.
Click N
ext at the bottom of the page.
62
hp StorageWorks Enterprise Virtual Array Up da ting Product
Software Instructions
Page 63

Chapter 3. Upgrading the Enterprise Virtual Array to v3.020
Figure 3.32. Storage Management Appliance software—Installation
Wizard—FTP server installation
5. Type, or accept, the following information to establish an FTP network connection
with the Storage Management Appliance.
Note
All entries are case sensitive.
•
For FTP server name, type the fully-qualified domain name of the FTP server on
which the SWP files are located (or enter the IP address of the server).
•
For Full File Path , type the absolute path of the download folder and the
Command_View_EVA_V3_2.swp file name in the text box.
/<download_folder_path>/Command_View_EVA_V3_2.swp
• User name, accept the default of anonymous.
6.
Click Next at the bottom of the page.
The SWP file downloads from the FTP server and unpacks.
The page returns with the file display name Command View EVA V3 2.
7.
Click Next.AnInstallation is in progress message displays. A status
bar displays.
When the installation completes, the wizard displays the message
Installation is complete.
8.
Click Finish.
hp StorageWorks Enterprise Virtual Array Updating Product
Software Instructions
63
Page 64

Chapter 3. Upgrading the Enterprise Virtual Array to v3.020
The management appliance returns to the Maintenance page.
9.
Click Devices in the tool bar.
The Devices page displays.
Figure 3.33. Storage Management Appliance software—Devices page
10.
Verify that a command view eva entryexistsontheDevicespage.
Does an entry exist?
•Yes.GotoVerifying the Command View EVA version.
• No. Return to st
Installing Command View EVA from a local disk on the Storage Management Appliance
ep 4 to repeat the installation.
To install Command View EVA from the local disk, perform the following steps:
1. Verify that the SWP file is in the C:\Compaq\SWPInstallKits directory.
To place the SWP file in the C:\Compaq\SWPInstallKits directory, perform the
following steps:
a. Copy the Command_View_EVA_V3_2.swp file to a network share accessible from
the Storage Management Appliance.
b. Open a Microsoft Terminal Services session to connect and log in to the Storage
Management Appliance.
Note
If a Terminal Services session is not available, then temporarily connect a monitor , mouse,
and keyboard to the Storage Management Appliance to complete this procedure.
64
c. From the Storage Management Appliance, connect to the network share that
contains the file copied in step a of this procedure.
d. Copy the Command_View_EVA_V3_2.swp file to the following Storage Management
Appliance directory: C:\Compaq\SWPInstallKits
hp StorageWorks Enterprise Virtual Array Up da ting Product
Software Instructions
Page 65

Chapter 3. Upgrading the Enterprise Virtual Array to v3.020
Note
Make sure that the .SWP file is in the
Installation W
Verify that the
appliance. If t
directory, reboot the appliance and then delete the installdownload directory.
izard looks for the .SWP file in this directory.
c:\temp\installdownload
his directory does exist, delete it. If you cannot delete the installdownload
The product software is now ready for installation.
e. Disconnect from the share drive.
f. Log out of the Terminal Services session or disconnect the monitor, mouse, and
keyboard.
2.
Click the Install Software option.
An Installation Wizard page displays.
3.
Click Next at the bottom of the page.
4.
Choose Local Disk on the Storage Management Appliance.
5.
Click Next at the bottom of the page.
C:\Compaq\SWPInstallKits
directory does not exist on the management
directory. The
Figure 3.34. Storage Management Appliance software—Installation
Wizard—local disk installation
6.
Choose Command_View_EVA_V3_2.swp from the drop-down list.
Note
Ifthefilenamedoesnotdisplayinthedrop-downlist,verifythatthe
C:\Compaq\SWPInstallKits directory.
hp StorageWorks Enterprise Virtual Array Updating Product
Software Instructions
.SWP
file is located in the
65
Page 66

Chapter 3. Upgrading the Enterprise Virtual Array to v3.020
7.
Click Next at the bottom of the page.
The screen returns with the file display name Command View EVA V3 2.
66
Figure 3.35. Storage Management Appliance software—Installation
Wizard—select file
8.
Click Next.
An Installation is in progress message displays.
A status bar displays.
When the installation completes, the wizard displays the message
Installation is complete.
9.
Click Devices in the tool bar.
The Devices page displays.
hp StorageWorks Enterprise Virtual Array Up da ting Product
Software Instructions
Page 67

Chapter 3. Upgrading the Enterprise Virtual Array to v3.020
Figure 3.36. Storage Management Appliance software— Devices page
10.
Verify that a command view eva entry exists on the Devices page.
Does an entry exist?
•Yes.GotoVerifying the Command View EVA version.
• No. Return to step 4 to repeat the installation.
Verifying the Command View EVA version
To verify the Command View EVA version, perform the following steps
1. Launch the Storage Management Appliance software. (See Step 2 in Upgrading to
Command View EVA v3.2.)
2. Log in to the Storage Management Appliance software using a valid username and
password.
Note
You must have administrator privileges.
3.
Click Devices in the tool bar.
The Devices page displays.
4.
Click command view eva.
The Storage Management Appliance Software launches Command View EVA, and the
HSV Storage Network Properties page displays.
hp StorageWorks Enterprise Virtual Array Updating Product
Software Instructions
67
Page 68

Chapter 3. Upgrading the Enterprise Virtual Array to v3.020
Figure 3.37. Command View EVA—HSV Storage Network Properties page
5.
Click Help in the Session pane.
68
Figure 3.38. Command View EVA Online Help
6.
Click About in the Help tool bar.
The About page displays the software version of Command View EVA.
hp StorageWorks Enterprise Virtual Array Up da ting Product
Software Instructions
Page 69

Chapter 3. Upgrading the Enterprise Virtual Array to v3.020
Figure 3.39. Command View EVA Help—About page
Important
If you are not using a recommended browser version and JRE (see Table 1.2 ), you should
update your browser version and JRE now.
hp StorageWorks Enterprise Virtual Array Updating Product
Software Instructions
69
Page 70

Step 7: Loading the add-on licenses
Estimated Time to Complete
5 minutes per license
If you are upgrading several storage systems in a SAN, the recommended action is to upgrade
all of your licenses at the same time. You can add licenses for Business Copy EVA and
Continuous Access EVA.
See the HP StorageWorks Business Copy EVA License Instructions and the HP StorageWorks
Continuous Access EVA V1.1 Getting Started Guide for more information about obtaining
licenses for Business Copy EVA and Continuous Access EVA, respectively.
Please contact your HP sales representative if you require licenses for Business Copy EVA and
Continuous Access EVA.
To add a license key, perform the following steps:
1. Launch Command View EVA in your browser.
Chapter 3. Upgrading the Enterprise Virtual Array to v3.020
2.
Click Agent Options in the Session pane.
The Management Agent Options page displays.
70
Figure 3.40. Command View EVA—Management Agent Options page
3.
Click Licensing options.
The Licensing Options page displays.
hp StorageWorks Enterprise Virtual Array Up da ting Product
Software Instructions
Page 71

Chapter 3. Upgrading the Enterprise Virtual Array to v3.020
Figure 3.41. Command View EVA — Licensing Options page
4.
Click Enter new license key.
The Add a license page displays.
Figure 3.42. Command View EVA—Add a license page
5. Copy the license text from the email you received from the license key fulfillment
Web site.
Note
For best results, use Microsoft® Notepad or an equivalent text editor to copy and paste the
license text.
6. Paste the license text into the text box.
Note
Y ou must enter the license key exactly as it is written in the email you received from the license
key fulfillment Web site.
hp StorageWorks Enterprise Virtual Array Updating Product
Software Instructions
71
Page 72

Chapter 3. Upgrading the Enterprise Virtual Array to v3.020
7.
Click Add license.
8. To enter additional license keys, repeat step 5 through step 7 for each license key.
9.
Click Cancel orclickaniconintheNavigationpanetoleavetheAddalicensepage.
72
hp StorageWorks Enterprise Virtual Array Up da ting Product
Software Instructions
Page 73

Chapter 3. Upgrading the Enterprise Virtual Array to v3.020
Step 8: Upgradi
Estimated Time to Complete
45 minutes
Before you can perform an online upgrade of the storage system software to v3.020 (which
includes VCS v3.020), you must be running VCS v3.010 (or later) on the HSV controllers. If
you need assistance in upgrading to VCS v2.00x or v3.010, please contact an HP Authorized
Service Representative.
Table 3. 4 describes the proper upgrade paths to VCS v3.020.
Table 3.4. VCS/Storage System Software Upgrade Paths
Current VCS/
Storage System
Software Version
1.021
2.000
2.002
2.003
2.004
2.005
2.006
3.000
3.001
ng the VCS/Storage System Software to v3.020
Upgrade Path
If you are running v1.021, you must
upgrade to a later version. Please contact
an HP Authorized Service Representative
to assist you.
b
c
b
c
c
c.d
ab
.
.
.
.
.
1. Upgrade to v2.006.
2. Upgrade to v3.01xc.
3. Upgrade to v3.020.
1. Upgrade to v2.006
2. Upgrade to v3.01x
3. Upgrade to v3.020.
1. Upgrade to v2.006
2. Upgrade to v3.01x
3. Upgrade to v3.020.
1. Upgrade to v3.01x
2. Upgrade to v3.020.
1. Upgrade to v3.01x
2. Upgrade to v3.020.
3.010
3.014
abcd
a
If you have a Windows 2000 host, you must perform an offline upgrade to upgrade the storage system software from v2.000 to v2.003.
b
You can upgrade to v2.003, v2.004, v2.005, or v2.006, depending on your EVA type (refer to Ta bl e 2. 2).
c
When you are running VCS v3.010, do not delete any LUNs, snapshots, or snapclones that exceed 1984GB.
d
If you are not using Continuous Access EVA in your storage solution, you can upgrade directly from VCS v3.000 or VCS v3.001 to
VCS v3.020.
Upgrade to v3.020
The following procedure describes an online upgrade or rolling of the storage system software.
HP recommends that you perform an online or rolling upgrade when you upgrade from one
storage system software version to the next.
During an online upgrade of the storage system software, VCS is upgraded on the HSV
controllers, while they are still receiving I/O from the applications on the host servers. The
HSV controllers do reboot at the same time (usually within host OS timeout periods). Online
upgrades should be conducted at off peak hours. Furthermore, database applications with
access to the storage system should not be running.
hp StorageWorks Enterprise Virtual Array Updating Product
Software Instructions
73
Page 74

Chapter 3. Upgrading the Enterprise Virtual Array to v3.020
During a rolling upgrade of the storage system software, VCS is upgraded on the HSV
controllers, while they are still receiving I/O from the applications on the host servers. The
HSV controller
s are upgraded one controller at a time, using the native redundancy of the
EVA to provide continuous communication with the hosts.
Note
If you have a Co
v3.010 (or lat
ntinuous Access EVA configuration and your storage systems are running VCS
er), you can perform an online upgrade.
When you upgrade an EVA storage system that is connected to one ore more EVA storage
systems in a Continuous Access EVA relationship, there are some special considerations.
Before you upgrade any storage system in a Continuous Access EVA relationship, ensure that
all of the storage systems are running the same version of VCS. Therefore, when you upgrade
one storage system, the resulting storage network will have two versions of VCS. You cannot
have more than two VCS versions in a Continuous Access EVA solution. During the time that
the Continuous Access EVA storage systems are running different VCS versions, you cannot
make any configuration changes to your storage systems. Furthermore, you must perform the
necessary upgrades (or downgrades) to the storage systems in the Continuous Access EVA
relationship within one week to make all of the VCS versions the same.
Note
You cannot perform an online upgrade if you have a host server with Windows Server 2003 or AIX
with SecurePath 2.0D SP2. If you have host servers with these operating systems, you must perform
an offline upgrade of the storage system software. After you perform on offline upgrade on a
storage system connected to a Windows Server 2003, rescan the disks in the storage system to verify
that the storage is available to the host server.
You can also perform an offline upgrade of the storage system software. The offline upgrade
requires you to stop the applications on the host machines to avoid host access to the storage
system. The offline upgrade is described in Step 4 of the system software upgrade procedure.
To upgrade the storage system software (including VCS on the HSV controllers), perform
the following steps:
Note
Make sure you add the required license keys before you upgrade the VCS version. See Step 7:
Loading the add-on licenses for more information about adding license keys. See Required licenses
for information about license versions.
1. Open Command View EVA in your browser.
2. Select a storage system in the Navigation pane.
74
Note
You can select an unitialized or initialized storage system.
The properties page for the selected storage system displays.
hp StorageWorks Enterprise Virtual Array Up da ting Product
Software Instructions
Page 75

Chapter 3. Upgrading the Enterprise Virtual Array to v3.020
Figure 3.43. Command View EVA—Initialized Storage System Properties
page
3. Check the status of all hardware components in the storage system. Clear all of the
hardwa
4. (Opti
the host machines that have access to the storage system you are upgrading. After you
have completed the storage system software upgrade, you can start the applications
on the
5. Disab
re errors before proceeding to the next step.
Caution
Ifyoudonotclearallofthehardwareerrorsbeforeyouloadthenewsystem
software, you risk losing all hardware-related error reports after you load the
new system software.
onal) If you are performing an offline upgrade, stop all applications running on
host machines.
le the failsafe mode on all DR groups.
hp StorageWorks Enterprise Virtual Array Updating Product
Software Instructions
75
Page 76

Chapter 3. Upgrading the Enterprise Virtual Array to v3.020
Caution
You cannot load code o nto the controllers if:
• The storage configuration is being changed in any way.
Wait until all c
EVA before proc
• In a Continuous Access EVA configuration, a DR group is logging,
merging, leveling, or copying. Furthermore, none of the DR groups can
be in a failsafe locked state.
Click the DR group icon in the Navigation pane. Check the Log State
in the DR Group Properties page.
• In a Continuous Access EVA configuration, the connection between the
storage systems is compromised or failed.
Click the Data Replication folder in the Navigation pane. Check the
Connection
In Continuous Access EVA configurations, all EVA storage systems must be
running normally with fully functional controller pairs.
If you atte
are met, controller operation will fail.
In a Continuous Access configuration, after you load code onto the first
controller pair (for example, the source controller pair), you must wait at
least three minutes, or until the preceding conditions are met on the second
controll
mpttoloadcodeontothecontrollersbeforetheaboveconditions
er pair.
onfiguration changes are c ompleted in the Command View
eeding with a code load.
State in the Data Replication Folder Properties page.
6.
Click Code load.
A confirmation message displays.
Figure 3.44. Command View EVA—first code load confirmation message
7.
Click OK.
76
The Code Load Storage System-Page 1 displays.
hp StorageWorks Enterprise Virtual Array Up da ting Product
Software Instructions
Page 77

Chapter 3. Upgrading the Enterprise Virtual Array to v3.020
Figure 3.45. Command View EVA—Code Load Storage System-Page 1
8. Insert the installation CD-ROM into the computer from which you are browsing
9.
Click Browse and select the file containing version 3.020 of the storage system software
from the installation CD-ROM.
The standard format for the filename is ent-vxxxx.sss, where xxxx represents the version
number.
Select t
10.
Click Next Step.
The Code Load Storage System-Page 2 displays.
he file named entv3020.sss
hp StorageWorks Enterprise Virtual Array Updating Product
Software Instructions
77
Page 78

Chapter 3. Upgrading the Enterprise Virtual Array to v3.020
Figure 3.46. Command View EVA—Code Load Storage System-Page 2
11.
Click Next Step.
A confirmation message displays.
Figure 3.47. Command View EVA—file confirmation message
78
12.
Click OK.
An upgrade confirmation message displays.
hp StorageWorks Enterprise Virtual Array Up da ting Product
Software Instructions
Page 79

Chapter 3. Upgrading the Enterprise Virtual Array to v3.020
Figure 3.48. Command View EVA—upgrade confirmation message
13.
Click OK to confirm that you have the proper licenses.
The new storage system software is loaded onto the HSV controllers, and the firmware on
the associated Fibre Channel drive enclosures is upgraded.
Note
For the VCS v 3.020 upgrade, the drive firmware is located in a sepa rate file. To upgrade the
drive enclosure firmware, repeat step 3 through step 12 for the drive firmware.
During this process, a command in progress messa
ge displays.
Figure 3.49. Command View EVA—command in progress message
The Code Load Storage System-Page 3 displays. The HSV controllers restart.
hp StorageWorks Enterprise Virtual Array Updating Product
Software Instructions
79
Page 80

Chapter 3. Upgrading the Enterprise Virtual Array to v3.020
Figure 3.50. Command View EVA—Code Load Storage System-Page 3
Note
Thesoftwareloadsinparallelonthedriveenclosures. Duringthesoftwareupdate,theEMUs
onthedriveenclosuresmightflashredLEDsandsoundanalarm. Afterthesoftwareupdate
completes, the flashing red LEDs and alarm sound cease. The process of updating the enclosure
software continues in the background after the controller software is updated.
During the EMU firmware upgrade, all of the disk drives are listed in the Unmappable
Hardware folder and all of the disk enclosure bays disappear from the navigation tree. The
firmware upgrade can take up to 10 minutes to complete. After the upgrade has completed,
the disk enclosure bays are listed under the Disk Enclosure elements.
ThesoftwareloadsontheHSVcontrollers. TheHSVcontrollerssynchronizeusingthenew
software. The Scanning for disks message on the controllers’ OCPs indicates that
synchronization is taking place.
14.
Click Finish after the HSV controllers have restarted.
The Command View EVA client refreshes.
An EMU firmware update message displays.
80
hp StorageWorks Enterprise Virtual Array Up da ting Product
Software Instructions
Page 81

Chapter 3. Upgrading the Enterprise Virtual Array to v3.020
Figure 3.51. Command View EVA—EMU firmware update message
15.
Click OK.
16. Refresh the browser.
•
In Internet Explorer, press Ctrl and click Refresh in the tool bar.
•
In Netscape Navigator, press Shift and click Reload in the tool bar.
17. Click the storage system icon in the Navigation pane to verify the version of the storage
system software.
The Initialized Storage System Properties page displays.
Figure 3.52. Command View EVA—Initialized Storage System Properties
page
18. Enable the failsafe mode on all DR groups.
hp StorageWorks Enterprise Virtual Array Updating Product
Software Instructions
81
Page 82

Chapter 3. Upgrading the Enterprise Virtual Array to v3.020
Step 9: Adding passwords to the HSV controllers (optional)
Estimated Time to Complete
15 minutes
Use the following procedure to add a password to the HSV controller pair.
Note
When you add a system password to the controller, you must enable password access in the
Command View EVA with access to this system.
Using the OCP on the HSV controller:
1. Press
2. Press
3. Press
4. Press
5. Press
6. Press
7. Press either
8. Press
to leave the default display.
four times to scroll to System Password.
to select System Password.
to display CHANGE PASSWORD? NO.
to display CHANGE PASSWORD YES.
to accept YES and go to step 7.
or to select an uppercase or lowercase character.
to accept a character and select the next password character. The character
display changes to an asterisk.
9. Repeat step 7 and step 8 for the remaining seven characters.
10. Press
to accept the password.
The password is changed. The system automatically returns to the default display.
11. Enable password access to the storage system in Command View EVA.
Enabling password access in C ommand View EVA
Estimated Time to Complete
82
10 minutes
To enable password access to a storage system, perform the following steps:
1. Launch Command View EVA in your browser.
2.
Click Agent Options in the Session pane.
The Management Agent Options page displays.
3.
Click Storage system password access.
The Storage System Password Access page displays.
4.
Click Enable.
The Enable Password Access to a Storage System page displays.
hp StorageWorks Enterprise Virtual Array Up da ting Product
Software Instructions
Page 83

Chapter 3. Upgrading the Enterprise Virtual Array to v3.020
Figure 3.53. Command View EVA—Enable Password Access to a Storage
System page
5. Select the World Wide Node Name of the storage system for which you want to enable
password access.
6.
Type the password in the Password and Confirm password fields.
Note
Make sure you use the sa me password you entered into the HSV controller OCP.
7.
Click Enable Password.
A message box displays.
8.
Click OK.
Command View EVA enables password access to the storage system.
hp StorageWorks Enterprise Virtual Array Updating Product
Software Instructions
83
Page 84

Step 10: Installing SMI-S EVA (optional)
HP StorageWorks SMI-S EVA v3.2 provides the Storage Management Initiative Specification
(SMI-S) interface for the management of HP StorageWorks EVA arrays.
SMI-S EVA runs as a service, by default, and starts when Command View EVA is started.
For information about manually starting and stopping SMI-S EVA, see Starting and stopping
SMI-S EVA.
You can install SMI-S EVA v3.2 after installing Command View EVA v3.2.
Note
After installation, change the default user names and passwords using
See UserAccountsManager.bat for more in formation.
To install SMI-S EVA, perform the procedures detailed in the following sections:
• Uninstalling SMI-S EVA
Chapter 3. Upgrading the Enterprise Virtual Array to v3.020
UserAccountsManager.bat
.
• Installing SMI-S EVA on the Storage Management Appliance
• Verifying SMI-S EVA installation
• Configuring SMI-S EVA
• Enabling SSL
Uninstalling SMI-S EVA
You must uninstall the previous version of SMI-S EVA before you install version 3.2 of
SMI-S EVA.
To uninstall a previous version of SMI-S EVA, perform the following steps:
1. Close all browser windows, MMC sessions, Terminal Services sessions, and Java applets
that are open on the desired Storage Management Appliance.
Note
Closing these windows and sessions ensures that no remnant files are left in cache memory
after the SMI-S EVA uninstallation. If you do not close the windows and sessions, the
uninsta
llation procedure may be interrupted.
84
2. From a client computer, launch a Web browser and browse to the Storage Management
Appliance, using the following format:
http://<managementappliance_name>
hp StorageWorks Enterprise Virtual Array Up da ting Product
Software Instructions
Page 85

Chapter 3. Upgrading the Enterprise Virtual Array to v3.020
Note
ThedefaultappliancenameforaStorageManagementAppliance(hardwareversion1.0)
swma
begins with
If the Storage Management Appliance software was restored using the Quick Restore CD v2.0,
thenthedefaultappliancenamebeginswith
for Storage Management Appliance III) of the appliance serial number.
The default a
includes all
appliance serial number.
The serial number is displayed on a sticker which is usually pasted to the lower right side of
theappliance(whenviewedfromthefront).
3.
In the Enter Network Password page, type your User Name and Password, and click OK.
and includes the last 6 characters of the appliance serial number.
ppliance name for a Storage Management Appliance II begins with
12 characters (10 characters for Storage Management Appliance III) of the
The Storage Management Appliance software home page displays.
4.
Click Settings.
5.
Click Maintenance.
6.
Click Remove Software.
sma
and includes all 12 characters (10 characters
sma
and
The Remove Application page displays.
7.
Click hp StorageWorks SMI-S for EVA.
8.
Click Remove.
The Remove Application page displays a remove application confirmation message.
9.
Click OK to remove SMI
-S EVA.
The following message displays:
Application has been removed.
See below for details (if any).
hp StorageWorks SMI-S for EVA <Date> <Time>
Uninstall Complete.
Caution
Clicking OK in step 9 initiates the removal of SMI-S EV A software from the
Storage Management Appliance.
10.
Verify that the hp StorageWorks SMI-S for EVA entry is not present on the Manage
Tools page.
Installing SMI-S EVA on the Storage Management Appliance
You can use two methods to install the SMI-S EVA software:
• Installing from a CD-ROM
• Installing from a local disk on the Storage Management Appliance
See Troubleshooting SMI-S EVA for help with common SMI-S EVA problems.
hp StorageWorks Enterprise Virtual Array Updating Product
Software Instructions
85
Page 86

Installing from a CD-ROM
Complete the following procedure to install SMI-S EVA v3.2 on the Storage Management
Appliance from the Command View EVA CD:
1. Close all browser windows, Microsoft Management Console (MMC) sessions, Terminal
Services sessions, and Java applets that are open on the Storage Management Appliance.
2. From a client computer, launch a Web browser and browse to the Storage Management
Appliance using the following format:
http://<managementappliance_name>
Note
The default appliance name for a Storage Management Appliance (hardware version 1.0)
begins with
If the SMA software was restored using the Quick Restore CD v2.0, then the default appliance
name begins with
Appliance III) of the appliance serial number.
ThedefaultappliancenameforanSMAIIbeginswith
characters for Storage Management Appliance III) of the appliance serial number.
The serial number is displayed on a sticker which is usually pasted to the lower right side of
theappliance(whenviewedfromthefront).
Chapter 3. Upgrading the Enterprise Virtual Array to v3.020
swma
and includes the last 6 characters of the appliance serial number.
sma
and includes all 12 characters (10 characters for Storage Management
sma
and includes all 12 characters (10
3.
In the Enter Network Password page, type your User Name and Password,and
click OK.
The Storage Management Appliancesoftwarehomepagedisplays.
4.
Click Settings.
5.
Click Maintenance.
6.
Click Install Software.
An Installation Wizard page displays.
Note
SMI-S EVA does not support reinstallation. Uninstall the previous version of SMI-S EVA before
installing SMI-S EVA v3.2. To uninstall SMI-S EVA, see Uninstalling SMI-S EVA.
7.
Click Next.
8.
Choose CD-ROM Drive on the Storage Management Appliance and click Next.
9. When prompted, insert the Command View EVA CD in the Storage Management
Appliance CD-ROM drive.
10.
From the drop-down list, choose hp SMI-S EVA.
11.
Click Next to start the installation.
The following message displays:
86
Installation is in progress.
The time taken to complete the installation depends on the size of the application and
the speed of the network connection. After the installation is complete, the following
message appears:
hp StorageWorks Enterprise Virtual Array Up da ting Product
Software Instructions
Page 87

Chapter 3. Upgrading the Enterprise Virtual Array to v3.020
Installation is complete.
Installing hp StorageWorks SMI-S for EVA <Date> <Time>
Install Complete
Note
In some cases, the message, Rebooting this Appliance,displays.
If the installation fails for any reason, the Storage Management Appliance does not permit
a subsequent installation attempt for one hour following the failed attempt. Attempting an
installation during this one hour period displays an error message.
12.
Click Finish.
13. Verify that an SMI-S EVA entry is displayed on the Manage Tools page, in the Storage
Management Appliance software.
To view the Manage Tools page, click Settings on the Storage Management Appliance
home page, and then click Manage Tools.
If an SMI-S EVA entry is displayed, the installation is complete.
If the entry is not displayed, then go to step 8 to repeat the installation procedure.
Installing from a local disk on the Storage Management Appliance
To install SMI-S EVA v3.2 software on the Storage Management Appliance, complete the
following procedure:
1. Copy the installation file hpSMISEVA_3_2.swp to a shared network drive that is
accessible from the Storage Management Appliance.
2. Open a Microsoft Terminal Services session to connect and log on to the Storage
Management Appliance. If Terminal Services is not available, connect a monitor, mouse,
and keyboard to the Storage Management Appliance.
3. Connect from the Storage Management Appliance to the shared network drive that
contains the file, hpSMISEVA_3_2.swp.
4. Copy hpSMISEVA_3_2.swp from the shared network drive into the following directory
on the Storage Management Appliance:
C:\COMPAQ\SWPInstallKits
5. Disconnect from the shared network drive and log off Terminal Services.
6. Disconnect the monitor, keyboard, and mouse.
7. From a client computer, launch a Web browser and browse to the SMA, using the
following format:
http://<managementappliance_name>
hp StorageWorks Enterprise Virtual Array Updating Product
Software Instructions
87
Page 88

Chapter 3. Upgrading the Enterprise Virtual Array to v3.020
Note
The default appliance name for a Storage Management Appliance (hardware version 1.0)
swma
begins with
If the Storage Management Appliance software was restored using the Quick Restore CD v2.0,
thenthedefaultappliancenamebeginswith
for Storage Management Appliance III) of the appliance serial number.
The default a
includes all
appliance serial number.
The serial number is displayed on a sticker which is usually pasted to the lower right side of
theappliance(whenviewedfromthefront).
8.
In the Enter Network Password page, type your User Name and Password,and
and includes the last 6 characters of the appliance serial number.
sma
and includes all 12 characters (10 characters
ppliance name for a Storage Management Appliance II begins with
12 characters (10 characters for Storage Management Appliance III) of the
click OK.
The Storage Management Appliancesoftwarehomepagedisplays.
9.
Click Settings.
10.
Click Maintenance.
sma
and
11.
Click Install Software.
The Installation Wizar
Note
SMI-S EVA does not support reinstallation. Uninstall the previous versions of SMI-S EVA before
installing SMI-S EVA v3.2. To uninstall SMI-S EVA see Uninstalling SMI-S EVA.
12.
Click Next.
13.
From the Installation Wizard, select Local Disk on the Storage Management Appliance.
14.
Click Next.
d welcome page displays.
15. From the drop-down list, choose the hpSMISEVA_3_2.swp.
16.
Click Next.
17. From the drop-down list, choose hp SMI-S EVA.
18.
Click Next to start the installation.
The following message displays:
Installation is in progress.
88
The time taken to complete the installation depends on the size of the application and
the speed of the network connection. After the installation completes, the following
message displays:
Installation is complete
Installing hp StorageWorks SMI-S for EVA <Date> <Time>
Install Complete
hp StorageWorks Enterprise Virtual Array Up da ting Product
Software Instructions
Page 89

Chapter 3. Upgrading the Enterprise Virtual Array to v3.020
Note
In some cases, the message, Rebooting this Appliance,isdisplayed.
If the installation fails for any reason, the Storage Management Appliance does not permit
a subsequent installation attempt for one hour following the failed attempt. Attempting an
installation during this one hour period displays an error message.
19.
Click Finish.
20. Verify whether an SMI-S EVA entry exists on the Manage Tools page in the Storage
Management Appliance software.
To view the Manage Tools page, click Settings on the Storage Management Appliance
home page, and then click Manage Tools.
If an SMI-S EVA entry is displayed, the installation is complete.
If the entry is not displayed, complete one of the following procedures:
• Go to step 8 and repeat the installation procedure.
• Delete the files in the C:\Program Files\Hewlett-Packard\hp
SMI-S\EVAProvider folder.Gotostep8andrepeatthe installation procedure.
Note
The CIMOM, by default, runs on the 5988 port.
Verifying SMI-S EVA installation
To verify the SMI-S EVA installation, complete the following procedure:
1.
Verify that hp StorageWorks SMI-S for EVA is listed under Application on the Manage
Tools page in the Software Management Appliance software.
To access the Manage Tools page, click Settings on the Storage Management Appliance
home page and then click Manage Tools.
2. Verify that the directory C:\Program Files\Hewlett-Packard\SMI-S
\EVAProvider exists on the Storage Management Appliance.
Configuring SMI-S EVA
You must complete the post-installation steps in this section before you can use SMI-S EVA.
Post installation steps
After SMI-S EVA is installed, add 127.0.0.1 to the list of recipients who receive events
generated by every HSV pair connected to the management appliance. This can be done using
the hp StorageWorks Storage Management Appliance software. In addition, configure the
event and host notifications as indicated in Configuring event and host notifications.
The configuration files for setting up the SMI-S EVA service are in the following directory
where SMI-S is installed: C:\Program Files\Hewlett-Packard\SMI-S\cimom.
hp StorageWorks Enterprise Virtual Array Updating Product
Software Instructions
89
Page 90

Chapter 3. Upgrading the Enterprise Virtual Array to v3.020
Modify the configuration files as indicated in Tab le 3.5 .
Table 3.5. Configuration Files
File
EVAprovider.properties
cim.properties
JAAS.policy
You can manually edit the configuration files by connecting through Windows Terminal
Services. After editing the configuration parameters, be sure to restart the SMI-S EVA service.
Description
Used for config
CIMOM related parameters for enabling SSL, JAAS and so on.
Used for configuring an access control list.
uring the provider.
90
hp StorageWorks Enterprise Virtual Array Up da ting Product
Software Instructions
Page 91

Chapter 3. Upgrading the Enterprise Virtual Array to v3.020
EVAprovider.properties
Configure EVAprovider.properties files as indicated in Table 3.6.
Table 3.6. Evaprovider.properties
Item
Apiserver
UserName
PortNumber Command View E
PassWord
NameSpace
DEBUG
MAX_LOG_FILES
Server name where the Command View EVA runs (usually
localhost).
UserName used to connect to the Command View EVA. (This
field is requi
Password used to connect to the Command View EVA. (This field
is required i
Represents the namespace supported by the provider. The default
value is root
Enables the debug option if you set its value to true. To
disable the debug option, set its value to false. If you
enable the debug option, the debug data, for example,
xml packets, is stored in the debug files in the CIMOM
directory. All debug files are stored in the following directory:
C:\Progra
Indicates the maximum number of log files that are allowed in
the cimom d
accumulates in the directory. This action removes the old data in
a cyclic fashion. In addition, the timestamp, which is appended
as part of
data file
the default value, 3.
red if Apiserver is not set to Localhost).
f Apiserver is not set to Localhost).
/EVA.
mFiles\Hewlett-Packard\SMI-S\cimom.
irectory. You can use it to limit the debug data that
thefilename,helpsinfindingthemostrecentdebug
. If you do not specify the value, MAX_LOG_FILES uses
Description
VA runs on 12301 port.
MAX_LOG
LIFECY
Cim.p
hp StorageWorks Enterprise Virtual Array Updating Product
Software Instructions
_FILESIZE
CLE_INDICATION_POLL_FREQUENCY
roperties file
y the parameters in the cim.properties file as indicated in Tab le 3 .7.
Modif
Indicat
specify
1MB.
Indicat
queries the underlying device to sense the lifecycle-related
changes. The minimum permitted value is 2 minutes, and the
default value is 10 minutes.
To rece
lowervalueforthisparameter.
Note: A low value for this property can create an overhead on
the sof
of the Command View EVA and SMI-S EVA provider software.
es the maximum size of the debug file. If you do not
a value for MAX_LOG_FILESIZE, it uses the default value,
es the frequency (in minutes) at which the EVA provider
ive the SMI-S lifecycle indications at a quicker rate, set a
tware. In addition, it can increase the overall response time
91
Page 92

Chapter 3. Upgrading the Enterprise Virtual Array to v3.020
Note
DonotmodifyanyparameterthatisnotlistedinTable 3.7.
Table 3.7. Cim.properties File
Field
EnableBasicAuthorization (true or false) Set to true for the basic level of authentication and authorization.
EnableCompleteAuthorization (true or false) Set to true for complete authentication and authorization.
Each command should be authorized before it is executed.
If EnableCompleteAuthori zation is set to true, the value of
EnableBasicAuthorization is ignored.
EnableSSL Set to true to enable SSL.
LogResponseSeparate
LogFilesCount
MaxLogFileSize
UserAccountsManager.bat
Set to true to separate the requests and response packets.
Settotruetotracktotalnumberoffilesandtoremoveolddata
in a cyclic fashion.
Set to true to indicate the maximum size of the debug file.
Purpose
User accounts are organized into groups, and a set of permissions are assigned to each group
using JAAS. To manage the user accounts use the script file (UserAccountsManager.bat)
located in the home directory. This is the directory where the CIM Object Manager is installed.
Typically, it is in C:\Program Files\Hewlett-Packard\SMI-S\cimom.Tofind
the list of switch options supported, run this script file with the -h option.
To list the available groups and users, execute this command:
UserAccountsManager -LG
Note
There is no other input parameter other than -LG to list the available groups and users. Currently
the available groups are
groups. User accounts in the
accounts in the
User
Administrator
group can only execute read-only operations.
Administrator
and
User
. There are no commands to add or remove the
group have complete control of all operations. User
To add a user, execute this command:
UserAccountsManager -AU -G <Group> -U <UserName> -P
<Password>
where:
-G is the group name for the user.
-U is the user name.
-P is Password for the user.
Example:
UserAccountsManager -AU -G Administrator -U Tom -P Vanilla2
92
hp StorageWorks Enterprise Virtual Array Up da ting Product
Software Instructions
Page 93

Chapter 3. Upgrading the Enterprise Virtual Array to v3.020
Note
The parameter Group is one of the groups listed by the -LG option. A user name can exist in
only one group.
To change a user password, execute this command:
UserAccountsManager -CP -U <UserName> -O <OldPassword>
-N <NewPassword>
where:
-U is the user name.
-O is the old password of the user.
-N is the new password for the user.
Example:
UserAccountsManager -CP -U Tom -O Vanilla2 -N Chocolate3
To remove a user, execute this command:
UserAccountsManager -DU -U <UserName>
where:
-U is the user name.
Example:
UserAccountsManager -DU -U Tom
For help, execute this command:
UserAccountsManager -h
where:
-h is help.
Configuring Event and Host Notifications
You can configure event and host notifications using the GUI of the hp StorageWorks Storage
Management Appliance software.
Configuring Event Notification
To configure the event notification, complete the following procedure:
1.
In the home page, select Devices.
The Devices page displays.
2.
Select command view area.
The HSV Storage Network Properties page displays.
3. In the left pane, select one of the subsystems of HSV Storage Network.
The Initialized Storage System Properties page displays.
hp StorageWorks Enterprise Virtual Array Updating Product
Software Instructions
93
Page 94

4.
Click Set Options.
The System Options page displays.
5.
Select Configure event notification.
The Configure Event Notification page displays. This page contains the following
sections:
• Configure events individually
• Configure events using a configuration file
6.
Under the Configure events individually section, select the required events or all the
events (Critical, Warning, and Normal), and click Configure.
The Set Event Notification Options page displays.
7.
From the Event Notification List table, select the required events, and click Save
Changes.
The Configure Event Notification page displays.
8.
To complete the event notification configuration, click OK.
Configuring Host Notification
Chapter 3. Upgrading the Enterprise Virtual Array to v3.020
SSL support
To configure the host notification, complete the following procedure:
1. Follow steps 1 through 4 mentioned in Configuring event notification.
2.
Select Configure host notification.
The Configure Host Notification page displays.
3.
Click Modify host list.
The Modify Host Notification List page displays.
4.
Under the Add a host to the list section, in the Host Name box, type the host name,
and click Save Changes.
The Configure Host Notification page displays.
5.
To complete the host notification configuration, click OK.
SMI-S EVA uses a SSL server-side certificate to help clients securely communicate with the
SMI-S server. A self-signed certificate (hpSMIS.cert) is packaged with SMI-S EVA. The
certificate is located in the following directory:
C:\Program Files\Hewlett-Packard\SMI-S\cimom.
The certificate can be replaced with a different certificate by the administrator. Be sure to
retain the certificate name (hpSMIS.cert). A cli
ent that wants to use SSL must copy the
certificate from C:\Program Files\Hewlett-Packard\SMI-S\cimom and
put it into its trust store.
94
A trust store is a repository of trusted certificates that are recognized by the client program.
Once the SMI-S certificate is trusted by a client program, the client communicates with the
SMI-S server using SSL. SSL helps secure the client server communication by providing
hp StorageWorks Enterprise Virtual Array Up da ting Product
Software Instructions
Page 95

Chapter 3. Upgrading the Enterprise Virtual Array to v3.020
clients with the ability to authenticate the entity claiming to be the SMI-S server, and also by
protecting the integrity of the transmitted data.
Port occupation
The CIMOM, by default, runs on port 5988 in both, SSL and non-SSL modes. If this port
is occupied by another process, the CIMOM searches for subsequent ports. For example,
if port 5988 is occupied, the CIMOM searches for 5989 and 5990 ports. If these ports are
also occupied, the CIMOM fails to start.
Enabling SSL
Enable SSL by setting the EnableSSL property in cim.properties to true. This file is
located in the directory C:\Program Files\Hewlett-Packard\SMI-S\cimom.
Once EnableSSL is set to true, all the client connections will use the https protocol.
If the client is implemented using Java, complete the following procedure to issue the
certificate:
1. Import the server certificate into the client trust store. To import the server certificate,
complete the following procedure:
a. Copy the server certificate to the client system.
b. Use the Java keytool to import the certificate into the client trust store.
$ keytool -import -alias hpsmis -file hpSMIS.cert
-keystore mytruststore
2. Enter a password.
Note
This password is required for modifying mytruststore in the future. If a trust store does not
currently exist, the keytool creates the trust store and then imports the specified certificate.
3. To specify a truststore, execute the following command in the client application
command line:
-Djavax.net.ssl.trustStore
Example:
$ java -Djavax.net.ssl.trustStore=mytruststore <MyClient>
<system> root/cimv2 <cimomport> ssl
4. If the client application is written to update the truststore file programmatically, you must
type the password (the one used to create the truststore):
-Djavax.net.ssl.trustStorePassword
Example:
$ java -Djavax.net.ssl.trustStore=mytruststore
-Djavax.net.ssl.trustStorePassword=wbem01 <MyClient>
<system> root/cimv2 <cimomport> ssl
hp StorageWorks Enterprise Virtual Array Updating Product
Software Instructions
95
Page 96

Note
See Port occupation for more information.
Viewing certificates using the keytool command
To view certificates in a certificate file, execute this keytool command.
$keytool -printcert -file hpSMIS.cert
Viewing all certific ates us ing the keytool command
To view all the certificates in a truststore, execute this keytool command.
$keytool -list -v -keystore mytruststore
Chapter 3. Upgrading the Enterprise Virtual Array to v3.020
96
hp StorageWorks Enterprise Virtual Array Up da ting Product
Software Instructions
Page 97

Chapter 3. Upgrading the Enterprise Virtual Array to v3.020
Step 11: Upgrad
Estimated Time to Complete
45 minutes
If you installed a Business Copy EVA v2.2 license in Step 7: Loading the add-on licenses
and your storage solution uses Business Copy EVA on the host servers, upgrade to Business
Copy EVA v2.2 on your host servers and host agents. For complete upgrade instructions,
please refer to the following documents:
HP StorageWorks Business Copy EVA/MA/EMA Host Agent v2.2 for HP OpenVMS
•
Installation Guide
HP StorageWorks Business Copy EVA/MA/EMA Host Agent v2.2 for HP Tru64 UNIX
•
Installation Guide
HP StorageWorks Business Copy EVA/MA/EMA Host Agent v2.2 for HP-UX Installation
•
Guide
HP StorageWorks Business Copy EVA/MA/EMA Host Agent v2.2 for IBM AIX Installation
•
Guide
HP StorageWo
•
Installation Guide
HP StorageWorks Business Copy EVA/MA/EMA Host Agent v2.2 for Windows Installation
•
Guide
ing Business Copy EVA (if installed)
rks Business Copy EVA/MA/EMA Host Agent v2.2 for Sun Solaris
HP StorageWorks Business Copy EVA/MA/EMA Server v2.2 Installation Guide
•
If you are running Business Copy EVA and Continuous Access EVA, you should also read HP
StorageWorks Business Copy EVA/MA/EMA v2.2 Using BC with Continuous Access EVA and
Data Replic
ation Manager Application Notes.
hp StorageWorks Enterprise Virtual Array Updating Product
Software Instructions
97
Page 98

Chapter 3. Upgrading the Enterprise Virtual Array to v3.020
Step 12: Upgrad
ing Continuous Access EVA (if installed)
Estimated Time to Complete
45 minutes
If you installed a Continuous Access EVA v1.1 license in Step 7: Loading the add-on licenses,
you will have to upgrade Continuous Access EVA on the Storage Management Appliance.
For complete upgrade instructions, please refer the HP StorageWorks Continuous Access
User Interface V1.1a Installation Guide.
Step 13: Migrating Network View to Storage Area Manager
Estimated Time to Complete
45 minutes
If HP SANworks Network View software is installed on your Storage Management Appliance,
you must migrate your Network View environment into Storage Area Manager.
For instructions on how to remove Network View from the Storage Management Appliance,
refer to the “U
Storage Resource Manager, Storage Allocation Reporter, and Network View to Storage Area
Manager Application Notes.
ninstalling SANworks Applications” section in the HP OpenView Migrating
Step 14: I nst
alling Storage Node Manag er (optional)
Yo u c a n i n st a
have installed Command View EVA v3.2. When you install Storage Node Manager, you
must also install the EVA Device Plug-In (DPI). DPI allows the Storage Area Manager to
support the E
Refer to the H
how to prepare for and install the Storage Node Manager component.
Note
The DPI is not
Area Manage
OpenView St
on how to plan and install the DPI.
ll Storage Node Manager on your Storage Management Appliance, after you
nterprise Virtual Array.
P OpenView Storage Area Manager 3.0 Installation Guide for information on
deliveredontheStorageAreaManagerCD.YoucandownloaditfromtheStorage
rDPIwebsiteat:http://ww w.openview.hp.com/products/dpi. Refer to the
orage Area Manager EVA Device Plug-In Installation Instructions
for information
HP
98
hp StorageWorks Enterprise Virtual Array Up da ting Product
Software Instructions
Page 99

Chapter 3. Upgrading the Enterprise Virtual Array to v3.020
Step 15: Disabl
Some Enterpris
potential EVA hardware problems. PRS sends information about hardware problems to an
HP Customer Support Center, which provides a solution.
The PRS software, prior to EVA v3.0, used trap-based SNMP notification to report event
information ab
are encouraged to upgrade their event reporting functionality with the following tools:
Proactive Remote Services (PRS) v5.0 and Web-Based Enterprise Services System Event
Analyzer (WEBE
Note
In some regions, such as Europe, the Middle East, and Africa, the EVAs run Event Viewer EVA (EVE)
v2.0 and Instant Support Enterprise Edition (ISEE) vA.02.50 daVinci instead of WEBES-SEA a nd
PRS as their remote error notification solution. If an EVA is using EVE and ISEE, an HP Authorized
Service Representative must still disable SNMP-trap notification to the PRS host.
ing SNMP notification to the PRS host
e Virtual Arrays run the Proactive Remote Services (PRS) software to identify
out the EVA. With the release of Enterprise Virtual Array v3.0xx, customers
S-SEA) v4.3.
hp StorageWorks Enterprise Virtual Array Updating Product
Software Instructions
99
Page 100

 Loading...