

Page 1
HP 9200c Digital Sender
Getting Started Guide
Panduan Memulai
Page 2

Page 3

HP 9200C Digital Sender
English
Getting Started Guide
Page 4

Copyright and License
© 2004 Copyright Hewlett-Packard
Development Company, LP
Reproduction, adaptation, or translation
without prior written permission is
prohibited, except as allowed under the
copyright laws.
The information contained in this document
is subject to change without notice.
The only warranties for HP products and
services are set forth in the express
warranty statements accompanying such
products and services. Nothing herein
should be construed as constituting an
additional warranty. HP shall not be liable
for technical or editorial errors or omissions
contained herein.
Part number: Q5916-90905
Edition 1, 11/2004
Trademark Credits
Microsoft® and Windows® are U.S.
registered trademarks of Microsoft
Corporation.
Pentium® is a registered trademark of Intel
Corporation or its subsidiaries in the United
States and other countries/regions.
Page 5

Table of contents
1 Introduction
Where to look for information ....................................................................................................2
Installation checklist ..................................................................................................................2
Before you begin .......................................................................................................................3
2 Setup
Step 1. Unpack and check package contents ...........................................................................6
Step 2. Installation requirements and product parts .................................................................7
Environmental requirements ...............................................................................................7
System requirements ..........................................................................................................7
Identifying the product parts ...............................................................................................9
Step 3. Change the control-panel overlays .............................................................................10
Step 4. Unlock the scanner head ............................................................................................12
Step 5. Connect the network cable .........................................................................................13
Step 6. Connect the power cord .............................................................................................14
Step 7. Configure the control-panel settings ...........................................................................15
Configuring the control-panel language ...........................................................................15
Configuring the date and time ..........................................................................................15
Step 8. Assign the IP address .................................................................................................16
Finding the DHCP IP address ..........................................................................................16
Manually assigning an IP address ....................................................................................16
Step 9. Install and configure the software ...............................................................................17
Before you begin ...............................................................................................................17
To install the software .......................................................................................................17
Step 10. Verify the product installation ...................................................................................21
English
3 Troubleshooting and customer support
Troubleshooting ......................................................................................................................24
Customer support ....................................................................................................................27
FCC regulations ......................................................................................................................28
Index
ENWW Table of contents iii
Page 6

iv ENWW
Page 7

1
Introduction
English
Congratulations on your purchase of the HP 9200C Digital Sender, a valuable addition to
your content-management processes. The digital sender scans all kinds of documents and
then sends them to e-mail addresses, fax destinations, or network folders. The digital sender
can also be set up to send documents to workflow destinations, along with metadata files
containing workflow information that is captured at the device control panel. By using these
features, the digital sender can be the interface for a variety of content-management
programs including Microsoft® Share Point, Documentum, Filenet, and Lotus Domino. By
using additional software such as HP Autostore, the digital sender can also send a
document through a more complex workflow that includes components such as bar code
recognition or Optical Character Recognition (OCR).
The digital sender includes the following features:
● Digital sending—Send scanned files to e-mail addresses, fax destinations, network
folders, and workflow folders. Digital-sending functions are carried out by the HP Digital
Sending Software (HP DSS), which is included with the digital sender.
● Flatbed scanner—The letter/A4 size scanner can scan both black-and-white and color
documents, and can scan the full page area within 1 mm (0.04 inch) of the paper edge.
● Interactive touchscreen control panel—Intuitive onscreen menus and wizards help to
carry out digital-sending tasks.
● Automatic document feeder (ADF)—The legal-size ADF accepts up to 50 pages, and
includes built-in duplexing for scanning both sides of a double-sided document.
●
Memory—The device includes 128 megabytes (MB) of random access memory (RAM).
● Hard disk—The device comes with a 20-gigabyte (GB) internal hard drive for storing
documents and settings.
● Connectivity—A 10/100Base-T port and an enhanced input/output (EIO) expansion slot
are provided for connectivity.
● HP Jetdirect Inside—An HP Jetdirect embedded print server is integrated directly on
the device for reliable network connectivity.
ENWW 1
Page 8
Where to look for information
Explore the following documentation sources to learn how to use the HP 9200C Digital
Sender.
Getting started guide (this document)—Provides step-by-step instructions for installing
and setting up the digital sender.
User guide and support guide—The HP 9200C Digital Sender User Guide (part number
Q5916-90910) contains information about using the digital sender and troubleshooting
problems. The HP 9200C Digital Sender Support Guide (part number Q5916-90930)
contains more detailed configuration and administration instructions. Both of these guides
are available on the documentation CD-ROM that came with the digital sender. They are
also available on the Web at http://www.hp.com/support/9200c.
Online Help—The HP MFP DSS Configuration Utility includes online help that contains
information about digital-sending options.
Installation checklist
This guide helps you set up and install your new product. For correct installation, complete
each step, in order.
Step 1: Unpack the product.
Step 2: Verify installation requirements and product parts.
Step 3: Change the control-panel overlays (optional).
Step 4: Unlock the digital-sender scanner head.
Step 5: Connect the network cable.
Step 6: Connect the power cord.
Step 7: Configure the control-panel settings.
2 Chapter 1 Introduction ENWW
Page 9

Step 8: Assign the device IP address.
Step 9: Install and configure the software.
Step 10: Verify the product installation.
Before you begin
During the software installation procedure, you are prompted to configure the digital-send
options. In order to complete this configuration, you need the following information:
● The software license key from the label on the software CD-ROM
● The host name or Internet Protocol (IP) address of the simple mail transfer protocol
(SMTP) e-mail server that will be used to send e-mail from the digital sender
● The host name or IP address of the Lightweight Directory Access Protocol (LDAP)
server that will be used to retrieve e-mail addresses (optional)
● The paths for any folders that are to be set up for the send-to-folder feature
● The host name or IP address of the digital sender
English
ENWW Before you begin 3
Page 10

4 Chapter 1 Introduction ENWW
Page 11

2
Setup
English
Follow these steps to set up and configure the digital sender. If you need more detailed
information about how to use or configure the device, see the HP 9200C Digital Sender User
Guide or the HP 9200C Digital Sender Support Guide.
ENWW 5
Page 12
Step 1. Unpack and check package contents
The following items ship in the box with the digital sender.
1
2
3
4
5
1 Getting started guide
2 HP DSS software and digital sender documentation CD-ROMs
3 Digital sender
4 Control panel overlays (optional)
5 Power cord
Follow these instructions to unpack the digital sender.
1. Lift the device out of its box and remove all shipping bags.
2. Remove all tape and packing material from the ADF.
3. Remove the protective film from the control-panel display.
6 Chapter 2 Setup ENWW
Page 13
Step 2. Installation requirements and product parts
Ensure that the proper environmental and network conditions exist for the installation of the
digital sender.
Environmental requirements
● Stable environment with no temperature or humidity changes
● Room temperature of 0 to 40°C (32 to 104°F)
● Relative humidity of 15 to 80% noncondensing
● Sturdy, level surface
● Well-ventilated room with no exposure to chemicals or direct sunlight
Observe the following space requirements when installing the digital sender.
English
NOTE
The digital sender requires 90 mm (3.5 inches) of free space behind the device in order to
fully open the top.
System requirements
The following system specifications are required for this product.
Hardware requirements
The digital sending software has the following hardware requirements for a server supporting
less than 50 digital sending devices (MFPs or 9200C digital senders):
● A PC with a Pentium® 3 or higher processor
● 512 MB of RAM
ENWW Step 2. Installation requirements and product parts 7
Page 14

The digital sending software has the following hardware requirements for a server supporting
50 to 250 digital sending devices:
● A PC with a 2 GHz Pentium® 4 or higher processor
● 1 GB of RAM
NOTE
NOTE
You must have Administrative privileges on the server in order to install the software.
Network system requirements
The digital sending software has the following network requirements:
● Windows® 2000 Professional, Server, or Advanced Server; Windows XP Professional;
or Windows Server 2003 Standard or Enterprise Server
● Fast Ethernet 100Base-TX or Ethernet 10Base-T
● Access to an SMTP e-mail gateway
It is highly recommended that the SMTP gateway be located on your own local area
network. However, you can configure your product for e-mail functionality even if your mail
services are provided by an outside Internet service provider (ISP) over a digital subscription
line (DSL).
● Access to a network LDAP server to support optional user authentication
8 Chapter 2 Setup ENWW
Page 15
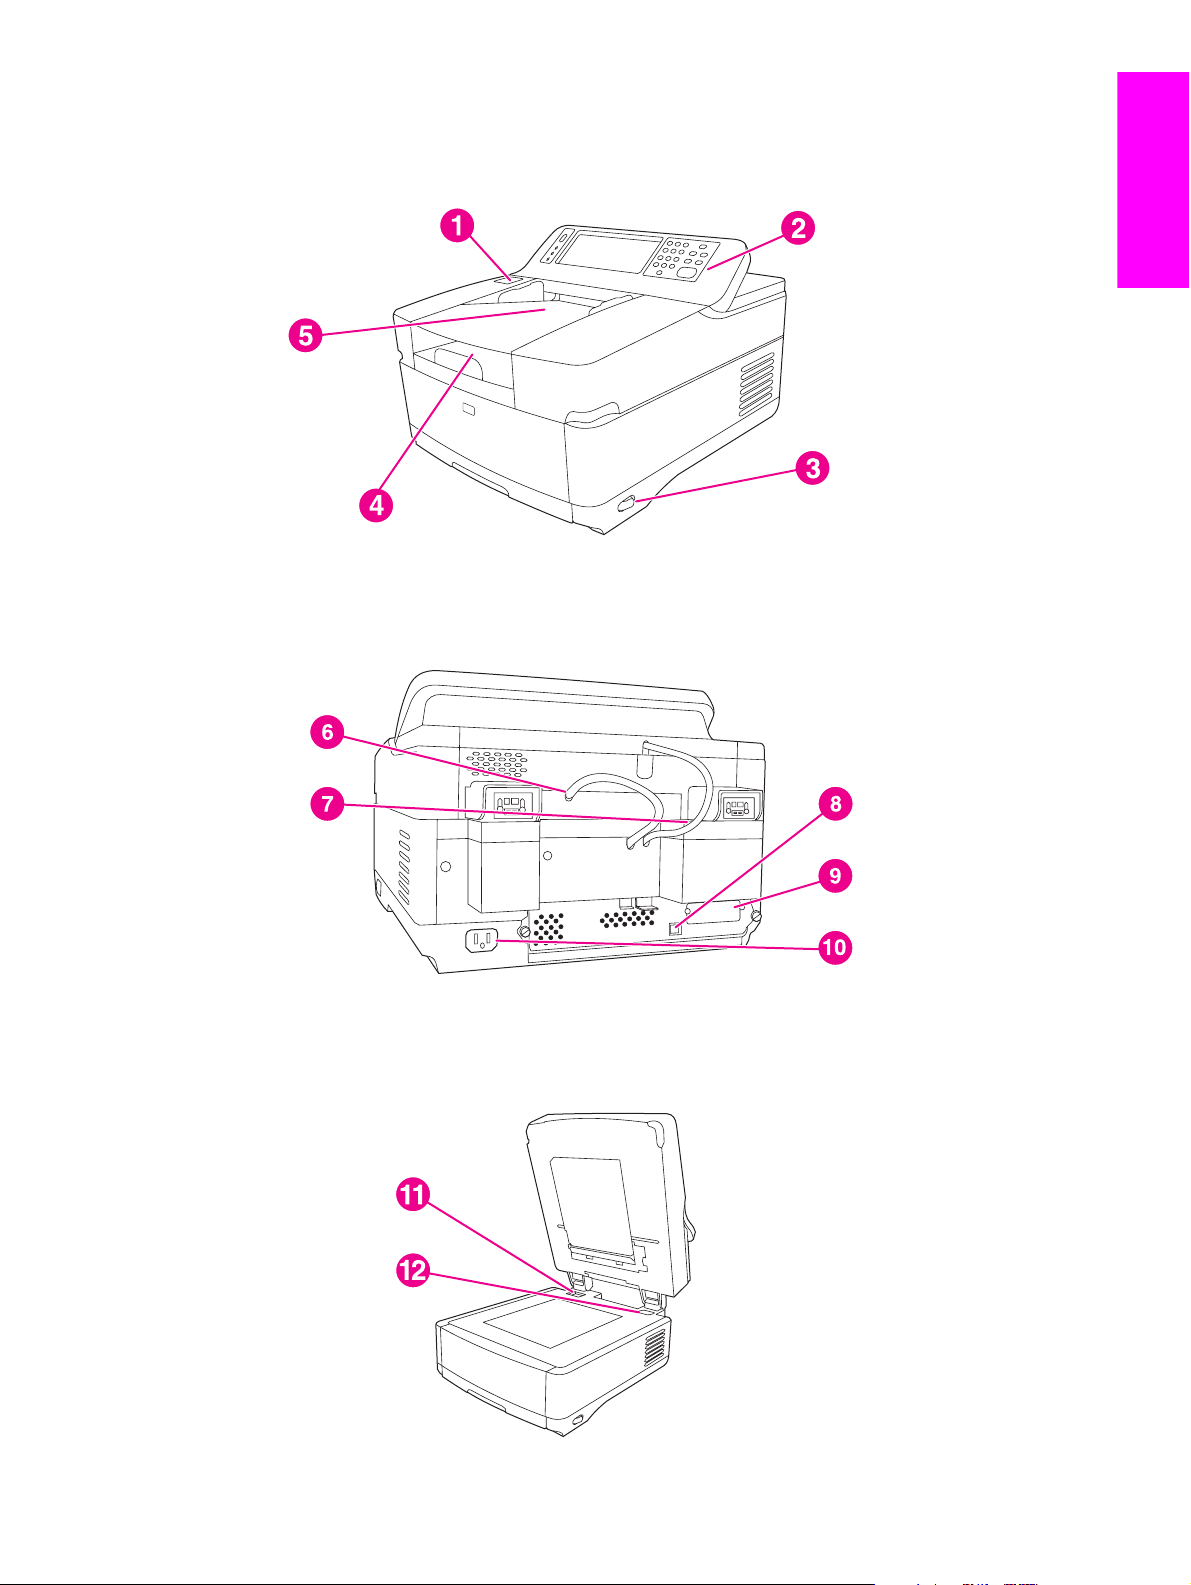
Identifying the product parts
The following illustrations show the location and names of the primary product parts.
1 Jam release button
2 Control panel
3 On/off switch
4 Output bin
5 ADF input bin
English
6 ADF cable
7 Control-panel cable
8
10/100Base-T network port
9
EIO port
10 Power connector
11 Scanner lock
12 Serial number
ENWW Step 2. Installation requirements and product parts 9
Page 16
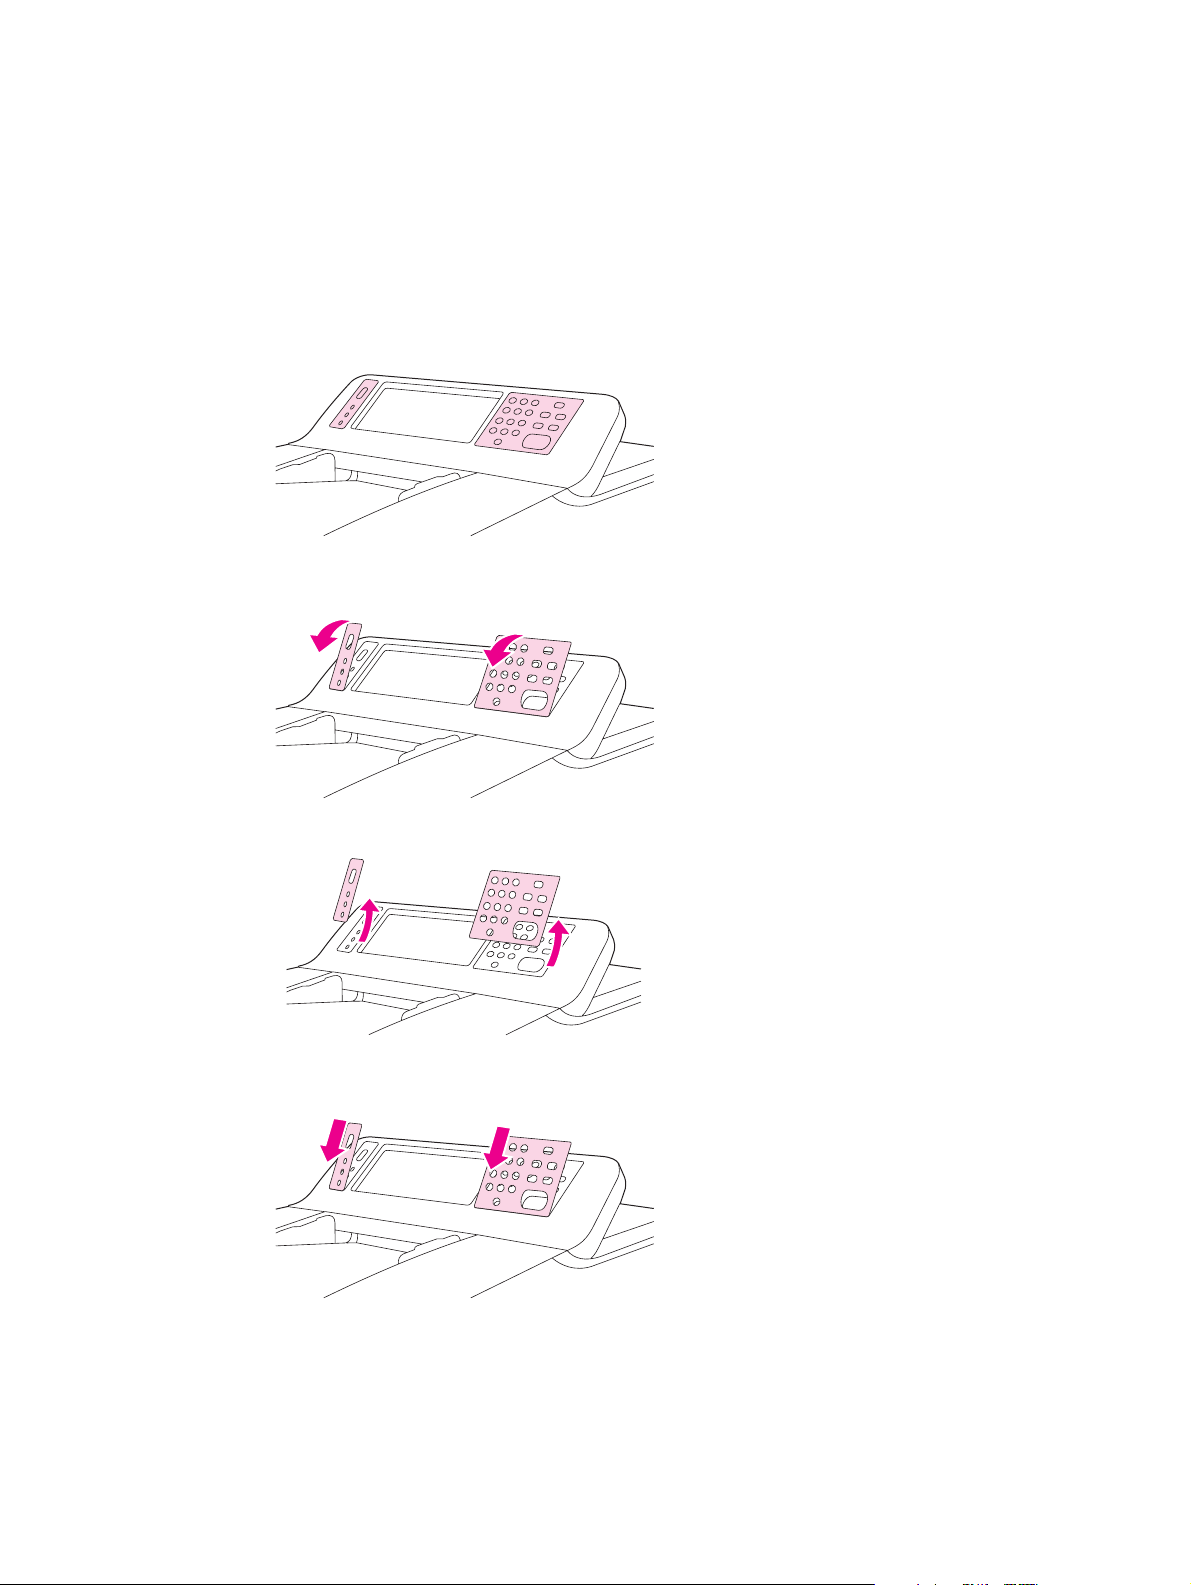
Step 3. Change the control-panel overlays
The device comes with overlays installed on the control panel, and overlays for different
languages might be included in the box. If necessary, use the following procedure to change
the control-panel overlays to support your preferred language.
1. Locate the two control-panel overlays.
2. Insert a small, flat-blade screwdriver or other thin tool in the slot at the top edge of one of
the overlays to pull the top away from the control panel.
3. Lift the overlay up and back to remove it from the product.
4. Position the new overlay over the control panel. Align the ends of the overlay with the
holes on the control panel and slide the overlay in.
10 Chapter 2 Setup ENWW
Page 17

5. Snap the overlay firmly onto the control panel. Ensure that the overlay is flat against the
control panel.
6. Repeat steps 2 through 5 to change the second overlay.
English
ENWW Step 3. Change the control-panel overlays 11
Page 18
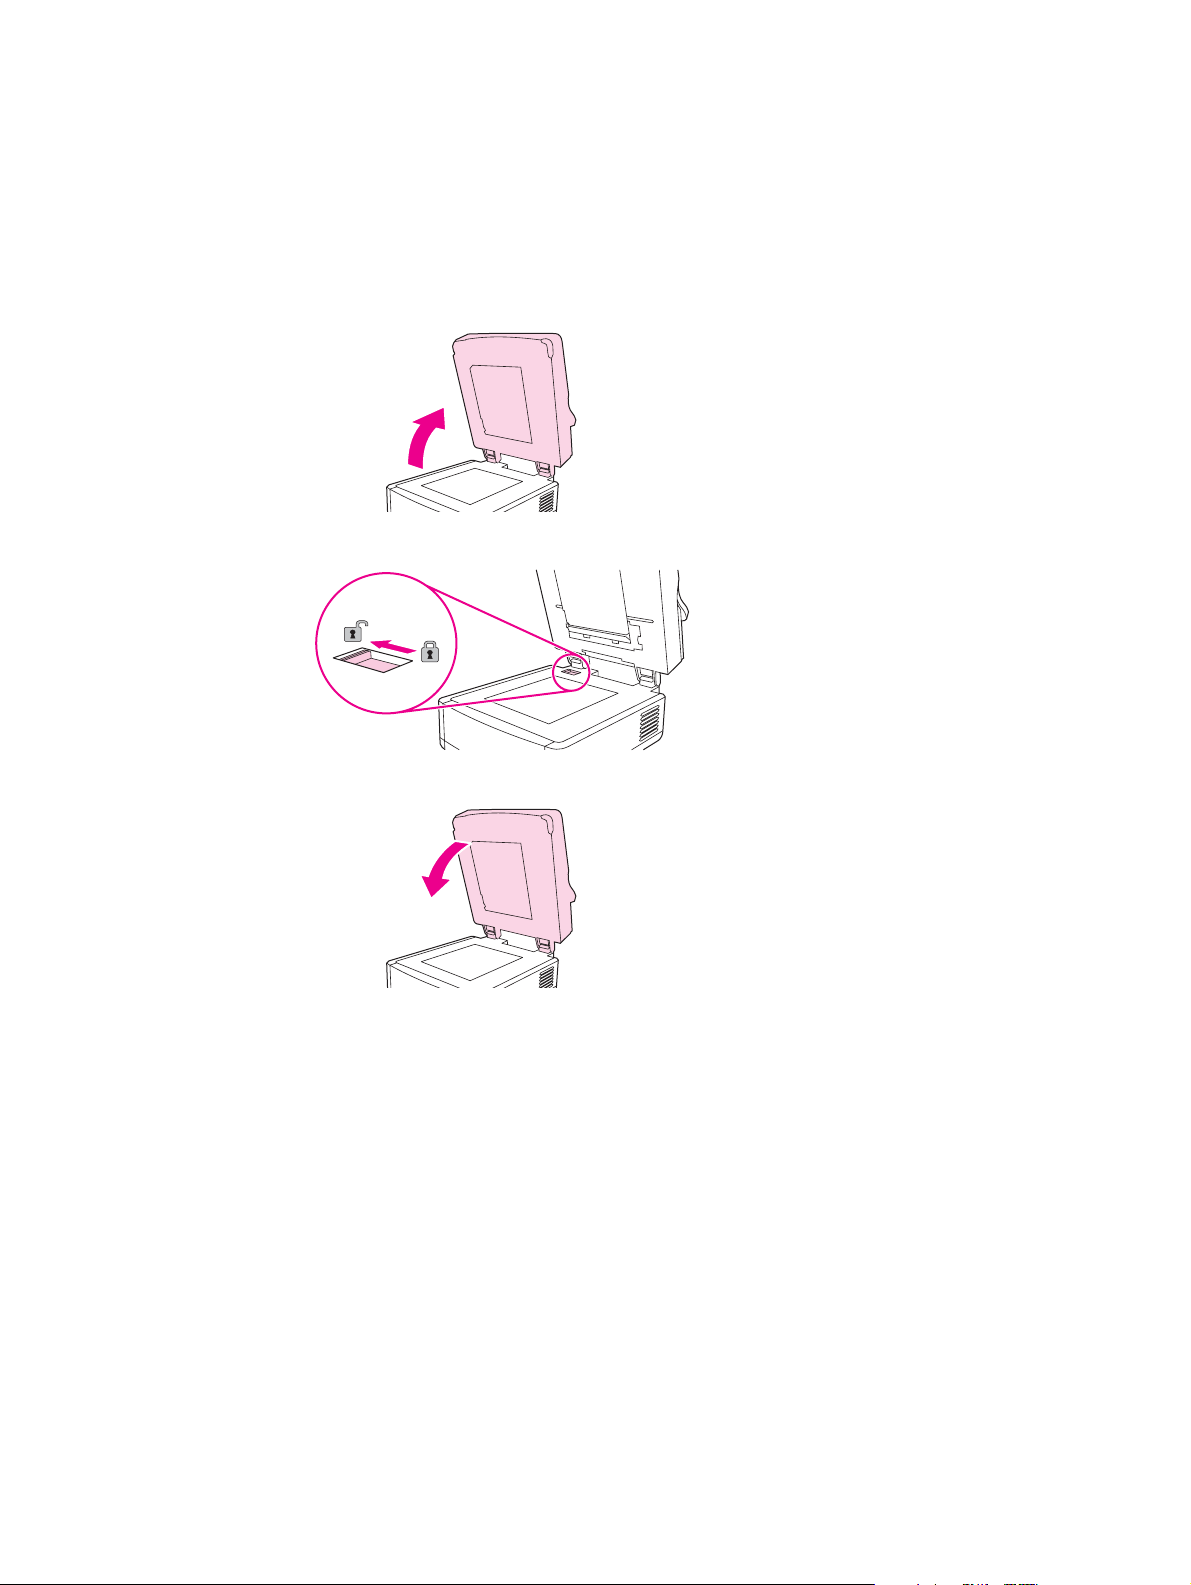
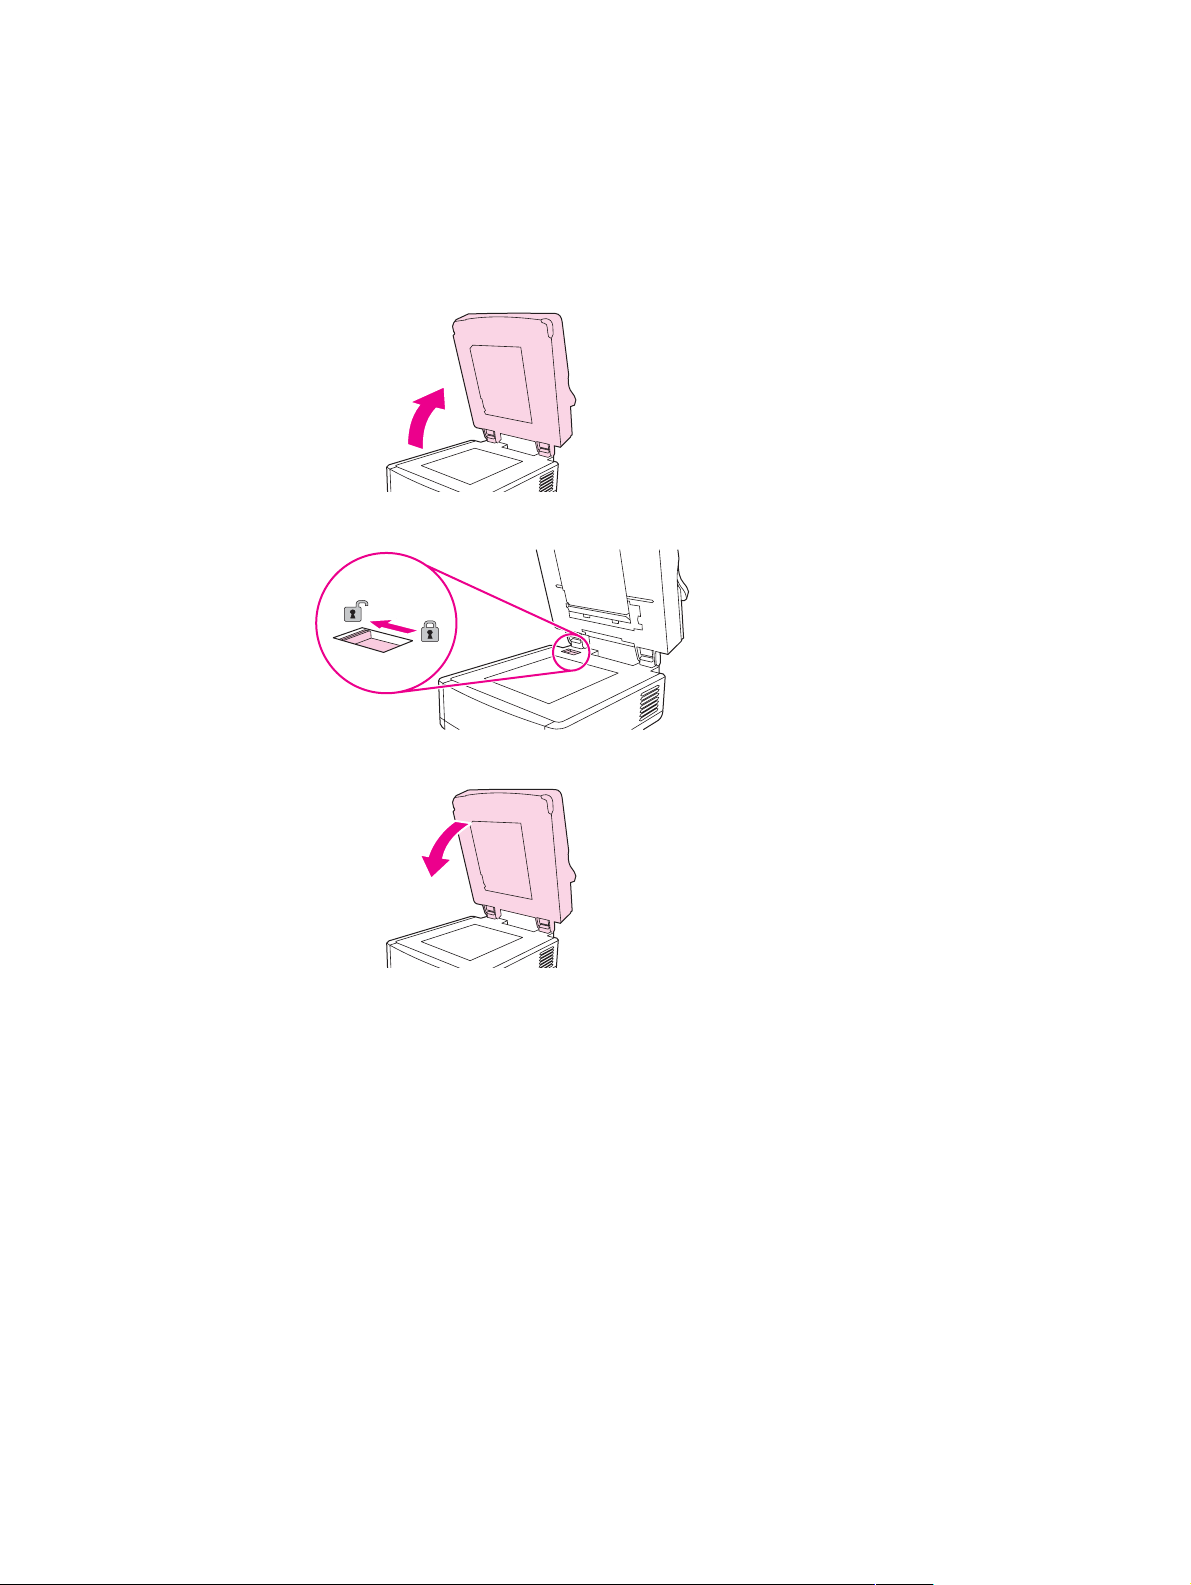
Step 4. Unlock the scanner head
The scanner head is locked to prevent damage during shipping. Follow these instructions to
unlock it.
1. Open the top of the digital sender.
2. Unlock the scanner head.
3. Close the top of the digital sender.
12 Chapter 2 Setup ENWW
Page 19
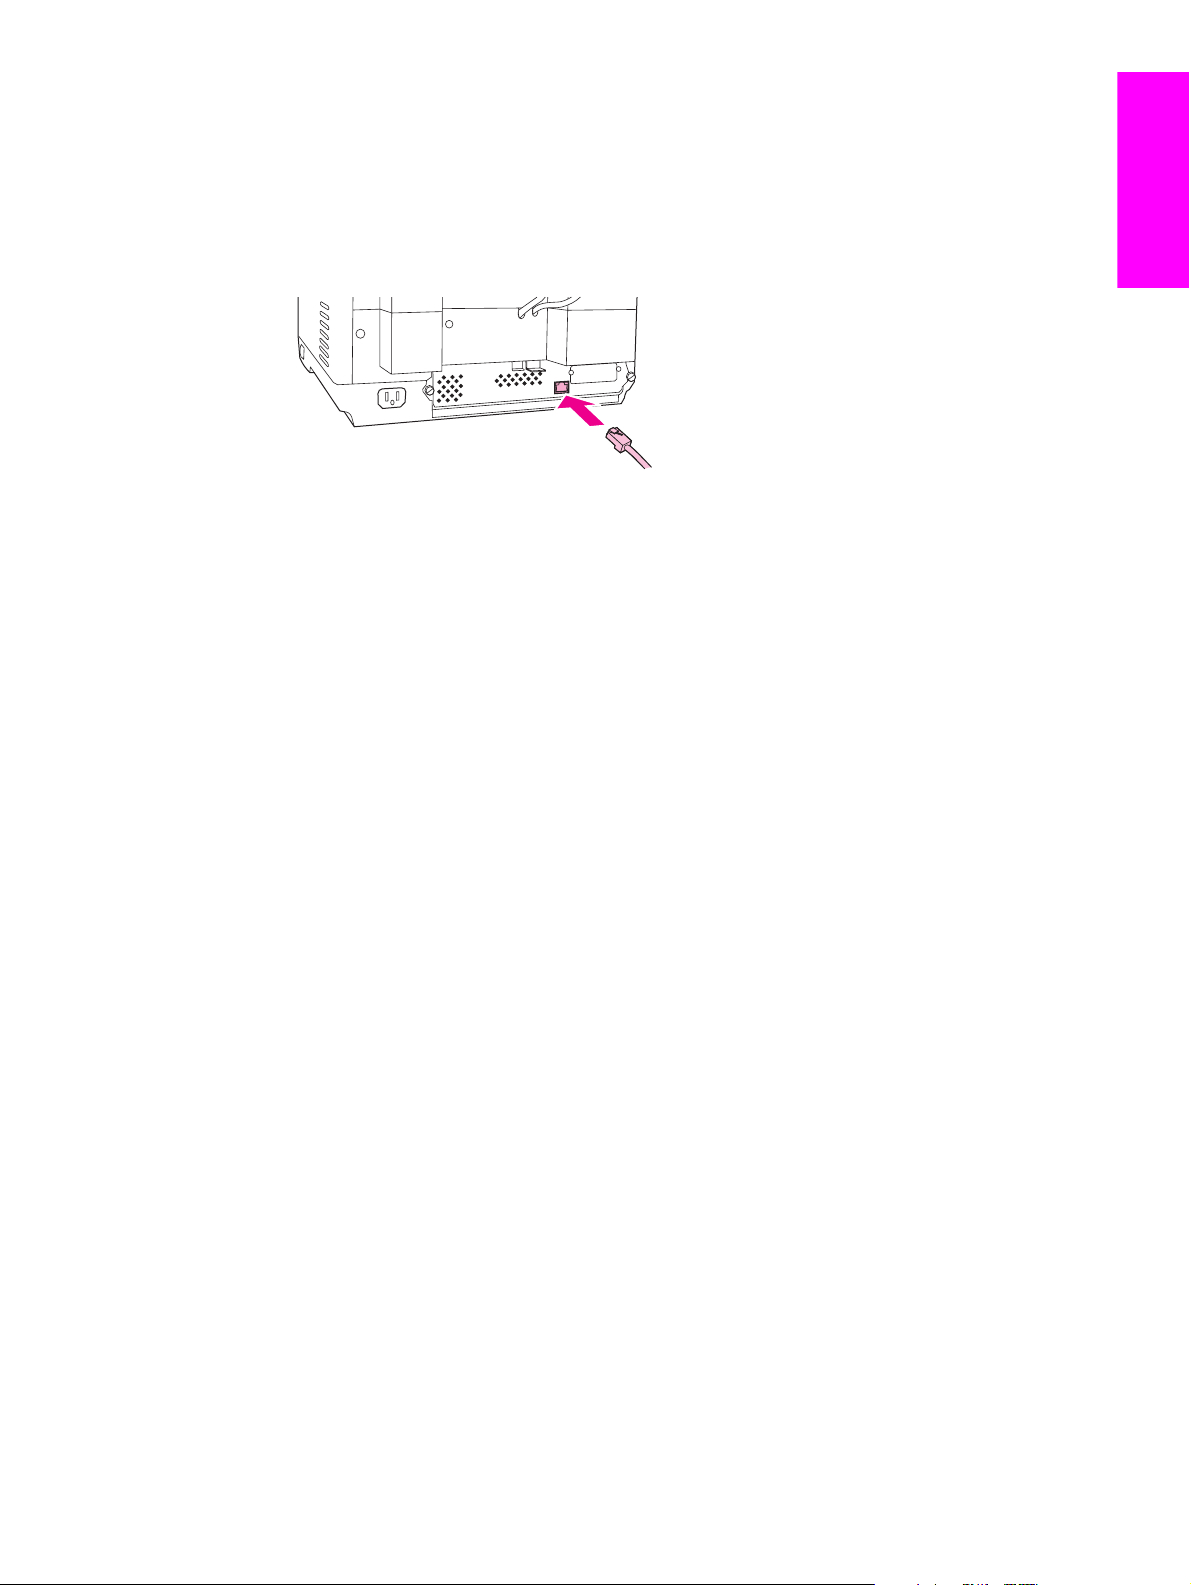
Step 5. Connect the network cable
Use the RJ-45 connector on the back of the device to connect the product to a Fast Ethernet
100Base-TX or Ethernet 10Base-T network.
English
ENWW Step 5. Connect the network cable 13
Page 20
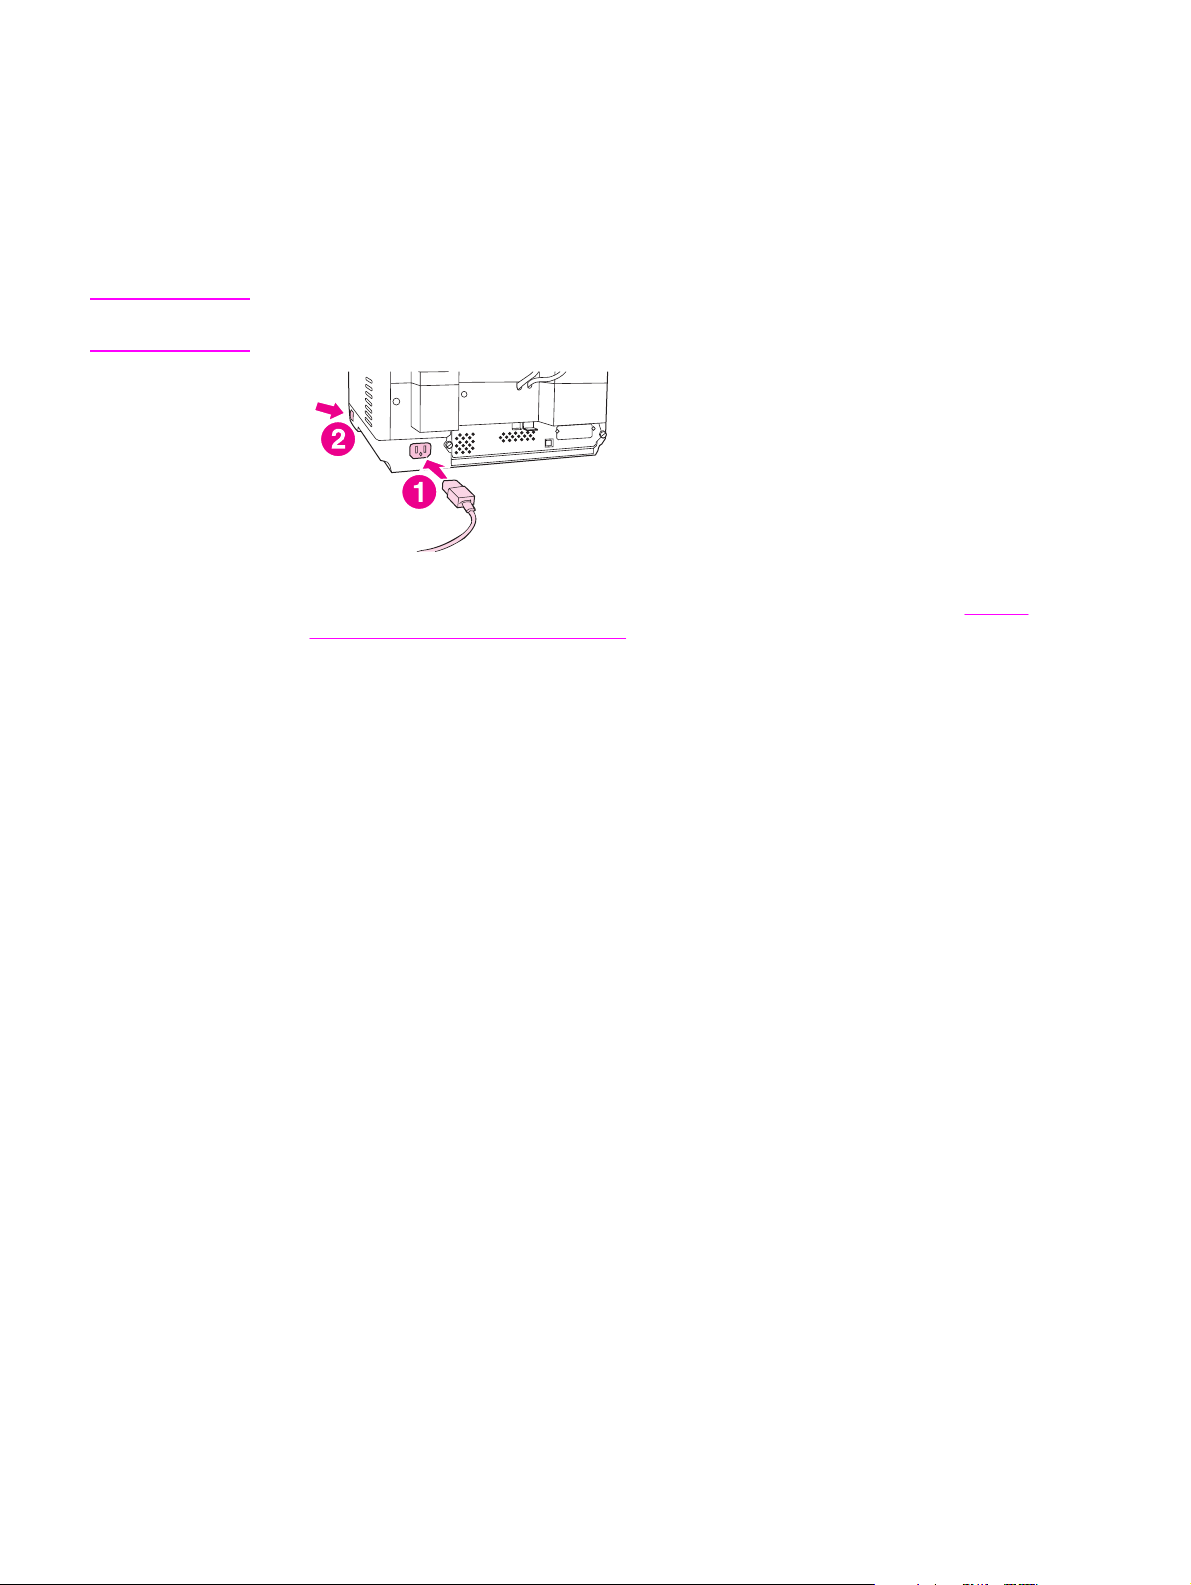
Step 6. Connect the power cord
1. Connect the power cord to the product power cord connector. Then connect the power
cord to an adequate alternating current (ac) outlet.
NOTE
This product can operate using either 110/120 volts (V), 60 hertz (Hz) power or 220/240 V,
50 Hz power.
2. Turn the product on by using the power button. After the product warms up, a prompt
appears asking you to configure your control-panel display language (see
Configure the control-panel settings).
Step 7.
14 Chapter 2 Setup ENWW
Page 21

Step 7. Configure the control-panel settings
NOTE
When the device is turned on for the first time, the control-panel display presents prompts for
setting the language, date, and time.
Configuring the control-panel language
By default, the control panel on the product shows messages in English. You can use the
control panel menus to configure the product to show messages in another supported
language. When the product is turned on for the first time, the LANGUAGE menu appears
on the control-panel display. Select a language to continue.
If no language is selected within 60 seconds, English is set as the language, and any
language change must be made using the process below.
Follow these instructions to change the control-panel language.
ENU
1. Press the M
2. Touch CONFIGURE DEVICE (the third menu item).
3. Touch SYSTEM SETUP (the fourth menu item).
4. Scroll down and touch LANGUAGE (the last menu item).
5. Touch the preferred language.
button on the control panel.
English
Configuring the date and time
After configuring the language, the control-panel display shows the current date and time. If
the date and time are wrong, touch OK to set them. If they are right, touch Exit. Once it has
been set, the real-time clock within the device will keep the correct time.
ENWW Step 7. Configure the control-panel settings 15
Page 22

Step 8. Assign the IP address
In order to function properly, the device must be assigned a valid IP address on your
network. If your network uses dynamic host configuration protocol (DHCP), this IP address
can be assigned automatically. DHCP is the default setting in the digital sender. If you are
not using DHCP, you will need to manually assign an IP address.
Finding the DHCP IP address
Use one of the methods below to find the IP address that DHCP has automatically assigned.
● Look at the upper-left corner of the digital-sender control-panel display. Next to the word
Ready the IP address should appear.
● If the IP address does not appear on the control-panel display, press the M
the control panel. Touch the INFORMATION menu, and then touch CONFIGURATION.
The digital-sender configuration information appears on the touchscreen. Touch the OK
button to see the Jetdirect data. Scroll through the information until you find the IP
address.
Manually assigning an IP address
If you need to assign an IP address to the device, follow these instructions.
ENU
button on
ENU
1. Press the M
2. Touch CONFIGURE DEVICE.
3. Scroll down and touch I/O.
4. Scroll down and touch EMBEDDED JETDIRECT MENU.
5. Touch TCP/IP.
6. Touch CONFIG METHOD.
7. Touch MANUAL.
8. Touch MANUAL SETTINGS.
9. Touch IP ADDRESS and use the control-panel keypad to type in the unique IP address
for the device.
button on the control panel.
16 Chapter 2 Setup ENWW
Page 23

Step 9. Install and configure the software
NOTE
NOTE
Install the software on the server that will be supporting the HP Digital Sending Software
English
(HP DSS) service. After installation, the HP DSS runs in the background as a service. It
starts automatically whenever the server is restarted.
The digital sender must be on and connected to the network in order to successfully
complete the software installation process.
Before you begin
During the software installation procedure, you are prompted to configure the digital-send
options. In order to complete this configuration, you need the following information:
● The software license key from the label on the software CD-ROM
● The host name or IP address of the SMTP e-mail server that will be used to send e-mail
from the digital sender
It is highly recommended that the SMTP gateway be located on your own local area
network. However, you may also configure your product for e-mail functionality even if your
mail services are provided by an outside Internet service provider (ISP) over a digital
subscription line (DSL).
● The host name or IP address of the LDAP server that will be used to retrieve e-mail
addresses (optional)
NOTE
NOTE
● The paths for any folders that are to be set up for the send-to-folder feature
● The host name or IP address of the digital sender
The installation steps that are provided here are for basic installation only. For more details,
and more advanced configuration information, see the HP 9200C Digital Sender Support
Guide.
To install the software
1. Insert the HP DSS CD-ROM into the CD-ROM drive. When the setup program starts,
select Install Now on the initial screen.
The setup program should start automatically. If it does not, browse to the CD-ROM drive
and run the SETUP.EXE file.
2. In the Choose Setup Language dialog box, select a language for the installation. The
setup wizard starts.
3. On the installation Welcome screen, click Next.
4. Accept the HP software license terms by clicking Yes.
5. Accept the default install location, or click Browse to select a different one.
ENWW Step 9. Install and configure the software 17
Page 24

6. After the software files have been installed, the HP MFP Digital Sending Software
Configuration Wizard appears.
When the HP Digital Sending Software is installed for the first time, the software can run
in trial mode for a set period of time. The Licenses section of this first Configuration
Wizard screen displays a “Trial License” entry. The remaining trial period is displayed in
this entry. When the trial period expires, the software becomes inactive until a valid
license is installed.
To enter the license key click the Add button, type the license code key from the label
on the software CD-ROM, and then click OK.
7. In the Administrator Information section of the screen, fill in the administrator contact
information. Select the Notify administrator of critical errors check box if you would
like to be notified by e-mail about errors that require administrative assistance.
8. Click Next to continue to the E-Mail Settings screen.
9. Configure the e-mail settings:
a. Click Find Servers to find the SMTP servers on the network.
b. In the dialog box that appears, select the SMTP server that you will be using to send
e-mail from the digital sender, and then click OK.
NOTE
NOTE
If you would like to have redundant servers, you can select more than one by holding down
the CTRL key while selecting the servers.
c. Select the SMTP server that you added and click Test to test its functionality. If the
test is not successful, contact your network administrator to verify that the SMTP
server is functional.
10. Click Next to continue to the Secondary E-mail Settings screen.
Secondary E-mail is designed for solutions that require an extra measure of data security. It
differs from the regular e-mail feature in that it requires a third-party e-mail security software
program in order to deliver the e-mail. The configuration of Secondary E-mail is not included
in this procedure. If you are planning to enable Secondary E-mail, see the HP 9200C Digital
Sender Support Guide for instructions.
11. Click Next to continue to the Authentication Settings screen.
12. Authentication is an important security feature. HP highly recommends that
authentication be enabled on the digital sender in order to prevent unauthorized use.
However, authentication is not required in order to send documents using the digital
sender. If you do not want to enable authentication at this time, skip to Step 13.
To enable authentication, start by selecting an option from the Authentication Method
drop-down list. This is the method that the device uses to verify the user’s login
credentials. The following options are available.
● None
● Microsoft Windows
● LDAP server
● Novell NDS (if Novell client software is present)
● Novell Bindery (if Novell client software is present)
After you select an option, the remainder of the settings appear on the screen.
18 Chapter 2 Setup ENWW
Page 25

a. Click the Find Servers button. The Select LDAP Server dialog box appears,
containing a list of LDAP servers on the network. (You might first be prompted for
your network login information.)
b. Select the LDAP server that you want to use. The information about the selected
server appears.
c. Click OK to accept the selected server. The server information is filled in on the
Authentication Settings screen.
d. Click the Test button to test the settings. In the Test User Authentication dialog
box, type in the network logon credentials of a network user in order to test whether
LDAP can successfully retrieve an e-mail address. If the test is not successful,
contact your network administrator to troubleshoot the LDAP configuration.
13. Click Next to continue to the Fax Settings screen.
English
NOTE
NOTE
Fax configuration is not included in this procedure. If you are planning to enable sending to
fax, see the HP 9200C Digital Sender Support Guide for instructions.
14. Click Next to continue to the Folder Settings screen.
15. If you would like to make the send-to-folder feature available, select the Enable Send to
Folder check box.
a. Click Add… to add a new folder. The Add Predefined Folder dialog box appears.
b. Type a name for the folder into the Alias Name text box. This name appears in the
device control-panel interface.
c. Click Browse… to browse to a folder location, and then click OK to accept it.
The supported operating systems for folder destinations are Windows 98, Windows NT,
Windows 2000, Windows Server 2003, Windows XP, and Novell NetWare.
d. In the Access Credentials drop-down list, select the credentials that you want to
use for access to the folder. If Public is selected, the program uses the Credentials
to Access Public Folders from the Folders Settings screen. If MFP User is
selected, the program uses the credentials with which the user has logged into the
device.
e. Click OK to save the settings. The new folder is added to the list.
f. Repeat steps a through e to add more folders.
g. In the Credentials to Access Public Folders area of the Folders tab, type the
public access credentials for saving files into folders. This information is required
before you can save the folder list.
16. Click Next to continue to the Workflow Settings screen.
NOTE
ENWW Step 9. Install and configure the software 19
Workflow configuration is not included in this procedure. If you are planning to enable
sending to workflows, see the HP 9200C Digital Sender Support Guide for instructions.
17. Click Next to continue to the Addressing Settings screen.
Page 26

18. If your network supports it, select the Enable PABs (Personal Address Books) check
box to allow users to use their Microsoft Outlook address books on the digital sender.
NOTE
NOTE
This is an optional feature which requires authentication to be enabled and set to Microsoft
Windows. The Microsoft Messaging API (MAPI) is also required. See the HP 9200C Digital
Sender Support Guide for more information.
19. Click Next to continue to the Preferences Settings page.
20. Click Next again. A dialog box appears asking if you want to configure MFPs to utilize
the service. Click Yes.
21. On the MFP Configuration screen, click Add…. The Add MFPs dialog box appears.
22. Click the Find MFPs button to find all MFPs and digital senders on the network. Select
the digital sender you are installing from the list that appears.
If you know the host name or IP address of the device, you can type it in the Hostname or
IP Address text box under Manually enter an MFP's network name rather than using the
Find MFPs button.
23. Click the Add--> button to add the device to the MFP List.
24. Click Close to close the Add MFPs dialog box. The digital sender now appears in the
MFPs list on the MFP Configuration screen.
25. Select the digital sender and click the Configure MFP button. Use the settings in the
Configure MFPs window to enable the digital sending options for the digital sender.
a. Select the Send to Email tab. Select the Enable Send to Email check box, and
select via the Digital Sender service in the Send Emails drop-down list.
NOTE
b. If you would like the users to be able to add their own e-mail message when sending
e-mail, click the Advanced button and select the Editable by user check box.
c. Select the Send to Folder tab and select the Enable Send to Folder check box.
d. If you are enabling authentication, select the Authentication tab and select the
Enable Authentication check box. If you are not enabling authentication, skip to
step f.
e. Select the features for which you want authentication enabled. Then select the
network domain from the Default Domain drop-down box.
f. Go to the Addressing tab and select the Allow MFP to directly access an LDAP
Address Book check box if you want HP DSS to retrieve e-mail addresses directly
from an LDAP server. Select the previously-configured LDAP server in the LDAP
Server drop-down list.
g. Click OK to save the MFP configuration settings.
If you are configuring a group of digital senders, use the Copy Settings button on the MFP
Configuration screen to copy the settings from the device you have configured, then use
the Paste Settings button to apply those settings to the other digital senders.
26. Click the Finish button. The final install screen appears.
27. Click the Finish button on the InstallShield Wizard Complete screen to complete the
installation.
20 Chapter 2 Setup ENWW
Page 27

Step 10. Verify the product installation
NOTE
Use the following procedure to test the installation and configuration of the device.
English
1. On the device control-panel display, verify that the E-Mail and Folder options appear.
2. Place a document face-up in the ADF or face-down on the flatbed glass.
3. Touch E-MAIL on the control-panel display.
4. If prompted, type in your user name and password.
5. If you were not prompted to log in, touch From: and then type in your e-mail address.
6. Touch To: and then type your own e-mail address.
Touch to delete any incorrect keystrokes.
7. Touch OK.
8. Press START. The device scans the document and sends it to you as an e-mail
attachment.
9. Repeat this process using the FOLDER option, and verify that the file is sent to the
correct folder.
If the document does not send the file correctly, verify your product installation and
configuration. For additional information, see the HP 9200C Digital Sender User Guide or
HP 9200C Digital Sender Support Guide.
If the test is successful, you can now scan documents and send them to an e-mail address
or to a folder. See the HP 9200C Digital Sender User Guide for detailed instructions about
how to use all of the send-to options, and see the HP 9200C Digital Sender Support Guide
for information about configuring all of the digital-sending features.
ENWW Step 10. Verify the product installation 21
Page 28

22 Chapter 2 Setup ENWW
Page 29

3
Troubleshooting and
English
customer support
Use the information in this section if you are having any problems with the initial setup of the
device. For more advanced troubleshooting, see the HP 9200C Digital Sender User Guide or
the HP 9200C Digital Sender Support Guide.
ENWW 23
Page 30
Troubleshooting
Use the following instructions to troubleshoot digital-sender installation problems.
Problem Action to take
The digital sender will not scan and a CHECK
CABLES. CHECK SCANNER LOCK. error
message is displayed.
The Find Servers button on the E-Mail
Settings screen did not find any servers.
The Find Servers button on the Authentication
Settings screen did not find any servers.
The scanner head lock is still in the locked
position. Switch it to the unlocked position. See
Step 4. Unlock the scanner head.
● Verify that you have a functioning SMTP
server on the network.
● Click the Add… button on the E-Mail
Settings screen and type in the host name
or IP address of the SMTP server. After
typing in the address, click the Test button to
verify that the software can contact the server.
● If testing the server is unsuccessful, contact
your network administrator to help
troubleshoot the communication with the
server.
● If you have any other digital senders or
MFPs that are using the HP DSS service,
you can use the Copy Settings button on
the MFP Configuration tab of the HP MFP
DSS Configuration Utility to copy the settings
from a device that is functioning correctly,
and then use the Paste Settings button to
apply those settings to the digital sender.
● Verify that you have a functioning LDAP
server on the network.
● Type the host name or IP address of the
LDAP server into the LDAP Server text box.
After typing in the address, click the Find
Settings button to retrieve the server
settings. Then click the Test button to verify
that the software can contact the server.
● If testing the server is unsuccessful, contact
your network administrator to help
troubleshoot the communication with the
server.
● If you have any other digital senders or
MFPs that are using the HP DSS service,
you can use the Copy Settings button on
the MFP Configuration tab of the HP MFP
DSS Configuration Utility to copy the settings
from a device that is functioning correctly,
and then use the Paste Settings button to
apply those settings to the digital sender.
24 Chapter 3 Troubleshooting and customer support ENWW
Page 31

Problem Action to take
The digital sender is not working.
Scanned pages are blank or have repeated
patterns.
The image quality is poor.
The ADF feeds multiple sheets, skews sheets,
or jams frequently.
● Make sure that the power cord is securely
connected to the device and that it is
plugged into the power outlet.
● Make sure that the device is turned on.
● Clear any error messages on the control-
panel display.
● Verify that the network cable is securely
connected to the device.
● Verify that one of the two green LEDs just
above the device network port is on.
Make sure that a page is not already on the glass.
● Make sure that the document you are trying
to send is placed correctly in the ADF (faceup) or on the glass (face-down).
● If possible, try changing some of the scan
settings, such as resolution or file type, to
improve the image quality.
● Adjust the guides so that they are snug
against the stack but do not bend the stack.
● The maximum number of pages that the
ADF can hold is 50 or fewer, depending on
the type of media that is being loaded.
English
● The maximum number of pages that the
output tray can hold is 50 or fewer. Make
sure that more pages are not stacking up in
the output tray.
● The paper must be stacked square and
straight in the ADF.
● If the original was previously stapled or three-
hole-punched, verify that the pages are not
stuck together.
● The type of media that is being loaded might
not meet the required specifications. See the
HP 9200C Digital Sender User Guide for
media specifications.
ENWW Troubleshooting 25
Page 32

Problem Action to take
An e-mail transmission did not arrive at the
destination e-mail address.
● If you typed the e-mail address at the control
panel, resend the e-mail message, making
sure that you type the address correctly and
that it is in the correct format (has no
spaces, contains the required @ sign, and
contains the required period).
● Resend the e-mail. Make sure that you type
the name in the correct format in the From:
field so that the message is not rejected and
so that you receive a message back if the email transmission fails.
● Have the network administrator verify that
the SMTP server is functioning.
A document that you sent to a folder did not
arrive at the destination folder.
● Resend the document.
● Verify whether the file name might have
been modified to resolve a duplicate-filename error.
The bottom of a page that you sent is cut off.
If the document was sent from the glass, the
document page might be too long. The maximum
length for documents scanned from the glass is
A4, or 210 x 297 mm (8.27 x 11.69 inches).
The control panel is using the wrong language. Use the control-panel menu to set the correct
language.
1. Push the M
ENU
button.
2. Select CONFIGURE DEVICE on the controlpanel display (the third menu item).
3. Touch SYSTEM SETUP (the fourth menu
item).
4. Scroll down and touch LANGUAGE (the last
menu item).
5. Touch the correct language.
26 Chapter 3 Troubleshooting and customer support ENWW
Page 33

Customer support
For additional information about the product, see the HP 9200C Digital Sender User Guide
or the HP 9200C Digital Sender Support Guide on the CD-ROM. For HP Customer Care
information, see the support flyer that came with the product. You can also visit
http://www.hp.com/support/9200c for more information.
English
ENWW Customer support 27
Page 34

FCC regulations
This equipment has been tested and found to comply with the limits for a Class B digital
device, pursuant to Part 15 of the FCC rules. These limits are designed to provide
reasonable protection against harmful interference in a residential installation. This
equipment generates, uses, and can radiate radio frequency energy. If this equipment is not
installed and used in accordance with the instructions, it can cause harmful interference to
radio communications. However, there is no guarantee that interference will not occur in a
particular installation; the presence of interference can be determined by turning the
equipment off and on. If this equipment does cause harmful interference to radio or
television communications, the user is encouraged to try to correct the interference by one or
more of the following measures:
● Reorient or relocate the receiving antenna.
● Increase distance between equipment and receiver.
● Connect equipment to an outlet on a circuit different from that to which the receiver is
located.
● Consult your dealer or an experienced radio/television technician.
NOTE
Any changes or modifications to the device that are not expressly approved by HP could
void the user’s authority to operate this equipment.
28 Chapter 3 Troubleshooting and customer support ENWW
Page 35

Index
English
A
ADF
bins, locating 9
features 1
troubleshooting 25
B
bins 9
blank pages, troubleshooting 25
box contents 6
C
cables, connecting 13
connecting network cable 13
control panel
language settings 15
locating 9
overlays 10
customer support 27
cut-off pages, troubleshooting 26
D
date, setting 15
DHCP IP address 16
documentation 2
DSS, installing 17
E
e-mail
sending to 21
troubleshooting 26
EIO port 9
environmental requirements 7
F
FCC statements 28
features 1
Find Servers, troubleshooting 24
folders, troubleshooting 26
H
hard disk 1
hardware requirements 7
help, online 2
HP DSS, installing 17
HP Jetdirect Inside 1
humidity requirements 7
I
image quality, troubleshooting 25
input bin 9
installation
about 2
checklist 2
control panel overlays 10
requirements 3
software 17
testing 21
IP address, assigning 16
J
jam release button 9
Jetdirect Inside 1
L
language, control panel
changing 15
overlays, installing 10
lock, scanner
locating 9
unlocking 12
M
manuals 2
margins, scanning 1
memory 1
N
network cable, connecting 13
network card, included 1
network port 9
network requirements 8
O
on/off switch 9
online help 2
operating environment requirements 7
operating system requirements 8
output bin 9
overlays, control panel 10
P
package contents 6
parts, locating 9
ports, locating 9
ENWW Index 29
Page 36

power cord, connecting 14
power switch 9
Q
quality, troubleshooting 25
R
regulatory statements
FCC 28
release button, jam 9
S
Scan Failure errors 24
scanner head lock
locating 9
unlocking 12
serial number, locating 9
servers, troubleshooting 24
settings
date and time 15
IP address 16
language 15
SMTP servers, troubleshooting 24
software, installing 17
specifications, features 1
support 27
support guide 2
system requirements 7
T
temperature requirements 7
testing installation 21
time, setting 15
troubleshooting
ADF 25
blank pages 25
cut-off pages 26
digital sending 25
e-mail 26
Find Servers 24
folders 26
image quality 25
Scan Failure errors 24
U
unlocking scanner head 12
unpacking the digital sender 6
user guide 2
V
verifying installation 21
W
Web sites, support 2
30 Index ENWW
Page 37

HP 9200C Digital Sender
简体中文
入门指南
Page 38

版权与许可
© 2004 Copyright Hewlett-Packard
Development Company, LP
除非版权法许可,否则,在事先未经书面许
可的情况下,严禁复制、改编或翻译本书。
本文档所含信息如有更改,恕不另行通知。
HP 产品和服务的保修仅以随该产品和服务
提供的书面保修声明为准。 本文所述任何内
容均不应被视为附加保修。 对任何技术或编
辑错误或本文所述内容的遗漏,HP 不承担
任何责任。
产品号: Q5916-90905
Edition 1, 11/2004
商标说明
Microsoft® 和 Windows® 是微软公司在美国
的注册商标。
Pentium® 是 Intel 公司或其子公司在美国和
其它国家/地区的注册商标。
Page 39

目录
1 简介
何处查找信息 .............................................................................................................................2
安装核对表 ................................................................................................................................2
开始前准备事项 .........................................................................................................................3
2 设置
步骤 1. 打开包装并检查包装内物品 ...........................................................................................6
步骤 2. 安装要求和产品部件 ......................................................................................................7
环境要求 .............................................................................................................................7
系统要求 .............................................................................................................................7
识别产品部件 ......................................................................................................................9
步骤 3. 更换控制面板贴面 .......................................................................................................10
步骤 4. 解锁扫描仪盖 ..............................................................................................................12
步骤 5. 连接网线 ......................................................................................................................13
步骤 6. 连接电源线 ..................................................................................................................14
步骤 7. 配置控制面板设置 .......................................................................................................15
配置控制面板语言 .............................................................................................................15
配置日期和时间 .................................................................................................................15
步骤 8. 指定 IP 地址 ................................................................................................................16
查找 DHCP IP 地址 ...........................................................................................................16
手动指定 IP 地址 ...............................................................................................................16
步骤 9. 安装和配置软件 ...........................................................................................................17
开始前准备事项 .................................................................................................................17
安装软件 ...........................................................................................................................17
步骤 10. 检验产品安装 ............................................................................................................21
简体中文
ZHCN
3 故障排除和客户支持
故障排除 ..................................................................................................................................24
客户支持 ..................................................................................................................................27
FCC 规则 .................................................................................................................................28
索引
目录
iii
Page 40

iv ZHCN
Page 41

1
简介
恭喜您购买了 HP 9200C Digital Sender(数字发送器),这是一台对内容管理过程极具价值
的附加产品。 此数字发送器可扫描所有类型的文档,然后将它们发送到电子邮件地址、传真目
的地或网络文件夹。 您还可以设置数字发送器,以便将文档和包括由设备控制面板采集的工作
流信息的元数据文件一并发送到工作流目的地。 通过使用以下功能,您可以将数字发送器用作
连接各类内容管理程序的中转站,包括 Microsoft® SharePoint、Documentum、Filenet 和
Lotus Domino。 通过使用储如 HP Autostore 之类的其它软件,数字发送器还可以通过更为复
杂的、包括条形码识别或光学字符识别 (OCR) 之类组件的工作流发送文档。
此数字发送器包括下列功能:
●
数字发送 - 将扫描的文件发送至电子邮件地址、传真目的地、网络文件夹及工作流文件
夹。 数字发送功能由 HP 数字发送软件 (HP DSS) 完成,数字发送器中包含有此软件。
●
平板扫描仪 - letter/A4 尺寸的扫描仪可以扫描黑白和彩色文档,并可以扫描距纸张边缘 1
毫米(0.04 英寸)范围内的整个页面区域。
●
交互式触摸屏控制面板 - 直观的屏幕菜单和向导有助于您完成数字发送任务。
●
自动文档进纸器 (ADF) - legal 尺寸的 ADF 最多可装 50 页纸,并带有内置双面扫描功
能,可扫描双面文档的两面。
●
内存 - 设备包括 128 兆字节 (MB) 的随机存取内存 (RAM)。
●
硬盘 - 设备附带了一个 20 GB 的内部硬盘驱动器,用于存储文档和设置。
●
连接 - 提供了一个 10/100Base-T 端口和增强的输入/输出 (EIO) 扩展槽,用于进行连接。
●
内置 HP Jetdirect - 设备上直接集成了一个内嵌式 HP Jetdirect 打印服务器,以保证可靠
的网络连接。
简体中文
ZHCN 1
Page 42

何处查找信息
查阅下列说明文资来源,了解如何使用 HP 9200C Digital Sender。
入门指南(本文档)- 分步骤详细说明了如何安装和设置数字发送器。
用户指南和支持指南 - 《HP 9200C Digital Sender 用户指南》(部件号 Q5916-90926)包含
了有关如何使用数字发送器和对问题进行故障排除的信息。 《HP 9200C Digital Sender 支持
指南》(部件号 Q5916-90946)包含了更加详细的配置和管理说明。 这两本指南都可在数字
发送器附带的 CD-ROM 上的说明文档中找到。 它们也可通过访问以下网址找到:
http://www.hp.com/support/9200c。
安装核对表
联机帮助 - HP MFP DSS 配置实用程序包括联机帮助,其中提供了有关数字发送选项的信息。
本指南有助于您设置和安装新产品。 为保证安装正确,请按顺序完成每一步。
步骤 1: 打开产品包装。
步骤 2: 检查安装要求和产品部件。
步骤 3: 更换控制面板贴面(可选)。
步骤 4: 解锁数字发送器扫描仪盖。
步骤 5: 连接网线。
步骤 6: 连接电源线。
步骤 7: 配置控制面板设置。
步骤 8: 指定设备的 IP 地址。
步骤 9: 安装并配置软件。
2 第 1 章简介 ZHCN
Page 43

步骤 10: 检查产品安装。
开始前准备事项
在软件安装过程中,系统将提示您配置数字发送选项。 为完成此配置,您需要下列信息:
●
●
●
●
●
软件 CD-ROM 标签上的软件许可证密钥
从数字发送器发送电子邮件时将用到的简单邮件传输协议 (SMTP) 电子邮件服务器的主机
名或 Internet 协议 (IP) 地址
简体中文
用于检索电子邮件地址的轻量级目录访问协议 (LDAP) 服务器的主机名或 IP 地址(可选)
设置后将用于发送至文件夹功能的任意文件夹的路径
数字发送器的主机名或 IP 地址
ZHCN
开始前准备事项
3
Page 44

4 第 1 章简介 ZHCN
Page 45

2
设置
按下列步骤操作安装和配置数字发送器。 如果您需要有关如何使用或配置设备的更详细信息,
请参阅 《HP 9200C Digital Sender 用户指南》或 《HP 9200C Digital Sender 支持指南》。
简体中文
ZHCN 5
Page 46

步骤 1. 打开包装并检查包装内物品
包装箱内随数字发送器提供了下列物品。
1
2
3
4
1
入门指南
2
HP DSS 软件和数字发送器说明文档 CD-ROM
3
数字发送器
4
控制面板贴面(可选)
5
电源线
打开数字发送器包装时请遵照下列说明。
1.
将设备从包装箱内移出,并拆除所有装运袋。
2.
从 ADF 上撕下胶带和包装材料。
3.
撕下控制面板显示屏上的保护膜。
5
6 第 2 章 设置 ZHCN
Page 47

步骤 2. 安装要求和产品部件
确保安装数字发送器时,具有合适的环境和网络条件。
环境要求
●
环境稳定,无温度或湿度变化
●
室温在 0 到 40°C(32 到 104°F)之间
●
相对湿度在 15% 到 80% 之间,无冷凝
●
表面稳固、平整
●
房间通风良好,设备不直接接触化学物质或受阳光直射
安装数字发送器时应满足下列空间要求。
简体中文
注意
数字发送器要求在设备后面留够 90 毫米(3.5 英寸)的空间,以便能完全打开顶盖。
系统要求
本产品要求系统符合下列规格。
硬件要求
数字发送软件对支持少于 50 台数字发送设备(MFP 或 9200C 数字发送器)的服务器有下列
硬件要求:
●
带 Pentium® 3 或更高处理器的 PC
●
512 MB 的 RAM
数字发送软件对支持 50 到 250 台数字发送设备的服务器有下列硬件要求:
●
带 2 GHz Pentium® 4 或更高处理器的 PC
●
1 GB 的 RAM
ZHCN 步骤 2. 安装要求和产品部件 7
Page 48

注意
您必须具有服务器的管理权限才能安装软件。
网络系统要求
数字发送软件对网络的要求如下:
●
Windows® 2000 Professional 、 Server 或 Advanced Server ; Windows XP
Professional;Windows Server 2003 Standard 或 Enterprise Server
●
快速以太网 100Base-TX 或以太网 10Base-T
●
能访问 SMTP 电子邮件网关
注意
强烈建议将 SMTP 网 关 安装在您的局 域网中。 但 是,即使您的电子邮件服务是由外部
Internet 服务提供商 (ISP) 通过数字租用线 (DSL) 提供,您也可以配置您的产品,实现电子邮
件功能。
●
访问网络 LDAP 服务器以支持可选用户验证
8 第 2 章 设置 ZHCN
Page 49

识别产品部件
下列图示显示了主要产品部件的位置和名称。
1
卡纸释放按钮
2
控制面板
3
电源开关
4
出纸槽
5
ADF 进纸槽
简体中文
6
ADF 电缆
7
控制面板电缆
8
10/100Base-T 网络端口
9
EIO 端口
10
电源接口
11
扫描仪锁
12
ZHCN 步骤 2. 安装要求和产品部件 9
序列号
Page 50

步骤 3. 更换控制面板贴面
设备装运时控制面板上安装有贴面,包装箱内还装入了不同语言的贴面。 如有必要,执行下列
步骤更换贴面,以支持您选择的语言。
1.
找到两个控制面板贴面的位置。
2.
在其中一个贴面顶部边缘的插槽中插入一把小的平口螺丝刀或其它细小工具,然后将贴面
顶部拉出控制面板。
3.
向上并向后提起贴面,将其从产品上卸下。
4.
将新贴面放在控制面板上。 将贴面底侧与控制面板上的小孔对齐,然后将贴面滑入。
10 第 2 章 设置 ZHCN
Page 51

5.
将贴面牢固卡在控制面板上。 确保贴面紧贴控制面板。
6.
重复步骤 2 至 5,更换另一贴面。
简体中文
ZHCN 步骤 3. 更换控制面板贴面 11
Page 52
步骤 4. 解锁扫描仪盖
扫描仪盖被锁定,以免在装运途中受到损坏。 请按下列说明操作为其解锁。
1.
打开数字发送器顶盖。
2.
解锁扫描仪盖。
3.
合上数字发送器顶盖。
12 第 2 章 设置 ZHCN
Page 53

步骤 5. 连接网线
使用设备背部的 RJ-45 接口将产品连接至快速以太网 100Base-TX 或以太网 10Base-T 网络。
简体中文
ZHCN 步骤 5. 连接网线 13
Page 54

步骤 6. 连接电源线
1.
将电源线连接至产品的电源线接口, 然后将电源线连接至适当的交流电源墙上插座。
注意
本产品可在 110/120 伏 (V),60 赫兹 (Hz) 的电源或 220/240 V,50 Hz 的电源下工作。
2.
使用电源按钮打开产品。 产品预热完成后,系统将提示您配置控制面板显示语言(参见
步骤 7. 配置控制面板设置)。
14 第 2 章 设置 ZHCN
Page 55

步骤 7. 配置控制面板设置
第一次打开设备后,控制面板显示屏上将显示提示,要求您设置语言、日期和时间。
配置控制面板语言
默认情况下,控制面板以英语显示消息。 您可以使用控制面板菜单配置产品,以用支持的其它
语言显示消息。 第一次打开产品后,控制面板显示屏上会显示 LANGUAGE(语言)菜单。
选择一种语言后继续。
注意
如果在 60 秒内未选择语言,系统将把语言设置成英语,若要更改语言,则必须按下列步骤操
作。
更改控制面板语言时请按下列说明操作。
1.
按控制面板上的 M
2.
轻触 CONFIGURE DEVICE(第三个菜单项)。
3.
轻触 SYSTEM SETUP(第四个菜单项)。
4.
向下滚动并轻触 LANGUAGE(最后一个菜单项)。
5.
轻触所需语言。
ENU
按钮。
配置日期和时间
配置好语言后,控制面板将显示当前日期和时间。 如果日期和时间有误,轻触 OK(确定)进
行设置。 如果正确,则轻触 Exit(退出)。 设置完成后,设备内的实时时钟将显示正确的时
间。
简体中文
ZHCN 步骤 7. 配置控制面板设置 15
Page 56

步骤 8. 指定 IP 地址
为确保工作正常,应在网络上为设备指定一个有效的 IP 地址。 如果您的网络使用的是动态主
机配置协议 (DHCP),系统将自动指定此 IP 地址。 DHCP 是数字发送器的默认设置。 如果您
使用的不是 DHCP,则需要手动指定一个 IP 地址。
查找 DHCP IP 地址
使用以下方法之一查找 DHCP 自动指定的 IP 地址。
●
查看数字发送器控制面板显示屏的左上角。 IP 地址应该显示在单词 Ready(就绪)旁
边。
●
如果 IP 地址未显示在控制面板显示屏上,请按控制面板上的 M
INFORMATION(信息)菜单,然后轻触 CONFIGURATION(配置)。 数字发送器配置
信息显示在触摸屏上。 轻触 OK(确定)按钮查看 Jetdirect 数据。 滚动查看信息,直至
您找到 IP 地址。
手动指定 IP 地址
如果您需要为设备指定一个 IP 地址,请按下列说明操作。
1.
按控制面板上的 M
ENU
(菜单)按钮。
ENU
(菜单)按钮。 轻触
2.
轻触 CONFIGURE DEVICE(配置设备)。
3.
向下滚动并轻触 I/O。
4.
向下滚动并轻触 EMBEDDED JETDIRECT MENU(内嵌式 JETDIRECT 菜单)。
5.
轻触 TCP/IP。
6.
轻触 CONFIG METHOD(配置方法)。
7.
轻触 MANUAL(手动)。
8.
轻触 MANUAL SETTINGS(手动设置)。
9.
轻触 IP ADDRESS(IP 地址),然后使用控制面板键盘键入设备的唯一 IP 地址。
16 第 2 章 设置 ZHCN
Page 57

步骤 9. 安装和配置软件
在将支持 HP 数字发送软件 (HP DSS) 服务的服务器上安装软件。 安装完成后,HP DSS 将作
为服务在后台运行。 每次重启服务器时它都会自动启动。
注意
注意
注意
数字发送器必须打开电源并连接到网络上,才能成功完成软件安装过程。
开始前准备事项
在软件安装过程中,系统将提示您配置数字发送选项。 为完成此配置,您需要下列信息:
●
软件 CD-ROM 标签上的软件许可证密钥
●
从数字发送器发送电子邮件时将用到的 SMTP 电子邮件服务器的主机名或 IP 地址
强烈建议将 SMTP 网 关 安装在您的局 域网中。 但 是,即使您的电子邮件服务是由外部
Internet 服务提供商 (ISP) 通过数字租用线 (DSL) 提供,您也可以配置您的产品,实现电子邮
件功能。
●
用于检索电子邮件地址的 LDAP 服务器的主机名或 IP 地址(可选)
●
设置后将用于发送至文件夹功能的任意文件夹的路径
●
数字发送器的主机名或 IP 地址
此处给出的安装步骤仅适用于基本安装。 有关详细信息和高级配置信息,请参阅 《 HP
9200C Digital Sender 支持指南》。
安装软件
简体中文
1.
将 HP DSS CD-ROM 放入 CD-ROM 驱动器中。 安装程序开始运行后,请在初始屏幕上
选择 Install Now(立即安装)。
注意
ZHCN 步骤 9. 安装和配置软件 17
安装程序会自动运行。 如果没有,浏览至 CD-ROM 驱动器并运行 SETUP.EXE 文件。
2.
在 Choose Setup Language(选择安装语言)对话框中选择一种安装语言。 安装向导启
动。
3.
在安装 Welcome(欢迎)屏幕上,单击 Next(下一步)。
4.
单击 Yes(是),以表示接受 HP 软件许可条款。
5.
采用默认安装路径,或单击 Browse(浏览)以选择别的路径。
6.
软件文件安装完毕后,将出现 HP MFP Digital Sending Software Configuration Wizard
(HP MFP 数字发送软件配置向导)。
如果是第一次安装 HP 数字发送软件,则该软件可以在设置的时间内以试用模式运行。 配
置向导第一个屏幕中的 Licenses(许可)部分将显示“Trial License”(试用许可)条
目。 试用期的剩余时间将显示在此条目中。 试用期结束后,软件将被禁用,直到安装了
一个有效许可证。
要输入许可证密钥,请单击 Add(添加)按钮,输入软件 CD-ROM 标签上的许可证号,
然后再单击 OK(确定)。
Page 58

7.
在屏幕的 Administrator Information(管理员信息)部分,填写管理员联系方式信息。
如 果 您 希望在出 现错误需要管理员援助时能收 到电子邮件通知 ,则选择 Notify
administrator of critical errors(通知管理员出现了严重错误)。
8.
单击 Next(下一步)进入 E-Mail Settings(电子邮件设置)屏幕。
9.
配置电子邮件设置:
a.
要在网络中查找 SMTP 服务器,请单击 Find Servers(查找服务器)。
b.
在出现的对话框中,选择从数字发送器上发送电子邮件时您希望用到的 SMTP 服务
器,然后再单击 OK(确定)。
注意
注意
如果您想有冗余的服务器,您可以通过在选择服务器时按住 CTRL 键不放选择多台服务器。
c.
选择您添加的 SMTP 服务器,然后单击 Test(测试)测试其功能。 如果测试不成
功,请与您的网络管理员联系以确定 SMTP 服务器是否正常。
10.
单击 Next(下一步)进入 Secondary E-mail Settings(辅助电子邮件设置)屏幕。
辅助电子邮件是专为需要特别数据安全措施的解决方案设计的。 它不同于常规电子邮件功能,
需要第三方电子邮件安全软件程序才能发送电子邮件。 以下步骤不包含辅助电子邮件的配
置。 如果您要启用辅助电子邮件,请参阅 《HP 9200C Digital Sender 支持指南》获得相关说
明。
11.
单击 Next(下一步)进入 Authentication Settings(验证设置)屏幕。
12.
验证是一个重要的安全功能。 HP 强烈推荐在数字发送器中启用验证功能,以便阻止未经
授权的使用。 但是,使用数字发送器发送文档时不需要进行验证。 如果您此时不想启用
验证功能,则跳到步骤 13。
要启用验证功能,请在 Authentication Method(验证方法)下拉列表中选择一个选项。
这是设备用于验证用户登录信息的方法。 您可以选择以下选项:
●
None(无)
● Microsoft Windows
●
LDAP server(LDAP 服务器)
●
Novell NDS(如果所用的是 Novell 客户机软件)
●
Novell Bindery(如果所用的是 Novell 客户机软件)
选择了一个选项后,其它设置将出现在屏幕上。
a.
单击 Find Servers(查找服务器)按钮。 出现 Select LDAP Server(选择 LDAP 服
务器)对话框,该对话框包含网络中的 LDAP 服务器列表。 (系统可能会先提示您给
出网络登录信息。)
b.
选择您要使用的 LDAP 服务器。 出现关于选定服务器的信息。
c.
单击 OK(确定),接受选定服务器。 Authentication Settings(验证设置)屏幕中
显示服务器信息。
d.
单击 Test(测试)按钮测试设置。 在 Test User Authentication(测试用户验证)
对话框中,输入网络用户的网络登录信息,以便测试 LDAP 能否成功地检索到电子邮
件地址。 如果测试不成功,请与您的网络管理员联系,以便排除 LDAP 配置的故障。
18 第 2 章 设置 ZHCN
Page 59

13.
单击 Next(下一步)进入 Fax Settings(传真设置)屏幕。
注意
注意
此步骤不包含传真配置。 如果您要启用发送至传真功能,请参阅 《 HP 9200C Digital Sender
支持指南》获得相关说明。
14.
单击 Next(下一步)进入 Folder Settings(文件夹设置)屏幕。
15.
如果您要启用发送至文件夹功能,请选择 Enable Send to Folder(启用发送至文件夹)
复选框。
a.
单击 Add...(添加...)添加一个新的文件夹。 出现 Add Predefined Folder(添加预
定义文件夹)对话框。
b.
在 Alias Name(别名)文本框中输入文件夹名称。 此名称将显示在设备控制面板界
面上。
c.
单击 Browse...(浏览...)浏览至文件夹所在位置,然后单击 OK(确定)使用它。
文件夹目的地支持的操作系统有:Windows 98、 Windows NT、Windows 2000、 Windows
Server 2003、Windows XP 和 Novell NetWare。
d.
在 Access Credentials( 访问证书)下拉列表中,选择您访问文件夹将使用的证
书。 如果选择 Public(公共),程序将从 Folders Settings(文件夹设置)屏幕中使
用 Credentials to Access Public Folders(访问公共文件夹的证书)。 如果选择
MFP User(MFP 用户),程序将使用用户登录设备时所使用的证书。
e.
单击 OK(确定)保存设置。 新文件夹即被添加到列表中。
f.
重复步骤 a 到 e 添加多个文件夹。
简体中文
注意
注意
g.
在 Folders(文件夹)选项卡的 Credentials to Access Public Folders(访问公共
文件夹的证书)区域,输入公共访问证书,以便将文件保存到文件夹中。 保存文件夹
列表时,您需要使用此信息。
16.
单击 Next(下一步)进入 Workflow Settings(工作流设置)屏幕。
此步骤不包含工作流配置。 如果您要启用发送至工作流,请参阅 《HP 9200C Digital Sender
支持指南》获得相关说明。
17.
单击 Next(下一步)进入 Addressing Settings(寻址设置)屏幕。
18.
如果您的网络支持,则选择 Enable PAB(启用 PAB)(个人通讯簿)复选框,以便用户
在数字发送器上使用他们的 Microsoft Outlook 通讯簿。
这是一个可选功能,它需 要经 过验证才能 在 Microsoft Windows 中启 用并设置。 还需要
Microsoft Messaging API (MAPI)。 有关详细信息,请参阅 《HP 9200C Digital Sender 支持
指南》。
19.
单击 Next(下一步)进入 Preferences Settings(首选项设置)页面。
20.
再次单击 Next(下一步)。 将出现一个对话框询问您是否要配置 MFP 以使用该服务。
单击 Yes(是)。
21.
在 MFP Configuration( MFP 配置)屏幕中,单击 Add... ( 添加 ...)。 将出现 Add
MFPs(添加 MFP)对话框。
ZHCN 步骤 9. 安装和配置软件 19
Page 60

22.
单击 Find MFPs(查找 MFP)按钮以查找网络上的所有 MFP 和数字发送器。 在出现的
列表中选择您要安装的数字发送器。
注意
如果您知道设备的主机名或 IP 地址,则可以在 Manually enter an MFP's network name
(手动输入 MFP 网络名)下的 Hostname or IP Address(主机名或 IP 地址)文本框中输入
它,而不使用 Find MFPs(查找 MFP)按钮。
23.
单击 Add-->(添加-->)按钮,将设备添加到 MFP List(MFP 列表)中。
24.
单击 Close(关 闭)以关闭 Add MFPs(添加 MFP)对话框。 此时数字发送器显示在
MFP Configuration(MFP 配置)屏幕的 MFP 列表中。
25.
选择数字发送器并单击 Configure MFP(配置 MFP)按钮。 使用 Configure MFPs(配
置 MFP)窗口中的设置以启用数字发送器的数字发送选项。
a.
选择 Send to Email(发送至电子邮件)选项卡。 选择 Enable Send to Email(启用
发送至电子邮件)复选框,然后在 Send Emails(发送电子邮件)下拉列表中选择
via the Digital Sender service(通过数字发送器服务)。
b.
如 果 您 想 让 用户在 发送电子邮件时能添 加 他 们 自 己 的电子邮件消 息,请 单 击
Advanced(高级)按钮并选择 Editable by user(用户可编辑)复选框。
c.
选择 Send to Folder(发送至文件夹)选项卡,然后选择 Enable Send to Folder
(启用发送至文件夹)复选框。
d.
如 果 您要启 用验证功能,请选择 Authentication (验证)选 项 卡 ,然后再选择
Enable Authentication(启用验证)复选框。 如果您不想启用验证功能,请跳至步
骤 f。
e.
选择您想为其启用验证的功能。 然后从 Default Domain(默认域)下拉框中选择网
络域。
注意
f.
如果您想让 HP DSS 直接从 LDAP 服务器检索电子邮件地址,请浏览至 Addressing
(寻址)选项卡,然后选择 Allow MFP to directly access an LDAP Address Book
(允许 MFP 直接访问 LDAP 通讯簿)复选框。 在 LDAP Server(LDAP 服务器)下
拉列表中选择预先配置好的 LDAP 服务器。
g.
单击 OK(确定)以保存 MFP 配置设置。
如果 您要配置一组数字发送器,请 使用 MFP Configuration(MFP 配置)屏幕中的 Copy
Settings(复制设置)按钮从您已配置好的设备中复制设置,然后再使用 Paste Settings(粘
贴设置)按钮将那些设置应用至其它数字发送器中。
26.
单击 Finish(完成)按钮。 将出现最终安装屏幕。
27.
单击 InstallShield Wizard Complete(InstallShield 向导完成)屏幕中的 Finish(完成)
按钮以完成安装。
20 第 2 章 设置 ZHCN
Page 61

步骤 10. 检验产品安装
请使用以下步骤测试设备的安装和配置。
1.
确定设备控制面板显示屏上是否显示电子邮件和文件夹选项。
2.
将文档正面朝上放入 ADF 或正面朝下放在平板玻璃上。
3.
轻触控制面板显示屏上的 E-MAIL(电子邮件)。
4.
根据系统提示,输入您的用户名和密码。
5.
如果系统没有提示您登录,轻触 From:(发件人:), 然后再输入您的电子邮件地址。
6.
轻触 To:(收件人:), 然后再输入您自己的电子邮件地址。
简体中文
注意
轻触 以删除所有错误按键输入。
7.
轻触 OK(确定)。
8.
按 START(开始)。 设备将扫描文档并以电子邮件附件形式将其发送给您。
9.
使用 FOLDER(文件夹)选项重复此步骤,并确定文件是否发送至正确的文件夹。
如果文档没有正确发送文件,则检查您的产品安装和配置。 有关其它信息,请参阅
《HP 9200C Digital Sender 用户指南》或 《HP 9200C Digital Sender 支持指南》。
如果测试成功,您可立即扫描文档并将它们发送至一个电子邮件地址或一个文件夹。 有关如何
使用所有发送至选项的详细说明,请参阅 《HP 9200C Digital Sender 用户指南》;有关配置
所有数字发送功能的详细信息,请参阅 《HP 9200C Digital Sender 支持指南》。
ZHCN 步骤 10. 检验产品安装 21
Page 62

22 第 2 章 设置 ZHCN
Page 63

3
故障排除和客户支持
如果您在首次安装此设备时遇到问题,请参阅本部分内容。 有关高级故障排除,请参阅
《HP 9200C Digital Sender 用户指南》或 《HP 9200C Digital Sender 支持指南》。
简体中文
ZHCN 23
Page 64

故障排除
使用以下说明来解决在安装数字发送器过程中出现的问题。
问题 采取的措施
数字发送器不能扫描,且屏幕上显示 CHECK
CABLES. CHECK SCANNER LOCK.(检查电
缆。检查扫描仪锁。) 错误消息。
E-Mail Settings(电子邮件设置)屏幕上的
Find Servers(查找服务器)按钮没有找到任何
服务器。
Authentication Settings(验证设置)屏幕中的
Find Servers(查找服务器)按钮没有找到任何
服务器。
扫描仪盖锁仍然处于锁定位置。 将它切换到未锁
定位置。 请参阅
●
确定您在网络上有一台能正常工作的 SMTP
服务器。
●
单击 E-Mail Settings(电子邮件设置)屏幕
上的 Add...(添加...)按钮并输入 SMTP 服
务器的主机名或 IP 地址。 输入地址后,单击
Test(测试)按钮以确定软件能与服务器通
讯。
●
如果测试服务器不成功,请联系您的网络管理
员,让他帮助解决与服务器的通信问题。
●
如果您有其它使用 HP DSS 服务器的数字发
送器或 MFP,则可以使用 HP MFP DSS 配置
实用程序的 MFP Configuration(MFP 配
置)选项卡上的 Copy Settings(复制设置)
按钮,复制能正常工作的设备上的设置,然后
使用 Paste Settings(粘贴设置)按钮将这些
设置应用到数字发送器上。
●
确定您在网络上有一台能正常工作的 LDAP 服
务器。
●
在 LDAP Server(LDAP 服务器)文本框中
输入 LDAP 服务器的主机名或 IP 地址。 输入
地址后,请单击 Find Settings(查找设置)
按钮检索服务器设置。 然后单击 Test(测
试)按钮,确定软件能否与服务器通信。
●
如果测试服务器失败,请联系您的网络管理
员,让他帮助解决与服务器的通信问题。
●
如果您有其它使用 HP DSS 服务器的数字发
送器或 MFP,则可以使用 HP MFP DSS 配置
实用程序的 MFP Configuration(MFP 配置)
选项卡上的 Copy Settings(复制设置)按
钮,复制能正常工作的设备上的设置,然后使
用 Paste Settings(粘贴设置)按钮将这些设
置应用到数字发送器上。
步骤 4. 解锁扫描仪盖。
24 第 3 章 故障排除和客户支持 ZHCN
Page 65
问题 采取的措施
●
数字发送器不工作。
确保电源线与设备连接稳固并已插入电源插
座。
●
确保设备电源已打开。
●
清除控制面板显示屏上出现的任何错误消息。
●
确定网线与设备连接稳固。
●
确定设备网络端口上的两个绿色 LED 指示灯
中有一个亮起。
扫描的页面空白或有重复图案。
图像质量很差。
ADF 经常出现一次送入多张纸、纸张歪斜或卡纸
的现象。
电子邮件没有到达目标电子邮件地址。
确保玻璃上没有纸张。
●
确保您准备发送的文档已正确放置在 ADF 中
(正面朝上)或玻璃上(正面朝下)。
●
如果可能,尝试更改一些扫描设置,如分辩率
或文件类型,以便提高图像质量。
●
调整导板,使它们紧贴纸叠但又不至于将纸叠
压弯。
●
ADF 最多可装 50 张纸或更少,这取决于所装
的介质类型。
●
出纸盘最多可装 50 张纸或更少。 确保出纸盘
中堆放的纸张没有超出上限。
●
纸张必须平整堆放在 ADF 中。
●
如果原稿已用订书钉装订或已经过三孔装订,
确保纸张没有粘在一起。
●
装入的介质类型可能不符合要求的规格。 有
关介质规格的详细信息,请参阅 《HP 9200C
Digital Sender 用户指南》。
●
如果您已在控制面板中输入了电子邮件地址,
请重新发送电子邮件消息,确保您输入的地址
正确而且格式也正确(没有空格,含有所需
的 @ 符号,并且包含要求的句点)。
简体中文
ZHCN
您发送到一个文件夹中的文档没有到达目标文件
夹。
发送的页面底部被截切。
●
重新发送电子邮件。 确定您在 From:(发件
人:)字段中输入的名字格式正确, 以免邮
件被拒收,并且在电子邮件传送失败后,您也
可以收到返回邮件。
●
请网络管理员检查 SMTP 服务器能否正常工
作。
●
重新发送文档。
●
确定文件名称是否已被修改,以便解决重复文
件名错误。
如果文档是从玻璃板上发送的,则可能是因为文档
页面太长。 从玻璃板上扫描的文档最大长度为 A4
或 210 x 297 毫米(8.27 x 11.69 英寸)。
故障排除
25
Page 66

问题 采取的措施
控制面板使用了错误语言。 使用控制面板菜单设置正确语言。
1.
按下 M
ENU
(菜单)按钮。
2.
在控制面板显示屏上选择 CONFIGURE
DEVICE(配置设备)(第三个菜单项)。
3.
轻触 SYSTEM SETUP(系统设置)(第四个
菜单项)。
4.
向下滚动并轻触 LANGUAGE(语言)(最后
一个菜单项)。
5.
轻触正确语言。
26 第 3 章 故障排除和客户支持 ZHCN
Page 67

客户支持
有关产品的其它信息,请参阅 CD-ROM 上的 《HP 9200C Digital Sender 用户指南》或
《HP 9200C Digital Sender 支持指南》。 有关 HP 客户服务信息,请参阅产品附带的支持传
单。 您还可以访问 http://www.hp.com/support/9200c,获得更多信息。
简体中文
ZHCN
客户支持
27
Page 68

FCC 规则
此设备经测试符合 FCC 规则第 15 部分的 B 级数字设备限制规定。 在住宅区安装时,这些限
制为防止有害干扰提供了合理保护。 本设备产生、使用并会发射无线电频能量。 如果没有按
照说明安装和使用本设备,它将对无线电通信造成有害干扰。 但是,不能保证采用一种特殊安
装便可避免造成干扰;用户可以通过关闭和开启该设备来确定是否存在干扰。 如果本设备对收
音机或电视通讯造成了有害干扰,则鼓励用户尝试采用以下一种或多种措施来调整干扰:
●
重新调整接收天线的方向或位置。
●
加大设备和无线电接收设备之间的距离。
●
将设备连接到与接收设备所用电路不同的电源插座上。
●
咨询代理商或经验丰富的收音机/电视机技术人员。
注意
未经 HP 书面批准而对设备进行任何更改或修改都将导致用户不能操作此设备。
28 第 3 章 故障排除和客户支持 ZHCN
Page 69

索引
A
ADF
功能 1
故障排除 25
纸槽,位置 9
安装
测试 21
关于 2
核对表 2
控制面板贴面 10
软件 17
要求 3
B
帮助,联机 2
包装内物品 6
边距,扫描 1
部件,位置 9
C
操作环境要求 7
操作系统要求 8
测试安装 21
查找服务器,故障排除 24
出纸槽 9
D
DHCP IP 地址 16
DSS,安装 17
打开数字发送器包装 6
打描仪盖锁
解锁 12
位置 9
电缆,连接 13
电源开关 9
电源线,连接 14
电子邮件
发送至 21
故障排除 25
服务器,故障排除 24
G
功能 1
故障排除
ADF 25
查找服务器 24
电子邮件 25
截切页面 25
空白页面 25
扫描失败错误 24
数字发送 25
图像质量 25
文件夹 25
规格,功能 1
规则说明
FCC 28
H
HP DSS,安装 17
环境要求 7
I
IP 地址,指定 16
J
检验安装 21
截切页面,故障排除 25
解锁扫描仪盖 12
进纸槽 9
K
卡纸释放按钮 9
客户支持 27
空白页面,故障排除 25
控制面板
贴面 10
位置 9
语言设置 15
简体中文
E
EIO 端口 9
F
FCC 声明 28
ZHCN
L
连接网线 13
联机帮助 2
索引
29
Page 70

N
内存 1
内置 HP Jetdirect 1
内置 Jetdirect 1
R
日期,设置 15
软件,安装 17
W
网卡,包括 1
网络端口 9
网络要求 8
网线,连接 13
网站,支持 2
温度要求 7
文件夹,故障排除 25
S
SMTP 服务器,故障排除 24
扫描失败错误 24
设置
IP 地址 16
日期和时间 15
语言 15
湿度要求 7
时间,设置 15
释放按钮,卡纸 9
手册 2
说明文档 2
锁定,扫描仪
解锁 12
位置 9
T
贴面,控制面板 10
图像质量,故障排除 25
X
系统要求 7
箱内物品 6
序列号,位置 9
Y
硬件要求 7
硬盘 1
用户指南 2
语言,控制面板
更改 15
贴面,安装 10
Z
支持 27
支持指南 2
纸槽 9
质量,故障排除 25
30
索引
ZHCN
Page 71

HP 9200C Digital Sender
Panduan Memulai
Bahasa
Indonesia
Page 72

Hak Cipta dan Lisensi
© 2004 Hak Cipta Hewlett-Packard
Development Company, LP
Dilarang memperbanyak, mengadaptasi,
atau menerjemahkan tanpa ijin tertulis
sebelumnya, kecuali sejauh yang
diperbolehkan oleh undang-undang hak
cipta.
Informasi yang terkandung di dalam
dokumen ini dapat berubah sewaktu-waktu
tanpa pemberitahuan sebelumnya.
Satu-satunya garansi untuk produk dan
layanan HP tercantum dalam pernyataan
garansi singkat yang disertakan dengan
produk dan layanan tersebut. Tidak ada
yang terkandung di sini yang dapat
ditafsirkan sebagai garansi tambahan HP.
HP tidak bertanggung jawab atas
kesalahan atau kekurangan teknis atau
editorial yang terkandung di sini.
Nomor komponen: Q5916-90905
Edition 1, 11/2004
Pemilik Merek Dagang
Microsoft® dan Windows® adalah merek
dagang terdaftar di A.S. dari Microsoft
Corporation.
Pentium® adalah merek dagang terdaftar
dari Intel Corporation atau anak
perusahaannya di Amerika Serikat dan
negara/kawasan lainnya.
Page 73

Isi
1 Pendahuluan
Di mana harus mencari informasi .............................................................................................2
Daftar pemeriksaan instalasi .....................................................................................................2
Sebelum Anda memulai ............................................................................................................3
2 Membuat pengaturan
Langkah 1. Membuka kemasan dan memeriksa isi kemasan ..................................................6
Langkah 2. Persyaratan instalasi dan komponen produk .........................................................7
Persyaratan lingkungan ......................................................................................................7
Persyaratan sistem .............................................................................................................7
Mengenali komponen produk .............................................................................................9
Langkah 3. Mengganti tutup tampilan panel kendali ..............................................................10
Langkah 4. Buka kunci kepala pemindai ................................................................................12
Langkah 5. Menyambungkan kabel jaringan ..........................................................................13
Langkah 6. Menyambungkan kabel daya ...............................................................................14
Langkah 7. Mengatur konfigurasi pengaturan panel kendali ..................................................15
Mengatur konfigurasi bahasa panel kendali .....................................................................15
Mengatur konfigurasi tanggal dan waktu ..........................................................................15
Langkah 8. Menetapkan alamat IP .........................................................................................16
Mencari alamat IP DHCP .................................................................................................16
Menetapkan alamat IP secara manual .............................................................................16
Langkah 9. Menginstalasi dan mengatur konfigurasi perangkat lunak ..................................17
Sebelum Anda memulai ...................................................................................................17
Untuk menginstalasi perangkat lunak ..............................................................................17
Langkah 10. Memeriksa instalasi produk ...............................................................................22
Bahasa
Indonesia
3 Pemecahan masalah dan dukungan pelanggan
Pemecahan masalah ..............................................................................................................24
Dukungan pelanggan ..............................................................................................................28
Peraturan FCC ........................................................................................................................29
Indeks
IDWW Isi iii
Page 74

iv IDWW
Page 75

1
Pendahuluan
Selamat atas pembelian HP 9200C Digital Sender (Pengirim Digital) Anda, tambahan
bernilai untuk proses manajemen-content Anda. Pengirim digital memindai segala jenis
dokumen dan mengirimkannya ke alamat e-mail, faks tujuan, atau folder jaringan. Pengirim
digital dapat juga diatur untuk mengirimkan dokumen ke tujuan workflow, beserta file
metadata yang berisi informasi workflow yang tertangkap di panel kendali perangkat.
Dengan menggunakan fitur ini, pengirim digital dapat menjadi antarmuka untuk berbagai
program manajemen-content termasuk Microsoft® SharePoint, Documentum, Filenet, dan
Lotus Domino. Dengan menggunakan perangkat lunak tambahan seperti HP Autostore,
pengirim digital dapat juga mengirimkan dokumen melalui workflow yang lebih kompleks
yang melibatkan komponen seperti pengenalan bar code atau Pengenalan Karakter Optik
(OCR).
Pengirim digital dilengkapi dengan sejumlah fitur berikut ini:
● Pengiriman digital—Mengirim file yang terpindai ke alamat e-mail, faks tujuan, folder
jaringan, dan folder workflow. Fungsi pengiriman-digital dijalankan oleh HP Digital
Sender Software (HP DSS), yang disertakan dengan pengirim digital.
● Pemindai alas datar—Pemindai berukuran letter/A4 dapat memindai dokumen hitam-
putih dan berwarna, dan dapat memindai bidang penuh halaman dalam 1 mm (0,04 inci)
dari tepi kertas.
● Panel kendali layar sentuh interaktif—Menu dan wizard intuitif pada layar membantu
dalam menjalankan tugas pengiriman digital.
● Pengumpan dokumen otomatis (ADF)—ADF berukuran legal menerima sampai 50
halaman, dan dilengkapi dupleks terpasang untuk memindai kedua sisi dokumen bolak-
balik.
● Memori—Perangkat dilengkapi dengan random access memory (RAM) 128 megabyte
(MB).
● Hard disk—Perangkat dilengkapi dengan hard drive internal 20-gigabyte (GB) untuk
menyimpan dokumen dan pengaturan.
● Konektivitas—Sebuah port 10/100Base-T dan celah perluasan masukan/keluaran
(EIO) tersedia untuk konektivitas.
● HP Jetdirect Terpadu—Sebuah print server HP Jetdirect disatukan langsung pada
perangkat untuk keandalan konektivitas jaringan.
Bahasa
Indonesia
IDWW 1
Page 76

Di mana harus mencari informasi
Jelajahi sumber-sumber dokumentasi berikut ini untuk mempelajari cara menggunakan HP
9200C Digital Sender.
Panduan memulai (dokumen ini)—Berisi petunjuk langkah-demi-langkah untuk
menginstalasi dan membuat pengaturan pengirim digital.
Panduan pengguna dan panduan dukungan— HP 9200C Digital Sender User Guide
(nomor komponen Q5916-90910) berisi informasi tentang penggunaan pengirim digital dan
pemecahan masalah. HP 9200C Digital Sender Support Guide(nomor komponen
Q5916-90930) berisi informasi konfigurasi dan petunjuk administrasi yang lebih terperinci.
Kedua panduan tersebut tersedia pada CD dokumentasi yang disertakan dengan pengirim
digital. Keduanya juga tersedia di Web di http://www.hp.com/support/9200c.
Bantuan Online—Utility DSS Configuration (Konfigurasi DSS) HP MFP dilengkapi bantuan
online yang berisi informasi tentang pilihan pengiriman-digital.
Daftar pemeriksaan instalasi
Panduan ini membantu Anda membuat pengaturan dan menginstalasi produk baru Anda.
Untuk instalasi yang benar, selesaikan setiap langkahnya, secara urut.
Langkah 1: Membuka kemasan produk.
Langkah 2: Memeriksa persyaratan instalasi dan komponen produk.
Langkah 3: Mengganti tutup tampilan panel kendali (opsional).
Langkah 4: Membuka kunci kepala pemindai pengirim-digital.
Langkah 5: Menyambungkan kabel jaringan.
Langkah : Menyambungkan kabel daya.
Langkah 7: Mengatur konfigurasi pengaturan panel kendali.
2 Bab 1 Pendahuluan IDWW
Page 77

Langkah 8: Menetapkan alamat IP perangkat.
Langkah 9: Menginstalasi dan mengatur konfigurasi perangkat lunak.
Langkah 10: Memeriksa instalasi produk.
Sebelum Anda memulai
Selama prosedur instalasi perangkat lunak, Anda diminta untuk mengatur konfigurasi pilihan
pengiriman-digital. Untuk dapat menyelesaikan konfigurasi ini, Anda memerlukan informasi
berikut:
● Kunci lisensi perangkat lunak dari label pada CD-ROM perangkat lunak
● Nama host atau alamat Internet Protocol (IP) dari server e-mail simple mail transfer
protocol (SMTP) yang akan digunakan untuk mengirimkan e-mail dari pengirim digital
● Nama host atau alamat IP dari server Lightweight Directory Access Protocol (LDAP)
yang akan digunakan untuk mengambil alamat e-mail (opsional)
● Path untuk semua folder yang akan dibuat pengaturannya untuk fitur kirim-ke-folder
● Nama host atau alamat IP dari pengirim digital
Bahasa
Indonesia
IDWW Sebelum Anda memulai 3
Page 78

4 Bab 1 Pendahuluan IDWW
Page 79

2
Membuat pengaturan
Ikuti langkah-langkah ini untuk membuat pengaturan dan mengkonfigurasikan pengirim
digital. Jika Anda memerlukan informasi lebih terperinci tentang cara menggunakan atau
mengatur konfigurasi perangkat ini, simak HP 9200C Digital Sender User Guide (Panduan
Pengguna) atau HP 9200C Digital Sender Support Guide (Panduan Dukungan).
Bahasa
Indonesia
IDWW 5
Page 80

Langkah 1. Membuka kemasan dan memeriksa isi kemasan
Barang-barang berikut ini dikirimkan di dalam kotak bersama dengan pengirim digital.
1
2
3
4
5
1 Panduan memulai
2 CD-ROM perangkat lunak HP DSS dan dokumentasi pengirim digital
3 Pengirim digital
4 Tutup tampilan panel kendali (opsional)
5 Kabel daya
Ikuti petunjuk berikut ini untuk membuka kemasan pengirim digital.
1. Angkat keluar perangkat dari kotaknya dan lepaskan semua kantong pengiriman.
2. Lepaskan semua pita perekat dan bahan kemasan dari ADF.
3. Lepaskan lapisan film pelindung dari tampilan panel kendali.
6 Bab 2 Membuat pengaturan IDWW
Page 81

Langkah 2. Persyaratan instalasi dan komponen produk
Pastikan bahwa kondisi lingkungan dan jaringan yang sesuai tersedia untuk instalasi
pengirim digital.
Persyaratan lingkungan
● Lingkungan yang stabil tanpa perubahan suhu atau kelembaban
● Suhu ruangan 0 s/d 40°C (32 s/d 104°F)
● Kelembaban relatif 15 s/d 80% tanpa pengembunan
● Permukaan yang kokoh, rata
● Ruangan yang berventilasi-cukup tanpa terpapar bahan kimia atau cahaya matahari
langsung
Perhatikan persyaratan ruang berikut ini sewaktu menginstalasi pengirim digital.
Bahasa
Indonesia
Perhatikan
Pengirim digital memerlukan jarak ruang 90 mm (3,5 inci) di belakang perangkat untuk dapat
membuka penuh bagian atasnya.
Persyaratan sistem
Spesifikasi sistem berikut diperlukan untuk produk ini.
Persyaratan perangkat keras
Perangkat lunak pengiriman digital memiliki persyaratan perangkat keras berikut ini untuk
server yang mendukung kurang dari 50 perangkat pengiriman digital (pengirim digital MFP
atau 9200C):
● PC dengan prosesor Pentium® 3 atau lebih tinggi
● RAM 512 MB
IDWW Langkah 2. Persyaratan instalasi dan komponen produk 7
Page 82

Perangkat lunak pengiriman digital memiliki persyaratan perangkat keras berikut ini untuk
server yang mendukung 50 s/d 250 prangkat pengiriman digital:
● PC dengan prosesor Pentium® 4 2 GHz atau lebih tinggi
● RAM 1 GB
Perhatikan
Perhatikan
Anda harus memiliki hak akses Administratif pada server untuk dapat menginstalasi
perangkat lunak.
Persyaratan sistem jaringan
Perangkat lunak pengiriman digital memiliki persyaratan jaringan berikut ini:
● Windows® 2000 Professional, Server, atau Advanced Server; Windows XP
Professional; atau Windows Server 2003 Standard atau Enterprise Server
● Fast Ethernet 100Base-TX atau Ethernet 10Base-T
● Akses ke sebuah gateway e-mail SMTP
Sangat dianjurkan bahwa gateway SMTP tersebut terletak di local area network (LAN)
Anda sendiri. Tetapi, Anda dapat mengatur konfigurasi produk Anda untuk fungsionalitas email meskipun jika layanan mail Anda disediakan oleh Internet service provider (ISP) luar
melalui jalur digital subscription line (DSL).
● Akses ke server LDAP jaringan untuk mendukung otentikasi pengguna opsional
8 Bab 2 Membuat pengaturan IDWW
Page 83

Mengenali komponen produk
Ilustrasi berikut ini menunjukkan lokasi dan nama dari komponen utama produk.
1 Tombol pelepas macet
2 Panel kendali
3 Saklar hidup/mati
4 Nampan keluaran
5 Nampan masukan ADF
Bahasa
Indonesia
6 Kabel ADF
7 Kabel panel kendali
8
Port jaringan 10/100Base-T
9
Port EIO
10 Konektor daya
11 Kunci pemindai
12 Nomor seri
IDWW Langkah 2. Persyaratan instalasi dan komponen produk 9
Page 84

Langkah 3. Mengganti tutup tampilan panel kendali
Perangkat dilengkapi dengan tutup tampilan yang terpasang pada panel kendali, dan tutup
tampilan untuk bahasa yang berbeda mungkin disertakan di dalam kotak. Bila perlu,
gunakan prosedur berikut ini untuk mengganti tutup tampilan panel kendali untuk
mendukung bahasa yang Anda inginkan.
1. Temukan kedua tutup tampilan panel kendali.
2. Selipkan obeng minus kecil atau alat tipis lainnya ke dalam celah di tepi atas salah satu
tutup tampilan untuk menarik bagian atasnya dari panel kendali.
3. Angkat tutup tampilan ke atas dan belakang untuk melepaskannya dari produk.
4. Letakkan tutup tampilan baru di atas panel kendali. Atur ujung tutup tampilan tepat pada
lubang pada panel kendali dan selipkan masuk tutup tampilan kedalamnya.
10 Bab 2 Membuat pengaturan IDWW
Page 85

5. Jepit tutup tampilan dengan kuat pada panel kendali. Pastikan bahwa tutup tampilan
menempel rata pada panel kendali.
6. Ulangi langkah 2 sampai 5 untuk mengganti tutup tampilan kedua.
Bahasa
Indonesia
IDWW Langkah 3. Mengganti tutup tampilan panel kendali 11
Page 86

Langkah 4. Buka kunci kepala pemindai
Kepala pemindai dikunci untuk mencegah kerusakan selama pengiriman. Ikuti petunjuk
berikut ini untuk membuka kuncinya.
1. Buka bagian atas dari pengirim digital.
2. Buka kunci kepala pemindai.
3. Tutup bagian atas pengirim digital.
12 Bab 2 Membuat pengaturan IDWW
Page 87

Langkah 5. Menyambungkan kabel jaringan
Gunakan konektor RJ-45 di bagian belakang perangkat untuk menyambungkan produk ke
jaringan Fast Ethernet 100Base-TX atau Ethernet 10Base-T.
Bahasa
Indonesia
IDWW Langkah 5. Menyambungkan kabel jaringan 13
Page 88

Langkah 6. Menyambungkan kabel daya
1. Sambungkan kabel daya ke konektor kabel daya produk. Kemudian sambungkan kabel
daya ke stopkontak arus bolak-balik (ac) yang memadai.
Perhatikan
Produk ini dapat beroperasi menggunakan daya 110/120 volt (V), 60 hertz (Hz) atau
220/240 V, 50 Hz.
2. Aktifkan produk dengan menggunakan tombol daya. Setelah pemanasan produk,
prompt akan ditampilkan yang meminta Anda untuk mengatur bahasa tampilan panel
kendali Anda (simak
Langkah 7. Mengatur konfigurasi pengaturan panel kendali).
14 Bab 2 Membuat pengaturan IDWW
Page 89

Langkah 7. Mengatur konfigurasi pengaturan panel kendali
Apabila perangkat diaktifkan untuk pertama kalinya, tampilan panel kendali menampilkan
prompt untuk mengatur bahasa, tanggal dan waktu.
Mengatur konfigurasi bahasa panel kendali
Secara standar, panel kendali pada produk menampilkan pesan dalam bahasa Inggris.
Anda dapat menggunakan menu panel kendali untuk mengatur konfigurasi produk untuk
menampilkan pesan dalam bahasa lain yang didukung. Apabila produk diaktifkan untuk
pertama kalinya, menu LANGUAGE (Bahasa) ditampilkan pada tampilan panel kendali. Pilih
bahasa untuk melanjutkan.
Perhatikan
Jika tidak ada bahasa yang dipilih dalam 60 detik, bahasa Inggris diatur sebagai bahasa
yang digunakan, dan setiap perubahan bahasa harus dilakukan menggunakan proses di
bawah ini.
Ikuti petunjuk berikut ini untuk mengganti bahasa panel kendali.
ENU
1. Tekan tombol M
2. Sentuh CONFIGURE DEVICE (pilihan menu ketiga).
3. Sentuh SYSTEM SETUP (pilihan menu keempat).
4. Gulir ke bawah dan sentuh LANGUAGE (pilihan menu terakhir).
5. Sentuh bahasa yang diinginkan.
pada panel kendali.
Mengatur konfigurasi tanggal dan waktu
Setelah mengatur konfigurasi bahasa, tampilan panel kendali menampilkan tanggal dan
waktu sekarang. Jika tanggal dan waktunya salah, sentuh OK untuk mengaturnya. Jika
benar, sentuh Exit (Keluar). Setelah diatur, jam waktu-sebenarnya di dalam perangkat akan
selalu menampilkan waktu yang benar.
Bahasa
Indonesia
IDWW Langkah 7. Mengatur konfigurasi pengaturan panel kendali 15
Page 90

Langkah 8. Menetapkan alamat IP
Untuk dapat berfungsi dengan benar, alamat IP perangkat harus ditetapkan pada jaringan
Anda. Jika jaringan Anda menggunakan protokol konfigurasi dinamis (DHCP), alamat IP ini
dapat ditetapkan secara otomatis. DHCP adalah pengaturan standar dalam pengirim digital.
Jika Anda tidak menggunakan DHCP, Anda harus menetapkan alamat IP secara manual.
Mencari alamat IP DHCP
Gunakan salah satu metode di bawah ini untuk mencari alamat IP yang telah ditetapkan
secara otomatis oleh DHCP.
● Lihat di sudut kiri-atas tampilan panel kendali pengirim digital. Di samping kata Ready
(Siap) alamat IP seharusnya ditampilkan.
● Jika alamat IP tidak ditampilkan pada tampilan panel kendali, tekan tombol M
panel kendali. Sentuh menu INFORMATION (Informasi), kemudian sentuh
CONFIGURATION (Konfigurasi). Informasi konfigurasi pengirim digital ditampilkan pada
layar sentuh. Sentuh tombol OK untuk melihat data Jetdirect. Gulir di antara informasi
sampai Anda menemukan alamat IP.
Menetapkan alamat IP secara manual
ENU
pada
Jika Anda perlu menetapkan alamat IP pada perangkat, ikuti petunjuk berikut ini.
ENU
1. Tekan tombol M
2. Sentuh CONFIGURE DEVICE.
3. Gulir ke bawah dan sentuh I/O.
4. Gulir ke bawah dan sentuh EMBEDDED JETDIRECT MENU.
5. Sentuh TCP/IP.
6. Sentuh CONFIG METHOD.
7. Sentuh MANUAL.
8. Sentuh MANUAL SETTINGS.
9. Sentuh IP ADDRESS dan gunakan papan tombol panel kendali untuk menuliskan
alamat IP unik untuk perangkat.
pada panel kendali.
16 Bab 2 Membuat pengaturan IDWW
Page 91

Langkah 9. Menginstalasi dan mengatur konfigurasi perangkat lunak
Lakukan instalasi perangkat lunak pada server yang akan mendukung layanan HP Digital
Sender Software (HP DSS). Setelah instalasi, HP DSS dijalankan di latar belakang sebagai
sebuah layanan. Ia otomatis dijalankan apabila server dijalankan ulang.
Perhatikan
Perhatikan
Pengirim digital harus diaktifkan dan terhubung ke jaringan untuk dapat menyelesaikan
proses instalasi perangkat lunak.
Sebelum Anda memulai
Selama prosedur instalasi perangkat lunak, Anda diminta untuk mengatur konfigurasi pilihan
pengiriman-digital. Untuk dapat menyelesaikan konfigurasi ini, Anda memerlukan informasi
berikut:
● Kunci lisensi perangkat lunak dari label pada CD-ROM perangkat lunak
● Nama host atau alamat Internet Protocol (IP) dari server e-mail SMTP yang akan
digunakan untuk mengirimkan e-mail dari pengirim digital
Sangat dianjurkan bahwa gateway SMTP tersebut terletak di local area network (LAN)
Anda sendiri. Tetapi, Anda dapat mengatur konfigurasi produk Anda untuk fungsionalitas email meskipun jika layanan mail Anda disediakan oleh Internet service provider (ISP) luar
melalui jalur digital subscription line (DSL).
● Nama host atau alamat IP dari server LDAP yang akan digunakan untuk mengambil
alamat e-mail (opsional)
● Path untuk semua folder yang akan dibuat pengaturannya untuk fitur kirim-ke-folder
● Nama host atau alamat IP dari pengirim digital
Bahasa
Indonesia
Perhatikan
Langkah instalasi yang diberikan di sini hanya untuk instalasi dasar. Untuk keterangan lebih
terperinci, dan informasi konfigurasi lebih lanjut, simak HP 9200C Digital Sender Support
Guide (Panduan Dukungan).
Untuk menginstalasi perangkat lunak
1. Masukkan CD-ROM HP DSS ke dalam CD-ROM drive. Pada saat program membuat
pengaturan dijalankan, pilih Install Now pada layar pembuka.
Perhatikan
IDWW Langkah 9. Menginstalasi dan mengatur konfigurasi perangkat lunak 17
Program membuat pengaturan akan otomatis dijalankan. Jika tidak, gulir ke CD-ROM drive
dan jalankan file SETUP.EXE.
2. Pada kotak dialog Choose Setup Language (Pilih Bahasa Membuat Pengaturan), pilih
bahasa untuk instalasi. Wizard membuat pengaturan akan dijalankan.
3. Pada layar Pembuka instalasi, klik Next (Lanjut).
4. Terima persyaratan lisensi perangkat lunak HP dengan klik pada Yes (Ya).
5. Terima lokasi instalasi standar, atau klik Browse (Gulir) untuk memilih lokasi lain.
Page 92

6. Setelah file perangkat lunak terinstalasi, HP MFP Digital Sending Software
Configuration Wizard ditampilkan.
Apabila Perangkat Lunak HP Digital Sender diinstalasi untuk pertama kalinya, perangkat
lunak dapat bekerja dalam modus percobaan selama jangka waktu yang ditentukan.
Bagian Licenses (Lisensi) pada layar pertama Wizard Konfigurasi menampilkan entri
"Lisensi Percobaan”. Jangka waktu percobaan yang tersisa ditampilkan pada entri ini.
Apabila jangka waktu percobaan habis, perangkat lunak akan dinonaktifkan sampai
lisensi yang berlaku didapatkan.
Untuk memasukkan kunci lisensi klik tombol Add (Tambahkan), tuliskan kunci kode
lisensi dari label pada CD-ROM perangkat lunak, kemudian klik OK.
7. Di bagian Administrator Information pada layar, isikan informasi kontak administrator.
Pilih kotak penanda Notify administrator of critical errors jika Anda ingin mendapat
pemberitahuan melalui e-mail tentang error yang memerlukan bantuan administrator.
8. Klik Next untuk melanjutkan ke layar E-Mail Settings (Pengaturan E-Mail).
9. Mengatur konfigurasi e-mail:
a. Klik Find Servers (Cari Server) untuk menemukan server SMTP pada jaringan.
b. Pada kotak dialog yang ditampilkan, pilih server SMTP yang akan Anda gunakan
untuk mengirim e-mail dari pengirim digital, kemudian klik OK.
Perhatikan
Perhatikan
Jika Anda menginginkan beberapa server, Anda dapat memilih lebih dari satu server
dengan menahan tombol CTRL sewaktu memilih server.
c. Pilih server SMTP yang Anda tambahkan dan klik Test untuk menguji
fungsionalitasnya. Jika tes ini tidak berhasil, hubungi administrator jaringan Anda
untuk memastikan fungsionalitas server SMTP.
10. Klik Next untuk melanjutkan ke layar Secondary E-Mail Settings (Pengaturan E-Mail
Sekunder).
E-mail Sekunder diperlukan untuk solusi yang memerlukan langkah keamanan data ekstra.
E-mail ini berbeda dari fitur e-mail biasa dalam arti ia memerlukan program perangkat lunak
keamanan pihak ketiga untuk dapat mengirimkan e-mail. Pengaturan konfigurasi E-mail
Sekunder tidak termasuk di dalam prosedur ini. Jika Anda merencanakan untuk
mengaktifkan E-mail Sekunder, simak petunjuknya pada HP 9200C Digital Sender Support
Guide (Panduan Dukungan).
11. Klik Next untuk melanjutkan ke layar Authentication Settings (Pengaturan Otentikasi).
12. Otentikasi adalah fitur keamanan yang penting. HP menganjurkan pengaktifan otentikasi
pada pengirim digital untuk mencegah penyalahgunaan. Meskipun demikian, otentikasi
tidak diperlukan untuk mengirim dokumen menggunakan pengirim digital. Jika Anda
tidak ingin mengaktifkan otentikasi pada saat ini, langsung ke Langkah 13.
Untuk mengaktifkan otentikasi, mulai dengan menentukan pilihan dari daftar buka-
bawah Authentication Method (Metode Otentikasi). Ini adalah metode yang digunakan
perangkat untuk verifikasi identitas log in pengguna. Tersedia pilihan berikut ini.
● Tidak ada
● Microsoft Windows
● Server LDAP
18 Bab 2 Membuat pengaturan IDWW
Page 93

● Novell NDS (jika ada perangkat lunak klien Novell)
● Novell Bindery (jika ada perangkat lunak klien Novell)
Setelah Anda menentukan pilihan, pengaturan selebihnya ditampilkan pada layar.
a. Klik tombol Find Servers (Cari Server). Kotak dialog Select LDAP Server (Pilih
Server LDAP) ditampilkan, berisi daftar server LDAP pada jaringan. (Anda mungkin
diminta untuk memberikan informasi log in Anda.)
b. Pilih server LDAP yang Anda ingin gunakan. Informasi tentang server yang dipilih
ditampilkan.
c. Klik OK untuk menerima server yang dipilih. Informasi server diisikan pada layar
Authentication Settings (Pengaturan Otentikasi).
d. Klik tombol Test untuk menguji pengaturan. Pada kotak dialog Test User
Authentication (Tes Otentikasi Pengguna), tuliskan identitas logon jaringan
seorang pengguna jaringan untuk menguji apakah LDAP dapat mengambil alamat email. Jika tes ini tidak berhasil, hubungi administrator jaringan Anda untuk
memecahkan masalah konfigurasi LDAP.
13. Klik Next untuk melanjutkan ke layar Fax Settings (Pengaturan Faks).
Perhatikan
Perhatikan
Pengaturan konfigurasi faks termasuk di dalam prosedur ini. Jika Anda merencanakan untuk
mengaktifkan pengiriman ke faks, simak petunjuknya pada HP 9200C Digital Sender
Support Guide (Panduan Dukungan).
14. Klik Next untuk melanjutkan ke layar Folder Settings (Pengaturan Folder).
15. Jika Anda ingin fitur kirim-ke-folder tersedia, tandai kotak penanda Enable Send to
Folder.
a. Klik Add… untuk menambahkan folder baru. Kotak dialog Add Predefined Folder
ditampilkan.
b. Tulis nama folder tersebut ke dalam kotak teks Alias Name (Nama Alias). Nama ini
ditampilkan pada antarmuka panel kendali.
c. Klik Browse… untuk bergulir ke lokasi folder, kemudian klik OK untuk menerimanya.
Sistem operasi yang didukung untuk folder tujuan adalah Windows 98, Windows NT,
Windows 2000, Windows Server 2003, Windows XP, dan Novell NetWare.
d. Pada daftar buka-bawah Access Credential, pilih identitas yang Anda ingin
gunakan untuk mengakses folder tersebut. Jika Public dipilih, program
menggunakan Credentials to Access Public Folders (Identitas untuk Mengakses
Folder Umum) dari layar Pengaturan Folder. Jika MFP User (Pengguna MFP)
dipilih, program menggunakan identitas yang digunakan oleh pengguna untuk log in.
e. Klik OK untuk menyimpan pengaturan tersebut. Folder yang baru ditambahkan ke
dalam daftar.
Bahasa
Indonesia
f. Ulangi langkah a sampai e untuk menambahkan folder lain.
g. Pada bidang Credentials to Access Public Folders dari tab Folders, tuliskan
identitas akses publik untuk menyimpan file ke dalam folder. Informasi ini diperlukan
sebelum Anda dapat menyimpan daftar folder.
IDWW Langkah 9. Menginstalasi dan mengatur konfigurasi perangkat lunak 19
Page 94

16. Klik Next untuk melanjutkan ke layar Workflow Settings (Pengaturan Workflow).
Perhatikan
Perhatikan
Perhatikan
Pengaturan konfigurasi Workflow tidak termasuk di dalam prosedur ini. Jika Anda
merencanakan untuk mengaktifkan workflow, simak petunjuknya pada HP 9200C Digital
Sender Support Guide (Panduan Dukungan).
17. Klik Next untuk melanjutkan ke layar Addressing Settings (Pengaturan Alamat).
18. Jika jaringan Anda mendukungnya, pilih kotak penanda Enable PABs (Buku Alamat
Pribadi) yang memungkinkan pengguna menggunakan buku alamat Microsoft Outlook
mereka pada pengirim digital.
Ini adalah fitur opsional yang memerlukan pengaktifan otentikasi dan diatur ke Microsoft
Windows. Microsoft Messaging API (MAPI) juga diperlukan. Simak HP 9200C Digital Sender
Support Guide (Panduan Dukungan) untuk informasi lebih lanjut.
19. Klik Next untuk melanjutkan ke layar Preferences Settings (Pengaturan Preferensi).
20. Klik Next kembali. Kotak dialog ditampilkan menanyakan apakah Anda ingin mengatur
konfigurasi MFP untuk memanfaatkan layanan tersebut. Klik Yes (Ya).
21. Pada layar MFP Configuration (Konfigurasi MFP), klik Add…. Kotak dialog Add MFPs
(Tambahkan MFP) ditampilkan.
22. Klik tombol Find MFPs (cari MFP) untuk menemukan semua MFP dan pengirim digital
dalam jaringan. Pilih pengirim digital yang Anda instalasi dari daftar yang ditampilkan.
Jika Anda tahu nama host atau alamat IP perangkat, Anda dapat menuliskannya pada kotak
teks Hostname or IP Address di bawah Manually enter an MFP's network name
daripada menggunakan tombol Find MFPs.
23. Klik tombol Add--> untuk menambahkan perangkat ke MFP List (Daftar MFP).
24. Klik Close untuk menutup kotak dialog Add MFPs. Pengirim digital akan muncul dalam
daftar MFP pada layar MFP Configuration.
25. Pilih pengirim digital lalu klik tombol Configure MFP. Gunakan pengaturan pada jendela
Configure MFPs untuk mengaktifkan pilihan pengiriman digital pada pengirim digital.
a. Pilih tab Send to Email (Kirim ke Email). Pilih kotak penanda Enable Send to
Email (Aktifkan Kirim ke Email), kemudian pilih via the Digital Sender service dari
daftar buka-bawah Send Emails.
b. Jika Anda ingin pengguna dapat menambahkan pesan e0mail mereka sendiri
apabila mengirimkan e-mail, klik tombol Advanced lalu pilih kotak penanda
Editable by user (Dapat diedit oleh pengguna).
c. Pilih tab Send to Folder kemudian pilih kotak penanda Enable Send to Folder
(aktifkan Kirim ke Folder).
d. Jika Anda mengaktifkan otentikasi, pilih tab Authentication lalu pilih kotak penanda
Enable Authentication (Aktifkan Otentikasi). Jika Anda tidak mengaktifkan
otentikasi, lanjutkan ke langkah f.
e. Pilih fitur yang Anda ingin aktifkan otentikasinya. Kemudian pilih domain jaringan
dari kotak buka-bawah Default Domain.
20 Bab 2 Membuat pengaturan IDWW
Page 95

f. Pergi ke tab Addressing lalu pilih kotak penanda Allow MFP to directly access an
LDAP Address Book jika Anda ingin HP DSS mengambil alamat e-mail langsung
dari server LDAP. Pilih server LDAP yang diatur konfigurasinya sebelumnya dari
daftar buka-bawah LDAP Server.
g. Klik OK untuk menyimpan pengaturan konfigurasi MFP.
Perhatikan
Jika Anda mengatur konfigurasi sejumlah pengirim digital, gunakan tombol Copy Settings
pada layar MFP Configuration untuk menyalin pengaturan Anda, kemudian gunakan
tombol Paste Settings untuk menerapkan pengaturan tersebut ke pengirim digital lainnya.
26. Klik tombol Finish (Akhiri). Layar penutup instalasi ditampilkan.
27. Klik tombol Finish pada layar InstallShield Wizard Complete untuk mengakhiri instalasi.
Bahasa
Indonesia
IDWW Langkah 9. Menginstalasi dan mengatur konfigurasi perangkat lunak 21
Page 96

Langkah 10. Memeriksa instalasi produk
Gunakan prosedur berikut ini untuk menguji instalasi dan konfigurasi perangkat.
1. Pada tampilan panel kendali perangkat, periksa apakah pilihan E-Mail dan Folder
ditampilkan.
2. Letakkan dokumen menghadap ke atas di dalam ADF atau menghadap ke bawah pada
kaca alas datar.
3. Sentuh E-MAIL pada tampilan panel kendali.
4. Jika diminta, masukkan user name dan password Anda.
5. Jika Anda tidak diminta untuk log in, sentuh From (Dari): kemudian tuliskan alamat e-
mail Anda.
6. Sentuh To (Ke): kemudian tuliskan alamat e-mail Anda sendiri.
Perhatikan
Sentuh untuk menghapus salah ketik.
7. Sentuh OK.
8. Tekan START. Perangkat memindai dokumen dan mengirimkannya kepada Anda
sebagai lampiran e-mail.
9. Ulangi proses ini menggunakan pilihan FOLDER, dan periksa apakah file dikirimkan ke
folder yang benar.
Jika dokumen tidak mengirimkan file dengan benar, periksa instalasi dan konfigurasi produk
Anda. Untuk informasi lebih lanjut, simak HP 9200C Digital Sender User Guide (Panduan
Pengguna) atau HP 9200C Digital Sender Support Guide (Panduan Dukungan).
Jika tes ini berhasil, Anda sekarang dapat memindai dokumen dan mengirimnya ke sebuah
alamat e-mail atau folder. Simak HP 9200C Digital Sender User Guide (Panduan Pengguna)
untuk petunjuk terperinci cara menggunakan semua pilihan kirim-ke, dan simak HP 9200C
Digital Sender Support Guide (Panduan Dukungan) untuk informasi tentang mengatur
konfigurasi semua fitur pengiriman digital.
22 Bab 2 Membuat pengaturan IDWW
Page 97

Pemecahan masalah dan
3
dukungan pelanggan
Gunakan informasi dalam bagian ini jika Anda menghadapi masalah dengan membuat
pengaturan awal perangkat. Untuk pemecahan masalah lebih lanjut, simak HP 9200C
Digital Sender User Guide (Panduan Pengguna) atau HP 9200C Digital Sender Support
Guide (Panduan Dukungan).
Bahasa
Indonesia
IDWW 23
Page 98

Pemecahan masalah
Gunakan petunjuk berikut ini untuk memecahkan masalah instalasi pengirim digital.
Masalah Tindakan yang diperlukan
Pengirim digital tidak mau memindai dan pesan
kesalahan CHECK CABLES (PERIKSA
KABEL). CHECK SCANNER LOCK (PERIKSA
KUNCI PEMINDAI). ditampilkan.
Tombol Find Servers (Cari Server) pada layar
E-Mail Settings tidak menemukan server
apapun.
Kunci kepala pemindai masih dalam posisi
terkunci. Geser ke posisi tidak terkunci. Simak
Langkah 4. Buka kunci kepala pemindai.
● Periksa apakah Anda memiliki server SMTP
yang berfungsi pada jaringan.
● Klik tombol Add… pada layar E-Mail
Settings lalu tuliskan nama host atau alamat
IP dari server SMTP. Setelah menuliskan
alamaynya, klik tombol Test untuk
memeriksa apakah perangkat lunak dapat
menghubungi server.
● Jika pengujian server tidak berhasil, hubungi
administrator jaringan Anda untuk
membantu memecahkan masalah
komunikasi dengan server.
● Jika Anda memiliki pengirim digital atau MFP
lain yang menggunakan layanan HP DSS
tersebut, Anda dapat menggunakan tombol
Copy Settings pada tab MFP
Configuration dari HP MFP DSS
Configuration Utility untuk menyalin
pengaturan dari perangkat yang berfungsi
dengan benar, kemudian gunakan tombol
Paste Settings untuk menerapkan
pengaturan tersebut pada pengirim digital.
24 Bab 3 Pemecahan masalah dan dukungan pelanggan IDWW
Page 99

Masalah Tindakan yang diperlukan
Tombol Find Servers (Cari Server) pada layar
Authentication Settings (Pengaturan
Otentikasi) tidak menemukan server apapun.
Pengirim digital tidak bekerja.
● Periksa apakah Anda memiliki server LDAP
yang berfungsi pada jaringan.
● Tuliskan nama host atau alamat IP dari
server LDAP ke dalam kotak teks LDAP
Server. Setelah menuliskan alamatnya, klik
tombol Find Settings untuk mendapatkan
pengaturan server. Kemudian klik tombol
Test untuk memeriksa apakah perangkat
lunak dapat menghubungi server.
● Jika pengujian server tidak berhasil, hubungi
administrator jaringan Anda untuk
membantu memecahkan masalah
komunikasi dengan server.
● Jika Anda memiliki pengirim digital atau MFP
lain yang menggunakan layanan HP DSS
tersebut, Anda dapat menggunakan tombol
Copy Settings pada tab MFP Configuration
dari HP MFP DSS Configuration Utility untuk
menyalin pengaturan dari perangkat yang
berfungsi dengan benar, kemudian gunakan
tombol Paste Settings untuk menerapkan
pengaturan tersebut pada pengirim digital.
● Pastikan bahwa kabel daya tersambung
dengan kuat ke perangkat dan ditancapkan
ke stopkontak listrik.
Bahasa
Indonesia
Halaman yang dipindai kosong atau memiliki
pola yang berulang.
Kualitas gambarnya buruk.
● Pastikan bahwa perangkat diaktifkan.
● Hapus semua pesan kesalahan pada
tampilan panel kendali.
● Periksa apakah kabel jaringan tersambung
dengan kuat ke perangkat.
● Periksa apakah salah satu dari dua LED
hijau di atas port jaringan perangkat menyala.
Pastikan apakah halaman belum berada di atas
kaca.
● Pastikan bahwa dokumen yang Anda coba
kirimkan diletakkan dengan benar pada ADF
(menghadap ke atas) atau di atas kaca
(menghadap ke bawah).
● Jika memungkinkan, coba mengganti
beberapa pengaturan pemindaian, seperti
resolusi atau jenis file, untuk meningkatkan
kualitas gambar.
IDWW Pemecahan masalah 25
Page 100

Masalah Tindakan yang diperlukan
ADF memasukkan lembaran rangkap, lembaran
miring, atau sering macet.
Pengiriman e-mail tidak sampai ke alamat email tujuan.
● Atur pemandu sehingga tepat menempel
pada tumpukan tetapi tidak menekuk
tumpukan.
● Jumlah halaman yang dapat ditampung ADF
adalah 50 atau kurang, tergantung dari jenis
media yang diisikan.
● Jumlah halaman yang dapat ditampung baki
keluaran adalah 50 atau kurang. Pastikan
tidak ada kelebihan kertas yang menumpuk
di baki keluaran.
● Kertas harus ditumpuk lurus dan rata di
dalam ADF.
● Jika dokumen asli sebelumnya dijilid atau
berlubang tiga, pastikan bahwa halamannya
tidak saling menempel.
● Jenis media yang diisikan mungkin tidak
memenuhi spesifikasi yang diperlukan.
Simak HP 9200C Digital Sender User Guide
(Panduan Pengguna) untuk spesifikasi media.
● Jika Anda menuliskan alamat e-mail di panel
kendali, kirim ulang pesan e-mail, pastikan
Anda menulis alamatnya dengan benar dan
dalam format yang benar (tanpa spasi, berisi
tanda @ yang diperlukan, dan berisi titik
yang diperlukan).
● Kirim ulang e-mail tersebut. Pastikan bahwa
Anda menulis namanya dengan format yang
benar pada kolom From (Dari): sehingga
pesan tidak ditolak dan Anda akan
menerima pesan tersebut kembali jika
pengiriman e-mail gagal.
● Minta administrator jaringan untuk
memeriksa apakah server SMTP berfungsi.
Dolumen yang Anda kirimkan ke folder tidak
sampai di folder tujuan.
Bagian bawah halaman yang Anda kirimkan
terpotong.
● Mengirim ulang dokumen.
● Periksa apakah nama filenya telah diubah
untuk mengatasi kesalahan duplikasi nama
file.
Jika dokumen dikirim dari kaca pemindai,
halaman dokumen mungkin terlalu panjang.
Panjang maksimal dokumen yang dipindai dari
kaca adalah A4, atau 210 x 297 mm (8,27 x
11,69 inci).
26 Bab 3 Pemecahan masalah dan dukungan pelanggan IDWW
 Loading...