

Page 1
HP LaserJet 9040/9050
User Guide
Page 2

Page 3

hp LaserJet 9040/9050 series printers
User Guide
Page 4

Copyright and License
© 2005 Copyright Hewlett-Packard Development Company, L.P.
Reproduction, adaptation or translation without prior written
permission is prohibited, except as allowed under the copyright laws.
The information contained herein is subject to change without notice.
The only warranties for HP products and services are set forth in the
express warranty statements accompanying such products and
services. Nothing herein should be construed as constituting an
additional warranty. HP shall not be liable for technical or editorial
errors or omissions contained herein.
Publication number: Q3721-90940
Edition 1, 02/2005
Trademark Credits
Adobe, Acrobat, and PostScript are trademarks of Adobe Systems
Incorporated.
E
NERGY STAR
®
is a U.S. registered mark.
HP-UX Release 10.20 and HP-UX Release 11.00 and later on all
HP 9000 computers are Open Group UNIX products,
Linux is a U.S. registered trademark of Linus Torvalds.
Microsoft, Windows and Windows NT
are U.S. registered trademarks
of Microsoft Corporation.
UNIX
is a registered trademark of The Open Group.
Page 5

Contents
7
1 Printer basics
Features and benefits of the printer . . . . . . . . . . . . . . . . . . . . . . . . . . . . . . . . . . . . . . . . . . . . . . .7
Parts or accessories. . . . . . . . . . . . . . . . . . . . . . . . . . . . . . . . . . . . . . . . . . . . . . . . . . . . . . .10
External view of printer and accessories . . . . . . . . . . . . . . . . . . . . . . . . . . . . . . . . . . . . . . . . . .14
Layout and basic operation of the control panel . . . . . . . . . . . . . . . . . . . . . . . . . . . . . . . . . . . . .15
Interpreting control-panel lights . . . . . . . . . . . . . . . . . . . . . . . . . . . . . . . . . . . . . . . . . . . . . .16
Using control-panel menus. . . . . . . . . . . . . . . . . . . . . . . . . . . . . . . . . . . . . . . . . . . . . . . . . .16
Paper-handling status LED interpretation . . . . . . . . . . . . . . . . . . . . . . . . . . . . . . . . . . . . . .17
Printer software. . . . . . . . . . . . . . . . . . . . . . . . . . . . . . . . . . . . . . . . . . . . . . . . . . . . . . . . . . . . . .18
Software features . . . . . . . . . . . . . . . . . . . . . . . . . . . . . . . . . . . . . . . . . . . . . . . . . . . . . . . . .18
Printer drivers. . . . . . . . . . . . . . . . . . . . . . . . . . . . . . . . . . . . . . . . . . . . . . . . . . . . . . . . . . . .19
Software for Macintosh computers. . . . . . . . . . . . . . . . . . . . . . . . . . . . . . . . . . . . . . . . . . . .22
Installing the printing system software . . . . . . . . . . . . . . . . . . . . . . . . . . . . . . . . . . . . . . . . .23
Uninstalling the software . . . . . . . . . . . . . . . . . . . . . . . . . . . . . . . . . . . . . . . . . . . . . . . . . . .26
Software for networks. . . . . . . . . . . . . . . . . . . . . . . . . . . . . . . . . . . . . . . . . . . . . . . . . . . . . .27
HP Web Jetadmin . . . . . . . . . . . . . . . . . . . . . . . . . . . . . . . . . . . . . . . . . . . . . . . . . . . . . . . .27
Communicating by using an optional HP Jetdirect print server . . . . . . . . . . . . . . . . . . . . . .29
Communicating by using the HP Jetdirect embedded print server . . . . . . . . . . . . . . . . . . .29
Embedded Web server . . . . . . . . . . . . . . . . . . . . . . . . . . . . . . . . . . . . . . . . . . . . . . . . . . . . . . . .30
Using the embedded Web server. . . . . . . . . . . . . . . . . . . . . . . . . . . . . . . . . . . . . . . . . . . . .30
HP Toolbox. . . . . . . . . . . . . . . . . . . . . . . . . . . . . . . . . . . . . . . . . . . . . . . . . . . . . . . . . . . . . . . . .31
Supported operating systems. . . . . . . . . . . . . . . . . . . . . . . . . . . . . . . . . . . . . . . . . . . . . . . .31
To view the HP Toolbox . . . . . . . . . . . . . . . . . . . . . . . . . . . . . . . . . . . . . . . . . . . . . . . . . . . .31
HP Toolbox sections . . . . . . . . . . . . . . . . . . . . . . . . . . . . . . . . . . . . . . . . . . . . . . . . . . . . . .31
Help system . . . . . . . . . . . . . . . . . . . . . . . . . . . . . . . . . . . . . . . . . . . . . . . . . . . . . . . . . . . . . . . .33
2 Printing tasks
Loading input trays . . . . . . . . . . . . . . . . . . . . . . . . . . . . . . . . . . . . . . . . . . . . . . . . . . . . . . . . . . .36
Loading optional Tray 1 . . . . . . . . . . . . . . . . . . . . . . . . . . . . . . . . . . . . . . . . . . . . . . . . . . . .36
To load optional Tray 1 when the same paper is used for multiple print jobs . . . . . . . . . . .37
Loading Trays 2, 3, and 4 . . . . . . . . . . . . . . . . . . . . . . . . . . . . . . . . . . . . . . . . . . . . . . . . . .39
Loading custom-size paper in Trays 2, 3, and 4 . . . . . . . . . . . . . . . . . . . . . . . . . . . . . . . . .45
Configuring the trays by using the Paper Handling menu . . . . . . . . . . . . . . . . . . . . . . . . . .47
Orienting media. . . . . . . . . . . . . . . . . . . . . . . . . . . . . . . . . . . . . . . . . . . . . . . . . . . . . . . . . . . . . .49
Basic printing instructions . . . . . . . . . . . . . . . . . . . . . . . . . . . . . . . . . . . . . . . . . . . . . . . . . . . . . .54
Selecting the output bin . . . . . . . . . . . . . . . . . . . . . . . . . . . . . . . . . . . . . . . . . . . . . . . . . . . . . . .55
Selecting an output location . . . . . . . . . . . . . . . . . . . . . . . . . . . . . . . . . . . . . . . . . . . . . . . . .56
Printing envelopes . . . . . . . . . . . . . . . . . . . . . . . . . . . . . . . . . . . . . . . . . . . . . . . . . . . . . . . . . . .57
Using the optional 3,000-sheet stacker. . . . . . . . . . . . . . . . . . . . . . . . . . . . . . . . . . . . . . . . . . . .60
Output features. . . . . . . . . . . . . . . . . . . . . . . . . . . . . . . . . . . . . . . . . . . . . . . . . . . . . . . . . . .60
Using the optional stacker/stapler . . . . . . . . . . . . . . . . . . . . . . . . . . . . . . . . . . . . . . . . . . . . . . .60
Selecting the stapler. . . . . . . . . . . . . . . . . . . . . . . . . . . . . . . . . . . . . . . . . . . . . . . . . . . . . . .60
Loading staples . . . . . . . . . . . . . . . . . . . . . . . . . . . . . . . . . . . . . . . . . . . . . . . . . . . . . . . . . .61
Using the optional multifunction finisher . . . . . . . . . . . . . . . . . . . . . . . . . . . . . . . . . . . . . . . . . . .63
Output features. . . . . . . . . . . . . . . . . . . . . . . . . . . . . . . . . . . . . . . . . . . . . . . . . . . . . . . . . . .63
Using the stapler . . . . . . . . . . . . . . . . . . . . . . . . . . . . . . . . . . . . . . . . . . . . . . . . . . . . . . . . .63
Loading staples . . . . . . . . . . . . . . . . . . . . . . . . . . . . . . . . . . . . . . . . . . . . . . . . . . . . . . . . . .64
Making booklets . . . . . . . . . . . . . . . . . . . . . . . . . . . . . . . . . . . . . . . . . . . . . . . . . . . . . . . . . .66
Using the optional 8-bin mailbox. . . . . . . . . . . . . . . . . . . . . . . . . . . . . . . . . . . . . . . . . . . . . . . . .68
Output features. . . . . . . . . . . . . . . . . . . . . . . . . . . . . . . . . . . . . . . . . . . . . . . . . . . . . . . . . . .68
ENWW Contents iii
Page 6

Printing both sides of paper (duplexing). . . . . . . . . . . . . . . . . . . . . . . . . . . . . . . . . . . . . . . . . . . 68
Printing on special paper . . . . . . . . . . . . . . . . . . . . . . . . . . . . . . . . . . . . . . . . . . . . . . . . . . . . . . 70
Printing on letterhead, prepunched paper, or preprinted paper (single-sided) . . . . . . . . . . 70
Printing on letterhead, prepunched paper, or preprinted paper (double-sided). . . . . . . . . . 70
Printing labels . . . . . . . . . . . . . . . . . . . . . . . . . . . . . . . . . . . . . . . . . . . . . . . . . . . . . . . . . . . 70
Printing on transparencies. . . . . . . . . . . . . . . . . . . . . . . . . . . . . . . . . . . . . . . . . . . . . . . . . . 71
Guidelines for custom-size paper, card stock, and heavy paper . . . . . . . . . . . . . . . . . . . . 71
Printing full-bleed images . . . . . . . . . . . . . . . . . . . . . . . . . . . . . . . . . . . . . . . . . . . . . . . . . . 71
3 Advanced printing tasks
Overview . . . . . . . . . . . . . . . . . . . . . . . . . . . . . . . . . . . . . . . . . . . . . . . . . . . . . . . . . . . . . . . . . . 73
Using features in the printer driver. . . . . . . . . . . . . . . . . . . . . . . . . . . . . . . . . . . . . . . . . . . . . . .74
Setting the registration . . . . . . . . . . . . . . . . . . . . . . . . . . . . . . . . . . . . . . . . . . . . . . . . . . . . . . . 75
Using a different first page . . . . . . . . . . . . . . . . . . . . . . . . . . . . . . . . . . . . . . . . . . . . . . . . . . . . . 76
Including a blank back page. . . . . . . . . . . . . . . . . . . . . . . . . . . . . . . . . . . . . . . . . . . . . . . . . . . . 77
Printing multiple pages on one sheet of paper. . . . . . . . . . . . . . . . . . . . . . . . . . . . . . . . . . . . . . 77
Customizing optional Tray 1 operation. . . . . . . . . . . . . . . . . . . . . . . . . . . . . . . . . . . . . . . . . . . . 78
Printing from optional Tray 1 when the loaded paper is requested . . . . . . . . . . . . . . . . . . . 78
Manually feeding paper from optional Tray 1 . . . . . . . . . . . . . . . . . . . . . . . . . . . . . . . . . . . 78
Specifying paper to print on . . . . . . . . . . . . . . . . . . . . . . . . . . . . . . . . . . . . . . . . . . . . . . . . . . . . 79
Benefits of printing by type and size of paper . . . . . . . . . . . . . . . . . . . . . . . . . . . . . . . . . . . 79
Using the job-storage features. . . . . . . . . . . . . . . . . . . . . . . . . . . . . . . . . . . . . . . . . . . . . . . . . .80
Printing a private job . . . . . . . . . . . . . . . . . . . . . . . . . . . . . . . . . . . . . . . . . . . . . . . . . . . . . . 80
Releasing private jobs . . . . . . . . . . . . . . . . . . . . . . . . . . . . . . . . . . . . . . . . . . . . . . . . . . . . . 81
Deleting a private job. . . . . . . . . . . . . . . . . . . . . . . . . . . . . . . . . . . . . . . . . . . . . . . . . . . . . .81
Storing a print job . . . . . . . . . . . . . . . . . . . . . . . . . . . . . . . . . . . . . . . . . . . . . . . . . . . . . . . . 81
Printing a stored job. . . . . . . . . . . . . . . . . . . . . . . . . . . . . . . . . . . . . . . . . . . . . . . . . . . . . . . 82
Deleting a stored job . . . . . . . . . . . . . . . . . . . . . . . . . . . . . . . . . . . . . . . . . . . . . . . . . . . . . .82
QuickCopying a job . . . . . . . . . . . . . . . . . . . . . . . . . . . . . . . . . . . . . . . . . . . . . . . . . . . . . . . 82
Printing additional copies of QuickCopy jobs. . . . . . . . . . . . . . . . . . . . . . . . . . . . . . . . . . . . 83
Deleting a QuickCopy job . . . . . . . . . . . . . . . . . . . . . . . . . . . . . . . . . . . . . . . . . . . . . . . . . . 83
Proofing and holding a job. . . . . . . . . . . . . . . . . . . . . . . . . . . . . . . . . . . . . . . . . . . . . . . . . . 83
Printing the remaining copies of a held job . . . . . . . . . . . . . . . . . . . . . . . . . . . . . . . . . . . . . 84
Deleting a held job. . . . . . . . . . . . . . . . . . . . . . . . . . . . . . . . . . . . . . . . . . . . . . . . . . . . . . . . 84
4 Security features
Overview . . . . . . . . . . . . . . . . . . . . . . . . . . . . . . . . . . . . . . . . . . . . . . . . . . . . . . . . . . . . . . . . . . 85
Secure Disk Erase . . . . . . . . . . . . . . . . . . . . . . . . . . . . . . . . . . . . . . . . . . . . . . . . . . . . . . . . . . 86
Affected data . . . . . . . . . . . . . . . . . . . . . . . . . . . . . . . . . . . . . . . . . . . . . . . . . . . . . . . . . . . . 86
Gaining access to Secure Disk Erase . . . . . . . . . . . . . . . . . . . . . . . . . . . . . . . . . . . . . . . . . 86
Additional information . . . . . . . . . . . . . . . . . . . . . . . . . . . . . . . . . . . . . . . . . . . . . . . . . . . . .86
Security lock. . . . . . . . . . . . . . . . . . . . . . . . . . . . . . . . . . . . . . . . . . . . . . . . . . . . . . . . . . . . . . . . 87
Job storage features . . . . . . . . . . . . . . . . . . . . . . . . . . . . . . . . . . . . . . . . . . . . . . . . . . . . . . . . . 87
5 Printer maintenance
Overview . . . . . . . . . . . . . . . . . . . . . . . . . . . . . . . . . . . . . . . . . . . . . . . . . . . . . . . . . . . . . . . . . . 89
Cleaning the printer . . . . . . . . . . . . . . . . . . . . . . . . . . . . . . . . . . . . . . . . . . . . . . . . . . . . . . . . . . 90
General cleaning . . . . . . . . . . . . . . . . . . . . . . . . . . . . . . . . . . . . . . . . . . . . . . . . . . . . . . . . .90
Printer maintenance kit . . . . . . . . . . . . . . . . . . . . . . . . . . . . . . . . . . . . . . . . . . . . . . . . . . . . . . . 92
To reset the printer maintenance count. . . . . . . . . . . . . . . . . . . . . . . . . . . . . . . . . . . . . . . . 92
To print a configuration page. . . . . . . . . . . . . . . . . . . . . . . . . . . . . . . . . . . . . . . . . . . . . . . . 92
Managing the print cartridge . . . . . . . . . . . . . . . . . . . . . . . . . . . . . . . . . . . . . . . . . . . . . . . . . . . 93
Print cartridge authentication. . . . . . . . . . . . . . . . . . . . . . . . . . . . . . . . . . . . . . . . . . . . . . . . 93
Non-HP print cartridges . . . . . . . . . . . . . . . . . . . . . . . . . . . . . . . . . . . . . . . . . . . . . . . . . . . . 93
Print cartridge storage . . . . . . . . . . . . . . . . . . . . . . . . . . . . . . . . . . . . . . . . . . . . . . . . . . . . .93
Checking the toner level . . . . . . . . . . . . . . . . . . . . . . . . . . . . . . . . . . . . . . . . . . . . . . . . . . . 93
Print cartridge conditions . . . . . . . . . . . . . . . . . . . . . . . . . . . . . . . . . . . . . . . . . . . . . . . . . . . . . . 94
iv ENWW
Page 7

Order the print cartridge . . . . . . . . . . . . . . . . . . . . . . . . . . . . . . . . . . . . . . . . . . . . . . . . . . . .94
Replace the print cartridge . . . . . . . . . . . . . . . . . . . . . . . . . . . . . . . . . . . . . . . . . . . . . . . . . .95
Recycling . . . . . . . . . . . . . . . . . . . . . . . . . . . . . . . . . . . . . . . . . . . . . . . . . . . . . . . . . . . . . . .95
Using the printer cleaning page . . . . . . . . . . . . . . . . . . . . . . . . . . . . . . . . . . . . . . . . . . . . . .95
6 Problem solving
Overview. . . . . . . . . . . . . . . . . . . . . . . . . . . . . . . . . . . . . . . . . . . . . . . . . . . . . . . . . . . . . . . . . . .97
Clearing jams . . . . . . . . . . . . . . . . . . . . . . . . . . . . . . . . . . . . . . . . . . . . . . . . . . . . . . . . . . . . . . .98
Clearing jams from the input tray areas . . . . . . . . . . . . . . . . . . . . . . . . . . . . . . . . . . . . . . . .99
Clearing jams from the duplex printing accessory (duplexer) . . . . . . . . . . . . . . . . . . . . . .103
Clearing jams from the output areas . . . . . . . . . . . . . . . . . . . . . . . . . . . . . . . . . . . . . . . . .105
To clear jams in the 8-bin mailbox . . . . . . . . . . . . . . . . . . . . . . . . . . . . . . . . . . . . . . . . . . .116
Solving repeated paper jams . . . . . . . . . . . . . . . . . . . . . . . . . . . . . . . . . . . . . . . . . . . . . . .117
Understanding printer messages . . . . . . . . . . . . . . . . . . . . . . . . . . . . . . . . . . . . . . . . . . . . . . .118
Resolving control-panel messages. . . . . . . . . . . . . . . . . . . . . . . . . . . . . . . . . . . . . . . . . . . . . .119
Correcting output quality problems. . . . . . . . . . . . . . . . . . . . . . . . . . . . . . . . . . . . . . . . . . . . . .128
Preventing wrinkles on envelopes . . . . . . . . . . . . . . . . . . . . . . . . . . . . . . . . . . . . . . . . . . .132
Solving common printer issues. . . . . . . . . . . . . . . . . . . . . . . . . . . . . . . . . . . . . . . . . . . . . . . . .133
Using the embedded Web server . . . . . . . . . . . . . . . . . . . . . . . . . . . . . . . . . . . . . . . . . . . . . . .142
Home pages. . . . . . . . . . . . . . . . . . . . . . . . . . . . . . . . . . . . . . . . . . . . . . . . . . . . . . . . . . . .142
Device pages . . . . . . . . . . . . . . . . . . . . . . . . . . . . . . . . . . . . . . . . . . . . . . . . . . . . . . . . . . .143
Networking pages. . . . . . . . . . . . . . . . . . . . . . . . . . . . . . . . . . . . . . . . . . . . . . . . . . . . . . . .143
Printing information pages . . . . . . . . . . . . . . . . . . . . . . . . . . . . . . . . . . . . . . . . . . . . . . . . . . . .144
Checking the printer configuration . . . . . . . . . . . . . . . . . . . . . . . . . . . . . . . . . . . . . . . . . . . . . .145
Menu map . . . . . . . . . . . . . . . . . . . . . . . . . . . . . . . . . . . . . . . . . . . . . . . . . . . . . . . . . . . . .145
Configuration page. . . . . . . . . . . . . . . . . . . . . . . . . . . . . . . . . . . . . . . . . . . . . . . . . . . . . . .146
Supplies status page . . . . . . . . . . . . . . . . . . . . . . . . . . . . . . . . . . . . . . . . . . . . . . . . . . . . .147
Usage page . . . . . . . . . . . . . . . . . . . . . . . . . . . . . . . . . . . . . . . . . . . . . . . . . . . . . . . . . . . .148
PCL or PS font list . . . . . . . . . . . . . . . . . . . . . . . . . . . . . . . . . . . . . . . . . . . . . . . . . . . . . . .149
Jetdirect page. . . . . . . . . . . . . . . . . . . . . . . . . . . . . . . . . . . . . . . . . . . . . . . . . . . . . . . . . . .150
Event log page . . . . . . . . . . . . . . . . . . . . . . . . . . . . . . . . . . . . . . . . . . . . . . . . . . . . . . . . . .151
Printing a paper path test . . . . . . . . . . . . . . . . . . . . . . . . . . . . . . . . . . . . . . . . . . . . . . . . . . . . .152
153
Appendix A Specifications
Overview. . . . . . . . . . . . . . . . . . . . . . . . . . . . . . . . . . . . . . . . . . . . . . . . . . . . . . . . . . . . . . . . . .153
Paper specifications . . . . . . . . . . . . . . . . . . . . . . . . . . . . . . . . . . . . . . . . . . . . . . . . . . . . . . . . .156
Supported sizes of paper for input and output . . . . . . . . . . . . . . . . . . . . . . . . . . . . . . . . .157
Supported types of paper . . . . . . . . . . . . . . . . . . . . . . . . . . . . . . . . . . . . . . . . . . . . . . . . . .160
Labels. . . . . . . . . . . . . . . . . . . . . . . . . . . . . . . . . . . . . . . . . . . . . . . . . . . . . . . . . . . . . . . . .161
Transparencies. . . . . . . . . . . . . . . . . . . . . . . . . . . . . . . . . . . . . . . . . . . . . . . . . . . . . . . . . .161
Envelopes. . . . . . . . . . . . . . . . . . . . . . . . . . . . . . . . . . . . . . . . . . . . . . . . . . . . . . . . . . . . . .161
Card stock and heavy paper . . . . . . . . . . . . . . . . . . . . . . . . . . . . . . . . . . . . . . . . . . . . . . .162
Environmental specifications . . . . . . . . . . . . . . . . . . . . . . . . . . . . . . . . . . . . . . . . . . . . . . . . . .163
Electrical specifications . . . . . . . . . . . . . . . . . . . . . . . . . . . . . . . . . . . . . . . . . . . . . . . . . . .163
Acoustical specifications . . . . . . . . . . . . . . . . . . . . . . . . . . . . . . . . . . . . . . . . . . . . . . . . . .164
Operating environment. . . . . . . . . . . . . . . . . . . . . . . . . . . . . . . . . . . . . . . . . . . . . . . . . . . .164
Appendix B Control-panel menus
Overview. . . . . . . . . . . . . . . . . . . . . . . . . . . . . . . . . . . . . . . . . . . . . . . . . . . . . . . . . . . . . . . . . .165
Retrieve job menu. . . . . . . . . . . . . . . . . . . . . . . . . . . . . . . . . . . . . . . . . . . . . . . . . . . . . . . . . . .166
Information menu . . . . . . . . . . . . . . . . . . . . . . . . . . . . . . . . . . . . . . . . . . . . . . . . . . . . . . . . . . .166
Paper handling menu . . . . . . . . . . . . . . . . . . . . . . . . . . . . . . . . . . . . . . . . . . . . . . . . . . . . . . . .167
Configure device menu. . . . . . . . . . . . . . . . . . . . . . . . . . . . . . . . . . . . . . . . . . . . . . . . . . . . . . .168
Printing submenu . . . . . . . . . . . . . . . . . . . . . . . . . . . . . . . . . . . . . . . . . . . . . . . . . . . . . . . .168
Print quality submenu. . . . . . . . . . . . . . . . . . . . . . . . . . . . . . . . . . . . . . . . . . . . . . . . . . . . .171
System setup submenu . . . . . . . . . . . . . . . . . . . . . . . . . . . . . . . . . . . . . . . . . . . . . . . . . . .173
ENWW v
Page 8

I/O submenu . . . . . . . . . . . . . . . . . . . . . . . . . . . . . . . . . . . . . . . . . . . . . . . . . . . . . . . . . . .175
Resets submenu . . . . . . . . . . . . . . . . . . . . . . . . . . . . . . . . . . . . . . . . . . . . . . . . . . . . . . . . 179
Diagnostics menu. . . . . . . . . . . . . . . . . . . . . . . . . . . . . . . . . . . . . . . . . . . . . . . . . . . . . . . . . . . 180
Service menu . . . . . . . . . . . . . . . . . . . . . . . . . . . . . . . . . . . . . . . . . . . . . . . . . . . . . . . . . . . . . . 180
Appendix C Printer memory and expansion
Overview . . . . . . . . . . . . . . . . . . . . . . . . . . . . . . . . . . . . . . . . . . . . . . . . . . . . . . . . . . . . . . . . . 181
Determining memory requirements . . . . . . . . . . . . . . . . . . . . . . . . . . . . . . . . . . . . . . . . . . . . . 182
Installing memory and fonts. . . . . . . . . . . . . . . . . . . . . . . . . . . . . . . . . . . . . . . . . . . . . . . . . . .182
To install DDR memory DIMMs. . . . . . . . . . . . . . . . . . . . . . . . . . . . . . . . . . . . . . . . . . . . . 182
To install a flash memory card. . . . . . . . . . . . . . . . . . . . . . . . . . . . . . . . . . . . . . . . . . . . . . 185
Checking memory installation . . . . . . . . . . . . . . . . . . . . . . . . . . . . . . . . . . . . . . . . . . . . . . . . . 188
Saving resources (permanent resources) . . . . . . . . . . . . . . . . . . . . . . . . . . . . . . . . . . . . . . . . 189
Installing EIO cards/mass storage . . . . . . . . . . . . . . . . . . . . . . . . . . . . . . . . . . . . . . . . . . . . . . 189
Appendix D Regulatory information
Environmental product stewardship program. . . . . . . . . . . . . . . . . . . . . . . . . . . . . . . . . . . . . . 191
Protecting the environment . . . . . . . . . . . . . . . . . . . . . . . . . . . . . . . . . . . . . . . . . . . . . . . . 191
Ozone production . . . . . . . . . . . . . . . . . . . . . . . . . . . . . . . . . . . . . . . . . . . . . . . . . . . . . . . 191
Power consumption. . . . . . . . . . . . . . . . . . . . . . . . . . . . . . . . . . . . . . . . . . . . . . . . . . . . . . 191
Toner consumption . . . . . . . . . . . . . . . . . . . . . . . . . . . . . . . . . . . . . . . . . . . . . . . . . . . . . . 191
Paper use . . . . . . . . . . . . . . . . . . . . . . . . . . . . . . . . . . . . . . . . . . . . . . . . . . . . . . . . . . . . . 191
Plastics . . . . . . . . . . . . . . . . . . . . . . . . . . . . . . . . . . . . . . . . . . . . . . . . . . . . . . . . . . . . . . . 192
HP LaserJet printing supplies . . . . . . . . . . . . . . . . . . . . . . . . . . . . . . . . . . . . . . . . . . . . . . 192
HP printing supplies returns and recycling program information . . . . . . . . . . . . . . . . . . . . 192
Material restrictions . . . . . . . . . . . . . . . . . . . . . . . . . . . . . . . . . . . . . . . . . . . . . . . . . . . . . .192
Material safety data sheet . . . . . . . . . . . . . . . . . . . . . . . . . . . . . . . . . . . . . . . . . . . . . . . . . 193
Appendix E Using accessibility shortcut keys in the Help Viewer
Using F6 to switch between the Navigation and Topic Panes . . . . . . . . . . . . . . . . . . . . . . . . . 195
Shortcut keys for the Help Viewer . . . . . . . . . . . . . . . . . . . . . . . . . . . . . . . . . . . . . . . . . . . . . . 195
Shortcut keys for the Contents tab. . . . . . . . . . . . . . . . . . . . . . . . . . . . . . . . . . . . . . . . . . . . . . 196
Shortcut keys for the Index tab . . . . . . . . . . . . . . . . . . . . . . . . . . . . . . . . . . . . . . . . . . . . . . . . 196
Shortcut keys for the Search tab . . . . . . . . . . . . . . . . . . . . . . . . . . . . . . . . . . . . . . . . . . . . . . . 196
Shortcut keys for the Favorites tab . . . . . . . . . . . . . . . . . . . . . . . . . . . . . . . . . . . . . . . . . . . . . 197
Appendix F Using the HTML Help Viewer
Getting more out of help. . . . . . . . . . . . . . . . . . . . . . . . . . . . . . . . . . . . . . . . . . . . . . . . . . . . . . 199
To find a help topic . . . . . . . . . . . . . . . . . . . . . . . . . . . . . . . . . . . . . . . . . . . . . . . . . . . . . . . . . 199
To create a list of favorite help topics . . . . . . . . . . . . . . . . . . . . . . . . . . . . . . . . . . . . . . . . . . . 200
To copy a help topic . . . . . . . . . . . . . . . . . . . . . . . . . . . . . . . . . . . . . . . . . . . . . . . . . . . . . . . . 200
To print the current help topic . . . . . . . . . . . . . . . . . . . . . . . . . . . . . . . . . . . . . . . . . . . . . . . . .200
To find topics using the toolbar buttons . . . . . . . . . . . . . . . . . . . . . . . . . . . . . . . . . . . . . . . . . 200
Using the shortcut menu commands . . . . . . . . . . . . . . . . . . . . . . . . . . . . . . . . . . . . . . . . . . . . 201
vi ENWW
Page 9

Printer basics
1
Congratulations on your purchase of an HP LaserJet 9040/9050 series printer. If you ha ve not
done so, see the Getting Started Guide that was provided with the printer for setup instructions.
Now that the printer is set up and ready to use, take a few moments to get to know the printer.
This chapter introduces the following information about the printer:
● Features and benefits of the printer
● Layout and basic operation of the control panel
● Printer software
● Embedded Web server
● Help system
Features and benefits of the printer
This section lists the major printer features.
Speed and throughput
● Transmit Once, Raster Image Processing (RIP) ONCE technology
● Eight-second standby to first page
● 40 pages per minute (ppm) (HP LaserJet 9040 series printer) or 50 ppm (HP LaserJet 9050
series printer) on letter or ISO A4 paper
● Duty cycle up to 300,000 pages per month
● 533 megahertz (MHz) microprocessor
Resolution
● 600 dots per inch (dpi) with Resolution Enhancement technology (REt)
● FastRes 1200 provides 1200 dpi quality at full speed
● Up to 220 levels of gr ay
Memory
● 64 megabytes (MB) of r andom access memory (RAM), e xpandab le to 512 MB using industry
standard 100-pin double data rate (DDR) dual in-line memory modules (DIMMs) for the base
model HP LaserJet 9040/9050 printer
● 128 MB of RAM, expanda ble to 512 MB by using industry-standard 100-pin DDR DIMMs f o r
the HP LaserJet 9040n/9050n and the HP LaserJet 9040dn/9050dn printers
● Memory Enhancement technology (MEt), which automatically compresses da ta to use RAM
more efficiently
ENWW Features and benefits of the printer 7
Page 10

User interface
● Graphic display on control pa nel
● Embedded Web server to gain access to sup port and order supplies (f or netw ork-connected
printers)
● HP Toolbox software to provide printer status and alerts, configure p rinter settin gs, and print
internal printer information pages
Language and fonts
● HP Printer Command Language (PCL) 6 driver
● HP PCL 5e driver for compatibility
● Printer Job Language (PJL)
● Printer Management Language
● 80 scalable TrueType typefaces
● HP PostScript 3 emulation (PS)
Print cartridge
● No-shake cartridge design
● Authentication of HP print cartridges
● No-pull tab with automatic seal-tab removal
● Internet-enabled supplies ordering
Paper handling
● Input
• Optional Tray 1 (multipurpose tray): A multipurpose tray for paper, transparencies,
labels, and envelopes. Holds up to 100 sheets of paper or 10 envelopes.
• Trays 2 and 3: Two 500-sheet trays. These trays automatically sense commonly used
standard paper sizes up to A3- or 11 x 17-siz e media, and can print on custom-siz e paper.
• Optional T ra y 4 (2,000-sheet input tra y): This tra y automatically senses commonly used
standard paper sizes up to A3 or 11 x 17, an d can print on custom-size paper.
• Optional duplex printing accessory: Provide s t wo-sided printing (both sides of paper).
● Output
• Standard output bins
• Standard top bin: The standard t op bin is located at t he top o f the printer and is the
factory default bin. This bin can receive up to 500 sheets of paper.
• Standard left bin: The left output bin is located on the left side of the printer. This
bin can hold up to 100 sheets of paper.
• Optional 3,000-sheet stacker: A stacking device.
• Upper bin (face-up): Holds up to 100 sheets of paper.
• Lower bin (face-down): Holds up to 3,000 sheets of paper.
• Optional 3,000-sheet stack er/stapler: Provides multiposition stapling f or up to 50 sheets
of paper per job, or equivalent job height of 5 mm (depending on paper thickness).
• Upper bin (face-up): Holds up to 100 sheets of paper.
• Lower bin (face-down): Holds up to 3,000 sheets of paper.
• Optional Multifunction finisher: Provides 1,00 0 sheets of stacking capacity, stapling f or
as many as 50 sheets of paper per document, plus folding and saddle stitching of
booklets that contain up to 10 sheets of paper.
• Upper bin (straight paper path): Holds up to 1,000 sheets of paper.
• Lower booklet bin: Holds up to 50 booklets.
8 Chapter 1 Printer basics ENWW
Page 11

• Optional 8-bin mailbox: A stacker, collator, or job separator that also provides eight
mailbox es that can be assigned to individual users or workgroups for easy identification
and retrieval. The mailbox can stack 2,000 sheets of A4- or Letter-size paper in all the
bins.
• Upper bin (face-up): Holds up to 125 sheets of pap er.
• Bins 1 through 8 (face-down): Each holds up to 250 sheets of paper.
Connectivity
● HP Jetdirect EIO print ser ver cards
• Universal serial bus (USB), serial, and LocalTalk
• Fast Ethernet 10/100TX
• Wireless 802.11b
● Parallel B connection
● Local area network (LAN)-connector (RJ-45) for the embedded print server (standard on t he
HP LaserJet 9040n/9050n and the HP LaserJet 9040dn/9050dn)
Environmental features
● The Sleep setting saves energy (meets ENERGY STAR
Note See Protecting the environment for more information.
®
guidelines, Ve rsion 3.0)
Firmware updates
Use information from the HP Web site to upgrade the printer and system firmware. To download
the latest firmware, go to www.hp.com/go/lj9040_firmware
or to www.hp.com/go/
lj9050_firmware and follow the onscreen instructions. To easily send firmware updates to
multiple printers, use the HP Web Jetadmin software (go to www.hp.com/go/webjetadmin
).
Note The firmware for the HP LaserJet 9040n/9050n and the HP LaserJet 9040dn/9050dn includes
the networking modules.
Optional HP EIO hard disk
The EIO hard disk accessory can be used to store selected print jobs, support RIP ONCE
technology, and permanently store downloaded fonts and forms in the printer. Unlike standard
printer memory, many items on the EIO hard disk remain in the printer even when the printer is
turned off. Fonts downloaded to the EIO hard disk are available to all users of the printer.
The EIO hard disk can be write-protected through software for additional security.
Use the device storage manag er applet in HP W eb Jet admin to delete files and mana ge f onts on
a mass-storage device. See Embedded Web server. For more information, see the printer
software Help.
Hewlett-Packard Company occasionally introduces new software tools fo r use with your printer
and accessories. These tools are available from the Internet. For more information, go to
www.hp.com/support/lj9050_lj9040
.
Macintosh users
Use the HP LaserJet Utility to download fonts and files. For more information, see HP LaserJet
Utility or the HP LaserJet Utility Guide online Help that is included with your HP LaserJet Utility
software.
ENWW Features and benefits of the printer 9
Page 12

Security features
● Secure Disk Erase
● Security lock
● Job retention
For more information about these features, see Security features.
Parts or accessories
The following table describes the parts and accessories that come with or are available to
purchase for use with your printer.
Type of item Item Description or use Order
number
Paper handling,
input
Optional Tray 1
(multipurpose
tray)
(standard on the
HP LaserJet
9040n/9050n
and 9040dn/
9050dn models)
Optional Tray 4
(2,000-sheet
feeder)
Optional Duplex
printing
accessory
(duplexer)
(standard on the
HP LaserJet
9040dn/9050dn
model)
Automatically feeds up to 100 sheets
of paper, or smaller amounts of
special media such as envelopes and
labels.
An optional tray that fits under the
printer for increased input capacity.
Produces automatic printing on both
sides of paper.
C8568A
C8531A
C8532A
10 Chapter 1 Printer basics ENWW
Page 13

Type of item Item Description or use Order
number
Optional output
devices (one device
can be installed in
any printer)
3,000-sheet
stacker
3,000-sheet
stacker/stapler
Multifunction
finisher
8-bin mailbox A device that provides a face-up bin
One 3,000-sheet stacking device.
The device also offers job offset
capabilities.
One 3,000-sheet stacking device that
provides stapling for as many as
50 sheets of paper per document.
The device also offers job offset
capabilities.
A finishing device that provides up to
1,000 sheets of stacking capacity,
stapling for as many as 50 sheets of
paper, plus folding and saddlestitching of booklets that contain up to
10 sheets of paper.
(upper bin) and 8 face-down bins that
can be assigned to individual users or
workgroups. The device also
functions as a job separator, stacker,
and sorter/collator.
C8084A
C8085A
C8088B
Q5693A
Printing supplies Print cartridge
(average of
30,000 pages at
approximately
5% coverage)
Staple cartridge
(for stacker/
stapler)
Staple cartridge
(for multifunction
finisher)
Replacement HP maximum capacity,
smart print cartridge.
Replacement HP 5,000-staple
cartridge.
Replacement HP 5,000-staple
cartridge.
C8543X
C8091A
C8092A
ENWW Features and benefits of the printer 11
Page 14

Type of item Item Description or use Order
number
Memory, fonts, and
mass storage
SDRAM double
data rate (DDR)
memory DIMMs
(100-pin)
Flash memory
cards
(100-pin)
EIO hard disk Permanent storage for fonts and
The printer has two memory DIMM
slots. One is used by factory-installed
memory.
Improves the ability of the printer to
handle large and stored jobs
(maximum 512 MB with HP-brand
DDR DIMMs).
32 MB
64 MB
128 MB
256 MB
512 MB
Permanent storage for fonts and
forms.
16 MB
32 MB
64 MB
forms. Enables RIP ONCE
technology of print jobs that are too
large to RIP ONCE in RAM.
Q3982A
Q2625A
Q2626A
C2627A
C2628A
Q2634A
Q2635A
Q2636A
J6073A
(> 5 GB)
12 Chapter 1 Printer basics ENWW
Page 15

Type of item Item Description or use Order
number
Cable and interface
EIO cards ● HP Jetdirect Connectivity Card
accessories
Maintenance kit Printer
maintenance kit
for USB, serial, and LocalTalk
connectivity
● HP Jetdirect 620N Print Server
for Fast Ethernet (10/100BaseTX) networks (RJ-45 only)
(embedded 10/100Base-TX on
the HP LaserJet 9040n/9050n
and 9040dn/9050dn models is
standard)
● HP 680n Wireless 802.11b
connectivity
● HP Jetdirect 625N Print Server
for Fast Ethernet (10/100BaseTX networks)
● The kit contains two Type 1
rollers, seven Type 2 rollers, one
transfer roller assembly, and one
fuser assembly.
J4135A
J7934A
J6058A
J7960A
C9152A (for
110-V models)
C9153A (for
220-V models)
ENWW Features and benefits of the printer 13
Page 16
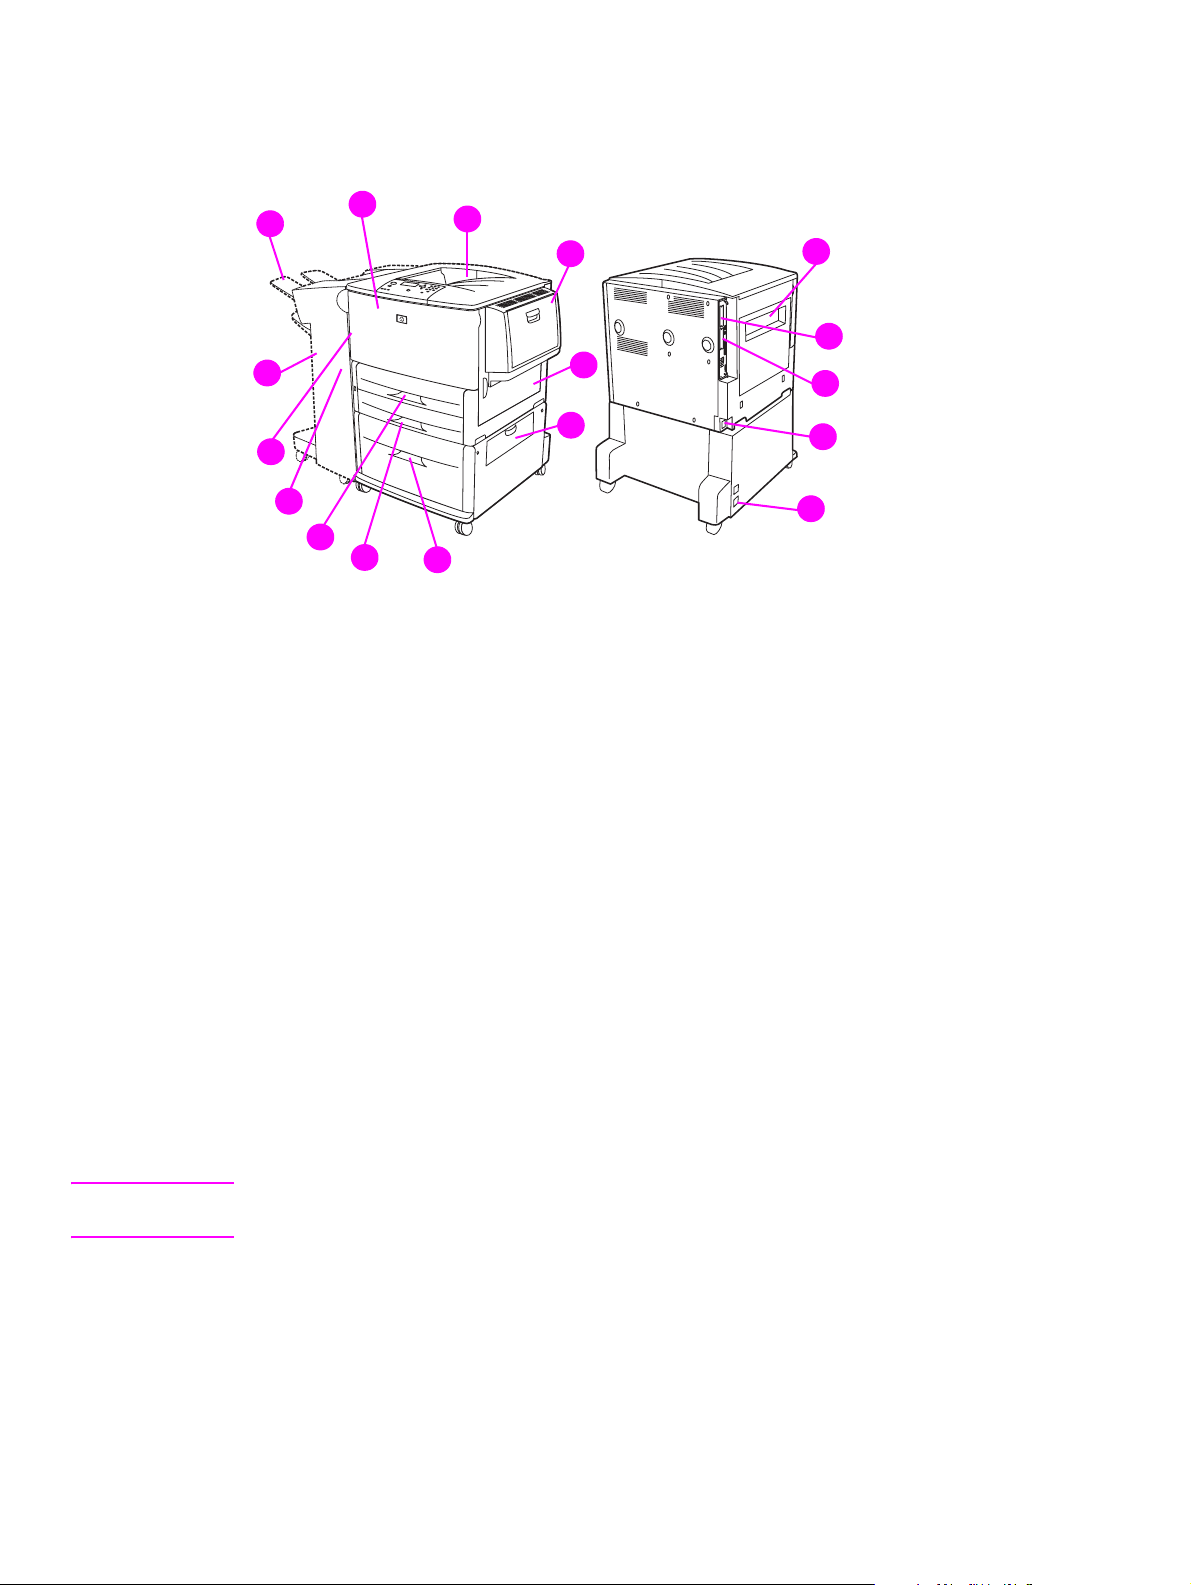
External view of printer and accessories
1
1
12
11
1
10
1
9
1
8
1
7
1
6
1. Standard top bin (face-down output bin)
2. Optional Tray 1
3. Right door
4. Vertical transfer door
5. Optional Tray 4
6. Tray 3
7. Tray 2
8. Left door (behind output device)
9. Optional duplex printing accessory (duplexer) (inside of the printer)
10. Optional output device (3,000-sheet stacker, 3,000-sheet stacker/stapler, multifunction
finisher, or 8-bin mailbox)
11. Upper bin (face-up output bin shown on optional output device)
12. Front door
13. Left door
14. EIO slot 1
15. EIO slot 2
16. Power cord
17. Tray 4 output power
1
1
1
2
1
3
1
4
1
5
13
1
17
1
14
15
1
16
1
1
Note For specific information about the output bins for each optional output device, see Selecting the
output bin.
14 Chapter 1 Printer basics ENWW
Page 17
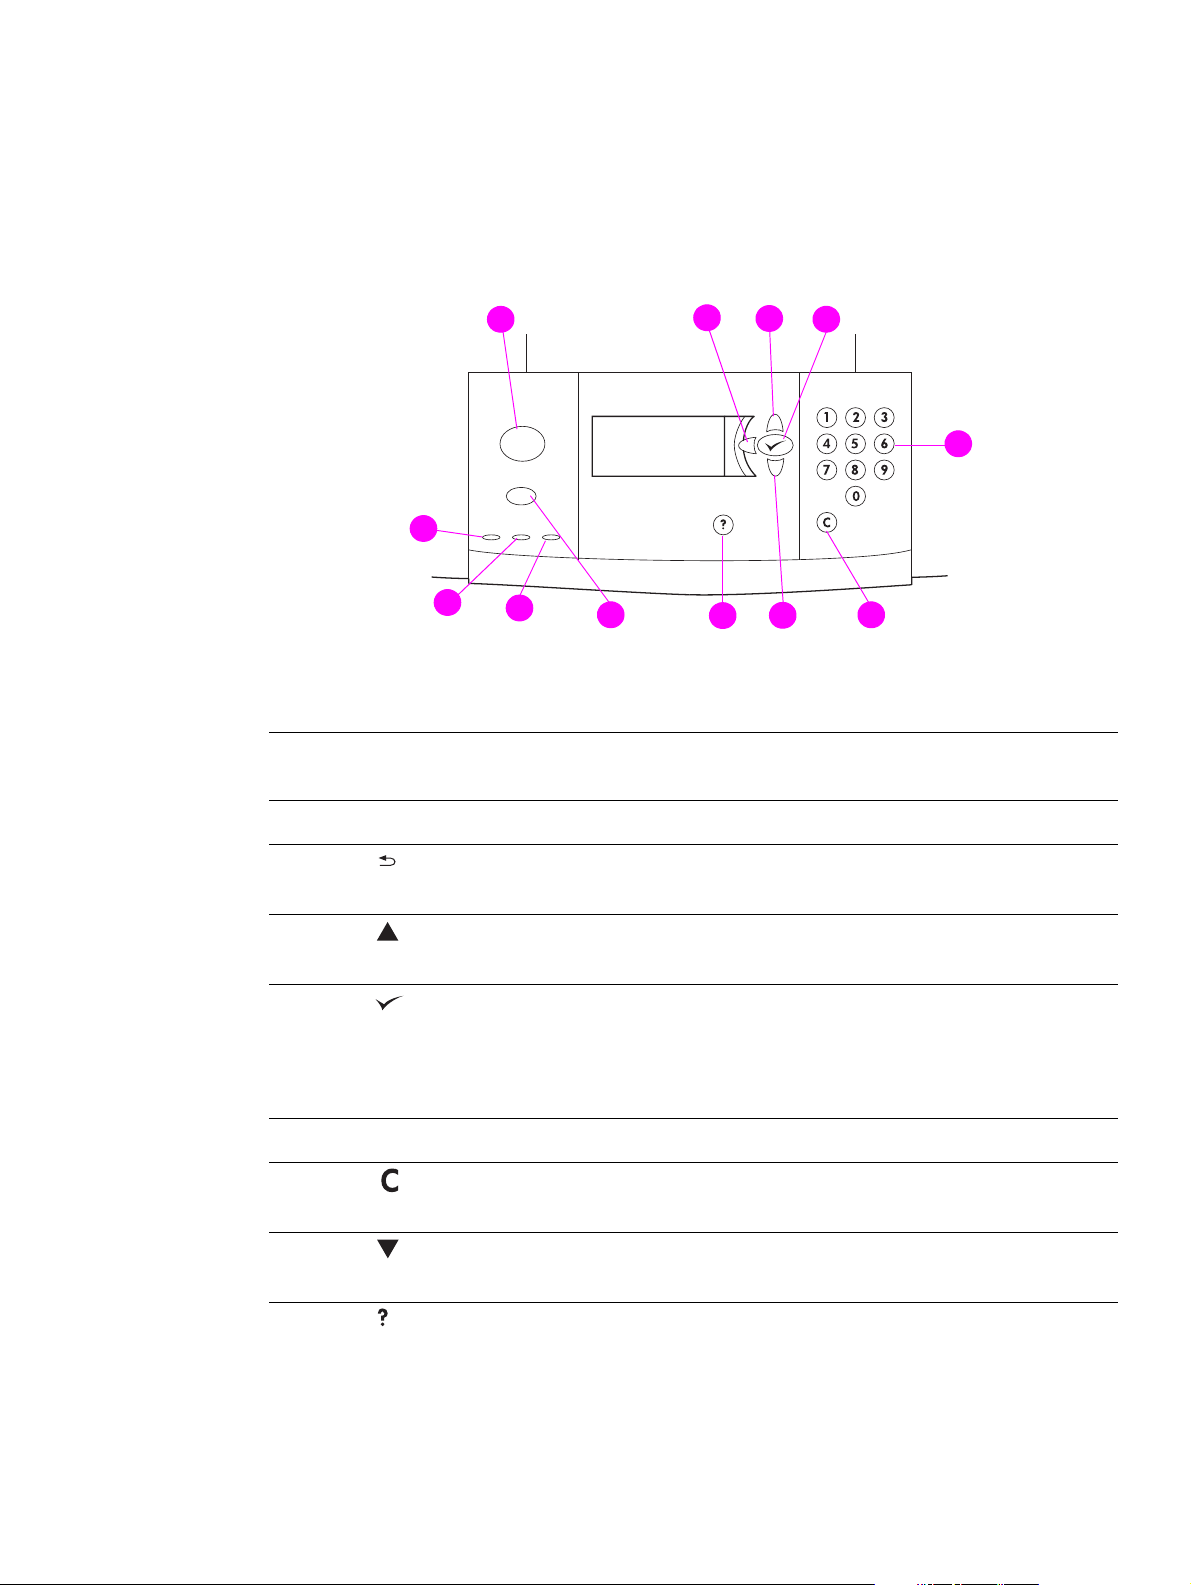
Layout and basic operation of the control panel
The control panel includes three light-emitting diode (LED) indicator lights, four navigation
buttons, dedicated Help, two job-specific buttons, a numeric keypad, and a graphical display
(capable of showing up to four lines of text).
1
1
12
1
11
1
1
1
10
1
9
2
1
3
1
1
7
8
1
4
1
5
1
6
Callout
number
1
2
3
4
5
6
7
8
Button Function
MENU Enters or exits the menus.
Backs up one step from a selection or from a keypad entry.
(Back Arrow)
Navigates to the previous item in the list.
(Up Arrow)
● Sav es the selected value f or that item. An asterisk ( * ) appears next
(SELECT)
NUMERIC KEYPAD Can be used to specify numeric values.
(Clear)
(Down Arrow)
(Help)
to the selection, indicating that it is the new default. Default settings
remain when the printer is turned off or is reset (unless you reset all
factory defaults from the Resets menu).
● Prints one of the printer information pages from the control panel.
Returns a numeric entry to its default value.
Navigates to the next item in the list.
Gets help about the message that currently appears.
ENWW Layout and basic operation of the control panel 15
Page 18

Callout
number
Button Function
9
STOP Brings up the Stop menu with the following options:
● Cancel th e current print job.
● Pause the printer.
● Resume printing if the printer was paused.
Interpreting control-panel lights
Callout
number
10
11
12
Light Indication
Attention Off
On
Blinking
Data Off
On
Blinking
Ready Off
On
Blinking
The printer has no error.
The printer has a critical error. Turn the printer off and
then on.
Action is required. See the control-panel display.
The printer has no data to print.
The printer has data to print, but is not ready or is offline.
The printer is processing or is printing the data.
The printer is offline or has an error.
The printer is ready to print.
The printer is going offline; wait for the blinking to stop.
Using control-panel menus
For a complete list of control-panel items and possible values, see Cont rol-panel menus. When
additional trays or other accessories are installed in the printer, new menu items automatically
appear.
To print a control-panel menu map
See Menu map for information about how to print a control-panel menu map.
To change a control-panel setting
1 Press or MENU to open the menus.
2 Use or to scroll to the menu you want, and press to select it. Depending on the
menu, you might have to repeat this step to select a submenu.
3 Use or to scroll to the item you want, and press to select it.
4 Use or to scroll to the value you want, and press to select it. An asterisk
appears next to the selection on the control-pa nel displa y, indicating that it is now the default .
5 Press
MENU to exit the menu.
Note Settings in the printer driver and software override control-panel settings. (Software settings
override printer driver settings .) If you cannot open a menu or use an item, it is either not an option
for the printer, or your network administrator has locked the function. (The control panel reads
ACCESS DENIED MENUS LOCKED.) See your network administrator.
( * )
16 Chapter 1 Printer basics ENWW
Page 19

Paper-handling status LED interpretation
Use the following t able to inte rpret the status LED on the optional 2,000- sheet input tra y (opt ional
Tray 4), optional 3,000-sheet stacker, optional 3 ,000 -she et sta cker/stapler, optional multifunction
finisher, and optional 8-bin mailbox.
Light Optional 2,000-sheet
input tray (Tray 4)
Solid green The accessory is on and
ready.
Blinking green The accessory is in service
mode.
Solid amber The accessory is
experiencing a hardware
malfunction.
Blinking amber The accessory has a jam, or
a page needs to be removed
from the tray, even if the
page is not jammed.
The vertical transfer door
might be open.
Off The printer might be in
Sleep mode. Press any
button of your choice.
The accessory is not
receiving power.
Optional output device (3,000-sheet
stacker, 3,000-sheet stacker/stapler,
multifunction finisher, or 8-bin
mailbox)
The accessory is on and ready.
The accessory is in service mode.
The accessory is experiencing a hardware
malfunction.
The accessory has a jam, or a page needs to
be removed from the unit, even if the page is
not jammed.
The accessory is not correctly attached to the
printer.
The printer might be in Sleep mode. Press
any button of your choice.
The accessory is not receiving power.
ENWW Layout and basic operation of the control panel 17
Page 20

Printer software
Included with the printer is a CD-ROM that contains the printing-system software. The software
components and printer drivers on this CD-R OM help y ou to use the printer to its f ullest potential.
See the installation notes on the CD-ROM for installation instructions.
Note For the latest information about the printing system software components, see the readme file on
the Web at www.hp.com/support/lj9050_lj9040
software, see the install notes on the CD-ROM that was included with the printer.
This section summarizes the software that is included on the CD-ROM. The printing system
includes software for the following operat ing environments:
● Microsoft
● Microsoft Windows NT
● IBM OS/2 version 3.0 or later (also available on the Web)
● Apple Mac OS 7.5 or later
● Linux (also available on the Web)
®
Windows 9X and Windows Millennium Edition (Me)
®
4.0, Windows 2000, and Windows XP
The printing system also includes software for network administrators that use the following
network operating systems:
● Microsoft Windows 9X and Windows Me
● Microsoft Windows NT 4.0, Windows 2000, and Windows XP
● Microsoft Windows Server 2003
● Mac OS (EtherTalk)
● Linux (Web)
● UNIX
®
(Web)
. For information about installing the printer
Network printer installation for UNIX and other network operating systems is available from the
Web or through a local HP-authorized dist ributor.
Note For a list of printer drivers, updated HP printer software, and product support information, go to
www.hp.com/support/lj9050_lj9040.
Software features
Automatic configuration, Update Now, and Preconfiguration features are available with the
HP LaserJet 9040/9050 series printers.
Driver Autoconfiguration
The HP LaserJet PCL 6 and PCL 5e drivers for Windows and the PS drivers for Windows 2000
and Windows XP feature automatic discovery and driver configuration for printer accessories at
the time of installation. Some accessories that Driver Autoconfiguration supports are the
duplexing unit, optional paper trays, and dual inline memory modules (DIMMs).
18 Chapter 1 Printer basics ENWW
Page 21

Update Now
If you hav e modified the config uration of the HP LaserJet 9040/9050 printer since installation, the
driver can be automatically updated with the new configuration in environments that support
bidirectional communication. Click the Update Now button to automatically reflect the new
configuration in the driver.
Note The Update Now feature is not supported from the client machine in a Point-and-Print
environment. Update Now can be used for locally-installed printers, and by the Point-and-Print
server.
HP Driver Preconfiguration
HP Driver Preconfiguration is a set of tools that you can use to customize and distribute
HP software in managed corporate printing environments. By using HP Driver Preconfiguration,
information technology, (IT) administrators can preconfigure the prin tin g an d device defaults for
HP printer drivers before insta lling th e drivers in the network environment. For more information,
see the HP Driver Preconfiguration Support Guide, which is available at www.hp.com/support/
lj9050_lj9040.
Printer drivers
Use the printer drivers to gain access to the printer features and allow the computer to
communicate with the printer (by using a printer language). Check the installation notes, the
readme file, and the late-breaking readm e file on the printer CD-R OM f or additional softw are and
languages.
The following table lists the printer drivers that are included with the printer. The most recent
drivers are available at www.hp.com/support/lj9050_lj9040
. (If you do not have access to the
Internet, see the HP support flyer.) Depending on the configuration of Windows-based
computers, the installation program for the printer software automatically checks the computer
for Internet access in order to obtain the latest drivers.
Note The PCL 5e print driver for all operating systems, plus the PCL 6 and PS drivers for
Windows NT 4.0, are available on the CD-ROM. However, these print drivers are not installed
during typical installation. To install one of these drivers, use the Add Printer Wizard .
1
Operating system
Windows 9X and Windows
Me
Windows NT 4.0, ➼➼➼
Windows 2000 ➼➼➼
Windows XP ➼➼➼
Windows Server 2003 ➼➼➼
Macintosh OS ➼➼➼➼
1.Not all of the printer features are available from all drivers or operating systems. See the contextsensitive Help in your driver for available features.
2.PostScript (PS) 3 emulation is referred to as PS throughout this guide.
3.Only PostScript Printer Description (PPDs) files are included (see PostScript Printer Description
Files (PPDs) and Printer Dialog Extension (PDEs)). If you need the Apple printer driver, it comes
with the Macintosh operating system (OS), or it can be obtained directly from Apple.
PCL 5e PCL 6 PS
➼➼➼
2
PPD
3
ENWW Printer software 19
Page 22

Note If your system did not automat ically check the Internet for the latest drivers during software
installation, you can download the latest drivers from www.hp.com/support/lj9050_lj9040
. After
you are connected, click Downloads and Drivers to find the driver that you want to download.
You can obtain Model Scripts for UNIX and Linux by downloading them from the Internet or by
requesting them from an HP-aut horized service or support provider. You can download the UNIX
installers at www.hp.com/support/net_printing
.
Note If the printer driver that you want is not on the printer CD-ROM or it is not listed here, check the
installation notes, the r eadme f ile , and the la te-b reaking r eadme file to see if t he printer driv er is
supported. If it is not supported, contact the manufacturer or distributor of the program that you
are using and request a driver for the printer.
Additional drivers
The following driv ers are not included on t he CD-ROM, b ut are a v ailable f rom the Internet or from
HP Customer Care.
● OS/2 PCL 5e/6 printer driver
● OS/2 PS printer driver
● UNIX model scripts
● Linux drivers
● HP OpenVMS drivers
Note The OS/2 drivers are a vailable from IBM and a re packaged with OS/2. They a re not available in
Traditional Chinese, Simplified Chinese, Korean, or Japanese.
Note The HP OpenVMS drivers are available from h71000.www7.hp.com.
Choose the correct printer driver for your needs
Select a printer driver based on the way that you use the printer. Certain printer features are
available only in the PCL 6 drivers. See the printer driver Help for available features.
● Use the PCL 6 driver to take full advantage of t he printer f eatures . F or gener al office printing,
the PCL 6 driver is recommended to provide optimum performance and print quality.
● Use the PCL 5e driver if you need backward compatibility with previous PCL printer drivers
or older printers.
● Use the PS driver if you are printing primarily from PostScript-specific programs such as
Adobe and Corel, for compatibility with P ostScript Level 3 needs, or for PS font DIMM
support.
Note The printer automatically switches between PS and PCL printer languages.
Printer driver Help
Each printer driver has help screens that can be activated by clicking the Help button, pressing
the
F1 key, or clicking the question mark symbol in the upper-right corner in the printer driver
(depending on the Windows operating system in use). These help screens give detailed
information about the specific driver. Printer driver Help is separate from the software program
Help.
20 Chapter 1 Printer basics ENWW
Page 23

Gaining access to the printer drivers
Use one of the following methods to gain access to the printer drivers from your computer:
Operating
system
Windows 9X,
Windows NT, and
Windows Me
Windows 2000
and Windows XP
Temp orarily change
settings
(from a software
program)
On the File menu, click
Print. Select the printer,
and then click
Properties. (The actual
steps can vary; this is the
most common method.)
On the File menu, click
Print. Select the printer,
and then click Properties
or Preferences. (The
actual steps can vary;
this is the most common
method.)
Change print job
default settings
(across all software
programs)
Click the Start button,
point to Settings, and
then click Printers.
Right-click the
appropriate printer icon,
and then select
Properties (Windows 98
and Windows Me) or
Document Defaults
(Windows NT 4.0).
Click the Start button,
point to Settings, and
then click Printers or
Printers and Faxes.
Right-click the printer
icon, and then select
Printing Preferences.
Change
configuration
settings (for
example, add a new
input tray)
Click the Start button,
point to Settings, and
then click Printers.
Right-click the
appropriate printer icon,
and then select
Properties. Click the
Configure tab.
Click the Start button,
point to Settings, and
then click Printers.
Right-click the
appropriate printer icon,
and then select
Properties. Click the
Device Settings tab.
Macintosh OS 9.1 On the File menu, click
Print. Change the
settings that you want on
the various pop-up
menus.
Macintosh OS X
10.1
On the File menu, click
Print. Change the
settings that you want on
the various pop-up
menus.
On the File menu, click
Print. As you change
settings on the pop-up
menu, click Save
Settings.
On the File menu, click
Print. As you change
settings on the various
pop-up menus, click
Save Custom Settings.
These settings are saved
as the Custom option. To
use the new settings, you
must select the Custom
option each time that you
open a program and
print.
Click the desktop printer
icon. From the Printing
menu, click Change
Setup.
Delete the printer and
reinstall it. The driver will
be automatically
configured with the new
options when the driver is
reinstalled (AppleTalk
connections only.)
Configuration settings
might not be available in
Classic mode.
ENWW Printer software 21
Page 24

Operating
system
Temp orarily change
settings
(from a software
program)
Change print job
default settings
(across all software
programs)
Change
configuration
settings (for
example, add a new
input tray)
Macintosh OS X.2 On the File menu, click
Print. Change the
settings that you want on
the various pop-up
menus.
Macintosh OS X.3 On the File menu, click
Print. Change the
settings that you want on
the various pop-up
menus.
On the File menu, click
Print. Change settings
on the various pop-up
menus. On the Presets
pop-up menu, click Save
as, and type a name for
the preset. These
settings are saved in the
Presets menu. To use
the new settings, you
must select the saved
preset option each time
that you open a program
and print.
Open the Print Center.
(Select the hard drive,
click Applications, click
Utilities, and then
double-click Print
Center.) Click the print
queue. On the Printers
menu, click Show Info.
Select the Installable
Options menu.
Configuration settings
might not be available in
Classic mode.
Open the Printer Setup
Utility. (Select the hard
drive, click Applications,
click Utilities, and then
double-click Printer
Setup Utility.) Click the
print queue. On the
Printers menu, click
Show Info. Select the
Installable Options
menu.
Software for Macintosh computers
The HP installer provides PostScript Printer Description (PPD) files, Printer Dialog Extensions
(PDEs), and the HP LaserJet Utility for use with Macintosh computers.
The embedded Web server ca n be used by Macintosh computers if the printer is connected to a
network.
PostScript Printer Description Files (PPDs) and Printer Dialog Extension
(PDEs)
Use PPDs, in combination with the PostScript drivers, to gain access to the printer features and
allow the computer to communica te with the printer. An installation program for the PPDs, PDEs,
and other software is provided on the CD-ROM. Use the appropriate PS driver that is provided
with the operating system.
22 Chapter 1 Printer basics ENWW
Page 25

HP LaserJet Utility
Use the HP LaserJet Utility to control features that are not available in the driver. Use the
illustrated screens to select the printer features that you want. Use the HP LaserJet Utility to
perform the following tasks:
● name the printer, assign it to a zone on the network, and download files and fonts
● configure and set the printer for Internet protocol (IP) printing
Note The HP LaserJet Utility is not currently supported for OS X, but the utility is supported for the
Classic environment.
Installing the printing system software
The following sections contain instructions for installing the printing system software.
The printer comes with printing system software and printer drivers on a CD-ROM. The printing
system software on the CD-ROM must be installed to take full advantage of the printer features.
If you do not have access to a CD-ROM drive, you can download the printing system software
from the Internet at www.hp.com/support/lj9050_lj9040
Note Sample model scripts for UNIX (HP-UX®, Sun Solaris) and Linux networks are available for
download at www.hp.com/support/net_printing.
.
Installing Windows printing system software for direct connections
This section explains how to install the printing system software for Microsoft Windows 98,
Windows Me, Windows NT 4.0, Windows 2000, Windows Server 2003, and Windows XP.
If you are installing the software on Windows NT 4.0, Windows 2000, Windows Server 2003, or
Windows XP, make sure that you have administrator privileges.
When installing the printing software in a direct-con nect environment, always install t he software
before connecting the pa rallel cable. If the par allel cable was connected before the software
installation, see Installing the software after the parallel cable has been connected.
To install the printing system software
1 Close all of the software progra ms that are open or running.
2 Insert the printer CD-ROM into the CD-ROM drive. If the welcome screen does not open,
start it by using the following procedure:
a On the Start menu, click Run.
b Type the following information: X:/setup (where X is the letter of the CD-ROM driv e).
c Click OK.
3 When prompted, click Install Printer and follow the instructions on the computer screen.
4 Click Finish when the installation is complete. You might need to restart the comput er.
5 Print a Test Page or a page from any software program to make sure that the software is
correctly installed.
If installation fails, reinstall the softw are . If th is fails, check the i nstallati on note s an d readme files
on the printer CD-ROM or the flyer that came in the printer box, or go to www.hp.com/support/
lj9050_lj9040 for help or more information.
ENWW Printer software 23
Page 26

Installing Windows printing system software for networks
The software on the printer CD-ROM supp orts network installation with a Micros of t net w o rk. For
network installation on other operating systems, go to www.hp.com/support/lj9050_lj9040
see the Network Installation Guide that is included with the printer.
The HP Jetdirect print server that is included with the HP LaserJet 9040n/9050n and the HP
LaserJet 9040dn/9050dn printer has a 1 0/100Base-TX n etwork port. If you need an HP Je tdirect
print server with another type of network port, see Parts or accessories or go to www.hp.com/
support/lj9050_lj9040.
The installer does not support printer installation or printer object creation on Novell servers. It
supports only direct-mode network installations between Windows computers and a printer. To
install your printer and create objects on a Novell server, use an HP utility (such as HP Web
Jetadmin or HP Install Network Printer Wizard) or a Novell utility (such as NWadmin).
To install the printing system software
1 Make sure that the HP Jetdirect print server is configured correctly f or the netw ork by printing
a configuration page (see Printing information pages). On the second page, locate the
printer IP address. You might need this address to complete network installation. If the
printer is using DHCP IP configuration, use the name on the second page. Otherwise, if the
printer is shut down for an e xtended pe riod of time, DHCP do es not guar antee that th e same
IP address will be issued.
2 Close all software programs that are open or running.
3 Insert the printer CD-ROM into the CD-ROM drive. If the welcome screen does not open,
start it by using the following procedure:
, or
a On the Start menu, click Run.
b Type the following: X:/ setup (where X is the letter of the CD-ROM drive).
c Click OK.
4 When prompted, click Install Printer and follow the instructions on the computer screen.
5 Click Finish when installation has completed. You might need to restart the computer.
6 Print a Test Page or a page from any software program to make sure that the software is
correctly installed.
Note If installation fails, reinstall the software. If this fails, ch eck the installat ion notes and read me files
on the printer CD-ROM or the flyer that came in the printer box, or go to www.hp.com/support/
lj9050_lj9040 for help or more information.
Setting up a Windows computer to use the network printer by using
Windows-sharing
If the printer is directly connected to a computer with a parallel cab le, you can share the printer
on the network so that other network users can print to it.
See your Windows documentation for information about how to make Windows-sharing
available. After the printer is shared, install the printer software on all computers that share the
printer.
24 Chapter 1 Printer basics ENWW
Page 27

Installing Macintosh printing system software for networks
This section describes how to install Macintosh printing system software. The printing system
software supports Mac OS versions 8.6 through 9.2.x, Mac OS version 10.1, and later.
The printing system software includes the following components:
● PostScriptR Printer Description (PPD) files
The PPDs, in combination with the PostScript printer drivers, provide access to printer
features . An installation program for the PPDs and other software is provided on the CDROM that came with the printer. Use the Apple LaserWriter 8 printer driver that comes with
the computer.
● HP LaserJet Utility
The HP LaserJet Utility provides access to features that are not av ailable in the printer driver.
Use the illustrated screens to select printer features and complete the following tasks with
the printer:
• Name the printer .
• Assign the printer to a zone on the netw ork.
• Assign an IP to the printer.
• Download files and fonts.
• Configure and set the printer for IP or AppleTalk printing.
Note The HP LaserJet Utility is not currently supported for OS X, but the utility is supported for the
Classic environment.
To install printer drivers from Mac OS 8.6 to 9.2
1 Connect the network cable between t he HP Jetdirect print server and a network port.
2 Insert the CD-ROM into the CD-ROM drive. The CD-ROM menu runs automat ically. If the
CD-ROM menu does not run automatically, double-click the CD-ROM icon on the desktop,
and then double-click the Installer icon. This icon is located in the Installer/ <language>
folder of the Starter CD-ROM (where <language> is your language preference). (For
example, the In staller/English folder contains the Installer icon for the English printer
software.)
3 Follow the instructions on the computer screen.
4 Open the Apple Desktop Printer Utility that is located in the {Startup Disk}: Applications:
Utilities folder.
5 Double-click Printer (AppleTalk).
6 Next to AppleTalk Printer Selection, click Change.
7 Select the printer, click Auto Setup, and then click Create.
8 On the Printing menu, click Set Default Printer.
Note The icon on the desktop is generic. All of the specific print panels appear in the print dialog box
in a program.
To install printer drivers from Mac OS 10.1 and later
1 Connect the network cable between t he HP Jetdirect print server and a network port.
2 Insert the CD-ROM into the CD-ROM drive. The CD-ROM menu runs automat ically. If the
CD-ROM menu does not run automatically, double-click the CD-ROM icon on the desktop,
and then double-click the Installer icon. This icon is located in the Installer/<language> f older
of the Starter CD-ROM (where <language> is your language pr eference). (Fo r example, the
Installer/English folder contains the Installer icon for the English printer software.)
ENWW Printer software 25
Page 28

3 Double-click the HP LaserJet Installers folder.
4 Follow the instructions on the computer screen.
5 Double-click the Installer icon for the appropriate language.
6 On your computer hard drive, double-click Applications, double-click Utilities, and then
double-click Print Center.
7 Click Add Printer.
8 Select the AppleTalk connection type on OS X 10.1 and the Rendezv ous connectio n type on
OS X 10.2.
9 Select the printer name.
10 Click Add Printer.
11 Close the Print Center by clicking the close button in the upper-left corner.
Note Macintosh computers cannot be connected directly to the printer by using a parallel port.
Installing the software after the parallel cable has been connected
If you have already connected a parallel cable to a Windows computer, the New Hardware
Found Wizard appears when you turn on the computer.
To allow the Wizard to search the CD and automatically install the printer software
1 In the New Hardware Found dialog box, click Search CD-ROM drive.
2 Click Next.
3 Follow the instructions on the computer screen.
4 Print a Test Page or a page from any software program to make sure that the software is
correctly installed.
If installation fails, reinstall the softw are . If th is fails, check the i nstallati on note s an d readme files
on the printer CD-ROM or the flyer that came in the printer box, or go to www.hp.com/support/
lj9050_lj9040 for help or more information.
Uninstalling the software
This section explains how to uninstall the printing system software.
To remove software from Windows operating systems
Use the Uninstaller in the HP LaserJet 9040/9050/Tools program group to select a nd remov e any
or all of the Windows HP printing system components.
1 Click Start and then click Programs.
2 Click HP LaserJet 9040 or HP LaserJet 9050, and then click Tools.
3 Click Uninstaller.
4 Click Next.
5 Select the HP printing system components that you wa nt to uninstall.
6 Click OK.
7 Follow the instructions on the computer screen to complete the uninstallation.
To remove software from Macintosh operating systems
Drag the HP LaserJet folder and PPDs to the trash can.
26 Chapter 1 Printer basics ENWW
Page 29

Software for networks
For a summary of av a ilab le HP n etwo rk installation an d configur ation softw are soluti ons , see th e
HP Jetdirect Print Server Administrator’s Guide. You can find this guide on the CD-ROM that is
included with the printer.
HP Web Jetadmin
Use HP Web Jetadmin to manage HP Jetdire ct connected printers within y our intrane t by using a
browser. HP Web Jetadmin is a browser-based management tool, and should be installed only
on a single network administration server. It can be installed and run on Red Hat Linux; Suse
Linux; Windows NT 4.0 Server and Workstation; Windows 2000 Professional, Server, and
Advanced Server; and Windows XP with Service Pack 1.
To download a current version of HP Web Jetadmin and for the latest list of supported host
systems, visit HP Customer Care Online at www.hp.com/go/webjetadmin
When HP Web Jetadmin is installed on a host server, any client can gain access to it through a
supported Web browser (such as Microsoft Internet Explorer 5.5 and 6.0 or Netscape
Navigator 7.0).
HP Web Jetadmin has the following features:
● The task-oriented user interface provides configurable view s, saving network managers
significant time.
● The customizable user profiles let network administrators include only the function that the
user will view or use.
● Instant e-mail notification of hardware failure, low supplies, and other printer problems can
be routed to different people.
● Remote installation and management can be completed from any location by using only a
standard Web bro wser.
● The advanced autodiscovery locates peripherals on the netwo rk, without manually entering
each printer into a database.
● It offers simple integration into enterprise management packages.
● Users can quickly find peripherals based on parameters such as IP address, color capability,
and model name.
● Peripheral s can be easily organized into logical groups, with virtual office maps for easy
navigation.
● Multiple printers can be configured and managed at the same time.
.
For the latest information about HP Web Jetadmin, go to www.hp.com/go/webjetadmin
.
UNIX
The HP Jetdirect Printer Installer for UNIX is a simple printer installation utility for HP-UX and
Solaris networks. It is available for download from HP Customer Care Online at www.hp.com/
support/net_printing.
Utilities
The printer is equipped with sev er al utilities to mak e it easy to mo nitor and manage t he printer on
a network.
ENWW Printer software 27
Page 30

Embedded Web server
This printer is equipped with an embedded Web server, which provides access to information
about printer and network activities. A W eb server provides an environment in which Web
programs can run, similar to the way an operating system, such as Windows, provides an
environment f or prog rams to run on y our comput er. The output from these prog rams can th en be
viewed in a We b browser, such as Microsoft Internet Explorer or Netscape Navigator.
When a Web server is “embedded,” that means that it resides on a hardware device (such as a
printer) or in firmware, rather than as software that is loaded on a network server.
The advantage of an embedded Web server is that it provides an interface to the printer that
anyone who has a netw ork-connected compu ter or a stand ard W eb bro wser can u se. You do not
need to install or configure any special software. For more information about the HP embedded
Web server , see t he Embedded W eb Server User Guide. You can find this guide on the CD-ROM
that was included with the printer.
Features
Use the HP embedded Web server to view the printer and network card status and to manage
printing functions from your computer. With the HP embedded W eb server, you can co mplete the
following tasks:
● view printer status information
● determine the remaining life on all supplies and order ne w ones
● view and change tray configurations
● view and change the printer control-panel menu config uration
● view and print internal pages
● receive notification of printer and supplies events
● add or customize links to other Web sites
● select the language in which to show the embedded Web server pages
● view and change network configuration
For information about the features and functionality of the embedded Web server, see
Embedded Web server.
HP Toolbox
For information about the HP Toolbox, see HP Toolbox.
Other components and utilities
Several software programs are available for Windows and Macintosh OS users, as well as for
network administrators. These programs are summarized in the following table.
Windows Macintosh OS Network administrator
● Software installer —
automates the printing
system installation
● Online Web registration
● HP Toolbox
● PostScript Printer
Description files (PPDs) —
for use with the PostScript
drivers that come with the
Mac OS
● LaserJet Utility (available
from the Internet) — a
printer management utility
for Mac OS users
● HP Toolbox (for Mac OS X
v10.2 and later)
● HP Web Jetadmin —a
browser-based system
management tool (see
www.hp.com/go/
webjetadmin for the latest
HP Web Jetadmin software)
● HP Jetdirect Printer Installer
for UNIX—available for
download from
www.hp.com/support/
net_printing
28 Chapter 1 Printer basics ENWW
Page 31

Communicating by using an optional HP Jetdirect print server
If you purchase an optional HP Jetdirect internal print server, and you cannot communicate with
the printer over the network, check the operation of the print server. Check the Jetdirect
configuration page for the message I/O CARD READY.
To print a configuration page
1 Press .
2 Use or to scroll to Information and then press .
3 Use or to scroll to Print Configuration and then press .
For troub leshooting information, see the documentation that came with the print server.
Communicating by using the HP Jetdirect embedded print
server
The HP LaserJet 9040n/9050n and the Laser Jet 9040dn/9050dn have an embedded print
server. If you cannot communicate with the printer over the network, check the operation of the
embedded print server. Check the embedded Jetdirect configuration page for the message I/O
CARD READY, and for the correct network configuration settings . See To print a configuration page
for instructions.
Verify that the print server was able to link t o the network automatically:
● Check that a link LED on the printer's LAN (RJ-45) connector is lit, which indicates a
successful link. A link failure is indicated when both LEDs a re off.
● Check the embedded Jetdirect configuration page for error messages. The message LOSS
OF CARRIER ERROR indicates a link failure.
For link failures, check all of the network cable connections. In addition, you can try to manually
configure the link settings on the embedded print server b y using the printer control-panel menus
(MENU, CONFIGURE DEVICE, I/O, EMBEDDED JETDIRECT MENU, LINK SPEED).
Note HP Jetdirect print servers are av ailable for m any diff erent net work connections , including 802.11
wireless networks.
ENWW Printer software 29
Page 32

Embedded Web server
Using the embedded Web server
The HP LaserJet 9040/9050 series printers come equipped with an embed ded Web server.
Open the embedded Web server from a Web browser to obtain the following information about
the printer:
● Control-panel messages
● Supplies levels and supplies ordering
● Tray configuration
● Printer control-panel menu configurations
● Printer configuration page
● Printer Event Log
● Printer usage (types of print jobs)
● Network configuration and management
● E-mail alerts
You can also use the embedded Web server to perform the print-job management functions that
would usually be done at the printer control panel, including these functions:
● Changing printer settings
● Changing printer configuration
● Canceling print jobs
To gain access to the embedded Web server
Note To use the embedded Web server, you must have an IP-based network and a Web browser.
In your Web browser, type the Internet Protocol (IP) address that is assigned to the printer. For
example, if the printer IP address is 192.0.0.192, you would type this address:
http://192.0.0.192
For more information, see the HP Embedded Web Server User Guide at www.hp.com/support/
lj9050_lj9040.
30 Chapter 1 Printer basics ENWW
Page 33

HP Toolbox
The HP Toolbox is a Web-based software program that you can use for the following tasks:
● Check the printer status.
● Print internal printer information pages.
You can view the HP Toolbox when the printer is connected to a network. The HP Toolbox
software is automatically installed as part of the typical software installation.
Note You do not need Internet access to open and use the HP Toolbox. However, if you click a link in
the Other Links area, you must have Internet access to go to the sit e tha t is associated with th e
link. See Other links for more information.
Supported operating systems
The HP Toolbox is supported for the following operating systems:
● Windows 98, Windows 2000, Windows Me, Windows Server 2003, and Windows XP
● Macintosh OS 10.2 or later
Supported browsers
To use the HP Toolbox, you must have one of the following browser s:
● Microsoft Internet Explorer 5.5 or later (Internet Explorer 5.2 or later for Macintosh)
● Netscape Navigator 7.0 or later (Netscape Navigator 7.0 or later for Macintosh)
● Opera Software ASA Opera 7.0 for Windows
● Safari 1.0 software for Macintosh
All HP Toolbox pages can be printed from the browser.
To view the HP Toolbox
On the Start menu, select Programs, select HP LaserJet 9040 or HP LaserJet 9050, and then
select HP LaserJet Toolbox.
Note You can also view the HP Toolbox by clicking the system tray icon or the desktop icon.
The HP Toolbox opens in a Web browser.
Note After you open the HP Toolbox, you can bookma rk it in y o ur browser so that you can return to it
quickly in the future.
HP Toolbox sections
The HP Toolbox software contains the following sections and options:
● Status tab
● Alerts tab
● Device Settings button
● HP Toolbox links
● Other links
ENWW HP Toolbox 31
Page 34

Status tab
The Status tab has links to the following main pages:
● Device Status. View printer status information. This page indicates various printer
conditions such as a paper jam or an empty tra y. Use the virtual control panel buttons on this
page to change printer settings. After you correct a problem with the printer, click the
Refresh button to update the device status.
● Supplies Status. View detailed sup plies status such a s the percentage of toner remaining in
the print cartridges and the number of pages that have been printed with the current print
cartridges. This page also has links to order supplies and to find recycling information.
● Print Info Pages. Print the configuration pa ge and other inf ormation pages that are a v ailable
for the printer, such as the Supplies Status page, the Demo page, and the Menu Map.
Alerts tab
Use the Alerts tab to configure the printer to automatically notify y ou of printer alerts. The Alerts
tab has links to the following main pages:
● Set up status alerts
● Administrative sett ings
On the Set up status alert s page, you can turn alerts on or off, specify when the printer should
send an alert, and select from the following types of alerts:
● a pop-up message
● a task-bar icon
Click Apply to activate the settings.
On the Administrative settings page, you can set the frequency with which the HP Toolbox
checks for printer alerts. The following settings are available:
● Less often: every 15000 milliseconds
● Normal: every 8000 milliseconds
● More often: every 4000 milliseconds
If you want to reduce network I/O traffic, reduce the frequency with which the printer checks for
alerts.
Device Settings button
Clicking the Device Settings button connects you to the printer’s embedded Web server.
See Using the embedded Web server for more information.
HP Toolbox links
The HP Toolbox links on the left side of the screen provide links to the following options:
● Select a device. Select from all of the HP Toolbox-enabled devices.
● View current alerts. View the current alerts for all of the installed printers. (You must be
printing to view current alerts.)
● Text only page. View HP Toolbox as a site map that links to text-only pages.
32 Chapter 1 Printer basics ENWW
Page 35

Help system
Other links
Each page in the HP Toolbox contains links to the HP Web site for the following information:
● Product registration
● Product support
● Ordering supplies
● HP Instant Support
You must have Internet access to use any of th ese links . If y ou use a dia l-u p connect ion and
●
did not connect to the Internet when you first opened the HP Toolbox, you must connect to
the Internet before you can visit these Web sites.
At any time, yo u can ga in access t o the Help syst em on th e printer control pa nel. Press on the
control panel.
TM
ENWW Help system 33
Page 36

34 Chapter 1 Printer basics ENWW
Page 37

2
Printing tasks
This section presents information about the following basic printing tasks:
● Loading input tra ys
● Orienting media
● Basic printing instructions
● Selecting the output bin
● Printing envelopes
● Using the optional 3,000-sheet stacker
● Using the optional stacker/stapler
● Using the optional multifunction finisher
● Using the optional 8-bin mailbox
● Printing both sides of paper (duplexing)
● Printing on special paper
ENWW 35
Page 38

Loading input trays
This section contains information about loading detectable and undetectable standard-size and
custom-size media into optional Tray 1, Tray 2, Tray 3, and optional Tray 4.
CAUTION To avoid a jam, nev er add or remov e paper from opt ional Tray 1 or open Tray 2, Tray 3, or optional
Tray 4 while printing from that tray.
To avoid damaging the printer, print labels and envelopes from optional Tray 1 only. Send labels
and envelopes t o the left ou tput bin o r upper bin . Print on only one side of labels an d envelopes.
Loading optional Tray 1
Optional Tray 1, which holds up to 100 sheets, is available for the printer. For paper
specifications, see Paper specifications.
To load optional Tray 1 for occasional one-time use
Use this procedure if Tray 1 usually remains empty and is used for printing on a variety of sizes
or types of paper.
1 Open optional Tray 1.
2 Load (orient) paper according to the size and the finishing op tions.
CAUTION To avoid jams, print sheets of labels one sheet at a time.
36 Chapter 2 Printing tasks ENWW
Page 39

3 Adjust the paper guides so that they lightly touch the paper stack, but do not bend th e p ape r.
4 Make sure that the paper f its under the tabs on the guides and that the stac k does not e xtend
above the load-level indicators.
Note If printing on A3, 11 x 17, or other long media, also pull out the tray extension until it stops.
5 Look at the control-panel displa y within a few seconds of loading the paper. (Reload the
paper if the time has already elapsed.)
• If TRAY X <TYPE> <SIZE> does not appear on the control-panel display, then the tray is
ready for use.
• If TRAY X <TYPE> <SIZE> appears on the control-panel, press to change the size and
type configuration. The Size menu appears.
6 Press to highlight ANY SIZE.
7 Press to select ANY SIZE. The message SETTING SAVED appears on the control-panel
display
8 When the Type menu appears, press to highlight ANY TYPE.
9 Press to select ANY TYPE. The message SETTING SAVED appears on the control-panel
display.
10 If TRAY 1 ANY SIZE ANY TYPE appears on the control- panel di spla y, then the printer is ready
for intermittent use of a variety of paper sizes and types. Press to accept the size and
type setting.
T o load optional Tray 1 when the same paper is used for multiple
print jobs
Use the following procedure if Tray 1 is usually loaded with the same type of paper, and the
paper is not usually removed fr om Tray 1 between print jobs. The follo wing procedure can usually
increase the printer performance when printing from Tray 1.
CAUTION To avoid a jam, never add or remove paper from a tray while printing from that tray.
1 On the control panel, press to open the menus.
2 Use or to scroll to PAPER HANDLING and then press .
3 Use or to scroll to TRAY 1 SIZE and then press .
4 Use or to scroll to the correct size and then press . The message SETTING SAVED
appears on the control-panel display.
Note If you select CUSTOM as the paper size, also select the un it of measure ( the X and Y di mensions).
ENWW Loading input trays 37
Page 40

5 Use or to scroll to TRAY 1 TYPE and then press .
6 Use or to scroll to the correct type and then press . The message SETTING SAVED
appears on the control-panel display.
7 Press M
ENU to exit the menus.
8 Open optional Tray 1.
9 Load (orient) paper according to size and finishing options.
CAUTION To avoid jams, print sheets of labels one at a time.
10 Adjust the paper guides so that t hey lightly touch the paper stack, but do not bend the p ape r.
11 Make sure that the paper fits under the tabs on the guides and does not extend above the
load level indicators.
Note If printing on A3, 11 x 17, or other long media, also pull out the tray extension until it stops.
12 Look at the control panel within a few seconds of loading the paper. The tray configuration
appears. (Open and close the tray again if the time has al ready elapsed.)
38 Chapter 2 Printing tasks ENWW
Page 41

13 Press M
ENU to exit the menus. The tray is ready to use.
Loading Trays 2, 3, and 4
The 500-sheet input trays (Trays 2 and 3) come with the printer. Tray 4 is an optional tray that
holds up to 2,000 sheets of standard-size paper. For paper specifications, see Paper
specifications.
To load detectable, standard-size paper in Trays 2, 3, and 4
Follow this procedure to load detectable standard-size paper in the tray. The following are the
detectable sizes, which are marked inside the tray:
● A4
● Letter
● A3
● Legal
● 11 x 17
● Executive
● B4 (JIS)
● B5 (JIS)
● A4-Rotated
● Letter-Rotated
CAUTION To avoid a jam, never add or remove paper from a tray while printing from that tray.
1 Open the tray until it stops.
2 Adjust the left (Y) paper guide by pressing the tab on the guide and set the guide to the
correct paper size.
ENWW Loading input trays 39
Page 42

3 Adjust the front (X) paper guide by pressing the tab on the guide and set the guide to the
correct paper size.
Note For Tray 4, when loading Letter-size or 11 x 17 paper, move the paper guide lock to the down
position. For all other paper sizes, the paper guide lock should be in the up position.
CAUTION For Tray 4, never store paper or other items in the area to t he left of the paper guides. Doing so
can permanently damage the tray.
4 Load (orient) the paper according to size.
Note See Orienting media for instructions on loading preprinted, letterhead, and prepunched paper.
40 Chapter 2 Printing tasks ENWW
Page 43

5 Set the Custom/Standard switch to Standard.
6 Close the tray.
7 Look at the control panel within a few seconds of closing the tray. (Open and close the tray if
the time has already elapsed.) The control panel indicates the tray size and type
configuration. Complete one of the following actions:
• If the size and type settings are correct, press to accept the settings.
• If the size and type settings are not correct, press . The TRAY X SIZE=*<SIZE> menu
appears.
8 To change the size setting, use or to scroll to the correct size and then press . The
message SETTING SAVED appears for a moment, and then the tray type menu appears.
Note Depending on the size that you selected, the printer might prompt you to move the Custom/
Standard switch in the tray to another position. The printer might also prompt you to move the
paper guides. Follow the instructions on the control panel, close the tray, and then repeat this
procedure starting with step 7.
9 To change the type setting, use or to scroll to the correct type and then press .
The message SETTING SAVED appears for a moment, and then the current size and type
settings appear.
10 If the size and type settings a re corr ect, p ress to accept the settings. The tr ay is ready to
use.
ENWW Loading input trays 41
Page 44
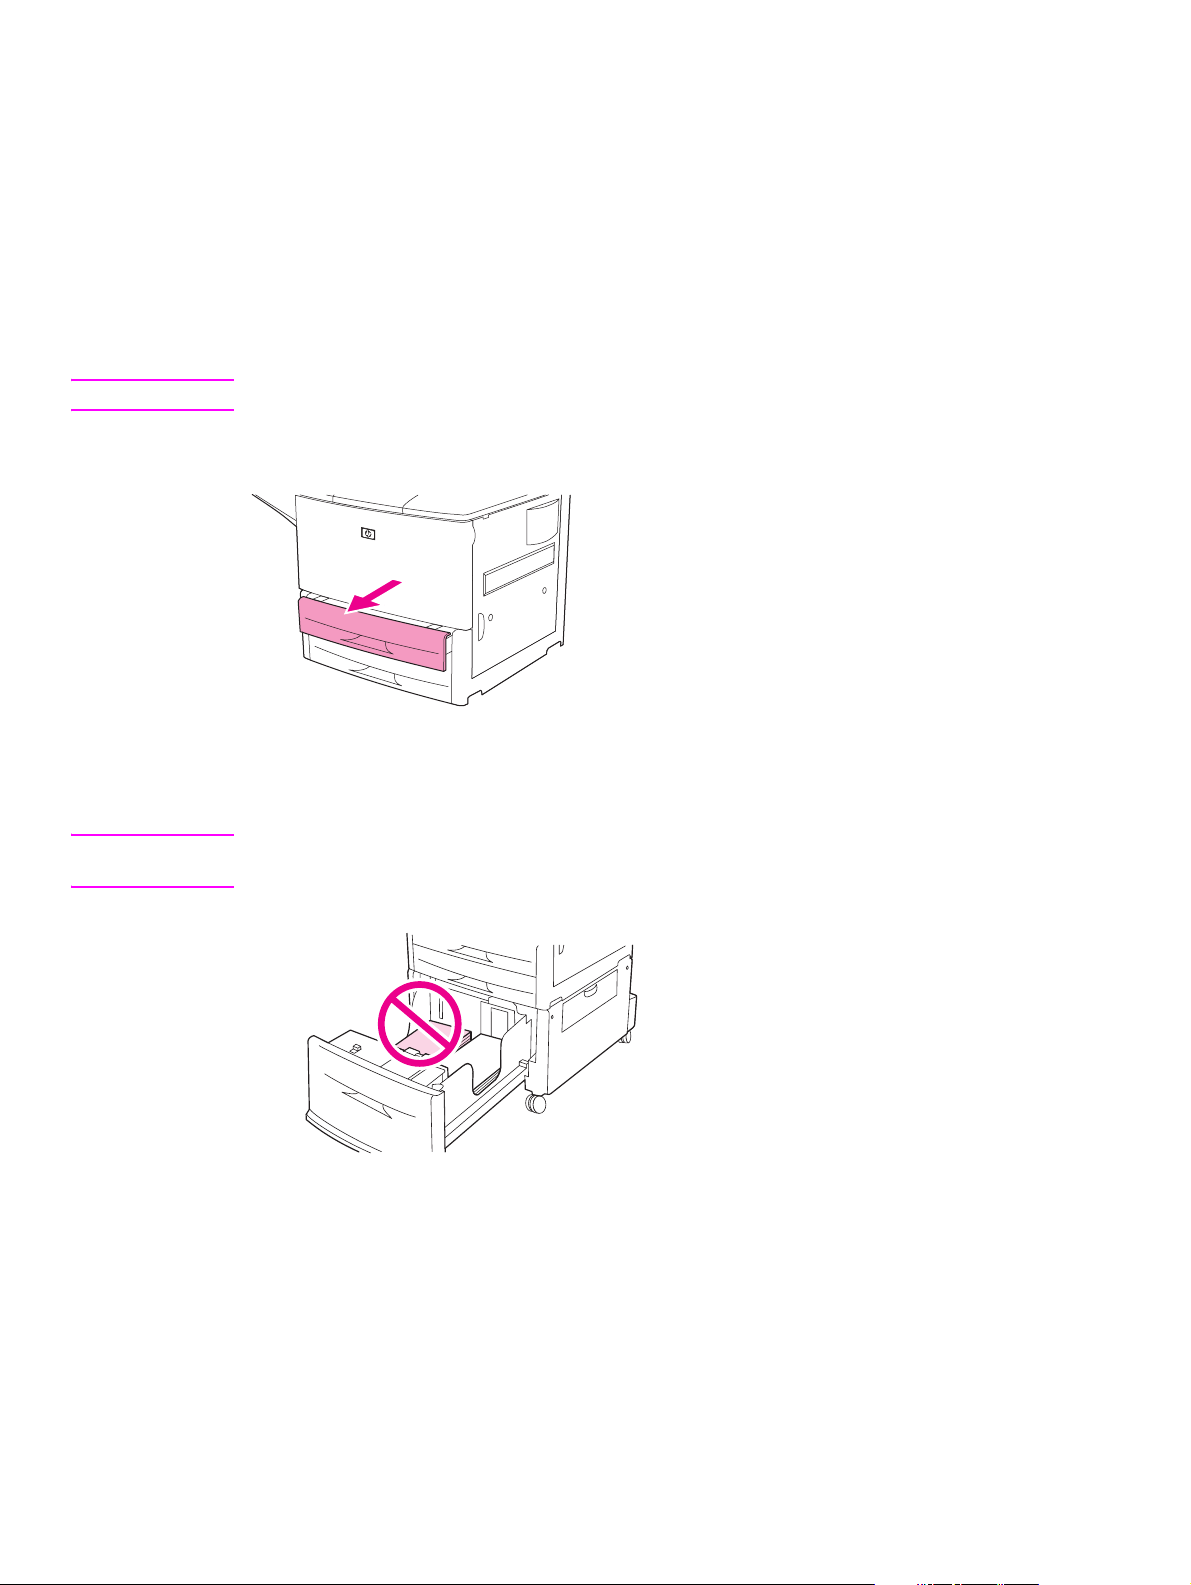
To load undetectable standard-size paper in Trays 2, 3, and 4
Follow this procedure to load undetectable standard-size paper in the tray. The following are the
undetectable standard sizes:
● A5
● 8K
● 16K
● JIS Executive
● Statement
● 8.5 x 13 (216 x 330 mm)
CAUTION To avoid a jam, never add or remove paper from a tray while printing from that tray.
1 Open the tray until it stops.
2 Press the tab on the front paper guide and slide the guide all the way out.
3 Press the tab on the left paper guide and slide the guide all the way out.
CAUTION For Tray 4, never store paper or other items in the area to t he left of the paper guides. Doing so
can permanently damage the tray.
42 Chapter 2 Printing tasks ENWW
Page 45

4 Load (orient) the paper according to size.
Note See Orienting media for instructions on loading preprinted, letterhead, and prepunched paper.
5 Adjust the left paper guide by pressing the tab on the guide and sliding the guide until it
gently touches the paper.
6 Adjust the front paper guide by pressing the tab on the guide and sliding the guide until it
gently touches the paper.
Note When loading Tray 4, make sure that the paper guide lock is in the up position.
ENWW Loading input trays 43
Page 46

7 Set the Custom/Standard switch to Custom.
8 Close the tray.
9 Look at the control panel within a few seconds of closing the tray. (Open and close the tray if
the time has already elapsed.) The control panel indicates the tray size and type settings.
Complete one of the following actions:
• If the size and type settings are correct, press to accept the settings.
• If the size and type settings are not correct, press . The TRAY X SIZE=*<SIZE> menu
appears.
10 To change the size setting, use or to scroll to the correct size and then press . The
message SETTING SAVED appears for a moment, and then the tray type menu appears.
Note Depending on the size that you selected, the printer might prompt you to move the Custom/
Standard switch in the tray to another position. The printer might also prompt you to move the
paper guides. Follow the instructions on the control panel, close the tray, and then repeat this
procedure starting with step 9.
11 To change the type setting, use or to scroll to the correct type and then press .
The message SETTING SAVED appears for a moment, and then the current size and type
settings appear.
12 If the size and type settings a re corr ect, p ress to accept the settings. The tr ay is ready to
use.
44 Chapter 2 Printing tasks ENWW
Page 47

Loading custom-size paper in Trays 2, 3, and 4
Use the following procedure to load custom-size paper in the tray.
CAUTION To avoid a jam, never add or remove paper from a tray while printing from that tray.
1 Open the tray until it stops.
2 Press the tab on the front (X) paper guide and slide the guide all the way out.
3 Press the tab on the left (Y) paper guide and slide the guide all the way out.
4 Load (orient) the paper according to size.
Note See Orienting media for instructions on loading preprinted, letterhead, and prepunched paper.
5 Set the Custom/Standard switch to Custom.
ENWW Loading input trays 45
Page 48
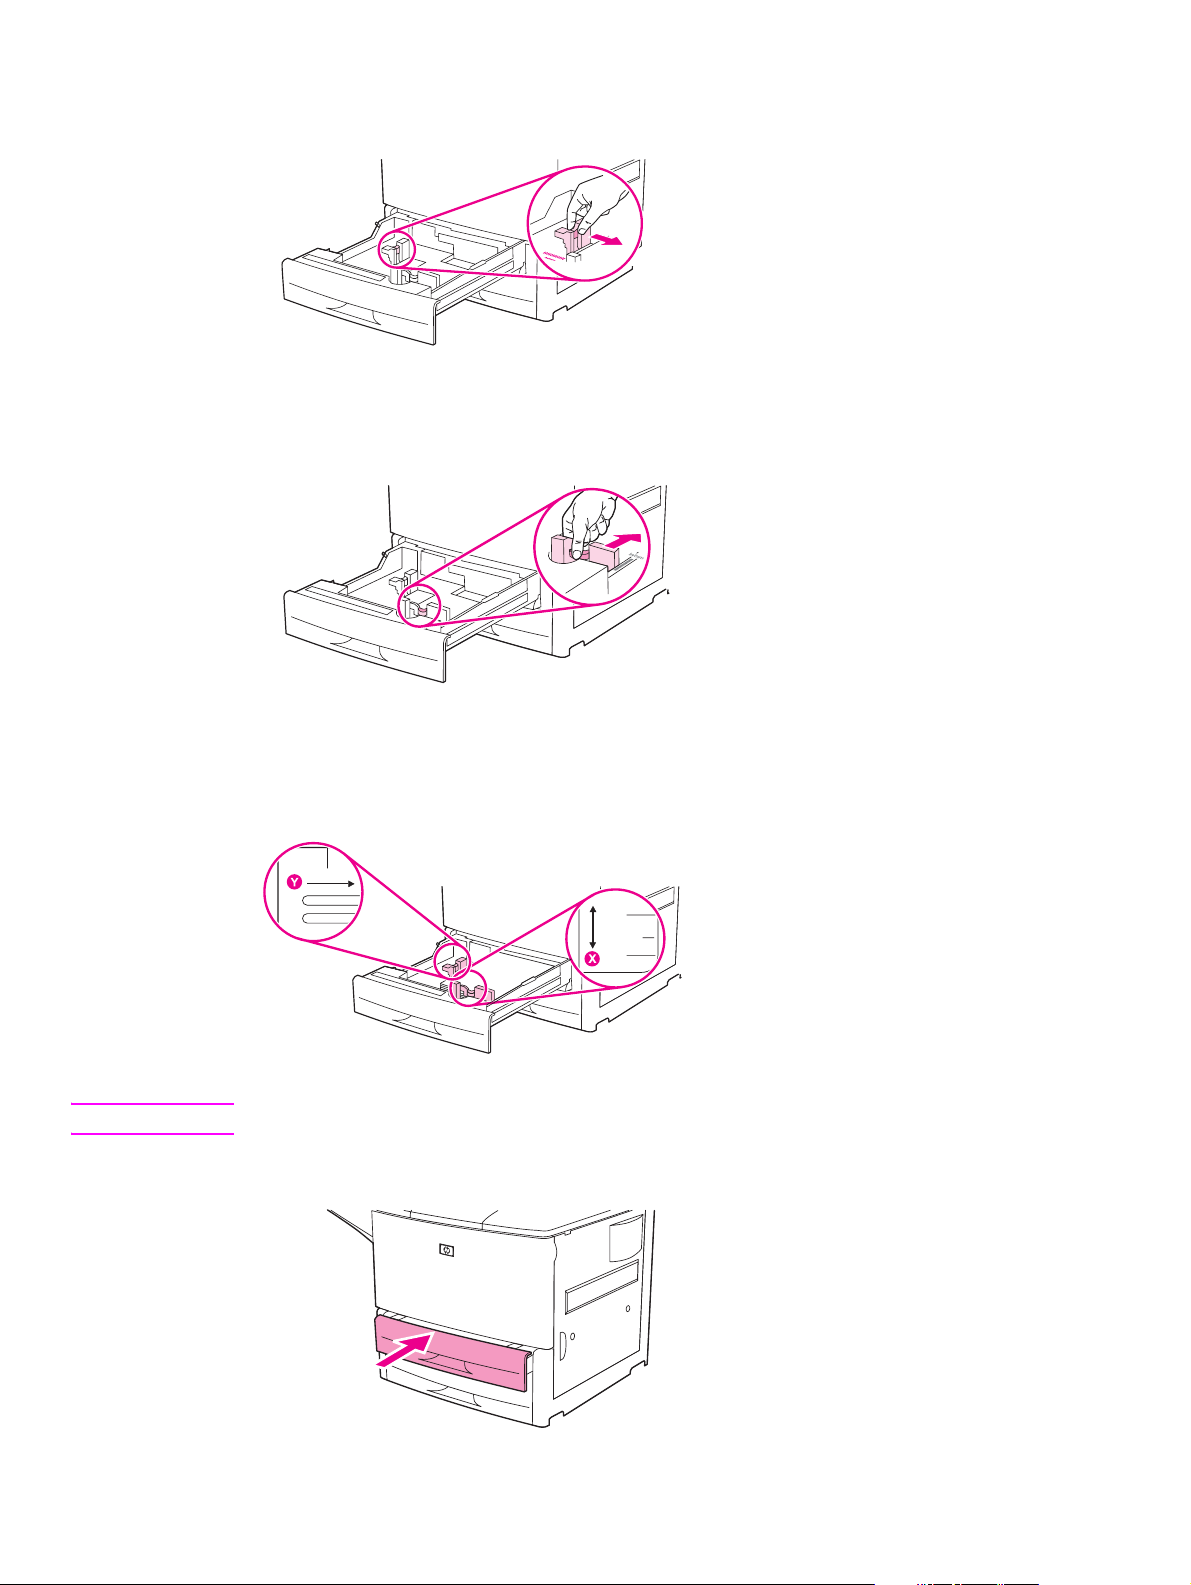
6 Adjust the left (Y) paper guide by pressing the tab on the guide and sliding the guide until it
gently touches the paper.
7 Adjust the front (X) paper guide by pressin g the tab on the gu ide and sliding the guide until it
gently touches the paper.
8 Note the orientation of the paper, as well as the value of the X dimension and the Y
dimension. The X and Y dimensions are marked in the tray. You will need this information for
a later step.
Note When loading Tray 4, make sure that the paper guide lock is in the up position.
9 Close the tray.
46 Chapter 2 Printing tasks ENWW
Page 49

10 Look at the control panel within a f e w second s of closing the tr ay. (Open and close the tray if
the time has already elapsed.) The tray size and type settings appear.
• If the size and type settings are correct, press to accept the settings. The tray is ready
for use. (You do not need to complete the rest of this procedure unless you want to
configure the exact custom dimension. See the following note for more information.)
• To change the size setting, press . The TRAY X SIZE=*<SIZE> menu appears.
Note If the size that appears on the control panel is CUSTOM, then the tray size is set to ANY CUSTOM.
The tray will match any custom-size print job, even if the print-job dimensions are different from
the dimensions of the paper that is loaded in the tray. If you prefer, you can specify the exact
dimensions of the custom-size paper that is loaded in the tray . When you specify exact dimensions,
the dimensions appear as the size, rather than CUSTOM.
11 Press to select CUSTOM. The UNIT OF MEASURE menu appears.
Note The printer might prompt you to mo ve the Cust om/Standard switch in the tray to another position.
The printer might also prompt you t o move the paper guides . Follow th e instructions on the control
panel, close the tray, and then repeat this procedure starting with step 10.
12 Use or to select the unit of measure (MILLIMETERS or INCHES) and then press .
13 Use the numeric keypad or th e or keys to specify the X (front to back) dimension and
then press .
14 Use the numeric keypad or the or keys to specify the Y (left to right) dimension and
then press . The message SETTING SAVED appears for a moment, and then the TRAY X
TYPE menu appears.
15 To change the type setting, use or to scroll to the correct type and then press .
The message SETTING SAVED appears for a moment, and then the current size in the
dimension that you selected appears.
16 Press to accept the settings. The tray is ready to use.
Configuring the trays by using the Paper Handling menu
You can configure the paper type and size for the input trays without a prompt on the printer
control-panel display. Use the following procedure to gain access to the Paper Handling menu
and configure the trays.
To configure the paper size for the tray
1 On the control panel, press to open the menus.
2 Use or to scroll to PAPER HANDLING and then press .
3 Use or to scroll to TRAY X SIZE and then press . (X is the number of the tray that
you want to configure.)
4 Use or to scroll to the correct size and then press .
5 Touch
Note Depending on the size that you selected, the printer might prompt you to move the Custom/
Standard switch in the tray to another position. The printer might also prompt you to move the
paper guides. Follow the instructions on the control panel, and then close the tray,
MENU to exit the menus.
ENWW Loading input trays 47
Page 50

To configure the paper type for the tray
1 On the control panel, press to open the menus.
2 Use or to scroll to PAPER HANDLING and then press .
3 Use or to scroll to TRAY X TYPE and then press . (X is the number of the tray that
you want to configure.)
4 Use or to scroll to the correct type and then press . The message SETTING SAVED
appears for a moment.
5 Touch
MENU to exit the menus.
48 Chapter 2 Printing tasks ENWW
Page 51

Orienting media
Orient media types and sizes according to the tray from which they will print and according to
whether the media will be duplexed (printed on both sides).
Type of media Tray Duplexed Media Orientation
Letter or A4, including
letterhead
(weights up to
216 g/m
(58 lb bond)
Letter or A4, including
letterhead
(weights up to
216 g/m2)
(58 lb bond)
NOTE
For better duplexing
performance, set the
size and type for
Tray 1.
2
)
1 No* Long edge toward feed direction; side to be
printed on facing up.
1 Yes Long edge toward feed direction; first side
to be printed on facing down.
Note: When printing on paper that is both
prepunched and preprinted/letterhead,
orient the paper in the same way that you
would orient preprinted/letterhead paper.
* When Alternate Letterhead mode is enabled and media type Letterhead or Preprinted is
selected, you must orient the media for two-sided (duplex) printing. For more information,
see Alternate Letterhead mode.
ENWW Orienting media 49
Page 52

Type of media Tray Duplexed Media Orientation
Letter or A4, including
letterhead
(weights up to
199 g/m
2
)
(53 lb bond)
Letter or A4, including
letterhead
(weights up to
199 g/m2)
(53 lb bond)
2, 3, or 4 No* Long edge toward feed direction; side to be
printed on facing down.
Note: When printing on paper that is both
prepunched and preprinted/letterhead,
orient the paper in the same way that you
would orient preprinted/letterhead paper.
2, 3, or 4 Yes Long edge toward feed direction; first side
to be printed on facing up.
Other standard sizes
and custom sizes
(weights up to
216 g/m
2
)
1 No* Short edge toward feed direction; side to be
printed on facing up.
(58 lb bond)
* When Alternate Letterhead mode is enabled and media type Letterhead or Preprinted is
selected, you must orient the media for two-sided (duplex) printing. For more information,
see Alternate Letterhead mode.
50 Chapter 2 Printing tasks ENWW
Page 53

Type of media Tray Duplexed Media Orientation
Other standard sizes
and custom sizes
(weights up to
199 g/m
2
)
(53 lb bond)
Other standard sizes
and custom sizes
(weights up to
216 g/m
2
)
(58 lb bond)
NOTE
For better duplexing
performance, set the
size and type for
Tray 1.
2, 3, or 4 No* Short edge toward feed direction; side to be
printed on facing down.
1 Yes Short edge toward feed direction; first side
to be printed on facing down.
Other standard sizes
and custom sizes
(weights up to
199 g/m
2
)
2, 3, or 4 Yes Short edge toward feed direction; first side
to be printed on facing up.
(53 lb bond)
* When Alternate Letterhead mode is enabled and media type Letterhead or Preprinted is
selected, you must orient the media for two-sided (duplex) printing. For more information,
see Alternate Letterhead mode.
ENWW Orienting media 51
Page 54

Type of media Tray Duplexed Media Orientation
Prepunched Letter or
A4
(weights up to
216 g/m
2
)
(58 lb bond)
Prepunched Letter or
A4
(weights up to
199 g/m
2
)
(53 lb bond)
1 Either Long edge with holes toward feed direction;
side to be printed on facing up.
Note: When printing on paper that is both
prepunched and preprinted/letterhead,
orient the paper in the same way that you
would orient preprinted/letterhead paper.
2, 3, or 4 Either Long edge with holes toward feed direction;
side to be printed on facing down.
Note: When printing on paper that is both
prepunched and preprinted/letterhead,
orient the paper in the same way that you
would orient preprinted/letterhead paper.
* When Alternate Letterhead mode is enabled and media type Letterhead or Preprinted is
selected, you must orient the media for two-sided (duplex) printing. For more information,
see Alternate Letterhead mode.
52 Chapter 2 Printing tasks ENWW
Page 55

Type of media Tray Duplexed Media Orientation
Labels, Letter, A4 size
sheets, or
transparencies
Envelopes Tray 1
Tray 1
only
only
No
(Never duplex)
No
(Never duplex)
Long edge toward feed direction; side to be
printed on facing up.
Short edge toward feed direction; side to be
printed on facing up and the postage end
toward the printer. If height of envelope is
greater than 190 mm (7 .5 inches), f eed flap
first. Otherwise, feed the flap towa rd the
rear of printer.
* When Alternate Letterhead mode is enabled and media type Letterhead or Preprinted is
selected, you must orient the media for two-sided (duplex) printing. For more information,
see Alternate Letterhead mode.
Alternate Letterhead mode
Windows drivers include an Alternate Letterhead mode, which is configured in the Device Settings portion
of the printer properties (in the Windows control panel). This mode causes all print jobs with media types of
Letterhead and Preprinted to be treated as two-sided (duplexed), so that you can load paper in the same
way for one-sided and two-sided printing. Because the print speed is the same as it is for two-sided (duplex)
printing, one-sided jobs print at approximately half-speed.
ENWW Orienting media 53
Page 56

Basic printing instructions
This section provides the basic instructions for printing when setting options from the printer
driver for this printer (Windows) or the Apple LaserWriter (Macintosh). If possible, you should try
to set printer options from the program in which you are working or from the Print dialog box.
Most Windows and Macintosh programs allow you to set the printer options this way. If a setting
is not available in the program or printer driver, you must set it at the printer control panel.
To print
1 Make sure that paper is loaded in the printer. See Loading input trays or www.hp.com/
support/lj9050_lj9040 for instructions.
2 If you loaded a custom-size media in Tray 2, Tray 3, or optional Tray 4, or if you loaded any
size media in optional Tray 1, set the tray to the size of paper that you loaded. See Loading
input trays or www.hp.com/support/lj9050_lj9040
3 Set the paper size.
• For Windows: On the File menu, click Page Setup or Print. If you select Print, make sure
that this printer is selected and then click Properties.
4 For Macintosh: On t he File men u, select Page Setup. Make sure that this printer is selected.
In the paper size box, select:
• The size of paper you are using .
•Custom.
for instructions.
5 Select the orientation, such as Portrait or Landscape.
6 If the printer driver is not already open, on the File menu click Print. In Windows programs,
also click Properties.
7 In the paper source box, select the paper type and size or select the tray from which you
want paper pulled. See Specifying paper to print on.
8 Select any other settings that you w ant, such as duple xing (if an optional du plex er is installed
in the printer), watermarks, or diff erent first p age . For more information about these sett ings ,
see the tasks in this section and in the next section (Advanced printing tasks).
9 The standard output top bin is the default output location. Use this location for output of
standard types of media. For lab els, transpare ncies, and hea vy paper , use the left output bin.
Or, you can select an optional output accessory, such as the stacker or stacker/stapler.
10 Select the Print command to print the job.
54 Chapter 2 Printing tasks ENWW
Page 57

Selecting the output bin
The printer has sever al output locat ions: the stand ard top bin, the left output b in, and the opti onal
output devices.
The left output bin (1), located on the left side of the printer, holds up to 100 sheets of paper.
The standar d top bin (2) is located at t he top of the printer and is the f actory defau lt bin. This bi n
can receive up to 500 sheets of paper in the correct (face-down) order as they exit the printer. A
sensor causes the printer to stop when the paper bin is full. Printing continues when you empty
or reduce the amount of paper in the bin.
1
1
1
2
1
4
1
1
1
1
2
3
1
5
1
6
Stacker or stacker/stapler output bins
For the 3,000-sheet stacker or 3,000-sheet st acker/stapler, the output bins are the upper bin (1)
(face-up) and the lower bin (2) (face-down).
The upper bin (face-up) (1) is the top bin on the stacker or stacker/stapler. This bin holds up to
100 sheets of paper in face-up order as they e xit t he printer . A sensor causes th e product to stop
when the bin is full. Product operation continues when y ou empty or reduce th e amount of pap er
in the bin.
Lower bin (face -down) (2) is the lower bin on the stac ker or stacker/stapl er. This bin holds up to
500 sheets of paper and can stack or staple jobs. This bin is the default output bin.
ENWW Selecting the output bin 55
Page 58

8-bin mailbox output bins
If you choose the 8-bin mailbox, the output bins are the upper bin (4) and the eight face-down
bins (3).
The upper bin (4) holds up to 125 sheets of paper.
The network administrator can assign the eight bins (3) to individual users or workgroups. Each
bin can stack up to 250 she ets of paper.
Note When an 8-bin mailbox de vice is connected to the printer, the def ault bin is the printer’ s standard
top bin.
Multifunction finisher output bins
If you choose the mu ltifunction finisher, the output bins are the upper bin (5) and the lower
booklet bin (6).
The upper bin (5) is the top bin on the multifunction finisher. This bin provides 1,000 sheets of
stacking capacity, and can offset each job as it is stacked, delivering unstapled jobs face up or
face down. This bin also provides stapling for up to 50 sheets of paper per document. The
upper bin is the default output bin when the multifunction finisher is attached.
The lower bin (4) is the lower bin on the multifunction finisher. This bin provides folding and
saddle stitching of booklets that contain up to 10 sheets of paper.
Selecting an output location
It is recommended that yo u select an output locat ion (bin) through y our pro gr am or printer driv er.
(Where and how you make selections depends on your progr am or printer driver.) If you cannot
select an output location from the pr og r am or printer driv er, set the default printer output location
from the printer control panel.
To select an output location from the control panel
1 Use or to scroll to Configure Device and then press .
2 Use or to scroll to Printing and then press .
3 Use or to scroll to Paper Destination and then press .
4 Use or to scroll to the output bin or device yo u want and then press . Your network
administrator might have changed the name of the device. An asterisk (*) appears next to
your selection.
56 Chapter 2 Printing tasks ENWW
Page 59

Printing envelopes
You can print on envelopes by using optional Tray 1, which holds up to 10 envelopes. Many types
of envelopes can be printed on from optional Tray 1.
Printing performance depends on the construction of the envelope. Always test a few sample
envelopes before purchasing a large quantity. For envelope specifica tions, see Paper
specifications or go to www.hp.com/support/lj905_lj9040
CAUTION Envelopes with clasps, snaps, windows, coated linings, exposed self-stick adhesives, or other
synthetic materials can severely dam age the printer. Do not use envelopes with pressur e-sensitive
adhesive.
The basic steps for printing envelopes are:
1 Move the fuser levers. See To change the fuser levers.
2 Load the envelopes. See To load envelopes in optional Tray 1.
3 Send the print job. See To print envelopes from a program.
Note If envelopes a re wrinkled when printed, see Preventing wrinkles on envelopes for instructions.
To load envelopes in optional Tray 1
.
1 Open optional Tray 1, but do not pull out the extension. (Most envelopes feed best without
the extension. However, oversize envelopes might need the extension.)
2 Load up to 10 env elope s in the cent e r of op ti ona l Tray 1 with the side to be printed on facing
up, and the postage end to war d the printer . Slide the env elopes into t he printer as fa r as they
will go without forcing them.
ENWW Printing envelopes 57
Page 60

3 Adjust the guides to touch the env elo pe stac k without ben ding the en velopes. Make sure the
envelope s fit under the tabs on the guides.
4 Change the fuser levers (see To change the fuser levers).
To change the fuser levers
1 If an optional output device is installed, slide it away from the printer to access the left door.
2 Open the left door.
WARNING! Avoid touching the adjacent fusing area. It can be hot.
58 Chapter 2 Printing tasks ENWW
Page 61
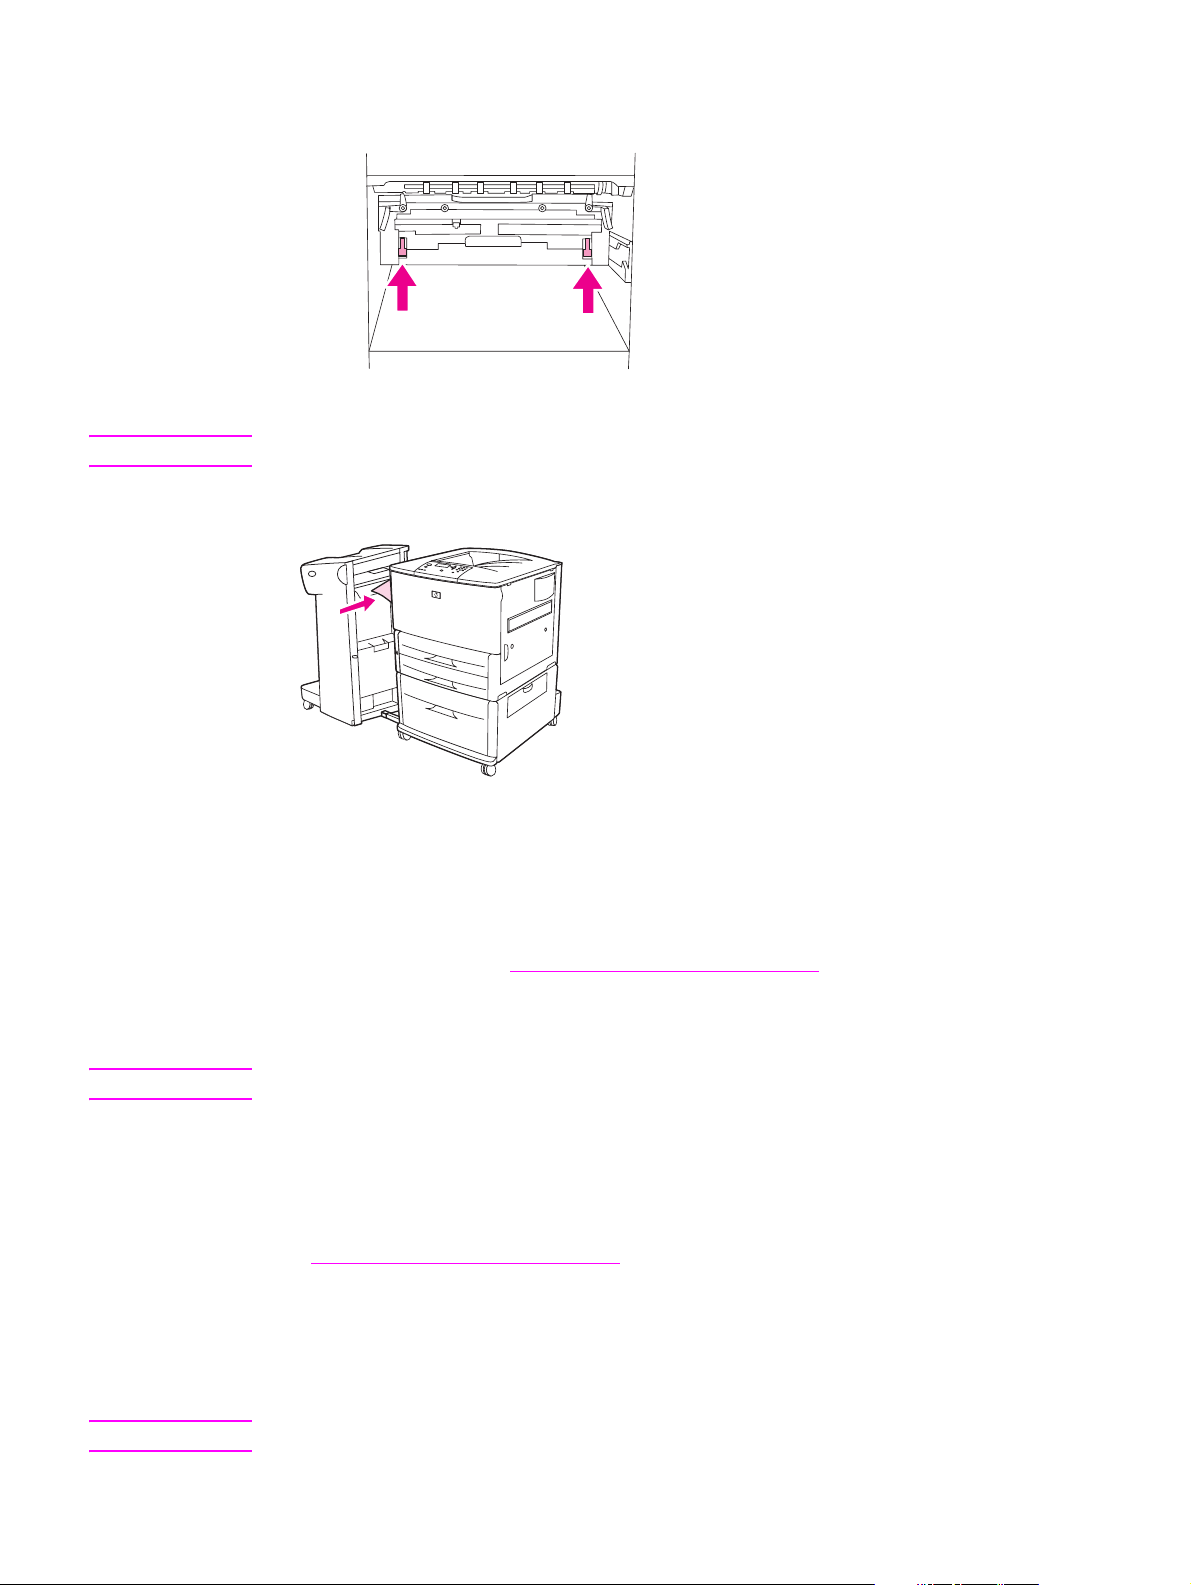
3 Locate and lift up the two blue levers.
Note Return the fuser levers to the down position after printing an envelope.
4 Close the left door.
To print envelopes from a program
1 Load envelopes into optional Tray 1.
2 In your program or in the printer driver, select optional Tray 1 as the source.
3 Set the appropriate envelope size and type. For envelope specifications, see Paper
specifications, or go to www.hp.com/support/lj9050_lj9040
4 If your program does not automatically format an envelope, specify “Portrait” for page
orientation.
CAUTION To avoid a printer jam, do not remove or insert an envelope after you begin printing.
5 Set margins to within 15 mm (0.6 inch) from the edge of the envelope. For best print quality,
set margins for a return and mailing address (typical address margins for a Commercial #10
or DL envelop e are of f ered ). Avoid printing o v er the area whe re the t hree bac k f laps mee t on
the back of an envelope.
6 To print by type and size of paper, see Specifying paper to print on, or go to
www.hp.com/support/lj9050_lj9040
7 Select the standard output bin (the default) as the output location. If you print envelopes to
the stacker, stacker/stapler, or multifunction finisher, they exit to the face-up bin of that
accessory.
8 When finished, return the fuser levers to the down position.
.
.
CAUTION F ailure to return lev ers to the down position f or standard paper types can result in poor print quality .
ENWW Printing envelopes 59
Page 62

Using the optional 3,000-sheet stacker
Output features
The optional 3,000-sheet stacker provides the following output features:
● Stacks up to 3,000 sheets of A4- or Letter-size paper
● Stacks up to 1,500 sheets of A3- or Ledger-size paper
● Can offset, print jobs or the first page can be offset
Bin 2 (face-down on the 3,000-sheet stacker and 3,000-sheet stacker/stapler) on the output
devices is the default bin for all output.
Using the optional stacker/stapler
The optional 3,000-sheet stac ker/stapler can staple documents consisting of a minimum of two
pages, and a maximum of 50 pages (75 g/m
(0.2 inches). The pages must be 64 to 199 g/m
supports
Keep in mind these additional points:
● The stacker can hold up to 3,000 sheets.
● Heavier media might have a stapling limit of less than 50 pages.
● If the job you want stapled consists of only one sh eet, or if it consist s of more than 50 sheets,
the printer will print the job. However it will not be stapled.
2
, 20 lb bond paper) or equivalent to 6 mm
2
(17 to 53 lb) for all sizes that the engine
Selecting the stapler
You can usually select the stapler through your program or printer driver, although some options
might only be available through the printer driver. Where and how you make selections depends
on your program or printer driver.
If you cannot select the stapler from the program or printer driver, select the stapler from the
printer control panel.
To select stapling as the default from the control panel
1 From the Ready state, use or to scroll to Configure Device menu and then press .
2 Use or to scroll to the stacker/stapler, and then press .
3 Use or to scroll to Staple and then press .
4 Select the number of staples that you want as a default.
5 Use or to scroll to Printing and then press .
6 Use or to scroll to the output bin or device you want and then press . An asterisk
(*) appears next to your selection.
60 Chapter 2 Printing tasks ENWW
Page 63

Loading staples
Load staples using this procedure.
To load staples
1 Move the stacker/stapler away from the printer.
2 Open the stacker/stapler-unit door.
3 Lift up on the green tab on the empty staple cartridge and pull it out.
ENWW Using the optional stacker/stapler 61
Page 64

4 Insert the new staple cartridge so that it snaps into place.
5 Close the stapler-unit door and attach the stacker/stapler to the pr in te r.
62 Chapter 2 Printing tasks ENWW
Page 65

Using the optional multifunction finisher
See the HP LaserJet 9040/9050 Getting Started Guide at www.hp.com/support/lj9050_lj9040 for
more information about the following topics:
● Stapling documents
● Saddle stitching
● Printing booklets
● Adding a cover to a booklet
Output features
The optional multifunction finisher provides the following output features:
● Stacks up to 1,000 sheets of A4- and Letter-size paper or up to 500 sheets of A3- and
Ledger-size paper
● Stacks up to 50 booklets of 5 sheets of A3- and Ledger-size paper
● Offsets jobs
● Staples up to 50 sheets of paper per document of A4- and Letter-size paper
● Staples up to 25 sheets of paper per document A3- and Ledger-size paper
● Folds single pages
● Saddle-stitches and folds booklets up to 10 sheets of paper (40 pages)
Using the stapler
The finisher can staple documents consisting of a minimum of two pages, and a maximum of
50 pages of 75 g/m
media or equivalent 6 mm (0.2 inch). The pages must be between 64 and 199 g/m
53 lb) for any size supported by the product.
Consider these additional points:
● The stacker can hold up to 1,000 sheets stacked (not stapled).
● Heavier media might have a stapling limit of fewer than 50 pages.
If the job you want stapled consists of only one sheet, or if it consists of more than 50 sheets, the
finisher delivers the job to the output bin without staples.
Selecting stapling
You can usually select the stapler through your program or driver, although some options might
be available only through the driver. Where and how you make selections depends on your
program or driver.
If you cannot select the stapler from the program or driver, select the stapler from the product
control panel.
1 Press to open the menus.
2 Use and to scroll to CONFIGURE DEVICE and then press .
2
(20 lb) A4- or Letter-size media or up to 25 pages of A3- or 11x 17-size
2
(17 and
3 Use and to scroll to STAPLES and then press .
4 Use and to scroll to the desired stapling option and then press .
Your stapling options are None, One, or Two staples.
ENWW Using the optional multifunction finisher 63
Page 66

Loading staples
1 Open the stapler-unit door.
2 Slide the stapler-unit toward you.
3 Turn the large green knob until the blue dot appears in the window of the stapler-unit.
64 Chapter 2 Printing tasks ENWW
Page 67

4 Turn the small green knob at the top of the stapler unit clockwise until the staple cartridge
moves to the left of the stapler unit.
CAUTION Th e blue dot must appear in t he window of the stapler-unit bef ore you remov e the staple cartridge.
If you try to remove the staple cartridge before the blue dot appears in the window, you could
damage the finisher.
5 On the empty staple cartridge, squeeze the tabs together and pull the empty cartridge out.
6 Insert the new staple cartridge so that it locks into place.
ENWW Using the optional multifunction finisher 65
Page 68

7 Slide the stapler-unit into the finisher.
8 Close the stapler-unit door.
Making booklets
You can gain access to the booklet-printing feature through some programs, such as desktop
publishing programs. Refer to the user guide that came with your program for information on
making booklets.
If you are using a program that does not support booklet making, you can create booklets by
using your HP drivers.
Note HP recommends that you use your program to prepare and pr eview your docume nt for printing,
and hen use your HP driver to print and saddle stitch your booklet.
Use these three main steps to create a booklet from your driver:
● Preparing your booklet: Arrange the pages on a sheet (booklet imposition) to create a
booklet. You can impose your document from your program or use the booklet-printing
feature in your HP driver.
● Adding a cover: Add a cover to your booklet by selecting a different first page of a different
paper type. You can also add a cover of the same paper type as y our booklet. Booklet cov e rs
must be the same size as the rest of the sheets. However, the covers can be a different
weight from the rest of the booklet. (See Using a different first page for more information
● Saddle stitching: Paper must be fed into the printer short-edge first. The printer will ask for
rotated paper. The finisher staples the center of your booklet (saddle stitching). If your
booklet is only one sheet of paper, the finisher will fold the sheet, but not staple it. If the
booklet consists of more than one sheet of paper, the finisher will staple and then fold up to
10 sheets per booklet.
66 Chapter 2 Printing tasks ENWW
Page 69

The booklet-printing feature of the multifunction finisher allows you to saddle stitch and fold
booklets using the following paper sizes:
● A3
● A4-Rotated (A4-R)*
● Letter-Rotated (Letter R)*
● Legal
● 11 x 17
See the Multifunction Finisher User’s Guide at www.hp.com/support/lj9050_lj9040
for detailed
information about making booklets.
*A4-R and Letter-R are A4-size and Letter-size media that are rotated 90º in the tray.
ENWW Using the optional multifunction finisher 67
Page 70

Using the optional 8-bin mailbox
Output features
● Handles high-capacity output that increases the printer’s output capacity to 2,000 sheets of
standard media
● Uses the upper bin to provide 125 sheets of face-up stacking capacity
● Delivers printed jobs face-d own to the eight face-do wn bins, and each bin provides
250 sheets of stacking capacity
● Offers stacking options in different operational modes: mailbox, stacker, job separator, and
sorter/collator
For more information about the 8-bin mailbox, see the use guide that came with the 8-bin
mailbox.
Printing both sides of paper (duplexing)
The printer can automatically print on both sides of paper when an optional duplex printing
accessory (duplexer) is installed and configur ed. See the documentatio n that is included with the
duplex er for installation instructions.
CAUTION Ne ve r try to print on both sides of labels, envelopes , transparencies , or paper that is heavier than
199 g/m2 (53 lb). Damage to the printer or a jam can result.
To print on both sides of paper
1 If necessary, configure the printer driver to recognize the duplexer. See the printer software
help for instructions.
2 Load (orient) paper for duplexing.
Note For better duplexing performance, set the size and type for Tray 1.
3 Select the Print on both sides option from the progr am or printer driver. If you cannot select
this option from one of those locations, set it at the printer control panel. (In the Configure
Device menu, select the Printing menu, select Duplex, and then select ON.)
4 Set the Binding and Orientation options from the Print dialog box, if possible. If not, set
them from the printer control panel. See La y out optio ns f or printing on both sides of pape r for
more information.
68 Chapter 2 Printing tasks ENWW
Page 71

Layout options for printing on both sides of paper
The four print layout options are shown below. Select the binding and orientation options for this
printer from the Print dialog box, if possible. The terminology in the Print dialog box for the
binding edge might be different than the terms that are listed here.
If you cannot set these opti ons from t he Print dialog box, set them from the control panel. Select
the Configure Device menu, select the Printing menu, select DUPLEX BINDING or
ORIENTATION, and then select the layout option that you want.
Printing left-to-right
2. Long-edge
landscape
Printing right-to-left
1. Long-edge
portrait (default)
3. Short-edge
portrait
4. Short-edge
landscape
1. Long-edge
portrait (default)
2. Long-edge
landscape
3. Short-edge
portrait
4. Short-edge
landscape
ENWW Printing both sides of paper (duplexing) 69
Page 72

Printing on special paper
This section contains guidelines for printing on special media, which includes letterhead,
transparencies, postcards, and custom-size and heavy paper, and printing full-bleed images.
Printing on letterhead, prepunched paper, or preprinted paper
(single-sided)
● When printing on letterhead, prepunched, or preprinted paper, be sure to cor rectly orient the
paper. See Orienting media for instructions.
● If the paper is heavier than 19 9 g/m
only in optional Tray 1. See Paper specifications, or go to www.hp.com/support/
lj9050_lj9040 for complete paper specifications.
Printing on letterhead, prepunched paper, or preprinted paper
(double-sided)
● When printing on letterhead, prepunched, or preprinted paper, be sure to cor rectly orient the
paper. See Orienting media for instructions.
● When printing on both sides of prepunched paper , y ou m ust select prepunche d paper as the
paper type in the Paper Handling menu from the control panel or select prepunched paper
from your printer driver.
2
(53 lb bond) and less than 216 g/m2 (58 lb bond) load it
Printing labels
● Orient labels according to the guidelines in Orienting media.
● Print a stack of up to 50 sheets of labels from optional Tray 1.
● Use only labels recommended for laser printers. Make sure the labels meet the correct
specifications. (See Paper specifications, or go to www.hp.com/support/lj9050_lj9040
CAUTION Failure to follow these instructions can damage the printer.
Special cautions:
● Do not load optional Tray 1 to capacity, because labels are heavier than paper.
● Do not use labels that are separating from the backing sheet, wrinkled, or damaged in any
way.
● Do not use labels that have the backing sheet exposed. (Labels must cover the entire
backing sheet with no exposed spaces.)
● Do not feed a sheet of labels through the printer more than once. The adhesive backing is
designed for only one pass through t he printer.
● Do not print on both sides of labels.
.)
70 Chapter 2 Printing tasks ENWW
Page 73

Printing on transparencies
● Transparencies used in this printer must be able to withstand the 200°C (392°F), the
maximum temperature for the printer.
● Use only transparencies recommended for use in laser printers.
● Use the left output bin for tr ansparencies. If you select the optional stacker, stacker/stapler,
multifunction finisher, or 8-bin mailbox, use t he upper bin for transparencies.
CAUTION Do not attempt to print on both sides of transparencies. Do not attempt to print on envelopes,
custom paper, or paper that is heavier than 199 g/m
2
(58 lb). Printing on other transparencies
can damage the printer.
Guidelines for custom-size paper, card stock, and heavy paper
● You can print on custom-size paper from optional Tray 1, Tray 2, Tray 3, or optional Tray 4.
● Any paper heavier than 199 g/m
specifications, see Paper specifications or go to www.hp.com/support/lj9050_lj9040
● If you are printing from optional Tray 1, the edge of th e paper f e eding into the printer must be
at least 98 mm (3.9 inches) wide to allow rollers inside the printer to grab the paper, and a
maximum of 312 mm (12.3 inches). Measuring from the leading edge to the trailing edge of
the paper, the length must be at least 191 mm (7.5 inches) and a maximum of 470 mm
(18.5 inches).
● If you are printing from Tray 2 or 3, the edge of the paper feeding into the printer must be at
least 148 mm (5.8 inches) wide to allow rollers inside the printer to g rab the paper, and a
maximum of 297 mm (11.7 inches). Measuring from the leading edge to the trailing edge of
the paper, the length must be at least 210 mm (8.3 inches) and a maximum of 432 mm
(17.0 inches).
● If you are printing from optional Tray 4, the edge of th e paper f e eding into the printer must be
at least 182 mm (7.2 inches) wide to allow rollers inside the printer to grab the paper , and a
maximum of 297 mm (11.7 inches). Measuring from the leading edge to the trailing edge of
the paper, the length must be at least 210 mm (8.3 inches) and a maximum of 432 mm
(17.0 inches).
2
(53 lb) must be fed only from optional Tray 1. For paper
.
Printing full-bleed images
Because the product can print on specially cut paper up to 312 x 470 mm (12.3 x 18.5 inches),
you can print bleed images of up to 297 x 450 mm (11.7 x 17.7 inches) in size by using crop
marks. Full-bleed images can be printed from Tray 1 only. The default for edge-to-edge or fullbleed printing is “off”. See your program help for more information.
ENWW Printing on special paper 71
Page 74

72 Chapter 2 Printing tasks ENWW
Page 75

3
Advanced printing tasks
Overview
This section presents these advanced printing tasks:
● Using features in the printer driver
● Setting the registration
● Using a different first page
● Including a blank back page
● Printing multiple pages on one sheet of paper
● Customizing optional Tray 1 operation
● Specifying paper to print on
● Using the job-storage features
• Printing a private job
• Storing a print job
• QuickCopying a job
• Proofing and holding a job
ENWW Overview 73
Page 76

Using features in the printer driver
When you print from a software program, many of the printer features are available from the
printer driver. To gain access to Windows printer drivers, see Gaining access to the printer
drivers.
Note Settings in the printer driver and software program generally override control-panel settings.
(Software program settings generally override printer driver settings.)
Printer collation
The printer collation feature allows multiple original prints (mopying) that provide you the
following advantages:
● reduced network traffic
● faster return to the software program
● all original documents
Saving printer setup information
Printer drivers allow you to save the printer settings you use most often as the default settings.
For example, the driver might be set to print on 2 sides (duplex).
All printer drivers for Windows 2000 and Windows XP, and PCL 6 and PCL 5e printer drivers for
Windows 9X, ME, and NT 4.0 allow you to save printer settings for multiple kinds of print jobs.
For e xample , y ou might w ant to create a quic k set for env elopes , or for printing the first page of a
document on letterhead.
New printer driver features
Look for Quick Sets, Scale to Fit (any page size to any page size), and Booklet Printing
options in the Windows printer driver, or see the printer driver help f or more information.
Printing watermarks
A watermark is a notice, such as “Top Secret,” printed in the background of ea ch page in a
document. Check the driver for available options, or see the printer driver online help for more
information.
For Macintosh, you can select “Custom” and specify the text you choose, depending on your
driver version.
74 Chapter 3 Advanced printing tasks ENWW
Page 77

Setting the registration
Use the Set Registration feature to center the front and bac k images on a page that has been
duplexed (printed on both sides). This feature also helps you set edge-to-edge printing to within
approximately 2 millimeters (0.1 inch) of all edges of the paper. Image placement will vary
slightly for each input tray. The alignment procedure must be performed for each tray. The
administrator can use an internal-tray registration page to calibrate each tray.
To set the registration
1 Press to open the menus.
2 Use and to scroll to CONFIGURE DEVICE and then press .
3 Use and to scroll to PRINT QUALITY and then press .
4 Use and to scroll to SET REGISTRATION and then press .
You can select a tray by specifying a SOURCE. The default SOURCE is tray 2. If you want to set the
registration for tray 2, go to step 7. Otherwise, proceed to the next step.
5 Use and to scroll to SOURCE and then press .
6 Use and to select a tray and then press . After selecting a tray, the control-panel
display returns to the SET REGISTRATION menu.
7 Use and to scroll to PRINT TEST PAGE and then press .
8 Follow the instructions on the printed page.
ENWW Setting the registration 75
Page 78

Using a different first page
To print a different first page
Follow these instructions f or printing a first page that is different from other pages in the print job .
The instructions are provided for Tray 1, however, you can print a different first page from other
trays.
1 For Windows , select “Use dif ferent paper for first page ” in your printer driver . Select one tray
for the first page and one of the other trays for the remaining pages. Place the paper for the
first page in the first tray that you selected. (For manual feed, place paper in optional Tray 1
after the job is sent to the printer and the printer reque sts paper.) For loading option al Tray 1,
place the paper with the side to be printed on facing up, the top of the page toward the rear
of the printer.
For Macintosh computers, select “First from” and “Remaining from” in the Print dialog box.
Note Where and how you make selections depends on your software program or associated printer
driver. (Some options are only available through the printer driver.)
2 Load the paper fo r the remainin g pages of the d ocument into an other tr ay. You can select the
first and remaining pages by type of paper. For mo re information, see Specifying paper to
print on.
76 Chapter 3 Advanced printing tasks ENWW
Page 79
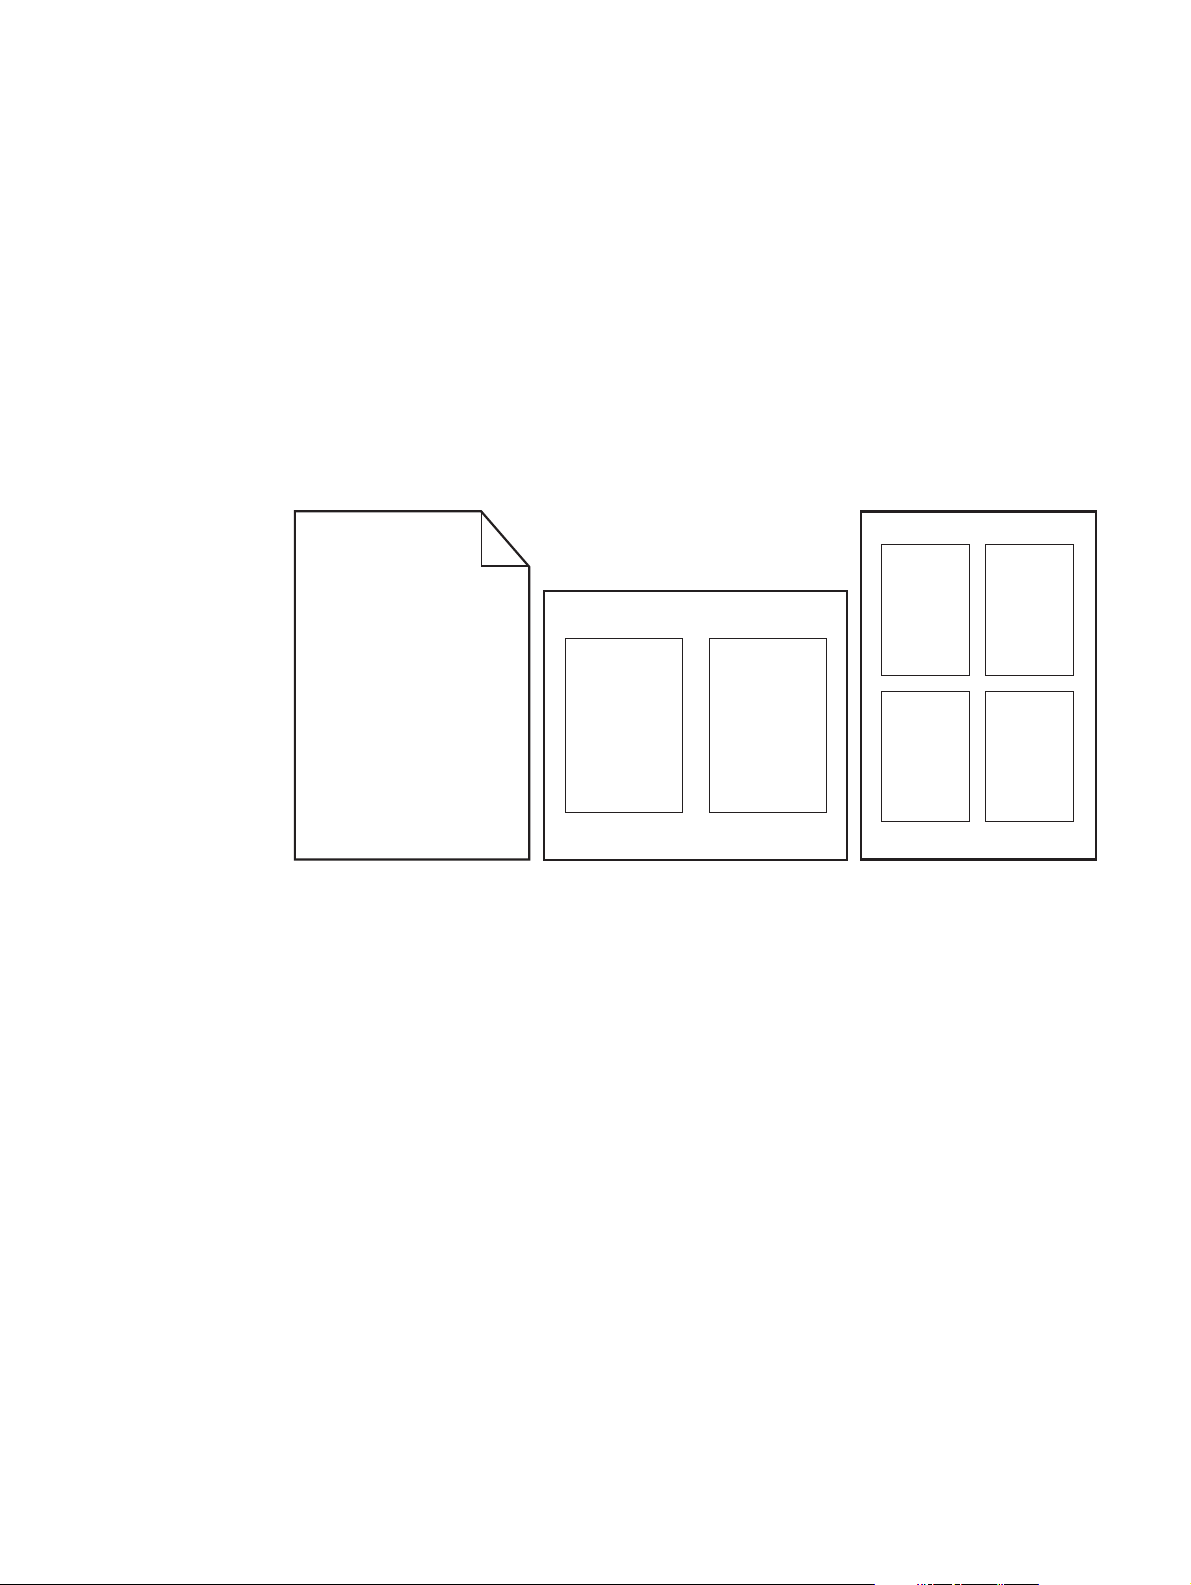
Including a blank back page
This option allows you to add blank pages to the end of a print job.
For Windows, select Use different paper for first page on the Paper tab of your printer driver,
and then select Back Page. You can then select the paper source you want to use for your back
page. To turn the feature off, select No back page.
Printing multiple pages on one sheet of paper
You can print more than one page on a single sheet of paper. This feature is available in some
printer drivers and provides a cost-effective way to print draft pages.
To print more than one page on a sheet of paper, look for a layout or pages per sheet option in
the printer driver. (This is sometimes called 2-up, 4-up, or n-up printing.)
ENWW Including a blank back page 77
Page 80

Customizing optional Tray 1 operation
Customize optional Tray 1 to fit your printing needs.
The printer can be set to print from optional Tray 1:
● When the tray is loaded and TRAY 1 SIZE=ANY SIZE and TRAY 1 TYPE=ANY TYPE; (formerly
First mode). Print speed might be slower than normal.
● Only when the type of paper loaded is specifically requested and TRAY 1 SIZE=a specific
size and TRAY 1 TYPE=a specific type (formerly Cassette mode).
Printing from optional Tray 1 when the loaded paper is
requested
When TRAY 1 SIZE=a specific size and TRAY 1 TYPE=a specific type (formerly Cassette mode),
the printer treats optional Tray 1 like the internal trays. Instead of looking for paper in optional
Tray 1 first, the printer pulls paper starting either from the bottom tray upward or starting with the
tray that matches type or size settings selected in the program from which you are printing.
From the pr ogram or the Print dialog bo x, select the type a nd size f or a tr a y, if possible. If not, set
the type and size from the printer contro l panel. (See Specifying paper to print on.)
When TRAY 1 SIZE=a specific size and TRAY 1 TYPE=a specific type is set at the printer control
panel, an option appears in the PAPER HANDLING menu to configure size as well as type settings
for optional Tray 1.
Manually feeding paper from optional Tray 1
The manual feed feature is another way of printing special paper from optional Tray 1, such as
envelopes or letterhead.
78 Chapter 3 Advanced printing tasks ENWW
Page 81

Specifying paper to print on
You can configure the printer to select paper by type (such as plain or letterhead) and size (such
as letter or A4), as opposed to source (a paper tray).
Printing by Type and Size means that the printer to pulls paper from the first tray that is loaded
with the type or size that you select. Selecting paper by type rather than source is similar to
locking out trays, which helps to protect special paper from accidental use. (However, selecting
the ANY SIZE, ANY TYPE, or PLAIN setting does not turn on the tray lock-out function.)
For ex ample, if Tray 2 is configured for letterhead, and you specify in the driver that you want to
print on plain paper, the printer will not pull the letterhead from Tray 2. Instead, the printer pulls
paper from a tray that has plain paper loaded and is configured for plain paper on the printer
control panel.
Selecting paper by type and size results in significantly better print quality for heavy paper,
glossy paper, and transparencies. Using the wrong setting can result in unsatisfactory print
quality. Always print by type for special print media such as labels or grayscale transparencies.
Always print by size for envelopes.
Benefits of printing by type and size of paper
If you frequently use se v eral kinds of paper , once tra ys are set correct ly, you do not have to chec k
which paper is loaded in each tray before you print. This is especially helpful when the printer is
shared and more than one person loads or removes paper. Printing by type and size of paper is
a way to be sure that print jobs alw ays print on the appropriate paper.
To set the type for the paper or media you loaded when y ou are unsure which type ( such as bond
or recycled) to choose, check the label on the package of paper. For supported types of paper,
see Paper specifications or go to www.hp.com/support/lj9050_lj9040
Note The type and size settings can al so be configured from the embedded W eb server or
HP Web Jetadmin software for networked printers. See the printer driver online help.
.
To print by type and size of paper
Note Settings in the printer driver and software program override control-panel settings. (Software
program settings generally override printer driver settings.)
1 Load and adjust the trays. (See Loading input trays, or go to www.hp.com/support/
lj9050_lj9040.)
2 At the printer control panel, press , use or to scroll to PAPER HANDLING, and then
press .
3 Do one of the following:
• To allow the printer to automatically pull the type and size of paper loaded in optional
Tray 1: Set TRAY 1 SIZE=ANY SIZE and TRAY 1 TYPE=ANY TYPE.
• To print by type and size from optiona l Tray 1: Set TRAY 1 SIZE to the size loade d, and set
TRAY 1 TYPE to the type loaded.
• To print by type and size from Tray 2, Tray 3, or optional Tray 4 when the tray is loaded
with standard size paper: Just set the type. If the size is a detectable standard size, it will
be automatically detected. If the size is an undetectable size, set the size.
• To print by type and size from Tray 2, Tray 3, or optional Tray 4 when the tray is loaded
with a custom size paper: set the size and type. For the size, select Custom, and then set
the values using the measurements on the guides in the trays.
4 From the program or printer driver, select the type and size of paper.
ENWW Specifying paper to print on 79
Page 82

Using the job-storage features
Four special job-storage features are available for this printer. All four are available when a hard
disk is installed. Private jobs and proof and hold jobs are available in RAM (with no hard disk
installed).
● Private jobs. When you send a private job to the printer, the job does not print until you
enter a PIN at the printer.
● Stored jobs. You can download a job such as a personnel form, time sheet, or calendar, to
the printer and allow other users to print the job at any time. Stored jobs are copied to the
optional hard disk and are not deleted if retention space on the printer becomes limited.
● QuickCopy jobs. You can print the requested number of copies of a job and then store a
copy of the job on the optional hard disk in the printer. Storing the job allows you to print
additional copies of the job later.
● Proof and hold jobs. This feature provides a quick and easy way to print and proof one
copy of a job and then print the additional copies.
Follow the instructions below to gain access to the job retention features at the computer. Then,
see the specific section for the type of job you want to create.
CAUTION If you turn the printer off, all QuickCopy, Proof and hold, and Private jobs are deleted.
To gain access to the job storage features
For Windows
1 On the File menu, click Print.
2 Click Properties and click the Job Storage tab.
3 Select the desired Job Storage Mode.
For Macintosh
In newer drivers: Select Job Retenti on from the pull-down menu in the print dialog box. In older
drivers, select Printer Specific Options.
Printing a private job
The private printing feature lets a user specify that a job is not printed until that user releases it
using a 4-digit personal identification number (P IN) through the printer control panel. The user
specifies the PIN in the driver, and the PIN is sent to the printer as part of the print job.
Note The private jobs feature uses available printer RAM memo ry if the printer does not have a hard
disk installed. For moderate to heavy use of this feature, HP recommends installing an optional
hard disk.
To create private jobs
To specify that a job is private from the driver, select the Private Job option, enter a User Name
and Job Name, and type a 4-digit PIN. The job will not print until you enter the PIN at the control
panel.
80 Chapter 3 Advanced printing tasks ENWW
Page 83

Releasing private jobs
The user can print a private job from the control panel.
To release private jobs
1 Press .
2 Use or to scroll to Retrieve Job and then press .
3 Scroll to USER NAME and press .
4 Use or to scroll to your job and then press .
5 Use or to scroll to Print and then press . (The Print icon should have next to
it.)
6 Use the numeric keypad to type the PIN, an d then press .
Deleting a private job
A private job is automatically deleted from the printer hard disk accessory after the user releases
it for printing. If you want to delete the job without printing it, use this procedure.
To delete private jobs
1 Press .
2 Use or to scroll to Retrieve Job and then press .
3 Scroll to USER NAME and press .
4 Use or to scroll to your job and then press .
5 Use or to scroll to Delete and then press . (Delete should have next to it.)
6 Use the numeric keypad to type the PIN, an d then press .
Storing a print job
The user can download a print job to the printer hard disk accessory without printing it. The user
can then print the job at any time through the printer control panel. For example, a user might
want to download a personnel form, calendar, time sheet, or accounting f orm that other users
can access and print.
To store a print job on the hard disk accessory, select the Stored Job option in the driver when
printing from the printer.
Note The stored job feature uses available RAM memory on the printer if the printer does not have a
hard disk installed. For moderate to heavy use of this feature, HP recommends installing an
optional hard disk.
To create stored jobs
In the printer driver, select the Stored Job option and type a user name and job name. The job
does not print until someone requests it at the printer. See Printing a stored job.
ENWW Using the job-storage features 81
Page 84

Printing a stored job
The user can print a job stored on the printer hard disk accessory from the control panel.
To print a stored job
1 Press .
2 Use or to scroll to Retrieve Job and then press .
3 Scroll to USER NAME and press .
4 Use or to scroll to your job and then press .
5 T o print the default n umber of copies, press . When is selected, the screen changes to
Copies=n. To change the number, use the numeric keypad or and to select a new
number, and then press .
If Print has next to it, the job is a private job and requires a PIN. See Printing a private job.
Deleting a stored job
Jobs stored on the printer hard disk accessory can be deleted from the control panel.
To delete a stored job
1 Press .
2 Use or to scroll to Retrieve Job and then press .
3 Scroll to USER NAME and press .
4 Use or to scroll to your job and then press .
5 Use or to scroll to Delete and then press .
If Delete has next to it, the job requires a PIN to delete. See Printing a private job.
QuickCopying a job
The QuickCopy feature prints the requested number of copies of a job and stores a copy on the
printer hard disk accessory. Additional copies of the job can be printed later. This feature can be
turned off from the driver.
The default number of different QuickCopy jobs that can be stored on the printer is 32. From the
control panel, you can set a different default number. See JOB STORAGE LIMIT=32.
To create QuickCopy jobs
CAUTION If the printer needs additional space to store newer QuickCopy jobs, the printer will delete other
stored QuickCopy jobs, starting with the oldest job. To permanently store the job and prevent the
printer from deleting it when space is needed, select the Stored Job option instead of the
QuickCopy option.
In the printer driver, select the QuickCopy option and type a user name and a job name.
When you send the job to print, the printer prints the number of copies you set in the printer
driver. To print more quick copies at the printer, see Printing additional copies of QuickCopy
jobs.
82 Chapter 3 Advanced printing tasks ENWW
Page 85

Printing additional copies of QuickCopy jobs
This section describes how to print additional copies of a job stored on the printer hard disk
accessory from the control panel.
To print more copies of a QuickCopy job
1 Press .
2 Use or to scroll to Retrieve Job and then press .
3 Scroll to USER NAME and press .
4 Use or to scroll to your job and then press .
5 To print the default number of copies, go to the next step. O th erwise, to check or change the
number of copies to print:
a Use or to scroll to Copies and then press . The number of copies to be printed
appears at the top of the window.
b To change the number, use the numeric keypad or and to select a new number
and then press .
6 Use or to scroll to Print and then press . The job prints.
If Print has next to it, the job requires a PIN to print. See Printing a private job.
Deleting a QuickCopy job
Delete a QuickCopy job at t he printer when you no longer need it. If the printer needs additional
space to store new QuickCopy jobs, the printer will automatically delete other stored QuickCopy
jobs, starting with the oldest job.
Note Stored QuickCopy jobs can be deleted from the control panel or from HP Web Jetadmin.
To delete a QuickCopy job
1 Press .
2 Use or to scroll to Retrieve Job and then press .
3 Scroll to USER NAME and press .
4 Use or to scroll to your job and then press .
5 Use or to scroll to Delete and then press .
If Delete has next to it, the job requires a PIN to delete. See Printing a private job.
Proofing and holding a job
The proof and hold feature provides a quick and easy way to print and proof one copy of a job
and then to print the additional copies.
To permanently store the job and prevent the printer from deleting it when space is needed for
something else, select the Stored Job option in the driver.
The proof and hold feature uses available RAM memory on the printer if the printer does not
have a hard disk installed. For moderate to heavy use of this feature, HP recommends installing
an optional hard disk.
ENWW Using the job-storage features 83
Page 86

To create a proof and hold job
CAUTION If the printer needs additional space to store newer proof and hold jobs, the printer will delete
other stored proof and hold jobs, starting with the oldest job. To permanently store the job and
preve nt the printer from deleting it when space is needed, select the Stored Job option in the
printer driver instead of the Proof and Hold option.
In the printer driver, select the Proof and Hold option and enter a user name and job name.
The printer prints one copy of the job fo r y ou to proof. Then, see Printing the remaining copies of
a held job.
Printing the remaining copies of a held job
The user can print the remaining copies of a job h eld on the p rinter hard disk accessory from the
control panel.
To print a proof and hold job
1 Press .
2 Use or to scroll to Retrieve Job and then press .
3 Scroll to USER NAME and press .
4 Use or to scroll to your job and then press .
5 Use or to scroll to Print and then press . The job prints the remaining copies
requested from the computer.
If Print has next to it, the job requires a PIN to print. See Printing a private job.
Deleting a held job
When a user sends a proof and hold job, the printer automatically deletes that user’s previous
proof and hold job . I f no proof and ho ld job alre ady exists for that job name and the printer needs
additional space, the printer might delete other proof and hold jobs, starting with the oldest one.
To delete a proof and hold job
1 Press .
2 Use or to scroll to Retrieve Job and then press .
3 Scroll to USER NAME and press .
4 Use or to scroll to your job and then press .
5 Use or to scroll to Delete and then press .
If Delete has next to it, the job requires a PIN to delete. See Printing a private job.
84 Chapter 3 Advanced printing tasks ENWW
Page 87

4
Security features
Overview
This section explains important security features available on your printer:
● Secure Disk Erase
● Security lock
● Job storage features
ENWW Overview 85
Page 88

Secure Disk Erase
You might need to protect deleted data from unauthorized access on the printer hard drive.
Secure Disk Erase is a security feature that you can use to securely erase print jobs from the
hard drive.
Security levels are set by using HP Web Jetadmin. Three levels of Secure Disk Erase are
available:
● Non-Secure Fast Erase
This is a simple file-table erase function. Access to the f ile is remo v ed, b ut actu al data is ret ained
on the disk until it is ov erwritten by subsequ ent data-storage operations . This is the f astest mode .
Non-Secure Fast Erase is the default erase mode.
● Secure Fast Erase
Access to the file is remov ed, a nd the d ata is o verwritten with a fixed, ide ntical cha racter pattern.
This is slower than Non-Secure Fast Erase, but all data is overwritten. Secure Fast Erase meets
the U.S. Department of Defense 5220-22.M requirements for the clearing of disk media.
● Secure Sanitizing Erase
This level is similar to the Secure Fast Erase mode. In addition, data is r epetitively overwritten b y
using an algorithm that prevents any residual data persistence. This mode will impact
performance. Secure Sanitizing Erase meets the U.S. Department of Defense 5220-22.M
requirements for the sanitization of disk media.
Affected data
Data affected (covered) by the Secure Disk Erase feature includes temporary files that are
created during the print and copying process, stored jobs, proof and hold jobs, disk-based fonts,
and disk-based macros (forms). Note that stored jobs will only be securely overwritten when they
have been deleted through the Retrieve Job menu on the device afte r the appropriate erase
mode has been set. (See Deleting a stored job.) This feature will not impact data that is stored
on flash-based printer non-volatile RAM (NVRAM) th at reta in s default printe r s et tin gs, page
counts, and similar data. This f eature does not affect data that is stored on a system RAM disk (if
one is used). This feature does not impact data that is stored on the flash-based system boot
RAM.
Changing the Secure Disk Erase mode does not o verwrite previous data on the disk, nor does it
immediately perform a full-disk sanitization. Changing the Secure Disk Erase mode changes
how the printer cleans up temporary data for jobs after the erase mode has been changed.
Gaining access to Secure Disk Erase
Use HP Web Jetadmin to set the Secure Disk Erase feature.
Additional information
For additional information about the HP Secure Disk Erase feature, see the HP support flyer or
go to www.hp.com/go/webjetadmin
).
86 Chapter 4 Security features ENWW
Page 89

Security lock
The security lock is a mechanical lock that can be used to prevent the removal of internal
computer components, Optional EIO acce sso ries are not protect ed , however. Purchase the lock
assembly separately, and then install it on the product.
Job storage features
Several job-storage features are av ailable for the printer. These features include printing private
jobs, storing print jobs, quick-copying jobs, and proofing and holding jobs.
For more information about job storage features, see Using the job-storage features.
ENWW Security lock 87
Page 90

88 Chapter 4 Security features ENWW
Page 91

5
Printer maintenance
Overview
This section explains basic printer maintenance.
● Cleaning the printer
● Printer maintenance kit
● Managing the print cartridge
● Print cartridge conditions
ENWW Overview 89
Page 92

Cleaning the printer
General cleaning
To maintain print quality, clean the printer thoroughly:
● every time you change the print cartridge.
● whenever print-quality problems occur.
Clean the outside of the printer with a lightly water-dampen ed clot h. Clea n the in sid e with only a
dry, lint-free cloth. Observe all warnings and cautions that appear with the cleaning tasks on the
following pages.
WARNING! Avoid touching the fusing area when cleaning the printer. It can be hot.
CAUTION To avoid permanent damage to the print cartridge, do not use ammonia-based cleaners on or
around your printer.
To clean the printer
1 Before you begin these steps, turn the printer off and disconnect all cables, including the
power cable.
2 Open the front cov er of the printer and remove the print cartridge.
CAUTION To prevent damage to the print cartridge, use two hands when removing it from the printer.
Do not expose the print cartridge to light for more than a few minutes. Cover the print cartridge
when it is outside of the printer.
Note If toner gets on your clothes , wipe it off with a dry cloth, and wash y our clothes in cold water. Hot
water sets toner into fabric.
90 Chapter 5 Printer maintenance ENWW
Page 93

3 With a dry, lint-free cloth, wipe any residue from the paper path area, the registration roller,
and the print cartridge cavity.
4 Replace the print cartridge.
5 Turn the green lever back to the locked position .
6 Close the front cover, reconnect all cables, and turn the printer on.
ENWW Cleaning the printer 91
Page 94

Printer maintenance kit
Note The printer maintenance kit is a consumable and is not covered under warranty.
To ensure optimum print quality, HP recommends that the printer maintenance kit be used
approximately every 350,000 pages. You might need to replace the kit more often, depending on
the type of printing you do. If you have questions about how frequently you should use a
maintenance kit, contact the support center at www.hp.com/support/lj9050_lj9040
When the PERFORM PRINTER MAINTENANCE message appears on the control panel, you need to
purchase a printer maintenance kit and install the new parts. The part number for th e 110-V kit is
C9152A. The part number for the 220-V kit is C9153A. The printer maint enan ce kit con tains two
Type 1 rollers, seven Type 2 rollers, one transfer roller assembly, and one fuser assembly.
Complete instructions for installing the kit components a re included in the printer maintenance kit
box.
After a new maintenance kit is installed, reset the printer maintenance count.
To reset the printer maintenance count
1 Turn the printer off.
2 Turn the printer on.
3 When the memory count starts, press and hold .
.
4 When the three LEDs are on, press until NEW MAINTENANCE KIT appears on the screen.
5 Press .
If the message persists,
1 Use or to scroll to CONFIGURE DEVICE.
2 Use or to scroll to RESETS.
3 Press .
4 Use or to scroll to CLEAR MAINTENANCE MESSAGE.
5 Press .
To verify that the maintenance kit is reset to zero, print a configuration page by using the
following procedure.
To print a configuration page
1 Press .
2 Use or to scroll to INFORMATION. and press
3 Use or to scroll to PRINT CONFIGURATION. and press .
For more information about installing the printer maintenance kit, see the instructions that
accompany it.
92 Chapter 5 Printer maintenance ENWW
Page 95

Managing the print cartridge
When you use a new, authentic HP print cartridge (C8543X), you can obtain the following types
of supplies information:
● amount of cartridge life remaining
● estimated number of pages remaining
● number of pages printed
● other supplies information
Print cartridge authentication
The printer will let you know that a cartridge is not a genuine HP print cartridge when you insert
it in the printer. If you insert a used HP cartridge from another HP printer, the printer can take as
many as 20 printed pages to receive the message authenticating that the cartridge is a genuine
HP part.
If the printer control-panel message states that this is not a genuine HP print cartridge and you
believe you purchased an HP cartridge, go to www.hp.com/go/anticounterfeit
Non-HP print cartridges
Hewlett-Packard Company cannot recommend use of non-HP print cartridges, either new or
remanufactured. Because they are not HP products, HP cannot influence their design or control
their quality. Service or repairs required as a result of using a non-HP print cartridge will not be
covered under the printer warranty.
.
Print cartridge storage
Do not remove the print cartridge from its package until you are ready to use it.
CAUTION To prevent damage to the print cartridge, do not expose it to light for more than a few minutes.
Checking the toner level
You can check the toner level by using the printer control panel, the embedded Web server, the
printer software, or HP Web Jetadmin.
Using the printer control panel
1 Press to open Menu.
2 Use or to select INFORMATION and then press .
3 Use or to select PRINT SUPPLIES STATUS PAGE and then press .
4 Press to print the supplies status page. See Supplies status pa ge for information about
the supplies status page.
Using the embedded Web server
1 In your Web browser, type the IP address for the printer home page. This takes you to the
printer status page.
2 On the left side of the screen, click Supplies Status. This takes you to the supplies status
page, which provides to ner le v el inf ormation. See Supplies status page f or inf ormation about
the supplies status page.
ENWW Managing the print cartridge 93
Page 96

Using printer software
The following conditions must be met in order to use this feature:
● The HP Toolbox software must be installed on your computer. (HP Toolbox is automatically
installed as part of the typical printer software installation.)
● The printer must be connected to a network.
● You must have access to the World Wide Web to order supplies.
To use the printer software
1 On the Start menu, select Programs, and then click HP toolbox.
The HP Toolbox opens in a Web browser.
2 On the left side of the window, click the Status tab, and then click Supplies Status.
Note If you want to order supplies, click Or der Supplies . This opens a browser that produces a URL
where you can purchase supplies . Select the supplies that y ou w ant to order an d then finish the
ordering process.
Using HP Web Jetadmin
In HP Web Jetadmin, select the printer device. The device status page shows toner lev el
information.
Print cartridge conditions
Use these procedures when you see a message that relates to the print cartridge, or when you
want to change or replace a print cartridge.
Order the print cartridge
When the print cartridge is low, the message ORDER CARTRIDGE appears on the printer control
panel.
If the ORDER CARTRIDGE message appears but the printer continues printing, the CARTRIDGE LOW
setting is set to CONTINUE (the default setting).
If the printer stops printing when low toner is detected, CARTRIDGE LOW is set to STOP. To resume
printing, press .
The message ORDER CARTRIDGE will continue to appear until you replace the print cartridge.
Select CARTRIDGE LOW=CONTINUE or CARTRIDGE LOW=STOP from the Configuration menu on the
printer control panel (see System setup submenu).
HP recommends that you pla ce a n o rde r for a replacement print cartridge when you fi rst re ce ive
an ORDER CARTRIDGE alert. You can order a cartridge by using the Internet Enabled Supplies
Ordering feature. To do so, click the printer icon on the bottom right of your screen, click the icon
for the printer that you use, and then click the Order Supplies link on the status page. In a
network environment, use the embedded Web server to order supplies online.
94 Chapter 5 Printer maintenance ENWW
Page 97

Replace the print cartridge
When the print cartridge is empty , a REPLACE CARTRIDGE messag e appear s on the printer control
panel. The printer continues printing (without customer interaction) until it reaches a drum-out
condition, but HP does not guarantee print quality after this message appears. However, if the
REPLACE CARTRIDGE message results from the drum life being e xceeded, the user has to replace
the cartridge immediately, and no ov e rride is po ssible. This is done to protect the printer and th e
print car tridge.
Recycling
For information about recycling the print cartridge, see Protecting the environment or go to
www.hp.com/recycle
.
Using the printer cleaning page
Note To ensure good print quality with certain types of paper, use the cleaning page every time the
print cartridge is replaced. If the cleaning page is frequently needed, try a different type of paper.
If toner specks appear on the fron t or back side of your print jobs, use the following procedure.
From the printer control panel:
1 Use or to select Configure Device and then press .
2 Use or to select Print Quality and then press .
3 Use or to select Create Cleaning Page and then press .
4 Follow the instructions on the cleaning page.
5 When toner has been cleaned from inside the printer, shiny black spots will appear on the
page black strip. If white spots appear on the bl ack strip, print another cleani ng page.
Note In order for the cleaning page to work correctly, print the cleaning page on copier-grade paper
(not bond or rough paper).
Rocking the print cartridge
When you install a print cartridge for the first time, gently rock the cartridge from front to back to
distribute the toner e venly inside the cartridge. Because of the new cartridge design, this is the
only time that you need to rock the cartridge.
Configuring alerts
You can use HP Web Jetadmin or the embedded Web server in the printer to config ure the
system to alert you to problems with the printer . The al erts take the form of e-mail messages that
are sent to the e-mail account or accounts that you specify.
You can configure the following items:
● the printer(s) that you want to monitor.
● which alerts are to be received (for example, alerts for paper jams, pap er out, order
cartridge, replace cartridge, and cover open)
● the e-mail account to which the alerts should be forwarded
Software Location for information
HP Web Jetadmin See the HP Web Jetadmin Help system for details on
alerts and how to set them up.
ENWW Print cartridge conditions 95
Page 98

Software Location for information
Embedded Web server See Using the embedded Web server for general
information about the embedded Web server.
See the embedded Web server Help system for
details on alerts and how to set them up.
You can also receive alerts through the HP Toolbox software. These alerts display as either a
pop-up window or an animated taskbar icon. The HP Toolbox software does not send alerts in
the form of an e-mail message. You can configure the HP Toolbox software to deliver only the
alerts that you want to receive, and you can also specify how often the software checks the
printer status. See HP Toolbox for more information.
96 Chapter 5 Printer maintenance ENWW
Page 99

6
Problem solving
Overview
This section will help you to troubleshoot and solve printer problems.
Clearing jams Occasionally , paper can jam during printing. This section will help you to locate
paper jams, properly clear them from the printer, and solve repeated jams.
Understanding
printer messages
Resolving controlpanel messages
Correcting output
quality problems
Solving common
printer issues
Using the
embedded Web
server
Many different messages can appear on the printer control-panel display.
Some messages tell the current printer status, such as INITIALIZING. Other
messages require action, such as CLOSE RIGHT DOOR. Most of these messages
are self-explanatory. However, some messages indicate a problem with the
printer, or require further action or description. This section lists these types of
messages and tells you what to do if a message persists.
This section lists messages that might appear on the control panel and
explains what causes the message and what action can be taken to resolve
the message
The printer should produce print jobs of the highest quality. If print jobs do not
appear sharp and clear, if defects such as lines, specks, or smears appear on
the page, or if paper is wrinkled or curled, use this section to troubleshoot and
solve the print quality problem.
Before you can eliminate a printer problem, you must understand the location
of the problem. Use the tables in this section to determine the printer problem,
and then follow the corresponding troubleshooting suggestions.
The pages that give information about the printer are on the embedded Web
server.
Printing information
pages
Checking the
printer configuration
Printing a paper
path test
ENWW Overview 97
These pages can be printed from the printer control panel.
From the printer, y ou can print information pages, which give details about the
printer and its configuration.
The paper path test can be used to verify that various paper paths are working
properly .
Page 100

Clearing jams
If a paper-jam message appears on the printer control panel, look for paper in the locations that
are indicated in the following graphic. You might need to look for paper in locations other than
those that are indicated in the paper-jam message . If the locatio n of the paper jam is not obvious ,
look first in the front-door area.
After looking at the graphic, you can go to the procedure for clearing the jam. When clearing
jams, be very careful not to tear the paper. If a small piece of paper is left in the printer, it could
cause additional jams. If jams are a recurrin g problem, see Solving repeated paper jams.
Note Loose toner might remain in the printer after a paper jam and cause output quality problems.
These should clear up within a few pages.
Jam locations
1
1
1
2
1
3
11
1
10
1
12
1
1
9
1
8
1
7
1. Standard top bin (face-down output bin)
2. Optional Tray 1
3. Right door
4. Vertical transfer door
5. Optional Tray 4
6. Tray 3
7. Tray 2
8. Left door (behind output accessory
9. Duplexer (inside the printer)
10. Optional output device
11. Front door and print cartridge area
12. Upper bin (face-up output bin)
1
6
1
4
1
5
98 Chapter 6 Problem solving ENWW
 Loading...