

Page 1
HP Officejet 5700
UIser Guide
User Gui
J
Page 2
© Copyright 2006 Hewlett-Packard
Development Company, L.P.
The information contained herein is
subject to change without notice.
Reproduction, adaptation or translation
without prior written permission is
prohibited, except as allowed under
copyright laws.
Adobe® and the Acrobat logo® are
trademarks of Adobe Systems
Incorporated.
Windows®, Windows NT®, Windows
ME®, Windows XP®, and Windows
2000® are U.S. registered trademarks
of Microsoft Corporation.
Intel® and Pentium® are trademarks or
registered trademarks of Intel
Corporation or its subsidiaries in the
United States and other countries.
October 2006
Notice
The only warranties for HP products
and services are set forth in the express
warranty statements accompanying
such products and services. Nothing
herein should be construed as
constituting an additional warranty. HP
shall not be liable for technical or
editorial errors or omissions contained
herein.
The Hewlett-Packard Company shall
not be liable for incidental or
consequential damages in connection
with, or arising out of the furnishing,
performance, or use of this document
and the program material which it
describes.
Note: Regulatory information can be
Regulatory notices.
found in
It is not lawful in many places to make
copies of the following items. When in
doubt, check with a legal representative
first.
Governmental paper or
•
documents:
Passports
•
Immigration papers
•
Selective service papers
•
Identification badges, cards,
•
or insignias
Governmental stamps:
•
Postage stamps
•
Food stamps
•
Checks or drafts drawn on
•
Governmental agencies
Paper currency, traveler’s checks,
•
or money orders
Certificates of deposit
•
Copyrighted works
•
Safety information
WARNING! To prevent fire or
shock hazard, do not expose this
product to rain or any type of
moisture.
Always follow basic safety precautions
when using this product to reduce risk
of injury from fire or electric shock.
WARNING! Potential shock
hazard
1. Read and understand all
instructions in the Setup Guide.
2. Use only a grounded electrical
outlet when connecting the device
to a power source. If you do not
know whether the outlet is
grounded, check with a qualified
electrician.
3. Observe all warnings and
instructions marked on the
product.
4. Unplug this product from wall
outlets before cleaning.
5. Do not install or use this product
near water or when you are wet.
6. Install the product securely on a
stable surface.
7. Install the product in a protected
location where no one can step on
or trip over the power cord, and
where the power cord will not be
damaged.
8. If the product does not operate
normally, see the onscreen
Troubleshooting help.
9. No operator-serviceable parts
inside. Refer servicing to qualified
service personnel.
10. Use in a well-ventilated area.
11. Use only with the power adapter
supplied by HP.
WARNING! This equipment will
be inoperable when main power
fails.
Page 3

Contents
1 HP Officejet J5700 All-in-One series Help..............................................................................7
2 Find more information
Sources of information................................................................................................................9
3 HP All-in-One overview
The HP All-in-One at a glance..................................................................................................11
Control panel features..............................................................................................................12
Text and symbols......................................................................................................................13
Enter text using the keypad on the control panel...............................................................13
Available symbols for dialing fax numbers.........................................................................14
Use the software.......................................................................................................................15
Connection information.............................................................................................................16
Supported connection types...............................................................................................16
Connect using a USB cable................................................................................................16
Use printer sharing.............................................................................................................16
1
Page 4

4 Finish setting up the HP All-in-One
Set your preferences................................................................................................................19
General preferences...........................................................................................................19
Set your language and country/region..........................................................................19
Set the date and time...................................................................................................20
Set the scroll speed......................................................................................................20
Set the prompt delay time.............................................................................................20
Restore the factory defaults..........................................................................................21
Fax preferences..................................................................................................................21
Set up the HP All-in-One to redial a fax number automatically....................................21
Adjust the volume.........................................................................................................22
Set tone or pulse dialing...............................................................................................22
Set the fax speed..........................................................................................................23
Fax setup..................................................................................................................................23
Set up the HP All-in-One for faxing....................................................................................24
Choose the correct fax setup for your home or office...................................................25
Select your fax setup case...........................................................................................27
Case A: Separate fax line (no voice calls received).....................................................29
Case B: Set up the HP All-in-One with DSL.................................................................29
Case C: Set up the HP All-in-One with a PBX phone system or an ISDN line.............31
Case D: Fax with a distinctive ring service on the same line........................................32
Case E: Shared voice/fax line......................................................................................33
Case F: Shared voice/fax line with voice mail..............................................................34
Case G: Fax line shared with computer dial-up modem (no voice calls
received).......................................................................................................................35
Case H: Shared voice/fax line with computer dial-up modem......................................37
Case I: Shared voice/fax line with answering machine................................................39
Case J: Shared voice/fax line with computer dial-up modem and answering
machine........................................................................................................................40
Case K: Shared voice/fax line with computer dial-up modem and voice mail..............43
Change settings on the HP All-in-One to receive faxes.....................................................45
Choose the recommended answer mode for your setup..............................................45
Set the answer mode....................................................................................................46
Set the number of rings before answering....................................................................46
Change the answer ring pattern for distinctive ringing.................................................47
Test your fax setup.............................................................................................................47
Set the fax header..............................................................................................................48
Set up speed dialing...........................................................................................................48
Set up individual speed dial entries..............................................................................49
Set up group speed dial entries....................................................................................50
Delete speed dial entries..............................................................................................50
Print the speed dial list.................................................................................................51
5 How do I?.................................................................................................................................53
6 Load originals and load paper
Load originals...........................................................................................................................55
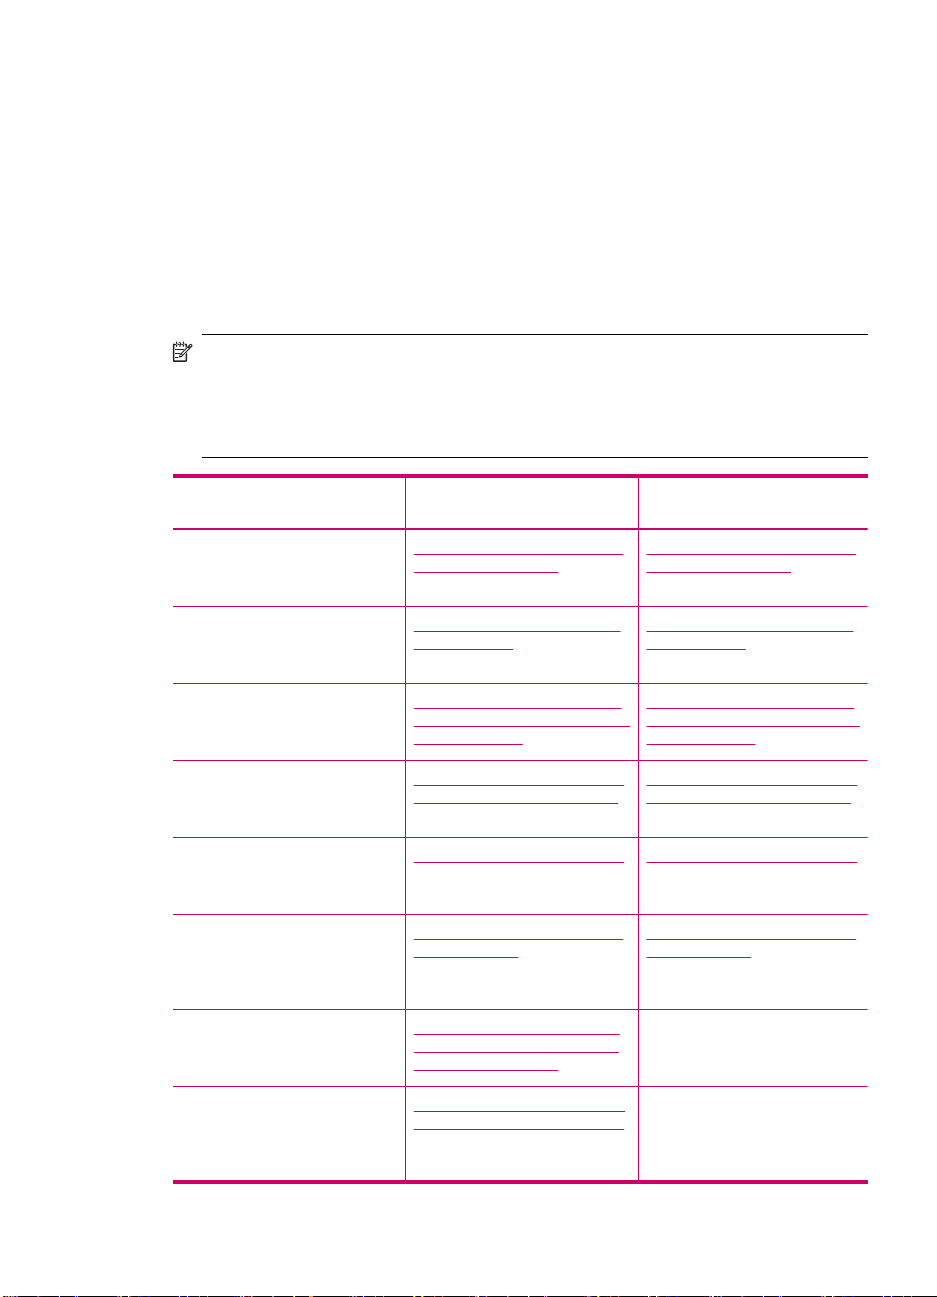
Load an original in the automatic document feeder............................................................55
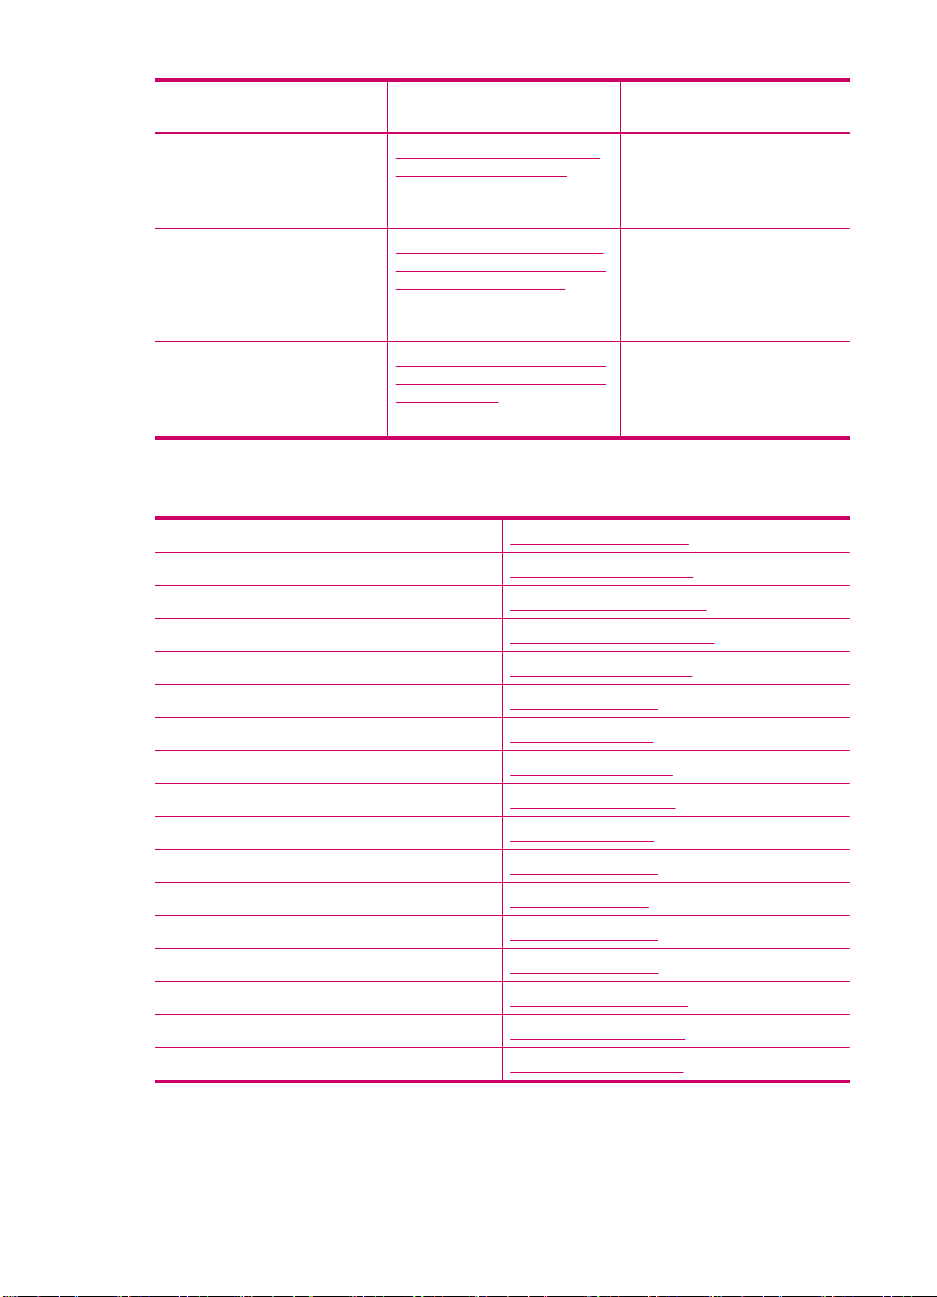
Load an original on the glass..............................................................................................56
2
Page 5

Contents
Select print media.....................................................................................................................57
Tips for selecting and using print media.............................................................................57
Understand specifications for supported media.................................................................58
Understand supported sizes.........................................................................................58
Understand supported media types and weights.........................................................61
Set minimum margins.........................................................................................................62
Papers to avoid...................................................................................................................62
Load paper...............................................................................................................................63
Load full-size paper............................................................................................................63
Load 10 x 15 cm (4 x 6 inch) photo paper..........................................................................66
Load index cards................................................................................................................67
Load envelopes..................................................................................................................68
Avoid paper jams......................................................................................................................68
7 Print from your computer
Print from a software application..............................................................................................71
Change the print settings..........................................................................................................72
Windows users...................................................................................................................72
Stop a print job.........................................................................................................................72
8 Use the copy features
Make a copy.............................................................................................................................73
Set the number of copies..........................................................................................................74
Set the copy paper size............................................................................................................74
Set the copy paper type............................................................................................................74
Change copy speed or quality..................................................................................................75
Change default copy settings...................................................................................................75
Make a 10 x 15 cm (4 x 6 inch) borderless copy of a photo.....................................................76
Resize an original to fit onto letter or A4 paper........................................................................77
Resize an original using custom settings.................................................................................77
Copy a legal-size document onto letter paper..........................................................................78
Adjust the lightness and darkness of your copy.......................................................................78
Enhance blurred areas of your copy.........................................................................................79
Enhance light areas of your copy.............................................................................................79
Stop copying.............................................................................................................................80
9 Use the scan features
Scan an image..........................................................................................................................81
Edit a scanned preview image..................................................................................................82
Edit a scanned image...............................................................................................................82
Edit a scanned photo or graphic.........................................................................................82
Edit a scanned document...................................................................................................82
3
Page 6

10 Use the fax features
Send a fax................................................................................................................................83
Send a basic fax.................................................................................................................83
Send a fax using speed dials..............................................................................................84
Send a fax manually from a phone.....................................................................................85
Send a fax using monitor dialing........................................................................................86
Send a fax from memory....................................................................................................87
Schedule a fax to send later...............................................................................................88
Send a fax to multiple recipients ........................................................................................89
Send a color original or photo fax.......................................................................................89
Change the fax resolution and Lighter / Darker settings...................................................90
Change the fax resolution.............................................................................................90
Change the Lighter / Darker setting............................................................................91
Set new default settings...............................................................................................92
Send a fax in Error Correction Mode..................................................................................92
Receive a fax............................................................................................................................93
Receive a fax manually......................................................................................................93
Set up backup fax reception...............................................................................................94
Reprint received faxes from memory..................................................................................95
Poll to receive a fax............................................................................................................96
Forward faxes to another number......................................................................................96
Set the paper size for received faxes.................................................................................97
Set automatic reduction for incoming faxes........................................................................97
Block junk fax numbers............................................................................................................98
Set the junk fax mode.........................................................................................................98
Add numbers to the junk fax list.........................................................................................98
Remove numbers from the junk fax list..............................................................................99
Fax over the Internet using IP phone.......................................................................................99
Print reports............................................................................................................................100
Print fax confirmation reports............................................................................................100
Print fax error reports........................................................................................................101
Print the fax log.................................................................................................................101
Print other reports.............................................................................................................102
Stop faxing..............................................................................................................................103
11 Maintain the HP All-in-One
Clean the HP All-in-One.........................................................................................................105
Clean the glass.................................................................................................................105
Clean the lid backing........................................................................................................105
Clean the exterior.............................................................................................................106
Clean the automatic document feeder..............................................................................106
Check the estimated ink levels...............................................................................................109
Print a self-test report.............................................................................................................110
4
Page 7

Contents
Work with print cartridges.......................................................................................................111
Handle the print cartridges...............................................................................................111
Replace the print cartridges..............................................................................................112
Use a photo print cartridge...............................................................................................115
Use the print cartridge protector.......................................................................................116
Align the print cartridges...................................................................................................116
Clean the print cartridges.................................................................................................118
Clean the print cartridge contacts.....................................................................................119
Clean the area around the ink nozzles.............................................................................121
12 Troubleshooting
Troubleshooting tips...............................................................................................................123
Communication problems over a USB connection...........................................................125
Information on print cartridges..........................................................................................126
Information on paper........................................................................................................126
Tips for using the automatic document feeder.................................................................127
Clear paper jams..............................................................................................................127
Print cartridge troubleshooting..........................................................................................129
Print quality troubleshooting...................................................................................................129
Print troubleshooting...............................................................................................................148
Fax troubleshooting................................................................................................................170
Copy troubleshooting..............................................................................................................223
Scan troubleshooting..............................................................................................................232
Device update.........................................................................................................................237
Errors......................................................................................................................................238
Device messages.............................................................................................................239
File messages...................................................................................................................243
Supported file types for the HP All-in-One..................................................................244
General user messages...................................................................................................244
Paper messages...............................................................................................................246
Power and connection messages.....................................................................................248
Print cartridge messages..................................................................................................250
13 Order supplies
Order paper or other media....................................................................................................255
Order print cartridges..............................................................................................................255
Order other supplies...............................................................................................................256
14 HP warranty and support
Warranty.................................................................................................................................257
Warranty upgrades...........................................................................................................257
Get support and other information from the Internet..............................................................257
Before you call HP customer support.....................................................................................258
Access your serial number and service ID.............................................................................258
Call in North America during warranty....................................................................................259
Call elsewhere in the world.....................................................................................................259
HP Quick Exchange Service (Japan).....................................................................................260
Prepare the HP All-in-One for shipment.................................................................................261
Remove the print cartridges before shipment...................................................................261
Remove the control panel faceplate.................................................................................262
Pack the HP All-in-One...........................................................................................................263
5
Page 8

15 Technical information
System requirements..............................................................................................................265
Paper specifications...............................................................................................................266
Paper tray capacities........................................................................................................266
Paper sizes.......................................................................................................................266
Print margin specifications................................................................................................267
Print specifications..................................................................................................................267
Copy specifications.................................................................................................................268
Fax specifications...................................................................................................................268
Scan specifications.................................................................................................................268
Physical specifications............................................................................................................269
Power specifications...............................................................................................................269
Environmental specifications..................................................................................................269
Memory specifications............................................................................................................269
Environmental product stewardship program.........................................................................269
Protecting the environment...............................................................................................270
Ozone production.............................................................................................................270
Paper use.........................................................................................................................270
Plastics.............................................................................................................................270
Material safety data sheets...............................................................................................270
Hardware recycling program............................................................................................270
HP inkjet supplies recycling program...............................................................................270
Disposal of Waste Equipment by Users in Private Households in the European
Union................................................................................................................................270
Regulatory notices..................................................................................................................271
Regulatory model identification number...........................................................................271
Notice to users of the U.S. telephone network: FCC requirements..................................271
FCC statement..................................................................................................................272
Note à l’attention des utilisateurs du réseau téléphonique canadien/notice to users of
the Canadian telephone network......................................................................................272
Notice to users in Japan...................................................................................................273
Power cord statement.......................................................................................................273
Notice to users in the European Economic Area..............................................................273
Notice to users of the German telephone network...........................................................274
Geräuschemission............................................................................................................274
Notice to users in Korea...................................................................................................274
Australia Wired Fax Statement.........................................................................................274
Declaration of conformity (European Economic Area)...........................................................274
HP Officejet J5700 All-in-One series declaration of conformity..............................................275
Index............................................................................................................................................277
6
Page 9

1 HP Officejet J5700 All-in-
One series Help
For information about the HP All-in-One, see:
•
Find more information
HP All-in-One overview
•
Finish setting up the HP All-in-One
•
How do I?
•
Load originals and load paper
•
Print from your computer
•
Use the fax features
•
Use the copy features
•
Use the scan features
•
Maintain the HP All-in-One
•
Troubleshooting
•
Order supplies
•
HP warranty and support
•
Technical information
•
HP Officejet J5700 All-in-One series Help 7
Page 10

Chapter 1
8 HP Officejet J5700 All-in-One series Help
Page 11
2 Find more information
You can access a variety of resources, both printed and onscreen, that provide
information about setting up and using the HP All-in-One.
•
Sources of information
Sources of information
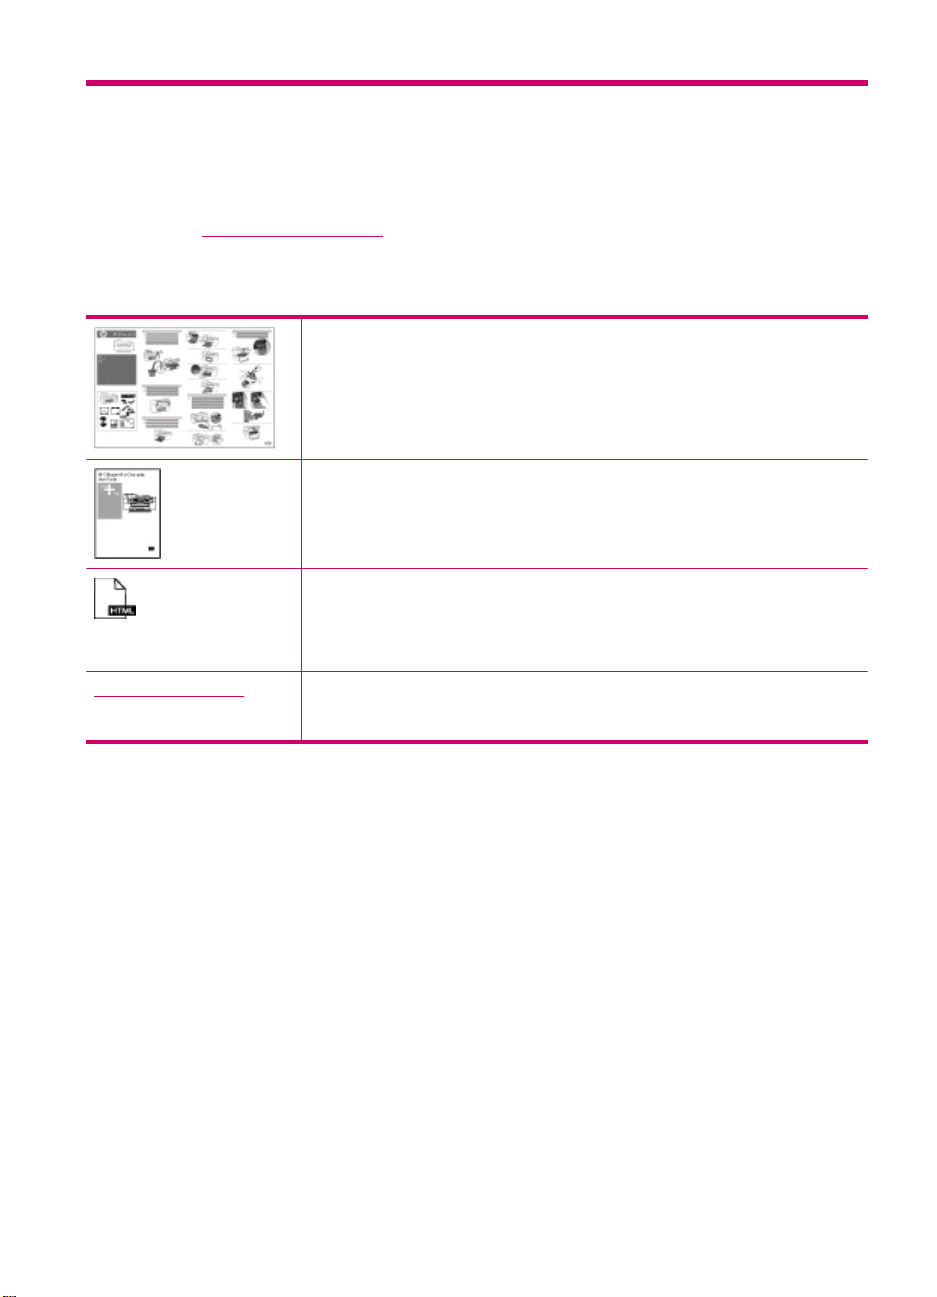
Setup Poster
The Setup Poster provides instructions for setting up your HP All-in-One and
installing software. Make sure you follow the steps in the Setup Poster in order.
User Guide
This User Guide contains information on how to use your HP All-in-One,
including troubleshooting tips and step-by-step instructions. It also provides
additional setup instructions to supplement those in the Setup Poster.
Readme
The Readme file contains the most recent information which might not be found
in other publications.
Install the software to access the Readme file.
www.hp.com/support If you have Internet access, you can get help and support from the HP website.
This website offers technical support, drivers, supplies, and ordering
information.
Find more information 9
Page 12

Chapter 2
10 Find more information
Page 13
3 HP All-in-One overview
You can access many HP All-in-One functions directly, without turning on your computer.
You can quickly and easily accomplish tasks such as making a copy or sending a fax
from the HP All-in-One.
This section describes the HP All-in-One hardware features and control panel functions.
This section contains the following topics:
•
The HP All-in-One at a glance
Control panel features
•
Text and symbols
•
Use the software
•
Connection information
•
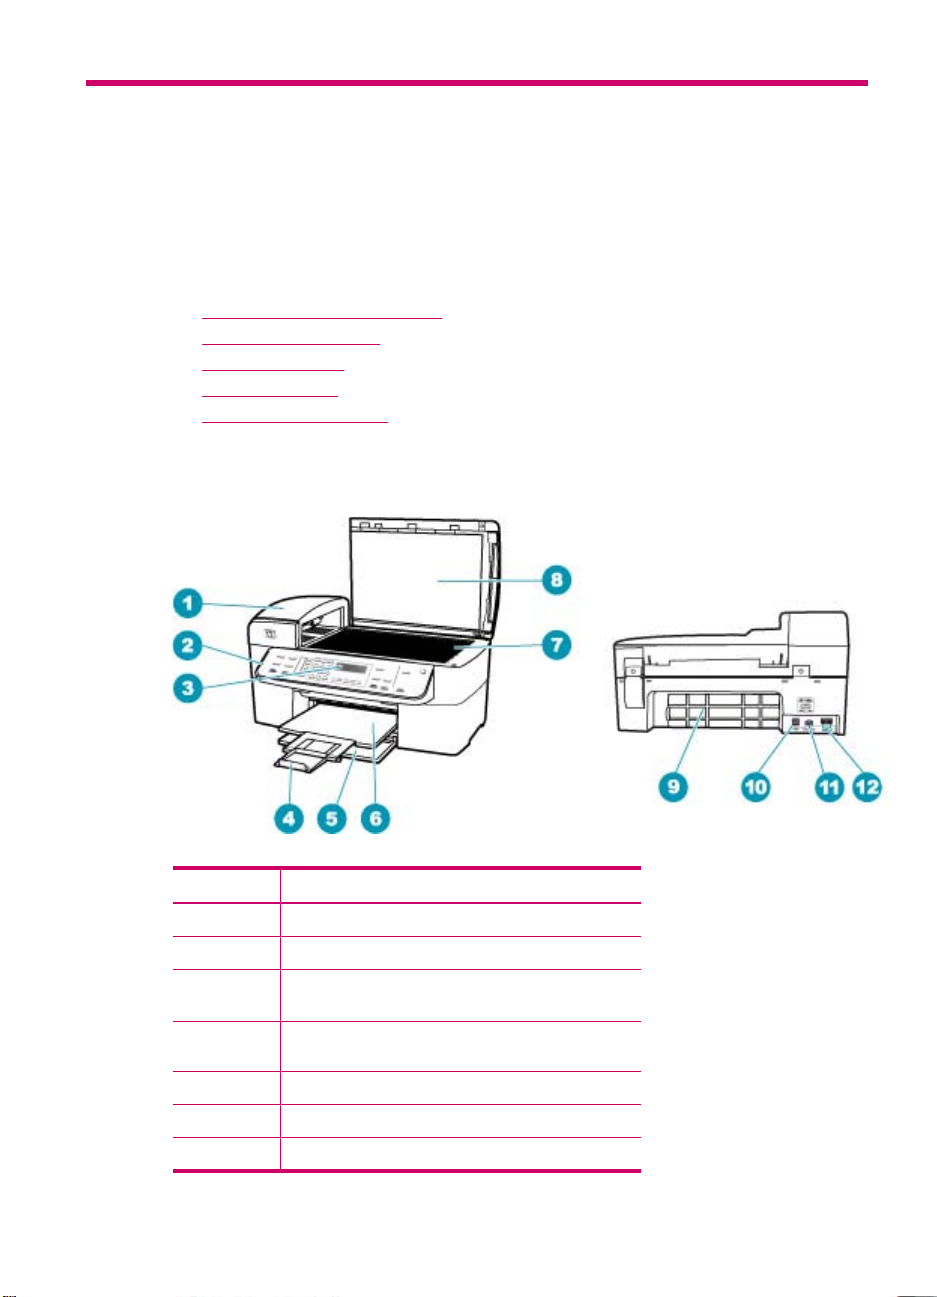
The HP All-in-One at a glance
Label Description
1 Automatic document feeder
2 Control panel
3 Control panel display (also referred to as the
display)
4 Output tray extender (also referred to as the tray
extender)
5 Input tray
6 Output tray
7 Glass
HP All-in-One overview 11
Page 14
Chapter 3
(continued)
Label Description
8 Lid backing
9 Rear door
10 Rear USB port
11 Power connection
12 1-LINE (fax) and 2-EXT (phone) ports
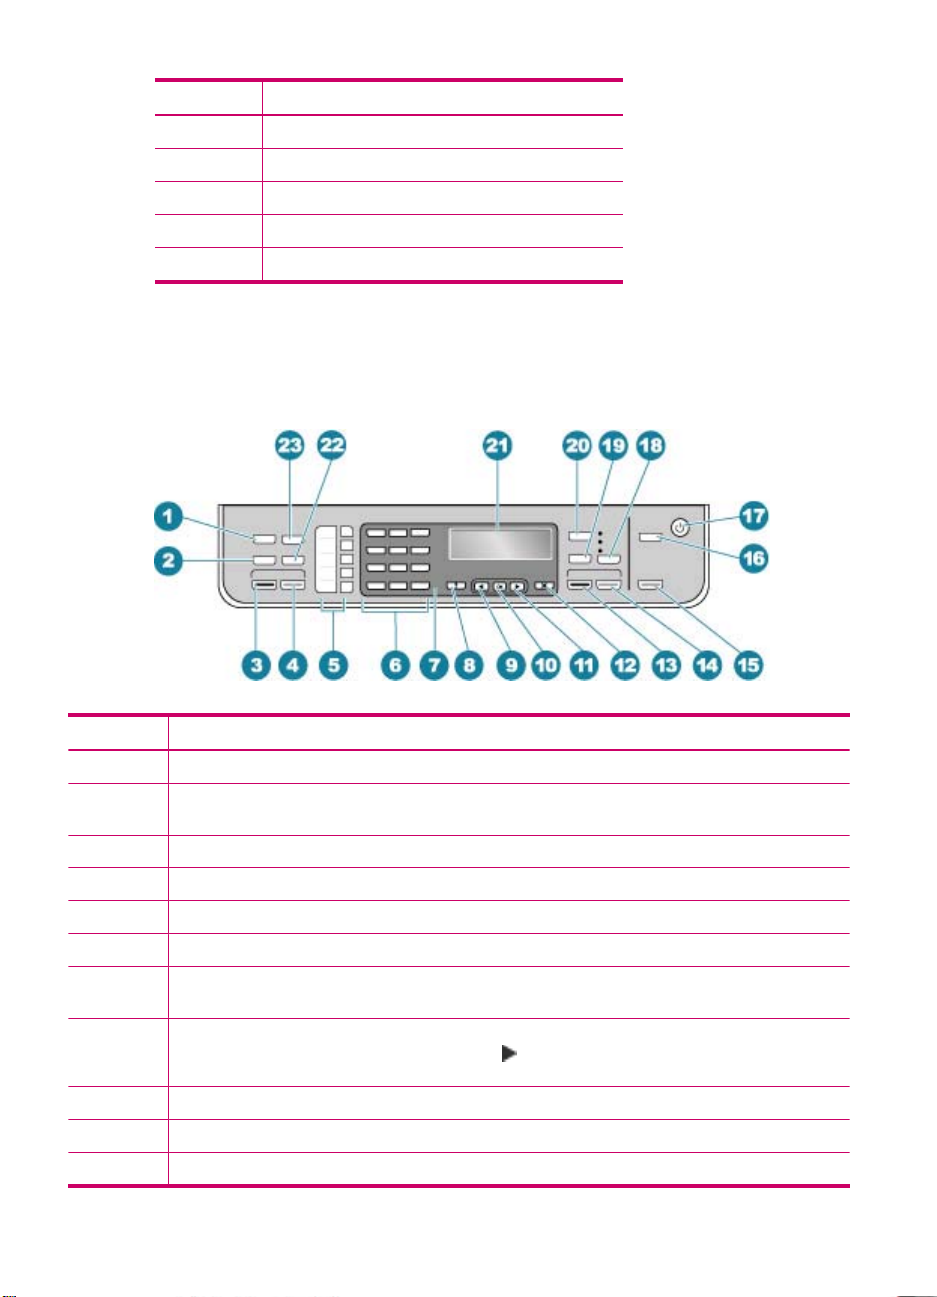
Control panel features
The following diagram and related table provide a quick reference to the HP All-in-One
control panel features.
Label Name and Description
1 Menu in the Fax area: Presents the Fax Menu for selecting options.
2 Redial/Pause: Redials the most recently dialed number, or insert a 3-second pause in a fax
3 Start Fax Black: Starts a black-and-white fax.
4 Start Fax Color: Starts a color fax.
5 One-touch speed dial buttons: Access the first five speed dial numbers.
6 Keypad: Enters fax numbers, values, or text.
7 Attention light: When blinking, the attention light indicates an error that requires your attention
8 Setup/?: Presents the Setup Menu for generating reports, changing fax and other maintenance
9 Left arrow: Decreases values on the display.
10 OK: Selects a menu or a setting on the display.
11 Right arrow: Increases values on the display.
12 HP All-in-One overview
number.
has occurred.
settings, and accessing the Help menu. Press to scroll through the Help topics available, and
then press OK to select a topic. The Help topic you select opens on your computer screen.
Page 15

(continued)
Label Name and Description
12 Cancel: Stops a job, exits a menu, or exits settings.
13 Start Copy Black: Starts a black-and-white copy job.
14 Start Copy Color: Starts a color copy job.
15 Start Scan: Starts a scan job and sends it to the destination you selected using the Scan To
16 Scan To: Presents the Scan To menu for selecting a scan destination.
17 Power: Turns the HP All-in-One on or off. The On button is lit when the HP All-in-One is on. The
18 Quality: Selects Best, Normal, or Fast quality for copying.
19 Reduce/Enlarge: Changes the size of a copy for printing.
20 Menu in the Copy area: Presents the Copy Menu for selecting options.
21 Display: View menus and messages.
22 Speed Dial: Selects a speed dial number.
23 The functionality of this button depends on the country/region in which the HP All-in-One is sold.
button.
light blinks while performing a job.
When the HP All-in-One is off, a minimal amount of power is still supplied to the device. To
completely disconnect the power supply to the HP All-in-One, turn the device off, and then
unplug the power cord.
The button name is one of the following:
Fax Resolution: Adjusts the resolution for the fax you are sending.
Junk Fax Blocker: Presents the Junk Fax Blocker Set Up menu for managing unwanted fax
calls. You are required to subscribe to a caller ID service with your phone company to use this
feature.
Text and symbols
You can use the control panel keypad to enter text and symbols when you set up speed
dial entries and the fax header information.
You can also enter symbols from the keypad when you dial a fax or phone number. When
the HP All-in-One dials the number, it will interpret the symbol and respond accordingly.
For example, if you enter a dash in the fax number, the HP All-in-One will pause before
dialing the remainder of the number. A pause is useful if you need to access an outside
line before dialing the fax number.
This section contains the following topics:
•
Enter text using the keypad on the control panel
Available symbols for dialing fax numbers
•
Enter text using the keypad on the control panel
You can enter text or symbols by using the keypad on the control panel.
Text and symbols 13
Page 16
Chapter 3
To enter text
1. Press the keypad numbers that correspond to the letters of a name. For example, the
letters a, b, and c correspond to the number 2, as shown on the button below.
TIP: Press a button multiple times to see the available characters. Depending
on your language and country/region setting, other characters might be available
in addition to the ones shown on the keypad.
2. After the correct letter appears, wait for the cursor to advance automatically to the
right, or press
. Press the number that corresponds to the next letter in the name.
Press the button multiple times until the correct letter appears. The first letter of a
word is automatically set to uppercase.
To enter a space, pause, or symbol
▲ To insert a space, press Space.
To enter a pause, press Redial/Pause. A dash appears in the number sequence.
To enter a symbol, such as @, press the Symbols button repeatedly to scroll through
the list of available symbols.
asterisk (*) dash (-) ampersand (&)
period (.) slash (/) parentheses ( )
apostrophe (') equals (=) number sign (#)
at (@) underscore (_) plus (+)
exclamation (!) semicolon (;) question (?)
comma (,) colon (:) percent (%)
approximation (~)
To erase a letter, number, or symbol
▲ If you make a mistake, press
to clear it, and then make the correct entry.
After you are done entering text, press OK to store your entry.
Available symbols for dialing fax numbers
To enter a symbol, such as *, press Symbols repeatedly to scroll through the list of
symbols. The following table provides the symbols that you can use in a fax or phone
number sequence, fax header information, and speed dial entries.
Available
symbols
* Displays an asterisk symbol when
14 HP All-in-One overview
Description Available when entering
required for dialing.
Fax header name, speed dial
names, speed dial numbers, fax or
Page 17

(continued)
Available
symbols
- When auto-dialing, the HP All-in-One
( ) Displays a left or right parenthesis to
W When auto-dialing, W causes the HP All-
R During auto-dialing, the R functions the
+ Displays a plus symbol. This symbol does
Use the software
Description Available when entering
phone numbers, and monitor dial
entries
enters a pause in the number sequence.
separate numbers, such as area codes,
for easier reading. These symbols do not
affect dialing.
in-One to wait for a dial tone before
continuing to dial.
same as a Flash button on your telephone.
not affect dialing.
Fax header name, fax header
number, speed dial names, speed
dial numbers, and fax or phone
numbers
Fax header name, fax header
number, speed dial names, speed
dial numbers, and fax or phone
numbers
Speed dial numbers and fax or
phone numbers
Speed dial numbers and fax or
phone numbers
Fax header name, fax header
number, speed dial names, speed
dial numbers, and fax or phone
numbers
You can use the HP Solution Center Software (Windows) or HP Photosmart Studio (Mac)
Software (Mac) to access many features not available from the control panel.
The software is installed on your computer when you set up the HP All-in-One. For further
information, see the Setup Poster that came with your device.
Access to the software differs by operating system (OS). For example, if you have a
Windows computer, the HP Solution Center Software entry point is the HP Solution
Center. If you have a Mac, the HP Photosmart Studio (Mac) Software entry point is the
HP Photosmart Studio window. Regardless, the entry point serves as the launching pad
for the software and services.
To open the HP Solution Center Software on a Windows computer
1. Do one of the following:
• On the Windows desktop, double-click the HP Solution Center icon.
• In the system tray at the far right of the Windows taskbar, double-click the HP
Digital Imaging Monitor icon.
• On the taskbar, click Start, point to Programs or All Programs, select HP, and
then click HP Solution Center.
2. If you have more than one HP device installed, select the HP All-in-One tab.
Use the software 15
Page 18

Chapter 3
NOTE: On a Windows computer, the features available in the HP Solution
Center vary depending on the devices you have installed. The HP Solution Center
is customized to display icons associated with the selected device. If the selected
device is not equipped with a particular feature, then the icon for that feature does not
display in the HP Solution Center.
TIP: If the HP Solution Center on your computer does not contain any icons, an
error might have occurred during the software installation. To correct this, use the
Control Panel in Windows to completely uninstall the HP Solution Center Software;
then reinstall the software. For more information, see the onscreen Help that came
with the HP All-in-One.
Connection information
You can use the HP All-in-One as a stand-alone copier and fax machine, or you can
connect the HP All-in-One to a computer to enable printing and other software features.
The different connection options available to you are described in the following sections.
This section contains the following topics:
•
Supported connection types
Connect using a USB cable
•
Use printer sharing
•
Supported connection types
Description Recommended number
of connected
computers for best
performance
USB connection One computer connected
with a USB cable to the
rear USB of the HP All-inOne.
Windows printer sharing Up to five computers.
The host computer must
be turned on at all times,
or the other computers
will not be able to print to
the HP All-in-One.
Connect using a USB cable
Refer to the Setup Poster that came with the HP All-in-One for detailed instructions on
using a USB cable to connect a computer to the rear USB port.
Use printer sharing
If your computer is on a network, and another computer on the network is connected to
the HP All-in-One by using a USB cable, you can use that device as your printer using
Windows printer sharing. The computer connected directly to the HP All-in-One acts as
Supported software
features
All features are
supported.
All features resident on
the host computer are
supported. Only print is
supported from the other
computers.
Setup instructions
Follow the Setup Poster
for detailed instructions.
For setup instructions,
see Use printer sharing.
16 HP All-in-One overview
Page 19

the host for the printer and has full feature functionality. Other computers on the network,
which are referred to as clients, have access only to the print features. All other functions
must be performed on the host computer.
For more information on enabling Windows printer sharing, refer to the user guide that
came with your computer or the Windows onscreen Help.
Connection information 17
Page 20

Chapter 3
18 HP All-in-One overview
Page 21

4 Finish setting up the HP All-in-
One
After you have completed the steps in your Setup Poster, refer to this section to help you
finish setting up the HP All-in-One. This section contains important setup-related
information for your device, including information on setting preferences.
This section contains the following topics:
•
Set your preferences
Fax setup
•
Set your preferences
You can change the settings on the HP All-in-One so that it behaves according to your
preference. For example, you can set general device preferences, such as the language
used to display messages and the date and time on the display. You can also restore the
device settings to what they were when you purchased your device. This will erase any
new defaults you have set.
This section contains the following topics:
•
General preferences
Fax preferences
•
General preferences
Before you begin using the HP All-in-One, you should review and, if necessary, adjust
the general device settings described in this section.
This section contains the following topics:
•
Set your language and country/region
Set the date and time
•
Set the scroll speed
•
Set the prompt delay time
•
Restore the factory defaults
•
Set your language and country/region
The language and country/region setting determines which language the HP All-in-One
uses to show messages on the display. Usually, you set the language and country/region
when you first set up the HP All-in-One. However, you can change the setting at any time
by using the following procedure.
To set your language and country/region
1. Press Setup.
2. Press 7, and then press 1.
This selects Preferences and then selects Set Language & Country/Region.
Finish setting up the HP All-in-One 19
Page 22

Chapter 4
3. Press or to scroll through the languages. When the language you want to use
appears, press OK.
4. When prompted, press 1 for Yes or 2 for No.
5. Press
or to scroll through the countries/regions. When the country/region you
want to select appears, press OK.
6. When prompted, press 1 for Yes or 2 for No.
Set the date and time
You can set the date and time from the control panel. The date and time format is based
on the language and country/region setting. When you send a fax, the current date and
time are transmitted, along with your name and fax number, as part of the fax header.
NOTE: In some countries/regions, the date and time stamp on the fax header is a
legal requirement.
If the HP All-in-One loses power for more than 72 hours, you might need to reset the date
and time.
To set the date and time
1. Press Setup.
2. Press 6, and then press 3.
This selects Tools and then selects Date and Time.
3. Enter the month, day, and year by pressing the appropriate numbers on the keypad.
Depending on your country/region setting, you might enter the date in a different
order.
4. Enter the hours and minutes.
5. If your time is displayed in the 12-hour format, press 1 for AM, or 2 for PM.
The new date and time settings appear on the display.
Set the scroll speed
The Set Scroll Speed option enables you to control the rate at which text messages
scroll from right to left on the display. For example, if the message is "Aligning
cartridges, please wait.", it will not completely fit in the display and will need to scroll.
This is so that you can read the entire message. You can choose the rate at which it will
scroll: Normal, Fast, or Slow. The default is Normal.
To set the scroll speed
1. Press Setup.
2. Press 7, then press 2.
This selects Preferences and then selects Set Scroll Speed.
3. Press
to select a scroll speed, then press OK.
Set the prompt delay time
The Set Prompt Delay Time option enables you to control the amount of time that passes
before a message prompts you to take further action.
20 Finish setting up the HP All-in-One
Page 23

For example, if you press Menu in the Copy area and the prompt delay time passes before
you press another button, the message "Press Menu for settings." appears on the
display.
To set the prompt delay time
1. Press Setup.
2. Press 7, then press 3.
This selects Preferences and then selects Set Prompt Delay Time.
3. Press
You can choose Normal, Fast, Slow, or Off. If you select Off, hints do not appear
on the display but other messages, such as low ink warnings and error messages,
do still appear.
Restore the factory defaults
You can restore the current settings to what they were when you purchased the HP Allin-One.
NOTE: Restoring the factory defaults will not affect any changes you made to scan
settings and the language and country/region settings. Personal settings and lists, for
example fax header, fax number, junk fax list, and speed dial list, that you have saved
will not be deleted when restoring the factory defaults.
You can perform this process from the control panel only.
To restore the factory defaults
1. Press Setup.
2. Press 6, then press 4.
This selects Tools and then selects Restore Factory Defaults.
The factory default settings are restored.
to select a delay time, then press OK.
Fax preferences
This section contains the following topics:
•
Set up the HP All-in-One to redial a fax number automatically
Adjust the volume
•
Set tone or pulse dialing
•
Set the fax speed
•
Set up the HP All-in-One to redial a fax number automatically
You can set the HP All-in-One to redial a busy or an unanswered number automatically.
The default Busy Redial setting is Redial. The default No Answer Redial setting is No
Redial.
Set your preferences 21
Page 24
Chapter 4
To set redial options from the control panel
1. Press Setup.
2. Do one of the following:
To change the Busy Redial setting
▲ Press 5, and then press 2.
This selects Advanced Fax Setup and then selects Busy Redial.
To change the No Answer Redial setting
▲ Press 5, and then press 3.
This selects Advanced Fax Setup and then selects No Answer Redial.
3. Press
to select Redial or No Redial.
4. Press OK.
Adjust the volume
The HP All-in-One provides three levels for adjusting the ring and speaker volume. The
ring volume is the volume of the phone rings. The speaker volume is the level of
everything else, such as the dial tones, fax tones, and button press beeps. The default
setting is Soft.
To adjust the volume from the control panel
1. Press Setup.
2. Press 4, and then press 5 again.
This selects Basic Fax Setup and then selects Ring and Beep Volume.
3. Press
to select one of the options: Soft, Loud, or Off.
NOTE: The beeps you hear when pressing buttons maintain the same volume
whether you choose Loud or Soft. These two options only affect ring, dial, and
other tones you hear when faxing. If you choose Off, however, the sounds of
button presses are also turned off.
If you select Off, you will not hear a dial tone, fax tones, or incoming ring tones.
With the Ring and Beep Volume set to Off, you cannot send a fax using monitor
dialing, such as when using a calling card to send a fax.
4. Press OK.
Related topics
Send a fax using monitor dialing
Set tone or pulse dialing
You can set the dial mode for the HP All-in-One to either tone dialing or pulse dialing.
Most telephone systems work with either type of dialing. If your telephone system does
not require pulse dialing, HP recommends using tone dialing. If you have a public
telephone system or a private branch exchange (PBX) system, you might need to
select Pulse Dialing. Contact your local telephone company if you are unsure which
setting to use.
22 Finish setting up the HP All-in-One
Page 25
NOTE: If you select Pulse Dialing, some phone system features might not be
available. It can also take longer to dial a fax or phone number.
NOTE: This feature is not supported in all countries/regions. If it is not supported in
your country/region, Tone or Pulse Dialing does not appear in the Basic Fax
Setup menu.
To set tone or pulse dialing from the control panel
1. Press Setup.
2. Press 4, and then press 6.
This selects Basic Fax Setup and then selects Tone or Pulse Dialing.
3. Press
Set the fax speed
You can set the fax speed used to communicate between the HP All-in-One and other
fax machines when sending and receiving faxes. The default fax speed varies by country/
region.
If you use one of the following, setting the fax speed to a slower speed might be required:
• An Internet phone service
• A PBX system
• Fax over Internet Protocol (FoIP)
• An integrated services digital network (ISDN) service
If you experience problems sending and receiving faxes, you might want to try setting
the Fax Speed setting to Medium or Slow.
to select an option, and then press OK.
To set the fax speed from the control panel
1. Press Setup.
2. Press 5, and then press 7.
3. Press
Fax setup
In this section, you will learn how to set up the HP All-in-One so that faxing works
successfully with equipment and services you might already have on the same phone
line as the HP All-in-One.
This selects Advanced Fax Setup and then selects Fax Speed.
to select one of the following settings, and then press OK.
Fax speed setting Fax speed
Fast v.34 (33600 baud)
Medium v.17 (14400 baud)
Slow v.29 (9600 baud)
Fax setup 23
Page 26

Chapter 4
TIP: You can also use the Fax Setup Wizard (Windows) or Fax Setup Utility (Mac)
to help you quickly set up some important fax settings such as the answer mode and
fax header information. You can access the Fax Setup Wizard (Windows) or Fax
Setup Utility (Mac) through the software you installed with the HP All-in-One. After
you run the Fax Setup Wizard (Windows) or Fax Setup Utility (Mac), follow the
procedures in this section to complete your fax setup.
This section contains the following topics:
Set up the HP All-in-One for faxing
•
Change settings on the HP All-in-One to receive faxes
•
Test your fax setup
•
Set the fax header
•
Set up speed dialing
•
Set up the HP All-in-One for faxing
Before you begin setting up the HP All-in-One for faxing, determine which kind of phone
system your country/region uses. The instructions for setting up the HP All-in-One for
faxing differ depending on whether you have a serial- or parallel-type phone system.
• If you do not see your country/region listed in the table below, you probably have a
serial-type phone system. In a serial-type phone system, the connector type on your
shared telephone equipment (modems, phones, and answering machines) does not
allow a physical connection to the "2-EXT" port on the HP All-in-One. Instead, all
equipment must be connected at the telephone wall jack.
NOTE: In some countries/regions that use serial-type phone systems, the phone
cord that came with the HP All-in-One might have an additional wall plug attached
to it. This enables you to connect other telecom devices to the wall jack where
you plug in the HP All-in-One.
• If your country/region is listed in the table below, you probably have a parallel-type
telephone system. In a parallel-type phone system, you are able to connect shared
telephone equipment to the phone line by using the "2-EXT" port on the back of the
HP All-in-One.
NOTE: If you have a parallel-type phone system, HP recommends you use the
2-wire phone cord supplied with the HP All-in-One to connect the HP All-in-One
to the telephone wall jack.
Table 4-1 Countries/regions with a parallel-type phone system
Argentina Australia Brazil
Canada Chile China
Colombia Greece India
Indonesia Ireland Japan
Korea Latin America Malaysia
24 Finish setting up the HP All-in-One
Page 27

Countries/regions with a parallel-type phone system (continued)
Mexico Philippines Poland
Portugal Russia Saudi Arabia
Singapore Spain Taiwan
Thailand USA Venezuela
Vietnam
If you are unsure which kind of telephone system you have (serial or parallel), check with
your telephone company.
•
Choose the correct fax setup for your home or office
Select your fax setup case
•
Case A: Separate fax line (no voice calls received)
•
Case B: Set up the HP All-in-One with DSL
•
Case C: Set up the HP All-in-One with a PBX phone system or an ISDN line
•
Case D: Fax with a distinctive ring service on the same line
•
Case E: Shared voice/fax line
•
Case F: Shared voice/fax line with voice mail
•
Case G: Fax line shared with computer dial-up modem (no voice calls received)
•
Case H: Shared voice/fax line with computer dial-up modem
•
Case I: Shared voice/fax line with answering machine
•
Case J: Shared voice/fax line with computer dial-up modem and answering machine
•
Case K: Shared voice/fax line with computer dial-up modem and voice mail
•
Choose the correct fax setup for your home or office
To fax successfully, you need to know what types of equipment and services (if any) share
the same phone line with the HP All-in-One. This is important because you might need
to connect some of your existing office equipment directly to the HP All-in-One, and you
might also need to change some fax settings before you can fax successfully.
To determine the best way to set up the HP All-in-One in your home or office, first read
through the questions in this section and record your answers. Next, refer to the table in
the following section and choose the recommended setup case based on your answers.
Make sure to read and answer the following questions in the order they are presented.
1. Do you have a digital subscriber line (DSL) service through your telephone company?
(DSL might be called ADSL in your country/region.)
Yes, I have DSL.
❑
No.
❑
If you answered Yes, proceed directly to
Case B: Set up the HP All-in-One with
DSL. You do not need to continue answering questions.
If you answered No, please continue answering questions.
2. Do you have a private branch exchange (PBX) phone system or an integrated
services digital network (ISDN) system?
If you answered Yes, proceed directly to
Case C: Set up the HP All-in-One with a
PBX phone system or an ISDN line. You do not need to continue answering questions.
If you answered No, please continue answering questions.
Fax setup 25
Page 28

Chapter 4
3. Do you subscribe to a distinctive ring service through your telephone company that
provides multiple phone numbers with different ring patterns?
Yes, I have distinctive ring.
❑
No.
❑
If you answered Yes, proceed directly to
Case D: Fax with a distinctive ring service
on the same line. You do not need to continue answering questions.
If you answered No, please continue answering questions.
Are you unsure if you have distinctive ring? Many phone companies offer a distinctive
ring feature that allows you to have several phone numbers on one phone line.
When you subscribe to this service, each phone number will have a different ring
pattern. For example, you can have single, double, and triple rings for the different
numbers. You might assign one phone number with a single ring to your voice calls,
and another phone number with double rings to your fax calls. This allows you to tell
the difference between voice and fax calls when the phone rings.
4. Do you receive voice calls at the same phone number you will use for fax calls on the
HP All-in-One?
Yes, I receive voice calls.
❑
No.
❑
Please continue answering questions.
5. Do you have a computer dial-up modem on the same phone line as the HP All-in-
One?
Yes, I have a computer dial-up modem.
❑
No.
❑
Are you unsure if you use a computer dial-up modem? If you answer Yes to any of
the following questions, you are using a computer dial-up modem:
• Do you send and receive faxes directly to and from your computer software
applications through a dial-up connection?
• Do you send and receive e-mail messages on your computer through a dial-up
connection?
• Do you access the Internet from your computer through a dial-up connection?
Please continue answering questions.
6. Do you have an answering machine that answers voice calls at the same phone
number you will use for fax calls on the HP All-in-One?
Yes, I have an answering machine.
❑
No.
❑
Please continue answering questions.
7. Do you subscribe to a voice mail service through your telephone company at the same
phone number you will use for fax calls on the HP All-in-One?
Yes, I have a voice mail service.
❑
No.
❑
After you have completed answering the questions, proceed to the next section to
select your fax setup case.
26 Finish setting up the HP All-in-One
Page 29
Select your fax setup case
Now that you have answered all the questions about the equipment and services that
share the phone line with the HP All-in-One, you are ready to choose the best setup case
for your home or office.
From the first column in the following table, choose the combination of equipment and
services applicable to your home or office setting. Then look up the appropriate setup
case in the second or third column based on your phone system. Step-by-step
instructions are included for each case in the sections that follow.
If you have answered all the questions in the previous section and have none of the
described equipment or services, choose "None" from the first column in the table.
NOTE: If your home or office setup is not described in this section, set up the HP All-
in-One as you would a regular analog phone. Make sure you use the phone cord
supplied in the box to connect one end to your telephone wall jack and the other end
to the port labeled 1-LINE on the back of the HP All-in-One. If you use another phone
cord, you might experience problems sending and receiving faxes.
Other equipment/services
sharing your fax line
None
(You answered No to all
questions.)
DSL service
(You answered Yes to question
1 only.)
PBX or ISDN system
(You answered Yes to question
2 only.)
Distinctive ring service
(You answered Yes to question
3 only.)
Voice calls
(You answered Yes to question
4 only.)
Voice calls and voice mail
service
(You answered Yes to
questions 4 and 7 only.)
Computer dial-up modem
(You answered Yes to question
5 only.)
Voice calls and computer dialup modem
(You answered Yes to
questions 4 and 5 only.)
Recommended fax setup for
parallel-type phone systems
Case A: Separate fax line (no
voice calls received)
Case B: Set up the HP All-inOne with DSL
Case C: Set up the HP All-inOne with a PBX phone system
or an ISDN line
Case D: Fax with a distinctive
ring service on the same line
Case E: Shared voice/fax line Case E: Shared voice/fax line
Case F: Shared voice/fax line
with voice mail
Case G: Fax line shared with
computer dial-up modem (no
voice calls received)
Case H: Shared voice/fax line
with computer dial-up modem
Recommended fax setup for
serial-type phone systems
Case A: Separate fax line (no
voice calls received)
Case B: Set up the HP All-inOne with DSL
Case C: Set up the HP All-inOne with a PBX phone system
or an ISDN line
Case D: Fax with a distinctive
ring service on the same line
Case F: Shared voice/fax line
with voice mail
Not applicable.
Not applicable.
Fax setup 27
Page 30
Chapter 4
(continued)
Other equipment/services
sharing your fax line
Recommended fax setup for
parallel-type phone systems
Recommended fax setup for
serial-type phone systems
Voice calls and answering
machine
(You answered Yes to
questions 4 and 6 only.)
Voice calls, computer dial-up
modem, and answering
machine
(You answered Yes to
questions 4, 5, and 6 only.)
Voice calls, computer dial-up
modem, and voice mail service
(You answered Yes to
questions 4, 5, and 7 only.)
Case I: Shared voice/fax line
with answering machine
Case J: Shared voice/fax line
with computer dial-up modem
and answering machine
Case K: Shared voice/fax line
with computer dial-up modem
and voice mail
Not applicable.
Not applicable.
Not applicable.
For additional fax setup information, in specific countries/regions, see the Fax
Configuration Web site listed below.
Austria www.hp.com/at/faxconfig
Germany www.hp.com/de/faxconfig
Switzerland (French) www.hp.com/ch/fr/faxconfig
Switzerland (German) www.hp.com/ch/de/faxconfig
United Kingdom www.hp.com/uk/faxconfig
Spain www.hp.es/faxconfig
The Netherlands www.hp.nl/faxconfig
Belgium (France) www.hp.be/fr/faxconfig
Belgium (Dutch) www.hp.be/nl/faxconfig
Portugal www.hp.pt/faxconfig
Sweden www.hp.se/faxconfig
Finland www.hp.fi/faxconfig
Denmark www.hp.dk/faxconfig
Norway www.hp.no/faxconfig
Ireland www.hp.com/ie/faxconfig
France www.hp.com/fr/faxconfig
Italy www.hp.com/it/faxconfig
28 Finish setting up the HP All-in-One
Page 31

Case A: Separate fax line (no voice calls received)
If you have a separate phone line on which you receive no voice calls, and you have no
other equipment connected on this phone line, set up the HP All-in-One as described in
this section.
Figure 4-1 Back view of the HP All-in-One
1 Telephone wall jack
2 Use the phone cord supplied in the box with the HP All-in-One to connect to the "1-LINE" port
To set up the HP All-in-One with a separate fax line
1. Using the phone cord supplied in the box with the HP All-in-One, connect one end to
your telephone wall jack, then connect the other end to the port labeled 1-LINE on
the back of the HP All-in-One.
NOTE: If you do not use the supplied cord to connect from the telephone wall
jack to the HP All-in-One, you might not be able to fax successfully. This special
phone cord is different from the phone cords you might already have in your home
or office.
2. Turn on the Auto Answer setting.
3. (Optional) Change the Rings to Answer setting to the lowest setting (two rings).
4. Run a fax test.
When the phone rings, the HP All-in-One will answer automatically after the number of
rings you set in the Rings to Answer setting. Then it will begin emitting fax reception
tones to the sending fax machine and receive the fax.
Case B: Set up the HP All-in-One with DSL
If you have a DSL service through your telephone company, use the instructions in this
section to connect a DSL filter between the telephone wall jack and the HP All-in-One.
The DSL filter removes the digital signal that can interfere with the HP All-in-One, so the
HP All-in-One can communicate properly with the phone line. (DSL might be called ADSL
in your country/region.)
NOTE: If you have a DSL line and you do not connect the DSL filter, you will not be
able to send and receive faxes with the HP All-in-One.
Fax setup 29
Page 32

Chapter 4
Figure 4-2 Back view of the HP All-in-One
1 Telephone wall jack
2 DSL filter and cord supplied by your DSL provider
3 Use the phone cord supplied in the box with the HP All-in-One to connect to the "1-LINE" port
To set up the HP All-in-One with DSL
1. Obtain a DSL filter from your DSL provider.
2. Using the phone cord supplied in the box with the HP All-in-One, connect one end to
your telephone wall jack, then connect the other end to the port labeled 1-LINE on
the back of the HP All-in-One.
NOTE: If you do not use the supplied cord to connect from the telephone wall
jack to the HP All-in-One, you might not be able to fax successfully. This special
phone cord is different from the phone cords you might already have in your home
or office.
3. Connect the DSL filter cord to the telephone wall jack.
NOTE: If you have other office equipment or services attached to this phone line,
such as a distinctive ring service, answering machine, or voice mail, see the
appropriate section in this section for additional setup guidelines.
4. Run a fax test.
30 Finish setting up the HP All-in-One
Page 33

Case C: Set up the HP All-in-One with a PBX phone system or an ISDN line
If you are using either a PBX phone system or an ISDN converter/terminal adapter, make
sure you do the following:
• If you are using either a PBX or an ISDN converter/terminal adaptor, connect the
HP All-in-One to the port that is designated for fax and phone use. Also, make sure
that the terminal adapter is set to the correct switch type for your country/region, if
possible.
NOTE: Some ISDN systems allow you to configure the ports for specific phone
equipment. For example, you might have assigned one port for telephone and
Group 3 fax and another port for multiple purposes. If you have problems when
connected to the fax/phone port of your ISDN converter, try using the port
designated for multiple purposes; it might be labeled "multi-combi" or something
similar.
• If you are using a PBX phone system, set the call waiting tone to "off".
NOTE: Many digital PBX systems include a call-waiting tone that is set to "on"
by default. The call waiting tone will interfere with any fax transmission, and you
will not be able to send or receive faxes with the HP All-in-One. Refer to the
documentation that came with your PBX phone system for instructions on how to
turn off the call-waiting tone.
• If you are using a PBX phone system, dial the number for an outside line before dialing
the fax number.
• Make sure you use the supplied cord to connect from the telephone wall jack to the
HP All-in-One. If you do not, you might not be able to fax successfully. This special
phone cord is different from the phone cords you might already have in your home or
office. If the supplied phone cord is too short, you can purchase a coupler from your
local electronics store and extend it.
Fax setup 31
Page 34

Chapter 4
Case D: Fax with a distinctive ring service on the same line
If you subscribe to a distinctive ring service (through your telephone company) that allows
you to have multiple phone numbers on one phone line, each with a different ring pattern,
set up the HP All-in-One as described in this section.
Figure 4-3 Back view of the HP All-in-One
1 Telephone wall jack
2 Use the phone cord supplied in the box with the HP All-in-One to connect to the "1-LINE" port
To set up the HP All-in-One with a distinctive ring service
1. Using the phone cord supplied in the box with the HP All-in-One, connect one end to
your telephone wall jack, then connect the other end to the port labeled 1-LINE on
the back of the HP All-in-One.
NOTE: If you do not use the supplied cord to connect from the telephone wall
jack to the HP All-in-One, you might not be able to fax successfully. This special
phone cord is different from the phone cords you might already have in your home
or office.
2. Turn on the Auto Answer setting.
3. Change the Distinctive Ring setting to match the pattern that the telephone company
assigned to your fax number.
NOTE: By default, the HP All-in-One is set to answer all ring patterns. If you do
not set the Distinctive Ring to match the ring pattern assigned to your fax
number, the HP All-in-One might answer both voice calls and fax calls or it might
not answer at all.
4. (Optional) Change the Rings to Answer setting to the lowest setting (two rings).
5. Run a fax test.
The HP All-in-One will automatically answer incoming calls that have the ring pattern you
selected (Distinctive Ring setting) after the number of rings you selected (Rings to
Answer setting). Then it will begin emitting fax reception tones to the sending fax machine
and receive the fax.
32 Finish setting up the HP All-in-One
Page 35

Case E: Shared voice/fax line
If you receive both voice calls and fax calls at the same phone number, and you have no
other office equipment (or voice mail) on this phone line, set up the HP All-in-One as
described in this section.
Figure 4-4 Back view of the HP All-in-One
1 Telephone wall jack
2 Use the phone cord supplied in the box with the HP All-in-One to connect to the "1-LINE" port
3 Telephone (optional)
To set up the HP All-in-One with a shared voice/fax line
1. Using the phone cord supplied in the box with the HP All-in-One, connect one end to
your telephone wall jack, then connect the other end to the port labeled 1-LINE on
the back of the HP All-in-One.
NOTE: If you do not use the supplied cord to connect from the telephone wall
jack to the HP All-in-One, you might not be able to fax successfully. This special
phone cord is different from the phone cords you might already have in your home
or office.
2. Now you need to decide how you want the HP All-in-One to answer calls,
automatically or manually:
• If you set up the HP All-in-One to answer calls automatically, it answers all
incoming calls and receives faxes. The HP All-in-One will not be able to
distinguish between fax and voice calls in this case; if you suspect the call is a
voice call, you will need to answer it before the HP All-in-One answers the call.
To set up the HP All-in-One to answer calls automatically, turn on the Auto
Answer setting.
• If you set up the HP All-in-One to answer faxes manually, you must be available
to respond in person to incoming fax calls or the HP All-in-One cannot receive
faxes. To set up the HP All-in-One to answer calls manually, turn off the Auto
Answer setting.
Fax setup 33
Page 36

Chapter 4
3. Now you need to decide how you want the HP All-in-One to answer calls,
automatically or manually:
• If you set up the HP All-in-One to answer calls automatically, it answers all
incoming calls and receives faxes. The HP All-in-One will not be able to
distinguish between fax and voice calls in this case; if you suspect the call is a
voice call, you will need to answer it before the HP All-in-One answers the call.
To set up the HP All-in-One to answer calls automatically, turn on the Auto
Answer setting. For more information, see
Set the answer mode.
• If you set up the HP All-in-One to answer faxes manually, you must be available
to respond in person to incoming fax calls or the HP All-in-One cannot receive
faxes. To set up the HP All-in-One to answer calls manually, turn off the Auto
Answer setting. For more information, see
Set the answer mode.
4. Run a fax test.
5. Plug your phone into the telephone wall jack.
6. Do one of the following, depending on your phone system:
• If you have a parallel-type phone system, remove the white plug from the port
labeled 2-EXT on the back of the HP All-in-One, and then connect a phone to this
port.
• If you have a serial-type phone system, you might plug your phone directly on top
of the HP All-in-One cable which has a wall plug attached to it.
If you pick up the phone before the HP All-in-One answers the call and hear fax tones
from a sending fax machine, you will need to answer the fax call manually.
Case F: Shared voice/fax line with voice mail
If you receive both voice calls and fax calls at the same phone number, and you also
subscribe to a voice mail service through your telephone company, set up the HP All-inOne as described in this section.
NOTE: You cannot receive faxes automatically if you have a voice mail service at
the same phone number you use for fax calls. You must receive faxes manually; this
means you must be available to respond in person to incoming fax calls. If you want
to receive faxes automatically instead, contact your telephone company to subscribe
to a distinctive ring service, or to obtain a separate phone line for faxing.
34 Finish setting up the HP All-in-One
Page 37

Figure 4-5 Back view of the HP All-in-One
1 Telephone wall jack
2 Use the phone cord supplied in the box with the HP All-in-One to connect to the "1-LINE" port
To set up the HP All-in-One with voice mail
1. Using the phone cord supplied in the box with the HP All-in-One, connect one end to
your telephone wall jack, then connect the other end to the port labeled 1-LINE on
the back of the HP All-in-One.
NOTE: If you do not use the supplied cord to connect from the telephone wall
jack to the HP All-in-One, you might not be able to fax successfully. This special
phone cord is different from the phone cords you might already have in your home
or office.
2. Turn off the Auto Answer setting.
3. Run a fax test.
You must be available to respond in person to incoming fax calls, or the HP All-in-One
cannot receive faxes.
Case G: Fax line shared with computer dial-up modem (no voice calls received)
If you have a fax line on which you receive no voice calls, and you also have a computer
dial-up modem connected on this line, set up the HP All-in-One as described in this
section.
Since your computer dial-up modem shares the phone line with the HP All-in-One, you
will not be able to use both your modem and the HP All-in-One simultaneously. For
Fax setup 35
Page 38

Chapter 4
example, you cannot use the HP All-in-One for faxing if you are using your computer dialup modem to send an e-mail or access the Internet.
Figure 4-6 Back view of the HP All-in-One
1 Telephone wall jack
2 Use the phone cord supplied in the box with the HP All-in-One to connect to the "1-LINE" port
3 Computer with modem
To set up the HP All-in-One with a computer dial-up modem
1. Remove the white plug from the port labeled 2-EXT on the back of the HP All-in-One.
2. Find the phone cord that connects from the back of your computer (your computer
dial-up modem) to a telephone wall jack. Disconnect the cord from the telephone wall
jack and plug it into the port labeled 2-EXT on the back of the HP All-in-One.
3. Using the phone cord supplied in the box with the HP All-in-One, connect one end to
your telephone wall jack, then connect the other end to the port labeled 1-LINE on
the back of the HP All-in-One.
NOTE: If you do not use the supplied cord to connect from the telephone wall
jack to the HP All-in-One, you might not be able to fax successfully. This special
phone cord is different from the phone cords you might already have in your home
or office.
4. If your modem software is set to receive faxes to your computer automatically, turn
off that setting.
NOTE: If you do not turn off the automatic fax reception setting in your modem
software, the HP All-in-One will not be able to receive faxes.
5. Turn on the Auto Answer setting.
6. (Optional) Change the Rings to Answer setting to the lowest setting (two rings).
7. Run a fax test.
When the phone rings, the HP All-in-One will answer automatically after the number of
rings you set in the Rings to Answer setting. Then it will begin emitting fax reception
tones to the sending fax machine and receive the fax.
36 Finish setting up the HP All-in-One
Page 39

Case H: Shared voice/fax line with computer dial-up modem
If you receive both voice calls and fax calls at the same phone number, and you also have
a computer dial-up modem connected on this phone line, set up the HP All-in-One as
described in this section.
Since your computer dial-up modem shares the phone line with the HP All-in-One, you
will not be able to use both your modem and the HP All-in-One simultaneously. For
example, you cannot use the HP All-in-One for faxing if you are using your computer dialup modem to send an e-mail or access the Internet.
There are two different ways to set up the HP All-in-One with your computer based on
the number of phone ports on your computer. Before you begin, check your computer to
see if it has one or two phone ports.
• If your computer has only one phone port, you will need to purchase a parallel splitter
(also called a coupler), as shown below. (A parallel splitter has one RJ-11 port on the
front and two RJ-11 ports on the back. Do not use a 2-line phone splitter, a serial
splitter, or a parallel splitter which has two RJ-11 ports on the front and a plug on the
back.)
Figure 4-7 Example of a parallel splitter
Fax setup 37
Page 40

Chapter 4
• If your computer has two phone ports, set up the HP All-in-One as described below.
Figure 4-8 Back view of the HP All-in-One
1 Telephone wall jack
2 "IN" phone port on your computer
3 "OUT" phone port on your computer
4 Telephone
5 Computer with modem
6 Use the phone cord supplied in the box with the HP All-in-One to connect to the "1-LINE"
port
To set up the HP All-in-One on the same phone line as a computer with two phone
ports
1. Remove the white plug from the port labeled 2-EXT on the back of the HP All-in-One.
2. Find the phone cord that connects from the back of your computer (your computer
dial-up modem) to a telephone wall jack. Disconnect the cord from the telephone wall
jack and plug it into the port labeled 2-EXT on the back of the HP All-in-One.
3. Connect a phone to the "OUT" port on the back of your computer dial-up modem.
4. Using the phone cord supplied in the box with the HP All-in-One, connect one end to
your telephone wall jack, then connect the other end to the port labeled 1-LINE on
the back of the HP All-in-One.
NOTE: If you do not use the supplied cord to connect from the telephone wall
jack to the HP All-in-One, you might not be able to fax successfully. This special
phone cord is different from the phone cords you might already have in your home
or office.
5. If your modem software is set to receive faxes to your computer automatically, turn
off that setting.
NOTE: If you do not turn off the automatic fax reception setting in your modem
software, the HP All-in-One will not be able to receive faxes.
38 Finish setting up the HP All-in-One
Page 41

6. Now you need to decide how you want the HP All-in-One to answer calls,
automatically or manually:
• If you set up the HP All-in-One to answer calls automatically, it answers all
incoming calls and receives faxes. The HP All-in-One will not be able to
distinguish between fax and voice calls in this case; if you suspect the call is a
voice call, you will need to answer it before the HP All-in-One answers the call.
To set up the HP All-in-One to answer calls automatically, turn on the Auto
Answer setting.
• If you set up the HP All-in-One to answer faxes manually, you must be available
to respond in person to incoming fax calls or the HP All-in-One cannot receive
faxes. To set up the HP All-in-One to answer calls manually, turn off the Auto
Answer setting.
7. Run a fax test.
If you pick up the phone before the HP All-in-One answers the call and hear fax tones
from a sending fax machine, you will need to answer the fax call manually.
Case I: Shared voice/fax line with answering machine
If you receive both voice calls and fax calls at the same phone number, and you also have
an answering machine that answers voice calls at this phone number, set up the HP Allin-One as described in this section.
Figure 4-9 Back view of the HP All-in-One
1 Telephone wall jack
2 "IN" port on your answering machine
3 "OUT" port on your answering machine
4 Telephone (optional)
5 Answering machine
6 Use the phone cord supplied in the box with the HP All-in-One to connect to the "1-LINE" port
Fax setup 39
Page 42

Chapter 4
To set up the HP All-in-One with a shared voice/fax line with answering machine
1. Remove the white plug from the port labeled 2-EXT on the back of the HP All-in-One.
2. Unplug your answering machine from the telephone wall jack, and connect it to the
port labeled 2-EXT on the back of the HP All-in-One.
NOTE: If you do not connect your answering machine directly to the HP All-in-
One, fax tones from a sending fax machine might be recorded on your answering
machine, and you probably will not be able to receive faxes with the HP All-inOne.
3. Using the phone cord supplied in the box with the HP All-in-One, connect one end to
your telephone wall jack, then connect the other end to the port labeled 1-LINE on
the back of the HP All-in-One.
NOTE: If you do not use the supplied cord to connect from the telephone wall
jack to the HP All-in-One, you might not be able to fax successfully. This special
phone cord is different from the phone cords you might already have in your home
or office.
4. (Optional) If your answering machine does not have a built-in phone, for convenience
you might want to connect a phone to the back of your answering machine at the
"OUT" port.
NOTE: If your answering machine does not let you connect an external phone,
you can purchase and use a parallel splitter (also known as a coupler) to connect
both the answering machine and telephone to the HP All-in-One. You can use
standard phone cords for these connections.
5. Turn on the Auto Answer setting.
6. Set your answering machine to answer after a low number of rings.
7. Change the Rings to Answer setting on the HP All-in-One to the maximum number
of rings supported by your device. (The maximum number of rings varies by country/
region.)
8. Run a fax test.
When the phone rings, your answering machine will answer after the number of rings you
have set, and then play your recorded greeting. The HP All-in-One monitors the call during
this time, "listening" for fax tones. If incoming fax tones are detected, the HP All-in-One
will emit fax reception tones and receive the fax; if there are no fax tones, the HP All-inOne stops monitoring the line and your answering machine can record a voice message.
Case J: Shared voice/fax line with computer dial-up modem and answering machine
If you receive both voice calls and fax calls at the same phone number, and you also have
a computer dial-up modem and answering machine connected on this phone line, set up
the HP All-in-One as described in this section.
Since your computer dial-up modem shares the phone line with the HP All-in-One, you
will not be able to use both your modem and the HP All-in-One simultaneously. For
example, you cannot use the HP All-in-One for faxing if you are using your computer dialup modem to send an e-mail or access the Internet.
40 Finish setting up the HP All-in-One
Page 43

There are two different ways to set the HP All-in-One with your computer based on the
number of phone ports on your computer. Before you begin, check your computer to see
if it has one or two phone ports.
• If your computer has only one phone port, you will need to purchase a parallel splitter
(also called a coupler), as shown below. (A parallel splitter has one RJ-11 port on the
front and two RJ-11 ports on the back. Do not use a 2-line phone splitter, a serial
splitter, or a parallel splitter which has two RJ-11 ports on the front and a plug on the
back.)
Figure 4-10 Example of a parallel splitter
• If your computer has two phone ports, set up the HP All-in-One as described below.
Figure 4-11 Back view of the HP All-in-One
1 Telephone wall jack
2 "IN" phone port on your computer
3 "OUT" phone port on your computer
4 Telephone (optional)
5 Answering machine
6 Computer with modem
7 Use the phone cord supplied in the box with the HP All-in-One to connect to the "1-LINE"
port
Fax setup 41
Page 44

Chapter 4
To set up the HP All-in-One on the same phone line as a computer with two phone
ports
1. Remove the white plug from the port labeled 2-EXT on the back of the HP All-in-One.
2. Find the phone cord that connects from the back of your computer (your computer
dial-up modem) to a telephone wall jack. Disconnect the cord from the telephone wall
jack and plug it into the port labeled 2-EXT on the back of the HP All-in-One.
3. Unplug your answering machine from the telephone wall jack, and connect it to the
“OUT” port on the back of your computer modem.
This allows a direct connection between the HP All-in-One and your answering
machine, even though the computer modem is connected first in line.
NOTE: If you do not connect your answering machine in this way, fax tones from
a sending fax machine might be recorded on your answering machine, and you
might not be able to receive faxes with the HP All-in-One.
4. Using the phone cord supplied in the box with the HP All-in-One, connect one end to
your telephone wall jack, then connect the other end to the port labeled 1-LINE on
the back of the HP All-in-One.
NOTE: If you do not use the supplied cord to connect from the telephone wall
jack to the HP All-in-One, you might not be able to fax successfully. This special
phone cord is different from the phone cords you might already have in your home
or office.
5. (Optional) If your answering machine does not have a built-in phone, for convenience
you might want to connect a phone to the back of your answering machine at the
"OUT" port.
NOTE: If your answering machine does not let you connect an external phone,
you can purchase and use a parallel splitter (also known as a coupler) to connect
both the answering machine and telephone to the HP All-in-One. You can use
standard phone cords for these connections.
6. If your modem software is set to receive faxes to your computer automatically, turn
off that setting.
NOTE: If you do not turn off the automatic fax reception setting in your modem
software, the HP All-in-One will not be able to receive faxes.
7. Turn on the Auto Answer setting.
8. Set your answering machine to answer after a low number of rings.
9. Change the Rings to Answer setting on the HP All-in-One to the maximum number
of rings supported by your device. (The maximum number of rings varies by country/
region.)
10. Run a fax test.
When the phone rings, your answering machine will answer after the number of rings you
have set, and then play your recorded greeting. The HP All-in-One monitors the call during
this time, "listening" for fax tones. If incoming fax tones are detected, the HP All-in-One
will emit fax reception tones and receive the fax; if there are no fax tones, the HP All-inOne stops monitoring the line and your answering machine can record a voice message.
42 Finish setting up the HP All-in-One
Page 45

Case K: Shared voice/fax line with computer dial-up modem and voice mail
If you receive both voice calls and fax calls at the same phone number, use a computer
dial-up modem on the same phone line, and subscribe to a voice mail service through
your telephone company, set up the HP All-in-One as described in this section.
NOTE: You cannot receive faxes automatically if you have a voice mail service at
the same phone number you use for fax calls. You must receive faxes manually; this
means you must be available to respond in person to incoming fax calls. If you want
to receive faxes automatically instead, contact your telephone company to subscribe
to a distinctive ring service, or to obtain a separate phone line for faxing.
Since your computer dial-up modem shares the phone line with the HP All-in-One, you
will not be able to use both your modem and the HP All-in-One simultaneously. For
example, you cannot use the HP All-in-One for faxing if you are using your computer dialup modem to send an e-mail or access the Internet.
There are two different ways to set up the HP All-in-One with your computer based on
the number of phone ports on your computer. Before you begin, check your computer to
see if it has one or two phone ports.
• If your computer has only one phone port, you will need to purchase a parallel splitter
(also called a coupler), as shown below. (A parallel splitter has one RJ-11 port on the
front and two RJ-11 ports on the back. Do not use a 2-line phone splitter, a serial
splitter, or a parallel splitter which has two RJ-11 ports on the front and a plug on the
back.)
Figure 4-12 Example of a parallel splitter
Fax setup 43
Page 46

Chapter 4
• If your computer has two phone ports, set up the HP All-in-One as described below.
Figure 4-13 Back view of the HP All-in-One
1 Telephone wall jack
2 "IN" phone port on your computer
3 "OUT" phone port on your computer
4 Telephone
5 Computer with modem
6 Use the phone cord supplied in the box with the HP All-in-One to connect to the "1-LINE"
port
To set up the HP All-in-One on the same phone line as a computer with two phone
ports
1. Remove the white plug from the port labeled 2-EXT on the back of the HP All-in-One.
2. Find the phone cord that connects from the back of your computer (your computer
dial-up modem) to a telephone wall jack. Disconnect the cord from the telephone wall
jack and plug it into the port labeled 2-EXT on the back of the HP All-in-One.
3. Connect a phone to the "OUT" port on the back of your computer dial-up modem.
4. Using the phone cord supplied in the box with the HP All-in-One, connect one end to
your telephone wall jack, then connect the other end to the port labeled 1-LINE on
the back of the HP All-in-One.
NOTE: If you do not use the supplied cord to connect from the telephone wall
jack to the HP All-in-One, you might not be able to fax successfully. This special
phone cord is different from the phone cords you might already have in your home
or office.
5. If your modem software is set to receive faxes to your computer automatically, turn
off that setting.
NOTE: If you do not turn off the automatic fax reception setting in your modem
software, the HP All-in-One will not be able to receive faxes.
6. Turn off the Auto Answer setting.
7. Run a fax test.
You must be available to respond in person to incoming fax calls, or the HP All-in-One
cannot receive faxes.
44 Finish setting up the HP All-in-One
Page 47

Change settings on the HP All-in-One to receive faxes
In order to receive faxes successfully, you might need to change some settings on the
HP All-in-One. If you are unsure which setting to choose for a specific fax option, refer to
the detailed fax setup instructions provided in the printed documentation.
This section contains the following topics:
•
Choose the recommended answer mode for your setup
Set the answer mode
•
Set the number of rings before answering
•
Change the answer ring pattern for distinctive ringing
•
Choose the recommended answer mode for your setup
Refer to the table below to determine how you should answer incoming fax calls based
on your home or office setup. From the first column in the table, choose the type of
equipment and services applicable to your office setup. Then, look up the appropriate
setting in the second column. The third column describes how the HP All-in-One answers
incoming calls.
After you have determined the recommended answer mode setting for your home or office
setup, see
Set the answer mode for more information.
Equipment/services sharing
your fax line
None.
(You have a separate phone line
on which you receive only fax
calls.)
A shared voice and fax line and no
answering machine.
(You have a shared phone line in
which you receive both voice and
fax calls.)
Voice mail service provided by
your telephone company.
An answering machine and a
shared voice and fax line.
Recommended
Auto Answer
setting
On The HP All-in-One automatically answers all incoming
Off The HP All-in-One will not automatically answer calls.
Off The HP All-in-One will not automatically answer calls.
On The HP All-in-One will not automatically answer calls.
Description
calls using the Rings to Answer setting.
You must press Start Fax Black or Start Fax Color
to receive a fax.
You might use this setting if the majority of calls on this
phone line are voice calls and you rarely receive
faxes.
You must press Start Fax Black or Start Fax Color
to receive a fax.
Instead, the HP All-in-One will monitor the line when
the call is answered by a person or by the answering
machine. If the HP All-in-One detects fax tones on the
line, the HP All-in-One receives the fax. If the
answering machine answers a voice call, the
answering machine records the incoming message.
In addition to the Auto Answer setting, set the
number of rings to answer on the HP All-in-One to a
greater number of rings than the answering machine.
You want the answering machine to answer before the
HP All-in-One.
Fax setup 45
Page 48

Chapter 4
(continued)
Equipment/services sharing
your fax line
Recommended
Auto Answer
setting
Description
Distinctive ringing service. On The HP All-in-One automatically answers all incoming
calls. Make sure the ring pattern the phone company
set for your fax line matches the Distinctive Ring
setting on the HP All-in-One.
Related topics
Set the number of rings before answering
•
Receive a fax manually
•
Change the answer ring pattern for distinctive ringing
•
Set the answer mode
The answer mode determines whether the HP All-in-One answers incoming calls or not.
• Turn on the Auto Answer setting if you want the HP All-in-One to answer faxes
automatically. The HP All-in-One will answer all incoming calls and faxes.
• Turn off the Auto Answer setting if you want to receive faxes manually. You must
be available to respond in person to the incoming fax call or the HP All-in-One will not
receive faxes.
To set the answer mode
1. Press Setup.
2. Press 4, and then press 2.
This selects Basic Fax Setup and then selects Rings to Answer.
3. Enter the appropriate number of rings by using the keypad, or press
or to change
the number of rings.
4. Press OK to accept the setting.
Related topics
•
Receive a fax manually
Choose the recommended answer mode for your setup
•
Set the number of rings before answering
If you turn on the Auto Answer setting, you can specify how many rings should occur
before the HP All-in-One automatically answers the incoming call.
The Rings to Answer setting is important if you have an answering machine on the same
phone line as the HP All-in-One, because you want the answering machine to answer
the phone before the HP All-in-One does. The number of rings to answer for the HP Allin-One should be greater than the number of rings to answer for the answering machine.
For example, set your answering machine to a low number of rings and the HP All-in-One
to answer in the maximum number of rings. (The maximum number of rings varies by
country/region.) In this setup, the answering machine will answer the call and the HP Allin-One will monitor the line. If the HP All-in-One detects fax tones, the HP All-in-One will
receive the fax. If the call is a voice call, the answering machine will record the incoming
message.
46 Finish setting up the HP All-in-One
Page 49

To set the number of rings before answering from the control panel
1. Press Setup.
2. Press 4, and then press 3.
This selects Basic Fax Setup and then selects Rings to Answer.
3. Enter the appropriate number of rings by using the keypad, or press
the number of rings.
4. Press OK to accept the setting.
Related topics
Set the answer mode
Change the answer ring pattern for distinctive ringing
Many phone companies offer a distinctive ringing feature that allows you to have several
phone numbers on one phone line. When you subscribe to this service, each number will
have a different ring pattern. You can set up the HP All-in-One to answer incoming calls
that have a specific ring pattern.
If you connect the HP All-in-One to a line with distinctive ringing, have your telephone
company assign one ring pattern to voice calls and another ring pattern to fax calls. HP
recommends that you request double or triple rings for a fax number. When the HP Allin-One detects the specified ring pattern, it will answer the call and receive the fax.
If you do not have a distinctive ring service, use the default ring pattern, which is All
Rings.
To change the distinctive ring pattern from the control panel
1. Verify that the HP All-in-One is set to answer fax calls automatically.
2. Press Setup.
3. Press 5, and then press 1.
This selects Advanced Fax Setup and then selects Distinctive Ring.
4. Press
When the phone rings with the ring pattern assigned to your fax line, the HP All-inOne answers the call and receives the fax.
to select an option, and then press OK.
or to change
Related topics
Set the answer mode
Test your fax setup
You can test your fax setup to check the status of the HP All-in-One and to make sure it
is set up properly for faxing. Perform this test after you have completed setting up the
HP All-in-One for faxing. The test does the following:
• Tests the fax hardware
• Verifies the correct type of phone cord is connected to the HP All-in-One
• Checks that the phone cord is plugged into the correct port
• Checks for a dial tone
Fax setup 47
Page 50

Chapter 4
• Checks for an active phone line
• Tests the status of your phone line connection
The HP All-in-One prints a report with the results of the test. If the test fails, review the
report for information on how to fix the problem and rerun the test.
To test your fax setup from the control panel
1. Set up the HP All-in-One for faxing according to your particular home or office setup
instructions.
2. Insert the print cartridges and load full-size paper in the input tray before starting the
test.
3. Press Setup.
4. Press 6, then press 6 again.
This selects the Tools menu and then selects Run Fax Test.
The HP All-in-One displays the status of the test on the display and prints a report.
5. Review the report.
• If the test passes and you are still having problems faxing, check the fax settings
listed in the report to verify the settings are correct. A blank or incorrect fax setting
can cause problems faxing.
• If the test fails, review the report for more information on how to fix any problems
found.
6. After you pick up the fax report from the HP All-in-One, press OK.
If necessary, resolve any problems found and rerun the test.
Set the fax header
The fax header prints your name and fax number on the top of every fax you send. HP
recommends that you set up the fax header by using the software that you installed with
the HP All-in-One. You can also set up the fax header from the control panel, as described
here.
NOTE: In some countries/regions the fax header information is a legal requirement.
To set a default fax header from the control panel
1. Press Setup.
2. Press 4, and then press 1.
This selects Basic Fax Setup and then selects Fax Header.
3. Enter your personal or company name, and then press OK.
4. Enter your fax number by using the numeric keypad, and then press OK.
Related topics
Text and symbols
Set up speed dialing
You can assign speed dial entries to fax numbers you use often. This lets you dial those
numbers quickly by using the control panel.
48 Finish setting up the HP All-in-One
Page 51

This section contains the following topics:
•
Set up individual speed dial entries
Set up group speed dial entries
•
Delete speed dial entries
•
Print the speed dial list
•
Set up individual speed dial entries
You can create speed dial entries for fax numbers that you use frequently. If necessary,
you can also edit the name or fax number of a speed dial entry you have already created.
TIP: You can include individual speed dial entries in a group speed dial entry. This
enables you to send a fax to a group of people at one time. (The maximum number
of individual speed dial entries allowed in a group speed dial entry varies by model.)
This section contains the following topics:
•
Create individual speed dial entries
Update individual speed dial entries
•
Create individual speed dial entries
You can create speed dial entries from the control panel or from your computer by using
the software that you installed with the HP All-in-One.
To create speed dial entries from the control panel
1. Press Setup.
2. Press 3, and then press 1.
This selects Speed Dial Setup and then selects Individual Speed Dial.
The first unassigned speed dial entry appears on the display.
3. Press OK to select the displayed speed dial entry. You can also press
or to select
an empty entry, and then press OK.
4. Enter the fax number to assign to that entry, and then press OK.
5. Enter the name, and then press OK.
6. Press 1 if you want to set up another number, or press 2 if you are finished creating
speed dial entries.
Related topics
Text and symbols
Update individual speed dial entries
You can edit the name or fax number in a speed dial entry from the control panel or from
your computer by using the software that you installed with the HP All-in-One.
To update a speed dial entry from the control panel
1. Press Setup.
2. Press 3, and then press 1.
This selects Speed Dial Setup and then selects Individual Speed Dial.
Fax setup 49
Page 52

Chapter 4
3. Press or to scroll through the speed dial entries, and then press OK to select the
appropriate entry.
4. When the current fax number appears, press
to erase it.
5. Enter the new fax number, and then press OK.
TIP: To add a pause in the fax number you are entering, press Redial/Pause,
or press the Symbols (*) button repeatedly, until a dash (-) appears on the display.
6. Enter the new name, and then press OK.
7. Press 1 to update another speed dial entry, or press 2 when you are finished.
Related topics
Text and symbols
Set up group speed dial entries
You can place individual speed dial entries that you have set up into groups, so that you
can fax the same document to multiple recipients at once. (The maximum number of
individual speed dial entries allowed in a group speed dial entry varies by model.)
NOTE: The numbers you include in the group speed dial entry must already be set
up as individual speed dial entries on the HP All-in-One.
To create group speed dial entries from the control panel
1. Press Setup.
2. Press 3, and then press 2.
This selects Speed Dial Setup and then selects Group Speed Dial.
The first unassigned speed dial entry appears on the display.
3. Press OK to select the displayed speed dial entry. You can also press
or to select
an empty entry, and then press OK.
4. Press
or to scroll through the individual speed dial entries you set up, and then
press OK to select the appropriate entry.
5. Press 1 to add another individual speed dial entry, or press 2 if you are finished.
6. Enter the group speed dial name, and then press OK.
7. Press 1 to add another group, or press 2 if you are finished.
Related topics
Set up individual speed dial entries
•
Text and symbols
•
Delete speed dial entries
You can delete an individual or group speed dial entry. When deleting speed dial entries,
consider the following:
• Deleting an individual speed dial entry also deletes that entry from any groups to
which you have assigned it.
• Deleting a group speed dial entry does not delete the individual speed dial entries
associated with it. You can still use the individual speed dial entries to send faxes.
50 Finish setting up the HP All-in-One
Page 53

To delete speed dial entries from the control panel
1. Press Setup.
2. Press 3, and then press 3 again.
This selects Speed Dial Setup and then selects Delete Speed Dial.
3. Press
or until the speed dial entry that you want to delete appears, and then
press OK to delete it.
Print the speed dial list
You can print a list of all the speed dial entries that you programmed on the HP All-inOne.
To print the speed dial list
1. Press Setup.
2. Press 3, and then press 4.
This selects Speed Dial Setup and then selects Print Speed Dial List.
TIP: You can also print this list by selecting Speed Dial List from the Print
Report menu. Press Setup, press 2, and then press 7.
Fax setup 51
Page 54

Chapter 4
52 Finish setting up the HP All-in-One
Page 55

5 How do I?
This section contains links to commonly performed tasks, such as sharing and printing
photos and optimizing your print jobs.
•
How do I print borderless photos on 10 x 15 cm (4 x 6 inch) paper?
How do I get the best print quality?
•
How do I test my fax?
•
How do I manually send faxes
•
How do I manually receive faxes?
•
How do I print a fax confirmation report?
•
How do I? 53
Page 56

Chapter 5
54 How do I?
Page 57

6 Load originals and load paper
You can load many different types and sizes of paper in the HP All-in-One, including letter
or A4 paper, photo paper, transparencies, and envelopes.
This section contains the following topics:
•
Load originals
Select print media
•
Load paper
•
Avoid paper jams
•
Load originals
You can load an original for a copy, fax, or scan job in the automatic document feeder or
on the glass. Originals that are loaded in the automatic document feeder will automatically
be fed into the HP All-in-One.
This section contains the following topics:
•
Load an original in the automatic document feeder
Load an original on the glass
•
Load an original in the automatic document feeder
You can copy, scan, or fax a single- or multiple-page letter-, A4- (up to 35 pages of plain
paper), or legal-size document (up to 20 sheets of plain paper) by placing it in the
document feeder tray.
CAUTION: Do not load photos in the automatic document feeder; this might cause
damage to your photos.
NOTE: Some features, such as the Fit to Page copy feature, do not work when you
load your originals in the automatic document feeder. You must load your originals
on the glass.
To load an original in the document feeder tray
1. Load your original, with the print side up, into the document feeder tray. Slide the
paper into the automatic document feeder until you hear a beep or see a message
on the display indicating that the HP All-in-One detected the pages you loaded.
TIP: For more help on loading originals in the automatic document feeder, refer
to the diagram engraved in the document feeder tray.
Load originals and load paper 55
Page 58
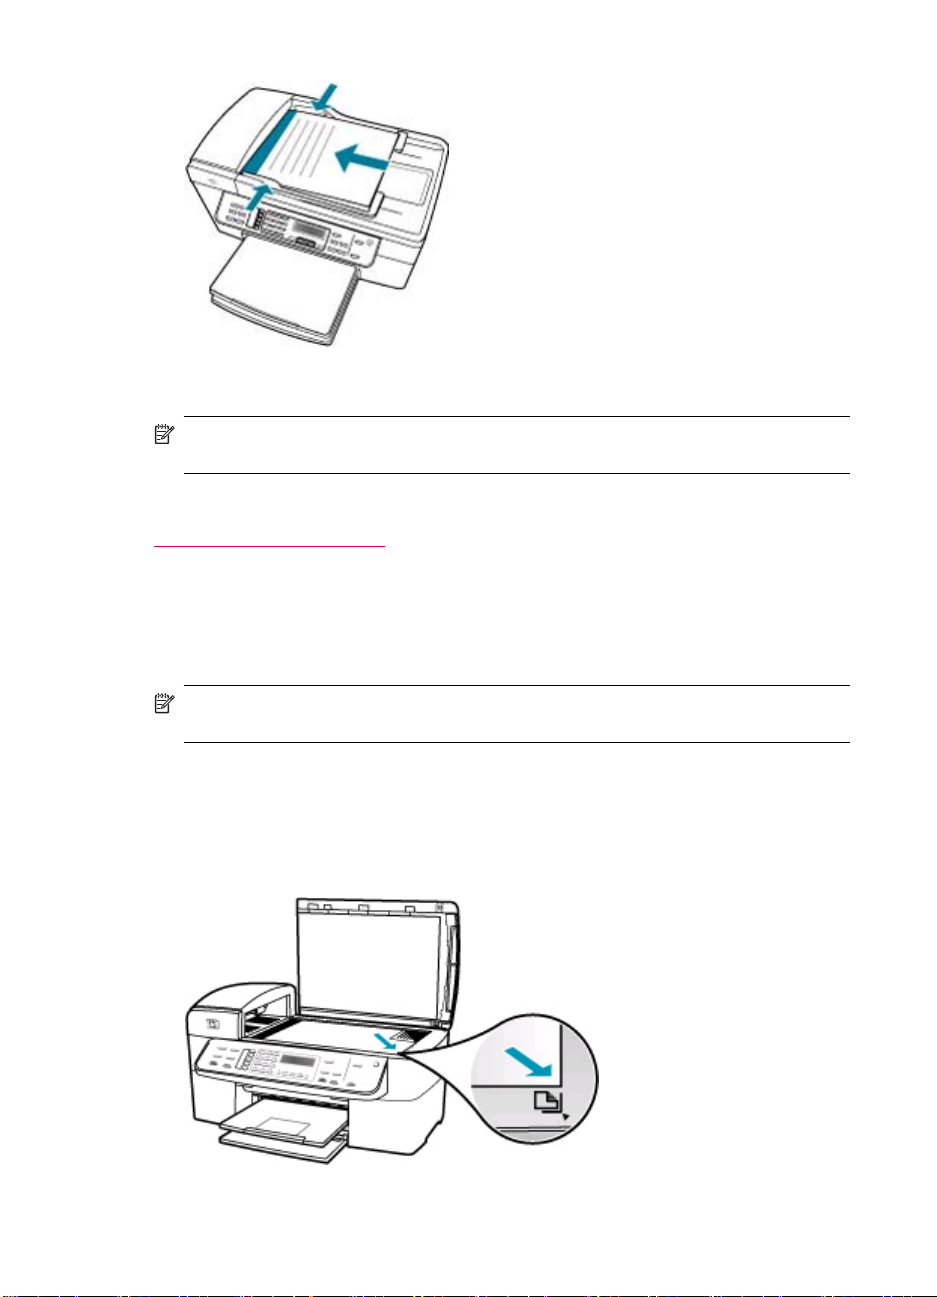
Chapter 6
2. Slide the paper guides inward until they stop at the left and right edges of the paper.
NOTE: Remove all originals from the document feeder tray before lifting the lid on
the HP All-in-One.
Related topics
Load an original on the glass
Load an original on the glass
You can copy, scan, or fax up to letter- or A4-size originals by loading them on the glass.
If your original is legal-size or contains multiple full-size pages, load it in the automatic
document feeder.
NOTE: Many of the special features will not work correctly if the glass and lid backing
are not clean.
To load an original on the scanner glass
1. Remove all originals from the document feeder tray, and then lift the lid on the HP All-
in-One.
2. Load your original print side down on the right front corner of the glass.
56 Load originals and load paper
Page 59

3. Close the lid.
Related topics
•
Load an original in the automatic document feeder
Clean the HP All-in-One
•
Select print media
The device is designed to work well with most types of office media. It is best to test a
variety of print media types before buying large quantities. Use HP media for optimum
print quality. Visit the HP Web site at
•
Tips for selecting and using print media
Understand specifications for supported media
•
Set minimum margins
•
Papers to avoid
•
Tips for selecting and using print media
For the best results, observe the following guidelines.
• Always use media that conforms to the device specifications. For more information,
see
Understand specifications for supported media.
• Load only one type of media at a time into a tray.
• For Tray 1 and Tray 2, load media print-side down and aligned against the right and
back edges of the tray. Tray 2 is available with some models. For more information,
see
Understand supported media types and weights.
• Tray 2 is designed to hold only plain paper.
• Do not overload the trays. For more information, see
supported media.
• To prevent jams, poor print quality, and other printing problems, avoid the following
media:
• Multipart forms
• Media that is damaged, curled, or wrinkled
• Media with cutouts or perforations
• Media that is heavily textured, embossed, or does not accept ink well
• Media that is too lightweight or stretches easily
www.hp.com for more information about HP media.
Understand specifications for
Cards and envelopes
• Avoid envelopes that have a very slick finish, self-stick adhesives, clasps, or windows.
Also avoid cards and envelopes with thick, irregular, or curled edges, or areas that
are wrinkled, torn, or otherwise damaged.
• Use tightly constructed envelopes, and make sure the folds are sharply creased.
• Load envelopes with the flaps facing up.
Select print media 57
Page 60

Chapter 6
Photo media
• Use the Best mode to print photographs. Note that in this mode, printing takes longer
and more memory is required from your computer.
• Remove each sheet as it prints and set it aside to dry. Allowing wet media to stack
up may cause smearing.
Transparencies
• Insert transparencies with the rough side down and the adhesive strip pointing
towards the back of the device.
• Use the Normal mode to print transparencies. This mode provides longer drying time
and ensures that the ink dries completely before the next page is delivered to the
output tray.
• Remove each sheet as it prints and set it aside to dry. Allowing wet media to stack
up may cause smearing.
Custom-sized media
• Use only custom-sized media that is supported by the device.
• If your application supports custom-sized media, set the media size in the application
before printing the document. If not, set the size in the print driver. You might need
to reformat existing documents to print them correctly on custom-sized media.
Understand specifications for supported media
Use the Understand supported sizes and Understand supported media types and
weights tables to determine the correct media to use with your device, and determine
what features will work with your media.
•
Understand supported sizes
Understand supported media types and weights
•
Understand supported sizes
Media size Tray 1 Duplexer ADF
Standard media sizes
U.S. Letter (216 x 279 mm; 8.5 x 11
inches)
U.S. Legal (216 x 356 mm; 8.5 x 14
inches)
A4 (210 x 297 mm; 8.3 x 11.7 inches)
U.S. Executive (184 x 267 mm; 7.25 x
10.5 inches)
B5 (182 x 257 mm; 7.17 x 10.12 inches)
A5 (148 x 210 mm; 5.8 x 8.3 inches)
58 Load originals and load paper
Page 61

(continued)
Media size Tray 1 Duplexer ADF
Borderless A4 (210 x 297 mm; 8.3 x 11.7
inches)*
Borderless A5 (148 x 210 mm; 5.8 x 8.3
inches)*
Borderless B5 (182 x 257 mm; 7.17 x
10.12 inches)*
Envelopes
U.S. #10 Envelope (105 x 241 mm; 4.12
x 9.5 inches)*
A2 Envelope (111 x 146 mm; 4.37 x 5.75
inches)*
DL Envelope (110 x 220 mm; 4.3 x 8.7
inches)*
C6 Envelope (114 x 162 mm; 4.5 x 6.4
inches)*
Japanese Envelope Chou #2 (119 x 277
mm; 4.7 x 10.9 inches)*
Japanese Envelope Chou #3 (120 x 235
mm; 4.7 x 9.3 inches)*
Japanese Envelope Chou #4 (90 x 205
mm; 3.5 x 8.1 inches)*
Cards
Index card (76.2 x 127 mm; 3 x 5 inches)
*
Index card (102 x 152 mm; 4 x 6 inches)
*
Index card (127 x 203 mm; 5 x 8 inches)
*
A6 card (105 x 148.5 mm; 4.13 x 5.83
inches)*
Borderless A6 card (105 x 148.5 mm;
4.13 x 5.83 inches)*
Hagaki** (100 x 148 mm; 3.9 x 5.8
inches)*
Ofuku Hagaki** (200 x 148 mm; 7.9 x 5.8
inches)*
Photo media
Photo media (102 x 152 mm; 4 x 6
inches)*
Photo media (5 x 7 inches)*
Select print media 59
Page 62

Chapter 6
(continued)
Media size Tray 1 Duplexer ADF
Photo media (8 x 10 inches)*
Photo media (10 x 20 cm)*
Photo media (4 x 8 inches)*
Photo media HV*
Photo media cabinet (165 x 120 mm; 6.5
x 4.7 inches)*
Photo media 2L (178 x 127 mm; 7 x 5
inches)*
Photo media (13 x 18 cm)*
Photo media B7 (88 x 125 mm; 3.5 x 4.9
inches)*
Photo L (89 x 127 mm; 3.5 x 5 inches)*
Borderless photo media (102 x 152 mm;
4 x 6 inches)*
Borderless photo media (10 x 20 cm)*
Borderless photo media (4 x 8inches)*
Borderless HV*
Borderless cabinet (165 x 120 mm; 6.5 x
4.7 inches)*
Borderless 2L (178 x 127 mm; 7 x 5
inches)*
Borderless photo media (5 x 7 inches)*
Borderless photo media (8 x 10 inches)
*
Borderless photo media (8.5 x 11
inches)*
Borderless photo media (13 x 18 cm)*
Borderless B7 (88 x 125 mm; 3.5 x 4.9
inches)*
Borderless hagaki (100 x 148mm)*
Borderless Photo L (89 x 127 mm; 3.5 x
5 inches)*
Other media
Custom-sized media between 76.2 to
216 mm wide and 127 to 594 mm long
60 Load originals and load paper
Page 63

(continued)
Media size Tray 1 Duplexer ADF
(3 to 8.5 inches wide and 5 to 23 inches
long) *
Custom-sized media (ADF) between
127 to 216 mm wide and 241 to 305 mm
long (5 to 8.5 inches wide and 9.5 to 12
inches long)
Panorama (4 x 10 inches, 4 x 11 inches,
4 x 12 inches, and double A4) *
Borderless panorama (4 x 10 inches, 4 x
11 inches, 4 x 12 inches, and double A4)
*
* Not compatible for use with the ADF for single- or double-sided printing
** The device is compatible with plain and inkjet hagaki from Japan Post only. It is not
compatible with photo hagaki from Japan Post.
Understand supported media types and weights
Tray Type Weight Capacity
Tray 1 Paper 60 to 105 g/m
(16 to 28 lb bond)
Transparencies Up to 70 sheets
Photo media 280 g/m
(75 lb bond)
Labels Up to 100 sheets
Envelopes 75 to 90 g/m
(20 to 24 lb bond
envelope)
Cards Up to 200 g/m
(110 lb index)
Duplexer Paper 60 to 105 g/m
(16 to 28 lb bond)
Output-bin All supported media Up to 150 sheets of plain
2
Up to 250 sheets of plain
paper
(25 mm or 1 inch
stacked)
(17 mm or 0.67 inch
stacked)
2
Up to 100 sheets
(17 mm or 0.67 inch
stacked)
(17 mm or 0.67 inch
stacked)
2
Up to 30 sheets
(17 mm or 0.67 inch
stacked)
2
2
Up to 80 cards
Not applicable
paper (text printing)
Select print media 61
Page 64

Chapter 6
Set minimum margins
The document margins must match (or exceed) these margin settings in portrait
orientation.
Media (1) Left
U.S. Letter
U.S. Legal
A4
Photo media
U.S. Executive
B5
A5
Cards
Envelopes 3.3 mm (0.13
* To achieve this margin setting on a computer running Windows, click the Advanced
tab in the print driver, and select Minimize Margins.
NOTE: If you are using the duplexer (available with some models), the minimum top
and bottom margins must match or exceed 12 mm (0.47 inch).
Papers to avoid
Using paper that is too thin or too thick, paper that has a slick texture, or paper that
stretches easily can cause paper jams. Using paper that has a heavy texture or does not
accept ink can cause printed images to smear, bleed, or not fill in completely.
margin
2 mm (0.12
inch)
2 mm (0.12
inch)
inch)
(2) Right
margin
2 mm (0.12
inch)
2 mm (0.12
inch)
3.3 mm (0.13
inch)
(3) Top
margin
1.8 mm (0.07
inch)
1.8 mm (0.07
inch)
16.5 mm (0.65
inch)
(4) Bottom
margin*
2 mm (0.12
inch)
6 mm (0.24
inch)
16.5 mm
(0.65 inch)
Papers to avoid for all print and copy jobs
• Any size paper other than those listed in the technical specifications. For more
information, see
Paper sizes.
• Paper with cutouts or perforations (unless specifically designed for use with HP inkjet
devices).
62 Load originals and load paper
Page 65

• Highly textured stock, such as linen. It might not print evenly, and the ink can bleed
into these papers.
• Extremely smooth, shiny, or coated papers not specifically designed for the HP All-
in-One. They can jam the HP All-in-One or repel the ink.
• Multi-part forms, such as duplicate and triplicate forms. They can wrinkle or get stuck,
and the ink is more likely to smear.
• Envelopes with clasps or windows. They can get stuck in the rollers and cause paper
jams.
• Banner paper.
Additional papers to avoid when copying
• Envelopes.
• Transparency film other than HP Premium Inkjet Transparency Film or HP Premium
Plus Inkjet Transparency Film.
• Iron-On Transfers.
• Greeting card paper.
Load paper
This section describes the procedure for loading different types and sizes of paper into
the HP All-in-One for your copies, printouts, or faxes.
TIP: To help prevent rips, wrinkles, and curled or bent edges, store all paper flat in
a resealable bag. If the paper is not stored properly, extreme changes in temperature
and humidity might result in curled paper that does not work well in the HP All-in-One.
This section contains the following topics:
•
Load full-size paper
Load 10 x 15 cm (4 x 6 inch) photo paper
•
Load index cards
•
Load envelopes
•
Load full-size paper
You can load many types of letter, A4, or legal paper into the input tray of the HP All-inOne.
Load paper 63
Page 66

Chapter 6
To load full-size paper
1. Remove the output tray.
2. Slide the paper-width guide to its outermost position.
3. Tap a stack of paper on a flat surface to align the edges, and then check the paper
for the following:
• Make sure it is free of rips, dust, wrinkles, and curled or bent edges.
• Make sure all the paper in the stack is the same size and type.
64 Load originals and load paper
Page 67

4. Insert the stack of paper into the input tray with the short edge forward and the print
side down. Slide the stack of paper forward until it stops.
CAUTION: Make sure that the HP All-in-One is idle and silent when you load
paper into the input tray. If the HP All-in-One is servicing the print cartridges or
otherwise engaged in a task, the paper stop inside the device might not be in
place. You could push the paper too far forward, causing the HP All-in-One to
eject blank pages.
TIP: If you are using letterhead, insert the top of the page first with the print side
down. For more help on loading full-size paper and letterhead, refer to the diagram
engraved in the base of the input tray.
5. Slide the paper-width guide inward until it stops at the edge of the paper.
Do not overload the input tray; make sure the stack of paper fits within the input tray
and is no higher than the top of the paper-width guide.
6. Replace the output tray.
Load paper 65
Page 68
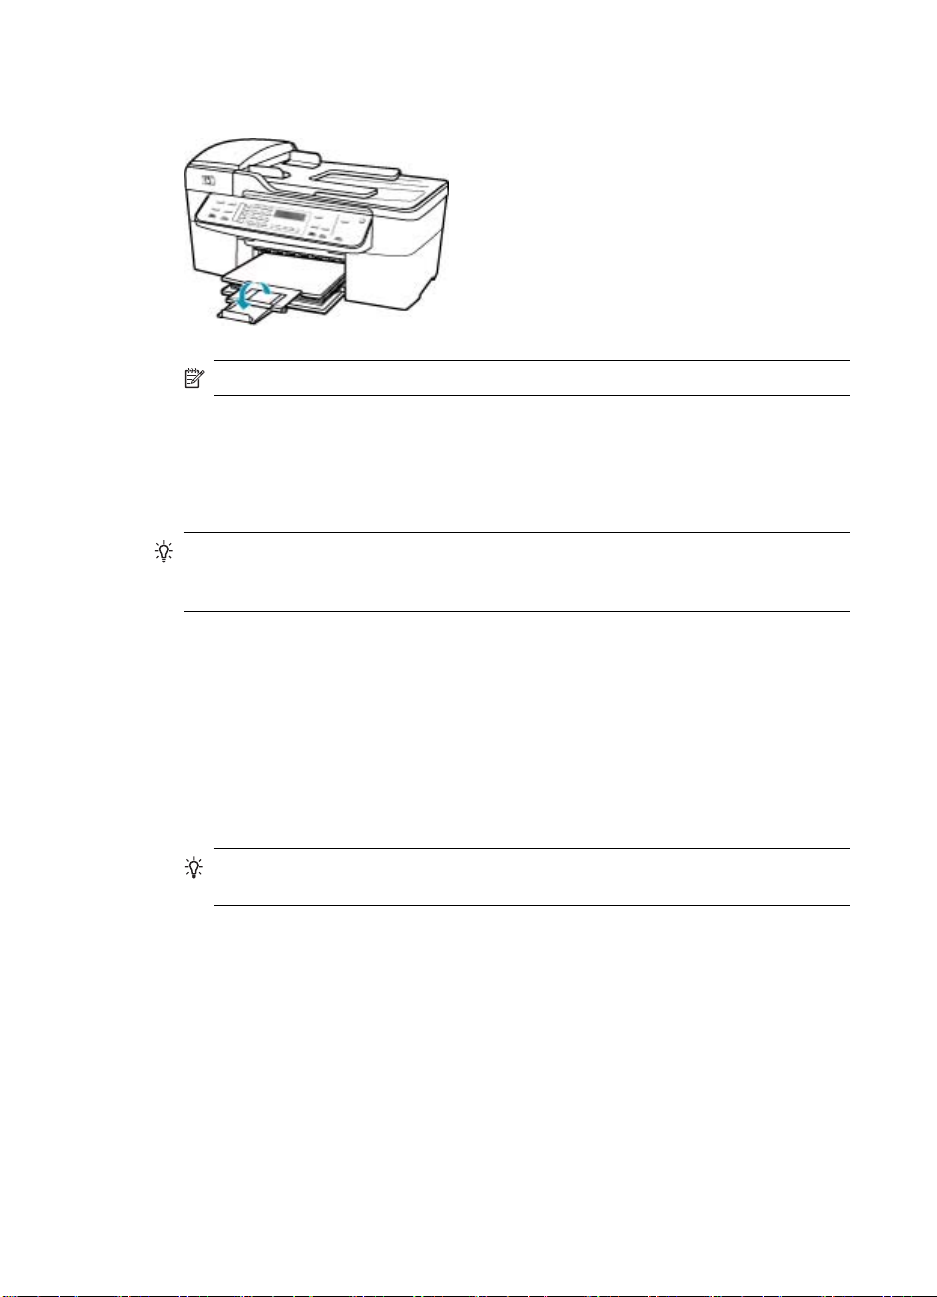
Chapter 6
7. Flip the tray extender up toward you.
NOTE: When you use legal-size paper, leave the tray extender closed.
Load 10 x 15 cm (4 x 6 inch) photo paper
You can load 10 x 15 cm (4 x 6 inch) photo paper into the input tray of the HP All-in-One.
For the best results, use 10 x 15 cm (4 x 6 inch) HP Premium Plus Photo Paper or HP
Premium Photo Paper.
TIP: To help prevent rips, wrinkles, and curled or bent edges, store all paper flat in
a resealable bag. If the paper is not stored properly, extreme changes in temperature
and humidity might result in curled paper that does not work well in the HP All-in-One.
For best results, set the paper type and paper size before copying or printing.
To load 10 x 15 cm ( 4 x 6 inch) photo paper with tab in the input tray
1. Remove the output tray.
2. Remove all paper from the input tray.
3. Insert the stack of photo paper into the far-right side of the input tray with the short
edge forward and the print side down. Slide the stack of photo paper forward until it
stops.
Load the photo paper so that the tabs are closest to you.
TIP: For more help on loading small-size photo paper, refer to the guides
engraved in the base of the input tray for loading photo paper.
66 Load originals and load paper
Page 69

4. Slide the paper-width guide inward against the photo paper until it stops.
Do not overload the input tray; make sure the stack of paper fits within the input tray
and is no higher than the top of the paper-width guide.
5. Replace the output tray.
Related topics
•
Understand specifications for supported media
Set the copy paper type
•
Load index cards
You can load index cards into the input tray of the HP All-in-One to print notes, recipes,
and other text.
For best results, set the paper type and paper size before copying or printing.
To load index cards in the input tray
1. Remove the output tray.
2. Remove all paper from the input tray.
3. Insert the stack of cards, print side down, into the far-right side of the input tray. Slide
the stack of cards forward until it stops.
4. Slide the paper-width guide inward against the stack of cards until it stops.
Do not overload the input tray; make sure the stack of cards fits within the input tray
and is no higher than the top of the paper-width guide.
5. Replace the output tray.
Load paper 67
Page 70

Chapter 6
Related topics
•
Load 10 x 15 cm (4 x 6 inch) photo paper
Set the copy paper type
•
Load envelopes
You can load one or more envelopes into the input tray of the HP All-in-One. Do not use
shiny or embossed envelopes or envelopes that have clasps or windows.
NOTE: For specific details on how to format text for printing on envelopes, consult
the help files in your word processing software. For best results, consider using a label
for the return address on envelopes.
To load envelopes
1. Remove the output tray.
2. Remove all paper from the input tray.
3. Insert one or more envelopes into the far-right side of the input tray with the envelope
flaps up and on the left. Slide the stack of envelopes forward until it stops.
4. Slide the paper-width guide inward against the stack of envelopes until it stops.
Do not overload the input tray; make sure the stack of envelopes fits within the input
tray and is not higher than the top of the paper-width guide.
TIP: For more help on loading envelopes, refer to the diagram engraved in the
base of the input tray.
5. Replace the output tray.
Avoid paper jams
To help avoid paper jams, follow these guidelines.
• Remove printed papers from the output tray frequently.
• Prevent curled or wrinkled paper by storing all unused paper flat in a resealable bag.
• Ensure that paper loaded in the input tray lays flat and the edges are not bent or torn.
• Do not combine different paper types and paper sizes in the input tray; the entire stack
of paper in the input tray must be the same size and type.
68 Load originals and load paper
Page 71

• Adjust the paper-width guide in the input tray to fit snugly against all paper. Make sure
the paper-width guide does not bend the paper in the input tray.
• Do not force paper too far forward in the input tray.
• Use paper types that are recommended for the HP All-in-One. For more information,
see
Understand specifications for supported media.
• Do not leave originals on the glass. If you load an original in the automatic document
feeder while there is already an original on the glass, the original can jam in the
automatic document feeder.
Avoid paper jams 69
Page 72

Chapter 6
70 Load originals and load paper
Page 73

7 Print from your computer
The HP All-in-One can be used with any software application that allows printing. You
can print a range of projects, such as borderless images, newsletters, greeting cards,
iron-on transfers, and posters.
This section contains the following topics:
•
Print from a software application
Change the print settings
•
Stop a print job
•
Print from a software application
Most print settings are automatically handled by the software application. You need to
change the settings manually only when you change print quality, print on specific types
of paper or transparency film, or use special features.
To print from a software application
1. Make sure you have paper loaded in the input tray.
2. On the File menu in your software application, click Print.
3. Select the HP All-in-One as the printer.
If you set the HP All-in-One as the default printer, you can skip this step. The HP Allin-One will already be selected.
4. If you need to change settings, click the button that opens the Properties dialog box.
Depending on your software application, this button might be called Properties,
Options, Printer Setup, Printer, or Preferences.
NOTE: When printing a photo, you must select options for the correct paper type
and photo enhancement.
5. Select the appropriate options for your print job by using the features available in
the Advanced, Printing Shortcuts, Features, and Color tabs.
TIP: You can easily select the appropriate options for your print job by choosing
one of the predefined print tasks on the Printing Shortcuts tab. Click a type of
print task in the Printing Shortcuts list. The default settings for that type of print
task are set and summarized on the Printing Shortcuts tab. If necessary, you
can adjust the settings here and save your custom settings as a new printing
shortcut. To save a custom printing shortcut, select the shortcut and click Save.
To delete a shortcut, select the shortcut and click Delete.
The settings you select apply only to the current print job.
6. Click OK to close the Properties dialog box.
7. Click Print or OK to begin printing.
Print from your computer 71
Page 74

Chapter 7
Change the print settings
You can customize the print settings of the HP All-in-One to handle nearly any print task.
•
Windows users
Windows users
Before you change print settings, you should decide if you want to change the settings
for the current print job only, or if you want to make the settings the defaults for all future
print jobs. How you display print settings depends on whether or not you want to apply
the change to all future print jobs or just to the current print job.
To change the print settings for all future jobs
1. In the HP Solution Center, click Settings, point to Print Settings, and then click
Printer Settings.
2. Make changes to the print settings, and click OK.
To change the print settings for the current job
1. On the File menu in your software application, click Print.
2. Make sure the HP All-in-One is the selected printer.
3. Click the button that opens the Properties dialog box.
Depending on your software application, this button might be called Properties,
Options, Printer Setup, Printer, or Preferences.
4. Make changes to the print settings, and click OK.
5. Click Print or OK in the Print dialog box to print the job.
Stop a print job
Although you can stop a print job from either the HP All-in-One or the computer, HP
recommends you stop it from the HP All-in-One for best results.
To stop a print job from the HP All-in-One
▲ Press Cancel on the control panel. If the print job does not stop, press Cancel again.
It can take a few moments for printing to be cancelled.
72 Print from your computer
Page 75

8 Use the copy features
The HP All-in-One enables you to produce high-quality color and black-and-white copies
on a variety of paper types, including transparencies. You can enlarge or reduce the size
of an original to fit a specific paper size, adjust the darkness of the copy, and use special
features to make high-quality copies of photos, including borderless copies.
TIP: For the best copy performance on standard copy projects, set the paper size
to Letter or A4, the paper type to Plain Paper, and the copy quality to Fast.
This section contains the following topics:
•
Make a copy
Set the number of copies
•
Set the copy paper size
•
Set the copy paper type
•
Change copy speed or quality
•
Change default copy settings
•
Make a 10 x 15 cm (4 x 6 inch) borderless copy of a photo
•
Resize an original to fit onto letter or A4 paper
•
Resize an original using custom settings
•
Copy a legal-size document onto letter paper
•
Adjust the lightness and darkness of your copy
•
Enhance blurred areas of your copy
•
Enhance light areas of your copy
•
Stop copying
•
Make a copy
You can make quality copies from the control panel. Load multiple-page originals into the
document feeder tray.
To make a copy from the control panel
1. Make sure you have paper loaded in the input tray.
2. Load your original print side down on the right front corner of the glass or print side
up in the document feeder tray.
If you use the document feeder tray, place the pages so that the top edge of the
document goes in first.
3. Do one of the following:
• Press Start Copy Black to initiate a black-and-white copy job.
• Press Start Copy Color to initiate a color copy job.
NOTE: If you have a color original, pressing Start Copy Black produces a black-
and-white copy of the color original, while pressing Start Copy Color produces
a full-color copy of the color original.
Use the copy features 73
Page 76

Chapter 8
Set the number of copies
You can set the number of copies that you want to print by using the Number of
Copies option.
To set the number of copies from the control panel
1. Make sure you have paper loaded in the input tray.
2. Load your original print side down on the right front corner of the glass or print side
up in the document feeder tray.
If you use the document feeder tray, place the pages so that the top edge of the
document goes in first.
3. In the Copy area, press Menu repeatedly until Number of Copies appears.
4. Press
(The maximum number of copies varies by model.)
5. Press Start Copy Black or Start Copy Color.
or use the keypad to enter the number of copies, up to the maximum.
TIP: If you hold down either of the arrow buttons, the number of copies changes
by increments of 5 to make it easier to set a large number of copies.
Set the copy paper size
You can set the paper size on the HP All-in-One. The paper size you select should match
what is loaded in your input tray.
To set the paper size from the control panel
1. In the Copy area, press Menu repeatedly until Copy Paper Size appears.
2. Press
3. Press Start Copy Black or Start Copy Color.
until the appropriate paper size appears.
Set the copy paper type
You can set the paper type on the HP All-in-One.
To set the paper type for copies
1. In the Copy area, press Menu repeatedly until Paper Type appears.
2. Press
3. Press Start Copy Black or Start Copy Color.
Refer to the following table to determine which paper type setting to choose based on the
paper loaded in the input tray.
Paper type Control panel setting
Copier paper or letterhead Plain Paper
HP Bright White Paper Plain Paper
HP Premium Plus Photo Paper, Glossy Premium Photo
74 Use the copy features
until the appropriate paper type appears.
Page 77

(continued)
Paper type Control panel setting
HP Premium Plus Photo Paper, Matte Premium Photo
HP Premium Plus 10 x 15 cm (4 x 6 inch) Photo Paper Premium Photo
HP Premium or Premium Plus Inkjet Transparency Film Transparency
Other transparency film Transparency
Plain Hagaki Plain Paper
Glossy Hagaki Premium photo
L (Japan only) Premium Photo
Change copy speed or quality
The HP All-in-One provides three options that affect copy speed and quality:
• Best produces the highest quality for all paper and eliminates the banding (striping)
effect that sometimes occurs in solid areas. Best copies slower than the other quality
settings.
• Normal delivers high-quality output and is the recommended setting for most of your
copying. Normal copies faster than Best and is the default setting.
• Fast copies faster than the Normal setting. The text is comparable to the quality of
the Normal setting, but the graphics might be lower quality. The Fast setting uses
less ink and extends the life of your print cartridges.
To change the copy quality
1. Make sure you have paper loaded in the input tray.
2. Load your original print side down on the right front corner of the glass or print side
up in the document feeder tray.
If you use the document feeder tray, place the pages so that the top edge of the
document goes in first.
3. In the Copy area, press Quality until the appropriate quality setting is lit.
4. Press Start Copy Black or Start Copy Color.
Change default copy settings
When you change copy settings from the control panel, the settings apply only to the
current copy job. To apply copy settings to all future copy jobs, you can save the settings
as defaults.
To set default copy settings from the control panel
1. Make any needed changes to the Copy settings.
2. In the Copy area, press Menu repeatedly until Set New Defaults appears.
3. Press
until Yes appears.
Change copy speed or quality 75
Page 78

Chapter 8
NOTE: The settings you specify here are only saved on the HP All-in-One. They do
not adjust the settings in the software. You can save your most frequently used
settings by using the software that you installed with the HP All-in-One.
Make a 10 x 15 cm (4 x 6 inch) borderless copy of a photo
For the best quality when copying a photo, load photo paper in the input tray and change
your copy settings for the correct paper type and photo enhancement. You might also
want to use the photo print cartridge for superior print quality. With the tri-color and photo
print cartridges installed, you have a six-ink system.
To make a borderless copy of a photo from the control panel
1. Load 10 x 15 cm (4 x 6 inch) photo paper in the input tray.
2. Load your original photo print side down on the right front corner of the glass.
Position the photo on the glass so the long edge of the photo is along the front edge
of the glass, as indicated by the engraved guides along the edge of the glass.
3. Press Start Copy Black or Start Copy Color.
The HP All-in-One makes a 10 x 15 cm (4 x 6 inch) borderless copy of your original
photo.
NOTE: If you loaded tabbed paper in the photo tray, you can remove the tab
from the copy of your photo once the ink has completely dried.
TIP: If the output is not borderless set the paper type to Premium Photo, and
then try making the copy again.
Related topics
Load 10 x 15 cm (4 x 6 inch) photo paper
•
Set the copy paper type
•
Use a photo print cartridge
•
76 Use the copy features
Page 79

Resize an original to fit onto letter or A4 paper
If the image or text on your original fills the entire sheet with no margins, use Fit to
Page or Full Page 91% to reduce your original and prevent unwanted cropping of the
text or images at the edges of the sheet.
TIP: You can also use Fit to Page to enlarge a small photo to fit within the printable
area of a full-size page. In order to do this without changing the proportions of the
original or cropping the edges, the HP All-in-One might leave an uneven amount of
white space around the edges of the paper.
To resize a document from the control panel
1. Make sure you have paper loaded in the input tray.
2. Load your original print side down on the right front corner of the glass or print side
up in the document feeder tray.
If you use the document feeder tray, place the pages so that the top edge of the
document goes in first.
3. In the Copy area, press the Reduce/Enlarge button.
4. Do one of the following:
• If you loaded your original in the document feeder tray or on the glass, press
until Full Page 91% appears.
• If you loaded a full- or small-size original on the glass, press
appears.
5. Press Start Copy Black or Start Copy Color.
until Fit to Page
Resize an original using custom settings
You can use your own custom settings to reduce or enlarge a copy of a document.
To set a custom size from the control panel
1. Make sure you have paper loaded in the input tray.
2. Load your original print side down on the right front corner of the glass.
If you use the document feeder tray, place the pages so that the top edge of the
document goes in first.
Resize an original to fit onto letter or A4 paper 77
Page 80

Chapter 8
3. In the Copy area, press the Reduce/Enlarge button.
4. Press
5. Press OK.
6. Press
(The minimum and maximum percentage to resize a copy varies by model.)
7. Press Start Copy Black or Start Copy Color.
until Custom 100% appears.
or use the keypad to enter a percentage to reduce or enlarge the copy.
Copy a legal-size document onto letter paper
You can use the Legal > Ltr 72% setting to reduce a copy of a legal-size document to a
size that fits onto letter paper.
NOTE: The percentage in the example, Legal > Ltr 72%, might not match the
percentage that appears in the display.
To copy a legal-size document onto letter paper
1. Make sure you have paper loaded in the input tray.
2. Load your legal-size document print side up in the document feeder tray.
Place the page in the document feeder tray so that the top edge of the document goes
in first.
3. In the Copy area, press the Reduce / Enlarge button.
4. Press
5. Press Start Copy Black or Start Copy Color.
until Legal > Ltr 72% appears.
Adjust the lightness and darkness of your copy
You can use the Lighter / Darker option to adjust the contrast of the copies you make.
78 Use the copy features
Page 81

To adjust the copy contrast from the control panel
1. Make sure you have paper loaded in the input tray.
2. Load your original print side down on the right front corner of the glass or print side
up in the document feeder tray.
If you use the document feeder tray, place the pages so that the top edge of the
document goes in first.
3. In the Copy area, press Menu repeatedly until Lighter / Darker appears.
4. Do one of the following:
• Press
• Press
5. Press Start Copy Black or Start Copy Color.
to darken the copy.
to lighten the copy.
Enhance blurred areas of your copy
You can use the Enhancements feature to adjust the quality of text documents by
sharpening edges of black text or adjust photographs by enhancing light colors that might
otherwise appear white.
The Mixed enhancement is the default option. Use the Mixed enhancement to sharpen
edges of most originals.
To copy a blurred document from the control panel
1. Make sure you have paper loaded in the input tray.
2. Position the photo on the glass so the long edge of the photo is along the front edge
of the glass.
Load your original print side down on the right front corner of the glass or print side
up in the document feeder tray.
3. In the Copy area, press Menu repeatedly until Enhancements appears.
4. Press
5. Press Start Copy Black or Start Copy Color.
If any of the following occur, turn off Text enhancement by selecting Photo or None:
• Stray dots of color surround some text on your copies
• Large, black typefaces look splotchy (not smooth)
• Thin, colored objects or lines contain black sections
• Horizontal grainy or white bands appear in light- to medium-gray areas
until the Text setting appears.
Enhance light areas of your copy
You can use Photo enhancements to enhance light colors that might otherwise appear
white. You can also use Photo enhancements to eliminate or reduce any of the following
that might occur when copying with Text enhancements:
• Stray dots of color surround some text on your copies
• Large, black typefaces look splotchy (not smooth)
• Thin, colored objects or lines contain black sections
• Horizontal grainy or white bands appear in light- to medium-gray areas
Enhance blurred areas of your copy 79
Page 82

Chapter 8
To copy an overexposed photo
1. Make sure you have paper loaded in the input tray.
2. Load your original photo print side down on the right front corner of the glass.
Position the photo on the glass so the long edge of the photo is along the front edge
of the glass.
3. In the Copy area, press Menu repeatedly until Enhancements appears.
4. Press
5. Press Start Copy Color.
Stop copying
To stop copying
▲ Press Cancel on the control panel.
until the Photo enhancement setting appears.
80 Use the copy features
Page 83

9 Use the scan features
Scanning is the process of converting text and pictures into an electronic format for your
computer. You can scan almost anything (photos, magazine articles and text documents),
as long as you are careful not to scratch the glass on the HP All-in-One.
You can use the scanning features of the HP All-in-One to do the following:
• Scan text from an article into your word processor and quote it in a report.
• Print business cards and brochures by scanning a logo and using it in your publishing
software.
• Send photos to friends and relatives by scanning your favorite prints and including
them in e-mail messages.
• Create a photographic inventory of your house or office.
• Archive treasured photos in an electronic scrapbook.
This section contains the following topics:
•
Scan an image
Edit a scanned preview image
•
Edit a scanned image
•
Scan an image
You can start a scan from your computer or from the HP All-in-One. This section explains
how to scan from the control panel of the HP All-in-One only.
To use the scan features, the HP All-in-One and computer must be connected and turned
on. The HP Solution Center Software (Windows) or HP Photosmart Studio (Mac) must
also be installed and running on your computer prior to scanning.
• On a Windows computer, look for the HP Digital Imaging Monitor icon in the
Windows system tray (at the lower right side of the screen, near the time) to verify
the software is running.
NOTE: Closing the HP Digital Imaging Monitor icon in the Windows system
tray can cause the HP All-in-One to lose some of its scan functionality and result
in the No Connection error message. If this happens, you can restore full
functionality by restarting your computer or by starting the HP Solution Center
Software.
• On a Mac, the software is always running.
TIP: You can use the HP Solution Center Software (Windows) or HP Photosmart
Studio (Mac) Software (Mac) to scan images, including panorama images. Using this
software, you can also edit, print, and even share your scanned images.
Use the scan features 81
Page 84

Chapter 9
To scan to a computer
1. Load your original print side down on the right front corner of the glass or print side
up in the document feeder tray.
2. Press Scan To. A list of destinations, including software applications, appears on the
display.
3. Press OK to select the default application to receive the scan, or press
different application, and then press OK.
A preview image of the scan appears on your computer, where you can edit it.
4. Make any edits to the preview image, and then click Accept when you are finished.
The HP All-in-One sends the scan to the selected application.
Edit a scanned preview image
You can use the tools in the HP Scanning software to modify a preview image. Any
changes that you make, such as brightness, image type, resolution, and more apply only
to this scan session.
You can make additional changes in the HP Photosmart Premier software after the image
is scanned.
Edit a scanned image
You can edit a scanned image using the software you installed with the HP All-in-One.
You can also edit a scanned document by using your Optical Character Recognition
(OCR) software.
This section contains the following topics:
•
Edit a scanned photo or graphic
Edit a scanned document
•
to select a
Edit a scanned photo or graphic
You can edit a scanned photo or graphic using the software you installed with the HP Allin-One. Using this software, you can rotate or crop the image, as well as adjust the
brightness, contrast, and color saturation.
Edit a scanned document
Scanning text (also known as optical character recognition or OCR) enables you to bring
the content of magazine articles, books, and other printed matter into your favorite word
processor and many other programs as fully editable text. Learning to do OCR right is
important if you want to obtain the best results. Do not expect scanned text documents
to be letter-perfect the first time you use your OCR software. Using OCR software is an
art that takes time and practice to master. For more information about scanning
documents, especially documents containing both text and graphics, see the
documentation that came with your OCR software.
82 Use the scan features
Page 85

10 Use the fax features
You can use the HP All-in-One to send and receive faxes, including color faxes. You can
set up speed dial entries to send faxes quickly and easily to frequently used numbers.
From the control panel, you can also set a number of fax options, such as resolution and
the contrast between lightness/darkness on the faxes you send.
NOTE: Before you begin faxing, make sure you have set up the HP All-in-One
properly for faxing. You might have already done this as part of the initial setup, by
using either the control panel or the software that came with the HP All-in-One.
You can verify the fax is set up correctly by running the fax setup test from the control
panel. You can access this test from the Setup menu.
This section contains the following topics:
•
Send a fax
Receive a fax
•
Block junk fax numbers
•
Fax over the Internet using IP phone
•
Print reports
•
Stop faxing
•
Send a fax
You can send a fax in a variety of ways. Using the control panel, you can send a blackand-white or color fax from the HP All-in-One. You can also send a fax manually by dialing
from an attached phone. This allows you to speak with the recipient before sending the
fax.
This section contains the following topics:
•
Send a basic fax
Send a fax using speed dials
•
Send a fax manually from a phone
•
Send a fax using monitor dialing
•
Send a fax from memory
•
Schedule a fax to send later
•
Send a fax to multiple recipients
•
Send a color original or photo fax
•
Change the fax resolution and Lighter / Darker settings
•
Send a fax in Error Correction Mode
•
Send a basic fax
You can easily send a single- or multiple-page black-and-white fax by using the control
panel, as described here.
Use the fax features 83
Page 86

Chapter 10
NOTE: If you need printed confirmation that your faxes were successfully sent,
enable fax confirmation before sending any faxes.
TIP: You can also send a fax manually by dialing from a phone or by using the
monitor dialing feature from the control panel. These features allow you to control the
pace of your dialing. They are also useful when you want to use a calling card to
charge the call and you need to respond to tone prompts while dialing.
To send a basic fax from the control panel
1. Load your originals print side up into the document feeder tray. If you are sending a
single-page fax, such as a photograph, you can also load your original print side down
on the glass.
NOTE: If you are sending a multiple-page fax, you must load the originals in the
document feeder tray. You cannot fax a multiple-page document from the glass.
2. Enter the fax number by using the keypad, press Speed Dial or a one-touch speed
dial button to select a speed dial, or press Redial/Pause to redial the last number
dialed.
TIP: To add a pause in the fax number you are entering, press Redial/Pause,
or press the Symbols (*) button repeatedly, until a dash (-) appears on the display.
3. Press Start Fax Black.
• If the device detects an original loaded in the automatic document feeder,
the HP All-in-One sends the document to the number you entered.
• If the device does not detect an original loaded in the automatic document
feeder, the Fax from glass? prompt appears. Make sure your original is loaded
print side down on the glass, and then press 1 to select Yes.
TIP: If the recipient reports issues with the quality of the fax you sent, you can
try changing the resolution or contrast of your fax.
Related topics
Send a fax manually from a phone
•
Send a fax using monitor dialing
•
Change the fax resolution and Lighter / Darker settings
•
Print fax confirmation reports
•
Send a color original or photo fax
•
Send a fax using speed dials
You can quickly send a black-and-white or color fax from the HP All-in-One or your
computer by using speed dials. From the control panel, you can press Speed Dial or a
one-touch speed dial button to access your speed dial entries. The one-touch speed dial
buttons correspond to the first five speed dial entries that you set up.
Speed dial entries will not appear until you have set them up.
84 Use the fax features
Page 87

To send a fax using speed dials from the control panel
1. Load your originals print side up into the document feeder tray. If you are sending a
single-page fax, such as a photograph, you can also load your original print side down
on the glass.
NOTE: If you are sending a multiple-page fax, you must load the originals in the
document feeder tray. You cannot fax a multiple-page document from the glass.
2. Do one of the following:
• Press a one-touch speed dial button to access one of the first five speed dial
entries.
• Press Speed Dial repeatedly, until the appropriate speed dial entry appears.
TIP: You can also scroll through the speed dial entries by pressing or ,
or you can select a speed dial entry by entering its speed dial code using the
keypad on the control panel.
3. Press Start Fax Black or Start Fax Color.
• If the device detects an original loaded in the automatic document feeder,
the HP All-in-One sends the document to the number you entered.
• If the device does not detect an original loaded in the automatic document
feeder, the Fax from glass? prompt appears. Make sure your original is loaded
on the glass, and then press 1 to select Yes.
Related topics
Set up speed dialing
Send a fax manually from a phone
You can initiate a fax call from a telephone on the same phone line as the HP All-in-One
if you are more comfortable using the keypad on your phone, rather than using the keypad
on the control panel of the HP All-in-One. This method of sending a fax is called manually
sending a fax. When you send a fax manually, you can hear the dial tones, telephone
prompts, or other sounds through the handset on your telephone. This makes it easy for
you to use a calling card to send your fax.
Depending on how the recipient has their fax machine set up, the recipient might answer
the phone, or the fax machine might take the call. If a person answers the phone, you
can speak with the recipient before sending the fax. If a fax machine answers the call,
you can send the fax directly to the fax machine when you hear the fax tones from the
receiving fax machine.
Send a fax 85
Page 88

Chapter 10
To send a fax manually from a phone
1. Load your originals print side up into the document feeder tray.
NOTE: This feature is not supported if you load your originals on the glass. You
must load your originals in the document feeder tray.
2. Dial the number by using the keypad on the phone that is connected to the HP All-in-
One.
NOTE: Do not use the keypad on the control panel of the HP All-in-One when
manually sending a fax. You must use the keypad on your phone to dial the
recipient's number.
3. If the recipient answers the telephone, you can engage in a conversation before
sending your fax.
NOTE: If a fax machine answers the call, you will hear fax tones from the
receiving fax machine. Proceed to the next step to transmit the fax.
4. Once you are ready to send the fax, press Start Fax Black or Start Fax Color.
NOTE: If prompted, press 1 to select Send Fax, and then press Start Fax
Black or Start Fax Color again.
If you were speaking with the recipient before sending the fax, inform the recipient
that they should press Start on their fax machine after they hear fax tones.
The telephone line is silent while the fax is transmitting. At this point, you can hang
up the telephone. If you want to continue speaking with the recipient, remain on the
line until the fax transmission is complete.
Send a fax using monitor dialing
Monitor dialing allows you to dial a number from the control panel as you would dial a
regular telephone. When you send a fax using monitor dialing, you can hear the dial tones,
telephone prompts, or other sounds through the speakers on the HP All-in-One. This
enables you to respond to prompts while dialing, as well as control the pace of your
dialing.
TIP: If you do not enter your calling card PIN fast enough, the HP All-in-One might
start sending fax tones too soon and cause your PIN not to be recognized by the
calling card service. If this is the case, you can create a speed dial entry to store the
PIN for your calling card.
NOTE: Make sure the volume is turned on, or you will not hear a dial tone.
86 Use the fax features
Page 89

To send a fax using monitor dialing from the control panel
1. Load your originals print side up into the document feeder tray. If you are sending a
single-page fax, such as a photograph, you can also load your original print side down
on the glass.
NOTE: If you are sending a multiple-page fax, you must load the originals in the
document feeder tray. You cannot fax a multiple-page document from the glass.
2. Press Start Fax Black or Start Fax Color.
• If the device detects an original loaded in the automatic document feeder,
you will hear a dial tone.
• If the device does not detect an original loaded in the automatic document
feeder, the Fax from glass? prompt appears. Make sure your original is loaded
on the glass, and then press 1 to select Yes.
3. Once you hear the dial tone, enter the number by using the keypad on the control
panel.
4. Follow any prompts that might occur.
TIP: If you are using a calling card to send a fax and you have your calling card
PIN stored as a speed dial, when prompted to enter your PIN, press Speed
Dial or a one-touch speed dial button to select the speed dial entry where you
have your PIN stored.
Your fax is sent when the receiving fax machine answers.
Related topics
Adjust the volume
•
Set up speed dialing
•
Send a fax from memory
You can scan a black-and-white fax into memory and then send the fax from memory.
This feature is useful if the fax number you are trying to reach is busy or temporarily
unavailable. The HP All-in-One scans the originals into memory and sends them once it
is able to connect to the receiving fax machine. After the HP All-in-One scans the pages
into memory, you can immediately remove the originals from the document feeder tray.
To send a fax from memory
1. Load your originals print side up into the document feeder tray.
NOTE: This feature is not supported if you load your originals on the glass. You
must load your originals in the document feeder tray.
2. In the Fax area, press Menu.
The Enter Number prompt appears.
3. Enter the fax number by using the keypad, press Speed Dial or a one-touch speed
dial button to select a speed dial, or press Redial/Pause to redial the last number
dialed.
4. In the Fax area, press Menu repeatedly until How to Fax appears.
Send a fax 87
Page 90

Chapter 10
5. Press until Scan & Fax appears, and then press OK.
6. Press Start Fax Black.
NOTE: If you press Start Fax Color, the fax will be sent in black and white and
a message appears on the display.
The HP All-in-One scans the originals into memory and sends the fax when the
receiving fax machine is available.
Schedule a fax to send later
You can schedule a black-and-white fax to be sent within the next 24 hours. This enables
you to send a black-and-white fax late in the evening, when phone lines are not as busy
or phone rates are lower, for example. When scheduling a fax, the originals must be
loaded in the document feeder tray and not on the glass. The HP All-in-One automatically
sends your fax at the specified time.
You can only schedule one fax to be sent at a time. You can continue to send faxes
normally, however, while a fax is scheduled.
NOTE: You cannot schedule a color fax due to memory limitations.
To schedule a fax from the control panel
1. Load your originals print side up into the document feeder tray.
NOTE: Load your originals in the document feeder tray, and not on the glass.
This feature is not supported if you load your originals on the glass.
2. In the Fax area, press Menu repeatedly until How to Fax appears.
3. Press
until Send Fax Later appears, and then press OK.
4. Enter the send time by using the numeric keypad, and then press OK. If prompted,
press 1 for AM, or 2 for PM.
5. Enter the fax number by using the keypad, press Speed Dial or a one-touch speed
dial button to select a speed dial, or press Redial/Pause to redial the last number
dialed.
6. Press Start Fax Black.
The HP All-in-One scans all pages and the scheduled time appears on the display.
The HP All-in-One sends the fax at the scheduled time.
To cancel a scheduled fax
1. In the Fax area, press Menu repeatedly until How to Fax appears.
2. Press
until Send Fax Later appears, and then press OK.
If there is a fax already scheduled, the Cancel prompt appears on the display.
3. Press 1 to select Yes.
NOTE: You can also cancel the scheduled fax by pressing Cancel on the control
panel when the scheduled time is visible on the display.
88 Use the fax features
Page 91

Send a fax to multiple recipients
You can send a fax to multiple recipients at once by grouping individual speed dial entries
into group speed dial entries.
To send a fax to multiple recipients from the control panel
1. Load your originals print side up into the document feeder tray. If you are sending a
single-page fax, such as a photograph, you can also load your original print side down
on the glass.
NOTE: If you are sending a multiple-page fax, you must load the originals in the
document feeder tray. You cannot fax a multiple-page document from the glass.
2. Press Speed Dial repeatedly, until the appropriate group speed dial entry appears.
TIP: You can also scroll through the speed dial entries by pressing or , or
you can select a speed dial entry by entering its speed dial code using the keypad
on the control panel.
3. Press Start Fax Black.
• If the device detects an original loaded in the automatic document feeder,
the HP All-in-One sends the document to each number in the group speed dial
entry.
• If the device does not detect an original loaded in the automatic document
feeder, the Fax from glass? prompt appears. Make sure your original is loaded
on the glass, and then press 1 to select Yes.
NOTE: You can only use group speed dial entries to send faxes in black and
white, because of memory limitations. The HP All-in-One scans the fax into
memory then dials the first number. When a connection is made, the HP All-inOne sends the fax and dials the next number. If a number is busy or not answering,
the HP All-in-One follows the settings for Busy Redial and No Answer Redial.
If a connection cannot be made, the next number is dialed and an error report is
generated.
Related topics
Set up group speed dial entries
•
Print fax confirmation reports
•
Send a color original or photo fax
You can fax a color original or photo from the HP All-in-One. If the HP All-in-One
determines that the recipient's fax machine only supports black-and-white faxes, the
HP All-in-One sends the fax in black and white.
HP recommends that you use only color originals for color faxing.
Send a fax 89
Page 92

Chapter 10
To send a color original or photo fax from the control panel
1. Load your originals print side up into the document feeder tray. If you are sending a
single-page fax, such as a photograph, you can also load your original print side down
on the glass.
NOTE: If you are sending a multiple-page fax, you must load the originals in the
document feeder tray. You cannot fax a multiple-page document from the glass.
TIP: To center a 10 x 15 cm (4 x 6 inch) photo, place the photo on the center of
a blank letter- or A4-size sheet of paper, and then place the original on the glass.
2. In the Fax area, press Menu.
The Enter Number prompt appears.
3. Enter the fax number by using the keypad, press Speed Dial or a one-touch speed
dial button to select a speed dial, or press Redial/Pause to redial the last number
dialed.
4. Press Start Fax Color.
• If the device detects an original loaded in the automatic document feeder,
the HP All-in-One sends the document to the number you entered.
• If the device does not detect an original loaded in the automatic document
feeder, the Fax from glass? prompt appears. Make sure your original is loaded
on the glass, and then press 1 to select Yes.
NOTE: If the recipient's fax machine only supports black-and-white faxes, the
HP All-in-One automatically sends the fax in black and white. A message appears
after the fax has been sent indicating that the fax was sent in black and white.
Press OK to clear the message.
Change the fax resolution and Lighter / Darker settings
You can change the Resolution and Lighter / Darker settings for documents that you
are faxing.
NOTE: These settings do not affect copy settings. Copy resolution and lightness/
darkness are set independently from fax resolution and lightness/darkness. Also, the
settings that you change from the control panel do not affect faxes you send from your
computer.
This section contains the following topics:
•
Change the fax resolution
Change the Lighter / Darker setting
•
Set new default settings
•
Change the fax resolution
The Resolution setting affects the transmission speed and quality of faxed black-andwhite documents. If the receiving fax machine does not support the resolution you have
chosen, the HP All-in-One sends faxes at the highest resolution supported by the
receiving fax machine.
90 Use the fax features
Page 93

NOTE: You can only change the resolution for faxes that you are sending in black
and white. The HP All-in-One sends all color faxes using Fine resolution.
The following resolution settings are available for sending faxes: Fine, Very Fine,
Photo, and Standard.
• Fine: provides high-quality text suitable for faxing most documents. This is the default
setting. When sending faxes in color, the HP All-in-One always uses the Fine setting.
• Very Fine: provides the best quality fax when you are faxing documents with very
fine detail. If you choose Very Fine, be aware that the faxing process takes longer to
complete and you can only send black-and-white faxes using this resolution. If you
send a color fax, it will be sent using Fine resolution instead.
• Photo: provides the best quality fax when sending photographs in black and white.
If you choose Photo, be aware that the faxing process takes longer to complete.
When faxing photographs in black and white, HP recommends that you choose
Photo.
• Standard: provides the fastest possible fax transmission with the lowest quality.
When you exit the Fax menu, this option returns to the default setting unless you set your
changes as the default.
To change the resolution from the control panel
1. Load your originals print side up into the document feeder tray. If you are sending a
single-page fax, such as a photograph, you can also load your original print side down
on the glass.
NOTE: If you are sending a multiple-page fax, you must load the originals in the
document feeder tray. You cannot fax a multiple-page document from the glass.
2. In the Fax area, press Menu.
The Enter Number prompt appears.
3. Enter the fax number by using the keypad, press Speed Dial or a one-touch speed
dial button to select a speed dial, or press Redial/Pause to redial the last number
dialed.
4. In the Fax area, press Menu repeatedly until Resolution appears.
5. Press
to select a resolution setting, and then press OK.
6. Press Start Fax Black.
• If the device detects an original loaded in the automatic document feeder,
the HP All-in-One sends the document to the number you entered.
• If the device does not detect an original loaded in the automatic document
feeder, the Fax from glass? prompt appears. Make sure your original is loaded
on the glass, and then press 1 to select Yes.
Related topics
Set new default settings
Change the Lighter / Darker setting
You can change the contrast of a fax to be darker or lighter than the original. This feature
is useful if you are faxing a document that is faded, washed out, or handwritten. You can
darken the original by adjusting the contrast.
Send a fax 91
Page 94

Chapter 10
NOTE: The Lighter / Darker setting applies to black and white faxes only, not color
faxes.
When you exit the Fax menu, this option returns to the default setting unless you set your
changes as the default.
To change the Lighter / Darker setting from the control panel
1. Load your originals print side up into the document feeder tray. If you are sending a
single-page fax, such as a photograph, you can also load your original print side down
on the glass.
NOTE: If you are sending a multiple-page fax, you must load the originals in the
document feeder tray. You cannot fax a multiple-page document from the glass.
2. In the Fax area, press Menu.
The Enter Number prompt appears.
3. Enter the fax number by using the keypad, press Speed Dial or a one-touch speed
dial button to select a speed dial, or press Redial/Pause to redial the last number
dialed.
4. In the Fax area, press Menu repeatedly until Lighter / Darker appears.
5. Press
to lighten the fax or press to darken it, and then press OK.
The indicator moves to the left or right as you press an arrow button.
6. Press Start Fax Black.
• If the device detects an original loaded in the automatic document feeder,
the HP All-in-One sends the document to the number you entered.
• If the device does not detect an original loaded in the automatic document
feeder, the Fax from glass? prompt appears. Make sure your original is loaded
on the glass, and then press 1 to select Yes.
Related topics
Set new default settings
Set new default settings
You can change the default value for the Resolution and Lighter / Darker settings
through the control panel.
To set new default settings from the control panel
1. Make changes to the Resolution and Lighter / Darker settings.
2. In the Fax area, press Menu repeatedly until Set New Defaults appears.
3. Press
until Yes appears, and then press OK.
Send a fax in Error Correction Mode
Error Correction Mode (ECM) prevents loss of data due to poor phone lines by detecting
errors that occur during transmission and automatically requesting retransmission of the
erroneous portion. Phone charges are unaffected, or might even be reduced, on good
phone lines. On poor phone lines, ECM increases sending time and phone charges, but
sends the data much more reliably. The default setting is On. Turn ECM off only if it
92 Use the fax features
Page 95

increases phone charges substantially, and you can accept poorer quality in exchange
for reduced charges.
Before turning the ECM setting off, consider the following. If you turn ECM off
• The quality and transmission speed of faxes you send and receive are affected.
• The Fax Speed is automatically set to Medium.
• You will no longer be able to send or receive faxes in color.
To change the ECM setting from the control panel
1. Press Setup.
2. Press 5, and then press 6.
This selects Advanced Fax Setup and then selects Error Correction Mode.
3. Press
4. Press OK.
Receive a fax
The HP All-in-One can receive faxes automatically or manually. If you turn off the Auto
Answer option, you will need to receive faxes manually. If you turn on the Auto
Answer option (the default setting), the HP All-in-One automatically answers incoming
calls and receives faxes after the number of rings specified by the Rings to Answer
setting. (The default Rings to Answer setting is five rings.)
You can receive faxes manually from a phone that is:
• Directly connected to the HP All-in-One (on the 2-EXT port)
• On the same telephone line, but not directly connected to the HP All-in-One
If you receive a legal-size fax and the HP All-in-One is not currently set to use legal-size
paper, the device reduces the fax so that it fits on the paper that is loaded in the HP Allin-One. If you have disabled the Automatic Reduction feature, the HP All-in-One might
print the fax on more than one page.
This section contains the following topics:
•
Receive a fax manually
Set up backup fax reception
•
Reprint received faxes from memory
•
Poll to receive a fax
•
Forward faxes to another number
•
Set the paper size for received faxes
•
Set automatic reduction for incoming faxes
•
to select On or Off.
NOTE: If you installed a photo print cartridge for printing photos, you might want to
replace it with the black print cartridge when receiving faxes.
Receive a fax manually
When you are on the phone, the person you are speaking with can send you a fax while
you are still connected. This is referred to as manual faxing. Use the instructions in this
section to receive a manual fax.
Receive a fax 93
Page 96

Chapter 10
You can receive faxes manually from a phone that is:
• Directly connected to the HP All-in-One (on the 2-EXT port)
• On the same phone line, but not directly connected to the HP All-in-One
To receive a fax manually
1. Make sure the HP All-in-One is turned on and you have paper loaded in the input tray.
2. Remove any originals from the document feeder tray.
3. Set the Rings to Answer setting to a high number to allow you to answer the incoming
call before the HP All-in-One answers. Or, turn off the Auto Answer setting so that
the HP All-in-One does not automatically answer incoming calls.
4. If you are currently on the phone with the sender, instruct the sender to press Start
on their fax machine.
5. When you hear fax tones from a sending fax machine, do the following:
a.Press Start Fax Black or Start Fax Color on the control panel of the HP All-in-
One.
b. When prompted, press 2 to select Fax Receive.
c. After the HP All-in-One begins to receive the fax, you can hang up the phone or
remain on the line. The phone line is silent during fax transmission.
Related topics
•
Set the number of rings before answering
Set the answer mode
•
Set up backup fax reception
Depending on your preference and security requirements, you can set up the HP All-inOne to store all the faxes it receives, only the faxes it receives while the device is in an
error condition, or none of the faxes it receives.
The following Backup Fax Reception modes are available:
On The default setting. When Backup Fax Reception is On, the HP All-in-One
On Error Only Causes the HP All-in-One to store faxes in memory only if there is an error
Off Means that faxes are never stored in memory. (You might want to turn
94 Use the fax features
stores all faxes it receives in memory. This enables you to reprint up to eight
of the most recently printed faxes if they are still saved in memory.
NOTE: When the memory gets low, the HP All-in-One overwrites the
oldest, printed faxes as it receives new faxes. If the memory becomes full
of unprinted faxes, the HP All-in-One will stop answering incoming fax calls.
NOTE: If you receive a fax that is too large, such as a very detailed color
photo, it might not be stored in memory due to memory limitations.
condition that prevents the HP All-in-One from printing the faxes (for
example, if the HP All-in-One runs out of paper). The HP All-in-One will
continue to store incoming faxes as long as there is memory available. (If
the memory becomes full, the HP All-in-One will stop answering incoming
fax calls.) When the error condition is resolved, the faxes stored in memory
print automatically and are then deleted from memory.
off Backup Fax Reception for security purposes, for example.) If an error
Page 97

(continued)
condition occurs that prevents the HP All-in-One from printing (for example,
the HP All-in-One runs out of paper), the HP All-in-One will stop answering
incoming fax calls.
NOTE: If Backup Fax Reception is enabled and you turn off the HP All-in-One, all
faxes stored in memory are deleted, including any unprinted faxes that you might have
received while the HP All-in-One was in an error condition. You will need to contact
the senders to ask them to resend any unprinted faxes. For a list of the faxes you
have received, print the Fax Log. The Fax Log is not deleted when the HP All-in-One
is turned off.
To set backup fax reception from the control panel
1. Press Setup.
2. Press 5, and then press 5 again.
This selects Advanced Fax Setup and then selects Backup Fax Reception.
3. Press
to select On, On Error Only, or Off.
4. Press OK.
Related topics
Reprint received faxes from memory
Reprint received faxes from memory
If you set the Backup Fax Reception mode to On, the HP All-in-One stores faxes it
receives in memory, whether the device has an error condition or not.
NOTE: After the memory becomes full, the HP All-in-One overwrites the oldest,
printed faxes as it receives new faxes. If all the stored faxes are unprinted, the HP Allin-One will not receive any more fax calls until you print or delete the faxes from
memory. You might also want to delete the faxes in memory for security or privacy
purposes. For more information, see
Print the fax log.
You can select to print only one fax, or to print all faxes in the stored memory. For example,
you might need to reprint your faxes if you lost the copy of your last printout.
To reprint faxes in memory from the control panel
1. Make sure you have paper loaded in the input tray.
2. Press Setup.
3. Press 6, and then press 5.
This selects Tools and then selects Reprint Faxes in Memory.
4. Highlight Print One fax or Print All faxes, and then press OK.
• If you selected Print One fax, then highlight the fax you want to print and
press OK.
• If you selected Print All faxes, the faxes are printed in the reverse order they
were received with the most recently received fax printed first, and so on.
5. If you want to stop reprinting the faxes in memory, press Cancel.
Receive a fax 95
Page 98

Chapter 10
To delete all the faxes in memory from the control panel
▲ Turn off the HP All-in-One by pressing the Power button.
All faxes stored in memory will be deleted from memory when you turn off the power
to the HP All-in-One.
NOTE: You can also delete any faxes stored in memory by selecting Clear Fax
Log from the Tools menu. To do so, press Setup, press 6, and then press 7.
Related topics
Set up backup fax reception
Poll to receive a fax
Polling allows the HP All-in-One to ask another fax machine to send a fax that it has in
its queue. When you use the Poll to Receive feature, the HP All-in-One calls the
designated fax machine and requests the fax from it. The designated fax machine must
be set for polling and have a fax ready to send.
NOTE: The HP All-in-One does not support polling pass codes. Polling pass codes
are a security feature that require the receiving fax machine to provide a pass code
to the device it is polling in order to receive the fax. Make sure the device you are
polling does not have a pass code set up (or has not changed the default pass code)
or the HP All-in-One will not be able to receive the fax.
To set up poll to receive a fax from the control panel
1. In the Fax area, press Menu repeatedly until How to Fax appears.
2. Press
3. Enter the fax number of the other fax machine.
4. Press Start Fax Black or Start Fax Color.
until Poll to Receive appears, and then press OK.
NOTE: If you press Start Fax Color but the sender sent the fax in black and
white, the HP All-in-One prints the fax in black and white.
Forward faxes to another number
You can set up the HP All-in-One to forward your faxes to another fax number. If you
receive a color fax, the HP All-in-One forwards the fax in black and white.
HP recommends that you verify the number you are forwarding to is a working fax line.
Send a test fax to make sure the fax machine is able to receive your forwarded faxes.
To forward faxes from the control panel
1. Press Setup.
2. Press 5, and then press 8.
This selects Advanced Fax Setup and then selects Fax Forwarding Black Only.
96 Use the fax features
Page 99

3. Press until On-Forward or On-Print & Forward appears, and then press OK.
• Choose On-Forward if you want to forward the fax to another number without
printing a backup copy on the HP All-in-One.
NOTE: If the HP All-in-One is not able to forward the fax to the designated
fax machine (if it is not turned on, for example), the HP All-in-One will print the
fax. If you set up the HP All-in-One to print error reports for received faxes, it
will also print an error report.
• Choose On-Print & Forward to print a backup copy of your received fax on the
HP All-in-One while forwarding the fax to another number.
4. At the prompt, enter the number of the fax machine that will receive the forwarded
faxes.
5. At the prompt, enter a start time and date and a stop time and date.
6. Press OK.
Fax Forwarding appears on the display.
If the HP All-in-One loses power when Fax Forwarding is set up, the HP All-in-One
saves the Fax Forwarding setting and phone number. When power is restored to
the device, the Fax Forwarding setting is still On.
NOTE: You can cancel fax forwarding by pressing Cancel on the control panel
when the Fax Forwarding message is visible on the display, or you can select
Off from the Fax Forwarding Black Only menu.
Set the paper size for received faxes
You can select the paper size for received faxes. The paper size you select should match
what is loaded in your input tray. Faxes can be printed on letter, A4, or legal paper only.
NOTE: If an incorrect paper size is loaded in the input tray when you receive a fax,
the fax does not print and an error message appears on the display. Load letter, A4,
or legal paper, and then press OK to print the fax.
To set the paper size for received faxes from the control panel
1. Press Setup.
2. Press 4, and then press 4.
This selects Basic Fax Setup and then selects Fax Paper Size.
3. Press
to select an option, and then press OK.
Set automatic reduction for incoming faxes
The Automatic Reduction setting determines what the HP All-in-One does if it receives
a fax that is too large for the default paper size. This setting is turned on by default, so
the image of the incoming fax is reduced to fit on one page, if possible. If this feature is
turned off, information that does not fit on the first page is printed on a second page.
Automatic Reduction is useful when you receive a legal-size fax and letter-size paper
is loaded in the input tray.
Receive a fax 97
Page 100

Chapter 10
To set automatic reduction from the control panel
1. Press Setup.
2. Press 5, and then press 4.
This selects Advanced Fax Setup and then selects Automatic Reduction.
3. Press
4. Press OK.
to select Off or On.
Block junk fax numbers
If you subscribe to a caller ID service through your phone provider, you can block specific
fax numbers, so the HP All-in-One does not print faxes received from those numbers in
the future. When an incoming fax call is received, the HP All-in-One compares the number
to the list of junk fax numbers you set up to determine if the call should be blocked. If the
number matches a number in the blocked fax numbers list, the fax is not printed. (The
maximum number of fax numbers you can block varies by model.)
This section contains the following topics:
•
Set the junk fax mode
Add numbers to the junk fax list
•
Remove numbers from the junk fax list
•
NOTE: This feature is not supported in all countries/regions. If it is not supported in
your country/region, Junk Fax Blocker Set Up does not appear in the Basic Fax
Setup menu.
Set the junk fax mode
By default, Block Junk Fax mode is turned On. If you do not subscribe to a caller ID
service through your phone provider, or do not want to use this feature, you can turn off
this setting.
To set the junk fax mode
1. Press Setup.
2. Press 4, and then press 7.
This selects Basic Fax Setup and then selects Junk Fax Blocker Set Up.
3. Press 4 to select Block Junk Fax.
4. Press
to select On or Off, and then press OK.
Add numbers to the junk fax list
There are two ways to add a number to your junk list. You can select numbers from your
caller ID history, or you can enter new numbers. The numbers in your junk list will be
blocked if Block Junk Fax mode is set to On.
To select a number from the caller ID list
1. Press Setup.
2. Press 4 and then press 7.
This selects Basic Fax Setup and then selects Junk Fax Blocker Set Up.
98 Use the fax features
 Loading...