

Page 1

HP 501 802.11ac Wireless Client Bridge Installation Guide
Abstract
This document describes the procedure to install and initially configure the HP 501 802.11ac Wireless Client Bridge (HP 501).
It is intended for professional installers who are trained in RF installation and knowledgeable in local regulations including
building and wiring codes, safety, channel, power, indoor/outdoor restrictions, and license requirements for the country of
use.
HP Part Number: 5998-4134
Published: December 2013
Edition: 1
Page 2

© Copyright 2013 Hewlett-Packard Development Company, L.P.
The information contained herein is subject to change without notice. The only warranties for HP products and services are set forth in the express
warranty statements accompanying such products and services. Nothing herein should be construed as constituting an additional warranty. HP shall
not be liable for technical or editorial errors or omissions contained herein.
Acknowledgments
Microsoft® and Windows® are U.S. registered trademarks of Microsoft Corporation.
Warranty
WARRANTY STATEMENT: To obtain a copy of the warranty for this product, see the warranty information website:
http://www.hp.com/go/storagewarranty
Page 3

Contents
1 Getting started...........................................................................................4
Overview................................................................................................................................4
Ports.......................................................................................................................................4
Antennas.................................................................................................................................5
2 Installing the HP 501...................................................................................6
Remove product from packaging.................................................................................................6
Wall or ceiling installation.........................................................................................................7
Desktop installation...................................................................................................................7
Plenum installation....................................................................................................................8
3 Initial configuration.....................................................................................9
Configure your computer...........................................................................................................9
Connect the cables and power on the HP 501..............................................................................9
Connect to the management tool..............................................................................................10
Assign an IP address to the HP 501..........................................................................................10
Configure the work group bridge..............................................................................................11
Test the wireless connection......................................................................................................11
............................................................................................................................................12
4 Support and other resources......................................................................13
Contacting HP........................................................................................................................13
Related information.................................................................................................................13
Websites..........................................................................................................................13
Typographic conventions.........................................................................................................13
5 Documentation feedback...........................................................................15
A Regulatory information..............................................................................16
Plenum installation..................................................................................................................16
Belarus Kazakhstan Russia marking...........................................................................................16
Turkey RoHS material content declaration...................................................................................17
Ukraine RoHS material content declaration................................................................................17
Warranty information..............................................................................................................17
Contents 3
Page 4
1 Getting started
The HP 501 (J9835A) is a dual band 802.11a/b/g/n/ac Wireless Client Bridge. It securely
connects legacy Ethernet or serial communications devices to a WLAN. The HP 501 is managed
through its web-based management tool using Microsoft Internet Explorer 8 or later, or Mozilla
Firefox 17 or later.
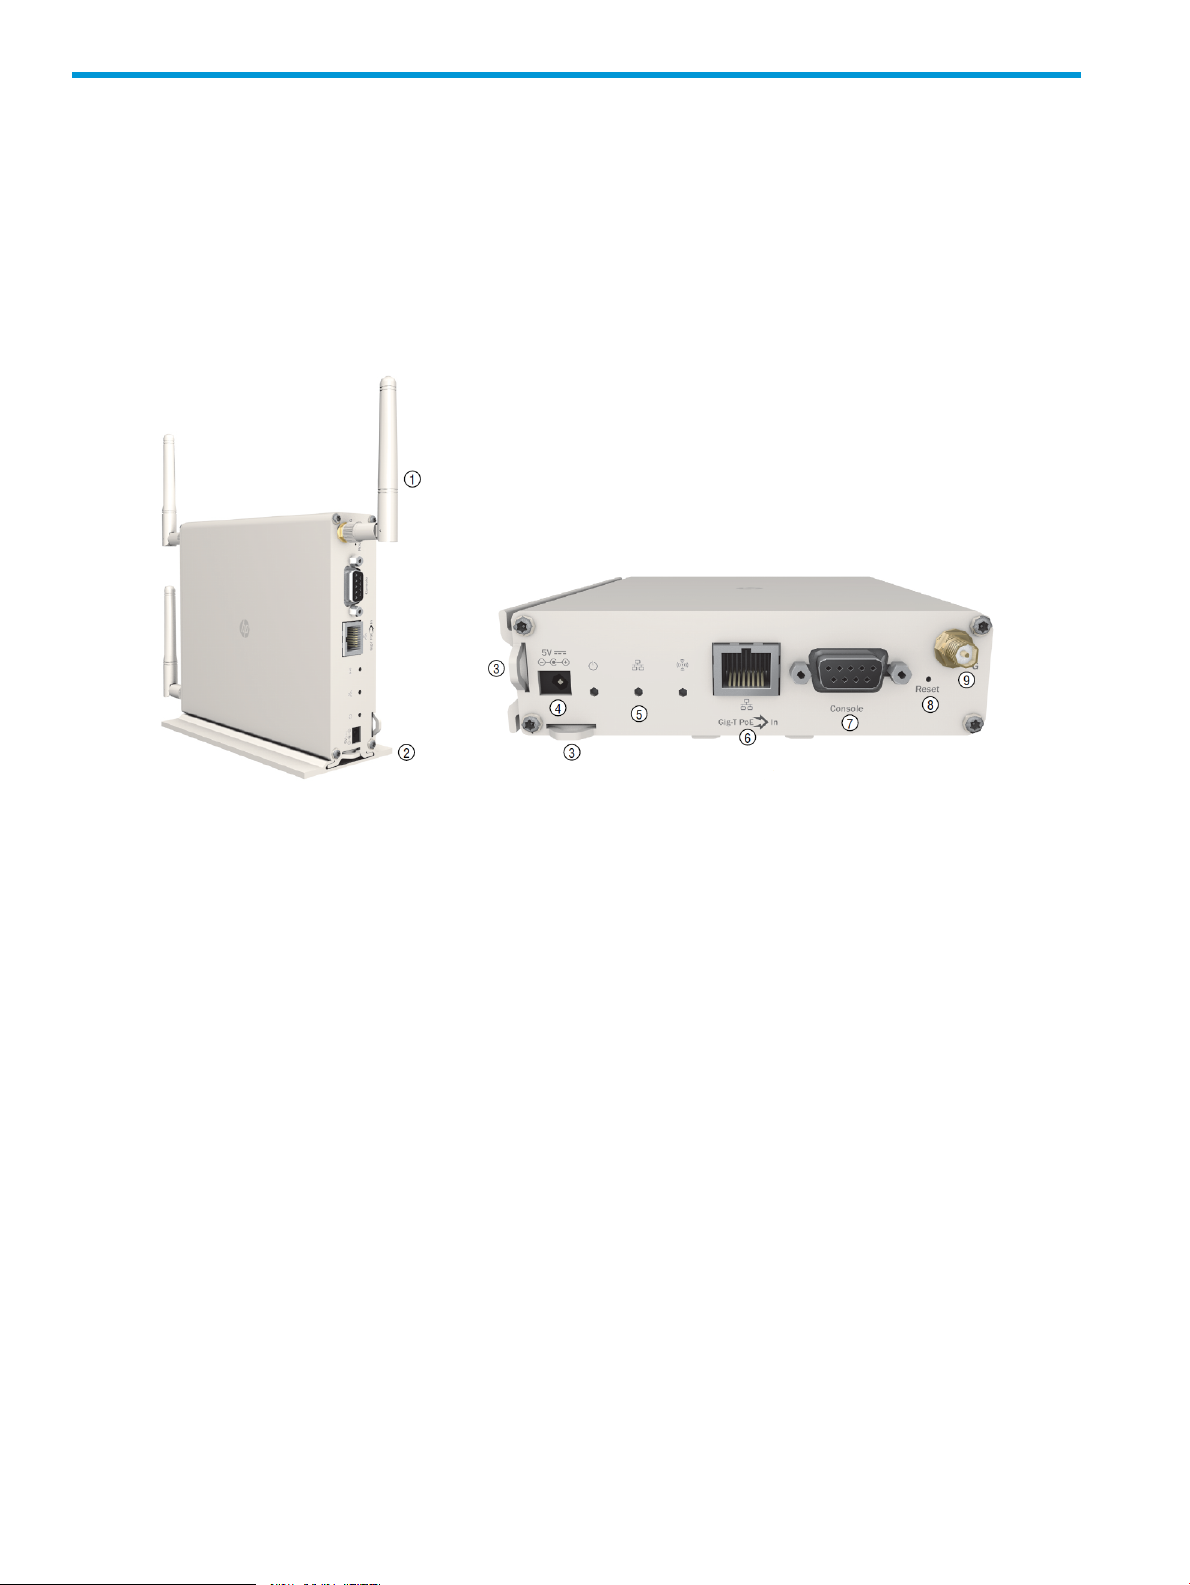
Overview
Figure 1 HP 501
Ports
7. Console port4. AC/DC adapter socket1. Detachable antennas
8. Reset button5. Status LEDs: Power, Ethernet, Radio2. Mounting bracket
9. Antenna connectors6. Ethernet port3. Power cord cable-tie points
The following ports are located on the front of the HP 501:
• Ethernet port: Auto-sensing 1000 BaseT Ethernet port with RJ-45 connector. The port supports
IEEE 802.3af Power over Ethernet (PoE).
• Console port: A standard serial port with a DB-9 (female) connector. To connect to a computer,
use a standard (straight-through) serial cable (male-to-female). For more information, see the
HP 501 802.11ac Wireless Client Bridge Configuration and Administration Guide.
4 Getting started
Page 5

Antennas
Three dual-band antennas are included with the HP 501. Optional outdoor antennas are available.
Table 1 Supported antennas
Number of
elementsUseGainBandTypePart number
1
2 dBi5 GHz
2
13.5 dBi5 GHz
1
Included with the HP 501.
2
In the US, channels in the 5150–5250 MHz band are disabled when the HP 501 is configured for use with the J9170A
antenna.
Impedience
(Ohms)
501Indoor1.8 dBi2.4 GHzOmnidirectional51889334
503Outdoor10.9 dBi2.4 GHzDirectionalJ9170A
503Outdoor6 dBi2.4 GHzOmnidirectionalJ9719A
503Outdoor8 dBi5 GHzOmnidirectionalJ9720A
CAUTION: When installing outdoor antennas outside, ensure that the metal shield is reliably
connected to the protective earthing system of the building.
NOTE: When using any of the optional high-gain antennas, you must also use a cable that
connects the HP 501 RP-SMA connector to the Type N connector on the optional antenna.
Antennas 5
Page 6
2 Installing the HP 501
The HP 501 is suited for indoor installation on a desktop, wall, ceiling, or in a plenum. The end
user is responsible for ensuring that installation and use comply with local safety and radio
regulations.
IMPORTANT: This device requires professional installation. Consult a professional installer trained
in RF installation and knowledgeable in local regulations including:
• Building and wiring codes
• Safety regulations
• Channel, power, and indoor/outdoor restrictions
• License requirements for the intended country
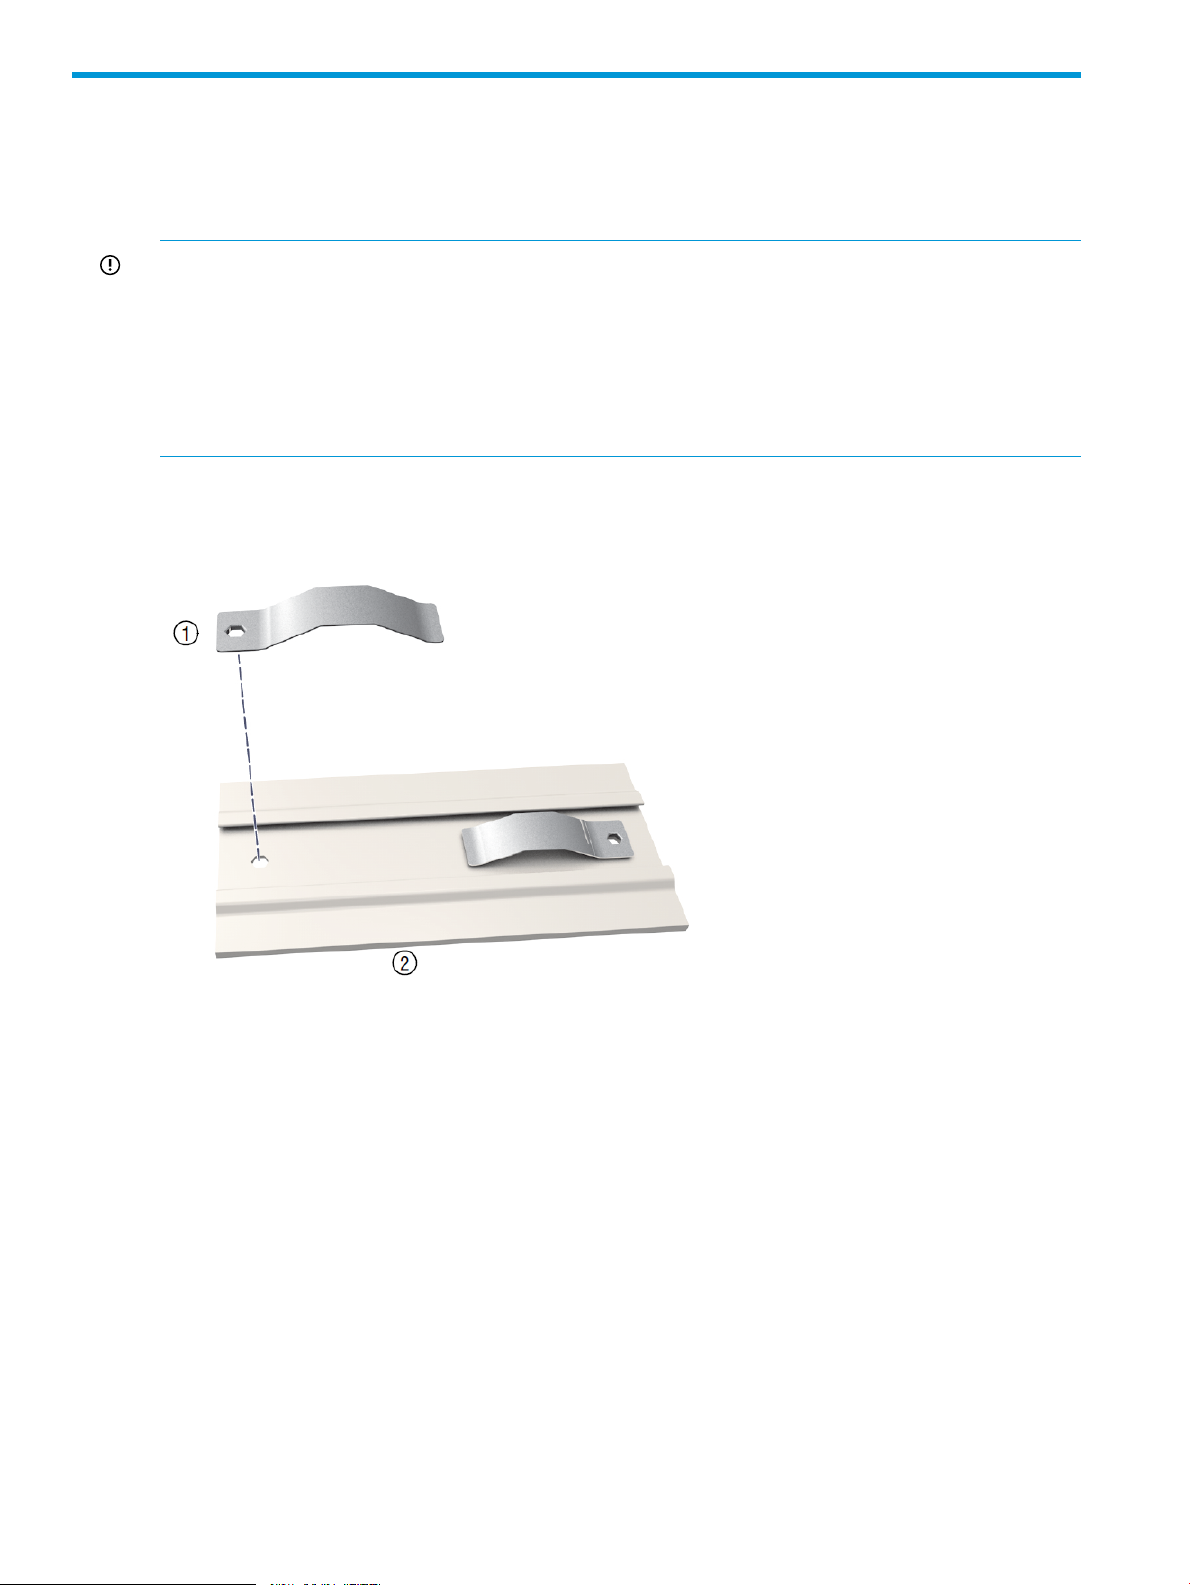
For ceiling and wall installations, HP highly recommends that you use the included spring clips
with the mounting bracket as shown to ensure a secure fit.
Figure 2 Mounting bracket and spring clips
Remove product from packaging
Inspect the package contents and verify that they are free from defects. The package contains:
• The HP 501 Wireless Client Bridge
• A mounting bracket
• Two spring clips
• Three dual-band omnidirectional antennas
• Two mounting screws with wall anchors
• One cable-tie
• Documentation
6 Installing the HP 501
2. Mounting bracket1. Spring clip
Page 7

Wall or ceiling installation
When mounting the HP 501 on a wall or ceiling, ensure that the mounting surface and the fasteners
you use can support at least 0.9 kg (2 lb). Allow extra weight for cables.
WARNING! Areas above false ceilings can contain dangerous electrical cabling, gas pipes,
and other hazards. Make whatever safety arrangements are needed to ensure that you can work
safely above the false ceiling. HP recommends that you use a non-conductive step ladder such as
one made of fiberglass.
1. Hold the mounting bracket against the wall or ceiling where it will be installed. Mark two
holes for the screws (wall anchors).
2. Drill two holes for the wall anchors, typically 4.7 mm (3/16 inch) in diameter.
3. Insert the anchors and tap them flush with the wall or ceiling surface.
4. Use the mounting screws to attach the spring clips and mounting bracket to the wall or ceiling.
5. Attach the three antennas to the HP 501.
6. Align the tab slots on the back of the HP 501 with the retention tabs on the mounting bracket.
Figure 3 Wall mount
7. Slide the HP 501 onto the mounting bracket until it is fully engaged.
Do not let go of the HP 501 until you confirm that it is firmly in place.
NOTE: Do not power on the HP 501 until directed to do so.
8. Proceed to “Initial configuration” (page 9).
Desktop installation
1. Attach the three antennas to the HP 501.
3. Mounting bracket1. Screws and wall anchors
4. HP 5012. Spring clips
Wall or ceiling installation 7
Page 8

2. Slide the HP 501 base onto the mounting bracket, and then place it on the desktop.
Figure 4 Desktop installation
2. Mounting bracket1. HP 501
NOTE: Do not power on the HP 501 until directed to do so.
3. Proceed to “Initial configuration” (page 9).
Plenum installation
To install the device in a plenum, you must use plenum-rated cables and attachment hardware. HP
recommends that you install the HP 501 in a similar orientation as in a ceiling installation. However,
a qualified installer can determine how to install/secure the HP 501 in a plenum in an appropriate
and safe manner. See “Wall or ceiling installation” (page 7) and “Plenum installation” (page 16).
8 Installing the HP 501
Page 9

3 Initial configuration
This chapter describes how to configure a factory-default HP 501. The sample configuration links
a wired computer to a private network through a wireless connection to an AP. For instructions on
how to configure other scenarios, see the HP 501 802.11ac Wireless Client Bridge Configuration
and Administration Guide.
Figure 5 Simple scenario
NOTE: Follow the procedures in the order listed.
Configure your computer
Private networkAPHP 501Wired computer
1. Disconnect your computer LAN port.
2. Configure your computer using the following settings:
a. Static IP address in the range 192.168.1.2 to 192.168.1.254.
b. Subnet mask as 255.255.255.0.
c. Default gateway as 192.168.1.1.
d. DNS server as 192.168.1.1.
3. Disable any wireless connection on your computer.
NOTE: Do not power on the HP 501 until directed.
Connect the cables and power on the HP 501
The HP 501 can be powered by:
• A 10/100 or 10/100/1000 PoE-enabled switch. Various PoE-enabled switches are available
from HP.
• An HP 1-Port Power Injector (J9407B).
• An HP AC/DC Power Adapter (J9405B).
NOTE: If the HP 501 is powered by a user-supplied PoE power injector, use only a
gigabit-compatible power injector. Although 10/100 PoE-enabled switches are compatible, PoE
injectors designed for 10/100 networks only are not compatible with the HP 501.
1. Connect the cables:
• If using a PoE switch, use Ethernet cables to connect your computer and the HP 501 to
an unused factory-default PoE switch port.
• If using a PoE injector, use Ethernet cables to connect your computer to the data-in port
of the PoE injector and the HP 501 to the data and power-out port of the PoE injector.
• If using an AC/DC adapter, connect it to the power connector on the HP 501.
Configure your computer 9
Page 10

2. Power on the HP 501 by powering on the PoE switch, power injector, or by plugging in the
AC/DC adapter.
Initially, the HP 501 power LED flashes amber. Wait approximately one minute until it turns
green before proceeding to the next step.
3. Connect the LAN port on your computer to the Ethernet port on the HP 501 using a standard
Ethernet cable.
Connect to the management tool
1. In a web browser, enter https://192.168.1.1.
2. The first time you connect to the management tool, a security certificate warning displays. This
is expected behavior. Select whatever option is needed in your web browser to continue to
the management tool.
3. On the Login page, specify admin for both Username and Password, and then click Login.
The HP 501 management tool home page opens.
4. On the License Agreement page, read the agreement and click Accept License Agreement.
The Registration page appears.
5. HP recommends that you continue with this procedure and register later.
A Country prompt appears.
IMPORTANT: Be sure to register at a later time using the management tool Maintenance >
Registration menu.
6. Select the country in which the HP 501 is operating.
The HP 501 automatically limits the available wireless channels, ensuring compliant operation
in the selected country.
CAUTION: To ensure compliance, you must select the correct country. Entering the incorrect
country can result in illegal operation and can cause harmful interference to other systems.
7. When prompted, HP recommends that you change the default password and click Save.
Passwords must be at least six characters long and include four different characters.
The management tool is organized with menus and sub-menus. Instructions for making menu
selections, such as “Select Tools > Ping” indicate that you should select the Tools menu, and then
thePing sub-menu, as follows:
Assign an IP address to the HP 501
By default, the HP 501 operates as a DHCP client. This means that if the network has a DHCP
server, the HP 501 automatically receives a new IP address in place of its default address of
192.168.1.1 upon connecting to the network. Use one of the following methods to assign an IP
address to the HP 501:
• Let the DHCP server automatically assign an IP address. By default, the DHCP server assigns
an IP address after the HP 501 connects to the network. After the DHCP server assigns the HP
501 an IP address, you can find the IP address of the HP 501 by looking for its Ethernet MAC
address in the DHCP server log.
• Preconfigure the DHCP server to assign a specific IP address to the HP 501. To do this, you
need to specify the HP 501 Ethernet MAC address and a reserved IP address on the DHCP
10 Initial configuration
Page 11

server. The HP 501 Ethernet MAC address is printed on the HP 501 label identified as MAC
ADDR, and listed on the management tool Home page as MAC address.
• Assign a static IP address to the HP 501. The address must be on the same subnet as the
network to which the HP 501 connects.
1. Select Network > IP.
2. Under IPv4 Configuration, select Static IP for the connection type. For Static IP address,
set an address that is on the same subnet as the network to which the HP 501 connects
after installation. Respect any DHCP server-mandated static address ranges. Also set
Subnet mask and Default gateway.
3. Set the DNS name servers to Manual, and then enter at least one server address.
4. Click Save.
Connection to the management tool is lost. You can later reconnect to the management
tool by specifying the new IP address.
Configure the work group bridge
The work group bridge configuration contains the settings that the HP 501 uses to establish a
connection with a wireless network. Configure the work group bridge as follows:
1. Select Wireless > Work group bridge.
The Work group bridge page opens.
2. Configure the following settings, and keep the default settings for the other options.
• Set the Work group bridge mode to Enabled.
• SSID: The name of the wireless network to which the HP 501 attempts to connect.
Click the arrow next to this field to select the private network AP from the list of
◦
neighborhood APs.
◦ To set the SSID directly, be sure to enter the same name as on the private network
AP.
CAUTION: The HP 501 wireless security setting must match the setting on the private network
AP. In this example, a setting of WPA/WPA2 Personal is used and presumes that the AP for
network HOME_A02A is configured the same way. For information on other wireless security
settings, see the HP 501 802.11ac Wireless Client Bridge Configuration and Administration
Guide.
3. To configure basic wireless protection, in the Security box, select WPA/ WPA2 Personal.
4. Select WPA version WPA or WPA2, and then in the Key box, enter the preshared key that
was configured on the AP.
5. Confirm the key, and then click Save.
The HP 501 automatically attempts to establish a wireless connection with the private network
AP. To verify the status of the connection, select Wireless > Work group bridge. The Connection
status should indicate a status of Associated.
When the wireless connection is established, the HP 501 is operational.
Test the wireless connection
This example assumes that the network has a DHCP server and an Internet connection. Broadband
routers typically include a DHCP server.
1. Disconnect your computer from the HP 501.
2. Power off the HP 501.
3. Reconnect power to the HP 501.
Configure the work group bridge 11
Page 12

4. Reconnect your computer to the HP 501.
5. Confirm that your wireless network interface is still disabled (it was disabled during an earlier
configuration step).
6. Enable the computer Ethernet network interface, and verify that it is set to automatically obtain
an IP address from DHCP.
7. Confirm that you can browse the Internet from your computer.
You can perform additional configuration procedures by launching the HP 501 management tool
at https://IP_address where IP_address is the IP address that the HP 501 obtained from the DHCP
server or that was statically configured in the HP 501 earlier. For more information, see HP 501
802.11ac Wireless Client Bridge Configuration and Administration Guide.
12 Initial configuration
Page 13

4 Support and other resources
Contacting HP
For worldwide technical support information, see the HP support website:
http://www.hp.com/support
Before contacting HP, collect the following information:
• Product model names and numbers
• Technical support registration number (if applicable)
• Product serial numbers
• Error messages
• Operating system type and revision level
• Detailed questions
Related information
The following documents provide related information:
• HP 501 802.11ac Wireless Client Bridge Configuration and Administration Guide
• HP 501 802.11ac Wireless Client Bridge Release Notes
You can find these documents on the Manuals page of the HP Support Center website:
http://www.hp.com/support/manuals
Enter your product name or number, and click GO.
Websites
• HP Networking Support website: www.hp.com/networking/
Typographic conventions
Table 2 Document conventions
Bold text
ElementConvention
Cross-reference linksBlue text: Table 2 (page 13)
Website addressesBlue, underlined text: http://www.hp.com
• Keys that are pressed
• Text typed into a GUI element, such as a box
• GUI elements that are clicked or selected, such as menu
and list items, buttons, tabs, and check boxes
Text emphasisItalic text
Contacting HP 13
Page 14

Table 2 Document conventions (continued)
ElementConvention
Monospace text
Monospace, italic text
• File and directory names
• System output
• Code
• Commands, their arguments, and argument values
• Code variables
• Command variables
Emphasized monospace textMonospace, bold text
WARNING! Indicates that failure to follow directions could result in bodily harm or death.
CAUTION: Indicates that failure to follow directions could result in damage to equipment or data.
IMPORTANT: Provides clarifying information or specific instructions.
NOTE: Provides additional information.
14 Support and other resources
Page 15

5 Documentation feedback
HP is committed to providing documentation that meets your needs. To help us improve the
documentation, send any errors, suggestions, or comments to Documentation Feedback
(docsfeedback@hp.com). Include the document title and part number, version number, or the URL
when submitting your feedback.
15
Page 16

A Regulatory information
For important safety, environmental, and regulatory information, see Safety and Compliance
Information for Server, Storage, Power, Networking, and Rack Products, available at http://
www.hp.com/support/Safety-Compliance-EnterpriseProducts.
Plenum installation
The device can be installed in a plenum. The HP 501 is suitable for use in environmental air space
in accordance with Section 300-22(C) of the National Electrical Code, and Sections 2-128,
12-010(3) and 12-100 of the Canadian Electrical Code, Part 1, CSA C22.1.
Belarus Kazakhstan Russia marking
Manufacturer and Local Representative Information
Manufacturer’s information:
• Hewlett-Packard Company, 3000 Hanover Street, Palo Alto, California 94304, US.
Local Representative information Russian:
• HP Belarus: ИООО «Хьюлетт-Паккард Бел», 220030, Беларусь, г. Минск, ул.
Интернациональная, 36-1, офис 722-723, тел.: +375 (17) 392 28 18, факс: +375 (17)
392 28 21
• HP Kazakhstan: ТОО «Хьюлетт-Паккард (К), 050040, Казахстан, г. Алматы, Бостандыкский
район, ул. Тимирязева, 28В, 1 этаж, тел./факс: +7 (727) 355 35 50, +7 (727) 355 35
51
• HP Russia: ЗАО “Хьюлетт-Паккард А.О.”, 125171, Россия, г. Москва, Ленинградское
шоссе, 16А, стр.3, тел/факс: +7 (495) 797 35 00, +7 (495) 287 89 05
Local Representative information Kazakh:
• HP Kazakhstan: ЖШС «Хьюлетт-Паккард (К)», Қазақстан, Алматы қ., Бостандық ауданы,
Тимирязев к-сі, 28В, тел./факс: +7 (727) 355 35 50, +7 (727) 355 35 51
Manufacturing Date – The manufacturing date is included in the product serial number, CCYMPPPZZZ
(HP serial number format for this product). The manufacturing date is indicated by YM in the serial
number, where Y indicates the year counting from within each new decade, with 2010 as the
starting point, and M is the month when the unit was manufactured. For example, 3A would indicate
3 for 2013 and A for the month of November. Following this convention, 2010 is indicated by 0,
2011 by 1, 2012 by 2, 2013 by 3, and so forth. Months start at 1 for January, 2 for February,
up to 9 for September. 0 (zero) is used for October, A for November, and B for December.
Дата изготовления – Дата изготовления включена в серийный номер изделия, CCYMPPPZZZ
(формат серийного номера HP для данного изделия). Дата изготовления указана как YM в
серийном номере, где Y соответствует году с началом отсчета в каждом новом десятилетии,
начиная с 2010, а M соответствует месяцу изготовления устройства. Например, в обозначении
3A цифра 3 соответствует 2013 году, а A обозначает ноябрь. В соответствии с данным принятым
обозначением, 2010 год указывается как 0, 2011 – как 1, 2012 – как 2, 2013 – как 3 и т. д.
Месяцы обозначаются как 1 (январь), 2 (февраль) и т. д. до 9 (сентябрь). 0 (ноль) обозначает
октябрь, A обозначает ноябрь, а B обозначает декабрь.
Жасалған күні – Жасалған күні CCYMPPPZZZ (осы өнімге арналған HP сериялық нөмірінің
пішімі) пішіміндегі өнімнің сериялық нөмірінде қамтылады. Жасалған күні сериялық нөмірдегі
YM əріптерімен көрсетіледі. Y əрпі 2010 жылдан басталатын жəне əр он жылдан бастап
есептелетін жылды көрсетеді жəне M əрпі құрылғының жасалған айын білдіреді. Мысалы, 3A
таңбалары келісіні білдіреді: 3 – 2013 жылды жəне A қараша айын көрсетеді. Бұл əдіс
бойынша, 2010 жыл 0 санымен, 2011 жыл 1 санымен, 2012 жыл 2 санымен, 2013 жыл 3
16 Regulatory information
Page 17

санымен жəне т.т. көрсетіледі. Айларды 1 мен 9 аралығындағы сандар көрсетеді:1 саны қаңтар
айы үшін, 2 саны ақпан айы үшін жəне 9 саны қыркүйек айы үшін. 0 (нөл) саны қазан айы
үшін, A əрпі қараша айы үшін жəне B əрпі желтоқсан айы үшін қолданылады.
Turkey RoHS material content declaration
Türkiye Cumhuriyeti: EEE Yönetmeliğine Uygundur
Ukraine RoHS material content declaration
Обладнання відповідає вимогам Технічного регламенту щодо обмеження використання деяких
небезпечних речовин в електричному та електронному обладнанні, затвердженого постановою
Кабінету Міністрів України від 3 грудня 2008 № 1057
Warranty information
HP Networking Products
http://www.hp.com/support/Networking-Warranties
Turkey RoHS material content declaration 17
 Loading...