

Page 1
HP DesignJet 500 and 800 Series Printers
Assembly and Set-Up Instructions
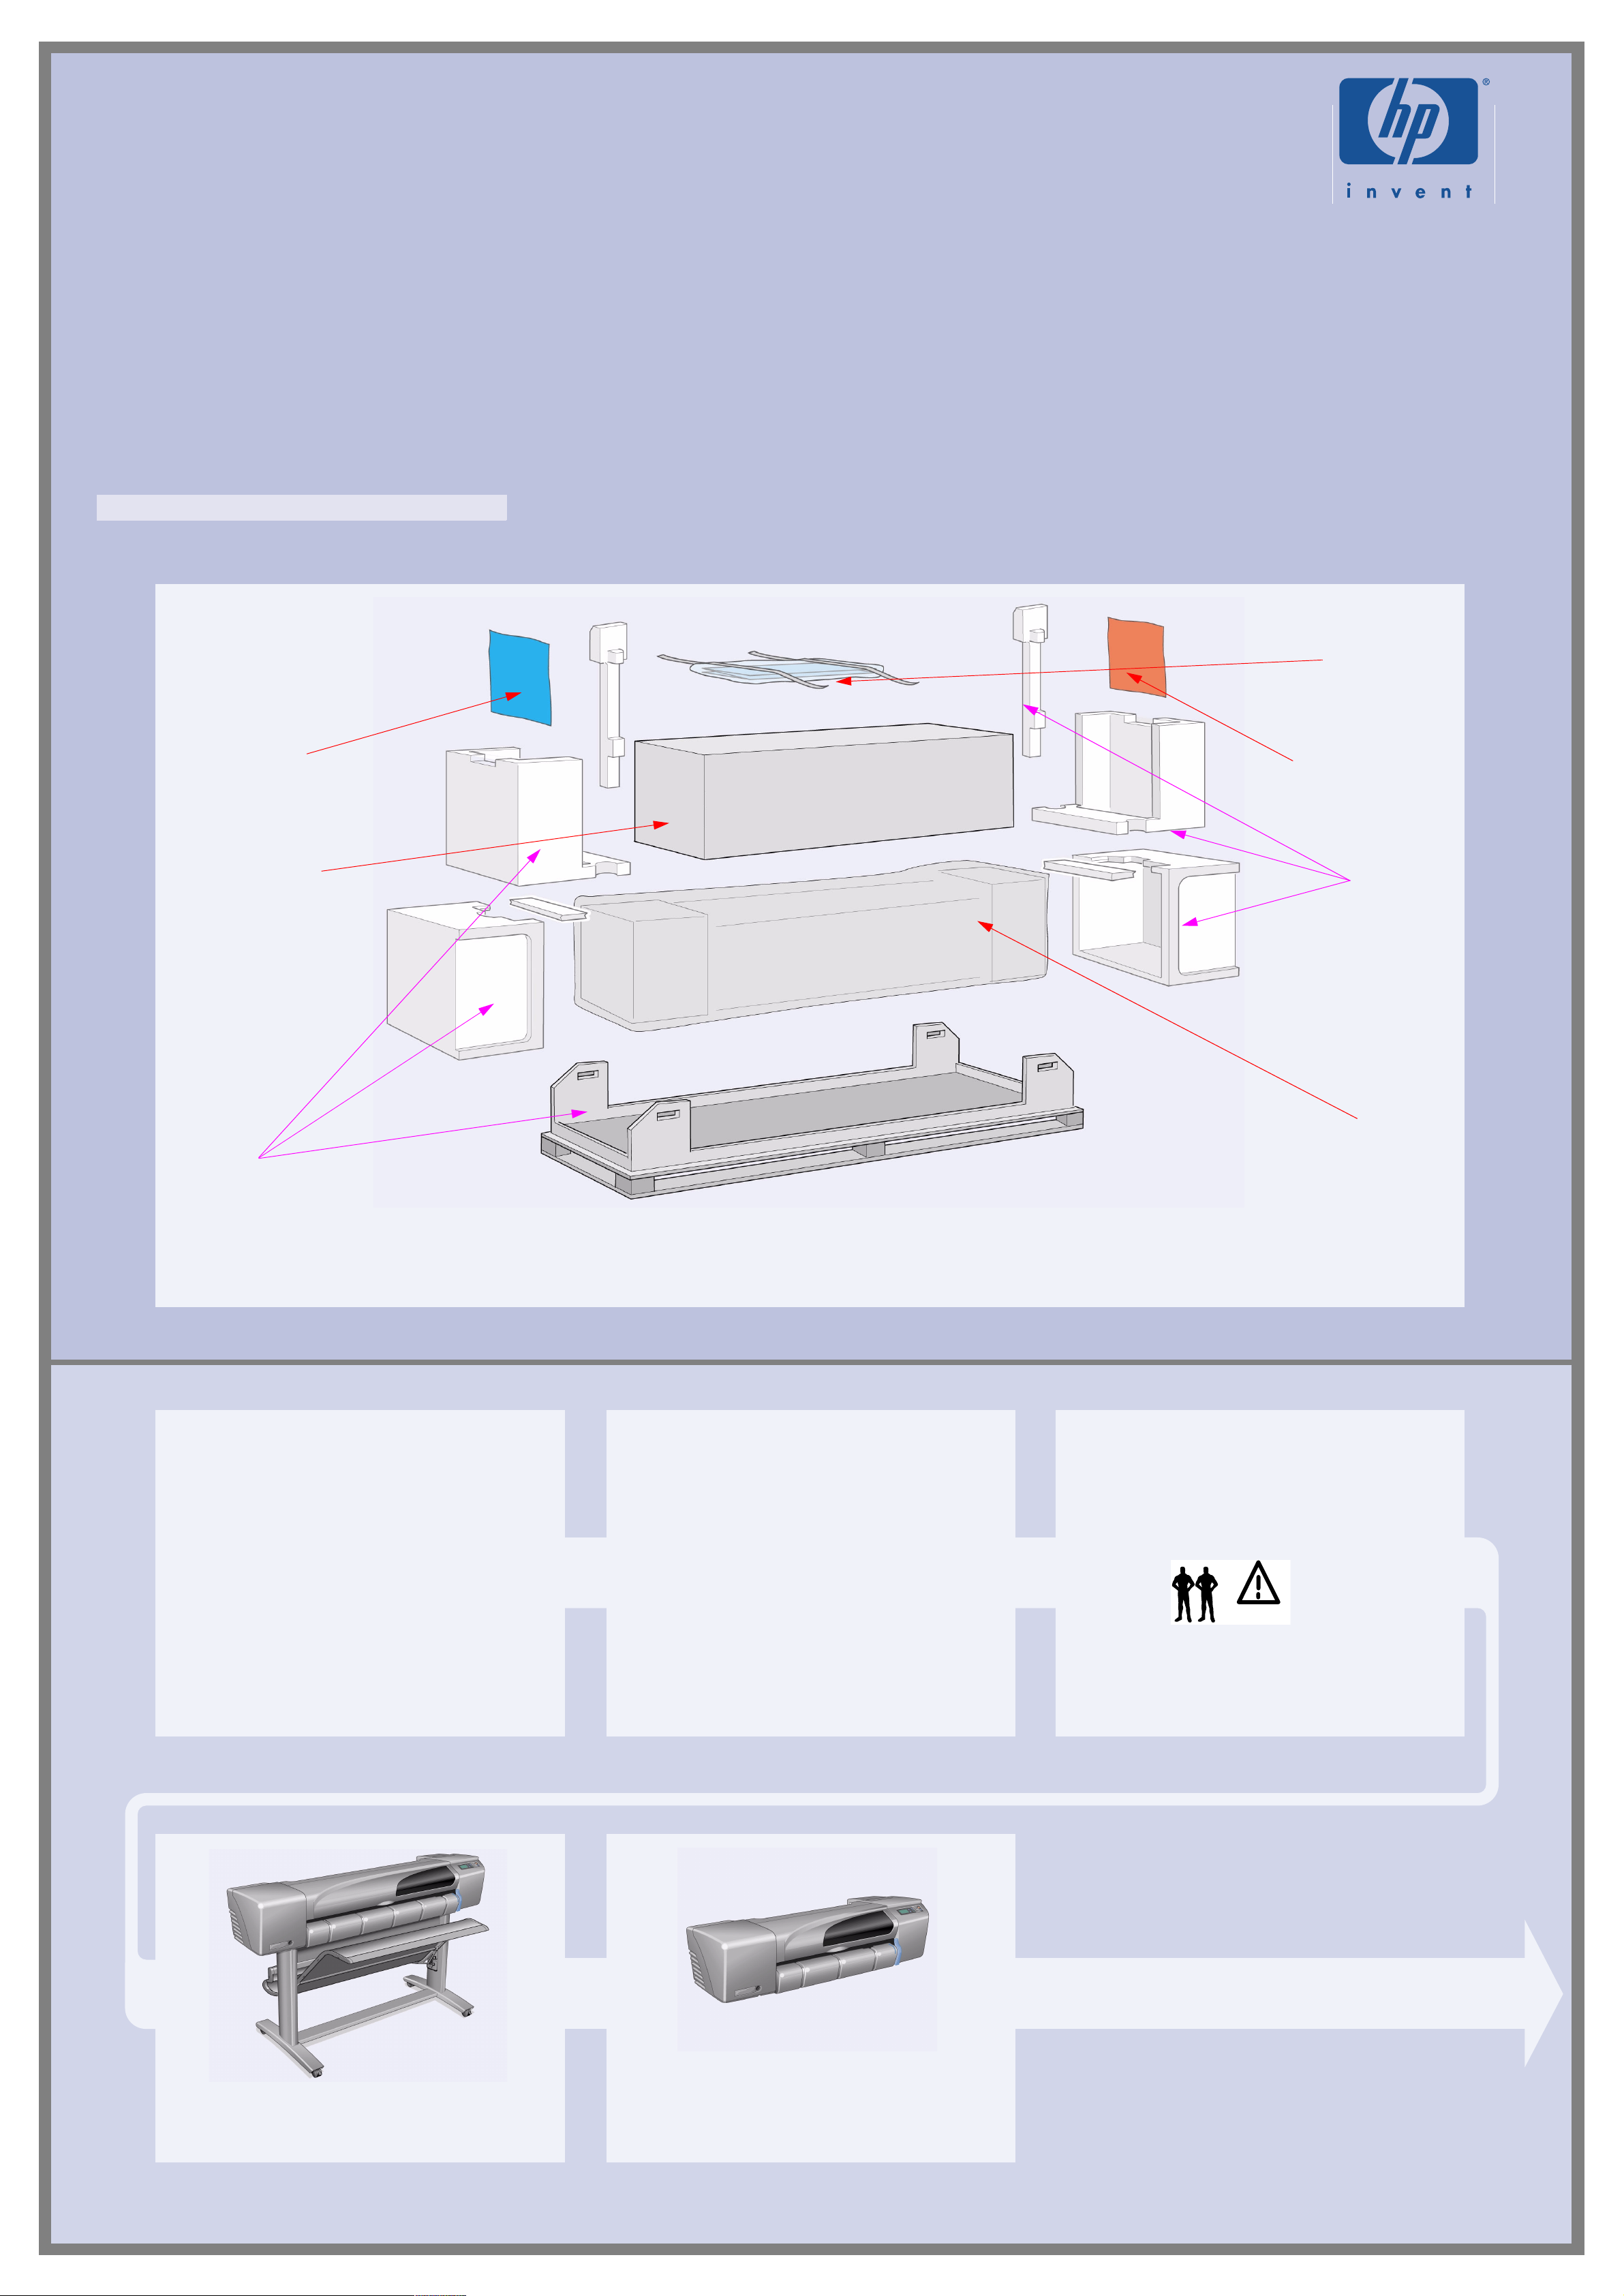
1. Check the Contents of the Package
“Day-to-day”
package containing
Using Your Printer
documentation CD.
Box containing paper
bin and printer stand
(E+/A0+-size models
only)
This Assembly and
Set-Up Poster
“Installation” package
containing cables,
printheads, ink
cartridges, Pocket Guide.
[Packaging]
[Packaging]
Check the items shown and noti fy your supp lier if any ar e missi ng. Don’t open the i tems unt il you ar e prompted to do so on thi s
Poster. The packaging varies between models; there may be addit ional items in the box.
Contents of This Poster
1. Check the Contents of the Package (page 1)
2. Unpack the Main Components (page 2)
3. Assemble the Stand (page 2)
4. Attach the Stand to the Printer (page 3)
5. Assemble the Paper Bin (page 3)
6. Locate the Front-Panel Overlay and Pocket
Guide (page 4)
7. Switch On and Choose a Language (page 4)
8. Insert Ink Cartridges (page 4)
9. Replace Set-Up Printheads with Active
Printheads (page 5)
10. Load a Roll of Paper (page 5)
11. Understand Printer Connections (page 6)
12. Install and Connect a LAN Card (page 7)
13. Using a USB Connection (page 7)
14. Set Up Your Software (page 8)
The information on this poster applies to the following
HP products:
• HP DesignJet 500, 500PS, 800 and 800PS Printers
(D/A1-size and E+/A0+-size models)–part numbers
C7769B, C7769C, C7770B, C7770C, C7779B,
C7779C, C7780B and C7780C.
• S tand and Paper Bin accessory for the D/A1-size
models–part numbers C7781A and C7782A.
If you are installing an accessory, such as a stand, after
the main installation has been completed, use the
instructions that came with the accessory.
If you are installing it at the same ti me as the main
installation, rea d the appropriate stages of this Poster.
For accessory cards, see “Understand Pri n ter
Connections” on page 6 and the documentation that
comes with these accessories.
Main Printer
body
Read these instructions carefully...
and complete each stage before you start the next.
What You Will Need to Do the Job
• Because some of the components of the printer are
bulky, you will need 2 or 3 people to lift them. See
the descriptions that follow f or det ail s—a symbol l ike
this is used:
• You are recommended to have a floor area of
approximately 6 square metres for unpacking and
assembling your printer.
• The time required to unpack, assemble and set up
the hardware is about 30 t o 90 minutes, depending
on the model and components (e.g. the stand).
The E+/A0+-size printer with stand and p aper bin as
standard.
The D/A1-size printer with no stand or paper bin as
standard. If you have ordered a stand and paper bin
and are installi ng it no w, follow these instructions , as f or
a E+/A0+-size model.
Page 2
C472301
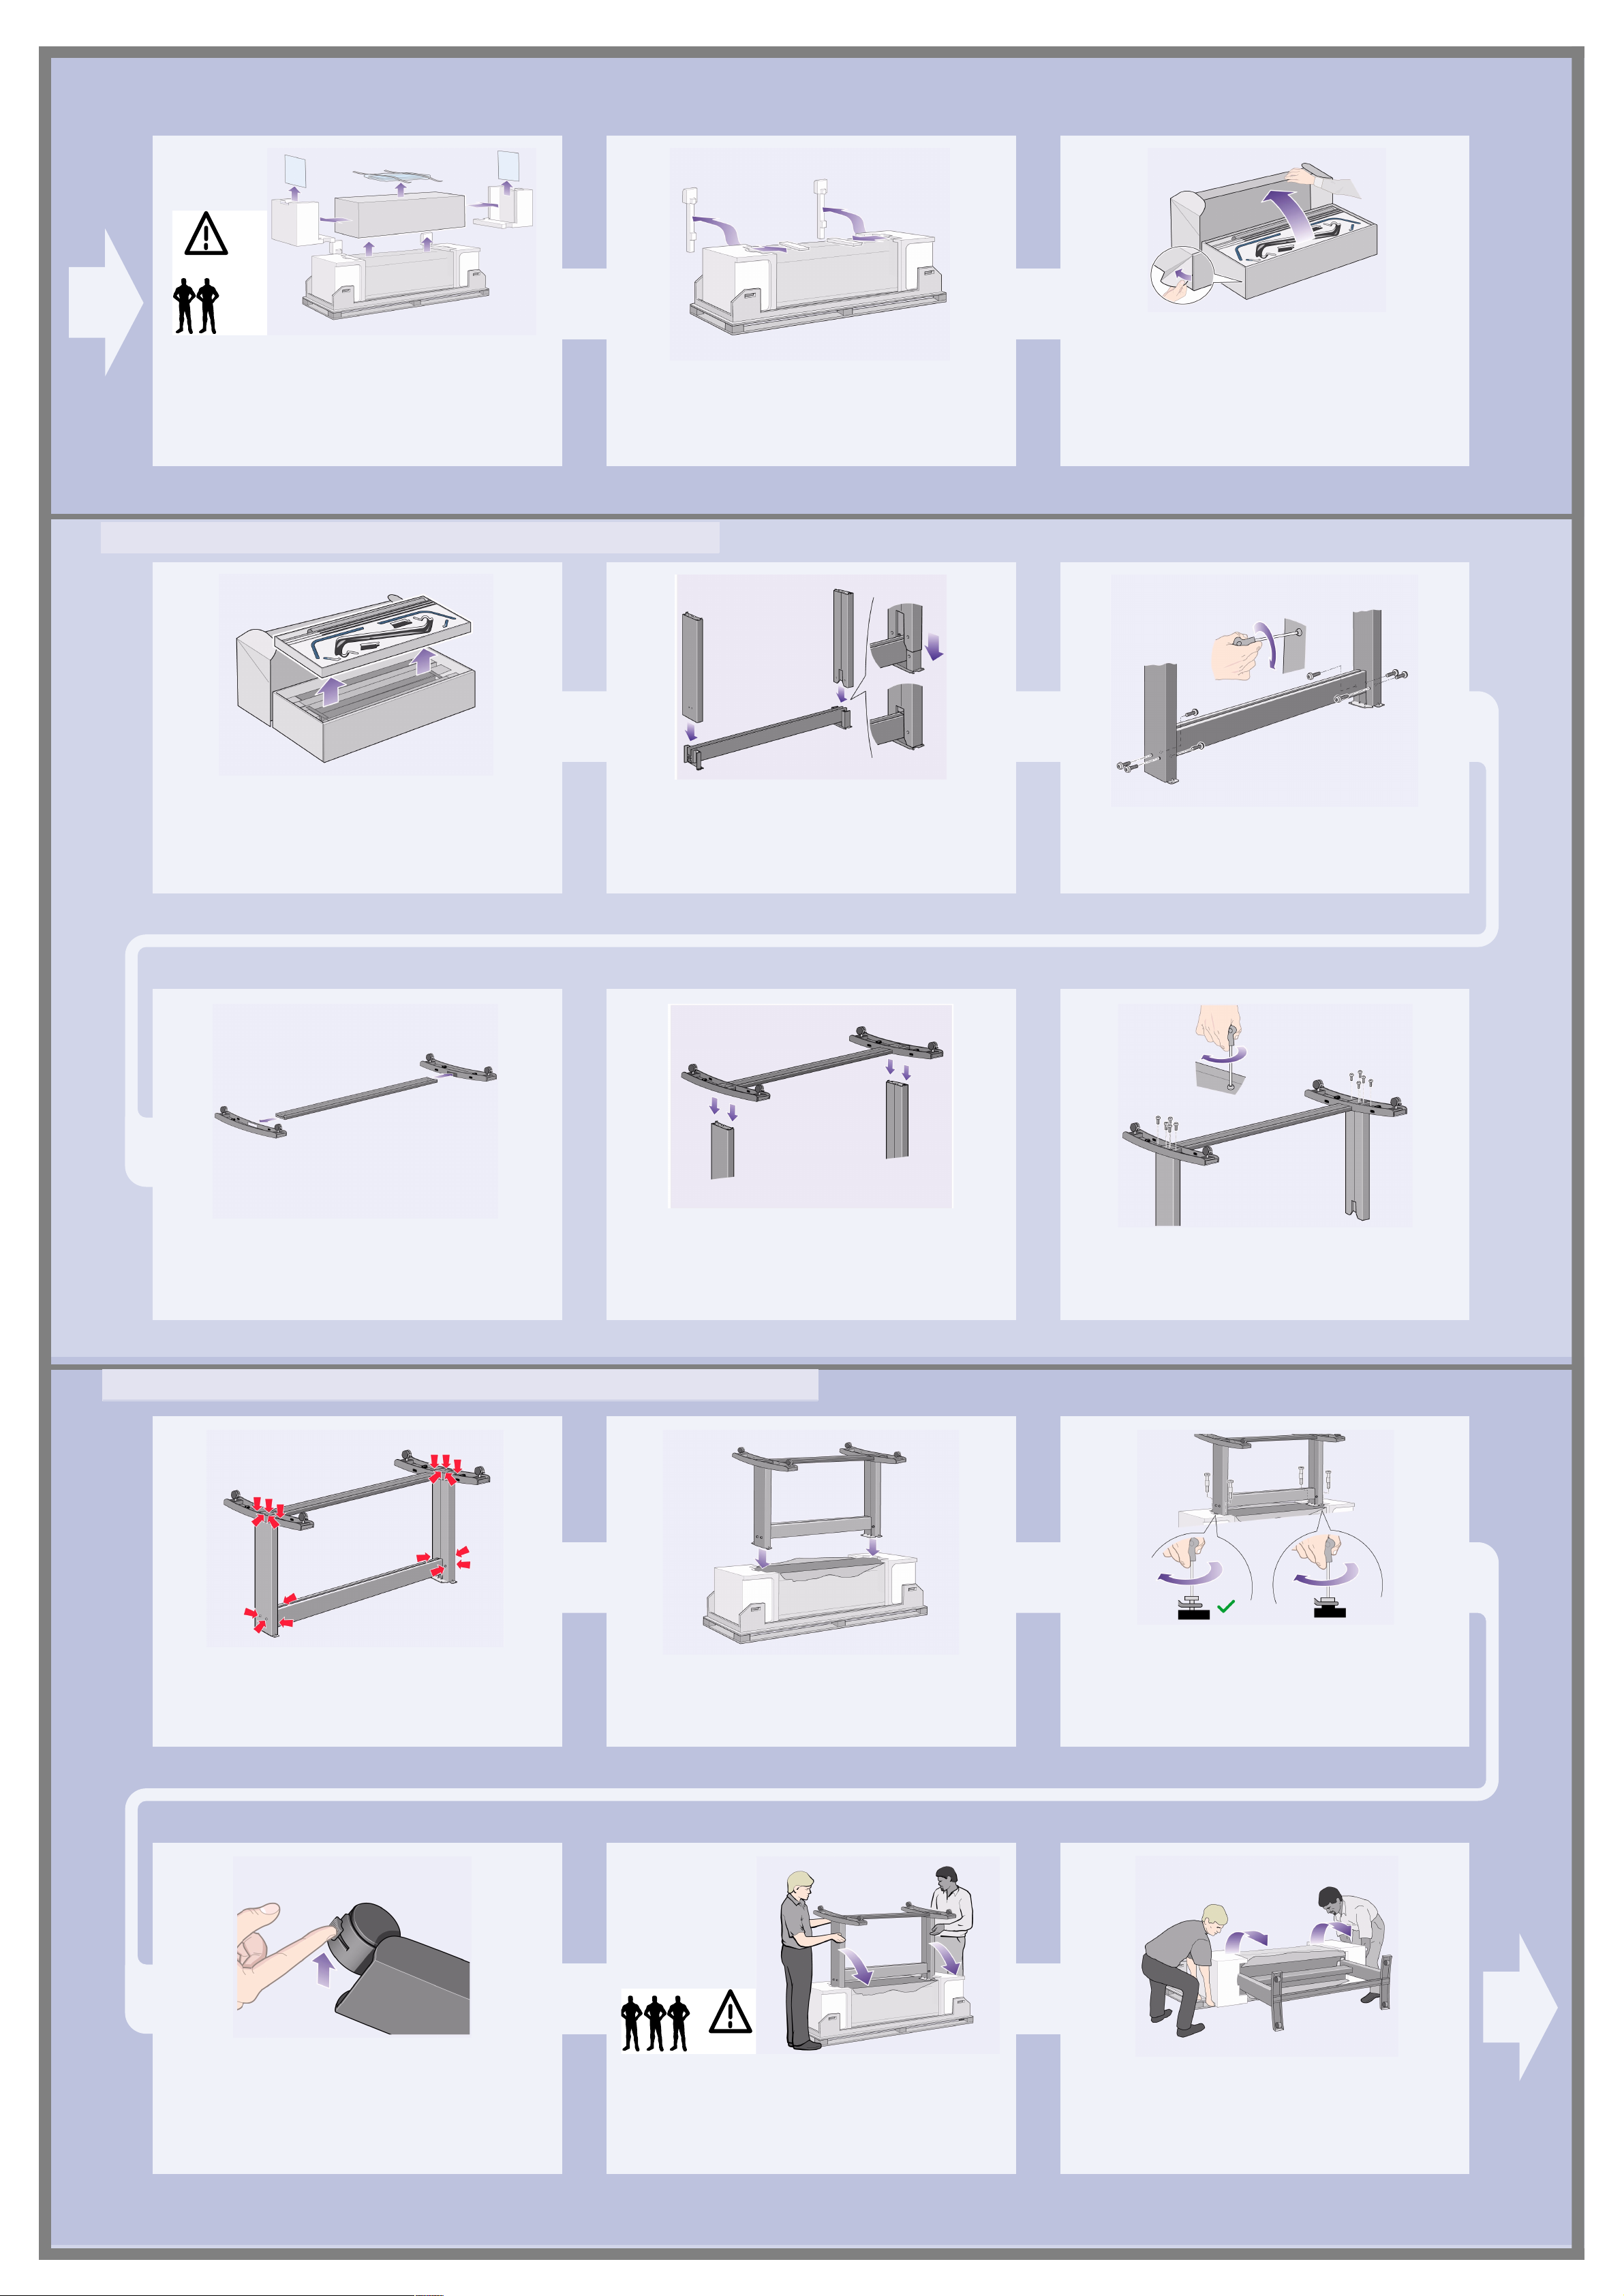
1–Remove:
– (E+/A0+-size model) The large box containing the stand and
paper bin. Two people may need to do this, as it’s rather large.
– The two packages containing documentation, cables, etc.
– The foam packaging that protects the ends of the printer.
2–Remove:
– The foam restraints on top of the printer.
– The vertical foam struts at the back of the packaging.
3. Assemble the Stand (E+/A0+-size models and accessory with D/A1-size models)
3–For E+/A0+-size models and if you have the
stand accessory with D/A1-size models, open the
box that contains the stand and the paper bin—it’s the
large box above the main printer body.
3–For D/A1-size models without a stand, go to
St age 6: Locate the Fr ont-Panel Overl ay and the Pocket
Guide on page 4.
1–Separate the stand from the paper bin. Set
aside the cardboard tray inside which separates the
components of the paper bin from those of the printer’s
stand. This gives you access to the stand components.
2–Attach the legs to the outside of the cross
brace. Note that the st and is asse mbled up si de-down.
You’ll find the screws and screwdriver inside the cross
brace.
3–Insert eight screws into the legs. Use the
smaller screws with washers.
4–Position the horizontal foot brace onto the
5–Position the feet on the legs assembly. The
wings on the leg brackets pass through the feet.
feet. Push the foot brace into the slot in each foot.
4. Attach the Stand to the Printer (E+/A0+-size models and accessory with D/A1-size models)
6–Secure the feet to the legs with ten screws.
Again, use the smaller screws with washers.
1–Check that all the stand screws are tight.
If you can’t tighten all the screws properly, try
unscrewing one or two so that the legs, feet and cross
braces are properly aligned, and then retighten them.
2–Put the stand assembly onto the printer.
Peel open the protective cover and then place the st and
onto the printer.
3–Secure the stand with the four screws that
have large flat heads.
secured normally.
CAUTION: Two of the screws on the same leg will
appear to be not fully tightened, as they will not go in as
far as the others—they should be firm but not over tight.
Two screws (on one leg) are
4–Ensure all four brakes are applied, as shown.
5–Tilt and lift the printer (1):
WARNING: 2–3 people for the E+/A0+-size model; 2
people for the D/A1-size model.
CAUTION: Ensure the area in front of the printer is clear
of any obstacles such as packaging or rolls of paper.
6–Tilt and lift the printer (2): Tilt the pri nter through
90-degrees onto its side, and then st and it up on its legs.
The printer may seem a little wobbly on one side, but
that is correct provided the screws have been tightened
as indicated in previous steps.
Page 3
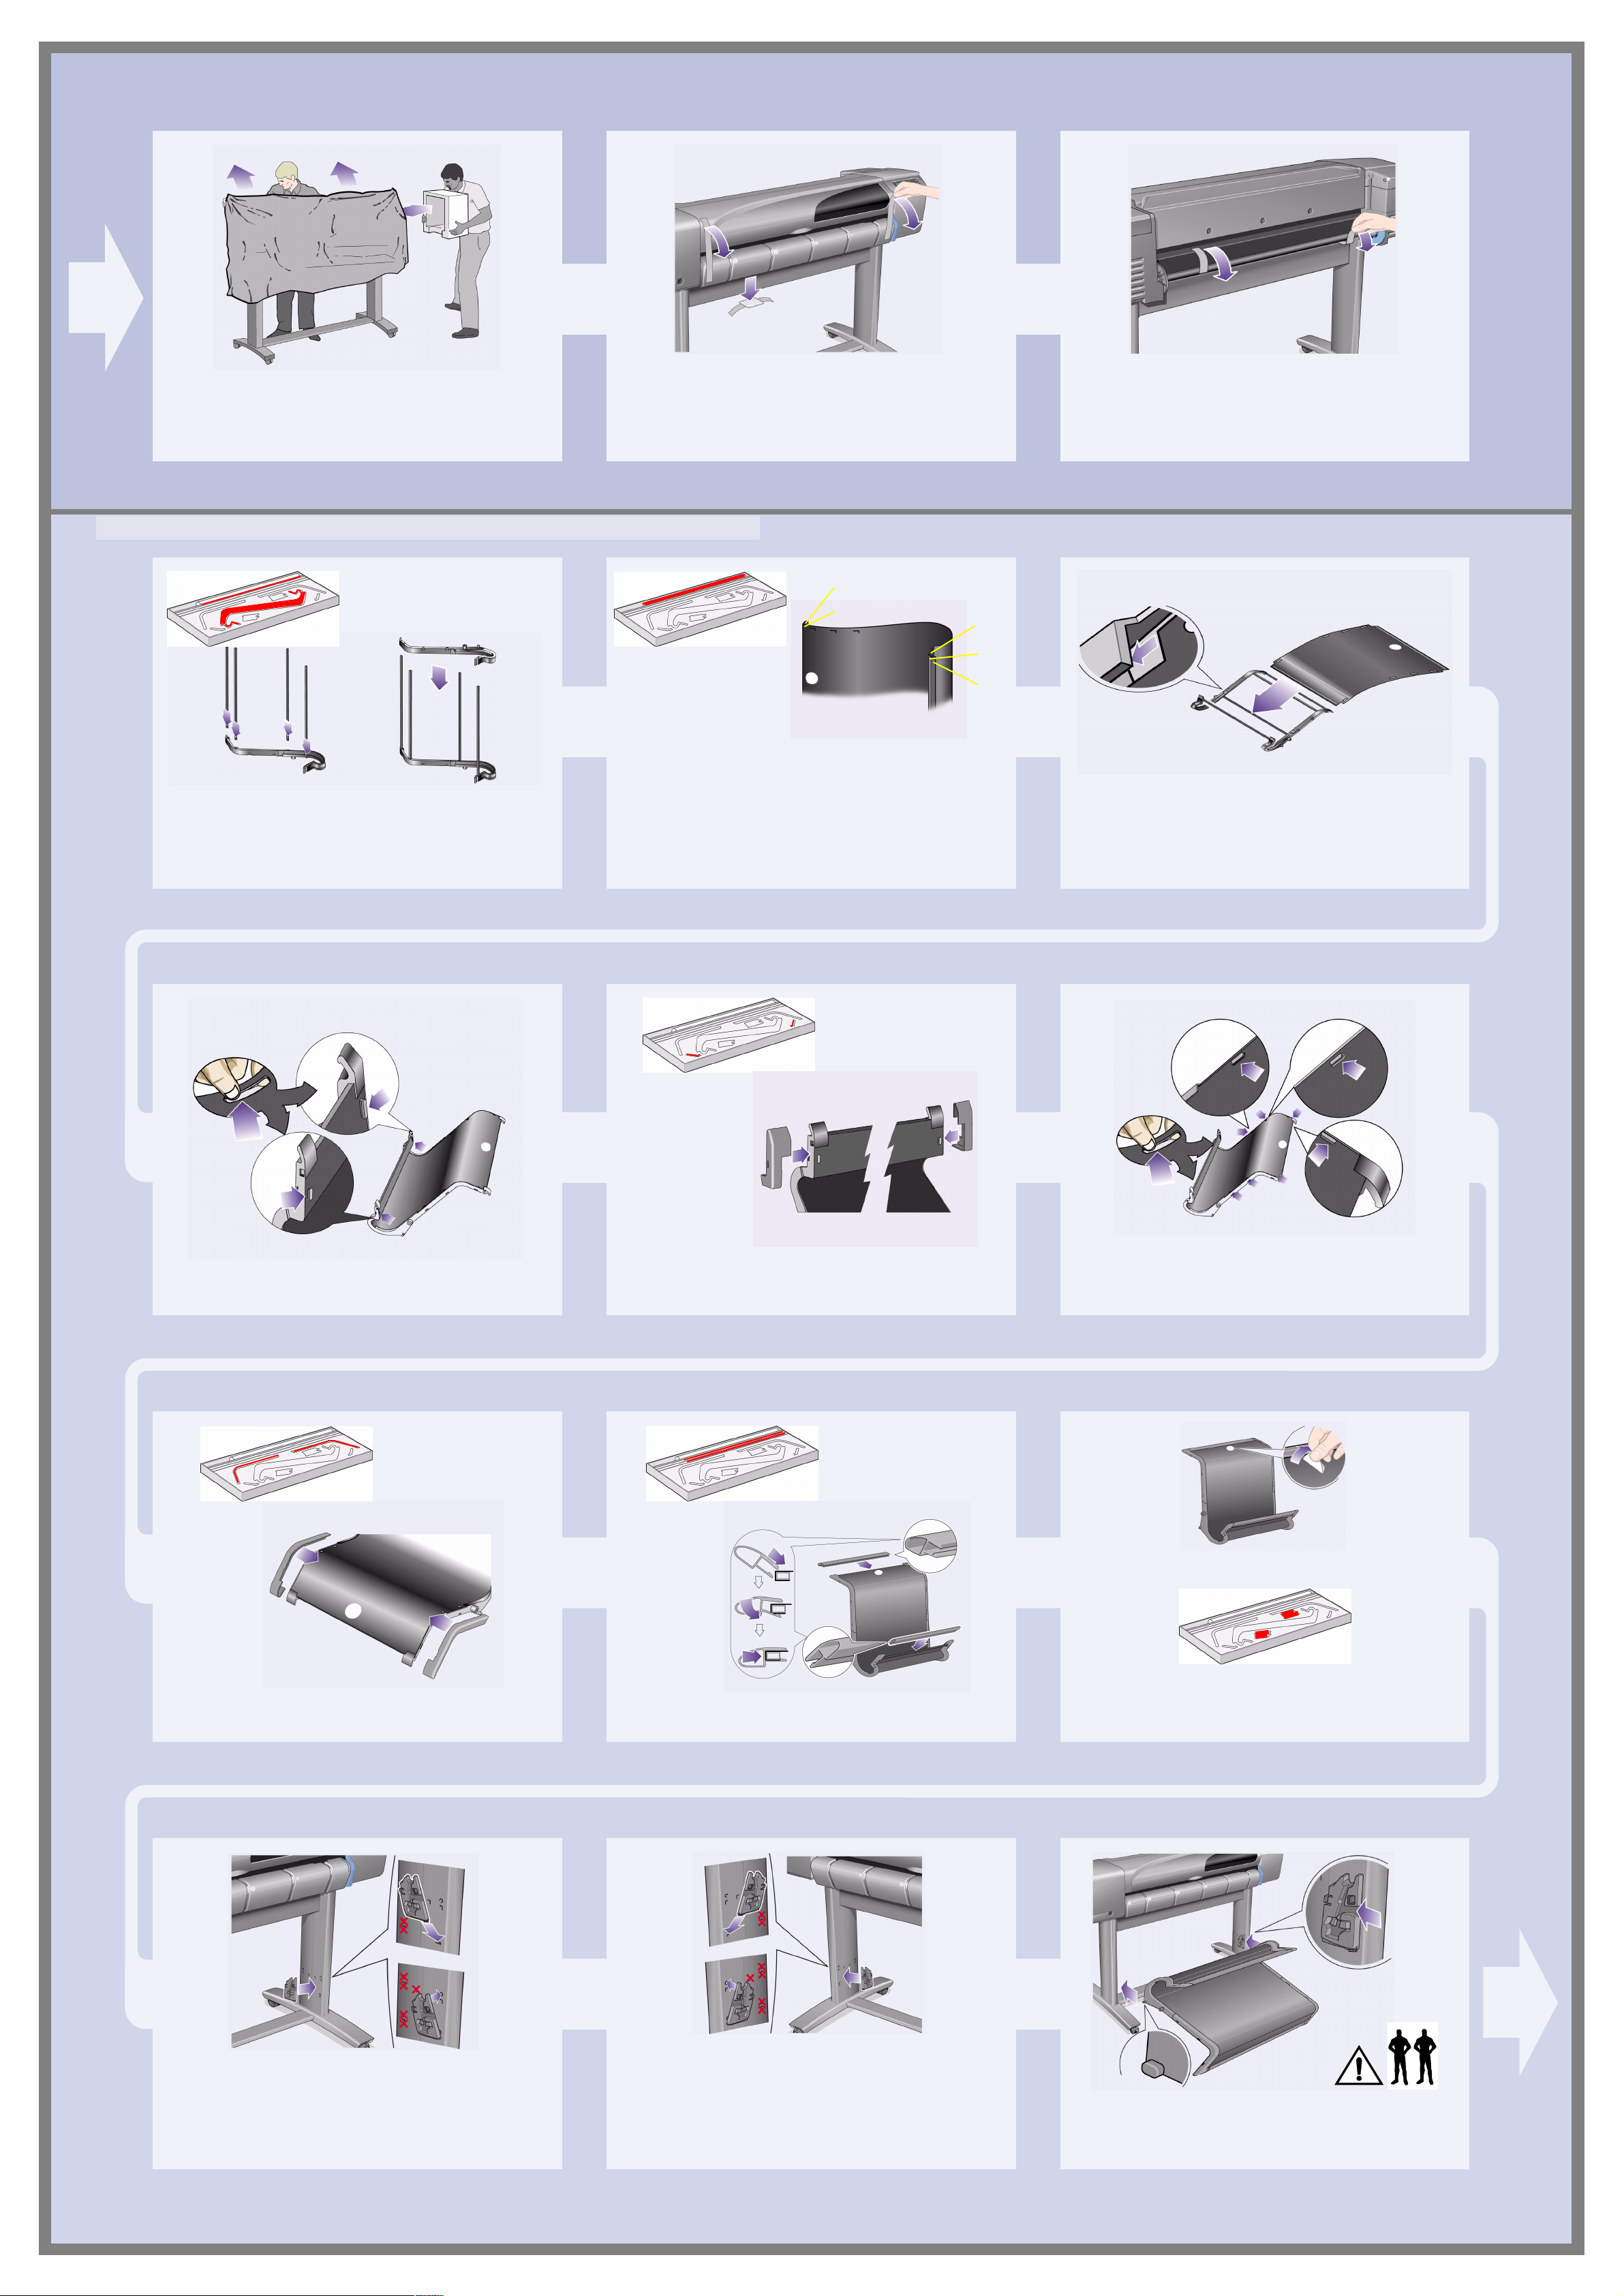
8–Remove the tapes from the window and the
7–Remove the plastic covering and foam end
caps.
spindle.
material.
Remove also the small bag of desiccant
5. Assemble the Paper Bin (E+/A0+-size models and accessory with D/A1-size models)
2–Remove the bin “film” from its container. You
will need to form five creases in the film s o that it will fit
properly into the bin hol ders. Four of these cr eases ar e
1–Insert the four bars into the slots in the right
bin holder, and then mount the left bin holder
onto the four bars.
1 cm and 2 cm from each end, both in the s ame sense,
with an orientation circle on the outside. The third
crease is also in the same sense, and 9 cm from the
end furthest from the circle.
9–Remove the tapes from the spindle at the
back of the printer.
1cm
1cm
7cm
1cm
1cm
3–Slide the bin “film” into the groove in the bin
holders, and bend it into position. Insert the end
with the two creases first. Slide the film fully to the end
so that the creases are in the correct positions.
4–Clip the film into place at one end...
5–...and attach the two caps to this end of the
6–Clip the film into place at the other end...
film.
9–The paper bin is now complete. You should
now peel off the orientat ion circle.
7–...and attach the two caps to this end.
10–Attach the right adapter to the stand. It is
marked with the letter ‘R’, and must be attached to the
front part of the right leg. Fir st hook the bottom into its
slot and then raise it into place; you should hear two
clicks as the top is clipped in.
8–Clip the end pieces to the film and sides.
11–Attach the left adapter to the stand. It is
marked with the letter ‘L’, and must be attached to the
front part of the left leg.
If you ever need to remove an adapter, the two latches
near the top must be unclipped; insert a pencil or similar
tool into the hole to release each latch.
In the next steps it will be atta ched to the printer stand
by two adapters which must first be located into the
printer legs; then the bin will be slotted into the
adapters.
12–Insert the bin onto the adapters. Hold the bin
horizontally and ins ert the small pins into their sl ots. (It’s
easier if two people do this for the E+/A0+-size model.)
Page 4
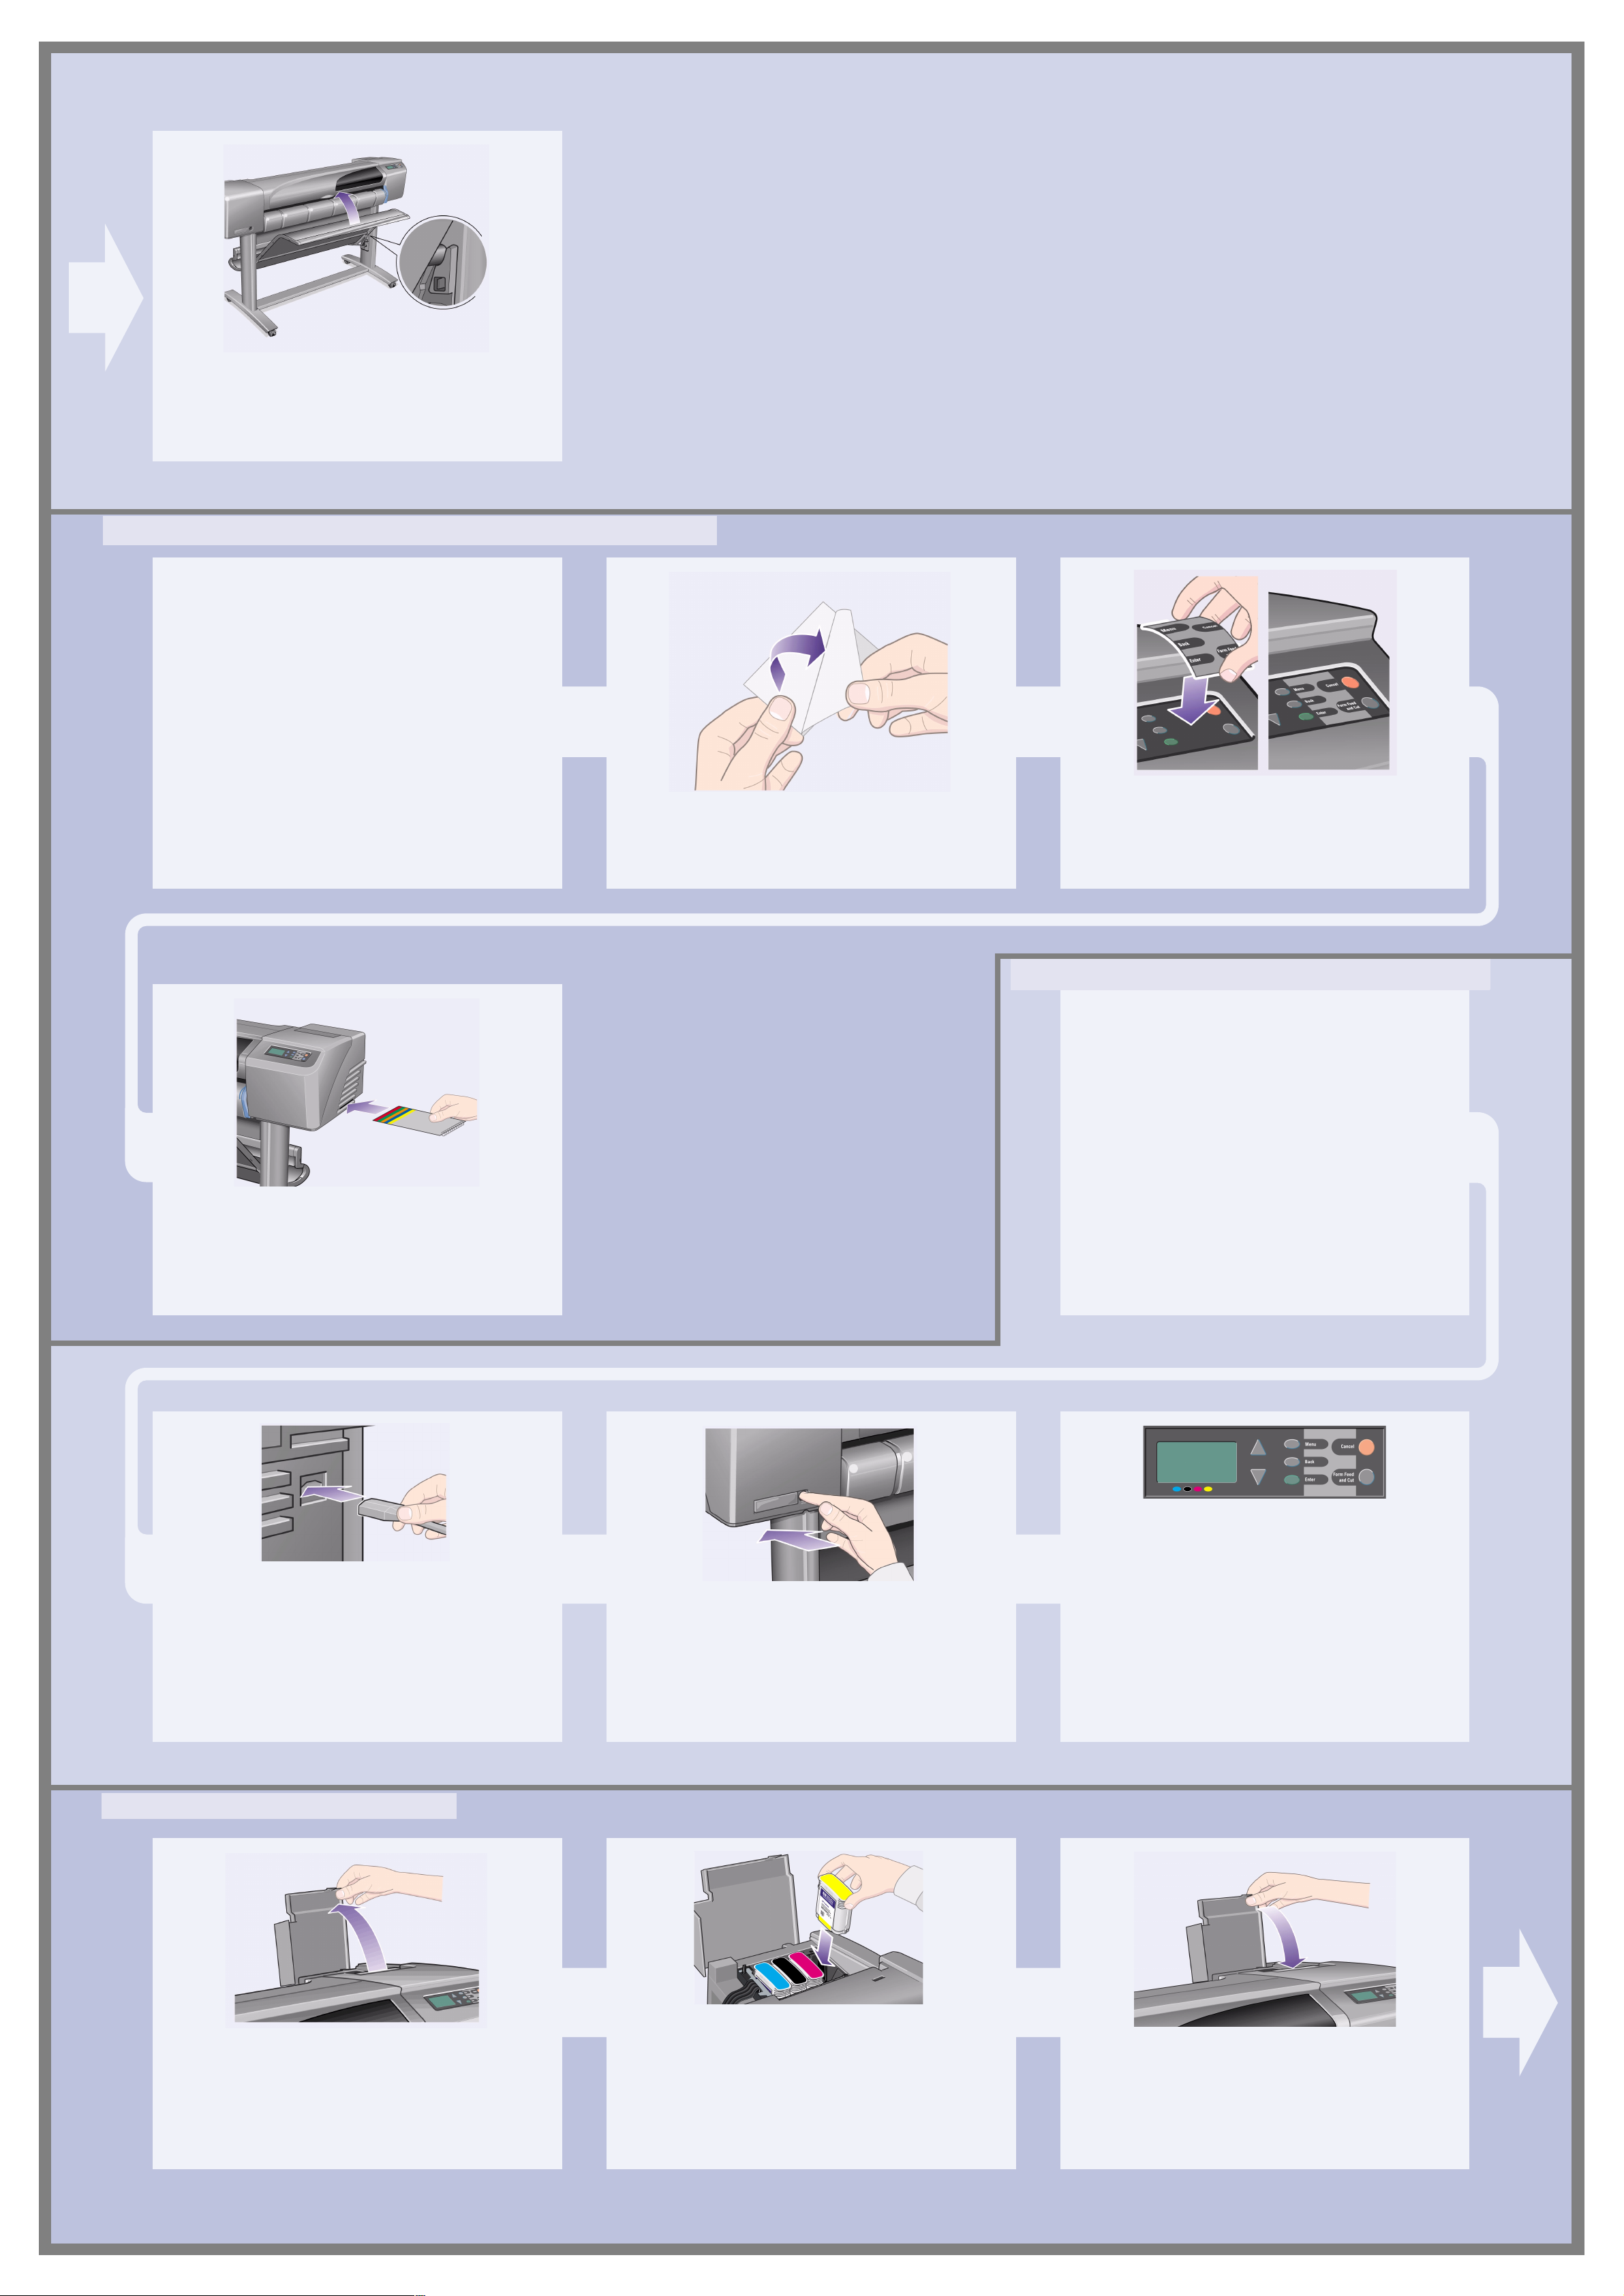
13–Raise the bin into its correct position.
Raise the bin until the large pins align with their slots
and the bin drops into place.
6. Locate the Front-Panel Overlay and Pocket Guide (all models)
1–From the red documentation package
(the “installation pack”) remove:
– The Front-Panel overlay, for use in the next step.
– The Pocket Guide, for use in the next step.
– The ink cartridges, for use in “Insert Ink Cartridges” on page 4.
– The printheads, for use in “Replace Set-Up Printheads with
Active Printheads” on page 5.
– The cables, for use in “Switch On and Choose a Language” on
page 4 and “Install and Connect a LAN Card” on page 7.
4–The Pocket Guide is also In the “Installation pack”
of documentation and other items. It cont ains important
information for the use of the printer. We strongly
recommend that you put the Pocket Guide into the
horizontal slot on the right-hand side of the printer, so
that users of the printer can refer to it when necess ary.
2–Front-Panel Overlay (1) The overlay for the Front
Panel of the printer is in the “Installation pack” of
documentation and other items. Peel off the backing.
3–Front-Panel Overlay (2) Carefully stick the
overlay onto the Front Panel, which is at the right side of
the front of the printer.
7. Switch On and Choose a Language (all models)
WARNINGS
• When the printer is power ed on, keep objects su ch as
hair, jewelry and clothing away from the printer
mechanisms.
• Make sure that the power cord supplied with your
printer matches your AC power outlet connection.
Only use a three-wire (earth-grounded) power cord
with this printer.
1–Plug the power cord into the socket at the back of
the printer and then into the AC power outlet.
8. Insert Ink Cartridges (all models)
2–Switch on if the printer doesn’t automatically
come on:
front left of the printer. It is a simple push-button switch
with a green light (LED) to indicate when it is On.
Switch the power on by pressing the button once.
If there is no sound from the printer and no light on the
switch’s LED, you have a power problem. Check the
power cord connections and power source.
The printer’s On/Off switch is located on the
3–Select a language: After up to a mi nute, the
printer’s front-panel menu will invite you to set the
language. The menus are available in the following
languages:
English, Italian, Portuguese, German, French,
Spanish, Catalan, Japanese, Korean, Traditional
Chinese, and Simplified Chinese.
On the front panel, press the ∆ or ∇ key until the
language you want is highlighted.
Then press the Enter key to select the language.
1–Open the ink cartridge cover and remove the
packaging from the ink cartridges, which are in the
“Installation pack” of documentation and other items.
2–Insert the ink cartridges into their correct
positions. Colored labels on the ink cartridges must
correspond with the same colored labels on the printer .
3–Close the ink cartridge cover. The printer starts
to initialize it s in k system as s oon as the last ca rtridge i s
inserted. Wait for about a minute until this has finished.
Page 5

The set-up printheads are provided to protect the ink
system while the printer is being transported from the
factory , and to f ill up the ink tubes insi de the printer when
it is first initialized. They must be replaced by act ive
(normal) printheads when the printer’s tubes have filled
with ink.
Set-up printheads cannot be used for printing.
It is important not to remove the set- up printheads too
early, as they are required while the printer is being
initialized.
When you have removed the set-up printheads (as
described in this st age), y ou should throw them away, as
they cannot be used for printing and are not needed any
more.
1–When you are prompted to do so in the front
panel, open the window and locate the carriage
assembly.
and set-up printheads have filled with in k.
This will be accessible once the ink tubes
2–Release the latch on the printhead cover. You
may need to hold this latch up out of the way during the
next steps.
3–Lift up the printhead cover; this will give you
access to the set-up printheads.
4–To remove a set-up printhead, lift up the blue
handle.
5–With controlled force pull the blue handle
upwards until the printhead is rel eased from the
carriage assembly.
6–Remove the tape from the new printheads.
9–Close the latch on the printhead cover. The
latch may feel rather stiff, but don’t worry as it needs
some pressure to close it.
7–Insert a new normal printhead ensuring th at the
colored label on the printhead corresponds to that on
the printhead slot.
10–Close the window. After the replacement of the
set-up printheads, the printer checks that the normal
printheads are functioning correctly. This may take
several minutes. You will be prompted to accept
Printhead Alignment—correct alignment of the
printheads is essential for good-q uality printing. For this
you will need to load paper, as described in the next
stages.
8–When you have replaced all the set-up
printheads with normal printheads, pull the
printhead cover down over the printheads, ensuri ng that
the cover hooks over the latch.
10. Load a Roll of Paper (all models)
The printer will now use a certain amount of paper for
checking and calibration. (If you prefer to use sheet
paper, see the Pocket Guide for loading instructions.)
1–If your printer has legs, make sure the printer
wheels are locked (the brake lever is pressed down)
to prevent the printer from moving.
2–At the back of the printer, remove the empty
spindle by pulling fir mly on each end as indicated.
3–The spindle has a stop at each end to keep
the roll in position.
be removed to mount a new roll; it slide s along the
spindle to hold rolls of different widths.
Remove the blue-colored stop from the end of the
spindle, and stand the spindle vertically, with the fixed
stop on the floor.
The stop that is colored blue can
Page 6

4–Slide the new roll of paper on to the spindle.
Make sure the orientation of the paper is loaded exactly
as shown. If it is not, remove the rol l, turn it through 180
degrees vertically and slide it back on to the spindle.
7–A front-panel message prompts you to load
paper to align the printheads.
5–Put the removable stop on to the upper end of
the spindle,
and push it down as far as it will go.
6–With the blue-colored roll stop on the right
(as seen from the back of the printer),
spindle into the printer left and then rig ht as shown by
the arrows. The paper should oriented on the roll
exactly as shown.
slide the
Press the Enter key.
Then, as above left, select Load roll (or Load sheet, if
you prefer–see the Pocket Guide for loading
instructions) and press Enter.
Using the ∆ or ∇ keys, select the type of paper loaded
(see above right) and press the Enter key. (If in doubt,
you should find the ‘type’ of the paper on its box.)
10–Follow the prompts (see steps 11 to 13).
Try to avoid touching the paper in t he middle (keep your
fingers as close as possible to each edge). Handle
glossy paper by the edges or wear cotton gloves. Skin
oils can interact with the ink and cause it to smear.
8–Lift the blue paper-load lever.
11–Leaning over the printer, feed the paper
through towards the front.
C6074102
9–From the front of the printer lean over the top
and feed the paper towar ds you i nto the slot at the back
of the printer, as shown here. (You may find it easier if
the paper bin is pushed back out of the way.)
12–At the front of the printer, align the paper
against the blue line as shown here.
13–Lower the blue paper-load lever. The printer
checks the alignment of the paper.
If it is not correctly aligned, the front panel displays help
instructions. The printe r trims the edge of the roll.
11. Understand Printer Connections (all models)
14–If there is an excess of loose paper wrap it
back onto the roll by turning the roll; then press Enter.
15–The printer will now print its alignment
pattern, using the paper you have loaded.
If there is a problem printing, check the fro nt panel error
messages. Explanations of these messages are in the
Pocket Guide (which you should have inserted in th e
slot on the right-hand side of the printer).
You should not cancel the alignment print as correct
alignment of the printheads is essentia l for good-quality
printing.
You may also be prompted to let the printer perform its
Color Calibration routine. Again, don ’t cancel this as it
will help ensure that the colors printed are best for the
paper you have loaded.
Printhead Alignment and Color Calibration are
different processes and should both be done when
required. They are brief ly described in the Pocket Guide
and more fully in the online User’s Reference Guide.
If you have purchased a network card, for connecting
your printer to a local area network (LAN), now is a
good time to install it—see Stage 12 below.
Also install now any HP-GL/2 Accessory card and any
additional memory for your Accessory card. See the
instructions packaged with these items for full
information on how to install them. The HP-GL/2
Accessory card is installed in much the same way as a
LAN card, as in Stage 12 on page 7.
See St age 12 on page 7 for connecting a LAN cable.
If you use a PC with Windows 98 and a USB
connection, see Stage 13 on page 7.
For details of how to install the software you may need
(except with a PC running Windows 98 and a USB
connection), turn to Stage 14 on page 8.
Sockets for connecting your printer to a
computer or to a network
The diagram on the right shows the sockets (or “ports”)
that you can use.
• The USB and parallel sockets are at the back of the
printer, alongside the mains socket.
• The LAN cable socket is inside the back cover of the
printer—see Stage 12 on page 7 for how to access it.
USB socket
Parallel socket
LAN cable socket
(inside
back cover)
Page 7

NOTE: An internal HP JetDirect Print Server may
Software setup
For Windows users
hp designjet printers
already be installed in your printer, inside the
compartment at the top left rear of the printer. If it is,
skip to step 8 below.
1–Before installing a card, switch off the printer
and unplug it from the mains electricity supply.
2–Carefully remove the plastic cover from the
left-hand back of the printer by unclipping it.
This cover gives access to the two slots for an
Accessory card and a LAN card.
a. Press in the thumb-tab on the side furthes t from the
edge that has the cable-hole.
b. Ease the cover out in the direction of the embossed
arrow , pivoti ng it by the hing e clips on the side th at has
the edge cable-hole.
3–Remove the cover completely. Inside the
compartment there are two slots for a LAN card or an
Accessory card.
You can use either slot for either card, but we
recommend putting a LAN card on the left (nearer to the
front of the print er) and an Accessory car d o n the r ight.
In this way the cable from the LAN card ca n easily p ass
through the slot in the door.
4–To insert a LAN card (or an Accessory card),
remove the metal cover from the appropriate
slot by unscrewing its two screws. You can use a
screwdriver or do it manually.
7–Carefully replace th e plastic cover by
clipping it back into place:
a. Put the two hinge clips on the side that has the edge
cable-hole into their slots.
b. Swivel the cover in the direction opposite to the
embossed arrow and clip the other two tabs on the
opposite side into their slot s. Ensure that the LAN
cable passes correctly thr ough the edge cable-hole
(shown by the yellow arrow) and avoids touching the
roll of paper on the spindle.
5–When you have inserted th e card, screw it
into place, using its two screws (a t the top and bottom
of the card). Again, this can be done wit h a screwdri ver
or manually.
8–Network Printer: To obtain the information you’ll
need when you install the software:
• Go to the Set-up menu in the printer’s front panel.
• Select I/O Set-up and press Enter.
• Select Card ID and press Enter.
There you will find the hardware address of your
printer, as MAC=xxxxxxxx.
You may also require an IP address or an AppleTalk
name, for which the software will prompt you.
6–Insert the LAN cable into the LAN card–it is
simply pushed into place with a click.
You have now finished the hardware assembly
and set-up of your printer. I f you are r unning
Windows 98 and a USB (Universal Serial Bus)
connection to your printer, continue with Stage 13.
Otherwise
network and turn to the next page.
connect the LAN cable (if any) to your
Now you are ready to start the software set-up.
Turn to the next page. (If you are running Windows 98
and are connecting your printer with a USB (Universal
Serial Bus) cable, continue with Stage 13.
13. Using a USB Connection (all models under Windows 98)
USB socket
1–To use a USB port on a PC running Windows
98 or Windows 2000, connect the USB cable to your
computer and then to the printer. For Windows 2000,
go next to Stage 14, “Set Up Your Software” on page 8.
For Windows 98 the “Add New Hardware Wizard”
should appear on your computer screen. Click “Next>”.
2–What do you want Windows to do? [The rest of
Stage 13 applies to Windows 98 only.] Select “Search
for the best driver for your device ” and click “Next>”.
3–Windows will search for new drivers...
In this screen, select “Specify a locati on” and click
“Browse...”.
4–Insert the HP DesignJet Printers Software
Setup CD into your CD-ROM drive...
5–...and browse to the USBWin98 folder. Select
that folder and click “OK”. Windows will then install the
USB driver for the printer.
6–You are now ready to install other software
for your printer.
driver installation, you should see the screen above. If
you don’t see this screen, run the SETUP.EXE program
in the root directory of the HP DesignJet Printers
Software Setup CD.
Follow the on-screen instructions to install the software.
When Windows finishes the USB
Page 8

Windows
Software setup
For Windows users
hp designjet printers
Use this CD
See “Using a USB Connection” on
page 7 if you run Windows 98 and
are using the USB port.
How will this Printer
be connected to your
Computer?
Client Setup
The printer is already set up as a shar ed device
on the network and is managed by a server or
another PC.
Printer Printer Server Your PC
4. When you get to the Network Printer Setup
screen, select Client Setup.
Macintosh
Macintosh software
Fall 2000
hp designjet 500/800
series
Use this CD
(HP DesignJet
800 Series
Printers)
Network Setup
Printer
Your PC
1. Connect the printer to the network.
2. Make sure the printer is properly setup,
turned on and ready to print.
3. Insert the HP DesignJet Printers Software
Setup CD and answer the questi ons.
(If the CD does not start automatically, run
the SETUP.EXE program in its root
directory).
Select the type of network setup
5. Follow the instructions to complete the
software setup.
Direct Network Setup
The printer will be setup and managed directly
over the network by this computer.
Printer
Your PC
4. When you get to the Network Printer Setup
screen, select Direct Network Setup.
UNIX
To install network software,
insert the HP JetDirect CD.
Direct Connect (parallel or USB cable)
Printer
Your PC
1. Make sure the printer is properly setup,
turned on and ready to print.
2. Make sure the printer is connected to your
computer via a parallel or USB cable and
that all the cable connecti ons are connected
properly.
3. Insert the HP DesignJet Printers Software
Setup CD and answer the questions.
(If the CD does not start automatically, run
the SETUP.EXE program in its root
directory).
4. Follow the instructions to complete the
software setup.
Novell Server Setup
The printer will be setup on the network a nd
managed by your Novell server.
For system administrators only.
Printer Your PCNovell Server
4. When you get to the Network Printer Setup
screen, select Novell Server Setup.
If you have Internet access, you can also get the software from
HP’s Web Site, the HP Download Service, Compuserve or AOL. You
will find more through the driver software installation instructions, and
a description of all supported installation methods on our web site,
www.hp.com/go/designjet.
For detailed information about all CDs see the documentation supplied
with them. (There may be other CDs in the box with your printer, they
contain samples and additional material—use them later).
Macintosh is a product
of Apple Computer Inc.
PostScript is a trademark
of Adobe Systems
Incorporated.
Copyright Hewlett-Packard
Company 2000
Part Number C7769-90031
First Edition
Hewlett-Packard Company
Inkjet Commercial Division
Avda. Graells, 501
Unix is a regist ered trademark
in the United States and other
countries licensed exclusively
through X/Open Company Ltd.
5. Follow the instructions to complete the software
setup.
Don’t forget...
• Keep the packaging in which your printer was packed; there are repacking
instructions on the HP web-s ite, www.designjet-online.com, in case you need to
return the printer. (If you no longer have this packaging when you need it, a
Repackaging Kit is available from HP.)
• The blue documentation pack (the “day-to-day pack”) is for the day-to-day use
of the printer and should be made available to its users.)
• The User’s Reference Guide for this printer is on the Using Your Printer CD (in
the “Day-to-day” pack of documentation and other items).
 Loading...