

Page 1

Router 5000 Family
Installation Guide
Router 5012 (3C13701)
Router 5232 (3C13751)
Router 5642 (3C13755)
Router 5682 (3C13759)
http://www.3com.com/
Part No. 10014373 Rev. AB
Published September 2005
Page 2

3Com Corporation
350 Campus Drive
Marlborough, MA
01752-3064
Copyright © 2004, 3Com Corporation. All rights reserved. No part of this documentation may be
reproduced in any form or by any means or used to make any derivative work (such as translation,
transformation, or adaptation) without written permission from 3Com Corporation.
3Com Corporation reserves the right to revise this documentation and to make changes in content from
time to time without obligation on the part of 3Com Corporation to provide notification of such revision or
change.
3Com Corporation provides this documentation without warranty, term, or condition of any kind, either
implied or expressed, including, but not limited to, the implied warranties, terms or conditions of
merchantability, satisfactory quality, and fitness for a particular purpose. 3Com may make improvements or
changes in the product(s) and/or the program(s) described in this documentation at any time.
If there is any software on removable media described in this documentation, it is furnished under a license
agreement included with the product as a separate document, in the hard copy documentation, or on the
removable media in a directory file named LICENSE.TXT or !LICENSE.TXT. If you are unable to locate a copy,
please contact 3Com and a copy will be provided to you.
UNITED STATES GOVERNMENT LEGEND
If you are a United States government agency, then this documentation and the software described herein
are provided to you subject to the following:
All technical data and computer software are commercial in nature and developed solely at private expense.
Software is delivered as “Commercial Computer Software” as defined in DFARS 252.227-7014 (June 1995)
or
as a “commercial item” as defined in FAR 2.101(a) and as such is provided with only such rights as are
provided in 3Com’s standard commercial license for the Software. Technical data is provided with limited
rights only as provided in DFAR 252.227-7015 (Nov
applicable. You agree not to remove or deface any portion of any legend provided on any licensed program
or documentation contained in, or delivered to you in conjunction with, this User Guide.
Unless otherwise indicated, 3Com registered trademarks are registered in the United States and may or may
not be registered in other countries.
3Com and the 3Com logo are registered trademarks of 3Com Corporation.
Intel and Pentium are registered trademarks of Intel Corporation. Microsoft, MS-DOS, Windows, and
Windows NT are registered trademarks of Microsoft
trademarks of Novell,
All other company and product names may be trademarks of the respective companies with which they are
associated.
Inc.
1995) or FAR 52.227-14 (June 1987), whichever is
Corporation. Novell and NetWare are registered
Page 3

CONTENTS
ABOUT THIS GUIDE
Conventions 3
Related Documentation 4
1 INTRODUCING THE ROUTER 5000 FAMILY
Router 5000 Family Software 6
Router 5000 Family Hardware 6
Router 5012 Hardware 8
Router 5232 Hardware 10
Router 5642 Hardware 11
Router 5682 Hardware 12
2 INSTALLING THE ROUTER
Preparing to Install the Router 15
Mounting the Router in a Rack 18
Installing the Router on the Workbench 19
Connecting the Power Cable 19
Connecting the Router to the Console Terminal 19
Installing SICs and MIMs 20
Connecting the Router to the Ethernet 21
Connecting the Router to the WAN 22
Verifying the Installation 23
3 BOOTING AND CONFIGURING THE ROUTER
Connecting the Router to a Local Console Terminal 25
Connecting the Router to a Remote Console Terminal 25
Setting the Parameters of the Console Terminal 26
Powering on the Router 29
Startup Process 30
Configuration Fundamentals of the Router 30
Naming and Arranging Interfaces 32
4 MAINTAINING THE ROUTER
Introduction 33
Page 4

5 TROUBLESHOOTING
The Power LED is Off. 43
Nothing is Displayed on the Terminal after Power-On 43
Illegible Characters Display on the Terminal after Power-On 44
Repeated Reboot 44
Troubleshooting SICs and MIMs 44
A CABLE SPECIFICATIONS
Console Cable 47
AUX Cable 48
Ethernet Cable 48
Serial Interface Cable 49
Dumb Terminal Adapter 54
E1 Cable 54
T1 Cable 55
ISDN cables 55
A OBTAINING SUPPORT FOR YOUR PRODUCT
Register Your Product 57
Purchase Value-Added Services 57
Troubleshoot Online 57
Access Software Downloads 57
Telephone Technical Support and Repair 58
Contact Us 58
Page 5
Conventions 3
ABOUT THIS GUIDE
This guide describes the 3Com® Router 5000 Family of routers and how to install
hardware, configure and boot software, and maintain software and hardware.
This guide also provides troubleshooting and support information for your router.
This guide is intended for the system or network administrator who is responsible
for configuring, using, and managing the routers. It asumes a working knowledge
of wide area network (WAN) operations and familiarity with communication
protocols that are used to interconnect WANs.
Always download the Release Notes for your product from the 3Com World Wide
Web site for the latest updates to product documentation:
http://www.3com.com
Conventions Ta bl e 1 and Tab l e 2 list conventions that are used throughout this guide.
Ta bl e 1 Notice Icons
Icon Notice Type Description
Information note Information that describes
Caution Information that alerts you
Warning Information that alerts you
Ta bl e 2 Text Conventions
Convention Description
Screen displays This typeface represents information as it
appears on the screen.
important features or
instructions.
to potential loss of data or
potential damage to an
application, system, or
device.
to potential personal injury.
Keyboard key names If you must press two or more keys
Press Ctrl+Alt+Del The words “enter” and type”
simultaneously, the key names are linked
with a plus sign (+), for example:
Page 6

4 CHAPTER : ABOUT THIS GUIDE
Table 2 Text Conventions
Convention Description
Related
Documentation
When you see the word “enter” in this
guide, you must type something, and then
press Return or Enter. Do not press Return or
Enter when an instruction simply says
“type.”
Italics are used to: Emphasize a point.
Denote a new term at the place where it is
defined in the text.
From the Help menu, select Contents. Click OK.
Words in bold Boldface type is used to highlight command
Words in italics
Identify menu names, menu commands, and
software button names. Examples:
names in text. For example, “Use the
display user-interface command to...”
The following manuals offer additional information necessary for managing your
Router 5000:
■ 3Com Router Command Reference Guide — Provides detailed descriptions of
command line interface (CLI) commands, that you require to manage the
Router 5000.
■ 3Com Router Configuration — Describes how to configure your Router 5000
using the supported protocols and CLI commands.
■ Release Notes — Contains the latest information about your product. If
information in this guide differs from information in the release notes, use the
information in the Release Notes.
These documents are available in Adobe Acrobat Reader Portable Document
Format (PDF) on the CD-ROM that acompanies your router or on the 3Com World
Wide Web site:
http://www.3com.com/
Page 7

INTRODUCING THE ROUTER 5000
1
FAMILY
Routers in the 3Com Router 5000 Family support two types of interface modules:
■ Smart Interface Cards (SICs) — small WAN cards
■ Multifunctional Interface Modules (MIMs) — larger WAN cards
The routers can be flexibly configured by changing or extending SICs or MIMs, to
provide different functions. Your router provides slots for the following modules:
■ Router 5012 — 2 SICs and 1 MIM
■ Router 5232— 3 MIMs
■ Router 5642 — 4 MIMs
■ Router 5682 — 8 MIMs
Software features of the Router 5000 Family include:
■ WAN routing capability — Router 5000 Family routers provide full routing of IP
using RIP, OSPF, IPX or BGP-4. They also provide WAN support for
Relay, X.25, PPP, PPPoE, MP, E1, T1, HDLC/SDLC, Sync / Async, Ethernet
(broadband)
ISDN, Frame
■ Security — Router 5000 Family routers offer RADIUS authentication, advanced
filtering, firewall, and support for VPN protocols, including IPSec with IKE, GRE
and L2TP
■ Powerful backup functionality — Router 5000 Family routers support interface
backup, link backup and route backup. The backup can be between a leased
line and a dialup line, between a leased line and a virtual link, or between
dialup lines. The Router 5000 Family supports mutual backup between such
networks as leased line, X.25, PSTN, ISDN, and Frame Relay.
■ Voice / Data Convergence — Router 5000 Family routers support QoS,
Multicast, 802.1q VLAN,
■ Resilience — Router 5000 Family routers support Virtual Router Redundancy
(VRRP),
multilink
■ E1/CE1/PRI and CT1/PRI compatibility — Router 5000 Family routers provide
CE1 (channelized E1) access, and the CE1 interface is compatible with the E1
interface. In addition, the ISDN PRI function can be implemented on the CE1
interface. CT1 (channelized T1) access is also provided and the CT1 interface is
compatible with the PRI interface. This compatibility allows one card to be used
for multiple purposes.
■ 5012High density ports — The Router 5682 supports a 28 2Mbps sync serial
port, which can connect to leased line, Frame Relay, and X.25 networks.
Backup Center (Configuration / Port), dial on demand routing, and
multi-links, load balancing and compression
Page 8

6 CHAPTER 1: INTRODUCING THE ROUTER 5000 FAMILY
■ Fast Ethernet access — Router 5000 Family routers support 100 Mbps access to
the local Ethernet and flexible networking configuration.
Router 5000 Family
Software
Data Security The Router 5000 Family routers provides data security through the following
Online Upgrades Application and configuration software can be upgraded online with 512 KB Boot
Router 5000 Family
Hardware
The Router 5000 Family software operates in Synchronous Dynamic Random
Access Memory (SDRAM). Flash memory stores router program files and
configuration files. Boot ROM stores boot and initialization programs.
features:
■ Authentication protocols, such as Password Authentication Protocol (PAP),
Challenge Handshake Authentication Protocol (CHAP), and Remote
Authentication Dial In User Service (RADIUS)
■ Firewall and packet filtering to prevent intrusions from external networks
■ Virtual Private Network (VPN) for example, GRE, L2TP; IP Security (IPSec); and
Internet Key Exchange (IKE) technologies, to guarantee the security of the
network in the Internet environment
■ Backup solutions based on backup center technology
ROM and 32MB Flash memory.
The Router 5000 Family routers share the following hardware features:
n Fixed ports
n Power supply and protection ground
n LEDs
Fixed Ports The Router 5000 Family routers provide the following fixed ports:
n Console port
n AUX port
n Ethernet port
Ta bl e 3 lists the attributes of the Router 5000 Family console port.
Ta bl e 3 Router 5000 Family Console Port Specifications
Attribute Description
Connector type RJ-45
Interface standard Asynchronous EIA/TIA-232
Baud rate 9600 to 115200 bps
Default 9600 bps Services supported
Connecting with character terminal Connecting with serial ports of the local PCs
and operating the terminal emulation
program on the PCs
Command line interface
Page 9

Router 5000 Family Hardware 7
Ta bl e 4 lists the attributes of the Router 5000 Family AUX port.
Ta bl e 4 Router 5000 Family AUX Port Specifications
Attribute Description
Connector type RJ-45
Interface standard Asynchronous EIA/TIA-232
Baud rate 300 to 115.2 kbps
Services supported Modem dial-up
Backup Operating as the console port when the CON
fails
Protocols supported PPP
SLIP MP
Ta bl e 5 lists the attributes of the Router 5000 Family Ethernet port.
Ta bl e 5 Router 5000 Family Ethernet Port Specifications
Attribute Description
Connector type RJ-45
Interface type MDI
Frame format supported Ethernet _ II
Ethernet _ SNAP IEEE 802.2
IEEE 802.3 Operating mode
10/100BASE-T Mbps autosensing Full duplex/half duplex
Network protocol supported IP, Novell IPX
Power Supply and
Protection Ground
LEDs Table below describes the LEDs on the Router 5012
Ta bl e 6 lists specifications for the Router 5000 Family power supply and protection
ground.
Ta bl e 6 Router 5000 Family Power Supply and Protection Ground
Item Description
Power supply input Rated Voltage: 100-240V, a.c. 50/60Hz
Max. voltage 90-264V a.c.50/60Hz
Protection ground Connecting to ground through ground wire.
POWER ON — The module (MIM or SIC) is operating
normally.
OFF — No module is installed in the current
slot or the MIM is not operating normally.
SYSTEM Flashing-unit is operating normally
OFF-power is Off
WAN Flashing-data is being transmitted from local
WAN port
OFF-no data transmitted on WAN port
LAN Flashing-Data is being transmitted on local
Ethernet port
OFF-no data is being transmitted on local
Ethernet port
Page 10

8 CHAPTER 1: INTRODUCING THE ROUTER 5000 FAMILY
SLOT 1-3 ON-The MIM the SIC is powered and
Ta bl e 7 describes the LEDs on the Router 5232, 5642, 5682 routers.
Ta bl e 7 Router 5232, 5642, 5682 LEDs
POWER ON — The module (MIM or SIC) is operating
SYSTEM Flashing-unit is operating normally
READY ON-Module found in particular slot
ACTIVE Flashing-Data is being transmitted by module
OFF — The module in the corresponding slot
is running abnormally or no module is
installed.
(not on Router 5012) Data transmission LED
Flashing green — Data is being transmitted by
the module in the corresponding slot.
SERIAL0 (Router 5012 only)
Fixed serial port LED — Shows the status of
data that is transmitting on the serial ports.
Flashing green — Data is being transmitted. ETHERNET0/LAN
Fixed Ethernet port LED — Shows the status of
data transmission on the fixed Ethernet port.
Flashing green — data is being transmitted. SYSTEM
Hardware system operating LED Flashing green — The system is operating
ON or OFF — The system is operating
abnormally.
System power LED ON — Power is on.
OFF — Power is off.
operating normally.
OFF-No module is installed in the current slot
or the module is not operating normally.
normally.
OFF — No module is installed in the current
slot or the MIM is not operating normally.
OFF-power is Off
OFF-No module found in particular slot
in corresponding slot
OFF-no data is being transmitted in
corresponding slot
ACTIVE
OFF — No data is being transmitted by the
module in the corresponding slot.
OFF — No data is being transmitted.
OFF — No data is being transmitted.
normally.
POWER
Router 5012 Hardware The Router 5012 can function as a small-sized access router by connecting to a
leased line or Public Switched Telephone Network (PSTN) through asynchronous
serial ports.
The Router 5012 has four fixed ports and three slots.
Figure 1 illustrates the front of the Router 5012.
Page 11
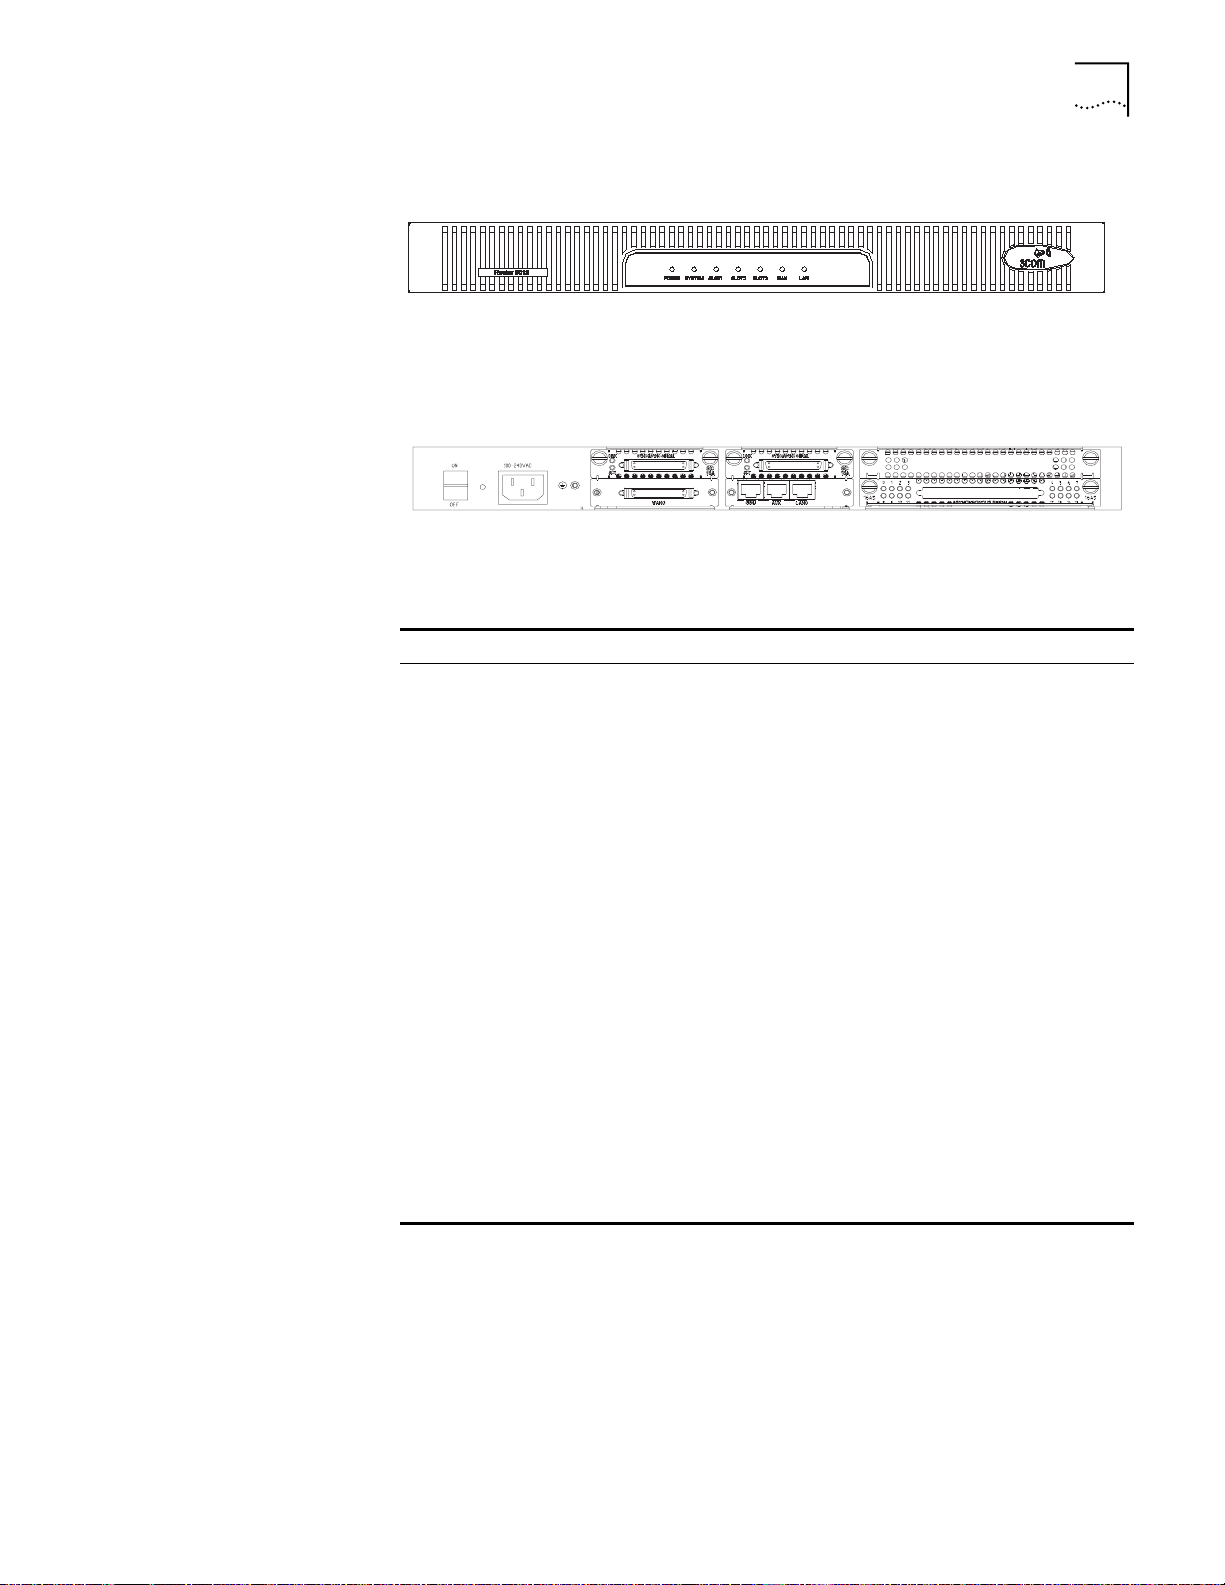
Figure 1 Front View of the Router 5012
Figure 2 illustrates the back of the Router 5012.
Figure 2 Back View of the Router 5012
Router 5012 Hardware 9
3
2
System Specifications Ta bl e 8 lists system specifications for the Router 5012
Ta bl e 8 System Specifications for the Router 5012
Item Description
Fixed ports 1 AUX port
1 Console port
1 LAN port
1 Console port 1 Synchronous/ asynchronous serial port
1 10/100 Mbps Ethernet port Slots
1 Encryption Accelerator MIM 2 SIC
Processor MPC8241 (200Mhz)
Boot ROM 512 KB
SDRAM 128 MB
Flash memory 32 MB
Power supply (external) Rated voltage: 100-240 V a.c.; 50/60 Hz
Maximum tolerance: 90-264 V a.c.; 50/60 Hz Input current: 1 to 0.5 A
Output voltage: 12 V d.c. Output current: 4 A
Max. power 40W
Dimensions (W x H x D) 376.2 x 79.4 x 287.9 mm (15 x 3.2 x 11.3 in),
including feet pads
Weight 2.5 kg (5.5 lbs)
Operating relative temperature 0 to 400 C
Operating humidity 5% to 85% (non-condensing)
1
Fixed Serial Port In addition to the fixed ports described in “Router 5000 Family Hardware”, the
Router 5012 provides a fixed synchronous/asynchronous serial port.
Page 12

10 CHAPTER 1: INTRODUCING THE ROUTER 5000 FAMILY
Ta bl e 9 lists the attributes of the Router 5012 synchronous/asynchronous serial
port.
Ta bl e 9 Synchronous/Asynchronous Serial Port Specifications
Description Attribute Synchronous Asynchronous
Connector type DB-50
Interface
standard and
operating mode
Minimum baud
rate (bps)
Maximum baud
rate (bps)
Services
supported
Protocols
supported
V.24 V.35 EIA/TIA-232
DTE, DCE DTE DCE
1200 1200 1200 300
64 k 2.048 M 2.048 M 115.2 k
Leased line backup
Terminal Access
Point-to-Point
Protocol (PPP)
Multilink PPP (MP)
Link Access
Procedure,
Balanced (LAPB)
High-Level Data
Link Control
(HDLC)
Synchronous Data
Link Control
(SDLC)
X.25 (ITU-T X
series
Recommendation)
Frame Relay
Modem dial-up
Backup
Dumb terminal
access
PPP
Serial Line
Internet Protocol
(SLIP)
MP
Router 5232 Hardware The Router 5232 has four fixed ports and three slots.
Figure 3 illustrates the front panel of the Router 5232.
Figure 3 Front Panel of the Router 5232
1 2 3 LAN
Figure 4 illustrates the back panel of the Router 5232.
Figure 4 Back Panel of the Router 5232 with MIMs installed
Page 13
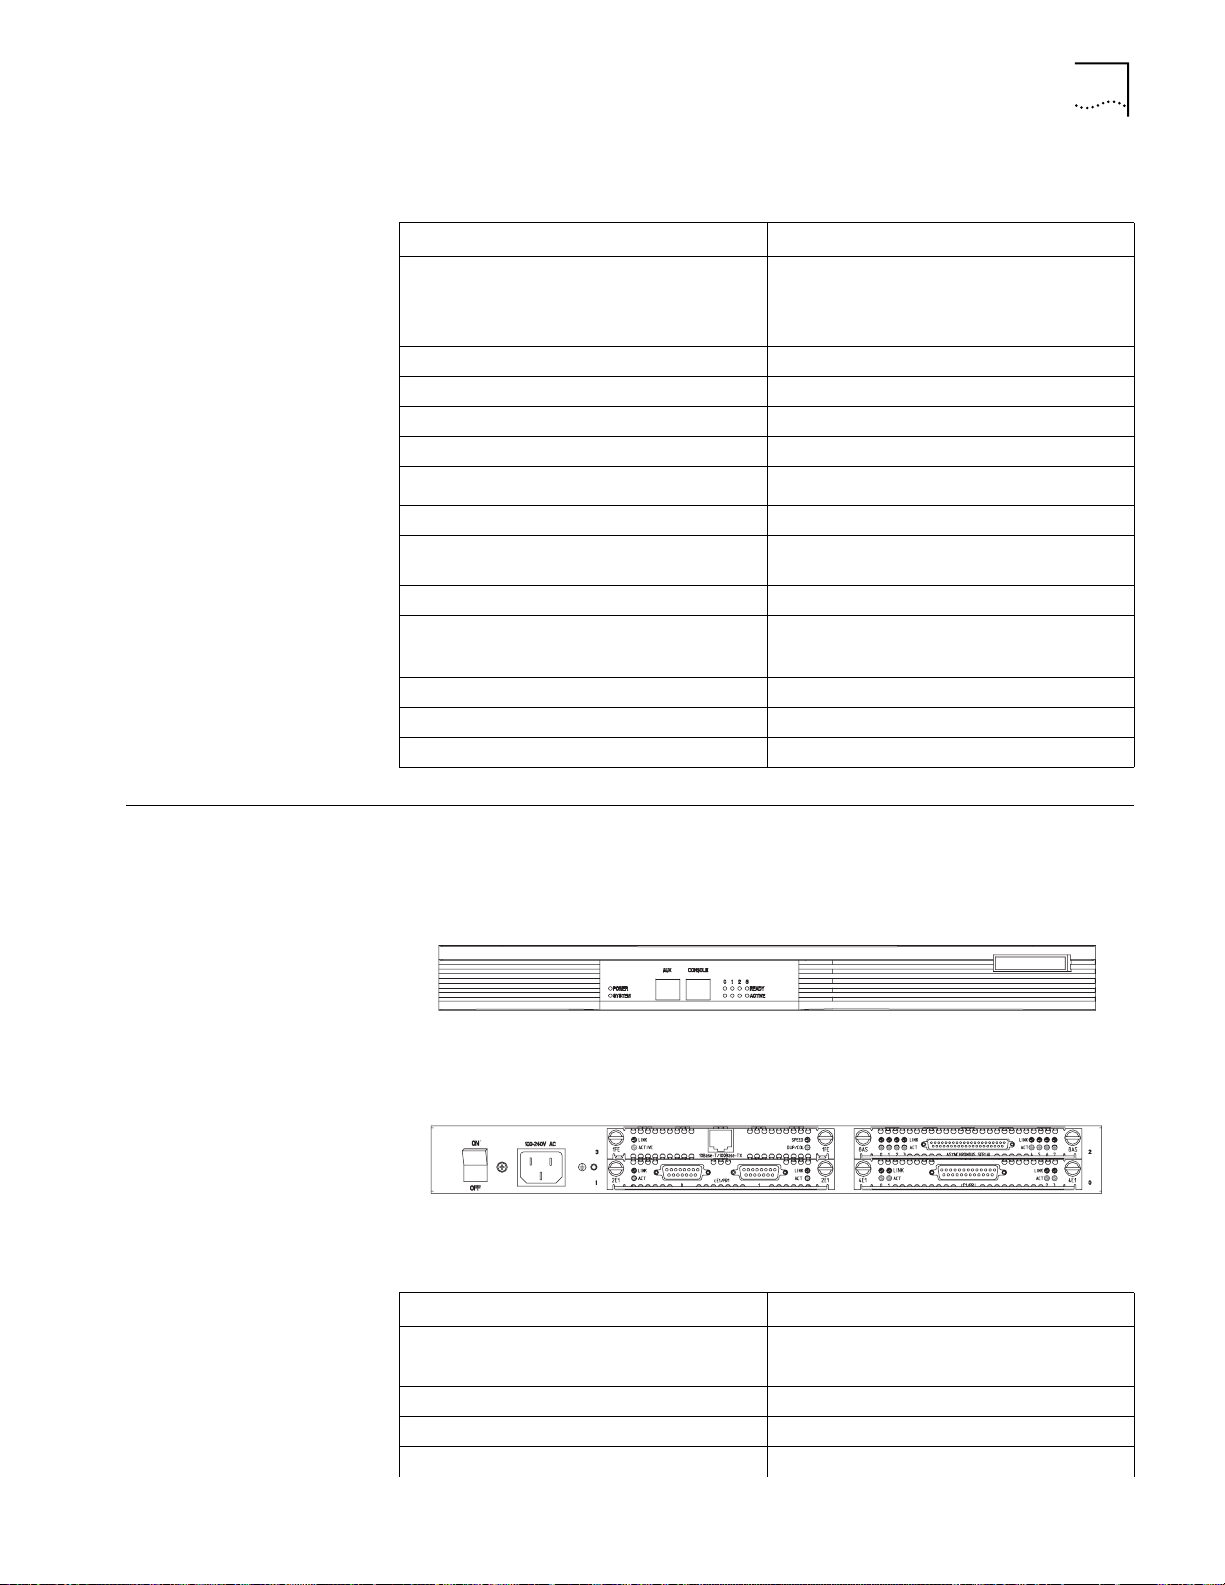
Router 5642 Hardware 11
System Specifications Ta bl e 10 lists the systems specifications for the Router 5232.
Ta bl e 10 System Specifications for the Router 5232
Item Router 5232 specifications
Fixed ports 1 AUX port
1 CONSOLE port
2 LAN port
Slots 3 (MIM)
Processor MPC 8245 300 MHz (AC power supply)
NVRAM 128 KB
Boot ROM 512 KB
SDRAM 256 MB
Flash 32 MB
Dimensions
(W x H x D)
Weight 8kg (17.64 lbs)
Input voltage Rated voltage: 100-240 V a.c.; 50/60 Hz
Max. power 80 W
Operating temperature 0 to 40O C
Operating humidity 5 to 85% (non-condensing)
442 x 44.4 x 413 mm (17.5 x 1.8 x 16.25 in)
excluding rubber feet
Maximum tolerance: 90-264 V a.c.; 50/60 Hz
Router 5642 Hardware The Router 5642 has two fixed ports and four slots.
Figure 5 illustrates the front panel of the Router 5642.
Figure 5 Front Panel of the Router 5642
Figure 6 illustrates the back panel of the Router 5642 with MIM cards installed.
Figure 6 Back Panel of the Router 5642
System Specifications Ta bl e 11 lists system specifications for the Router 5642.
Ta bl e 11 System Specifications for the Router 5642
Item Router 5642 specifications
Fixed ports 1 AUX port
1 CONSOLE port
Slots 4 (MIM)
Processor MPC 8245 300 MHz
NVRAM 128 KB
Page 14
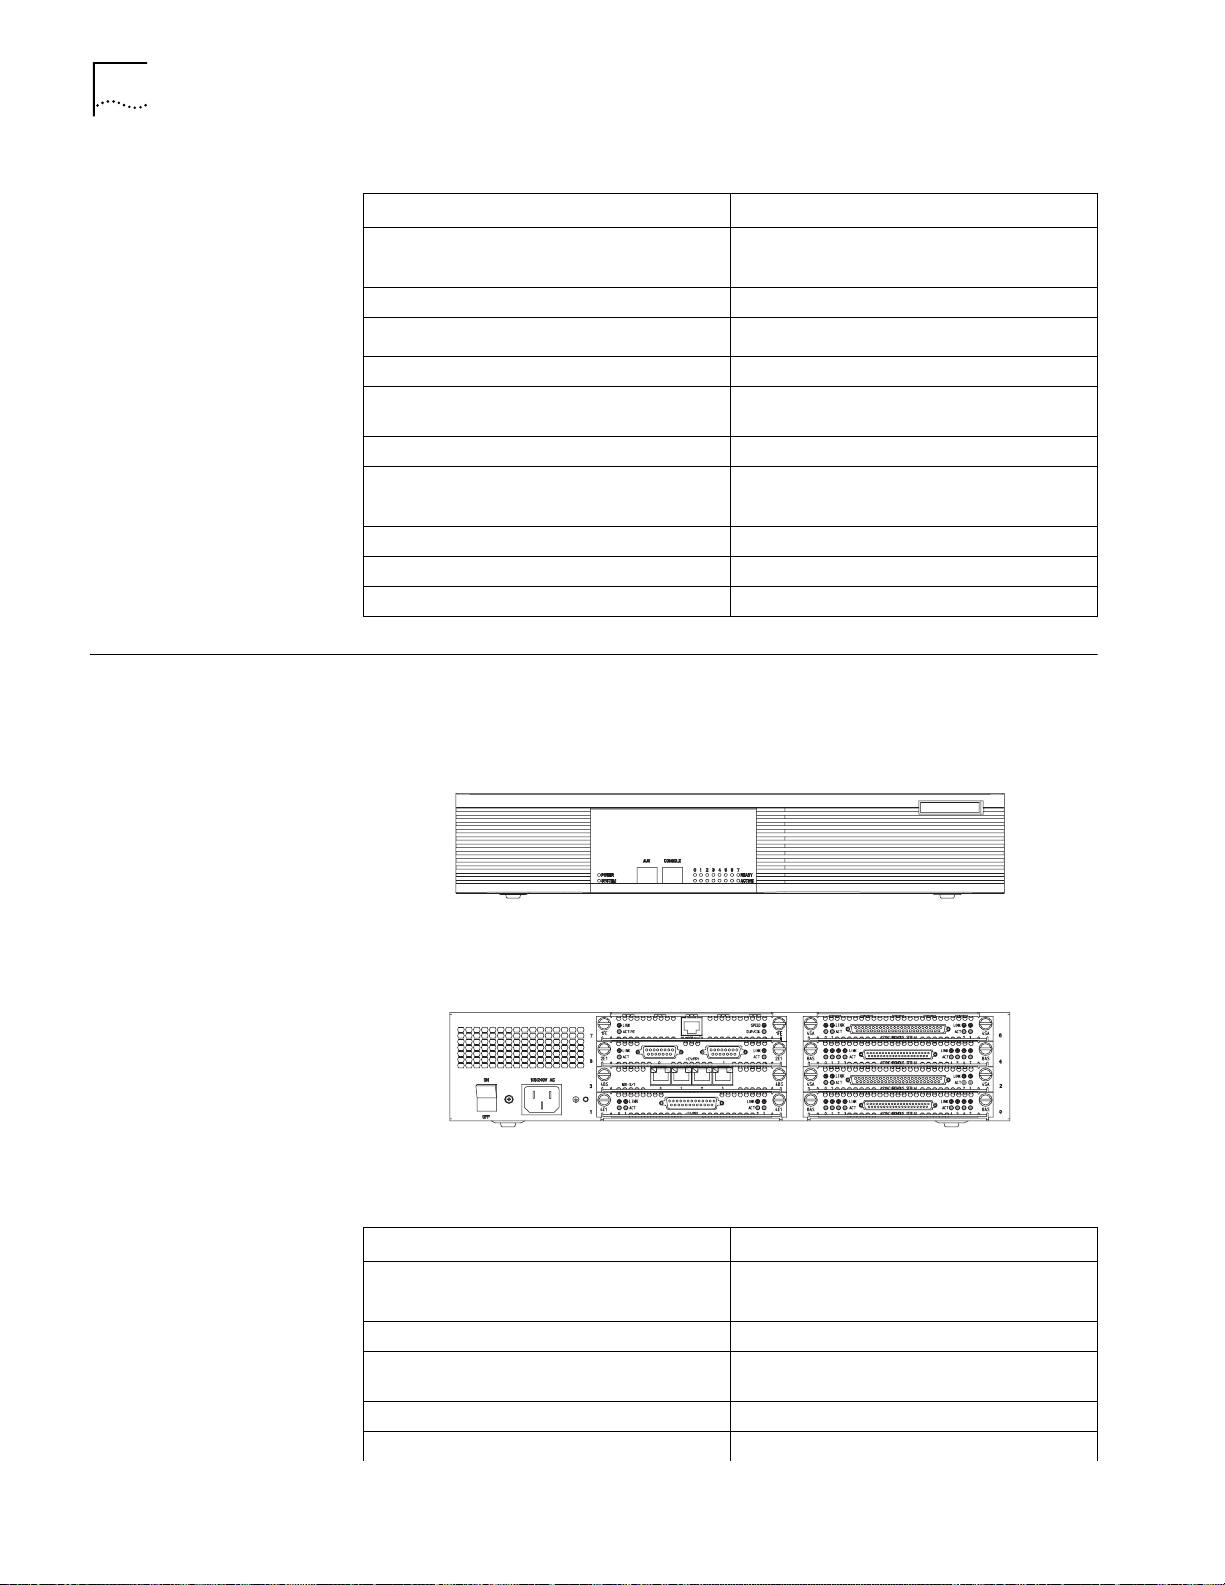
12 CHAPTER 1: INTRODUCING THE ROUTER 5000 FAMILY
Table 11 System Specifications for the Router 5642 (continued)
Item Router 5642 specifications
Fixed ports 1 AUX port
Boot ROM 512 KB
SDRAM 256 MB
Flash 32 MB
Dimensions
(W x H x D)
Weight 8 kg (17.64 lbs)
Input voltage Rated voltage: 100-240 V a.c.; 50/60 Hz
Max. power 80 W
Operating temperature 0 to 40O C
Operating humidity 5 to 85% (non-condensing)
1 CONSOLE port
442 x 44.4 x 413 mm (17.5 x 1.8 x 16.25 in)
excluding rubber feet
Maximum tolerance: 90-264 V a.c.; 50/60 Hz
Router 5682 Hardware The Router 5682 has two fixed ports and eight slots.
Figure 7 illustrates the front panel of the Router 5682.
Figure 7 Front Panel of the Router 5682
Figure 8 illustrates the back panel of the Router 5682 with MIM cards installed.
Figure 8 Back Panel of the Router 5682
System Specifications Ta bl e 12 lists system specifications for the Router R5682.
Ta bl e 12 System Specifications for the Router 5682
Item Router 5682 specifications
Fixed ports 1 AUX port
1 console port
Slots 8 (MIM)
Processor MPC 8245 300 MHz (AC power supply and
DC power supply)
NVRAM 128 KB
Boot ROM 512 KB
Page 15

Router 5682 Hardware 13
Table 12 System Specifications for the Router 5682
Item Router 5682 specifications
Fixed ports 1 AUX port
1 console port
SDRAM 256 MB
Flash 32 MB
Dimensions
(W x H x D)
Weight 14 kg (30.86 lbs)
Input voltage Rated voltage: 100-240 V a.c.; 50/60 Hz
Max. power 120 W
Operating temperature 0 to 40O C
Operating humidity 5 to 85% (non-condensing)
442 x 91.2 x 413 mm (17.5 x 3.6 x 16.25 in)
excluding rubber feet
Maximum tolerance: 90-264 V a.c.; 50/60 Hz
Page 16

14 CHAPTER 1: INTRODUCING THE ROUTER 5000 FAMILY
Page 17

2
INSTALLING THE ROUTER
There are several ways you can install your router:
■ On a vertical surface
■ In a rack
■ On a workbench
The following sections describe how to prepare and install your router:
■ Preparing to Install the Router
■ Mounting the Router in a Rack
■ Installing the Router on the Workbench
■ Connecting the Power Cable
■ Connecting the Router to the Console Terminal
■ Installing SICs and MIMs
Preparing to Install
the Router
Safety Warnings Before installing your router, consider the following safety guidelines:
■ Connecting the Router to the Ethernet
■ Connecting the Router to the WAN
■ Verifying the Installation
This section provides guidelines for preparing your site and router for installation.
■ Switch off the power supply before connecting the cables.
■ Keep the router away from heat sources.
■ To ensure normal heat dissipation, do not stack routers.
■ Do not keep a router in a damp place, and prevent liquid from getting into the
router.
■ Ensure that the neutral point of the power is grounded properly, to avoid
personal injury.
■ Ensure that the power is off before plugging or unplugging the interface cards,
modules and cables of the router.
■ Before removing the chassis, disconnect all the power cords and external
cables.
■ To avoid damage to the router, connect all the cables correctly. Never connect
telephone cables (including the ISDN lines) to the console or AUX port.
Page 18

16 CHAPTER 2: INSTALLING THE ROUTER
■ During the installation, wear an Electro-Static Discharge (ESD) preventive wrist
3Com recommends that you use an uninterrupted power supply (UPS) with your
router.
strap and ESD-preventive gloves.
General Site
Requirements
The environment of the installation site influences the performance and lifetime of
the router. The installation site for your router should meet the following
requirements for temperature and humidity, dust, gases, static electricity, and
electromagnetic discharge.
Temperature and Humidity
To ensure normal operation and to prolong the operational lifetime of the router,
the temperature and humidity of the equipment room must be within controlled
limits. The requirements for the temperature and humidity of the router
installation site are listed below.
Ta bl e 13 Temperature and Humidity Requirements
Temperature Relative humidity
00 to 400C (320 to 1040F) 5% to 85%
Dust
Dust is harmful to the safe operation of the router. The specifications for the dust
content and diameter of the granule within the equipment room are listed below.
Ta bl e 14 Specification for Dust Content
Maximum
diameter (µ m)
Maximum
density (the
number of
granules per
cubic meter)
0.5 1 3 5
1.4 x 10
7
7 x 10
5
2.4 x 10
5
1.3 x 10
5
Gases
The equipment room of the router must meet strict requirements for the content
of salt, acid and sulfide. The specific limitation values of these harmful gases are
given below.
Ta bl e 15 Harmful Gas Limitation Values in Equipment Room
Gas Average (mg/m3) Maximum (mg/m3)
SO
2
H2S 0.006 0.03
NO
2
NH
3
Cl
2
0.2 1.5
0.04 0.15
0.05 0.15
0.01 0.3
Static Electricity
To prevent damage caused by the static electricity, ensure that:
■ The equipment is grounded
Page 19

Preparing to Install the Router 17
■ The equipment room is dust-proof
■ Adequate temperature and humidity conditions prevail
■ The operator wears the ESD-preventive wrist strap, ESD-preventive gloves and
ESD-preventive clothes while handling the circuit board.
■ The dismantled circuit board is placed upward on the ESD preventive
workbench, or put into an ESD preventive bag.
■ You avoid direct contact with the elements of the circuit board.
Electromagnetic Discharge
To prevent damage by electromagnetic discharge, do the following:
■ Take effective measures against electrical interference for the power supply
system.
■ Separate the working ground of the router from the grounding device of the
power equipment, or thunder proof grounding.
■ Keep the router away from wireless launchers, radar launchers and other high
frequency and high current equipment.
■ Adopt electromagnetic shielding if necessary.
Lightning Damage
To minimize the risk of lightning damage do the following:
■ Install a lightning arrester on the input end of a telephone cable, ISDN line or
T1/E1 line.
■ Ensure that the PGND wire of the chassis is well grounded
■ Ensure that the neutral point of the socket of AC power supply is well
grounded
■ Install a lightning arrester at the input end of the power supply
Workbench
Requirements
Whether you install the router in a rack or place it directly on the workbench, it is
necessary to ensure that:
■ Airflow is not restricted around the router.
■ The cabinet and workbench are strong enough to support the weight of the
router and other installation accessories.
■ The cabinet and workbench are well grounded.
Installation Checklist After you verify that the installation conditions comply with these requirements,
open the packing case of the router and check the contents against the your order
contract. Contact your Service representative if you find any discrepancies.
To install your router, you will need:
■ To ol s
n Phillips screwdriver
n Flat-head screwdriver
n ESD-preventive wrist strap and ESD-preventive gloves
n Flat-blade screws (used in wall mounting)
Page 20

18 CHAPTER 2: INSTALLING THE ROUTER
■ Cables
■ Equipment
1
n Ethernet cable
n Console cable
n AUX cable
n Power supply (for the Router 5012), power cord and chassis ground wire
n Interface cables for the selected interface modules
n A router
n Optional SICs and MIMs
n Ethernet 100BASE-T Hub or LAN switch
n Channel service unit/data service unit (CSU/DSU) or other data
communications equipment (DCE) equipment (such as a modem)
n Configuration terminal, such as a PC
n Additional equipment for the selected interface modules
Mounting the Router
in a Rack
The Router 5232, Router 5642, and Router 5682 can be mounted in a standard
19-inch rack. To install a router in a rack:
1 Check the grounding condition and stability of the rack. Secure the fastening
brackets to both sides of the front and rear panels of the router.
2 Place the router on one of the trays in the rack. Move the router into position
along the guide rail in the rack.
3 Ensure that the router is level and securely fixed. Use pan head screws to fasten
the brackets to the rack. The pan head screws should be anti-rust and should
satisfy the rack installation requirements.
4 Ensure that the ventilation holes are not obstructed.
Figure 9 Rack-Mounting a Router
19" rack
Guide
Bracket
Panhead screw
Page 21

Installing the Router on the Workbench 19
Installing the Router
on the Workbench
Connecting the Power
Cable
Connecting the Router
to the Console
Te rm i na l
You can install any Router 5000 on a workbench.
To install the router on a workbench, take the following precautions:
■ Ensure that the workbench is smooth and stable.
■ Leave a heat-dissipation clearance of 10 cm (4 in) around the router.
■ Do not put heavy objects on the router.
To connect the router to the power outlet and confirm that the PGND wire is
properly grounded, do the following:
1 Connect the output end of the power socket on the rear panel of the router.
2 Connect the input end to the AC power outlet.
3 Turn on the power switch on the router.
4 Confirm that the router has power by checking whether the POWER LED is on.
The Router 5000 provides a console port, through which you can configure the
router.
The console cable is an 8-core shielded cable. The end that is used to connect to
the console port of the router has an RJ-45 connector. At the other end of the
console cable has both a DB-9 (female) adapter and a DB-25 (female) adapter. Use
the appropriate connector for the port on the console terminal.
Figure 10 Console Cable Assembly
Enlarged A side
DB25 Female
8P8C Plug
DB9 Female
Enlarged B side
Enlarged C side
To connect the router to a console terminal:
1 Turn off power to the router.
2 Select a console terminal — This can be either a standard ASCII terminal with an
RS-232 serial port, or a PC.
3 Connect the cable — Turn the power switch off, and then connect the serial
interface of the console cable to the console port of the router.
Page 22

20 CHAPTER 2: INSTALLING THE ROUTER
Figure 11 Connecting the Console Port to the PC (router shown for illustration only)
Installing SICs and
MIMs
PC serial
interface
Console
cable
Console port
PC
After connection, power on the router. The startup information of the router is
displayed on the console terminal.
Before you install a SIC or MIM, assemble the following equipment:
■ Flat-blade screwdriver
■ Anti-static wrist strap
The Router 5000 Family routers do not support hot swappable SICs and MIMs. To
avoid injury from electric shock or damage to a router, put on an anti-static wrist
strap, make sure that power to the router has been turned off and that the power
cord has been unplugged before performing any of the following operations.
Before you can install a SIC or MIM, you must remove the filler panel from the slot.
Remove the captive screws of the blank filler panel by unscrewing them in a
counter-clockwise direction with the flat-blade screwdriver, as shown below.
Do not remove the blank filler panel with black film above SLOT0.
To install a SIC or MIM:
1 Turn the router so the rear panel faces you.
2 Turn off the power switch of the router and unplug the power cord.
3 Match the remote edge of the module with the slot on the router's rear panel.
4 Push the module into the router until its front panel is level with the back panel of
the router.
5 Fasten the module into the router with the captive screws.
6 Power on the router, and check the LED of the corresponding slot on the front
panel. After the initialization of the module, if the LED for the corresponding slot is
on, the module is operating normally. If the LED for the corresponding slot remains
off, the POST for the module has failed and you should contact your Service
representative.
Page 23

Figure 12 Installing a SIC or MIM
Connecting the Router to the Ethernet 21
Connecting the Router
to the Ethernet
The Router 5000 Family routers provide a fixed 100BASE-TX fast Ethernet port
that uses category-5 twisted pair cable.
Note the following before you connect:
■ The fixed Ethernet cables are supplied with the router.
■ Use shielded cables to ensure electromagnetic compatibility.
■ Identify the mark on the module so you can plug the cable in correctly.
■ When connecting the Ethernet cable to a LAN Switch, plug the cable into the
10/100BASE-T interface marked with MDIX.
To connect the Ethernet cable:
1 Turn off power to the router.
2 Select the Ethernet cable.
While connecting the router with a PC or a router, use the crossover network
cable.
When connecting the router to a hub or a LAN switch, use the straight-through
network cable.
3 Connect one end of the Ethernet cable to the appropriate Ethernet port on the
router.
4 Connect the other end of the Ethernet cable to the Ethernet port of the network
device.
5 Verify the connection by checking that the 100M ETH LED on the top of the router
is on.
Page 24

22 CHAPTER 2: INSTALLING THE ROUTER
Figure 13 Connecting the Router to the Ethernet
10/100M Ethernet
interface
LAN switch or hub
Ethernet cable
ETHERNET0 interface
Connecting the Router
to the WAN
Connecting the AUX
Port to the Modem
The Router 5000 Family provides two fixed WAN ports, and gives you the option
to install further WAN ports as required. The fixed ports are the AUX port and the
serial port. The additional ports are provided by the SICs and MIMs supported by
the Router.
The auxiliary (AUX) port is a serial port that is used for remote configuration or
dial-up backup. To connect the router to a remote device, a local modem must be
connected to a remote modem through PSTN. For the connection method, see
Chapter 5. For AUX port specifications, see Chapter 1.
If the console port fails, the AUX port can also serve as a console port.
To connect the AUX cable:
1 Turn off power to the router.
2 Plug the RJ-45 connector of the AUX cable into the AUX port of the router.
3 Connect the DB-25 or DB-9 adapter of the AUX cable to the serial port of the
analog modem, as shown below.
Figure 14 Connecting the AUX Port to the Analog Modem
Modem
Connecting the Serial
Port to a CSU/DSU
Serial interface
AUX cable
AUX port
The serial port is usually used to connect the router to DSU/CSU.
Plugging or unplugging the connectors of the serial cable on line can damage the
router or the remote device.
Page 25

Verifying the Installation 23
Use the following procedure to connect the serial cable (take the connection from
SERIAL0 to DSU/CSU):
1 Turn off power to the router.
2 Choose the appropriate serial cable.
3 Plug the DB-50 adapter of the cable into the SERIAL0 port of the router.
4 Connect the other end of the cable to the CSU/DSU device. (If the WAN uses a
dial-up line, connect the cable to the serial port of the analog modem.
Figure 15 Connecting the Serial Port to DSU/CSU
DSU/CSU
Serial interface
Synch/asynch cable
SERIAL0
interface
Verifying the
Installation
Verify whether the router has been correctly installed by checking the following
items:
■ There is airflow around the router
■ Power is connected correctly
■ The ground wire of the router is correctly connected
■ The router is connected to other devices, such as the console terminal
Page 26

24 CHAPTER 2: INSTALLING THE ROUTER
Page 27

BOOTING AND CONFIGURING THE
3
Connecting the Router
to a Local Console
Te rm i na l
ROUTER
During the initial configuration of the router, you can use only the console or AUX
port. This chapter describes how to connect the router to a local or remote
console terminal and how to set parameters at the console terminal.
To set up the local configuration environment, connect the RJ-45 connector of the
console cable to the console port on the router, and the DB-25 connector or DB-9
connector to the serial port of a PC, as shown below.
Figure 16 Local Configuration Through the Console Port
RS232 Serial interface
RS232 Serial interface
PC
PC
Console port
Console cable
Console cable
Console port
Connecting the Router
to a Remote Console
Te rm i na l
To set up the remote configuration environment, you must connect a local modem
to the serial port of a local PC. Connect a remote modem to the AUX port of the
remote router using an AUX cable. Use PSTN to connect the local and remote
modems, as shown below.
Figure 17 Remote Configuration Through the AUX Port
Modem serial interface cable
Modem
PC
AUX cable
Router 5012
Modem
Telephone cable
PSTN
Telephone cable
Page 28

26 CHAPTER 3: BOOTING AND CONFIGURING THE ROUTER
Setting the
Parameters of the
Console Terminal
To set terminal parameters:
1 Start the PC and select Start > Programs > Accessories > Communications >
HyperTerminal.
The HyperTerminal window displays the Connection Description dialog box, as
shown below.
Figure 18 Connection Description Dialog Box
2 Enter the name of the new connection in the Name field and click OK. The
Connect To dialog box, shown below displays.
Figure 19 Connect To Dialog Box
3 Select the serial port for the connection from the Connect using dropdown menu
and click OK. The Connection Properties dialog box, shown below displays.
Page 29

Setting the Parameters of the Console Terminal 27
Figure 20 Connection Properties Dialog Box
4 Set the following parameters:
Bits per second — 9600
Data bits — 8
Parity — None
Stop bits — 1
Flow control — None.
5 Click OK. The HyperTerminal dialog box displays, as shown.
Page 30

28 CHAPTER 3: BOOTING AND CONFIGURING THE ROUTER
Figure 21 HyperTerminal Window
6 Select Properties. The Properties dialog box for your connection displays.
7 Click the Settings tab, as shown.
Figure 22 Settings Tab
8 In the Emulation dropdown menu, select VT100 or Auto detect. Click OK.
Page 31

Powering on the Router 29
Powering on the
Router
Checking and Operating
after Power-on
Before you power on the router, verify that:
■ The connection between the power cord and ground wire is secure
■ The voltage of the power supply complies with the requirement of the router
■ The console cable is correctly connected to either the PC or the terminal, and
that the parameters are correct.
Before switching on the power, locate the power-off switch in the workroom so
that, in case of an electrical accident, power can be turned off quickly.
Turn on the power switch of the router.
After the router is powered on, verify that:
■ The LEDs on the front panel are normal.
During the power-on self-test (POST), the memory test is successful if the LEDs
light in the following sequence:
1. SLOT0 to 2 and SERIAL0
2. SLOT1 and 2
If SLOT0 and 1 LEDs light, the memory test failed.
For the status of the LEDs during normal operation after power-on, see the LED
tables in Chapter 1.
■ The console terminal display is normal
For the local configuration, the startup interface on the console terminal
displays after the router is powered on.
For the remote configuration, you must dial up, using HyperTerminal, after the
router is powered on, as shown. After the dial-up, the startup interface is
displayed on the terminal.
Figure 23 Connect Dialog Box
After the POST, press Enter. When the [3Com] prompt displays, you can
configure the router.
Page 32

30 CHAPTER 3: BOOTING AND CONFIGURING THE ROUTER
Startup Process After the router starts up, the Boot ROM program runs and the following
information displays on the terminal screen:
Booting
********************************************
* 3Com Router Boot Rom, V4.60
********************************************
Copyright(C) 2002-2005 by 3Com Corporation, Inc.
Compiled at 20:46:59 , Jan 23 2003.
Now testing memory...OK
256M bytes SDRAM
8192k bytes flash memory
Press Ctrl-B to Enter Boot Menu
The contents displayed on the terminal can vary with different versions of Boot
ROM.
Configuration
Fundamentals of the
Router
If you press Ctrl+B immediately, the system displays the Boot Menu. If you do not
press Ctrl+B, the system initiates the program decompression process.
After “3Com Router Boot Rom, V4.60” appears, “Booting” disappears.
When the system begins the decompression and initialization process, the screen
displays:
Now system is self-decompressing...
System now is starting...
Press ENTER to get started
Press Enter. The system displays the [3Com] prompt, which indicates that the
router has entered the system view and you can configure the router.
The configuration process includes the following steps:
1 Clarify your networking requirements. These requirements include:
■ The connectivity requirements of the remote sites
■ The types of LAN and WAN interfaces required for the network
■ The configuration of IP and IP subnet settings and any other protocols
■ The network reliability, management, and security policies
2 Based on your network requirements, draw a clear and integrated networking
diagram.
Page 33

Configuration Fundamentals of the Router 31
3 Configure the WAN interface of the router:
■ Configure the physical operating parameters (the operating mode of the serial
port, baud rate, and synchronous clock) of the interface according to the
transmission medium of the WAN. For the dial-up port, you need to configure
DDR parameters.
■ Configure the link layer protocol encapsulated on the interface and the related
operating parameters according to the type of the WAN.
4 Configure the IP addresses or IPX network number for all the ports of the router
according to the division of the subnets.
5 Configure the routes. If you have to start up the dynamic routing protocol,
configure the related operating parameters of the protocol.
6 Create the security configuration for the router, as necessary.
7 Create the reliability configuration for the router, as necessary.
SNMP Management For help managing routers on your network, you can use 3Com Network Director
software to discover, map, and display network links and IP devices.
To allow Network Director to monitor your routers, you must first configure SNMP
V1 with the following commands:
[3Com]snmp-agent sys-info version v1
[3Com]snmp-agent community read <read-community-string>
[3Com]snmp-agent community write <write-community-string>
To learn more about Network Director, on the 3Com Corporation World Wide
Web site, enter this URL into your Internet browser:
http://www.3com.com/3nd
Command Line Interface The command line interface of the Router 5000 routers provides commands to
configure and manage the router. The command line interface has the following
characteristics:
■ Performs local configuration through the console port.
■ Performs local or remote configuration through the telnet command, which
can be used to log on directly and manage other routers.
■ Implements the configuration on the router through the terminals (the
asynchronous interface, including those connected to the AUX port and AS
port) in dumb terminal mode.
■ Configures the hierarchical user protection (guest, operator, administrator).
Only administrator users are authorized to configure and manage the routers.
■ Online help, available by typing ? at any time.
■ Provides network diagnostic tools, such as Tracert and Ping, to quickly diagnose
the availability of the network.
■ Provides detailed debugging information to diagnose network faults.
■ The command line interpreter adopts fuzzy search for the keywords of the
command. A conflict-free keyword if entered, will be interpreted accordingly.
For example, for a display command, you can enter dis.
Page 34

32 CHAPTER 3: BOOTING AND CONFIGURING THE ROUTER
To facilitate the management of the router in the system view, all the commands
are grouped. Each group corresponds to a view. Users can use these commands to
switch between different views. Many commands are limited to use in a single
view. Other commands (such as ping, display current-configuration, interface)
can be executed in all views.
Help for the
Configuration
Naming and
Arranging Interfaces
Router 5000 Family routers provide online Help for the command line interface:
■ In any view, enter ? for all the commands in the view and a brief description of
each command.
■ Enter a command, followed by a space and ?, in the keyword position for a list
of all keywords and a brief description of each one.
■ Enter a command, followed by a space and ?, in the argument position for a
description of related arguments.
■ Enter a character string, followed by a space and ?, for a list of all commands
that begin with the character string.
■ Enter a command, followed by a character string and ?, for a list of all
keywords that begin with the string.
The Router 5000 FamilyRouter 5000 Family routers support the following ports:
■ CON
■ AUX
■ Ethernet
■ Serial (synchronous/asynchronous)
■ Asynchronous
■ E1/T1
■ ISDN
The sequence number of each type of port begins with 0.
Inside the interface card, the order of the interface is arranged by serial numbers
on the interface card, from left to right.
Page 35

MAINTAINING THE ROUTER
4
Introduction The files managed by the Router 5000 are of 3 types:
■ Boot ROM program files used by the Router to boot the application program
files
■ Application files (main software)
■ Configuration files
This chapter will introduce you with three methods:
■ Application and Boot ROM programs upgrade via XModem
■ Application program upgrade via TFTP
■ Application program and configuration file upload/download via FTP
Boot Menu Boot Menu:
1: Download application program with XMODEM
2: Download application program with NET
3: Clear configuration
4: Clear application password
5: Start up and ignore configuration
6: Enter debugging environment
7: Boot Rom Operation Menu
8: Do not check the version of the software
9: Exit and reboot
Enter your choice(1-9):
Options of Boot menu are described as follows:
1 Download application program with Xmodem.
2 Download application program with Ethernet.
This option leads you into NET port download menu, which includes these
options:
Net Port Download Menu:
1: Change Net Parameter
2: Download From Net
3: Exit to Main Menu
Enter your choice(1-3):1
3 Clear the configuration file.
Page 36

34 CHAPTER 4: MAINTAINING THE ROUTER
4 Clear application program password.
This option clears super user password. This option functions for only one time
and password authentication for super users is restored after the router is
rebooted.
5 Ignore configuration file and start up with initial configuration.
6 Enter debugging environment in case of faults.
7 Boot menu provides two methods for upgrading the program and the Boot ROM
sub-menu operations, which are introduced in the following subsections.
Options of Boot ROM operation menu include:
Boot ROM Download Menu:
1: Download Boot ROM with XModem
2: Download Extended Segment of Boot ROM with XModem
3: Restore Extended Segment of Boot ROM from FLASH
4: Backup Extended Segment of Boot ROM to FLASH
5: Exit to Main Menu
Enter your choice(1-5):
This menu provides options to upgrade, back up or restore Boot ROM program. .
Upgrading Application
Program and Boot ROM
through XModem
Protocol
CAUTION: It is recommended to upgrade the software under the guidance of the
technical support personnel. In addition, when upgrading the router, note to
match the version of the Boot ROM software with that of the main software.
When upgrading the software through the XModem protocol, you can simply use
the console port rather than building up another configuration environment.
Upgrading application program
1 Enter the Boot menu (refer to the1.1.1 Boot Menu), press <1> to select the
XModem protocol for downloading the application program. The following
download speeds are available for the router:
Downloading application program from serial ...
Please choose your download speed:
1: 9600 bps
2: 19200 bps
3: 38400 bps
4: 57600 bps
5: 115200 bps
6: Exit and reboot
Enter your choice(1-6):
2 Select an appropriate download speed. For example, enter <5> to select the
download speed 115200 bps and the router will prompt:
Download speed is 115200 bps. Change the terminal's speed to 115200
bps, and select XModem protocol. Press ENTER key when ready.
3 According to the above information, change the baud rate set at the console
terminal for keeping it in consistency with the selected software download baud
rate. After that, disconnect the terminal (that is [Dial-in/Disconnect]), reconnect it
(that is [Dial-in/Dialing]) and then press <Enter> to begin downloading. The system
will prompt:
Page 37

Introduction 35
Downloading ... CCCCC
After the baud rate at the console terminal is set, the new setting can become
valid only if the terminal emulation program is disconnected and reconnected for
at least once.
4 Select [Transmit/send file] in the terminal window and the following dialog box will
pop up:
Figure 24 Send File dialog box
5 Click <Browse>, select the application file to be downloaded, and set the protocol
to Xmodem. Then click <Send>, and the system will pop up the following
interface:
Figure 25 Sending file interface
6 After completing download, the system begins writing to Flash (Flash memory),
then the following information will be displayed in the terminal interface,
indicating that the download has been completed:
Download completed.
Writing to flash memory...
Please wait,it needs a long time .Please wait...
########################################################
Writing FLASH Success.
Page 38

36 CHAPTER 4: MAINTAINING THE ROUTER
Please use 9600 bps.Press <ENTER> key to reboot the system.
Then restore the baudrate of the configuration terminal to 9600bps as per the
prompt (disconnection and re-dialing are also required here), and then the system
start up normally.
Upgrading the entire Boot ROM program
1 Enter Boot menu, select <7> to turn to Boot ROM operation menu.
2 Select <1> in the Boot ROM operation sub-menu to download the Boot ROM
program with XModem. The Router provides you with several speeds. The
subsequent operation steps are the same as those described in
CAUTION: If the all Boot ROM program fails during upgrade, it cannot be
restored on site. Therefore, only when necessary can you upgrade the whole Boot
ROM, besides, you must upgrade under the guide of technical support personnel.
Upgrading the extended
1 Enter Boot menu, select <7> to turn to Boot ROM operation menu.
2 Select <2> in the operation sub-menu to upgrade the extended segment of Boot
ROM program with XModem. The Router provides you with several speeds. The
subsequent operation steps are the same as those described earlier
Backing up and
Restoring the Extended
Segment of Boot ROM
Program
Backup the extended segment of Boot ROM Program in FLASH
1 Enter Boot menu, select <7> to turn to Boot ROM operation menu.
2 Select <4> in the operation sub-menu to copy the current extended segment of
Boot ROM program into the FLASH, and then the following information will be
displayed in the terminal interface if the restoring operation is successful.
Writing to FLASH.Please wait...####
Backuping Boot ROM program to FLASH successed!
3 When the sub-menu appears again, select <5> to exit the Boot menu and proceed
to execute the router's main software.
Restore the extended segment of Boot ROM program from FLASH
In case that faults occur to the extended segment of the Boot ROM program that
is in use or you upgrade the extended segment wrongly, you can restore the
extended segment saved in FLASH into the Boot ROM by doing the following:
1 Enter Boot menu, select <7> to turn to Boot ROM operation menu.
2 Select <3> in the operation sub-menu to to restore Boot ROM from FLASH, and
then the following information will be displayed if the restoring operation is
successful.
Writing to Boot ROM.Please wait...######
Restoring Boot ROM program successed!
3 When the sub-menu appears again, select <5> to exit the Boot menu and proceed
to execute the router's main software.
Page 39

Introduction 37
Upgrading Application
Program with Ethernet
It refers to downloading application program through Ethernet port. The router
serves as client, so it needs to be connected to TFTP Server or FTP Server through
its fixed Ethernet port. The following are the details.
CAUTION: TFTP Server or FTP Server program is not included in 5000 Family
routers, so you have to buy and install it.
Both TFTP loading and FTP loading are available in 5000 Family routers.
1 Start TFTP server or FTP server at the PC connecting the Ethernet port of the router
and configure path for the files to be loaded. For FTP Server, you should also set
username and password.
2 Enter NET download menu
3 Select <2> in BOOT menu to turn to NET download menu.
Net Port Download Menu:
1: Change Net Parameter
2: Download From Net
3: Exit to Main Menu
Enter your choice(1-3):1
4 Configure parameters
Select <1> in NET download menu to turn to parameter configuration interface.
Change Boot Parameter:
'.' = clear field; '-' = go to previous field; ^D = quit
boot device : fei0
processor number : 0
host name : 8040
file name : M8240ram.arj
inet on ethernet (e) : 169.254.10.10
inet on backplane (b):
host inet (h) : 169.254.10.11
gateway inet (g) :
user (u) : 8040
ftp password (pw) (blank = use rsh):
flags (f) : 0x0
target name (tn) :
startup script (s) :
other (o) :
5 Configure these parameters for TFTP mode
file name: File name to be loaded
inet on ethernet (e): IP address for the Ethernet port for loading
host inet (h): IP address for TFTP Server
flags (f): The flag must be 0x80 for TFTP mode
6 Configure these parameters for FTP mode
file name: File name to be loaded
inet on ethernet (e) : IP address for the Ethernet port for loading
host inet (h) : IP address for FTP Server
user (u): User name, which must be consistent with that for FTP Server
ftp password (pw) (blank = use rsh): Password, which must be consistent with that
for FTP Server
Page 40

38 CHAPTER 4: MAINTAINING THE ROUTER
flags (f): The flag must be 0x0 for FTP mode
These parameters will be saved automatically when your configuration is
completed.
Router restarts after successful upgrading
Press <Enter> to return to NET download menu and select <2>, and then this
information is prompted:
boot device : fei
unit number : 0
processor number : 0
host name : 8040
file name : Q8040.BIN
inet on ethernet (e) : 10.110.27.235
host inet (h) : 10.110.27.231
user (u) : 8040
ftp password (pw) : 8040
flags (f) : 0x80
Attached TCP/IP interface to fei0.
Subnet Mask: 0xfffff800
Attaching network interface lo0... done.
Uploading/Download
Application, Boot ROM
program and
Configuration File Using
FTP
Loading...
NET download completed...
read len = [04378489]
Please wait,it needs a long time
####################################################################
####################################################################
###########################
Writing Vrpsoftware File Succeeds!
Press <Enter> key to reboot the system .
7 Press <Enter> to reboot the system.
3Com 5000 Family Routers provide FTP Server function, which gives another
approach for updating application file, Boot ROM program or configuration file.
Any FTP Client (including local and remote users) connected to a router can
perform the operation. Configuration file, Boot ROM program or application files
can be uploaded/downloaded if the user passes authentication. Follow these steps
to upload/download the application/Boot ROM program/configuration file
through FTP:
Upload: Transmit files from the PC running as FTP client to the router connected to
the PC via the Ethernet interface, that is, perform the put operation.
Download: Transmit files from the router to the PC running as FTP client, which is
connected to the Ethernet interface of the router, that is to implement the get
operation.
Page 41

Introduction 39
Build up FTP local upload/download environment
Figure 26 Building up FTP local upload/download environment
1 Connect the Ethernet interface on the router to the PC.
2 Assign an IP address for the Ethernet interface on the router. It is assumed to be
10.110.10.10.
3 Assign an IP address for the Ethernet interface on the PC. It is assumed to be
10.110.10.13.
4 Copy the application files, Boot ROM program or configuration files to a directory,
which is assumed to be "C:\ version".
CAUTION: The IP addresses of the network interface on the PC and the router's
Ethernet interface must be on the same segment.
Build up FTP remote upload/download environment
Figure 27 Building up FTP remote upload/download environment
Quidway R2630E
WAN
10.110.10.10
Quidway R2610£¨FTP Server£©
PC£¨FTP Client£©
1 Connect the PC to any port of the router through a WAN. This approach does not
require the IP addresses of the PC and the router to be on the same segment and
is used for upgrading the router remotely.
2 Copy the application files, Boot ROM program or configuration files to a directory,
which is assumed to be "C:\version".
Page 42

40 CHAPTER 4: MAINTAINING THE ROUTER
Starting the FTP server Perform the following configurations with the help of the maintenance personnel
at the router side:
1 Set authentication mode
You can select an AAA configuration scheme depending on the actual situation. F
2 Add user name and password
[Router] local-user router password simple 123 service-type ftp
"Router" represents the user name and "123" the password.
3 Add server type
[Router] local-user Router service-type ftp
4 Add right level
[Router] local-user Router level 3
5 Specify FTP directory
[Router] local-user Router ftp-directory flash:
6 Start FTP server.
[Router] ftp-server enable
With these operations, the FTP server has been started on the router and the
username has been set. In this case, all the FTP client programs can use the
username and password to log onto the FTP server.
Uploading/Downloading application, configuration file and Uploading
Boot ROM program
1 Enter the directory containing the application file, Boot ROM program or
configuration files in the DOS state. Execute the ftp command to set up an FTP
connection with the router. For example:
C:\version\ftp 10.110.10.10
If the connection is set up, the following information will be displayed (taking
Windows98 as an example):
Connected to 10.110.10.10
220 FTP server ready on Router at
User(10.110.10.10:(none)):
2 Log in the FTP server with the username and password set on the router.
User(10.110.10.10:(none)): Router
331 Password required for ftp
Password:
230 User ftp logged in
ftp>
The appearance of the prompt "ftp>" means that you can begin the
upload/download operation.
3 Upload/Download the application files, Boot ROM program or configuration files.
By default, the application file and configuration file on the router are respectively
named "system" and "config", the file of the extended Boot ROM program
segment is named "bootrom", and the entire Boot ROM file name defaults to
bootromall.
Page 43

Introduction 41
Upload the application program file or Boot ROM program or configuration file.
ftp>put
local file (Input the name of appplication/Boot ROM
program/Configuration file to be uploaded.)
remote file (Input the name of appplication/Boot ROM
program/Configuration file to be saved at the router side after
uploading.)
After the uploading is completed, the prompt "ftp>" will be displayed again.
Enter <dir> to display the name and size of the file on the router. The size of the
configuration file will be the same as that of the original file on the host if the
uploading is successful.
CAUTION: After you have uploaded Boot ROM program using the put command,
you should immediately use the upgrade bootrom [ full ] command to decompress
the bootrom/bootromfull program from the root directory Flash, then write it into
Boot ROM. At this point, the upgrade of Boot ROM is completed.
Download the application or Boot ROM program or configuration file.
ftp>get
local file (Input the name of appplication/Boot ROM
program/Configuration file to be saved.)
remote file (Input the name of ppplication/Boot ROM
program/Configuration file at the router side)
4 After implementing uploading/downloading, exit the FTP client program.
ftp>quit
Recovering the Lost
Router Password
If the Boot ROM password of router is lost, please contact the local agent of 3Com
Corporation. The technician will help you enter the router's Boot ROM menu and
reset the password.
Installing a Module The procedure for installing a SIC or MIM is provided in the following list and
shown in
Figure 28.
1 Turn the router so the rear panel faces you.
2 Turn off the power switch of the router and unplug the power cord.
3 Remove the module and match its remote edge with the edge of the slot on the
rear panel of the router.
4 Push the module into the router until it closely matches the rear panel of the
router.
5 Fasten the module into the router with the captive screws.
6 Power on the router, and check the LEDs of the corresponding slot on the front
panel. After the initialization of the module, if the LEDs for the corresponding slot
are on, the module operates normally. If the LEDs for the corresponding slot
remain off, the POST failed and you should contact your Service representative.
Page 44

42 CHAPTER 4: MAINTAINING THE ROUTER
Figure 28 Installing a Module
Closing the Router
Chassis Cover
To prevent cables from being pressed or cut off when you close the cover of the
router chassis, roll up all the cables and put them into the chassis before closing
the cover.
Page 45

TROUBLESHOOTING
5
The Power LED is Off. If the power LED is off, verify that:
■ The power switch of the router is turned on.
■ The power supply switch is turned on.
■ The power cord of the router is connected properly.
■ The power supply suits the requirement of the router.
Do not plug in or unplug the power cord when the power is on. After having
checked the conditions in the previous list, if the power LED is still off, contact
your Service representative.
Nothing is Displayed
on the Terminal after
Power-On
After the system runs the power-on self-test (POST), if the system operates
normally, the start-up information is displayed on the console terminal. If the
configuration system has a fault, the terminal may display nothing.
If the terminal does not display any information after the POST, verify that:
■ The power system is operating normally.
■ The console cable is connected correctly.
If the power system is normal and the console cable is connected properly, there
may be something wrong with the console cable or the HyperTerminal
parameters. Check the cable or the parameters.
HyperTerminal parameters should have the following values:
■ Baud — 9600
■ Data bits — 8
■ Stop bit — 1
■ Parity — None
■ Flow control — None
■ Terminal emulation — VT100
If the parameter settings do not match these values, reconfigure them.
If the previous checks do not solve the problem, contact your Service
representative and follow the representative’s instructions.
Page 46

44 CHAPTER 5: TROUBLESHOOTING
Illegible Characters
Display on the
Terminal after
If the system operates normally after the system runs the POST, the start-up
information is displayed on the console terminal. If the configuration system has a
fault, the terminal may display only illegible characters.
Power-On
If the console terminal displays illegible characters after the POST, verify that the
HyperTerminal parameters are set properly, as follows:
■ Baud — 9600
■ Data bits — 8
■ Stop bit — 1
■ Parity — None
■ Flow control — None
■ Terminal emulation — VT100
If the parameter settings do not match these values, reconfigure them.
Repeated Reboot There are two possible situations in which the system reboots repeatedly:
■ After Now testing memory... displays
■ After System now is starting... displays, the system restarts repeatedly and
displays,
Copied program error.
Troubleshooting SICs
and MIMs
Repeated reboots are caused by damage to the SDRAM. You can check whether
the SDRAM has a fault by checking the LED status of the router. During the POST,
the SLOT0 – SLOT2 LEDs and SERIAL0 LED light first. If the SLOT0 and SLOT1 LEDs
are on instead, the SDRAM test has failed.
If the SDRAM is damaged, you must replace it. See “Replacing the SDRAM” on
page 82.
The LEDs on the Router 5000 Family routers indicate whether the modules are
properly installed. After the installation of a module, turn on the power and check
the corresponding LED on front panel of the router. If the LEDs are on, the POST
was successful and the router is working normally. If the LEDs are off, the POST
has failed. You can test it using the following steps:
■ Check that the port cable matches the port.
■ Verify that the module is in normal operation by observing its LEDs .
■ Use the display command to check whether the module or interface module
has accepted the configuration.
All LEDs of the Encryption Accelerator MIM Remain off after Startup
After startup, all LEDs should blink once. If all indictors are off, the module or
hardware on the module has not powered on. Check whether the power of the
integrated equipment is properly connected.
If the power of the integrated equipment is in normal operation, the fuse of the
module may have burnt out or the Complex Programmable Logic Device (CPLD)
Page 47

Troubleshooting SICs and MIMs 45
may be out of order. In such a case and you should contact your Service
representative.
After Startup, All LEDs Remain On.
After startup, all LEDs should once, which indicates that the processor of the
module is in operation. If all LEDs are on, the module’s system bus is not operating
normally or the CPLD is out of order.
The RUN LED Remains On.
When the module is in operation, the RUN LED should blink, rather than remain
on. If the RUN LED remains on, the module is powered on, but not operating
normally. It is possible that the module has been forced to reset. If there are other
LEDs that remain on simultaneously (for example, the ACT, SPEED, or DENY LEDs),
the encryption card may be faulty. If the encryption card is operating normally, the
faults may have occurred in the host.
The RUN LED Blinks Rapidly During Sartup
The rapid blinking of the RUN LED indicates that the module is initializing. During
this period, if the DENY LED blinks occasionally, there is a memory fault. In this
case, contact your Service representative to check the module. If, during
initialization, the SPEED LED is occasionally on, the booting of the module system
has failed. In this case, check the system configuration or contact your Service
representative.
The RUN LED Blinks Slowly After Startup
The slow blinking of the RUN LED indicates that the module is in offline. Check
whether the router host is properly configured and supports the encryption card.
The ACT LED Remains On.
When the ACT LED is flashing green, the module is upgrading the firmware. If the
ACT indictor remains on, the software upgrade has failed and the software should
be upgraded once again. If the ACT LED remains on after a second attempt to
upgrade, contact your Service representative.
The DENY LED Blinks during Normal Operation
When the DENY indictor blinks during normal operation, the module performance
or capacity is not adequate for encryption demands. This situation is not a
software or hardware failure. It is results from the technical specification limit of
the existing encryption module version. If necessary, contact your Service
representative to upgrade the encryption module with greater processing
capability.
Page 48

46 CHAPTER 5: TROUBLESHOOTING
Page 49

A
CABLE SPECIFICATIONS
The tables in this appendix describe the pinouts for the cables that you can use
with Router 5000 Family routers. P
tables are not connected.
ins that are not described in the following
Console Cable
Ta bl e 16 Console Cable Pinouts
RJ-45 Signal Direction DB-25 DB-9 Signal
1 —> 5 8 CTS
2 —> 6 6 DSR
3 —> 3 2 RXD
4 <— 8 1 DCD
5 - 7 5 GND
6 <— 2 3 TXD
7 <— 20 4 DTR
8 <— 4 7 RTS
Page 50

48 APPENDIX A: CABLE SPECIFICATIONS
e
e
AUX Cable Figure 29 AUX Cable Assembly
Enlarged A side
DB25 Male
8P8C Plug
Label
DB9Male
Ta bl e 17
RJ-45 Signal Direction DB-25 DB-9 Signal
1 —> 4 7 RTS
2 —> 20 4 DTR
3 —> 2 3 TXD
4 <— 8 1 DCD
5 - 7 5 GND
6 <— 3 2 RXD
7 <— 6 6 DSR
8 <— 5 8 CTS
Enlarged B sid
Enlarged C sid
Ethernet Cable The Ethernet cable uses an RJ-45 connector and category 5 twisted pair cable.
Figure 30 Ethernet Cable Assembly
The Ethernet cables are classified as straight-through network cable and crossover
network cable. They have the following features:
■ Straight-through network cable — The sequences of the wires crimped at the
RJ-45 connectors at each end are the same (see
connection between a terminal device, such as a PC or a router, and the Hub or
LAN Switch. Straight-through network cables are delivered with the router.
■ Crossover network cable — The sequences of the wires crimped at the RJ-45
connectors of the two ends are different (see
connection between the terminal device, such as a PC or a router, and the
terminal device. You can create this cable yourself, if necessary.
Ta bl e 18). The cable is used to
Ta bl e 19). The cable is used in the
Page 51

Ta bl e 18 Straight-through Network Cable Pinouts
Ethernet Cable 49
RJ-45 Signal
twisted pair
Signal Direction RJ-45
1 TX+ White (Orange) —> 1
2 TX- Orange —> 2
3 RX+ White (Green) <— 3
4 - Blue - 4
5 - White (Blue) - 5
6 RX- Green <— 6
7 - White (Brown) - 7
8 - Brown - 8
Ta bl e 19 Crossover Network Cable Pinouts
Category 5
Category 5
RJ-45 Signal
Twisted Pair
Signal Direction RJ-45
1 TX+ White (Orange) —> 3
2 TX- Orange —> 6
3 RX+ White (Green) <— 1
4 - Blue - 4
5 - White (Blue) - 5
6 RX- Green <— 2
7 - White (Brown) - 7
8 - Brown - 8
You can use the table as a reference while distinguishing or preparing the two
kinds of Ethernet cables. While preparing the Ethernet cables, follow the
chromatogram given in this table to arrange the wires. Otherwise, communication
quality will be affected even though the equipment at two ends is connected.
Page 52

50 APPENDIX A: CABLE SPECIFICATIONS
Serial Interface Cable Synchronous and Asynchronous Mode
V.35 and V.24 (EIA/TIA-232) standards support synchronous operating mode. V.24
(EIA/TIA-232) also supports the asynchronous operating mode. The maximum
transmission distance and baud rate of the signal vary with the operating mode.
Ta bl e 20 Transmission Rate and Transmission Distance of V.24 (EIA/TIA-232)/V.35 Cable
V.24 (EIA/TIA-232) V.35
Maximum
transmission
Baud rate (bps)
2400 60 2400 1250
4800 60 4800 625
9600 30 9600 312
19200 30 19200 156
38400 20 38400 78
64000 20 54000 60
115200 10 64000 50
- - 2048000 30
distance (m)
Baud rate (bps)
Maximum
transmission
distance (m)
The baud rate should not exceed 64 Kbps when the V.24 cable operates in
synchronous mode.
DTE and DCE Mode
The synchronous serial interface can operate in both DTE and DCE modes. For two
devices connected directly, one device should operate in DTE mode, and the other
device should operate in DCE mode. The DCE device provides a synchronous clock
and specifies the transmission rate, the DTE device accepts the synchronous clock
and communicates at the specified transmission rate. Usually, the router serves as
the DTE device. To determine whether the device is a DTE or a DCE, refer to the
user manual for the device.
Ta bl e 21 Typical DTE and DCE
Type of Equipment Type of Interface Typical Equipment
DTE male PC or router
DCE female Modem, multiplexer or
CSU/DSU
The asynchronous serial interface generally is connected to a modem or a terminal
adapter (TA) to act as the dial-up interface. You do not need to determine if the
device is DTE or DCE, you must only select the appropriate baud rate.
The synchronous/asynchronous serial port cable is connected to a DB-50
receptacle. Proper connection cable needs to be selected for the protocol applied.
Four types of synchronous/asynchronous serial port cables are available. However,
these cables are optional and you must select the proper one based on your
requirements when you purchase the router All these types of cables have a DB-50
adapter at one end.
Page 53

Serial Interface Cable 51
e
At the network end, the connector is different for each type of cable, as described
in the following list:
■ V.24 (EIA/TIA-232) DTE cable — DB-25 (male) adapter
■ V.24 (EIA/TIA-232) DCE cable — DB-25 (female) adapter
■ V.35 DTE cable — 34-pin (male) adapter
■ V.35 DCE cable — 34-pin (female) adapter
V.24 DTE Cable Assembly
and Pinouts
Figure 31 illustrates the V.24 DTE cable assembly.
Figure 31 V.24 DTE Cable Assembly
Enlarged A side
DB50 Male
Label
DB25 Male
Ta bl e 22 describes the V.24 DTE cable pinouts.
Ta bl e 22 V.24 DTE Cable Pinouts
DB-50 Signal Signal Direction DB-25 Signal
5 TxD/RxD —> 2 TxD
27 RxD/TxD <— 3 RxD
2 RTS/CTS —> 4 RTS
31 CTS/RTS <— 5 CTS
6 DSR/DTR <— 6 DSR
30 DCD/LL <— 8 DCD
Enlarged B sid
3 TxC/NIL <— 15 TxC
28 RxC/TxCE <— 17 RxC
1 LL/DCD —> 18 LTST
26 DTR/DSR —> 20 DTR
4 TxCE/TxC —> 24 TxCE
50 GND - 1 Shield_GND
7 GND - 7 Circuit_GND
Page 54

52 APPENDIX A: CABLE SPECIFICATIONS
V.24 DCE Cable
Assembly and Pinouts
Figure 32 illustrates the V.24 DCE cable assembly.
Figure 32 V.24 DCE Cable Assembly
Enlarged A side
DB50 Male
Label
DB25 Male
Ta bl e 23 describes the V.24 DCE cable pinouts.
Ta bl e 23 V.24 DCE Cable Pinouts
DB-50 Signal Signal Direction DB-25 Signal
5 TxD/RxD —> 3 RxD
27 RxD/TxD <— 2 TxD
2 RTS/CTS —> 5 CTS
31 CTS/RTS <— 4 RTS
26 DTR/DSR —> 6 DSR
1 LL/DCD —> 8 DCD
Enlarged B side
4 TxCE/TxC —> 15 TxC
29 NIL/RxC —> 17 RxC
30 DCD/LL <— 18 LTST
6 DSR/DTR <— 20 DTR
28 RxC/TxCE <— 24 TxCE
50 GND - 1 Shield_GND
7 GND - 7 Circuit_GND
Page 55

Serial Interface Cable 53
V.35 DTE Cable Assembly
and Pinouts
Figure 33 illustrates the V.35 DTE cable assembly.
Figure 33 V.35 DTE Cable Assembly
V.35 Male
Enlarged A side Enlarged B side
DB50 Male
Label
Ta bl e 24 describes the V.35 DTE cable pinouts.
Ta bl e 24 V.35 DTE Cable Pinouts
DB-50 Signal Signal Direction 34PIN Signal
2 RTS/CTS —> C RTS
31 CTS/RTS <— D CTS
6 DSR/DTR <— E DSR
30 DCD/LL <— F RLSD
26 DTR/DSR —> H DTR
1 LL/DCD —> K LT
15 TxD/RxD+ —> P SD+
39 TxD/RxD- —> S SD-
20 RxD/TxD+ <— R RD+
44 RxD/TxD- <— T RD-
16 TxCE/TxC+ —> U SCTE+
40 TxCE/TxC- —> W SCTE-
19 RxC/TxCE+ <— V SCR+
43 RxC/TxCE- <— X SCR-
18 TxC/RxC+ <— Y SCT+
42 TxC/RxC- <— AA SCT-
50 GND - A Shield_GND
7 GND - B Circuit_GND
24 RxD-REST GND - -
49 RxC-REST GND - -
25 TxC-REST GND - -
Page 56

54 APPENDIX A: CABLE SPECIFICATIONS
V.35 DCE Cable
Assembly and Pinouts
Figure 34 illustrates the V.35 DCE cable assembly.
Figure 34 V.35 DCE Cable Assembly
V.35 Female
Enlarged A side
DB50 Male
Label
Ta bl e 25 describes V.35 DCE cable pinouts.
Ta bl e 25 V.35 DCE cable Pinouts
DB-50 Signal Signal Direction 34PIN Signal
31 CTS/RTS <— C RTS
2 RTS/CTS —> D CTS
26 DTR/DSR —> E DSR
1 LL/DCD —> F RLSD
6 DSR/DTR <— H DTR
Enlarged B side
30 DCD/LL <— K LT
20 RxD/TxD+ <— P SD+
44 RxD/TxD- <— S SD-
15 TxD/RxD+ —> R RD+
39 TxD/RxD- —> T RD-
19 RxC/TxCE+ <— U SCTE+
43 RxC/TxCE- <— W SCTE-
17 NIL/RxC+ —> V SCR+
41 NIL/RxC- —> X SCR-
16 TxCE/TxC+ —> Y SCT+
40 TxCE/TxC- —> AA SCT-
50 GND - A Shield_GND
7 GND - B Circuit_GND
24 RxD-REST GND - -
49 RxC-REST GND - -
Page 57

Dumb Terminal Adapter 55
Dumb Terminal
Adapter
Ta bl e 26 describes dumb terminal adapter pinouts.
Ta bl e 26 Dumb Terminal Adapter Pinouts
RJ-45 (female) DB-25 (female) Signal
1 8 DCD
2 6 DSR
3 20 DTR
4 7 GND
5 2 TxD
6 3 RxD
7 4 RTS
8 5 CTS
E1 Cable Ta bl e 27 describes E1 cable pinouts. In this table, Tx = transmit and Rx = receive.
These markings on 75-ohm coaxial cables are in relation to the routers, and they
should be connected to the peer's “Tx” and “Rx”.
Ta bl e 27 E1 Cable Pinouts
DB-15
BNC (75-ohm
coaxial cable)
RJ-45 (120-ohm
twisted pair
9 Tx Tip Tx Tip 1 Tx Tip
2 Tx Ring Tx Ring 2 Tx Ring
10 Tx Shield - 3 Tx Shield
8 Rx Tip Rx Tip 4 Rx Tip
15 Rx ring Rx Ring 5 Rx Ring
7 Rx Shield - 6 Rx Shield
T1 Cable Ta bl e 28 describes T1 cable pinouts.
Ta bl e 28 T1 Cable Pinouts
Straight-throug
h Shielded
RJ-45
1 White (Orange) Rx Ring 1
2 Orange Rx Tip 2
3 White (Green) - - 3
4 Blue Tx Ring 4
5 White (Blue) Tx Tip 5
Network Cable
Signal Description RJ-45
6 Green - - 6
7 White (Brown) - - 7
8 Brown - - 8
Page 58

56 APPENDIX A: CABLE SPECIFICATIONS
ISDN cables The ISDN S/T cable, shown in Figure 35, is a 4-core twisted pair cable. Both ends of
the cable have RJ-45 connectors in which pin 3 and pin 6 are the sending end, and
pin 4 and pin 5 are the receiving end.
Figure 35 ISDN S/T Cable
The ISDN U cable, shown in Figure 36, is a 2-core twisted pair cable. One end has
an RJ11 connector and the other end has an output terminal (OT) connector.
Figure 36 ISDN U Cable
Page 59

OBTAINING SUPPORT FOR YOUR
A
PRODUCT
Register Your Product Warranty and other service benefits start from the date of purchase, so it is
important to register your product quickly to ensure you get full use of the
warranty and other service benefits available to you.
Warranty and other service benefits are enabled through product registration.
Register your product at
are based on accounts that you create or have authorization to access. First time
users must apply for a user name and password that provides access to a number
of eSupport features including Product Registration, Repair Services, and Service
Request. If you have trouble registering your product, please contact 3Com Global
Services for assistance.
http://eSupport.3com.com/. 3Com eSupport services
Purchase Value-Added
Services
Troubleshoot Online You will find support tools posted on the 3Com web site at
Access Software
Downloads
To enhance response times or extend warranty benefits, contact 3Com or your
authorized 3Com reseller. Value-added services like 3Com Express
Guardian
onsite assistance or advance hardware replacement. Experienced engineers are
available to manage your installation with minimal disruption to your network.
Expert assessment and implementation services are offered to fill resource gaps
and ensure the success of your networking projects. More information on 3Com
maintenance and Professional Services is available at
Contact your authorized 3Com reseller or 3Com for a complete list of the
value-added services available in your area.
http://www.3com.com/
3Com Knowledgebase helps you troubleshoot 3Com products. This query-based
interactive tool is located at
thousands of technical solutions written by 3Com support engineers.
Software Updates are the bug fix / maintenance releases for the version of
software initially purchased with the product. In order to access these Software
Updates you must first register your product on the 3Com web site at
http://eSupport.3com.com/.
SM
can include 24x7 telephone technical support, software upgrades,
http://www.3com.com/
http://knowledgebase.3com.com and contains
SM
and
First time users will need to apply for a user name and password. A link to
software downloads can be found at
Product Support heading at
http://www.3com.com/
http://eSupport.3com.com/, or under the
Page 60

58 APPENDIX A: OBTAINING SUPPORT FOR YOUR PRODUCT
Software Upgrades are the software releases that follow the software version
included with your original product. In order to access upgrades and related
documentation you must first purchase a service contract from 3Com or your
reseller.
Telephone Technical
Support and Repair
To obtain telephone support as part of your warranty and other service benefits,
you must first register your product at
http://eSupport.3com.com/
Warranty and other service benefits start from the date of purchase, so it is
important to register your product quickly to ensure you get full use of the
warranty and other service benefits available to you.
When you contact 3Com for assistance, please have the following information
ready:
■ Product model name, part number, and serial number
■ Proof of purchase, if you have not pre-registered your product
■ A list of system hardware and software, including revision level
■ Diagnostic error messages
■ Details about recent configuration changes, if applicable
To send a product directly to 3Com for repair, you must first obtain a return
authorization number (RMA). Products sent to 3Com, without authorization
numbers clearly marked on the outside of the package, will be returned to the
sender unopened, at the sender’s expense. If your product is registered and under
warranty, you can obtain an RMA number online at
http://eSupport.3com.com/. First time users will need to apply for a user name
and password.
Contact Us 3Com offers telephone, e-mail and internet access to technical support and repair
services. To access these services for your region, use the appropriate telephone
number, URL or e-mail address from the list below.
Telephone numbers are correct at the time of publication. Find a current directory
of support telephone numbers posted on the 3Com web site at
http://csoweb4.3com.com/contactus/
Country Telephone Number Country Telephone Number
Asia, Pacific Rim Telephone Technical Support and Repair
Australia
Hong Kong
India
Indonesia
Japan
Malaysia
New Zealand
Pakistan
You can also obtain support in this region using the following e-mail: apr_technical_support@3com.com
1 800 678 515
800 933 486
+61 2 9424 5179 or
000800 650 1111
001 803 61009
00531 616 439 or
03 3507 5984
1800 801 777
0800 446 398
+61 2 9937 5083
Philippines
P.R. of China
Singapore
S. Korea
Taiwan
Thailand
1235 61 266 2602 or
1800 1 888 9469
800 810 3033
800 6161 463
080 333 3308
00801 611 261
001 800 611 2000
Page 61

Contact Us 59
Country Telephone Number Country Telephone Number
Or request a repair authorization number (RMA) by fax using this number: + 65 543 6348
Europe, Middle East, and Africa Telephone Technical Support and Repair
From anywhere in these
regions, call:
From the following countries, you may use the numbers shown:
Austria
Belgium
Denmark
Finland
France
Germany
Hungary
Ireland
Israel
Italy
You can also obtain support in this region using the following URL:
http://emea.3com.com/support/email.html
Latin America Telephone Technical Support and Repair
Antigua
Argentina
Aruba
Bahamas
Barbados
Belize
Bermuda
Bonaire
Brazil
Cayman
Chile
Colombia
Costa Rica
Curacao
Ecuador
Dominican Republic
You can also obtain support in this region using the following:
Spanish speakers, enter the URL:
http://lat.3com.com/lat/support/form.html
Portuguese speakers, enter the URL:
http://lat.3com.com/br/support/form.html
English speakers in Latin America should send e-mail to:
lat_support_anc@3com.com
+44 (0)1442 435529
01 7956 7124
070 700 770
7010 7289
01080 2783
0825 809 622
01805 404 747
06800 12813
1407 3387
1800 945 3794
199 161346
1 800 988 2112
0 810 444 3COM
1 800 998 2112
1 800 998 2112
1 800 998 2112
52 5 201 0010
1 800 998 2112
1 800 998 2112
0800 13 3COM
1 800 998 2112
AT&T +800 998 2112
AT&T +800 998 2112
AT&T +800 998 2112
1 800 998 2112
AT&T +800 998 2112
AT&T +800 998 2112
Luxembourg
Netherlands
Norway
Poland
Portugal
South Africa
Spain
Sweden
Switzerland
U.K.
Guatemala
Haiti
Honduras
Jamaica
Martinique
Mexico
Nicaragua
Panama
Paraguay
Peru
Puerto Rico
Salvador
Trinidad and Tobago
Uruguay
Venezuela
Virgin Islands
342 0808128
0900 777 7737
815 33 047
00800 441 1357
707 200 123
0800 995 014
9 021 60455
07711 14453
08488 50112
0870 909 3266
AT&T +800 998 2112
57 1 657 0888
AT&T +800 998 2112
1 800 998 2112
571 657 0888
01 800 849CARE
AT&T +800 998 2112
AT&T +800 998 2112
54 11 4894 1888
AT&T +800 998 2112
1 800 998 2112
AT&T +800 998 2112
1 800 998 2112
AT&T +800 998 2112
AT&T +800 998 2112
57 1 657 0888
US and Canada Telephone Technical Support and Repair
1 800 876 3266
Page 62

60 APPENDIX A: OBTAINING SUPPORT FOR YOUR PRODUCT
 Loading...