

Page 1

HP 3PAR HP-UX 11i v2 and v3
Implementation Guide
HP Part Number: QL226-96021
Published: August 2011
Page 2

© Copyright 2011 Hewlett-Packard Development Company, L.P.
Confidential computer software. Valid license from HP required for possession, use or copying. Consistent with FAR 12.211 and 12.212, Commercial
Computer Software, Computer Software Documentation, and Technical Data for Commercial Items are licensed to the U.S. Government under
vendor's standard commercial license.
The information contained herein is subject to change without notice. The only warranties for HP products and services are set forth in the express
warranty statements accompanying such products and services. Nothing herein should be construed as constituting an additional warranty. HP shall
not be liable for technical or editorial errors or omissions contained herein.
Acknowledgments
Intel®, Itanium®, Pentium®, Intel Inside®, and the Intel Inside logo are trademarks or registered trademarks of Intel Corporation or its subsidiaries
in the United States and other countries.
Microsoft®, Windows®, Windows® XP, and Windows NT® are U.S. registered trademarks of Microsoft Corporation.
Java and Oracle are registered trademarks of Oracle and/or its affiliates.
UNIX® is a registered trademark of The Open Group.
Page 3

Contents
1 Introduction...............................................................................................4
Supported Configurations..........................................................................................................4
InForm OS Upgrade Considerations............................................................................................4
Audience.................................................................................................................................4
Related Documentation..............................................................................................................4
Typographical Conventions........................................................................................................5
Advisories................................................................................................................................5
2 Configuring the HP 3PAR Storage System for Fibre Channel.............................6
Configuring the HP 3PAR Storage System Running InForm OS 3.1.x and OS 2.3.x.............................6
Configuring Ports for a Direct Connection................................................................................6
Configuring Ports for a Fabric Connection...............................................................................7
Creating the Host Definition..................................................................................................7
Configuring the HP 3PAR Storage System Running InForm OS 2.2.x................................................8
Configuring Ports for a Direct Connection................................................................................8
Configuring Ports for a Fabric Connection...............................................................................8
Creating the Host Definition..................................................................................................9
Connecting the HP 3PAR Storage System to the Host.....................................................................9
Setting Up and Zoning the Fabric...............................................................................................9
Configuration Guidelines for Fabric Vendors..........................................................................10
Target Port Limits and Specifications.....................................................................................10
Configuration Diagrams for Zoning......................................................................................11
Single Initiator to Single Target Zoning No Fan-In No Fan-Out............................................11
Single Initiator to Single Target Zoning with Fan-Out from One HP 3PAR Storage System Port
to Multiple Host Server Ports...........................................................................................11
Single Initiator to Single Target Zoning with Fan-In from Multiple HP 3PAR Storage System
Ports to One Host Server Port..........................................................................................12
Single Initiator to Single Target Zoning with Mixed Fan-In and Fan-Out Configurations...........12
Non-Compliant Zoning Examples....................................................................................13
3 Connecting a Host Server with Fibre Channel...............................................14
Installing the HBA...................................................................................................................14
Installing the Host OS..............................................................................................................14
4 Allocating Storage for Access by the HP-UX Host..........................................17
Creating Storage on the HP 3PAR Storage System.......................................................................17
Creating Virtual Volumes....................................................................................................17
Creating Thin Provisioned Volumes.......................................................................................18
Exporting LUNs to the Host......................................................................................................18
Restrictions on Volume Size and Number...................................................................................19
Restrictions on Dynamic LUN Expansion.....................................................................................19
Setting Up Multipathing Software on 11i v3...............................................................................19
Setting Up Multipathing Software on 11i v2...............................................................................32
Optional Instructions for Multipathing........................................................................................37
Using the ioscan Command with Multipathing Software to Verify HBA Connections.........................37
5 Removing HP 3PAR Devices on the Host Server.............................................42
6 Booting the Host from the HP 3PAR Storage System.......................................43
HP 3PAR Storage System Setup Requirements.............................................................................43
HP-UX Itanium Host HBA Considerations....................................................................................43
Installation from HP-UX 11i v2 or 11i v3 DVDs.............................................................................44
A HP-UX Software List Command Output........................................................46
Contents 3
Page 4

1 Introduction
This implementation guide provides the information you need to configure an HP 3PAR Storage
System with HP-UX 11i v2 or v3. General information is also provided on the basic steps required
to allocate storage on the HP 3PAR Storage System that can then be accessed by the HP-UX host.
The information contained in this implementation guide is the outcome of careful testing of the
HP 3PAR Storage System with as many representative hardware and software configurations as
possible.
REQUIRED
For predictable performance and results with your HP 3PAR Storage System, the information in
this guide must be used in concert with the documentation set provided by HP for the HP 3PAR
Storage System and the documentation provided by the vendor for their respective products.
Supported Configurations
Fibre Channel connections are supported between the HP 3PAR Storage System and HP-UX host
server.
For complete details on supported host configurations, consult the HP 3PAR InForm OS Configuration
Matrix, which is available on HP’s Business Support Center (BSC).
To obtain a copy of this documentation, go to http://www.hp.com/go/3par/, navigate to
your product page, click HP Support & Drivers, and then click Manuals.
InForm OS Upgrade Considerations
Refer to the InForm OS Upgrade Pre-Planning Guide for information and planning of an online
HP 3PAR InForm Operating System upgrade.
Audience
This implementation guide is intended for system and storage administrators who monitor and
direct system configurations and resource allocation for HP 3PAR Storage Systems. The tasks
described in this manual assume that the administrator is familiar with HP-UX 11i v2 or v3 and the
HP 3PAR InForm OS. Although this guide attempts to provide the basic information that is required
to establish communications between the HP 3PAR Storage System and the HP-UX host, and to
allocate the required storage for a given configuration, the appropriate HP 3PAR documentation
must be consulted in conjunction with the HP-UX host and HBA vendor documentation for specific
details and procedures.
NOTE: This implementation guide does NOT intend to reproduce any third-party product
documentation. For details about devices such as host servers, HBAs, fabric and Ethernet switches,
and non-HP 3PAR software management tools, consult the appropriate third-party documentation.
Related Documentation
The following documents also provide information related to HP 3PAR Storage Systems and the
InForm Operating System:
Read the…For information about…
HP 3PAR InForm Configuration MatrixSpecific platforms supported
InForm OS Command Line Interface ReferenceCLI commands and their usage
HP 3PAR InForm OS Management Console Online HelpUsing the InForm Management Console to configure and
administer HP 3PAR Storage Systems
4 Introduction
Page 5

Read the…For information about…
HP 3PAR InForm OS Concepts GuideHP 3PAR Storage System concepts and terminology
HP 3PAR InServ S-Class/T-Class Storage Server Physical
Planning Manual or the HP 3PAR InServ E-Class/F-Class
Determining HP 3PAR Storage System hardware
specifications, installation considerations, power
requirements, networking options, and cabling Storage Server and Third-Party Rack Physical Planning
Manual
HP 3PAR InForm OS Messages and Operator’s GuideIdentifying storage server components and detailed alert
information
HP 3PAR Remote Copy User’s GuideUsing HP 3PAR Remote Copy
HP 3PAR CIM API Programming ReferenceUsing HP 3PAR CIM
Typographical Conventions
This guide uses the following typographical conventions:
Table 1 Typographical Conventions
ExampleMeaningTypeface
When prompted, click Finish to
complete the installation.
Used for dialog elements such as titles,
button labels, and other screen
elements.
ABCDabcd
Open the fileUsed for paths, filenames, and screen
output.
ABCDabcd
\os\windows\setup.exe
# cd \opt\3par\consoleUsed to differentiate user input from
screen output.
ABCDabcd
Modify the content string by adding
the-P <x> after -jar inform.jar
Used for variables in filenames, paths,
and screen output.
<ABCDabcd>
#.\java -jar inform.jar -P<x>Used for variables in user input.<ABCDabcd>
Advisories
To avoid injury to people or damage to data and equipment, be sure to observe the cautions and
warnings in this guide. Always be careful when handling any electrical equipment.
WARNING! Warnings alert you to actions that can cause injury to people or irreversible damage
to data or the operating system.
CAUTION: Cautions alert you to actions that can cause damage to equipment, software, or data.
NOTE: Notes are reminders, tips, or suggestions that supplement the procedures included in this
guide.
Typographical Conventions 5
Page 6

2 Configuring the HP 3PAR Storage System for Fibre
Channel
This chapter describes how to establish a connection between an HP 3PAR Storage System and
HP-UX host using Fibre Channel and how to set up the fabric when running InForm OS 3.1.x, OS
2.3.x, or OS 2.2.x. For information on setting up the physical connection for a particular HP 3PAR
Storage System, see the appropriate HP 3PAR installation manual.
REQUIRED
If you are setting up a fabric along with your installation of the HP 3PAR Storage System, consult
“Setting Up and Zoning the Fabric” (page 9) before configuring or connecting your HP 3PAR
Storage System.
Configuring the HP 3PAR Storage System Running InForm OS 3.1.x and
OS 2.3.x
This section describes how to configure the HP 3PAR Storage System running InForm OS 3.1.x
and OS 2.3.x.
REQUIRED
The following setup must be completed before connecting the HP 3PAR Storage System port to a
device.
Configuring Ports for a Direct Connection
To configure HP 3PAR Storage System ports for a direct connection to the HP-UX host, complete
the following steps:
1. To set up the HP 3PAR Storage System ports for a direct connection, issue the following set
of commands with the appropriate parameters for each direct connect port:
a. controlport offline [node:slot:port]
b. controlport config host –ct loop [node:slot:port]
where -ct loop specifies a direct connection.
c. controlport rst [node:slot:port]
Example:
# controlport offline 1:5:1
# controlport config host -ct loop 1:5:1
# controlport rst 1:5:1
2. After all ports have been configured, verify that the ports are configured for a host in a direct
connection by issuing the showport -par command on the HP 3PAR Storage System.
# showport -par
N:S:P Connmode ConnType CfgRate MaxRate Class2 UniqNodeWwn VCN IntCoal
...
1:5:1 host loop auto 4Gbps disabled disabled disabled enabled
...
6 Configuring the HP 3PAR Storage System for Fibre Channel
Page 7

Configuring Ports for a Fabric Connection
To configure HP 3PAR Storage System ports for a fabric connection, complete the following steps
for each port connecting to a fabric.
CAUTION: Before taking a port offline in preparation for a fabric connection, you should verify
that the port has not been previously defined and that it is not already connected to a host as this
would interrupt the existing host connection. If an HP 3PAR Storage System port is already configured
for a fabric connection, you can ignore Step 2 as you do not have to take the port offline.
1. To determine if a port has already been configured for a host port in fabric mode, issue
showport -par on the HP 3PAR Storage System.
# showport -par
N:S:P Connmode ConnType CfgRate MaxRate Class2 UniqNodeWwn VCN
IntCoal
...
1:5:1 host point auto 4Gbps disabled disabled disabled
enabled
...
2. If the port has NOT been configured, take the port offline before configuring it for connection
to a host server. To take the port offline, issue the InForm CLI command controlport
offline [node:slot:port].
# controlport offline 1:5:1
3. To configure the port to the host server, issue controlport config host –ct
point[node:slot:port], where -ct point indicates that the connection type specified
is a fabric connection.
# controlport config host –ct point 1:5:1
4. Reset the port by issuing the controlport rst [node:slot:port] command.
# controlport rst 1:5:1
Creating the Host Definition
Before connecting the HP-UX host to the HP 3PAR Storage System, create a host definition that
specifies a valid host persona for each HP 3PAR Storage System that is to be connected to a host
HBA port through a fabric or a direct connection.
1. To create host definitions, issue the createhost [options] <hostname> [<WWN>...]
command. For example:
# createhost -persona 7 hpux-host 1122334455667788 1122334455667799
Configuring the HP 3PAR Storage System Running InForm OS 3.1.x and OS 2.3.x 7
Page 8

2. To verify that the host has been created, issue the showhost command.
# showhost
Id Name Persona -WWN/iSCSI_Name- Port
...
2 hpux-host HPUX-legacy 1122334455667788 -- 1122334455667799 ---
Configuring the HP 3PAR Storage System Running InForm OS 2.2.x
This section describes how to configure the HP 3PAR Storage System running InForm OS 2.2.x.
REQUIRED
The following setup must be completed before connecting the HP 3PAR Storage System port to a
device.
Configuring Ports for a Direct Connection
To configure the HP 3PAR Storage System ports for a direct connection, complete the following
steps.
1. Set each HP 3PAR Storage System port to port personality 5 by issuing controlport
persona 5 <X:X:X>, where <X:X:X> is the port location, expressed as node:slot:port.
# controlport persona 5 1:2:1
2. Verify that each port has the appropriate personality defined:
# showport -par
N:S:P ConnType CfgRate MaxRate Class2 VCN ------------Persona------------ IntCoal
...
1:2:1 loop auto 2Gbps disable disabled (5) aglt, g_hba, hp, 0, DC
enabled
...
NOTE: When deploying your storage server in a direct connection, the HP Tachyon HBA
WWN does not show up.
Configuring Ports for a Fabric Connection
To configure the HP 3PAR Storage System ports for a fabric connection, complete the following
steps.
1. Set each storage server port that will connect to a fabric to port persona 8 by issuing
controlport persona 8 <X:X:X>, where <X:X:X> is the port location, expressed as
node:slot:port.
8 Configuring the HP 3PAR Storage System for Fibre Channel
Page 9

2. Issue controlport vcn disable -f <X:X:X> for each port.
Verify that each port has the appropriate persona defined:
# controlport persona 8 1:2:1
# showport -par
N:S:P ConnType CfgRate MaxRate Class2 VCN -----------Persona-----------IntCoal
...
1:2:1 point auto 2Gbps disable enabled (8) aglt, g_hba, hp, 0, FA
enabled
...
Creating the Host Definition
Before connecting the HP-UX host to the HP 3PAR Storage System, create a host definition that is
to be connected to a host HBA port through a fabric or a direct connection.
To create host definitions on the HP 3PAR Storage System, issue createhost
[options]<hostname> [<WWN>].
# createhost hpux-host 1122334455667788 1122334455667799
• To verify the host definition, issue showhost:
# showhost
Id Name -WWN/iSCSI_Name- Port
...
2 hpux-host 1122334455667788 -- 1122334455667799 ---
Connecting the HP 3PAR Storage System to the Host
During this stage connect the HP 3PAR Storage System to the host server directly or to the fabric.
This set of tasks includes physically cabling the HP 3PAR Storage System to the host server or fabric.
Setting Up and Zoning the Fabric
Fabric zoning controls which devices have access to each other on the fabric. The required use
of single initiator to single target zoning isolates the host server and HP 3PAR Storage System ports
from Registered State Change Notifications (RSCNs) that are irrelevant to these ports.
You can set up fabric zoning by associating the device World Wide Names (WWNs) or ports
with specified zones in the fabric. Although you can use either the WWN or the port zoning
methods with the HP 3PAR Storage System, the WWN zoning method is recommended because
the zone survives the changes of ports when cables are reconnected on a fabric.
Use the methods provided by the switch vendor to create relationships between host server HBA
ports and storage server ports before you connect the host server HBA ports or HP 3PAR Storage
System ports to the fabric.
REQUIRED
When you establish zoning with the HP 3PAR Storage System, there must only be a single initiator
zoned with a single target. If an issue occurs using another zoning approach, HP may require that
you implement this zoning approach as part of troubleshooting and/or corrective action.
Connecting the HP 3PAR Storage System to the Host 9
Page 10

After connecting each host server HBA port and HP 3PAR Storage System port to the fabric(s),
verify the switch and zone configurations using the InForm CLI showhost command, to ensure
that each initiator is zoned with the correct target.
In the following explanations an initiator port (initiator for short) refers to a host server HBA port
and a target port (target for short) refers to an HP 3PAR Storage System HBA port.
Configuration Guidelines for Fabric Vendors
Use the following fabric vendor guidelines before configuring ports on fabric(s) to which the
HP 3PAR Storage System connects.
• Brocade switch ports that connect to a host server HBA port or to an HP 3PAR Storage System
port should be set to their default mode. On Brocade 3xxx switches running Brocade firmware
3.0.2 or later, verify that each switch port is in the correct mode using the Brocade telnet
interface and the portcfgshow command as follows:
brocade2_1:admin> portcfgshow
Ports 0 1 2 3 4 5 6 7
-----------------+--+--+--+--+----+--+--+-Speed AN AN AN AN AN AN AN AN
Trunk Port ON ON ON ON ON ON ON ON
Locked L_Port .. .. .. .. .. .. .. ..
Locked G_Port .. .. .. .. .. .. .. ..
Disabled E_Port .. .. .. .. .. .. .. ..
where AN:AutoNegotiate, ..:OFF, ??:INVALID.
• McData switch or director ports should be in their default modes as type GX-Port with a speed
setting of Negotiate.
• Cisco switch ports that connect to HP 3PAR Storage System ports or host HBA ports should
be set to AdminMode = FXand AdminSpeed = auto port, with the speed set to auto negotiate.
• QLogic switch ports should be set to port type GL-port and port speed auto-detect.
• QLogic switch ports that connect to the HP 3PAR Storage System should be set to I/O Stream
Guard disable or auto, but never enable.
Target Port Limits and Specifications
To avoid overwhelming a target port and ensure continuous I/O operations, refer to the following
limitations on a target port:
• Maximum of 64 host server ports per HP 3PAR Storage System port, with a maximum total of
1,024 host server ports per HP 3PAR Storage System.
• I/O queue depth on each InServ Storage Server HBA model as follows:
QLogic 2G: 497◦
◦ LSI 2G: 510
◦ Emulex 4G: 959
◦ HP 3PAR HBA 4G: 1638
◦ HP 3PAR HBA 8G: 3276
• The I/O queues are shared among the connected host server HBA ports on a first-come,
first-served basis
• When all queues are in use and a host HBA port tries to initiate I/O, it receives a target queue
full response from the HP 3PAR Storage System port. This condition can result in erratic I/O
performance on each host server. If this condition occurs, each host server should be throttled
10 Configuring the HP 3PAR Storage System for Fibre Channel
Page 11
so that it cannot overrun the HP 3PAR Storage System port's queues when all host servers are
delivering their maximum number of I/O requests.
NOTE: When host server ports can access multiple targets on fabric zones, the assigned target
number assigned by the host driver for each discovered target can change when the host server
is booted and some targets are not present in the zone. This situation may change the device node
access point for devices during a host server reboot. This issue can occur with any fabric-connected
storage, and is not specific to the HP 3PAR Storage System.
Configuration Diagrams for Zoning
This section describes various zoning configurations.
NOTE: In the examples in the following sections, a fabric can be one or more Fibre Channel
switches or directors.
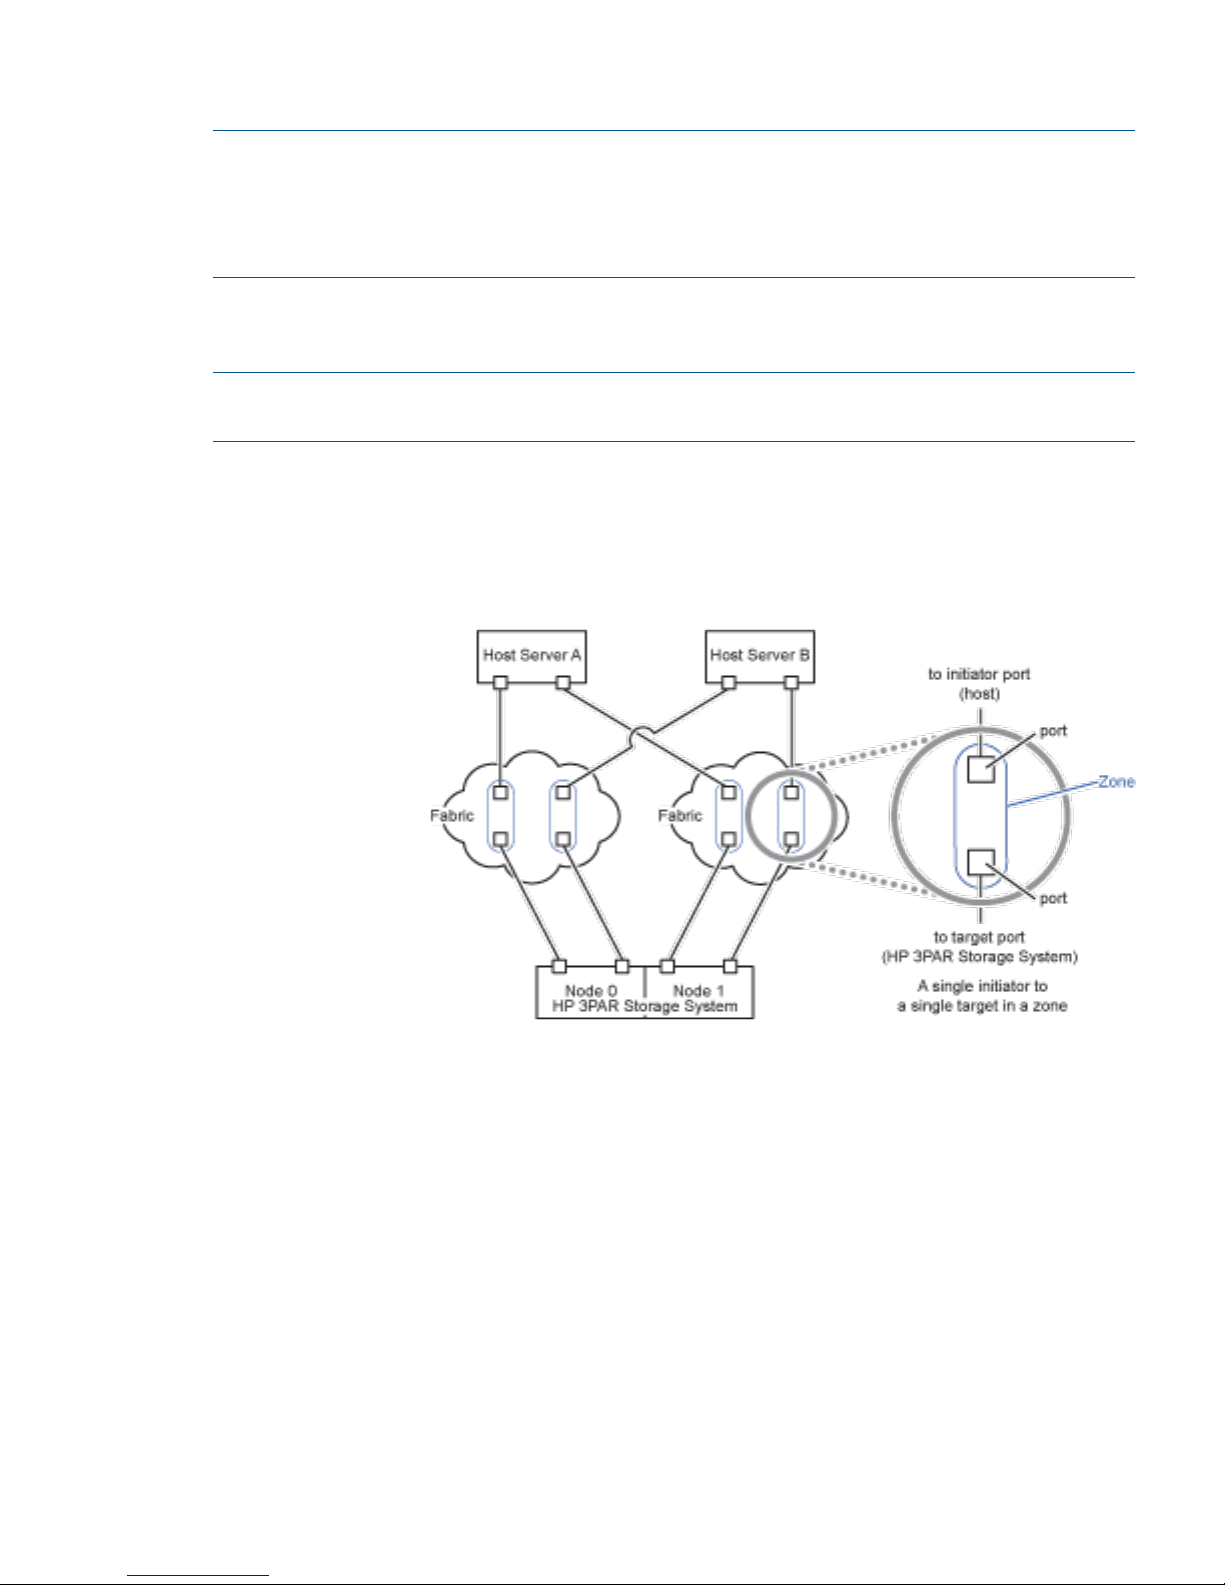
Single Initiator to Single Target Zoning No Fan-In No Fan-Out
With a single initiator to single target zoning, in a no fan-in, no fan-out configuration, each HBA
port is connected to only one HP 3PAR Storage System port, as shown in Figure 1 (page 11).
Figure 1 Single Initiator to Single Target Zoning No Fan-In/No Fan-Out
Single Initiator to Single Target Zoning with Fan-Out from One HP 3PAR Storage System Port to
Multiple Host Server Ports
With single initiator to single target zoning, in a fan-out configuration, the HP 3PAR Storage System
port is connected to more that one host port, as shown in Figure 2 (page 12).
Setting Up and Zoning the Fabric 11
Page 12
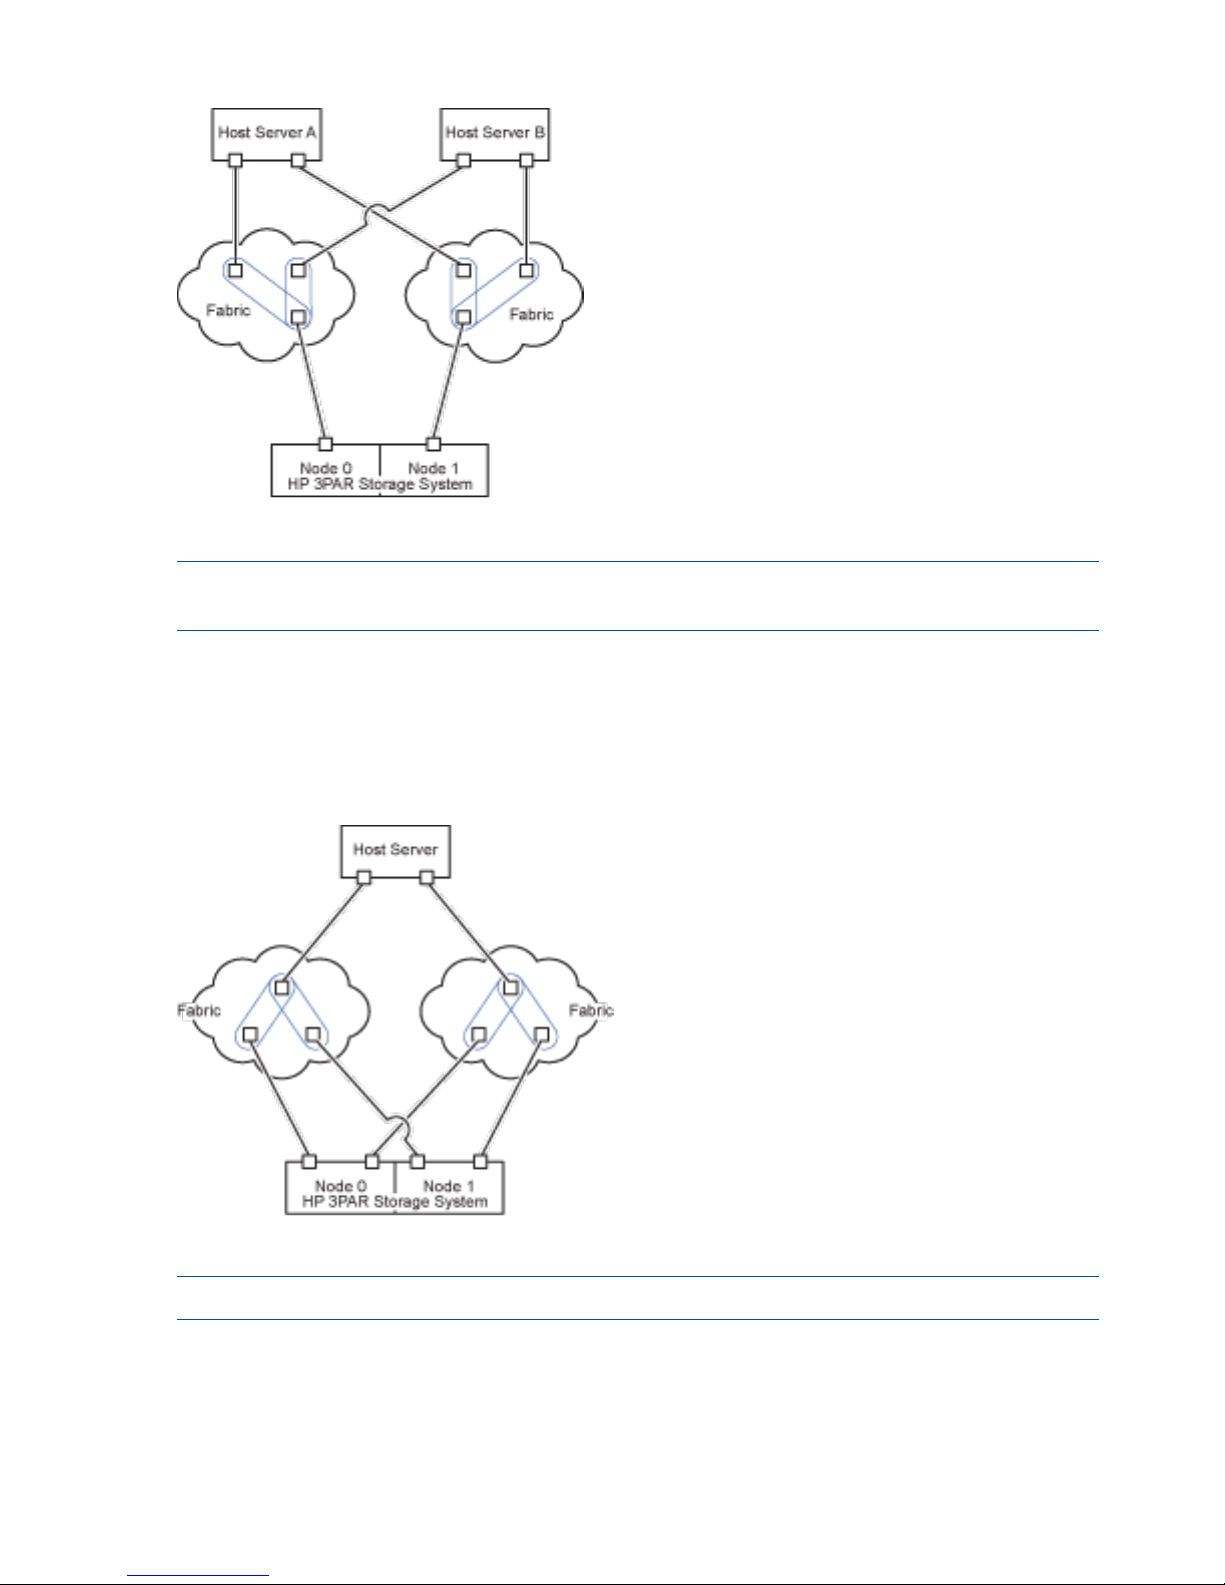
Figure 2 Single Initiator to Single Target Zoning with Fan-Out
NOTE: A maximum of 64 host server ports can fan-out from a single HP 3PAR Storage System
port.
Single Initiator to Single Target Zoning with Fan-In from Multiple HP 3PAR Storage System Ports to
One Host Server Port
With single initiator to single target zoning, in a fan-in configuration a host server port connects
to many HP 3PAR Storage System ports, as shown in Figure 3 (page 12).
Figure 3 Single Initiator to Single Host Target Zoning with Fan-In
NOTE: A maximum of four HP 3PAR Storage System ports can fan-in to a single host server port.
Single Initiator to Single Target Zoning with Mixed Fan-In and Fan-Out Configurations
With single initiator to single target zoning, in a fan-in and fan-out configuration, one HP 3PAR
Storage System connects to multiple host servers.
12 Configuring the HP 3PAR Storage System for Fibre Channel
Page 13
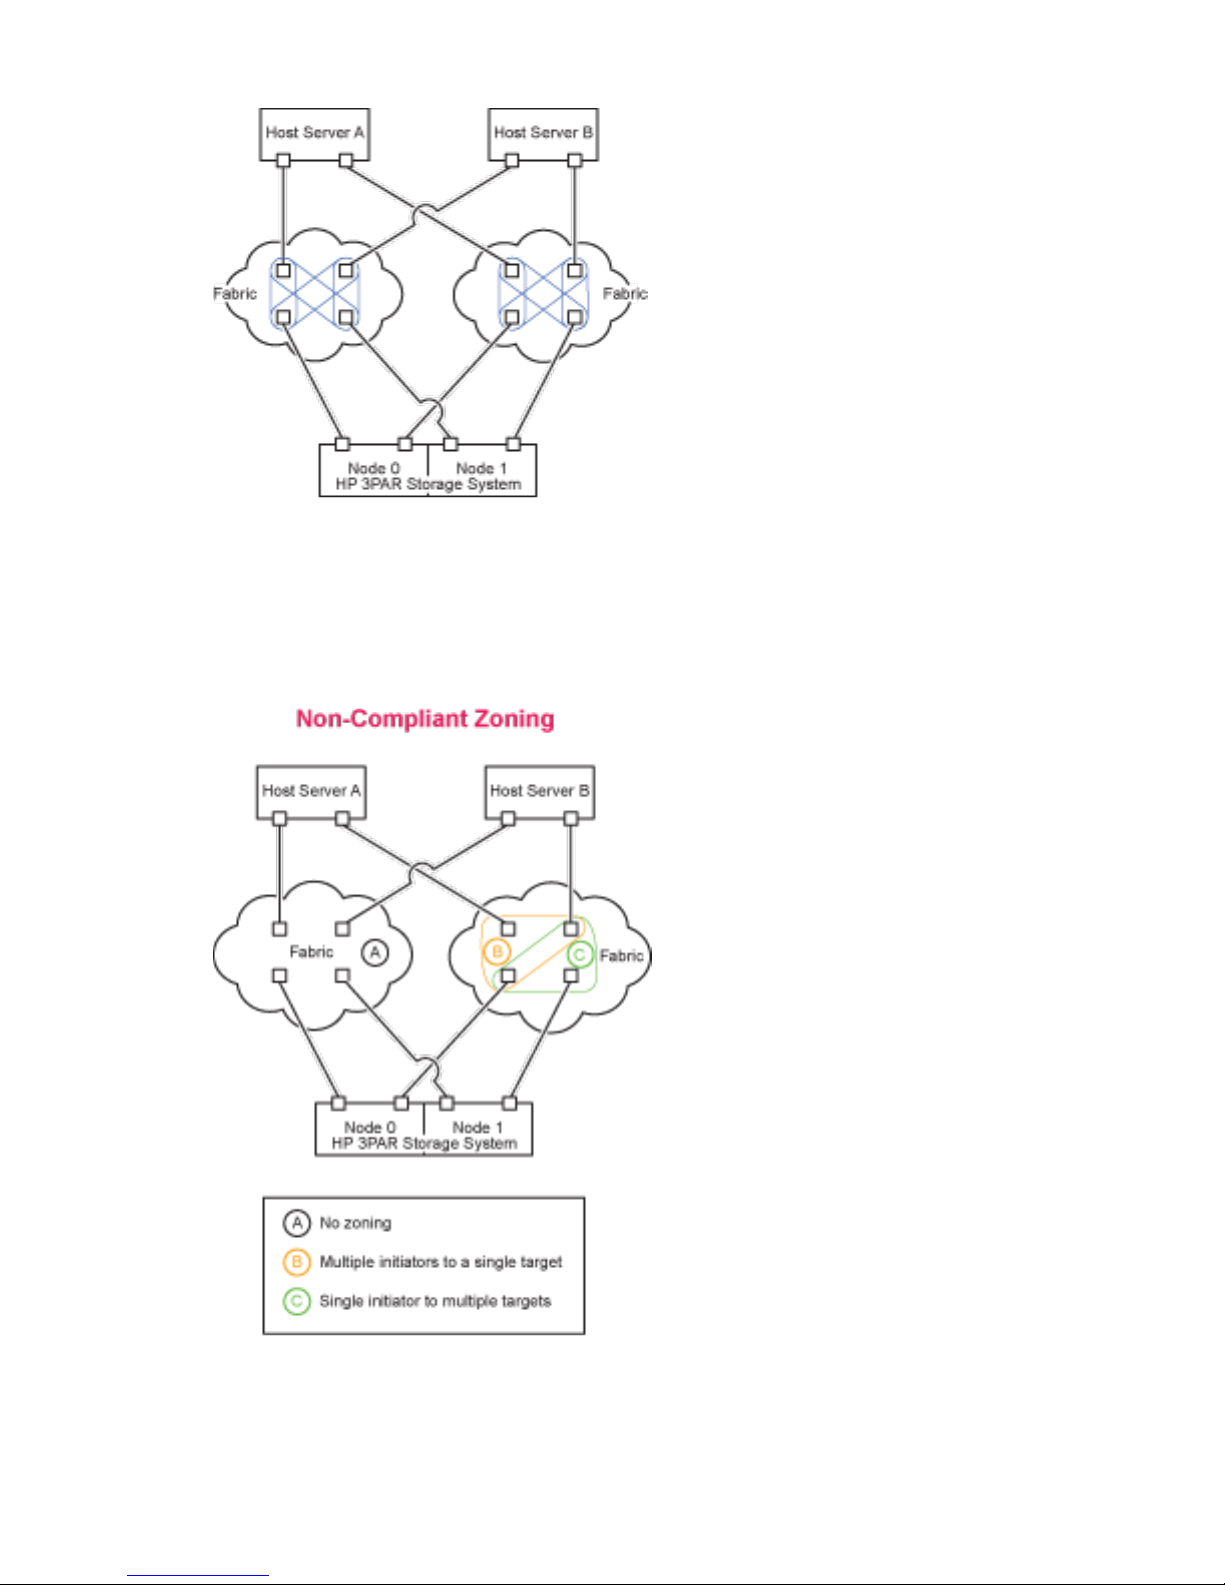
Figure 4 Single Initiator to Single Target Zoning with Fan-In and Fan-Out
Non-Compliant Zoning Examples
In the following example, the zoning rule of one initiator zoned to one target is not respected, as
shown in Figure 5 (page 13).
Figure 5 Non-Compliant Zoning
Setting Up and Zoning the Fabric 13
Page 14

3 Connecting a Host Server with Fibre Channel
This chapter describes the tasks necessary for connecting the host to Fibre Channel.
Installing the HBA
1. Install the HP-UX operating system from the HP-UX 11i v2 Mission Critical OE June 2008
Release or from the HP-UX 11i v3 Data Center OE March 2011 Release on Integrity/PA-RISC
Servers.
2. Install the HP Fibre Channel Mass Storage adapter(s), such as the AB379A/B, AH402A and
AD193A, in the server using the documentation supplied with the HBA from the server vendor.
A complete list of supported HBAs can be found on SPOCK. The HBA installation manuals
are also available at the folllowing web site:
http://www.hp.com
Installing the Host OS
The following information is for HP-UX 11i v2 or 11i v3 Itanium/PA-RISC server installations with
the AB379A/B, AH402A, and AD193A HBAs.
1. Check the installed patches using the System Administration Manager (SAM) for 11i v2 or
SMH for 11i v3 using the swlist command.
• GUI:
SAM→Software Management→View Installed Software
• CLI:
# swlist | grep -i FibrChanl
The list should include the following software; the support versions are listed in the HP 3PAR
InForm Configuration Matrix:
• For 11i v3:
# swlist FibrChanl*
#
# FibrChanl-00 B.11.31.1003 FibreChannel;HW=A6795A,A5158A
FibrChanl-00.FC-TACHYON-TL B.11.31.1003 FibreChannel (TD) Driver
# FibrChanl-01 B.11.31.1103
FibrChnl;HW=A6826A,A9782A,A9784A,AB378A/B,AB379A/B,AB465A,AD193A,AD194A,AD300A
FibrChanl-01.FC-FCD B.11.31.1103 FibreChannel (FCD) Driver
# FibrChanl-02 B.11.31.1103
FCLP;HW=AD299A,AD355A,AD221A,AD222A,AD393A,AH402A,AH403A,403621-B21,456972-B21
FibrChanl-02.FC-FCLP B.11.31.1103 PCIe FibreChannel
# FibrChanl-03 B.11.31.1103 FCOC;HW=581199-001
FibrChanl-03.FC-FCOC B.11.31.1103 PCIe FibreChannel
# FibrChanl-04 B.11.31.1103 FCQ;HW=P3P
FibrChanl-04.FC-FCQ B.11.31.1103 FibreChannel (FCQ) Driver
• For 11i v2:
# swlist FibrChanl*
#
14 Connecting a Host Server with Fibre Channel
Page 15

# FibrChanl-00 B.11.23.0712 PCI FibreChannel;Supptd
HW=A6795A,A5158A
FibrChanl-00.FC-TACHYON-TL B.11.23.0712 PCI FibreChannel;Supptd
HW=A6795A,A5158A
# FibrChanl-01 B.11.23.08.02
FibrChnl;SupptdHW=A6826A,A9782A,A9784A,AB378A,AB379A,AB465A,AD193A,AD194A,AD300A
FibrChanl-01.FC-FCD B.11.23.08.02 HP PCI-X/PCIe FibreChannel
Driver(FCD)
# FibrChanl-02 B.11.23.0712 PCIe FibreChannel;Supptd
HW=AD299A,AD355A
FibrChanl-02.FC-FCLP B.11.23.0712 PCIe FibreChannel
The drivers are installed as part of the operating system install. FibreChanl-00 must
be also installed for FibrChanl-01 to function.
2. Verify that the OnlineDiag or Support Tools Bundle software is installed and install the software
if it is not present. The OnlineDiag bundle is present in the OS media.
# swlist Online*
# OnlineDiag B.11.31.04.05 HPUX 11.31 Support
Tools Bundle, September 2008
3. HP recommends that the Server is at a certain firmware version to detect the Fibre Channel
Cards. Verify the firmware version using the MP interface on the Integrity or HP 9000 Server.
MP:CM> SYSREV
FIRMWARE:
Core IO
Master : A.006.012
Event Dict. : 1.009
Slave : A.006.012
Event Dict. : 1.009
Cell 0
PDHC : A.003.023
Pri SFW : 22.002 (PA)
Sec SFW : 1.025 (IA)
Cell 1
PDHC : A.003.023
Pri SFW : 22.002 (PA)
Sec SFW : 1.025 (IA)
Alternately, if the Online Diagnostics have been installed, run the cstm tool to determine the
firmware version.
a. Run the Support Tools Manager (STM) utility cstm.
# /usr/sbin/cstm
b. Use the selall and ilcommands to find all the required system information.
cstm>selall
cstm>il
...
Product ID : ia64 hp server rx7620
Product Number : not set
System Firmware Revision : 001.025
BMC Revision : v06.12
System Serial Number: : not set
System Software ID : 3801066248
Installing the Host OS 15
Page 16

NOTE: Contact HP for information on upgrading the system firmware.
c. For Itanium systems, install the supported EFI firmware for the AB379A/B, A6826A,
A6795A card. The firmware is downloadable from www.hp.com by searching the HBA
model. Those firmware versions are essential to enable the boot over SAN feature.
16 Connecting a Host Server with Fibre Channel
Page 17

4 Allocating Storage for Access by the HP-UX Host
Creating Storage on the HP 3PAR Storage System
This section describes the general steps and commands that are required to create the Virtual
Volumes that can then be exported for discovery by the HP-UX host. For additional information,
see the HP 3PAR InForm OS CLI Administrator’s Manual. For complete details on creating Virtual
Volumes, see the appropriate HP 3PAR documentation.
Creating Virtual Volumes
Virtual Volumes are the only data layer visible to hosts. After devising a plan for allocating space
for host servers on the HP 3PAR Storage System, create the Virtual Volumes.
After devising a plan for allocating space for the HP-UX host, you need to create the required
Virtual Volumes on the HP 3PAR Storage System. You can create volumes that are provisioned
from one or more Common Provisioning Groups (CPGs). Volumes can be fully provisioned from
a CPG or can be thinly provisioned. You can optionally specify a CPG for snapshot space for fully
provisioned volumes.
Using the InForm Management Console:
1. From the Menu bar, select:
Actions→Provisioning→VV→Create Virtual Volume
2. Use the Create Virtual Volume wizard to create a base volume.
3. Select one of the following options from the Provisioning list:
• Fully Provisioned from PDs
• Fully Provisioned from CPG
• Thinly Provisioned
Using the InForm CLI:
To create a fully provisioned or thinly provisioned virtual volume, issue the following InForm
CLI command:
createvv [options] <usr_cpg> <vvname> [.<index>] <size>[g|G|t|T]
Here is an example:
# createcpg CPG_test
# createvv -cnt 5 CPG_test TestLUNs 5g
# showvv
----Rsvd(MB)---- -(MB) Id Name Prov Type CopyOf BsId Rd -Detailed_State- Adm Snp
Usr VSize
...
6525 TestLUNs.0 full base --- 6525 RW normal 0 0
5120 5120
6526 TestLUNs.1 full base --- 6526 RW normal 0 0
5120 5120
6527 TestLUNs.2 full base --- 6527 RW normal 0 0
5120 5120
6528 TestLUNs.3 full base --- 6528 RW normal 0 0
5120 5120
6529 TestLUNs.4 full base --- 6529 RW normal 0 0
5120 5120
Creating Storage on the HP 3PAR Storage System 17
Page 18

NOTE: To create thinly provisioned virtual volumes, an HP 3PAR Thin Provisioning license
is required.
Consult the InForm Management Console help and the HP 3PAR Command Line Reference
for complete details on creating volumes for the InForm OS version that is being used on the
HP 3PAR Storage System. Note that the commands and options available for creating a virtual
volume may vary for earlier versions of the InForm OS.
Creating Thin Provisioned Volumes
To create Thin Provisioned volumes, see the following documents:
• HP 3PAR InForm OS Concepts Guide
• HP 3PAR InForm OS CLI Administrator’s Manual
• InForm OS Command Line Interface Reference
Exporting LUNs to the Host
This section explains how to export LUNs to the host server as VVs, referred to as Virtual LUNs
(VLUNs).
To export VVs as Virtual LUNs, issue the following command:
createvlun -cnt <number> <VV_name> <LUN> <host_name>
where:
• -cnt <number> specifies that a sequence of VLUNs, as specified by the number argument,
are exported to the same system port and host that is created. The number argument can be
specified as any integer. For each VLUN created, the .int suffix of the VV_name specifier
and LUN are incremented by one.
• <VV_name> specifies name of the virtual volume being exported as a virtual LUN.
• <LUN> indicates that this is the starting LUN number.
• <hostname/hostdefinition> indicates that hostname is the name of the host created in
sections 2.1.1, 2.1.2, or 2.1.3.
Example:
# createvlun -cnt 5 TestLUNs.0 1 hpux-host
To verify that VLUNs have been created, issue showvlun:
# showvlun
Active VLUNs
Lun VVName HostName -Host_WWN/iSCSI_Name- Port Type
...
VLUN Templates
Lun VVName HostName -Host_WWN/iSCSI_Name- Port Type
1 TestLUNs.0 hpux-host ---------------- --- host
2 TestLUNs.1 hpux-host ---------------- --- host
3 TestLUNs.2 hpux-host ---------------- --- host
4 TestLUNs.3 hpux-host ---------------- --- host
5 TestLUNs.4 hpux-host ---------------- --- host
...
18 Allocating Storage for Access by the HP-UX Host
Page 19

Restrictions on Volume Size and Number
Follow the guidelines for creating virtual volumes (VVs) and Virtual LUNs (VLUNs) in the HP 3PAR
InForm OS CLI Administrator’s Manual while adhering to these cautions and guidelines:
• This configuration supports sparse LUNs (meaning that LUNs may be skipped). LUNs may
also be exported in non-ascending order (e.g. 0, 5, 7, 3).
• The HP 3PAR Storage System supports the exportation of VLUNs with LUNs in the range from
0 to 16838. Testing was limited to 256 LUNs per storage server port (target) using LUN
numbers 1 to 256.
• The maximum LUN size that can be exported to a HP-UX host is 16TB when the installed
InForm OS version is 2.3.x. or later. The upper limits on a HP-UX host is dependant on the
LVM version. See LVM Version 2.0 Volume Groups in HP-UX 11i v3 and LVM Version 1.0
Volume Groups in HP-UX 11iv2 on http://www.hp.com.
Restrictions on Dynamic LUN Expansion
Dynamic LUN Expansion (DLE) is currently not supported on HP-UX 11iv3 and HP 3PAR Storage
systems.
• Beginning with HP-UX 11iv3 March 2009 Update, administrators can use the online vgmodify
command to invoke Dynamic LUN Expansion (DLE) on LVM versions 2.x and 1.0. While HP
3PAR Storage Systems allow a LUN to be dynamically resized, the HP-UX Logical Volume
Manager DLE feature is currently not supported with HP 3PAR Storage Systems.
• As a temporary workaround, administrators can leverage the HP-UX diskinfo command to
trigger detection of the LUN expansion by the operating system.
# diskinfo /dev/rdisk/disk100
Setting Up Multipathing Software on 11i v3
HP 3PAR supports the HP-UX native multipathing solution.
1. In Agile Addressing Mode, the persistent DSF maps /dev/disk/diskXX to the Device
WorldWide Identifier (WWID) or serial number which correlates to an HP 3PAR Storage
System VV (VV WWN). This WWN is unique and is not affected by LUN path changes; the
DSF is called Agile addressing.
NOTE: Additional information on Agile Addressing Mode is provided in the Next Generation
Mass Storage Stack, HP-UX 11i v3 Native Multipathing for Mass Storage, and other documents
about Storage Area Management for HP-UX 11i v3 available at http://docs.hp.com.
2. By default, the Agile Addressing Mode is enabled. After exporting, new VLUNs that are
exported while the host server is running will not be registered on the host until you issue the
ioscan command. This command scans the hardware for all the new and usable devices.
You can consult /var/adm/syslog/syslog.log during the discovery process to verify
that the new devices are being discovered. Special device files for the new devices (raw and
block device paths) that are required to access the devices are created as part of the ioscan
command by internally executing the insf -e command.
# ioscan
# tail -f /var/adm/sy slog/syslog.log
vmunix: 0/0/4/1/0.0x20420002ac000036.0x400a000000000000 eslpt
vmunix: 0/0/4/1/1.0x21520002ac000036.0x400a000000000000 eslpt
vmunix: 64000/0xfa00/0x243 esdisk
Restrictions on Volume Size and Number 19
Page 20

sfd[2330]: started 'insf' to create device special files for newly found devices.
sfd[2330]: execution of 'insf' completed.
Always use the -N option for the ioscan command to see the persistent devices or agile
devices. Without the -N option, legacy devices will be seen.
NOTE: Broken or stale device paths are displayed with S/W state of NO_HW in the output
of the ioscan -kfnNC disk command. The CLAIMED state indicates a valid disk device
path existence.
Example: Without the -N option, legacy devices are shown.
# ioscan -kfnC disk
Class I H/W Path Driver S/W State H/W Type Description
=======================================================================
disk 19 0/0/0/3/0.6.0 sdisk CLAIMED DEVICE HP 36.4GST336753LC
/dev/dsk/c8t6d0 /dev/dsk/c8t6d0s2
/dev/rdsk/c8t6d0 /dev/rdsk/
c8t6d0s2
/dev/dsk/c8t6d0s1 /dev/dsk/c8t6d0s3
/dev/rdsk/c8t6d0s1 /dev/rdsk/
c8t6d0s3
disk 7 0/0/4/1/0.18.1.0.0.0.1 sdisk CLAIMED DEVICE 3PARdataVV
/dev/dsk/c11t0d1 /dev/rdsk/c11t0d1
disk 8 0/0/4/1/0.18.1.0.0.0.2 sdisk CLAIMED DEVICE 3PARdataVV
/dev/dsk/c11t0d2 /dev/rdsk/c11t0d2
disk 9 0/0/4/1/0.18.1.0.0.0.3 sdisk CLAIMED DEVICE 3PARdataVV
Example: Using the -N option displays the persistent devices.
# ioscan -kfNnC disk
Class I H/W Path Driver S/W State H/W Type Description
===================================================================
disk 0 64000/0xfa00/0x23e esdisk CLAIMED DEVICE 3PARdataVV
/dev/disk/disk0 /dev/rdisk/disk0
disk 1 64000/0xfa00/0x23f esdisk CLAIMED DEVICE 3PARdataVV
/dev/disk/disk1 /dev/rdisk/disk1
disk 3 64000/0xfa00/0x240 esdisk CLAIMED DEVICE 3PARdataVV
/dev/disk/disk3 /dev/rdisk/disk3
Example: The output of ioscan shows the relationship between the legacy and persistent
devices.
# ioscan -m dsf
Persistent DSF Legacy DSF(s)
========================================
/dev/rdisk/disk0 /dev/rdsk/c11t0d1
/dev/rdsk/c15t0d1
/dev/rdisk/disk1 /dev/rdsk/c11t0d2
/dev/rdsk/c15t0d2
/dev/rdisk/disk2 /dev/rdsk/c8t6d0
3. HP recommends that you do not use the legacy device paths; instead, migrate any application
from legacy to persistent device paths by disabling the legacy device paths. All LVM commands
20 Allocating Storage for Access by the HP-UX Host
Page 21

works with persistent device paths (DSF). Use the rmsf -v -L command to disable the legacy
device paths.
# rmsf -vL
WARNING: This command may be disruptive to the system.
Before running this command, make sure you have first run
iofind(1M) and migrated all applications using legacy device
special files. Please refer to the man page of rmsf(1M) to
verify the possible side effects of the option '-L'.
Do you want to continue ?
(You must respond with 'y' or 'n'.): y
rmsf: Removing special file /dev/dsk/c0t6d0
rmsf: Removing special file /dev/dsk/c0t6d0s1
rmsf: Removing special file /dev/dsk/c0t6d0s2
NOTE: You can enable the legacy device paths any time by executing the insf -L
command. Even if you perform I/O on legacy paths, it will be internally routed through the
persistent device files.
# insf -L
This command will re-install all legacy I/O nodes and legacy DSFs.
Do you want to continue ?
(You must respond with 'y' or 'n'.): y
insf: Legacy mode has been successfully enabled
Use insf -Lv to display the status as to whether Legacy Mode is enabled or disabled.
# insf -Lv
insf: Legacy mode is disabled
NOTE: The rest of this document assumes that legacy path has been disabled.
4. You can use various options for the ioscan command to obtain more details.
Example:
a. To show discovered devices, issue ioscan -kfnNC disk. The description field will
have HP 3PAR VV for all HP 3PAR Storage System volumes.
# ioscan -kfnNC disk
Class I H/W Path Driver S/W State H/W Type Description
===================================================================
disk 2 64000/0xfa00/0x0 esdisk CLAIMED DEVICE HP 36.4GST336753LC
/dev/disk/disk2 /dev/disk/disk2_p2 /dev/rdisk/disk2 /dev/rdisk/disk2_p2
disk 0 64000/0xfa00/0x23e esdisk CLAIMED DEVICE 3PARdataVV
/dev/disk/disk0 /dev/rdisk/disk0
disk 1 64000/0xfa00/0x23f esdisk CLAIMED DEVICE 3PARdataVV
/dev/disk/disk1 /dev/rdisk/disk1
CAUTION: All I/O to the devices should use /dev/rdisk/disk for raw disk or
/dev/disk/disk for block I/O. Any partition on the device will be represented as
/dev/disk/diskX_pN number.
b. To determine the connected target ports (0:4:2 and 1:5:2) use the following commands:
Setting Up Multipathing Software on 11i v3 21
Page 22

1) Issue ioscan -kfnNC tgtpath on the HP-UX host.
# ioscan -kfnNC tgtpath
Class I H/W Path Driver S/W State H/W Type Description
======================================================================
tgtpath 2 0/0/0/3/0.0x6 estp CLAIMED TGT_PATH parallel_scsi
target served by c8xx
driver
tgtpath 0 0/0/4/1/0.0x20420002ac000036 estp CLAIMED TGT_PATH
fibre_channel target
served by fcd driver
tgtpath 1 0/0/4/1/1.0x21520002ac000036 estp CLAIMED TGT_PATH
fibre_channel target
served by fcd driver
2) Issue showport -i on the HP 3PAR Storage System:
# showport -i
N:S:P Mode State ----Node_WWN---- -Port_WWN/HW_Addr- Type
...
0:4:2 target ready 2FF70002AC000036 20420002AC000036 host
1:5:2 target ready 2FF70002AC000036 21520002AC000036 host
3) To determine the Fibre Channel HBA’s model, hardware path, and the fcd driver
instance, issue ioscan -kfnNC fc:
# ioscan -kfnNC fc
Class I H/W Path Driver S/W State H/W Type Description
==================================================================
fc 5 0/0/4/1/0 fcd CLAIMED INTERFACE HP AB379-60001
4Gb Dual Port PCI/PCI-X Fibre Channel Adapter (FC Port 1)
/dev/fcd5
fc 6 0/0/4/1/1 fcd CLAIMED INTERFACE HP AB379-60001
4Gb Dual Port PCI/PCI-X Fibre Channel Adapter (FC Port 2)
/dev/fcd6
fc 7 0/0/6/1/0 td CLAIMED INTERFACE HP Tachyon XL2
Fibre Channel Mass Storage Adapter
/dev/td7
fc 8 0/0/10/1/0 fcd CLAIMED INTERFACE HP A6826-60001
2Gb Dual Port PCI/PCI-X Fibre Channel Adapter (FC Port 1)
/dev/fcd8
fc 9 0/0/10/1/1 fcd CLAIMED INTERFACE HP A6826-60001
2Gb Dual Port PCI/PCI-X Fibre Channel Adapter (FC Port 2)
4) To determine the number of LUN paths for each DSF, issue ioscan -m hwpath:
# ioscan -m hwpath
Lun H/W Path Lunpath H/W Path Legacy H/W Path
====================================================================
64000/0xfa00/0x0
0/0/0/3/0.0x6.0x0
64000/0xfa00/0x17
0/0/4/1/1.0x21520002ac000036.0x0
64000/0xfa00/0x18
0/0/4/1/0.0x20420002ac000036.0x0
64000/0xfa00/0x23e
0/0/4/1/0.0x20420002ac000036.0x4001000000000000
0/0/4/1/1.0x21520002ac000036.0x4001000000000000
64000/0xfa00/0x23f
22 Allocating Storage for Access by the HP-UX Host
Page 23

0/0/4/1/0.0x20420002ac000036.0x4002000000000000
0/0/4/1/1.0x21520002ac000036.0x4002000000000000
In the LUN path the 16 bits address following the target port ID
(0x20420002ac000036) represents the LUN number where the device is seen and
the addressing mode. For example, for 0x4001 (which translates to
0100000000000001) the first two bits 01 represents VSA mode and the remaining
14 bits represent the LUN number, which is LUN 1 in this example.
The host uses estp driver for target paths, eslpt for LUN paths and esdisk as
disk driver.
5) You can find the health of a device, target, LUN path and determine whether it is
on or off line using the -P option. The -C option can be used to specify attributes
such as target ports, disks, or individual LUN paths. The status limited means some
paths are taken offline from the available multiple paths
# ioscan -P health -C tgtpath
Class I H/W Path health
====================================
tgtpath 2 0/0/0/3/0.0x6 online
tgtpath 0 0/0/4/1/0.0x20420002ac000036 online
tgtpath 1 0/0/4/1/1.0x21520002ac000036 offline
#ioscan -P health -C disk
Class I H/W Path health
===============================
disk 2 64000/0xfa00/0x0 online
disk 0 64000/0xfa00/0x23e online
disk 1 64000/0xfa00/0x23f online
disk 3 64000/0xfa00/0x240 limited
disk 4 64000/0xfa00/0x241 limited
# ioscan -P health -C lunpath
lunpath 0 0/0/4/1/0.0x20420002ac000036.0x0 online
lunpath 4 0/0/4/1/0.0x20420002ac000036.0x4001000000000000 online
lunpath 5 0/0/4/1/0.0x20420002ac000036.0x4002000000000000 online
lunpath 1 0/0/4/1/1.0x21520002ac000036.0x0 offline
lunpath 2 0/0/4/1/1.0x21520002ac000036.0x4001000000000000 offline
lunpath 9 0/0/4/1/1.0x21520002ac000036.0x4002000000000000 offline
5. A given DSF file (/dev/disk/diskXX) once allocated to a given unique device (HP 3PAR
Storage System VV) remains persistent and will not be reused for any other devices (VVs) even
after the original device (VV) is removed. Whenever the actual or original VV reappears, the
same DSF name is allocated.
Example:
Issuing showvlun -a on the HP 3PAR Storage System shows that the HP 3PAR Storage
System VV hpcheck is exported as LUN 20.
# showvlun -a
Lun VVname Host -Host_WWN/iSCSI_Name- Port Type
20 hpcheck sqahpit2 50060B00001D1192 1:5:2 host
20 hpcheck sqahpit2 50060B000068D5A4 0:4:2 host
Setting Up Multipathing Software on 11i v3 23
Page 24

Issuing ioscan -kfnNC lunpath shows that host recognizes the VV as
/dev/disk/disk20.
# ioscan -kfnNC lunpath
lunpath 15 0/0/4/1/0.0x20420002ac000036.0x4014000000000000 eslpt CLAIMED LUN_PATH
LUN path for disk20
lunpath 16 0/0/4/1/1.0x21520002ac000036.0x4014000000000000 eslpt NO_HW LUN_PATH
LUN path for disk20
Remove the LUN and reexport it as LUN 25 and you can see that /dev/disk/disk20 is
recreated for LUN 25 and the LUN path for LUN number 20 goes stale (NO_HW).
HP 3PAR Storage System:
# showvlun -a
Lun VVname Host -Host_WWN/iSCSI_Name- Port Type
25 hpcheck sqahpit2 50060B00001D1192 1:5:2 host
25 hpcheck sqahpit2 50060B000068D5A4 0:4:2 host
HP-UX host:
# ioscan -kfnNC lunpath
lunpath 15 0/0/4/1/0.0x20420002ac000036.0x4014000000000000 eslpt NO_HW LUN_PATH
LUN path for disk20
lunpath 17 0/0/4/1/0.0x20420002ac000036.0x4019000000000000 eslpt CLAIMED LUN_PATH
LUN path for disk20
lunpath 16 0/0/4/1/1.0x21520002ac000036.0x4014000000000000 eslpt NO_HW LUN_PATH
LUN path for disk20
lunpath 18 0/0/4/1/1.0x21520002ac000036.0x4019000000000000 eslpt CLAIMED LUN_PATH
LUN path for disk20
6. HP-UX 11i v3 provides the scsimgr command, which provides generic management and
diagnostic capabilities for the SCSI subsystem of the mass storage stack. Use the scsimgr
command to obtain the SCSI disk status information, statistics, change multipath options, set
attributes, inquiry information and to perform other task management functions such as LUN
and target resets.
Example:
a. Issue the scsimgr command to obtain the relationship between the hardware LUN path,
device special file (DSF), and HP 3PAR VV.
# scsimgr -p get_attr all_lun -a hw_path -a device_file -a wwid -a
serial_number -a vid
64000/0xfa00/0x17:/dev/pt/pt11::00000000:3PARdata
64000/0xfa00/0x18:/dev/pt/pt4::00000000:3PARdata
64000/0xfa00/0x23e:/dev/rdisk/disk0:0x50002ac002480036:02480036:3PARdata
64000/0xfa00/0x23f:/dev/rdisk/disk1:0x50002ac002490036:02490036:3PARdata
64000/0xfa00/0x240:/dev/rdisk/disk3:0x50002ac0024a0036:024A0036:3PARdata
b. On the HP 3PAR Storage System, issue showvv -d and showvlun -lvw.
# showvv -d
Id Name Rd Mstr Prnt Roch Rwch PPrnt PBlkRemain -----VV_WWN-----
--------CreationTime-------584 hpcluster.0 RW 0/1/- --- --- --- --- - 50002AC002480036
Tue Oct 23 12:53:36 PDT 2007
24 Allocating Storage for Access by the HP-UX Host
Page 25

585 hpcluster.1 RW 1/0/- --- --- --- --- - 50002AC002490036
Tue Oct 23 12:53:36 PDT 2007
586 hpcluster.2 RW 0/1/- --- --- --- --- - 50002AC0024A0036
Tue Oct 23 12:53:36 PDT 2007
# showvlun -lvw
Active VLUNs
Lun VVname -----VV_WWN----- Host -Host_WWN/iSCSI_Name- Port Type
1 hpcluster.0 50002AC002480036 sqahpit2 50060B000068D5A4 0:4:2 host
2 hpcluster.1 50002AC002490036 sqahpit2 50060B000068D5A4 0:4:2 host
3 hpcluster.2 50002AC0024A0036 sqahpit2 50060B000068D5A4 0:4:2 host
1 hpcluster.0 50002AC002480036 sqahpit2 50060B00001D1192 1:5:2 host
2 hpcluster.1 50002AC002490036 sqahpit2 50060B00001D1192 1:5:2 host
3 hpcluster.2 50002AC0024A0036 sqahpit2 50060B00001D1192 1:5:2 host
The output above shows that /dev/rdisk/disk0 is a device special file for HP 3PAR
Storage System VV hpcluster.0 exported as LUN 1 and verified from HP 3PAR Storage
System CLI showvv and showhost commands.
c. To obtain information about the number of paths for a given disk, issue scsimgr
lun_map or scsimgr lun_map -D /dev/rdisk/disk6:
# scsimgr lun_map -D /dev/rdisk/disk6
LUN PATH INFORMATION FOR LUN : /dev/rdisk/disk6
Total number of LUN paths = 2
World Wide Identifier(WWID) = 0x50002ac0024d0036
LUN path : lunpath13
Class = lunpath
Instance = 13
Hardware path = 0/0/4/1/0.0x20420002ac000036.0x400a000000000000
SCSI transport protocol = fibre_channel
State = UNOPEN
Last Open or Close state = ACTIVE
LUN path : lunpath14
Class = lunpath
Instance = 14
Hardware path = 0/0/4/1/1.0x21520002ac000036.0x400a000000000000
SCSI transport protocol = fibre_channel
State = UNOPEN
Last Open or Close state = ACTIVE
d. To determine all device attributes such as the multipathing policy, timeout values and
device capacity, issue scsimgr getinfo all_lun or scsimgr get_info -D
/dev/rdisk/disk6:
# scsimgr get_info -D /dev/rdisk/disk6
STATUS INFORMATION FOR LUN : /dev/rdisk/disk6
Generic Status Information
SCSI services internal state = UNOPEN
Device type = Direct_Access
EVPD page 0x83 description code = 1
EVPD page 0x83 description association = 0
EVPD page 0x83 description type = 3
World Wide Identifier (WWID) = 0x50002ac0024d0036
Setting Up Multipathing Software on 11i v3 25
Page 26

Serial number = 024D0036
Vendor id = 3PARdata
Product id = VV
...
I/O load balance policy = round_robin
...
Driver esdisk Status Information :
Capacity in number of blocks = 2097152
Block size in bytes = 512
Number of active IOs = 0
Special properties =
Maximum number of IO retries = 45
IO transfer timeout in secs = 30
FORMAT command timeout in secs = 86400
START UNIT command timeout in secs = 60
Timeout in secs before starting failing IO = 120
IO infinite retries = false
e. The default load balancing policy is round robin. HP offers other load balancing options.
HP 3PAR has tested the round_robin and least_cmd_load load balancing options.
The load balancing policy can be changed globally or for an individual disk.
Example: Issue the following commands to globally change from round_robin to
least_cmd_load:
# scsimgr get_attr -N /escsi/esdisk -a load_bal_policy
SCSI ATTRIBUTES FOR SETTABLE ATTRIBUTE SCOPE : /escsi/esdisk
name = load_bal_policy
current = round_robin
default = round_robin
saved =
# scsimgr set_attr -N /escsi/esdisk -a load_bal_policy=least_cmd_load
Verify it is changed
# scsimgr get_attr -N /escsi/esdisk -a load_bal_policy
SCSI ATTRIBUTES FOR SETTABLE ATTRIBUTE SCOPE : /escsi/esdisk
name = load_bal_policy
current = least_cmd_load
default = round_robin
saved =
Save the load_bal_policy so the change in intact even with reboots.
# scsimgr save_attr -N /escsi/esdisk -a load_bal_policy=least_cmd_load
Verify the change made
# scsimgr get_attr -N /escsi/esdisk -a load_bal_policy
SCSI ATTRIBUTES FOR SETTABLE ATTRIBUTE SCOPE : /escsi/esdisk
name = load_bal_policy
current = least_cmd_load
default = round_robin
saved = least_cmd_load
# scsimgr get_attr -a load_bal_policy -D /dev/rdisk/disk6
26 Allocating Storage for Access by the HP-UX Host
Page 27

SCSI ATTRIBUTES FOR LUN : /dev/rdisk/disk6
name = load_bal_policy
current = round_robin
default = least_cmd_load
saved =
f. If the load_bal_policy needs to be changed to default, issue the following commands.
# scsimgr save_attr -N /escsi/esdisk -a load_bal_policy=default
# scsimgr get_attr -N /escsi/esdisk -a load_bal_policy
SCSI ATTRIBUTES FOR SETTABLE ATTRIBUTE SCOPE : /escsi/esdisk
name = load_bal_policy
current = round_robin
default = round_robin
saved =
CAUTION: Do not change any other default values such as path failover and I/O retry
values.
g. LUN 0, which is used as a special Array Controller mode when talking with the HP
initiator, is seen as a pass through device (pt) created by the esctl driver which only
supports path_lockdown load balancing policy. Do not change any of these attributes
for LUN 0.
# ioscan -kfnNC lunpath
lunpath 0 0/0/4/1/0.0x20420002ac000036.0x0 eslpt CLAIMED
LUN_PATH LUN path for ctl4
lunpath 4 0/0/4/1/0.0x20420002ac000036.0x4001000000000000 eslpt CLAIMED
LUN_PATH LUN path for disk0
# scsimgr get_attr all_lun
...
SCSI ATTRIBUTES FOR LUN : /dev/pt/pt4
Device type = Array_Controller
Serial number = 00000000
Vendor id = 3PARdata
Product id = ARRAY
Product revision = 0000
I/O load balance policy = path_lockdown
LUN Path used when policy is path_lockdown =
0/0/4/1/0.0x20420002ac000036.0x0
h. You can use the get_stat option to obtain the statistics of a given device and for debug
purposes.
# scsimgr get_stat -D /dev/rdisk/disk6
STATISTICS FOR LUN :/dev/rdisk/disk6
Generic Statistics:
Setting Up Multipathing Software on 11i v3 27
Page 28

...
I/O transfer Statistics:
Bytes read = 22816
Bytes written = 912
Total I/Os processed = 512
Asynchronous IO read failures = 0
Asynchronous IO write failures = 0
i. In HP-UX 11i v3, a device WWN (HP 3PAR Storage System VV) is closely tied to its
exported LUN ID (HP 3PAR Storage System VLUN). When seeing a different device WWN
(HP 3PAR Storage System VV) on a previously used LUN ID (VLUN) to prevent data
corruption, the host puts the LUN into an authentication failure state where the LUN path
cannot be used for I/O transfer. This state causes the host to log a message in
/var/adm/syslog/syslog.log and on the console to alert the user. The user should
rely on these messages and should apply the recommended corrective action, which
usually consists of running the scsimgr replace_wwid command.
NOTE: scsimgr replace_wwid replaced the fcmsutil replace_dsk option
used in earlier HP-UX releases.
Example: issuing showremovevlun and createvlun shows that the HP 3PAR Storage
System volume oracle1 is exported as LUN 6 and seen as /dev/rdisk/disk22 on the
host.
# showvv -d
590 oracle1 RW 0/1/- --- --- --- --- - 50002AC0024E0036
Tue Oct
30 19:31:59 PDT 2007
591 oracle2 RW 1/0/- --- --- --- --- - 50002AC0024F0036
Tue Oct
30 19:32:01 PDT 2007
# showvlun -a
Lun VVname Host -Host_WWN/iSCSI_Name- Port Type
6 oracle1 sqahpit2 50060B000068D5A4 0:4:2 host
6 oracle1 sqahpit2 50060B00001D1192 1:5:2 host
On the host, the following ioscan commands show that the host recognizes the VV.
# ioscan -kfnNC disk
Class I H/W Path Driver S/W State H/W Type Description
===================================================================
disk 22 64000/0xfa00/0x244 esdisk CLAIMED DEVICE 3PARdataVV
/dev/disk/disk22 /dev/rdisk/disk22
# ioscan -kfnNC lunpath
Class I H/W Path Driver S/W State H/W Type Description
==================================================================
....
lunpath 19 0/0/4/1/0.0x20420002ac000036.0x4006000000000000 eslpt CLAIMED
LUN_PATH LUN path for disk22
lunpath 20 0/0/4/1/1.0x21520002ac000036.0x4006000000000000 eslpt CLAIMED
LUN_PATH LUN path for disk22
# scsimgr get_attr -D /dev/rdisk/disk22
...
current = 0x50002ac0024e0036 --> Oracle1
28 Allocating Storage for Access by the HP-UX Host
Page 29

Remove the VLUN oracle1, and export oracle2 on the same LUN ID 6.
# removevlun oracle1 6 sqahpit2
# createvlun oracle2 6 sqahpit
Issuing ioscan on the HP-UX 11i v3 host shows the scsimgr replace_wwid in the
syslog.log file and that the LUN path instances (19, 20) have failed the authentication.
# ioscan
# tail -f /var/adm/syslog/syslog.log
sqahpit2 vmunix: class : lunpath, instance 19
sqahpit2 vmunix: Evpd inquiry page 83h/80h failed or the current page 83h/80h
data do not match the previous known page 83h/80h data on LUN id 0x0 probed
beneath the target path (class = tgtpath, instance = 0) The lun path is
(class = lunpath, instance 19).Run 'scsimgr replace_wwid' command to validate
the change
sqahpit2 vmunix: An attempt to probe existing LUN id 0x4006000000000000 failed
with errno of 14.
sqahpit2 vmunix: class : lunpath, instance 20
sqahpit2 vmunix: class : lunpath, instance 19
sqahpit2 vmunix: Evpd inquiry page 83h/80h failed or the current page 83h/80h
data do not match the previous known page 83h/80h data on LUN id 0x0 probed
beneath the target path (class = tgtpath, instance = 1) The lun path is
(class = lunpath, instance 20).Run 'scsimgr replace_wwid' command to validate
the change
You can use oracle2 volume with the same device name (/dev/rdisk/disk22), which
was previously allocated to oracle1 and have the same LUN path instance (19, 20). This
feature is very useful for cases where applications, volume manager, file system do not
need to be reconfigured. Then, use the DSF option as part of the scsimgr
replace_wwid command which will preserve and reuse the existing device name
(/dev/rdisk/disk22).
Not using the DSF option will generate a new DSF names example
(/dev/rdisk/disk23) using the same LUN path instances.
# scsimgr replace_wwid -D /dev/rdisk/disk22 dsf
scsimgr:WARNING: Performing replace_wwid on the resource may have some
impact on system operation.
Do you really want to replace? (y/[n])? y
scsimgr: Successfully validated binding of LUN paths with new LUN.
# ioscan -kfnNC disk
Class I H/W Path Driver S/W State H/W Type Description
===================================================================
disk 22 64000/0xfa00/0x244 esdisk CLAIMED DEVICE 3PARdataVV
/dev/disk/disk22 /dev/rdisk/disk22
# ioscan -kfnNC lunpath
Class I H/W Path Driver S/W State H/W Type Description
==================================================================
....
lunpath 19 0/0/4/1/0.0x20420002ac000036.0x4006000000000000 eslpt
CLAIMED LUN_PATH LUN path for disk22
lunpath 20 0/0/4/1/1.0x21520002ac000036.0x4006000000000000 eslpt
CLAIMED LUN_PATH LUN path for disk22
# scsimgr get_attr -D /dev/rdisk/disk22
...
current = 0x50002ac0024f0036 --> Oracle2
Setting Up Multipathing Software on 11i v3 29
Page 30

Without using the dsf option
# scsimgr replace_wwid -D /dev/rdisk/disk22
scsimgr:WARNING: Performing replace_wwid on the resource may have some
impact on system operation.
Do you really want to replace? (y/[n])? y
scsimgr: Successfully validated binding of LUN paths with new LUN.
# ioscan -kfnNC disk
Class I H/W Path Driver S/W State H/W Type Description
===================================================================
...
disk 22 64000/0xfa00/0x244 esdisk NO_HW DEVICE 3PARdataVV
/dev/disk/disk22 /dev/rdisk/disk22
disk 23 64000/0xfa00/0x245 esdisk CLAIMED DEVICE 3PARdataVV
/dev/disk/disk23 /dev/rdisk/disk23
# ioscan -kfnNC lunpath
Class I H/W Path Driver S/W State H/W Type Description
==================================================================
lunpath 19 0/0/4/1/0.0x20420002ac000036.0x4006000000000000 eslpt
CLAIMED LUN_PATH LUN path for disk23
lunpath 20 0/0/4/1/1.0x21520002ac000036.0x4006000000000000 eslpt
CLAIMED LUN_PATH LUN path for disk23
# scsimgr get_attr -D /dev/rdisk/disk23
...
current = 0x50002ac0024f0036 --> Oracle2
j. In cases where all the LUNs below the target port are put in authentication state, which
can happen when the target port was moved but the LUNs are same, then the target port
must be authenticated. Use the following command to authenticate a target:
# scsimgr -f replace_wwid -C tgtpath -I 3
scsimgr: Successfully validated binding of LUN paths with new LUN
The target instance can be obtained using the “ioscan -kfnNC tgtpath” command
k. You can change the DSF name to a new name or to an existing stale device using the
io_redirect_dsf command.
The following example shows the host converting /dev/disk/disk23 to the stale
/dev/disk/disk22.
CAUTION: All I/O should be paused and the disk reconfigured from Volume Manger
or Application before changing the name. For details, consult the appropriate HP
documentation.
# io_redirect_dsf -d /dev/disk/disk23 -n /dev/disk/disk22
# ioscan
# ioscan -kfnNC disk
..
disk 23 64000/0xfa00/0x244 esdisk NO_HW DEVICE 3PARdataVV
/dev/disk/disk23 /dev/rdisk/disk23
disk 22 64000/0xfa00/0x245 esdisk CLAIMED DEVICE 3PARdataVV
/dev/disk/disk22 /dev/rdisk/disk22
30 Allocating Storage for Access by the HP-UX Host
Page 31

# scsimgr get_attr -D /dev/rdisk/disk22
...
current = 0x50002ac0024f0036 --> Oracle2
l. You can give alias names for the disk as a way of tracking the device names with the
HP 3PAR Storage System volume name using the alias option for set_attr in the
scsimgr command.
# ioscan -kfnNC disk
Class I H/W Path Driver S/W State H/W Type Description
===================================================================
...
disk 22 64000/0xfa00/0x245 esdisk CLAIMED DEVICE 3PARdataVV
/dev/disk/disk22 /dev/rdisk/disk22
# scsimgr get_attr -D /dev/rdisk/disk22
...
current = 0x50002ac0024f0036 --> Oracle2 (InServ VV name)
# scsimgr set_attr -D /dev/rdisk/disk22 -a alias=oracle2
# scsimgr save_attr -D /dev/rdisk/disk22 -a alias=oracle2
# scsimgr -p get_attr all_lun -a device_file -a alias
...
/dev/rdisk/disk23:oracle2
7. You can list and remove all stale devices in the system using the following commands:
# ioscan -s --> lists all stale devices
Class I H/W Path Driver
================================
disk 19 0/0/0/3/0.6.0 sdisk
fcp 0 0/0/4/1/0.18 fcd_fcp
ext_bus 11 0/0/4/1/0.18.1.0.0 fcd_vbus
disk 7 0/0/4/1/0.18.1.0.0.0.1 sdisk
disk 8 0/0/4/1/0.18.1.0.0.0.2 sdisk
# lssf -s --> also lists stale devices
# rmsf -x --> remove all stale device entries
rmsf: Removing stale entry at 0/0/0/3/0.6.0 for sdisk
rmsf: Removing stale entry at 0/0/4/1/0.18 for fcd_fcp
rmsf: Removing stale entry at 0/0/4/1/0.18.1.0.0 for fcd_vbus
rmsf: Removing stale entry at 0/0/4/1/0.18.1.0.0.0.1 for sdisk
8. The maximum volume size that can be created and exported on the storage server port is
currently 2096128 MB (2047G). HP-UX is capable of registering a VV of this size. Use the
diskinfo or scsimgr command or SAM tool to display the volume size of the exported
LUN.
# diskinfo /dev/rdisk/disk3
SCSI describe of /dev/rdisk/disk3:
vendor: 3PARdata
product id: VV
type: direct access
size: 5242880 Kbytes
bytes per sector: 512
Setting Up Multipathing Software on 11i v3 31
Page 32

# scsimgr get_info -D /dev/rdisk/disk3
Driver esdisk Status Information :
Capacity in number of blocks = 10485760
Block size in bytes = 512
9. Some of the LVM commands such as vgimport require the-N option to be specified to use
the new DSF device name (/dev/disk/disk). All display commands will show the persistent
DSF name.
# ioscan -kfnNC disk
Class I H/W Path Driver S/W State H/W Type Description
===================================================================
disk 0 64000/0xfa00/0x23e esdisk CLAIMED DEVICE 3PARdataVV
/dev/disk/disk0 /dev/rdisk/disk0
# vgdisplay -v
VG Name /dev/vgcluster
VG Write Access read/write
VG Status available
...
--- Physical volumes -- PV Name /dev/disk/disk0
PV Status available
Total PE 1279
Free PE 1279
Autoswitch On
Proactive Polling On
Setting Up Multipathing Software on 11i v2
1. For multipath load balancing and failover using the VERITAS DMP driver, install VERITAS
Volume Manager using the instructions given in the VERITAS Volume Manager installation
and administrator guides, available from:
www.VERITAS.com
or
http://docs.hp.com
2. The base VxVM package is installed as part of the HP-UX Operating System installation. To
enable VxDMP, also install the following product bundle:
Patch bundle B9116AA on the HP-UX 11i v1 or v2 application Software CD or DVD for the
appropriate installed OS release.
NOTE: This is licensed software. Contact HP or Veritas for the license.
3. After installation, use the swlist command to display the installed software:
#swlist (Itanium Server)
Base-VXVM B.04.10.011 Base VERITAS Volume Manager Bundle 4.1 for HPUXB9116BA
4.1.010.1 VERITAS Volume Manager 4.1 for HP-UX
# swlist (PA-RISC Server)
B9116AA 3.5o VERITAS Volume Manager 3.5 for HP-UX
Base-VXVM B.03.50.5 Base VERITAS Volume Manager Bundle 3.5 for HP-UX
32 Allocating Storage for Access by the HP-UX Host
Page 33

4. To configure the VERITAS vxdmp driver to manage the HP 3PAR Storage System server paths
for path failure management and dynamic load balancing, register the storage server as a
generic JBOD device using the following case-sensitive VERITAS command:
# vxddladm addjbod vid-3PARdata
5. To confirm the VERITAS vxdmp driver has registered the HP 3PAR Storage System as a generic
JBOD device, issue the following VERITAS command:
# vxddladm listjbod
VID PID Opcode Page Code Page Offset SNO length
======================================================================
3PARdata ALL PIDs 18 -1 36 12
6. PVLinks, a component of Logical Volume Manager (LVM), can be used with storage server
VVs that are exported on multiple paths to the host server to provide path failure management.
PVLinks is an alternate pathing scheme where a primary and one or more alternate paths are
defined for a device. The primary path is used until it fails, which causes one of the alternate
paths to be used until the primary path is restored. In order for path failover with PVLinks to
work, host I/O must be pointed at the LVM Logical Volume device, not at the raw or block
special files in /dev/rdskand /dev/dsk.
WARNING! Because HP-UX sees every path to a device (i.e., a single storage server VLUN)
as a different device (e.g., cxt0d0 and cyt0d0), the potential to overwrite data on a LUN
exists if I/O is performed directly to the /dev/dsk/ or /dev/rdsk/ special files. The PVLinks
feature is part of LVM volume management. Refer to HP LVM documentation (available at
http://docs.hp.com) for information on using PVLinks. One such reference is the following HP
document: Managing Systems and Workgroups: A Guide for HP-UX System Administrators
HP, 9000, Computers Edition 5Manufacturing Part Number: B2355-90742 Chapter 6:
Administering a System: Managing Disks and Files Section: Setting Up Alternate Links to a
Physical Volume.
Alternate links (paths) to a volume are defined at the volume group level using the vgcreate
command or by using the SAM GUI.
# sam > Disk and File systems > Volume Groups & Logical Volumes
The order of failover paths specified during volume creation is important, as the failover priority
will be considered in the same order as used when the volume was created. For example:
# vgcreate <volume name> <path1> <path2> <path3>…<pathn>
The failover path for the primary active path will be increased by 1 up to path n.
NOTE: If you are using the SAM utility to create volume groups, it creates all possible
alternate links by default.
After the primary link has recovered, LVM will automatically switch the active I/O from the
alternate path to the primary path unless you previously instructed it not to by using the
pvchange LVM command.
After initial volume-group setup, path management is manipulated at the physical-volume level
using HP-UX pv... commands. To display the paths to a device, and the status of each path,
use HP-UX's pvdisplay /dev/dsk/... command. To display the paths to all devices
within a volume-group, use HP-UX's vgdisplay -v command. The following example show
partial output from these commands:
# vgdisplay -v
--- Logical volumes --
Setting Up Multipathing Software on 11i v2 33
Page 34

LV Name /dev/testdg/testvol1
LV Status available/syncd
LV Size (Mbytes) 10000
Current LE 2500
Allocated PE 2500
Used PV 1
--- Physical volumes --
PV Name /dev/dsk/c120d1
PV Name /dev/dsk/c14t0d1 Alternate Link
PV Status available
Total PE 2559
Free PE 0
Autoswitch On
NOTE: Refer to HP documentation at http://docs.hp.com for complete information on using
the PVLinks feature to manage device paths.
7. If the VERITAS Volume Manager's DMP driver is to be used, make the newly-registered VLUNs
visible to the DMP layer using the following command which causes VxVM to rebuild its view
of the device nodes:
# vxdctl enable
NOTE: LVM and VxVM may coexist on the same system but should not be used to manage
the same devices.
NOTE: Remember to create raw and block device paths for the exported VLUNs using
HP-UX's ioscan and insf commands before executing any LVM and VxVM commands for the
new devices.
NOTE: The driver for AB379A, A6826A is fcd and driver for A6795A, A5158A is td.
Replace fcd to td if using the A6795 or A5158 HBA in the below examples. The below
example is for the A6826A HBA.
8. The fcmsutil utility can be used to display important information about each HBA port using
the port's /dev/fcd<instance> device node. The fcd instance number is shown in the
output of the ioscan -fun command.
# ioscan -fun
Class I H/W Path Driver S/W State H/W Type Description
===========================================================================
fc 0 0/0/8/1/0 fcd CLAIMED INTERFACE HP A6826-60001
2Gb Dual Port PCI/PCI-X Fibre Channel Adapter (FC Port 1)
NOTE: Topology will be PRIVATE_LOOP for Direct connect and PTTOPT_FABRIC for Fabric
connect. The below example is for Fabric.
# fcmsutil /dev/fcd0 (for Fabric connect)
Vendor ID is = 0x001077
Device ID is = 0x002312
PCI Sub-system Vendor ID is = 0x00103c
PCI Sub-system ID is = 0x0012ba
PCI Mode = PCI-X 133
MHz
ISP Code version = 3.3.153/
34 Allocating Storage for Access by the HP-UX Host
Page 35

ISP Chip version = 3
Topology =
PTTOPT_FABRIC
Link Speed = 2Gb
Local N_Port_id is = 0x050200
Previous N_Port_id is = 0x050200
N_Port Node World Wide Name =
0x50060b00001d5845
N_Port Port World Wide Name =
0x50060b00001d5844
Switch Port World Wide Name =
0x200200051e3534c9
Switch Node World Wide Name =
0x100000051e3534c9
Driver state = ONLINE
Hardware Path is = 0/0/8/1/0
Maximum Frame Size = 2048
Driver-Firmware Dump Available = NO
Driver-Firmware Dump Timestamp = N/A
Driver Version = @(#) libfcd.a HP Fibre Channel ISP 23xx &
24xx Driver
B.11.23.04 /ux/core/isu/FCD/kern/src/common/wsio/fcd_init.c:Oct 18
2005,08:21:11
9. The Vital Product Data (VPD), including firmware version (Engineering Data Code), is shown
using the vpd option of fcmsutilfor A6826A HBA on the Itanium Server.
# fcmsutil /dev/fcd0 vpd
V I T A L P R O D U C T D A T A
--------- ------------- ------ Product Description : "Dual Port 2Gbps/1Gbps Fibre Channel Universal
PCI-X Adapter"
Part number : "A6826-60001"
Engineering Date Code : "A-4408"
Part Serial number : "US00015487"
Misc. Information : "PW=15W;PCI 66MHZ;PCI-X 133MHZ"
Mfd. Date : "4410"
Check Sum : 0xbc
EFI version : "001.47"
ROM Firmware version : "003.003.154"
Asset Tag : "NA"
10. Use fcmsutil to find out other command fabric service parameters and connected storage
server port WWNs. Here is an example for Fabric Connect:
# fcmsutil /dev/fcd0 get remote all
Target N_Port_id is = 0x050300
Target state = DSM_READY
Symbolic Name = LSI7202XP-LC A.1 03-00021-02B
FW:01.02.18 Port 1
Port Type = N_PORT
FCP-2 Support = NO
Target Port World Wide Name = 0x20110002ac00003e
Target Node World Wide Name = 0x2ff70002ac00003e
Common Service parameters (all values shown in hex):
^^^^^^^^^^^^^^^^^^^^^^^^^^^^^^^^^^^^^^^^^^^^^^^^^^^^
Common Features : 8800 RO_Bitmap: f
Total Conseq: ff
Class 3 Service parameters (all values shown in hex):
^^^^^^^^^^^^^^^^^^^^^^^^^^^^^^^^^^^^^^^^^^^^^^^^^^^^
Open Sequences/Exchg: 1 Conseq: ff
Setting Up Multipathing Software on 11i v2 35
Page 36

Recipient Control Flags: 0 Rxsz: 800
Example for Direct Connect
# fcmsutil /dev/fcd0 get remote all
Target N_Port_id is = 0x0000ef
Target Loop_id is = 0
Target state = DSM_UNOPENED
Symbolic Name =
Port Type = NL_PORT
FCP-2 Support = NO
Target Port World Wide Name = 0x20020002ac00003e
Target Node World Wide Name = 0x2ff70002ac00003e
Common Service parameters (all values shown in hex):
^^^^^^^^^^^^^^^^^^^^^^^^^^^^^^^^^^^^^^^^^^^^^^^^^^^^
Common Features : 8800 RO_Bitmap: fe
Total Conseq: ff
Class 3 Service parameters (all values shown in hex):
^^^^^^^^^^^^^^^^^^^^^^^^^^^^^^^^^^^^^^^^^^^^^^^^^^^^
Open Sequences/Exchg: 1 Conseq: ff
Recipient Control Flags: 0 Rxsz: 800
11. To find the storage volume serial number for the corresponding disk id on the HP-UX host, use
the cstm command. The HP Online diagnostic tool must be installed to access the cstm
command. For example:
# cstm
# selclass type disk
# info
# infolog
. . .
Hardware path: 0/2/0/0.8.0.0.0.0.4
The selected device is not supported by this tool.
Inaccurate information could be displayed by the tool.
Product Id: VV Vendor: 3PARdata
Device Type: SCSI Disk Firmware Rev: 0000
Device Qualifier: 3PARdataVV Logical Unit: 4
Serial Number: 003B003E
Capacity (M Byte): 4096.00
Block Size: 512
Max Block Address: 8388607
. . .
Check the ioscan -fun disk for the given hardware path and use the HP 3PAR Storage System
CLI command showvlun -lvw or showvv -d to get the volume name. The data which
matches is in bold font:
# showvlun -lvw -host <hostname>
. . .
Active VLUNs
Lun VVname -----VV_WWN----- Host ----Host_WWN---- Port Type
4 hpuxN.0 50002AC0003B003E hp 50060B0000101A4C 1:0:3 host
4 hpuxN.0 50002AC0003B003E hp 50060B00000670A8 2:1:1 host
. . .
12. If an HP 3PAR Storage System node is rebooted or an HP 3PAR Storage System Cluster is
rebooted and the connection type is Direct, performing an ioscan or I/O on any storage
volume connected to the Agilent A6795A, A5158A HBA is required in order to see the host
WWN with the showhost command. This is because the HPUX host driver log's into the
target port only on doing one of the above operations.
36 Allocating Storage for Access by the HP-UX Host
Page 37

Optional Instructions for Multipathing
1. For multipath load balancing and failover using the VERITAS DMP driver, install VERITAS
Volume Manager using the instructions given in the VERITAS Volume Manager installation
and administrator guides, available from:
www.VERITAS.com
or
http://docs.hp.com
2. The base VxVM package is installed as part of the HP-UX Operating System installation. To
enable VxDMP, also install the following product bundle:
Patch bundle B9116AA on the HP-UX 11i v1 or v2 application Software CD or DVD for the
appropriate installed OS release
NOTE: This is licensed software. Contact HP or Veritas for the license.
3. After installation, use the swlist command to display the installed software:
#swlist (Itanium Server)
Base-VXVM B .04.10.011 Base VERITAS Volume Manager Bundle 4.1 for HPUXB9116BA
4.1.010.1 VERITAS Volume Manager 4.1 for HP-UX
# swlist (PA-RISC Server)
B9116AA 3.5o VERITAS Volume Manager 3.5 for HP-UX
Base-VXVM B.03.50.5 Base VERITAS Volume Manager Bundle 3.5 for HP-UX
4. To configure the VERITAS vxdmp driver to manage the InServ storage server paths for path
failure management and dynamic load balancing, register the storage server as a generic
JBOD device using the following case-sensitive VERITAS command:
# vxddladm addjbod vid=3PARdata
5. To confirm the VERITAS vxdmp driver has registered the HP 3PAR Storage System as a generic
JBOD device, issue the following VERITAS command:
# vxddladm listjbod
VID PID Opcode Page Code Page Offset SNO length
======================================================================
3PARdata ALL PIDs 18 -1 36 12
Using the ioscan Command with Multipathing Software to Verify HBA
Connections
1. PVLinks, a component of Logical Volume Manager (LVM), can be used with storage server
VVs that are exported on multiple paths to the host server to provide path failure management.
PVLinks is an alternate pathing scheme where a primary and one or more alternate paths are
defined for a device. The primary path is used until it fails, which causes one of the alternate
paths to be used until the primary path is restored. In order for path failover with PVLinks to
Optional Instructions for Multipathing 37
Page 38

work, host I/O must be pointed at the LVM Logical Volume device, not at the raw or block
special files in /dev/rdsk and /dev/dsk.
WARNING! Because HP-UX sees every path to a device (i.e., a single storage server VLUN)
as a different device (e.g., cxt0d0 and cyt0d0), the potential to overwrite data on a LUN
exists if I/O is performed directly to the /dev/dsk/ or /dev/rdsk/ special files. The PVLinks
feature is part of LVM volume management. Refer to HP LVM documentation (available at
http://docs.hp.com) for information on using PVLinks. One such reference is the following HP
document: Managing Systems and Workgroups: A Guide for HP-UX System Administrators,
HP 9000 Computers Edition 5, Manufacturing Part Number: B2355-90742, Chapter 6,
“Administering a System: Managing Disks and Files,” Section, “Setting Up Alternate Links to
a Physical Volume.”
Alternate links (paths) to a volume are defined at the volume group level using the vgcreate
command or by using the SAM GUI.
# sam > Disk and File systems > Volume Groups & Logical Volumes
The order of failover paths specified during volume creation is important, as the failover priority
will be considered in the same order as used when the volume was created. For example:
# vgcreate <volume name> <path1> <path2> <path3>...<pathn>
The failover path for the primary active path will be increased by 1 up to path n.
NOTE: If you are using the SAM utility to create volume groups, it creates all possible
alternate links by default.
After the primary link has recovered, LVM will automatically switch the active I/O from the
alternate path to the primary path unless you previously instructed it not to by using the
pvchange LVM command.
After initial volume-group setup, path management is manipulated at the physical-volume level
using HP-UX pv... commands. To display the paths to a device, and the status of each path,
use HP-UX's pvdisplay /dev/dsk/... command. To display the paths to all devices
within a volume-group, use HP-UX's vgdisplay -v command. The following example shows
partial output from these commands:
# vgdisplay -v
--- Logical volumes --LV Name /dev/testdg/testvol1
LV Status available/syncd
LV Size (Mbytes) 10000
Current LE 2500
Allocated PE 2500
Used PV 1
--- Physical volumes ---
PV Name /dev/dsk/c120d1
PV Name /dev/dsk/c14t0d1 Alternate Link
PV Status available
Total PE 2559
Free PE 0
Autoswitch On
38 Allocating Storage for Access by the HP-UX Host
Page 39

NOTE: Refer to HP documentation at http://docs.hp.com for complete information on using
the PVLinks feature to manage device paths.
2. If the VERITAS Volume Manager's DMP driver is to be used, make the newly-registered VLUNs
visible to the DMP layer using the following command, which causes VxVM to rebuild its view
of the device nodes:
# vxdctl enable
NOTE: LVM and VxVM may coexist on the same system but should not be used to manage
the same devices.
NOTE: Remember to create raw and block device paths for the exported VLUNs using
HP-UX's ioscan and insf commands before executing any LVM and VxVM commands for
the new devices.
NOTE: The driver for AB379A, AD194A is fcd and driver for A6795A, AH402A is td.
Replace fcd to td if using the A6795 or AH402A HBA in the examples below. The example
below is for the AD194A HBA.
3. The fcmsutil utility can be used to display important information about each HBA port using
the port's /dev/fcd<instance> device node. The fcd instance number is shown in the
output of the ioscan -fun command.
# ioscan -fun
Class I H/W Path Driver S/W State H/W Type Description
==============================================================================
fc 0 0/0/8/1/0 fcd CLAIMED INTERFACE HP AD194-60001
2Gb Dual Port PCI/PCI-X Fibre Channel Adapter (FC Port 1)
NOTE: Topology will be PRIVATE_LOOP for Direct connect and PTTOPT_FABRIC for Fabric
connect. The example below is for Fabric.
# fcmsutil /dev/fcd0 (for Fabric connect)
Vendor ID is = 0x001077
Device ID is = 0x002312
PCI Sub-system Vendor ID is = 0x00103c
PCI Sub-system ID is = 0x0012ba
PCI Mode = PCI-X 133 MHz
ISP Code version = 3.3.153
ISP Chip version = 3
Topology = PTTOPT_FABRIC
Link Speed = 2Gb
Local N_Port_id is = 0x050200
Previous N_Port_id is = 0x050200
N_Port Node World Wide Name = 0x50060b00001d5845
N_Port Port World Wide Name = 0x50060b00001d5844
Switch Port World Wide Name = 0x200200051e3534c9
Switch Node World Wide Name = 0x100000051e3534c9
Driver state = ONLINE
Hardware Path is = 0/0/8/1/0
Maximum Frame Size = 2048
Driver-Firmware Dump Available = NO
Driver-Firmware Dump Timestamp = N/A
Driver Version = @(#) libfcd.a HP Fibre Channel ISP 23xx & 24xx Driver
B.11.23.04 /ux/core/isu/FCD/kern/src/common/wsio/fcd_init.c:Oct 18
2005,08:21:11
Using the ioscan Command with Multipathing Software to Verify HBA Connections 39
Page 40

4. The Vital Product Data (VPD), including firmware version (Engineering Data Code), is shown
using the vpd option of fcmsutil for AD194A HBA on the Itanium Server.
# fcmsutil /dev/fcd0 vpd
V I T A L P R O D U C T D A T A
--------- ------------------ ---------Product Description : "Dual Port 2Gbps/1Gbps Fibre Channel Universal PCI-X Adapter"
Part number : "A6826-60001"
Engineering Date Code : "A-4408"
Part Serial number : "US00015487"
Misc. Information : "PW=15W;PCI 66MHZ;PCI-X 133MHZ"
Mfd. Date : "4410"
Check Sum : 0xbc
EFI version : "001.47"
ROM Firmware version : "003.003.154"
Asset Tag : "NA"
5. Use fcmsutil to find out other command fabric service parameters and connected storage
server port WWNs. Here is an example for Fabric Connect:
# fcmsutil /dev/fcd0 get remote all
Target N_Port_id is = 0x050300
Target state = DSM_READY
Symbolic Name = LSI7202XP-LC A.1 03-00021-02B
FW:01.02.18 Port 1
Port Type = N_PORT
FCP-2 Support = NO
Target Port World Wide Name = 0x20110002ac00003e
Target Node World Wide Name = 0x2ff70002ac00003e
Common Service parameters (all values shown in hex):
^^^^^^^^^^^^^^^^^^^^^^^^^^^^^^^^^^^^^^^^^^^^^^^^^^^^
Common Features: 8800 RO_Bitmap: f
Total Conseq: ff
Class 3 Service parameters (all values shown in hex):
^^^^^^^^^^^^^^^^^^^^^^^^^^^^^^^^^^^^^^^^^^^^^^^^^^^^
Open Sequences/Exchg: 1 Conseq: ff
Recipient Control Flags: 0 Rxsz: 800
Example for Direct Connect
# fcmsutil /dev/fcd0 get remote all
Target N_Port_id is = 0x0000ef
Target Loop_id is = 0
Target state = DSM_UNOPENED
Symbolic Name =
Port Type = NL_PORT
FCP-2 Support = NO
Target Port World Wide Name = 0x20020002ac00003e
Target Node World Wide Name = 0x2ff70002ac00003e
Common Service parameters (all values shown in hex):
^^^^^^^^^^^^^^^^^^^^^^^^^^^^^^^^^^^^^^^^^^^^^^^^^^^^
Common Features: 8800 RO_Bitmap: fe
Total Conseq: ff
Class 3 Service parameters (all values shown in hex):
^^^^^^^^^^^^^^^^^^^^^^^^^^^^^^^^^^^^^^^^^^^^^^^^^^^^
Open Sequences/Exchg: 1 Conseq: ff
Recipient Control Flags: 0 Rxsz: 800
40 Allocating Storage for Access by the HP-UX Host
Page 41

6. To find the storage volume serial number for the corresponding disk id on the HP-UX host, use
the cstm command. The HP Online diagnostic tool must be installed to access the cstm
command. For example:
# cstm
# selclass type disk
# info
# infolog
. . .
Hardware path: 0/2/0/0.8.0.0.0.0.4
The selected device is not supported by this tool.
Inaccurate information could be displayed by the tool.
Product Id: VV Vendor: 3PARdata
Device Type: SCSI Disk Firmware Rev: 0000
Device Qualifier: 3PARdataVV Logical Unit: 4
Serial Number: 003B003E
Capacity (M Byte): 4096.00
Block Size: 512
Max Block Address: 8388607
. . .
Check the ioscan -fun disk for the given hardware path and use the HP 3PAR Storage System
CLI command showvlun -lvw or showvv -d to get the volume name. The data which matches
is in bold font:
# showvlun -lvw -host <hostname>
. . .
Active VLUNs
Lun VVname -----VV_WWN----- Host ---- Host_WWN---- Port Type
4 hpuxN.0 50002AC0003B003E hp 50060B0000101A4C 1:0:3 host
4 hpuxN.0 50002AC0003B003E hp 50060B00000670A8 2:1:1 host
. . .
7. If an InServ node is rebooted or InServ Cluster is rebooted and the connection type is Direct,
performing an ioscan or I/O on any storage volume connected to the Agilent A6795A,
AH402A HBA is required in order to see the host WWN with the showhost command. This
is because the HPUX host driver logs into the target port only on performing one of the above
operations.
Using the ioscan Command with Multipathing Software to Verify HBA Connections 41
Page 42

5 Removing HP 3PAR Devices on the Host Server
To remove a VV from the HP-UX 11i v3 or 11i v2 host, complete the following steps
1. Consult the appropriate HP-UX document about how to remove a specific volume type (e.g.,
VxVM, LVM).
2. Remove the VLUN from the HP 3PAR Storage System by issuing removevlun <VVname>
<LUN> <host>.
# removevlun testvlun 0 hpux-host
42 Removing HP 3PAR Devices on the Host Server
Page 43

6 Booting the Host from the HP 3PAR Storage System
Refer to HP-UX boot over SAN from http://docs.hp.com to learn the benefits of configuring HP-UX
to boot from the HP 3PAR Storage System.
HP 3PAR Storage System Setup Requirements
Booting from the HP 3PAR Storage System is supported in fabric and direct connect modes.
Make sure you have allocated enough space when creating your virtual volumes to be able to
install your HP-UX OS.
To configure the HP 3PAR Storage System, see “Configuring the HP 3PAR Storage System Running
InForm OS 3.1.x and OS 2.3.x” (page 6). After creating your first virtual volume, you must export
it to your HP-UX host.
HP-UX Itanium Host HBA Considerations
You need to use the HBA’s EFI version at the required minimum to handle booting from the HP 3PAR
Storage System.
1. To prepare host, install required firmware for host HBAs to enable boot from the HP 3PAR
Storage System. Collect and record the WWN of HBAs installed on the host. Check the
memory size and give plenty of swap space on the boot volume. Decide the capacity of the
boot volume before OS installation.
NOTE: For Itanium systems, install the supported EFI firmware for the AB379A/B, A6826A,
A6795A cards. The firmware is downloadable from http://www.hp.com by searching the
HBA model. Those versions of firmware are essential to enable the boot over SAN feature.
Here are the firmware and driver information for 3 major types of HBA on HP hosts.
Table 2 HBA and EFI Version
EFI VersionHBA
2.20AB379B
4.00A8AH402A
2.20AD193A
The following example shows the HBA and EFI version in bold.
For AH402A
# fcmsutil /dev/fcd8 vpd
V I T A L P R O D U C T D A T A
--------- ------------- -------
Product Description : "HP 8Gb Single Channel PCI-e 2.0 FC HBA"
Part number : "AJ762-63001"
Engineering Date Code : "A-4408"
Part Serial number : "MY19084VLN"
Misc. Information : "PW=10.1 W; PCIE X8 GEN 2"
Mfd. Date : "4908"
Check Sum : 0xb7
EFI version : "UU5.03A10
ROM Firmware version : "1.11X7 SLI-3 (U3D1.11X7)"
Asset Tag : "NA"
HP 3PAR Storage System Setup Requirements 43
Page 44

2. Prepare boot volume on HP 3PAR Storage System.
Refer to “Creating Storage on the HP 3PAR Storage System” (page 17) to setup the boot
volume and export it to the host. Use the WWN recorded in Step 1.
3. Connect cable between host HBA port and HP 3PAR Storage System HBA port. Both direct
and fabric connections are supported.
4. Power on host and check MP firmware level, refer to section 7 for requirements. Upgrade
firmware if needed. Then insert installation DVD and boot from DVD to this point:
Installation from HP-UX 11i v2 or 11i v3 DVDs
Use the procedure described in HP-UX 11i v2 and 11i v3 Implementation Guide from http://
docs.hp.com.
1. Insert the DVD into the HP-UX host server, and the following screen appears:
Welcome to the HP-UX installation/recovery process!
Use the <tab> key to navigate between fields, and the arrow keys
within fields. Use the <return/enter> key to select an item.
Use the <return/enter> or <space-bar> to pop-up a choices list. If the
menus are not clear, select the "Help" item for more information.
Hardware Summary: System Model: 9000/800/rp7420
+----------------------+---------------+--------------------+[ Scan Again ]
| Disks: 1 ( 33.9GB)| Floppies: 0 | LAN cards: 3 |
| CD/DVDs: 1 | Tapes: 0 | Memory: 2040Mb |
| Graphics Ports: 0 | IO Buses: 7 | CPUs: 4 |[ H/W Details ]
+----------------------+---------------+--------------------+
[ Install HP-UX ]
[ Run an Expert Recovery Shell ]
[ Advanced Options ]
[ Reboot ] [ Help ]
2. Select H/W Details to verify that the HP 3PAR Storage System VV is visible.
[ H/W Details ]
Disk Drives:
Model Capacity(Mb) WWID
HP_36.4GST33675 34732 0x0011c6fffe28ddfc
1/0/0/3/0.0x6.0x0
3PARdataVV 36864 0x50002ac0001000b4
1/0/6/1/0.0x21410002ac0000b4.0x4320000000000000
3. Select Root Disk then select 3PARdataVV.
/opt/ignite/bin/itool () +
¦ ¦
¦ +-------++----------++--------++-------------++----------+ ¦
¦ ¦ Basic ¦¦ Software ¦¦ System ¦¦ File System ¦¦ Advanced ¦ ¦
¦ ¦ \-------------------------------------------------------------------+¦
¦ ¦ ¦¦
¦ ¦ Configurations: [ HP-UX B.11.31 Default ->] [ Description... ] ¦¦
¦ ¦ ¦¦
¦ ¦ Environments: [ HP-UX Data Center Operatin ->] (HP-UX B.11.31) ¦¦
¦ ¦ ¦¦
¦ ¦ [ Root Disk ] HP_36.4GST336753LC, 1/0/0/3/0.0x6.0x0, 3> ¦¦
¦ ¦ ¦¦
¦ ¦ File System: [ Logical Volume Manager (LVM) with VxFS ->] ¦¦
44 Booting the Host from the HP 3PAR Storage System
Page 45

¦ ¦ ¦¦
¦ ¦ [ Root Swap (MB)... ] 2048 Physical Memory (RAM) = 2040 MB ¦¦
¦ ¦ ¦¦
¦ ¦ [ Languages... ] English [ Keyboards... ] [ Additional... ] ¦¦
¦ ¦ ¦¦
¦ +---------------------------------------------------------------------------+¦
¦ [ Show Summary... ] [ Reset Configuration ] ¦
¦------------------------------------------------------------------------------¦
¦ [ Go! ] [ Cancel ] [ Help ] ¦
+------------------------------------------------------------------------------+
[ Root Disk ]
[ Root Disk ] 3PARdataVV, 1/0/6/1/0.0x21410002ac0000b4>
The following screen shows that the HP 3PAR Storage System is selected as the root disk.
/opt/ignite/bin/itool () +
¦ ¦
¦ +-------++----------++--------++-------------++----------+ ¦
¦ ¦ Basic ¦¦ Software ¦¦ System ¦¦ File System ¦¦ Advanced ¦ ¦
¦ ¦ \-------------------------------------------------------------------+¦
¦ ¦ ¦¦
¦ ¦ Configurations: [ HP-UX B.11.31 Default ->] [ Description... ] ¦¦
¦ ¦ ¦¦
¦ ¦ Environments: [ HP-UX Data Center Operatin ->] (HP-UX B.11.31) ¦¦
¦ ¦ ¦¦
¦ ¦ [ Root Disk ] 3PARdataVV, 1/0/6/1/0.0x21410002ac0000b4> ¦¦
¦ ¦ ¦¦
¦ ¦ File System: [ Logical Volume Manager (LVM) with VxFS ->] ¦¦
¦ ¦ ¦¦
¦ ¦ [ Root Swap (MB)... ] 2048 Physical Memory (RAM) = 2040 MB ¦¦
¦ ¦ ¦¦
¦ ¦ [ Languages... ] English [ Keyboards... ] [ Additional... ] ¦¦
¦ ¦ ¦¦
¦ +---------------------------------------------------------------------------+¦
¦ [ Show Summary... ] [ Reset Configuration ] ¦
¦------------------------------------------------------------------------------¦
¦ [ Go! ] [ Cancel ] [ Help ] ¦
+------------------------------------------------------------------------------+
4. The installation process will start to install files to the boot volume and set it to be the primary
boot path. HP recommends that you have an HA redundant boot path.
Installation from HP-UX 11i v2 or 11i v3 DVDs 45
Page 46

A HP-UX Software List Command Output
Different servers may have different patch requirements. HP Itanium Servers boot over SAN running
HP-UX 11i v3 March 2011 Data Center OE and HP-UX 11i v2 June 2008 Mission Critical OE
installed with AB379A/B, AH402A, and AD193A HBA Cards. The list below shows all the products
installed on our test server. The following products are part of the operating system installation, as
well as other specific patches mentioned in the Host Server Setup section.
For HP-UX 11i v3:
# swlist
#
# Bundle(s):
B6848BA 1.4.gm.46.13 Ximian GNOME 1.4 GTK+ Libraries for HP-UX
B9073BA B.11.23.08.03.00.22 HP-UX iCOD Instant Capacity (iCAP)
B9901AA A.11.23.15.01 HP IPFilter 3.5alpha5
BUNDLE11i B.11.23.0409.3 Required Patch Bundle for HP-UX 11i v2 (B.11.23), September
2004
Base-VXFS 4.1.002 VERITAS File System Bundle 4.1 for HP-UX
Base-VXVM B.04.10.011 Base VERITAS Volume Manager Bundle 4.1 for HP-UX
CDE-English B.11.23.0409 English CDE Environment
CommonIO B.11.23.0712 Common IO Drivers
DSAUtilities C.01.00.11 HP-UX Distributed Systems Administration Utilities
DynRootDisk A.3.0.0.1027 Dynamic Root Disk
EnableVxFS B.11.23.07 File-System library, commands enhancements for VxFS4.1 and 5.0
FDDI-00 B.11.23.01 PCI FDDI;Supptd HW=A3739B;SW=J3626AA
FEATURE11i B.11.23.0712.070 Feature Enablement Patches for HP-UX 11i v2, December
2007
FIREFOX 2.0.0.4ar.00 Firefox for HP-UX
FIREFOXsrc 2.0.0.4ar.00 Firefox Source distribution
FibrChanl-00 B.11.23.0712 PCI FibreChannel;Supptd HW=A6795A,A5158A
FibrChanl-01 B.11.23.08.02
FibrChnl;SupptdHW=A6826A,A9782A,A9784A,AB378A,AB379A,AB465A,AD193A,AD194A,AD300A
FibrChanl-02 B.11.23.0712 PCIe FibreChannel;Supptd HW=AD299A,AD355A
GTK 2.6.8.00.01 GTK+ 2.6 The Gnome GUI Runtime Toolkit
GTKsrc 2.6.8.00.01 Gtk Source distribution
GigEther-00 B.11.23.0512 PCI GigEther;Supptd
HW=A4926A/A4929A/A6096A;SW=J1642AA
GigEther-01 B.11.23.0712 PCI GigEther;Supptd
HW=A6825A/A6794A/A6847A/A8685A/A9782A/A9784A/A7109A/AB465A
GuestAVIOStor B.11.23.0712 HPVM Guest AVIO Storage Software
GuestAvioLan B.11.23.0712 HPVM Guest AVIO LAN Software
HPUX11i-OE-MC B.11.23.0712 HP-UX Mission Critical Operating Environment Component
HPUXBaseAux B.11.23.0712 HP-UX Base OS Auxiliary
HPUXBaseOS B.11.23 HP-UX Base OS
HPUXBastille B.3.0.29 Bastille Security Hardening Tool
HWEnable11i B11.23.0712.070 Hardware Enablement Patches for HP-UX 11i v2, December
2007
HostAVIOStor B.11.23.0712 HPVM Host AVIO Storage Software
HostAvioLan B.11.23.0712.01 HPVM Host AVIO LAN Software
IEther-00 B1.23.0712 PCI/PCI-X/PCIe IEther
ISEEPlatform A.03.95.510.46.03 ISEE Platform
Java15JDK 1.5.0.09.00 Java 1.5 JDK for HP-UX
Java15JDKadd 1.5.0.09.00 Java 1.5 JDK -AA addon for HP-UX
Java15JRE 1.5.0.09.00 Java 1.5 JRE for HP-UX
Java15JREadd 1.5.0.09.00 Java 1.5 JRE -AA addon for HP-UX
Judy B.11.23.04.17 Judy Library and Related files
LVMProvider R11.23.009 CIM/WBEM Provider for LVM
46 HP-UX Software List Command Output
Page 47

MOZILLA 1.7.13.01.00 Mozilla for HP-UX
MOZILLAsrc 1.7.13.01.00 Mozilla Source distribution
OnlineDiag B.11.23.10.05 HPUX 11.23 Support Tools Bundle, December 2007
ParMgr B.23.02.01.03 Partition Manager - HP-UX
ProviderDefault B.11.23.0712 Select WBEM Providers
QPKAPPS B.11.23.0712.070a Applications Patches for HP-UX 11i v2, December 2007
QPKBASE B.11.23.0712.070a Base Quality Pack Bundle for HP-UX 11i v2, December 2007
RAID-01 B.11.23.0806 RAID SA; Supptd HW=A7143A/A9890A/A9891A
Sec00Tools B.01.04.10 Install-Time security infrastructure.
SerialSCSI-00 B.11.23.0806 PCI-X/PCI-E SerialSCSI
SwAssistant C.01.02 HP-UX Software Assistant
SysFaultMgmt B.05.00.05.01 HPUX System Fault Management
SysMgmtWeb A.2.2.7 HP-UX Web Based System Management User Interfaces
T1456AA 1.4.2.15.00 Java2 1.4 SDK for HP-UX
T1456AAaddon 1.4.2.15.00 Java2 1.4 SDK -AA addon for HP-UX
T1457AA 1.4.2.15.00 Java2 1.4 RTE for HP-UX
T1457AAaddon 1.4.2.15.00 Java2 1.4 RTE -AA addon for HP-UX
T1471AA A.04.50.021 HP-UX Secure Shell
TBIRD 2.0.0.6.00 Thunderbird for HP-UX
TBIRDsrc 2.0.0.6.00 Thunderbird Source distribution
USB-00 C.01.04.07 USB Subsystem and Drivers
VMGuestLib A.03.50 Integrity VM Guest Support Libraries
hpuxwsApache B.2.0.59.01 HP-UX Apache-based Web Server
hpuxwsTomcat B.5.5.23.00 HP-UX Tomcat-based Servlet Engine
hpuxwsWebmin A.1.070.10 HP-UX Webmin-based Admin
hpuxwsXml A.2.03 HP-UX XML Web Server Tools
perl D.5.8.8.B 5.8.8 Perl Programming Language
scsiU320-00 B.11.23.0712 PCI-X SCSI U320; Supptd HW=A7173A/AB290A
For HP-UX 11i v2:
# swlist
#
# Bundle(s):
B6848BA 1.4.gm.46.13 Ximian GNOME 1.4 GTK+ Libraries for HP-UX
B9073BA B.11.23.08.03.00.22 HP-UX iCOD Instant Capacity (iCAP)
B9901AA A.11.23.15.01 HP IPFilter 3.5alpha5
BUNDLE11i B.11.23.0409.3 Required Patch Bundle for HP-UX 11i v2 (B.11.23), September
2004
Base-VXFS v4.1.002 VERITAS File System Bundle 4.1 for HP-UX
Base-VXVM B.04.10.011 Base VERITAS Volume Manager Bundle 4.1 for HP-UX
CDE-English B.11.23.0409 English CDE Environment
CommonIO B.11.23.0712 Common IO Drivers
DSAUtilities C.01.00.11 HP-UX Distributed Systems Administration Utilities
DynRootDisk A.3.0.0.1027 Dynamic Root Disk
EnableVxFS B.11.23.07 File-System library, commands enhancements for VxFS4.1 and 5.0
FDDI-00 B.11.23.01 PCI FDDI;Supptd HW=A3739B;SW=J3626AA
FEATURE11i B.11.23.0712.070 Feature Enablement Patches for HP-UX 11i v2, December
2007
FIREFOX 2.0.0.4ar.00 Firefox for HP-UX
FIREFOXsrc 2.0.0.4ar.00 Firefox Source distribution
FibrChanl-00 B.11.23.0712 PCI FibreChannel;Supptd HW=A6795A,A5158A
FibrChanl-01 B.11.23.08.02
FibrChnl;SupptdHW=A6826A,A9782A,A9784A,AB378A,AB379A,AB465A,AD193A,AD194A,AD300A
FibrChanl-02 B.11.23.0712 PCIe FibreChannel;Supptd HW=AD299A,AD355A
GTK 2.6.8.00.01 GTK+ 2.6 The Gnome GUI Runtime Toolkit
GTKsrc 2.6.8.00.01 Gtk Source distribution
GigEther-00 B.11.23.0512 PCI GigEther;Supptd
HW=A4926A/A4929A/A6096A;SW=J1642AA
47
Page 48

GigEther-01 B.11.23.0712 PCI GigEther;Supptd
HW=A6825A/A6794A/A6847A/A8685A/A9782A/A9784A/A7109A/AB465A
GuestAVIOStor B.11.23.0712 HPVM Guest AVIO Storage Software
GuestAvioLan B.11.23.0712 HPVM Guest AVIO LAN Software
HPUX11i-OE-MC B.11.23.0712 HP-UX Mission Critical Operating Environment Component
HPUXBaseAux B.11.23.0712 HP-UX Base OS Auxiliary
HPUXBaseOS B.11.23 HP-UX Base OS
HPUXBastille B.3.0.29 Bastille Security Hardening Tool
HWEnable11i B.11.23.0712.070 Hardware Enablement Patches for HP-UX 11i v2, December
2007
HostAVIOStor B.11.23.0712 HPVM Host AVIO Storage Software
HostAvioLan B.11.23.0712.01 HPVM Host AVIO LAN Software
IEther-00 B.11.23.0712 PCI/PCI-X/PCIe IEther
ISEEPlatform A.03.95.510.46.03 ISEE Platform
Java15JDK 1.5.0.09.00 Java 1.5 JDK for HP-UX
Java15JDKadd 1.5.0.09.00 Java 1.5 JDK -AA addon for HP-UX
Java15JRE 1.5.0.09.00 Java 1.5 JRE for HP-UX
Java15JREadd 1.5.0.09.00 Java 1.5 JRE -AA addon for HP-UX
Judy B.11.23.04.17 Judy Library and Related files
LVMProvider R11.23.009 CIM/WBEM Provider for LVM
MOZILLA 1.7.13.01.00 Mozilla for HP-UX
MOZILLAsrc 1.7.13.01.00 Mozilla Source distribution
OnlineDiag B.11.23.10.05 HPUX 11.23 Support Tools Bundle, December 2007
ParMgr B.23.02.01.03 Partition Manager - HP-UX
ProviderDefault B.11.23.0712 Select WBEM Providers
QPKAPPS B.11.23.0712.070a Applications Patches for HP-UX 11i v2, December 2007
QPKBASE B.11.23.0712.070a Base Quality Pack Bundle for HP-UX 11i v2, December 2007
RAID-01 B.11.23.0806 RAID SA; Supptd HW=A7143A/A9890A/A9891A
Sec00Tools B.01.04.10 Install-Time security infrastructure.
SerialSCSI-00 B.11.23.0806 PCI-X/PCI-E SerialSCSI
SwAssistant C.01.02 HP-UX Software Assistant
SysFaultMgmt B.05.00.05.01 HPUX System Fault Management
SysMgmtWeb A.2.2.7 HP-UX Web Based System Management User Interfaces
T1456AA 1.4.2.15.00 Java2 1.4 SDK for HP-UX
T1456AAaddon 1.4.2.15.00 Java2 1.4 SDK -AA addon for HP-UX
T1457AA 1.4.2.15.00 Java2 1.4 RTE for HP-UX
T1457AAaddon 1.4.2.15.00 Java2 1.4 RTE -AA addon for HP-UX
T1471AA A.04.50.021 HP-UX Secure Shell
TBIRD 2.0.0.6.00 Thunderbird for HP-UX
TBIRDsrc 2.0.0.6.00 Thunderbird Source distribution
USB-00 C.01.04.07 USB Subsystem and Drivers
VMGuestLib A.03.50 Integrity VM Guest Support Libraries
hpuxwsApache B.2.0.59.01 HP-UX Apache-based Web Server
hpuxwsTomcat B.5.5.23.00 HP-UX Tomcat-based Servlet Engine
hpuxwsWebmin A.1.070.10 HP-UX Webmin-based Admin
hpuxwsXml A.2.03 HP-UX XML Web Server Tools
perl D.5.8.8.B 5.8.8 Perl Programming Language
scsiU320-00 B.11.23.0712 PCI-X SCSI U320; Supptd HW=A7173A/AB290A
48 HP-UX Software List Command Output
 Loading...