

Page 1
LASERJET PRO 300 COLOR MFP
LASERJET PRO 400 COLOR MFP
User Guide
M375
M475
Page 2

Page 3

HP LaserJet Pro 300 color MFP M375
and HP LaserJet Pro 400 color MFP
M475
User Guide
Page 4

Copyright and License
© 2011 Copyright Hewlett-Packard
Development Company, L.P.
Reproduction, adaptation, or translation
without prior written permission is
prohibited, except as allowed under the
copyright laws.
The information contained herein is subject
to change without notice.
The only warranties for HP products and
services are set forth in the express
warranty statements accompanying such
products and services. Nothing herein
should be construed as constituting an
additional warranty. HP shall not be liable
for technical or editorial errors or omissions
contained herein.
Edition 2, 10/2011
Part number: CE863-90907
Trademark Credits
®
, Acrobat®, and PostScript® are
Adobe
trademarks of Adobe Systems
Incorporated.
Intel® Core™ is a trademark of Intel
Corporation in the U.S. and other countries.
Java™ is a US trademark of Sun
Microsystems, Inc.
Microsoft®, Windows®, Windows® XP, and
Windows Vista® are U.S. registered
trademarks of Microsoft Corporation.
®
is a registered trademark of The
UNIX
Open Group.
ENERGY STAR and the ENERGY STAR
mark are registered U.S. marks.
Page 5

Conventions used in this guide
TIP: Tips provide helpful hints or shortcuts.
NOTE: Notes provide important information to explain a concept or to complete a task.
CAUTION: Cautions indicate procedures that you should follow to avoid losing data or damaging
the product.
WARNING! Warnings alert you to specific procedures that you should follow to avoid personal
injury, catastrophic loss of data, or extensive damage to the product.
ENWW iii
Page 6

iv Conventions used in this guide ENWW
Page 7

Table of contents
1 Product basics ................................................................................................................................................ 1
Product comparison ............................................................................................................................. 2
Environmental features ........................................................................................................................ 5
Accessibility features ............................................................................................................................ 5
Product views ....................................................................................................................................... 6
Front view ............................................................................................................................ 6
Back view ............................................................................................................................. 7
Interface ports ...................................................................................................................... 8
Serial number and model number location .......................................................................... 9
Control panel layout ........................................................................................................... 10
2 Control panel menus .................................................................................................................................... 13
Setup Menu ........................................................................................................................................ 14
HP Web Services menu ..................................................................................................... 15
Reports menu .................................................................................................................... 16
Quick Forms menu ............................................................................................................ 17
Fax Setup menu ................................................................................................................ 18
System Setup menu .......................................................................................................... 21
Service menu ..................................................................................................................... 26
Network Setup menu ......................................................................................................... 28
Function specific menus ..................................................................................................................... 30
Copy menu ........................................................................................................................ 30
Fax menu ........................................................................................................................... 32
Scan menu ......................................................................................................................... 34
USB Flash Drive ................................................................................................................ 35
3 Software for Windows .................................................................................................................................. 37
Supported operating systems and printer drivers for Windows .......................................................... 38
Select the correct printer driver for Windows ..................................................................................... 38
HP Universal Print Driver (UPD) ........................................................................................ 40
Change print job settings for Windows ............................................................................................... 41
ENWW v
Page 8

Priority for print settings ..................................................................................................... 41
Change the settings for all print jobs until the software program is closed ........................ 41
Change the default settings for all print jobs ...................................................................... 41
Change the product configuration settings ........................................................................ 42
Remove the printer driver from Windows ........................................................................................... 43
Supported utilities for Windows .......................................................................................................... 44
Other Windows components and utilities ........................................................................... 44
Software for other operating systems ................................................................................................. 44
4 Use the product with Mac ............................................................................................................................ 45
Software for Mac ................................................................................................................................ 46
Supported operating systems and printer drivers for Mac ................................................. 46
Install software for Mac operating systems ........................................................................ 46
Remove the printer driver from Mac operating systems .................................................... 49
Priority for print settings for Mac ........................................................................................ 49
Change printer-driver settings for Mac .............................................................................. 50
Software for Mac computers .............................................................................................. 51
Supported utilities for Mac ................................................................................................. 51
Basic print tasks with Mac .................................................................................................................. 53
Cancel a print job with Mac ................................................................................................ 53
Change the paper size and type with Mac ......................................................................... 53
Resize documents or print on a custom paper size with Mac ............................................ 53
Create and use printing presets with Mac ......................................................................... 53
Print a cover page with Mac .............................................................................................. 54
Use watermarks with Mac .................................................................................................. 54
Print multiple pages on one sheet of paper with Mac ........................................................ 55
Print on both sides of the page (duplex printing) with Mac ................................................ 55
Set the color options with Mac ........................................................................................... 56
Use AirPrint ........................................................................................................................................ 57
Fax with Mac ...................................................................................................................................... 58
Scan with Mac .................................................................................................................................... 59
Solve problems with Mac ................................................................................................................... 60
5 Connect the product with Windows ............................................................................................................ 61
Printer sharing disclaimer ................................................................................................................... 62
Use HP Smart Install to connect to a computer, a wired network, or a wireless network .................. 62
HP Smart Install for Windows direct connections (USB) ................................................... 62
HP Smart Install for Windows wired networks ................................................................... 62
HP Smart Install for Windows wireless networks, method 1: Use the product control
panel .................................................................................................................................. 63
vi ENWW
Page 9

HP Smart Install for Windows wireless networks, method 2: Temporarily connect a
USB cable .......................................................................................................................... 63
HP Smart Install for Windows wireless networks, method 3: Use WPS ............................ 63
Connect with USB .............................................................................................................................. 64
CD installation .................................................................................................................... 64
Connect to a network with Windows .................................................................................................. 65
Supported network protocols ............................................................................................. 65
Install the product on a wired network with Windows ........................................................ 65
Install the product on a wireless network with Windows (wireless models only) ............... 66
Configure IP network settings with Windows ..................................................................... 68
6 Paper and print media .................................................................................................................................. 71
Understand paper use ........................................................................................................................ 72
Change the printer driver to match the paper type and size in Windows ........................................... 74
Supported paper sizes ....................................................................................................................... 75
Supported paper types and tray capacity ........................................................................................... 77
Load paper trays ................................................................................................................................ 80
Load Tray 1 ........................................................................................................................ 80
Load Tray 2 or optional Tray 3 ........................................................................................... 81
Load the document feeder ................................................................................................. 83
Configure trays ................................................................................................................................... 85
7 Print cartridges ............................................................................................................................................. 87
Print cartridge information .................................................................................................................. 87
Supplies views .................................................................................................................................... 88
Print cartridge views .......................................................................................................... 88
Manage print cartridges ...................................................................................................................... 89
Change settings for print cartridges ................................................................................... 89
Store and recycle supplies ................................................................................................. 91
HP anticounterfeit Web site ............................................................................................... 91
Replacement instructions ................................................................................................................... 92
Replace the print cartridges ............................................................................................... 92
Solve problems with supplies ............................................................................................................. 96
Check the print cartridges .................................................................................................. 96
Interpret control panel messages for supplies ................................................................. 100
8 Print tasks .................................................................................................................................................... 107
Cancel a print job ............................................................................................................................. 108
Basic print tasks with Windows ........................................................................................................ 109
Open the printer driver with Windows .............................................................................. 109
ENWW vii
Page 10

Get help for any printing option with Windows ................................................................. 110
Change the number of print copies with Windows ........................................................... 111
Save custom print settings for reuse with Windows ........................................................ 111
Improve print quality with Windows ................................................................................. 114
Print on both sides (duplex) with Windows ...................................................................... 116
Print multiple pages per sheet with Windows .................................................................. 119
Select page orientation with Windows ............................................................................. 120
Set color options with Windows ....................................................................................... 122
Use HP ePrint ................................................................................................................................... 123
Additional print tasks with Windows ................................................................................................. 124
Print colored text as black (grayscale) with Windows ...................................................... 124
Print on preprinted letterhead or forms with Windows ..................................................... 124
Print on special paper, labels, or transparencies with Windows ...................................... 126
Print the first or last page on different paper with Windows ............................................. 129
Scale a document to fit page size with Windows ............................................................. 131
Add a watermark to a document with Windows ............................................................... 133
Create a booklet with Windows ....................................................................................... 133
Walk-up USB printing ....................................................................................................................... 136
9 Color ............................................................................................................................................................. 139
Adjust color ....................................................................................................................................... 140
Change the color theme for a print job ............................................................................ 140
Change the color options ................................................................................................. 141
Manual color options ........................................................................................................ 141
Use the HP EasyColor option ........................................................................................................... 143
Match colors to your computer screen ............................................................................................. 144
10 Copy ........................................................................................................................................................... 145
Use copy functions ........................................................................................................................... 146
Copy ................................................................................................................................ 146
Multiple copies ................................................................................................................. 146
Copy a multiple-page original .......................................................................................... 147
Copy identification cards .................................................................................................. 148
Cancel a copy job ............................................................................................................ 149
Reduce or enlarge a copy ................................................................................................ 149
Collate a copy job ............................................................................................................ 150
Make color or black and white copies .............................................................................. 151
Copy settings .................................................................................................................................... 152
Change copy quality ........................................................................................................ 152
Check the scanner glass for dirt and smudges ................................................................ 153
Adjust the lightness or darkness for copies ..................................................................... 154
viii ENWW
Page 11

Define custom copy settings ............................................................................................ 154
Set the paper size and type for copying on special paper ............................................... 155
Restore copy default settings .......................................................................................... 155
Copy photos ..................................................................................................................................... 156
Copy mixed size originals ................................................................................................................. 157
Copy on both sides ........................................................................................................................... 158
Copy on both sides automatically (duplex models only) .................................................. 158
Copy on both sides manually ........................................................................................... 159
11 Scan ........................................................................................................................................................... 161
Use scan functions ........................................................................................................................... 162
Scan methods .................................................................................................................. 162
Cancel a scan .................................................................................................................. 163
Scan settings .................................................................................................................................... 164
Scanner resolution and color ........................................................................................... 164
Scan quality ..................................................................................................................... 166
Scan a photo .................................................................................................................................... 167
12 Fax .............................................................................................................................................................. 169
Set up fax ......................................................................................................................................... 170
Install and connect the hardware ..................................................................................... 170
Configure fax settings ...................................................................................................... 174
Use the HP Fax Setup Wizard ......................................................................................... 175
Use the phone book ......................................................................................................................... 176
Use the control panel to create and edit the fax phone book .......................................... 176
Import or export Microsoft Outlook contacts into the fax phone book .............................. 176
Use phone-book data from other programs ..................................................................... 176
Delete phone book entries ............................................................................................... 177
Use speed dials ............................................................................................................... 177
Manage group-dial entries ............................................................................................... 178
Set fax settings ................................................................................................................................. 180
Send fax settings ............................................................................................................. 180
Receive fax settings ......................................................................................................... 184
Set fax polling .................................................................................................................. 189
Use fax ............................................................................................................................................. 190
Fax software .................................................................................................................... 190
Cancel a fax ..................................................................................................................... 190
Use fax on a DSL, PBX, or ISDN system ........................................................................ 190
Use fax on a VoIP service ............................................................................................... 191
Fax memory ..................................................................................................................... 192
Delete faxes from memory ............................................................................................... 192
ENWW ix
Page 12

Send a fax ........................................................................................................................ 192
Receive a fax ................................................................................................................... 198
Solve fax problems ........................................................................................................................... 200
Fax troubleshooting checklist .......................................................................................... 200
Fax error messages ......................................................................................................... 202
Troubleshoot fax codes and trace reports ....................................................................... 208
Fax logs and reports ........................................................................................................ 209
Change error correction and fax speed ........................................................................... 211
Solve problems sending faxes ......................................................................................... 212
Solve problems receiving faxes ....................................................................................... 219
Solve general fax problems ............................................................................................. 225
Regulatory information and warranties ............................................................................................. 227
13 Manage and maintain ............................................................................................................................... 229
Print information pages .................................................................................................................... 230
Use the HP Embedded Web Server ................................................................................................. 232
Open the HP Embedded Web Server .............................................................................. 232
HP Embedded Web Server features ............................................................................... 232
Use HP Web Jetadmin software ...................................................................................................... 233
Product security features .................................................................................................................. 233
Assign a system password .............................................................................................. 233
Economy settings ............................................................................................................................. 234
Print with EconoMode ...................................................................................................... 234
Powersave modes ........................................................................................................... 234
Archive print ..................................................................................................................... 235
Install memory DIMMs ...................................................................................................................... 236
Install memory DIMMs ..................................................................................................... 236
Enable memory ................................................................................................................ 239
Check DIMM installation .................................................................................................. 240
Memory allocation ............................................................................................................ 240
Clean the product ............................................................................................................................. 241
Clean the paper path ....................................................................................................... 241
Clean the scanner glass strip and platen ......................................................................... 241
Clean the document feeder pickup rollers and separation pad ....................................... 242
Clean the touch screen .................................................................................................... 243
Product updates ............................................................................................................................... 244
14 Solve problems ......................................................................................................................................... 245
Self help ........................................................................................................................................... 246
Problem-solving checklist ................................................................................................................. 247
Step 1: Check that the product power is on ..................................................................... 247
x ENWW
Page 13

Step 2: Check the control panel for error messages ....................................................... 247
Step 3: Test print functionality ......................................................................................... 247
Step 4: Test copy functionality ......................................................................................... 248
Step 5: Test the fax sending functionality ........................................................................ 248
Step 6: Test the fax receiving functionality ...................................................................... 248
Step 7: Try sending a print job from a computer .............................................................. 248
Step 8: Test the walk-up USB printing functionality ......................................................... 248
Factors that affect product performance .......................................................................... 249
Restore the factory-set defaults ....................................................................................................... 249
Paper feeds incorrectly or becomes jammed ................................................................................... 250
The product does not pick up paper ................................................................................ 250
The product picks up multiple sheets of paper ................................................................ 250
Prevent paper jams .......................................................................................................... 250
Clear jams ........................................................................................................................................ 252
Jam locations ................................................................................................................... 252
Clear jams from the document feeder ............................................................................. 253
Clear jams in Tray 1 ......................................................................................................... 255
Clear jams in Tray 2 ......................................................................................................... 257
Clear jams in the fuser area ............................................................................................. 258
Clear jams in the output bin ............................................................................................. 259
Clear jams in the duplexer (duplexing models only) ........................................................ 260
Improve print quality ......................................................................................................................... 262
Use the correct paper type setting in the printer driver .................................................... 262
Adjust color settings in the printer driver .......................................................................... 263
Use paper that meets HP specifications .......................................................................... 265
Print a cleaning page ....................................................................................................... 265
Calibrate the product to align the colors .......................................................................... 266
Check the print cartridges ................................................................................................ 266
Use the printer driver that best meets your printing needs .............................................. 269
Improve print quality for copies ........................................................................................ 271
The product does not print or it prints slowly .................................................................................... 272
The product does not print ............................................................................................... 272
The product prints slowly ................................................................................................. 273
Solve walk-up USB printing problems .............................................................................................. 274
The USB Flash Drive menu does not open when you insert the USB accessory ........... 274
The file does not print from the USB storage accessory ................................................. 274
The file that you want to print is not listed in the USB Flash Drive menu ........................ 275
Solve product connectivity problems ................................................................................................ 275
Solve direct-connect problems ........................................................................................ 275
Solve network problems .................................................................................................. 275
Solve wireless network problems ..................................................................................................... 278
ENWW xi
Page 14

Wireless connectivity checklist ........................................................................................ 278
The control panel displays the message: The wireless feature on this product has
been turned off ................................................................................................................. 279
The product does not print after the wireless configuration completes ............................ 279
The product does not print, and the computer has a third-party firewall installed ........... 279
The wireless connection does not work after moving the wireless router or product ...... 279
Cannot connect more computers to the wireless product ................................................ 280
The wireless product loses communication when connected to a VPN .......................... 280
The network does not appear in the wireless networks list ............................................. 280
The wireless network is not functioning ........................................................................... 281
Solve product software problems with Windows .............................................................................. 282
Solve product software problems with Mac ...................................................................................... 283
The printer driver is not listed in the Print & Fax list ........................................................ 283
The product name does not appear in the product list in the Print & Fax list .................. 283
The printer driver does not automatically set up the selected product in the Print &
Fax list ............................................................................................................................. 283
A print job was not sent to the product that you wanted .................................................. 284
When connected with a USB cable, the product does not appear in the Print & Fax list
after the driver is selected. ............................................................................................... 284
You are using a generic printer driver when using a USB connection ............................. 284
Appendix A Supplies and accessories ........................................................................................................ 285
Order parts, accessories, and supplies ............................................................................................ 286
Part numbers .................................................................................................................................... 286
Appendix B Service and support ................................................................................................................. 287
Hewlett-Packard limited warranty statement .................................................................................... 288
HP's Premium Protection Warranty: LaserJet print cartridge limited warranty statement ................ 290
Data stored on the print cartridge ..................................................................................................... 291
End User License Agreement .......................................................................................................... 292
OpenSSL .......................................................................................................................................... 295
Customer support ............................................................................................................................. 296
Appendix C Product specifications ............................................................................................................. 297
Physical specifications ..................................................................................................................... 298
Power consumption, electrical specifications, and acoustic emissions ............................................ 298
Environmental specifications ............................................................................................................ 298
Appendix D Regulatory information ............................................................................................................ 299
FCC regulations ............................................................................................................................... 300
Environmental product stewardship program ................................................................................... 300
xii ENWW
Page 15

Protecting the environment .............................................................................................. 300
Ozone production ............................................................................................................ 300
Power consumption ......................................................................................................... 300
Toner consumption .......................................................................................................... 301
Paper use ........................................................................................................................ 301
Plastics ............................................................................................................................ 301
HP LaserJet print supplies ............................................................................................... 301
Return and recycling instructions ..................................................................................... 302
Paper ............................................................................................................................... 303
Material restrictions .......................................................................................................... 303
Disposal of waste equipment by users in private households in the European Union .... 304
Chemical substances ....................................................................................................... 304
Material Safety Data Sheet (MSDS) ................................................................................ 304
For more information ....................................................................................................... 305
Declaration of conformity .................................................................................................................. 306
Declaration of conformity (wireless models) ..................................................................................... 308
Safety statements ............................................................................................................................. 310
Laser safety ..................................................................................................................... 310
Canadian DOC regulations .............................................................................................. 310
VCCI statement (Japan) .................................................................................................. 310
Power cord instructions ................................................................................................... 310
Power cord statement (Japan) ......................................................................................... 310
EMC statement (Korea) ................................................................................................... 311
Laser statement for Finland ............................................................................................. 311
GS statement (Germany) ................................................................................................. 312
Substances Table (China) ............................................................................................... 312
Restriction on Hazardous Substances statement (Turkey) ............................................. 312
Restriction on Hazardous Substances statement (Ukraine) ............................................ 312
Additional statements for telecom (fax) products ............................................................................. 313
EU Statement for Telecom Operation .............................................................................. 313
New Zealand Telecom Statements .................................................................................. 313
Additional FCC statement for telecom products (US) ...................................................... 313
Telephone Consumer Protection Act (US) ...................................................................... 314
Industry Canada CS-03 requirements ............................................................................. 314
Vietnam Telecom wired/wireless marking for ICTQC Type approved products .............. 315
Additional statements for wireless products ..................................................................................... 316
FCC compliance statement—United States .................................................................... 316
Australia statement .......................................................................................................... 316
Brazil ANATEL statement ................................................................................................ 316
Canadian statements ....................................................................................................... 316
European Union regulatory notice ................................................................................... 316
ENWW xiii
Page 16

Notice for use in France ................................................................................................... 317
Notice for use in Russia ................................................................................................... 317
Korean statement ............................................................................................................ 317
Taiwan statement ............................................................................................................ 318
Vietnam Telecom wired/wireless marking for ICTQC Type approved products .............. 318
Index ................................................................................................................................................................. 319
xiv ENWW
Page 17

1 Product basics
Product comparison
●
Environmental features
●
Accessibility features
●
Product views
●
ENWW 1
Page 18

Product comparison
HP LaserJet Pro 300
color MFP M375nw
CE903A
Paper handling Tray 1 (50-sheet
capacity)
Tray 2 (250-sheet
capacity
Optional Tray 3 (250sheet capacity)
Standard output bin (150sheet capacity)
Automatic duplex printing
Supported operating
systems
Windows Vista, 32-bit
Windows 7, 32-bit and
Windows 2003 Server
Windows XP, 32-bit
and 64-bit
64-bit
(32-bit, Service Pack 3),
printer and scan drivers
only
HP LaserJet Pro 400
color MFP M475dn
CE863A
HP LaserJet Pro 400
color MFP M475dw
CE864A
Windows 2008 Server,
printer and scan drivers
only
Windows 2008 Server
R2, printer and scan
drivers only
Mac OS X v10.5 and
later
Connectivity Hi-Speed USB 2.0
10/100 Ethernet LAN
connection
Wireless network
connection
HP Smart Install for easy
software installation
(Windows only)
Memory 192 MB RAM,
expandable to 448 MB
2 Chapter 1 Product basics ENWW
Page 19

HP LaserJet Pro 300
color MFP M375nw
HP LaserJet Pro 400
color MFP M475dn
HP LaserJet Pro 400
color MFP M475dw
CE903A
Control-panel display Color graphical touch
screen
Print Prints 18 pages per
minute (ppm) on A4-size
paper and 19 ppm on
Letter-size paper
Prints 20 pages per
minute (ppm) on A4-size
paper and 21 ppm on
Letter-size paper
Automatic duplex printing
Walk-up USB printing (no
computer required
Copy Copies at up to 18 ppm
Copies at up to 20 ppm
Copy resolution is 300
dots per inch (dpi)
50-page document
feeder that supports
page sizes from 127 to
356 mm (5 to 14 in) in
length and from 127 to
216 mm (5 to 8.5 in) in
width
CE863A
CE864A
ENWW
Flatbed scanner supports
page sizes up to 297 mm
(11.7 in) in length and up
to 215 mm (8.5 in) in
width
Automatic duplex
copying
Product comparison
3
Page 20

HP LaserJet Pro 300
color MFP M375nw
HP LaserJet Pro 400
color MFP M475dn
HP LaserJet Pro 400
color MFP M475dw
Scan Scans in black and white
with resolution up to
1200 dpi
Scans in color with
resolution up to 600 dpi
Automatic duplex
scanning
Walk-up USB scanning
(no computer required)
Fax V.34 with two RJ-11 fax
ports
CE903A
CE863A
CE864A
4 Chapter 1 Product basics ENWW
Page 21

Environmental features
Duplex printing Save paper by using the manual duplex printing option. Automatic duplex printing is available
with the HP LaserJet Pro 400 color MFP M475dn and HP LaserJet Pro 400 color MFP
M475dw models.
Print multiple pages per
sheet
Copies multiple pages per
sheet
Recycling Reduce waste by using recycled paper.
Energy savings Instant on Fusing technology and sleep mode enable this product to quickly go into reduced
Save paper by printing two or more pages of a document side-by-side on one sheet of paper.
Access this feature through the printer driver.
Save paper by copying two or four pages of an original document side-by-side on one sheet
of paper.
Recycle print cartridges by using the HP Planet Partners return process.
power states when not printing, thus saving energy.
Accessibility features
The product includes several features that aid users with accessibility issues.
● Online user guide that is compatible with text screen-readers.
● Print cartridges can be installed and removed by using one hand.
All doors and covers can be opened by using one hand.
●
ENWW
Environmental features
5
Page 22
Product views
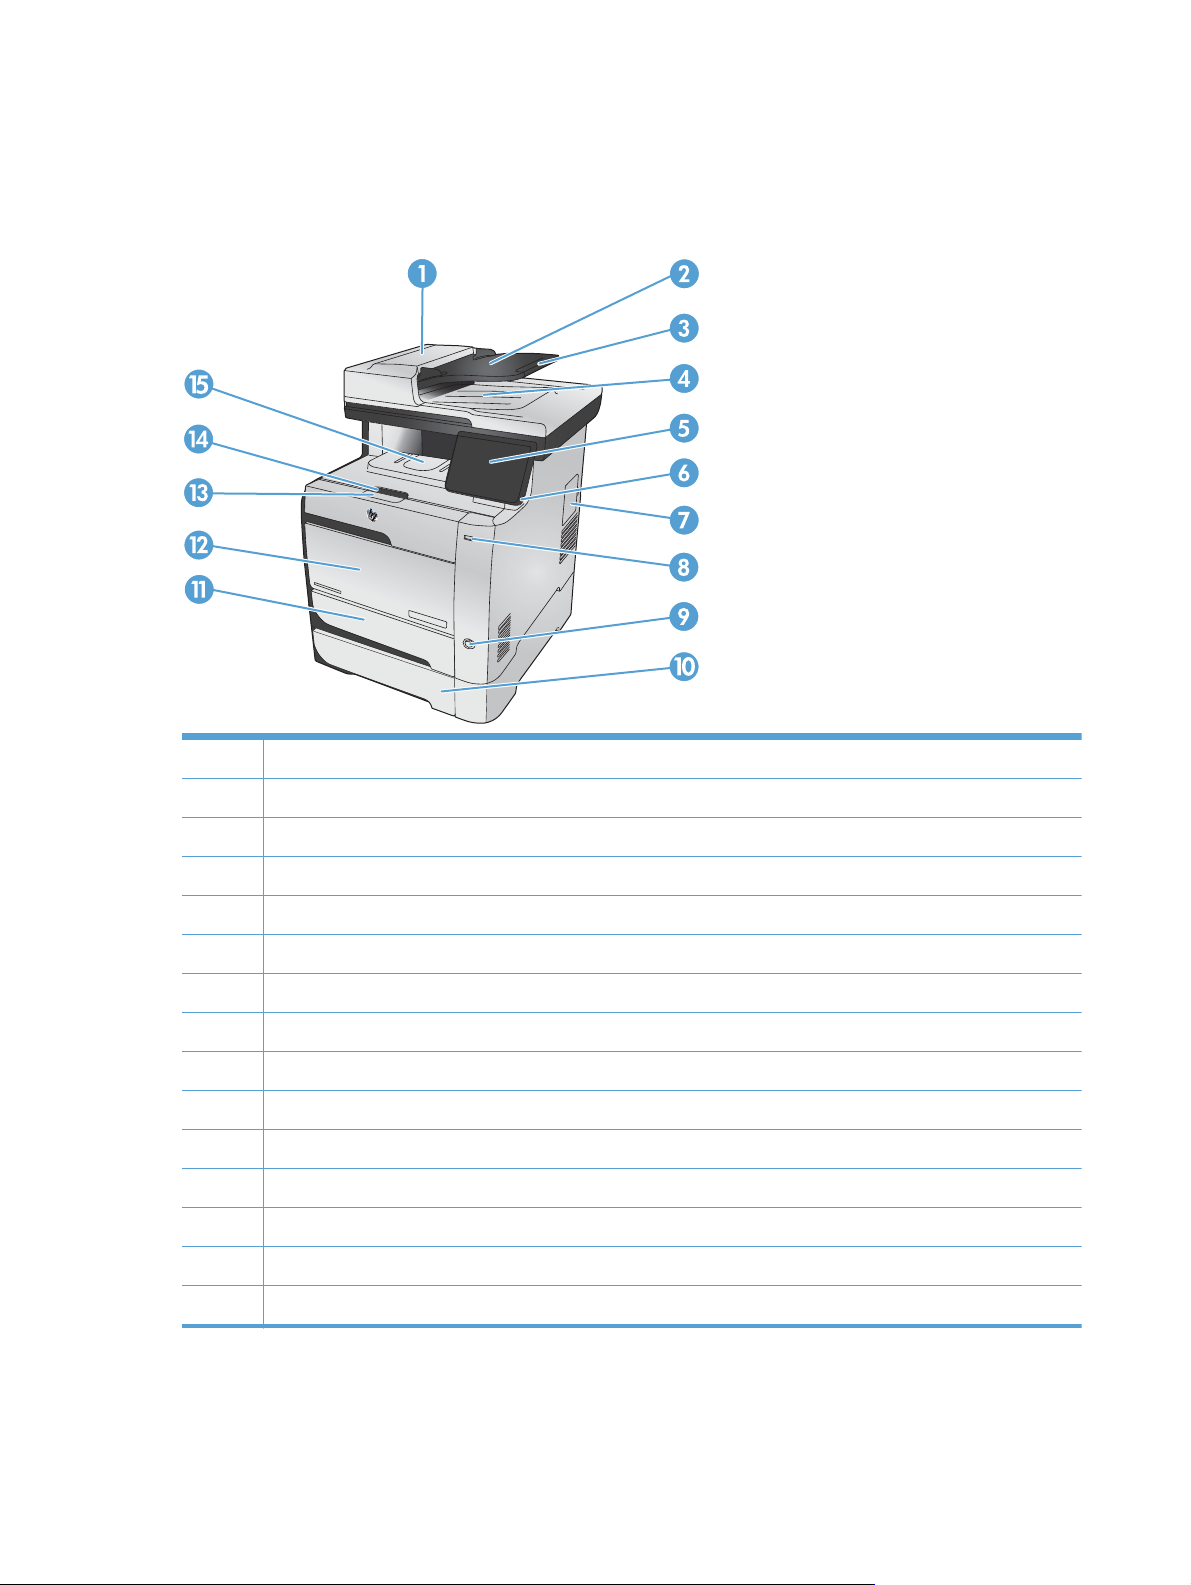
Front view
1 Document feeder cover
2 Document feeder input tray
3 Document feeder input tray extension
4 Document feeder output bin
5 Color touch screen control panel
6 Control-panel-adjustment lever
7 DIMM access door
8 Walk-up USB printing port
9 On/Off button
10 Optional Tray 3
11 Tray 2 (access for clearing jams)
12 Tray 1
13 Print-cartridge-door handle
14 Output bin stop
15 Output bin
6 Chapter 1 Product basics ENWW
Page 23
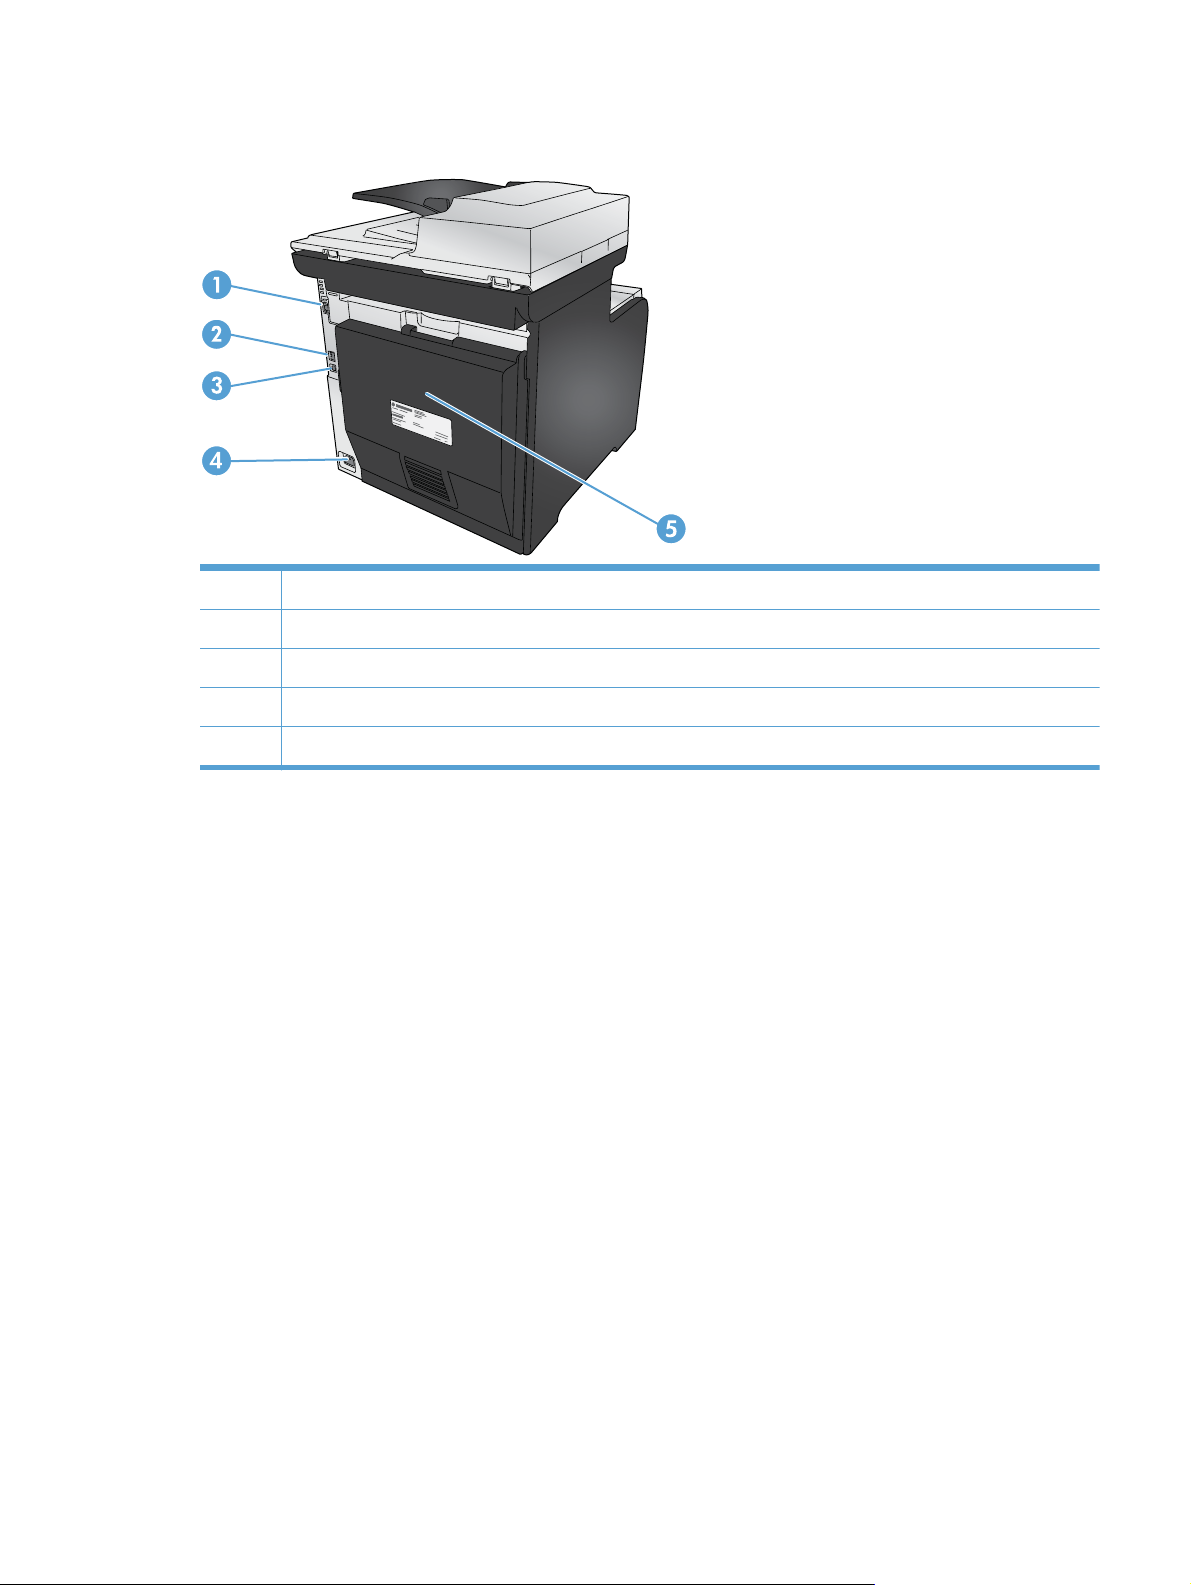
Back view
1 Fax ports
2 Network port
3 Hi-Speed USB 2.0 port
4 Power connection
5 Rear door (access for clearing jams)
ENWW
Product views
7
Page 24
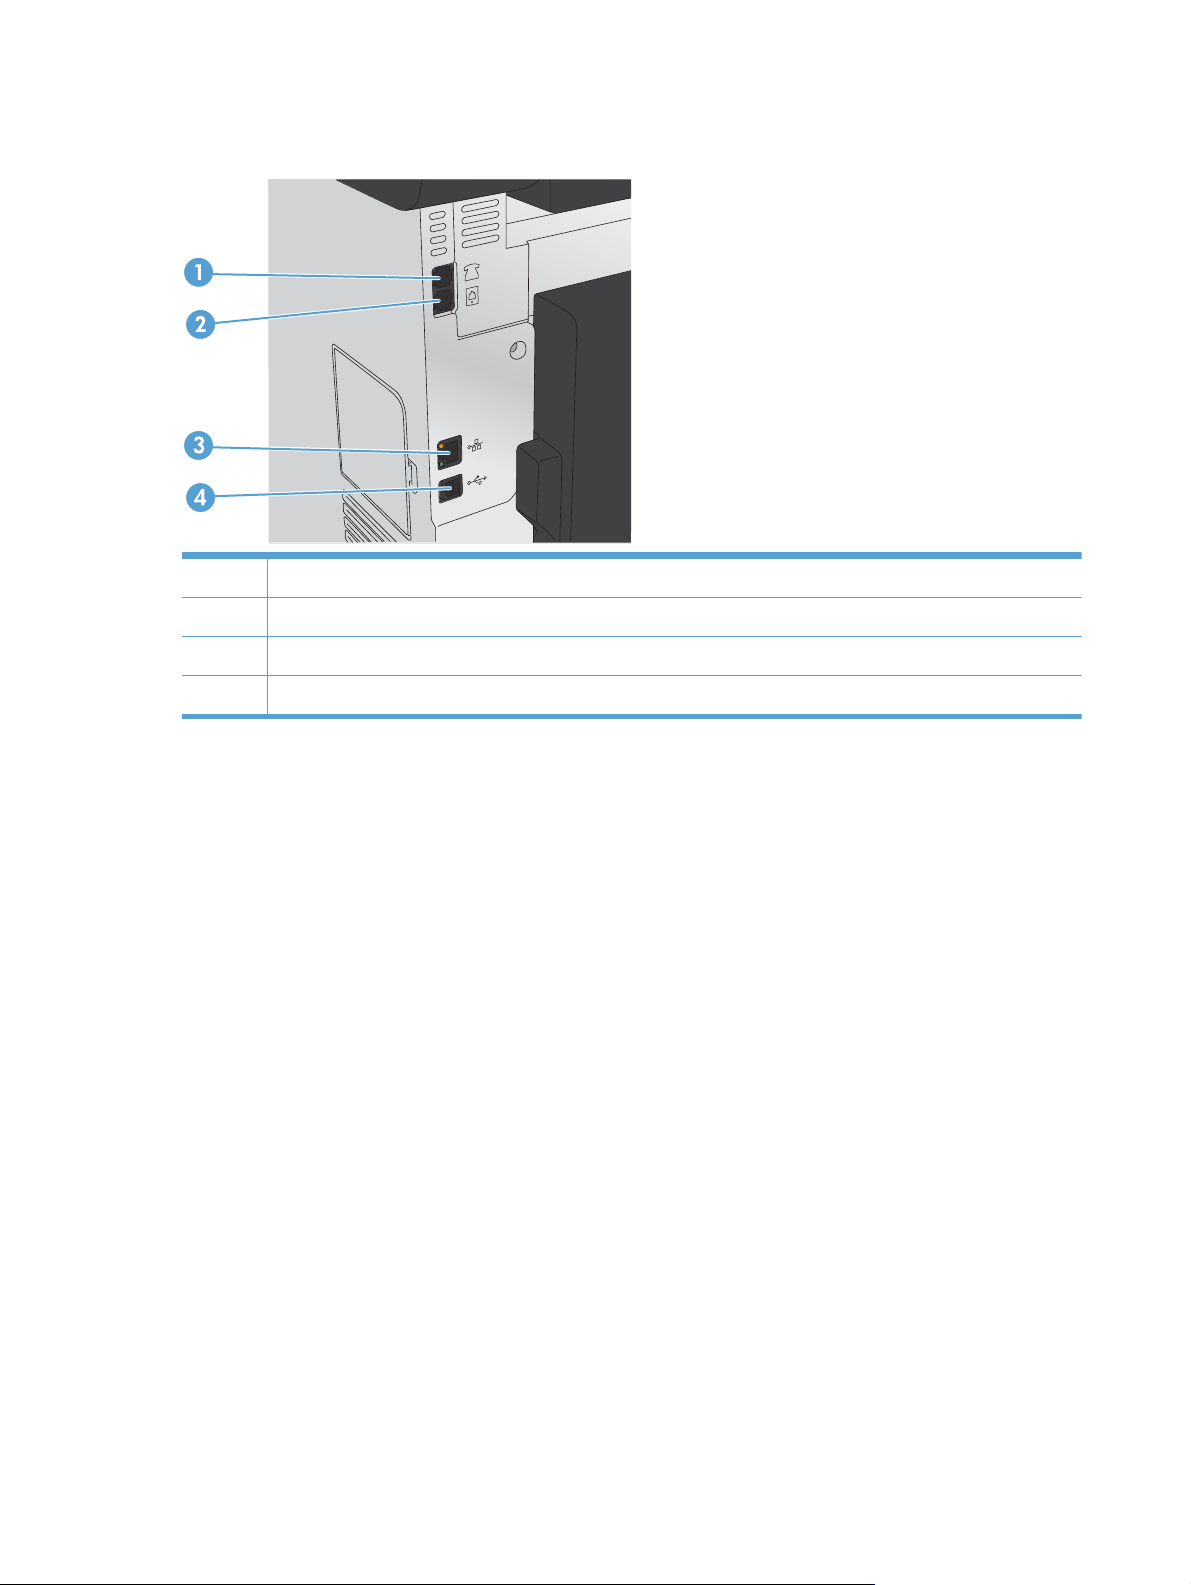
Interface ports
1 Telephone “line out” port for attaching an extension phone, answering machine, or other device
2 Fax “line in” port for attaching fax line to product
3 Network port
4 Hi-Speed USB 2.0 port
8 Chapter 1 Product basics ENWW
Page 25

Serial number and model number location
The serial number and product model number label is at the back of the product.
NOTE: Another label is inside the front door.
ENWW
Product views
9
Page 26
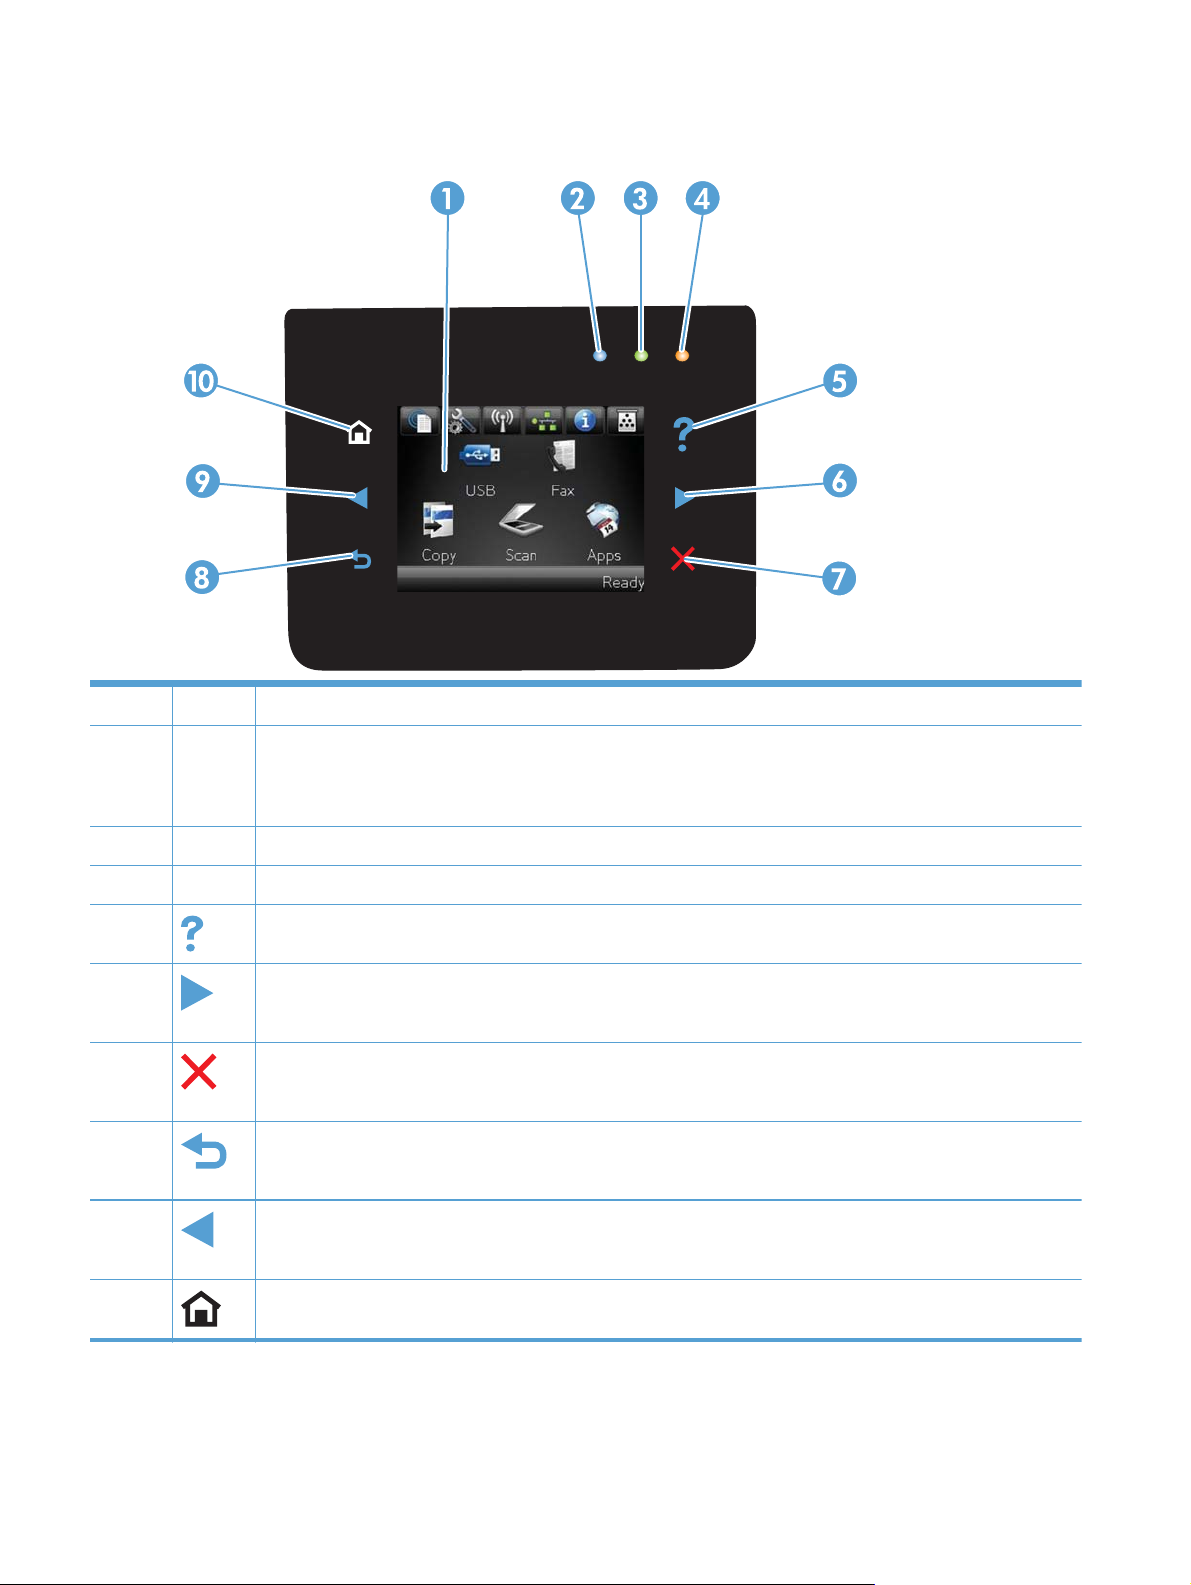
Control panel layout
1 Touch screen display
2 Wireless light: indicates the wireless network is enabled. The light blinks while the product is establishing a
connection to the wireless network. When connected, the light stops blinking and stays lit.
NOTE: Wireless models only
3 Ready light: indicates the product is ready
4 Attention light: indicates a problem with the product
5
6
7
8
9
10
Help button and light: provides access to the control panel help system
Right arrow button and light: moves the cursor to the right or moves the display image to the next screen
NOTE: This button illuminates only when the current screen can use this feature.
Cancel button and light: clears settings, cancels the current job or exits the current screen.
NOTE: This button illuminates only when the current screen can use this feature.
Back button and light: returns to the previous screen
NOTE: This button illuminates only when the current screen can use this feature.
Left arrow button and light: moves the cursor to the left
NOTE: This button illuminates only when the current screen can use this feature.
Home button and light: provides access to the Home screen
10 Chapter 1 Product basics ENWW
Page 27
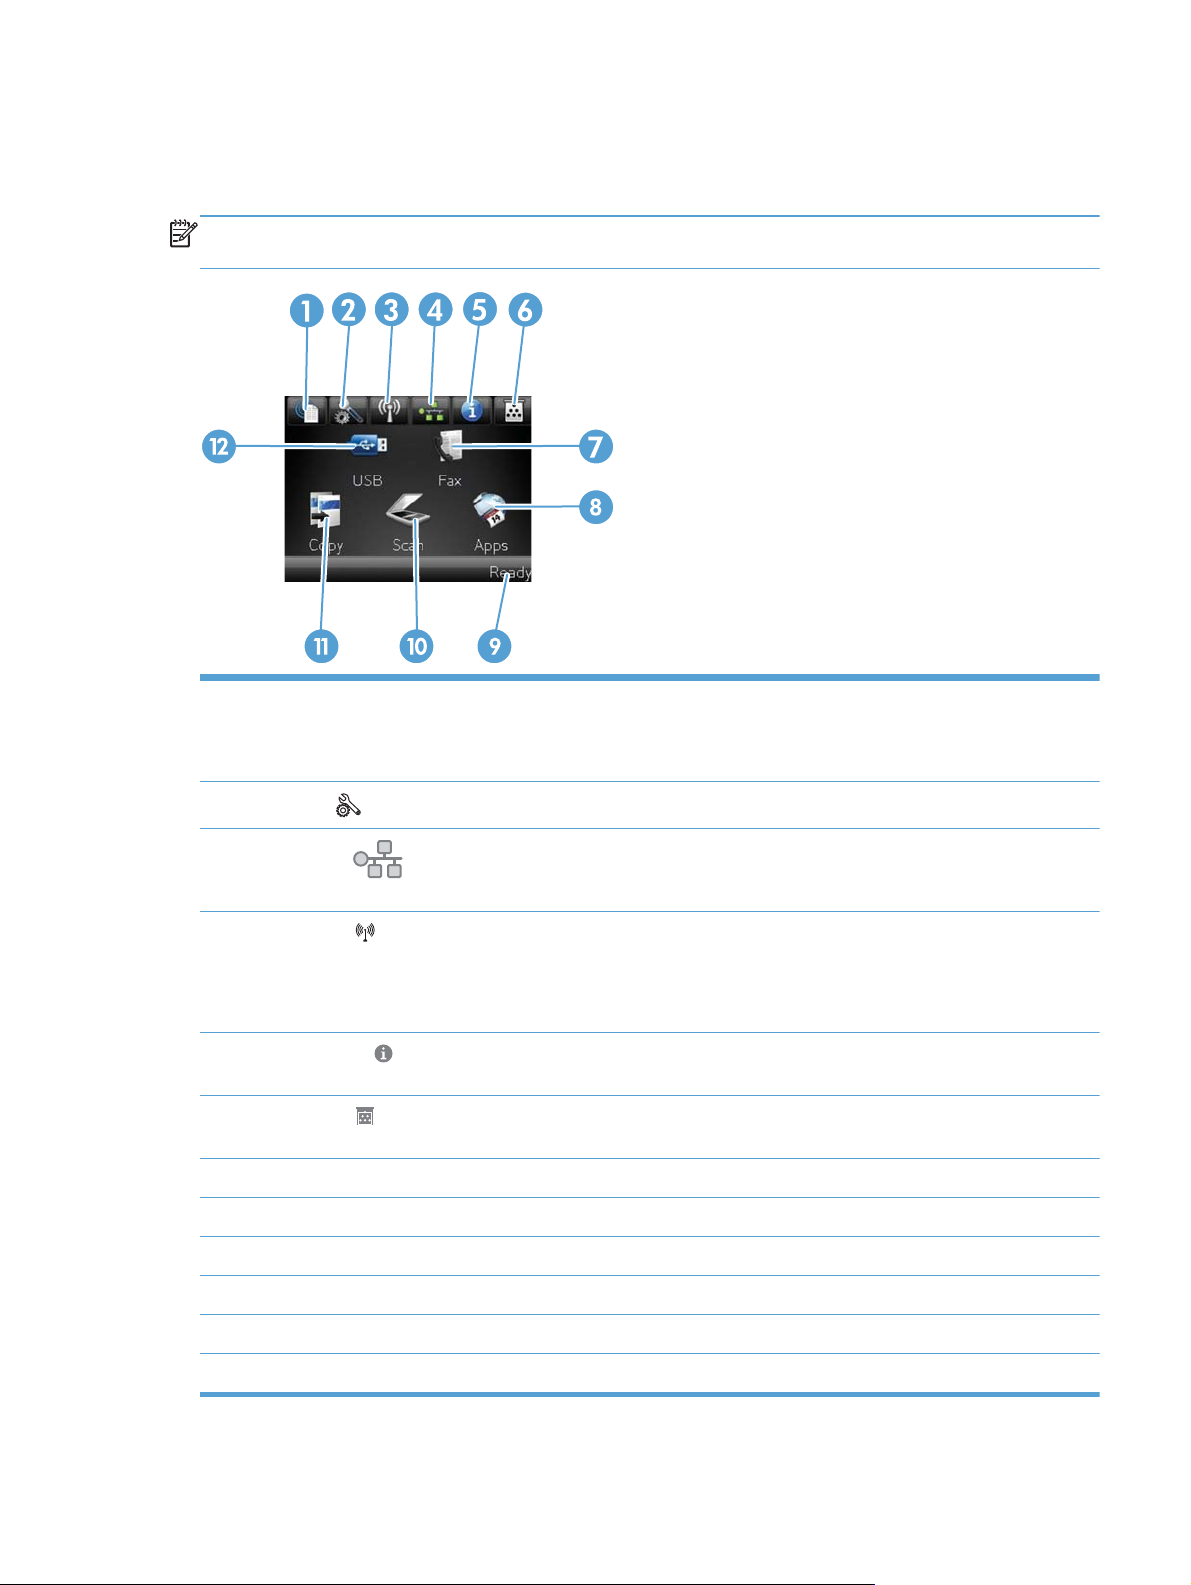
Buttons on the Home screen
The Home screen provides access to the product features, and it indicates the product status.
NOTE: Depending on the product configuration, the features on the Home screen can vary. The
layout might also be reversed for some languages.
1 Web Services button: provides quick access to HP Web Services features, including HP ePrint.
HP ePrint is a tool that prints documents by using any e-mail enabled device to send them to the product’s e-mail
address.
2
3
4
5
6
7 Fax button: provides access to the fax feature
8 Apps button: provides access to the Apps menu to print directly from select Web applications
9 Product status
10 Scan button: provides access to the scan feature
Setup
Network
you can print the Network Summary page.
Wireless
NOTE: Wireless models only
NOTE: When you are connected to a wireless network, this icon changes to a set of signal strength bars.
Information
Configuration Report page.
Supplies
the Supplies Status page.
button: provides access to the main menus
button: provides access to network settings and information. From the network settings screen,
button: provides access to the Wireless menu and wireless status information.
button: provides product status information. From the status summary screen, you can print the
button: provides information about supplies status. From the supplies summary screen, you can print
ENWW
11 Copy button: provides access to the copy feature
12 USB button: provides access to the walk-up USB printing and scanning feature (no computer is required)
Product views
11
Page 28

Control panel help system
The product has a built-in Help system that explains how to use each screen. To open the Help
system, touch the Help
For some screens, the Help opens to a global menu where you can search for specific topics. You
can browse through the menu structure by touching the buttons in the menu.
Some Help screens include animations that guide you through procedures, such as clearing jams.
For screens that contain settings for individual jobs, the Help opens to a topic that explains the
options for that screen.
button in the upper-right corner of the screen.
If the product alerts you of an error or warning, touch the Help
describes the problem. The message also contains instructions to help solve the problem.
button to open a message that
12 Chapter 1 Product basics ENWW
Page 29

2 Control panel menus
Setup Menu
●
Function specific menus
●
ENWW 13
Page 30

Setup Menu
To open this menu, touch the Setup button. The following sub menus are available:
HP Web Services
●
Reports
●
Quick Forms
●
Fax Setup
●
● System Setup
Service
●
Network Setup
●
14 Chapter 2 Control panel menus ENWW
Page 31

HP Web Services menu
Menu item Description
Enable Web Services Enables HP Web Services so you can use HP ePrint and the Apps menu.
HP ePrint is a tool that prints documents by using any e-mail enabled device to send them
to the product’s e-mail address.
Use the Apps menu to print directly from select Web applications.
Display E-Mail Address Select whether to display the product's IP address on the control panel.
Print Information Sheet Print a page that contains the e-mail address for the product as well as other information
for HP Web Services.
Turn ePrint On/Off Turn HP ePrint on or off.
Turn Apps On/Off Turn the Apps feature on or off.
Remove Web Services Remove HP Web Services from this product.
ENWW
Setup Menu
15
Page 32

Reports menu
Use the Reports menu to print reports that provide information about the product.
Menu item Description
Demo Page Prints a page that demonstrates print quality
Menu Structure Prints a map of the control panel-menu layout. The active settings for each menu
Configuration Report Prints a list of all the product settings. Includes basic network information when
Supplies Status Prints the status for each print cartridge, including the following information:
Network Summary Prints a list of all product network settings
are listed.
the product is connected to a network.
● Estimated percentage of cartridge life remaining
Approximate pages remaining
●
Part numbers for HP print cartridges
●
● Number of pages printed
Information about ordering new HP print cartridges and recycling used HP
●
print cartridges
Usage Page Prints a page that lists pages that were jammed or mispicked in the product,
monochrome (black and white) or color pages, and reports the count for pages
scanned, faxed, and copied.
PCL Font List Prints a list of all the PCL fonts that are installed.
PS Font List Prints a list of all the PostScript (PS) fonts that are installed
PCL6 Font List Prints a list of all the PCL6 fonts that are installed
Color Usage Log Prints a report that shows the user name, application name, and color usage
information on a job-by-job basis
Service Page Prints the service report
Diagnostics Page Prints the calibration and color diagnostics pages
Print Quality Page Prints a page that helps solve problems with print quality
16 Chapter 2 Control panel menus ENWW
Page 33

Quick Forms menu
Menu item Sub-menu item Description
Notebook Paper Narrow Rule
Wide Rule
Child Rule
Graph Paper 1/8 inch
5 mm
Checklist 1-Column
2-Column
Music Paper Portrait
Landscape
Prints pages that have preprinted lines
Prints pages that have preprinted graph lines
Prints pages that have preprinted lines with check boxes
Prints pages that have preprinted lines for writing music
ENWW
Setup Menu
17
Page 34

Fax Setup menu
In the following table, items that have an asterisk (*) indicate the factory default setting.
Menu item Sub-menu item Sub-menu item Description
Fax Set-Up Utility This is a tool for configuring the fax settings. Follow the on-
screen prompts and select the appropriate response for each
question.
Basic Setup Time/Date (Settings for time
format, current time,
date format, and
current date.)
Fax Header Enter your fax
number.
Enter company
name.
Answer Mode Automatic*
Manual
TAM
Fax/Tel
Sets the time and date setting for the product.
Sets the identifying information that is sent to the receiving
product.
Sets the type of answer mode. The following options are
available:
Automatic: The product automatically answers an incoming
●
call on the configured number of rings.
● Manual: The user must press the Start Fax button or use an
extension phone (press buttons 1-2-3 on the extension
phone) to make the product answer the incoming call.
TAM: A telephone answering machine (TAM) is attached to
●
the Aux phone port of the product. The product will listen for
fax tones after the answering machine has picked up the
call-and pick up a call if fax tones are detected.
Fax/Tel: The product will automatically pick up all calls and
●
determine if the call is a voice or fax call. If the call is a fax
call, the product handles the call as an incoming fax. If the
incoming call is detected as a voice call, the product will
generate an audible synthesized ring to alert the user of an
incoming voice call.
Rings to Answer Sets the number of rings that must occur before the fax modem
answers. The default setting is 5.
18 Chapter 2 Control panel menus ENWW
Page 35

Menu item Sub-menu item Sub-menu item Description
Distinctive Ring All Rings*
Single
Double
Triple
Double and Triple
Dial Prefix On
Off*
Advanced Setup Fax Resolution Standard
Fine*
Superfine
If you have distinctive ring phone service, use this item to
configure how the product responds to incoming calls.
● All Rings: The product answers all ring patterns or calls that
come through the telephone line.
● Single: The product answers any calls that produce a
single-ring pattern.
Double: The product answers any calls that produce a
●
double-ring pattern.
● Triple: The product answers any calls that produce a triple-
ring pattern.
Double and Triple: The product answers any calls that
●
produce a double-ring or triple-ring pattern.
Specifies a prefix number that must be dialed when sending
faxes from the product. If you turn this feature on, the product
prompts you to enter the number and then it automatically
includes that number every time you send a fax.
Sets the resolution for sent documents. Higher resolution images
have more dots per inch (dpi), so they show more detail. Lower
resolution images have fewer dots per inch and show less detail,
but the file size is smaller and the fax takes less time to transmit.
Photo
Lighter/Darker Sets the darkness of outgoing faxes.
Fit to Page On*
Off
Glass Size Letter
A4
Dialing Mode Tone*
Pulse
Redial if Busy On*
Off
Redial if No Answer On
Off*
Redial if Comm. Error On*
Off
Detect Dial Tone On
Off*
Shrinks incoming faxes that are larger than the paper size set for
the tray.
Sets the default paper size for documents being scanned from
the flatbed scanner.
Sets whether the product should use tone or pulse dialing.
Sets whether the product should attempt to redial if the line is
busy.
Sets whether the product should attempt to redial if the recipient
fax number does not answer.
Sets whether the product should attempt to redial the recipient
fax number if a communication error occurs.
Sets whether the product should check for a dial tone before
sending a fax.
ENWW
Setup Menu
19
Page 36

Menu item Sub-menu item Sub-menu item Description
Billing Codes On
Off*
Extension Phone On*
Off
Stamp Faxes On
Off*
Private Receive On
Off*
Confirm Fax Number On
Off*
Enables the use of billing codes when set to On. A prompt
appears where you can enter the billing code for an outgoing fax.
When this feature is enabled, you can press the 1-2-3 buttons on
the extension phone to cause the product to answer an incoming
fax call.
Sets the product to print the date, time, sender's phone number,
and page number on each page of incoming faxes.
Setting the Private Receive feature to On requires you to set a
product password. After setting the password, the following
options are set:
The Private Receive feature is turned on.
●
● All old faxes are deleted from memory.
Fax forwarding is set to Off and is not allowed to be
●
changed.
● All incoming faxes are stored in memory.
Confirm a fax number by entering it a second time.
Allow Fax Reprint On*
Off
Fax/Tel Ring Time 20*
30
40
70
Print Duplex On
Off*
Fax Speed Fast (V.34)*
Medium (V.17)
Slow (V.29)
Sets whether incoming faxes are stored in memory for reprinting
later.
Sets the time, in seconds, after which the product should stop
sounding the Fax/Tel audible ring to notify the user of an
incoming voice call.
Sets duplex printing as the default for faxes.
NOTE: This item is available only for duplex models.
Sets the allowed fax communication speed.
20 Chapter 2 Control panel menus ENWW
Page 37

System Setup menu
In the following table, items that have an asterisk (*) indicate the factory default setting.
Menu item Sub-menu item Sub-menu item Sub-menu item Description
Language (List of available
control-panel
display
languages.)
Paper Setup Default Paper Size Letter
Default Paper
Type
Tray 1 Paper Type
Tray 2 Paper Type
Paper Out Action Wait forever*
Sets the language in which the control panel displays
A4
Legal
Lists available
paper types.
Paper Size
Paper Size
Cancel
Override
messages and product reports.
Sets the size for printing internal reports, faxes, or any
print job that does not specify a size.
Sets the type for printing internal reports, faxes, or any
print job that does not specify a type.
Select the default size and type for Tray 1 from the list
of available sizes and types.
Select the default size and type for Tray 2 from the list
of available sizes and types.
Determines how the product reacts when a print job
requires a paper size or type that is unavailable or
when the tray is empty.
Wait forever: The product waits until you load the
●
correct paper.
Override: Print on a different size paper after a
●
specified delay.
Cancel: Automatically cancel the print job after a
●
specified delay.
If you select either the Override or Cancel item,
●
the control panel prompts you for the number of
seconds to delay.
Print Quality Color Calibration Calibrate Now
Power-On
Calibration
Adjust Alignment Print Test Page Use this menu to shift the margin alignment to center
Performs a full calibration.
Calibrate Now: Performs an immediate
●
calibration.
Power-On Calibration: Specify the length of time
●
the product should wait after you turn it on before
it calibrates.
the image on the page from top to bottom and from left
to right. Before adjusting these values, print a test
page. It provides alignment guides in the X and Y
directions so you can determine which adjustments are
necessary.
ENWW
Setup Menu
21
Page 38

Menu item Sub-menu item Sub-menu item Sub-menu item Description
Adjust Tray <X> X1 Shift
X2 Shift
Y Shift
Energy Settings Sleep Delay 15 Minutes*
30 Minutes
1 Hour
2 Hours
Off
1 Minute
Auto Power Down Power Down
Delay
Sets how long the product remains idle before it enters
30 Minutes*
1 Hour
2 Hours
4 Hours
Use the X1 Shift setting to center the image from side
to side on a single-sided page or for the second side of
a two-sided page.
Use the X2 Shift setting to center the image from side
to side on the first side of a two-sided page.
Use the Y Shift setting to center the image from top to
bottom on the page.
Sleep mode. The product automatically exits Sleep
mode when you send a print job or press a control
panel button.
NOTE: The default Sleep Delay time is 15 minutes.
Select the length of time after which the product
automatically turns off.
NOTE: The default Power Down Delay time is 30
minutes.
8 Hours
24 Hours
Never
Wake Events USB Job
LAN Job
Wireless Job
Button Press
Volume Settings Alarm Volume
Ring Volume
Key-Press Volume
Phone Line
Volume
Time/Date (Settings for time
format, current
time, date format,
and current date.)
Set the volume levels for the product. The following
Sets the time and date setting for the product.
Select whether the product wakes when it receives
each of these types of jobs or actions.
The default for each option is Yes.
options are available for each volume setting:
Off
●
Soft
●
Medium*
●
● Loud
22 Chapter 2 Control panel menus ENWW
Page 39

Menu item Sub-menu item Sub-menu item Sub-menu item Description
Product Security On
Off
USB Flash Drive On
Off
Disable Fax On
Off
Supply Settings Black Cartridge Very Low Setting Prompt
Sets the product-security feature. If you select the On
Enable or disable printing directly from the USB port on
Enable or disable the Fax feature.
Continue*
Stop
setting, you must set a password.
the front of the product.
Set how the product behaves when the black print
cartridge reaches the very low threshold.
● Prompt: The product stops printing and prompts
you to replace the print cartridge. You can
acknowledge the prompt and continue printing. A
customer configurable option on this product is
"Prompt to Remind Me in 100 pages, 200 pages,
300 pages, or never." This option is provided as a
customer convenience and is not an indication
these pages will have acceptable print quality.
Continue: The product alerts you that the print
●
cartridge is very low, but it continues printing.
Stop: The product stops printing until you replace
●
the print cartridge.
Low Threshold Enter percentage Use the arrow buttons to increase or decrease the
percentage of estimated life remaining at which the
product alerts you that the print cartridge is low.
For the black cartridge that ships with the product, the
default is 27%. For the standard replacement black
print cartridge, the default is 15%. For the highcapacity replacement black print cartridge, the default
is 8%.
The default values are intended to provide
approximately two weeks of use before the cartridge
reaches the very low state.
ENWW
Setup Menu
23
Page 40

Menu item Sub-menu item Sub-menu item Sub-menu item Description
Color Cartridges Very Low Setting Stop
Prompt
Continue
Print Black*
Set how the product behaves when the one of the
color print cartridges reaches the very low threshold.
● Prompt: The product stops printing and prompts
you to replace the print cartridge. You can
acknowledge the prompt and continue printing. A
customer configurable option on this product is
"Prompt to Remind Me in 100 pages, 200 pages,
300 pages, or never." This option is provided as a
customer convenience and is not an indication
these pages will have acceptable print quality.
Continue: The product alerts you that the print
●
cartridge is very low, but it continues printing.
Print Black: The product has been customer
●
configured to print using only the black print
cartridge when the level of a color supply is very
low. The color supply might still be able to
produce acceptable print quality. To print in color,
either replace the color supply or reconfigure the
product.
When you choose to replace the very low print
cartridge, color printing resumes automatically.
Stop: The product stops printing until you replace
●
the print cartridge.
Low Threshold Cyan
Magenta
Yellow
Enter percentage
Use the arrow buttons to increase or decrease the
percentage of estimated life remaining at which the
product alerts you that the print cartridge is low.
For the color print cartridges that ship with the product,
the default is 20%. For the replacement color print
cartridges, the default is 10%.
The default values are intended to provide
approximately two weeks of use before the cartridge
reaches the very low state.
24 Chapter 2 Control panel menus ENWW
Page 41

Menu item Sub-menu item Sub-menu item Sub-menu item Description
Store Usage Data On Supply*
Not on Supply
Courier Font Regular
Dark
Color Copy On
Off
Sets Courier font values.
Enables or disables color copying.
The product automatically stores print cartridge usage
data in its internal memory. It can also store this data
on memory chips in the print cartridges. Select the Not
on Supply option to store the data only in the product
memory.
The information stored on the print cartridge memory
chip helps HP design future products to meet our
customers' printing needs. HP collects a sampling of
memory chips from print cartridges returned to HP's
free return and recycling program. The memory chips
from this sampling are read and studied in order to
improve future HP products.
The data collected from the print cartridge memory
chip does not contain information that can be used to
identify a customer or user of the print cartridge or their
product.
ENWW
Setup Menu
25
Page 42

Service menu
In the following table, items that have an asterisk (*) indicate the factory default setting.
Menu item Sub-menu item Sub-menu item Description
Fax Service Clear Saved Faxes Clears all faxes in memory.
Run Fax Test Performs a fax test to verify that the phone cord is plugged
in the correct outlet and that there is a signal on the phone
line. A fax test report is printed indicating the results.
Print T.30 Trace Now
Never*
If Error
At End of Call
Error Correction On*
Off
Fax Service Log The fax service log prints out the last 40 entries in the fax
Cleaning Page Cleans the product when specks or other marks appear on
Prints or schedules a report that is used to troubleshoot fax
transmission issues.
The error correction mode allows the sending device to retransmit data if it detects an error signal.
log.
printed output. The cleaning process removes dust and
excess toner from the paper path.
When selected, the product prompts you to load plain
Letter or A4 paper in Tray 1. Touch the OK button to begin
the cleaning process. Wait until the process completes.
Discard the page that prints.
NOTE: For models that do not have an automatic
duplexer, the product prints the first side and then prompts
you to remove the page from the output bin and reload it in
Tray 1, keeping the same orientation.
USB Speed High*
Full
Less Paper
Curl
Archive Print On
Firmware
Datecode
On
Off*
Off*
Displays the current firmware datecode
Sets the USB speed for the USB connection to the
computer. For the product to actually operate at high
speed, it must have high speed enabled and be connected
to an EHCI host controller that is also operating at high
speed. This menu item also does not reflect the current
operating speed of the product.
When printed pages are consistently curled, this option
sets the product to a mode that reduces curl.
When printing pages that will be stored for a long time, this
option sets the product to a mode that reduces toner
smearing and dusting.
26 Chapter 2 Control panel menus ENWW
Page 43

Menu item Sub-menu item Sub-menu item Description
Restore
Defaults
HP Smart
Install
Sets all settings to the factory default values
On*
Off
Enable or disable the HP Smart Install tool.
Disable the tool if you want to connect to a network by
using an Ethernet cable.
If you disable HP Smart Install, you must use the product
software CD to install the product software.
ENWW
Setup Menu
27
Page 44

Network Setup menu
In the following table, items that have an asterisk (*) indicate the factory default setting.
Menu item Sub-menu item Sub-menu item Description
Wireless Menu
NOTE: You can also
access this menu by
touching the Wireless
button on the control
panel.
Wireless Direct Settings Wireless Direct On/Off Enables or disables the Direct Wi-Fi wireless access
feature.
Wireless Direct Name Set the product's Direct Wifi name, so you can access it
from other wireless devices that support the Wi-Fi Direct
protocol.
Wireless Direct Mode Set the product's Direct Wifi mode.
Select the Print Only option (the default setting) to
●
allow wireless access to only the product print
functions from a mobile device.
Select the Open Network option to allow wireless
●
access to all product functions and settings from a
mobile device.
Wireless Setup Wizard Guides you through the steps to set up the product on a
wireless network
Wi-Fi Protected Setup If your wireless router supports this feature, use this
method to set up the product on a wireless network. This
is the simplest method.
Run Network Test Tests the wireless network and prints a report with the
results.
Turn Wireless On/Off Enables or disables the wireless network feature.
TCP/IP Config Automatic*
Manual
Auto Crossover On*
Off
Network Services IPv4
IPv6
Link Speed Automatic*
10T Full
10T Half
100TX Full
100TX Half
Automatic: The product automatically configures all the
TCP/IP settings via DHCP, BootP or AutoIP.
Manual: You can manually configure the IP address,
subnet mask, and default gateway. The control panel
prompts you to specify values for each address section.
As each address is completed, the product prompts for
address confirmation before moving to the next one. After
all three addresses are set, the network reinitializes.
Enables or disables the use of a standard 10/100 network
cable when the product is directly connected to a
computer.
Enable or disable the IPv4 and IPv6 protocols. By default,
each protocol is enabled.
Sets the link speed manually if needed.
After setting the link speed, the product automatically
restarts.
28 Chapter 2 Control panel menus ENWW
Page 45

Menu item Sub-menu item Sub-menu item Description
HTTPS Enforcement Yes
No*
Restore Defaults Resets all network configurations to their factory defaults.
Sets the product so that it communicates only with Web
sites that use hypertext transfer protocol secure (HTTPS).
ENWW
Setup Menu
29
Page 46

Function specific menus
The product features function-specific menus for copying, faxing, and scanning. To open these
menus, touch the button for that function on the control panel.
Copy menu
To open this menu, touch the Copy button, and then touch the Settings... button.
NOTE: Settings that you change with this menu expire 2 minutes after the last copy completes.
Menu item Sub-menu item Sub-menu item Description
ID Copy
NOTE: This item is available
from the main Copy screen. You
do not need to touch the
Settings... button to access it.
Number of Copies (1–99) Specifies the number of copies
Reduce/Enlarge Original=100%*
Copies both sides of
identification cards, or other
small-size documents, onto the
same side of one sheet of
paper.
Specifies the size of the copy.
Legal to Letter=78%
Legal to A4=83%
A4 to Letter=94%
Letter to A4=97%
Full Page=91%
Fit to Page
2 Pages per Sheet
4 Pages per Sheet
Custom: 25 to 400%
Lighter/Darker Specifies the contrast of the
copy.
Optimize Describe Original Auto Select*
Mixed
Text
Picture
Paper Paper Size
Paper Type
Specifies the paper size and
Specifies the type of content in
the original document, so the
copy is the best match for the
original.
type for copies.
30 Chapter 2 Control panel menus ENWW
Page 47

Menu item Sub-menu item Sub-menu item Description
Multi-Page Copy Off*
On
Collation On*
Off
Tray Select Auto Select*
Tray 1
Tray 2
Two Sided 1-Sided to 1-Sided*
1-Sided to 2-Sided
2-Sided to 1-Sided
2-Sided to 2-Sided
Draft Mode Off*
On
Image Adjustment Lightness
Contrast
When this feature is on, the
product prompts you to load
another page onto the scanner
glass or to indicate that the job
is complete.
Specifies whether to collate
copy jobs
Specifies which tray to use for
copies.
Specifies the duplex setting for
copies.
NOTE: This item is available
for duplex models only.
Specifies whether to use draft-
quality printing for copies
Adjusts the image quality
settings for copies
Sharpen
Background Removal
Color Balance
Grayness
Set as New Defaults Saves any changes you have
made to this menu as the new
defaults
Restore Defaults Restores the factory defaults for
this menu
ENWW
Function specific menus
31
Page 48

Fax menu
To open this menu, touch the Fax button, and then touch the Fax Menu button.
Menu item Sub-menu item Sub-menu item Description
Fax Reports Fax Confirmation On Every Fax
On Send Fax Only
On Receive Fax Only
Never*
Include First Page On*
Off
Fax Error Report On Every Error*
On Send Error
On Receive Error
Never
Print Last Call Report Prints a detailed report of the
Fax Activity Log Print Log Now
Auto Log Print
Sets whether the product prints
a confirmation report after a fax
job.
Sets whether the product
includes a thumbnail image of
the first page of the fax on the
report.
Sets whether the product prints
a report after a failed fax job.
last fax operation, either sent or
received.
Print Log Now: Prints a list of
the faxes that have been sent
from or received by this product.
Auto Log Print: Automatically
prints a report after every fax
job.
Print Phone Book Prints a list of the speed dials
that have been set up for this
product.
Print Junk Fax list Prints a list of phone numbers
that are blocked from sending
faxes to this product.
Print Billing Report Prints a list of billing codes that
have been used for outgoing
faxes. This report shows how
many sent faxes were billed to
each code. This menu item
appears only when the billing
codes feature is turned on.
Print All Fax Reports Prints all fax-related reports.
Send Options Send Fax Later Allows a fax to be sent at a later
time and date.
Broadcast Fax Sends a fax to multiple
recipients.
32 Chapter 2 Control panel menus ENWW
Page 49

Menu item Sub-menu item Sub-menu item Description
Fax Job Status Displays pending fax jobs, and
allows you to cancel pending fax
jobs.
Fax Resolution Standard
Fine
Superfine
Photo
Receive Options Print Private Faxes Prints stored faxes when the
Block Junk Faxes Add Number
Delete Number
Delete All Numbers
Print Junk Fax list
Reprint Faxes Prints the received faxes stored
Sets the resolution for sent
documents. Higher resolution
images have more dots per inch
(dpi), so they show more detail.
Lower resolution images have
fewer dots per inch and show
less detail, but the file size is
smaller.
private-receive feature is on.
This menu item appears only
when the private-receive feature
is turned on. The product
prompts you for the system
password.
Modifies the junk fax list. The
junk fax list can contain up to 30
numbers. When the product
receives a call from one of the
junk fax numbers, it deletes the
incoming fax. It also logs the
junk fax in the activity log along
with job-accounting information.
in available memory. This item
is available only if you have
turned on the Allow Fax Reprint
feature in the Fax Setup menu.
Forward Fax On
Off*
Polling Receive Allows the product to call
Phone Book Setup Individual Setup Edits the fax phone book speed
Group Setup
Delete Entry Deletes a specific phone book
entry.
Delete All Entries Deletes all entries in the phone
book.
ENWW
Sets product to send all
received faxes to another fax
machine.
another fax machine that has
polling send enabled.
dials and group-dial entries. The
product supports up to 120
phone book entries, which can
be either individual or group
entries.
Function specific menus
33
Page 50

Menu item Sub-menu item Sub-menu item Description
Print Report Now Prints a list of all the individual
and group dial entries in the
phone book.
Change Defaults Opens the Fax Setup menu.
Scan menu
Menu item Sub-menu item Sub-menu item Description
Scan to USB Drive
NOTE: Touch the Settings...
button to access the sub menus.
Scan Resolution 75 dpi
Scan Paper Size Letter
Scan Source Document Feeder
File Name Prefix Provides a way to set a
Output Color Color
Scan File Type JPEG
PDF
150 dpi
300 dpi
Legal
A4
Flatbed Scanner
Black & White
Scans a document and stores it
as a .PDF file or .JPEG image
on the USB flash drive.
Specifies the resolution to use
for the scanned image.
Scan quality increases with
higher resolution, but the file
size also increases.
Specifies the size of the page to
use for the scanned file.
Specifies whether the scanned
page is in the document feeder
or on the scanner glass.
standard name prefix for scan
job files.
Specifies whether the scan
output file will be a color image
or a monochrome image.
Set as New Defaults Saves any changes you have
made to this menu as the new
defaults.
34 Chapter 2 Control panel menus ENWW
Page 51

USB Flash Drive
Menu item Description
Print Documents Prints documents stored on the USB drive. Use the arrow
View and Print Photos Previews photos on the USB drive. Use the arrow buttons to
Scan to USB Drive Scans a document and stores it as a .PDF file or .JPEG
buttons to scroll through the documents. Touch the names of
documents that you want to print.
Touch the summary screen to change settings such as the
number of copies, the paper size, or the paper type.
Touch the Print button when you are ready to print the
documents.
scroll through the photos. Touch the preview image for each
photo that you want to print. You can adjust the settings, and
you can save the changes as the new default settings. When
you are ready to print the photos, touch the Print button.
image on the USB flash drive.
ENWW
Function specific menus
35
Page 52

36 Chapter 2 Control panel menus ENWW
Page 53

3 Software for Windows
Supported operating systems and printer drivers for Windows
●
Select the correct printer driver for Windows
●
Change print job settings for Windows
●
Remove the printer driver from Windows
●
Supported utilities for Windows
●
Software for other operating systems
●
ENWW 37
Page 54

Supported operating systems and printer drivers for Windows
The product supports the following Windows operating systems:
Recommended software installation
● Windows XP (32-bit, Service Pack 2)
Windows Vista (32-bit and 64-bit)
●
Windows 7 (32-bit and 64-bit)
●
Print and scan drivers only
● Windows 2003 Server (32-bit, Service Pack 3)
Windows 2008 Server
●
Windows 2008 Server R2
●
The product supports the following Windows printer drivers:
HP PCL 6 (this is the default printer driver included on the product CD and in the HP Smart
●
Install program)
HP Universal Print Driver for Windows Postscript
●
HP Universal Print Driver for PCL 5
●
The printer drivers include online Help that has instructions for common printing tasks and also
describes the buttons, checkboxes, and drop-down lists that are in the printer driver.
NOTE: For more information about the UPD, see www.hp.com/go/upd.
Select the correct printer driver for Windows
Printer drivers provide access to the product features and allow the computer to communicate with
the product (using a printer language). The following printer drivers are available at
www.hp.com/go/
LJColorMFPM375_software or www.hp.com/go/LJColorMFPM475_software.
HP PCL 6 driver
HP UPD PS driver
Provided as the default driver. This driver is automatically installed unless
●
you select a different one.
Recommended for all Windows environments
●
Provides the overall best speed, print quality, and product-feature support for
●
most users
Developed to align with the Windows Graphic Device Interface (GDI) for the
●
best speed in Windows environments
● Might not be fully compatible with third-party and custom software programs
that are based on PCL 5
●
Recommended for printing with Adobe
highly graphics-intensive software programs
Provides support for printing from postscript emulation needs, or for
●
postscript flash font support
®
software programs or with other
38 Chapter 3 Software for Windows ENWW
Page 55

HP UPD PCL 5
Recommended for general office printing in Windows environments
●
Compatible with previous PCL versions and older HP LaserJet products
●
The best choice for printing from third-party or custom software programs
●
The best choice when operating with mixed environments, which require the
●
product to be set to PCL 5 (UNIX, Linux, mainframe)
● Designed for use in corporate Windows environments to provide a single
driver for use with multiple printer models
Preferred when printing to multiple printer models from a mobile Windows
●
computer
HP UPD PCL 6
Recommended for printing in all Windows environments
●
● Provides the overall best speed, print quality, and printer feature support for
most users
Developed to align with Windows Graphic Device Interface (GDI) for best
●
speed in Windows environments
May not be fully compatible with third-party and custom solutions based on
●
PCL5
ENWW
Select the correct printer driver for Windows
39
Page 56

HP Universal Print Driver (UPD)
The HP Universal Print Driver (UPD) for Windows is a single driver that gives you instant access to
virtually any HP LaserJet product, from any location, without downloading separate drivers. It is built
on proven HP print driver technology and has been tested thoroughly and used with many software
programs. It is a powerful solution that performs consistently over time.
The HP UPD communicates directly with each HP product, gathers configuration information, and
then customizes the user interface to show the product’s unique, available features. It automatically
enables features that are available for the product, such as two-sided printing and stapling, so you do
not need to enable them manually.
For more information, go to
UPD installation modes
Traditional mode
Dynamic mode
www.hp.com/go/upd.
Use this mode if you are installing the driver from a CD for a single computer.
●
When installed from the CD that comes with the product, UPD operates like
●
traditional printer drivers. It operates with a specific product.
If you use this mode, you must install UPD separately for each computer and
●
for each product.
To use this mode, download UPD from the Internet. See
●
upd.
Dynamic mode allows you to use a single driver installation, so you can
●
discover and print to HP products in any location.
● Use this mode if you are installing UPD for a workgroup.
www.hp.com/go/
40 Chapter 3 Software for Windows ENWW
Page 57

Change print job settings for Windows
Priority for print settings
Changes to print settings are prioritized depending on where the changes are made:
NOTE: The names of commands and dialog boxes might vary depending on your software
program.
Page Setup dialog box: Click Page Setup or a similar command on the File menu of the
●
program you are working in to open this dialog box. Settings changed here override settings
changed anywhere else.
Print dialog box: Click Print, Print Setup, or a similar command on the File menu of the
●
program you are working in to open this dialog box. Settings changed in the Print dialog box
have a lower priority and usually do not override changes made in the Page Setup dialog box.
● Printer Properties dialog box (printer driver): Click Properties in the Print dialog box to open
the printer driver. Settings changed in the Printer Properties dialog box usually do not override
settings anywhere else in the printing software. You can change most of the print settings here.
Default printer driver settings: The default printer driver settings determine the settings used
●
in all print jobs, unless settings are changed in the Page Setup, Print, or Printer Properties
dialog boxes.
Printer control panel settings: Settings changed at the printer control panel have a lower
●
priority than changes made anywhere else.
Change the settings for all print jobs until the software program is closed
1. On the File menu in the software program, click Print.
2. Select the driver, and then click Properties or Preferences.
The steps can vary; this procedure is most common.
Change the default settings for all print jobs
1. Windows XP, Windows Server 2003, and Windows Server 2008 (using the default Start
menu view): Click Start, and then click Printers and Faxes.
Windows XP, Windows Server 2003, and Windows Server 2008 (using the Classic Start
menu view): Click Start, click Settings, and then click Printers.
Windows Vista: Click Start, click Control Panel, and then in the category for Hardware and
Sound click Printer.
Windows 7: Click Start, and then click Devices and Printers.
ENWW
2. Right-click the driver icon, and then select Printing Preferences.
Change print job settings for Windows
41
Page 58

Change the product configuration settings
1. Windows XP, Windows Server 2003, and Windows Server 2008 (using the default Start
menu view): Click Start, and then click Printers and Faxes.
Windows XP, Windows Server 2003, and Windows Server 2008 (using the Classic Start
menu view): Click Start, click Settings, and then click Printers.
Windows Vista: Click Start, click Control Panel, and then in the category for Hardware and
Sound click Printer.
Windows 7: Click Start, and then click Devices and Printers.
2. Right-click the driver icon, and then select Properties or Printer properties.
3. Click the Device Settings tab.
42 Chapter 3 Software for Windows ENWW
Page 59

Remove the printer driver from Windows
Windows XP
1. Click the Start button, , and then click the Printers and Faxes item.
2. Find and right-click the product from the list, and then click the Delete item.
3. From the File menu, click the Server Properties item. The Print Server Properties dialog box
opens.
4. Click the Drivers tab, and in the list, select the driver to be removed.
5. Click the Remove button, and then click the Yes button to confirm the removal.
Windows Vista
1. Click the Start button , and then click the Control Panel item.
2. In the Hardware and Sound group, click the Printer item.
3. Find and right-click the product, click the Delete item, and then click the Yes button to confirm
the removal.
4. From the File menu, click the Server Properties item. The Print Server Properties dialog box
opens.
Windows 7
5. Click the Drivers tab, and in the list, select the driver to be removed.
6. Click the Remove button, and then click the Yes button to confirm the removal.
1. Click the Start button, and then click the Devices and Printers item.
2. Find and select the product from the list.
3. Click the Remove device button at the top of the dialog box, and then click the Yes button to
confirm the removal.
4. Click the Print server properties button at the top of the dialog box, and then click the Drivers
tab.
5. Select the product in the list, and then click the Remove button.
6. Select to delete only the driver and or the driver software package, and then click the OK bu
tton
ENWW
Re
move the printer driver from Windows
43
Page 60

Supported utilities for Windows
HP Web Jetadmin
●
HP Embedded Web Server
●
● HP ePrint
Other Windows components and utilities
HP Smart Install — automates the printing system installation
●
Online Web registration
●
HP LaserJet Scan
●
PC Fax Send
●
HP Device Toolbox
●
HP Uninstall
●
HP Help & Learn Center
●
Reconfigure your HP device
●
HP Fax Setup Wizard
●
HP LaserJet Customer Participation Program
●
Software for other operating systems
OS Software
UNIX For HP-UX and Solaris networks, go to
the HP Jetdirect printer installer for UNIX.
For Unix print drivers, go to
Linux For information, go to
www.hp.com/pond/modelscripts/index2.
www.hp.com/go/linuxprinting.
www.hp.com/support/net_printing to download
44 Chapter 3 Software for Windows ENWW
Page 61

4 Use the product with Mac
Software for Mac
●
Basic print tasks with Mac
●
Use AirPrint
●
Fax with Mac
●
Scan with Mac
●
Solve problems with Mac
●
ENWW 45
Page 62

Software for Mac
Supported operating systems and printer drivers for Mac
The product supports the following Mac operating systems:
Mac OS X 10.5 and 10.6
●
NOTE: For Mac OS X 10.5 and later, PPC and Intel® Core™ Processor Macs are supported. For
Mac OS X 10.6, Intel Core Processor Macs are supported.
The HP LaserJet software installer provides PostScript® Printer Description (PPD) files, Printer Dialog
Extensions (PDEs), and the HP Utility for use with Mac OS X computers. The HP printer PPD and
PDE files, in combination with the built-in Apple PostScript printer drivers, provide full printing
functionality and access to specific HP printer features.
Install software for Mac operating systems
Install software for Mac computers connected directly to the product
This product supports a USB 2.0 connection. Use an A-to-B type USB cable. HP recommends using
a cable that is no longer than 2 m (6.5 ft).
1. Connect the USB cable to the product and the computer.
2. Install the software from the CD.
3. Click HP Installer icon, and follow the onscreen instructions.
4. On the Congratulations screen, click the OK button.
5. Print a page from any program to make sure that the printing software is correctly installed.
46 Chapter 4 Use the product with Mac ENWW
Page 63

Install software for Mac computers on a wired network
Configure the IP address
1. Connect the network cable to the product and to the network.
2. Wait for 60 seconds before continuing. During this time, the network recognizes the product and
assigns an IP address or host name for the product.
Install the software
1. Install the software from the CD. Click the product icon, and follow the onscreen instructions.
2. Print a page from any program to make sure that the software is correctly installed.
ENWW
Software for Mac
47
Page 64

Install software for Mac computers on a wireless network
Before installing the product software, make sure the product is not connected to the network using a
network cable. Make sure your Mac computer is connected to the same wireless network to which
you plan to connect the product.
Use one of the following procedures to connect the product to the wireless network.
Connect the product to a wireless network using WPS by using the control panel menus
●
Connect the product to a wireless network using a USB cable
●
If your router supports Wi-Fi Protected Setup (WPS), use that method to add the product to your
network. This is the simplest way to set up the product on a wireless network.
NOTE: Apple AirPort wireless routers do not support WPS button setup.
If your wireless router does not support Wi-Fi Protected Setup (WPS), obtain the wireless router
network settings from your system administrator, or complete the following tasks:
Obtain the wireless network name or service set identifier (SSID).
●
Determine the security password or encryption key for the wireless network.
●
Connect the product to a wireless network using WPS by using the control panel menus
1. On the front of the product, press the Wireless button. Look at the control panel display to see if
the Wireless Menu item has opened. If it has not opened, complete these steps:
a. At the control panel, press the OK button to open the menus.
b. Open the following menus:
Network Setup
●
Wireless Menu
●
2. Select the Wi-Fi Protected Setup item.
3. Use one of these methods to complete the setup:
Pushbutton: Select the Pushbutton option and follow the instructions on the control panel.
●
Establishing the wireless connection can take a few minutes.
PIN: Select the Generate PIN option. The product generates a unique PIN, which you must
●
type into the wireless router's setup screen. Establishing the wireless connection can take a
few minutes.
4.
At the computer, open the Apple menu
the Print & Fax icon.
, click the System Preferences menu, and then click
48 Chapter 4 Use the product with Mac ENWW
Page 65

5. Click the plus (+) symbol in the lower left corner of the Printer Names column.
By default, Mac OS X uses the Bonjour method to find the product over the local network and
add it to the printer pop-up menu. This method is best in most situations. If Mac OS X cannot
find the HP printer driver, an error message displays. Reinstall the software.
6. Print a page from any program to make sure that the software is correctly installed.
NOTE: If this method is not successful, try using the wireless network using a USB cable method.
Connect the product to a wireless network using a USB cable
If your wireless router does not support WiFi-Protected Setup (WPS), use this method to set up the
product on a wireless network. Using a USB cable to transfer settings makes setting up a wireless
connection easier. After the setup is complete, you can disconnect the USB cable and use the
wireless connection.
1. Insert the software CD into the computer CD tray.
2. Follow the on-screen instructions. When prompted, select the Configure your device for a
wireless network option. Connect the USB cable to the product when prompted.
CAUTION: Do not connect the USB cable until the installation program prompts you.
3. When the installation is complete, print a configuration page to make sure that the product has a
SSID name.
4. Print a page from any program to make sure that the software is correctly installed.
Remove the printer driver from Mac operating systems
You must have administrator rights to remove the software.
1. Open System Preferences.
2. Select Print & Fax.
3. Highlight the product.
4. Click the minus (-) symbol.
5. Click the Delete Printer button to remove the print queue.
NOTE: If you want to remove all the software associated with the project, use the HP Uninstaller
utility in the Hewlett-Packard program group.
Priority for print settings for Mac
ENWW
Changes to print settings are prioritized depending on where the changes are made:
Software for Mac
49
Page 66

NOTE: The names of commands and dialog boxes might vary depending on your software
program.
Page Setup dialog box: Click Page Setup or a similar command on the File menu of the
●
program you are working in to open this dialog box. Settings changed here might override
settings changed anywhere else.
Print dialog box: Click Print, Print Setup, or a similar command on the File menu of the
●
program you are working in to open this dialog box. Settings changed in the Print dialog box
have a lower priority and do not override changes made in the Page Setup dialog box.
Default printer driver settings: The default printer driver settings determine the settings used
●
in all print jobs, unless settings are changed in the Page Setup, Print, or Printer Properties
dialog boxes.
Printer control panel settings: Settings changed at the printer control panel have a lower
●
priority than changes made anywhere else.
Change printer-driver settings for Mac
Change the settings for all print jobs until the software program is closed
1. On the File menu, click the Print button.
2. Change the settings that you want on the various menus.
Change the default settings for all print jobs
1. On the File menu, click the Print button.
2. Change the settings that you want on the various menus.
3. On the Presets menu, click the Save As... option and type a name for the preset.
These settings are saved in the Presets menu. To use the new settings, you must select the saved
preset option every time you open a program and print.
Change the product configuration settings
1.
From the Apple menu
icon.
2. Select the product in the left side of the window.
3. Click the Options & Supplies button.
4. Click the Driver tab.
5. Configure the installed options.
, click the System Preferences menu and then click the Print & Fax
50 Chapter 4 Use the product with Mac ENWW
Page 67

Software for Mac computers
HP Utility for Mac
Use the HP Utility to set up product features that are not available in the printer driver.
You can use the HP Utility when the product uses a universal serial bus (USB) cable or is connected
to a TCP/IP-based network.
Open the HP Utility
From the dock, click HP Utility.
▲
-or-
From Applications, open the Hewlett-Packard folder, and then click HP Utility.
HP Utility features
Use the HP Utility software to perform the following tasks:
Obtain information about supplies status.
●
Obtain information about the product, such as the firmware version and the serial number.
●
Print a configuration page.
●
For products connected to an IP-based network, obtain network information and open the
●
HP Embedded Web Server.
Configure the paper type and size for the tray.
●
Transfer files and fonts from the computer to the product.
●
Update the product firmware.
●
Display the color usage page.
●
Configure basic fax settings.
●
Supported utilities for Mac
HP Embedded Web Server
The product is equipped with the HP Embedded Web server, which provides access to information
about product and network activities. Access the HP Embedded Web Server from the HP Utility.
Open the Printer Settings menu, and then select the Additional Settings option.
ENWW
Software for Mac
51
Page 68

HP ePrint
You can also access the HP Embedded Web Server from the Safari Web browser:
1. Select the page icon in the left side of the Safari toolbar.
2. Click the Bonjour logo.
3. In the list of printers, double-click this product. The HP Embedded Web Server opens.
With HP ePrint , you can print anywhere, anytime, from a mobile phone, laptop, or any other mobile
device. HP ePrint works with any email-capable device. If you can e-mail, you can print to an
HP ePrint-enabled product. For more details, go to
NOTE: The product must be connected to a network and have Internet access to use HP ePrint.
HP ePrint is disabled as a default setting in the product. Use this procedure to enable it.
1. Type the product IP address into the address line of a Web browser to open the HP Embedded
Web Server.
2. Click the HP Web Services tab.
3. Select the option to enable Web Services.
www.hpeprintcenter.com.
AirPrint
Direct printing using Apple’s AirPrint is supported for iOS 4.2 or later. Use AirPrint to print directly to
the product from an iPad (iOS 4.2), iPhone (3GS or later), or iPod touch (third generation or later) in
the following applications:
Mail
●
Photos
●
Safari
●
Select third-party applications
●
To use AirPrint, the product must be connected to a wireless network. For more information about
using AirPrint and about which HP products are compatible with AirPrint, go to
airprint.
NOTE: You might need to upgrade the product firmware to use AirPrint. Go to www.hp.com/go/
LJColorMFPM375 or www.hp.com/go/LJColorMFPM475.
www.hp.com/go/
52 Chapter 4 Use the product with Mac ENWW
Page 69

Basic print tasks with Mac
Cancel a print job with Mac
1. If the print job is currently printing, cancel it by pressing the Cancel button on the product
control panel.
NOTE: Pressing the Cancel button clears the job that the product is currently processing. If
more than one process is running, pressing the Cancel
currently appears on the product control panel.
2. You can also cancel a print job from a software program or a print queue.
Software program: Typically, a dialog box appears briefly on the computer screen,
●
allowing you to cancel the print job.
Mac print queue: Open the print queue by double-clicking the product icon in the dock.
●
Highlight the print job, and then click Delete.
Change the paper size and type with Mac
1. On the File menu in the software program, click the Print option.
2. In the Copies & Pages menu, click the Page Setup button.
button clears the process that
3. Select a size from the Paper Size drop-down list, and then click the OK button.
4. Open the Finishing menu.
5. Select a type from the Media-type drop-down list.
6. Click the Print button.
Resize documents or print on a custom paper size with Mac
Mac OS X 10.5 and 10.6
Use one of these methods.
1. On the File menu, click the Print option.
2. Click the Page Setup button.
3. Select the product, and then select the correct settings for the Paper Size
and Orientation options.
1. On the File menu, click the Print option.
2. Open the Paper Handling menu.
3. In the Destination Paper Size area, click the Scale to fit paper size box,
and then select the size from the drop-down list.
Create and use printing presets with Mac
Use printing presets to save the current printer driver settings for reuse.
ENWW
Basic print tasks with Mac
53
Page 70

Create a printing preset
1. On the File menu, click the Print option.
2. Select the driver.
3. Select the print settings that you want to save for reuse.
4. In the Presets menu, click the Save As... option, and type a name for the preset.
5. Click the OK button.
Use printing presets
1. On the File menu, click the Print option.
2. Select the driver.
3. In the Presets menu, select the printing preset.
NOTE: To use printer-driver default settings, select the standard option.
Print a cover page with Mac
1. On the File menu, click the Print option.
2. Select the driver.
3. Open the Cover Page menu, and then select where to print the cover page. Click either the
Before Document button or the After Document button.
4. In the Cover Page Type menu, select the message that you want to print on the cover page.
NOTE: To print a blank cover page, select the standard option from the Cover Page Type
menu.
Use watermarks with Mac
1. On the File menu, click the Print option.
2. Open the Watermarks menu.
3. From the Mode menu, select the type of watermark to use. Select the Watermark option to print
a semi-transparent message. Select the Overlay option to print a message that is not
transparent.
4. From the Pages menu, select whether to print the watermark on all pages or on the first page
only.
5. From the Text menu, select one of the standard messages, or select the Custom option and
type a new message in the box.
6. Select options for the remaining settings.
54 Chapter 4 Use the product with Mac ENWW
Page 71

Print multiple pages on one sheet of paper with Mac
1. On the File menu, click the Print option.
2. Select the driver.
3. Open the Layout menu.
4. From the Pages per Sheet menu, select the number of pages that you want to print on each
sheet (1, 2, 4, 6, 9, or 16).
5. In the Layout Direction area, select the order and placement of the pages on the sheet.
6. From the Borders menu, select the type of border to print around each page on the sheet.
Print on both sides of the page (duplex printing) with Mac
Use automatic duplex printing
1. Insert enough paper into one of the trays to accommodate the print job.
2. On the File menu, click the Print option.
3. Open the Layout menu.
4. From the Two-Sided menu, select a binding option.
Print on both sides manually
1. Insert enough paper into one of the trays to accommodate the print job.
2. On the File menu, click the Print option.
3. Open the Finishing menu, and click the Manual Duplex tab or open the Manual Duplex menu.
4. Click the Manual Duplex box, and select a binding option.
ENWW
5. Click the Print button. Follow the instructions in the pop-up window that appears on the
computer screen before replacing the output stack in Tray 1 for printing the second half.
Basic print tasks with Mac
55
Page 72

6. Go to the product, and remove any blank paper that is in Tray 1.
7. Insert the printed stack face-up with the bottom edge feeding into the printer first in Tray 1. You
must print the second side from Tray 1.
8. If prompted, press the appropriate control-panel button to continue.
Set the color options with Mac
If you are using the HP Postscript printer driver for Mac, HP EasyColor technology scans all
documents and automatically adjusts all photographic images with the same improved photographic
results.
In the following example, the images on the left were created without using the HP EasyColor option.
The images on the right show the enhancements that result from using the HP EasyColor option.
The HP EasyColor option is enabled by default in the HP Mac Postscript printer driver, so you do not
need to make manual color adjustments. To disable the option so you can manually adjust the color
settings, use the following procedure.
1. On the File menu, click the Print option.
2. Select the driver.
3. Open the Color/Quality Options menu, and then click the HP EasyColor check box to clear it.
4. Open the Advanced menu, or select the appropriate tab.
5. Adjust the individual settings for text, graphics, and photographs.
56 Chapter 4 Use the product with Mac ENWW
Page 73

Use AirPrint
Direct printing using Apple’s AirPrint is supported for iOS 4.2 or later. Use AirPrint to print directly to
the product from an iPad (iOS 4.2), iPhone (3GS or later), or iPod touch (third generation or later) in
the following applications:
Mail
●
Photos
●
Safari
●
Select third-party applications
●
To use AirPrint, the product must be connected to a network. For more information about using
AirPrint and about which HP products are compatible with AirPrint, go to
NOTE: You might need to upgrade the product firmware to use AirPrint. Go to www.hp.com/go/
LJColorMFPM375 or www.hp.com/go/LJColorMFPM475.
www.hp.com/go/airprint.
ENWW
Use AirPrint
57
Page 74

Fax with Mac
To send a fax by printing to a fax driver, complete the following steps:
1. Open the document that you want to fax.
2. Click File and then click Print.
3. In the Printer pop-up menu, select the fax print queue that you want to use.
4. In the Copies field, adjust the number of copies if necessary.
5. In the Paper Size pop-up menu, adjust the paper size if necessary.
6. In the Fax Information area, enter the fax number of one or more recipients.
NOTE: If you need to include a dialing prefix, enter it in the Dialing Prefix field.
7. Click Fax.
58 Chapter 4 Use the product with Mac ENWW
Page 75

Scan with Mac
Use the HP Scan software to scan images to a Mac computer.
1. Load the document onto the scanner glass or into the document feeder.
2. Open the Applications folder, and then click Hewlett-Packard. Double-click HP Scan.
3. Open the HP Scan menu and click Preferences. From the Scanner pop-up menu, select this
product from the list, and click Continue.
4. To use the standard preset settings, which produce acceptable results for images and text, click
the Scan button.
To use presets optimized for pictures or text documents, select a preset from the Scanning
Presets pop-up menu. To adjust the settings, click the Edit button. When you are ready to scan,
click the Scan button.
5. To scan more pages, load the next page and click Scan. Click Append to List to add the new
pages to the current list. Repeat until you have scanned all the pages.
6. Click the Save button, and then browse to the folder on your computer where you want to save
the file.
NOTE: To print the scanned images now, click the Print button.
ENWW
Scan with Mac
59
Page 76

Solve problems with Mac
For information about solving problems with a Mac, see Solve product software problems with Mac
on page 283.
60 Chapter 4 Use the product with Mac ENWW
Page 77

5 Connect the product with Windows
Printer sharing disclaimer
●
Use HP Smart Install to connect to a computer, a wired network, or a wireless network
●
Connect with USB
●
Connect to a network with Windows
●
ENWW 61
Page 78

Printer sharing disclaimer
HP does not support peer-to-peer networking, as the feature is a function of Microsoft operating
systems and not of the HP printer drivers. Go to Microsoft at
www.microsoft.com.
Use HP Smart Install to connect to a computer, a wired network, or a wireless network
The software installation files are in the product memory. The HP Smart Install program uses a USB
cable to transfer the installation files from the product to your computer. This installer supports USB
connections, wired networks, and wireless networks. It installs all files you need to print, copy, scan,
and fax. To use the HP Smart Install program, follow one of these procedures, depending on your
connection type.
NOTE: If you prefer not to use the HP Smart Install program, you can insert the product CD to
install the software.
HP Smart Install for Windows direct connections (USB)
1. Turn the product on.
2. Connect an A-to-B type USB cable to the computer and the product. The HP Smart Install
program might take a few minutes to start.
3. The HP Smart Install program should start automatically. Follow the onscreen instructions to
install the software.
NOTE: The HP Smart Install program might take a few minutes to start. If the HP Smart Install
program does not start automatically, AutoPlay might be disabled on the computer. Browse the
computer and double-click the HP Smart Install drive to run the program.
NOTE: If the HP Smart Install program fails, disconnect the USB cable, turn the product off
and then on again, and then insert the product CD into your computer. Follow the onscreen
instructions. Connect the cable only when the software prompts you.
HP Smart Install for Windows wired networks
1. Connect a network cable to the product and a network port. Allow a few minutes for an IP
address to be assigned.
2.
On the product control panel, touch the network
3. At the computer, open a Web browser and type the IP address in the URL address bar to open
the HP Embedded Web Server. Click the HP Smart Install tab and follow the onscreen
instructions.
button to display the product IP address.
NOTE: If the HP Smart Install program fails, insert the product CD into your computer. Follow the
onscreen instructions.
62 Chapter 5 Connect the product with Windows ENWW
Page 79

HP Smart Install for Windows wireless networks, method 1: Use the product control panel
NOTE: Use this method only if you know your wireless network SSID and password.
1. On the product control panel, touch the Wireless button. Touch the Wireless Menu button,
and then touch the Wireless Setup Wizard item. Follow the instructions to complete the wireless
setup.
2. On the product control panel, touch the wireless status
address.
3. At the computer, open a Web browser and type the IP address in the URL address bar to open
the HP Embedded Web Server. Click the HP Smart Install tab and follow the onscreen
instructions.
button to display the product IP
HP Smart Install for Windows wireless networks, method 2: Temporarily connect a USB cable
1. Connect an A-to-B type USB cable to the computer and the product. The HP Smart Install
program might take a few minutes to start.
2. Follow the onscreen instructions. Choose the Wireless Network option for the installation type.
Remove the USB cable when instructed.
HP Smart Install for Windows wireless networks, method 3: Use WPS
1. On the product control panel, touch the Wireless button. Touch the Wireless Menu button,
and then touch the Wi-Fi Protected Setup item. Follow the instructions to complete the wireless
setup.
2. On the product control panel, touch the wireless status
address.
button to display the product IP
ENWW
3. At the computer, open a Web browser and type the IP address in the URL address bar to open
the HP Embedded Web Server. Click the HP Smart Install tab and follow the onscreen
instructions.
Use HP Smart Install to connect to a computer, a wired network, or a wireless network
63
Page 80

Connect with USB
NOTE: Use this procedure if you are not using the HP Smart Install.
This product supports a USB 2.0 connection. Use an A-to-B type USB cable. HP recommends using
a cable that is no longer than 2 m (6.5 ft).
CAUTION: Do not connect the USB cable until the installation software prompts you to connect it.
CD installation
1. Quit all open programs on the computer.
2. Install the software from the CD, and follow the onscreen instructions.
3. When prompted, select the Directly connect to this computer using a USB cable option, and
then click the Next button.
4. When the software prompts you, connect the USB cable to the product and the computer.
5. At the end of the installation, click the Finish button.
6. On the More Options screen, you can install more software, or click the Finish button.
7. Print a page from any program to make sure that the printing software is correctly installed.
64 Chapter 5 Connect the product with Windows ENWW
Page 81

Connect to a network with Windows
Supported network protocols
To connect a networking-equipped product to a network, you need a network that uses one or more
of the following protocols.
TCP/IP (IPv4 or IPv6)
●
LPD Printing
●
SLP
●
● WS-Discovery
Install the product on a wired network with Windows
NOTE: Use this procedure if you are not using the HP Smart Install.
Obtain the IP address
1. Connect the network cable to the product and to the network. Turn the product on.
ENWW
2. Wait for 60 seconds before continuing. During this time, the network recognizes the product and
assigns an IP address or host name for the product.
3.
At the product control panel, press the Setup
4. Touch the Reports menu, and then touch the Configuration Report button to print the
configuration report.
button.
Connect to a network with Windows
65
Page 82

5. Find the IP address on the configuration report.
Jetdirect Page
Install the software
1. Quit all programs on the computer.
2. Install the software from the CD.
3. Follow the onscreen instructions.
HP Color LaserJet
Page 1
4. When prompted, select the Connect through a wired network option, and then click the Next
button.
5. From the list of available printers, select the printer that has the correct IP address.
6. Click the Finish button.
7. On the More Options screen, you can install more software, or click the Finish button.
8. Print a page from any program to make sure that the printing software is correctly installed.
Install the product on a wireless network with Windows (wireless models only)
NOTE: Use this procedure if you are not using the HP Smart Install.
Before installing the product software, make sure the product is not connected to the network using a
network cable.
If your wireless router does not support Wi-Fi Protected Setup (WPS), obtain the wireless router
network settings from your system administrator, or complete the following tasks:
Obtain the wireless network name or service set identifier (SSID).
●
Determine the security password or encryption key for the wireless network.
●
66 Chapter 5 Connect the product with Windows ENWW
Page 83

Connect the product to a wireless network using WPS
If your wireless router supports Wi-Fi Protected Setup (WPS), this is the simplest way to set up the
product on a wireless network.
1. From the Home screen on the product control panel, touch the Wireless
2. Touch the Wireless Menu button, and then touch the Wi-Fi Protected Setup button.
3. Use one of these methods to complete the setup:
Pushbutton: Select the Pushbutton option and follow the instructions on the control panel.
●
Establishing the wireless connection can take a few minutes.
PIN: Select the Generate PIN option and follow the instructions on the control panel. The
●
product generates a unique PIN, which you must type into the wireless router's setup
screen. Establishing the wireless connection can take a few minutes.
NOTE: If this method is not successful, try using the Wireless Setup Wizard on the product control
panel or try using the USB cable connection method.
button.
Connect the product to a wireless network using the Wireless Setup Wizard
If your wireless router does not support WiFi-Protected Setup (WPS), you can use this method to
install the product on a wireless network.
1. From the Home screen on the product control panel, touch the Wireless
2. Touch the Wireless Menu button, and then touch the Wireless Setup Wizard button.
button.
3. The product scans for available wireless networks and returns a list of network names (SSIDs).
Select the SSID for your wireless router from the list if it is available. If the SSID for your wireless
router is not in the list, touch the Enter SSID button. When prompted for the type of network
security, select the option that your wireless router uses. A keypad opens on the control panel
display.
4. If your wireless router uses WPA security, type the passphrase on the keypad.
If your wireless router uses WEP security, type the key on the keypad.
5. Touch the OK button, and wait while the product establishes a connection with the wireless
router. Establishing the wireless connection can take a few minutes.
Connect the product to a wireless network using a USB cable
If your wireless router does not support WiFi-Protected Setup (WPS), use this method to set up the
product on a wireless network. Using a USB cable to transfer settings makes setting up a wireless
ENWW
Connect to a network with Windows
67
Page 84

connection easier. After the setup is complete, you can disconnect the USB cable and use the
wireless connection.
1. Insert the software CD into the computer CD tray.
2. Follow the on-screen instructions. When prompted, select the Connect through a wireless
network option. Connect the USB cable to the product when prompted.
CAUTION: Do not connect the USB cable until the installation program prompts you.
3. When the installation is complete, print a configuration page to make sure that the product has a
SSID name.
4. When installation is complete, disconnect the USB cable.
Install the software for a wireless product currently on the network
If the product already has an IP address on a wireless network and you want to install product
software on a computer, complete the following steps.
1. From the product control panel, print a configuration page to obtain the product IP address.
2. Install the software from the CD.
3. Follow the on-screen instructions.
4. When prompted, select the Connect through a wireless network option, and then click the
Next button.
5. From the list of available printers, select the printer that has the correct IP address.
Configure IP network settings with Windows
View or change network settings
Use the embedded Web server to view or change IP configuration settings.
1. Print a configuration page, and locate the IP address.
If you are using IPv4, the IP address contains only digits. It has this format:
●
xxx.xxx.xxx.xxx
If you are using IPv6, the IP address is a hexadecimal combination of characters and digits.
●
It has a format similar to this:
xxxx::xxxx:xxxx:xxxx:xxxx
2. To open the HP Embedded Web Server, type the IP address (IPv4) into the address line of a
Web browser. For IPv6, use the protocol established by the Web browser for entering IPv6
addresses.
3. Click the Networking tab to obtain network information. You can change settings as needed.
68 Chapter 5 Connect the product with Windows ENWW
Page 85

Set or change the product password
Use the HP Embedded Web Server to set a password or change an existing password for a product
on a network.
1. Type the product IP address into the address line of a Web browser. Click the Networking tab,
and click the Security link.
NOTE: If a password has previously been set, you are prompted to type the password. Type
the password, and then click the Apply button.
2. Type the new password in the New Password box and in the Verify password box.
3. At the bottom of the window, click the Apply button to save the password.
Manually configure IPv4 TCP/IP parameters from the control panel
Use the control-panel menus to manually set an IPv4 address, subnet mask, and default gateway.
1.
Touch the Setup
2. Scroll to and touch the Network Setup menu.
3. Touch the TCP/IP Config menu, and then touch the Manual button.
4. Use the numeric keypad to enter the IP address, and touch the OK button. Touch the Yes button
to confirm.
5. Use the numeric keypad to enter the subnet mask, and touch the OK button. Touch the Yes
button to confirm.
6. Use the numeric keypad to enter the default gateway, and touch the OK button. Touch the Yes
button to confirm.
button.
ENWW
Connect to a network with Windows
69
Page 86

Link speed and duplex settings
NOTE: This information applies only to Ethernet networks. It does not apply to wireless networks.
The link speed and communication mode of the print server must match the network hub. For most
situations, leave the product in automatic mode. Incorrect changes to the link speed and duplex
settings might prevent the product from communicating with other network devices. If you need to
make changes, use the product control panel.
NOTE: The setting must match with the network product to which you are connecting (a network
hub, switch, gateway, router, or computer).
NOTE: Making changes to these settings causes the product to turn off and then on. Make changes
only when the product is idle.
1.
Touch the Setup
button.
2. Scroll to and touch the Network Setup menu.
3. Touch the Link Speed menu.
4. Select one of the following options.
Setting Description
Automatic The print server automatically configures itself for the highest link speed and
communication mode allowed on the network.
10T Half 10 megabytes per second (Mbps), half-duplex operation
10T Full 10 Mbps, full-duplex operation
100TX Half 100 Mbps, half-duplex operation
100TX Full 100 Mbps, full-duplex operation
5. Touch the OK button. The product turns off and then on.
70 Chapter 5 Connect the product with Windows ENWW
Page 87

6 Paper and print media
Understand paper use
●
Change the printer driver to match the paper type and size in Windows
●
Supported paper sizes
●
Supported paper types and tray capacity
●
Load paper trays
●
Configure trays
●
ENWW 71
Page 88

Understand paper use
This product supports a variety of paper and other print media. Paper or print media that does not
meet the following guidelines might cause poor print quality, increased jams, and premature wear on
the product.
It is possible for paper to meet all of these guidelines and still not produce satisfactory results. This
might be the result of improper handling, unacceptable temperature and/or humidity levels, or other
variables over which Hewlett-Packard has no control.
CAUTION: Using paper or print media that does not meet Hewlett-Packard's specifications might
cause problems for the product, requiring repair. This repair is not covered by the Hewlett-Packard
warranty or service agreements.
For best results, use only HP-brand paper and print media designed for laser printers or
●
multiuse.
Do not use paper or print media made for inkjet printers.
●
CAUTION: HP LaserJet products use fusers to bond dry toner particles to the paper in very
precise dots. HP laser paper is designed to withstand this extreme heat. Using inkjet paper could
damage the product.
Hewlett-Packard Company cannot recommend the use of other brands of media because HP
●
cannot control their quality.
Use the following guidelines to obtain satisfactory results when using special paper or print media.
Set the paper type and size in the printer driver to obtain the best results.
Media type Do Do not
Envelopes
Labels ● Use only labels that have no
Transparencies
Store envelopes flat.
●
● Use envelopes where the seam
extends all the way to the corner
of the envelope.
● Use peel-off adhesive strips that
are approved for use in laser
printers.
exposed backing between them.
Use labels that lie flat.
●
Use only full sheets of labels.
●
Use only transparencies that are
●
approved for use in color laser
printers.
Place transparencies on a flat
●
surface after removing them from
the product.
Do not use envelopes that are
●
wrinkled, nicked, stuck together, or
otherwise damaged.
Do not use envelopes that have
●
clasps, snaps, windows, or coated
linings.
● Do not use self-stick adhesives or
other synthetic materials.
● Do not use labels that have
wrinkles or bubbles, or are
damaged.
Do not print partial sheets of
●
labels.
Do not use transparent print media
●
not approved for laser printers.
72 Chapter 6 Paper and print media ENWW
Page 89

Media type Do Do not
Letterhead or preprinted forms
Heavy paper
Glossy or coated paper
Use only letterhead or forms
●
approved for use in laser printers.
Use only heavy paper that is
●
approved for use in laser printers
and meets the weight
specifications for this product.
Use only glossy or coated paper
●
that is approved for use in laser
printers.
Do not use raised or metallic
●
letterhead.
Do not use paper that is heavier
●
than the recommended media
specification for this product
unless it is HP paper that has
been approved for use in this
product.
Do not use glossy or coated paper
●
designed for use in inkjet products.
ENWW
Understand paper use
73
Page 90

Change the printer driver to match the paper type and size in Windows
1. On the File menu in the software program, click Print.
2. Select the product, and then click the Properties or Preferences button.
3. Click the Paper/Quality tab.
4. Select a size from the Paper size drop-down list.
5. Select a paper type from the Paper type drop-down list.
6. Click the OK button.
74 Chapter 6 Paper and print media ENWW
Page 91

Supported paper sizes
NOTE: To obtain best print results, select the appropriate paper size and type in your print driver
before printing.
Table 6-1 Supported paper and print media sizes
Size Dimensions Tray 1 Tray 2 or optional
Tray 3
Letter 216 x 279 mm (8.5 x 11 inches)
Legal 216 x 356 mm (8.5 x 14 inches)
A4 210 x 297 mm (8.27 x 11.69 inches)
Executive 184 x 267 mm (7.24 x 10.51 inches)
A5 148 x 210 mm (5.83 x 8.27 inches)
A6 105 x 148 mm (4.13 x 5.83 inches)
B5 (JIS) 182 x 257 mm (7.17 x 10.12 inches)
16k 184 x 260 mm (7.24 x 10.23 inches)
195 x 270 mm (7.68 x 10.62 inches)
197 x 273 mm (7.75 x 10.75 inches)
8.5 x 13 216 x 330 mm (8.5 x 13 inches)
4 x 6 107 x 152 mm (4 x 6 inches)
Automatic duplex
printing
5 x 8 127 x 203 mm (5 x 8 inches)
10 x 15 cm 100 x 150 mm (3.9 x 5.9 inches)
Custom Minimum: 76 x 127 mm (3 x 5 in)
Maximum: 216 x 356 mm (8.5 x 14 in)
Custom Minimum: 102 x 153 mm (4 x 6 in)
Maximum: 216 x 356 mm (8.5 x 14 in)
Table 6-2 Supported envelopes and postcards
Size Dimensions Tray 1 Tray 2 Automatic duplex
printing
Envelope #10 105 x 241 mm (4.13 x 9.49 inches)
Envelope DL 110 x 220 mm (4.33 x 8.66 inches)
Envelope C5 162 x 229 mm (6.93 x 9.84 inches)
ENWW
Supported paper sizes
75
Page 92

Table 6-2 Supported envelopes and postcards (continued)
Size Dimensions Tray 1 Tray 2 Automatic duplex
printing
Envelope B5 176 x 250 mm (6.7 x 9.8 inches)
Envelope
Monarch
Postcard 100 x 148 mm (3.94 x 5.83 inches)
Double
postcard
98 x 191 mm (3.9 x 7.5 inches)
148 x 200 mm (5.83 x 7.87 inches)
76 Chapter 6 Paper and print media ENWW
Page 93

Supported paper types and tray capacity
Table 6-3 Tray 1
Paper type Weight
Capacity
1
Paper orientation
Every day:
● Plain
Light
●
Bond
●
● Recycled
Presentation:
● Matte paper, mid-weight to
heavy
Glossy paper, mid-weight
●
to heavy
Brochure:
Matte paper, mid-weight to
●
heavy
Glossy paper, mid-weight
●
to heavy
Photo/cover
● Matte cover paper
60 to 90 g/m
Up to 176 g/m
Up to 176 g/m
Up to 176 g/m
2
(16 to 24 lb)
2
2
(47 lb)
2
2
(47 lb)
2
2
(47 lb)
Up to 50 sheets Side to be printed on face-up,
with the top edge at the back of
the tray
,
3
Up to 5 mm (0.2 in) stack height Side to be printed on face-up,
with the top edge at the back of
the tray
,
3
Up to 5 mm (0.2 in) stack height Side to be printed on face-up,
with the top edge at the back of
the tray
,
3
Up to 5 mm (0.2 in) stack height Side to be printed on face-up,
with the top edge at the back of
the tray
Glossy cover paper
●
Matte photo paper
●
● Glossy photo paper
Postcard
●
Cardstock
●
ENWW
Supported paper types and tray capacity
77
Page 94

Table 6-3 Tray 1 (continued)
Paper type Weight
Capacity
1
Paper orientation
Other:
●
Color laser transparency
●
●
●
●
●
4
Labels
Letterhead
Envelope
4
Preprinted
Prepunched
Up to 50 sheets, or 10
4
● Colored
Rough
●
Tough
4
1
Capacity can vary depending on paper weight and thickness, and environmental conditions.
2
The product supports up to 220 g/m2 (59 lb) for glossy, glossy photo paper, and postcards.
3
The product supports 60-160 g/m2 (16-42 lb) paper weight for automatic duplex printing.
4
This paper type is not supported for automatic duplex printing.
●
Table 6-4 Tray 2 and Tray 3
Media type Weight
envelopes
Capacity
Side to be printed on face-up,
with the top edge toward the
product
1
Paper orientation
Every day:
Plain
●
Light
●
Bond
●
● Recycled
Presentation:
● Matte paper, mid-weight to
heavy
Glossy paper, mid-weight
●
to heavy
Brochure:
Matte paper, mid-weight to
●
heavy
Glossy paper, mid-weight
●
to heavy
60 to 90 g/m
Up to 163 g/m
Up to 163 g/m
2
(16 to 24 lb)
2
(43 lb)
2
(43 lb)
Up to 250 sheets Side to be printed on face-up,
with the top edge at the back of
the tray
2
Up to 12.5 mm (0.5 in) stack
height
Side to be printed on face-up,
with the top edge at the back of
the tray
2
Up to 12.5 mm (0.5 in) stack
height
Side to be printed on face-up,
with the top edge at the back of
the tray
78 Chapter 6 Paper and print media ENWW
Page 95

Table 6-4 Tray 2 and Tray 3 (continued)
Media type Weight
Photo/cover
Matte cover paper
●
Glossy cover paper
●
Matte photo paper
●
Glossy photo paper
●
Postcard
●
● Cardstock
Up to 163 g/m
Postcard: Up to 176 g/m2 (47 lb)
2
(43 lb)
Capacity
2
Up to 12.5 mm (0.5 in) stack
1
height
Paper orientation
Side to be printed on face-up,
with the top edge at the back of
the tray
Other:
●
Color laser transparency
●
●
●
●
●
3
Labels
Letterhead
Envelope
3
Preprinted
Prepunched
● Colored
Rough
●
Tough
3
1
Capacity can vary depending on paper weight and thickness, and environmental conditions.
2
The product supports 60-160 g/m2 (16-42 lb) paper weight for automatic duplex printing.
3
This paper type is not supported for automatic duplex printing.
●
Up to 50 sheets, or 10
3
envelopes
Side to be printed on face-up,
with the top edge at the back of
the tray or the stamp-end at the
back of the tray
ENWW
Supported paper types and tray capacity
79
Page 96

Load paper trays
Load Tray 1
1. Open Tray 1.
2. Pull out the extension tray.
80 Chapter 6 Paper and print media ENWW
Page 97

3. If you are loading long sheets of paper, flip
out the extension.
4. Extend the paper guides fully (callout 1) and
then load the paper stack into Tray 1 (callout
2). Adjust the paper guides to the size of the
paper.
NOTE: Place the paper into Tray 1 with the
side to be printed on face-up and the top
toward the product.
Load Tray 2 or optional Tray 3
1. Pull the tray out of the product.
ENWW
Load paper trays
81
Page 98

2. Slide open the paper length and width guides.
3. To load Legal-size paper, extend the tray by
pressing and holding the extension tab while
pulling the front of the tray toward you.
NOTE: When it is loaded with Legal-size
paper, the tray extends from the front of the
product approximately 64 mm (2.5 inches).
4. Place the paper in the tray and make sure
that it is flat at all four corners. Slide the side
paper width guides so that they align with the
paper-size marking in the bottom of the tray.
Slide the front paper length guide so that it
pushes the stack of paper against the back of
the tray.
82 Chapter 6 Paper and print media ENWW
Page 99

5. Push down on the paper to make sure that
the paper stack is below the paper limit tabs
on the side of the tray.
6. Slide the tray into the product.
Load the document feeder
The document feeder holds up to 50 sheets of 75 g/m2 (20 lb bond) paper.
CAUTION: To prevent damage to the product, do not load an original document that contains
correction tape, correction fluid, paper clips, or staples. Also, do not load photographs, small originals,
or fragile originals into the document feeder.
ENWW
Load paper trays
83
Page 100

1. Insert the originals into the document feeder
face-up.
2. Adjust the guides until they are snug against
the paper.
84 Chapter 6 Paper and print media ENWW
 Loading...