

Page 1
Page 2

Page 3

HP LaserJet MFP Analog Fax Accessory 300
Fax Guide
Page 4

Copyright and License
Trademark Credits
© 2008 Copyright Hewlett-Packard
Development Company, L.P.
Reproduction, adaptation, or translation
without prior written permission is prohibited,
except as allowed under the copyright laws.
The information contained herein is subject
to change without notice.
The only warranties for HP products and
services are set forth in the express warranty
statements accompanying such products
and services. Nothing herein should be
construed as constituting an additional
warranty. HP shall not be liable for technical
or editorial errors or omissions contained
herein.
Edition 1, 04/2008
Part number: Q3701-91070
Microsoft® and Windows® are U.S.
registered trademarks of the Microsoft
Corporation.
All products mentioned herein may be
trademarks of their respective companies.
Local country/region laws may prohibit the
use of this product outside of the countries/
regions specified. It is strictly forbidden by
law in most countries/regions to connect
nonapproved telecommunications
equipment (fax machines) to public
telephone networks.
ENERGY STAR® and the ENERGY STAR®
logo are U.S. registered marks of the United
States Environmental Protection Agency.
Page 5

Table of contents
1 Setup
Parts included with the fax accessory .................................................................................................. 2
Installing the fax accessory .................................................................................................................. 3
Installing/replacing the fax accessory in the HP LaserJet 9040/9050mfp ........................... 3
Installing/replacing the fax accessory in the HP LaserJet 4345mfp .................................... 6
Installing/replacing the fax accessory in the HP LaserJet M4345 MFP ............................. 10
Installing/replacing the fax accessory in the HP Color LaserJet 4730mfp and HP Color
LaserJet CM4730 MFP ...................................................................................................... 12
Installing/replacing the fax accessory in the HP LaserJet M5025 MFP and M5035
MFP ................................................................................................................................... 20
Installing/replacing the fax accessory in the HP Color LaserJet CM6040 MFP Series .. .. . 23
Installing/replacing the fax accessory in the HP LaserJet M9040 MFP / M9050 MFP ...... 31
Verifying fax operation ........................................................................................................................ 35
Required fax settings .......................................................................................................................... 36
Fax Configuration Wizard .................................................................................................. 36
Accessing fax settings menu ............................................................................................. 36
Set or verify the date and time for the HP LaserJet 4345mfp and 9040/9050mfp, and
the HP Color LaserJet 4730mfp and 9500mfp .................................................................. 36
Set or verify the date and time on the HP LaserJet M3035 MFP, M3027 MFP, M4345
MFP, M5025 MFP, M5035 MFP, M9040 MFP, M9050 MFP and HP Color LaserJet
CM4730 MFP and CM6040 MFP Series ........................................................................... 37
Set, verify, or change the MFP/fax accessory country/region ........................................... 37
Set the fax header ............................................................................................................. 38
2 Set fax settings
Remote fax configuration ................................................................................................................... 42
Web browser ...................................................................................................................... 42
HP Web Jetadmin .............................................................................................................. 42
HP MFP Digital Sending Software Configuration Utility ..................................................... 43
Send fax settings ................................................................................................................................ 44
Set the dial tone detection ................................................................................................. 44
Set the overlay header (outgoing faxes) ............................................................................ 44
Set the dialing mode .......................................................................................................... 45
Set a dialing prefix ............................................................................................................. 45
Set the redial rules ............................................................................................................. 46
ENWW iii
Page 6

Set redial-on-busy ............................................................................................. 46
Set redial-on-no-answer .................................................................................... 47
Set redial interval .............................................................................................. 48
Set the outgoing fax resolution .......................................................................................... 48
Set billing codes ................................................................................................................. 49
Set the JBIG compression mode ....................................................................................... 50
Change the sharpness setting ........................................................................................... 51
Change the background setting ......................................................................................... 51
Change the light/dark setting ............................................................................................. 52
Activate Fax Number Confirmation .................................................................................... 52
Activate Fax Number Speed Dial Matching ....................................................................... 53
Receive fax settings ........................................................................................................................... 54
Set rings-to-answer ............................................................................................................ 54
Stamp received faxes (incoming faxes) ............................................................................. 54
Set fit-to-page .................................................................................................................... 55
Set the paper tray .............................................................................................................. 55
Set the destination bin ....................................................................................................... 56
Blocking incoming faxes .................................................................................................... 57
Create a blocked-fax list .................................................................................... 57
Remove numbers from the blocked-fax list ....................................................... 57
Clear all numbers from the blocked-fax list ....................................................... 58
Initiate polling receive ........................................................................................................ 59
Changing notification settings ............................................................................................ 59
Set the error correction mode ............................................................................................................. 61
Set the modem volume ...................................................................................................................... 62
Set the ringer volume ......................................................................................................................... 63
3 Use Fax
Fax feature screen ............................................................................................................................. 66
HP LaserJet 4345mfp and 9040/9050mfp, and HP Color LaserJet 4730mfp and
9500mfp fax feature screen ............................................................................................... 66
HP LaserJet M3035 MFP, M3027 MFP, M4345 MFP, M5025 MFP, M5035 MFP, M9040
MFP, M9050 MFP and HP Color LaserJet CM4730 MFP and CM6040 MFP Series fax
feature screen .................................................................................................................... 67
Status message bar ........................................................................................................................... 69
Send a fax .......................................................................................................................................... 70
Send a fax - enter number(s) manually ............................................................................. 70
Send a fax using speed dial ............................................................................................... 73
Sending a fax using one touch speed dial ......................................................................... 74
Search a speed-dial list by name ....................................................................................... 75
Sending a fax using phone book numbers ........................................................................ 76
DSS fax phone book search .............................................................................................. 78
Canceling a fax ................................................................................................................................... 80
Cancel the current fax transmission .................................................................................. 80
iv ENWW
Page 7

Cancel all pending faxes .................................................................................................... 80
Receiving faxes .................................................................................................................................. 82
Creating and deleting speed dial lists ................................................................................................. 83
Create a speed dial list ...................................................................................................... 83
Delete a speed dial list ....................................................................................................... 83
Delete a single number from the speed dial list ................................................................. 84
Add a number to an existing speed dial list ....................................................................... 85
Assigning speed dial lists to one-touch keys ...................................................................................... 86
Assign a speed dial to a one-touch key for the HP LaserJet 4345mfp and 9040/9050mfp,
and the HP Color LaserJet 4730mfp and 9500mfp ........................................................... 86
Clear or reassign speed dial lists to one-touch keys for the HP LaserJet 4345mfp and
9040/9050mfp, and the HP Color LaserJet 4730mfp and 9500mfp .................................. 86
Voice Calls and Retries ...................................................................................................................... 87
Fax Call Report .................................................................................................................. 87
Fax Activity Log ................................................................................................................. 87
T.30 Report ........................................................................................................................ 87
Secure settings ................................................................................................................................... 88
Change your PIN ............................................................................................................... 88
Set fax forwarding .............................................................................................................................. 90
Scheduling fax printing (memory lock) ............................................................................................... 91
Fax-printing behavior ......................................................................................................... 91
Enable or disable the schedule for printing of faxes .......................................................... 92
Create a fax printing schedule ........................................................................................... 93
Using Fax over VoIP networks ........................................................................................................... 95
4 Solve fax problems
Is your fax set up correctly? ............................................................................................................... 98
What type of phone line are you using? ............................................................................ 98
Are you using a surge-protection device? ......................................................................... 98
Are you using a phone company voice-messaging service or an answering
machine? ........................................................................................................................... 98
Checking fax accessory status ........................................................................................................... 99
Fax feature is not operating .............................................................................................................. 100
General fax problems ....................................................................................................................... 101
Receiving fax problems .................................................................................................................... 102
Sending fax problems ....................................................................................................................... 104
Error codes ....................................................................................................................................... 105
Fax error messages ......................................................................................................................... 106
Send-fax messages ......................................................................................................... 107
Receive-fax messages .................................................................................................... 108
Fax logs and reports ......................................................................................................................... 109
Printing the fax call report (include thumbnail) ................................................................. 109
Printing the fax activity log ............................................................................................... 111
To schedule fax call report printing ................................................................. 110
ENWW v
Page 8

Printing the billing code report ......................................................................................... 112
Clearing the fax activity log and billing code report ......................................................... 112
Printing the blocked fax list report .................................................................................... 113
Printing the speed dial list report ..................................................................................... 113
Service settings ................................................................................................................................ 115
Firmware upgrades .......................................................................................................................... 117
Appendix A Service and support
Hewlett-Packard limited warranty statement .................................................................................... 120
HP Customer Care ........................................................................................................................... 121
World Wide Web .............................................................................................................. 121
E-mail ............................................................................................................................... 121
Phone .............................................................................................................................. 121
Appendix B Specifications
Fax accessory product specifications ............................................................................................... 124
Replacement parts and accessories ................................................................................................ 125
Appendix C Regulatory Information
Environmental Product Stewardship Program ................................................................................. 128
Declaration of conformity .................................................................................................................. 129
US Federal Communications Commission ....................................................................................... 130
FCC Part 15 Compliance Statement ............................................................................... 130
FCC Part 68 Telecom ...................................................................................................... 130
Telephone Consumer Protection Act (US) ...................................................................... 131
Canadian Department of Communications ...................................................................................... 132
Canadian Limitations Notice ............................................................................................ 132
Other regulatory information ............................................................................................................. 133
Regulatory information for EU countries/regions ............................................................. 133
New Zealand Telecom Warning Notice ........................................................................... 133
South African Notice ........................................................................................................ 134
TAIWAN BSMI Class A Warning ..................................................................................... 134
Index ................................................................................................................................................................. 135
vi ENWW
Page 9

1Setup
The HP LaserJet MFP Analog Fax Accessory 300 enables the HP multifunction product (MFP) to
function as a standalone analog fax machine.
This guide describes the fax functions of this product in the following sections:
Parts included with the fax accessory
●
Installing the fax accessory
●
Verifying fax operation
●
Required fax settings
●
In addition, this guide provides information on product specifications and regulatory information.
NOTE: In addition to the analog fax feature, the MFP also supports LAN faxing. LAN faxing is managed
by the HP MFP Digital Sending Software Configuration Utility which is a separate product and is not
covered in this document. For information about LAN faxing, see the HP MFP Digital Sending Software
User Guide or the HP MFP Digital Sending Software Support Guide. If both the analog fax accessory
and the LAN fax are installed, only one fax can be enabled at a time.
You should save this guide so that you can refer back to instructions on specific fax features.
NOTE: If the MFP did not come with the fax accessory installed, you need to install it as described in
this chapter.
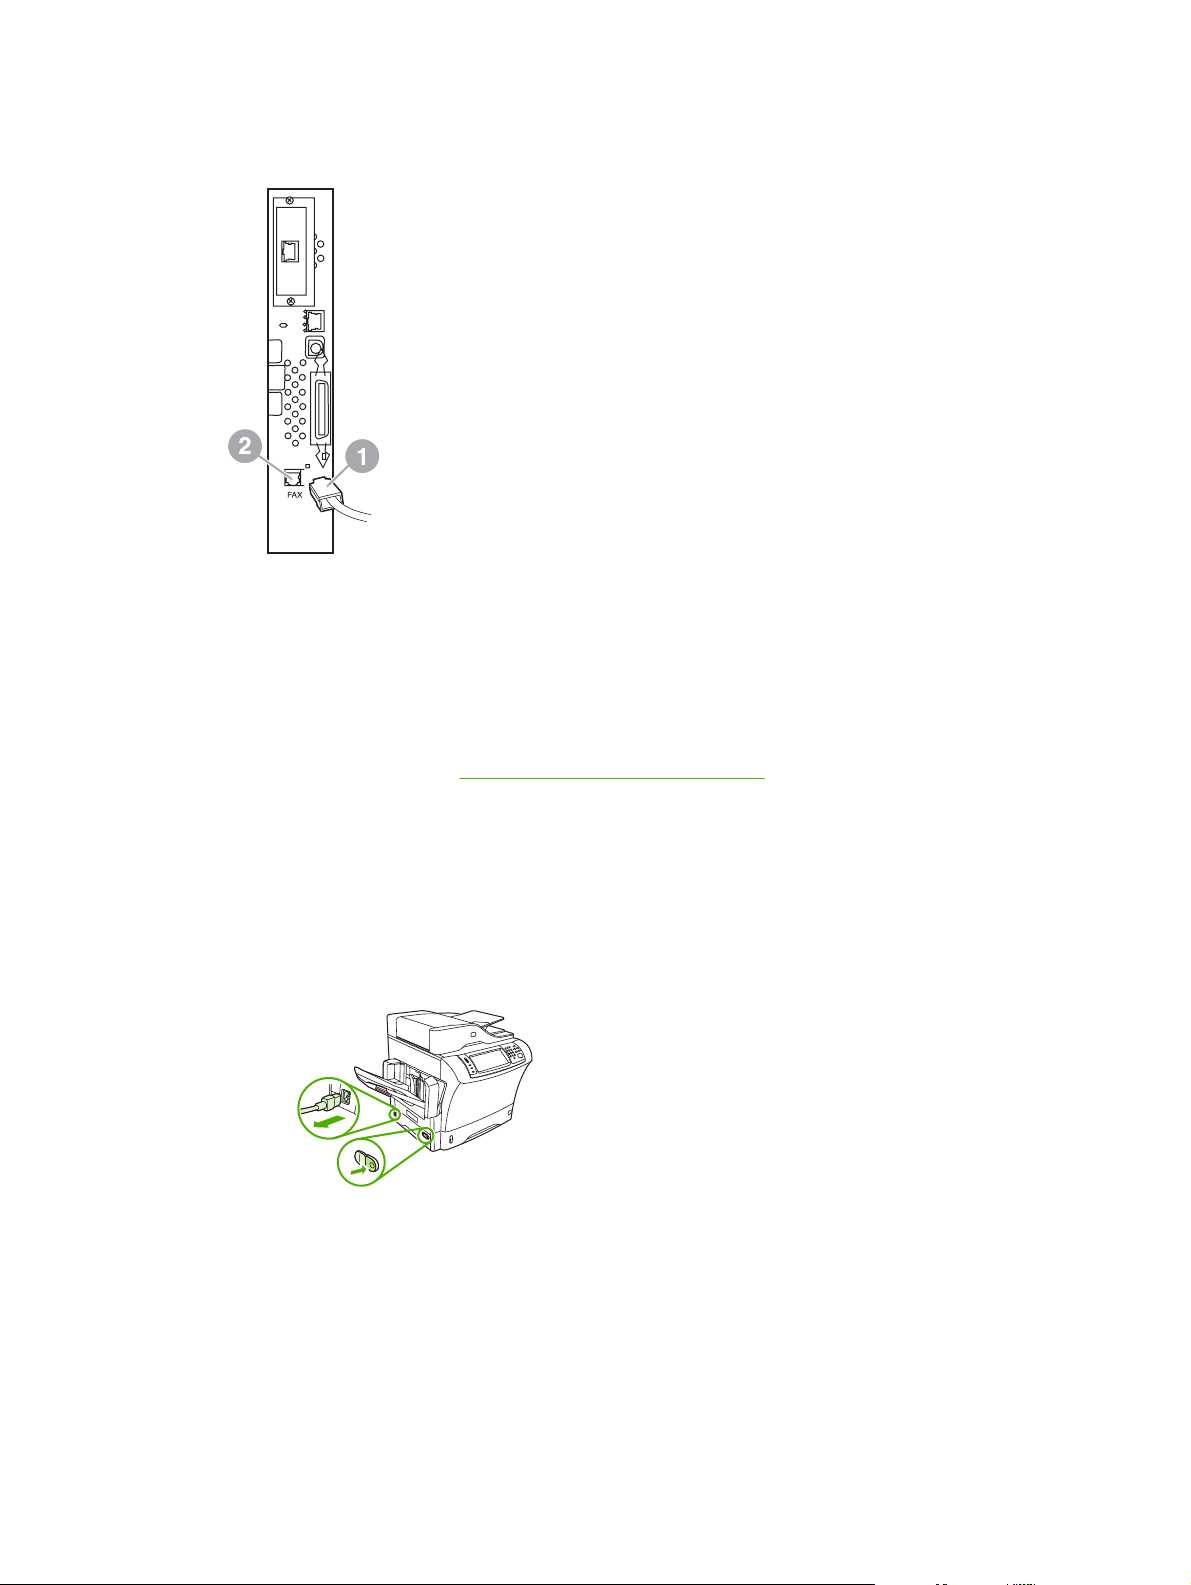
NOTE: If the MFP came with the fax accessory installed, you need to remove the fax connection cover,
connect the phone cord, and then perform the initial fax configuration that is also described in this
chapter. The fax connection cover is located on the phone connector on the formatter rear panel.
ENWW 1
Page 10
Parts included with the fax accessory
The following components are included with the fax accessory:
Fax guide (this document) (on CD)
●
Send Fax Driver and Send Fax Driver Guide (on CD)
●
Fax accessory hardware card
●
Phone cord(s) (cords vary depending on the country/region)
●
Figure 1-1 HP LaserJet MFP Analog Fax Accessory 300 contents
www.hp.com/support/lj4345
NOTE: The Send Fax Driver allows a user to send a fax directly from their PC to a network connected
MFP. Installation of this driver is optional. (See Send Fax Driver Guide on the CD for further
instructions).
2 Chapter 1 Setup ENWW
Page 11
Installing the fax accessory
Installing/replacing the fax accessory in the HP LaserJet 9040/9050mfp
●
Installing/replacing the fax accessory in the HP LaserJet 4345mfp
●
Installing/replacing the fax accessory in the HP LaserJet M4345 MFP
●
Installing/replacing the fax accessory in the HP Color LaserJet 4730mfp and HP Color LaserJet
●
CM4730 MFP
Installing/replacing the fax accessory in the HP LaserJet M5025 MFP and M5035 MFP
●
Installing/replacing the fax accessory in the HP Color LaserJet CM6040 MFP Series
●
Installing/replacing the fax accessory in the HP LaserJet M9040 MFP / M9050 MFP
●
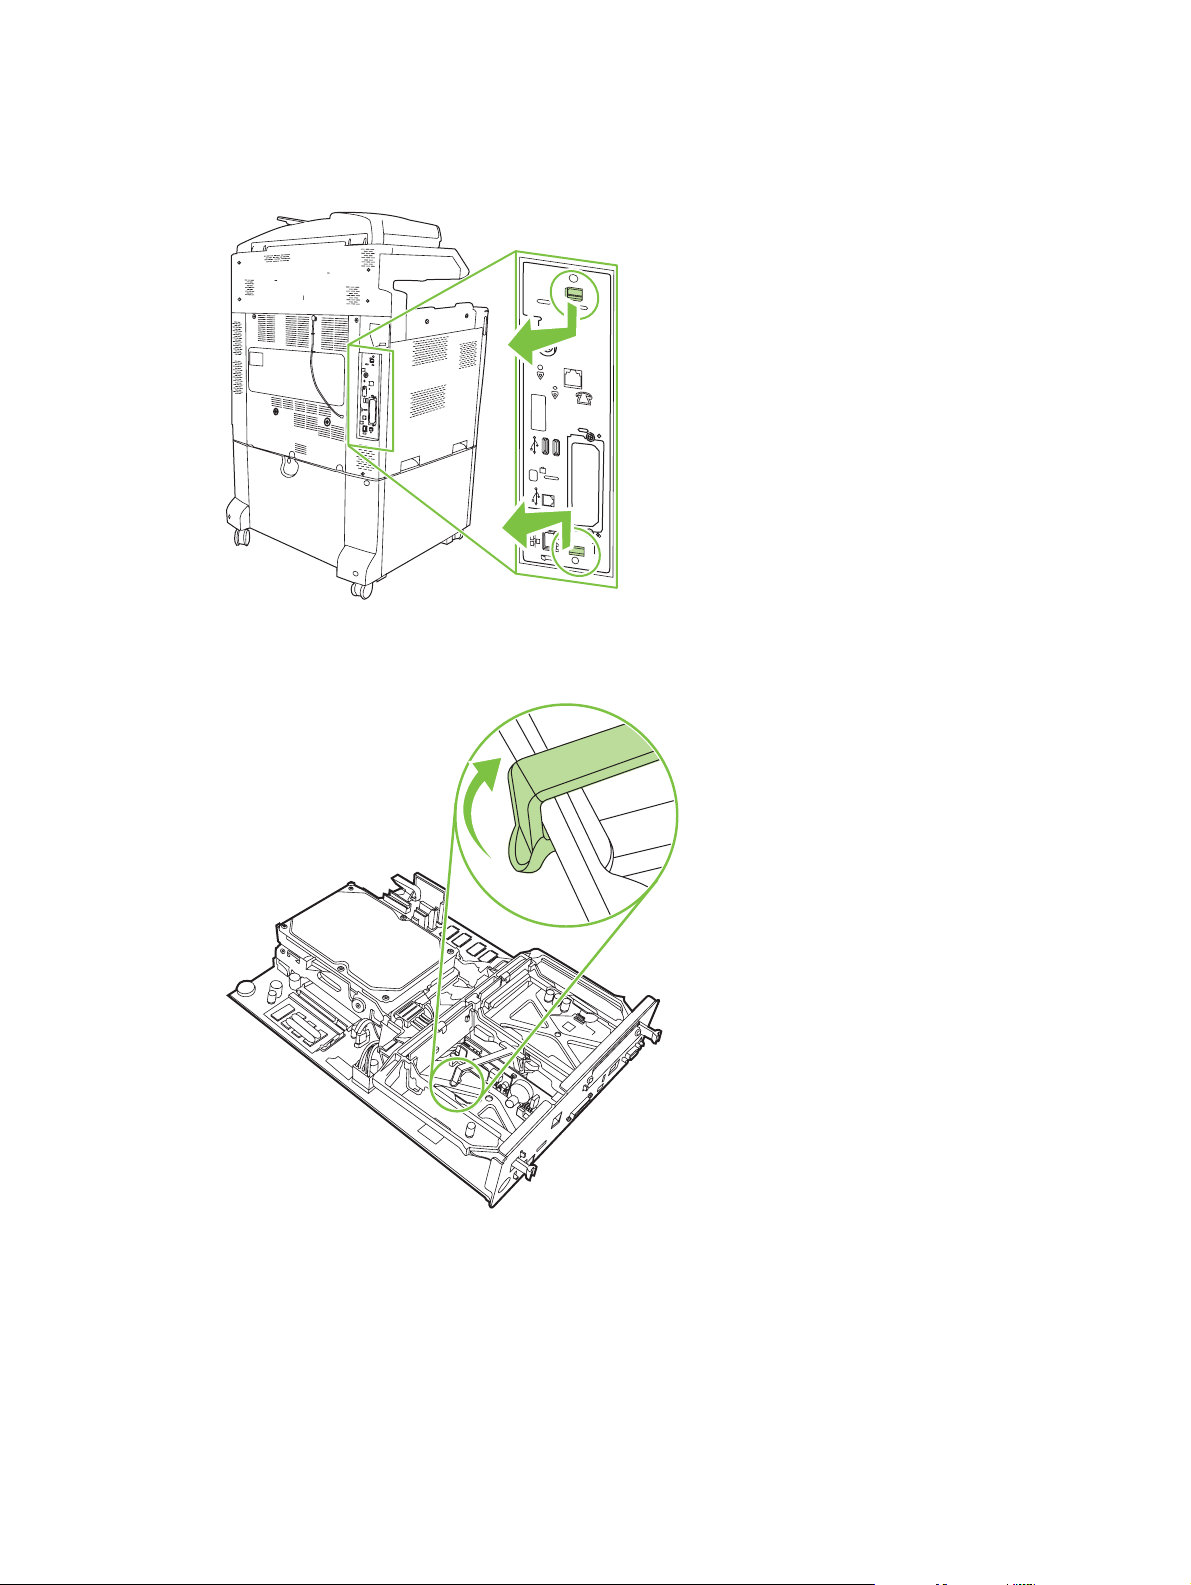
Installing/replacing the fax accessory in the HP LaserJet 9040/9050mfp
This procedure provides information on how to install or replace the fax card in the HP LaserJet
9040/9050mfp.
NOTE: If you purchased the MFP with the fax accessory installed, you do not need to perform this
hardware installation; however, you will need to connect the phone cord as described in steps 10 and
11 of this procedure and you will also need to make the required configuration settings. See
fax settings on page 36.
Required
The fax accessory card is installed on the MFP formatter board which must be removed to install the
fax card. To install or to replace an existing fax card, complete the following steps.
NOTE: The Fax Accessory is also supported on the M3035xs MFP and the M3027x MFP, and it is
factory installed. This also applies to the Color LaserJet 9500mfp.
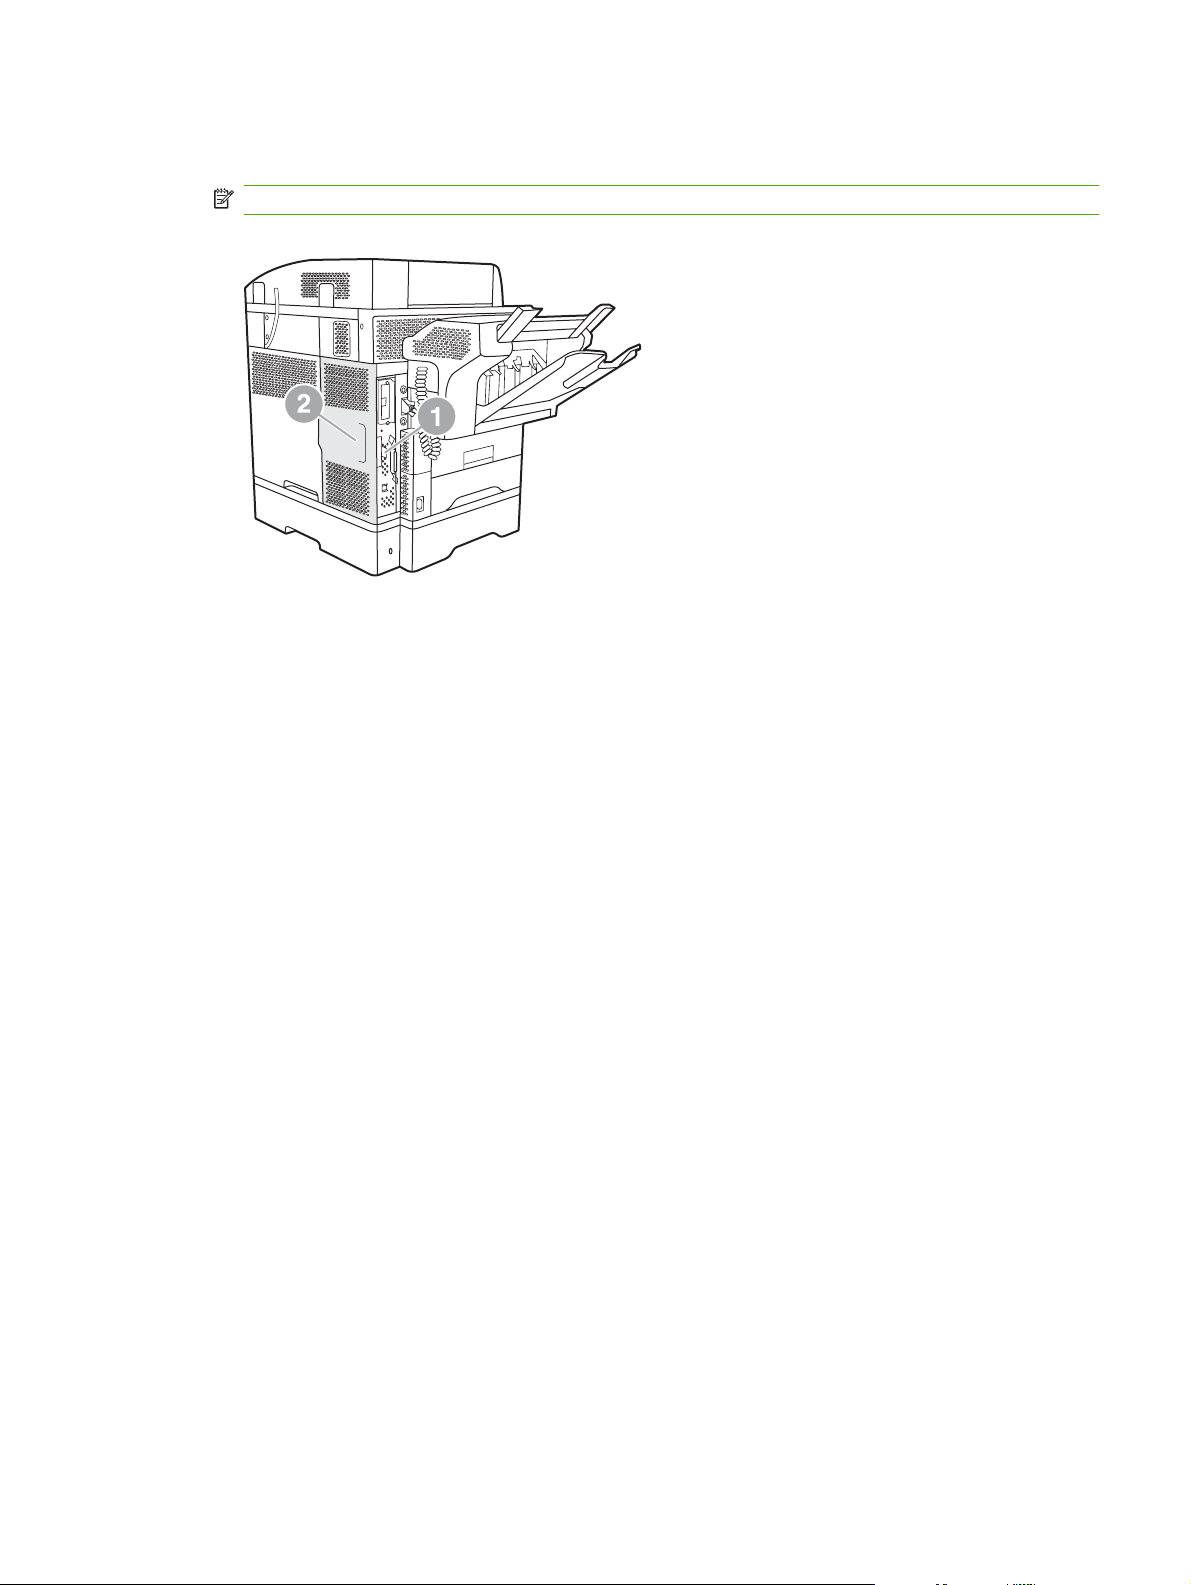
1. Unpack the fax card from the box. Do not remove the fax card from its antistatic pouch.
2. Set the MFP's power switch to off and disconnect the AC power cord.
3. Locate the formatter board. The formatter board is attached to a sheet-metal plate (1) located on
the left side of the MFP towards the back.
Figure 1-2 HP LaserJet 9040/9050mfp formatter location
ENWW Installing the fax accessory 3
Page 12
4. Disconnect all the cables (2) from the formatter (1). Remember where the cables are removed from
to ensure that you reinstall them in the same locations.
NOTE: If this is the first time the fax is installed, remove the small cover over the opening for the
phone jack on the rear panel of the formatter before inserting the fax card into the formatter.
The formatter board contains parts that are sensitive to electrostatic discharge (ESD). When
handling the formatter board, use static protection, such as a grounding wrist strap connected to
the metal frame of the MFP or hold the metal frame with your hand. Also, avoid touching the
components on the board.
5. Loosen two captive thumb-screws (3) at the top and bottom of the formatter plate, and pull the
formatter plate and board (1) out of the MFP. Set the formatter board on a flat, non-conductive
surface.
Figure 1-3 HP LaserJet 9040/9050mfp formatter removal
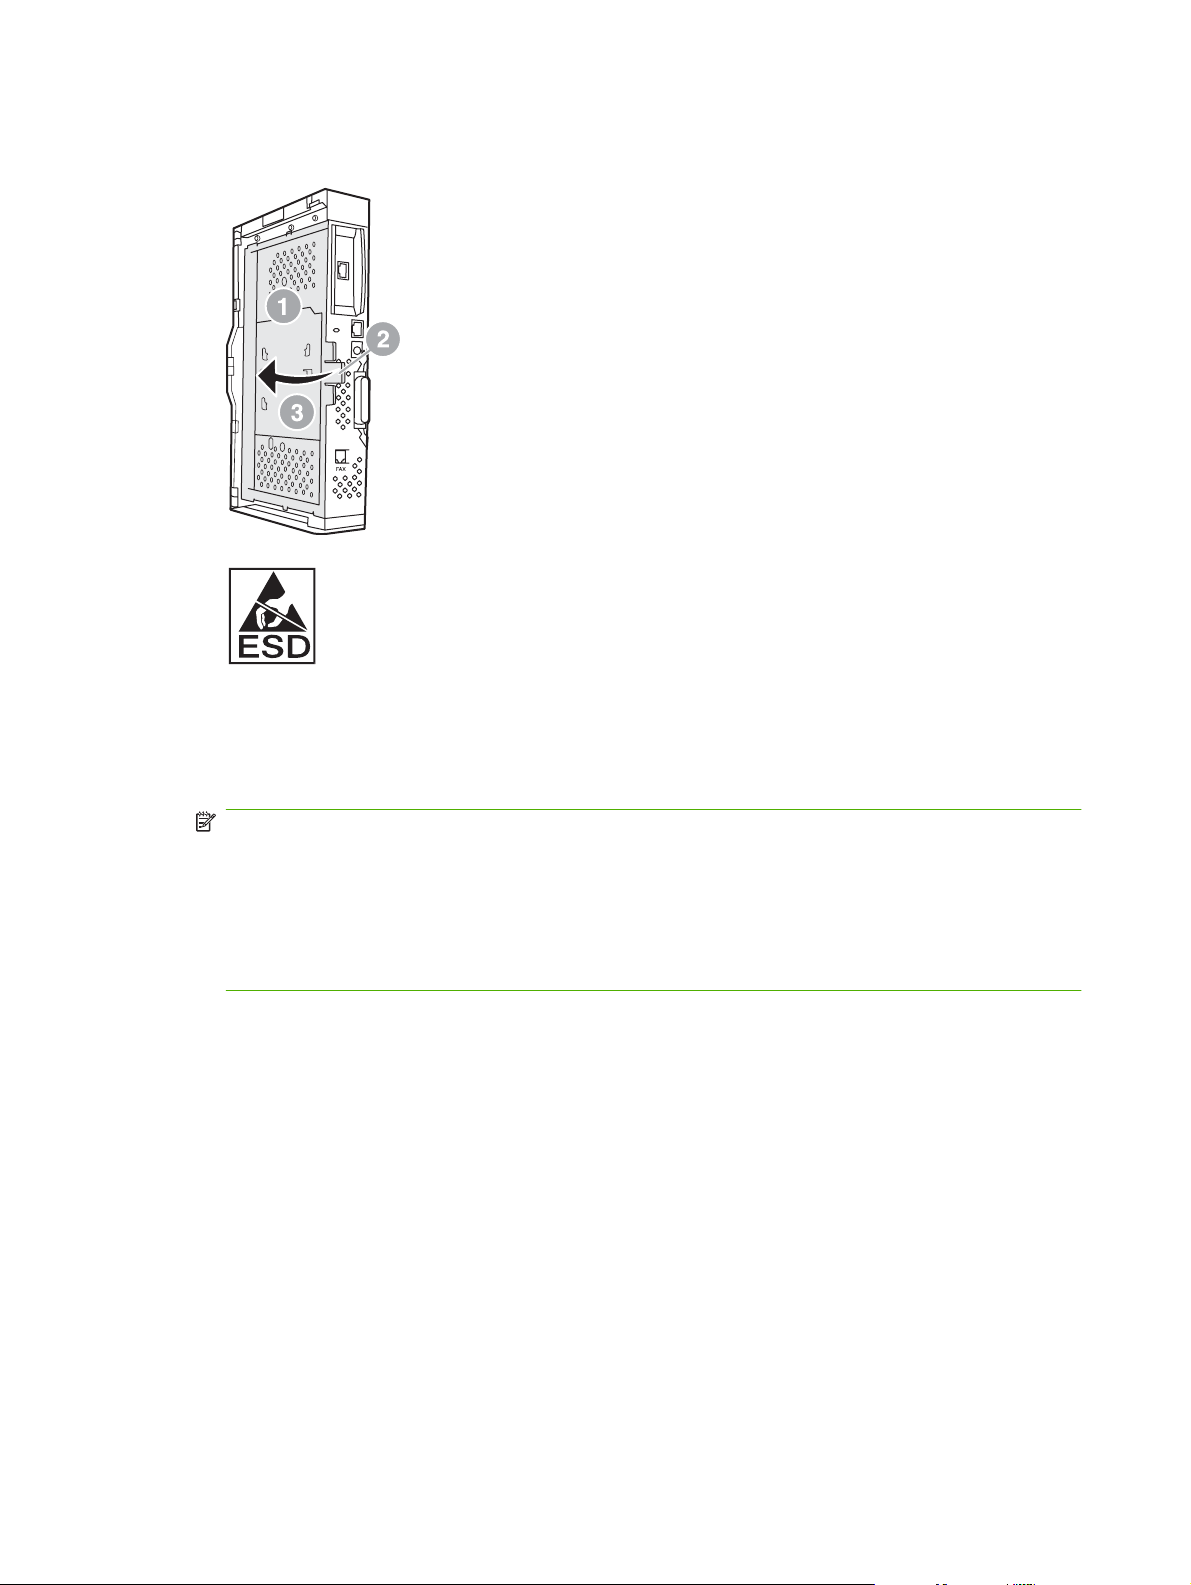
The fax card contains parts that are sensitive to electrostatic discharge (ESD). When removing the
fax card from its antistatic pouch and while installing it, use static protection such as a grounding
wrist strap connected a grounded metal component such as the metal frame of the MFP, or touch
the grounded metal frame with your hand. Also, avoid touching the components on the board.
NOTE: If you are replacing an existing fax card, remove the card that is to be replaced from the
formatter.
NOTE: While handling the fax card, do not press on the yellow component on the card because
this could damage it and result in a fax malfunction.
4 Chapter 1 Setup ENWW
Page 13

6. Remove the fax accessory from its antistatic pouch.
7. Insert the fax card connector (1) into the formatter fax connector (2). The connector on the formatter
board is labeled "FAX ACCESSORY." When inserting the card into the connector, the ends of the
card should slide into the two board guides (3) and "snap" into place when it is fully seated in the
connector.
Verify that the accessory is securely seated. The phone connector on the fax card should be aligned
with the opening in the back of the formatter cage.
Figure 1-4 Installing the fax card on the HP LaserJet 9040/9050mfp formatter board
Install the formatter back into the MFP.
Figure 1-5 Reinstalling the formatter into the HP LaserJet 9040/9050mfp
8. Reconnect any cables (4) removed from the formatter in step 4.
NOTE: When connecting the fax card to a phone line, ensure that the phone line being used is
a dedicated, single-channel analog line that is not used by any other devices. This line should be
an analog line because the fax will not function correctly if connected to some digital PBX systems.
If you are unsure of what type of line you have, contact your telecom provider. Also, HP
recommends using the phone cord that comes with the fax accessory to ensure the accessory
functions correctly.
ENWW Installing the fax accessory 5
Page 14
NOTE: The phone wall jack is electrified and you might receive an electric shock if you touch the
wall jack. When installing the phone cable, do not touch the wall phone jack or, if you connect the
phone cable into the wall phone jack first, do not touch the wires on the phone cable connector at
other end.
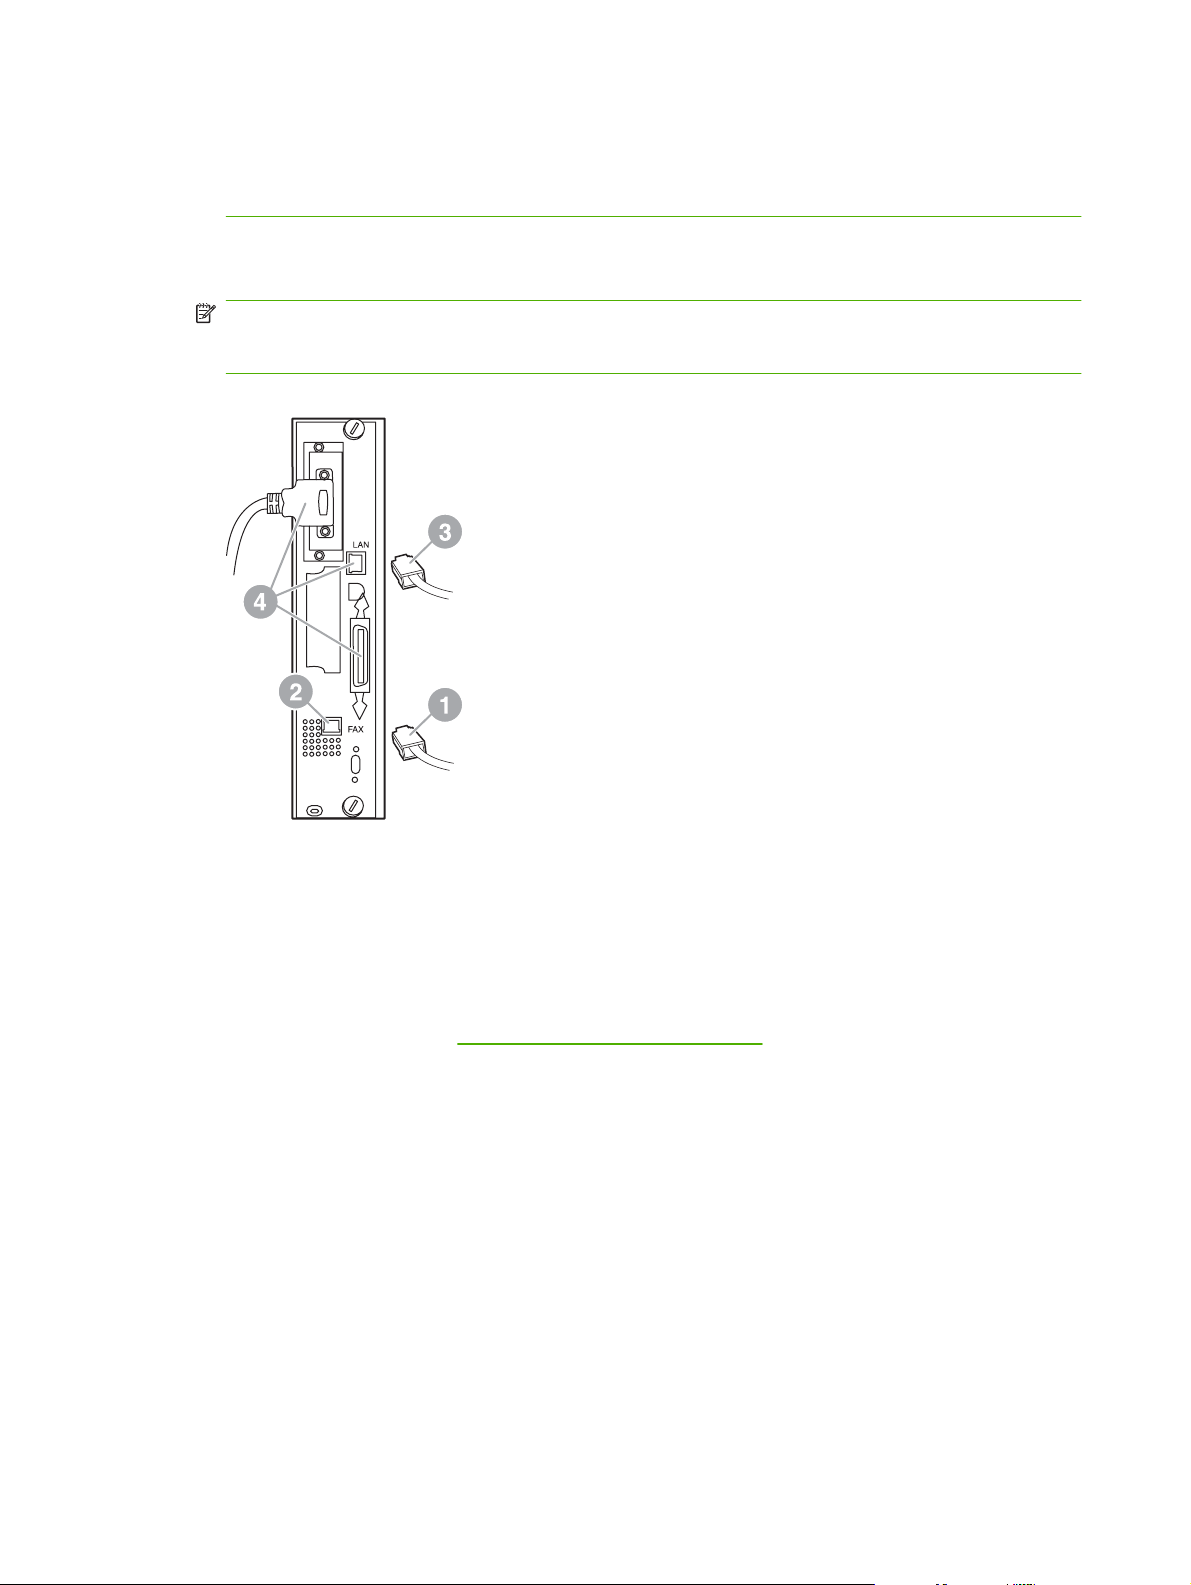
9. Connect the phone cord connector (1) into the FAX connector (2) on the formatter plate. Push the
connector in until it "clicks".
NOTE: The LAN connector and the phone cord connector are similar. Ensure that you connect
the LAN cable plug (3) into the LAN connector and the phone cord connector (1) into the FAX
connector (2). Note that the LAN connector is wider than the phone connector.
Figure 1-6 Making cabling connections to the formatter for the HP LaserJet 9040/9050mfp
10. Connect the other end of the phone cord into the phone jack on the wall. Push the connector until
you hear a click or until the connector is securely seated. Because there are different types of
connectors, depending on the country/region, the connector might make an audible click when
connected or might not make an audible click.
11. Plug in the MFP AC power cord and set the power switch to on.
This completes the installation of the fax card. Next, you need to verify that the fax has been installed
correctly and is operating. See
Verifying fax operation on page 35.
Installing/replacing the fax accessory in the HP LaserJet 4345mfp
This procedure provides information on how to install the fax card in the HP LaserJet 4345mfp.
The fax card is installed on the MFP formatter board, which is accessed by removing a MFP side panel.
To install the fax card, complete the following steps.
1. Unpack the fax card from the box, but do not remove it from its antistatic pouch.
2. Set the MFP's power switch to off and disconnect the AC power cord.
3. Locate the formatter board (1) on the back of the printer.
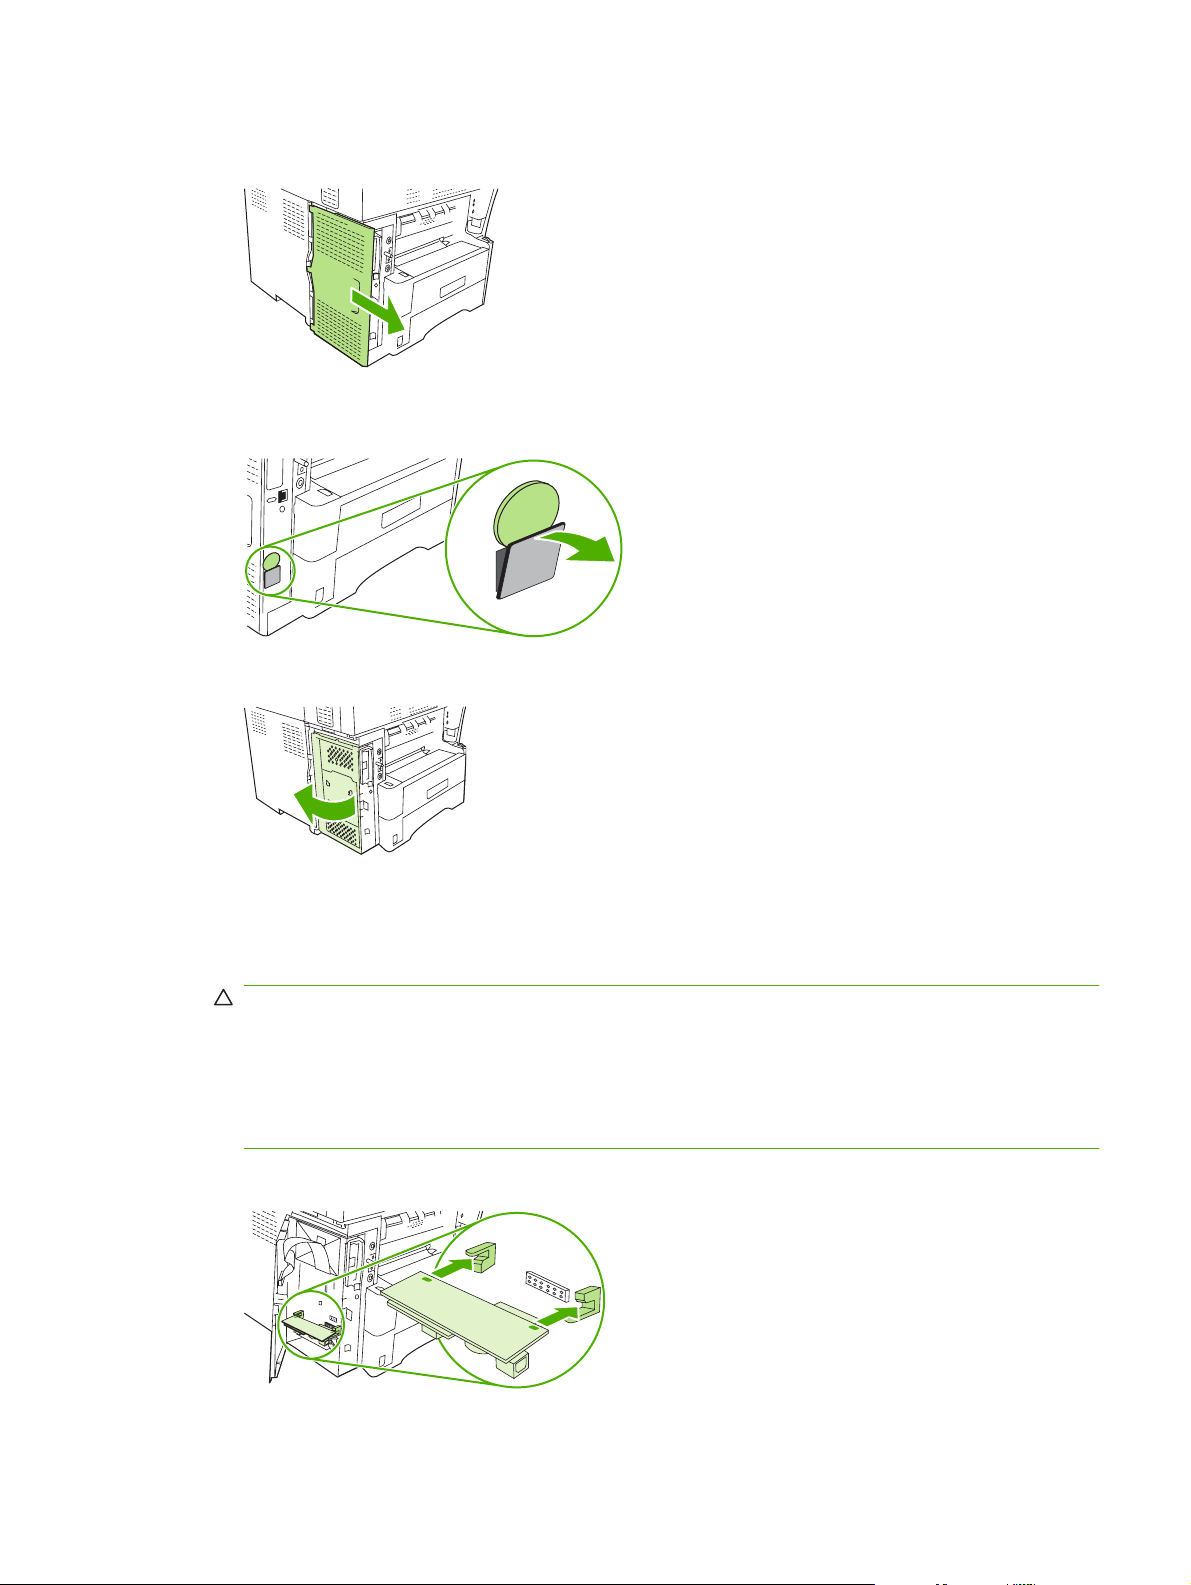
4. To access the formatter board, locate the removable cover (2) on the side of the MFP.
6 Chapter 1 Setup ENWW
Page 15
5. Remove the side cover by placing your fingers in the cover's indented area (2) and pulling, to slide
it back and remove it from the printer.
NOTE: You do not need to remove any cables from the formatter for this procedure.
Figure 1-7 MFP formatter cover - HP LaserJet 4345mfp (rear view)
ENWW Installing the fax accessory 7
Page 16
6. Open the formatter cage door (1) by pulling out on the door tab (2) and swing (3) the door open.
Figure 1-8 Formatter cage door - HP LaserJet 4345mfp
The fax card contains parts that are sensitive to electrostatic discharge (ESD). When removing the
fax accessory from its antistatic pouch and while installing it, use static protection, such as a
grounding wrist strap connected to a grounded metal frame of the MFP or touch the metal frame
of the MFP with your hand while installing the fax card.
NOTE: If this is the first time the fax is installed, remove the small cover over the opening for the
phone jack on the rear panel of the formatter before inserting the fax card into the formatter.
NOTE: If you are replacing an existing fax card, remove the card that is to be replaced from the
formatter.
NOTE: While handling the fax card, do not press on the yellow component on the card because
this could damage it and cause a fax malfunction.
7. Remove the fax card from its antistatic pouch.
8 Chapter 1 Setup ENWW
Page 17
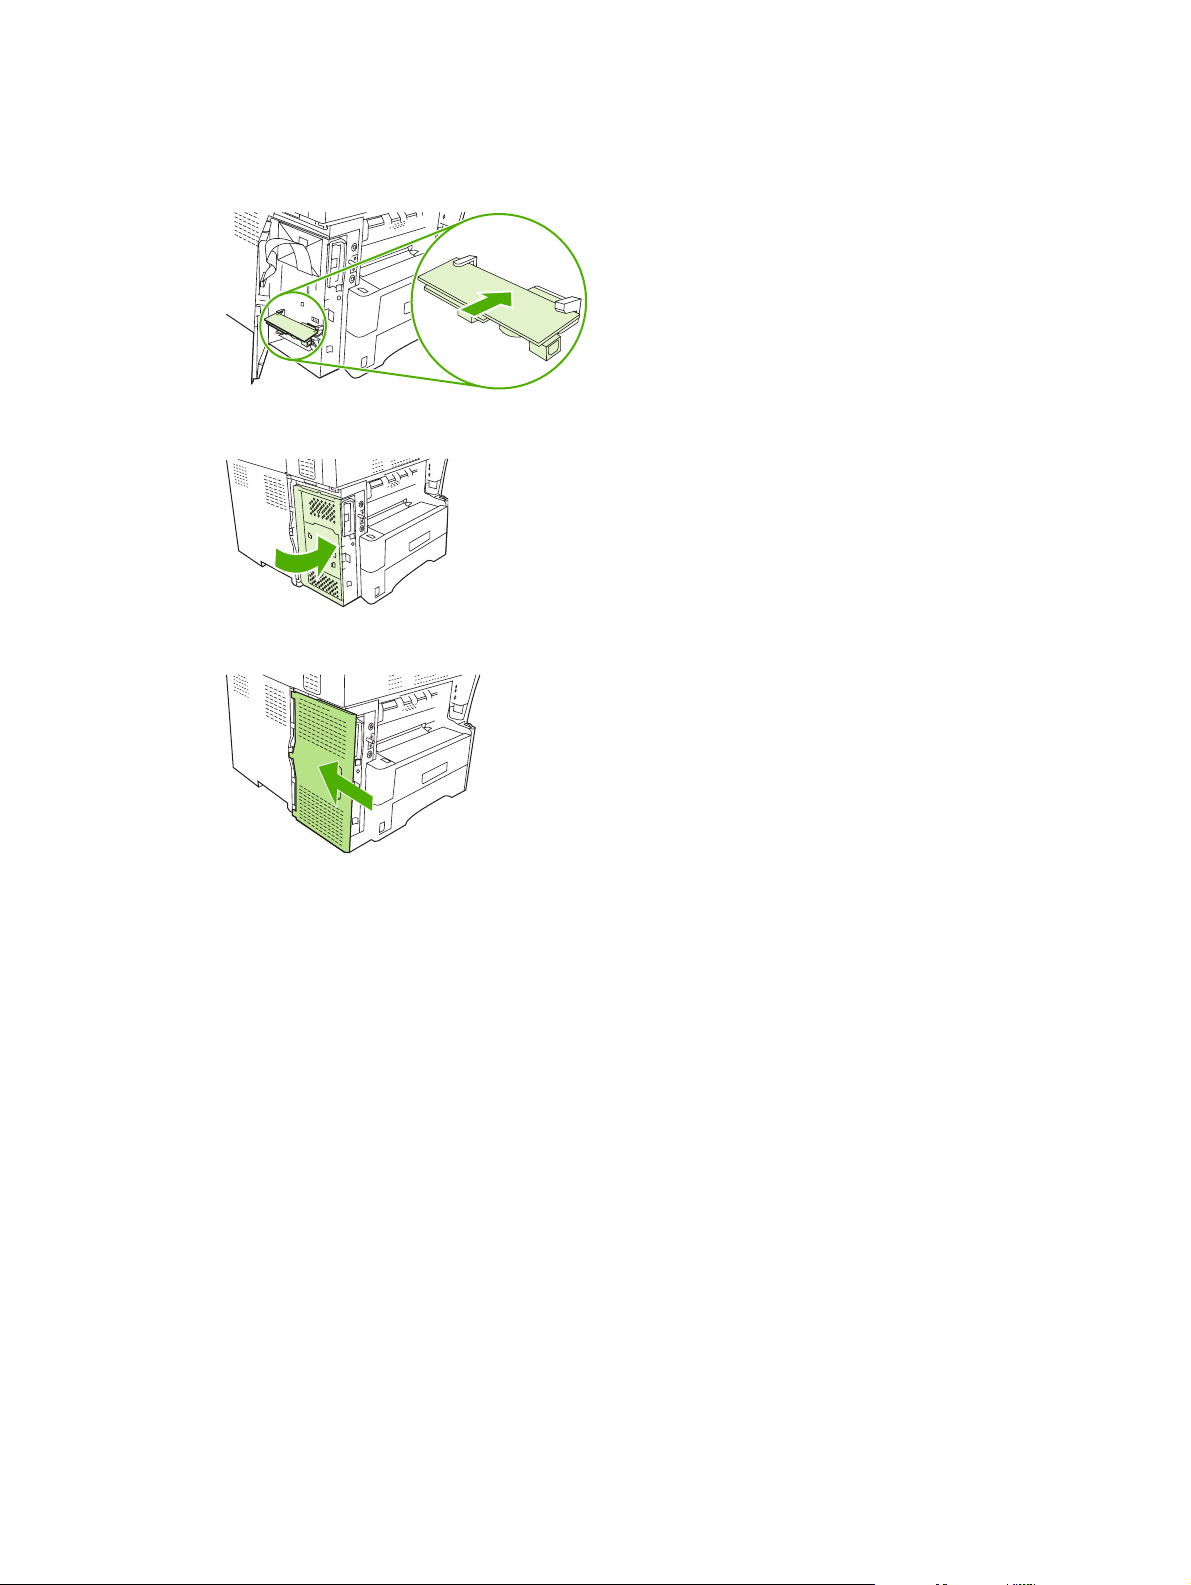
8. Insert the fax card connector (1) into the formatter fax connector (2). The connector (2) on the
formatter board is labeled "FAX ACCESSORY." The ends of the card should slide into the two
guides (3) and the card should "snap" into place when it is fully seated.
Verify that the accessory is securely seated. The phone connector (4) on the fax card should be
aligned with the opening (5) in the back of the formatter cage.
Figure 1-9 Installing the fax card on the formatter - HP LaserJet 4345mfp
9. Close the formatter cage door and replace the MFP formatter cover.
NOTE: When connecting the fax accessory to a phone line, ensure that the phone line being
used for the fax accessory is a dedicated line that is not used by any other devices. This line should
be an analog line, because the fax will not function correctly if connected to some digital PBX
systems. If you are unsure of what type of line you have, contact your telecom provider. Also, HP
recommends using the phone cord that comes with the fax accessory to ensure that the accessory
functions correctly.
NOTE: The phone wall jack is electrified and you might receive an electric shock if you touch the
connector wires. When installing the phone cable, do not touch the wall phone jack or, if you connect
the phone cable into the wall phone jack first, do not touch the wires on the phone cable connector
at other end.
ENWW Installing the fax accessory 9
Page 18
10. Connect one phone cord connector (1) into the FAX connector (2). Push it in until it "clicks."
Figure 1-10 Making cabling connections - HP LaserJet 4345mfp
11. Connect the other end of the phone cord into the phone jack on the wall. Push the connector until
you hear a click or until the connector is securely seated. Because there are different types of
connectors, depending on the country/region, the connector might make an audible click when
connected or might not make an audible click.
12. Plug the MFP AC power cord in and set the power switch to on.
This completes the installation of the fax card. Next, you need to verify that the fax has been installed
correctly and is operating, see,
Verifying fax operation on page 35.
Installing/replacing the fax accessory in the HP LaserJet M4345 MFP
If your device does not have the HP LaserJet Analog Fax Accessory 300 installed, use the following
procedure to install it.
1. Unpack the fax accessory from the box, but do not remove it from the antistatic pouch.
2. Turn off the device, and unplug the power cable.
10 Chapter 1 Setup ENWW
Page 19
3. At the back of the device, remove the side cover by placing your fingers in the indented area and
sliding the cover off.
4. If necessary, remove the plastic fax-accessory cover from the formatter. Insert a coin into the
groove at the top of the cover, and use it to pry the cover away from the formatter.
5. Open the formatter-cage door by grasping the metal tab and pulling the door open.
6. If you are replacing an existing fax accessory, remove the old card from the formatter by pulling it
out of the slot.
7. Remove the new fax accessory from the antistatic pouch.
CAUTION: The fax accessory contains parts that are sensitive to electrostatic discharge (ESD).
When handling the fax accessory, use static protection such as a grounding wrist strap that is
connected to the metal frame of the device, or touch the metal frame of the device with your other
hand.
CAUTION: When handling the fax accessory, do not press the yellow component on the card.
Doing so can damage the card and cause a fax malfunction.
8. Align the two cutouts on the new fax accessory with the two fax-accessory guides on the formatter.
ENWW Installing the fax accessory 11
Page 20
9. Push the fax accessory into place, and then verify that it is securely connected to the formatter.
The phone connector on the fax accessory should be aligned with the square opening in the
formatter cage.
10. Close the formatter-cage door.
11. Replace the formatter cover.
12. Plug the power cable into the device, and turn on the device.
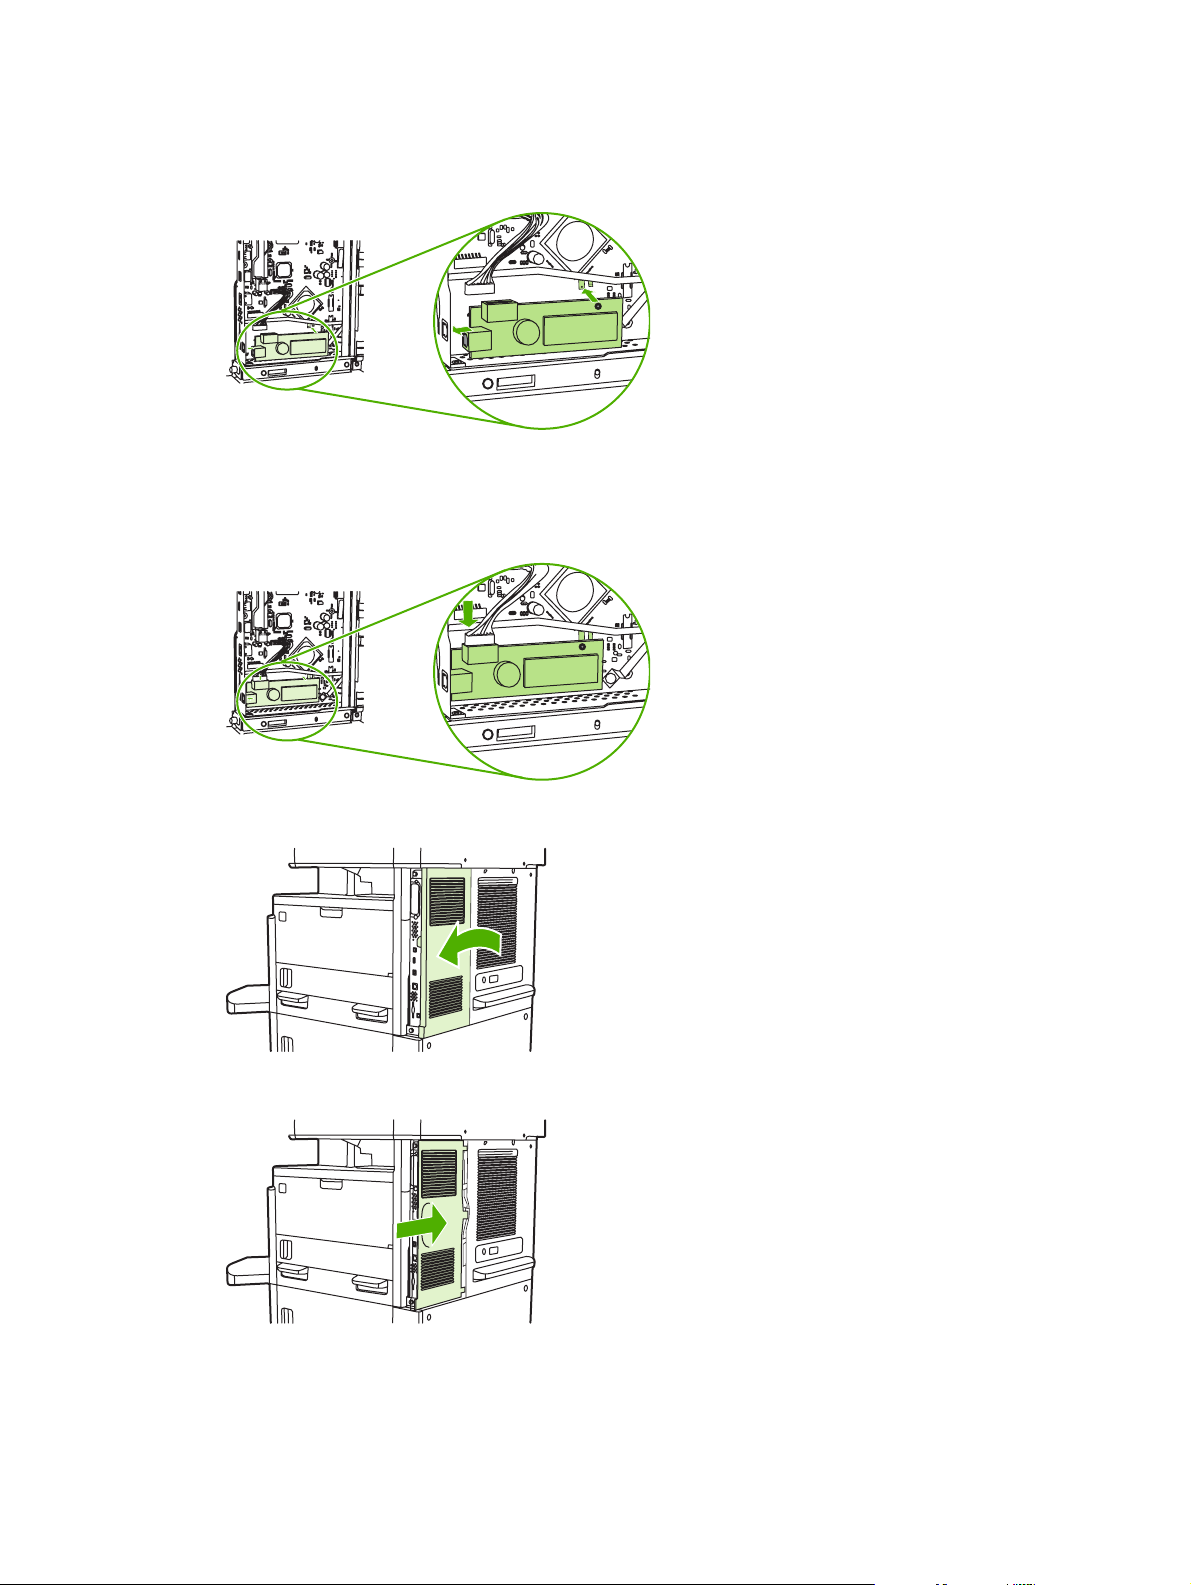
Installing/replacing the fax accessory in the HP Color LaserJet 4730mfp and
HP Color LaserJet CM4730 MFP
The HP Color LaserJet 4730 and HP Color LaserJet CM4730 MFP are not equipped with the analog
fax accessory installed. The HP Color LaserJet 4730x, 4730xs, and 4730xm MFP models come with
an Analog Fax Accessory 300 already installed. Windows users can also install the optional HP Digital
Sending Software (DSS), which provides digital faxing services.
12 Chapter 1 Setup ENWW
Page 21
Use this procedure to install the analog fax accessory for the HP Color LaserJet 4730mfp and HP Color
LaserJet CM4730 MFP if it is not already installed.
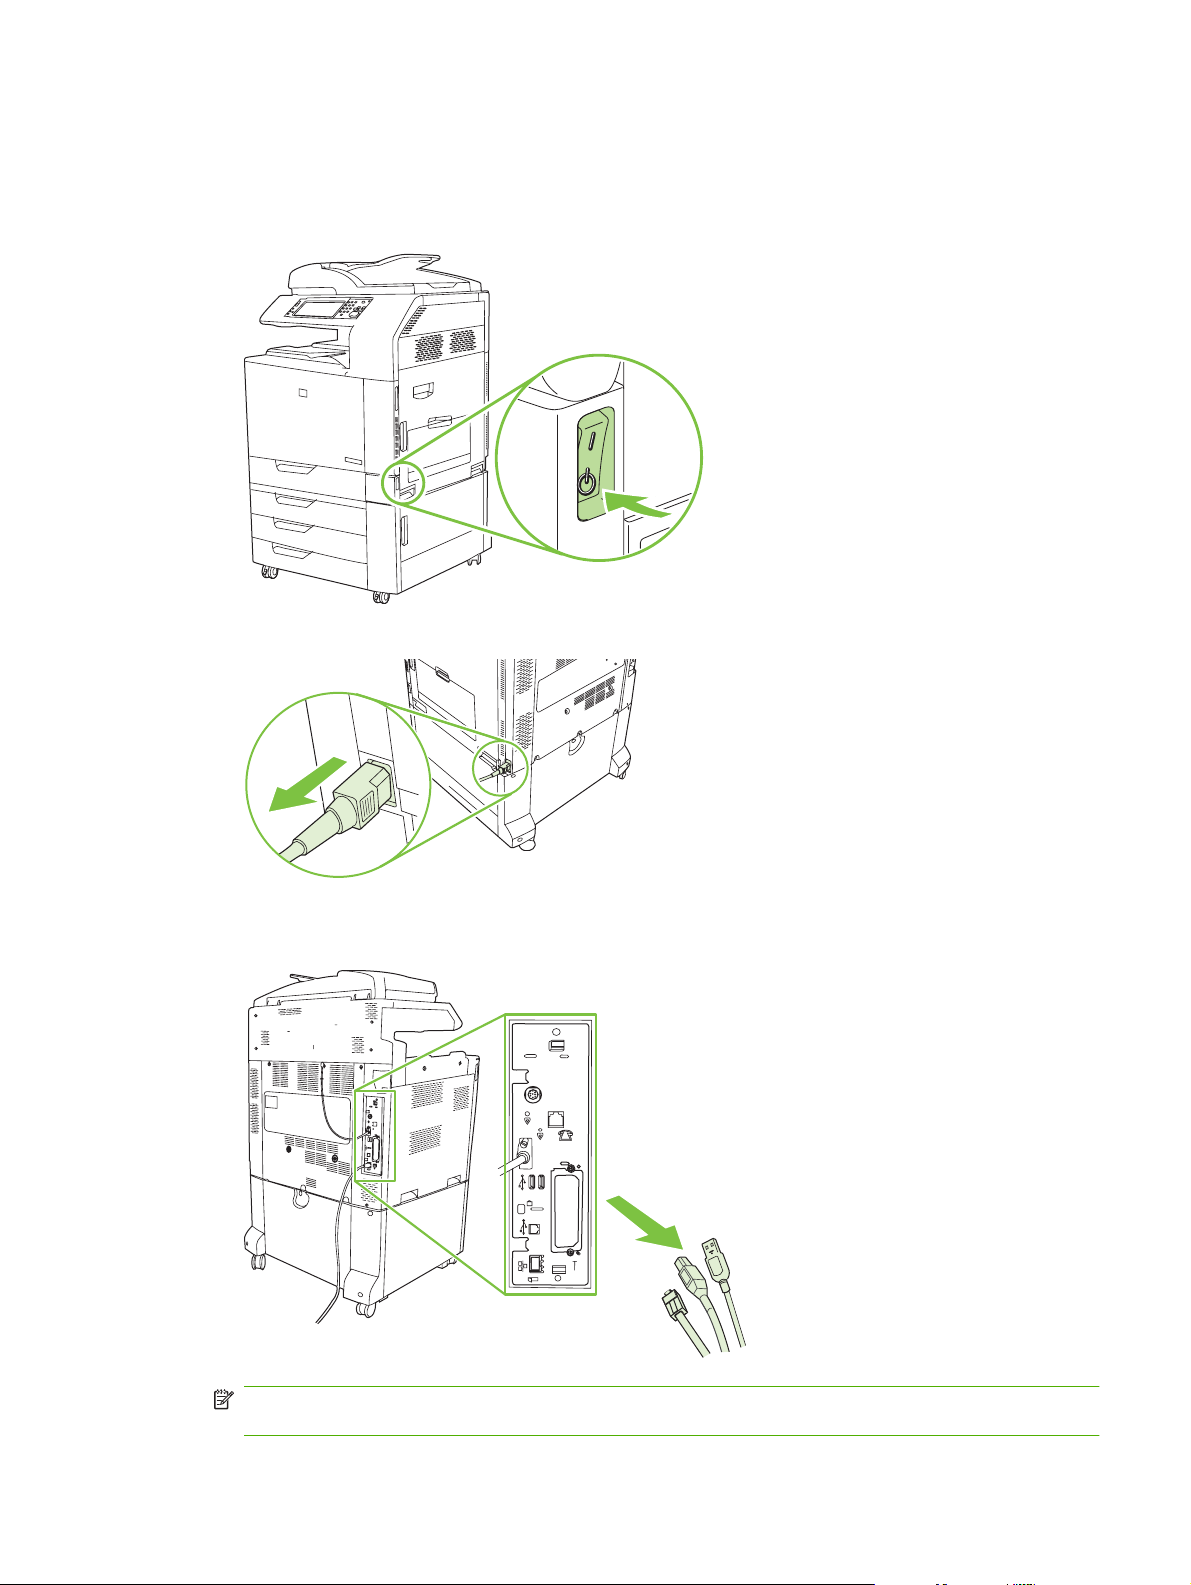
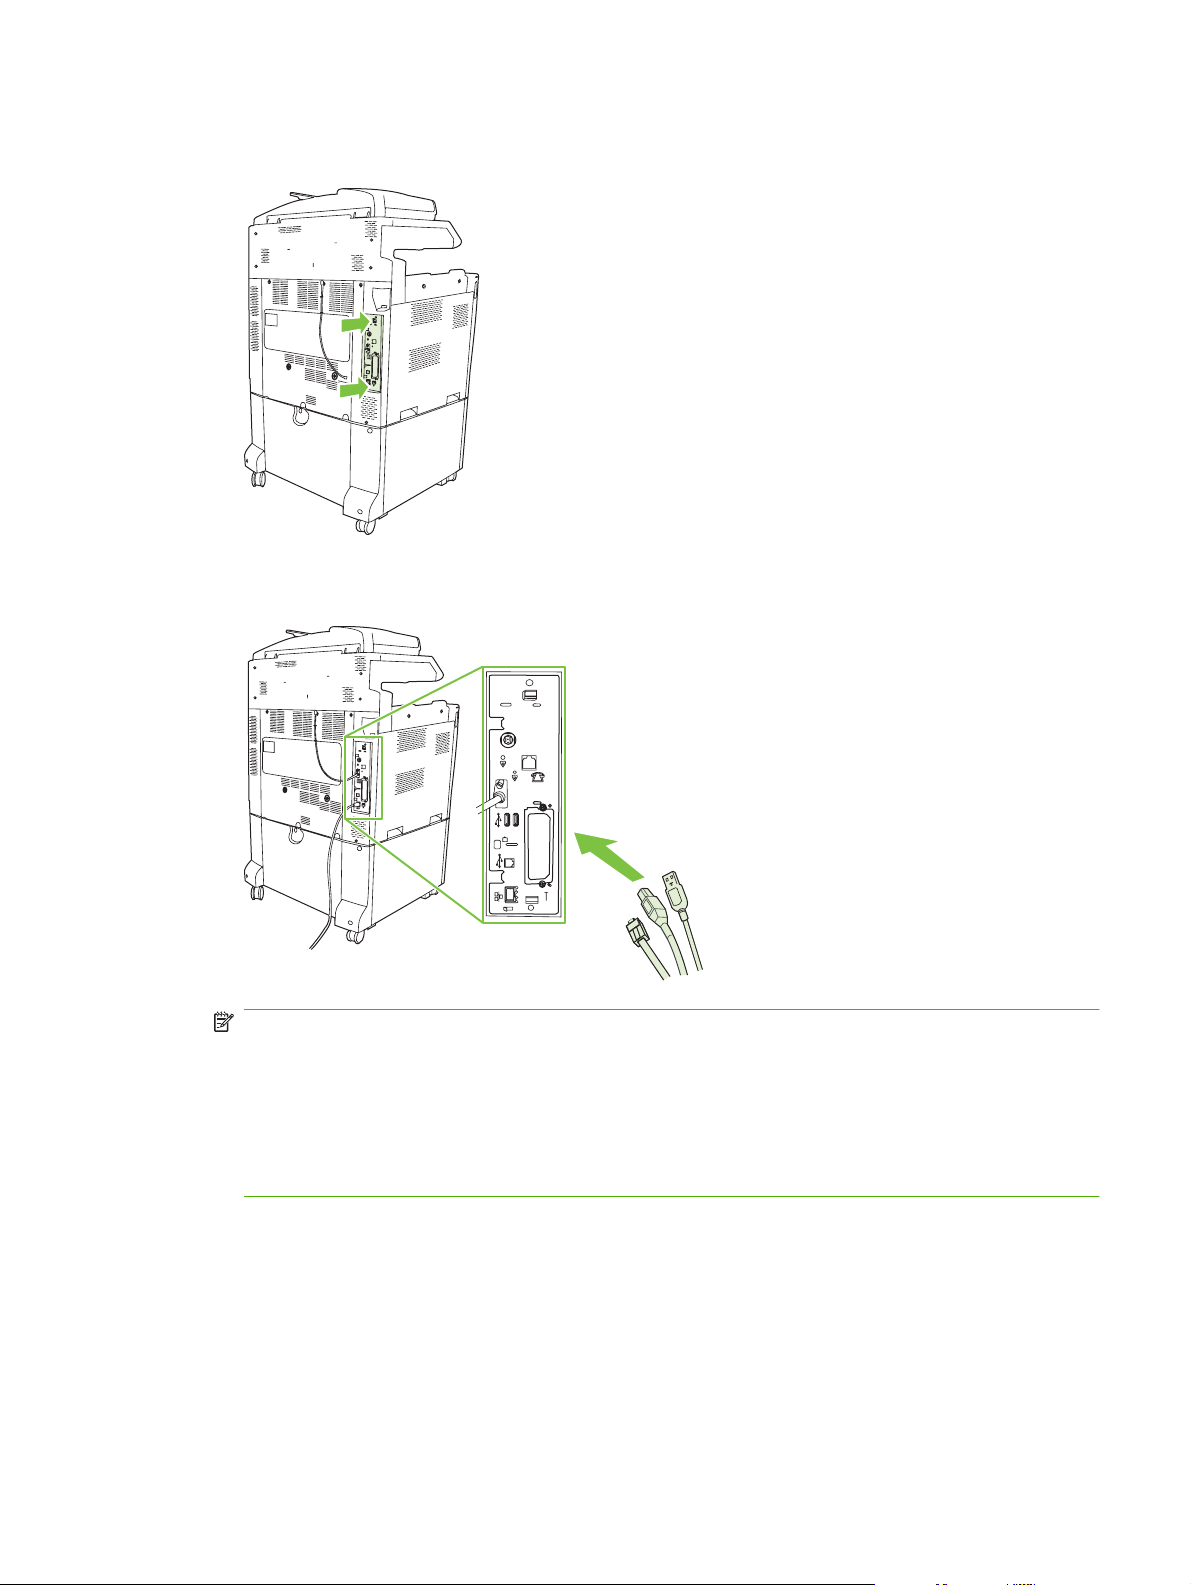
1. Turn off the MFP, and disconnect all cables.
Figure 1-11 Turning the power off
Figure 1-12 Disconnecting the cables
2. Locate the formatter board in the back of the MFP.
Figure 1-13 Locating the formatter board
NOTE: If this is the first time the fax is installed, remove the small cover over the opening for the
phone jack on the rear panel of the formatter before inserting the fax card into the formatter.
ENWW Installing the fax accessory 13
Page 22
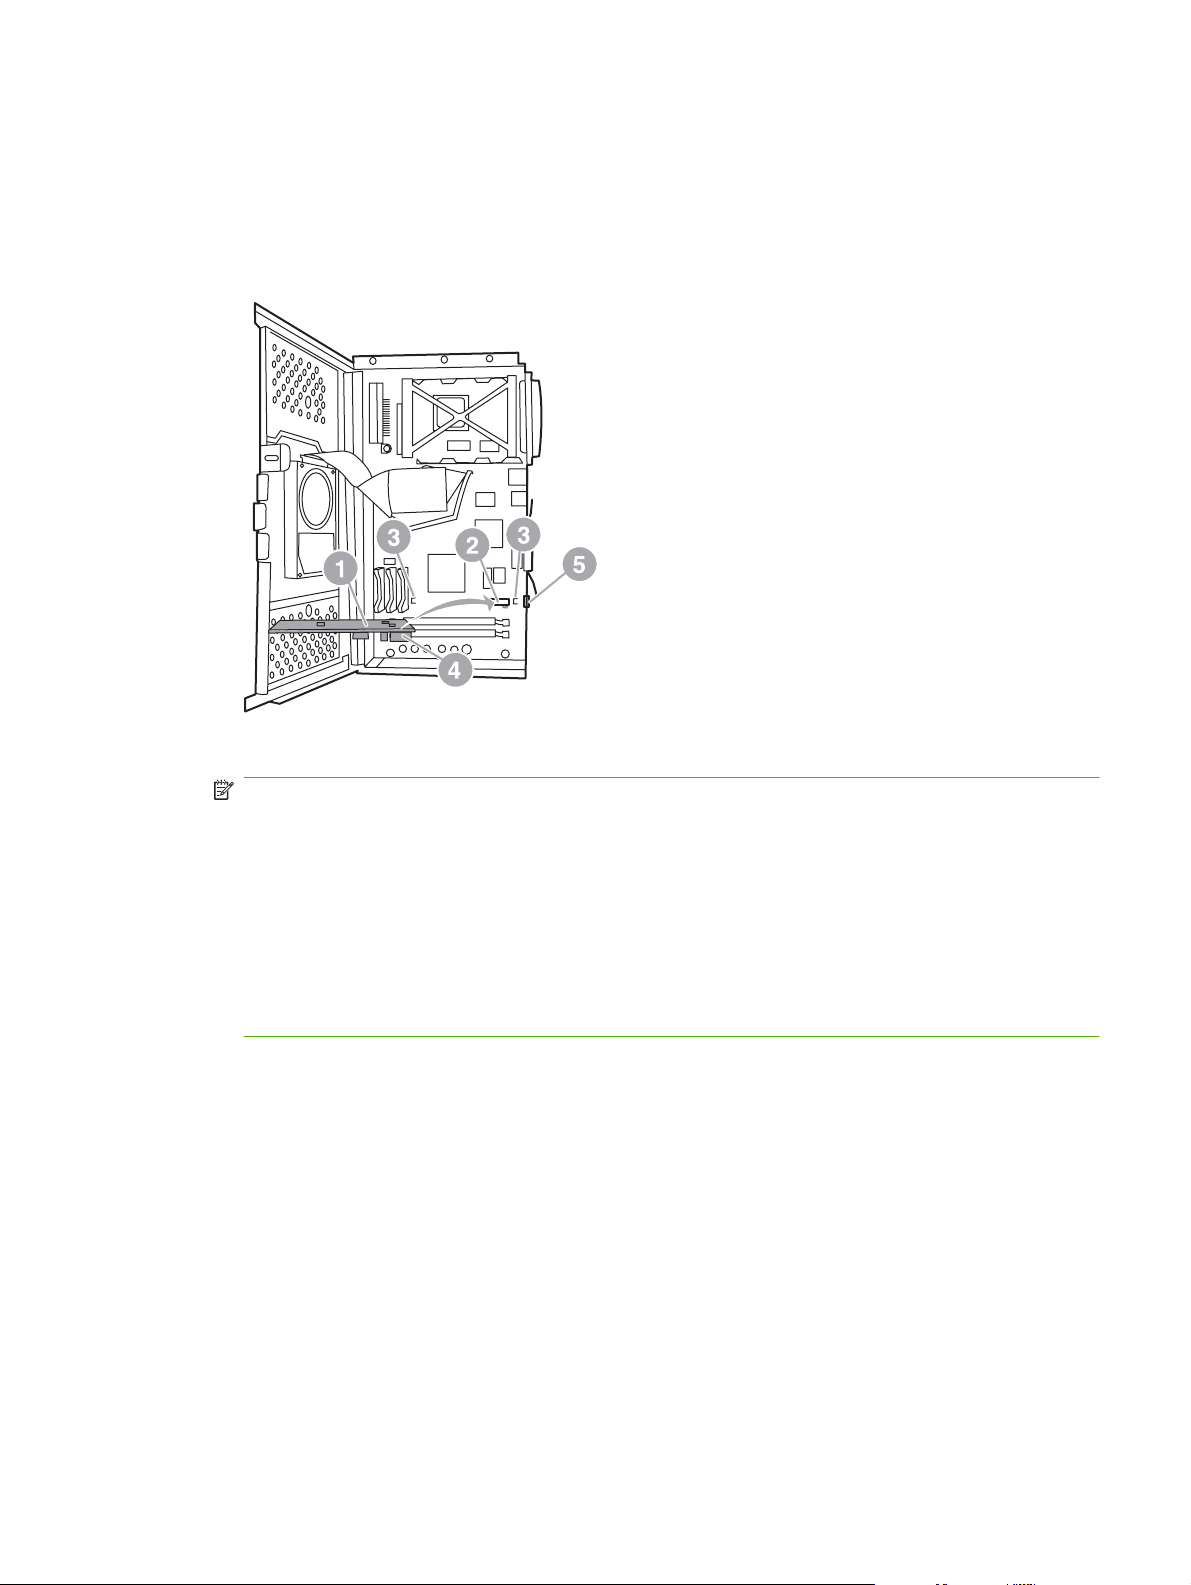
3. Gently pull on the black tabs at the top and bottom of the formatter board to pull the board from the
MFP. Place the formatter board on a clean, flat, grounded surface.
Figure 1-14 Pulling the black tabs
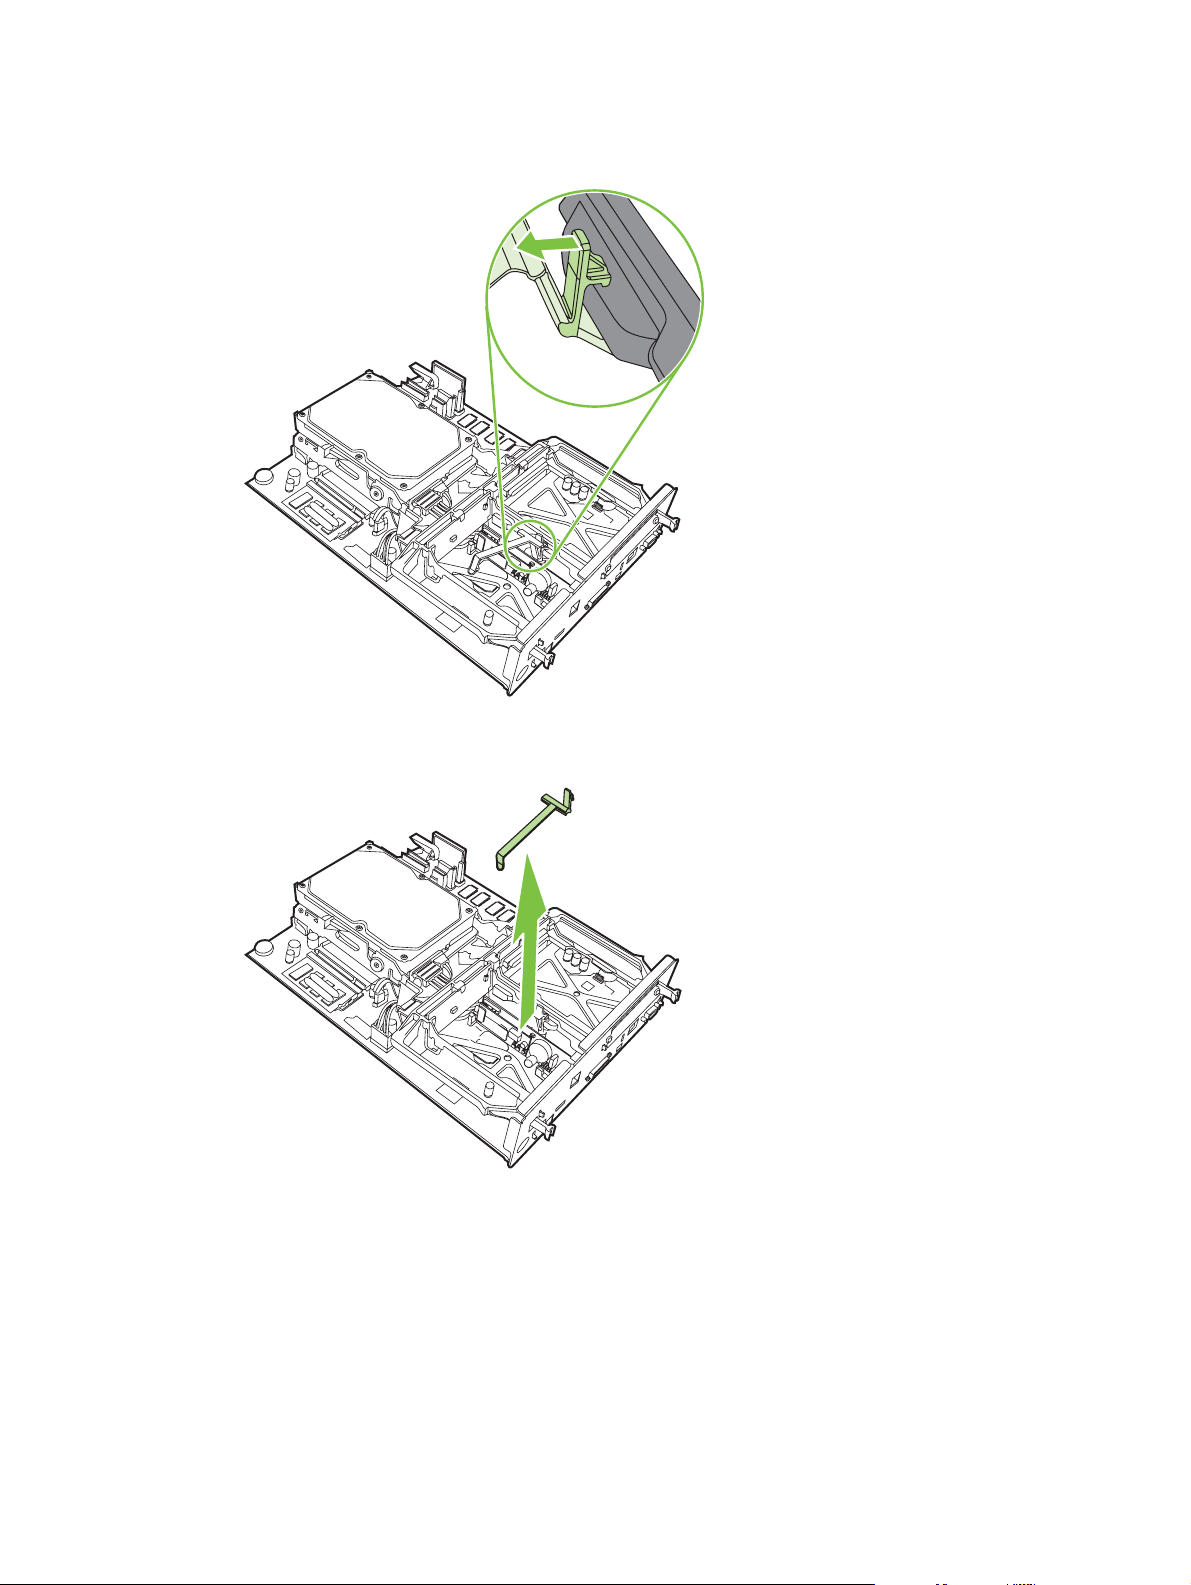
4. Lift up on the left side of the fax card strap.
Figure 1-15 Lifting up the left side of the fax card strap
14 Chapter 1 Setup ENWW
Page 23
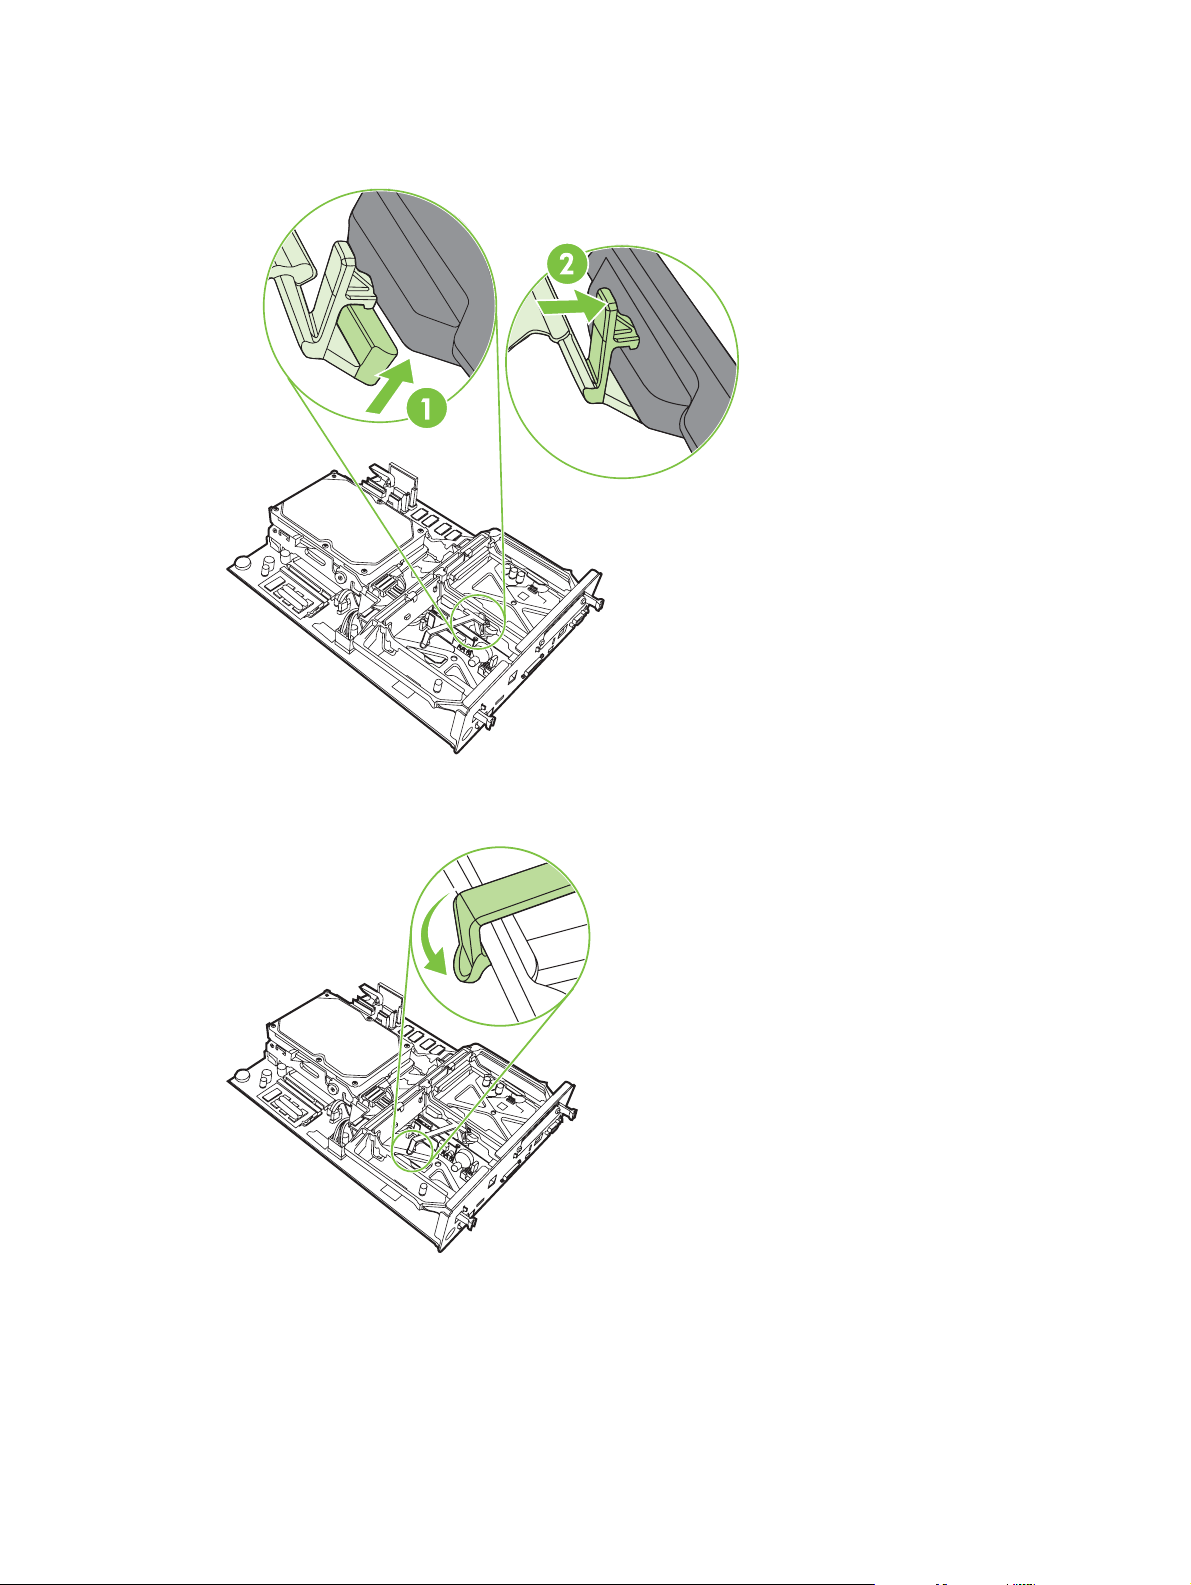
5. Push the tab on the right side of the fax card strap to the left.
Figure 1-16 Releasing the tab to the left side of the fax card strap
6. Lift up to remove the fax card strap.
Figure 1-17 Removing the fax card strap
ENWW Installing the fax accessory 15
Page 24
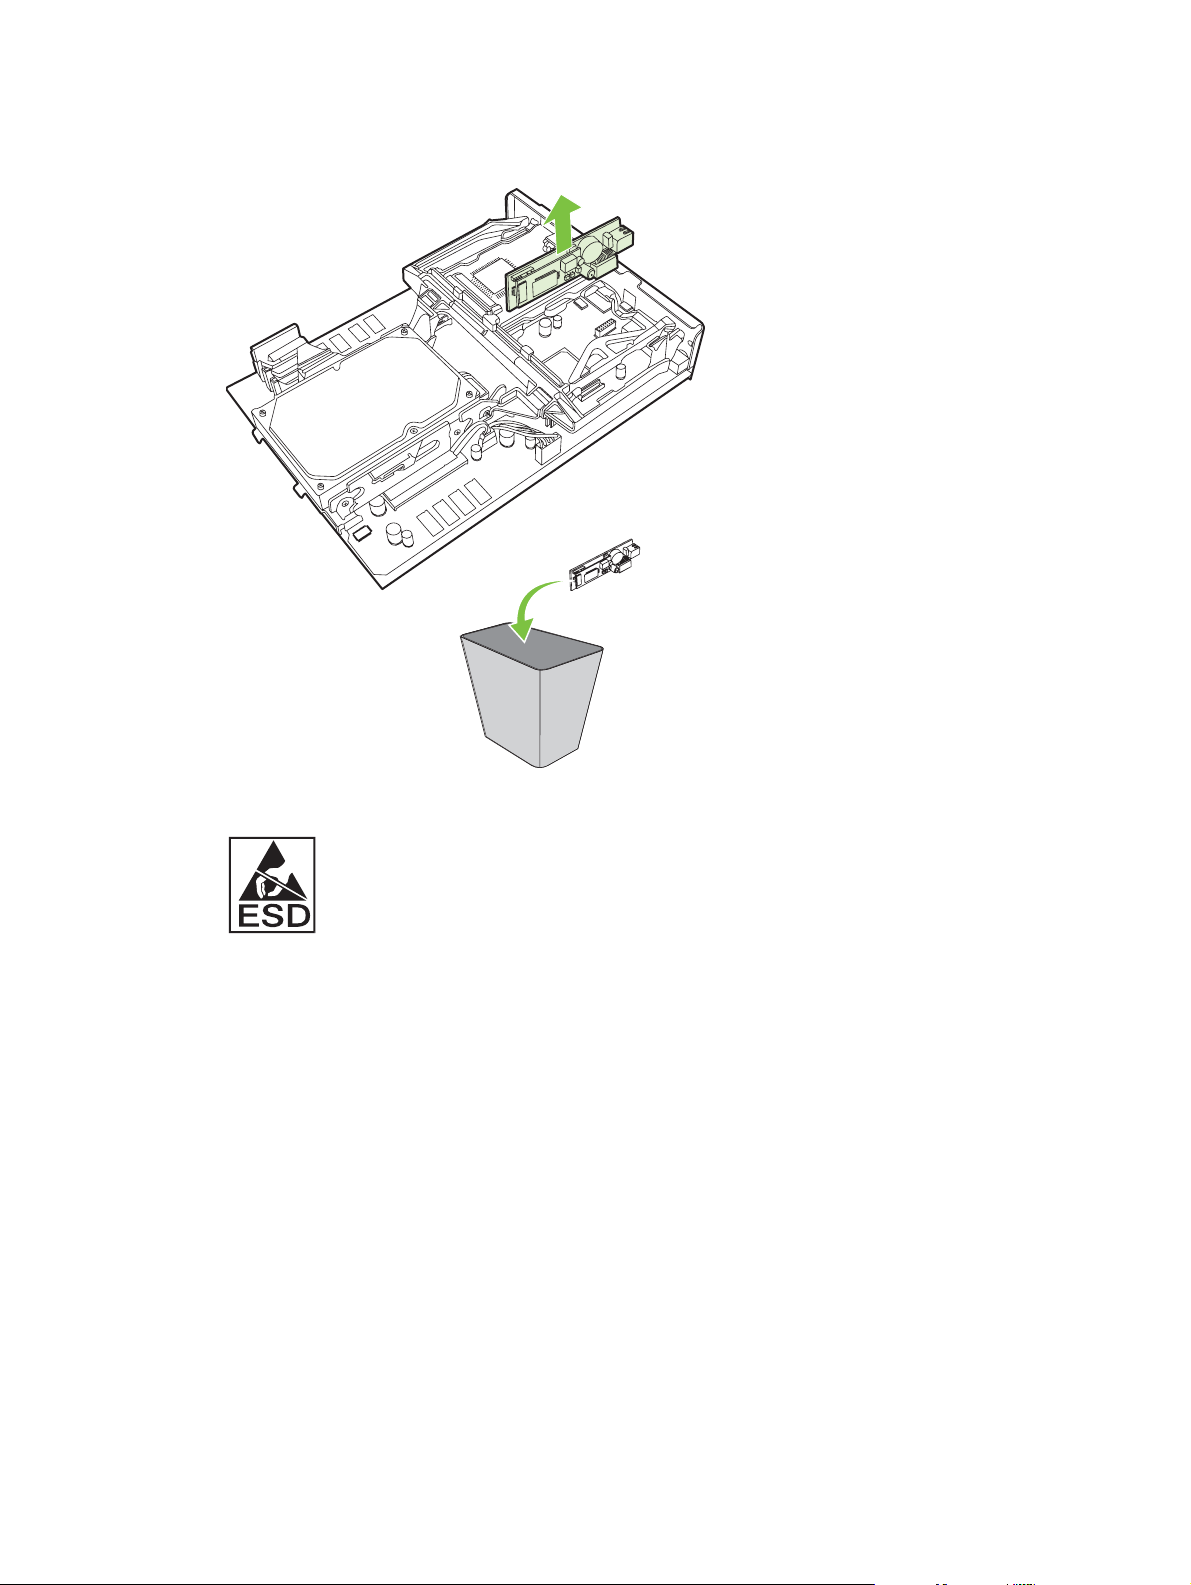
7. If you are replacing an existing fax accessory, pull up to remove it.
Figure 1-18 Replacing an existing fax accessory
8. Remove the fax accessory from its antistatic pouch.
The fax accessory contains parts that are sensitive to electrostatic discharge (ESD). When
removing the fax accessory from its antistatic pouch and while installing it, use static protection,
such as a grounding wrist strap that is connected to the metal frame of the MFP, or touch the metal
frame of the MFP with your other hand.
16 Chapter 1 Setup ENWW
Page 25
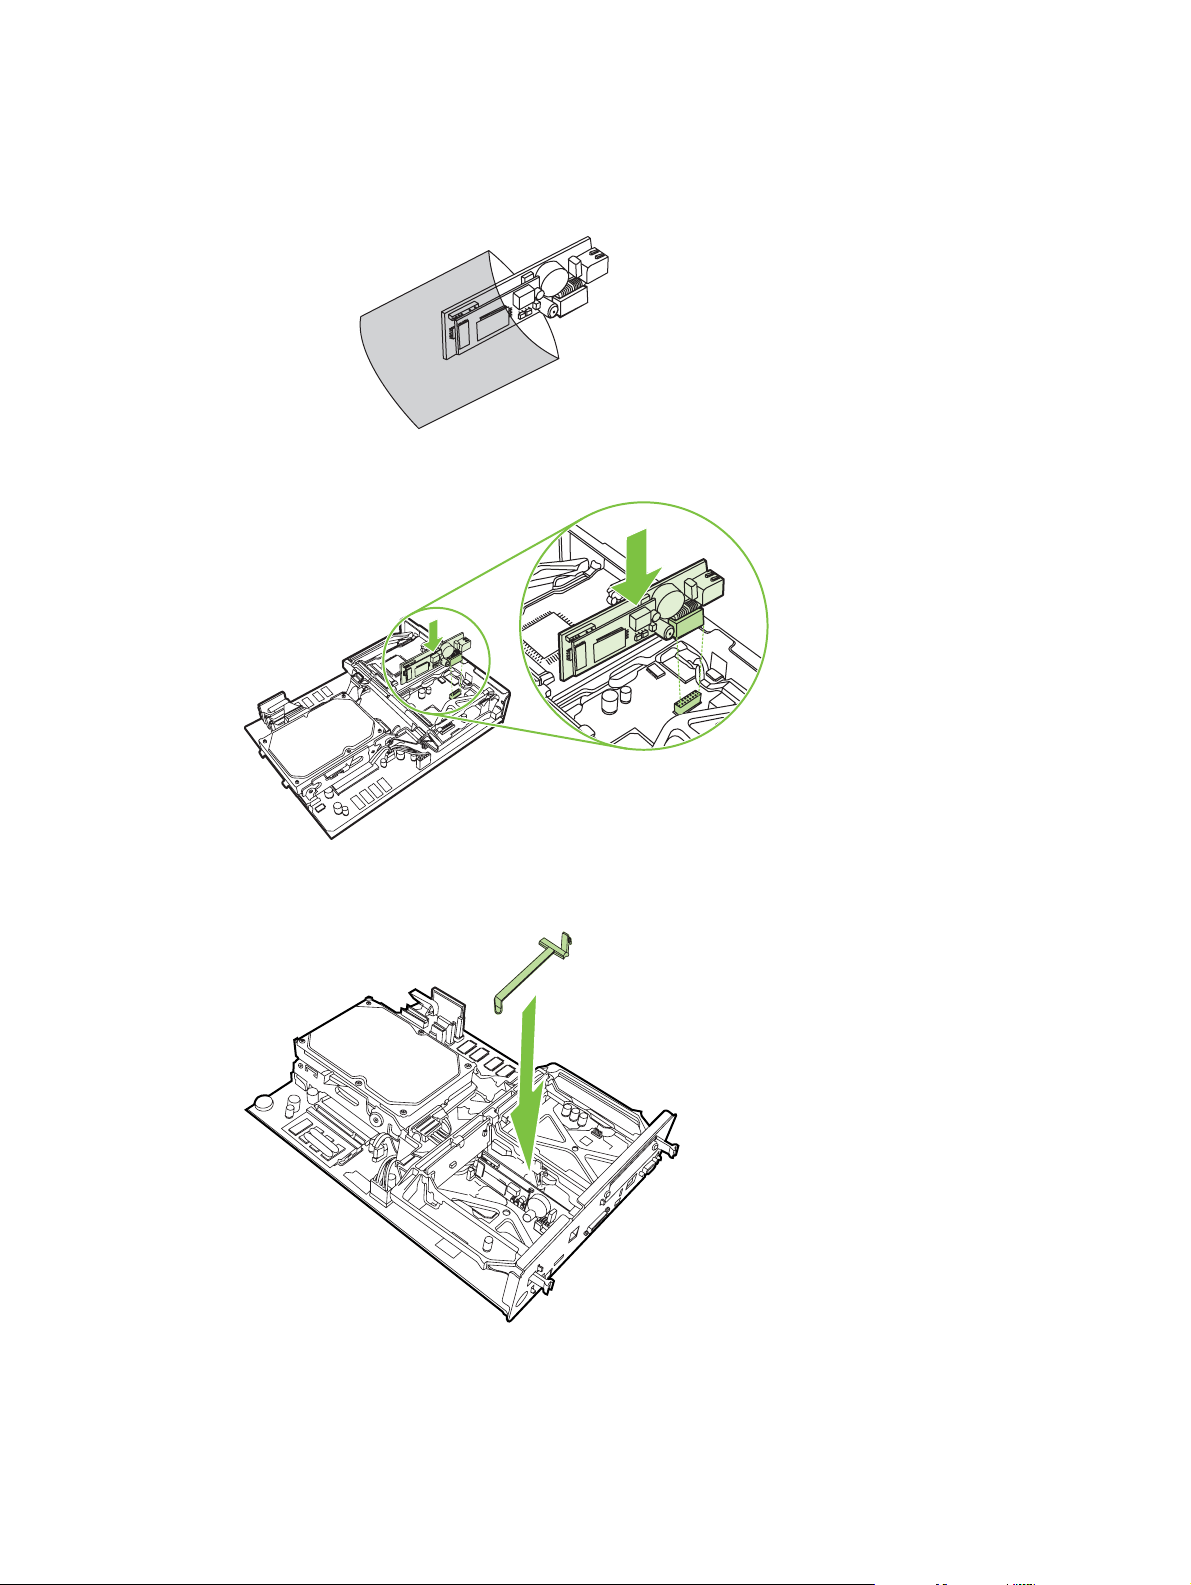
9. Align the fax accessory with the two guides. Make sure that the connector pins are aligned, and
then push the fax accessory into place. Make sure that the fax accessory is securely connected to
the formatter.
Figure 1-19 Inserting the fax accessory
10. Replace the fax card strap.
Figure 1-20 Replacing the fax card strap
ENWW Installing the fax accessory 17
Page 26
11. Secure the tab on the right side of the fax card strap.
Figure 1-21 Securing the right side of the fax card strap tab
12. Secure the tab on the left side of the fax card strap.
Figure 1-22 Securing the left side of the fax card strap tab
18 Chapter 1 Setup ENWW
Page 27
13. Align the formatter board in the tracks at the top and bottom, and slide the board back into the MFP.
Figure 1-23 Aligning the formatter board
14. Reconnect all the cables, and turn on the MFP.
Figure 1-24 Reconnecting the cables
NOTE: When connecting the fax accessory to a phone line, ensure that the phone line being
used for the fax accessory is a dedicated line that is not used by any other devices. Also, this line
should be an analog line because the fax will not function correctly if it is connected to some digital
PBX systems. If you are not sure whether you have an analog or digital phone line, contact your
telecom provider.
NOTE: HP recommends using the phone cord that comes with the fax accessory to ensure that
the accessory functions correctly.
ENWW Installing the fax accessory 19
Page 28
15. Locate the phone cord that is included with the fax accessory kit. Connect one end of the phone
cord into the fax accessory phone jack that is on the formatter. Push the connector until you hear
a click.
Figure 1-25 Connecting the phone cord
NOTE: Be sure to connect the phone line to the fax accessory port, which is near the top of the
formatter. Do not connect the phone line to the HP Jetdirect LAN port, which is nearer the bottom
of the formatter.
16. Connect the other end of the phone cord into the phone jack on the wall. Push the connector until
you hear a click or until the connector is securely seated. Because there are different types of
connectors, depending on the country/region, the connector might make an audible click when
connected or might not make an audible click.
Installing/replacing the fax accessory in the HP LaserJet M5025 MFP and M5035 MFP
1. Unpack the fax accessory from the box, but do not remove it from the antistatic pouch.
2. Turn off the device, and unplug the power cable.
3. At the back of the device, remove the side cover by placing your fingers in the indented area and
sliding the cover off.
20 Chapter 1 Setup ENWW
Page 29
4. If necessary, remove the plastic fax-accessory cover from the formatter. Insert a coin into the
groove at the top of the cover, and then pry the cover away from the formatter.
5. Open the formatter-cage door by grasping the metal tab and pulling the door open.
6. If you are replacing an existing fax accessory, unplug the fax cable and remove the accessory from
the device.
7. Remove the new fax accessory from the antistatic pouch.
CAUTION: The fax accessory contains parts that are sensitive to electrostatic discharge (ESD).
When handling the fax accessory, use static protection such as a grounding wrist strap that is
connected to the metal frame of the device, or touch the metal frame of the device with your other
hand.
CAUTION: When handling the fax accessory, do not press the yellow component on the card.
Doing so can damage the card and cause a fax malfunction.
ENWW Installing the fax accessory 21
Page 30
8. Align the new fax accessory with the black fax-accessory guides at the bottom of the formatter.
The phone connector on the fax accessory should be aligned with the square opening in the
formatter cage.
9. Push the fax accessory into place, and verify that the fax accessory is securely connected to the
formatter.
10. Connect the fax cable to the new fax accessory.
11. Close the formatter-cage door.
12. Replace the formatter cover.
13. Plug the power cable into the device, and turn on the device.
22 Chapter 1 Setup ENWW
Page 31

Installing/replacing the fax accessory in the HP Color LaserJet CM6040 MFP Series
Use this procedure to install the analog fax accessory in the HP Color LaserJet CM6040 MFP Series.
1. Turn off the MFP, and unplug the power cord from the MFP
Figure 1-26 Turning the power off
Figure 1-27 Unplugging the power
2. Disconnect all cables from the MFP.
Figure 1-28 Disconnecting the cables
ENWW Installing the fax accessory 23
Page 32

3. Pinch the black tabs at the top and bottom towards the center of the formatter board and then gently
pull the board from the MFP. Place the formatter board on a clean, flat, grounded surface.
Figure 1-29 Pulling the black tabs
4. Lift up on the left side of the fax card strap.
Figure 1-30 Lifting up the left side of the fax card strap
24 Chapter 1 Setup ENWW
Page 33

5. Push the tab on the right side of the fax card strap to the left.
Figure 1-31 Releasing the tab to the left side of the fax card strap
6. Lift up to remove the fax card strap.
Figure 1-32 Removing the fax card strap
ENWW Installing the fax accessory 25
Page 34

7. If you are replacing an existing fax accessory, pull up to remove it.
Figure 1-33 Replacing an existing fax accessory
8. Remove the fax accessory from its antistatic pouch.
The fax accessory contains parts that are sensitive to electrostatic discharge (ESD). When
removing the fax accessory from its antistatic pouch and while installing it, use static protection,
such as a grounding wrist strap that is connected to the metal frame of the MFP, or touch the metal
frame of the MFP with your other hand.
26 Chapter 1 Setup ENWW
Page 35

9. Align the fax accessory with the two guides. Make sure that the connector pins are aligned, and
then push the fax accessory into place. Make sure that the fax accessory is securely connected to
the formatter.
Figure 1-34 Inserting the fax accessory
10. Replace the fax card strap.
Figure 1-35 Replacing the fax card strap
ENWW Installing the fax accessory 27
Page 36

11. Secure the tab on the right side of the fax card strap.
Figure 1-36 Securing the right side of the fax card strap tab
12. Secure the tab on the left side of the fax card strap.
Figure 1-37 Securing the left side of the fax card strap tab
28 Chapter 1 Setup ENWW
Page 37

13. Align the formatter board in the tracks at the top and bottom, and slide the board back into the MFP.
Push black tabs on the formatter board outward until they click back into position.
Figure 1-38 Aligning the formatter board
14. Reconnect all the cables, and turn on the MFP.
Figure 1-39 Reconnecting the cables
NOTE: When connecting the fax accessory to a phone line, ensure that the phone line being
used for the fax accessory is a dedicated line that is not used by any other devices. Also, this line
should be an analog line because the fax will not function correctly if it is connected to some digital
PBX systems. If you are not sure whether you have an analog or digital phone line, contact your
telecom provider.
NOTE: HP recommends using the phone cord that comes with the fax accessory to ensure that
the accessory functions correctly.
ENWW Installing the fax accessory 29
Page 38

15. Plug the power cord into the MFP, and then turn on the power.
Figure 1-40 Plugging in the power cord
Figure 1-41 Turning on the power
30 Chapter 1 Setup ENWW
Page 39

16. Locate the phone cord that is included with the fax accessory kit. Connect one end of the phone
cord into the fax accessory phone jack that is on the formatter. Push the connector until you hear
a click.
Figure 1-42 Connecting the phone cord
17. Connect the other end of the phone cord into the phone jack on the wall. Push the connector until
you hear a click or until the connector is securely seated. Because there are different types of
connectors, depending on the country/region, the connector might make an audible click when
connected or might not make an audible click.
Installing/replacing the fax accessory in the HP LaserJet M9040 MFP / M9050 MFP
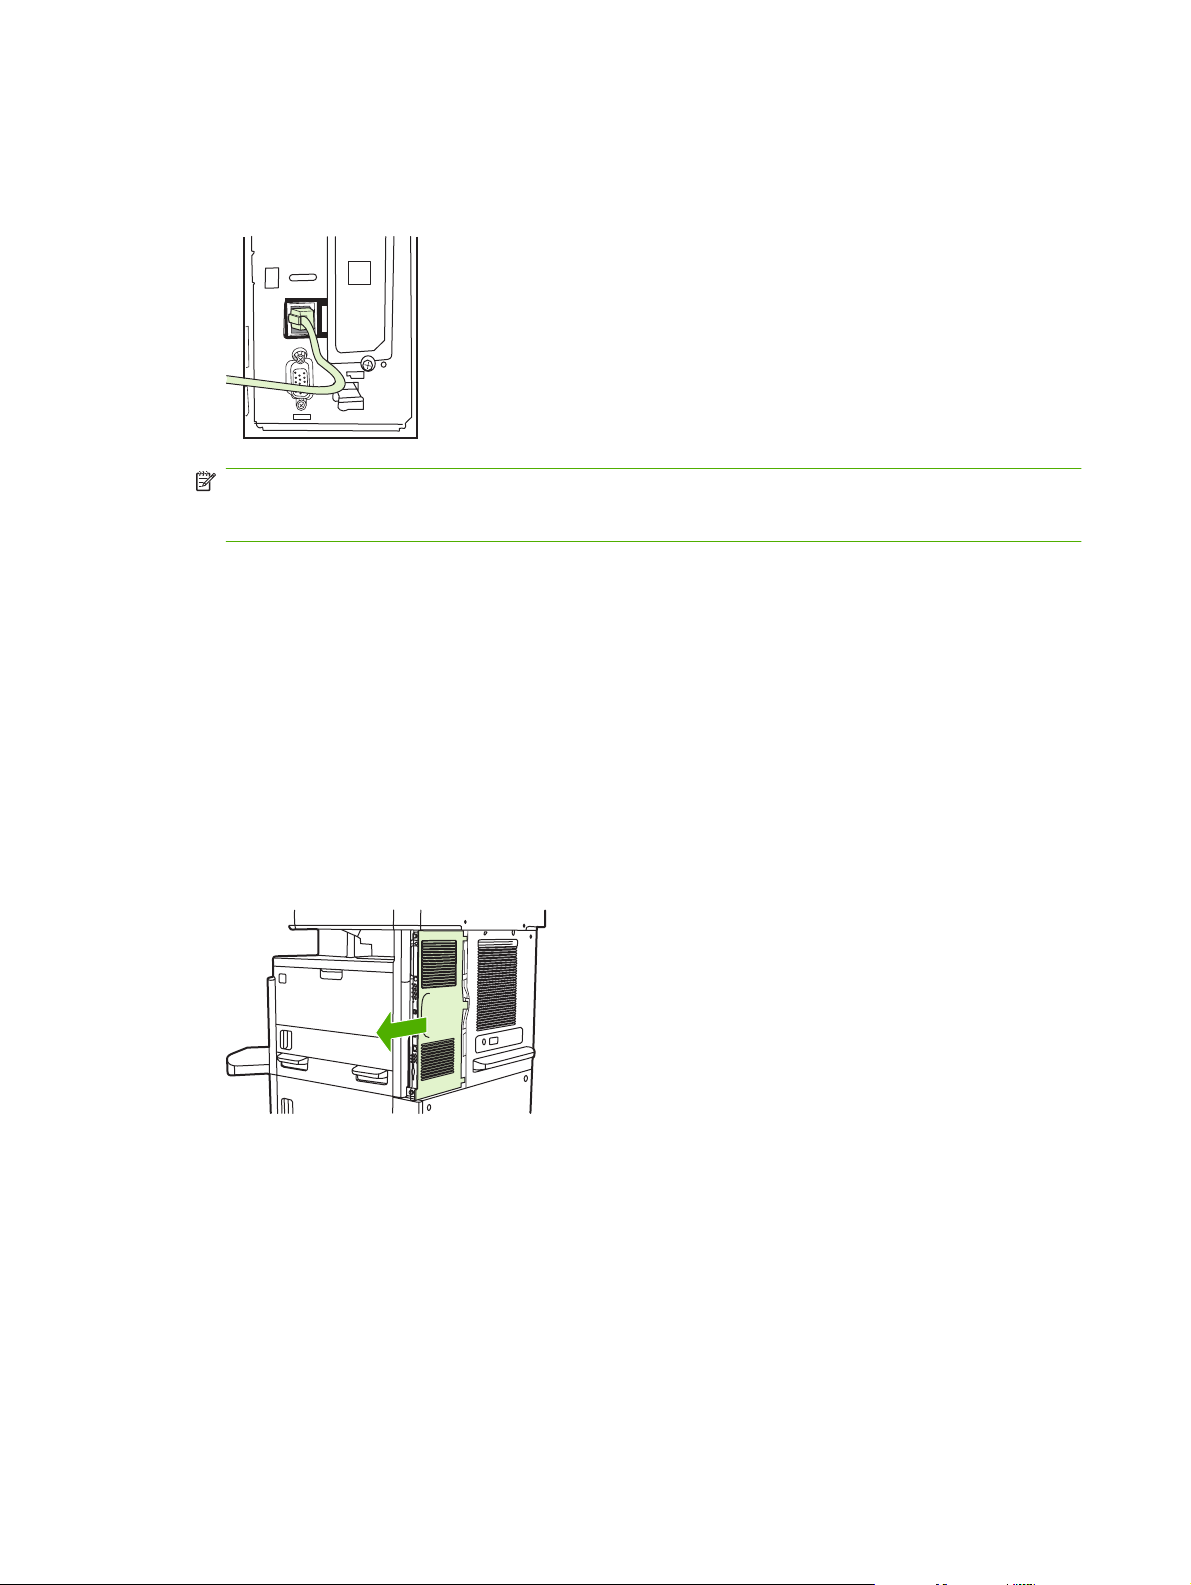
Use this procedure to install the analog fax accessory in the HP LaserJet M9040 MFP / M9050 MFP.
1. Slide the optional output device away from the print engine.
Figure 1-43 Sliding away the output device
2. Turn off the MFP, and then disconnect the power cord and all cables.
Figure 1-44 Turning the power off and disconnecting cables
ENWW Installing the fax accessory 31
Page 40

3. Loosen the two captive thumb screws on the back of the MFP.
Figure 1-45 Loosening the screws
4. Grasp the screws and pull the formatter board out of the MFP. Place it on a flat, non-conductive
surface.
Figure 1-46 Removing the formatter
5. If you are replacing an existing fax accessory, pull up to remove it.
Figure 1-47 Replacing an existing fax accessory
32 Chapter 1 Setup ENWW
Page 41

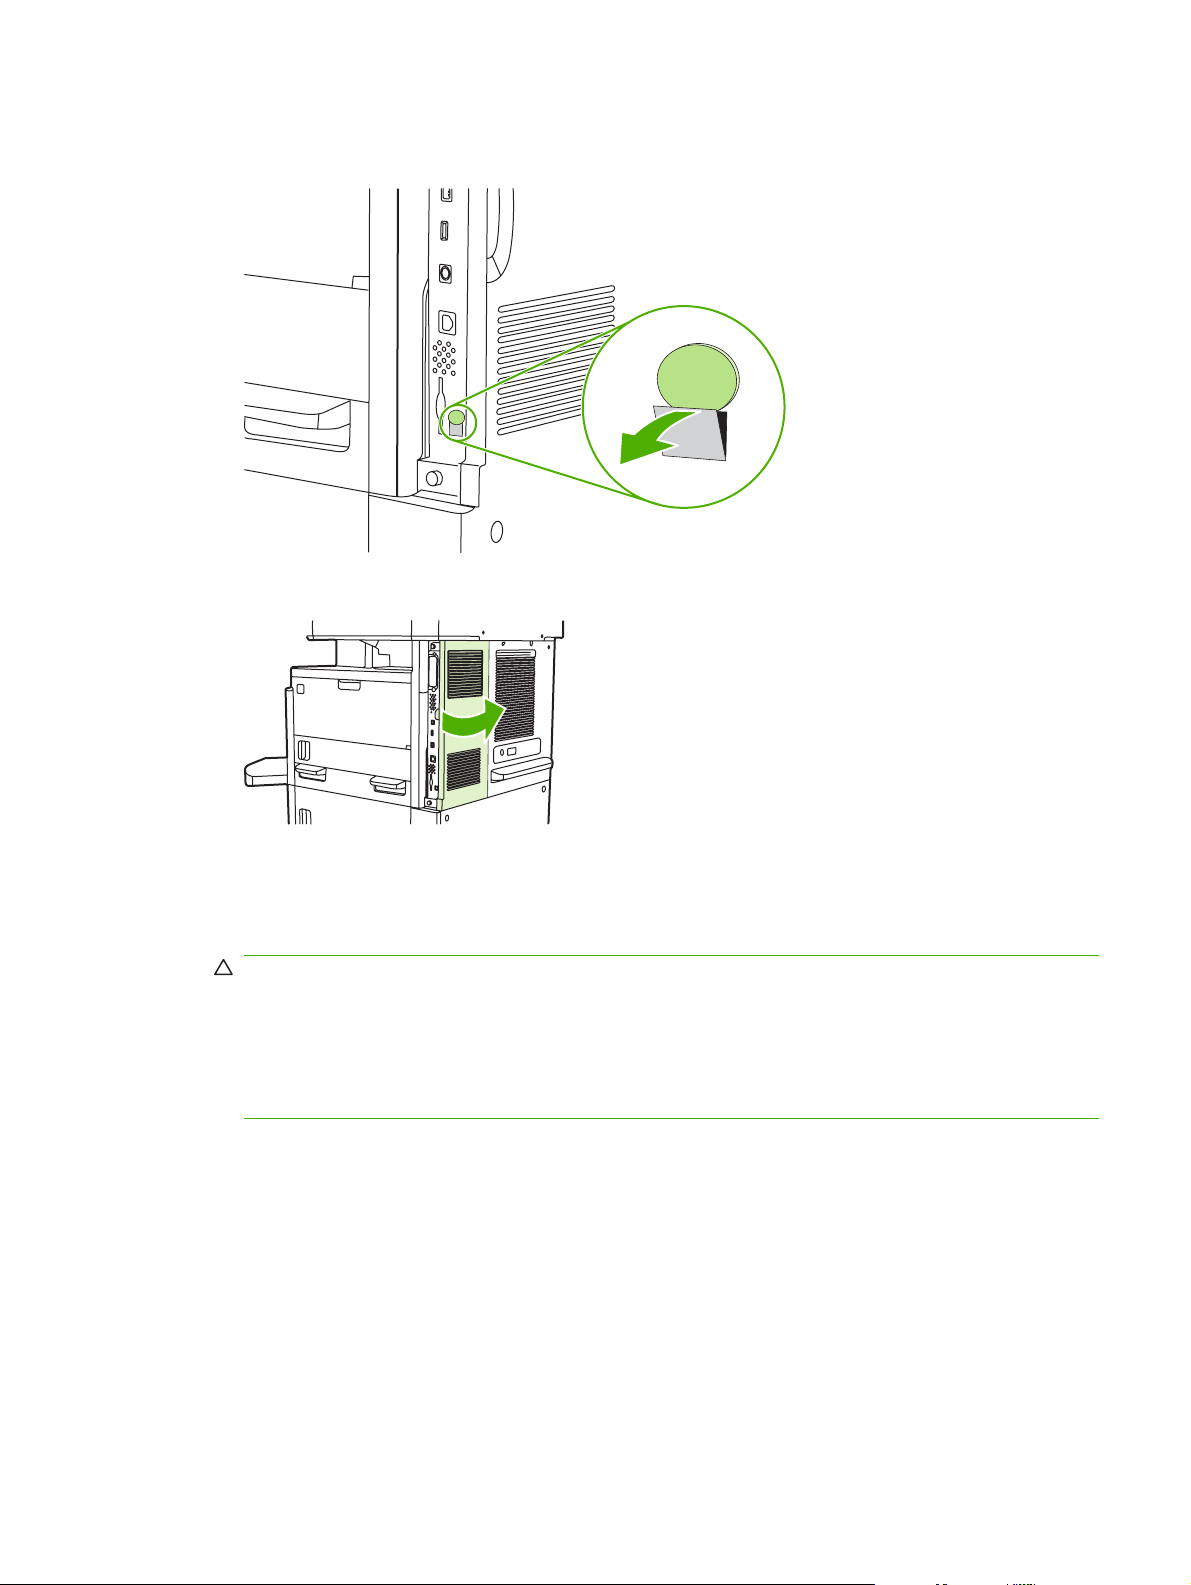
6. Remove the fax accessory from its antistatic pouch.
The fax accessory contains parts that are sensitive to electrostatic discharge (ESD). When
removing the fax accessory from its antistatic pouch and while installing it, use static protection,
such as a grounding wrist strap that is connected to the metal frame of the MFP, or touch the metal
frame of the MFP with your other hand.
7. Align the fax accessory with the two guides. Make sure that the connector pins are aligned, and
then push the fax accessory into place. Make sure that the fax accessory is securely connected to
the formatter.
Figure 1-48 Inserting the fax accessory
8. Slide the formatter board back into the MFP and tighten the two screws.
Figure 1-49 Inserting the formatter
ENWW Installing the fax accessory 33
Page 42

9. Reconnect the power cord and all cables, and then turn on the MFP.
Figure 1-50 Reconnecting cables and turning on the MFP
NOTE: When connecting the fax accessory to a phone line, ensure that the phone line being
used for the fax accessory is a dedicated line that is not used by any other devices. Also, this line
should be an analog line because the fax will not function correctly if it is connected to some digital
PBX systems. If you are not sure whether you have an analog or digital phone line, contact your
telecom provider.
NOTE: HP recommends using the phone cord that comes with the fax accessory to ensure that
the accessory functions correctly.
10. Locate the phone cord that is included with the fax accessory kit. Connect one end of the phone
cord into the fax accessory phone jack that is on the formatter. Push the connector until you hear
a click.
Figure 1-51 Connecting the phone cord
NOTE: Be sure to connect the phone line to the fax accessory port, which is near the top of the
formatter. Do not connect the phone line to the HP Jetdirect LAN port, which is nearer the bottom
of the formatter.
11. Connect the other end of the phone cord into the phone jack on the wall. Push the connector until
you hear a click or until the connector is securely seated. Because there are different types of
connectors, depending on the country/region, the connector might make an audible click when
connected or might not make an audible click.
34 Chapter 1 Setup ENWW
Page 43

Verifying fax operation
When the fax accessory is installed and operating correctly, the fax icon displays on the MFP control
panel. If the fax accessory has just been installed but has not been configured, the fax icon is grayedout and (depending on the MFP model) may have Not Configured written across it. If this occurs, the
fax accessory needs to be configured, see
Required fax settings on page 36.
ENWW Verifying fax operation 35
Page 44

Required fax settings
NOTE: A Fax Configuration Wizard is available to guide you through the steps to make the required
fax settings. For more information, see
After the fax accessory is installed, you must configure certain settings before you can use the
accessory. If these settings are not configured, the fax icon is grayed-out. These settings include:
Date and time
●
Location (country/region)
●
Fax header (phone number and company name)
●
This information is used in the fax header, which is printed on all outgoing faxes.
NOTE: When first installed, the fax accessory might read some of these settings from the MFP;
therefore, a value may already be set. You should check the values to verify that they are set and correct.
NOTE: In the U.S. and many other countries/regions, setting the date, time, location, phone number,
and company name is a legal requirement for fax.
Fax Configuration Wizard
The Fax Configuration Wizard guides users through a step-by-step procedure to configure fax settings
that are required to use the fax feature. If the settings are not configured, the fax feature is disabled.
The following is a list of fax settings that are configured using the wizard:
Fax Configuration Wizard on page 36.
Location (country/region)
●
Fax phone number
●
Company name
●
This information is used in the fax header, which is printed on all outgoing faxes.
The wizard starts when the device is turned on. You can choose to use the wizard or exit the wizard to
configure the settings at a later date.
NOTE: The settings configured using the wizard on the control panel override any settings made in
the embedded Web server.
Accessing fax settings menu
The required fax settings are set by accessing the appropriate menu for your MFP.
NOTE: If the fax menu settings do not appear in the menu listing, LAN fax may be enabled. When
LAN fax is enabled, the analog fax accessory is disabled and the fax menu does not display. Only one
fax feature, either LAN fax or analog fax, can be enabled at a time. The fax icon displays for either fax
feature. If you wish to use analog fax when LAN fax is enabled, use the HP MFP Digital Sending Software
Configuration Utility to disable LAN fax.
Set or verify the date and time for the HP LaserJet 4345mfp and
9040/9050mfp, and the HP Color LaserJet 4730mfp and 9500mfp
The date and time setting for the fax accessory is the same value as the MFP date and time setting. If
this is the first time you are powering up the MFP, you will prompted for this information.
36 Chapter 1 Setup ENWW
Page 45

To verify or change the date and time settings, complete the following steps.
1. On the control panel, press the Menu button to display the main menu.
2. Touch FAX to display the fax menu.
3. Touch FAX SETUP REQUIRED to display the required settings menu.
4. Touch DATE/TIME to display the settings.
5. Select the date format and then enter the date.
6. Select the time format and then enter the time.
7. Touch OK to accept the settings.
Set or verify the date and time on the HP LaserJet M3035 MFP, M3027 MFP,
M4345 MFP, M5025 MFP, M5035 MFP, M9040 MFP, M9050 MFP and HP Color
LaserJet CM4730 MFP and CM6040 MFP Series
The date and time setting for the fax accessory is the same value as the MFP date and time setting. If
this is the first time you are powering up the MFP, you will prompted for this information.
To verify or change the date and time settings, complete the following steps.
1. On the control panel, scroll to and touch the Administration icon to open the Administration menu.
2. Scroll to and touch Initial Setup to display the setup settings menu and then touch Fax Setup.
3. Touch Required Settings.
4. Select the date format and then enter the date.
5. Select the time format and then enter the time.
6. Touch Save to accept the settings.
Set, verify, or change the MFP/fax accessory country/region
The location setting identifies the country/region where the MFP/fax accessory is located. This setting
also sets the date/time format and minimum/maximum rings-to-answer range for the country/region.
Because this setting is a legal requirement in some countries/regions, it must be set for the fax accessory
to operate. If this is the first time you are powering up the printer, you will be prompted for this information.
Set, verify, or change the MFP/fax country/region on the HP LaserJet 4345mfp and 9040/9050mfp, and the
HP Color LaserJet 4730mfp and 9500mfp
1. On the control panel, press the Menu button to display the main menu.
2. Touch FAX to display the fax menu.
3. Touch FAX SETUP REQUIRED to display the required settings menu.
4. Touch Fax Header to display the header settings.
5. Touch Location to display the list of countries/regions.
6. Scroll through the list until your country/region is displayed, and then touch the country/region to
select it.
ENWW Required fax settings 37
Page 46

Set, verify, or change the MFP/fax location on the HP LaserJet M3025 MFP, M3027 MFP, M4345 MFP, M5025
MFP, M5035 MFP, M9040 MFP, M9050 MFP, and HP Color LaserJet CM4730 MFP and CM6040 MFP
Series
1. On the control panel, scroll to and touch the Administration icon to open the Administration menu.
2. Scroll to and touch Initial Setup to display the setup settings menu.
3. Touch Fax Setup to display the Fax Setup menu and touch Required Settings.
4. Touch Location to display the list of countries/regions.
5. Scroll through the list until your country/region is displayed, and then touch the country/region to
select it.
6. Touch Save to save the settings.
Set the fax header
The fax header setting is used to set a phone number and company name that are placed in the fax
header. This information is required and must be set.
If the fax icon is displayed on the control panel screen and does not have Not Configured written across
and/or is not grayed, you have completed all necessary setup. To send a fax, see
on page 65 for information about sending faxes.
Set, verify, or change the fax header on the HP LaserJet 4345mfp and 9040/9050mfp, and the HP Color
LaserJet 4730mfp and 9500mfp outgoing faxes
Use Fax
1. On the control panel, press the Menu button to display the main menu.
2. Touch FAX to display the fax menu.
3. Touch FAX SETUP REQUIRED to display the required settings menu.
4. Touch Fax Header to display the settings.
5. Touch Phone Number to display the keyboard.
6. Enter a phone number, and then touch OK to return to the Fax Header menu.
7. Touch Company Name to display the keyboard.
8. Type the company name, and then touch OK to complete the setting.
Set, verify, or change the fax header on the HP LaserJet M3025 MFP, M3027 MFP, M4345 MFP, M5025 MFP,
M5035 MFP, M9040 MFP, M9050 MFP and HP Color LaserJet CM4730 MFP and CM6040 MFP Series
1. On the control panel, scroll to and touch the Administration icon to open the Administration menu.
2. Scroll to and touch Initial Setup to display the Initial Setup menu.
3. Touch Fax Setup to display the Fax Setup menu.
4. Touch Required Settings to display the Required Settings menu.
5. Touch Fax Header Information to display the header information.
6. Touch Phone Number to display the Phone Number screen.
7. Touch the text box to display the keyboard.
38 Chapter 1 Setup ENWW
Page 47

8. Using the keyboard, type the phone number, and then touch OK.
9. Touch Save to save the header phone number.
10. Touch Company Name and repeat the process.
ENWW Required fax settings 39
Page 48

40 Chapter 1 Setup ENWW
Page 49

2 Set fax settings
This chapter describes the configuration settings for the MFP fax accessory that you access through
the fax menu on the control panel. In addition to the control panel, you can access these settings through
remote configuration tools.
NOTE: For information about the following settings, see Setup on page 1. The following fax settings
are described in the first chapter and are not included here: Canceling faxes; Setting the date and time;
Setting the location; Setting the header.
ENWW 41
Page 50

Remote fax configuration
In addition to using the MFP control panel, you can configure the fax accessory remotely by using various
software tools. Because the MFP contains an embedded Web server (EWS), you can configure the fax
accessory across the Web by using either a Web browser or HP Web Jetadmin (WJA). In addition, you
can configure the fax accessory across the network with a network-connected computer by using the
HP MFP Digital Sending Software Configuration Utility (DSS). These tools provide access to most of
the fax accessory configuration settings that available from the MFP fax menu, as described in this
document.
NOTE: The DSS configuration utility can disable or enable the analog-fax feature on the MFP. If the
DSS configuration utility disables the analog fax and then the MFP is detached from the configuration
utility, you will not see Send to Fax in the EWS or WJA Digital Sending menu. If this happens, enable
the analog fax for the MFP by using the DSS configuration utility.
Web browser
The MFP contains an embedded Web server (EWS). The EWS allows you to use a Web browser to
access and set the analog-fax settings, described in this chapter.
To use a Web browser to access the EWS fax setting screens, perform the following steps.
1. Type the IP address of the MFP in the browser URL address bar and press Enter to open the EWS
Configure MFP screen. To get the IP address of the MFP, print an MFP Configuration page.
NOTE: If DSS is being used, a message appears on EWS indicating that DSS is in control. The
only way to change settings is through DSS.
2. Click the Digital Sending tab.
3. Click the Send Fax tab to open the Fax configuration settings screen.
4. On the Fax Settings screen make any changes to the settings and click OK to accept the settings.
Select Advanced to open the Advanced MFP Modem Settings screen for additional fax settings.
For information about the settings, see the setting descriptions in this guide.
5. After you have made changes to the settings, click OK to accept the settings.
HP Web Jetadmin
To access the MFP analog-fax settings by using HP Web Jetadmin, perform the following steps. For
detailed information about HP Web Jetadmin, see the HP Web Jetadmin Reference Manual.
1. Start HP Web Jetadmin.
2. In the At a Glance text box, type the IP address of the MFP in the Quick Device Find text box,
and then click Go to see the device status in the right pane. Select Digital Sending and Fax from
the status drop-down menu in that pane.
3. Configure the options in the Fax Settings or the Advanced Fax Settings sections. For information
about a specific setting, select the context help next to the setting.
4. After you have made changes to the settings, click Apply to accept the settings.
In addition to configuring a single MFP, you can also perform multiple device configuration. Multiple
device mode configures several MFPs at once. For information about this feature, see the HP Web
Jetadmin Reference Manual.
42 Chapter 2 Set fax settings ENWW
Page 51

HP MFP Digital Sending Software Configuration Utility
To access the analog MFP fax settings by using the DSS configuration utility, perform the following
steps.
1. 1. Start the utility (on the computer or server) to open the main screen.
2. Select the MFP and click the Configure MFP button on the main screen, and then click the Send
to Fax tab to open the Fax Settings screen.
3. To enable the fax capabilities on the MFP, select Enable Send to Fax. To access Analog-fax
settings, select directly from the MFP's internal modem in the Send Faxes drop-down list. On the
Fax Settings screen make any changes to the settings and click OK to accept the settings. Select
Advanced to open the Advanced MFP Modem Settings screen for additional fax settings.
For information about these settings, see the setting descriptions in this guide.
4. After you have made changes to the settings, click OK to accept the settings.
In addition to configuring a single MFP, you can also configure multiple devices. For more information
about the HP MFP Digital Sending Software Configuration Utility, see the HP MFP Digital Sending
Software User Guide or the HP MFP Digital Sending Software Support Guide.
NOTE: Depending on the capabilities and settings of your fax method, some of these options might
not be available or configurable.
ENWW Remote fax configuration 43
Page 52

Send fax settings
Set the dial tone detection
The detect dial tone setting determines whether the fax checks for a dial tone before sending a fax.
Set the dial tone detection on the HP LaserJet 4345mfp and 9040/9050mfp, and the HP Color LaserJet
4730mfp and 9500mfp
1. On the control panel, press the Menu button to open the main menu.
2. Touch FAX to open the fax menu.
3. Scroll to and touch FAX SEND.
4. Scroll to and touch Detect Dial Tone to see the detect dial tone settings.
5. Touch OFF (default) to disable dial tone detection, or touch ON to enable dial tone detection.
Set the dial tone detection on the HP LaserJet M3025 MFP, M3027 MFP, M4345 MFP, M5025 MFP, M5035
MFP, M9040 MFP, M9050 MFP and HP Color LaserJet CM4730 MFP and CM6040 MFP Series
1. On the control panel, scroll to and touch the Administration icon to open the Administration menu.
2. Scroll to touch Initial Setup to open the initial setup menu.
3. Touch Fax Setup to open the fax setup menu.
4. Touch Fax Send Settings and use the down arrow key to scroll to Detect Dial Tone.
5. Touch Enabled (default) to enable dial tone detection, or touch Disabled to disable dial tone
detection.
Set the overlay header (outgoing faxes)
The overlay header consists of the date, time, company name, phone number, and page number and
is printed at the top of the page on outgoing faxes. This setting determines whether the header is
appended to the top of the page or is printed as an overlay. If the header is appended to the top of a
page, it moves page data down which can result in data at the bottom of a page being pushed to another
page, possibly printing an additional page. If the header is printed as an overlay, it does not push any
page data, but might print over data at the top of the page.
NOTE: When fax forwarding is enabled, the overlay header is always appended to the top of the page,
even if overlay is enabled.
Set the overlay header for outgoing faxes on the HP LaserJet 4345mfp and 9040/9050mfp, and the HP Color
LaserJet 4730mfp and 9500mfp
1. On the control panel, press the Menu button to open the main menu.
2. Touch FAX to open the fax menu.
3. Scroll to and touch FAX SEND.
4. Touch OVERLAY HEADER to see the header settings.
5. Touch Yes to print the header as an overlay, or touch No (default) to append the header to the top
of the page.
44 Chapter 2 Set fax settings ENWW
Page 53

Set the overlay header for outgoing faxes on the HP LaserJet M3025 MFP, M3027 MFP, M4345 MFP, M5025
MFP, M5035 MFP, M9040 MFP, M9050 MFP and HP Color LaserJet CM4730 MFP and CM6040 MFP Series
1. On the control panel, touch the Administration icon to open the Administration menu.
2. Scroll to and touch Default Job Options
3. Scroll to and touch Default Fax Options.
4. Scroll to and touch FAX SEND.
5. Touch Fax Header to see the header settings.
6. Touch Overlay to print the header as an overlay, or touch Prepend (default) to append the header
to the top of the page.
7. Touch Save.
Set the dialing mode
The dialing mode setting sets the type of dialing that is used: either tone (touch-tone phones) or pulse
(rotary-dial phones).
To set the dialing mode, perform the following steps.
Set the dialing mode on the HP LaserJet 4345mfp and 9040/9050mfp, and the HP Color LaserJet 4730mfp
and 9500mfp
1. On the control panel, press the Menu button to open the main menu.
2. Touch FAX to open the fax menu.
3. Scroll to and touch FAX SEND. Use the down arrow key to scroll to Dialing Mode.
4. Touch Dialing Mode to see the dialing mode settings.
5. Touch Tone (default) to set the fax for tone dialing, or touch Pulse to set the fax for pulse dialing.
Set the dialing mode on the HP LaserJet M3025 MFP, M3027 MFP, M4345 MFP, M5025 MFP, M5035 MFP,
M9040 MFP, M9050 MFP and HP Color LaserJet CM4730 MFP and CM6040 MFP Series
1. On the control panel, scroll to and touch the Administration icon to open the Administration menu.
2. Scroll to touch Initial Setup to open the initial setup menu.
3. Touch Fax Setup to open the fax setup menu.
4. Touch Fax Send Settings and use the down arrow key to scroll to Dialing Mode.
5. Touch Dialing Mode to see the dialing mode settings.
6. Touch Tone (default) to set the fax for tone dialing, or touch Pulse to set the fax for pulse dialing.
7. Touch Save.
Set a dialing prefix
The dialing prefix setting allows you to enter a prefix number (such as a "9" to access an outside line)
when dialing. This prefix number is automatically added to all phone numbers when dialed.
ENWW Send fax settings 45
Page 54

NOTE: You might need a pause between the prefix and the phone number. To insert a 2–second
pause, enter a comma (,). For more information on using a comma see
Set a dialing prefix on the HP LaserJet 4345mfp and 9040/9050mfp, and the HP Color LaserJet 4730mfp
and 9500mfp
1. On the control panel, press the Menu button to open the main menu.
2. Touch FAX to open the fax menu.
3. Scroll to and touch FAX SEND.
4. Scroll to and touch DIAL PREFIX to see the prefix settings.
5. Touch OFF (default) to disable dialing prefix, or touch Custom to make the keyboard available, and
type a prefix.
6. Type the prefix number(s), and then touch OK.
Set a dialing prefix on the HP LaserJet M3025 MFP, M3027 MFP, M4345 MFP, M5025 MFP, M5035 MFP,
M9040 MFP, M9050 MFP and HP Color LaserJet CM4730 MFP and CM6040 MFP Series
1. On the control panel, scroll to and touch the Administration icon to open the Administration menu.
2. Scroll to touch Initial Setup to open the initial setup menu.
3. Touch Fax Setup to open the fax setup menu.
Send a fax on page 70.
4. Touch Fax Send Settings and use the down arrow key to scroll to Dialing Prefix to see the dialing
prefix settings.
5. Touch Custom to enter a dialing prefix number.
NOTE: If you want to disable the dialing prefix, touch OFF (default), touch Save, and then skip
the remaining steps.
6. Touch Save to open the Set Dialing Prefix screen.
7. Touch Dialing Prefix Number.
8. Touch the text box to display the keyboard.
9. Type the dialing prefix number and touch OK.
10. Touch Save.
Set the redial rules
Set redial-on-busy
The redial-on-busy setting selects the number of times (0 through 9) the fax accessory redials a number
when the number is busy. The interval between retries is set by the Redial Interval setting.
Set the redial-on-busy setting on the HP LaserJet 4345mfp and 9040/9050mfp, and the HP Color LaserJet
4730mfp and 9500mfp
1. On the control panel, press the Menu button to open the main menu.
2. Touch FAX to open the fax menu.
46 Chapter 2 Set fax settings ENWW
Page 55

3. Scroll to and touch FAX SEND.
4. Touch Redial on Busy to open the redial-on-busy setting screen.
5. Use the up and down arrows to select the number (default=3), and then touch OK.
Set the redial-on-busy setting on the HP LaserJet M3025 MFP, M3027 MFP, M4345 MFP, M5025 MFP, M5035
MFP, M9040 MFP, M9050 MFP and HP Color LaserJet CM4730 MFP and CM6040 MFP Series
1. On the control panel, scroll to and touch the Administration icon to open the Administration menu.
2. Scroll to touch Initial Setup.
3. Scroll to touch Fax Setup.
4. Touch Fax Send Settings and use the down arrow key to scroll to Redial on Busy.
5. Touch the text box to display the keyboard.
6. Enter the value (0–9) and touch OK.
7. Touch Save.
Set redial-on-no-answer
The redial-on-no-answer setting selects the number of times the fax accessory redials if the number
dialed does not answer. The number of retries is either 0 to 1 (used in the U.S.) or 0 to 2, depending on
the country/region setting. The interval between retries is set by the redial interval setting.
Set the redial-on-no-answer setting on the HP LaserJet 4345mfp and 9040/9050mfp, and the HP Color
LaserJet 4730mfp and 9500mfp
1. On the control panel, press the Menu button to open the main menu.
2. Touch FAX to open the fax menu.
3. Scroll to and touch FAX SEND.
4. Scroll to and touch Redial on No Answer to open the setting screen.
5. Use the up and down arrows to select the number (default=0), and then touch OK.
Set the redial-on-busy setting on the HP LaserJet M3025 MFP, M3027 MFP, M4345 MFP, M5025 MFP, M5035
MFP, M9040 MFP, M9050 MFP and HP Color LaserJet CM4730 MFP and CM6040 MFP Series
1. On the control panel, scroll to and touch the Administration icon to open the Administration menu.
2. Scroll to touch Initial Setup to open the initial setup menu.
3. Scroll to touch Fax Setup to open the fax setup menu.
4. Touch Fax Send Settings and use the down arrow key to scroll to Redial on No Answer.
5. Touch Never or Once.
6. Touch Save.
ENWW Send fax settings 47
Page 56

Set redial interval
The redial interval setting selects the number of minutes between retries if the number dialed is busy or
not answering.
NOTE: You might observe a redial message on the control panel when both the Redial-on-Busy and
Redial-on-No-Answer settings are set to off. This occurs when the fax accessory dials a number,
establishes a connection, and then loses the connection. As a result of this error condition, the fax
accessory performs two automatic redial attempts regardless of the redial settings (the first one at 26,400
bps and, if that fails, a second one at 14,400 bps). During this redial operation, a message appears on
the control panel to indicate that a redial is in progress.
Set the redial-interval on the HP LaserJet 4345mfp and 9040/9050mfp, and the HP Color LaserJet 4730mfp
and 9500mfp
1. On the control panel, press the Menu button to open the main menu.
2. Touch FAX to open the fax menu.
3. Scroll to and touch FAX SEND.
4. Scroll to and touch Redial Interval to open the setting screen.
5. Use the up and down arrows to select the number (1 through 5 minutes; default=5), and then touch
OK.
Set the redial interval on the HP LaserJet M3025 MFP, M3027 MFP, M4345 MFP, M5025 MFP, M5035 MFP,
M9040 MFP, M9050 MFP and HP Color LaserJet CM4730 MFP and CM6040 MFP Series
1. On the control panel, scroll to and touch the Administration icon to open the Administration menu.
2. Scroll to touch Initial Setup to open the initial setup menu.
3. Touch Fax Setup to open the fax setup menu.
4. Touch Fax Send Settings and use the down arrow key to scroll to Redial Interval.
5. Touch the text box to display the keyboard.
6. Enter the value (1–5) and touch OK.
7. Touch Save.
Set the outgoing fax resolution
The outgoing fax resolution setting determines the maximum resolution supported by the receiving fax.
The fax accessory uses the highest possible resolution (as limited by this setting) and the maximum
resolution of the receiving fax.
NOTE: Faxes wider than 21.25 cm (8.5 inches) are automatically sent by using standard or fine
resolution, to reduce phone time.
NOTE: The default resolution setting is a lower dpi than previous MFP model default resolution
settings. For example, previous MFP models had a default resolution of FINE (200 x 200 dpi).
NOTE: The higher the resolution, the longer the transmission time required.
48 Chapter 2 Set fax settings ENWW
Page 57

Set the resolution for outgoing faxes on the HP LaserJet 4345mfp and 9040/9050mfp, and the HP Color
LaserJet 4730mfp and 9500mfp
1. On the control panel, press the Menu button to open the main menu.
2. Touch FAX to open the fax menu.
3. Scroll to and touch FAX SEND.
4. Touch DEFAULT RESOLUTION to see the resolution settings.
5. Touch Standard (200 x 100 dpi, default), Fine (200 x 200 dpi), or Superfine (300 x 300 dpi) to select
the resolution.
Set the resolution for outgoing faxes on the HP LaserJet M3025 MFP, M3027 MFP, M4345 MFP, M5025 MFP,
M5035 MFP, M9040 MFP, M9050 MFP, and HP Color LaserJet CM4730 MFP and CM6040 MFP Series
1. On the control panel, scroll to and touch the Administration icon to open the Administration menu.
2. Touch Default Job Options
3. Touch Default Fax Options
4. Scroll to and touch FAX SEND.
5. Touch Resolution to see the resolution settings.
6. Touch Standard (200 x 100 dpi, default), Fine (200 x 200 dpi), or Superfine (300 x 300 dpi) to select
the resolution.
7. Touch Save.
Set billing codes
The billing-code setting, when enabled, prompts the user to enter a number when sending a fax. This
number is placed in the billing-code report. To view the billing-code report, either print the report or query
it by using an application.
Set billing codes on the HP LaserJet 4345mfp and the HP Color LaserJet 4730mfp, 9040/9050mfp, and
9500mfp
1. On the control panel, press the Menu button to open the main menu.
2. Touch FAX to open the fax menu.
3. Scroll to and touch FAX SEND to see the Fax Send settings.
4. Scroll to and touch BILLING CODE to see the billing code settings.
5. Touch Custom to open the billing-code screen. Use the up and down arrows to select the minimum
number of digits that you want in the billing code, and then touch OK to enable billing codes. To
disable billing codes, touch OFF (default).
Set billing codes on the HP LaserJet M3025 MFP, M3027 MFP, M4345 MFP, M5025 MFP, M5035 MFP, M9040
MFP, M9050 MFP and HP Color LaserJet CM4730 MFP and CM6040 MFP Series
1. On the control panel, scroll to and touch the Administration icon to open the Administration menu.
2. Scroll to and touch Initial Setup and then Fax Setup to open the fax menu.
ENWW Send fax settings 49
Page 58

3. Touch Fax Send Settings to see the Fax Send settings.
4. Scroll to and touch Billing Codes to see the billing code settings.
5. Touch Custom to enable billing codes.
NOTE: If you want to disable billing codes, touch OFF, touch Save, and then skip the remaining
steps.
6. Touch Save to open the Billing Code screen.
7. Touch the text box to display the keyboard.
8. Type the minimum number of digits you want in the billing code, and then touch OK.
9. Touch Save.
Set the JBIG compression mode
Enabling JBIG compression can reduce phone-call charges by reducing fax transmission time and is,
therefore, the preferred setting. However, JBIG might cause compatibility problems when
communicating with some older fax machines, in which case you might need to disable it.
NOTE: JBIG compression only works when both the sending and receiving machines have JBIG
compression.
To enable or disable JBIG compression, perform the following steps.
Set the JBIG compression mode on the HP LaserJet 4345mfp and 9040/9050mfp, and the HP Color LaserJet
4730mfp and 9500mfp
1. On the control panel, press the Menu button to open the main menu.
2. Touch FAX to open the fax menu.
3. Touch FAX SETUP OPTIONAL to see the optional setup items.
4. Touch JBIG Compression to see the settings.
5. Touch ON (default) to enable JBIG compression, or touch OFF to disable JBIG compression.
Set the JBIG compression mode on the HP LaserJet M3025 MFP, M3027 MFP, M4345 MFP, M5025 MFP,
M5035 MFP, M9040 MFP, M9050 MFP and HP Color LaserJet CM4730 MFP and CM6040 MFP Series
1. On the control panel, scroll to and touch the Administration icon to open the Administration menu.
2. Scroll to and touch Initial Setup.
3. Scroll to and touch Fax Setup.
4. Scroll to and touch Fax Send Settings.
5. Touch JBIG Compression to see the settings.
6. Touch Enable (default) to enable JBIG compression, or touch Disabled to disable JBIG
compression.
50 Chapter 2 Set fax settings ENWW
Page 59

Change the sharpness setting
The Sharpness setting specifies the sharpness that the scanner uses when the MFP scans your original.
Sharpness enhances the edges of the original so that faint or fine text and graphics are reproduced
more sharply. Increasing sharpness increases resolution which also increases transmission time.
Change the sharpness setting on the HP LaserJet 4345 MFP and 9040/9050mfp, and the HP Color LaserJet
4730mfp and 9500mfp
1. On the control panel main screen, touch the FAX icon to open the Fax screen.
2. Touch Settings to open the Settings screen.
3. Touch the Fax Settings icon to open the Fax Settings screen.
4. On the ENHANCE tab, touch the left arrow to decrease the sharpness or touch the right arrow to
increase the sharpness of the image.
5. Touch OK to accept the setting.
Change the sharpness setting on the HP LaserJet M3025 MFP, M3027 MFP, M4345 MFP, M5025 MFP, M5035
MFP, M9040 MFP, M9050 MFP and HP Color LaserJet CM4730 MFP and CM6040 MFP Series
1. On the control panel, touch the FAX icon to display the Fax screen.
2. Scroll to and touch More Options.
3. Scroll to and touch Image Adjustment.
4. Scroll to and touch Sharpness.
5. Touch the left arrow to decrease the sharpness or touch the right arrow to increase the sharpness
of the image.
6. Touch OK to accept the setting.
Change the background setting
If you are faxing a document that is printed on colored paper, you can enhance your fax copy quality by
removing the background that might cause your fax copy to streak or blur.
Change the background setting on the HP LaserJet 4345mfp and 9040/9050mfp, and the HP Color LaserJet
4730mfp and 9500mfp
1. On the control panel main screen, touch the FAX icon to open the Fax screen.
2. Touch Settings to open the Settings screen.
3. Touch the Fax Settings icon to open the Fax Settings screen.
4. On the ENHANCE tab, touch the left arrow to increase background or touch the right arrow to
decrease the background.
5. Touch OK to accept the setting.
ENWW Send fax settings 51
Page 60

Change the background setting on the HP LaserJet M3025 MFP, M3027 MFP, M4345 MFP, M5025 MFP,
M5035 MFP, M9040 MFP, M9050 MFP and HP Color LaserJet CM4730 MFP and CM6040 MFP Series
1. On the control panel, touch the FAX icon to display the Fax screen.
2. Scroll to and touch More Options.
3. Scroll to and touch Image Adjustment.
4. Scroll to and touch Background Cleanup.
5. Touch the left arrow or touch the right arrow to change the background setting.
6. Touch OK to accept the setting.
Change the light/dark setting
The light/dark setting adjusts how light or dark the transmitted image appears on the recipient fax
machine.
Change the light/dark setting on the HP LaserJet 4345mfp and 9040/9050mfp, and the HP Color LaserJet
4730mfp and 9500mfp
1. On the control panel main screen, touch the FAX icon to open the Fax screen.
2. Touch Settings to open the Settings screen.
3. Touch the Light arrow to lighten the image or touch the Dark arrow to darken the image.
4. Touch OK to accept the setting.
Change the light/dark setting on the HP LaserJet M3025 MFP, M3027 MFP, M4345 MFP, M5025 MFP, M5035
MFP, M9040 MFP, M9050 MFP and HP Color LaserJet CM4730 MFP and CM6040 MFP Series
1. On the control panel, touch the FAX icon to display the Fax screen.
2. Scroll to and touch More Options.
3. Scroll to and touch Image Adjustment.
4. Scroll to and touch Darkness.
5. Touch the left arrow to make the image lighter and touch the right arrow to make the image darker.
6. Touch OK to accept the setting.
Activate Fax Number Confirmation
When fax number confirmation is enabled, the fax number must be entered twice to ensure that it was
entered correctly. The default setting for this feature is Disabled.
Activate Fax Number Confirmation on the HP LaserJet M3025 MFP, M3027 MFP, M4345 MFP, M5025 MFP,
M5035 MFP, M9040 MFP, M9050 MFP and HP Color LaserJet CM4730 MFP and CM6040 MFP Series
1. On the control panel, touch the Administration icon to open the Administration menu.
2. Scroll to and touch Initial Setup and then Send Setup.
3. Scroll to and touch Fax Number Confirmation.
52 Chapter 2 Set fax settings ENWW
Page 61

4. Touch Enable.
5. Touch Save.
Activate Fax Number Speed Dial Matching
If this feature is enabled, the MFP tries to match any fax number entered with existing entries in the
speed dial list. If a match is found, you can confirm the match and have the MFP complete the faxing
action automatically. The default setting for this feature is Disabled.
Activate Fax Number Speed Dial Matching on the HP LaserJet M3025 MFP, M3027 MFP, M4345 MFP, M5025
MFP, M5035 MFP, M9040 MFP, M9050 MFP and HP Color LaserJet CM4730 MFP and CM6040 MFP Series
1. On the control panel, touch the Administration icon to open the Administration menu.
2. Scroll to and touch Initial Setup and then Send Setup.
3. Scroll to and touch Fax Number Speed Dial Matching.
4. Touch Enable.
5. Touch Save.
ENWW Send fax settings 53
Page 62

Receive fax settings
Set rings-to-answer
The rings-to-answer setting determines the number of times the phone rings before the call is answered
by the fax accessory.
NOTE: The default setting range for rings-to-answer is country/region-specific.
Set the number of rings-to-answer on the HP LaserJet 4345mfp and 9040/9050mfp, and the HP Color
LaserJet 4730mfp and 9500mfp
1. On the control panel, press the Menu button to open the main menu.
2. Touch FAX to open the fax menu.
3. Scroll to and touch FAX RECEIVE.
4. Touch Rings To Answer to open the rings-to-answer screen.
5. Use the up and down arrows to select the number of rings, and then touch OK.
Set the number of rings-to-answer on the HP LaserJet M3025 MFP, M3027 MFP, M4345 MFP, M5025 MFP,
M5035 MFP, M9040 MFP, M9050 MFP and HP Color LaserJet CM4730 MFP and CM6040 MFP Series
1. On the control panel, touch the Administration icon to open the Administration menu.
2. Scroll to and touch Initial Setup and then Fax Setup to open the fax menu.
3. Scroll to and touch Fax Receive Settings.
4. Touch Rings To Answer to open the rings-to-answer screen.
5. Use the up and down arrows to select the number of rings (the default is 2), and then touch OK.
6. Touch the text box to display the keyboard.
7. Type the number of rings (1–9), and then touch OK.
8. Touch Save.
Stamp received faxes (incoming faxes)
The stamp received faxes setting enables or disables stamping incoming faxes. The stamp prints the
date, time, phone number, and page number on each incoming page.
Stamp received faxes (incoming faxes) on the HP LaserJet 4345mfp and 9040/9050mfp, and the HP Color
LaserJet 4730mfp and 9500mfp
1. On the control panel, press the Menu button to open the main menu.
2. Touch FAX to open the fax menu.
3. Scroll to and touch FAX RECEIVE to see the Fax Receive setting.
4. Scroll to and touch Stamp Received Faxes to see the settings.
5. Touch No (default) to disable the stamp, or touch Yes to enable the stamp.
54 Chapter 2 Set fax settings ENWW
Page 63

Stamp received faxes (incoming faxes) on the HP LaserJet M3025 MFP, M3027 MFP, M4345 MFP, M5025
MFP, M5035 MFP, M9040 MFP, M9050 MFP and HP Color LaserJet CM4730 MFP CM6040 MFP Series
1. On the control panel, scroll to and touch the Administration icon to open the Administration menu.
2. Touch Default Job Options and then Default Fax Options.
3. Touch Fax Receive to see the Fax Receive setting.
4. Touch Stamp Received Faxes to see the settings.
5. Touch Disabled (default) to disable the stamp, or touch Enabled to enable the stamp.
6. Touch Save.
Set fit-to-page
When selecting a page size to print a fax, the MFP determines the closest page size that matches the
intended size from sizes available in the MFP. If the fit-to-page setting is enabled and the received image
is larger than that page size, the MFP attempts to scale the image to fit the page. If this setting is disabled,
an incoming image larger than the page splits across pages.
Set fit-to-page on the HP LaserJet 4345mfp and 9040/9050mfp, and the HP Color LaserJet 4730mfp and
9500mfp
1. On the control panel, press the Menu button to open the main menu.
2. Touch FAX to open the fax menu.
3. Scroll to and touch FAX RECEIVE.
4. Touch Fit to Page to see the fit-to-page settings.
5. Touch ON to enable fit-to-page, or touch OFF (default) to disable fit-to-page.
Set fit-to-page on the HP LaserJet M3025 MFP, M3027 MFP, M4345 MFP, M5025 MFP, M5035 MFP, M9040
MFP, M9050 MFP and HP Color LaserJet CM4730 MFP and CM6040 MFP Series
1. On the control panel, scroll to and touch the Administration icon to open the Administration menu.
2. Touch Default Job Options and then Default Fax Options.
3. Scroll to and touch Fax Receive to see the Fax Receive setting.
4. Touch Fit to Page to see the fit-to-page settings.
5. Touch Enabled (default) to enable fit-to-page, or touch Disabled to disable fit-to-page.
6. Touch Save.
Set the paper tray
The paper tray setting selects the MFP paper tray to pull paper from for printing faxes.
Set the paper tray on the HP LaserJet 4345mfp and 9040/9050mfp, and the HP Color LaserJet 4730mfp and
9500mfp
1. On the control panel, press the Menu button to display the main menu.
2. Touch FAX to display the fax menu.
ENWW Receive fax settings 55
Page 64

3. Scroll down and touch FAX RECEIVE.
4. Touch Fax Paper Tray to display the settings screen.
5. Use the up and down arrows to select the number for the tray (default=0), and then touch OK.
Set the paper tray on the HP LaserJet M3025 MFP, M3027 MFP, M4345 MFP, M5025 MFP, M5035 MFP, M9040
MFP, M9050 MFP and HP Color LaserJet CM4730 MFP and CM6040 MFP Series
1. On the control panel, scroll to and touch the Administration icon to open the Administration menu.
2. Touch Default Job Options.
3. Touch Default Fax Options.
4. Touch Fax Receive to display the Fax Receive menu.
5. Touch Fax Paper Tray to display the Fax Paper Tray menu.
6. Touch the text box to enter the desired paper tray value, 0 (default) - 2. (Other values may be
displayed depending on installed paper trays)
7. Touch Save to save the paper tray value.
Set the destination bin
The destination bin setting specifies the MFP output bin to receive the printed fax.
Set the destination bin on the HP LaserJet 4345mfp and 9040/9050mfp, and the HP Color LaserJet 4730mfp
and 9500mfp
1. On the control panel, press the Menu button to display the main menu.
2. Touch FAX to display the fax menu.
3. Scroll down and touch FAX RECEIVE.
4. Scroll down and touch FAX DESTINATION BIN to display the settings screen.
5. Use the up and down arrows to select the number of the bin (default=0), and then touch OK.
Set the output bin on the HP LaserJet M3025 MFP, M3027 MFP, M4345 MFP, M5025 MFP, M5035 MFP, M9040
MFP, M9050 MFP and HP Color LaserJet CM4730 MFP and CM6040 MFP Series
NOTE: Some menu items (such as Output Bin) are not present if there is only a single selection
available.
1. On the control panel, scroll to and touch the Administration icon to open the Administration menu.
2. Touch Default Job Options to display the Default Job Options menu.
3. Touch Default Fax Options to display the Fax Receive menu.
4. Touch Output Bin to display the Output Bin menu.
5. Touch the text box to enter the desired paper tray value, 0 (default) - 2. (Other values may be
displayed depending on installed paper trays)
6. Touch Save.
56 Chapter 2 Set fax settings ENWW
Page 65

Blocking incoming faxes
Use the fax block list setting to create a list of blocked phone numbers. When a fax is received from a
blocked phone number, the fax is not printed and is immediately deleted from memory.
NOTE: Only numbers can be used in the fax block list. Do not use dashes or spaces. If a fax is sent
from a blocked phone number and the sender uses a dash or a space in the number, the fax will not be
blocked.
Create a blocked-fax list
Create a blocked fax list on the HP LaserJet 4345mfp and 9040/9050mfp, and the HP Color LaserJet
4730mfp and 9500mfp
1. On the control panel, press the Menu button to open the main menu.
2. Touch FAX to open the fax menu.
3. Scroll to and touch FAX RECEIVE.
4. Scroll to and touch Blocked Fax List to open the blocked fax menu.
5. Touch Add Blocked Number to make the keyboard available.
6. Type a number and touch OK.
7. To add additional numbers, repeat steps 5 and 6.
Create a blocked fax list on the HP LaserJet M3025 MFP, M3027 MFP, M4345 MFP, M5025 MFP, M5035 MFP,
M9040 MFP, M9050 MFP and HP Color LaserJet CM4730 MFP and CM6040 MFP Series
1. On the control panel, scroll to and touch the Administration icon to open the Administration menu.
2. Scroll to and touch Initial Setup.
3. Touch Fax Setup.
4. Scroll to and touch Fax Receive Settings.
5. Scroll to and touch Blocked Fax List to open the blocked fax menu.
6. Touch Add Blocked Number to make the keyboard available.
7. Type a number and touch OK.
8. To add additional numbers, repeat steps 5 and 6.
Remove numbers from the blocked-fax list
Remove numbers from the blocked-fax list on the HP LaserJet 4345mfp and 9040/9050mfp, and the HP
Color LaserJet 4730mfp and 9500mfp
1. On the control panel, press the Menu button to open the main menu.
2. Touch FAX to open the fax menu.
3. Scroll to and touch FAX RECEIVE.
4. Touch Blocked Fax List to open the blocked fax menu.
ENWW Receive fax settings 57
Page 66

5. Touch Remove Blocked Number to see the list of blocked phone numbers.
6. Scroll through the numbers to highlight one you want to remove, and then touch the phone number
to remove it. Repeat this step for any numbers you want to remove.
7. Touch OK to exit.
Remove numbers from the blocked-fax list on the HP LaserJet M3025 MFP, M3027 MFP, M4345 MFP, M5025
MFP, M5035 MFP, M9040 MFP, M9050 MFP and HP Color LaserJet CM4730 MFP and CM6040 MFP Series
1. On the control panel, scroll to and touch the Administration icon to open the Administration menu.
2. Scroll to and touch Initial Setup.
3. Touch Fax Setup.
4. Scroll to and touch Fax Receive Settings.
5. Scroll to and touch Blocked Fax List to open the blocked fax menu.
6. Touch Remove Blocked Number to make the keyboard available.
7. Type a number and touch OK.
8. To add additional numbers, repeat steps 5 and 6.
Clear all numbers from the blocked-fax list
Clear all numbers from the blocked-fax list on the HP LaserJet 4345mfp and 9040/9050mfp, and the HP
Color LaserJet 4730mfp and 9500mfp
1. On the control panel, press the Menu button to open the main menu.
2. Touch FAX to open the fax menu.
3. Scroll to and touch FAX RECEIVE.
4. Scroll to and touch Blocked Fax List to see the blocked fax list menu.
5. Touch Clear all Blocked Numbers to open the settings screen.
6. Touch Yes to clear all numbers from the list, or touch No to exit and retain the numbers.
Clear all numbers from the blocked-fax list on the HP LaserJet M3025 MFP, M3027 MFP, M4345 MFP, M5025
MFP, M5035 MFP, M9040 MFP, M9050 MFP and HP Color LaserJet CM4730 MFP and CM6040 MFP Series
1. On the control panel, scroll to and touch the Administration icon to open the Administration menu.
2. Scroll to and touch Initial Setup.
3. Touch Fax Setup.
4. Scroll to and touch Fax Receive Settings.
5. Scroll to and touch Blocked Fax Numbers to open the blocked fax menu.
6. Touch Clear all Blocked Numbers to make the keyboard available.
7. Touch Yes to clear all numbers from the list, or touch No to exit and retain the numbers.
58 Chapter 2 Set fax settings ENWW
Page 67

Initiate polling receive
Some fax machines can hold a fax until another fax machine requests that the fax be sent. When an
MFP polls another fax machine that is holding a fax and requests that the held fax be sent to the MFP,
this is known as polling receive.
Initiate polling receive for the HP LaserJet 4345mfp and 9040/9050mfp, and the HP Color LaserJet 4730mfp
and 9500mfp
1. On the control panel, press the Menu button to access the main menu.
2. Touch FAX to display the fax menu.
3. Scroll to and touch FAX FUNCTIONS.
4. Touch INITIATE POLLING RECEIVE to display the keyboard.
5. Use the keyboard to type a polling receive number, and then touch OK.
6. Using the keypad, type a polling receive number, and then touch Start.
7. The number entered is dialed. If a stored fax is being held at the fax machine dialed, that fax is
transmitted to the mfp and printed. If no fax is held, a No Fax is Available message will be
displayed. If the fax machine does not support the polling feature, a Poll Invalid error message
will be shown.
Initiate polling receive on the HP LaserJet M3025 MFP, M3027 MFP, M4345 MFP, M5025 MFP, M5035 MFP,
M9040 MFP, M9050 MFP and HP Color LaserJet CM4730 MFP and CM6040 MFP Series
1. On the control panel, touch the FAX icon to display the Fax screen.
2. Touch More Options to display the options screen.
3. Scroll to page 3.
4. Touch Fax Polling to display the Fax Polling screen.
5. Touch the text box to display the keyboard.
6. Using the keypad, type a polling receive number, and then touch Start.
7. The number entered is dialed. If a stored fax is being held at the fax machine dialed, that fax is
transmitted to the mfp and printed. If no fax is held, a No Fax is Available message will be
displayed. If the fax machine does not support the polling feature, a Poll Invalid error message
will be shown.
Changing notification settings
Notification selects when and how you are notified of the status of an outgoing fax. This setting applies
to the current fax only. To change the setting permanently, change the default setting.
Change notification settings on the HP LaserJet 4345mfp and 9040/9050mfp, and the HP Color LaserJet
4730mfp and 9500mfp
1. On the control panel main screen, touch the FAX icon to display the Fax screen.
2. Touch NOTIFY
ENWW Receive fax settings 59
Page 68

3. Under the NOTIFY tab:
Touch None to turn off notification, and then touch OK, to complete the setting and return to
●
the Fax feature screen.
Touch This Job or On Error to enable notification and continue to the next step.
●
4. Touch Print to receive a printed notification and complete the notification process, or, touch E-
MAIL to display the keyboard.
NOTE: E-mail notification works if e-mail has been configured. If the e-mail icon on the MFP
screen has "Not Available" across it, e-mail is not configured. To configure e-mail, use the MFP email menu settings, see the MFP user documentation for detailed information on configuring email.
5. If you selected e-mail, use the keyboard to type an e-mail address, and then touch OK to complete
the notification setting and to return to the Fax menu.
Change notification settings on the HP LaserJet M3025 MFP, M3027 MFP, M4345 MFP, M5025 MFP, M5035
MFP, M9040 MFP, M9050 MFP and HP Color LaserJet CM4730 MFP and CM6040 MFP Series
1. On the control panel, touch the FAX icon to open the Fax screen.
2. Touch More Options.
3. Touch Notification.
4. Select a notification setting:
Touch None to turn off notification.
●
Touch This Job to enable notification for the current job.
●
Touch On Error to enable error notification only for the current job.
●
5. Touch Print to receive a printed notification, or touch E-MAIL to receive an e-mail notification.
6. If you selected Print, touch OK to complete the notification setup.
-or-
If you selected E-MAIL, use the keyboard to type an e-mail address. Then touch OK to complete
the notification setup.
60 Chapter 2 Set fax settings ENWW
Page 69

Set the error correction mode
Normally, the fax accessory monitors the signals on the telephone line while it is sending or receiving
a fax. If the fax accessory detects an error during the transmission and the error correction setting is on,
the fax accessory can request that the error portion of the fax be sent again.
You should turn off error correction only if you are having trouble sending or receiving a fax and if you
are willing to accept the errors in the transmission. Turning off the setting might be useful when you are
trying to send a fax overseas or receive one from overseas, or if you are using a satellite telephone
connection.
Set the error correction mode on the HP LaserJet 4345mfp and 9040/9050mfp, and the HP Color LaserJet
4730mfp and 9500mfp
1. On the control panel, press the Menu button to open the main menu.
2. Touch FAX to open the fax menu.
3. Touch FAX SETUP OPTIONAL to see the optional setup items.
4. Touch Error Correction Mode to see the settings.
5. Touch ON (default) to enable error correction mode, or touch OFF to disable correction mode.
Set the error correction mode on the HP LaserJet M3025 MFP, M3027 MFP, M4345 MFP, M5025 MFP, M5035
MFP, M9040 MFP, M9050 MFP and HP Color LaserJet CM4730 MFP and CM6040 MFP Series
1. On the control panel, scroll to and touch the Administration icon to open the Administration menu.
2. Touch Initial Setup to open the setup settings menu and then touch Fax Setup.
3. Touch Fax Send Settings to see the settings.
4. Touch Error Correction Mode to see the settings.
5. Touch Enabled (default) to enable error correction mode, or touch Disabled to disable correction
mode.
ENWW Set the error correction mode 61
Page 70

Set the modem volume
Set the modem volume on the HP LaserJet 4345mfp and 9040/9050mfp, and the HP Color LaserJet 4730mfp
and 9500mfp
1. On the control panel, press the Menu button to display the main menu.
2. Touch FAX to display the fax menu.
3. Touch FAX SETUP OPTIONAL to display the optional settings menu.
4. Touch MODEM VOLUME to display the volume settings.
5. Touch OFF, Medium (default), or LOUD to set the volume.
Set the modem volume on the HP LaserJet M3025 MFP, M3027 MFP, M4345 MFP, M5025 MFP, M5035 MFP,
M9040 MFP, M9050 MFP and HP Color LaserJet CM4730 MFP and CM6040 MFP Series
1. On the control panel, scroll to and touch the Administration icon to open the Administration menu.
2. Scroll to and touch Initial Setup to display the Initial Setup menu.
3. Touch Fax Setup to display the Fax Setup menu.
4. Touch Fax Send Settings to display the Fax Send Settings menu.
5. Touch Fax Dial Volume to display the Fax Dial Volume menu.
6. Touch OFF; Low (default), or High to set the volume.
7. Touch Save to save the volume setting.
62 Chapter 2 Set fax settings ENWW
Page 71

Set the ringer volume
Set the ringer volume on the HP LaserJet 4345mfp and 9040/9050mfp, and the HP Color LaserJet 4730mfp
and 9500mfp
1. On the control panel, press the Menu button to open the main menu.
2. On the control panel, touch the Administration icon to open the Administration menu.
3. Touch FAX to open the fax settings menu.
4. Touch FAX SETUP OPTIONAL.
5. Touch Ringer Volume to see the settings.
6. Touch OFF, Medium (default), or LOUD to set the volume.
Set the ringer volume on the HP LaserJet M3025 MFP, M3027 MFP, M4345 MFP, M5025 MFP, M5035 MFP,
M9040 MFP, M9050 MFP and HP Color LaserJet CM4730 MFP and CM6040 MFP Series
1. On the control panel, scroll to and touch the Administration icon to open the Administration menu.
2. Scroll to and touch Initial Setup to display the Initial Setup menu.
3. Touch Fax Setup to display the Fax Setup menu.
4. Touch Fax Receive Settings to display the Fax Receive Settings menu.
5. Touch Ringer Volume to display the Ringer Volume menu.
6. Touch OFF; Low (default), or High to set the volume.
7. Touch Save to save the volume setting.
ENWW Set the ringer volume 63
Page 72

64 Chapter 2 Set fax settings ENWW
Page 73

3Use Fax
This chapter provides information about fax setup, sending faxes, and receiving faxes in the following
sections:
Fax feature screen
●
Status message bar
●
Send a fax
●
Canceling a fax
●
Receiving faxes
●
Creating and deleting speed dial lists
●
Assigning speed dial lists to one-touch keys
●
Voice Calls and Retries
●
Secure settings
●
Set fax forwarding
●
Scheduling fax printing (memory lock)
●
Using Fax over VoIP networks
●
ENWW 65
Page 74

Fax feature screen
The Fax feature screen is used to send faxes. To access this screen, press the FAX icon displayed on
the control panel Home screen.
HP LaserJet 4345mfp and 9040/9050mfp, and HP Color LaserJet 4730mfp and 9500mfp fax feature screen
Figure 3-1 HP LaserJet 4345mfp and 9040/9050mfp, and the HP Color LaserJet 4730mfp and 9500mfp
fax feature screen
1 Status Message Bar
2 Fax Recipients
3 One Touch keys
4
5 Start
6 Configure (one touch keys)
7 Notify
8
9 Speed Dial
10 Remove
11 Settings
12 Next Number
13 Phone Book
1
Displays only if configured using HP MFP Digital Sending Software Configuration Utility
2
This button is also used to add the special character brackets [ and ] to hide a PIN number.
Back
PIN
1
2
66 Chapter 3 Use Fax ENWW
Page 75

HP LaserJet M3035 MFP, M3027 MFP, M4345 MFP, M5025 MFP, M5035 MFP,
M9040 MFP, M9050 MFP and HP Color LaserJet CM4730 MFP and CM6040
MFP Series fax feature screen
Figure 3-2 Fax feature screen
1 Home Key - return to main screen
2 Send Fax - press to send fax to recipients
3 Enter Number into Recipient List
4 Backspace/Delete Number
5 Status Message Bar
6 Access Phone Book
7 Speed Dial Search by Number
8 Alert Message - touch to display
9 Help - touch to display help selections
10 Speed Dial - Edit Key
11 Speed Dial - Search by Name
12 Speed Dial List (scroll to display other entries)
13 Current Date and Time
14 Touch to access additional Fax Settings for current job
15 Press for Details of Selected Recipient
16 Press to Delete Selected Recipient from List
17 Recipient List
18 Recipient Number Entry Box - Touch for keyboard or enter
from control panel keypad
1
ENWW Fax feature screen 67
Page 76

1
When the Recipient Number Entry Box is pressed, a pop up is displayed which includes the PIN button
for adding special character brackets ([ ]) to hide a PIN number, and a Pause button to insert a comma
for a two second pause. See the figure below:
Figure 3-3 Recipient number entry box
68 Chapter 3 Use Fax ENWW
Page 77

Status message bar
While sending and receiving faxes, status information will display in the status bar located at the top of
some touch screens. This status includes such information as: Ready, Receiving call, Page sent, and
others.
ENWW Status message bar 69
Page 78

Send a fax
To send a fax, you can use one of three basic methods to enter numbers:
Enter number(s) manually.
●
Enter number(s) using speed dial.
●
Enter number(s) using the phone book (available only if HP MFP Digital Sending Software
●
Configuration Utility is installed and the phone book has been populated).
NOTE: For online information about sending a fax, touch ? on the screen to access the help menu,
and then touch Send a fax under the list of help topics.
When entering a phone number from the numeric keypad, include any pauses or other numbers, such
as area codes, access codes for numbers outside a PBX system (usually a 9 or 0), or a long-distance
prefix. A two second pause may be included by typing a comma (,). If the fax prefix setting has been
set to automatically include the dialing prefix, you will not need to enter it.
NOTE: When a fax is sent, it is first scanned and stored into memory. After the entire document is
stored, it is sent and then deleted from memory. Faxes that fail to send, because the number was busy
or did not answer, are deleted from memory. If Redial-On-Busy or Redial-On-No-Answer are set, the
fax will not be deleted until all retries fail or the fax is sent successfully.
Send a fax - enter number(s) manually
Send a fax - enter number(s) manually on the HP LaserJet 4345mfp and 9040/9050mfp, and the HP Color
LaserJet 4730mfp and 9500mfp
1. Place the document in the automatic document feeder (ADF) or on the scanner glass.
2. From the main screen, touch the FAX icon. You may be prompted to type a user name and
password if authentication is required by your administrator.
3. Touch Settings. Verify that the Describe Original settings match those of your original. These
settings include:
Page size (such as letter or A4)
●
1–sided or 2–sided printing
●
Page content (text, mixed text and graphics, or graphics and photos) Sending graphics and
●
photos in text mode results in lower quality images.
Orientation (portrait or landscape)
●
Job Mode combines multiple scans into a single job.
●
If the settings do not match, complete the following steps.
a. Touch Describe Original to display the Original Setting screen.
b. Make any required changes to match your original.
c. When all settings are completed, touch OK to return to the Settings screen.
NOTE: All settings made on the Settings screen are temporary settings, enabled for the current
fax only.
70 Chapter 3 Use Fax ENWW
Page 79

4. On the Settings screen touch Fax Settings to make adjustments to the following settings:
Sharpness--enhances text and graphic edges.
●
Background--removes a background that might be a result from copying color paper.
●
Notify/Notification--changes how you are notified of the status of the fax transmission (that
●
is, if the fax was sent or if an error occurred and the fax was not sent).
NOTE: Notify/Notification changes the notification setting for the current fax only.
5. When all settings are completed, touch OK to return to the Settings screen.
6. On the Settings screen, to adjust the lightness/darkness of the fax you are sending, touch the
Light or Dark arrows.
7. When all settings are completed on the Settings screen, touch OK to return to the Fax screen.
8. Using the keyboard, enter a phone number. To enter additional numbers, touch Next Number and
continue entering numbers.
To remove a number from the list, use the arrow keys to highlight a number and then touch
Remove.
NOTE: If needed, enter a comma (,) to provide a two second pause after a prefix number (such
as a "9" or "0" ) to allow the internal phone system time to access an outside line before the
remainder of the number is dialed.
You can also use the PIN button to add the special character brackets ([) and (]) to hide a PIN
number.
9. Touch Start to send the fax. You can either touch the Start button on the touch screen or press the
green Start button on the control panel.
NOTE: If you have made any changes to the settings on the Settings screen (such as changing
notification or 1-sided to 2-sided), a Processing Job screen displays asking Would you like to
keep your current settings?. If you press Yes, the MFP returns you to the Fax screen and the
settings you made are retained. This allows you to send another fax using the same settings. If
you press No, the settings are cleared (returned to their default values) and the MFP home screen
displays.
Send a fax - enter number(s) manually on the HP LaserJet M3025 MFP, M3027 MFP, M4345 MFP, M5025
MFP, M5035 MFP, M9040 MFP, M9050 MFP and HP Color LaserJet CM4730 MFP and CM6040 MFP Series
1. Place the document in the automatic document feeder (ADF) or on the scanner glass.
2. From the main screen, touch the FAX icon. You may be prompted to type a user name and
password.
3. Touch More Options. Verify that the Describe Original settings match those of your original. These
settings include:
Original size (such as letter or A4)
●
Original sides - 1–sided or 2–sided printing
●
Optimize text/picture (text, mixed text and graphics, or graphics and photos) Sending
●
graphics and photos in text mode results in lower quality images.
ENWW Send a fax 71
Page 80

Content Orientation (portrait or landscape)
●
Job Build combines multiple scans into a single job.
●
Image adjustment
●
Sharpness enhances text and graphic edges.
●
Darkness
●
Background removes a background that might be a result from copying color paper.
●
Notification changes how you are notified of the status of the fax transmission (that is, if the
●
fax was sent or if an error occurred and the fax was not sent).
NOTE: Notification changes the notification setting for the current fax only.
4. When all settings are completed, touch OK to return to the Settings menu.
5. On the Settings screen, touch the Light or Dark arrow to adjust the lightness/darkness of the fax
you are sending.
6. When all settings are completed on the Settings screen, touch OK to return to the Fax screen.
7. Using the keyboard, enter a phone number. To enter additional numbers, touch Next Number and
continue entering numbers.
To remove a number from the list, use the arrow keys to highlight a number and then touch
Remove.
NOTE: If needed, enter a comma (,) to provide a two second pause after a prefix number (such
as a "9" or "0" ) to allow the internal phone system time to access an outside line before the
remainder of the number is dialed. To enter a comma, use the keypad on the control panel that
pops up when you touch the Recipient Number Entry Box
To enter a PIN as part of the recipient number, use the keypad on the control panel. Touch the
Recipient field, and then touch the PIN button. This inserts a left bracket ([). Type the PIN, and
then touch the PIN button again to insert the right (]) bracket. The number within the brackets is
not displayed in the fax number that appears on fax reports.
8. Touch Start to send the fax. You can either touch the Start icon on the touch screen or press the
green Start button on the control panel.
9. If the fax recipient number matches one or more saved speed dials, the matched speed dials are
displayed and you are asked if you want to continue sending the fax to the indicated recipient(s).
Touch Yes to confirm the number and send the fax, or touch No to cancel the fax. Note that this
step is not required if the Fax Number Speed Dial Matching feature is disabled.
If the fax recipient number does not match any saved speed dials, a number confirmation screen
appears and you must re-type the fax number. After re-typing the number, touch OK to send the
fax. Note that this step is not required if the Fax Number Confirmation feature is disabled.
NOTE: If you have made any changes to the settings on the Settings screen (such as changing
notification or 1-sided to 2-sided), a Processing Job screen displays asking "Would you like to keep your
current settings?". If you press Yes, the MFP returns you to the Fax screen and the settings you made
are retained. This allows you to send another fax using the same settings. If you press No, the settings
are cleared (returned to their default values) and the MFP home screen displays.
72 Chapter 3 Use Fax ENWW
Page 81

Send a fax using speed dial
NOTE: Prior to sending a fax using speed dial, you must create a speed dial. To create a speed dial,
Creating and deleting speed dial lists on page 83.
see
Send a fax using the speed dial on the HP LaserJet 4345mfp and 9040/9050mfp, and the HP Color LaserJet
4730mfp and 9500mfp
1. Place the document in the automatic document feeder (ADF) or on the scanner glass.
2. From the main screen, touch the FAX icon. You may be prompted to type a user name and
password.
3. Touch Settings. Verify that the Describe Original settings match those of your original. These
settings include:
Page size (such as letter or A4)
●
1-sided or 2-sided printing
●
Page content (text, mixed text and graphics, or graphics and photos) Sending graphics and
●
photos in text mode results in lower quality images.
Orientation (portrait or landscape)
●
Job Mode combines multiple scans into a single job.
●
If the settings do not match, complete the following steps.
a. Touch Describe Original to display the Original Setting screen.
b. Make any required changes to match your original.
c. When all settings are completed, touch OK to return to the Settings screen.
NOTE: All settings made on the Settings screen are temporary settings, enabled for the current
fax only.
4. On the Settings screen touch Fax Settings to make adjustments to the following settings:
Sharpness--enhances text and graphic edges.
●
Background--removes a background that might be a result from copying color paper.
●
Notify/Notification--changes how you are notified of the status of the fax transmission (that
●
is, if the fax was sent or if an error occurred and the fax was not sent). For the HP LaserJet
4345mfp and the 4730mfp, access to the notification settings is through the NOTIFY button
located on the main fax screen.
NOTE: Notify/Notification changes the notification setting for the current fax only.
5. When all settings are completed, touch OK to return to the Settings screen.
6. On the Settings screen, to adjust the lightness/darkness of the fax you are sending, touch the
Light or Dark arrows.
7. When all settings are completed on the Settings screen, touch OK to return to the Fax screen.
8. Touch Speed Dial to display the Speed Dial screen.
ENWW Send a fax 73
Page 82

9. Touch the check box in front of the speed dial name you wish to use.
10. Touch OK to return to the Fax screen. The speed dial number(s) will be listed in the Fax Recipient
screen.
11. Touch Start to send the fax. You can either touch the Start button on the touch screen or press the
green Start button on the control panel.
NOTE: If you have made any changes to the settings on the Settings screen (such as changing
notification or 1-sided to 2-sided), a Processing Job screen displays asking "Would you like to keep
your current settings?". If you press Yes, the MFP returns you to the Fax screen and the settings
you made are retained which allows you to send another fax using the same settings. If you press
No, the settings are cleared (returned to their default values) and the MFP home screen is
displayed.
Send a fax using the speed dial on the HP LaserJet M3025 MFP, M3027 MFP, M4345 MFP, M5025 MFP,
M5035 MFP, M9040 MFP, M9050 MFP and HP Color LaserJet CM4730 MFP and CM6040 MFP Series
1. Place the document in the automatic document feeder (ADF) or on the scanner glass.
2. On the control panel, touch the FAX icon to display the Fax screen.
3. Touch Speed Dials to display the Speed Dial screen.
4. Touch a Speed Dial number for the speed dial name you wish to use.
5. The speed dial name will appear in the Fax Recipients section of the Fax screen.
6. Touch the fax recipient name to highlight.
7. Touch Start to send the fax. You can either touch the Start button on the touch screen or press the
green Start button on the control panel.
Sending a fax using one touch speed dial
NOTE: Prior to sending a fax using a one touch speed dial key, you must first create a speed dial, see
Creating and deleting speed dial lists on page 83. Then, set up the one touch keys, see Assign a
speed dial to a one-touch key for the HP LaserJet 4345mfp and 9040/9050mfp, and the HP Color
LaserJet 4730mfp and 9500mfp on page 86.
NOTE: If you have made any changes to the settings on the Settings screen (such as changing
notification or 1-sided to 2-sided ), a Processing Job screen displays asking "Would you like to keep
your current settings?". If you press Yes, the MFP returns you to the Fax screen and the settings you
made are retained which allows you to send another fax using the same settings. If you press No, the
settings are cleared (returned to their default values) and the MFP home screen is displayed.
Send a fax using one touch speed dial from the HP LaserJet 4345mfp and 9040/9050mfp, and the HP Color
LaserJet 4730mfp and 9500mfp
1. Place the document in the automatic document feeder (ADF) or on the scanner glass.
2. From the main screen, touch the FAX icon. You may be prompted to type a user name and
password.
74 Chapter 3 Use Fax ENWW
Page 83

3. Touch Settings. Verify that the Describe Original settings match those of your original. These
settings include:
Page size (such as letter or A4)
●
1-sided or 2-sided printing
●
Page content (text, mixed text and graphics, or graphics and photos) Sending graphics and
●
photos in text mode results in lower quality images.
Orientation (portrait or landscape)
●
Job Mode combines multiple scans into a single job.
●
If the settings do not match, complete the following steps.
a. Touch Describe Original to display the Original Setting screen.
b. Make any required changes to match your original.
c. When all settings are completed, touch OK to return to the Settings screen.
NOTE: All settings made on the Settings screen are temporary settings, enabled for the current
fax only.
4. On the Settings screen touch Fax Settings to make adjustments to the following settings:
Sharpness--enhances text and graphic edges.
●
Background Removal--removes a background that might be a result from copying color
●
paper.
5. When all settings are completed, touch OK to return to the Settings screen.
6. On the Settings screen, to adjust the lightness/darkness of the fax you are sending, touch the
Light or Dark arrows and touch OK to return to the Settings screen.
7. When all settings are completed on the Settings screen, touch OK to return to the Fax screen.
8. To change notification, touch NOTIFY. Make changes to notification settings and then touch OK
to return to the Settings screen.
NOTE: Notify/Notification changes the notification setting for the current fax only.
9. Touch the one touch speed dial key for the speed dial you want.
10. Touch Start to send the fax. You can either touch the Start button on the touch screen or press the
green Start button on the control panel.
Search a speed-dial list by name
Use this feature to search an existing speed dial by name.
ENWW Send a fax 75
Page 84

Search a speed-dial list by name on the HP LaserJet 4345mfp, HP Color LaserJet 4730mfp, HP LaserJet
9040/9050mfp, and HP Color LaserJet 9500mfp
NOTE: This feature is new for these models.
1. On the control-panel main screen, touch the FAX icon to display the Fax screen.
2. Touch Speed Dial to open the Speed Dial screen.
3. Touch Search to make the onscreen keyboard available.
4. Type the speed-dial name. As you type, the remaining letters of the first matching speed-dial name
are automatically filled in. If necessary, type additional letters to refine your search.
5. Touch OK when you have located your speed dial on the search screen. The speed-dial list appears
with the speed dial that you specified at the top of the list.
6. Select the speed-dial name from the list and touch OK to place the speed dial in the recipient list
on the fax screen. You can select more than one speed dial before clicking OK.
NOTE: If you do not know the unique name of the speed dial, type a letter to select any portion of the
list. For example, to view speed-dial names that begin with the letter N, type the letter N. If no matching
entries exist, a message appears before the search shows the entry that is closest to the letter N.
Search a speed-dial list by name on the HP LaserJet M5035, M5025, M3035, M3027, M4345, M9040 MFP,
M9050 MFP and HP Color LaserJet CM4730 MFP and CM6040 MFP Series
1. On the control-panel main screen, touch the FAX icon to display the Fax screen.
2. Touch the Speed Dial Search button. This button looks like a magnifying glass and is located to
the right of the Speed Dial button.
3. Type the first letters of the name to search for. As matches are found, the list at the top of the search
screen is populated. If necessary, scroll to see all the entries, or type more letters to narrow the
search.
4. Select the appropriate name from the list and touch OK. The speed-dial list on the main fax screen
shows the selected entry at the top of the list.
5. Touch the selected entry to add it into the recipients list.
6. Select or search for additional names as needed.
Sending a fax using phone book numbers
The fax phone book feature is available when the MFP is configured to use the HP MFP Digital Sending
Configuration software. If the MFP has not been configured for use with this software, the Phone Book
button will not display. To configure the MFP for use with the HP MFP Digital Sending Configuration
software, see the HP MFP Digital Sending Software User Guide or the HP MFP Digital Sending
Software Support Guide.
Also, when Authentication is enabled from the HP MFP Digital Sending Configuration software, your
personal fax numbers from your Microsoft® Exchange contact list appear in the phone book.
NOTE: Fax numbers cannot be added or deleted from the phone book from this device. Fax numbers
can only be added or deleted using the Address Book Manager (ABM) running on the Digital Send
Server or by changing the entries in your contact list.
76 Chapter 3 Use Fax ENWW
Page 85

Send a fax using the phone book from the HP LaserJet 4345mfp and 9040/9050mfp, and the HP Color
LaserJet 4730mfp and 9500mfp
1. Place the document in the automatic document feeder (ADF) or on the scanner glass.
2. From the main screen, touch the FAX icon. You may be prompted to type a user name and
password.
3. Touch Settings. Verify that the Describe Original settings match those of your original. These
settings include:
Page size (such as letter or A4)
●
1-sided or 2-sided printing
●
Page content (text, mixed text and graphics, or graphics and photos) Sending graphics and
●
photos in text mode results in lower quality images.
Orientation (portrait or landscape)
●
Job Mode combines multiple scans into a single job.
●
If the settings do not match, complete the following steps.
a. Touch Describe Original to display the Original Setting screen.
b. Make any required changes to match your original.
c. When all settings are completed, touch OK to return to the Settings screen.
NOTE: All settings made on the Settings screen are temporary settings, enabled for the
current fax only.
4. On the Settings screen touch Fax Settings to make adjustments to the following settings:
Sharpness--enhances text and graphic edges.
●
Background Removal--removes a background that might be a result from copying color
●
paper.
Notify/Notification--changes how you are notified of the status of the fax transmission (that
●
is, if the fax was sent or if an error occurred and the fax was not sent). For the HP LaserJet
4345mfp and the 4730mfp, access to the notification settings is through the NOTIFY button
located on the main fax screen.
NOTE: Notify/Notification changes the notification setting for the current fax only.
5. When all settings are completed, touch OK to return to the Settings screen.
6. On the Settings screen, to adjust the lightness/darkness of the fax you are sending, touch the
Light or Dark arrows.
7. When all settings are completed on the Settings screen, touch OK to return to the Fax screen.
NOTE: When you use the Phone Book, names instead of numbers appear in the fax recipients
list.
8. Touch Phone Book to display the Fax Phone Book screen.
9. Use the scroll arrows to highlight a name or a number in the list, and then touch Add to enter the
name/number in the window. You can add as many names/numbers as you want.
ENWW Send a fax 77
Page 86

The Details button displays the fax number or list of fax numbers for the selected phone book entry.
The Personal button shows only entries from the user's contact list in the phone book. The All
button provides a merged list of the public fax entries and the personal entries from the contact list.
10. Touch OK to return to the Fax screen. The list of fax names is displayed in the Recipients window.
11. Touch Start to send the fax. You can either touch the Start button on the touch screen or press the
green Start button on the control panel.
NOTE: If you have made any changes to the settings on the Settings screen (such as changing
notification or 1-sided to 2-sided), a Processing Job screen displays asking "Would you like to keep your
current settings?". If you press Yes, the MFP returns you to the Fax screen and the settings you made
are retained, which allows you to send another fax using the same settings. If you press No, the settings
are cleared (returned to their default values) and the MFP home screen is displayed.
Send a fax using the phone book on the HP LaserJet M3025 MFP, M3027 MFP, M4345 MFP, M5025 MFP,
M5035 MFP, M9040 MFP, M9050 MFP and HP Color LaserJet CM4730 MFP and CM6040 MFP Series
1. On the control panel, touch the FAX icon to display the Fax screen.
2. Touch Address Book icon to display the Address Book screen.
3. Select a phone book source from the drop down menu.
4. Touch the names to highlight and touch the Right Arrow icon to move the highlighted names to the
Fax Recipients section.
5. Touch OK to return to the Fax screen.
6. Touch Start to send the fax. You can either touch the Start button on the touch screen or press the
green Start button on the control panel.
DSS fax phone book search
Use the fax phone book search feature to complete a name search of the fax phone book that is supplied
through the Digital Sending Service (DSS) and the Address Book Manager (ABM).
Check the HP Web site to determine if firmware updates are available for your MFP model.
NOTE: If you are not using DSS, the fax phone book does not appear on the MFP display. The DSS
phone book is not the same as the speed-dial list.
Use the fax phone book search feature on the HP LaserJet 4345mfp, HP Color LaserJet 4730mfp, HP
LaserJet 9040/9050mfp, and HP Color LaserJet 9500mfp
1. Touch the FAX icon on the display.
2. Touch Phone Book to make the onscreen keyboard available.
3. Type the name of the fax destination. As you type, the remaining letters of the first matching name
are automatically filled in. If necessary, type additional letters to refine your search. If no match is
found, the entry will not auto-complete.
4. As entries are located, use a semicolon (;) to separate names and search for additional entries
without leaving the search screen. Touch OK to return to the main fax screen.
78 Chapter 3 Use Fax ENWW
Page 87

5. If you do not know the unique name of the destination, press the phone-book icon at the top of the
screen to see the phone-book listing. Scroll to the entry that you want, touch Add, and then touch
OK. The name appears in the Search Phone Book entry list.
6. Touch OK to place the entry in the Fax Recipients list on the Fax screen.
Use the fax phone book search feature on the HP LaserJet M5035 MFP, M5025 MFP, M3035 MFP, M3027
MFP, M4345 MFP, M9040 MFP, M9050 MFP and HP Color LaserJet CM4730 MFP and CM6040 MFP Series
1. Touch the FAX icon on the display.
2. Touch the Phone Book icon (located to the right of the fax recipients box).
3. Select the phone book source or All in the pull-down menu at the top of the phone book screen.
4. Select the recipient name from the phone book list.
For long lists, a name search is available by pressing the Search icon (magnifying glass) at the
bottom of the phone book screen. In the search screen, type the first letter or letters of the name;
matching recipients appear as letters are typed. Type more letters to further refine the search.
Select from the name(s) found at the top of the screen, and then touch OK. The screen returns to
the Fax Phone Book.
5. Touch the right arrow to enter the selected name into the Fax Recipients list.
6. Touch OK to return to the Send Fax job screen.
NOTE: Use the Address Book Manager (part of DSS) to create/add content to the Fax Address Book.
NOTE: To import/export the local fax phone book to the EWS, refer to the EWS documentation.
ENWW Send a fax 79
Page 88

Canceling a fax
Cancel the current fax transmission
The Cancel Current Transmission menu item only appears if an outgoing fax call is in progress.
NOTE: The cancel operation may require up to 30 seconds to complete.
Cancel the current fax transmission using the menus on the HP LaserJet 4345mfp and 9040/9050mfp, and
the HP Color LaserJet 4730mfp and 9500mfp
1. On the control panel, press the Menu button to display the main menu.
2. Touch FAX to display the fax menu.
3. Touch CANCEL CURRENT TRANSMISSION to cancel the fax.
NOTE: While a fax or faxes are being deleted, a canceling fax message displays in the status
bar.
Cancel the current fax transmission using the Stop button on the HP LaserJet 4345mfp and 9040/9050mfp,
and the HP Color LaserJet 4730mfp and 9500mfp
1. On the MFP control panel, press the FAX icon.
2. Press the red Stop/Cancel button.
NOTE: The status message Processing job displays on the MFP when the red Stop/Cancel is
pressed to cancel the fax.
Cancel the current fax transmission on the HP LaserJet M3025 MFP, M3027 MFP, M4345 MFP, M5025 MFP,
M5035 MFP, M9040 MFP, M9050 MFP and HP Color LaserJet CM4730 MFP and CM6040 MFP Series
1. On the control panel, press the red Stop button to display the Cancel Fax menu.
NOTE: All current and pending Fax jobs on the device will continue progress until the cancellation
is confirmed with OK
2. Touch Cancel current fax job to cancel the current fax job.
3. Touch OK to cancel the current fax transmission.
Cancel all pending faxes
This deletes all outgoing faxes stored in memory. However, if a fax is in the process of being transmitted,
that fax is not deleted and will be sent.
NOTE: If other outgoing faxes are waiting in memory, they will also be deleted.
Cancel all pending faxes on the HP LaserJet 4345mfp and 9040/9050mfp, and the HP Color LaserJet
4730mfp and 9500mfp
1. On the control panel, press the Menu button to display the main menu.
2. Touch FAX to display the fax menu.
3. Touch CANCEL ALL PENDING TRANSMISSIONS to cancel all stored faxes.
80 Chapter 3 Use Fax ENWW
Page 89

Cancel all pending faxes on the HP LaserJet M3025 MFP, M3027 MFP, M4345 MFP, M5025 MFP, M5035
MFP, M9040 MFP, M9050 MFP and HP Color LaserJet CM4730 MFP and CM6040 MFP Series
1. On the control panel, press the red Stop button to display the Cancel Fax menu.
NOTE: All current and pending Fax jobs on the device will continue progress until the cancellation
is confirmed with OK.
2. Touch Cancel all fax jobs to cancel all current and pending fax jobs.
3. Touch OK to cancel all current and pending fax jobs.
ENWW Canceling a fax 81
Page 90

Receiving faxes
When the fax accessory receives incoming faxes, it stores them in memory before printing. After the
entire fax is stored, it is printed and then deleted from memory. Faxes print when received unless
Schedule Printing of Faxes is enabled. If Schedule Printing of Faxes is enabled, all incoming faxes are
stored in memory and not printed. When Schedule Printing of Faxes is disabled, all stored faxes print.
For more information, see
You can change the fax-receive default settings to modify the way a fax is received. These settings
include the following options:
Selecting the number of rings-to-answer
●
Printing date, time, and page number on faxes (stamp)
●
Selecting input paper tray and destination bin
●
Forwarding faxes to another number
●
Blocking faxes from certain numbers
●
Schedule the printing of faxes (memory lock)
●
Scheduling fax printing (memory lock) on page 91.
For information about changing these menu settings, see
NOTE: You cannot cancel incoming faxes.
Set fax settings on page 41.
82 Chapter 3 Use Fax ENWW
Page 91

Creating and deleting speed dial lists
Speed dial allows you to assign a speed dial name to a single number or a group of numbers and then
send a fax to that number or numbers by selecting the speed dial name.
Create a speed dial list
Create a speed dial list on the HP LaserJet 4345mfp and 9040/9050mfp, and the HP Color LaserJet 4730mfp
and 9500mfp
1. On the control panel main screen, touch the FAX icon to display the Fax screen.
2. Touch Speed Dial to display the Speed Dial screen.
3. Touch Add to display the New Speed Dial screen.
4. Type a number using the keypad. If you wish to enter more than one number, touch Next
Number and enter another number. Repeat this step to enter all the numbers for the speed dial.
5. Touch the Name button to display the keyboard.
6. Type a name for the speed dial using the keyboard, and then touch OK to return to the New Speed
Dial screen.
7. Touch OK to accept the speed dial.
Create a speed dial list on the HP LaserJet M3025 MFP, M3027 MFP, M4345 MFP, M5025 MFP, M5035 MFP,
M9040 MFP, M9050 MFP and HP Color LaserJet CM4730 MFP and CM6040 MFP Series
1. On the control panel, touch the FAX icon to display the Fax screen.
2. Touch Speed Dials to display the Speed Dial screen.
3. Touch a Speed Dial number.
4. Touch the Speed Dial Name box to display the keyboard.
5. Type a name for the speed dial and touch OK to return to the Speed Dials screen.
6. Touch the Fax Numbers box to display the keyboard.
7. Type a fax number for the Speed Dial Name and touch OK to return to the Speed Dials screen.
8. Touch the Speed Dial number selected for the Speed Dial Name to save. The name and fax number
will appear next to the Speed Dial number.
9. Repeat steps 3-8 to enter all the numbers for the speed dial
10. When finished, press OK to return to the Fax screen
Delete a speed dial list
Delete a speed dial list on the HP LaserJet 4345mfp, 9040/9050mfp, and 5035mfp, and the HP Color LaserJet
4730mfp and 9500mfp
1. On the control panel main screen, touch the FAX icon to display the Fax screen.
2. Touch Speed Dial to display the Speed Dial screen.
ENWW Creating and deleting speed dial lists 83
Page 92

3. Select a speed dial name in the speed dial list.
4. Touch Delete to delete the speed dial list.
5. Touch Yes to confirm the deletion; or, touch No to retain the list.
6. Touch OK to return to the Fax screen.
Delete a speed dial list on the HP LaserJet M3025 MFP, M3027 MFP, M4345 MFP, M5025 MFP, M5035 MFP,
M9040 MFP, M9050 MFP and HP Color LaserJet CM4730 MFP and CM6040 MFP Series
1. On the control panel main screen, touch the FAX icon to display the Fax screen.
2. Touch Speed Dial to display the Speed Dial screen.
3. Touch a Speed Dial number of the list to be deleted.
4. Touch Delete.
5. The next screen will ask to confirm the deletion.
6. Touch Yes to delete the speed dial list.
7. Touch Yes again to return to the Fax screen.
Delete a single number from the speed dial list
Delete a single number from a speed dial list on the HP LaserJet 4345mfp, 9040/9050mfp, and 5035mfp,
and the HP Color LaserJet 4730mfp, and 9500mfp
1. On the control panel main screen, touch the FAX icon to display the Fax screen.
2. Touch Speed Dial to display the Speed Dial screen.
3. Touch the check box in front of the speed dial which holds the number you wish to delete. You may
need to use the scroll arrows to display the speed dial name.
4. Touch Details to display the list of numbers for the speed dial.
5. Use the up and down scroll arrows to highlight a number to delete.
6. Touch Remove or Remove All.
7. Touch OK or Cancel.
Delete a single number from a speed dial list on the HP LaserJet M3025 MFP, M3027 MFP, M4345 MFP,
M5025 MFP, M5035 MFP, M9040 MFP, M9050 MFP and HP Color LaserJet CM4730 MFP and CM6040 MFP
Series
1. On the control panel, touch the FAX icon to display the Fax screen.
2. Touch Speed Dials to display the Speed Dial screen.
3. Touch the Speed Dial number of the list to be edited.
4. Touch the Fax Numbers box to display the keyboard.
5. Scroll through the list of fax numbers and touch the screen to the right of last digit of the fax number
to be deleted. Use the backspace key to delete the fax number.
84 Chapter 3 Use Fax ENWW
Page 93

6. Touch OK to return to the Speed Dials screen.
7. Touch OK to return to the Fax screen.
Add a number to an existing speed dial list
Add a number to an existing speed dial list on the HP LaserJet 4345mfp, 9040/9050mfp, and 5035mfp, and
the HP Color LaserJet 4730mfp and 9500mfp
1. On the control panel main screen, touch the FAX icon to display the Fax screen.
2. Touch Speed Dial to display the Speed Dial screen.
3. Touch the check box in front of the speed dial. You may need to use the scroll arrows to display
the speed dial name.
4. Touch Details to display the list of numbers for the speed dial.
5. Touch Next Number.
6. Type a number using the keypad. Repeat this step to enter all the numbers for the speed dial.
7. Touch OK to accept the speed dial.
Add a number to an existing speed dial list on the HP LaserJet M3025 MFP, M3027 MFP, M4345 MFP, M5025
MFP, M5035 MFP, M9040 MFP, M9050 MFP and HP Color LaserJet CM4730 MFP and CM6040 MFP Series
1. On the control panel, touch the FAX icon to display the Fax screen.
2. Touch Speed Dials to display the Speed Dial screen.
3. Touch the Speed Dial number of the list to be edited.
4. Touch the Fax Numbers box to display the keyboard.
5. Using the keyboard, type the fax number to add to the speed dial list.
NOTE: The cursor defaults to the next open space below the last entered fax number of the speed
dial list.
6. Touch OK to return to the Speed Dials screen.
7. Touch OK to return to the Fax screen.
ENWW Creating and deleting speed dial lists 85
Page 94

Assigning speed dial lists to one-touch keys
The one-touch keypad allows you to send a fax to a speed dial list simply by touching a one-touch key.
However, before using the one-touch keys, you must create a speed dial list and assign the speed dial
name to a one-touch key.
Assign a speed dial to a one-touch key for the HP LaserJet 4345mfp and
9040/9050mfp, and the HP Color LaserJet 4730mfp and 9500mfp
1. Create a speed dial. For more information, see Creating and deleting speed dial lists on page 83.
2. Touch Configure on the fax screen to open the One-Touch Button Configuration screen.
3. Touch any (Available) number you want to assign to the speed dial.
4. On the Speed Dial List, select the speed dial check box you want to assign to the key.
5. Touch OK.
6. Touch OK to accept the settings.
Clear or reassign speed dial lists to one-touch keys for the HP LaserJet
4345mfp and 9040/9050mfp, and the HP Color LaserJet 4730mfp and
9500mfp
If you want to remove a speed dial list from a one-touch button, perform the following steps.
1. Touch Configure on the one-touch keypad to open the One-Touch Button Configuration screen.
2. Touch the number key with the speed dial name that you want to remove.
3. The Button is already configured screen opens. Touch Clear to remove the speed dial name from
the one-touch button, or touch Reassign to assign a different speed dial name to the key, or touch
Cancel to return to the One-Touch Button Configuration screen.
4. Touch OK to accept the settings.
86 Chapter 3 Use Fax ENWW
Page 95

Voice Calls and Retries
Voice calls are not included in the Fax Activity log and do not generate a T.30 report. The following
sections provide information on retries of a fax job.
Fax Call Report
When all fax attempts have been exhausted, a Fax Call Report will be printed for a fax send. It shows
the fax job log ID. The result of the final attempt is printed on the Fax Call Report.
A Fax Call Report does not print for voice calls.
NOTE: A Fax Call Report only generates Job numbers for final attempts. If one of these reports is
printed manually from the menu and the last call was neither the final attempt nor a Voice call the Job
number will be zero.
Fax Activity Log
Voice Calls are not included in the Fax Activity Log by default. Only the final attempt will be displayed
in the Fax Activity Log.
T.30 Report
Voice Calls will not cause a T.30 report to print. All retry attempts will cause a T.30 report to print.
ENWW Voice Calls and Retries 87
Page 96

Secure settings
Two settings, fax forwarding and fax printing, are secure features and require a PIN. The first time you
access either setting, you will be required to create a PIN. After you create that PIN, it is used to access
both features. That is, if a PIN that has been created for fax forwarding it is also used to access fax
printing, or if the PIN was first created for fax printing, it must be used to access fax forwarding. Only
one PIN can be created to access these secure settings.
If fax call report is enabled with thumbnails, a report prints with a thumbnail of the first page of the fax
when fax printing or fax forwarding is enabled. If you want secure fax printing, disable printing the
thumbnail on the fax call report.
Change your PIN
This procedure describes how to change your existing PIN.
CAUTION: Always save your PIN in a secure place. If you lose your PIN, you must contact HP Service
Support for information about how to reset the PIN. For more information, see
on page 121.
Change your PIN on the HP LaserJet 4345mfp and 9040/9050mfp, and the HP Color LaserJet 4730mfp and
9500mfp
1. On the control panel, press the Menu button to open the main menu.
2. Touch FAX to open the fax menu.
HP Customer Care
3. Scroll to and touch FAX RECEIVE.
4. Scroll to and touch FORWARD FAX or Fax Printing to open the settings screen.
5. Touch Change PIN to open the PIN screen.
6. Using the keypad, type the PIN (at least four digits), and then touch OK to open the Change PIN
screen.
7. Type a new PIN by using the keypad, and then press OK.
8. Verify the PIN by typing it again, and then touch OK to save the new PIN.
Change your PIN on the HP LaserJet M3025 MFP, M3027 MFP, M4345 MFP, M5025 MFP, M5035 MFP, M9040
MFP, M9050 MFP and HP Color LaserJet CM4730 MFP and CM6040 MFP Series
1. On the control panel, scroll to and touch the Administration icon to open the Administration menu.
2. Touch Default Job Options to display the Default Job Options menu.
3. Touch Default Fax Options to display the Default Fax Options menu.
4. Touch Fax Receive to display the Fax Receive screen.
5. Touch Fax Forwarding to display the PIN screen.
6. Using the keypad, type the PIN (at least four digits), and then touch OK to display the Fax
Forwarding screen.
7. Touch Change PIN to display the PIN screen.
8. Using the keypad, type the new PIN (at least four digits), and then touch OK.
88 Chapter 3 Use Fax ENWW
Page 97

9. Using the keypad, confirm the new PIN, and then touch OK.
10. Touch OK again.
ENWW Secure settings 89
Page 98

Set fax forwarding
Use the forward fax setting to forward all received faxes to another fax number. When forward fax is
enabled, the receiving MFP prints the fax (if fax printing is disabled, the fax prints when the printing is
enabled), and also forwards the fax to the fax forward number.
NOTE: If the fax fails to forward to another phone number, the device will not attempt to forward the
fax again. All faxes are forwarded in fine or standard resolution.
Set fax forwarding from the HP LaserJet 4345mfp and 9040/9050mfp, and the HP Color LaserJet 4730mfp
and 9500mfp
1. On the control panel, press the Menu button to open the main menu.
2. Touch FAX to open the fax menu.
3. Scroll to and touch FAX RECEIVE.
4. Scroll to and touch FORWARD FAX to open the PIN screen.
5. Using the keypad, type your PIN (must be at least four digits) and touch OK. If you have an existing
PIN, the Forward to Number screen opens. If a PIN has not been created, you are prompted to
verify the new PIN by typing it again, and then press OK.
NOTE: Always save your PIN in a secure place. If you lose your PIN, you must contact HP Service
Support for information about how to reset the PIN. For more information, see
on page 121.
HP Customer Care
6. Touch Fax Forwarding to open the FAX FORWARDING settings screen.
7. Touch Forward to Number to make the keypad available.
8. Type the fax forward phone number, and then touch OK to enable fax forwarding.
Set fax forwarding on the HP LaserJet M3025 MFP, M3027 MFP, M4345 MFP, M5025 MFP, M5035 MFP,
M9040 MFP, M9050 MFP and HP Color LaserJet CM4730 MFP and CM6040 MFP Series
1. On the control panel, scroll to and touch the Administration icon to open the Administration menu.
2. Touch Default Job Options to display the Default Job Options menu.
3. Touch Default Fax Options to display the Default Fax Options menu.
4. Touch Fax Receive to display the Fax Receive screen.
5. Touch Fax Forwarding to display the PIN screen.
6. Using the keypad, type the PIN (at least four digits), and then touch OK to display the Fax
Forwarding screen.
7. Touch Fax Forwarding.
8. Touch Custom and touch save to display the Set Fax Forwarding screen.
9. Touch Forward to Number to display the Forward to Number screen.
10. Touch the text box to enter the fax forward phone number and touch OK.
90 Chapter 3 Use Fax ENWW
Page 99

Scheduling fax printing (memory lock)
Use the fax printing feature to specify when faxes print. There are three fax printing modes that can be
selected. The selections are Store all received faxes, Print all received faxes, or Use fax printing
schedule.
If Store all received faxes is selected, then all incoming faxes will be stored in memory and not printed.
It is possible to access fax jobs stored in memory through the MFP Retrieve Job menu. Using this menu,
you can print or delete print jobs while they are stored in memory. For additional information about this
feature, see the Retrieve Job menu description in the MFP user guide.
NOTE: The MFP Retrieve Job option is only available to the HP LaserJet 4345mfp and the HP Color
LaserJet 4730mfp, 9040/9050mfp, and 9500mfp. For the HP LaserJet M3035 MFP, M3027 MFP, M4345
MFP, M5025 MFP, M5035 MFP, M9040 MFP, M9050 MFP and HP Color LaserJet CM4730 MFP and
CM6040 MFP Series, retrieved stored faxes can be accessed by entering the Fax Printing menu and
changing the mode to Print all received faxes.
If Print all received faxes is selected, then all incoming faxes will be printed. Any faxes that are currently
stored in memory will also be printed.
If Use fax printing schedule is selected, then faxes will be only printed per the fax printing schedule. The
fax printing schedule can be set to lockout an entire day (24 hours) or lockout a time period during the
day. Only one lockout period can be set, but it can be applied to any number of days. The lockout period
is setup under the Fax Printing menu. For more information, see
on page 93.
Create a fax printing schedule
NOTE: When the lockout time ends, any faxes that were received and stored during the lockout period
are printed automatically.
Fax-printing behavior
To increase fax security, the behavior of the Fax Printing feature changed with the release of the HP
LaserJet M5035 MFP, M5025 MFP, M3035 MFP, M3027 MFP, M4345 MFP, M9040 MFP, M9050 MFP
and HP Color LaserJet CM4730 MFP and CM6040 MFP Series. The key differences are how call
reports, T.30 reports, report menus, and the control panel status line are handled or displayed. The
following table assumes that Fax Printing is enabled.
Menu setting for
call report and/or
T.30 Report
Legacy MFP
Operation (9500,
9040/50, 4345,
4730)
M5035, M5025,
M3035, M3027,
M4345, M9040,
M9050, CM4730,
CM6040 MFPs
Never Not printed Fax prints Shown Yes
Every fax Not printed Fax prints Shown Yes
Never Not printed Fax prints Hidden Hidden
Every fax Not printed and
When fax is
received, how are
call report/T.30
report handled?
stored with fax
What happens
when a stored fax
is printed?
Fax prints, call
report(s) prints
What happens to
menus for fax
reports & T.30
report?
Hidden Hidden
Does the control
panel show
incoming
telephone
number?
ENWW Scheduling fax printing (memory lock) 91
Page 100

Enable or disable the schedule for printing of faxes
NOTE: Before enabling a fax-printing schedule, a schedule must be created. For more information,
Create a fax printing schedule on page 93.
see
Enable/disable the schedule for printing of faxes on the HP LaserJet 4345mfp and 9040/9050mfp, and the
HP Color LaserJet 4730mfp and 9500mfp
1. On the control panel, press the Menu button to display the main menu.
2. Touch FAX to display the fax menu.
3. Scroll to and touch FAX RECEIVE.
4. Scroll to and touch Fax Printing to display the PIN menu.
5. Type your PIN (must be at least four digits) and touch OK to display the Fax Printing menu. If you
do not have a PIN, you will be prompted to create one.
NOTE: Always save your PIN in a secure place. If you loose your PIN, you must contact
HP Service Support for information on how to reset the PIN. For more information, see
HP Customer Care on page 121.
6. Touch Fax Printing Mode.
7. Select a fax printing mode:
Touch Store all received faxes to disable printing of faxes and store all received faxes to
●
memory.
Touch Print all received faxes to allow all stored faxes to print and to print all faxes as received.
●
Touch Create Fax Printing Schedule to use the fax printing schedule to automatically turn on
●
and off the printing of faxes.
8. Touch OK to exit.
Enable/disable the schedule for printing of faxes on the HP LaserJet M3025 MFP, M3027 MFP, M4345 MFP,
M5025 MFP, M5035 MFP, M9040 MFP, M9050 MFP and HP Color LaserJet CM4730 MFP and CM6040 MFP
Series
1. On the control panel, scroll to and touch the Administration icon to open the Administration menu.
2. Scroll to and touch Time/Scheduling to display the Time/Scheduling screen.
3. Scroll to and touch Fax Printing to display the PIN menu.
4. Touch the text box to display the keyboard.
5. Using the keypad, type the PIN (at least four digits), and then touch OK to display the Fax Printing
menu.
If you do not have a PIN, you will be prompted to create one.
NOTE: Always save your PIN in a secure place. If you loose your PIN, you must contact HP
Service Support for information on how to reset the PIN. For more information, see
Care on page 121.
6. Scroll to and touch Fax Printing Mode.
92 Chapter 3 Use Fax ENWW
HP Customer
 Loading...