

Page 1

HP DesignJet Z6610 60-in Production Printer
HP DesignJet Z6810 42-in Production Printer
HP DesignJet Z6810 60-in Production Printer
User Guide
Page 2

© Copyright 2018 HP Development Company,
L.P.
Edition 1
Legal notices
The information contained herein is subject to
change without notice.
The only warranties for HP Products and
services are set forth in the express warranty
statement accompanying such products and
services. Nothing herein should be construed as
constituting an additional warranty. HP shall not
be liable for technical or editorial errors or
omissions contained herein.
Trademarks
Adobe®, Acrobat®, Adobe Photoshop®, and
PostScript® are trademarks of Adobe Systems
Incorporated.
Microsoft® and Windows® are U.S. registered
trademarks of Microsoft Corporation.
PANTONE®* is *Pantone, Inc.'s check-standard
trademark for color.
Page 3

Table of contents
1 Introduction ............................................................................................................................................................................................... 1
Safety precautions ................................................................................................................................................................... 2
Product models ........................................................................................................................................................................ 2
Use of this guide ....................................................................................................................................................................... 3
The printer’s main features ..................................................................................................................................................... 4
The printer’s main components ............................................................................................................................................. 4
The Embedded Web Server’s main components .............................................................................................................. 10
The HP DesignJet Utility’s main features ........................................................................................................................... 11
The printer’s internal prints .................................................................................................................................................. 11
Turn the printer on and o ................................................................................................................................................... 12
2 Connectivity and software instructions .............................................................................................................................................. 13
Choose which connection method to use .......................................................................................................................... 14
Connect to a network (Windows) ......................................................................................................................................... 14
Connect to a network (Mac OS X) ........................................................................................................................................ 15
Uninstall the printer software .............................................................................................................................................. 15
Congure the Customer Involvement Program and other printer services ................................................................. 15
3 Personalize the printer .......................................................................................................................................................................... 17
Change the language of the front-panel display .............................................................................................................. 18
Access the Embedded Web Server ..................................................................................................................................... 18
Change the language of the Embedded Web Server ....................................................................................................... 18
Access the HP DesignJet Utility ............................................................................................................................................ 19
Change the language of the HP DesignJet Utility ............................................................................................................. 19
Change the sleep mode setting ........................................................................................................................................... 19
Turn the buzzer on and o ................................................................................................................................................... 19
Change the front-panel display contrast ........................................................................................................................... 20
Change the units of measurement ..................................................................................................................................... 20
Congure network settings .................................................................................................................................................. 20
Change the graphic language setting ................................................................................................................................. 21
Personalize the list of paper types ..................................................................................................................................... 21
ENWW iii
Page 4

Select paper mismatch action ............................................................................................................................................. 23
4 Handle the paper .................................................................................................................................................................................... 25
Overview .................................................................................................................................................................................. 26
Load a roll onto the spindle .................................................................................................................................................. 31
Load a roll into the printer .................................................................................................................................................... 33
Unload a roll from the printer .............................................................................................................................................. 35
Use the take-up reel .............................................................................................................................................................. 35
View information about the paper ...................................................................................................................................... 43
Perform paper advance calibration ..................................................................................................................................... 43
Download paper presets ....................................................................................................................................................... 45
Use non-HP paper .................................................................................................................................................................. 45
Cancel the drying time .......................................................................................................................................................... 46
Change the drying time ......................................................................................................................................................... 46
Printing paper info ................................................................................................................................................................. 47
Feed and cut the paper ......................................................................................................................................................... 47
Store the paper ....................................................................................................................................................................... 47
Order paper ............................................................................................................................................................................. 48
Non-recommended paper types ......................................................................................................................................... 53
5 Handle the ink system ........................................................................................................................................................................... 55
Ink system components ........................................................................................................................................................ 56
Ink system tips ........................................................................................................................................................................ 59
Work with ink system components ..................................................................................................................................... 60
Order ink supplies .................................................................................................................................................................. 79
6 Print options ............................................................................................................................................................................................ 81
Create a print job .................................................................................................................................................................... 82
Select print quality ................................................................................................................................................................. 83
Print a draft ............................................................................................................................................................................. 84
High-quality printing .............................................................................................................................................................. 85
Select paper size .................................................................................................................................................................... 85
Select margins options ......................................................................................................................................................... 86
Rescale a print ........................................................................................................................................................................ 87
Preview a print ........................................................................................................................................................................ 87
Print 16-bit color images ...................................................................................................................................................... 88
Change the treatment of overlapping lines ....................................................................................................................... 88
Print crop lines ........................................................................................................................................................................ 89
Rotate an image ..................................................................................................................................................................... 89
Print in gray shades ............................................................................................................................................................... 91
iv ENWW
Page 5

Use paper economically ........................................................................................................................................................ 91
Nest jobs to save paper ......................................................................................................................................................... 91
Use ink economically ............................................................................................................................................................. 93
7 Color management ................................................................................................................................................................................ 95
What is color? .......................................................................................................................................................................... 96
The problem: color in the computer world ........................................................................................................................ 96
The solution: color management ........................................................................................................................................ 98
Color and your Z6810 Printer .............................................................................................................................................. 99
Color and your Z6610 Printer ............................................................................................................................................ 104
Color-management options ............................................................................................................................................... 107
Color-adjustment options .................................................................................................................................................. 109
HP Professional PANTONE* Emulation ............................................................................................................................. 110
Color emulation modes ...................................................................................................................................................... 111
8 Job queue management ..................................................................................................................................................................... 115
Embedded Web Server job queue page ........................................................................................................................... 116
Job preview ........................................................................................................................................................................... 116
Turn o the job queue ......................................................................................................................................................... 117
Pause the job queue ............................................................................................................................................................ 117
Select when to print a job in the queue ............................................................................................................................ 117
Identify a job in the queue .................................................................................................................................................. 117
Prioritize a job in the queue ............................................................................................................................................... 118
Delete a job from the queue .............................................................................................................................................. 118
Reprint or copy a job in the queue .................................................................................................................................... 118
Job status messages ........................................................................................................................................................... 118
9 Retrieve printer usage information ................................................................................................................................................... 121
Get printer accounting information .................................................................................................................................. 122
Check printer usage statistics ............................................................................................................................................ 122
Check ink and paper usage for a job ................................................................................................................................. 122
10 Practical printing examples .............................................................................................................................................................. 125
Overview ............................................................................................................................................................................... 126
Resize an image with Adobe Photoshop CS4 ................................................................................................................. 126
Print a color photo with Photoshop CS2 .......................................................................................................................... 128
Print a draft for revision with the correct scale .............................................................................................................. 129
Reprint a job with consistent colors .................................................................................................................................. 132
Use ESRI ArcGIS 9 to print a map ...................................................................................................................................... 134
ENWW v
Page 6

11 Maintain the printer ........................................................................................................................................................................... 137
Clean the exterior of the printer ........................................................................................................................................ 138
Clean the platen ................................................................................................................................................................... 138
Clean the paper-advance sensor window ....................................................................................................................... 140
Lubricate the printhead carriage ....................................................................................................................................... 140
Maintain the ink cartridges ................................................................................................................................................. 141
Perform preventive maintenance ..................................................................................................................................... 141
Move or store the printer .................................................................................................................................................... 142
Update the printer rmware .............................................................................................................................................. 143
Change the ink absorber .................................................................................................................................................... 144
Secure disk erase ................................................................................................................................................................. 147
12 Accessories ......................................................................................................................................................................................... 149
Order accessories ................................................................................................................................................................ 149
13 Troubleshoot print-quality issues ................................................................................................................................................... 151
General advice ...................................................................................................................................................................... 153
Troubleshooting tools ......................................................................................................................................................... 153
Lines are too thick, too thin, or missing ........................................................................................................................... 154
Lines appear stepped or jagged ........................................................................................................................................ 155
Parts of lines or text are missing ...................................................................................................................................... 155
Lines are printed double or in the wrong colors ............................................................................................................. 156
Lines are blurred (ink bleeds from lines) ......................................................................................................................... 156
Lines are slightly warped .................................................................................................................................................... 157
Dark or light horizontal lines across the image (banding) ............................................................................................ 157
The image is grainy ............................................................................................................................................................. 158
The image has a metallic hue (bronzing) ......................................................................................................................... 158
The printed output is not at ............................................................................................................................................. 159
The print smudges when touched .................................................................................................................................... 159
Ink marks appear on the paper ......................................................................................................................................... 159
Defects near the top of a print .......................................................................................................................................... 160
Colors are inaccurate ........................................................................................................................................................... 161
The output is completely blank ......................................................................................................................................... 163
The output contains only a partial print ........................................................................................................................... 164
The image is clipped ............................................................................................................................................................ 164
The image is in one portion of the printing area ............................................................................................................ 165
The image is unexpectedly rotated .................................................................................................................................. 165
The print is a mirror image of the original ....................................................................................................................... 165
The print is distorted or unintelligible .............................................................................................................................. 165
One image overlays another on the same print ............................................................................................................. 165
vi ENWW
Page 7

Pen settings seem to have no eect ................................................................................................................................ 166
The image has a wood-grain appearance (aeroworms) ............................................................................................... 166
A square is not square ........................................................................................................................................................ 166
Color drift on area ll edges ............................................................................................................................................... 166
14 Troubleshoot paper issues .............................................................................................................................................................. 167
The paper cannot be loaded successfully ....................................................................................................................... 168
The paper has jammed ....................................................................................................................................................... 168
Prints do not stack correctly in the bin ............................................................................................................................. 170
Automatic paper-cutter does not function ...................................................................................................................... 170
Take-up reel paper jammed .............................................................................................................................................. 170
Take-up reel does not wind ............................................................................................................................................... 171
15 Troubleshoot ink-system issues ..................................................................................................................................................... 173
Cannot insert an ink cartridge ........................................................................................................................................... 174
Cannot insert a printhead ................................................................................................................................................... 174
Cannot insert the maintenance cartridge ........................................................................................................................ 174
Front panel recommends reseating or replacing a printhead ...................................................................................... 174
Clean the printheads ........................................................................................................................................................... 174
Align the printheads ............................................................................................................................................................ 175
16 Troubleshoot other issues ............................................................................................................................................................... 179
The printer is not printing ................................................................................................................................................... 180
The software program slows down or stalls while generating the print job ............................................................. 180
The printer seems slow ...................................................................................................................................................... 180
Communication failures between computer and printer .............................................................................................. 181
Cannot access the Embedded Web Server ...................................................................................................................... 181
“Out-of-memory” error message ..................................................................................................................................... 182
The platen rollers squeak ................................................................................................................................................... 182
Cannot access the HP DesignJet Utility ............................................................................................................................ 182
Print job canceled and purged when held for preview .................................................................................................. 183
Printer alerts ......................................................................................................................................................................... 183
17 HP Customer Care ............................................................................................................................................................................. 185
Introduction .......................................................................................................................................................................... 186
HP Professional Services .................................................................................................................................................... 186
HP Instant Support .............................................................................................................................................................. 187
HP Proactive Support .......................................................................................................................................................... 187
Customer Self Repair .......................................................................................................................................................... 188
Contact HP Support ............................................................................................................................................................. 188
ENWW vii
Page 8

Appendix A Overnight job scenario ....................................................................................................................................................... 191
Task 1: Handle the digital content .................................................................................................................................... 191
Task 2: Handle the paper .................................................................................................................................................... 191
Task 3: Handle the ink system ........................................................................................................................................... 192
Task 4: Handle print jobs .................................................................................................................................................... 193
Task 5: Adjust printed images ............................................................................................................................................ 193
Appendix B Urgent walk-in job scenario .............................................................................................................................................. 195
Task 1: Handle the digital content .................................................................................................................................... 195
Task 2: Handle print jobs .................................................................................................................................................... 195
Task 3: Handle the paper .................................................................................................................................................... 196
Task 4: Handle the ink system ........................................................................................................................................... 197
Task 5: Adjust printed images ............................................................................................................................................ 198
Appendix C Front-panel menus ............................................................................................................................................................ 199
Paper menu .......................................................................................................................................................................... 200
Job management menu ..................................................................................................................................................... 201
Ink menu ............................................................................................................................................................................... 202
Setup menu .......................................................................................................................................................................... 203
Image quality maintenance menu .................................................................................................................................... 205
Connectivity menu ............................................................................................................................................................... 206
Internal prints menu ............................................................................................................................................................ 207
Information menu ................................................................................................................................................................ 208
Appendix D Front-panel error messages ............................................................................................................................................ 209
Appendix E Printer specications ......................................................................................................................................................... 213
Functional specications .................................................................................................................................................... 214
Physical specications ........................................................................................................................................................ 215
Memory specications ........................................................................................................................................................ 216
Power specications ........................................................................................................................................................... 217
Ecological specications ..................................................................................................................................................... 217
Environmental specications ............................................................................................................................................. 217
Acoustic specications ........................................................................................................................................................ 218
Glossary ..................................................................................................................................................................................................... 219
Index ........................................................................................................................................................................................................... 221
viii ENWW
Page 9

1 Introduction
●
Safety precautions
●
Product models
●
Use of this guide
●
The printer’s main features
●
The printer’s main components
●
The Embedded Web Server’s main components
●
The HP DesignJet Utility’s main features
●
The printer’s internal prints
●
Turn the printer on and o
ENWW 1
Page 10

Safety precautions
The following precautions ensure the correct use of the printer and prevent printer damage. Use these
precautions at all times.
●
Use the power supply voltage that is specied on the nameplate. To avoid overloading the printer's
electrical outlet, do not use the outlet for multiple devices.
●
Make sure that the printer is well-grounded. Failure to ground the printer can result in electrical shock, re,
and susceptibility to electromagnetic interference.
●
Do not disassemble or repair the printer yourself, unless authorized by HP (see Customer Self Repair
on page 188). Contact your local HP Service Representative for service. See HP Customer Care
on page 185.
●
Use only the electrical cord that HP supplied with the printer. Do not damage, cut, or repair the power cord.
A damaged power cord creates a risk of re and electric shock. Replace a damaged power cord with an HPapproved power cord.
●
Do not allow metal or liquids (except those used in HP Cleaning Kits) to touch the internal parts of the
printer. Doing so can cause re, electric shock, or other serious hazards.
●
Turn o the printer and unplug the power cable from the power outlet in any of the following cases:
–
When you place your hands inside the printer
–
If smoke or an unusual smell emanates from the printer
–
If the printer is making an unusual noise that does not occur during normal operation
–
If a piece of metal or a liquid (not part of cleaning and maintenance routines) touches internal parts of
the printer
–
During an electrical (thunder or lightning) storm
–
During a power failure
Product models
This guide covers the following product models, normally referring to them by their short names for brevity.
Full name Part number
HP DesignJet Z6810 60-in Production Printer 2QU14
HP DesignJet Z6610 60-in Production Printer 2QU13
HP DesignJet Z6810 42-in Production Printer 2QU12
HP DesignJet Z6810 60-in Production with PostScript/PDF upgrade 2QU14
HP DesignJet Z6610 60-in Production with PostScript/PDF upgrade 2QU13
HP DesignJet Z6810 42-in Production with PostScript/PDF upgrade 2QU12
2 Chapter 1 Introduction ENWW
Page 11

Use of this guide
This guide is the most complete source of information about this product and is organized into the following
chapters.
Introduction
This chapter provides a brief introduction to the printer and its documentation for new users.
Use and maintenance
These chapters help you carry out normal printer procedures and include the following topics:
●
Connectivity and software instructions on page 13
●
Personalize the printer on page 17
●
Handle the paper on page 25
●
Handle the ink system on page 55
●
Print options on page 81
●
Color management on page 95
●
Practical printing examples on page 125
●
Maintain the printer on page 137
Troubleshooting
These chapters help you solve problems that might occur while printing and include the following topics:
●
Troubleshoot print-quality issues on page 151
●
Troubleshoot ink-system issues on page 173
●
Troubleshoot paper issues on page 167
●
Troubleshoot other issues on page 179
●
Front-panel error messages on page 209
Support and specications
These chapters contain reference information, including HP customer care and the specications of the printer:
●
HP Customer Care on page 185
●
Printer specications on page 213
Appendices
The appendices highlight some of the more common printing scenarios you might face as a user. Each appendix
takes a step-by-step approach to working through a given printing scenario, and points you to various parts of
this guide that provide more task-specic information and instruction.
ENWW Use of this guide 3
Page 12

Glossary
This chapter contains denitions of printing and HP terms that are used in this documentation.
Index
In addition to the table of contents, an alphabetical index is included to help you to nd topics quickly.
Warnings and Cautions
Symbols are used in this manual to ensure the proper use of the printer and to prevent printer damage. Follow
the instructions that are marked with these symbols.
WARNING! Failure to follow the guidelines that are marked with this symbol could result in serious personal
injury or death.
CAUTION: Failure to follow the guidelines that are marked with this symbol could result in minor personal injury
or damage to the product.
The printer’s main features
Some major features of the printer are shown below:
●
Fast, high-quality printing with a resolution of up to 2400 × 1200 optimized dots per inch (dpi), from a
1200 × 1200 dpi input (using the Max. resolution for photo papers option)
●
Maximum paper width of 1067 mm (42-in) or 1524 mm (60-in)
●
Take-up reel supplied with the 60-in printer, available as an accessory for the 42-in printer
●
Accurate and consistent color reproduction features:
–
Press emulations for U.S., European, and Japanese standards; and color-monitor red-green-blue
(RGB) emulations
–
Automatic color calibration (Z6610/Z6810) and proling (only Z6810)
●
An eight ink system on the Z6810 and a six-ink system on the Z6610 that provides a wide color range on
matte ne-art papers and glossy photo papers for photographic and graphic arts prints. The ink system
also oers complete coverage of International Organization for Standards (ISO) and Specications for Web
Oset Publications (SWOP) gamuts for color accuracy in pre-press applications.
●
An HP Embedded Spectrophotometer for consistent and accurate color, even with paper and environment
changes. On the Z6810 it also enables the easy creation of custom International Color Custom (ICC) proles
(see HP Embedded Spectrophotometer on page 99)
●
Ink and paper usage information that is available from the Web through the Embedded Web Server (see
The Embedded Web Server’s main components on page 10)
●
Paper exibility and automatic easy load, including information and paper presets that are available on the
front panel, or through the HP DesignJet Utility
The printer’s main components
The following views illustrate the main components of the Z6810 42-in and Z6610/Z6810 60-in Printers.
4 Chapter 1 Introduction ENWW
Page 13
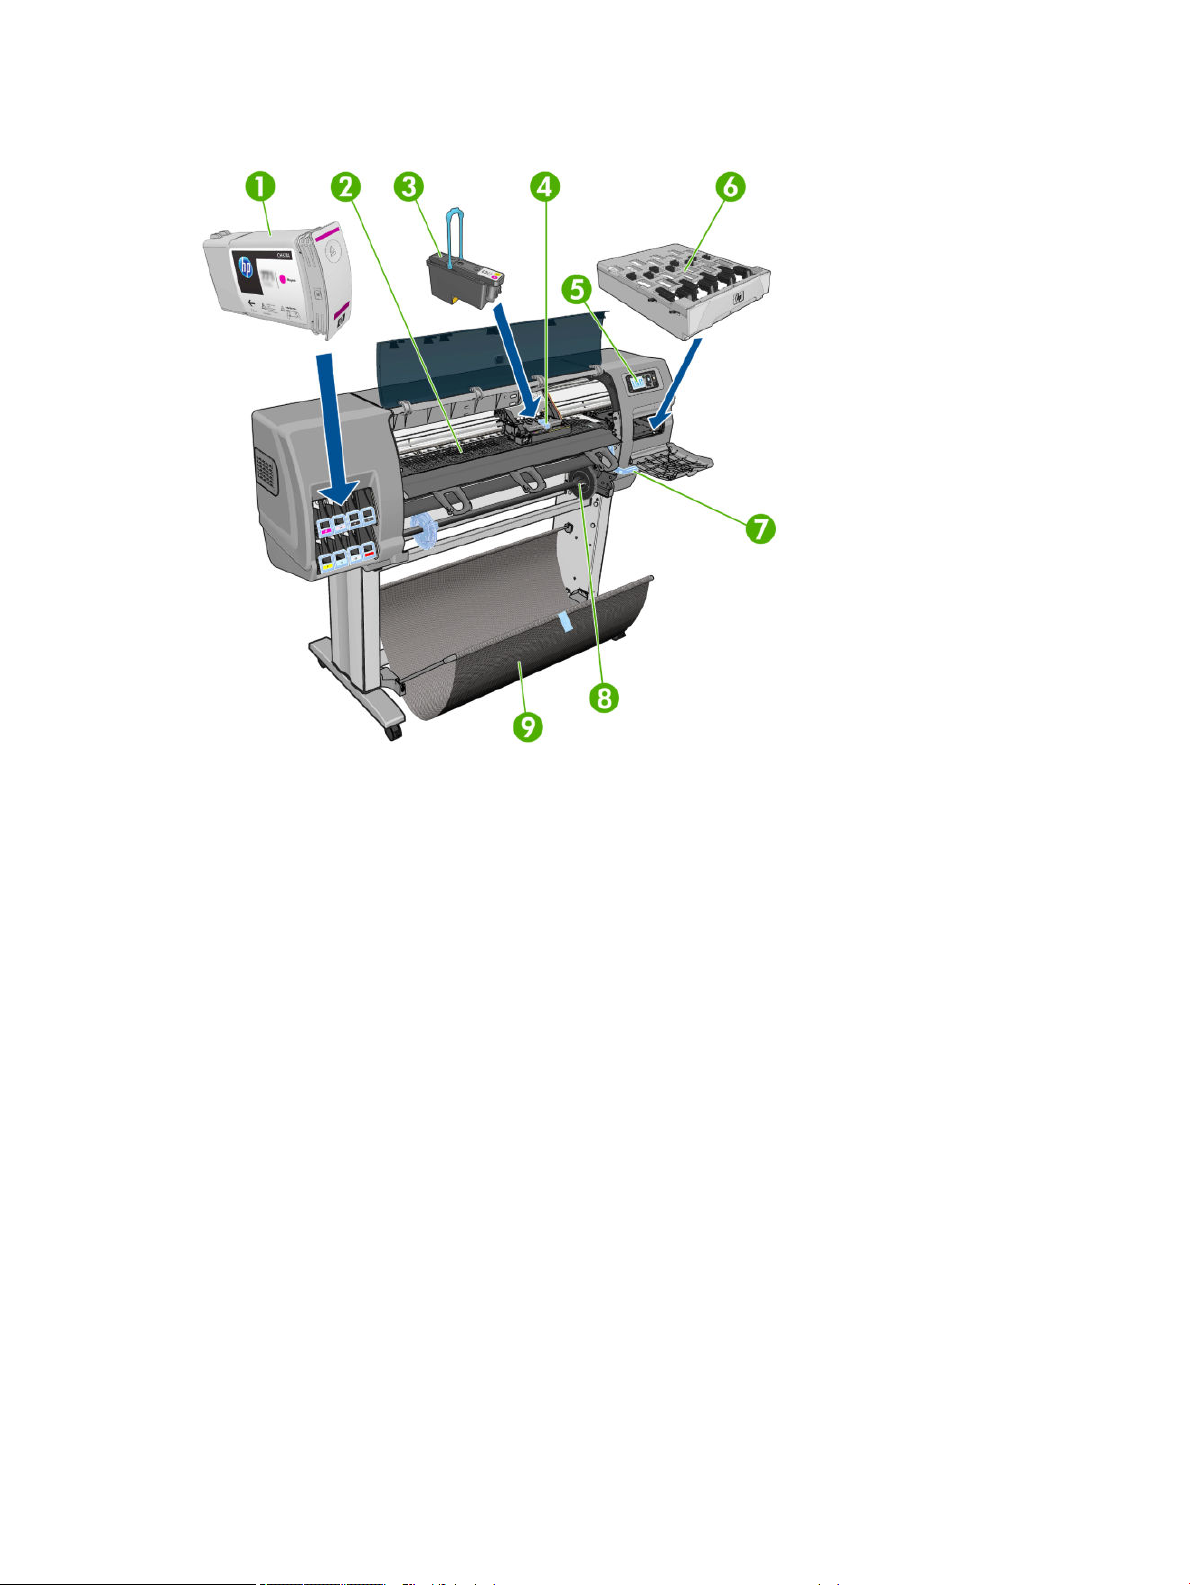
Front view 42-in printer
1. Ink cartridge
2. Platen
3. Printhead
4. Printhead carriage
5. Front panel
6. Maintenance cartridge
7. Paper-load lever
8. Spindle
9. Bin
ENWW The printer’s main components 5
Page 14
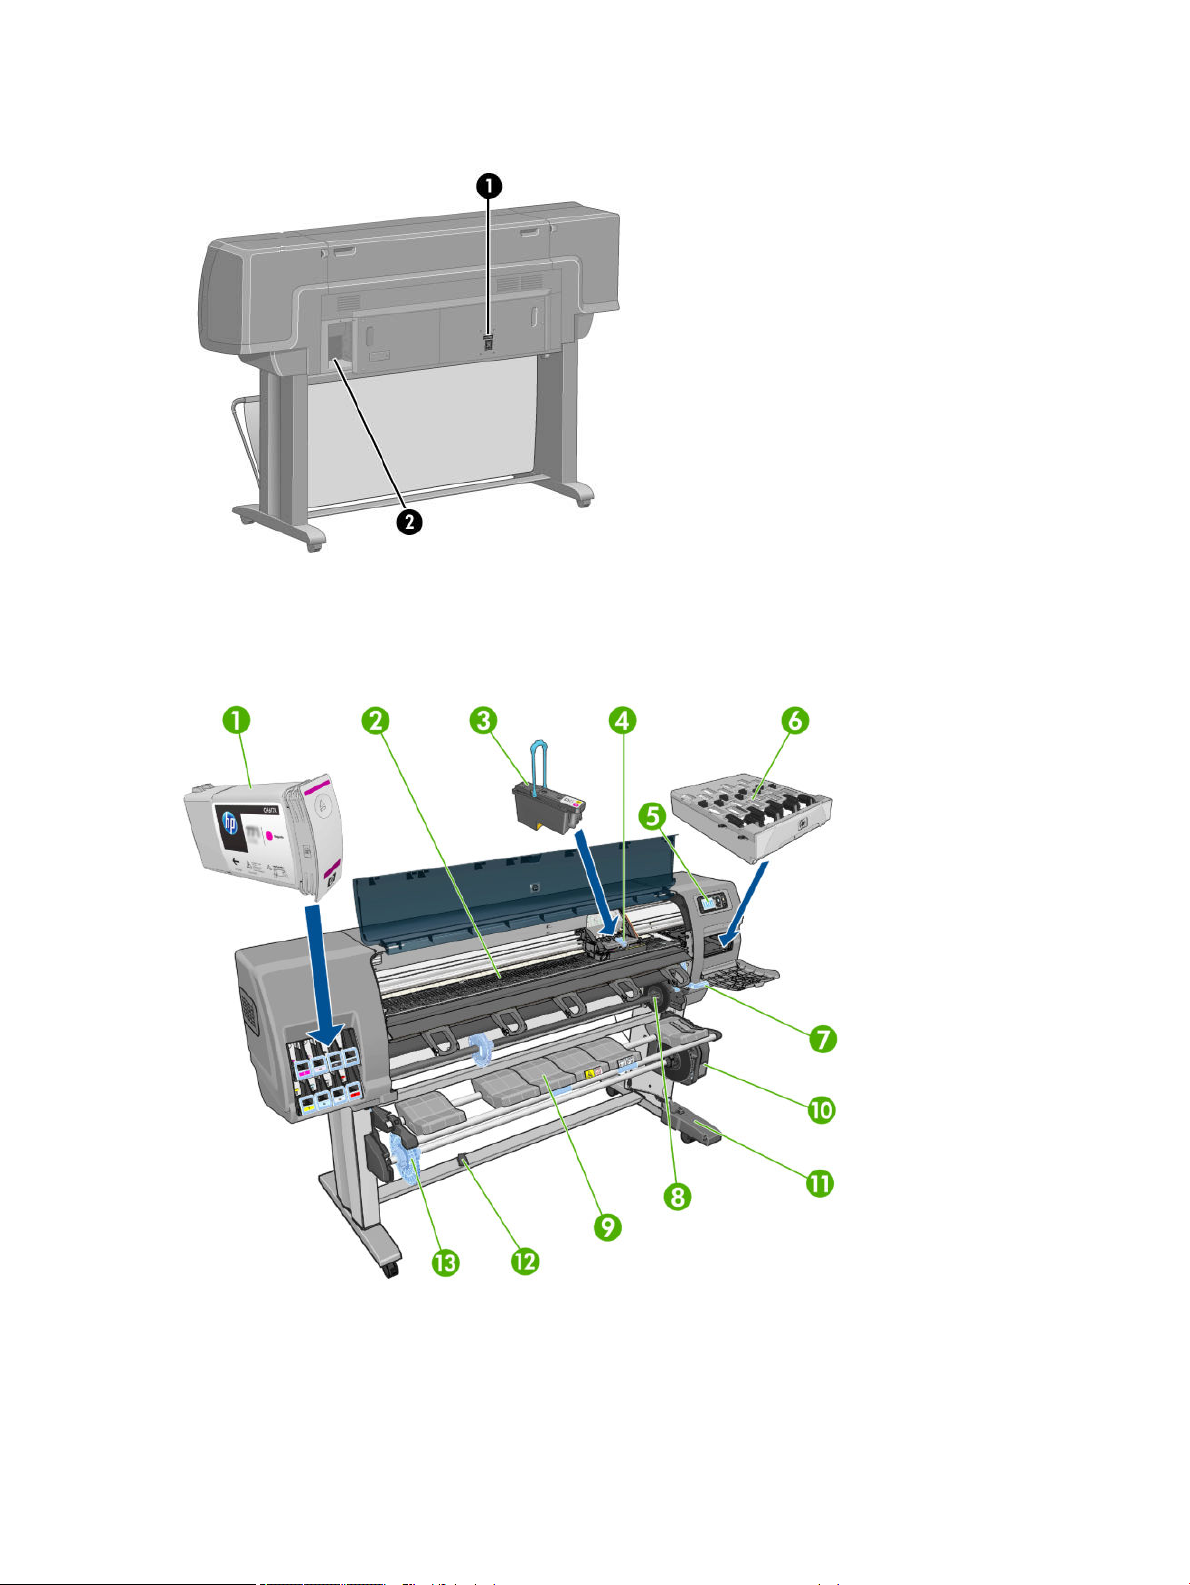
Rear view 42-in printer
1. Power switch and socket
2. Sockets for communication cables and optional accessories
Front view 60-in printer
1. Ink cartridge
2. Platen
3. Printhead
4. Printhead carriage
6 Chapter 1 Introduction ENWW
Page 15
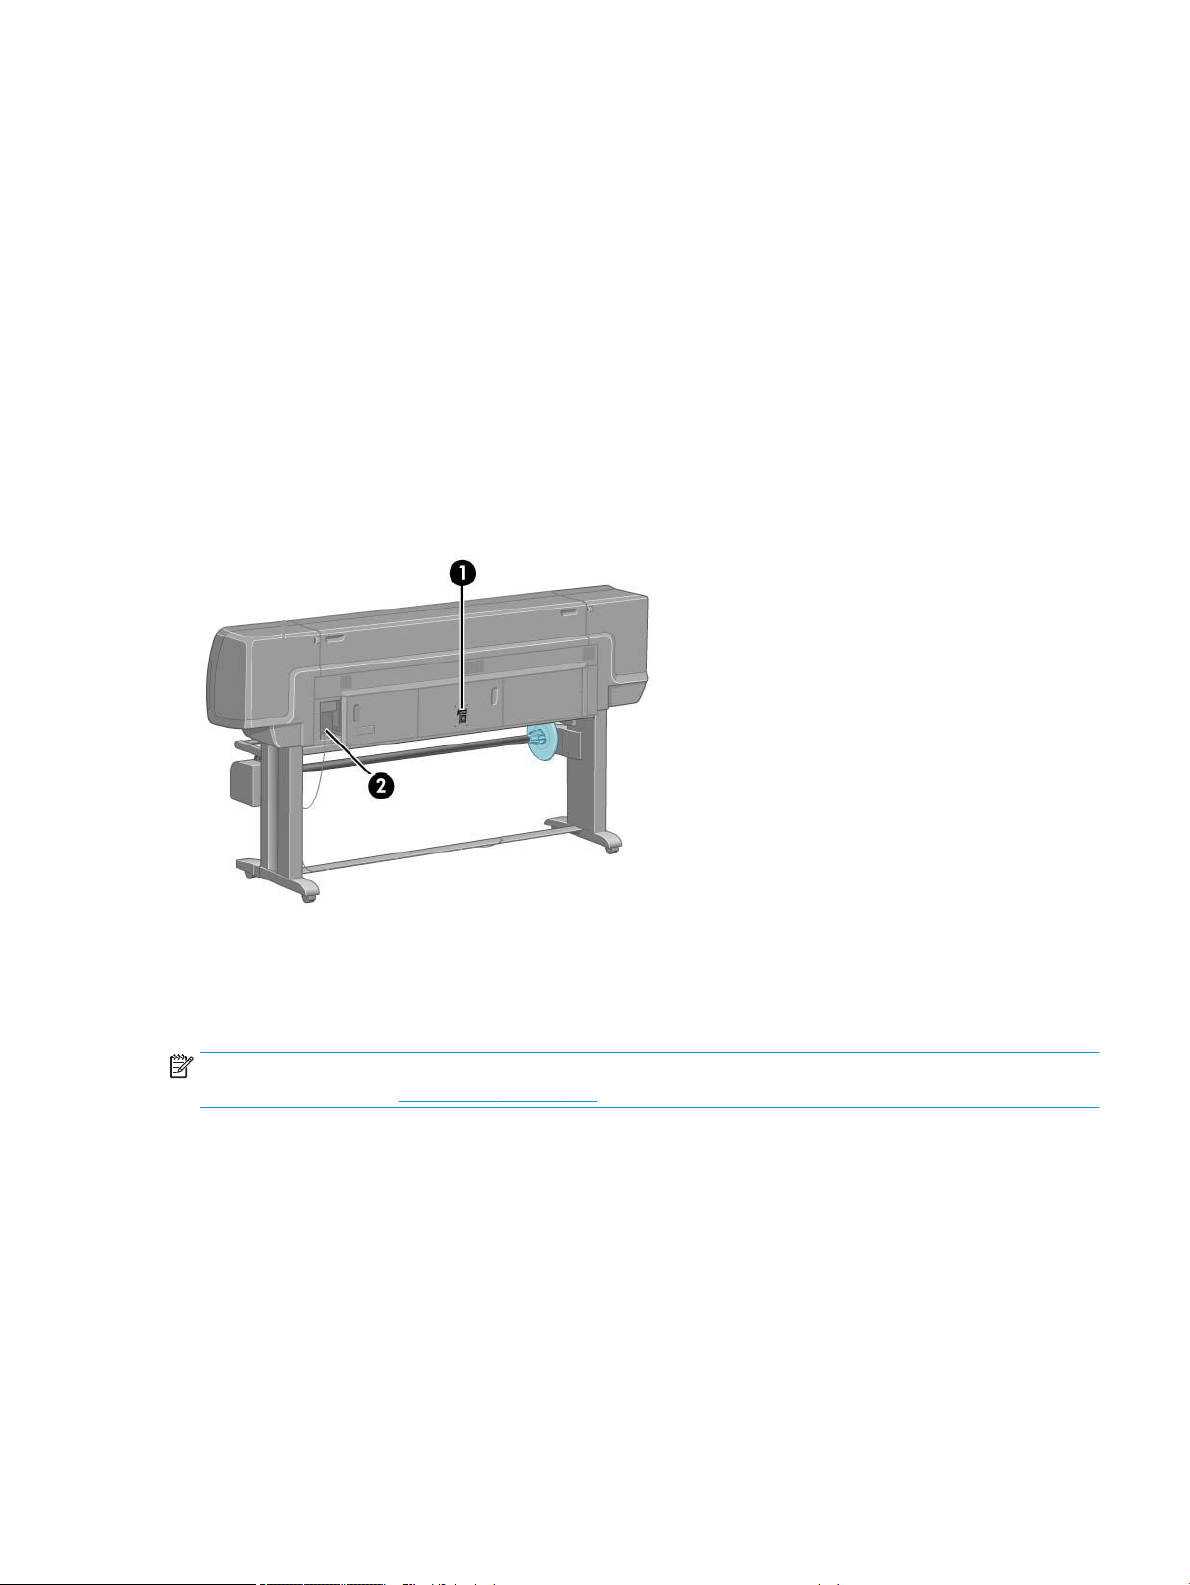
5. Front panel
6. Maintenance cartridge
7. Paper-load lever
8. Spindle
9. Loading table
10. Take-up reel motor
11. Take-up reel cable and sensor housing unit
12. Take-up reel sensor
13. Take-up reel spindle hub
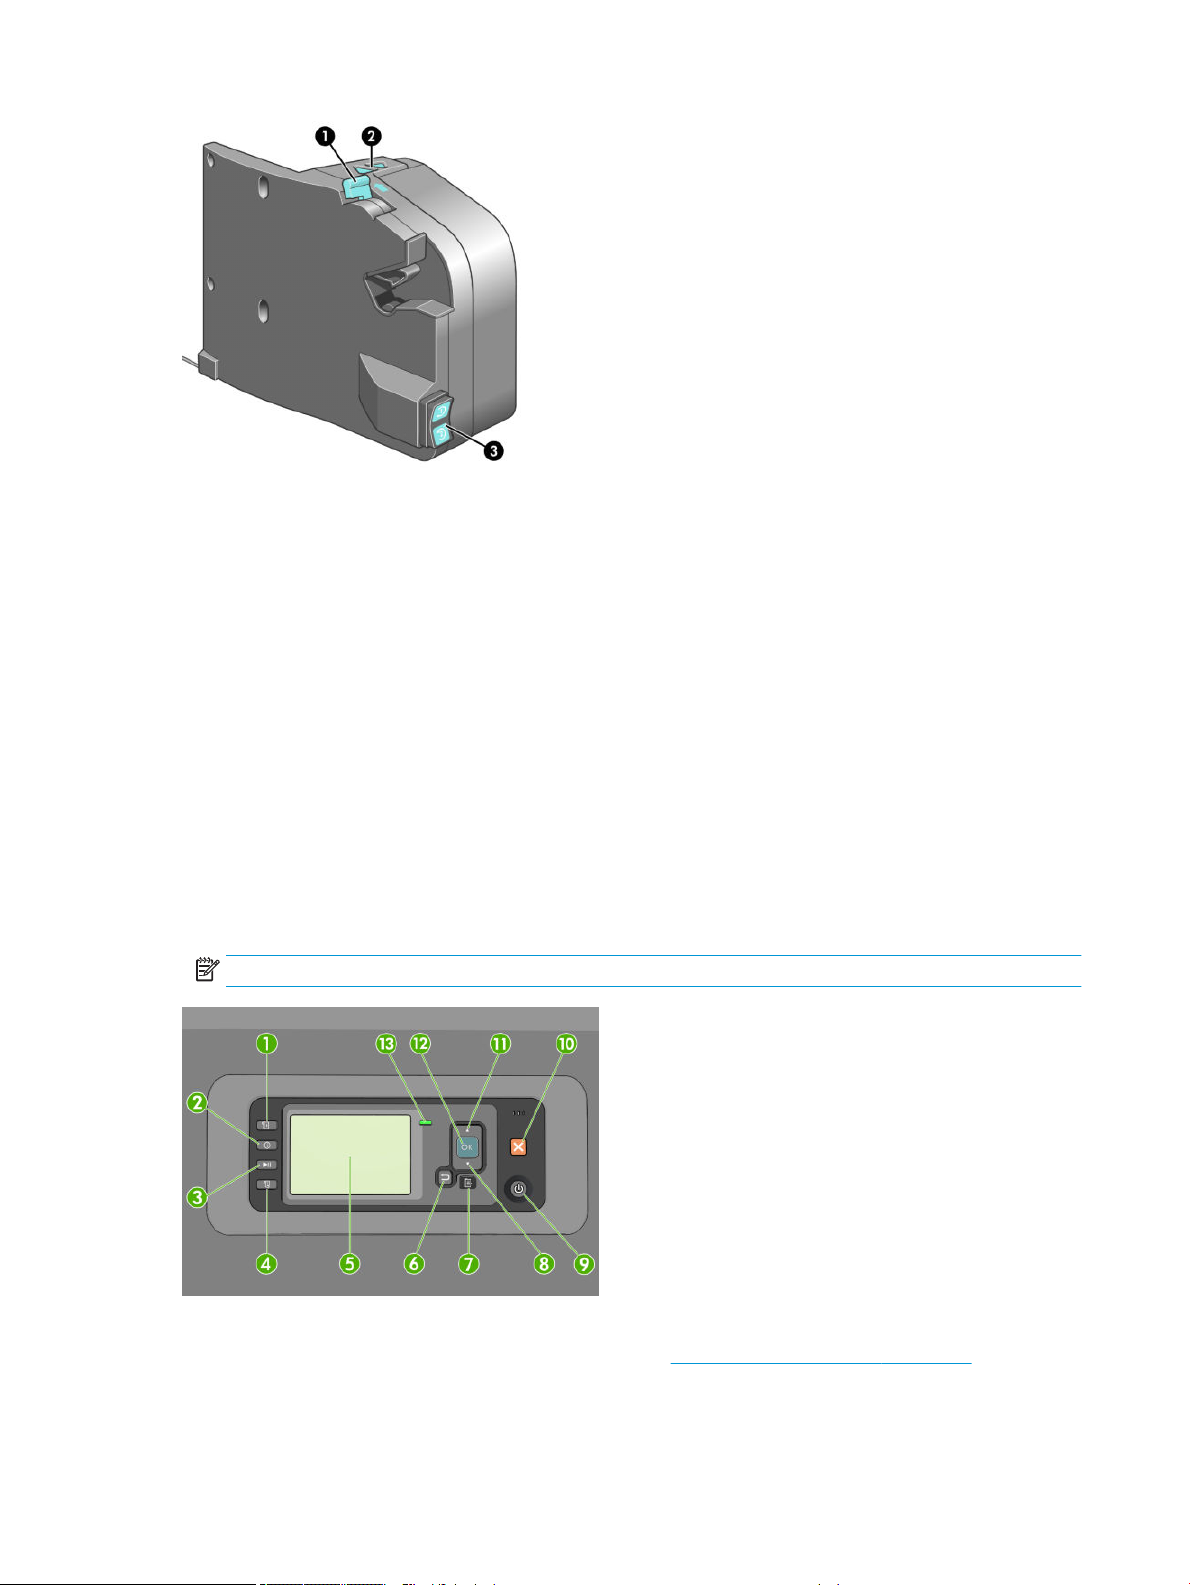
Rear view 60-in printer
1. Power switch and socket
2. Sockets for communication cables and optional accessories
Take-up reel motor
NOTE: The take-up reel is a standard feature with the Z6610 60-in printer. It is an optional accessory for the
Z6810 42-in printer. See Accessories on page 149.
ENWW The printer’s main components 7
Page 16
1. Take-up reel spindle lever
2. Manual winding buttons
3. Wind-direction switch
The front panel
Your printer's front panel is located on the front of the printer, on the right-hand side. It has the following
important functions:
●
It is used to perform certain operations, such as loading and unloading paper
●
It displays up-to-date information about the status of the printer, the ink cartridges, the printheads, the
maintenance cartridge, the paper, the print jobs, and other parts and processes
●
It gives guidance on using the printer
●
It displays warning and error messages, when appropriate, with audible alerts to call attention
●
It can be used to change the values of printer settings and the operation of the printer
NOTE: Settings in the Embedded Web Server or in the printer driver override front-panel settings.
The front panel has the following components, starting with the four direct-access keys:
1. Paper loading key starts the paper loading process: see Load a roll into the printer on page 33.
2. View paper information key displays information about the loaded paper.
8 Chapter 1 Introduction ENWW
Page 17

3. Pause printing key pauses printing after nishing the current page. Press the key again to restart printing.
This can be useful, for instance, when you want to change or load a roll of a dierent paper type.
4. Form feed and cut key: see Feed and cut the paper on page 47.
5. Front-panel display displays errors, warnings and information on using your printer.
6. Back key: To go to the previous step in a procedure or interaction. To go to the upper level, or leave the
option in the menu, or when given an option.
7. Menu key: Press to return to the main menu of the front-panel display. If you are already on the main menu
it will display the status screen.
8. Down key: To go down in a menu or option, or to decrease a value, for example when conguring the front-
panel display contrast or the IP address.
9. Power key: To turn the printer o or on, it also has a light to indicate the printer's status. If the power key
light is o the printer is o. If the power key light is blinking green, the printer is starting up. If the power
key light is green on, the printer is on. If the power key light is amber on, the printer is in standby. If the
power key light is blinking amber, the printer needs attention.
10. Cancel key: To abort a procedure or interaction.
11. Up key: To go up in a menu or option, or to increase a value, for example when conguring the front-panel
display contrast or the IP address.
12. OK key: To conrm an action while in a procedure or interaction. To enter in a submenu in the menu. To
select a value when given an option. If the status screen is displayed, this key takes you to the main menu.
13. Status light: Indicates the printer's status. If the Status light is solid green, the printer is ready. If it is
ashing green, the printer is busy. If it is solid amber, there is a system error. If it is ashing amber, the
printer needs attention.
To highlight an item in the front-panel display, press the Up or Down key until the item is highlighted.
To select an item in the front-panel display, rst highlight it and then press the OK key.
When this guide shows a series of front-panel display items like this: Item1 > Item2 > Item3, it means that you
should select Item1, then select Item2, then select Item3.
For detailed information on the front-panel menus, see Front-panel menus on page 199.
For an annotated list of front-panel error messages, see Front-panel error messages on page 209.
Information about specic uses of the front panel can be found throughout this guide.
Printer software
Download from (according to printer model):
●
http://hp.com/go/Z6610/software
●
http://hp.com/go/Z6810/software
The following software is provided with your printer:
●
The Embedded Web Server, which runs in the printer and enables you to use a Web browser on any
computer to check ink levels and printer status (see The Embedded Web Server’s main components
on page 10).
ENWW The printer’s main components 9
Page 18

The following software is available for your printer:
●
PCL and PS printer driver for Windows operating systems:
–
http://hp.com/go/Z6610/software
–
http://hp.com/go/Z6810/software
●
The Embedded Web Server, which runs in the printer and enables you to use a Web browser on any
computer to check ink levels and printer status (see The Embedded Web Server’s main components
on page 10).
●
The HP DesignJet Utility: go to http://www.hp.com (see The HP DesignJet Utility’s main features
on page 11).
●
PostScript drivers for Windows and MAC OS X (provided through a link in the PostScript/PDF Upgrade Kit),
(see Accessories on page 149).
NOTE: The HP Utility under Mac OS X and the HP DesignJet Utility under Windows have similar functions and
are sometimes referred to collectively as the HP DesignJet Utility in this guide.
NOTE: New versions of all printer software can be expected to appear from time to time. In some cases, when
you receive your printer there may already be later versions available on HP's website of some of the software
provided with it.
The Embedded Web Server’s main components
The Embedded Web Server is a Web server running inside the printer. Users can obtain printer information,
manage the print queue and paper presets, change printer settings and troubleshoot problems through the
Embedded Web Server. It also allows service engineers to retrieve internal information on printer problems.
Access the Embedded Web Server remotely by using an ordinary Web browser running on any computer (see
Access the Embedded Web Server on page 18). Its features and functionality are organized within three tabs.
Online help is available on every page.
Main tab
●
Manage the print queue
●
Add new jobs to the queue
●
View supplies status
●
Monitor paper and ink usage
●
PANTONE©* emulation (with the PostScript/PDF upgrade)
Setup tab
●
Dene printer, network and security settings
●
Send accounting reports and notications of warnings and errors by e-mail
●
Update rmware
●
Import and export paper presets
●
Set the date and time
10 Chapter 1 Introduction ENWW
Page 19

Support tab
●
Use the Print Quality Troubleshooting wizard to help resolve some of the most common print-quality
issues
●
Browse helpful information from a variety of sources
●
Access HP DesignJet links for technical support with your printer, driver and accessories
●
Access service support pages that show current and historical data on the usage of your printer
The HP DesignJet Utility’s main features
The HP DesignJet Utility provides an easy-to-use interface that allows the user to manage and access various
printer features and functionality.
●
Manage the printer, including single-point color control with the HP Color Center
●
Gain access to the online HP Knowledge Center
●
View the status of the ink cartridges, the printheads and the paper
●
Manage, install, and create International Color Consortium (ICC) proles (with the PostScript/PDF upgrade)
●
Access and use embedded proles (with the PostScript/PDF upgrade)
●
Update the printer's rmware (see Update the printer rmware on page 143)
●
Calibrate the printer and display
●
Change various printer settings (on the Settings tab)
●
Congure network settings
The printer’s internal prints
The internal prints provide various kinds of information about your printer. You can request these prints from the
front panel without using a computer.
Before requesting any internal print, make sure that paper is loaded and that the Ready message appears on the
front-panel display.
To print an internal print, select the icon, then select the type of internal print that you want.
The following internal prints are available:
●
Demo: shows some of the capabilities of the printer
●
Menu map: shows details of all the front-panel menus
●
Conguration: shows all the current front-panel settings
●
Usage report: shows estimates of the total number of prints, number of prints by paper type, number of
prints by print-quality option, and total amount of ink used per color. The accuracy of these estimates is not
guaranteed.
ENWW The HP DesignJet Utility’s main features 11
Page 20
●
PostScript font list: lists the PostScript fonts that are installed in the printer (with the PostScript/PDF
upgrade)
●
Service information: provides information that service engineers require
Turn the printer on and o
TIP: The printer can be left powered on without wasting energy. Leaving it on improves response time and
overall system reliability. When the printer has not been used for a certain period of time (the default time is
determined by Energy Star), it saves power by going into sleep mode. However, any interaction with the printer's
front-panel display, or sending a new job to print, returns it to active mode, and it can resume printing
immediately. To change the sleep mode time, see Change the sleep mode setting on page 19.
NOTE: In sleep mode, the printer performs maintenance service to the printheads from time-to-time. This
avoids long preparation times after long idle periods. Therefore, it is strongly recommended to leave the printer
powered on or in sleep mode to avoid wasting ink and time.
The printer has three levels of power consumption.
●
Plugged in: the power cord is plugged into the back of the printer
●
Switched on: the switch at the back of the printer is in the on position
●
Powered on: the Power key on the front panel shows a green light
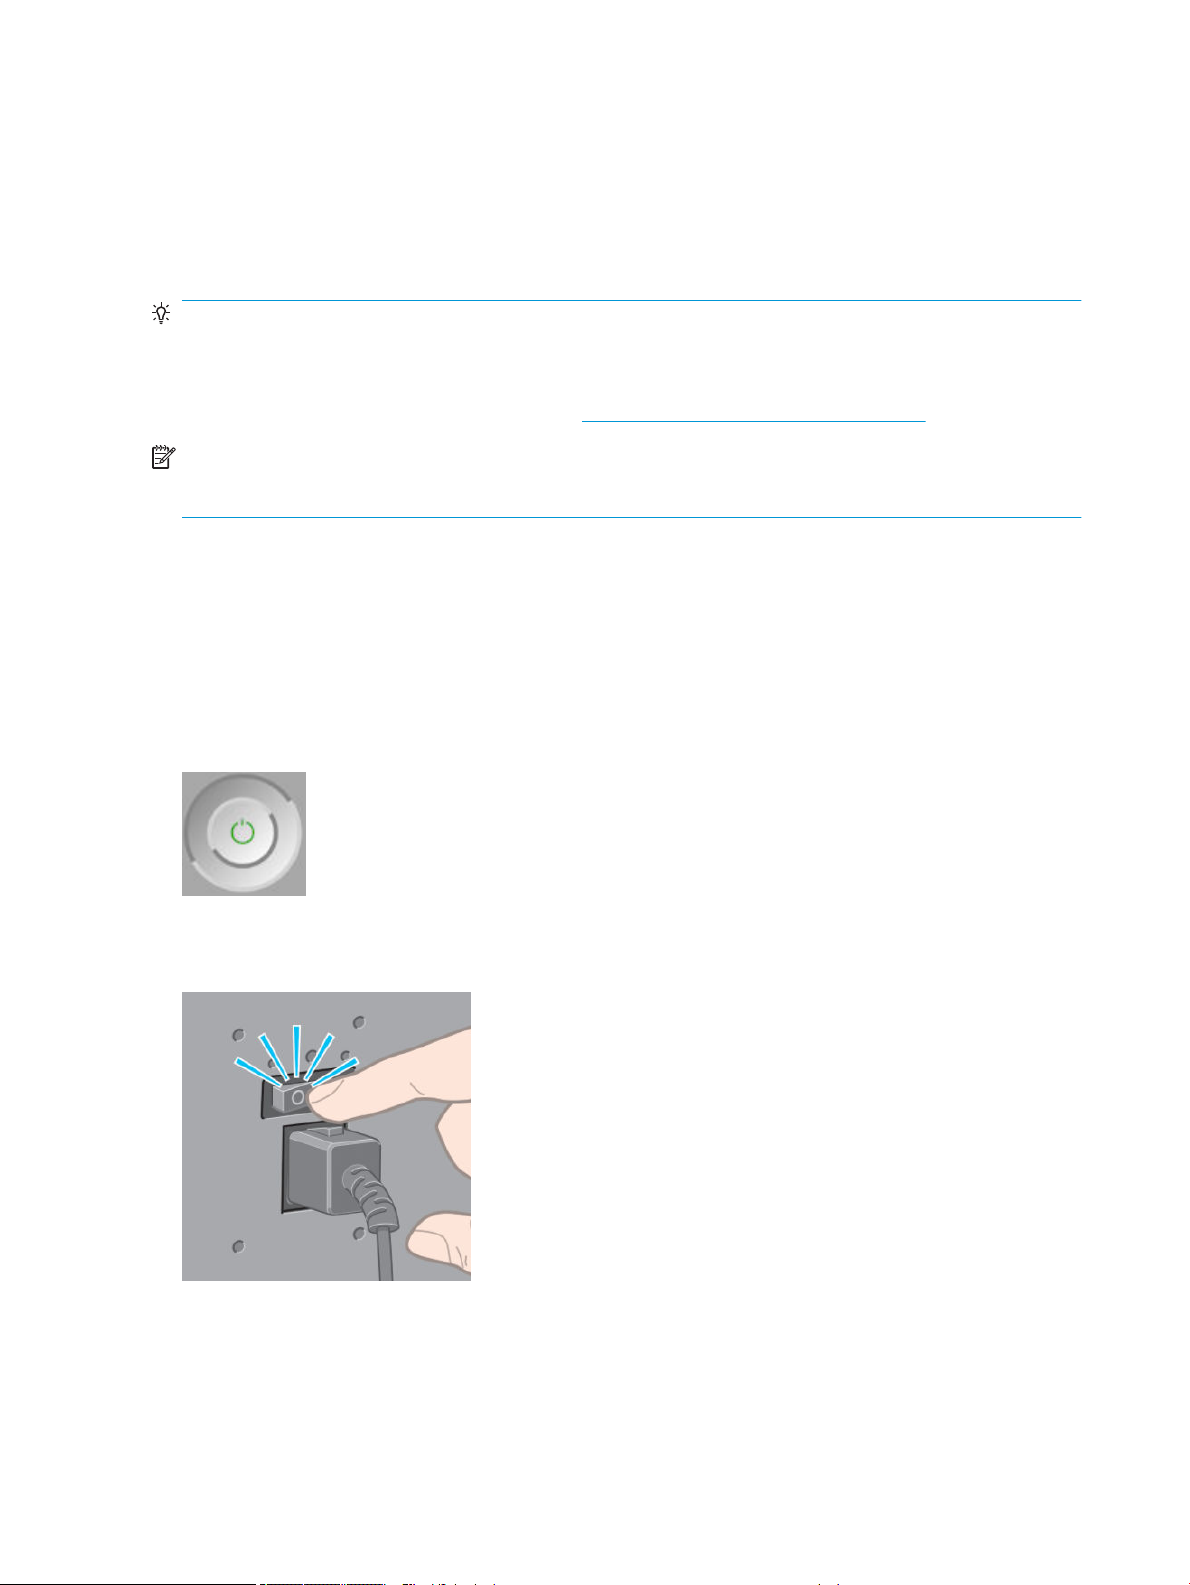
If you wish to turn the printer on or o or reset the printer, the normal and recommended method is to use the
Power key on the front panel.
However, if you plan to store the printer indenitely, you are recommended to power it o using the Power key,
and then also switch o the power switch at the rear. Also, if the Power key does not seem to work, you can use
the switch at the rear instead.
To turn it back on, use the power switch at the rear.
When the printer is powered back on, it takes about three minutes to initialize and check and prepare the
printheads. Preparing the printheads takes about one minute and 15 seconds. However, if the printer has been
o for six weeks or more, preparing the printheads could take up to 45 minutes.
12 Chapter 1 Introduction ENWW
Page 21

2 Connectivity and software instructions
●
Choose which connection method to use
●
Connect to a network (Windows)
●
Connect to a network (Mac OS X)
●
Uninstall the printer software
●
Congure the Customer Involvement Program and other printer services
ENWW 13
Page 22
Choose which connection method to use
The following methods can be used to connect your printer.
Connection type Speed Cable length Other factors
Gigabit Ethernet Very fast; varies according to
network trac
Jetdirect print server (optional
accessory)
Moderate; varies according to
network trac
NOTE: The speed of any network connection depends on all components used in the network, which may
include network interface cards, hubs, routers, switches and cables. If any one of these components is not
capable of high-speed operation, you will nd that you have a low-speed connection. The speed of your network
connection can also be aected by the total amount of trac from other devices on the network.
NOTE: There are various possible ways of connecting the printer to a network, but only one of them can be
active at a time; with the exception of the Jetdirect print server, which can be active at the same time as one
other network connection.
Connect to a network (Windows)
Once the network cable is connected and the printer is powered up, it automatically obtains an IP address. You
need to perform the following steps to congure the printer in the network:
Long: 100 m (328 ft) Requires extra equipment
(switches).
Long: 100 m (328 ft) Requires extra equipment
(switches).
Useful for wireless or AppleTalk
connection, and for Novell
printing.
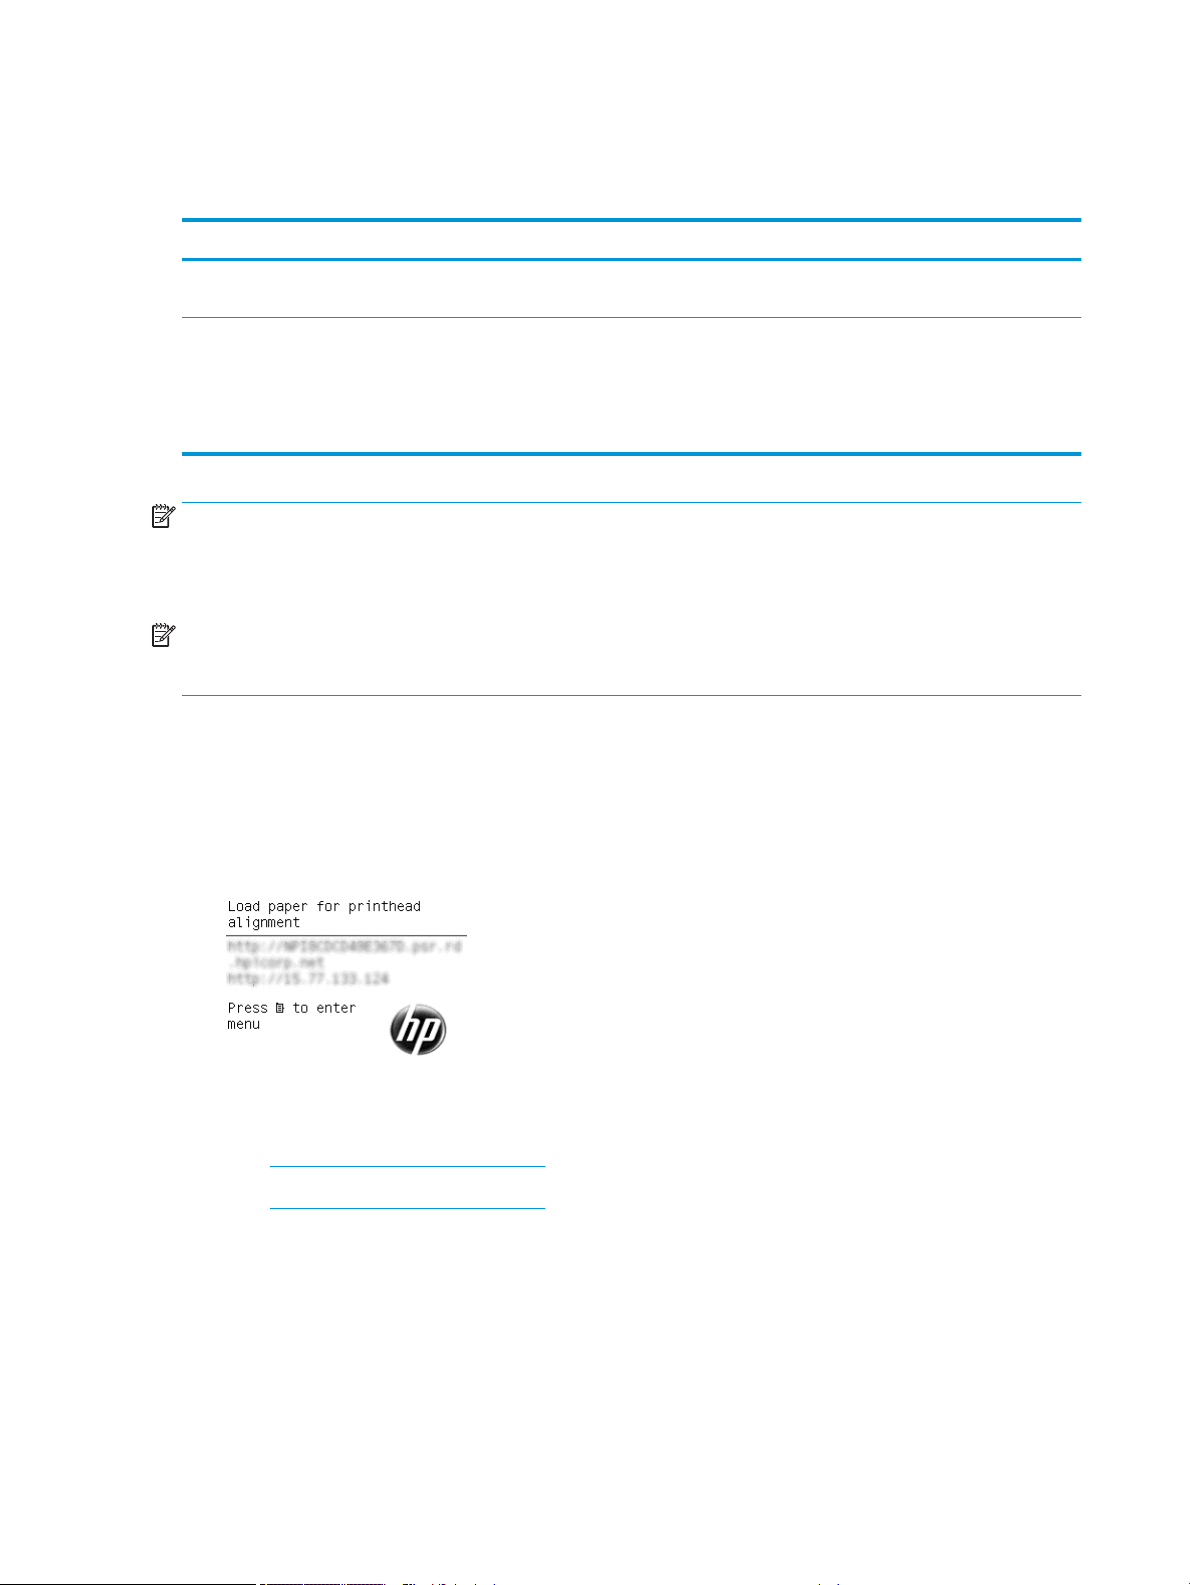
1. Go to your printer's front panel and press the Menu key if necessary until you see the following screen.
Note the IP address of your printer (15.77.133.124 for example).
2. Go to (according to printer model):
●
http://hp.com/go/Z6610/software
●
http://hp.com/go/Z6810/software
3. The Printer Software download page should open, click on “Download Windows Installer” and the Software
Conguration package download should start. Once the Software Conguration package has been
downloaded it should be executed by clicking on it.
4. The conguration program will look for printers connected to your network. When the search has nished,
a list of printers will be displayed. Identify your printer by its IP address and select it from the list.
If your printer does not appear in the list, select Help me nd my network printer and click Next. In the next
screen, give the IP address of your printer.
14 Chapter 2 Connectivity and software instructions ENWW
Page 23

Connect to a network (Mac OS X)
1. Go to the front panel or open the Embedded Web Server (see Access the Embedded Web Server
on page 18). Note the mDNS service name of your printer and/or TCP/IP address.
2. Go to (according to printer model):
●
http://hp.com/go/Z6610/software
●
http://hp.com/go/Z6810/software
3. Your Web browser opens to display the rest of the software installation procedure. You must select
Windows or Mac OS X software, and choose which specic software you want to install (by default, all of it).
4. If you install the HP DesignJet utility, follow the installation instructions in you computer.
5. In the Setup Assistant screen, look for your printer's mDNS service name or TCP/IP printer address (which
you noted in step 1) in the Printer Name and Details columns.
●
If you nd the right name, scroll sideways if necessary to see the Connection Type column, and check
that it shows Bonjour or TCP/IP. Then highlight that line. Otherwise, continue searching further down
the list.
●
If you cannot nd your printer's name just click Continue and do the setup manually in your System
Preferences later on.
Click Continue.
6. Continue following the instructions on the screen.
Uninstall the printer software
During previous Installation step, you have the option to select HP Uninstaller application to be installed in your
system. This one should be available under HP in the system Applications folder.
IMPORTANT: The HP Uninstaller application will uninstall all HP Software installed in your system.
To delete the print queue only, select the Print & Fax dialog from the system preferences. Select the name of the
printer and click the – button.
Congure the Customer Involvement Program and other printer
services
You can check your Customer Involvement Program status in the printer’s front panel, or through the EWS.
To change it in the front panel, go to: Main menu > Setup > Customer Involvement Program.
This menu appears:
ENWW Connect to a network (Mac OS X) 15
Page 24
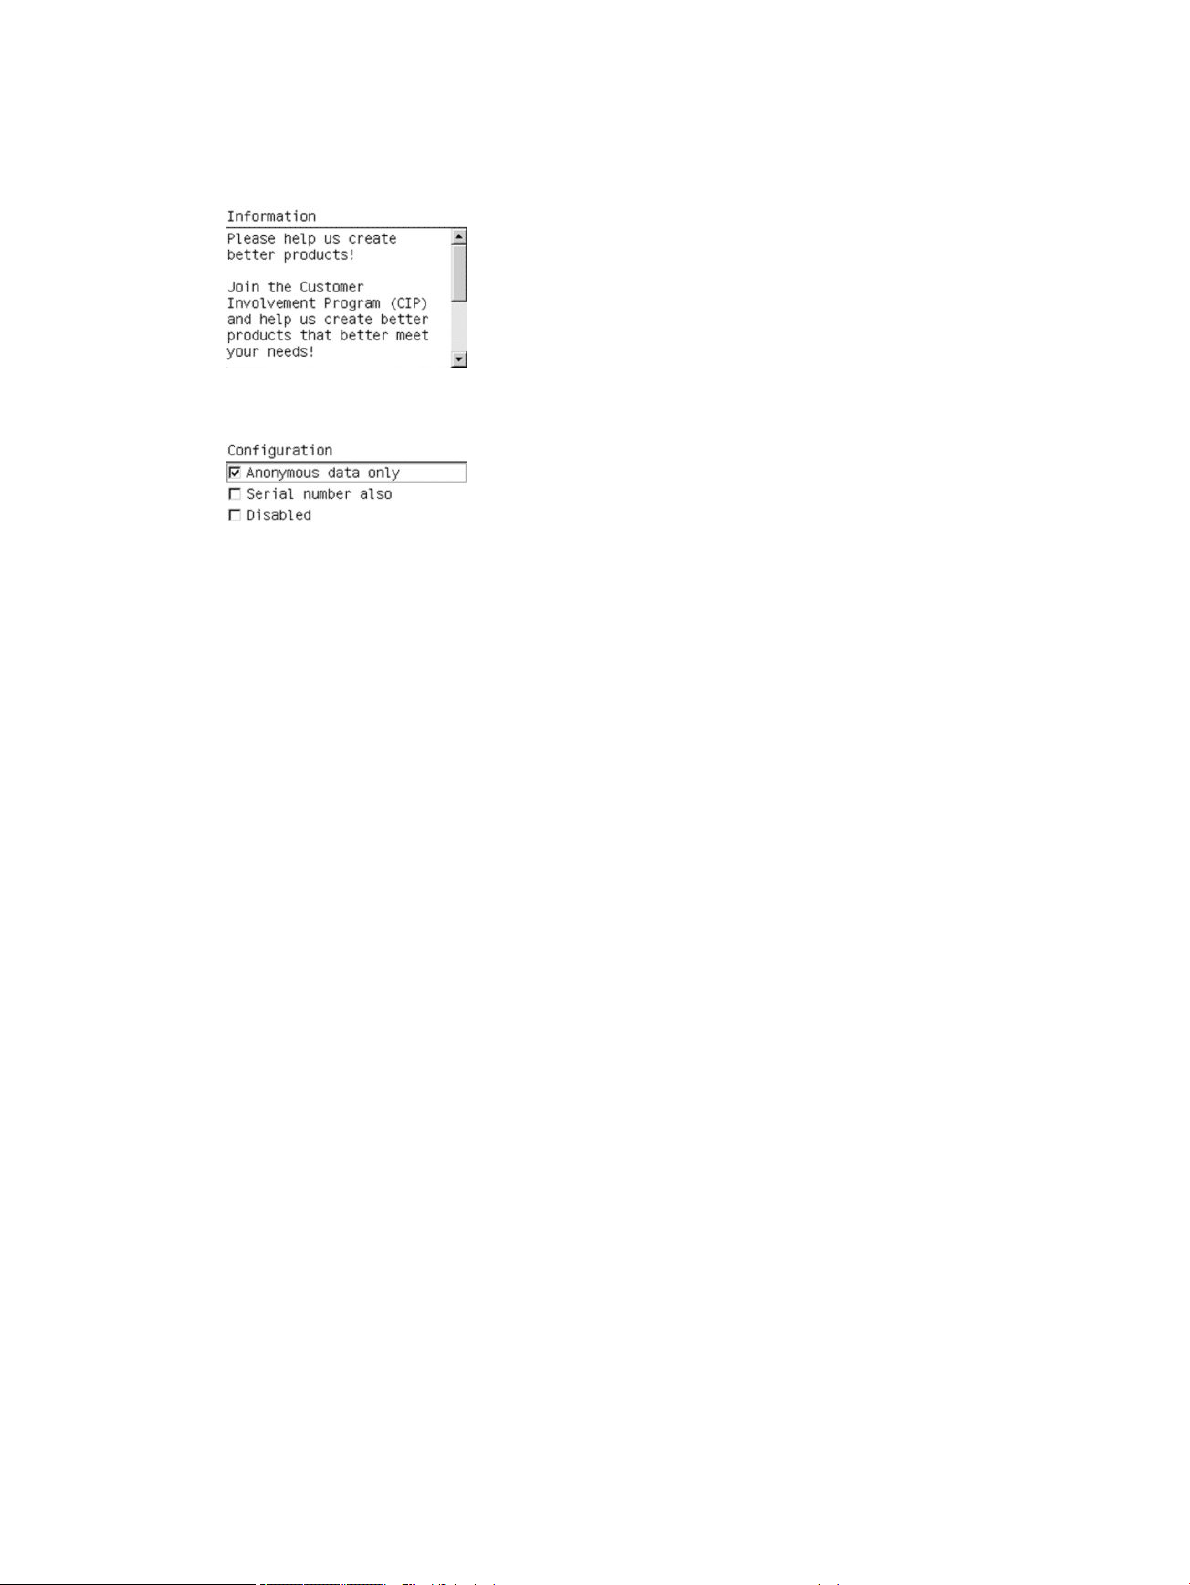
In which;
1. Information: gives you CIP information.
2. Conguration: allows you to change the status.
In the EWS, look for the corresponding tab.
16 Chapter 2 Connectivity and software instructions ENWW
Page 25

3 Personalize the printer
●
Change the language of the front-panel display
●
Access the Embedded Web Server
●
Change the language of the Embedded Web Server
●
Access the HP DesignJet Utility
●
Change the language of the HP DesignJet Utility
●
Change the sleep mode setting
●
Turn the buzzer on and o
●
Change the front-panel display contrast
●
Change the units of measurement
●
Congure network settings
●
Change the graphic language setting
●
Personalize the list of paper types
●
Select paper mismatch action
ENWW 17
Page 26
Change the language of the front-panel display
There are two possible ways to change the language of the front-panel menus and messages.
●
If you can understand the current front-panel display language, select the Setup menu icon , then
Front panel options > Select language.
●
If you cannot understand the current front-panel display language, start with the printer powered o. At
the front panel, press the OK key and hold it down. While holding the OK key down, press the Power key
and hold it down. Continue to hold down both keys until the green light on the right side of the front-panel
display starts ashing, and then release both keys. You can expect a delay of about one second. If the
green light starts ashing without any delay, you may need to start again.
Whichever method you used, the language selection menu should now appear on the front-panel display.
Highlight your preferred language with the Up and Down keys, then press the OK key.
When you have selected your preferred language, turn o the printer with the Power key and then turn it on
again. The front panel will appear in the selected language.
Access the Embedded Web Server
The Embedded Web Server enables you to manage your printer remotely using an ordinary Web browser
running on any computer.
To access the Embedded Web Server directly, you must have a TCP/IP connection to your printer. However, you
can access the Embedded Web Server indirectly through the HP DesignJet Utility.
The following browsers are known to be compatible with the Embedded Web Server:
●
Internet Explorer 6 and later, for Windows
●
Safari 2 and later, for Mac OS X 10.4
●
Firefox 1.5 and later
To access the Embedded Web Server on any computer, open your Web browser and give the IP address of your
printer.
You can see your printer's IP address (192.168.1.1 in this example) on the front panel.
If you have followed these instructions but failed to get through to the Embedded Web Server, see Cannot
access the Embedded Web Server on page 181.
Change the language of the Embedded Web Server
The Embedded Web Server can work in the following languages: English, Portuguese, Spanish, Catalan, French,
Italian, German, Russian, Simplied Chinese, Traditional Chinese, Korean and Japanese. It uses whichever
18 Chapter 3 Personalize the printer ENWW
Page 27

language you have specied in your Web browser's options. If you have specied a language that it cannot
support, it works in English.
To change the language, you must change your Web browser's language setting. For example, in Internet
Explorer version 6, go to the Tools menu and select Internet Options, Languages. Then ensure that the language
you want is at the top of the list in the dialog box.
Access the HP DesignJet Utility
The HP DesignJet Utility enables you to manage your printer from a computer with TCP/IP or Jetdirect
connection. When you open the HP DesignJet Utility for the
enhanced functionality that we recommend you to accept.
●
Under Windows, start the HP DesignJet Utility from your desktop shortcut or from Start > All Programs >
HP > HP DesignJet Utility > HP DesignJet Utility. This launches the HP DesignJet Utility, showing the printers
installed on your computer. When you open the HP DesignJet Utility for the rst time, it may oer you an
automatic update with enhanced functionality that we recommend you accept.
●
Under Mac OS X, launch the HP DesignJet Utility from your dock shortcut or by selecting Applications > HP>
HP DesignJet Utility. This launches the HP DesignJet Utility, showing the printers installed on your
computer.
When you select your printer in the left pane, everything that appears in the right pane is specic to that
printer.
rst time, it may oer you an automatic update with
If you have followed these instructions but failed to get through to the HP DesignJet Utility, see Cannot access
the HP DesignJet Utility on page 182.
Change the language of the HP DesignJet Utility
The HP DesignJet Utility can work in the following languages: English, Portuguese, Spanish, Catalan (Windows
only), French, Italian, German, Polish, Russian, Simplied Chinese, Traditional Chinese, Korean and Japanese.
●
Under Windows, select Tools > Set Language and select a language from the list.
●
Under Mac OS X, the language is changed as for any other application. In System Preferences, select
Language & Text and re-launch the application.
Change the sleep mode setting
If the printer is left switched on but unused for a certain period of time, it goes automatically into sleep mode to
save power. To change the time the printer waits before it goes into sleep mode, go to the front panel and select
the Setup menu icon , then Front panel options > Sleep mode wait time. Highlight the wait time you want
and then press the OK key. You can set the time from 1 to 240 minutes. The default time is 25 minutes.
Turn the buzzer on and o
To turn the printer's buzzer on or o, go to the front panel and select the Setup menu icon , then Front
panel options > Enable buzzer, and highlight on or o and press the OK key. By default, the buzzer is set to on.
ENWW Access the HP DesignJet Utility 19
Page 28
Change the front-panel display contrast
To change the contrast of the front-panel display, select the Setup menu icon , then Front panel options >
Select display contrast, and enter a value using the Up or Down key. Press the OK key to set the value. The
default contrast is set to 50.
Change the units of measurement
To change the units of measurement in the front-panel display, select the Setup menu icon , then Front
panel options
> Select units, and select English or Metric. By default the units are set to metric.
Congure network settings
You can view and congure the network settings from the HP DesignJet Utility. Under Windows, select the Admin
tab, then Network Settings. Under Mac OS X, select Network Settings. The following settings are available:
●
IP Conguration method: specify the way to set an IP address, selecting BOOTP, DHCP, Auto IP or Manual.
●
Host name: specify an IP name for the network device. The name may contain up to 32 ASCII characters.
●
IP address: specify the IP address on the print server. Duplicate IP addresses on a TCP/IP network are not
allowed.
NOTE: If you change the current IP address and click Apply, the browser loses the current connection to
the print server because it is pointing to the old address. To reconnect, browse to the new IP address.
●
Subnet mask: specify a subnet mask, which is a 32-bit number applied to an IP address to determine which
bits specify the network and subnet and which bits uniquely specify the node.
●
Default gateway: specify the IP address of a router or computer that is used to connect to other networks
or sub-networks. If none exist, use the IP address of the computer or the IP address of the print server.
●
Domain name: specify the name of the DNS domain in which the print server resides (for example,
support.hp.com).
NOTE: The domain name does not include the host name: it is not the fully qualied domain name, such
as printer1.support.hp.com.
●
Idle timeout: specify the number of seconds that an idle connection is allowed to remain open; 30 is the
default value. If set to zero, the timeout is disabled and TCP/IP connections remain open until closed by the
other node (such as a workstation) on the network
●
Default IP: specify the IP address to use when the print server is unable to obtain an IP address from the
network when powered on or when recongured to use BOOTP or DHCP.
●
Send DHCP requests: specify whether DHCP requests are transmitted when a legacy default IP address or a
default Auto IP is assigned.
To congure the same network settings from the front panel, select the Connectivity menu icon , then Fast
Ethernet
You have various other options available from the Connectivity menu icon.
20 Chapter 3 Personalize the printer ENWW
or Gigabit Ethernet > Modify conguration.
Page 29

●
Jetdirect EIO: view information, congure and reset the Jetdirect connection
●
Advanced > Select I/O timeout: specify the number of seconds that an idle connection is allowed to remain
open, 270 is the default value, if set to zero, the timeout is disabled
●
Advanced > Allow SNMP: specify whether SNMP is permitted
●
Advanced > Embedded Web Server > Allow EWS: specify whether the Embedded Web Server is enabled
●
Advanced > Web Services > HP DesignJet Utility software: view the HP DesignJet Utility software settings
●
Advanced > Web Services > Color and paper management: view the color and paper management settings
Change the graphic language setting
You can change the graphic language setting from the HP DesignJet Utility with the following steps.
1. Under Windows, select the Admin tab then Printer settings > Printing preferences.
Under Mac OS X, select Printer settings > Printing preferences.
2. Select one of the following options.
●
Select Automatic to let the printer determine which type of le it is receiving. This is the default
setting; it works for most software applications. You should not normally need to change it.
●
Select HP-GL/2 only if you are sending a le of that type directly to the printer, without going through
a printer driver.
●
Select PDF only if you are sending a le of that type directly to the printer, without going through a
printer driver (with the PostScript/PDF upgrade).
●
Select PostScript only if you are sending a le of that type directly to the printer, without going
through a printer driver (only with the PostScript/PDF upgrade).
●
Select TIFF only if you are sending a le of that type directly to the printer, without going through a
printer driver (only with the PostScript/PDF upgrade).
●
Select JPEG only if you are sending a le of that type directly to the printer, without going through a
printer driver (only with the PostScript/PDF upgrade).
You can change the graphic language setting from the front panel. Select the Setup menu icon , then
Printing preferences > Select graphic language. Select the desired option and press the OK key to set the value.
NOTE: If the graphic language is set from the HP DesignJet Utility, it overrides the front panel setting.
Personalize the list of paper types
If there are some paper types that you never use, you can remove them from the list shown in the front panel,
the Embedded Web Server and the HP DesignJet Utility.
1. In the Embedded Web Server, select the Setup tab and then Paper management.
ENWW Change the graphic language setting 21
Page 30
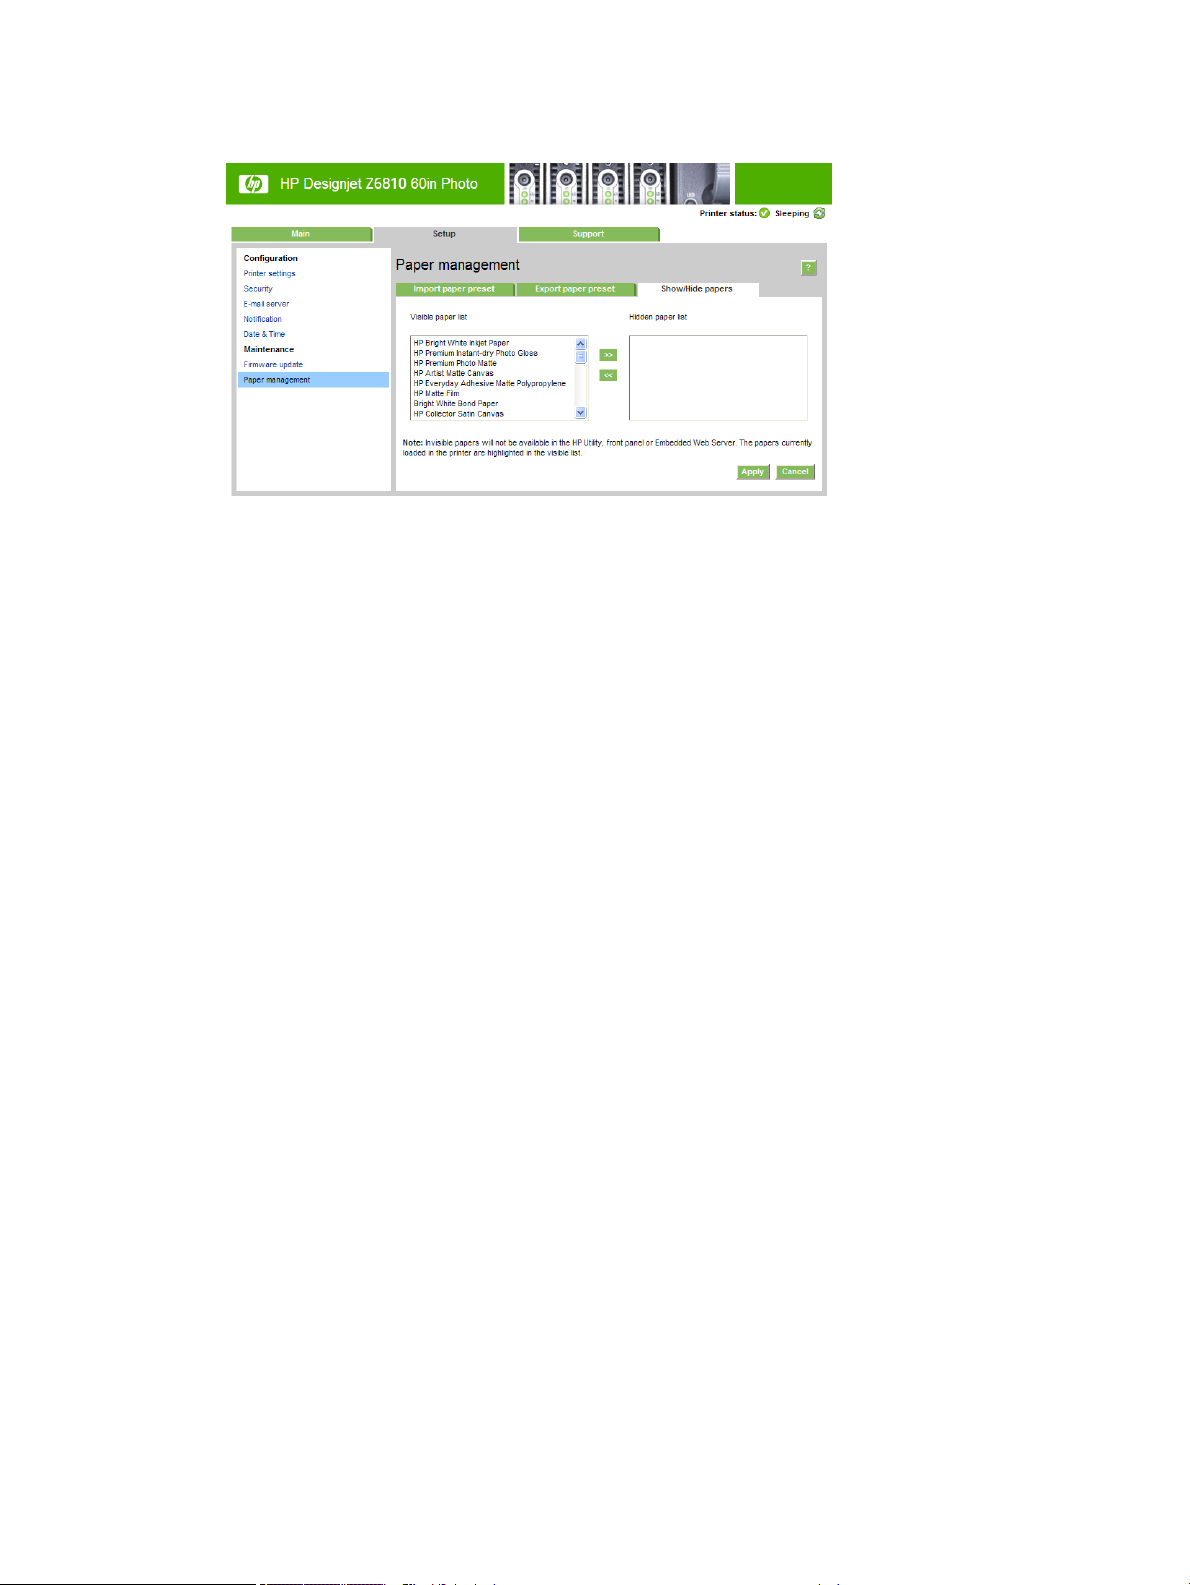
2. In the Paper Management pane, select the Show/Hide papers tab.
3. Select any paper type you want to hide, and use the >> button to move it to the hidden paper list.
4. When you have nished, use the Apply button to save your changes.
If you change your mind later, you can move papers from the hidden list back to the visible list at any time.
22 Chapter 3 Personalize the printer ENWW
Page 31

Select paper mismatch action
If the paper currently loaded in the printer is not suitable for a particular job, the printer can either put the job on
hold until some suitable paper is loaded, or it can ignore the problem and print the job on the unsuitable paper.
There are two ways in which the loaded paper may be considered unsuitable:
●
The paper type is not as specied for the job
●
The paper size is smaller than specied for the job
You can set the printer's behavior in such cases from the front panel.
●
Select the Setup menu icon , then Job management options > Select paper mismatch action > Print
anyway if you want such jobs to print on whatever paper is loaded. This is the default option.
●
Select the Setup menu icon , then Job management options > Select paper mismatch action > Put job
on hold if you want such jobs to be put on hold. The printer will send an alert whenever a job is put on hold.
When a job is put on hold for paper, it is kept in the printer queue until some suitable paper is loaded (in which
case, all jobs waiting for that paper type can be printed). Meanwhile, other jobs with dierent requirements can
continue printing.
ENWW Select paper mismatch action 23
Page 32

24 Chapter 3 Personalize the printer ENWW
Page 33

4 Handle the paper
●
Overview
●
Load a roll onto the spindle
●
Load a roll into the printer
●
Unload a roll from the printer
●
Use the take-up reel
●
View information about the paper
●
Perform paper advance calibration
●
Download paper presets
●
Use non-HP paper
●
Cancel the drying time
●
Change the drying time
●
Printing paper info
●
Feed and cut the paper
●
Store the paper
●
Order paper
●
Non-recommended paper types
ENWW 25
Page 34

Overview
Paper is only a subset of the portfolio of printing materials that the printer can handle. You can also print on a
wide variety of lms, textiles and fabrics, self-adhesive materials, and banner and sign materials. Throughout
this guide, however, these materials are generally referred to as paper.
NOTE: Because the front panel has limited space, the names of the HP paper might be abbreviated and might
not appear in the front panel exactly as they are shown on the packaging label.
NOTE: Because the complete list of supported paper is very long, only the most common paper types appear
in the front panel. If you want to see an HP paper type that does not appear on the front panel, download the
paper preset for the Z6810 from http://www.hp.com/go/Z6800/paperpresets/ and download the paper preset
for the Z6610 from http://www.hp.com/go/Z6600/paperpresets/. See Download paper presets on page 45.
NOTE: The automatic paper-cutter feature is disabled for some of the heaviest paper types, because some
heavy printing materials can damage the cutter.
Use paper
Choosing the correct paper type for your needs is an essential step in ensuring good print quality. For best
printing results, use only recommended HP paper (see Supported paper types on page 27), HP papers have
been developed and thoroughly tested to ensure reliable performance. All printing components (printer, ink
system, and paper) have been designed to work together to oer trouble-free operation and ensure optimal
print quality.
Here are some additional tips about paper usage:
●
Allow all paper types to adapt to room conditions, out of the packaging, for 24 hours before using them for
printing.
●
Handle lm and photo paper by the edges, or wear cotton gloves. Skin oils can be transferred to the paper,
leaving ngerprint marks.
●
Keep the paper tightly wound on the roll throughout the loading and unloading procedures. To make sure
that the roll stays tightly wound, consider using tape to stick the leading edge of the roll to the core just
before removing the roll from the printer. You can keep the roll taped during storage. If the roll starts to
unwind, it can become dicult to handle.
NOTE: The use of tape to attach the leading edge of the roll is especially important for 76.2-mm (3-in)
cores, in which the inherent stiness of the printing material can cause the material to loosen and unwind
from its core.
●
Whenever you load a roll, the front panel prompts you to specify the paper type that you are loading. For
good print quality, it is essential to specify this correctly. Make sure that the paper name that is printed on
the packaging label matches the description on the front panel.
If you cannot nd a specic paper on the front-panel display, download the latest paper preset for the
Z6810 at http://www.hp.com/go/Z6800/paperpresets/ and for the Z6610 at http://www.hp.com/go/
Z6600/paperpresets/, or select the paper description that best matches the paper name printed on the
packaging label.
●
The quality of some images might be reduced if you use a paper type that is unsuitable for your image.
This is especially important to consider when printing on ber-based papers such as HP Universal Coated
Paper, HP Coated Paper, HP Heavyweight Coated Paper and HP Universal Heavyweight Coated Paper.
Printing images that contain high-saturation area lls on ber-based papers can create unwanted wavy
patterns as a result of paper expansion. This can ultimately contribute to more severe problems. Consider
26 Chapter 4 Handle the paper ENWW
Page 35

using Super Heavyweight Coated Paper and other cockle-free papers or make use of the take up reel when
printing high-saturation area lls.
●
Make sure that the appropriate print-quality setting (Best, Normal, or Fast) is selected. You can set the print
quality in the driver, in the Embedded Web Server, or on the front panel. Driver or Embedded Web Server
settings override front panel settings. The combination of paper type and print-quality settings tells the
printer how to place the ink on the paper—for example, the ink density and halftoning method. See Select
print quality on page 83.
●
Although the ink systems that are supplied with this printer have good light-fastness, colors will eventually
fade or change if exposed to sunlight over a long period of time
●
If the paper type shown on the front panel does not correspond to the paper that you intend to use, take
one of the following actions:
–
Reload the roll into the printer and select the correct paper type. See Unload a roll from the printer
on page 35 and Load a roll into the printer on page 33.
–
Use the Embedded Web Server or the HP DesignJet Utility to recongure the paper type for the roll.
–
At the printer's front panel, select the icon, then Change active paper type.
NOTE: The paper advance calibration is not performed when the paper type is changed from the
front panel.
Drying time
With some paper types and under certain environmental conditions, the ink needs some time to dry before the
paper is unloaded. The following settings are available for each paper type:
●
Automatic: the printer automatically determines the appropriate drying time, based on the paper you have
selected and the current temperature. If any drying time is required, a “drying time to go” countdown
appears on the front panel.
●
Extended: the default drying time is extended. This can be used if you nd that the default drying time is
sucient to dry the ink.
●
Reduced: the default drying time is reduced. This can be used if you want to get prints as fast as possible,
and you nd that the reduced drying time causes no signicant problem in your environment.
●
None: no drying time is provided. This can be used, for example, if you are manually removing the prints as
quickly as the printer is producing them.
●
Manual: this allows you to specify the drying time (in seconds).
To change the drying time, see Change the drying time on page 46.
Supported paper types
The following table lists the most common paper types that are suitable for use with your printer, and shows the
name that you should select on the front panel when loading each paper type. If you want to use an HP paper
that does not appear on the front panel, go to http://www.hp.com/go/Z6600/paperpresets/ or
http://www.hp.com/go/Z6800/paperpresets/ and download the appropriate paper preset according to your
printer model. You need to download a preset only once; the printer stores it for future use and it subsequently
appears in the front panel.
For the part numbers, widths, and weights of these papers, see Order paper on page 48.
ENWW Overview 27
Page 36

NOTE: This list is likely to change over the course of time. For the latest information, visit
http://www.globalbmg.com/hp.
Table 4-1 Supported paper types — Z6810
Paper type Paper name Front panel name
Bond and Coated Paper HP Super Heavyweight Plus Matte Paper HP Matt Super HW Plus
HP Heavyweight Coated Paper HP HW Coated Paper
HP Universal Heavyweight Coated Paper HP Univ HeavyweightCoated Paper
HP Coated Paper HP Coated Paper
HP Universal Coated Paper HP Universal Coated Paper
HP Bright White Inkjet Paper HP Bright White IJ Paper
HP Universal Bond Paper HP Universal Bond Paper
HP Recycled Bond Paper HP Recycled Bond Paper
Super heavyweight coated paper Super HW Coated Paper
Heavyweight coated paper Heavyweight Coated Paper
Coated paper Coated Paper
Bright White Bond paper Bright Bond Paper
Plain Paper Plain Paper
Photographic Paper HP Premium Matte Photo Paper HP Prem Matte Photo Paper
HP Everyday Instant-dry Gloss Photo
Paper
HP Everyday Instant-dry Satin Photo Paper HP Evday Pigm Satn Phto
HP Professional Instant-dry Satin Photo
Paper
HP Premium Instant-dry Gloss Photo
Paper
HP Premium Instant-dry Satin Photo Paper HP Premium ID Satn
HP Universal Instant-dry Gloss Photo
Paper
HP Universal Instant-dry Satin Photo Paper HP Universal ID SemiGloss
Photo gloss/semi-gloss/satin paper Photo Gls/S-Gls/Satn Papr
Photo gloss/semi-gloss/satin paper (less
ink)
Photo gloss/semi-gloss/satin paper (more
ink)
Photo Matte paper Photo Matte Paper
HP Evday Pigm Gls Phto
HP Prof Satin Photo Paper
HP Premium ID Gloss
HP Universal ID Gloss
Photo Gls/S-Gls/Satn –ink
Photo Gls/S-Gls/Satn +ink
Fine Art Material HP Matte Litho-realistic Paper HP Matt Litho
HP Professional Matte Canvas HP Prof Matte Canvas
HP Collector Satin Canvas HP Collector Satin Canvas
28 Chapter 4 Handle the paper ENWW
Page 37

Table 4-1 Supported paper types — Z6810 (continued)
Paper type Paper name Front panel name
HP Artist Matte Canvas HP Artist Matte Canvas
HP Universal Matte Canvas HP Universal Matte Canvas
Canvas (more ink) Canvas (more ink)
Canvas Canvas
Fine art paper (more ink) Fine Art Paper (more ink)
Fine Art Paper Fine Art Paper
Backlit Material HP Premium Vivid Color Backlit Film HP Premium Vivid Backlit
Backlit material Backlit material
Backlit material (more ink) Backlit material (+ ink)
Banner and Sign Material HP Opaque Scrim HP Opaque Scrim
HP Durable Banner with DuPont Tyvek HP Durable Banner-Tyvek®
Scrim Banner Scrim Banner
Indoor Banner Indoor Banner
Technical Paper HP Natural Tracing Paper HP Natural Tracing Paper
HP Translucent Bond Paper HP Translucent Bond
HP Vellum Paper HP Vellum Paper
Natural tracing paper Natural Tracing Paper
Translucent bond paper Translucent Bond
Vellum Vellum Paper
Film HP Clear Film HP Clear Film
HP Matte Film HP Matte Film
Transparent or clear lm Transparent/Clear lm
Matte lm Matte lm
Proong Paper Proong Gloss Paper Proong Gloss Paper
Proong Semi-Gloss/Satin Paper Proong SG/Satin Paper
Proong Matte Paper Proong Matte Paper
Self-Adhesive Material HP Colorfast Adhesive Vinyl HP Colorfast Adh Vinyl
HP Everyday Adhesive Matte
Polypropylene
Adhesive Polypropylene Adhesive Polypropylene
Adhesive Polypropylene Matte Adhesive Polyp. Matte
HP Eday Adh Matt Polyprop
Adhesive Vinyl Adhesive Vinyl
Additional HP Paper HP Premium Matte Polypropylene HP Premium Matte Polyp
ENWW Overview 29
Page 38

Table 4-2 Supported paper types — Z6610
Paper type Paper name Front panel name
Bond and Coated Paper HP Universal Bond Paper HP Universal Bond Paper
HP Heavyweight Coated Paper HP HW Coated Paper
HP Bright White Inkjet Paper HP Bright White IJ Paper
Super heavyweight coated paper Super HW Coated Paper
Heavyweight coated paper Heavyweight Coated Paper
Coated paper Coated Paper
Plain Paper Plain Paper
Photographic Paper HP Premium Matte Photo Paper HP Prem Matte Photo Paper
HP Everyday Instant-dry Gloss Photo
Paper
HP Everyday Instant-dry Satin Photo Paper HP Evday Pigm Satn Phto
HP Professional Instant-dry Satin Photo
Paper
HP Premium Instant-dry Gloss Photo
Paper
HP Premium Instant-dry Satin Photo Paper HP Premium ID Satin
HP Universal Instant-dry Gloss Photo
Paper
HP Universal Instant-dry Satin Photo Paper HP Universal ID SemiGloss
Photo Photo Gls/S-Gls/Satn Papr
Photo less ink Photo Gls/S-Gls/Satn -ink
Photo more ink Photo Gls/S-Gls/Satn +ink
Photo Matte Photo Matte Paper
Fine Art Material HP Matte Litho-realistic Paper HP Matte Litho
HP Artist Matte Canvas HP Artist Matte Canvas
HP Universal Matte Canvas HP Universal Matte Canvas
HP Evday Pigm Gls Phto
HP Prof Satin Photo Paper
HP Premium ID Gloss
HP Universal ID Gloss
Canvas Canvas
Fine Art Fine Art Paper
Fine Art more ink Fine Art Paper (more ink)
Backlit Material HP Premium Vivid Color Backlit Film HP Premium Vivid Backlit
Backlit material Backlit material
Self-adhesive Material HP Everyday Adhesive Matte
Polypropylene
Adhesive Polypropylene Matte Adhesive Polyp. Matte
Adhesive Vinyl Adhesive Vinyl
Banner and Sign Material HP Opaque Scrim HP Opaque Scrim
HP Eday Adh Matt Polyprop
30 Chapter 4 Handle the paper ENWW
Page 39
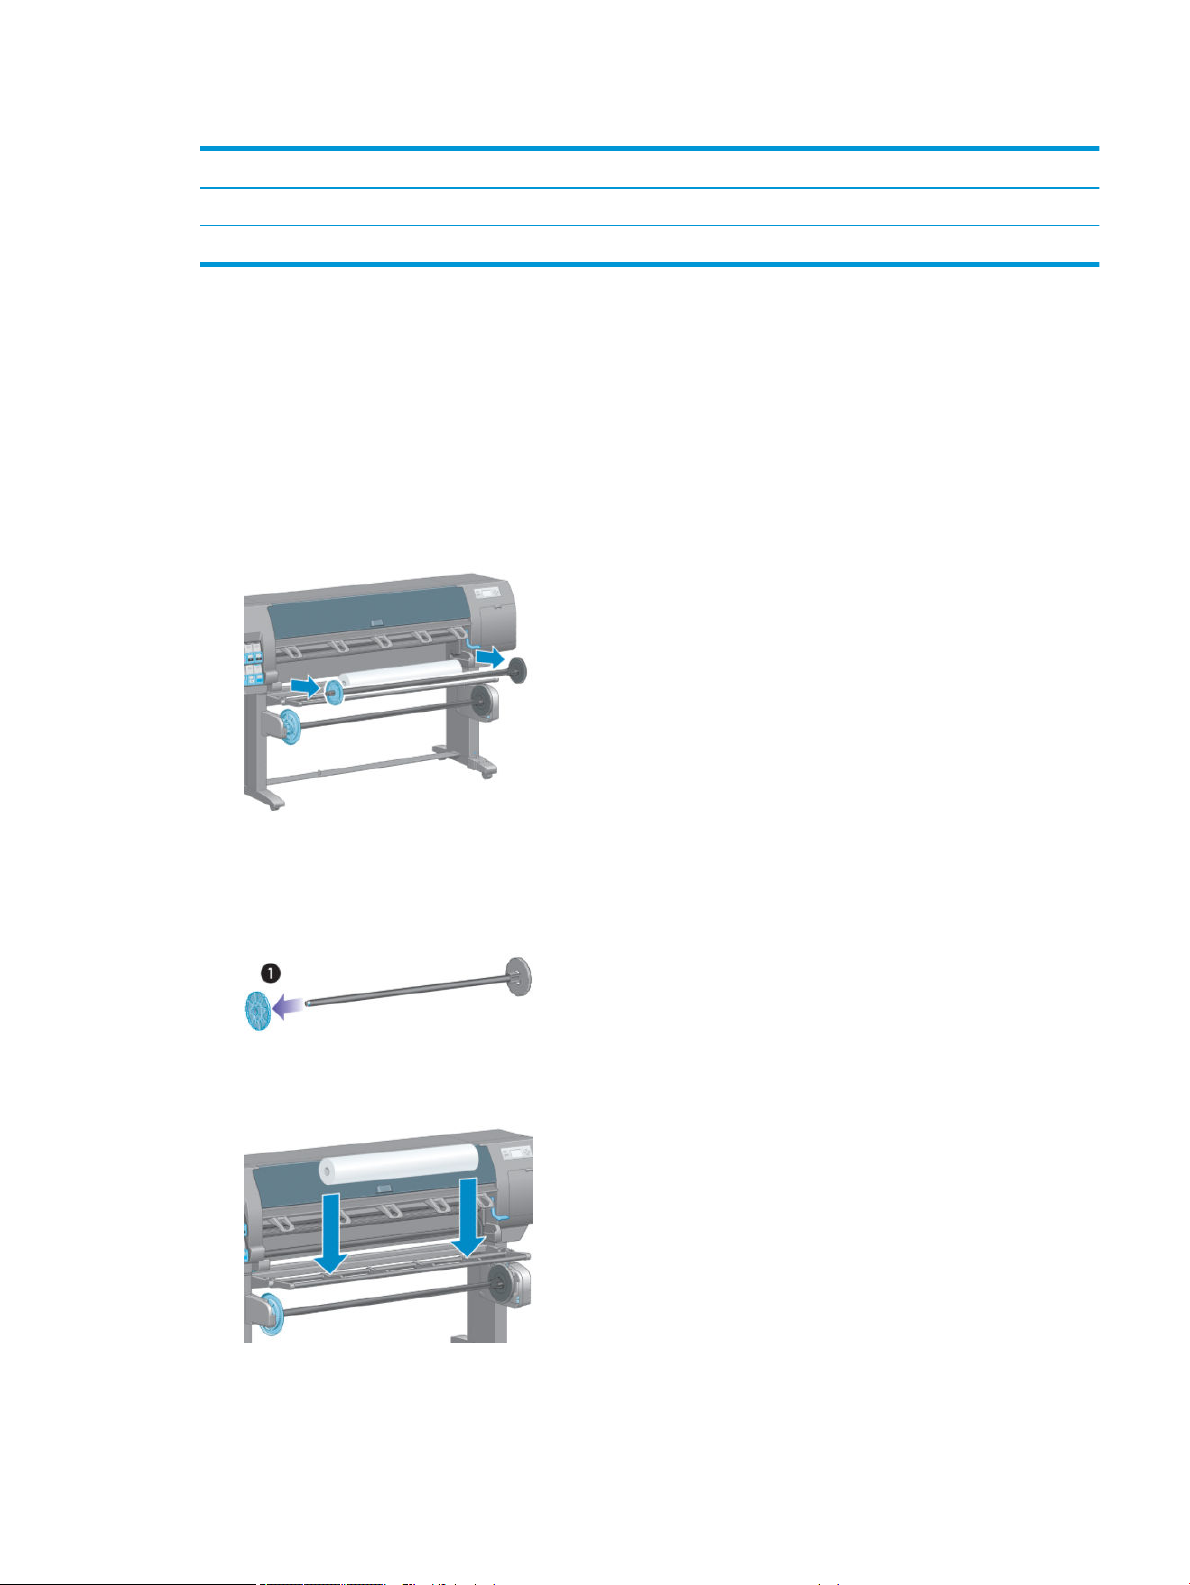
Table 4-2 Supported paper types — Z6610 (continued)
Paper type Paper name Front panel name
Scrim Banner Scrim Banner
Additional HP Paper HP Premium Matter Polypropylene HP Premium Matte Polyp
Load a roll onto the spindle
1. Make sure that the printer wheels are locked (the brake lever is pressed down) to prevent the printer from
moving.
2. Release the spindle lock on the right-hand side.
3. Remove the rst end of the spindle from the right-hand side of the printer, and then move the spindle to
the right in order to extract the other end. Do not insert your ngers into the spindle supports during the
removal process.
The spindle has a hub at each end to keep the roll in position. Remove the blue hub at the left end to
mount a new roll. The hub slides along the spindle to hold rolls of dierent widths.
4. Slide the lever-lock on the blue hub to the unlocked position and remove the hub (1) from the left end of
the spindle.
5. Rest the roll of paper that you want to load on the loading table. The roll might be long and heavy, and you
might need two people to handle it.
ENWW Load a roll onto the spindle 31
Page 40
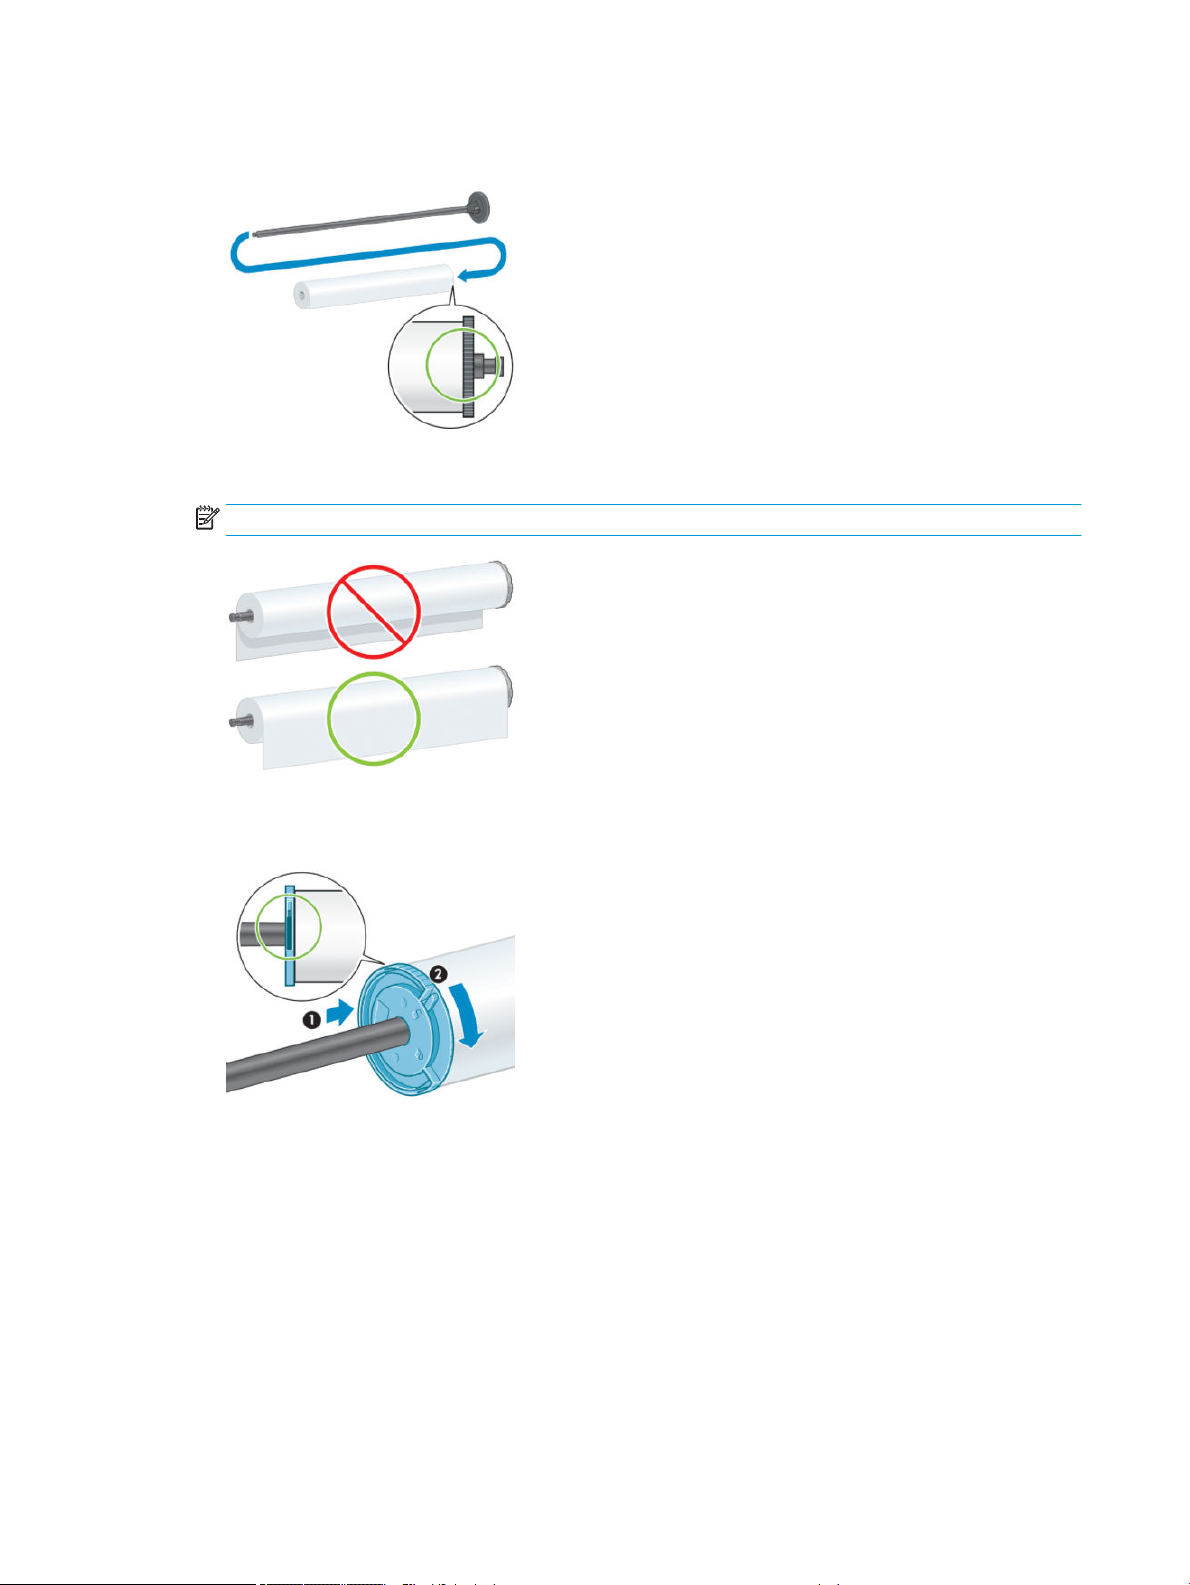
6. Slide the spindle into the roll. Make sure that no space exists between the roll and the xed hub at the right
end of the spindle.
Make sure that the paper will wind o the roll in the correct direction. If it does not, remove the spindle
from the roll, turn the roll 180° and rest it on the loading table. Then slide the spindle into the roll.
NOTE: A label on the spindle also shows the correct winding direction.
7. Put the blue hub on to the upper end of the spindle, and push it towards the end of the roll as shown in
step 1 in the following image. Then slide the lever-lock to the locked position as shown in step 2.
32 Chapter 4 Handle the paper ENWW
Page 41
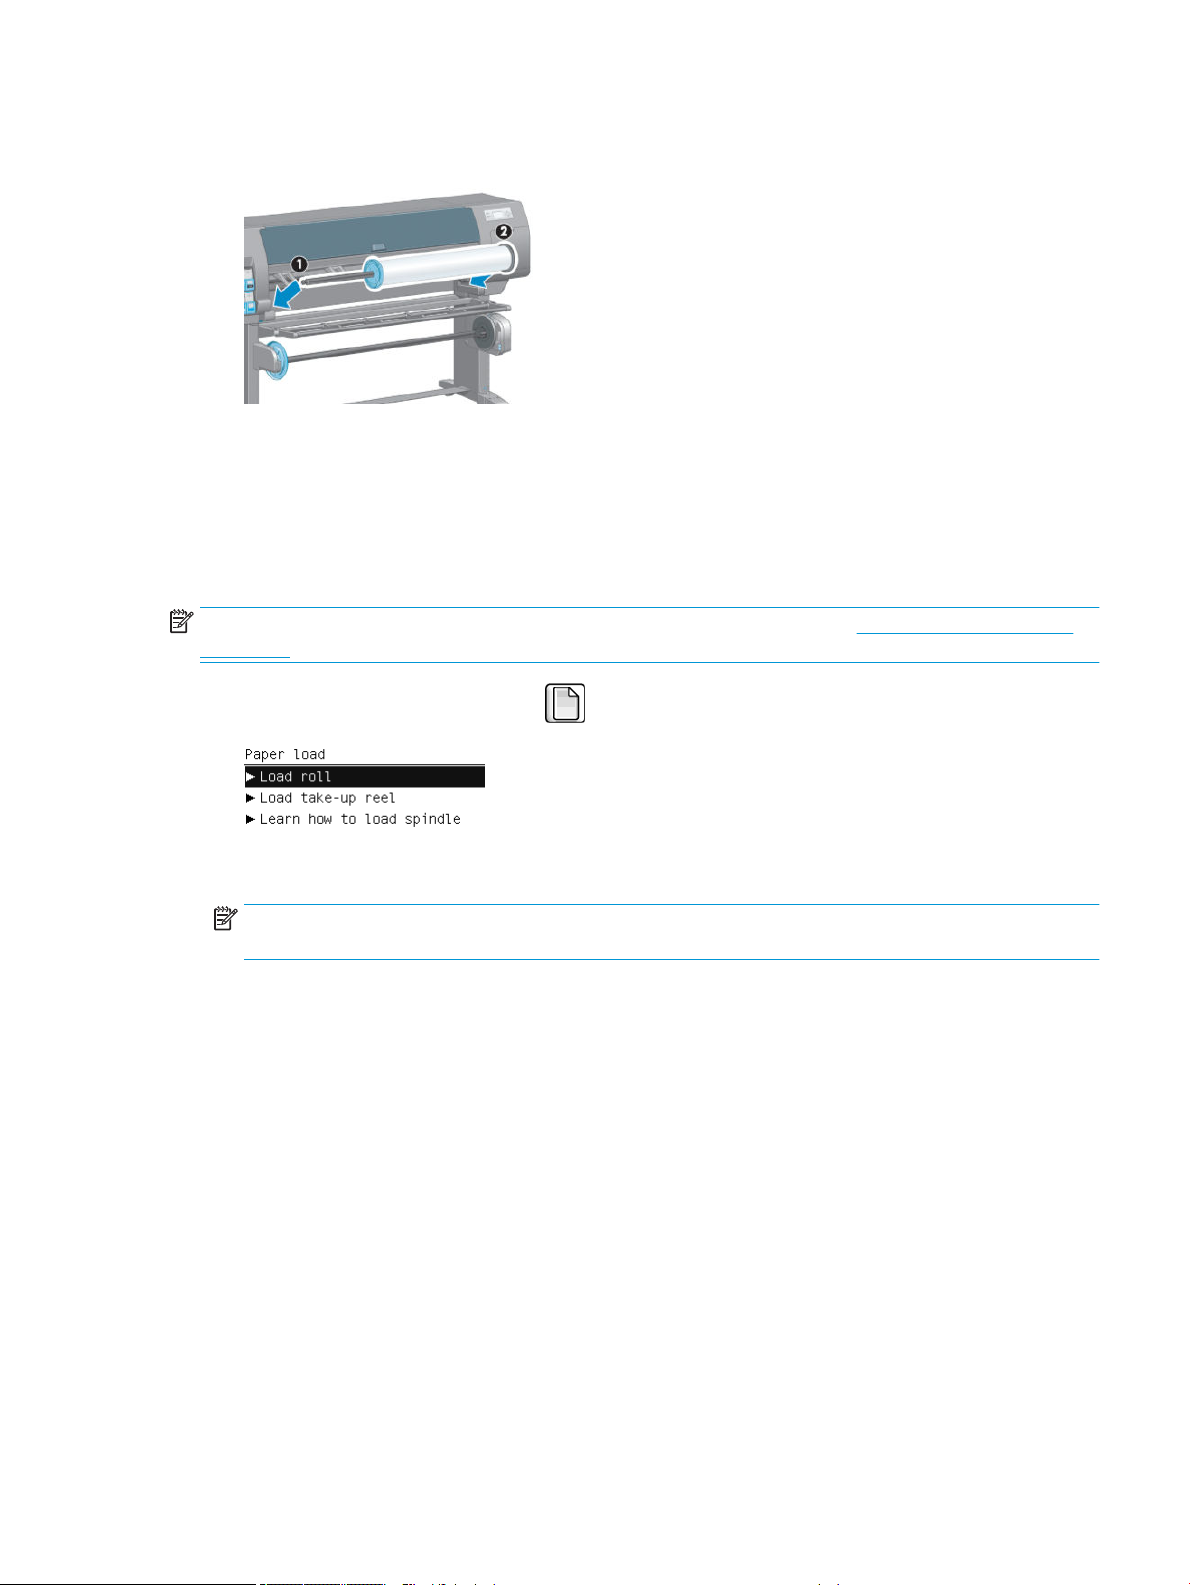
8. With the blue hub on the left, insert the spindle into the left side of the printer (1), and then into the right
side of the printer (2).
9. Close the spindle lock on the right-hand side.
If you regularly use dierent paper types, you can change rolls more quickly if you pre-load rolls of dierent
paper types on dierent spindles. Extra spindles are available for purchase.
Load a roll into the printer
NOTE: To start this procedure, you need to have a roll loaded on the spindle. See Load a roll onto the spindle
on page 31.
1.
At the printer's front panel, select the icon, and then select Paper load > Load roll.
Alternatively, you can start loading paper without using the front panel, by feeding paper in or lifting the
pinch lever when there is no paper loaded.
NOTE: If you lift the pinch lever, you will need to align the paper manually; follow the instructions on the
front panel.
2. If printing paper info is disabled, the front panel asks you to select the paper type.
3. The front panel asks you to feed paper. When the printer detects the paper, paper checks will begin.
ENWW Load a roll into the printer 33
Page 42
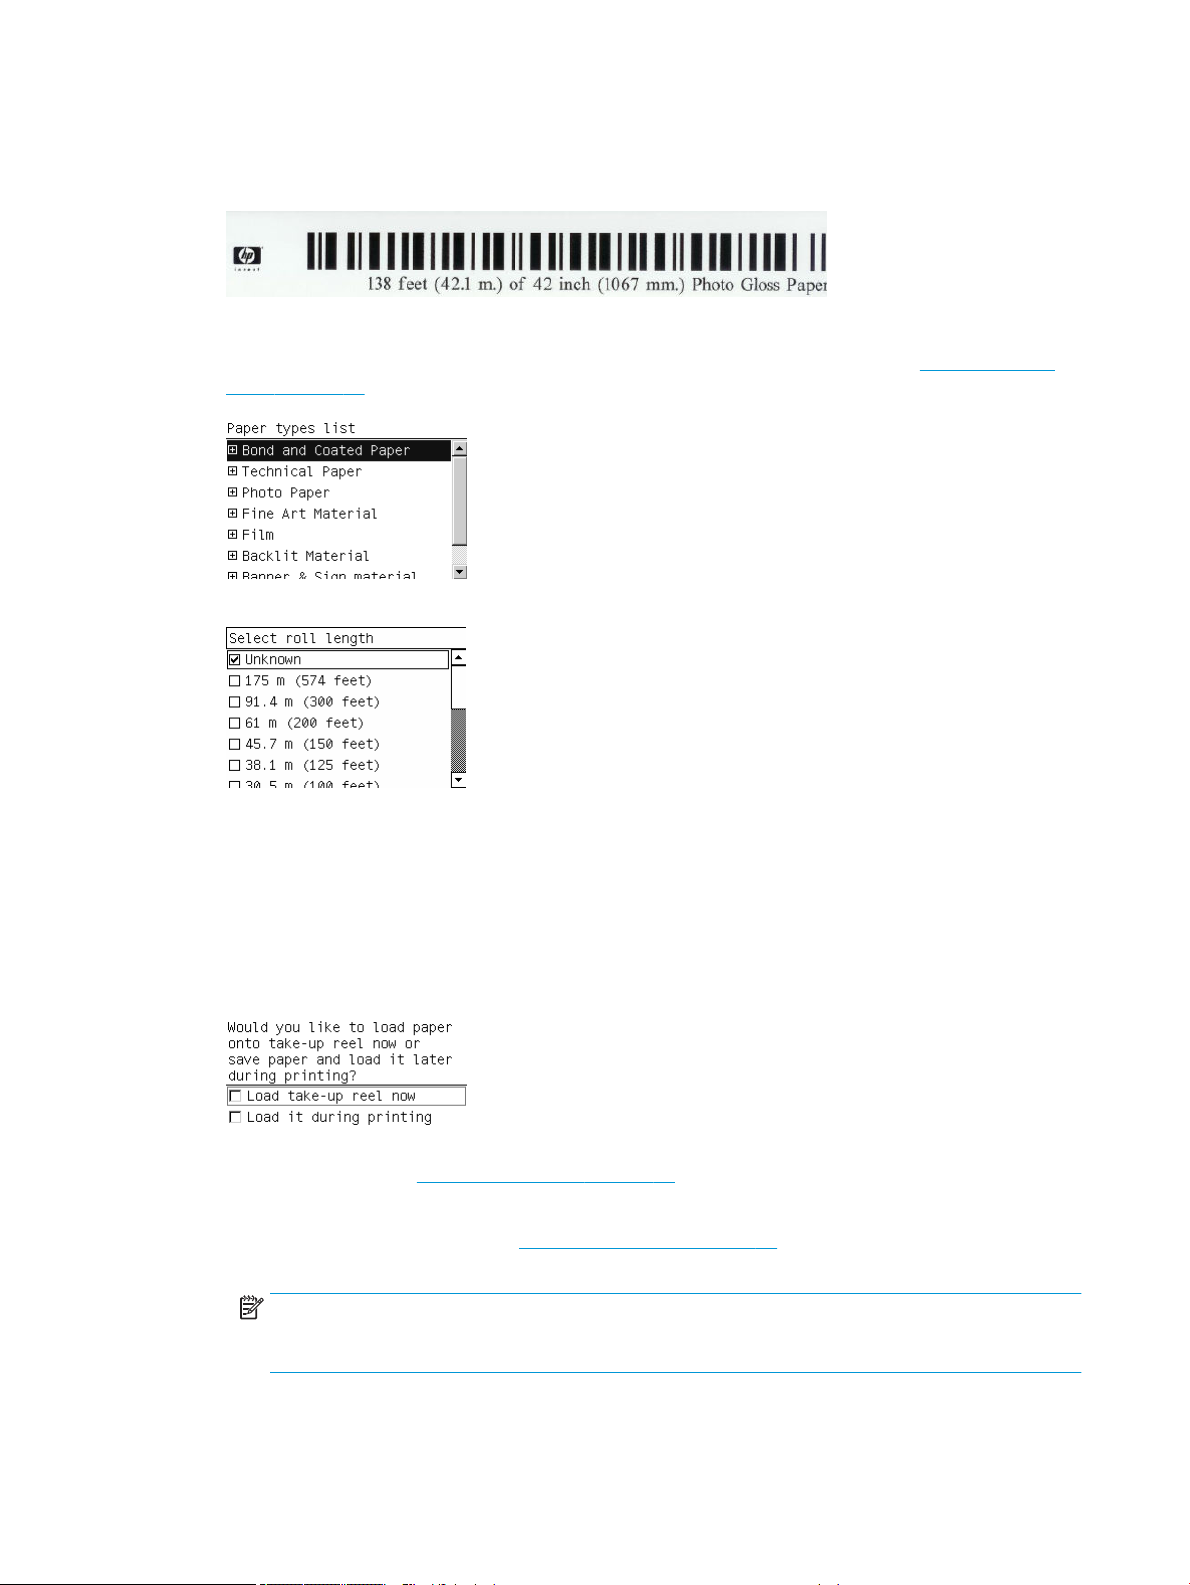
4. If the paper that you are using has a paper-data barcode printed on the leading edge of the roll, and
printing paper info is enabled, the printer automatically reads the information. If printing paper info is
disabled, the barcode is ignored.
If printing paper info is enabled and no barcode is detected on the roll that is being loaded, the front panel
asks you to enter the paper type and the length of the roll you are loading. Select the paper category and
paper type of the roll. If it is not clear which paper category or paper type to select, see Supported paper
types on page 27.
Select the length of the roll.
5. If some of the paper checks failed, the front panel explains the problem and helps you to load paper
successfully.
6. If you have a take-up reel (a standard feature on the 1.5m printer and an optional accessory on the 1.1m
printer), a message will appear on the front panel asking if you want to load paper onto the take-up reel. If
you select No (or if you do not have a take-up reel) the front panel displays the Ready message and the
printer is ready to print. If you select Yes, a message will appear on the front panel asking if you want to
load the take-up reel now or during printing.
●
If you want to load the take-up reel now, select Load take-up reel now, read through the introductory
text in the section Use the take-up reel on page 35, and then continue to step 3 of the procedure.
●
If you want to load the take-up reel during printing, select Load it during printing, read through the
introductory text in the section Use the take-up reel on page 35, and then continue to step 3 of the
procedure.
NOTE: Familiarize yourself with the procedural steps, because loading the take-up reel while
printing requires you to complete the procedure while the printer is feeding and printing paper.
Loading the take-up reel during printing saves approximately 1 m (3 ft) of paper.
34 Chapter 4 Handle the paper ENWW
Page 43
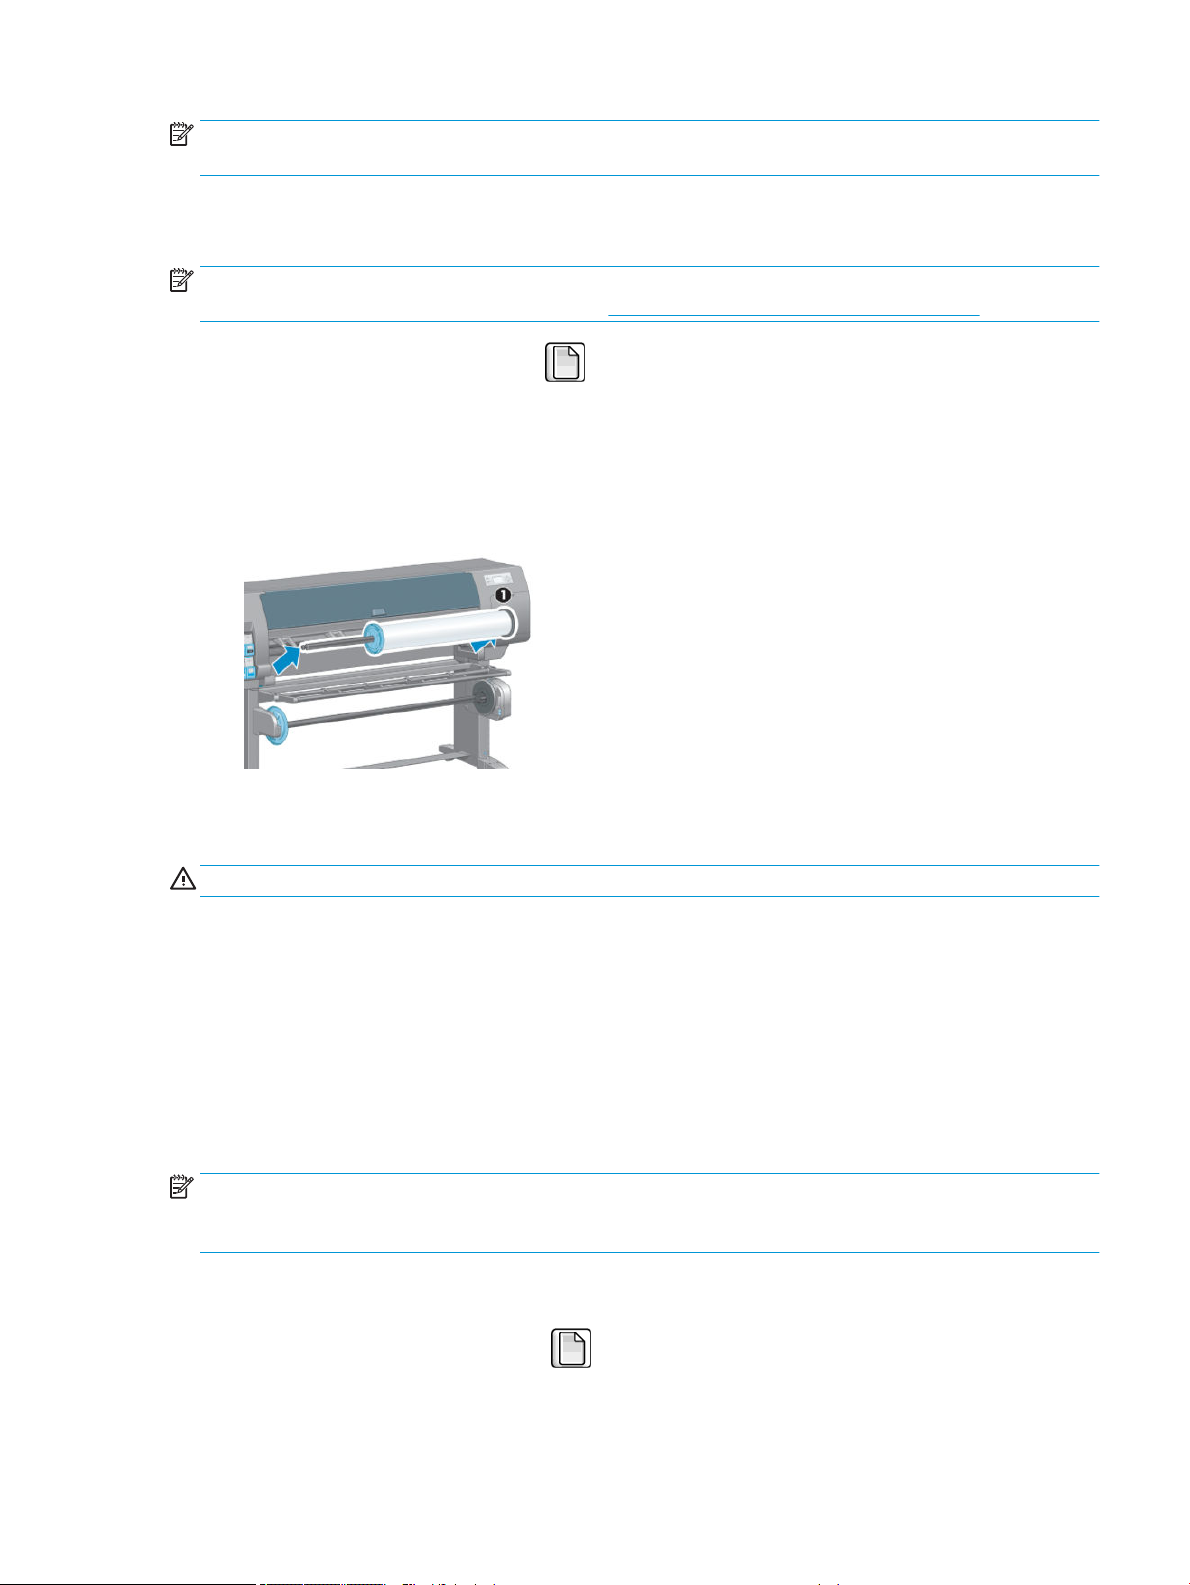
NOTE: During the initial printer setup, printhead alignment and color calibration are performed automatically
after the roll is loaded into the printer.
Unload a roll from the printer
NOTE: If you used the take-up reel during printing, unload the printed roll from the take-up reel before
attempting to remove the roll from the printer. See Unload a roll from the take-up reel on page 40.
1.
At the printer's front panel, select the icon, then Paper unload > Unload roll.
2. The paper is unloaded from the printer.
3. Release the spindle lock.
4. Remove the roll from the printer, pulling out the right end on the right side of the printer rst. Do not insert
your ngers into the spindle supports during the removal process.
Use the take-up reel
CAUTION: Make sure the printer is turned o when installing the take-up reel motor on the printer.
The take-up reel is operated from the front panel.
Follow these guidelines when taping rolls to the take-up reel spindle core:
●
Make sure that the paper is straight when it is attached to the spindle core. Otherwise it skews as it winds
onto the core.
●
The spindle core on the take-up reel must be the same width as the paper that you are using.
●
Check that neither side of the spindle core has end caps, and make sure the spindle core is pushed rmly
into both spindle guides.
NOTE: If you want to load the take-up reel during printing, familiarize yourself with the procedural steps.
Loading the take-up reel during printing requires you to complete the procedure while the printer is feeding and
printing paper. Loading the take-up reel during printing saves approximately 1 m (3 ft) of paper.
Load a roll onto the take-up reel
1.
On the printer's front panel, select the icon, and then select Paper load > Load take-up reel.
ENWW Unload a roll from the printer 35
Page 44
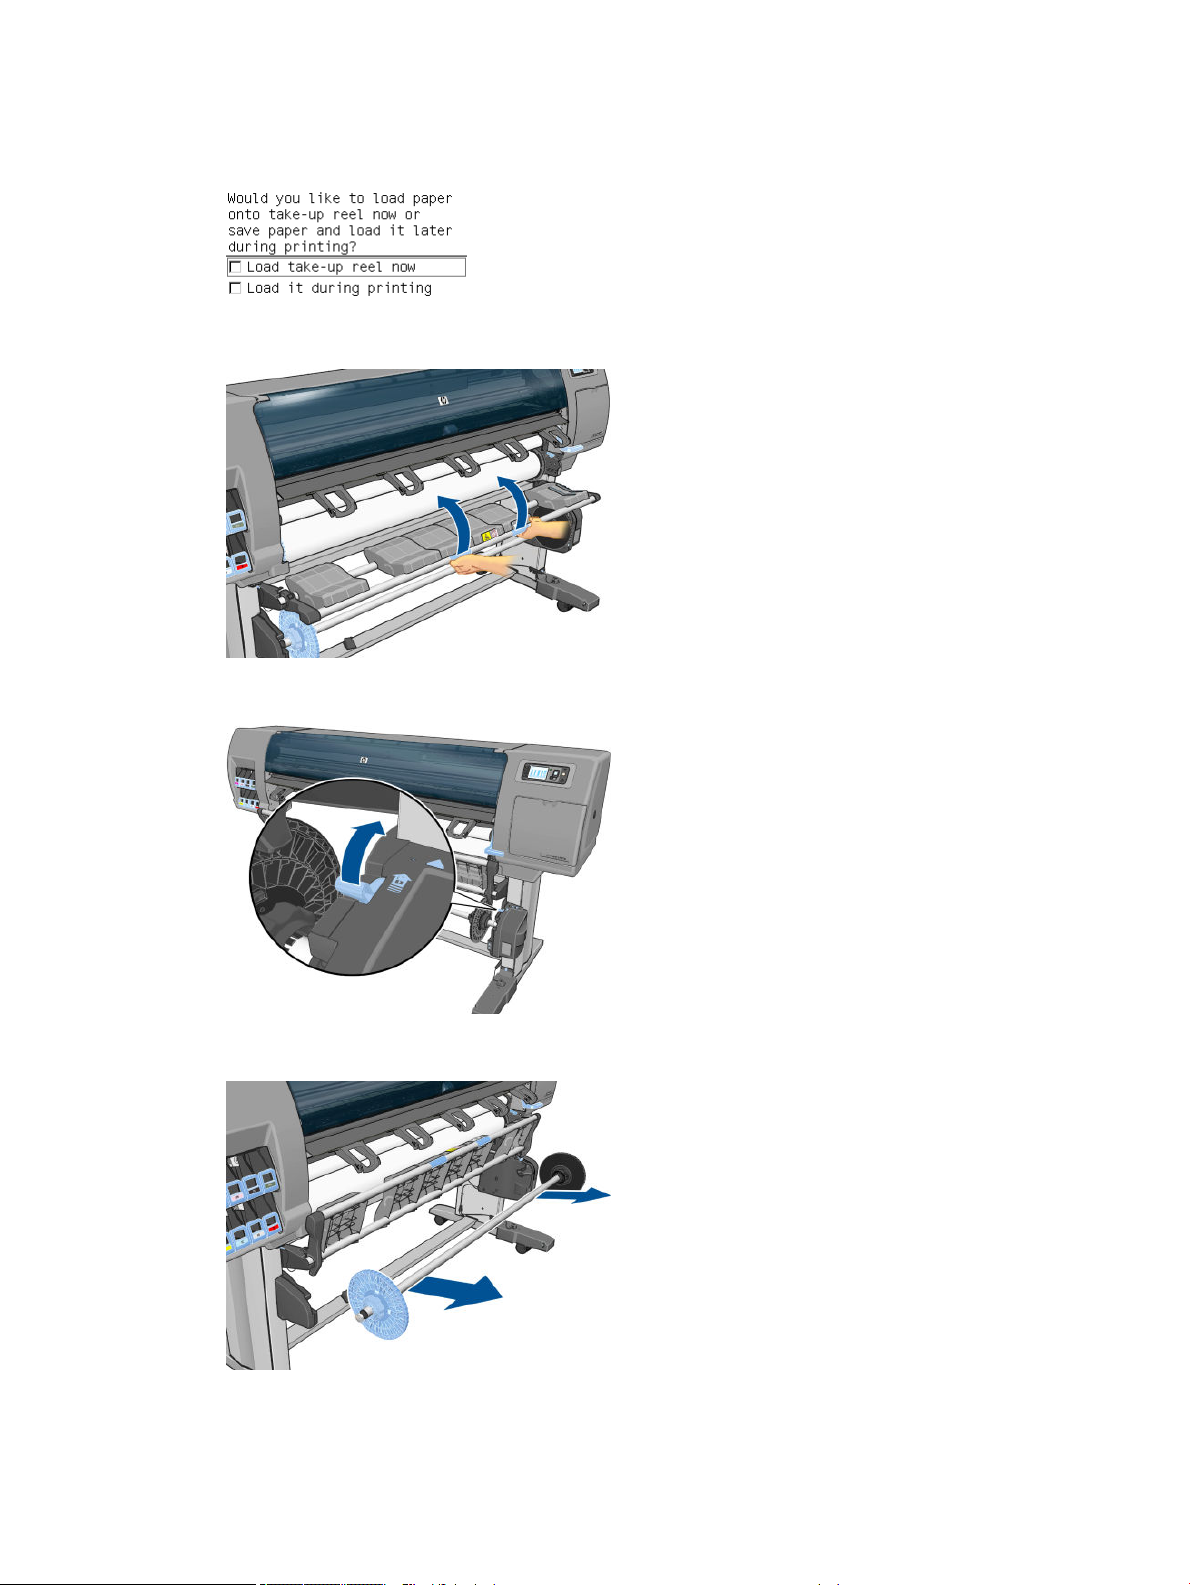
2. If you want to load the take-up reel now, select Load take-up reel now on the front panel. If you want to
load the take-up reel during printing, select Load it during printing on the front panel.
. Make sure that the loading table is in its upright position.
3
4. Unlock the take-up reel spindle by pushing the spindle lever to its uppermost position.
5. Remove the take-up reel spindle.
36 Chapter 4 Handle the paper ENWW
Page 45
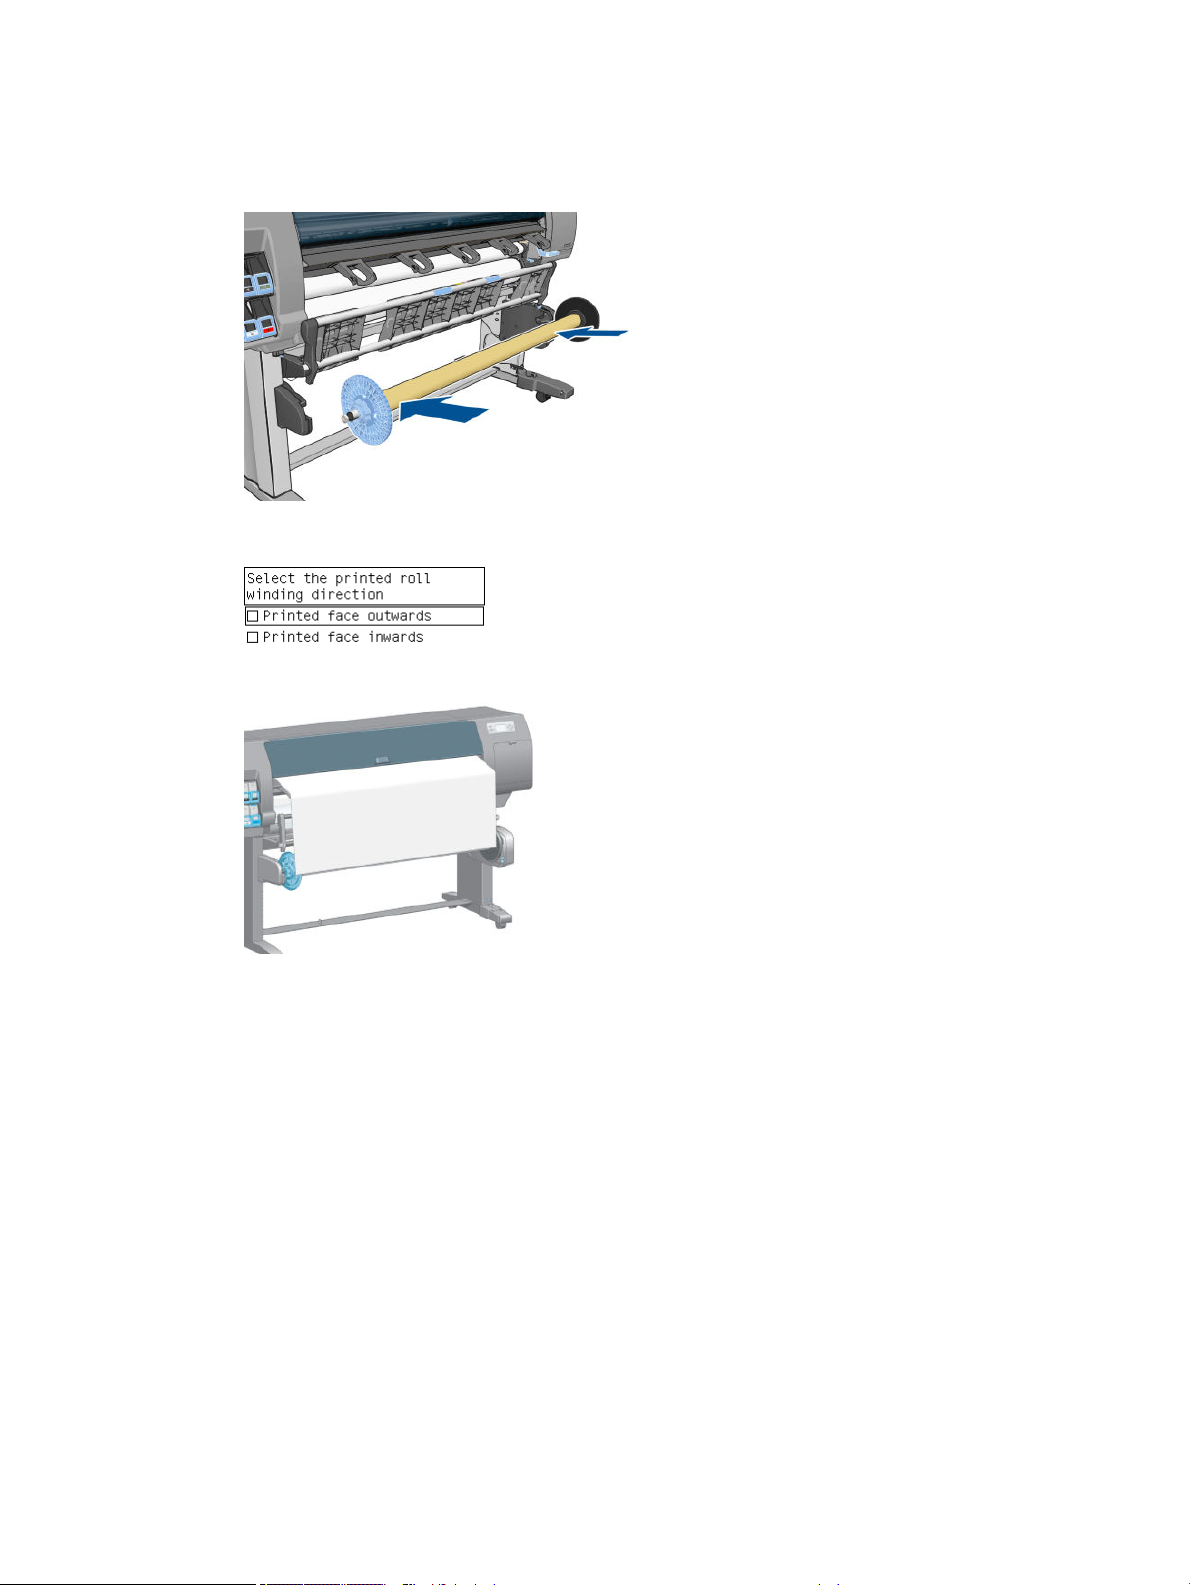
6. The front-panel display guides you through the process of loading the take-up reel spindle core onto the
take-up reel spindle. When that task is complete, load the take-up reel spindle into the printer by pushing
rmly on both ends of the spindle.
7. Press the OK key on the front panel, and then select a winding direction.
The printer advances the paper. Make sure that the paper passes in front of the loading table, as shown.
ENWW Use the take-up reel 37
Page 46
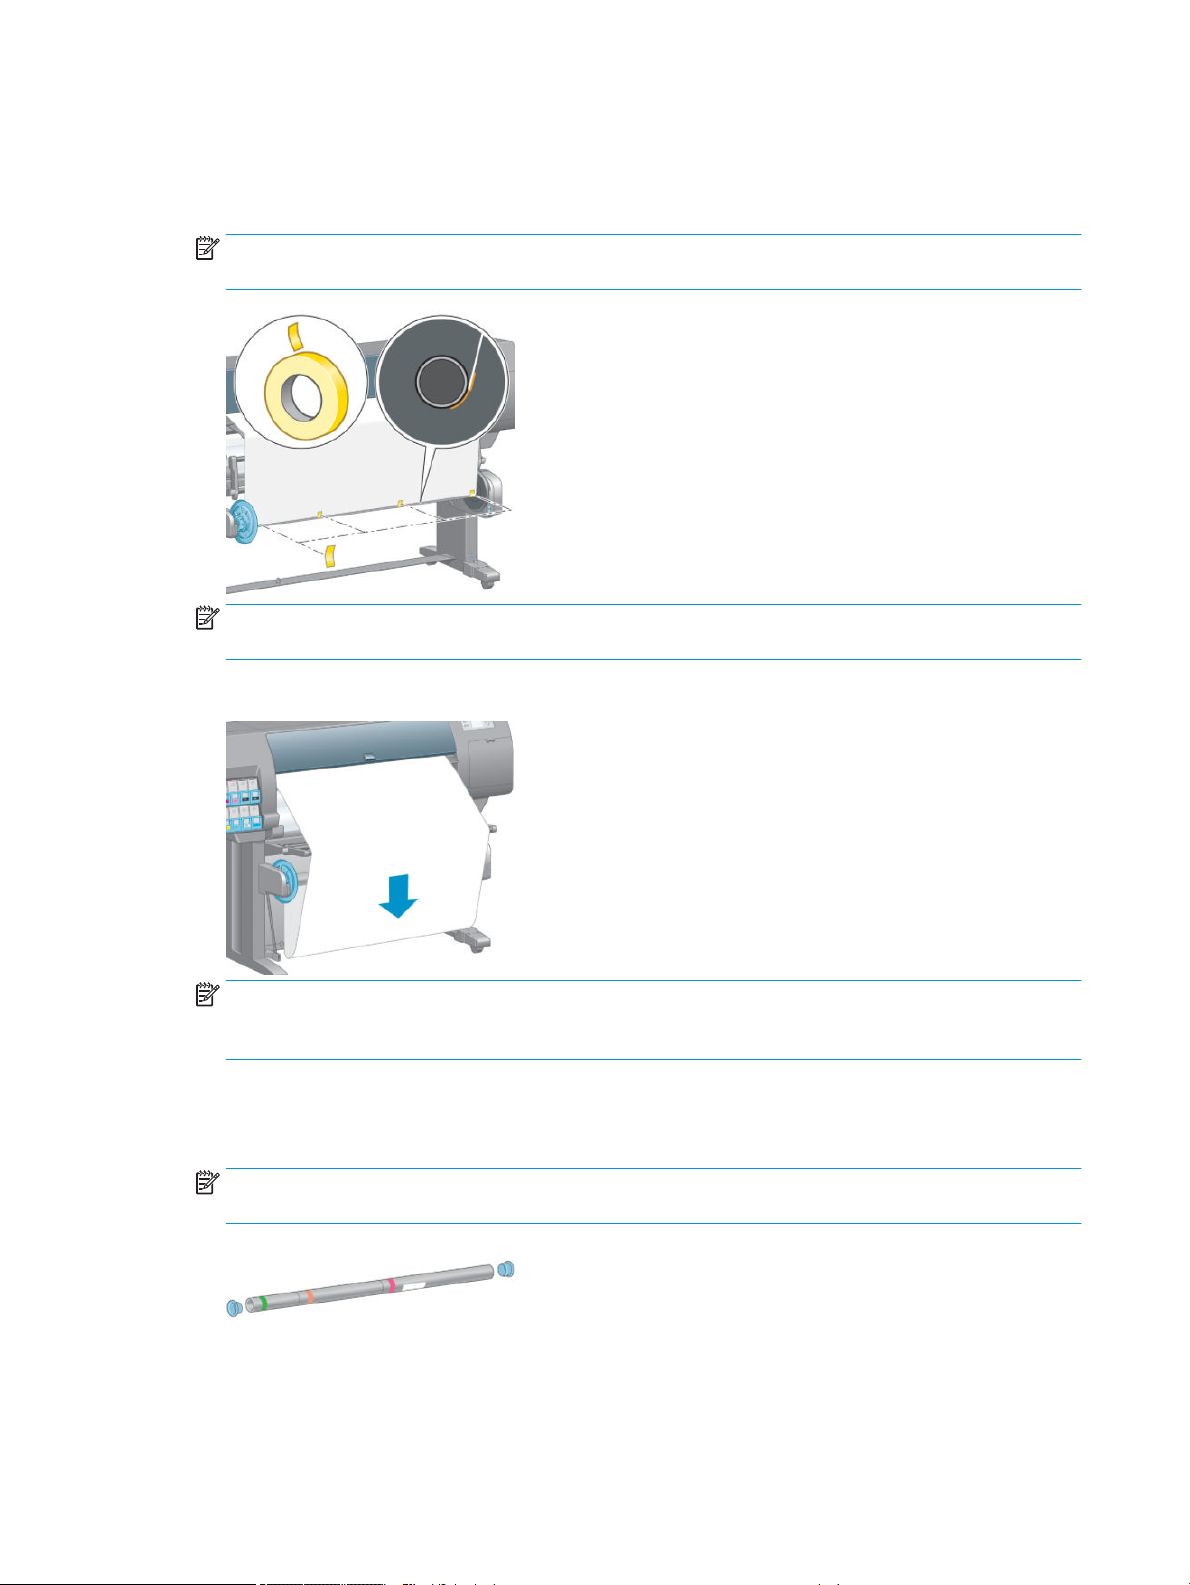
8. Pull the paper taut to the position shown in the following gure. Do not attempt to pull more paper out of
the printer. Use tape to secure the paper to the spindle core. You might need to use more tape than is
shown in the following image. The paper should be secure enough to support the weight of the loopshaping core, which you insert in step 12.
NOTE: If you are loading the take-up reel during printing you do not need to pull the paper taut. Tape the
paper to the spindle core when an adequate length of paper has fed from the printer after printing begins.
NOTE: To avoid having the paper skew as it winds onto the spindle core, make sure the paper is straight
when you attach it. It is sometimes useful to use the core grooves to align the paper.
9. Press the OK key on the front panel. The printer advances the paper.
NOTE: Make sure that you insert the loop-shaping core. The take-up reel will not function correctly
without it. The loop-shaping core must have end caps. Make sure that the end caps extend over the edges
of the paper.
10. Assemble a loop-shaping core by matching the shape-coded and color-coded lengths of plastic tubing. The
loop-shaping core must be the same width as the paper that you are using. Make sure that both end caps
are rmly tted on the ends of the loop-shaping core.
NOTE: The front-panel display shows the required length of the loop-shaping core based on the width of
the roll that you have loaded into the printer.
38 Chapter 4 Handle the paper ENWW
Page 47
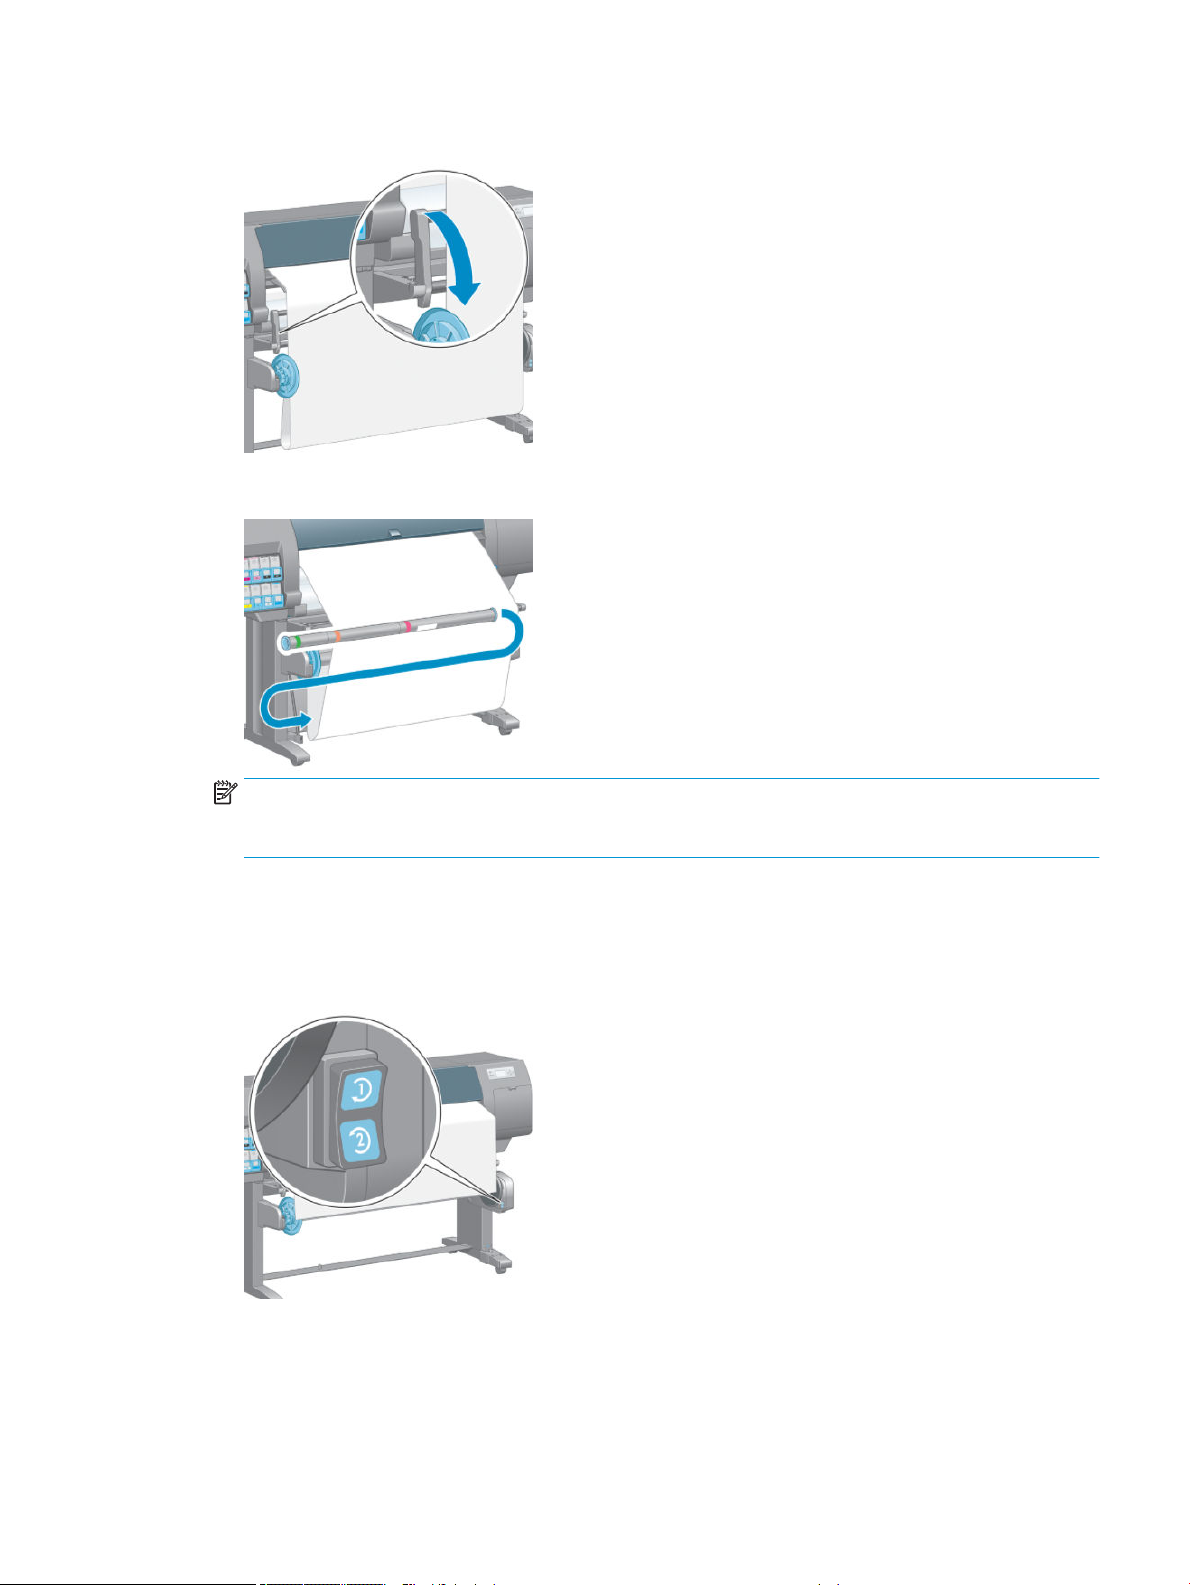
11. Gently lower the loading table.
12. Carefully insert the loop-shaping core.
NOTE: Make sure that you insert the loop-shaping core. The take-up reel will not function correctly
without it. The loop-shaping core must have end caps. Make sure that the end caps extend over the edges
of the paper.
13. Use the wind-direction switch on the take-up reel motor to select the winding direction. Setting 1 winds the
paper so that the printed image faces in. Setting 2 winds the paper so that the printed image faces out.
The front panel shows you to the correct setting based on the winding-direction decision you made in step
7.
14. Press the OK key on the front panel. The Take-up reel has been successfully installed message appears.
ENWW Use the take-up reel 39
Page 48
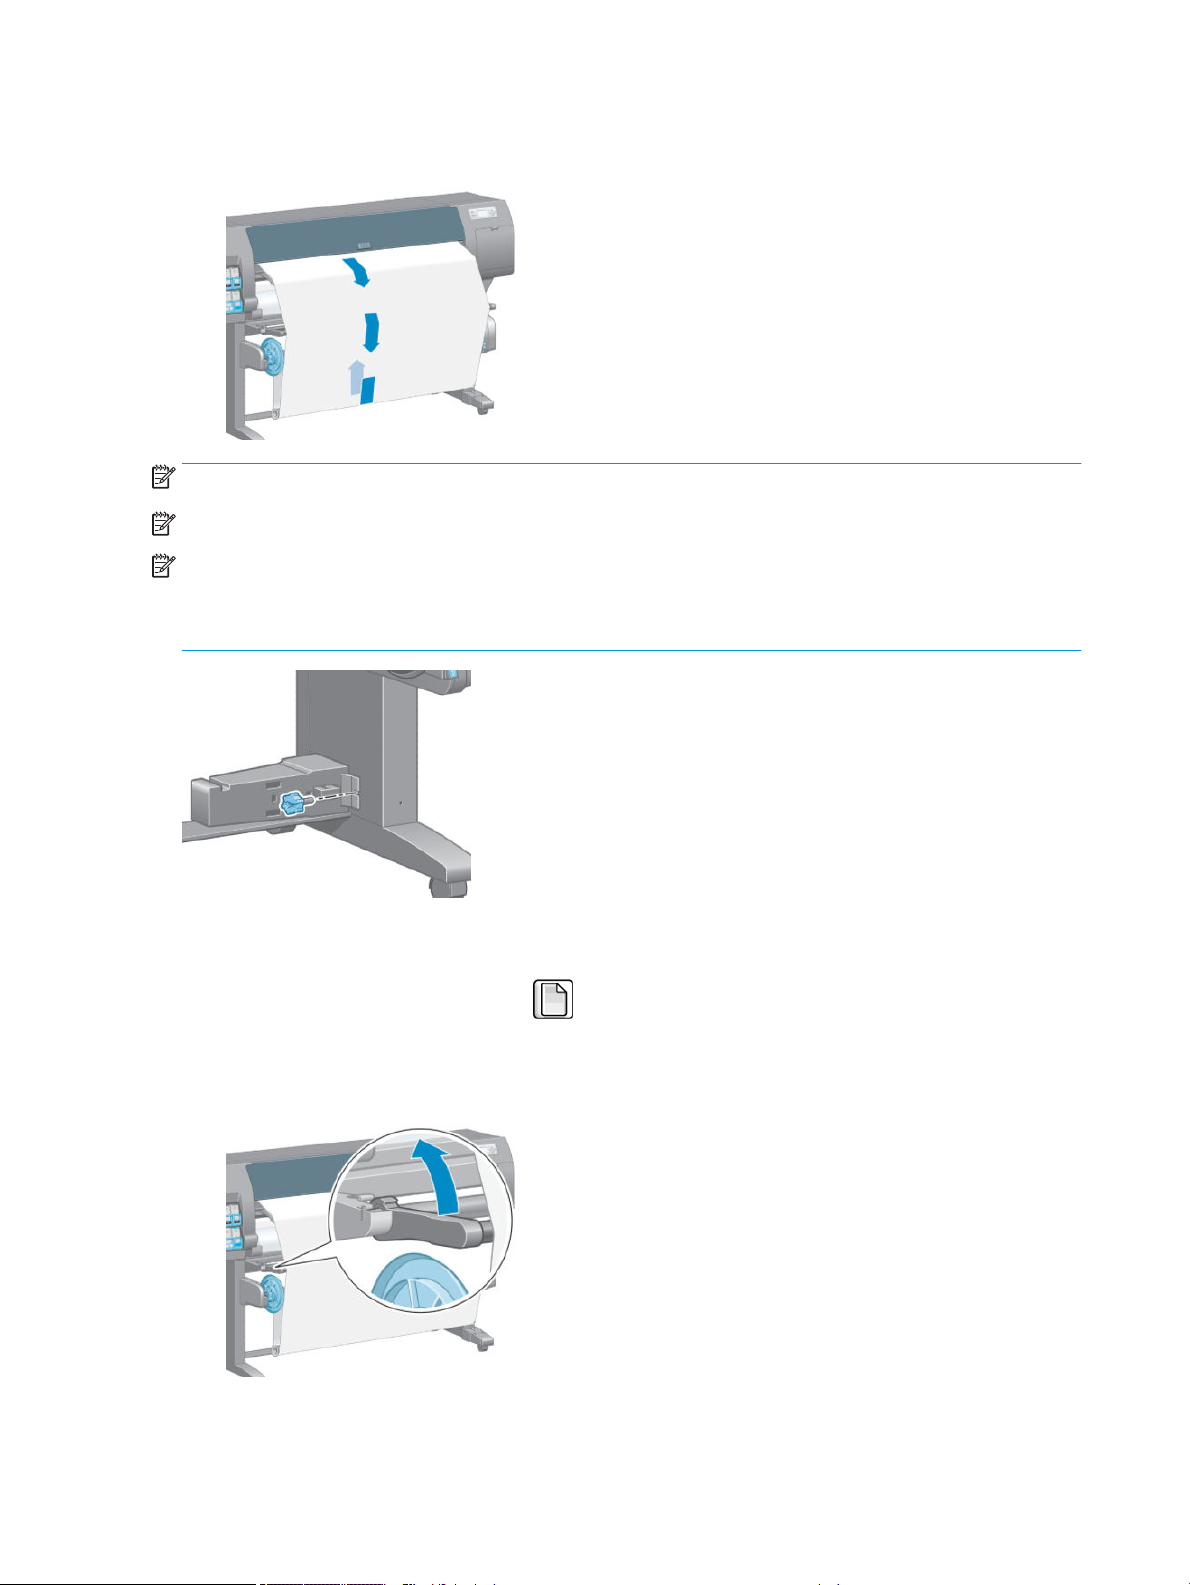
15. The following image shows how the printer looks when it is operating. As paper is fed from the printer, it
drops down in a loop and then up into the take-up reel spindle.
NOTE: While the take-up reel is operating, make sure that the take-up reel sensors are not blocked.
NOTE: The automatic paper-cutter is disabled when the take-up reel is in use.
NOTE: If you want to move the printer, rst remove the take-up reel sensor and cable housing unit from the
foot of the printer stand. Place the sensor and cable housing unit on the printer stand crossbar and use the blue
plastic screw to ax the housing unit to the leg of the stand, as shown, while the printer is being moved. When
reinstalling the housing unit, make sure that the wheel on the foot of the printer stand is pointing forward.
Unload a roll from the take-up reel
1.
On the printer's front panel, select the icon, and then select Paper unload > Unload take-up reel.
The printer advances the paper to allow for cutting.
2. Lift the loading table to its upright position.
40 Chapter 4 Handle the paper ENWW
Page 49
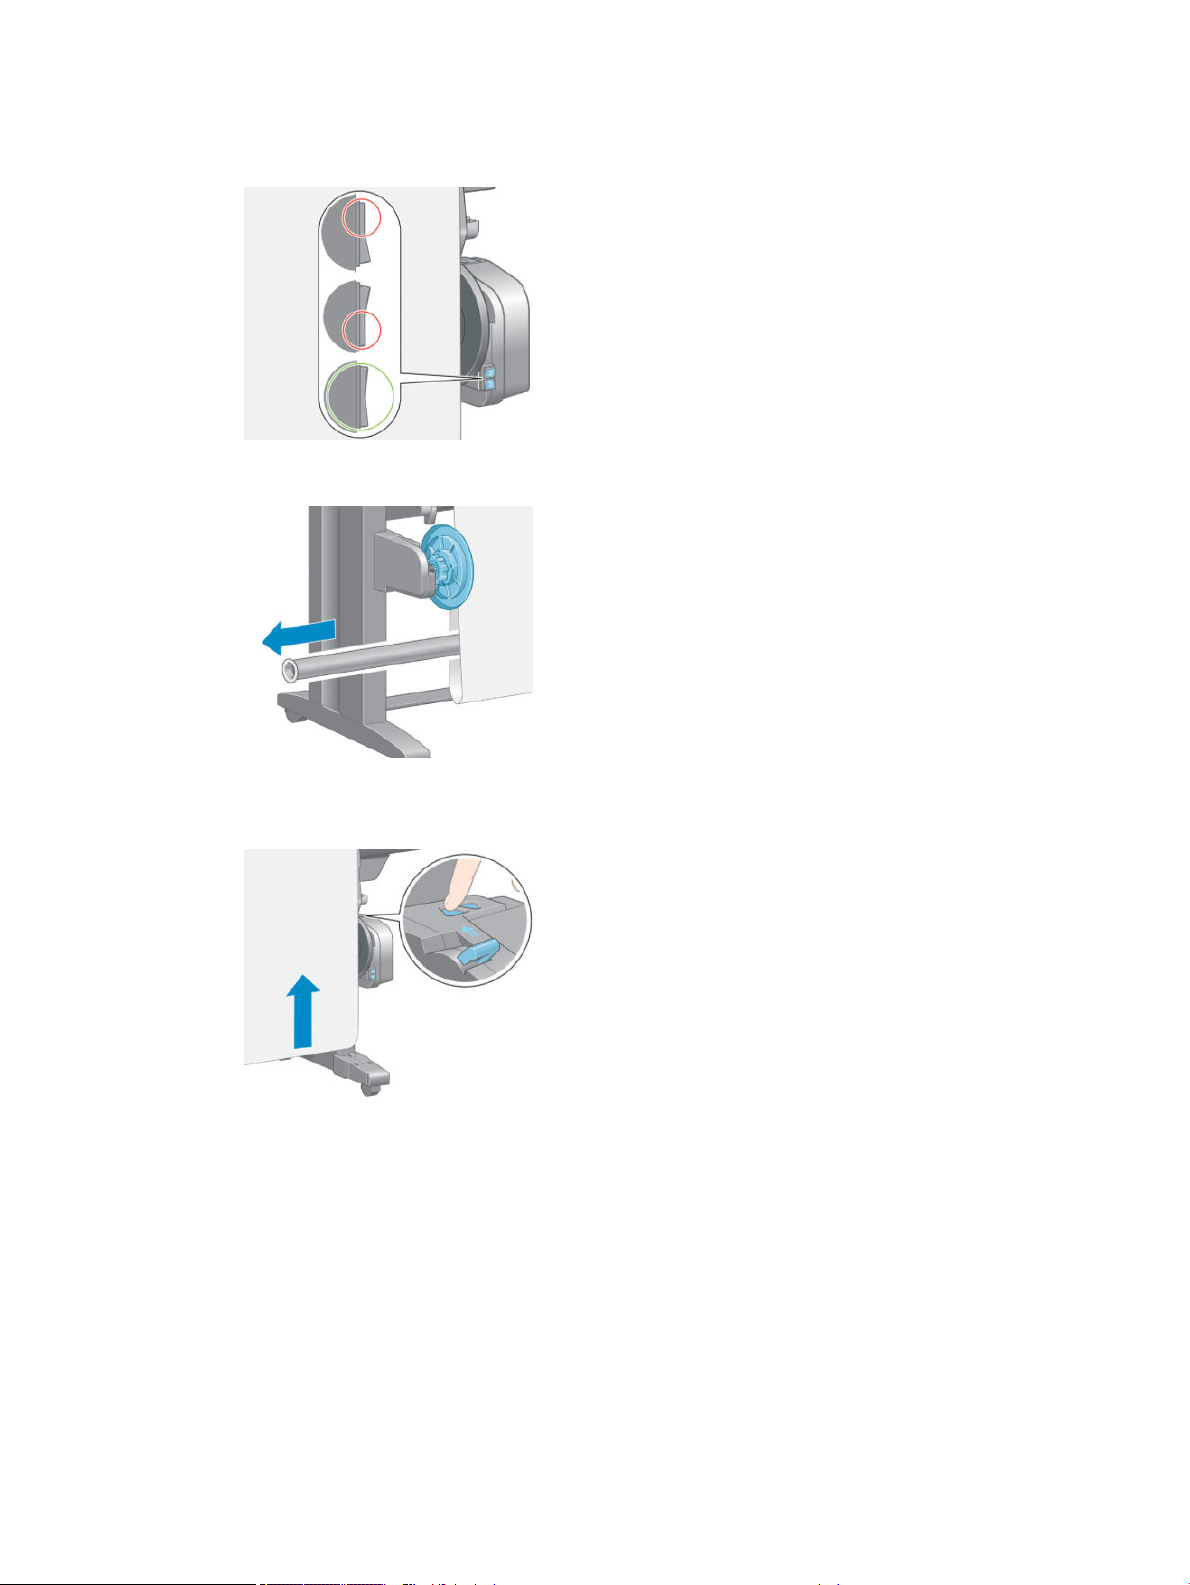
3. Switch the wind-direction switch to the o position. The switch is in the o position when it is centered (in
other words, when the switch is neither in position 1 nor position 2).
4. Remove the loop-shaping core.
5. Use the winding button on the take-up reel motor to wind the excess paper around the take-up reel
spindle.
6. Press the OK key on the front panel.
ENWW Use the take-up reel 41
Page 50
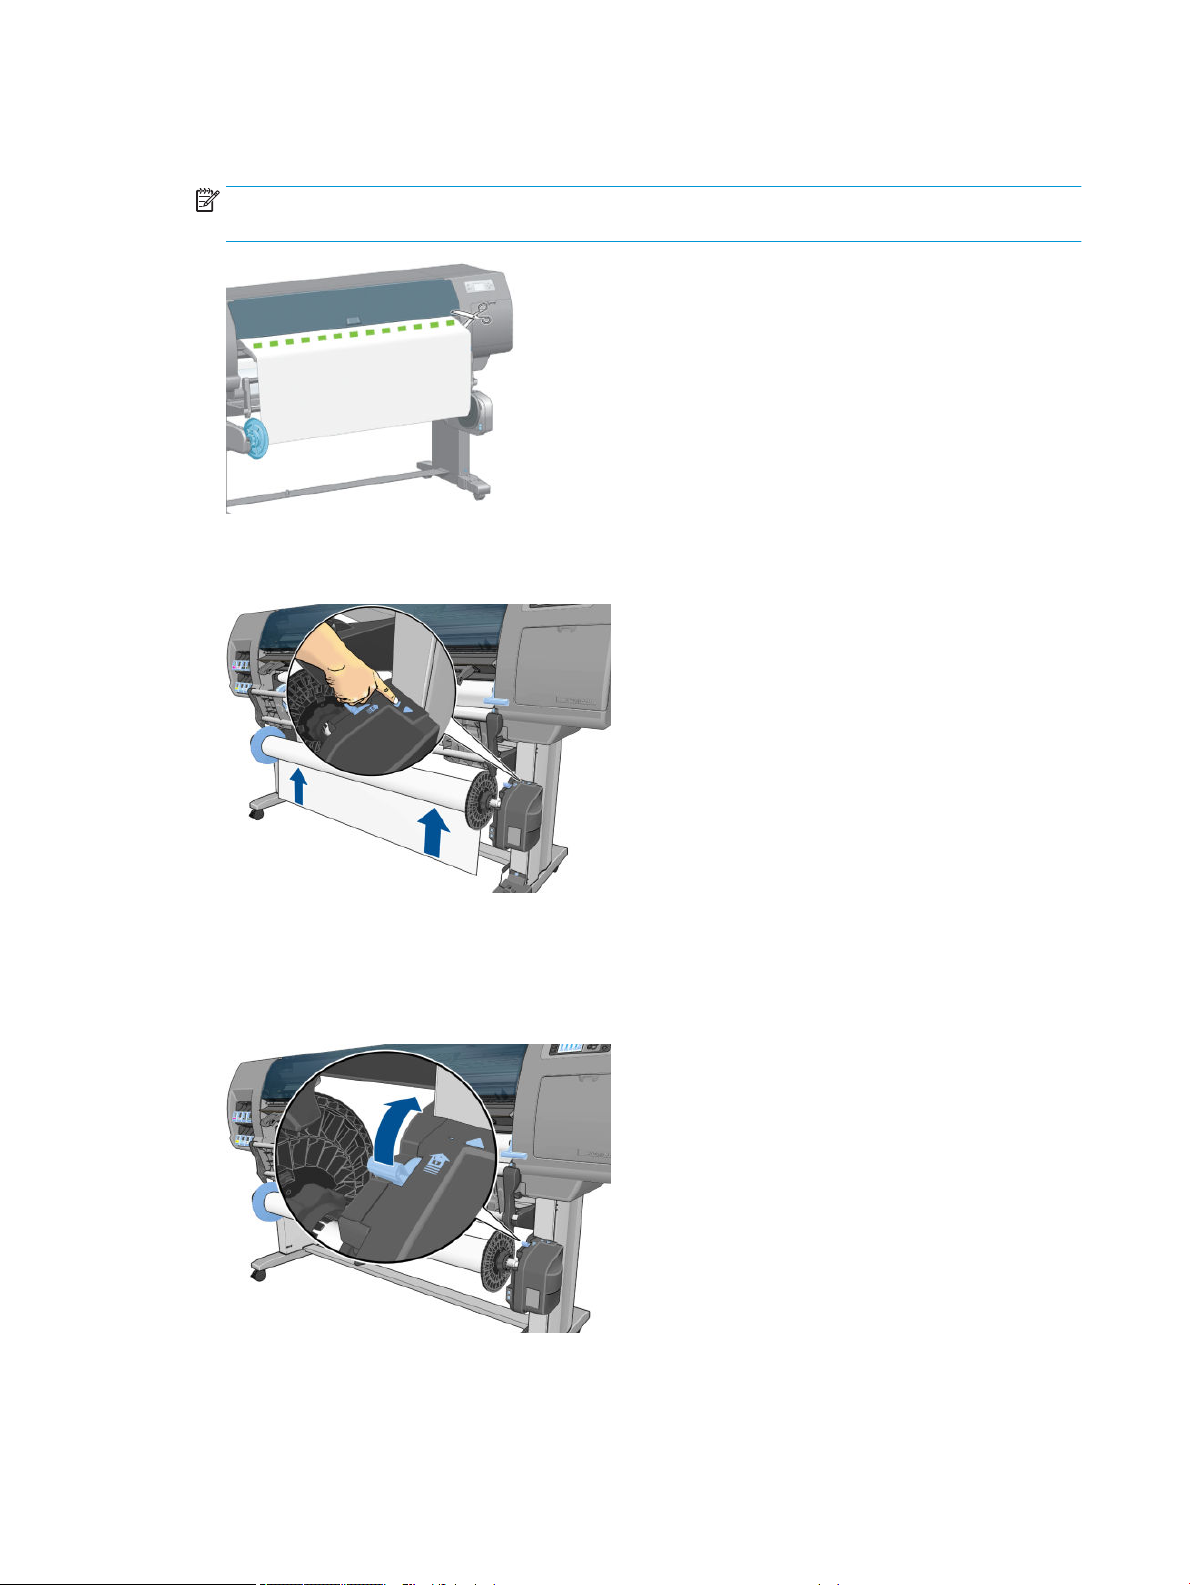
7. The printer knows if the type of paper that is loaded is suitable for the automatic paper-cutter. The paper is
cut if it is suitable. If the paper is not suitable, cut the paper manually.
NOTE: The automatic paper-cutter feature is disabled for some of the heaviest paper types, because they
can damage the cutter.
8. Use the winding button on the take-up reel motor to wind the remainder of the paper around the take-up
reel spindle.
9. Press the OK key on the front panel.
The amount of printed paper that is on the take-up reel spindle appears on the front panel.
10. Unlock the take-up reel spindle by pushing the spindle lever to its uppermost position.
42 Chapter 4 Handle the paper ENWW
Page 51
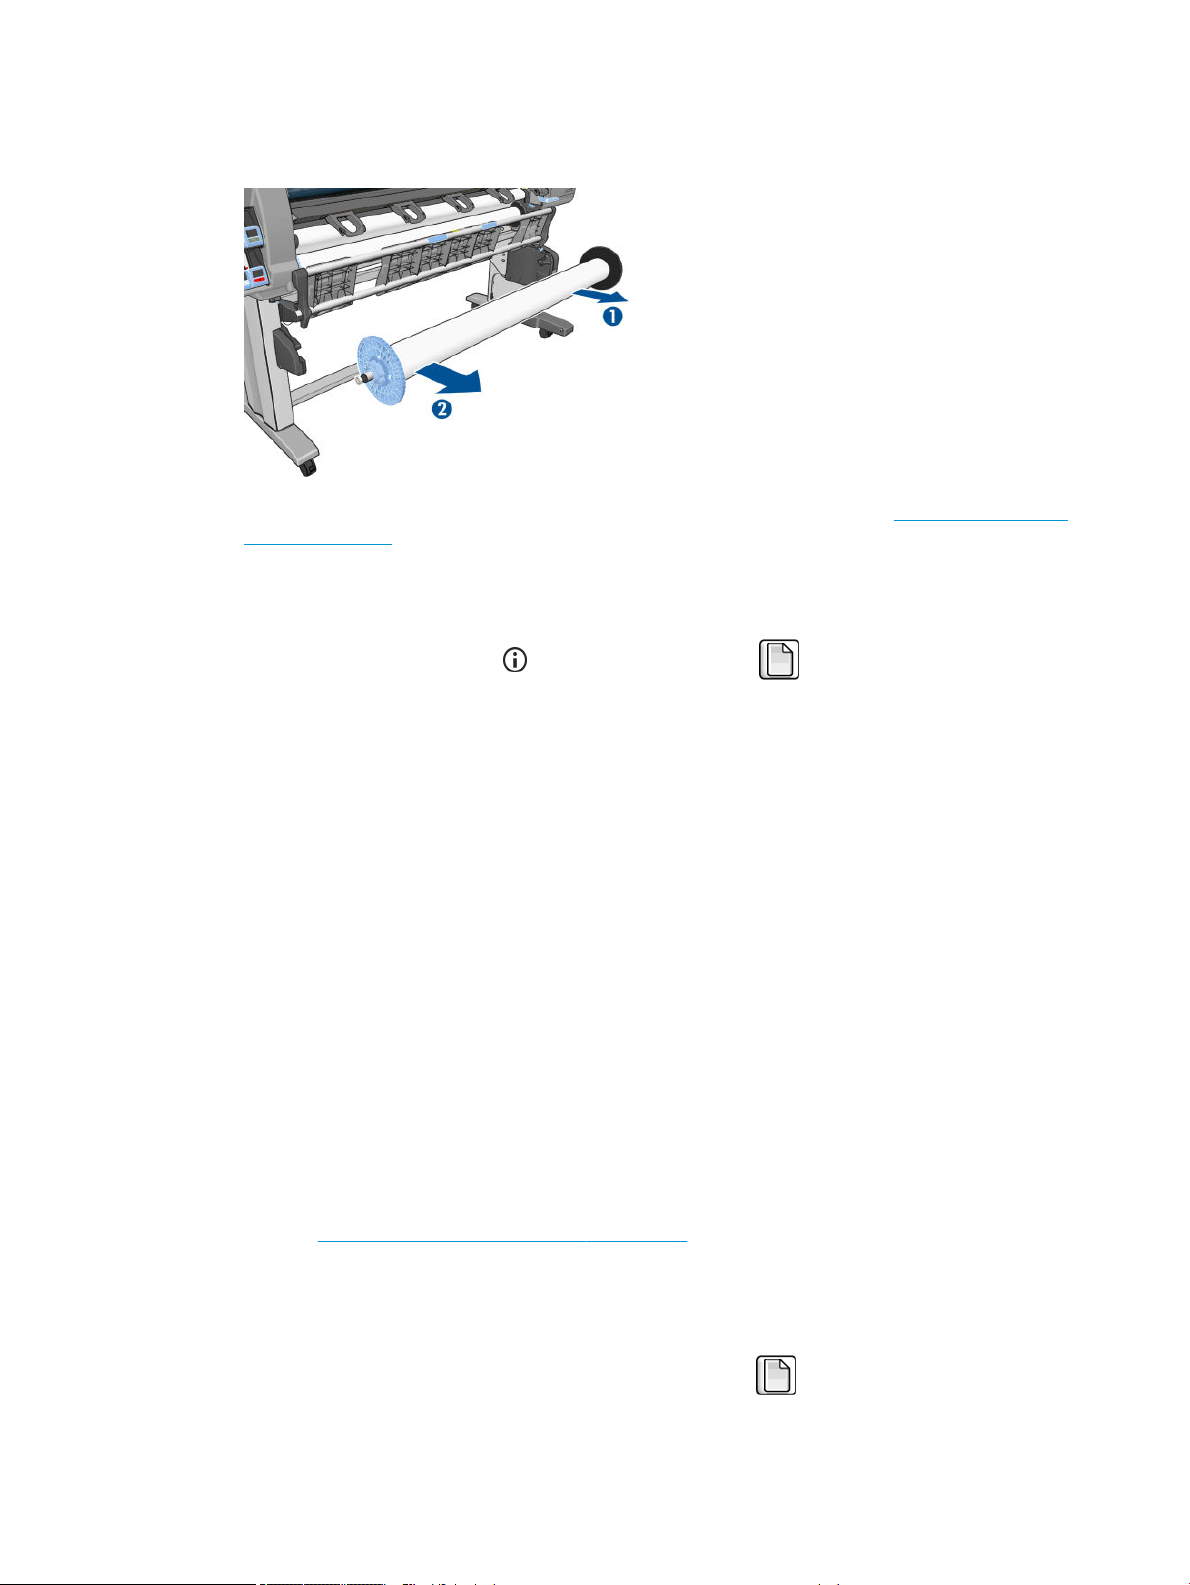
11. Remove the roll from the printer, pulling out the end on the right side of the printer rst. Do not insert your
ngers into the spindle supports during the removal process.
12. To remove the roll from the printer after you have unloaded the take-up reel, see Unload a roll from the
printer on page 35.
View information about the paper
On the printer's front panel, press the key. Alternatively, select the icon, then View loaded paper.
The following information appears on the front panel:
●
The roll status
●
The paper type that you have selected
●
The width of the paper in millimeters (estimated by the printer)
●
The length of the paper in millimeters (estimated by the printer)
●
The color calibration status
●
The paper advance calibration status
If no paper is loaded, the message Out of paper appears.
The same information appears on the Embedded Web Server's Supplies page.
Perform paper advance calibration
The printer is calibrated to advance correctly when printing all the papers that appear on the front panel. When
you select the type of loaded paper, the printer adjusts the rate at which it advances the paper while printing.
However, to ne-tune the image quality of your print, you might need to calibrate the rate at which the paper
advances. See Troubleshoot print-quality issues on page 151 to determine whether paper-advance calibration
is the solution for your issue.
Accurate paper advance controls proper placement of dots on the paper. If the paper is not advanced correctly,
light or dark bands appear in the printed image and the grain in the image might increase.
To check the paper advance calibration status of the paper, select the icon, then View loaded paper. The
status appears:
ENWW View information about the paper 43
Page 52
●
DEFAULT: this status appears when an HP paper is loaded. Unless you experience image-quality problems
in your printed image, such as banding or graininess, HP recommends that you do not calibrate the paper
advance.
●
RECOMMENDED: this status appears when you create a new paper. The paper advance values for this paper
are inherited from the family type. HP recommends that you perform a paper advance calibration to
optimize the values.
●
OK: this status indicates that the loaded paper has been calibrated previously. However, you might need to
repeat the calibration if you experience image-quality problems, such as banding or graininess in your
printed image.
NOTE: Whenever you update the printer rmware, the paper-advance calibration values are reset to the
factory default. See Update the printer rmware on page 143.
NOTE: Colored papers, glossy canvas, and transparent materials such as translucent bond, clear lm,
natural tracing paper, and vellum are not suitable for paper-advance calibration.
Overview of the paper advance procedure
1.
On the front panel, select the icon, and then select Image quality maintenance > Paper advance
calibration > Calibrate paper advance. The printer automatically calibrates the paper-advance and prints a
paper advance calibration image.
2. Wait until the front panel shows the status screen, and then reprint your image.
NOTE: The calibration procedure takes approximately six minutes. The front-panel display shows any
errors in the process.
If you are satised with your image, continue using this calibration for your paper type. If you see
improvement in your image, continue with step 3. If you are dissatised with the calibration, return to the
default calibration. See Return to the default calibration on page 44.
3.
To ne-tune the calibration, select the icon, and then select Image quality maintenance > Paper
advance calibration > Adjust paper advance.
4. Select the percentage of change from -100% to 100%. To correct light banding, decrease the percentage.
To correct dark banding, increase the percentage.
5. Press the OK key on the front panel to save the value.
6. Wait until the front panel shows the status screen, and then reprint your image.
Return to the default calibration
Returning to the default calibration sets all the paper-advance calibration to zero. To return to the default paper
advance-calibration value, you must reset the calibration.
1.
On the front panel, select the icon, and then select Image quality maintenance > Paper advance
calibration
> Reset paper advance.
2. Wait until the front panel shows that the operation has been successfully completed before you press the
Back key to return to the Ready screen.
44 Chapter 4 Handle the paper ENWW
Page 53

Download paper presets
Each supported paper type has its own characteristics. The printer changes the way it prints on each dierent
paper type. For example, some might need more ink and some might require a longer drying time. The printer
requires a description of the requirements of each paper type. This description is called the “paper preset”.
The paper preset contains the ICC prole, which describes the color characteristics of the paper. It also contains
information about other characteristics and requirements of the paper that are not directly related to color.
Existing paper presets for your printer are installed in the printer's software.
Your printer contains paper presets for only the most commonly used paper types. If you buy a paper type for
which your printer has no preset, you cannot select that paper type in the front panel.
You can assign a preset for a new paper type in three ways:
●
Use an HP factory paper preset by selecting the closest category and type on the front panel or in the
HP DesignJet Utility
NOTE: Because colors might not be accurate, this method is not recommended for high-quality prints.
●
Download the correct paper preset from: http://www.hp.com/go/Z6610/paperpresets/ or
http://www.hp.com/go/Z6810/paperpresets/ according to your printer model.
NOTE: HP provides presets for HP paper types only. If you do not nd the paper preset that you want on
the Web, it might have been added to the latest rmware for your printer. Check the rmware release notes
for information. See Update the printer rmware on page 143.
●
Add a custom paper type. See Use non-HP paper on page 45, and create an ICC prole for either HP or
non-HP papers.
Use non-HP paper
HP paper has been fully tested with the printer and can be expected to give the best print quality.
However, you can print on paper from any manufacturer. Before doing so, add the custom paper type and allow
the printer to run a color calibration. You can add a custom paper by using the HP Color Center in the
HP DesignJet Utility.
NOTE: If you have already selected Custom paper > Add Custom Paper from the HP DesignJet Utility, the rst
Add New Paper screen appears and you can start this procedure at step 4.
1. Go to the Color Center in the HP DesignJet Utility.
2. Select Manage Papers.
3. In Windows, select Add new paper. In Mac OS X, click +.
4. Type the paper name.
TIP: If you use the commercial name of the paper, other users will be able to recognize it easily.
5. Select a paper category. This is important, because it determines a number of basic parameters for printer-
paper interaction, taking into account the properties of both sides of the paper.
TIP: In some cases, you may need to experiment with dierent paper categories in order to nd out which
one works best in practice.
ENWW Download paper presets 45
Page 54

TIP: You can get information about the characteristics of each HP paper type from the front panel: select
the icon, then Paper types list > Paper category > Paper type > View paper details. This may help you
to match your non-HP paper with a similar HP paper type.
6. Load the custom paper. See Load a roll into the printer on page 33.
7. Click Next. The printer performs a color calibration and prints a calibration chart. This can take up to 10
minutes.
NOTE: For more information on the processes available in the Color Center, for the Z6810 see A summary
of the color-management process on page 100, and for the Z6610 see A summary of the colormanagement process on page 104.
8. After the new calibration parameters are calculated and stored, you are reminded to create an ICC prole.
Click Done. The custom paper is added to the paper category you selected.
9. To create an ICC prole, which allows you to print on your paper with the best possible color accuracy, for
the Z6810 see Color proling on page 102, and for the Z6610 see Color proling on page 106.
10. Perform paper advance calibration (see Perform paper advance calibration on page 43). The default paper
advance values for your custom paper are inherited from the paper category, but can probably be
improved by calibration.
Cancel the drying time
Press the Form Feed and Cut key on the front panel.
CAUTION: A print that has not dried suciently can suer from quality problems.
Change the drying time
You can use the HP DesignJet Utility to change the drying time for a particular paper type, to accommodate
special printing conditions.
1. Open the HP Color Center.
2. Select Paper preset management.
3. Select Change printing properties.
4. Select the paper category.
5. Select the paper type.
6. Choose a drying time from the Dry Time drop-down menu.
NOTE: The text box to the right of the drop-down menu will not display the time in seconds when the
Automatic option is selected (it is selected by default for all paper types). This is because the Automatic
option means that the printer will calculate the optimal drying time for you depending on the temperature
at printing time, and therefore it cannot be known in advance.
You can turn o all drying time for all paper types by selecting the icon, then Print retrieval > Select drying
time > O.
46 Chapter 4 Handle the paper ENWW
Page 55
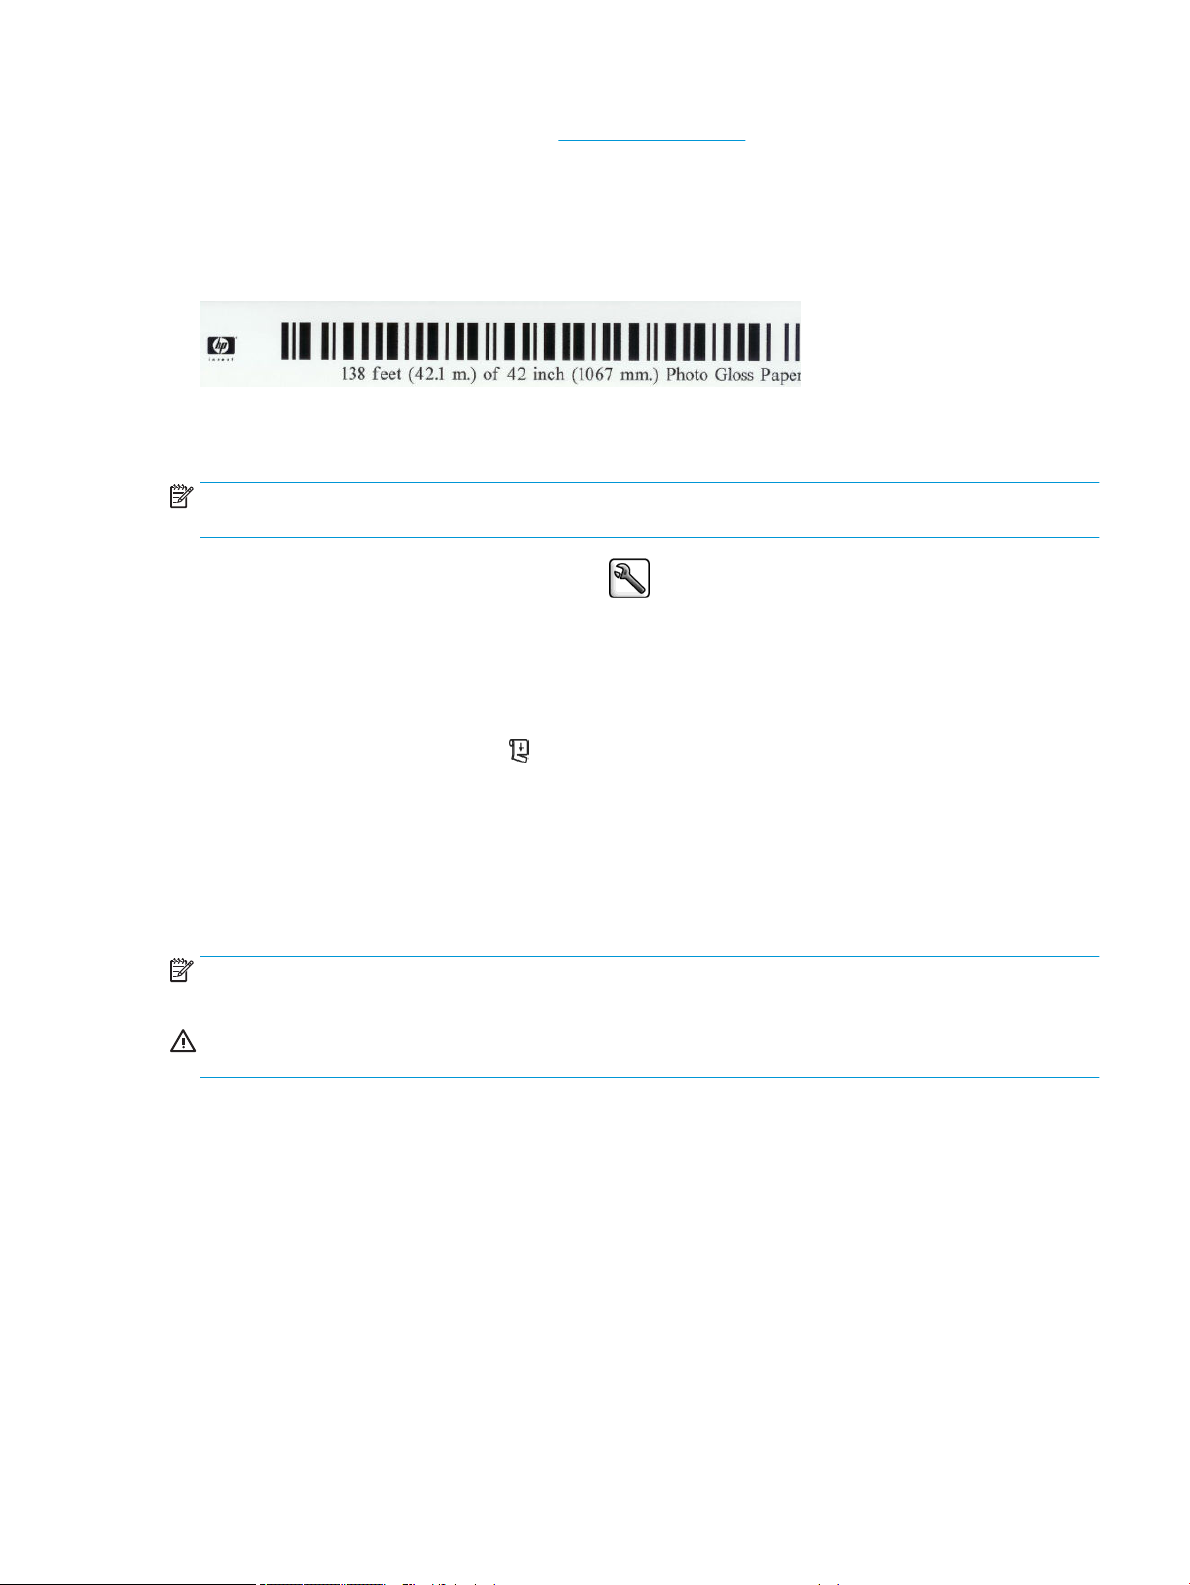
For more information about drying time, see Drying time on page 27.
Printing paper info
The Printing paper info option is enabled by default; it allows the printer to estimate the remaining roll length by
reading a barcode that is printed on the leading edge of the roll whenever the paper is unloaded.
When you load a new, unused roll, there is no barcode already printed on it, so the front panel will ask you for
the length. The length printed on the barcode at unloading time is calculated from the length you declare at the
start, minus the length that has been printed.
NOTE: If you declare at loading time that the length of the roll is unknown, and then later reload the same roll,
the front panel will request the length again.
To disable the Printing paper info option, select the icon in the printer's front panel, and then select Printing
preferences
barcode will be neither printed nor read.
> Paper options > Disable printing paper info. In this case, the length will not be requested, and the
Feed and cut the paper
If you press the Form feed and cut key on the front panel, the printer advances the paper and makes a
straight cut across the front edge. There are several possible reasons why you might want to do this.
●
To trim the leading edge of the paper if it is damaged or not straight.
●
To feed and cut the paper when the automatic cutter has been disabled.
●
To cancel the waiting time and print the available pages immediately, if the printer is waiting to nest more
pages.
NOTE: The printheads are serviced after each print, and the paper cannot be cut until the process completes,
so you may notice a delay.
CAUTION: Remove the cut piece from the output tray. If strips or short prints are left in the output tray, the
printer could jam.
Store the paper
The following are tips for storing paper:
●
Always keep unused rolls wrapped in the plastic wrap to prevent discoloration. Rewrap partially used rolls if
they are not being used.
●
Do not stack rolls.
●
Allow all paper types to adapt to room conditions out of the packaging for 24 hours before printing.
ENWW Printing paper info 47
Page 56

●
Handle lm and glossy paper by the edges or wear cotton gloves. Skin oils can be transferred to the paper,
leaving ngerprint marks.
●
Keep the paper tightly wound on the roll throughout the loading and unloading procedures. If the roll starts
to unwind, it can become dicult to handle.
Order paper
The following paper types are currently provided for use with your printer.
NOTE: This list is likely to change over the course of time. For the latest information, see
http://www.globalbmg.com/hp.
Key to availability:
●
(E): Europe, the Middle East and Africa
●
(J): Japan
●
(L): Latin America
●
(N): North America
If the part number is not followed by parentheses, the paper is available in all regions.
Table
4-3 Roll paper
Paper type g/m² Length Width Part numbers
HP Bond and Coated Paper
HP Super Heavyweight Plus Matte
Paper
HP Super Heavyweight Plus Matte
Paper, 3-in Core
HP Universal Bond Paper 80 45.7 m (150 ft) 594 mm (23.4 in) (A1) Q8003A (AJ)
200 30.5 m (100 ft) 610 mm (24 in) Q6626B (ELN)
914 mm (36 in) Q6627B (AELN)
1066 mm (42-in) Q6628B (ELN)
1524 mm (60-in) Q6630B
200 61 m (200 ft) 914 mm (36 in) D9R36A
1066 mm (42-in) D9R37A (ELN)
1372 mm (54 in) D9R38A
1524 mm (60-in) D9R39A
SA089A (2 Pack) (J)
610 mm (24 in) Q1396A
SA025A (2 Pack) (J)
914 mm (36 in) Q1397A
1066 mm (42-in) Q1398A
1117 mm (44 in) 2NC45A
175 m (574 ft) 914 mm (36 in) Q8751A (ELN)
90.1 m (300 ft) 594 mm (23.4 in) (A1) Q8004A (AEJ)
48 Chapter 4 Handle the paper ENWW
Page 57

Table 4-3 Roll paper (continued)
Paper type g/m² Length Width Part numbers
841 mm (33.1 in) (A0) Q8005A (AEJ)
HP Bright White Inkjet Paper 90 45.7 m (150 ft) 421 mm (16.5 in) (A2) Q1446A (EJ)
594 mm (23.4 in) (A1) Q1445A (EJ)
610 mm (24 in) C1860A (LN)
610 mm (24 in) C6035A (EAJ)
841 mm (33.1 in) (A0) Q1444A (EAJ)
914 mm (36 in) C6036A (EAJ)
914 mm (36 in) C1861A (LN)
914 mm (36 in) 914 mm (36 in) C6810A
HP Heavyweight Coated Paper 131 30.5 m (100 ft) 610 mm (24 in) C6029C
914 mm (36 in) C6030C
1066 mm (42-in) C6569C
1372 mm (54 in) C6570C
1524 mm (60-in) C6977C
68.5 m (225 ft) 1066 mm (42-in) Q1956A (ELN)
1524 mm (60-in) Q1957A (ELN)
HP Coated Paper 90 45.7 m (150 ft) 420 mm (16.5 in) (A2) Q1443A (J)
594 mm (23.4 in) (A1) Q1442A (AEJ)
610 mm (24 in) C6019B
841 mm (33.1 in) (A0) Q1441A (EJ)
914 mm (36 in) C6020B
1066 mm (42-in) C6567B
1372 mm (54 in) C6568B
91.4 m (300 ft) 914 mm (36 in) C6980A
HP Universal Coated Paper 90 45.7 m (150 ft) 610 mm (24 in) Q1404B
914 mm (36 in) Q1405B
1066 mm (42-in) Q1406B
1524 mm (60-in) Q1408B
HP Universal Coated Paper, 3-in Core 90 91.4 m (300 ft) 914 mm (36 in) L5C74A
HP Universal Heavyweight Coated
Paper
131 30.5 m (100 ft) 610 mm (24 in) Q1412B
914 mm (36 in) Q1413B
1066 mm (42-in) Q1414B
1524 mm (60-in) Q1416B
ENWW Order paper 49
Page 58

Table 4-3 Roll paper (continued)
Paper type g/m² Length Width Part numbers
HP Universal Heavyweight Coated
Paper, 3-in Core
HP Film (Technical and Graphic)
HP Clear Film 174 22.9 m (75 ft) 610 mm (24 in) C3876A
HP Matte Film 160 38.1 m (125 ft) 610 mm (24 in) 51642A
HP Natural Tracing Paper 90 45.7 m (150 ft) 610 mm (24 in) C3869A
HP Photographic Paper
HP Satin Wrapping Paper, 3-in Core 100 152.4 m (500 ft) 762 mm (30 in) Z6G71A
HP Universal Instant-dry Gloss Photo
Paper
131 61 m (100 ft) 914 mm (36 in) D9R44B (LN)
1372 mm (54 in) D9R46B (LN)
1524 mm (60-in) D9R47B (LN)
91.4 m (300 ft) 914 mm (36 in) L5C80A
1016 mm (40 in) L5C81A (LNE)
914 mm (36 in) C3875A
914 mm (36 in) 51642B
914 mm (36 in) C3868A
200 30.5 m (100 ft) 610 mm (24 in) Q6574A
914 mm (36 in) Q6575A
HP Universal Instant-dry Satin Photo
Paper
HP Everyday Instant-dry Gloss Photo
Paper
1066 mm (42-in) Q6576A
1524 mm (60-in) Q6578A
61 m (200 ft) 1066 mm (42-in) Q8754A (ELN)
1524 mm (60-in) Q8756A (ELN)
200 30.5 m (100 ft) 610 mm (24 in) Q6579A
914 mm (36 in) Q6580A
1066 mm (42-in) Q6581A
1270 mm (50 in) Q6582A (ALN)
1524 mm (60-in) Q6583A
61 m (200 ft) 1066 mm (42-in) Q8755A (AELN)
1524 mm (60-in) Q8757A (ELN)
235 30.5 m (100 ft) 610 mm (24 in) Q8916A
SD709A (2 Pack) (J)
914 mm (36 in) Q8917A
1066 mm (42-in) Q8918A
1524 mm (60-in) Q8919A
HP Everyday Instant-dry Satin Photo
Paper
235 30.5 m (100 ft) 610 mm (24 in) Q8920A
50 Chapter 4 Handle the paper ENWW
Page 59

Table 4-3 Roll paper (continued)
Paper type g/m² Length Width Part numbers
914 mm (36 in) Q8921A
1066 mm (42-in) Q8922A
1524 mm (60-in) Q8923A
61 m (200 ft) 1524 mm (60-in) CG842A
HP Premium Instant-dry Gloss Photo
Paper
HP Premium Instant-dry Satin Photo
Paper
HP Premium Matte Photo Paper 200 30.5 m (100 ft) 610 mm (24 in) CG459B
HP Backlit Material
HP Premium Vivid Color Backlit Film 285 30.5 m (100 ft) 914 mm (36 in) Q8747A (AELN)
260 22.9 m (75 ft) 610 mm (24 in) Q7991A (AELN)
30.5 m (100 ft) 914 mm (36 in) Q7993A (AELN)
1066 mm (42-in) Q7995A (AELN)
1270 mm (50 in) Q7997A (LN)
1524 mm (60-in) Q7999A (AELN)
260 22.9 m (75 ft) 610 mm (24 in) Q7992A (AELN)
30.5 m (100 ft) 914 mm (36 in) Q7994A (AELN)
1066 mm (42-in) Q7996A
1270 mm (50 in) Q7998A (AJLN)
1524 mm (60-in) Q8000A
914 mm (36 in) CG460B
1066 mm (42-in) Q8748A (AELN)
594 mm (23.4 in) (A1) Y3N93A (E)
1372 mm (54 in) Q8749A (AELN)
1524 mm (60-in) Q8750A
HP Self-Adhesive Material
HP Everyday Adhesive Matte
Polypropylene, 2 Pack
HP Everyday Adhesive Matte
Polypropylene, 3-in Core
HP Everyday Adhesive Gloss
Polypropylene, 2 Pack
120
168 with
liner
120
168 with
liner
140
190 with
liner
22.9 m (75 ft) 610 mm (24 in) C0F18A (AELN)
914 mm (36 in) C0F19A (AELN)
1066 mm (42-in) C0F20A (AELN)
1524 mm (60-in) C0F22A (AELN)
30.5 m (100 ft) 914 mm (36 in) D9R24A (ELN)
1066 mm (42-in) D9R25A (AELN)
1270 mm (50 in) D9R26A (ELN)
1524 mm (60-in) D9R27A (ELN)
22.9 m (75 ft) 914 mm (36 in) C0F28A (AELN)
1066 mm (42-in) C0F29A (AELN)
ENWW Order paper 51
Page 60

Table 4-3 Roll paper (continued)
Paper type g/m² Length Width Part numbers
HP Universal Adhesive Vinyl 160
300 with
liner
HP Universal Adhesive Vinyl 160
300 with
liner
HP Banner and Sign Material
HP Everyday Matte Polypropylene, 2
Pack
HP Everyday Matte Polypropylene, 3-in
Core
120 30.5 m (100 ft) 610 mm (24 in) CH022A
120 61 m (200 ft) 914 mm (36 in) D9R28A
20 m (65 ft) 610 mm (24 in) W4Y93A (ELN)
914 mm (36 in) C2T51A (2 Pack) (AELN)
1066 mm (42-in) C2T52A (2 Pack) (ELN)
45.7 m (150 ft) 914 mm (36 in) 1AF11A (ELN)
1016 mm (40 in) 2HY31A (ELN)
914 mm (36 in) CH023A
1066 mm (42-in) CH025A
1270 mm (50 in) CH026A
1524 mm (60-in) CH027A
61 m (200 ft) 914 mm (36 in) CH024A
1066 mm (42-in) D9R29A
1270 mm (50 in) D9R30A
1524 mm (60-in) D9R31A
HP Premium Matte Polypropylene, 2
Pack
HP Everyday Blockout Display Film 220 30.5 m (100 ft) 914 mm (36 in) Y3Z17A (ELN)
HP Durable Semi-gloss Display Film 265 15.2 m (50 ft) 914 mm (36 in) Q6620B (ELN)
HP Opaque Scrim 495 15.2 m (50 ft) 914 mm (36 in) Q1898C (AELN)
HP Everyday Blockout Display Film 265 15.2 m (50 ft) 914 mm (36 in) Q6620B (ELN)
HP Durable Banner with DuPont™
Tyvek®, 2 Pack
HP Fine Art Material
HP Professional Matte Canvas 392 15.2 m (50 ft) 610 mm (24 in) E4J59C (AELN)
140 22.9 m (75 ft) 914 mm (36 in) C2T53A (ELN)
1066 mm (42-in) C2T54A (ELN)
1270 mm (50 in) Y3Z19A (E)
1524 mm (60-in) Y3Z20A (ELN)
1066 mm (42-in) Q1899C (AELN)
1372 mm (54 in) Q1901C (LN)
1524 mm (60-in) Q1902C (ELN)
133 22.9 m (75 ft) 914 mm (36 in) C0F12A
1066 mm (42-in) C0F13A
1524 mm (60-in) C0F14A
914 mm (36 in) E4J60B (AELN)
52 Chapter 4 Handle the paper ENWW
Page 61

Table 4-3 Roll paper (continued)
Paper type g/m² Length Width Part numbers
1066 mm (42-in) E4J61B (AELN)
1117 mm (44 in) J3E86A (AELN)
1524 mm (60-in) J3E87B (AELN)
HP Artist Matte Canvas 390 15.2 m (50 ft) 610 mm (24 in) E4J54B
914 mm (36 in) E4J55B
1066 mm (42-in) E4J56B
1117 mm (44 in) E4J57A
1524 mm (60-in) E4J58B
HP Matte Litho-realistic Paper, 3-in
Core
269 30.5 m (100 ft) 610 mm (24 in) K6B77A
Non-recommended paper types
In many cases, paper types that HP does not support might be compatible with your printer. However, the
following paper types are unlikely to give satisfactory results:
●
Photo paper that swells
●
Brochure paper
914 mm (36 in) K6B78A
1117 mm (44 in) K6B80A
1524 mm (60-in) K6B82A
ENWW Non-recommended paper types 53
Page 62

54 Chapter 4 Handle the paper ENWW
Page 63

5 Handle the ink system
●
Ink system components
●
Ink system tips
●
Work with ink system components
●
Order ink supplies
ENWW 55
Page 64
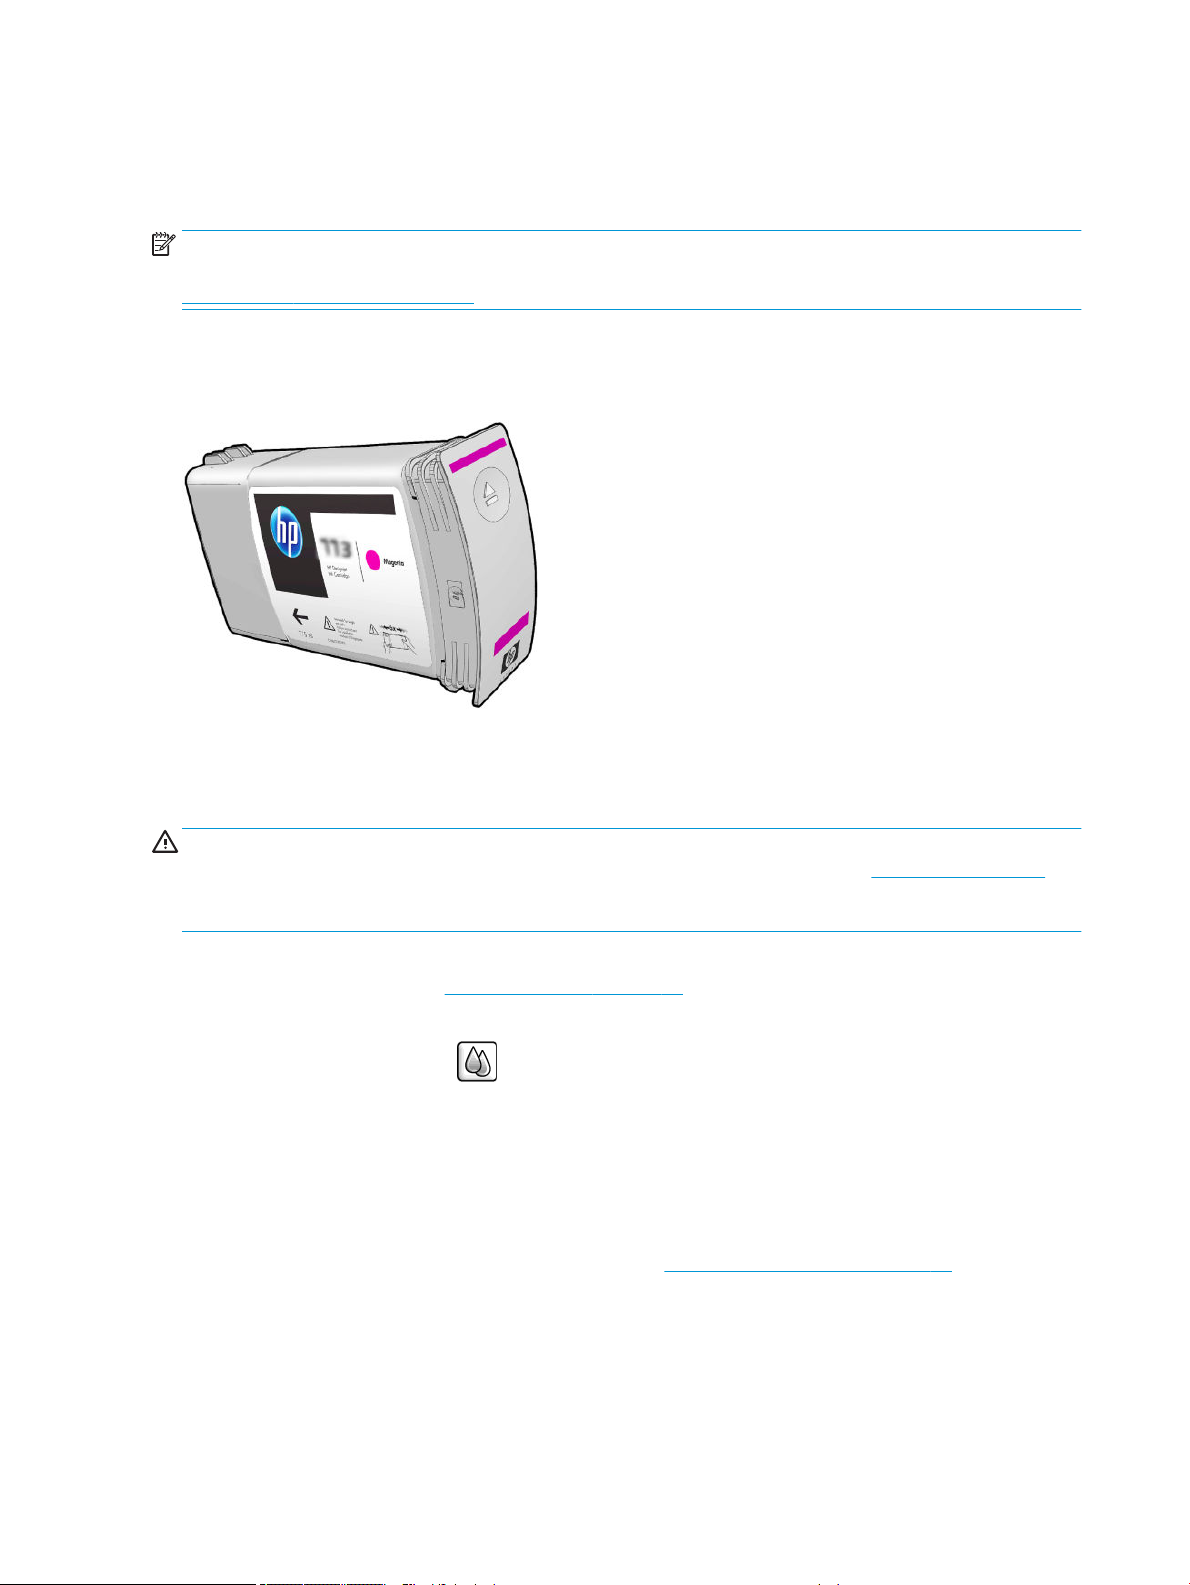
Ink system components
Ink cartridges
NOTE: Dynamic security enabled printer. Only intended to be used with cartridges using an HP original chip.
Cartridges using a non-HP chip may not work, and those that work today may not work in the future. More at:
www.hp.com/go/learnaboutsupplies.
The printer's ink cartridges provide ink to the printheads: - For the Z6810: matte black, chromatic red, magenta,
yellow, light magenta, cyan, photo black and light gray - For the Z6610: matte black, yellow, light magenta, cyan,
photo black and light gray
Ink cartridges require no maintenance or cleaning. When each ink cartridge is shaken vigorously before
installation, and inserted correctly into its slot, the ink will ow to the printheads. Because the printheads control
the amount of ink that is transferred to the page, high-quality printing results continue even when the ink levels
are getting low.
CAUTION: Avoid touching pins, leads, and circuitry when handling ink cartridges because these elements are
sensitive to electrostatic discharge. Such devices are called ESD-sensitive devices. See Glossary on page 219.
Electrostatic discharges are one of the main hazards to electronics products. This type of damage can reduce the
life expectancy of the device.
Each ink cartridge can be used only in a specic region of the world, as indicated by the letter A, B, or C after
“77X” on the cartridge label (see Order ink supplies on page 79). If you move the printer to a dierent region,
you can change the region of your printer once in the following way:
1.
At the front panel, select the icon.
2. Highlight Replace ink cartridges, but do not select it.
3. Press the Cancel key and the Down key at the same time, and hold them down for at least two seconds.
4. The front panel displays a series of warning messages. In response to each message, press the Cancel key
to cancel the process, or the OK key to conrm that you wish to continue.
5. The front panel prompts you to select your region: see Select the printer region on page 56.
If you change the region of the printer, of course you will need to install the correct ink cartridges for the new
region.
Select the printer region
1. The front panel prompts you to select the region where the printer is located:
56 Chapter 5 Handle the ink system ENWW
Page 65
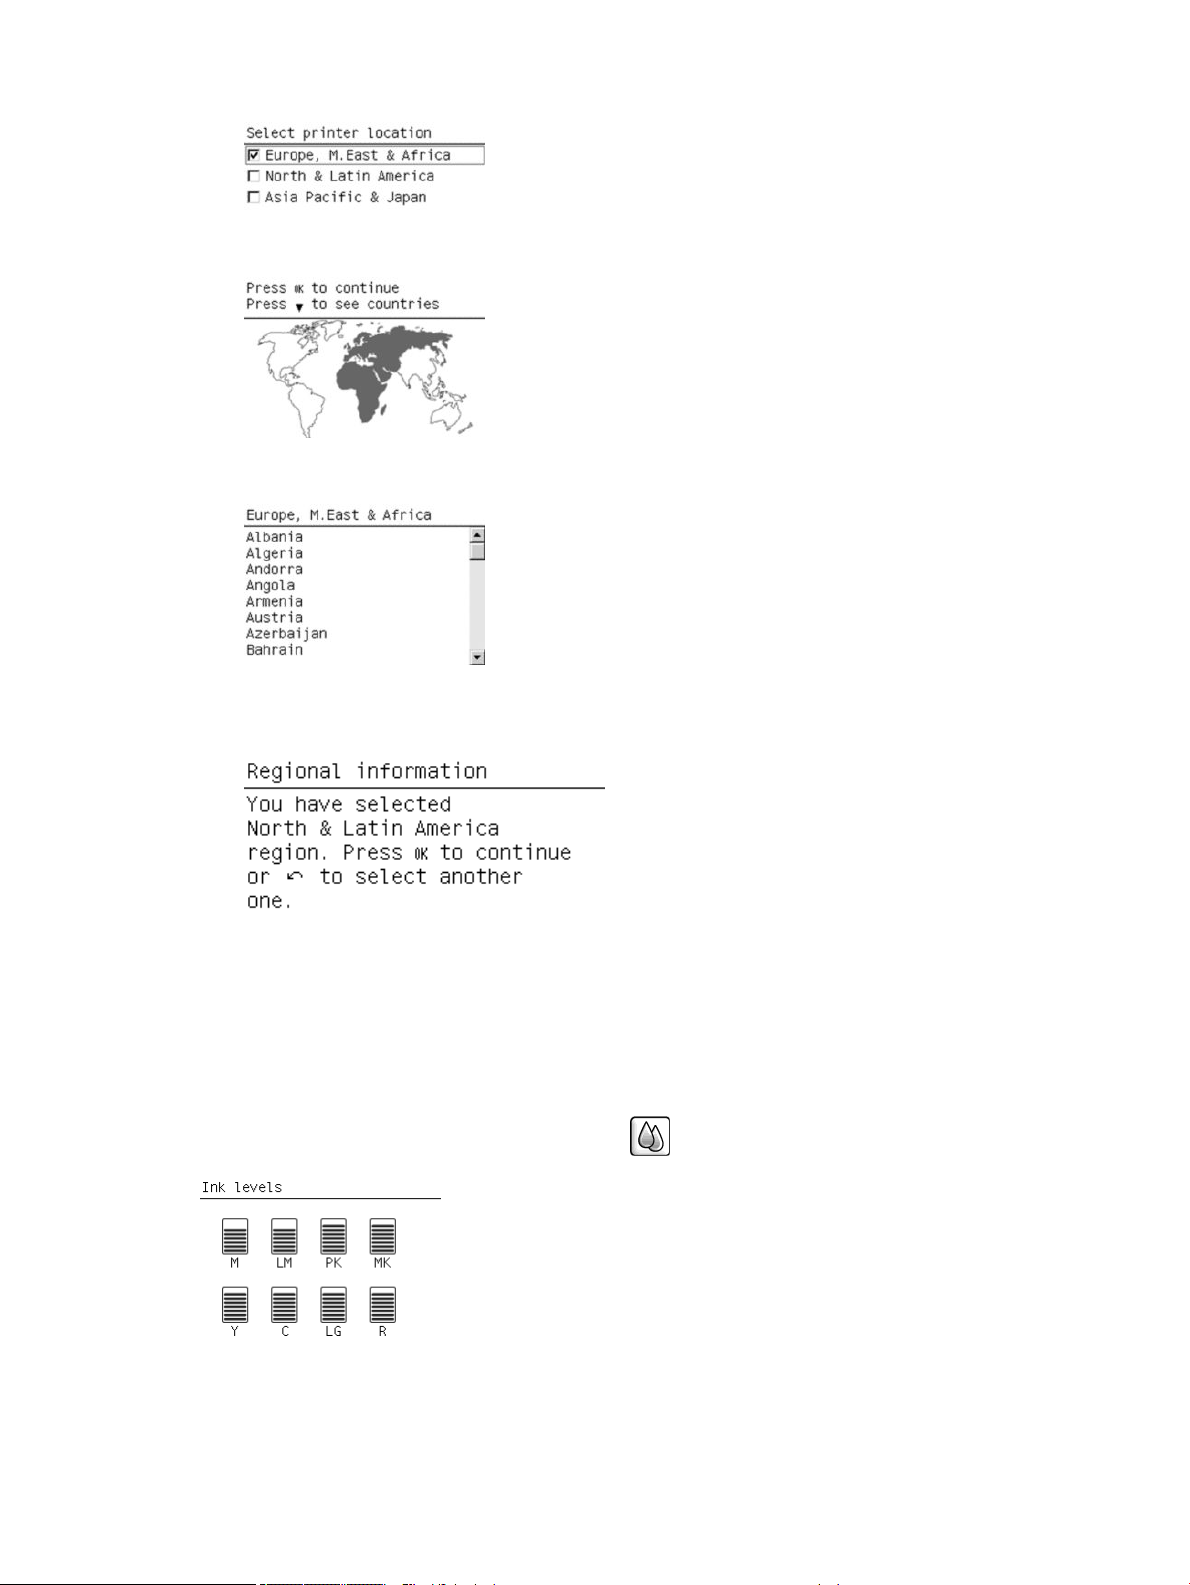
2. A map of the world is shown with the selected region emphasized.
3. To see a detailed list of the countries included in that region, press the down arrow.
Once you agree with the selection, you can press OK to continue.
4. At the end of the process, an information screen appears about the region selected.
5. If you press OK, the printer restarts.
Replace ink cartridges
To check the ink levels in the ink cartridges, select the icon, then View ink levels.
The front panel warns you when cartridge ink level is low. When a cartridge is empty, the printer stops printing
and the front panel provides an explanation.
ENWW Ink system components 57
Page 66

HP recommends that you replace the empty cartridge with a new HP cartridge. See Order ink supplies
on page 79, Remove an ink cartridge on page 60, and Insert an ink cartridge on page 62.
The use of relled or non-HP ink cartridges has several serious disadvantages:
●
There is some risk of damaging the printer. In this case the printer warranty will not be valid for any printer
repairs that are related to the cartridge, nor for any problems due to ink contamination.
●
You will invalidate the warranty of all printheads of the same color used in the printer subsequently, unless
and until the whole ink system (including ink tubes) is replaced.
●
Print quality may be impaired.
●
The printer will be unable to estimate the ink level in the cartridge, and will report it as empty.
To force the printer to accept cartridges that it believes to be empty, follow these instructions:
1. Install the cartridge in the printer (see Insert an ink cartridge on page 62).
2. The front panel will complain that the cartridge is empty, and the cartridge removal process will start. Press
the Cancel key to stop this automatic process.
3.
At the front panel, select the icon.
4. Highlight Replace ink cartridges, but do not select it.
5. Press the Cancel key and the Up key at the same time, and hold them down for at least two seconds.
6. The front panel displays a series of warning messages. In response to each message, press the Cancel key
When you have pressed OK in response to all warning messages, the front panel will give the usual ink cartridge
status display, but the cartridge will be shown as empty with a warning sign.
Safe mode
Under certain conditions, including printer operation outside of environmental specications, and when a used,
relled, or counterfeit ink cartridge has been detected, the printer will operate in ‘safe’ mode. HP is unable to
warrant the performance of the printing system when operated outside of environmental specications or when
a used, relled, or counterfeit ink cartridge is installed. Safe mode is designed to protect the printer and the
printheads from damage due to unexpected conditions, and is in operation when ! is displayed by the Embedded
Web Server. For optimal performance, use Original HP ink cartridges. HP DesignJet printing systems, including
Original HP inks and printhead, are designed and engineered together to provide uncompromising print quality,
consistency, performance, durability, and value—with every print.
NOTE: This printer is not designed to use continuous ink systems. To resume printing, remove the continuous
ink system and install genuine HP (or compatible) cartridges.
NOTE: This printer is designed for ink cartridges to be used until they are empty. Relling cartridges prior to
depletion might cause your printer to fail. If this happens, insert a new cartridge (either genuine HP or
compatible) to continue printing.
NOTE: Dynamic security enabled printer. Only intended to be used with cartridges using an HP original chip.
Cartridges using a non-HP chip may not work, and those that work today may not work in the future. More at:
www.hp.com/go/learnaboutsupplies.
to cancel the process, or the OK key to conrm that you wish to continue.
58 Chapter 5 Handle the ink system ENWW
Page 67
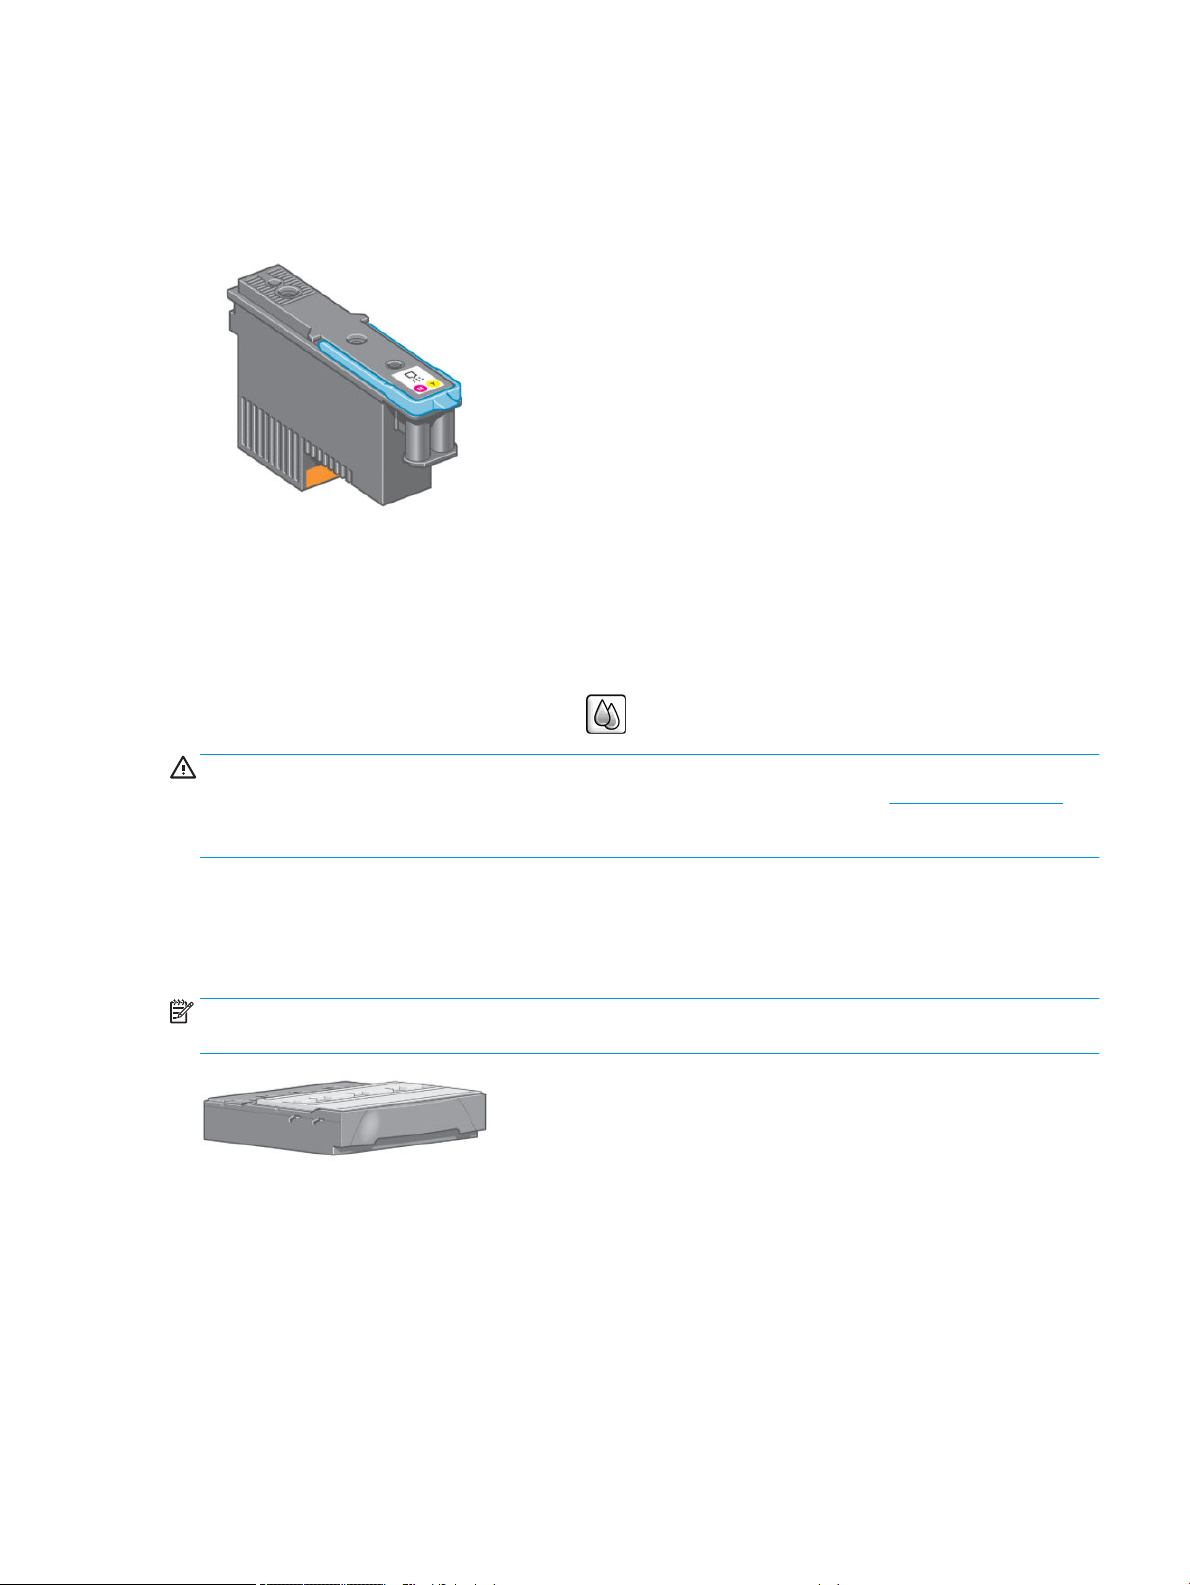
Printheads
The printheads are connected to the ink cartridges. They use jet action to put ink on the paper. Each printhead
has two ink-cartridge connection points and two sets of nozzles, which means that each printhead prints in two
dierent colors. For example, the printhead below prints in magenta and yellow.
The printheads are extremely durable and do not need to be replaced every time an ink cartridge is replaced.
They provide excellent results even when the ink cartridges contain a low level of ink.
To maintain optimum print quality, the printheads are automatically tested at regular intervals, and
automatically serviced when necessary. This takes a little time and can occasionally delay printing.
When a printhead eventually needs to be replaced, the front panel will display a message.
To check the status of the printheads, select the icon, then View printhead status.
CAUTION: Avoid touching pins, leads, and circuitry when handling ink cartridges because these elements are
sensitive to electrostatic discharge. Such devices are called ESD-sensitive devices. See Glossary on page 219.
Electrostatic discharges are one of the main hazards to electronics products. This type of damage can reduce the
life expectancy of the device.
Maintenance cartridge
Use the maintenance cartridge to clean and maintain the printheads, ensure the best possible print quality, and
seal the printheads when they are not in use to prevent them from drying out.
NOTE: The maintenance cartridge contains liquid. Therefore, store any maintenance cartridges upright and on
a at surface.
Ink system tips
For best results, always follow these guidelines:
●
Install the ink cartridges, printheads, and maintenance cartridge before the warranty end date.
●
Follow the instructions on the front panel during installation.
●
Allow the printer and the maintenance cartridge to clean the printheads automatically.
ENWW Ink system tips 59
Page 68
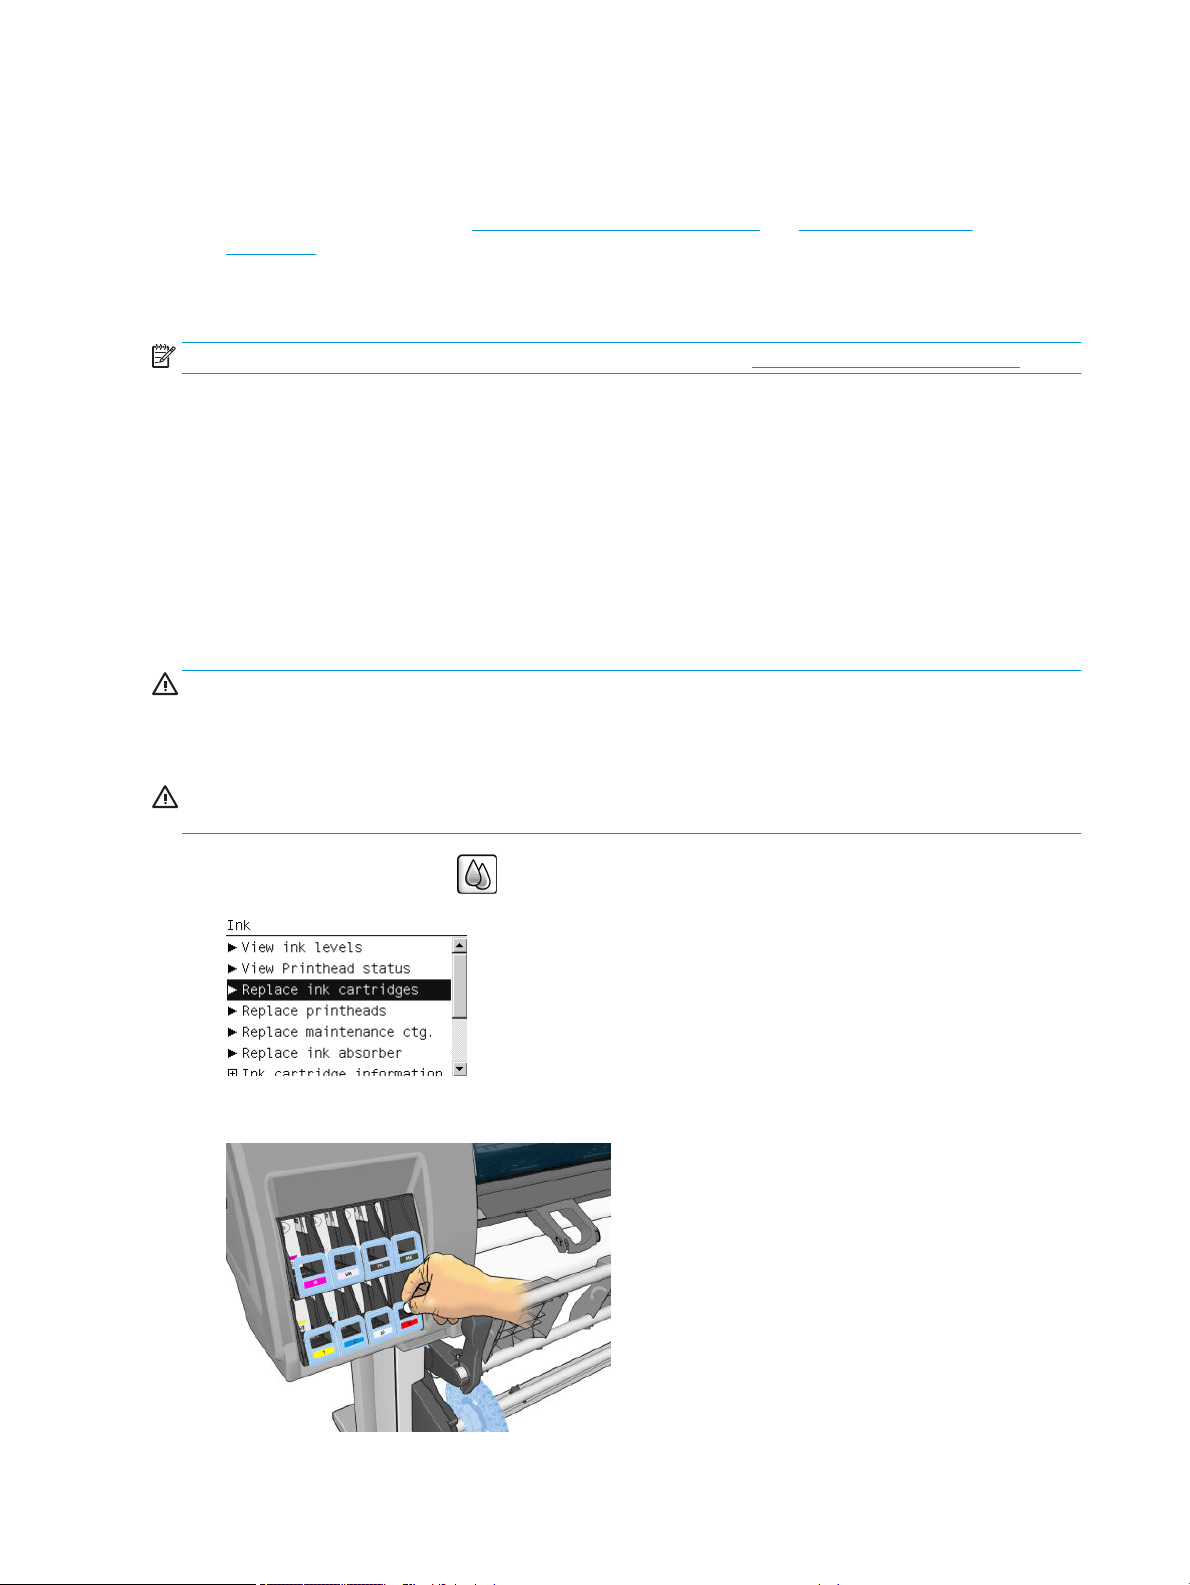
●
Avoid unnecessary removal of the ink cartridges and printheads.
●
The ink cartridges should never be removed while the printer is printing. They should be removed only
when the printer is ready for you to replace them. The front panel guides you through the removal and
installation procedures (or see Remove an ink cartridge on page 60 and Insert an ink cartridge
on page 62.
●
Make sure that you comply with all applicable laws and regulations when disposing of ink system
consumables.
NOTE: Shake the ink cartridges vigorously before installing them. See Insert an ink cartridge on page 62.
Work with ink system components
Remove an ink cartridge
Ink cartridges should be removed for the following two reasons:
●
The ink cartridge is very low and you want to replace it with a full cartridge for unattended printing. You can
use the remaining ink in the rst cartridge at a more convenient time.
●
The ink cartridge is empty or faulty, and you must replace it to continue printing.
CAUTION: The procedure to remove an ink cartridge must be initiated from the front panel. Do not remove an
ink cartridge until the front panel prompts you.
CAUTION: Remove an ink cartridge only if you are ready to insert another one.
WARNING! Make sure that the printer wheels are locked (the brake lever is pressed down) to prevent the
printer from moving.
1.
At the front panel, select the icon, then select Replace ink cartridges.
2. Grip the blue tab in front of the cartridge that you want to remove.
60 Chapter 5 Handle the ink system ENWW
Page 69
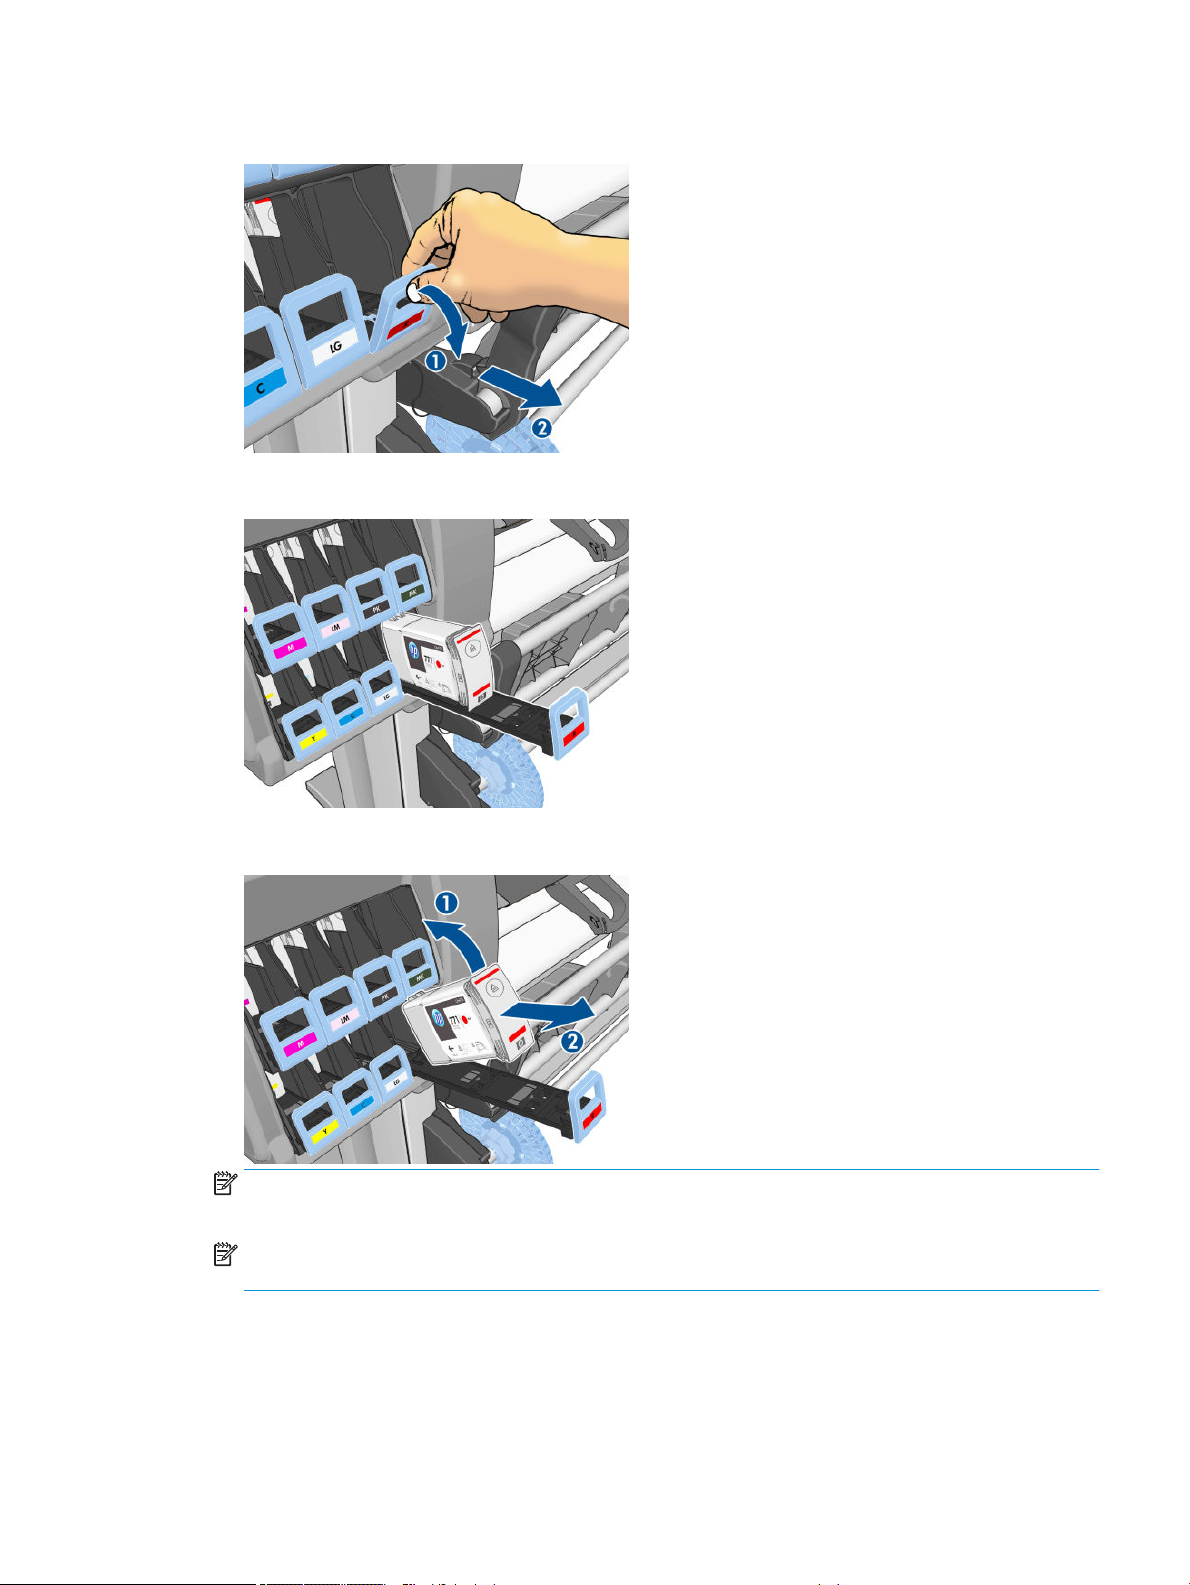
3. Pull the blue tab down and then pull it outwards, towards you.
4. The cartridge comes out, in its drawer.
5. Lift the cartridge out of its drawer.
NOTE: Avoid touching the end of the cartridge that is inserted into the printer, because the connection
might be coated with ink.
NOTE: If necessary, store a partially-used ink cartridge in the same position as if it were inserted in the
printer. Avoid using a partially-used cartridge that has been stored on its end.
ENWW Work with ink system components 61
Page 70
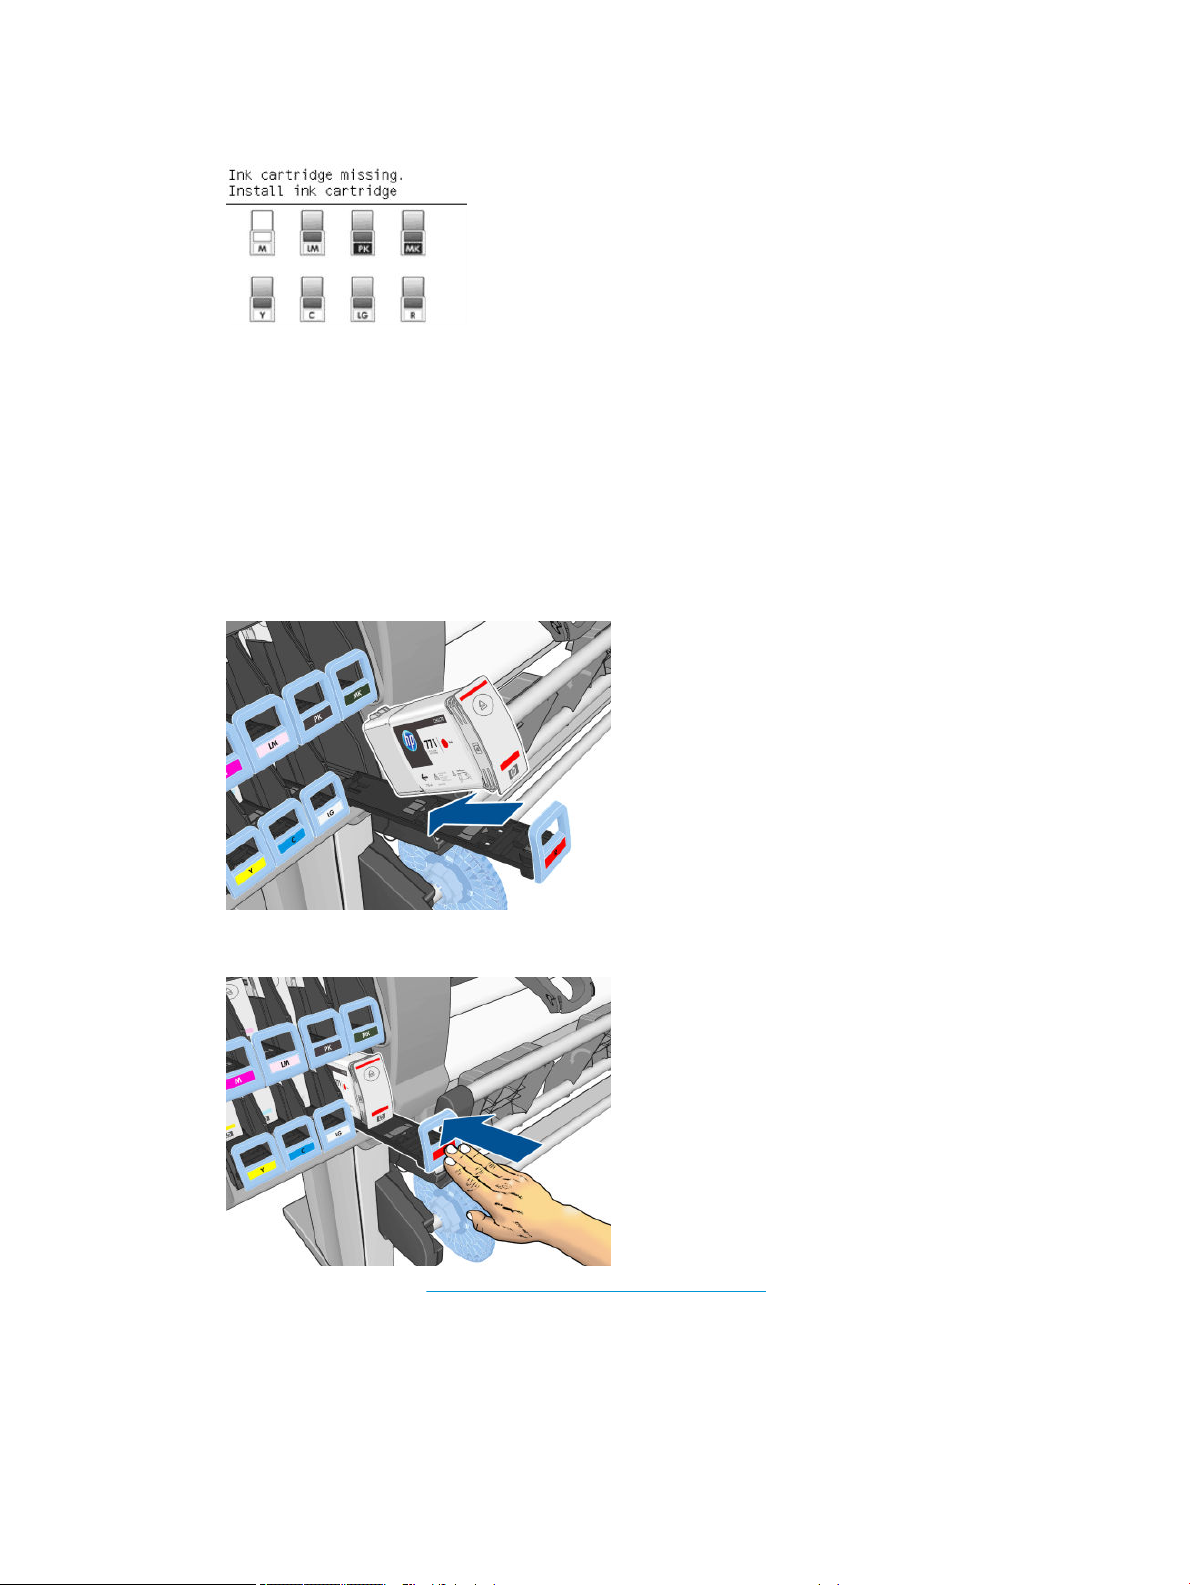
6. The front-panel display identies the missing ink cartridge.
Insert an ink cartridge
1. Pick up the new ink cartridge and nd the label that identies the ink color. Hold the ink cartridge so that
you can see the label at the top of the side that is facing you.
2. Check that the colored label above the empty slot in the printer matches the color of the label on the
cartridge.
3. Shake the cartridge vigorously for about 15 seconds.
4. Insert the ink cartridge into the cartridge drawer.
5. Slide the drawer and cartridge into the slot until they lock into position.
If you have diculty, see Cannot insert an ink cartridge on page 174.
62 Chapter 5 Handle the ink system ENWW
Page 71
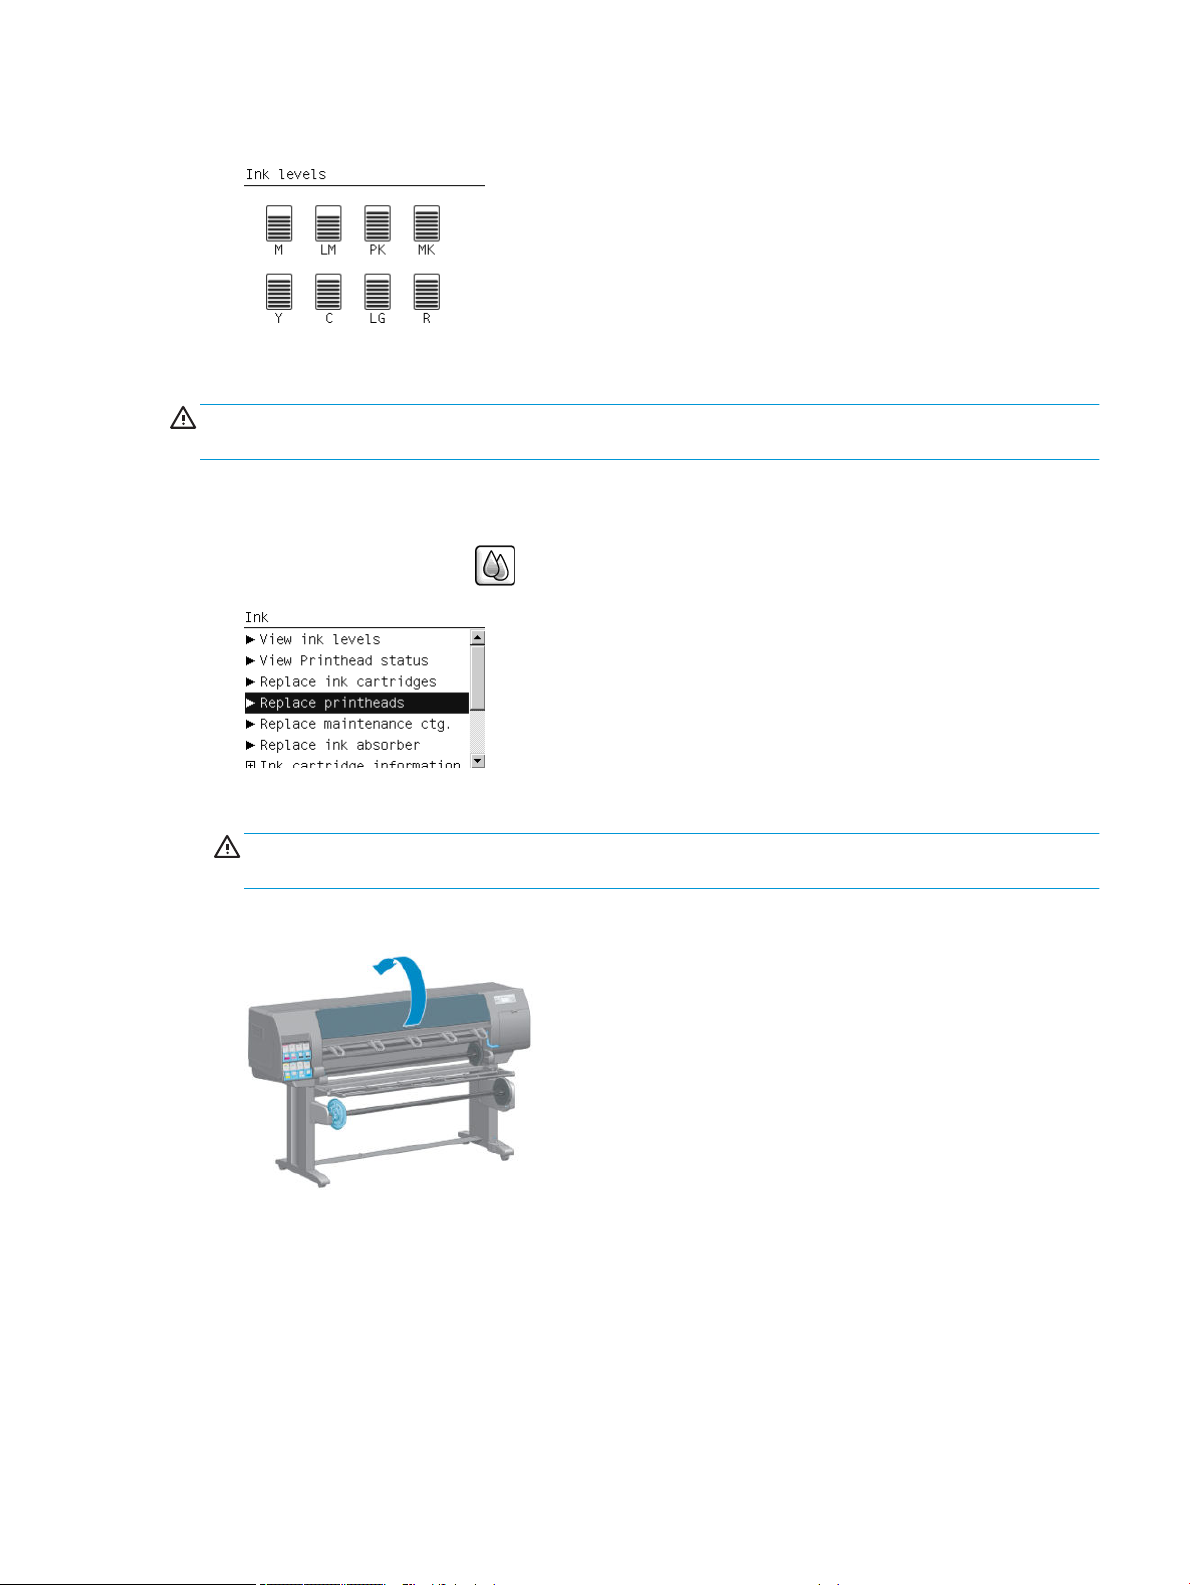
6. The front-panel display conrms that all cartridges have been correctly inserted.
Remove a printhead
WARNING! Make sure that the printer wheels are locked (the brake lever is pressed down) to prevent the
printer from moving.
Printhead replacement must be performed after the printer has been turned on with the hard power switch at
the back of the printer.
1.
At the front panel, select the icon, then select Replace printheads.
2. The printer moves the carriage into the correct position.
CAUTION: If the carriage remains in the removal position for more than 3 minutes without inserting or
removing any printheads, it will attempt to return back to its home position to the right.
3. When the carriage has stopped moving, the front panel prompts you to open the printer window.
ENWW Work with ink system components 63
Page 72
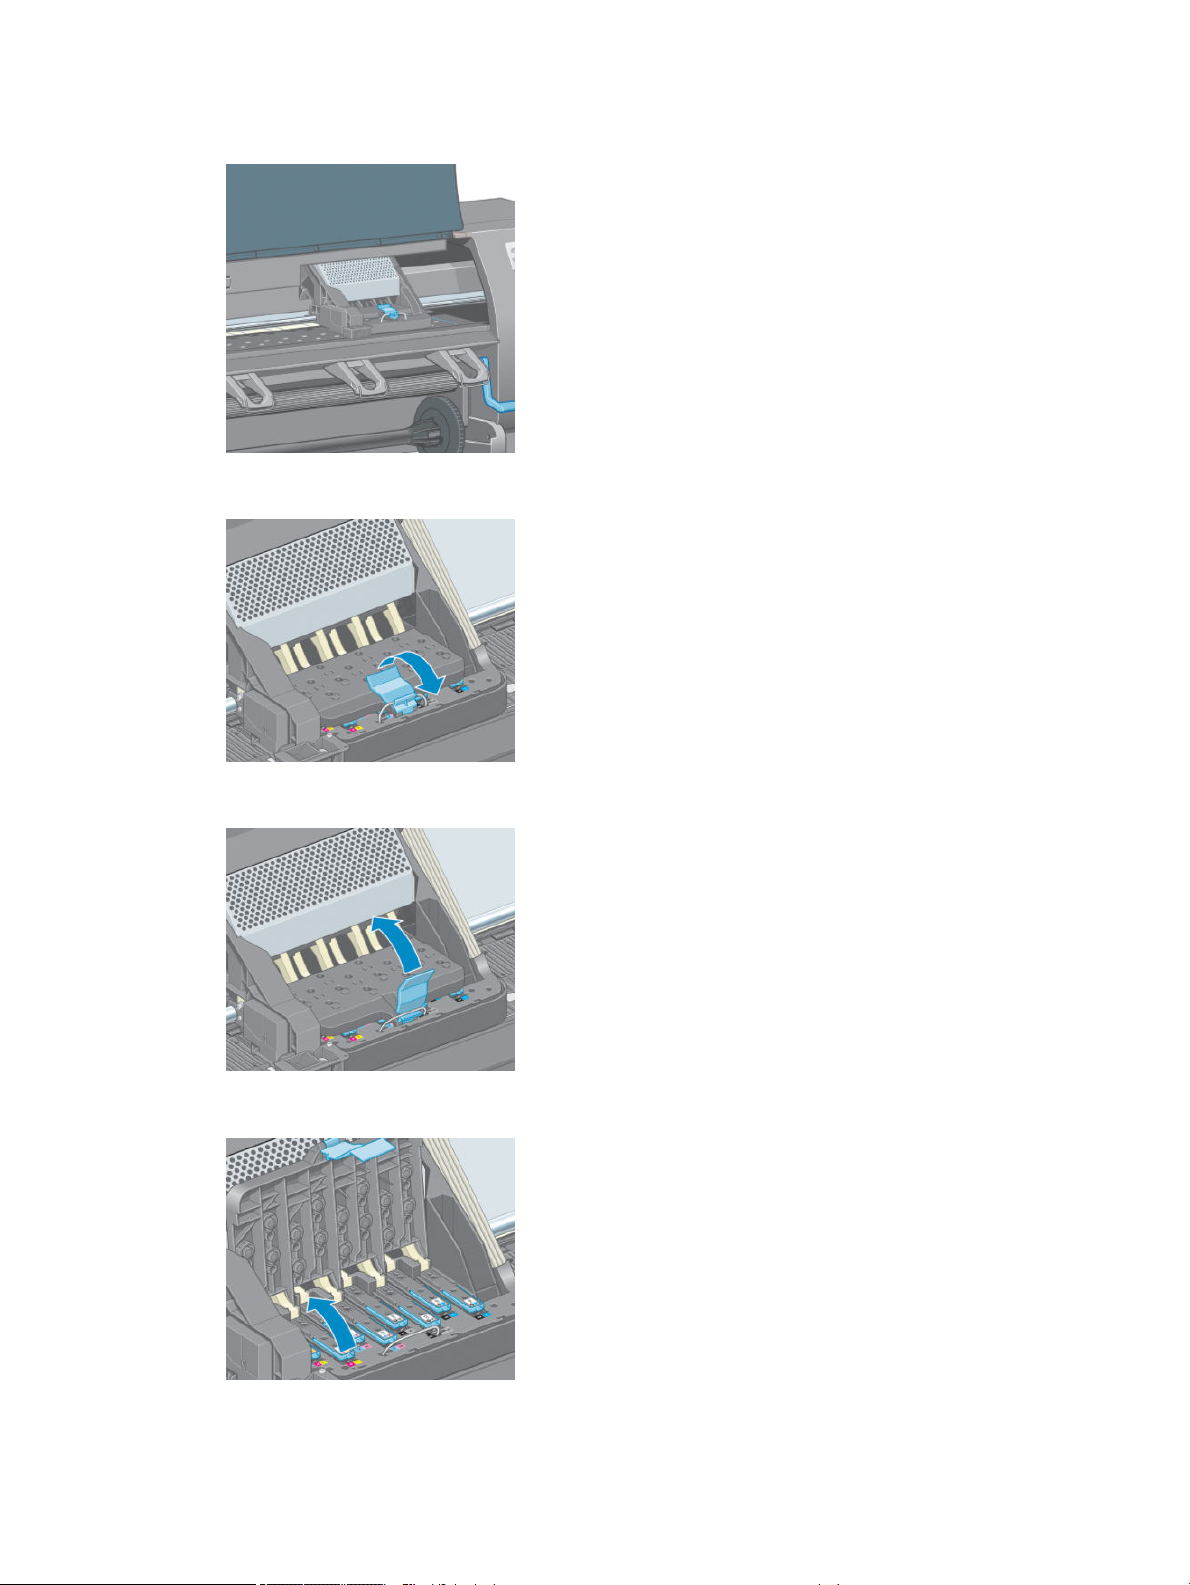
4. Locate the carriage on the right side of the printer.
5. Pull up and release the latch on top of the carriage.
6. Lift up the cover. This provides access to the printheads.
7. To remove a printhead, lift up the blue handle.
64 Chapter 5 Handle the ink system ENWW
Page 73
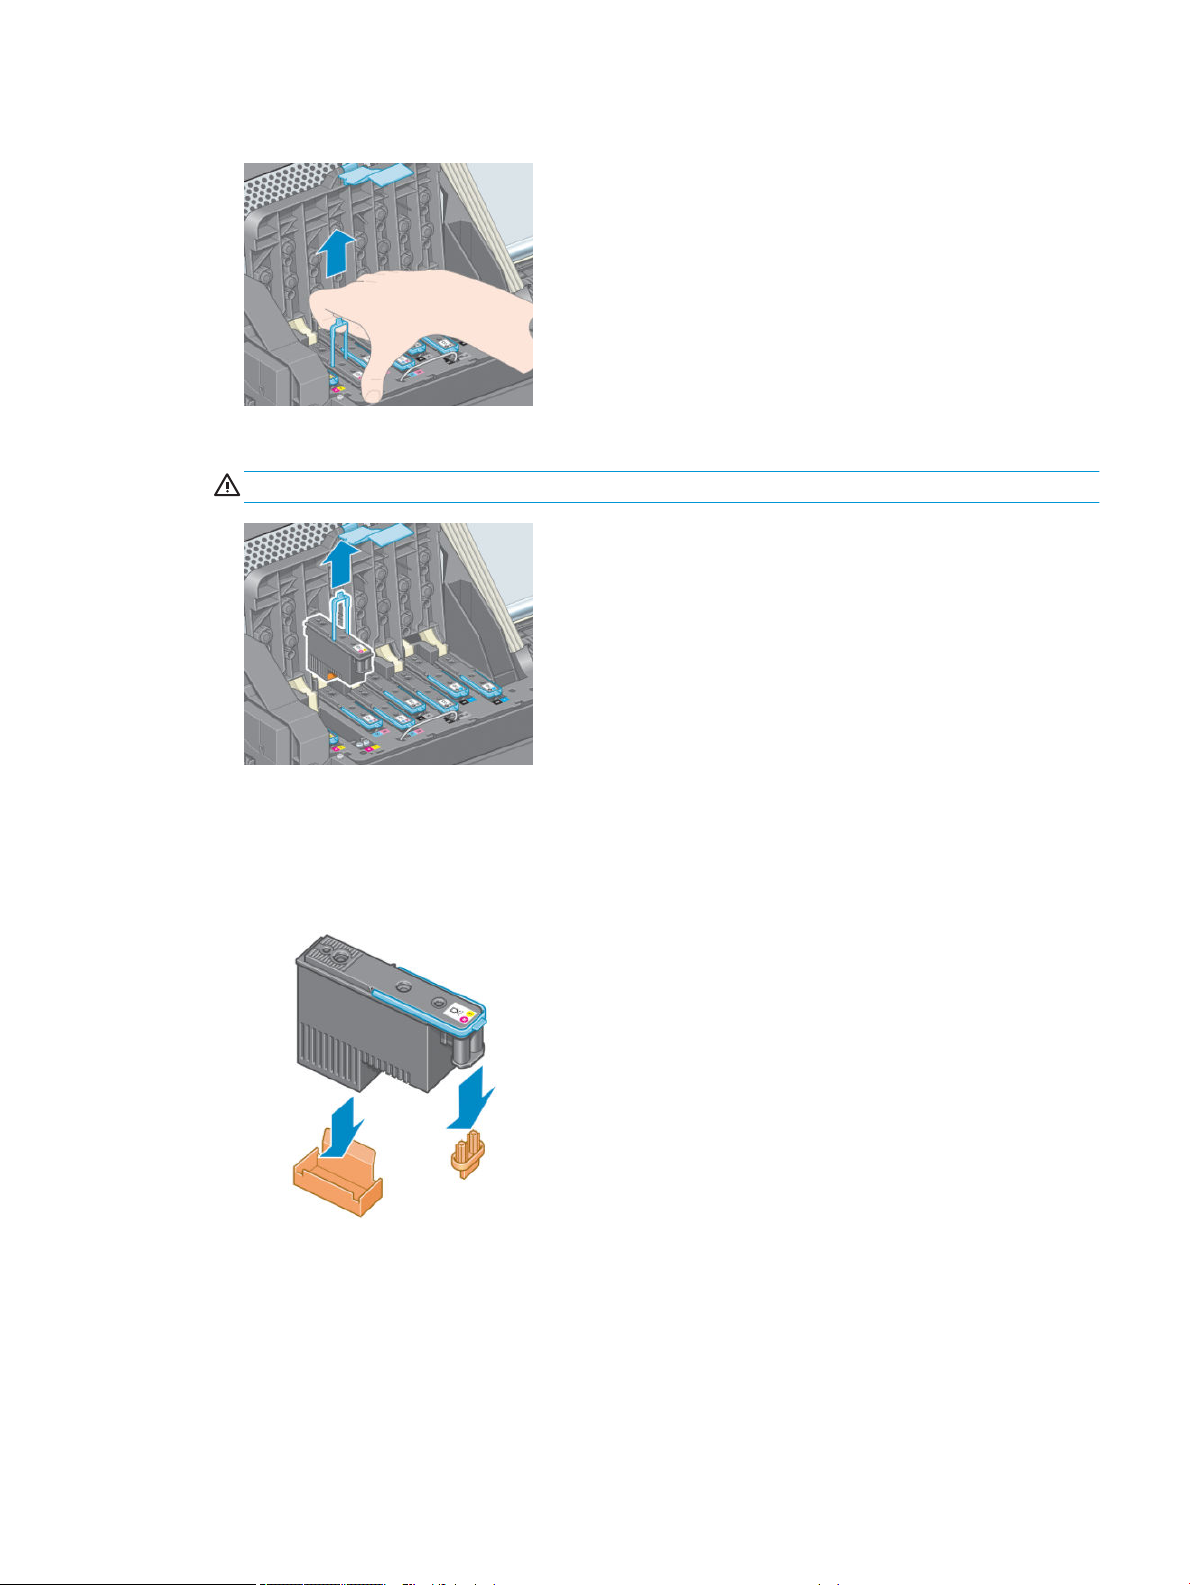
8. Using the blue handle, gently disengage the printhead.
9. Gently pull the blue handle upward until the printhead is released from the carriage.
CAUTION: Do not pull abruptly. That action can damage the printhead.
10. The front-panel display identies the missing printhead.
Insert a printhead
1. Remove the orange protective caps by pulling them down.
2. The printhead is designed to prevent you from accidentally inserting it into the wrong slot. Check that the
colored label on the printhead matches the colored label of the carriage slot into which the printhead is to
be inserted.
ENWW Work with ink system components 65
Page 74
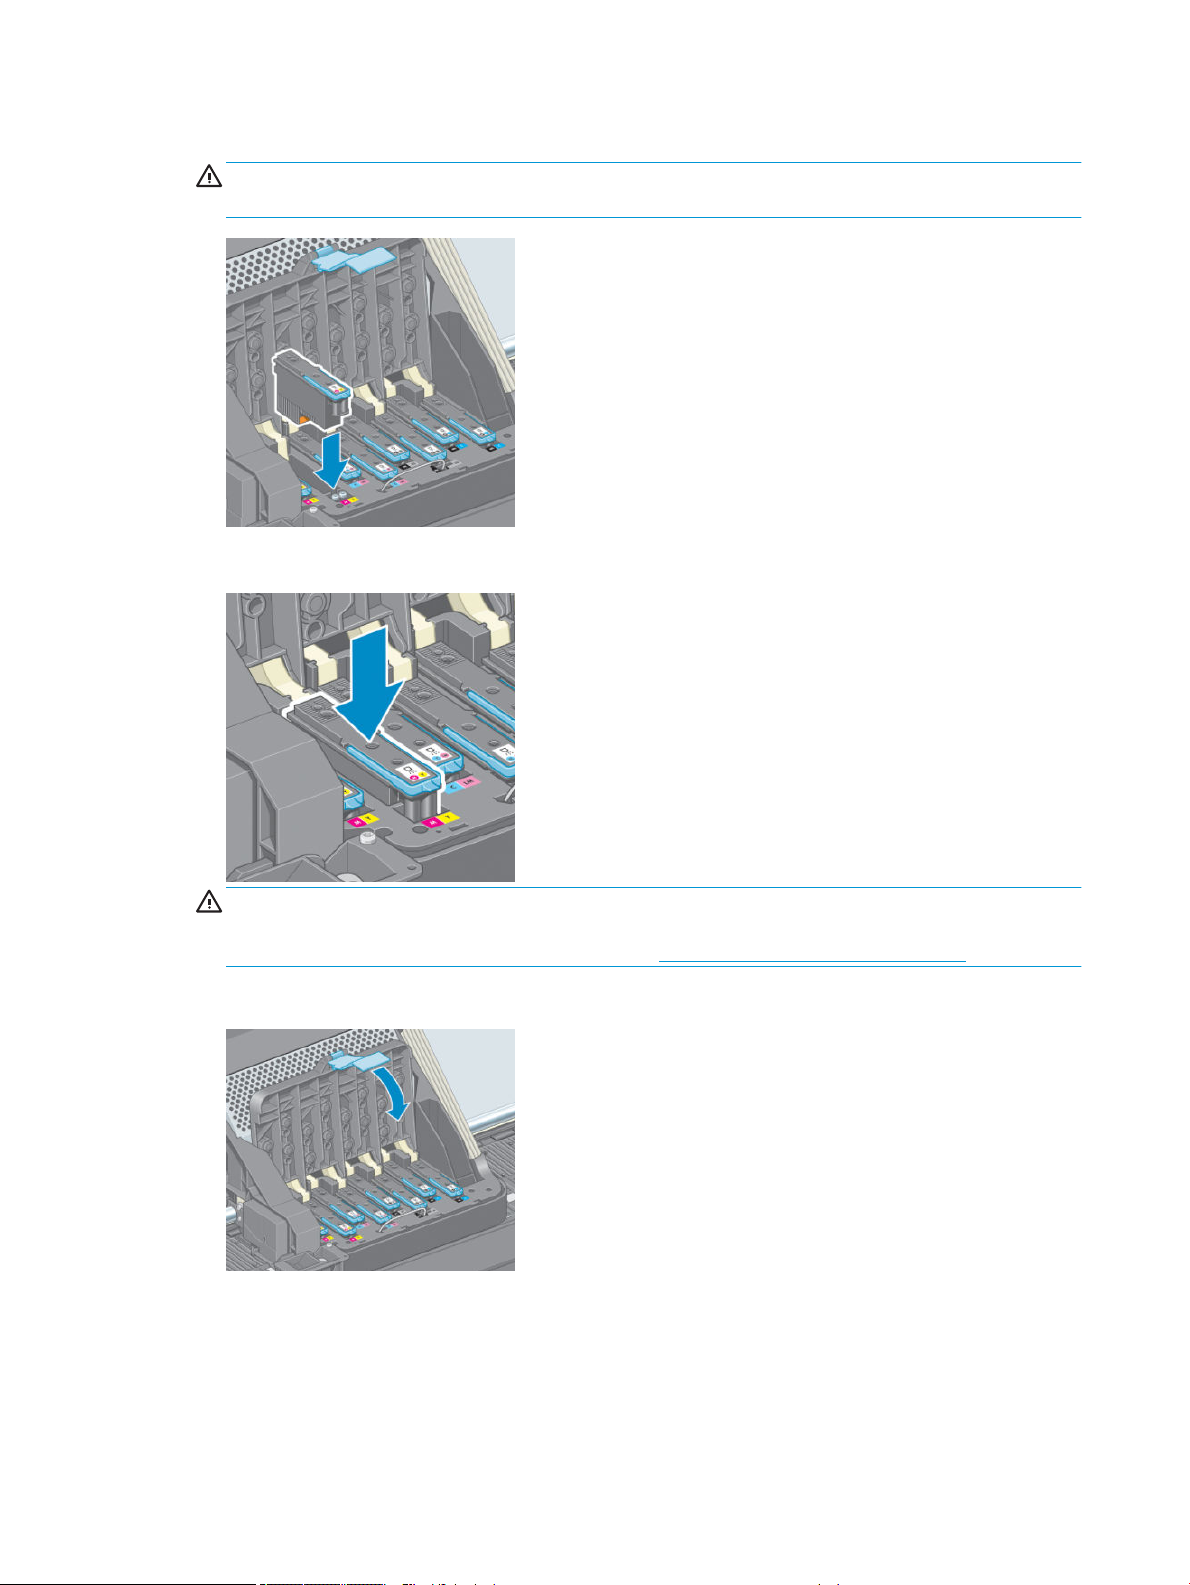
3. Insert the new printhead into its correct slot in the carriage.
CAUTION: Insert the printhead slowly and vertically, straight down. It can be damaged if you insert it too
quickly, or at an angle, or if you rotate it as you insert it.
4. Push down as indicated by the arrow.
CAUTION: You might feel some resistance when installing the new printhead, so you need to press it
down rmly but smoothly. You should hear a beep and see conrmation on the front-panel display that the
printhead has been inserted. If you have diculty, see Cannot insert a printhead on page 174.
5. Insert all of the other printheads that need to be installed, and close the carriage cover.
66 Chapter 5 Handle the ink system ENWW
Page 75
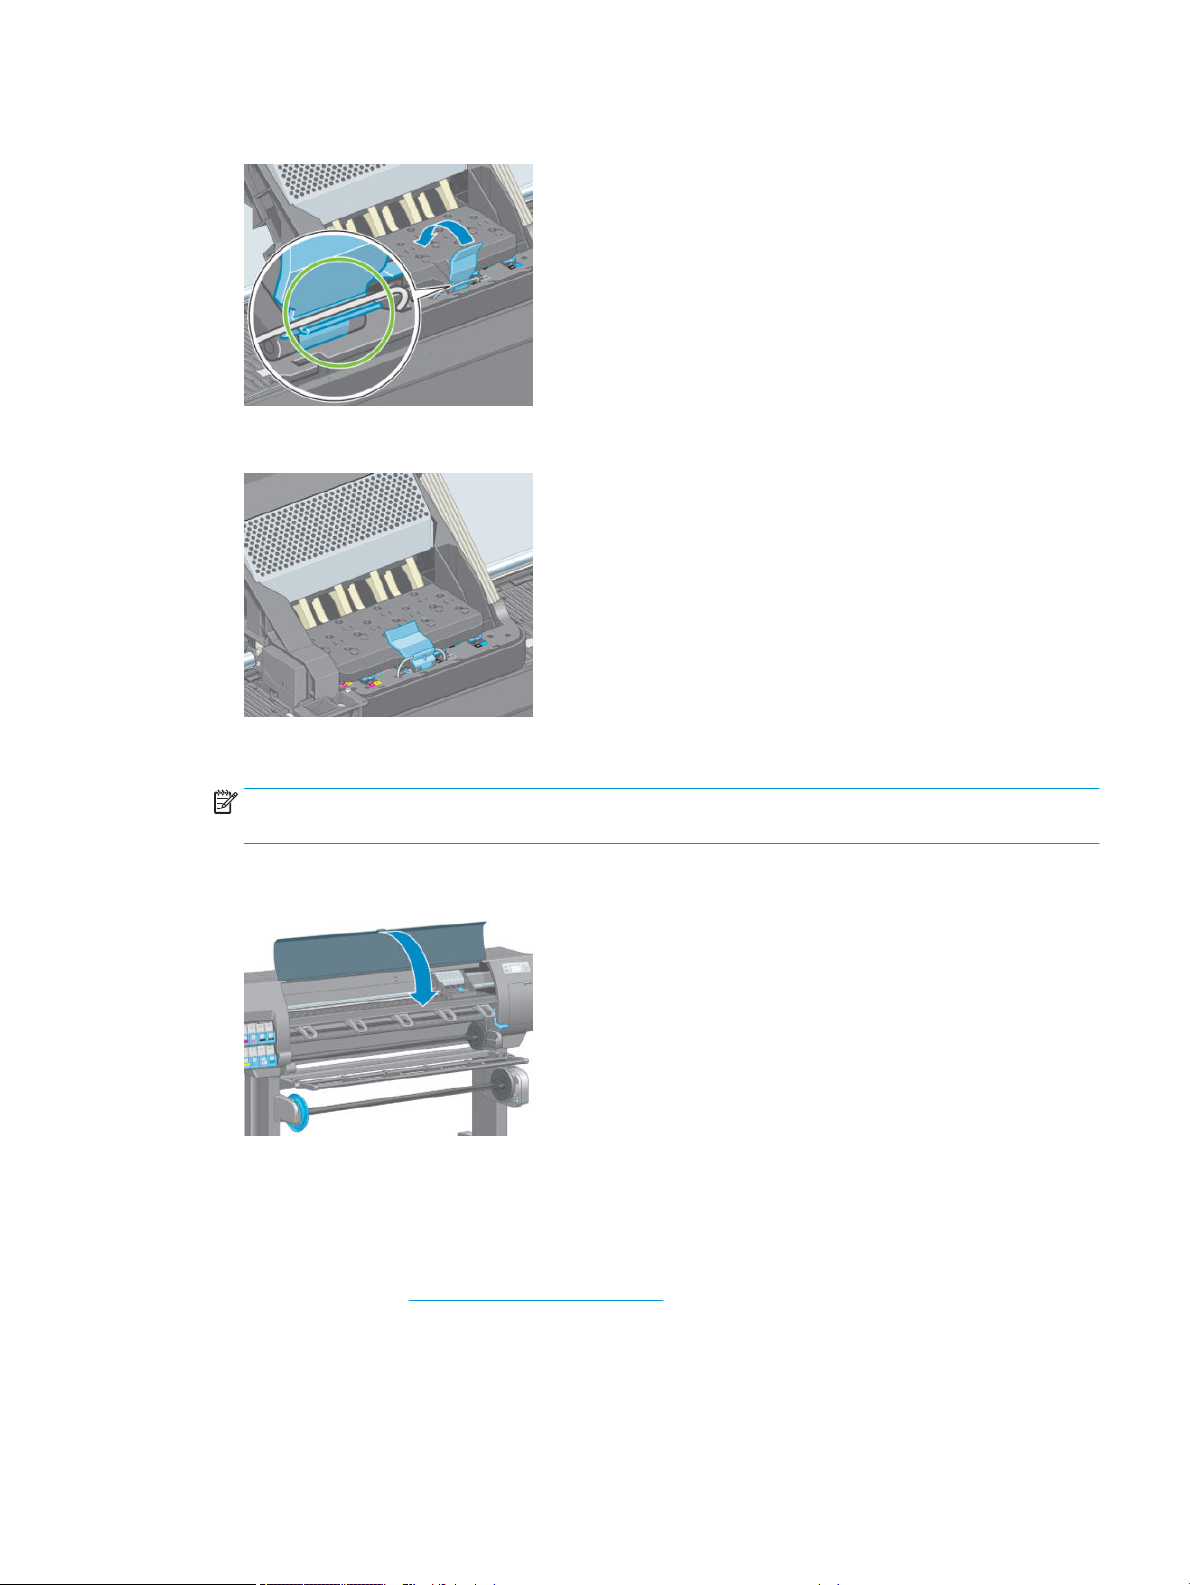
6. Make sure that the end of the blue handle catches the wire loop on the near side of the carriage.
7. Lower the handle to rest on the carriage cover.
When all of the printheads have been inserted correctly and the printer has accepted them, the printer
beeps.
NOTE: If the printer does not beep when you insert the printhead and the Replace message appears on
the front-panel display, you might need to reinsert the printhead.
8. Close the printer window.
9. The front-panel display conrms that all of the printheads are correctly inserted. The printer starts
checking and preparing the printheads. The default routine process, when all printheads are changed, takes
about 18 minutes. If the printer identies a problem when preparing the printheads, the process takes
longer, up to 30 minutes. For a single printhead insertion, the time varies between 10 and 20 minutes.
After all printheads are checked and prepared, the printhead realignment procedure runs automatically if
paper is loaded. See Align the printheads on page 71.
ENWW Work with ink system components 67
Page 76
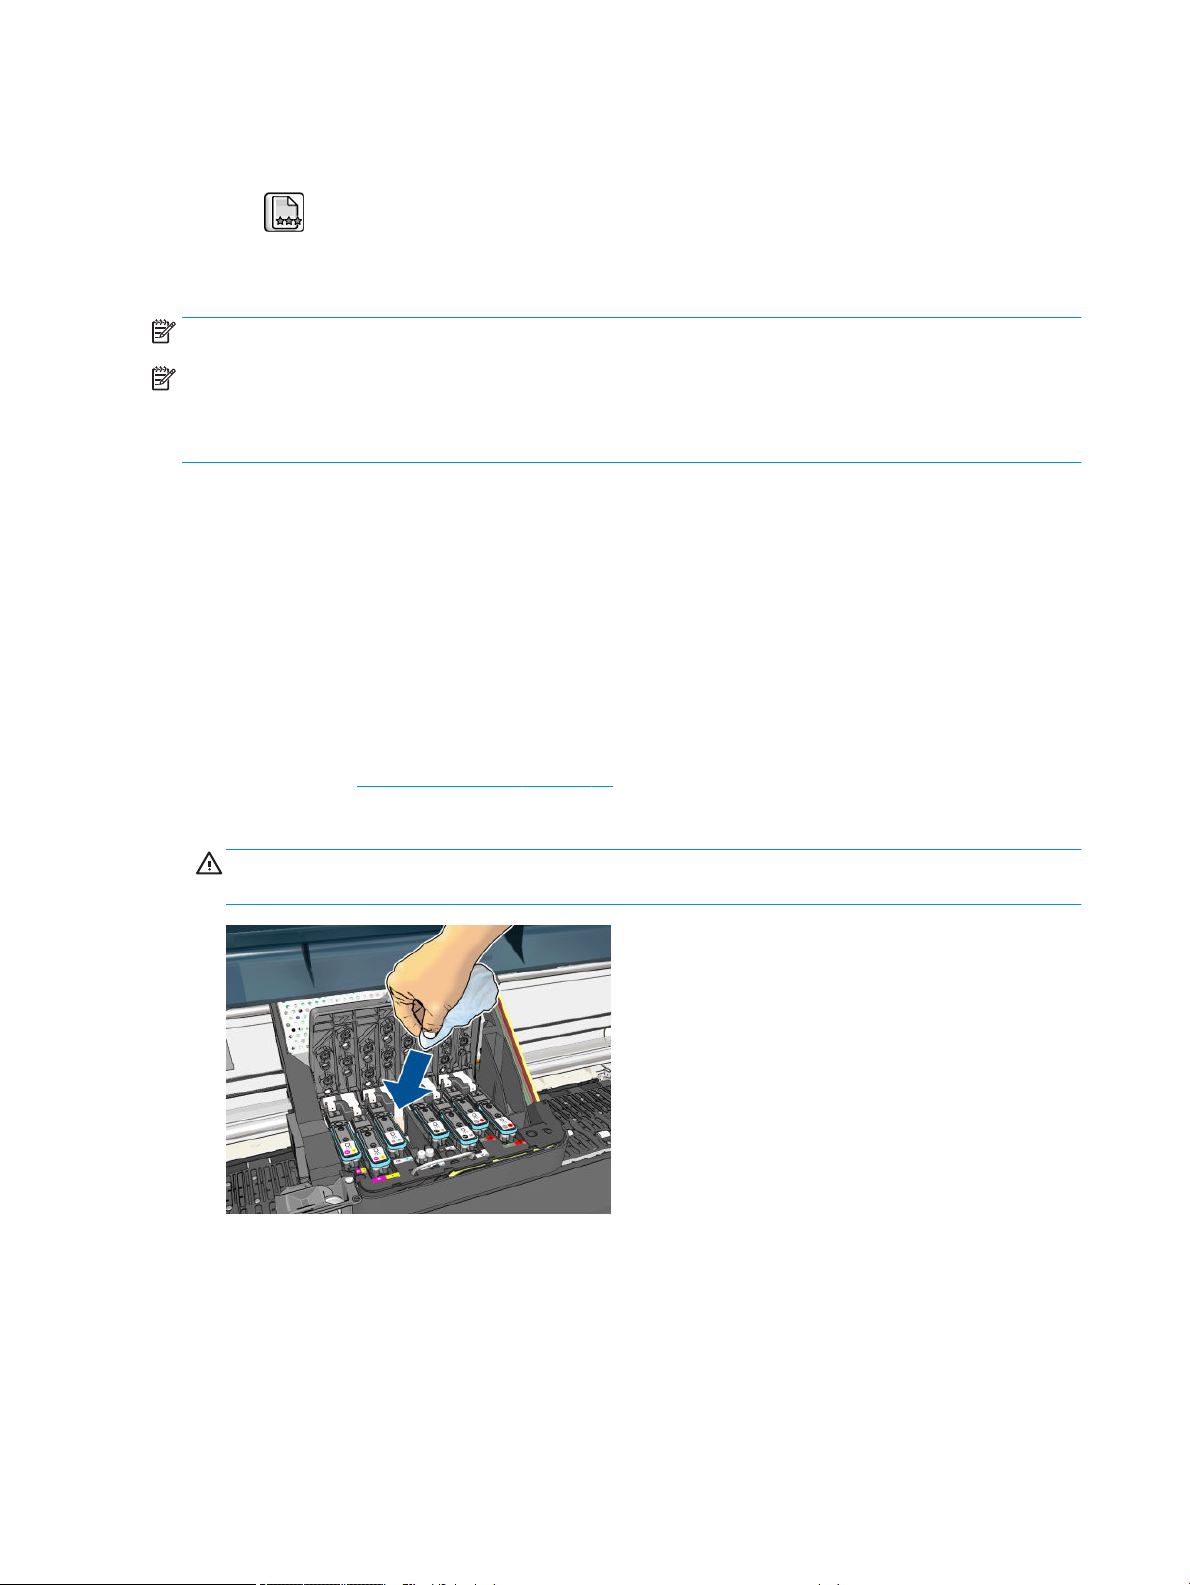
Clean (recover) the printheads
To clean the printheads (which often enables them to recover from problems), go to the printer's front panel and
select the icon, then select Clean printheads. Specify which printheads you would like to clean. You can
clean all of the printheads or only some of them.
Cleaning all printheads takes about 5 minutes. Cleaning any two printheads takes about 3 minutes.
NOTE: Cleaning all printheads uses more ink than cleaning a single pair.
NOTE: HP recommends that you purge the ink from the printheads before printing a job if the printer has been
turned o for more than six weeks or if you are experiencing inconsistent colors from print to print after long
storage periods. Purging the ink from the printheads helps to ensure maximum color consistency; it is not a
remedy for poor printhead health.
Clean the electrical connections on a printhead
It is possible that the printer will not recognize a printhead after it has been installed. This can happen when ink
builds up on the electrical connections between the printhead and the printhead carriage. Under these
circumstances, HP recommends that you clean the electrical connections on the printhead. However, routine
cleaning of the connections when no problems are apparent is not recommended.
Use an absorbent lint-free cloth, slightly dampened with isopropyl alcohol, to clean the electrical interconnects
on both the printhead carriage and the printhead if the Reseat or Replace message persists next to the printhead
on the front-panel display.
1. Open the printhead carriage latch and extract the printhead that is causing the problem, as indicated on the
front panel. See Remove a printhead on page 63.
2. Cover your nger with the cloth and insert it into the printhead slot at the back.
CAUTION: If the carriage remains in the central part of the printer for more than 7 minutes, it attempts to
return to its home position to the right.
68 Chapter 5 Handle the ink system ENWW
Page 77
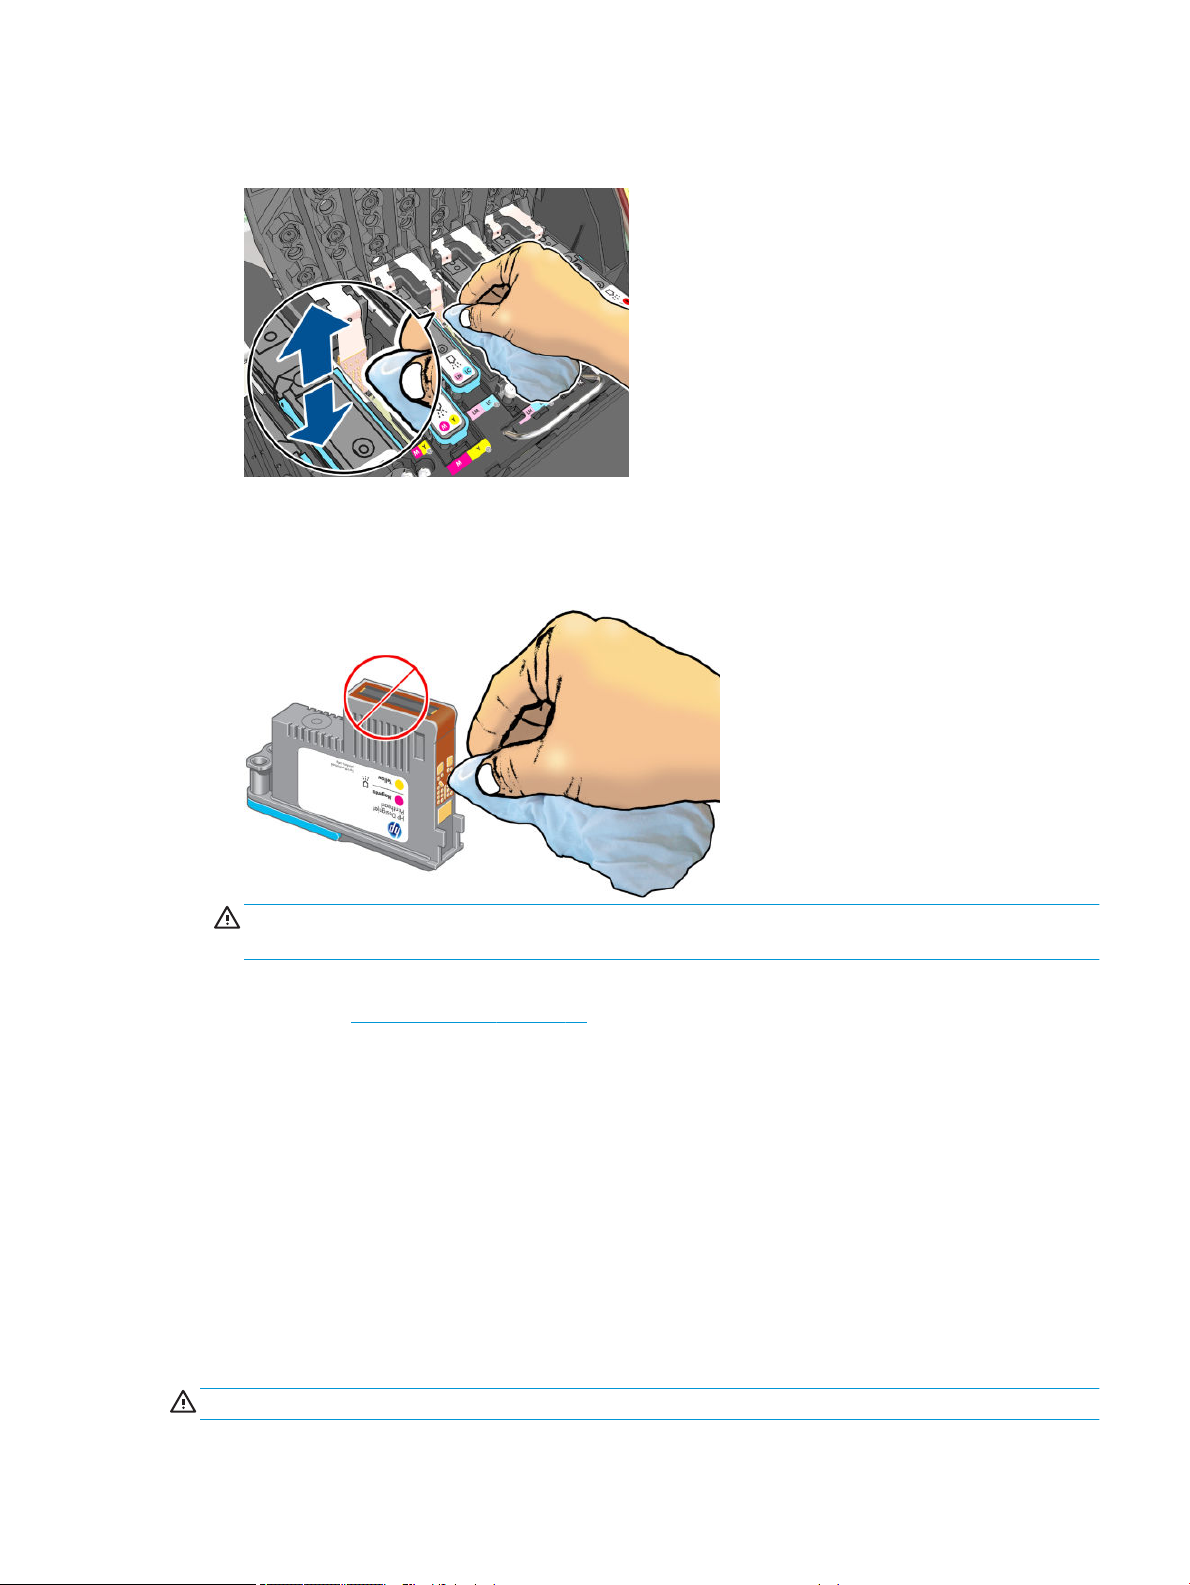
3. Rub the cloth against the electrical contacts with a light force along the entire depth of the ex connector.
Try to avoid picking up any ink deposit that may have accumulated on the bottom surface of the slot.
4. Take special care to clean all contacts thoroughly, including the ones at the lowest point of the connector.
5. Using the same cloth, clean the strip of electrical contacts on the printhead (unless the printhead is new).
Avoid touching the printhead nozzles.
CAUTION: Do not touch the surface of the printhead that contains the nozzles, because the nozzles are
easily damaged.
6. After waiting a few moments to allow both connectors to dry, replace the printhead into the printhead
carriage. See Insert a printhead on page 65.
7. Wash or dispose of the cloth. Take care to prevent the transfer of ink onto hands and clothing.
If the front panel continues to show the Reseat or Replace message, replace the printhead or contact your
HP customer service representative.
Clean the printhead drop detector
The printhead drop detector is a sensor that detects which nozzles on the printheads are not printing, so that
other nozzles can substitute for them. If particles block the sensor (such as bers, hair or small pieces of paper),
print quality is aected.
When the front panel displays a warning message that the drop detector needs cleaning, you are recommended
to clean it. If you do not clean it immediately, the printer continues working normally, but the front panel display
continues to show the warning.
CAUTION: Wear gloves to avoid getting ink on your hands.
ENWW Work with ink system components 69
Page 78
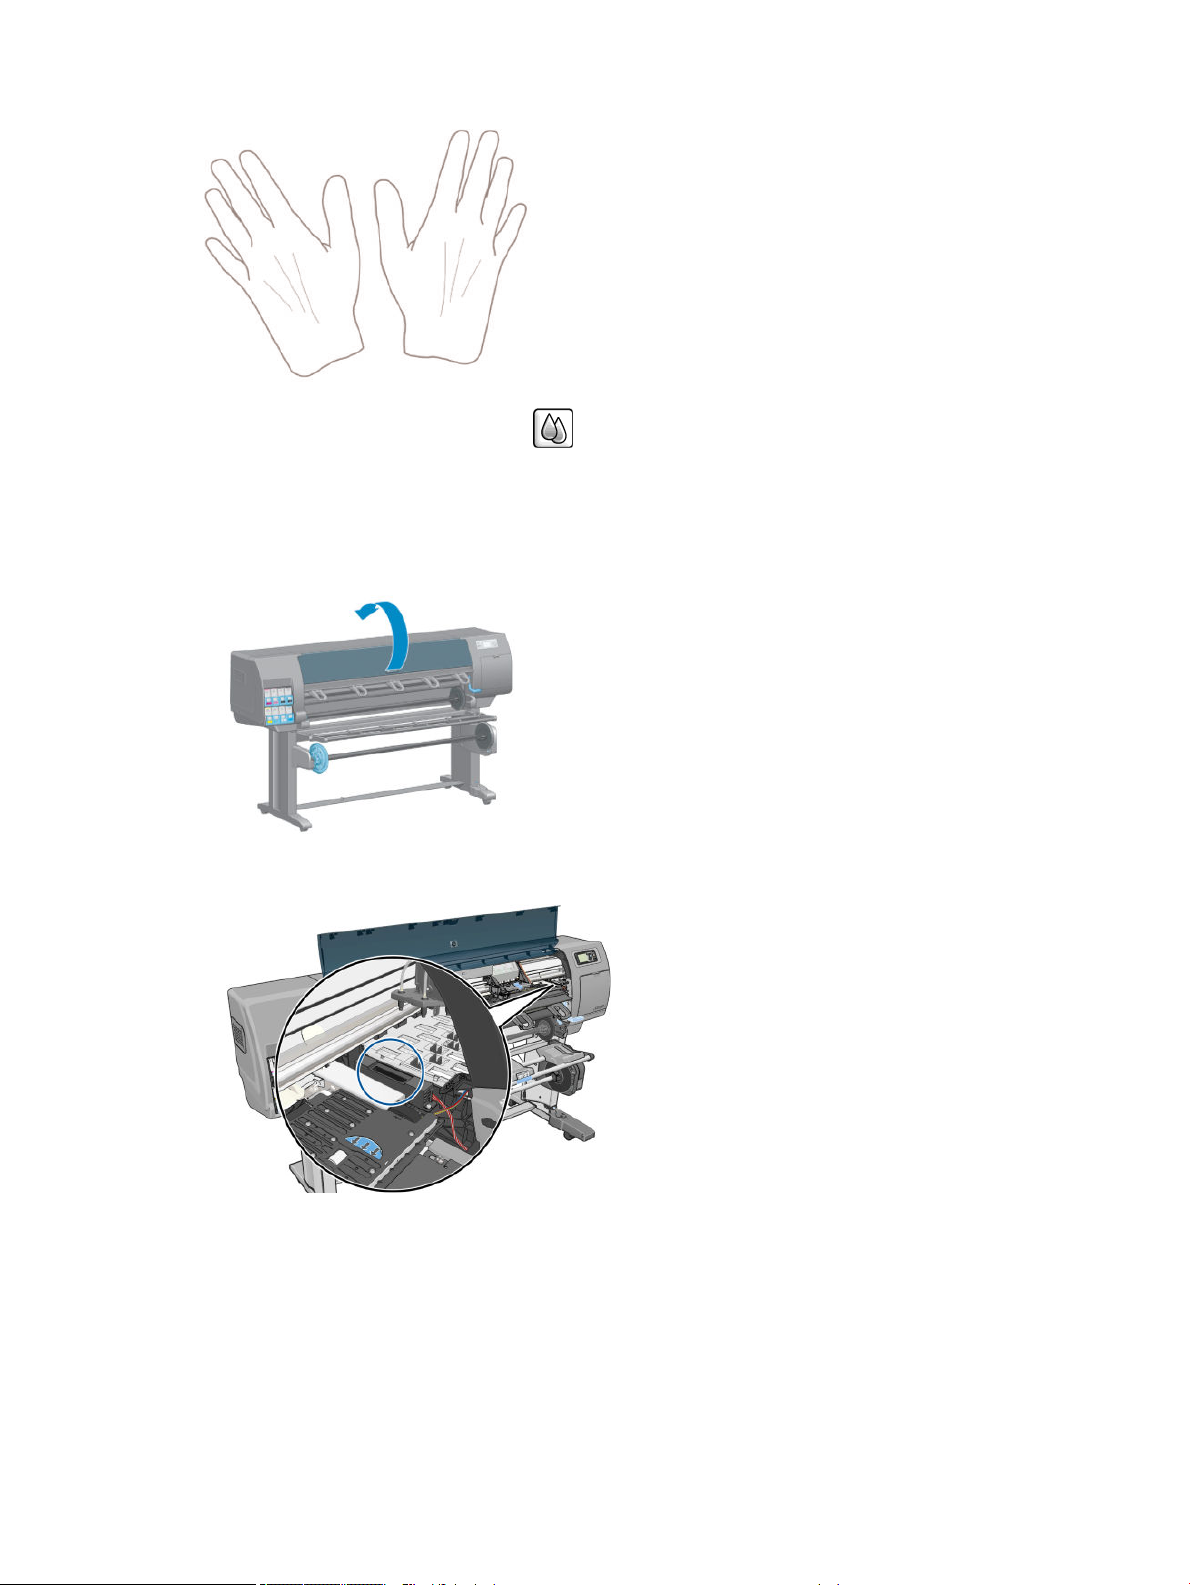
1.
On the printer's front panel, select the icon, then select Replace printheads.
2. Turn o the printer at the front panel.
3. To avoid an electric shock, switch the printer o and unplug it.
4. Open the printer window.
5. Find the printhead drop detector to the right of the printhead carriage.
6. Remove any debris blocking the printhead drop detector.
70 Chapter 5 Handle the ink system ENWW
Page 79
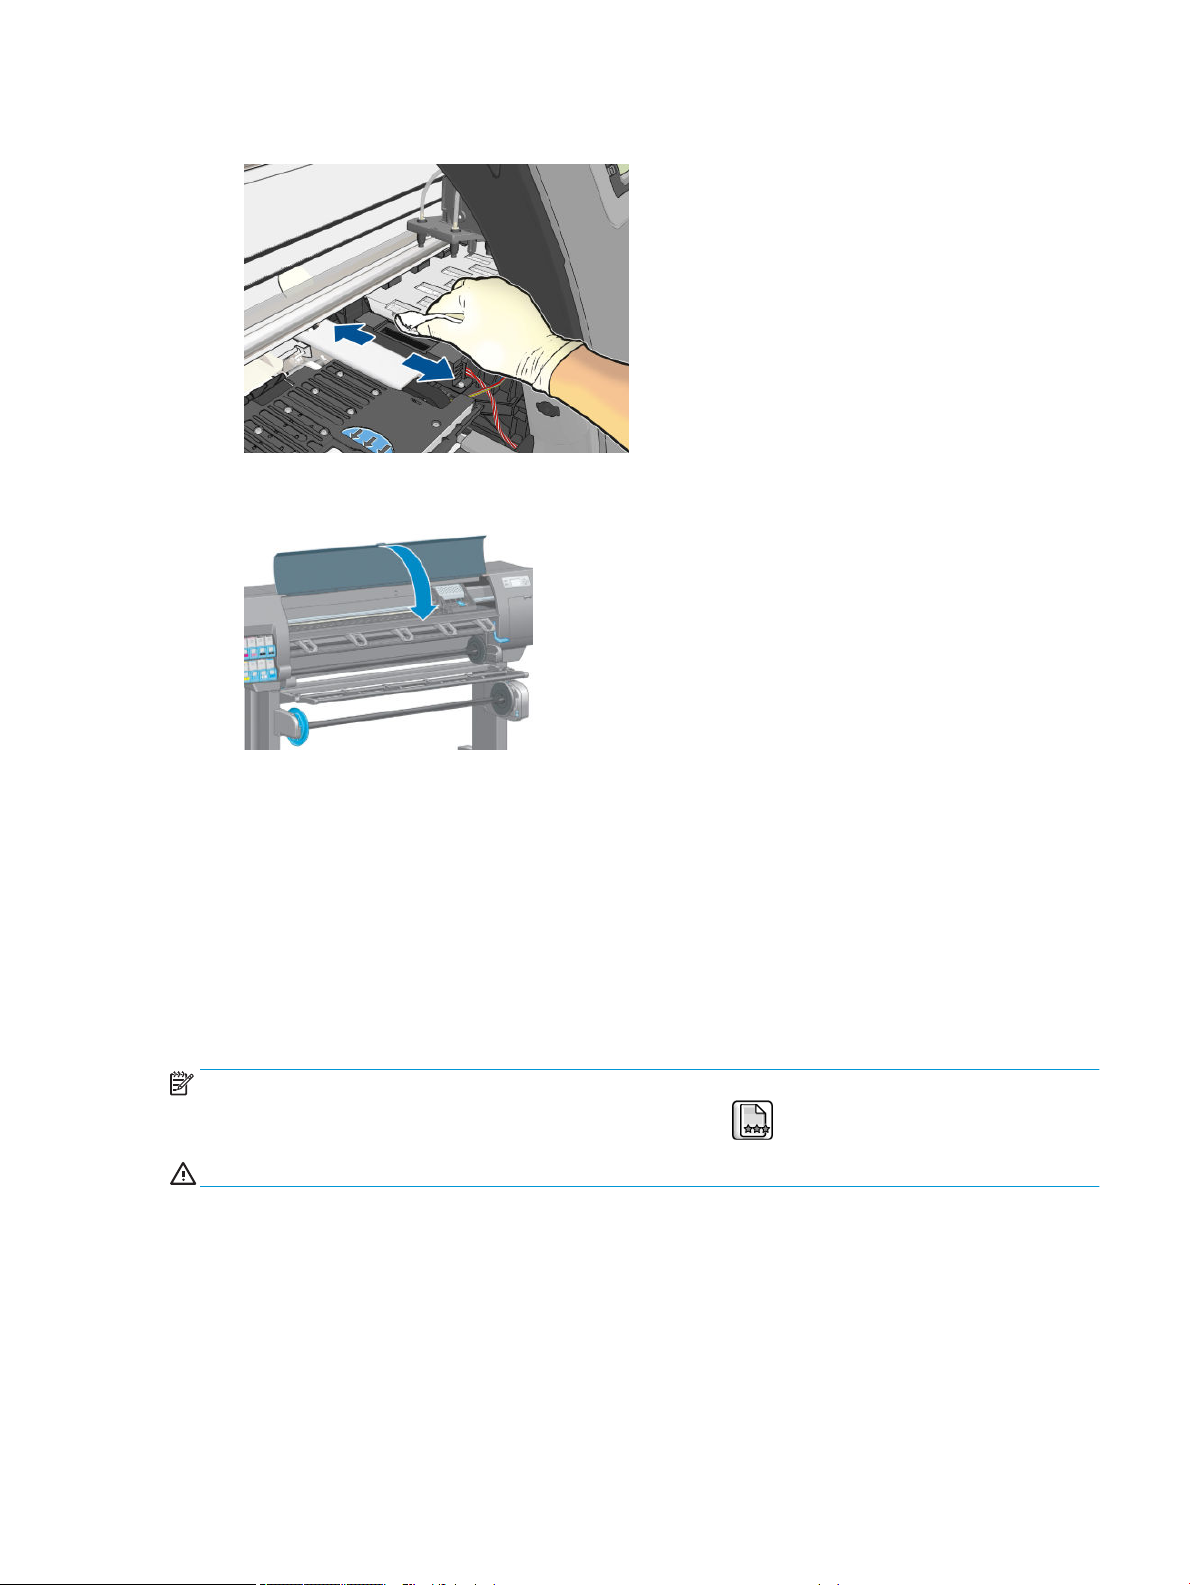
7. With a dry, lint-free cloth, wipe the surface of the drop detector to remove any non-visible debris.
8. Close the printer window.
9. Plug in and switch on the printer.
10. Power the printer on at the front panel.
Align the printheads
Precise alignment between printheads is essential for accurate colors, smooth color transitions and sharp edges
in graphical elements. Your printer has an automatic printhead alignment process which runs whenever a
printhead has been accessed or replaced.
If the paper has jammed or you are experiencing problems with color accuracy, you may need to align the
printheads.
NOTE: If the paper has jammed, it is recommended that you reinsert the printheads and initiate the
realignment procedure from the Image Quality Maintenance menu .
CAUTION: Do not use transparent or semi-transparent paper to align the printheads.
Reinsert printheads procedure
1. If the realignment process is running and the wrong paper is loaded, press the Cancel key on the front
panel.
ENWW Work with ink system components 71
Page 80

CAUTION: Do not print if the realignment process has been canceled. You can restart the alignment with
the Image Quality Maintenance menu procedure.
2. Load the paper you wish to use, see Handle the paper on page 25. It should be at least 457.2 mm (18 in)
wide.
CAUTION: Do not use transparent or semi-transparent paper to align the printheads.
3. Remove and re-insert all the printheads, see Remove a printhead on page 63 and Insert a printhead
on page 65. This starts the printhead alignment procedure.
4. Ensure the window is closed, as a strong light source near the printer during printhead realignment can
aect alignment.
5. The process takes about six minutes. Wait until the front-panel display shows the process complete before
using the printer.
NOTE: The printer prints a calibration image. Do not worry about the image. The front-panel display
shows any errors in the process.
Image Quality Maintenance menu procedure
1. Load the paper you wish to use, see Handle the paper on page 25. It should be at least 457.2 mm (18 in)
wide.
CAUTION: Do not use transparent or semi-transparent paper to align the printheads.
2.
From the front panel, select the Image Quality Maintenance menu icon , then Align printheads. The
printer checks to see if it has enough paper to run the realignment.
3. If the loaded paper is satisfactory, the printer runs the realignment and prints a realignment pattern.
Ensure the window is closed, as a strong light source near the printer during printhead realignment can
aect alignment.
4. The process takes about ve minutes. Wait until the front-panel display shows the process complete
before using the printer.
Scanning errors during alignment
If the alignment process fails, a Scanning problems message appears on the front panel. This means that the
alignment has not completed successfully. Therefore the printer is not aligned and the alignment should be
repeated before printing with good image quality. The problem may be due to:
●
The paper used was not valid, repeat the alignment with valid paper
●
Printhead health problems, clean printheads, see Clean the printheads on page 174
●
The alignment was done with the window open, repeat the alignment with the window closed
If the problem persists after using valid paper, cleaning the printheads and keeping the window closed, there
may be a failure in the scanning system needing reparation or the printheads, although clean, may not work and
need to be replaced.
72 Chapter 5 Handle the ink system ENWW
Page 81
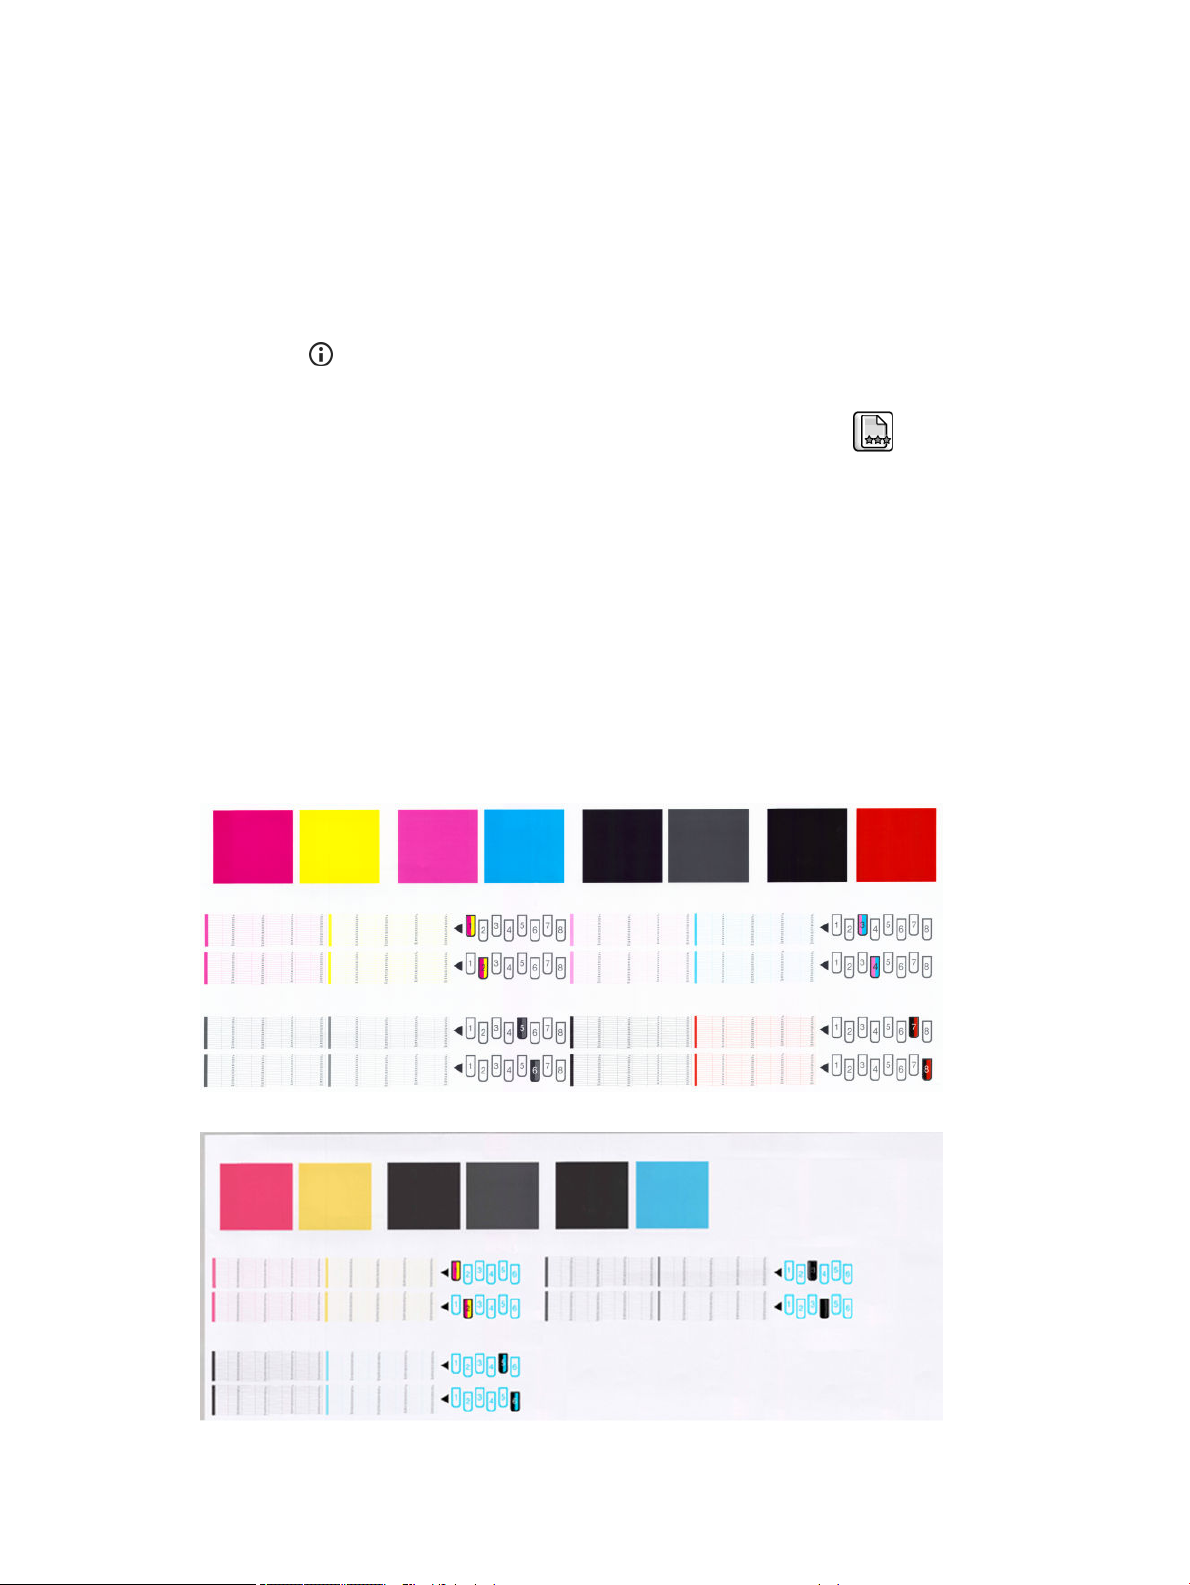
The Image Diagnostics Print
The Image Diagnostics Print consists of patterns designed to highlight printhead reliability problems. It helps you
to check the performance of the printheads that are currently installed in your printer, and whether any
printhead suers from clogging or other problems.
To print the Image Diagnostics Print:
1. Use the same paper type that you were using when you detected a problem.
2.
Use the key on the front panel to check that the selected paper type is the same as the paper type
loaded into the printer.
3.
At the printer's front panel, select the Image Quality Maintenance menu icon , then Print diagnostic
image
.
It takes about two minutes to print the Image Diagnostics Print.
The print is divided into two parts, both of which test printhead performance.
●
Part 1 (top) consists of rectangles of pure colors, one for each printhead. This part represents the print
quality that you will get from each color.
●
Part 2 (bottom) consists of small dashes, one for each nozzle on each printhead. This part complements
the rst, and aims more specically to detect how many faulty nozzles each printhead has.
Please look carefully at the print. The names of the colors are shown above the rectangles and in the center of
the patterns of dashes.
Figure 5-1 Image Diagnostics Print — Z6810
Figure 5-2 Image Diagnostics Print — Z6610
ENWW Work with ink system components 73
Page 82

First look at the upper part of the print (part 1). Each colored rectangle should be a uniform color without any
horizontal lines across it.
Then look at the bottom part of the print (part 2). For each individual colored pattern, check that most of the
dashes are present.
If you see horizontal lines in part 1 and also missing dashes in part 2 for the same color, the printhead
responsible needs cleaning. However, if the rectangles look solid, do not worry about just a few missing dashes
in part 2; these are acceptable because the printer can compensate for a few clogged nozzles.
Here is an example of a gray printhead in a good state:
And here is an example of the same printhead in a bad state:
Corrective action
1. Clean any faulty printheads (see Clean the printheads on page 174). Then reprint the Image Diagnostics
Print to see whether the problem has been solved.
2. If the problem remains, clean the printheads again, and reprint the Image Diagnostics Print to see whether
the problem has been solved.
3. If the problem remains, consider cleaning your printheads manually (see Clean the printheads
on page 174). You could also try reprinting your current print job, in case it now prints satisfactorily.
4. If the problem remains, try cleaning the printhead drop detector. The printer normally noties you when
this is necessary, but it may be worth trying even if the printer has not suggested it. See Clean the
printhead drop detector on page 69.
5. If the problem still remains, replace any persistently faulty printheads (see Handle the ink system
on page 55), or contact HP Support (see HP Customer Care on page 185).
74 Chapter 5 Handle the ink system ENWW
Page 83
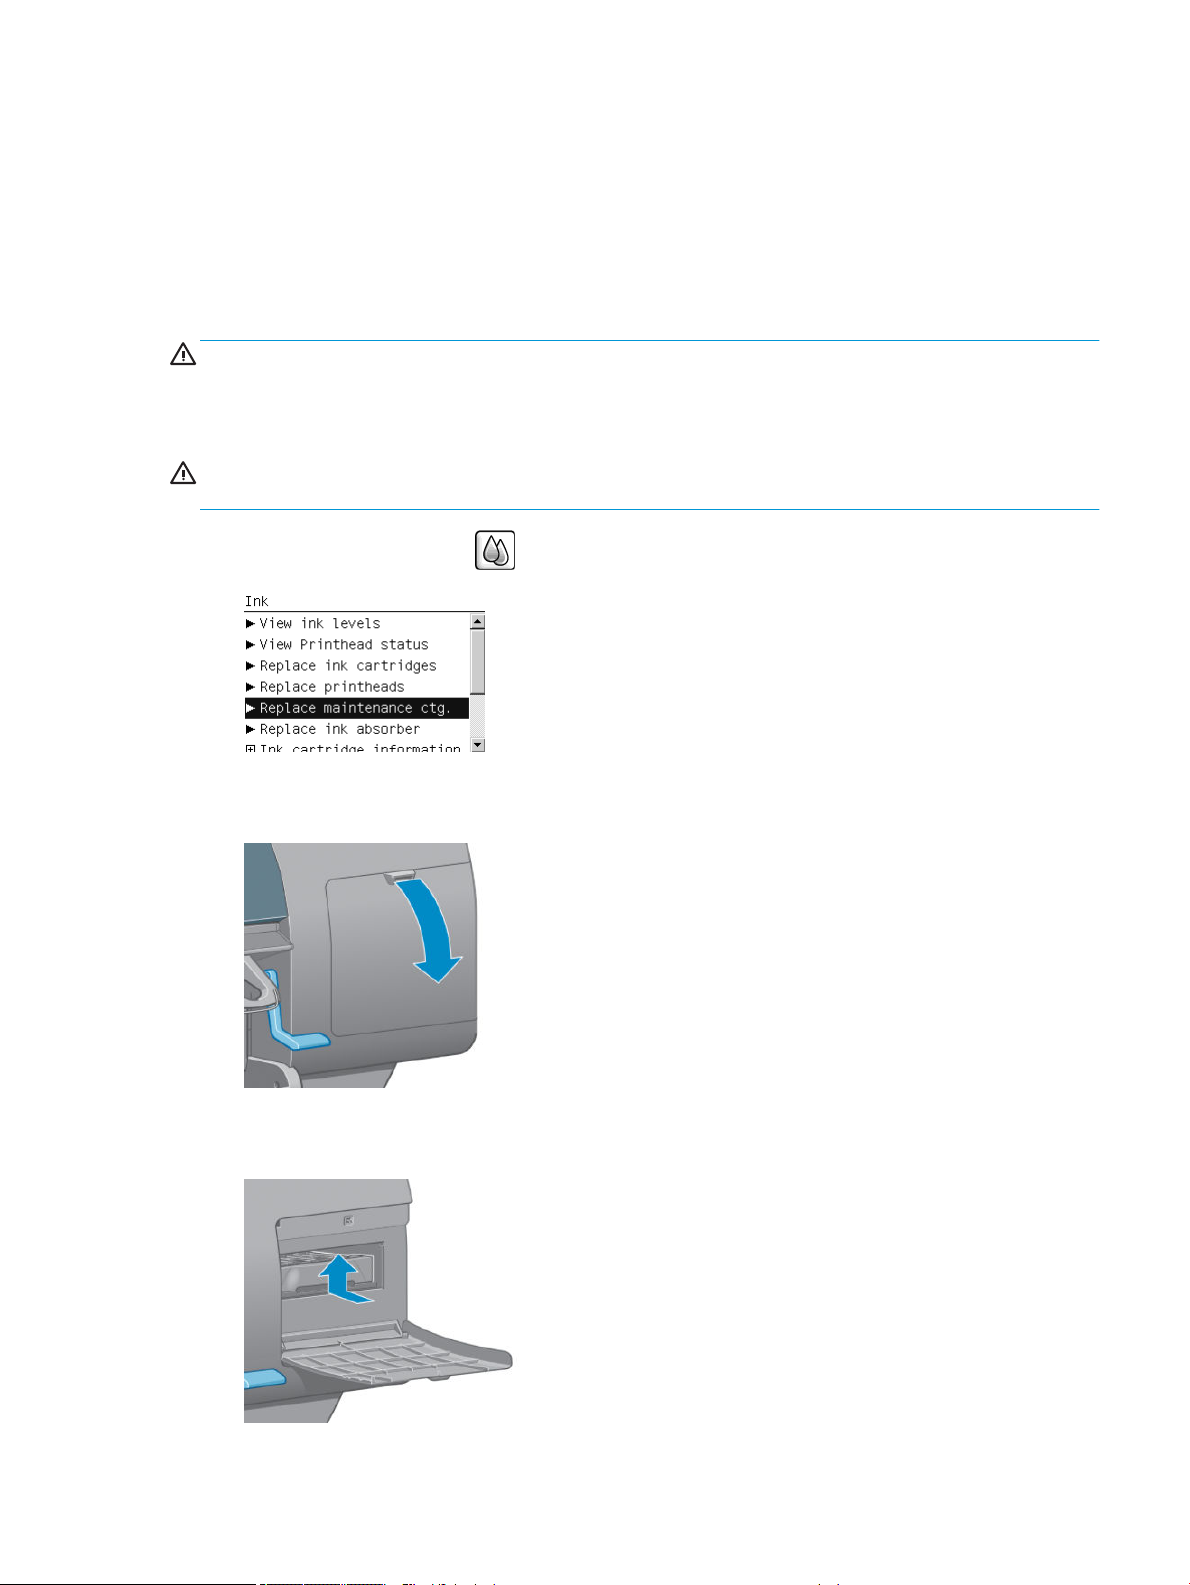
Remove the maintenance cartridge
A message appears on the front panel when you must change the maintenance cartridge. Follow these
precautions when removing a maintenance cartridge:
●
Be careful not to get ink on your hands. Ink might be on, around, and inside the replaced maintenance
cartridge.
●
Always handle and store the replaced maintenance cartridge upright to avoid spilling any ink.
CAUTION: A message appears on the front panel when the maintenance cartridge is almost full and again
when it is completely full and must be changed. You can ignore the alert and continue printing by pressing the
OK key on the front panel. However, HP strongly recommends that you change the maintenance cartridge when
prompted. Ignoring the alert can result in serious damage to the printer.
WARNING! Make sure that the printer wheels are locked (the brake lever is pressed down) to prevent the
printer from moving.
1.
At the front panel, select the icon, then select Replace maintenance ctg.
2. The maintenance cartridge is located in a slot underneath the front panel, at the front of the printer. Open
the door.
3. The maintenance cartridge has a handle on the front. To remove the cartridge, press inward and upward as
indicated by the arrow, until the cartridge is released.
ENWW Work with ink system components 75
Page 84
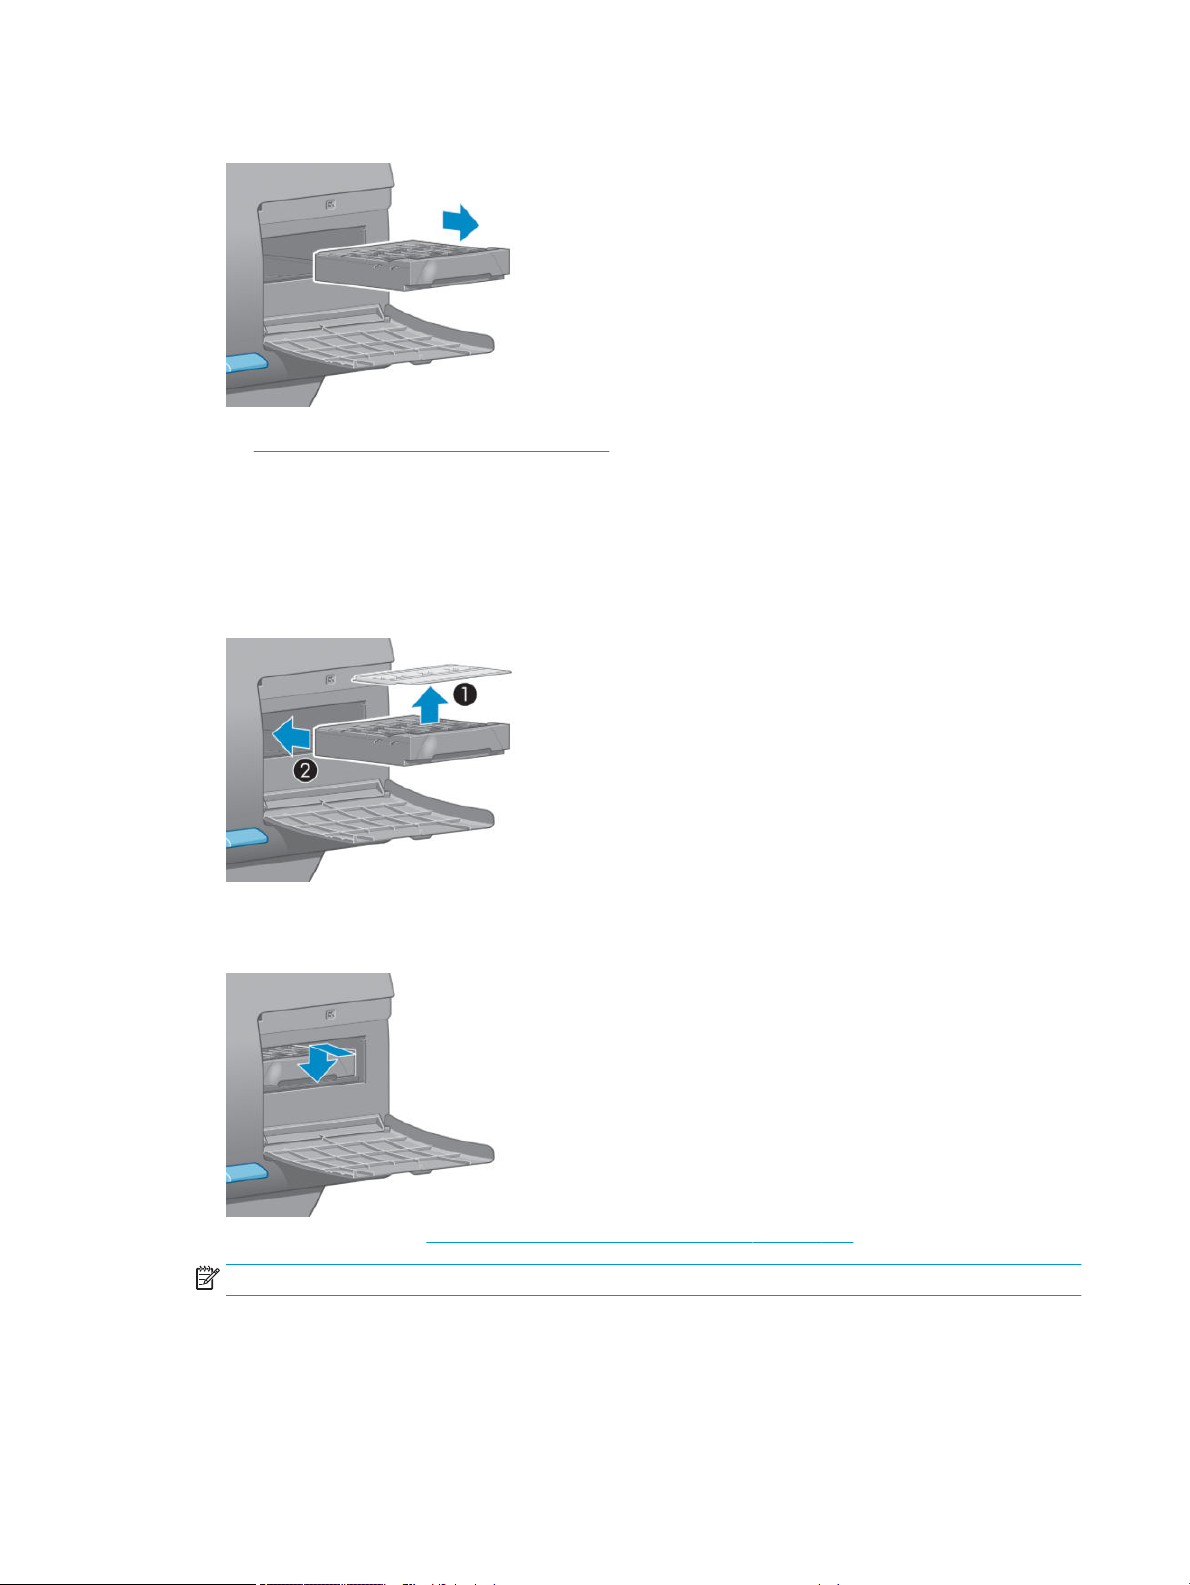
4. Lift up the maintenance cartridge to remove it from the slot, and slide it out.
See also Insert the maintenance cartridge on page 76.
Insert the maintenance cartridge
The plastic bag in which the new maintenance cartridge comes can be used to dispose of the old maintenance
cartridge.
1. Insert the maintenance cartridge into the slot, in the direction indicated by the arrow.
2. When the maintenance cartridge has been pushed all the way in, press inwards and downwards as
indicated, until it clicks into place.
If you have diculty, see Cannot insert the maintenance cartridge on page 174.
NOTE: The front panel will not show the new maintenance cartridge until the door is closed.
76 Chapter 5 Handle the ink system ENWW
Page 85
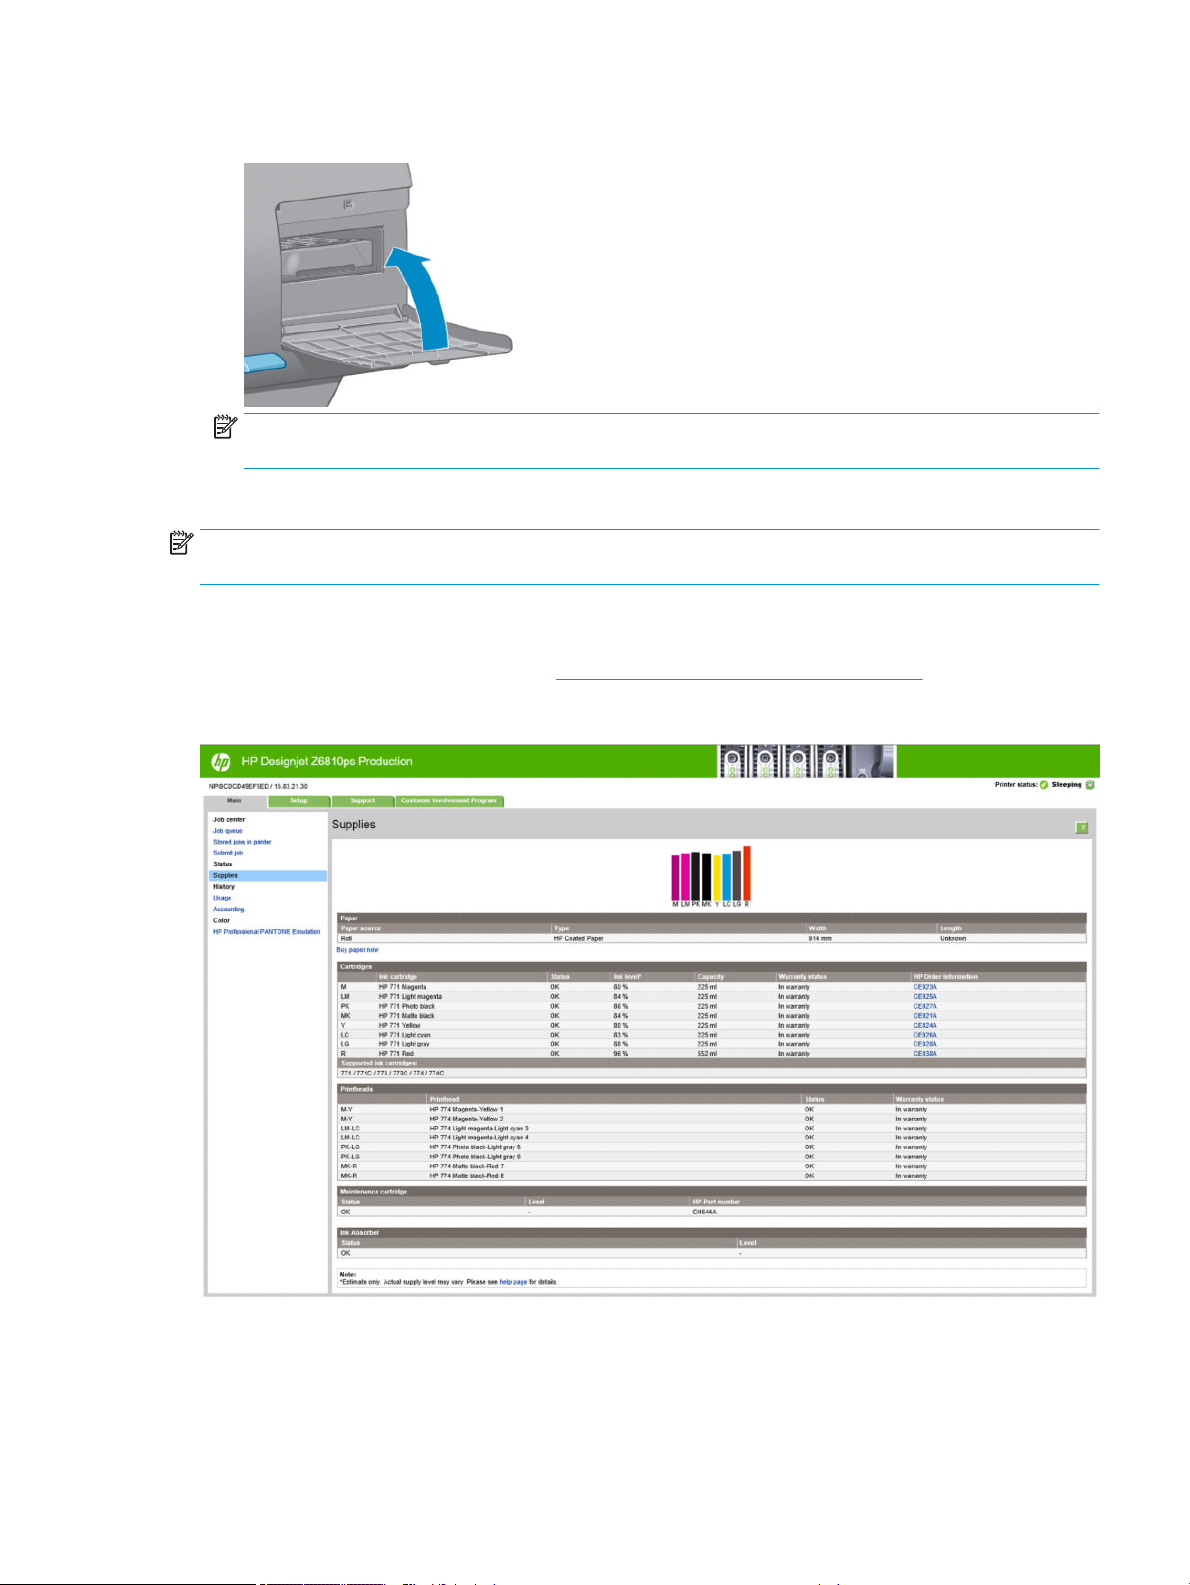
3. When you have inserted the maintenance cartridge into the printer, close the door.
NOTE: The printer needs all the ink cartridges, printheads and maintenance cartridge to be installed
before it can continue.
4. If no paper is loaded, the front panel will instruct you to load some.
NOTE: Make sure that the printer window and the door to the right are closed after you replace the supplies.
The printer will not print while these are open.
Check the status of the ink system
1. Access the Embedded Web Server. See Access the Embedded Web Server on page 18.
2. Go to the Supplies page on the Main tab.
The Supplies page shows you the status of the ink cartridges (including the ink levels), the printheads, the
maintenance cartridge, and the loaded paper.
ENWW Work with ink system components 77
Page 86

View ink cartridge information
You can view information about your ink cartridges using the front panel or the HP DesignJet Utility.
Front panel procedure
1.
At the front panel, select the icon, then Ink cartridge information.
2. Select the cartridge about which you want information.
3. The front panel shows the following information:
●
Color
●
Product name
●
Supported ink cartridges
●
Product number
●
Serial number
●
Status
●
Ink level, if known
●
Total ink capacity in milliliters
●
Expiration date
●
Warranty status
●
Manufacturer
HP DesignJet Utility procedures
●
In the HP DesignJet Utility for Windows, go to the Overview tab. The status of each cartridge appears when
you select Supply Status > Cartridges.
●
In the HP DesignJet Utility for Mac OS X, select Printer Status.
View printhead information
The printer automatically checks and services the printheads after each print. Follow these steps to get more
information on your printheads.
1.
At the front panel, select the icon, then Printhead information.
2. Select the printhead for which you want to see information.
3. The front panel shows the following information:
●
Colors
●
Product name
●
Product number
78 Chapter 5 Handle the ink system ENWW
Page 87

●
Serial number
●
Status (see Front-panel error messages on page 209)
●
Volume of ink it has used
●
Warranty status
You can also get most of this information without leaving your computer by using the HP DesignJet Utility.
NOTE: If the status is See warranty note, this indicates that non-HP ink is being used. Printer service or repairs
required as a result of using non-HP ink are not covered under warranty. See the Legal Information document for
detailed warranty implications.
Order ink supplies
You can order the following ink supplies for your printer.(*)
Table 5-1 Ink cartridges
Cartridge Part number Region Z6610 Z6810
HP 774 775 ml Chromatic Red DesignJet Ink Cartridge P2W02A Worldwide x
HP 773B 775 ml Matte Black DesignJet Ink Cartridge C1Q29A Asia, Pacic, Japan x x
HP 773B 775 ml Magenta DesignJet Ink Cartridge C1Q31A Asia, Pacic, Japan x x
HP 773B 775 ml Yellow DesignJet Ink Cartridge C1Q32A Asia, Pacic, Japan x x
HP 773B 775 ml Light Magenta DesignJet Ink Cartridge C1Q33A Asia, Pacic, Japan x
HP 773B 775 ml Cyan DesignJet Ink Cartridge C1Q34A Asia, Pacic, Japan x x
HP 773B 775 ml Photo Black DesignJet Ink Cartridge C1Q35A Asia, Pacic, Japan x x
HP 773B 775 ml Light Gray DesignJet Ink Cartridge C1Q36A Asia, Pacic, Japan x x
HP 773C 775 ml Matte Black DesignJet Ink Cartridge C1Q37A Europe, Middle East,
Africa
HP 773C 775 ml Magenta DesignJet Ink Cartridge C1Q39A Europe, Middle East,
Africa
HP 773C 775 ml Yellow DesignJet Ink Cartridge C1Q40A Europe, Middle East,
Africa
HP 773C 775 ml Light Magenta DesignJet Ink Cartridge C1Q41A Europe, Middle East,
Africa
HP 773C 775 ml Cyan DesignJet Ink Cartridge C1Q42A Europe, Middle East,
Africa
HP 773C 775 ml Photo Black DesignJet Ink Cartridge C1Q43A Europe, Middle East,
Africa
HP 773C 775 ml Light Gray DesignJet Ink Cartridge C1Q44A Europe, Middle East,
Africa
x x
x x
x x
x
x x
x x
x x
HP 773A 775 ml Matte Black DesignJet Ink Cartridge C1Q21A Americas x x
HP 773A 775 ml Magenta DesignJet Ink Cartridge C1Q23A Americas x x
HP 773A 775 ml Yellow DesignJet Ink Cartridge C1Q24A Americas x x
ENWW Order ink supplies 79
Page 88

Table 5-1 Ink cartridges (continued)
Cartridge Part number Region Z6610 Z6810
HP 773A 775 ml Light Magenta DesignJet Ink Cartridge C1Q25A Americas x
HP 773A 775 ml Cyan DesignJet Ink Cartridge C1Q26A Americas x x
HP 773A 775 ml Photo Black DesignJet Ink Cartridge C1Q27A Americas x x
HP 773A 775 ml Light Gray DesignJet Ink Cartridge C1Q28A Americas x x
(*) The Z6810 Photo Production Printer and the Z6610 Production Printer are also compatible with HP771 Ink
Cartridges (all details available on hp.com).
Table 5-2 Printheads
Part
number Printhead Z6610 Z6810
P2V97A HP 774 Matte Black & Chromatic Red DesignJet Printhead x
P2V99A HP 774 Magenta & Yellow DesignJet Printhead x x
P2V98A HP 774 Light Magenta & Light Cyan DesignJet Printhead x
P2W00A HP 774 Photo Black & Light Gray DesignJet Printhead x x
P2W01A HP 774 Matte Black & Cyan DesignJet Printhead x
Table 5-3 Maintenance cartridge
Maintenance cartridge Part number
HP 771 DesignJet Maintenance Cartridge CH644A
80 Chapter 5 Handle the ink system ENWW
Page 89

6 Print options
●
Create a print job
●
Select print quality
●
Print a draft
●
High-quality printing
●
Select paper size
●
Select margins options
●
Rescale a print
●
Preview a print
●
Print 16-bit color images
●
Change the treatment of overlapping lines
●
Print crop lines
●
Rotate an image
●
Print in gray shades
●
Use paper economically
●
Nest jobs to save paper
●
Use ink economically
ENWW 81
Page 90
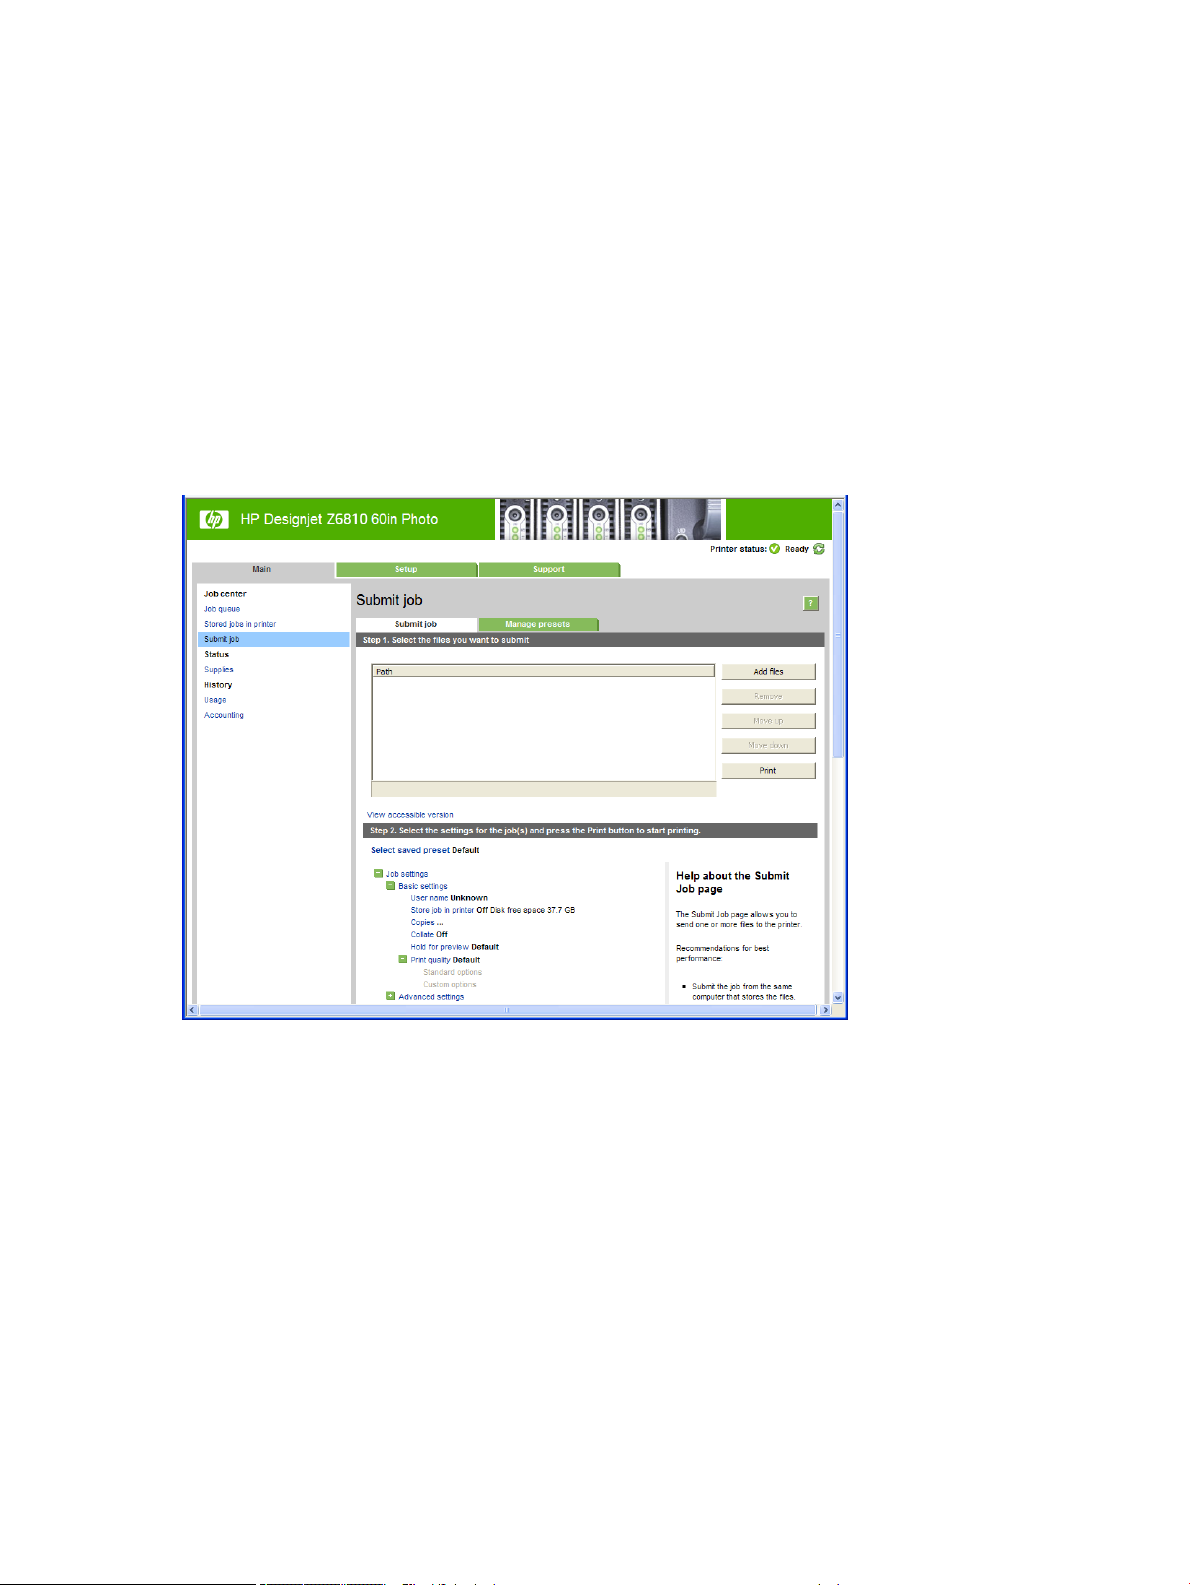
Create a print job
In order to print something, you must send it to the printer. This constitutes a print job, which is entered into the
printer's print queue. There are two main ways of sending a print job to the printer:
●
To print directly from a program, use the program's Print command as usual. When you select your printer,
the printer driver is invoked to send your job to the printer.
●
If you have a le that is already in a supported graphical format, you can use the Embedded Web Server to
send it directly to the printer without going through a printer driver (see below).
Using the Embedded Web Server to print les
From the HP DesignJet Utility or the Embedded Web Server, select Submit Job in the Job Center group. You will
see the window below.
Press the Add les button to choose the les from your computer that you want to print. The les must be in one
of the following formats:
●
PDF*
●
PostScript*
●
TIFF*
●
JPEG*
●
HP-GL/2
●
CALS/G4
*Only supported when PS/PDF Upgrade Kit is installed.
82 Chapter 6 Print options ENWW
Page 91

NOTE: When you print to a le, the le should be in one of the above formats, but its name may have an
extension such as .plt or .prn.
If the les are not in one of these formats, they will not be printed successfully.
If the jobs have been generated with the appropriate settings (such as page size, rotation, resizing and number
of copies), you can just press the Print button and they will be sent to the printer.
If you need to specify printing settings, go to the Job settings section and select the options you need. Each
option has explanatory text on the right, so that you can understand the behavior of each setting. Remember
that, if you leave the setting as Default, the setting saved in the job will be used. If the job contains no setting,
the setting in the printer will be used.
Printing stored jobs
When you print a le with the Embedded Web Server, you can mark the job to be stored permanently in the
printer.
If you select Stored jobs in printer in the Main tab of the Embedded Web Server, you will see a list of the stored
jobs. The information displayed for each job includes:
●
The name of the job
●
The size of the job
●
The date and time when the job was received by the printer
●
The name given by the person who submitted the job
You can click on the title of any column to sort the list by the information in that column.
You can select one or more jobs in the list and perform the following operations on them by using the buttons at
the top of the list.
●
Print: The selected jobs are printed with the original settings. You will be able to see the progress of your
jobs on the Job queue page.
●
Advanced print: The settings of the selected jobs are displayed, and you can modify them. You can save the
new settings by pressing the Save button, and print the jobs by pressing the Print button.
The value of a setting is shown only if it has the same value in all of the selected jobs. Otherwise, a hyphen
is shown.
●
Delete: The selected jobs are permanently deleted from the printer.
Select print quality
The printer has various print-quality options because best-quality printing requires some loss of speed, while
fast printing implies some reduction in print quality.
Therefore, the standard print-quality selector is a slider that allows you to choose between quality and speed.
Alternatively, you can select from the custom options: Best, Normal and Fast. If you select Fast, you can also
select Economode, which uses a lower rendering resolution and consumes less ink. It therefore increases
printing speed even further, but reduces print quality. Economode can be selected only from the custom options
(not from the slider).
ENWW Select print quality 83
Page 92

There are also two supplementary custom options that may have an eect on print quality: Max. resolution and
Unidirectional. See High-quality printing on page 85.
NOTE: In the Windows driver dialog, the rendering and printing resolutions for your job are displayed in the
Paper/Quality tab. In the Mac OS X Print dialog, they are displayed in the Summary panel.
You can select print-quality options in the following ways:
●
In the Windows driver dialog: go to the Paper/Quality tab and look at the Print Quality section. If you select
Standard Options, you will see a simple slider with which you can select speed or quality. If you select
Custom Options, you will see the more specic options described above.
●
In the Mac OS X Print dialog: go to the Paper/Quality panel and look at the Quality Options section. If you
select Standard quality options, you will see a simple slider with which you can select speed or quality. If
you select Custom quality options, you will see the more specic options described above.
●
In the Mac OS X Print dialog: go to the Paper/Quality panel and move the print-quality slider to the far left
('Speed').
●
On the Embedded Web Server's Submit Job page: select Basic settings > Print quality. If you then select
Standard options, you can choose between Speed and Quality. If you select Custom options, you will see
the more specic options described above.
●
Using the front panel: select the Setup menu icon , then Printing preferences > Print quality.
NOTE: If you have set the print quality from your computer, that overrides the print-quality setting in the
front panel.
NOTE: You cannot change the print quality of pages that the printer is already receiving or has already received
(even if they have not started to print yet).
Print a draft
You can specify fast draft-quality printing in the following ways:
●
In the Windows driver dialog: go to the Paper/Quality tab and look at the Print Quality section. Move the
print-quality slider to the extreme left ('Speed').
●
In the Mac OS X Print dialog: go to the Paper/Quality panel and move the print-quality slider to the far left
('Speed').
●
On the Embedded Web Server's Submit Job page: select Basic settings > Print quality > Standard options >
Speed.
You can specify even faster draft-quality printing by using Economode, as follows. This is intended mainly for
documents containing only text and line drawings.
●
In the Windows driver dialog: go to the Paper/Quality tab and look at the Print Quality section. Select
Custom Options, then set the quality level to Fast and check the Economode box.
●
In the Mac OS X Print dialog: go to the Paper/Quality panel and set the quality options to Custom, then set
quality to Fast and check the Economode box.
●
On the Embedded Web Server's Submit Job page: select Basic settings > Print quality > Custom. Set Quality
level to Fast, and Economode to On.
84 Chapter 6 Print options ENWW
Page 93

High-quality printing
You can specify high-quality printing in the following ways:
●
In the Windows driver dialog: go to the Paper/Quality tab and look at the Print Quality section. Move the
print-quality slider to the extreme right ('Quality').
●
In the Mac OS X Print dialog: go to the Paper/Quality panel and move the print-quality slider to the extreme
right ('Quality').
●
On the Embedded Web Server's Submit Job page: select Basic settings > Print quality > Standard options >
Quality.
Printing is bidirectional by default (the printheads print when travelling in both directions across the paper), but
you can choose Unidirectional printing for a further small improvement in quality at the expense of speed. This
option is not available if you have chosen Fast print quality.
If you have a high-resolution image
If your image has a resolution greater than the rendering resolution (which you can see in the driver's Paper/
Quality tab under Windows), print sharpness may be improved by selecting the Max. resolution option. This
option is available only if you are printing on glossy paper and you have selected Best print quality.
●
In the driver dialog (Mac OS X Print dialog): select custom instead of standard print-quality options, then
check the Max. resolution box.
●
On the Embedded Web Server's Submit Job page: select Basic settings > Print quality > Custom. Set Quality
level to Best, and Max. resolution to Yes.
NOTE: The Max. resolution option results in slower printing with photo papers, but it does not increase the
amount of ink used.
Select paper size
The paper size can be specied in the following ways.
NOTE: The paper size specied here should be the paper size in which the document was created. It is possible
to rescale the document to a dierent size for printing. See Rescale a print on page 87.
●
In the Windows driver dialog: select the Paper/Quality tab, then select your paper size from the Document
Size list.
●
In the Mac OS X Page Setup dialog: select your printer in the Format for popup menu, then Paper Size.
NOTE: If your application oers no Page Setup dialog, please use the Print dialog.
●
On the Embedded Web Server's Submit Job page: select Advanced settings > Paper > Page size > Standard.
●
Using the front panel: select the Setup menu icon , then Printing preferences > Paper options > Select
paper size.
NOTE: If you have set the paper size from your computer, that overrides the paper size setting in the
front panel.
NOTE: If you have disabled skew checking, the paper length is estimated as four times the width.
ENWW High-quality printing 85
Page 94

TIP: If your document is 330 × 483 mm (13 × 19 in), designed to t on sheet paper of the same size, select the
document size Super B/A3.
Custom paper sizes
To choose a non-standard paper size not shown in the list of paper sizes:
●
Under Windows, there are two dierent ways:
–
In the driver dialog, press the Custom button in the Paper/Quality tab, then specify the name and the
dimensions of your new paper size, then click
driver, to see your new custom size in the list of custom sizes, you need to exit the printer properties,
then reenter them (and use the More button if necessary).
NOTE: The driver will not allow you to create a paper size whose width exceeds its length.
–
From the Start menu, select Printers, then from the File menu select Server Properties. In the Forms
tab, check the Create a new form box, specify the name and dimensions of the new form, then click
Save Form.
NOTE: Such forms are not available when using a shared printer that is connected to a dierent
computer.
●
In the Mac OS X Page Setup dialog: select Paper Size > Manage Custom Sizes.
Save to save your new paper size. In the PostScript
NOTE: If your application oers no Page Setup dialog, please use the Print dialog.
●
On the Embedded Web Server's Submit Job page: select Advanced settings > Paper > Page size > Custom.
Select margins options
By default, the printer leaves a 5 mm (0.2 in) margin between the edges of your image and the edges of the
paper. However, you can change this behavior in several ways.
●
In the Windows driver dialog: select the Paper/Quality tab and then the Margins/Layout button.
TIP: In the Windows PostScript driver, make sure you have made the right choice from the Document size
list. You should select a 'no margins' document size if you intend to use the Oversize or Clip Contents By
Margins options.
●
In the Mac OS X Print dialog: select the Margins/Layout panel.
●
On the Embedded Web Server's Submit Job page: select Advanced settings > Paper > Layout/Margins.
You will then see at least some of the following options.
NOTE: Under Mac OS X, the available margins options depend on the paper size selected in the Page Setup
dialog.
86 Chapter 6 Print options ENWW
Page 95

●
Standard. Your image will be printed on a page of the size you have selected, with a narrow margin
between the edges of the image and the edges of the paper. The image should be small enough to t
between the margins.
●
Oversize. Your image will be printed on a page slightly larger than the size you have selected. If you cut o
the margins, you will be left with a page of the size you selected, with no margins remaining between your
image and the edges of the paper.
●
Clip Contents By Margins. Use this option when your image has white borders and a size equal to that of
the paper you have selected. The printer will use the white border for its margins and you will get a page of
size equal to that which is selected in the driver.
Rescale a print
You can send an image to the printer at a certain size but tell the printer to rescale it to a dierent size (normally
larger). This may be useful if your software does not support large formats.
You can rescale an image in the following ways:
●
In the Windows driver dialog: go to the Features tab and look at the Resizing Options section.
–
The Print document on option adjusts the image size to the paper size you have selected. For
example, if you have selected ISO A2 as the paper size and you print an A3-sized image, it is enlarged
to t the A2 paper. If the ISO A4 paper size is selected, the printer reduces a larger image to t the A4
size.
–
The % of actual size option enlarges the printable area of the original paper size (the page minus the
margins) by the percentage indicated, then adds the margins to create the output paper size.
●
In the Mac OS X Print dialog: select the Finishing panel, then Print document on to adjust the image size to
the paper size you have selected. For example, if you have selected ISO A2 as the paper size and you print
an A3-sized image, it is enlarged to t the A2 paper. If the ISO A4 paper size is selected, the printer reduces
a larger image to t the A4 size.
●
On the Embedded Web Server's Submit Job page: select Advanced settings > Resizing.
–
The Standard and Custom options adjust the image size to the standard or custom paper size you
have selected. For example, if you have selected ISO A2 as the paper size and you print an A3-sized
image, it is enlarged to t the A2 paper. If the ISO A4 paper size is selected, the printer reduces a
larger image to t the A4 size.
–
The % of actual size option enlarges the printable area of the original paper size (the page minus the
margins) by the percentage indicated, then adds the margins to create the output paper size.
●
Using the front panel: select the Setup menu icon , then Printing preferences > Paper options >
Resize.
If you are printing to a single sheet, you must ensure that the image can actually t onto the sheet, otherwise
the image will be clipped.
Preview a print
Previewing a print on the screen allows you to check the layout of the print before printing, which may help you
to avoid wasting paper and ink on a bad print.
ENWW Rescale a print 87
Page 96

NOTE: If you load sheet paper with skew checking disabled, the printer does not measure the length of the
sheet, so the print preview will not be a reliable guide to the nal printout.
●
To preview a print under Windows, you have the following options:
–
Use your application's print preview option.
–
Check the Show preview before printing option, which you can nd in the driver's Paper/Quality tab
and Features tab. The preview may be provided in dierent ways, depending on your printer and
printer driver.
●
To preview a print under Mac OS X, you have the following options:
–
Use your application's print preview option.
–
Only with PostScript upgrade: open the PDF menu at the bottom left of your application's Printing
panel. Select the HP Print Preview option, which opens the HP Print Preview application to display the
nal appearance of your printed image. Printing features, such as the ability to change paper size,
paper type, and print quality, or rotate the image, can be changed on the y.
●
To preview a print using the Embedded Web Server, select Basic settings > Hold for preview.
Print 16-bit color images
In a 16-bit RGB image, each of the three primary colors is encoded by a 16-bit value, so that each pixel takes up
48 bits.
If you print your 16-bit color images through a printer driver, they will be reduced to 8-bit colors before they
reach the printer.
In order to send a 16-bit color image to the printer, you must save it as a 16-bit color TIFF or JPEG le, then send
the le directly to the printer without using a printer driver (see Using the Embedded Web Server to print les
on page 82). In this case, color management is done on the 16-bit color image, and is therefore done more
accurately. The image is still reduced to 8-bit colors for nal printing.
TIP: Some applications refuse to save a 16-bit color image in JPEG format; others automatically reduce it to 8-
bit colors. A TIFF le generally gives a higher-quality result, and is recommended.
Change the treatment of overlapping lines
NOTE: This topic applies only when printing an HP-GL/2 job.
The merge option controls the overlapping lines in an image. There are two settings:
●
O: where the lines cross, only the color of the top line is printed. This is the default setting.
●
On: where the lines cross, the colors of the two lines merge.
To turn merge on, go to the front panel and select the Setup menu icon , then Printing preferences > HP-
GL/2 options > Enable merge. You can set the merge option from your software in some applications. Settings in
your software override the front-panel settings.
88 Chapter 6 Print options ENWW
Page 97

Print crop lines
Crop lines indicate where the paper should be cut to reduce it to your selected page size. You can print crop lines
automatically with individual jobs in the following ways:
●
In the Windows driver dialog: select the Features tab, then Enable crop lines.
●
In the Mac OS X Print dialog: go to the Finishing panel and select crop lines.
●
On the Embedded Web Server's Submit Job page: select Advanced settings > Roll options > Enable crop
lines.
●
Using the front panel: select the Setup menu icon , then Printing preferences > Paper options > Enable
crop lines > On.
To print crop lines with nested jobs (see Nest jobs to save paper on page 91), you must select a dierent
option:
●
In the Embedded Web Server: select Job management > Use crop lines when nest is enabled > On.
●
Using the front panel: select the Setup menu icon , then Job management > Nest options > Enable
crop lines > On.
Rotate an image
By default, images are printed with their shorter sides parallel to the leading edge of the paper, like this:
You may wish to rotate your images by 90 degrees in order to save paper, like this:
ENWW Print crop lines 89
Page 98
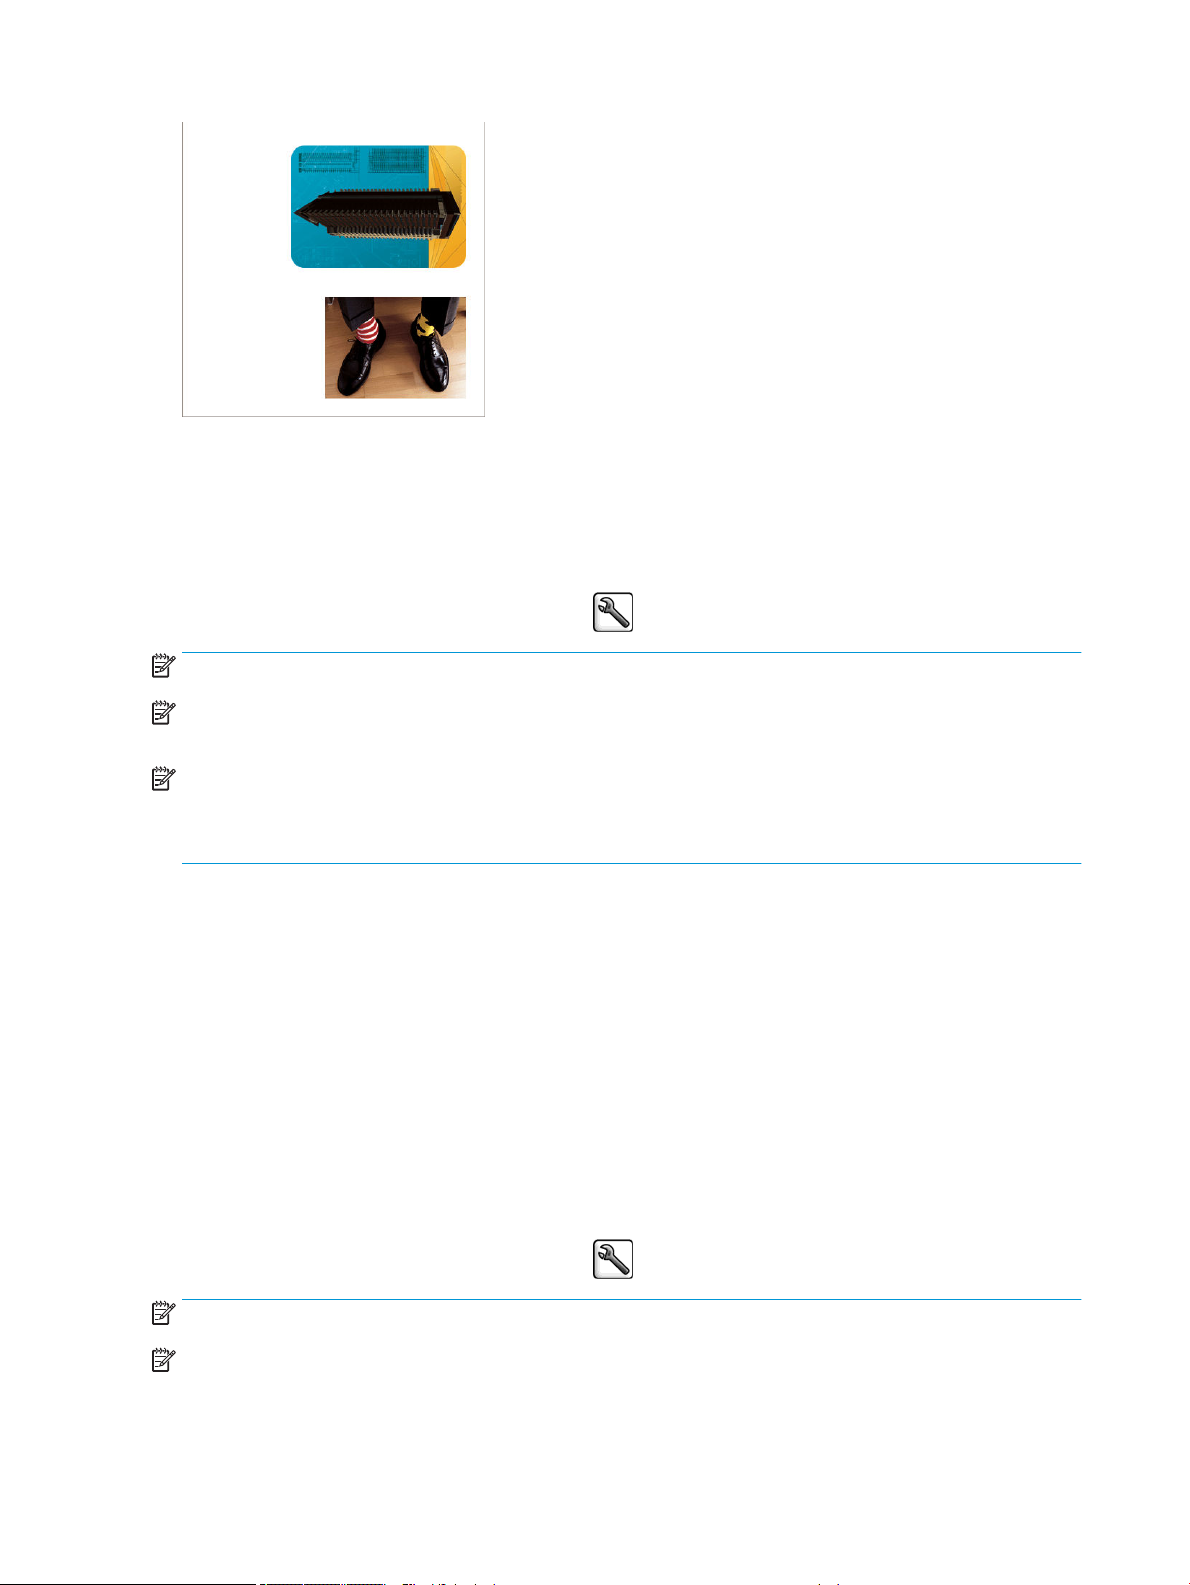
You can do this in the following ways:
●
●
●
●
NOTE: If rotation is set from your computer, it overrides the setting in the front panel.
NOTE: When you rotate a job, the page length may be increased to avoid clipping, because the top and bottom
margins are usually larger than the side margins.
NOTE: If you rotate an image to landscape whose original orientation was portrait, the paper may not be wide
enough for the image. For example, rotating a portrait D/A1-size image on D/A1-size paper by 90 degrees will
probably exceed the width of the paper. If you are using the Embedded Web Server, the preview screen will
conrm this with a warning triangle.
Autorotate
The Autorotate option automatically rotates jobs by 90 degrees if doing so will save paper.
Autorotation allows you to defer the decision of rotating a page until printing time. This may be useful if you
routinely work with dierent roll sizes and want to ensure that plots will not get clipped or waste unnecessary
paper width if and when roll conditions change.
In the Windows driver dialog: select the Features tab, then Rotate by 90 degrees.
In the MAC OS X Print dialog: go to the Finishing panel and select Rotate by 90 degrees.
On the Embedded Web Server's Submit Job page: select Advanced settings > Roll options > Rotate.
In the front panel: select the Setup menu icon , then Printing preferences > Paper options > Rotate.
To enable autorotation:
●
In the Windows driver dialog: select the Features tab, then Autorotate.
●
In the MAC OS X Print dialog: go to the Finishing panel and select Autorotate.
●
On the Embedded Web Server's Submit Job page: select Advanced settings > Roll options > Autorotate.
●
In the front panel: select the Setup menu icon , then Job management > Autorotate.
NOTE: If autorotation is set from your computer, it overrides the setting in the front panel.
NOTE: If autorotation is enabled, the Rotate option is ignored.
90 Chapter 6 Print options ENWW
Page 99

NOTE: The autorotate decision requires known page dimensions. Therefore, the job must have When to Start
Printing set to After Processing (see Select when to print a job in the queue on page 117) and cannot have
variable dimensions, which happens when Fit to roll or Remove top/bottom blank areas is used.
TIP: Once the job is rendered and ready for reprints, autorotation may take a few minutes, depending on job
dimensions and resolution. To speed up autorotated reprints, send the job to render when the roll conguration
meets your planned scenario, and leave last-minute autorotation only to correct unexpected changes in roll
conditions. This applies to TIFF/JPEG/PS/PDF jobs only.
Print in gray shades
You can convert all colors in your image to shades of gray in the following ways:
●
In your application program: many programs provide this option.
●
In the Windows driver dialog: go to the Color tab and look at the Color Options section. Select Print in
Grayscale.
●
In the Mac OS X Print dialog: go to the Color Options panel and select Grayscale from the Mode drop-down
list.
●
On the Embedded Web Server's Submit Job page: select Color > Color/Grayscale pure grays/Grayscale full
set of inks > Print in grayscale.
Use paper economically
Here are some recommendations for making economical use of paper:
●
If you are printing relatively small images or document pages, you can use nesting to print them side by
side instead of one after another. See Nest jobs to save paper on page 91.
●
If you are printing multipage documents with relatively small pages, you can print up to 16 of them on one
sheet of paper. Use the Pages per sheet option in the Features tab (Windows driver) or the Layout panel
(MAC OS X driver).
●
You may be able to save some roll paper by using the following options:
–
In the Windows driver dialog: select the Features tab and then Remove Top/Bottom Blank Areas
and/or Rotate by 90 degrees or Autorotate.
–
In the MAC OS X Print dialog: select the Finishing panel, then Remove Top/Bottom Blank Areas and/or
Rotate by 90 degrees or Autorotate.
–
On the Embedded Web Server's Submit Job page: select Advanced settings > Roll options > Remove
top/bottom blank areas and/or Rotate.
●
If you check the print preview on your computer before printing, you can sometimes avoid wasting paper
on prints containing obvious mistakes. See Preview a print on page 87.
Nest jobs to save paper
Nesting means automatically printing images or document pages side by side on the paper, rather than one
after the other. This is done to avoid wasting paper.
ENWW Print in gray shades 91
Page 100
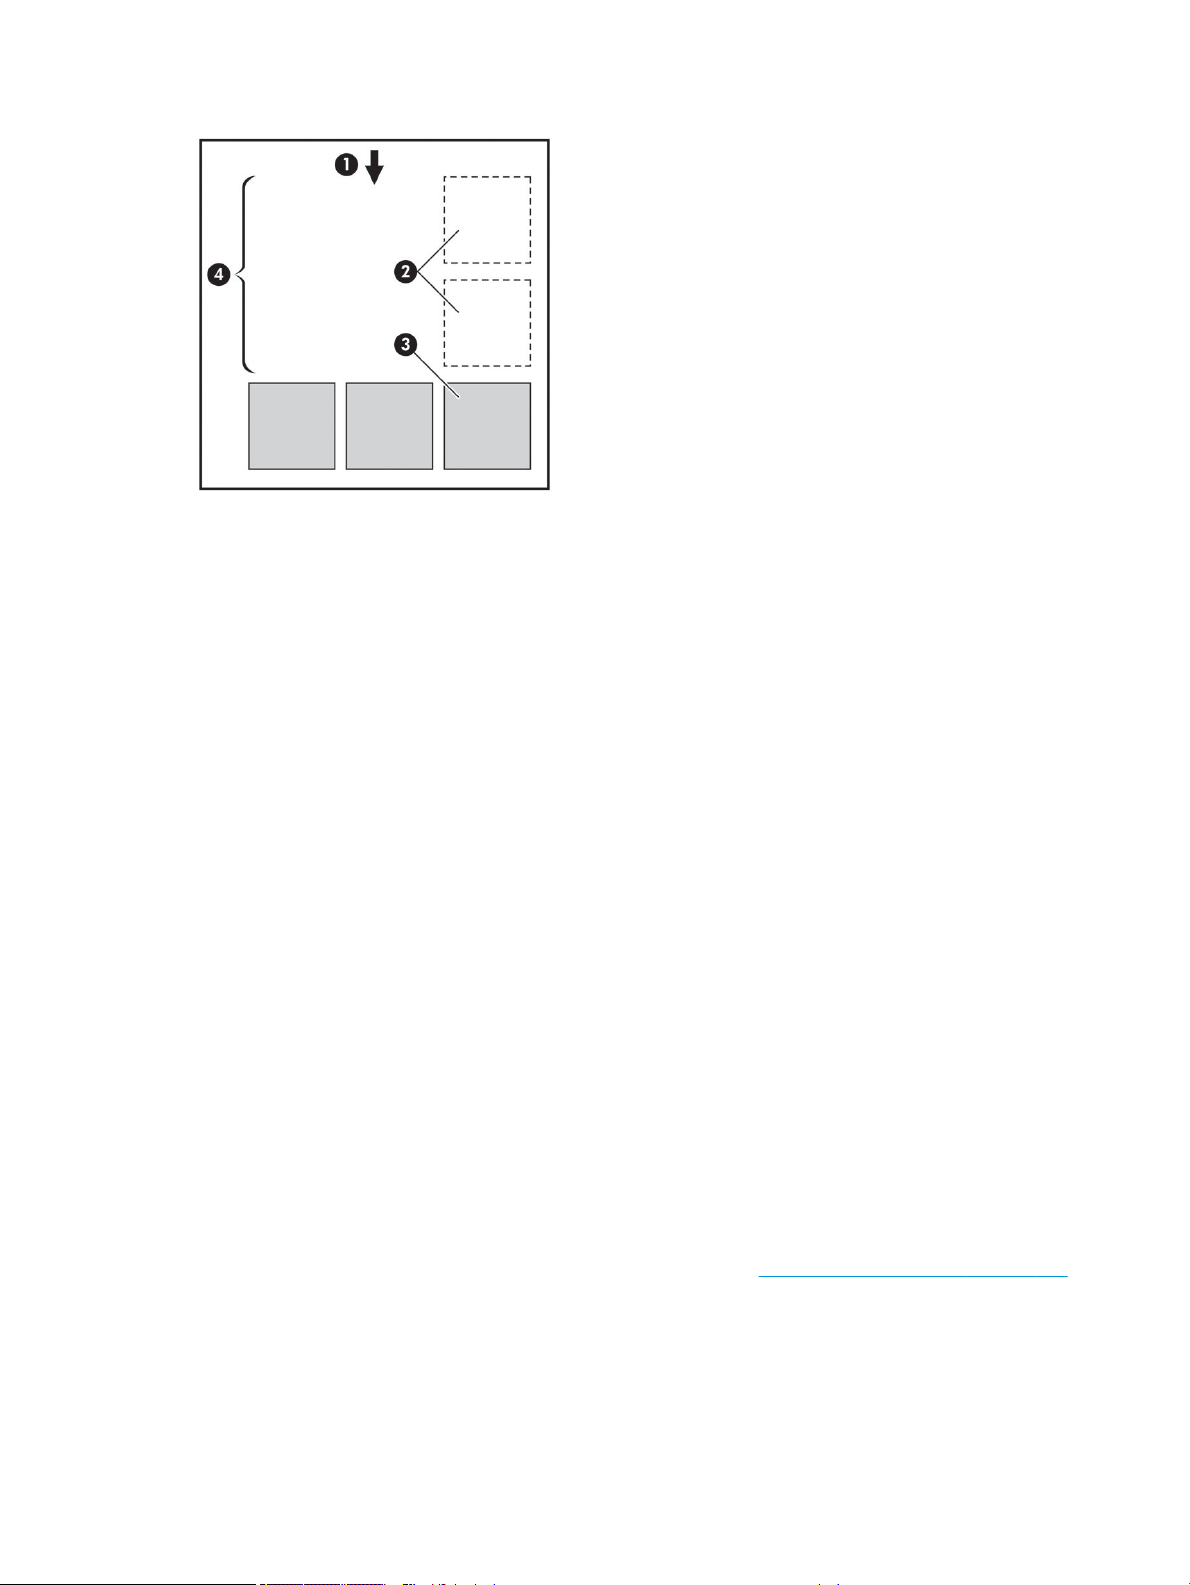
1. Direction of paper ow
2. Nesting o
3. Nesting on
4. Paper saved by nesting
When does the printer try to nest pages?
When Nest is On in the front panel's Job Management menu and the Embedded Web Server's Job Management
page.
What pages can be nested?
All pages can be nested, unless they are so large that two of them cannot t side by side on the roll, or unless
there are too many of them to t into the remaining length of the roll. A single group of nested pages cannot be
split between two rolls.
Which pages qualify for nesting?
In order to be in the same nest, the individual pages must be compatible in all of the following ways:
●
All pages must have the same print quality setting (Economode, Fast, Normal or Best).
●
The Max. resolution and Unidirectional setting must be the same on all pages.
●
The Margins setting must be the same for all pages.
●
The Mirror Image setting must be the same for all pages.
●
The Cutter setting must be the same for all pages.
●
The color adjustment settings must be the same for all pages. See Color-adjustment options on page 109.
●
Pages must be all color, or all grayscale: not some in color and some in grayscale.
●
All pages must be in one or other of the following two groups (the two groups cannot be mixed in the same
nest):
92 Chapter 6 Print options ENWW
 Loading...