

Page 1
User’s Guide
Page 2

Page 3

HP Business Inkjet 2800 series printer
User’s Guide
Page 4

Copyright Information
© 2005 Copyright H ewlett-Packard
Development Company, L.P.
Edition 1, 2/2005
Reproduction, adaptation or translation
without prior written permission is
prohibited, except as allowed under the
copyright laws.
The info rm atio n c on ta in ed he r ei n is subj ec t
to change without notice.
The only warranties for HP products and
services are set forth in the express
warranty statemen ts accompan ying such
products and serv ices. Nothing herein
shoul d be con st r ue d as con st itu t in g an
additional warranty. HP shall not be liable
for tech nica l o r edit or ial er ro rs or o mi ssion s
contained herein.
Trademark Credits
Microsoft
MS-DOS
®
, Windows®, Windows NT®, and
®
are U.S. registe red trademarks
of Microsoft Corporation.
®
UNIX
is a registered tr ademark of the
Open Group.
®
Novell
and NetWare® are registered
trademarks of Novell Corporation.
®
Pentium
is a registered trademark of Intel
Corporation.
®
Adobe
and Acrobat® are registered
trademarks of Adobe Systems Incorporate.
Safety Information
Alwa ys follow basi c sa fety preca u tions
when using this product to reduce risk of
injury from fire or electric shock.
1 Read and understand all instructions in
the documentation that comes with the
printer.
2 Use only a grounded electrical outlet
when connecting this product to a power
source. If you do not know whether the
outlet is grounded, check with a
qualified electrician.
3 Observe all warnings and instructions
marke d on the pr o du ct .
4 Unplug this product from wall outlets
before cleaning.
5 Do not install or use this product
near water, or when you a re wet.
6 Install the product securely on a
stablesurface.
7 Insta ll the pr od uc t in a pr o tec ted
location where no one can step on or
trip over the line cord, and the line cord
cann ot be dam ag ed .
8 If the product does not operate
normally, see Maintaining and
troubleshooting.
9 There are no user-serviceable parts
inside . Refer servicing to qualified
servic e personn el.
Page 5

Contents
1 Getting started
Finding other resources for the product. . . . . . . . . . . . . . . . . . . . . . . . . . . . . . . . . . . . . . . . 6
Understanding the printer parts . . . . . . . . . . . . . . . . . . . . . . . . . . . . . . . . . . . . . . . . . . . . . . 8
2 Installing accessories
Installing tray 2. . . . . . . . . . . . . . . . . . . . . . . . . . . . . . . . . . . . . . . . . . . . . . . . . . . . . . . . . . 11
Installing the auto-duplex unit . . . . . . . . . . . . . . . . . . . . . . . . . . . . . . . . . . . . . . . . . . . . . . 12
Installing the HP Jetdirect print server . . . . . . . . . . . . . . . . . . . . . . . . . . . . . . . . . . . . . . . . 13
To install the HP Jetdirect print server. . . . . . . . . . . . . . . . . . . . . . . . . . . . . . . . . . . . . 13
To verify that the print server has been installed correctly . . . . . . . . . . . . . . . . . . . . . 13
To obtain more information . . . . . . . . . . . . . . . . . . . . . . . . . . . . . . . . . . . . . . . . . . . . . 14
Installing memory modules . . . . . . . . . . . . . . . . . . . . . . . . . . . . . . . . . . . . . . . . . . . . . . . . 15
To install a DIMM. . . . . . . . . . . . . . . . . . . . . . . . . . . . . . . . . . . . . . . . . . . . . . . . . . . . . 15
To verify that the DIMM is installed correctly. . . . . . . . . . . . . . . . . . . . . . . . . . . . . . . . 16
Enabling accessories in the printer driver . . . . . . . . . . . . . . . . . . . . . . . . . . . . . . . . . . . . . 17
3 Using the printer
Selecting print media . . . . . . . . . . . . . . . . . . . . . . . . . . . . . . . . . . . . . . . . . . . . . . . . . . . . . 18
Tips for selecting and using print media . . . . . . . . . . . . . . . . . . . . . . . . . . . . . . . . . . . 18
Understanding specifications for supported media . . . . . . . . . . . . . . . . . . . . . . . . . . . 19
Setting minimum margins . . . . . . . . . . . . . . . . . . . . . . . . . . . . . . . . . . . . . . . . . . . . . . 22
Loading media . . . . . . . . . . . . . . . . . . . . . . . . . . . . . . . . . . . . . . . . . . . . . . . . . . . . . . . . . . 23
Changing print settings . . . . . . . . . . . . . . . . . . . . . . . . . . . . . . . . . . . . . . . . . . . . . . . . . . . 25
Canceling a print job . . . . . . . . . . . . . . . . . . . . . . . . . . . . . . . . . . . . . . . . . . . . . . . . . . . . . 25
Printing with the front or rear manual feed slot . . . . . . . . . . . . . . . . . . . . . . . . . . . . . . . . . 26
Printing on both sides (duplexing) . . . . . . . . . . . . . . . . . . . . . . . . . . . . . . . . . . . . . . . . . . . 27
Guidelines for printing on both sides of a page . . . . . . . . . . . . . . . . . . . . . . . . . . . . . . 27
To perform duplexing (Windows). . . . . . . . . . . . . . . . . . . . . . . . . . . . . . . . . . . . . . . . . 28
To perform automatic duplexing (Mac OS) . . . . . . . . . . . . . . . . . . . . . . . . . . . . . . . . . 28
Printing on special and custom-size media . . . . . . . . . . . . . . . . . . . . . . . . . . . . . . . . . . . . 29
4 Configuring and managing the printer
Managing the printer . . . . . . . . . . . . . . . . . . . . . . . . . . . . . . . . . . . . . . . . . . . . . . . . . . . . . 30
Overview of printer management tasks. . . . . . . . . . . . . . . . . . . . . . . . . . . . . . . . . . . . 30
Monitor the printer . . . . . . . . . . . . . . . . . . . . . . . . . . . . . . . . . . . . . . . . . . . . . . . . . . . 31
Configure network options. . . . . . . . . . . . . . . . . . . . . . . . . . . . . . . . . . . . . . . . . . . . . . 33
Overview of printer management tools . . . . . . . . . . . . . . . . . . . . . . . . . . . . . . . . . . . . 33
Understanding and printing the configuration page . . . . . . . . . . . . . . . . . . . . . . . . . . . . . . 38
Upgrading the firmware in the printer. . . . . . . . . . . . . . . . . . . . . . . . . . . . . . . . . . . . . . . . . 39
Configuring the printer (Windows) . . . . . . . . . . . . . . . . . . . . . . . . . . . . . . . . . . . . . . . . . . . 40
Direct connection . . . . . . . . . . . . . . . . . . . . . . . . . . . . . . . . . . . . . . . . . . . . . . . . . . . . 40
Network connection. . . . . . . . . . . . . . . . . . . . . . . . . . . . . . . . . . . . . . . . . . . . . . . . . . . 42
Configuring the printer (Mac OS). . . . . . . . . . . . . . . . . . . . . . . . . . . . . . . . . . . . . . . . . . . . 44
Uninstalling the printer software. . . . . . . . . . . . . . . . . . . . . . . . . . . . . . . . . . . . . . . . . . . . . 46
ENWW 3
Page 6

5 Control panel
Understanding control-panel messages. . . . . . . . . . . . . . . . . . . . . . . . . . . . . . . . . . . . . . . 47
Types of control-panel messages . . . . . . . . . . . . . . . . . . . . . . . . . . . . . . . . . . . . . . . . 47
Control-panel messages . . . . . . . . . . . . . . . . . . . . . . . . . . . . . . . . . . . . . . . . . . . . . . . 48
Understanding control-panel menus . . . . . . . . . . . . . . . . . . . . . . . . . . . . . . . . . . . . . . . . . 50
Information menu. . . . . . . . . . . . . . . . . . . . . . . . . . . . . . . . . . . . . . . . . . . . . . . . . . . . . 50
Paper Handling menu . . . . . . . . . . . . . . . . . . . . . . . . . . . . . . . . . . . . . . . . . . . . . . . . . 51
Configure Device menu. . . . . . . . . . . . . . . . . . . . . . . . . . . . . . . . . . . . . . . . . . . . . . . . 53
Printing menu . . . . . . . . . . . . . . . . . . . . . . . . . . . . . . . . . . . . . . . . . . . . . . . . . . . . . . . 54
Maintenance menu . . . . . . . . . . . . . . . . . . . . . . . . . . . . . . . . . . . . . . . . . . . . . . . . . . . 55
Changing networking parameters from the control panel . . . . . . . . . . . . . . . . . . . . . . . . . 56
EIO menu . . . . . . . . . . . . . . . . . . . . . . . . . . . . . . . . . . . . . . . . . . . . . . . . . . . . . . . . . . 56
Disabling network protocols (optional). . . . . . . . . . . . . . . . . . . . . . . . . . . . . . . . . . . . . 58
Resetting the HP Jetdirect print server . . . . . . . . . . . . . . . . . . . . . . . . . . . . . . . . . . . . 59
Printing control-panel menu map . . . . . . . . . . . . . . . . . . . . . . . . . . . . . . . . . . . . . . . . . . . . 59
Changing printer settings from the control panel . . . . . . . . . . . . . . . . . . . . . . . . . . . . . . . . 59
6 Maintaini ng and troubleshooting
Replacing the ink cartridges. . . . . . . . . . . . . . . . . . . . . . . . . . . . . . . . . . . . . . . . . . . . . . . . 60
Maintaining the printheads. . . . . . . . . . . . . . . . . . . . . . . . . . . . . . . . . . . . . . . . . . . . . . . . . 61
Calibrating the color. . . . . . . . . . . . . . . . . . . . . . . . . . . . . . . . . . . . . . . . . . . . . . . . . . . . . . 66
Calibrating the linefeed . . . . . . . . . . . . . . . . . . . . . . . . . . . . . . . . . . . . . . . . . . . . . . . . . . . 66
Troubleshooting tips and resources. . . . . . . . . . . . . . . . . . . . . . . . . . . . . . . . . . . . . . . . . . 67
General troubleshooting tips . . . . . . . . . . . . . . . . . . . . . . . . . . . . . . . . . . . . . . . . . . . . . . . 67
Resetting the control panel language. . . . . . . . . . . . . . . . . . . . . . . . . . . . . . . . . . . . . . . . . 68
Resolving printing problems. . . . . . . . . . . . . . . . . . . . . . . . . . . . . . . . . . . . . . . . . . . . . . . . 68
Printer shuts down unexpectedly. . . . . . . . . . . . . . . . . . . . . . . . . . . . . . . . . . . . . . . . . 68
All printer lights are blinking. . . . . . . . . . . . . . . . . . . . . . . . . . . . . . . . . . . . . . . . . . . . . 68
Printer is not responding (nothing prints). . . . . . . . . . . . . . . . . . . . . . . . . . . . . . . . . . . 68
Printer does not accept printhead . . . . . . . . . . . . . . . . . . . . . . . . . . . . . . . . . . . . . . . . 69
Printer takes a long time to print . . . . . . . . . . . . . . . . . . . . . . . . . . . . . . . . . . . . . . . . . 70
Blank page printed. . . . . . . . . . . . . . . . . . . . . . . . . . . . . . . . . . . . . . . . . . . . . . . . . . . . 70
Placement of the text or graphics is wrong . . . . . . . . . . . . . . . . . . . . . . . . . . . . . . . . . 70
Poor print quality and unexpected printouts. . . . . . . . . . . . . . . . . . . . . . . . . . . . . . . . . . . . 71
Meaningless characters print. . . . . . . . . . . . . . . . . . . . . . . . . . . . . . . . . . . . . . . . . . . . 72
Ink is smearing . . . . . . . . . . . . . . . . . . . . . . . . . . . . . . . . . . . . . . . . . . . . . . . . . . . . . . 72
Ink is not filli n g the t e xt o r graphics com ple t e ly . . . . . . . . . . . . . . . . . . . . . . . . . . . . . . 73
Output is faded or dull colored. . . . . . . . . . . . . . . . . . . . . . . . . . . . . . . . . . . . . . . . . . . 74
Colors are printing as black and white. . . . . . . . . . . . . . . . . . . . . . . . . . . . . . . . . . . . . 74
Wrong colors are printing . . . . . . . . . . . . . . . . . . . . . . . . . . . . . . . . . . . . . . . . . . . . . . 74
Printout shows bleeding colors . . . . . . . . . . . . . . . . . . . . . . . . . . . . . . . . . . . . . . . . . . 74
Colors do not line up properly . . . . . . . . . . . . . . . . . . . . . . . . . . . . . . . . . . . . . . . . . . . 75
Lines or dots are missing from text or graphics. . . . . . . . . . . . . . . . . . . . . . . . . . . . . . 75
Resolving paper-feed problems. . . . . . . . . . . . . . . . . . . . . . . . . . . . . . . . . . . . . . . . . . . . . 76
Tray cannot be inserted. . . . . . . . . . . . . . . . . . . . . . . . . . . . . . . . . . . . . . . . . . . . . . . . 76
Media is not supported for the printer or tray. . . . . . . . . . . . . . . . . . . . . . . . . . . . . . . . 76
Media i s n o t p i c ked up from tra y 1 or tray 2. . . . . . . . . . . . . . . . . . . . . . . . . . . . . . . . . 76
Media is not coming out correctly . . . . . . . . . . . . . . . . . . . . . . . . . . . . . . . . . . . . . . . . 76
Pages are skewing . . . . . . . . . . . . . . . . . . . . . . . . . . . . . . . . . . . . . . . . . . . . . . . . . . . 76
Resolving printer management problems . . . . . . . . . . . . . . . . . . . . . . . . . . . . . . . . . . . . . 77
Embedded Web server (EWS) cannot be opened. . . . . . . . . . . . . . . . . . . . . . . . . . . . 77
Troubleshooting installation issues . . . . . . . . . . . . . . . . . . . . . . . . . . . . . . . . . . . . . . . . . . 78
Problems printing alignment page. . . . . . . . . . . . . . . . . . . . . . . . . . . . . . . . . . . . . . . . 78
Problems installing software . . . . . . . . . . . . . . . . . . . . . . . . . . . . . . . . . . . . . . . . . . . . 78
Problems connecting to a network . . . . . . . . . . . . . . . . . . . . . . . . . . . . . . . . . . . . . . . 79
Clearing jams. . . . . . . . . . . . . . . . . . . . . . . . . . . . . . . . . . . . . . . . . . . . . . . . . . . . . . . . . . . 80
4 ENWW
Page 7

A HP supplies and accessories
Ordering printing supplies online . . . . . . . . . . . . . . . . . . . . . . . . . . . . . . . . . . . . . . . . . . . . 82
Accessories . . . . . . . . . . . . . . . . . . . . . . . . . . . . . . . . . . . . . . . . . . . . . . . . . . . . . . . . . . . . 83
Supplies . . . . . . . . . . . . . . . . . . . . . . . . . . . . . . . . . . . . . . . . . . . . . . . . . . . . . . . . . . . . . . . 84
Ink supplies . . . . . . . . . . . . . . . . . . . . . . . . . . . . . . . . . . . . . . . . . . . . . . . . . . . . . . . . . 84
HP Media . . . . . . . . . . . . . . . . . . . . . . . . . . . . . . . . . . . . . . . . . . . . . . . . . . . . . . . . . . . 84
B Support and warranty
Obtaining electronic support . . . . . . . . . . . . . . . . . . . . . . . . . . . . . . . . . . . . . . . . . . . . . . . 87
Obtaining HP telephone support . . . . . . . . . . . . . . . . . . . . . . . . . . . . . . . . . . . . . . . . . . . . 87
Before you call. . . . . . . . . . . . . . . . . . . . . . . . . . . . . . . . . . . . . . . . . . . . . . . . . . . . . . . 87
Telephone support numbers . . . . . . . . . . . . . . . . . . . . . . . . . . . . . . . . . . . . . . . . . . . . 88
Hewlett-Packard limited warranty statement . . . . . . . . . . . . . . . . . . . . . . . . . . . . . . . . . . . 92
C Printer spec ifica tio ns
Printer specifications . . . . . . . . . . . . . . . . . . . . . . . . . . . . . . . . . . . . . . . . . . . . . . . . . . . . . 96
D Regulato ry info r mation
FCC statement. . . . . . . . . . . . . . . . . . . . . . . . . . . . . . . . . . . . . . . . . . . . . . . . . . . . . . . . . 101
EMI statement (Korea). . . . . . . . . . . . . . . . . . . . . . . . . . . . . . . . . . . . . . . . . . . . . . . . . . . 101
VCCI statement (Japan). . . . . . . . . . . . . . . . . . . . . . . . . . . . . . . . . . . . . . . . . . . . . . . . . . 102
Regulatory model number . . . . . . . . . . . . . . . . . . . . . . . . . . . . . . . . . . . . . . . . . . . . . . . . 1 02
Power cord statement . . . . . . . . . . . . . . . . . . . . . . . . . . . . . . . . . . . . . . . . . . . . . . . . . . . 102
LED classification. . . . . . . . . . . . . . . . . . . . . . . . . . . . . . . . . . . . . . . . . . . . . . . . . . . . . . . 102
Declaration of conformity . . . . . . . . . . . . . . . . . . . . . . . . . . . . . . . . . . . . . . . . . . . . . . . . . 1 03
Environmental sust a inability pro g r am . . . . . . . . . . . . . . . . . . . . . . . . . . . . . . . . . . . . . . . 104
Reduction and elimination . . . . . . . . . . . . . . . . . . . . . . . . . . . . . . . . . . . . . . . . . . . . . 104
Power consumption. . . . . . . . . . . . . . . . . . . . . . . . . . . . . . . . . . . . . . . . . . . . . . . . . . 104
Hazardous materials . . . . . . . . . . . . . . . . . . . . . . . . . . . . . . . . . . . . . . . . . . . . . . . . . 105
Recycling. . . . . . . . . . . . . . . . . . . . . . . . . . . . . . . . . . . . . . . . . . . . . . . . . . . . . . . . . . 105
Material safety data sheets . . . . . . . . . . . . . . . . . . . . . . . . . . . . . . . . . . . . . . . . . . . . 105
End-of-life returns . . . . . . . . . . . . . . . . . . . . . . . . . . . . . . . . . . . . . . . . . . . . . . . . . . . 1 05
Index . . . . . . . . . . . . . . . . . . . . . . . . . . . . . . . . . . . . . . . . . . . . . . . . . . . . 106
ENWW 5
Page 8

Getting started
1
Thank you for buying the printer. This guide provides details about how to use the printer and
to resolve printer and printing problems.
Finding other resources for the product
You can obtain product information and further troubleshooting resources that are not included
in this guide from the following resources:
Resource Description Location
Setup poster Provides illustr ated setup informati on. A printed v ersio n o f th is do cument
is provided with the printer. Also,
an electronic version is available
as an Adobe
Document Format (PDF) file on
the Starter CD.
®
Acrobat® Portable
Getting started
guide
Readme file and
release notes
Embedded Web
server (network
connection)
Toolbox
(Microsoft
Windows
Printer-driver
onscreen Help
(Windows)
HP Instant
Support
HP Jetdirect
Administrator’s
Guide
Control-panel Provides status, error, and warning information
®
®
)
Provides instructions for setting up the printer
and information about the warranty and
safety issues.
Provide late-breaking information and
troubleshoot ing tips.
Allows you to view status inf ormation, change
settings, and manage the printer from any
computer on the networ k.
See Embedded Web serve r (EWS).
Provides information about printhead health.
See Toolbox (Windows) for more information.
Provides an explan ation of the features in the
printer driver.
Helps you quickly ident ify, diagnose, and
resolve printing problems.
See HP Instant Support for more information.
Provides information for configuring and
troubleshoot ing the HP Jetdirect print server
that is installed in the printer.
about printer operation.
Included as a printed guide in the
box with the printer.
Included on the Starter CD.
Available through any standard
Web browser.
Available if you choose an
installation option that includes
the T oolbox.
Available from the printer driver.
Available through any standard
Web browser or through the
Toolbox (Windows).
Included on the Starter CD.
See Control panel.
Configuration
page
6 1 - Getting started ENWW
Provides informati on about the print er hardwar e
(such as the firmware version and model
number), printer settings, and accessories that
are installed (such as memory and trays). If the
printer is connected to a network, an additional
network configuration page is available.
See Understandi ng and pri nting
the configuration page.
Page 9

Resource Description Location
System tests and
printouts (such t he
demo page
printout and
paper-path test)
Provides inform ation to help dia gnose probl ems
in the print mechanism and paper path.
z Demo page printout
z Paper-path test
HP websites Provides the late st pri nter sof tware , product and
support inform ati on.
HP telephone
support
Lists information to contact HP. During the
warranty period, this support is often free
of charge.
See Administer the printer.
http://www.hp.com/support/
businessinkjet2800
http://www.hp.com
See Telephone support numbers
.
ENWW Finding other resources for the product 7
Page 10
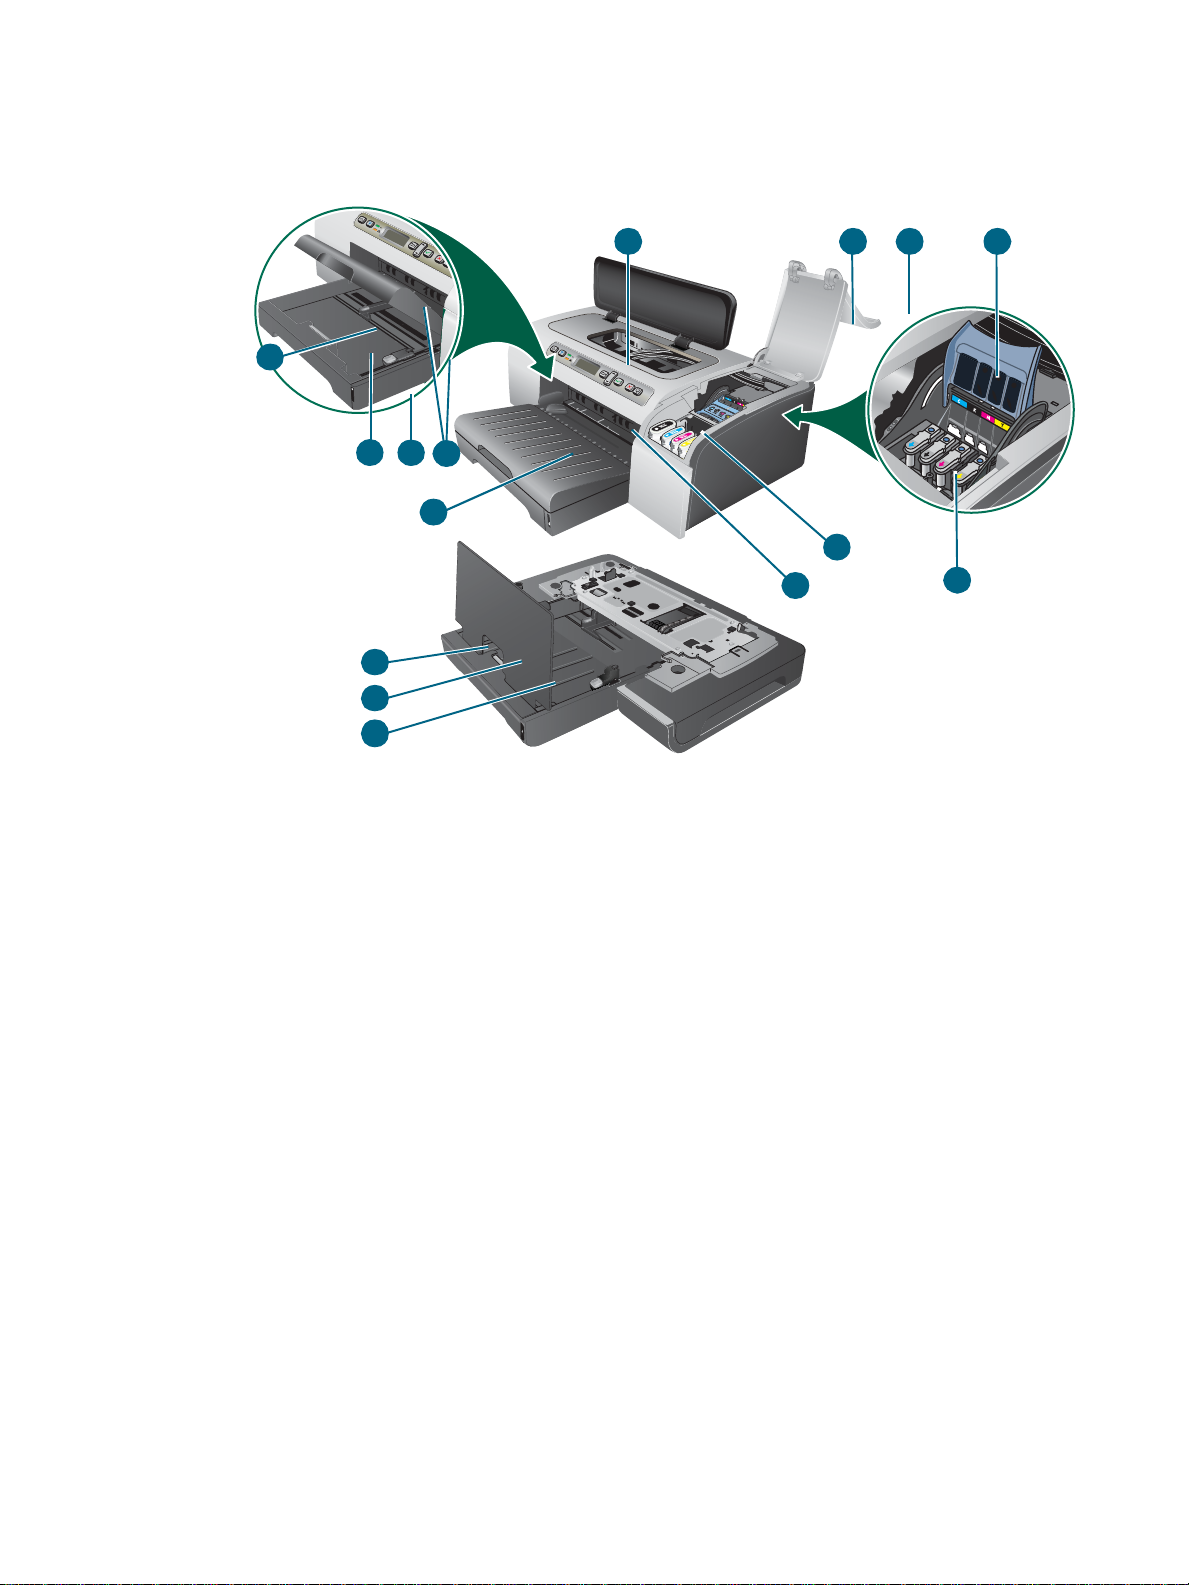
Understanding the printer parts
Front view
13
12
13
14
1 Control panel
1 2 3
98
10
11
6
7
4
5
2 Printhead cover
3 Ink cartridge cover
4 Printhead latch
5 Printheads
6 Ink cartridges
7 Front manual feed slot
8 Tray 1
9 Stack indicator
10 Guides
11 Output tray
12 Tray 2
13 Tray ex tension lock
14 Tray 2 Cover
8 1 - Getting started ENWW
Page 11
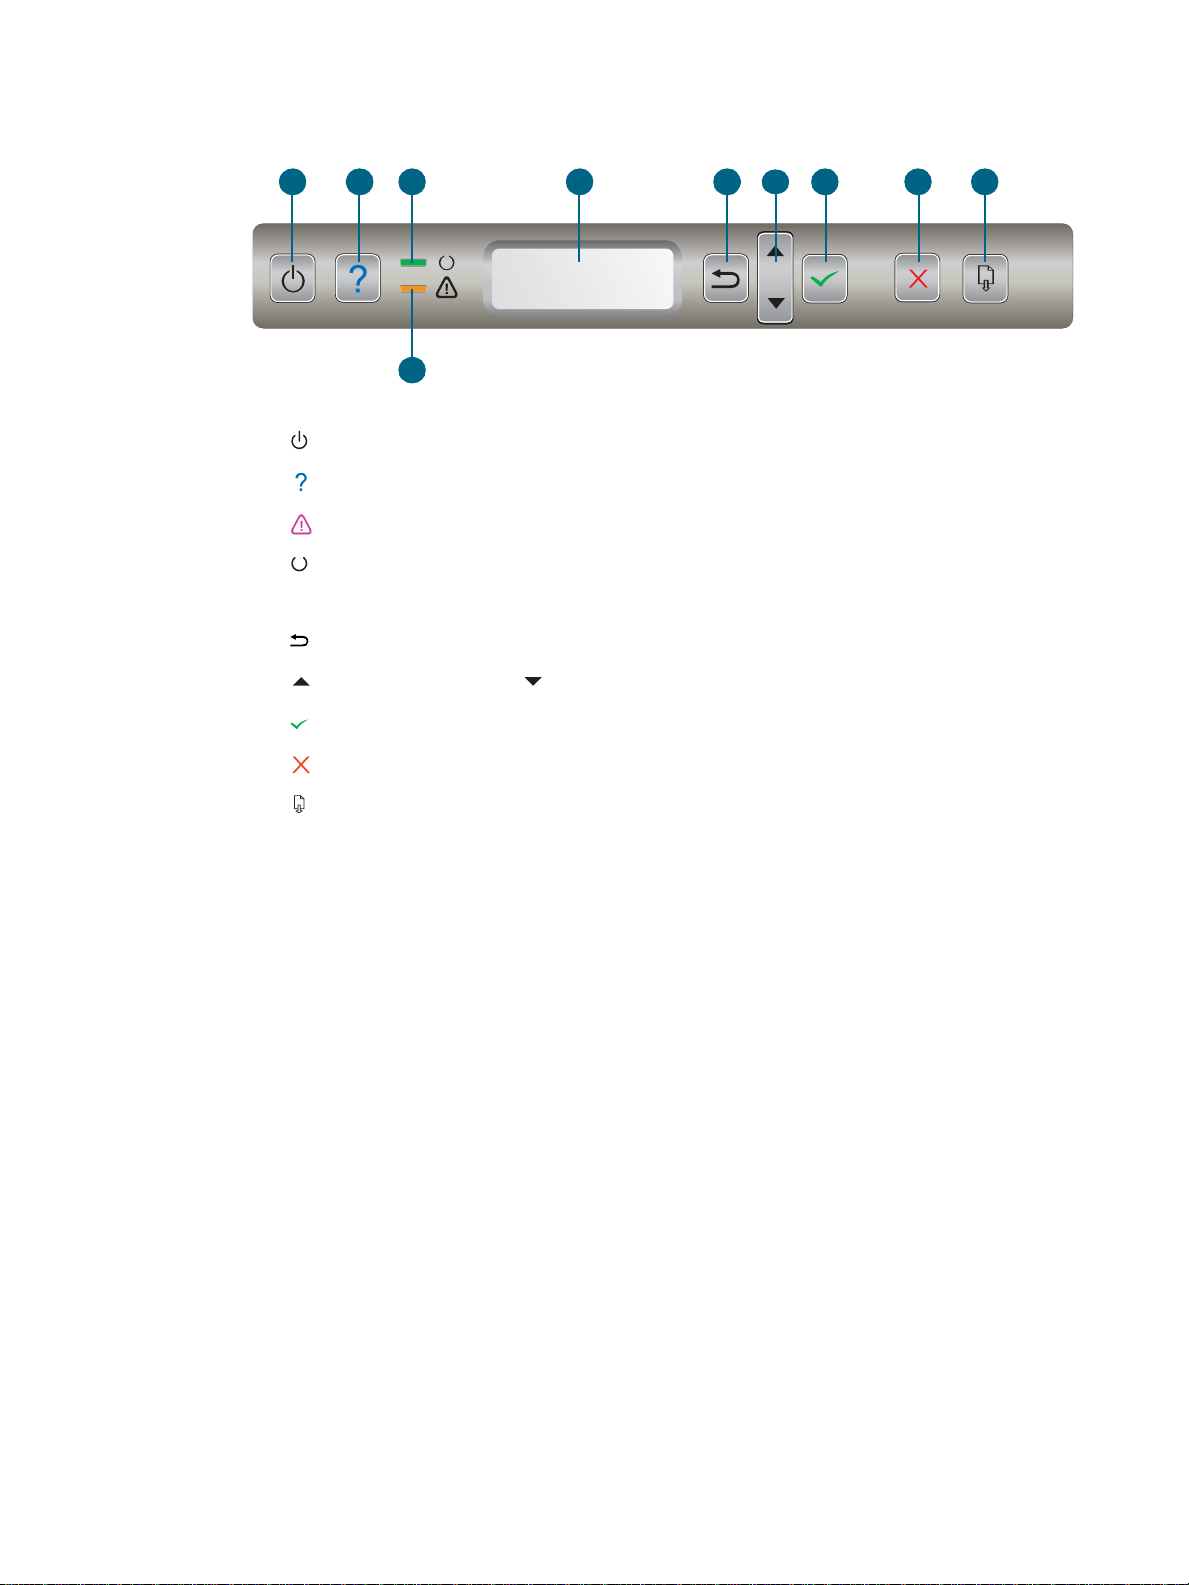
Control panel
See Control panel for more information.
1 234 5
1 (Power button)
2 (Help button)
3 (Attention light)
4 (Ready light)
5 Control-panel display
6 (Back button)
7 (Up Arrow button) and (Down Arrow button)
8 (Select button)
7
8 1096
9 (Cancel bu tton)
10 (Resume button)
ENWW Understanding the printer parts 9
Page 12
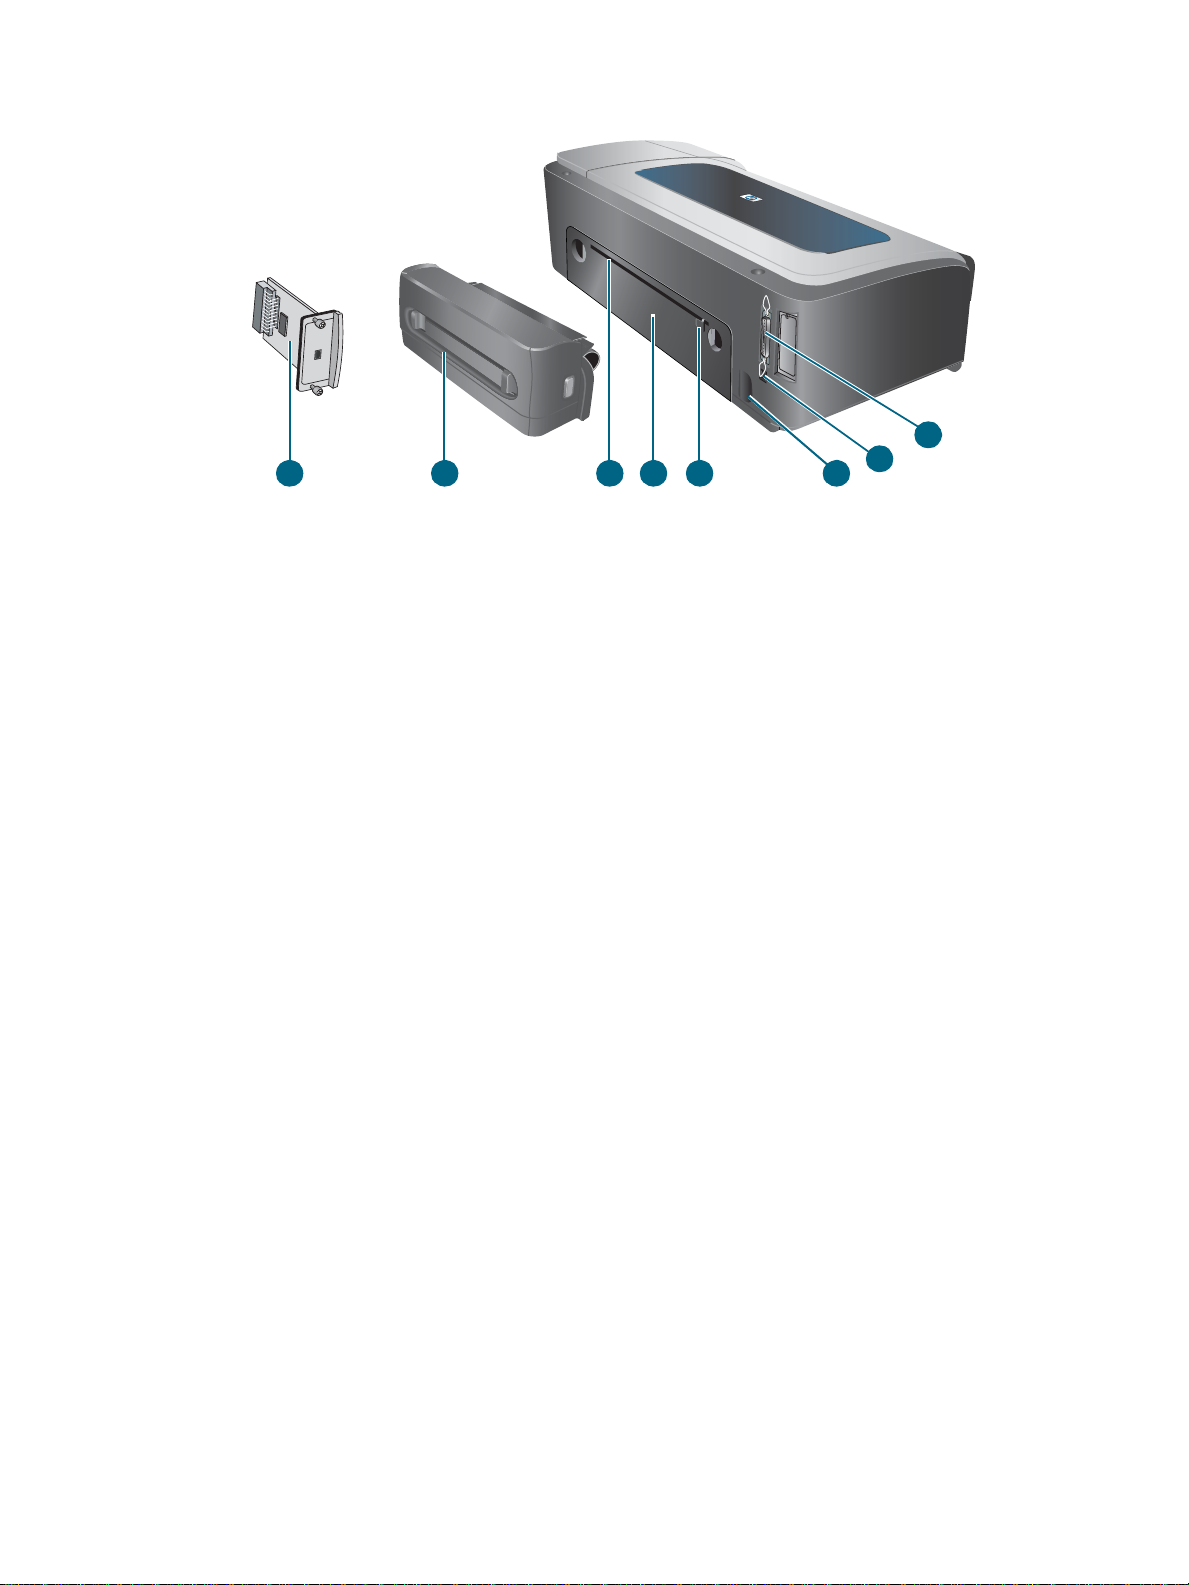
Back view
8
1 Parallel (IEEE 1284) connector
2 USB connector
3 Power input
4 Guide
1
2
3567 4
5 Rear access panel
6 Rear manual feed slot
7 Auto-duplex unit (HP Business Inkjet 2800dt and HP Business Inkjet 2800dtn printers)
8 HP Jetdirect print server (HP Bus ine ss Inkjet 2800dtn printer)
10 1 - Getting started ENWW
Page 13
Installing accessor ies
2
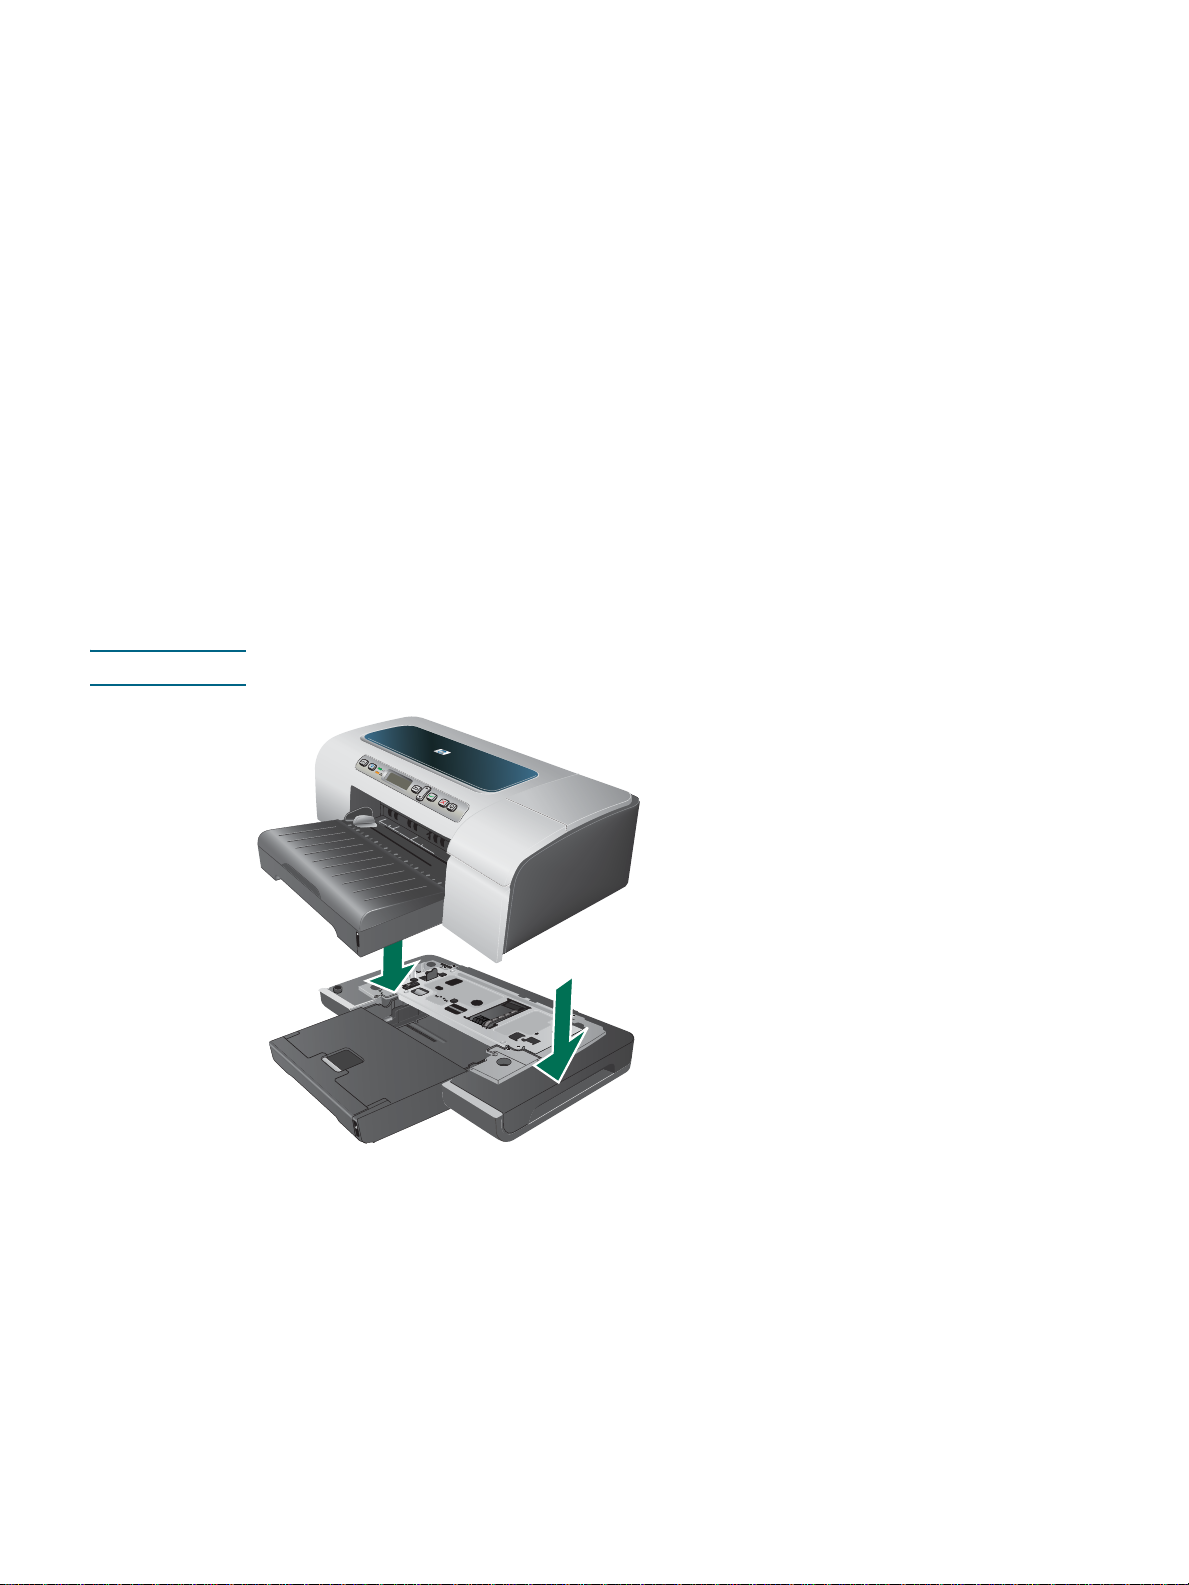
Installing tray 2
Tray 2 comes with the HP Business Inkjet 2800dt and HP Business Inkjet 2800dtn printers.
It can hold up to 250 sheet s of plain paper.
To install tray 2
1 Unpack the tray, remove the packing tapes and materials, and move the tray to the
prepared location.
2 Turn off the printer, and disconnect the power cord.
3 Set the printer on top of the tray.
WARNING! Be careful to keep your fingers and hands clear of the bottom of the printer.
4 Connect the power cord and turn on the printer.
5 Enable the tray in the printer driver. See Enabling accessories in the printer driver.
ENWW Installing tray 2 11
Page 14
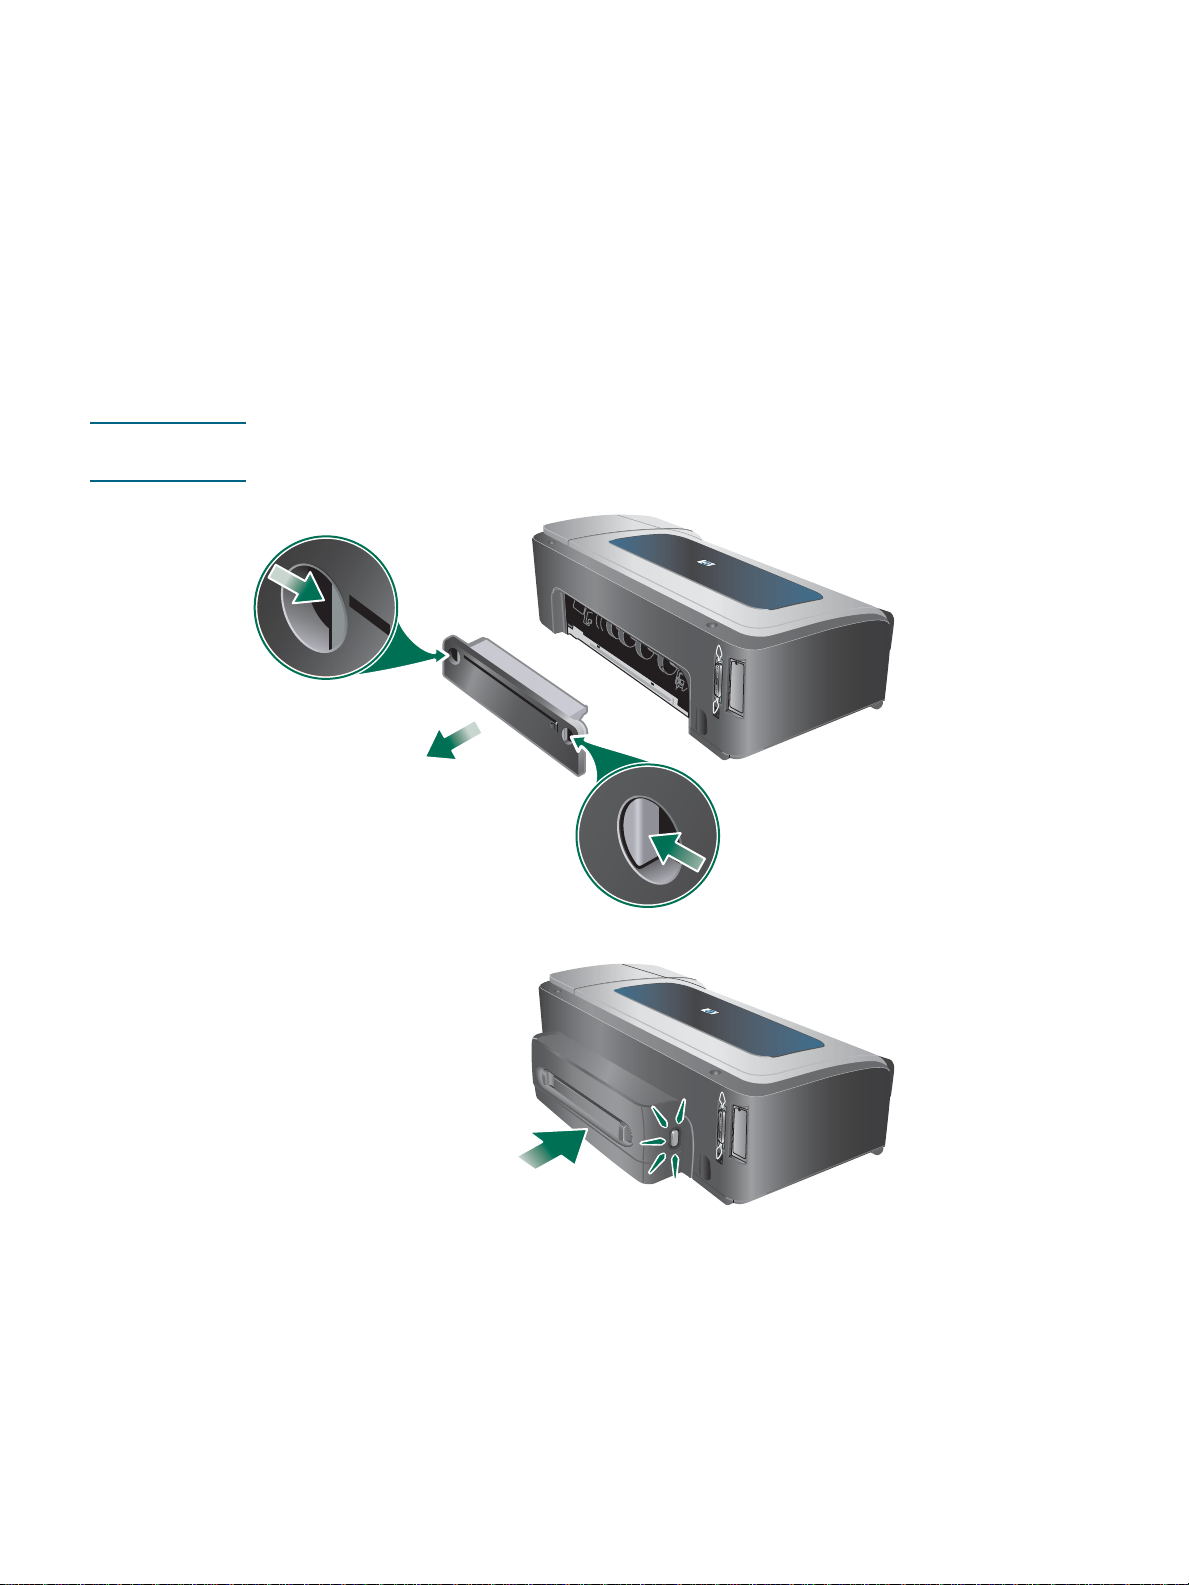
Installing the auto-duplex unit
You can print on both sides of a sheet of paper automatically when the auto-duplex unit is
installed on the printer. The auto-duplex unit comes with the HP Business Ink jet 2800dt and
HP Business Inkjet 2800dtn printers. For information on using it, see Enabling accessories in
the printer driver and Printing on both sides (duplexing).
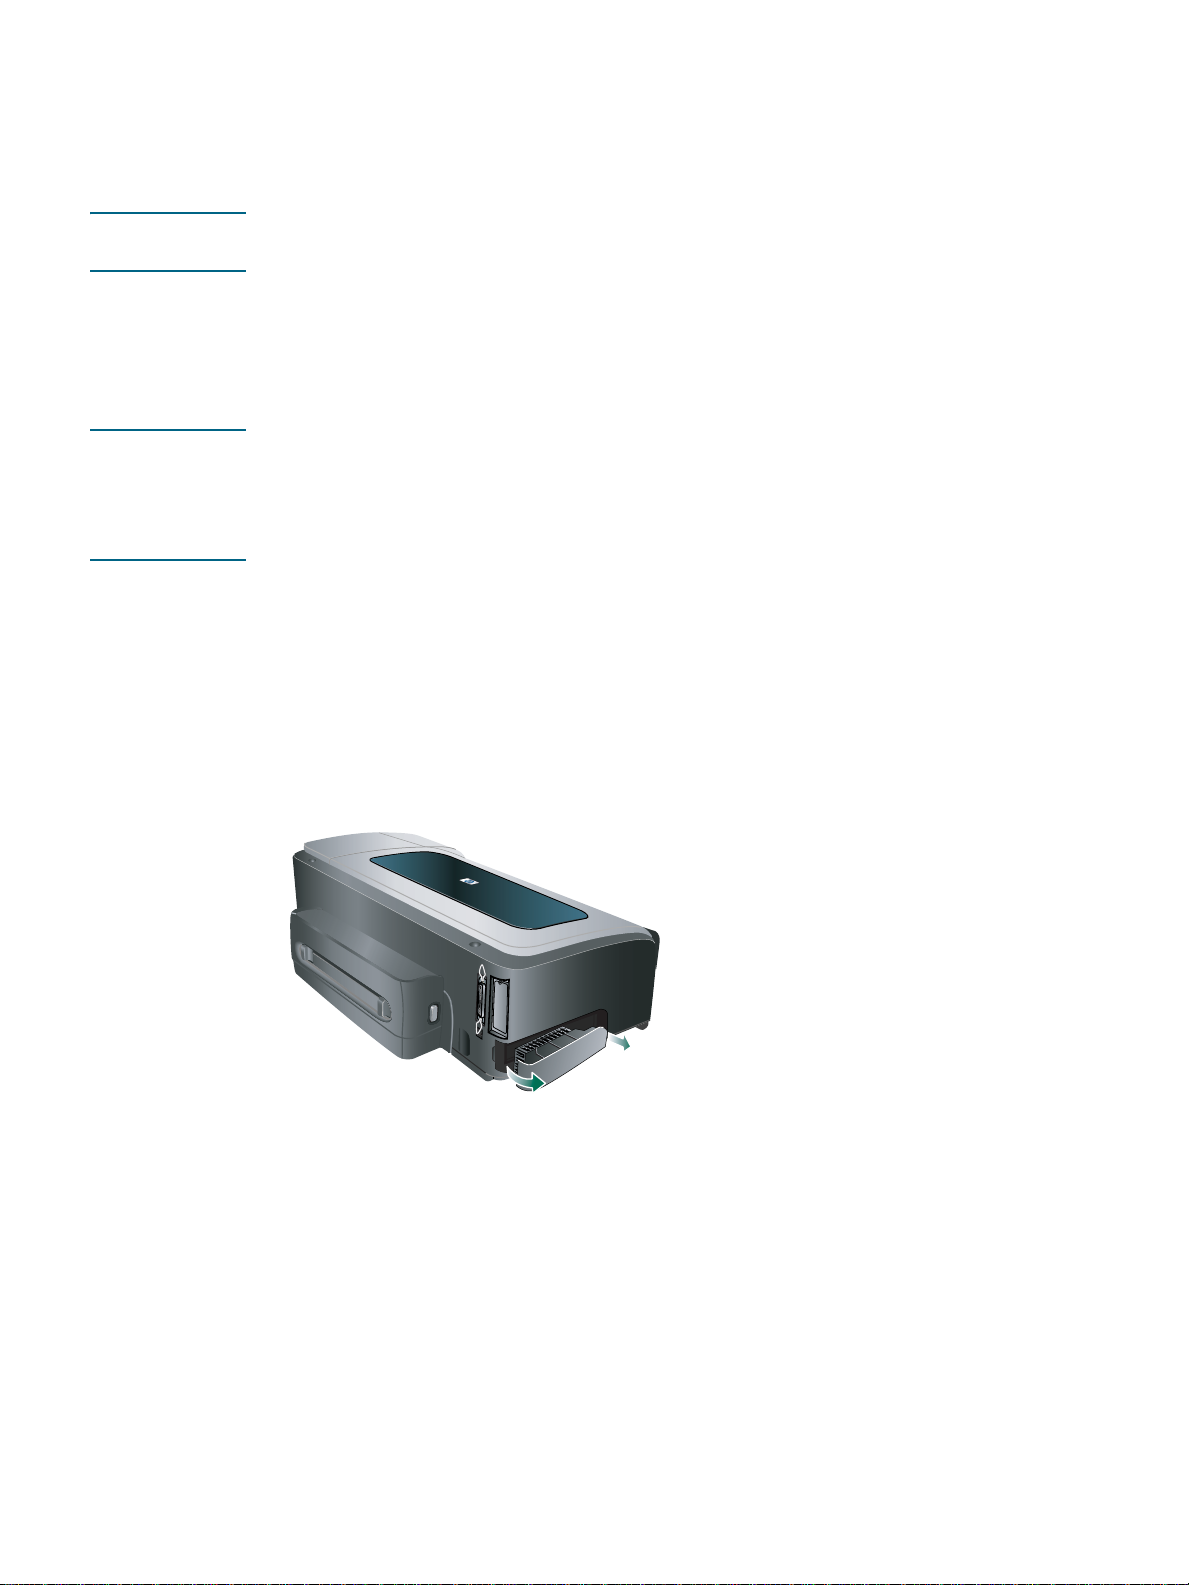
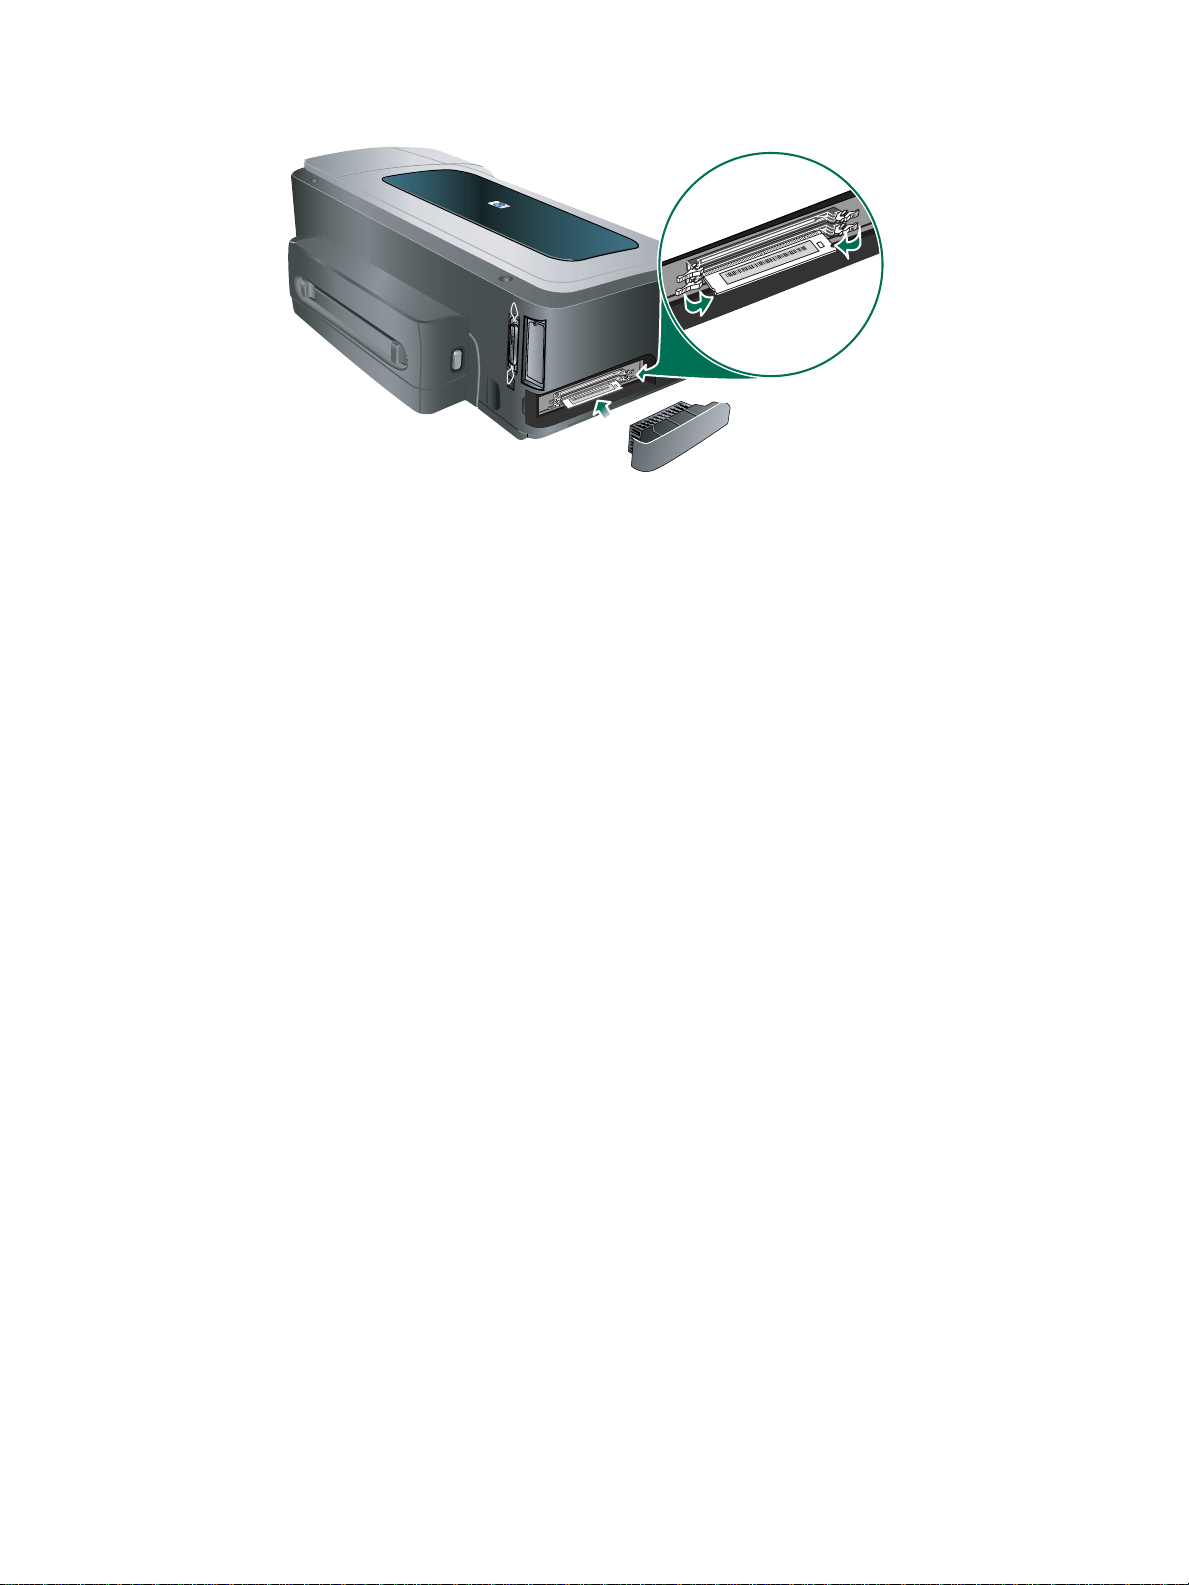
To install an auto-duplex unit
1 Push the buttons on both sides of the rear access panel and remove the panel from the
printer.
2 Slide the auto-duplex unit into the printer until the unit locks into place.
Note Do not press the buttons on either side of the auto-duplex unit when installing; use them only
for removing the unit from the printer.
3 Enable the auto-duplex unit in the printer driver. See Enabling accessories in the
printer driver.
12 2 - Installing accessories ENWW
Page 15
Installing the HP Jetdirect print server
Your printer can be shared in a network environment by connecting it directly to the network
with an HP Jetdirect print server. The print server can be used in both client-server and
peer-to-peer printing configurations. It can provide better performance than printing through
non-network connections, and can also provide flexibility in preparing a location for the printer.
An HP Jetdirect print server is preinstalled in the HP Business Inkjet 2800dtn printer. For a list
of print servers that can be purchased for the printer, see Accessories.
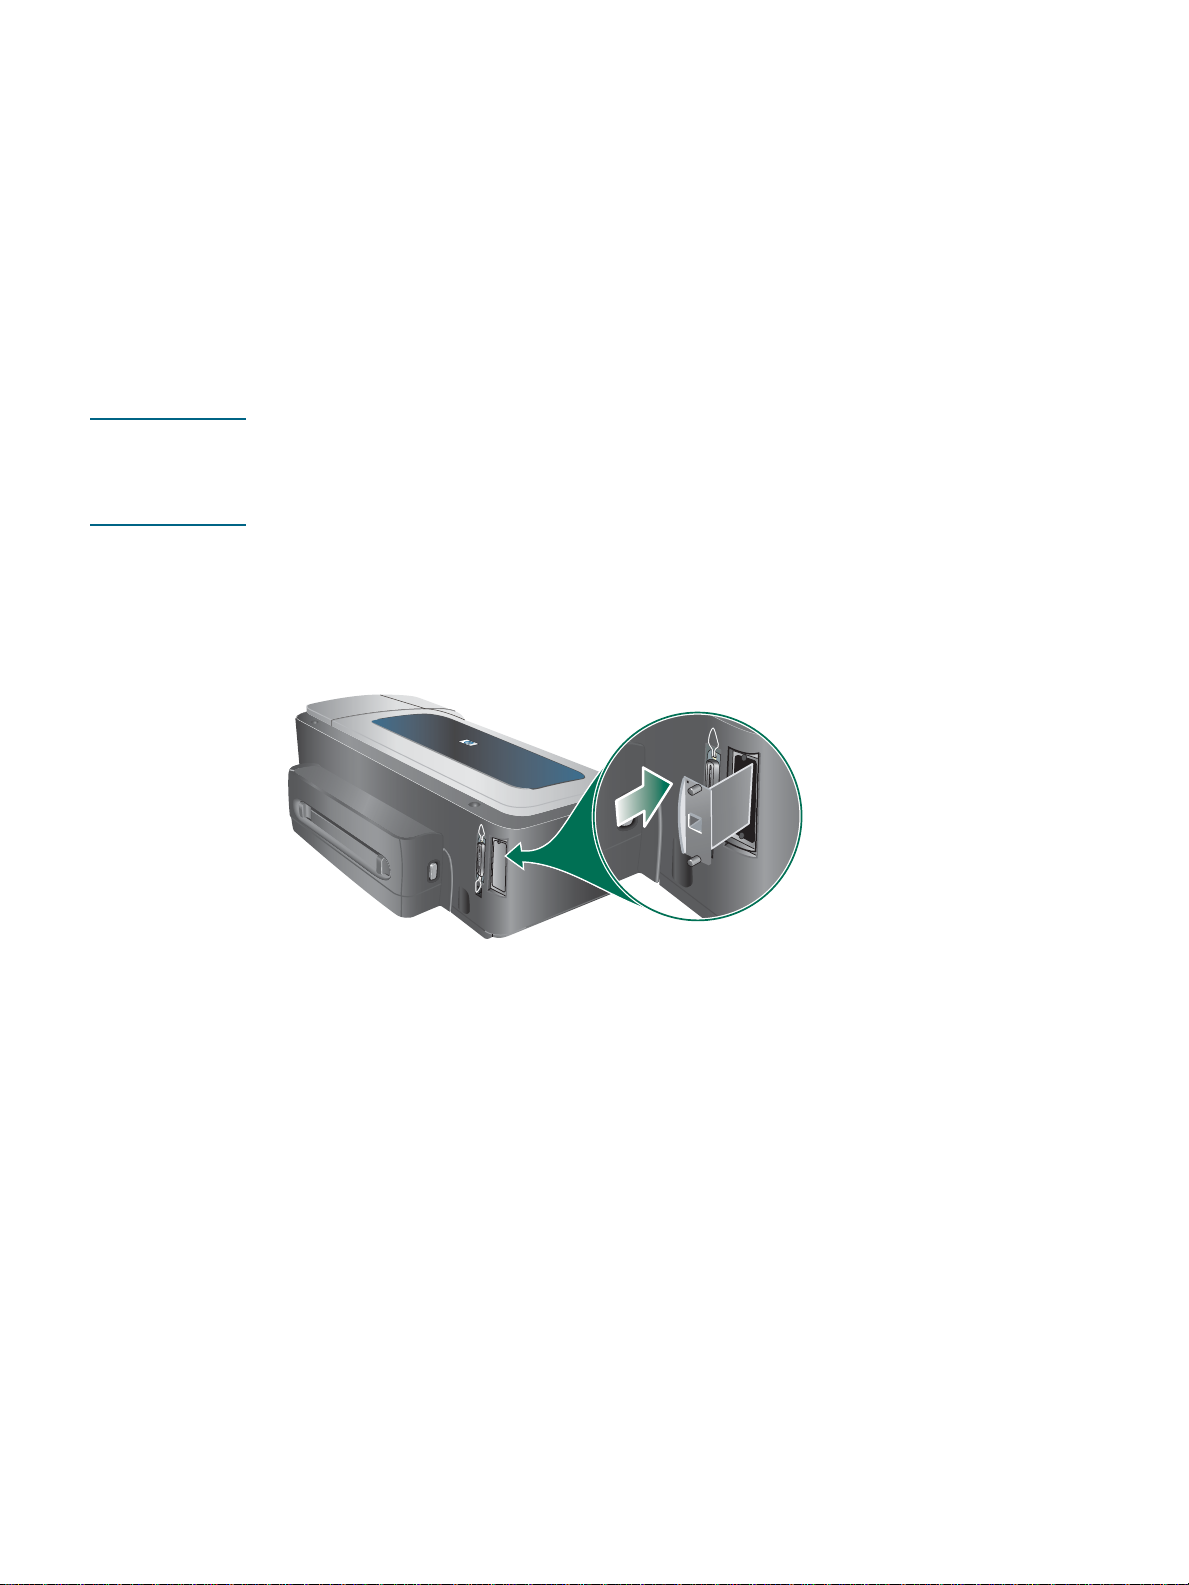
To install the HP Jetdirect print server
CAUTION The HP Jetdirect print server card contains electronic component s that can be damaged by
static electricity. If possible, wear a grounding wrist strap (or similar device). Handle the print
server card carefully at all times. Avoid touching electronic components or circuit paths.
Failure to follow these recommen dations cou ld result in damage to the parts.
1 Turn off the printer, and disconnect the power cord and any other cables.
2 Use a Phillips screwdriver to loosen and remove the retaining screw that hold the cover for
the empty EIO slot. Remove the cover.
3 Firmly insert the HP Jetdirect print server card into the EIO slot.
4 Insert and tighten the retaining screws that came with the print server card.
5 Connect a network cable between the print server card and the network.
To verify that the print server has been installed correctly
1 Connect the power cord and turn on the printer.
2 Print a configuration page. See Understanding and printing the configuration page.
Two pages should print. The second page is the network configuration page for the print
server card. If the page does not print, uninstall and reinstall the print server card to
ensure that it is completely seated in the slot.
ENWW Installing the HP Jetdirect print server 13
Page 16

To obtain more information
If you encounter any problems or difficulty printing over a network, see the following
resources.
Document Description
HP Jetdirect Administrator’s
Guide
Documentation for the
operating system and
network operating system
This guide, which is included on the Starter CD, provides detailed
information about setting up and using an HP Jetdirect print server.
The guide also provides information about the fo ll owing topics:
z HP software solutions for H P Jetdirect pri nt servers
z TCP/IP configurations
z Line Printer Daemon (LPD) services on the print server
z File Transfer Protocol (FTP) printing
z Configuration page messages and troubleshooting
z Embedded Web server, a Web-based tool for configuring and
managing network devices
This documentati on cam e wit h your computer or your network oper ating
system and provides basic information about network printing issues .
In addition to these resources, printer information and configuration features are available
through HP Web Jetadmin. See HP Web Jetadmin software or visit http://www.hp.com/
support/businessinkjet2800 for more information.
14 2 - Installing accessories ENWW
Page 17
Installing memory modules
If you often print complex graphics or PostScript® (PS) documents, or if you print with the
auto-duplex unit, you might want to add more memory to the printer.
Note Adding memory gives the printer the ability to process these more complex print jobs, but might
not increase processing speed.
The printer contains 96 MB of built-in memory and has two DIMM slots that accept 64 MB,
128 MB, or 256 MB of RAM (see Accessories for ordering information.) You can find out how
much memory is installed from the printer configuration page. Note that the printer only
recognizes up to 544 MB of printer memory. As such, if you have installed two 256 MB RAM,
the total printer usable memory is only 544 MB.
CAUTION The DIMMs contain electronic component s that can be damaged by static electricity.
To prevent the buildup of static electricity, maintain frequent contact with any bare sheet metal
surface on the printer. If possible, wear a grounding wrist strap (or similar device). Handle the
DIMMs carefully at all times. Avoid touching electronic components or circuit paths. Failure to
follow these recommendations could result in damage to the parts.
To install a DIMM
1 Print the printer configuration page to find out how much memory is available in the
printer. See Understanding and printing the configuration page.
2 Turn off the printer, and disconnect the power cord and any other cables.
3 On the left side of the printer, remove the side cover.
4 On an empty DIMM slot, push the DIMM locks outward to release the locks.
5 Remove the DIMM from the antistatic package.
ENWW Installing memory modules 15
Page 18
6 Align the DIMM so that the notches on the lower edge line up with the raised marks in the
DIMM sl ot.
7 Insert and press the DIMM into the slot until the DIMM snaps into place.
8 Replace the side cover.
9 Connect the power cord and any cables, and turn on the printer.
10 Enable t he DIMMs in the printer driver. See Enabling accessorie s in the printer driver.
To verify that the DIMM is installed correctly
1 Make sure the power cord and any cables are connected and the printer is turned on.
2 Make sure that
a DIMM might have been installed incorrectly.
3 Print the printer configuration page. In the memory section, compare the memory amount
with the amount on the configuration page that you printed before installing the DIMM. If
the amount of memory has not increased, one of the following problems might have
occurred:
• The DIMM might not be installed correctly. Remove the DIMM and repeat the
installation procedure.
• The DIMM might be defective. Try a new DIMM.
READY appears on the control-panel display. If an error message appears,
16 2 - Installing accessories ENWW
Page 19

Enabling accessories in the printer driver
Note The Mac OS automatically turns on the auto-duplex unit and tray 2 in the printer driver when
you install the printer software. However, you will need to manually enable the DIMMs.
To enable accessories on Windows computers
After installing the printer software on Windows computers, tray 2 and the auto-duplex unit
must be enabled in the printer driver in order for them to work.
1 Click Start, point to Settings, and then click Printers or Printers and Faxes.
2 Right-click the printer icon, and then click Properties, Document Defaults,
or Printing Preferences.
3 Click the Configure, Device Settings, or Device Options tab. The name of the tab
depends on the printer driver and the operating system.
4 On the selected tab, click Automatic Configuration, click Update now..., and then
click OK.
ENWW Enabling accessories in the printer driver 17
Page 20

Using t he printer
3
Selecting print medi a
The printer is designed to work well with most types of office paper. It is best to test a variety of
print media types before buying large quantities. Use HP media for optimum print quality.
See HP supplies and accessories.
Tips for selecting and using print media
For the best results, observe the following guidelines.
z Always use media that conforms to the printer specifications. See Understanding
specifications for supported media.
z Select the appropriate medi a type and size from the printer driver. See Changing
print settings.
z Load only one type of media of the same size at a time into a tray.
z For tray 1 and tray 2, load media print-side down and aligned against the rig ht and back
edges of the tray. See Load ing media.
Note Tray 2 is designed to hold only plain paper.
z Do not overload the trays. See Understanding specifications for supported media.
z To prevent jams, poor print quality, and other printer problems, avoid the following media:
• Multipart forms
• Media that is damaged, curled, or wrinkled
• Media with cutouts or perforations
• Media that is heavily textured, embossed, or does not accept ink well
• Media that is too lightweight or stretches easily
For more information on printing on supported media, see Printing on special and
custom-size media.
Cards and envelopes
z Avoid envelopes that have a very slick finish, self-stick adhesives, clasps, or windows.
Also avoid cards and envelopes with thick, irregular, or curled edges, or areas that are
wrinkled, torn, or otherwise damaged.
z Use tightly constructed envelopes, and make sure the folds are sharply creased.
z Load envelopes into the printer according to the icon on the tray.
18 3 - Using the printer ENWW
Page 21

Photo paper
z Use the Best mode to print photographs. Note that in this mode, printing takes longer and
more memory may be required from your computer and printer.
z Remove each sheet as it prints and set it aside to dry . Allowing wet media to stack up may
cause smearing.
Transparencies
z Insert transparencies with the rough side down and the adhesive strip pointing towards the
back of the printer.
z Use the Best mode to print transparencies. This mode provides longer drying time and
ensures that the ink dries completely before the next page is delivered to the output tray.
Allowing wet media to stack up may cause smearing.
Custom-size media
z Use only custom-size media supported by the printer.
z If your application supports custom-s ize media, set the media size in the application
before printing the document. If not, set the size in the printer driver. You might need to
reformat existing documents to print them correctly on custom-size media.
Understanding specifications for supported media
This section provides information regarding the sizes, types, and weights of media that the
printer supports. It also provides information on the tray capacity.
Note Tray 2 and auto-deplex unit comes with the HP Business Inkjet 2800dt and
HP Business Inkjet 2800dtn printers.
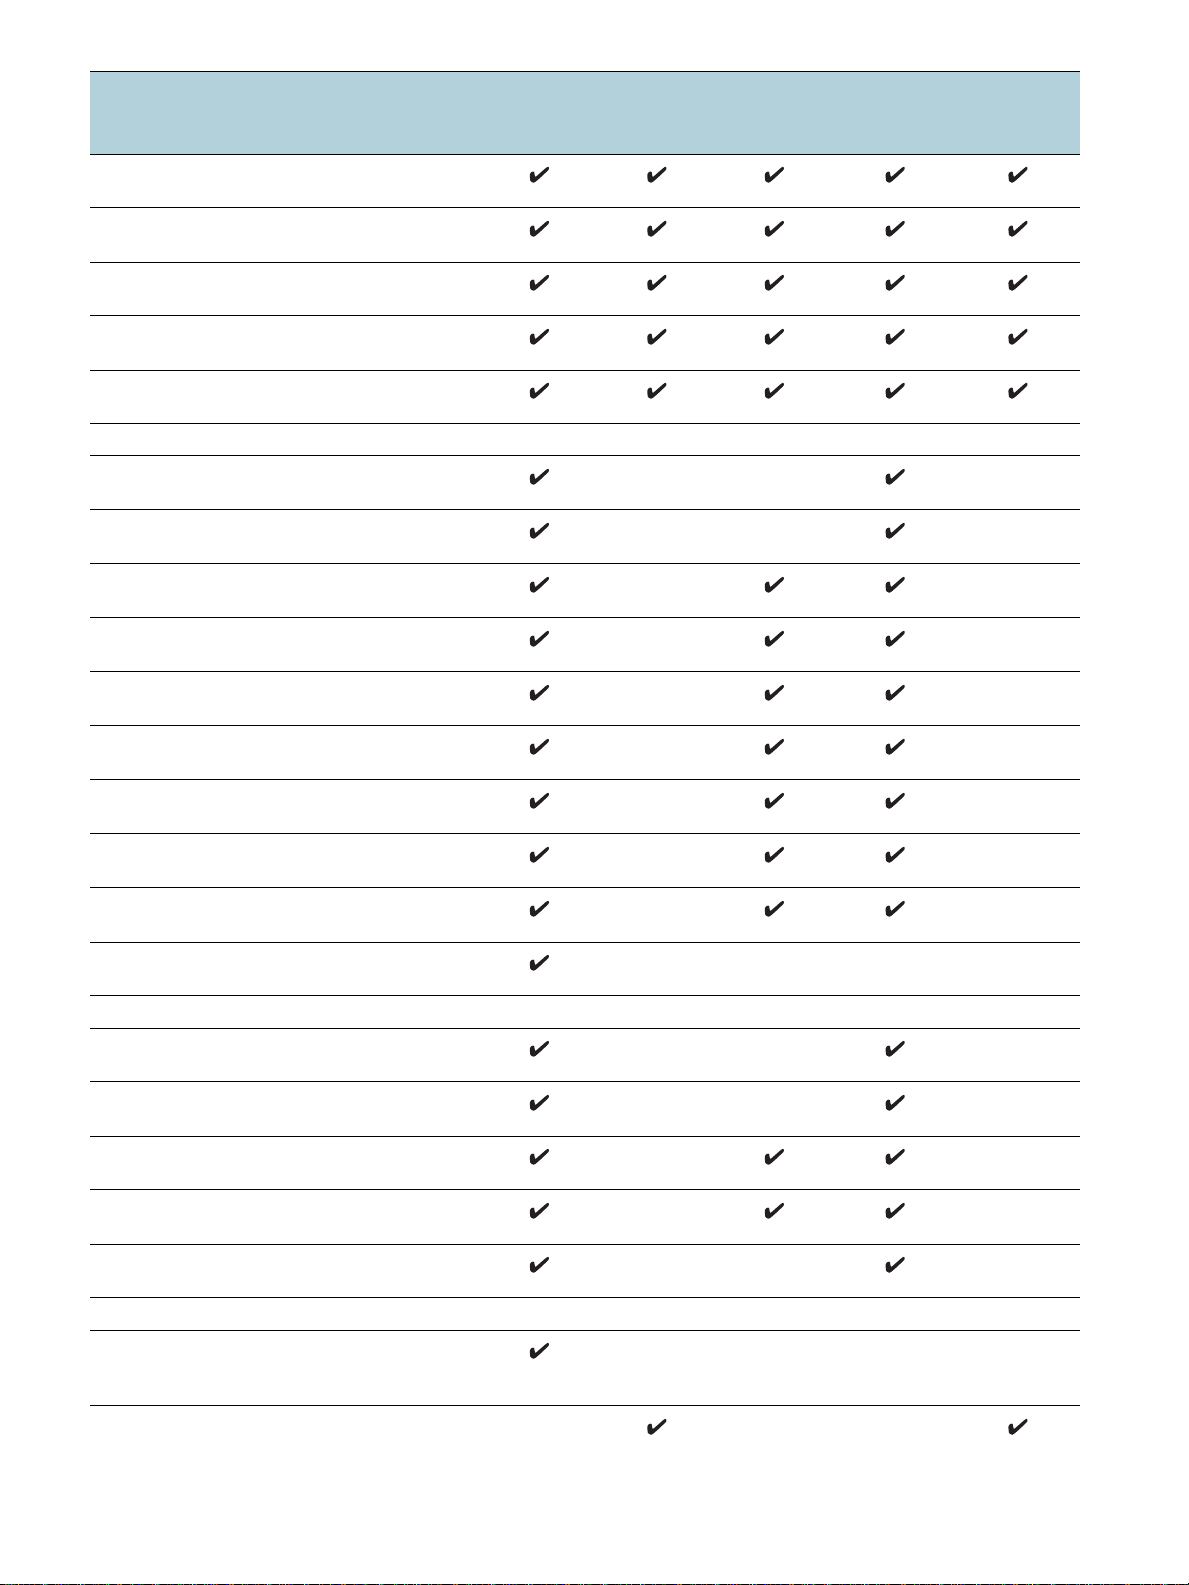
Supported media sizes
* These media sizes support manual duplex. See Printing on both sides (duplexing ).
Media size Tray 1 Tray 2 Front
manual
feed slot
Standard paper sizes
U.S. Letter
(216 by 279 mm; 8.5 by 11 inches)
U.S. Legal
(216 by 356 mm; 8.5 by 14 inches)
A4
(210 by 297 mm; 8.3 by 11.7 inches)
U.S. Executive
(184 by 267 mm; 7.25 by 10.5 inc hes)
U.S. Statement
(140 by 216 mm; 5.5 by 8.5 inches)
A5
(148 by 210 mm; 5.8 by 8.3 inches)
A6
(105 by 148 mm; 4.1 by 5.8 inches)
Rear
manual
feed slot
Auto-duplex
unit
ENWW Selecting print media 19
Page 22
Media size Tray 1 Tray 2 Front
manual
feed slot
JIS B4
(257 by 364 mm; 10.1 by 14.3 inc hes)
JIS B5
(182 by 257 mm; 7.2 by 10.1 inches)
Tabloid
(279 by 432 mm; 11 by 17 inches)
A3
(297 by 420 mm; 11.7 by 16.5 inc hes)
Super B, A3 Nobi
(330 by 483 mm; 13.0 by 19.0 inc hes)
Envelopes
U.S. #10 Envelope
(105 by 241 mm; 4.12 by 9.5 inches)
Monarch Envelope
(98 by 191 mm; 3.88 by 7.5 inches)
HP Greeting Card Envelope
(111 by 152 mm; 4.38 by 6 inches)
Envelope A2
(111 by 146 mm; 4.37 by 5.75 inc hes)
DL Envelope
(110 by 220 mm; 4.3 by 8.7 inches)
C5 Envelope
(162 by 229 mm; 6.4 by 9 inches)
C6 Envelope
(114 by 162 mm; 4.5 by 6.4 inches)
Envelope Kaku #2
(240 by 332 mm; 9.4 by 13.1 inches)
Japanese Envelope Chou #3
(120 x 235 mm; 4.7 by 9.3 inches )
Japanese Envelope Chou #4
(90 x 205 mm; 3.5 by 8.1 inches )
Cards
Index card
(102 by 152 mm; 4 by 6 inches)
Index card
(127 by 203 mm; 5 by 8 inches)
4 x 6 Index card with tab
(102 by 152 mm; 4 by 6 inches)
Hagaki
(100 by 148 mm; 3.9 by 5.8 inches)
Ofuku Hagaki
(148 by 200 mm; 5.8 by 7.9 inches)
Custom-size media
Between 90 to 330 mm wide and 146 to
483 mm long (3.54 to 13.0 inches wide and
5.75 t o 19.0 in ches l o ng)
Between 182 to 330 mm wide and 257 to
483 mm long (7.2 to 13.0 inches wide and
10.1 t o 19.0 in ches l o ng)
Rear
manual
feed slot
Auto-duplex
unit
20 3 - Using the printer ENWW
Page 23

Media size Tray 1 Tray 2 Front
manual
feed slot
Between 110 to 330 mm wide and 220 to
483 mm long (4.33 to 13.0 inches wide and
8.65 t o 19.0 in c hes long)
Between 96 to 330 mm wide and 146 to
483 mm long (3.77 to 13.0 inches wide and
5.75 t o 19.0 in c hes long)
Supported media types and weights
Tray Type Weight Capacity
Tray 1 Paper 60 to 90 g/m
(16 to 24 lb bond)
Envelopes 75 to 90 g/m
(20 to 24 lb bond
envelope)
Cards Up to 200 g/m
(110 lb index)
Transparencies or labels Up to 30 sheets
2
2
2
Rear
manual
Auto-duplex
unit
feed slot
Up to 150 sheets of plain paper
(13 mm or 0.5 inch stacked)
Up to 22 sheets
(13 mm or 0.5 inch stacked)
Up to 5 card s
(8 mm or 0.3 inch stacked)
Special Media Up to 50 sheets
Tray 2 Plain paper only 60 to 90 g/m
(16 to 24 lb bond)
Front manual
feed
Paper 60 to 90 g/m
(16 to 24 lb bond)
Envelopes 75 to 90 g/m
(20 to 24 lb)
Transparencies Up to 8 sheets
Special media Up to 6 sheets
Rear manual
feed
Paper 60 to 270 g/m
(16 to 72 lb bond)
Envelopes 75 to 90 g/m
(20 to 24 lb)
Cards Up to 200 g/m
(Up to 110 lb index)
Transparencies One sheet at a time
Special media One sheet at a time
Auto-duplex unit Paper 60 to 90 g/m
(16 to 24 lb bond)
(13mm or 0.5 inch stacked)
2
Up to 250 sheets of plain paper
(25 mm or 1 inch stacked)
2
2
2
2
2
2
Up to 10 sheets
One sheet at a time
One sheet at a time
One sheet at a time
One sheet at a time
N.A.
Two-sided special media N.A.
Output tray All suppor ted media Up to 100 sheets of plain paper
(text printi ng)
ENWW Selecting print media 21
Page 24
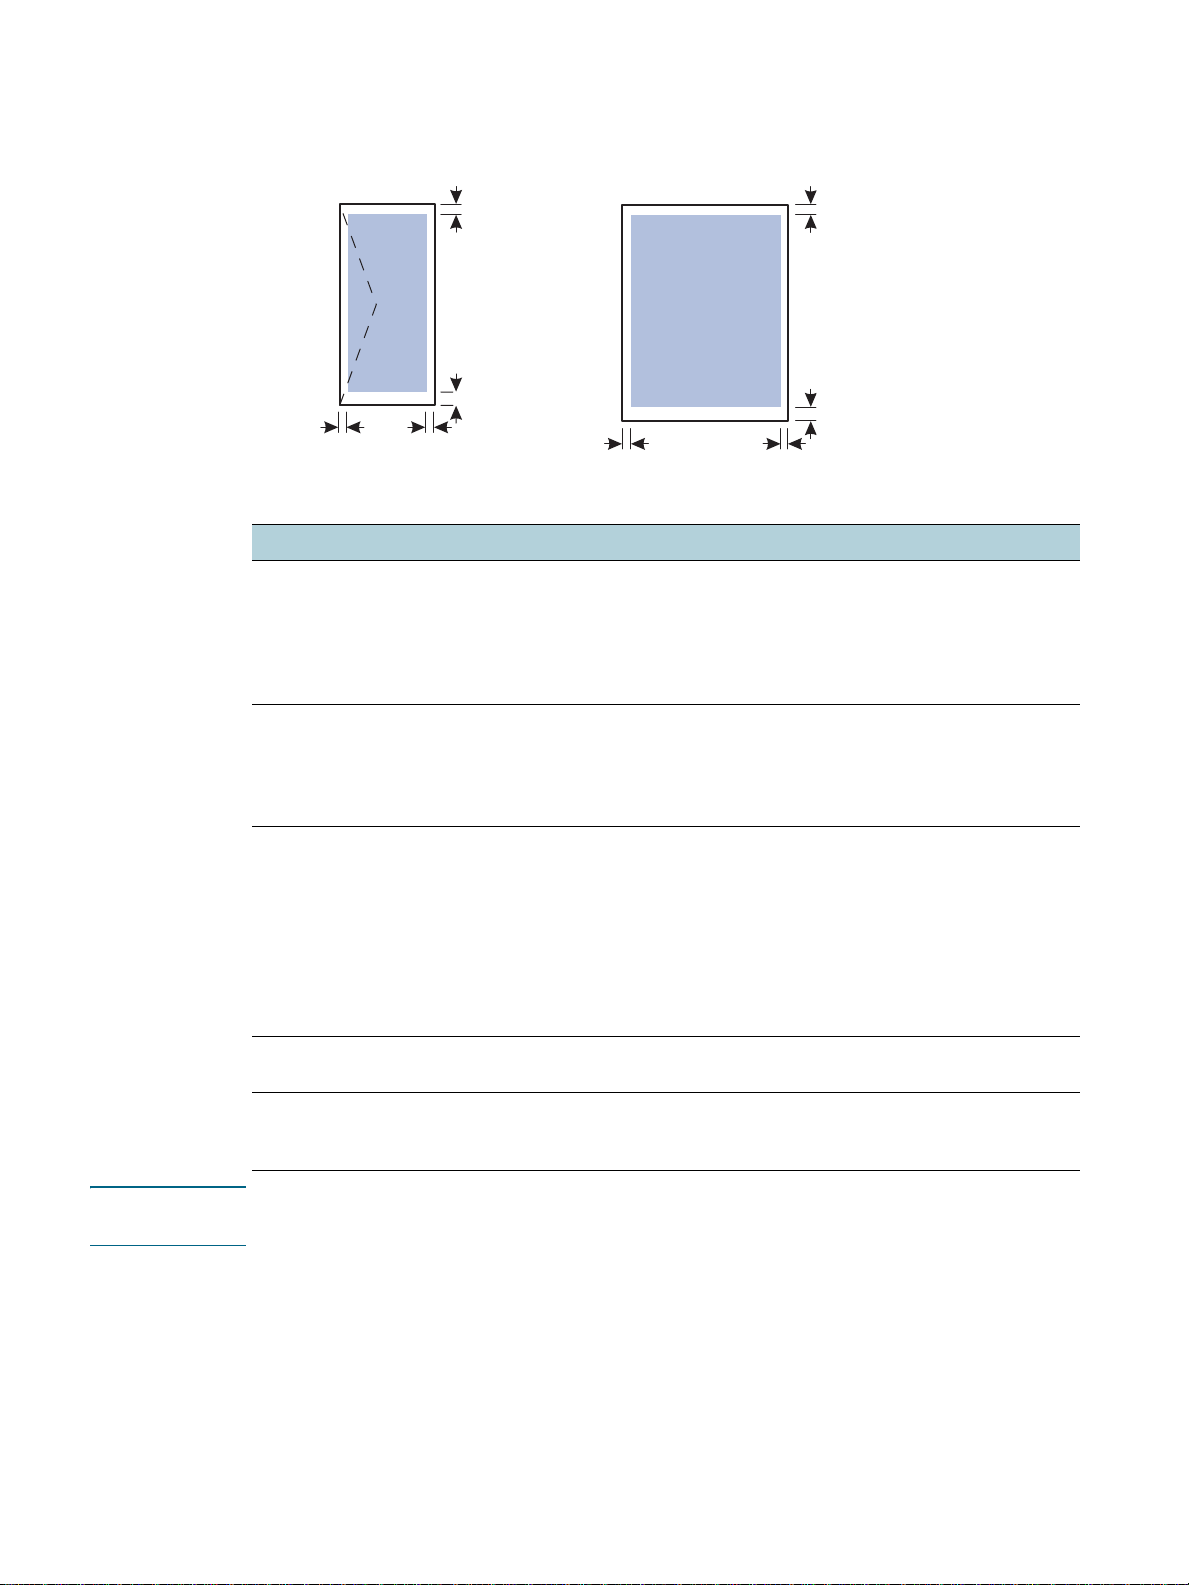
Setting minimum margins
The document margins must match (or exceed) these minimum margin settings in
portrait orientation.
Top
Bottom
Left
Right
Top
Bottom
RightLeft
Media Left margin Right margin Top margin Bott om margin
U.S. Letter, A4, U.S.
Executive, U.S. Statement,
Hagaki, Ofuku Hagaki ,
JIS B4, JIS B5,
Index Card (5 by 8 inches),
A5, A6 cards
U.S. Legal, Tabloid,
A3, Super B, A3 Nobi,
custom-size media
3.3 mm
(0.13 inch)
5.1 mm
(0.2 inch)
3.3 mm
(0.13 inch)
5.1 mm
(0.2 inch)
11.7 mm
(0.46 inch)
11.7 mm
(0.46 inch)
11.7 mm
(0.46 inch);
3.0 mm (0.12 inch
with minimized
margins)
11.7 mm
(0.46 inch);
3.0 mm (0.12 inch
with minimized
margins)
U.S. #10 Envelope,
Monarch Envelope,
HP Greeting Card
Envelope, Envelop e A2,
DL Envelope, C5
Envelope, C6 Envelope ,
Japanese Envelope
Chou #3, Japanese
Env elope C h ou #4
Envelope Kaku #2 5.1 mm
Photo media (4 by
6 inches, or 101.6 by
152.4 mm) with tear-off tab
3.2 mm
(0.13 inch)
(0.2 inch)
3.0 mm
(0.12 inch)
3.2 mm
(0.13 inch)
5.1 mm
(0.2 inch)
3.0 mm
(0.12 inch)
11.7 mm
(0.46 inch)
11.7 mm
(0.46 inch)
3.0 mm
(0.12 inch)
11.7 mm
(0.46 inch)
11.7 mm
(0.46 inch)
3.0 mm
(0.12 inch)
Note When you are using the auto-duplex unit, the minimum top and bottom margin must match or
exceed 12.7 mm (0.5 inch).
22 3 - Using the printer ENWW
Page 25
Loading media
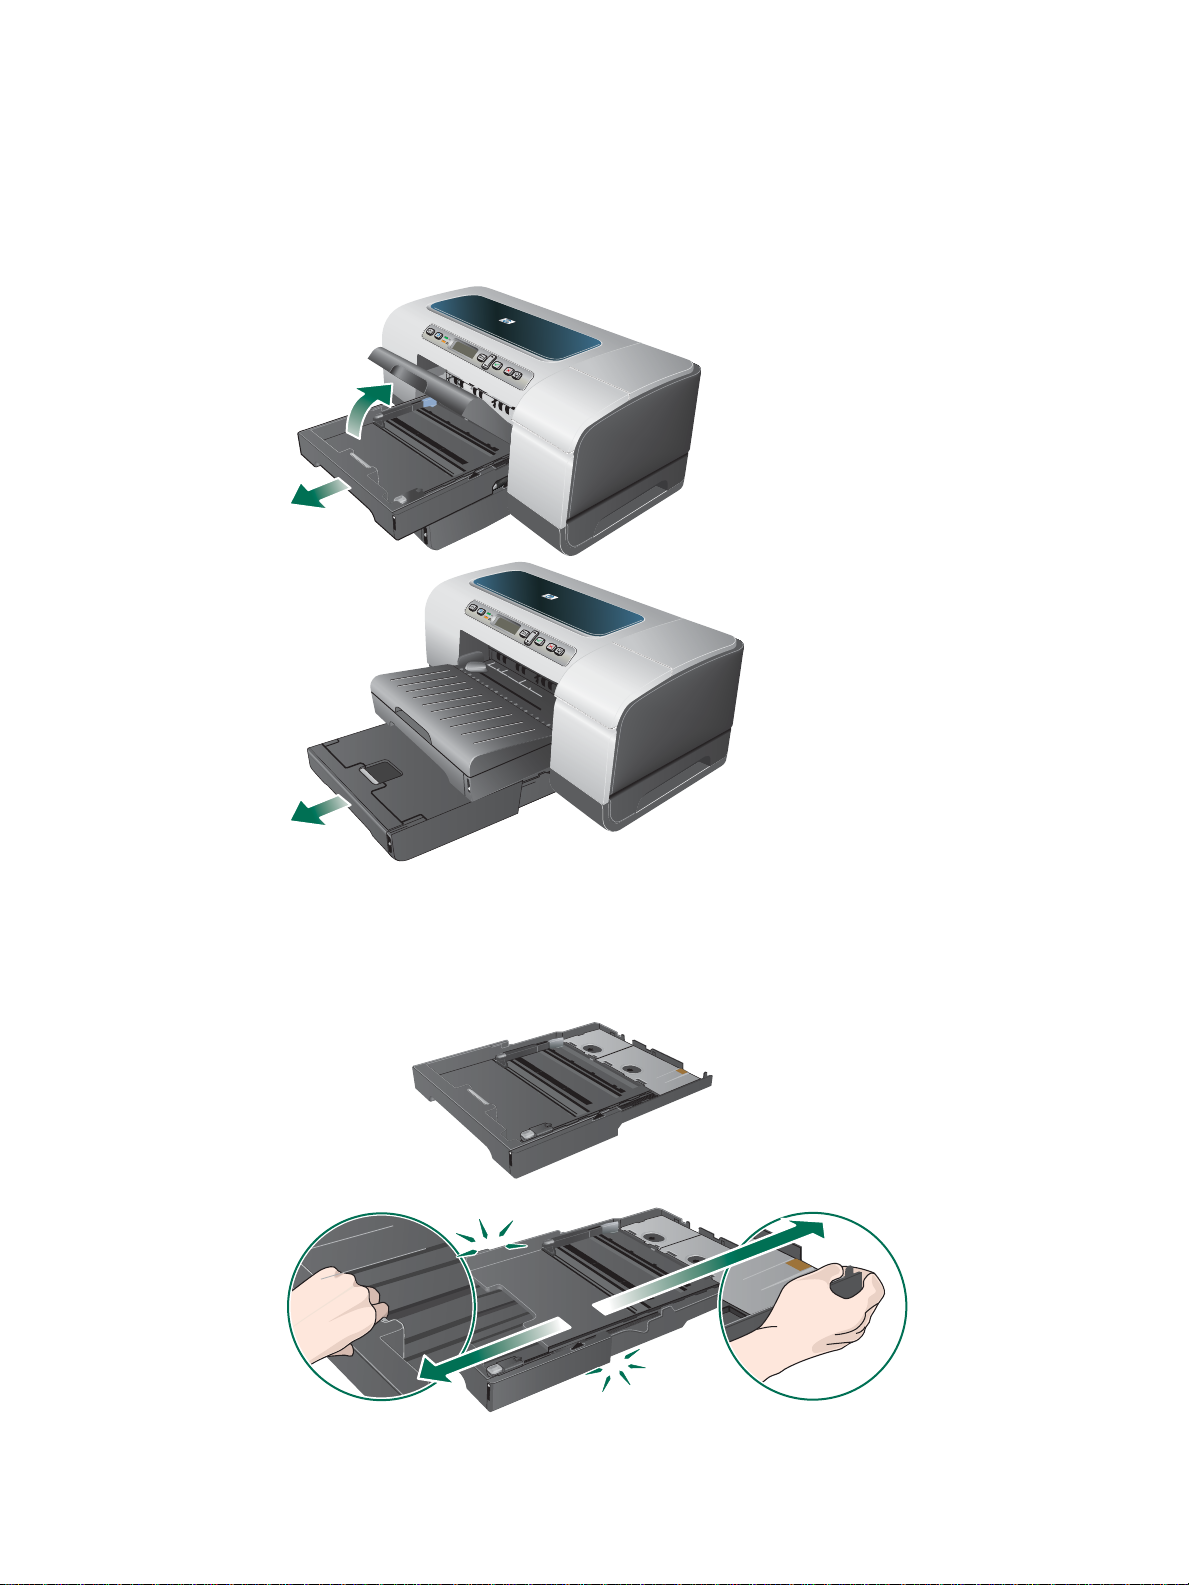
To load tray 1 or tray 2
1 If you are loading tray 1, raise the output tray and pull tray 1 out of the printer by grasping
under the front of the tray 1.
If you are loading tray 2, pull out tray 2 and raise its cover.
2 If you are loading A3 or larger sized media, extend the tray by pressing the tray extension
lock near the front of the tray and pulling both ends of the tray in opposite directions until it
is fully extended.
Tray 1
3 Press the button of the media width guide and slide the guide to the left. Press the button
of the media length guide and slide the guide towards you.
ENWW Loading media 23
Page 26
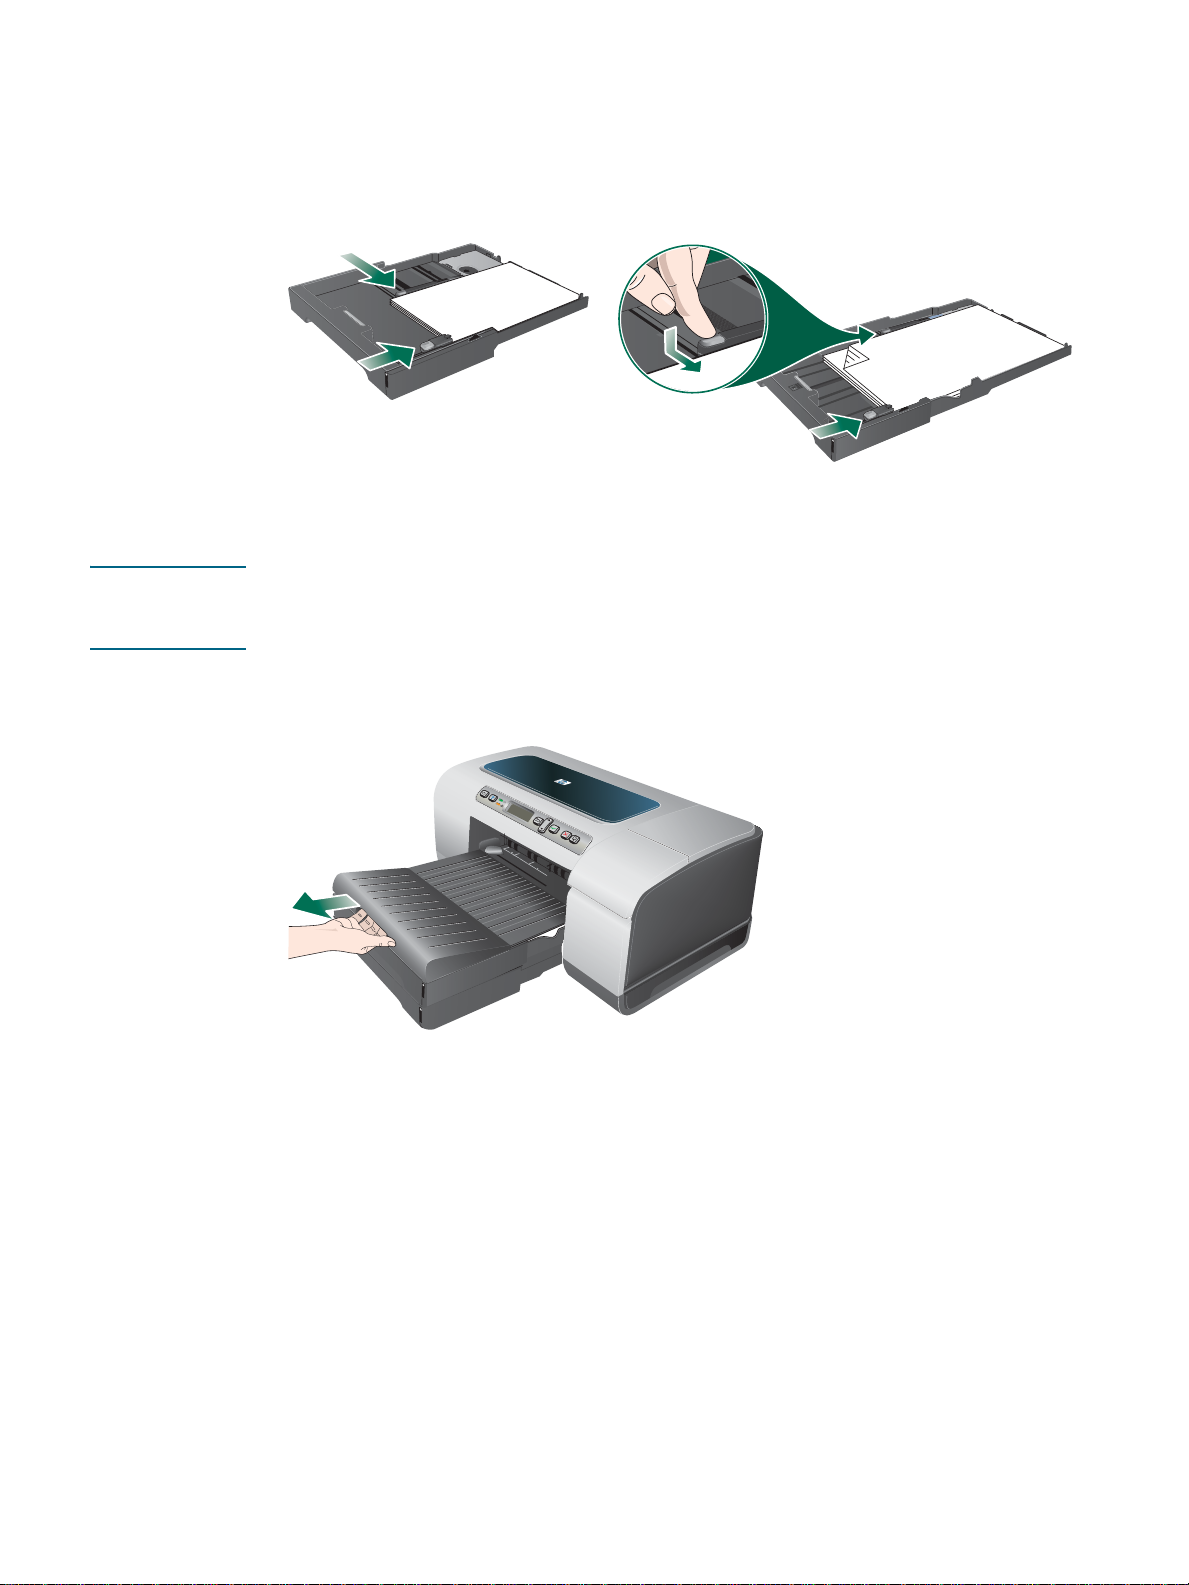
4 Insert the media print-side down along the right of the tray. Make sure the stack of media
aligns with the right and back edges of the tray, and does not spill over the edges.
5 Press the buttons of the media guides and slide the guides to the edges of the
loaded media.
Tray 1
6 If you removed tray 1, gently reinsert it into the printer and lower the output tray to its
original position.
If you removed tray 2, lower the tray cover and gently reinsert tray 2.
CAUTION If you have extended the tray, do not press the tray extension lock when inserting the tray.
Pressing it will cause the tray to be retracted when you push in the tray. The longer media in
the tray will be folded; this will cause problem during printing.
7 If you have extended tray 1 or tray 2, extend the output tray by grasping under the front of
the output tray and pulling out the media extension.
8 When printing, select the appropriate media type and size from the printer driver.
See Changing print settings.
24 3 - Using the printer ENWW
Page 27

Changing print settings
You can change print settings (such as media size or type) from an application or the printer
driver. Changes made from an application take precedence over changes made from the
printer driver. However, after the application is closed, the settings return to the defaults
configured in the printer driver.
Note To set print settings for all print jobs, make the changes in the printer driver.
For more information about printer driver features in Windows, see the printer driver online
help. For more information about printing from a specific application, see the documentation
for that application.
To change settings from an application for current jobs (Windows)
1 Open the document you want to print.
2 On the File menu, click Print, and then click Setup or Properties.
(Specific options may vary depending on the application you are using.)
3 Change any other desired settings and click OK, Print, or a similar command.
To change default settings for all future jobs (Windows)
1 Click Start, point to Settings, and then click Printers or Printers and Faxes.
2 Right-click the printer icon, and then choose Properties, Document Defaults,
or Printing Preferences.
3 Change any other desired settings and click OK.
To change settings (Mac OS)
1 On the File menu, click Page Setup.
2 Change any desired settings and click OK.
3 On the File menu, click Print.
4 Change any desired settings and click Print.
Canceling a print job
You can cancel a print job using one of the following ways.
z Control panel
Press the (Cancel button). This will clear the job that the printer is currently processing.
It does not affect jobs waiting to be processed.
z Windows
Double-click the printer icon that appears in the lower right corner of the computer screen.
Select the print job, and then press the Delete key on the keyboard.
z Mac OS X (10.1.5 and later)
Click the Print Center icon, and then double-click the printer icon. Select the print job and
click Delete.
ENWW Changing print settings 25
Page 28

Printing with the front or rear manual feed slot
Note The rear manual feed slot is not available if you have installed an auto-duplex unit.
1 For Windows:
a Open the printer driver.
b On the Paper/Quality tab, select the manual feed option from the Source is
drop-down list.
c Change any other desired settings and click OK.
d Print your document.
For Mac OS:
a On the File menu, click Page S e t u p.
b Select the media size.
c On the File menu, click Print.
d In the Copies & Pages panel, select the manual feed option.
e Open the Paper Type/Quality panel.
f Click the Paper tab and select the media type.
g Change any other desired settings and click OK or Print.
2 Wait fo r the Resume li ght to blink.
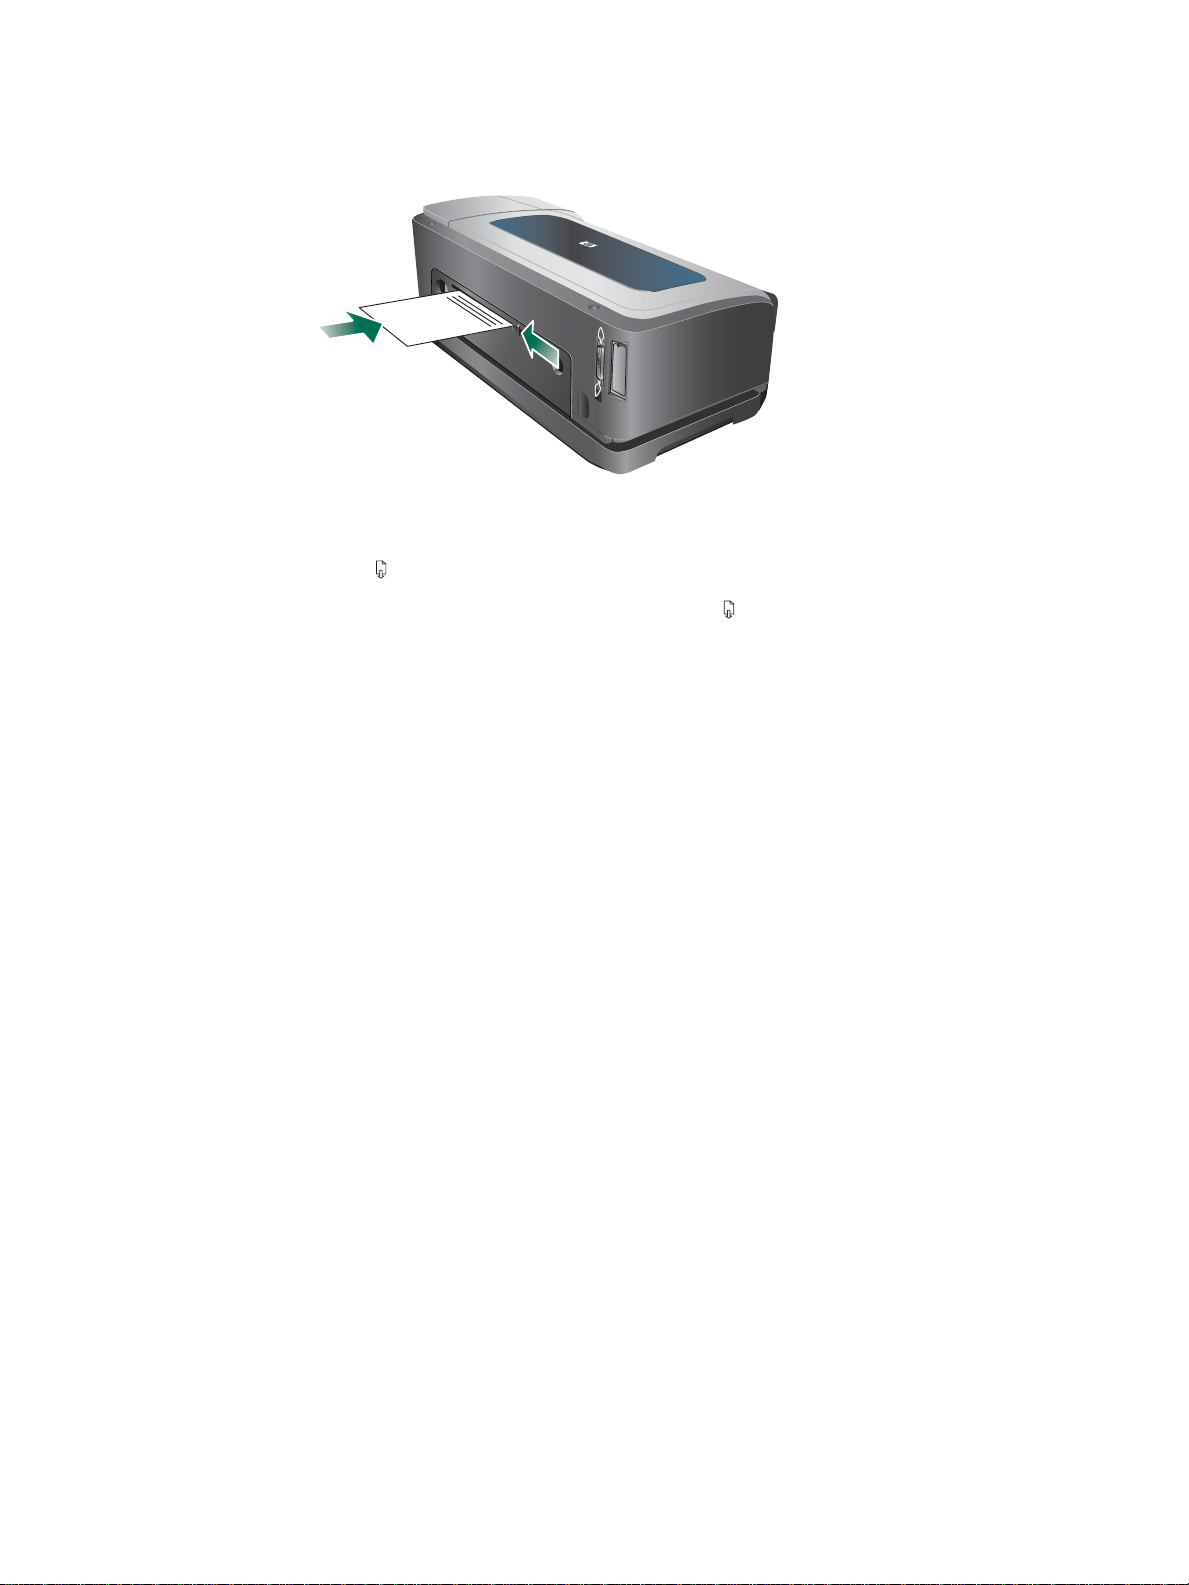
3 If you are using the front manual feed slot, do the following:
a Remove any printouts on the output tray.
b Insert media, print-side down along the right of the slot until the media reaches the
maximum depth. For envelopes, insert them according to the icon on the tray.
See Supported media types and weights.
c Slide the media width guide to the edge of the loaded media.
d Press (Resum e button) to print.
26 3 - Using the printer ENWW
Page 29
4 If you are using the rear manual feed slot, do the following:
a If the auto-duplex unit is installed, replace with the rear access panel.
b Slide the media width guide to the required media width.
c Insert a sheet of media print-side up into the left side of the slot until the printer grips
the media.
d Press (Resum e button) to print.
e If you are printing more than one page, press (Resume button) to print after
inserting each sheet.
Printing on both sides (duplexing)
You can print on both sides of a sheet of media, either automatically by using the auto-duplex
unit or manually by turning the media over and feeding it into the printer again.
Guidelines for printing on both sides of a page
z Always use media that conforms to the printer specifications. See Understanding
specifications for supported media.
z Specify duplex options in your application or in the printer driver.
z Do not print on both sides of transparencies, envelopes, photo paper, glossy media.
Jams might occur with these media types.
z Several kinds of media require a specific orientation when you print on both sides of a
page, such as letterhead, preprinted paper, and paper with watermarks. When you print
from a computer running Windows, the printer prints the first side of the media first. When
you print from a computer using the Mac OS, the printer prints the second side first. Load
the media with the front side facing down.
z When printing finishes on one side of the media, the printer holds the media and pause s
while the ink dries. Once the ink dries, the media is pulled back into the printer and the
second side is printed. When printing is complete, the media is dropped onto the output
tray. Do not grab it before printing is complete.
z You can print on both sides of supported custom-size media by using the printer’s manual
duplex capabilities. (For a list of supported custom sizes, see Understanding
specifications for supported media.)
ENWW Printing on both sides (duplexing) 27
Page 30

To perform duplexing (Windows)
Note For automatic-duplexing, ensure the auto-duplex unit is properly installed and enabled. See
Enabling accessories in the printer driver. The printer w ill pr in t on on e si d e (simplex) of the
media if the auto-duplex unit is not installed.
1 Load the appropriate media. See Guidelines for printing on both sides of a page and
Loading media.
2 With a document open, on the File menu, click Print, and then choose Properties,
Document Defaults, or Printing Preferences.
3 Click the Finishing tab.
4 Select the Print on B o t h Sides check box.
5 For automatic duplexing, ensure that Use auto-duplex unit is selected.
For manual duplexing, ensure the option is cleared. See Enabling accessories in the
printer driver.
6 To automatically resize each page to match the document's onscreen layou t, ensure
Preserve Layout is selected. Clearing this option may result in unwanted page breaks.
7 Select or clear the Flip Pages Up check box depending on which way you want the
binding. See the graphics in the printer driver for examples.
8 Change any other desired settings and click OK.
9 Print your document.
Note If you are using a computer running Windows NT 4.0, click Continue in the dialog box that
appears to print the document. Otherwise, the printer does not start printing.
10 For manual dupl exing, after the first side of the document is printed, follow the onscreen
instructions and reload the paper into the tray (blank-side down) or the front manual feed
(blank-side up) to complete printing.
To perform automatic duplexing (Mac OS)
Note For automatic-duplexing, ensure the auto-duplex unit is properly installed and enabled.
See Enabling accessories in the printer driver.
1 Load the appropriate media. See Guidelines for printing on both sides of a page and
Loading media.
2 On the File menu, click Print.
3 Open the Duplex or Layout panel.
4 Select the option to print on both sides.
5 Select the desired binding orientation by clicking the appropriate icon.
6 Change any other desired settings and click Print.
28 3 - Using the printer ENWW
Page 31

Printing on special and custom-size m edia
This section provides information on how to print on media such as envelopes, photo paper,
postcards, and transparencies, as well as custom-size media.
To print on special media (Windows)
1 Load the appropriate media. See Loading med ia.
2 With a document open, on the File menu, click Print, and then click Setup or Properties.
3 Click the Paper/Quality tab.
4 Select the media type from the Type is drop-down list.
5 Select the media size from the Size is drop-down list.
-Or
Click Custom, enter the dimensions of the media, and click OK.
6 Select the tray in which the media is loaded from the source is drop-down list.
7 Change any other desired settings and click OK.
8 Print your document.
To print on special media (Mac OS)
1 Load the appropriate media. See Loading med ia.
2 On the File menu, click Page Setup.
3 Select the media size.
4 To set a custom media size, complete the following steps:
a Click Custom Paper Size in the Settings pull-down menu.
b Click New, and then type a name for the size in the Paper Size Name box.
c In the Width and Height boxes, type the dimensions and set the margins.
d Click Done or OK.
5 On the File menu, click Print.
6 Open the Color pane l.
7 Click the Paper tab and select the media type.
8 Change any other desired settings and click Print.
ENWW Printing on special and custom-size media 29
Page 32

Configuring and ma naging
4
the printer
Managing the printer
Overview of printer management tasks
The following table lists the printer tools that can be used to manage the printer. It lists the
most common tools that are used for administrator functions.
For more information about the administrator tools listed in the table, see Overview of printer
management tools.
If you want to... ...use these tools.*
Monitor the printer
z Operation and status
z Media and supplies
z Jobs and printer usage
Administer the printer
z Printer security
z Configure job-accounting
options
z Set language
z Set PowerSave mode time
z Change tray and
media-handli ng settings
z Set up alerts and
notifications
z Upgrade firmware on the
printer
Control
panel
Embedded
Web
server
(EWS)
Toolbox
(Windows)
HP Web
Jetadmin
software
myPrintMileage
z Reset the HP Jetdirect
print server
Configure network options
z Configure I/O timeout
z C onfig u re network
parameters
*Windows users can use the control panel, EWS, Toolbox, HP Web Jetadmin, and
myPrintMileage. Mac OS users can use the control panel and EWS.
30 4 - Configuring and managing the printer ENWW
Page 33

Monitor the printer
Note For information about opening and using specific management tools, see Overview of printer
management tools.
Use this tool... ...to obtain the following information.
Control panel Status of jobs that are being processed, the operating status of the
printer, and the status of ink cartridges andprintheads.
See Control panel for more information.
Embedded Web server
(EWS)
T oolbox (Windows)
HP Web Jetadmin software Supplies information and network status. See HP Web Jetadmin
myPrintMileage Supplies usage of the printer. See myPrintMileage.
z Printer status information:
Click the Information tab, and then click an option avail able on
the left pane.
z Ink cartridge and printhead status:
Click the Information tab, and then click Ink Supplies in the
left pane.
z Accumulated ink and media usage:
Click the Information tab, and then click Usage in the left pane.
z Total number of pages and ink used by each user of the pri nter:
Click the Settings tab, click Job Accounting in the left pane,
and then click the Users tab in the right pane.
z Usage information:
Click the Settings tab, and then click Job Accounti ng in the
left pane.
z Ink cartridge information:
The ink-level information appears on the Printer Status tab.
Click Ink Cartridge Information for information abou t
replacement ink cartridges and expir ation date.
software.
Administer the printer
This section contains information about administering the printer and modify printer settings.
Note For information about opening and using specific management tools, see Overview of printer
management tools.
ENWW Managing the printer 31
Page 34

Use this tool... ...to do the following.
Control panel z Set the control-panel language:
1 Press (Select button) on th e control panel.
2 Press (Down Arrow button) until CONFIGURE D EVICE is
highlighted, and then press (Select button).
3 Press (Down Arrow button) until SYSTEM SETU P is
highlighted, and then press (Select button).
4 Press (Down Arrow button) until th e language option is
highlighted, then press (Select button), and change the
desired setting s .
z Change tray and media-handling setti ngs:
Press (Select button). Press (Down Arrow button) until
PAPER HANDLING is highlighted, then pre ss (Select butt on),
and change the desired settings.
z Perform printer maintenance tasks:
Press (Select button). Press (Up Arrow button) until
MAINTENANCE is highlighted, then pre ss (Select button), and
change the desired settings.
z Reset the HP Jetdirect print server:
Press (Power button) to turn off the pri nter. While holding
(Back button) and (Resume button), turn on the printer.
Embedded Web server
z Modify the administrator password:
Click the Settings tab, and click Security in the left pane.
z Change job accounting settings:
Click the Settings tab, click Job Accounting in the left pane,
and then click the Options tab.
z Set the language in the control panel and EWS:
Click the Settings tab, and then click Language in the left pane.
z Change tray and media-handling setti ngs:
Click the Settings tab, and then click Paper Handling in the
left pane.
z Perform printer maintenance tasks:
Click the Settings tab, and then c li ck Diagnostic in the l eft pane.
z Set up EWS alerts and notifications:
Click the Settings tab, and then click Alerts in the left pane.
HP Web Jetadmin software Remotely install, confi gure, and monitor status (including levels for
supplies); conduct remote diagnostics; and troubleshoot probl em s.
Go to http://www.hp. com/go/webjetadmin.
myPrintMileage Keep track of supplies usage of the printer so that you can forecast
and plan the purchase of supplies. See myPrintMileage.
32 4 - Configuring and managing the printer ENWW
Page 35

Configure network options
This section contains information about configuring the printer’s network settings.
For information about opening and using specific management tools, see Ov erview of printer
management tools.
For a list of current settings, print a configuration page. See Understanding and printing the
configuration page. If the printer is connected to a network with an HP Jetdirect print server,
you can use a variety of common network protocols such as TCP/IP.
By factory default, all supported network protocols are turned on. However, turning off unused
protocols can provide such benefits as decreasing network traffic that the printer generates
and preventing unauthorized users from printing to the printer.
Use this tool... ...to do the following.
Control panel Configure the I/O timeout: Pres s (Select but ton). Pres s (Down
Arrow button) until CONFIGURE DEVICE is highlighted, then press
(Select button); press (Down Arrow button) until I/O is
highlighted, then press (Select button).
Embedded Web server
HP Web Jetadmin software Remotely configure network settings. See HP Web Jetadmi n
z Configure network parameters: Click the Networking tab.
z Set a static IP address: Clic k the Networking tab, select Manual
from the IP Configuration Method drop-down list, enter the
static IP address in the IP A ddr e ss box, enter the Host Name,
Subnet Mask, and Defaul t Gateway, if needed, and click Apply.
Note: It is not recommended that you assign a static IP address
to the printer. However, a static IP address might resolve certain
setup and printing problems, such as a conflic t wit h a personal
firewall.
software.
Overview of printer management tools
Embedded Web server (E WS)
When the printer is connected to a network, you can use the printer’s EWS to view status
information, change settings, and manage the printer at your computer.
Note For a list of system requirements for the EWS, see Printer specifications.
Some settings might be restricted by the requirement for an EWS password.
You can open and use the EWS without being connected to the Internet.
However, some features will not be available.
ENWW Managing the printer 33
Page 36

To open the EWS
You can open the EWS in the following ways:
Note To open the EWS from the Toolbox (Windows) or the HP Inkjet Toolbox (Mac OS), the printer
must be on a network and must have an IP address.
z Web browser
In a supported Web browser on your computer, type the IP address that has been
assigned to the printer. For example, if the IP address is 123.123.123.123, type the
following address into the Web browser:
http://123.123.123.123.
The IP address for the printer is listed on the configuration page; see Understanding and
printing the configuration page.
After you open the EWS, you can bookmark it so that you can return to it quickly in
the future.
z Toolbox (Windows)
1 Open the Toolbox. For instructions, see Toolbox (Windo ws).
2 Click the Information tab, and then click Launch EWS.
EWS page s
The EWS contains pages that you can use to view product information and change printer
settings. The pages also contain links to other e-services.
Pages Contents
Information Shows status information about the printer, its ink suppl ies and usage, and a log of
printer events (such as errors).
Settings Shows the settings that have been configured for the printer and gives you the ability
to change these settings.
Networking Shows network status and the network settings that have been configur ed for the
printer. These pages only appear if the printer i s connected to a network. See
Configure network options for more information. See also the HP Jetdirect
Administrator’s Guide on the Starter CD for more information.
Other Links Connects you to other resources, including e-services, such as HP Instant Support,
myPrintMilea ge, and online or dering of suppli es. For more in format ion, see HP Instant
Support and myPrintMileage.
You can also add or customiz e up to fi ve links to the websites of your choice.
These links appear on the left pane throughout the EWS pages.
HP Web Jetadmin software
The HP Web Jetadmin software is a Web-based management solution for remotely installing,
configuring (both individually or in batch mode), monitoring status (including levels for
supplies), conducting remote diagnostics, and troubleshooting a wide variety of HP and
non-HP network peripherals.
After the HP Web Jetadmin software has been installed, you can gain access to it from
anywhere within your intranet by using a standard Web browser.
To get more information or to download the software, go to http://www.hp.com/go/
webjetadmin.
34 4 - Configuring and managing the printer ENWW
Page 37

Toolbox (Windows)
The Toolbox provides status and maintenance information about the printer. It also provides
links to this guide for help in performing basic printing tasks and solving problems.
Note If the Toolbox was not installed with the other printer software components, you can install it
using the installation program on the Starter CD.
To monitor a printer on a shared port (for example, \\portname\printername) from a client
machine, the Toolbox must be running on the server machine as well as on the client machine.
To open the Toolbox
1 From the Start menu at your computer, point to Programs.
2 Point to the printer name, and then click the Toolbox icon.
Toolbox tabs
The Toolbox contains tabs that you can use to view product information.
Tabs Contents
Printer Status z Selected print er
Displays a list of installed printers that are supported by the Toolbox.
z Ink Level Information
Shows estimated i nk levels for each cartridge.
z Order Supplies
Provides access to a website where you can order pr int ing supplies fo r t he printer
online.
z Ink Cartridge Info rm ation
Shows order numbers and expiration dates for the installed ink cartridges.
z Preferences
Gives you the abil it y to set advanced Toolbox settings, such as selecting whi ch
printer error messages appear, specifying whether you want to be notified by an
audio alert when an error occurs, as well as the types of error messages that you
want to see.
Also, you can turn on myPrintMileage AutoSend, a service that HP provides to
help you keep track of your device usage to help you forecast device usage and
plan the purchase of supplies. See myPrintMileage for more inform a tion.
Information
ENWW Managing the printer 35
z P ri n te r In fo rmation
Provides links to myPrintMileage and shows the printer hardware and printhead
health information. See myPrintMileage for more i n fo rma tion.
z Help Informa tion
Provides links to HP Instant Support and HPCustomer Support, as well as to this
guide for help in performing tasks and troubleshooting. It also provides
instruct ions that guide you through registering the printer onscreen. See
HP Instant Support for more information.
Page 38

HP Instant Support
HP Instant Support is a suite of Web-based troubleshooting tools that help you quickly identify,
diagnose, and resolve printing problems.
It provides the following information about your device:
z Easy access to troubleshooting tips
Provides tips that are customized for your device.
z Resolution of specific device errors
Provides immediate access to information that can help you resolve error messages
specific to your device.
To see a description of the problem, as well as recommendations for solving or preventing
the problem, click the link within the message. To see a list of past device errors,
click Alerts on the left side of the HP Instant Support page.
z Notification of device driver and firmware updates
Alerts you when there is a firmware or driver update, a message appears on the
HP Instant Support home page. Click the link within the message to go directly to the
download section of the HP website.
z Obtaining suppo rt services
Provides a list of the support services that are available for your device.
z Managing ink and media usag e (myPrintMileag e)
Helps you manage and forecast printer supplies usage.
z Self diagnostic testing for your device
Runs a diagnostic test of your device. Select Printer on the Self Help menu on the
Instant Support page to start diagnosing the devices. HP Instant Support checks the
computer, and a list of configured devices appears. When you select the device that you
want to diagnose, HP Instant Support can help you with such tasks as making sure that
you have the latest device driver available and gaining access to reports about the device
status and detailed device-diagnostic information.
If any errors are detected during this process, you are given the option to perform updates
to the device drivers or Jetdriver firmware or to perform detailed diagnostic tests on the
device.
z Knowle dge datab as e
Use the HP knowledge database to quickly find answers to your questions.
Security and privacy
When you use HP Instant Support, detailed device information, such as the serial number,
error conditions, and status, is sent to HP. HP respects your privacy and manages this
information according to the guidelines that are outlined in the HP Online Privacy Statement
(http://www.hp.com/country/us/eng/privacy.htm).
Note To view all the data that is sent to HP, select Source (for Internet Explorer) or P age Source
(for Netscape) from the View menu in your Web browser.
36 4 - Configuring and managing the printer ENWW
Page 39

To gain access to HP Instant Support
z Toolbox (Windows)
Click the Information tab, and then click HP Instant Suppor t.
z Embedded Web server
In a Web browser, type the IP address assigned to the device (this information is listed on
the configuration page; see Understanding and printing the configuration page). In the
Other Links section of the Information or Settings tab, click HP Instan t Support.
Note Do not bookmark the Web pages that are used to open HP Instant Support. If you bookmark
the site and connect to it by using the bookmark, the pages will not contain the current
information.
myPrintMileage
myPrintMileage is a service that HP provides to help you keep track of your device usage to
help you forecast device usage and plan the purchase of supplies. It consists of two parts:
z myPrintMileage website
z myPrintMileage AutoSend, a utility that periodically updat es the device usage information
on the myPrintMileage website
To use myPrintMileage, you must have the following:
z Internet co nnection
z Device connected
Note HP recommends that you enable myPrintMileage to send data for three to six months to allow
a meaningful amount of data to accumulate on the myPrintMileage webs ite.
To use the Print accounting features, you must register for the service through the
myPrintMileage site.
On the myPrintMileage website, you can see the following items:
z Print analysis, such as the amount of ink you have used, whether you use more black or
color ink, and the estimated number of pages you can print with the remaining amount
of ink.
z Print accounting, which allows you to generate reports showing usage data, cost per
page, or cost per job for a specific time period; export this data as Microsoft Excel
spreadsheet files; and configure the e-mail alerts and notifications to receive print
accounting reports.
To gain access to myPrintMileage
z Embedded Web server
Click myPrintMileage in the Oth er Li nks section.
z Toolbox (Windows)
On the Information tab, click myPrintMileage, and then follow the onscreen instruction.
z Windows taskbar
Right-click the Toolbox icon in the Windows taskbar, click myPrintMileage, and then
select View my print usage.
Note Do not bookmark the Web pages that are used to open myPrintMileage. If you bookmark the
site and connect to it by using the bookmark, the pages will not contain the current information.
ENWW Managing the printer 37
Page 40

Understanding and printing the configuration page
Use the configuration page to view current printer settings, ink supply status, and printhead
health; to help troubleshoot printer problems. The configuration page also contains a log of
recent events. If the printer is connected to a network, an additional network configuration
page prints; this page shows the network settings for the printer.
If you need to call HP, it is often useful to print the configuration page before calling.
1
2
3
4
1 Prin t e r Informat ion: Shows general printer information, such as the firmware version
number, model name, and amount of memory that is installed.
2 Ink Cartridge Status: Shows the estimated ink levels (represented in graphical form as
gauges).
3 Printhead Status: Shows the printhead health status and whether the printhead needs to
be replaced.
4 Event Log: Shows a log of recent events that have occurred.
For more information on HP Ink Supplies, see HP Inkjet Supplies - Warranty Quick Reference.
38 4 - Configuring and managing the printer ENWW
Page 41

To pri n t a configuration page
z Control panel
1 Ensure the printer is turned on.
2 Press (Select button) on the control panel.
3 Ensure INFORMATION MENU is highlighted, and then press (Select button).
4 Press (Down Arrow button) until the option to print configuration page is highlighted,
and then press (Select button).
5 Press (Down Arrow button) until the option to print configuration page is highlighted,
and then press (Select button) to print.
z Toolbox (Windows)
On the Printer Statu s tab, click Ink Cartridge Infor m ation, and then click Print.
Upgrading the firmware in the printer
HP provides firmware upgrades for products. These upgrades provide additional or improved
functionality. When a firmware upgrade for the printer is available, a notification message
appears on the HP Instant Support homepage. You can open the download site from the
homepage. You can also obtain information about available upgrades at http://www.hp.com/
support/businessinkjet2800.
Use the methods in the following sections to upgrade the firmware. See the readme file
associated with the firmware upgrade for details.
You do not need to keep the firmware upgrade file after you have performed the upgrade.
CAUTION Do not cancel the firmware upgrade after you have started it. Canceling the process can
damage the firmware in the printer.
To upgrade the firmware by usi ng the MS-DOS prompt (Windows only)
Note To upgrade the firmware using this procedure, the printer must be connected directly to the
computer using a parallel cable.
1 Download the firmware upgrade file from the HP website and store it on the hard disk of
your computer.
2 Open an MS-DOS command window.
3 Type copy /b path\filename por tname at the command prom pt .
• path is the location of the firmware upgrade file
• filename is the name of the firmware upgrade file that you downloaded from the
website
• portname is the appropriate printer port (for example, LPT1)
4 Press Enter. The firmware upgrade file is copied onto the printer, replacing the old
firmware f ile .
ENWW Upgrading the firmware in the printer 39
Page 42

Configuri ng the printer (Wind ows )
You can connect the printer directly to a computer, or you can share the printer among other
users on a network.
Note You must have administrator privileges to install a printer driver in Windows 2000 or
Windows X P.
Direct connection
You can connect the printer directly to your computer using a USB cable or an IEEE
1284-compliant bidirectional parallel cable.
Note Windows NT 4.0 does not support USB.
Do not connect a USB and a parallel cable to printer at the same time.
If you install the printer software and connect a printer to a computer running Windows, you can
connect additional print er s to the same comput er with USB cables without reinstalling the
printing software.
Installing printer software and sharing the printer
When setting up the printer, HP recommends that you connect the printer after installing the
software because the installation program is designed to provide you with the easiest setup
experience.
However, if you have connected the cable first, see To connect the printer before the installing
software.
To install the software before connecting the printer (recommended)
It is recommended to install the Toolbox, which provides status and maintenance information
about your printer, and online help tools for solving printer problems. If you do not install the
Toolbox, you will not see printer error messages on your computer screen and will not have
access to the myPrintMileage website. See Toolbo x (Windows) for more information.
1 Close any running applications.
2 Insert the Starter CD into the CD drive. The CD menu runs automatically.
If the CD menu does not start automatically, click Start, and then click Run. Browse to the
CD-ROM drive for the computer, click Autorun.exe, and then click Open. In the Run
dialog box, click OK.
3 On the CD menu, click Install Printer Dri ver.
4 Follow the instructions on the screen to complete the installation.
5 When prompted, connect the USB or parallel cable to the computer and the printer.
The Found New Hardware wizard appears on the computer screen and the printer icon is
created in the Printers folder.
Note You can also share the printer with other computers using a simple form of networking known
as locally shared networking. See To share the printer on a locally shared network.
40 4 - Configuring and managing the printer ENWW
Page 43

To connect the printer before the installing software
If you conn e cte d the printe r to the c o mputer befor e ins talling the pr inter softwa re , the Found
New Hardware wizard appeared on the computer screen.
Note If you have turned on the printer, do not turn off the printer or unplug the cable from the printer
while the installation pr ogram is running . If you do so, the installation program will not finish.
1 In the Found New Hardware dialog box that provides the option for selecting a method to
locate the driver, select the advanced option and click Next.
Note Do not allow the Found New Hardware wizard to perform an automatic search for the driver.
2 Select the check box for specifying the driver location, and ensure that the other check
boxes are clear.
3 Insert the Starter CD into the CD-ROM drive.
If the CD menu appears, close the CD menu.
4 Browse to locate the root directory on the Starter CD (for example, D), and then click OK.
5 Click Next, and then follow the instructions on the screen.
6 Click Finish to close the Found New Hardware wizard.
The wizard automatically starts the installation program (this might take a short while).
For Windows 98 and Windows Me, you must complete the installation program at this
point if you wish to install a non-English driver.
7 Complet e the in s t allation pro ces s .
Note The setup program provides options to install non-driver components such as the Toolbox,
which you are recommended to install. For instructions about installing these components,
see To install the software before connecting the printer (recommended).
You can also share the printer with other computers using a simple form of networking known
as locally shared networking. See To share the printer on a locally shared network.
To share the printer on a locally shared network
In a locally shared network, the printer is connected directly to the USB or parallel connector of
a selected computer (known as the server) and is shared by other computers (clients).
Note When sharing a directly connected printer, use the computer with the newest operating system
as the server. For example, if you have a computer running Windows 2000 and another
computer running an older version of Windows, use the computer running Windows 2000 as
the server.
Use this configuration only in small groups or when usage is low. The computer that is
connected to the printer is slowed down when many users print to the printer.
1 From the Windows desktop, click Start, point to Settings, and then click Printers or
Printers and Faxes.
2 Right-click the printer icon, click Properties, and then click the Sharing tab.
3 Click the option to share the printer, and give the printer a share name.
4 If you are sharing the printer with client computers that use other versions of Windows,
you can click Additional Drivers to install their drivers as a convenience to them.
This optional step requires you to have the Starter CD in your CD drive.
ENWW Configuring the printer (Windows) 41
Page 44

Network connec tion
If the printer has network capability, the printer can be shared in a network environment by
connecting it directly to the network. This type of connection offers the ability to manage the
printer using the embedded Web server from any computer on the network.
Installing printer software and sharing the printer
Choose the installation option for the type of network you have:
z Client/server network: If your network has a computer acting as a dedicated print server,
install the printer software on the server (To install the software on a network), and then
install the printer software on the client computers (To install the printing software on client
computers).
z Peer-to-peer networ k: If you have a peer-to-peer network (a network without a dedicated
print server), install the software on the computers that will be using the printer (To install
the software on a network).
In addition, you can connect to a network printer in both types of networks using the
Add Printer wizard in Windows (To install the printer driver using Add Printer).
To install the software on a network
Use the following steps to install the printer software in the following networking scenarios:
z Your network has a computer acting as a dedicated print server
z You have a peer-to-peer network (a network without a dedicated print ser ver)
1 Connect the printer to the network.
2 Close any programs that are open.
3 Insert the Starter CD into the CD-ROM drive. The CD menu starts automatically.
If the CD menu does not start automatically, click Start, and then click Run. Browse to the
CD-ROM drive for the computer, click Autorun.exe, and then click Open. In the Run
dialog box, click OK.
4 Click Install Printer Driver and follow the instructions on the screen to complete the
installation.
Note If you are installing the software on a dedicated print server, select the option to share the
printer when prompted, and then select to install printer drivers for Windows clients.
The installation program installs the driver for the server and copies the client drivers to a
location on the server for users (clients).
To share the printer with Windows client computers, see To install the printing software on
client computers.
42 4 - Configuring and managing the printer ENWW
Page 45

To install the printing software on client computers
After the printer drivers have been installed on the computer that is acting as the print server,
the printing functionality can be shared. Individual Windows users who want to use the
network printer must install the software on their computers (clients).
A client computer can connect to the printer in the following ways:
z In the Printers folder, double-click the Add Printer icon and follow the instructions for a
network installation. (See To install the printer driver using Add Printer.)
z On the network, browse to the printer and drag it to your Printers folder.
z Add the printer and install the software from the INF file on your network.
On the Starter CD, the INF files are stored in folders that use the following format:
<CD drive>:\Setup\Drivers\<driver>\<operating system>\<language>.
For example, if your CD drive letter is D, then D:\Setup\Drivers\PCL6\Win2k_XP\English
would contain the English PCL 6 INF file for Windows 2000 and Windows XP.
To install the printer driver using Add Printer
1 From the Windows desktop, click Start, point to Settings, and then click Printers.
Or, click Start, click Control Panel, and then click Printers and Faxes.
2 Double-click Add Printer, and then click Next.
3 Select Network Printer or Network Printer Server.
4 Click Next.
5 Do one of the following:
• Type in the network path or queue name of the shared printer and click Next.
Click Have Disk when prompted to select the printer model.
•Click Next, and then locate the printer in the Shared printers list.
6 Click Next, and then follow the instructions on the screen to complete the installation.
ENWW Configuring the printer (Windows) 43
Page 46

Configuri ng the printer (Mac OS)
You can use the printer with a single Macintosh computer using a USB cable, or you can
share the printer among other users on a network.
To install the software for network or direct connection
1 Connect the printer to the computer with the USB cable or to the network with a
network cable.
2 Insert the Starter CD into the CD-ROM drive.
3 Click Install Driver and follow the instructions on the screen for your connection type.
4 Complet e the in s t allation:
a Open the Print Center, which is located in the Applications\Utilities folder.
b Click Add Printer.
c For a direct connection, select USB from the menu.
-OrFor a network connection on an IP network, on the pop-up menu, select IP Printing,
and then type the IP address for the printer, or select Rendezvous.
d Select the printer from the printer list, and then click Add. A mark appears beside the
printer name, indicating that this printer is now the default printer.
e Close the Print Center.
5 If necessary, share the printer with other Macintosh computer users.
• Direct connection
Share the printer with the other Macintosh computer users. See To share the printer on
a locally shared network for mo re informatio n .
• Network connection
Individual Macintosh computer users who want to use the network printer must install
the printer software on their computers.
To share the printer on a locally shared network
When you connect the printer directly, you can still share the printer with other computers
using a simple form of networking known as locally shared networking. Use this configuration
only in small groups or when usage is low. The computer that is connected to the printer is
slowed down when many users print to the printer.
Basic requirements for sharing in a Macintosh environment include the following items:
z The Macintosh computers must be communicating on the network using TCP/ IP, and the
Macintosh computers must have IP addresses. (AppleTalk is not supported.)
z The printer that is being shared must be connected to a built-in USB port on the host
Macintosh computer.
z Both the host Macintosh computer and the client Macintosh com pute rs that are using the
shared printer must have printer-sharing software installed and the printer driver or PPD
for the printer that is installed. (You can run the installation program to install the printer
sharing software and associated Help files.)
z The client Macintosh computers should have the appropriate HP printer drivers installed.
z The client Macintosh computers must be PowerMac computers.
For more information about USB printer sharing, see the support information that is available
on the Apple website (http://www.apple.com) or the Mac Help on the computer.
44 4 - Configuring and managing the printer ENWW
Page 47

To share among computers with the same operating system
Use the following steps to share the printer among Macintosh computers with the same
operating system:
1 Turn on printer sharing on the computer that is connected to the printer (the host).
• Mac OS X (10.2.x and later): Open System Preferences, click Sharing,
click Services, and then select the Printer Sharing check box.
2 To print from the other Macintosh computers (the clients) on the network, preselect the
printer in USB Printer Sharing (Mac OS 9, version 9.1 and later) or Sharing (Mac OS X,
version 10.2.x and later). Then, choose the neighborhood where the printer is shared and
select the printer.
3 To print from the other Macintosh computers (the clients) on the network, preselect the
printer in Sharing. Then, choose the neighborhood where the printer is shared and select
the printer.
To share among computers with different operating systems
Use the following steps to share with Mac O S 9 (9.1 and later) computers when the host
computer is running the Mac OS X (10.1.5 and later).
Note Printers connected using USB cables can only be shared between the Mac O S 9 (9.1 and
later) and the Mac OS X (10.1.5 and later) through the Classic environment in the Mac OS X.
1 On the Mac OS X (10.1.5 and later) host computer, open System Preferences,
make sure that printer sharing is off, and then quit System Preferences.
2 Locate the Mac OS 9 (9.1 and later) System Folder, open Co nt rol Panel , and then
open USB Printer Sharing. (If the Classic environment is not already running, it starts.)
3 Click the Start/Stop tab, and then click Start.
4 When USB Printer Sharing On appears, click the My Printers tab.
5 Select the check box next to the device that you want to share.
6 Close the control panel.
ENWW Configuring the printer (Mac OS) 45
Page 48

Uninstalling the printer software
To uninstall the software for Windows computers
If you are using Windows 2000 or Windows XP, you must have administrator privileges to
uninstall the printer software.
1 From the Windows desktop, click Start, point to Programs, followed by the printer name,
and then click the uninstall option.
2 Follow the onscreen instructions to remove the software.
Alternatively, do the following.
1 If the computer is connected directly to the computer using a USB or parallel cable,
disconnect the printer.
2 Close any running applications.
3 From the Start menu, open the Control Panel.
4 Double-click Add/Remove Programs.
5 Select the printing software that you wish to remove.
6 Click the button for adding or removing software.
7 Follow the onscreen instructions to remove the software.
Note If the uninstallation process fails, restart the computer and complete the steps above to
uninstall the softwar e .
If the software was not successfully installed or the uninstaller could not be found, complete
the following steps to run the scrubber utility. (The scrubber utility is not available for computers
running Windows NT 4.0.)
8 Disconnect the printer from the computer.
9 On the computer, restart Windows.
10 Insert the Starter CD in the CD drive. If the CD menu appears, exit the CD menu.
11 Locate the scrubber utility on the Starter CD and run the utility.
• For Windows 98 and Windows Me, use the scrub9x.exe file located in the
Utils\Scrubber\Win9x_Me folder.
• For Windows 2000 and Windows XP, use the scrub2k.exe file located in the
Utils\Scrubber\Win2k_XP folder.
To uninstall the software for Macintosh computers
1 If the computer is connected directly to the computer using a USB cable,
disconnect the printer.
2 Delete the printer queue from the Printer Center.
46 4 - Configuring and managing the printer ENWW
Page 49

Control pa nel
5
The control panel allows you to change printer settings, view printer status and printer
messages, and diagnose printer problems. Additional menu items can appear in the
control panel, depending on the options installed in the printer.
Understanding control-panel messages
This section briefly explains some of the messages that may appear on the control-panel
display. Follow instructions on the display or the computer screen to resolve the messages, or
turn off the printer and turn it on again. If the message persists, see Finding other resources
for the product.
Types of control-panel messages
The following types of messages may appear on the control-panel display when the printer is
turned on.
z Status messag es
Reflect the current state of the printer and require no action from users. For example,
PROCESSING JOB, CANCELING JOB, or READY.
z Warning messages
Describe events that require attention but do not prevent the printing. For example,
INK LOW IN BLACK CARTRIDGE.
z Error messages
Describe events that require action, such as loading media or clearing a media jam.
If an error code is displayed, turn off the printer and turn it on again. If the message
persists, write down the error code and go to HP Instant Support for details
(see HP Instant Support). In case of a device failure, contact HP (see Obtaining HP
telephone support).
ENWW Understanding control-panel messages 47
Page 50

Control-panel messages
The following table describes some of the common control-panel mess ages.
For information on:
z Replacing the printheads or ink cartridges: See Replacing the ink cartridges and
Maintaining the printheads.
z Loading paper : See Loa ding m edia.
Message Description
CLOSE ALL COVERS The printer canno t print because one or more of the
covers is open.
Ensure all covers are properly closed.
ENSURE REAR ACCESS P ANEL IS PR OPERLY
CLOSED
[TRAY X OR ACCESSORY] NOT AVAILABLE... The tray or auto-duplex unit is not available.
CARRIAGE STALL... Something is preve nting the carriage from moving.
LOAD [SIZE] MEDIA IN TRAY [X]. PRESS
RESUME TO CONTINUE.
LOAD [TYPE][SIZE] ME DIA IN TRA Y [X].
PRESS RESUME TO CONT INUE.
PAPER JAM... Media is jammed in the printer.
PRINTED PAGE IS DRYI NG. PRESS RESUME TO
CONTINUE.
REMOVE PRINTED PAGES FROM OUTP UT TRAY.
PRESS RESUME TO CONT INUE
The rear access panel is not closed properly.
Push it in firmly unt il it locks into place.
To use media from another tray or print without
duplexing, pr ess
print job, press
Open the top cover, cl ear the obstruction, and t hen
press
The specified t ray is either empty or contains media
whose type and/or size are different from what have
been selected for the pr int job.
Load the correct media into the tray, and
press (Resume button) to continue printing.
See Clearing jams.
The printer is waiting for the printed page to dry before
continuing to print. You can remove the page from the
output tray (handle it carefully to avoid smearing
the ink), and press
the next page.
The output tray i s fu ll.
Remove the printed page s and
press (Resume button) to continue print ing.
(Resume button) to continue printing.
(Resume butt on). To cancel the
(Cancel button).
( Resume button) t o start printi ng
REPLACE INCOMPATIBLE OR FAULTY [COLOR]
PRINTHEAD
REPLACE INCOMPATIBLE OR FAULTY [COLOR]
INK CARTRIDGE
INSTALL [COLOR] PRINTHEAD
INSTALL [COLOR] INK CARTRIDGE
INK LOW IN [COLOR] CARTRIDGE The ink cartridge is running low on ink and will need to
REPLACE EMPTY [COLOR] INK CARTRID GE
REPLACE EXPIRED [COL OR] INK CA RTRIDGE
The printhead or ink cartridge is either incompatible or
faulty.
Replace with a HP printhead or ink cartridge to
continue printing.
The printhead or ink cartridge is either missing or not
installed correctly.
Ensure the printhead or ink cartridge is in its correct
color-coded slot, and press down firmly to ensure
proper contact .
be replaced soon.
Press
The ink cartridge is either empty or has expired.
Replace with a HP ink cartridge to continue printing.
(Resume butt on) to clear this message.
48 5 - Control panel ENWW
Page 51

Message Description
[COLOR] INK CARTRIDG E IS EXPIR ING SOON When the ink cartridge expires, replace with a new HP
ink cartridge.
Press
NON-HP [COLOR] INK C ARTRIDGE... A non-HP ink cartridge has been detected.
Replace with a HP ink cartridge.
To continue printi ng with non-HP ink cartridge, pre ss
and hold
button) three times, and release
However, print quality and ink level information may
be affected.
HP recognizes cust om er’ s choice, but cannot
guarantee the quality or reliability of non-HP ink
cartridges. Printer services or repairs required as a
result of using non-HP ink cartridges will not be
covered under warr anty.
If you believe you have purchased a genuine HP ink
cartridge, visit http://www.hp.com/go/anticounterfeit.
INSUFFICIENT MEMORY More data has been received from the computer than
fits in the pri n te r’ s m e mo ry . Y o u m a y try to com p r es s
your file before pr inting or use a lower print quality.
Alternativel y, you can add extra DIMMs to increase t he
printer’s memory.
Press
(Resume butt on) to clear this message.
(Power button), press (Resume
(Power button).
(Resume butt on) to clear this message.
POWERING OFF The printer is prepar ing to turn off. Please wait.
PROCESSING JOB... The printer is performing some tasks. Please wait.
READY The printer is ready to accept print jobs.
ENWW Understanding control-panel messages 49
Page 52

Understanding control-panel menus
Informatio n men u
This menu contains printer information pages that give details about the printer and
its configuration. To print an information page, scroll to the desired page and
press (Select button).
Message Description
PRINT MENU MAP This item prints a ma p of the printer menu structure.
PRINT CONFIGURATION PAGE This item pr int s a page describing the current pri nter
configuration (such as firmware version, model, accessories
installed, I /O suppor t, or ot her det ails) . If an HP Jetdirect print
server is instal led, a second page will be printed, which
displays the settings for the HP Jetdirect pri nt server.
PRINT DIAGNOSTIC PAG E This item prints a dia gnostic page describing the current
printer configuration, printhead information, and technical
information.
PRINT DEMO This item prints a demonstration page.
PRINT PCL FONT LIST This item prints the available PCL fonts.
PRINT PS FONT LIST This item prints the available PS (emulated PostScript) fonts.
SHOW IP ADDRESS This item displays the printer’s default IP address.
50 5 - Control panel ENWW
Page 53

Paper Handling menu
These settings control the default media options. However, settings made in the software
application from which you print or in the printer driver override control panel settings for the
current print job.
Message Value or Submenu Description
TRAY 1 SIZE NO T SET
SUPER B (13 X 19 IN.)
A3 NOBI
A3
A4
A5
A6
B4 (JIS)
B5 (JIS)
EXECUTIVE
LEGAL
LETTER
STATEMENT
11 X 17
ENVELOPE #10
ENVELOPE A2
ENVELOPE C5
ENVELOPE C6
ENVELOPE DL
JAPANESE ENVELOPE KA KU #2
ENVELOPE MONARCH
JAPANESE ENVELOPE CH OU #3
JAPANESE ENVELOPE CH OU #4
HP GREETING CARD ENV ELOPE
4 X 6 IN. WITH TAB
4 X 6 IN.
5 X 8 IN.
OFUKU HAGAKI
HAGAKI CARD
CUSTOM
This item allows you to select the
media size loaded in Tray 1.
Default = NOT SET
TRAY 1 TYPE NO T SET
PLAIN PAPER
HP PREMIUM PAPER
HP HEAVYWEIGHT PREMI UM PAPER
HP PREMIUM TRANSPARE NCY FILM
HP PREMIUM PLUS TRAN SPARENCY FILM
HP EVERYDAY PHOTO PA PER, MATT E FINISH
HP EVERYDAY PHOTO PA PER, SEMI GLOSS
HP COLORFAST PHOTO P APER, GLO SSY
HP PREMIUM + PHOTO P APER, GLO SSY
HP PREMIUM + PHOTO P APER, MAT TE
HP PREMIUM PHOTO PAPER, GLOSSY
HP PHOTO PAPER, GLOS SY
HP BROCHURE & FLYER, GLOSS
HP BROCHURE & FLYER, MATTE
ENWW Understanding control-panel menus 51
This item allows you to select the
media type loaded in Tray 1.
Default = NOT SET
Page 54

Message Value or Submenu Description
TRAY 2 SIZE NO T SET
SUPER B (13 X 19 IN.)
A3 NOBI
A3
A4
B4 (JIS)
B5 (JIS)
EXECUTIVE
LEGAL
LETTER
STATEMENT
11 X 17
CUSTOM
TRAY 2 TYPE NO T SET
PLAIN PAPER
DEFAULT TRAY TRAY 1
TRAY 2
AUTOMATIC MEDIA
TYPE SENSE
FAST NORMAL PRINT
SPEED
OFF
ON
HIGH
LOW
This item allows you to select the
media size loaded in Tray 2.
Default = NOT SET
This item shows the media type
for Tray 2.
Default = NOT SET
This item allows you to set the
default tray. If a tray is not
selected in the printer driver, the
printer will draw media from thi s
tray.
Default = TRAY 2
This item allows you to enable the
media type sensor.
Default = OFF
This item helps to improve the
printing speed when Fast Normal
print quality i s selected.
Default = HIGH
OUTPUT RAMP
EXTENSION
ON
OFF
This item enables the pri nter's
output ramp to be extende d to
hold the paper before releasing it
onto the output tray.
Default = OFF
52 5 - Control panel ENWW
Page 55

Configure Device menu
Items in this menu affect printer behavior. Configure the printer according to your
printing needs.
Message Value or Submenu Description
PRINT PS/PCL6 ERRORS OFF
ON
UNATTENDED PRINTING OFF
ON
SYSTEM SETUP PERSONALITY This item sets the default personality
LANGUAGE This item sets the default language.
I/O I/O TIMEOUT This item sets the le ngth of time
EIO This item allows you to access
This item allows you to print a list of
PS/PCL6 errors.
Default = OFF
This item sets the printer to pause
during large print jobs (after every
100 pages) so that you can clear the
output tray.
Default = OFF
to automatic switc hing, PCL5, PCL6,
or PostScript em ulation.
Default = AUTO
Select it from the list of supported
languages.
Default = ENGLISH
(from 5 to 300 seconds) that the
printer waits for remaining data for a
print job. If that time is exceeded,
the printer prints the print job.
Default = 15
submenus for the HP Jetdirect print
server, if one is installed. For details,
see Changing networking parameters
from the contro l panel.
RESTORE FACTORY
SETTINGS
YES
NO
This item rest ores all values to the
printer’s predetermined factory values.
Resetting the printer
You may need to reset the printer in the following circumstances:
z You want to restore the printer’s default settings.
z Communication between the printer and computer has been interrupted.
CAUTION When you use the restore factory settings option on this menu, you can lose printer
configuration settings.
Note This option does not reset an HP Jetdirect print server to its default settings if one is installed
in the printer. To reset the HP Jetdirect print server, see Resetting the HP Jetdirect print server.
ENWW Understanding control-panel menus 53
Page 56

Printing menu
The items in this menu are used when printing from MS-DOS®, UNIX, and Linux. If your
computer is running Windows or Mac OS, configure these settings using the printer driver.
Message Value or Submenu Description
COPIES 1 - 100 This item sets the numbe r of
copies to print.
Default = 1
DEFAULT PAPER
SIZE
DEFAULT PAPER
TYPE
DEFAULT QUALITY
LEVEL
LETTER
A4
PLAIN PAPER
HP PREMIUM PAPER
HP HEAVYWEIGHT PREMI UM PAPER
HP PREMIUM TRANSPARE NCY FILM
HP PREMIUM PLUS TRAN SPARENCY FILM
HP EVERYDAY PHOTO PA PER, MATT E FINISH
HP EVERYDAY PHOTO PA PER, SEMI GLOSS
HP COLORFAST PHOTO P APER, GLO SSY
HP PREMIUM + PHOTO P APER, GLO SSY
HP PREMIUM + PHOTO P APER, MAT TE
HP PREMIUM PHOTO PAPER, GLOSSY
HP PHOTO PAPER, GLOS SY
HP BROCHURE & FLYER, GLOSS
HP BROCHURE & FLYER, MATTE
FAST
FAST NORMAL
NORMAL
BEST
This item allows you to set the
default media size.
Default = LETTER
This item allows you to set the
default media type.
Default = PLAIN PAPER
This item allows you to select the
default level for print quality. This
setting is used if t he pri nt job
contains no print-quality selecti on.
Default = NORMAL
DUPLEX OFF
ON
OVERRIDE
A4/LETTER
PCL FO RM LENGTH
NO
YES
ORIENTATION
FONT NUMBER
FONT PITCH
FONT POINT SIZE
SYMBOL SET
ISE FONTS
APPEND CR TO LF
This item appears only when an
auto-duplex unit is installed. Set
the value to ON to print on both
sides (duplex) or OFF to print on
one side of a sheet of paper.
For more informati on, see Printing
on both sides (duple xing).
Default = OFF
This item sets the printer to print
an A4 job on letter-size paper
when no A4 paper is load ed, or to
print a letter-size job on A4 paper
when no letter-size paper i s
loaded.
Default = NO
This item allows you to configure
settings for printer control
language (PCL) when using the
PCL 5c or PCL 6 printer
personality.
54 5 - Control panel ENWW
Page 57

Maintenance menu
Print Quality menu
This menu allows you to adjust aspects of print quality, including calibration, printhead
alignment, and quality level.
.
Message Value or
Submenu
ALIGN PRINTHEADS N.A. This item begins the pri nthead alignment
COLOR CALIBRATION N.A. This item begins the color calibration process.
LINEFEED CALIBRATION N.A. This item begins the linefeed calibration
CLEAN PRINTHEADS N.A. This item begins the pri nthead cleaning
Diagnostics menu
This menu allows you to view the printer’s event log.
Message Description
Description
process.
process.
process.
SHOW EVENT LOG This item displays the last 10 events on the control panel,
starting with the most recent event.
Paper Path Test menu
This menu allows you to test various components of the printer so you can identify and solve
problems.
Message Description
START TEST
SOURCE
DUPLEX
COPIES
The items on this menu let you test the paper handling feat ures
of the printer . If you have difficulty printing from one of the trays,
or printing on both sides of the page, ru n thi s test to verify that the
paper path is working prop erly.
ENWW Understanding control-panel menus 55
Page 58

Changing networking parameters from the control panel
The EIO (enhanced input/output) submenu appea rs on the I/O menu only when an
HP Jetdirect print server is installed. If the printer contains an HP Jetdirect print server,
you can configure basic networking paramet ers using the EIO menu. Network printer
administrators can also use HP Web Jetadmin or the embedded Web server to configure
these and other parameters remotely.
Note The items available on the menu vary depending on the particular print server that is installed.
EIO menu
This menu allows you to configure the networking parameters for the printer. To check the
printer’s current network settings, print a configuration page. See Understanding and printing
the configuration page.
Message Value or Submenu Description
CFG NETWORK NO
YES
TCP/IP
IPX/SPX
ATALK
DLC/LLC
CFG TCP/IP N O
ON
OFF
YES
Selects whethe r or not you want to use the EIO
Jetdirect menu items. You must change this option
to YES each time you want to use the EIO Jet direct
menu.
Selects whether to enable or disable a protocol.
Select OFF to disable a protocol.
Selects whet her t o use t he TCP/IP menu and set t he
TCP/IP protocol parameters.
In the TCP/IP menu, you can specify BOOTP=YES or
DHCP=YES for TCP/IP parameters to be automatically
configured by a BootP or DHCP server when t he
printer is tur ned on.
If you specify BOOTP=NO and DHCP =NO, you can
choose AUTO IP=YES to have a link-local address
169.254.x.x assigned automatically.
If you specify BOOTP=NO, DH CP=NO, and AUTO I P=NO,
you can manually set the following TCP/IP
parameters fr om the control panel:
z IP address (IP)
z Subnet Mask (SM)
z Syslog Server (LG)
z Default Gateway (G W)
z Idle Timeout period (default is 270 seconds;
0 disables the timeout)
When setting IP numbers, press (Up Arrow
button) to increase the number by 1. Press
(Down Arrow button) to dec rease the number by 1.
Press (Select button)
to make your selecti on.
56 5 - Control panel ENWW
Page 59

Message Value or Submenu Description
CFG IPX/SPX NO
YES
WEB HTTPS
HTTP/HTTPS
Selects whethe r to use the IPX/SPX me nu and set
the IPX/SPX protocol paramet ers.
In the IPX/SPX menu, you can specify the frame
type parameter used on your network.
z The default is AUTO, which automatically sets
and limits the frame ty pe to th e first one
detected.
z For Ethernet networks, frame type selections
include EN_8023, EN_II, EN_8022, and EN_SNAP.
z For Token Ring networks, frame t ype selections
include TR_8022 and TR_SNAP.
In the submenu for Token Ring cards, you can also
specify the NetWa re Source Routing parameter,
which can be AUTO (default), OFF, SINGLE R,
or ALL RT.
For configur ati on m anagement, specify whet her the
embedded Web server will accept communications
using HTTPS (Secure HTTP) only, or both HTTP
and HTTPS.
z HTTPS: For secure, encrypted communications,
only HTTPS access is accept ed. The print
server will appear as a secure site.
z HTTP/HTTPS: Access using either HTTP or
HTTPS is permitted.
SECURITY KEEP
RESET
CFG LINK NO
YES
Specify whether the current security settings on the
print serv er wi ll be saved or reset to factory defaults.
z KEEP (default): The current securi ty settings are
maintained.
z RESET: Security settings are reset to factory
defaults.
Selects whether you want to manually configure the
HP Jetdirect 10/100Base-TX print server’s net work
link speed and comm unication mode.
The HP Jetdirect settings must match the network.
The default set ti ng is NO, which bypasses the link
configurat ion menu items.
If you specify YES, you can select one of the
following li nk configuration menu items:
z AUTO (default): The print server automatically
configures itself to match the link speed and
communication mo de of t he ne twork. If it fails,
100TX HALF will be set.
z 10T HALF: 10 Mbps, half-duplex operation
z 10T FULL: 10 Mbps, full-duplex operation
z 100TX HALF: 100 Mbps, half-duplex operation
z 100TX FULL: 100 Mbps, full-duplex operation
ENWW Changing networking parameters from the control panel 57
Page 60

Novell NetWare frame type parameters
The HP Jetdirect print server automatically selects a NetWare frame type. Select a frame type
manually only when the print server selects an incorrect frame type. To identify the frame type
chosen by the HP Jetdirect print server, print a configuration page from the control panel.
See Understanding and printing the configuration page.
The following frame types are supported:
z Ethernet_802.3
z Ethernet_II
z Ethernet_802.2
z Ethernet_SNAP
Disabling network protoco ls (optional)
By factory default, all supported network protocols are enabled. Disabling unused protocols
has the following benefits:
z It decreases printer-generated network traffic.
z It prevents unauthorized users from printing to the printer.
z It provides only pertinent information on the Configuration page.
z It allows the control panel to display protocol-specific error and warning message s.
To disable network protocols
Note Do not disable the IPX/SPX protocol if Windows 98, Windows NT, Windows Me,
Windows 2000, or Windows XP users will be printing to the printer.
1 Press (Select button) on the control panel to enter the menus.
2 Press (Down Arrow button) to highlight CONFIGURE DEVI CE, and then
press (select button).
3 Press (Down Arrow button) to highlight I/O, and then press (Select button).
4 Press (Down Arrow button) to highlight EIO SUBMENU, and then
press (Select button).
5 Press (Down arrow button) to highlight the network protocol you want to disable,
and then press (Selec t button).
6 Press (Down Arrow button) to highlight OFF, and then press (Select button).
7 Press (Cancel button) to return to the READY state.
58 5 - Control panel ENWW
Page 61

Resetting the HP Jetdirect print server
Resetting the HP Jetdirect print server restores the factory default values of the Jetdirect
print server.
Note When you restore the factory default values for the HP Jetdirect print server, all previously
stored EIO settings are lost.
To reset the HP Jetdirect print server
1 Press (Power button) to turn off the printer.
2 While holding (Back button) and (Resume button), turn on the printer.
Printing control-panel menu map
You can print a menu map of the settings that can be accessed through the control panel.
1 Press (Select button) on the control panel.
2 Press (Down Arrow button) to highlight INFORMATION, and then
press (Select button).
3 Press (Select button) to select PRINT MENU MAP.
Changing printer settings from the control panel
The control panel is one of three ways to set options in the printer. You can also change
options from the printer driver and the software applications from which you print. Printer driver
and application settings override control panel settings for the current print job. Application
settings override default printer driver settings.
Menu items in the control panel are numbered from 1 to 9. If a menu has more than nine
items, the additional items will appear with a letter value from A to Z. However, the numbers
and letter values are not included in the procedures in this guide.
For more information about any control panel menu or item, press (Help button).
To access the menus and settings
1 Press (Select button) on the control panel to enter the menus.
2 Navigate to the menu or submenu that contains the setting you want to change.
• Press (Down Arrow button) or (Up Arrow button) to highlight the desired menu.
(Hold down either of these buttons to auto-scroll through the selections.)
Press (Select button) to access the desired menu. Repeat this procedure to access
submenus.
• Press (Down Arrow button) or (Up Arrow button) to highlight the desired setting,
and then press (Select button) to save the setting. An asterisk (*) appears next to
the setting in the display, indicating that the new setting is now the default.
3 Press (Cancel button) to exit the menus and return the printer to the
button is pressed for 30 seconds, the printer returns automatically to the
ENWW Printing control-panel menu map 59
READY state. If no
READY state.
Page 62

Maintaining and
6
troubleshooting
Replacing the ink cartridges
You can check the ink levels from the control panel or the embedd ed Web serve r.
For information about using these tools, see Overview of printer management tools .
After removing a cartridge from its package, install it right away. Do not remove a cartridge
from the printer for long periods of time.
CAUTION HP recognizes customer’s choice, but cannot guarantee the quality or reliability of non-HP
ink cartridges. Printer services or repairs required as a result of using non-HP or refilled
ink cartridges is not covered under warranty.
Note To find out which ink cartridges work with your printer, see Supplies.
To replace an ink cartridge
1 Ensure the printer is turned on.
2 Lift to open the ink cartridge cover.
60 6 - Maintaining and troubleshooting ENWW
Page 63

3 Remove the ink cartridge that requires replacement by grasping it between your thumb
and forefinger and pulling it firmly toward you.
4 Remove the new ink cartridge from its package.
5 Insert the cartridge into its own color-coded slot. Press down firmly on the cartridge to
ensure proper contact.
6 Close the ink cartridge cover.
Maintaining the printheads
If printed characters are incomplete, or dots or lines are missing from printouts, this may be
caused by clogged ink nozzles and you might need to clean the printheads. To find out which
printheads work with your printer, see Supplies.
When the quality of printouts deteriorates, complete the following:
z Check the health of the printheads.
z Initiate the automatic printhead cleaning process.
z Manually clean the printhead cont acts.
z Replace the printheads, if the problems persist after cleaning.
CAUTION HP is not responsible for damage to the printer that results from modifying the printheads.
To check printhead health
Note If any printhead status is bad, clean or replace the printhead.
z From the configuration page
Check the printhead health section of the configuration page. See Understanding and
printing the configuration page.
z From the embedded Web server
1 Open the embedded Web server. See To open the EWS.
2 Click the Information tab.
3 Click Ink Supplies in the left pane.
ENWW Maintaining the printheads 61
Page 64

To align the printheads
Whenever you replace a printhead, the printer automatically aligns the printheads to ensure
the best print quality. However, if the appearance of your printed pages indicates that the
printheads are misaligned, you can align them manually.
z From the control panel
1 Press (Select button) on the control panel.
2 Press (Up Arrow button) until MAINTENANCE is highlighted, and then
press (Select button).
3 Ensure PRINT QUALITY is highlighte d, and then press (Selec t button).
4 Ensure ALIGN PRINTHEADS is highlighted, and then press (Select button).
z From the Embedded Web server
1 Open the embedded Web server. See To open the EWS.
2 Click the Settings tab.
3 Click Diagnostic in the left pane.
4 In the Printheads section, select the option to align printheads from the drop-down list.
To clean printheads automatically
Note Clean the printheads only when necessary; cleaning uses ink and shortens the life of the
printheads. There are three levels of cleaning available. After one level of cleaning, perform the
next level of cleaning only if the results are not satisfactory.
z From the control panel
1 Press (Select button) on the control panel.
2 Press (Up Arrow button) until MAINTENANCE is highlighted, and then
press (Select button).
3 Ensure PRINT QUALITY is highlighte d, and then press (Selec t button).
4 Press (Up Arrow button) until the option to clean printheads is highlighted, and then
press (Select button).
z From the Embedded Web server
1 Open the embedded Web server. See To open the EWS.
2 Click the Settings tab.
3 To clean the printheads, click Diagnostic in the left pane. Then, select the appropriate
cleaning level from the drop-down list in the Printheads section.
62 6 - Maintaining and troubleshooting ENWW
Page 65

To replace the printheads
Note Only replace printheads after you have attempted to clean the printheads. See To clean
printheads automatically and To clean the printhead contacts man ually.
1 Ensure the printer is plugged in and turned on.
2 Lift the ink cartridge cover, and then lift the printhead cover.
3 Lift to open the printhead latch.
4 Lift the handle of a printhead and use it to pull the printhead out of its slot.
5 Remove the new printhead from its package, and then remove the protective tape.
6 Insert the printhead into its color-coded slot. Press down firmly on the printhead to ensure
proper contact.
ENWW Maintaining the printheads 63
Page 66

7 Close the printhead latch. Press down to ensure it is in the lock position.
8 Close the covers.
9 Wait while the printer initializes the printheads and prints two alignment pages.
To clean the printhead contacts manually
To find out which printheads are compatible with your printer, see Supplies.
CAUTION Clean the printhead contacts only after you have attem pted to clean the printheads
automatical ly. See To clean printheads automatically. Printhead contact s contain sensitive
electronic components that can be damaged easily.
1 Ensure the printer is plugged in and turned on.
2 Lift the ink cartridge cover and printhead cover.
3 Wait two or three seconds, and then unplug the printer power cord.
4 Lift to open the printhead latch.
5 Lift the handle of a printhead and use it to pull the printhead out of its slot.
64 6 - Maintaining and troubleshooting ENWW
Page 67

6 Carefully remove any ink from the contact pads on the printhead using a dry cotton swab
or a soft, dry, lint-free cloth that will not come apart or leave fibers behind.
CAUTION Only wipe the contact pads. Wiping the nozzles (located on the underside of the printhead)
can cause severe damage to the printhead.
7 Insert the printhead into its color-coded slot. Press down firmly on the printhead to ensure
proper contact.
CAUTION Avoid using drinking water or alcohol, which could damage the printheads.
8 After cleaning, place the printhead on a sheet of paper or paper towel.
9 Clean the contact points in the printhead slot inside the printer with a dampened
cotton swab. Before re-inserting the printheads, make sure all the electrical contacts
have had at least five minutes to dry.
10 P lug in the power cord and turn on the printer. The cont rol p anel should still indicate that
a printhead is missing.
11 If you are replacing a printhead, remove the new printhead from its package, and then
remove the protective tape.
12 Insert the printhead into its color-coded slot. Press down firmly on the printhead to ensure
proper contact.
13 Close the printhead latch. Ensure it is in the lock position.
14 Where neces sary, repeat the abo ve steps for the remaining printheads.
15 Wait while the printer initializes the printheads and prints an alignment page. If the printer
does not print an alignment page, replace the printhead you have cleaned.
ENWW Maintaining the printheads 65
Page 68

Calibrating the color
Whenever you replace a printhead, the printer automatically calibrates the colors to ensure the
best print quality. If you are not satisfied with the appearance of the colors, you can calibrate
colors manually.
z From the control panel
1 Press (Select button) on the control panel.
2 Press (Up Arrow button) until MAINTENANCE is highlighted, and then
press (Select button).
3 Ensure PRINT QUALITY is highlighte d, and then press (Selec t button).
4 Press (Down Arrow button) until COLOR CALIBRATION is highlighted, and then
press (Select button).
A color calibration page prints.
5 Follow the instructions on the control-panel display to complete the process.
Calibrating the linefeed
If regular horizontal bands appear in printed text or graphics, calibrate the linefeed.
To calibrate the linefeed
1 Press (Select button) on the control panel.
2 Press (Up Arrow button) until MAINTENANCE is highlighted, and then
press (Select button).
3 Ensure PRINT QUALITY is highlighted, and then press (Select button).
4 Press (Down Arrow button) until LINEFEED CALIBRATION is highlighted, and then
press (Select button).
Two linefeed calibration pages print.
5 Follow the instructions on the control-panel display to complete the process.
a On the calibration page, find the box that has the fewest horizontal bands across it,
and note its number.
b Press (Up Arrow button) or (Down Arrow button) to select the number of the box,
and then press (Select button).
66 6 - Maintaining and troubleshooting ENWW
Page 69

Troublesh ooting tips and re s our c e s
Use the following tips and resources to resolve printing problems.
z For paper jam, see Clearing jams.
z For paper-feed problems, such as the paper skew and paper pick,
see Resolving pape r-feed problems.
Some printer problems can be resolved by resetting the printer.
To reset the printer
1 Press (Power button) to turn off the printer.
2 Disconnect the power cord from the printer.
3 Wait about 20 seconds, and then reconnect the power cord.
4 Press (Power button) to turn on the printer.
General troubleshooting tips
Ensure the following:
z Power light is on and not blinking. When the printer is first turned on, it takes
approximately 45 seconds to warm up.
z Make sure the printer is in the Ready state.
z No error messages appear on the computer screen.
z Power cord and other cables are working and firmly connected to the printer. Make sure
the printer is connected firmly to a functioning alternating current (AC) power outlet and is
turned on. See Printer specifications for voltage requirements.
z Media is loaded correctly in the tray and is not jammed in the printer.
z Printheads and ink cart ri dges are properl y installed in their correct color-coded slots.
Press down firmly on each one to ensure proper contact. Ensure you have removed the
tape from each printhead.
z Printhead latch and all covers are closed.
z Rear access panel or auto-duplex unit is locked into place.
z All packing tapes and materials are removed from the printer.
z Printer can print a configuration page. See Understanding and printing the configuration
page.
z The printer is set as the current or default printer. For Windows, set the printer as the
default in the Printers folder. For Mac OS, set the printer as the default in the Chooser or
the Print Center. See your computer’s documentation for more information.
z Pause Printing is not selected if you are using a computer running Windows.
z You are not running too many programs when you are performing a task. Close programs
that you are not using or restart the computer before attempting the task again.
ENWW Troubleshooting tips and resources 67
Page 70

Resetting th e con t r ol pa ne l language
1 Press (Power button) to turn off printer.
2 Press and hold (Power button) and then press (Select button) once.
3 Release (Power button).
The printer will initialize and prompt for language selection.
4 Scroll using (Up Arrow button) or (Down Arrow button) and press (Select button)
to select the language.
Resolving printing proble ms
Printer shuts down unexpectedly
Check power and power connections
Make sure the printer is connected firmly to a functioning alternating current (AC)
power outlet. See Pr in t er sp e c ifi c a tio n s for voltage requirements.
All printer lights are blinking
A non-recoverable error has occurred
Reset the printer. See To re set the printer.
If the problem persists, contact HP. See Support and warranty.
Printer is not responding (not hing prints)
Check printer setup
See General troubleshooting tips.
Check the printhead initialization
When printheads are installed or replaced, the printer automatically prints two alignment
pages to align the printheads. This process takes about eight minutes. You can print
documents only after the automatic alignment pages have been printed.
Check the printer software installation
If the printer is turned off when printing, an alert message should appear on your computer
screen; otherwise, the printer software might not be installed correctly. To resolve this,
uninstall the software completely, and then reinstall the printer software. See Uninstalling
the printer software.
68 6 - Maintaining and troubleshooting ENWW
Page 71

Check cable connections
z Make sure both ends of the cable (USB, parallel, or network) are secure.
z If the printer is connected to a network, check the following:
• Check the Link light on the back of the printer.
• Make sure you are not using a phone cord to connect the printer.
• The network hub, switch, or router is on and working properly.
Check printer setup for network environment
Ensure the correct printer driver and printer driver port are being used. For more
information about network connections, see Configuring the printer (Windows),
Configuring the printer (Mac OS), or the documentation provided by your network
vendors.
Check any personal firewall software installed on the computer
The personal software firewall is a security program that protects a computer from
intrusion. However, the firewall might block communication between the computer and the
printer. If there is a problem communicating with the printer, try temporarily disabling the
firewall. If the problem persists, the firewall is not the source of the communication
problem. Re-enable the firewall.
If disabling the firewall allows you to communicate with the printer, you might want to
assign the printer a static IP address and re-enable the firewall. See Configure network
options.
Printe r does not a ccept printhead
Inspect the printhead
Remove the printhead and make sure the protective tape has been removed completely
from the printhead.
Clean the printhead
Complete the printhead cleaning procedure. See To clean printheads automatically.
Turn off the printer after removing the printhead
After removing the printhead, turn the printer off, and then turn on the printer without the
printhead installed. After the printer has restarted, reinsert the printhead.
ENWW Resolving printing problems 69
Page 72

Printer takes a long time to print
Check the system configuration
Make sure the computer meets the minimum system requirements for the printer.
See Print er sp e c ifi c a tio n s.
Check the port setting
The port setting configuration in your system might not be set to ECP.
See the documentation that came with the computer for information on how to change
the port setting, or contact the computer manufacturer.
Check the printer software settings
The printer prints slower when Best or Maximum dpi is selected as the print quality.
To increase the print speed, select different print settings in the printer driver.
See Changing print settings.
Blank page printed
Check media settings
z Make sure the page settings in the printer driver matches the width and length of media
loaded in the tray. See Changing print settings.
Check the parallel port on you r compu ter
If you are using a parallel cable, make sure the printer is connected directly to the parallel
port. Avoid sharing the port with other devices, such as a Zip drive or other printers.
Placement of the text or graphics is wrong
Check how the media is loaded
Make sure the media width and length guides fit snugly against the edges of the stack
of media, and make sure the tray is not overloaded. See Loa ding media.
Check the media size
z Content on a page might be cut off if the document size is larger than the media that you
are using.
z Make sure the media size selected in the printer driver matches the size of media loaded
in the tray.
z If you are using a computer running Windows, select Emulate LaserJet Margins in the
printer driver to print Laser Jet formatted document.
Check margin settings
If the text or graphics are cut off at the edges of the page, make sure the margin settings
for the document do not exceed the printable area of your printer. See Setting minimum
margins.
70 6 - Maintaining and troubleshooting ENWW
Page 73

Check the page-orientation setting
Make sure the media size and page orientation selected in the application match the
settings in the printer driver.
Check the Preserve Layout setting (Windows)
If you are using an auto-duplex unit to do automatic duplex printing, ensure Preserve
Layout is selected in the printer driver. Clearing this option may result in unwanted
page breaks. See Printing on both sides (duplexing).
Check the printer location and length of USB cable
If the solutions do not work, the problem may be caused by the inability of the application
to interpret print settings properly. See the release notes for known software conflicts;
or refer to the application’s documentation, or contact the software manufacturer for
specific help.
Poor prin t quality and unexpected print outs
Check the printheads and ink cartridges
Replace any clogged or worn printheads or low ink cartridges (see Maint ain i n g the
printheads), and try to print again.
Check the paper quality
The paper might be too moist or too rough. Make sure the media used meets HP
specifications (see Selecting print media), and try to print again.
Check the type of media loaded in the printer
z Make sure the tray supports the type of media you have loaded. See Understanding
specifications for supported media.
z Make sure you have selected the tray in the printer driver that contains the media you want
to use. See Changing print settings.
Check the printer location and length of USB cable
See Check the printer location and length of USB cable.
ENWW Poor print quality and unexpected printouts 71
Page 74

Meaningless characters print
If an interruption occurs to a job that is printing, the printer might not recognize the rest of
the job.
Cancel the print job and wait for the printer to return to the ready state. If the printer does
not return to the ready state, cancel all jobs, and wait again. When the printer is ready,
resend the jo b. If prompted by the computer to retry the job, click Cancel.
Check cable connections
If the printer and computer are connected with a USB or parallel cable, the problem may
be due to a poor cable connection.
Make sure the cable connections at both ends are secure. If the problem persists, turn off
the printer, disconnect the cable from the printer, turn on the printer without connecting the
cable, and delete any remaining jobs from the print spooler. When the Power light is on
and not flashing, reconnect the cable.
Check the document file
The document file may be damaged. If you can print other documents from the same
application, try printing a backup copy of your document, if available.
Ink is smearing
Check print settings
z When you print documents that use much ink, allow more time to dry before handling the
printouts. This is especially true for transparencies. In the printer driver, select the Best
print quality , also increase the ink drying time and reduce the ink saturation using the
ink volume under the advanced features (Windows) or ink features (Mac OS) in the
printer software. However, note that decreasing ink saturation might give printouts a
“washed-out” quality.
z Color documents that have rich, blended colors can wrinkle or smear when printed using
the Best print quality. Tr y using the other print mode to reduce ink, or use HP Premium
Paper designed for printing vivid color documents. See Changing print settings.
Check the media type
Some types of media do not acc ept ink well , ink will dr y more slow ly and s me ar ing
may occur. See Selecting print media.
Check the margin settings
If you are using a computer running Windows, make sure the option to minimize margins
is not selected.
72 6 - Maintaining and troubleshooting ENWW
Page 75

Clean the inside of the auto-duplex unit
After extensive printing, ink might be deposited on the inside of the auto-duplex unit
causing ink to smear when printing on both sides of the paper. To remove the deposited
ink, use a lint free cloth to clean the inside of the auto-duplex unit.
Enable the printer's outpu t ramp
When printing in Fast Normal (default) or Fast print mode, the printer does not use the
output ramp to hold each printed page before releasing it onto the output tray. If the printer
starts printing the next page while the printed page is still drying on the output tray, the
newly printed page might rub against the printed page on the output tray, causing ink to
smear. Severity of smearing depends on the amount of ink used on each printed page.
To prevent the printed pages from rubbing against each other, print using the Normal or
Best print mode. Alternatively, enable the OUTPUT RAMP EXTENSI ON on the printer
control panel. See Paper Handling menu.
Ink is not filling the text or graphics completely
Check the ink cartridges
Ink cartridges might have run out of ink. Replace any empty cartridge. Or try removing and
reinstalling the cartrid ges , ma ke sure th ey snap firmly into plac e. See Repl acing the ink
cartridges.
Check the media type
Some media types are not suitable for use with the printer. See Selecting print media.
ENWW Poor print quality and unexpected printouts 73
Page 76

Output is faded or dull colored
Check the print mode
The Fast Normal and Fast modes in the printer driver allow you to print at a faster rate,
they are good for printing drafts. To get better result, select Normal or Best.
See Changing print settings.
Check the paper type setting
When printing on transparencies or other special media, select the corresponding media
type in the printer driver. See Printing on special and custom-size media.
Check the ink cartridges
If lines in the text or image are broken or do not print properly, one or more of the ink
cartridges may have run out of ink or are defective. Replace these cartridges with
new ones.
Colors are pr int in g as bla ck and white
Check print settings
Make sure Print in Grayscale is not selected in the printer driver.
Wrong colors are printing
Check print settings
Make sure Print in Grayscale is not selected in the printer driver.
Check the printheads
Whenever print quality noticeably decreases, you may need to clean the printheads.
See Maintaining the printheads.
Printo ut shows bleeding colors
Check print settings
Some media type settings (such as Transparency Films and Photo Papers) and print
quality settings (such as Best) require more ink than others. Choose different print
settings in the printer driver, make sure you select the correct media type. See Changing
print settings.
Check ink cartridges
Make sure ink cartridges have not been tampered with. Refilling processes and the use of
incompatible inks can disrupt the intricate printing system and result in reduced print
quality and damage to the printer. HP does not guarantee or support refilled ink cartridges.
For ordering information, see HP supplies and accessories.
74 6 - Maintaining and troubleshooting ENWW
Page 77

Colors do not line up properly
Check printheads
The printheads are automatically aligned when a printhead is replaced. However,
you might notice improveme nt in the print quality by performing the alignment procedure
yourself. See Maintaining the printheads.
Check graphics placement
Use the zoom or print preview feature of your software to check for gaps in the placement
of graphics on the page.
Lines or dots are missing from text or graphics
Check printheads
The printheads or printhead contact pads might need cleaning. See M ain t aining the
printheads.
ENWW Poor print quality and unexpected printouts 75
Page 78

Resolving paper -feed problem s
This section provides solutions to common paper-feed problems.
For information on resolving jams, see Cl earing jams.
Tray ca nnot be inserted
z With the tray remov ed from the printer, turn the printer off and then on again.
Reinsert the tray.
z Make sure the tray is aligned with the printer opening.
z Check for jammed paper.
Media is not supported for th e printer or tray
Use only media that is supported for the printer and the tray being used.
See Understanding specifications for supported media.
Media is not picked up from tray 1 or tray 2
z Make sure the media guides are set to the correct markings in the trays for the media size
you are loading. Also make sure the guides are snug, but not tight, against the stack.
z Make sure media in the tray is not curled. Uncurl paper by bending it in the opposite
direction of the curl.
z Make sure the tray is inserted properly.
Media is not coming out correct ly
z Make sure the output tray extension is extended, otherwise, printed pages may fall off
the printer.
z Remove excess media from the output tray. There is a limit to the number of sheets the
tray can.
z If the auto-duplex unit is not installed properly during a duplex job, media may ex it through
the rear of the printer. Reinstall the auto-duplex unit or close its cover.
Pages are skewing
z Make sure the media length and width guides in the trays are adjusted snugly against the
media, but do not crinkle or bend it.
z Avoid loading media of different types or sizes in a tray.
z Make sure media in the tray is not curled. Uncurl paper by bending it in the opposite
direction of the curl.
76 6 - Maintaining and troubleshooting ENWW
Page 79

Multiple pages are being picked up
z Make sure the media guides are set to the correct markings in the trays for the media size
you are loading. Also make sure the guides are snug, but not tight, against the stack.
z Make sure that the tray is not overloaded with paper.
z When you load paper, avoid fanning the stack. Fanning paper can cause static electricity
to build up and intensify multiple-pick problems.
z When reinser t ing a tray into the printer, do so gently. Forceful insertion with a full stack of
paper may cause sheets to slide up within the printer, causing the printer to jam or pick
multiple sheets at one time.
Resolving printer management problems
Embedded Web server (EWS) cannot be opened
Check your network setup
z Make sure you are not using a phone cord to connect the printer to the network.
z Make sure the network cable is securely connected to the printer.
z Make sure the network hub, switch, or router is on and working properly.
Check the computer
Make sure the computer that you are using is connected to the network.
Check your Web browser
Make sure the Web browser meets the minimum system requirements.
See Print er specifications.
Check the printer IP address
z Print a configuration page, and then locate the printer’s IP address on the second page.
See Understanding and printing the config uration page.
z Ping the printer using the IP address from an MS-DOS prompt. For example, if the
IP address is 123.123.123.123, type the following at the MS-DOS prompt:
C:\Ping 123.123.123.123
If the a reply appears, the IP address is correct.
ENWW Resolving printer management problems 77
Page 80

Troublesh ooting installation issues
If you had trouble installing the printer, check these items:
Problems printing alignment page
When printheads are installed or replaced, the printer automatically prints two alignment
pages to align the printheads. This process takes about eight minutes. The alignment pages
may be discarded after they are printed. If the printer does not print the pages, see General
troubleshooting tips, or align the printheads manually (see To align the printheads).
Problems in sta llin g soft ware
Verify the computer requirements
Make sure the computer meets the system requirements. See System requirement s
(Minimum).
Verify installation preliminaries
z Before installing software on a Windows computer, ensure all other programs are closed.
z If the computer does not recognize the path to the CD drive that you type, ensure you are
specifying the correct drive letter.
z If the computer cannot recognize the Starter CD in the CD drive, inspect the CD for
damage. You can download the printer driver from http://www.hp.com/support/
businessinkjet2800.
Reinstall the printer software
If you are using Windows and the computer cannot detect the printer, run the Scrubber
utility (located in the Utils\Scrubber folder on the Starter CD) to perform a clean printer
driver uninstallation. Restart your computer, and re-install the printer driver.
See Uninstalling the printer software.
78 6 - Maintaining and troubleshooting ENWW
Page 81

Problems connecting to a network
Note After correcting any of the following, run the setup program again.
General network troubleshooting
If you are unable to install the printer software on the computer, verify that:
z All cable connections to the computer and the printer are secure.
z The network is operational and the network hub is turned on.
z All applications, including virus protection programs and personal firewalls, are closed
or disabled.
z Make sure the printer is installed on the same subnet as the computers that will be using
the printer.
z If the installation program cannot discover the printer, print the configuration page and
enter the IP address manually in the installation program. See Understanding and printing
the configuration page.
z Ping the printer using the IP address from an MS-DOS prompt. For example, if the
IP address is 123.123.123.123, type the following at the MS-DOS prompt:
C:\Ping 123.123.123.123
If the a reply appears, the IP address is correct.
z If you are using a computer running Windows, make sure that the network ports created in
the printer driver match the printer IP address:
1 Print a configuration page. See Understanding and printing the configuration page.
2 From the Windows desktop, click Start, point to Settings, and then click Printers or
Printers and Faxes.
3 Right-click the printer icon, click Properties, and then click the Ports t ab.
4 Select the TCP/IP port for the printer, and then click Configure Port.
5 Compare the IP address listed in the dialog box and make sure it matches the IP
address listed on the configuration page. If the IP addresses are different, change the
IP address in the dialog box to match the address on the configuration page.
6 Click OK twice to save the settings and close the dialog boxes.
Problems connecting to a wired network
z If the Link light on the network connector does not turn on, make sure that all of the
General troubleshooting tips conditions are met.
z Though it is not recommended that you assign the printer with a static IP address,
you might resolve some installation problems (such as a conflict with a personal firewall)
by assigning the printer with a static IP address. For more information, see Configure
network options.
ENWW Troubleshooting installation issues 79
Page 82

Clearing jams
To avoid jams
z Make sure tray 2 is properly inserted, and the printer and trays are placed on a
z Make sure that nothing is blocking the paper path.
z Do not overload the trays. See Understanding specifications for supported media.
z Load paper properly. See Loading media.
z Do not use media that is curled or crumpled.
z Always use media that conforms with specifications. See Selecting print media.
z Make sure the output tray is not overly full when you send a job to print.
z Make sure media is aligned against the right side of the tray.
z Make sure the media length and width guides are adjusted snugly against the media,
z If you have extended the tray, do not press the tray extension lock while inserting the tray.
To clear a jam
flat surface.
but do not crinkle or bend it.
Pressing it will cause the tray to retract when you push in the tray and cause paper jam.
1 Remove all media from the output tray.
2 Check the rear access panel or the auto-duplex unit.
a Push the button on either side of the rear access panel or the auto-duplex unit and
remo ve the unit.
b Locate any jamme d media inside the printer, grasp it with both hands and pull it
towards you.
c If the jam is not there, push the buttons in front of the auto-duplex unit and remove
the cover. If the jam is inside, carefully remove it. Close the cover.
d Reinsert the rear access panel or the auto-duplex unit into the printer.
80 6 - Maintaining and troubleshooting ENWW
Page 83

3 If you cannot locate the jam, lift the output tray and check for a jam in tray 1. If media is
jammed in the tray, do the following:
a Pull out tray 1.
b Pull the paper towards you.
c Ensure the media is properly aligned in the tray, reinsert the tray and lower the
output tray.
4 If you have not found the jam and have tray 2 installed, pull out the tray and remove the
jammed media, if possible. If not, do the following:
a Ensure the printer is turned off, and disconnect the power cord.
b Lift the printer off tray 2.
c Remove the jammed media from the bottom of the printer or from tray 2.
d Reposition the printer on top of tray 2.
5 Open the top cover. If there is paper remaining inside the printer, ensure the carriage has
moved to the right of the printer, free any paper scraps or wrinkled media and pull the
media towards you through the top of the printer.
WARNING! Do not reach into the printer when the printer is on and the carriage is stuck. When you open
the top cover, the carriage should return to its position on t he right side of the printer. If it does
not move to the right, turn off the printer before you remove any jam.
6 After clearing the jam, close all covers, turn on the printer (if you turned it off), and then
press (Resume button) to continue printing.
The printer will continue printing the next page. You will need to resend any page that was
jammed in the printer.
ENWW Clearing jams 81
Page 84

HP supplies and accessories
A
This section provides information on HP supplies and accessories for the printer.
The information is subject to changes, visit HP website (http://www.hpshopping.com) for the
latest updates. You may also make purchase through the website.
Ordering printing supplies online
Besides the HP website, you may order printing supplies through the embedded Web server
(EWS) or the Toolbox (Windows).
System requirements for ordering printing supplies
To use the Toolbox, ensure you have the following:
z Internet ac cess
z Printer connected to your computer using a USB or parallel cable, or connected to
the network
z Toolbox installed on your computer (supported for Windows only)
To use the EWS, ensure you have the following:
z Printer connected to the network
z Web browser installed on your computer (either Netscape Navigator 4.8 or
Microsoft Internet Explorer 5.0 or later)
To orde r printi ng supplies
1 From the Toolbox (Windows): On the Printer Status tab, click Or der Supplies.
Your default web browser starts and displays a website.
From the EWS: On the Information tab, click Order Supplies.
2 Follow the instructions on the website to select and order printing supplies.
82 A - HP supplies and accessories ENWW
Page 85

Accessories
Accessories and cables
250-sheet input tray C8261A
HP auto-duplex unit C8258A
HP IEEE-1284 A-B Parallel Cable (2 mete r) C2950A
HP IEEE-1284 A-B Parallel Cable (3 mete r) C2951A
HP USB A-B (2 meter) C6518A
Memory modules
HP 64 MB SDRAM DIMM Q1887A
HP 128 MB SDRAM DIMM C9121A
Network interfaces
HP Jetdirect 620N print server/Internet connector (EIO module;
Fast Ethernet)
HP Jetdirect 625N print server/Internet connector (EIO module; Gigabit ) J7960A
HP Jetdirect 170X ext ernal print server via USB (Fast Ethern et) J3258B
HP Jetdirect 175X ext ernal print server via USB (Fast Ethern et) J6035B
HP Jetdirect 310X ext ernal print server via USB (Fast Ethern et) J6038A
HP Jetdirect 500X ext ernal print server via USB (Fast Ethern et) J3264A
HP Jetdirect 680N wireless 802.11b EIO print server J6058A
HP Jetdirect EW2400 external Fast Ethernet wired and wirel ess 802.11g
print server
HP BT3100 Bluetooth wireless pri nter adapter (USB 1.0 or
parallel interfaces)
HP Print Server Appliance 4250 J7941A
J7934A
J3265A
J7951A
J6072A
ENWW Accessories 83
Page 86

Supplies
Ink supplies
Ink cartridges
HP 10 Black C4844A
HP 11 Cyan C4836A
HP 11 Magenta C4837A
HP 11 Yellow C4838A
Printheads
HP 11 Black C4810A
HP 11 Cyan C4811A
HP 11 Magenta C4812A
HP 11 Yellow C4813A
HP Media
Plain paper
HP Bright White Inkjet Paper
500 sheets Letter (8.5 by 11 inches ) HPB1124
500 sheets A4 (210 by 297 mm) C1825A
200 sheets A3 (297 by 420 mm) C1858A
250 sheets Tabloid (11 by 17 inches) B1724
250 sheets Letter (8.5 by 11 inches ) B250
HP Office Paper
2500 sheets Letter (8.5 by 11 inches) 25005
10-ream carton Letter (8.5 by 11 inches) C8511
10-ream carton Legal (8.5 by 14 inches) C8514
Tabloid (11 by 17 inches) C1117
HP Office Recycled Paper
500 sheets Letter (8.5 by 11 inches ) E1120
500 sheets Letter (8.5 by 11 inches ) E1420
84 A - HP supplies and accessories ENWW
Page 87

HP Multipurpose Paper
5-ream carton Letter (8.5 by 11 inches) M115R
250 sheets Letter (8.5 by 11 inches ) 25011
500 sheets Letter (8.5 by 11 inches ) M1120
500 sheets Letter (8.5 by 11 inches ) MR311
500 sheets Legal (8.5 by 14 inches) M1420
Photo paper
HP Premium Plus Photo Paper
20 sheets, glossy Le tter (8.5 by 11 inches) C6831A
50 sheets, glossy Le tter (8.5 by 11 inches) Q1785A
20 sheets, glossy 4 by 6 inches Q1977A
20 sheets, matte Letter (8.5 by 11 inches) C6950A
20 sheets, matte A4 (210 by 297 mm) C6951A
20 sheets, glossy A4 (210 by 297 m m) C6832A
25 sheets, glossy A3 (2 97 by 420 m m) (Asia/Pacific) Q5497A
20 sheets, glossy A3 (297 by 420 m m) (Europe) Q5496A
25 sheets, glossy Tab loi d (11 by 17 inches) Q5495A
HP Premium Photo Paper
100 sheets, matte Letter ( 8.5 by 11 inches) C6563A
100 sheets, glossy Letter (8.5 by 11 inches) C5477A
50 sheets, glossy Le tter (8.5 by 11 inches) C6979A
15 sheets, glossy A4 (210 by 297 m m) Q2519A
20 sheets, glossy A3 (297 by 420 m m) C6059A
20 sheets, glossy Tab loi d (11 by 17 inches) C6058A
HP Photo Paper
20 sheets, two-sided glossy Letter (8.5 by 11 inches) C1846A
20 sheets, two-sided glossy A4 (210 by 297 mm) C1847A
20 sheets, one-si ded glossy A4 (210 by 297 mm) C6765A
HP Everyday Photo Paper
100 sheets, two-sided, matte Letter (8.5 by 11 inches) C7007A
25 sheets, two-sided, matte Letter (8.5 by 11 inches) C6983A
25 sheets, two-sided, semi-gloss A4 (Asia/Pacific) (210 by 297 m m) C7006A
25 sheets, one-si ded, semi-gloss A4 (210 by 297 mm) Q5451A
25 sheets, one-si ded, semi-gloss Letter (8.5 by 11 inches) Q5498A
100 sheets, one-si ded, semi-gloss 10 by 16.3 mm (Europe) Q5441A
ENWW Supplies 85
Page 88

Business communication paper
HP B rochure and Flye r P ape r
50 sheets, two-sided, glossy Letter (8.5 by 11 inches) C6817A
50 sheets, matte Letter (8.5 by 11 inches) C6955A
100 sheets, tri-f old, two-sided, glossy Letter (8.5 by 11 inches) C7020A
100 sheets, tri-fold, matte Letter (8.5 by 11 inches) Q5443A
100 sheets, tri-f old, matte A4 (210 by 297 mm) Q6590A
50 sheets, tri-f old, two-sided, glossy A4 (210 by 297 mm) Q2525A
50 sheets, two-sided, glossy A4 (210 by 297 mm ) C6818A
100 sheets, matte A4 (210 by 297 mm ) Q6592A
100 sheets, matte Letter (8.5 by 11 inches) Q5445A
150 sheets, two-sided, glossy Letter (8.5 by 11 inches) Q1987A
50 sheets, matte A3 (297 by 420 mm) Q6591A
50 sheets, two-sided, glossy A3 (297 by 420 mm ) C6821A
50 sheets, two-sided, glossy Tabloid (11 by 17 inches) C6820A
HP Premium Presentation Paper
150 sheets Letter (8.5 by 11 inches) Q5449A
150 sheets A4 (210 by 297 mm) Q6593A
100 sheets A3 (297 by 420 mm) Q6594A
100 sheets Tabloid (11 by 17 inc hes) Q6595A
HP Premium Inkjet Transparency Film
20 sheets Letter (8.5 by 11 inches) C3828A
50 sheets Letter (8.5 by 11 inches) C3834A
20 sheets A4 (210 by 297 mm) C3832A
50 sheets A4 (210 by 297 mm) C3835A
HP Premium Plus Inkjet Transparency Film
20 sheets A4 (210 by 297 mm) C7031A
20 sheets Letter (8.5 by 11 inches) C7030A
50 sheets A4 (210 by 297 mm) C7029A
50 sheets Letter (8.5 by 11 inches) C7028A
HP Premium Inkjet Paper
200 sheets Letter (8.5 by 11 inches) 51634Y
200 sheets, coated, ma tt e A4 (210 by 297 mm) 51634Z
100 sheets, coated, heavyweight A4 (210 by 297 mm) C1853A
100 sheets A3 (297 by 420 mm) C1856A
100 sheets Tabloid (11 by 17 inc hes) C1855A
86 A - HP supplies and accessories ENWW
Page 89

Support an d wa rra nty
B
If the printer is not operating properly and the suggestions in Maintaining and troubleshooting
do not solve the problem, try using one of the following support services to obtain assistance.
Obtaining electronic support
You can obtain support from HP from the following electronic sources:
z Web
Visit the printer website on hp.com for the latest software, product, operating system,
and support information:
http://www.hp.com/support/businessinkjet2800
z Toolbox (Windows)
The Toolbox provides easy, step-by-step solutions to common printing problems.
See Toolbox (Windows).
Obtaining HP telephone support
During the warranty period, you may obtain assistance from the HP Customer Care Center.
Before you call
To assist our Customer Care Center r epresentatives to s erve you better, prepare the following
information before calling.
1 Print the printer configuration page. See Understanding and printing the configuration
page for instructions on how to print this page. If the printer does not print, get the
following information ready.
a model number and serial number. (Check the back of the printer.)
b printer model
2 Check the operating system that you are using, such as Windows 98 SE.
3 If the printer is connected to the network, check the network operating system, such as
Windows NT Server 4.0.
4 Note how the printer is connected to your system, such as parallel, USB, or network.
5 Obtain the printer driver and version number of the printer software, such as
HP Business Inkjet 2800 Series Version: 62.43.12.0. (To find the printer driver version
number, open the printer settings or properties dialog box and click the About tab.)
6 If you have a problem printing from a particular application, note the application and
version number.
ENWW Obtaining electronic support 87
Page 90

Teleph on e su pp or t num be r s
In many location, HP provides toll free telephone support during the warranty period.
However, some of the support numbers listed below may not be toll free.
For the most current list of telephone support numbers, see http://www.hp.com/support.
Country/Region Telephone number
Albania *
Algeria 213 17 63 80
Anguila 1-800-8722881
Argentina 0-810-555-5520
Aruba 800-8000
Australia (03) 8877 8000
Austria 08 1000 1000
Bahamas 1-800-711-2884
Bahrain +971 4 366 2020
Barbados 001-800-8722881
Belgium 078 600 600
Belize 811
Bermuda 1-800-711-2884
Bolivia 0-800-1110
Bosnia-Hercogovina *
Brazil Outside São Paolo: 0800-157751
Greater Sao Paolo: (11) 4689-2012
Brit. Virgin Islan ds 001-800-8722881
Bulgaria *
Canada (905) 206-4663
(877) 621-4722
Cayman Islands 1-800-711-2884
Chile 800-3600999
China 021-38814518
Colombia 01-8000-114726
Costa Rica 0-800-011-0524
Croatia *
Cyprus 800 9 2649
Czech Republic 2 61 307 310
Denmark 70 11 77 00
Dominican Republic 1-800-711-2884
Ecuador Andinatel 999119
Pacifictel 1-800-225528
Egypt 202 532 5222
88 B - Support and warranty ENWW
Page 91

Country/Region Telephone number
El Salvador 800-1-785
Finland 0203 53232
France 0826 10 4949
Germany 01805 258 143
HP bietet während der Gewährl eistungsfrist
vielerorts gebührenfreien telef onischen Support an.
Die nachfolgend aufgelisteten Rufnummern sind
jedoch unter Umstä nden nicht gebührenfrei.
Zur weiteren Klärung oder um zusätzliche Informati on
zu erhalten, können Sie Kontakt mit der
Online-Kundenbetreuung von HP
(http://www.hp.com/cpso-support/guide/psd/
cscemea.html) aufnehm e n.
Gibraltar 0870 842 2339
Greece 801 11 22 55 47
Guatemala 1-800-999-5105
Guyana 165
Haiti 183
Honduras 800-0-123
Hong Kong 85 (2) 2802 4098
Hungary 1 382 1111
Iceland 507 10 00
India +91-80-8526900 or 1 600 447- 737
Support in Hindi & English
Indonesia +62 ( 21) 350 3408
Ireland 1890 946 500
Israel 9 830 4848
Italy 02 3859 1212
Jamaica 0-800-711-2884
Japan 0570-000-511(Navi Dial, Japan Domestic
Only)
81-3-3335-9800
Jordan +971 4 366 2020
Kazakhstan *
Korea, Republic of 1588 3003
Kuwait +971 4 366 2020
Lebanon +971 4 366 2020
Liechtenstein 0848 802 020
Luxembourg 27 303 303
Macedonia *
ENWW Obtaining HP telephone support 89
Page 92

Country/Region Telephone number
Malaysia +1800 805 405
Malta *
Mexico Mexico City: 52-58-9922
Outside Mexico City: 01-800-472 6684
Moldova *
Monaco +33 (0) 173018475
Morocco 22 40 47 47
Netherlands 0900 117 0000
New Zealand +64 (9) 356 6640
Nicaragua 174
Nigeria *
Norway 800 62 800
Oman +971 4 366 2020
Panama 001-800-711-2884
Peru 0-800-10111
Philippines (2) 867 3551
Poland (22) 5666 000
Portugal 213 164 164
Puerto Rico 1 877 232 0589
Qatar +971 4 366 2020
Romania (21) 315 4442
Russia Moscow: 095 797 3520
St. Petersburg: 812 346 799 7
San Marino 02 3859 1212
Saudi Arabia 800 897 1444
Serbia and Montenegro *
Singapore 6272 5300
Slovakia 2 5752 5752
Slovenia *
South Africa (RSA), Republic of 086 000 1030
Spain 902 010 333
Suriname 156
Sweden 077 130 3000
Switzerland 0848 80 20 20
Syria +971 4 366 2020
Taiwan 886-2-8722-8000
886-800-010-055
Thailand (2) 353 9000
90 B - Support and warranty ENWW
Page 93

Country/Region Telephone number
Trinidad & Tobago 1-800-711-2884
Tunisia 71 89 12 22
Turkey 212 444 71 71
United Kingdom 0870 842 2339
Ukraine Kiev: 44 4903520
United Arabic Emirat es (UAE) 800 4520
04 366 2020
United States 1-800 HP INVENT
Vatican City 02 3859 1212
Vietnam (8) 823 4530
West Africa (Engl ish-speaking countries/regions) *
West Africa (French-speaking countries/regions) +351 213 17 63 80
Yemen +971 4 366 2020
* For support information, call your HP service provider.
ENWW Obtaining HP telephone support 91
Page 94

Hewlett-Packard limited warranty statement
HP product Duration of Limited Warra nty
Software 1 year
Accessories 1 year
Ink cartridges 6 months*
Printheads 1 year*
Printer peripheral hardware (see below for details) 1 year
*For more detailed warranty information, see http://www.hp.com/support/inkjet_warranty.
Extent of limited warranty
1 Hewlett-Packard warrants to the end-user customer that the HP products specified above
will be free from defects in materials and workmanship for the duration specified above,
which duration begins on the date of purchase by the customer.
2 For software products, HP’s limited warranty applies only to a failure to execute
programming instructions. HP does not warrant that the operation of any product will be
uninterrupted or error free.
3 HP’s limited warranty covers only those defects that arise as a result of normal use of the
product, and does not cover any other problems, including those that arise as a result of:
a Improper maintenance or modification;
b Software, media, parts, or supplies not provided or supported by HP; or
c Operation outside the product’s specifications.
d Unauth o rized m o dification or misus e .
4 For HP printer products, the use of a non-HP ink cartridge or a refilled ink cartridge does
not affect either the warranty to the customer or any HP support contract with the
customer. However, if printer failure or damage is attributable to the use of a non-HP or
refilled ink cartridge, HP will charge its standard time and materials charges to service the
printer for the particular failure or damage.
5 If HP receives, during the applicable warranty period, notice of a defect in any product
which is covered by HP’s warranty, HP shall either repair or replace the product,
at HP’s option.
6 If HP is unable to repair or replace, as applicable, a defective product which is covered by
HP’s warranty, HP shall, within a reasonable time after being notified of the defect, refund
the purchase price for the product.
7 HP shall have no obligation to repair, replace, or refund until the customer returns the
defective product to HP.
8 Any replacement product may be either new or like new, provided that it has functionality
at least equal to that of the product being replaced.
9 HP products may contain remanufactured parts, components, or materials equivalent to
new in performance.
10 HP’s Limited Wa rranty Statement is valid in any country/region where the covered HP
product is distributed by HP. Contracts for additional warranty services, such as on-site
service , are av a ilable from an y authorized HP serv ic e f a c ilit y in cou ntries/re gio ns w he r e
the product is distributed by HP or by an authorized importer.
92 B - Support and warranty ENWW
Page 95

Limitations of warranty
TO THE EXTENT ALLOWED BY LOCAL LAW, NEITHER HP NOR ITS THIRD PARTY
SUPPLIERS MA KES ANY OTHER WARRANTY OR CO NDITI ON OF ANY KIND, WHETHE R
EXPRESS OR IMPLIED WARRANTIES OR CONDITIONS OF MERCHANTABILITY,
SATISFACTORY QUALITY, AND FITNESS FOR A PARTICULAR PURPOSE.
Limitations of liability
1 To the extent allowed by local law, the remedies provided in this Warranty Statement are
the customer’s sole and exclusive remedies.
2 TO THE EXTENT ALLOWED BY LOCAL LAW, EXCEPT FOR THE OBLIGATIONS
SPECIFICALL Y SET FORTH IN THIS WARRAN TY STATEMENT, IN NO EVENT SHALL
HP OR ITS THIRD PARTY SUPPL IER S BE L IABLE FOR DIRECT, INDIRECT, S PECIAL,
INCIDENTAL, OR CONSEQUENTIAL DAMAGES, WHETHER BASED ON CONTRACT,
TORT, OR ANY OTHER LEGAL THEORY AND WHETHER ADVISED OF THE
POSSIBILITY OF SUCH DAMAGES.
Local law
1 This Warranty Statement gives the customer specific legal rights. The customer may also
have other rights which vary from state to state in the United States, from province to
province in Canada, and from country/region to country/region elsewhere in the world.
2 To the extent that this Warranty Statement is inconsistent with local law, this Warranty
Statement shall be deemed modified to be consistent with such local law. Under such
local law, certain disclaimers and limitations of this Warranty Statement may not apply to
the customer. For example, some states in the United States, as well as some
governments outside the United States (including provinces in Canada), may:
a Preclude the disclaimers and limitations in this Warranty Statement from limiting the
statutory rights of a customer (e.g. the United Kingdom);
b Otherwise restrict the ability of a manufacturer to enforce such dis claim ers or
limitations; or
c Grant the customer additional warranty rights, specify the duration of implied warranties
which the manufacturer cannot disclaim, or allow limitations on the duration of implied
warranties.
3 FOR CONSUMER TRANSACTIONS IN AUSTRALIA AND NEW ZEALAND, THE TERMS
IN THIS WARRANTY STATEMENT, EXCEPT TO THE EXTENT LAWFULL Y
PERMITTED, DO NOT EXCLUDE, RESTRICT, OR MODIFY, AND ARE IN ADDITION
TO, THE MANDAT ORY STAT UTORY RIG HT S APPLI CABLE T O THE SALE O F THE HP
PRODUCTS TO SUCH CUSTOMERS.
ENWW Hewlett-Packard limited warranty statement 93
Page 96

HP Inkjet Supplies - Warranty Quick Reference
Note This information is intended to be an easy-to-read summary of the full HP warranty statement.
To read the full warranty statement, go to www.hp.com/support/inkjet_warranty and select
your supply.
Is your product covered under warranty?
If you believe your ink supply or printhead is defective, you may return it for a refund or
replacement provided that ALL of the following are true:
z Ink supply: It is not out of ink.
z Printhead : It has not exceeded its warranted usage:
– Black printhead: 530 ml
– Color printhead: 200 ml
Note To determine the volume of ink that has passed through the printhead currently installed in
your printer, see “Accumulated ink usage (ml)” located under the “Printhead Status” section
of the configuration page.
z Ink supply: It has not been refilled, remanufactured, or otherwise tampered with.
z Printhead or ink supply: Its “end of warranty” date has not passed. Look at the illustration
below to find the date location for your product.
End of warrant y date location s
Date format: YYYYMMDD
Figure 1: New printheads Figure 2: Older printheads Figure 3: Ink supplies
Install-By Date
Make sure to install your product before the install-by date printed on the supply package.
Installing before or on the install-by date ensures that you will have at least the following
before the end-of-warranty date:
• Printhead: one year (subject to accumulated ink usage limit)
• Ink supply: six months
94 B - Support and warranty ENWW
Page 97

HP Inkjet Supplies - Expiration
As ink ages, it loses water. When ink is old enough, it can damage the printheads or other
parts of the printing system. In normal use, most cart ridges w ill run out of ink long before
the ink is old enough to cause damage. However, to prevent any possibility of damage,
HP printers that use the cartridges listed above are designed to stop printing with the
cartridges before the ink gets too old. See “Expiration date (Y-M-D)” located under the
“Ink Cartridge Status” section of the configuration date
z Expiration has nothing to do with the product warranty. For information about the warranty
on your ink cartridge, see http://www.hp.com/support/inkjet_warranty.
z Expiration prevents damage from old ink. When ink cartridges expire, they stop working
and must be replaced.
How do you return a product?
There are two ways to return a product under warranty:
z Visit the retailer where you bought the product (subject to the retailer's return policy)
z If you cannot return the product to the retailer, call the support phone number listed on the
product insert that came in the box with the product
ENWW Hewlett-Packard limited warranty statement 95
Page 98

Printer specifications
C
Printer specifications
For media and media-handling specifications, see Select ing print media.
Physical specifications
Available model s and
physical dimensions
Size (width by depth
by height)
Weight (does not
include printheads
or ink cartridges)
676 by 498 by 199 mm (26.6 by 19.6 by 7.8 inches)
z With auto-dupl ex unit:
676 by 588 by 199 mm (26.6 by 23.1 by 7.8 inches)
z With tr a y 2 :
676 by 498 by 264 mm (26.6 by 19.6 by 10.4 inches)
z With tray 2 and auto-duplex unit:
676 by 588 by 264 mm (26.6 by 23.1 by 10.4 inches)
13.5 kg (29.7 lb)
z With auto-dupl ex unit: 15.5 kg (34.1 lb)
z With tray 2: 17.0 kg (37.4 lb)
z With tray 2 and auto-duplex unit: 19.0 kg (41.9 lb)
Product features and capacities
Connectivity z IEEE 1284-compl iant bidirectional par allel (all models)
z USB 2.0-compliant full speed (all model s)
z HP Jetdirect Internal Print Server for Fast Ethernet 10/
100Base-TX in EIO slot (included with
HP Business Inkjet 2800dtn printer)
z 2 DIMM slots (100 pin, SDRAM, PC 100 or greater)
Print method Drop-on-demand thermal inkjet printing
Ink cartridges 4 ink cartridges (1 each for black , cyan, magenta, and
yellow)
Printheads 4 printheads (1 each for black, cyan , magenta, and yellow)
Supply yields
(based on 5%
coverage)
Color calibration
Device languages
Ink cartridges 1,750 pages
Printheads
z Black: 16,000 pages
z Cyan, magenta, and yel low: 24,000 pages
z ColorSync
z ICC Profiles
z PANTONE
*PANTONE, Inc’s check-standard trademark for color.
z PCL 5c
z PCL 6
z PostScript 3 emulation
z Automatic language switching
®*
96 C - Printer specifications ENWW
Page 99

Font support z 45 TrueType and 35 PostScript fonts built-in (all
PostScript emulation, PCL 5c, and PCL 6 accessible)
z Intellifo nt and TrueType rasteri zer built int o PCL 5c and
PCL 6
Duty cycle Up to 12,000 pages per month
Advanced security*
*Applies to full-feature HP Jetdirect
z SNMP v3
z SSL/TLS (HTTPS)
products with firmwa re ver sion x.24.yy or
later — EIO (615n, 620n, and later),
External (en3700)
Processor and memory speci fications
Device processor z Motorola 32-bit ColdFire 4e RISC (256 MHz)
Device memory
z 96 MB built-in RAM
Operating system and network protocol specifications
Operating system compatibility z Windows 98, Windows Me, Windows NT 4.0,
Windows 2000, Windows XP (Professional and
Home Editions), and Windows Server 2003
z Mac OS X (10.1.5 and later)
z OS/2
z Linux
z UNIX
z MS-DOS printer driver support through third-party
1
For information about using the IBM PostScript 3
emulation printer driver for IBM OS/2,
see http://www7.software.ibm.com/2bcprod.nsf.
2
For information about using Linux with HP printers,
see http://www.linuxprinting.org.
3
Printer installation software for UNIX® (HP-U X,
Sun Solaris) networks is available for downl oad at
http://www.hp.com.
1
2
3
applications
System requirements (Minimum)
Note: Graphic- intensive, complex,
and large files might require more
hard disk space.
z Windows 98:
Pentium
®
90 MHz, 16 MB RAM, 130 MB free hard disk
space
z Windows Me:
Pentium
®
150 MHz, 32 MB RAM, 130 MB free hard
disk space
z Windows 2000:
Pentium 300 MHz, 64 MB RAM, 160 MB free hard
disk space
z Windows XP 32-bit edition:
Pentium 233 MHz, 64 MB RAM, 160 MB free hard
disk space
z Windows Server 2003:
Pentium 233 MHz, 128 MB RAM, 160 MB free hard
disk space
z iMac:
600 MHz, 128 MB RAM
z Power Mac G3 or later
400 MHz, 128 MB RAM
z iBook
366 MHz, 128 MB RAM
ENWW Printer specifications 97
Page 100

Network operat ing system compatibil ity z Windows 98, Windows Me, Windows NT 4.0,
Windows 2000, Windows XP 32-bit (Professional and
Home Editions), Windows XP 64-bit Edition
z Novell NetWare 4.x, 5.x, 6, NDS, and NDPS
z HP-UX 10.20, 11.x
z Solaris, 2.6, 7, 8 (SPARC systems only)
z RedHat Linux 7.1 and later
z SuSE Linux 7.1 and later
z Mac OS X (10.1.5 and later)
z IBM OS/2 Wa rp 4. x*
z IBM AIX 3.2.5 and later*
z MPE-iX*
z Microsoft Wind ows Terminal Server Edition 4.0
z Microsoft Wind ows 2003 Server Terminal Services
(formerly known as Microsoft Windows XP Server
Terminal Services)
z Microsoft Wind ows 2000 Server Terminal Services with
Citrix MetaFrame 1.8
z Microsoft Wind ows 2003 Server Terminal Services with
Citrix MetaFrame 1.8
z Microsoft Wind ows NT and Windows 2000 Server
Terminal Services with Citrix V1.8 MetaFrame 1.8
z Microsoft Wind ows NT and Windows 2000 Server
Terminal Services with Citrix XP MetaFrame XP
z Microsoft Wind ows 2000 Server Terminal Services*
Contact your network operating system vendor for
software , documentation, and supp ort.
Compatible network protocols
z TCP/IP
z IPX/SPX
z AppleTalk*
z DLC/LLC
z IP Direct Mode
z LPD
z FTP Printing
z IPP
z NDS
z Bindery
z NCP
z NDPS
z iPrint Telnet
z SLP
z IGMP
z BOOTP/DHCP
z WINS
z SNMP
z HTTP
*AppleTalk is not supported on Token Ring print servers.
z Not all protoc ol and oper ating system comb inations are
supported. For more inf ormation, go to
http://www.hp.com and
http://www.hp.com/support/businessinkjet2800.
98 C - Printer specifications ENWW
 Loading...