

Page 1

Page 2

Page 3

table of contents
product overview .................................................................................................................1
unique product features ...................................................................................................... 2
key selling points...................................................................................................................4
marketing statement ............................................................................................................6
product sku........................................................................................................................... 7
localization...........................................................................................................................8
dimensions ..........................................................................................................................10
front view ............................................................................................................................ 12
rear view .............................................................................................................................13
printing supplies area ......................................................................................................... 14
control panel ................................ ................................................................ ......................15
specifications................................................................................................ ......................17
competitive test suites........................................................................................................20
user replaceable components........................................................................................... 21
consumables................................................................ ...................................................... 22
technology updates ...........................................................................................................27
value added services.........................................................................................................29
education and training................................ ................................................................ ......31
support services..................................................................................................................33
standard warranty for the product .................................................................................... 35
setup requirements .............................................................................................................41
contents of the box............................................................................................................43
overall setup procedure ..................................................................................................... 44
install tray 2.........................................................................................................................47
install auto-duplex unit/rear access panel (cleanout).......................................................49
install HP Jetdirect 620n print server card...........................................................................51
install additional memory ...................................................................................................53
enable accessories in printer driver.................................................................................... 55
install ink cartridges ............................................................................................................ 57
install printheads .................................................................................................................59
paper type matrix...............................................................................................................62
paper capacity and weight matrix....................................................................................66
test hardware installation ...................................................................................................67
contents of the software CD ROM for Windows.................................................................70
contents of software CD ROM for Macintosh..................................................................... 71
startup page of the CD browser for Windows.................................................................... 72
browse documentation................................................................................................ ......73
register product .................................................................................................................. 74
customization utility............................................................................................................75
install the printer software for Windows - direct ..................................................................83
install the printer software for Windows - network................................ ..............................90
install the printer driver for Windows - using the Add Printer wizard................................. 104
test software installation...................................................................................................109
uninstall printer software for Windows .............................................................................. 111
install to olbox................................ ................................................................ .................... 120
contents of the software CD ROM for Windows...............................................................127
contents of software CD ROM for Macintosh ...................................................................128
uninstall toolbox ................................................................................................................129
startup page of the CD browser for Macintosh................................................................131
install the printer softwar e for Macintosh..........................................................................132
share the printer software for Macintosh ..........................................................................138
Page 4

delete printer spooler queue for Macintosh.....................................................................141
summary of driver configurations under different install methods ...................................142
Web deployment of drivers .............................................................................................. 144
scrubber utility..................................................................................................................145
setup issues .......................................................................................................................146
print a Configuration page..............................................................................................152
overview of the control panel..........................................................................................157
LCD messages ..................................................................................................................159
LED indications .................................................................................................................162
menu map........................................................................................................................164
loading media into trays ..................................................................................................174
manual feed .....................................................................................................................180
printing on both sides.......................................................................................................185
printing on special media................................................................................................. 196
firmware upgrading procedure .......................................................................................199
changing default software settings..................................................................................202
software features and functions ....................................................................................... 203
navigating the driver user interface in Windows advanced tab.....................................204
navigating the driver user interface in Windows paper/quality tab................................218
navigating the driver user interface in Windows effects tab............................................ 222
navigating the driver user interface in Windows finishing tab .......................................... 225
navigating the driver user interface in Windows color tab..............................................227
navigating user interface in Macintosh X ......................................................................... 229
overview of the Windows toolbox................................................................ ....................241
HP Instant Support (HPIS) ..................................................................................................249
myPrintMileage.................................................................................................................259
EWS...................................................................................................................................263
HP Web Jetadmin.............................................................................................................288
firmware upgrading procedure .......................................................................................289
changing default software settings..................................................................................292
cleaning and maintaining the printer..............................................................................293
troubleshooting usage issues................................................................ ............................294
troubleshooting paper- related problem .......................................................................... 297
clearing media jams.........................................................................................................299
troubleshooting print quality-related problems................................................................302
low or excess use of ink in printouts..................................................................................305
incorrect color printouts...................................................................................................308
printing process ................................................................................................................311
writing systems..................................................................................................................313
ink delivery system................................................................ ............................................314
ink supply station..............................................................................................................315
service station ...................................................................................................................316
paper path-feed motor and jam detection ................................................................ .... 317
electronics........................................................................................................................320
sensors and encoders .......................................................................................................321
keypanel PCA ..................................................................................................................322
media ease of use strategy..............................................................................................323
installer..............................................................................................................................332
input/output.....................................................................................................................334
key software improvements.............................................................................................335
toolbox features ...............................................................................................................337
driver features...................................................................................................................338
Page 5

known issues.....................................................................................................................341
product escalation path by region..................................................................................353
white papers.....................................................................................................................354
print test pages.................................................................................................................357
configuration page..........................................................................................................362
serial number ................................ ................................................................ .................... 367
born-on date................................ ................................................................ .................... 368
color calibration test page...............................................................................................369
printhead alignment ........................................................................................................372
diagnostic page...............................................................................................................374
customer service checklist ...............................................................................................376
field replacement unit: customer requirements ...............................................................377
repair flow chart...............................................................................................................378
exploded view..................................................................................................................379
tools for repair...................................................................................................................382
non V-coded parts (CREW)..............................................................................................384
non V-coded parts (FRU)..................................................................................................390
troubleshooting strategy ..................................................................................................411
troubleshooting power-on problems................................................................................412
troubleshooting print media problems.............................................................................418
troubleshooting paper eject problems ............................................................................420
troubleshooting unusual noises.........................................................................................422
troubleshooting initialization.............................................................................................423
troubleshooting two-sided printing problems...................................................................424
troubleshooting short ink cartridge/printhead life................................ ............................426
quick checkup .................................................................................................................427
error codes .......................................................................................................................429
repackaging by customer to return to HP........................................................................446
repackaging kit: setup the exchan ged unit..................................................................... 447
Page 6

Page 7

1
table of contents
product overview .......................................................................................................................1
unique product features ............................................................................................................ 2
key selling points.........................................................................................................................4
marketing statement ..................................................................................................................6
product sku.................................................................................................................................7
localization .................................................................................................................................8
dimensions ................................................................................................................................10
front view..................................................................................................................................12
rear view ................................................................................................................................... 13
printing supplies area ............................................................................................................... 14
control panel............................................................................................................................15
specifications............................................................................................................................17
competitive test suites................................................................ .............................................. 20
user replaceable components.................................................................................................21
consumables ............................................................................................................................ 22
technology updates.................................................................................................................27
value added services ...............................................................................................................29
education and training............................................................................................................31
support services........................................................................................................................33
standard warranty for the product .......................................................................................... 35
Service and Support Manual
Page 8

table of figures
HP Business Inkjet 2800 Printer .....................................................................................................1
HP Business Inkjet 2800 Printer .....................................................................................................4
HP Business Inkjet 2800 Series Demo Page.................................................................................. 6
HP Business Inkjet 2800 Printer SKUs .............................................................................................7
Dimensions for HP Business Inkjet 2800................................................................ ......................10
Dimensions for HP Business Inkjet 2800dt ...................................................................................10
Dimensions for HP Business Inkjet 2800dtn.................................................................................11
Front View of the Printer ........................................................................................................... 12
Rear View of the Printer ............................................................................................................13
Printing Supplies Area ............................................................................................................... 14
Control Panel Buttons and LEDs ............................................................................................... 15
Ink Cartridges for the Printer ..................................................................................................... 22
Printheads for the Printer .......................................................................................................... 23
Printhead Status........................................................................................................................ 37
New Printheads ........................................................................................................................ 37
Older Printheads .......................................................................................................................37
Ink Supplies...............................................................................................................................38
Ink Cartridge Status..................................................................................................................38
Service and Support Manual
Page 9

product overview
product overview
HP Business Inkjet 2800 Printer
HP Business Inkjet 2800 Printer Series is a high -performance, wide-format, and costeffective business inkjet designed for a small work team.
Some of the basic features of this product are:
• Better price range as compared to that of HP CP 1700 and HP Business Inkjet
2600 printers
• Expandability options, such as optional auto-duplex unit and second tray
• Multiple SKUs
• Targeted at small and medium sized business
• Individual high capacity ink cartridges
• Separate long -life printheads
• High capacity trays
• Ability to create photo-realistic images on A4 or letter-size, A3+ or 330.2 by
482.6 mm (13 by 19 inches), B-size paper, and special media
• Cost-effective color documents
• Connectivity options, such as the EIO slot, parallel port, or the USB port
Tour the Product hp confidential 1 - 1
Page 10

unique product features
unique product features
Unique product features of the HP Business Inkjet 2800 Printer Series are:
• Back-lit, text based LCD Control Panel
• Speed performance up to 24 ppm black and 21 ppm color in draft mode
• 96MB built-in RAM, upgradeable up to 544MB with optional two 100-pin DIMM
slots
• High performance CPU (256 MHz)
• 150-sheet input tray and an optional 250-sheet second tray
• 100-sheet output tray
• Low cost per page with 2.2 US cents for black ink and 8.4 US cents for mixed
color ink (Based on 5% black and 20% color coverage)
• Archives true-to-life photo-quality printing using HP PhotoREt III technology
• Four separate long -life print heads
• Individual, user replaceable high capacity ink cartridges
Other Features
Some other features of the product are:
• Ink level gauge
• Auto pen alignment
• Laser-quality print speed up to 7 ppm black and 5.5 ppm color
• PCL5c, PCL6, PostScript3 emulation, and automatic language switching
• Drop-on-demand thermal inkjet printing print method
• Duty cycle with maximum monthly volume of up to 12,000 pages per month
• Robust network solutions with optional EIO Jetdirect 620n print server card
(standard with DTN Printer)
• Lower cost barcode printing
• Easy printer management with internally enabled Embedded Web Server
(EWS) e-services
• One-year limited hardware warranty
Accessories
1 - 2
The optional hardware accessories available with the product are:
• Auto-duplex unit (Built- in with the HP Business Inkjet 2800dt and 2800dtn printer
SKUs)
• 250-sheet second paper tray (Built-in with the HP Business Inkjet 2800dt and
2800dtn printer SKUs)
• Network cards:
• HP JD 620N EIO [10/100] (Built-in with the HP Business Inkjet 2800dtn
printer SKU)
• HP JD 625N EIO [10/100]
• HP JD 680N EIO [wireless 802.11b]
• HP JD 500X EX box [TR]
• HP JD 500X EX box [10/100]
• HP JD 300X EX box [10/100]
• HP JD 380X EX box [wireless 801.11b]
• HP JD ew2400 EX box [wireless 801.11g]
hp confidential
Tour the Product
Page 11

Font Support
The fonts supported by the product are:
• 45 TrueType and 35 PostScript built-in fonts
• Intellifont and TrueType rasterizer built into PCL5c and PCL6
Tour the Product hp confidential 1 - 3
Page 12

key selling points
key selling points
HP Business Inkjet 2800 Printer
HP Business Inkjet 2800 Printer Series is a wide-format, low running cost color inkjet
printer that is designed for a small workteam. The key selling points of the product
are its high performance, cost effectiveness, and flexible networking solutions.
Performance
This product provides laser-quality speeds, excellent color, high memory capacity,
and two input trays to ensure professional performance for users. The various
performance-enhancing features of the product are:
• Postcard to poster printing capability
• Print speed of up to 24 ppm black and 21 ppm color in fast mode
• Excellent print quality with 4800 optimized dpi on photo paper
• Duty Cycle of up to 12,000 pages per month
• New Embedded Web Server (EWS) solutions:
• EWS - Job Accounting and Pages Remaining solution to help users
estimate ink levels and allow administrators to optimize printer
deployment, workload, and purchase of supplies.
• Barcode printing solution from JetCAPS. JetCAPS provides more than
50 types of barcodes for shipment and production labels. The points
that make the printer advantageous for barcode printing are:
• Faster first -page out as compared to laser and thermal printers.
• No ozone emission, as compared to laser printers.
• Low cost barcode printer, as compared to Intermec Mobile
Thermal printer, which is US$950.
• Prints on a variety of media, as compared to thermal printers
that print only on thermal paper.
• Prints in color, as compared to thermal printers, which prints in
mono color only.
• No fading in barcodes, as compared to direct thermal printers.
• Connectivity features, such as USB, Parallel (IEEE 1284-compliant), and EIO
1 - 4
hp confidential
Tour the Product
Page 13

Cost Effectiveness
This product provides features, such as professional performance, speed,
resolution, and paper handling at a low acquisition and operating cost. Robust
duty cycle and networking solutions also contribute to the cost effectiveness of
the printer. Some other features that make the printer ideal for small workgroups
are:
• The printer series consists of three printer SKUs that are priced between US$499
and US$999. These SKU options are:
• HP Business Inkjet 2800 - Base printer
• HP Business Inkjet 2800dt - Base printer with built-in auto-duplex unit and
250-sheet capacity second tray
• HP Business Inkjet 2800dtn - Base printer with built-in auto -duplex unit,
250-sheet capacity second tray, and EIO Jetdirect 620n print server
card
• Individual, high capacity ink cartridges yield 1750 pages per color
• Cost-efficient 4-pen operation
• Low cpp of 2.2 cents mo no and 8.4 cents color (Based on 5% black and 20%
color coverage)
• Optional auto -duplex unit to save printing costs
• Paper path capacity:
• Rear manual feed: 1 sheet (16 to 74 lb Bond/60 to 280 gsm)
• Front manual feed: 10 sheets (16 to 36 lb Bond/60 to 135 gsm)
• Input tray 1: 150 sheets (16 to 36 lb Bond/60 to 135 gsm)
• Input tray 2: 250 sheets (16 to 36 lb Bond/60 to 135 gsm)
• Output tray: 100 sheets
• Auto-duplex unit: 1 sheet at a time (16 to 36 lb Bond/60 to 135 gsm)
Networking
This product is network ready and designed to complement any existing
Information Technology (IT) environment across a variety of platforms including
Macintosh. The features that contribute to robust networking solutions for users are:
• Back-lit LCD Control Panel
• Supports EWS and Web Jet Admin
• Supports PCL5/PCL6 and PS3
• EIO networking solution with HP Jetdirect 620n print server card for easy
manageability (Built -in with HP Business Inkjet 2800dtn)
Tour the Product hp confidential 1 - 5
Page 14

marketing statement
marketing statement
1 - 6
The marketing statement for the HP Business Ink jet 2800 Printer Series is: Highperformance, wide-format, cost-effective business inkjet designed for a small work
team.
The key messages in the marketing statement are:
• Performance that meets business needs of the customer: The product provides
the ability to create postcard to poster- sized documents from 4 by 6 inches
to 13 by 19 inches.
• Reliability at a low cost of ownership: The product supports fast print speeds of
up to 24 ppm black and 21 ppm color. It saves money and paper over time
with four individual ink cartridges and automatic two-sided printing feature,
respectively.
• Design for sharing: The product provides sophisticated connectivity with PCL5c
and PCL6 and PostScript 3 emulation. In addition, it enables connectivity to
major networks and operating systems with Embedded Web Server (EWS)
for remote printer management.
HP Business Inkjet 2800 Series Demo Page
hp confidential
Tour the Product
Page 15
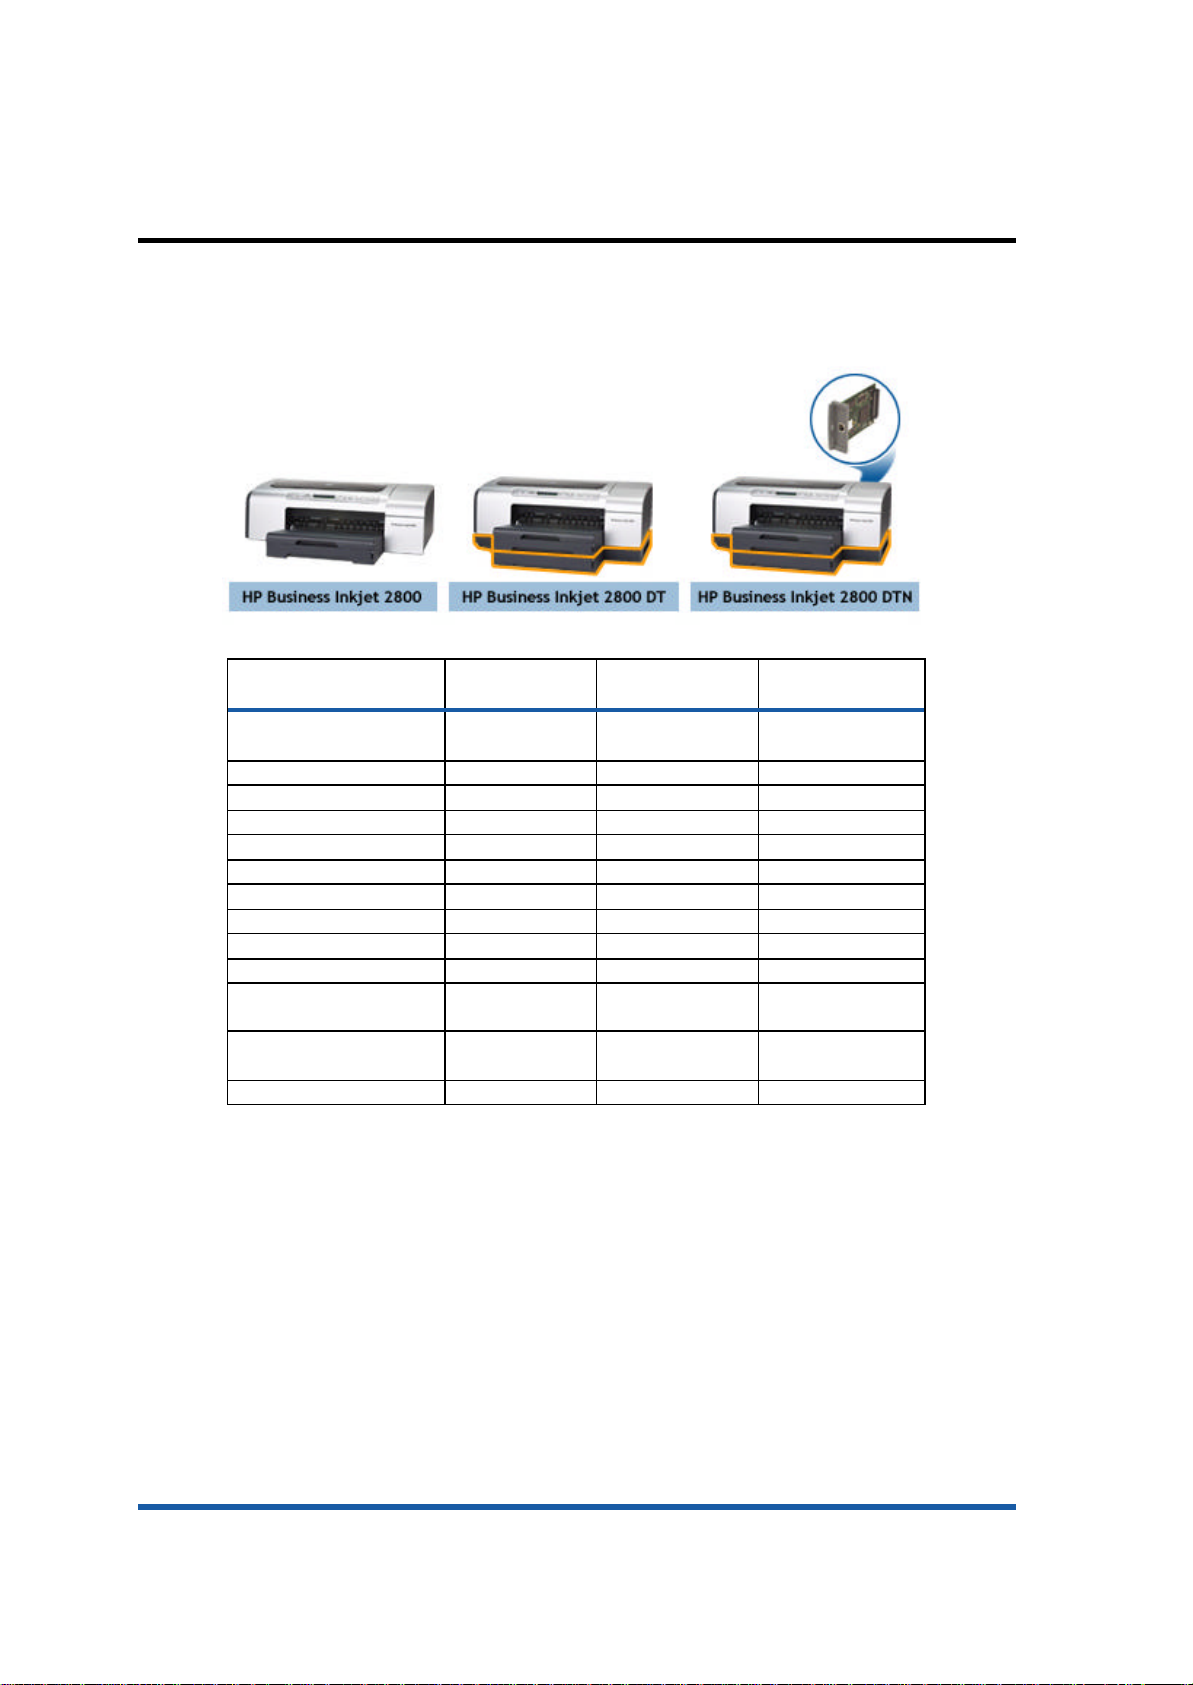
product sku
HP Jetdirect 620n Print
product sku
HP Business Inkjet 2800 Printer SKUs
- HP Business
Inkjet 2800
Base Printer Yes Yes Yes
Power Cord Yes Yes Yes
AC Power Adaptor Yes Yes Yes
Driver Software CD Yes Yes Yes
Getting Started Guide Yes Ye s Yes
Setup Poster Yes Yes Yes
Support Flyer Yes Yes Yes
Regulatory Leaflet Yes Yes Yes
Four Printheads Yes Yes Yes
Four Ink Cartridges Yes Yes Yes
Auto-Duplex Unit No Yes Yes
Rear Access Panel
(Cleanout)
Server Card
250-Sheet Input Tray No Yes Yes
Table Comparing Contents of the Box for HP Business Inkjet 2800 Printer Series
Yes Yes Yes
No No Yes
HP Business
Inkjet 2800dt
HP Business
Inkjet 2800dtn
Tour the Product hp confidential 1 - 7
Page 16

Language
Windows
Macintosh
Macintosh
Macintosh
Driver/Install
localization
localization
CD1 will be localized in the following languages:
• US English
• French
• Portuguese
• Spanish
• German
• Italian
• Dutch
• Swedish
• Danish
• Finish
• Norwegian
CD2 will be localized in the following languages:
• US English
• French
• Japanese
• Korean
• Simplified Chinese
• Traditional Chinese
• Czech
• Polish
• Russian
The items that are localized in all of the above languages are:
• Setup Poster (Graphics)
• JetAdmin Guide
• Windows CD Browser
• Windows Readme
• Windows Driver
• Windows Toolbox
• Windows Installer
However, all items may not be localized in all the languages. For example, items,
such as Windows Acrobat, Macintosh CD browser, and Macintosh readme, are
localized in only some languages. In the table displayed below, a Yes against a
language indicates that the item will be localized for that language. A No
indicates that the item is not supported or available for that language.
None of the topics are localized in Hungarian, Turkish, Arabic, Hebrew, and Greek.
Note
Macintosh
1 - 8
Acrobat
US English Yes Yes No Yes Yes
CD
Browser
hp confidential
Acrobat
Readme
Tour the Product
PS
er
Page 17

French No Yes No Yes Yes
Norwegian
Traditional
Brazilian
Portugues
e
EuroSpanish
German No Yes No Yes Yes
Italian No Yes No Yes Yes
Dutch No Yes No Yes Yes
Swedish No Yes No Yes Yes
Czech No No No No No
Danish No No No No No
Finnish No No No No No
Polish No No No No No
Russian No No No No No
Japanese No Yes No Yes Yes
Korean No Yes No Yes Yes
Simplified
Chinese
Chinese
Table Displaying the Localization Support for HP Business Inkjet 2800 Printer Series
No Yes No Yes Yes
No Yes No Yes Yes
No No No No No
No Yes No Yes Yes
No Yes No Yes Yes
Tour the Product hp confidential 1 - 9
Page 18

dimensions
dimensions
Dimensions for HP Business Inkjet 2800
Dimensions for HP Business Inkjet 2800dt
1 - 10
hp confidential
Tour the Product
Page 19

Dimensions for HP Business Inkjet 2800dtn
Dimension HP Business
Inkjet 2800
Width 676 mm (26.6
inches)
Height 199 mm (7.8
inches)
Depth 498 mm (19.6
inches)
Weight 13.5 kg (29.7
lbs)
Dimensions For HP Business Inkjet 2800 Printer SKUs
HP Business
Inkjet 2800dt
676 mm (26.6
inches)
264 mm (10.4
inches)
588 mm (23.1
inches)
19.0 kg (41.9
lbs)
HP Business
Inkjet 2800dtn
676 mm (26.6
inches)
264 mm (10.4
inches
588 mm (23.1
inches)
19.0 kg (41.9
lbs)
Tour the Product hp confidential 1 - 11
Page 20

front view
front view
Front View of the Printer
The following components are located at the front of the printer:
1. Control panel: The control panel is used to change printer settings, view
the printer status and messages, and diagnose printer problems.
2. Front manual feed slot: The front manual feed slot is used to feed media
manually.
3. Tray 1: Tray 1 holds 150 sheets of paper.
4. Printing supplies area : The printing supplies area contains ink cartridges
and printheads.
5. Output tray: The output tray is the location for collecting printed output.
6. Guides : The guides hold the media firmly in the trays.
7. Paper stack indicator : The paper stack indicator helps indicate the amount
of paper left in tray 1 and tray 2.
8. Tray 2 cover : The tray 2 cover covers the tray.
9. Tray 2: Tray 2 holds 250 sheets of paper.
10. Tray extension lock: The tray extension lock helps extend the tray.
1 - 12
hp confidential
Tour the Product
Page 21

rear view
rear view
The following components are located at the rear of the printer:
1. Parallel (IEEE 1284) connector: The parallel connector connects the printer
to the computer using the parallel cable.
2. EIO Slot: The EIO slot is used to install the Jetdirect print server card for
networking The HP Jetdirect 620n print server card is included with HP
Business Inkjet 2800dtn Printer SKU.
3. Auto-duplex unit: The auto-duplex unit provides automatic printing on both
sides of a sheet of paper. The auto-duplex unit is available with HP Business
Inkjet 2800/2800dt/2800dtn Printer SKUs.
4. Paper guide: The paper guide guides paper during rear manual feed.
5. Rear manual feed slot: The rear manual feed slot is used to perform manual
feed using rear panel.
6. Rear access panel (cleanout) : The rear access panel must be removed to
install the auto-duplex unit and clear paper jams.
7. Network connector: The network connector connects the printer directly to
the network. It is available with HP Business Inkjet 2800dtn Printer SKU.
8. Power input: The required power input for the printer.
9. Universal Serial Bus connector: The USB connector is used for plug and play
printing support.
Rear View of the Printer
Tour the Product hp confidential 1 - 13
Page 22

printing supplies area
printing supplies area
The following components are available in the printing supplies area:
Printing Supplies Area
1. Ink cartridge cover: The ink cartridge cover covers the ink cartridges.
2. Printhead cover : The printhead cover covers the printheads.
3. Printhead latch: The printhead latch provides access to install or remove
printheads from their color-coded slots.
4. Printheads : The product has four separate color printheads. Each
printhead must be placed in its color-coded slot.
5. Ink cartridges: The product has four separate colored ink cartridges. Each
ink cartridge must be placed in its color-coded slot.
1 - 14
hp confidential
Tour the Product
Page 23

control panel
control panel
Control Panel Buttons and LEDs
The functions of the Control Panel are:
• Change printer settings.
• View printer status.
• View printer messages.
• Diagnose printer problems.
The components located on the Control Panel are:
1. Power button : The Power button is used to turn the printer on and off.
2. Help button : The Help button is used to provide information about LCD
printer messages and menu items.
3. Attention light: The Attention light is used to indicate the following three
states:
• Off: Indicates that there are no conditions that require attention. A
printer status message usually accompanies this indicator.
• Flashing: Indicates that the printer has encountered errors, such as a
paper jam. Such errors can be resolved by user intervention. The
LCD displays an error message when the Attention light is flashing.
• Flashing alternately with Ready light: Indicates that the printer has
encountered a critical error. The LCD displays a critical error
message.
4. Ready light: The Ready light is used to indicate the following three states:
• On: Indicates that the printer is online and ready to accept print jobs.
• Off: Indicates that the printer is turned off.
• Flashing: Indicates that the printer is initializing, canceling a print job, or
turning off.
5. LCD display: The LCD display is used to display status and error messages,
and ink cartridge levels.
6. Back button : The Back button is used to move backwards by one level in a
menu.
7. Up and Down arrow buttons: The Up and Down arrow buttons are used to
navigate through menu items. These buttons also increase or decrease
numerical values in a menu item.
8. Select button : The Select button is used to enter a menu and select a
highlighted menu item.
9. Cancel Job button: The Cancel Job button is used to cancel the current
print job. The time taken by the button to cancel a print job varies
depending upon the size of a print job. Typically, it is pressed only once to
cancel a print job. The Cancel button exits all menus.
Tour the Product hp confidential 1 - 15
Page 24

10. Resume button: The Resume button is used to resume an interrupted
printing process. Similar to the Cancel button, the Resume button exits all
menus.
1 - 16
hp confidential
Tour the Product
Page 25

specifications
optimized dpi on HP premium photo papers,
specifications
The following table lists the different printer specifications:
Parameter Values
Print Speeds • Draft mode:
Print Quality • Print Quality: Better than or equal to BIJ2600
Printheads
and Ink
Supplies
Paper
Handling
Media Size
and Types
Reliability • 150,000 page life
I/O Interface • IEEE 1284- compliant bi-directional parallel
o Black text: 24 ppm
o Mixed text/color graphics: 21 ppm
• Laser-quality speed:
o Black text: 7 ppm
o Mixed text/color graphics: 5.5 ppm
• Color: HP enhanced Color Layering Technology
with PhotoREt III for photo quality (up to 4,800 by
1,2001,200 by 1,200-input dpi)
• 4 CMYK user replaceable printheads (TIJ3.0
Cyppo/Expresso ink)
• 4 CMYK ink supplies (1750 page black, 1750 page
color)
• 150- sheet multipurpose tray (supports up to 22
envelopes, 60 cards, 30 transparencies, 30 sheets
of labels)
o Front manual feed: up to 10 sheets
capacity
o Rear manual feed: 1 sheet capacity
• 250- sheet input tray (standard with HP Business
Inkjet 2800dt and 2800dtn printers)
• 100- sheet output tray
• Automatic two-sided printing module (standard
with HP Business Inkjet 2800dt and 2800dtn printers)
• Sizes: from 4 by 6 inches postcards to 13 by 19
inches posters
• Weight: 16 to 36 lb bond, up to 110 lb index card,
11 mils thick
• Types: CP1700 supported media
• Duty cycle 12,000 pages/month
• USB 2.0 compliant full speed
• EIO slot for EIO networking
• User upgradeable DIMM slots
• 1 power button, 5 push buttons and 1 toggle
button; 2 LED for alert and status; 2x20 character
backlit LCD display
Tour the Product hp confidential 1 - 17
Page 26

Software
PostScript 3 emulation printer driver for IBM
Unix®: Printer installation software for UNIX®
UX, Sun Solaris) networks is available for
Number
Compatibility
• Operating systems:
o Windows 95, 98, Me, 2000, NT4.0, XP
o Macintosh OS X: Macintosh OS 10.3 is
supported only with network connections
o OS/2: For information about using the IBM
OS/2, refer to the URL
http://www7.software.ibm.com/2bcprod.ns
f
o For information about using Linux with HP
printers, refer to the URL
http://www.linuxprinting.org/
o
(HPdownload at http://www.hp.com/
o MS-DOS printer driver support through third-
party applications
• Drivers: PCL5/PCL6, PS3
Color
Management
Table Displaying the HP Business Inkjet 2800 Printer Series Datasheet
Support for ICM, ColorSync, ICC Profiles, Pantone
Note
The laser -quality speed comparison compares the pages per minute speeds of the
HP Business Inkjet 2800 Printer Series against the benchmark of the HP Color LaserJet
4600 at comparable print quality. This comparison is based solely on the internal
testing of HP.
The following table displays ordering information:
Product
Printer SKUs
HP Business Inkjet 2800 C8174A
HP Business Inkjet 2800dt C8163A
HP Business Inkjet 2800dtn C8164A
Paper Handling
250-Sheet Input Tray C8261A
HP Auto -Duplex Unit C8258A
Print Supplies
HP No.10 Black Ink Cartridge (69 ml) - upto 1750 pages C4844A
HP No.11 Cyan Ink Cartridge (28 ml) - upto 1750 pages C4836A
HP No.11 Magenta Ink Cartridge (28 ml) - upto 1750 pages C4837A
HP No.11 Yellow Ink Cartridge (28 ml) - upto 1750 pages C4838A
HP No.11 Black Printhead - up to 16,000 pages C4810A
HP No.11 Cyan Printhead - up to 24,000 pages C4811A
HP No.11 Magenta Printhead - up to 24,000 pages C4812A
HP No.11 Yellow Printhead - up to 24,000 pages C4813A
Cables
HP IEEE-1284 A-B Parallel Cable (2 meter) C2950A
HP IEEE-1284 A-B Parallel Cable (3 meter) C2951A
1 - 18
hp confidential
Tour the Product
Page 27

HP USB A-B (2 meter) C6518A
Print Server Cards
HP Jetdirect 620N Print Server/Internet Connector (EIO Module;
J7934A
Fast Ethernet)
HP Jetdirect 625N Print Server/Internet Connector (EIO Module;
J7960A
Gigabit)
HP Jetdirect 680N Wireless 802.11b EIO Print Server J6058A
HP Jetdirect EW2400 External Fast Ethernet Wired and Wireless
J7951A
802.11g Print Server
HP Jetdirect 500x TR External Print Server J3264A
HP Jetdirect 500x 10/100 External Print Server J3265A
HP Jetdirect 300x 10/100 External Print Server J3263A
HP Jetdirect 380x 802.11b Wireless External Print Server J6061A
Table Displaying the HP Business Inkjet 2800 Printer Series Ordering Information
Tour the Product hp confidential 1 - 19
Page 28

competitive test suites
competitive test suites
Laser-Quality Speed (LQS) is an HP -developed specification that helps customers
compare the print speeds of HP Business Inkjets with HP Color LaserJets.
LQS benchmarks the page-per-minute speeds of the HP Business Inkjet series
printers against the HP Color LaserJets at comparable print quality. This
comparison is based solely on the internal tests of HP. Performance benchmarking
is done on the basis of:
• Total of 40 plus mono and color files fr om more than 10 popular office
applications
• Total of more than 220 pages (16% b/w, 84% color)
The parameters are:
• Typical applications such as Word, Excel, PowerPoint, Netscape Navigator,
Acrobat, Lotus Notes, Internet Explorer, Publisher, Corel Draw, Pho toshop,
Freelance Graphics, and Adobe Illustrator
• Complexity
• Length
Benefits of LQS
The benefits of LQS are:
• Fair Comparison : LQS provides a reasonable standard to compare an HP
Business Inkjet against an HP Color LaserJet without the benefit of having an
industry standard speed specification across LaserJet and Inkjet.
• Robust Testing : Using a complete suite of representative office applications,
document lengths and complexities, ensure that Business Inkjets deliver
according to customer experiences.
Applications Used in the Competitive Speed Test Suites
This benchmarking suite is HP-managed and consists of internal and externally
sourced customer representative files. The suite is designed to be a representative
of documents created using typical applica tions, which are similar in complexity
and length, printed using a shared color printer.
Applications Mono Docs Color Docs
Word 2 5
Excel 3 4
PowerPoint 1 4
Netscape Navigator 1 2
Acrobat 1 3
Lotus Notes - 1
Internet Explorer 1 2
Publisher - 3
Corel Draw - 2
Photo Shop - 3
Freelance Graphics - 2
Adobe Illustrator - 2
Total 9 33
Applications Used in Competitive Speed Test Suites
1 - 20
hp confidential
Tour the Product
Page 29

user replaceable components
user replaceable components
The user replaceable components available in the HP Business Inkjet 2800 Printer
Series are:
Part Name Part Number
ASSY-INPUT TRAY MAIN C8174-67012
ASSY-OUTPUT TRAY C8174-67013
ASSY-2nd BIN SVC C8174-67014
BEZEL-PDL SVC C8174-67049
ASSY-CLEANOUT TROUGH SVC C8174-67031
AUTO DUPLEX SVC C8174-67028
ASSY-PICK ROLLER SVC C8174-67015
COVER-SHIELD DIMM SVC C8174-67010
PICK ROLLER CLEANING SHEET C8174-67057
List of User Replaceable Components
Tour the Product hp confidential 1 - 21
Page 30

consumables
consumables
Consumables provided with the HP Business Inkjet 2800 Printer Series include:
• Ink Cartridges
• Printheads
• HP Media Types
Ink Cartridges
Ink Cartridges for the Printer
The following table lists ink cartridge details, such as the part number and price:
Model Part
number
Black ink cartridge (in-box
only)
HP No.10 Black ink cartridge C4844A 69cc US$33.99 1750
HP No.11 Cyan ink cartridge C4836A 28cc US$33.99 1750
HP No.11 Magenta ink
cartridge
HP No.11 Yellow ink cartridge C4838A 28cc US$33.99 1750
Table Listing Ink Ca rtridge Details
C4840A 28cc - 700 pages
C4837A 28cc US$33.99 1750
Volume Price Yield
pages
pages
pages
pages
1 - 22
hp confidential
Tour the Product
Page 31

Printheads
The following table lists printhead details, such as the part number and price:
Model Part Number Price Yield
HP No.11 Black Printhead C4810A US$33.99 16,000 pages
HP No.11 Cyan Printhead C4811A US$33.99 24,000 pages
HP No.11 Magenta Printhead C4812A US$33.99 24,000 pages
HP No.11 Yellow Printhead C4813A US$33.99 24,000 pages
HP Media Types
The following lists details, such as the paper type and their respective size used for
the product:
Plain Paper Type A-size B-size 3-hole
HP Bright White Yes Yes No
HP Color Inkjet Yes Yes No
HP Multipurpose Yes No No
HP Office Yes Yes Yes
Table Listing Plain Paper Type Details
Coated Paper Type A-size B-size
HP Brochure and Flyer, Glossy and Matte Yes Yes
HP Premium Plus Photo, Glossy and Matte Yes Yes
HP Premium Photo Yes Yes
HP Premium Inkjet Yes Yes
HP Premium Presentation Yes Yes
HP Premium Transparency Yes No
HP Everyday Photo Yes No
Table Listing Coated Paper Type Details
Printheads for the Printer
Table Listing Printhead Details
Tour the Product hp confidential 1 - 23
Page 32

Note
Similar to the HP Business Inkjet 2600 Printer Series, the HP Business Inkjet 2800 Printer
Series does not support Banner printing.
Plain Paper Type Paper Size Part Number
HP Bright White Inkjet Paper
500 sheets Letter (8.5 by 11
inches)
500 sheets A4 (210 by 297
mm)
200 sheets A3 (297 by 420
mm)
250 sheets Tabloid (11 by 17
inches)
250 sheets Letter (8.5 by 11
inches)
HP Office Paper
2500 sheets Letter (8.5 by 11
inches)
10 ream carton Letter (8.5 by 11
inches)
10 ream carton Legal (8.5 by 14
inches)
Tabloid (11 by 17 inches) C1117
HP Office Recy cled Paper
500 sheets Letter (8.5 by 11
inches)
500 sheets Letter (8.5 by 11
inches)
Table Listing Plain Paper Types
HPB1124
C1825A
C1858A
B1724
B250
25005
C8511
C8514
E1120
E1420
HP Multipurpose Paper
5- ream carton Letter (8.5 by 11 inches) M115R
250 sheets Letter (8.5 by 11 inches) 25011
500 sheets Letter (8.5 by 11 inches) M1120
500 sheets Letter (8.5 by 11 inches) MR311
500 sheets Legal (8.5 by 14 inches) M1420
HP Premium Plus Photo Paper
20 sheets, glossy Letter (8.5 by 11 inches) C6831A
50 sheets, glossy Letter (8.5 by 11 inches) Q1785A
20 sheets, glossy 4 by 6 inches Q1977A
20 sheets, matte Letter (8.5 by 11 inches) C6950A
20 sheets, matte A4 (210 by 297 mm) C6951A
20 sheets, glossy A4 (210 by 297 mm) C6832A
1 - 24
Photo Paper Types Paper Size Part
Number
hp confidential
Tour the Product
Page 33

25 sheets, glossy A3 (297 by 420 mm)
(Asia/Pacific)
20 sheets, glossy A3 (297 by 420 mm) (Europe) Q5496A
25 sheets, glossy Tabloid (11 by 17 inches) Q5495A
HP Premium Photo Paper
100 sheets, matte Letter (8.5 by 11 inches) C6563A
100 sheets, glossy Letter (8.5 by 11 inches) C5477A
50 sheets, glossy Letter (8.5 by 11 inches) C6979A
15 sheets, glossy A4 (210 by 297 mm) Q2519A
20 sheets, glossy A3 (297 by 420 mm) C6059A
20 sheets, glossy Tabloid (11 by 17 inches) C6058A
HP Photo Paper
20 sheets, two-sided glossy Letter (8.5 by 11 inches) C1846A
20 sheets, two-sided glossy A4 (210 by 297 mm) C1847A
20 sheets, one-sided glossy A4 (210 by 297 mm) C6765A
HP Everyday Photo Paper
100 sheets, two-sided, matte Letter (8.5 by 11 inches) C7007A
25 sheets, two-sided, matte Letter (8.5 by 11 inches) C6983A
25 sheets, two-sided, semigloss
25 sheets, one-sided, semigloss
25 sheets, one-sided, semigloss
100 sheets, one-sided, semigloss
A4 (Asia/Pacific) (210 by 297
mm)
A4 (210 by 297 mm) Q5451A
Letter (8.5 by 11 inches) Q5498A
10 by 16.3 mm (Europe) Q5441A
Q5497A
C7006A
Table Listing Photo Paper Types
Business Communication Paper
Type
HP Brochure and Flyer Paper
50 sheets, two-sided, glossy Letter (8.5 by 11
50 sheets, matte Letter (8.5 by 11
100 sheets, tri-fold, two-sided, glossy Letter (8.5 by 11
100 sheets, tri-fold, matte Letter (8.5 by 11
100 sheets, tri-fold, matte A4 (210 by 297 mm) Q6590A
50 sheets, tri -fold, two-sided, glossy A4 (210 by 297 mm) Q2525A
50 sheets, two-sided, glossy A4 (210 by 297 mm) C6818A
100 sheets, matte A4 (210 by 297 mm) Q6592A
100 sheets, matte Letter (8.5 by 11
150 sheets, two-sided, glossy Letter (8.5 by 11
50 sheets, matte A3 (297 by 420 mm) Q6591A
50 sheets, two-sided, glossy A3 (297 by 420 mm) C6821A
Paper Size Part
Number
C6817A
inches)
C6955A
inches)
C7020A
inches)
Q5443A
inches)
Q5445A
inches)
Q1987A
inches)
Tour the Product hp confidential 1 - 25
Page 34

50 sheets, two-sided, glossy Tabloid (11 by 17
HP Premium Plus Inkjet Transparency
inches)
HP Premium Presentation Paper
150 sheets Letter (8.5 by 11
inches)
150 sheets A4 (210 by 297 mm) Q6593A
100 sheets A3 (297 by 420 mm) Q6594A
100 sheets Tabloid (11 by 17
inches)
HP Premium Inkjet Transparency Film
20 sheets Letter (8.5 by 11
50 sheets Letter (8.5 by 11
20 sheets A4 (210 by 297 mm) C3832A
50 sheets A4 (210 by 297 mm) C3835A
inches)
inches)
C6820A
Q5449A
Q6595A
C3828A
C3834A
Film
20 sheets A4 (210 by 297 mm) C7031A
20 sheets Letter (8.5 by 11
inches)
50 sheets A4 (210 by 297 mm) C7029A
50 sheets Letter (8.5 by 11
inches)
HP Premium Inkjet Paper
200 sheets Letter (8.5 by 11
inches)
200 sheets, coated, matte A4 (210 by 297 mm) 51634Z
100 sheets, coated, heavyweight A4 (210 by 297 mm) C1853A
100 sheets A3 (297 by 420 mm) C1856A
100 sheets Tabloid (11 by 17
inches)
Table Listing Business Communication Paper Types
C7030A
C7028A
51634Y
C1855A
1 - 26
hp confidential
Tour the Product
Page 35

technology updates
technology updates
HP printers use various inkjet technologies to create printed outputs of outstanding
quality with low cost of printer ownership. These technologies offer benefits, such
as printing on specialty, wide-format, and unique media types and the
capabilities to produce photorealistic images. Some of these inkjet technologies
include:
• Thermal Inkjet Technology
• HP PhotoREt III Color Layering Technology
• ColorSmart Technology
• Under Printing and Over Printing
Thermal Inkjet Technology
Thermal Inkjet Technology (TIJ) was invented at the HP laboratories in 1979. This
technology enables HP printers to pulse warm the ink. Warming the ink keeps them
liquid by reducing viscosity. Liquid inks improve the performance of print cartridges
and increase printer reliability by preventing some common causes of print quality
degradation, such as nozzle clogging and kogation. Kogation is the build up of
residue on the resistor caused by firing ink over a period of time.
HP PhotoREt III Color Layering Technology
The PhotoREt III technology uses small, precisely placed drops of ink that visually
blend together to create rich colors, smooth gradations, and well defined color
boundaries. This technology works with the printer resolution to deliver excellent
results without creating large file sizes and without slowing down printing. The
following table lists some of the features of the PhotoREt III technology.
Features PhotoREt III
Number of color inks 4
Drop volume for color dots 5 pl
Drops per dot (on photo media) 29
Levels of shades of color 17
Numbers of colors 3500
Table Displaying PhotoREt III Features
ColorSmart Technology
ColorSmart technology enables the printers to analyze documents and apply
special image-processing algorithms for optimizing color output quality and
performance. The primary benefit of this technology is that it provides clear and
vivid color without complicated user intervention.
Under Printing and Over Printing
HP printers use under printing technology, which ensures that small amounts of
color ink, such as cyan or magenta, is always present under black ink. During
printing, color ink is quickly absorbed by the paper. This provides foundation for
black ink, which otherwise takes longer to dry. The order in which ink cartridges or
printheads are installed allow color ink to be printed before black ink. While the
installation sequence for ink cartridges is black, cyan, magenta, and yellow, that
for printheads is cyan, black, magenta, and yellow.
Tour the Product hp confidential 1 - 27
Page 36

Under printing improves resistance to smudging of ink, the ink dry time, and the
black ink optical density. In addition, under printing improves media
independence, which means that it provides better print quality inspite of media
variations.
Over printing follows the same principle as under printing, but in reverse order. This
means that in overprinting, black ink is present underneath color ink.
1 - 28
hp confidential
Tour the Product
Page 37

value added services
value added services
The value added services HP provides with the HP Business Inkjet 2800 Printer Series
are:
• Support over the Web
• HP Instant Support (HPIS) Web site
• myPrintMileage
• HP Web JetAdmin
• EWS
• Toolbox
Support Over the Web
HP provides several resources on the Web for help related to the following:
• Latest printer software/driver
• Product information
• Support information
To obtain support information, click
http://www.hp.com/support/businessinkjet2800.
HP Instant Support (HPIS) Web site
The HPIS Web site hosts a set of dynamic Web resources for printers. This Web site
helps manage the printer and plan the purchase of consumables.
Access the HPIS Web site to view the following information:
• Printer usage pattern
• Error alerts
• On-line troubleshooting tips
myPrintMileage
The myPrintMileage service helps track and forecast printer usage. In addition, it
helps plan the purchase of printer supplies. This service consists of two parts:
• myPrintMileage Web site
• myPrintMileage AutoSend, a utility that periodically updates the device usage
information on the myPrintMileage Web site
HP Web JetAdmin
HP Web JetAdmin is a browser- based system administration tool that enables users
to perform the following activities:
• Install and manage networked peripherals remotely
• Configure network printers in the individual and batch modes
• Manage printer features
• Monitor printer status
This tool can be hosted from any of the fol lowing operating systems:
• Windows NT 4.0, Windows 2000, or Windows XP Professional
• Red Hat Linux
• SuSE Linux
The tool can be accessed from the link provided on the Optional Software screen
of the CD browser or downloaded from
http://www.hp.com/support/businessinkjet2800. HP Web JetAdmin is available
only if the printer is connected to an IP-based network.
Tour the Product hp confidential 1 - 29
Page 38

Embedded Web Server (EWS)
EWS is a Web-based tool that can be used to view status information, change
settings, and manage the printer from any computer on the network. It includes
links to HPIS and myPrintMileage, which are additional Web -based tools for
troubleshooting printer problems and for managing printer activities and supplies
effectively.
Toolbox
The Toolbox provides status and maintenance information about the printer. It also
provides links to the onscreen user guide for help in performing basic printing tasks
and solving problems. The Toolbox is only available with the Windows operating
system.
1 - 30
hp confidential
Tour the Product
Page 39

education and training
guide provides
Diagnose
education and training
HP provides different modes, such as a user guide and the printer Web site for
educating and training service engineers. The following table lists the different
modes, their purpose, and their description:
Documentation/Training Information Purpose
Setup Poster Setup poster
User Guide Onscreen user
Getting Started Guide (GSG) GSG provides
Readme file and release notes The readme
provides
illustrated
information
about the
setup of the
printer.
information
about setting
up the printer,
completing
basic tasks,
and solving
printer
problems.
instructions for
setting up the
printer and
information
about
warranty and
safety issues.
files and
release notes
provide late breaking
information
and printer
troubleshootin
g tips.
Printer
Setup
and
solve
printer
problems
Printer
Setup
Support
and
Warranty
Tour the Product hp confidential 1 - 31
Page 40

Printer- driver onscreen Help (Windows) The onscreen
printer and the
Diagnose
http://www.hp.com/support/businessinkjet280
Diagnose
help includes
overview
information
about the
procedures
performed
using printer
software.
HP Web sites on the World Wide Web (WWW)
(
0 )
Table Displaying Modes of Training and Education
HP Web sites
provide the
latest printer
software,
product
information,
and support
information
that is
available for
the printer.
and
solve
printer
problems
and
solve
printer
problems
1 - 32
hp confidential
Tour the Product
Page 41

support services
support services
HP offers various support services to troubleshoot and diagnose printer problems
and provides instructions for service and repair. In addition, HP offers
documentation and online and telephone support for troubleshooting. Th e various
types of support services provided by HP are:
• Return and repair of the printer
• Support packs
• Free repair during 1-year warranty (worldwide)
Online Support
HP provides several resources on the Web for troubleshooting.
The URL http://www.hp.com/support/businessinkjet2800 or
http://www.hp.com/cposupport can be accessed for the following information:
• Setting up and using the printer
• Downloading printer drivers
• Accessing HPIS
• Solving a problem
• Ordering a product
Customers can also find product information on the following Web site:
http://www.hp.com/.
Telephone Support
Telephone support is available to all HP customers:
• Located worldwide
• Toll free telephone support is available during the warranty period in many
locations
Note
Tour the Product hp confidential 1 - 33
It is important to note that telephone assistance is available during office hours
only. In many locations, HP provides toll free telephone support during the warranty
period. However, some of the support numbers may not be toll free.
Representatives at Customer Care Center answer questions regarding the setup,
configuration, installation, and operation of the printer. They also help troubleshoot
and diagnose printer problems and provide instructions for service and repair. To
assist the Customer Care Center representatives, it is recommended that
customers prepare the following information ready before calling:
1. Print the printer Configuration page or note the model and serial number,
and the printer model. The model number and serial number are located
at the back of the printer. Some examples include C8124A or C8135A and
SG1881119P, respectively. Examples for the printer model include HP
Business Inkjet 2800, 2800dt, or 2800dtn.
2. Check the operating system of the computer connected to the printer,
such as Windows 98 SE.
3. If the printer is connected to the network, check the network operating
system, such as Windows NT Server 4.0.
4. Note the mode through which the printer is connected to the computer,
such as parallel, USB, or network.
Page 42

5. Obtain the printer driver and version number of the printer software, such
as HP Business Inkjet 2800 PCL 5c version 60.43.41.0.
6. Note the application and version number, if it is a problem to print from a
particular application.
1 - 34
hp confidential
Tour the Product
Page 43

standard warranty for the product
standard warranty for the product
HP Product Duration of Limited Warranty
Printer software 1 year
Accessories 1 year
Printer peripheral hardware 1 year
Duration of Warranty for HP Business Inkjet 2800 Printer Series Parts
Extent of limited warranty
1. Hewlett-Packard warrants to the end-user customer that the HP products
specified above will be free from defects in materials and workmanship for
the duration specified above. The duration begins on the date of purchase
by the customer.
2. For software products, HP's limited warranty applies only to a failure to
execute programming instructions. HP does not warrant that the operation
of any product will be uninterrupted or error free.
3. HP's limited warranty covers only those defects that arise as a result of
normal use of the product, and does not cover any other problems,
including those that arise as a result of:
1. Improper maintenance or modification;
2. Software, media, parts, or supplies not provided or supported by
HP; or
3. Operation outside the product's specifications.
4. Unauthorized modification or misuse.
4. For HP printer products, the use of a non -HP ink cartridge or a refilled ink
cartridge does not affect either the warranty to the customer or any HP
support contract with the customer. However, if printer failure or damage is
attributable to the use of a non-HP or refilled ink cartridge, HP will charge its
standard time and materials charges to service the printer for the
particular failure or damage.
5. If HP receives, during the applicable warranty period, notice of a defect in
any product, which is covered by HP's warranty, HP shall either repair or
replace the product, at HP's option.
6. If HP is unable to repair or replace, as applicable, a defective product,
which is covered by HP's warranty, HP shall, within a reasonable time after
being notified of the defect, refund the purchase price for the product.
7. HP shall have no obligation to repair, replace, or refund until the customer
returns the defective product to HP.
8. Any replacement product may be either new or like new, provided that it
has functionality at least equal to that of the product being replaced.
9. HP products may contain remanufactured parts, components, or materials
equivalent to new in performance.
10. HP's Limited Warranty Statement is valid in any country/region where the
covered HP product is distributed by HP. Contracts for additional warranty
services, such as on -site service, are available from any authorized HP
service facility in countries where the product is distributed by HP or by an
authorized importer.
Tour the Product hp confidential 1 - 35
Page 44

Limitations of warranty
TO THE EXTENT ALLOWED BY LOCAL LAW, NEITHER HP NOR ITS THIRD PARTY
SUPPLIERS MAKES ANY OTHER WARRANTY OR CONDITION OF ANY KIND, WHETHER
EXPRESS OR IMPLIED WARRANTIES OR CONDITIONS OF MERCHANTABILITY,
SATISFACTORY QUALITY, AND FITNESS FOR A PARTICULAR PURPOSE.
Limitations of liability
1. To the extent allowed by local law, the remedies provided in this Warranty
Statement are the customer's sole and exclusive remedies.
2. TO THE EXTENT ALLOWED BY LOCAL LAW, EXCEPT FOR THE OBLIGATIONS
SPECIFICALLY SET FORTH IN THIS WARRANTY STATEMENT, IN NO EVENT SHALL
HP OR ITS THIRD PARTY SUPPLIERS BE LIABLE FOR DIRECT, INDIRECT, SPECIAL,
INCIDENTAL, OR CONSEQUENTIAL DAMAGES, WHETHER BASED ON
CONTRACT, TORT, OR ANY OTHER LEGAL THEORY AND WHETHER ADVISED
OF THE POSSIBILITY OF SUCH DAMAGES.
Local law
1. This Warranty Statement gives the customer specific legal rights. The
customer may also have other rights, which vary from state to state in the
United States, from province to province in Canada, and from
country/region to country/region elsewhere in the world.
2. To the extent that this Warranty Statement is inconsistent with local law, this
Warranty Statement shall be deemed modified to be consistent with such
local law. Under such local law, certain disclaimers and limitations of this
Warranty Statement may not apply to the customer. For example, some
states in the United States, as well as some governments outside the United
States (including provinces in Canada), may:
1. Preclude the disclaimers and limitations in this Warranty Statement
from limiting the statutory rights of a customer (for example, the
United Kingdom);
2. Otherwise restrict the ability of a manufacturer to enforce such
disclaimers or limitations
3. Grant the customer additional warranty rights, specify the duration
of implied warranties, which the manufacturer cannot disclaim, or
allow limitations on the duration of i mplied warranties.
3. FOR CONSUMER TRANSACTIONS IN AUSTRALIA AND NEW ZEALAND, THE
TERMS IN THIS WARRANTY STATEMENT, EXCEPT TO THE EXTENT LAWFULLY
PERMITTED, DO NOT EXCLUDE, RESTRICT, OR MODIFY, AND ARE IN ADDITION
TO, THE MANDATORY STATUTORY RIGHTS APPLICABLE TO THE SALE OF THE HP
PRODUCTS TO SUCH CUSTOMERS.
Repair and Warranty Information
HP Inkjet Supplies - Warranty Quick Reference
1 - 36
Hewlett-Packard warrants that the HP product will be free from defects for the
specified duration from the date of purchase. HP limited warranty covers those
defects that arise due to normal use.
The HP Inkjet Supplies - Warranty Quick Reference document is intended to be an
easy-to-read summary of the full HP warranty statement. To read the full warranty
statement, view http://www.hp.com/support/inkjet_warranty and select the
supply.
hp confidential
Tour the Product
Page 45

Is the product covered under warranty? - If the ink supply or printhead is defective,
return it for a refund or replacement provided all the following conditions are true:
• Ink supply: It is not out of ink.
• Ink supply: It has not been refilled, remanufactured, or tampered.
• Printhead: It has not exceeded its warranted usage:
• Black printhead: 530 ml (530 cc)
• Color printhead: 200 ml (200 cc)
Note
To determine the volume of ink that has passed through the printhead currently
installed in the printer, view Accumulated ink usage (ml) located under the
Printhead Status section of the Configuration page. The Warranty Status Legend is
not displayed if the printhead Warranty status is valid for all colors.
Printhead Status
• Printhead or ink supply: Its End-of-Warranty date has not expired. The End-of-
Warranty date is printed on the printheads and ink cartridges. The format of
the End-of-Warranty date is YYYYMMDD.
New Printheads
Older Printheads
Tour the Product hp confidential 1 - 37
Page 46

Ink Supplies
Install-By Date: Make sure to install the product before the install-by date printed
on the supply package. Installing before or on the install -by date ensures that at
least the following will be available before the End-of-Warranty date:
• Printhead: One year (Subject to accumulated ink usage limit)
• Ink supply: Six months
HP Inkjet Supplies - Expiration: As ink ages, it loses water. Old ink can damage the
printheads or other parts of the printing system. In normal use, most cartridges will
run out of ink long before the ink is old and cause damage. However, to prevent
any possibility of damage, HP printers that use HP ink cartridges are designed to
stop printing with the cartridges before the ink gets too old. View the Expiration
date (Y-M-D) located under the Ink Cartridge Status section of the Configuration
page.
Note
Ink Cartridge Status
Expiration has nothing to do with the product warranty. Expiration only prevents
damage from old ink. When ink cartridges expire, they stop working and must be
replaced. For information about the warranty on ink cartridges, view
http://www.hp.com/support/inkjet_warranty.
Returning the Product: There are two ways to return a product under warranty:
• Visit the retailer from whom the product was bought. (The warranty may be
subject to the return policy of the retailer).
• If the product cannot be returned to the retailer, call the support phone
number listed on the product insert that came in the box with the product.
1 - 38
hp confidential
Tour the Product
Page 47

Tour the Product hp confidential 1 - 39
Page 48

1 - 40
hp confidential
Tour the Product
Page 49

2
table of contents
setup requirements................................................................................................................... 41
contents of the box ..................................................................................................................43
overall setup procedure...........................................................................................................44
install tray 2...............................................................................................................................47
install auto- duplex unit/rear access panel (cleanout) .............................................................49
install HP Jetdirect 620n print server card.................................................................................51
install additional memory.........................................................................................................53
enable accessories in printer driver.......................................................................................... 55
install ink cartridges .................................................................................................................. 57
install printheads....................................................................................................................... 59
paper type matrix .....................................................................................................................62
paper capacity and weight matrix..........................................................................................66
test hardware installation .........................................................................................................67
contents of the software CD ROM for Windows....................................................................... 70
contents of software CD ROM for Macintosh........................................................................... 71
startup page of the CD browser for Windows..........................................................................72
browse documentation............................................................................................................ 73
register product ........................................................................................................................ 74
customization utility..................................................................................................................75
install the printer software for Windows - direct ........................................................................83
install the printer software for Windows - network.................................................................... 90
install the printer driver for Windows - using the Add Printer wizard.......................................104
test software installation .........................................................................................................109
uninstall printer software for Windows................................ ....................................................111
install toolbox..........................................................................................................................120
contents of the software CD ROM for Windows.....................................................................127
contents of software CD ROM for Macintosh.........................................................................128
uninstall toolbox ......................................................................................................................129
startup page of the CD browser for Macintosh......................................................................131
install the printer software for Macintosh................................................................................132
share the printer software for Macintosh ................................................................................ 138
delete printer spooler queue for Macintosh ........................................................................... 141
summary of driver configurations under different install methods.........................................142
Web deployment of drivers................................................................ ....................................144
scrubber utility........................................................................................................................145
setup issues.............................................................................................................................146
print a Configuration page .................................................................................................... 152
Service and Support Manual
Page 50

table of figures
Contents of the Box.................................................................................................................. 43
Overall Setup Procedure - Steps 1 to 3.....................................................................................44
Overall Setup Procedure - Steps 4 to 8.....................................................................................44
Set the Printer on Top of the Tray 2 Base .................................................................................. 47
Remove the Rear Access Panel............................................................................................... 49
Slide the Auto-Duplex Unit into the Printer................................................................................49
Slide the Rear Access Panel into the Printer.............................................................................50
Insert the HP Jetdirect 620n Print Server Card into the EIO Slot................................................51
Remove the DIMM Cover .........................................................................................................53
Align the DIMM.........................................................................................................................54
Device Settings Window ........................................................................................................... 55
Printer Info Window - Installable Options Tab ...........................................................................56
Lift the Cover............................................................................................................................57
Insert the Ink Cartridge into the Slot.........................................................................................58
Open the Top Cover ................................................................................................................ 59
Lift the Printhead Latch ............................................................................................................ 60
Insert Printhead into Its Color Socket ........................................................................................ 60
Close the Printhead Latch ........................................................................................................61
Printhead Alignment Pages................................................................ ...................................... 67
Demo Page................................ ................................................................ ..............................68
Configuration and Network Configuration Pages.................................................................... 68
Startup Page of the CD Browser for Windows ..........................................................................72
Documentation Available with the Printer...............................................................................73
Register Product ....................................................................................................................... 74
Startup Page of the Software CD .............................................................................................76
Choose Setup Language Dialog Box.......................................................................................76
Welcome to the HP Business Inkjet 2800 series Installer Customization Wizard Page ...............77
Language Page....................................................................................................................... 77
Printer Port Page.......................................................................................................................78
Connector Type Page................................ ................................................................ ..............78
Model Page ................................................................................................ ..............................79
Features Page .......................................................................................................................... 79
Driver Configuration Page - Change Driver Configuration................................ ......................80
Driver Configuration Page - Maintain Default Configuration................................................... 81
Custom Installer Location Page................................................................................................81
Finish Page................................................................................................................................ 82
CD Browser Startup Page .........................................................................................................83
Choose Setup Language Dialog Box.......................................................................................84
HP Software License Agreement Page .................................................................................... 84
Printer Connection Page.......................................................................................................... 85
Connector Type Page................................ ................................................................ ..............85
Model Page................................ ................................................................ ..............................86
Installation Type Page................................................................ .............................................. 86
Printer Name Page...................................................................................................................87
Printer Sharing Page.................................................................................................................87
Ready to Install Page................................................................................................................88
Looking for new hardware Dialog Box.....................................................................................88
Finish Page................................................................................................................................ 89
Next Steps Page....................................................................................................................... 89
Server Connected or Point -and-Print Network.........................................................................90
Peer-to-Peer Network............................................................................................................... 90
Service and Support Manual
Page 51

CD Browser Startup Page .........................................................................................................91
Choose Setup Language Dialog Box.......................................................................................92
Welcome to the HP Business Inkjet 2800 series Setup Wizard Page.......................................... 92
Printer Conn ection Page..........................................................................................................93
Identify Printer Page - Search from a List of Printers..................................................................93
Identify Printer Page - Specify the Printer by Address...............................................................94
Specify Printer Page ................................................................................................................. 94
Identify Printer Page - Enter Settings for the Printer...................................................................95
Printer Settings Page................................................................................................................. 95
Printer Found Page...................................................................................................................96
Confirm Settings Page................................................................ .............................................. 96
Confirm Changing Setting Page................................ .............................................................. 97
Set Network Protocol Page ......................................................................................................98
Model Page ................................................................................................ ..............................99
Installation Type Page................................................................ .............................................. 99
Printer Name Page.................................................................................................................100
Printer Sharing Page...............................................................................................................100
Ready to Install Page..............................................................................................................101
Finish Page..............................................................................................................................101
Next Steps Page.....................................................................................................................102
Start Menu ..............................................................................................................................104
Printers Window ......................................................................................................................105
Welcome to the Add Printer Wizard Page.............................................................................105
Local or Network Printer Page................................................................................................106
Locate Your Printer Page........................................................................................................106
Find Printers Dialog Box...........................................................................................................107
Find Printers Dialog Box...........................................................................................................107
Default Printer Page...............................................................................................................108
Finish Page..............................................................................................................................108
From the Installer.....................................................................................................................109
From the Add Printer Wizard ...................................................................................................109
From the Add printer Wizard...................................................................................................110
Uninstall Printer Software for Windows ................................................................ ....................111
Uninstallation Confirmation Dialog Box ..................................................................................112
Finish Page..............................................................................................................................112
Start Menu ..............................................................................................................................113
Control Panel Window................................ ................................................................ ............ 114
Add/Remove Programs Window................................ ............................................................115
Uninstallation Confirmation Dialog Box ..................................................................................115
Finish Page..............................................................................................................................116
Start Menu ..............................................................................................................................117
Printers Window ......................................................................................................................117
Printers Window - Access Server Properties............................................................................118
Print Server Properties Window...............................................................................................118
Choose Setup Language Dialog Box.....................................................................................120
Welcome to the HP Business Inkjet 2800 series Setup Wizard Page........................................121
Printer Connection Page........................................................................................................121
Connector Type Page................................ ................................................................ ............ 122
Model Page ................................................................................................ ............................122
Installation Type Page................................................................ ............................................123
Printer Driver Page..................................................................................................................123
Features Page ........................................................................................................................124
Service and Support Manual
Page 52

Printer Name Page.................................................................................................................124
Printer Sharing Page...............................................................................................................125
Ready to Install Page..............................................................................................................125
Looking for new hardware Dialog Box...................................................................................126
Finish Pa ge..............................................................................................................................126
Preferences Window - Run Toolbox when Windows starts Check Box ...................................129
Startup Page of the CD Browser for Macintosh ......................................................................131
HPBIJ2800 CD Icon ..................................................................................................................132
Setup Icon ..............................................................................................................................133
Startup Page of the CD Browser.............................................................................................133
HPBIJ2800 Installer Page .........................................................................................................134
Installing Dialog Box................................................................................................................134
Installation Complete Dialog Box...........................................................................................134
Print Center Option.................................................................................................................135
Print Center Page...................................................................................................................135
USB Option ..............................................................................................................................136
IP Printing Option................................ ................................................................ .................... 136
Print Center Page - Printer Added.......................................................................................... 137
System Preferences Option................................................................ ....................................139
System Preferences Page .......................................................................................................139
Service Tab - Printer Sharing Option.......................................................................................140
Configuration Page................................................................................................................152
EIO Configuration Page .........................................................................................................154
Service and Support Manual
Page 53

setup requirements
setup requirements
Software Requirements
The minimum software requirements for installing the printer driver are:
• Internet Explorer 5.0 or later
• Operating systems:
• Windows 98
• Windows Me
• Windows 2000
• Windows XP 32-bit edition
• Windows 2003
• iMac
• Power Mac G3 or later
• iBook
Operating System (OS) Support for HP Business Inkjet 2800 Printer Series:
OS support Inbox:
• Windows XP, 2000, Me/98
• Windows NT 4.0 (print drivers only)
• Macintosh OS 10.1.5, 10.2, 10.3*
• Macintosh OS 8 and 9 are NOT supported
OS support on the Web:
• LINUX - http://www.linuxprinting.org
• UNIX - http://www.hp.com/go/unixmodelscripts
• IBM OS/2 - http://www7.software.ibm.com/2bcprod.nsf
Hardware Requirements
The minimum system requirements to install the printer software on Windows 98,
Me, NT, 2000, XP operating systems are:
Operating System Minimum System Requirements
Windows 98 • Pentium® 90 MHz
• 16 MB RAM
• 130 MB free hard disk space
Windows Me • Pentium® 150 MHz
• 32 MB RAM
• 130 MB free hard disk space
Windows 2000 • Pentium® 300 MHz
• 64 MB RAM
• 160 MB free hard disk space
Windows XP 32-bit edition • Pentium® 233 MHz
• 32 MB RAM
• 145 MB free hard disk space
Windows 2003 • Pentium® 233 MHz
• 128 MB RAM
• 160 MB free hard disk space
System Requirements for Windows 98, Me, NT, 2000, XP
Setup and Configure hp confidential 2 - 41
Page 54

The minimum system requirements to install the printer software on Macintosh OS
10.1.5, 10.2, and 10.3 operating systems are:
Operating System Minimum System Requirements
iMac • 600 MHz
• 128 MB RAM
Power Mac G3 or later • 400 MHz
• 128 MB RAM
iBook • 366 MHz
• 128 MB RAM
System Requirements for Macintosh OS 10.1.5, 10.2, 10.3*
* Mac OS 10.3 is supported only with network connections.
2 - 42
hp confidential Setup and Configure
Page 55

contents of the box
contents of the box
Contents of the Box
S.
Printer Component HP Business
No
.
1 Base Printer Yes Yes Yes
2 Power Cord Yes Yes Yes
3 Four Ink Cartridges Yes Yes Yes
4 Four Printheads Yes Yes Yes
5 Getting Started Guide,
Support Flyer, Regulatory
Leaflet
6 Setup Poster Yes Yes Yes
7 Driver Software CD Yes Yes Yes
8 250-Sheet Input Tray
(Optional Accessory)
9 Rear Access Panel
(Cleanout)
10 Auto-Duplex Unit
(Optional Accessory)
Table Comparing Contents of the HP Business Inkjet 2800 Printer Series Box
For more information on the printer, visit the Web site,
Inkjet 2800
Yes Yes Yes
No Yes Yes
Yes Yes Yes
No Yes Yes
HP Business
Inkjet 2800dt
HP Business
Inkjet
2800dtn
http://www.hp.com/support/businessinkjet2800, and click Products & Services.
Setup and Configure hp confidential 2 - 43
Page 56

overall setup procedure
overall setup procedure
Overall Setup Procedure - Steps 1 to 3
Overall Setup Procedure - Steps 4 to 8
The setup procedure for the printer is as follows:
Step
Numb
er
- Check the
Setup
Procedure
contents of
the box.
Steps
Check the contents of the box.
2 - 44
hp confidential Setup and Configure
Page 57

1 Remove the
Inkjet 2800dtn printer SKUs by default. The steps to
Load paper in
o fit larger media, such as A3+ size, which
side down along the right of the
output tray by grasping under the front of
the output tray and pulling out the media
turn on
packing tape
and materials.
2 Install tray 2
and auto duplex unit.
3
tray 1.
The steps to remove the packing tape and
materials are:
1. Remove the packing tape from the
printer.
2. Open the printhead cover and remove
the tape from the inside of the printer.
Tray 2 and auto-duplex unit are available with
the HP Business Inkjet 2800dt and HP Business
install tray 2 and auto- duplex unit are listed
below:
1. To install tray 2, set the printer on top of
the tray 2 base.
2. To install the auto-duplex unit, press the
buttons on the rear access panel to
release the panel.
3. Pull the rear access panel outwards to
remove it.
4. Slide the auto-duplex unit into the printer
until the unit locks into place.
The steps to load paper in tray 1 are:
1. Raise the output tray.
2. Pull tray 1 out of the printer by grasping
under the front of the tray.
3. T
is 330 by 482 mm (13 by 19 inches), pull
the tray out by pressing the tray extension
lock near the front of the tray. Pull both
ends of the tray in opposite directions
until it is fully extended.
4. Slide the guides in the tray to adjust them
for the loaded media size.
5. Insert up to 150 sheets of paper into tray 1
with print-
tray.
6. Press the media guides and slide the
guides towards the edges of the loaded
paper.
7. Gently reinsert the tray.
8. Lower the output tray.
9. If tray 1 or tray 2 is extended, extend the
4 Connect the
power cord
and turn on
the printer.
Setup and Configure hp confidential 2 - 45
extension.
The steps to connect the power cord and
the printer are:
1. Connect the power cord to the printer.
2. Plug the other end of the power cord to
an alternating current (AC) socket.
3. Press the Power button to turn on the
printer.
Page 58

5 Install the ink
Print Printhead
wired, connect the printer to the network
cartridges.
6 Install the
printheads.
7
Alignment
Pages.
8 Connect the
printer.
The steps to install ink cartridges are:
1. Press and release the ink cartridge cover
to open the cover.
2. Remove each ink cartridge from its
package.
3. Align each cartridge with its color-coded
slot, and insert the cartridge into the slot.
To ensure proper contact, press down
firmly on the cartridges until they snap
into place.
4. Close the ink cartridge cover.
The steps to install printheads are:
1. Open the top cover.
2. Lift the printhead latch.
3. Remove each printhead fro m its
package, and remove the protective
tape from the printhead.
4. Insert each printhead into its color-coded
slot. Press down firmly on each printhead
to ensure proper contact.
5. Pull the printhead latch all the way
forward and press down to ensure that
the latch is properly engaged.
6. Close the top cover.
To ensure the best possible print quality, the
printer automatically aligns the printheads. The
Power
light blinks at the beginning of the
alignment process. When the process ends, the
printer prints two Printhead Alignment pages.
Printhead alignment takes approximately seven
minutes.
Connect the printer according to the desired
connection type, such as USB, parallel, or wired
network.
• If the connection type to be used is USB or
parallel, first install the printer software
and then wait for a prompt to connect
the cable.
• If the connection type to be used is a
- Register the
printer.
2 - 46
using a LAN cable and install the printer
software.
Register the printer to receive important support
and technical information. If the printer was not
registered while installing the software, register
later at http://register.hp.com/.
Setup Procedure for the Printer
hp confidential Setup and Configure
Page 59

install tray 2
S. No.
Unpack
Pull out
install tray 2
Tray 2 is an optional accessory available with the HP Business Inkjet 2800dt and HP
Business Inkjet 2800dtn printers. This tray supports up to 250 sheets of plain paper.
Installing Tray 2
The procedure to install and set up tray 2 is:
Steps Description
1
tray 2.
2 Install
tray 2.
Remove the tape on the tray 2 base.
The steps to install tray 2 are:
1. Move the tray 2 base to the location of the printer.
The printer is designed to fit directly on top of the
base.
2. Turn off the printer and unplug the power cord from
the electrical socket.
3. Lift the printer and align it with the pin on the tray 2
base.
4. Set the printer on top of the tray 2 base.
Set the Printer on Top of the Tray 2 Base
5. Plug the power cord into the electrical socket and
turn on the printer.
6. Enable the tray in the printer driver.
3
tray 2.
Setup and Configure hp confidential 2 - 47
Pull tray 2 outwards from the base of the tray by holding it
from the front.
Page 60

4 Extend
side down along the right of the
Make sure the stack of media aligns with the right and
nsert
tray 2.
5 Open
tray 2
cover.
6 Load
media
in tray
2.
7 Adjust
media
in tray
2.
8 Rei
tray 2.
Table Displaying the Installation and Setup Procedure for Tray 2
To fit larger media, such as A3+ size, pull out the tray by
pressing the tray extension lock near the front of the tray. Pull
both ends of the tray in opposite directions until it is fully
extended. If tray 1 or tray 2 is extended, extend the output
tray by grasping under the front of the output tray and
pulling out the media extension.
To open the tray 2 cover, grab it from the bottom and pull it
up.
The steps to load media in tray 2 are:
1. Insert the media printtray.
2. Press the button of the media guides and slide the
guides to the edges of the loaded media.
The steps to adjust media in tray 2 are:
1.
back edges of the tray and does not spill over the
edges.
2. Lower the tray 2 cover.
The steps to reinsert tray 2 are:
1. Gently reinsert tray 2 in the base. However, do not
press the tray extension lock when inserting the tray.
Pressing the lock will cause the tray to retract when
pushed. The longer media in the tray will get folded
and this will cause problems during printing.
2. Extend the output tray by holding the front of the
output tray and pulling out the media extension.
Testing Installation of Tray 2
To test the installation of tray 2, print a test page from tray 2. To do this, either keep
tray 1 empty or change the settings from the printer properties to print using tray 2.
By default, the printer draws paper from tray 1. If tray 1 is empty, the printer draws
paper from tray 2, if it is installed. This default behavior can be changed through
the Embedded Web Server (EWS), Toolbox, or the printer driver.
Caution
While setting the printer on top of the tray 2 base, be careful to keep fingers and
hands clear of the bottom of the printer.
2 - 48
hp confidential Setup and Configure
Page 61

install auto-duplex unit/rear access panel (cleanout)
install auto-duplex unit/rear access panel (cleanout)
Installing the Auto-Duplex Unit
The auto-duplex unit is used for printing on both sides of the paper. In the HP
Business Inkjet 2800 Printer Series, the auto-duplex unit is used to pick paper,
because there is no cleanout trough present in the printer. In this printer series, the
auto-duplex unit is available with the HP Business Inkjet 2800dt and 2800dtn SKUs.
The steps to install the auto-duplex unit are:
1. Turn off the printer.
2. Remove the rear access panel of the printer by pressing the buttons on the
rear access panel.
Remove the Rear Access Panel
3. Hold the auto-duplex unit upright with the top flap button facing up.
4. Slide the auto-duplex unit into the printer until the unit locks into place.
Slide the Auto-Duplex Unit into the Printer
To remove the auto-duplex unit from the printer, press the two buttons on the side
of the auto-duplex unit and pull it away from the printer.
Setup and Configure hp confidential 2 - 49
Page 62

The auto-duplex unit is enabled by default for Macintosh operating system. For
Windows, it needs to be enabled.
Installing the Rear Access Panel
In the HP Business Inkjet 2800 Printer Series, the rear access panel or the cleanout
allows simplex jobs. The rear access panel is available with all the HP Business Inkjet
2800 Printer SKUs.
The steps to install the rear access panel are:
1. Turn off the printer.
2. Hold the rear access panel upright with the top flap button facing up.
3. Slide the rear access panel into the printer until it locks into place.
Slide the Rear Access Panel into the Printer
To remove the rear access panel from the printer, press the two buttons on the
side of the auto- duplex unit and pull it away from the printer.
2 - 50
hp confidential Setup and Configure
Page 63

install HP Jetdirect 620n print server card
install HP Jetdirect 620n print server card
The HP Jetdirect 620n print server card is used to directly connect and share the
printer on a network. Connecting the printer to the network through the print
server card provides better performance than printing through non -network
connections and offers greater flexibility in locating the printer. The HP Jetdirect
620n print server card can be used in both client/server and peer-to-peer printing
configurations.
The HP Jetdirect 620n print server card is preinstalled in the HP Business Inkjet
2800dtn SKU. In the HP Business Inkjet 2800 and HP Business Inkjet 2800dt SKUs, the
print server card can be installed for enabling printer access over the network.
Installing the HP Jetdirect 620n Print Server Card
The steps to install the HP Jetdirect 620n print server card are:
1. Press and hold the Power button to turn off the printer.
2. Unplug the power cable.
3. Use a Phillips screwdriver to loosen and remove the retaining screws that
hold the cover for the empty Jetdirect slot.
4. Remove the cover.
5. Insert the HP Jetdirect 620n print server card into the EIO slot firmly.
Insert the HP Jetdirect 620n Print Server Card into the EIO Slot
The HP Jetdirect 620n print server card contains electronic components
that can be damaged by static electricity. To prevent the build up of static
electricity:
• Maintain contact with a bare sheet metal surface on the printer.
• Wear a grounding wrist strap and handle the print server card with
caution.
• Avoid touching the electronic components or circuit paths.
6. Insert and tighten the retaining screws of the HP Jetdirect 620n print server
card.
Setup and Configure hp confidential 2 - 51
Page 64

7. Connect the HP Jetdirect 620n print server card to the network using a
network cable.
Testing the HP Jetdirect 620n Print Server Card Installation
The steps to test the installation of the HP Jetdirect 620n print server card are:
1. Plug the power cable into the electrical socket.
2. Turn on the printer.
3. Print a Configuration page using one of the following methods:
• Press the Select button on the Control Panel display.
• Press the Down Arrow button to display INFORMATION MENU, and then
press the Select button.
• Press the Down Arrow button to display PRINT CONFIGURATION PAGE,
and then press the Select button.
Two pages are printed, Configuration page and Network Configuration page. The
Network Configuration page contains information related to the print server card.
Note
If the Network Configuration page does not print, reinstall the print server card to
ensure that the card is properly placed in the EIO slot.
2 - 52
hp confidential Setup and Configure
Page 65

install additional memory
install additional memory
The HP Business Inkjet 2800 Printer Series contains 96 MB of built-in memory and two
DIMM slots that accept 64 MB, 128 MB, or 256 MB memory modules. The printer
recognizes a maximum of 544 MB of RAM only. The Configuration page displays
the total amount of RAM that is installed in the printer.
To increase the built-in memory available in the printer, additional memory
modules can be installed. These additional memory modules enable the printer to
process complex print jobs, but do not increase the processing speed.
The DIMMs contain electronic components that can be damaged by static
electricity. To prevent the build up of static electricity:
• Maintain frequent contact with any bare sheet metal surface on the printer.
• Wear a grounding wrist strap (or similar device).
• Handle the DIMMs carefully at all times.
• Avoid touching electronic components or circuit paths.
Failure to follow these recommendations could result in damage to the parts.
Installing Additional Memory Modules or DIMMs
The steps to install additional memory modules or DIMMs in the printer are:
1. Print the Configuration page to find out how much memory is available in
the printer.
2. Turn off the printer, unplug the power cord from the electrical socket, and
remove any other cables.
3. On the left side of the printer, remove the DIMM cover.
Remove the DIMM Cover
4. On an empty DIMM slot, push the DIMM locks outward to release the locks.
5. Remove the additional DIMM from the antistatic package.
6. Align the DIMM so that the notches on the lower edge line up with the
raised marks in the DIMM slot.
Setup and Configure hp confidential 2 - 53
Page 66

Align the DIMM
7. Insert and press the DIMM into its slot until it snaps into place.
8. Replace the DIMM cover.
9. Connect the power cord and any cables, and turn on the printer.
10. Enable the DIMMs in the printer driver.
Testing the Installation of Additional Memory Modules or DIMMs
The steps to verify that the DIMM is installed correctly are:
1. Make sure that the power cord is plugged into the electrical socket, and
all other required cables are connected, and the printer is turned on.
2. Check that the Control Panel displays the READY message. If an error
message appears, a DIMM might have been installed incorrectly.
3. Print the Configuration page again. From the memory section of this
Configuration page, note the RAM value. Compare this RAM value with
the one mentioned in the Configuration page that was printed before
installing the DIMM. If the amount of memory has not increased, one of the
following problems may have occurred:
• The DIMM may not be installed correctly. Remove the DIMM and
repeat the installation procedure.
• The DIMM may be defective. Use a new DIMM.
2 - 54
hp confidential Setup and Configure
Page 67

enable accessories in printer driver
enable accessories in printer driver
HP Business Inkjet 2800 Printer Series supports three accessories: auto-duplex unit,
tray 2, and memory DIMMs.
Enabling Accessories in Windows Operating System (OS)
Memory DIMMs are enabled by default in the Windows operating system (OS).
Users need to enable the auto-duplex unit and tray 2.
The steps to enable the auto-duplex unit and tray 2 in Windows are:
1. Click Start, point to Settings, and then click Printers or Printers and Faxes.
2. Right-click the printer icon, then click Properties, Document Defaults, or
Printing Preferences.
3. Click the Configure, Device Setting s, or Device Options tab. The name of
the tab depends on the printer driver and the operating system.
Device Settings Window
4. On the selected tab, click Automatic Configuration , select Update Now,
and click OK.
Setup and Configure hp confidential 2 - 55
Page 68

Enabling Accessories in Macintosh OS
Optional accessories, such as an auto -duplex unit, memory DIMMs, and tray 2 are
enabled by default, when the printer software is installed, in Macintosh OS X (10.1
and later).
The steps to confirm status of the installed accessories are:
1. Double-click the printer icon on the desktop to launch the Printing menu.
2. In the Printing dialog box, click Change Setup .
3. Select the optional accessory that is to be modified on the Change menu.
4. On the To menu, click Installed to select it.
2 - 56
Printer Info Window - Installable Options Tab
To modify information about printer accessories, use the options on the
Installable Options tab of the Printer Info window:
1. Clear the Duplex Unit check box to disable two-sided printing.
2. Use the Printer Memory list to change the memory size after
installing the DIMM.
3. Clear the Tray 2 check box to disable the second tray.
hp confidential Setup and Configure
Page 69

install ink cartridges
Part Number
Pages Out
Ink Capacity
install ink cartridges
The table below lists the ink cartridge details:
Name
C4844A HP No.10 Black Ink Cartridge 1750 69 ml
C4836A HP No.11 Cyan Ink Cartridge 1750 28 ml
C4837A HP No.11 Magenta Ink Cartridge 1750 28 ml
C4838A HP No.11 Yellow Ink Cartridge 1750 28 ml
Installing Ink Cartridges
The steps to install new ink cartridges are:
1. Lift the printing supplies area cover.
Ink Cartridge Details
Lift the Cover
2. Remove each ink cartridge from its package.
3. Align the arrow on each cartridge with the arrow on its color-coded slot,
and then insert the cartridge into the slot.
Setup and Configure hp confidential 2 - 57
Page 70

Note
4. To ensure proper contact, press firmly on the cartridges until they snap into
Insert the Ink Cartridge into the Slot
place.
All four ink cartridges must be correctly installed for the printer to work.
To test the installation of the ink cartridges, print a test page.
Maintaining Ink Cartridges
Some guidelines for maintaining ink cartridges are:
• Replace any low or empty ink cartridges. Low ink levels can also cause
incomplete characters, missing lines, or dots on the prin touts.
• To reduce water vapor loss, keep the ink cartridges sealed in the original
packaging until ready to use.
• Store ink cartridges at room temperature.
• Use a first -in first-out inventory process to avoid having expired ink cartridges in
stock.
• Install ink cartridges before the install-by date to maximize warranty.
2 - 58
hp confidential Setup and Configure
Page 71

install printheads
install printheads
The table below lists the printhead details:
Part
Number
C4810A HP No.11 Black Printhead 16000
C4811A HP No.11 Cyan Printhead 24000
C4812A HP No.11 Magenta
C4813A HP No.11 Yellow Printhead 24000
Installing Printheads
The steps to install printheads are:
1. Open the top cover.
Name Pages Out Warranted Ink
Usage
530 ml
pages
200 ml
pages
Printhead
24000
pages
pages
Printhead Details
200 ml
200 ml
Open the Top Cover
Setup and Configure hp confidential 2 - 59
Page 72

2. Lift the printhead latch.
Lift the Printhead Latch
3. Remove each printhead from its package and remove the protective
tape from each printhead.
4. Insert each printhead into its respective color-coded socket.
Insert Printhead into Its Color Socket
5. Press in each printhead to ensure proper contact.
6. Pull the printhead latch all the way forward and press down to ensure that
the latch is properly engaged. Use the yellow color lines on the latch.
2 - 60
hp confidential Setup and Configure
Page 73

Close the Printhead Latch
7. Close the top cover.
To ensure the best possible print quality, the printer aligns the printheads. The
Power light blinks at the beginning of the alignment process. At the end of the
process, the printer prints two Printhead Alignment pages. The printhead
alignment takes approximately seven minutes. To test the installation of the
printheads, print a test page.
Maintaining Printheads
Some guidelines for maintaining the printheads are:
• Keep the printheads sealed in the original packaging until ready to use.
• Keep the printheads that are either open in the printer or sealed in a plastic
bag separately. Each printhead should have its own bag.
• Store printheads at room temperature.
• Turn off the printer by pressing the Power button. Turning off with the Power
button ensures the carriage is at the service station position. The service
station caps the printhead ink nozzles to prevent them from drying.
• Install printhead by the install-by-date to maximize warranty.
• When the quality of printouts deteriorates, check the health of the printheads
and replace them if necessary.
• If printed characters are incomplete, or dots or lines are missing from printouts,
this maybe caused by clogged ink nozzles in the printheads. In this case,
cleaning the printheads might help.
• Clean the printheads only when necessary.
Setup and Configure hp confidential 2 - 61
Page 74

paper type matrix
Tray
Tray
U.S. Executive 184 by 267 mm
paper type matrix
The printer is designed to work with most types of office paper. The different paper
types supported by the printer are:
• Photo paper
• Transparencies
• Cards
• Envelopes
The following table lists the different paper types with the resolutions:
Media
Standard Paper Sizes
U.S. Letter 216 by 279 mm
(8.5 by 11 inches)
U.S. Legal 216 by 356 mm
(8.5 by 14 inches)
A4 210 by 297 mm (8.3 by
11.7 inches)
(7.3 by 10.5 inches)
U.S. Statement 140 by 216
mm (5.5 by 8.5 inches)
A5 148 by 210 mm (5.8 by 8.3
inches)
A6 105 by 148 mm (4.1 by 5.8
inches)
JIS B4 257 by 364 mm (10.1
by 14.3 inches)
JIS B5 182 by 257 mm (7.2 by
10.1 inches)
Tabloid 279 by 432 mm (11
by 17 inches)
A3 297 by 420 mm (11.7 by
16.5 inches)
Super B, A3 Nobi 330 by 483
mm (13.0 by 19.0 inches)
Envelopes
U.S. #10 Envelope 105 by 241
mm (4.12 by 9.5 inches)
U.S. #10 Envelope 105 by 241
mm (4.12 by 9.5 inches)
Monarch Envelope 98 by 191
mm (3.88 by 7.5 inches)
HP Greeting Card Envelope
111 by 152 mm (4.38 by 6
inches)
Front
1
2
Manual
Feed Slot
Yes Yes Yes Yes Yes
Yes Yes Yes Yes Yes
Yes Yes Yes Yes Yes
Yes Yes Yes Yes Yes
Yes - Yes Yes -
Yes - - Yes -
Yes - - Yes -
Yes Yes Yes Yes Yes
Yes Yes Yes Yes Yes
Yes Yes Yes Yes Yes
Yes Yes Yes Yes Yes
Yes Yes Yes Yes Yes
Yes - - Yes -
Yes - - Yes -
Yes - - Yes -
Yes - Yes Yes -
Rear
Manual
Feed Slot
AutoDuplex
Unit
2 - 62
hp confidential Setup and Configure
Page 75

Envelope A2 111 by 146 mm
40 by 333
Japanese Envelope Chou #3
Japanese Envelope Chou #4
Ofuku Hagaki 148 by 200 mm
182 to 330 mm wide and 257
(4.37 by 5.75 inches)
DL Envelope 110 by 220 mm
(4.3 by 8.7 inches)
C5 Envelope 162 by 229 mm
(6.4 by 9 inches)
C6 Envelope 114 by 162 mm
(4.5 by 6.4 inches)
Envelope Kaku #2 2
mm (9.4 by 13.1 inches)
120 by 235 mm (4.7 by 9.3
inches)
90 by 205 mm (3.5 by 8.1
inches)
Cards
Index card 102 by 152 mm (4
by 6 inches)
Index card 127 by 203 mm (5
by 8 inches)
Index card with tab 102 by
152 mm (4 by 6 inches)
Hagaki 100 by 148 mm (3.9
by 5.8 inches)
(5.8 by 7.9 inches)
Custom-Size Media
90 to 330 mm wide and 146
to 483 mm long (3.54 to 13.0
inches wide and 5.75 to 19.0
inches long)
to 483 mm long (7.2 to 13.0
inches wide and 10.1 to 19.0
inches long)
110 to 330 mm wide and 220
to 483 mm long (4.33 to 13.0
inches wide and 8.65 to 19.0
inches long)
96 to 330 mm wide and 146
to 483 mm long (3.77 to 13.0
inches wide and 5.75 to 19.0
inches long)
Yes - Yes Yes -
Yes - Yes Yes -
Yes - Yes Yes -
Yes - Yes Yes -
Yes - Yes Yes -
Yes - Yes Yes -
Yes - - - -
Ye s - - Yes -
Yes - - Yes -
Yes - Yes Yes -
Yes - Yes Yes -
Yes - - Yes -
Yes - - - -
- Yes - - Yes
- - Yes - -
- - - Yes -
Note
Setup and Configure hp confidential 2 - 63
If envelopes and cards are used in the auto-duplex unit, it can cause paper jams.
This may also damage the printer and the auto-duplex unit.
Paper Type Matrix
Page 76

Setting Minimum Margins
Margin
3.3 mm
U.S. Legal, Tabloid, A3, Super B,
5.1 mm
5.1 mm
3.2 mm
3.2 mm
5.1 mm
5.1 mm
3.0 mm
3.0 mm
3.0 mm
duplex unit, the minimum top and bottom margin must match
The document margins must match (or exceed) the minimum margin settings in
portrait orientation.
The follow ing table lists the settings for minimum margins:
Media Left
Margi
n
U.S. Letter, A4, U.S. Executive,
U.S. Statement, Hagaki, Ofuku
Hagaki, JIS B4, JIS B5, Index
Card 127 by 203 mm (5 by 8
inches), A5, A6 cards
A3 Nobi, custom-size media
U.S. #10 Envelope, Monarch,
Envelope, HP Greeting Card,
Envelope, Envelope A2, DL
Envelope, C5 Envelope, C6
Envelope, Japanese Envelope
Chou #3, Japanese Envelope
Chou #4
Envelope Kaku #2
Photo media 101.6 by 152.4
mm (4 by 6 inches) with tear -
off tab
Minimum Margin Settings
3.3 mm
(0.13
inch)
(0.2
inch)
(0.13
inch)
(0.2
inch)
(0.12
inch)
Right
Margi
n
(0.13
inch)
(0.2
inch)
(0.13
inch)
(0.2
inch)
(0.12
inch)
Top
11.7
mm
(0.46
inch)
11.7
mm
(0.46
inch)
11.7
mm
(0.46
inch)
11.7
mm
(0.46
inch)
(0.12
inch)
Bottom Margin
11.7 mm (0.46
inch); 3.0 mm
(0.12 inch with
minimized
margins)
11.7 mm (0.46
inch); 3.0 mm
(0.12 inch with
minimized
margins)
11.7 mm (0.46
inch)
11.7 mm (0.46
inch)
3.0 mm (0.12
inch)
Note
Setting Paper Orientation
2 - 64
When using the autoor exceed 12.7 mm (0.5 inches).
Changes to print settings, such as media size or type, can be made from an
application or the printer driver. Changes made from an application take
precedence over those made from the printer driver. After the application is
closed, defaults settings configured in the printer driver are restored.
The steps to change settings for current print jobs in Windows operating system
using an application are:
1. Open the document to be printed.
2. On the File menu, click Print, and then click Setup or Properties.
hp confidential Setup and Configure
Page 77

Note
Specific options may vary depending on the application used.
3. Change the desired settings, such as media orientation and media type
and click OK, Print, or a similar command.
The steps to change the default settings for all future print jobs in Windows
operating system are:
1. Click Start, Settings, and then click Printers or Printers and Faxes.
2. Right-click the printer icon and then choose Properties, Document Defaults,
or Printing Preferences .
3. Change the desired settings, such as media orientation and media type,
and click OK, Print, or a similar command.
The steps to change the default settings for all future print jobs in Macintosh
operating system are:
1. On the File menu, click Page Setup .
2. Change the desired settings and click OK.
3. On the File menu, click Print.
4. Change the desired settings from the printer driver, such as media
orientation and media type and click OK.
Enable Minimize or LaserJet Margins in the Printer Driver
To print closer to the bottom edge of a page, minimize margins must be enabled.
The steps to enable minimize margins are:
1. Click Start and then click Settings.
2. Right-click the desired printer and click Printers or Properties to open the
Printing Preferences dialog box.
3. On the Effects tab, select Minimize Margins and click OK.
Note
The minimize margins setting may not have a noticeable effect if automatic
duplexing is enabled.
Emulate LaserJet Margins
The emulate LaserJet margins must be enabled if a document is formatted for a
LaserJet printer. This option enables users to automatically scale the document to
fit the document margin. The steps to emulate LaserJet margins are:
1. Click Start, and then click Settings.
2. Right-click the desired printer and click Printers or Properties to open the
Printing Preferences dialog box.
3. On the Effects tab, select the Emulate LaserJet Margins and click OK.
Setup and Configure hp confidential 2 - 65
Page 78

paper capacity and weight matrix
Transparencies or
plain paper (25 mm or 1
60 to 270 g/m2 (16
60 to 105 g/m2 (16
ial
paper capacity and weight matrix
The following table lists the types, weights, and maximum capacity of media that
each paper path can accept and hold:
Tray Media Type Weight Capacity
Tray 1 Paper 60 to 90 g/m2 (16
to 24 lb bond)
- Envelopes 75 to 90 g/m2 (20
to 24 lb bond
envelope)
- Cards Up to 200 g/m2
(110 lb index)
-
labels
- Special Media - Up to 50 sheets (13 mm
Tray 2 Plain paper only 60 to 90 g/m2 (16
Front
Manual
Feed
- Envelopes 75 to 90 g/m2 (20
- Transparencies - Up to 8 sheets
- Special Media - Up to 6 sheets
Rear
Manual
Feed
- Envelopes 75 to 90 g/m2 (20
- Cards Up to 200 g/m2
- Transparencies - One sheet at a time
- Special Media - One sheet at a time
Autoduplex
unit
- Two-sided spec
Output
tray
Paper 60 to 90 g/m2 (16
Paper
Plain Paper
media
All supported
media
Understanding Supported Media Types and Weights
- Up to 30 sheets (8 mm
to 24 lb bond)
to 24 lb bond)
to 24 lb)
to 72 lb bond)
to 24 lb)
(110 lb index)
to 28 lb bond)
- N.A.
- Up to 100 sheets of
Up to 150 sheets of
plain paper (15 mm or
0.5 inch stacked)
Up to 22 sheets (13 mm
or 0.5 inch stacked)
Up to 5 cards
or 0.3 inch stacked)
or 0.5 inch stacked)
Up to 250 sheets of
inch stacked)
Up to 10 sheets
One sheet at a time
One sheet at a time
One sheet at a time
One sheet at a time
N.A.
plain paper (text
printing)
2 - 66
hp confidential Setup and Configure
Page 79

test hardware installation
test hardware installation
Users can test and ensure the successful installation of hardware accessories and
consumables by printing different test pages, such as the printhead alignment,
demo, and configuration pages, from the printer. These test pages can be printed
from the printer without being connected to the computer, or from the HP Toolbox
after the printer software is installed on the computer.
Testing Printhead Alignment
The printer aligns the printheads in the following circumstances:
• Before the first use of the printer.
• Each time a printhead is replaced.
• Each time the printer is turned on and the printhead tests fail.
• When the alignment process is manually started.
The printer aligns the printheads automatically in the first three situations. Printhead
alignment can be performed manually either through the menu items displayed in
the LCD panel or by using the tap value of the Control Panel buttons. The tap
value for printing printhead alignment pages is 3.
Each time printheads are aligned a test page prints. This sheet displays the result of
the alignment test whether it is V (test passed), X (test failed), or C (test cancelled).
Printhead Alignment Pages
Setup and Configure hp confidential 2 - 67
Page 80

Printing a Demo Page
The printer demo page can be used as a quick check of the image quality from
the black and tri -color print cartridges. Press and hold RESUME button to print a
demo page.
Demo Page
Printing a Configuration/Network Configuration Page
The Configuration page can be used to view current printer settings, help
troubleshoot printer problems, and to verify installation of optional accessories,
such as trays. The Configuration page also contains a log of recent events. If the
printer is connected to a network, an additional network Configuration page
prints; this page shows the network settings for the printer.
Configuration and Network Configuration Pages
2 - 68
hp confidential Setup and Configure
Page 81

The tap values for the different test pages are listed in the following table:
Test Pages Tap Values
Printhead Alignment 3
Demo Page 1
Configuration page/Network (EIO) Configuration page 10
Tap Values for Different Test Pages
Setup and Configure hp confidential 2 - 69
Page 82

contents of the software CD ROM for Windows
contents of software CD ROM for Windows
The software CD ROM for Windows includes the following options:
• Driver Installer : Installs the software required for using the HP Business Inkjet 2800
Printer Series on the computer. The computer can be connected to the
printer direct or through a network.
Documentation
•
related to the HP Business Inkjet 2800 Printer Series. This option includes
documentation, such as release notes, user's guide, HP Jetdirect guide,
setup poster, and the link to the printer Web site.
• Register Product: Allows the user to register the HP Business Inkjet 2800 Printer
Series using the Internet.
• Customization Utility: Allows the administrator to create a custom software
installer that can be copied to a local hard drive or a n etwork drive.
• Optional Software: Provides link to download HP Web Jetadmin software and
PANTONE Color Palettes. HP Web Jetadmin is a Web -browser based
network printer management tool.
• Scrubber Utility: Cleans up the registry in case of a failed USB installation or an
unclean or failed uninstallation. It is recommended that users restart the
computer before running the utility. The utility is located in the
UTILS\SCRUBBER folder of the software CD.
• Expand Utility : Uncompresses the driver bits. The expand utility is located in the
UTILS\EXPAND folder of the software CD.
The optional software available with the software CD includes:
• HP Web JetAdmin:
http://h10010.www1.hp.com/wwpc/pscmisc/vac/us/en/en/network_software
/wja_overview.html
• PANTONE® Color Palettes (Not Available):
http://www.hp.com/support/businessinkjet2800
• Acrobat Reader 5.01 (Windows Only)
: Consists of release notes and provides installation information
2 - 70
hp confidential Setup and Configure
Page 83

contents of software CD ROM for Macintosh
contents of software CD ROM for Macintosh
The software CD ROM for Macintosh includes the following options:
• Driver Installer : Installs the software required for using the HP Business Inkjet 2800
Printer Series on a computer running the Macintosh operating system. The
computer can be connected to the printer direct or through a network.
• Documentation: Consists of documentation, such as release notes and user's
guide, and provides installation information r elated to the printer.
• CD Browser : Enables users to browse the Macintosh CD.
Setup and Configure hp confidential 2 - 71
Page 84

startup page of the CD browser for Windows
startup page of the CD browser for Windows
The startup page of the CD browser for Windows consists of the following
components:
• Install Printer Driver : Installs the printer driver for a direct printer or a network
printer in the Windows environment.
• Browse Documentation: Opens the Browse D ocumentation page from which
the user can select the document to view.
• Register Product: Opens the Web site where the printer can be registered. The
Web site provides customer service, technical support, notices of product
and software upgrades, free newsletters with exclusive guidelines, and
special offers. The registration Web site can be accessed to create and
update profiles.
Customization Utility
•
a system administrator to create a custom software installer that can be
copied to a local hard drive and or a network drive.
• Optional Software: Opens the Optional Software page from which users can
download tools, such as HP Web JetAdmin and PANTONE Color Palettes,
for enhanced printer management. HP Web Jetadmin is a Web browserbased network management tool. Click the HP Web JetAdmin option on
the Optional Software page or type the URL
Startup Page of the CD Browser for Windows
: Launches the MakeDisk utility. The MakeDisk utility allows
http://www.hp.com/go/webjetadmin, in the default Web browser on the
system. PANTONE color palettes for a specific printer ensure that the colors
on a printed media match the PANTONE Color Palette Sample Book colors.
2 - 72
hp confidential Setup and Configure
Page 85

browse documentation
browse documentation
Documentation Available with the Printer
The following documentation can be accessed using the CD browser:
• Release Notes: Displays the release notes. The release notes contains
installation and latest information about the printer.
• User's Guide: Displays information to determine how to:
• Use the printer.
• Maintain the printer.
• Troubleshoot printer-related problems.
• Get help.
• HP Jetdirect Guide: Displays info rmation about the steps to configure the
printer for network printing and troubleshoot the HP Jetdirect print server
card.
• Setup Poster : Contains figures that show how to perform printer setup.
• Printer Web site: Displays the link used to access the HP Web site,
http://www.hp.com/support/businessinkjet2800. This Web site contains the
latest printer-related information and software.
Setup and Configure hp confidential 2 - 73
Page 86

register product
register product
Click the Register Product button on the startup page of the CD browser to access
the HP registration Web site. Alternatively, type the URL, http://register.hp.com/, in
the default Web browser of the system to access the Web site.
Do the following after accessing the HP registration Web site:
• Create a profile.
• Update a profile.
The following information can be accessed on the HP registration Web site:
• Enhanced customer service
• Fast expert technical support
• Timely notices of product and software upgrades
• Free newsletters with exclusive guidelines
• Special offers specific to the requirements
Register Product
2 - 74
hp confidential Setup and Configure
Page 87

customization utility
customization utility
Creating the Customization Utility
The customization utility is used to create a customized unattended installer.
System administrators can copy the installer to floppy disks, local hard drives, or
network drives and deploy the printer driver in a corporate environment easily.
Customization utility has the following functions:
• Allows administrator to create customized installation package for
deployment in corporate or enterprise environment.
• Enables to silently launch the customized installer from a batch file. No user
interaction is required.
• Provides the option to create new network ports in silent installation. No
validation of IP address during administration. The Internet protocol (IP) is
validated during installation.
• Allows silent roll back for any error during installation. No error messages are
displayed.
Customization utility has the following advantages:
• Flexibility: Offers flexibility to modify certain settings during runtime. These
settings include port selection, printer naming, printer share name, printer
comment, and location.
• Virtual ports and USB setup: Is capable of creating virtual ports and allowing
USB installation.
• Maintenance mode: Provides maintenance options after the first installation.
The maintenance mode options include:
• Adding an additional printer or printer driver.
• Modifying the existing installation.
To create the customization utility, follow these steps:
1. Start Windows and ensure that no other Windows applications are running.
2. Insert the Starter CD into the CD ROM drive. The System Setup Wizard runs
automatically.
Setup and Configure hp confidential 2 - 75
Page 88

3. Click Customization Utility from the CD Browser menu.
Startup Page of the Software CD
4. Click OK on the Choose Setup Language dialog box.
2 - 76
Choose Setup Language Dialog Box
hp confidential Setup and Configure
Page 89

5. Click Next on the Welcome to the HP Business Inkjet 2800 series Installer
Customization Wizard page.
Welcome to the HP Business Inkjet 2800 series Installer Customization Wizard Page
6. Select the appropriate language for the installer and click Next on the
Language page.
Language Page
Setup and Configure hp confidential 2 - 77
Page 90

7. Select the printer port and click Next.
Printer Port Page
Note
The selected port can be overridden during run-time installation.
8. The parallel port is selected by default. This step allows the selection of
parallel, USB, or any other port. Select the connector type the computer
will use to communicate with the printer and click Next.
2 - 78
Connector Type Page
hp confidential Setup and Configure
Page 91

9. Select the printer model to be installed and click Next. Users can select
from three SKUs: HP Business Inkjet 2800, HP Business Inkjet 2800dt, or HP
Business Inkjet 2800dtn.
Model Page
10. Click Next after selecting the program features that need to be installed.
Features Page
Setup and Configure hp confidential 2 - 79
Page 92

11. To configure the driver settings before installing the printer driver, click the
Yes, allow me to configure the drivers option. On the Driver Configuration
page, use the list box options in the Printing Preferences and Device
Settings tab to modify the default values. After making all the changes,
click Next.
2 - 80
To maintain the default configuration and proceed with the driver installation,
click No, I don't want to configure the drivers and click Next.
Driver Configuration Page - Change Driver Configuration
hp confidential Setup and Configure
Page 93

Driver Configuration Page - Maintain Default Configuration
12. Select a location to copy the customized installer on the Custom Installer
Location page. Type the location in the Location text box or click Change
to select a different location. After specifying the location, click Install.
Custom Installer Location Page
Setup and Configure hp confidential 2 - 81
Page 94

13. Click Finish to close the installer.
Finish Page
2 - 82
hp confidential Setup and Configure
Page 95

install the printer software for Windows - direct
install the printer software for Windows - direct
Users can connect the printer directly to the computer using a USB cable or an
IEEE 1284-compliant bi -directional parallel cable. This printer can then be shared
with other computers using a simple form of networking known as locally shared
networking.
When setting up the printer, users can connect it to the computer in either of the
following ways:
• Before installing the printer software: Connecting the printer before installing
the printer software allows the New Hardware Found wizard in Windows to
guide users through the printer setup.
• During the installation of the software: Connecting the printer when prompted
during the installation of the software allows the installation program to
guide users through the printer setup .
HP recommends that users connect the printer to the computer when prompted
during software installation.
Installing Printer Software for Windows Directly
The steps to install the printer software for Windows directly on a computer are as
follows:
1. Start Windows and ensure that no other applications are running.
2. Insert the Starter CD in the CD ROM drive. The System Setup Wizard runs
automatically. If the System Setup Wizard does not run automatically, click
Start and then click Run. Type [CD ROM drive]: \SETUP in the command line
box. For example, type D:\SETUP if the D drive is the CD ROM drive.
3. Click Install Printer Driver from the CD Browser menu to display the Choose
Setup Language dialog box.
CD Browser Startup Page
Setup and Configure hp confidential 2 - 83
Page 96

4. Click OK after selecting the language for installing the printer software.
Choose Setup Language Dialog Box
5. Click the Software License Agreement button and read the agreement.
Click OK to close the license agreement and then click Next.
2 - 84
HP Software License Agreement Page
hp confidential Setup and Configure
Page 97

6. The Connected directly to this computer option is selected by default.
Click Next to install the printer directly to the computer.
Printer Connection Page
7. Select a connector type for the printer. The connector can be a parallel,
USB, or any other cab le. Click Next.
Connector Type Page
Setup and Configure hp confidential 2 - 85
Page 98

8. Select the printer model and click Next.
Model Page
9. Select Typical Installation (Recommended) to install the most common
drivers and components. Click Next.
2 - 86
Installation Type Page
hp confidential Setup and Configure
Page 99

10. Specify a name for the printer in the Printer Name text box and click Next.
Printer Name Page
11. The Not Shared option is selected by default. If the printer needs to be
shared, select the Share as option and specify a share name. Else, click
Next.
Printer Sharing Page
Setup and Configure hp confidential 2 - 87
Page 100

12. Click Install to begin the installation process.
Ready to Install Page
13. Connect the USB cable from the computer to the printer. Ensure that the
printer is turned on. Click Skip if the connection is to be established at a
later date.
Looking for new hardware Dialog Box
2 - 88
hp confidential Setup and Configure
 Loading...