

Page 1

User Guide
Page 2

Page 3

© 2015 Hewlett-Packard Development Company, L.P.
Microsoft, Windows, and Windows Vista are either
trademarks or registered trademarks of Microsoft
Corporation in the United States and/or other countries.
The only warranties for HP products and services are set
forth in the express warranty statements accompanying
such products and services. Nothing herein should be
construed as constituting an additional warranty. HP shall
not be liable for technical or editorial errors or omissions
contained herein.
This document contains proprietary information that is
protected by copyright. No part of this document may be
photocopied, reproduced, or translated to another
language without the prior written consent of HewlettPackard Company.
Document Part Number: 819651-001
First Edition (Mar 2015)
Page 4

ii
About This Guide
This guide provides information on setting up the monitor, installing drivers, using the
on-screen display menu, troubleshooting and technical specifications.
WARNING! Text set off in this manner indicates that failure to follow directions
could result in bodily ha
rm or loss of life.
CAUTION: Text set off in this manner indicates that failure to follow directions
could result in damage to equipment or loss of information.
NOTE: Text set off in this manner provides important supplemental information.
Page 5

Table of Contents
About This Guide
1. Product Features
HP LCD Monitors . . . . . . . . . . . . . . . . . . . . . . . . . . . . . . . . . . . . . . . . . . . . . . . . . . . . . . . . . . . . . . . . . . . . . . . . . . . . . . . . 1
2. Safety and Maintenance Guidelines
Important Safety Information . . . . . . . . . . . . . . . . . . . . . . . . . . . . . . . . . . . . . . . . . . . . . . . . . . . . . . . . . . . . . . . . . . . . . . . 2
Safety Precautions . . . . . . . . . . . . . . . . . . . . . . . . . . . . . . . . . . . . . . . . . . . . . . . . . . . . . . . . . . . . . . . . . . . . . . . . . . . . . . . 2
Maintenance Guidelines . . . . . . . . . . . . . . . . . . . . . . . . . . . . . . . . . . . . . . . . . . . . . . . . . . . . . . . . . . . . . . . . . . . . . . . . . . . 3
Cleaning the Monitor . . . . . . . . . . . . . . . . . . . . . . . . . . . . . . . . . . . . . . . . . . . . . . . . . . . . . . . . . . . . . . . . . . . . . . . . . . . 3
3. Setting Up the Monitor
Unpacking the Monitor . . . . . . . . . . . . . . . . . . . . . . . . . . . . . . . . . . . . . . . . . . . . . . . . . . . . . . . . . . . . . . . . . . . . . . . . . . . . 4
Installing the Monitor. . . . . . . . . . . . . . . . . . . . . . . . . . . . . . . . . . . . . . . . . . . . . . . . . . . . . . . . . . . . . . . . . . . . . . . . . . . . . . 4
Connecting Monitor Cables . . . . . . . . . . . . . . . . . . . . . . . . . . . . . . . . . . . . . . . . . . . . . . . . . . . . . . . . . . . . . . . . . . . . . . . . 7
Connecting the Audio Cable (Select Models) . . . . . . . . . . . . . . . . . . . . . . . . . . . . . . . . . . . . . . . . . . . . . . . . . . . . . . . . . . . 8
High-Bandwidth Digital Content Protection (HDCP)
(Available on Select Models) . . . . . . . . . . . . . . . . . . . . . . . . . . . . . . . . . . . . . . . . . . . . . . . . . . . . . . . . . . . . . . . . . . . . . . . 8
Connecting the Power Cable . . . . . . . . . . . . . . . . . . . . . . . . . . . . . . . . . . . . . . . . . . . . . . . . . . . . . . . . . . . . . . . . . . . . . . . 9
Adjusting the Tilt . . . . . . . . . . . . . . . . . . . . . . . . . . . . . . . . . . . . . . . . . . . . . . . . . . . . . . . . . . . . . . . . . . . . . . . . . . . . . . . . 10
4. Operating the Monitor
CD Software and Utilities . . . . . . . . . . . . . . . . . . . . . . . . . . . . . . . . . . . . . . . . . . . . . . . . . . . . . . . . . . . . . . . . . . . . . . . . . 11
Installing Drivers . . . . . . . . . . . . . . . . . . . . . . . . . . . . . . . . . . . . . . . . . . . . . . . . . . . . . . . . . . . . . . . . . . . . . . . . . . . . . 11
Installing the monitor driver software from the CD. . . . . . . . . . . . . . . . . . . . . . . . . . . . . . . . . . . . . . . . . . . . . . . . . . . . 11
Downloading updated drivers from the Internet . . . . . . . . . . . . . . . . . . . . . . . . . . . . . . . . . . . . . . . . . . . . . . . . . . . . . . 11
Front-Panel Controls . . . . . . . . . . . . . . . . . . . . . . . . . . . . . . . . . . . . . . . . . . . . . . . . . . . . . . . . . . . . . . . . . . . . . . . . . . . . 12
How To Adjust A Setting . . . . . . . . . . . . . . . . . . . . . . . . . . . . . . . . . . . . . . . . . . . . . . . . . . . . . . . . . . . . . . . . . . . . . . . . . . 14
Adjusting The Picture . . . . . . . . . . . . . . . . . . . . . . . . . . . . . . . . . . . . . . . . . . . . . . . . . . . . . . . . . . . . . . . . . . . . . . . . . . . . 15
Selecting Video Input Connectors . . . . . . . . . . . . . . . . . . . . . . . . . . . . . . . . . . . . . . . . . . . . . . . . . . . . . . . . . . . . . . . . . . 17
Identifying Monitor Conditions . . . . . . . . . . . . . . . . . . . . . . . . . . . . . . . . . . . . . . . . . . . . . . . . . . . . . . . . . . . . . . . . . . . . . 18
Adjusting Screen Quality . . . . . . . . . . . . . . . . . . . . . . . . . . . . . . . . . . . . . . . . . . . . . . . . . . . . . . . . . . . . . . . . . . . . . . . . . 18
Power-Saver Feature . . . . . . . . . . . . . . . . . . . . . . . . . . . . . . . . . . . . . . . . . . . . . . . . . . . . . . . . . . . . . . . . . . . . . . . . . . . . 19
A. Troubleshooting
Solving Common Problems . . . . . . . . . . . . . . . . . . . . . . . . . . . . . . . . . . . . . . . . . . . . . . . . . . . . . . . . . . . . . . . . . . . . . . . 20
Getting Support from hp.com . . . . . . . . . . . . . . . . . . . . . . . . . . . . . . . . . . . . . . . . . . . . . . . . . . . . . . . . . . . . . . . . . . . . . . 21
Preparing to Call Technical Support . . . . . . . . . . . . . . . . . . . . . . . . . . . . . . . . . . . . . . . . . . . . . . . . . . . . . . . . . . . . . . . . . 21
Locating the Rating Label. . . . . . . . . . . . . . . . . . . . . . . . . . . . . . . . . . . . . . . . . . . . . . . . . . . . . . . . . . . . . . . . . . . . . . . . . 21
B. Technical Specifications
HP LCD Monitors . . . . . . . . . . . . . . . . . . . . . . . . . . . . . . . . . . . . . . . . . . . . . . . . . . . . . . . . . . . . . . . . . . . . . . . . . . . . . . . 22
Preset Video Modes . . . . . . . . . . . . . . . . . . . . . . . . . . . . . . . . . . . . . . . . . . . . . . . . . . . . . . . . . . . . . . . . . . . . . . . . . . . . . 23
LCD Monitor Quality and Pixel Policy. . . . . . . . . . . . . . . . . . . . . . . . . . . . . . . . . . . . . . . . . . . . . . . . . . . . . . . . . . . . . . . . 24
ENWW 1
Page 6

ENWW HP LCD Monitors 1
1. Product Features
HP LCD Monitors
The HP LCD (liquid crystal display) monitors have an active matrix, thin-film transistor
(TFT) screen with the following features:
• Large diagonal display
• Maximum graphics resolution:
1920 x 1080 @ 60Hz
Plus full-screen support for lower resolutions
• VGA analog signal
• DVI digital signal
• HDMI digital signal
• Easy viewing from a sitting or standing position, or while moving from one side of
the monitor to the other
• Tilt adjustment
• Removable base
• Built in stereo speakers on select models
• Security lock slot for a locking security cable (security cable sold separately)
• Plug and Play capability, if supported by your computer system
• On-Screen Display (OSD) adjustments in several languages for easy setup and
screen optimization
• Power Saver to reduce energy consumption
• HDCP (High Bandwidth Digital Content Protection) on DVI input for select models
• Software and utilities CD, containing the following:
Drivers
Documents
Page 7

2 Chapter 2. Safety and Maintenance Guidelines ENWW
2. Safety and Maintenance Guidelines
Important Safety Information
A power cord is included with the monitor. If another cord is used, use only a power
source and connection appropriate for this monitor. For information on the correct
power cord set to use with the monitor, refer to the Product Notices provided on your
media disc, if one is included, or in your documentation kit.
WARNING! To reduce the risk of electric shock or damage to the equipment:
• Do not disable the power cord grounding featur
e. The grounding plug is an
important safety feature.
• Plug the power cord in a grounded (earthed) outlet that is easily accessible at all
times.
• Disconnect power from the product by unplugging the power cord from the
e
lectrical outlet.
For your safety, do not place anything on power cords or cables. Arrange them so that
n
o one may accidentally step on or trip over them. Do not pull on a cord or cable.
When unplugging from the electrical outlet, grasp the cord by the plug.
To reduce the risk of serious injury, read the Safety
and Comfort Guide . It describes
proper workstation, setup, posture, and health and work habits for computer users,
and provides important electrical and mechanical safety information. This guide is
located on the Web at
http://www.hp.com/ergo and/or on the documentation CD, if
one is included with the monitor.
CAUTION: For the protection of the monitor, as well as the computer, connect all
power cords for the computer and its peripheral devices (such as a monitor, printer,
sca
nner) to some form of surge protection device such as a power strip or
Uninterruptible Power Supply (UPS). Not all power strips provide surge protection; the
power strips must be specifically labeled as having this ability. Use a power strip
whose manufacturer offers a Damage Replacement Policy so you can replace the
equipment, if surge protection fails.
Use the appropriate and correctly sized furnitur
e designed to properly support your
HP LCD monitor.
WARNING: LCD monitors that are inappropriately situated on dressers, book
cases, shelves, desks, speake
rs, chests, or carts may fall over and cause personal
injury. Care should be taken to route all cords and cables connected to the LCD
monitor so that they can not be pulled, grabbed, or tripped over.
For displays with glossy bezels the user sho
uld consider the placement of the display
as the bezel may cause disturbing reflections from surrounding light and bright
surfaces.
Safety Precautions
• Use only a power source and connection compatible with this monitor, as
indicated on the label/back plate of the monitor.
• Be sure the total ampere rating of the products connected to the outlet does not
ex
ceed the current rating of the electrical outlet, and the total ampere rating of the
products connected to the power cord does not exceed the rating of the power
Page 8

ENWW Maintenance Guidelines 3
cord. Look on the power label to determine the ampere rating (Amps or A) for
each device.
• Install your monitor near a power outlet that you
can easily reach. Disconnect the
monitor by grasping the plug firmly and pulling it from the outlet. Never disconnect
the monitor by pulling the cord.
• Do not allow anything to rest on the power cord. Do not walk on the cord.
Maintenance Guidelines
To enhance the performance and extend the life of the monitor:
• Do not open the monitor cabinet or attempt to service this product yourself. Adjust
o
nly those controls that are covered in the operating instructions. If the monitor is
not operating properly or has been dropped or damaged, contact an authorized
HP dealer, reseller, or service provider.
• Use only a power source and connection appropriate for this monitor, as indicated
o
n the label/back plate of the monitor.
• Be sure the total ampere rating of the products connected to the outlet does not
ex
ceed the current rating of the electrical outlet, and the total ampere rating of the
products connected to the cord does not exceed the rating of the cord. Look on
the power label to determine the ampere rating (AMPS or A) for each device.
• Install the monitor near an outlet that
you can easily reach. Disconnect the
monitor by grasping the plug firmly and pulling it from the outlet. Never disconnect
the monitor by pulling the cord.
• Turn the monitor off when not in use. You can substantially increase the life
e
xpectancy of the monitor by using a screen saver program and turning off the
monitor when not in use
• Slots and openings in the cabinet are provided for ventilation. These openings
mu
st not be blocked or covered. Never push objec ts of any kind into cabinet slots
or other openings.
• Do not drop the monitor or place it on an unstable surface.
• Do not allow anything to rest on the power cord. Do not walk on the cord.
• Keep the monitor in a well-ventilated area, away from excessive light, heat or
mo
isture.
• When removing the monitor base, you must lay the monitor face down on a soft
ar
ea to prevent it from getting scratched, defaced, or broken.
Cleaning the Monitor
1. Turn off the monitor and the computer.
2. Unplug the monitor from the wall outlet or the power brick.
3. Clean the monitor plastics with a clean cloth dampened with water.
4. Clean the monitor screen with an antistatic screen cleaner.
CAUTION: Do not use benzene, thinner, ammonia, or any other volatile
substances to clean the monitor or the scree
n. These chemicals may damage the
cabinet finish as well as the screen.
Page 9
4 Chapter 3. Setting Up the Monitor ENWW
3. Setting Up the Monitor
Unpacking the Monitor
1. Unpack the monitor. Make sure all contents are included. Store the packing box.
2. Turn off the computer and other attached devices.
3. Prepare a flat area to assemble the monitor. You may need a flat, soft, protected
a
rea for placing the monitor screen-down while preparing it for installation.
Installing the Monitor
You can install the monitor on a desktop or wall-mount it. Place the monitor in a
convenient, well-ventilated location near your computer. Connect the monitor cables
after you have installed the monitor.
Preparing the monitor for desktop use
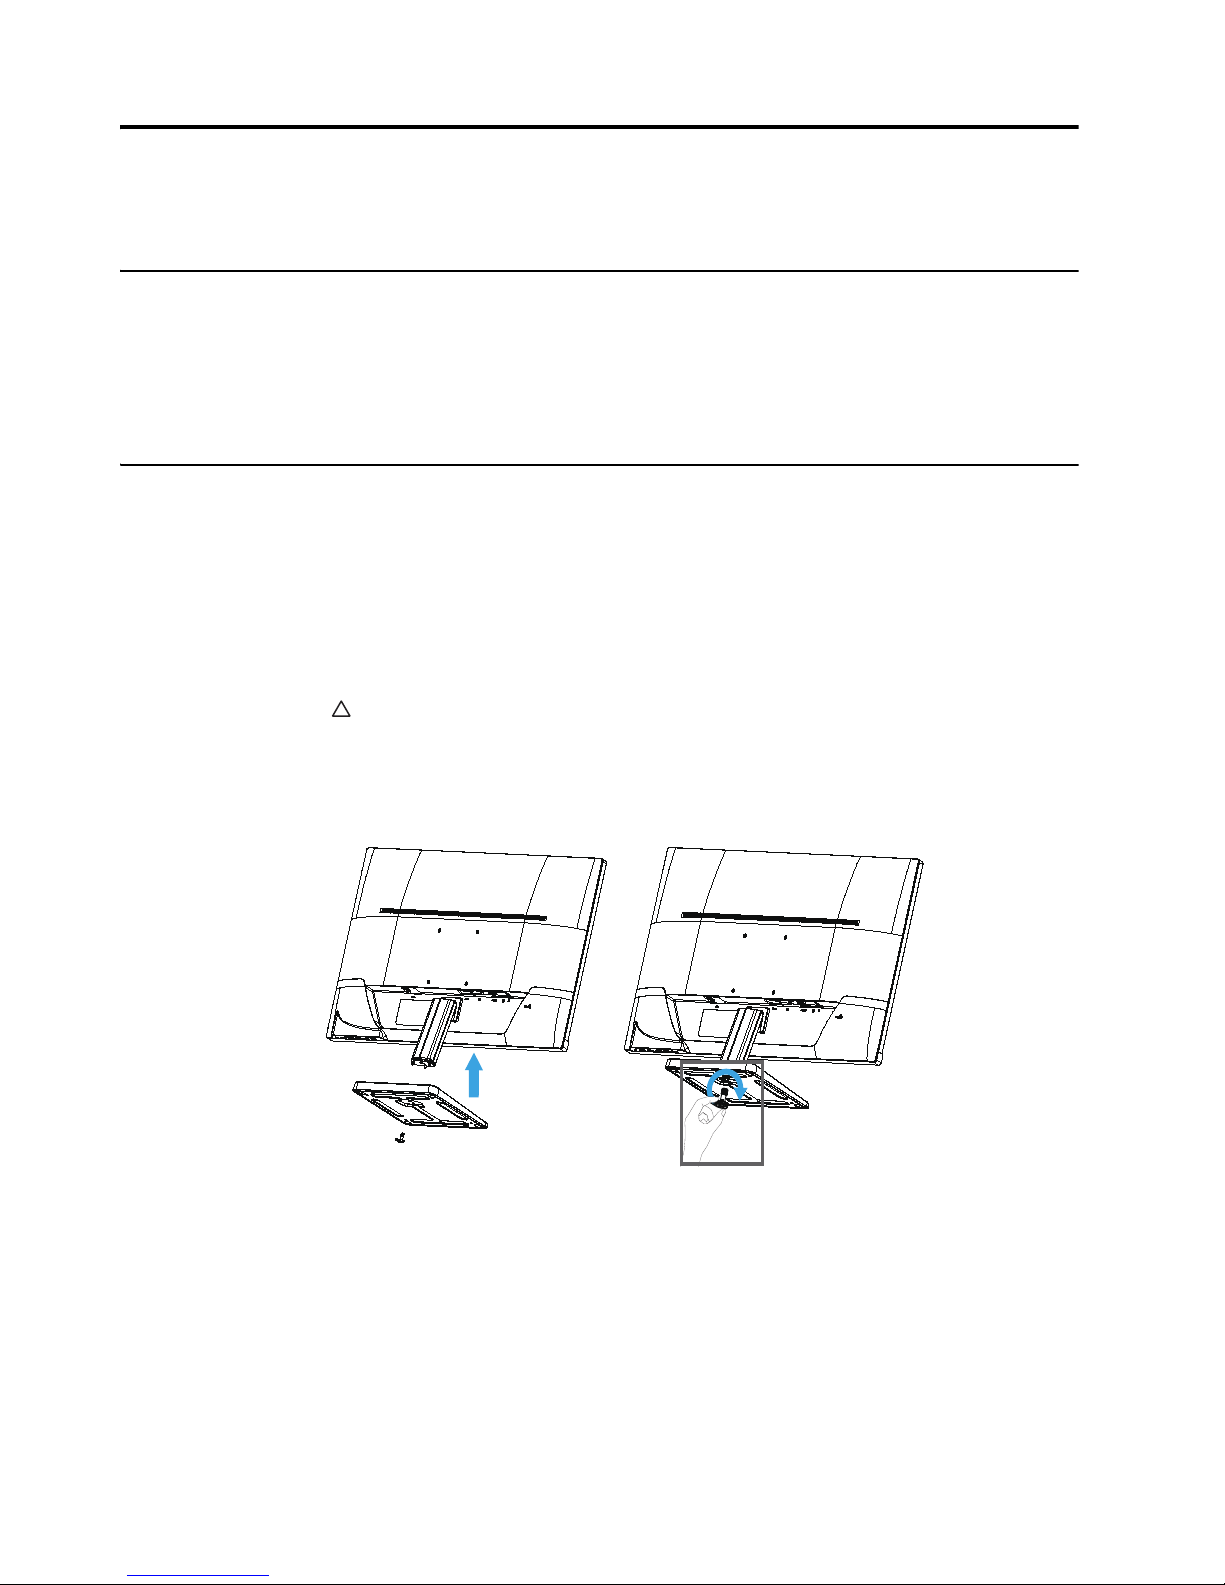
1. Set the monitor screen face down on a flat, soft, protected table or desk surface
with th
e support column overhanging the edge.
CAUTION: The screen is fragile. Avoid touching or applying pressure to the LCD
screen; doing so can cause damage.
2. Press the base into the colum
n until it locks in position, and then secure the base
by tightening the screw on the bottom of the base.
Figure 3-1 Attaching the Base
Page 10
ENWW Installing the Monitor 5
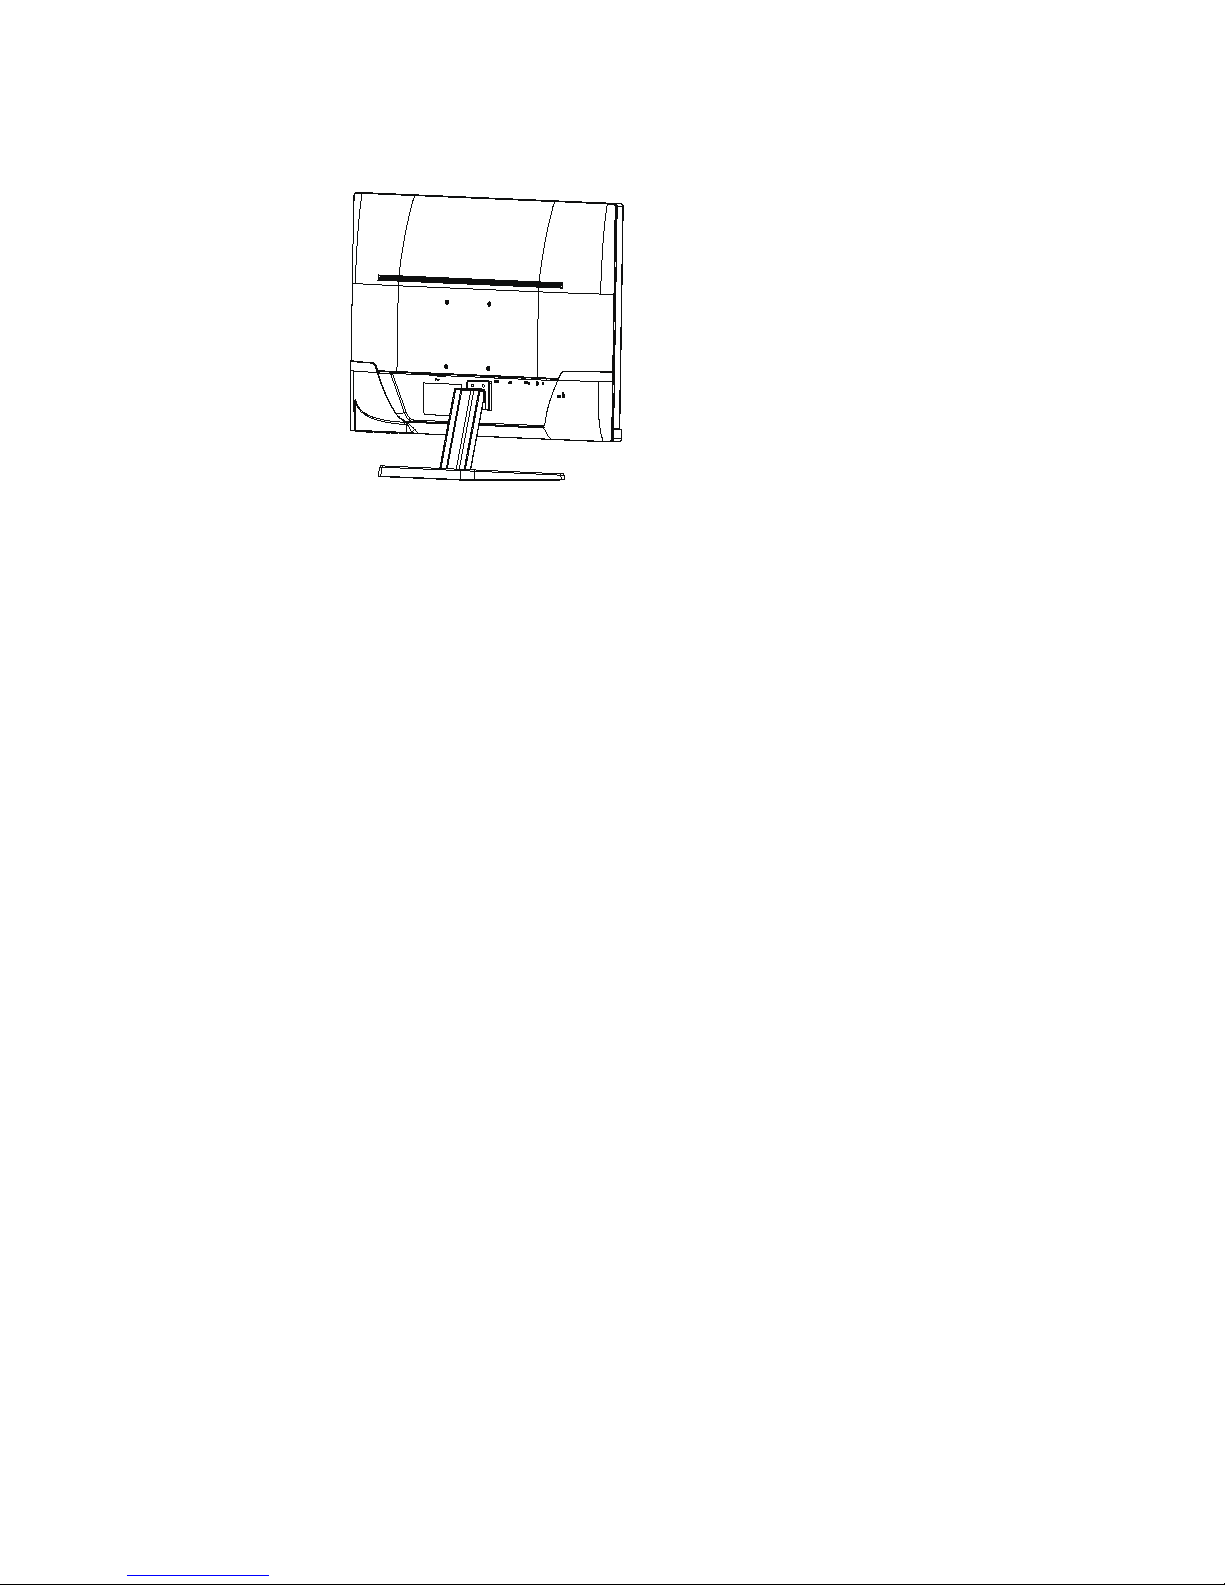
3. Lift the monitor to an upright position and place on a flat, stable surface.
Figure 3-2 Monitor in upright position
Page 11
6 Chapter 3. Setting Up the Monitor ENWW
Preparing the monitor for wall-mounting
1. Check the stability of the wall-mounting
fixture.
WARNING! To reduce the risk of personal injury or of damage to the equipment,
check that the wall-mounting fixture is adequately installed and secured before
at
taching the monitor. Refer to the instructions supplied with the wall-mounting fixture
and check that it is capable of supporting the monitor.
2. Disconnect the power cable and any other cables from the monitor.
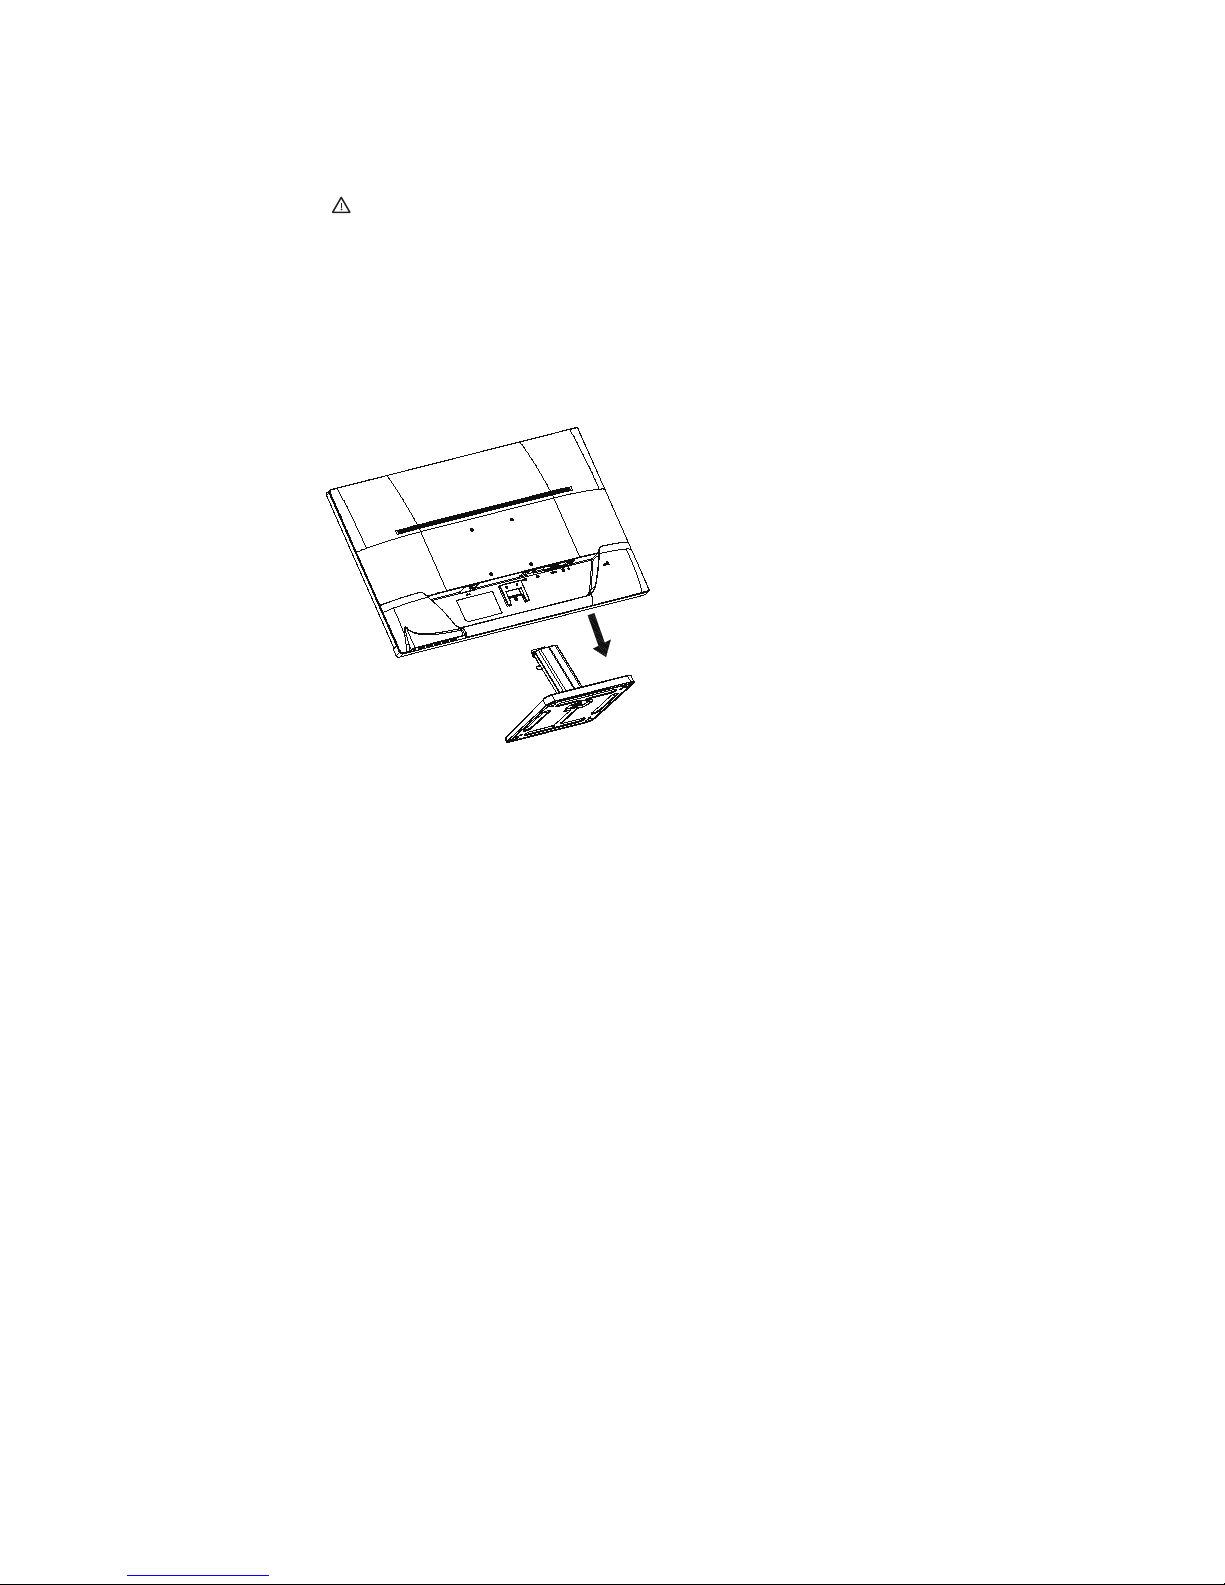
3. Place the monitor face down on a flat, protected surface.Slide the base away from
th
e bottom of the monitor.
Figure 3-3 Sliding the base away from the monitor
4. Four threaded holes are exposed on the back panel of the monitor. These holes
are for screws to attach the swing arm or other mounting fixture to the back of the
monitor.
5. Follow the instructions included with the mo
unting fixture to ensure that the
monitor is safely attached. The four threaded holes that are on the back of the
panel are compliant with the VESA standard for mounting flat-panel monitors.
6. Attach a swing arm or other mounting fixture.
Page 12
ENWW Connecting Monitor Cables 7
Connecting Monitor Cables
Connecting the VGA (Analog) Cable or DVI-D (Digital) Cable or HDMI (Digital)
Cable
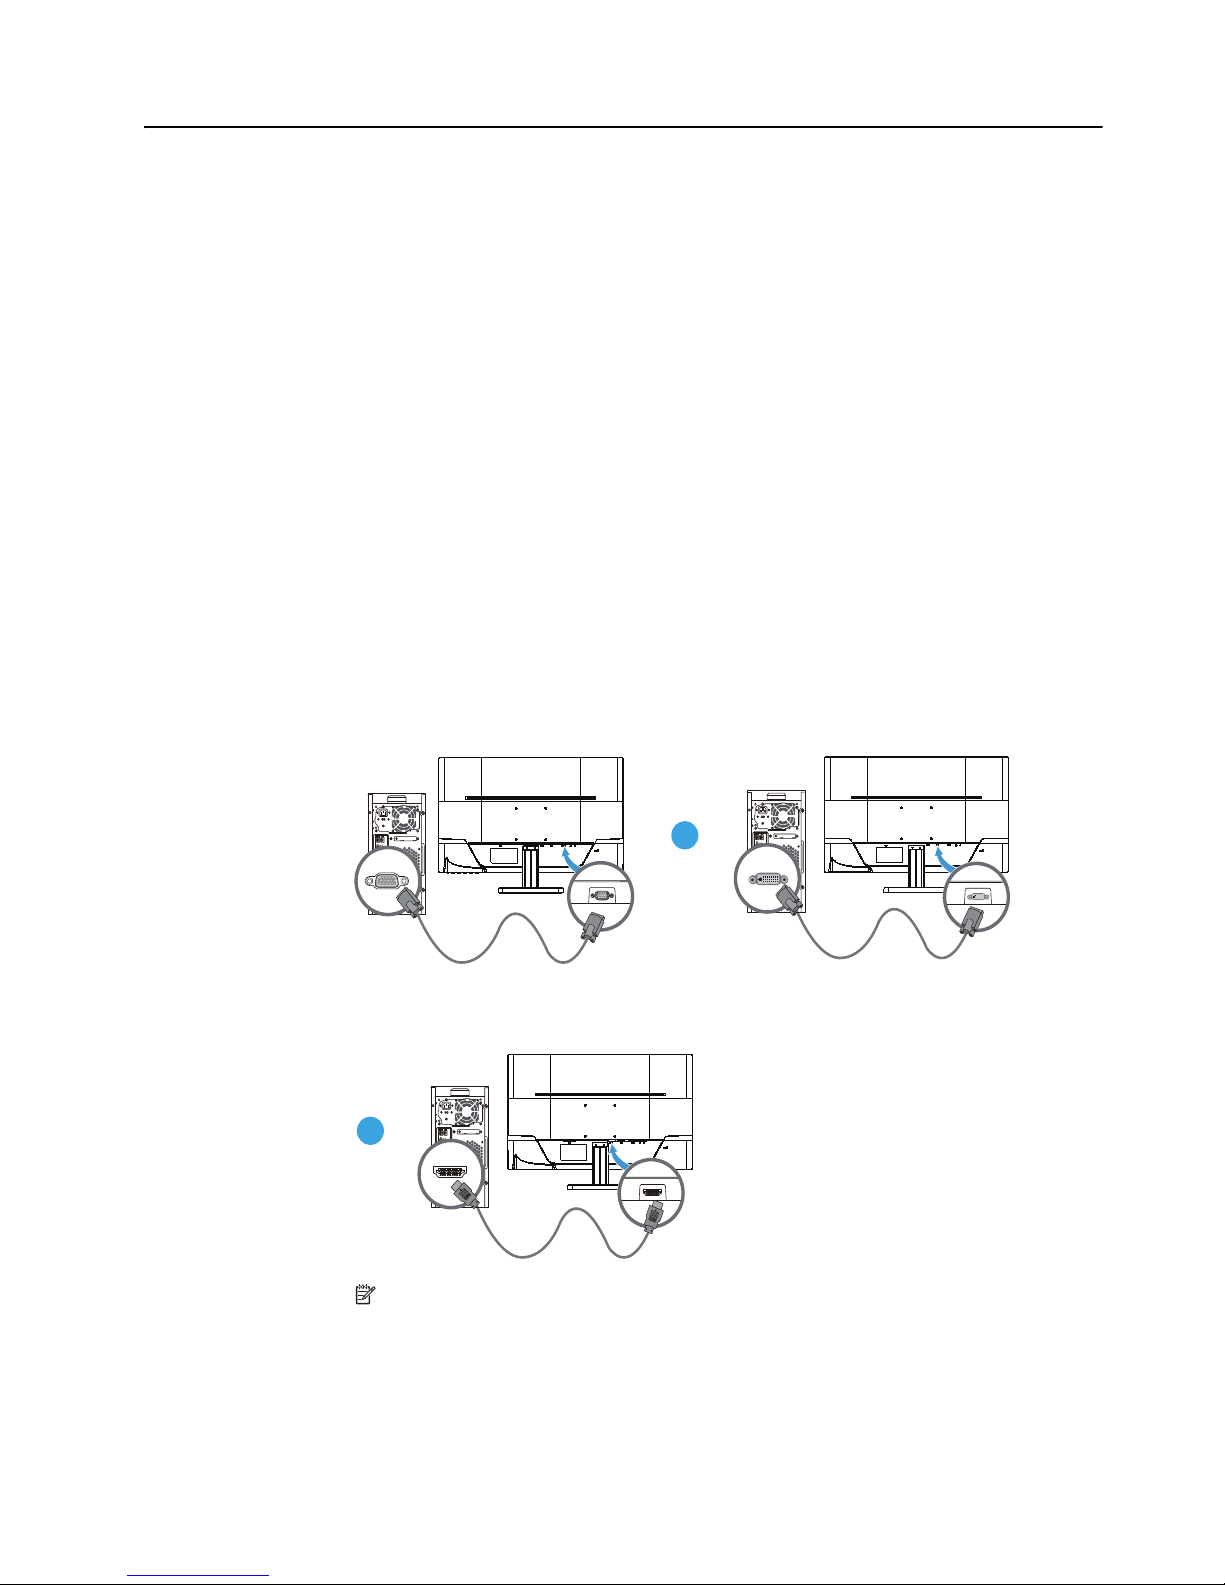
Use a VGA video cable or a DVI-D cable or a HDMI cable
to connect your monitor to
your computer. To use DVI, you must have a DVI-compliant graphic card. Connectors
are located on the back of the monitor. Be sure the computer and monitor are turned
off and unplugged.
1.To connect the VGA cable:
Connect one end of the VGA video cable to the back of the monitor and the other end
to the VGA video
connector on the computer.
2.To connect the DVI-D cable:
Connect one end of the DVI-D video cable to the back of the monitor and the other
e
nd to the DVI-D video connector on the computer. You can use this cable only if your
computer has a DVI compliant graphics card installed. The monitor DVI-D connector
and cable are included.
3. To connect the HDMI cable:
Connect one end of the HDMI cable to the back of the monitor and the other end to
the
HDMI connector on the computer.
Figure 3-4 Connecting the VGA or a DVI-D or a HDM
I cable- connector locations
may vary
HDMI
OR
OR
VGA
DVI
NOTE: When using a VGA or DVI or HDMI signal, you must connect your audio
separately because a VGA or DVI o
r HDMI signal converts only video data, not audio
data.
Page 13
8 Chapter 3. Setting Up the Monitor ENWW
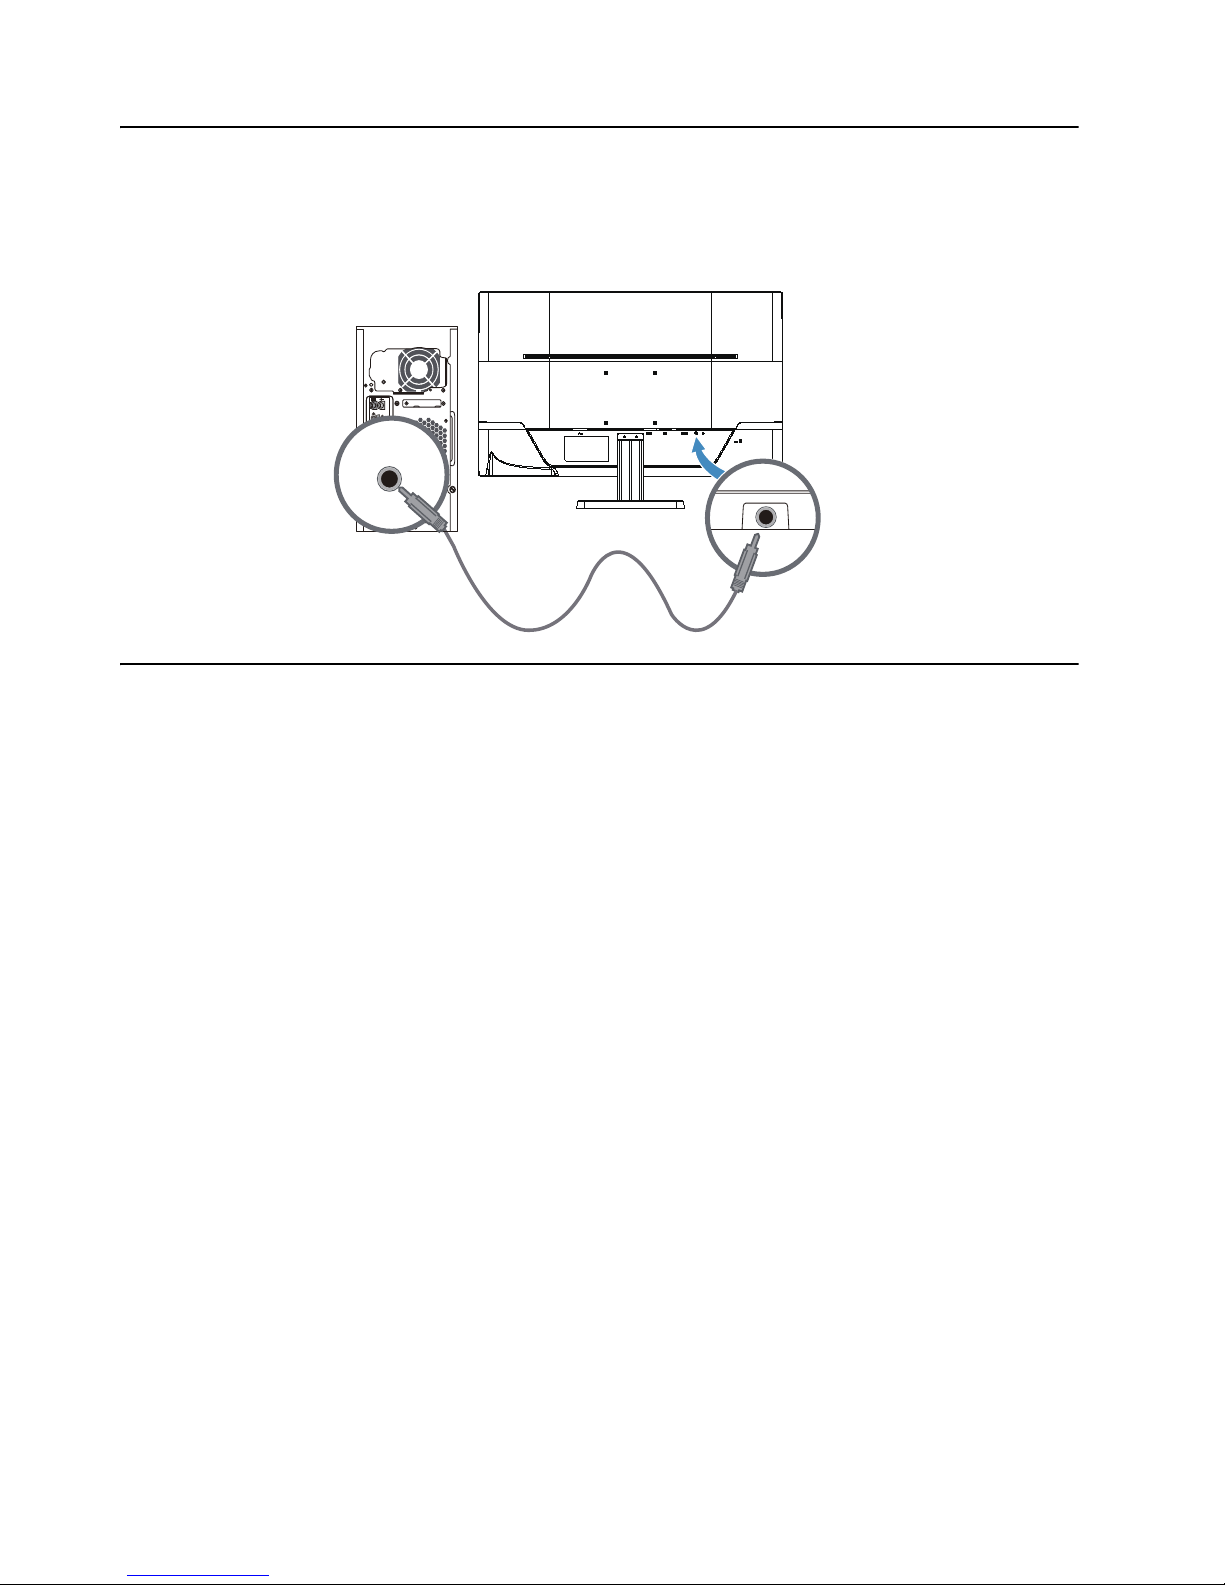
Connecting the Audio Cable (Select Models)
Connect the built-in monitor speakers to the computer by using the audio cable as
shown in the following illustration
Figure 3-5 connecting the Audio Cables - connector locations may vary
High-Bandwidth Digital Content Protection (HDCP)
(Available on Select Models)
Your monitor supports HDCP and can receive high-definition content. High-definition
content is available in many sources, such as Blue-ray Disc devices or HDTV air or
cable broadcasts. If you do not have an HDCP-enabled monitor, you will see a blank
screen or a lower resolution picture when playing high-definition protected content.
Your computer graphics card and monitor must both support HDCP to display
protected content.
Page 14
ENWW Connecting the Power Cable 9
Connecting the Power Cable
1. Follow all Electrical and Power Warnings
WARNING! To reduce the risk of electric shock or damage to your equipment: Do
not disable the power cord grounding plug. The grounding plug is an important safety
fe
ature.
Plug the power cord into a grounded (earthed) electrical outlet.
Be sure that the grounded power outlet you pl
ug the power cord into is easily
accessible to the operator and located as close to the equipment as possible. A power
cord should be routed so that it is not likely to be walked on or pinched by items that
are placed upon it or against it.
Do not place anything on power cords or cables. Arrange them so that no one may
a
ccidentally step on or trip over them. Do not pull on a cord or cable.
See"Technical Specification" (Appendix B) for additional information.
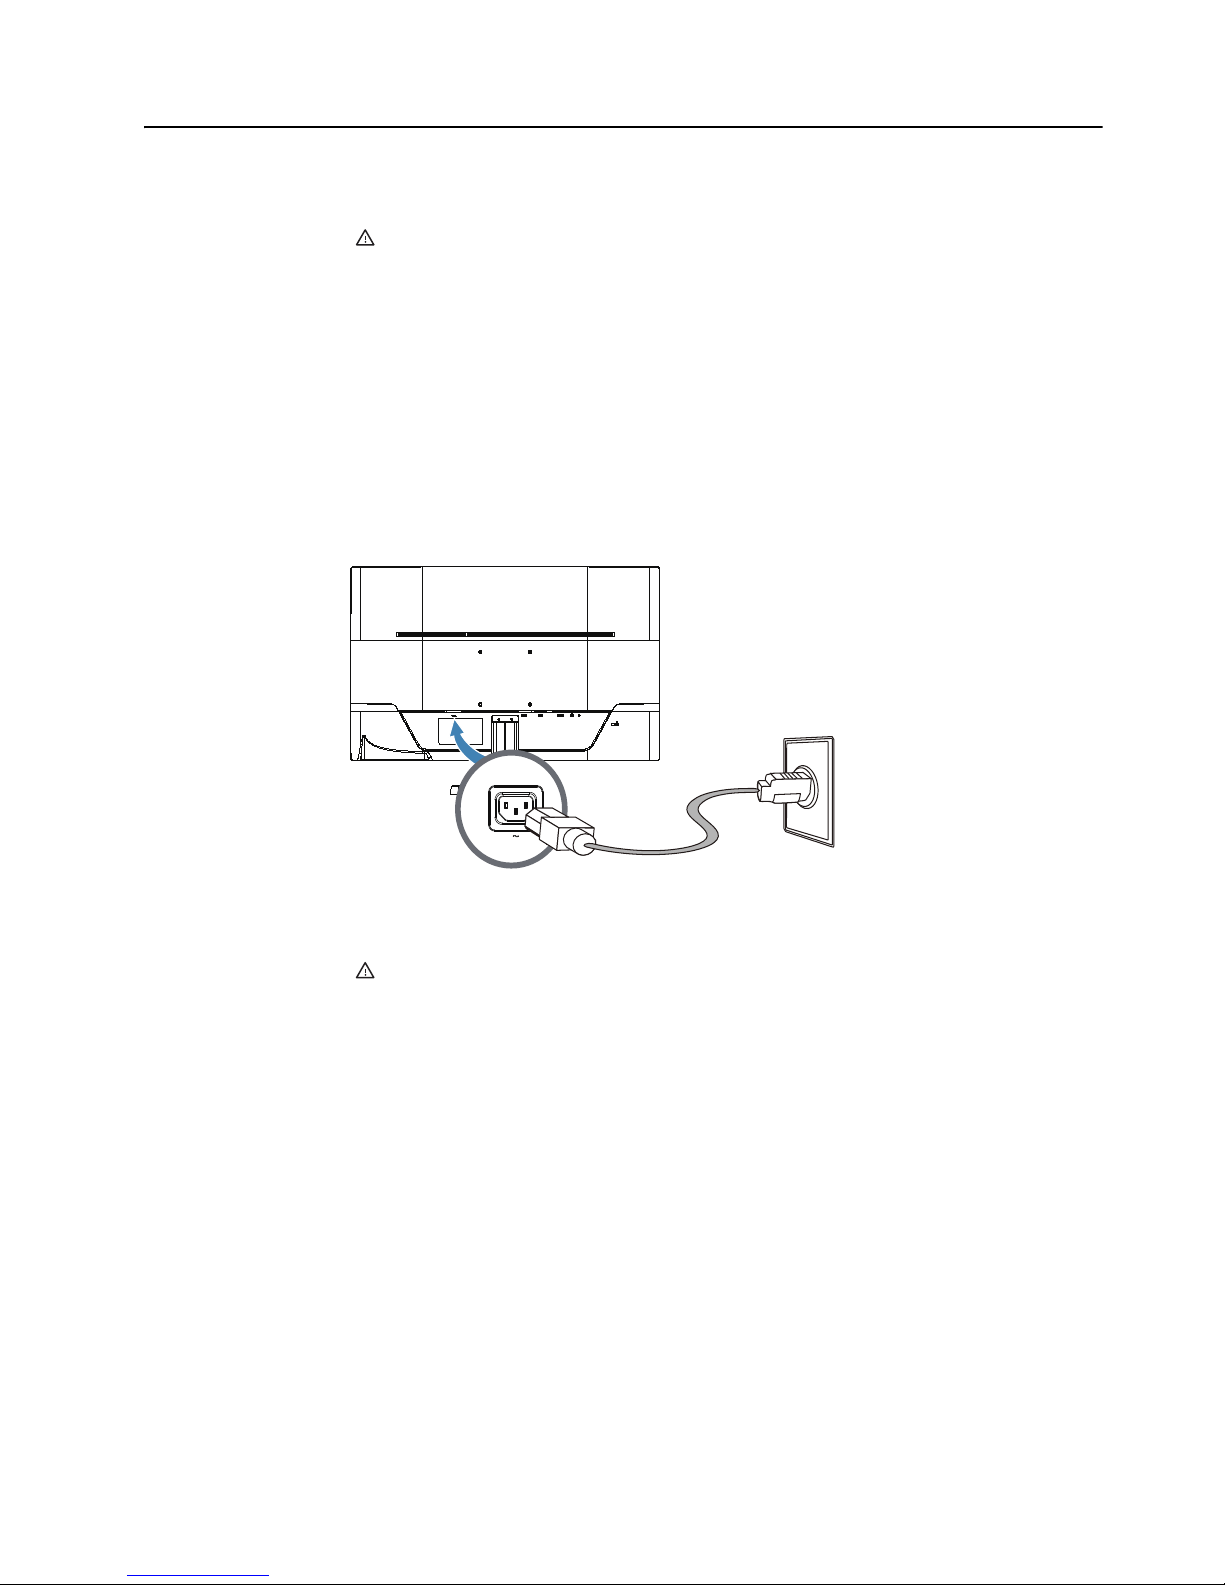
Figure 3-6 Connecting the power cable
2. Connect one end of the power cable to the monitor and the other end to a
grounded electrical outlet.
WARNING! To prevent injury from electrical shock, you should do one of the
following if a properly grounded electrical outle
t is not available: (1) You should use an
electrical outlet adapter that provides proper grounding. (2) You should have a
properly grounded electrical outlet installed.
Page 15
10 Chapter 3. Setting Up the Monitor ENWW
Adjusting the Tilt
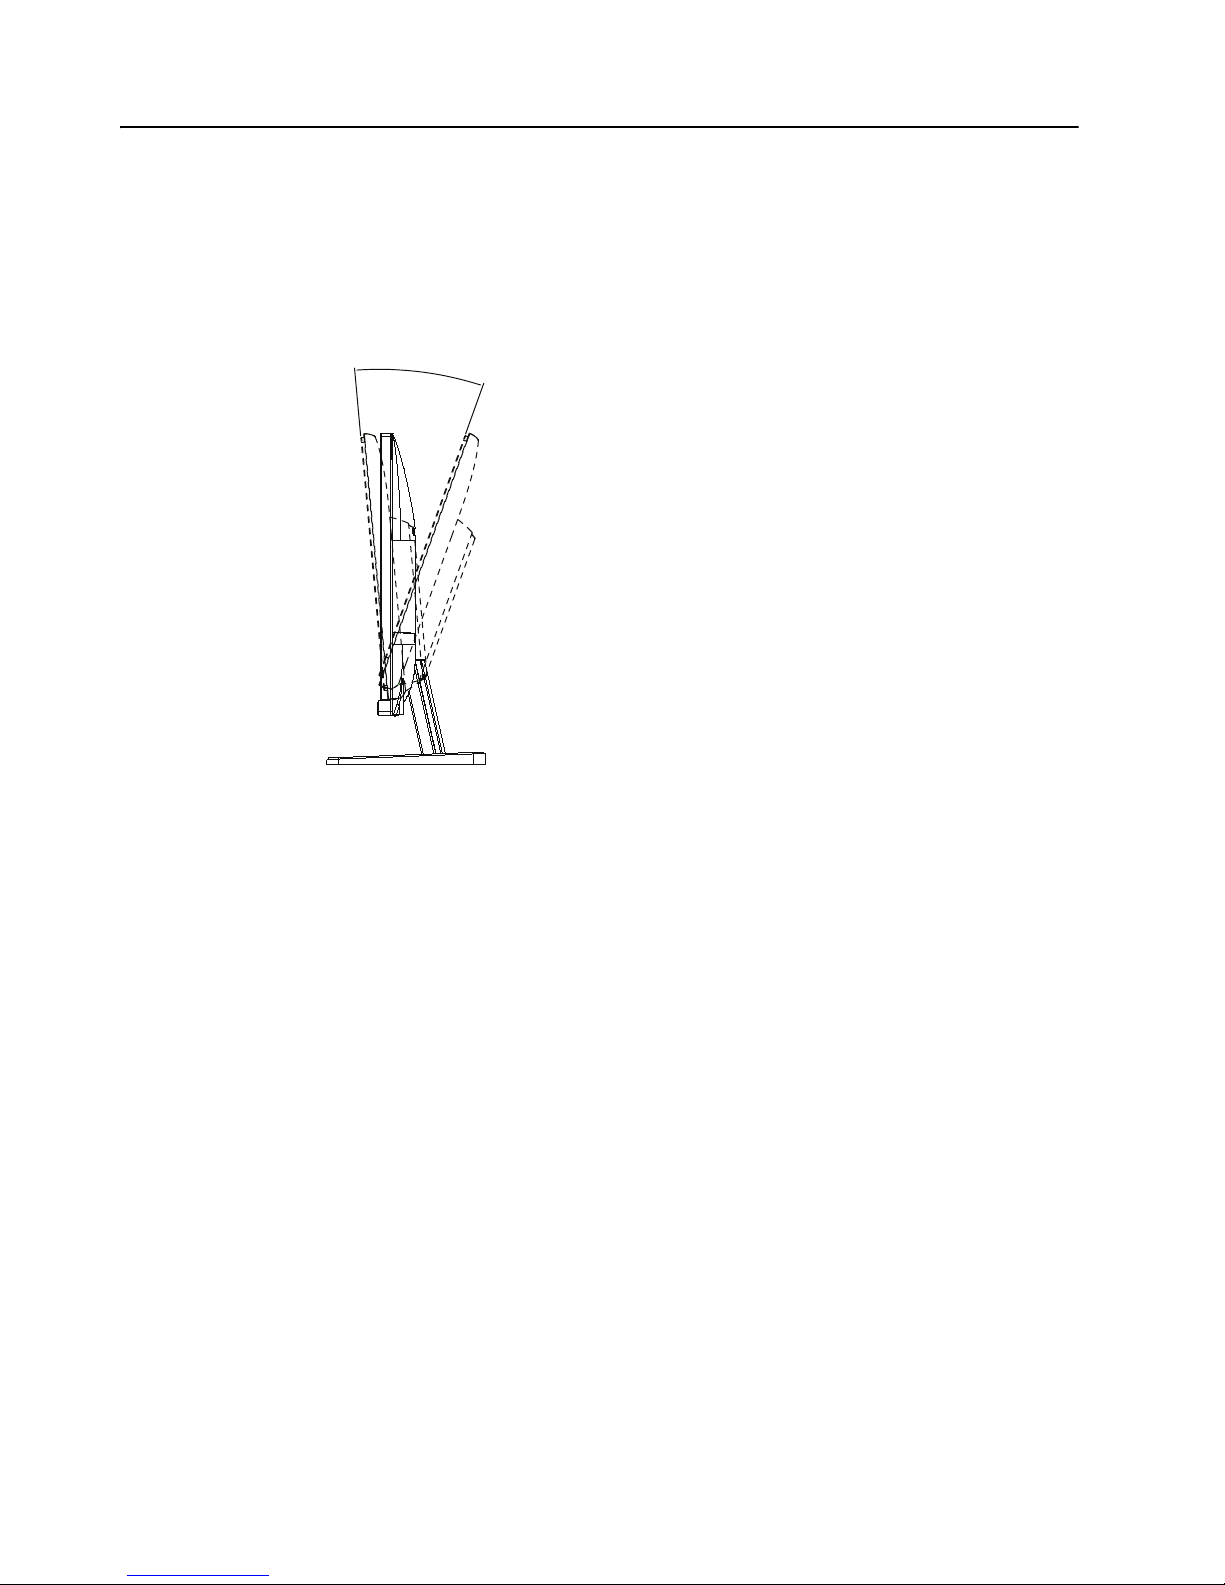
For optimal viewing, adjust the screen tilt to your own preference, as follows:
1. Face the front of the monitor and hold the base so that you do not topple the
mo
nitor while changing the tilt.
2. Adjust the tilt by moving the top edge of the mo
nitor either toward or away from
you, without touching the screen.
Figure 3-7 Tilt adjustment
Page 16

ENWW CD Software and Utilities 11
4. Operating the Monitor
CD Software and Utilities
The CD that is included with this monitor contains drivers and software that you can
install on your computer.
Installing Drivers
If you determine that you need to update the drivers, you can install the monitor driver
INF and ICM files from the CD, or download them from the Internet.
Installing the monitor driver software from the CD
To install the monitor driver software from the CD:
1. Insert the CD in your computer CD drive. The CD menu appears.
2. Select the language.
3. Click Inst
all Monitor Driver Software.
4. Follow the on-screen instructions.
5. Ensure that the proper resolutions and refresh rates appear in the Display Control
Panel settings.
Refer to the Windows
®
operating system documentation for more information.
NOTE: You might need to install the digitally signed monitor drivers (INF or ICM
files) manually from the CD, in case of an inst
allation error. Refer to the "HP Monitor
Software Information" file on the CD for instructions (in English only).
Downloading updated drivers from the Internet
To download the latest version of drivers and software files from the HP Support site:
1. Refer to: htt
p://www.hp.com/support .
2. Select your country/region.
3. Select Downl
oad Drivers and Software.
4. Enter the model number of your monitor and click Go.
5. Download and install the driver and software files
by following the instructions on
the download pages.
6. Ensure that your system meets the requirements.
Page 17
12 Chapter 4. Operating the Monitor ENWW
Front-Panel Controls
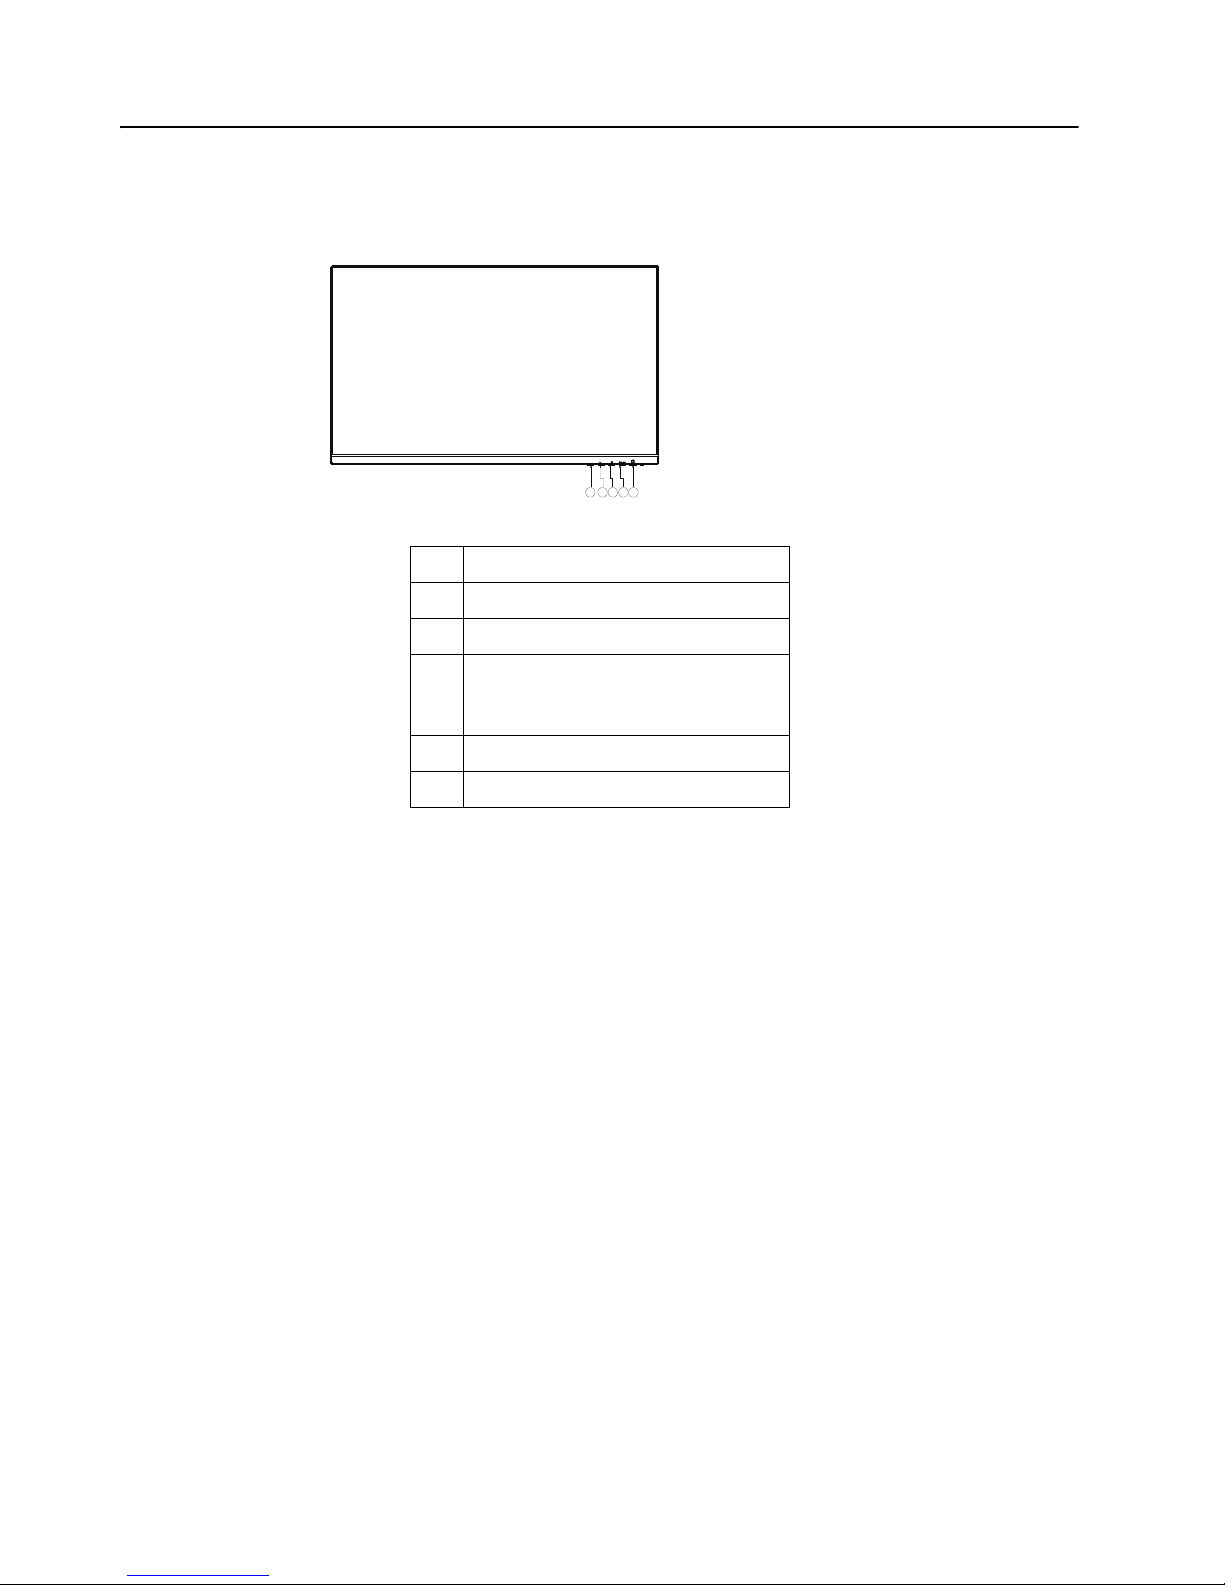
The monitor buttons are located on the bottom of the front panel
Figure 4-1 Front-panel control buttons
45 3 2 1
Auto
No. Icon
1 Power button
2 MENU/ENTER
3 27sv: + / Volume & audio source
V272: + / Volume
4 - / ECO
5 Auto Config. button / Exit
Page 18

ENWW Front-Panel Controls 13
• Power Button:
Press to switch the monitor on or off.
• Power Indicator:
Blue — Power On mode.
Orange — Standby mode.
LED off — Off mode.
• MENU / ENTER:
Activate OSD menu or function adjust confirm or Exit OSD menu when in
Brightness/Contrast OSD status.
• + / Volume(V272):
Activate the volume control when the OSD is OFF, Press + or - to adjust the setting
when OSD is ON.
• + / Volume & audio source(27sv):
When the OSD is closed, press the button will be Audio Hot-Key Function, and press
MENU key to move the orange cursor to Audio Source, then it can be adjust.
• - / ECO:
Activate the ECO function when the OSD is OFF, navigate through adjustment icons
when OSD is ON, or adjust a function when function is activated.
• Auto Config. button / Exit:
1. When OSD menu is off, press and hold to activate the Auto Adjustment function
(only for VGA source). The Auto Adjustment function is used to optimize the
H.Pos, V.Pos, Clock and Phase.
2. When OSD menu is on, press to exit the OSD menu.
3. When the OSD is closed, Press Auto/Source button continuously about 3 second
to popup Source window.
OSD Lock Function: To lock the OSD, press and hold the MENU button while the
monitor is off and then press power button to turn the monitor on. To un-lock the OSD,
press and hold the MENU button while the monitor is off and then press power button
to turn the monitor on.
NOTES
• Do not install the monitor in a location near heat sources such as radiators or air
ducts, or in a place subject to direct sunlight, or excessive dust or mechanical
vibration or shock.
• Save the original shipping carton and packing materials, as they will come in
handy if you ever have to ship your monitor.
• For maximum protection, repackage your monitor as it was originally packed at
the factory.
• To keep the monitor looking new, periodically clean it with a soft cloth. Stubborn
stains may be removed with a cloth lightly dampened with a mild detergent
solution. Never use strong solvents such as thinner, benzene, or abrasive
cleaners, since these will damage the cabinet. As a safety precaution, always
unplug the monitor before cleaning it.
• Do not scratch the screen with hard things, it may cause permanent damage.
• Do not leak liquid into monitor which will result in the damage of component.
Page 19
14 Chapter 4. Operating the Monitor ENWW
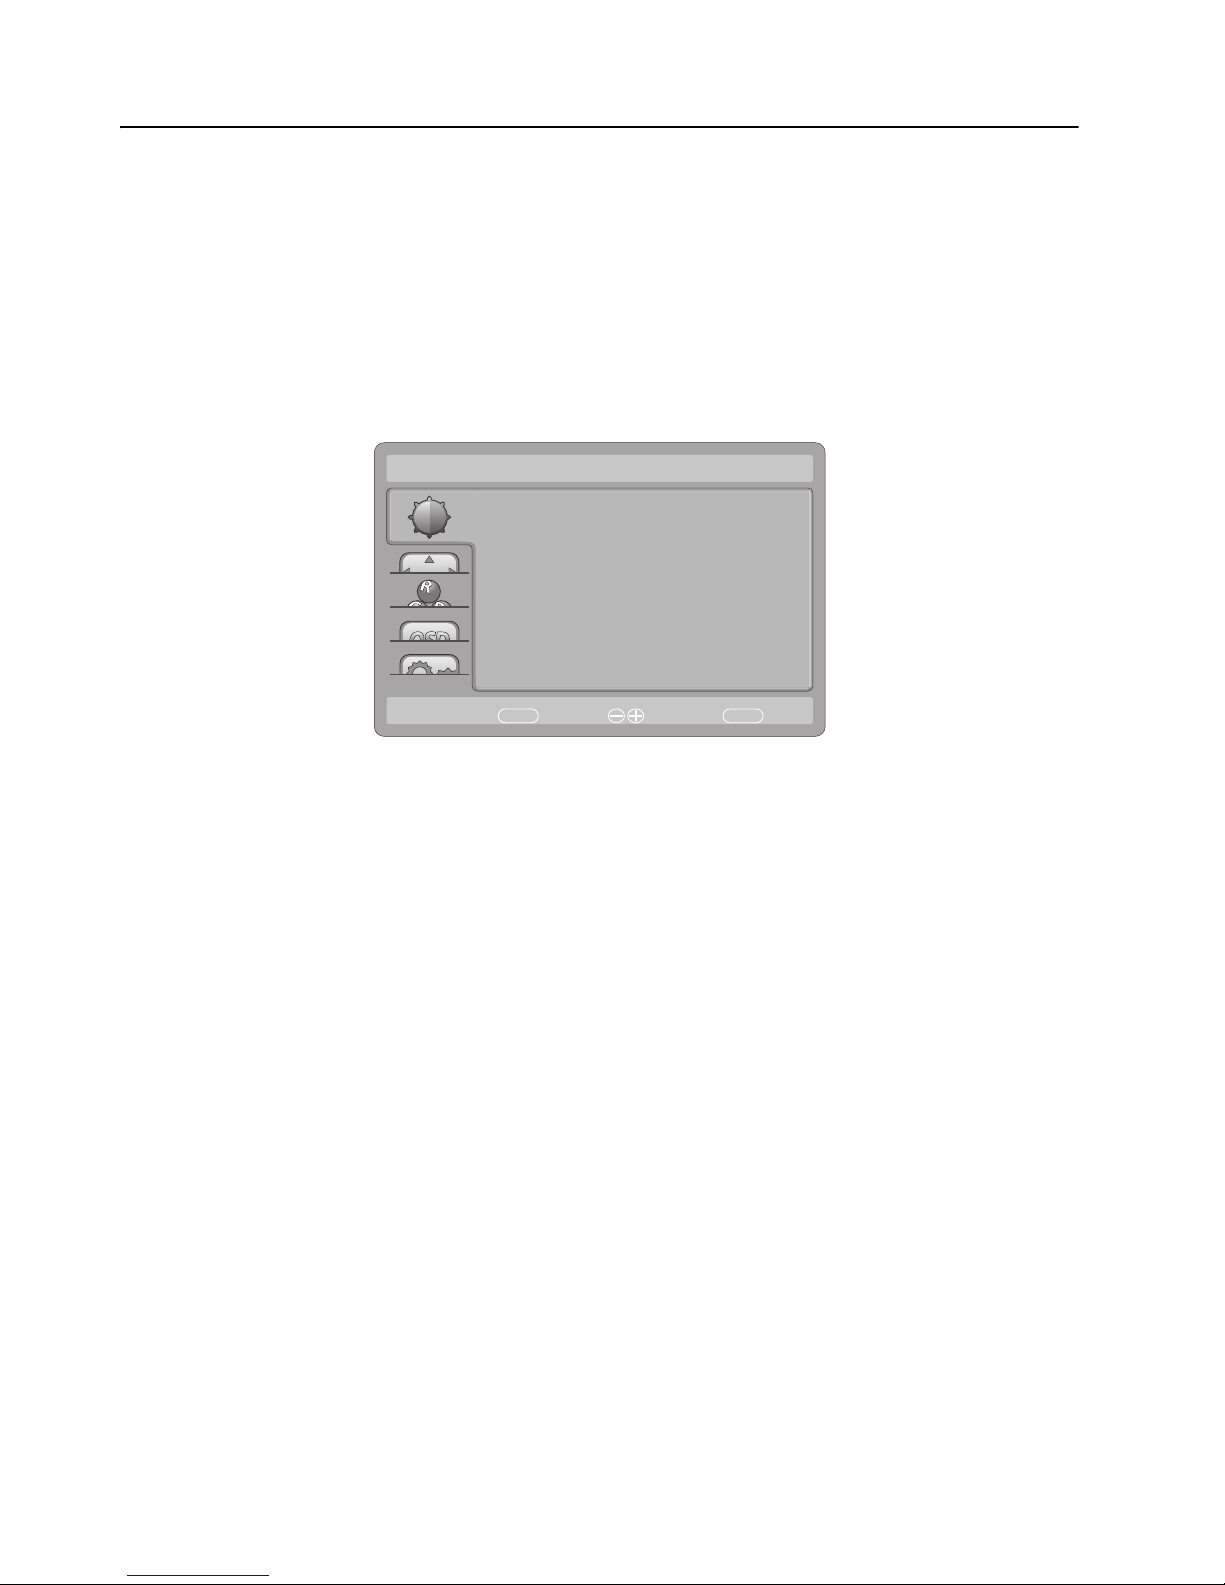
How To Adjust A Setting
1. Press the MENU-button to display the OSD menu.
2. Press + or - to navigate through the me
nu items. Once the desired item is
highlighted, press the MENU-button to enter. Press + or - again to navigate
through the sub-menu.Once the desired item is highlighted, press MENU-button
to activate it.
3. Press + or - to adjust the setting.
4. To exit and save, press the
EXIT-button. If you would like to adjust other settings,
please repeat steps 2-3.
Luminance
Contrast
Brightness
Eco Mode
AUTO
:Exit
50
0
Standard
MENU
:Select:Move
DCR
AMA
Off
Off
Page 20
ENWW Adjusting The Picture 15
Adjusting The Picture
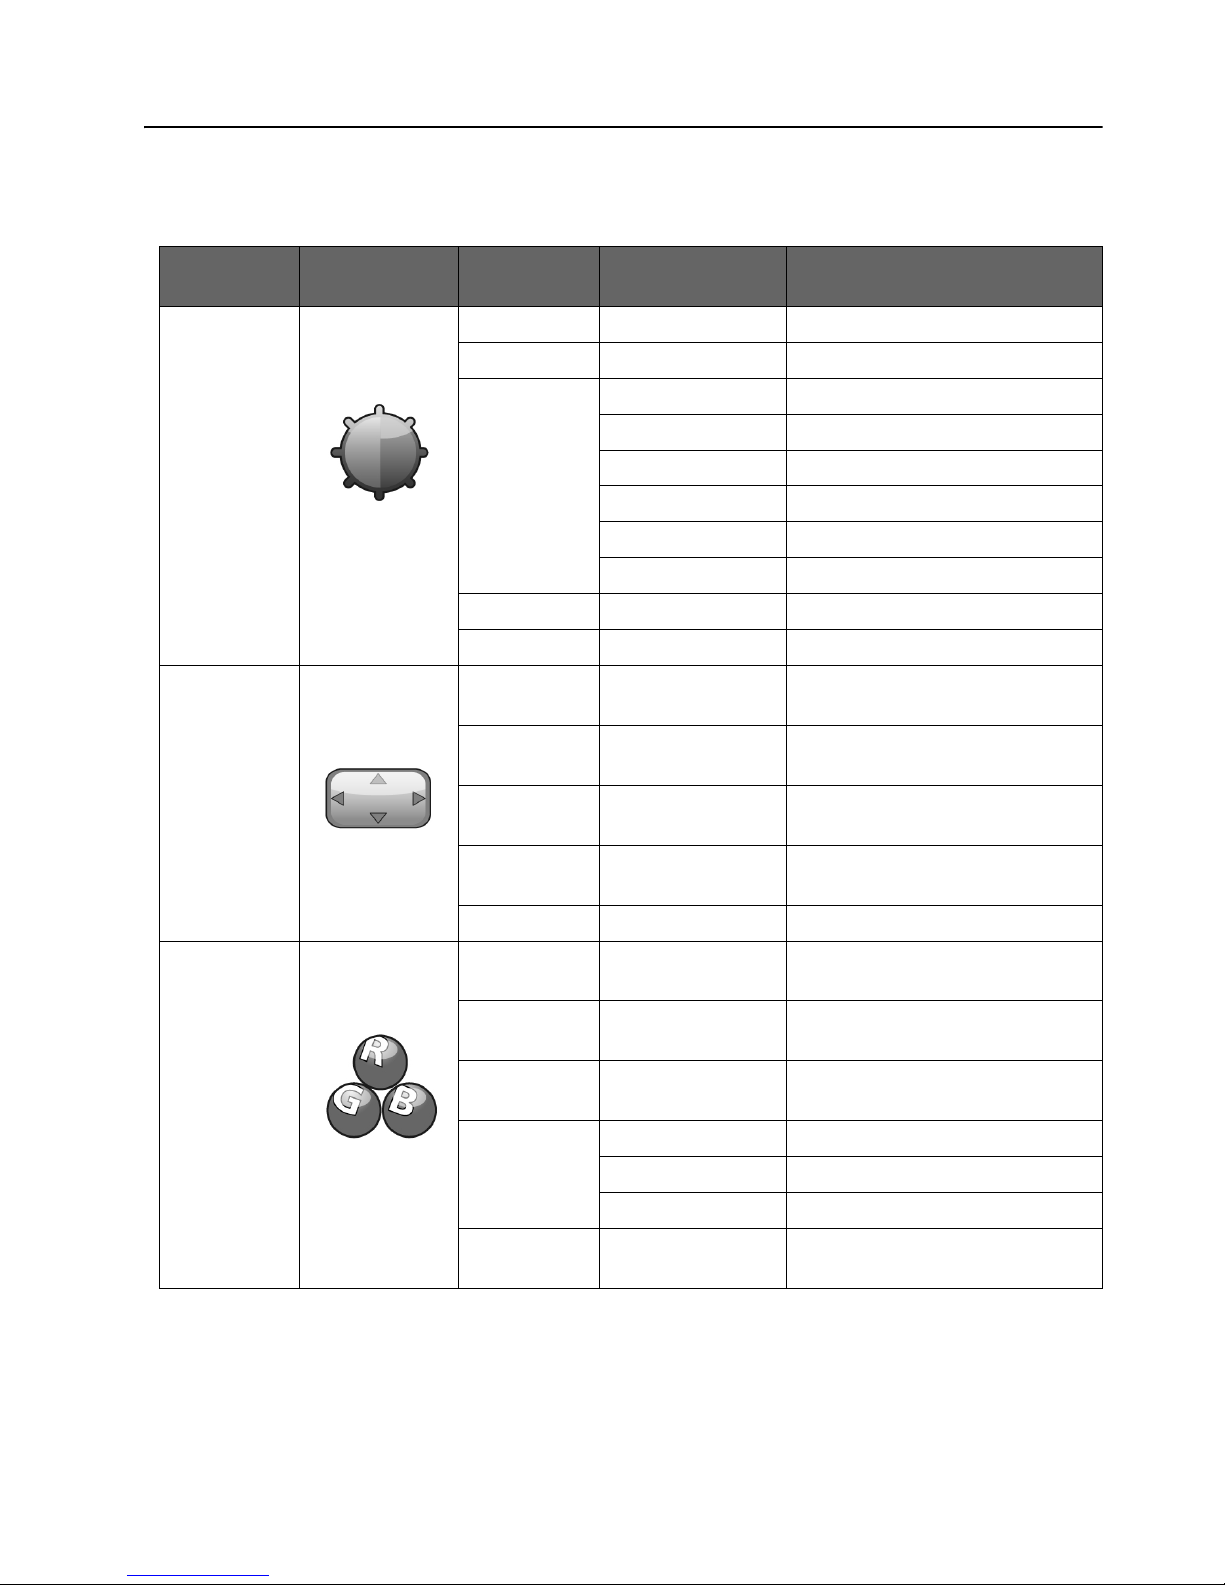
The descriptions for function control:
Main Menu
Item
Main Menu
Icon
Sub Menu
Item
Sub Menu Description
Luminance
Contrast* Contrast adjustment
Brightness* Brightness adjustment
Eco Standard Standard Mode
Te xt Text Mode
Internet Internet Mode
Game Game Mode
Movie Movie Mode
Sports Sports Mode
DCR
Off/on Turn On/Off DCR Mode
AMA
Off/on
Image Setup
Clock Adjust picture Clock to reduce
Vertical-Line noise.
Phase Adjust Picture Phase to reduce
Ho
rizontal-Line noise
H.Position Adjust the vertical position of the
picture
.
V.Pos it io n Adjust the horizontal position of
th
e picture.
Image Ratio Wide/4:3 Select Picture wide and 4:3
Color Temp.
Warm Recall Warm Color Temperature
from EEPROM.
Normal Recall Normal Color Temperature
from EEPROM.
Cool Recall Cool Color Temperature
from EEPROM.
User Red Red gain adjustment
Green Green gain adjustment
Blue Blue gain adjustment
sRGB Recall SRGB Color Temperature
from EEPROM.
Page 21
16 Chapter 4. Operating the Monitor ENWW
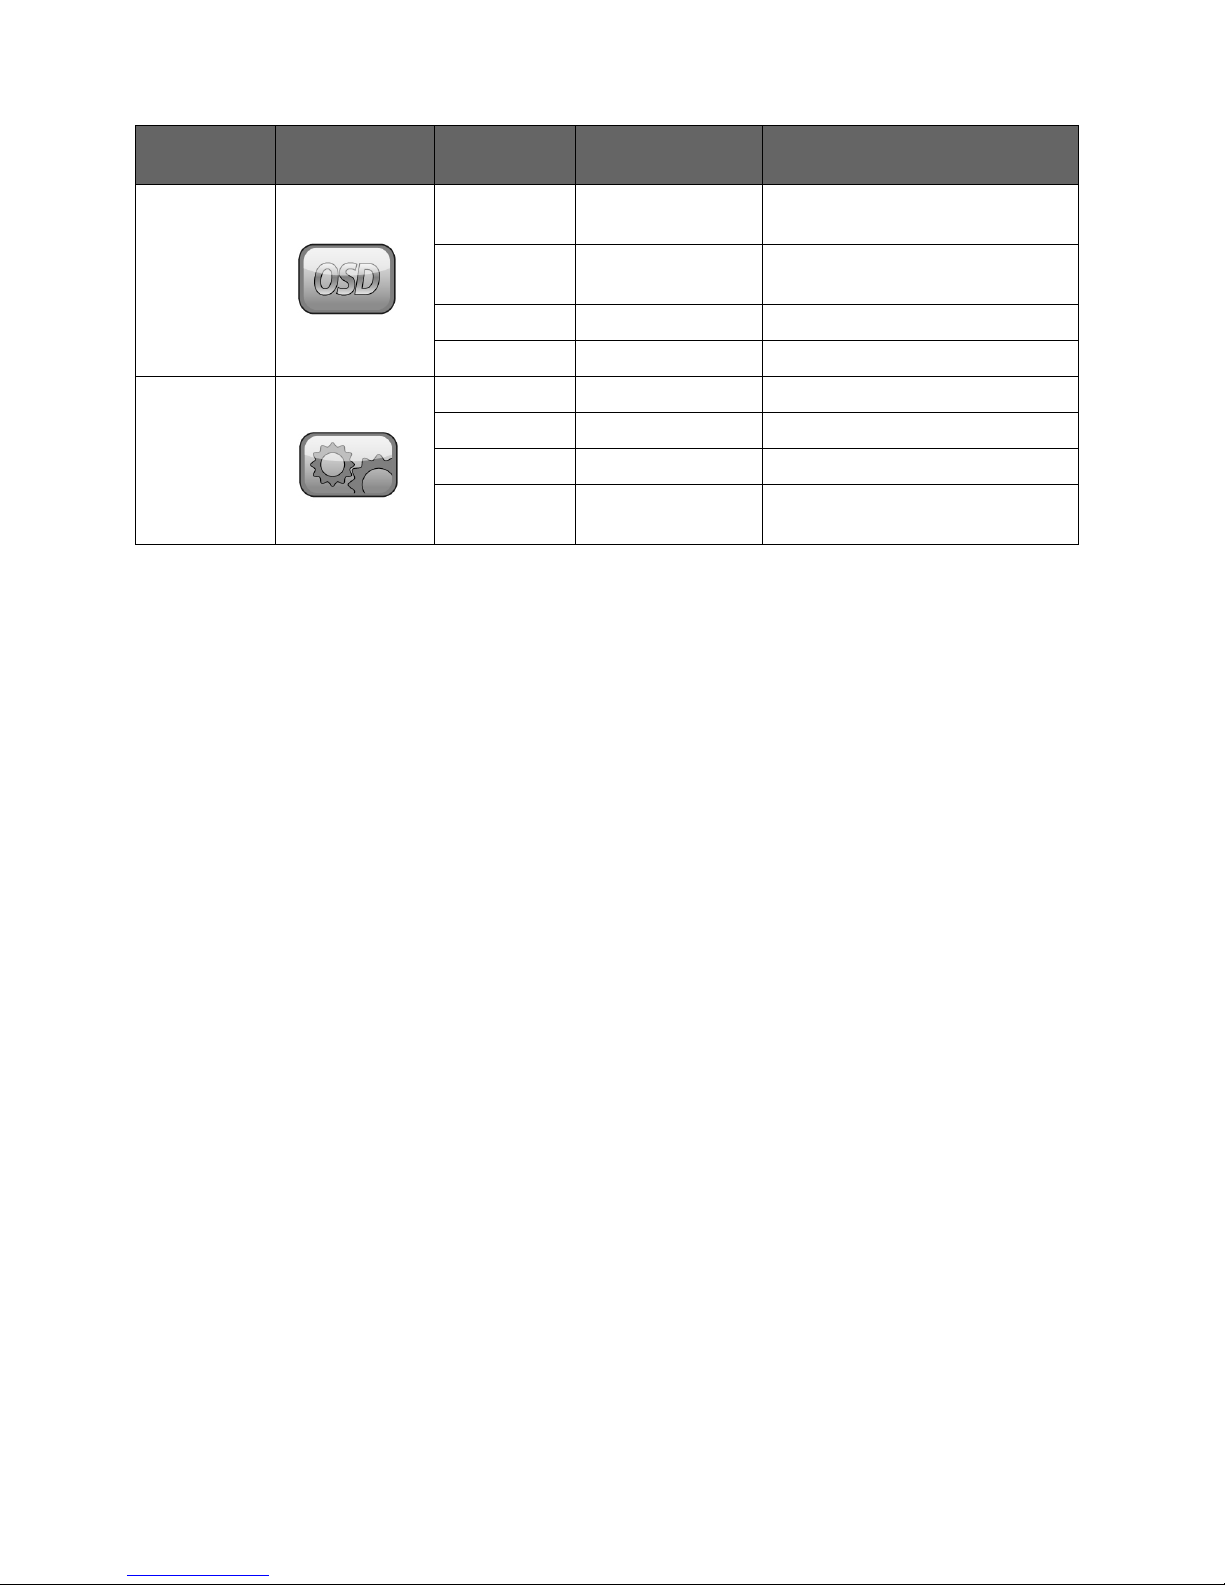
OSD Setup H.Position Adjust the horizontal position of
OSD
V.Pos it io n Adjust the vertical position of
OSD
Timeout Adjust the OSD Timeout
Language Select the OSD language
Extra
Input Select D-SUB/DVI/HDMI
DDC/CI Turn ON/OFF DDC/CI Support
Reset yes or no Reset the menu to default.
Information
Show the information of the main
image source.
Main Menu
Item
Main Menu
Icon
Sub Menu
Item
Sub Menu Description
Page 22

ENWW Selecting Video Input Connectors 17
Selecting Video Input Connectors
The input connectors are:
• VGA connector (analog)
• DVI-D connector (digital)
• HDMI connector (digital)
The monitor automatically determines which inputs have valid video signals, and
displays the image.
You can connect the VGA cable, the DVI-D cable and the HDMI cable, or all. If both or
all cables are installed, the default input selection is VGA.The source of input can be
switched using the Input Select option in the OSD menu.
Page 23

18 Chapter 4. Operating the Monitor ENWW
Identifying Monitor Conditions
Special messages will appear on the monitor screen when identifying the following
monitor conditions:
• Input Signal Out of Range.Indicates the monitor does not support the input signal
because the resolution and/or refresh rate are set higher than the monitor
supports.
• No Signal - Indicates the monitor is not receiving a video signal from the PC on
the monitor video input connector. Check to determine if the PC or input signal
source is off or in the power saving mode or input source signal is not the same
with OSD Input Select setting.
• Auto Adjustment in Progress - Indicates the auto-adjustment function is active.
• Monitor Going to Sleep - Indicates the screen display is entering a sleep mode.
• OSD Lock - The OSD can be enabled or disabled by pressing and holding the
Menu button
while the monitor is off and then press power button to turn the
monitor on.
• If the OSD is locked, press and hold the Menu button while the monitor is off
and then press power button to turn the monitor on
to unlock the OSD.
• If the OSD is unlocked, press and hold the Menu button while the monitor is
off and then press power button to turn the monitor on
to lock the OSD.
• Dynamic Contrast Ratio On - Indicates that Dynamic Contrast Ratio has been
turned on. This occurs if Dynamic Contrast Ratio is turned on in the
Luminance
OSD menu.
• Dynamic Contrast Ratio Off - Indicates that Dynamic Contrast Ratio has been
turned off. This occurs if Dynamic Contrast Ratio is turned off in the
Luminance
OSD menu.
Adjusting Screen Quality
The auto adjustment feature automatically fine-tunes the image quality for display
size, position, clock, and phase each time a new video mode is displayed. For more
precise adjustments of VGA input, run the Auto Adjustment software on the CD. If you
want additional image quality improvement, use the Clock and Phase controls of the
monitor to fine tune the image.
Optimizing Analog Video
Some monitors contain advanced circuitry that allow the monitor to function as a
standard analog monitor. Two controls in the OSD menu can be adjusted to improve
analog image performance:
Clock - Increase or decrease the value to minimize any vertical bars or stripes visible
on the screen background.
Phase - Increase or decrease the value to minimize video distortion or video jitter.
Use these controls only when the auto adjustment function does not provide a
satisfactory monitor image in analog mode. To obtain the best results:
1. Allow the monitor to warm up for 30 minutes before adjusting.
2. Access the OSD menu, then select Image Setup.
3. Set the main Clock settings correctly first, because the Phase settings depend on
the main Clock settings.When adjusting the Clock and Phase values, if the
monitor images become distorted,continue adjusting the values until the distortion
disappears. To restore the factory settings, access the OSD menu, select Factory
Reset , and then select Yes .
Page 24

ENWW Power-Saver Feature 19
Power-Saver Feature
When the monitor is in normal operating mode, the Power light is blue and the monitor
uses the normal watts of power. For power usage, refer to "Technical Specification"
(Appendix B). The monitor also supports a power
-saver mode that is controlled by the
computer. When the monitor is in the reduced-power state, the monitor screen is
blank, the backlight is off, and the Power light is amber. The monitor uses minimum
power. When the monitor is "awakened," a brief warm-up period occurs before the
monitor returns to normal operating mode. The energy-saving reduced power state
activates if the monitor does not detect either the horizontal sync signal or the vertical
sync signal. The power-saver feature must be activated on your computer for this
feature to work. Refer to your computer documentation for instructions on setting
energy-saver features (sometimes called power-management features).
NOTE: The energy-saver feature works only when the monitor is connected to
computers that have e
nergy-saver features.
Page 25
20 Appendix A. Troubleshooting ENWW
A. Troubleshooting
Solving Common Problems
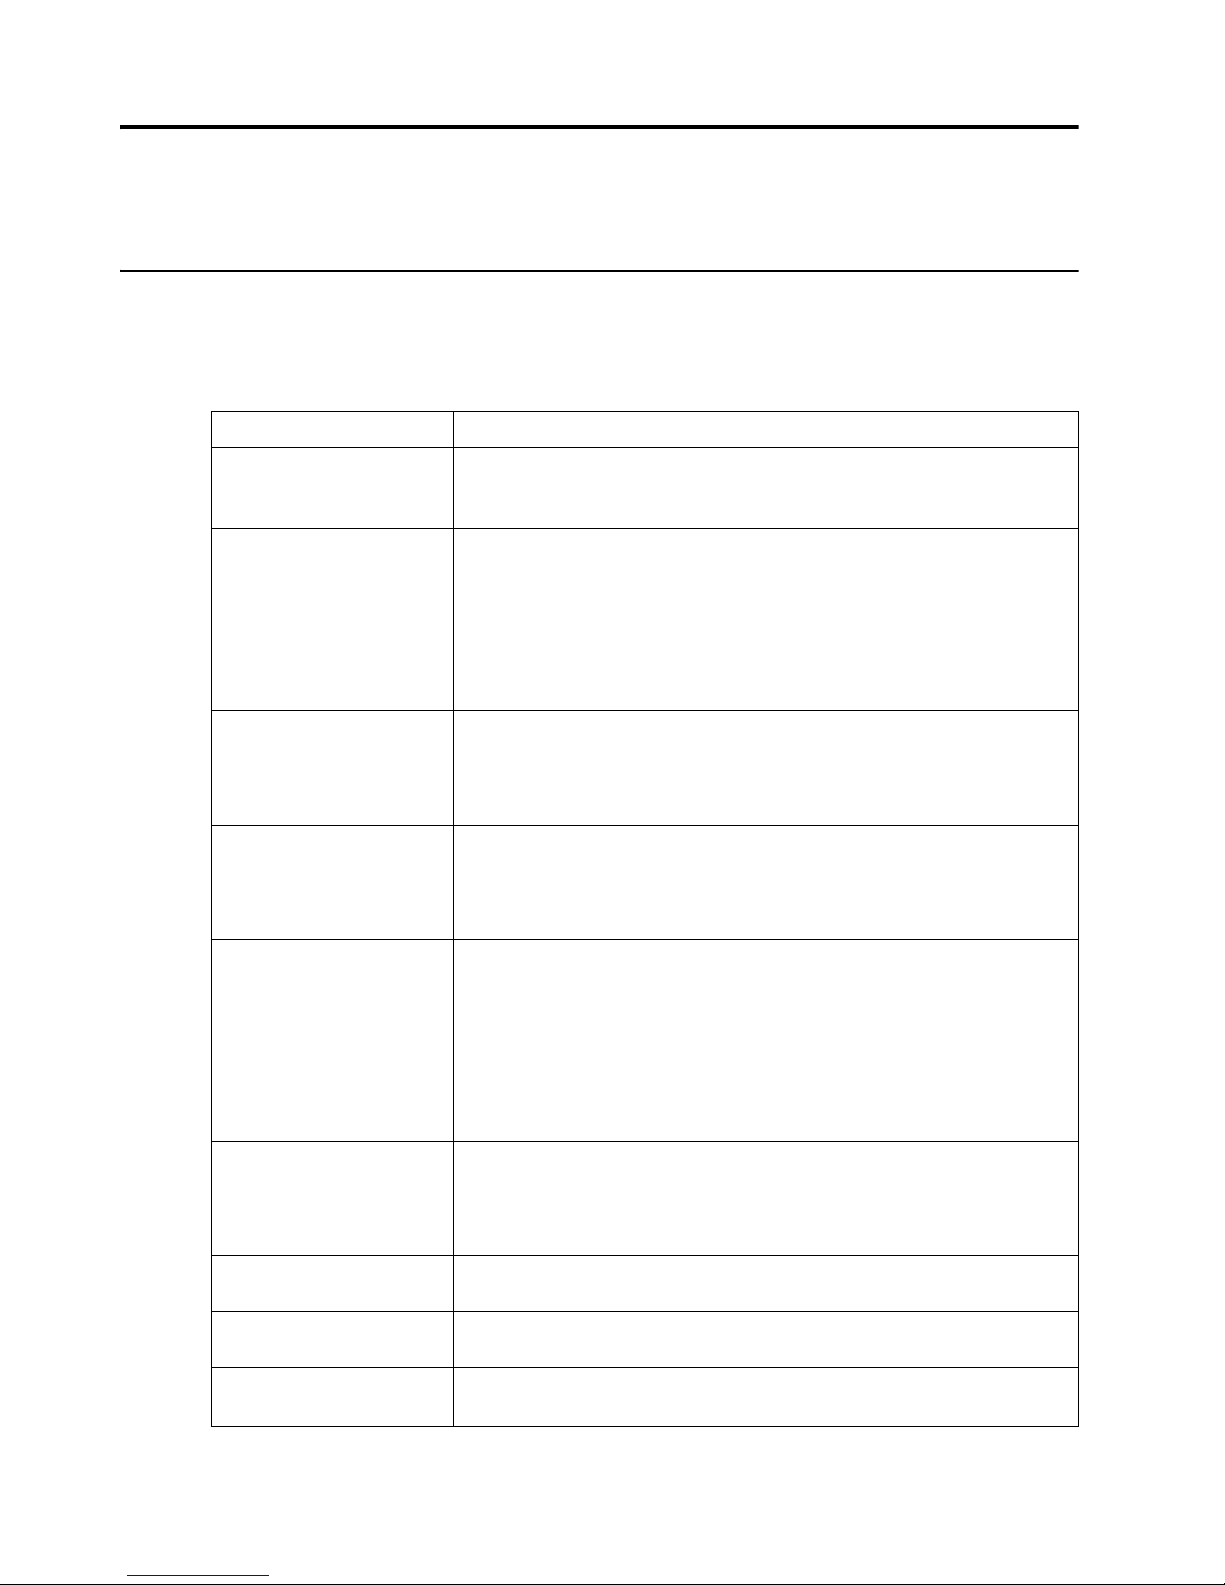
The following table lists possible problems, the possible cause of each problem, and
the recommended solutions:
Problem Solution
Problem & Question Possible Solutions
Power LED Is Not ON
• Make sure the power button is ON and the Power Cord is
properly connected to a grounded power outlet and to the
monitor.
No Plug & Play
• In order for the Plug & Play feature of the monitor to work,
you need a Plug & Play compatible computer & video card.
Check with your computer manufacturer. Also check the
monitor's video cable and make sure none of the pins are
bent.
• Make sure the HP Monitor Drivers are installed (HP Monitor
Dr
ivers are available at : http://www.hp.com/support)
Picture Is Fuzzy & Has
Ghosting Shadowing
Problem
• Adjust the Contrast and Brightness Controls.
• Make sure you are not using an extension cable or switch
bo
x. We recommend plugging the monitor directly to the
video card output connector on the back of your computer.
Picture Bounces, Flickers Or
Wave Pattern Is Present In
The Picture
• Move electrical devices that may cause electrical
interference as far away from the monitor as possible.
• Use the maximum refresh rate your monitor is capable of at
th
e resolution your are using.
Monitor Is Stuck In Active
Off-Mode
• The Computer Power Switch should be in the ON position.
• The Computer Video Card should be snugly seated in its
slot.
• Make sure the monitor's video cable is properly connected to
th
e computer.
• Inspect the monitor's video cable
and make sure none of the
pins are bent.
Missing one of the primary
colors (RED, GREEN, or
BLUE)
• Inspect the monitor's video cable and make sure that none
of the pins are bent.
• Make sure the monitor's video cable is properly connected to
the comp
uter.
Screen image is not
centered or sized properly
• Adjust H-Position and V-Position or press hot-key (AUTO).
Picture has color defects
(white does not look white)
• Adjust RGB color or select color temperature
Horizontal or vertical
disturbances on the screen
• Use Windows shut-down mode. Adjust CLOCK and Phase
or press the Auto button to display ideal setting
Page 26

ENWW 21
Getting Support from hp.com
Before you contact customer service, refer to HP Technical Support at:
http://www.hp.com/support
Select your country/region, and then follow the links to the support page for your
monitor.
Preparing to Call Technical Support
If you cannot solve a problem by using the troubleshooting tips in this section, you
might have to call technical support. For technical support contact information, refer to
the printed documentation included with the monitor.
Have the following information available when you call:
• Monitor model number (located on label on back of monitor)
• Monitor serial number (located on label on back of monitor or in the OSD display
in the Informationmenu)
• Purchase date on invoice
• Conditions under which the problem occurred
• Error messages received
• Hardware configuration
• Name and version of hardware and software you are using
Locating the Rating Label
The rating label on the monitor provides the product number and serial number. You
may need these numbers when contacting HP about your monitor model.
The rating label is on the back of the monitor.
Page 27
22 Appendix B. Technical Specifications ENWW
B. Technical Specifications
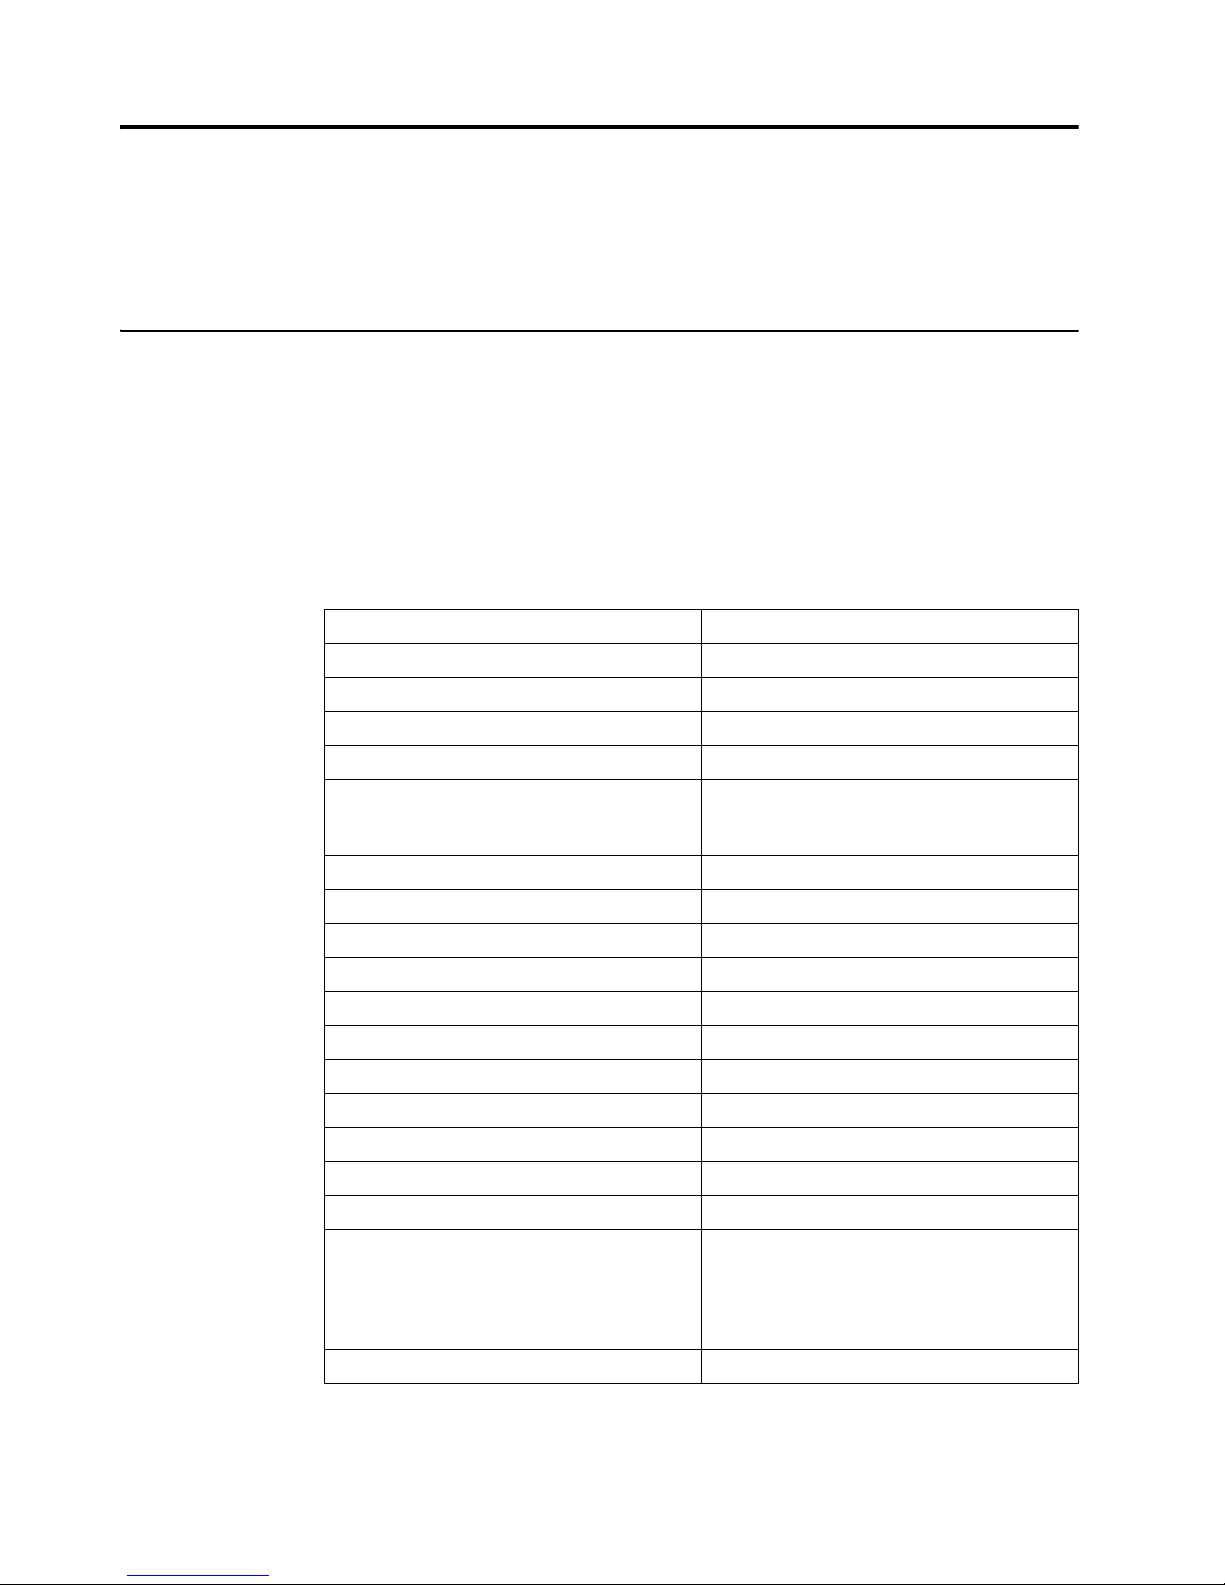
All specifications represent the typical specifications provided by HP's component
manufacturers; actual performance may vary either higher or lower.
HP LCD Monitors
Face treatment: Glare polarizer with hard coating
Input terminal:
VGA connector
DVI-D 24-pin D-type connector
HDMI connector
Table B-1
Specifications:
Display Type: IPS/LED backlight
Viewable Image Size 68.6 cm (27 in.) diagonal
Tilt -2 (+/
-1)~+25 (+/-1)
Maximum Weight (unpacked) 5.3 kg (11.7 lbs)
Dimensions (h x w x d) 62.23cm x 20.0cm x 43.42cm
24.5 x 7.88 x 17.09 in
Maximum Graphics Resolution 1920x1080 @ 60 Hz
Optimum Graphics Resolution 1920x1080 @ 60 Hz
Text Mode 720 x 400
Dot Pitch 0.311(H) x 0.311(V) mm/0.012 x 0.012 in
Horizontal Frequency (analog mode) 30 to 80 kHz
Vertical Frequency (analog mode) 50 to 60 Hz
Operating Temperature 41 to
95F (5 to 35C)
Non-Operating Temperature -4 to
140F (-20 to 60C)
Operating Humidity 15% to 90%
Non-Operating Humidity 5% to 90%
Power Source 100-240V~, 50/60 Hz
Power Consumption 27sv:40 W (Full power); 26 W (Typical
settings)
V272:36 W (Full power); 24 W (Typical
settings)
Sleep Power Consumption <0.5 watts (W)
Page 28
ENWW 23
Preset Video Modes
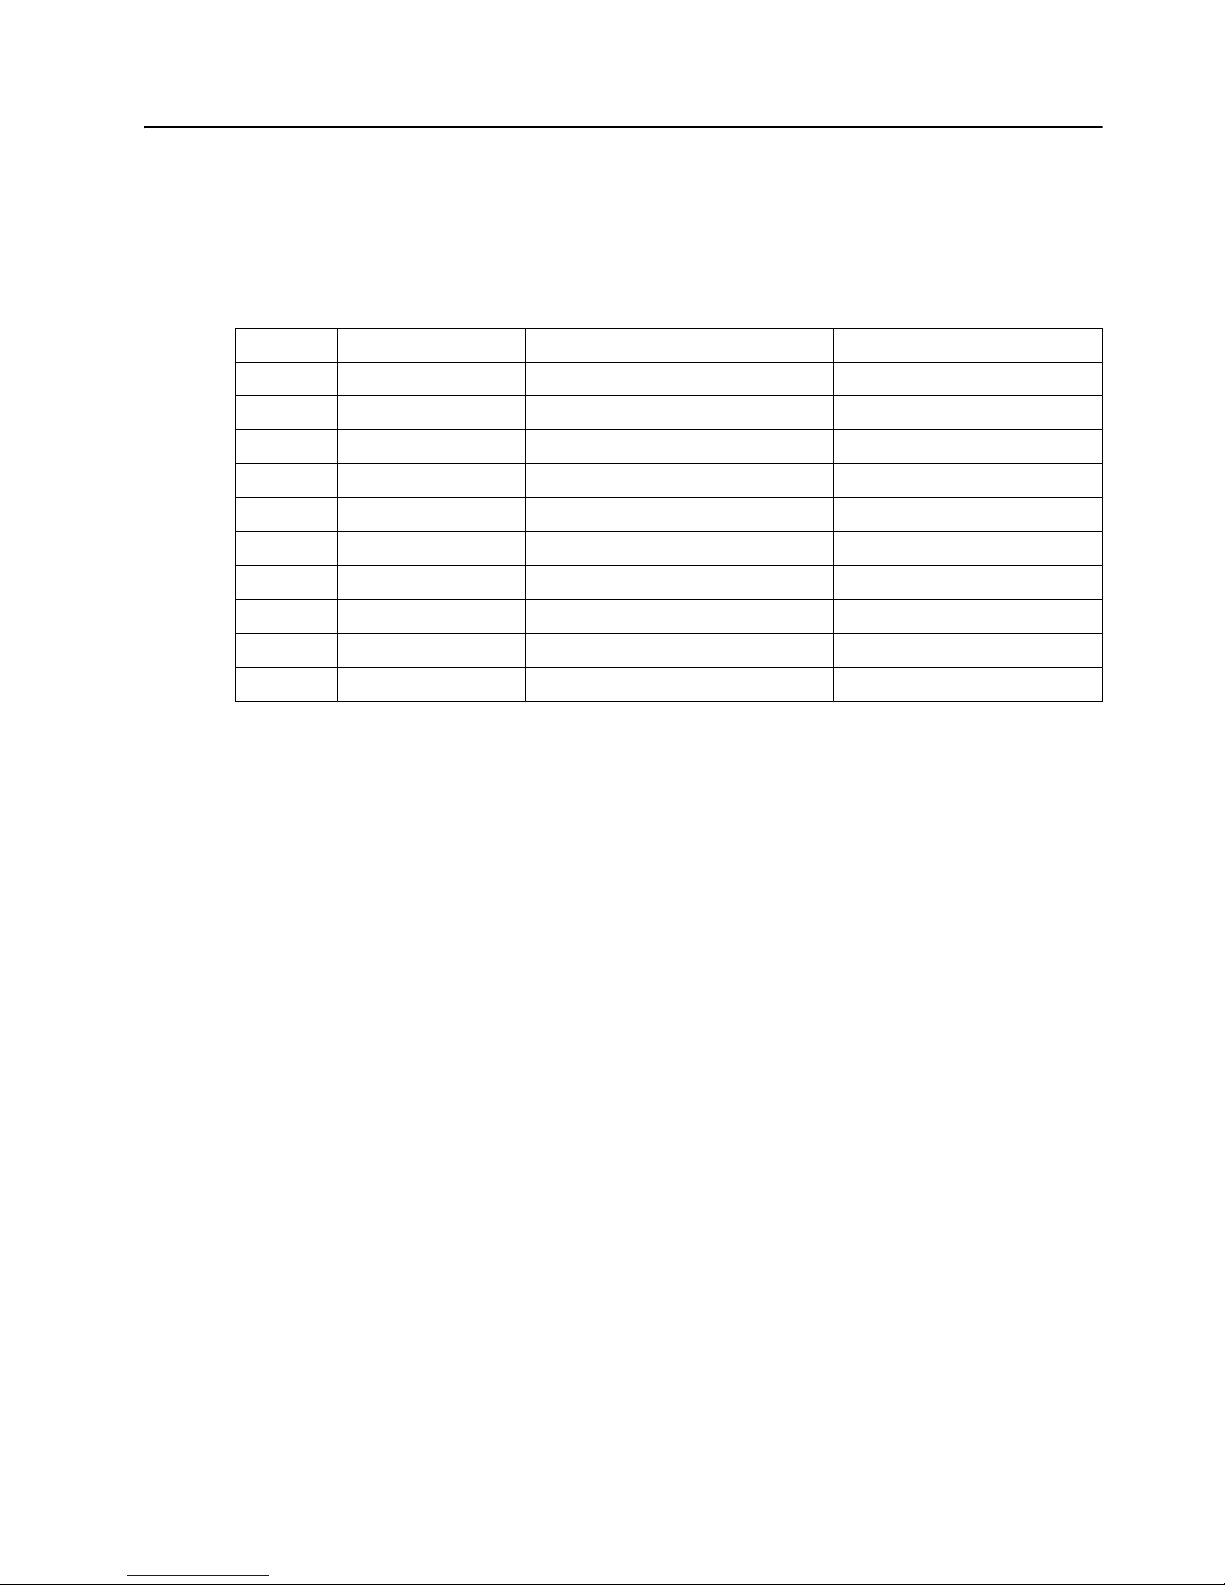
The monitor automatically recognizes many preset video input modes that will appear
properly sized and centered on the screen.
Table B-2 Factory Preset Video Input Modes
Item Preset Resolution Horizontal Frequency (kHz) Vertical Frequency (Hz)
1 640 x 480 31.469 59.940
2 800 x 600 37.879 60.317
3 1024 x 768 48.363 60.004
4 1280 x 720 45.00 60.000
5 1280 x 800 49.702 59.810
6 1280 x 1024 63.981 60.020
7 1440 x 900 55.935 59.887
8 1600 x 900 60.000 60.000
9 1680 x 1050 65.290 59.954
10 1920 x 1080 67.500 60.000
Page 29

24 Appendix B. Technical Specifications ENWW
LCD Monitor Quality and Pixel Policy
Your LCD Monitor uses high-precision technology, manufactured according to high
standards, to help guarantee trouble-free performance. Nevertheless, the display may
have cosmetic imperfections that appear as small bright or dark spots. This is
common to all LCD displays used in products supplied by all vendors and is not
specific to your LCD Monitor. These imperfections are caused by one or more
defective pixels or subpixels.
A pixel consists of one red, one green, and one blue subpixel. A defective whole pixel
is always turned on (a bright spot on a dark background), or it is always off (a dark
spot on a bright background). The first is the more visible of the two. A defective
subpixel (dot defect) is less visible than a defective whole pixel, and is small and only
visible on a specific background.
To locate defective pixels, the monitor should be viewed under normal operating
conditions and in normal operating mode at a supported resolution and refresh rate,
from a distance of approximately 50 cm (16 inches). We expect that, over time, the
industry will continue to improve its ability to produce displays with fewer cosmetic
imperfections, and we will adjust guidelines as improvements are made. For more
information about your LCD Monitor, refer to the HP Web site at:
http://www.hp.com/support.
 Loading...