

Page 1

HP Webcam User’s Guide
Version 2.0
Page 2

Copyright © 2006–2007 Hewlett-Packard Development Company, L.P.
The information contained herein is subject to change without notice.
The only warranties for HP products and services are set forth in the express warranty statements
accompanying such products and services. Nothing herein should be construed as constituting an
additional warranty. HP shall not be liable for technical or editorial errors or omissions contained
herein.
Product Registration
Registration is quick, easy and offers: e-mail updates containing notifications about product
enhancements, the most recent support alerts, and driver updates specific to the product(s)
you own.
For faster help, be sure to register your recently purchased product at
https://register.hp.com
Page 3

Table of Contents
Welcome .................................................................................................1
Overview ..............................................................................................................1
Using Your HP Webcam ...........................................................................3
Recording a Video..................................................................................................3
Starting a Video Conference....................................................................................4
Taking a Picture .....................................................................................................4
Adjusting Webcam Settings......................................................................5
Adjusting the Focus.................................................................................................5
Using Face-Tracking................................................................................................5
Adjusting Video Stream Settings...............................................................................6
Adjusting General Settings ......................................................................................6
Adjusting Image Settings .........................................................................................7
For HP VGA Webcam for Notebook PCs..............................................................7
For HP 1.3-Megapixel Webcam for Notebook PCs................................................ 8
Adjusting Advanced Settings....................................................................................9
Troubleshooting .....................................................................................11
HP Webcam User’s Guide iii
Page 4

iv HP Webcam User’s Guide
Page 5
Overview
Welcome
Congratulations on purchasing one of the following products:
HP VGA Webcam for Notebook PCs
HP 1.3-Megapixel Webcam for Notebook PCs
This guide shows you how to use your new webcam to record videos, hold video
conferences, take pictures, and adjust the webcam settings.
5
1
2
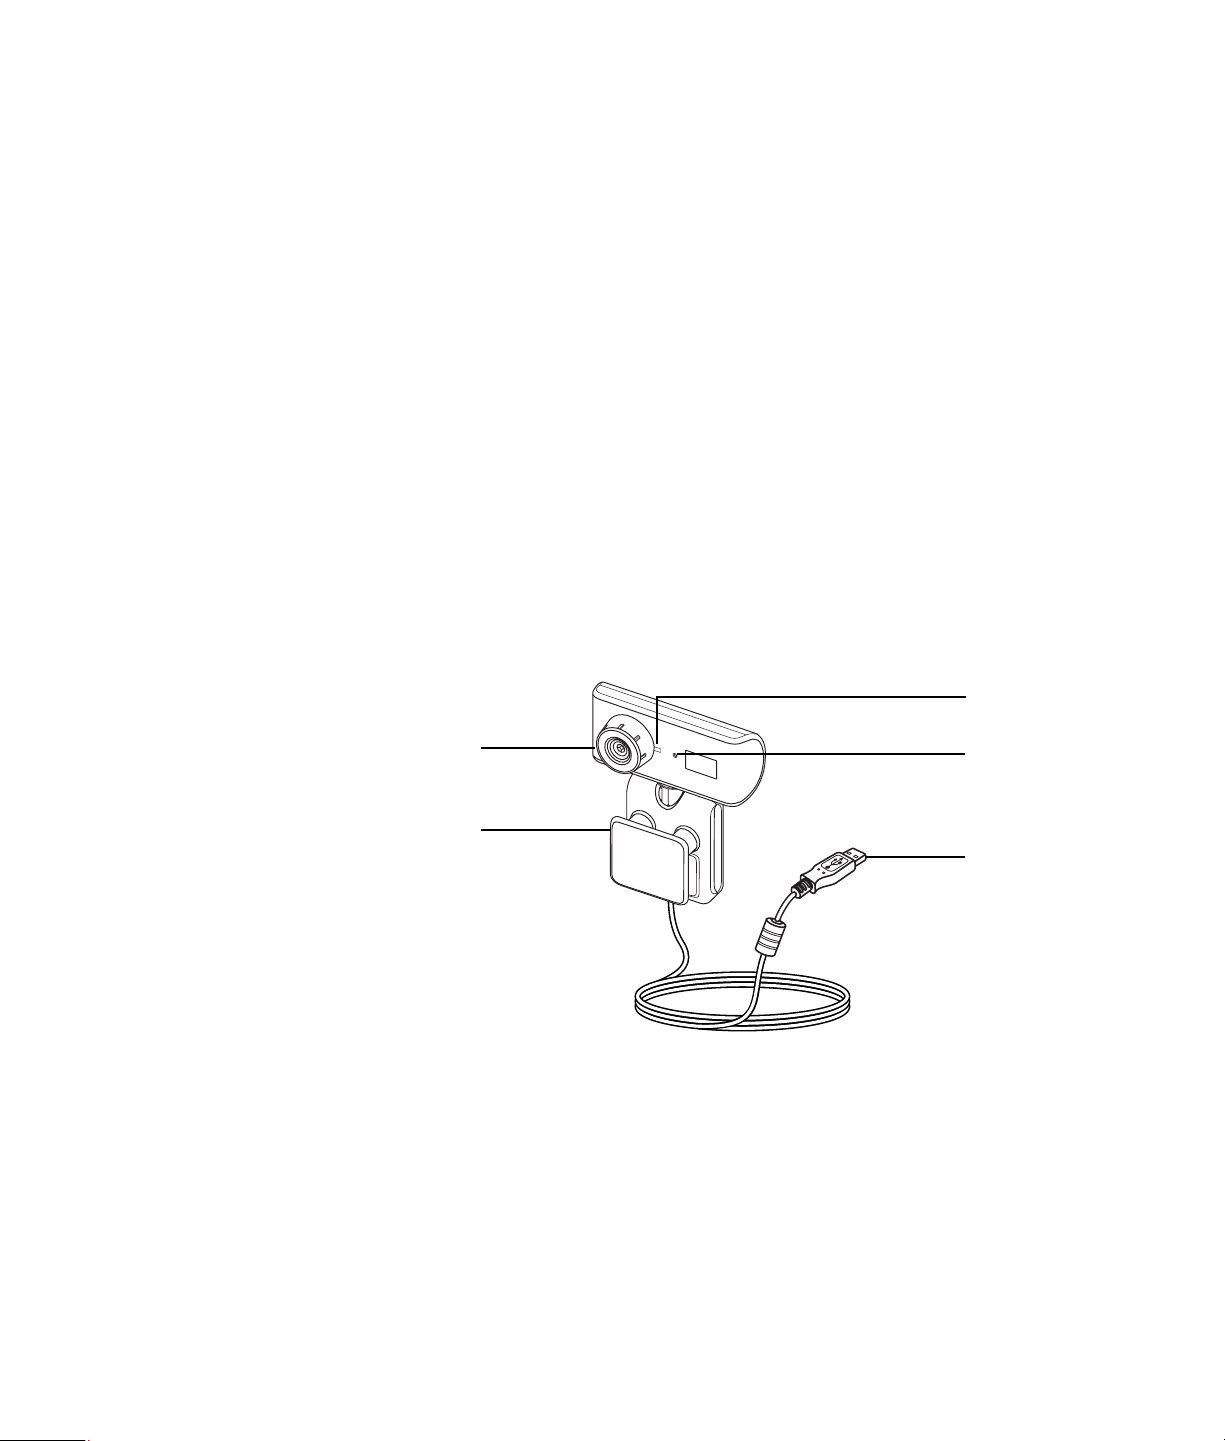
1 Focus ring
2 Adjustable clip
3 USB connector
4 Integrated microphone
5 LED
4
3
HP Webcam User’s Guide 1
Page 6

2 HP Webcam User’s Guide
Page 7

Recording a Video
1 Double-click the ArcSoft
VideoImpression icon on the
Windows desktop.
2 Click Create a New Video.
3 Click Capture From Device.
4 Make sure Live is selected and Video
is checked.
5 Click the Record icon to begin
recording the video.
6 Click the Stop icon to stop
recording the video.
Using Your HP Webcam
If you want to edit your video and send it
by e-mail, Arcsoft VideoImpression can do
all that and more. To learn more about
using ArcSoft VideoImpression, click the
Help menu.
HP Webcam User’s Guide 3
Page 8

Starting a Video Conference
You can add live video to the most popular instant messaging (IM) applications
(ISP connection required):
Windows Live
AOL
Yahoo!
Skype
®
Instant Messenger™ (AIM®)
®
®
™
Messenger
Messenger
NOTE: HP recommends using VGA resolution or lower to optimize your video
conferencing experience. Video performance varies depending on your PC performance
and Internet bandwidth.
1 Open the instant messaging application.
2 Sign in.
3 Follow the video conferencing steps in your IM application’s documentation.
Taking a Picture
1 Double-click the HP Photosmart
Essential icon on the Windows
desktop.
2 Select View>Get Images>From
Scanner. The Select Device dialog
box appears.
3 Select HP Camera and then
click OK.
4 A warning appears to indicate that the
device isn’t a scanner. Click Yes.
5 Click Capture to take a picture
(snapshot).
6 Click Transfer to save the picture in
the My Documents/My Scans/
<Current Month> folder.
Now you are ready to edit and share your photos with HP Photosmart Essential. To learn
more about using HP Photosmart Essential, click the Help menu.
4 HP Webcam User’s Guide
Page 9

Adjusting Webcam Settings
You can use the hardware and software controls to adjust your webcam’s settings.
Adjusting the Focus
Rotate the focus ring on the outside of the webcam lens until the image on the screen comes into focus.
Using Face-Tracking
1 In ArcSoft VideoImpression or HP Photosmart Essential,
click Settings.
2 Click the Advanced tab.
3 Face the webcam for a few seconds so that the software
can recognize your facial features.
4 Click Face Tracking.
5 (Optional) Adjust the Tracking Speed.
6 (Optional) Select the Picture in Picture check box to
turn on this feature. Select a location for the picture, and
if you want to view the focal point of the tracking feature,
select the Tracking Line check box.
7 Click OK.
HP Webcam User’s Guide 5
Page 10

Adjusting Video Stream Settings
1 In ArcSoft VideoImpression or HP Photosmart Essential,
click Format.
2 Click Frame Rate to adjust the number of frames per
second.
3 Click Color Space/Compression to adjust the
number of colors. The file size decreases when you select
fewer colors.
4 Click Output Size to adjust the size of the image.
5 Click OK.
NOTE: If the Output Size is larger than 640x480,
you cannot adjust the Advanced settings in the Settings
dialog box.
Adjusting General Settings
1 In ArcSoft VideoImpression or HP Photosmart Essential,
click Settings.
2 Click the General tab.
3 Drag the sliders to adjust the Brightness, Contrast,
Gamma, Saturation, or Sharpness levels.
4 (Optional) Click Save As to store your settings and
assign them a name, so you can use them again later.
5 Click OK.
NOTE: To use previously saved settings, select Load and
then select the name you assigned to the settings. To
restore the factory settings, select Default.
6 HP Webcam User’s Guide
Page 11

Adjusting Image Settings
The Image settings options vary slightly based on your webcam model. The sections that follow describe the Image
settings for each webcam model.
For HP VGA Webcam for Notebook PCs
1 In ArcSoft VideoImpression or HP Photosmart Essential,
click Settings.
2 Click the Image tab.
3 Under White balance, select the Auto check box to let
the software automatically detect color levels, or uncheck
the box and drag the sliders to manually adjust the color
levels.
4 Under Exposure, select the Auto check box to let the
software automatically detect the optimum shutter speed,
or uncheck the box and drag the slider to manually
adjust the speed.
5 Under USB Bandwidth, select Auto to let the software
automatically detect the optimum speed. If you need to
share USB resources between accessories, select a
specific speed limit for the webcam resources.
6 Under Mirror, indicate whether you want to rotate the
image by checking the Horizontal and Vertical
boxes.
7 Under Status LED, select On to turn on the webcam LED,
or select Off to turn it off.
8 Under Flicker, select Outdoor if you’re outside or using all natural lighting. Select 50Hz if you’re outside
North America, or select 60Hz if you’re inside North America.
9 (Optional) Click Save As to store your settings and assign them a name, so you can use them again later.
10 Click OK.
NOTE: To use previously saved settings, select Load and then select the name you assigned to the settings. To
restore the factory settings, select Default.
HP Webcam User’s Guide 7
Page 12

For HP 1.3-Megapixel Webcam for Notebook PCs
1 In ArcSoft VideoImpression or HP Photosmart Essential,
click Settings.
2 Click the Image tab.
3 Select the Auto check box to let the software
automatically detect color levels and the optimum shutter
speed, or uncheck the box and drag the sliders to
manually adjust the color levels and shutter speed.
4 Under USB Bandwidth, select Auto to let the software
automatically detect the optimum speed. If you need to
share USB resources between accessories, select a
specific speed limit for the webcam resources.
5 Under Mirror, indicate whether you want to rotate the
image by checking the Horizontal and Vertical
boxes.
6 Under Status LED, select On to turn on the webcam LED,
or select Off to turn it off.
7 Under Flicker, select Outdoor if you’re outside or using
all natural lighting. Select 50Hz if you’re outside North
America, or select 60Hz if you’re inside North America.
8 (Optional) Click Save As to store your settings and assign them a name, so you can use them again later.
9 Click OK.
8 HP Webcam User’s Guide
Page 13

Adjusting Advanced Settings
1 In ArcSoft VideoImpression or HP Photosmart Essential,
click Settings.
2 Click the Advanced tab.
NOTE: If you can’t adjust the settings on the Advanced
tab, you need to lower the Output Size setting. See
Adjusting Video Stream Settings
3 Select one of the following settings:
Disable turns off Face Tracking, Manual Zoom,
Mask, and Smooth Background.
Face Tracking sets the camera to follow your face
as you move. See Using Face-Tracking
information.
Manual Zoom enables you to control zoom levels
and directions.
Mask hides the face in the center of the image.
Smooth Background softens edges in the
background behind the central face.
4 (Optional) Select the Wide Screen check box to add a dark border above and below the image.
for details.
for more
5 (Optional) Select the Video Off check box to turn off the video signal. The screen goes dark when this box is
selected.
6 Click OK.
HP Webcam User’s Guide 9
Page 14

10 HP Webcam User’s Guide
Page 15

Troubleshooting
Problem Solution
The image is fuzzy Rotate the focus ring to bring the image into focus.
I can’t take a picture You must open the HP Photosmart Essential application and select the
From Scanner option before taking a picture. See Taking a Picture
details.
for
Face-tracking is too slow or
too fast
There are lines interfering with
the image
The Advanced settings tab
disappeared
I can’t access the settings on
the Image tab
Still need help? Please refer to the warranty that came with your webcam for support phone numbers and Web site
information.
Adjust the Tracking Speed setting on the Advanced tab in the Properties
dialog box. See Using Face-Tracking
Select a different Flicker setting on the Image tab in the Properties dialog
box. See Adjusting Image Settings
Decrease the Output Size setting on the Stream Format tab in the
Properties dialog box. The Advanced settings tab is not available when the
Output Size is larger than 640x480. See Adjusting Video Stream Settings
details.
Decrease the Output Size setting on the Stream Format tab in the
Properties dialog box. The options on the Image settings tab are not available
when the Output Size is set to 1600x1200. See Adjusting Video Stream
Settings for details.
for details.
for details.
for
HP Webcam User’s Guide 11
Page 16

DECLARATION OF CONFORMITY
according to ISO/IEC 17050-1 and EN 17050-1
Supplier’s Name: Hewlett-Packard Company
Supplier’s Address: Hewlett-Packard Company
10500 Ridgeview Court
Cupertino, CA. 95014
declares, that the product(s):
Product: Web Camera (HP VGA Webcam for Notebook PCs);
Web Camera (HP 1.3-Megapixel Webcam for Notebook PCs)
Model Number(s): RD346AA#XXX, SCA0346
RD345AA#XXX, SCA0345
conforms to the following Product Specifications:
EMC: CISPR 22: 1997 / EN 55022: 1998 +A1:2000 +A2:2003, Class B
CISPR 24: 1997 / EN 55024:+1998 +A1:2001 +A2:2003
IEC 61000-3-2:2000 / EN 61000-3-2: 2000
IEC 61000-3-3:1994 + A1: 2001 / EN 61000-3-3: 1995 + A1: 2001
GB9254: 1998
FCC Title 47 CFR, Part 15 Class B / ICES-002, issue 2
AS/NZS CISPR 22: 2002
Supplementary Information:
The product herewith complies with the requirements of the Low Voltage Directive 73/23/EEC, the EMC Directive 89/336/EEC and the
R&TTE Directive 1999/5/EC and carries the “CE Marking” accordingly.
This device complies with Part 15 of FCC rules. Operation is subject to the following two conditions: (1) this device may not cause harmful
interference, and (2) this device must accept any interference received, including interference that may cause undesired operation.
Cupertino, CA USA July 7, 2006
For regulatory compliance information only, contact:
Australia Contact: Product Regulations Manager, Hewlett-Packard Australia Pty Ltd., 31-41 Joseph Street, Blackburn, Victoria 3130
European Contact: Hewlett-Packard GmbH, HQ-TRE, Herrenberger Straße 140, 71034 Böblingen, Germany (FAX: +49-7031-14-3143)
North America Contact: Hardware Quality Eng. Manager, Hewlett-Packard, CPC, 10500 Ridgeview Ct., Cupertino, CA 95015-4010.
Phone: (408)-343-5000
12 HP Webcam User’s Guide
Part number: 5991-7028
 Loading...