

Page 1

hp photosmart 1215/1218 color printer
network guide for windows
Page 2

Table of Contents
1 Using Your Printer on a Network . . . . . . . . . . . . . . . . . . . . . . . . . . . . . . . . . . . . . . . . . . . . . . . . .1
2 Locally Shared Printer Connection . . . . . . . . . . . . . . . . . . . . . . . . . . . . . . . . . . . . . . . . . . . . . . . .2
Operating Systems for a Locally Shared Connection........................................................... 2
Setting Up a Locally Shared Printer................................................................................... 3
Setting Up Windows 95, 98, and Me Hosts...................................................................... 4
Setting Up Windows NT 4.0 Hosts................................................................................... 7
Setting Up Windows 2000 Hosts..................................................................................... 9
Installing the Printer Software on Each Client ................................................................... 11
3 Peer-to-Peer Connection . . . . . . . . . . . . . . . . . . . . . . . . . . . . . . . . . . . . . . . . . . . . . . . . . . . . . .14
Operating Systems and Print Servers for a Peer-to-Peer Connection..................................... 14
Setting Up a Peer-to-Peer Printer Connection.................................................................... 15
Installing the Printer Software on Each Client ................................................................... 16
4 Client Server Network Connection . . . . . . . . . . . . . . . . . . . . . . . . . . . . . . . . . . . . . . . . . . . . . . .19
Operating Systems for a Client Server Connection ........................................................... 19
Setting Up a Client Server in Windows NT 4.0 or Windows 2000 .................................... 20
Setting Up a Client Server in NetWare ........................................................................... 20
Appendix ........................................................................................................................................21
hp photosmart 1215/1218 color printer network guide for windows
i
Page 3
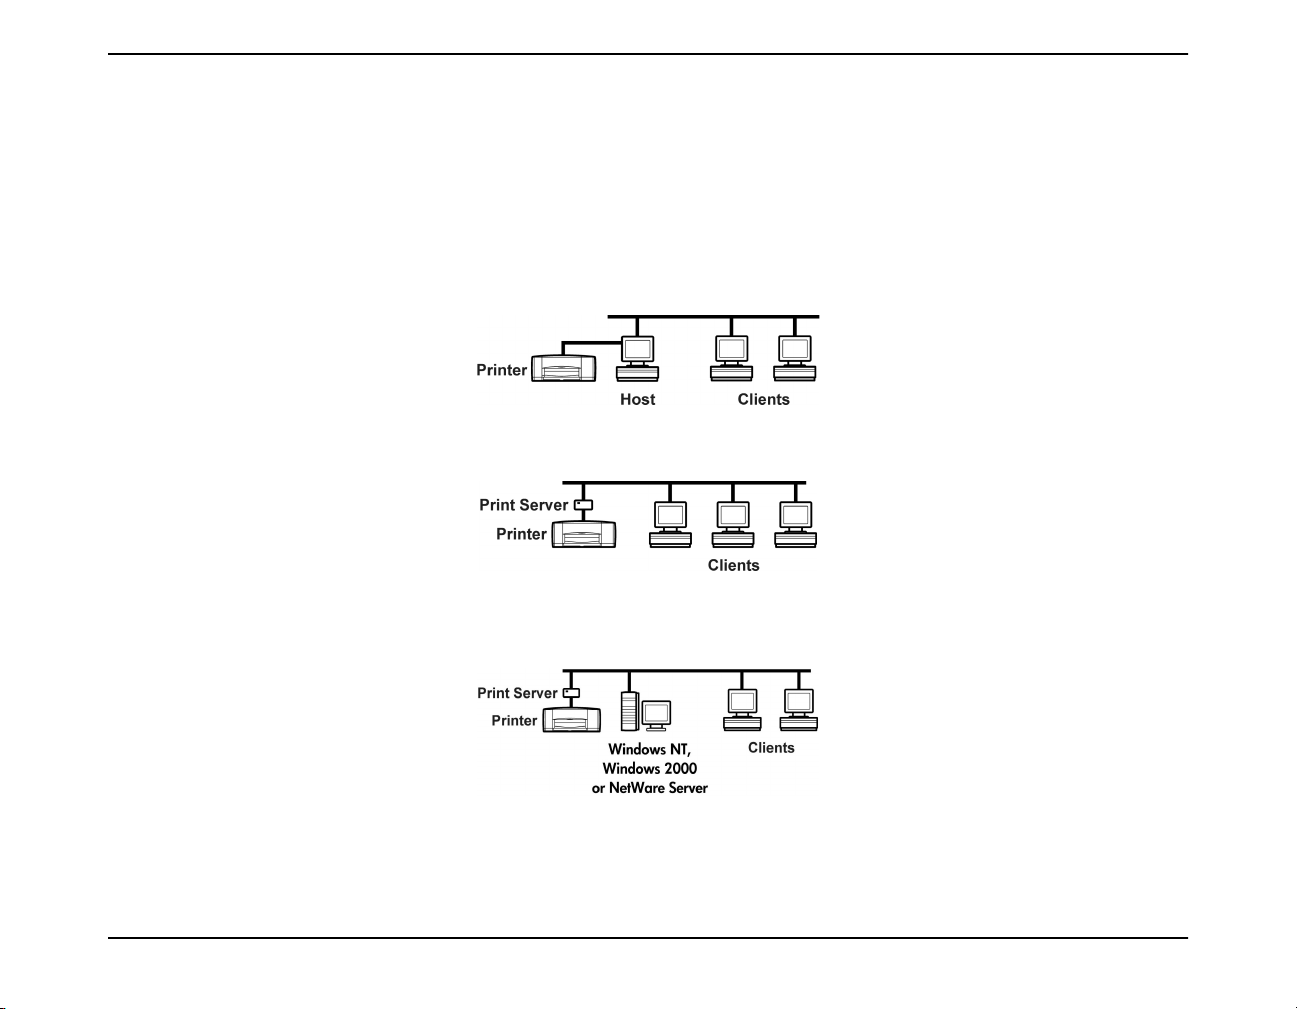
1 Using Your Printer on a Network
Before you set up your printer, check that your computer is fully set up, operational, and meets the minimum system requirements listed
in “System Requirements” in your HP PhotoSmart 1215/1218 Printer User’s Guide.
Your HP PhotoSmart 1215/1218 printer can be shared over a network in three different ways:
•
Locally Shared:
connecting your printer to the parallel port of the host computer. See “Locally Shared Printer Connection” on page 2 for details.
Share your printer from a network-connected computer by enabling printer sharing on a host computer and
•
Peer-to-Peer:
Server. See “Peer-to-Peer Connection” on page 14 and consult your print server documentation for help setting up the print server.
•
Print Server Network Connection:
and share the printer from a Windows NT 4.0, Windows 2000, or NetWare 3.12, 4.11, or 5.0 server on your network. Clients
print through a Windows NT or NetWare server. See “Client Server Network Connection” on page 19 for details.
Note:
hp photosmart 1215/1218 color printer network guide for windows 1
Clients on a network do not have access to the CompactFlash or SmartMedia card slots. Clients only have the ability to print.
Host computers in a locally shared configuration will have access to the card slots, only if software is loaded using the full
installation method.
Connect your printer to a network via the parallel port of an HP JetDirect 70X, 170X, or 300X External Printer
Connect your printer to a network via the parallel port of an HP JetDirect External Print Server
Page 4

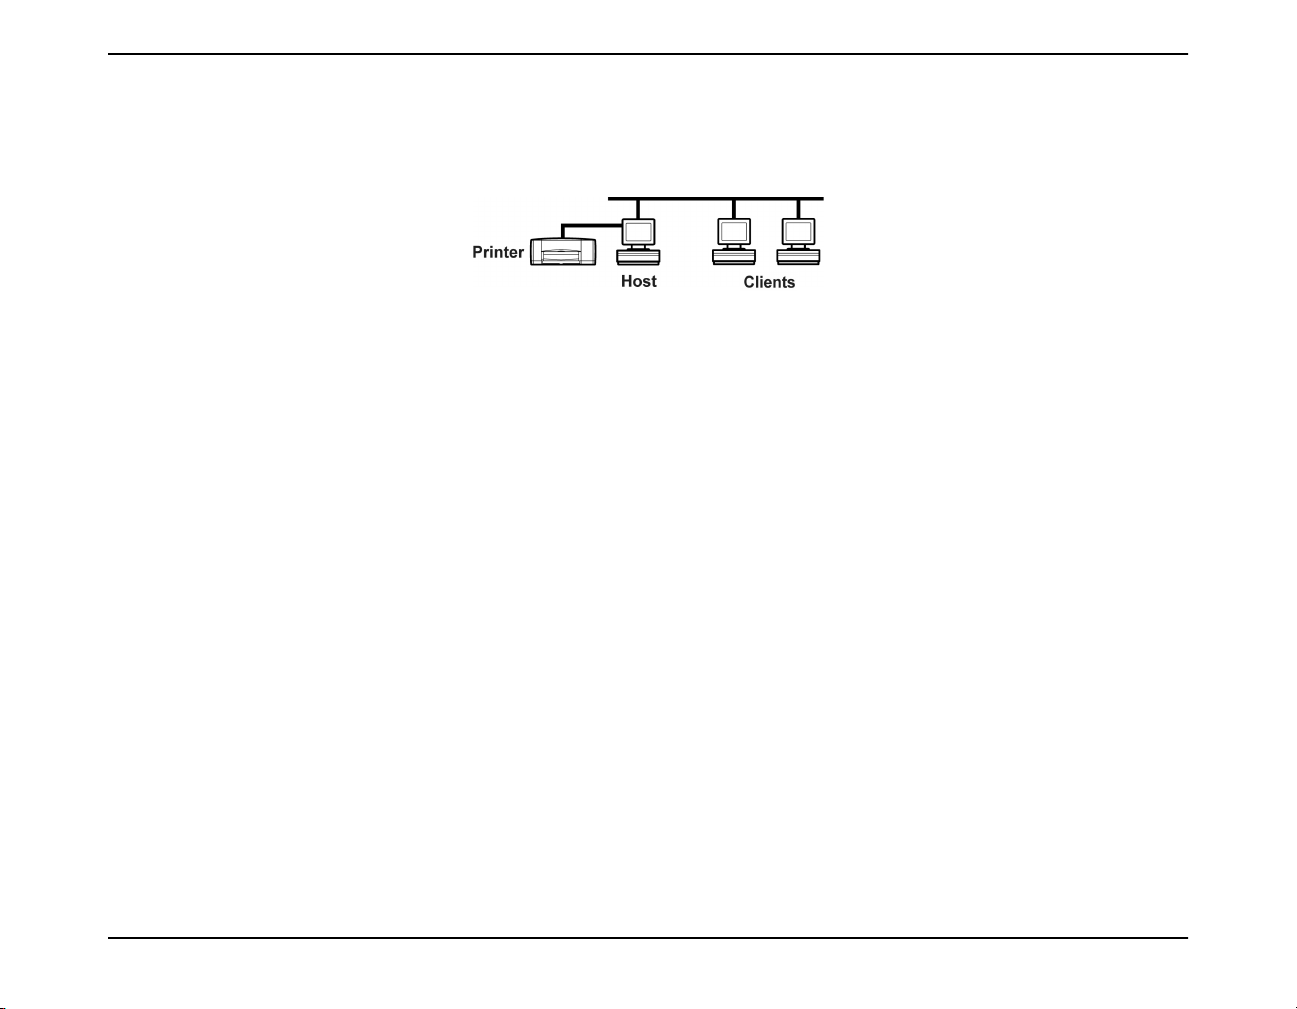
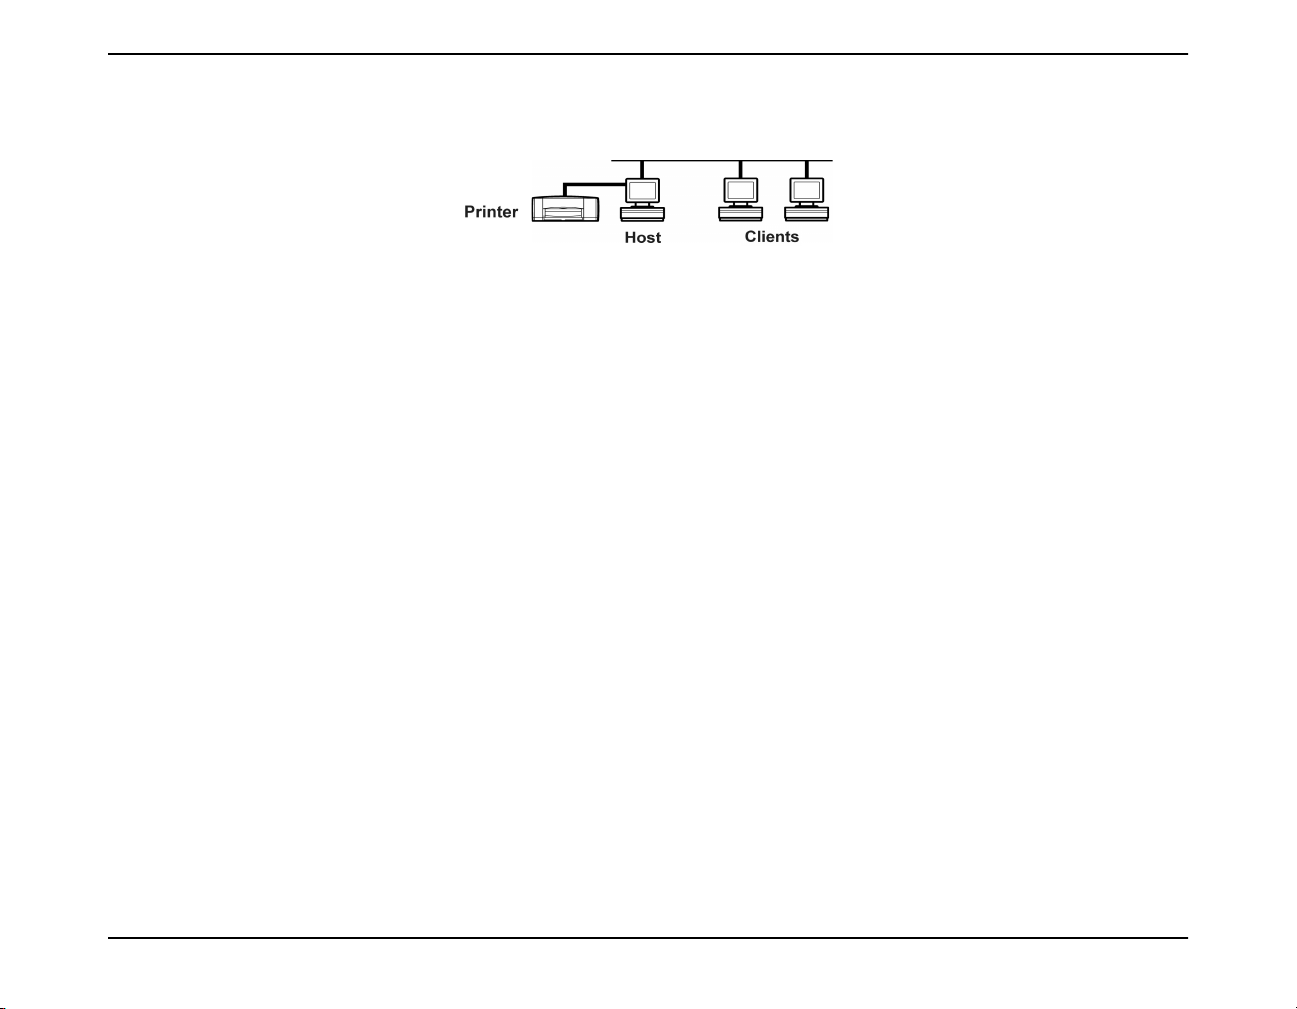
2 Locally Shared Printer Connection
In the locally shared configuration, the printer is connected directly to the parallel or USB port of a selected computer that functions as
a host to other computers on the network. To locally share your printer, the printer software must be installed on the host computer and
on each client computer.
Note:
Operating Systems for a Locally Shared Connection
Installation instructions for the supported operating systems can be found on the following pages:
USB is only supported on Windows 98, Windows Me, and Windows 2000.
Operating Systems Host Client
Windows 95, 98, Me Page 4 Page 11
Windows NT 4.0 Page 7 Page 12
Windows 2000 Page 9 Page 13
hp photosmart 1215/1218 color printer network guide for windows 2
Page 5
Setting Up a Locally Shared Printer
1. Set up the printer. Follow the instructions on the Quick Start poster (included in the box).
Note:
2. Install the printer software on the host computer, and share your printer on the network. See the table on page 2 to find instructions
for your operating system.
3. Install the printer software on each of the client computers. See the table on page 2 to find instructions for your operating system.
Make sure you do not have any peripheral devices, such as scanners, switch boxes, backup units, etc. installed between
the printer and the computer. The printer must be connected directly to the host computer.
hp photosmart 1215/1218 color printer network guide for windows 3
Page 6
Setting Up Windows 95, 98, and Me Hosts
Installing the Printer Software on a Windows 95, Windows 98, or Windows Me Host
On host installations, two methods may be used:
• Full installation – includes card reader accessibility (recommended for all USB installations).
• Minimal installation – allows print-only capability.
Full Installation
1. Close or disable any virus protection programs or other software programs that are open and running on the computer,
except the HP PhotoSmart Software Installer and Windows Explorer.
2. Using the installation instructions included in the box, install the software following the instructions for your operating system.
Minimal Installation
Note:
1. From the Windows
2. Double-click
3. Choose
4. Click the
hp photosmart 1215/1218 color printer network guide for windows 4
If your computer displays the Found New Hardware Wizard, begin at step 5.
Note:
menu, select
Add Printer
Local Printer
Have Disk
Start
, then click
as the printer connection, then click
button, and insert the HP PhotoSmart 1200 series printer software CD into your CD-ROM drive.
Settings
Next
If the printer software automatically begins installing from the CD, close the auto installer.
, then select
.
Printers
Next
.
.
Page 7

5. In the
Install From Disk
dialog box, click
Browse
, then navigate to the
• Double-click your language folder. See the language code chart on page 21. For example, if your language is English,
double-click
enu
.
• Double-click your operating system folder. For example, if your computer’s operating system is Windows 95, Windows
98, or Windows Me, double-click
•Click
6. Click
7. C l i c k
hpdj.inf
, then click OK to close the
OK
Next
.
.
8. Select the printer port from the
Install From Disk
Available ports
9xinf
.
list (
dialog box.
is recommended), then click
LPT1
9. Accept the default name for your printer (recommended) or enter a new name. To use this printer as your default printer,
click
10. Click
, then click
Yes
Finish
.
Next
.
Preparing your Computer to Share the Printer on the Network
1. Turn on the host computer and the printer.
2. From the Windows
3. Double-click the
4. Click the
Network
File and Print Sharing
5. If it is not already checked, check
6. Click
to close the
OK
7. If prompted, restart Windows.
menu, select
Start
Settings
control panel.
button.
I want to be able to allow others to print to my printer(s)
File and Print Sharing
, then select
Control Panel
dialog box, then click OK to close the
hpdj.inf
.
file.
Next
Network
.
.
dialog box.
hp photosmart 1215/1218 color printer network guide for windows 5
Page 8

Sharing Your Printer on the Network
1. From the Windows
2. Right-click the HP PhotoSmart 1215/1218 printer icon and choose
3. Select
Shared As
menu, select
Start
Settings
, then select
Printers
.
Sharing
from the pop-up menu.
and enter the name you want to use for your printer on the network. Use a name of eight characters or less. If
you want to restrict access to your printer, enter a password in the Password field. Users will need to enter this password in order
to print to your printer.
Note:
4. Click
See your Windows 95, Windows 98, or Windows Me documentation for more information about sharing your printer.
.
OK
5. If a password was set, retype it and click OK.
hp photosmart 1215/1218 color printer network guide for windows 6
Page 9

Setting Up Windows NT 4.0 Hosts
Installing the Printer Software on a Windows NT 4.0 Host
Note:
On host installations, two methods may be used:
• Full installation – includes card reader accessibility.
• Minimal installation – allows print-only capability.
You must have administrator privileges to install the printer software on a Windows NT 4.0 system.
Full Installation
1. Turn on the host computer and the printer.
2. Close or disable any virus protection programs or other software programs that are open and running on the computer,
except the HP PhotoSmart 1215/1218 Software Installer and Windows Explorer.
3. Using the installation instructions included in the box, install the software following the instructions for your operating system.
hp photosmart 1215/1218 color printer network guide for windows 7
Page 10

Minimal Installation
1. From the Windows
2. Double-click
3. Choose
Add Printer
My Computer
4. Select a printer port from the
5. Click the
Note:
6. In the
Have Disk
If the printer software automatically begins installing from the CD, close the auto installer.
Install From Disk
menu, select
Start
Settings
, then select
Printers
.
.
as the printer connection, then click
Available ports
list (
is recommended), then click
LPT1
Next
.
.
Next
button, and insert the HP PhotoSmart 1200 series printer software CD into your CD-ROM drive.
dialog box, click
Browse
, then navigate to the
hpdj.inf
file.
• Double-click your language folder. See the language code chart on page 21. For example, if your language is English,
double-click
enu
.
• Double-click your operating system folder. For example, if your computer’s operating system is Windows NT 4.0, doubleclick
•Click
7. C l i c k
8. Click
Open
Next
9. Accept the default name for your printer (recommended) or enter a new name, then click
10. Click
Shared
11. If you want to print a test page, click
12. Click
Finish
.
nt4inf
hpdj.inf
.
, then click OK to close the
Install From Disk
.
and enter a share name for the printer.
.
Yes
.
dialog box.
Next
.
hp photosmart 1215/1218 color printer network guide for windows 8
Page 11

Setting Up Windows 2000 Hosts
Installing the Printer Software on a Windows 2000 Host
Note:
You must have administrator privileges to install the printer software on a Windows 2000 system.
On host installations, two methods may be used:
• Full installation – includes card reader accessibility (recommended for all USB installations).
• Minimal installation – allows print-only capability.
Full Installation
1. Turn on the host computer and the printer.
2. Close or disable any virus protection programs or other software programs that are open and running on the computer,
except the HP PhotoSmart 1215/1218 Software Installer and Windows Explorer.
3. Using the installation instructions included in the box, install the software following the instructions for your operating system.
Minimal Installation
Note:
1. From the Windows
2. Double-click
3. Choose
4. Uncheck
5. Select a printer port in the
If your computer displays the Found New Hardware Wizard, begin at step 6.
menu, select
Start
Add Printer
Local Printer
Automatically detect and install my plug and play printer
, then click
as the printer connection.
Use the following port
Settings
Next
, then select
.
list (
Printers
.
, then click
is recommended), then click
LPT1
Next
.
Next
.
hp photosmart 1215/1218 color printer network guide for windows 9
Page 12

6. Click the
Note:
7. In t h e
Install From Disk
Have Disk
If the printer software automatically begins installing from the CD, close the auto installer.
button, and insert the HP PhotoSmart 1200 series printer software CD into your CD-ROM drive.
dialog box, click
Browse
, then navigate to the
hpdj.inf
file.
• Double-click your language folder. See the language code chart on page 21. For example, if your language is English,
double-click
enu
.
• Double-click your operating system folder. For example, if your computer’s operating system is Windows 2000, double-
.
nt4inf
hpdj.inf
.
, then click OK to close the
.
Install From Disk
dialog box.
•Click
8. Click
9. C li ck
click
Open
Next
10. Accept the default name for your printer (recommended) or enter a new name. To use this printer as your default printer, click
, then click
Yes
11. Click
12. Click
Share As
.
Next
13. Type the location of your printer and any additional comments (optional), then click
14. If you want to print a test page, click
15. Click
Finish
.
.
Next
and type the name you want to use for your printer on the network.
, then click
Yes
Next
.
Next
.
hp photosmart 1215/1218 color printer network guide for windows 10
Page 13

Installing the Printer Software on Each Client
Make sure you have installed printer software on the host and set up the printer for sharing before you install the printer software on the
client.
Add Printer Installation
You can install the printer software on the client computers using the Add Printer installation. The Add Printer installation is the most
compatible with different operating systems.
Note:
Installing the Printer Software on Windows 95, Windows 98, or Windows Me Clients
You can also use the Point and Print installation to install printer software directly from the host computer on client computers
running Windows 95, Windows 98, or Windows NT 4.0.
1. From the Windows
2. Double-click
3. Choose
4. Click
Add Printer
Network Printer
Browse
to locate the print server and printer, click OK, then click
menu, select
Start
, then click
Settings
Next
, then select
.
as the printer connection, then click
Printers
Next
.
.
(recommended).
Next
or
Enter the path or queue name of the printer. For example, type:
\\ServerName\QueueName
5. Click the
Note:
hp photosmart 1215/1218 color printer network guide for windows 11
Have Disk
If the printer software automatically begins installing from the CD, close the auto installer.
button, and insert the HP PhotoSmart 1200 series printer software CD into your CD-ROM drive.
, then click
Next
.
\\HostComputerName\PrinterName
or
Page 14

6. Accept the default name for your printer (recommended) or enter a new name. To use this printer as your default printer, click
7. If you want to print a test page, click
8. Click
Finish
.
Yes
.
Installing the Printer Software on a Windows NT 4.0 Client
Yes
.
Note:
1. From the Windows
2. Double-click
3. Choose
4. Browse the
You must have administrator privileges to install the printer software on a Windows NT 4.0 system.
menu, select
Start
Add Printer
Network Printer Server
Shared Printers
, then click
list box to locate and select the print server and printer.
Settings
Next
as the printer connection, then click
, then select
.
or
Enter the path or queue name of the printer. For example, type:
\\ServerName\QueueName
Note:
If the host computer does not use Windows NT4.0, you will need to install the printer software from the printer software
.
CD or from a shared network drive.
5. To use this printer as your default printer, click
6. Click
Finish
.
, then click
Yes
Printers
.
.
Next
\\HostComputerName\PrinterName
.
Next
or
hp photosmart 1215/1218 color printer network guide for windows 12
Page 15

Installing the Printer Software on a Windows 2000 Client
Note:
1. From the Windows
2. Double-click
3. Choose
4. Click
You must have administrator privileges to install the printer software on a Windows 2000 system.
menu, select
Start
Add Printer
Network Printer
to browse for a printer (recommended).
Next
, then click
as the printer connection, then click
Settings
Next
.
or
Select
Type the printer name
and enter the printer’s name and path.
or
Select
Connect to a printer on the Internet or on your intranet
5. In the
Note:
Shared printers
If the host computer does not use Windows 2000, you will need to install the printer software from the printer software
box, double-click the host computer on which the printer is installed, select the printer, then click
CD or from a shared network drive.
6. To use this printer as your default printer, click
7. C l i c k
Finish
.
, then select
, then click
Yes
Next
.
.
Printers
and enter the printer’s address.
.
Next
Next
.
hp photosmart 1215/1218 color printer network guide for windows 13
Page 16

3 Peer-to-Peer Connection
In a peer-to-peer direct network configuration, the printer is directly connected to the network via an HP JetDirect External Print Server.
Each computer on the network sends print jobs directly to the HP JetDirect External Print Server.
Operating Systems and Print Servers for a Peer-to-Peer Connection
The following client operating systems and print servers are supported:
Operating Systems Print Servers
• Windows 95
• Windows 98
• Windows Me
• Windows NT 4.0
• Windows 2000
hp photosmart 1215/1218 color printer network guide for windows 14
• HP JetDirect 70X
• HP JetDirect 170X
• HP JetDirect 300X
Page 17

Setting Up a Peer-to-Peer Printer Connection
1. Set up the printer. Follow the Quick Start poster included in the box. Be sure to connect the printer to the HP JetDirect External Print
Server using a bi-directional IEEE 1284-compliant parallel cable.
2. Set up the HP JetDirect External Print Server. Install and configure the HP JetDirect External Print Server according to the instructions
provided with the print server.
3. Install the HP PhotoSmart 1215/1218 printer software on each of the clients. Installation instructions for the supported operating
systems can be found on the following pages:
Operating Systems Client
Windows 95, 98, Me Page 16
Windows NT 4.0 Page 17
Windows 2000 Page 18
hp photosmart 1215/1218 color printer network guide for windows 15
Page 18

Installing the Printer Software on Each Client
Installing the Printer Software on a Windows 95, Windows 98, or Windows Me Client
1. From the Windows
2. Double-click
3. Choose
4. Click
Add Printer
Network Printer
Browse
to locate the print server and printer, then click
menu, select
Start
, then click
Settings
Next
, then select
.
as the printer connection, then click
Printers
Next
Next
.
.
.
or
Enter the path or queue name of the printer. For example, type:
\\ServerName\QueueName
5. Click the
Note:
6. In the
Have Disk
If the printer software automatically begins installing from the CD, close the auto installer.
Install From Disk
, then click
button, and insert the HP PhotoSmart 1200 series printer software CD into your CD-ROM drive.
dialog box, click
.
Next
Browse
, then navigate to the
\\HostComputerName\PrinterName
hpdj.inf
file.
or
• Double-click your language folder. See the language code chart on page 21. For example, if your language is English,
double-click
enu
.
• Double-click your operating system folder. For example, if your computer’s operating system is Windows 95, Windows 98, or
Windows Me, double-click
•Click
hpdj.inf
.
9xinf
.
hp photosmart 1215/1218 color printer network guide for windows 16
Page 19

7. C l i c k OK, then click OK to close the
8. Click
Next
.
Install From Disk
dialog box.
9. Accept the default name for your printer (recommended) or enter a new name.
10. Click
Finish
.
Installing the Printer Software on a Windows NT 4.0 Client
Note:
1. From the Windows
2. Double-click
3. Choose
4. Select the printer port, from the
5. Click the
6. In the
7. C l i c k
8. Click
9. Accept the default name for your printer (recommended) or enter a new name, then click
10. If you want to print a test page, click
11. Click
You must have administrator privileges to install the printer software on a Windows NT 4.0 system.
My Computer
then click
Have Disk
Install From Disk
Add Printer
.
Next
menu, select
Start
, then click
Settings
Next
as the printer connection, then click
Available ports
button, and insert the HP PhotoSmart 1200 series printer software CD into your CD-ROM drive.
dialog box, click
, then select
Printers
.
.
.
Next
list, that you configured when you set up the HP JetDirect External Print Server,
Browse
, then navigate to the
hpdj.inf
• Double-click your language folder. See the language code chart on page 21. For example, if your language is English,
double-click
enu
.
• Double-click your operating system folder. For example, if your computer’s operating system is Windows NT 4.0, double-click
.
nt4inf
•Click
Open
Next
Finish
hpdj.inf
.
.
, then click OK to close the
.
Install From Disk
.
Yes
dialog box.
file.
Next
.
hp photosmart 1215/1218 color printer network guide for windows 17
Page 20

Installing the Printer Software on a Windows 2000 Client
1. Install the HP JetDirect port software on each client according to the instructions included with the print server.
2. From the Windows
3. Double-click
4. Choose
Add Printer
Network Printer
5. Select the printer port, from the
Server, then click
6. Click the
Note:
7. In t h e
Have disk
If the printer software automatically begins installing from the CD, close the auto installer.
Install From Disk
• Double-click your language folder. See the language code chart on page 21. For example, if your language is English,
double-click
• Double-click your operating system folder. For example, if your computer’s operating system is Windows 2000, double-click
.
nt4inf
•Click
8. Click
9. C li ck
hpdj.inf
, and then click OK to close the
Open
.
Next
10. Type the location of your printer and any additional comments (optional), then click
11. If you want to print a test page, click
12. Click
Finish
.
Start
Next
menu, select
, then click
Settings
Next
as the printer connection, then click
Use the following port
.
.
, then select
list, that you configured when you set up the HP JetDirect External Print
Printers
Next
.
.
button and insert the HP PhotoSmart 1200 series printer software CD into your CD-ROM drive.
dialog box, click
.
enu
Browse
, then navigate to the
hpdj.inf
file.
.
Install From Disk
, then click
Yes
Next
dialog box.
.
Next
.
hp photosmart 1215/1218 color printer network guide for windows 18
Page 21

4 Client Server Network Connection
In the client server connection, you connect your HP PhotoSmart 1215/1218 printer to the network with an HP JetDirect External Print
Server. Clients print to the Windows NT 4.0, Windows 2000, or NetWare server that is serviced by the HP JetDirect External Print
Server.
Operating Systems for a Client Server Connection
Installation instructions for the supported operating systems can be found on the following pages:
Server Operating Systems
NetWare 3.12, 4.11, or 5.0 Page 20
Windows NT 4.0 or Windows 2000 Page 20
Client Operating Systems
Windows 95, 98, or Me Page 11
Windows NT 4.0 Page 12
Windows 2000 Page 13
hp photosmart 1215/1218 color printer network guide for windows 19
Page 22

Setting Up a Client Server in Windows NT 4.0 or Windows 2000
1. Set up the printer. Follow the Quick Start poster included in the box. Be sure to connect the printer to the HP JetDirect External Print
Server using a bi-directional IEEE 1284-compliant parallel cable.
2. Set up the HP JetDirect External Print Server. Install and configure the HP JetDirect External Print Server according to the instructions
provided with the print server.
3. Install the printer software on the Windows NT 4.0 or Windows 2000 server and share your printer on the network. Be sure to
select the port you configured when you set up the HP JetDirect External Print Server.
• Windows NT 4.0 Server: See the Minimal Installation instructions in “Installing the Printer Software on a Windows NT 4.0
Host” on page 7.
• Windows 2000 Server: See the Minimal Installation instructions in “Installing the Printer Software on a Windows 2000 Host”
on page 9.
4. Install the printer software on each of the client computers. See “Installing the Printer Software on Each Client” on page 11 to find
instructions for your operating system.
Setting Up a Client Server in NetWare
• Refer to Novell's documentation or web site for NetWare printer installation methods and NetWare client software.
• See the documentation that came with your HP JetDirect External Print Server or search on “Novell” at
for information on setting up an HP JetDirect External Print Server in a NetWare environment and for additional network printing
information.
• You can copy your HP PhotoSmart 1215/1218 printer software to a NetWare drive. See the language code table on page 21 to
help you select which languages and operating systems you should copy.
www.hp.com/cposupport
hp photosmart 1215/1218 color printer network guide for windows 20
Page 23

Appendix
Language Codes
If you are doing an Add Printer Installation in Windows 95, Windows 98, Windows Me, Windows NT 4.0, or Windows 2000, you
need to browse to the INF file for your operating system’s language.
•
Windows 95, Windows 98, and Windows Me:
•
Windows NT 4.0 and Windows 2000:
Find the language code for your operating system’s language in the table below.
The INF file is in the path: [CD drive letter]: \[language code]\nt4inf\hpdj.inf
Language Language code
English enu
French fra
German deu
Italian ita
Japanese jpn
Spanish esm
The INF file is in the path: [CD drive letter]: \[language code]\9xinf\hpdj.inf
hp photosmart 1215/1218 color printer network guide for windows 21
 Loading...