

Page 1
User & Installation Guide
LAM2202
60cm Integrated Extractor
Page 2
www.howdens.com
Page _ 2
Dear Customer,
Congratulations on your choice of domestic appliance which has been designed to give you excellent
service.
The user manual will help you use your product quickly and safely.
• Please read this user manual before installing and using the oven.
• Always follow the safety instructions.
• Keep this user manual within easy reach for future reference.
• Please read any other documents supplied with the product.
Explanation of symbols
Throughout this user manual the following symbols are used:
Important information or useful tips about usage.
Warning for possible hazards to health and property.
Warning possibility of electric shock.
This product’s packaging material is recyclable. Help recycle it and protect the
environment by dropping it off in the municipal receptacles provided for this purpose.
Your product also contains a great amount of recyclable material. It is marked with this
label to indicate the used appliances that should not be mixed with other waste. This
way, the appliance recycling organised by your manufacturer will be done under the
best possible conditions, in compliance with European Directive 2002/96/EC on Waste
Electrical and Electronic Equipment. Contact your town hall or your retailer for the used
appliance collection points closest to your home. We thank you doing your part to protect
the environment.
Page 3

Exclusive to Howdens Joinery.co
Page _ 3
User manual LAM2202
Index
Before using the extractor 04
Safety 04
General 04
Fire Saftey 05
Safety for Children 05
50 yticirtcelE htiW gnikroW nehW ytefaS
General information & Operation 06
60 tuoyaL rotcartxE
Control Panel Layout 06
Using Your Cooker Hood 07
General Cleaning 07
Care and maintenance 08
General Cleaning 08
Grease Filters 08
Carbon Filters 09
Replacing the Lamps 09
Installation 10
Methods of Extraction 10
Extraction Via Ducting 10
Extraction Via Recirculation 10
Before Beginging Instalation 11
Installing Your Cooker Hood 11
Connecting to External Ducting 12
Electrical Connections 13
14
Troubleshooting 15
Your Guarantee 16
Page 4

www.howdens.com
Page _ 4
• Make sure that you have removed all packaging, wrappings, stickers and from the Extractor
• It is recommended that you clean the extractor’s surface before using for the
time.
Before using the Extractor
This appliance is for domestic extraction
purposes only. It must not be used for other
purposes. Commercial use will void the guarantee.
The manufacturer shall not be liable for any damage
caused by improper use, installation or handling
errors
General
This product is not intended to be used by persons
with physical, sensory or mental disorders or
unlearned or inexperienced people (including
children) unless they are supervised by a person
who will be responsible for their safety or who will
instruct them accordingly in the use of the product.
• Do not operate the product if the power cable
is damaged. Call a Howdens’ service agent.
• Do not carry out any repairs or
on the product. However, you may remedy
some the problems that do not require any
repairs or
See Troubleshooting,
at the rear of this manual.
• Never wash down the product with excessive
water, as there is the risk of electric shock!
• Never use the product when your judgment or
coordination is impaired by the use of alcohol
and/or drugs.
• Product must be disconnected from the mains
during installation, maintenance, cleaning and
repair procedures.
• Repair procedures must always be performed
by
service agents. The manufacturer
shall not be held responsible for damages
arising from procedures carried out by
unauthorised persons, which may also void
the guarantee.
• Keep all ventilation slots clear of obstructions,
as this may cause premature failure of the
appliance
• Do not trap the mains cable and do not route
it over surfaces which may become hot. The
cable insulation may melt and cause a
as
a result of a short circuit.
• Make sure that the product function buttons
are switched off after every use.
• Product must be installed by a
person
in accordance with the regulations in force
otherwise, the guarantee may become void.
• The hood must be installed in accordance
with the installation instructions and all
measurements followed.
• If the cooker hood is installed for use above a
gas appliance then the provision for ventilation
must be in accordance with the Gas Safety
Codes of Practice BS.6172, BS.5440 &
BS.6891 (Natural Gas) and BS.5482 (LP Gas)
1994, the Gas Safety (Installation & Use)
Regulations, the Building Regulations issued
by the Department of the Environment, the
Building Standards (Scotland) (Consolidated)
Regulations issued by the Scottish
Development Department.
Safety
Check the data label inside the appliance; if the
symbol
is printed, this
appliance has such technical particulars that it
belongs to class II insulation, therefore it MUST
NOT be earthed.
Check the data label inside the appliance; if the
symbol
is NOT printed,
then this appliance MUST be earthed.
When making the electrical connections, check
that the current socket has a ground connection.
•
•
Caution: accessable parts may become hot
when used with cooking appliances
•
Page 5
Exclusive to Howdens Joinery.co
Page _ 5
Do not set your cooker hood less than
700mm above your cooker.
• When installed between adjoining wall
cabinets, the cabinets must not overhang the
hob.
• The edges of the cooker hood may be sharp
– be mindful of this as you handle your
appliance, especially during installation and
cleaning.
• If the room where the cooker hood is to be
used contains a fuel burning appliance such
as a central heating boiler then its
must
be of the sealed or balanced
type.
• When the hood is being used in extraction
mode, ensure that the ducting is
retardant
and that there are no bends greater than 90
degrees as this will reduce the
of
the hood.
• Ensure the ducting for the extractor mode has
the same diameter as the outlet hole all the
way through.
• Always put lids on pans and ensure that pans
are always on hobs when burners are lit.
• Remember that when in extraction mode, your
cooker hood is removing air from your room.
Ensure that proper ventilation measures are
being observed.
Fire Safety
When installing the hood, ensure that the
following recommended distances are observed
between the highest point on the hob top
(including the burners) and the bottom of the
cooker hood:
Electric cookers: 650 mm
Gas cookers: 650 mm
Coal / oil cookers: 800 mm
• Never
cook under this cooker hood.
• Dirty cooking oil is an even greater
risk.
• Do not install above a cooker with a high level
grill.
Safety for children
• Electrical products can be dangerous to
children. Keep children away from the product
when it is operating and do not allow them to
play with or near the product.
• The packaging materials will be dangerous for
children. Keep the packaging materials away
from children. Please dispose of all parts of
the packaging according to environmental
standards.
Safety when working with
electricity
• In case of any damage, switch off the product
and disconnect it from the mains. To do this,
turn off the fuse at the fuse box.
• Make sure that fuse rating is compatible with
the product.
User manual LAM2202
There shall be adequate venilation of the room
when the cooker hood is used at the same
time as appliances burning gas or other fuels.
When the hood is being used in extraction
mode the air MUST NOT be discharged into a
flue that is used for exhausing fumes from
appliances burning gas or other fuels.
•
This kitchen hood is intended for installation
in domestic kitchens above cooktops, cooking
devices and similat kitchen equipment.
•
There is a fire risk if cleaning is not carried
out in accordance with these instructions.
•
Page 6
www.howdens.com
Page _ 6
1.
2.
3.
5.
6.
4.
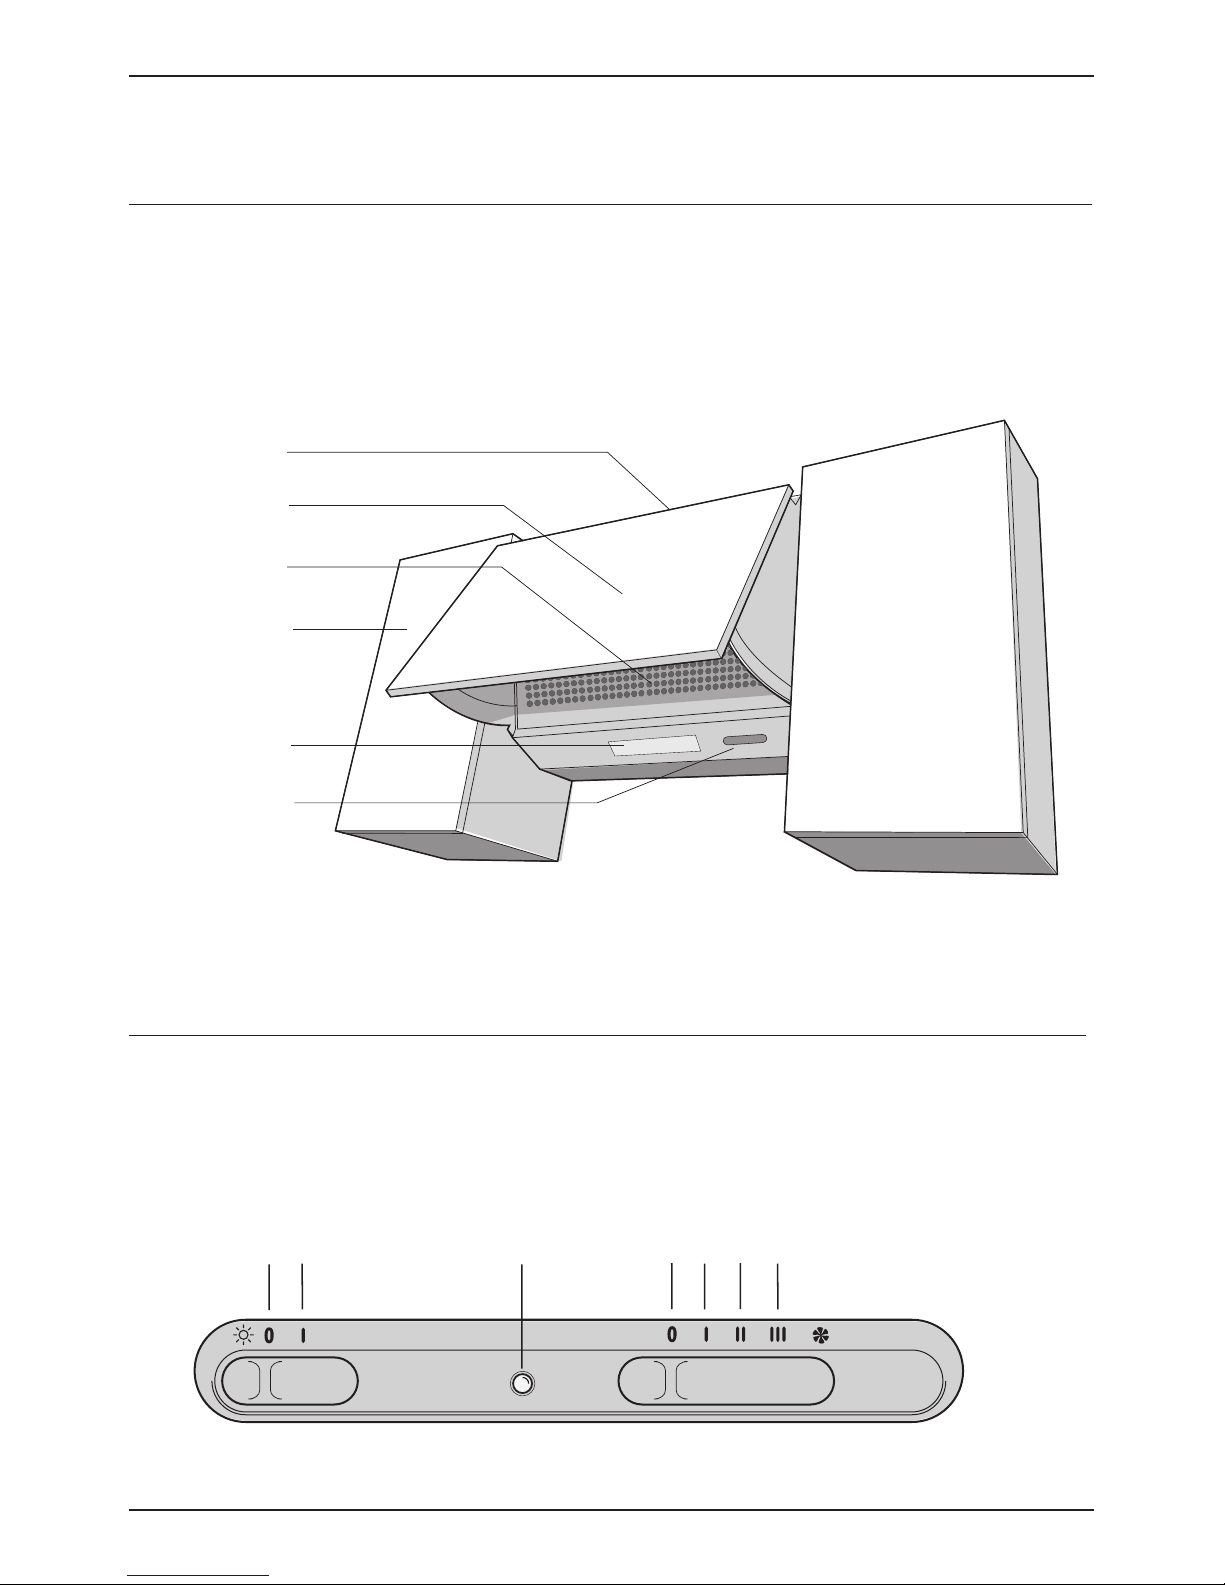
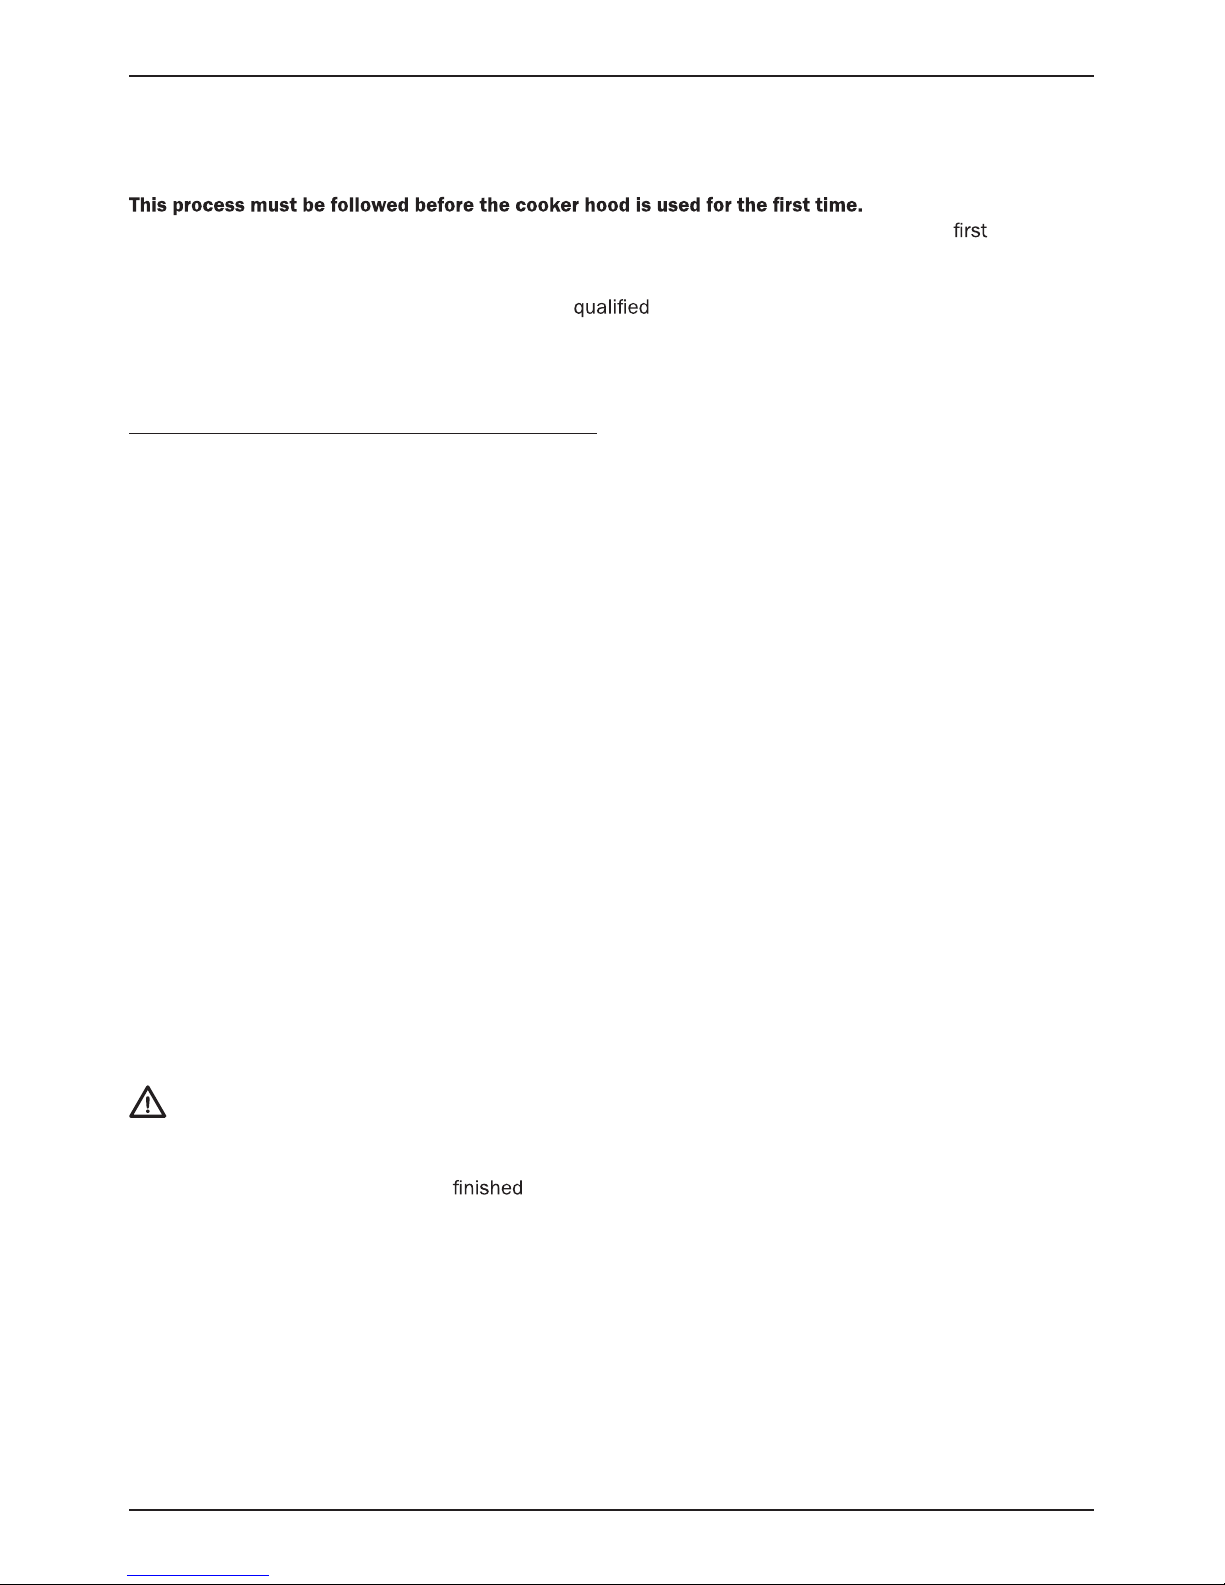
1. Exhaust / Recirculation Vent
2. Cabinet Door / Facia
3. Air Intake
4. Wall Cabinets
5. Light
6. Control Panel
General Information & Operation
tuoyaL rotcartxE
Control Panel Layout
1. Light Off
2. Light On
3. Motor Neon Indicator
4. Extraction Off
5. Extraction Level Low
6. Extraction Level Medium
7. Extraction Level High
1.
2.
3.
5.
6.
1.
2.
3.
4.
5. 7.
6.
4.
Page 7
Exclusive to Howdens Joinery.co
Page _ 7
Using Your Cooker Hood
To use your cooker hood
• The control panel can be located by opening
the front panel and looking to the right hand
side of the cooker hood.
• There are two sliders on the control panel,
which perform separate functions.
Light ON/OFF slider
0 = Light off
1 =Light on
Motor on indicator neon
This will light when the motor is switched on using
the speed control slider.
Speed control slider
1. Off
2. Low speed
3. Medium speed
4. High speed
ideally you should turn on your hood ten
minutes before you start to cook, or at the very least
when you begin cooking. You should also run your
hood for ten minutes after you have
cooking.
You should clean the
appliance using a damp new cloth and warm soapy water before using the appliance for the
time. You
should then dry it thoroughly using a soft cloth.
Make sure that it has been installed by a suitably
person, as per the installation instructions.
User manual LAM2202
Page 8
www.howdens.com
Page _ 8
Before cleaning or attempting any type of maintenance, always make sure that the electricity
supply is disconnected.
The manufacturer declines all liability in cases where the instructions for the appropriate installation,
maintenance and use of the extractor hood are not observed.
If the power cable is cut or damaged in any way, disconnect the extractor from the electricity supply and call
the service number on the rear cover of this booklet or a suitably
repairer.
General Cleaning
Wipe the external surfaces of the appliance regularly using warm water and a mild detergent. NEVER use
abrasive cleaners.
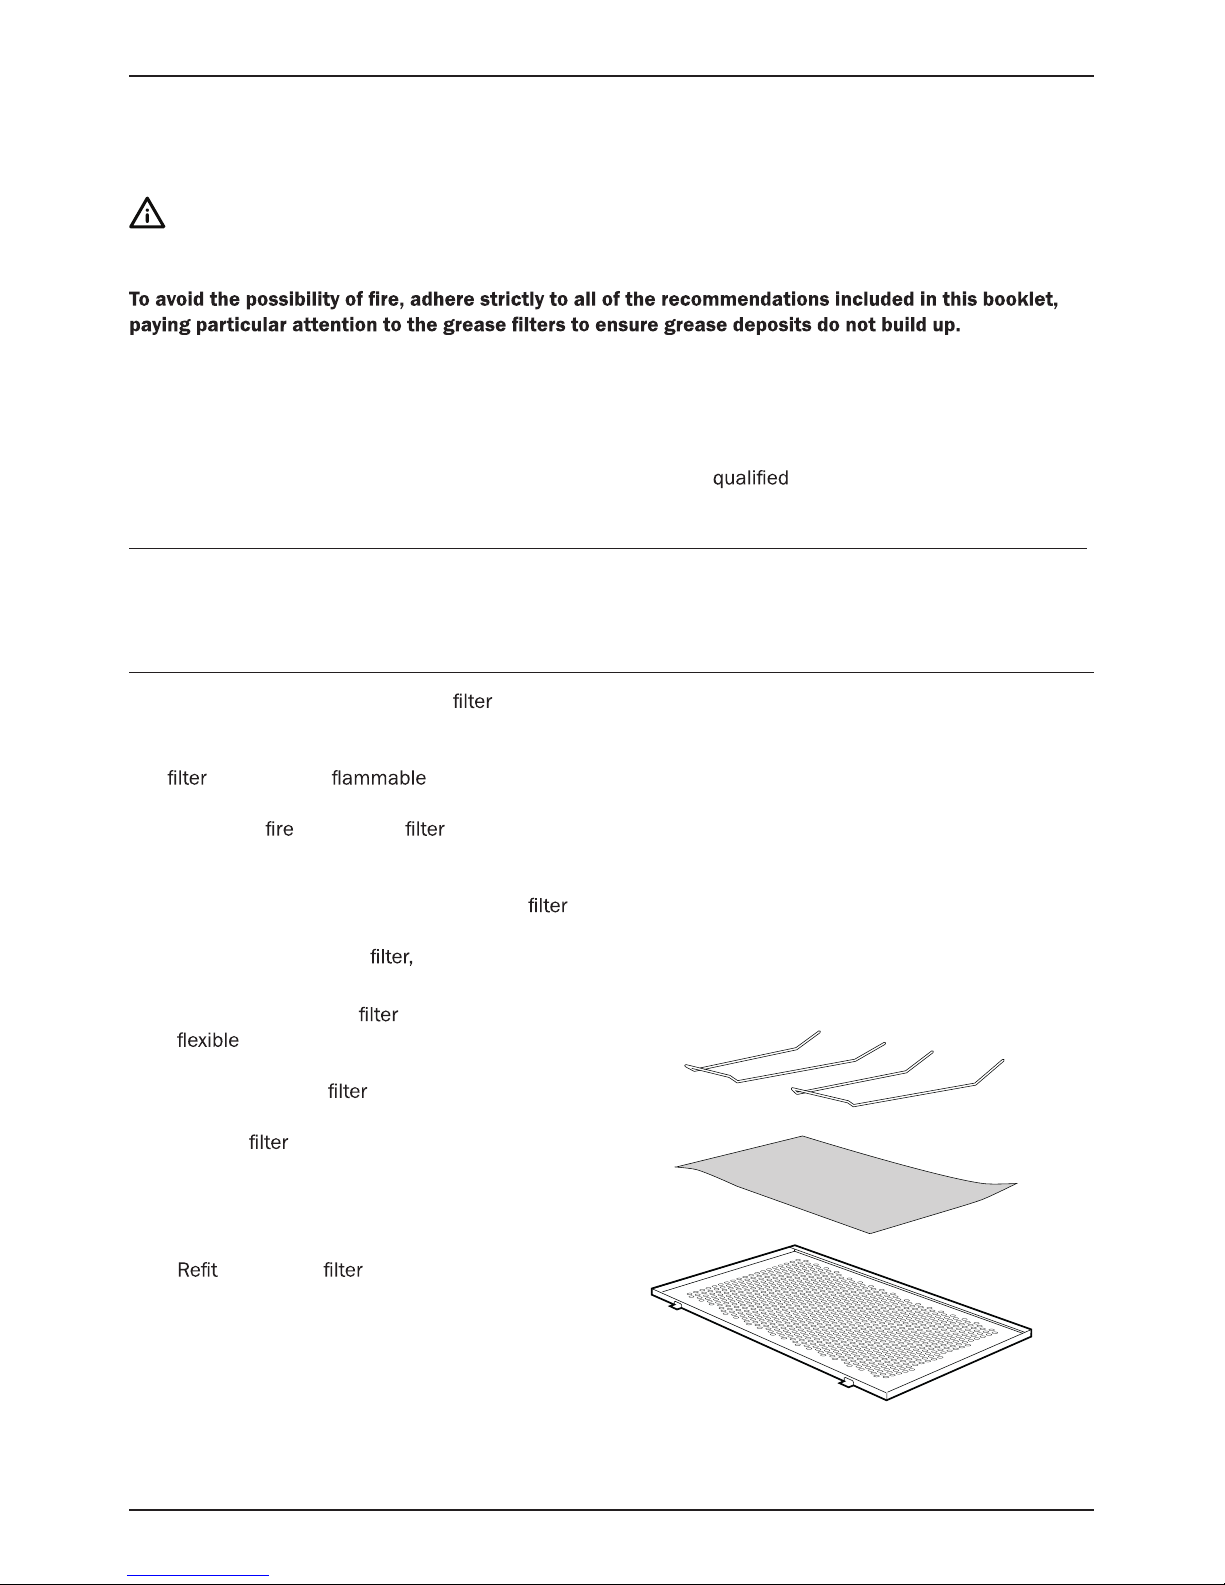
The Grease Filters
Your cooker hood includes a grease which helps to absorb grease from cooking to protect your kitchen
and furniture from greasy residues.
The
may become if it becomes saturated with this greasy residue.
To prevent this
hazard, the should be cleaned or replaced regularly. Depending on use, this should
be done probably at least once a month, * using hot water and normal washing-up detergent.
(* Depending upon the type of grease sheet
used)
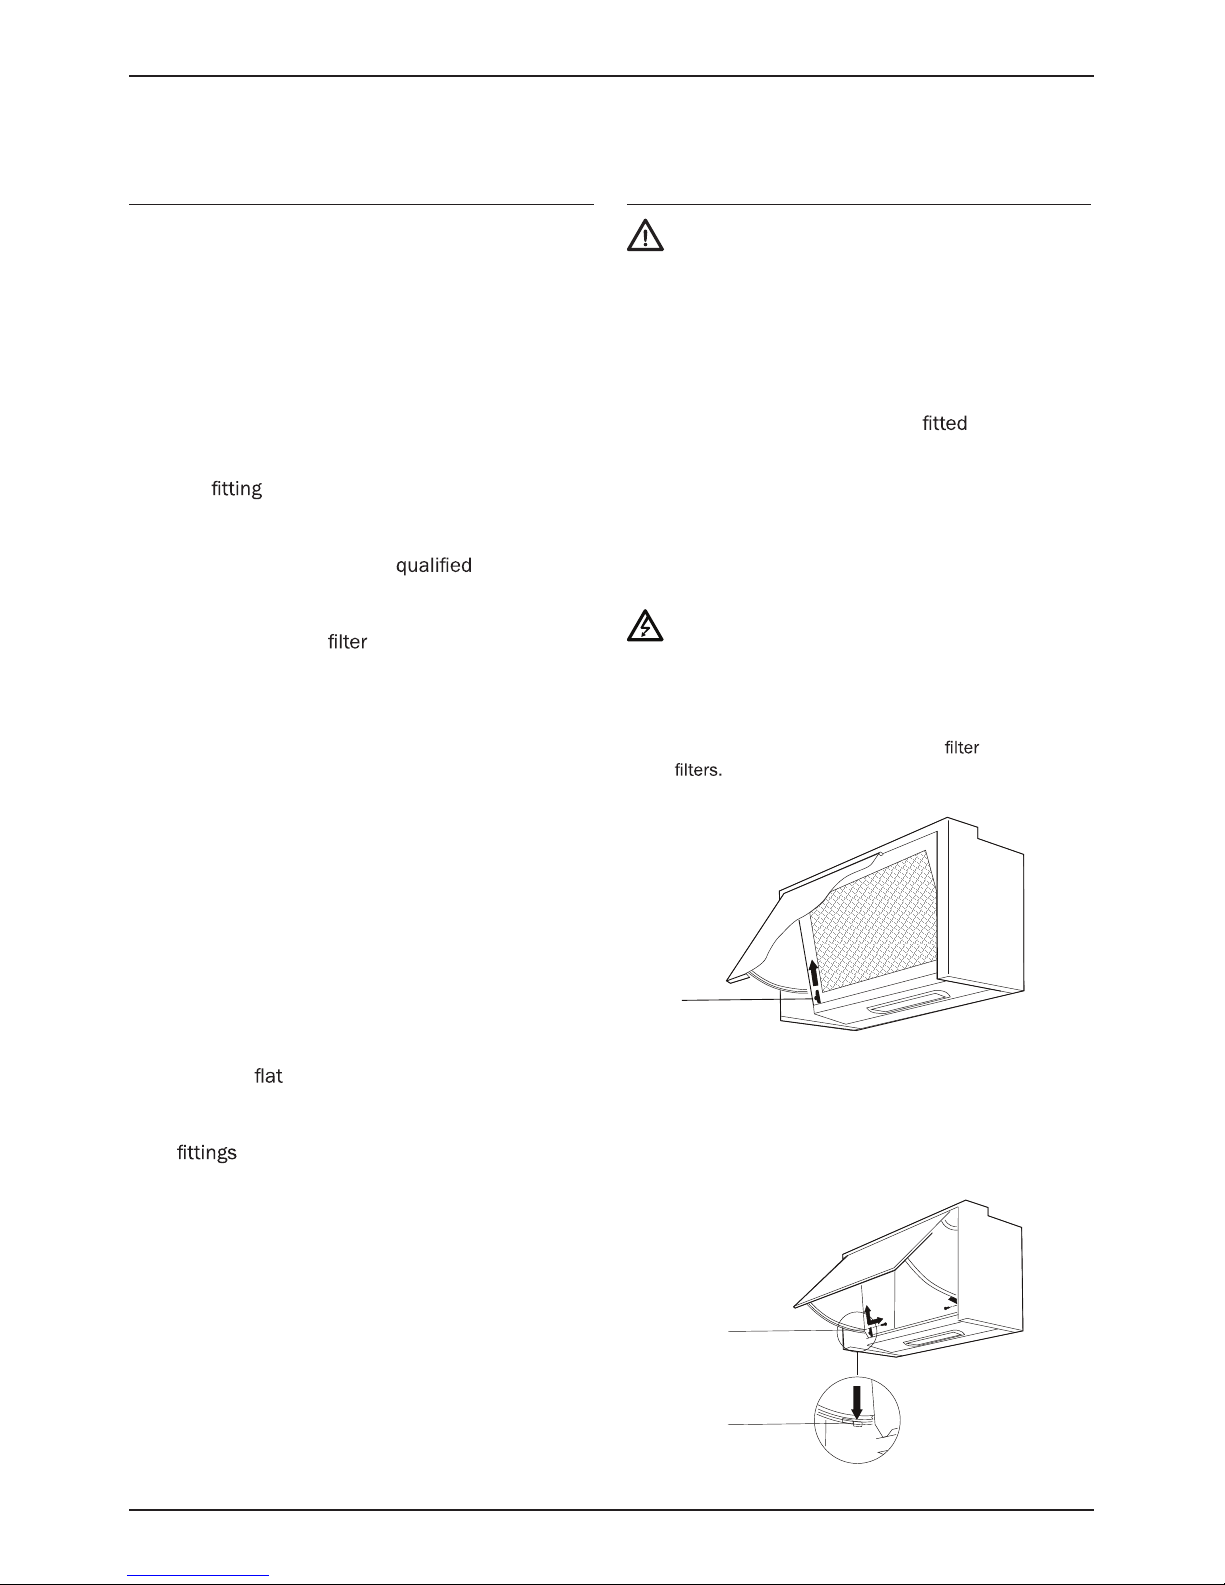
1. To access the grease
open the front panel and push the two catches (A) upwards.
Care and maintenance
2. Take out the grease by removing the
wire retainers
3. Soak the grease
in hot water and washing
up liquid for about an hour. (* If not washablereplace
instead)
4. Rinse it off thoroughly with hot water.
5. Repeat the process if required.
6. the grease once it has dried.
7. Close the front cover.
You should wipe over the front panel with a damp
cloth and hot soapy water, then dry it thoroughly
with a soft cloth.
Page 9
Exclusive to Howdens Joinery.co
Page _ 9
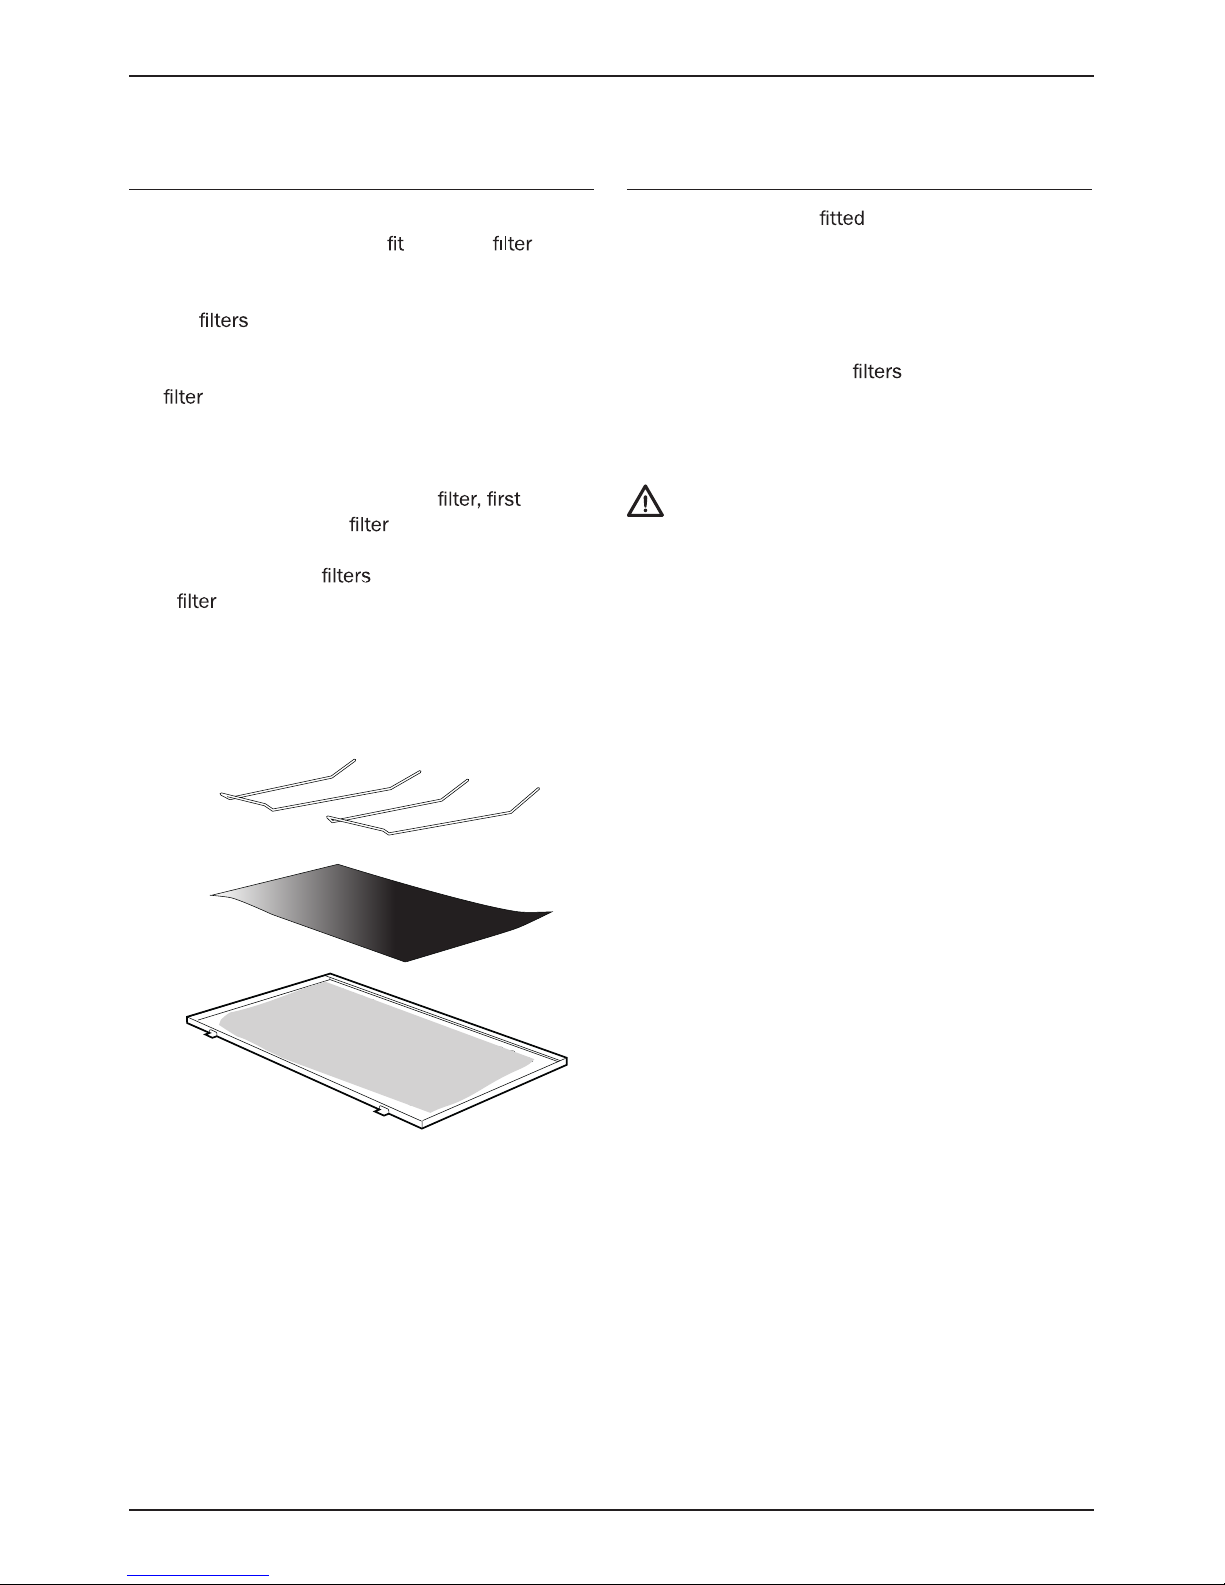
The Carbon Filter
If the appliance is going to be used in recirculation
mode then it is necessary to
nobrac a
This will help to absorb odours caused by cooking.
Carbon
have a limited life. We advise you
to change them when there is a noticeable drop
in performance. The intervals between changing
the
will depend entirely upon the amount of
cooking you do, but on average they will last about
6 months.
• To gain access to the carbon
of all
remove the grease
.evoba sa
• Remove the old
and install new charcoal
by
first removing the flexible wire
retainers. Then remove the old carbon filter
and replace with a new one, this should be
placed above the grease filter. Finally replace
the wire retainers and refit the assembly.
Replacing the Lamps
The extractor hood is pmal htiw s that may
need to be replaced periodically.
To do this, ensure that the power is switched off and
the lamp has had time to cool.
• Remove the grease
to gain access.
• Unscrew the lamp and replace with new
lamp of the same type and wattage.
Lamp replacement is not covered by your
guarantee
The lamps on this appliance should only be used
during operation of the cooker hood. They should
not be left on permanently and used as a main
lighting source. The extractor is for domestic use
only.
.
User manual LAM2202
Grease filter: HJA2913
Carbon filter: HJA2914
Lamp: 28W Eco-Halogen SES
Page 10
www.howdens.com
Page _ 10
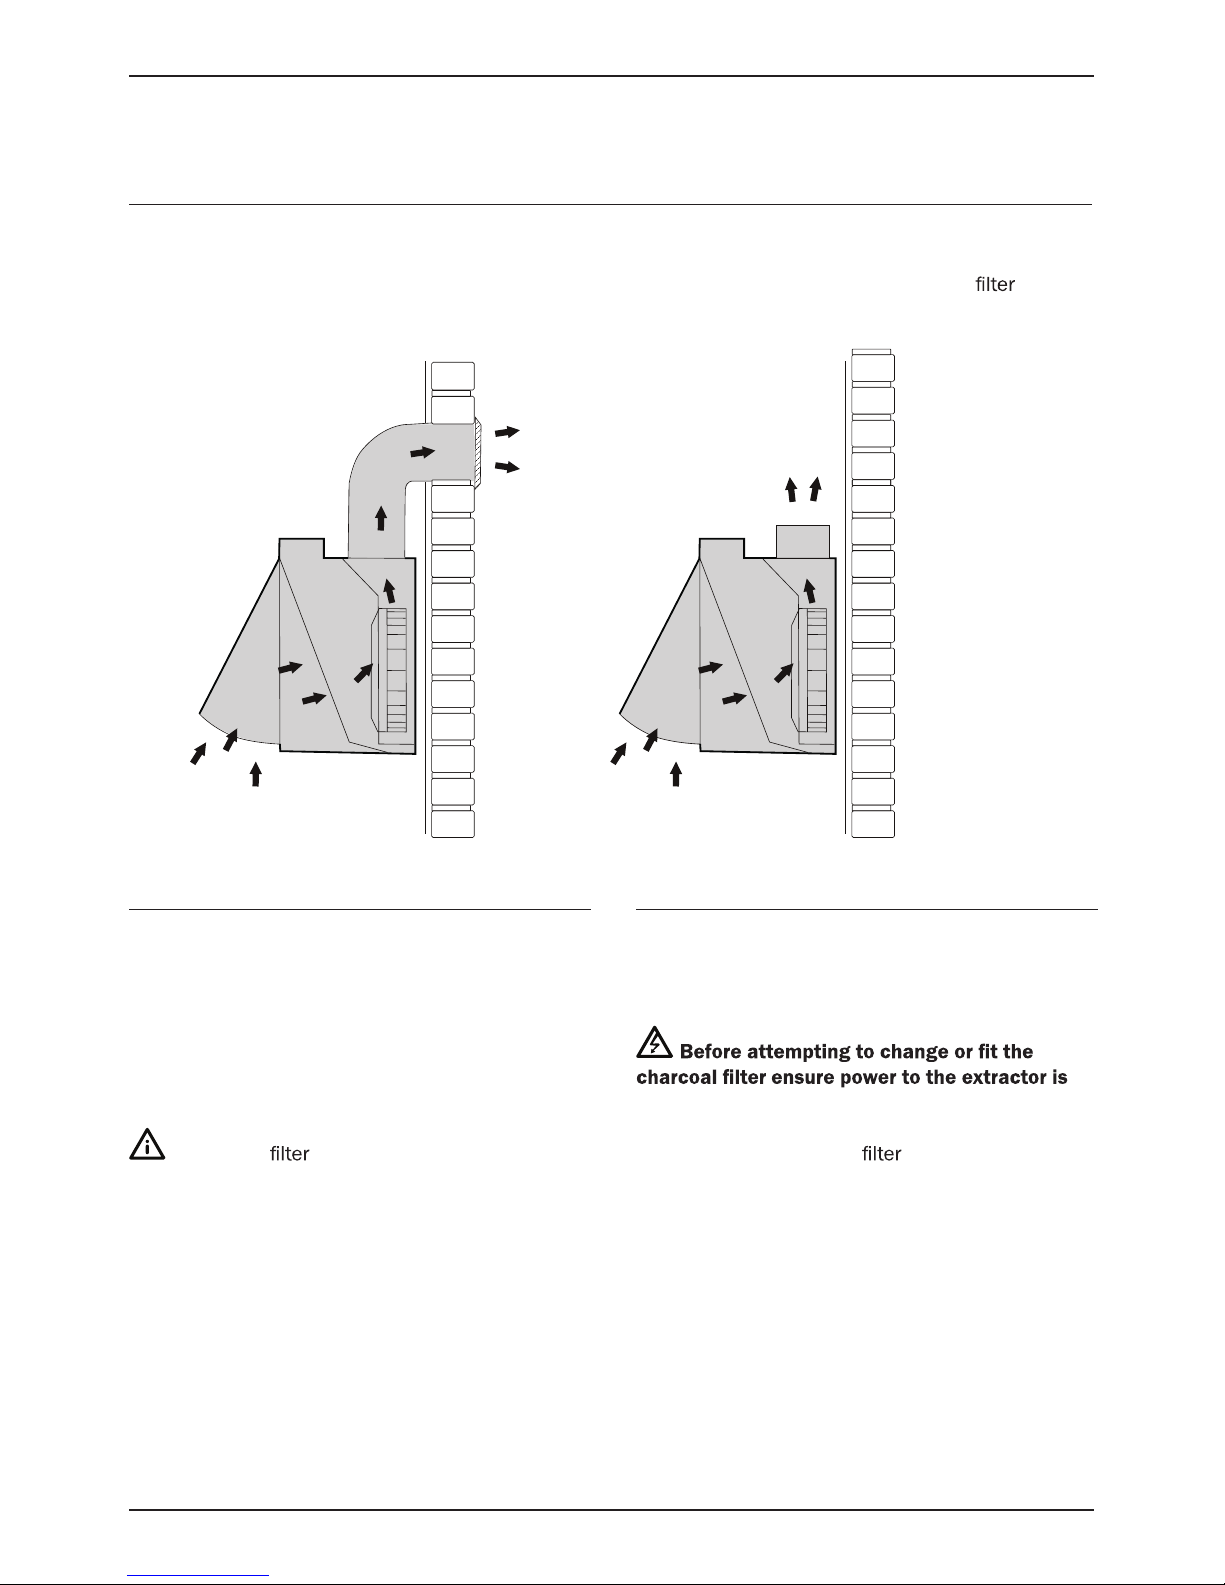
Methods of Extraction
The very best method of clearing the kitchen of unwanted odours is by connecting the appliance to an
exhaust duct and venting to the outside atmosphere via the ceiling or an exterior wall. (Suitable ducting kits
laocrahc a deen ton od uoY ).rotcartxe eht thguob uoy erehw toped eht morf desahcrup eb yam
nehw
using the external ducting mode.
Extraction Via Ducting
Never use the hood in areas where devices with
exhaust pipes connected to the outside are
already operating unless perfect ventilation can be
guaranteed.
• Connect the external ducting kit to the outlet
of the extractor.
A charcoal rotcartxe eht fi deriuqer ton si
is to be ducted out.
Extraction Via Recirculation
For extraction via recirculation, attach the charcoal
filter above the grease filter.
switched off.
• Remove
Remove the flexible wire retainers.
Place the carbon filter above the grease filter.
Finally replace the wire retainers and
refit the assembly.
the grease
Installation
E. F. G.
A.
B.
C.
•
•
•
Page 11
Exclusive to Howdens Joinery.co
Page _ 11
Before beginning installation
• Check that the product purchased is of a
suitable size for the chosen installation area.
In addition check whether there is an electrical
socket available that will be accessible once
the hood is mounted. If the product is going to
be used in extraction mode, then there should
also be space to connect a ducting hose to the
outside.
• Carry out all necessary masonry work prior to
the of the cooker hood.
• Ensure that all electrical connections are
carried out by a suitably
person.
• Before commencing installation of the cooker
hood the grease
should be removed.
• Check inside the product and ensure that
there is no transit packaging or any other
materials, such as packets of screws,
guarantees etc. These should be removed and
kept for future use.
• If possible, disconnect and move freestanding
or slot-in cookers from their position, to
provide easier access to the rear wall and
cupboards. If this is not possible, then a thick,
protective covering should be placed over
the worktop, hob top or cooker. This will help
to protect these surfaces from damage and
debris.
• Select a
surface for assembling the cooker
hood. Cover that surface with a protective
covering and place all cooker hood parts and
on it.
• Do not tile, grout or silicone this appliance
to the wall or cabinetry. This appliance is
designed to be surface mounted only.
Installing your cooker hood
You will have to decide before installing your
cooker hood whether to use it in extraction mode
or recirculation mode.
We recommend that at least two people install this
hood.
Your cooker hood should only be
to a wall and
secured between two cupboards.
It must be positioned at least 650mm above the
hob underneath it. This measurement should be
taken from the highest point on the hob, including
the burners.
Your cooker hood should only be connected to the
mains power supply after the rest of the installation
process has been completed.
1. Open the front panel and push the two catches (A)
upwards. Then remove the grease or grease
A.
2. Whilst the front panel is still open, remove the two
screws (B). Press the tab (C) down and remove the
front panel from its guide rails.
A.
B.
C.
User manual LAM2202
• Connect the coupling to the top or the rear of the
cooker hood,
• eht htiw dedulcni palf tfard-itna na dnif yam uoY
uoY .dooh rekooc eht rof sgnittif dna serutxif
should
sit this in the top of the coupling.
Page 12
www.howdens.com
Page _ 12
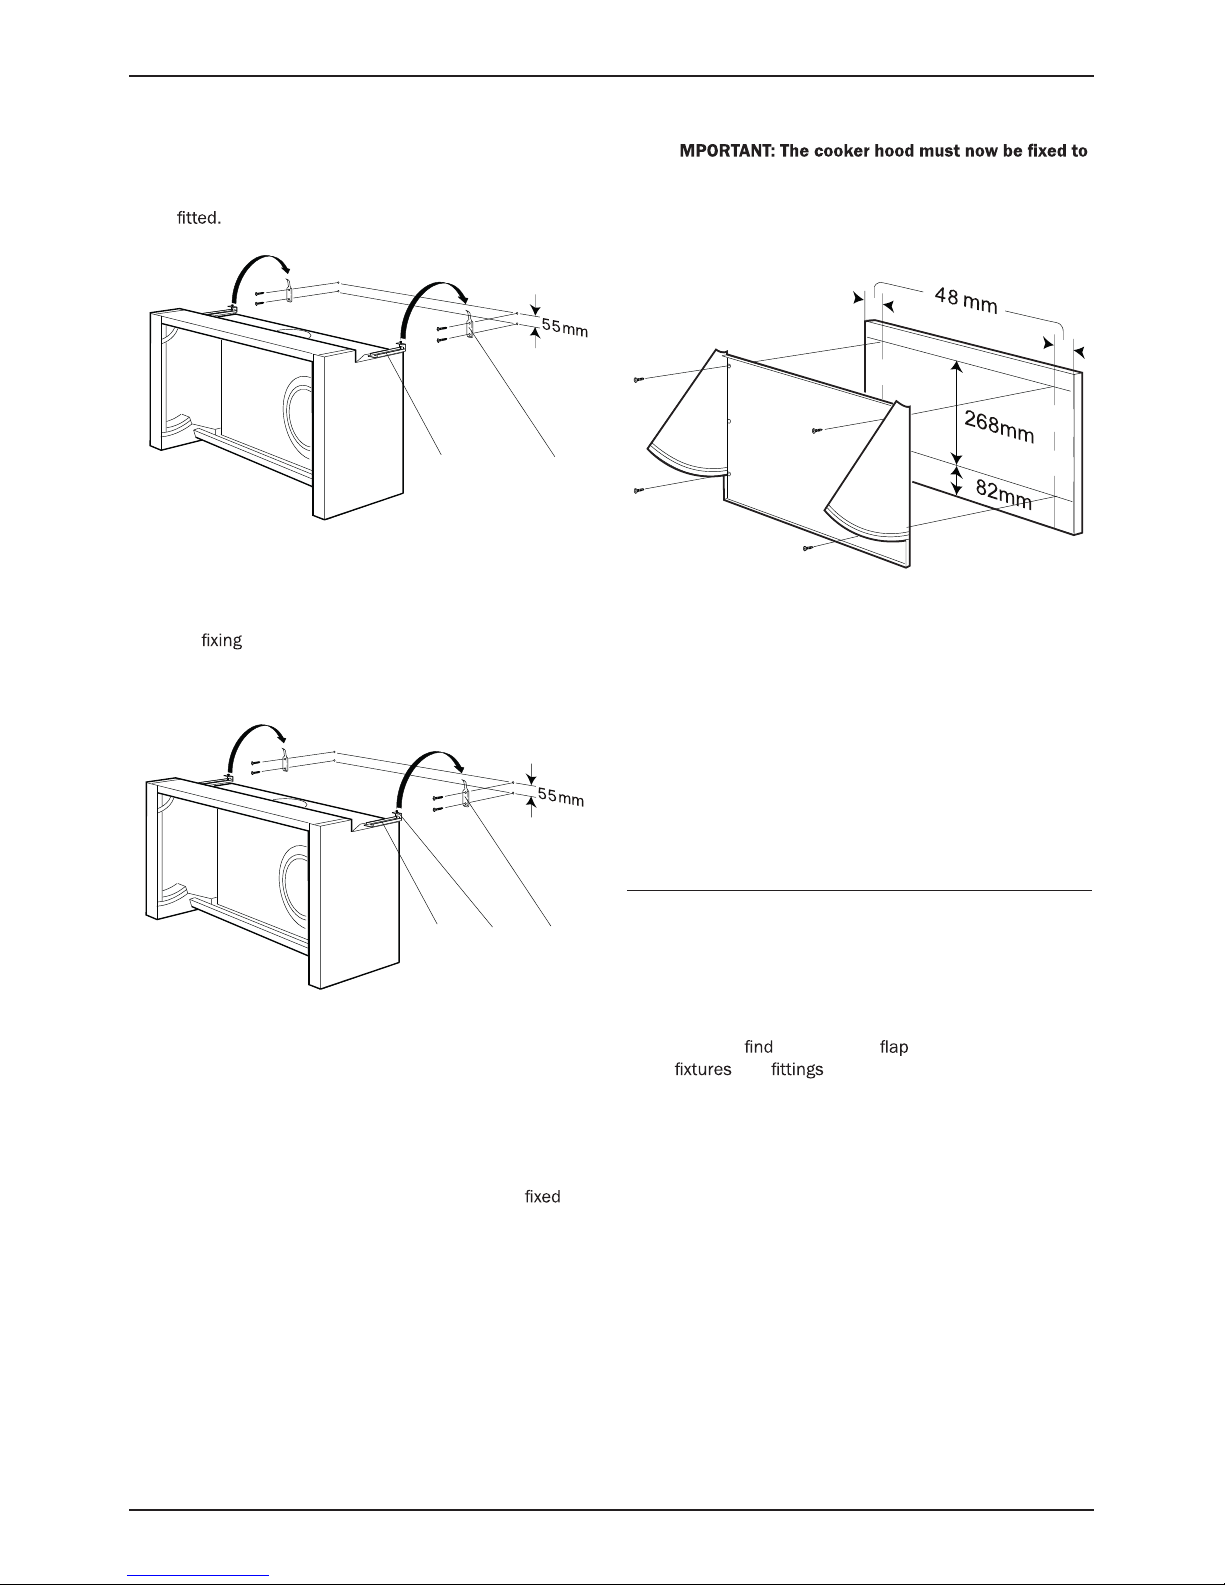
3. Secure the extractor mounting brackets (D) onto
the top of the hood, using the screws and washers
(E) supplied. Check that the adjustment screw (F) is
E.
D.
F.
E. F. G.
D.
G.
4. Measure a distance of 1050 mm between the
highest point on the hob top and the wall that you will
be
the hood to. You should also measure and
record the distance between the top of the extractor
mounting brackets (D).
E.
D.
F.
E. F. G.
Using a pencil, mark this height and then attach the two
mounting brackets (G) to the wall at this height, using the
screws provided. They should be positioned the same
distance apart as the extractor mounting brackets (D).
IMPORTANT: These screws must be securely tightened.
Hook the extractor mounting brackets (D) that you
to
the hood in step 3, onto the mounting brackets (G).
5. Some adjustment is provided within the extractor
mounting brackets. Use screw (E) to adjust the front
to back alignment of the hood. Use screw (F) to
adjust the height alignment of the hood.
6. If there is a gap between the rear of the cooker hood
and the rear wall. There is a spacer provided that can
be cut to the size of the gap and attached to the rear
of the cooker hood.
7. I
the adjacent cabinets, using screws (not provided).
You should screw through the holes in the side
of the hood, into the adjacent cabinets. THESE
SCREWS MUST BE FULLY TIGHTENED.
8. Place the front panel against the furniture door.
Using screws (not provided) secure the front panel of
the cooker hood to the inner surface of the furniture
door. Make sure that these screws are fully tightened.
9. Reattach the front panel to the front of the cooker
hood.
Connecting to external ducting
• Connect the coupling to the top or the rear of the
cooker hood, and then connect a 125 mm ducting
hose to the coupling (please note that the ducting
hose is not supplied with the appliance).
• You may an anti-draft included with the
and for the cooker hood. You should
sit this in the top of the coupling.
• If you use the rear or top venting position, the other
one should be blocked off using the blanking plate
supplied.
• The other end of the ducting hose should be
connected to a discharge outlet that is suitable for
cooking vapours. It should have a cross section of at
least 150 cm².
• The maximum distance between the coupling and
your discharge outlet should be 3 metres, with one
90 degree bend.
Page 13
Exclusive to Howdens Joinery.co
Page _ 13
Electrical Connections
IMPORTANT: Ensure that the electricity supply is switched off before connecting. Your Extractor is
intended for permanent installation.
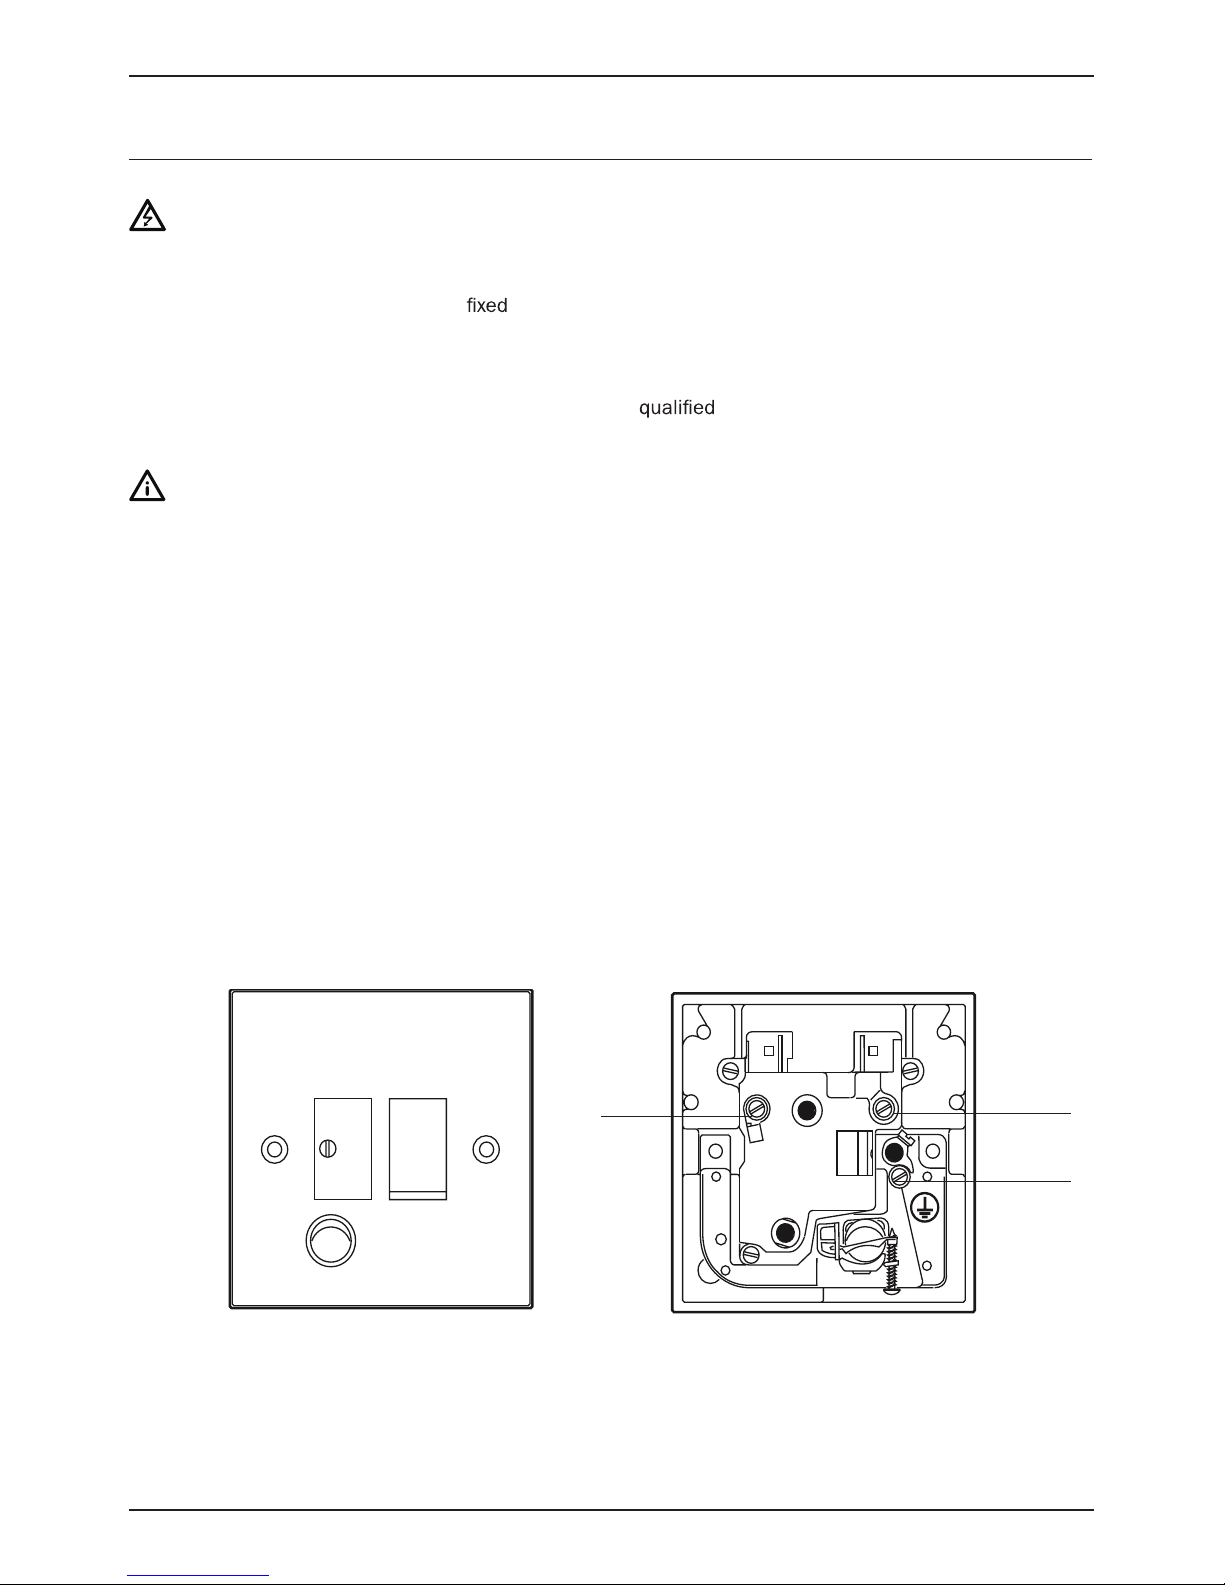
Your appliance must be connected to
teltuo rups desuf dehctiws elop elbuod a fo esu eht aiv gniriw
with at least 3mm contact separation. The isolation switch must be accessible after installation. (See
technical data for fuse rating).
We strongly recommend the appliance is connected by a
electrician and the installation must
comply with the I.E.E and any local regulations.
The terminology DOUBLE POLE -/+ means that both the live and neutral supplies are switched and
disconnected at the same time.
The terminations labelled SUPPLY are the connections for the internal house wiring and the terminations
labelled LOAD are for connection to the appliance.
IMPORTANT: The wires in the mains lead are coloured in accordance with the following code:-
Blue..........Neutral
Brown......Live
As the colours of the wires in the mains lead of this appliance may not correspond with the coloured
markings identifying the terminals in your spur box, proceed as follows;
The wire which is coloured blue must be connected to the terminal which is marked with the letter
‘N’ or coloured BLACK. The wire which is coloured brown must be connected to the terminal which is
marked with the letter ‘L’ or coloured RED.
Fig 3. Fig 4.
N
L
L
N
LOAD
SUPPLY
LOAD
SUPPLY
DP
250V~
FUSE
ON
Blue.
(Neutral)
Brown.
(Live)
Green / Yellow.
(Earth)
User manual LAM2202
Page 14
www.howdens.com
Page _ 14
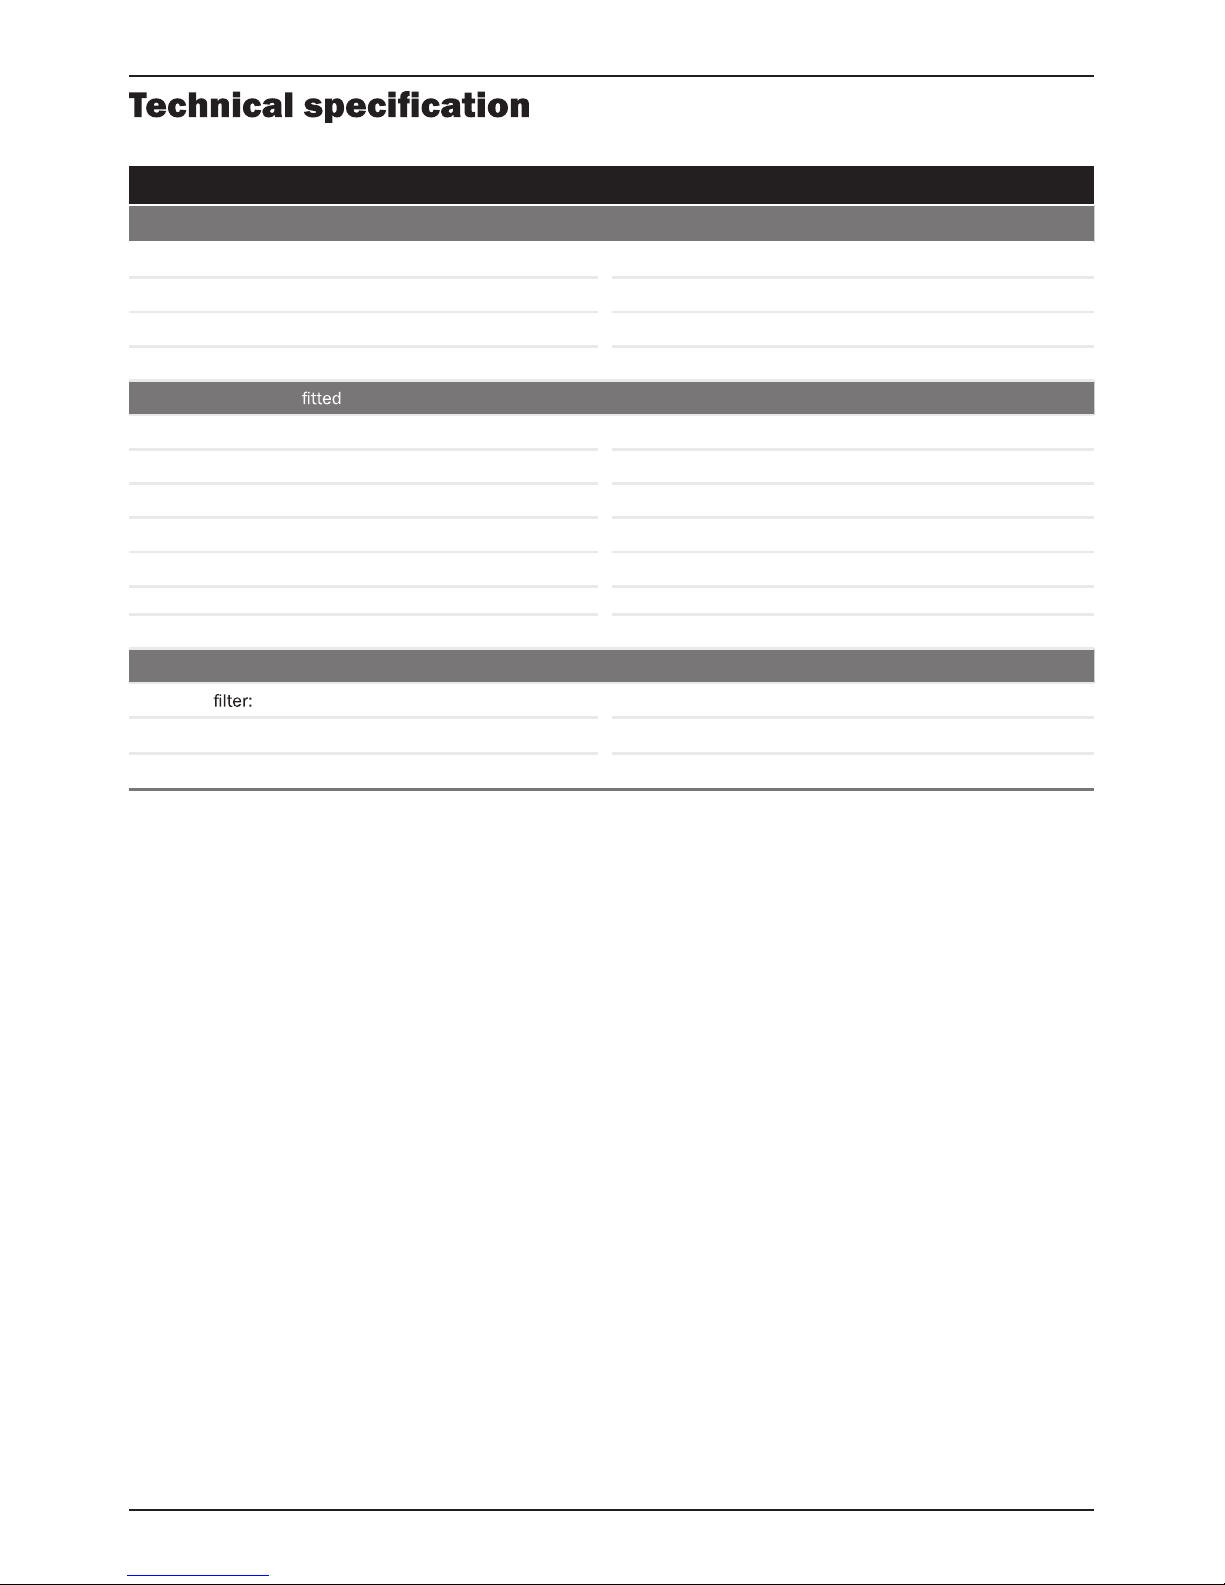
TECHNICAL INFORMATION
Dimensions:
Width (canopy): 600mm
Depth (canopy): 270mm
Height (canopy): 380 mm
Your Cooker Hood is
with:
Single motor
Slider control operation
Slider control operation
3 Speeds
Optional Extras:
Charcoal
Ducting kits: APL 2805/6/7
HJA2914
Grease filter: HJA2913
Page 15
Exclusive to Howdens Joinery.co
Page _ 15
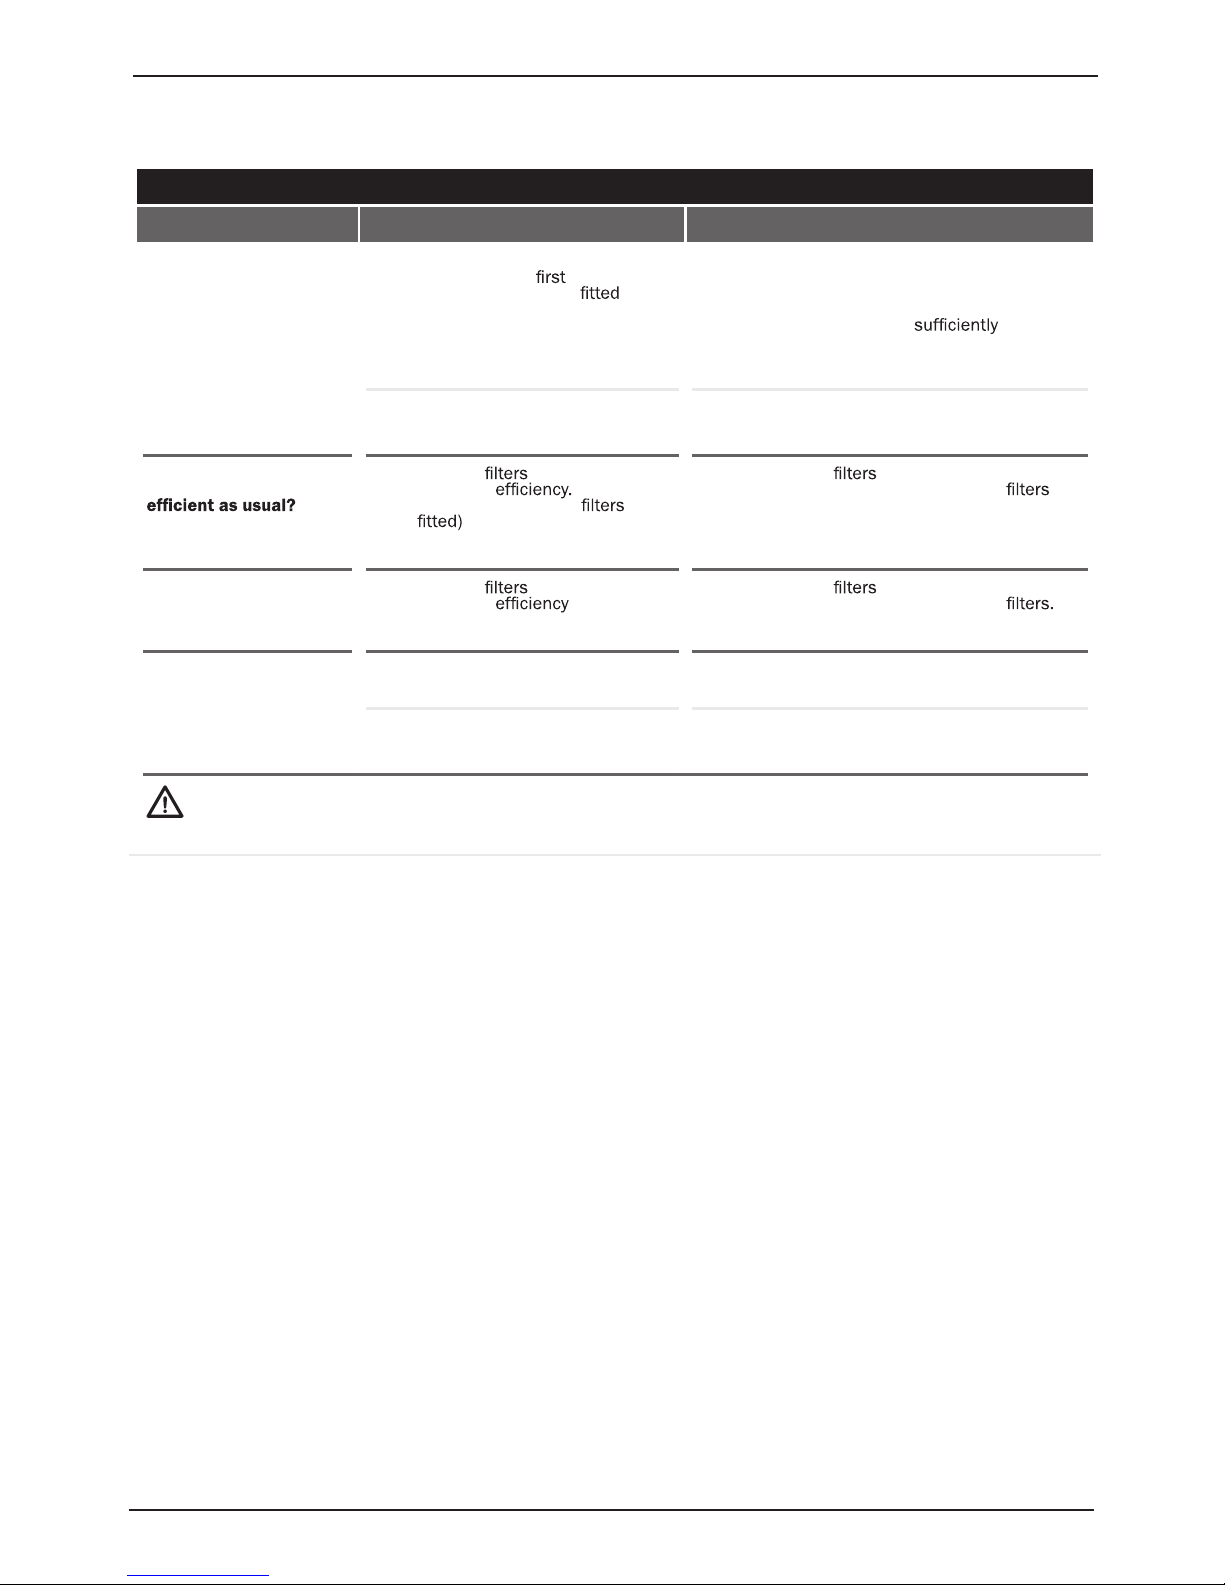
TROUBLESHOOTING GUIDE
Symptoms Possible Cause Solutions
Lamp fails to operate? • A replacement lamp is probably
necessary, but
check that
the lamp is correctly
into
its holder.
(Remember that the lamp is not
covered by the guarantee.)
Disconnect the mains electricity supply before
adjusting or replacing the lamp.
The extractor lamp may become hot; therefore
ensure the bulb has cooled
before
replacing.
• Power is cut. Check if there is power. Check the fuses in the
fuse box. If necessary, replace or reset the fuses.
Motor is on but fan
does not seem to be as
• Clogged can reduce the
product’s
Check the
grease and charcoal
(if
also ensure any venting is
not obstructed?
Clean the grease
with warm water and mild
detergent, and/or replace any charcoal
The extractor works
normaly but smells
linger?
• Clogged
can reduce the
product’s
and may
cause unwanted smells.
Clean the grease
with warm water and mild
detergent, and/or replace any charcoal
Product does not
operate?
• The mains fuse maybe defective
or has tripped
Check fuses in the fuse box. If necessary, replace
or reset them.
• Product is not connected
properly.
Check all power connections.
If you cannot eliminate the problem after following the instructions in this section, consult your
depot or the Authorized Service Agent. Never try to repair a nonfunctional product yourself.
Troubleshooting
User manual LAM2202
Page 16
www.howdens.com
Page _ 16
Your guarantee
Product Guarantee Details (UK only)
breakdown repairs. (Details of which are shown on your Proof of Purchase Document).
• Any claim during the period of the guarantee (MUST BE ACCOMPANIED BY THE PROOF OF PURCHASE)
• The product must be correctly installed and operated in accordance with the manufacturer’s
instructions and used for normal domestic purposes.
• This guarantee does not cover accidental damage, misuse or alternations which are likely to affect the
product.
• The guarantee is invalid if the product is tampered with, or repaired by any unauthorised person.
(The guarantee in no way affects your statutory or legal rights)
What to do if you need to report a problem-
Please ensure you have ready:
• The product’s model & serial numbers
• Howdens Proof of Purchase document
• Your full contact details
Call the Service Line on 0845 00 60 006
Page 17
Exclusive to Howdens Joinery.co
Page _ 17
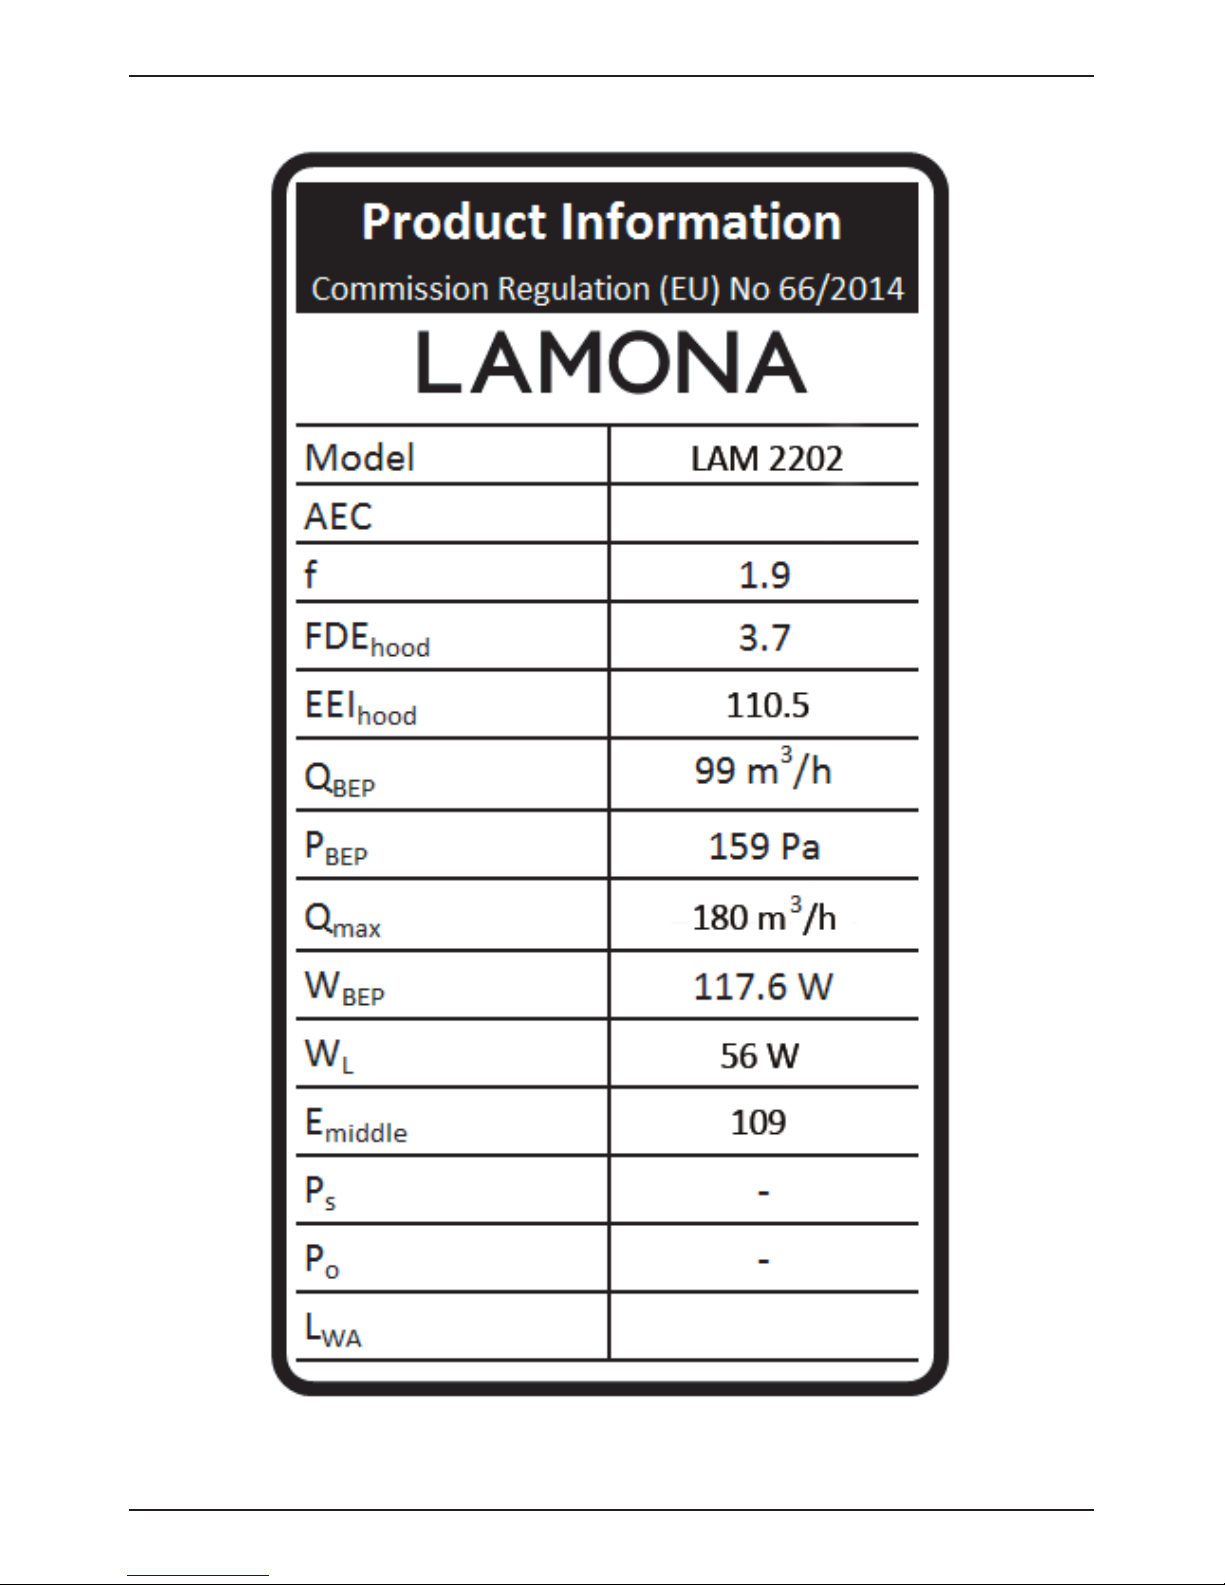
User manual LAM2202
122.4kWh/a
65dBa
Page 18

Page 19

Page 20
If supplied, please stick your self adhesive product rating plate
here, or make a note of the product serial number below in the
box below for future reference.
Serial Number : ...........................................................................................
Issue 6 : 07/2015
04308486/
 Loading...