

Page 1
Kitchen
Installation Manual
www.howdens.com
June 2018
Page 2

2
www.howdens.com
Page 3
Kitchen installation manual
Section pages
Introduction ........................................................ page 4
Supplied products ................................................... page 4
Guide - Hints and tips ................................................ page 5
Cabinet installation fittings ............................................ page 6
Additional installation fittings in pack ................................... page 7
Planning dimensions
Standard cabinets ............................................... page 8
Deep wall cabinets ............................................... page 9
Profile kitchens .................................................. page 10
Profile kitchens - Larder ........................................... page 11
Cabinet corner - Standard wall ..................................... page 12
Cabinet corner - Deep wall......................................... page 13
Section 1:
Kitchen installation - base cabinets..................................... page 15
Section 2:
Profile kitchens ..................................................... page 35
Section 3:
Linear Look......................................................... page 53
Section 4:
Kitchen installation (excluding base cabinets) ............................ page 59
Section 5:
Integrated handle design kitchen....................................... page 111
Section 6:
Appliance tower shelf configurations .................................... page 121
Bosch washing machine installation .................................... page 169
Bosch washer dryer installation ........................................ page 170
Section 7:
Midi-tower shelf configurations ........................................ page 175
Section 8:
Curved units ........................................................ page 193
Section 9:
Inclusive kitchens ................................................... page 201
Section 10:
Contract kitchens.................................................... page 211
Index .............................................................. page 214
3www.howdens.com
Page 4
Kitchen installation manual
This manual has been produced to give information on how to effectively install a Howdens Joinery kitchen. It contains not only installation information, but also
assembly details on some products and components such as drawer boxes, corner base cabinets and other specific items.
The manual is a complete guide to the assembly and installation of the kitchen and we would encourage you to keep this for reference when installing
Howdens Joinery kitchens in the future. Your Howdens depot will be able to advise you on any installation queries you may have, but please refer to this manual
in the first instance.
Whilst you may have installed many kitchens in the past, please ensure you are familiar with the basics of installation before starting the build.
One main point to note is the new Linear style of kitchen which can be created using new and existing components. Please refer to the linear section 3.
Howdens has also has a profile system enabling the opening of the slab doors and drawers whilst maintaining the clean lines and linear look of the handle-less
frontal. The profiles are simple to fit and are covered in section 2.
The profiles secure to the front of the base cabinets and the sides of the cabinets in larder/appliance tower applications.
Profiles are supplied in specific lengths and should be cut down to the appropriate size to fit to the cabinet run. The planning section of this manual shows
examples of the different profile applications and the principles for installation which can be applied to your cabinets. It also covers the profile packs and fittings
provided with them.
Supplied products
Cabinets are supplied with a fittings pack which contains the fittings required for installation. NOTE: There may be some additional items in the pack such as
worktop fixing brackets which will not be required for this handle-less kitchen installation.
Profiles for the various applications are packaged separately and are supplied with the fittings required for installation.
Appliance towers are supplied in a standard format and will require modification depending on the appliance you’re using. Follow the appliance tower section
of the manual for the different configurations and adjust the cabinet accordingly.
If you are installing a solid timber or solid surface worktop (such as granite), please refer to the separate installation instructions for these worktop types
which are available from the Howdens Joinery Depot.
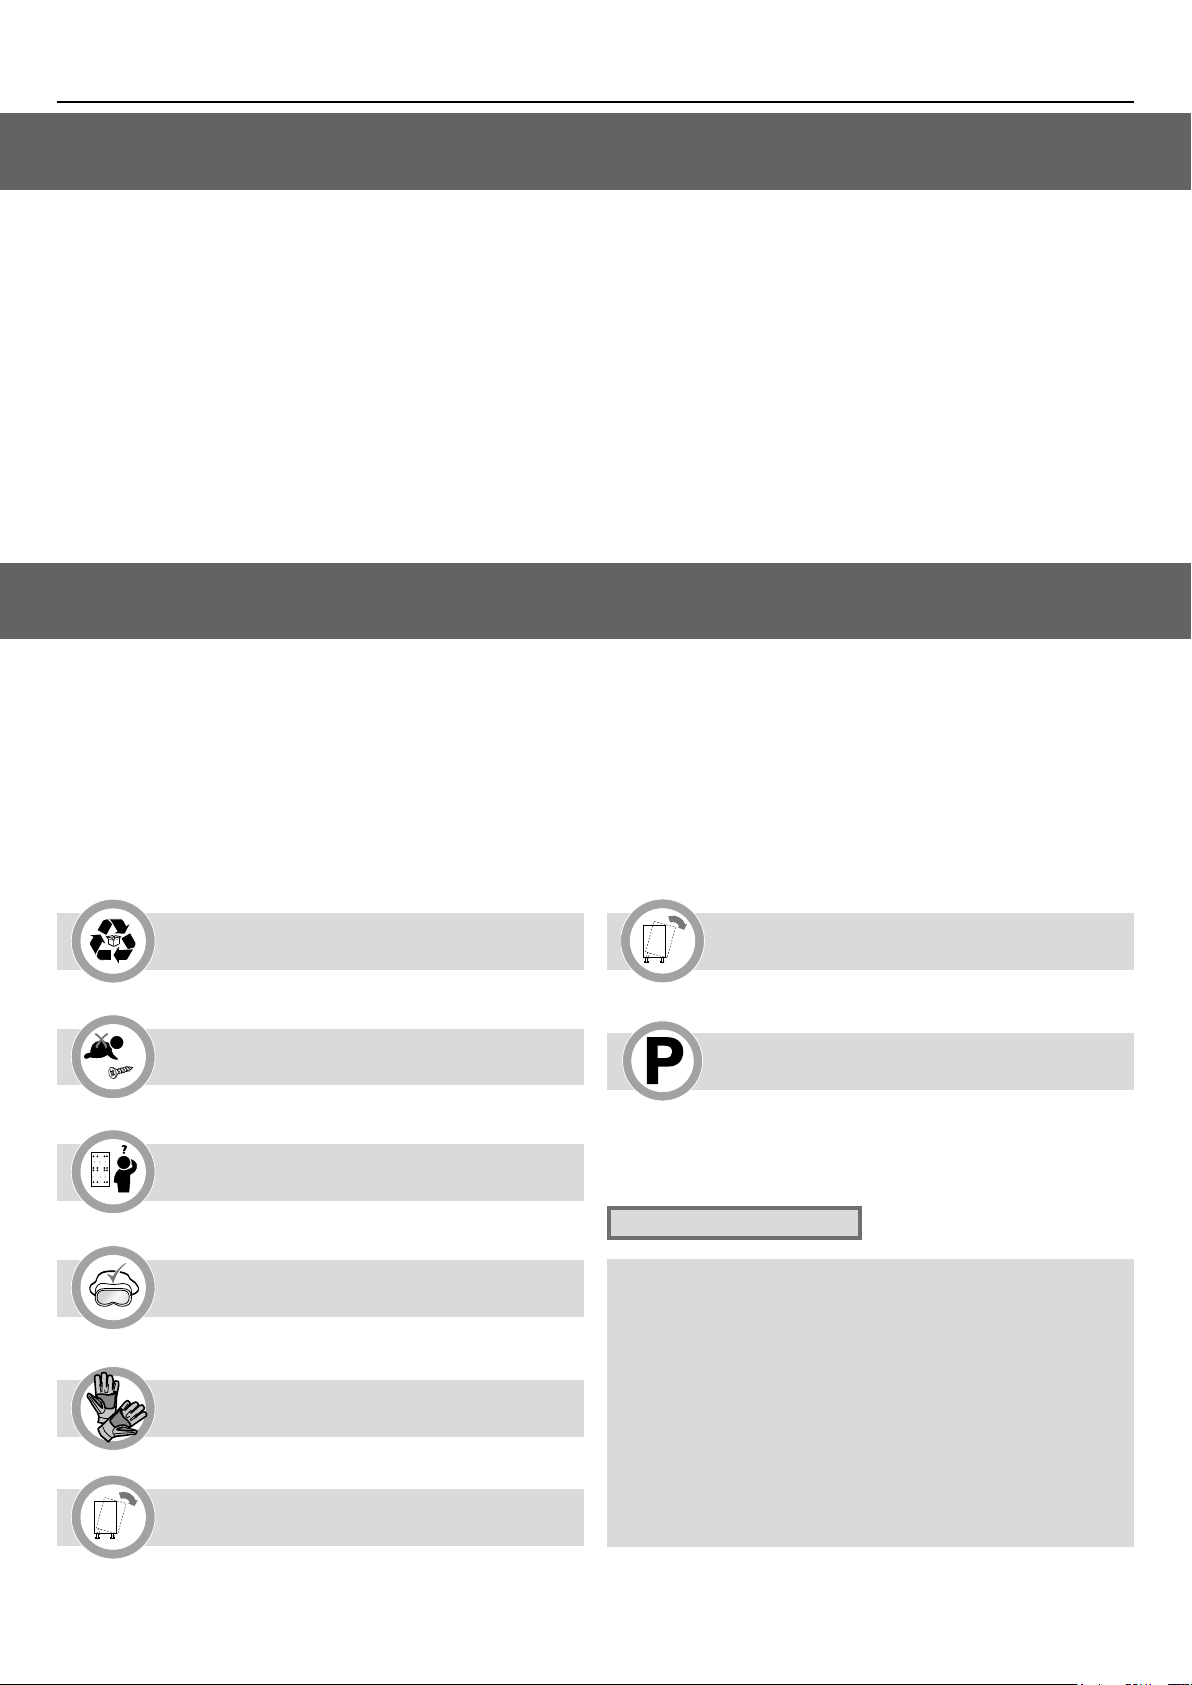
Recycle packaging in a safe environmentally friendly way.
Choking hazard, keep away from young children.
Panels can be multi-drilled, use only correct hole location.
Secure to wall (additional fittings may be required).
PROFILE KITCHENS ONLY
GENERAL NOTES:
Protective eye wear required.
Beware of sharp edges on profiles.
Secure to wall (additional fittings may be required).
4
- If fitting plinth drawers to base cabinet, these must be fitted before
cabinet installation.
- The appliance tower back panel must be removed from the cabinet before
installing an appliance. The back panel is only required behind a cupboard
area, as the aperture for the appliance must not be enclosed due to
ventilation.
- When adjusting the feet on base cabinets, ensure the thread is not
extended too high.
- When routering laminate worktops, care should be taken not to burn the
laminate. Always ensure the tooling is not blunt and the wheel bearings
are moving freely.
- When cutting profiles, ensure tooling is not blunt so as not to damage
profile.
www.howdens.com
Page 5
Kitchen installation manual
Guide - Hints and tips
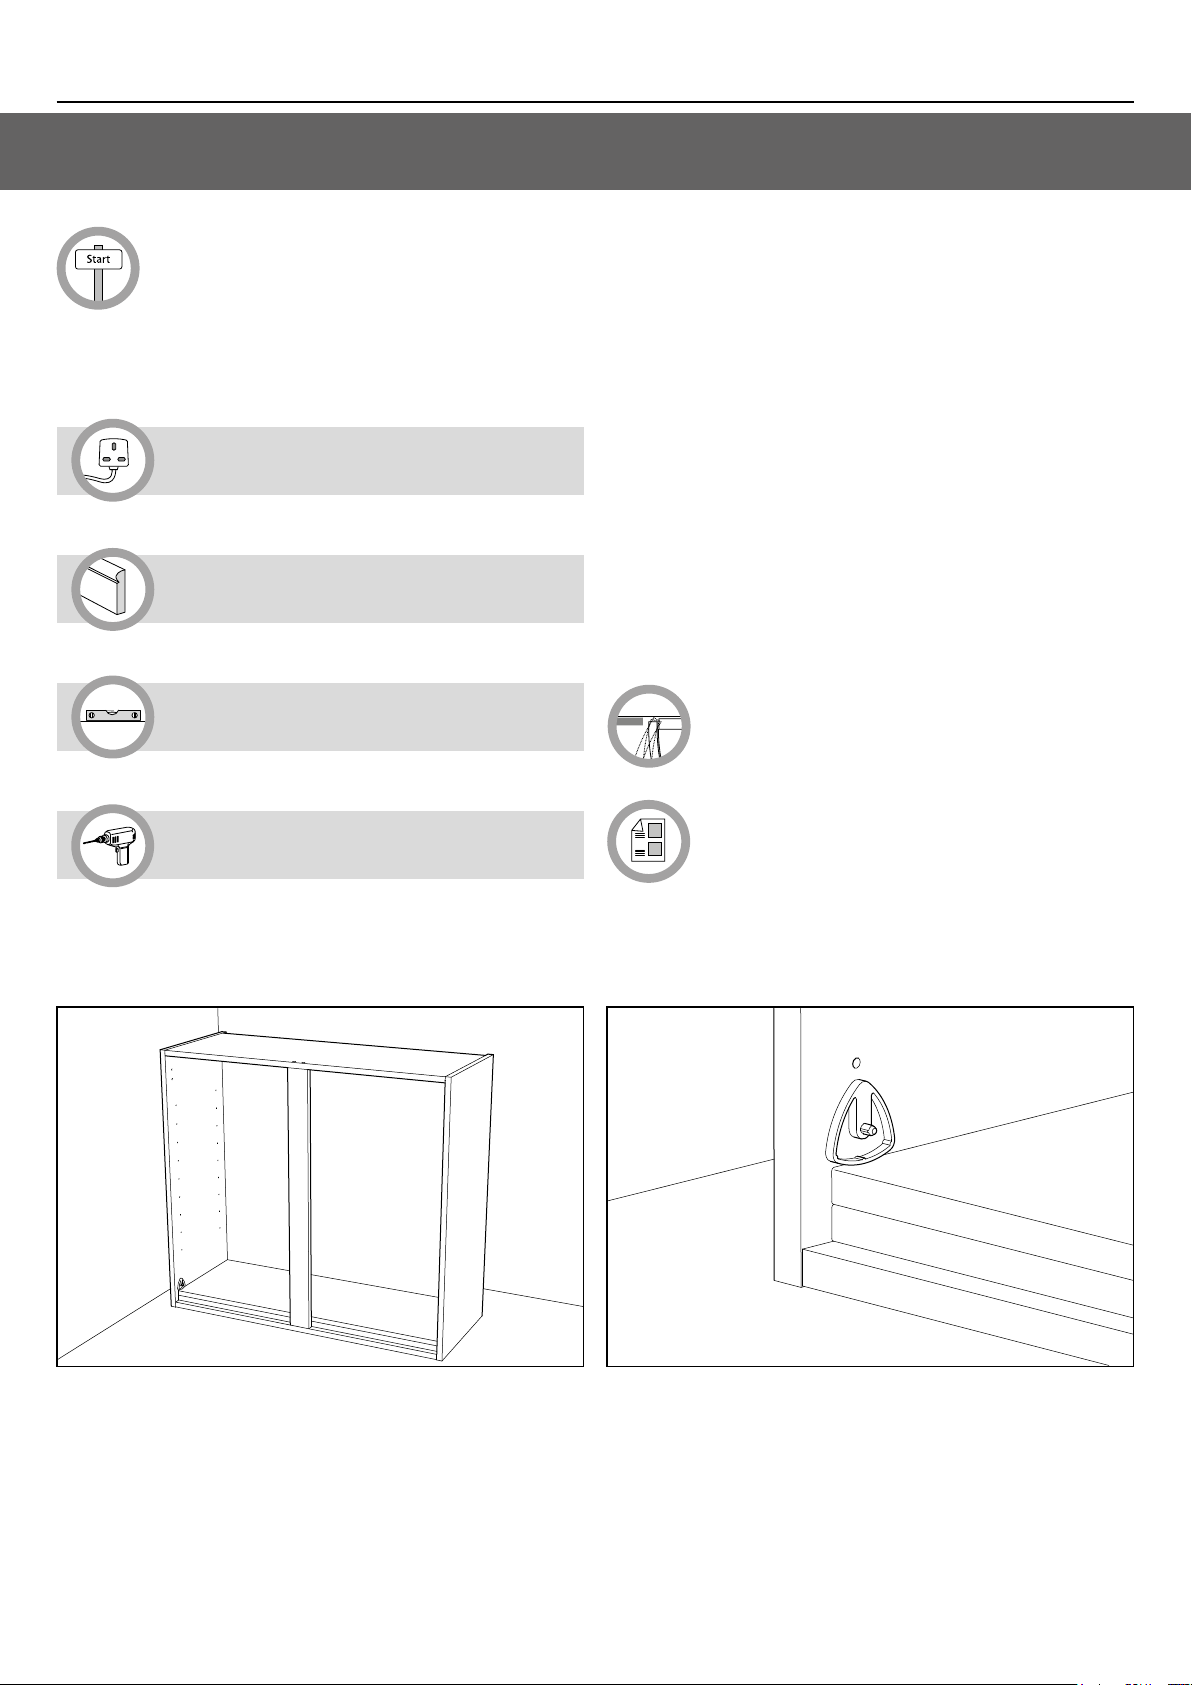
Installation should start in a corner, working out along the
walls. Base cabinets should be installed first, followed by
tower cabinets and finally wall cabinets. Worktops, doors, door
handles, drawer fronts, plinths, pelmets and cornice are best
fitted at the end of the installation.
Whilst the room is empty, check the position of the
plumbing and electrical points.
You may need to remove skirting boards along the length/
walls of the cabinets for some installations.
It is important that all cabinets are installed both plumb
and level before starting.
IMPORTANT:
Before fixing any cabinets to the wall, ensure the construction of that wall
is capable of taking the weight of the loaded cabinet and the appropriate
fixings are used. If in any doubt, please consult a professional.
IMPORTANT:
When fitting granite or quartz worktops, a metal bar should be fitted to
support any unsupported spans. This may be where an appliance has
been fitted between cabinets, where a gap has been left in a breakfast
bar application or where the cabinet front support rail has been cut to
accommodate a sink or hob. The metal bar can be fitted directly under the
profile, or under the MDF worktop support rail where applicable. Please refer
to the granite/quartz installation guides for details of the metal support bars
and fitting method.
Glue:
When using PVA wood glue, wipe away excess glue with a clean damp cloth.
NOTE: EXCESSIVE USE OF GLUE IN PANEL HOLES MAY CAUSE SPLITTING.
IMPORTANT: When tiling up to the curved wall cabinet,
ensure sufficient gap is left to enable the door to
open correctly.
Be aware of concealed plumbing and electrical
wiring when drilling into walls.
NOTE: During transit, standard and deep wall cabinet shelves have been secured in the base of the cabinet with retaining clips. Before installation, remove the
shelves from the cabinet by removing the clips. These clips can be discarded. Shelf pegs have been supplied in a separate fittings pack.
Ensure this installation manual is retained for future use.
5www.howdens.com
Page 6
Kitchen installation manual
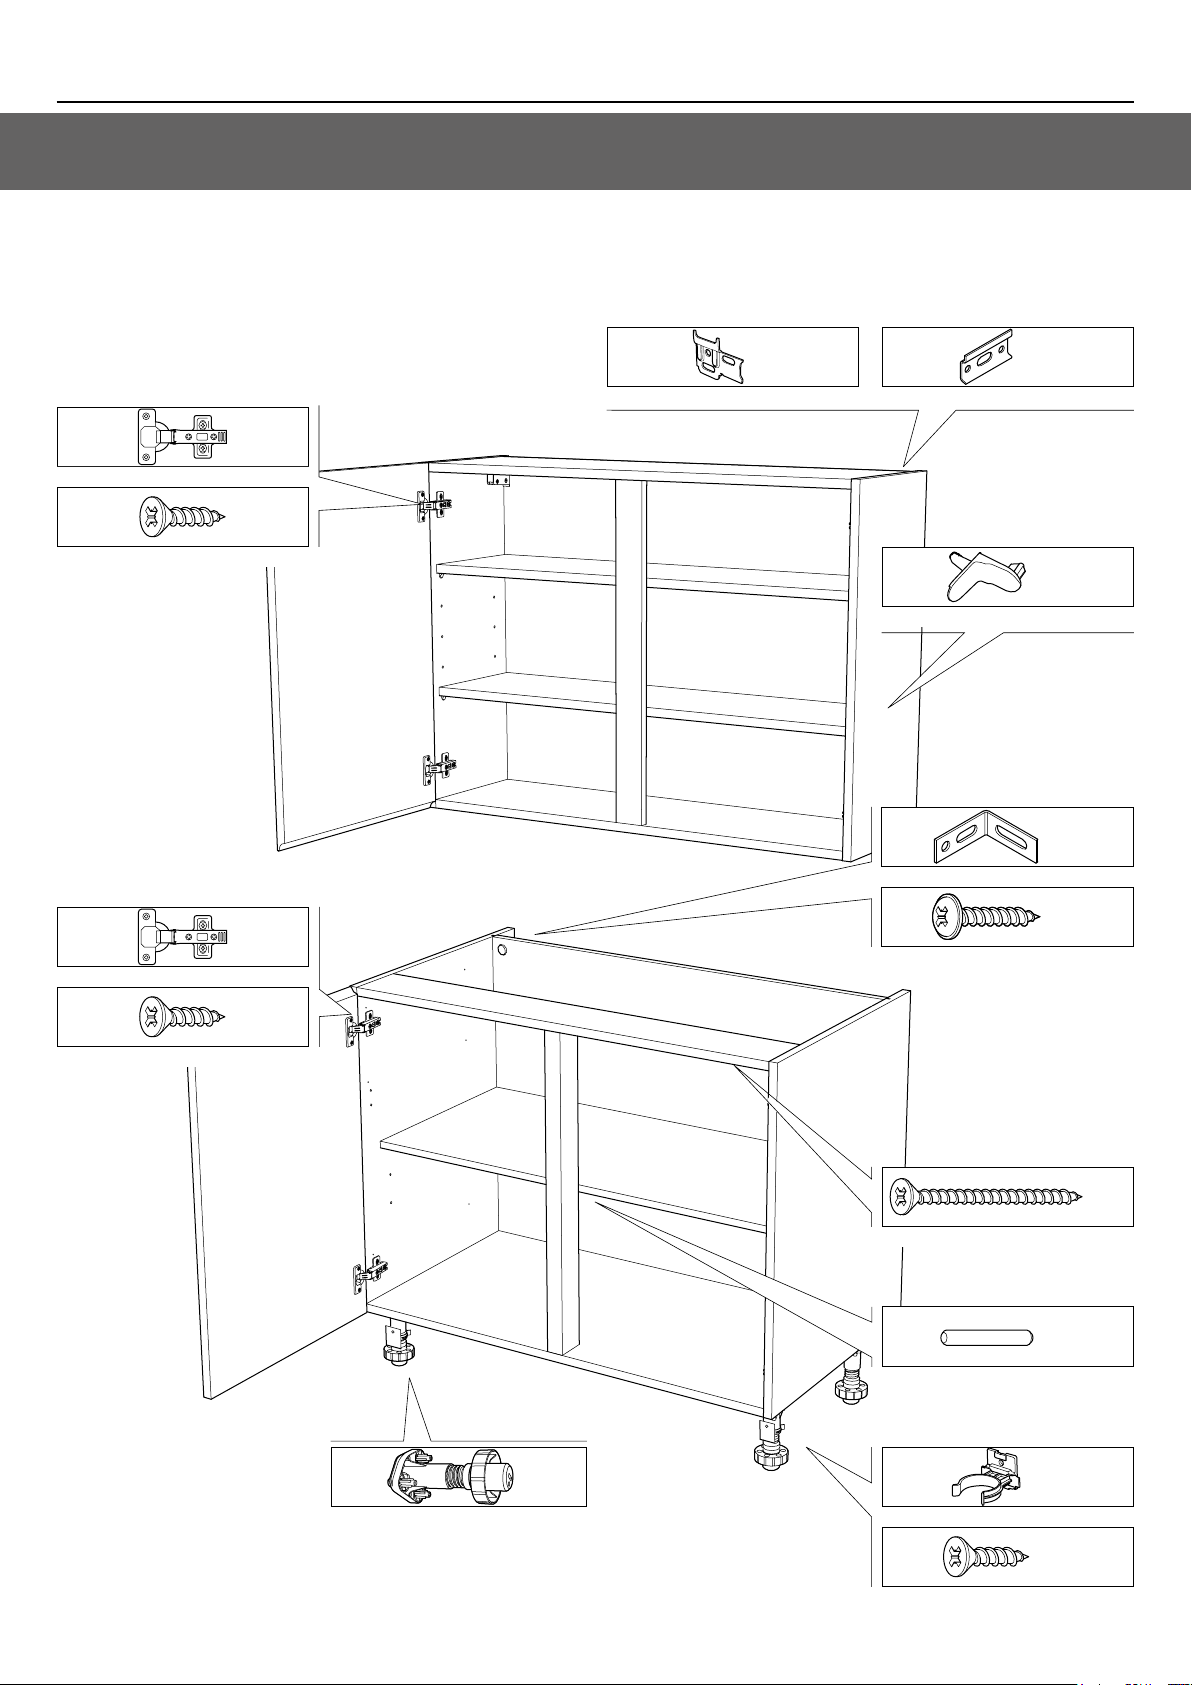
The fittings shown on these pages are standard fittings that may have been
supplied with the cabinet pack for installation.
Other fittings may be shown in this manual for specific cabinet types. These
will be referenced at the appropriate stages.
Wall and base cabinets
*Hinge and hinge plate
13m CSK screw
NOTE: Wall fixing screws have not been supplied
due to different wall types requiring different fixings.
Suspension bracketDeep wall suspension bracket
Standard metal shelf peg
*Hinge and hinge plate
13mm CSK screw
Fixing bracket
16mm Flange head screw
40mm CSK screw
Metal shelf barrel peg
*NOTE: Hinge and hinge plate may vary
depending on cabinet type.
6
Cabinet leg
2 Part plastic plinth clip
13mm CSK screw
www.howdens.com
Page 7
Kitchen installation manual
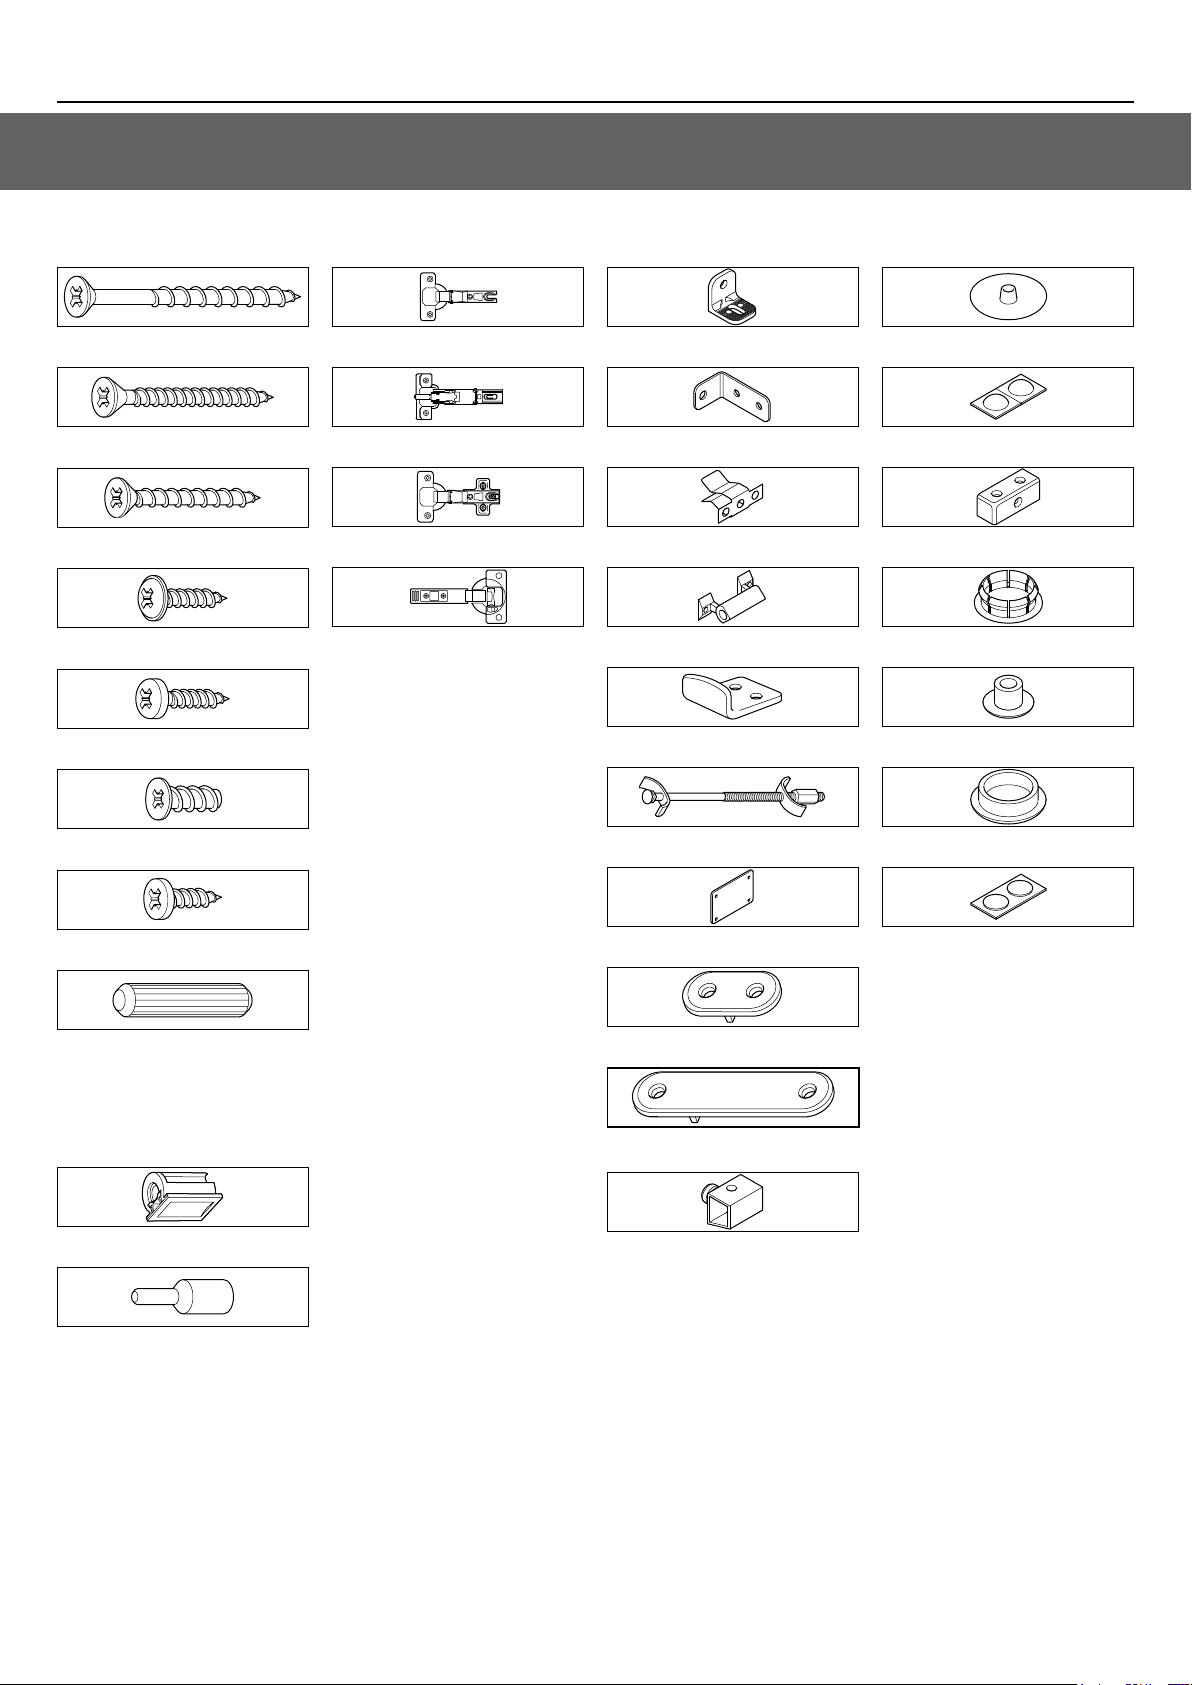
Additional installation fittings in pack
Screws and fixings
45mm or 50mm CSK screw
30mm CSK screw
25mm CSK screw
13mm Flange head screw
12mm Pan head screw
170° Kitchen hinge
Slimline hinge
Integrated soft close hinge
Brackets and jointsHinges Caps
90° Die cast bracket110° Kitchen hinge
Larder bracket
Spring clip - Female
Spring clip - Male
Stable door stop
Screw cover cap
Bumpons (x2)
KD block
Hinge hole cover cap
5mm Cover cap
EURO screw
14mm screw
6 x 22 Wooden dowel
Deep wall cabinet
shelf fixings
Concealed shelf peg housing
Concealed shelf peg
Worktop connector bolts
Steel jointing plate
Steel jointing plate
Long steel jointing plate
Worktop fixing bracket
Corner cover cap
Self-adhesive cover cap
7www.howdens.com
Page 8
Kitchen installation manual
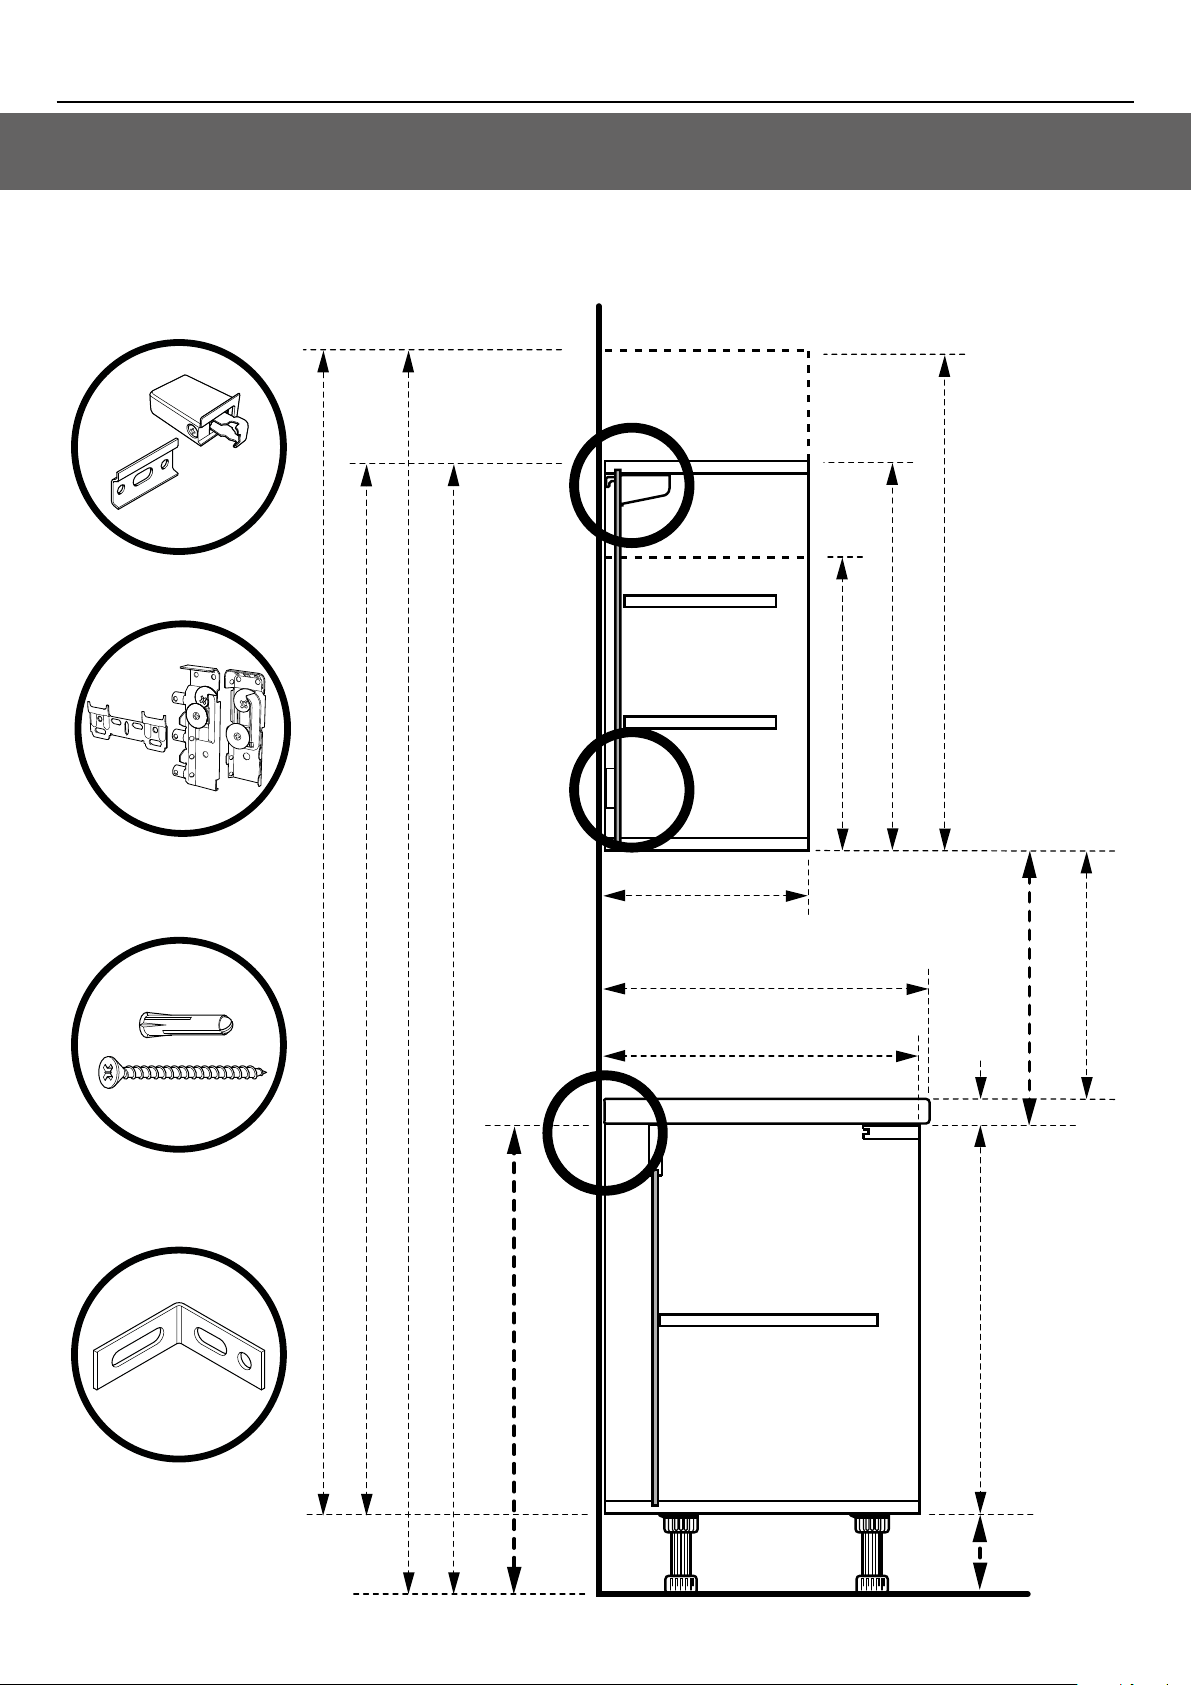
Planning dimensions - Standard cabinets
CONSIDERATIONS
• Use 25mm screws for 12mm decor ends.
A
A
Wall hanging
brackets
900mm (extra tall)
A
Concealed wall hanging
bracket (deep wall only)
B
Wall fixings
2122mm
1942mm
2292mm (extra tall)
2112mm (standard)
B
C
290mm
616mm
575mm
720mm (full height)
557mm (standard)
28/38/
40mm
464mm
502mm
(based on 38mm worktop)
C
720mm
890mm
Base cabinet
fixing bracket
170mm
8
www.howdens.com
Page 9
Kitchen installation manual
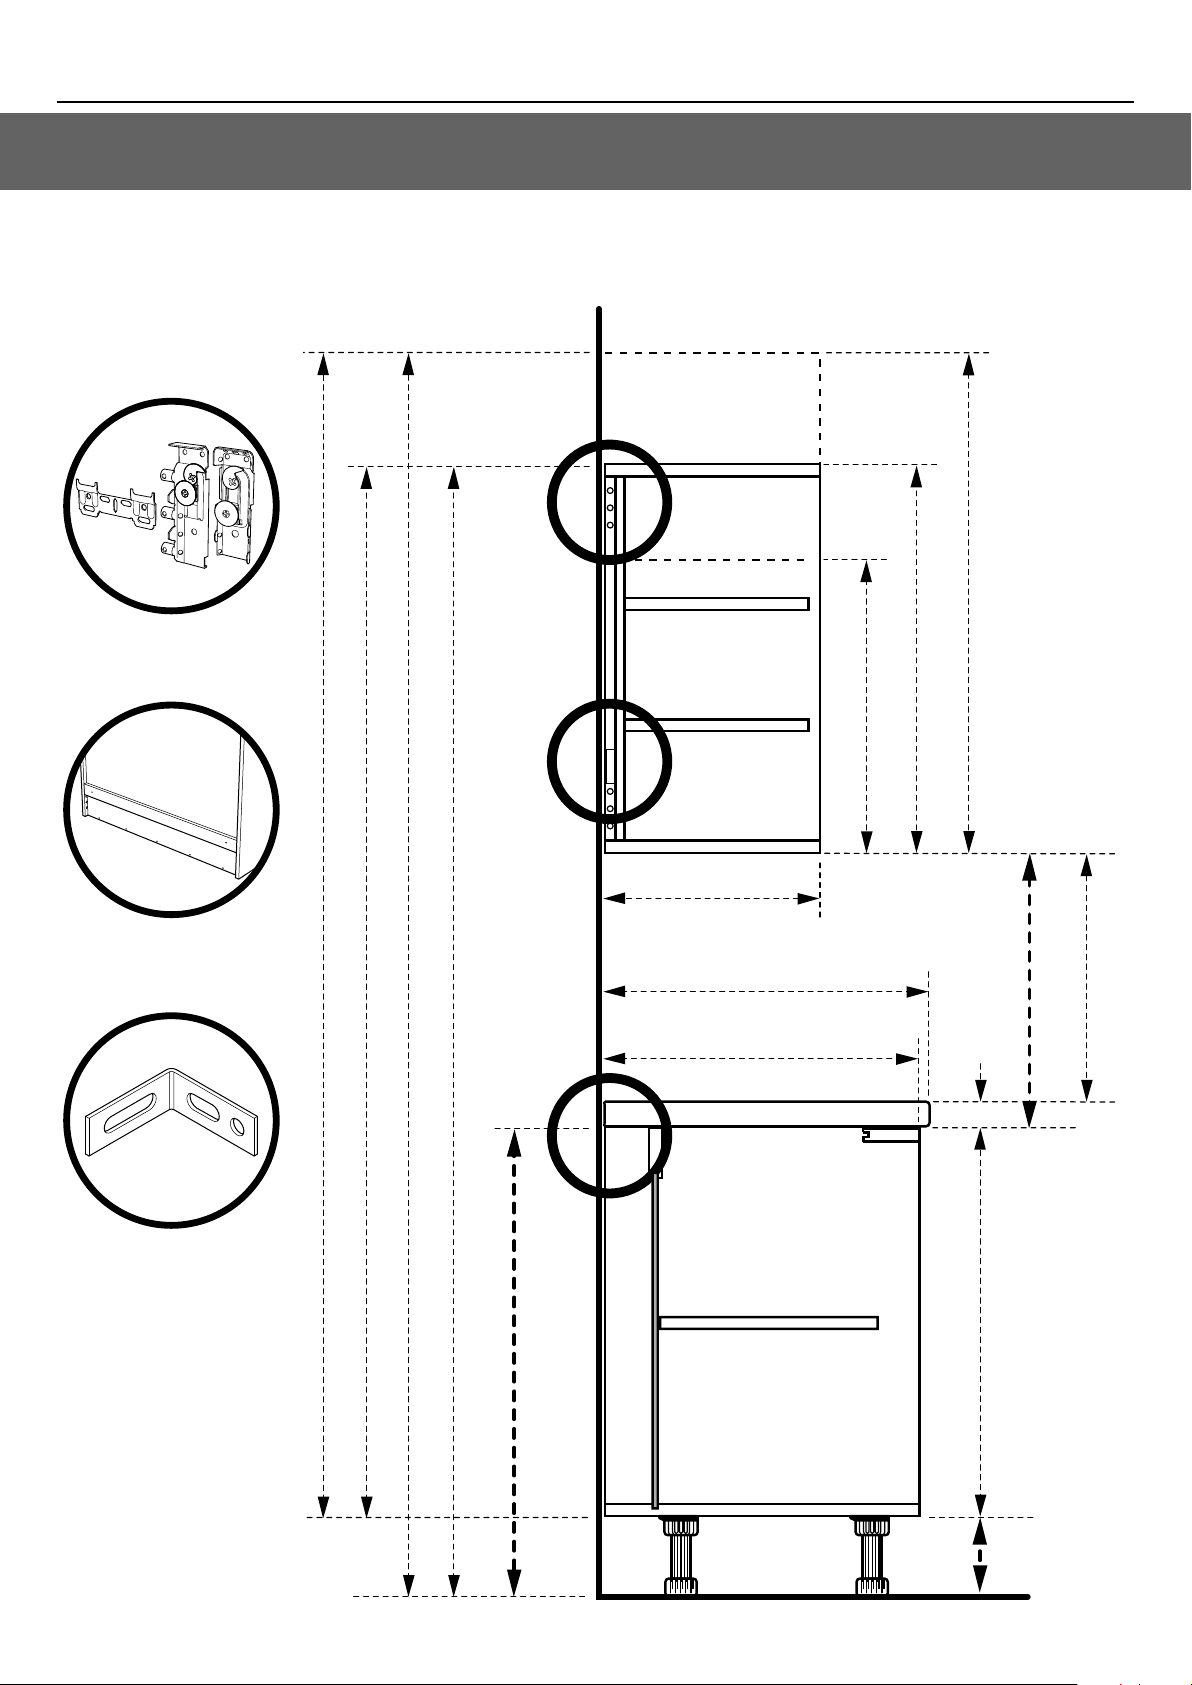
Planning dimensions - Deep wall cabinets
CONSIDERATIONS
• Use 25mm screws for 12mm decor ends.
A
Concealed wall
hanging brackets
B
Wall fixing
back rail
C
2122mm
1942mm
2292mm (extra tall)
2112mm (standard)
A
B
C
390mm
616mm
575mm
900mm (extra tall)
720mm (full height)
557mm (standard)
28/38/
40mm
464mm
502mm
(based on 38mm worktop)
Base cabinet
fixing bracket
720mm
890mm
170mm
9www.howdens.com
Page 10
Kitchen installation manual
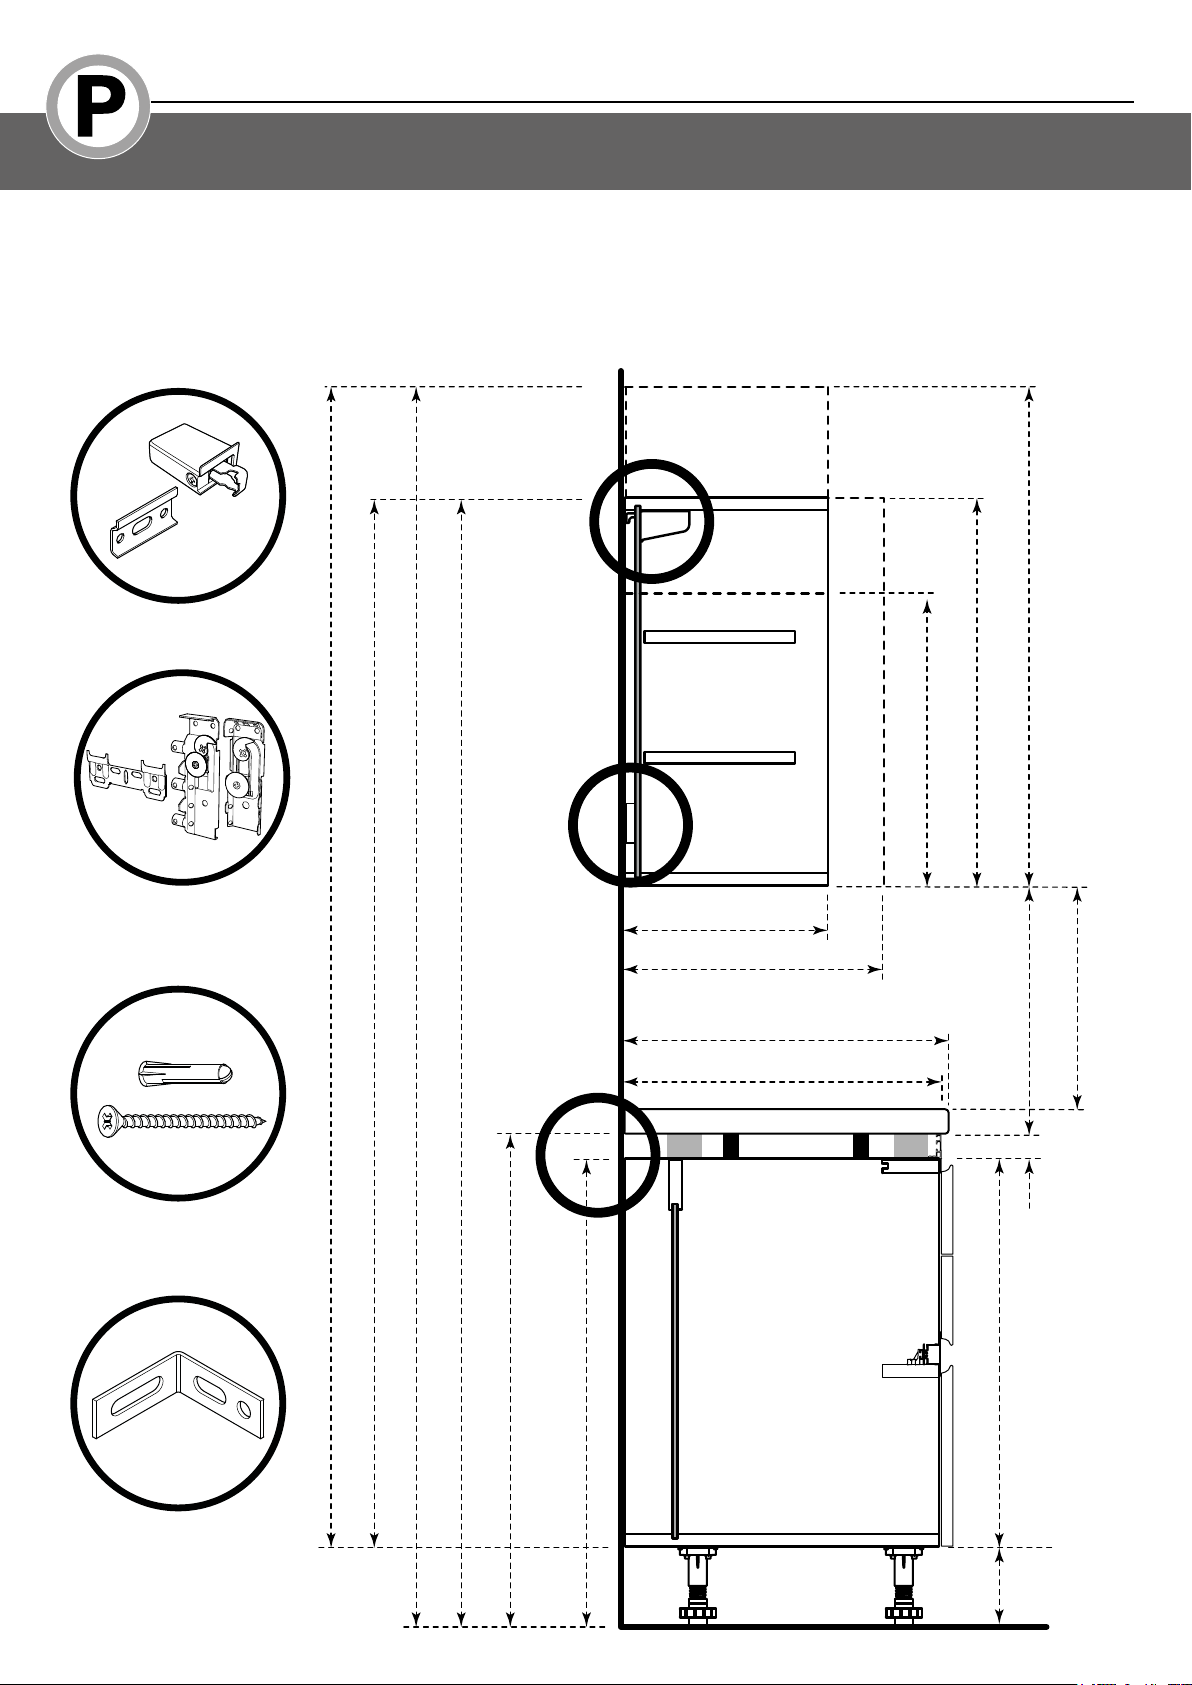
Planning dimensions - Profile kitchens
CONSIDERATIONS
• Worktop height is elevated by 30mm due to the profile application compared to other kitchen ranges.
• Tower/larder applications require a 30mm spacing each side to allow for the profile fitting.
• Pelmet rail should not be used on this handle-less style kitchen range.
• Appliance/larder towers are left and right handed depending on the door opening preference.
• When fitting two half height cabinets on top of each other, the top opening door will require a magnetic catch – push to open.
• Use 25mm screws for 12mm decor ends.
A
Wall hanging
brackets
A
Concealed wall hanging
bracket (deep wall only)
B
2122mm
1942mm
2292mm (extra tall)
2112mm (standard)
C
B
A
290mm
390mm
600mm
575mm
557mm (standard)
720mm (full height)
900mm (extra tall)
472mm
30mm
434mm
(based on 38mm worktop)
10
Wall fixings
C
Base cabinet
fixing bracket
920mm
720mm
890mm
170mm
www.howdens.com
Page 11
Kitchen installation manual
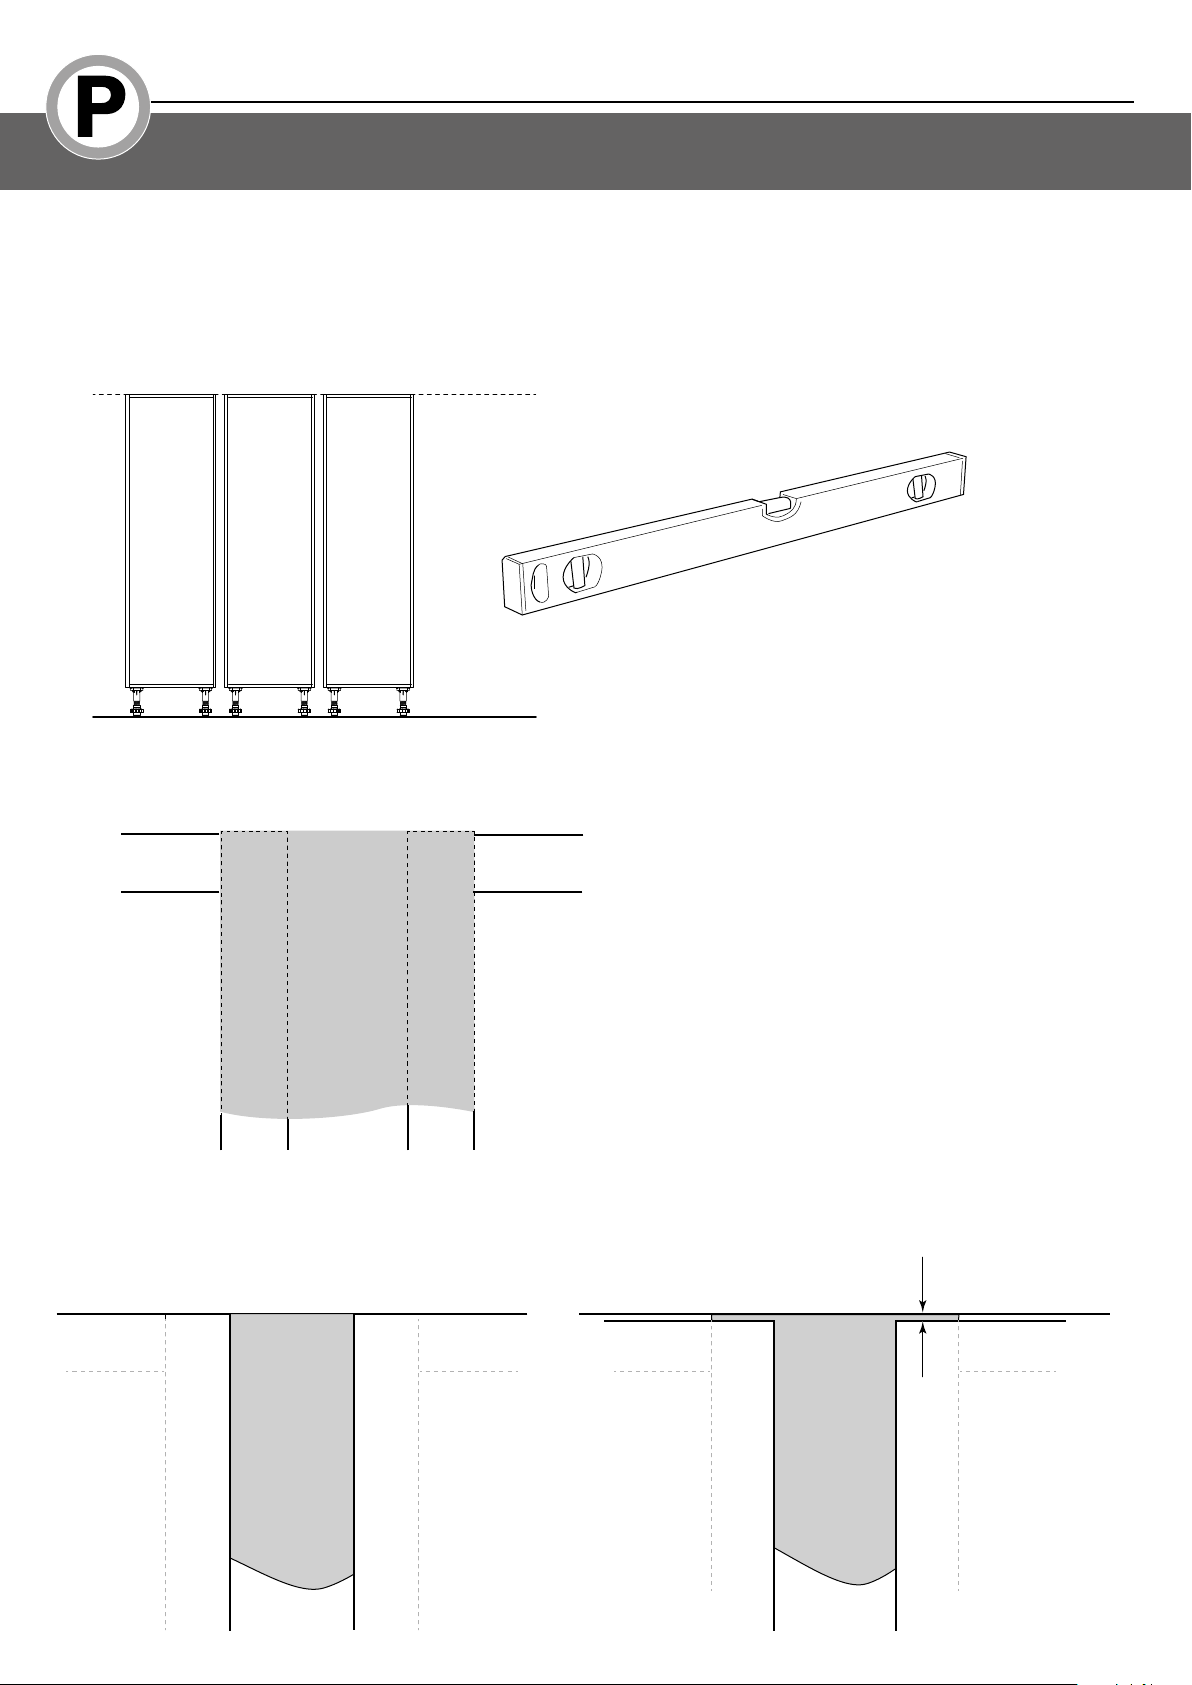
End and mid larder profiles
Important fitting information
Ensure cabinets are perfectly aligned and level before fitting profiles.
Profiles must be fitted flush with the top edge of the cabinet end panels.
Profile
Fit the top door first so it is flush with the top edge of the profile.
NOTE: If you have a low ceiling height which is touching the top of the profile,
adjust the door down 2mm to give clearance.
Low Ceiling
2mm
Door DoorProfile
Door
Profile
Door
11www.howdens.com
Page 12
Kitchen installation manual
290mm
310mm
595mm
400mm
opening
400
wall
300
wall
1000 base
600 wall
300 FH door
400
FH wall
31mm
400mm
290mm
310mm
595mm
331mm400mm 300mm
575mm
600mm
400mm
1031mm
1031mm
290mm
310mm
595mm
400mm
opening
400
wall
300
wall
1000 base
600 wall
300 FH door
400
FH wall
31mm
400mm
290mm
310mm
595mm
331mm400mm 300mm
575mm
600mm
400mm
1031mm
1031mm
300mm
opening
300
wall
300
wall
900/931 CNR base*
*931 corner applications can
be achieved by using the
900 base or the 931 cabinet.
600 wall
300 FH door
31mm
300mm
290mm
310mm
595mm
290mm
310mm
595mm
290mm
310mm
595mm
331mm300mm 300mm
575mm
600mm
931mm
931mm
400mm
opening
400
wall
300
wall
1000 base
600 wall
300 FH door
400
FH wall
300
FH wall
31mm
400mm
290mm
310mm
595mm
331mm400mm 300mm
575mm
600mm
400mm
1031mm
1031mm
300mm
290mm
310mm
595mm
600mm
opening
600
wall
300
wall
1000 base
600 wall
300 FH door
600
FH wall
31mm
600mm
290mm
310mm
595mm
331mm600mm
300mm
575mm
600mm
600mm
1231mm
1231mm
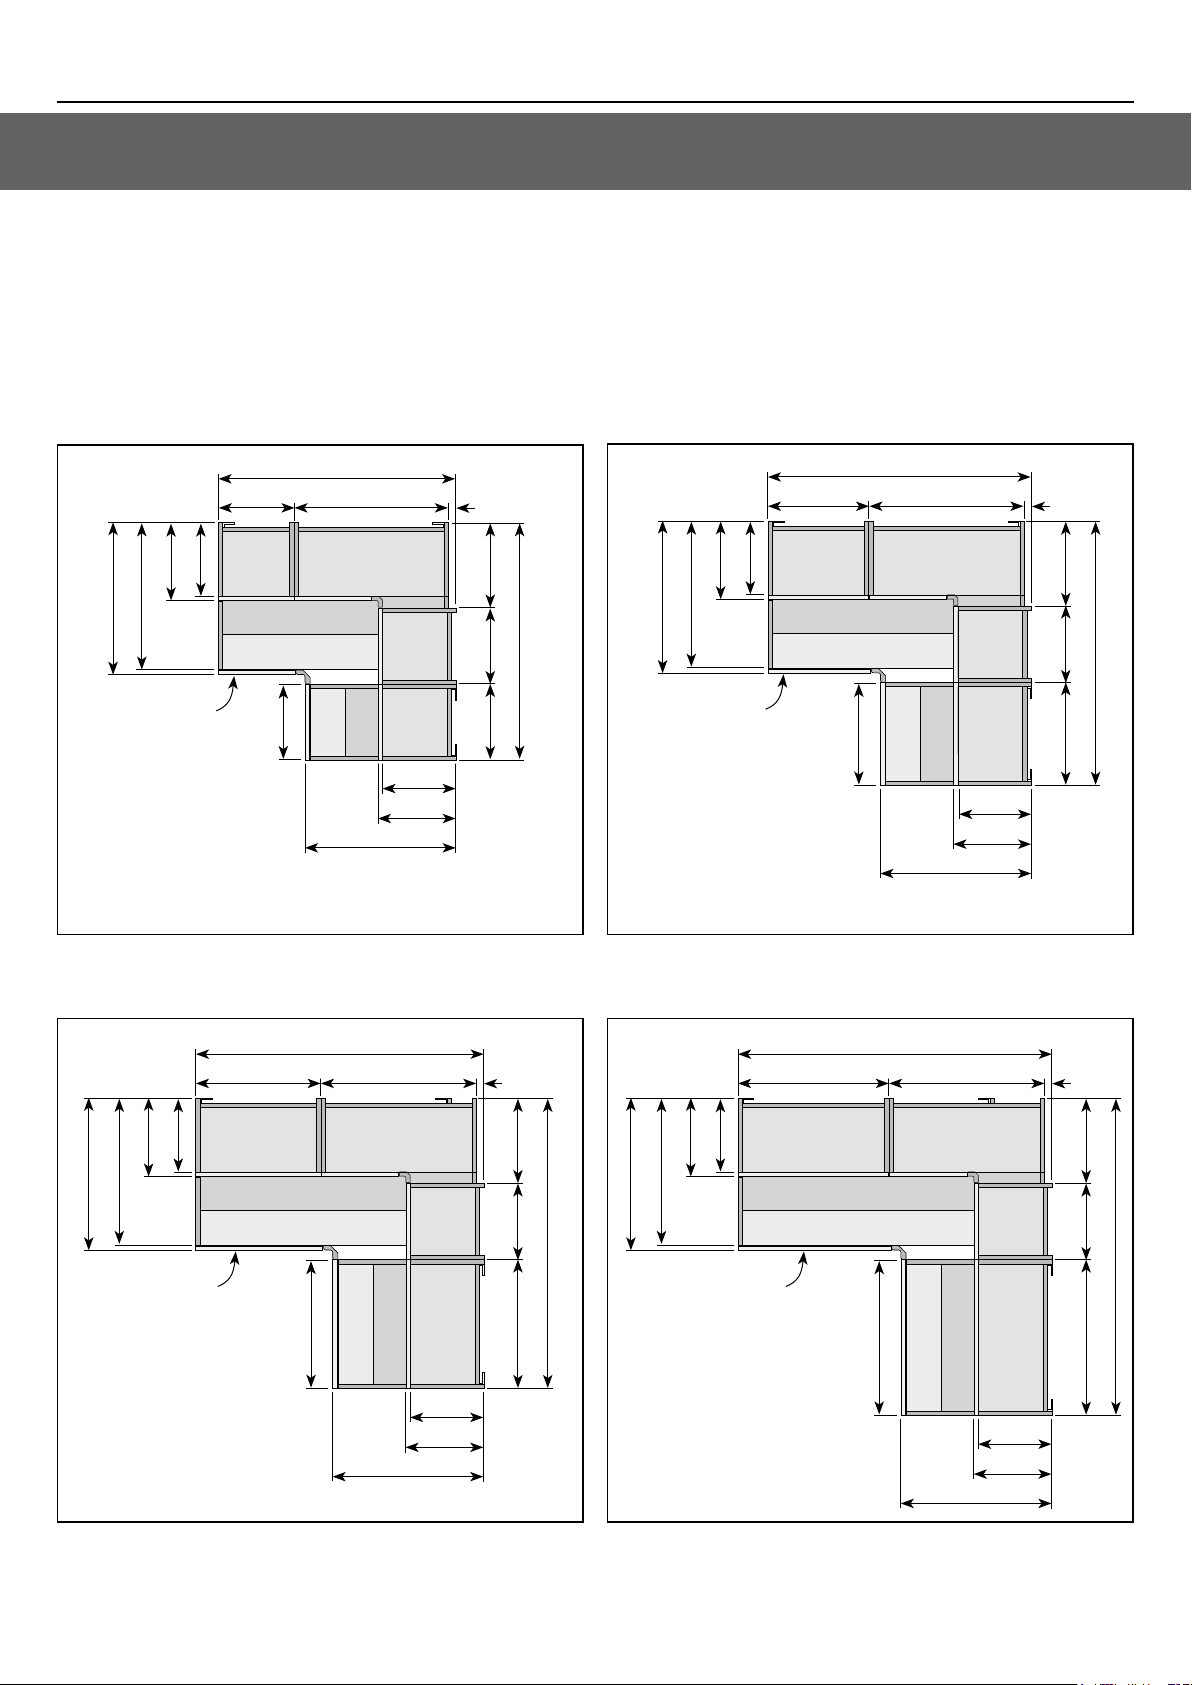
Standard wall cabinet
Always plan your kitchen/start the installation from a corner.
Movable centre uprights are fitted to the cabinets to give flexibility to the configurations.
Ensure consideration is given to cabinet alignment and lighting.
NOTE: 600mm corner wall and adjacent cabinet can be replaced using a 631 L shaper wall as required.
931 Corner 1031 Corner
931mm
300mm
300
FH wall
290mm
310mm
575mm
595mm
900/931 CNR base*
300mm
opening
*931 corner applications can
be achieved by using the
900 base or the 931 cabinet.
1131 Corner 1231 Corner
500mm
300mm
600mm
600 wall
300 FH door
595mm
1131mm
300
wall
300
wall
290mm
310mm
600mm
31mm
331mm300mm
300mm
931mm
31mm
595mm
310mm
575mm
400mm
opening
290mm
400mm
400
FH wall
1000 base
600mm
1031mm
300 FH door
400mm
1231mm
600mm
600 wall
595mm
600mm
300
wall
400
wall
290mm
310mm
31mm
331mm400mm
300mm
31mm
1031mm
12
575mm
595mm
310mm
500mm
opening
290mm
500
FH wall
1000 base
500mm
600 wall
500 FH door
290mm
310mm
595mm
300
wall
500
wall
331mm500mm
300mm
1131mm
595mm
310mm
575mm
290mm
600mm
opening
FH wall
600
1000 base
300 FH door
600mm
600 wall
595mm
331mm600mm
300
wall
600
wall
290mm
310mm
www.howdens.com
300mm
1231mm
Page 13
Kitchen installation manual
390mm
410mm
595mm
400mm
opening
300
wall
300
wall
1000 base
700 wall300
FH wall
300 FH door
31mm
400mm
390mm
410mm
595mm
431mm300mm 300mm
575mm
700mm
300mm
1031mm
1031mm
390mm
410mm
595mm
400mm
opening
300
wall
300
wall
1000 base
700 wall300
FH wall
300 FH door
31mm
400mm
390mm
410mm
595mm
431mm300mm 300mm
575mm
700mm
300mm
1031mm
1031mm
300mm
opening
500
wall
900/931
CNR base*
*931 corner applications can
be achieved by using the
900 base or the 931 cabinet.
700 wall
300 FH door
31mm
300mm
390mm
410mm
595mm
390mm
410mm
595mm
390mm
410mm
595mm
431mm500mm
575mm
931mm
931mm
400mm
opening
300
wall
300
wall
1000 base
700 wall300
FH wall
300 FH door
31mm
400mm
390mm
410mm
595mm
431mm300mm 300mm
575mm
700mm
300mm
1031mm
1031mm
700mm
200mm
200
FH
wall
390mm
410mm
595mm
600mm
opening
500
wall
300
wall
1000 base
700 wall500
FH wall
300 FH door
31mm
600mm
390mm
410mm
595mm
431mm500mm 300mm
575mm
700mm
500mm
1131mm
1131mm
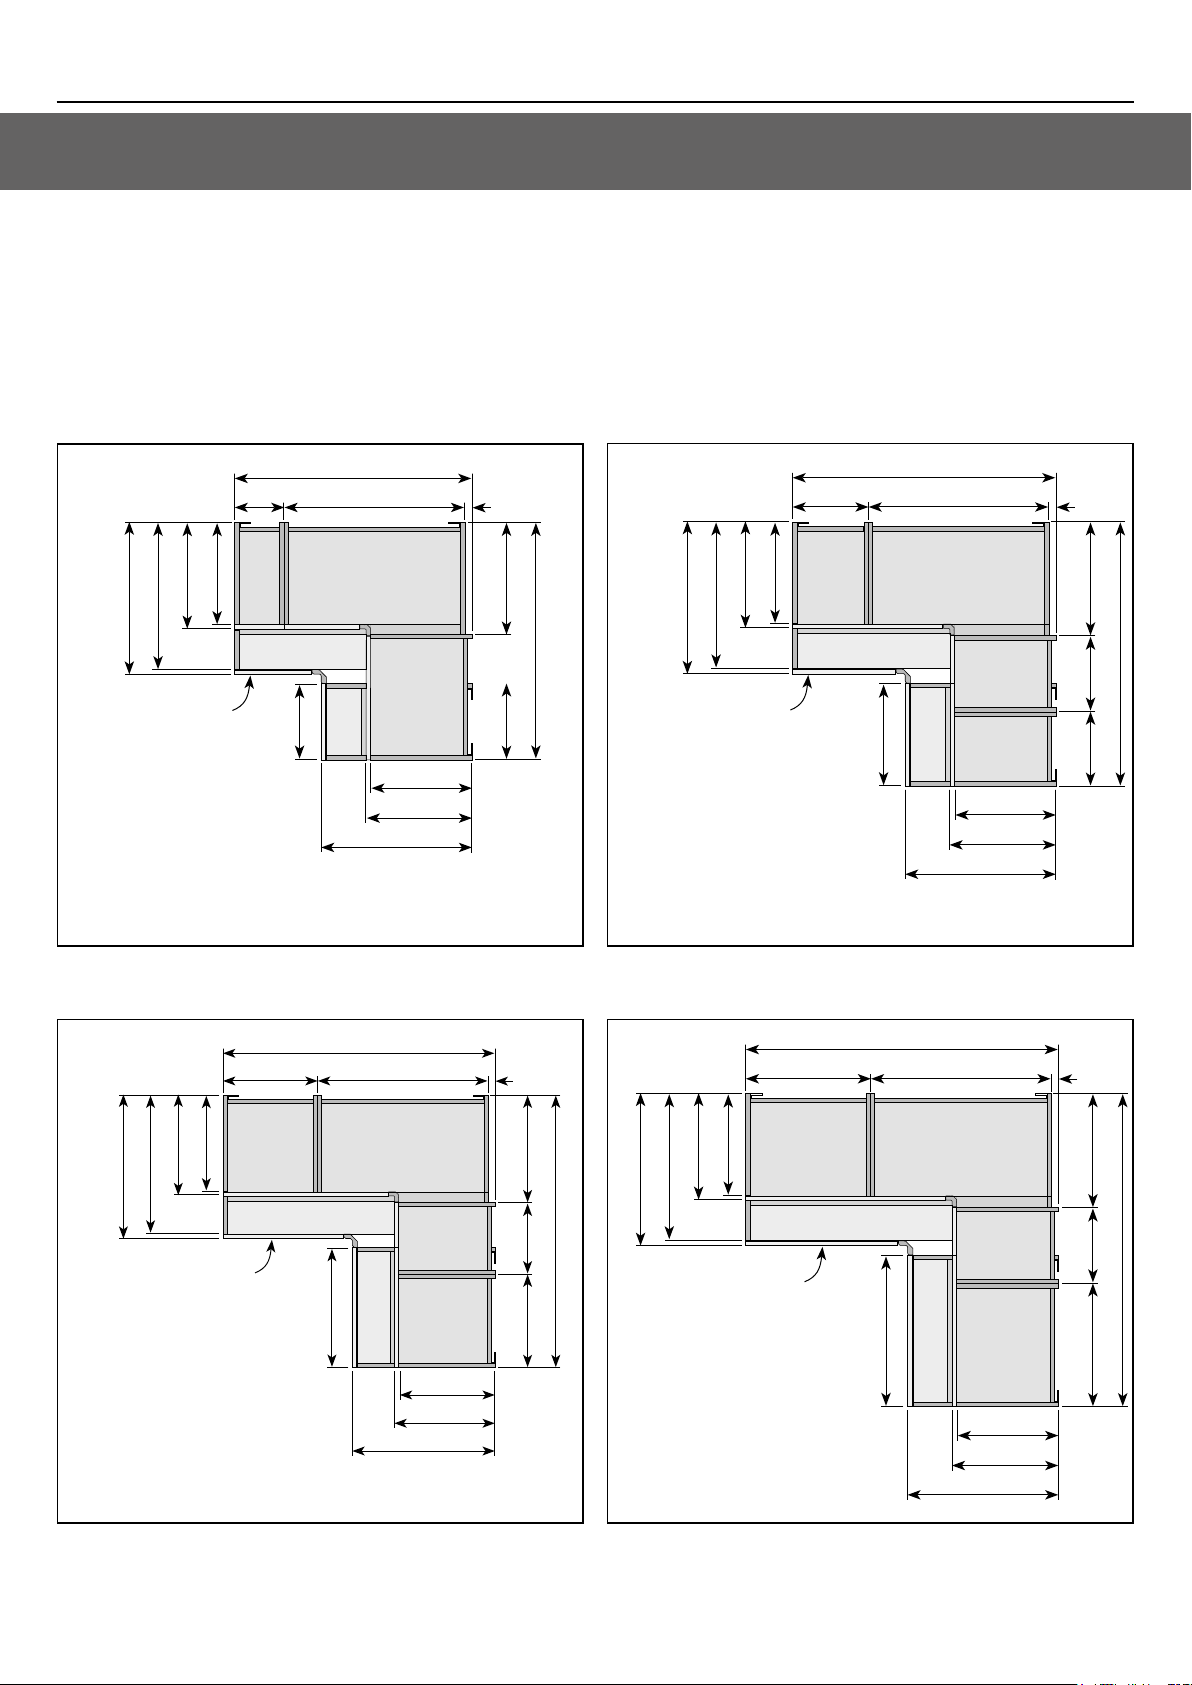
Planning dimensions - Cabinet cornerPlanning dimensions - Cabinet corner
Deep wall cabinet
Always plan your kitchen/start the installation from a corner.
Movable centre uprights are fitted to the cabinets to give flexibility to the configurations.
Ensure consideration is given to cabinet alignment and lighting.
NOTE: 700mm corner wall and adjacent cabinet can be replaced using a 731 L shaper wall as required.
931 Corner 1031 Corner
931mm
595mm
575mm
410mm
200mm
200
390mm
FH
wall
700mm
700 wall
300 FH door
31mm
431mm500mm
595mm
900/931
CNR base*
595mm
1131mm
700mm
700 wall400
300 FH door
500
wall
390mm
410mm
300
wall
400
wall
390mm
410mm
595mm
400mm
FH wall
390mm
500mm
opening
300mm
1000 base
500mm
300mm
opening
*931 corner applications can
900 base or the 931 cabinet.
1131 Corner 1231 Corner
be achieved by using the
410mm
575mm
595mm
931mm
31mm
431mm400mm
300mm
1131mm
575mm
595mm
575mm
390mm
410mm
410mm
400mm
opening
600mm
opening
300mm
FH wall
390mm
500mm
FH wall
1000 base
1000 base
400mm
600mm
1031mm
700mm
700 wall300
300 FH door
1131mm
700mm
700 wall500
300 FH door
390mm
410mm
595mm
595mm
300
wall
300
wall
300
wall
500
wall
390mm
410mm
31mm
431mm300mm
300mm
31mm
431mm500mm 300mm
1031mm
1131mm
13www.howdens.com
Page 14

14
www.howdens.com
 Loading...