

Page 1

Instructions for use
WASHING MACHINE
GB
English,1
TR
Türkçe,37
WML 701
IT
Italiano,13
BG
Български,49
GR
Ελληνικά,25
Contents
Installation, 2-3
Unpacking and levelling
Connecting the electricity and water supplies
The first wash cycle
Technical data
Care and maintenance, 4
Cutting off the water or electricity supply
Cleaning the washing machine
Cleaning the detergent dispenser drawer
Caring for the door and drum of your appliance
Cleaning the pump
Checking the water inlet hose
Precautions and tips, 5
General safety
Disposal
Description of the washing machine
and starting a wash cycle, 6-7
Control panel
Indicator lights
Starting a wash cycle
GB
Wash cycles, 8
Table of wash cycles
Personalisation, 9
Setting the temperature
Setting the spin speed
Functions
Detergents and laundry, 10
Detergent dispenser drawer
Preparing the laundry
Garments requiring special care
Load balancing system
Troubleshooting, 11
Service, 12
1
Page 2
Installation
GB
! This instruction manual should be kept in a
safe place for future reference. If the washing
machine is sold, transferred or moved, make
sure that the instruction manual remains with
the machine so that the new owner is able to
familiarise himself/herself with its operation
and features.
! Read these instructions carefully: they contain vital information relating to the safe installation and operation of the appliance.
Unpacking and levelling
Unpacking
1. Remove the washing machine from its
packaging.
2. Make sure that the washing machine has
not been damaged during the transportation
process. If it has been damaged, contact the
retailer and do not proceed any further with
the installation process.
3. Remove the 3
protective screws
(used during transportation) and the rubber
washer with the corresponding spacer,
located on the rear
part of the appliance
(see figure).
4. Close off the holes using the plastic plugs
provided.
5. Keep all the parts in a safe place: you will
need them again if the washing machine needs to be moved to another location.
! Packaging materials should not be used as
toys for children.
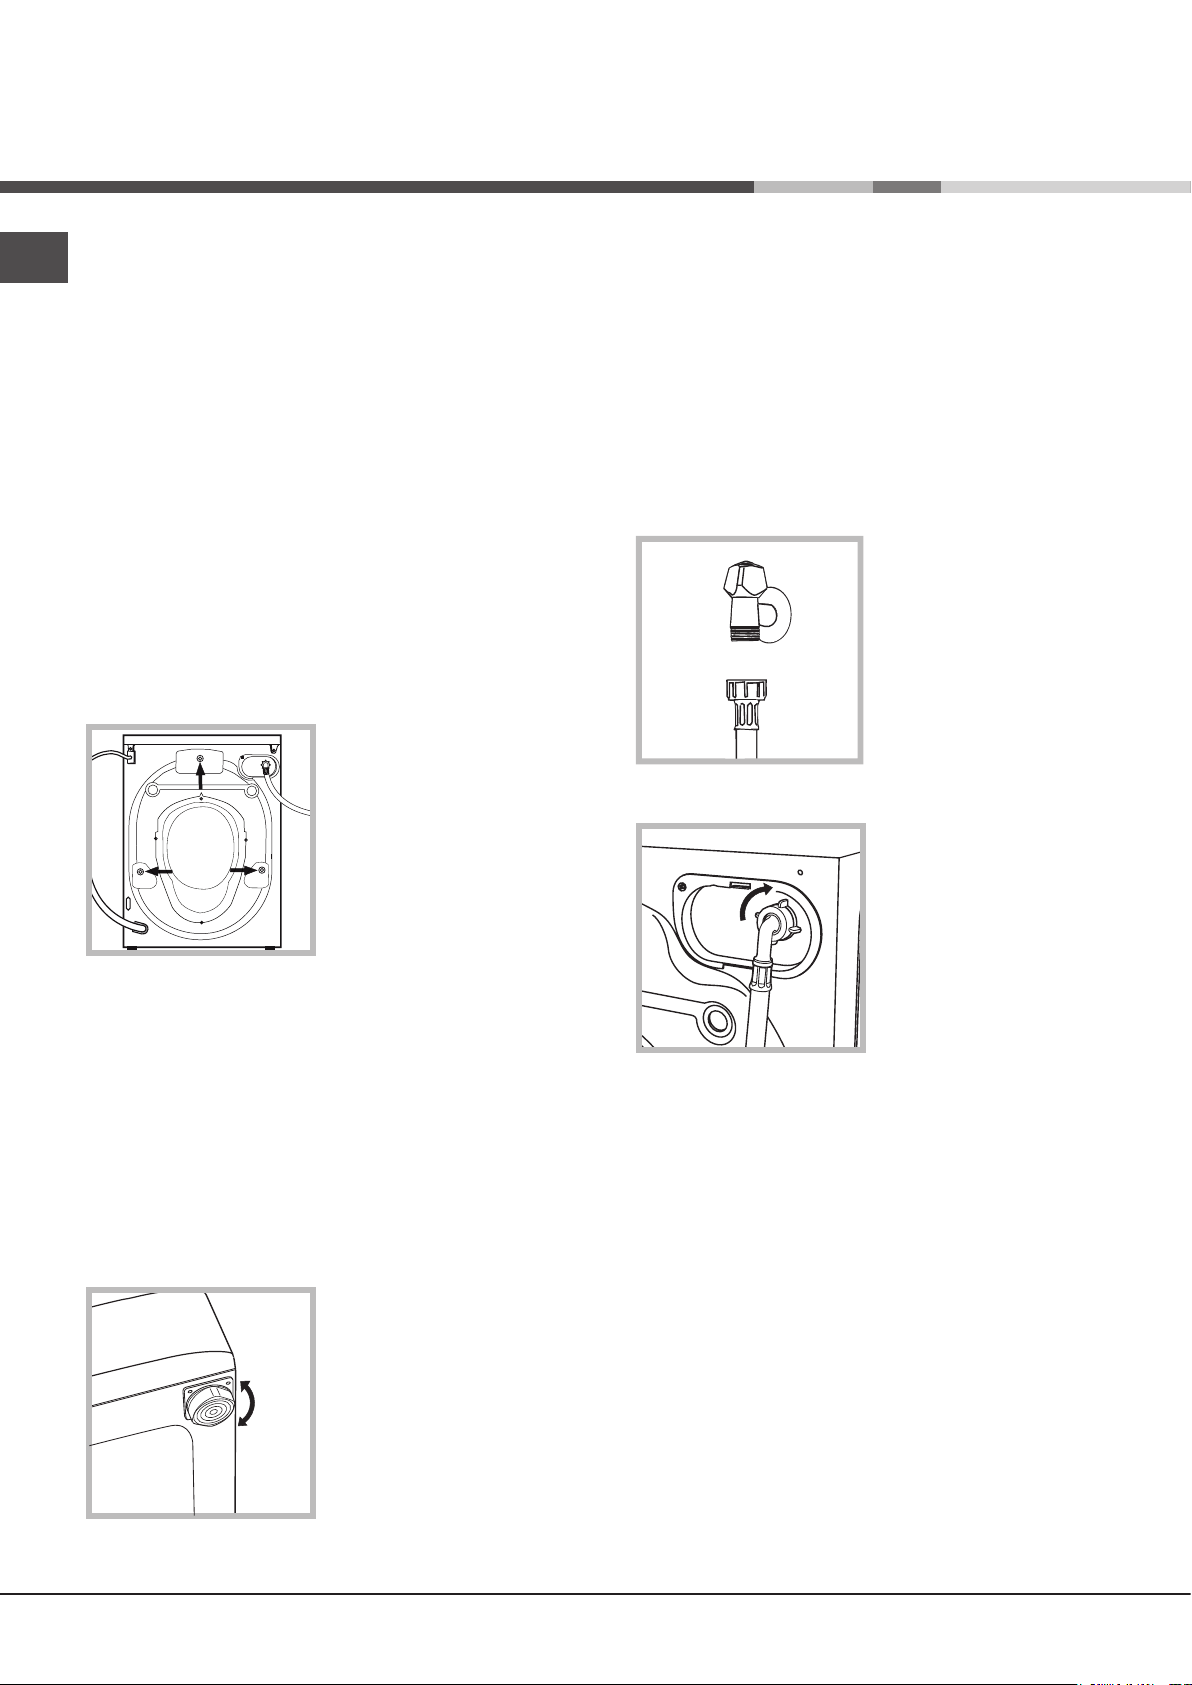
Levelling
1. Install the washing machine on a flat sturdy
floor, without resting it up against walls, furniture cabinets or anything else.
2. If the floor is not
perfectly level, compensate for any unevenness by tightening
or loosening the
adjustable front feet
(see figure); the angle
of inclination, measured in relation to the
worktop, must not
exceed 2°.
Levelling the machine correctly will provide
it with stability, help to avoid vibrations and
excessive noise and prevent it from shifting
while it is operating. If it is placed on carpet or
a rug, adjust the feet in such a way as to allow
a sufficient ventilation space underneath the
washing machine.
Connecting the electricity and
water supplies
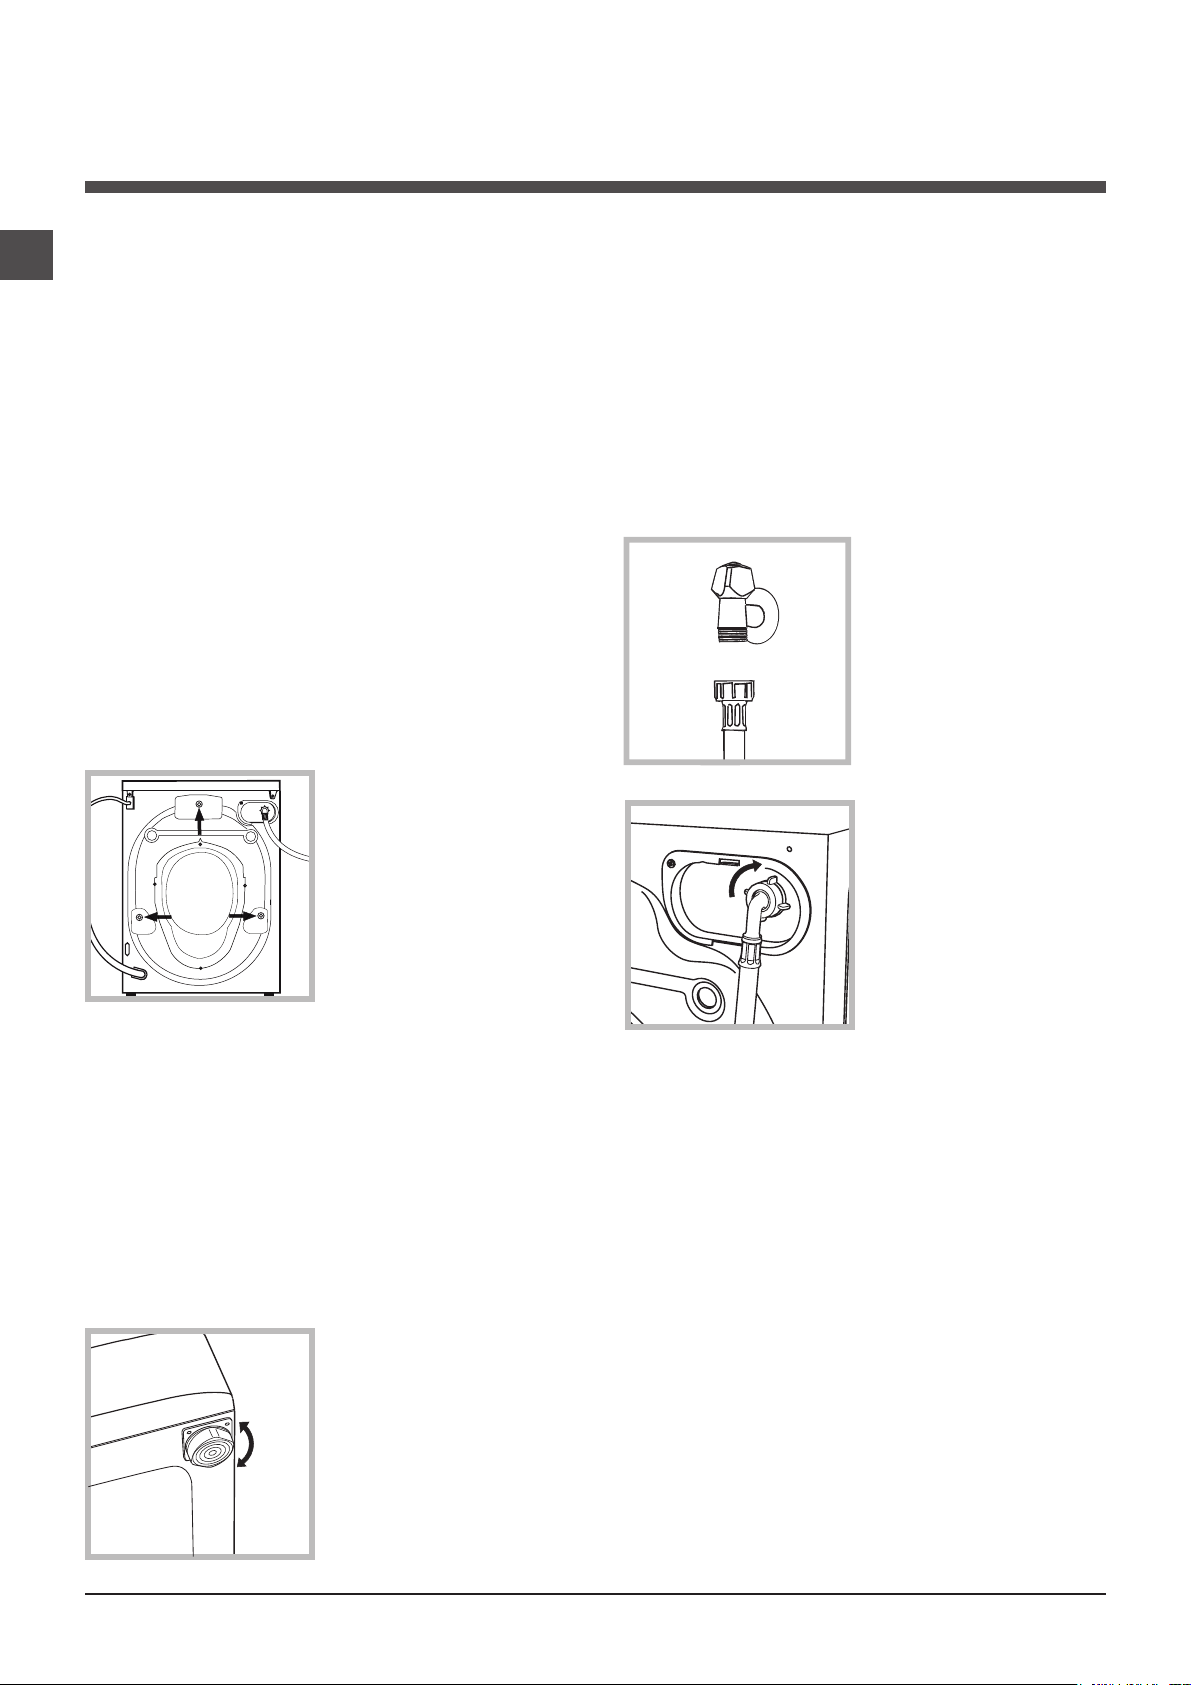
Connecting the water inlet hose
1. Connect the inlet
hose by screwing it to
a cold water tap using
a 3/4 gas threaded
connection (see figu-
re).
Before performing the
connection, allow the
water to run freely until
it is perfectly clear.
2. Connect the inlet
hose to the washing
machine by screwing
it onto the corresponding water inlet of the
appliance, which is
situated on the top
right-hand side of the
rear part of the appliance (see figure).
3. Make sure that the hose is not folded over
or bent.
! The water pressure at the tap must fall within
the range of values indicated in the Technical
data table (see next page).
! If the inlet hose is not long enough, contact a
specialised shop or an authorised technician.
! Never use second-hand hoses.
! Use the ones supplied with the machine.
2
Page 3
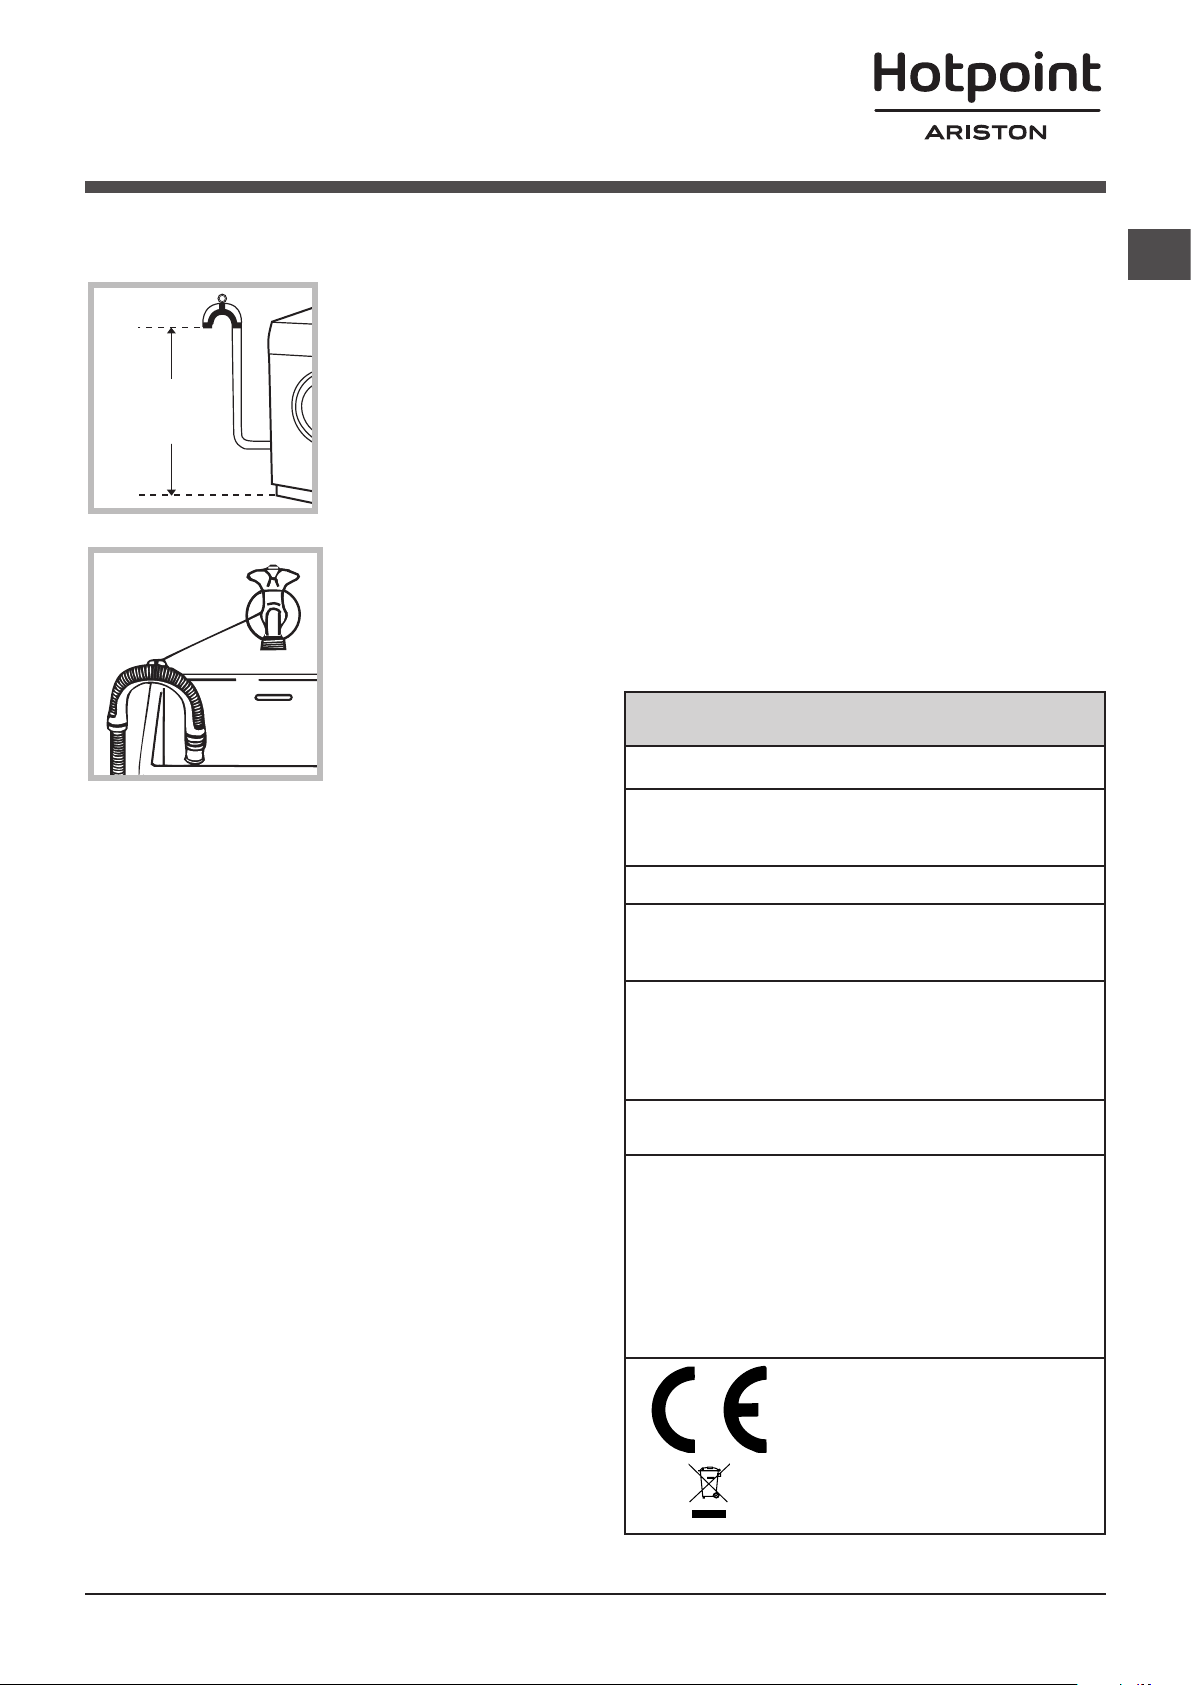
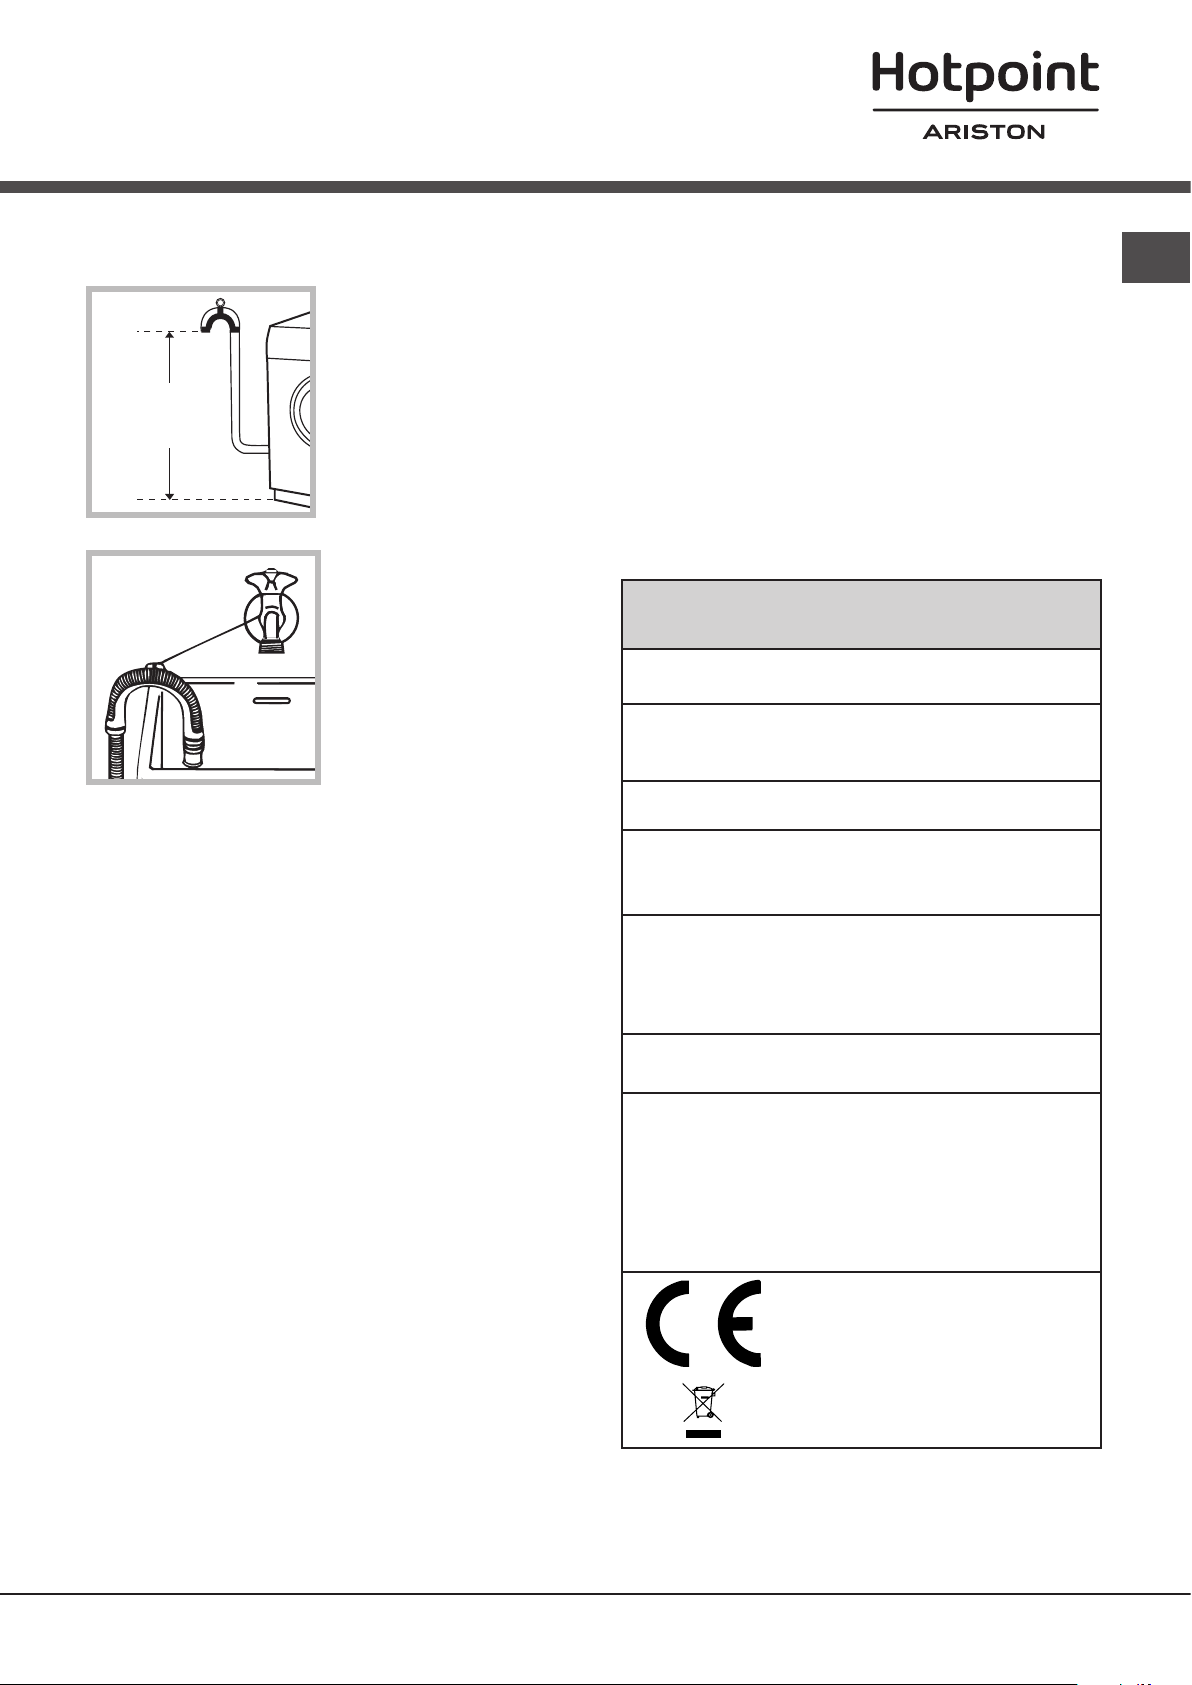
Connecting the drain hose
65 - 100 cm
Connect the drain
hose, without bending
it, to a drain duct or
a wall drain situated
between 65 and 100
cm from the floor;
alternatively, placed
it over the edge of a
basin, sink or tub, fastening the duct supplied to the tap (see
figure). The free end
of the hose should
not be underwater.
! Do not use extension cords or multiple sockets.
! The cable should not be bent or compressed.
! The power supply cable must only be replaced by authorised technicians.
Warning! The company shall not be held responsible in the event that these standards are
not observed.
The first wash cycle
Once the appliance has been installed, and
before you use it for the first time, run a wash
cycle with detergent and no laundry, using
wash cycle number “Auto Clean” (see “Clea-
ning the washing machine”).
Technical data
GB
! We advise against the use of hose extensions;
if it is absolutely necessary, the extension must
have the same diameter as the original hose
and must not exceed 150 cm in length.
Electrical connections
Before plugging the appliance into the electricity socket, make sure that:
• thesocketisearthedandcomplieswithall
applicable laws;
• thesocketisabletowithstandthemaximum power load of the appliance as indicated
in the Technical data table (see opposite);
• thepowersupplyvoltagefallswithinthevalues indicated in the Technical data table (see
opposite);
• thesocketiscompatiblewiththeplugofthe
washing machine. If this is not the case, replace the socket or the plug.
Model
Dimensions
Capacity
Electrical
connections
Water connections
Spin speed
Test wash
cycles in
accordance
with regulations
1061/2010
and
1015/2010
WML 701
width 59.5 cm
height 85 cm
depth 51,7 cm
from 1 to 7 kg
please refer to the technical
data plate fixed to the machine
maximum pressure
1 MPa (10 bar)
minimum pressure
0.05 MPa (0.5 bar)
drum capacity 46 litres
up to 1000 rotations per
minute
Programme 4:
Eco Cotton 60°C.
Programme 4:
Eco Cotton 40°C.
! The washing machine must not be installed
outdoors, even in covered areas. It is extremely dangerous to leave the appliance exposed
to rain, storms and other weather conditions.
! When the washing machine has been installed, the electricity socket must remain within
easy reach.
This appliance conforms to
the following EC Directives:
- 2004/108/EC (Electromagnetic Compatibility)
- 2006/95/EC (Low Voltage)
- 2012/19/EU - WEEE
3
Page 4
Care and maintenance
1
2
GB
Cutting off the water and electricity supplies
•Turnoffthewatertapaftereverywashcycle.
This will limit wear on the hydraulic system inside the washing machine and help to prevent
leaks.
•Unplugthewashingmachinewhencleaning
it and during all maintenance work.
Cleaning the washing machine
•Theouterpartsandrubbercomponents
of the appliance can be cleaned using a soft
cloth soaked in lukewarm soapy water. Do not
use solvents or abrasives.
•Thewashingmachinehasa“AutoClean”
programme for its internal parts that must be
run with no load in the drum.
To help the wash cycle you may want to use
either the detergent (i.e. a quantity 10% the
quantity specified for lightly-soiled garments)
or special additives to clean the washing
machine. We recommend running a cleaning
programme every 40 wash cycles.
A
B
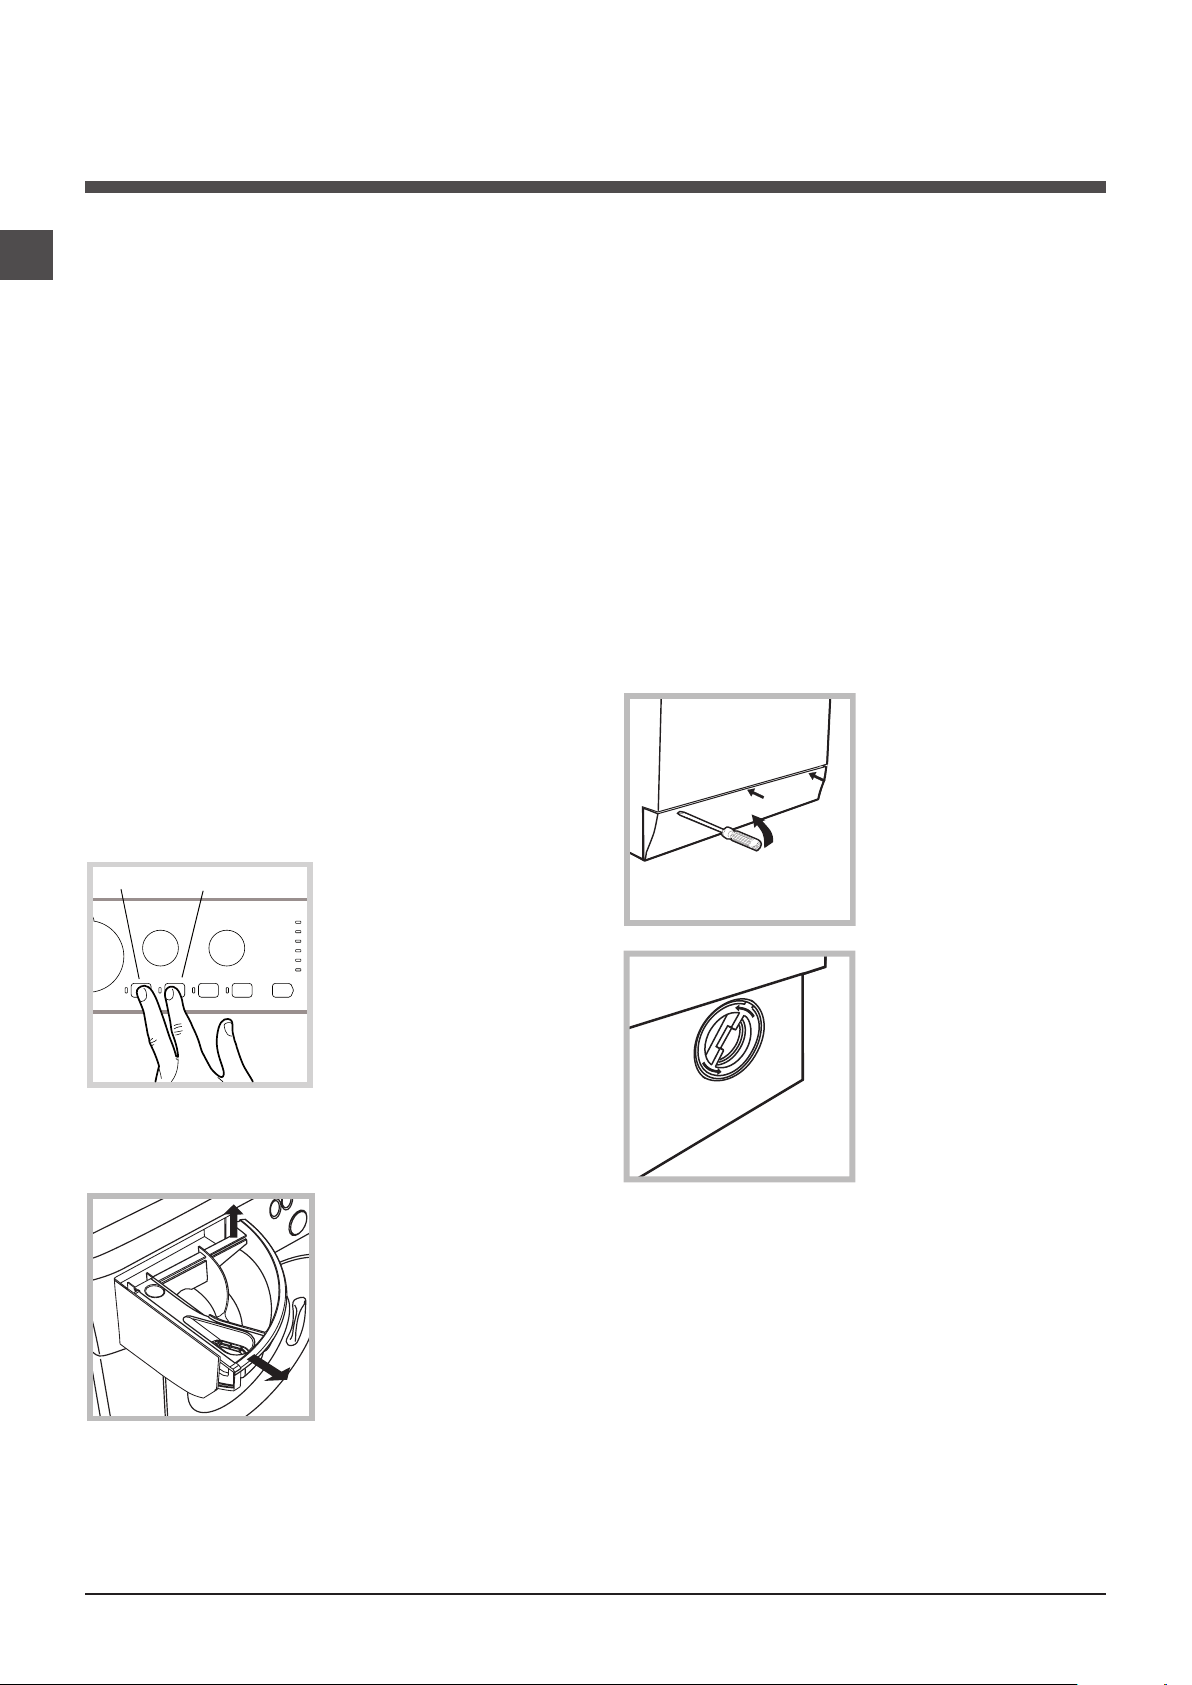
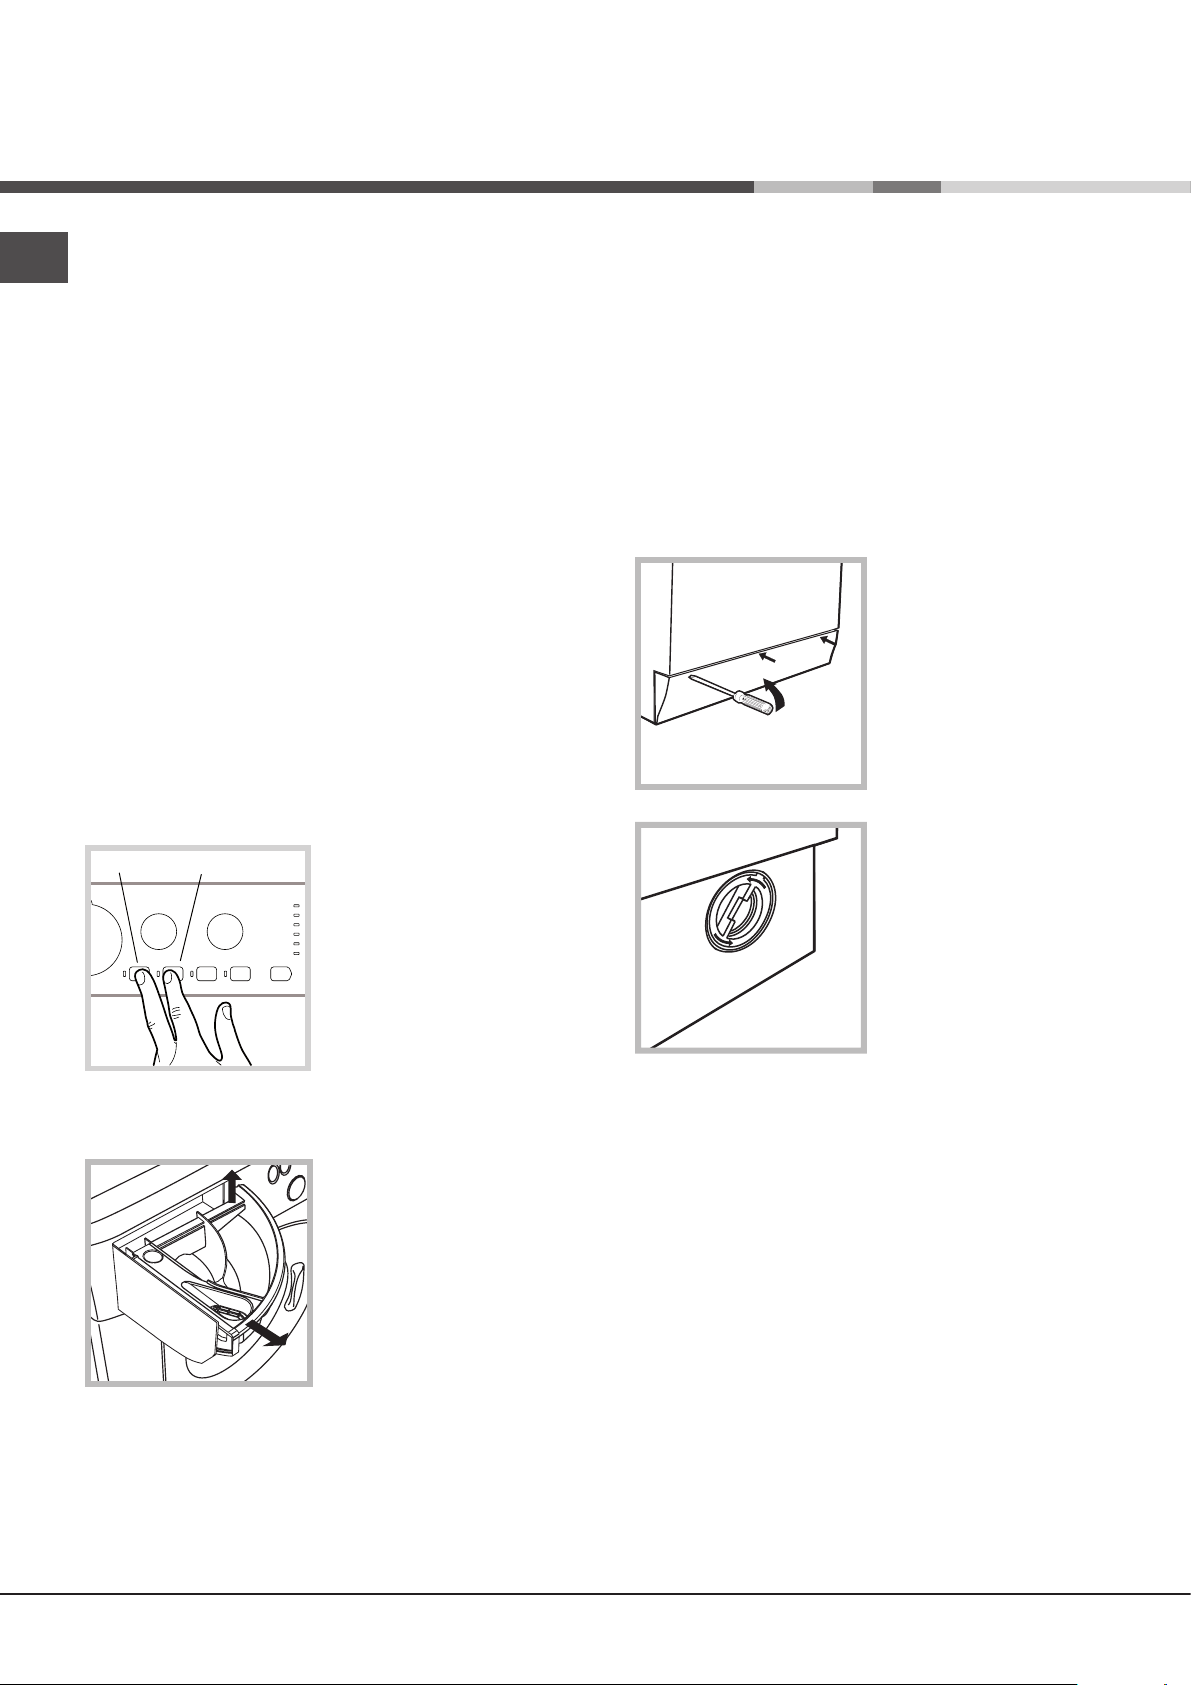
To start the programme
press buttons A and
B simultaneously for 5
seconds (see figure).
The programme will
start automatically and
will run for about 70
minutes. To stop the
cycle press the START/
PAUSE button.
Caring for the door and drum of
your appliance
•Alwaysleavetheportholedoorajarinorder
to prevent unpleasant odours from forming.
Cleaning the pump
The washing machine is fitted with a self-cleaning pump which does not require any maintenance. Sometimes, small items (such as coins
or buttons) may fall into the pre-chamber which
protects the pump, situated in its bottom part.
! Make sure the wash cycle has finished and
unplug the appliance.
To access the pre-chamber:
1. using a screwdriver, remove the cover
panel on the lower
front part of the washing machine (see
figure);
2. unscrew the lid
by rotating it anticlockwise (see figu-
re): a little water may
trickle out. This is
perfectly normal;
Cleaning the detergent dispenser
drawer
Remove the dispenser by raising it and
pulling it out (see
figure).
Wash it under running
water; this operation
should be repeated
frequently.
4
3. clean the inside thoroughly;
4. screw the lid back on;
5. reposition the panel, making sure the hooks
are securely in place before you push it onto
the appliance.
Checking the water inlet hose
Check the inlet hose at least once a year. If
there are any cracks, it should be replaced
immediately: during the wash cycles, water
pressure is very strong and a cracked hose
could easily split open.
! Never use second-hand hoses.
Page 5

Precautions and tips
! This washing machine was designed and constructed in
accordance with international safety regulations. The following information is provided for safety reasons and must
therefore be read carefully.
General safety
•Thisappliancewasdesignedfordomesticuseonly.
• This appliance can be used by children aged
from 8 years and above and persons with
reduced physical, sensory or mental capabilities or lack of experience and knowledge if
they have been given supervision or instruction concerning use of the appliance in a
safe way and understand the hazards involved. Children shall not play with the appliance. Cleaning and user maintenance shall not
be made by children without supervision..
•Donottouchthemachinewhenbarefootorwithwetor
damp hands or feet.
•Donotpullonthepowersupplycablewhenunplugging
the appliance from the electricity socket. Hold the plug
and pull.
•Donotopenthedetergentdispenserdrawerwhilethe
machine is in operation.
•Donottouchthedrainedwaterasitmayreachextremely high temperatures.
•Neverforcetheportholedoor.Thiscoulddamagethesafety
lock mechanism designed to prevent accidental opening.
•Iftheappliancebreaksdown,donotunderanycircumstances access the internal mechanisms in an attempt
to repair it yourself.
•Alwayskeepchildrenwellawayfromtheappliancewhile
it is operating.
•Thedoorcanbecomequitehotduringthewashcycle.
•Iftheappliancehastobemoved,workinagroupoftwo
or three people and handle it with the utmost care. Never
try to do this alone, because the appliance is very heavy.
•Beforeloadinglaundryintothewashingmachine,make
sure the drum is empty.
GB
Disposal
•Disposingofthepackagingmaterials:observelocalregu-
lations so that the packaging may be re-used.
•TheEuropeanDirective2012/19/EU-WEEEonWaste
Electrical and Electronic Equipment, requires that old
household electrical appliances must not be disposed of in
the normal unsorted municipal waste stream. Old appliances must be collected separately in order to optimise the
recovery and recycling of the materials they contain and
reduce the impact on human health and the environment.
The crossed out “wheeled bin” symbol on the product
reminds you of your obligation, that when you dispose of
the appliance it must be separately collected. Consumers
should contact their local authority or retailer for information
concerning the correct disposal of their old appliance.
5
Page 6
Description of the washing
machine and starting a wash cycle
GB
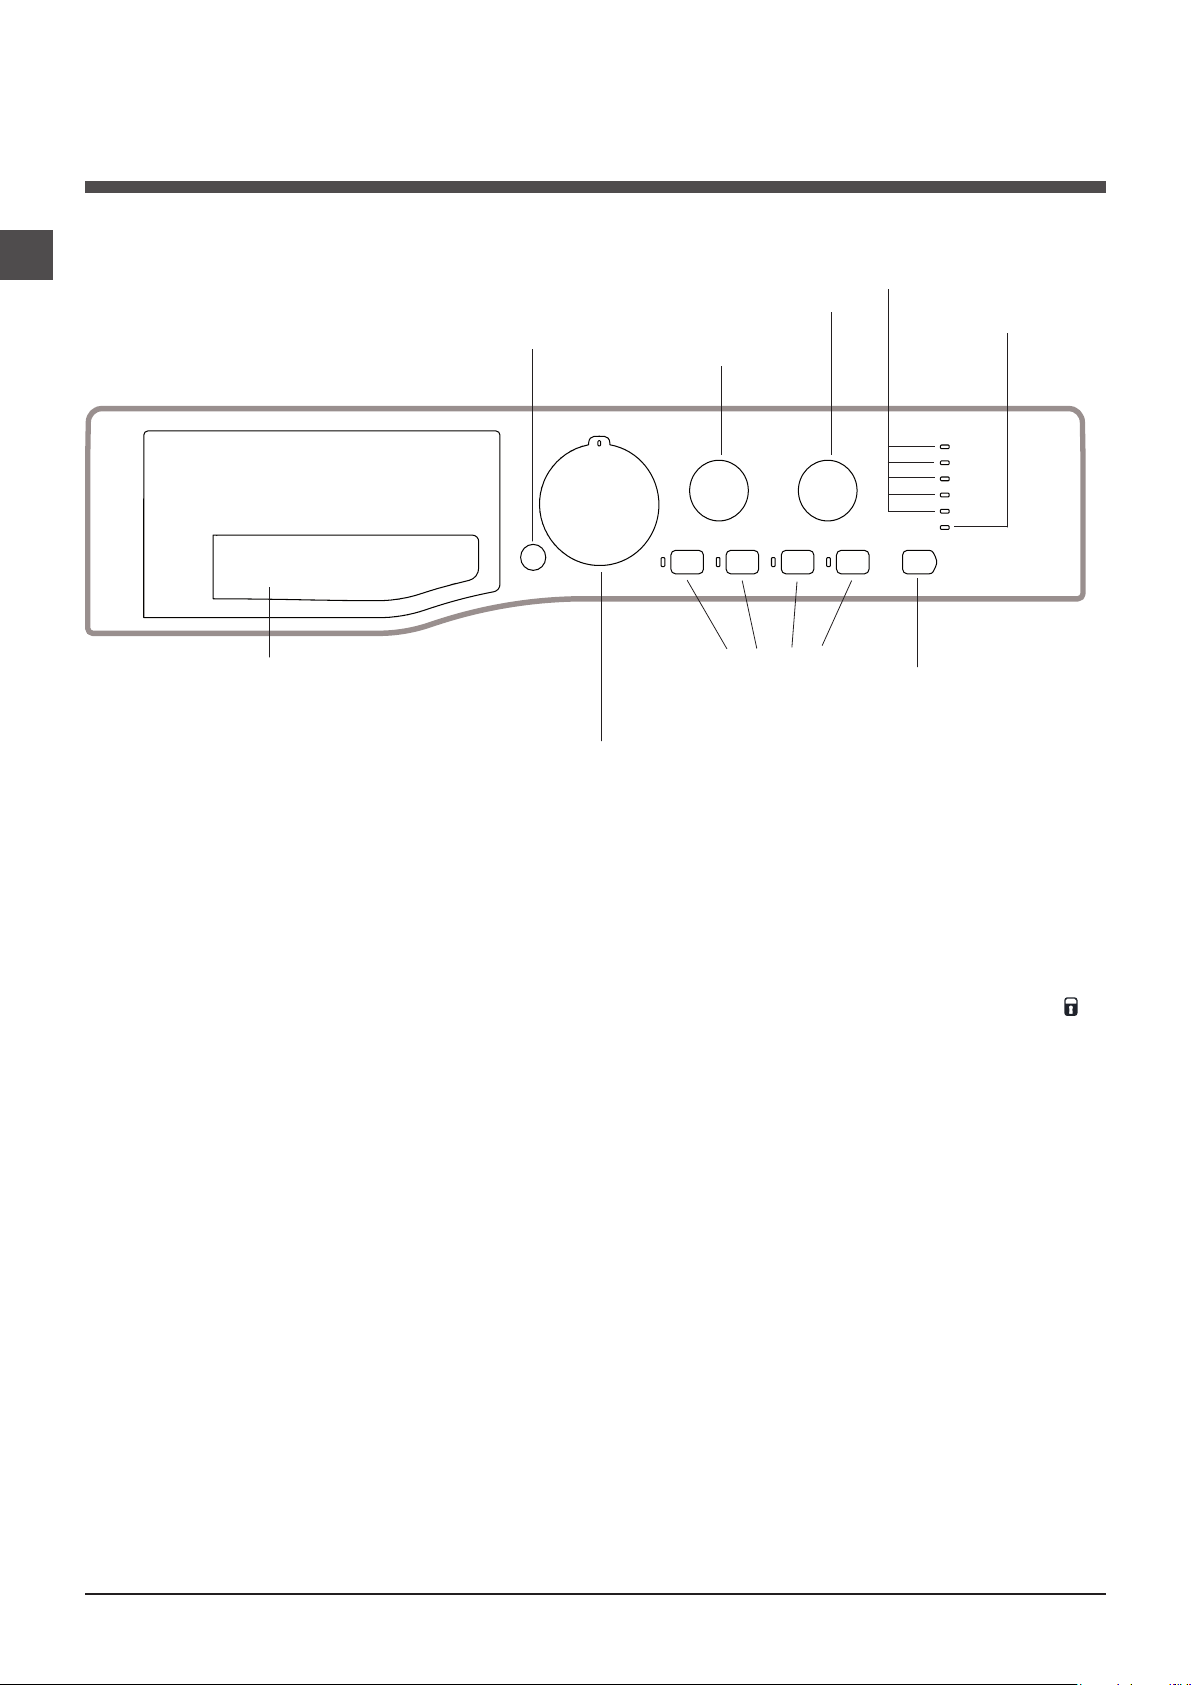
Control panel
Detergent dispenser drawer
ON/OFF
button
TEMPERATURE
WASH CYCLE
knob
SPIN SPEED
knob
FUNCTION
buttons with
indicator lights
WASH CYCLE PROGRESS/
DELAY TIMER indicator lights
knob
START/PAUSE
button with indicator
light
DOOR
LOCKED
indicator light
Detergent dispenser drawer: used to dispense
detergents and washing additives (see “Detergents and
laundry”).
ON/OFF button: switches the washing machine on and off.
WASH CYCLE knob: programmes the wash cycles. Du-
ring the wash cycle, the knob does not move.
FUNCTION buttons with indicator light: used to select the
available functions. The indicator light corresponding to the
selected function will remain lit.
TEMPERATURE knob: sets the temperature or the cold
wash cycle (see “Personalisation”).
SPIN SPEED knob: sets the spin speed or exclude the
spin cycle completely (see “Personalisation”).
WASH CYCLE PROGRESS/DELAY TIMER
light
s: used to monitor the progress of the wash cycle.
The illuminated indicator light shows which phase is in
progress.
If the Delay Timer function has been set, the time remaining
until the wash cycle starts will be indicated (see next page).
indicator
START/PAUSE button with indicator light: starts or temporarily interrupts the wash cycles.
N.B. To pause the wash cycle in progress, press this
button; the corresponding indicator light will flash orange,
while the indicator light for the current wash cycle phase
will remain lit in a fixed manner. If the DOOR LOCKED
indicator light is switched off, the door may be opened
(wait approximately 3 minutes).
To start the wash cycle from the point at which it was interrupted, press this button again.
Standby mode
This washing machine, in compliance with new energy saving regulations, is fitted with an automatic standby system
which is enabled after about 30 minutes if no activity is
detected. Press the ON-OFF button briefly and wait for the
machine to start up again.
DOOR LOCKED indicator light: indicates whether the
door may be opened or not (see next page).
6
Page 7
Indicator lights
END
The indicator lights provide important information.
This is what they can tell you:
Wash cycle phase indicator lights
Once the desired wash cycle has been selected and has
begun, the indicator lights switch on one by one to indicate
which phase of the cycle is currently in progress.
GB
Delayed start
If the DELAY TIMER function has been activated (see “Personalisation”), after the wash cycle has been started the
indicator light corresponding to the selected delay period
will begin to flash:
As time passes, the remaining delay will be displayed and
the corresponding indicator light will flash:
Once the set delay has elapsed, the flashing indicator light
will switch off and the selected wash cycle will begin.
Wash
Rinse
Spin
Pump out
End of wash cycle
Function buttons and corresponding indicator lights
When a function is selected, the corresponding indicator
light will illuminate.
If the selected function is not compatible with the programmed wash cycle, the corresponding indicator light will
flash and a sound alert (3 beeps); the function will not be
activated.
If a function which is incompatible with another function
selected previously, only the most recent selection will
remain active.
Door locked indicator light
If this indicator light is on, the appliance door is locked to
prevent it from being opened accidentally; to avoid any
damage, wait for the indicator light to switch off before you
open the appliance door (wait approximately 3 minutes).
N.B. If the DELAY TIMER function is activated, the door
cannot be opened; pause the machine by pressing the
START/PAUSE button if you wish to open it.
! If the START/PAUSE indicator light (orange) flashes
rapidly at the same time as the function indicator light, this
indicates a problem has occurred (see “Troubleshooting”).
Starting a wash cycle
1. Turn the washing machine on by pressing the ON/OFF button. All the indicator lights will turn on for a few seconds, then only
the indicator lights relative to the selected programme settings will remain lit and the START/PAUSE indicator light will flash.
2. Load the laundry and close the door.
3. Set the WASH CYCLE knob to the desired programme.
4. Set the washing temperature (see “Personalisation”).
5. Set the spin speed (see “Personalisation”).
6. Measure out the detergent and washing additives (see “Detergents and laundry”).
7. Select the desired functions.
8. Start the wash cycle by pressing the START/PAUSE button and the corresponding indicator light will remain lit in a fixed
manner, in green.
To cancel the set wash cycle, pause the machine by pressing the START/PAUSE button and select a new cycle.
9. At the end of the wash cycle the indicator light will switch on. The DOOR LOCKED indicator light will switch off, indi-
cating that the door may be opened (wait approximately 3 minutes). Take out your laundry and leave the appliance door ajar
to make sure the drum dries completely. Switch the washing machine off by pressing the ON/OFF button.
7
Page 8
GB
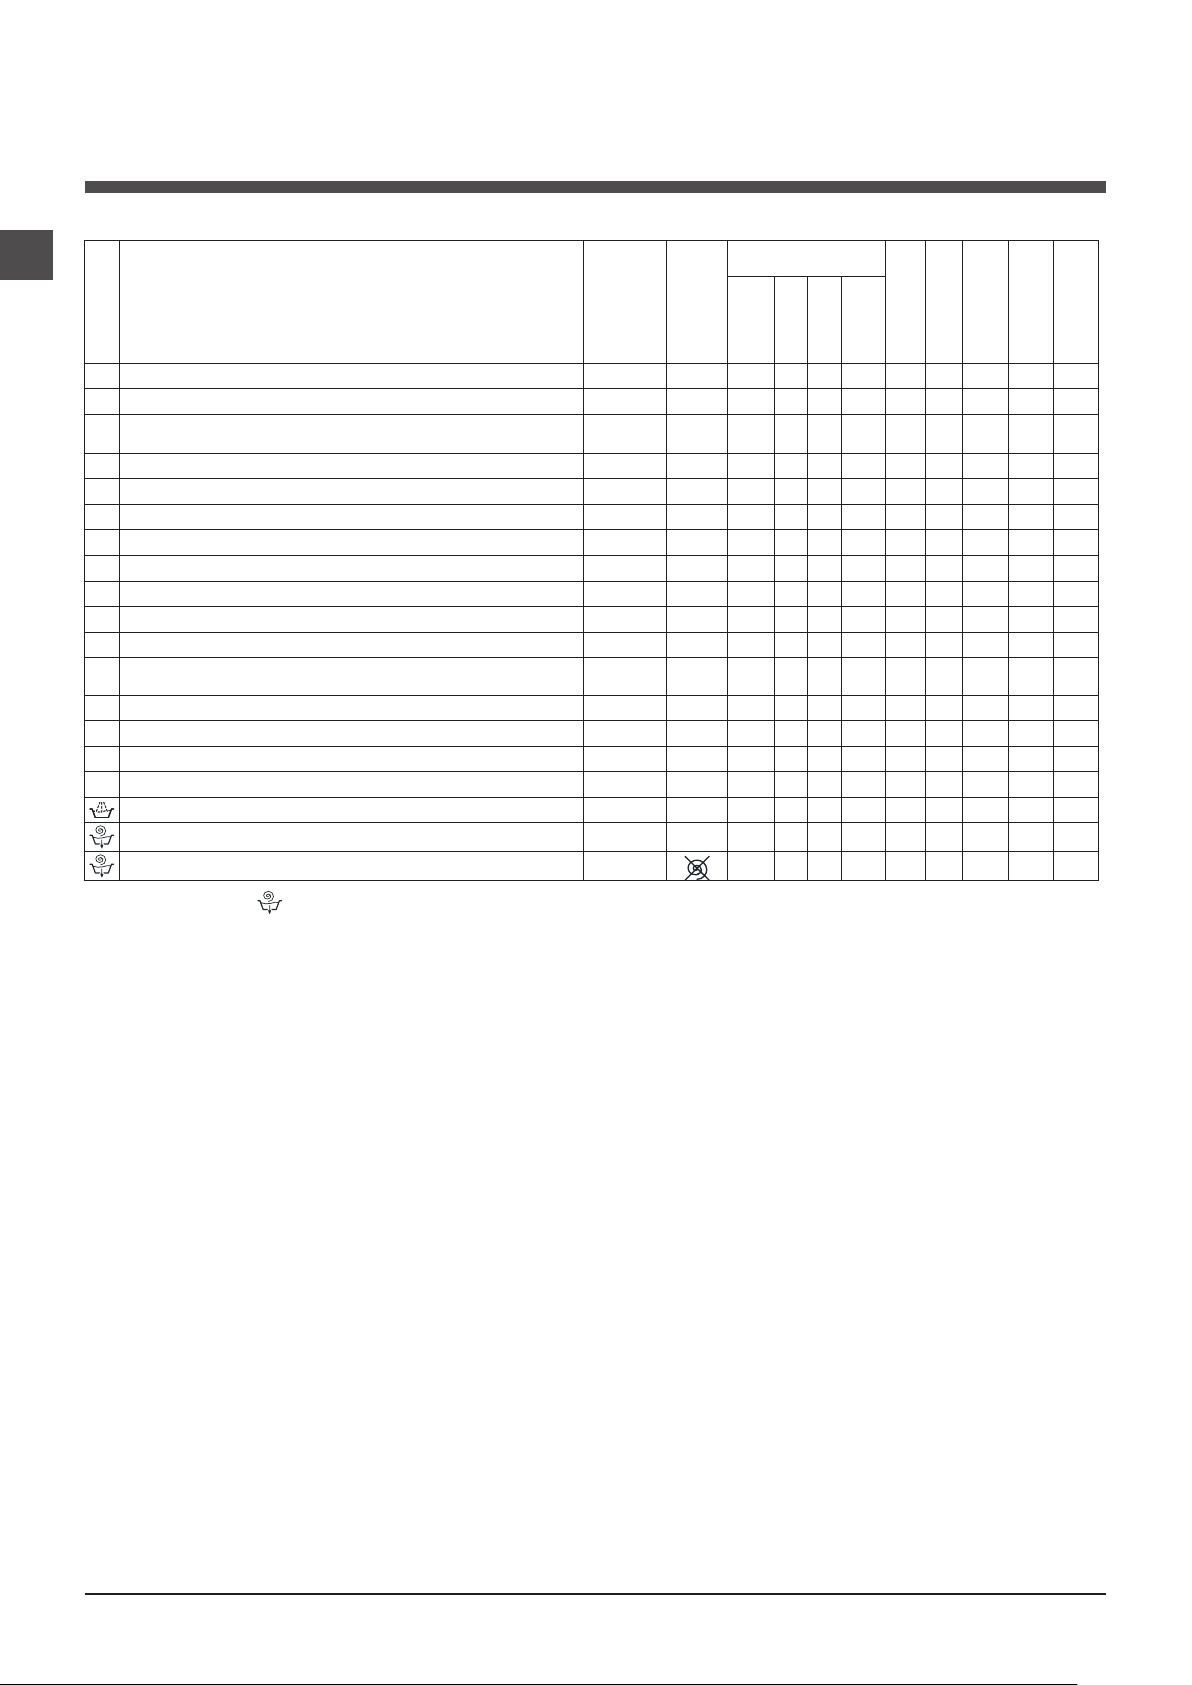
Wash cycles
Table of wash cycles
Description of the wash cycle
Wash cycles
Anti Stain
1
Whites
2
Cotton: lightly soiled resistant and delicate colours.
3
4
Eco Cotton 60° (1): heavily soiled whites and resistant colours.
Eco Cotton 40° (2): lightly soiled resistant and delicate colours.
4
Synthetics: heavily soiled resistant colours.
5
Synthetics (3): lightly soiled resistant colours.
5
Anti allergy
6
Baby
7
Wool: for wool, cashmere, etc.
8
Delicates
9
Fast Wash 60’: to refresh normal soiled garments quickly (not
10
suitable for wool, silk and clothes which require washing by hand).
Cotton 20°: lightly soiled resistant and delicate colours.
11
Eco Cottons
12
Eco Synthetics
13
Eco Fast 30’
14
Rinse
Spin and Pump out
Pump out only *
Detergents
Max.
temp.
(°C)
40° 1000
60° 1000
40°
(Max. 90°)
60° 1000 40° 1000 60° 1000
40° 1000
60° 1000 40° 1000
40° 800 30° 0 -
60° 1000 -
20° 1000 -
Cold Water
Cold Water
Cold Water
Max.
speed
(rpm)
1000
1000 1000 -
800 -
- 1000 - -
- 1000 - - - - 7 - - - 10’
- - - - - 7 - - - 3’
Wash
Prewash
Bleach
-
-
-
-
-
-
-
-
-
-
Fabric
softener
1,5 - - - 80’
3,5 62 0,68 30 60’
pness%
Energy con-
Max. load (kg)
4 - - - 180’
4 - - - 180’
7 - - - 115’
7 62 1,21 52,5 195’
7 62 0,81 76 185’
3 44 0,78 33 120’
3 - - - 110’
4 - - - 185’
3 - - - 145’
1 - - - 75’
7 - - - 180’
7 - - - 100’
3 - - - 75’
3 70 0,05 36 30’
7 - - - 49’
sumptionkWh
Residual dam-
Total water lt
Cycle duration
* If you select programme and exclude the spin cycle, the machine will drain only.
The length of cycle shown on the display or in this booklet is an estimation only and is calculated assuming standard working conditions. The actual duration can vary according to factors such as water temperature and pressure, the amount of detergent used, the amount and type of load inserted, load balancing and any wash options selected.
1) Test wash cycle in compliance with regulation 1061/2010: set wash cycle 4 with a temperature of 60°C.
This cycle is designed for cotton loads with a normal soil level and is the most efficient in terms of both electricity and water consumption; it should be used for garments which can be
washed at 60°C . The actual washing temperature may differ from the indicated value.
2) Test wash cycle in compliance with regulation 1061/2010: set wash cycle 4 with a temperature of 40°C.
This cycle is designed for cotton loads with a normal soil level and is the most efficient in terms of both electricity and water consumption; it should be used for garments which can be
washed at 40°C . The actual washing temperature may differ from the indicated value.
For all Test Institutes:
2) Long wash cycle for cottons: set wash cycle 4 with a temperature of 40°C.
3) Long wash cycle for synthetics: set wash cycle 5 with a temperature of 40°C.
Anti Stain: the programme 1 is suitable to heavily-soiled garments with resistant colours. It ensures a washing class that is
higher than the standard class (A class). When running the programme, do not mix garments of different colours. We recommend the use of powder detergent. Pre-treatment with special additives is recommended if there are obstinate stains.
Whites: use this cycle 2 to wash white clothes. The programme is designed to maintain the brightness of white clothes over
time. Use powder detergent for best results.
Anti allergy: use programme 6 to remove major allergens such as pollen, mites, cat’s and dog’s hair.
Baby: use the special wash cycle 7 to remove the remove the soiling typically caused by babies, while removing all traces
of detergent from nappies in order to prevent the delicate skin of babies from suffering allergic reactions. The cycle has been
designed to reduce the amount of bacteria by using a greater quantity of water and optimising the effect of special disinfecting additives added to the detergent.
Eco cycles
The Eco Cycles assure energy saving by eliminating the need of heating water and it’s an advantage both to your
energy bill and the environment! These innovative Eco programmes (
12
Eco Cottons,
13
Eco Synthetics and
14
Eco
Fast 30’) are available for various fabrics and different quantity of garment; they have been designed to guarantee a
high cleaning action even at low temperature and can be used for lightly to medium soiled loads. Eco Cycles give the
best results thanks to an intensified wash action, water optimization and are carried out in the same average time of a
standard cycle. For the best washing results with Eco Cycles we recommend the usage of a liquid detergent.
Cotton 20°: the programme 11 ideal for lightly soiled cotton loads. The effective performance levels achieved at cold
temperatures, which are comparable to washing at 40°, are guaranteed by a mechanical action which operates at varying
speed, with repeated and frequent peaks.
8
Page 9

Personalisation
Setting the temperature
Turn the TEMPERATURE knob to set the wash temperature (see Table of wash cycles).
The temperature may be lowered, or even set to a cold wash ( ).
The washing machine will automatically prevent you from selecting a temperature which is higher than the maximum value
set for each wash cycle.
! Exception: if the
3
programme is selected, the temperature can be increased up to a value of 90°C.
Setting the spin speed
Turn the SPIN SPEED knob to set the spin speed for the selected wash cycle.
The maximum spin speeds available for each wash cycle are as follows:
Wash cycles Maximum spin speed
Cottons 1000 rpm
Synthetics 1000 rpm
Wool 800 rpm
Silk drain only
The spin speed may be lowered, or the spin cycle can be excluded altogether by selecting the symbol .
The washing machine will automatically prevent you from selecting a spin speed which is higher than the maximum speed
set for each wash cycle.
Functions
The various wash functions available with this washing machine will help to achieve the desired results, every time.
To activate the functions:
1. Press the button corresponding to the desired function;
2. the function is enabled when the corresponding indicator light is illuminated.
Note:
- If the selected function is not compatible with the programmed wash cycle, the corresponding indicator light will flash and
a sound alert (3 beeps); the function will not be activated.
- If a function which is incompatible with another function selected previously, only the most recent selection will remain
active.
GB
Super Wash
This option offers a high-performance wash due to the greater quantity of water used in the initial phase of the cycle, and due
to the increased wash cycle duration, is particularly useful for the removal of stubborn stains. It can be used with or without
bleach. If you desire bleaching, insert the extra tray compartment (4) into compartment 1. When pouring in the bleach, be
careful not to exceed the “max” level marked on the central pivot (see figure pag. 10).
Easy iron
By selecting this function, the wash and spin cycles will be modified in order to reduce the formation of creases. At the end
of the cycle the washing machine will perform slow rotations of the drum; the EASY IRON indicator light will flash and the
phase will remain lit in a fixed manner. To end the cycle, press the START/PAUSE button or the EASY IRON button.
Prewash
If this function is selected, the pre-wash cycle will run; this is useful for removing stubborn stains.
N.B.: Put the detergent in the relevant compartment.
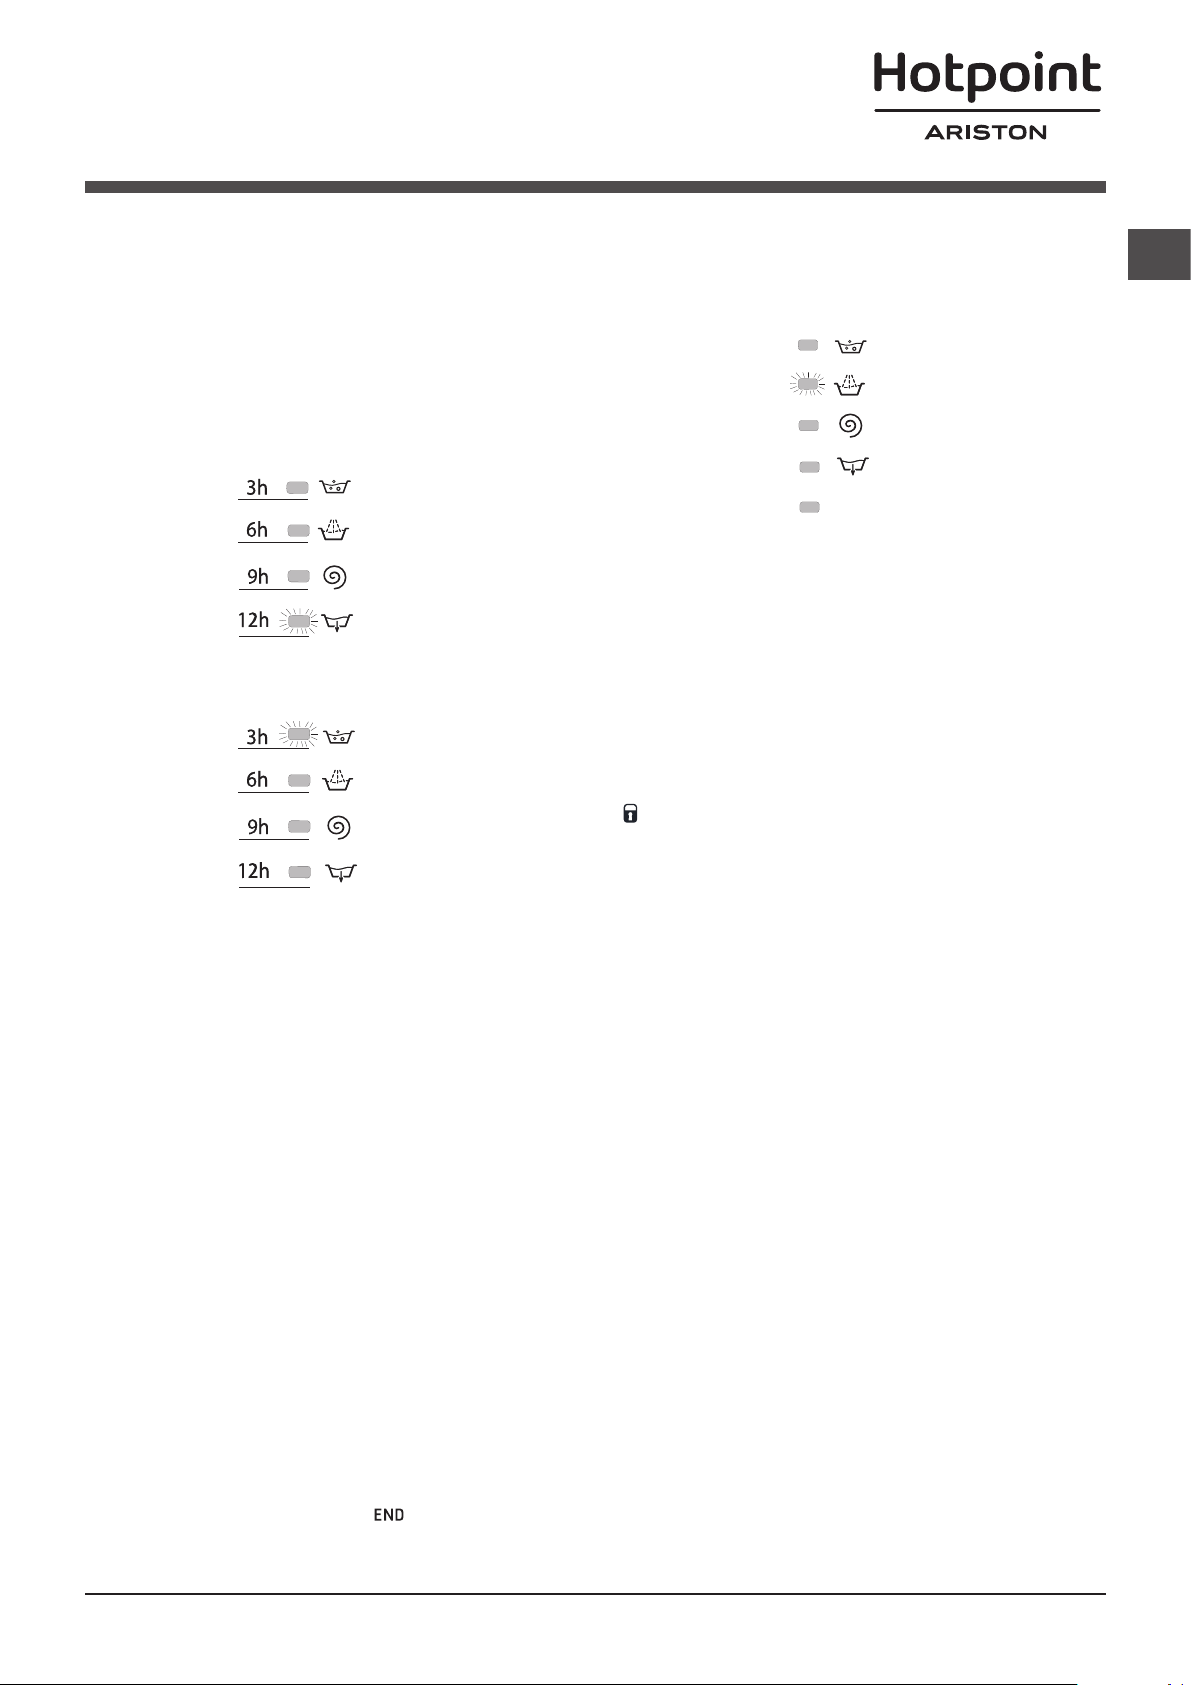
Delay timer
This timer delays the start time of the wash cycle by up to 12 hours.
Press the button repeatedly until the indicator light corresponding to the desired delay time switches on. The fifth time the button
is pressed, the function will be disabled.
N.B. Once you have pressed the START/PAUSE button, the delay time may only be decreased if you wish to modify it.
9
Page 10

Detergents and laundry
M
AX
1
2
4
3
A
B
GB
Detergent dispenser drawer
Good washing results also depend on the correct dose of
detergent: adding too much detergent will not necessarily result in a more efficient wash, and may in fact cause
build up on the inside of your appliance and contribute to
environmental pollution.
! Use powder detergent for white cotton garments, for
pre-washing, and for washing at temperatures over 60°C.
! Follow the instructions given on the detergent packaging.
! Do not use hand washing detergents because these
create too much foam.
Open the detergent dispenser drawer and pour
in the detergent or washing
additive, as follows.
compartment 1: Pre-wash detergent (powder)
Before pouring in the detergent, make sure that extra compartment 4 has been removed.
compartment 2: Detergent for the wash cycle
(powder or liquid)
If liquid detergent is used, it is recommended that the
removable plastic partition A (supplied) be used for proper
dosage.
If powder detergent is used, place the partition into slot B.
compartment 3: Additives (fabric softeners, etc.)
The fabric softener should not overflow the grid.
extra compartment 4: Bleach
Preparing the laundry
Garments requiring special care
Wool - Woolmark Apparel Care - Green:
the wool wash cycle of this machine has been approved
by The Woolmark Company for the washing of wool garments labelled as “hand wash” provided that the products
are washed according to the instructions on the garment
label and those issued by the manufacturer of this washing
machine.
In UK, Eire, Hong Kong and India the Woolmark trade
mark is a Certification trade mark.
Delicates: use programme 9 to wash very delicate gar-
ments having strasses or sequins.
We recommend turning the garments inside out before
washing and placing small items into the special bag for
washing delicates.
Use liquid detergent on delicate garments for best results.
To wash silk garments and curtains select cycle 9 and then
function ; the machine will end the cycle while the
laundry is soaking and the indicator light will flash. To
drain the water so that the laundry may be removed, press
the START/PAUSE button or the button.
Load balancing system
Before every spin cycle, to avoid excessive vibrations and
to distribute the load in a uniform manner, the drum rotates
continuously at a speed which is slightly greater than the
washing rotation speed. If, after several attempts, the load
is not balanced correctly, the machine spins at a reduced
spin speed. If the load is excessively unbalanced, the
washing machine performs the distribution process instead
of spinning. To encourage improved load distribution and
balance, we recommend small and large garments are
mixed in the load.
•Dividethelaundryaccordingto:
- the type of fabric/the symbol on the label
- the colours: separate coloured garments from whites.
•Emptyallgarmentpocketsandcheckthebuttons.
• Donotexceedthelistedvalues,whichrefertothe
weight of the laundry when dry: see “Table of wash
cycles”.
How much does your laundry weigh?
1 sheet 400-500 g
1 pillow case 150-200 g
1 tablecloth 400-500 g
1 bathrobe 900-1200 g
1 towel 150-250 g
10
Page 11

Troubleshooting
Your washing machine could fail to work. Before contacting the Technical Assistance Centre (see “Assistance”), make sure
that the problem cannot be solved easily using the following list.
Problem:
The washing machine does not
switch on.
The wash cycle does not start.
The washing machine does not
take in water (the indicator light for
the first wash cycle stage flashes
rapidly).
The washing machine continuously
takes in and drains water.
Possible causes / Solutions:
•Theapplianceisnotpluggedintothesocketfully,orisnotmakingcontact.
•Thereisnopowerinthehouse.
•Thewashingmachinedoorisnotclosedproperly.
•TheON/OFFbuttonhasnotbeenpressed.
•TheSTART/PAUSEbuttonhasnotbeenpressed.
•Thewatertaphasnotbeenopened.
•Adelayedstarthasbeenset(see “Personalisation”).
•Thewaterinlethoseisnotconnectedtothetap.
•Thehoseisbent.
•Thewatertaphasnotbeenopened.
•Thereisnowatersupplyinthehouse.
•Thepressureistoolow.
•TheSTART/PAUSEbuttonhasnotbeenpressed.
•Thedrainhoseisnotfittedataheightbetween65and100cmfromthefloor
(see “Installation”).
•Thefreeendofthehoseisunderwater(see “Installation”).
•Thewalldrainagesystemisnotfittedwithabreatherpipe.
If the problem persists even after these checks, turn off the water tap, switch
the appliance off and contact the Assistance Service. If the dwelling is on one of
the upper floors of a building, there may be problems relating to water drainage,
causing the washing machine to fill with water and drain continuously. Special
anti-draining valves are available in shops and help to avoid this inconvenience.
GB
The washing machine does not
drain or spin.
The washing machine vibrates a lot
during the spin cycle.
The washing machine leaks.
The START/PAUSE indicator light
(orange) and the function indicator
lights flash rapidly.
There is too much foam.
•Thewashcycledoesnotincludedraining:somewashcyclesrequirethedrain
phase to be started manually.
•TheEASYIRONfunctionhasbeenactivated:Tocompletethewashcycle,
press the START/PAUSE button (“Personalisation”).
•Thedrainhoseisbent(see “Installation”).
•Thedrainageductisclogged.
•Thedrumwasnotunlockedcorrectlyduringinstallation(see “Installation”).
•Thewashingmachineisnotlevel(see “Installation”).
•Thewashingmachineistrappedbetweencabinetsandwalls(see “Installation”).
•Thewaterinlethoseisnotscrewedonproperly(see “Installation”).
•Thedetergentdispenserdrawerisblocked(forcleaninginstructions,see
“Care and maintenance”).
•Thedrainhoseisnotfixedproperly(see “Installation”).
•Switchoffthemachineandunplugit,waitforapproximately1minuteand
then switch it back on again.
If the problem persists, contact the Technical Assistance Service.
•Thedetergentisnotsuitableformachinewashing(itshoulddisplaythetext
“for washing machines” or “hand and machine wash”, or the like).
•Toomuchdetergentwasused.
11
Page 12
Service
GB
Before calling for Assistance:
• Check whether you can solve the problem alone (see “Troubleshooting”);
• Restarttheprogrammetocheckwhethertheproblemhasbeensolved;
• Ifthisisnotthecase,contactanauthorisedTechnicalAssistanceCentreusingthetelephonenumberprovidedonthe
guarantee certificate.
! Always request the assistance of authorised technicians.
Have the following information to hand:
• thetypeofproblem;
• theappliancemodel(Mod.);
• theserialnumber(S/N).
This information can be found on the data plate applied to the rear of the washing machine, and can also be found on the
front of the appliance by opening the door.
12
Page 13

Istruzioni per l’uso
LAVABIANCHERIA
IT
Italiano
WML 701
Sommario
Installazione, 14-15
Disimballo e livellamento
Collegamenti idraulici ed elettrici
Primo ciclo di lavaggio
Dati tecnici
Manutenzione e cura, 16
Escludere acqua e corrente elettrica
Pulire la lavabiancheria
Pulire il cassetto dei detersivi
Curare oblò e cestello
Pulire la pompa
Controllare il tubo di alimentazione dell’acqua
Precauzioni e consigli, 17
Sicurezza generale
Smaltimento
Descrizione della lavabiancheria e
avviare un programma, 18-19
Pannello di controllo
Spie
Avviare un programma
IT
Programmi, 20
Tabella dei programmi
Personalizzazioni, 21
Impostare la temperatura
Impostare la centrifuga
Funzioni
Detersivi e biancheria, 22
Cassetto dei detersivi
Preparare la biancheria
Capi particolari
Sistema bilanciamento del carico
Anomalie e rimedi, 23
Assistenza, 24
Assistenza Attiva 7 giorni su 7
13
Page 14
Installazione
IT
! È importante conservare questo libretto per
poterlo consultare in ogni momento. In caso di
vendita, di cessione o di trasloco, assicurarsi
che resti insieme alla lavabiancheria per informare il nuovo proprietario sul funzionamento e
sui relativi avvertimenti.
! Leggere attentamente le istruzioni: ci sono
importanti informazioni sull’installazione,
sull’uso e sulla sicurezza.
Disimballo e livellamento
Disimballo
1. Disimballare la lavabiancheria.
2. Controllare che la lavabiancheria non abbia
subìto danni nel trasporto. Se fosse danneggiata non collegarla e contattare il rivenditore.
3. Rimuovere le 3 viti
di protezione per il
trasporto e il gommino
con il relativo distanziale, posti nella parte
posteriore (vedi figura).
4. Chiudere i fori con i tappi di plastica in dotazione.
5. Conservare tutti i pezzi: qualora la lavabiancheria debba essere trasportata, dovranno
essere rimontati.
! Gli imballaggi non sono giocattoli per bambini.
Un accurato livellamento dà stabilità alla
macchina ed evita vibrazioni, rumori e spostamenti durante il funzionamento. In caso di
moquette o di un tappeto, regolare i piedini in
modo da conservare sotto la lavabiancheria
uno spazio sufficiente per la ventilazione.
Collegamenti idraulici ed elettrici
Collegamento del tubo di alimentazione
dell’acqua
1. Collegare il tubo
di alimentazione
avvitandolo a un
rubinetto d’acqua
fredda con bocca
filettata da 3/4 gas
(vedi figura).
Prima di allacciare,
far scorrere l’acqua
finché non sia limpida.
2. Collegare il tubo
di alimentazione alla
lavabiancheria
avvitandolo all’apposita presa d’acqua,
nella parte posteriore
in alto a destra (vedi
figura).
3. Fare attenzione che nel tubo non ci siano
né pieghe né strozzature.
Livellamento
1. Installare la lavabiancheria su un pavimento
piano e rigido, senza appoggiarla a muri, mobili
o altro.
2. Se il pavimento non
fosse perfettamente
orizzontale, compensare le irregolarità
svitando o avvitando
i piedini anteriori (vedi
figura); l’angolo di
inclinazione, misurato
sul piano di lavoro, non
deve superare i 2°.
14
! La pressione idrica del rubinetto deve essere compresa nei valori della tabella Dati tecnici (vedi pagina a fianco).
! Se la lunghezza del tubo di alimentazione
non fosse sufficiente, rivolgersi a un negozio
specializzato o a un tecnico autorizzato.
! Non utilizzare mai tubi già usati.
! Utilizzare quelli in dotazione alla macchina.
Page 15
Collegamento del tubo di scarico
65 - 100 cm
Collegare il tubo di
scarico, senza piegarlo, a una conduttura di scarico o a
uno scarico a muro
posti tra 65 e 100
cm da terra;
oppure appoggiarlo
al bordo di un lavandino o di una vasca,
legando la guida in
dotazione al
rubinetto (vedi figu-
ra). L’estremità libera
del tubo di scarico
non deve rimanere
immersa nell’acqua.
! È sconsigliato usare tubi di prolunga; se indispensabile, la prolunga deve avere lo stesso diametro del tubo originale e non superare
i 150 cm.
! Il cavo di alimentazione deve essere sostituito
solo da tecnici autorizzati.
Attenzione! L’azienda declina ogni responsabilità qualora queste norme non vengano rispettate.
Primo ciclo di lavaggio
Dopo l’installazione, prima dell’uso, effettuare
un ciclo di lavaggio con detersivo e senza biancheria impostando il programma “Auto Pulizia”
(vedi “Pulire la lavabiancheria”).
Dati tecnici
Modello
Dimensioni
Capacità
Collega-
menti elettrici
WML 701
larghezza cm 59,5
altezza cm 85
profondità cm 51,7
da 1 a 7 kg
vedi la targhetta caratteristiche tecniche applicata sulla
macchina
IT
Collegamento elettrico
Prima di inserire la spina nella presa della
corrente, accertarsi che:
• la presa abbia la messa a terra e sia a norma di legge;
• la presa sia in grado di sopportare il carico
massimo di potenza della macchina, indicato
nella tabella Dati tecnici (vedi a fianco);
• la tensione di alimentazione sia compresa
nei valori indicati nella tabella Dati tecnici (vedi
a fianco);
• la presa sia compatibile con la spina della
lavabiancheria. In caso contrario sostituire la
presa o la spina.
! La lavabiancheria non va installata all’aperto, nemmeno se lo spazio è riparato, perché
è molto pericoloso lasciarla esposta a pioggia
e temporali.
! A lavabiancheria installata, la presa della
corrente deve essere facilmente raggiungibile.
! Non usare prolunghe e multiple.
! Il cavo non deve subire piegature o com-
pressioni.
Collegamenti idrici
Velocità di
centrifuga
Programmi
di controllo
secondo i
regolamenti
1061/2010
1015/2010
pressione massima
1 MPa (10 bar)
pressione minima
0,05 MPa (0,5 bar)
capacità del cesto 46 litri
sino a 1000 giri al minuto
programma 4;
Eco Cotone 60°C.
programma 4;
Eco Cotone 40°C.
Questa apparecchiatura è
conforme alle seguenti Direttive Comunitarie:
- 2004/108/CE (Compatibilità
Elettromagnetica)
- 2012/19/EU - WEEE
- 2006/95/CE (Bassa Tensione)
15
Page 16
Manutenzione e cura
1
2
IT
Escludere acqua e corrente elettrica
• Chiudere il rubinetto dell’acqua dopo ogni lavaggio. Si limita così l’usura dell’impianto idraulico della lavabiancheria e si elimina il pericolo di
perdite.
• Staccare la spina della corrente quando si
pulisce la lavabiancheria e durante i lavori di
manutenzione.
Pulire la lavabiancheria
• La parte esterna e le parti in gomma possono essere puliti con un panno imbevuto di
acqua tiepida e sapone. Non usare solventi o
abrasivi.
• La lavabiancheria è dotata di un programma
di “Auto Pulizia” delle parti interne che deve
essere effettuato senza alcun tipo di carico
nel cesto.
Il detersivo (nella quantità pari al 10% di quella
consigliata per capi poco sporchi) o additivi specifici per la pulizia della lavabiancheria,
potranno essere utilizzati come coadiuvanti nel
programma di lavaggio. Si consiglia di effettuare
il programma di pulizia ogni 40 cicli di lavaggio.
A
B
Per attivare il programma premere contemporaneamente il tasto
A e B per 5 sec. (vedi
figura).
Il programma partirà
automaticamente ed
avrà una durata di circa
70 minuti. Per fermare
il ciclo premere il tasto
START/PAUSE.
Pulire il cassetto dei detersivi
Sfilare il cassetto sollevandolo e tirandolo
verso l’esterno (vedi
figura).
Lavarlo sotto l’acqua
corrente; questa pulizia
va effettuata
frequentemente.
Pulire la pompa
La macchina è dotata di una pompa autopulente che non ha bisogno di manutenzione. Può però succedere che piccoli oggetti
(monete, bottoni) cadano nella precamera
che protegge la pompa, situata nella parte
inferiore di essa.
! Assicurarsi che il ciclo di lavaggio sia terminato e staccare la spina.
Per accedere alla precamera:
1. rimuovere il pannello di copertura sul
lato anteriore della
macchina con l’ausilio di un giravite (vedi
figura);
2. svitare il coperchio ruotandolo in
senso antiorario
(vedi figura): è normale che fuoriesca
un po’ d’acqua;
3. pulire accuratamente l’interno;
4. riavvitare il coperchio;
5. rimontare il pannello assicurandosi, prima
di spingerlo verso la macchina, di aver inserito i ganci nelle apposite asole.
Controllare il tubo di alimentazione dell’acqua
Controllare il tubo di alimentazione almeno
una volta all’anno. Se presenta screpolature e
fessure va sostituito: durante i lavaggi le forti
pressioni potrebbero provocare improvvise
spaccature.
Curare oblò e cestello
• Lasciare sempre socchiuso l’oblò per evitare
che si formino cattivi odori.
16
! Non utilizzare mai tubi già usati.
Page 17

Precauzioni e consigli
! La lavabiancheria è stata progettata e costruita in
conformità alle norme internazionali di sicurezza. Queste
avvertenze sono fornite per ragioni di
sicurezza e devono essere lette attentamente.
Sicurezza generale
• Questo apparecchio è stato concepito esclusivamente
per un uso di tipo domestico.
•Questo apparecchio può essere usato da
bambini da 8 anni in su e da persone con
capacità fisiche, sensoriali o mentali ridotte
o con esperienza e conoscenze insufficienti
se sono supervisionati o se hanno ricevuto
adeguata formazione in merito all’uso dell’apparecchio in modo sicuro e capendo i pericoli
connessi. I bambini non devono giocare con
l’apparecchio. Manutenzione e pulizia non
devono essere effettuati dai bambini senza
supervisione.
• Non toccare la macchina a piedi nudi o con le mani o i
piedi bagnati o umidi.
• Non staccare la spina dalla presa della corrente tirando il
cavo, bensì afferrando la spina.
• Non aprire il cassetto dei detersivi mentre la macchina è
in funzione.
• Non toccare l’acqua di scarico, che può raggiungere
temperature elevate.
• Non forzare in nessun caso l’oblò: potrebbe danneggiarsi
il meccanismo di sicurezza che protegge da aperture
accidentali.
• In caso di guasto, in nessun caso accedere ai meccanismi
interni per tentare una riparazione.
• Controllare sempre che i bambini non si avvicinino alla
macchina in funzione.
• Durante il lavaggio l’oblò tende a scaldarsi.
• Se dev’essere spostata, lavorare in due o tre persone con
la massima attenzione. Mai da soli perché la macchina è
molto pesante.
• Prima di introdurre la biancheria controlla che il cestello
sia vuoto.
Il simbolo del cestino barrato è riportato su tutti i prodotti per
ricordare gli obblighi di raccolta separata.
Per ulteriori informazioni, sulla corretta dismissione degli
elettrodomestici, i detentori potranno rivolgersi al servizio
pubblico preposto o ai rivenditori.
IT
Smaltimento
• Smaltimento del materiale di imballaggio:
attenersi alle norme locali, così gli imballaggi potranno
essere riutilizzati.
• La direttiva Europea 2012/19/EU - WEEE sui rifiuti di
apparecchiature elettriche ed elettroniche, prevede che gli
elettrodomestici non debbano essere smaltiti nel normale
flusso dei rifiuti solidi urbani. Gli apparecchi dismessi devono essere raccolti separatamente per ottimizzare il tasso
di recupero e riciclaggio dei materiali che li compongono
ed impedire potenziali danni per la salute e l’ambiente.
17
Page 18
Descrizione della lavabiancheria e
avviare un programma
IT
Pannello di controllo
Cassetto dei detersivi
Tasto ON/OFF
PROGRAMMI
TEMPERATURA
Manopola
CENTRIFUGA
Manopola
Manopola
Tasti con spie
FUNZIONE
SPIE AVANZAMENTO
CICLO/PARTENZA
RITARDATA
Spia
OBLÒ
BLOCCATO
Tasto con spia
START/
PAUSE
Cassetto dei detersivi: per caricare detersivi e additivi
(vedi “Detersivi e biancheria”).
Tasto ON/OFF: per accendere e spegnere la lavabiancheria.
Manopola PROGRAMMI: per impostare i programmi. Durante il programma la manopola resterà ferma.
Tasti FUNZIONE: per selezionare le funzioni disponibili. La
spia relativa alla funzione selezionata rimarrà accesa.
Manopola CENTRIFUGA: per impostare la centrifuga o
escluderla (vedi “Personalizzazioni”).
Manopola TEMPERATURA: per impostare la temperatura
o il lavaggio a freddo (vedi “Personalizzazioni”).
SPIE AVANZAMENTO CICLO/PARTENZA RITARDATA:
per seguire lo stato di avanzamento del programma di lavaggio.
La spia accesa indica la fase in corso.
Se è stata impostata la funzione “Partenza Ritardata”, indicheranno il tempo mancante all’avvio del programma (vedi
pagina a fianco).
Spia OBLÒ BLOCCATO: per capire se l’oblò è apribile
(vedi pagina a fianco).
Tasto START/PAUSE: per avviare i programmi o inter-
romperli momentaneamente.
N.B.: mettere in pausa il lavaggio in corso premere
questo tasto, la spia relativa lampeggerà con colore
arancione mentre quella della fase in corso sarà accesa
fissa. Se la spia OBLÒ BLOCCATO sarà spenta, si
potrà aprire l’oblò (attendere 3 minuti circa).
Per far ripartire il lavaggio dal punto in cui è stato
interrotto, premere nuovamente questo tasto.
Modalità di stand by
Questa lavatrice, in conformità alle nuove normative
legate al risparmio energetico, è dotata di un sistema
di autospegnimento (stand by) che entra in funzione
dopo circa 30 minuti nel caso di non utilizzo. Premere
brevemente il tasto ON/OFF e attendere che la macchina
si riattivi.
18
Page 19

Spie
END
Le spie forniscono informazioni importanti.
Ecco che cosa dicono:
Spie fase in corso
Una volta selezionato e avviato il ciclo di lavaggio desiderato, le spie si accenderanno progressivamente per indicarne
lo stato di avanzamento:
IT
Partenza ritardata
Se è stata attivata la funzione “Partenza ritardata” (vedi
“Personalizzazioni”), dopo avere avviato il programma, ini-
zierà a lampeggiare la spia relativa al ritardo selezionato:
Col trascorrere del tempo verrà visualizzato il ritardo
residuo con il lampeggio della spia relativa:
Trascorso il ritardo selezionato la spia lampeggiante si
spengnerà e avrà inizio il programma impostato.
Lavaggio
Risciacquo
Centrifuga
Scarico
Fine lavaggio
Tasti funzione e relative spie
Selezionando una funzione la spia relativa si illuminerà.
Se la funzione selezionata non è compatibile con il programma impostato la spia relativa lampeggerà, verranno emessi
“3 beep” e la funzione non verrà attivata.
Nel caso venga impostata una funzione incompatibile con
un’altra precedentemente selezionata rimarrà attiva solo
l’ultima scelta.
Spia oblò bloccato
La spia accesa indica che l’oblò è bloccato per impedire
aperture accidentali; per evitare danni è necessario attendere che la spia si spenga prima di aprire l’oblò (attendere 3
minuti circa).
! Il lampeggio veloce della spia START/PAUSE (arancione)
contemporaneo a quello delle funzioni segnala un’anomalia
(vedi “Anomalie e rimedi”).
Avviare un programma
1. Accendere la lavabiancheria premendo il tasto ON/OFF. Tutte le spie si accenderanno per qualche secondo, poi rimarranno
accese le spie ralative alle impostazioni del programma selezionato e pulserà la spia START/PAUSE.
2. Caricare la biancheria e chiudere l’oblò.
3. Impostare con la manopola PROGRAMMI il programma desiderato.
4. Impostare la temperatura di lavaggio (vedi “Personalizzazioni”).
5. Impostare la velocità di centrifuga (vedi “Personalizzazioni”).
6. Versare detersivo e additivi (vedi “Detersivi e biancheria”).
7. Selezionare le funzioni desiderate.
8. Avviare il programma premendo il tasto START/PAUSE e la spia relativa rimarrà accesa fissa di colore verde.
Per annullare il ciclo impostato mettere la macchina in pausa premendo il tasto START/PAUSE e scegliere un nuovo ciclo.
9. Al termine del programma si illuminerà la spia END. La spia OBLÒ BLOCCATO si spegnerà indicando che l’oblò è apribile
(attendere 3 minuti circa). Estrarre la biancheria e lasciare l’oblò socchiuso per far asciugare il cestello. Spegnere la lavabiancheria premendo il tasto ON/OFF.
19
Page 20

Programmi
Tabella dei programmi
IT
Descrizione del Programma
Programmi
1
Antimacchia
2
Bianchi
3
Cotone: Bianchi e colorati delicati poco sporchi.
Eco Cotone 60° (1): Bianchi e colorati resistenti molto spor-
4
chi.
4
Eco Cotone 40° (2): Bianchi e colorati delicati poco sporchi. 40° 1000 -
5
Sintetici: Colori resistenti molto sporchi. 60° 1000
5
Sintetici (3): Colori resistenti poco sporchi. 40° 1000
6
Anti Allergy
7
Baby
8
Lana: Per lana, cachemire, ecc. 40° 800 -
9
Delicati
Rapido 60': Per rinfrescare rapidamente capi sporchi
10
(non indicato per lana, seta e capi da lavare a mano).
11
Cotone 20°: Bianchi e colorati delicati poco sporchi. 20° 1000 -
12
Eco Cotone
13
Eco Sintetici
14
Eco Rapido 30'
Risciacquo
Centrifuga + Scarico
Solo scarico *
* Selezionando il programma ed escludendo la centrifuga la macchina effettuerà solo lo scarico.
La durata del ciclo indicata sul display o sul libretto è una stima calcolata in base a condizioni standard. Il tempo effettivo può variare in base a numerosi fattori
quali la temperatura e la pressione dell’acqua in ingresso, la temperatura ambiente, la quantità di detersivo, la quantità ed il tipo di carico, il bilanciamento del
carico, le opzioni aggiuntive selezionate.
1) Programma di controllo secondo il regolamento 1061/2010: impostare il programma 4 con una temperaura di 60°C.
Questo ciclo è adatto per pulire un carico di cotone normalmente sporco ed è il più efficiente in termini di consumo combinato di energia e di acqua, da usare su
capi lavabili a 60 °C. La temperatura effettiva di lavaggio può differire da quella indicata.
2) Programma di controllo secondo il regolamento 1061/2010: impostare il programma 4 con una temperatura di 40°C.
Questo ciclo è adatto per pulire un carico di cotone normalmente sporco ed è il più efficiente in termini di consumo combinato di energia e di acqua, da usare su
capi lavabili a 40°C. La temperatura effettiva di lavaggio può differire da quella indicata.
Per tutti Test Institutes:
2) Programma cotone lungo: impostare il programma 4 con una temperatura di 40°C.
3) Programma sintetico lungo: impostare il programma 5 con una temperatura di 40°C.
Temp.
max.
(°C)
40° 1000
60° 1000
40°
(Max. 90°)
60° 1000 -
60° 1000 40° 1000
30° 0 -
60° 1000 -
Acqua
fredda
Acqua
fredda
Acqua
fredda
Velocità
max.
(giri al
minuto)
1000
1000 -
1000 -
800 -
- 1000 - -
- 1000 - - - - 7 - - - 10’
-
Detersivi
gina
Prelaggio
- - - - 7 - - - 3’
Candeg-
Lavaggio
-
-
-
-
-
-
-
-
-
-
Ammorbi-
(Kg)
dente
Carico max.
Umidità residua
4 - - - 180’
4 - - - 180’
7 - - - 115’
7 62 1,21 52,5 195’
7 62 0,81 76 185’
3 44 0,78 33 120’
3 - - - 110’
4 - - - 185’
3 - - - 145’
1,5 - - - 80’
1 - - - 75’
3,5 62 0,68 30 60’
7 - - - 180’
7 - - - 100’
3 - - - 75’
3 70 0,05 36 30’
7 - - - 49’
%
gia kWh
Consumo ener-
Durata ciclo
Acqua totale lt
Antimacchia: il programma 1 è adatto al lavaggio di capi molto sporchi, con colori resistenti. Il programma garantisce una
classe di lavaggio superiore alla classe standard (classe A). Non eseguire il programma mescolando capi di colore diverso. Si
consiglia l’utilizzo di detersivo in polvere. Per macchie ostinate è consigliato il pretrattamento con additivi specifici.
Bianchi: utilizzare il ciclo 2 per il lavaggio dei capi bianchi. Il programma è studiato per il mantenimento della brillantezza del
bianco nel tempo. Per risultati migliori si raccomanda l’utilizzo del detersivo in polvere.
Anti Allergy: utilizzare il programma 6 per la rimozione dei principali allergeni come polline, acari, peli del gatto e cane.
Baby: utilizzare l’apposito programma 7 per asportare lo sporco tipico dei bambini e rimuovere il detersivo dai panni onde
evitare reazioni allergiche alla pelle delicata dei bambini. Questo ciclo è stato studiato per ridurre la carica batterica utilizzando
una maggior quantità di acqua e ottimizzando l’effetto di additivi specifici igenizzanti aggiunti al detersivo.
Programmi Eco
I programmi Eco offrono buone performance di lavaggio a basse temperature consentendo un minore utilizzo di energia
elettrica con un beneficio per l’ambiente e un risparmio economico. I programmi Eco (
12
Eco Cotone,
13
Eco Sintetici e
14
Eco Rapido 30’) sono stati creati per diversi tipi di tessuto e per capi poco sporchi. Per garantire un risultato ottimale raccomandiamo l’uso di un detergente liquido; si consiglia di pretrattare polsini, colli e macchie.
Cotone 20°: il programma 11 per carichi in cotone sporchi. Le buone performance anche a freddo, comparabili con un lavaggio
a 40°, sono garantite da un’azione meccanica che lavora con variazione di velocità a picchi ripetuti e ravvicinati.
20
Page 21

Personalizzazioni
Impostare la temperatura
Ruotando la manopola TEMPERATURA si imposta la temperatura di lavaggio (vedi Tabella programmi).
La temperatura si può ridurre sino al lavaggio a freddo ( ).
La macchina impedirà automaticamente di impostare una temperatura maggiore a quella massima prevista per ogni programma.
! Eccezione: selezionando il programma
3
la temperatura può essere portata sino a 90°.
Impostare la centrifuga
Ruotando la manopola CENTRIFUGA si imposta la velocità di centrifuga del programma selezionato.
Le velocità massime previste per i programmi sono:
Programmi Velocità massima
Cotone 1000 giri al minuto
Sintetici 1000 giri al minuto
Lana 800 giri al minuto
Seta solo scarico
La velocità di centrifuga può essere ridotta, oppure esclusa selezionando il simbolo .
La macchina impedirà automaticamente di effettuare una centrifuga maggiore a quella massima prevista per ogni programma.
Funzioni
Le varie funzioni di lavaggio previste dalla lavabiancheria permettono di ottenere la pulizia e il bianco desiderati.
Per attivare le funzioni:
1. premere il tasto relativo alla funzione desiderata;
2. l’accensione della spia relativa segnala che la funzione è attiva.
Nota:
- Se la funzione selezionata non è compatibile con il programma impostato la spia relativa lampeggerà, verranno emessi “3
beep” e la funzione non verrà attivata.
- Nel caso venga impostata una funzione incompatibile con un’altra precedentemente selezionata rimarrà attiva solo l’ultima scelta.
IT
Super Lavaggio
Questa opzione garantisce un lavaggio di alte prestazioni grazie all’utilizzo di una maggior quantità d’ acqua nella fase iniziale
del ciclo e alla maggior durata del programma ed è utile per eliminare le macchie più resistenti.
Può essere utilizzata con o senza candeggina.
Se si desidera effettuare il candeggio inserire la vaschetta aggiuntiva 4, in dotazione, nella vaschetta 1. Nel dosare la
candeggina non superare il livello “max” indicato sul perno centrale (vedi figura a pag 22).
Stira Facile
Selezionando questa funzione, il lavaggio e la centrifuga saranno opportunamente modificati per ridurre la formazione di
pieghe. Al temine del ciclo la lavabiancheria effettuerà delle lente rotazioni del cestello;
la spia della funzione STIRA FACILE e quella di START/PAUSE lampeggeranno (arancione) e la fase END rimarrà accesa
fissa. Per terminare il ciclo si dovrà premere il tasto START/PAUSE o il tasto STIRA FACILE.
Prelavaggio
Selezionando questa funzione si effettua il prelavaggio, utile per rimuovere macchie ostinate.
N.B.: Aggiungere il detersivo nell’apposito scomparto.
Partenza Ritardata
Ritarda l’avvio della macchina sino a 12 ore.
Premere più volte il tasto fino a far accendere la spia relativa al ritardo desiderato. Alla quinta pressione del tasto la funzione si
disattiverà.
N.B.: Una volta premuto il tasto START/PAUSE, si può modificare il valore del ritardo solo diminuendolo.
21
Page 22

Detersivi e biancheria
M
AX
1
2
4
3
A
B
IT
Cassetto dei detersivi
Il buon risultato del lavaggio dipende anche dal corretto
dosaggio del detersivo: eccedendo non si lava in modo più
efficace e si contribuisce a incrostare le parti interne della
lavabiancheria e a inquinare l’ambiente.
! Usare detersivi in polvere per capi in cotone bianchi e per il
prelavaggio e per lavaggi con temperatura superiore a 60°C.
! Seguire le indicazioni riportate sulla confezione di detersivo.
! Non usare detersivi per il lavaggio a mano, perché formano
troppa schiuma.
Estrarre il cassetto dei detersivi e inserire il detersivo o
l’additivo come segue.
vaschetta 1: Detersivo per prelavaggio
(in polvere)
Prima di versare il detersivo verificare che non sia inserita la
veschetta aggiuntiva 4.
vaschetta 2: Detersivo per lavaggio
(in polvere o liquido)
Nel caso di utilizzo di detersivo liquido si consiglia di utilizzare la paretina A in dotazione per un corretto dosaggio.
Per l’utilizzo del detersivo in polvere riporre la paretina nella
cavità B.
vaschetta 3: Additivi (ammorbidente, ecc.)
L’ammorbidente non deve fuoriuscire dalla griglia.
vaschetta aggiuntiva 4: Candeggina
Preparare la biancheria
• Suddividere la biancheria secondo:
- il tipo di tessuto / il simbolo sull’etichetta.
- i colori: separare i capi colorati da quelli bianchi.
• Vuotare le tasche e controllare i bottoni.
• Non superare i valori indicati, riferiti al peso della
biancheria asciutta: vedi “Tabella dei programmi”.
Quanto pesa la biancheria?
Capi particolari
L a n a - W o o l m a r k A p p a rel Care - G r e e n :
Il ciclo di lavaggio “Lana” di questa lavatrice è stato approvato
dalla Woolmark Company per il lavaggio di capi di lana
classificati come “lavabili a mano”, purché il lavaggio venga
eseguito nel rispetto delle istruzioni riportate sull’etichetta
dell’indumento e delle indicazioni fornite dal produttore di
questa lavatrice.
Delicati: utilizzare il programma 9 per il lavaggio dei capi
molto delicati, che presentano applicazioni quali strass o
paillettes.
Si raccomanda di rovesciare i capi prima del lavaggio e di
inserire gli indumenti piccoli nell’apposito sacchetto per il
lavaggio dei capi delicati.
Per risultati migliori si raccomanda l’utilizzo del detersivo
liquido per capi delicati.
Per il lavaggio dei capi in seta e tende, selezionare il
ciclo 9 e attivare la funzione ; la macchina terminerà
il ciclo con la biancheria in ammollo e la spia della
funzione lampeggeraà. Per scaricare l’acqua e
poter rimuovere il bucato sarà necessario premere il tasto
START/PAUSE o il tasto .
Sistema bilanciamento del carico
Prima di ogni centrifuga, per evitare vibrazioni eccessive
e per distribuire il carico in modo uniforme, il cestello
effettua delle rotazioni ad una velocità leggermente
superiore a quella del lavaggio. Se al termine di ripetuti
tentativi il carico non fosse ancora correttamente
bilanciato la macchina effettua la centrifuga ad una
velocità inferiore a quella prevista.
In presenza di eccessivo sbilanciamento la lavabiancheria
effettua la distribuzione anzichè la centrifuga. Per favorire
una migliore distribuzione del carico e il suo corretto
bilanciamento si consiglia di mescolare capi grandi e
piccoli.
1 lenzuolo 400-500 gr.
1 federa 150-200 gr.
1 tovaglia 400-500 gr.
1 accappatoio 900-1200 gr.
1 asciugamano 150-250 gr.
22
Page 23

Anomalie e rimedi
Può accadere che la lavabiancheria non funzioni. Prima di telefonare all’Assistenza (vedi “Assistenza”), controllare che non si
tratti di un problema facilmente risolvibile aiutandosi con il seguente elenco.
Anomalie:
La lavabiancheria
non si accende.
Il ciclo di lavaggio
non inizia.
La lavabiancheria non carica
acqua (lampeggia velocemente la
spia della prima fase di lavaggio).
La lavabiancheria carica e scarica
acqua di continuo.
Possibili cause / Soluzione:
• La spina non è inserita nella presa della corrente, o non abbastanza
da fare contatto.
• In casa non c’è corrente.
• L’oblò non è ben chiuso
• Il tasto ON/OFF non è stato premuto.
• Il tasto START/PAUSE non è stato premuto.
• Il rubinetto dell’acqua non è aperto.
• Si è impostato un ritardo sull’ora di avvio (PARTENZA RITARDATA,
vedi “Personalizzazioni”).
• Il tubo di alimentazione dell’acqua non è collegato al rubinetto.
• Il tubo è piegato.
• Il rubinetto dell’acqua non è aperto.
• In casa manca l’acqua.
• Non c’è sufficiente pressione.
• Il tasto START/PAUSE non è stato premuto.
• Il tubo di scarico non è installato fra 65 e 100 cm da terra (vedi “Installazione”).
• L’estremità del tubo di scarico è immersa nell’acqua (vedi “Installazione”).
• Lo scarico a muro non ha lo sfiato d’aria.
Se dopo queste verifiche il problema non si risolve, chiudere il rubinetto dell’acqua, spegnere la lavabiancheria e chiamare l’Assistenza. Se l’abitazione si trova
agli ultimi piani di un edificio, è possibile che si verifichino fenomeni di sifonaggio, per cui la lavabiancheria carica e scarica acqua di continuo. Per eliminare
l’inconveniente sono disponibili in commercio apposite valvole anti-sifonaggio.
IT
La lavabiancheria non scarica
o non centrifuga.
La lavabiancheria vibra
molto durante la centrifuga.
La lavabiancheria perde acqua.
La spia START/PAUSE (arancione)
e le spie delle funzioni lampeggiano velocemente.
Si forma troppa schiuma.
• Il programma non prevede lo scarico: con alcuni programmi occorre
avviarlo manualmente.
• È attiva la funzione STIRA FACILE: per completare il programma
premere il tasto START/PAUSE (“Personalizzazioni”).
• Il tubo di scarico è piegato (vedi “Installazione”).
• La conduttura di scarico è ostruita.
• Il cestello, al momento dell’installazione, non è stato sbloccato
correttamente (vedi “Installazione”).
• La lavabiancheria non è in piano (vedi “Installazione”).
• La lavabiancheria è stretta tra mobili e muro (vedi “Installazione”).
• Il tubo di alimentazione dell’acqua non è ben avvitato (vedi “Installazione”).
• Il cassetto dei detersivi è intasato (per pulirlo vedi “Manutenzione e cura”).
• Il tubo di scarico non è fissato bene (vedi “Installazione”).
• Spegnere la macchina e togliere la spina dalla presa, attendere circa
1 minuto quindi riaccenderla.
Se l’anomalia persiste, chiamare l’Assistenza.
• Il detersivo non è specifico per lavabiancheria (deve esserci la
dicitura “per lavatrice”, “a mano e in lavatrice”, o simili).
• Il dosaggio è stato eccessivo.
23
Page 24

Assistenza
IT
Prima di contattare l’Assistenza:
Verificare se l’anomalia può essere risolta da soli (vedi “Anomalie e rimedi”);
•
• Riavviare il programma per controllare se l’inconveniente è stato ovviato;
• In caso negativo, contattare il Numero Unico 199.199.199*.
! Non ricorrere mai a tecnici non autorizzati.
Comunicare:
• il tipo di anomalia;
• il modello della macchina (Mod.);
• il numero di serie (S/N).
Queste informazioni si trovano sulla targhetta applicata nella parte posteriore della lavabiancheria e nella parte anteriore
aprendo l’oblò.
Assistenza Attiva 7 giorni su 7
In caso di necessità d’intervento chiamare il Numero Unico Nazionale 199.199.199*.
Un operatore sarà a completa disposizione per fissare un appuntamento con il Centro Assistenza Tecnico
Autorizzato più vicino al luogo da cui si chiama.
È attivo 7 giorni su 7, sabato e domenica compresi, e non lascia mai inascoltata una richiesta.
* Al costo di 14,25 centesimi di Euro al minuto (iva inclusa) dal Lun. al Ven. dalle 08:00 alle 18:30, il Sab. dalle 08:00 alle 13:00 e di 5,58 centesimi di
Euro al minuto (iva inclusa) dal Lun. al Ven. dalle 18:30 alle 08:00, il Sab. dalle 13:00 alle 08:00 e i giorni festivi, per chi chiama da telefono fisso.
Per chi chiama da radiomobile le tariffe sono legate al piano tariffario dell’operatore telefonico utilizzato.
Le suddette tariffe potrebbero essere soggette a variazione da parte dell’operatore telefonico; per maggiori informazioni consultare il sito
http://www.hotpoint.eu/hotpoint/
*
24
Page 25

Οδηγίες χρήσης
ΠΛΥΝΤΗΡΙΟ ΡΟΥΧΩΝ
GR
Ελληνικά
WML 701
Περιεχόμενα
Εγκατάσταση, 26-27
Αποσυσκευασία και οριζοντίωση
Υδραυλικές και ηλεκτρικές συνδέσεις
Πρώτος κύκλος πλυσίματος
Τεχνικά στοιχεία
Συντήρηση και φροντίδα, 28
Αποκλεισμός νερού και ηλεκτρικού ρεύματος
Καθαρισμός του πλυντηρίου
Καθαρισμός του συρταριού απορρυπαντικών
Φροντίδα της πόρτας και του κάδου
Καθαρισμός της αντλίας
Έλεγχος του σωλήνα τροφοδοσίας του νερού
Προφυλάξεις και συμβουλές, 29
Γενική ασφάλεια
Διάθεση
Περιγραφή του πλυντηρίου και εκκίνηση
ενός προγράμματος, 30-31
Πίνακας ελέγχου
Ενδεικτικά φωτάκια
Εκκίνηση ενός προγράμματος
GR
Προγράμματα, 32
Πίνακας των Προγραμμάτων
Εξατομικεύσεις, 33
Θέστε τη θερμοκρασία
Θέστε το στύψιμο
Λειτουργίες
Απορρυπαντικά και μπουγάδα, 34
Θήκη απορρυπαντικών
Προετοιμασία της μπουγάδας
Ειδικά ρούχα
Σύστημα ισοστάθμισης του φορτίου
Ανωμαλίες και λύσεις, 35
Υποστήριξη, 36
25
Page 26

Εγκατάσταση
GR
! Είναι σημαντικό να διατηρήσετε το
εγχειρίδιο αυτό για να μπορείτε να το
συμβουλεύεστε οποιαδήποτε στιγμή. Σε
περίπτωση πώλησης, παραχώρησης ή
μετακόμισης, βεβαιωθείτε ότι παραμένει μαζί
με το πλυντήριο για να πληροφορεί τον νέο
ιδιοκτήτη για τη λειτουργία και τις σχετικές
προειδοποιήσεις.
! Διαβάστε προσεκτικά τις οδηγίες:
υπάρχουν σημαντικές πληροφορίες για την
εγκατάσταση, τη χρήση και την ασφάλεια.
Αποσυσκευασία και οριζοντίωση
Αποσυσκευασία
1. Αποσυσκευάστε το πλυντήριο.
2. Ελέγξτε αν το πλυντήριο έχει υποστεί
ζημιές κατά τη μεταφορά. Αν έχει υποστεί
ζημιές μην το συνδέετε και επικοινωνήστε με
τον μεταπωλητή.
3. Αφαιρέστε τις 3
βίδες προστασίας
για τη μεταφορά και
το λαστιχάκι με το
σχετικό διαχωριστικό,
που βρίσκονται στο
πίσω μέρος (βλέπε
εικόνα).
4. Κλείστε τις οπές με τα πλαστικά πώματα
που σας παρέχονται.
5. Διατηρείστε και τα τρία τεμάχια: αν το
πλυντήριο χρειαστεί να μεταφερθεί, θα
πρέπει να ξαναμονταριστούν.
! Οι συσκευασίες δεν είναι παιχνίδια για
μικρά παιδιά.
Ευθυγράμμιση
1. Εγκαταστήστε το πλυντήριο σε ένα
δάπεδο επίπεδο και ανθεκτικό, χωρίς να το
ακουμπήσετε σε τοίχους, έπιπλα ή άλλο.
2. Αν το δάπεδο
δεν είναι απόλυτα
οριζοντιωμένο,
αντισταθμίστε
τις ανωμαλίες
βιδώνοντας ή
ξεβιδώνοντας τα
πρόσθια ποδαράκια
(βλέπε εικόνα).Η
γωνία κλίσης,
μετρημένη στην
επιφάνεια εργασίας, δεν πρέπει να ξεπερνάει
τις 2°.
Μια φροντισμένη οριζοντίωση προσδίδει
σταθερότητα στη μηχανή και αποσοβεί
δονήσεις, θορύβους και μετατοπίσεις κατά
τη λειτουργία. Σε περίπτωση μοκέτας ή
τάπητα, ρυθμίστε τα ποδαράκια έτσι ώστε να
υφίσταται κάτω από το πλυντήριο αρκετός
χώρος για τον αερισμό.
Υδραυλικές και ηλεκτρικές
συνδέσεις
Σύνδεση του σωλήνα τροφοδοσίας του
νερού
1. Συνδέστε το
σωλήνα τροφοδοσίας
βιδώνοντάς τον σε
ένα κρουνό κρύου
νερού με στόμιο
σπειρώματος 3/4 gas
(βλέπε εικόνα).
Πριν τη σύνδεση,
αφήστε να τρέξει το
νερό μέχρι να γίνει
διαυγές.
2. Συνδέστε το
σωλήνα τροφοδοσίας
στο πλυντήριο
βιδώνοντάς τον στην
αντίστοιχη είσοδο
νερού, στο πίσω
μέρος επάνω δεξιά
(βλέπε εικόνα).
3. Προσέξτε ώστε στο σωλήνα να μην
υπάρχουν ούτε πτυχώσεις, ούτε στενώσεις.
! Η πίεση νερού του κρουνού πρέπει να
κυμαίνεται μεταξύ των τιμών του πίνακα
Τεχνικά στοιχεία (βλέπε σελίδα δίπλα).
! Αν το μήκος του σωλήνα τροφοδοσίας δεν
επαρκεί, απευθυνθείτε σε ένα ειδικευμένο
κατάστημα ή σε εξουσιοδοτημένο τεχνικό.
! Μη χρησιμοποιείτε ποτέ
χρησιμοποιημένους σωλήνες.
! Χρησιμοποιείτε εκείνους που σας
παρέχονται με τη μηχανή.
26
Page 27

Σύνδεση του σωλήνα αδειάσματος
65 - 100 cm
Συνδέστε το σωλήνα
αδειάσματος, χωρίς
να τον διπλώσετε,
σε μια σωλήνωση
αδειάσματος ή σε
μια παροχέτευση
επιτοίχια σε ύψος
από το έδαφος
μεταξύ 65 και 100
cm.
! Με την εγκατάσταση του πλυντηρίου, η
πρίζα ρεύματος πρέπει να είναι εύκολα
προσβάσιμη.
! Μη χρησιμοποιείτε προεκτάσεις και
πολύπριζα.
! Το καλώδιο δεν πρέπει να φέρει πτυχές ή
να είναι συμπιεσμένο.
! Το καλώδιο τροφοδοσίας πρέπει να
αντικαθίσταται μόνο από εξουσιοδοτημένους
τεχνικούς.
Προσοχή! Η επιχείρηση αποποιείται κάθε
ευθύνης σε περίπτωση που δεν τηρούνται
αυτοί οι κανόνες.
GR
Ή στηρίξτε τον στο
χείλος ενός νιπτήρα
ή μιας λεκάνης,
δένοντας τον οδηγό
που σας παρέχεται
στον κρουνό (βλέπε
εικόνα). Το ελεύθερο
άκρο του σωλήνα
αδειάσματος δεν
πρέπει να παραμένει
βυθισμένο στο νερό.
! Δεν συνιστάται η χρήση προεκτάσεων
σωλήνων. Αν απαιτείται, η προέκταση πρέπει
να έχει την ίδια διάμετρο του αρχικού σωλήνα
και να μην ξεπερνάει τα 150 cm.
Ηλεκτρική σύνδεση
Πριν εισάγετε το βύσμα στην ηλεκτρική
πρίζα, βεβαιωθείτε ότι:
• η πρίζα διαθέτει γείωση και τηρεί τις εκ του
νόμου προδιαγραφές.
• Η πρίζα να είναι σε θέση να υποφέρει το
μέγιστο φορτίο ισχύος της μηχανής, που
αναφέρεται στον πίνακα Τεχνικών στοιχείων
(βλέπε δίπλα).
• Η τάση τροφοδοσίας να κυμαίνεται μεταξύ
των τιμών που αναφέρονται στον πίνακα
Τεχνικών στοιχείων (βλέπε δίπλα).
• Η πρίζα να είναι συμβατή με το βύσμα
του πλυντηρίου. Σε αντίθετη περίπτωση,
αντικαταστήστε την πρίζα ή το βύσμα.
! Το πλυντήριο δεν εγκαθίσταται σε ανοιχτό
χώρο, ακόμη και αν ο χώρος είναι καλυμμένος,
διότι είναι πολύ επικίνδυνο να το αφήνετε
εκτεθειμένο σε βροχή και κακοκαιρία.
Πρώτος κύκλος πλυσίματος
Μετά την εγκατάσταση, πριν τη χρήση,
διενεργήστε ένα κύκλο πλυσίματος με
απορρυπαντικό και χωρίς ρούχα θέτοντας το
πρόγραμμα “ΑΥΤΌ-ΚΑΘΑΡΙΣΜΟΣ” (βλέπε
«Καθαρισμός του πλυντηρίου»).
ФечнйкЬ уфпйчеЯб
МпнфЭлп WML 701
рлЬфпт cm 59,5
ДйбуфЬуейт
Чщсзфйкьфзфб áðü 1 Ýùò 7 kg
ЗлекфсйкЭт
ухндЭуейт
УхндЭуейт
неспэ
Фбчэфзфб
уфхшЯмбфпт
Προγράμματα
ελέγχου
σύμφωνα με
τις οδηγίες
1061/2010
και
1015/2010
эшпт cm 85
вЬипт cm 51,7
ВлЭре фзн рйнбкЯдб
чбсбкфзсйуфйкюн ерЯ фзт
мзчбнЮт
мЭгйуфз рЯеуз
1 MPa (10 bar)
ЕлЬчйуфз рЯеуз
0,05 MPa (0,5 bar)
чщсзфйкьфзфб фпх кЬдпх 46 лЯфсб
мЭчсй 1000 уфспцЭт фп лерфь
рсьгсбммб 4;
Eco βαμβακερά 60°C.
рсьгсбммб 4;
Eco βαμβακερά 40°C.
З ухукехЮ бхфЮ еЯнбй
уэмцщнз ме фйт бкьлпхиет
КпйнпфйкЭт ПдзгЯет:
- 2004/108/CE
(ЗлекфспмбгнзфйкЮ
Ухмвбфьфзфб)
- 2012/19/EU - WEEE
- 2006/95/CE (ЧбмзлЮ ФЬуз)
27
Page 28

Συντήρηση και φροντίδα
1
2
A
B
GR
Αποκλεισμός νερού και ηλεκτρικού
ρεύματος
• Κλείνετε τον κρουνό του νερού μετά
από κάθε πλύσιμο. Έτσι περιορίζεται η
φθορά της υδραυλικής εγκατάστασης του
πλυντηρίου και αποσοβείται ο κίνδυνος
απωλειών.
• Να βγάζετε το βύσμα από το ρεύμα όταν
καθαρίζετε το μηχάνημα και κατά τις
εργασίες συντήρησης.
Καθαρισμός του πλυντηρίου
• Το εξωτερικό μέρος και τα λαστιχένια
μέρη μπορούν να καθαρίζονται με ένα πανί
βρεγμένο με χλιαρό νερό και σαπούνι. Μη
χρησιμοποιείτε διαλύτες ή αποξυστικά.
• Το πλυντήριο διαθέτει ένα πρόγραμμα
“ΑΥΤΌ-ΚΑΘΑΡΙΣΜΟΣ” των εσωτερικών
μερών που πρέπει να διενεργείται χωρίς
κανένα τύπο φορτίου στον κάδο.
Το απορρυπαντικό
(σε ποσότητα ίση
με το 10% της
προτεινόμενης
για ρούχα λίγο
λερωμένα) ή
πρόσθετα ειδικά για
τον καθαρισμό του
πλυντηρίου, μπορούν
να χρησιμοποιηθούν
ως ενισχυτικά
στο πρόγραμμα πλύσης. Συνιστάται να
διενεργείτε το πρόγραμμα καθαρισμού κάθε
40 κύκλους πλυσίματος.
Για την ενεργοποίηση του προγράμματος
πατήστε ταυτόχρονα τα κουμπιά Α και Β για 5
δευτερόλεπτα (βλέπε Εικόνα).
Το πρόγραμμα θα ξεκινήσει αυτόματα και
θα έχει διάρκεια περίπου 70 λεπτών. Για να
σταματήσετε τον κύκλο πατήστε το κουμπί
START/PAUSE.
Καθαρισμός του συρταριού
απορρυπαντικών
Τραβήξτε το συρτάρι
ανασηκώνοντάς το
και τραβώντας το
προς τα έξω (βλέπε
εικόνα).
Πλένετέ το κάτω από
τρεχούμενο νερό. Ο
καθαρισμός αυτός
διενεργείται συχνά.
Φροντίδα της πόρτας και του κάδου
• Να αφήνετε πάντα μισόκλειστη την πόρτα
για να μην παράγονται δυσοσμίες.
Καθαρισμός της αντλίας
Το πλυντήριο διαθέτει μια αντλία
αυτοκαθαριζόμενη που δεν χρειάζεται
συντήρηση. Μπορεί, όμως, να τύχει να
πέσουν μικρά αντικείμενα (κέρματα, κουμπιά)
στον προθάλαμο που προστατεύει την
αντλία, που βρίσκεται στο κάτω μέρος αυτής.
! Βεβαιωθείτε ότι ο κύκλος πλυσίματος έχει
τελειώσει και βγάλτε το βύσμα.
Για να έχετε πρόσβαση στον προθάλαμο:
1. αφαιρέστε το
ταμπλό κάλυψης
στο πρόσθιο πλευρό
του πλυντηρίου με
τη βοήθεια ενός
κατσαβιδιού
(βλέπε εικόνα).
2. Ξεβιδώστε το
καπάκι στρέφοντάς
το αριστερόστροφα
(βλέπε εικόνα): είναι
φυσικό να βγαίνει
λίγο νερό.
3. καθαρίστε επιμελώς το εσωτερικό.
4. ξαναβιδώστε το καπάκι.
5. ξαναμοντάρετε το πάνελ όντας σίγουροι,
πριν το σπρώξετε προς τη μηχανή, ότι έχετε
εισάγει τα γαντζάκια στις αντίστοιχες εσοχές.
Έλεγχος του σωλήνα τροφοδοσίας
του νερού
Ελέγχετε το σωλήνα τροφοδοσίας
τουλάχιστον μια φορά ετησίως. Αν
παρουσιάζει σκασίματα και σχισμές
αντικαθίσταται: κατά τα πλυσίματα οι ισχυρές
πιέσεις θα μπορούσαν να προκαλέσουν
αναπάντεχα σπασίματα.
28
! Μη χρησιμοποιείτε ποτέ
χρησιμοποιημένους σωλήνες.
Page 29

Προφυλάξεις και
συμβουλές
! Το πλυντήριο σχεδιάστηκε και κατασκευάστηκε σύμφωνα με
τους διεθνείς κανόνες ασφαλείας. Αυτές οι προειδοποιήσεις
παρέχονται για λόγους ασφαλείας και πρέπει να διαβάζονται
προσεκτικά.
Γενική ασφάλεια
• Η συσκευή αυτή μπορεί να χρησιμοποιηθεί
από παιδιά άνω των 8 ετών και από άτομα
με μειωμένες φυσικές, αισθητηριακές ή
νοητικές ικανότητες ή με εμπειρία και γνώσεις
ανεπαρκείς, αν επιτηρούνται ή αν έχουν δεχτεί
κατάλληλη εκπαίδευση σχετικά με τη χρήση της
συσκευής με τρόπο ασφαλή και κατανοώντας
τους σχετικούς κινδύνους. Τα παιδιά δεν πρέπει
να παίζουν με τη συσκευή. Συντήρηση και
καθαρισμός δεν πρέπει να διενεργούνται από
παιδιά χωρίς επιτήρηση.
• Η συσκευή αυτή σχεδιάστηκε αποκλειστικά για οικιακή
χρήση.
• Μην αγγίζετε το μηχάνημα με γυμνά πόδια ή με τα χέρια
ή τα πόδια βρεγμένα.
• Μην βγάζετε το βύσμα από την ηλεκτρική πρίζα
τραβώντας το καλώδιο, αλλά να πιάνετε την πρίζα.
• Μην ανοίγετε το συρταράκι απορρυπαντικών ενώ το
μηχάνημα είναι σε λειτουργία.
• Μην αγγίζετε το νερό αδειάσματος, αφού μπορεί να
φτάσει σε υψηλές θερμοκρασίες.
• Μην ζορίζετε σε καμία περίπτωση την πόρτα: θα
μπορούσε να χαλάσει ο μηχανισμός ασφαλείας που
προστατεύει από τυχαία ανοίγματα.
• Σε περίπτωσ η β λάβης, σε καμία περίπτωση να
μην επεμβαίνετε στους εσωτερικούς μηχανισμούς
προσπαθώντας να την επισκευάσετε.
• Να ελέγχετε πάντα τα παιδιά να μην πλησιάζουν στο
μηχάνημα σε λειτουργία.
• Κατά το πλύσιμο η πόρτα τείνει να θερμαίνεται.
• Αν πρέπει να μετατοπιστεί, συνεργαστείτε δύο ή τρία
άτομα με τη μέγιστη προσοχή. Ποτέ μόνοι σας γιατί το
μηχάνημα είναι πολύ βαρύ.
• Πριν εισάγετε τη μπουγάδα ελέγξτε αν ο κάδος είναι
άδειος.
Το σύμβολο με το διεγραμμένο “δοχείο αποβλήτων” στο
προϊόν υπενθυμίζει σε σας την υποχρέωσή σας, πως
όταν επιθυμείτε να πετάξετε τη συσκευή ,πρέπει να
συλλεχθεί χωριστά.
Οι καταναλωτές θα πρέπει να απευθύνονται στις τοπικές
αρχές ή στα καταστήματα λιανικής για πληροφορίες που
αφορούν τη σωστή διάθεση των παλαιών ηλεκτρικών
συσκευών.
GR
Διάθεση
• Διάθεση του υλικού συσκευασίας: τηρείτε τους τοπικούς
κανονισμούς, ώστε οι συσκευασίες να μπορούν να
επαναχρησιμοποιηθούν.
• Η ευρωπαϊκή οδηγία 2012/19/EU - WEEE για τα
Απόβλητα Ηλεκτρικού και Ηλεκτρονικού Εξοπλισμού,
απαιτεί ότι οι παλαιές οικιακές ηλεκτρικές συσκευές δεν
πρέπει να αποβάλονται μαζί με τα υπόλοιπα απόβλητα
του δημοτικού δικτύου. Οι παλαιές συσκευές πρέπει να
συλλεχθούν χωριστά προκειμένου να βελτιστοποιηθούν
η αποκατάσταση και η ανακύκλωση των υλικών που
περιέχουν και με σκοπό τη μείωση των βλαβερών
επιπτώσεων στην ανθρώπινη υγεία και το περιβάλλον.
29
Page 30

Περιγραφή του πλυντηρίου και
εκκίνηση ενός προγράμματος
GR
Πίνακας ελέγχου
Κουμπί ON/OFF
Θήκη απορρυπαντικών
ΠΡΟΓΡΑΜΜΑΤΩΝ
Θήκη απορρυπαντικών: για την προσθήκη
απορρυπαντικών και πρόσθετων (βλέπε «Απορρυπαντικά
και μπουγάδα»).
Κουμπί ON/OFF: Για να ανάψετε ή να σβήσετε το
πλυντήριο.
Επιλογέας ΠΡΟΓΡΑΜΜΑΤΩΝ: για να θέσετε τα
προγράμματα. Κατά τη διάρκεια του προγράμματος ο
επιλογέας παραμένει ακίνητος.
Κουμπι ά με ενδεικτικά φωτάκια ΛΕΙΤΟΥΡΓΙΑΣ: για να
επιλέξετε τις διαθέσιμες λειτουργίες. Το σχετικό με την
επιλεγείσα λειτουργία ενδεικτικό φωτάκι θα παραμείνει
αναμμένο.
Επιλογέας ΣΤΥΨΙΜΑΤΟΣ: για να θέσετε το στύψιμο ή να
το αποκλείσετε (βλέπε “Εξατομικεύσεις”).
Επιλογέας ΘΕΡΜΟΚΡΑΣΙΑ: για να θέσετε τη θερμοκρασία
ή το πλύσιμο σε κρύο νερό (βλέπε «Εξατομικεύσεις»).
Επιλογέας
ΕΝΔΕΙΚΤΙΚΑ ΦΩΤΑΚΙΑ
ΠΡΟΩΘΗΣΗΣ ΚΥΚΛΟΥ/
ΚΑΘΥΣΤΕΡΗΜΕΝΗΣ
ΕΚΚΙΝΗΣΗΣ
Επιλογέας
ΣΤΥΨΙΜΑΤΟΣ
Επιλογέας
ΘΕΡΜΟΚΡΑΣΙΑ
Κουμπι ά με ενδεικτικά
φωτάκια ΛΕΙΤΟΥΡΓΙΑΣ
Κουμπί με ενδεικτικό φωτάκι START/PAUSE: για την
εκκίνηση των προγραμμάτων ή την προσωρινή διακοπή
τους.
ΣΗΜΕΙΩΣΗ: για να θέσετε σε παύση το σε εξέλιξη
πλύσιμο, πιέστε το κουμπί αυτό, το σχετικό ενδεικτικό
φωτάκι θα ανάψει με πορτοκαλί χρώμα ενώ εκείνο της
σε εξέλιξης φάσης θα είναι συνεχώς αναμμένο. Αν το
ενδεικτικό φωτάκι ΠΟΡΤΑ ΑΣΦΑΛΙΣΜΕΝΗ σβήσει,
μπορείτε να ανοίξετε την πόρτα (περιμένετε 3 λεπτά
περίπου).
Για να ξεκινήσει πάλι το πλύσιμο από το σημείο
διακοπής, πατήστε εκ νέου το κουμπί αυτό.
Τρόπος stand by
Το πλυντήριο αυτό, σύμφωνα με τις νέες διατάξεις για
την εξοικονόμηση ενέργειας, διαθέτει ένα σύστημα
αυτόματου σβησίματος (stand by) που τίθεται σε
λειτουργία εντός 30 λεπτών στην περίπτωση μη χρήσης.
Πιέστε στιγμιαία το κουμπί ON/OFF και περιμένετε να
ενεργοποιηθεί εκ νέου η μηχανή.
Ενδεικτικό
φωτάκι ΠΟΡΤΑ
ΑΣΦΑΛΙΣΜΕΝΗ
Κουμπί με
ενδεικτικό φωτάκι
START/PAUSE
ΕΝΔΕΙΚΤΙΚΑ ΦΩΤΑΚΙΑ ΠΡΟΩΘΗΣΗΣ ΚΥΚΛΟΥ/
ΚΑΘΥΣΤΕΡΗΜΕΝΗΣ ΕΚΚΙΝΗΣΗΣ: για να ακολουθείτε
την κατάσταση προόδου του προγράμματος πλυσίματος.
Το αναμμένο ενδεικτικό φωτάκι δείχνει την σε εξέλιξη
φάση. Αν τέθηκε η λειτουργία “Καθυστερημένη εκκίνηση”,
θα δείχνουν τον χρόνο που υπολείπεται για την έναρξη
του προγράμματος (βλέπε σελίδα δίπλα).
Ενδεικτικό φωτάκι ΠΟΡΤΑ ΑΣΦΑΛΙΣΜΕΝΗ: για να
καταλάβετε αν η πόρτα ανοίγει (βλέπε σελίδα δίπλα).
30
Page 31

Ενδεικτικά φωτάκια
END
Τα ενδεικτικά φωτάκια παρέχουν σημαντικές πληροφορίες.
Να τι μας λένε:
Ενδεικτικά φωτάκι φάσης σε εξέλιξη
Κατά τον επιθυμητό κύκλο πλυσίματος, τα ενδεικτικά
φωτάκια θα ανάψουν προοδευτικά για να δείξουν την
κατάσταση προώθησης:
GR
Καθυστερημένη εκκίνηση
Αν ενεργοποιήθηκε η λειτουργία “Καθυστερημένη εκκίνηση”
(βλέπε “Εξατομικεύσεις”), αφού εκκινήσετε το πρόγραμμα,
θα αρχίσει να αναβοσβήνει το ενδεικτικό φωτάκι το σχετικό
με την επιλεγμένη καθυστέρηση:
Με το πέρασμα του χρόνου θα απεικονίζεται η υπολειπόμενη
καθυστέρηση, με το σχετικό ενδεικτικό φωτάκι να
αναβοσβήνει.
Αφού διανυθεί η επιλεγείσα καθυστέρηση το ενδεικτικό
φωτάκι που αναβοσβήνει θα σβήσει και θα αρχίσει το τεθέν
πρόγραμμα.
Πλύσιμο
Ξέβγαλμα
Στύψιμο
Άδειασμα
Τέλος Πλυσίματος
Κουμπιά λειτουργίας και σχετικά ενδεικτικά φωτάκια
Επιλέγοντας μια λειτουργία το σχετικό ενδεικτικό φωτάκι
θα φωτιστεί.
Αν η επιλεγμένη λειτουργία δεν είναι συμβατή με το τεθέν
πρόγραμμα το σχετικό ενδεικτικό φωτάκι θα αναβοσβήνει
και η λειτουργία δεν θα ενεργοποιηθεί.
Στην περίπτωση που τεθεί μια λειτουργία μη συμβατή με
μια άλλη που επιλέχθηκε προηγουμένως θα παραμείνει
ενεργή μόνο η τελευταία επιλογή.
Ενδεικτικό φωτάκι ασφαλισμένης πόρτας
Το αναμμένο ενδεικτικό φωτάκι δείχνει ότι η πόρτα είναι
ασφαλισμένη για την παρεμπόδιση τυχαίων ανοιγμάτων.
Για την αποφυγή ζημιών πρέπει να περιμένετε να σβήσει το
ενδεικτικό φωτάκι πριν το άνοιγμα της πόρτας (περιμένετε
3 λεπτά περίπου).
ΣΗΜΕΙΩΣΗ: αν είναι ενεργή η λειτουργία “Καθυστερημένη
εκκίνηση” η πόρτα δεν μπορεί να ανοίξει, για να την ανοίξετε
θέστε τη μηχανή σε παύση πιέζοντας το κουμπί START/
PAUSE.
! Το ταχύ αναβοσβήσιμο του φωτός START/PAUSE
(πορτοκαλί) ταυτόχρονα με εκείνο των λειτουργιών
επισημαίνει μια ανωμαλία (βλέπε “Ανωμαλίες και λύσεις”).
Εκκίνηση ενός προγράμματος
1. Ανάβει το πλυντήριο πιέζοντας το κουμπί ON/OFF. Όλα τα ενδεικτικά φωτάκια θα ανάψουν για μερικά δευτερόλεπτα,
μετά θα παραμείνουν αναμμένα τα ενδεικτικά φωτάκια τα σχετικά με τις ρυθμίσεις του επιλεγμένου προγράμματος και θα
πάλλεται το ενδεικτικό φωτάκι START/PAUSE.
2. Φορτώστε τη μπουγάδα και κλείστε την πόρτα.
3. Θέστε με τον επιλογέα ΠΡΟΓΡΑΜΜΑΤΩΝ το επιθυμητό πρόγραμμα.
4. Θέστε τη θερμοκρασία πλυσίματος (βλέπε «Εξατομικεύσεις»).
5. Θέστε την ταχύτητα στυψίματος (βλέπε «Εξατομικεύσεις»).
6. Χύστε απορρυπαντικό και πρόσθετα (βλέπε «Απορρυπαντικά και μπουγάδα»).
7. Επιλέξετε τις διαθέσιμες λειτουργίες.
8. Εκκινήστε το πρόγραμμα πιέζοντας το κουμπί START/PAUSE και το σχετικό ενδεικτικό φωτάκι θα παραμείνει αναμμένο
συνεχώς με πράσινο χρώμα.
Για να ακυρώσετε τον τεθέντα κύκλο θέστε τη μηχανή σε παύση πιέζοντας το κουμπί START/PAUSE και επιλέξτε ένα νέο
κύκλο.
9. Στο τέλος του προγράμματος θα φωτιστεί το ενδεικτικό φωτάκι . Το ενδεικτικό φωτάκι ΠΟΡΤΑ ΑΣΦΑΛΙΣΜΕΝΗ θα
σβήσει δείχνοντας ότι η πόρτα μπορεί να ανοίξει (περιμένετε 3 λεπτά περίπου). Βγάλτε τη μπουγάδα και αφήστε την
πόρτα μισόκλειστη για να στεγνώσει ο κάδος. Σβήστε το πλυντήριο πιέζοντας το κουμπί ON/OFF.
31
Page 32

Προγράμματα
Μέγιστο Φορτίο.
ΔΥΣΚΟΛΟΙ ΛΕΚΕΔΕΣ
Πίνακας των Προγραμμάτων
GR
РесйгсбцЮ фпх РспгсЬµµбфпт
Προγράμματα
1
Λευκά
2
βαμβακερά: Λευκά λίγο λερωμένα και ευαίσθητα χρώματα.
3
Eco βαμβακερά 60°C (1): Λευκά και χρωματιστά ανθεκτικά, πολύ
4
λερωμένα.
Eco βαμβακερά 40°C (2): Λευκά λίγο λερωμένα και ευαίσθητα
4
χρώματα.
УхниефйkЬ: ЧсщµбфйуфЬ бниекфйкЬ, рплэ лесщµЭнб.
5
УхниефйkЬ (3): ЧсщµбфйуфЬ бниекфйкЬ, λίγο ëåñùµÝíá.
5
Αντι-αλλεργικό
6
Μωρουδιακά
7
МЬллйнб: Гйб µЬллйнб, cachemire, клр.
8
Ευαίσθητα
9
Mix 60’: Гйб фп гсЮгпсп цсеукЬсйуµб спэчщн елбцсЬ
лесщµЭнщн (ден ендеЯкнхфбй гйб µЬллйнб, µефбощфЬ кбй спэчб
10
рпх рлЭнпнфбй уфп чЭсй).
βαμβακερά 20°C: Λευκά λίγο λερωμένα και ευαίσθητα χρώματα.
11
ВбмвбкесЬ ¢дейбмб
12
УхниефйкЬ ¢дейбмб
13
Ταχύ
14
30’ ¢дейбмб
ОЭвгблмб
Уфэшймп + ¢нфлзпз
Μόνο άδειασμα *
БрпссхрбнфйкЬ
МЭгйуфз
èåñµïêñ.
(°C)
МЭгйуфз
фбчэфзфб
(уфспцЭт бнЬ
40° 1000
60° 1000
40°
(Max. 90°)
1000
60° 1000 -
40° 1000 60° 1000
40° 1000
60° 1000 40° 1000
40° 800 30° 0 -
60° 1000 -
20° 1000 -
1000 1000 -
800 -
- 1000 - -
лерфь)
ðñüð-
ëõóç
Ðëý-
óéµï
нфйкь
Лехкб-
-
-
-
-
-
-
-
-
-
-
(Kg)
υγρασία %
Κατανάλωση
ενέργειας kWh
Мблбкфйкь
Υπολειπόμενη
4 - - - 180’
4 - - - 180’
7 - - - 115’
7 62 1,21 52,5 195’
7 62 0,81 76 185’
3 44 0,78 33 120’
3 - - - 110’
4 - - - 185’
3 - - - 145’
1,5 - - - 80’
1 - - - 75’
3,5 62 0,68 30 60’
7 - - - 180’
7 - - - 100’
3 - - - 75’
3 70 0,05 36 30’
7 - - - 49’
- 1000 - - - - 7 - - - 10’
- - - - - 7 - - - 3’
νερό lt
Συνολικό
Διάρκεια κύκλου
* Επιλέγοντας το πρόγραμμα και αποκλείοντας τη φυγοκέντρηση η συσκευή θα εκτελέσει μόνο το άδειασμα.
Η διάρκεια του κύκλου που φαίνεται στην οθόνη ή στο εγχειρίδιο αποτελεί μια εκτίμηση υπολογισμένη με βάση τις στάνταρ συνθήκες. Ο πραγματικός χρόνος μπορεί να ποικίλει με βάση πολυάριθμους παράγοντες
όπως θερμοκρασία και πίεση του εισερχόμενου νερού, θερμοκρασία περιβάλλοντος, ποσότητα απορρυπαντικού, ποσότητα και τύπος φορτίου, ισοστάθμιση του φορτίου, πρόσθετες επιλεγμένες δυνατότητες.
1) Πρόγραμμα ελέγχου σύμφωνα με την προδιαγραφή 1061/2010: θέστε το πρόγραμμα 4 σε μια θερμοκρασία 60°C.
Ο κύκλος αυτός είναι κατάλληλος για τον καθαρισμό φορτίου βαμβακερών με συνηθισμένη βρωμιά και είναι ο πλέον αποτελεσματικός σε όρους κατανάλωσης
ενέργειας και νερού, προς χρήση σε ρούχα πλενόμενα στους 60 °C. Η πραγματική θερμοκρασία πλυσίματος μπορεί να διαφέρει από την υποδεικνυόμενη.
2) Πρόγραμμα ελέγχου σύμφωνα με την προδιαγραφή 1061/2010: θέστε το πρόγραμμα 4 σε μια θερμοκρασία 40°C.
Ο κύκλος αυτός είναι κατάλληλος για τον καθαρισμό φορτίου βαμβακερών με συνηθισμένη βρωμιά και είναι ο πλέον αποτελεσματικός σε όρους κατανάλωσης
ενέργειας και νερού, προς χρήση σε ρούχα πλενόμενα στους 40 °C. Η πραγματική θερμοκρασία πλυσίματος μπορεί να διαφέρει από την υποδεικνυόμενη.
Για όλα τα Test Institutes:
2) Πρόγραμμα βαμβακερών μακρύ: θέστε το πρόγραμμα 4 σε μια θερμοκρασία 40°C.
3) Πρόγραμμα συνθετικών μεγάλης διάρκειας: θέστε το πρόγραμμα 5 σε μια θερμοκρασία 40°C.
ΔΥΣΚΟΛΟΙ ΛΕΚΕΔΕΣ: το πρόγραμμα 1 είναι κατάλληλο για το πλύσιμο ρούχων πολύ λερωμένων, με χρώματα
ανθεκτικά. Το πρόγραμμα εγγυάται μια κλάση πλυσίματος ανώτερη της κλάσης στάνταρ (κλάση A). Μην εκτελείτε το
πρόγραμμα αναμιγνύοντας ρούχα διαφορετικού χρώματος. Συνιστάται η χρήση απορρυπαντικού σε σκόνη. Για λεκέδες
δύσκολους συνιστάται η προκαταρκτική περιποίηση με ειδικά πρόσθετα.
Λευκά: χρησιμοποιήστε τον κύκλο για 2 το πλύσιμο των λευκών ρούχων. Το πρόγραμμα μελετήθηκε για τη διατήρηση της
λαμπρότητας του λευκού στο χρόνο. Για καλύτερα αποτελέσματα συστήνεται η χρήση απορρυπαντικού σε σκόνη.
Αντι-αλλεργικό: χρησιμοποιήστε το πρόγραμμα 6 για την απομάκρυνση των κυριότερων αλλεργιογόνων όπως γύρη, άκαρι,
τρίχες γάτας και σκύλου.
Μωρουδιακά: χρησιμοποιήστε το αντίστοιχο πρόγραμμα 7 για να αφαιρέσετε τους τυπικούς λεκέδες των παιδιών και να
απομακρύνετε το απορρυπαντικό από τα ρούχα για να μην υπάρξουν αλλεργικές αντιδράσεις στο ευαίσθητο δέρμα των
παιδιών. Ο κύκλος αυτό μελετήθηκε για να μειώνει το βακτηριδιακό φορτίο χρησιμοποιώντας μεγαλύτερη ποσότητα νερού
και βελτιστοποιώντας την επίδραση των ειδικών εξυγιαντικών πρόσθετων στο απορρυπαντικό.
Προγηράμματα Eco
Τα προγράμματα Eco προσφέρουν καλές επιδόσεις πλυσίματος σε χαμηλές θερμοκρασίες επιτρέποντας λιγότερη
χρήση ηλεκτρικής ενέργειας με ωφέλεια για το περιβάλλον και εξοικονόμηση χρημάτων.
Τα προγράμμα Eco (Βαμβακερά 12, Συνθετικά 13 και Ταχύ 30’ 14) δημιουργήθηκαν για διαφόρους τύπους
υφασμάτων και για ρούχα λίγο λερωμένα. Για τη διασφάλιση ενός βέλτιστου αποτελέσματος συστήνεται η χρήση
υγρού απορρυπαντικού. Προτείνεται η πρόπλυση των γιακάδων, των μανικετιών και των λεκέδων.
βαμβακερά 20°C: (πρόγραμμα 11) ιδανικό για φορτία λερωμένων βαμβακερών. Οι καλές επιδόσεις και σε χαμηλή
θερμοκρασία, συγκρίσιμες με ένα πλύσιμο στους 40°, εξασφαλίζονται από μια μηχανική δράση που λειτουργεί με
μεταβολή ταχύτητας σε επαναλαμβανόμενες και κοντινές αυξομειώσεις.
32
Page 33

Εξατομικεύσεις
Θέστε τη θερμοκρασία
Στρέφοντας τον επιλογέα ΘΕΡΜΟΚΡΑΣΙΑ τίθεται η θερμοκρασία πλυσίματος (βλέπε Πίνακα προγραμμάτων).
Η θερμοκρασία μπορεί να μειωθεί μέχρι το πλύσιμο σε κρύο νερό ( ).
Το μηχάνημα θα παρεμποδίσει αυτόματα τη θέση θερμοκρασίας μεγαλύτερης της μέγιστης προβλεπόμενης για κάθε
πρόγραμμα.
! Εξαίρεση: επιλέγοντας το πρόγραμμα 3 η θερμοκρασία μπορεί να αυξηθεί μέχρι 90°.
Θέστε το στύψιμο
Στρέφοντας τον επιλογέα ΣΤΥΨΙΜΟ τίθεται η ταχύτητα στυψίματος του επιλεγμένου προγράμματος.
Οι μέγιστες προβλεπόμενες ταχύτητες για τα προγράμματα είναι:
Προγράμματα Μέγιστη ταχύτητα
Βαμβακερά 1000 στροφές ανά λεπτό
Συνθετικά 1000 στροφές ανά λεπτό
Μάλλινα 800 στροφές ανά λεπτό
Μεταξωτά μόνο άδειασμα
Η ταχύτητα στυψίματος μπορεί να ελαττωθεί ή να αποκλειστεί επιλέγοντας το σύμβολο .
Το μηχάνημα θα παρεμποδίσει αυτόματα τη διενέργεια στυψίματος μεγαλύτερου του μέγιστου προβλεπόμενου για κάθε
πρόγραμμα.
Λειτουργίες
Οι διάφορες λειτουργίες πλυσίματος που προβλέπονται από το πλυντήριο επιτρέπουν την επίτευξη του καθαρισμού και
του λευκού που επιθυμείτε.
Για την ενεργοποίηση των λειτουργιών:
1. πιέστε το πλήκτρο το σχετικό με την επιλεγμένη λειτουργία.
2. Το άναμμα του ενδεικτικού φωτός επισημαίνει ότι η λειτουργία είναι ενεργή.
Παρατήρηση:
- Αν η επιλεγμένη λειτουργία δεν είναι συμβατή με το τεθέν πρόγραμμα το σχετικό ενδεικτικό φωτάκι θα αναβοσβήνει
και η λειτουργία δεν θα ενεργοποιηθεί.
- Στην περίπτωση που τεθεί μια λειτουργία μη συμβατή με μια άλλη που επιλέχθηκε προηγουμένως θα παραμείνει
ενεργή μόνο η τελευταία επιλογή.
GR
Super Wash
Η δυνατότητα αυτή εξασφαλίζει ένα πλύσιμο υψηλών επιδόσεων χάρη στη χρήση μεγαλύτερης ποσότητας νερού
στην αρχική φάση του κύκλου και στη μεγαλύτερη διάρκεια του προγράμματος. Μπορεί να χρησιμοποιείται με ή χωρίς
λευκαντικό. Αν επιθυμείτε να διενεργήσετε και τη λεύκανση εισάγετε την πρόσθετη λεκανίτσα 4, που παρέχεται, στη
λεκανίτσα 1 (βλέπε σελίδα 34).
Εύκολο σιδέρωμα
Επιλέγοντας τη λειτουργία αυτή, το πλύσιμο και το στύψιμο θα τροποποιηθούν κατάλληλα για τη μείωση σχηματισμού
τσαλακωμάτων. Στο τέλος του κύκλου πλύσης θα γίνουν αργές περιστροφές του κάδου. Το ενδεικτικό φωτάκι της
λειτουργίας ΕΥΚΟΛΟ ΣΙΔΕΡΩΜΑ και της START/PAUSE θα αναβοσβήνουν (πορτοκαλί) και η φάση θα παραμείνει
συνεχώς αναμμένη. Για το πέρας του κύκλου πατήστε το κουμπί START/PAUSE ή το κουμπί ΕΥΚΟΛΟ ΣΙΔΕΡΩΜΑ.
Πρόπλυση
Επιλέγοντας τη λειτουργία αυτή διενεργείται η πρόπλυση, χρήσιμη για την απομάκρυνση δύσκολων λεκέδων.
ΠΑΡΑΤΗΡΗΣΗ: Προσθέστε το απορρυπαντικό στο αντίστοιχο διαμέρισμα.
Καθυστερημένη εκκίνηση
Καθυστερεί την εκκίνηση του μηχανήματος μέχρι 12 ώρες.
Πιέστε πολλές φορές το πλήκτρο μέχρι να ανάψει το ενδεικτικό φωτάκι το σχετικό με την επιθυμητή καθυστέρηση. Στην
πέμπτη φορά που θα πιέσετε το κουμπί η λειτουργία θα απενεργοποιηθεί.
ΣΗΜΕΙΩΣΗ: Αφού πατηθεί το πλήκτρο START/PAUSE, μπορείτε να αλλάξετε την τιμή καθυστέρησης μόνο μειώνοντάς την.
33
Page 34

Απορρυπαντικά και μπουγάδα
M
AX
1
2
4
3
A
B
GR
Θήκη απορρυπαντικών
Το καλό αποτέλεσμα του πλυσίματος εξαρτάται επίσης
και από τη σωστή δοσολογία του απορρυπαντικού:
υπερβάλλοντας δεν πλένουμε αποτελεσματικότερα
και συντελούμε στη δημιουργία κρούστας στα
εσωτερικά μέρη του πλυντηρίου και στη μόλυνση του
περιβάλλοντος.
! Να χρησιμοποιείτε απορρυπαντικά σε σκόνη για
ρούχα λευκά βαμβακερά και για την πρόπλυση και για
πλυσίματα σε θερμοκρασία μεγαλύτερη των 60°C..
! Ακολουθήστε τις υποδείξεις που αναγράφονται στη
συσκευασία του απορρυπαντικού.
! Μη χρησιμοποιείτε απορρυπαντικά για πλύσιμο στο
χέρι, διότι παράγουν πολύ αφρό.
Βγάλτε τη θήκη
απορρυπαντικών και
εισάγετε το απορρυπαντικό
ή το πρόσθετο ως εξής.
θήκη 1: Απορρυπαντικό για πρόπλυση
(σε σκόνη)
Πριν χύσετε το απορρυπαντικό ελέγξτε αν έχει εισαχθεί η
πρόσθετη λεκανίτσα 4.
θήκη 2: Απορρυπαντικό για πλύσιμο (σε σκόνη ή υγρό)
Σε περίπτωση χρήσης υγρού απορρυπαντικού,
συστήνεται να χρησιμοποιείτε το δοσομετρητή Α που σας
παρέχεται για σωστή δοσολογία.
Για τη χρησιμοποίηση του απορρυπαντικού σε σκόνη
αποθέστε το δοσομετρητή στην κοιλότητα B.
θήκη 3: Πρόσθετα (μαλακτικό, κλπ.)
θήκη πρόσθετη 4: Λευκαντικό
Προετοιμασία της μπουγάδας
Ειδικά ρούχα
ΜΑΛΛΙΝΑ: Ο κύκλος πλυσίματος “Μάλλινα” αυτού του
πλυντηρίου εγκρίθηκε από την Woolmark Company για
το πλύσιμο μάλλινων ρούχων που ταξινομούνται ως
“πλενόμενα στο χέρι”, αρκεί το πλύσιμο να εκτελείται
σύμφωνα με τις οδηγίες της ετικέτας του ενδύματος και
τις υποδείξεις του κατασκευαστή του πλυντηρίου αυτού.
Ευαίσθητα: χρησιμοποιήστε το πρόγραμμα 9 για
το πλύσιμο ρούχων πολύ ευαίσθητων που φέρουν
πρόσθετα όπως στρας ή παγέτες.
Συνιστάται να γυρίζετε από την ανάποδη τα ρούχα πριν
το πλύσιμο και να βάζετε τα μικρά ρούχα στο ειδικό
σακίδιο για το πλύσιμο των ευαίσθητων ρούχων.
Για καλύτερα αποτελέσματα συνιστάται η χρήση υγρού
απορρυπαντικού για ευαίσθητα ρούχα.
Για το πλύσιμο μεταξωτών ρούχων και κουρτινών,
επιλέξτε τον κύκλο 9 και ενεργοποιήστε τη
δυνατότητα ; η μηχανή θα περατώσει τον κύκλο με
την μπουγάδα σε μούλιασμα και το ενδεικτικό φωτάκι
θα αναβοσβήνει. Για το άδειασμα του νερού και για
να μπορείτε να απομακρύνετε την μπουγάδα χρειάζεται
να πατήσετε το κουμπί START/PAUSE ή το κουμπί .
Σύστημα ισοστάθμισης του φορτίου
Πριν από κάθε στύψιμο, για να αποφύγετε δονήσεις
υπερβολικές και για να κατανείμετε ομοιόμορφα το
φορτίο, ο κάδος διενεργεί περιστροφές σε μια ταχύτητα
ελαφρά ανώτερη εκείνης του πλυσίματος. Αν στο τέλος
των διαδοχικών προσπαθειών το φορτίο δεν έχει ακόμη
εξισορροπηθεί σωστά η μηχανή διενεργεί το στύψιμο σε
μια ταχύτητα χαμηλότερη της προβλεπόμενης. Παρουσία
υπερβολικής αστάθειας, το πλυντήριο διενεργεί την
κατανομή αντί του στυψίματος. Για να ευνοηθεί καλύτερη
κατανομή του φορτίου και της σωστής εξισορρόπησης
συνιστάται η ανάμιξη ρούχων μεγάλων και μικρών
διαστάσεων.
• Χωρίστε τη μπουγάδα ανάλογα:
- με το είδος του υφάσματος/ το σύμβολο της ετικέτας.
- τα χρώματα: χωρίστε τα χρωματιστά ρούχα από τα
λευκά.
• Εκκενώστε τις τσέπες και ελέγξτε τα κουμπιά.
• Μην ξεπερνάτε τις υποδεικνυόμενες τιμές στον
“Πίνακας Προγραμμάτων” σε σχέση με το βάρος της
στεγνής μπουγάδας.
Πόσο ζυγίζει η μπουγάδα;
1 σεντόνι 400-500 gr.
1 μαξιλαροθήκη 150-200 gr.
1 τραπεζομάντιλο 400-500 gr.
1 μπουρνούζι 900-1.200 gr.
1 πετσέτα 150-250 gr.
34
Page 35

Ανωμαλίες και λύσεις
Μπορεί να συμβεί το πλυντήριο να μη λειτουργεί. Πριν τηλεφωνήσετε στην Υποστήριξη (βλέπε “Υποστήριξη”), ελέγξτε αν
δεν πρόκειται για πρόβλημα που επιλύεται εύκολα με τη βοήθεια του ακόλουθου καταλόγου.
Ανωμαλίες:
Το πλυντήριο δεν ανάβει.
Ο κύκλος πλυσίματος δεν ξεκινάει.
Το πλυντήριο δεν φορτώνει νερό
(αναβοσβήνει γρήγορα το ενδεικτικό
φωτάκι της πρώτης φάσης πλύσης).
Το πλυντήριο φορτώνει και αδειάζει
νερό συνεχώς.
Δυνατά αίτια / Λύση:
• Το βύσμα δεν έχει εισαχθεί στην ηλεκτρική πρίζα ή τουλάχιστον όχι αρκετά για
να κάνει επαφή.
• Στο σπίτι δεν υπάρχει ρεύμα.
• Η πόρτα δεν κλείνει καλά.
• Το κουμπί ON/OFF δεν πατήθηκε.
• Το κουμπί START/PAUSE δεν πατήθηκε.
• Η βρύση του νερού δεν είναι ανοιχτή.
• Τέθηκε μια καθυστέρηση στον χρόνο εκκίνησης (βλέπε «Εξατομικεύσεις»).
• Ο σωλήνας τροφοδοσίας του νερού δεν είναι συνδεδεμένος στον κρουνό.
• Ο σωλήνας είναι διπλωμένος.
• Η βρύση του νερού δεν είναι ανοιχτή.
• Στο σπίτι λείπει το νερό.
• Δεν υπάρχει αρκετή πίεση.
• Το κουμπί START/PAUSE δεν πατήθηκε.
• Ο σωλήνας αδειάσματος δεν έχει εγκατασταθεί μεταξύ 65 και 100 cm από το
έδαφος (βλέπε «Εγκατάσταση»).
• Το άκρο του σωλήνα αδειάσματος είναι βυθισμένο στο νερό (βλέπε
“Εγκατάσταση”).
• Το επιτοίχιο άδειασμα δεν έχει απαέρωση.
Αν μετά από αυτούς τους ελέγχους το πρόβλημα δεν λύνεται, κλείστε τη βρύση
του νερού, σβήστε το πλυντήριο και καλέστε την υποστήριξη. Αν η κατοικία
βρίσκεται στους τελευταίους ορόφους ενός κτιρίου, μπορεί να διαπιστωθούν
φαινόμενα σιφωνισμού, οπότε το πλυντήριο φορτώνει και αδειάζει νερό συνεχώς.
Για την αντιμετώπιση του προβλήματος διατίθενται στο εμπόριο κατάλληλες
βαλβίδες αντι-σιφωνισμού.
GR
Το πλυντήριο δεν φορτώνει ή δεν στύβει.
Το πλυντήριο δονείται πολύ κατά το
στύψιμο.
Το πλυντήριο χάνει νερό.
Το ενδεικτικό φωτάκι START/PAUSE
(πορτοκαλί) και τα ενδεικτικά φωτάκια
αναβοσβήνουν γρήγορα.
Σχηματίζεται πολύς αφρός.
• Το πρόγραμμα δεν προβλέπει το άδειασμα: με ορισμένα προγράμματα πρέπει
να το εκκινήσετε χειρονακτικά.
• Είναι ενεργή η λειτουργία ΕΥΚΟΛΟ ΣΙΔΕΡΩΜΑ: για την ολοκλήρωση του
προγράμματος πιέστε το κουμπί START/PAUSE («Εξατομικεύσεις»).
• Ο σωλήνας αδειάσματος είναι διπλωμένος (βλέπε «Εγκατάσταση»).
• Ο αγωγός εκκένωσης είναι βουλωμένος.
• Ο κάδος, τη στιγμή της εγκατάστασης, δεν ξεμπλόκαρε σωστά (βλέπε
“Εγκατάσταση”).
• Το πλυντήριο δεν είναι οριζοντιωμένο (βλέπε “Εγκατάσταση”).
• Το πλυντήριο είναι πολύ στενά μεταξύ τοίχου και επίπλων (βλέπε
“Εγκατάσταση”).
• Ο σωλήνας τροφοδοσίας του νερού δεν είναι καλά βιδωμένος (βλέπε
“Εγκατάσταση”).
• Η θήκη των απορρυπαντικών είναι βουλωμένη (για να την καθαρίσετε βλέπε
“Συντήρηση και φροντίδα”).
• Ο σωλήνας αδειάσματος δεν έχει στερεωθεί καλά (βλέπε «Εγκατάσταση»).
• Σβήστε τη μηχανή και βγάλτε το βύσμα από την πρίζα, περιμένετε περίπου
1 λεπτό μετά ξανανάψτε τη.
Αν η ανωμαλία επιμένει, καλέστε την Υποστήριξη.
• Το απορρυπαντικό δεν είναι ειδικό για πλυντήριο (πρέπει να υπάρχει η ένδειξη
“για πλυντήριο”, “για πλύσιμο στο χέρι και στο πλυντήριο”, ή παρόμοια).
• Η δοσολογία υπήρξε υπερβολική.
35
Page 36

Υποστήριξη
GR
Πριν επικοινωνήσετε με την Υποστήριξη:
•
Ελέγξτε αν η ανωμαλία μπορείτε να την αντιμετωπίσετε μόνοι σας (βλέπε “Ανωμαλίες και λύσεις”);
• Επανεκκινήστε το πρόγραμμα για να ελέγξετε αν το πρόβλημα αντιμετωπίστηκε;
• Σε αρνητική περίπτωση, επικοινωνήστε με την εξουσιοδοτημένη Τεχνική Υποστήριξη στον τηλεφωνικό αριθμό που
υπάρχει στο πιστοποιητικό εγγύησης.
! Μην καταφεύγετε ποτέ σε μη εξουσιοδοτημένους τεχνικούς.
Γνωστοποιήστε:
• το είδος της ανωμαλίας;
• το μοντέλο του μηχανήματος (Mod.);
• τον αριθμό σειράς (S/N).
Οι πληροφορίες αυτές βρίσκονται στην ταμπελίτσα που υπάρχει στο πίσω μέρος του πλυντηρίου και στο πρόσθιο μέρος
ανοίγοντας την πόρτα.
36
Page 37

Kullanma Kılavuzu
ÇAMAŞIR MAKİNESİ
TR
Türkçe
WML 701
İçindekiler
Montaj, 38-39
Ambalajın çıkartılması ve seviye ayarı getirilmesi
Su ve elektrik bağlantıları
İlk yıkama
Teknik veriler
Bakım ve özen, 40
Su ve elektrik kesilmesi
Çamaşır makinesin temizlenmesi
Deterjan haznesinin temizlenmesi
Kapak ve hazne bakımı
Pompanın temizlenmesi
Su besleme hortumunun kontrol edilmesi
Önlemler ve öneriler, 41
Genel güvenlik uyarıları
Atıkların tasye edilmesi
Çamaşır makinesinin tanımı ve
programların çalıştırılması, 42-43
Kontrol paneli
Işıklı göstergeler
Bir programın başlatılması
TR
Programlar, 44
Program tablosu
Kişisel ayarlar, 45
Sıcaklık ayarı
Sıkma hızı ayarı
Fonksiyonlar
Deterjan ve çamaşır, 46
Deterjan haznesi
Çamaşırın hazırlanması
Özel yıkama çevrimleri
Yük dengeleme sistemi
Arızalar ve onarımlar, 47
Teknik Servis, 48
37
Page 38

Montaj
TR
! Bu kitapçığı gerektiği her an danışabilmeniz
için özenle saklayınız. Çamaşır makinesinin
satılması, devri veya nakli durumlarında da,
yeni sahibinin faydalanabilmesi için bu kılavuz
makineyle beraber saklanmalıdır.
! Talimatları dikkatlice okuyunuz; montaj,
kullanım ve güvenliğe ilişkin önemli bilgiler
içermektedir.
! Taşıma ve Nakliye Sırasında Dikkat Edilecek Konular
Taşıma ve nakliye sırasında ambalajın tamamen kapalı olduğundan emin olunuz, Taşıma
ve nakliye işlemini orijinal ambalajı ile yapınız.
Taşıma esnasında üründe hasar ve arıza
oluşmamasına, vurma, çarpma, düşürme vb.
dış etkenler nedeniyle ürünün zarar görmemesine dikkat ediniz.
Ambalajı zarar verebilecek nem, su, v.b. dış
etkenlere karşı koruyunuz.
Cihazın montajı yetkili servis tarafından
gerçekleştirilecektir.
Ambalajın çıkartılması ve aynı seviyeye getirilmesi
Ambalajdan çıkartılması
1. Ç a maş ı r mak ines i nin a mbal ajda n
çıkartılması.
2. Çamaşır makinesinin taşıma esnasında
hasar görmemiş olduğunu kontrol ediniz.
Hasar görmüş ise monte etmeyiniz. Satıcıya
başvurunuz.
3. Taşıma sırasında
arka tarafta bulunan
3 adet koruyucu vidayı
ve ara parçasıyla birlikte buradaki lastiği
de çıkartınız (bakınız
şekil).
2. Yerleştirilecek zemin tam düz değilse
çamaşır makinesinin
vidalı ön ayaklarını
s ı k a r a k v e y a
gevşeterek dengeyi
sağlayınız (bkz. şekil);
eğim açısı, makinenin
üst tezgahına göre 2°
den fazla olmamalıdır.
Sağlıklı bir dengeleme, çamaşır makinesine sağlam bir duruş
kazandıracağı gibi, çalışması esnasındaki
sarsıntı, gürültü ve hareketlilikleri de önleyecektir. Zeminde moket veya halı olması halinde,
ayarı makinenin altında havalandırma olabilecek
şekilde yapınız .
Su ve elektrik bağlantıları
Su besleme hortumunun takılması
1. Tedarik borusunu
3/4 gaz vidalý baðlantý
kullanarak bir soðuk
su musluðuna
baðlayýn (bkz. þekil).
Baðlantýyý yapmadan
önce, suyu berraklaþana kadar akýtýnýz.
2. Su besleme hortu-
munu arka kısımının
üst sağ köşesinde
bulunan su girişine
vidalayarak makineye
bağlayınız (bkz. şekil).
4. Delikleri ambalajda bulacağınız plastik kapaklarla kapayınız.
5. Tüm parçaları muhafaza ediniz: çamaşır
makinesinin nakli gerektiği takdirde takılmaları
gerekmektedir.
! Ambalajlar çocuk oyuncağı değildir.
Cihazın aynı seviyeye getirilmesi
1. çamaşır makinesini düz ve sert bir zemine yerleştiriniz, duvar veya mobilyalara
dayamayınız.
38
3. Hortumda katlanma ve ezilme olmamasına
dikkat ediniz.
! Musluğun su basıncının Teknik Veriler
tabelasında belirtildiği gibi olması gerekir (bkz.
yan sayfa).
! Besleme hortumunun boyu yetersizse yetkili
bir satıcı mağaza veya teknisyene başvurunuz.
! Kesinlikle daha önceden kullanılmış hortum
kullanmayınız.
! Makine ile birlikte verilen hortumları kullanınız.
Page 39

Tahliye hortumunun bağlanması
65 - 100 cm
Tahliye hortumunu
bükmeden zeminden 65 ila 100 cm
yukarıda yer alan pis
su borusuna veya
duvar tahliyesine
bağlayın;
Buna alternatif
olarak, makine
ile birlikte verilen
pis su borusunu
musluğa (şekle
bakınız) bağlayarak
lavabo veya küvetin
kenarına yerleştirin.
Hortumun serbest
kalan ucu suya
daldırılmamalıdır.
! Hortum eklerinin kullanımı önermiyoruz; kesinlikle gerekliyse ek hortum orijinal hortum
ile aynı çapta olmalı ve uzunluğu 150 cm.
aşmamalıdır.
Elektrik bağlantıları
Cihazı elektrik prizine takmadan önce,
aşağıdakilerden emin olun:
• Prizin topraklandıgından ve ilgili mevzuata
uygun oldugundan;
• Prizin teknik veri tablosunda gösterilmekte
olan maksimum cihaz elektrik yüküne
dayanıp dayanamayacagından (teknik veri
tablosuna bakiniz);
• Güç kaynagı voltajının teknik veri tablosunda
gösterilen degerlere uygun olup olmadigindan
(teknik veri tablosuna bakiniz);
• Elektrik prizinin çamaşır makinesinin fişi
ile uyumlu olup olmadığından emin olun.
Muhafazalı değilse, priz veya şi değiştirin.
! Çamaşır makinesi kapalı alan olsa bile, evin
dışına yerleştirilmemelidir. Cihazın yağmur,
fırtına ve diğer hava koşullarına maruz
bırakılması son derece tehlikelidir.
! Kablo bükülmemeli veya sıkıştırılmamalıdır.
! Güç kablosu ve si sadece yetkili teknis-
yenler tarafından degistirilmelidir.
Uyarı! Bu standartlara uyulmaması durumunda sirket sorumlu tutulamaz.
İlk yıkama
Ilk kullanimdan önce programlar tablosundaki
“Kendi kendini temizleme” Programi kullanarak çamasir olmadan deterjanla bir yikama
yapin (“Çamaşır makinesinin temizlenmesi”
bakınız).
Teknik bilgiler
Model WML 701
genişlik 59,5 cm
Ölçüler
Kapasite 1 - 7 kg
Elektrik
bağlantıları
Su
bağlantıları
Sıkma hızı
1061/2010 ve
1015/2010
sayılı vorschriften
göre kontrol
programları
yükseklik 85 cm
derinlik 51,7 cm
makine üstünde takılı olan
teknik veriler plakasına
bakınız.
max. su basıncı
1 MPa (10 bar)
min. su basıncı
0,05 MPa (0,5 bar)
tambur kapasitesi 46 litre
maksimum dakikada 1000
devire kadar
program 4;
Eko Pamuklu 60°C.
program 4;
Eko Pamuklu 40°C.
Bu makina aşağıda belirtilen
AB normlarına uygundur:
- 2004/108/CE (Elektromanyetik Uyum)
- 2012/19/EU (WEEE)
- 2006/95/CE (Alçak gerilim)
TR
! Çamaşır makinesi yerleştirildiğinde, elektrik
prizi kolay ulaşılabilir bir durumda olmalıdır.
! Uzatma kablosu veya çoklu priz kullanmayın.
39
Page 40

Bakım ve onarım
1
2
A
B
TR
Su ve elektrik kesilmesi
• Su musluğunu her yıkamadan sonra
kapatınız. Böylece çamaşır makinesinin su
tesisatının eskimesi engellenir, su kaçağı
tehlikesi ortadan kalkar.
• Bakım ve temizlik işlemleri esnasında
çamaşır makinesinin şini çekiniz.
Çamaşır makinesinin temizlenmesi
• Dış gövde ve plastik aksam ılık su ve
sabunla ıslatılmış bir bez vasıtasıyla temizlenebilir. Çözücü ve aşındırıcı maddeler
kullanmayınız.
• Çamaşır makinesinde tambur boşken
çalıştırılması gereken “Kendi kendini te-
mizleme” programı bulunmaktadır.
Deterjan (az kirli çamaşırlar için tavsiye
edilen miktarın %10’u kadar) veya çamaşır
makinesinin temizliği için kullanılan özel katkı
maddeleri, yıkama programında yardımcı
olarak kullanılabilir. 40 yıkamada bir “Kendi
kendini temizleme” programını çalıştırmanız
önerilir.
Programı devreye
sokmak için 5 saniye boyunca A ve B
tuşlarına aynı anda
basınız (bakınız
Şekil).
Program, otomatik
olarak başlayacak
ve yaklaşık 70 dakika sürecektir. Devreyi durdurmak için
START/PAUSE tuşuna basınız.
Deterjan haznesinin temizlenmesi
Hazneyi kaldırarak,
dışarıya doğru
çekmek suretiyle
çıkartınız (bkz. şekil).
Akar su altında
yıkayınız, bu çekmecenin temizliği sık sık
yapılmalıdır.
Pompanın temizlenmesi
Çamaşır makinesinin pompası kendini temizleyen bir özelliğe sahip olup, ayrıca
temizlik gerektirmez. Ancak, bazı küçük
cisimler (madeni para, düğme) pompanın alt
kısmındaki koruyucu bölmeye düşebilirler.
! Yıkama devresinin bitmiş olup olmadığını
kontrol ediniz ve şini çekiniz.
Pompa koruyucu bölgesine erişebilmek için:
1. çamaşır makinesinin ön kapama panelini, bir tornavida
vasıtasıyla çıkartınız
(bkz. şekil);
2. makine kapağını
saatin ters yönünde
çevirerek sökünüz
(bkz. şekil). bir miktar
su gelmesi normaldir;
3. içini dikkatlice temizleyiniz;
4. kapağı vidalayınız;
5. paneli takarken, tam yerleştirmeden evvel,
kancaların yuvalara gelip gelmediğini kontrol
ediniz.
Su besleme hortumunun kontrol
edilmesi
Su besleme hortumunu, en azından senede
bir defa kontrol ediniz. Yarık veya çatlaklar
varsa değiştiriniz: yıkama esnasındaki yüksek basınçlar ani patlamalara yol açabilirler.
Kapak ve hazne bakımı
• Kötü kokuların oluşmasını engellemek için
kapağı daima aralık bırakınız.
40
! Kesinlikle daha önceden kullanılmış hortum
kullanmayınız.
Page 41

Önlemler ve öneriler
! Çamaşır makinesi uluslararası güvenlik standartlarına
uygun olarak projelendirilmiş ve üretilmiştir. Bu uyarılar
güvenlik amaçlı olup dikkatlice okunmalıdır.
Genel güvenlik uyarıları
• Makine meskenlerde kullanılmak üzere tasarlanmış olup
profesyonel kullanım amaçlı değildir.
• Bu cihaz, eğer gözetim altında bulunuyorlar
ise veya güvenli şekilde ve ilişkin tehlikeler
göz önünde bulundurularak, cihazın kullanımı
hakkında uygun eğitim almışlar ise, 8 yaşından
büyük çocuklar ve ziksel, duyusal veya mental
kapasitelerden yoksun veya yetersiz tecrübe
ve bilgiye sahip kişiler tarafından kullanılabilir.
Çocuklar, cihaz ile oynamamalıdır. Bakım
ve temizlik işlemleri, denetimsiz çocuklar
tarafından gerçekleştirilmemelidir.
• Cihaza ayaklarınız çıplakken yada elleriniz veya
ayaklarınız ıslak yada nemliyken dokunmayınız.
• Fişi prizden çekerken kablosundan değil şin kendisin-
den tutarak çekiniz.
• Makine çalışırken deterjan haznesini açmayınız.
• Tahliye suyuna el sürmeyiniz, yüksek ısıda olabilir.
• Kapağı, hiçbir şekilde zorlamayınız: istenmedik
açılmalara karşı olan güvenlik mekanizması arıza yapabilir.
• Arıza halinde onarmak amacıyla iç mekanizmaları
kurcalamayınız.
• Çocukların çalışır vaziyetteki makineye yaklaşmalarına
mani olunuz.
• Çalışma esnasında kapak ısınabilir.
• Taşınması gerektiğinde, bu işlemin, iki veya üç kişi
tarafından, azami dikkatle yapılması gerekir. Kesinlikle
tek başınıza yapmayınız, çünkü makine çok ağırdır.
• Çamaşırları yerleştirmeden evvel, sepetin boş
olduğundan emin olunuz.
• Atık Elektrikli ve Elektronik Eşyaların (AEEE) Kontrolü
Yönetmeliği.
• AEEE Yönetmeliğine uygu
TR
Atıkların tasye edilmesi
• Ambalaj malzemelerinin tasye edilmesi: yerel yasalara uyunuz, bu şekilde ambalajların geri dönüşümü
mümkün olur.
• Elektrik ve elektronik cihazların atıklarını değerlendirme
2012/19/EU - WEEE sayılı Avrupa Konseyi direktinde;
beyaz eşyaların kentsel katı atık genel yöntemi ile tasye
edilmemesi öngörülmüştür. Kullanılmayan cihazların, madde geri kazanım ve geri dönüşüm oranını en yüksek seviyeye yükseltmek, çevre ve insan sağlığına olası zararları
engellemek için ayrı ayrı toplanması gerekir. Tüm ürünlerin
üzerinde; ayrı toplama hükümlerini hatırlatmak amacıyla
üstünde çarpı işareti olan sepet sembolü verilmiştir.
Cihazların tasye edilmesi konusunda daha geniş bilgi almak için cihaz sahiplerinin mevcut müşteri hizmetine veya
satış noktalarına başvurulması gerekir.
41
Page 42

Çamaşır makinesinin tanımı ve
programların çalıştırılması
TR
Kontrol paneli
Deterjan Bölmesi
ON/OFF düğmesi
PROGRAMLAR
SİCAKLİK AYARİ
düğmesi
SİKMA HİZİ AYARİ
düğmesi
düğmesi
FONKSİYON
uyarı lambalı tuşları
PROGRAM TAKİP /
GECİKMELİ BAŞLATMA
Uyarı lambası
KAPAK
KİLİTLİ
göstergesi
START/PAUSE
uyarı lambalı tuş
Deterjan Bölmesi: ve diğer katkıları koyunuz (“Deterjanlar bölümüne” bakınız).
ON/OFF düğmesi: çamaşır makinesini çalıştırmak ve
kapatmak için.
PROGRAMLAR uyarı lambalı tuşları: programları ayarlamak. Program esnasında düğme sabit kalır.
FONKSİYON düğmeleri: işlev seçimi için. Seçilen işlev
düğmesinde ışıklı gösterge yanık kalır.
SİCAKLİK AYARİ düğmesi: istenen sıcaklığı veya soğuk
suyla yıkamayı ayarlamak için (bkz. Kişisel ayarlar
bölümü).
SİKMA HİZİ AYARİ düğmesi: sıkma çalıştırmak veya
durdurmak için (bkz. Kişisel ayarlar bölümü).
PROGRAM TAKİP uyarı lambası: yıkama programının
aşamalarını görmek için. Uyarı lambası makinenin açık
olduğunu gösterir.
“Gecikmeli başlatma” işlevini programlayarak sonradan
çalıştırma ayarı yapıldıysa, çalışmaya başlaması için
kalan süreyi gösterir (bkz. yan sayfa).
START/PAUSE uyarı lambalı tuş: programları başlatmak
yada geçici olarak durdurmak için.
Not: devrede olan bir programın beklemeye alınması için
bu düğmeye basınız; turuncu renkli uyarı lambası yanıp
sönecektir. MAKİNE KAPAĞI KİLİTLİ uyarı lambası
kapalı ise, kapak açılabilir (yaklaþýk 3 dakika bekleyiniz).
Yıkama programının kaldığı yerden devam etmesi için bu
düğmeye tekrar basınız.
Bekleme modu
Yeni enerji tasarrufu düzenlemeleri ile uyumlu bu çamaşır
makinesine herhangi bir faaliyet algılanmadığında 30
dakika içinde devreye sokulan otomatik bekleme sistemi
yerleştirilmiştir ON/OFF düğmesine bir süre basın ve
makinenin tekrar çalışmasını bekleyin.
KAPAK KİLİTLİ göstergesi: çamaşır makinesinin
kapağının açılabilirliğini görmek için (bkz. yan sayfa).
42
Page 43

Işıklı göstergeler
END
Işıklı göstergeler önemli bilgiler verir.
İşte verdikleri bilgiler:
Program Takip uyarı lambasi
İstenilen yıkama devresini seçtikten sonra çalışma
esnasında ışıklı göstergeler sürekli yanarak yürütülmekte olan işlemi gösterecektir.
TR
Zaman Ayarı
Gecikmeli başlatmayı programlayarak sonradan
çalıştırma ayarı yapıldıysa (bkz. kişisel ayarlar bölümü),
gösterge yanacak ve çalışma başlangıcı için kalan süreyi
gösterecektir:
Süre geçtikçe, bu ışıklı gösterge kalan süreyi göstermeye
devam edecektir.
Seçilen gecikme sonunda, gösterge sönecek ve makine
ayarlandığı programda çalışmaya başlayacaktır.
Yıkama
Durulama
Sıkma
Su boşaltma
Yıkama sonu
FONKSİYON tuşları ve ilgili uyarı lambaları
Herhangi bir işlem seçildiğinde ilgili gösterge yanacaktır.
Seçim, seçilen program ile uyumlu değilse, bu uyumsuzluk gösterge lambasının hızlı bir şekilde yanıp
sönmesi ve bir alarm sesi (3 bip) ile bildirilecektir, seçim
devreye sokulmayacaktır.
Daha önceden ayarlanmış olanla uyumsuz bir işlem
seçildiği takdirde son seçilen işlem geçerli olacaktır.
KAPAK KİLİTLİ göstergesi
Işıklı gösterge devamlı yanıyorsa, kapak istenmeyen
açılmalara karşı kapalı demektir, açmak için göstergenin
sönmesini bekleyiniz (yaklaþýk 3 dakika bekleyiniz).
Not: “Zaman Ayarı” işlevi seçili ise makinenin kapağını
açmak mümkün değildir. Kapağı açabilmek için START/
PAUSE tuşuna basarak makineyi beklemeye alınız.
! KAPAK KİLİTLİ göstergesinin (turuncu olarak) işlev
göstergesi ile aynı anda hızlı şekilde yanıp sönmesi, bir
arıza göstergesidir (“Arızalar ve onarımlar”).
Bir programın başlatılması
1. ON/OFF düğmesine basarak çamaşır makinesini açın. Gösterge lambalarının hepsi birkaç saniyeliğine yanacaktır
ve daha sonra sadece seçilen program ayarları ile ilgili gösterge lambaları yanık kalacaktır, START/PAUSE gösterge
lambaları yanıp sönecektir.
2. Çamaşırı yerleştirip kapağı kapatınız.
3. PROGRAMLAR düğmesiyle istenen programı seçiniz.
4. Yıkama suyu sıcaklığını seçiniz (bkz. “Kişisel ayarlar”).
5. Sıkma hız ayarını seçiniz (bkz. “Kişisel ayarlar”).
6. Deterjan ve diğer katkıları koyunuz (Bkz. Deterjanlar ve çamaşırlar bölümü).
7. İstenilen işlevleri seçin.
8. START/PAUSE düğmesine basmak suretiyle programı çalıştırınız ve ilgili gösterge yeşil renkte yanık kalacaktır.
Seçilen programı iptal etmek için makineyi beklemeye aldıktan sonra START/PAUSE tuşunu basılı tutarak yeni bir program seçiniz.
9. Program bitiminde “END” göstergesi yanmaya başlayacaktır. KAPAK KİLİTLİ göstergesinin yanıp sönmesi sona
erecek, kapağın açılabilir olduğunu gösterecektir (yaklaþýk 3 dakika bekleyiniz). Çamaşırı çıkarınız ve içerisinin kuruması
için kapağı haf aralık bırakınız. ON/OFF tuşuna basarak çamaşır makinasını kapatınız.
43
Page 44

Programlar
TR
Program tablosu
Yıkama çevrimi açıklaması
Yıkama
çevrimleri
Leke Çıkarma
1
Beyazlar
2
Pamuklu: çok kirli beyazlar ve hassas renkliler.
3
Eko Pamuklu 60° (1): çok kirli dayanıklı beyaz ve renkliler.
4
Eko Pamuklu 40° (2): çok kirli beyazlar ve hassas renkliler.
4
Sentetikler: çok kirlenmiş dayanıklı renkliler.
5
Sentetikler (3): kirlenmiş dayanıklı renkliler.
5
Anti - Alerji
6
Bebek Programı
7
Yünlüler: Yün, kaşmir vs.
8
Hassas Çamaşırlar
9
Hızlı Yıkama: Az kirlenmiş giysileri hemen temizlemek için (elle
10
yıkamayı gerektiren yün, ipek ve elbiseler için uygun değildir).
Pamuklu 20°: çok kirli beyazlar ve hassas renkliler.
11
Eko Pamuklu
12
Eko Sentetikler
13
Eko Hızlı Yıkama 30’
14
Durulama
Sıkma + Su Boşaltma
Sadece Boşaltma *
Deterjan ve katkı
Maks.
Sıcak
(°C)
Maks.
Hız
(dev/
dak.)
40° 1000
60° 1000
40°
(Max. 90°)
1000
60° 1000 40° 1000 60° 1000
40° 1000
60° 1000 40° 1000
40° 800 30° 0 -
60° 1000 20° 1000 -
Soğuk
su
Soğuk
su
Soğuk
su
1000 -
1000 -
800 -
- 1000 - -
maddeleri
Ön
Ana
yıkama
suyu
Yıkama
Çamaşır
-
-
-
-
-
-
-
-
-
-
şatıcı
Yumu-
(kg)
Maks. yük
mi kWh
Enerji tüketi-
Kalan nem %
4 - - - 180’
4 - - - 180’
7 - - - 115’
7 62 1,21 52,5 195’
7 62 0,81 76 185’
3 44 0,78 33 120’
3 - - - 110’
4 - - - 185’
3 - - - 145’
1,5 - - - 80’
1 - - - 75’
3,5 62 0,68 30 60’
7 - - - 180’
7 - - - 100’
3 - - - 75’
3 70 0,05 36 30’
7 - - - 49’
- 1000 - - - - 7 - - - 10’
- - - - - 7 - - - 3’
süresi
Çevrim
Toplam su lt
* programını seçer ve dönüş çevirimini devre dışı bırakırsanız, makine sadece tahliye yapar.
Ekran veya kitapçık üzerinde gösterilen devre süresi, standart şartlara göre hesaplanmış tahmini bir süredir. Geçerli olan süre, girişteki sıcaklık derecesi ve suyun
basıncı, ortam sıcaklığı, deterjan miktarı, yük miktarı ve tipi, yükün dengesi, seçilen ilave seçenekler gibi sayısız faktörlere göre değişiklik gösterebilmektedir.
1) 1061/2010 düzenlemesine uygun test yıkama çevrimi: 60°C sıcaklıkta yıkama çevrimi 4’yi seçin.
Bu devre, orta kirlilikteki pamuklu çamaşırları temizlemek için uygundur ve 60°C’de yıkanabilir çamaşırlar üzerinde kullanılacak, kombine enerji ve su tüketimi
açısından en etkili devredir. Geçerli olan yıkama sıcaklık derecesi, belirtilen sıcaklık derecesinden farklı olabilir.
2) 1061/2010 düzenlemesine uygun test yıkama çevrimi: 40°C sıcaklıkta yıkama çevrimi 4’yi seçin.
Bu devre, orta kirlilikteki pamuklu çamaşırları temizlemek için uygundur ve 40°C’de yıkanabilir çamaşırlar üzerinde kullanılacak, kombine enerji ve su tüketimi
açısından en etkili devredir. Geçerli olan yıkama sıcaklık derecesi, belirtilen sıcaklık derecesinden farklı olabilir.
Bütün Test merkezleri için:
2) Pamuklular için kısa yıkama çevrimi: 40°C sıcaklıkta yıkama çevrimi 4’yi seçin.
3) Uzun sentetik programı: 40°C sıcaklıkta yıkama çevrimi 5’yi seçin.
Leke Çıkarma: Program 1, renkleri solmayan ve çok kirli çamaşırların yıkanması için uygundur. Program, standart
sınıftan yüksek bir yıkama sınıfını garanti eder (A sınıfı). Farklı renkteki çamaşırları bu programda yıkamayınız. Toz deterjan kullanılması ve inatçı lekeler için özel katkı maddeleri ile ön yıkama yapmanız önerilir.
Beyazlar: beyaz çamaşırları yıkama devresini kullanınız. Program 2, zaman içinde beyaz parlaklığının korunması için
düşünülmüştür. Daha iyi sonuçlar için, toz deterjanın kullanılması tavsiye edilir.
Anti-Alerji: Polen, mayt, kedi ve köpek tüyü gibi temel alerjenleri ortadan kaldırmak için 6 programını kullanınız.
Bebek Programı:
Bu program 7 çocuklara ve bebeklere ait tipik kirleri yok ettiği gibi, bezlerde deterjan kalmamasını
sağlar ve böylece bebeklerin hassas ciltlerine zarar vermez. Bu program, daha fazla miktarda su kullanarak ve
deterjana ilave edilen özel hijyen sağlayıcı katkı maddelerinin etkisini optimize ederek bakteri oranını azaltmak
amacına yönelik tasarlanmıştır
.
Pamuklu 20°C: kirli pamuklu çamaşırlar için idealdir. 40°’de bir yıkama ile mukayese edilebilen, soğuk suda da etkili olan
performanslar, yinelenen ve karşılaştırılan en yüksek hız varyasyonu ile çalışan mekanik bir hareket ile sağlanır.
Eko Programlar
Eco programlar, çevre için bir avantaja ve ekonomik bir tasarrufa sahip daha az elektrik enerjisi kullanmayı sağlayarak,
düşük sıcaklıklarda etkili yıkama performansları sunmaktadır.
Eco programlar (Pamuklu 12, Sentetikler 13 ve Hızlı Yıkama 30’ 14), farklı kumaş türleri ve az kirli çamaşırlar için
oluşturulmuştur. En iyi sonucu garanti etmek için, sıvı bir deterjan kullanmanızı öneririz; manşet, yaka ve lekeleri önceden
işleme tabi tutmanız tavsiye edilir.
44
Page 45

Kişisel ayarlar
Sıcaklık ayarı
Yıkama suyu ısısını SİCAKLİK AYARI düğmesini çevirerek seçiniz (bkz. Program tablosu).
sıcaklık ayarı soğuk suyla yıkanacak seviyeye kadar düşürülebilir ( ).
Makine, seçilen program için öngörülenin üzerinde bir yıkama ısısını otomatik olarak uygulamayacaktır.
! İstisna: 3 programı seçildiğinde sıcaklık derecesi 90°C ye kadar yükseltilebilir
Sıkma hızı ayarı
Seçilen programın SIKMA HIZI ayarı bu düğmenin çevrilmesiyle yapılır.
Programlar için öngörülen azami süratler şöyledir:
Programlar Azami Sıkma hızı
Pamuklular Dakikada 1000 devir
Sentetik kumaşlar Dakikada 1000 devir
Yünlüler Dakikada 800 devir
İpekli sadece boşaltma
Sıkma sürati azaltılabilir veya işareti seçilerek devre dışı bırakılabilir. Makine, her bir program için öngörülenin üzerinde bir sıkma hızını kabul etmez.
Fonksiyonlar
Çamaşır makinesince öngörülen muhtelif işlemler arzu edilen temizlik ve beyazlıktaki yıkamalara olanak sağlar.
İşlevleri çalıştırmak için:
1. istediğiniz işlev düğmesine basınız;
2. ilgili göstergenin yanması işlevin başladığını belirtir.
Not:
- Seçim, seçilen program ile uyumlu değilse, bu uyumsuzluk gösterge lambasının hızlı bir şekilde yanıp sönmesi ve bir
alarm sesi (3 bip) ile bildirilecektir, seçim devreye sokulmayacaktır.
-Daha önceden ayarlanmış olanla uyumsuz bir işlem seçildiği takdirde son seçilen işlem geçerli olacaktır
TR
Süper Beyaz
kullandığından ve arttırılmış programı süresinden dolayı yüksek performanslı bir yıkama sağlar.
Bu fonksiyon özellikle inatçı lekelerin çıkarılması için kullanışlıdır. Çamaşır suyu ile veya çamaşır suyu olmadan
kullanılabilir.
Ağartma isterseniz, ilave raf bölmesini (4) bölme 1 ‘in içerisine yerleştirin. Çamaşır suyunu bölmeye dökerken, ortadaki
milde işaretli “max”(maksimum) seviyesini aşmamaya dikkat edin (bakınız şekil syf. 46).
Kolay Ütü
Bu işlev seçildiğinde kırışıkları önleyecek şekilde yıkama ve sıkma devrinin özellikleri değiştirilecektir. Program bitiminde çamaşır makinesi iç sepetini yavaşça döndürecektir, KOLAY ÜTÜ ve START/PAUSE uyarı lambaları turuncu renkte
yanıp sönecek ve “END” safhasının lambası yanık kalacaktır. Programı bitirmek için START/PAUSE veya KOLAY ÜTÜ
düğmesine basınız.
Ön Yıkama
Bu işlev seçildiğinde en dayanıklı lekeleri çıkarmak için kullanılan ön yıkama gerçekleştirilir
Not: Mevcut olan hazneye deterjan koyunuz.
Zaman Ayarı
Makinanın çalışmasını 12 saate kadar geciktirebilir.
Gecikmeli çalıştırmayı programlamak için arzu ettiğiniz süreyi görünceye kadar göstergeli düğmeye basınız. Düğmeye
beşinci basışınızda işlem iptal olacaktır.
Not: START/PAUSE tuşuna bastıktan sonra süre ayarı ancak aşağıya doğru ayarlanabilir.
! Tüm programlarla uygulanabilir.
45
Page 46

Deterjanlar ve çamaşır
M
AX
1
2
4
3
A
B
TR
Deterjan çekmecesi
Başarılı yıkama sonuçları aynı zamanda doğru miktarda
deterjan kullanımına bağlıdır: çok fazla deterjan ilave edilmesi daha iyi bir yıkama ile sonuçlanmadığı gibi, cihazın
içerisinde birikir ve çevre kirliliğine katkıda bulunur.
! Beyaz pamuklu çamaşırlar, ön yıkama ve 60°C’den yüksek
sıcaklık derecesi ile yıkamalar için toz deterjan kullanınız.
! Deterjan ambalajı üzerinde aktarılan bilgileri takip ediniz.
! Çok fazla köpük yapacağından çitileme deterjanı
kullanmayın.
Deterjan çekmecesini açın
ve deterjan veya katkı maddelerini aşağıdaki şekilde
dökün.
Bölüm 1: Ön yıkama deterjanı (toz)
Deterjanı dökmeden önce, ilave bölme 4’ün çıkarıldığından
emin olun.
Bölüm 2: Yıkama deterjanı (toz veya sıvı)
Sıvı deterjan kullanılması halinde doğru doz ayarlaması
için makinede gösterilen A kademesini kullanmanız önerilir. Toz deterjan ile yıkamalarda B kademesini kullanınız.
Bölüm 3: Katkı maddeleri (yumuşatıcı vs.)
Yumuşatıcı ızgaranın dışına taşmamalıdır.
ilave bölme 4: Çamaşır suyu
Çamaşırın hazırlanması
• Çamaşırı aşağıdakilere göre ayırın:
- etiketteki kumaş türü/sembole
- renge: renkli giysileri beyazlardan ayırın.
• Bütün cepleri boşaltın ve düğmeleri kontrol edin.
• Kurulama sırasında çamaşırın ağırlığını gösteren
“Programlar Tablosu”’’daki değerleri aşmayın.
Özel yıkama çevrimleri
Yünlüler: bu makinenin yünlü yıkama devri The Wo-
olmark Company tarafından ürünler giysi etiketinde
yer alan ve bu çamaşır makinesinin üreticisi tarafından
verilen talimatlara göre yıkandıkları taktirde “elde
yıkama” olarak etiketlenen yün giysilerin yıkanması için
onaylanmıştır.
Hassas Çamaşılrar: Taşlı veya pullu giysiler gibi çok
hassas çamaşırları yıkamak için programını kullanınız 9.
Çamaşırları yıkamadan önce ters çevirmeniz ve küçük
parçaları hassas çamaşırların yıkanması için kullanılan
özel torba içerisine koymanız önerilir.
Daha iyi sonuçlar elde etmek için hassas çamaşırlara
özel sıvı deterjanın kullanılması önerilir.
İpek çamaşırların ve perdelerin yıkanması için, 9
devresini seçiniz ve opsiyonunu devreye sokunuz;
makine çamaşırları durulama suyu içinde bekletir ve
uyarı lambası yanıp sönmeye başlar. Su boşaltmak
için START/PAUSE ya da düğmesine basmanız
gerekir.
Yük dengeleme sistemi
Her dönüş çevriminden önce aşırı titreşimi önlemek ve
yükü tek bir yönde dağıtmak için, tambur yıkama dönüş
hızından biraz daha fazla olan bir hızda sürekli döner.
Birkaç denemeden sonra, yük doğru şekilde dengelenmezse, makine düşük bir dönüş hızında döner. Yük çok
dengesizse, çamaşır makinesi döndürme yerine dağıtma
işlemini uygular. Gelişmiş yük dağılımı ve dengeyi desteklemek için, küçük ve büyük giysilerin yük içerisinde
karıştırılmasını öneririz.
Çamaşırınız ağırlığı ne kadardır ?
1 çarşaf 400-500 gr
1 yastık kılıfı 150-200 gr
1 masa örtüsü 400-500 gr
1 bornoz 900-1.200 gr
1 havlu 150-250 gr
46
Page 47

Arızalar ve onarımlar
Çamaşır makinesi çalışmıyor olabilir. Teknik Servise başvurmadan önce (Teknik Servis bölümüne bakınız) aşağıdaki liste
yardımıyla kolay çözülebilecek bir problem olup olmadığını kontrol ediniz.
Arızalar:
Çamaşır makinesi çalışmıyor.
Yıkama işlemi başlamıyor.
Çamaşır makinesi su almıyor (ilk
yıkama safhasının gösterge lambası
hızlıca yanıp sönüyor).
Çamaşır makinesi devamlı su alıp
veriyor.
Olası nedenler / Çözümler:
• Fiş prize takılı değil veya tam temas etmiyor.
• Evde elektrik yok.
• Makinanın kapağı tam kapanmamış.
• ON/OFF düğmesine basılmamış.
• START/PAUSE düğmesine basılmamış.
• Su musluğu açık değil.
• Su besleme hortumu musluğa takılı değil.
• Hortum bükülmüş.
• Su musluğu açık değil.
• Evde su kesik.
• Basınç yetersiz.
• START/PAUSE düğmesine basılmamış.
• Tahliye hortumu yerden 65 ile 100 cm arasında yerleştirilmemiş (bkz. “Montaj”).
• Tahliye hortumunun başı suya girmiş (bkz. “Montaj”).
• Duvardaki tahliyenin hava boşluğu yok.
Bu kontrollerden sonra olumlu sonuç alınamazsa, musluğu ve kapatıp,
çamaşır makinesini durdurarak Servise haber veriniz. Daire, binanın üst
katlarındaysa, sifon olayı meydana gelerek çamaşır makinesi devamlı su
alıp, veriyor olabilir. Bu sorunun çözümü için piyasada sifon önleyici valar
satılmaktadır.
TR
Çamaşır makinesi su boşaltmıyor
veya santrifüj yapmıyor.
Çamaşır makinesi santrifüj esnasında
aşırı sarsılıyor.
Çamaşır makinesi su kaçırıyor.
START/PAUSE uyarı lambası yanıp
sönerse deviri bitirmek için düğmeye
basınız.
Aşırı köpük oluşuyor.
• Program su boşaltmayı öngörmüyor: bazı programlarda su boşaltma
işlemini elle müdahale ederek başlatmak gerekir.
• “Kolay Ütü” işlevi devrede: programı tamamlamak için START/PAUSE
düğmesine basınız (“Kişisel ayarlar”).
• Tahliye hortumu bükülmüş (bkz. “Montaj”).
• Tahliye kanalı tıkalı.
• Hazne, çamaşır makinesinin montajı esnasında düzgün çözülmemiş (bkz.
“Montaj”).
• Çamaşır makinesinin bulunduğu zemin düz değil (bkz. “Montaj”).
• Çamaşır makinesi mobilyalarla duvar arasında sıkışmış (bkz. “Montaj”).
• Su giriş hortumu tam sıkılmamış (bkz. “Montaj”).
• Deterjan haznesi tıkanmış (temizlemek için bkz. “Bakım ve özen”).
• Tahliye hortumu düzgün takılmamış (bkz. “Montaj”).
• Makineyi kapatınız, prizden şi çekiniz ve 1 dakika sonra tekrar açınız.
Arıza çözülmüyorsa Teknik Servisine başvurunuz.
• Deterjan çamaşır makinesi için uygun değil (“çamaşır makinesi için”, elde
yıkama ve çamaşır makinesi için” veya benzer ibareler olmalıdır).
• Aşırı doz kullanıldı.
47
Page 48

Teknik Servis
TR
Servise başvurmadan önce:
• Servise başvurmadan çözülebilecek bir ariza olup olmadığını kontrol ediniz (“Arızalar ve onarımlar” bölümüne bakınız);
• Programı tekrar başlatarak, sorunun çözülüp çözülmediğini görünüz;
• Aksi takdirde, garanti belgesinde belirtilen telefon numaralarından teknik servisi arayınız.
! Kesinlikle, yetkili olmayan tamircilere müracaat etmeyiniz.
Şunları bildiriniz:
• arıza tipini;
• cihazın modeli (Mod.);
• seri numarası (S/N).
Bu bilgiler, çamaşır makinesinin arkasındaki plakada bulunurlar.
Cihazın ömrü 10 yıldır.
Tüm Türkiye’de; Yetkili Teknik Servis, Orijinal Yedek Parça, Bakım Ürünlerimiz ve Garanti ile ilgili bilgi için:
0 212 444 50 10.
Tüketicilerin Seçimlik Hakları
• Tüketicinin Korunması Hakkındaki Kanun’un 11. maddesi çerçevesinde malın ayıplı olduğunun anlaşılması durumunda tüketici, satıcıdan (i)
satılanı geri vermeye hazır olduğunu bildirerek sözleşmeden dönme, (ii) satılanı alıkoyup ayıp oranında satış bedelinden indirim isteme, (iii) aşırı
bir masraf gerektirmediği takdirde, bütün masraarı satıcıya ait olmak üzere satılanın ücretsiz onarılmasını isteme, (iv) imkan varsa, satılanın
ayıpsız bir misli ile değiştirilmesini isteme seçimlik haklarına sahiptir. Ücretsiz onarım veya malın ayıpsız misli ile değiştirilmesi hakları üretici veya
ithalatçıya karşı da kullanılabilir.
• Ücretsiz onarım hakkının seçilmesi durumunda işçilik masrafı, değiştirilen parça bedeli ya da başka herhangi bir ad altında hiçbir ücret talep
etmeksizin malın onarımı yapılacak veya yaptırılacaktır.
• Ücretsiz onarım hakkının kullanması halinde malın, garanti süresi içinde tekrar arızalanması, tamiri için gereken azami sürenin aşılması, tamirinin
mümkün olmadığının, yetkili servis istasyonu, satıcı, üretici veya ithalatçı tarafından bir raporla belirlenmesi durumlarında, malın bedel iadesi, ayıp
oranında bedel indirimi veya imkan varsa malın ayıpsız misli ile değiştirilmesi (mevzuattaki istisnalar saklı kalmak kaydıyla) talep edilebilecektir.
Sözleşmeden dönme veya ayıp oranında bedelden indirim hakkının seçildiği durumlarda, satıcı, malın bedelinin tümünü veya bedelden yapılan
indirim tutarını derhal tüketiciye iade edecektir.
Malın ayıpsız misli ile değiştirilmesi hakkının seçilmesi durumunda talep kendilerine bildirilmesinden itibaren satıcı veya üretici tarafından azami
otuz iş günü içerisinde, bu talep yerine getirilecektir.
Kullanım Hataları
• Cihazın kullanma kılavuzunda yer alan hususlara aykırı kullanılmasından kaynaklanan arızalar garanti kapsamı dışındadır.
Tüketici Şikayetleri
• Çıkabilecek sorunlar için tüketiciler şikayet ve itirazları konusundaki başvurularını tüketici mahkemelerine ve tüketici hakem heyetlerine yapabilirler.
Ürün Verileri
İthalatçı Firma:
Indesit Company Beyaz Eşya PAZARLAMA A.Ş.
Balmumcu Cad. Karahasan Sok.
No: 11, 34349 – Balmumcu Beşiktaş – İstanbul
Tel: (0212) 355 53 00
48
Page 49

Инструкции за ползване
ПЕРАЛНА МАШИНА
BG
Български
WML 701
Съдържание
Монтиране, 50-51
Разопаковане и нивелиране
Хидравлични и електрически връзки
Първо пране
Технически данни
Поддръжка и почистване, 52
Спиране на водата и изключване на електрозахранването
Почистване на пералната машина
Почистване на чекмеджето за перилни препарати
Поддръжка на люка и на барабана
Почистване на помпата
Проверка на маркуча за студена вода
Мерки за безопасност и препоръки, 53
Общи предохранителни мерки
Рециклиране
Описание на пералната машина и пускането
на дадена програма, 54-55
Табло за управление
Светлинни индикатори
Включване на програма
BG
Програми, 56
Таблица с програмите
Персонализирания, 57
Задаване на температурата
Задаване на центрофугата
Функции
Перилни препарати и дрехи за пране, 58
Чекмедже за перилните препарати
Подготвяне на прането
Специфично пране
Система за измерване на товара
Проблеми и мерки за отстраняването им, 59
Сервизно обслужване, 60
49
Page 50

Монтиране
BG
! Важно е да съхранявате инструкциите,
за да можете да правите допълнителни
справки по всяко време. В случай
че пералната машина се продаде,
преотстъпи или премести, трябва да
се погрижите инструкциите винаги да
я придружават, за да се предостави
информация на новия собственик за
работата и съответните предупреждения.
! Прочетете внимателно инструкциите:
защото съдържат важна информация за
монтажа, използването и безопасността.
Разопаковане и нивелиране
Разопаковане
1. Разопаковайте пералната машина.
2. Проверете дали пералната машина не
е повредена при транспортирането. Ако е
повредена, не я свързвайте, а се обърнете
към продавача.
3. Свалете
3-те винта за
предпазване
при транспорт
и гумичката със
съответната
втулка, поставени
от задната страна
(виж показаното на
фигурата).
4. Затворете отворите с предоставените
пластмасови капачки.
5. Съхранете всички части: за да се
монтират отново при необходимост
пералната машина да бъде
транспортирана.
! Опаковъчният материал не е детска играчка.
Нивелиране
1. Монтирайте пералната машина на
равен и твърд под, без да я опирате в
стени, мебели и др.
2. Ако подът
не е идеално
хоризонтален,
компенсирайте
неравностите, като
отвиете или завиете
предните крачета
(виж фигурата);
ъгълът на наклона,
измерен върху работната повърхност, не
трябва да надвишава 2°.
Точното нивелиране позволява машината
да бъде стабилна и да се избягват
вибрациите, шумът и преместването й
по време на работа. Когато настилката
е мокет или килим, регулирайте така
крачетата, че под пералната машина да
остане достатъчно място за вентилация.
Хидравлични и електрически
връзки
Свързване на маркуча към
водопроводната мрежа
1. Свържете
захранващия
маркуч, като го
завиете към крана
за студената вода с
накрайник с газова
резба 3/4 (вижте
фигурата).
Преди да го
свържете, източете
водата, докато се избистри.
2. Свържете
маркуча за
студената вода към
пералната машина,
като го завиете
към специалния
щуцер, разположен
от задната страна,
горе вдясно (âèæ
фигурата).
3. Внимавайте маркуча да не се прегъва и
притиска.
! Налягането по водопроводната мрежа
трябва да бъде в границите, указани
в таблицата „Технически данни” (âæ.
следващата страница).
! Ако дължината на захранващия
маркуч не е достатъчна, се обърнете
към специализиран магазин или към
оторизиран техник.
! Никога не използвайте вече употребяван
маркуч.
! Използвайте тези, което са доставени с
пералната машина.
50
Page 51

Свързване на маркуча за мръсната вода
65 - 100 cm
Свържете маркуча
за мръсната
вода, без да го
прегъвате, към
канализационната
тръба или
към тръбата
за отвеждане
в стената,
разположени на
височина между 65
и 100 см от пода, или го подпрете на ръба
на мивката или ваната,
свързвайки
доставения
водач към крана
(вж. фигурата).
Свободният край
на маркуча за
мръсната вода
не трябва да
бъде потопен във
водата.
! Не се препоръчва използването на
удължителни маркучи. Ако е необходимо,
удължителят трябва да има същия
диаметър като оригиналния и да не
надвишава 150 см.
! Не използвайте удължители или
разклонители.
! Кабелът не трябва да бъде огънат или
сплескан.
! Захранващият кабел трябва да се
подменя само от оторизирани техници.
Внимание! Фирмата отхвърля всякаква
отговорност в случаите, в които тези
норми не се спазват.
Първо пране
След инсталиране и преди употреба
включете един цикъл на изпиране с
перилен препарат, но без дрехи, задавайки
програма „Автоматично почистване“ (вижте
Почистване на пералната машина).
Технически данни
Модел WML 701
ширина 59,5 см
Размери
Вместимост îò 1 äî 7 êã.
Електрическо
захранване
височина 85 см
дълбочина 51,7 см
Виж табелката с
характеристиките,
поставена на машината
BG
Свързване към електрическата мрежа
Преди да свържете щепсела в контакта,
проверете дали:
• контактът е заземен съгласно
действащите стандарти;
• контактът може да поеме максималната
мощност на натоварване на машината,
указана в таблицата с техническите
данни (виж следващата страница);
• захранващото напрежение е в границите
на указаното в таблицата с техническите
данни (виж следващата страница);
• контактът отговаря на щепсела на
пералната машина. В противен случай
заменете щепсела или контакта.
! Пералната машина не се монтира на
открито, дори под навес, защото е много
опасно да се остави на влиянието на
атмосферните условия.
! За монтираната перална машина
електрическият контакт трябва да бъде
лесно достъпен.
Захранване с
вода
Скорост на
центрофугата
Програми
за проверка
съгласно
Регламенти №
1061/2010 и №
1015/2010 на
Комисията.
максимално налягане
1 МРа (10 bar)
минимално налягане
0,05 МРа (0,5 bar)
обем на казана 46 литра
до 1000 оборота/
минута
програма 4;
Eкo памук 60 C°.
програма 4;
Eкo памук 40°C°.
Пералната машина
съответства на
следните Европейски
директиви:
- 2004/108/СЕ (за
електромагнитна
съвместимост)
- 2012/19/EU (WEEE)
- 2006/95/CE (за ниско
напрежение)
51
Page 52

Поддръжка и почистване
1
2
A
B
BG
Спиране на водата и изклчване
на електрозахранването
Затваряйте крана за вода след всяко
изпиране. По този начин се ограничава
износването на хидравличната
инсталация на пералната машина и се
ограничава опасността от течове.
Изключвайте щепсела от електрическото
захранване, когато почиствате пералната
машина и по време на работи по
поддръжката.
Почистване на пералната машина
• Външната част и гумените части могат
да се почистват с кърпа с хладка вода и
сапун. Не използвайте разтворители или
абразивни препарати.
• Пералнята разполага с програма за
„Автоматично почистване“ на вътрешните
части, което трябва да се извършва при
абсолютно празен барабан.
Прахът за пране (10% от препоръчваното
количество за слабо замърсено пране)
или специални допълнителни препарати
за почистване на пералнята може да се
ползват в добавка към програмата за
изпиране. Препоръчва се пускането на
програмата за почистване на всеки 40
изпирания.
За да задействате
програмата,
натиснете
едновременно
бутони A и B за 5 сек
(вижте фигурата).
Програмата ще
се активира
автоматично и ще
продължи около 70
минути. За да спрете цикъла, натиснете
бутона START/PAUSE.
Почистване на чекмеджето за
перилните препарати
Извадете
чекмеджето с
повдигане и
изтегляне навън
(виж фигурата).
Измийте го под
течаща вода. Това
почистване трябва
да се извършва
често.
Поддръжка на лка и на барабана
Оставяйте люка винаги открехнат за
избягване образуването на неприятни
миризми.
Почистване на помпата
Пералната машина е окомплектована със
самопочистваща се помпа, която няма
нужда от поддръжка. Възможно е обаче
малки предмети (монети, копчета) да
попаднат във филтъра, който предпазва
помпата и се намира в долната й част.
! верете се, че цикълът на пране е
завършил, и изключете щепсела от
контакта.
За достъп до филтъра:
1. свалете панела
в предната част
на пералната
машина с помощта
на отвертка (âæ.
фигура);
2. отвийте
капачката, като
я завъртите в
посока, обратна
на часовниковата
стрелка (âèæ
фигура нормално
е да изтече малко
вода;
3. почистете внимателно отвътре;
4. завийте отново капачката;
5. затворете отново панела, като, преди
да го избутате към пералнята, се уверите,
че сте поставили правилно закрепващите
куки в специалните водачи.
Проверка на маркуча за студената
вода
Проверявайте маркуча за студената вода
поне веднъж годишно. а се замени, ако
е напукан и нацепен, защото по време
на изпиране голямото налягане може да
предизвика внезапно спукване.
! Никога не използвайте вече употребяван
маркуч.
52
Page 53

Мерки за безопасност и
препоръки
! Пералната машина е проектирана и произведена в
съответствие с международните норми за безопасност.
Предупрежденията тук са продиктувани от съображения
за безопасност и трябва да се четат внимателно.
Общи мерки за безопасност
• Този уред е предназначен изключително за домашна
употреба.
Този уред може да бъде използван от деца над 8
години и лица с ограничени физически, сетивни
или умствени способности, или с недостатъчен
опит и познания, ако те са наблюдавани или
инструктирани относно използването на уреда
от лице, отговорно за тяхната безопасност и
разбират опасностите, свързани с употребата
на уреда. Децата не трябва да си играят с уреда.
Поддръжката и почистването не трябва да се
извършват от деца без надзор.
• Пералната машина трябва да се използва само от
възрастни хора съгласно инструкциите, предоставени в
тази книжка.
• Не докосвайте машината, когато сте боси, с мокри или
влажни ръце или крака.
• Не изключвайте щепсела от контакта за електрически
ток, като дърпате кабела, а като хващате щепсела.
• Не отваряйте чекмеджето с перилни препарати, докато
пералната машина работи.
• Не докосвайте маркуча за мръсната вода, защото
може да е достигнал високи температури.
• Никога не отваряйте люка със сила, защото може да се
повреди обезопасителния механизъм, който предпазва
от случайно отваряне.
• В случай на повреда по никакъв повод не достигайте
до вътрешните механизми в опити за ремонт.
• Винаги контролирайте децата да не се доближават до
работещата машина.
• По време на изпиране люкът се нагрява.
• Преместването да се извършва внимателно от
двама или трима души. Никога от сам човек, защото
пералната машина тежи много.
• Преди да заредите машината, проверете дали
барабанът е празен.
относно правилното извеждане от употреба на
домакинските електроуреди се обърнете към
предназначената за това обществена служба или
към дистрибуторите.
BG
Рециклиране
• Унищожаване на опаковъчния материал:
спазвайте местните норми – по този начин
опаковъчният материал може да се рециклира.
• Европейската директива 2012/19/EU - WEEE
за отпадъците от електрическо и електронно
оборудване предвижда домакинските електроуреди
да не се изхвърлят заедно с обичайните твърди
градски отпадъци. Извадените от употреба уреди
трябва да бъдат събирани отделно с цел да бъде
увеличен делът на подлежащите на повторна
употреба и рециклиране материали, от които са
направени, както и да бъдат избегнати евентуални
вреди за здравето и околната среда. Символът
със зачеркнатия контейнер е поставен върху
всички продукти, за да напомня за задължителното
разделно събиране. За по-нататъшна информация
53
Page 54

Описание на пералната машина и
пускането на дадена програма
BG
Табло за управление
Бутон ON/OFF
Чекмедже за перилните
препарати
Чекмедже за перилните препарати: за дозиране
на перилните препарати и добавките (âæ. “Перилни
препарати и дрехи за пране”).
Програматор
ПРОГРАМИ
Светлинни ИНДИКАТОРИ ЗА ХОД НА
ЦИКЪЛ/ЗАБАВЕНО ВКЛЮЧВАНЕ
Програматор
ЦЕНТРОФУГА
Програматор
ТЕМПЕРАТУРА
Бутони със светлинни
индикатори ФУНКЦИЯ
Светлинен индикатор БЛОКИРАН ЛЮК: за да
се разбере дали люкът може да се отвори (âæ.
съседната страница).
Светлинен
индикатор
БЛОКИРАН
ЛЮК
Бутон със светлинен
индикатор
START/PAUSE
Бутон ON/OFF: за включване и изключване на
пералнята.
Програматор ПРОГРАМИ: за задаване на
програмите. По време на изпълнение на програмата
ключът остава неподвижен.
Бутони със светлинни индикатори ФУНКЦИЯ: за
селектиране на възможните функции. Светлинният
индикатор за избраната функция ще продължи да
свети.
Програматор ЦЕНТРОФУГА: за задаване
на центрофуга или за изключването й (âæ.
“Персонализирания”).
Програматор ТЕМПЕРАТУРА: за задаване на
температура или пране със студена вода (âæ.
“Персонализирания”).
Светлинни ИНДИКАТОРИ ЗА ХОД НА ЦИКЪЛ/
ЗАБАВЕНО ВКЛЮЧВАНЕ: за да следвате хода на
изпълнение на програмата за пране.
Включеният светлинен индикатор показва, че се
извършва определена фаза от цикъла.
Ако е зададена функцията “Забавено включване”, ще
се посочва времето, оставащо до стартирането на
програмата (вж. съседната страница).
Бутон със светлинен индикатор START/PAUSE:
за стартиране на програмите или временното им
прекъсване.
Забележка: за задаване на пауза в прането
натиснете отново бутона - индикаторът ще
мига с оранжева светлина, докато светлинният
индикатор, указващ изпълнение на фаза, ще
свети непрекъснато. Ако светлинният индикатор
БЛОКИРАН ЛЮК е угаснал, ще може да се отвори
вратата на люка (изчакайте около 3 минути).
За продължаване на цикъла пране от мястото, в
което е бил прекъснат, натиснете отново този бутон.
Режим на stand by
В съответствие с новите нормативи за пестене
на енергия тази перална машина е снабдена със
система за автоматично изключване (stand by), която
се задейства след 30 минути в случай, че машината
не се използва. Натиснете за кратко бутон
изчакайте машината да се задейства отново.
ON/OFF
и
54
Page 55

Светлинни индикатори
END
Следящите светлинни индикатори дават важна
информация.
Ето какво казват:
Светлинни индикатори за текущите фази
След като е избран и стартиран желаният цикъл на
пране, светлинните индикатори ще светват един след
друг, за да указват хода на цикъла:
Пране
BG
Отложен старт
Ако е активирана функцията “Забавено включване” (âæ.
“Персонализирания”), след пускане на програмата ще
светне индикаторът за избраното забавяне:
В течение на времето ще се визуализира оставащото
забавяне чрез мигане на съответния светлинен
индикатор:
След като изтече времето за отлагане на
изпълнението, примигващият светлинен индикатор
ще угасне и избраната програма ще се стартира.
Изплакване
Центрофуга
Източване на водата
Край на прането
Бутони за функция и съответни светлинни
индикатори
При избор на функция съответният светлинен
индикатор ще светне.
Ако избраната опция не е съвместима със
зададената програма, тази несъвместимост ще се
сигнализира от звуков сигнал (трикратно) и опцията
няма да се активира.
В случай на задаване на функция, несъвместима с
друга, зададена преди нея функция, остава активен
само последният избор.
Светлинен индикатор блокиран лк
Светещият индикатор показва, че люкът е блокиран,
за да се предотвратят случайни отваряния; за
избягване на щети е необходимо да се изчака
изгасването на светлинния индикатор, преди да се
отвори люкът (изчакайте около 3 минути).
! Бързото мигане на светлинния индикатор START/
PAUSE (оранжев) заедно с индикатора за функциите
е сигнал за неизправност (âæ. “Неизправности и
отстраняването им”).
Вклчване на програма
1. Включете пералната машина, като натиснете бутона
светят в продължение на няколко секунди, след което ще продължат да светят тези на зададената програма, а
индикаторът за START/PAUSE ще свети с пулсираща светлина.
2. Заредете дрехите за пране и затворете люка.
3. Задайте желаната програма с ключа ПРОГРАМИ.
4. Задайте температурата на пране (âæ. “Персонализирания”).
5. Задайте скоростта на центрофугиране (âæ. “Персонализирания”).
6. Поставете перилен препарат и добавки âæ. “Перилни препарати и дрехи за пране”.
7. Избиране на желаните функции.
8. Включете програмата, като натиснете бутона START/PAUSE, съответният светлинен индикатор ще свети
постоянно в зелен цвят.
За да отмените зададения цикъл, поставете машината в пауза, като натиснете бутона START/PAUSE, и изберете
новия цикъл.
9. Когато програмата свърши, ще светне индикаторът . Светлинният индикатор за БЛОКИРАН ЛЮК ще угасне,
указвайки, че люкът може да бъде отварян (изчакайте около 3 минути).
Извадете прането и оставете люка притворен, за да изсъхне барабанът. Изключете пералнята, като натиснете
бутона ON/OFF.
ON/OFF
. Всички индикатори ще се включат и ще
55
Page 56

Програми
Таблица с програмите
BG
Описание на програмата
Програми
БЕЗ ПЕТНА
1
БЕЛИ
2
3
4
4
5
5
6
7
8
9
10
11
12
13
14
Бели и цветни, деликатни,
Памук:
Eкo памук 60° (1):
Eкo памук 40° (2):
замърсени.
СИНТЕТИЧНИ: Цветни, устойчиви, силно замърсени.
СИНТЕТИЧНИ
Противоалергично действие
Áåáå
Âúëí: за вълна, кашмир и т.н.
Фини тъкани
БЪРЗО ПРАНЕ 60: За бързо освежаване на не много замърсени
дрехи (не се препоръчва за вълна, коприна и дрехи, които трябва
да се перат на ръка).
Памук 20°:
Памук
Синтетика
Бърза 30’
Изплакване
Центрофуга и Източване на водата
Само източване на водата *
Бели и цветни, устойчиви, силно замърсени
Бели и цветни, деликатни,
(3):
Цветни, устойчиви, много
Бели и цветни, деликатни,
много
много
замърсени.
много
замърсени.
замърсени.
Перилни препарати
Макс.
температура ()
40° 1000
60° 1000
40°
(Max. 90°)
.
60° 1000 -
40° 1000 -
60° 1000
40° 1000
60° 1000 40° 1000
40° 800 30° 0 -
60° 1000 -
20° 1000 -
студена
вода
студена
вода
студена
вода
- 1000 - -
(обороти
в минута)
Макс. скорост
1000
1000 -
1000 -
800 -
ране
пране
Ïредп-
Белина
Основно
-
-
-
-
-
-
-
-
-
-
тител
Омеко-
1,5 - - - 80’
3,5 62 0,68 30 60’
%
)
ìêñ (êã
Зареждане
Остатъчна
Разход на
влажност
енергия kWh
Продълж-
на вода lt
Общ разход
4 - - - 180’
4 - - - 180’
7 - - - 115’
7 62 1,21 52,5 195’
7 62 0,81 76 185’
3 44 0,78 33 120’
3 - - - 110’
4 - - - 185’
3 - - - 145’
1 - - - 75’
7 - - - 180’
7 - - - 100’
3 - - - 75’
3 70 0,05 36 30’
7 - - - 49’
цикъла
ителност на
- 1000 - - - - 7 - - - 10’
- - - - - 7 - - - 3’
* С избирането на програма и изключването на центрофугата пералнята само ще източи водата
Продължителността на цикъла, показана на дисплея или посочена в ръководството, е приблизително изчислена въз основа на стандартните условия.
Реалното времетраене може да варира в зависимост от множество фактори като температура и налягане на водата при пълнене, температура на въздуха
в помещението, количество перилен препарат, количество, вид и тегло на прането, допълнително избрани опции.
1) Програма за проверка съгласно стандарт 1061/2010: задайте програма 4 с температура 60°C.
Този цикъл е подходящ за пране на памучни, нормално замърсени тъкани и е най-ефективен от гледна точка на комбиниран разход на енергия и вода, подходящ е за дрехи,
които могат да се перат на 60°C. Действителната температура на пране може да се различава от указаната.
2) Програма за проверка съгласно стандарт 1061/2010: задайте програма 4 с температура 40°C.
Този цикъл е подходящ за пране на памучни, нормално замърсени тъкани и е най-ефективен от гледна точка на комбиниран разход на енергия и вода, подходящ е за дрехи,
които могат да се перат на 40°C. Действителната температура на пране може да се различава от указаната.
За всички институции, извършващи изпитания:
2) Продължителна програма за памук: задайте програма 4; с температура 40° C.
3) Дълга програма за синтетични тъкани: задайте програма 5 с температура 40° C.
БЕЗ ПЕТНА: програмата 1 е подходяща за изпирането на силно замърсено пране с устойчиви цветове. Програмата
осигурява по-висок клас изпиране от стандартния (клас A). Не активирайте програмата при разноцветно пране. Препоръчва
се използването на прахообразен перилен препарат. Срещу упорити петна се препоръчва предварителна обработка със
специални допълнителни препарати.
Бели: Използвайте този цикъл за 2 изпиране на бели тъкани. Програмата е разработена с цел продължителното запазване
на искрящия бал цвят на тъканите. За по-добри резултати се препоръчва използването на прах за пране. използвайте цикъла
за прането в светли цветове. Програмата е разработена с цел продължителното запазване на тъмните цветове на тъканите.
Противоалергично действие: използвайте програмата 6 за отстраняване на основните алергени като полени, акари,
кучешки и котешки косми.
Бебе: използвайте специалната програма 7, за да отстраните типичното замърсяване на детските дрехи и премахнете
перилния препарат, за да се избегнат алергични реакции на деликатната детска кожа. Цикълът е създаден за елиминиране
на бактериите чрез използване на по-голямо количество вода и оптимизиране на ефекта от специфичните хигиенизиращи
добавки към перилния препарат.
Програми „Еко“
Програмите „Еко“ предлагат добър резултат от изпирането при ниска температура, позволявайки по-ниско потребление
на електроенергия, като с това допринасят за опазването на околната среда и икономическата ефективност. Програмите
„Еко“ (12 Памук, 13 Синтетика и 14 Бърза 30’) са създадени за различни видове тъкани и слабо замърсени дрехи. За да
бъдат гарантирани оптимални резултати, препоръчваме да използвате течен перилен препарат; добре е да обработите
предварително маншетите, яките и петната.
Памук 20 C°: програмата 11 е идеална за замърсено пране от памучна тъкан. Добрите резултати включително при изпиране със
студена вода, в сравнение с тези след пране при 40°, са гарантирани от механичното действие с промяна на скоростта, многократно
и често достигащо до пикови стойности.
56
Page 57

Персонализирания
Задаване на температурата
Завъртайки ключа ТЕМПЕРАТРА, се задава температурата на пране (вж. Таблица на програмите).
Температурата може да се понижи до пране със студена вода ( ).
Пералнята автоматично ще попречи да се зададе температура, която е по-висока от максималната температура,
предвидена за всяка програма.
! Изключение: с избиране на програма 3 температурата може да се повиши до 90°.
Задаване на центрофугата
Завъртайки ключа ЦЕНТРОФГА, се задава скоростта на центрофугиране за избраната програма.
Максималните предвидени скорости за програмите са:
Програми Максимална скорост
Памучни 1000 оборота в минута
Синтетични тъкани 1000 оборота в минута
Вълна 800 оборота в минута
Коприна, само източване
Скоростта на центрофугиране може да се намали или да се изключи, като се избере символът .
Пералнята автоматично ще попречи да се центрофугира със скорост, по-висока от максимално предвидената за
всяка програма.
Функции
опълните функции за пране, предвидени в пералната машина, дават възможност за постигане на желаното бяло
и чисто пране:
За активиране на възможните функции;
1. натиснете бутона, съответстващ на желаната функция;
2. светването на съответния индикатор показва, че функцията е избрана.
Бележка:
- Ако избраната опция не е съвместима със зададената програма, тази несъвместимост ще се сигнализира от
звуков сигнал (трикратно) и опцията няма да се активирa.
- В случай на задаване на функция, несъвместима с друга, зададена преди нея функция, остава активен само
последният избор.
BG
Супер изпиране
Благодарение на използването на по-голямо количество вода в началната фаза на цикъла и на по-дългото време
на пране, тази опция гарантира висококачествено изпиране.
Може да се използва с или без белина. Ако желаете избелване, поставете допълнителната ваничка 4, комплект
с доставката във ваничка 1. При дозиране на белина не надвишавайте максималното ниво „max“, указано на
централната ос (вижте фигурата на стр. 58).
Лесно гладене
При избор на тази функция прането и центрофугирането ще се изменят целесъобразно, така че да се намали
образуването на гънки. При завършване на цикъла пералнята прави бавни завъртания на барабана, следящият
светлинен индикатор на функцията ЛЕСНО ГЛАЕНЕ ще светят с мигаща светлина и следящият индикатор
ще светне. За завършване на цикъла трябва да се натисне бутон START/PAUSE или бутон ЛЕСНО ГЛАЕНЕ.
Предпране
С избора на тази функция се извършва предпране, полезно за отстраняване на трудно почистващи се петна.
Забележка: Добавете перилен препарат в предназначеното за това отделение.
Отложен Старт
Забавя пускането на машината до 12 часа.
Натиснете многократно бутона, докато светне индикаторът, съответстващ на желаната стойност за време на
забавяне. При петото натискане на бутона функцията няма да е активна.
Забележка: След натискане на бутона START/PAUSE стойността на забавянето може да се променя само като се
намалява.
57
Page 58

Перилни препарати и
M
AX
1
2
4
3
A
B
дрехи за пране
BG
Чекмедже за перилните препарати
обрият резултат от прането зависи и от правилното
дозиране на перилните препарати. с предозиране
не се пере по-ефикасно, а това води до отлагане на
налепи по вътрешната страна на пералната машина
и до замърсяване на околната среда.
! Използвайте прахообразни перилни препарати за
бели памучни тъкани за предпране и за пране при
температура над 60°C.
! Уверете се, че следвате указанията, посочени върху
опаковката на перилния препарат.
! Не използвайте препарати за ръчно пране, защото
образуват много пяна.
Изтеглете чекмеджето за
перилните препарати и
изсипете праха за пране
и допълните препарати
по следния начин.
Специфично пране
Âúëí: Цикълът на изпиране „Вълна“ на тази пералня
е тестван и одобрен от компанията Woolmark за пране
на вълнени тъкани, определени като „подходящи
за изпиране на ръка“, при условие че се спазват
инструкциите от етикета на дрехата и указанията на
производителя на пералнята.
Фини тъкани: използвайте програмата 9 за изпиране
на много фини тъкани с апликации от рода на страс
или пайети.
Препоръчва се обръщането на дрехите наопаки
преди прането и слагането на малките дрехи в
торбичката за фино пране. За по-добри резултати се
препоръчва използването на течен препарат за пране
за фини тъкани.
За изпиране на копринени тъкани и пердета
изберете цикъл 9 и включете опция ; пералнята
ще завърши цикъла с накиснатото пране и ще
започне да мига светлинният индикатор . За да
се източи водата и да може да се извади прането, е
необходимо да се натисне бутон START/PAUSE или
бутон .
Отделение 1: Препарат за предпране (на прах)
Преди да изсипете препарата, проверете дали не е
поставена допълнителната ваничка 4.
Отделение 2: Препарат за пране (на прах или
течен)
При употребата на течен препарат за пране се
препоръчва да се използва разделителят от
комплекта A с цел правилно дозиране. В случай на
употреба на прах за пране върнете разделителя в
отделение B.
Отделение 3: Допълнителни препарати
(омекотител и др.)
Омекотителят не трябва да изтича извън решетката.
допълнителна ваничка 4: Белина
Подготвяне на прането
• Разпределете прането съобразно:
- типа на тъканите/символа върху етикета.
- цветовете: отделете цветните от белите дрехи.
• Изпразнете джобовете и проверете копчетата.
• Не надвишавайте указните стойности за теглото на
сухото пране: вижте “Таблица с програмите”.
Колко тежат дрехите за пране?
1 чаршаф 400-500 г
1 калъфка 150-200 г
1 покривка 400-500 г
1 хавлия 900-1200 г
1 кърпа 150-250 г
Система за измерване на товара
Преди всяко центрофугиране, с цел избягване
на прекалени вибрации и за равномерно
разпределяне на товара, барабанът се завърта
с малко по-висока от тази при прането скорост.
Ако след направените последователни опити
товарът все още не е перфектно разпределен,
машината извършва центрофугиране при скорост,
по-ниска от предвидената. При наличие на
прекален дебалансиране пералнята извършва
разпределението вместо центрофугата. За
улесняване на по-доброто разпределение на товара
и правилното му балансиране се препоръчва да се
смесват дрехи за пране с големи и малки размери.
58
Page 59

Проблеми и мерки за
отстраняването им
Възможно е пералната машина да откаже да работи. Преди да се обадите в сервиза за техническа поддръжка и
ремонт (âæ. “Сервизно обслужване”), проверете дали не става въпрос за лесно решим проблем, като си помогнете
със следващия списък.
Проблеми:
Пералната машина не се вклчва.
Цикълът на изпиране не започва.
Пералната машина не се пълни
с вода (бързо мига светлинният
индикатор за първата фаза на
пране).
Пералнята непрекъснато се пълни
и източва.
Възможни причини / Мерки за отстраняването им:
• Щепселът не е включен към електрически контакт или не е добре
включен, за да прави контакт.
• Нямате ток вкъщи.
• Люкът не е затворен добре.
• Бутонът ON/OFF не е бил натиснат.
• Бутонът START/PAUSE не е бил натиснат.
• Кранът за вода не е отворен.
• Зададено е забавяне, което се е насложило върху времето за пускане
(âæ. “Персонализирания”).
• Маркучът за студената вода не е свързан към крана.
• Маркучът е прегънат.
• Кранът за вода не е отворен.
• Няма вода по водопроводната мрежа.
• Налягането е недостатъчно.
• Бутонът START/PAUSE не е бил натиснат.
• Маркучът за мръсната вода не е монтиран между 65 и 100 см от земята
(âæ. “Монтиране”).
• Краят на маркуча за мръсната вода е потопен във вода (âæ. “Монтиране”.
• Канализационната тръба в стената няма отдушник.
Ако след тези проверки проблемът не се реши, затворете крана за
водата, изключете пералната машина и позвънете в сервиза. Ако
жилището ви се намира на последните етажи на сградата, налягането
на студената вода може да е ниско, поради което пералната машина
непрекъснато се пълни и източва. За избягване на това неудобство в
търговската мрежа се предлагат подходящи възвратни клапани.
BG
Пералната не се източва или не
центрофугира.
Пералната вибрира много по време
на центрофугиране.
Пералната има теч.
Светлинният индикатор START/
PAUSE (оранжев) и светлинните
индикатори за функции мигат бързо.
Образува се твърде много пяна.
• Програмата не предвижда източване: с някои програми трябва да се
извършва ръчно.
• Включена е функцията ЛЕСНО ГЛАЕНЕ: за завършване на програмата се
натиска бутон START/PAUSE (âæ. “Персонализирания”).
• Маркучът за мръсната вода е притиснат (âæ. “Монтиране”.
• Канализационната тръба е запушена.
• При монтажа барабанът не е бил отблокиран правилно (âæ. “Монтиране”.
• Пералната машина не е нивелирана (âæ. “Монтиране”.
• Пералната машина е притисната между мебели и стена (âæ.
“Монтиране”.
• Маркучът за студената вода не е добре свързан (âæ. “Монтиране”.
• Чекмеджето за перилните препарати е запушено (за почистването му
âæ. “Поддръжка и почистване”).
• Маркучът за мръсната вода не е фиксиран добре (âæ. “Монтиране”.
• Изключете машината и извадете щепсела от контакта, изчакайте около
1 минута и я включете отново.
Ако неизправността не може да се отстрани, потърсете услугите на
Сервиза.
• Перилният препарат не е за автоматична перална (трябва да има
надпис “за автоматична перална”, “за пране на ръка и за автоматична
перална” или подобен надпис).
• озирането е било твърде голямо.
59
Page 60

Сервизно обслужване
195140588.00
12/2015
BG
Преди да се свържете с техническия сервиз:
• Проверете дали можете да решите сами проблема (âæ. “Проблеми и мерки за отстраняването им”);
• Включете отново програмата, за да проверите дали неизправността е отстранена;
• В противен случай се обърнете към оторизирания технически сервиз на телефонния номер, указан на
гаранционната карта.
! Никога не ползвайте услугите на неоторизирани техници.
Съобщете:
• типа на проблема;
• модела на машината (Mod.);
• серийния номер (S/N).
Тази информация се намира на фабричната табелка, разположена на задната страна на пералната машина и в
предната част, след като се отвори люкът.
Üretici Firma:
Indesit Company Beyaz Eşya PAZARLAMA A.Ş.
Balmumcu Cad. Karahasan Sok.
No: 11, 34349– Balmumcu Beşiktaş – İstanbul
Tel: (0212) 355 53 00
60
 Loading...