

Page 1

Instructions for use
WASHING MACHINE
GB
English,1
WML 701
IT
Italiano,13
TR
Türkçe,25
Contents
Installation, 2-3
Unpacking and levelling
Connecting the electricity and water supplies
The first wash cycle
Technical data
Care and maintenance, 4
Cutting off the water or electricity supply
Cleaning the washing machine
Cleaning the detergent dispenser drawer
Caring for the door and drum of your appliance
Cleaning the pump
Checking the water inlet hose
Precautions and tips, 5
General safety
Disposal
Opening the porthole door manually
Description of the washing machine
and starting a wash cycle, 6-7
Control panel
Indicator lights
Starting a wash cycle
GB
Wash cycles, 8
Table of wash cycles
Personalisation, 9
Setting the temperature
Setting the spin speed
Functions
Detergents and laundry, 10
Detergent dispenser drawer
Preparing the laundry
Garments requiring special care
Load balancing system
Troubleshooting, 11
Service, 12
1
Page 2

Installation
GB
! This instruction manual should be kept in a
safe place for future reference. If the washing
machine is sold, transferred or moved, make
sure that the instruction manual remains with
the machine so that the new owner is able to
familiarise himself/herself with its operation
and features.
! Read these instructions carefully: they contain vital information relating to the safe installation and operation of the appliance.
Unpacking and levelling
Unpacking
1. Remove the washing machine from its
packaging.
2. Make sure that the washing machine has
not been damaged during the transportation
process. If it has been damaged, contact the
retailer and do not proceed any further with
the installation process.
3. Remove the 4
protective screws
(used during transportation) and the rubber
washer with the corresponding spacer,
located on the rear
part of the appliance
(see figure).
4. Close off the holes using the plastic plugs
provided.
5. Keep all the parts in a safe place: you will
need them again if the washing machine needs to be moved to another location.
! Packaging materials should not be used as
toys for children.
Levelling
1. Install the washing machine on a flat sturdy
floor, without resting it up against walls, furniture cabinets or anything else.
2. If the floor is not
perfectly level, compensate for any unevenness by tightening
or loosening the
adjustable front feet
(see figure); the angle
of inclination, measured in relation to the
worktop, must not
exceed 2°.
Levelling the machine correctly will provide
it with stability, help to avoid vibrations and
excessive noise and prevent it from shifting
while it is operating. If it is placed on carpet or
a rug, adjust the feet in such a way as to allow
a sufficient ventilation space underneath the
washing machine.
Connecting the electricity and
water supplies
Connecting the water inlet hose
1. Connect the inlet
hose by screwing it to
a cold water tap using
a 3/4 gas threaded
connection (see figu-
re).
Before performing the
connection, allow the
water to run freely until
it is perfectly clear.
2. Connect the inlet
hose to the washing
machine by screwing
it onto the corresponding water inlet of the
appliance, which is
situated on the top
right-hand side of the
rear part of the appliance (see figure).
3. Make sure that the hose is not folded over
or bent.
! The water pressure at the tap must fall within
the range of values indicated in the Technical
data table (see next page).
! If the inlet hose is not long enough, contact a
specialised shop or an authorised technician.
! Never use second-hand hoses.
! Use the ones supplied with the machine.
2
Page 3
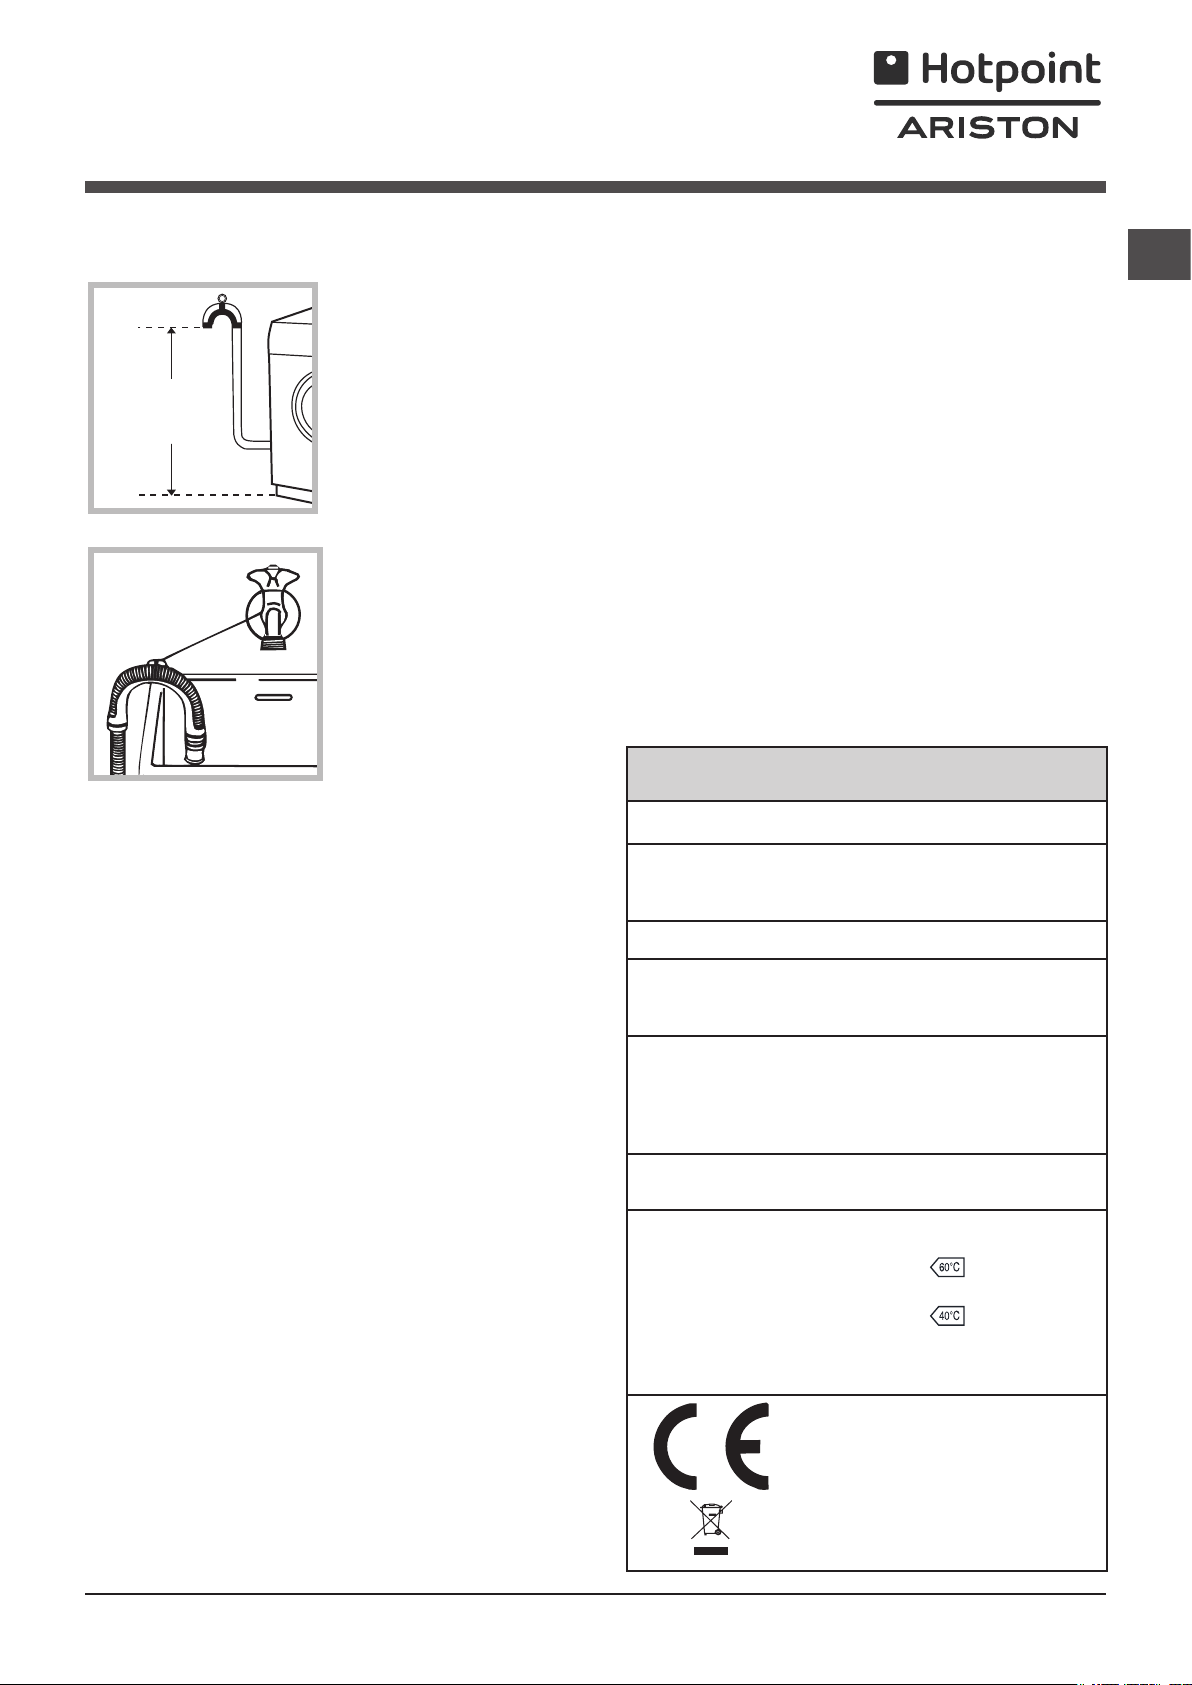
Connecting the drain hose
65 - 100 cm
Connect the drain
hose, without bending
it, to a drain duct or
a wall drain situated
between 65 and 100
cm from the floor;
alternatively, placed
it over the edge of a
basin, sink or tub, fastening the duct supplied to the tap (see
figure). The free end
of the hose should
not be underwater.
! We advise against the use of hose extensions;
if it is absolutely necessary, the extension must
have the same diameter as the original hose
and must not exceed 150 cm in length.
Electrical connections
! Do not use extension cords or multiple sockets.
! The cable should not be bent or compressed.
! The power supply cable must only be replaced by authorised technicians.
Warning! The company shall not be held responsible in the event that these standards are
not observed.
The first wash cycle
Once the appliance has been installed, and
before you use it for the first time, run a wash
cycle with detergent and no laundry, using
wash cycle number “Auto Clean” (see “Clea-
ning the washing machine”).
Technical data
Model
Dimensions
Capacity
WML 701
width 59.5 cm
height 85 cm
depth 54 cm
from 1 to 7 kg
GB
Before plugging the appliance into the electricity socket, make sure that:
• the socket is earthed and complies with all
applicable laws;
• the socket is able to withstand the maximum power load of the appliance as indicated
in the Technical data table (see opposite);
• the power supply voltage falls within the values indicated in the Technical data table (see
opposite);
• the socket is compatible with the plug of the
washing machine. If this is not the case, replace the socket or the plug.
! The washing machine must not be installed
outdoors, even in covered areas. It is extremely dangerous to leave the appliance exposed
to rain, storms and other weather conditions.
! When the washing machine has been installed, the electricity socket must remain within
easy reach.
Electrical
connections
Water connections
Spin speed
Test wash
cycles in
accordance with
directives
1061/2010
1015/2010
please refer to the technical
data plate fixed to the machine
maximum pressure
1 MPa (10 bar)
minimum pressure
0.05 MPa (0.5 bar)
drum capacity 52 litres
up to 1000 rotations per
minute
programme
Cotton Standard 60°C.
programme ;
Cotton Standard 40°C.
This appliance conforms to
the following EC Directives:
- 2004/108/EC (Electromagnetic Compatibility)
- 2006/95/EC (Low Voltage)
- 2012/19/EU
;
3
Page 4
Care and maintenance
1
2
GB
Cutting off the water and electricity supplies
• Turn off the water tap after every wash cycle.
This will limit wear on the hydraulic system inside the washing machine and help to prevent
leaks.
• Unplug the washing machine when cleaning
it and during all maintenance work.
Cleaning the washing machine
• The outer parts and rubber components
of the appliance can be cleaned using a soft
cloth soaked in lukewarm soapy water. Do not
use solvents or abrasives.
• The washing machine has a “Auto Clean”
programme for its internal parts that must be
run with no load in the drum.
To help the wash cycle you may want to use
either the detergent (i.e. a quantity 10% the
quantity specified for lightly-soiled garments)
or special additives to clean the washing
machine. We recommend running a cleaning
programme every 40 wash cycles.
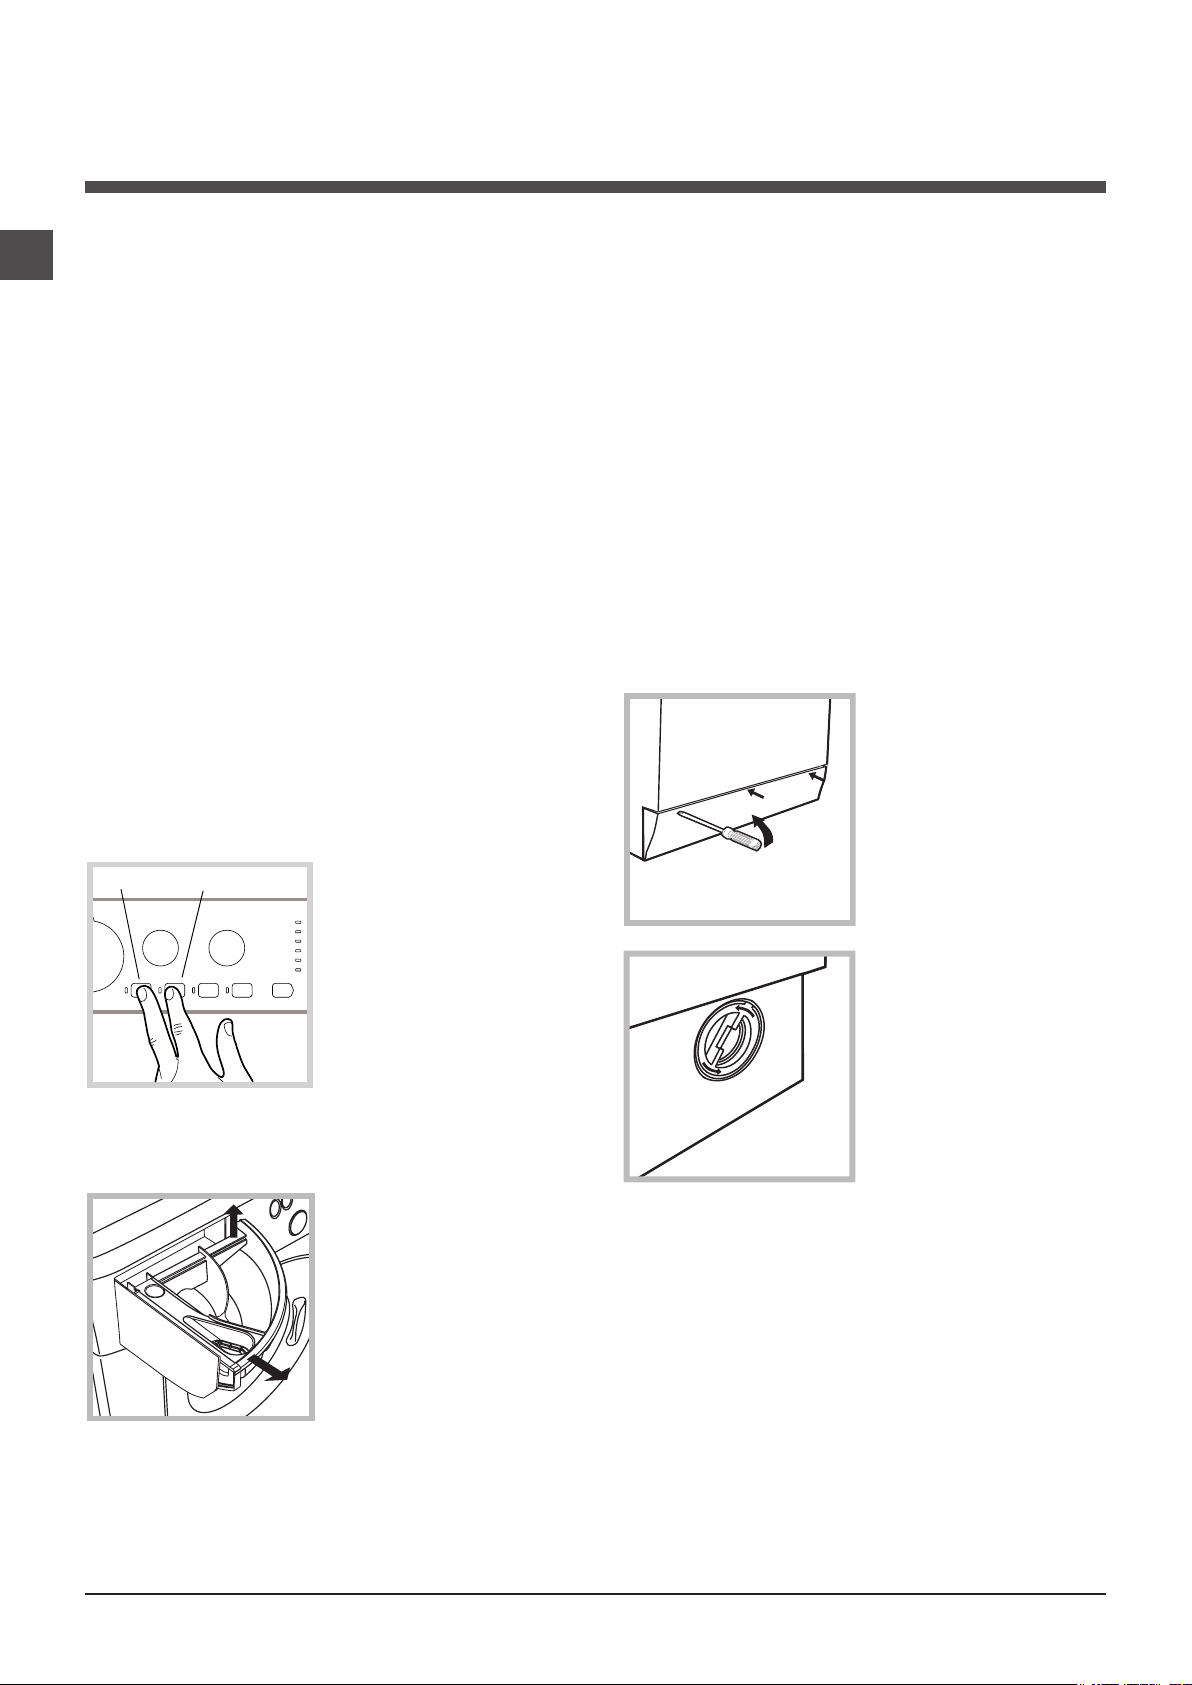
A
B
To start the programme
press buttons A and
B simultaneously for 5
seconds (see figure).
The programme will
start automatically and
will run for about 70
minutes. To stop the
cycle press the START/
PAUSE button.
Caring for the door and drum of
your appliance
• Always leave the porthole door ajar in order
to prevent unpleasant odours from forming.
Cleaning the pump
The washing machine is fitted with a self-cleaning pump which does not require any maintenance. Sometimes, small items (such as coins
or buttons) may fall into the pre-chamber which
protects the pump, situated in its bottom part.
! Make sure the wash cycle has finished and
unplug the appliance.
To access the pre-chamber:
1. using a screwdriver, remove the cover
panel on the lower
front part of the washing machine (see
figure);
2. unscrew the lid
by rotating it anticlockwise (see figu-
re): a little water may
trickle out. This is
perfectly normal;
Cleaning the detergent dispenser
drawer
Remove the dispenser by raising it and
pulling it out (see
figure).
Wash it under running
water; this operation
should be repeated
frequently.
4
3. clean the inside thoroughly;
4. screw the lid back on;
5. reposition the panel, making sure the hooks
are securely in place before you push it onto
the appliance.
Checking the water inlet hose
Check the inlet hose at least once a year. If
there are any cracks, it should be replaced
immediately: during the wash cycles, water
pressure is very strong and a cracked hose
could easily split open.
! Never use second-hand hoses.
Page 5

Precautions and tips
20
! This washing machine was designed and constructed in
accordance with international safety regulations. The following information is provided for safety reasons and must
therefore be read carefully.
General safety
• This appliance was designed for domestic use only.
•
This appliance can be used by children aged
from 8 years and above and persons with
reduced physical, sensory or mental capabilities or lack of experience and knowledge if
they have been given supervision or instruction concerning use of the appliance in a
safe way and understand the hazards involved. Children shall not play with the appliance. Cleaning and user maintenance shall not
be made by children without supervision.
• Do not touch the machine when barefoot or with wet or
damp hands or feet.
• Do not pull on the power supply cable when unplugging
the appliance from the electricity socket. Hold the plug
and pull.
• Do not open the detergent dispenser drawer while the
machine is in operation.
• Do not touch the drained water as it may reach extremely high temperatures.
• Never force the porthole door. This could damage the safety
lock mechanism designed to prevent accidental opening.
• If the appliance breaks down, do not under any circumstances access the internal mechanisms in an attempt
to repair it yourself.
• Always keep children well away from the appliance while
it is operating.
• The door can become quite hot during the wash cycle.
• If the appliance has to be moved, work in a group of two
or three people and handle it with the utmost care. Never
try to do this alone, because the appliance is very heavy.
• Before loading laundry into the washing machine, make
sure the drum is empty.
Disposal
• Disposing of the packaging materials: observe local regu-
lations so that the packaging may be re-used.
• The European Directive 2012/19/EU on Waste Electrical
and Electronic Equipment, requires that old household
electrical appliances must not be disposed of in the normal
unsorted municipal waste stream. Old appliances must be
collected separately in order to optimise the recovery and
recycling of the materials they contain and reduce the impact on human health and the environment. The crossed
out “wheeled bin” symbol on the product reminds you of
your obligation, that when you dispose of the appliance it
must be separately collected. Consumers should contact
their local authority or retailer for information concerning the
correct disposal of their old appliance.
Opening the porthole door manually
In the event that it is not possible to open the porthole
door due to a powercut, and if you wish to remove the
laundry, proceed as follows:
1. remove the plug from the
electrical socket.
2. make sure the water level
inside the machine is lower
than the door opening; if it
is not, remove excess water
using the drain hose, collecting it in a bucket as indicated
in the figure.
3. using a screwdriver, remove the cover panel on the lower front part of the washing
machine (see figure).
4. pull outwards using the tab as indicated in the figure,
until the plastic tie-rod is freed from its stop position; pull
downwards and open the door at the same time.
5. reposition the panel, making sure the hooks are securely
in place before you push it onto the appliance.
GB
5
Page 6
Description of the washing
machine and starting a wash cycle
GB
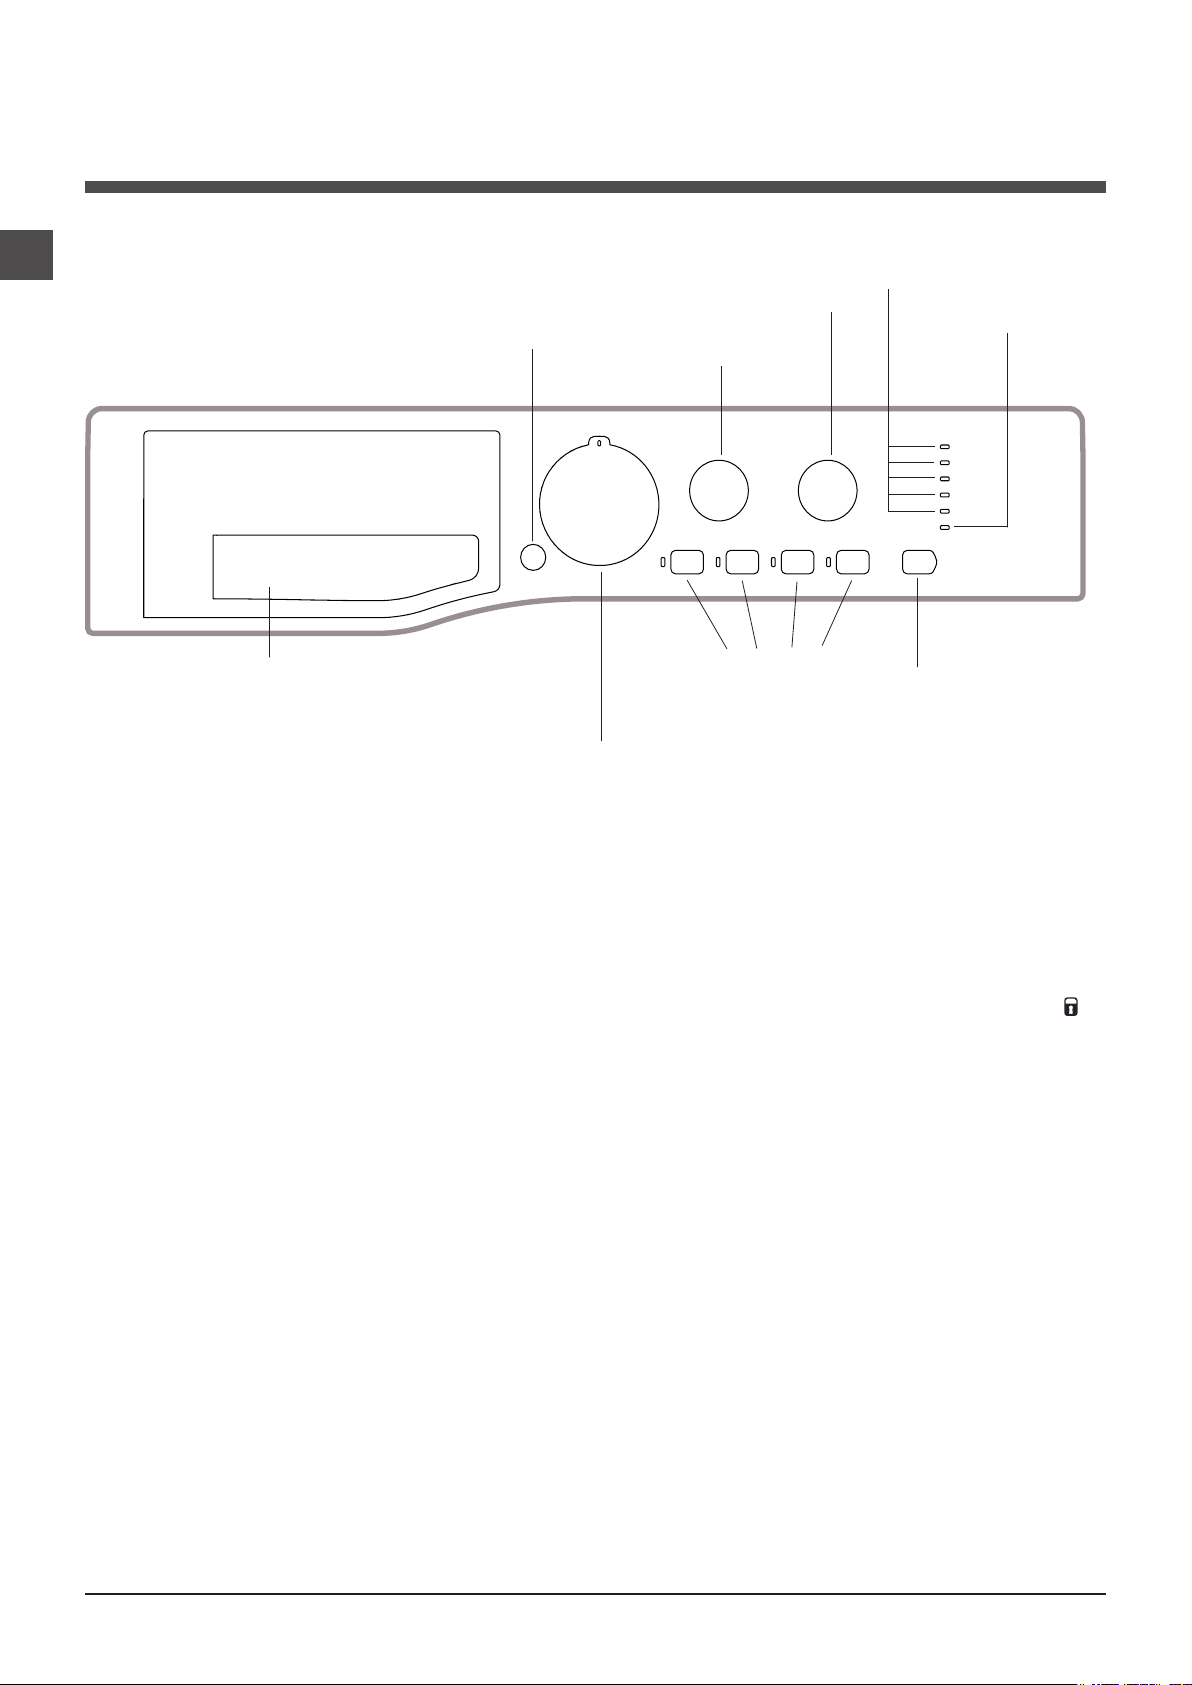
Control panel
Detergent dispenser drawer
ON/OFF
button
TEMPERATURE
WASH CYCLE
knob
SPIN SPEED
knob
FUNCTION
buttons with
indicator lights
WASH CYCLE PROGRESS/
DELAY TIMER
knob
indicator lights
DOOR
LOCKED
indicator light
START/PAUSE
button with indicator
light
Detergent dispenser drawer: used to dispense
detergents and washing additives (see “Detergents and
laundry”).
ON/OFF button: switches the washing machine on and off.
WASH CYCLE knob: programmes the wash cycles. Du-
ring the wash cycle, the knob does not move.
FUNCTION buttons with indicator light: used to select the
available functions. The indicator light corresponding to the
selected function will remain lit.
TEMPERATURE knob: sets the temperature or the cold
wash cycle (see “Personalisation”).
SPIN SPEED knob: sets the spin speed or exclude the
spin cycle completely (see “Personalisation”).
WASH CYCLE PROGRESS/DELAY TIMER
light
s: used to monitor the progress of the wash cycle.
The illuminated indicator light shows which phase is in
progress.
If the Delay Timer function has been set, the time remaining
until the wash cycle starts will be indicated (see next page).
indicator
START/PAUSE button with indicator light: starts or temporarily interrupts the wash cycles.
N.B. To pause the wash cycle in progress, press this
button; the corresponding indicator light will flash orange,
while the indicator light for the current wash cycle phase
will remain lit in a fixed manner. If the DOOR LOCKED
indicator light is switched off, the door may be opened.
To start the wash cycle from the point at which it was interrupted, press this button again.
Standby mode
This washing machine, in compliance with new energy saving regulations, is fitted with an automatic standby system
which is enabled after about 30 minutes if no activity is
detected. Press the ON-OFF button briefly and wait for the
machine to start up again.
Consumption in off-mode: 0,5 W
Consumption in Left-on: 8 W
DOOR LOCKED indicator light: indicates whether the
door may be opened or not (see next page).
6
Page 7
Indicator lights
END
The indicator lights provide important information.
This is what they can tell you:
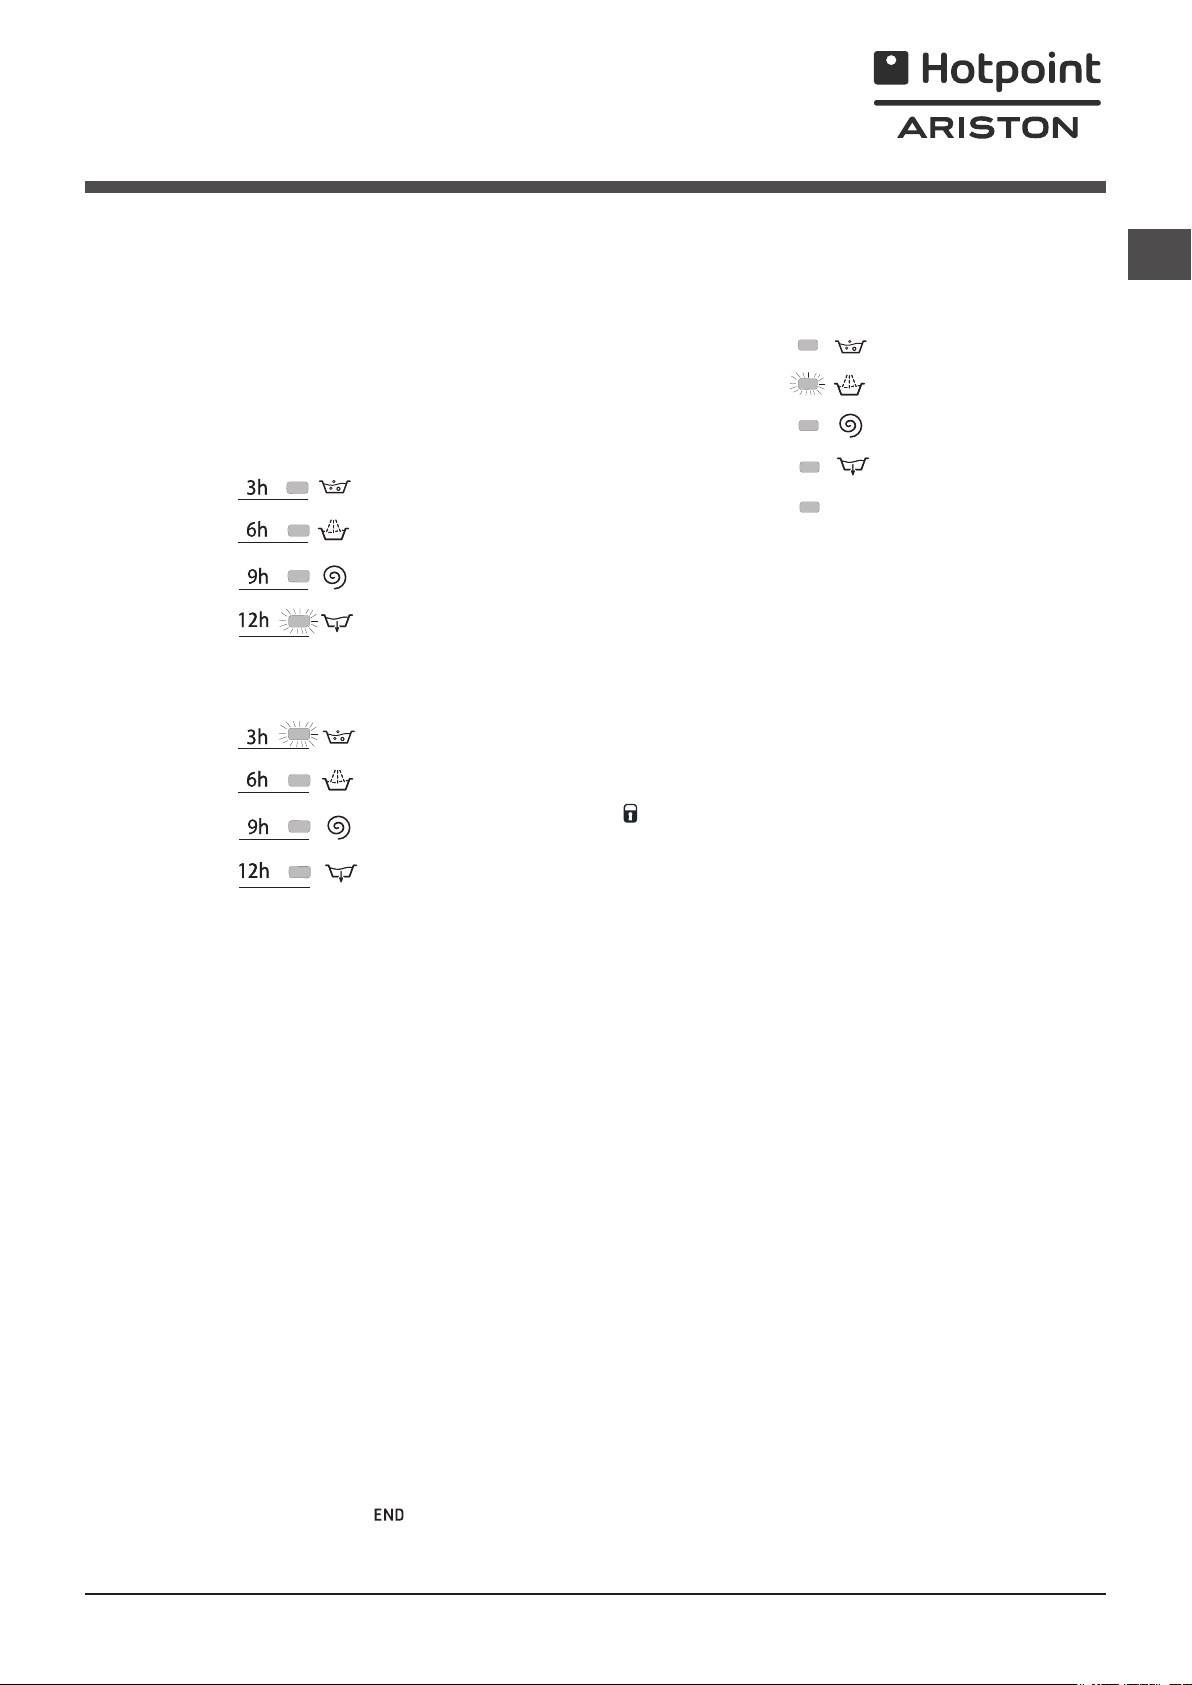
Wash cycle phase indicator lights
Once the desired wash cycle has been selected and has
begun, the indicator lights switch on one by one to indicate
which phase of the cycle is currently in progress.
GB
Delayed start
If the DELAY TIMER function has been activated (see “Personalisation”), after the wash cycle has been started the
indicator light corresponding to the selected delay period
will begin to flash:
As time passes, the remaining delay will be displayed and
the corresponding indicator light will flash:
Once the set delay has elapsed, the flashing indicator light
will switch off and the selected wash cycle will begin.
Wash
Rinse
Spin
Pump out
End of wash cycle
Function buttons and corresponding indicator lights
When a function is selected, the corresponding indicator
light will illuminate.
If the selected function is not compatible with the programmed wash cycle, the corresponding indicator light will
flash and a sound alert (3 beeps); the function will not be
activated.
If a function which is incompatible with another function
selected previously, only the most recent selection will
remain active.
Door locked indicator light
If this indicator light is on, the appliance door is locked to
prevent it from being opened accidentally; to avoid any
damage, wait for the indicator light to switch off before you
open the appliance door.
N.B. If the DELAY TIMER function is activated, the door
cannot be opened; pause the machine by pressing the
START/PAUSE button if you wish to open it.
! If the START/PAUSE indicator light (orange) flashes
rapidly at the same time as the function indicator light, this
indicates a problem has occurred (see “Troubleshooting”).
Starting a wash cycle
1. Turn the washing machine on by pressing the ON/OFF button. All the indicator lights will turn on for a few seconds, then only
the indicator lights relative to the selected programme settings will remain lit and the START/PAUSE indicator light will flash.
2. Load the laundry and close the door.
3. Set the WASH CYCLE knob to the desired programme.
4. Set the washing temperature (see “Personalisation”).
5. Set the spin speed (see “Personalisation”).
6. Measure out the detergent and washing additives (see “Detergents and laundry”).
7. Select the desired functions.
8. Start the wash cycle by pressing the START/PAUSE button and the corresponding indicator light will remain lit in a fixed
manner, in green.
To cancel the set wash cycle, pause the machine by pressing the START/PAUSE button and select a new cycle.
9. At the end of the wash cycle the
cating that the door may be opened. Take out your laundry and leave the appliance door ajar to make sure the drum dries
completely. Switch the washing machine off by pressing the ON/OFF button.
indicator light will switch on. The DOOR LOCKED indicator light will switch off, indi-
7
Page 8

GB
Wash cycles
Table of wash cycles
Detergents
Description of the wash cycle
Wash cycles
Anti Stain
1
Whites
2
Cotton Standard 60° (1): heavily soiled whites and resistant colours.
Cotton Standard 40° (2): lightly soiled resistant and delicate colours.
Synthetics: heavily soiled resistant colours.
5
Synthetics (4): lightly soiled resistant colours.
5
Anti allergy
6
Baby
7
Wool: for wool, cashmere, etc.
8
Delicates
9
Fast Wash 60’: to refresh normal soiled garments quickly (not
10
suitable for wool, silk and clothes which require washing by hand).
Cotton Standard 20°: lightly soiled resistant and delicate colours.
11
Eco Cottons
12
Eco Synthetics
13
Eco Fast 30’
14
Rinse
Spin and Pump out
The length of cycle shown on the display or in this booklet is an estimation only and is calculated assuming standard working conditions. The actual duration can vary according to factors such as water temperature and pressure, the amount of detergent used, the amount and type of load inserted, load balancing and any wash options selected.
1) Test wash cycle in compliance with directive 1061/2010: set wash cycle with a temperature of 60°C.
This cycle is designed for cotton loads with a normal soil level and is the most efficient in terms of both electricity and water consumption; it should be used for garments which can be
washed at 60°C . The actual washing temperature may differ from the indicated value.
2) Test wash cycle in compliance with directive 1061/2010: set wash cycle
This cycle is designed for cotton loads with a normal soil level and is the most efficient in terms of both electricity and water consumption; it should be used for garments which can be
washed at 40°C . The actual washing temperature may differ from the indicated value.
3) At 60 °C the “Prewash” function cannot be selected.
For all Test Institutes:
2) Long wash cycle for cottons: set wash cycle
4) Long wash cycle for synthetics: set wash cycle 5 with a temperature of 40°C.
with a temperature of 40°C.
with a temperature of 40°C.
Max.
temp.
(°C)
40° 1000
60° 1000
60°
(Max. 90°)
40° 1000 60° 800
40° 800
60° 1000 40° 1000
40° 800 30° 0 -
60° 1000 -
20° 1000 -
Cold
Water
Cold
Water
Cold
Water
Max.
speed
(rpm)
Prewash
(3)
1000
1000 -
800 -
800 -
- 1000 - -
Wash
Bleach
-
-
-
-
-
-
-
-
Fabric
softener
3.5 44 0.93 47 115’
3.5 44 0.57 46 100’
1.5 - - - 70’
3.5 62 0.81 40 60’
pness%
Energy con-
Total water lt
Max. load (kg)
sumptionkWh
Residual dam-
4 - - - 180’
4 - - - 180’
7 62 1.23 52.5 195’
7 62 1.09 92 190’
4 - - - 195’
4 - - - 145’
1 - - - 80’
7 - - - 170’
7 62 0.17 63 80’
3 48 0.07 30 70’
3 71 0.04 34 30’
7 - - - 36’
- 1000 - - - - 7 - - - 16’
Cycle duration
Anti Stain: the programme 1 is suitable to heavily-soiled garments with resistant colours. It ensures a washing class that is
higher than the standard class (A class). When running the programme, do not mix garments of different colours. We recommend the use of powder detergent. Pre-treatment with special additives is recommended if there are obstinate stains.
Whites: use this cycle 2 to wash white clothes. The programme is designed to maintain the brightness of white clothes over
time. Use powder detergent for best results.
Anti allergy: use programme 6 to remove major allergens such as pollen, mites, cat’s and dog’s hair.
Baby: use the special wash cycle 7 to remove the remove the soiling typically caused by babies, while removing all traces
of detergent from nappies in order to prevent the delicate skin of babies from suffering allergic reactions. The cycle has been
designed to reduce the amount of bacteria by using a greater quantity of water and optimising the effect of special disinfecting additives added to the detergent.
Eco cycles
The Eco Cycles assure energy saving by eliminating the need of heating water and it’s an advantage both to your
energy bill and the environment! These innovative Eco programmes (
12
Eco Cottons,
13
Eco Synthetics and
14
Eco
Fast 30’) are available for various fabrics and different quantity of garment; they have been designed to guarantee a
high cleaning action even at low temperature and can be used for lightly to medium soiled loads. Eco Cycles give the
best results thanks to an intensified wash action, water optimization and are carried out in the same average time of a
standard cycle. For the best washing results with Eco Cycles we recommend the usage of a liquid detergent.
Cotton Standard 20°: the programme 11 ideal for lightly soiled cotton loads. The effective performance levels achieved
at cold temperatures, which are comparable to washing at 40°, are guaranteed by a mechanical action which operates at
varying speed, with repeated and frequent peaks.
8
Page 9

Personalisation
Setting the temperature
Turn the TEMPERATURE knob to set the wash temperature (see Table of wash cycles).
The temperature may be lowered, or even set to a cold wash (
The washing machine will automatically prevent you from selecting a temperature which is higher than the maximum value
set for each wash cycle.
! Exception: if the
programme is selected, the temperature can be increased up to a value of 90°C.
).
Setting the spin speed
Turn the SPIN SPEED knob to set the spin speed for the selected wash cycle.
The maximum spin speeds available for each wash cycle are as follows:
Wash cycles Maximum spin speed
Cottons 1000 rpm
Synthetics 800 rpm
Wool 800 rpm
Silk drain only
The spin speed may be lowered, or the spin cycle can be excluded altogether by selecting the symbol
The washing machine will automatically prevent you from selecting a spin speed which is higher than the maximum speed
set for each wash cycle.
.
Functions
The various wash functions available with this washing machine will help to achieve the desired results, every time.
To activate the functions:
1. Press the button corresponding to the desired function;
2. the function is enabled when the corresponding indicator light is illuminated.
Note: If the indicator light flashes rapidly, this signals that this particular function may not be selected in conjunction with the
selected wash cycle.
GB
Super Wash
This option offers a high-performance wash due to the greater quantity of water used in the initial phase of the cycle, and due
to the increased wash cycle duration, is particularly useful for the removal of stubborn stains. It can be used with or without
bleach. If you desire bleaching, insert the extra tray compartment (4) into compartment 1. When pouring in the bleach, be
careful not to exceed the “max” level marked on the central pivot (see figure pag. 10).
! This function may not be used in conjunction with wash cycles 2, 6, 8, 9, 10, 12, 13, 14,
Easy iron
By selecting this function, the wash and spin cycles will be modified in order to reduce the formation of creases. At the end
of the cycle the washing machine will perform slow rotations of the drum; the EASY IRON indicator light will flash and the
phase will remain lit in a fixed manner. To end the cycle, press the START/PAUSE button or the EASY IRON button.
.
! This function may not be used in conjunction with wash cycles 1, 2, 6, 8, 12, 13, 14, , .
Prewash
If this function is selected, the pre-wash cycle will run; this is useful for removing stubborn stains.
N.B.: Put the detergent in the relevant compartment.
! It cannot be used in conjunction with wash cycles
Delay timer
This timer delays the start time of the wash cycle by up to 12 hours.
Press the button repeatedly until the indicator light corresponding to the desired delay time switches on. The fifth time the button
is pressed, the function will be disabled.
N.B. Once you have pressed the START/PAUSE button, the delay time may only be decreased if you wish to modify it.
(60°), , 6, 8, 9, 10, 11, 12, 13, 14, , .
! This option is enabled with all programmes.
9
Page 10
Detergents and laundry
M
AX
1
2
4
3
A
B
GB
Detergent dispenser drawer
Good washing results also depend on the correct dose of
detergent: adding too much detergent will not necessarily result in a more efficient wash, and may in fact cause
build up on the inside of your appliance and contribute to
environmental pollution.
! Use powder detergent for white cotton garments, for
pre-washing, and for washing at temperatures over 60°C.
! Follow the instructions given on the detergent packaging.
! Do not use hand washing detergents because these
create too much foam.
Open the detergent dispenser drawer and pour
in the detergent or washing
additive, as follows.
compartment 1: Pre-wash detergent (powder)
Before pouring in the detergent, make sure that extra compartment 4 has been removed.
compartment 2: Detergent for the wash cycle
(powder or liquid)
If liquid detergent is used, it is recommended that the
removable plastic partition A (supplied) be used for proper
dosage.
If powder detergent is used, place the partition into slot B.
compartment 3: Additives (fabric softeners, etc.)
The fabric softener should not overflow the grid.
extra compartment 4: Bleach
Preparing the laundry
• Divide the laundry according to:
- the type of fabric/the symbol on the label
- the colours: separate coloured garments from whites.
• Empty all garment pockets and check the buttons.
• Do not exceed the listed values, which refer to the
weight of the laundry when dry: see “Table of wash
cycles”.
Garments requiring special care
Wool: the wool wash cycle on this Hotpoint-Ariston
machine has been tested and approved by The Woolmark
Company for washing wool garments labelled as hand washable provided that the garments are washed according
to the instructions on the garment label and those issued
by the manufacturer of this washing machine. HotpointAriston is the first washing machine brand to be approved
by The Woolmark Company for Apparel Care- Platinum for
its washing performance and consumption of energy and
water. (M1126)
In UK, Eire, Hong Kong and India the Woolmark trade
mark is a Certification trade mark.
Delicates: use programme 9 to wash very delicate gar-
ments having strasses or sequins.
We recommend turning the garments inside out before
washing and placing small items into the special bag for
washing delicates.
Use liquid detergent on delicate garments for best results.
To wash silk garments and curtains select cycle 9 and then
function
laundry is soaking and the
drain the water so that the laundry may be removed, press
the START/PAUSE button or the
; the machine will end the cycle while the
indicator light will flash. To
button.
Load balancing system
Before every spin cycle, to avoid excessive vibrations and
to distribute the load in a uniform manner, the drum rotates
continuously at a speed which is slightly greater than the
washing rotation speed. If, after several attempts, the load
is not balanced correctly, the machine spins at a reduced
spin speed. If the load is excessively unbalanced, the
washing machine performs the distribution process instead
of spinning. To encourage improved load distribution and
balance, we recommend small and large garments are
mixed in the load.
How much does your laundry weigh?
1 sheet 400-500 g
1 pillow case 150-200 g
1 tablecloth 400-500 g
1 bathrobe 900-1200 g
1 towel 150-250 g
10
Page 11

Troubleshooting
Your washing machine could fail to work. Before contacting the Technical Assistance Centre (see “Assistance”), make sure
that the problem cannot be solved easily using the following list.
Problem:
The washing machine does not
switch on.
The wash cycle does not start.
The washing machine does not
take in water (the indicator light for
the first wash cycle stage flashes
rapidly).
The washing machine continuously
takes in and drains water.
Possible causes / Solutions:
• The appliance is not plugged into the socket fully, or is not making contact.
• There is no power in the house.
• The washing machine door is not closed properly.
• The ON/OFF button has not been pressed.
• The START/PAUSE button has not been pressed.
• The water tap has not been opened.
• A delayed start has been set (see “Personalisation”).
• The water inlet hose is not connected to the tap.
• The hose is bent.
• The water tap has not been opened.
• There is no water supply in the house.
• The pressure is too low.
• The START/PAUSE button has not been pressed.
• The drain hose is not fitted at a height between 65 and 100 cm from the floor
(see “Installation”).
• The free end of the hose is under water (see “Installation”).
• The wall drainage system is not fitted with a breather pipe.
If the problem persists even after these checks, turn off the water tap, switch
the appliance off and contact the Assistance Service. If the dwelling is on one of
the upper floors of a building, there may be problems relating to water drainage,
causing the washing machine to fill with water and drain continuously. Special
anti-draining valves are available in shops and help to avoid this inconvenience.
GB
The washing machine does not
drain or spin.
The washing machine vibrates a lot
during the spin cycle.
The washing machine leaks.
The START/PAUSE indicator light
(orange) and the function indicator
lights flash rapidly.
There is too much foam.
• The wash cycle does not include draining: some wash cycles require the drain
phase to be started manually.
• The EASY IRON function has been activated: To complete the wash cycle,
press the START/PAUSE button (“Personalisation”).
• The drain hose is bent (see “Installation”).
• The drainage duct is clogged.
• The drum was not unlocked correctly during installation (see “Installation”).
• The washing machine is not level (see “Installation”).
• The washing machine is trapped between cabinets and walls (see “Installation”).
• The water inlet hose is not screwed on properly (see “Installation”).
• The detergent dispenser drawer is blocked (for cleaning instructions, see
“Care and maintenance”).
• The drain hose is not fixed properly (see “Installation”).
• Switch off the machine and unplug it, wait for approximately 1 minute and
then switch it back on again.
If the problem persists, contact the Technical Assistance Service.
• The detergent is not suitable for machine washing (it should display the text
“for washing machines” or “hand and machine wash”, or the like).
• Too much detergent was used.
11
Page 12

Service
GB
Before calling for Assistance:
• Check whether you can solve the problem alone (see “Troubleshooting”);
• Restart the programme to check whether the problem has been solved;
• If this is not the case, contact an authorised Technical Assistance Centre using the telephone number provided on the
guarantee certificate.
! Always request the assistance of authorised technicians.
Have the following information to hand:
• the type of problem;
• the appliance model (Mod.);
• the serial number (S/N).
This information can be found on the data plate applied to the rear of the washing machine, and can also be found on the
front of the appliance by opening the door.
12
Page 13

Istruzioni per l’uso
LAVABIANCHERIA
I
Italiano
WML 701
Sommario
Installazione, 14-15
Disimballo e livellamento
Collegamenti idraulici ed elettrici
Primo ciclo di lavaggio
Dati tecnici
Manutenzione e cura, 16
Escludere acqua e corrente elettrica
Pulire la lavabiancheria
Pulire il cassetto dei detersivi
Curare oblò e cestello
Pulire la pompa
Controllare il tubo di alimentazione dell’acqua
Precauzioni e consigli, 17
Sicurezza generale
Smaltimento
Apertura manuale della porta oblò
Descrizione della lavabiancheria e
avviare un programma, 18-19
Pannello di controllo
Spie
Avviare un programma
I
Programmi, 20
Tabella dei programmi
Personalizzazioni, 21
Impostare la temperatura
Impostare la centrifuga
Funzioni
Detersivi e biancheria, 22
Cassetto dei detersivi
Preparare la biancheria
Capi particolari
Sistema bilanciamento del carico
Anomalie e rimedi, 23
Assistenza, 24
Assistenza Attiva 7 giorni su 7
13
Page 14

Installazione
! È importante conservare questo libretto per
I
poterlo consultare in ogni momento. In caso di
vendita, di cessione o di trasloco, assicurarsi
che resti insieme alla lavabiancheria per informare il nuovo proprietario sul funzionamento e
sui relativi avvertimenti.
! Leggere attentamente le istruzioni: ci sono
importanti informazioni sull’installazione,
sull’uso e sulla sicurezza.
Disimballo e livellamento
Disimballo
1. Disimballare la lavabiancheria.
2. Controllare che la lavabiancheria non abbia
subìto danni nel trasporto. Se fosse danneggiata non collegarla e contattare il rivenditore.
3. Rimuovere le 4 viti
di protezione per il
trasporto e il gommino
con il relativo distanziale, posti nella parte
posteriore (vedi figura).
4. Chiudere i fori con i tappi di plastica in dota-
zione.
5. Conservare tutti i pezzi: qualora la lavabian-
cheria debba essere trasportata, dovranno
essere rimontati.
! Gli imballaggi non sono giocattoli per bambini.
Un accurato livellamento dà stabilità alla
macchina ed evita vibrazioni, rumori e spostamenti durante il funzionamento. In caso di
moquette o di un tappeto, regolare i piedini in
modo da conservare sotto la lavabiancheria
uno spazio sufficiente per la ventilazione.
Collegamenti idraulici ed elettrici
Collegamento del tubo di alimentazione
dell’acqua
1. Collegare il tubo
di alimentazione
avvitandolo a un
rubinetto d’acqua
fredda con bocca
filettata da 3/4 gas
(vedi figura).
Prima di allacciare,
far scorrere l’acqua
finché non sia limpida.
2. Collegare il tubo
di alimentazione alla
lavabiancheria
avvitandolo all’apposita presa d’acqua,
nella parte posteriore
in alto a destra (vedi
figura).
3. Fare attenzione che nel tubo non ci siano
né pieghe né strozzature.
Livellamento
1. Installare la lavabiancheria su un pavimento
piano e rigido, senza appoggiarla a muri, mobili
o altro.
2. Se il pavimento non
fosse perfettamente
orizzontale, compensare le irregolarità
svitando o avvitando
i piedini anteriori (vedi
figura); l’angolo di
inclinazione, misurato
sul piano di lavoro, non
deve superare i 2°.
14
! La pressione idrica del rubinetto deve essere compresa nei valori della tabella Dati tecnici (vedi pagina a fianco).
! Se la lunghezza del tubo di alimentazione
non fosse sufficiente, rivolgersi a un negozio
specializzato o a un tecnico autorizzato.
! Non utilizzare mai tubi già usati.
! Utilizzare quelli in dotazione alla macchina.
Page 15

- 2006/95/CE (Bassa Tensione)
Collegamento del tubo di scarico
65 - 100 cm
Collegare il tubo di
scarico, senza piegarlo, a una conduttura di scarico o a
uno scarico a muro
posti tra 65 e 100
cm da terra;
oppure appoggiarlo
al bordo di un lavandino o di una vasca,
legando la guida in
dotazione al
rubinetto (vedi figu-
ra). L’estremità libera
del tubo di scarico
non deve rimanere
immersa nell’acqua.
! È sconsigliato usare tubi di prolunga; se indispensabile, la prolunga deve avere lo stesso diametro del tubo originale e non superare
i 150 cm.
! Il cavo di alimentazione deve essere sostituito
solo da tecnici autorizzati.
Attenzione! L’azienda declina ogni responsabilità qualora queste norme non vengano rispettate.
Primo ciclo di lavaggio
Dopo l’installazione, prima dell’uso, effettuare
un ciclo di lavaggio con detersivo e senza biancheria impostando il programma “Auto Pulizia”
(vedi “Pulire la lavabiancheria”).
Dati tecnici
Modello
Dimensioni
Capacità
WML 701
larghezza cm 59,5
altezza cm 85
profondità cm 54
da 1 a 7 kg
I
Collegamento elettrico
Prima di inserire la spina nella presa della
corrente, accertarsi che:
• la presa abbia la messa a terra e sia a nor-
ma di legge;
• la presa sia in grado di sopportare il carico
massimo di potenza della macchina, indicato
nella tabella Dati tecnici (vedi a fianco);
• la tensione di alimentazione sia compresa
nei valori indicati nella tabella Dati tecnici (vedi
a fianco);
• la presa sia compatibile con la spina della
lavabiancheria. In caso contrario sostituire la
presa o la spina.
! La lavabiancheria non va installata all’aperto, nemmeno se lo spazio è riparato, perché
è molto pericoloso lasciarla esposta a pioggia
e temporali.
! A lavabiancheria installata, la presa della
corrente deve essere facilmente raggiungibile.
! Non usare prolunghe e multiple.
! Il cavo non deve subire piegature o com-
pressioni.
Collegamenti elettrici
Collegamenti idrici
Velocità di
centrifuga
Programmi
di controllo
secondo
la direttive
1061/2010
1015/2010
vedi la targhetta caratteristiche tecniche applicata sulla
macchina
pressione massima
1 MPa (10 bar)
pressione minima
0,05 MPa (0,5 bar)
capacità del cesto 52 litri
sino a 1000 giri al minuto
programma
;
Cotone Standard 60°C.
programma ;
Cotone Standard 40°C.
Questa apparecchiatura è
conforme alle seguenti Direttive Comunitarie:
- 2004/108/CE (Compatibilità
Elettromagnetica)
- 2012/19/EU
15
Page 16

Manutenzione e cura
1
2
Escludere acqua e corrente elettrica
I
• Chiudere il rubinetto dell’acqua dopo ogni lavaggio. Si limita così l’usura dell’impianto idraulico della lavabiancheria e si elimina il pericolo di
perdite.
• Staccare la spina della corrente quando si
pulisce la lavabiancheria e durante i lavori di
manutenzione.
Pulire la lavabiancheria
• La parte esterna e le parti in gomma possono essere puliti con un panno imbevuto di
acqua tiepida e sapone. Non usare solventi o
abrasivi.
• La lavabiancheria è dotata di un programma
di “Auto Pulizia” delle parti interne che deve
essere effettuato senza alcun tipo di carico
nel cesto.
Il detersivo (nella quantità pari al 10% di quella
consigliata per capi poco sporchi) o additivi specifici per la pulizia della lavabiancheria,
potranno essere utilizzati come coadiuvanti nel
programma di lavaggio. Si consiglia di effettuare
il programma di pulizia ogni 40 cicli di lavaggio.
A
B
Per attivare il programma premere contemporaneamente il tasto
A e B per 5 sec. (vedi
figura).
Il programma partirà
automaticamente ed
avrà una durata di circa
70 minuti. Per fermare
il ciclo premere il tasto
START/PAUSE.
Pulire il cassetto dei detersivi
Sfilare il cassetto sollevandolo e tirandolo
verso l’esterno (vedi
figura).
Lavarlo sotto l’acqua
corrente; questa pulizia
va effettuata
frequentemente.
Pulire la pompa
La macchina è dotata di una pompa autopulente che non ha bisogno di manutenzione. Può però succedere che piccoli oggetti
(monete, bottoni) cadano nella precamera
che protegge la pompa, situata nella parte
inferiore di essa.
! Assicurarsi che il ciclo di lavaggio sia terminato e staccare la spina.
Per accedere alla precamera:
1. rimuovere il pannello di copertura sul
lato anteriore della
macchina con l’ausilio di un giravite (vedi
figura);
2. svitare il coperchio ruotandolo in
senso antiorario
(vedi figura): è normale che fuoriesca
un po’ d’acqua;
3. pulire accuratamente l’interno;
4. riavvitare il coperchio;
5. rimontare il pannello assicurandosi, prima
di spingerlo verso la macchina, di aver inserito i ganci nelle apposite asole.
Controllare il tubo di alimentazione dell’acqua
Controllare il tubo di alimentazione almeno
una volta all’anno. Se presenta screpolature e
fessure va sostituito: durante i lavaggi le forti
pressioni potrebbero provocare improvvise
spaccature.
Curare oblò e cestello
• Lasciare sempre socchiuso l’oblò per evitare
che si formino cattivi odori.
16
! Non utilizzare mai tubi già usati.
Page 17

Precauzioni e consigli
20
! La lavabiancheria è stata progettata e costruita in
conformità alle norme internazionali di sicurezza. Queste
avvertenze sono fornite per ragioni di
sicurezza e devono essere lette attentamente.
Sicurezza generale
• Questo apparecchio è stato concepito esclusivamente
per un uso di tipo domestico.
•Questo apparecchio può essere usato da
bambini da 8 anni in su e da persone con
capacità fisiche, sensoriali o mentali ridotte
o con esperienza e conoscenze insufficienti
se sono supervisionati o se hanno ricevuto
adeguata formazione in merito all’uso dell’apparecchio in modo sicuro e capendo i pericoli
connessi. I bambini non devono giocare con
l’apparecchio. Manutenzione e pulizia non
devono essere effettuati dai bambini senza
supervisione.
• Non toccare la macchina a piedi nudi o con le mani o i
piedi bagnati o umidi.
• Non staccare la spina dalla presa della corrente tirando il
cavo, bensì afferrando la spina.
• Non aprire il cassetto dei detersivi mentre la macchina è
in funzione.
• Non toccare l’acqua di scarico, che può raggiungere
temperature elevate.
• Non forzare in nessun caso l’oblò: potrebbe danneggiarsi
il meccanismo di sicurezza che protegge da aperture
accidentali.
• In caso di guasto, in nessun caso accedere ai meccanismi
interni per tentare una riparazione.
• Controllare sempre che i bambini non si avvicinino alla
macchina in funzione.
• Durante il lavaggio l’oblò tende a scaldarsi.
• Se dev’essere spostata, lavorare in due o tre persone con
la massima attenzione. Mai da soli perché la macchina è
molto pesante.
• Prima di introdurre la biancheria controlla che il cestello
sia vuoto.
Il simbolo del cestino barrato è riportato su tutti i prodotti per
ricordare gli obblighi di raccolta separata.
Per ulteriori informazioni, sulla corretta dismissione degli
elettrodomestici, i detentori potranno rivolgersi al servizio
pubblico preposto o ai rivenditori.
Apertura manuale della porta oblò
Nel caso non sia possibile aprire la porta oblò a causa della
mancanza di energia elettrica e volete stendere il bucato,
procedere come segue:
1. togliere la spina dalla presa
di corrente.
2. verificate che il livello
dell’acqua all’interno della
macchina sia inferiore rispetto
all’apertura dell’oblò; in caso
contrario togliere l’acqua in
eccedenza attraverso il tubo
di scarico raccogliendola in un
secchio come indicato in figura.
3. rimuovere il pannello di
copertura sul lato anteriore della
lavabiancheria con l’ausilio di un
giravite (vedi figura).
I
Smaltimento
• Smaltimento del materiale di imballaggio:
attenersi alle norme locali, così gli imballaggi potranno
essere riutilizzati.
• La direttiva Europea 2012/19/EU sui rifiuti di apparecchiature elettriche ed elettroniche, prevede che gli elettrodomestici non debbano essere smaltiti nel normale flusso dei
rifiuti solidi urbani. Gli apparecchi dismessi devono essere
raccolti separatamente per ottimizzare il tasso di recupero
e riciclaggio dei materiali che li compongono ed impedire
potenziali danni per la salute e l’ambiente.
4. utilizzando la linguetta indicata in figura tirare verso
l’esterno fino a liberare il tirante in plastica dal fermo; tirarlo
successivamente verso il basso e contemporaneamente
aprire la porta.
5. rimontare il pannello assicurandosi, prima di spingerlo
verso la macchina, di aver inserito i ganci nelle apposite asole.
17
Page 18

Descrizione della lavabiancheria e
avviare un programma
Pannello di controllo
I
Manopola
Tasti con spie
FUNZIONE
Tasto ON/OFF
Cassetto dei detersivi
CENTRIFUGA
Manopola
TEMPERATURA
Manopola
PROGRAMMI
SPIE AVANZAMENTO
CICLO/PARTENZA
RITARDATA
Tasto con spia
START/
PAUSE
Spia
OBLÒ
BLOCCATO
Cassetto dei detersivi: per caricare detersivi e additivi
(vedi “Detersivi e biancheria”).
Tasto ON/OFF: per accendere e spegnere la lavabiancheria.
Manopola PROGRAMMI: per impostare i programmi. Durante il programma la manopola resterà ferma.
Tasti FUNZIONE: per selezionare le funzioni disponibili. La
spia relativa alla funzione selezionata rimarrà accesa.
Manopola CENTRIFUGA: per impostare la centrifuga o
escluderla (vedi “Personalizzazioni”).
Manopola TEMPERATURA: per impostare la temperatura
o il lavaggio a freddo (vedi “Personalizzazioni”).
SPIE AVANZAMENTO CICLO/PARTENZA RITARDATA:
per seguire lo stato di avanzamento del programma di lavaggio.
La spia accesa indica la fase in corso.
Se è stata impostata la funzione “Partenza Ritardata”, indicheranno il tempo mancante all’avvio del programma (vedi
pagina a fianco).
Spia OBLÒ BLOCCATO: per capire se l’oblò è apribile
(vedi pagina a fianco).
Tasto START/PAUSE: per avviare i programmi o inter-
romperli momentaneamente.
N.B.: mettere in pausa il lavaggio in corso premere
questo tasto, la spia relativa lampeggerà con colore
arancione mentre quella della fase in corso sarà accesa
fissa. Se la spia OBLÒ BLOCCATO
potrà aprire l’oblò.
Per far ripartire il lavaggio dal punto in cui è stato
interrotto, premere nuovamente questo tasto.
Modalità di stand by
Questa lavatrice, in conformità alle nuove normative
legate al risparmio energetico, è dotata di un sistema
di autospegnimento (stand by) che entra in funzione
dopo circa 30 minuti nel caso di non utilizzo. Premere
brevemente il tasto ON/OFF e attendere che la macchina
si riattivi.
Consumo in off-mode: 0,5 W
Consumo in Left-on: 8 W
sarà spenta, si
18
Page 19

Spie
END
Le spie forniscono informazioni importanti.
Ecco che cosa dicono:
Spie fase in corso
Una volta selezionato e avviato il ciclo di lavaggio desiderato, le spie si accenderanno progressivamente per indicarne
lo stato di avanzamento:
I
Partenza ritardata
Se è stata attivata la funzione “Partenza ritardata” (vedi
“Personalizzazioni”), dopo avere avviato il programma, ini-
zierà a lampeggiare la spia relativa al ritardo selezionato:
Col trascorrere del tempo verrà visualizzato il ritardo
residuo con il lampeggio della spia relativa:
Trascorso il ritardo selezionato la spia lampeggiante si
spengnerà e avrà inizio il programma impostato.
Lavaggio
Risciacquo
Centrifuga
Scarico
Fine lavaggio
Tasti funzione e relative spie
Selezionando una funzione la spia relativa si illuminerà.
Se la funzione selezionata non è compatibile con il programma impostato la spia relativa lampeggerà, verranno emessi
“3 beep” e la funzione non verrà attivata.
Nel caso venga impostata una funzione incompatibile con
un’altra precedentemente selezionata rimarrà attiva solo
l’ultima scelta.
Spia oblò bloccato
La spia accesa indica che l’oblò è bloccato per impedire
aperture accidentali; per evitare danni è necessario attendere che la spia si spenga prima di aprire l’oblò.
! Il lampeggio veloce della spia START/PAUSE (arancione)
contemporaneo a quello delle funzioni segnala un’anomalia
(vedi “Anomalie e rimedi”).
Avviare un programma
1. Accendere la lavabiancheria premendo il tasto ON/OFF. Tutte le spie si accenderanno per qualche secondo, poi rimarranno
accese le spie ralative alle impostazioni del programma selezionato e pulserà la spia START/PAUSE.
2. Caricare la biancheria e chiudere l’oblò.
3. Impostare con la manopola PROGRAMMI il programma desiderato.
4. Impostare la temperatura di lavaggio (vedi “Personalizzazioni”).
5. Impostare la velocità di centrifuga (vedi “Personalizzazioni”).
6. Versare detersivo e additivi (vedi “Detersivi e biancheria”).
7. Selezionare le funzioni desiderate.
8. Avviare il programma premendo il tasto START/PAUSE e la spia relativa rimarrà accesa fissa di colore verde.
Per annullare il ciclo impostato mettere la macchina in pausa premendo il tasto START/PAUSE e scegliere un nuovo ciclo.
9. Al termine del programma si illuminerà la spia END. La spia OBLÒ BLOCCATO si spegnerà indicando che l’oblò è apribile.
Estrarre la biancheria e lasciare l’oblò socchiuso per far asciugare il cestello. Spegnere la lavabiancheria premendo il tasto
ON/OFF.
19
Page 20

Programmi
Tabella dei programmi
I
Descrizione del Programma
Programmi
1
Antimacchia
2
Bianchi
Cotone Standard 60° (1): Bianchi e colorati resistenti molto
sporchi.
Cotone Standard 40° (2): Bianchi e colorati delicati poco
sporchi.
5
Sintetici: Colori resistenti molto sporchi. 60° 800
5
Sintetici (4): Colori resistenti poco sporchi. 40° 800
6
Anti Allergy
7
Baby
8
Lana: Per lana, cachemire, ecc. 40° 800 -
9
Delicati
Rapido 60': Per rinfrescare rapidamente capi sporchi
10
(non indicato per lana, seta e capi da lavare a mano).
11
Cotone Standard 20°: Bianchi e colorati delicati poco sporchi
12
Eco Cotone
13
Eco Sintetici
14
Eco Rapido 30'
Risciacquo
Centrifuga + Scarico
La durata del ciclo indicata sul display o sul libretto è una stima calcolata in base a condizioni standard. Il tempo effettivo può variare in base a numerosi fattori
quali la temperatura e la pressione dell’acqua in ingresso, la temperatura ambiente, la quantità di detersivo, la quantità ed il tipo di carico, il bilanciamento del
carico, le opzioni aggiuntive selezionate.
1) Programma di controllo secondo la direttiva 1061/2010: impostare il programma con una temperaura di 60°C.
Questo ciclo è adatto per pulire un carico di cotone normalmente sporco ed è il più efficiente in termini di consumo combinato di energia e di acqua, da usare su
capi lavabili a 60 °C. La temperatura effettiva di lavaggio può differire da quella indicata.
2) Programma di controllo secondo la direttiva 1061/2010: impostare il programma con una temperatura di 40°C.
Questo ciclo è adatto per pulire un carico di cotone normalmente sporco ed è il più efficiente in termini di consumo combinato di energia e di acqua, da usare su
capi lavabili a 40°C. La temperatura effettiva di lavaggio può differire da quella indicata.
3) Alla temperatura di 60° la funzione “Prelavaggio“ non può essere attivata.
Per tutti Test Institutes:
2) Programma cotone lungo: impostare il programma
4) Programma sintetico lungo: impostare il programma 5 con una temperatura di 40°C.
con una temperatura di 40°C.
Temp.
max.
(°C)
40° 1000
60° 1000
60°
(Max. 90°)
40° 1000 -
60° 1000 40° 1000
30° 0 -
60° 1000 -
. 20° 1000 -
Acqua
fredda
Acqua
fredda
Acqua
fredda
Velocità
max.
(giri al
minuto)
1000
1000 -
800 -
800 -
- 1000 - -
- 1000 - - - - 7 - - - 16’
Detersivi
Prelaggio
(3)
Candeg-
Lavaggio
-
-
-
-
-
-
-
-
%
gina
Ammorbi-
(Kg)
dente
Carico max.
Umidità residua
4 - - - 180’
4 - - - 180’
7 62 1.23 52.5 195’
7 62 1.09 92 190’
3.5 44 0.93 47 115’
3.5 44 0.57 46 100’
4 - - - 195’
4 - - - 145’
1.5 - - - 70’
1 - - - 80’
3.5 62 0.81 40 60’
7 - - - 170’
7 62 0.17 63 80’
3 48 0.07 30 70’
3 71 0.04 34 30’
7 - - - 36’
gia kWh
Consumo ener-
Durata ciclo
Acqua totale lt
Antimacchia: il programma 1 è adatto al lavaggio di capi molto sporchi, con colori resistenti. Il programma garantisce una
classe di lavaggio superiore alla classe standard (classe A). Non eseguire il programma mescolando capi di colore diverso. Si
consiglia l’utilizzo di detersivo in polvere. Per macchie ostinate è consigliato il pretrattamento con additivi specifici.
Bianchi: utilizzare il ciclo 2 per il lavaggio dei capi bianchi. Il programma è studiato per il mantenimento della brillantezza del
bianco nel tempo. Per risultati migliori si raccomanda l’utilizzo del detersivo in polvere.
Anti Allergy: utilizzare il programma 6 per la rimozione dei principali allergeni come polline, acari, peli del gatto e cane.
Baby: utilizzare l’apposito programma 7 per asportare lo sporco tipico dei bambini e rimuovere il detersivo dai panni onde
evitare reazioni allergiche alla pelle delicata dei bambini. Questo ciclo è stato studiato per ridurre la carica batterica utilizzando
una maggior quantità di acqua e ottimizzando l’effetto di additivi specifici igenizzanti aggiunti al detersivo.
Programmi Eco
I programmi Eco offrono buone performance di lavaggio a basse temperature consentendo un minore utilizzo di energia
elettrica con un beneficio per l’ambiente e un risparmio economico. I programmi Eco (
12
Eco Cotone,
13
Eco Sintetici e
14
Eco Rapido 30’) sono stati creati per diversi tipi di tessuto e per capi poco sporchi. Per garantire un risultato ottimale raccomandiamo l’uso di un detergente liquido; si consiglia di pretrattare polsini, colli e macchie.
Cotone Standard 20°: il programma 11 per carichi in cotone sporchi. Le buone performance anche a freddo, comparabili con
un lavaggio a 40°, sono garantite da un’azione meccanica che lavora con variazione di velocità a picchi ripetuti e ravvicinati.
20
Page 21

Personalizzazioni
Impostare la temperatura
Ruotando la manopola TEMPERATURA si imposta la temperatura di lavaggio (vedi Tabella programmi).
La temperatura si può ridurre sino al lavaggio a freddo (
La macchina impedirà automaticamente di impostare una temperatura maggiore a quella massima prevista per ogni programma.
! Eccezione: selezionando il programma
la temperatura può essere portata sino a 90°.
).
Impostare la centrifuga
Ruotando la manopola CENTRIFUGA si imposta la velocità di centrifuga del programma selezionato.
Le velocità massime previste per i programmi sono:
Programmi Velocità massima
Cotone 1000 giri al minuto
Sintetici 800 giri al minuto
Lana 800 giri al minuto
Seta solo scarico
La velocità di centrifuga può essere ridotta, oppure esclusa selezionando il simbolo
La macchina impedirà automaticamente di effettuare una centrifuga maggiore a quella massima prevista per ogni programma.
.
Funzioni
Le varie funzioni di lavaggio previste dalla lavabiancheria permettono di ottenere la pulizia e il bianco desiderati.
Per attivare le funzioni:
1. premere il tasto relativo alla funzione desiderata;
2. l’accensione della spia relativa segnala che la funzione è attiva.
Nota: Il lampeggio veloce della spia indica che la funzione relativa non è selezionabile per il programma impostato.
I
Super Lavaggio
Questa opzione garantisce un lavaggio di alte prestazioni grazie all’utilizzo di una maggior quantità d’ acqua nella fase iniziale
del ciclo e alla maggior durata del programma ed è utile per eliminare le macchie più resistenti.
Può essere utilizzata con o senza candeggina.
Se si desidera effettuare il candeggio inserire la vaschetta aggiuntiva 4, in dotazione, nella vaschetta 1. Nel dosare la
candeggina non superare il livello “max” indicato sul perno centrale (vedi figura a pag 22).
! Non è attivabile sui programmi 2, 6, 8, 9, 10, 12, 13, 14,
Stira Facile
Selezionando questa funzione, il lavaggio e la centrifuga saranno opportunamente modificati per ridurre la formazione di
pieghe. Al temine del ciclo la lavabiancheria effettuerà delle lente rotazioni del cestello;
la spia della funzione STIRA FACILE e quella di START/PAUSE lampeggeranno (arancione) e la fase
fissa. Per terminare il ciclo si dovrà premere il tasto START/PAUSE o il tasto STIRA FACILE.
! Non è attivabile sui programmi 1, 2, 6, 8, 12, 13, 14,
Prelavaggio
Selezionando questa funzione si effettua il prelavaggio, utile per rimuovere macchie ostinate.
N.B.: Aggiungere il detersivo nell’apposito scomparto.
! Non è attivabile sui programmi
Partenza Ritardata
Ritarda l’avvio della macchina sino a 12 ore.
Premere più volte il tasto fino a far accendere la spia relativa al ritardo desiderato. Alla quinta pressione del tasto la funzione si
disattiverà.
N.B.: Una volta premuto il tasto START/PAUSE, si può modificare il valore del ritardo solo diminuendolo.
! E’ attivo con tutti i programmi.
(60°), , 6, 8, 9, 10, 11, 12, 13, 14, , .
.
END rimarrà accesa
, .
21
Page 22

Detersivi e biancheria
M
AX
1
2
4
3
A
B
Cassetto dei detersivi
I
Il buon risultato del lavaggio dipende anche dal corretto
dosaggio del detersivo: eccedendo non si lava in modo più
efficace e si contribuisce a incrostare le parti interne della
lavabiancheria e a inquinare l’ambiente.
! Usare detersivi in polvere per capi in cotone bianchi e per il
prelavaggio e per lavaggi con temperatura superiore a 60°C.
! Seguire le indicazioni riportate sulla confezione di detersivo.
! Non usare detersivi per il lavaggio a mano, perché formano
troppa schiuma.
Estrarre il cassetto dei detersivi e inserire il detersivo o
l’additivo come segue.
vaschetta 1: Detersivo per prelavaggio
(in polvere)
Prima di versare il detersivo verificare che non sia inserita la
veschetta aggiuntiva 4.
vaschetta 2: Detersivo per lavaggio
(in polvere o liquido)
Nel caso di utilizzo di detersivo liquido si consiglia di utilizzare la paretina A in dotazione per un corretto dosaggio.
Per l’utilizzo del detersivo in polvere riporre la paretina nella
cavità B.
vaschetta 3: Additivi (ammorbidente, ecc.)
L’ammorbidente non deve fuoriuscire dalla griglia.
vaschetta aggiuntiva 4: Candeggina
Preparare la biancheria
• Suddividere la biancheria secondo:
- il tipo di tessuto / il simbolo sull’etichetta.
- i colori: separare i capi colorati da quelli bianchi.
• Vuotare le tasche e controllare i bottoni.
• Non superare i valori indicati, riferiti al peso della
biancheria asciutta: vedi “Tabella dei programmi”.
Quanto pesa la biancheria?
Capi particolari
Lana: Il ciclo di lavaggio “Lana” di questa lavatrice
Hotpoint-Ariston è stato testato e approvato dalla
Woolmark Company per il lavaggio di capi in lana
classificati come “lavabili a mano”, purché il lavaggio
venga eseguito nel rispetto delle istruzioni riportate
sull’etichetta dell’indumento e delle indicazioni fornite dal
produttore dell’elettrodomestico. Hotpoint-Ariston è la
prima marca di lavatrici ad aver ottenuto dalla Woolmark
Company la certificazione Woolmark Apparel Care Platinum per le sue prestazioni di lavaggio e il consumo di
acqua ed energia. (M1126)
Delicati: utilizzare il programma 9 per il lavaggio dei capi
molto delicati, che presentano applicazioni quali strass o
paillettes.
Si raccomanda di rovesciare i capi prima del lavaggio e di
inserire gli indumenti piccoli nell’apposito sacchetto per il
lavaggio dei capi delicati.
Per risultati migliori si raccomanda l’utilizzo del detersivo
liquido per capi delicati.
Per il lavaggio dei capi in seta e tende, selezionare il
ciclo 9 e attivare la funzione
il ciclo con la biancheria in ammollo e la spia della
funzione
poter rimuovere il bucato sarà necessario premere il tasto
START/PAUSE o il tasto
lampeggeraà. Per scaricare l’acqua e
; la macchina terminerà
.
Sistema bilanciamento del carico
Prima di ogni centrifuga, per evitare vibrazioni eccessive
e per distribuire il carico in modo uniforme, il cestello
effettua delle rotazioni ad una velocità leggermente
superiore a quella del lavaggio. Se al termine di ripetuti
tentativi il carico non fosse ancora correttamente
bilanciato la macchina effettua la centrifuga ad una
velocità inferiore a quella prevista.
In presenza di eccessivo sbilanciamento la lavabiancheria
effettua la distribuzione anzichè la centrifuga. Per favorire
una migliore distribuzione del carico e il suo corretto
bilanciamento si consiglia di mescolare capi grandi e
piccoli.
1 lenzuolo 400-500 gr.
1 federa 150-200 gr.
1 tovaglia 400-500 gr.
1 accappatoio 900-1200 gr.
1 asciugamano 150-250 gr.
22
Page 23

Anomalie e rimedi
Può accadere che la lavabiancheria non funzioni. Prima di telefonare all’Assistenza (vedi “Assistenza”), controllare che non si
tratti di un problema facilmente risolvibile aiutandosi con il seguente elenco.
Anomalie:
La lavabiancheria
non si accende.
Il ciclo di lavaggio
non inizia.
La lavabiancheria non carica
acqua (lampeggia velocemente la
spia della prima fase di lavaggio).
La lavabiancheria carica e scarica
acqua di continuo.
Possibili cause / Soluzione:
• La spina non è inserita nella presa della corrente, o non abbastanza
da fare contatto.
• In casa non c’è corrente.
• L’oblò non è ben chiuso
• Il tasto ON/OFF non è stato premuto.
• Il tasto START/PAUSE non è stato premuto.
• Il rubinetto dell’acqua non è aperto.
• Si è impostato un ritardo sull’ora di avvio (PARTENZA RITARDATA,
vedi “Personalizzazioni”).
• Il tubo di alimentazione dell’acqua non è collegato al rubinetto.
• Il tubo è piegato.
• Il rubinetto dell’acqua non è aperto.
• In casa manca l’acqua.
• Non c’è sufficiente pressione.
• Il tasto START/PAUSE non è stato premuto.
• Il tubo di scarico non è installato fra 65 e 100 cm da terra (vedi “Installazione”).
• L’estremità del tubo di scarico è immersa nell’acqua (vedi “Installazione”).
• Lo scarico a muro non ha lo sfiato d’aria.
Se dopo queste verifiche il problema non si risolve, chiudere il rubinetto dell’acqua, spegnere la lavabiancheria e chiamare l’Assistenza. Se l’abitazione si trova
agli ultimi piani di un edificio, è possibile che si verifichino fenomeni di sifonaggio, per cui la lavabiancheria carica e scarica acqua di continuo. Per eliminare
l’inconveniente sono disponibili in commercio apposite valvole anti-sifonaggio.
I
La lavabiancheria non scarica
o non centrifuga.
La lavabiancheria vibra
molto durante la centrifuga.
La lavabiancheria perde acqua.
La spia START/PAUSE (arancione)
e le spie delle funzioni lampeggiano velocemente.
Si forma troppa schiuma.
• Il programma non prevede lo scarico: con alcuni programmi occorre
avviarlo manualmente.
• È attiva la funzione STIRA FACILE: per completare il programma
premere il tasto START/PAUSE (“Personalizzazioni”).
• Il tubo di scarico è piegato (vedi “Installazione”).
• La conduttura di scarico è ostruita.
• Il cestello, al momento dell’installazione, non è stato sbloccato
correttamente (vedi “Installazione”).
• La lavabiancheria non è in piano (vedi “Installazione”).
• La lavabiancheria è stretta tra mobili e muro (vedi “Installazione”).
• Il tubo di alimentazione dell’acqua non è ben avvitato (vedi “Installazione”).
• Il cassetto dei detersivi è intasato (per pulirlo vedi “Manutenzione e cura”).
• Il tubo di scarico non è fissato bene (vedi “Installazione”).
• Spegnere la macchina e togliere la spina dalla presa, attendere circa
1 minuto quindi riaccenderla.
Se l’anomalia persiste, chiamare l’Assistenza.
• Il detersivo non è specifico per lavabiancheria (deve esserci la
dicitura “per lavatrice”, “a mano e in lavatrice”, o simili).
• Il dosaggio è stato eccessivo.
23
Page 24

Assistenza
Prima di contattare l’Assistenza:
I
• Verificare se l’anomalia può essere risolta da soli (vedi “Anomalie e rimedi”);
• Riavviare il programma per controllare se l’inconveniente è stato ovviato;
• In caso negativo, contattare il Numero Unico 199.199.199*.
! Non ricorrere mai a tecnici non autorizzati.
Comunicare:
• il tipo di anomalia;
• il modello della macchina (Mod.);
• il numero di serie (S/N).
Queste informazioni si trovano sulla targhetta applicata nella parte posteriore della lavabiancheria e nella parte anteriore
aprendo l’oblò.
Assistenza Attiva 7 giorni su 7
In caso di necessità d’intervento chiamare il Numero Unico Nazionale 199.199.199*.
Un operatore sarà a completa disposizione per fissare un appuntamento con il Centro Assistenza Tecnico
Autorizzato più vicino al luogo da cui si chiama.
È attivo 7 giorni su 7, sabato e domenica compresi, e non lascia mai inascoltata una richiesta.
* Al costo di 14,25 centesimi di Euro al minuto (iva inclusa) dal Lun. al Ven. dalle 08:00 alle 18:30, il Sab. dalle 08:00 alle 13:00 e di 5,58 centesimi di
Euro al minuto (iva inclusa) dal Lun. al Ven. dalle 18:30 alle 08:00, il Sab. dalle 13:00 alle 08:00 e i giorni festivi, per chi chiama da telefono fisso.
Per chi chiama da radiomobile le tariffe sono legate al piano tariffario dell’operatore telefonico utilizzato.
Le suddette tariffe potrebbero essere soggette a variazione da parte dell’operatore telefonico; per maggiori informazioni consultare il sito
http://www.hotpoint.eu/hotpoint/
*
24
Page 25

Kullanma Kılavuzu
ÇAMAŞIR MAKİNESİ
TR
Türkçe
WML 701
İçindekiler
Montaj, 26-27
Ambalajın çıkartılması ve seviye ayarı getirilmesi
Su ve elektrik bağlantıları
İlk yıkama
Teknik veriler
Bakım ve özen, 28
Su ve elektrik kesilmesi
Çamaşır makinesin temizlenmesi
Deterjan haznesinin temizlenmesi
Kapak ve hazne bakımı
Pompanın temizlenmesi
Su besleme hortumunun kontrol edilmesi
Önlemler ve öneriler, 29
Genel güvenlik uyarıları
Atıkların tasye edilmesi
Cam kapağın açılması
Çamaşır makinesinin tanımı ve
programların çalıştırılması, 30-31
Kontrol paneli
Işıklı göstergeler
Bir programın başlatılması
TR
Programlar, 32
Program tablosu
Kişisel ayarlar, 33
Sıcaklık ayarı
Sıkma hızı ayarı
Fonksiyonlar
Deterjan ve çamaşır, 34
Deterjan haznesi
Çamaşırın hazırlanması
Özel yıkama çevrimleri
Yük dengeleme sistemi
Arızalar ve onarımlar, 35
Teknik Servis, 36
25
Page 26

Montaj
TR
! Bu kitapçığı gerektiği her an danışabilmeniz
için özenle saklayınız. Çamaşır makinesinin satılması, devri veya nakli durumlarında
da, yeni sahibinin faydalanabilmesi için bu
kılavuz makineyle beraber saklanmalıdır.
! Talimatları dikkatlice okuyunuz; montaj,
kullanım ve güvenliğe ilişkin önemli bilgiler
içermektedir.
Ambalajın çıkartılması ve aynı seviyeye getirilmesi
Ambalajdan çıkartılması
1. Çamaşır makinesinin ambalajdan
çıkartılması.
2. Çamaşır makinesinin taşıma esnasında
hasar görmemiş olduğunu kontrol ediniz.
Hasar görmüş ise monte etmeyiniz. Satıcıya
başvurunuz.
3. Taşıma sırasında
arka tarafta bulunan 4 adet koruyucu vidayı ve ara
parçasıyla birlikte
buradaki lastiği de
çıkartınız (bakınız
şekil).
Sağlıklı bir dengeleme, çamaşır makinesine
sağlam bir duruş kazandıracağı gibi, çalışması
esnasındaki sarsıntı, gürültü ve hareketlilikleri de önleyecektir. Zeminde moket veya
halı olması halinde, ayarı makinenin altında
havalandırma olabilecek şekilde yapınız .
Su ve elektrik bağlantıları
Su besleme hortumunun takılması
1. Tedarik borusunu 3/4 gaz vidalý
baðlantý kullanarak
bir soðuk su musluðuna baðlayýn (bkz.
þekil).
Baðlantýyý yapmadan
önce, suyu berraklaþana kadar akýtýnýz.
2. Su besleme hortumunu arka kısımının
üst sağ köşesinde
bulunan su girişine
vidalayarak makineye bağlayınız (bkz.
şekil).
4. Delikleri ambalajda bulacağınız plastik
kapaklarla kapayınız.
5. Tüm parçaları muhafaza ediniz: çamaşır
makinesinin nakli gerektiği takdirde
takılmaları gerekmektedir.
! Ambalajlar çocuk oyuncağı değildir.
Cihazın aynı seviyeye getirilmesi
1. çamaşır makinesini düz ve sert bir zemine yerleştiriniz, duvar veya mobilyalara
dayamayınız.
2. Yerleştirilecek
zemin tam düz
değilse çamaşır
makinesinin vidalı
ön ayaklarını sıkarak
veya gevşeterek
dengeyi sağlayınız
(bkz. şekil); eğim
açısı, makinenin üst tezgahına
göre 2° den fazla
olmamalıdır.
3. Hortumda katlanma ve ezilme olmamasına
dikkat ediniz.
! Musluğun su basıncının Teknik Veriler
tabelasında belirtildiği gibi olması gerekir
(bkz. yan sayfa).
! Besleme hortumunun boyu yetersizse
yetkili bir satıcı mağaza veya teknisyene
başvurunuz.
! Kesinlikle daha önceden kullanılmış hortum
kullanmayınız.
! Makine ile birlikte verilen hortumları kullanınız.
26
Page 27

Tahliye hortumunun bağlanması
65 - 100 cm
Tahliye hortumunu
bükmeden zeminden 65 ila 100 cm
yukarıda yer alan pis
su borusuna veya
duvar tahliyesine
bağlayın;
Buna alternatif
olarak, makine
ile birlikte verilen
pis su borusunu
musluğa (şekle
bakınız) bağlayarak
lavabo veya küvetin
kenarına yerleştirin.
Hortumun serbest
kalan ucu suya
daldırılmamalıdır.
! Hortum eklerinin kullanımı önermiyoruz; kesinlikle gerekliyse ek hortum orijinal hortum
ile aynı çapta olmalı ve uzunluğu 150 cm.
aşmamalıdır.
! Kablo bükülmemeli veya sıkıştırılmamalıdır.
! Güç kablosu ve si sadece yetkili teknis-
yenler tarafından degistirilmelidir.
Uyarı! Bu standartlara uyulmaması durumunda sirket sorumlu tutulamaz.
İlk yıkama
Ilk kullanimdan önce programlar tablosundaki
“Kendi kendini temizleme” Programi kullanarak çamasir olmadan deterjanla bir yikama
yapin (“Çamaşır makinesinin temizlenmesi”
bakınız).
Teknik bilgiler
Model WML 701
genişlik 59,5 cm
Ölçüler
yükseklik 85 cm
derinlik 54 cm
TR
Elektrik bağlantıları
Cihazı elektrik prizine takmadan önce,
aşağıdakilerden emin olun:
• Prizin topraklandıgından ve ilgili mevzuata
uygun oldugundan;
• Prizin teknik veri tablosunda gösterilmekte
olan maksimum cihaz elektrik yüküne
dayanıp dayanamayacagından (teknik veri
tablosuna bakiniz);
• Güç kaynagı voltajının teknik veri tablosunda
gösterilen degerlere uygun olup olmadigindan
(teknik veri tablosuna bakiniz);
• Elektrik prizinin çamaşır makinesinin fişi
ile uyumlu olup olmadığından emin olun.
Muhafazalı değilse, priz veya şi değiştirin.
! Çamaşır makinesi kapalı alan olsa bile, evin
dışına yerleştirilmemelidir. Cihazın yağmur,
fırtına ve diğer hava koşullarına maruz
bırakılması son derece tehlikelidir.
! Çamaşır makinesi yerleştirildiğinde, elektrik
prizi kolay ulaşılabilir bir durumda olmalıdır.
! Uzatma kablosu veya çoklu priz kullanmayın.
Kapasite 1 - 7 kg
Elektrik
bağlantıları
makine üstünde takılı olan
teknik veriler plakasına
bakınız.
max. su basıncı
Su
bağlantıları
1 MPa (10 bar)
min. su basıncı
0,05 MPa (0,5 bar)
tambur kapasitesi 52 litre
Sıkma hızı
maksimum dakikada 1000
devire kadar
1061/2010 ve
1015/2010
sayýlý direktiflere
göre kontrol
Program
Pamuklu Standart 60°C.
Program ;
Pamuklu Standart 40°C.
programlarý
Bu makina aşağıda belirtilen
AB normlarına uygundur:
- 2004/108/CE (Elektromanyetik Uyum)
- 2012/19/EU
- 2006/95/CE (Alçak gerilim)
;
27
Page 28

Bakım ve onarım
1
2
A
B
TR
Su ve elektrik kesilmesi
• Su musluğunu her yıkamadan sonra
kapatınız. Böylece çamaşır makinesinin su
tesisatının eskimesi engellenir, su kaçağı
tehlikesi ortadan kalkar.
• Bakım ve temizlik işlemleri esnasında
çamaşır makinesinin şini çekiniz.
Çamaşır makinesinin temizlenmesi
• Dış gövde ve plastik aksam ılık su ve
sabunla ıslatılmış bir bez vasıtasıyla temizlenebilir. Çözücü ve aşındırıcı maddeler
kullanmayınız.
• Çamaşır makinesinde tambur boşken
çalıştırılması gereken “Kendi kendini te-
mizleme” programı bulunmaktadır.
Deterjan (az kirli çamaşırlar için tavsiye
edilen miktarın %10’u kadar) veya çamaşır
makinesinin temizliği için kullanılan özel katkı
maddeleri, yıkama programında yardımcı
olarak kullanılabilir. 40 yıkamada bir “Kendi
kendini temizleme” programını çalıştırmanız
önerilir.
Programı devreye
sokmak için 5 saniye boyunca A ve B
tuşlarına aynı anda
basınız (bakınız
Şekil).
Program, otomatik
olarak başlayacak
ve yaklaşık 70 dakika sürecektir. Devreyi durdurmak için
START/PAUSE tuşuna basınız.
Deterjan haznesinin temizlenmesi
Hazneyi kaldırarak,
dışarıya doğru
çekmek suretiyle
çıkartınız (bkz. şekil).
Akar su altında
yıkayınız, bu çekmecenin temizliği sık sık
yapılmalıdır.
Pompanın temizlenmesi
Çamaşır makinesinin pompası kendini temizleyen bir özelliğe sahip olup, ayrıca
temizlik gerektirmez. Ancak, bazı küçük
cisimler (madeni para, düğme) pompanın alt
kısmındaki koruyucu bölmeye düşebilirler.
! Yıkama devresinin bitmiş olup olmadığını
kontrol ediniz ve şini çekiniz.
Pompa koruyucu bölgesine erişebilmek için:
1. çamaşır makinesinin ön kapama panelini, bir tornavida
vasıtasıyla çıkartınız
(bkz. şekil);
2. makine kapağını
saatin ters yönünde
çevirerek sökünüz
(bkz. şekil). bir miktar
su gelmesi normaldir;
3. içini dikkatlice temizleyiniz;
4. kapağı vidalayınız;
5. paneli takarken, tam yerleştirmeden evvel,
kancaların yuvalara gelip gelmediğini kontrol
ediniz.
Su besleme hortumunun kontrol
edilmesi
Su besleme hortumunu, en azından senede
bir defa kontrol ediniz. Yarık veya çatlaklar
varsa değiştiriniz: yıkama esnasındaki yüksek basınçlar ani patlamalara yol açabilirler.
Kapak ve hazne bakımı
• Kötü kokuların oluşmasını engellemek için
kapağı daima aralık bırakınız.
28
! Kesinlikle daha önceden kullanılmış hortum
kullanmayınız.
Page 29

Önlemler ve öneriler
20
! Çamaşır makinesi uluslararası güvenlik standartlarına
uygun olarak projelendirilmiş ve üretilmiştir. Bu uyarılar
güvenlik amaçlı olup dikkatlice okunmalıdır.
Genel güvenlik uyarıları
• Makine meskenlerde kullanılmak üzere tasarlanmış olup
profesyonel kullanım amaçlı değildir.
•
Bu cihaz, eğer gözetim altında bulunuyorlar
ise veya güvenli şekilde ve ilişkin tehlikeler
göz önünde bulundurularak, cihazın kullanımı
hakkında uygun eğitim almışlar ise, 8 yaşından
büyük çocuklar ve ziksel, duyusal veya mental
kapasitelerden yoksun veya yetersiz tecrübe
ve bilgiye sahip kişiler tarafından kullanılabilir.
Çocuklar, cihaz ile oynamamalıdır. Bakım
ve temizlik işlemleri, denetimsiz çocuklar
tarafından gerçekleştirilmemelidir.
• Cihaza ayaklarınız çıplakken yada elleriniz veya
ayaklarınız ıslak yada nemliyken dokunmayınız.
• Fişi prizden çekerken kablosundan değil şin kendisin-
den tutarak çekiniz.
• Makine çalışırken deterjan haznesini açmayınız.
• Tahliye suyuna el sürmeyiniz, yüksek ısıda olabilir.
• Kapağı, hiçbir şekilde zorlamayınız: istenmedik
açılmalara karşı olan güvenlik mekanizması arıza yapabilir.
• Arıza halinde onarmak amacıyla iç mekanizmaları
kurcalamayınız.
• Çocukların çalışır vaziyetteki makineye yaklaşmalarına
mani olunuz.
• Çalışma esnasında kapak ısınabilir.
• Taşınması gerektiğinde, bu işlemin, iki veya üç kişi
tarafından, azami dikkatle yapılması gerekir. Kesinlikle
tek başınıza yapmayınız, çünkü makine çok ağırdır.
• Çamaşırları yerleştirmeden evvel, sepetin boş
olduğundan emin olunuz.
• Atık Elektrikli ve Elektronik Eşyaların (AEEE) Kontrolü
Yönetmeliği.
• AEEE Yönetmeliğine uygu
Cam kapağın açılması
Elektrik kesildiğinde makine kapağını açamadığınız
zaman çamaşırları çıkarıp asmak istediğinizde aşağıdaki
gibi yapınız:
1. şi prizden çekiniz
2. makinenin içindeki su seviyesinin makine kapağından
daha alçak olmasını
sağlayınız, aksi takdirde
A şeklinde gösterildiği
gibi bir kapta toplanacak
şekilde boşaltma hortumu
vasıtasıyla içindeki suyu
gideriniz.
3. çamaşır makinesinin ön panelini, bir tornavida vasıtasıyla,
çıkartınız (bkz. şekil).
TR
Atıkların tasye edilmesi
• Ambalaj malzemelerinin tasye edilmesi: yerel yasalara uyunuz, bu şekilde ambalajların geri dönüşümü
mümkün olur.
• Elektrik ve elektronik cihazların atıklarını değerlendirme
2012/19/EU sayılı Avrupa Konseyi direktinde; beyaz
eşyaların kentsel katı atık genel yöntemi ile tasye edilmemesi öngörülmüştür. Kullanılmayan cihazların, madde
geri kazanım ve geri dönüşüm oranını en yüksek seviyeye yükseltmek, çevre ve insan sağlığına olası zararları
engellemek için ayrı ayrı toplanması gerekir. Tüm ürünlerin
üzerinde; ayrı toplama hükümlerini hatırlatmak amacıyla
üstünde çarpı işareti olan sepet sembolü verilmiştir.
Cihazların tasye edilmesi konusunda daha geniş bilgi almak için cihaz sahiplerinin mevcut müşteri hizmetine veya
satış noktalarına başvurulması gerekir.
4. şekilde gösterilen dilciğinden tutarak blokajından
çıkıncaya kadar dışarıya doğru çekiniz; aynı anda aşağı
doğru çekerek kapıyı açınız.
5. paneli takarken, tam yerleştirmeden evvel, kancaların
yuvalara gelip gelmediğini kontrol ediniz.
29
Page 30

Çamaşır makinesinin tanımı ve
programların çalıştırılması
TR
Kontrol paneli
Deterjan Bölmesi
ON/OFF düğmesi
PROGRAMLAR
SİCAKLİK AYARİ
düğmesi
SİKMA HİZİ AYARİ
düğmesi
düğmesi
FONKSİYON
uyarı lambalı tuşları
PROGRAM TAKİP /
GECİKMELİ BAŞLATMA
Uyarı lambası
KAPAK
KİLİTLİ
göstergesi
START/PAUSE
uyarı lambalı tuş
Deterjan Bölmesi: ve diğer katkıları koyunuz (“Deterjan-
lar bölümüne” bakınız).
ON/OFF düğmesi: çamaşır makinesini çalıştırmak ve
kapatmak için.
PROGRAMLAR uyarı lambalı tuşları: programları ayarlamak. Program esnasında düğme sabit kalır.
FONKSİYON düğmeleri: işlev seçimi için. Seçilen işlev
düğmesinde ışıklı gösterge yanık kalır.
SİCAKLİK AYARİ düğmesi: istenen sıcaklığı veya soğuk
suyla yıkamayı ayarlamak için (bkz. Kişisel ayarlar
bölümü).
SİKMA HİZİ AYARİ düğmesi: sıkma çalıştırmak veya
durdurmak için (bkz. Kişisel ayarlar bölümü).
PROGRAM TAKİP uyarı lambası: yıkama programının
aşamalarını görmek için. Uyarı lambası makinenin açık
olduğunu gösterir.
“Gecikmeli başlatma” işlevini programlayarak sonradan
çalıştırma ayarı yapıldıysa, çalışmaya başlaması için
kalan süreyi gösterir (bkz. yan sayfa).
START/PAUSE uyarı lambalı tuş: programları başlatmak
yada geçici olarak durdurmak için.
Not: devrede olan bir programın beklemeye alınması için
bu düğmeye basınız; turuncu renkli uyarı lambası yanıp
sönecektir. MAKİNE KAPAĞI KİLİTLİ
kapalı ise, kapak açılabilir.
Yıkama programının kaldığı yerden devam etmesi için bu
düğmeye tekrar basınız.
Bekleme modu
Yeni enerji tasarrufu düzenlemeleri ile uyumlu bu çamaşır
makinesine herhangi bir faaliyet algılanmadığında 30
dakika içinde devreye sokulan otomatik bekleme sistemi
yerleştirilmiştir ON/OFF düğmesine bir süre basın ve
makinenin tekrar çalışmasını bekleyin.
Off-mode’da tüketim: 0,5 W
Left-on’da tüketim: 8 W
uyarı lambası
KAPAK KİLİTLİ göstergesi: çamaşır makinesinin
kapağının açılabilirliğini görmek için (bkz. yan sayfa).
30
Page 31

Işıklı göstergeler
END
Işıklı göstergeler önemli bilgiler verir.
İşte verdikleri bilgiler:
Program Takip uyarı lambasi
İstenilen yıkama devresini seçtikten sonra çalışma
esnasında ışıklı göstergeler sürekli yanarak yürütülmekte olan işlemi gösterecektir.
TR
Zaman Ayarı
Gecikmeli başlatmayı programlayarak sonradan
çalıştırma ayarı yapıldıysa (bkz. kişisel ayarlar bölümü),
gösterge yanacak ve çalışma başlangıcı için kalan süreyi
gösterecektir:
Süre geçtikçe, bu ışıklı gösterge kalan süreyi göstermeye
devam edecektir.
Seçilen gecikme sonunda, gösterge sönecek ve makine
ayarlandığı programda çalışmaya başlayacaktır.
Yıkama
Durulama
Sıkma
Su boşaltma
Yıkama sonu
FONKSİYON tuşları ve ilgili uyarı lambaları
Herhangi bir işlem seçildiğinde ilgili gösterge yanacaktır.
Seçim, seçilen program ile uyumlu değilse, bu uyumsuzluk gösterge lambasının hızlı bir şekilde yanıp
sönmesi ve bir alarm sesi (3 bip) ile bildirilecektir, seçim
devreye sokulmayacaktır.
Daha önceden ayarlanmış olanla uyumsuz bir işlem
seçildiği takdirde son seçilen işlem geçerli olacaktır.
KAPAK KİLİTLİ göstergesi
Işıklı gösterge devamlı yanıyorsa, kapak istenmeyen
açılmalara karşı kapalı demektir, açmak için göstergenin
sönmesini bekleyiniz.
Not: “Zaman Ayarı” işlevi seçili ise makinenin kapağını
açmak mümkün değildir. Kapağı açabilmek için START/
PAUSE tuşuna basarak makineyi beklemeye alınız.
! KAPAK KİLİTLİ göstergesinin (turuncu olarak) işlev
göstergesi ile aynı anda hızlı şekilde yanıp sönmesi, bir
arıza göstergesidir (“Arızalar ve onarımlar”).
Bir programın başlatılması
1. ON/OFF düğmesine basarak çamaşır makinesini açın. Gösterge lambalarının hepsi birkaç saniyeliğine yanacaktır
ve daha sonra sadece seçilen program ayarları ile ilgili gösterge lambaları yanık kalacaktır, START/PAUSE gösterge
lambaları yanıp sönecektir.
2. Çamaşırı yerleştirip kapağı kapatınız.
3. PROGRAMLAR düğmesiyle istenen programı seçiniz.
4. Yıkama suyu sıcaklığını seçiniz (bkz. “Kişisel ayarlar”).
5. Sıkma hız ayarını seçiniz (bkz. “Kişisel ayarlar”).
6. Deterjan ve diğer katkıları koyunuz (Bkz. Deterjanlar ve çamaşırlar bölümü).
7. İstenilen işlevleri seçin.
8. START/PAUSE düğmesine basmak suretiyle programı çalıştırınız ve ilgili gösterge yeşil renkte yanık kalacaktır.
Seçilen programı iptal etmek için makineyi beklemeye aldıktan sonra START/PAUSE tuşunu basılı tutarak yeni bir program seçiniz.
9. Program bitiminde “END” göstergesi yanmaya başlayacaktır. KAPAK KİLİTLİ göstergesinin yanıp sönmesi sona ere-
cek, kapağın açılabilir olduğunu gösterecektir. Çamaşırı çıkarınız ve içerisinin kuruması için kapağı haf aralık bırakınız.
ON/OFF tuşuna basarak çamaşır makinasını kapatınız.
31
Page 32

Programlar
TR
Program tablosu
Deterjan ve katkı
Yıkama çevrimi açıklaması
Yıkama
çevrimleri
Leke Çıkarma
1
Beyazlar
2
Pamuklu Standart 60° (1): çok kirli dayanıklı beyaz ve renkliler.
Pamuklu Standart 40° (2): çok kirli beyazlar ve hassas renkliler.
Sentetikler: çok kirlenmiş dayanıklı renkliler.
5
Sentetikler (4): kirlenmiş dayanıklı renkliler.
5
Anti - Alerji
6
Bebek Programı
7
Yünlüler: Yün, kaşmir vs.
8
Hassas Çamaşırlar
9
Hızlı Yıkama: Az kirlenmiş giysileri hemen temizlemek için (elle
10
yıkamayı gerektiren yün, ipek ve elbiseler için uygun değildir).
Pamuklu Standart 20°: çok kirli beyazlar ve hassas renkliler.
11
Eko Pamuklu
12
Eko Sentetikler
13
Eko Hızlı Yıkama 30’
14
Durulama
Sıkma + Su Boşaltma
Ekran veya kitapçık üzerinde gösterilen devre süresi, standart şartlara göre hesaplanmış tahmini bir süredir. Geçerli olan süre, girişteki sıcaklık derecesi ve suyun
basıncı, ortam sıcaklığı, deterjan miktarı, yük miktarı ve tipi, yükün dengesi, seçilen ilave seçenekler gibi sayısız faktörlere göre değişiklik gösterebilmektedir.
1) 1061/2010 düzenlemesine uygun test yıkama çevrimi: 60°C sıcaklıkta yıkama çevrimi yi seçin.
Bu devre, orta kirlilikteki pamuklu çamaşırları temizlemek için uygundur ve 60°C’de yıkanabilir çamaşırlar üzerinde kullanılacak, kombine enerji ve su tüketimi
açısından en etkili devredir. Geçerli olan yıkama sıcaklık derecesi, belirtilen sıcaklık derecesinden farklı olabilir.
2) 1061/2010 düzenlemesine uygun test yıkama çevrimi: 40°C sıcaklıkta yıkama çevrimi yi seçin.
Bu devre, orta kirlilikteki pamuklu çamaşırları temizlemek için uygundur ve 40°C’de yıkanabilir çamaşırlar üzerinde kullanılacak, kombine enerji ve su tüketimi
açısından en etkili devredir. Geçerli olan yıkama sıcaklık derecesi, belirtilen sıcaklık derecesinden farklı olabilir.
3) 60 °C sıcaklıkta “Ön Yıkama” fonksiyonu etkinleştirilemez.
Bütün Test merkezleri için:
2) Pamuklular için kısa yıkama çevrimi: 40°C sıcaklıkta yıkama çevrimi
4) Uzun sentetik programı: 40°C sıcaklıkta yıkama çevrimi 5’yi seçin.
Maks.
Sıcak
(°C)
40° 1000
60° 1000
60°
(Max. 90°)
40° 1000 60° 800
40° 800
60° 1000 40° 1000
40° 800 30° 0 -
60° 1000 -
20° 1000 -
Soğuk
Soğuk
Soğuk
Maks.
Hız
(dev/
dak.)
1000
su
su
su
1000 -
800 -
800 -
- 1000 - -
- 1000 - - - - 7 - - - 16’
yi seçin.
maddeleri
Ön
Ana
yıkama
Yıkama
Çamaşır
(3)
-
-
-
-
-
-
-
-
(kg)
suyu
şatıcı
Yumu-
Maks. yük
Kalan nem %
4 - - - 180’
4 - - - 180’
7 62 1.23 52.5 195’
7 62 1.09 92 190’
3.5 44 0.93 47 115’
3.5 44 0.57 46 100’
4 - - - 195’
4 - - - 145’
1.5 - - - 70’
1 - - - 80’
3.5 62 0.81 40 60’
7 - - - 170’
7 62 0.17 63 80’
3 48 0.07 30 70’
3 71 0.04 34 30’
7 - - - 36’
mi kWh
Enerji tüketi-
Toplam su lt
Çevrim
süresi
Leke Çıkarma: Program 1, renkleri solmayan ve çok kirli çamaşırların yıkanması için uygundur. Program, standart
sınıftan yüksek bir yıkama sınıfını garanti eder (A sınıfı). Farklı renkteki çamaşırları bu programda yıkamayınız. Toz deterjan kullanılması ve inatçı lekeler için özel katkı maddeleri ile ön yıkama yapmanız önerilir.
Beyazlar: beyaz çamaşırları yıkama devresini kullanınız. Program 2, zaman içinde beyaz parlaklığının korunması için
düşünülmüştür. Daha iyi sonuçlar için, toz deterjanın kullanılması tavsiye edilir.
Anti-Alerji: Polen, mayt, kedi ve köpek tüyü gibi temel alerjenleri ortadan kaldırmak için 6 programını kullanınız.
Bebek Programı:
Bu program 7 çocuklara ve bebeklere ait tipik kirleri yok ettiği gibi, bezlerde deterjan kalmamasını
sağlar ve böylece bebeklerin hassas ciltlerine zarar vermez. Bu program, daha fazla miktarda su kullanarak ve
deterjana ilave edilen özel hijyen sağlayıcı katkı maddelerinin etkisini optimize ederek bakteri oranını azaltmak
amacına yönelik tasarlanmıştır
.
Pamuklu Standart 20°C: kirli pamuklu çamaşırlar için idealdir. 40°’de bir yıkama ile mukayese edilebilen, soğuk suda da
etkili olan performanslar, yinelenen ve karşılaştırılan en yüksek hız varyasyonu ile çalışan mekanik bir hareket ile sağlanır.
Eko Programlar
Eco programlar, çevre için bir avantaja ve ekonomik bir tasarrufa sahip daha az elektrik enerjisi kullanmayı sağlayarak,
düşük sıcaklıklarda etkili yıkama performansları sunmaktadır.
Eco programlar (Pamuklu 12, Sentetikler 13 ve Hızlı Yıkama 30’ 14), farklı kumaş türleri ve az kirli çamaşırlar için
oluşturulmuştur. En iyi sonucu garanti etmek için, sıvı bir deterjan kullanmanızı öneririz; manşet, yaka ve lekeleri önceden
işleme tabi tutmanız tavsiye edilir.
32
Page 33

Kişisel ayarlar
Sıcaklık ayarı
Yıkama suyu ısısını SİCAKLİK AYARI düğmesini çevirerek seçiniz (bkz. Program tablosu).
sıcaklık ayarı soğuk suyla yıkanacak seviyeye kadar düşürülebilir (
Makine, seçilen program için öngörülenin üzerinde bir yıkama ısısını otomatik olarak uygulamayacaktır.
! İstisna:
programı seçildiğinde sıcaklık derecesi 90°C ye kadar yükseltilebilir
).
Sıkma hızı ayarı
Seçilen programın SIKMA HIZI ayarı bu düğmenin çevrilmesiyle yapılır.
Programlar için öngörülen azami süratler şöyledir:
Programlar Azami Sıkma hızı
Pamuklular Dakikada 1000 devir
Sentetik kumaşlar Dakikada 800 devir
Yünlüler Dakikada 800 devir
İpekli sadece boşaltma
Sıkma sürati azaltılabilir veya
de bir sıkma hızını kabul etmez.
işareti seçilerek devre dışı bırakılabilir. Makine, her bir program için öngörülenin üzerin-
Fonksiyonlar
Çamaşır makinesince öngörülen muhtelif işlemler arzu edilen temizlik ve beyazlıktaki yıkamalara olanak sağlar.
İşlevleri çalıştırmak için:
1. istediğiniz işlev düğmesine basınız;
2. ilgili göstergenin yanması işlevin başladığını belirtir.
Not: göstergenin hızlı bir şekilde yanıp sönmesi seçilen işlevin yürütülmekte olan programa uygun olmadığının işaretidir.
TR
Süper Beyaz
kullandığından ve arttırılmış programı süresinden dolayı yüksek performanslı bir yıkama sağlar.
Bu fonksiyon özellikle inatçı lekelerin çıkarılması için kullanışlıdır. Çamaşır suyu ile veya çamaşır suyu olmadan
kullanılabilir.
Ağartma isterseniz, ilave raf bölmesini (4) bölme 1 ‘in içerisine yerleştirin. Çamaşır suyunu bölmeye dökerken, ortadaki
milde işaretli “max”(maksimum) seviyesini aşmamaya dikkat edin (bakınız şekil syf. 34).
! Bu programlarda uygulanamaz: 2, 6, 8, 9, 10, 12, 13, 14, .
Kolay Ütü
Bu işlev seçildiğinde kırışıkları önleyecek şekilde yıkama ve sıkma devrinin özellikleri değiştirilecektir. Program bitiminde çamaşır makinesi iç sepetini yavaşça döndürecektir, KOLAY ÜTÜ ve START/PAUSE uyarı lambaları turuncu renkte
yanıp sönecek ve “END” safhasının lambası yanık kalacaktır. Programı bitirmek için START/PAUSE veya KOLAY ÜTÜ
düğmesine basınız.
! Bu programlarda uygulanamaz: 1, 2, 6, 8, 12, 13, 14, , .
Ön Yıkama
Bu işlev seçildiğinde en dayanıklı lekeleri çıkarmak için kullanılan ön yıkama gerçekleştirilir
Not: Mevcut olan hazneye deterjan koyunuz.
! Sonraki programlarda uygulanamaz:
Zaman Ayarı
Makinanın çalışmasını 12 saate kadar geciktirebilir.
Gecikmeli çalıştırmayı programlamak için arzu ettiğiniz süreyi görünceye kadar göstergeli düğmeye basınız. Düğmeye
beşinci basışınızda işlem iptal olacaktır.
Not: START/PAUSE tuşuna bastıktan sonra süre ayarı ancak aşağıya doğru ayarlanabilir.
(60°), , 6, 8, 9, 10, 11, 12, 13, 14, , .
! Tüm programlarla uygulanabilir.
33
Page 34

Deterjanlar ve çamaşır
M
AX
1
2
4
3
A
B
TR
Deterjan çekmecesi
Başarılı yıkama sonuçları aynı zamanda doğru miktarda
deterjan kullanımına bağlıdır: çok fazla deterjan ilave edilmesi daha iyi bir yıkama ile sonuçlanmadığı gibi, cihazın
içerisinde birikir ve çevre kirliliğine katkıda bulunur.
! Beyaz pamuklu çamaşırlar, ön yıkama ve 60°C’den yüksek
sıcaklık derecesi ile yıkamalar için toz deterjan kullanınız.
! Deterjan ambalajı üzerinde aktarılan bilgileri takip ediniz.
! Çok fazla köpük yapacağından çitileme deterjanı
kullanmayın.
Deterjan çekmecesini açın
ve deterjan veya katkı maddelerini aşağıdaki şekilde
dökün.
Bölüm 1: Ön yıkama deterjanı (toz)
Deterjanı dökmeden önce, ilave bölme 4’ün çıkarıldığından
emin olun.
Bölüm 2: Yıkama deterjanı (toz veya sıvı)
Sıvı deterjan kullanılması halinde doğru doz ayarlaması
için makinede gösterilen A kademesini kullanmanız önerilir. Toz deterjan ile yıkamalarda B kademesini kullanınız.
Bölüm 3: Katkı maddeleri (yumuşatıcı vs.)
Yumuşatıcı ızgaranın dışına taşmamalıdır.
ilave bölme 4: Çamaşır suyu
Hotpoint-Ariston, yıkama performanslarından ve su ve
elektrik tüketiminden dolayı Woolmark Company
tarafından Woolmark Apparel Care - Platinum sertikasını
elde eden ilk çamaşır makinesi markasıdır. (M1126)
Hassas Çamaşılrar: Taşlı veya pullu giysiler gibi çok
hassas çamaşırları yıkamak için programını kullanınız 9.
Çamaşırları yıkamadan önce ters çevirmeniz ve küçük
parçaları hassas çamaşırların yıkanması için kullanılan
özel torba içerisine koymanız önerilir.
Daha iyi sonuçlar elde etmek için hassas çamaşırlara
özel sıvı deterjanın kullanılması önerilir.
İpek çamaşırların ve perdelerin yıkanması için, 9
devresini seçiniz ve
makine çamaşırları durulama suyu içinde bekletir ve
uyarı lambası yanıp sönmeye başlar. Su boşaltmak
için START/PAUSE ya da
gerekir.
opsiyonunu devreye sokunuz;
düğmesine basmanız
Yük dengeleme sistemi
Her dönüş çevriminden önce aşırı titreşimi önlemek ve
yükü tek bir yönde dağıtmak için, tambur yıkama dönüş
hızından biraz daha fazla olan bir hızda sürekli döner.
Birkaç denemeden sonra, yük doğru şekilde dengelenmezse, makine düşük bir dönüş hızında döner. Yük çok
dengesizse, çamaşır makinesi döndürme yerine dağıtma
işlemini uygular. Gelişmiş yük dağılımı ve dengeyi desteklemek için, küçük ve büyük giysilerin yük içerisinde
karıştırılmasını öneririz.
Çamaşırın hazırlanması
• Çamaşırı aşağıdakilere göre ayırın:
- etiketteki kumaş türü/sembole
- renge: renkli giysileri beyazlardan ayırın.
• Bütün cepleri boşaltın ve düğmeleri kontrol edin.
• Kurulama sırasında çamaşırın ağırlığını gösteren
“Programlar Tablosu”’’daki değerleri aşmayın.
Çamaşırınız ağırlığı ne kadardır ?
1 çarşaf 400-500 gr
1 yastık kılıfı 150-200 gr
1 masa örtüsü 400-500 gr
1 bornoz 900-1.200 gr
1 havlu 150-250 gr
Özel yıkama çevrimleri
Yünlüler: bu Hotpoint-Ariston çamaşır makinesinin
“Yünlüler” yıkama devresi, yıkama işlemi giysilerin etiketi
üzerinde aktarılan talimatlara ve elektrikli ev aletinin üretici
rması tarafından verilen talimatlara riayet ederek
gerçekleştirildiği sürece, “elde yıkanabilir” olarak
sınıandırılan yünlü çamaşırların yıkanması için Woolmark
Company tarafından test edilmiş ve onaylanmıştır.
34
Page 35

Arızalar ve onarımlar
Çamaşır makinesi çalışmıyor olabilir. Teknik Servise başvurmadan önce (Teknik Servis bölümüne bakınız) aşağıdaki liste
yardımıyla kolay çözülebilecek bir problem olup olmadığını kontrol ediniz.
Arızalar:
Çamaşır makinesi çalışmıyor.
Yıkama işlemi başlamıyor.
Çamaşır makinesi su almıyor (ilk
yıkama safhasının gösterge lambası
hızlıca yanıp sönüyor).
Çamaşır makinesi devamlı su alıp
veriyor.
Olası nedenler / Çözümler:
• Fiş prize takılı değil veya tam temas etmiyor.
• Evde elektrik yok.
• Makinanın kapağı tam kapanmamış.
• ON/OFF düğmesine basılmamış.
• START/PAUSE düğmesine basılmamış.
• Su musluğu açık değil.
• Su besleme hortumu musluğa takılı değil.
• Hortum bükülmüş.
• Su musluğu açık değil.
• Evde su kesik.
• Basınç yetersiz.
• START/PAUSE düğmesine basılmamış.
• Tahliye hortumu yerden 65 ile 100 cm arasında yerleştirilmemiş (bkz. “Montaj”).
• Tahliye hortumunun başı suya girmiş (bkz. “Montaj”).
• Duvardaki tahliyenin hava boşluğu yok.
Bu kontrollerden sonra olumlu sonuç alınamazsa, musluğu ve kapatıp,
çamaşır makinesini durdurarak Servise haber veriniz. Daire, binanın üst
katlarındaysa, sifon olayı meydana gelerek çamaşır makinesi devamlı su
alıp, veriyor olabilir. Bu sorunun çözümü için piyasada sifon önleyici valar
satılmaktadır.
TR
Çamaşır makinesi su boşaltmıyor
veya santrifüj yapmıyor.
Çamaşır makinesi santrifüj esnasında
aşırı sarsılıyor.
Çamaşır makinesi su kaçırıyor.
START/PAUSE uyarı lambası yanıp
sönerse deviri bitirmek için düğmeye
basınız.
Aşırı köpük oluşuyor.
• Program su boşaltmayı öngörmüyor: bazı programlarda su boşaltma
işlemini elle müdahale ederek başlatmak gerekir.
• “Kolay Ütü” işlevi devrede: programı tamamlamak için START/PAUSE
düğmesine basınız (“Kişisel ayarlar”).
• Tahliye hortumu bükülmüş (bkz. “Montaj”).
• Tahliye kanalı tıkalı.
• Hazne, çamaşır makinesinin montajı esnasında düzgün çözülmemiş (bkz.
“Montaj”).
• Çamaşır makinesinin bulunduğu zemin düz değil (bkz. “Montaj”).
• Çamaşır makinesi mobilyalarla duvar arasında sıkışmış (bkz. “Montaj”).
• Su giriş hortumu tam sıkılmamış (bkz. “Montaj”).
• Deterjan haznesi tıkanmış (temizlemek için bkz. “Bakım ve özen”).
• Tahliye hortumu düzgün takılmamış (bkz. “Montaj”).
• Makineyi kapatınız, prizden şi çekiniz ve 1 dakika sonra tekrar açınız.
Arıza çözülmüyorsa Teknik Servisine başvurunuz.
• Deterjan çamaşır makinesi için uygun değil (“çamaşır makinesi için”, elde
yıkama ve çamaşır makinesi için” veya benzer ibareler olmalıdır).
• Aşırı doz kullanıldı.
35
Page 36

Teknik Servis
195107792.03
06/2014 - Xerox Fabriano
TR
Servise başvurmadan önce:
• Servise başvurmadan çözülebilecek bir ariza olup olmadığını kontrol ediniz (“Arızalar ve onarımlar” bölümüne bakınız);
• Programı tekrar başlatarak, sorunun çözülüp çözülmediğini görünüz;
• Aksi takdirde, garanti belgesinde belirtilen telefon numaralarından teknik servisi arayınız.
! Kesinlikle, yetkili olmayan tamircilere müracaat etmeyiniz.
Şunları bildiriniz:
• arıza tipini;
• cihazın modeli (Mod.);
• seri numarası (S/N).
Bu bilgiler, çamaşır makinesinin arkasındaki plakada bulunurlar.
Cihazın ömrü 10 yıldır.
Tüm Türkiye’de; Yetkili Teknik Servis, Orijinal Yedek Parça, Bakım Ürünlerimiz ve Garanti ile ilgili bilgi için:
0 212 444 50 10.
Ürün Verileri
İthalatçı Firma:
Indesit Company Beyaz Eşya PAZARLAMA A.Ş.
Balmumcu Cad. Karahasan Sok.
No: 11, 34349 – Balmumcu Beşiktaş – İstanbul
Tel: (0212) 355 53 00
36
Üretici Firma:
Indesit Company Spa
Viale Aristide Merloni, 47
60044 Fabriano Italy
Tel: +39 0732 66 11
Indesit Company Spa
Viale Aristide Merloni, 47
60044 Fabriano (AN)
Italy
www.hotpoint.eu
 Loading...