

Page 1

Instructions for use
WASHING MACHINE
GB
English,1
BG
Български,37
WML 621
RO
Română,13
SR
Cрпски,25
Contents
Installation, 2-3
Unpacking and levelling
Connecting the electricity and water supplies
The first wash cycle
Technical data
Care and maintenance, 4
Cutting off the water or electricity supply
Cleaning the washing machine
Cleaning the detergent dispenser drawer
Caring for the door and drum of your appliance
Cleaning the pump
Checking the water inlet hose
Precautions and tips, 5
General safety
Disposal
Description of the washing machine
and starting a wash cycle, 6-7
Control panel
Indicator lights
Starting a wash cycle
GB
Wash cycles, 8
Table of wash cycles
Personalisation, 9
Setting the temperature
Setting the spin speed
Functions
Detergents and laundry, 10
Detergent dispenser drawer
Preparing the laundry
Garments requiring special care
Load balancing system
Troubleshooting, 11
Service, 12
1
Page 2
Installation
GB
! This instruction manual should be kept in a
safe place for future reference. If the washing
machine is sold, transferred or moved, make
sure that the instruction manual remains with
the machine so that the new owner is able to
familiarise himself/herself with its operation
and features.
! Read these instructions carefully: they contain vital information relating to the safe installation and operation of the appliance.
Unpacking and levelling
Unpacking
1. Remove the washing machine from its
packaging.
2. Make sure that the washing machine has
not been damaged during the transportation
process. If it has been damaged, contact the
retailer and do not proceed any further with
the installation process.
3. Remove the 3
protective screws
(used during transportation) and the rubber
washer with the corresponding spacer,
located on the rear
part of the appliance
(see figure).
4. Close off the holes using the plastic plugs
provided.
5. Keep all the parts in a safe place: you will
need them again if the washing machine needs to be moved to another location.
! Packaging materials should not be used as
toys for children.
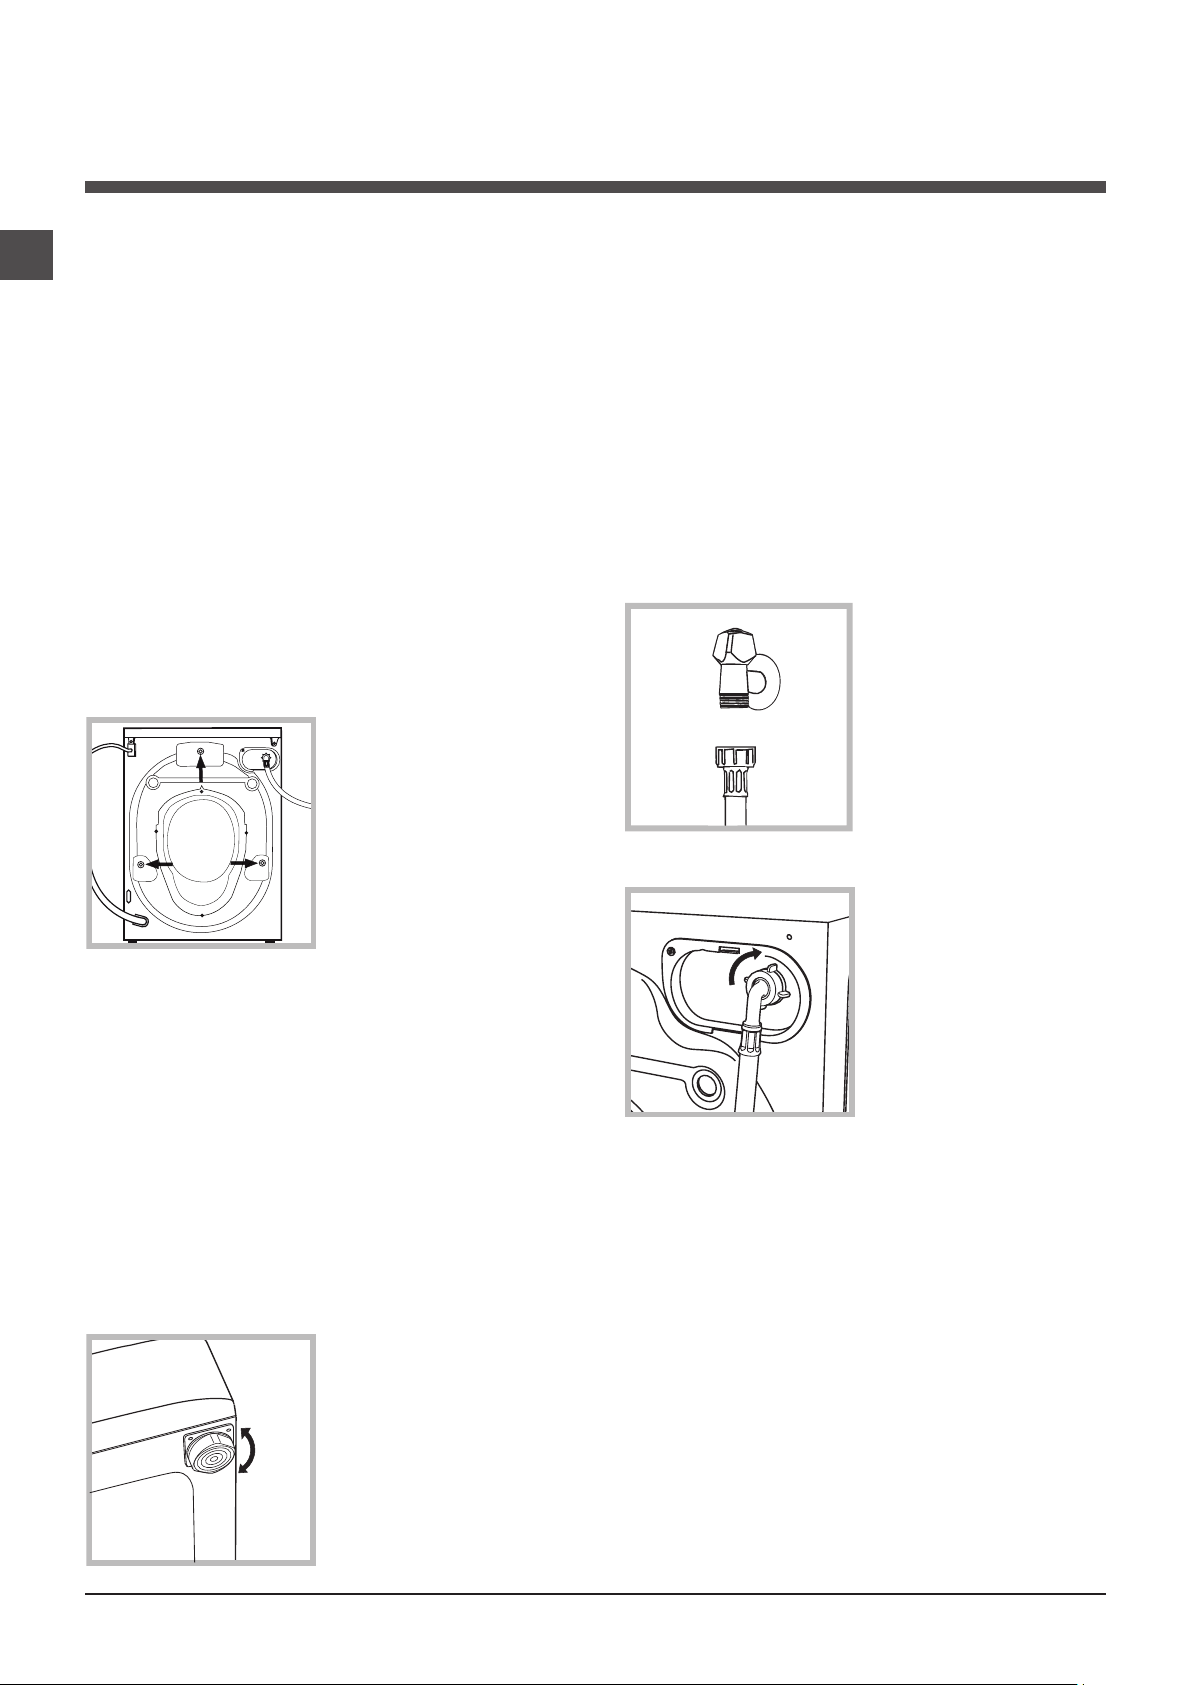
Levelling
1. Install the washing machine on a flat sturdy
floor, without resting it up against walls, furniture cabinets or anything else.
2. If the floor is not
perfectly level, compensate for any unevenness by tightening
or loosening the
adjustable front feet
(see figure); the angle
of inclination, measured in relation to the
worktop, must not
exceed 2°.
Levelling the machine correctly will provide
it with stability, help to avoid vibrations and
excessive noise and prevent it from shifting
while it is operating. If it is placed on carpet or
a rug, adjust the feet in such a way as to allow
a sufficient ventilation space underneath the
washing machine.
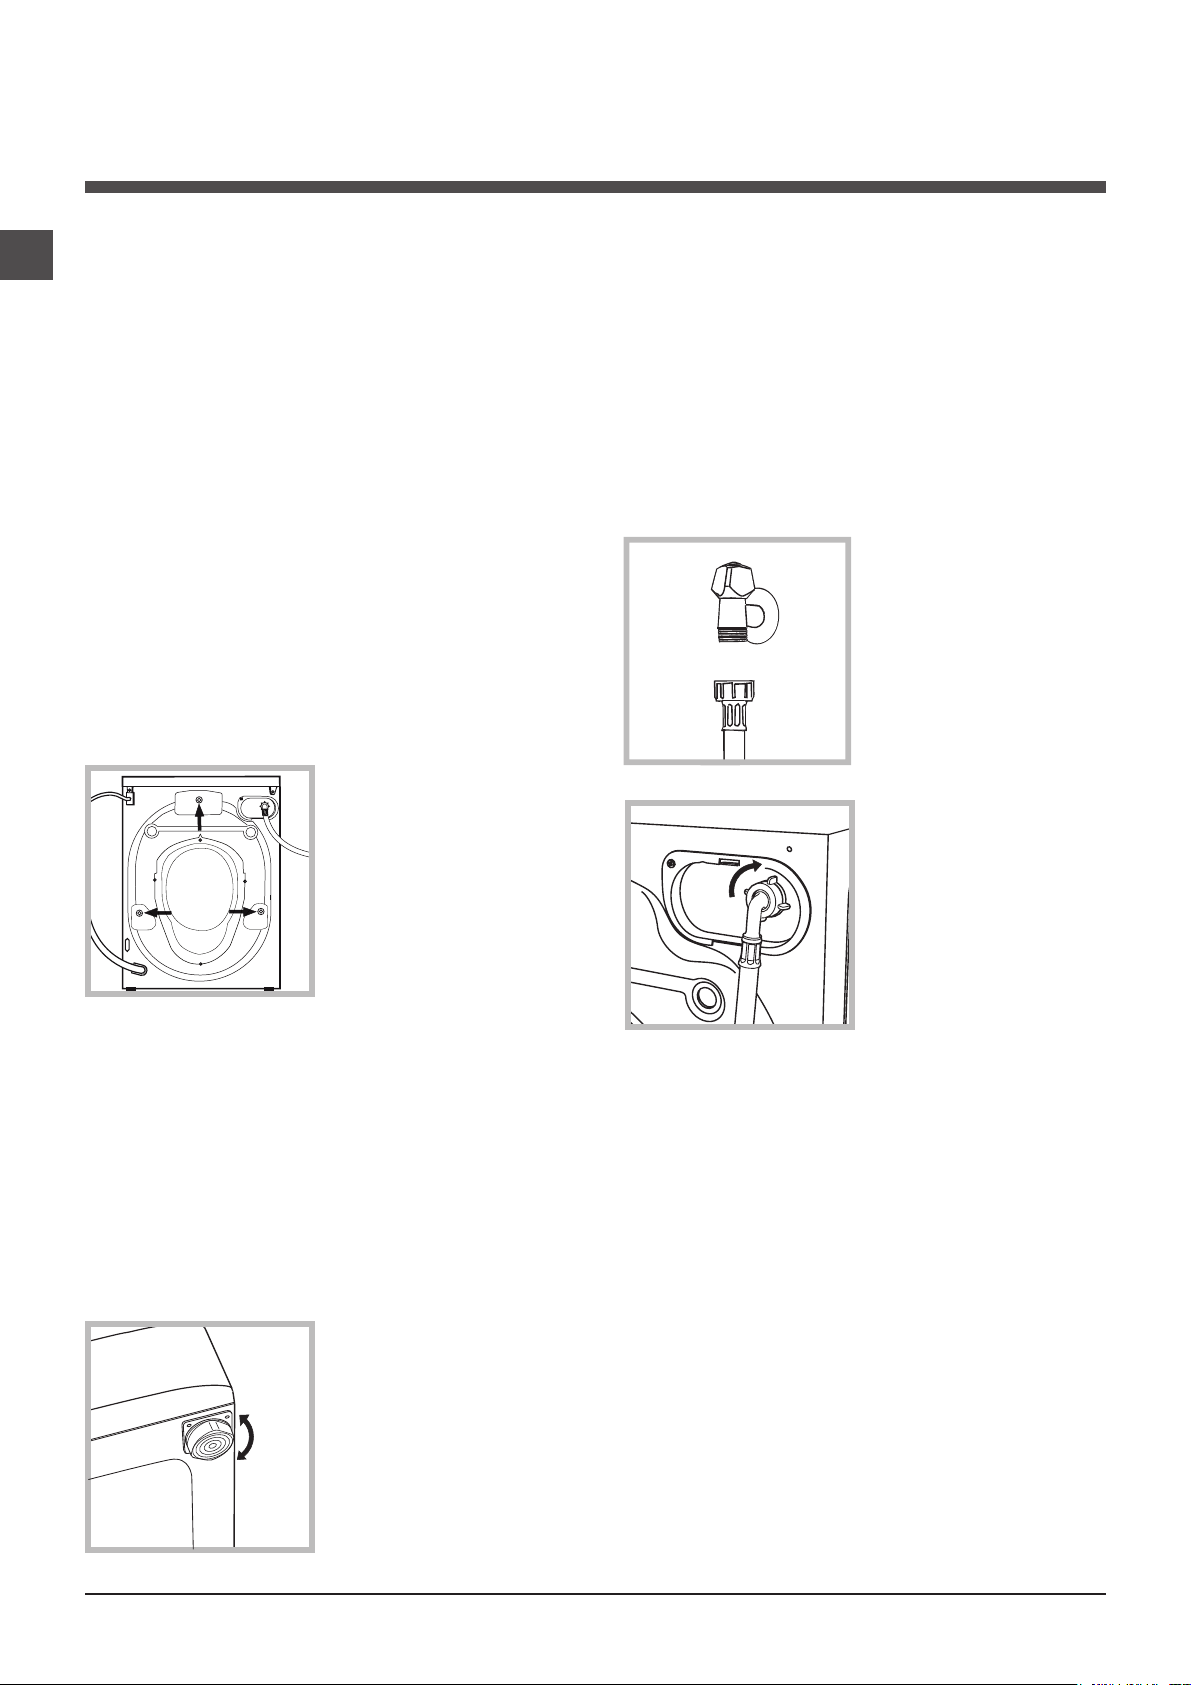
Connecting the electricity and
water supplies
Connecting the water inlet hose
1. Connect the inlet
hose by screwing it to
a cold water tap using
a 3/4 gas threaded
connection (see figu-
re).
Before performing the
connection, allow the
water to run freely until
it is perfectly clear.
2. Connect the inlet
hose to the washing
machine by screwing
it onto the corresponding water inlet of the
appliance, which is
situated on the top
right-hand side of the
rear part of the appliance (see figure).
3. Make sure that the hose is not folded over
or bent.
! The water pressure at the tap must fall within
the range of values indicated in the Technical
data table (see next page).
! If the inlet hose is not long enough, contact a
specialised shop or an authorised technician.
! Never use second-hand hoses.
! Use the ones supplied with the machine.
2
Page 3
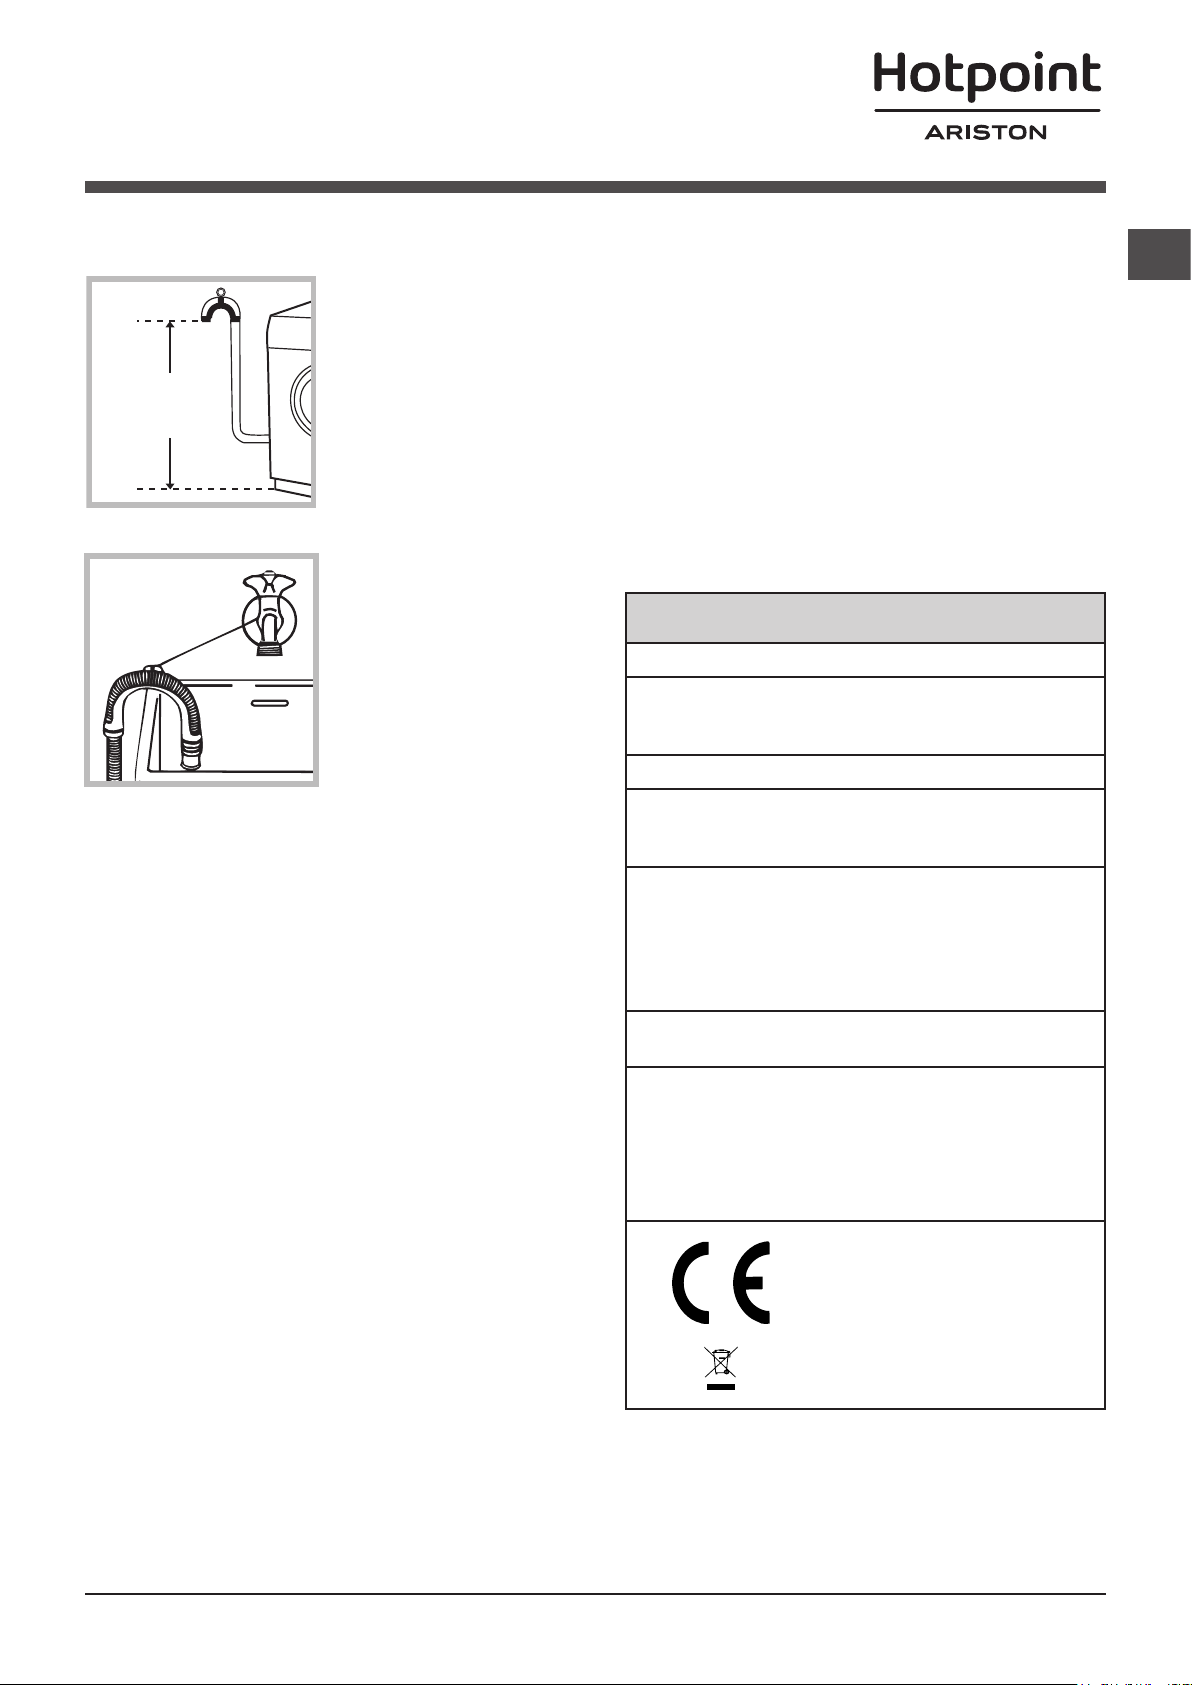
Connecting the drain hose
65 - 100 cm
Connect the drain
hose, without bending
it, to a drain duct or
a wall drain situated
between 65 and 100
cm from the floor;
alternatively, placed
it over the edge of a
basin, sink or tub, fastening the duct supplied to the tap (see
figure). The free end
of the hose should
not be underwater.
! Do not use extension cords or multiple sockets.
! The cable should not be bent or compressed.
! The power supply cable must only be replaced by authorised technicians.
Warning! The company shall not be held responsible in the event that these standards are
not observed.
The first wash cycle
Once the appliance has been installed, and
before you use it for the first time, run a wash
cycle with detergent and no laundry, using
wash cycle number “Auto Clean” (see “Clea-
ning the washing machine”).
Technical data
GB
! We advise against the use of hose extensions;
if it is absolutely necessary, the extension must
have the same diameter as the original hose
and must not exceed 150 cm in length.
Electrical connections
Before plugging the appliance into the electricity socket, make sure that:
• thesocketisearthedandcomplieswithall
applicable laws;
• thesocketisabletowithstandthemaximum power load of the appliance as indicated
in the Technical data table (see opposite);
• thepowersupplyvoltagefallswithinthevalues indicated in the Technical data table (see
opposite);
• thesocketiscompatiblewiththeplugofthe
washing machine. If this is not the case, replace the socket or the plug.
! The washing machine must not be installed
outdoors, even in covered areas. It is extremely dangerous to leave the appliance exposed
to rain, storms and other weather conditions.
Model
Dimensions
Capacity
Electrical
connections
Water connections
Spin speed
Test wash
cycles in
accordance
with regulations
1061/2010
1015/2010
WML 621
width 59.5 cm
height 85 cm
depth 51,7 cm
from 1 to 6 kg
please refer to the technical
data plate fixed to the machine
maximum pressure
1 MPa (10 bar)
minimum pressure
0.05 MPa (0.5 bar)
drum capacity 46 litres
up to 1200 rotations per
minute
programme 4;
Eco Cotton 60°C.
programme 4;
Eco Cotton 40°C.
This appliance conforms to
the following EC Directives:
- 2004/108/EC (Electromagnetic Compatibility)
- 2006/95/EC (Low Voltage)
- 2012/19/EU - WEEE
! When the washing machine has been installed, the electricity socket must remain within
easy reach.
3
Page 4
Care and maintenance
1
2
GB
Cutting off the water and electricity supplies
•Turnoffthewatertapaftereverywashcycle.
This will limit wear on the hydraulic system inside the washing machine and help to prevent
leaks.
•Unplugthewashingmachinewhencleaning
it and during all maintenance work.
Cleaning the washing machine
•Theouterpartsandrubbercomponents
of the appliance can be cleaned using a soft
cloth soaked in lukewarm soapy water. Do not
use solvents or abrasives.
•Thewashingmachinehasa“AutoClean”
programme for its internal parts that must be
run with no load in the drum.
To help the wash cycle you may want to use
either the detergent (i.e. a quantity 10% the
quantity specified for lightly-soiled garments)
or special additives to clean the washing
machine. We recommend running a cleaning
programme every 40 wash cycles.
A
B
To start the programme
press buttons A and
B simultaneously for 5
seconds (see figure).
The programme will
start automatically and
will run for about 70
minutes. To stop the
cycle press the START/
PAUSE button.
Caring for the door and drum of
your appliance
•Alwaysleavetheportholedoorajarinorder
to prevent unpleasant odours from forming.
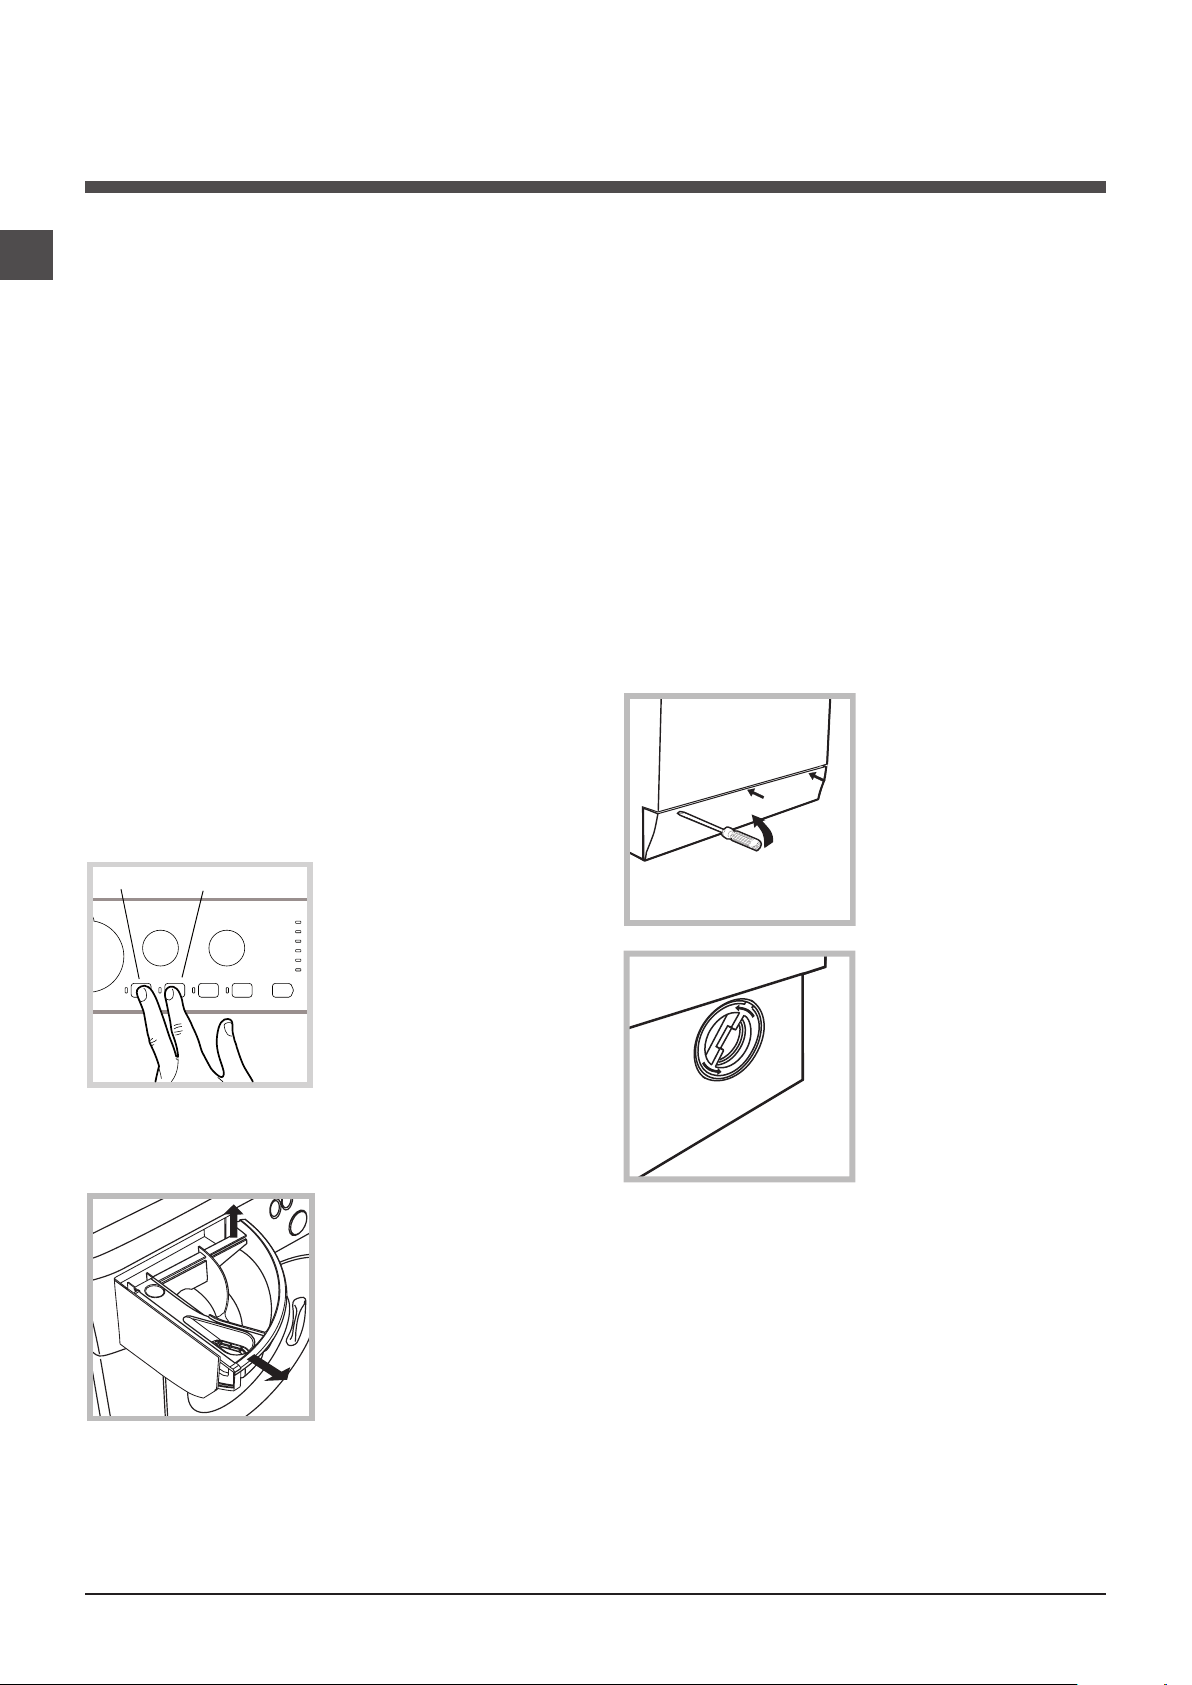
Cleaning the pump
The washing machine is fitted with a self-cleaning pump which does not require any maintenance. Sometimes, small items (such as coins
or buttons) may fall into the pre-chamber which
protects the pump, situated in its bottom part.
! Make sure the wash cycle has finished and
unplug the appliance.
To access the pre-chamber:
1. using a screwdriver, remove the cover
panel on the lower
front part of the washing machine (see
figure);
2. unscrew the lid
by rotating it anticlockwise (see figu-
re): a little water may
trickle out. This is
perfectly normal;
Cleaning the detergent dispenser
drawer
Remove the dispenser by raising it and
pulling it out (see
figure).
Wash it under running
water; this operation
should be repeated
frequently.
4
3. clean the inside thoroughly;
4. screw the lid back on;
5. reposition the panel, making sure the hooks
are securely in place before you push it onto
the appliance.
Checking the water inlet hose
Check the inlet hose at least once a year. If
there are any cracks, it should be replaced
immediately: during the wash cycles, water
pressure is very strong and a cracked hose
could easily split open.
! Never use second-hand hoses.
Page 5

Precautions and tips
! This washing machine was designed and constructed in
accordance with international safety regulations. The following information is provided for safety reasons and must
therefore be read carefully.
General safety
• Thisappliancewasdesignedfordomesticuseonly.
• This appliance can be used by children aged
from 8 years and above and persons with
reduced physical, sensory or mental capabilities or lack of experience and knowledge if
they have been given supervision or instruction concerning use of the appliance in a
safe way and understand the hazards involved. Children shall not play with the appliance. Cleaning and user maintenance shall not
be made by children without supervision..
• Donottouchthemachinewhenbarefootorwithwetor
damp hands or feet.
• Donotpullonthepowersupplycablewhenunplugging
the appliance from the electricity socket. Hold the plug
and pull.
• Donotopenthedetergentdispenserdrawerwhilethe
machine is in operation.
• Donottouchthedrainedwaterasitmayreachextremely high temperatures.
• Neverforcetheportholedoor.Thiscoulddamagethesafety
lock mechanism designed to prevent accidental opening.
• Iftheappliancebreaksdown,donotunderanycircumstances access the internal mechanisms in an attempt
to repair it yourself.
• Alwayskeepchildrenwellawayfromtheappliancewhile
it is operating.
• Thedoorcanbecomequitehotduringthewashcycle.
• Iftheappliancehastobemoved,workinagroupoftwo
or three people and handle it with the utmost care. Never
try to do this alone, because the appliance is very heavy.
• Beforeloadinglaundryintothewashingmachine,make
sure the drum is empty.
GB
Disposal
•Disposingofthepackagingmaterials:observelocalregu-
lations so that the packaging may be re-used.
•TheEuropeanDirective2012/19/EU-WEEEonWaste
Electrical and Electronic Equipment, requires that old
household electrical appliances must not be disposed of in
the normal unsorted municipal waste stream. Old appliances must be collected separately in order to optimise the
recovery and recycling of the materials they contain and
reduce the impact on human health and the environment.
The crossed out “wheeled bin” symbol on the product
reminds you of your obligation, that when you dispose of
the appliance it must be separately collected. Consumers
should contact their local authority or retailer for information
concerning the correct disposal of their old appliance.
5
Page 6
Description of the washing
machine and starting a wash cycle
GB
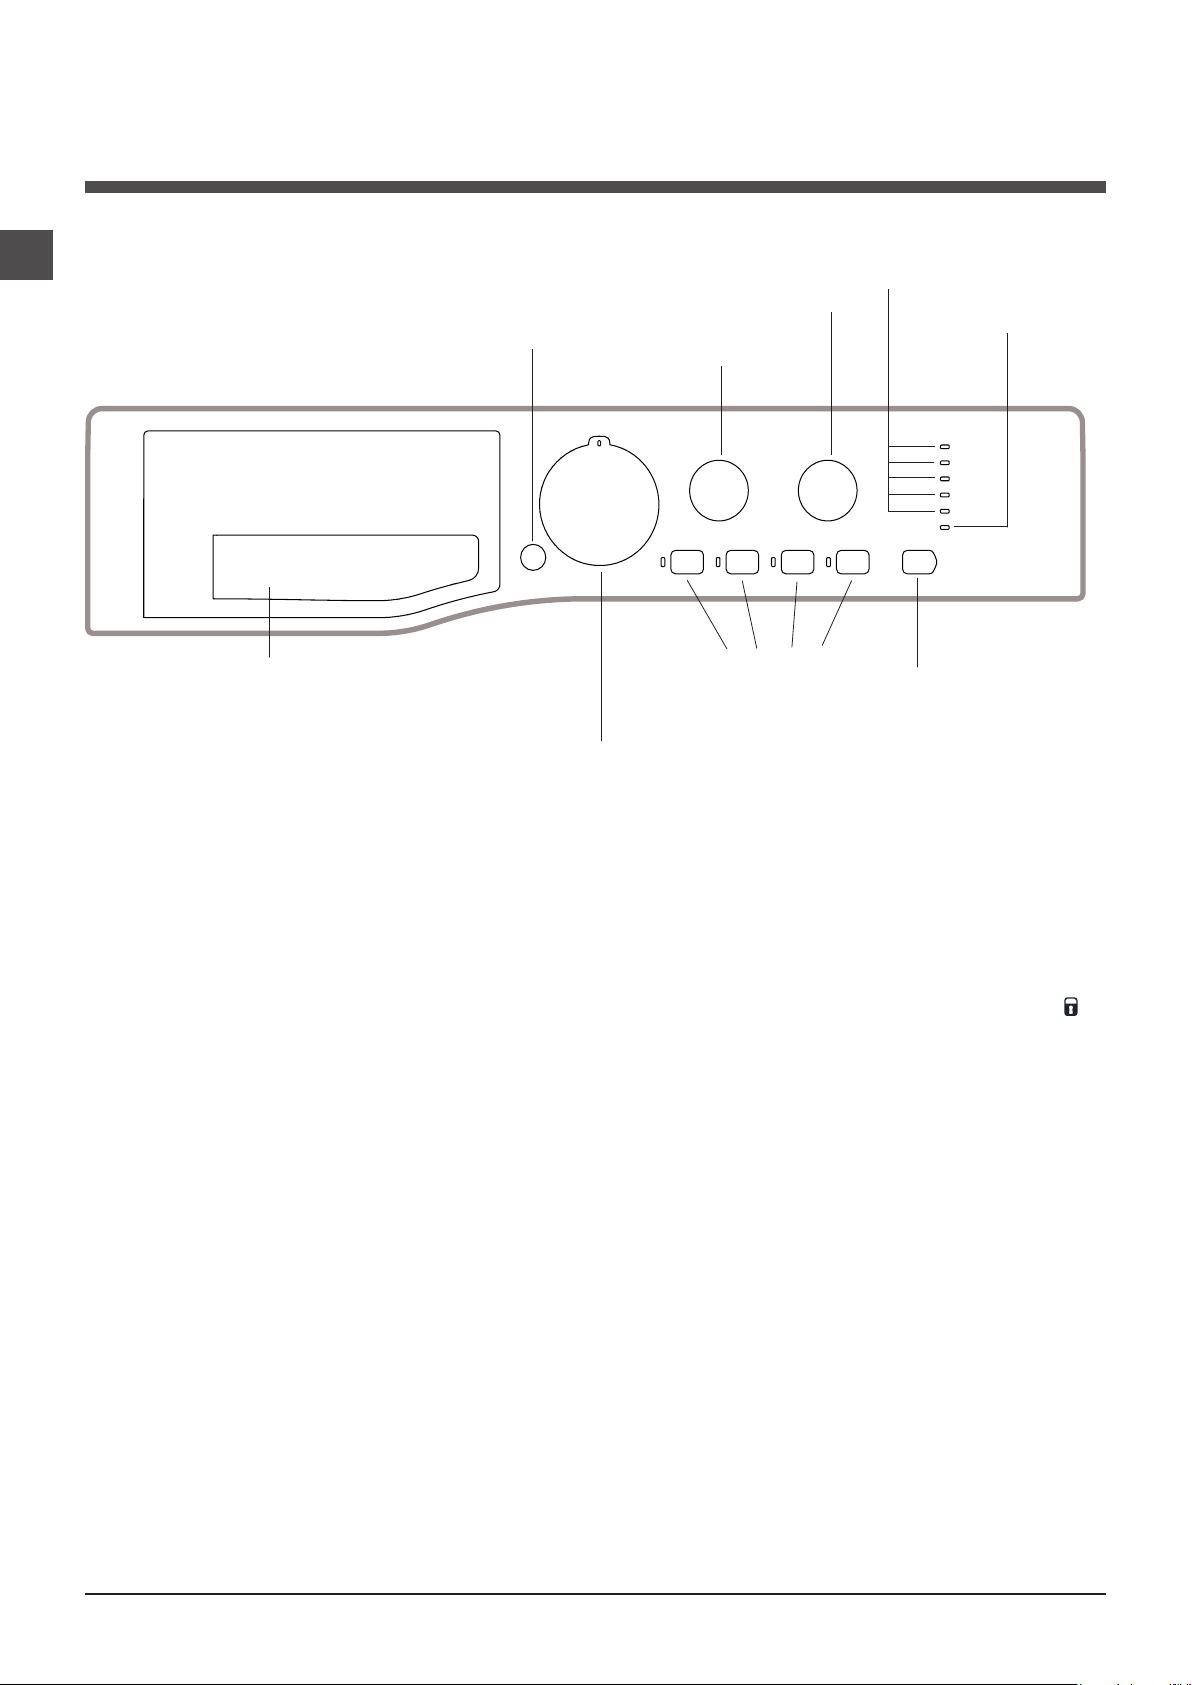
Control panel
Detergent dispenser drawer
ON/OFF
button
TEMPERATURE
WASH CYCLE
knob
SPIN SPEED
knob
FUNCTION
buttons with
indicator lights
WASH CYCLE PROGRESS/
DELAY TIMER indicator lights
knob
START/PAUSE
button with indicator
light
DOOR
LOCKED
indicator light
Detergent dispenser drawer: used to dispense
detergents and washing additives (see “Detergents and
laundry”).
ON/OFF button: switches the washing machine on and off.
WASH CYCLE knob: programmes the wash cycles. Du-
ring the wash cycle, the knob does not move.
FUNCTION buttons with indicator light: used to select the
available functions. The indicator light corresponding to the
selected function will remain lit.
TEMPERATURE knob: sets the temperature or the cold
wash cycle (see “Personalisation”).
SPIN SPEED knob: sets the spin speed or exclude the
spin cycle completely (see “Personalisation”).
WASH CYCLE PROGRESS/DELAY TIMER
light
s: used to monitor the progress of the wash cycle.
The illuminated indicator light shows which phase is in
progress.
If the Delay Timer function has been set, the time remaining
until the wash cycle starts will be indicated (see next page).
indicator
START/PAUSE button with indicator light: starts or temporarily interrupts the wash cycles.
N.B. To pause the wash cycle in progress, press this
button; the corresponding indicator light will flash orange,
while the indicator light for the current wash cycle phase
will remain lit in a fixed manner. If the DOOR LOCKED
indicator light is switched off, the door may be opened
(wait approximately 3 minutes).
To start the wash cycle from the point at which it was interrupted, press this button again.
Standby mode
This washing machine, in compliance with new energy saving regulations, is fitted with an automatic standby system
which is enabled after about 30 minutes if no activity is
detected. Press the ON-OFF button briefly and wait for the
machine to start up again.
DOOR LOCKED indicator light: indicates whether the
door may be opened or not (see next page).
6
Page 7

Indicator lights
END
The indicator lights provide important information.
This is what they can tell you:
Wash cycle phase indicator lights
Once the desired wash cycle has been selected and has
begun, the indicator lights switch on one by one to indicate
which phase of the cycle is currently in progress.
GB
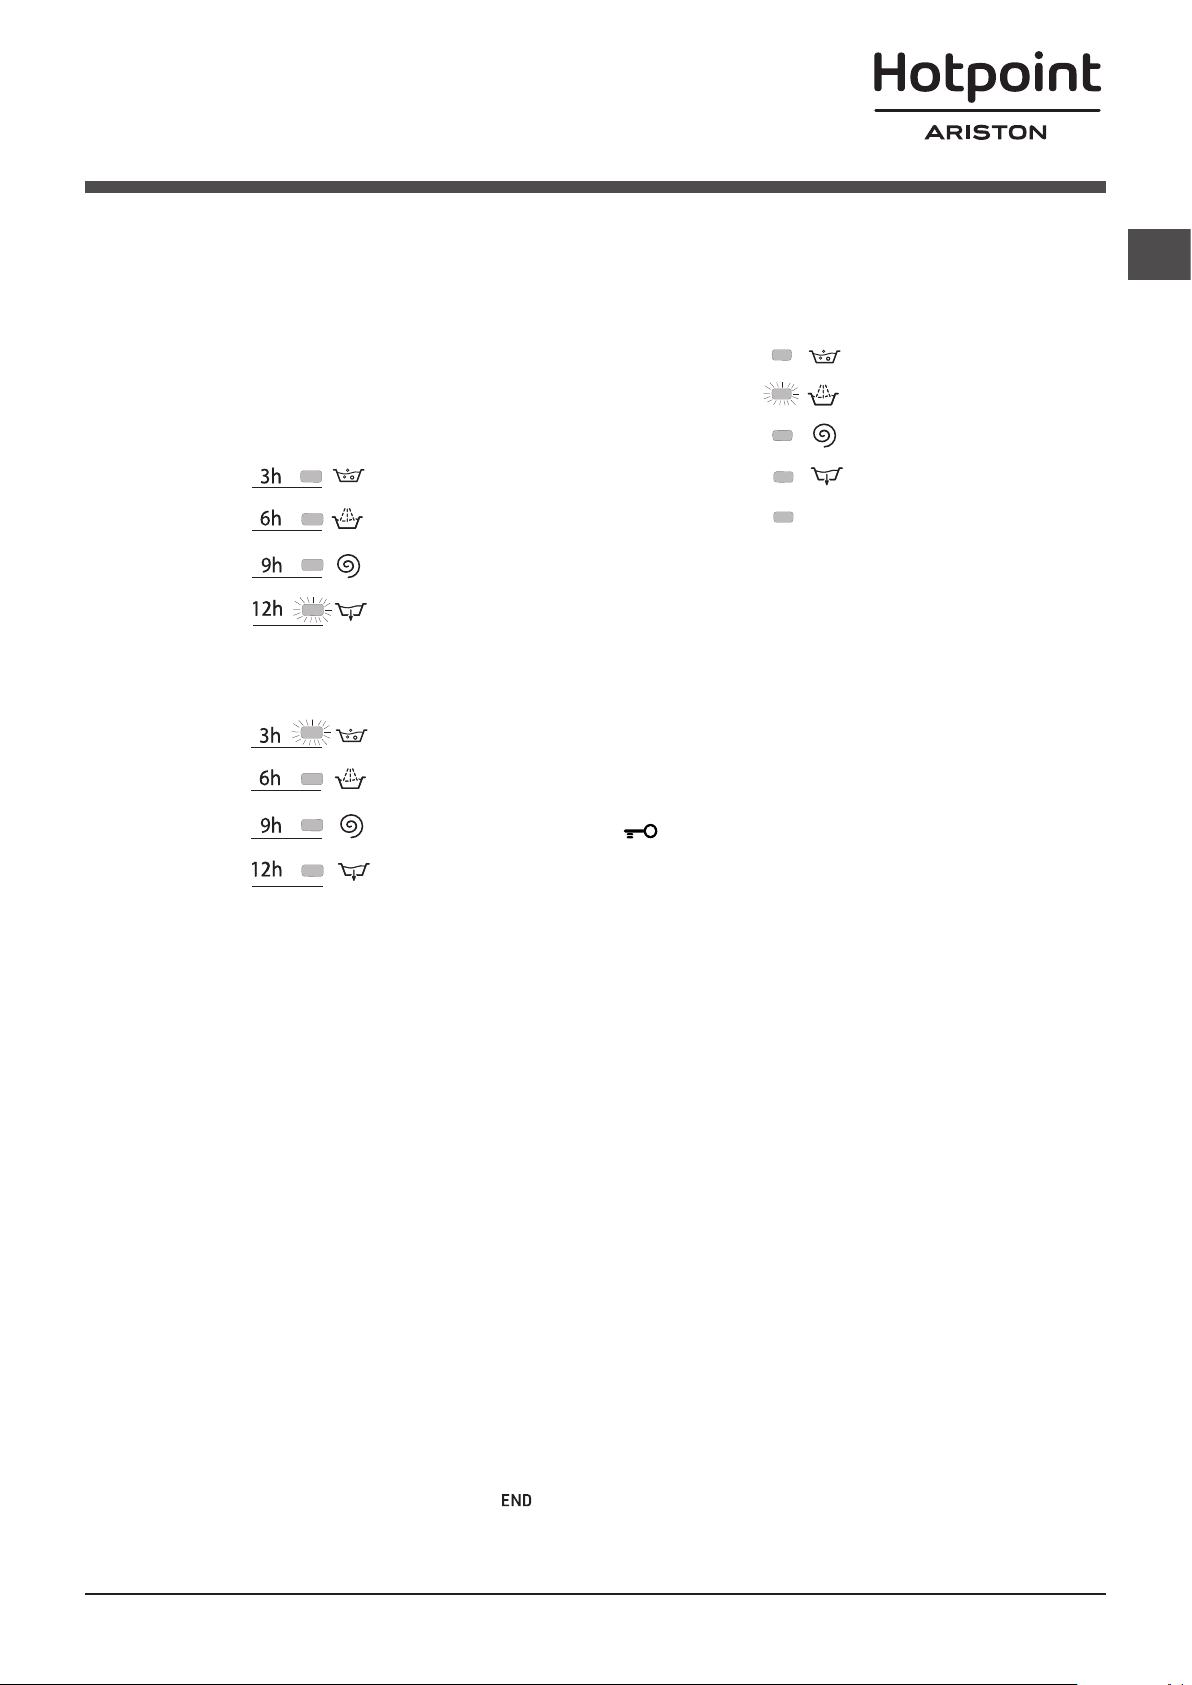
Delayed start
If the DELAY TIMER function has been activated (see “Personalisation”), after the wash cycle has been started the
indicator light corresponding to the selected delay period
will begin to flash:
As time passes, the remaining delay will be displayed and
the corresponding indicator light will flash:
Once the set delay has elapsed, the flashing indicator light
will switch off and the selected wash cycle will begin.
Wash
Rinse
Spin
Pump out
End of wash cycle
Function buttons and corresponding indicator lights
When a function is selected, the corresponding indicator
light will illuminate.
If the selected function is not compatible with the programmed wash cycle, the corresponding indicator light will
flash and a sound alert (3 beeps); the function will not be
activated.
If a function which is incompatible with another function
selected previously, only the most recent selection will
remain active.
Door locked indicator light
If this indicator light is on, the appliance door is locked to
prevent it from being opened accidentally; to avoid any
damage, wait for the indicator light to switch off before you
open the appliance door (wait approximately 3 minutes).
N.B. If the DELAY TIMER function is activated, the door
cannot be opened; pause the machine by pressing the
START/PAUSE button if you wish to open it.
! If the START/PAUSE indicator light (orange) flashes
rapidly at the same time as the function indicator light, this
indicates a problem has occurred (see “Troubleshooting”).
Starting a wash cycle
1. Turn the washing machine on by pressing the ON/OFF button. All the indicator lights will turn on for a few seconds, then only
the indicator lights relative to the selected programme settings will remain lit and the START/PAUSE indicator light will flash.
2. Load the laundry and close the door.
3. Set the WASH CYCLE knob to the desired programme.
4. Set the washing temperature (see “Personalisation”).
5. Set the spin speed (see “Personalisation”).
6. Measure out the detergent and washing additives (see “Detergents and laundry”).
7. Select the desired functions.
8. Start the wash cycle by pressing the START/PAUSE button and the corresponding indicator light will remain lit in a fixed
manner, in green.
To cancel the set wash cycle, pause the machine by pressing the START/PAUSE button and select a new cycle.
9. At the end of the wash cycle the indicator light will switch on. The DOOR LOCKED indicator light will switch off, indi-
cating that the door may be opened (wait approximately 3 minutes). Take out your laundry and leave the appliance door ajar
to make sure the drum dries completely. Switch the washing machine off by pressing the ON/OFF button.
7
Page 8
GB
Wash cycles
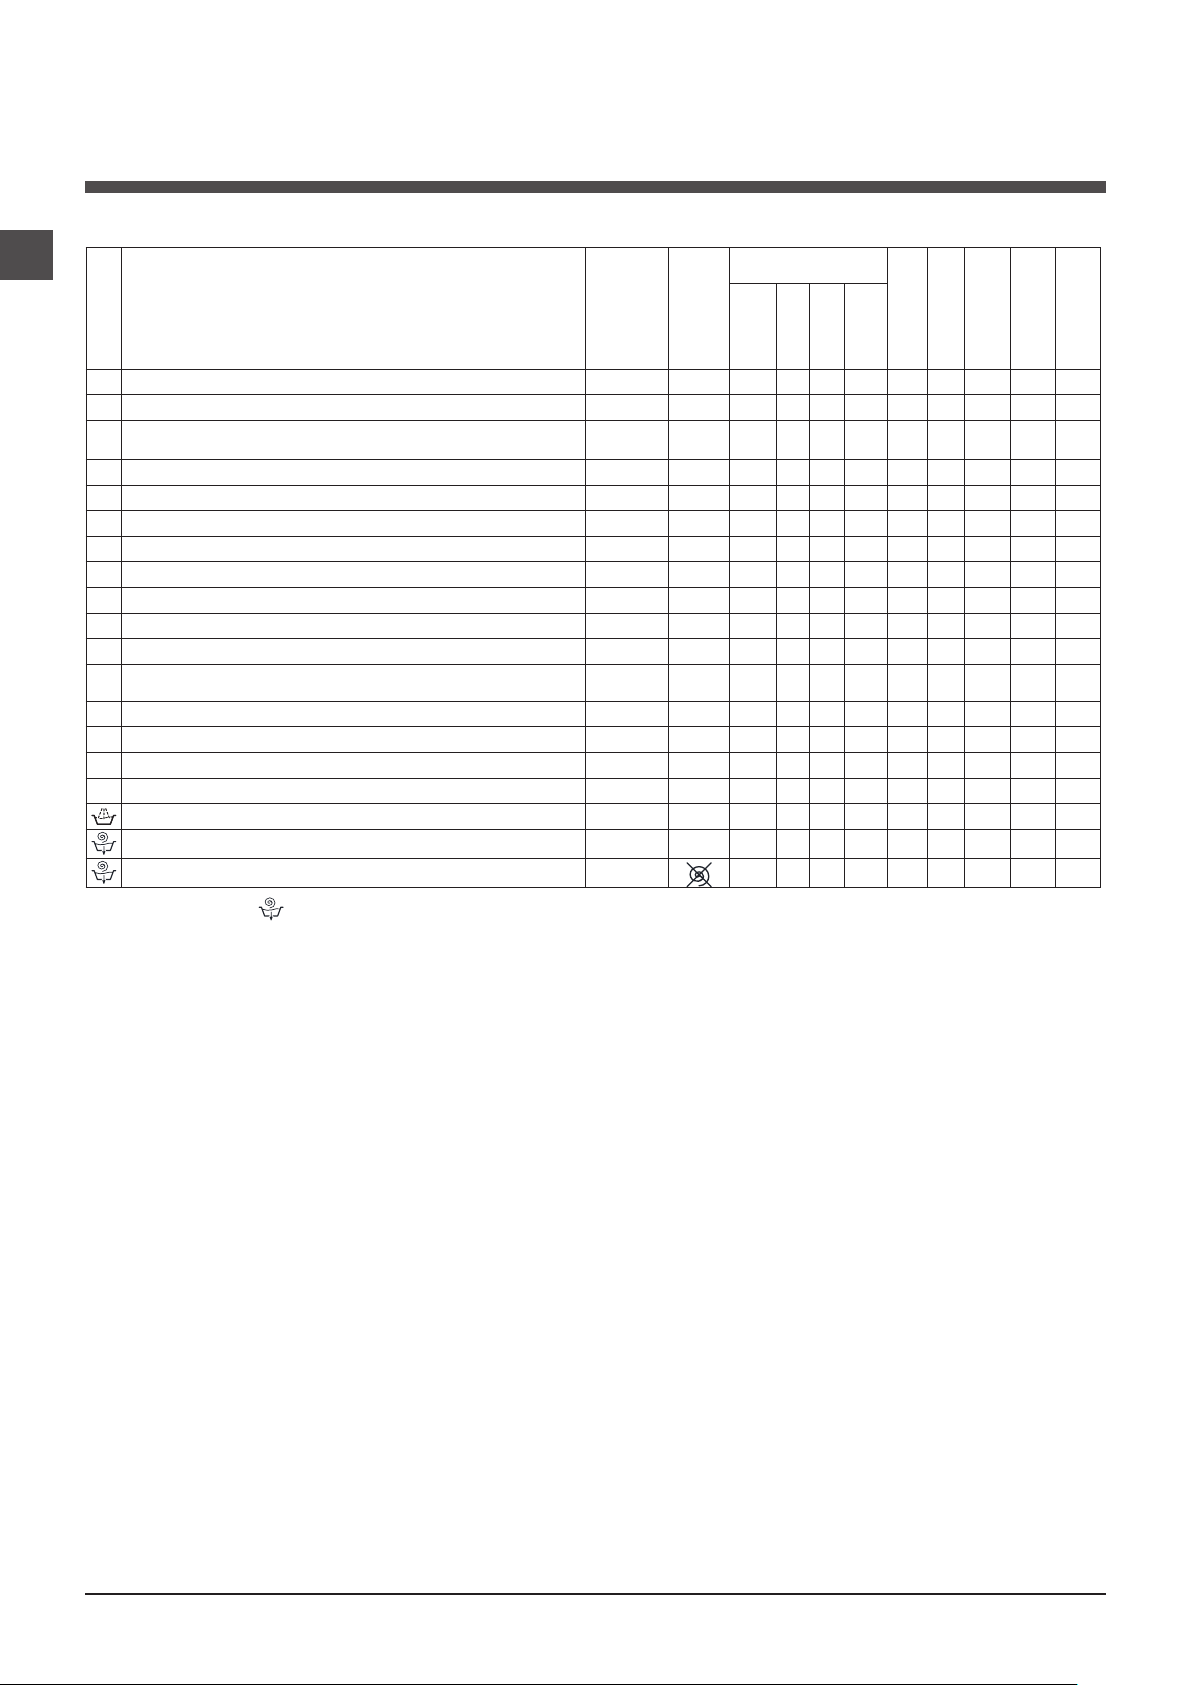
Table of wash cycles
Description of the wash cycle
Wash cycles
Anti Stain
1
Whites
2
Cotton: lightly soiled resistant and delicate colours.
3
Eco Cotton 60° (1): heavily soiled whites and resistant colours.
4
Eco Cotton 40° (2): lightly soiled resistant and delicate colours.
4
Synthetics: heavily soiled resistant colours.
5
Synthetics (3): lightly soiled resistant colours.
5
Anti allergy
6
Baby
7
Wool: for wool, cashmere, etc.
8
Delicates
9
Fast Wash 60’: to refresh normal soiled garments quickly (not
10
suitable for wool, silk and clothes which require washing by hand).
Cotton 20°: lightly soiled resistant and delicate colours.
11
Eco Cottons
12
Eco Synthetics
13
Eco Fast 30’
14
Rinse
Spin and Pump out
Pump out only *
Detergents
Max.
temp.
(°C)
40° 1200
60° 1200
40°
(Max. 90°)
60° 1200 -
40° 1200 -
60° 1000
40° 1000
60° 1200 -
40° 1000
40° 800 -
30° 0 -
60° 1200 -
20° 1200 -
Cold Water
Cold Water
Cold Water
Max.
speed
(rpm)
1200
1200 -
1000 -
800 -
- 1200 - -
- 1200 - - - - 6 - - - 10’
- - - - - 6 - - - 3’
Wash
Prewash
Bleach
-
-
-
-
-
-
-
-
-
-
Fabric
softener
1,5 - - - 80’
3,5 53 0,68 30 60’
pness%
Energy con-
Max. load (kg)
4 - - - 180’
4 - - - 180’
6 - - - 115’
6 53 1,02 49,8 195’
6 53 0,86 76 185’
3 44 0,78 33 120’
3 - - - 110’
4 - - - 185’
3 - - - 145’
1 - - - 75’
6 - - - 180’
6 - - - 100’
3 - - - 75’
3 70 0,05 36 30’
6 - - - 49’
sumptionkWh
Residual dam-
Total water lt
Cycle duration
* If you select programme and exclude the spin cycle, the machine will drain only.
The length of cycle shown on the display or in this booklet is an estimation only and is calculated assuming standard working conditions. The actual duration can vary according to factors such as water temperature and pressure, the amount of detergent used, the amount and type of load inserted, load balancing and any wash options selected.
1) Test wash cycle in compliance with regulation 1061/2010: set wash cycle 4 with a temperature of 60°C.
This cycle is designed for cotton loads with a normal soil level and is the most efficient in terms of both electricity and water consumption; it should be used for garments which can be
washed at 60°C . The actual washing temperature may differ from the indicated value.
2) Test wash cycle in compliance with regulation 1061/2010: set wash cycle 4 with a temperature of 40°C.
This cycle is designed for cotton loads with a normal soil level and is the most efficient in terms of both electricity and water consumption; it should be used for garments which can be
washed at 40°C . The actual washing temperature may differ from the indicated value.
For all Test Institutes:
2) Long wash cycle for cottons: set wash cycle 4 with a temperature of 40°C.
3) Long wash cycle for synthetics: set wash cycle 5 with a temperature of 40°C.
Anti Stain: the programme 1 is suitable to heavily-soiled garments with resistant colours. It ensures a washing class that is
higher than the standard class (A class). When running the programme, do not mix garments of different colours. We recommend the use of powder detergent. Pre-treatment with special additives is recommended if there are obstinate stains.
Whites: use this cycle 2 to wash white clothes. The programme is designed to maintain the brightness of white clothes over
time. Use powder detergent for best results.
Anti allergy: use programme 6 to remove major allergens such as pollen, mites, cat’s and dog’s hair.
Baby: use the special wash cycle 7 to remove the remove the soiling typically caused by babies, while removing all traces
of detergent from nappies in order to prevent the delicate skin of babies from suffering allergic reactions. The cycle has been
designed to reduce the amount of bacteria by using a greater quantity of water and optimising the effect of special disinfecting additives added to the detergent.
Eco cycles
The Eco Cycles assure energy saving by eliminating the need of heating water and it’s an advantage both to your
energy bill and the environment! These innovative Eco programmes (
12
Eco Cottons,
13
Eco Synthetics and
14
Eco
Fast 30’) are available for various fabrics and different quantity of garment; they have been designed to guarantee a
high cleaning action even at low temperature and can be used for lightly to medium soiled loads. Eco Cycles give the
best results thanks to an intensified wash action, water optimization and are carried out in the same average time of a
standard cycle. For the best washing results with Eco Cycles we recommend the usage of a liquid detergent.
Cotton 20°: the programme 11 ideal for lightly soiled cotton loads. The effective performance levels achieved at cold
temperatures, which are comparable to washing at 40°, are guaranteed by a mechanical action which operates at varying
speed, with repeated and frequent peaks.
8
Page 9
Personalisation
Setting the temperature
Turn the TEMPERATURE knob to set the wash temperature (see Table of wash cycles).
The temperature may be lowered, or even set to a cold wash ( ).
The washing machine will automatically prevent you from selecting a temperature which is higher than the maximum value
set for each wash cycle.
! Exception: if the
3
programme is selected, the temperature can be increased up to a value of 90°C.
Setting the spin speed
Turn the SPIN SPEED knob to set the spin speed for the selected wash cycle.
The maximum spin speeds available for each wash cycle are as follows:
Wash cycles Maximum spin speed
Cottons 1200 rpm
Synthetics 1000 rpm
Wool 800 rpm
Silk drain only
The spin speed may be lowered, or the spin cycle can be excluded altogether by selecting the symbol .
The washing machine will automatically prevent you from selecting a spin speed which is higher than the maximum speed
set for each wash cycle.
Functions
The various wash functions available with this washing machine will help to achieve the desired results, every time.
To activate the functions:
1. Press the button corresponding to the desired function;
2. the function is enabled when the corresponding indicator light is illuminated.
Note:
- If the selected function is not compatible with the programmed wash cycle, the corresponding indicator light will flash and
a sound alert (3 beeps); the function will not be activated.
- If a function which is incompatible with another function selected previously, only the most recent selection will remain
active.
GB
Super Wash
This option offers a high-performance wash due to the greater quantity of water used in the initial phase of the cycle, and due
to the increased wash cycle duration, is particularly useful for the removal of stubborn stains. It can be used with or without
bleach. If you desire bleaching, insert the extra tray compartment (4) into compartment 1. When pouring in the bleach, be
careful not to exceed the “max” level marked on the central pivot (see figure pag. 10).
Easy iron
By selecting this function, the wash and spin cycles will be modified in order to reduce the formation of creases. At the end
of the cycle the washing machine will perform slow rotations of the drum; the EASY IRON indicator light will flash and the
phase will remain lit in a fixed manner. To end the cycle, press the START/PAUSE button or the EASY IRON button.
Prewash
If this function is selected, the pre-wash cycle will run; this is useful for removing stubborn stains.
N.B.: Put the detergent in the relevant compartment.
Delay timer
This timer delays the start time of the wash cycle by up to 12 hours.
Press the button repeatedly until the indicator light corresponding to the desired delay time switches on. The fifth time the button
is pressed, the function will be disabled.
N.B. Once you have pressed the START/PAUSE button, the delay time may only be decreased if you wish to modify it.
9
Page 10
Detergents and laundry
M
AX
1
2
4
3
A
B
GB
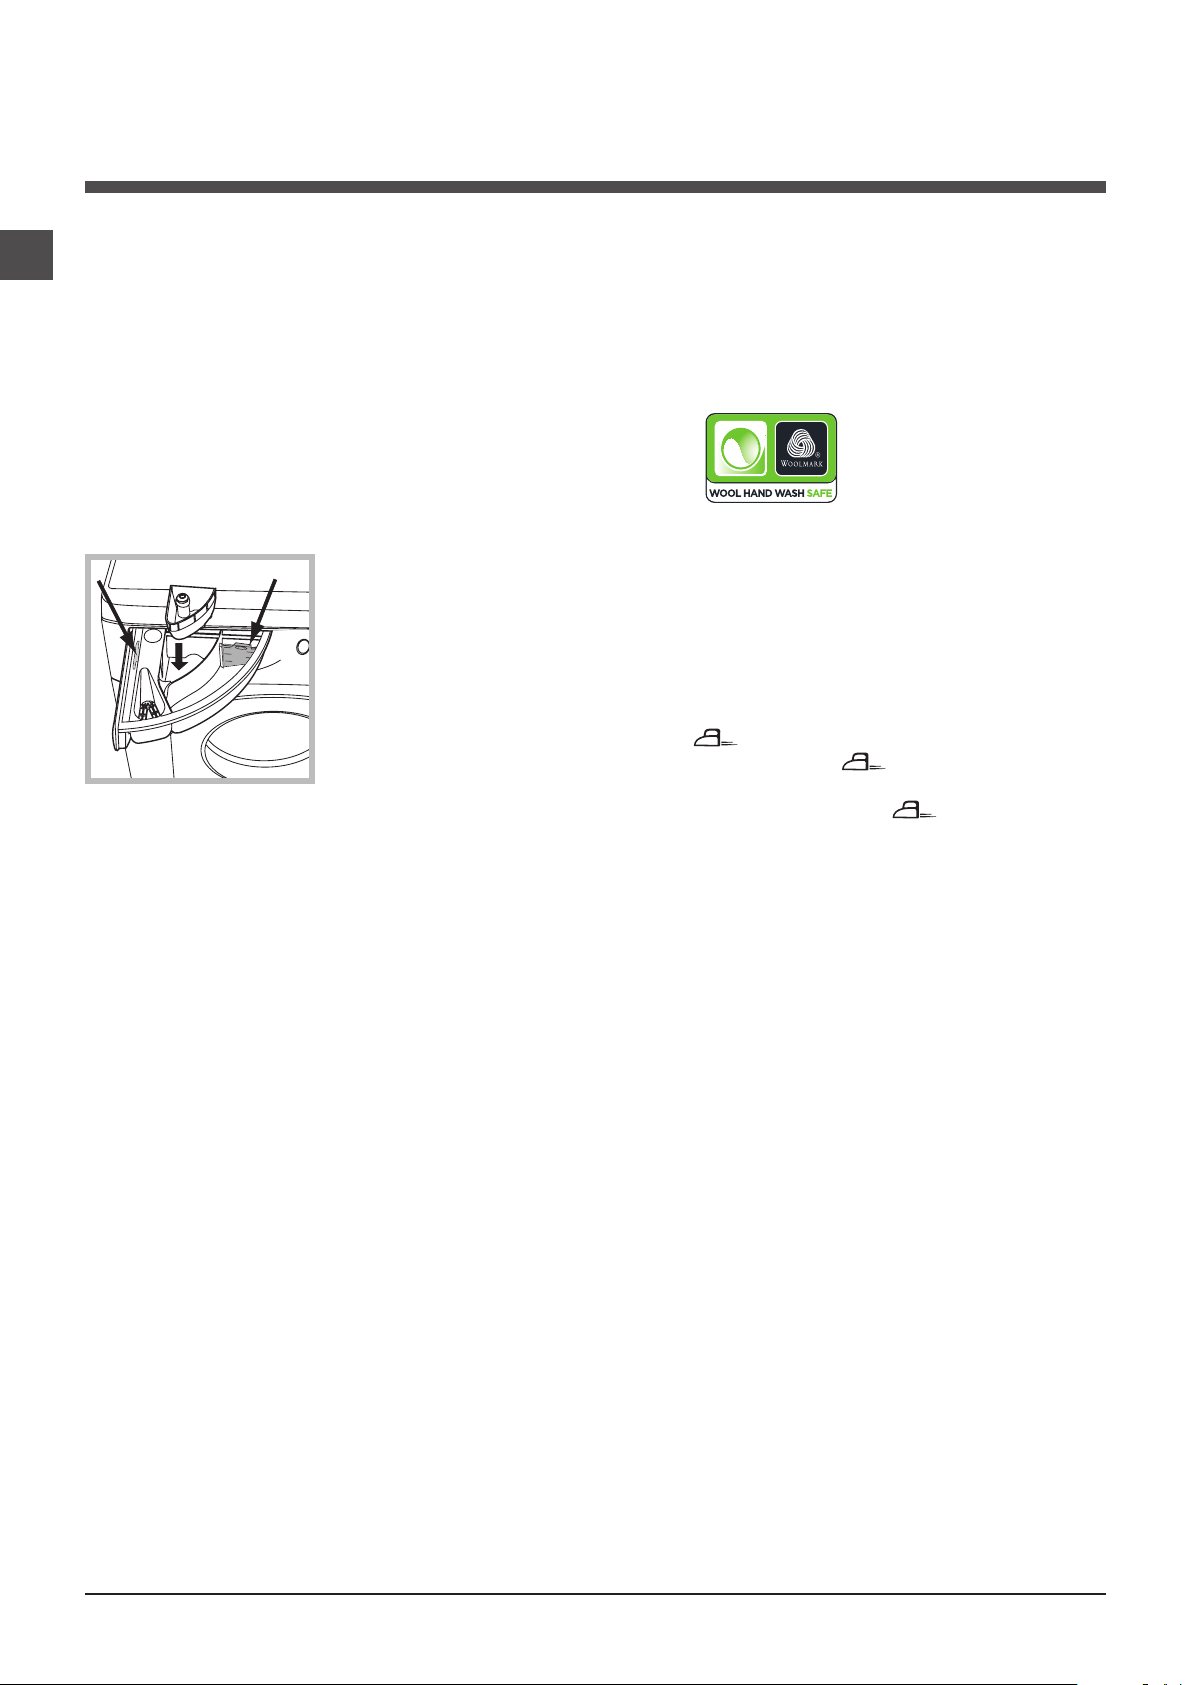
Detergent dispenser drawer
Good washing results also depend on the correct dose of
detergent: adding too much detergent will not necessarily result in a more efficient wash, and may in fact cause
build up on the inside of your appliance and contribute to
environmental pollution.
! Use powder detergent for white cotton garments, for
pre-washing, and for washing at temperatures over 60°C.
! Follow the instructions given on the detergent packaging.
! Do not use hand washing detergents because these
create too much foam.
Open the detergent dispenser drawer and pour
in the detergent or washing
additive, as follows.
compartment 1: Pre-wash detergent (powder)
Before pouring in the detergent, make sure that extra compartment 4 has been removed.
compartment 2: Detergent for the wash cycle
(powder or liquid)
If liquid detergent is used, it is recommended that the
removable plastic partition A (supplied) be used for proper
dosage.
If powder detergent is used, place the partition into slot B.
compartment 3: Additives (fabric softeners, etc.)
The fabric softener should not overflow the grid.
extra compartment 4: Bleach
Preparing the laundry
Garments requiring special care
Wool - Woolmark Apparel Care - Green:
the wool wash cycle of this machine has been approved
by The Woolmark Company for the washing of wool garments labelled as “hand wash” provided that the products
are washed according to the instructions on the garment
label and those issued by the manufacturer of this washing
machine.
In UK, Eire, Hong Kong and India the Woolmark trade
mark is a Certification trade mark.
Delicates: use programme 9 to wash very delicate gar-
ments having strasses or sequins.
We recommend turning the garments inside out before
washing and placing small items into the special bag for
washing delicates.
Use liquid detergent on delicate garments for best results.
To wash silk garments and curtains select cycle 9 and then
function ; the machine will end the cycle while the
laundry is soaking and the indicator light will flash. To
drain the water so that the laundry may be removed, press
the START/PAUSE button or the button.
Load balancing system
Before every spin cycle, to avoid excessive vibrations and
to distribute the load in a uniform manner, the drum rotates
continuously at a speed which is slightly greater than the
washing rotation speed. If, after several attempts, the load
is not balanced correctly, the machine spins at a reduced
spin speed. If the load is excessively unbalanced, the
washing machine performs the distribution process instead
of spinning. To encourage improved load distribution and
balance, we recommend small and large garments are
mixed in the load.
•Dividethelaundryaccordingto:
- the type of fabric/the symbol on the label
- the colours: separate coloured garments from whites.
•Emptyallgarmentpocketsandcheckthebuttons.
• Donotexceedthelistedvalues,whichrefertothe
weight of the laundry when dry: see “Table of wash
cycles”.
How much does your laundry weigh?
1 sheet 400-500 g
1 pillow case 150-200 g
1 tablecloth 400-500 g
1 bathrobe 900-1200 g
1 towel 150-250 g
10
Page 11

Troubleshooting
Your washing machine could fail to work. Before contacting the Technical Assistance Centre (see “Assistance”), make sure
that the problem cannot be solved easily using the following list.
Problem:
The washing machine does not
switch on.
The wash cycle does not start.
The washing machine does not
take in water (the indicator light for
the first wash cycle stage flashes
rapidly).
The washing machine continuously
takes in and drains water.
Possible causes / Solutions:
• Theapplianceisnotpluggedintothesocketfully,orisnotmakingcontact.
• Thereisnopowerinthehouse.
• Thewashingmachinedoorisnotclosedproperly.
• TheON/OFFbuttonhasnotbeenpressed.
• TheSTART/PAUSEbuttonhasnotbeenpressed.
• Thewatertaphasnotbeenopened.
• Adelayedstarthasbeenset(see “Personalisation”).
• Thewaterinlethoseisnotconnectedtothetap.
• Thehoseisbent.
• Thewatertaphasnotbeenopened.
• Thereisnowatersupplyinthehouse.
• Thepressureistoolow.
• TheSTART/PAUSEbuttonhasnotbeenpressed.
• Thedrainhoseisnotfittedataheightbetween65and100cmfromthefloor
(see “Installation”).
• Thefreeendofthehoseisunderwater(see “Installation”).
• Thewalldrainagesystemisnotfittedwithabreatherpipe.
If the problem persists even after these checks, turn off the water tap, switch
the appliance off and contact the Assistance Service. If the dwelling is on one of
the upper floors of a building, there may be problems relating to water drainage,
causing the washing machine to fill with water and drain continuously. Special
anti-draining valves are available in shops and help to avoid this inconvenience.
GB
The washing machine does not
drain or spin.
The washing machine vibrates a lot
during the spin cycle.
The washing machine leaks.
The START/PAUSE indicator light
(orange) and the function indicator
lights flash rapidly.
There is too much foam.
• Thewashcycledoesnotincludedraining:somewashcyclesrequirethedrain
phase to be started manually.
• TheEASYIRONfunctionhasbeenactivated:Tocompletethewashcycle,
press the START/PAUSE button (“Personalisation”).
• Thedrainhoseisbent(see “Installation”).
• Thedrainageductisclogged.
• Thedrumwasnotunlockedcorrectlyduringinstallation(see “Installation”).
• Thewashingmachineisnotlevel(see “Installation”).
• Thewashingmachineistrappedbetweencabinetsandwalls(see “Installation”).
• Thewaterinlethoseisnotscrewedonproperly(see “Installation”).
• Thedetergentdispenserdrawerisblocked(forcleaninginstructions,see
“Care and maintenance”).
• Thedrainhoseisnotfixedproperly(see “Installation”).
• Switchoffthemachineandunplugit,waitforapproximately1minuteand
then switch it back on again.
If the problem persists, contact the Technical Assistance Service.
• Thedetergentisnotsuitableformachinewashing(itshoulddisplaythetext
“for washing machines” or “hand and machine wash”, or the like).
• Toomuchdetergentwasused.
11
Page 12
Service
GB
Before calling for Assistance:
• Check whether you can solve the problem alone (see “Troubleshooting”);
• Restarttheprogrammetocheckwhethertheproblemhasbeensolved;
• Ifthisisnotthecase,contactanauthorisedTechnicalAssistanceCentreusingthetelephonenumberprovidedonthe
guarantee certificate.
! Always request the assistance of authorised technicians.
Have the following information to hand:
• thetypeofproblem;
• theappliancemodel(Mod.);
• theserialnumber(S/N).
This information can be found on the data plate applied to the rear of the washing machine, and can also be found on the
front of the appliance by opening the door.
12
Page 13

Instrucţiuni de folosire
MAŞINĂ DE SPĂLAT RUFE
RO
Română
WML 621
Sumar
Instalare, 14-15
Despachetare şi punere la nivel
Racorduri hidraulice şi electrice
Primul ciclu de spălare
Date tehnice
Întreţinere şi curăţire, 16
Întreruperea alimentării cu apă şi curent electric
Curăţarea maşinii de spălat
Curăţarea compartimentului pentru detergent
Îngrijirea uşii şi a tamburului
Curăţarea pompei
Controlarea furtunului de alimentare cu apă
Precauţii şi sfaturi, 17
Siguranţa generală
Scoaterea aparatului din uz
Descrierea maşinii de spălat şi activarea
unui program, 18-19
Panoul de control
Indicatoare luminoase
Activarea unui program
RO
Programe, 20
Tabel de programe
Personalizare, 21
Reglarea temperaturii
Reglarea centrifugării
Funcţii
Detergenţi şi rufe albe, 22
Compartimentul pentru detergenţi
Pregătirea rufelor
Articole delicate
Sistemul de echilibrare a încărcăturii
Anomalii şi remedii, 23
Asistenţă, 24
13
Page 14
Instalare
RO
! Este important să păstraţi acest manual
pentru a-l putea consulta în orice moment.
În caz de vânzare, de cesiune sau de schimbare a locuinţei, acesta trebuie să rămână
împreună cu maşina de spălat pentru a informa noul proprietar cu privire la funcţionare şi
la respectivele avertismente.
! Citiţi cu atenţie instrucţiunile: veţi găsi
informaţii importante cu privire la instalare, la
folosire şi la siguranţă.
Despachetare şi punere la nivel
Despachetare
1. Scoaterea din ambalaj a maşinii de spălat.
2. Controlaţi ca maşina de spălat să nu fost
deteriorată în timpul transportului. Dacă este
deteriorată, nu o conectaţi şi contactaţi agentul de vânzare.
3. Scoateţi cele 3
şuruburi de protecţie
pentru transport
şi cauciucul cu
distanţierul respectiv, situate în partea
posterioară (a se
vedea gura).
4. Închideţi oriciile cu dopurile din plastic
aate în dotaţie.
5. Păstraţi toate piesele: pentru cazul în
care maşina de spălat va trebui să e
transportată, piesele vor trebui montante din
nou.
! Ambalajele nu sunt jucării pentru copii!
re (a se vedea gura); unghiul de înclinare,
măsurat pe planul de lucru, nu trebuie să
depăşească 2°.
O nivelare precisă conferă stabilitate maşinii
şi evită vibraţii, zgomote şi deplasări pe
timpul funcţionării. În cazul mochetelor sau
a unui covor, reglaţi picioruşele astfel încât
să menţineţi sub maşina de spălat un spaţiu
sucient pentru ventilare.
Racorduri hidraulice şi electrice
Racordarea furtunului de alimentare cu
apă
1. Conectaţi furtunul de alimentare,
înşurubându-l la un
robinet de apă rece
cu gura letată de
3/4 gaz (a se vedea
gura).
Înainte de conectare,
lăsaţi apa să curgă
până când nu a deve-
nit limpede.
2. Conectaţi tubul
de alimentare la
maşina de spălat,
înşurubândul la priza
de apă respectivă,
amplasată în partea
posterioară, sus în
dreapta (a se vedea
gura).
3. Fiţi atenţi ca furtunul să nu e nici pliat,
nici îndoit.
Punere la nivel
1. Instalaţi maşina de spălat pe un paviment
plan şi rigid, fără a o sprijini de ziduri, mobilă
sau altceva.
2. Dacă podeaua nu este perfect orizontală,
compensaţi
neregularităţile
deşurubând
sau înşurubând
picioruşele anterioa-
14
! Presiunea apei de la robinet trebuie să e
cuprinsă în valorile din tabelul cu Date tehni-
ce (a se vedea pagina alăturată).
! Dacă lungimea furtunului de alimentare nu
este sucientă, adresaţivă unui magazin specializat sau unui instalator autorizat.
! Nu folosiţi niciodată tuburi folosite deja.
! Utilizaţi tuburile furnizate cu maşina.
Page 15
Conectarea furtunului de golire
65 - 100 cm
Conectaţi furtunul
de evacuare, fără al
îndoi, la o conductă
sau la o gură de evacuare în zid, situate
între 65 şi 100 cm de
pământ;
sau sprijiniţil pe
marginea unei chiuvete sau a unei căzi,
legând elementul de
ghidare la robinet
(a se vedea gura).
Capătul liber al furtunului de golire nu
trebuie să rămână
cufundat în apă.
! Nu se recomandă folosirea furtunurilor prelungitoare; dacă este indispensabil, acestea
trebuie să aibă acelaşi diametru ca şi furtunul
original şi nu trebuie să depăşească 150 cm
lungime.
Racordarea electrică
Înainte de a introduce ştecherul în priza de
curent, asiguraţi-vă că:
• priza să e cu împământare şi conformă
prevederilor legale;
• priza să poată suporta sarcina maximă de
putere a maşinii, indicată în tabelul cu Date
tehnice (a se vedea alături);
• tensiunea de alimentare să e cuprinsă în
valorile indicate în tabelul cu Date tehnice
(a se vedea alături);
• priza să e compatibilă cu ştecărul maşinii
de spălat. În caz contrar înlocuiţi priza sau
ştecărul.
! Maşina de spălat nu trebuie instalată
afară, nici chiar în cazul în care spaţiul este
adăpostit, deoarece este foarte periculoasă
expunerea maşinii la ploi şi furtuni.
! După instalarea maşinii de spălat, priza de
curent trebuie să e uşor accesibilă.
! Nu folosiţi prelungitoare şi prize multiple.
! Cablul nu trebuie să e îndoit sau compri-
mat.
! Cablul de alimentare trebuie să e înlocuit
doar de instalatorii autorizaţi.
Atenţie! Firma îşi declină orice responsabilitate în cazul în care aceste norme nu se
respectă.
Primul ciclu de spălare
După instalare, înainte de folosire, efectuaţi
un ciclu de spălare cu detergent şi fără rufe,
selectând programul „AUTOCURĂŢARE” (a
se vedea “Curăţarea maşinii de spălat”).
Date tehnice
Model WML 621
lãrgime 59,5 cm
Dimensiuni
Capacitate de la 1 la 6 kg
Legãturi electrice
Legãturi hidrice
Viteza de centrifugare
Programe de control conform
reglementările
1061/2010 şi
1015/2010.
înãlþime 85 cm
profunzime 51,7 cm
Vezi placuta cu caracteristicile tehnice, aplicata pe masina.
presiune maximã
1 MPa (10 bari)
presiune minimã
0,05 MPa (0,5 bari)
capacitatea cuvei 46
litri
pânã la 1200 de rotaþii
pe minut
Programul 4: Eco bumbac 60°C.
Programul 4: Eco bumbac 40°C.
Acest aparat este conform cu urmãtoarele
Directive Comunitare:
- 2004/108/CE (Compatibilitate Electromagneticã)
- 2006/95/CE (Tensiuni
Joase)
- 2012/19/EU (WEEE)
RO
15
Page 16

Întreţinere şi curăţire
1
2
A
B
RO
Întreruperea alimentării cu apă şi
curent electric
• Închideţi robinetul de apă după ecare
spălare. Se limitează astfel uzura instalaţiei
hidraulice a maşinii de spălat şi se elimină
pericolul scurgerilor.
• Scoateţi stecherul din priza de curent atunci când curăţaţi maşina de spălat şi când se
efectuează lucrări de întreţinere.
Curăţarea maşinii de spălat
• Partea externă şi părţile din cauciuc pot
curăţate cu o lavetă înmuiată în apă călduţă
şi săpun. Nu folosiţi solvenţi sau substanţe
abrazive.
• Maşina de spălat este prevăzută cu un
program de „AUTOCURĂŢARE” a pieselor
interne care trebuie realizat fără niciun fel
de încărcătură în cuvă.
Detergentul (în cantitate de 10% din cea
recomandată pentru rufe puţin murdare) sau
aditivii specici pentru curăţarea maşinii de
spălat pot folosite ca mijloace auxiliare în
programul de spălare. Se recomandă efectuarea programului de curăţare la ecare 40
de cicluri de spălare.
Pentru a activa
programul, apăsaţi
butoanele A şi B în
acelaşi timp pentru 5
secunde (a se vedea
gura).
Programul porneşte
automat şi durează
aproximativ 70 de minute. Pentru a termi-
na ciclul, apăsaţi butonul START/PAUSE.
Curăţarea compartimentului pentru
detergent
Curăţarea pompei
Maşina de spălat este dotată cu o pompă
de autocurăţare care nu are nevoie de
întreţinere. Se poate întâmpla însă ca unele
obiecte mici (monede, nasturi) să cadă în
anticamera care protejează pompa, situată în
partea inferioară a acesteia.
! Vericaţi ca ciclul de spălare să e încheiat
şi scoateţi stecherul din priză.
Pentru a avea acces la anticameră:
1. scoateţi panoul de
acoperire din partea
din faţă a maşinii
de spălat folosind o
şurubelniţă
(a se vedea gura);
2. deşurubaţi capacul rotindu-l în sens
invers acelor de ceasornic (a se vedea
gura). Este normal
să iasă puţină apă;
3. curăţaţi cu grijă interiorul;
4. înşurubaţi la loc capacul;
5. montaţi din nou panoul vericând, înainte
de a-l împinge spre maşină, de a introdus
cârligele în oriciile respective.
Trageti afara compatimentul ridicându-l
si tragându-l spre
exterior (a se vedea
gura).
Spălaţi-l sub un jet de
apă; această operaţie
trebuie efectuată cât
mai des posibil.
Îngrijirea uşii şi a tamburuluii
• Lăsaţi mereu uşa întredeschisă pentru a
evita formarea de mirosuri neplăcute.
16
Controlarea furtunului de alimentare cu
apă
Controlaţi tubul de alimentare cel puţin o
dată pe an. Dacă prezintă crăpături sau suri
trebuie înlocuit: pe parcursul spălărilor, presiunea puternică ar putea provoca crăpături
neaşteptate.
! Nu folosiţi niciodată tuburi folosite deja.
Page 17

Precauţii şi sfaturi
! Maşina de spălat a fost proiectată şi construită conform norme-
lor internaţionale de protecţie. Aceste avertizări sunt furnizate din
motive de siguranţă şi trebuie să e citite cu atenţie.
Siguranţa generală
• Acest aparat a fost conceput exclusiv pentru utilizarea
în locuinţe.
• Aparatul nu trebuie utilizat de către persoane
(inclusiv Aparat aparat poate folosit de copii
începând cu vârsta de 8 ani şi de persoane
cu capacităţi zice, senzoriale sau mentale
reduse sau cu experienţă şi cunoştinţe insuciente dacă sunt supravegheate sau dacă au
primit o pregătire adecvată privind folosirea
aparatului în mod sigur şi înţelegând pericolele respective. Copiii nu trebuie să se joace cu
aparatul. Întreţinerea şi curăţarea nu trebuie
să e efectuate de copii fără supraveghere.
• Maşina de spălat trebuie să e folosită doar de persoane
adulte care respectă instrucţiunile din acest manual.
• Nu atingeţi maşina când sunteţi desculţi sau cu mâini-
le sau picioarele ude sau umede.
• Nu scoateţi ştecherul din priză trăgând de cablu, ci
apucând ştecherul.
• Nu deschideţi sertarul detergenţilor în timp ce maşina
se aă în funcţiune.
• Nu atingeţi apa de evacuare: poate avea o
temperatură ridicată.
• Nu forţaţi în nici un caz uşa: s-ar putea deteriora
mecanismul de siguranţă care evită deschiderea
accidentală.
• În caz de defecţiune, nu umblaţi în niciun caz la meca-
nismele din interior şi nu încercaţi să o reparaţi singuri.
• Controlaţi mereu ca în apropierea maşinii aate în
funcţiune, să nu se ae copii.
• Pe durata spălării uşa se poate încălzi.
• Dacă trebuie să deplasaţi maşina, cereţi ajutor unei alte
(sau 2) persoane şi ţi foarte atenţi. Niciodată nu deplasaţi
maşina singuri deoarece aceasta este foarte grea.
• Înainte de a introduce rufele, controlaţi ca şi cuva să
e goală.
colecta separat. Pentru informaţii suplimentare cu privire
la scoaterea sin uz a electrocasnicelor, deţinătorii acestora pot apela la centrele de colectare a deşeurilor sau la
vânzătorii de la care au achiziţionat produsele respective.
RO
Scoaterea din uz
• Eliminarea ambalajelor:
respectaţi reglementările locale, în acest fel ambalajele
vor putea refolosite.
• Directiva Europeană 2012/19/EU - WEEE cu privire
la deşeurile care provin de la aparatura electrică sau
electronică prevede ca aparatele electrocasnice să nu e
colectate împreună cu deşeurile urbane solide, obişnuite.
Aparatele scoase din uz trebuie să e colectate separat
atât pentru a optimiza rata de recuperare şi de reciclare
a materialelor componente cât şi pentru a evita pericolele care pot afecta sănătatea omului sau polua mediul
înconjurător. Simbolul tomberonului tăiat care apare pe
toate produsele vă aminteşte tocmai obligaţia de a le
17
Page 18

Descrierea maşinii de spălat şi
activarea unui program
RO
Panoul de control
Sertarul detergenţilor
Tasta
ON/OFF
PROGRAME
TEMPERATURĂ
Selector
CENTRIFUGARE
Selector
Selector
Taste cu led
FUNCŢII
Indicatoare
DESFĂŞURARE
CICLU/PORNIRE
ÎNTÂRZIATĂ
Indicator
UŞĂ
BLOCATĂ
Tastă cu led
START/PAUSE
Sertarul detergenţilor: pentru a introduce detergenţi
sau aditivi (a se vedea “Detergenţi şi rufe albe”).
Tasta ON/OFF: pentru a porni şi opri maşina.
Selector PROGRAME: pentru a selecta programele.
Pe durata desfăşurării programului selectorul rămâne în
aceeaşi poziţie.
Taste cu led FUNCŢII: pentru a selecta funcţiile disponibile. Indicatorul corespunzător funcţiei alese va rămâne
aprins.
Selector CENTRIFUGARE: pentru a activa / anula centrifugarea (a se vedea “Personalizare”).
Selector TEMPERATURĂ: pentru a selecta temperatura
sau spălarea la rece (a se vedea “Personalizare”).
Indicatoare DESFĂŞURARE CICLU/PORNIRE
ÎNTÂRZIATĂ: pentru a putea urmări avansarea progra-
mului de spălare.
Indicatorul aprins arată faza în curs de desfăşurare.
Dacă a fost selectată funcţia “Pornire întârziată”, va
indicat timpul care lipseşte până la pornirea programului
(a se vedea pag. alăturată).
Tastă cu led START/PAUSE: pentru a activa / opri mo-
mentan programele.
N.B.: pentru a întrerupe momentan un ciclu apăsaţi
această tastă; ledul se va aprinde intermitent (culoare
portocalie) în timp ce ledul corespunzător fazei în curs
de desfăşurare va rămâne aprins. Dacă indicatorul UŞĂ
BLOCATĂ este stins, atunci uşa se poate deschide
(aşteptaţi aproximativ 3 minute).
Pentru a continua spălarea, de unde a fost întreruptă,
apăsaţi din nou tasta.
Modalitatea de stand by
Această maşină de spălat rufe, conform noilor norme
legate de economia de curent electric, este dotată cu
un sistem de oprire automat (stand-by) care intră în
funcţiune după 30 minute de neutilizare. Apăsaţi scurt
tasta
ON/OFF
maşinii.
şi aşteptaţi repunerea în funcţiune a
Indicator UŞĂ BLOCATĂ: pentru a înţelege dacă uşa se
poate deschide sau nu (a se vedea pag. alăturată).
18
Page 19
Indicatoare luminoase
END
Ledurile furnizează informaţii importante.
Iată ce indică:
Indicatoare de fază
După alegerea şi activarea ciclului dorit, indicatoarele luminoase se vor aprinde unul după altul, ceea ce vă indică
starea de avansare a programului:
RO
Pornire întârziată
Dacă a fost activată funcţia “Pornire întârziată” (a se vedea
“Personalizare”), după activarea programului, se va
aprinde intermitent ledul corespunzător întârzieriiselectate:
Cu trecerea timpului, se va vizualiza întârzierea restantă,
prin aprinderea intermitentă a ledului respectiv.
La expirarea întârzierii selectate, indicatorul luminos se
va stinge şi programul selectat va intra în funcţiune.
Spălare
Clătire
Centrifugă
Golire
Sfârşit Spălare
Tastele de funcţii şi ledurile corespunzătoare
Alegerea unei funcţii implică aprinderea ledului
corespunzător.
Dacă opţiunea selectată nu este compatibilă cu programul setat, incompatibilitatea va semnalată prin aprinderea intermitentă a ledului şi printr-un semnal acustic
(3 bip), iar opţiunea nu va activată.
În cazul în care va selectată o funcţie incompatibilă cu
alta selectată anterior, se va activa doar ultima funcţie
aleasă.
Indicator uşă blocată:
Indicatorul luminos aprins indică faptul că uşa este
blocată, ceea ce evită deschiderea accidentală; pentru a
evita orice daună, este necesar să se aştepte stingerea
ledului, înainte de a deschide uşa.
N.B.: dacă funcţia “Pornire întârziată” este activă, uşa
nu se poate deschide; pentru a o deschide, apăsaţi tasta
START/PAUSE pentru a întrerupe momentan programarea
(aşteptaţi aproximativ 3 minute).
! Aprinderea intermitentă rapidă a indicatorului START/
PAUSE (culoare portocalie) concomitent cu un alt led indică
apariţia unei anomalii (a se vedea “Anomalii şi remedii”).
Activarea unui program
1. Porniţi maşina de spălat apăsând pe butonul ON/OFF. Toate indicatoarele se aprind câteva secunde, apoi se sting;
indicatorul START/PAUSE va lumina intermitent.
2. Introduceţi rufele şi închideţi uşa.
3. Selectaţi programul dorit cu ajutorul selectorului de PROGRAME.
4. Reglaţi temperatura de spălare (a se vedea “Personalizare”).
5. Reglaţi viteza de centrifugare (a se vedea “Personalizare”).
6. Adăugaţi detergentul şi aditivii (a se vedea “Detergenţi şi rufe”).
7. Alegeţi funcţiile dorite.
8. Activaţi programul apăsând tasta START/PAUSE; indicatorul luminos se va aprinde (culoare verde).
Pentru a anula un ciclu selectat, apăsaţi tasta START/PAUSE pentru a întrerupe momentan ciclul şi alegeţi un nou program.
9. La încheierea programului, indicatorul luminos se va aprinde. Indicatorul UŞĂ BLOCATĂ se va stinge, ceea ce
vă arată că uşa poate deschisă (aşteptaţi aproximativ 3 minute). Scoateţi rufele şi lăsaţi uşa întredeschisă pentru a se
putea usca cuva si tamburul. Opriti maşina de spălat apăsând pe tasta ON/OFF.
19
Page 20

Programe
Tabel de programe
RO
Viteza
Descrierea Programului
Programe
Antitipată
1
Albituri
2
Bumbac: Albe ºi colorate delicate puþin murdare.
3
Eco Bumbac 60°C (1): Albe ºi colorate rezistente foarte
4
murdare.
Eco Bumbac 40°C (2): Albe ºi colorate delicate puþin mur-
4
dare.
Sintetice: colorate rezistente foarte murdare.
5
Sintetice (3): colorate rezistente puţin murdare.
5
Antialergic
6
Baby
7
Lână: pentru lână, caşmir, etc.
8
Ultra Delicate
9
SPĂLARE RAPIDĂ 60’: pentru a împrospăta rapid
articolele puţin murdare (nu este indicat pentru lână,mătase
10
şi articole de spălat cu mâna).
Bumbac 20 °C: aalbe şi colorate delicate puţin murdare.
11
Bumbac Apă rece
12
Sintetice Apă rece
13
Rapid 30’ Apă rece
14
Clătire
Centrifugă + Golire
Numai golire *
* Dacă selectaţi programul şi excludeţi centrifugarea, maşina va face doar evacuarea.
Durata ciclului indicată pe display sau în carte este calculată în baza unor condiţii standard. Timpul efectiv poate varia în baza a numeroşi factori, precum temperatura şi presiunea apei la intrare, temperatura mediului, cantitatea de detergent, cantitatea şi tipul încărcăturii, echilibrarea încărcăturii, opţiunile suplimentare selectate.
1) Programul de control conform reglementările 1061/2010: setaţi programul 4 cu o temperatură de 60°C.
Acest ciclu este potrivit pentru curăţarea unei încărcături de bumbac cu grad de murdărie normal şi este cel mai ecient din punct de vedere al consumului combinat de energie şi apă; se
foloseşte pentru articole de îmbrăcăminte care pot spălate la 60°C. Temperatura efectivă de spălare poate diferi de cea indicată.
2) Programul de control conform reglementările 1061/2010: setaţi programul 4 cu o temperatură de 40°C.
Acest ciclu este potrivit pentru curăţarea unei încărcături de bumbac cu grad de murdărie normal şi este cel mai ecient din punct de vedere al consumului combinat de energie şi apă; se
foloseşte pentru articole de îmbrăcăminte care pot spălate la 40°C. Temperatura efectivă de spălare poate diferi de cea indicată.
Pentru toate Instituţiile de Testare:
2) Program pentru bumbac, prelungit: setaţi programul 4 cu o temperatură de 40°C.
3) Program sintetic lung: setaţi programul 5 cu o temperatură de 40°C.
Temp.
max.
(°C)
40° 1200
60° 1200
40°
(Max. 90°)
60° 1200 -
40° 1200 -
60° 1000
40° 1000
60° 1200 40° 1000
40° 800 30° 0 -
60° 1200 -
20° 1200 -
max.
(rotaþii
pe
minut)
1200
1200 1000 -
800 -
- 1200 - -
- 1200 - - - - 6 - - - 10’
- - - - - 6 - - - 3’
Detergenþi
rufe
Balsam
Decolorant
Prespãlare
-
-
-
-
-
-
-
-
-
-
kWh
reziduală%
Consum energie
Spãlare
(Kg)
Umiditate
Sarcina Max.
4 - - - 180’
4 - - - 180’
6 - - - 115’
6 53 1,02 49,8 195’
6 53 0,86 76 185’
3 44 0,78 33 120’
3 - - - 110’
4 - - - 185’
3 - - - 145’
1,5 - - - 80’
1 - - - 75’
3,5 53 0,68 30 60’
6 - - - 180’
6 - - - 100’
3 - - - 75’
3 70 0,05 36 30’
6 - - - 49’
Apă totală lt
Durata ciclului
de spalare
Antipată: programul 1 este potrivit pentru rufe foarte murdare, cu culori rezistente. Programul asigură o clasă de spălare
superioară faţă de clasa standard (clasa A). Nu efectuaţi programul amestecând rufe de culori diferite. Se recomandă folosirea
unui detergent praf. Pentru petele dicile se recomandă pre-tratamentul cu aditivi specici.
Albituri: folosiţi acest ciclu 2 pentru spălarea rufelor albe. Programul este conceput pentru a păstra strălucirea culorii albe în
timp. Pentru rezultate mai bune, se recomandă folosirea unui detergent praf.
Antialergic: folosiţi programul 6 pentru îndepărtarea principalilor alergeni, cum ar polenul, acarienii din praf, părul de pisică şi de câine.
Baby: folosiţi programul special 7 pentru a înlătura murdăria tipică a copiilor şi pentru a elimina detergentul din rufe, evitând ast-
fel reacţiile alergice pentru pielea delicată a copiilor. Ciclul a fost conceput pentru a diminua încărcarea bacteriană prin folosirea
unei cantităţi de apă mai mari şi prin optimizarea aditivelor speciale de igienizare, adăugate la detergent.
Programele Eco
Programele Eco oferă performanţe bune de spălare la temperaturi scăzute, permiţând o folosire redusă a energiei electrice,
ceea ce înseamnă un beneciu pentru mediul înconjurător şi o economie de bani.
Programele Eco (Bumbac 12, Sintetice 13 şi Rapid 30’ 14) au fost create pentru diferite tipuri de ţesături şi pentru rufe
puţin murdare. Pentru a garanta un rezultat optim, recomandăm folosirea unui detergent lichid; se recomandă pre-tratarea
manşetelor, gulerelor şi petelor.
Bumbac 20°C: programul 11 este ideal pentru rufe de bumbac murdare. Performanţele bune şi la rece, comparabile cu o
spălare la 40°, sunt garantate de o acţiune mecanică care lucrează prin varierea vitezei la intervale repetate şi apropiate.
20
Page 21

Personalizare
Reglarea temperaturii
Rotind selectorul de TEMPERATURĂ se xează temperatura de spălare (a se vedea Tabelul programelor).
Temperatura poate redusă până la spălarea la rece ( ).
Maşina va împiedica în mod automat de a alege o temperatură mai mare decât maxima admisă pentru ecare program.
! Excepţie: dacă selectaţi programul 3 temperatura poate crescută până la 90°.
Reglarea centrifugării
Rotind selectorul de CENTRIFUGARE se stabileşte viteza de stoarcere pentru programul selectat.
Vitezele maxime, prevăzute pentru programe sunt:
Programe Viteză maximă
Bumbac 1200 rotaţii pe minut
Sintetice 1000 rotaţii pe minut
Lână 800 rotaţii pe minut
Mătase excludere stoarcere
Viteza de centrifugaare poate redusă sau centrifugarea poate exclusă selectând simbolul .
Maşina va împiedica în mod automat alegerea unei viteze mai mari decât maxima admisă pentru ecare program.
Funcţii
Diferitele funcţii de spălare prevăzute pentru maşina de spălat, permit obţinerea unor rufe curate şi albe, după dorinţă.
Pentru a activa funcţiile:
1. apăsaţi tasta corespunzătoare funcţiei dorite;
2. aprinderea ledului respectiv indică activarea funcţiei.
Notă:
- Dacă opţiunea selectată nu este compatibilă cu programul setat, incompatibilitatea va semnalată prin aprinderea
intermitentă a ledului şi printr-un semnal acustic (3 bip), iar opţiunea nu va activată
- În cazul în care va selectată o funcţie incompatibilă cu alta selectată anterior, se va activa doar ultima funcţie
aleasă.
RO
Super spălare
Mulţumită utilizării unei cantităţi mai mari de apă în faza iniţială a ciclului şi duratei de timp îndelungate, această funcţie
garantează o spălare de mare performanţă.
Poate utilizată cu sau fără decolorant. Dacă se doreşte şi efectuarea înălbirii introduceţi recipientul auxiliar 4, din dotare,
în recipientul 1. La dozarea decolorantului, nu depăşiţi nivelul “max” indicat pe pivotul central (a se vedea pag. 22).
Călcare uşoară
Selectând această opţiune, spălarea şi centrifugarea vor modicate în mod oportun, pentru a reduce şifonarea
rufelor. La încheierea ciclului, maşina de spălat va executa rotaţii lente ale cuvei; ledul corespunzător funcţiei CĂLCARE
UŞOARĂ şi START/PAUSE se vor aprinde (culoarea portocalie) intermitent, iar cel al fazei de va rămâne aprins.
Pentru a termina ciclul, apăsaţi tasta START/PAUSE sau tasta CĂLCARE UŞOARĂ.
Prespălare
Această funcţie este utilă pentru prespălarea rufelor, mai ales în scopul de a îndepărta petele rezistente.
N.B.: Adăugaţi detergent în sertarul respectiv.
Pornirea întârziată
Întârzie pornirea maşinii cu până la 12 de ore.
Apăsaţi de mai multe ori până la aprinderea butonului cu întârzierea dorită. La a cincea apăsare a tastei, funcţia se va
dezactiva.
N.B.: După apăsarea tastei START/PAUSE, se va putea modica întârzierea doar diminuând-o.
21
Page 22

Detergenţi şi rufe albe
M
AX
1
2
4
3
A
B
RO
Compartimentul pentru detergenţi
Un rezultat bun la spălare depinde şi de dozarea corectă
a detergentului: excesul de detergent nu garantează o
spălare mai ecientă, ci contribuie la deteriorarea părţilor
interne ale maşinii de spălat şi la poluarea mediului
înconjurător.
! Utilizaţi detergenţi praf pentru rufele albe de bumbac,
pentru prespălare şi pentru spălarea la temperaturi mai
mari de 60°C.
! Respectaţi indicaţiile de pe ambalajul detergentului.
! Nu introduceţi în maşină detergenţii pentru spălarea
manuală deoarece formează prea multă spumă.
Deschideţi compartimentul pentru detergenţi şi
introduceţi detergentul sau
aditivul după cum urmează:
compartiment 1: Detergent pentru prespălare (sub
formă de praf)
Înainte de a adăuga detergentul vericaţi ca sertarul
adiţional 4 să nu e introdus.
compartiment 2: Detergent pentru spălare
(sub formă de praf sau lichid)
Când utilizaţi detergent lichid este recomandat să folosiţi
peretele despărţitor A prevăzut pentru dozarea corectă.
Pentru utilizarea de detergent praf puneţi peretele
despărţitor în cavitatea B.
compartiment 3: Aditivi (soluţie de înmuiat, balsam
rufe etc.)
Soluţia de înmuiat nu trebuie să iasă deasupra grătarului.
compartiment adiþional 4: Decolorant (Inãlbitor)
Articole delicate
Lână: ciclul de spălare „Lână“ al acestei maşini de spălat
a fost aprobat de Woolmark Company pentru spălarea
articolelor de lână clasicate pentru „spălarea manuală“,
cu condiţia ca spălarea să se efectueze cu respectarea instrucţiunilor specicate pe eticheta articolului de
îmbrăcăminte şi a indicaţiilor furnizate de producătorul
acestei maşini de spălat.
Ultra Delicate: folosiţi programul 9 pentru spălarea
rufelor foarte delicate, care au aplicaţii, cum ar strass
sau paiete.
Se recomandă să întoarceţi pe dos rufele înainte de
spălare şi să introduceţi articolele mici într-un sac special
pentru spălarea rufelor delicate.
Pentru cele mai bune rezultate, vă recomandăm
utilizarea unui detergent lichid pentru rufe delicate.
Pentru a spăla articole din mătase şi perdele, selectaţi
ciclul 9 şi activaţi opţiunea ; maşina de spălat va
termina ciclul cu rufele la înmuiat, iar ledul se va
aprinde intermitent. Pentru a goli apa din maşină şi a
scoate rufele, este necesar să apăsaţi butonul START/
PAUSE sau butonul .
Sistemul de echilibrare a încărcăturii
Pentru a evita trepidaţiile excesive, înainte de stoarcere, cuva maşinii va distribui cantitatea de rufe în mod
uniform, centrifuga efectuând câteva rotaţii la o viteză
mai mare decât viteza de spălare. Dacă, după numeroase încercări, maşina nu reuşeşte să echilibreze
greutatea, stoarcerea rufelor se va face la o viteză mai
mică decât cea prevăzută în program. Dacă instabilitatea
este prea mare, maşina va distribui greutatea în locul
centrifugei. Pentru a favoriza o mai bună repartizare a
rufelor şi echilibrarea corectă a maşinii, se recomandă să
introduceţi în maşină atât articole mari cât şi mici.
Pregătirea rufelor
• Sortaţi rufele în funcţie de:
- tipul de material / simbolul de pe etichetă.
- culori: separaţi rufele colorate de cele albe.
• Goliţi buzunarele şi controlaţi nasturii.
• Nu depăşiţi valorile indicate, referite la greutatea
rufelor uscate: a se vedea “Tabel de programe”.
Cât cântăresc rufele?
1 cearceaf 400-500 g.
1 faţă de pernă 150-200 g.
1 faţă de masă 400-500 g.
1 halat de baie 900-1.200 g.
1 prosop 150-250 g.
22
Page 23

Anomalii şi remedii
Se poate întâmpla ca maşina de spălat să nu funcţioneze. Înainte de a apela serviciul de Service
(a se vedea “Asistenţă”), vericaţi dacă nu este vorba de o problemă uşor de rezolvat:
Anomalii:
Maşina de spălat nu porneşte.
Ciclul de spălare nu porneşte.
Maşina de spălat nu se alimentează
cu apă (ledul primei faze de spălare
se aprinde intermitent şi rapid).
Maşina de spălat încarcă şi descarcă
apă continuu.
Cauze posibile / Rezolvare:
• Stecherul nu este introdus în priza de curent, sau nu face contact.
• Aveţi o pană de curent la domiciliu.
• Uşa nu este bine închisă.
• Tasta ON/OFF nu a fost apăsată.
• Tasta START/PAUSE nu a fost apăsată.
• Robinetul de apă nu este deschis.
• A fost xată o întârziere de pornire (a se vedea “Personalizare”).
• Furtunul de alimentare cu apă nu este racordat la robinet.
• Furtunul este îndoit.
• Robinetul de apă nu este deschis
• Apa la domiciliul dumneavoastră.
• Apa nu are presiune sucientă.
• Tasta START/PAUSE nu a fost apăsată.
• Furtunul de golire nu a fost instalat la o înălţime cuprinsă între 65 şi 100 cm
de pământ (a se vedea “Instalare”).
• Capătul furtunului de evacuare este cufundat în apă (a se vedea “Instalare”).
• Evacuarea din perete nu are răsuare pentru aer.
Dacă după aceste vericări problema nu se rezolvă, închideţi robinetul de apă,
opriţi maşina de spălat şi chemaţi Service-ul. Dacă locuinţa se aă la ultimele
etaje ale unui ediciu, este posibil să aibă loc fenomene de sifonare, motiv
pentru care maşina de spălat încarcă şi descarcă apă încontinuu. Pentru a
elimina acest inconvenient, se găsesc în comerţ supape anti-sifonare.
RO
Maşina de spălat nu se goleşte sau
nu stoarce.
Maşina de spălat vibrează foarte mult
în timpul stoarcerii.
Maşina de spălat pierde apă.
Ledul START/PAUSE (portocaliu) şi
ledurile funcţiilor se aprind intermitent.
Se formează prea multă spumă.
• Programul nu prevede golirea apei: în cazul anumitor programe, este
necesară activarea manuală.
• Funcţia CĂLCARE UŞOARĂ este activă: pentru a încheia programul,
apăsaţi tasta START/PAUSE (a se vedea “Personalizare”).
• Furtunul de golire este îndoit (a se vedea “Instalare”).
• Conducta de descărcare este înfundată.
• Cuva, în momentul instalării, nu a fost deblocată în mod corespunzător (a se
vedea “Instalare”).
• Maşina de spălat este în pantă (a se vedea “Instalare”).
• Maşina de spălat este prea aproape de pereţi şi mobilier (a se vedea “Instalare”).
• Furtunul de alimentare cu apă nu este bine înşurubat (a se vedea “Instalare”).
• Compartimentul de detergenţi este înfundat (pentru a-l curăţa a se vedea
“Întreţinere şi curăţare”).
• Furtunul de golire nu este bine xat (a se vedea “Instalare”).
• Opriţi maşina şi scoateţi stecherul din priză; aşteptaţi aproximativ 1 minut
înainte de a o reaprinde.
Dacă nu obţineţi nici un rezultat, apelaţi Centrul de service pentru asistenţă.
• Detergentul nu este compatibil cu maşina de spălat (trebuie să e scris
„pentru maşina de spălat”, „de mână sau în maşina de spălat”, sau ceva
asemănător).
• Dozajul a fost excesiv.
23
Page 24

Asistenţă
RO
Înainte de a lua legătura cu Service-ul:
• Vericaţi dacă puteţi rezolva singuri problema (a se vedea “Anomalii şi remedii”);
• Porniţi din nou programul pentru a controla dacă inconvenientul a fost eliminat;
• În caz negativ, luaţi legătura cu asistenţa tehnică autorizată la numărul telefonic indicat pe certicatul de garanţie.
! Nu apelaţi niciodată la persoane neautorizate.
Comunicaţi:
• tipul de anomalie;
• modelul maşinii (Mod.);
• numărul de serie (S/N).
Aceste informaţii sunt specicate pe plăcuţa cu date tehnice, lipită în partea din spate a maşinii de spălat precum şi în
partea anterioară, după ce deschideţi uşa.
Atenţionãri în conformitate cu legislaţia în vigoare
• Conform prevederilor legislaţiei privind gestionarea deşeurilor, este interzisã eliminarea deşeurilor de echipamente electrice şi electronice (DEEE) alãturi de deşeurile municipale nesortate. Ele trebuie predate la punctele municipale de colectare,
societãţile autorizate de colectare/reciclare sau distribuitori (în cazul în care se achiziţioneazã echipamente noi de acelaşi tip).
• Autoritãţile locale trebuie sã asigure spaţiile necesare pentru colectarea selectivã a deşeurilor precum şi funcţionalitatea
acestora. Contactaţi societatea de salubrizare sau compartimentul specializat din cadrul primãriei pentru informaţii detaliate.
• Deşeurile de echipamente electrice şi electronice pot predate şi distribuitorilor, la achiziţionarea de echipamente noi
de acelaşi tip (schimb 1 la 1).
• Predarea, de cãtre utilizatori, a deşeurilor de echipamente electrice şi electronice, la punctele de colectare municipale, societãţile autorizate de colectare/reciclare sau distribuitori (în cazul în care se achiziţioneazã echipamente noi de
acelaşi tip) faciliteazã refolosirea, reciclarea sau alte forme de valoricare a acestora.
• Deşeurile de echipamente electrice şi electronice pot conţine substanţe periculoase care pot avea un impact negativ asupra mediului şi sãnãtãţii umane în cazul în care DEEE nu sunt colectate selectiv şi gestionate conform prevederilor legale.
• Simbolul alãturat (o pubela cu roţi, barata cu douã linii în forma de X), aplicat pe un echipament electric sau electronic,
semnicã faptul cã acesta face obiectul unei colectãri separate şi nu poate eliminat împreunã cu deşeurile municipale
nesortate.
24
Page 25

Упутство за употребу
МАШИНА ЗА ПРАЊЕ РУБЉА
SR
Cрпски
WML 621
Садржај
Постављање, 26-27
Распакивање и нивелисање
Повезивање на водоводну и електричну мреж
Први циклус прања
Технички подаци
Одржавање и чување, 28
Искључивање воде и електричне енергије
Чишћење машине за прање веша
Чишћење посуде за детерџент
Нега врата и бубња
Чишћење пумпе
Провера црева за напајање водом
Упозорења и савети, 29
Општа сигурност
Одлагање на отпад
Ручно отварање врата
Опис машине за прање веша и покретање
програма, 30-31
Командна табла
Контролне лампице
Покретање програма
SR
Програми, 32
Табела програма
Посебна подешавања, 33
Задавање температуре
Задавање центрифуге
Функције
Детерџенти и веш, 34
Посуда за детерџент
Припрема веша
Посебни програми
Систем за балансирање терета
Неправилности и решења, 35
Помоћ, 36
25
Page 26

Постављање
SR
! Важно је сачувати ову књижицу како
бисте је могли консултовати у сваком
тренутку. У случају продаје, уступања или
селидбе, обезбедите да остане уз машину
за прање веша како би нови власник могао
да се обавести о раду и одговарајућим
упозорењима.
! Пажљиво прочитати упутства: садрже
важне информације о постављању,
употреби и безбедности.
Распакивање и нивелисање
Распакивање
1. Распакивање машине за веш.
2. Проверити да машина није претрпела
оштећења при транспорту. Уколико
је оштећена, немојте је повезивати и
обратите се продавцу.
3. Скините 3
завртња постављена
као заштита при
транспорту и гумицу
са одговарајућим
одбојником,
постављене на
задњем делу
машине (погледајте
слику).
4. Затворити отворе приложеним
пластичним затварачима.
5. Сачувати све делове: уколико машину
треба транспортовати, биће потребно
поново их поставити.
! Амбалажа није играчка за децу.
Нивелисање
1. Поставити машину на равну и чврсту
површину, не наслањати је на зид,
намештај или друге површине.
2. Уколико под
није савршено
раван, надокнадите
неправилност
отпуштањем или
затезањем предњих
стопица (погледајте
слику); угао нагиба,
измерен на радној
површини не сме
прелазити 2°.
Прецизно нивелисање даје стабилност
и спречава вибрације, буку и померање
током рада машине. У случају да машину
постављате на итисон или тепих, подесите
стопице тако да испод машине оставите
довољно простора за вентилацију.
Повезивање на водоводну и
електричну мрежу
Повезивање црева за напајање водом
1. Повежите црево
за напајање са
славином за хладну
воду са навојем на
излазном отвору од
¾ цола (погледајте
слику).
Пре повезивања
пустите воду да тече
све док не постане
чиста.
2. Повежите
доводно црево са
машином заврћући
га на одговарајући
прикључак за воду,
на задњем делу
машине, горе десно
(погледајте слику).
3. Обратите пажњу да црево не буде
преломљено или пригњечено.
! Притисак воде у славини треба да се
креће у границама вредности датим
у табели са Техничким подацима
(погледајте страницу поред).
! Уколико дужина доводног црева није
довољна, обратите се специјализованој
продавници или овлашћеном сервисеру.
! Никада не користите већ коришћена
црева.
! Користите црева испоручена уз машину.
26
Page 27

Повезивање одводног црева
65 - 100 cm
Повежите
одводно црево,
без савијања, на
одводну цев или
на одвод у зиду
постављене на
65 до 100 цм од
земље;
можете га
пребацити преко
ивице умиваоника
или каде, али
га морате
причврстити
за славину
(погледајте
слику). Слободни
крај одводног
црева не сме да
буде уроњен у воду.
! Не препоручујемо употребу продужних
црева; ако је неопходно, продужетак треба
да буде истог пречника као и оригинално
црево и да не прелази 150 цм.
Повезивање на електричну мрежу
Пре него што гурнете утикач у утичницу,
проверите да ли:
• је утичница повезана са уземљења
изведеним у складу са прописима;
• је утичница у могућности да издржи
максимално оптерећење снаге машине,
наведено у табели са Техничким
подацима (погледајте поред);
• се напон напајања креће у границама
вредности наведених у табели са
Техничким подацима (погледајте поред);
• је утичница компатибилна са утикачем
машине. У случају да не одговара,
променити утичницу или утикач.
! Не постављајте машину на отворено,
чак ни ако је простор преправљен, јер
је веома опасно остављати је изложену
киши и временским непогодама.
! Код инсталирања машине утичница
мора да буде лако доступна.
! Не употребљавајте продужне каблове и
разделнике.
! Кабл не сме да буде изложен савијању
или притискању.
! Замену напојног кабла треба да обавља
само овлашћени сервисер.
Пажња! Произвођач се ограђује од сваке
одговорности у случају непоштовања ових
норми.
Први циклус прања
Након постављања, пре употребе,
извршите циклус прања са детерџентом
и без веша задајући програм
„Самочишћење“(погледајте „Чишћење
машине за прање веша").
Технички подаци
Модел WML 621
ширина 59,5 цм
Димензије
Капацитет од 1 до 6 кг
Електрично
повезивање
Повезивање
на
водоводну
мрежу
Брзина
центрифуге
Контролни
програми
према
директиви
1061/2010
1015/2010
висина 85 цм
дубина 51,7 цм
Погледајте налепницу
са техничким
карактеристикама која се
налази на машини
максималан притисак
1 MPa (10 бара)
минималан притисак
0,05 MPa (0,5 бара)
капацитет бубња 46 литра
до 1200 обртаја у минути
програм 4; Еко памук
60°C.
програм 4; Еко памук
40°C.
Ова опрема је усклађена
са следећим Директивама
заједнице:
- 2004/108/CE
(електромагнетна
компатибилност)
- 2006/95/CЕ (Ниски напон)
- 2012/19/EU (WEEE)
SR
27
Page 28

Одржавање и чување
1
2
SR
Искључивање воде и електричне
енергије
• Затворите славину за воду после сваког
прања. Овим се спречава хабање
водоводних инсталација машине и
уклања опасност од цурења.
• Електрични кабл уклоните када чистите
машину и током поправки.
Чишћење машине за прање веша
• Спољашњи и гумени делови се могу
чистити меком крпом наквашеном млаком
водом и сапуницом. Не користите растворе
или абразивна средства.
• Машина за прање рубља има програм
„Самочишћење“ за унутрашње делове
који треба обавити без икакве одеће у
бубњу.
A
Препоручује се програм чишћења на сваких
40 циклуса прања.
Да бисте активирали програм, истовремено
притисните тастере A и B на 5 секунди.
(погледајте слику). Програм почиње
аутоматски и траје око 70 минута. Да бисте
зауставили циклус, притисните тастер
START/PAUSE.
B
Детерџент (количина
одговара 10% од оне
која се препоручује за
мало запрљану одећу)
или посебни адитиви
за чишћење машине
за прање рубља
могу се користити
као додатак у току
програма прања.
Чишћење посуде за детерџент
Ослободите
фиоку тако што
ћете је подићи и
повући према себи
(погледајте слику).
Исперите је под
млазом воде; ово
треба често радити.
Нега врата и бубња
• Врата увек остављајте одшкринута да би
се избегло стварање непријатних мириса.
Чишћење пумпе
Машина је опремљена пумпом која се
сама чисти и није јој потребно одржавање.
Ипак, може се десити да мали предмети
(метални новац, дугмад) упадну у
предкомору која штити пумпу, а која се
налази у њеном доњем делу.
! Уверите се да је циклус прања завршен и
извуците утикач.
За приступ преткомори:
1. скинути плочу
на предњем
делу машине
помоћу одвијача
(погледајте слику);
2. одврните
поклопац окрећући
га у супротно од
смера кретања
казаљке на сату
(погледајте слику):
излазак воде је
нормалан;
3. очистите унутрашњост пажљиво;
4. вратите поклопац;
5. вратите плочу, водећи рачуна да су
шарке убачене у одговарајуће осовине,
пре него што га притиснете према
машини.
Провера црева за напајање водом
Црево за довод воде проверите барем
једном годишње. Уколико има напрслина и
пукотина треба га заменити: јаки притисци
током прања могли би изазвати изненадна
пуцања.
! Никада не користите већ коришћена
црева.
28
Page 29

Упозорења и савети
! Машина је пројектована и направљена да задовољи све
међународне безбедносне норме. Ова упозорења су дата
из безбедносних разлога и треба их пажљиво прочитати.
Општа сигурност
• Овај уређај је направљен искључиво за кућну употребу.
• Овај уређај могу да користе деца од 8 година
старости и особе са смањеним физичким,
сензорним и менталним могућностима и са
недовољним искуством и знањем ако их
неко надгледа или ако су добили адектватне
информације у вези са коришћењем уређаја
на сигуран начин и разумели опасне
спојеве. Деца не смеју да се играју са
уређајем. Одржавање и чишћење не смеју
да обављају деца без надгледања.
• Машину не додирујте босим ногама или влажних руку
или ногу.
• Утикач из утичнице не извлачите повлачењем за кабл,
него чврсто ухватите утикач.
• Не отварајте посуду за детерџенте док машина ради.
• Не додирујте воду која се испушта, јер може достићи
високу температуру.
• Ни у ком случају не отварати врата силом: могао би
се оштетити сигурносни механизам који спречава
случајно отварање.
• У случају квара, нипошто не пролазити унутрашњим
механизмима у покушају поправљања.
• Проверавајте стално да се деца не приближавају
машини док ради.
• Током прања врата машине могу се могу загрејати.
• Уколико треба померити машину, то треба да раде
две или три особе уз максималну пажњу. Ово немојте
никада радити сами, јер је машина веома тешка.
• Пре убацивања веша проверите да ли је бубањ празан.
SR
Одлагање на отпад
• Одлагање амбалаже на отпад:
придржавајте се локалних прописа, тако да
амбалажа може бити поново употребљена.
• Европска директива 2012/19/EU - WEEE о отпаду
електричних и електронских уређаја, прописује да
кућни уређаји не смеју бити одлагани у редовном
промету чврстог градског отпада. Одбачене уређаје
треба посебно сакупити чиме се побољшава стопа
прикупљања корисног отпада и рециклаже материјала
од којих су сачињени и спречава потенцијално
нарушавање здравља и животне средине.
Симбол прецртане канте за отпатке налази се на свим
производима да би подсетио на обавезу одвојеног
сакупљања.
За детаљније информације о правилном одлагању
кућних уређаја власници се могу обратити
предвиђеној јавној служби или продавцима.
29
Page 30

Опис машине за прање веша и
покретање програма
SR
Командна табла
Посуда за детерџент
Тастер
ON/OFF
ПРОГРАМИ
ТЕМПЕРАТУРА
Дугме
ЦЕНТРИФУГА
Дугме
Дугме
Тастер са лампицама
ФУНКЦИЈА
Контролне лампице
НАПРЕДОВАЊА ЦИКЛУСА/
ЗАДРШКЕ ПОЧЕТКА
Контролна
лампица ВРАТА
БЛОКИРАНА
Тастер са
лампицом
START/PAUSE
Посуда за детерџент: за сипање детерџената и
адитива (види «Детерџенти и веш»).
Дугме ON/OFF: притисните га за укључивање или
искључивање машине.
Дугме ПРОГРАМИ: за задавање програма. Током
трајања програма дугме се не помера.
Тастер са лампицама ФУНКЦИЈА: за избор функција
које су на располагању. Контролна лампица која
одговара одабраној функцији остаће упаљена.
Дугме ЦЕНТРИФУГА: за задавање или искључивање
центрифуге (види «Посебна подешавања»).
Дугме ТЕМПЕРАТУРА: за задавање температуре или
прање на хладно (види «Посебна подешавања»).
Контролне лампице НАПРЕДОВАЊА ЦИКЛУСА/
ЗАДРШКЕ ПОЧЕТКА: за праћење статуса
напредовања програма прања.
Упаљена контролна лампица показује фазу у току.
Ако је активирана функција “пауза почетка”,
показиваће време преостало до покретања програма
(види страну поред).
Тастер са лампицом START/PAUSE: за покретање
или моментално прекидање програма.
НАПОМЕНА: за покретање паузе прања које је у
току, притиснути овај тастер, одговарајућа контролна
лампица ће треперити наранџастом бојом а лампица
фазе у току ће светлети константно. Када се
контролна лампица
врата је могуће отворити (Сачекајте око 3 минута).
За повратак прања на део у којем је прекинуто
притиснути поново овај тастер.
Статус stand by
Ова машина за прање испуњава све нове стандарде
везане за уштеду електричне енергије и опремљена
је системом за аутоматско гашење (stand by) који се
активира након око 30 минута у случају да се машина
не користи. Накратко притисните тастер ON/OFF и
машина ће се поново активирати.
ВРАТА БЛОКИРАНА
угаси,
Контролна лампица ВРАТА БЛОКИРАНА: за
обавештавање да ли се врата могу отворити (види
страну поред).
30
Page 31

Контролне лампице
END
Контролне лампице пружају важне информације.
Ево шта оне значе:
Контролне лампице фазе у току
По избору и покретању жељеног циклуса прања,
лампице ће се прогресивно палити указујући на
статус напредовања:
SR
Пауза почетка
Ако је активирана функција “пауза почетка” (види
«Посебна подешавања»), после покретања програма,
почеће да трепери контролна лампица одабране
задршке:
Како време протиче треперењем одговарајуће
контролне лампице очитаваће се преостало време
задршке:
Када истекне одабрано време задршке лампица која
трепери ће се угасити и задати програм ће започети.
Прање
Испирање
Центрифуга
Пражњење
Крај прања
Тастери функција и одговарајуће контролне лампице
Избором функције одговарајућа лампица ће се
упалити.
Ако одабрана опција не одговара задатом програму,
ову неусклађеност ће сигнализирати треперење
лампице и звучни сигнал (3 кратка звучна сигнала), а
опција се неће активирати.
У случају да се зада функцију која не одговара некој
претходно одабраној функцији, остаће активна само
она која је последња одабрана.
Лампица блокаде врата:
Упаљена лампица указује да су врата блокирана како
би се спречило случајно отварање; да би се избегле
штете пре отварања врата треба сачекати да се
сијалица угаси (Сачекајте око 3 минута).
! Брзо трептање лампице START/PAUSE (наранџасто)
истовремено са лампицом функције указује на
неправилност (види “Неправилности и решења”).
Покретање програма
1. Укључити машину притиском на тастер ON/OFF. Све контролне лампице ће се укључити на неколико секунди,
затим ће се угасити а наставиће да пулсира лампица START/PAUSE.
2. Убаците рубље и затворите врата.
3. На дугмету ПРОГРАМИ одаберите жељени програм.
4. Задати температуру прања (види «Посебна подешавања»).
5. Задати брзину центрифуге (види «Посебна подешавања»).
6. Сипати детерџент и адитиве (види «Детерџенти и веш»).
7. Одабрати жељене функције.
8. Покренути програм притиском на тастер START/PAUSE и одговарајућа лампица ће остати да светли константно
зеленом бојом. За поништавање задатог циклуса укључити паузу машине притиском на тастер START/PAUSE и
одабрати нови циклус.
9. По завршетку програма упалиће се лампица . Лампица ВРАТА БЛОКИРАНА ће се угасити указујући да
је могуће отворити врата. Извући веш и оставити врата одшкринута да би се осушио бубањ (Сачекајте око 3
минута). Искључити машину притиском на тастер ON/OFF.
31
Page 32

SR
Програми
Табела програма
Детерџенти
Опис програма
Програми
Против мрља
1
Бело рубље
2
Памук: Мало запрљан бели и осетљиви шарени веш
3
постојаних боја.
Еко Памук 60° (1): Веома запрљан бели и шарени веш
4
постојаних боја.
Еко Памук 40° (2): Мало запрљан бели и осетљиви
4
шарени веш постојаних боја.
Синтетика: Веома прљав отпоран шарени веш
5
Синтетика (3): Мало прљав отпоран шарени веш.
5
Антиалергијско
6
Беби
7
Вуна: За вуну, кашмир, итд.
8
Осетљиво
9
Брзо 60 минута: За брзо освежавање прљавог
10
веша (није за вуну, свилу и веш који се пере ручно).
Памук 20°: Мало запрљан бели и осетљиви шарени веш
11
постојаних боја.
Памук
12
Синтетика
13
Брзо 30 минута
14
Испирање
Центрифуга + Пражњење
Само Пражњење воде *
* Избором програма и искључивањем циклуса центрифуге, машина ћити само пражњење.
Трајање циклуса приказано на екрану или наведено у упутству је процена заснована на стандардним условима. Стварно време може да зависи
од више бројних фактора, као што су температура и притисак воде на улазу, температура околине, количина детерџента, количина и тип
рубља, уравнотеженост рубља, додатне изабране опције.
1) Контролни програм према норми 1061/2010: задајте програм 4 са температуром од 60°C.
Овај циклус је погодан за прање памучног рубља које је уобичајено запрљано и најефикаснији је у погледу комбиноване потрошње струје и воде
за рубље које може да се пере на 60°C. Ефективна температура прања може да се разликује од оне која је назначена.
2) Контролни програм према норми 1061/2010: задајте програм 4 са температуром од 40°C.
Овај циклус је погодан за прање памучног рубља које је уобичајено запрљано и најефикаснији је у погледу комбиноване потрошње струје и воде
за рубље које може да се пере на 40°C. Ефективна температура прања може да се разликује од оне која је назначена.
За све Тест институте:
2) Дуги програм за памук: задајте програм 4 са температуром од 40°C.
3) Дуги програм за синтетику: задајте програм 5 са температуром од 40°C.
Макс.
темп.
(°C)
40° 1200
60° 1200
40°
(Max. 90°)
60° 1200 -
40° 1200 -
60° 1000
40° 1000
60° 1200 40° 1000
40° 800 30° 0 -
60° 1200 -
20° 1200 -
Хладна
вода
Хладна
вода
Хладна
вода
Брзина
макс.
(обртаја
у
минути)
Претпрање
1200
1200 -
1000 -
800 -
- 1200 - -
Прање
Избељивач
-
-
-
-
-
-
-
-
-
-
(кг)
струје kWh
Омекшивач
Оптерећење макс.
Преостала влага %
4 - - - 180’
4 - - - 180’
6 - - - 115’
6 53 1,02 49,8 195’
6 53 0,86 76 185’
3 44 0,78 33 120’
3 - - - 110’
4 - - - 185’
3 - - - 145’
1,5 - - - 80’
1 - - - 75’
3,5 53 0,68 30 60’
6 - - - 180’
6 - - - 100’
3 - - - 75’
3 70 0,05 36 30’
6 - - - 49’
воде lt
Укупна потрошња
- 1200 - - - - 6 - - - 10’
- - - - - 6 - - - 3’
Трајање циклуса
Против мрља: oвај програм 1 је прилагођен прању много запрљаног рубља са отпорним бојама. Овај програм
гарантује супериорнију класу прања од стандардне (класа А). Не користите овај програм ако сте помешали рубље
различитих боја. Препоручујемо употребу детерџента у праху. За упорне мрље препоручујемо претходно третирање
са посебним адитивима.
Бело рубље: употребљавајте циклус 2 за прање белог рубља. Програм је намењен очувању светле боје белог
рубља током времена. За најбоље резултате се препоручује коришћење детерџента у праху.
Антиалергијско: Користите програм 6 за уклањање главних изазивача алергија попут полена, гриња, псећих или
мачећих длака.
Беби: користите програм 7 за скидање прљавштине типичне за децу и скидање детерџента са крпа како бисте избегли
алергијске реакције осетљиве дечије коже. Циклус је осмишљен тако да смањи количину бактерија употребом веће
количине воде и оптимизирањем ефекта специфичних хигијенских адитива додатих детерџенту.
Еко програми
Еко програми нуде добре перформансе прања на основу ниске температуре са малим утрошком енергије ради
заштите животне средине и уштеде. Еко програми (
12
Памук,
13
Синтетика и
14
Брзо 30 минута) направљени су за
разне врсте тканина и за мало прљав веш. За оптималан резултат препоручујемо коришћење течног детерџента;
саветујемо претходно третирање манжетни, оковратника и мрља.
Памук 20°: програм 11 стандард је идеалан за прљав памучни веш. Добре перформансе, такође са хладном водом,
упоредне са прањем на 40°, гарантоване су механичком радњом која функционише варирањем брзине поновљеним
и приближеним ударцима.
32
Page 33

Посебна подешавања
Задавање температуре
Окретањем дугмета ТЕМПЕРАТУРА задаје се температура прања (види Табелу програма).
Температура се може смањити све до хладног прања ( ).
Машина аутоматски спречава задавање температуре веће од предвиђеног максимума за сваки програм.
! Избором програма 3 температуру можете повећати све до 90°.
Задавање центрифуге
Окретањем дугмета ЦЕНТРИФУГА задаје се брзина центрифуге одабраног програма.
Максималне предвиђене брзине за програме су:
Програми Максимална брзина
Памук 1200 обртаја у минути
Синтетика 1000 обртаја у минути
Вуна 800 обртаја у минути
Свила само пуњење
Брзина центрифуге се може смањити или искључити избором симбола .
Машина аутоматски спречава центрифугу јачу од максимума предвиђеног за сваки програм.
Функције
Различите предвиђене функције прања омогућују постизање жељене чистоће и белине.
За активирање функција:
1. притиснути тастер који одговара жељеној функцији;
2. паљење одговарајуће лампице показује да је функција активна.
Напомена:
- Ако одабрана опција не одговара задатом програму, ову неусклађеност ће сигнализирати треперење лампице
и звучни сигнал (3 кратка звучна сигнала), а опција се неће активирати.
- У случају да се зада функцију која не одговара некој претходно одабраној функцији, остаће активна само она
која је последња одабрана.
SR
Супер прање
Ова опција гарантује прање високог учинка захваљујући употреби веће количине воде у почетној фази циклуса и
дужем трајању програма и користан је за уклањање најупорнијих флека.
Може се користити са избељивачем или без њега.
Ако желите да обавите избељивање, убаците испоручену додатну кадицу 4, у кадицу 1. При дозирању
избељивача не прелазите ниво „max“ обележен на централном делу (погледајте слику на стр. 34).
Лако пеглање
Избором ове функције, прање и центрифуга ће бити на одговарајући начин измењени тако да се смањи гужвање.
На крају циклуса машина ће извести лагано окретање бубња;
упалиће се лампица функције ЛАКО ПЕГЛАЊЕ трепериће и фаза END остаје упаљена. За завршетак циклуса
треба притиснути тастер START/PAUSE или тастер ЛАКО ПЕГЛАЊЕ.
Предпрање
Избором ове функције реализује се предпрање, корисно при скидању тврдокорних мрља.
НАПОМЕНА: Додати детерџент у одговарајућу кадицу.
Задршка почетка
Одлаже време почетка рада машине до 12 часова.
Притискати тастер све док се не упали лампица која одговара жељеном времену задршке. На пети притисак
дугмета функција се деактивира.
НAПОМЕНА: После притиска на тастер START/PAUSE, време задршке је могуће само смањити.
! Активна је са свим програмима.
33
Page 34

Детерџенти и веш
M
AX
1
2
4
3
A
B
SR
Посуда за детерџент
Добар резултат прања зависи чак и од исправног
дозирања детерџента: повећаном дозом прање није
ефикасније а доприноси се стварању наслага на
унутрашњим деловима машине и загађењу животне
средине.
! Користите детерџент у праху за бело памучно
рубље и за претпрање или за прање рубља на
температури већој од 60°C.
! Пратите упутства на паковању детерџента.
! Не користите детерџенте за ручно прање, пошто
стварају много пене.
Извуците посуду за
детерџенте и сипајте
детерџент или адитив
прању на следећи начин.
кадица 1: Детерџент за претпрање (у праху)
Пре сипања детерџента проверите да није убачена
додатна кадица 4.
кадица 2: Детерџент за прање
(у праху или течан)
У случају да користите течан детерџент, препоручује
се коришћење приложеног зида А за исправно
дозирање. За употребу детерџента у праху користите
зид у отвору B.
кадица 3: Адитиви (омекшивач, итд.)
Омекшивач не сме да цури кроз решетку.
додатна кадица 4: Избељивач
Припрема веша
• Веш поделите према:
- врсти тканине/ симболу на етикети.
-бојама: одвојите шарени од белог веша.
• Испразните џепове и проверите дугмад.
• Не прелазите наведене вредности, које се односе
на суво рубље: погледајте „Табелу програма“.
Посебни програми
Вуна - Woolmark Apparel Care - Green:
Циклус прања „Вуна“ ове машине за прање веша је
одобрен од стране Woolmark Company за прање одеће
од вуне класификоване за „ручно прање“, под условом да
се прање извршава у складу са упутствима наведеним
на етикети одеће и напоменама произвођача машине за
прање веша.
Осетљиво: користите програм 9 за прање веома
осетљивог рубља, које има апликације од штраса или
перлица.
Препоручујемо да преврнете одећу пре прања и
ставите мале делове у одговарајућу врећицу за
прање осетљиве одеће. За најбоље резултате
се препоручује коришћење течног детерџента за
осетљиву одећу.
За прање одеће од свиле и завеса изаберите
циклус 9 и активирајте опцију ; машина ће
завршити циклус са влажним вешом, а лампица
ће треперити. Да бисте избацили воду и извадили
влажан веш, потребно је да притиснете тастер
START/PAUSE или тастер .
Систем балансирања терета
Пре сваке центрифуге, да би се избегле претеране
вибрације и терет равномерно распоредио, бубањ
се окреће брзином мало већом од оне током прања.
Ако се после неколико поновљених покушаја
терет још увек није равномерно распоредио,
машина ће извршити центрифугу брзином мањом
од предвиђене. У случају великог дисбаланса,
распоређивање врши машина уместо центрифуге. Да
би се побољшало распоређивање терета и правилно
балансирање, препоручује се мешање великих и
малих комада веша.
Колико је тежак веш?
1 чаршав 400-500 гр.
1 јастучница 150-200 гр.
1 столњак 400-500 гр.
1 баде-мантил 900-1200 гр.
1 пешкир 150-250 гр.
34
Page 35

Неправилности и решења
Може се догодити да машина не ради. Пре позивања Техничке службе (види “Помоћ”), проверите да се не ради о
проблему лако решивом уз помоћ следећег списка.
Неправилности:
Машина се не укључује.
Циклус прања не почиње.
Машина не убацује воду
(лампица прве фазе прања
трепће брзо).
Машина константно убацује
и испушта воду.
Могући узроци / Решење:
• Утикач није увучен у утичницу или није увучен довољно да би имао контакт.
• Нема струје у кући.
• Врата нису добро затворена.
• Тастер ON/OFF није притиснут.
• Тастер START/PAUSE није притиснут.
• Славина за воду није отворена.
• Задата пауза на време покретања (Тајмер задршке), види «Посебна
подешавања»).
• Црево за довод воде није повезано са славином.
• Црево је савијено.
• Славина за воду није отворена.
• У кући нема воде.
• Нема довољног притиска.
• Тастер START/PAUSE није притиснут.
• Одводно црево није постављено између 65 и 100 цм од земље (види
“Постављање”).
• Крај одводног црева је потопљен у воду (види “Постављање”).
• Цев у зиду пропушта ваздух.
Ако се и после ових провера проблем не реши, затворите славину за воду,
искључите машину и позовите Техничку службу. Ако се стан налази на последњим
спратовима зграде, могуће је да се јавља феномен сифона, због чега машина
стално убацује и избацује воду. За решавање овог проблема у продаји су доступни
одговарајући неповратни вентили.
SR
Машина не испушта воду или
не центрифугира.
Машина јако вибрира током
центрифуге.
Машина губи воду.
Брзо трепери лампица START/
PAUSE и лампице функција.
Ствара се много пене.
• Програмом није предвиђено избацивање: код неких програма потребно је ручно
га покренути (види “Покретање програма”).
• Активирана функција ЛАКО ПЕГЛАЊЕ: за завршетак програма притиснути
тастер START/PAUSE (“Посебна подешавања”).
• Одводно црево је савијено (види “Постављање”).
• Вод за пражњење је запушен.
• Бубањ у тренутку инсталације није био правилно деблокиран (види
“Постављање”).
• Машина не стоји равно (види “Постављање”).
• Машина је притиснута између намештаја и зида (види “Постављање”).
• Црево за довод воде није добро затегнуто (види “Постављање”).
• Посуда за детерџенте је загушена (за чишћење види “Одржавање и чување”).
• Одводно црево није добро причвршћено (види “Постављање”).
• Искључите машину и извуците утикач из утичнице, сачекајте око 1 минут, а
затим је поново укључите.
Уколико неправилност остане, позвати Техничку службу.
• Детерџент не одговара машини (треба да носи натпис “за машинско прање”, “за
ручно и машинско прање” или слично).
• Доза је превелика.
35
Page 36

Помоћ
SR
Пре него што позовете Техничку службу:
• Проверите да ли неправилност можете решити сами (види “Неправилности и решења”);
• Поново започните програм да видите да ли је проблем отклоњен;
• У супротном контактирајте овлаштени Центар техничке службе на број телефона назначен на гарантном листу.
! Никада не користите неовлашћене сервисе.
Јавите:
• врсту неисправности;
• модел машине (Мо.);
• серијски број (S/N).
Ове информације се налазе на плочици постављеној на задњем делу машине и у предњем делу отвора.
36
Page 37

Инструкции за ползване
ПЕРАЛНА МАШИНА
BG
Български
WML 621
Съдържание
Монтиране, 38-39
Разопаковане и нивелиране
Хидравлични и електрически връзки
Първо пране
Технически данни
Поддръжка и почистване, 40
Спиране на водата и изключване на електрозахранването
Почистване на пералната машина
Почистване на чекмеджето за перилни препарати
Поддръжка на люка и на барабана
Почистване на помпата
Проверка на маркуча за студена вода
Мерки за безопасност и препоръки, 41
Общи предохранителни мерки
Рециклиране
Описание на пералната машина и пускането
на дадена програма, 42-43
Табло за управление
Светлинни индикатори
Включване на програма
BG
Програми, 44
Таблица с програмите
Персонализирания, 45
Задаване на температурата
Задаване на центрофугата
Функции
Перилни препарати и дрехи за пране, 46
Чекмедже за перилните препарати
Подготвяне на прането
Специфично пране
Система за измерване на товара
Проблеми и мерки за отстраняването им, 47
Сервизно обслужване, 48
37
Page 38

Монтиране
BG
! Важно е да съхранявате инструкциите,
за да можете да правите допълнителни
справки по всяко време. В случай
че пералната машина се продаде,
преотстъпи или премести, трябва да
се погрижите инструкциите винаги да
я придружават, за да се предостави
информация на новия собственик за
работата и съответните предупреждения.
! Прочетете внимателно инструкциите:
защото съдържат важна информация за
монтажа, използването и безопасността.
Разопаковане и нивелиране
Разопаковане
1. Разопаковайте пералната машина.
2. Проверете дали пералната машина не
е повредена при транспортирането. Ако е
повредена, не я свързвайте, а се обърнете
към продавача.
3. Свалете
3-те винта за
предпазване
при транспорт
и гумичката със
съответната
втулка, поставени
от задната страна
(виж показаното на
фигурата).
4. Затворете отворите с предоставените
пластмасови капачки.
5. Съхранете всички части: за да се
монтират отново при необходимост
пералната машина да бъде
транспортирана.
! Опаковъчният материал не е детска играчка.
Нивелиране
1. Монтирайте пералната машина на
равен и твърд под, без да я опирате в
стени, мебели и др.
2. Ако подът
не е идеално
хоризонтален,
компенсирайте
неравностите, като
отвиете или завиете
предните крачета
(виж фигурата);
ъгълът на наклона,
измерен върху работната повърхност, не
трябва да надвишава 2°.
Точното нивелиране позволява машината
да бъде стабилна и да се избягват
вибрациите, шумът и преместването й
по време на работа. Когато настилката
е мокет или килим, регулирайте така
крачетата, че под пералната машина да
остане достатъчно място за вентилация.
Хидравлични и електрически
връзки
Свързване на маркуча към
водопроводната мрежа
1. Свържете
захранващия
маркуч, като го
завиете към крана
за студената вода с
накрайник с газова
резба 3/4 (вижте
фигурата).
Преди да го
свържете, източете
водата, докато се избистри.
2. Свържете
маркуча за
студената вода към
пералната машина,
като го завиете
към специалния
щуцер, разположен
от задната страна,
горе вдясно (âèæ
фигурата).
3. Внимавайте маркуча да не се прегъва и
притиска.
! Налягането по водопроводната мрежа
трябва да бъде в границите, указани
в таблицата „Технически данни” (âæ.
следващата страница).
! Ако дължината на захранващия
маркуч не е достатъчна, се обърнете
към специализиран магазин или към
оторизиран техник.
! Никога не използвайте вече употребяван
маркуч.
! Използвайте тези, което са доставени с
пералната машина.
38
Page 39

Свързване на маркуча за мръсната вода
65 - 100 cm
Свържете маркуча
за мръсната
вода, без да го
прегъвате, към
канализационната
тръба или
към тръбата
за отвеждане
в стената,
разположени на
височина между 65
и 100 см от пода, или го подпрете на ръба
на мивката или ваната,
свързвайки
доставения
водач към крана
(вж. фигурата).
Свободният край
на маркуча за
мръсната вода
не трябва да
бъде потопен във
водата.
! Не се препоръчва използването на
удължителни маркучи. Ако е необходимо,
удължителят трябва да има същия
диаметър като оригиналния и да не
надвишава 150 см.
! Не използвайте удължители или
разклонители.
! Кабелът не трябва да бъде огънат или
сплескан.
! Захранващият кабел трябва да се
подменя само от оторизирани техници.
Внимание! Фирмата отхвърля всякаква
отговорност в случаите, в които тези
норми не се спазват.
Първо пране
След инсталиране и преди употреба
включете един цикъл на изпиране с
перилен препарат, но без дрехи, задавайки
програма „Автоматично почистване“ (вижте
Почистване на пералната машина).
Технически данни
Модел WML 621
ширина 59,5 см
Размери
Вместимост îò 1 äî 6 êã.
Електрическо
захранване
височина 85 см
дълбочина 51,7 см
Виж табелката с
характеристиките,
поставена на машината
BG
Свързване към електрическата мрежа
Преди да свържете щепсела в контакта,
проверете дали:
• контактът е заземен съгласно
действащите стандарти;
• контактът може да поеме максималната
мощност на натоварване на машината,
указана в таблицата с техническите
данни (виж следващата страница);
• захранващото напрежение е в границите
на указаното в таблицата с техническите
данни (виж следващата страница);
• контактът отговаря на щепсела на
пералната машина. В противен случай
заменете щепсела или контакта.
! Пералната машина не се монтира на
открито, дори под навес, защото е много
опасно да се остави на влиянието на
атмосферните условия.
! За монтираната перална машина
електрическият контакт трябва да бъде
лесно достъпен.
Захранване с
вода
Скорост на
центрофугата
Програми
за проверка
съгласно
Регламенти №
1061/2010 и №
1015/2010 на
Комисията.
максимално налягане
1 МРа (10 bar)
минимално налягане
0,05 МРа (0,5 bar)
обем на казана 46 литра
до 1200 оборота/
минута
програма 4; Еко памук
60 C°.
програма 4; Еко памук
40 C°.
Пералната машина
съответства на
следните Европейски
директиви:
- 2004/108/СЕ (за
електромагнитна
съвместимост)
- 2012/19/EU (WEEE)
- 2006/95/CE (за ниско
напрежение)
39
Page 40

Поддръжка и почистване
1
2
A
B
BG
Спиране на водата и изклчване
на електрозахранването
Затваряйте крана за вода след всяко
изпиране. По този начин се ограничава
износването на хидравличната
инсталация на пералната машина и се
ограничава опасността от течове.
Изключвайте щепсела от електрическото
захранване, когато почиствате пералната
машина и по време на работи по
поддръжката.
Почистване на пералната машина
• Външната част и гумените части могат
да се почистват с кърпа с хладка вода и
сапун. Не използвайте разтворители или
абразивни препарати.
• Пералнята разполага с програма за
„Автоматично почистване“ на вътрешните
части, което трябва да се извършва при
абсолютно празен барабан.
Прахът за пране (10% от препоръчваното
количество за слабо замърсено пране)
или специални допълнителни препарати
за почистване на пералнята може да се
ползват в добавка към програмата за
изпиране. Препоръчва се пускането на
програмата за почистване на всеки 40
изпирания.
За да задействате
програмата,
натиснете
едновременно
бутони A и B за 5 сек
(вижте фигурата).
Програмата ще
се активира
автоматично и ще
продължи около 70
минути. За да спрете цикъла, натиснете
бутона START/PAUSE.
Почистване на чекмеджето за
перилните препарати
Извадете
чекмеджето с
повдигане и
изтегляне навън
(виж фигурата).
Измийте го под
течаща вода. Това
почистване трябва
да се извършва
често.
Поддръжка на лка и на барабана
Оставяйте люка винаги открехнат за
избягване образуването на неприятни
миризми.
Почистване на помпата
Пералната машина е окомплектована със
самопочистваща се помпа, която няма
нужда от поддръжка. Възможно е обаче
малки предмети (монети, копчета) да
попаднат във филтъра, който предпазва
помпата и се намира в долната й част.
! верете се, че цикълът на пране е
завършил, и изключете щепсела от
контакта.
За достъп до филтъра:
1. свалете панела
в предната част
на пералната
машина с помощта
на отвертка (âæ.
фигура);
2. отвийте
капачката, като
я завъртите в
посока, обратна
на часовниковата
стрелка (âèæ
фигура нормално
е да изтече малко
вода;
3. почистете внимателно отвътре;
4. завийте отново капачката;
5. затворете отново панела, като, преди
да го избутате към пералнята, се уверите,
че сте поставили правилно закрепващите
куки в специалните водачи.
Проверка на маркуча за студената
вода
Проверявайте маркуча за студената вода
поне веднъж годишно. а се замени, ако
е напукан и нацепен, защото по време
на изпиране голямото налягане може да
предизвика внезапно спукване.
! Никога не използвайте вече употребяван
маркуч.
40
Page 41

Мерки за безопасност и
препоръки
! Пералната машина е проектирана и произведена в
съответствие с международните норми за безопасност.
Предупрежденията тук са продиктувани от съображения
за безопасност и трябва да се четат внимателно.
Общи мерки за безопасност
• Този уред е предназначен изключително за домашна
употреба.
Този уред може да бъде използван от деца над 8
години и лица с ограничени физически, сетивни
или умствени способности, или с недостатъчен
опит и познания, ако те са наблюдавани или
инструктирани относно използването на уреда
от лице, отговорно за тяхната безопасност и
разбират опасностите, свързани с употребата
на уреда. Децата не трябва да си играят с уреда.
Поддръжката и почистването не трябва да се
извършват от деца без надзор.
• Пералната машина трябва да се използва само от
възрастни хора съгласно инструкциите, предоставени в
тази книжка.
• Не докосвайте машината, когато сте боси, с мокри или
влажни ръце или крака.
• Не изключвайте щепсела от контакта за електрически
ток, като дърпате кабела, а като хващате щепсела.
• Не отваряйте чекмеджето с перилни препарати, докато
пералната машина работи.
• Не докосвайте маркуча за мръсната вода, защото
може да е достигнал високи температури.
• Никога не отваряйте люка със сила, защото може да се
повреди обезопасителния механизъм, който предпазва
от случайно отваряне.
• В случай на повреда по никакъв повод не достигайте
до вътрешните механизми в опити за ремонт.
• Винаги контролирайте децата да не се доближават до
работещата машина.
• По време на изпиране люкът се нагрява.
• Преместването да се извършва внимателно от
двама или трима души. Никога от сам човек, защото
пералната машина тежи много.
• Преди да заредите машината, проверете дали
барабанът е празен.
относно правилното извеждане от употреба на
домакинските електроуреди се обърнете към
предназначената за това обществена служба или
към дистрибуторите.
BG
Рециклиране
• Унищожаване на опаковъчния материал:
спазвайте местните норми – по този начин
опаковъчният материал може да се рециклира.
• Европейската директива 2012/19/EU - WEEE
за отпадъците от електрическо и електронно
оборудване предвижда домакинските електроуреди
да не се изхвърлят заедно с обичайните твърди
градски отпадъци. Извадените от употреба уреди
трябва да бъдат събирани отделно с цел да бъде
увеличен делът на подлежащите на повторна
употреба и рециклиране материали, от които са
направени, както и да бъдат избегнати евентуални
вреди за здравето и околната среда. Символът
със зачеркнатия контейнер е поставен върху
всички продукти, за да напомня за задължителното
разделно събиране. За по-нататъшна информация
41
Page 42

Описание на пералната машина и
пускането на дадена програма
BG
Табло за управление
Бутон ON/OFF
Чекмедже за перилните
препарати
Чекмедже за перилните препарати: за дозиране
на перилните препарати и добавките (âæ. “Перилни
препарати и дрехи за пране”).
Програматор
ПРОГРАМИ
Светлинни ИНДИКАТОРИ ЗА ХОД НА
ЦИКЪЛ/ЗАБАВЕНО ВКЛЮЧВАНЕ
Програматор
ЦЕНТРОФУГА
Програматор
ТЕМПЕРАТУРА
Бутони със светлинни
индикатори ФУНКЦИЯ
Светлинен индикатор БЛОКИРАН ЛЮК: за да
се разбере дали люкът може да се отвори (âæ.
съседната страница).
Светлинен
индикатор
БЛОКИРАН
ЛЮК
Бутон със светлинен
индикатор
START/PAUSE
Бутон ON/OFF: за включване и изключване на
пералнята.
Програматор ПРОГРАМИ: за задаване на
програмите. По време на изпълнение на програмата
ключът остава неподвижен.
Бутони със светлинни индикатори ФУНКЦИЯ: за
селектиране на възможните функции. Светлинният
индикатор за избраната функция ще продължи да
свети.
Програматор ЦЕНТРОФУГА: за задаване
на центрофуга или за изключването й (âæ.
“Персонализирания”).
Програматор ТЕМПЕРАТУРА: за задаване на
температура или пране със студена вода (âæ.
“Персонализирания”).
Светлинни ИНДИКАТОРИ ЗА ХОД НА ЦИКЪЛ/
ЗАБАВЕНО ВКЛЮЧВАНЕ: за да следвате хода на
изпълнение на програмата за пране.
Включеният светлинен индикатор показва, че се
извършва определена фаза от цикъла.
Ако е зададена функцията “Забавено включване”, ще
се посочва времето, оставащо до стартирането на
програмата (вж. съседната страница).
Бутон със светлинен индикатор START/PAUSE:
за стартиране на програмите или временното им
прекъсване.
Забележка: за задаване на пауза в прането
натиснете отново бутона - индикаторът ще
мига с оранжева светлина, докато светлинният
индикатор, указващ изпълнение на фаза, ще
свети непрекъснато. Ако светлинният индикатор
БЛОКИРАН ЛЮК е угаснал, ще може да се отвори
вратата на люка (изчакайте около 3 минути).
За продължаване на цикъла пране от мястото, в
което е бил прекъснат, натиснете отново този бутон.
Режим на stand by
В съответствие с новите нормативи за пестене
на енергия тази перална машина е снабдена със
система за автоматично изключване (stand by), която
се задейства след 30 минути в случай, че машината
не се използва. Натиснете за кратко бутон
изчакайте машината да се задейства отново.
ON/OFF
и
42
Page 43

Светлинни индикатори
END
Следящите светлинни индикатори дават важна
информация.
Ето какво казват:
Светлинни индикатори за текущите фази
След като е избран и стартиран желаният цикъл на
пране, светлинните индикатори ще светват един след
друг, за да указват хода на цикъла:
Пране
BG
Отложен старт
Ако е активирана функцията “Забавено включване” (âæ.
“Персонализирания”), след пускане на програмата ще
светне индикаторът за избраното забавяне:
В течение на времето ще се визуализира оставащото
забавяне чрез мигане на съответния светлинен
индикатор:
След като изтече времето за отлагане на
изпълнението, примигващият светлинен индикатор
ще угасне и избраната програма ще се стартира.
Изплакване
Центрофуга
Източване на водата
Край на прането
Бутони за функция и съответни светлинни
индикатори
При избор на функция съответният светлинен
индикатор ще светне.
Ако избраната опция не е съвместима със
зададената програма, тази несъвместимост ще се
сигнализира от звуков сигнал (трикратно) и опцията
няма да се активира.
В случай на задаване на функция, несъвместима с
друга, зададена преди нея функция, остава активен
само последният избор.
Светлинен индикатор блокиран лк
Светещият индикатор показва, че люкът е блокиран,
за да се предотвратят случайни отваряния; за
избягване на щети е необходимо да се изчака
изгасването на светлинния индикатор, преди да се
отвори люкът (изчакайте около 3 минути).
! Бързото мигане на светлинния индикатор START/
PAUSE (оранжев) заедно с индикатора за функциите
е сигнал за неизправност (âæ. “Неизправности и
отстраняването им”).
Вклчване на програма
1. Включете пералната машина, като натиснете бутона
светят в продължение на няколко секунди, след което ще продължат да светят тези на зададената програма, а
индикаторът за START/PAUSE ще свети с пулсираща светлина.
2. Заредете дрехите за пране и затворете люка.
3. Задайте желаната програма с ключа ПРОГРАМИ.
4. Задайте температурата на пране (âæ. “Персонализирания”).
5. Задайте скоростта на центрофугиране (âæ. “Персонализирания”).
6. Поставете перилен препарат и добавки âæ. “Перилни препарати и дрехи за пране”.
7. Избиране на желаните функции.
8. Включете програмата, като натиснете бутона START/PAUSE, съответният светлинен индикатор ще свети
постоянно в зелен цвят.
За да отмените зададения цикъл, поставете машината в пауза, като натиснете бутона START/PAUSE, и изберете
новия цикъл.
9. Когато програмата свърши, ще светне индикаторът . Светлинният индикатор за БЛОКИРАН ЛЮК ще угасне,
указвайки, че люкът може да бъде отварян (изчакайте около 3 минути).
Извадете прането и оставете люка притворен, за да изсъхне барабанът. Изключете пералнята, като натиснете
бутона ON/OFF.
ON/OFF
. Всички индикатори ще се включат и ще
43
Page 44

Програми
Таблица с програмите
BG
Описание на програмата
Програми
Без Петна
1
Бели
2
3
Памук:
Бели и цветни, деликатни,
Еко памук 60° (1):
4
4
Еко памук 40° (2):
Синтетични: Цветни, устойчиви, силно замърсени.
5
Синтетични
5
Противоалергично действие
6
7
Áåáå
Âúëí: за вълна, кашмир и т.н.
8
Фини тъкани
9
Бързо Пране 60: За бързо освежаване на не много замърсени
дрехи (не се препоръчва за вълна, коприна и дрехи, които трябва
10
да се перат на ръка).
11
Памук 20°:
Памук
12
Синтетика
13
Бърза 30’
14
Изплакване
Центрофуга и Източване на водата
Само източване на водата *
Бели и цветни, устойчиви, силно замърсени
Бели и цветни, деликатни,
(3):
Цветни, устойчиви, много
Бели и цветни, деликатни,
много
много
замърсени.
много
замърсени.
замърсени.
замърсени.
Макс.
температура ()
40° 1200
60° 1200
40°
(Max. 90°)
.
60° 1200 40° 1200 60° 1000
40° 1000
60° 1200 40° 1000
40° 800 30° 0 -
60° 1200 -
20° 1200 -
студена
вода
студена
вода
студена
вода
- 1200 - -
- 1200 - - - - 6 - - - 10’
- - - - - 6 - - - 3’
(обороти
в минута)
Макс. скорост
1200
1200 -
1000 -
800 -
Перилни препарати
ране
пране
Ïредп-
Белина
Основно
-
-
-
-
-
-
-
-
-
-
%
)
ìêñ (êã
Остатъчна
Зареждане
тител
Омеко-
Разход на
влажност
4 - - - 180’
4 - - - 180’
6 - - - 115’
6 53 1,02 49,8 195’
6 53 0,86 76 185’
3 44 0,78 33 120’
3 - - - 110’
4 - - - 185’
3 - - - 145’
1,5 - - - 80’
1 - - - 75’
3,5 53 0,68 30 60’
6 - - - 180’
6 - - - 100’
3 - - - 75’
3 70 0,05 36 30’
6 - - - 49’
енергия kWh
Общ разход на
вода lt
цикъла
Продълж-
ителност на
* С избирането на програма и изключването на центрофугата пералнята само ще източи водата
Продължителността на цикъла, показана на дисплея или посочена в ръководството, е приблизително изчислена въз основа на стандартните условия.
Реалното времетраене може да варира в зависимост от множество фактори като температура и налягане на водата при пълнене, температура на въздуха
в помещението, количество перилен препарат, количество, вид и тегло на прането, допълнително избрани опции.
1) Програма за проверка съгласно стандарт 1061/2010: задайте програма 4 с температура 60°C.
Този цикъл е подходящ за пране на памучни, нормално замърсени тъкани и е най-ефективен от гледна точка на комбиниран разход на енергия и вода, подходящ е за дрехи,
които могат да се перат на 60°C. Действителната температура на пране може да се различава от указаната.
2) Програма за проверка съгласно стандарт 1061/2010: задайте програма 4 с температура 40°C.
Този цикъл е подходящ за пране на памучни, нормално замърсени тъкани и е най-ефективен от гледна точка на комбиниран разход на енергия и вода, подходящ е за дрехи,
които могат да се перат на 40°C. Действителната температура на пране може да се различава от указаната.
За всички институции, извършващи изпитания:
2) Продължителна програма за памук: задайте програма 4; с температура 40° C.
3) Дълга програма за синтетични тъкани: задайте програма 5 с температура 40° C.
БЕЗ ПЕТНА: програмата 1 е подходяща за изпирането на силно замърсено пране с устойчиви цветове. Програмата
осигурява по-висок клас изпиране от стандартния (клас A). Не активирайте програмата при разноцветно пране. Препоръчва
се използването на прахообразен перилен препарат. Срещу упорити петна се препоръчва предварителна обработка със
специални допълнителни препарати.
Бели: Използвайте този цикъл за 2 изпиране на бели тъкани. Програмата е разработена с цел продължителното запазване
на искрящия бал цвят на тъканите. За по-добри резултати се препоръчва използването на прах за пране. използвайте цикъла
за прането в светли цветове. Програмата е разработена с цел продължителното запазване на тъмните цветове на тъканите.
Противоалергично действие: използвайте програмата 6 за отстраняване на основните алергени като полени, акари,
кучешки и котешки косми.
Бебе: използвайте специалната програма 7, за да отстраните типичното замърсяване на детските дрехи и премахнете
перилния препарат, за да се избегнат алергични реакции на деликатната детска кожа. Цикълът е създаден за елиминиране
на бактериите чрез използване на по-голямо количество вода и оптимизиране на ефекта от специфичните хигиенизиращи
добавки към перилния препарат.
Програми „Еко“
Програмите „Еко“ предлагат добър резултат от изпирането при ниска температура, позволявайки по-ниско потребление
на електроенергия, като с това допринасят за опазването на околната среда и икономическата ефективност. Програмите
„Еко“ (12 Памук, 13 Синтетика и 14 Бърза 30’) са създадени за различни видове тъкани и слабо замърсени дрехи. За да
бъдат гарантирани оптимални резултати, препоръчваме да използвате течен перилен препарат; добре е да обработите
предварително маншетите, яките и петната.
Памук 20 C°: програмата 11 е идеална за замърсено пране от памучна тъкан. Добрите резултати включително при изпиране със
студена вода, в сравнение с тези след пране при 40°, са гарантирани от механичното действие с промяна на скоростта, многократно
и често достигащо до пикови стойности.
44
Page 45

Персонализирания
Задаване на температурата
Завъртайки ключа ТЕМПЕРАТРА, се задава температурата на пране (вж. Таблица на програмите).
Температурата може да се понижи до пране със студена вода ( ).
Пералнята автоматично ще попречи да се зададе температура, която е по-висока от максималната температура,
предвидена за всяка програма.
! Изключение: с избиране на програма 3 температурата може да се повиши до 90°.
Задаване на центрофугата
Завъртайки ключа ЦЕНТРОФГА, се задава скоростта на центрофугиране за избраната програма.
Максималните предвидени скорости за програмите са:
Програми Максимална скорост
Памучни 1200 оборота в минута
Синтетични тъкани 1000 оборота в минута
Вълна 800 оборота в минута
Коприна, само източване
Скоростта на центрофугиране може да се намали или да се изключи, като се избере символът .
Пералнята автоматично ще попречи да се центрофугира със скорост, по-висока от максимално предвидената за
всяка програма.
Функции
опълните функции за пране, предвидени в пералната машина, дават възможност за постигане на желаното бяло
и чисто пране:
За активиране на възможните функции;
1. натиснете бутона, съответстващ на желаната функция;
2. светването на съответния индикатор показва, че функцията е избрана.
Бележка:
- Ако избраната опция не е съвместима със зададената програма, тази несъвместимост ще се сигнализира от
звуков сигнал (трикратно) и опцията няма да се активирa.
- В случай на задаване на функция, несъвместима с друга, зададена преди нея функция, остава активен само
последният избор.
BG
Супер изпиране
Благодарение на използването на по-голямо количество вода в началната фаза на цикъла и на по-дългото време
на пране, тази опция гарантира висококачествено изпиране.
Може да се използва с или без белина. Ако желаете избелване, поставете допълнителната ваничка 4, комплект
с доставката във ваничка 1. При дозиране на белина не надвишавайте максималното ниво „max“, указано на
централната ос (вижте фигурата на стр. 46).
Лесно гладене
При избор на тази функция прането и центрофугирането ще се изменят целесъобразно, така че да се намали
образуването на гънки. При завършване на цикъла пералнята прави бавни завъртания на барабана, следящият
светлинен индикатор на функцията ЛЕСНО ГЛАЕНЕ ще светят с мигаща светлина и следящият индикатор
ще светне. За завършване на цикъла трябва да се натисне бутон START/PAUSE или бутон ЛЕСНО ГЛАЕНЕ.
Предпране
С избора на тази функция се извършва предпране, полезно за отстраняване на трудно почистващи се петна.
Забележка: Добавете перилен препарат в предназначеното за това отделение.
Отложен Старт
Забавя пускането на машината до 12 часа.
Натиснете многократно бутона, докато светне индикаторът, съответстващ на желаната стойност за време на
забавяне. При петото натискане на бутона функцията няма да е активна.
Забележка: След натискане на бутона START/PAUSE стойността на забавянето може да се променя само като се
намалява.
! Валидна с всички програми.
45
Page 46

Перилни препарати и
M
AX
1
2
4
3
A
B
дрехи за пране
BG
Чекмедже за перилните препарати
обрият резултат от прането зависи и от правилното
дозиране на перилните препарати. с предозиране
не се пере по-ефикасно, а това води до отлагане на
налепи по вътрешната страна на пералната машина
и до замърсяване на околната среда.
! Използвайте прахообразни перилни препарати за
бели памучни тъкани за предпране и за пране при
температура над 60°C.
! Уверете се, че следвате указанията, посочени върху
опаковката на перилния препарат.
! Не използвайте препарати за ръчно пране, защото
образуват много пяна.
Изтеглете чекмеджето за
перилните препарати и
изсипете праха за пране
и допълните препарати
по следния начин.
Отделение 1: Препарат за предпране (на прах)
Преди да изсипете препарата, проверете дали не е
поставена допълнителната ваничка 4.
Отделение 2: Препарат за пране (на прах или
течен)
При употребата на течен препарат за пране се
препоръчва да се използва разделителят от
комплекта A с цел правилно дозиране. В случай на
употреба на прах за пране върнете разделителя в
отделение B.
Отделение 3: Допълнителни препарати
(омекотител и др.)
Омекотителят не трябва да изтича извън решетката.
допълнителна ваничка 4: Белина
Подготвяне на прането
• Разпределете прането съобразно:
- типа на тъканите/символа върху етикета.
- цветовете: отделете цветните от белите дрехи.
• Изпразнете джобовете и проверете копчетата.
• Не надвишавайте указните стойности за теглото на
сухото пране: вижте “Таблица с програмите”.
Специфично пране
Âúëí: Цикълът на изпиране „Вълна“ на тази
пералня е тестван и одобрен от компанията Woolmark за пране на вълнени тъкани, определени
като „подходящи за изпиране на ръка“, при условие
че се спазват инструкциите от етикета на дрехата
и указанията на производителя на пералнята.
Фини тъкани: използвайте програмата 9 за изпиране
на много фини тъкани с апликации от рода на страс
или пайети.
Препоръчва се обръщането на дрехите наопаки
преди прането и слагането на малките дрехи в
торбичката за фино пране. За по-добри резултати се
препоръчва използването на течен препарат за пране
за фини тъкани.
За изпиране на копринени тъкани и пердета
изберете цикъл 9 и включете опция ; пералнята
ще завърши цикъла с накиснатото пране и ще
започне да мига светлинният индикатор . За да
се източи водата и да може да се извади прането, е
необходимо да се натисне бутон START/PAUSE или
бутон .
Система за измерване на товара
Преди всяко центрофугиране, с цел избягване
на прекалени вибрации и за равномерно
разпределяне на товара, барабанът се завърта
с малко по-висока от тази при прането скорост.
Ако след направените последователни опити
товарът все още не е перфектно разпределен,
машината извършва центрофугиране при скорост,
по-ниска от предвидената. При наличие на
прекален дебалансиране пералнята извършва
разпределението вместо центрофугата. За
улесняване на по-доброто разпределение на товара
и правилното му балансиране се препоръчва да се
смесват дрехи за пране с големи и малки размери.
Колко тежат дрехите за пране?
1 чаршаф 400-500 г
1 калъфка 150-200 г
1 покривка 400-500 г
1 хавлия 900-1200 г
1 кърпа 150-250 г
46
Page 47

Проблеми и мерки за
отстраняването им
Възможно е пералната машина да откаже да работи. Преди да се обадите в сервиза за техническа поддръжка и
ремонт (âæ. “Сервизно обслужване”), проверете дали не става въпрос за лесно решим проблем, като си помогнете
със следващия списък.
Проблеми:
Пералната машина не се вклчва.
Цикълът на изпиране не започва.
Пералната машина не се пълни
с вода (бързо мига светлинният
индикатор за първата фаза на
пране).
Пералнята непрекъснато се пълни
и източва.
Възможни причини / Мерки за отстраняването им:
• Щепселът не е включен към електрически контакт или не е добре
включен, за да прави контакт.
• Нямате ток вкъщи.
• Люкът не е затворен добре.
• Бутонът ON/OFF не е бил натиснат.
• Бутонът START/PAUSE не е бил натиснат.
• Кранът за вода не е отворен.
• Зададено е забавяне, което се е насложило върху времето за пускане
(âæ. “Персонализирания”).
• Маркучът за студената вода не е свързан към крана.
• Маркучът е прегънат.
• Кранът за вода не е отворен.
• Няма вода по водопроводната мрежа.
• Налягането е недостатъчно.
• Бутонът START/PAUSE не е бил натиснат.
• Маркучът за мръсната вода не е монтиран между 65 и 100 см от земята
(âæ. “Монтиране”).
• Краят на маркуча за мръсната вода е потопен във вода (âæ. “Монтиране”.
• Канализационната тръба в стената няма отдушник.
Ако след тези проверки проблемът не се реши, затворете крана за
водата, изключете пералната машина и позвънете в сервиза. Ако
жилището ви се намира на последните етажи на сградата, налягането
на студената вода може да е ниско, поради което пералната машина
непрекъснато се пълни и източва. За избягване на това неудобство в
търговската мрежа се предлагат подходящи възвратни клапани.
BG
Пералната не се източва или не
центрофугира.
Пералната вибрира много по време
на центрофугиране.
Пералната има теч.
Светлинният индикатор START/
PAUSE (оранжев) и светлинните
индикатори за функции мигат бързо.
Образува се твърде много пяна.
• Програмата не предвижда източване: с някои програми трябва да се
извършва ръчно.
• Включена е функцията ЛЕСНО ГЛАЕНЕ: за завършване на програмата се
натиска бутон START/PAUSE (âæ. “Персонализирания”).
• Маркучът за мръсната вода е притиснат (âæ. “Монтиране”.
• Канализационната тръба е запушена.
• При монтажа барабанът не е бил отблокиран правилно (âæ. “Монтиране”.
• Пералната машина не е нивелирана (âæ. “Монтиране”.
• Пералната машина е притисната между мебели и стена (âæ.
“Монтиране”.
• Маркучът за студената вода не е добре свързан (âæ. “Монтиране”.
• Чекмеджето за перилните препарати е запушено (за почистването му
âæ. “Поддръжка и почистване”).
• Маркучът за мръсната вода не е фиксиран добре (âæ. “Монтиране”.
• Изключете машината и извадете щепсела от контакта, изчакайте около
1 минута и я включете отново.
Ако неизправността не може да се отстрани, потърсете услугите на
Сервиза.
• Перилният препарат не е за автоматична перална (трябва да има
надпис “за автоматична перална”, “за пране на ръка и за автоматична
перална” или подобен надпис).
• озирането е било твърде голямо.
47
Page 48

Сервизно обслужване
195140587.00
12/2015
BG
Преди да се свържете с техническия сервиз:
• Проверете дали можете да решите сами проблема (âæ. “Проблеми и мерки за отстраняването им”);
• Включете отново програмата, за да проверите дали неизправността е отстранена;
• В противен случай се обърнете към оторизирания технически сервиз на телефонния номер, указан на
гаранционната карта.
! Никога не ползвайте услугите на неоторизирани техници.
Съобщете:
• типа на проблема;
• модела на машината (Mod.);
• серийния номер (S/N).
Тази информация се намира на фабричната табелка, разположена на задната страна на пералната машина и в
предната част, след като се отвори люкът.
Üretici Firma:
Indesit Company Beyaz Eşya PAZARLAMA A.Ş.
Balmumcu Cad. Karahasan Sok.
No: 11, 34349– Balmumcu Beşiktaş – İstanbul
Tel: (0212) 355 53 00
48
 Loading...