

Page 1

Instructions for use
WASHING MACHINE
GB
English,1
PT
Português,37
WMD 1044
GR
ΕΛΛΗΝΙΚΑ,13
DE
Deutsch,49
IT
Italiano,25
TR
Türkçe,61
Contents
Installation, 2-3
Unpacking and levelling
Connecting the electricity and water supplies
The first wash cycle
Technical data
Care and maintenance, 4
Cutting off the water or electricity supply
Cleaning the washing machine
Cleaning the detergent dispenser drawer
Caring for the door and drum of your appliance
Cleaning the pump
Checking the water inlet hose
Precautions and tips, 5
General safety
Disposal
Opening the porthole door manually
Description of the washing machine, 6-7
Control panel
Display
GB
Running a wash cycle, 8
Wash cycles and functions, 9
Table of wash cycles
Wash functions
Detergents and laundry, 10
Detergent dispenser drawer
Preparing the laundry
Special wash cycles
Load balancing system
Troubleshooting, 11
Service, 12
1
Page 2

Installation
GB
! This instruction manual should be kept in a
safe place for future reference. If the washing
machine is sold, transferred or moved, make
sure that the instruction manual remains with
the machine so that the new owner is able to
familiarise himself/herself with its operation
and features.
! Read these instructions carefully: they contain vital information relating to the safe installation and operation of the appliance.
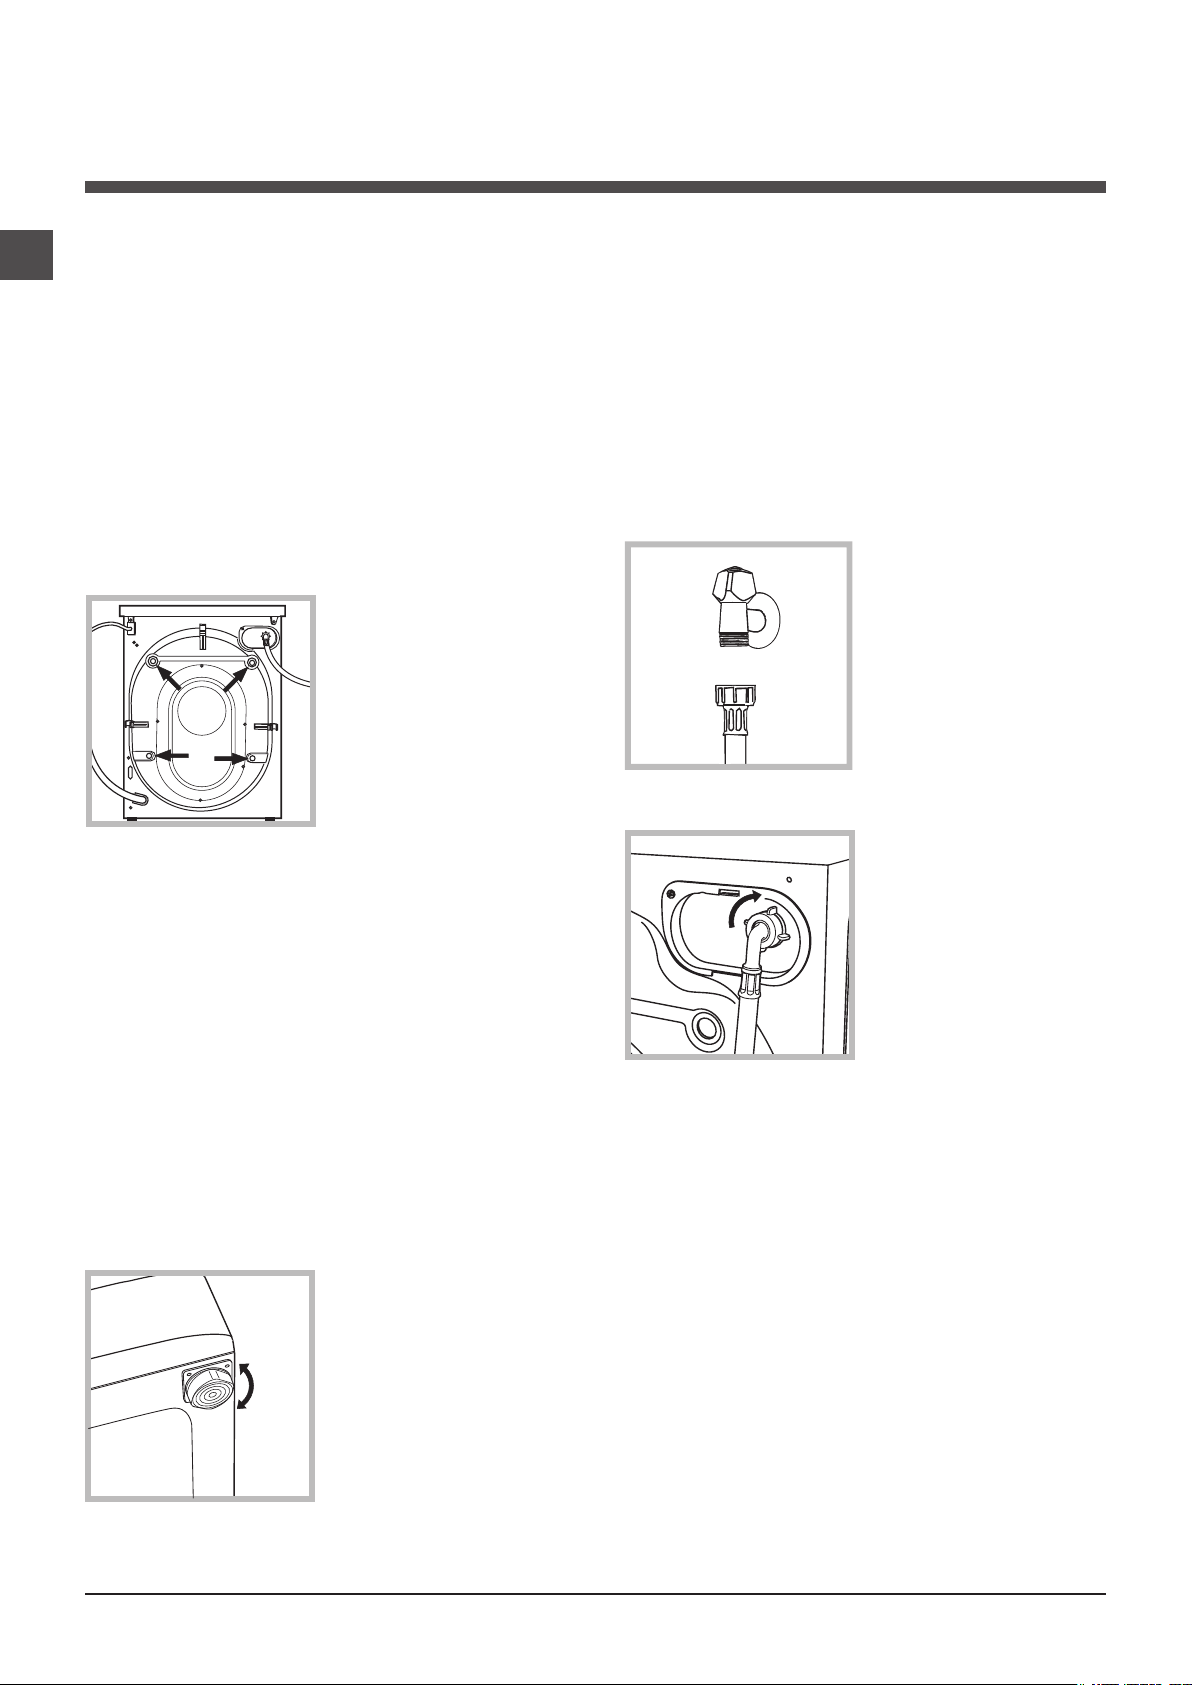
Unpacking and levelling
Unpacking
1. Remove the washing machine from its
packaging.
2. Make sure that the washing machine has
not been damaged during the transportation
process. If it has been damaged, contact the
retailer and do not proceed any further with
the installation process.
3. Remove the 4 protective screws (used
during transportation)
and the rubber washer with the corresponding spacer,
located on the rear
part of the appliance
(see figure).
4. Close off the holes using the plastic plugs
provided.
5. Keep all the parts in a safe place: you will
need them again if the washing machine needs to be moved to another location.
! Packaging materials should not be used as
toys for children.
Levelling
venness by tightening or loosening the adjustable front feet (see figure); the angle of inclination, measured in relation to the worktop,
must not exceed 2°.
Levelling the machine correctly will provide
it with stability, help to avoid vibrations and
excessive noise and prevent it from shifting
while it is operating. If it is placed on carpet or
a rug, adjust the feet in such a way as to allow
a sufficient ventilation space underneath the
washing machine.
Connecting the electricity and
water supplies
Connecting the water inlet hose
1. Connect the inlet
hose by screwing it to
a cold water tap using
a 3/4 gas threaded
connection (see figu-
re).
Before performing the
connection, allow the
water to run freely until it is perfectly clear.
2. Connect the inlet
hose to the washing
machine by screwing
it onto the corresponding water inlet of the
appliance, which is
situated on the top
right-hand side of the
rear part of the appliance (see figure).
3. Make sure that the hose is not folded over
or bent.
! The water pressure at the tap must fall within
the range of values indicated in the Technical
data table (see next page).
1. Install the washing
machine on a flat
sturdy floor, without
resting it up against
walls, furniture cabinets or anything else.
2. If the floor is not
perfectly level, compensate for any une-
2
! If the inlet hose is not long enough, contact a
specialised shop or an authorised technician.
! Never use second-hand hoses.
! Use the ones supplied with the machine.
Page 3
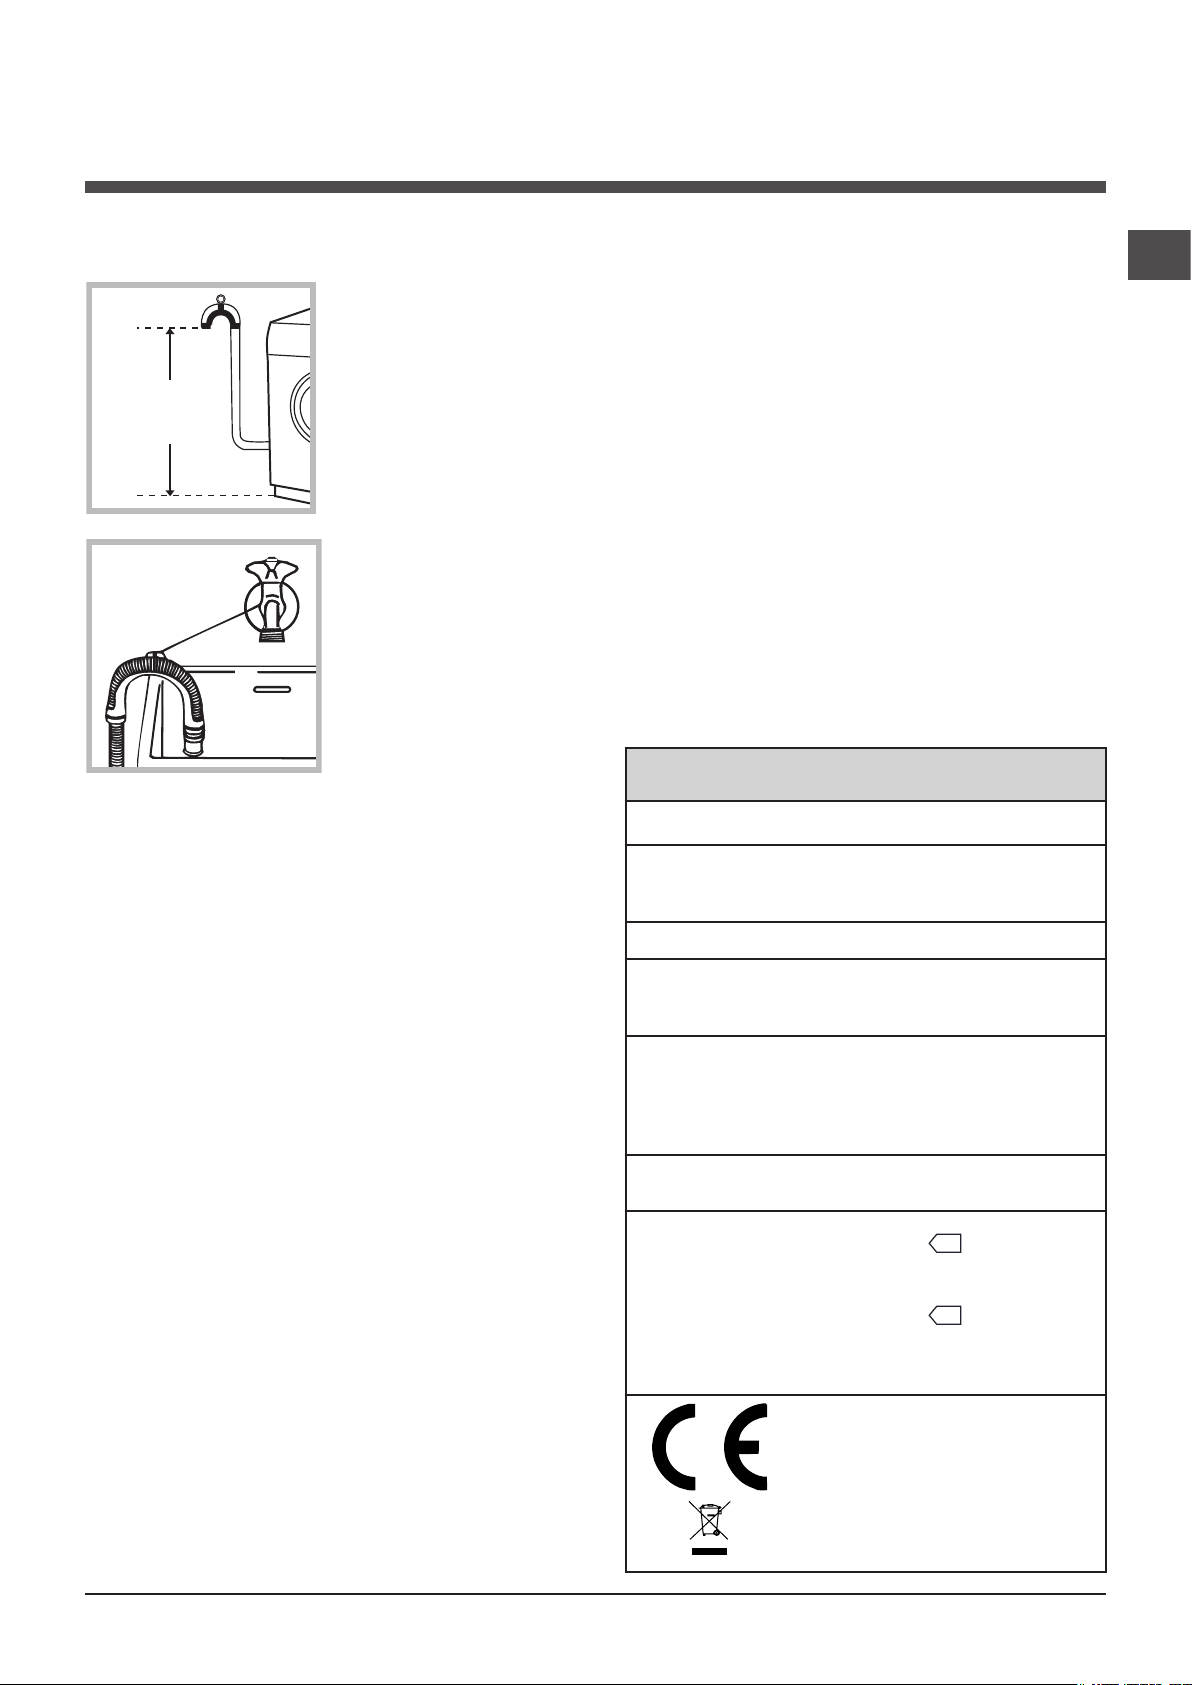
Connecting the drain hose
65 - 100 cm
Connect the drain
hose, without bending
it, to a drain duct or
a wall drain situated
between 65 and 100
cm from the floor;
alternatively, placed
it over the edge of a
basin, sink or tub, fastening the duct supplied to the tap (see
figure). The free end
of the hose should
not be underwater.
! Do not use extension cords or multiple sockets.
! The cable should not be bent or compressed.
! The power supply cable must only be replaced by authorised technicians.
Warning! The company shall not be held responsible in the event that these standards are
not observed.
The first wash cycle
Once the appliance has been installed, and
before you use it for the first time, run a wash
cycle with detergent and no laundry, using
wash cycle number “Auto Clean”.
GB
! We advise against the use of hose extensions;
if it is absolutely necessary, the extension must
have the same diameter as the original hose
and must not exceed 150 cm in length.
Electrical connections
Before plugging the appliance into the electricity socket, make sure that:
• the socket is earthed and complies with all
applicable laws;
• the socket is able to withstand the maximum power load of the appliance as indicated
in the Technical data table (see opposite);
• the power supply voltage falls within the values indicated in the Technical data table (see
opposite);
• the socket is compatible with the plug of the
washing machine. If this is not the case, replace the socket or the plug.
! The washing machine must not be installed
outdoors, even in covered areas. It is extremely dangerous to leave the appliance exposed
to rain, storms and other weather conditions.
! When the washing machine has been installed, the electricity socket must remain within
easy reach.
Technical data
Model
Dimensions
Capacity
Electrical
connections
Water connections
Spin speed
Test wash
cycles in
accordance with
directives
1061/2010
1015/2010
WMD 1044
width 59.5 cm
height 85 cm
depth 60.5 cm
from 1 to 10 kg
please refer to the technical
data plate fixed to the machine
maximum pressure
1 MPa (10 bar)
minimum pressure
0.05 MPa (0.5 bar)
drum capacity 71 litres
up to 1400 rotations per
minute
programme
press of the button); Cotton
Standard 60°.
programme (40°) (2nd
press of the button); Cotton
Standard 40°.
This appliance conforms to
the following EC Directives:
- 2004/108/EC (Electromagnetic Compatibility)
- 2006/95/EC (Low Voltage)
- 2002/96/EC
(60°) (1st
3
Page 4
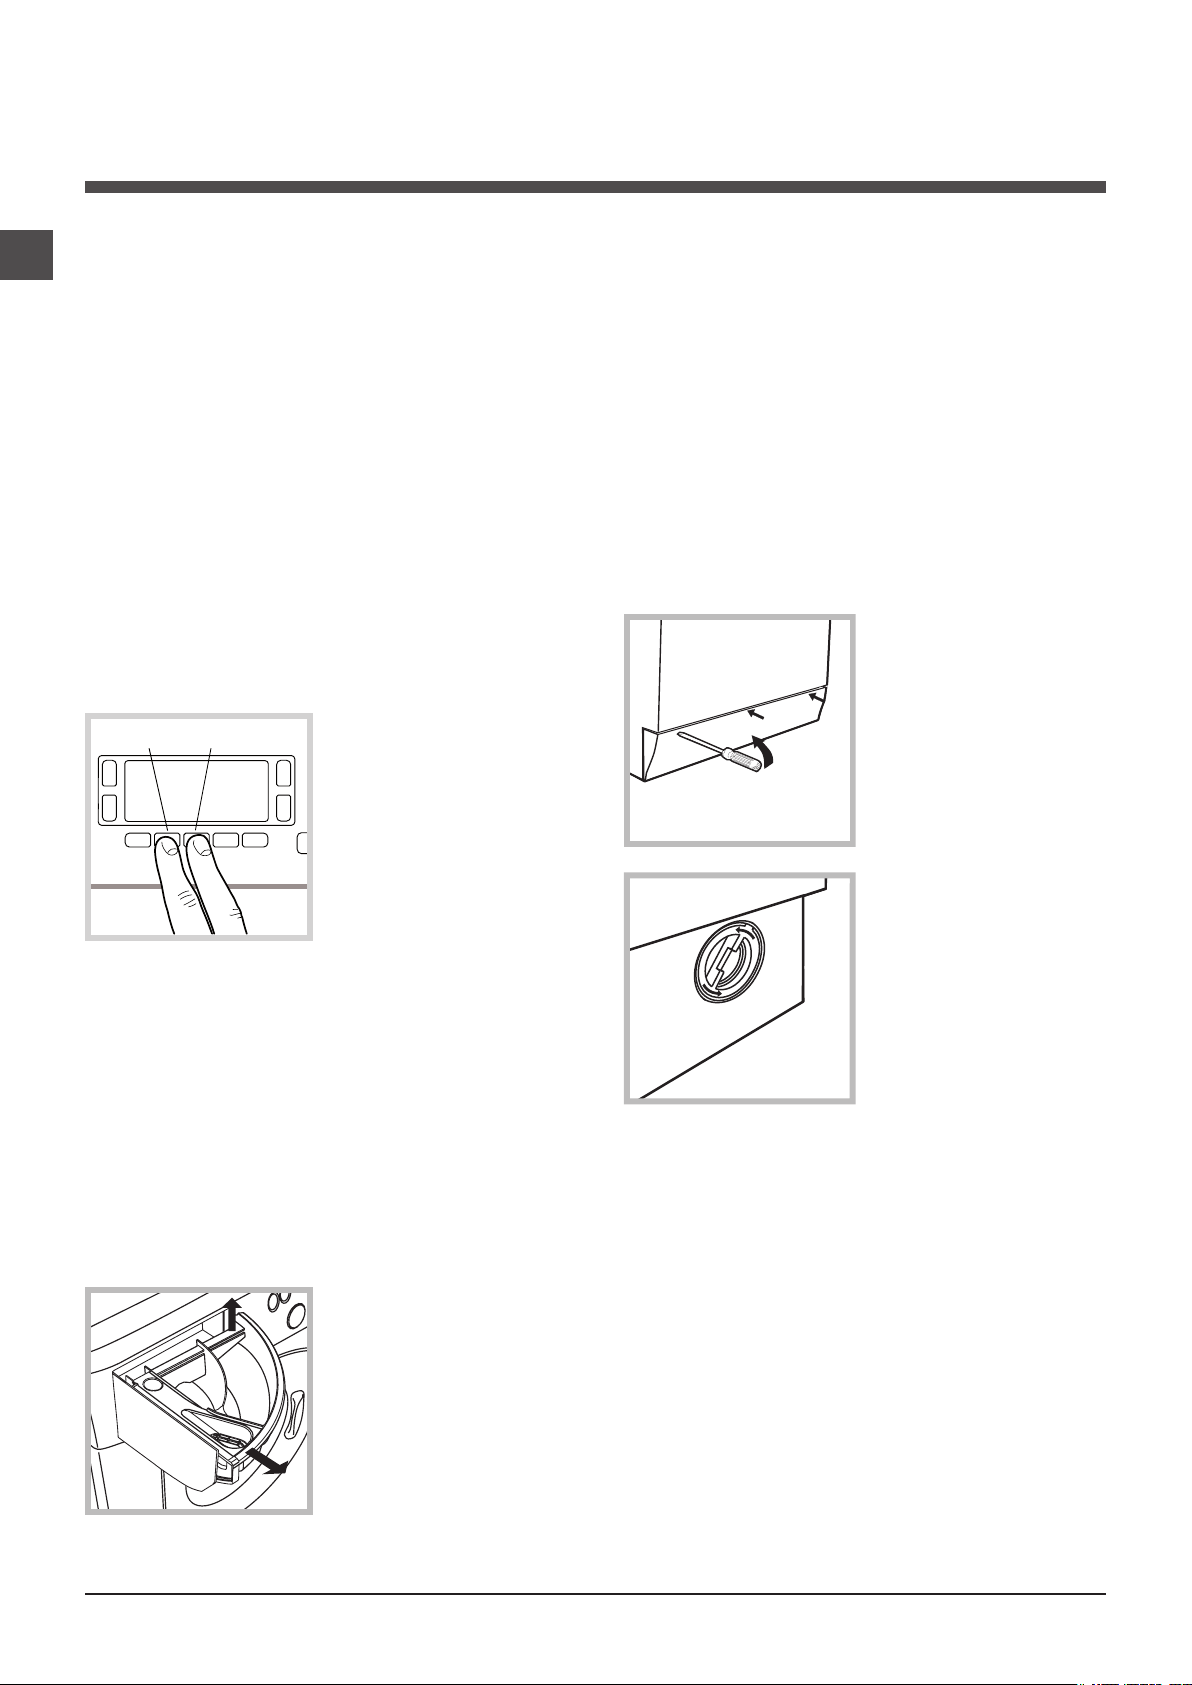
Care and maintenance
1
2
GB
Cutting off the water and electricity supplies
• Turn off the water tap after every wash cycle.
This will limit wear on the hydraulic system inside the washing machine and help to prevent
leaks.
• Unplug the washing machine when cleaning
it and during all maintenance work.
Cleaning the washing machine
• The outer parts and rubber components
of the appliance can be cleaned using a soft
cloth soaked in lukewarm soapy water. Do not
use solvents or abrasives.
• The washing machine has a “Auto Clean”
programme for its internal parts that must be
run with no load in the drum.
A
programme every 40 wash cycles.
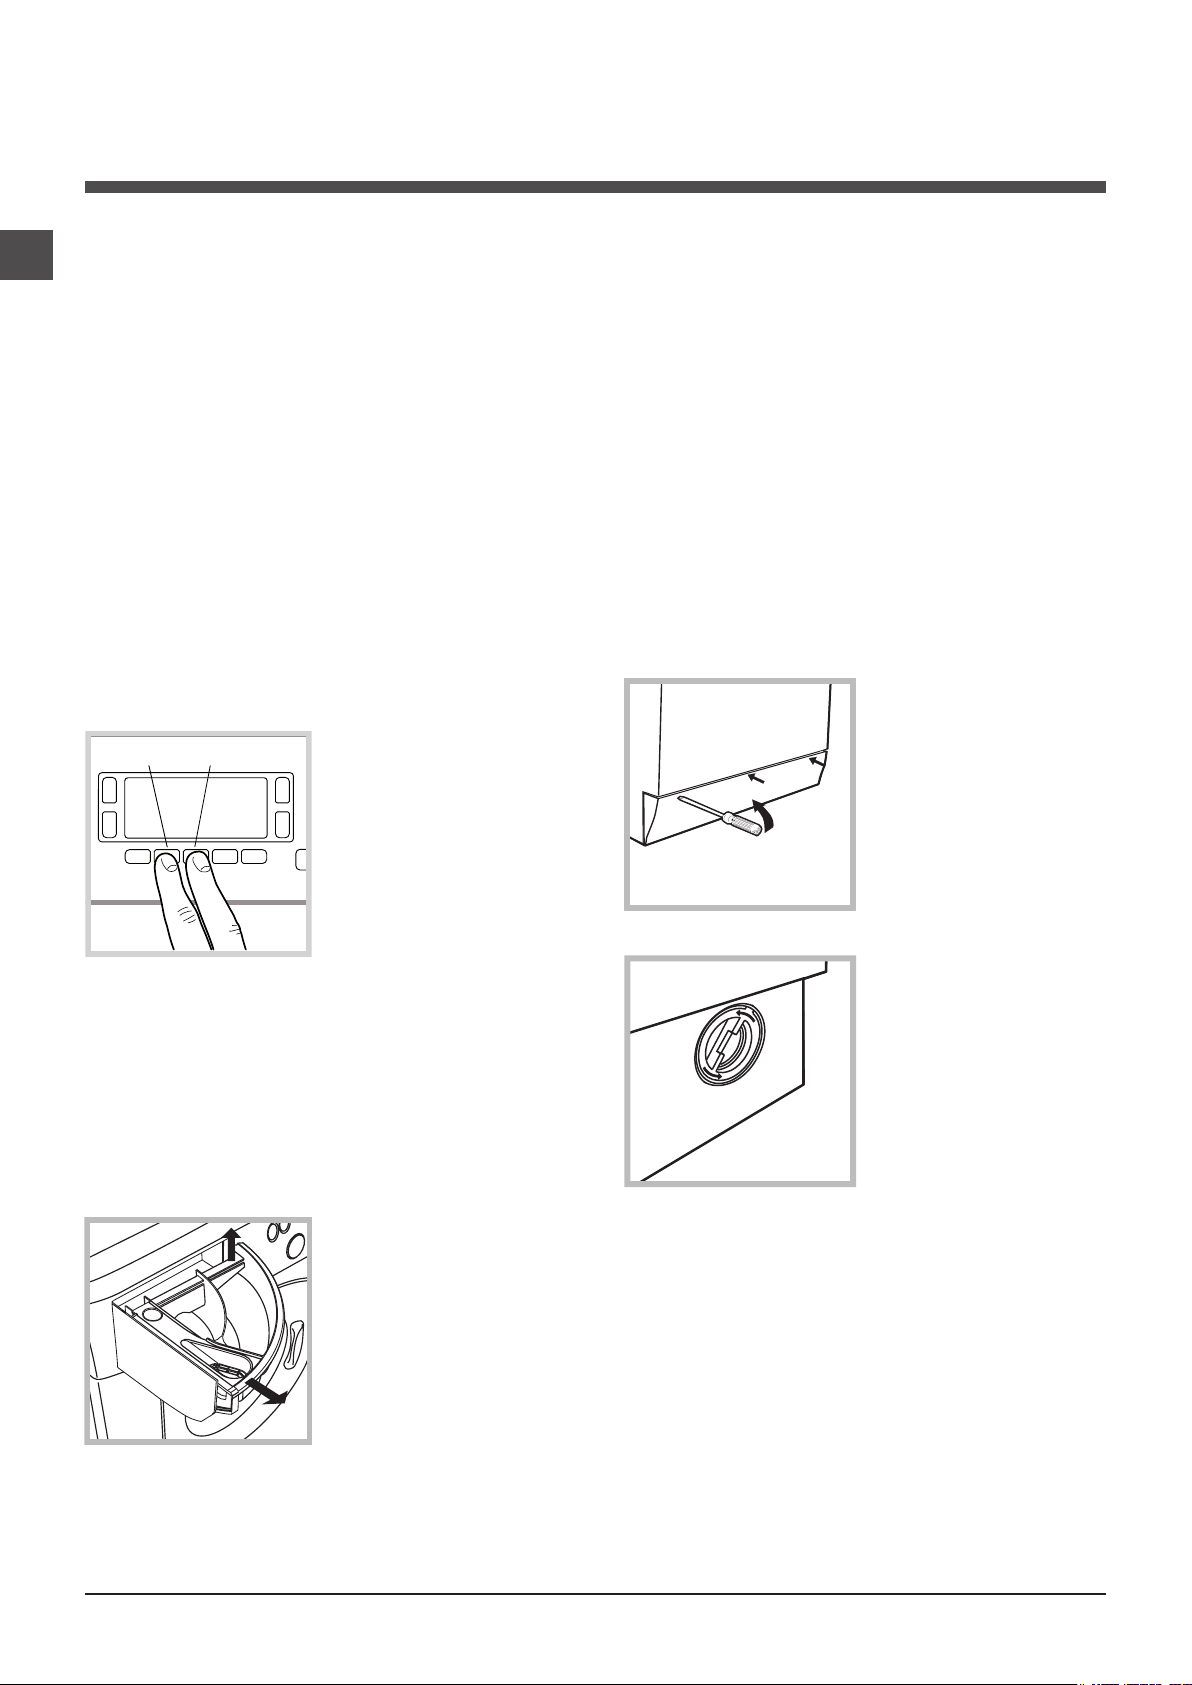
To start the programme press buttons A and
B simultaneously for 5 seconds (see figure).
The programme will start automatically and will
run for about 70 minutes. To stop the cycle
press the START/PAUSE button.
B
To help the wash cycle
you may want to use
either the detergent
(i.e. a quantity 10% the
quantity specified for
lightly-soiled garments)
or special additives to
clean the washing machine. We recommend
running a cleaning
Caring for the door and drum of
your appliance
• Always leave the porthole door ajar in order
to prevent unpleasant odours from forming.
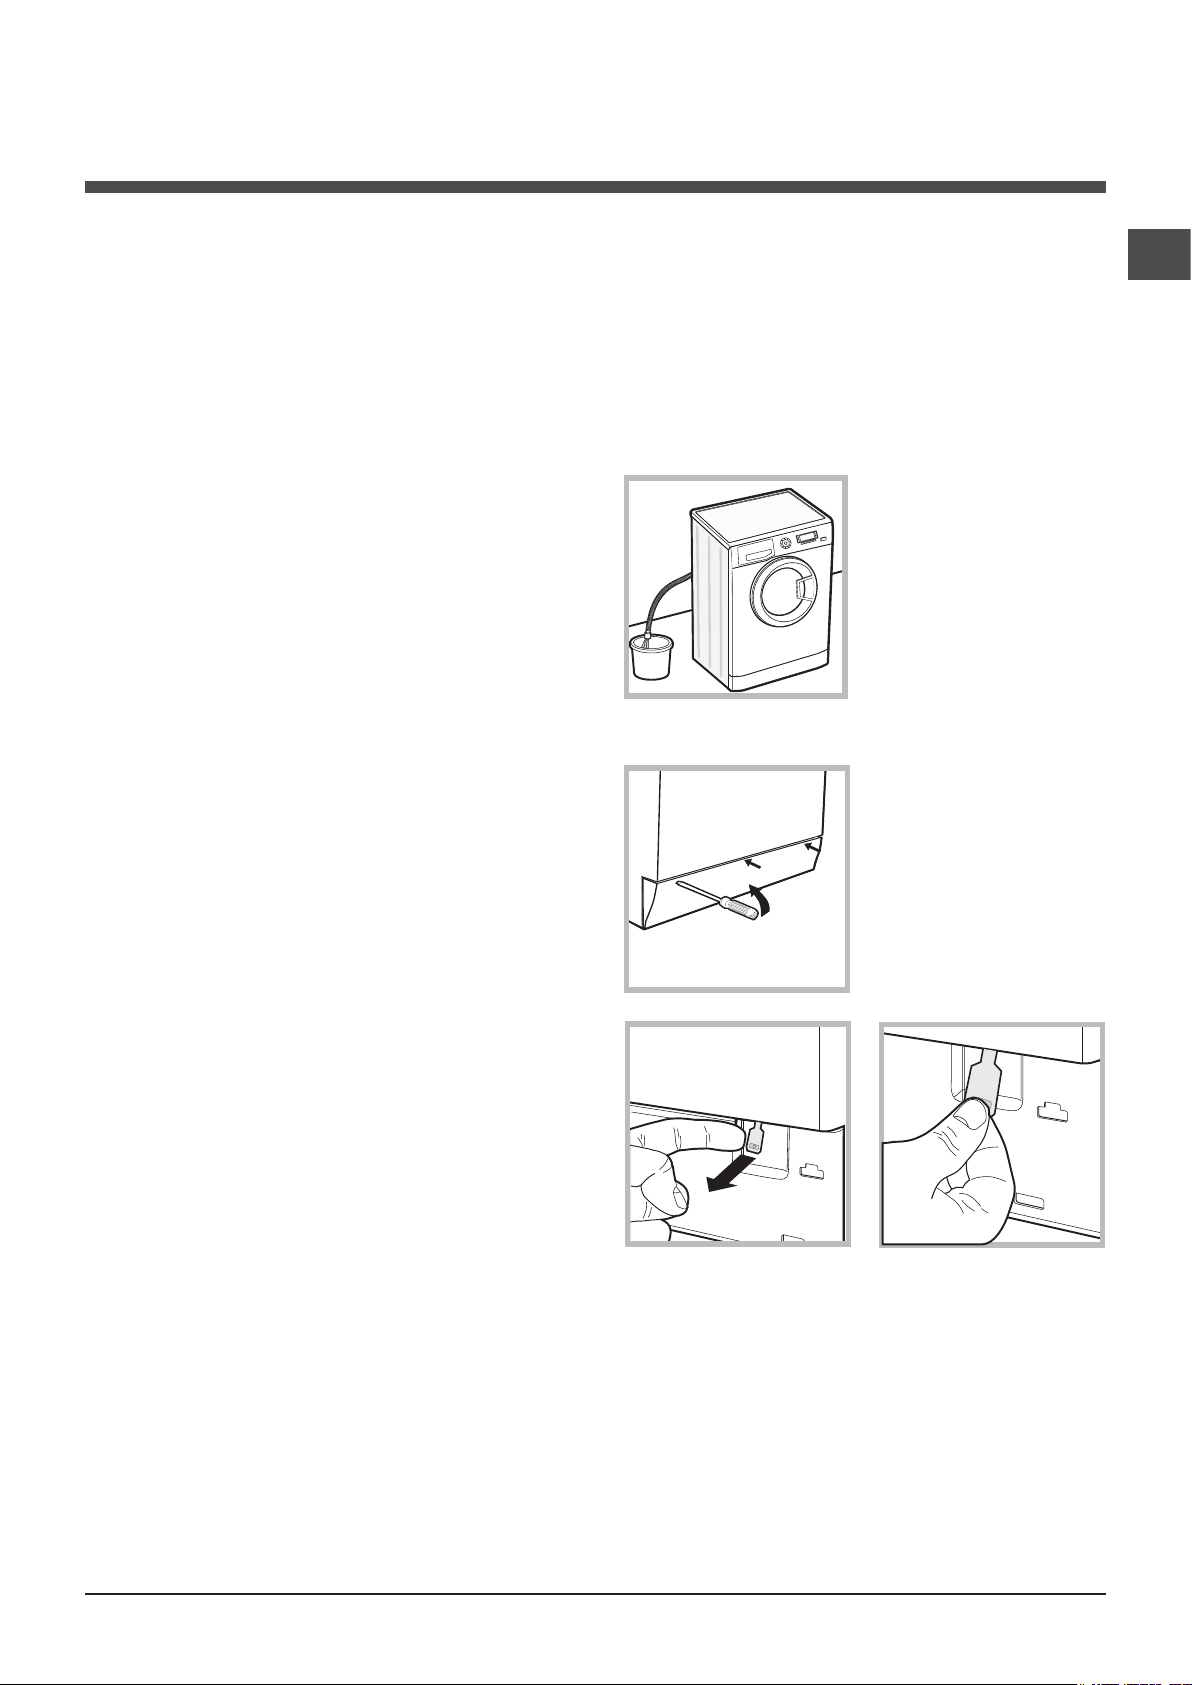
Cleaning the pump
The washing machine is fitted with a self-cleaning pump which does not require any maintenance. Sometimes, small items (such as coins
or buttons) may fall into the pre-chamber which
protects the pump, situated in its bottom part.
! Make sure the wash cycle has finished and
unplug the appliance.
To access the pre-chamber:
1. using a screwdriver, remove the cover
panel on the lower
front part of the washing machine (see
figure);
2. unscrew the lid
by rotating it anticlockwise (see figu-
re): a little water may
trickle out. This is
perfectly normal;
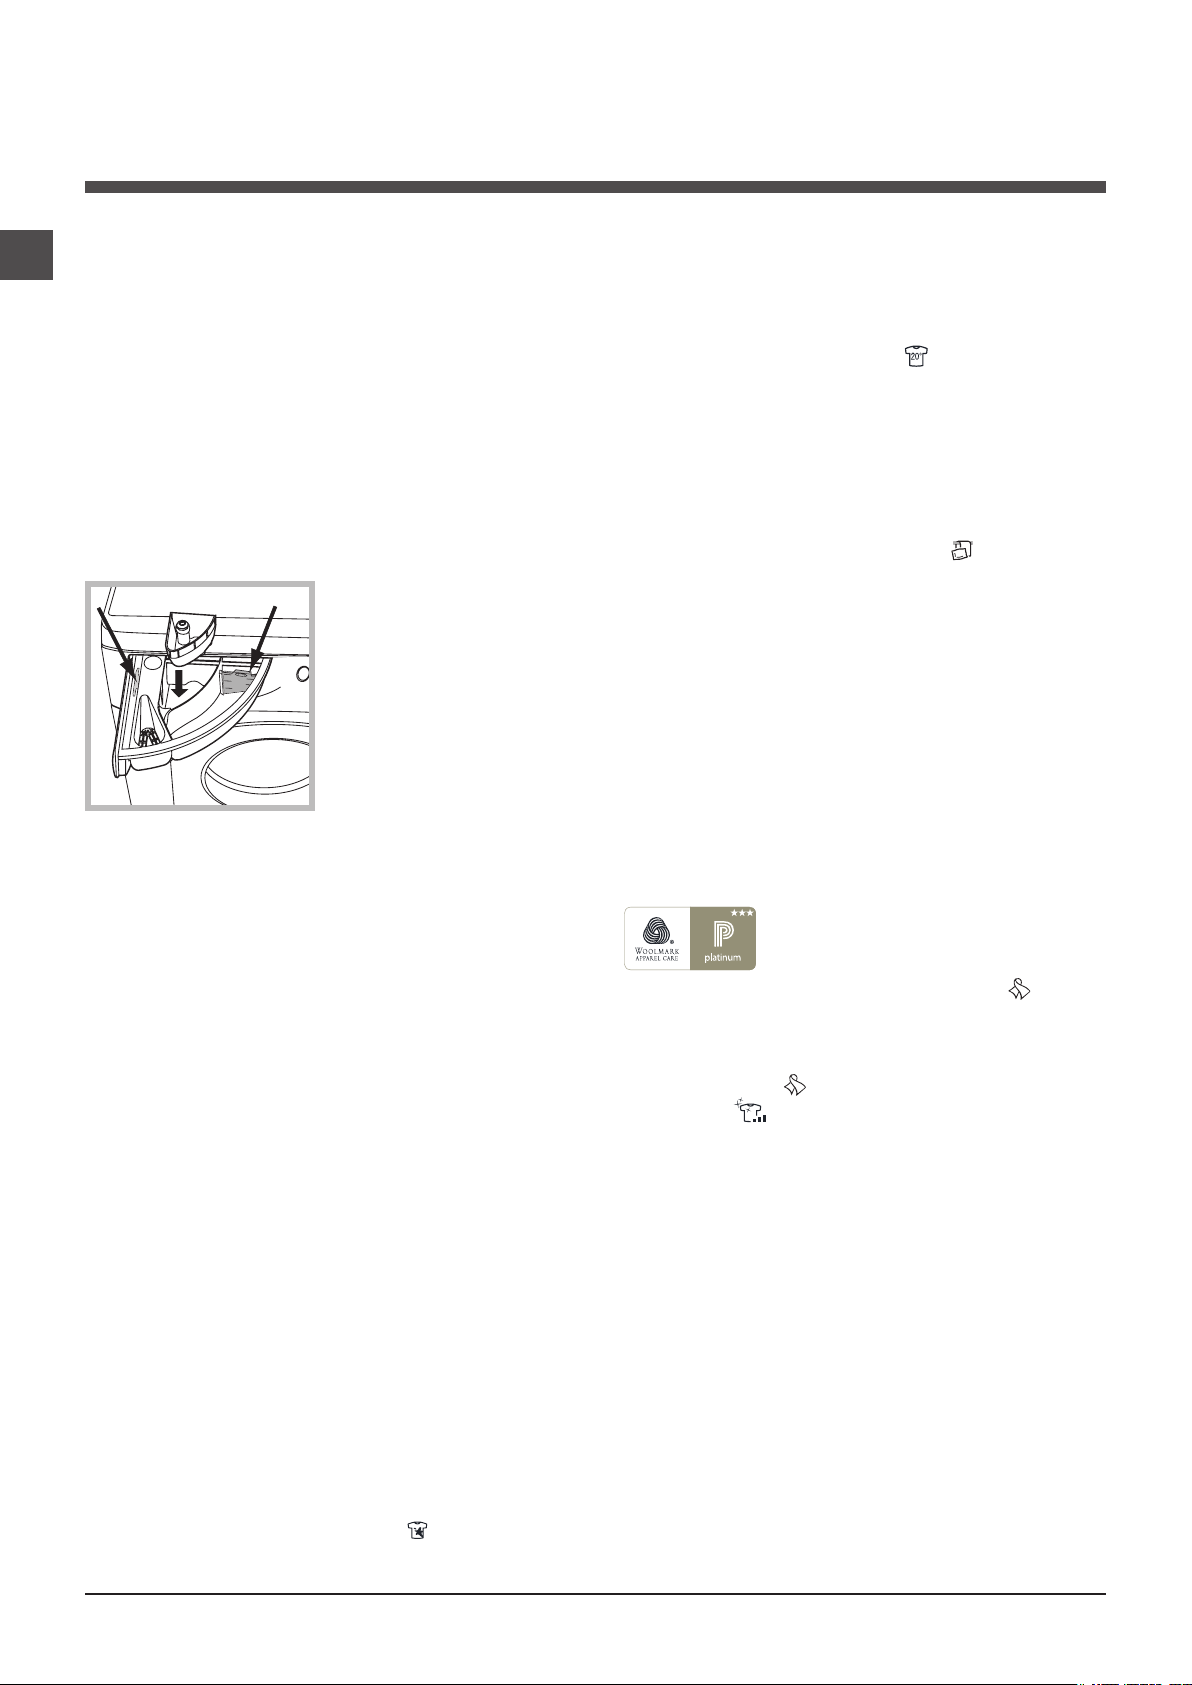
Cleaning the detergent dispenser
drawer
Remove the dispenser
by raising it and pulling it out (see figure).
Wash it under running
water; this operation
should be repeated
frequently.
4
3. clean the inside thoroughly;
4. screw the lid back on;
5. reposition the panel, making sure the hooks
are securely in place before you push it onto
the appliance.
Checking the water inlet hose
Check the inlet hose at least once a year. If
there are any cracks, it should be replaced
immediately: during the wash cycles, water
pressure is very strong and a cracked hose
could easily split open.
! Never use second-hand hoses.
Page 5
Precautions and tips
20
! This washing machine was designed and constructed in
accordance with international safety regulations. The following information is provided for safety reasons and must
therefore be read carefully.
General safety
• This appliance was designed for domestic use only.
• This appliance is not intended for use by persons (including children) with reduced physical, sensory or mental
capabilities, or lack of experience and knowledge, unless
they have been given supervision or instruction concerning use of the appliance by a person responsible for
their safety. Children should be supervised to ensure that
they do not play with the appliance.
• Do not touch the machine when barefoot or with wet or
damp hands or feet.
• Do not pull on the power supply cable when unplugging
the appliance from the electricity socket. Hold the plug
and pull.
• Do not open the detergent dispenser drawer while the
machine is in operation.
• Do not touch the drained water as it may reach extremely high temperatures.
• Never force the porthole door. This could damage the safety
lock mechanism designed to prevent accidental opening.
• If the appliance breaks down, do not under any circumstances access the internal mechanisms in an attempt
to repair it yourself.
• Always keep children well away from the appliance while
it is operating.
• The door can become quite hot during the wash cycle.
• If the appliance has to be moved, work in a group of two
or three people and handle it with the utmost care. Never
try to do this alone, because the appliance is very heavy.
• Before loading laundry into the washing machine, make
sure the drum is empty.
Opening the porthole door manually
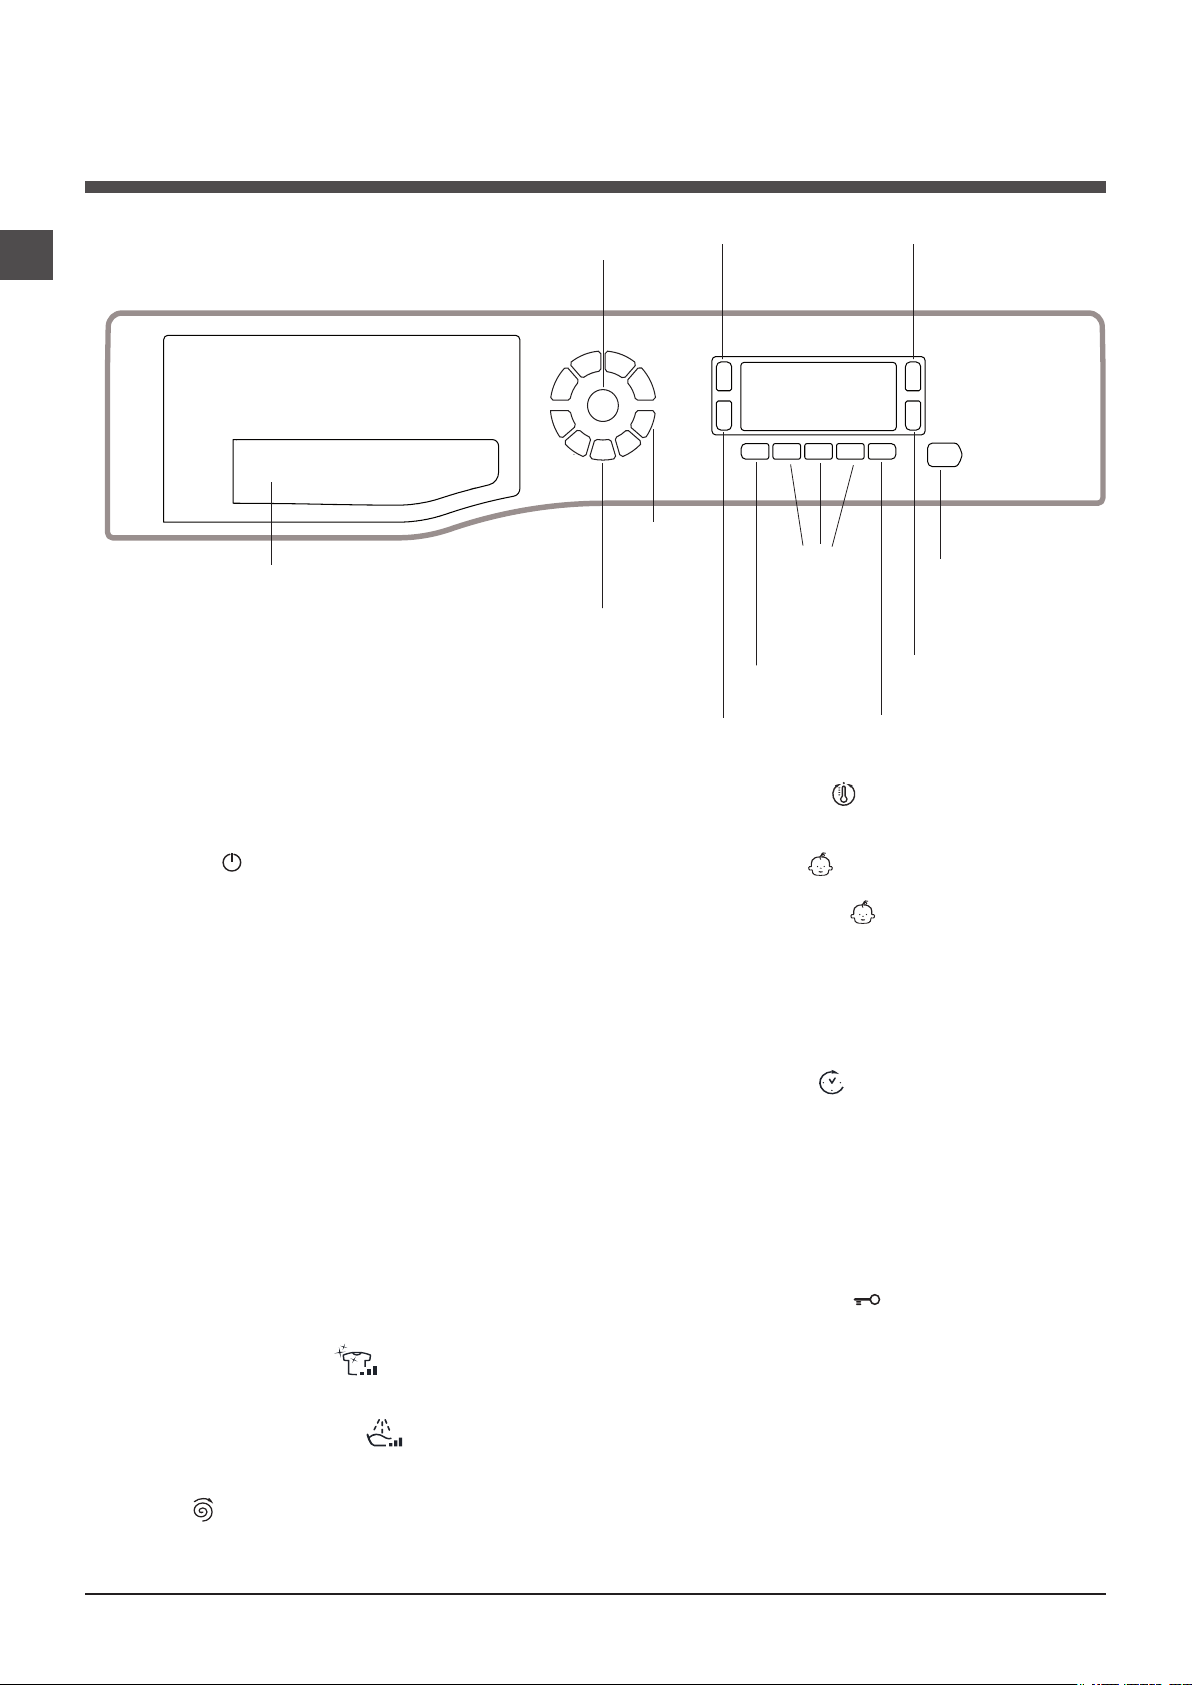
In the event that it is not possible to open the porthole
door due to a powercut, and if you wish to remove the
laundry, proceed as follows:
1. remove the plug from the
electrical socket.
2. make sure the water level
inside the machine is lower
than the door opening; if it
is not, remove excess water
using the drain hose, collecting it in a bucket as indicated
in the figure.
3. using a screwdriver, remove the cover panel on the lower front part of the washing
machine (see figure).
GB
Disposal
• Disposing of the packaging materials: observe local regu-
lations so that the packaging may be re-used.
• The European Directive 2002/96/EC on Waste Electrical
and Electronic Equipment, requires that old household
electrical appliances must not be disposed of in the normal
unsorted municipal waste stream. Old appliances must be
collected separately in order to optimise the recovery and
recycling of the materials they contain and reduce the impact on human health and the environment. The crossed
out “wheeled bin” symbol on the product reminds you of
your obligation, that when you dispose of the appliance it
must be separately collected. Consumers should contact
their local authority or retailer for information concerning the
correct disposal of their old appliance.
4. pull outwards using the tab as indicated in the figure,
until the plastic tie-rod is freed from its stop position; pull
downwards and open the door at the same time.
5. reposition the panel, making sure the hooks are securely
in place before you push it onto the appliance.
5
Page 6
Description of the washing machine
GB
Control panel
ON/OFF
WASH
Detergent dispenser drawer
Detergent dispenser drawer: used to dispense deter-
gents and washing additives (see “Detergents and laundry”).
CYCLE
SELECTOR
buttons
button
CLEANING
ACTION
button
DISPLAY
MY
CYCLE
button
ANTI
ALLERGY
RINSE
button
TEMPERATURE button : press to decrease the tem-
perature: the value will be shown on the display.
FUNCTION
buttons
DELAY
TIMER
button
SPIN SPEED
button
START/PAUSE
button with
indicator light
TEMPERATURE
button
CHILD LOCK
button
ON/OFF button : press this briefly to switch the machine on or off. The START/PAUSE indicator light, which
flashes slowly in a green colour shows that the machine is
switched on. To switch off the washing machine during the
wash cycle, press and hold the button for approximately 3
seconds; if the button is pressed briefly or accidentally the
machine will not switch off. If the machine is switched off
during a wash cycle, this wash cycle will be cancelled.
WASH CYCLE SELECTOR buttons: used to set the
desired wash cycle (see “Table of wash cycles”).
MY CYCLE button: press and hold the button to store a
cycle with your own set of preferences in the memory of
the machine. To recall a previously stored cycle, press the
MY CYCLE button.
FUNCTION buttons: press the button to select the
desired function. The corresponding indicator light on the
display will switch on.
CLEANING ACTION
wash intensity.
ANTI ALLERGY RINSE
the desired rinse type.
SPIN button : press to reduce or completely exclude
the spin cycle - the value is indicated on the display.
button : to select the desired
button : press to select
CHILD LOCK button : to activate the control panel
lock, press and hold the button for approximately 2
seconds. When the symbol is illuminated, the control
panel is locked (apart from the ON/OFF button). This
means it is possible to prevent wash cycles from being
modified accidentally, especially where there are children in
the home. To deactivate the control panel lock, press and
hold the button for approximately 2 seconds.
DELAY TIMER button : press to set a delayed start
time for the selected wash cycle. The delay time will be
shown on the display.
START/PAUSE button with indicator light: when the green indicator light flashes slowly, press the button to start a
wash cycle. Once the cycle has started the indicator light
will remain lit in a fixed manner. To pause the wash cycle,
press the button again; the indicator light will flash in an
orange colour. If the symbol is not illuminated, the door
may be opened. To start the wash cycle from the point at
which it was interrupted, press the button again.
Standby mode
This washing machine, in compliance with new energy saving regulations, is fitted with an automatic standby system
which is enabled after about 30 minutes if no activity is
detected. Press the ON-OFF button briefly and wait for the
machine to start up again.
Consumption in off-mode: 0,5 W
Consumption in Left-on: 0,5 W
6
Page 7
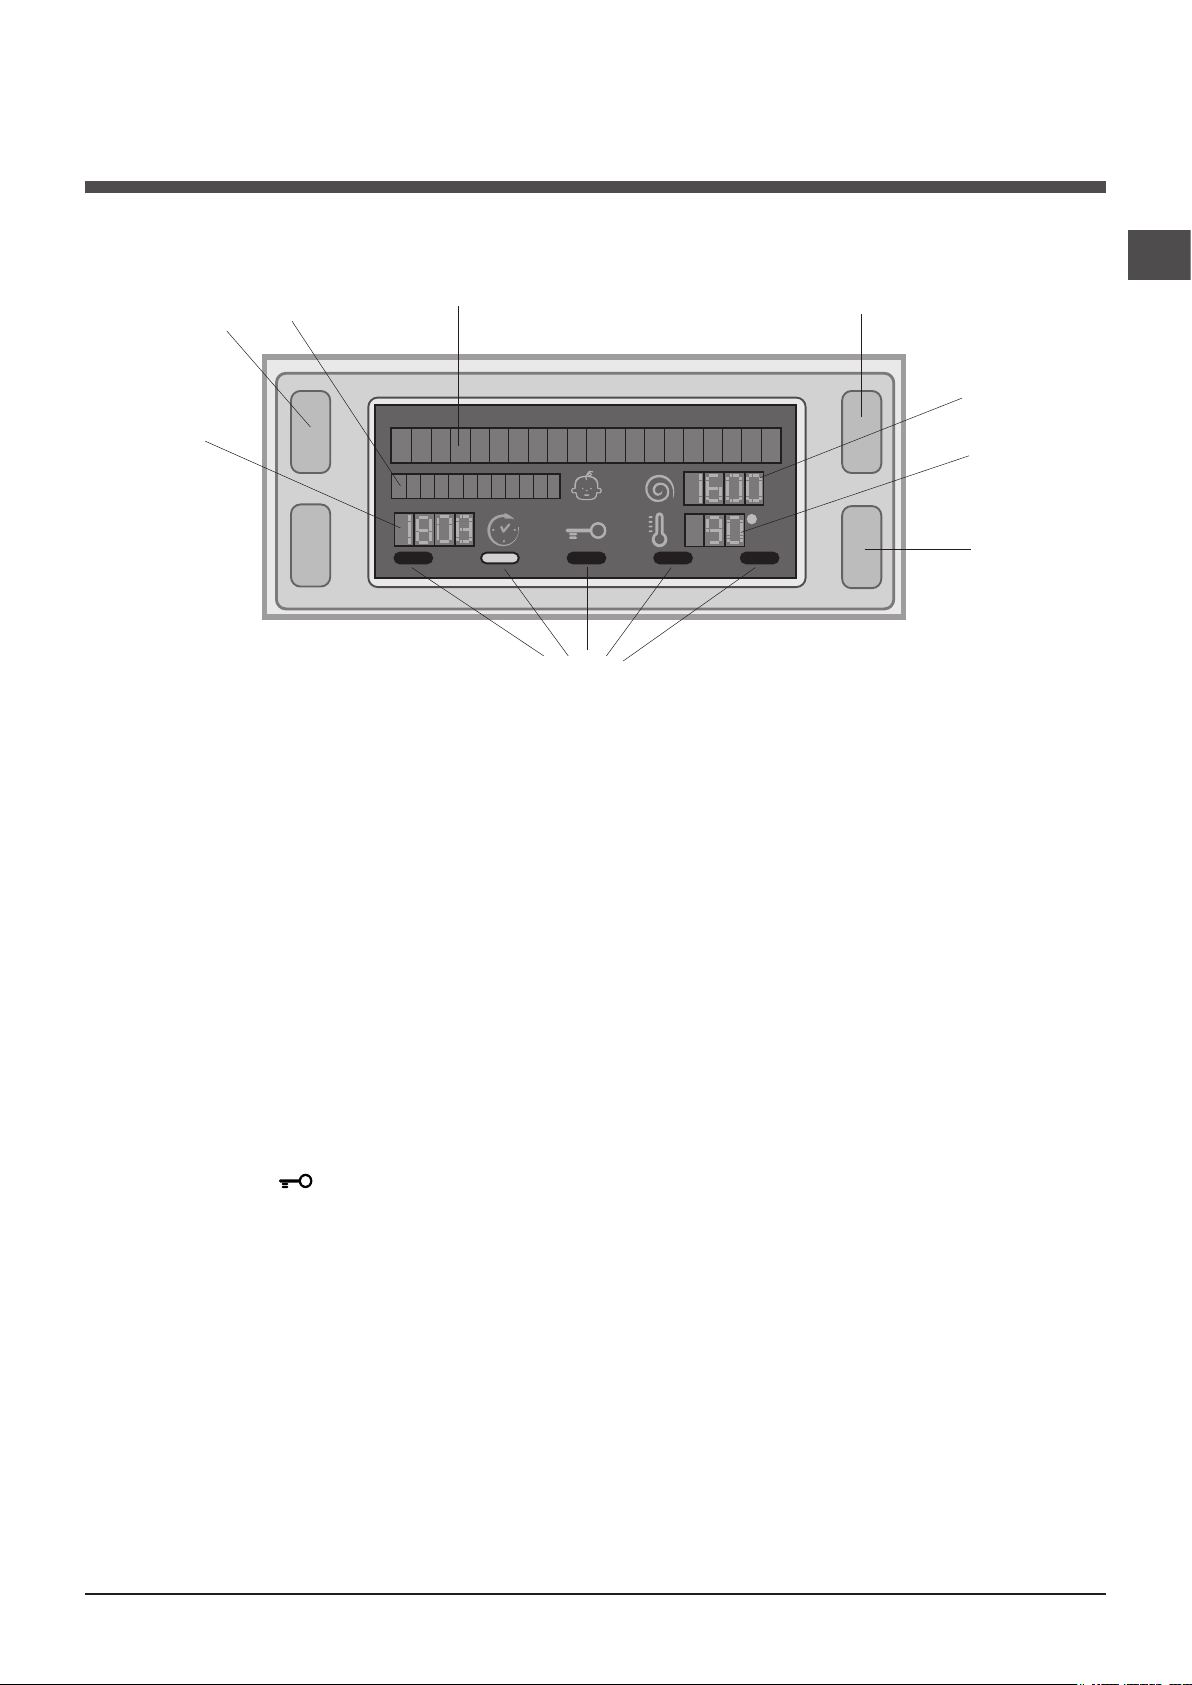
Display
GB
Z
B
A
X
D
C
E
Y
F
The display is useful when programming the machine and provides a great deal of information.
The two upper strings A and B provide details of the wash cycle selected, the wash cycle phase in progress and all information relating to the progress status of the wash cycle.
String C shows the time remaining until the end of the wash cycle in progress and, if a DELAYED START has been set, the
time remaining until the start of the selected wash cycle.
String D shows the maximum spin speed value (this depends on the selected wash cycle); if the wash cycle does not include
a spin cycle, the string remains unused.
String E shows the maximum temperature value which may be selected (this depends on the wash cycle used); if the temperature of the wash cycle cannot be modified, the string remains unused.
Indicator lights F correspond to the functions and light up when the selected function is compatible with the set wash cycle.
Door locked symbol
If the symbol is lit, this indicates that the washing machine door is blocked to prevent it from being opened accidentally. To
prevent any damage from occurring, wait for the symbol to switch itself off before opening the appliance door.
N.B.: if the DELAYE TIMER function has been activated, the door cannot be opened; pauses the machine by pressing the
START/PAUSE button if you wish to open it.
! The first time the machine is switched on, you will be asked to select the language and the display will automatically show
the language selection menu.
To select the desired language press the X and Y buttons; to confirm the selection press the Z button.
To change the language switch off the machine and press buttons X, Y, Z simultaneously until an alarm is heard: the
language-selection menu will be displayed again.
7
Page 8

Running a wash cycle
GB
1. SWITCH THE MACHINE ON. Press the On/Off
button ; the text POWER ON will appear on the
display and the START/PAUSE indicator light will flash
slowly in a green colour.
2. LOAD THE LAUNDRY. Open the porthole door.
Load the laundry, making sure you do not exceed
the maximum load value indicated in the table of
programmes on the following page.
3. MEASURE OUT THE DETERGENT. Open the
detergent dispenser drawer and pour the detergent into
the relevant compartments as described in “Detergents
and laundry”.
4. CLOSE THE DOOR.
5. SELECT THE WASH CYCLE. Press one of the WASH
CYCLE SELECTOR buttons to select the required wash
cycle; the name of the wash cycle will appear on the
display. A temperature and spin speed is set for each
wash cycle; these may be adjusted. The duration of the
cycle will appear on the display.
6. CUSTOMISE THE WASH CYCLE. Use the relevant
buttons:
Modifying the temperature and/or spin
speed. The machine automatically selects the
maximum temperature and spin speed set for the
selected wash cycle; these values cannot therefore
be increased. The temperature can be decreased by
pressing the button, until the cold wash “OFF”
setting is reached. The spin speed may be progressively
reduced by pressing the button, until it is completely
excluded (the “OFF” setting). If these buttons are
pressed again, the maximum values are restored.
! Exception: if the
programme is selected, the temperature can be
increased up to a value of 90°C.
Setting a delayed start.
To set a delayed start for the selected programme,
press the corresponding button repeatedly until the
required delay period has been reached. When this
option is enabled, the symbol lights up on the
display. To remove the delayed start function press the
button until the text “OFF” appears on the display.
Set the desired wash intensity.
Option makes it possible to optimise washing
based on the level of soil in the fabrics and on desired
wash cycle intensity.
Select the wash programme: the cycle will be
automatically set to “Normal” as optimised for garments
with an average level of soil (this setting is not applicable to
the “Wool” cycle, which is automatically set to “Delicate”).
For heavily-soiled garments press button until
the “Super Wash” level is reached. This level ensures
a high-performance wash due to a larger quantity of
water used in the initial phase of the cycle and due to
increased drum rotation. It is useful when removing the
most stubborn stains.
It can be used with or without bleach. If you wish to
bleach the items insert the additional compartment
(4) into compartment 1. When pouring the bleach, be
careful not to exceed the “max” level marked on the
central pivot (see figure pag. 10).
(60°)
(1st press of the button)
For lightly-soiled garments or a more delicate treatment
of the fabrics, press button until the “Delicate” level
is reached.
The cycle will reduce the drum rotation to ensure
washing results are perfect for delicate garments.
Set the rinse type.
Option makes it possible to select the desired rinse
type for sensitive skin. Press the button once for the
“Extra Rinse” level, which makes it possible to select
an additional rinse after the standard cycle rinse and
remove all traces of detergent. Press the button again
for the “Sensitive Skin” level, which makes it possible to
select two additional rinses to the standard cycle rinses; it
is recommended for very sensitive skin. Press the button
for the third time for the “Anti allergy Rinse” level, which
makes it possible to select three additional rinses to the
standard cycle rinses and remove major allergens such as
pollen, mites, cat and dog hair. Press the button again to
go back to the “Normal Rinse” rinse type. If the current
adjustment can be neither set nor changed, the display will
show “Not allowed”.
Modifying the cycle settings.
• Press the button to enable the function; the indicator
light corresponding to the button will switch on.
• Press the button again to disable the function; the
indicator light will switch off.
! If the selected function is not compatible with the
programmed wash cycle, the indicator light will flash
and the function will not be activated.
! If the selected function is not compatible with
another function which has been selected previously,
the indicator light corresponding to the first function
selected will flash and only the second function will
be activated; the indicator light corresponding to the
enabled function will remain lit.
! The functions may affect the recommended load value
and/or the duration of the cycle.
7. START THE PROGRAMME. Press the START/PAUSE
button. The corresponding indicator light will become
green, remaining lit in a fixed manner, and the door will be
locked (the DOOR LOCKED symbol will be on). During
the wash cycle, the name of the phase in progress will
appear on the display. To change a wash cycle while
it is in progress, pause the washing machine using the
START/PAUSE button (the START/PAUSE indicator light
will flash slowly in an orange colour); then select the
desired cycle and press the START/PAUSE button again.
To open the door while a cycle is in progress, press
the START/PAUSE button; if the DOOR LOCKED
symbol is switched off the door may be opened. Press
the START/PAUSE button again to restart the wash cycle
from the point at which it was interrupted.
8. THE END OF THE WASH CYCLE. This will be
indicated by the text “END OF CYCLE” on the display;
when the DOOR LOCKED symbol switches off
the door may be opened. Open the door, unload the
laundry and switch off the machine.
! If you wish to cancel a cycle which has already begun,
press and hold the button. The cycle will be stopped
and the machine will switch off.
8
Page 9
Wash cycles and functions
Table of wash cycles
Detergents
Description of the wash cycle
Wash cycles
Anti Stain
Cotton Standard 60° (1st press of the button) (1): heavily soiled whites
and delicate colours.
Cotton Standard 40° (2nd press of the button) (2): lightly soiled whites
and delicate colours.
Cotton Standard 20° (3rd press of the button): lightly soiled whites and
delicate colours.
Synthetics (1st press of the button): heavily soiled resistant colours. 60° 800
Synthetics (1st press of the button) (4): lightly soiled resistant colours. 40° 800
Synthetics (2nd press of the button): lightly soiled delicate colours. 40° 800
Fast Wash 60' (1st press of the button): to refresh normal soiled garments quic-
kly (not suitable for wool, silk and clothes which require washing by hand).
Fast Wash 30' (2nd press of the button): to refresh lightly soiled garments quic-
kly (not suitable for wool, silk and clothes which require washing by hand).
M
My Cycle: allows for any wash cycle to be stored.
Bed&Bath: washes bathroom laundry and bedlinen. 60° 1400
Wool: for wool, cashmere, etc. 40° 800 -
Delicates
Spin (1st press of the button) - 1400 - - - - 10 - - - 16’
Rinse (2nd press of the button) - 1400 - - -
Pump out (3rd press of the button) - 0 - - - - 10 - - - 2’
The length of cycle shown on the display or in this booklet is an estimation only and is calculated assuming standard working conditions. The actual duration can vary according to factors such as
water temperature and pressure, the amount of detergent used, the amount and type of load inserted, load balancing and any wash options selected.
Max.
temp.
(°C)
40° 1400
60°
(Max. 90°)
40° 1400 -
20° 1400 -
60° 1400 -
30° 800 -
30° 0 -
Max.
speed
(rpm)
1400
Wash
Prewash
(3)
Bleach
-
-
-
-
-
-
(kg)
pness %
Max. load
Fabric
softener
Residual dam-
Energy consum-
6 - - - 190’
10 53 1,09 85 210’
10 53 1,09 92 185’
10 - - - 175’
5,5 48 0,99 57 120’
5,5 48 0,63 55 100’
5,5 - - - 80’
4 53 0,54 57 60’
4 71 0,21 41 30’
10 - - - 155’
2,5 - - - 100’
1 - - - 80’
10 - - - 49’
ption kWh
Total water lt
GB
Cycle duration
1) Test wash cycle in compliance with directive 1061/2010: set wash cycle 60°C (1st press of the button).
This cycle is designed for cotton loads with a normal soil level and is the most efficient in terms of both electricity and water consumption; it should be used for garments
which can be washed at 60°C. The actual washing temperature may differ from the indicated value.
2) Test wash cycle in compliance with directive 1061/2010: set wash cycle 40°C (2nd press of the button).
This cycle is designed for cotton loads with a normal soil level and is the most efficient in terms of both electricity and water consumption; it should be used for garments
which can be washed at 40°C. The actual washing temperature may differ from the indicated value.
3) At 60 °C the “Prewash” function cannot be selected.
For all Test Institutes:
2) Long wash cycle for cottons: set wash cycle 40°C (2nd press of the button).
4) Long wash cycle for synthetics: set wash cycle 60°C (1st press of the button); temperature of 40°C (press TEMPERATURE button).
Wash functions
Prewash
If this function is selected, the pre-wash cycle will run; this
is useful for removing stubborn stains.
N.B.: put the detergent in the relevant compartment.
! It cannot be used in conjunction with wash cycles
, , , ,
(60°), (40°),
.
Easy Iron
By selecting this function, the wash and spin cycles will be
modified in order to reduce the formation of creases.
At the end of the cycle the washing machine will perform
slow rotations of the drum; the “Easy Iron” and START/
PAUSE indicator lights will flash (orange) and the text “END
OF CYCLE” will appear on the display. To end the cycle,
press the START/PAUSE button or the “Easy Iron” button.
! It cannot be used with the , “Fast Wash 30’”, , , .
Eco Wash
The Eco Wash function saves energy by not heating the
water used to wash your laundry – an advantage both to
the environment and to your energy bill. Instead, intensified
wash action and water optimisation ensure great wash
results in the same average time of a standard cycle.
For the best washing results we recommend the usage of
a liquid detergent.
! It cannot be used with the , , , , , .
9
Page 10

M
AX
1
2
4
3
A
B
Detergents and laundry
GB
Detergent dispenser drawer
Good washing results also depend on the correct dose of
detergent: adding too much detergent will not necessarily
result in a more efficient wash, and may in fact cause a
build up on the inside of your appliance and contribute to
environmental pollution.
! Use powder detergent for white cotton garments, for
pre-washing, and for washing at temperatures over 60°C.
! Follow the instructions given on the detergent packaging.
! Do not use hand washing detergents because these
create too much foam.
Open the detergent dispenser drawer and pour
in the detergent or washing
additive, as follows.
compartment 1: Pre-wash detergent (powder)
Before pouring in the detergent, make sure that extra compartment 4 has been removed.
compartment 2: Detergent for the wash cycle
(powder or liquid)
If liquid detergent is used, it is recommended that the
removable plastic partition A (supplied) be used for proper
dosage.
If powder detergent is used, place the partition into slot B.
compartment 3: Additives (fabric softeners, etc.)
The fabric softener should not overflow the grid.
extra compartment 4: Bleach
Preparing the laundry
• Divide the laundry according to:
- the type of fabric/the symbol on the label
- the colours: separate coloured garments from whites.
• Empty all garment pockets and check the buttons.
• Do not exceed the listed values, which refer to the
weight of the laundry when dry: see “Table of wash
cycles”.
How much does your laundry weigh?
1 sheet 400-500 g
1 pillow case 150-200 g
1 tablecloth 400-500 g
1 bathrobe 900-1200 g
1 towel 150-250 g
Special wash cycles
Anti Stain : this programme is suitable to heavily-soiled
garments with resistant colours. It ensures a washing
class that is higher than the standard class (A class). When
running the programme, do not mix garments of different
colours. We recommend the use of powder detergent.
Pre-treatment with special additives is recommended if
there are obstinate stains.
Cotton Standard 20° : ideal for heavily soiled cotton
loads. The effective performance levels achieved at cold
temperatures, which are comparable to washing at 40°,
are guaranteed by a mechanical action which operates at
varying speed, with repeated and frequent peaks.
Bed&Bath: use programme to wash bed linen
and towels in one single cycle: it optimises softener
performance and helps you save time and energy. We
recommend the use of powder detergent.
Wool: the wool wash cycle on this Hotpoint/Ariston
machine has been tested and approved by The Woolmark Company for washing wool garments labelled as
hand washable provided that the garments are washed
according to the instructions on the garment label and
those issued by the manufacturer of this washing machine. Hotpoint/Ariston is the first washing machine brand
to be approved by The Woolmark Company for Apparel
Care- Platinum for its washing performance and consumption of energy and water. (M1135)
In UK, Eire, Hong Kong and India the Woolmark trade
mark is a Certification trade mark.
Delicates: use programme to wash very delicate
garments with decorative features, such as diamantes and
sequins.
To wash silk garments and curtains select the cycle
and set the “Delicate” level from option .
We recommend turning the garments inside out before
washing and placing small items into the special bag
for washing delicates. Use liquid detergent on delicate
garments for best results.
Load balancing system
Before every spin cycle, to avoid excessive vibrations and
to distribute the load in a uniform manner, the drum rotates
continuously at a speed which is slightly greater than the
washing rotation speed. If, after several attempts, the load
is not balanced correctly, the machine spins at a reduced
spin speed. If the load is excessively unbalanced, the
washing machine performs the distribution process instead
of spinning. To encourage improved load distribution and
balance, we recommend small and large garments are
mixed in the load.
10
Page 11

Troubleshooting
Your washing machine could fail to work. Before contacting the Technical Assistance Centre (see “Assistance”), make sure
that the problem cannot be not solved easily using the following list.
Problem:
The washing machine does not
switch on.
The wash cycle does not start.
The washing machine does not
take in water (the text “NO WATER,
CHECK SUPPLY” appears on the
display).
The washing machine continuously
takes in and
drains water.
Possible causes / Solutions:
• The appliance is not plugged into the socket fully, or is not making contact.
• There is no power in the house.
• The washing machine door is not closed properly.
• The ON/OFF button has not been pressed.
• The START/PAUSE button has not been pressed.
• The water tap has not been opened.
• A delayed start has been set (see “Running a wash cycle”).
• The water inlet hose is not connected to the tap.
• The hose is bent.
• The water tap has not been opened.
• There is no water supply in the house.
• The pressure is too low.
• The START/PAUSE button has not been pressed.
• The drain hose is not fitted at a height between 65 and 100 cm from the floor
(see “Installation”).
• The free end of the hose is under water (see “Installation”).
• The wall drainage system is not fitted with a breather pipe.
If the problem persists even after these checks, turn off the water tap, switch
the appliance off and contact the Assistance Service. If the dwelling is on one of
the upper floors of a building, there may be problems relating to water drainage,
causing the washing machine to fill with water and drain continuously. Special
anti-draining valves are available in shops and help to avoid this inconvenience.
GB
The washing machine does not
drain or spin.
The washing machine vibrates a lot
during the spin cycle.
The washing machine leaks.
The machine is locked and the display
flashes, indicating an
error code (e.g. F-01, F-..).
There is too much foam.
• The wash cycle does not include draining: some wash cycles require the drain
phase to be started manually (see “Wash cycles and functions”).
• The EASY IRON function has been activated: To complete the wash cycle,
press the START/PAUSE button (see “Wash cycles and functions”).
• The drain hose is bent (see “Installation”).
• The drainage duct is clogged.
• The drum was not unlocked correctly during installation (see “Installation”).
• The washing machine is not level (see “Installation”).
• The washing machine is trapped between cabinets and walls (see “Installation”).
• The water inlet hose is not screwed on properly (see “Installation”).
• The detergent dispenser drawer is blocked (for cleaning instructions, see “Care
and maintenance”).
• The drain hose is not fixed properly (see “Installation”).
• Switch off the machine and unplug it, wait for approximately 1 minute and then
switch it back on again.
If the problem persists, contact the Technical Assistance Service.
• The detergent is not suitable for machine washing (it should display the text
“for washing machines” or “hand and machine wash”, or the like).
• Too much detergent was used.
11
Page 12

Service
GB
Before calling for Assistance:
• Check whether you can solve the problem alone (see “Troubleshooting”);
• Restart the programme to check whether the problem has been solved;
• If this is not the case, contact an authorised Technical Assistance Centre using the telephone number provided on the
guarantee certificate.
! Always request the assistance of authorised technicians.
Have the following information to hand:
• the type of problem;
• the appliance model (Mod.);
• the serial number (S/N).
This information can be found on the data plate applied to the rear of the washing machine, and can also be found on the
front of the appliance by opening the door.
12
Page 13

Οδηγίες χρήσης
ΠΛΥΝΤΗΡΙΟ ΡΟΥΧΩΝ
GR
Ελληνικά
WMD 1044
Περιεχόμενα
Εγκατάσταση, 14-15
Αποσυσκευασία και οριζοντίωση
Υδραυλικές και ηλεκτρικές συνδέσεις
Πρώτος κύκλος πλυσίματος
Τεχνικά στοιχεία
Συντήρηση και φροντίδα, 16
Αποκλεισμός νερού και ηλεκτρικού ρεύματος
Καθαρισμός του πλυντηρίου
Καθαρισμός του συρταριού απορρυπαντικών
Φροντίδα της πόρτας και του κάδου
Καθαρισμός της αντλίας
Έλεγχος του σωλήνα τροφοδοσίας του νερού
Προφυλάξεις και συμβουλές, 17
Γενική ασφάλεια
Διάθεση
Χειρονακτικό άνοιγμα της πόρτας
Περιγραφή του πλυντηρίου, 18-19
Πίνακας ελέγχου
Οθόνη
GR
Πως διενεργείται ένας κύκλος πλυσίματος, 20
Προγράμματα και λειτουργίες, 21
Πίνακας των Προγραμμάτων
Λειτουργίες πλυσίματος
Απορρυπαντικά και μπουγάδα, 22
Θήκη απορρυπαντικών
Προετοιμασία της μπουγάδας
Ειδικά προγράμματα
Σύστημα ισοστάθμισης του φορτίου
Ανωμαλίες και λύσεις, 23
Υποστήριξη, 24
13
Page 14
Εγκατάσταση
GR
! Είναι σημαντικό να διατηρήσετε το
εγχειρίδιο αυτό για να μπορείτε να το
συμβουλεύεστε οποιαδήποτε στιγμή. Σε
περίπτωση πώλησης, παραχώρησης ή
μετακόμισης, βεβαιωθείτε ότι παραμένει μαζί
με το πλυντήριο για να πληροφορεί τον νέο
ιδιοκτήτη για τη λειτουργία και τις σχετικές
προειδοποιήσεις.
! Διαβάστε προσεκτικά τις οδηγίες:
υπάρχουν σημαντικές πληροφορίες για την
εγκατάσταση, τη χρήση και την ασφάλεια.
Αποσυσκευασία και οριζοντίωση
Αποσυσκευασία
1. Αποσυσκευάστε το
πλυντήριο.
2. Ελέγξτε αν το
πλυντήριο έχει
υποστεί ζημιές κατά
τη μεταφορά. Αν
έχει υποστεί ζημιές
μην το συνδέετε και
επικοινωνήστε με τον
μεταπωλητή.
3. Αφαιρέστε τις 4 βίδες προστασίας για
τη μεταφορά και το λαστιχάκι με το σχετικό
διαχωριστικό, που βρίσκονται στο πίσω
μέρος (βλέπε εικόνα).
4. Κλείστε τις οπές με τα πλαστικά πώματα
που σας παρέχονται.
5. Διατηρείστε και τα τρία τεμάχια: αν το
πλυντήριο χρειαστεί να μεταφερθεί, θα
πρέπει να ξαναμονταριστούν.
! Οι συσκευασίες δεν είναι παιχνίδια για
μικρά παιδιά.
Ευθυγράμμιση
1. Εγκαταστήστε το πλυντήριο σε ένα
δάπεδο επίπεδο και ανθεκτικό, χωρίς να το
ακουμπήσετε σε τοίχους, έπιπλα ή άλλο.
2. Αν το δάπεδο
δεν είναι απόλυτα
οριζοντιωμένο,
αντισταθμίστε
τις ανωμαλίες
βιδώνοντας ή
ξεβιδώνοντας τα
πρόσθια ποδαράκια
(βλέπε εικόνα).Η
γωνία κλίσης,
μετρημένη στην
επιφάνεια εργασίας, δεν πρέπει να ξεπερνάει
τις 2°.
Μια φροντισμένη οριζοντίωση προσδίδει
σταθερότητα στη μηχανή και αποσοβεί
δονήσεις, θορύβους και μετατοπίσεις κατά
τη λειτουργία. Σε περίπτωση μοκέτας ή
τάπητα, ρυθμίστε τα ποδαράκια έτσι ώστε να
υφίσταται κάτω από το πλυντήριο αρκετός
χώρος για τον αερισμό.
Υδραυλικές και ηλεκτρικές
συνδέσεις
Σύνδεση του σωλήνα τροφοδοσίας του
νερού
1. Συνδέστε το
σωλήνα τροφοδοσίας
βιδώνοντάς τον σε
ένα κρουνό κρύου
νερού με στόμιο
σπειρώματος 3/4 gas
(βλέπε εικόνα).
Πριν τη σύνδεση,
αφήστε να τρέξει το
νερό μέχρι να γίνει
διαυγές.
2. Συνδέστε το
σωλήνα τροφοδοσίας
στο πλυντήριο
βιδώνοντάς τον στην
αντίστοιχη είσοδο
νερού, στο πίσω
μέρος επάνω δεξιά
(βλέπε εικόνα).
3. Προσέξτε ώστε στο σωλήνα να μην
υπάρχουν ούτε πτυχώσεις, ούτε στενώσεις.
! Η πίεση νερού του κρουνού πρέπει να
κυμαίνεται μεταξύ των τιμών του πίνακα
Τεχνικά στοιχεία (βλέπε σελίδα δίπλα).
! Αν το μήκος του σωλήνα τροφοδοσίας δεν
επαρκεί, απευθυνθείτε σε ένα ειδικευμένο
κατάστημα ή σε εξουσιοδοτημένο τεχνικό.
! Μη χρησιμοποιείτε ποτέ
χρησιμοποιημένους σωλήνες.
! Χρησιμοποιείτε εκείνους που σας
παρέχονται με τη μηχανή.
14
Page 15

Σύνδεση του σωλήνα αδειάσματος
65 - 100 cm
чщсзфйкьфзфб фпх кЬдпх 71 лЯфсб
- 2006/95/CE (ЧбмзлЮ ФЬуз)
Συνδέστε το σωλήνα
αδειάσματος, χωρίς
να τον διπλώσετε,
σε μια σωλήνωση
αδειάσματος ή σε
μια παροχέτευση
επιτοίχια σε ύψος
από το έδαφος
μεταξύ 65 και 100
cm.
Ή στηρίξτε τον στο
χείλος ενός νιπτήρα
ή μιας λεκάνης,
δένοντας τον οδηγό
που σας παρέχεται
στον κρουνό (βλέπε
εικόνα). Το ελεύθερο
άκρο του σωλήνα
αδειάσματος δεν πρέπει να παραμένει
βυθισμένο στο νερό.
! Με την εγκατάσταση του πλυντηρίου, η
πρίζα ρεύματος πρέπει να είναι εύκολα
προσβάσιμη.
! Μη χρησιμοποιείτε προεκτάσεις και
πολύπριζα.
! Το καλώδιο δεν πρέπει να φέρει πτυχές ή
να είναι συμπιεσμένο.
! Το καλώδιο τροφοδοσίας πρέπει να
αντικαθίσταται μόνο από εξουσιοδοτημένους
τεχνικούς.
Προσοχή! Η επιχείρηση αποποιείται κάθε
ευθύνης σε περίπτωση που δεν τηρούνται
αυτοί οι κανόνες.
Πρώτος κύκλος πλυσίματος
Μετά την εγκατάσταση, πριν τη χρήση,
διενεργήστε ένα κύκλο πλυσίματος με
απορρυπαντικό και χωρίς ρούχα θέτοντας το
πρόγραμμα “ΑΥΤΌ-ΚΑΘΑΡΙΣΜΟΣ”.
ФечнйкЬ уфпйчеЯб
МпнфЭлп WMD 1044
рлЬфпт cm 59,5
ДйбуфЬуейт
эшпт cm 85
вЬипт cm 60,5
GR
! Δεν συνιστάται η χρήση προεκτάσεων
σωλήνων. Αν απαιτείται, η προέκταση πρέπει
να έχει την ίδια διάμετρο του αρχικού σωλήνα
και να μην ξεπερνάει τα 150 cm.
Ηλεκτρική σύνδεση
Πριν εισάγετε το βύσμα στην ηλεκτρική
πρίζα, βεβαιωθείτε ότι:
• η πρίζα διαθέτει γείωση και τηρεί τις εκ του
νόμου προδιαγραφές.
• Η πρίζα να είναι σε θέση να υποφέρει το
μέγιστο φορτίο ισχύος της μηχανής, που
αναφέρεται στον πίνακα Τεχνικών στοιχείων
(βλέπε δίπλα).
• Η τάση τροφοδοσίας να κυμαίνεται μεταξύ
των τιμών που αναφέρονται στον πίνακα
Τεχνικών στοιχείων (βλέπε δίπλα).
• Η πρίζα να είναι συμβατή με το βύσμα
του πλυντηρίου. Σε αντίθετη περίπτωση,
αντικαταστήστε την πρίζα ή το βύσμα.
! Το πλυντήριο δεν εγκαθίσταται σε ανοιχτό
χώρο, ακόμη και αν ο χώρος είναι καλυμμένος,
διότι είναι πολύ επικίνδυνο να το αφήνετε
εκτεθειμένο σε βροχή και κακοκαιρία.
Чщсзфйкьфзфб áðü 1 Ýùò 10 kg
ЗлекфсйкЭт
ухндЭуейт
ВлЭре фзн рйнбкЯдб
чбсбкфзсйуфйкюн ерЯ фзт
мзчбнЮт
мЭгйуфз рЯеуз
УхндЭуейт
неспэ
Фбчэфзфб
уфхшЯмбфпт
Προγράμματα
ελέγχου
σύμφωνα με
τις οδηγίες
1061/2010
και
1015/2010
1 MPa (10 bar)
ЕлЬчйуфз рЯеуз
0,05 MPa (0,5 bar)
мЭчсй 1400 уфспцЭт фп лерфь
рсьгсбммб
(1° рЬфзмб фпх кпхмрйпэ); κανονικό
(60°)
πρόγραμμα για βαμβακερά
στους 60°C;
рсьгсбммб (40°)
(2° рЬфзмб фпх кпхмрйпэ); κανονικό
πρόγραμμα για βαμβακερά
στους 40°C.
З ухукехЮ бхфЮ еЯнбй
уэмцщнз ме фйт бкьлпхиет
КпйнпфйкЭт ПдзгЯет:
- 2004/108/CE
(ЗлекфспмбгнзфйкЮ
Ухмвбфьфзфб)
- 2002/96/CE
15
Page 16
Συντήρηση και φροντίδα
1
2
A
B
GR
Αποκλεισμός νερού και ηλεκτρικού
ρεύματος
• Κλείνετε τον κρουνό του νερού μετά
από κάθε πλύσιμο. Έτσι περιορίζεται η
φθορά της υδραυλικής εγκατάστασης του
πλυντηρίου και αποσοβείται ο κίνδυνος
απωλειών.
• Να βγάζετε το βύσμα από το ρεύμα όταν
καθαρίζετε το μηχάνημα και κατά τις
εργασίες συντήρησης.
Καθαρισμός του πλυντηρίου
• Το εξωτερικό μέρος και τα λαστιχένια
μέρη μπορούν να καθαρίζονται με ένα πανί
βρεγμένο με χλιαρό νερό και σαπούνι. Μη
χρησιμοποιείτε διαλύτες ή αποξυστικά.
• Το πλυντήριο διαθέτει ένα πρόγραμμα
“ΑΥΤΌ-ΚΑΘΑΡΙΣΜΟΣ” των εσωτερικών
μερών που πρέπει να διενεργείται χωρίς
κανένα τύπο φορτίου στον κάδο.
Το απορρυπαντικό
(σε ποσότητα ίση
με το 10% της
προτεινόμενης
για ρούχα λίγο
λερωμένα) ή
πρόσθετα ειδικά για
τον καθαρισμό του
πλυντηρίου, μπορούν
να χρησιμοποιηθούν
ως ενισχυτικά
στο πρόγραμμα πλύσης. Συνιστάται να
διενεργείτε το πρόγραμμα καθαρισμού κάθε
40 κύκλους πλυσίματος.
Για την ενεργοποίηση του προγράμματος
πατήστε ταυτόχρονα τα κουμπιά Α και Β για 5
δευτερόλεπτα (βλέπε Εικόνα).
Το πρόγραμμα θα ξεκινήσει αυτόματα και
θα έχει διάρκεια περίπου 70 λεπτών. Για να
σταματήσετε τον κύκλο πατήστε το κουμπί
START/PAUSE.
Καθαρισμός του συρταριού
απορρυπαντικών
Τραβήξτε το συρτάρι
ανασηκώνοντάς το
και τραβώντας το
προς τα έξω (βλέπε
εικόνα).
Πλένετέ το κάτω από
τρεχούμενο νερό. Ο
καθαρισμός αυτός
διενεργείται συχνά.
Φροντίδα της πόρτας και του κάδου
• Να αφήνετε πάντα μισόκλειστη την πόρτα
για να μην παράγονται δυσοσμίες.
Καθαρισμός της αντλίας
Το πλυντήριο διαθέτει μια αντλία
αυτοκαθαριζόμενη που δεν χρειάζεται
συντήρηση. Μπορεί, όμως, να τύχει να
πέσουν μικρά αντικείμενα (κέρματα, κουμπιά)
στον προθάλαμο που προστατεύει την
αντλία, που βρίσκεται στο κάτω μέρος αυτής.
! Βεβαιωθείτε ότι ο κύκλος πλυσίματος έχει
τελειώσει και βγάλτε το βύσμα.
Για να έχετε πρόσβαση στον προθάλαμο:
1. αφαιρέστε το
ταμπλό κάλυψης
στο πρόσθιο πλευρό
του πλυντηρίου με
τη βοήθεια ενός
κατσαβιδιού
(βλέπε εικόνα).
2. Ξεβιδώστε το
καπάκι στρέφοντάς
το αριστερόστροφα
(βλέπε εικόνα): είναι
φυσικό να βγαίνει
λίγο νερό.
3. καθαρίστε επιμελώς το εσωτερικό.
4. ξαναβιδώστε το καπάκι.
5. ξαναμοντάρετε το πάνελ όντας σίγουροι,
πριν το σπρώξετε προς τη μηχανή, ότι έχετε
εισάγει τα γαντζάκια στις αντίστοιχες εσοχές.
Έλεγχος του σωλήνα τροφοδοσίας
του νερού
Ελέγχετε το σωλήνα τροφοδοσίας
τουλάχιστον μια φορά ετησίως. Αν
παρουσιάζει σκασίματα και σχισμές
αντικαθίσταται: κατά τα πλυσίματα οι ισχυρές
πιέσεις θα μπορούσαν να προκαλέσουν
αναπάντεχα σπασίματα.
16
! Μη χρησιμοποιείτε ποτέ
χρησιμοποιημένους σωλήνες.
Page 17
Προφυλάξεις και
20
συμβουλές
! Το πλυντήριο σχεδιάστηκε και κατασκευάστηκε σύμφωνα με
τους διεθνείς κανόνες ασφαλείας. Αυτές οι προειδοποιήσεις
παρέχονται για λόγους ασφαλείας και πρέπει να διαβάζονται
προσεκτικά.
Γενική ασφάλεια
• Η συσκευή δεν πρέπει να χρησιμοποιείται από άτομα
(συμπεριλαμβανομένων των παιδιών) με φυσικές,
αισθητηριακές ή νοητικές ικανότητες και με εμπειρίες
και γνώσεις ανεπαρκείς, εκτός κι αν η χρήση αυτή
γίνεται υπό την επίβλεψη ή τις οδηγίες ενός ατόμου
υπεύθυνου για την ασφάλειά τους.Τα παιδιά πρέπει να
επιτηρούνται για να εξασφαλιστεί ότι δεν θα παίξουν με
τη συσκευή.
• Η συσκευή αυτή σχεδιάστηκε αποκλειστικά για οικιακή
χρήση.
• Μην αγγίζετε το μηχάνημα με γυμνά πόδια ή με τα
χέρια ή τα πόδια βρεγμένα.
• Μην βγάζετε το βύσμα από την ηλεκτρική πρίζα
τραβώντας το καλώδιο, αλλά να πιάνετε την πρίζα.
• Μην ανοίγετε το συρταράκι απορρυπαντικών ενώ το
μηχάνημα είναι σε λειτουργία.
• Μην αγγίζετε το νερό αδειάσματος, αφού μπορεί να
φτάσει σε υψηλές θερμοκρασίες.
• Μην ζορίζετε σε καμία περίπτωση την πόρτα: θα
μπορούσε να χαλάσει ο μηχανισμός ασφαλείας που
προστατεύει από τυχαία ανοίγματα.
• Σε περίπτωση βλάβης, σε καμία περίπτωση να
μην επεμβαίνετε στους εσωτερικούς μηχανισμούς
προσπαθώντας να την επισκευάσετε.
• Να ελέγχετε πάντα τα παιδιά να μην πλησιάζουν στο
μηχάνημα σε λειτουργία.
• Κατά το πλύσιμο η πόρτα τείνει να θερμαίνεται.
• Αν πρέπει να μετατοπιστεί, συνεργαστείτε δύο ή τρία
άτομα με τη μέγιστη προσοχή. Ποτέ μόνοι σας γιατί το
μηχάνημα είναι πολύ βαρύ.
• Πριν εισάγετε τη μπουγάδα ελέγξτε αν ο κάδος είναι
άδειος.
Οι καταναλωτές θα πρέπει να απευθύνονται στις τοπικές
αρχές ή στα καταστήματα λιανικής για πληροφορίες που
αφορούν τη σωστή διάθεση των παλαιών ηλεκτρικών
συσκευών.
Χειρονακτικό άνοιγμα της πόρτας
Στην περίπτωση αδυναμίας ανοίγματος της πόρτας εξ
αιτίας απουσίας ηλεκτρικής ενέργειας ενώ θέλετε να
απλώσετε την μπουγάδα, προχωρήστε ως ακολούθως:
1. βγάλτε το βύσμα από την
ηλεκτρική πρίζα.
2. βεβαιωθείτε ότι η στάθμη
του νερού στο εσωτερικό της
μηχανής είναι χαμηλότερη
σε σχέση με το άνοιγμα της
πόρτας. Σε αντίθετη περίπτωση
αφαιρέστε το σε περίσσεια νερό
μέσω του σωλήνα αδειάσματος
συλλέγοντάς το σε ένα κουβά
όπως φαίνεται στηνεικόνα.
3. αφαιρέστε το ταμπλό
κάλυψης στο πρόσθιο
πλευρό του πλυντηρίου με
τη βοήθεια ενός κατσαβιδιού
(βλέπε εικόνα).
GR
Διάθεση
• Διάθεση του υλικού συσκευασίας: τηρείτε τους τοπικούς
κανονισμούς, ώστε οι συσκευασίες να μπορούν να
επαναχρησιμοποιηθούν.
• Η ευρωπαϊκή οδηγία 2002/96/EK για τα Απόβλητα
Ηλεκτρικού και Ηλεκτρονικού Εξοπλισμού, απαιτεί ότι
οι παλαιές οικιακές ηλεκτρικές συσκευές δεν πρέπει
να αποβάλονται μαζί με τα υπόλοιπα απόβλητα του
δημοτικού δικτύου. Οι παλαιές συσκευές πρέπει να
συλλεχθούν χωριστά προκειμένου να βελτιστοποιηθούν
η αποκατάσταση και η ανακύκλωση των υλικών που
περιέχουν και με σκοπό τη μείωση των βλαβερών
επιπτώσεων στην ανθρώπινη υγεία και το περιβάλλον.
Το σύμβολο με το διεγραμμένο “δοχείο αποβλήτων” στο
προϊόν υπενθυμίζει σε σας την υποχρέωσή σας, πως
όταν επιθυμείτε να πετάξετε τη συσκευή ,πρέπει να
συλλεχθεί χωριστά.
4. χρησιμοποιώντας τη γλωσσίτσα που φαίνεται στην
εικόνα τραβήξτε προς τα έξω μέχρι να ελευθερώσετε το
πλαστικό από το στοπ. Τραβήξτε το ακολούθως προς τα
κάτω και ταυτόχρονα ανοίξτε την πόρτα.
5. ξαναμοντάρετε το πάνελ όντας σίγουροι, πριν το
σπρώξετε προς τη μηχανή, ότι έχετε εισάγει τα γαντζάκια
στις αντίστοιχες εσοχές.
17
Page 18

Περιγραφή του πλυντηρίου
GR
Πίνακας ελέγχου
Θήκη απορρυπαντικών
Θήκη απορρυπαντικών: για την προσθήκη απορρυπαντικών
και πρόσθετων (βλέπε «Απορρυπαντικά και μπουγάδα»).
Κουμπί ON/OFF : πιέστε για λίγο το κουμπί για να
ανάψετε ή να σβήσετε το πλυντήριο. Το ενδεικτικό φωτάκι
START/PAUSE πράσινου χρώματος που αναβοσβήνει
αργά δείχνει ότι το πλυντήριο είναι αναμμένη. Για
να σβήσετε το πλυντήριο κατά το πλύσιμο πρέπει να
κρατάτε πατημένο το κουμπί πιο πολύ, περίπου 3 sec.
Στιγμιαίο ή τυχαίο πάτημα δεν επιτρέπει το σβήσιμο του
πλυντηρίου. Το σβήσιμο του πλυντηρίου κατά το πλύσιμο
σε εξέλιξη ακυρώνει το ίδιο το πλύσιμο
Κουμπί ΕΠΙΛΟΓΕΑΣ ΠΡΟΓΡΑΜΜΑΤΩΝ: Για να θέσετε
Κουμπί ON/OFF
Κουμπί
ΕΠΙΛΟΓΕΑΣ
ΠΡΟΓΡΑΜΜΑΤΩΝ
ΞΕΒΓΑΛΜΑΤΟΣ
ΚΑΘΥΣΤΕΡΗΜΕΝΗΣ
το επιθυμητό πρόγραμμα (βλέπε τον “Πίνακας των
Προγραμμάτων”).
Κουμπί MY CYCLE: κρατήστε πατημένο το κουμπί για
την αποθήκευση ενός κύκλου και των προσωπικών
σας προτιμήσεων. Για την ανάκληση ενός κύκλου που
αποθηκεύτηκε προηγουμένως πατήστε το κουμπί
MY CYCLE.
Κουμπι ΛΕΙΤΟΥΡΓΙΑΣ: πιέστε το πλήκτρο για να
επιλέξετε την επιθυμητή λειτουργία. Στην οθόνη θα
φωτιστεί το σχετικό ενδεικτικό φωτάκι.
Κουμπι
επιλέξετε την επιθυμητή ένταση πλυσίματος.
Κουμπι
επιλέξετε τον επιθυμητό τύπο ξεβγάλματος.
Κουμπι ΣΤΥΨΙΜΑΤΟΣ : πιέστε για να μειώσετε ή να
αποκλείσετε τελείως το στύψιμο – η τιμή φαίνεται στην
οθόνη.
Κουμπι ΘΕΡΜΟΚΡΑΣΙΑ : Πατήστε για να μειώσετε τη
θερμοκρασία: η τιμή εμφανίζεται στην οθόνη.
ΚΑΘΑΡΙΣΤΙΚΗ ΔΡΑΣΗ
ΤΥΠΟΣ ΞΕΒΓΑΛΜΑΤΟΣ
: πιέστε για να
: πιέστε για να
Κουμπί
ΚΑΘΑΡΙΣΤΙΚΗ
ΔΡΑΣΗ
Οθόνη
Κουμπί
MY CYCLE
Κουμπί
ΤΥΠΟΣ
Κουμπί
ΕΚΚΙΝΗΣΗΣ
Κουμπι
ενεργοποίηση του μπλοκ του πίνακα ελέγχου, κρατήστε
πατημένο το κουμπί για περίπου 2 δευτερόλεπτα. Το
αναμμένο σύμβολο δείχνει ότι ο πίνακας ελέγχου είναι
ασφαλισμένος. Με τον τρόπο αυτόν παρεμποδίζονται
τυχαίες τροποποιήσεις των προγραμμάτων, κυρίως αν
στο σπίτι υπάρχουν παιδιά. Για την απενεργοποίηση του
κλειδώματος του πίνακα ελέγχου, κρατήστε πατημένο το
κουμπί για περίπου 2 δευτερόλεπτα.
Κουμπι ΚΑΘΥΣΤΕΡΗΜΕΝΗΣ ΕΚΚΙΝΗΣΗΣ :
Πατήστε για να θέσετε μια εκκίνηση με υστέρηση του
προεπιλεγμένου προγράμματος. Η υστέρηση εμφανίζεται
στην οθόνη.
Κουμπί με ενδεικτικό φωτάκι START/PAUSE: όταν το
πράσινο ενδεικτικό φωτάκι αναβοσβήνει αργά, πατήστε
το κουμπί για την εκκίνηση πλυσίματος. Με την εκκίνηση
του κύκλου το ενδεικτικό φωτάκι σταθεροποιείται. Για
να θέσετε μια παύση στο πλύσιμο, πατήστε εκ νέου
το κουμπί. Το ενδεικτικό φωτάκι θα αναβοσβήνει
με πορτοκαλί χρώμα. Αν το σύμβολο δεν είναι
φωτισμένο, μπορείτε να ανοίξετε την πόρτα. Για να
ξεκινήσει πάλι το πλύσιμο από το σημείο διακοπής,
πατήστε εκ νέου το κουμπί.
Τρόπος stand by
Το πλυντήριο αυτό, σύμφωνα με τις νέες διατάξεις για
την εξοικονόμηση ενέργειας, διαθέτει ένα σύστημα
αυτόματου σβησίματος (stand by) που τίθεται σε
λειτουργία εντός περίπου 30 λεπτών στην περίπτωση
μη χρήσης. Πιέστε στιγμιαία το κουμπί ON/OFF και
περιμένετε να ενεργοποιηθεί εκ νέου η μηχανή.
Κατανάλωση σε off-mode: 0,5 W
Κατανάλωση σε Left-on: 0,5 W
ΑΣΦΑΛΙΣΗΣ
Κουμπι
ΛΕΙΤΟΥΡΓΙΑΣ
ΚΟΥΜΠΙΩΝ : Για την
Κουμπί
ΣΤΥΨΙΜΑΤΟΣ
Κουμπί με ενδεικτικό
φωτάκι
START/PAUSE
Κουμπί
ΘΕΡΜΟΚΡΑΣΙΑ
Κουμπί
ΑΣΦΑΛΙΣΗΣ
ΚΟΥΜΠΙΩΝ
18
Page 19

Οθόνη
GR
Z
B
A
X
D
C
E
Y
F
Η οθόνη είναι χρήσιμη για τον προγραμματσισμό της μηχανής του πλυντηρίου και παρέχει πολλαπλές πληροφορίες.
Στις δύο επάνω γραμμές A και B απεικονίζονται το επιλεγμένο πρόγραμμα πλυσίματος, η φάση πλυσίματος σε εξέλιξη και
όλες οι υποδείξεις οι σχετικές με την κατάσταση προώθησης του προγράμματος.
Στη γραμμή C απεικονίζεται ο υπολειπόμενος χρόνος για το τέλος του κύκλου πλυσίματος σε εξέλιξη και στην
περίπτωση που τεθεί μια ΚΑΘΥΣΤΕΡΗΜΕΝΗ ΕΚΚΙΝΗΣΗ, ο υπολειπόμενος χρόνος για την εκκίνηση του επιλεγμένου
προγράμματος.
Στη γραμμή D απεικονίζεται η μέγιστη τιμή της ταχύτητας στυψίματος που μπορεί να διενεργήσει το πλυντήριο με βάση το
επιλεγμένο πρόγραμμα. Αν το πρόγραμμα δεν προβλέπει το στύψιμο, η γραμμή παραμένει σβηστή.
Στη γραμμή Ε απεικονίζεται η μέγιστη τιμή της θερμοκρασία που μπορεί να επιλεγεί με βάση το τεθέν πρόγραμμα. Αν το
πρόγραμμα δεν προβλέπει τη ρύθμιση της θερμοκρασίας, η γραμμή παραμένει σβηστή.
Τα ενδεικτικά φωτάκια F σχετίζονται με τις λειτουργίες και ανάβουν όταν η επιλεγμένη λειτουργία είναι συμβατή με το τεθέν
πρόγραμμα.
Σύμβολο ασφαλισμένη Πόρτας
Το αναμμένο σύμβολο δείχνει ότι η πόρτα είναι ασφαλισμένη για την παρεμπόδιση τυχαίων ανοιγμάτων. Για την αποφυγή
ζημιών πρέπει να περιμένετε να σβήσει το σύμβολο πριν ανοίξετε την πόρτα.
ΣΗΜΕΙΩΣΗ: αν είναι ενεργή η λειτουργία ΚΑΘΥΣΤΕΡΗΜΕΝΗ ΕΚΚΙΝΗΣΗ η πόρτα δεν μπορεί να ανοίξει, για να την
ανοίξετε θέστε τη μηχανή σε παύση πιέζοντας το κουμπί START/PAUSE.
! Στο πρώτο άναμμα θα ζητηθεί η επιλογή της γλώσσας και η οθόνη θα μπει αυτόματα στο μενού επιλογής γλώσσας.
Για να επιλέξετε την επιθυμητή γλώσσα πιέστε τα κουμπιά X και Y, για να επιβεβαιώσετε την επιλογή πιέστε το κουμπί Z.
Αν θέλετε να αλλάξετε γλώσσα, σβήστε τη συσκευή, πατήστε ταυτόχρονα τα κουμπιά X, Y, Z μέχρι να ακούσετε ένα
ηχητικό σήμα, θα εμφανιστεί εκ νέου το μενού επιλογής γλώσσας.
19
Page 20

Πως διενεργείται ένας κύκλος
πλυσίματος
GR
1. ΑΝΑΨΤΕ ΤΟ ΠΛΥΝΤΗΡΙΟ. Πατήστε το κουμπί , στην
οθόνη θα εμφανιστεί η ένδειξη ΚΚΙΝΗΣΗ ΣΕ ΕΞΕΛΙΞΗ.
Το ενδεικτικό φωτάκι START/PAUSE θα αναβοσβήνει
αργά με πράσινο χρώμα.
2. ΦΟΡΤΩΣΗ ΡΟΥΧΩΝ. Ανοίξτε την πόρτα. Φορτώστε τα
ρούχα, προσέχοντας να μην ξεπεράσετε την ποσότητα
φορτίου που υποδεικνύεται στον πίνακα προγραμμάτων
της επόμενης σελίδας.
3. ΔΟΣΟΛΟΓΙΑ ΤΟΥ ΑΠΟΡΡΥΠΑΝΤΙΚΟΥ. Βγάλτε το συρτάρι
και χύστε το απορρυπαντικό στις αντίστοιχες λεκανίτσες
όπως εξηγείται στο “Απορρυπαντικά και μπουγάδα”.
4. ΚΛΕΙΣΤΕ ΤΗΝ ΠΟΡΤΑ.
5. ΕΠΙΛΕΞΤΕ ΤΟ ΠΡΟΓΡΑΜΜΑ. Στρέψτε ένα από τα
κουμπιά του ΕΠΙΛΟΓΕΑΣ ΠΡΟΓΡΑΜΜΑΤΩΝ για να
επιλέξετε το επιθυμητό πρόγραμμα. Το όνομα του
προγράμματος θα εμφανιστεί στην οθόνη και σε αυτό
αντιστοιχίζεται μια θερμοκρασία και μια ταχύτητα
στυψίματος που μπορούν να τροποποιηθούν. Στην οθόνη
θα εμφανιστεί η διάρκεια του κύκλου.
6. ΕΞΑΤΟΜΙΚΕΥΣΗ ΤΟΥ ΚΥΚΛΟΥ ΠΛΥΣΙΜΑΤΟΣ.
Ενεργήστε στα αντίστοιχα κουμπιά:
Τροποποιήστε τη θερμοκρασία ή/και το στύψιμο.
Η μηχανή επιλέγει αυτόματα τη μέγιστη θερμοκρασία
και στύψιμο για το τεθέν πρόγραμμα και συνεπώς
δεν μπορούν να αυξηθούν. Πατώντας το κουμπί
μειώνεται προοδευτικά η θερμοκρασία μέχρι το πλύσιμο
σε κρύο νερό “OFF”. Πατώντας το κουμπί μειώνεται
προοδευτικά το στύψιμο μέχρι τον αποκλεισμό του
“OFF”. Περαιτέρω πάτημα των κουμπιών επαναφέρει τις
τιμές στις μέγιστες προβλεπόμενες.
! Εξαίρεση: επιλέγοντας το πρόγραμμα
του κουμπιού) η θερμοκρασία μπορεί να αυξηθεί μέχρι 90°.
Θέστε μια εκκίνηση με υστέρηση.
Για να θέσετε την εκκίνηση με υστέρηση του
προεπιλεγμένου προγράμματος, πατήστε το σχετικό
κουμπί μέχρι να επιτευχθεί ο χρόνος της επιθυμητής
υστέρησης. Όταν η δυνατότητα αυτή είναι ενεργή, στην
οθόνη φωτίζεται το σύμβολο . Για να απαλείψετε την
εκκίνηση με υστέρηση πατήστε το κουμπί μέχρις ότου
εμφανιστεί στην οθόνη η ένδειξη OFF.
Θέστε την επιθυμητή ένταση πλυσίματος.
Η δυνατότητα επιτρέπει τη βελτιστοποίηση του
πλυσίματος με βάση τον βαθμό λερώματος των
υφασμάτων και την επιθυμητή ένταση πλυσίματος.
Επιλέξτε το πρόγραμμα πλυσίματος, ο κύκλος τίθεται
αυτόματα στο επίπεδο “ΚΑΝΟΝΙΚΟ”, βελτιστοποιημένο
για ρούχα μετρίως λερωμένα, (αύτη η ρύθμιση δεν
ενδείκνυται για τον κύκλο “Μάλλινα”, που τίθεται
αυτόματα στο επίπεδο “ΑΠΑΛΟ”).
Για ρούχα πολύ λερωμένα πατήστε το κουμπί μέχρι
την επίτευξη του επιπέδου “ΕΝΤΑΤΙΚΟ”. Το επίπεδο
αυτό εξασφαλίζει ένα πλύσιμο υψηλών επιδόσεων χάρη
στη χρησιμοποίηση μεγαλύτερης ποσότητας νερού στην
αρχική φάση του κύκλου και στη μεγαλύτερη μηχανική
κίνηση, και είναι χρήσιμο για την απομάκρυνση των
πλέον ανθεκτικών λεκέδων. Μπορεί να χρησιμοποιείται
με ή χωρίς λευκαντικό; Αν επιθυμείτε να κάνετε λεύκανση
εισάγετε την πρόσθετη λεκανίτσα 4, που σας παρέχεται,
στη λεκανίτσα 1. Στη δοσολογία του λευκαντικού μην
ξεπεράσετε τη στάθμη «max» που υποδεικνύεται στον
κεντρικό πείρο (βλέπε εικόνα της σελ. 22).
Για ρούχα λίγο λερωμένα ή για μια πιο ευαίσθητη
μεταχείριση των υφασμάτων, πατήστε το κουμπί
μέχρι την επίτευξη του επιπέδου “ΑΠΑΛΟ”. Ο κύκλος
(60°C) (1° πάτημα
θα μειώσει τη μηχανική κίνηση εξασφαλίζοντας τέλεια
αποτελέσματα πλυσίματος για ευαίσθητα υφάσματα.
Θέστε τον τύπο ξεβγάλματος.
Η δυνατότητα επιτρέπει την επιλογή του επιθυμητού
τύπου ξεβγάλματος για τη μέγιστη φροντίδα των
ευαίσθητων επιδερμίδων. Με το πρώτο πάτημα του
κουμπιού τίθεται το επίπεδο “ΕΝΤΟΝΟ ΞΕΒΓΑΛΜΑ”
που επιτρέπει την επιλογή ενός πρόσθετου ξεβγάλματος
με εκείνα τα στάνταρ του κύκλου, για την απομάκρυνση
όλων των ιχνών του απορρυπαντικού. Στο δεύτερο
πάτημα του κουμπιού τίθεται το επίπεδο “ΕΥΑΙΣΘΗΤΗ
ΕΠΙΔΕΡΜΙΔΑ” που επιτρέπει την επιλογή δύο
πρόσθετων ξεβγαλμάτων με εκείνα τα στάνταρ
του κύκλου και συνιστάται για τις πιο ευαίσθητες
επιδερμίδες. Στο τρίτο πάτημα του κουμπιού τίθεται
το επίπεδο “ΥΠΟ-ΑΛΛΕΡΓΙΚΟ” που επιτρέπει την
επιλογή τριών πρόσθετων ξεβγαλμάτων με εκείνα τα
στάνταρ του κύκλου, για την απομάκρυνση των κύριων
αλλεργιογόνων όπως γύρη, άκαρι, τρίχες γάτας και
σκύλου. Πατήστε πάλι το κουμπί για να επιστρέψετε
στον τύπο ξεβγάλματος “ΚΑΝΟΝΙΚΟ ΞΕΒΓΑΛΜΑ”.
Αν δεν είναι δυνατό να θέσετε ή να τροποποιήσετε την
υπάρχουσα ρύθμιση, στην οθόνη θα εμφανιστεί η ένδειξη
“ΑΝΕΝΕΡΓΗ”.
Τροποποίηση των χαρακτηριστικών του κύκλου.
• Πατήστε το κουμπί για την ενεργοποίηση της λειτουργίας.
Το ενδεικτικό φωτάκι του αντίστοιχου κουμπιού θα ανάψει.
• Πατήστε εκ νέου το κουμπί για την απενεργοποίηση της
λειτουργίας. Το ενδεικτικό φωτάκι θα σβήσει.
! Αν η επιλεγμένη λειτουργία δεν είναι συμβατή με το
τεθέν πρόγραμμα το ενδεικτικό φωτάκι θα αναβοσβήνει
και η λειτουργία δεν θα ενεργοποιηθεί.
! Αν η επιλεγμένη λειτουργία δεν είναι συμβατή με μια
άλλη που επελέγη προηγουμένως, το σχετικό φωτάκι της
πρώτης επιλεγμένης λειτουργίας θα αναβοσβήνει και θα
ενεργοποιηθεί μόνο η δεύτερη, το ενδεικτικό φωτάκι της
ενεργοποιηθείσας λειτουργίας θα φωτιστεί.
! Οι λειτουργίες μπορεί να τροποποιούν το προτεινόμενο
φορτίο ή/και τη διάρκεια του κύκλου.
7. ΕΚΚΙΝΗΣΗ ΤΟΥ ΠΡΟΓΡΑΜΜΑΤΟΣ. Πατήστε το κουμπί
START/PAUSE. Το σχετικό ενδεικτικό φωτάκι θα φωτιστεί
πράσινο σταθερό και η πόρτα θα μπλοκάρει (σύμβολο
ΑΣΦΑΛΙΣΜΕΝΗΣ ΠΟΡΤΑΣ αναμμένο). Κατά το
πλύσιμο, στην οθόνη θα εμφανιστεί το όνομα της σε
εξέλιξη φάσης. Για να αλλάξετε ένα πρόγραμμα ενώ είναι
σε εξέλιξη ένας κύκλος, θέστε το πλυντήριο σε παύση
πιέζοντας το κουμπί START/PAUSE (το ενδεικτικό φωτάκι
START/PAUSE θα αναβοσβήνει αργά με πορτοκαλί
χρώμα). Κατόπιν επιλέξτε τον επιθυμητό κύκλο και
πατήστε εκ νέου το κουμπί START/PAUSE. Για να ανοίξετε
την πόρτα όσο ένας κύκλος είναι σε εξέλιξη πατήστε το
κουμπί START/PAUSE. Αν το σύμβολο ΑΣΦΑΛΙΣΜΕΝΗΣ
ΠΟΡΤΑΣ είναι σβηστό μπορείτε να ανοίξετε την πόρτα.
Πατήστε εκ νέου το κουμπί START/PAUSE για να ξεκινήσει
πάλι το πρόγραμμα από το σημείο διακοπής.
8. ΤΕΛΟΣ ΤΟΥ ΠΡΟΓΡΑΜΜΑΤΟΣ. Επισημαίνεται με την
ένδειξη “ΤΕΛΟΣ ΚΥΚΛΟΥ” στην οθόνη, όταν το σύμβολο
ΑΣΦΑΛΙΣΜΕΝΗΣ ΠΟΡΤΑΣ σβήσει μπορείτε να
ανοίξετε την πόρτα. Ανοίξτε την πόρτα, αδειάστε τα ρούχα
και σβήστε τη μηχανή.
! Αν επιθυμείτε αν ακυρώσετε έναν ήδη τεθέντα κύκλο,
πατήστε επί μακρόν το κουμπί . Ο κύκλος θα διακοπεί και
η μηχανή θα σβήσει.
20
Page 21

Προγράμματα και λειτουργίες
Πίνακας των Προγραμμάτων
БрпссхрбнфйкЬ
РесйгсбцЮ фпх РспгсЬµµбфпт
Προγράμματα
ΔΥΣΚΟΛΟΙ ΛΕΚΕΔΕΣ
ΚΑΝΟΝΙΚΌ ΒΑΜΒΑΚΕΡΑ 60° (1° рЬфзмб фпх кпхмрйпэ) (1): ЛехкЬ кбй
чсщµбфйуфЬ бниекфйкЬ, рплэ лесщµЭнб.
ΚΑΝΟΝΙΚΌ ΒΑΜΒΑΚΕΡΑ 40° (2° рЬфзмб фпх кпхмрйпэ) (2):
ЧсщµбфйуфЬ бниекфйкЬ, лЯгп лесщµЭнб.
ΚΑΝΟΝΙΚΌ ΒΑΜΒΑΚΕΡΑ 20° (3° рЬфзмб фпх кпхмрйпэ): ЧсщµбфйуфЬ
бниекфйкЬ, лЯгп лесщµЭнб.
ΑΝΘΕΚΤ. ΣΥΝΘΕΤΙΚΑ (1° рЬфзмб фпх кпхмрйпэ): ЧсщµбфйуфЬ бниекфйкЬ,
рплэ лесщµЭнб.
ΑΝΘΕΚΤ. ΣΥΝΘΕΤΙΚΑ (4) (1° рЬфзмб фпх кпхмрйпэ): ЧсщµбфйуфЬ
бниекфйкЬ, лЯгп лесщµЭнб.
ΕΥΑΙΣΘ. ΣΥΝΘΕΤΙΚΑ (2° рЬфзмб фпх кпхмрйпэ): ευαίσθητα χρώματα λίγο
λερωμένα
ΓΡΗΓΟΡΗ ΠΛΥΣΗ 60' (1° рЬфзмб фпх кпхмрйпэ): Гйб фп гсЮгпсп
цсеукЬсйуµб спэчщн елбцсЬ лесщµЭнщн (ден ендеЯкнхфбй гйб µЬллйнб,
µефбощфЬ кбй спэчб рпх рлЭнпнфбй уфп чЭсй).
ΓΡΗΓΟΡΗ ΠΛΥΣΗ 30' (2° рЬфзмб фпх кпхмрйпэ): Гйб фп гсЮгпсп
цсеукЬсйуµб спэчщн елбцсЬ лесщµЭнщн (ден ендеЯкнхфбй гйб µЬллйнб,
µефбощфЬ кбй спэчб рпх рлЭнпнфбй уфп чЭсй).
MY CYCLE (MNHMH): ЕрйфсЭрей фзн брпиЮкехуз прпйпхдЮрпфе фэрпх рлхуЯмбфпт.
M
ΣΕΝΤΟΝΙΑ+ΠΕΤΣΕΤΕΣ: Για ασπρόρουχα κρεβατιού και μπάνιου.
ΦΡΟΝΤΙΔΑ ΜΑΛΛΙΝΑ (ΜΑΛΛΙΝΑ): Гйб µЬллйнб, cachemire, клр.
ΕΥΑΙΣΘΗΤΑ
ΣΤΥΨΙΜΟ (1° рЬфзмб фпх кпхмрйпэ).
ΞΕΒΓΑΛΜΑ (2° рЬфзмб фпх кпхмрйпэ).
ΑΠΟΧΕΤΕΥΣΗ ΝΕΡΟΥ (3° рЬфзмб фпх кпхмрйпэ).
Η διάρκεια του κύκλου που φαίνεται στην οθόνη ή στο εγχειρίδιο αποτελεί μια εκτίμηση υπολογισμένη με βάση τις στάνταρ συνθήκες. Ο πραγματικός χρόνος μπορεί να ποικίλει με βάση
πολυάριθμους παράγοντες όπως θερμοκρασία και πίεση του εισερχόμενου νερού, θερμοκρασία περιβάλλοντος, ποσότητα απορρυπαντικού, ποσότητα και τύπος φορτίου, ισοστάθμιση του
φορτίου, πρόσθετες επιλεγμένες δυνατότητες.
1) Πρόγραμμα ελέγχου σύμφωνα με την προδιαγραφή 1061/2010: θέστε το πρόγραμμα
Ο κύκλος αυτός είναι κατάλληλος για τον καθαρισμό φορτίου βαμβακερών με συνηθισμένη βρωμιά και είναι ο πλέον αποτελεσματικός σε όρους κατανάλωσης
ενέργειας και νερού, προς χρήση σε ρούχα πλενόμενα στους 60 °C. Η πραγματική θερμοκρασία πλυσίματος μπορεί να διαφέρει από την υποδεικνυόμενη.
2) Πρόγραμμα ελέγχου σύμφωνα με την προδιαγραφή 1061/2010: θέστε το πρόγραμμα
Ο κύκλος αυτός είναι κατάλληλος για τον καθαρισμό φορτίου βαμβακερών με συνηθισμένη βρωμιά και είναι ο πλέον αποτελεσματικός σε όρους κατανάλωσης
ενέργειας και νερού, προς χρήση σε ρούχα πλενόμενα στους 40 °C. Η πραγματική θερμοκρασία πλυσίματος μπορεί να διαφέρει από την υποδεικνυόμενη.
3) Στη θερμοκρασία των 60 °C η λειτουργία “Πρόπλυση” δεν μπορεί να είναι ενεργή.
Για όλα τα Test Institutes:
2) Πρόγραμμα βαμβακερών μακρύ: θέστε το πρόγραμμα
4) Πρόγραμμα УХНИЕФЙKБ μακρύ: θέστε τη θερμοκρασία στους 60°C (1° πάτημα του κουμπιού). Θερμοκρασία στους 40°C (πατήστε το κουμπί ΘΕΡΜΟΚΡΑΣΙΑ).
40°C (2° πάτημα του κουμπιού)
МЭгйуфз
èåñµïêñ.
(°C)
40° 1400
60°
(Max. 90°)
40° 1400 -
20° 1400 -
60° 800
40° 800
40° 800
60° 1400 -
30° 800 -
60° 1400
40° 800 -
30° 0 -
МЭгйуфз фбчэфзфб
1400
лерфь)
(уфспцЭт бнЬ
нфйкь
Лехкб-
Рлэуйµп
Πρόπλυση
(3)
-
-
-
-
-
-
(Kg)
кфйкь
Ìáëá-
υγρασία %
Κατανάλωση
Υπολειπόμενη
МЭгйуфп ЦпсфЯп.
6 - - - 190’
10 53 1,09 85 210’
10 53 1,09 92 185’
10 - - - 175’
5,5 48 0,99 57 120’
5,5 48 0,63 55 100’
5,5 - - - 80’
4 53 0,54 57 60’
4 71 0,21 41 30’
10 - - - 155’
2,5 - - - 100’
1 - - - 80’
- 1400 - - - - 10 - - - 16’
- 1400 - - -
10 - - - 49’
- 0 - - - - 10 - - - 2’
60°C (1° πάτημα του κουμπιού)
40°C (2° πάτημα του κουμπιού)
.
.
.
ÄéÜñ-
ενέργειας kWh
Συνολικό νερό lt
GR
кейб кэклпх
Λειτουργίες πλυσίματος
Πρόπλυση
Επιλέγοντας τη λειτουργία αυτή διενεργείται η πρόπλυση,
χρήσιμη για την απομάκρυνση δύσκολων λεκέδων.
ΠΑΡΑΤΗΡΗΣΗ: Προσθέστε το απορρυπαντικό στο
αντίστοιχο διαμέρισμα.
! Δεν είναι διαθέσιμη στα προγράμματα , , , ,
(60°), (40°),
Εύκολο Σιδέρωμα
Επιλέγοντας τη λειτουργία αυτή, το πλύσιμο και το
στύψιμο θα τροποποιηθούν κατάλληλα για τη μείωση
σχηματισμού τσαλακωμάτων.
Στο τέλος του κύκλου πλύσης θα γίνουν αργές
περιστροφές του κάδου. Το ενδεικτικό φωτάκι της
λειτουργίας ΕΥΚΟΛΟ ΣΙΔΕΡΩΜΑ θα αναβοσβήνουν και
η ένδειξη «ΤΕΛΟΣ ΚΥΚΛΟΥ» θα εμφανίζεται στη οθόνη.
Για το πέρας του κύκλου πρέπει να πατήσετε το κουμπί
START/PAUSE ή το κουμπί ΕΥΚΟΛΟ ΣΙΔΕΡΩΜΑ.
! Δεν ενεργοποιείται στα προγράμματα , “ΓΡΗΓΟΡΗ
ΠΛΥΣΗ 30’”, , , .
.
Eco wash
Η λειτουργία Eco Wash συμβάλλει στην εξοικονόμηση
ενέργειας μη θερμαίνοντας το νερό που χρησιμοποιείται
στο πλύσιμο της μπουγάδας – ένα πλεονέκτημα
τόσο για το περιβάλλον όσο και για τον λογαριασμό
του ηλεκτρικού. Πράγματι, η ενισχυμένη δράση και η
βελτιστοποιημένη κατανάλωση εγγυώνται βέλτιστα
αποτελέσματα στην ίδια μέση διάρκεια ενός στάνταρ
κύκλου. Για να πετύχετε τα βέλτιστα αποτελέσματα
πλυσίματος, συστήνεται η χρήση ενός υγρού
απορρυπαντικού.
! Δεν είναι ενεργό στα προγράμματα , , , , , .
21
Page 22
Απορρυπαντικά και μπουγάδα
M
AX
1
2
4
3
A
B
GR
Θήκη απορρυπαντικών
Το καλό αποτέλεσμα του πλυσίματος εξαρτάται επίσης
και από τη σωστή δοσολογία του απορρυπαντικού:
υπερβάλλοντας δεν πλένουμε αποτελεσματικότερα
και συντελούμε στη δημιουργία κρούστας στα
εσωτερικά μέρη του πλυντηρίου και στη μόλυνση του
περιβάλλοντος.
! Να χρησιμοποιείτε απορρυπαντικά σε σκόνη για
ρούχα λευκά βαμβακερά και για την πρόπλυση και για
πλυσίματα σε θερμοκρασία μεγαλύτερη των 60°C.
! Ακολουθήστε τις υποδείξεις που αναγράφονται στη
συσκευασία του απορρυπαντικού.
! Μη χρησιμοποιείτε απορρυπαντικά για πλύσιμο στο
χέρι, διότι παράγουν πολύ αφρό.
Βγάλτε τη θήκη
απορρυπαντικών και
εισάγετε το απορρυπαντικό
ή το πρόσθετο ως εξής.
θήκη 1: Απορρυπαντικό για πρόπλυση (σε σκόνη)
Πριν χύσετε το απορρυπαντικό ελέγξτε αν έχει εισαχθεί η
πρόσθετη λεκανίτσα 4.
θήκη 2: Απορρυπαντικό για πλύσιμο (σε σκόνη ή υγρό)
Σε περίπτωση χρήσης υγρού απορρυπαντικού,
συστήνεται να χρησιμοποιείτε το δοσομετρητή Α που σας
παρέχεται για σωστή δοσολογία.
Για τη χρησιμοποίηση του απορρυπαντικού σε σκόνη
αποθέστε το δοσομετρητή στην κοιλότητα B.
θήκη 3: Πρόσθετα (μαλακτικό, κλπ.)
θήκη πρόσθετη 4: Λευκαντικό
Προετοιμασία της μπουγάδας
• Χωρίστε τη μπουγάδα ανάλογα:
- με το είδος του υφάσματος/ το σύμβολο της ετικέτας.
- τα χρώματα: χωρίστε τα χρωματιστά ρούχα από τα λευκά.
• Εκκενώστε τις τσέπες και ελέγξτε τα κουμπιά.
• Μην ξεπερνάτε τις υποδεικνυόμενες τιμές στον
“Πίνακας Προγραμμάτων” σε σχέση με το βάρος της
στεγνής μπουγάδας.
Πόσο ζυγίζει η μπουγάδα;
1 σεντόνι 400-500 gr.
1 μαξιλαροθήκη 150-200 gr.
1 τραπεζομάντιλο 400-500 gr.
1 μπουρνούζι 900-1.200 gr.
1 πετσέτα 150-250 gr.
Ειδικά προγράμματα
ΔΥΣΚΟΛΟΙ ΛΕΚΕΔΕΣ: το πρόγραμμα είναι κατάλληλο
για το πλύσιμο ρούχων πολύ λερωμένων, με χρώματα
ανθεκτικά. Το πρόγραμμα εγγυάται μια κλάση πλυσίματος
ανώτερη της κλάσης στάνταρ (κλάση A). Μην εκτελείτε
το πρόγραμμα αναμιγνύοντας ρούχα διαφορετικού
χρώματος. Συνιστάται η χρήση απορρυπαντικού σε
σκόνη. Για λεκέδες δύσκολους συνιστάται η προκαταρκτική
περιποίηση με ειδικά πρόσθετα.
ΚΑΝΟΝΙΚΌ ΒΑΜΒΑΚΕΡΑ 20°C : ιδανικό για
φορτία λερωμένων βαμβακερών. Οι καλές επιδόσεις
και σε χαμηλή θερμοκρασία, συγκρίσιμες με ένα
πλύσιμο στους 40°, εξασφαλίζονται από μια μηχανική
δράση που λειτουργεί με μεταβολή ταχύτητας σε
επαναλαμβανόμενες και κοντινές αυξομειώσεις.
ΣΕΝΤΟΝΙΑ+ΠΕΤΣΕΤΕΣ: για να πλύνετε τα
ασπρόρουχα μπάνιου και ύπνου σε ένα μοναδικό
κύκλο, χρησιμοποιήστε το πρόγραμμα που
βελτιστοποιεί τη χρήση του μαλακτικού και επιτρέπει
εξοικονόμηση χρόνου και ενέργειας. Συνιστάται η χρήση
απορρυπαντικού σε σκόνη.
ΜΑΛΛΙΝΑ: Ο κύκλος πλυσίματος “Μάλλινα” αυτού του
πλυντηρίου Hotpoint-Ariston δοκιμάστηκε και εγκρίθηκε
από την Woolmark Company για το πλύσιμο ρούχων
μάλλινων που ταξινομούνται ως “πλενόμενα στο χέρι”,
αρκεί το πλύσιμο να εκτελείται σύμφωνα με τις οδηγίες
της ετικέτας του ενδύματος και τις υποδείξεις του
κατασκευαστή της οικιακής ηλεκτρικής συσκευής. Η
Hotpoint-Ariston είναι η πρώτη μάρκα που απέκτησε από
την Woolmark Company την πιστοποίηση Woolmark Apparel Care - Platinum για τις επιδόσεις της στο πλύσιμο
και τη χαμηλή κατανάλωση νερού και ενέργειας. (M1135)
ΕΥΑΙΣΘΗΤΑ: χρησιμοποιήστε το πρόγραμμα για
το πλύσιμο ρούχων πολύ ευαίσθητων που φέρουν
πρόσθετα όπως στρας ή παγέτες.
Για το πλύσιμο μεταξωτών ρούχων και κουρτινών,
επιλέξτε τον κύκλο και θέστε το επίπεδο “ΑΠΑΛΟ” της
δυνατότητας .
Συνιστάται να γυρίζετε από την ανάποδη τα ρούχα πριν
το πλύσιμο και να βάζετε τα μικρά ρούχα στο ειδικό
σακίδιο για το πλύσιμο των ευαίσθητων ρούχων.
Για καλύτερα αποτελέσματα συνιστάται η χρήση υγρού
απορρυπαντικού για ευαίσθητα ρούχα.
Σύστημα ισοστάθμισης του φορτίου
Πριν από κάθε στύψιμο, για να αποφύγετε δονήσεις
υπερβολικές και για να κατανείμετε ομοιόμορφα το
φορτίο, ο κάδος διενεργεί περιστροφές σε μια ταχύτητα
ελαφρά ανώτερη εκείνης του πλυσίματος. Αν στο τέλος
των διαδοχικών προσπαθειών το φορτίο δεν έχει ακόμη
εξισορροπηθεί σωστά η μηχανή διενεργεί το στύψιμο σε
μια ταχύτητα χαμηλότερη της προβλεπόμενης. Παρουσία
υπερβολικής αστάθειας, το πλυντήριο διενεργεί την
κατανομή αντί του στυψίματος. Για να ευνοηθεί καλύτερη
κατανομή του φορτίου και της σωστής εξισορρόπησης
συνιστάται η ανάμιξη ρούχων μεγάλων και μικρών
διαστάσεων.
22
Page 23

Ανωμαλίες και λύσεις
Μπορεί να συμβεί το πλυντήριο να μη λειτουργεί. Πριν τηλεφωνήσετε στην Υποστήριξη (βλέπε “Υποστήριξη”), ελέγξτε αν
δεν πρόκειται για πρόβλημα που επιλύεται εύκολα με τη βοήθεια του ακόλουθου καταλόγου.
Ανωμαλίες:
Το πλυντήριο δεν ανάβει.
Ο κύκλος πλυσίματος δεν ξεκινάει.
Το πλυντήριο δεν φορτώνει νερό
(Στην οθόνη θα εμφανιστεί η ένδειξη
“ΑΠΟΥΣΙΑ ΝΕΡΟΥ, ΑΝΟΙΞΤΕ ΤΗΝ
ΠΑΡΟΧΗ”).
Το πλυντήριο φορτώνει και αδειάζει
νερό συνεχώς.
Δυνατά αίτια / Λύση:
• Το βύσμα δεν έχει εισαχθεί στην ηλεκτρική πρίζα ή τουλάχιστον όχι αρκετά για
να κάνει επαφή.
• Στο σπίτι δεν υπάρχει ρεύμα.
• Η πόρτα δεν κλείνει καλά.
• Το κουμπί ON/OFF δεν πατήθηκε.
• Το κουμπί START/PAUSE δεν πατήθηκε.
• Η βρύση του νερού δεν είναι ανοιχτή.
• Τέθηκε μια καθυστέρηση στον χρόνο εκκίνησης (βλέπε «Πως διενεργείται ένας
κύκλος πλυσίματος»).
• Ο σωλήνας τροφοδοσίας του νερού δεν είναι συνδεδεμένος στον κρουνό.
• Ο σωλήνας είναι διπλωμένος.
• Η βρύση του νερού δεν είναι ανοιχτή.
• Στο σπίτι λείπει το νερό.
• Δεν υπάρχει αρκετή πίεση.
• Το κουμπί START/PAUSE δεν πατήθηκε.
• Ο σωλήνας αδειάσματος δεν έχει εγκατασταθεί μεταξύ 65 και 100 cm από το
έδαφος (βλέπε «Εγκατάσταση»).
• Το άκρο του σωλήνα αδειάσματος είναι βυθισμένο στο νερό (βλέπε
“Εγκατάσταση”).
• Το επιτοίχιο άδειασμα δεν έχει απαέρωση.
Αν μετά από αυτούς τους ελέγχους το πρόβλημα δεν λύνεται, κλείστε τη βρύση
του νερού, σβήστε το πλυντήριο και καλέστε την υποστήριξη. Αν η κατοικία
βρίσκεται στους τελευταίους ορόφους ενός κτιρίου, μπορεί να διαπιστωθούν
φαινόμενα σιφωνισμού, οπότε το πλυντήριο φορτώνει και αδειάζει νερό συνεχώς.
Για την αντιμετώπιση του προβλήματος διατίθενται στο εμπόριο κατάλληλες
βαλβίδες αντι-σιφωνισμού.
GR
Το πλυντήριο δεν φορτώνει ή δεν
στύβει.
Το πλυντήριο δονείται πολύ κατά το
στύψιμο.
Το πλυντήριο χάνει νερό.
Η μηχανή είναι ασφαλισμένη, η οθόνη
αναβοσβήνει και επισημαίνει έναν
κωδικό ανωμαλίας (π.χ.: F-01, F-..).
Σχηματίζεται πολύς αφρός.
• Το πρόγραμμα δεν προβλέπει το άδειασμα: με ορισμένα προγράμματα πρέπει
να το εκκινήσετε χειρονακτικά(βλέπε “Προγράμματα και λειτουργίες”).
• Είναι ενεργή η λειτουργία ΕΥΚΟΛΟ ΣΙΔΕΡΩΜΑ: για την ολοκλήρωση του
προγράμματος πιέστε το κουμπί START/PAUSE («Προγράμματα και
λειτουργίες»).
• Ο σωλήνας αδειάσματος είναι διπλωμένος (βλέπε «Εγκατάσταση»).
• Ο αγωγός εκκένωσης είναι βουλωμένος.
• Ο κάδος, τη στιγμή της εγκατάστασης, δεν ξεμπλόκαρε σωστά (βλέπε
“Εγκατάσταση”).
• Το πλυντήριο δεν είναι οριζοντιωμένο (βλέπε “Εγκατάσταση”).
• Το πλυντήριο είναι πολύ στενά μεταξύ τοίχου και επίπλων (βλέπε
“Εγκατάσταση”).
• Ο σωλήνας τροφοδοσίας του νερού δεν είναι καλά βιδωμένος (βλέπε
“Εγκατάσταση”).
• Η θήκη των απορρυπαντικών είναι βουλωμένη (για να την καθαρίσετε βλέπε
“Συντήρηση και φροντίδα”).
• Ο σωλήνας αδειάσματος δεν έχει στερεωθεί καλά (βλέπε «Εγκατάσταση»).
• Σβήστε τη μηχανή και βγάλτε το βύσμα από την πρίζα, περιμένετε περίπου
1 λεπτό μετά ξανανάψτε τη.
Αν η ανωμαλία επιμένει, καλέστε την Υποστήριξη.
• Το απορρυπαντικό δεν είναι ειδικό για πλυντήριο (πρέπει να υπάρχει η ένδειξη
“για πλυντήριο”, “για πλύσιμο στο χέρι και στο πλυντήριο”, ή παρόμοια).
• Η δοσολογία υπήρξε υπερβολική.
23
Page 24

Υποστήριξη
GR
Πριν επικοινωνήσετε με την Υποστήριξη:
• Ελέγξτε αν η ανωμαλία μπορείτε να την αντιμετωπίσετε μόνοι σας (βλέπε “Ανωμαλίες και λύσεις”);
• Επανεκκινήστε το πρόγραμμα για να ελέγξετε αν το πρόβλημα αντιμετωπίστηκε;
• Σε αρνητική περίπτωση, επικοινωνήστε με την εξουσιοδοτημένη Τεχνική Υποστήριξη στον τηλεφωνικό αριθμό που
υπάρχει στο πιστοποιητικό εγγύησης.
! Μην καταφεύγετε ποτέ σε μη εξουσιοδοτημένους τεχνικούς.
Γνωστοποιήστε:
• το είδος της ανωμαλίας;
• το μοντέλο του μηχανήματος (Mod.);
• τον αριθμό σειράς (S/N).
Οι πληροφορίες αυτές βρίσκονται στην ταμπελίτσα που υπάρχει στο πίσω μέρος του πλυντηρίου και στο πρόσθιο μέρος
ανοίγοντας την πόρτα.
24
Page 25

Istruzioni per l’uso
LAVABIANCHERIA
I
Italiano
WMD 1044
Sommario
Installazione, 26-27
Disimballo e livellamento
Collegamenti idraulici ed elettrici
Primo ciclo di lavaggio
Dati tecnici
Manutenzione e cura, 28
Escludere acqua e corrente elettrica
Pulire la lavabiancheria
Pulire il cassetto dei detersivi
Curare oblò e cestello
Pulire la pompa
Controllare il tubo di alimentazione dell’acqua
Precauzioni e consigli, 29
Sicurezza generale
Smaltimento
Apertura manuale della porta oblò
Descrizione della lavabiancheria, 30-31
Pannello di controllo
Display
I
Come effettuare un ciclo di lavaggio, 32
Programmi e funzioni, 33
Tabella dei programmi
Funzioni di lavaggio
Detersivi e biancheria, 34
Cassetto dei detersivi
Preparare la biancheria
Programmi particolari
Sistema bilanciamento del carico
Anomalie e rimedi, 35
Assistenza, 36
Assistenza Attiva 7 giorni su 7
25
Page 26

Installazione
! È importante conservare questo libretto per
I
poterlo consultare in ogni momento. In caso di
vendita, di cessione o di trasloco, assicurarsi
che resti insieme alla lavabiancheria per informare il nuovo proprietario sul funzionamento e
sui relativi avvertimenti.
! Leggere attentamente le istruzioni: ci sono
importanti informazioni sull’installazione,
sull’uso e sulla sicurezza.
Disimballo e livellamento
Disimballo
1. Disimballare la lavabiancheria.
2. Controllare che la lavabiancheria non abbia
subìto danni nel trasporto. Se fosse danneggiata non collegarla e contattare il rivenditore.
3. Rimuovere le 4 viti
di protezione per il
trasporto e il gommino
con il relativo distanziale, posti nella parte
posteriore (vedi figura).
4. Chiudere i fori con i tappi di plastica in dota-
zione.
5. Conservare tutti i pezzi: qualora la lavabian-
cheria debba essere trasportata, dovranno
essere
rimontati.
Un accurato livellamento dà stabilità alla
macchina ed evita vibrazioni, rumori e spostamenti durante il funzionamento. In caso di
moquette o di un tappeto, regolare i piedini in
modo da conservare sotto la lavabiancheria
uno spazio sufficiente per la ventilazione.
Collegamenti idraulici ed elettrici
Collegamento del tubo di alimentazione
dell’acqua
1. Collegare il tubo
di alimentazione
avvitandolo a un
rubinetto d’acqua
fredda con bocca
filettata da 3/4 gas
(vedi figura).
Prima di allacciare,
far scorrere l’acqua
finché non sia limpida.
2. Collegare il tubo
di alimentazione alla
lavabiancheria
avvitandolo all’apposita presa d’acqua,
nella parte posteriore
in alto a destra (vedi
figura).
3. Fare attenzione che nel tubo non ci siano
né pieghe né strozzature.
! Gli imballaggi non sono giocattoli per bambini.
Livellamento
1. Installare la lavabiancheria su un pavimento
piano e rigido, senza appoggiarla a muri, mobili
o altro.
2. Se il pavimento non
fosse perfettamente
orizzontale, compensare le irregolarità
svitando o avvitando
i piedini anteriori (vedi
figura); l’angolo di
inclinazione, misurato
sul piano di lavoro, non
deve superare i 2°.
26
! La pressione idrica del rubinetto deve essere compresa nei valori della tabella Dati tecnici (vedi pagina a fianco).
! Se la lunghezza del tubo di alimentazione
non fosse sufficiente, rivolgersi a un negozio
specializzato o a un tecnico autorizzato.
! Non utilizzare mai tubi già usati.
! Utilizzare quelli in dotazione alla macchina.
Page 27

- 2006/95/CE (Bassa Tensione)
Collegamento del tubo di scarico
65 - 100 cm
Collegare il tubo di
scarico, senza piegarlo, a una conduttura di scarico o a
uno scarico a muro
posti tra 65 e 100
cm da terra;
oppure appoggiarlo
al bordo di un lavandino o di una vasca,
legando la guida in
dotazione al
rubinetto (vedi figu-
ra). L’estremità libera
del tubo di scarico
non deve rimanere
immersa nell’acqua.
! È sconsigliato usare tubi di prolunga; se indispensabile, la prolunga deve avere lo stesso diametro del tubo originale e non superare
i 150 cm.
! Il cavo di alimentazione deve essere sostituito
solo da tecnici autorizzati.
Attenzione! L’azienda declina ogni responsabilità qualora queste norme non vengano rispettate.
Primo ciclo di lavaggio
Dopo l’installazione, prima dell’uso, effettuare
un ciclo di lavaggio con detersivo e senza biancheria impostando il programma “Auto Pulizia”.
Dati tecnici
Modello
Dimensioni
Capacità
WMD 1044
larghezza cm 59,5
altezza cm 85
profondità cm 60,5
da 1 a 10 kg
I
Collegamento elettrico
Prima di inserire la spina nella presa della
corrente, accertarsi che:
• la presa abbia la messa a terra e sia a nor-
ma di legge;
• la presa sia in grado di sopportare il carico
massimo di potenza della macchina, indicato
nella tabella Dati tecnici (vedi a fianco);
• la tensione di alimentazione sia compresa
nei valori indicati nella tabella Dati tecnici (vedi
a fianco);
• la presa sia compatibile con la spina della
lavabiancheria. In caso contrario sostituire la
presa o la spina.
! La lavabiancheria non va installata all’aperto, nemmeno se lo spazio è riparato, perché
è molto pericoloso lasciarla esposta a pioggia
e temporali.
! A lavabiancheria installata, la presa della
corrente deve essere facilmente raggiungibile.
! Non usare prolunghe e multiple.
! Il cavo non deve subire piegature o com-
pressioni.
Collegamenti elettrici
Collegamenti idrici
Velocità di
centrifuga
Programmi
di controllo
secondo
la direttive
1061/2010
1015/2010
vedi la targhetta caratteristiche tecniche applicata sulla
macchina
pressione massima
1 MPa (10 bar)
pressione minima
0,05 MPa (0,5 bar)
capacità del cesto 71 litri
sino a 1400 giri al minuto
programma
sione del tasto); Cotone Standard
(60°C) (1° pres-
60°C.
programma (40°C) (2° pres-
sione del tasto); Cotone Standard
40°C.
Questa apparecchiatura è
conforme alle seguenti Direttive Comunitarie:
- 2004/108/CE (Compatibilità
Elettromagnetica)
- 2002/96/CE
27
Page 28

Manutenzione e cura
1
2
Escludere acqua e corrente elettrica
• Chiudere il rubinetto dell’acqua dopo ogni la-
vaggio. Si limita così l’usura dell’impianto idraulico della lavabiancheria e si elimina il pericolo di
perdite.
• Staccare la spina della corrente quando si
pulisce la lavabiancheria e durante i lavori di
manutenzione.
Pulire la lavabiancheria
• La parte esterna e le parti in gomma pos-
sono essere puliti con un panno imbevuto di
acqua tiepida e sapone. Non usare solventi o
abrasivi.
• La lavabiancheria è dotata di un programma
di “Auto Pulizia” delle parti interne che deve
essere effettuato senza alcun tipo di carico
nel cesto.
Il detersivo (nella quan-
A
ogni 40 cicli di lavaggio.
Per attivare il programma premere contemporaneamente il tasto A e B per 5 sec. (vedi figura).
Il programma partirà automaticamente ed avrà
una durata di circa 70 minuti. Per fermare il
ciclo premere il tasto START/PAUSE.
B
tità pari al 10% di quella
consigliata per capi
poco sporchi) o additivi
specifici per la pulizia
della lavabiancheria,
potranno essere utilizzati
come coadiuvanti nel
programma di lavaggio.
Si consiglia di effettuare
il programma di pulizia
Pulire il cassetto dei detersivi
Sfilare il cassetto sollevandolo e tirandolo
verso l’esterno (vedi
figura).
Lavarlo sotto l’acqua
corrente; questa pulizia
va effettuata
frequentemente.
Pulire la pompa
La macchina è dotata di una pompa autopulente che non ha bisogno di manutenzione. Può però succedere che piccoli oggetti
(monete, bottoni) cadano nella precamera
che protegge la pompa, situata nella parte
inferiore di essa.
! Assicurarsi che il ciclo di lavaggio sia terminato e staccare la spina.
Per accedere alla precamera:
1. rimuovere il pannello di copertura sul
lato anteriore della
macchina con l’ausilio di un giravite (vedi
figura);
2. svitare il coperchio ruotandolo in
senso antiorario
(vedi figura): è normale che fuoriesca
un po’ d’acqua;
3. pulire accuratamente l’interno;
4. riavvitare il coperchio;
5. rimontare il pannello assicurandosi, prima
di spingerlo verso la macchina, di aver inserito i ganci nelle apposite asole.
Controllare il tubo di alimentazione dell’acqua
Controllare il tubo di alimentazione almeno
una volta all’anno. Se presenta screpolature e
fessure va sostituito: durante i lavaggi le forti
pressioni potrebbero provocare improvvise
spaccature.
I
Curare oblò e cestello
• Lasciare sempre socchiuso l’oblò per evitare
che si formino cattivi odori.
! Non utilizzare mai tubi già usati.
28
Page 29

Precauzioni e consigli
20
! La lavabiancheria è stata progettata e costruita in
conformità alle norme internazionali di sicurezza. Queste
avvertenze sono fornite per ragioni di
sicurezza e devono essere lette attentamente.
Sicurezza generale
• Questo apparecchio è stato concepito esclusivamente
per un uso di tipo domestico.
• L’apparecchio non deve essere utilizzato da
persone (bambini compresi) con capacità fisiche,
sensoriali o mentali ridotte e con esperienze e
conoscenze insufficienti, a meno che tale utilizzo
non avvenga sotto la supervisione o le istruzioni di
una persona responsabile della loro sicurezza. I
bambini devono essere sorvegliati per garantire
che non giochino con l’apparecchio.
• Non toccare la macchina a piedi nudi o con le mani o i
piedi bagnati o umidi.
• Non staccare la spina dalla presa della corrente tirando il
cavo, bensì afferrando la spina.
• Non aprire il cassetto dei detersivi mentre la macchina è
in funzione.
• Non toccare l’acqua di scarico, che può raggiungere
temperature elevate.
• Non forzare in nessun caso l’oblò: potrebbe danneggiarsi
il meccanismo di sicurezza che protegge da aperture
accidentali.
• In caso di guasto, in nessun caso accedere ai meccanismi
interni per tentare una riparazione.
• Controllare sempre che i bambini non si avvicinino alla
macchina in funzione.
• Durante il lavaggio l’oblò tende a scaldarsi.
• Se dev’essere spostata, lavorare in due o tre persone con
la massima attenzione. Mai da soli perché la macchina è
molto pesante.
• Prima di introdurre la biancheria controlla che il cestello
sia vuoto.
Il simbolo del cestino barrato è riportato su tutti i prodotti per
ricordare gli obblighi di raccolta separata.
Per ulteriori informazioni, sulla corretta dismissione degli
elettrodomestici, i detentori potranno rivolgersi al servizio
pubblico preposto o ai rivenditori.
Apertura manuale della porta oblò
Nel caso non sia possibile aprire la porta oblò a causa della
mancanza di energia elettrica e volete stendere il bucato,
procedere come segue:
1. togliere la spina dalla presa
di corrente.
2. verificate che il livello
dell’acqua all’interno della
macchina sia inferiore rispetto
all’apertura dell’oblò; in caso
contrario togliere l’acqua in
eccedenza attraverso il tubo
di scarico raccogliendola in un
secchio come indicato in figura.
3. rimuovere il pannello di
copertura sul lato anteriore della
lavabiancheria con l’ausilio di un
giravite (vedi figura).
I
Smaltimento
• Smaltimento del materiale di imballaggio:
attenersi alle norme locali, così gli imballaggi potranno
essere riutilizzati.
• La direttiva Europea 2002/96/CE sui rifiuti di apparecchia-
ture elettriche ed elettroniche, prevede che gli elettrodomestici non debbano essere smaltiti nel normale flusso dei
rifiuti solidi urbani. Gli apparecchi dismessi devono essere
raccolti separatamente per ottimizzare il tasso di recupero
e riciclaggio dei materiali che li compongono ed impedire
potenziali danni per la salute e l’ambiente.
4. utilizzando la linguetta indicata in figura tirare verso
l’esterno fino a liberare il tirante in plastica dal fermo; tirarlo
successivamente verso il basso e contemporaneamente
aprire la porta.
5. rimontare il pannello assicurandosi, prima di spingerlo
verso la macchina, di aver inserito i ganci nelle apposite asole.
29
Page 30

Descrizione della lavabiancheria
Pannello di controllo
I
Cassetto dei detersivi
Cassetto dei detersivi: per caricare detersivi e additivi
(vedi “Detersivi e biancheria”).
Tasto ON/OFF
Tasti
SELETTORE
PROGRAMMI
Tasto
MY
CYCLE
Tasto
TIPO DI
RISCIACQUO
Tasto
PARTENZA
PROGRAMMATA
Tasto TEMPERATURA : premere per ridurre la tem-
peratura; il valore viene indicato nel display.
Tasto
TIPO DI
LAVAGGIO
DISPLAY
Tasti
FUNZIONE
Tasto
CENTRIFUGA
Tasto con spia
START/PAUSE
Tasto
TEMPERATURA
Tasto
BLOCCI
TASTI
Tasto ON/OFF : premere brevemente il tasto per accendere o spegnere la macchina. La spia START/PAUSE che
lampeggia lentamente di colore verde indica che la macchina è accesa. Per spegnere la lavabiancheria durante il lavaggio è necessario tenere premuto il tasto più a lungo, circa 3
sec.; una pressione breve o accidentale non permetterà lo
spegnimento della macchina.
Lo spegnimento della macchina durante un lavaggio in
corso annulla il lavaggio stesso.
Tasti SELETTORE PROGRAMMI: per impostare il programma desiderato (vedi “Tabella dei programmi”).
Tasto MY CYCLE: tenere premuto il tasto per memorizzare
un ciclo e le proprie personalizzazioni preferite. Per richiamare un ciclo precedentemente memorizzato premere il
tasto MY CYCLE.
Tasti FUNZIONE: premere il tasto per selezionare la funzione desiderata. Sul display si illuminerà la spia relativa.
Tasto
TIPO DI LAVAGGIO
l’intensità di lavaggio desiderata.
Tasto
TIPO DI RISCIACQUO
nare il tipo di risciacquo desiderato.
Tasto CENTRIFUGA : premere per ridurre o escludere
del tutto la centrifuga; il valore viene indicato nel display.
: premere per selezionare
: premere per selezio-
Tasto BLOCCO TASTI : per attivare il blocco del
pannello di controllo, tenere premuto il tasto per circa 2
secondi. Il simbolo acceso indica che il pannello di
controllo è bloccato (ad eccezione del tasto ON/OFF). In
questo modo si impediscono modifiche accidentali dei
programmi, soprattutto se in casa ci sono dei bambini.
Per disattivare il blocco del pannello di controllo, tenere
premuto il tasto per circa 2 secondi.
Tasto PARTENZA RITARDATA : premere per impo-
stare una partenza ritardata del programma prescelto; il
ritardo viene indicato nel display.
Tasto con spia START/PAUSE: quando la spia verde lam-
peggia lentamente, premere il tasto per avviare un lavaggio.
A ciclo avviato la spia diventa fissa. Per mettere in pausa il
lavaggio, premere nuovamente il tasto; la spia lampeggerà
con colore arancione. Se il simbolo non è illuminato, si
potrà aprire l’oblò. Per far ripartire il lavaggio dal punto in cui
è stato interrotto, premere nuovamente il tasto.
Modalità di stand by
Questa lavatrice, in conformità alle nuove normative
legate al risparmio energetico, è dotata di un sistema di
autospegnimento (stand by) che entra in funzione dopo
circa 30 minuti nel caso di non utilizzo. Premere brevemente
il tasto ON/OFF e attendere che la macchina si riattivi.
Consumo in off-mode: 0,5 W
Consumo in Left-on: 0,5 W
30
Page 31

Display
I
Z
B
A
X
D
C
E
Y
F
Il display è utile per programmare la macchina e fornisce molteplici informazioni.
Nelle due stringhe superiori A e B vengono visualizzati il programma di lavaggio selezionato, la fase di lavaggio in corso e
tutte le indicazioni relative allo stato d’avanzamento del programma.
Nella stringa C viene visualizzato il tempo residuo alla fine del ciclo di lavaggio in corso e nel caso fosse stata impostata una
PARTENZA RITARDATA, il tempo mancante all’avvio del programma selezionato.
Nell’area D viene visualizzato il valore massimo della velocità della centrifuga che la macchina può effettuare in base al programma impostato; se il programma non prevede la centrifuga l’area resta spenta.
Nell’area E viene visualizzato il valore massimo della temperatura che si può selezionare in base al programma impostato; se il
programma non prevede l’impostazione della temperatura l’area resta spenta.
Le spie F sono relative alle funzioni e si accendono quando la funzione selezionata è compatibile con il programma impostato.
Simbolo Oblò bloccato
Il simbolo acceso indica che l’oblò è bloccato per impedire aperture accidentali. Per evitare danni è necessario attendere che
il simbolo si spenga prima di aprire l’oblò.
N.B.: se è attiva la funzione PARTENZA RITARDATA l’oblo non si può aprire, per aprirlo mettere la macchina in pausa premendo il tasto START/PAUSE.
! Alla prima accensione verrà richiesto di selezionare la lingua ed il display entrerà automaticamente nel menu di selezione lingua.
Per scegliere la lingua desiderata premere i tasti X e Y, per confermare la scelta premere il tasto Z.
Se si vuole cambiare lingua, spegnere la macchina, premere contemporaneamente i tasti X, Y, Z fino a sentire un segnale
acustico, verrà visualizzato di nuovo il menu di selezione lingua.
31
Page 32

Come effettuare un ciclo di
lavaggio
1. ACCENDERE LA MACCHINA. Premere il tasto , sul
I
display comparirà la scritta “ACCENSIONE IN CORSO”; la
spia START/PAUSE lampeggia lentamente di colore verde.
2. CARICARE LA BIANCHERIA. Aprire la porta oblò.
Caricare la biancheria facendo attenzione a non superare
la quantità di carico indicata nella tabella programmi della
pagina seguente.
3. DOSARE IL DETERSIVO. Estrarre il cassetto e versare
il detersivo nelle apposite vaschette come spiegato in
“Detersivi e biancheria”.
4. CHIUDERE L’OBLO’.
5. SCEGLIERE IL PROGRAMMA. Premere uno dei
tasti del SELETTORE PROGRAMMI per selezionare il
programma desiderato; il nome del programma comparirà
sul display; ad esso è associata una temperatura e una
velocità di centrifuga che possono essere modificate. Sul
display comparirà la durata del ciclo.
6. PERSONALIZZARE IL CICLO DI LAVAGGIO. Agire
sugli appositi tasti:
Modificare la temperatura e/o la centrifuga. La
macchina seleziona automaticamente la temperatura e la
centrifuga massime previste per il programma impostato
e non possono pertanto essere aumentate. Premendo il
tasto si riduce progressivamente la temperatura sino
al lavaggio a freddo “OFF”. Premendo il tasto si riduce
progressivamente la centrifuga sino alla sua esclusione
“OFF”. Un’ulteriore pressione dei tasti riporterà i valori al
massimo consentito per il ciclo selezionato.
! Eccezione: selezionando il programma
(1° pressione del tasto) la temperatura può essere portata sino
a 90°.
Impostare una partenza ritardata.
Per impostare la partenza ritardata del programma
prescelto, premere il tasto relativo fino a raggiungere
il tempo di ritardo desiderato. Quando tale opzione è
attiva, sul display si illumina il simbolo . Per rimuovere
la partenza ritardata premere il tasto fino a che sul display
compare la scritta “OFF”.
Impostare l’intensità di lavaggio desiderata.
L’opzione permette di ottimizzare il lavaggio in base
al grado di sporco dei tessuti e all’intensità di lavaggio
desiderata.
Selezionare il programma di lavaggio, il ciclo viene
impostato automaticamente sul livello “Normale”,
ottimizzato per capi mediamente sporchi, (impostazione
non valida per il ciclo “Lana”, che si imposta
automaticamente sul livello “Delicato”).
Per capi molto sporchi premere il tasto fino al
raggiungimento del livello “Lavaggio Intensivo”. Questo
livello garantisce un lavaggio di alte prestazioni grazie
all’utilizzo di una maggiore quantità di acqua nella fase
iniziale del ciclo ed una maggiore movimentazione
meccanica, ed è utile per eliminare le macchie più
resistenti. Può essere utilizzato con o senza candeggina.
Se si desidera effettuare il candeggio inserire la
vaschetta aggiuntiva 4, in dotazione, nella vaschetta 1.
Nel dosare la candeggina non superare il livello “max”
indicato sul perno centrale (vedi figura a pag. 34).
Per capi poco sporchi o per un trattamento più delicato
dei tessuti, premere il tasto fino al raggiungimento
del livello “Delicato”.
(60°C)
Il ciclo ridurrà la movimentazione meccanica per
garantire risultati di lavaggio perfetti per i capi delicati.
Impostare il tipo di risciacquo.
L’opzione consente di selezionare il tipo di
risciacquo desiderato per la massima cura delle
pelli sensibili. Alla prima pressione del tasto viene
impostato il livello “Extra risciacquo” che permette di
selezionare un risciacquo aggiuntivo a quelli standard
del ciclo, per eliminare tutte le tracce di detergente.
Alla seconda pressione del tasto viene impostato il
livello “Pelli Sensibili” che permette di selezionare due
risciacqui aggiuntivi a quelli standard del ciclo ed è
consigliato per le pelli più sensibili. Alla terza pressione
del tasto viene impostato il livello “Anti Allergico” che
permette di selezionare tre risciacqui aggiuntivi a quelli
standard del ciclo, per rimuovere i principali allergeni
come polline, acari, peli del gatto e cane. Premere
nuovamente il tasto per tornare al tipo di risciacquo
“Risciacquo Normale”. Se non è possibile impostare
o modificare la regolazione esistente, sul display verrà
visualizzato “Non permesso”.
Modificare le caratteristiche del ciclo.
• Premere il tasto per attivare la funzione; la spia
corrispondente al pulsante si accenderà.
• Premere nuovamente il tasto per disattivare la
funzione; la spia si spegnerà.
! Se la funzione selezionata non è compatibile con
il programma impostato, la spia lampeggerà e la
funzione non verrà attivata.
! Se la funzione selezionata non è compatibile con
un’altra precedentemente impostata, la spia relativa
alla prima funzione selezionata lampeggerà e verrà
attivata solo la seconda, la spia della funzione attivata
si illuminerà.
! Le funzioni possono variare il carico raccomandato
e/o la durata del ciclo.
7. AVVIARE IL PROGRAMMA. Premere il tasto
START/PAUSE. La spia relativa si illuminerà di
colore verde fisso e l’oblò si bloccherà (simbolo
OBLO’BLOCCATO acceso). Durante il lavaggio,
sul display comparirà il nome della fase in corso. Per
cambiare un programma mentre un ciclo è in corso,
mettere la lavabiancheria in pausa premendo il tasto
START/PAUSE (la spia START/PAUSE lampeggerà
lentamente di colore arancione); selezionare quindi
il ciclo desiderato e premere nuovamente il tasto
START/PAUSE. Per aprire la porta mentre un ciclo è
in corso premere il tasto START/PAUSE; se il simbolo
OBLO’BLOCCATO è spenta sarà possibile aprire
l’oblò. Premere nuovamente il tasto START/PAUSE
per far ripartire il programma dal punto in cui era stato
interrotto.
8. FINE DEL PROGRAMMA. Viene indicata dalla
scritta “FINE CICLO” sul display, quando il simbolo
OBLO’BLOCCATO si spegnerà sarà possibile
aprire l’oblò. Aprire l’oblò, scaricare la biancheria e
spegnere la macchina.
! Se si desidera annullare un ciclo già avviato, premere a
lungo il tasto . Il ciclo verrà interrotto e la macchina si
spegnerà.
32
Page 33

Programmi e funzioni
Tabella dei programmi
Velo-
Descrizione del Programma
Programmi
Antimacchia
Cotone Standard 60° (1) (1° pressione del tasto): bianchi e colorati
resistenti molto sporchi.
Cotone Standard 40° (2) (2° pressione del tasto): bianchi e colorati
delicati poco sporchi.
Cotone Standard 20° (3° pressione del tasto): bianchi e colorati deli-
cati poco sporchi.
Sintetici Resistenti (1° pressione del tasto): colori resistenti molto sporchi.
Sintetici Resistenti (4) (1° pressione del tasto): colori resistenti poco sporchi.
Sintetici Delicati (2° pressione del tasto): colori delicati poco sporchi.
Rapido 60' (1° pressione del tasto): per rinfrescare rapidamente capi
normalmente (non indicato per lana, seta e capi da lavare a mano).
Rapido 30' (2° pressione del tasto): per rinfrescare rapidamente capi
poco sporchi (non indicato per lana, seta e capi da lavare a mano).
My Cycle (Memo): permette di memorizzare un qualsiasi ciclo di lavaggio.
M
Biancheria 7 giorni: per biancheria da letto e da bagno.
Woolmark Platinum (Lana): per lana, cachemire, ecc.
Delicati
Centrifuga (1° pressione del tasto).
Risciacquo (2° pressione del tasto).
Scarico (3° pressione del tasto).
La durata del ciclo indicata sul display o sul libretto è una stima calcolata in base a condizioni standard. Il tempo effettivo può variare in base a numerosi fattori
quali la temperatura e la pressione dell’acqua in ingresso, la temperatura ambiente, la quantità di detersivo, la quantità ed il tipo di carico, il bilanciamento del
carico, le opzioni aggiuntive selezionate.
1) Programma di controllo secondo la direttiva 1061/2010: impostare il programma
Questo ciclo è adatto per pulire un carico di cotone normalmente sporco ed è il più efficiente in termini di consumo combinato di energia e di acqua, da usare su capi lavabili a 60 °C. La
temperatura effettiva di lavaggio può differire da quella indicata.
2) Programma di controllo secondo la direttiva 1061/2010: impostare il programma 40°C
Questo ciclo è adatto per pulire un carico di cotone normalmente sporco ed è il più efficiente in termini di consumo combinato di energia e di acqua, da usare su capi lavabili a 40°C. La
temperatura effettiva di lavaggio può differire da quella indicata.
3) Alla temperatura di 60° la funzione “Prelavaggio“ non può essere attivata.
Per tutti Test Institutes:
2) Programma cotone lungo: impostare il programma
4) Programma sintetico lungo: impostare il programma a 60°C
40°C
(2° pressione del tasto)
(1° pressione del tasto)
Temp.
max.
(°C)
40° 1400
60°
(Max. 90°)
40° 1400 -
20° 1400 -
60° 800
40° 800
40° 800
60° 1400 -
30° 800 -
60° 1400
40° 800 30° 0 -
cità
max.
(giri al
minu-
to)
1400
- 1400 - - - - 10 - - - 16’
- 1400 - - -
- 0 - - - - 10 - - - 2’
60°C
(1° pressione del tasto)
(2° pressione del tasto)
.
; temperaura di 40°C
Detersivi
gio
Prelavag-
(3)
gina
Candeg-
Lavaggio
-
dente
Ammobi-
-
-
-
-
-
.
.
(premere il tasto TEMPERATURA).
%
Umidità residua
Carico max. (Kg)
gia kWh
Consumo ener-
Acqua
6 - - - 190’
10 53 1,09 85 210’
10 53 1,09 92 185’
10 - - - 175’
5,5 48 0,99 57 120’
5,5 48 0,63 55 100’
5,5 - - - 80’
4 53 0,54 57 60’
4 71 0,21 41 30’
10 - - - 155’
2,5 - - - 100’
1 - - - 80’
10 - - - 49’
totale lt
Durata ciclo
I
Funzioni di lavaggio
Prelavaggio
Selezionando questa funzione si effettua il prelavaggio,
utile per rimuovere macchie ostinate.
N.B.: Aggiungere il detersivo nell’apposito scomparto.
! Non è attivabile sui programmi
(40°),
.
Stira facile
Selezionando questa funzione, il lavaggio e la centrifuga
saranno opportunamente modificati per ridurre la
formazione di pieghe.
Al temine del ciclo la lavabiancheria effettuerà delle lente
rotazioni del cestello; la spia della funzione STIRA FACILE
lampeggerà e la scritta “FINE CICLO” apparirà su display.
Per terminare il ciclo si dovrà premere il tasto START/
PAUSE o il tasto STIRA FACILE.
! Non è attivabile sui programmi , “Rapido 30’”, ,
, .
, , , ,
(60°),
Eco wash
La funzione Eco Wash contribuisce al risparmio energetico
non riscaldando l’acqua utilizzata per lavare il bucato – un
vantaggio sia per l’ambiente, sia per la bolletta elettrica.
Infatti, l’azione rafforzata e il consumo ottimizzato dell’acqua
garantiscono ottimi risultati nella stessa durata media di un
ciclo standard.
Per ottenere i migliori risultati di lavaggio, si consiglia l’uso di
un detersivo liquido.
! Non è attivabile sui programmi , , , , , .
33
Page 34

Detersivi e biancheria
M
AX
1
2
4
3
A
B
Cassetto dei detersivi
I
Il buon risultato del lavaggio dipende anche dal corretto
dosaggio del detersivo: eccedendo non si lava in modo più
efficace e si contribuisce a incrostare le parti interne della
lavabiancheria e a inquinare l’ambiente.
! Usare detersivi in polvere per capi in cotone bianchi e per il
prelavaggio e per lavaggi con temperatura superiore a 60°C.
! Seguire le indicazioni riportate sulla confezione di detersivo.
! Non usare detersivi per il lavaggio a mano, perché formano
troppa schiuma.
Estrarre il cassetto dei detersivi e inserire il detersivo o
l’additivo come segue.
vaschetta 1: Detersivo per prelavaggio
(in polvere)
Prima di versare il detersivo verificare che non sia inserita la
veschetta aggiuntiva 4.
vaschetta 2: Detersivo per lavaggio
(in polvere o liquido)
Nel caso di utilizzo di detersivo liquido si consiglia di utilizzare la paretina A in dotazione per un corretto dosaggio.
Per l’utilizzo del detersivo in polvere riporre la paretina nella
cavità B.
vaschetta 3: Additivi (ammorbidente, ecc.)
L’ammorbidente non deve fuoriuscire dalla griglia.
vaschetta aggiuntiva 4: Candeggina
Preparare la biancheria
• Suddividere la biancheria secondo:
- il tipo di tessuto / il simbolo sull’etichetta.
- i colori: separare i capi colorati da quelli bianchi.
• Vuotare le tasche e controllare i bottoni.
• Non superare i valori indicati, riferiti al peso della
biancheria asciutta: vedi “Tabella dei programmi”.
Quanto pesa la biancheria?
1 lenzuolo 400-500 gr.
1 federa 150-200 gr.
1 tovaglia 400-500 gr.
1 accappatoio 900-1200 gr.
1 asciugamano 150-250 gr.
Programmi speciali
Antimacchia: il programma è adatto al lavaggio di
capi molto sporchi, con colori resistenti. Il programma
garantisce una classe di lavaggio superiore alla classe
standard (classe A). Non eseguire il programma mescolando capi di colore diverso. Si consiglia l’utilizzo di
detersivo in polvere. Per macchie ostinate è consigliato il
pretrattamento con additivi specifici.
Cotone Standard 20° : ideale per carichi in cotone
sporchi. Le buone performance anche a freddo, comparabili con un lavaggio a 40°, sono garantite da un’azione
meccanica che lavora con variazione di velocità a picchi
ripetuti e ravvicinati
Biancheria da bagno e da letto: per lavare la biancheria da bagno e da letto in un unico ciclo, utilizzare il
programma che ottimizza l’uso dell’ammorbidente e
ti consente di risparmiare tempo ed energia. Si consiglia
l’utilizzo di detersivo in polvere.
Lana: il ciclo di lavaggio “Lana” di questa lavatrice
Hotpoint-Ariston è stato testato e approvato dalla
Woolmark Company per il lavaggio di capi in lana
classificati come “lavabili a mano”, purché il lavaggio
venga eseguito nel rispetto delle istruzioni riportate
sull’etichetta dell’indumento e delle indicazioni fornite dal
produttore dell’elettrodomestico. Hotpoint-Ariston è la
prima marca di lavatrici ad aver ottenuto dalla Woolmark
Company la certificazione Woolmark Apparel Care Platinum per le sue prestazioni di lavaggio e il consumo di
acqua ed energia. (M1135)
Delicati: utilizzare il programma per il lavaggio dei capi
molto delicati, che presentano applicazioni quali strass o
paillettes.
Per il lavaggio dei capi in seta e tende, selezionare il ciclo
ed impostare il livello “Delicato” dell’opzione .
Si raccomanda di rovesciare i capi prima del lavaggio e di
inserire gli indumenti piccoli nell’apposito sacchetto per il
lavaggio dei capi delicati.
Per risultati migliori si raccomanda l’utilizzo del detersivo
liquido per capi delicati.
Sistema bilanciamento del carico
Prima di ogni centrifuga, per evitare vibrazioni eccessive
e per distribuire il carico in modo uniforme, il cestello
effettua delle rotazioni ad una velocità leggermente
superiore a quella del lavaggio. Se al termine di ripetuti
tentativi il carico non fosse ancora correttamente
bilanciato la macchina effettua la centrifuga ad una
velocità inferiore a quella prevista.
In presenza di eccessivo sbilanciamento la lavabiancheria
effettua la distribuzione anzichè la centrifuga. Per favorire
una migliore distribuzione del carico e il suo corretto
bilanciamento si consiglia di mescolare capi grandi e
piccoli.
34
Page 35

Anomalie e rimedi
Può accadere che la lavabiancheria non funzioni. Prima di telefonare all’Assistenza (vedi “Assistenza”), controllare che non si
tratti di un problema facilmente risolvibile aiutandosi con il seguente elenco.
Anomalie:
La lavabiancheria
non si accende.
Il ciclo di lavaggio
non inizia.
La lavabiancheria non carica acqua (nel display apparirà la sctitta
“Manca l’acqua, apri il rubinetto”).
La lavabiancheria carica e scarica
acqua di continuo.
Possibili cause / Soluzione:
• La spina non è inserita nella presa della corrente, o non abbastanza
da fare contatto.
• In casa non c’è corrente.
• L’oblò non è ben chiuso.
• Il tasto ON/OFF non è stato premuto.
• Il tasto START/PAUSE non è stato premuto.
• Il rubinetto dell’acqua non è aperto.
• Si è impostato un ritardo sull’ora di avvio (PARTENZA RITARDATA,
vedi “Come effettuare un ciclo di lavaggio”).
• Il tubo di alimentazione dell’acqua non è collegato al rubinetto.
• Il tubo è piegato.
• Il rubinetto dell’acqua non è aperto.
• In casa manca l’acqua.
• Non c’è sufficiente pressione.
• Il tasto START/PAUSE non è stato premuto.
• Il tubo di scarico non è installato fra 65 e 100 cm da terra (vedi “Installazione”).
• L’estremità del tubo di scarico è immersa nell’acqua (vedi “Installazione”).
• Lo scarico a muro non ha lo sfiato d’aria.
Se dopo queste verifiche il problema non si risolve, chiudere il rubinetto dell’acqua, spegnere la lavabiancheria e chiamare l’Assistenza. Se l’abitazione si trova
agli ultimi piani di un edificio, è possibile che si verifichino fenomeni di sifonaggio, per cui la lavabiancheria carica e scarica acqua di continuo. Per eliminare
l’inconveniente sono disponibili in commercio apposite valvole anti-sifonaggio.
I
La lavabiancheria non scarica
o non centrifuga.
La lavabiancheria vibra
molto durante la centrifuga.
La lavabiancheria perde acqua.
La macchina è bloccata, il display
lampeggia e segnala un codice di
anomalia (es.: F-01, F-..).
Si forma troppa schiuma.
• Il programma non prevede lo scarico: con alcuni programmi occorre
avviarlo manualmente.
• È attiva la funzione STIRA FACILE: per completare il programma
premere il tasto START/PAUSE (“Programmi e funzioni”).
• Il tubo di scarico è piegato (vedi “Installazione”).
• La conduttura di scarico è ostruita.
• Il cestello, al momento dell’installazione, non è stato sbloccato
correttamente (vedi “Installazione”).
• La lavabiancheria non è in piano (vedi “Installazione”).
• La lavabiancheria è stretta tra mobili e muro (vedi “Installazione”).
• Il tubo di alimentazione dell’acqua non è ben avvitato (vedi “Installazione”).
• Il cassetto dei detersivi è intasato (per pulirlo vedi “Manutenzione e cura”).
• Il tubo di scarico non è fissato bene (vedi “Installazione”).
• Spegnere la macchina e togliere la spina dalla presa, attendere circa 1
minuto quindi riaccenderla.
Se l’anomalia persiste, chiamare l’Assistenza.
• Il detersivo non è specifico per lavabiancheria (deve esserci la
dicitura “per lavatrice”, “a mano e in lavatrice”, o simili).
• Il dosaggio è stato eccessivo.
35
Page 36

Assistenza
Prima di contattare l’Assistenza:
I
• Verificare se l’anomalia può essere risolta da soli (vedi “Anomalie e rimedi”);
• Riavviare il programma per controllare se l’inconveniente è stato ovviato;
• In caso negativo, contattare il Numero Unico 199.199.199*.
! Non ricorrere mai a tecnici non autorizzati.
Comunicare:
• il tipo di anomalia;
• il modello della macchina (Mod.);
• il numero di serie (S/N);
Queste informazioni si trovano sulla targhetta applicata nella parte posteriore della lavabiancheria e nella parte anteriore
aprendo l’oblò.
Assistenza Attiva 7 giorni su 7
In caso di necessità d’intervento chiamare il Numero Unico Nazionale 199.199.199*.
Un operatore sarà a completa disposizione per fissare un appuntamento con il Centro Assistenza Tecnico
Autorizzato più vicino al luogo da cui si chiama.
È attivo 7 giorni su 7, sabato e domenica compresi, e non lascia mai inascoltata una richiesta.
*
* Al costo di 14,25 centesimi di Euro al minuto (iva inclusa) dal Lun. al Ven. dalle 08:00 alle 18:30, il Sab. dalle 08:00 alle 13:00 e di 5,58 centesimi di
Euro al minuto (iva inclusa) dal Lun. al Ven. dalle 18:30 alle 08:00, il Sab. dalle 13:00 alle 08:00 e i giorni festivi, per chi chiama da telefono fisso.
Per chi chiama da radiomobile le tariffe sono legate al piano tariffario dell’operatore telefonico utilizzato.
Le suddette tariffe potrebbero essere soggette a variazione da parte dell’operatore telefonico; per maggiori informazioni consultare il sito
www.hotpoint-ariston.it.
36
Page 37

Instruções para utilização
MÁQUINA DE LAVAR ROUPA
PT
Português
WMD 1044
Sumário
Instalação, 38-39
Desembalar e nivelar
Ligações hidráulicas e eléctricas
Primeiro ciclo de lavagem
Dados técnicos
Manutenção e cuidados, 40
Interromper a alimentação de água e de corrente eléctrica
Limpar a máquina de lavar roupa
Limpar a gaveta dos detergentes
Cuidados com a porta de vidro e o tambor
Limpar a bomba
Verificar o tubo de alimentação de água
Precauções e conselhos, 41
Segurança geral
Eliminação
Abertura manual da porta de vidro
Descrição da máquina de lavar roupa, 42-43
Painel de comandos
Visor
PT
Como efectuar um ciclo de lavagem, 44
Programas e funções, 44
Tabela dos programas
Funções de lavagem
Detergentes e roupa, 46
Gaveta dos detergentes
Preparar a roupa
Programas especiais
Sistema de balanceamento da carga
Anomalias e soluções, 47
Assistência, 48
37
Page 38

Instalação
PT
! É importante guardar este manual para
poder consultá-lo a qualquer momento. Se a
máquina for vendida, cedida ou transferida,
certifique-se que este manual permaneça com
a máquina para informar o novo proprietário
acerca do seu funcionamento e das respectivas advertências.
! Leia com atenção estas instruções: há importantes informações acerca da instalação,
da utilização e da segurança.
Desembalar e nivelar
Desembalar
1. Tire a máquina de lavar roupa da embalagem.
2. Verifique se a máquina de lavar roupa sofreu danos no transporte. Se estiver danificada
não efectue a sua ligação e contacte o revendedor.
3. Tire os 4 parafusos
de protecção para o
transporte e a borrachinha com o respectivo calço, situados
na parte traseira (veja
a figura).
4. Tampe os furos com as tampas em plástico
fornecidas.
5. Guarde todas as peças: se for necessário
transportar a máquina de lavar roupa, terão de
ser montadas outra vez.
! Embalagens não são brinquedos para as
crianças!
Um cuidadoso nivelamento dá estabilidade à
máquina e evita vibrações, ruídos e deslocamentos durante o funcionamento. Se houver
tapete ou alcatifa, regule os pés em modo que
embaixo da máquina de lavar roupa deixe um
espaço suficiente para ventilação.
Ligações hidráulicas e eléctricas
Ligação do tubo de alimentação da
água
1. Realize a ligação
do tubo de alimentação parafusando-o
a uma torneira de
água fria com bocal
de rosca de 3/4 gás
(veja a figura).
Antes de realizar esta
ligação, deixe a água
escorrer até estar
límpida.
2. Ligue o tubo de
alimentação na
máquina de lavar
roupa atarraxando-o
no apropriado fornecimento da água,
na parte traseira, em
cima à direita (veja a
figura).
3. Tome cuidado para o tubo não ser dobrado
nem esmagado.
Nivelamento
1. Instale a máquina de lavar roupa sobre um
pavimento plano e rígido, sem encostá-la em
paredes, móveis nem outro.
2. Se o pavimento
não for perfeitamente horizontal, para
compensar qualquer
irregularidade, desatarraxe ou atarraxe os
pés dianteiros (veja a
figura); o ângulo de
inclinação, medido
no plano de trabalho,
não deve ultrapassar
2°.
38
! A pressão hídrica da torneira deve ser entre
os valores da tabela dos Dados técnicos (veja
a página ao lado).
! Se o comprimento do tubo de alimentação
não for suficiente, contacte uma oficina especializada ou um técnico autorizado.
! Nunca utilize tubos já usados.
! Utilize aqueles fornecidos com a máquina.
Page 39

65 - 100 cm
Ligação do tubo de descarga
Ligue o tubo de descarga, sem dobrálo, a um conduto de
descarga ou a uma
descarga de parede
colocados entre 65 e
100 cm do chão;
em alternativa, coloque na beira de um
lavabo ou de uma
banheira, prendendo
na torneira a guia fornecida (veja a figura).
A ponta solta do tubo
de descarga não
deve permanecer
emergida na água.
! É desaconselhado empregar tubos de extensão; mas se for indispensável, a extensão
deve ter o mesmo diâmetro do tubo original e
não medir mais de 150 cm de comprimento.
! Não empregue extensões nem fichas múltiplas.
! O cabo não deve ser dobrado nem apertado.
! O cabo de alimentação deve ser substituído
somente por técnicos autorizados.
Atenção! O fabricante declina toda a responsabilidade se estas regras não forem respeitadas.
Primeiro ciclo de lavagem
Depois da instalação, antes de usar, efectue
um ciclo de lavagem com detergente mas
sem roupa, defina o programa “Auto Limpeza”
(veja “Limpar a máquina de lavar roupa”).
Dados técnicos
Modelo
Medidas
Capacidade
WMD 1044
largura 59,5 cm.
altura 85 cm.
profundidade 60,5 cm.
de 1 a 10 kg.
PT
Ligação eléctrica
Antes de ligar a ficha na tomada eléctrica,
certifique-se que:
• a tomada tenha uma ligação à terra e seja
nos termos da legislação;
• a tomada tenha a capacidade para suportar a
carga máxima de potência da máquina, indicada na tabela dos Dados técnicos (veja ao lado);
• a tensão de alimentação seja entre os valores indicados na tabela dos Dados técnicos
(veja ao lado);
• a tomada seja compatível com a ficha da
máquina de lavar roupa. Se não for, substitua a tomada ou a ficha.
! Esta máquina de lavar roupa não deve ser
instalada ao aberto, nem mesmo abrigada,
porque é muito perigoso deixá-la exposta à
chuva e às tempestades.
! Depois de ter instalado a máquina de lavar roupa, o acesso à tomada eléctrica deve ser fácil.
Ligações
eléctricas
Ligações
hídricas
Velocidade
da centrifugação
Programas
de controlo
conforme as
directivas
1061/2010
e
1015/2010
Veja a placa das características técnicas colocada na
máquina.
pressão máxima
1 MPa (10 bars)
pressão mínima
0,05 MPa (0,5 bar)
capacidade do tambor 71 litros
até 1400 rotações por minuto
programa
(60°) (1ª pres-
são da tecla); Algodão Normal
60°C.
programa (40°) (2ª pres-
são da tecla); Algodão Normal
40°C.
Esta aparelhagem é em conformidade com as seguintes Directivas Comunitárias:
- 2004/108/CE (Compatibilidade Electromagnética)
- 2002/96/CE
- 2006/95/CE (Baixa Tensão)
39
Page 40

Manutenção e cuidados
1
2
A
B
PT
Interromper a alimentação de
água e de corrente eléctrica
• Feche a torneira da água depois de cada
lavagem. Desta maneira diminuiu-se o desgaste do sistema hidráulico da máquina de lavar
roupa e elimina-se o risco de inundação.
• Tire a ficha da tomada eléctrica quando for
limpar a máquina de lavar roupa e durante os
trabalhos de manutenção.
Limpar a máquina de lavar roupa
• A parte externa e as peças em borracha
podem ser limpas com um pano molhado
com água morna e sabão. Não empregue
solventes nem abrasivos.
• A máquina de lavar roupa dispõe de um
programa de “Auto Limpeza” das suas partes
internas que deve ser efectuado sem carga
alguma dentro do tambor.
O detergente (na quantidade equivalente ao
10% daquela recomendada para peças pouco
sujas) ou aditivos específicos para a limpeza da máquina de lavar roupa, poderão ser
utilizados como coadjuvantes no programa de
lavagem. Recomenda-se efectuar o programa
de limpeza a cada 40 ciclos de lavagem.
Para activar o programa, pressione
contemporaneamente
as teclas A e B por 5
segundos (ver figura).
O programa iniciará
automaticamente e
terá uma duração de
aproximadamente 70
minutos. Para terminar o ciclo, carregar
no botão START/PAUSE button.
Cuidados com a porta de vidro e o
tambor
• Deixe a porta sempre entreaberta para evitar
que se formem odores desagradáveis.
Limpar a bomba
Esta máquina de lavar roupa é equipada com
uma bomba com limpeza automática que não
precisa de operações de manutenção. Entretanto
pode acontecer que pequenos objectos (moedinhas, botões) caiam na pré-câmara que protege a
bomba, situada na parte inferior da mesma.
! Certifique-se que o ciclo de lavagem tenha
terminado e tire a ficha da tomada.
Para obter acesso à pré-câmara:
1. remova o painel
de cobertura no lado
anterior da máquina
empurrando para o
centro, em seguida
empurre para baixo
de ambos os lados
e remova-o (veja as
figuras).
2. desenrosque a
tampa girando-a no
sentido anti-horário
(veja a figura). é
normal que perca um
pouco de água;
Limpar a gaveta dos detergentes
Para tirar a gaveta,
erga-a e puxe-a para
fora (veja a figura).
Lave-a com água
corrente; esta limpeza
deve ser efectuada
frequentemente.
40
3. limpe o interior com cuidado;
4. enrosque outra vez a tampa;
5. monte outra vez o painel, certifique-se, antes
de empurrá-la na máquina, que os ganchos
foram colocados nas respectivas ranhuras.
Verificar o tubo de alimentação
de água
Verifique o tubo de alimentação pelo menos
uma vez por ano. Se houver rachaduras ou
fendas, será necessário substitui-lo: durante
as lavagens as fortes pressões podem provocar repentinas quebras.
! Nunca utilize tubos já usados.
Page 41

Precauções e conselhos
20
! Esta máquina de lavar roupa foi projectada e fabricada
em conformidade com os regulamentos internacionais de
segurança. Estas advertências são fornecidas por razões
de segurança e devem ser lidas com atenção.
Segurança geral
• O aparelho não deve ser utilizado por pessoas (incluindo crianças) com capacidades físicas, sensoriais ou
mentais reduzidas ou sem experiência e conhecimentos, salvo se supervisionadas ou se tiverem recebido
instruções sobre a utilização do dispositivo por parte
de uma pessoa responsável pela sua segurança. As
crianças devem ser mantidas sob vigilância para evitar
que brinquem com a máquina.
• Este aparelho foi projectado exclusivamente para um
uso doméstico.
• Não toque na máquina com os pés descalços nem com
as mãos ou os pés molhados ou húmidos.
• Não puxe o cabo eléctrico para tirar a ficha da tomada,
pegue a ficha mesmo.
• Não abra a gaveta dos detergentes enquanto a máquina
estiver a funcionar.
• Não toque a água de descarga, que poderá chegar a
temperaturas altas.
• Em nenhum caso force a porta para abri-la: poderá danificar o mecanismo de segurança que a protege contra
aberturas acidentais.
• Se houver avarias, em nenhum caso mexa nos mecanismos internos para tentar reparar.
• Verifique sempre que criança não se aproximem da
máquina a funcionar.
• Durante a lavagem a porta de vidro tende a aquecer-se.
• Se for preciso deslocá-la, são precisas pelo menos duas
ou três pessoas, com a máxima atenção. Nunca sozinho
porque a máquina é muito pesada.
• Antes de colocar a roupa verifique que o tambor esteja
vazio.
Os consumidores devem contactar as autoridades
locais ou os pontos de venda para solicitar informação
referente ao local apropriado onde devem depositar os
electrodomésticos velhos.
Abertura manual da porta de vidro
Caso não seja possível abrir a porta de vidro por falta de
energia eléctrica e quiser pendurar a roupa lavada, proceda da seguinte maneira:
1. tire a ficha da tomada de
corrente.
2. verifique que o nível de
água no interior da máquina seja inferior respeito à
abertura da porta de vidro;
caso contrário, tirar a água
em excesso através do tubo
de descarga recolhendo-a
num balde como indicado na
figura.
3. tire o painel de cobertura
da parte dianteira da máquina de lavar roupa com ajuda
de uma chave de fendas(veja
a figura).
PT
Eliminação
• Eliminação do material de embalagem: obedeça os
regulamentos locais, de maneira que as embalagens
possam ser reutilizadas.
• A directiva Europeia 2002/96/CE referente à gestão de
resíduos de aparelhos eléctricos e electrónicos, prevê
que os electrodomésticos não devem ser escoados no
fluxo normal dos resíduos sólidos urbanos. Os aparelhos
desactualizados devem ser recolhidos separadamente
para optimizar a taxa de recuperação e reciclagem dos
materiais que os compõem e impedir potenciais danos
para a saúde humana e para o ambiente. O símbolo
constituído por um contentor de lixo barrado com uma
cruz deve ser colocado em todos os produtos por forma
a recordar a obrigatoriedade de recolha separada.
4. utilizando a lingueta indicada na figura, puxe para o
exterior até liberar o tirante de plástico do fecho; puxá-lo
sucessivamente para baixo e contemporaneamente abrir
a porta.
5. monte outra vez o painel, certifique-se, antes de
empurrá-la na máquina, que os ganchos foram colocados
nas respectivas ranhuras.
41
Page 42

Descrição da máquina de lavar
roupa
PT
Painel de comandos
Gaveta dos detergentes
Gaveta dos detergentes: para colocar detergentes e
aditivos (veja “Detergentes e roupa”).
Tecla de ON/OFF
Teclas
SELECTOR
PROGRAMAS
ENXAGUAMENTO
Tecla
INTENSIDADE
LAVAGEM
VISOR
Tecla
MY
CYCLE
Tecla
TIPO DE
Tecla
INÍCIO
POSTERIOR
Tecla TEMPERATURA : pressionar para reduzir a tem-
peratura: o valor é indicado no visor.
Teclas
FUNÇÕES
Tecla
CENTRIFUGAÇÃO
Tecla com
indicador luminoso
START/PAUSE
Tecla
TEMPERATURA
Tecla
BLOQUEIO
DAS
TECLAS
Tecla ON/OFF : carregue brevemente na tecla para ligar
ou desligar a máquina. O indicador luminoso START/PAUSE que pisca lentamente com a cor verde, indica que a
máquina está ligada. Para desligar a máquina de lavar roupa durante a lavagem, é necessário manter pressionado a
tecla por mais tempo, aproximadamente 3 segundos; uma
pressão breve ou acidental não anulará o funcionamento
da máquina. O desligar a máquina durante uma lavagem
em curso anula a própria lavagem.
Teclas SELECTOR PROGRAMAS: para seleccionar o
programa desejado (veja a “Tabela dos programas”).
Tecla MY CYCLE: manter pressionado a tecla para memorizar um ciclo e as próprias personalizações preferidas.
Para activar um ciclo previamente memorizado, pressionar
a tecla MY CYCLE.
Teclas FUNÇÃO: carregue na tecla para seleccionar a
função desejada. No visor acender-se-á o respectivo indicador luminoso.
Tecla
INTENSIDADE LAVAGEM
seleccionar a intensidade de lavagem desejada.
Tecla
TIPO DE ENXAGUAMENTO
para seleccionar o tipo de enxaguamento desejado.
Tecla CENTRIFUGAÇÃO : pressionar para reduzir ou
excluir completamente a centrifugação - o valor é indicado
no visor.
: pressione para
: pressione
Tecla BLOQUEIO DAS TECLAS : para activar o
bloqueio do painel de comandos, manter pressionada
a tecla durante aproximadamente 2 segundos. O
símbolo aceso indica que o painel de comandos está
bloqueado. Deste modo, impedem-se modificações
acidentais dos programas, sobretudo se houver crianças
em casa. Para desactivar o bloqueio do painel de
comandos, mantenha pressionada a tecla durante
aproximadamente 2 segundos.
Tecla INÍCIO POSTERIOR : pressionar para programar um início atrasado do programa escolhido. O atraso é
indicado no visor.
Tasto com indicador luminoso START/PAUSE: quando
o indicador luminoso verde, acender intermitentemente,
carregue na tecla para iniciar uma lavagem. Quando o
ciclo iniciar, o indicador permanecerá aceso fixo. Para
colocar em pausa a lavagem, carregar novamente no
botão; o indicador ficará intermitente com uma luz laranja.
Se o símbolo não estiver iluminado, será possível abrir
a porta de vidro. Para fazer iniciar a lavagem do ponto em
que foi interrompida, carregar novamente na tecla.
Modalidade de Stand by
Esta máquina de lavar roupa, em conformidade com as
novas normas sobre a economia energética, dispõe de
um sistema de desligação automática (stand by) que entra
em função aproximadamente 30 minutos depois, no caso
de inutilização. Carregue brevemente no botão ON/OFF e
aguarde até a reactivação da máquina.
Consumo em off-mode: 0,5 W
Consumo em Left-on: 0,5 W
42
Page 43

Visor
PT
Z
B
A
X
D
C
E
Y
F
O visor é útil para programar a máquina e fornece muitas informações.
Nas duas cadeias de caracteres superiores A e B, são visualizados o programa de lavagem seleccionado, a fase de lavagem em curso e todas as indicações relativas ao estado de avanço do programa.
Na cadeia C é visualizado o tempo restante para o fim do ciclo de lavagem em curso e caso tenha sido programado um
INÍCIO POSTERIOR, o tempo restante para o início do programa seleccionado.
Na cadeia D é visualizado o valor máximo da velocidade de centrifugação que a máquina pode efectuar conforme o programa seleccionado; se o programa não prever a centrifugação a cadeia ficará apagada.
Na cadeia E é visualizado o valor máximo da temperatura que pode ser seleccionado conforme o programa seleccionado;
se o programa não prever a configuração da temperatura, a cadeira ficará apagada.
Os indicadores luminosos F são relativos às funções e acendem-se quanto a função seleccionada for compatível com o
programa seleccionado.
Simbolo Porta bloqueada
O símbolo aceso indica que a porta está bloqueada para impedir a sua abertura. Para evitar danos é necessário aguardar
que o símbolo se apague antes de abrir a porta de vidro.
Obs.: se estiver activa a função INÍCIO POSTERIOR a porta não poderá ser aberta, para abrir, colocar a máquina em pausa
carregando na tecla START/PAUSE.
! Na primeira utilização, será pedida a selecção do idioma e o visor entrará automaticamente no menu de selecção do
idioma.
Para escolher o idioma desejado carregue nas teclas X e Y, para confirmar a escolha, carregue na tecla Z.
Se desejar modificar o idioma, desligue a máquina, pressione contemporaneamente as teclas X, Y, Z até ouvir um sinal
acústico, será visualizado novamente o menu de selecção do idioma.
43
Page 44

Como efectuar um ciclo de
lavagem
PT
1. LIGAR A MÁQUINA. Carregue no botão , no visor
aparecerá a escrita LIGAÇÃO EM CURSO; o indicador
luminoso START/PAUSE irá piscar lentamente com a cor
verde.
2. COLOCAR A ROUPA. Abrir a porta de vidro. Coloque
a roupa dentro da máquina prestando atenção para
não superar a carga máxima indicada na tabela dos
programas na página seguinte.
3. DOSAGEM DO DETERGENTE. Extrair a gaveta e
deitar o detergente nos específicos recipientes como
explicado no parágrafo “Detergentes e roupa”.
4. FECHAR A PORTA DE VIDRO.
5. ESCOLHA DE PROGRAMA. Carregue numa das
teclas do SELECTOR PROGRAMAS para seleccionar o
programa desejado; o nome do programa aparecerá no
visor; será associada uma temperatura e uma velocidade
de centrifugação que podem ser modificadas. No visor
aparecerá a duração do ciclo.
6. PERSONALIZAR O CICLO DE LAVAGEM. Utilizar as
específicas teclas:
Modificar a temperatura e/ou a
centrifugação. A máquina selecciona automaticamente
a temperatura e a centrifugação máximas para o
programa seleccionado e portanto não podem ser
aumentadas. Carregando no botão pode-se reduzir
a temperatura progressivamente até a lavagem a frio
“OFF”. Carregando no botão pode-se reduzir a
centrifugação progressivamente até a sua exclusão
“OFF”. Uma nova pressão dos botões colocará os
valores novamente nos máximos previstos.
! Excepção: seleccionando o programa
da tecla) a temperatura pode ser aumentada até a 90º.
Programar um início posterior.
Para programar o início atrasado do programa escolhido,
carregue no botão respectivo até alcançar o tempo de
atraso desejado. Quando esta opção estiver activa, no
visor aparecerá o símbolo . Para cancelar o início
posterior, carregue no botão até que no visor apareça a
escrita OFF.
Configurar a intensidade de lavagem desejada.
A opção permite optimizar a lavagem conforme o
grau de sujidade dos tecidos e à intensidade de lavagem
desejada.
Seleccionar o programa de lavagem, o ciclo será
configurado automaticamente no nível “Normal”,
optimizado para peças mediamente sujas (configuração
não válida para o ciclo “Lã” que configura-se
automaticamente no nível “Delicado”).
Para peças muito sujas, pressione a tecla até chegar
ao nível “Super lavagem”. Este nível garante uma lavagem
de alto desempenho, graças ao uso de uma maior
quantidade de água na fase inicial do ciclo e a uma maior
movimentação mecânica, útil para eliminar as manchas
mais resistentes. Pode ser utilizada com ou sem lixívia.
Se quiser efectuar o branqueamento, coloque o recipiente
adicional 4, fornecido com o produto, no recipiente 1.
Quando deitar a lixívia, não ultrapasse o nível “máx”
indicado no pino central (veja a figura da pág. 46).
Para peças pouco sujas ou para um tratamento mais
delicado dos tecidos, pressione a tecla até alcançar
o nível “Delicado”.
(60°) (1ª pressão
O ciclo reduzirá a movimentação mecânica para garantir
resultados de lavagem perfeitos para as peças delicadas.
Configurar o tipo de enxaguamento.
A opção permite seleccionar o tipo de enxaguamento
desejado para o máximo cuidado das peles sensíveis.
Com a primeira pressão da tecla, é configurado o nível
“Enxaguamento Extra” que permite seleccionar um
enxaguamento adicional além daquelas normais do
ciclo, para eliminar todos os restos de detergente. Com
a segunda pressão da tecla é configurado o nível “Peles
Sensíveis” que permite seleccionar dois enxaguamentos
adicionais além daqueles normais do ciclo e é
recomendado para as peles mais sensíveis. Com a terceira
pressão da tecla é configurado o nível “Antialérgico”
que permite seleccionar três enxaguamentos adicionais
além daquelas normais do ciclo, para remover os
principais alergenos como pólen, ácaros, pelos de gato
e cão. Pressione novamente a tecla para voltar ao tipo
de enxaguamente “Enxaguamento Normal”. Se não for
possível configurar ou modificar a regulação existente, no
display aparecerá a mensagem “Não admitido”.
Modificar as características do ciclo.
• Pressionar o botão para activar a função; o indicador
luminoso correspondente ao botão irá acender-se.
• Pressionar novamente o botão para desactivar a
função; o indicador luminoso apagar-se-á.
! Se a função seleccionada não for compatível com
o programa definido, o indicador luminoso ficará
intermitente e a função não será activada.
! Se a função seleccionada não for compatível com uma
outra programada anteriormente, o indicador luminoso
relativo à primeira função seleccionada irá piscar e será
activada somente a segunda, o indicador luminoso da
função activada acender-se-á.
! As funções podem variar a carga recomendada e/ou a
duração do ciclo.
7. INICIAR O PROGRAMA. Carregar no botão START/
PAUSE. O respectivo indicador luminoso ficará verde
e a porta de vidro irá bloquear-se (símbolo PORTA DE
VIDRO BLOQUEADA aceso). Durante a lavagem, o
visor mostrará o nome da fase em curso. Para modificar
um programa durante a realização de um ciclo, colocar
a máquina de lavar roupa em pausa carregando na tecla
START/PAUSE (o indicador luminoso START/PAUSE irá
piscar lentamente com a cor laranja); seleccionar então o
ciclo desejado e carregar novamente no botão START/
PAUSE. Para abrir a porta durante a realização de um ciclo,
carregar no botão START/PAUSE; se o símbolo PORTA DE
VIDRO BLOQUEADA estiver apagado será possível abrir
a porta. Carregar novamente no botão START/PAUSE para
fazer iniciar o programa do ponto em que foi interrompido.
8. FIM DO PROGRAMA. É indicado pela escrita “FIM
DO CICLO” no visor, quando o símbolo PORTA
BLOQUEADA apagar será possível abrir a porta.
Abrir a porta, retirar a roupa e desligar a máquina.
! Se desejar anular um ciclo já iniciado, carregue por
alguns segundos na tecla . O ciclo será interrompido e a
máquina desligar-se-á.
44
Page 45

Programas e funções
Tabela dos programas
Descrição do Programa
Programas
Antimancha
Algodão Normal 60° (1ª pressão da tecla) (1): brancos e coloridos
resistentes muito sujos.
Algodão Normal 40° (2ª pressão da tecla) (2): brancos e coloridos
delicados pouco sujos.
Algodão Normal 20° (3ª pressão da tecla): brancos e coloridos deli-
cados pouco sujos.
Sintéticos Resistentes (1ª pressão da tecla): coloridos resistentes
muito sujos.
Sintéticos Resistentes (4) (1ª pressão da tecla): coloridos resistentes
pouco sujos.
Sintéticos Delicados (2ª pressão da tecla): coloridos delicados pouco sujos.
Rápido 60' (1ª pressão da tecla) : para refrescar rapidamente roupas su-
jas (não é indicado para lã, seda e roupas que deve ser lavadas à mão).
Rápido 30' (2ª pressão da tecla) : para refrescar rapidamente roupas levemente
sujas (não é indicado para lã, seda e roupas que deve ser lavadas à mão).
My Cycle (Memo): possibilita guardar na memória qualquer tipo de lavagem.
M
Roupa de 7 dias (3): roupa de banho e de cama.
Woolmark Platina (Lã): para lã, cashmere, etc.
Delicados
Centrifugação (1ª pressão da tecla).
Enxaguamento (2ª pressão da tecla).
Descarga (3ª pressão da tecla).
A duração do ciclo indicada no visor ou no manual é uma estima calculada com base nas condições padrão. O tempo efectivo poderá variar a depender de vários factores, tais como a temperatura e a pressão da água em entrada, a temperatura ambiental, a quantidade de detergente, a quantidade e o tipo de carga, o balanceamento da carga e as opções adicionais seleccionadas.
Para todos Test Institutes:
1) Programa de controlo segundo a directiva 1061/2010: configurar o programa 60°C (1ª pressão da tecla).
Este ciclo é adapto para lavar uma carga de algodão normalmente suja e é o mais eficiente em termos de consumo combinado de energia e de água, para lavar a 60ºC. A temperatura efectiva de
lavagem pode ser diferente daquela indicada.
2) Programa de controlo segundo a directiva 1061/2010: configurar o programa 40°C (2ª pressão da tecla).
Este ciclo é adapto para lavar uma carga de algodão normalmente suja e é o mais eficiente em termos de consumo combinado de energia e de água, para lavar a 40°C. A temperatura efectiva de
lavagem pode ser diferente daquela indicada.
3) À temperatura de 60 ºC, a função de “Pré-lavagem” não pode ser activada.
Para todos Test Institutes:
2) Programa longo para algodão: configurar o programa 40°C (2ª pressão da tecla).
4) Programa longo para sintético: configurar o programa a 60°C (1ª pressão da tecla); temperatura de 40°C (pressione a tecla TEMPERATURA).
Temp.
max.
(°C)
40° 1400
60°
(Max. 90°)
40° 1400 -
20° 1400 -
60° 800
40° 800
40° 800
60° 1400 -
30° 800 -
60° 1400
40° 800 30° 0 -
Velocità
max.
(rotações
por mi-
nuto)
1400
- 1400 - - - - 10 - - - 16’
- 1400 - - -
- 0 - - - - 10 - - - 2’
Detergentes
gem
Prélava-
(3)
Lixívia
Lavagem
-
-
-
-
-
-
dor
Amacia-
dual %
Consumo de
Humidade resi-
Carga max. (Kg)
6 - - - 190’
10 53 1,09 85 210’
10 53 1,09 92 185’
10 - - - 175’
5,5 48 0,99 57 120’
5,5 48 0,63 55 100’
5,5 - - - 80’
4 53 0,54 57 60’
4 71 0,21 41 30’
10 - - - 155’
2,5 - - - 100’
1 - - - 80’
10 - - - 49’
energia kWh
Água total lt
PT
Duração ciclo
Funções de lavagem
Pré-lavagem
Seleccionando esta função efectua-se a pré-lavagem, útil
para remover manchas resistentes.
Obs.: Acrescentar o detergente no específico
compartimento.
! Não pode ser activada nos programas , , , ,
(60°), (40°),
Engomar fácil
Seleccionando esta função, a lavagem e a centrifugação
serão oportunamente modificadas para reduzir a formação
de rugas. No fim do ciclo, a máquina de lavar roupa
efectuará rotações lentas do tambor; o indicador luminoso
da função ENGOMAR FÁCIL ficarão intermitente e no
visor aparecerá a escrita “FIM DO CICLO”. Para terminar
o ciclo, carregar no botão START/PAUSE ou na tecla
ENGOMAR FÁCIL.
! Não pode ser activada nos programas , “Rápido 30’”,
, , .
.
Eco wash
A função Eco Wash contribui com a economia energética
não aquecendo a água utilizada para lavar a roupa – uma
vantagem tanto para o ambiente, quanto para a factura
da energia eléctrica. Com efeito, a acção reforçada e o
consumo óptimo da água garantem excelentes resultados
na mesma duração média de um ciclo padrão. Para obter
os melhores resultados de lavagem, aconselha-se o uso
de detergente líquido.
! Não pode ser activada nos programas , , , ,
, .
45
Page 46

Detergentes e roupa
M
AX
1
2
4
3
A
B
PT
Gaveta dos detergentes
O bom resultado da lavagem depende também do emprego da dose certa de detergente: com excessos não se
lava de maneira mais eficaz, mas contribui-se para formar
crostas nas peças internas da máquina de lavar roupa e
poluir o meio ambiente.
! Usar detergentes em pó para roupas de algodão bran-
cas e para a pré-lavagem e para lavagens com temperatura superior aos 60ºC.
! Seguir as indicações fornecidas pelo produtor na emba-
lagem do detergente.
! Não use detergentes para lavagem à mão, porque for-
mam espuma demais.
Tire a gaveta dos detergentes e deite o detergente
ou o aditivo da seguinte
maneira:
Gaveta 1: Detergente para pré-lavagem (em pó)
Antes de deitar detergente verifique se está colocada a
gaveta adicional 4.
Gaveta 2: Detergente para lavagem (em pó ou
líquido)
No caso do uso de detergente líquido, aconselha-se usar
o recipiente A fornecido com o aparelho para uma correcta dosagem. Para o uso do detergente em pó, coloque o
recipiente na cavidade B.
Gaveta 3: Aditivos (para amaciar etc.)
O aditivo para amaciar não deve ultrapassar a grade.
gaveta adicional 4: Água de Javel
Preparar a roupa
• Divida a roupa em função:
- do tipo de tecido / do símbolo na etiqueta.
- das cores: separe as peças coloridas das brancas.
• Esvazie as algibeiras e verifique se há botões soltos.
• Não ultrapasse os valores indicados que se referem ao
peso da roupa enxuta: veja a “Tabela dos programas”.
Quanto pesa a roupa?
1 lençol 400 - 500 g.
1 fronha 150 - 200 g.
1 toalha de mesa 400 - 500 g.
1 roupão 900 - 1200 g.
1 toalha de rosto 150 - 250 g.
Programas especiais
Antimanchas: o programa é adequado à lavagem de
peças muito sujas com cores resistentes. O programa
garante uma classe de lavagem superior à classe padrão
(classe A). Não misture roupas de cor diferente com este
programa. Aconselhamos a utilização de detergente em
pó. Para manchas resistentes recomenda-se pré-tratamento com aditivos específicos.
Algodão normal 20ºC ideal para cargas de algodão sujas.
Os bons desempenhos mesmo a frio, comparáveis a uma
lavagem a 40º, são garantidos por uma acção mecânica
que trabalha com alterações de velocidade em picos
repetidos e aproximados.
Roupa de banho e de cama: para lavar toda a roupa de
banho e de cama com um único ciclo, utilize o programa
que optimiza o uso do amaciador e consente uma
economia de tempo e energia. Aconselhamos a utilização
de detergente em pó.
Lã: o ciclo de lavagem “Lã” desta máquina de lavar roupa
Hotpoint-Ariston foi testado e aprovado pela Woolmark
Company para a lavagem de vestuário em lã classificado
como “lavável à mão”, desde que a lavagem seja executada de acordo com as instruções indicadas na etiqueta
da peça e com as indicações fornecidas pelo produtor do
electrodoméstico. Hotpoint-Ariston é a primeira marca de
máquinas de lavar roupa a obter a certificação Woolmark
Apparel Care - Platinum da Woolmark Company pelo seu
desempenho de lavagem e consumo de água e energia.
(M1135)
Delicados: utilize o programa para a lavagem de
peças muito delicadas, que possuem aplicações como
aplicações ou brilhantes.
Para a lavagem de peças de seda e cortinas,
seleccionar o ciclo e configurar o nível “Delicado” da
opção .
Recomenda-se virar do avesso as roupas antes de laválas e colocar as peças pequenas no saquinho específico
para a lavagem das peças delicadas.
Para obter melhores resultados, recomenda-se o uso de
detergente líquido para peças delicadas.
Sistema de balanceamento da carga
Antes de cada centrigfugação, para evitar vibrações
excessivas e para distribuir a carga em modo uniforme, o
tambor efectua algumas rotações a uma velocidade levemente superior àquela de lavagem. Se no fim de repetidas tentativas a carga ainda não estiver correctamente
balanceada, a máquina efectuará a centrifugação com
uma velocidade inferior àquela prevista. No caso de um
excessivo desbalanceamento, a máquina de lavar roupa
efectuará a distribuição ao invés da centrifugação. Para favorecer uma melhor distribuição da carga e o seu correcto
balanceamento, aconselha-se misturar peças grandes
com peças pequenas.
46
Page 47

Anomalias e soluções
Pode acontecer que a máquina de lavar roupa não funcione. Antes de telefonar para a Assistência Técnica (veja “Assistência”), verifique se não se trata de um problema fácil de resolver com ajuda da seguinte lista.
Anomalias:
A máquina de lavar roupa não liga.
O ciclo de lavagem não inicia.
A máquina de lavar roupa não carrega a água (no visor aparecerá a
escrita “FALTA ÁGUA, ABRIR TORNEIRA”).
A máquina de lavar roupa carrega e
descarrega água continuamente.
Possíveis causas / Solução:
• A ficha não está colocada na tomada eléctrica, ou não o suficiente para haver
contacto.
• Em casa não há corrente.
• A porta de vidro não está bem fechada.
• O botão ON/OFF não foi pressionado.
• O botão START/PAUSE não foi pressionado.
• A torneira da água não está aberta.
• Foi programado um início posterior (veja as “Como efectuar um ciclo de lavagem”).
• O tubo de alimentação de água não está ligado na torneira.
• O tubo está dobrado.
• A torneira da água não está aberta.
• Está a faltar água em casa.
• Não há suficiente pressão.
• O botão START/PAUSE não foi pressionado.
• O tubo de descarga não está instalado entre 65 e 100 cm de altura do chão
(veja “Instalação”).
• A ponta do tubo de descarga está imersa na água (veja “Instalação”).
• Da descarga na parede não foi sangrado o ar.
Se depois destas verificações o problema não for resolvido, feche a torneira
da água, desligue a máquina de lavar roupa e chame a assistência técnica.
Se a morada encontrar-se nos últimos andares de um edifício, é possível que
aconteçam fenómenos de sifão por causa dos quais a máquina de lavar roupa
carrega e descarrega água continuamente. Para eliminar este inconveniente, há
a disposição no comércio apropriadas válvulas contra o efeito sifão.
PT
A máquina de lavar roupa não
descarrega ou nem realiza centrifugação.
A máquina de lavar roupa vibra
muito durante a centrifugação.
Da máquina de lavar roupa está a
perder água.
A máquina está bloqueada, o visor pisca e sinaliza um código de anomalia
(por ex.: F-01, F-..).
Está a formar-se demasiada espuma.
• No programa não há descarga: com alguns programas será necessário iniciar
a descarga manualmente.
• Está activa a função ENGOMAR FÁCIL: para completar o programa mete na
tecla START/PAUSE (veja as “Programas e funções”).
• O tubo de descarga está dobrado (veja “Instalação”).
• A conduta de descarga está entupida.
• O tambor, no momento da instalação, não foi liberado correctamente (veja
“Instalação”).
• A máquina não está nivelada (veja “Instalação”).
• A máquina está apertada entre móveis e parede (veja “Instalação”).
• O tubo de alimentação da água não está bem enroscado (veja “Instalação”).
• O gaveta dos detergentes está entupida (para limpá-la veja “Manutenção e
cuidados”).
• O tubo de descarga não está fixado correctamente (veja “Instalação”).
• Desligue a máquina e tire a ficha da tomada, aguarde aproximadamente 1
minuto e volte a ligá-la.
Se a anomalia persistir, contacte a Assistência Técnica.
• O detergente não é específico para máquina de lavar roupa (deve haver a escrita
“para máquina de lavar”, “à mão e para máquina de lavar” ou similares).
• A dose foi excessiva.
47
Page 48

Assistência
PT
Antes de contactar a Assistência Técnica:
• Verifique se consegue resolver a anomalia sozinho (veja “Anomalias e soluções”);
• Reinicie o programa para verificar se o inconveniente foi resolvido;
• Em caso negativo, contacte a o Centro de Assistência técnica autorizada no número de telefone indicado no certificado de
garantia.
! Nunca recorra a técnicos não autorizados.
Comunique:
• o tipo de anomalia;
• o modelo da máquina (Mod.);
• o número de série (S/N).
Estas informações encontram-se na placa colocada na parte traseira da máquina de lavar roupa e na parte anterior abrindo
a porta de vidro.
48
Page 49

Bedienungsanleitungen
WASCHVOLLAUTOMAT
DE
Deutsch
WMD 1044
INHALTSVERZEICHNIS
Installation, 50-51
Auspacken und Aufstellen
Wasser- und Elektroanschlüsse
Erster Waschgang
Technische Daten
Reinigung und Pflege, 52
Abstellen der Wasser- und Stromversorgung
Reinigung des Gerätes
Reinigung der Waschmittelschublade
Pflege der Gerätetür und Trommel
Reinigung der Pumpe
Kontrolle des Wasserzulaufschlauchs
Vorsichtsmaßregeln und Hinweise, 53
Allgemeine Sicherheit
Entsorgung
Manuelles Öffnen der Gerätetür
Beschreibung Ihres Waschvollautomaten, 54-55
Bedienblende
Display
DE
Durchführung eines Waschprogramms, 56
Programme und Funktionen, 57
Programmtabelle
Waschfunktionen
Waschmittel und Wäsche, 58
Waschmittelschublade
Vorsortieren der Wäsche
Sonderprogramme
Unwuchtkontrollsystem
Störungen und Abhilfe, 59
Kundendienst, 60
49
Page 50

Installation
DE
! Es ist äußerst wichtig, diese Bedienungsanleitung
sorgfältig aufzubewahren, um sie jederzeit zu Rate
ziehen zu können. Sorgen Sie dafür, dass sie im
Falle eines Umzugs oder einer Übergabe an einen
anderen Benutzer das Gerät stets begleitet, damit
auch der neue Inhaber die Möglichkeit hat, diese
zu Rate zu ziehen.
! Lesen Sie bitte folgende Hinweise aufmerksam durch: sie liefern wichtige Informationen
hinsichtlich der Installation, des Gebrauchs
und der Sicherheit.
Auspacken und Aufstellen
Auspacken
1. Gerät auspacken.
2. Sicherstellen, dass der Waschvollautomat
keine Transportschäden erlitten hat. Schließen
Sie das Gerät im Falle einer Beschädigung bitte nicht an und kontaktieren Sie Ihren Händler.
3. Die 4 Transportschutzschrauben ausschrauben und das an
der Rückwand befindliche Gummiteil und
das entsprechende
Abstandsstück abnehmen (siehe Abbildung).
4. Die Löcher mittels der mitgelieferten Kunst-
stoffstöpsel schließen.
5. Sämtliche Teile aufbewahren: Sollte der
Waschvollautomat erneut transportiert werden
müssen, müssen diese Teile wieder eingesetzt
werden.
! Verpackungsmaterial ist kein Spielzeug für
Kinder.
Nivellierung
1. Der Waschvollautomat muss auf einem
ebenen, festen Untergrund aufgestellt werden,
ohne diesen an Wände, Möbelteile oder ähnliches anzulehnen.
2. Sollte der Boden
nicht perfekt eben
sein, müssen die
Unebenheiten durch
An- bzw. Ausdrehen
der vorderen Stellfüße
ausgeglichen werden
(siehe Abbildung), der
auf der Arbeitsfläche
zu ermittelnde Neigungsgrad darf 2°
nicht überschreiten.
Eine präzise Nivellierung verleiht dem Gerät die
erforderliche Stabilität, durch die Vibrationen,
Betriebsgeräusche und ein Verrücken des
Gerätes vermieden werden. Bei Teppichböden
müssen die Stellfüße so reguliert werden, dass
ein ausreichender Freiraum zur Belüftung unter
dem Waschvollautomaten gewährleistet ist.
Wasser- und Elektroanschlüsse
Anschluss des Zulaufschlauches
1. Schrauben Sie den
Wasserschlauch an
einen Kaltwasserhahn
mit ¾-Zoll-Gewindeanschluss an (siehe
Abbildung).
Lassen Sie das Wasser vor dem Anschluss so lange
auslaufen, bis klares
Wasser austritt.
2. Das andere Ende
des Schlauches an
den oben rechts am
Rückteil des Waschvollautomaten befindlichen Wasseranschluss anschließen
(siehe Abbildung).
3. Der Schlauch darf nicht eingeklemmt oder
abgeknickt werden.
! Der Wasserdruck muss innerhalb der Werte liegen, die in der Tabelle der Technischen
Daten angegeben sind (siehe nebenstehende
Seite).
! Sollte der Zulaufschlauch nicht lang genug
sein, dann wenden Sie sich bitte an einen
Fachhändler oder an einen autorisierten Fachmann.
! Verwenden Sie niemals bereits gebrauchte
Schläuche.
! Verwenden Sie die Schläuche, die mit dem
Gerät geliefert wurden.
50
Page 51

Anschluss des Ablaufschlauches
65 - 100 cm
- 2006/95/CE (Niederspannung)
Schließen Sie den
Ablaufschlauch, ohne
ihn dabei zu knicken,
an eine Ablaufleitung,
oder an einen in der
Wand, in einer Höhe
von 65cm bis 100cm
an;
! Verwenden Sie bitte keine Verlängerungen
oder Mehrfachstecker.
! Das Netzkabel darf nicht gebogen bzw. eingeklemmt werden.
! Das Versorgungskabel darf nur durch autorisierte Fachkräfte ausgetauscht werden.
Achtung! Der Hersteller übernimmt keinerlei
Haftung, sollten diese Vorschriften nicht genau
beachtet werden.
Erster Waschgang
DE
oder hängen Sie
diesen in ein Becken
oder eine Wanne ein;
befestigen Sie den
Schlauch in diesem
Falle mittels der mitgelieferten Führung
an dem Wasserhahn
(siehe Abbildung).
Das freie Ablaufschlauchende darf
nicht unter Wasser bleiben.
! Verlängerungsschläuche sollten nicht eingesetzt werden, sollte dies jedoch absolut
unvermeidlich sein, muss die Verlängerung
denselben Durchmesser des Originalschlauchs aufweisen und darf eine Länge von 150
cm nicht überschreiten.
Elektroanschluss
Vor Einfügen des Netzsteckers in die Steckdose ist sicherzustellen, dass:
• die Steckdose über eine normgerechte
Erdung verfügt;
• die Steckdose die in den Technischen Da-
ten angegebenen Höchstlast des Gerätes
trägt (siehe nebenstehende Tabelle);
• die Stromspannung den in den Technischen
Daten angegebenen Werten entspricht (sie-
he nebenstehende Tabelle);
• die Steckdose mit dem Netzstecker des
Waschvollautomaten kompatibel ist. Andernfalls muss der Netzstecker (oder die
Steckdose) ersetzt werden.
! Der Waschvollautomat darf nicht im Freien
installiert werden, auch nicht, wenn es sich
um einen geschützten Platz handelt. Es ist gefährlich, das Gerät Gewittern und Unwettern
auszusetzen.
! Die Steckdose muß jederzeit zugänglich sein.
Lassen Sie nach der Installation bzw. vor
erstmaligem Gebrauch erst einen Waschgang
(mit Waschmittel) ohne Wäsche durchlaufen. Stellen Sie hierzu das Waschprogramm
„AUTO REINIGEN“.
Technische Daten
Modell
Abmessunge
Fassungsvermögen
Elektroanschlüsse
Wasseranschlüsse
Schleudertouren
Prüfprogramme
gemäß der
Richtlinien
1061/2010
und
1015/2010
WMD 1044
Breite 59,5 cm
Höhe 85 cm
Tiefe 60,5 cm
1 bis 10 kg
siehe das am Gerät befindliche Typenschild
Höchstdruck
1 MPa (10 bar)
Mindestdruck
0,05 MPa (0,5 bar)
Trommelvolumen 71 Liter
bis zu 1400 U/min.
Programm
(60°) (erster
tastendruck); Baumwolle
60°C.
Programm (40°) (zwei-
ter tastendruck); Baumwolle
40°C.
Dieses Gerät entspricht den
folgenden EG-Richtlinien:
- 2004/108/CE (elektromagnetische Verträglichkeit)
- 2002/96/CE
51
Page 52

Reinigung und Pflege
1
2
A
B
DE
Abstellen der Wasser- und Stromversorgung
• Drehen Sie den Wasserhahn nach jedem
Waschvorgang zu. Hierdurch wird der Verschleiß der Wasseranlage verringert und
Wasserlecks vorgebeugt.
• Ziehen Sie den Netzstecker aus der
Steckdose, bevor Sie Ihren Waschvollautomaten reinigen.
Reinigung des Gerätes
• Die Gehäuseteile und die Teile aus Gummi
können mit einem mit warmer Spülmittellauge
angefeuchteten Tuch gereinigt werden. Vermeiden Sie Löse- und Scheuermittel.
• Die Waschmaschine verfügt über ein „AUTO
REINIGEN“-Programm der inneren Teile, das
gänzlich ohne Wäsche durchgeführt werden
muss.
Als Hilfsmittel können bei diesem Waschgang
Waschmittel (10 % von der für gering verschmutzte Kleidungsstücke empfohlenen Menge)
oder spezifische Zusatzstoffe für die Reinigung
von Waschmaschinen verwendet werden. Es
wird empfohlen, das Reinigungsprogramm alle
40 Waschgänge durchzuführen.
Um das Programm
zu aktivieren, drücken
Sie fünf Sekunden
lang gleichzeitig die
Tasten A und B (siehe
abb.).
Das Programm startet automatisch und
dauert etwa 70 Minuten. Um den Zyklus
anzuhalten, drücken
Sie die Taste START/PAUSE.
Reinigung der Waschmittelschublade
Heben Sie die Schublade leicht an und
ziehen Sie sie nach
vorne hin heraus (sie-
he Abbildung).
Spülen Sie sie regelmäßig unter fließendem Wasser gründlich
aus.
Pflege der Gerätetür und Trommel
• Lassen Sie die Gerätetür stets leicht offen
stehen, um die Bildung unangenehmer
Gerüche zu vermeiden.
Reinigung der Pumpe
Ihr Gerät ist mit einer selbstreinigenden Pumpe
ausgerüstet, eine Wartung ist demnach nicht
erforderlich. Es könnte jedoch vorkommen,
dass kleine Gegenstände (Münzen, Knöpfe) in
die zum Schutz der Pumpe dienende Vorkammer (befindlich unter der Pumpe) fallen.
! Vergewissern Sie sich, dass der Waschgang
abgeschlossen ist und ziehen Sie den Netzstecker heraus.
Zugang zur Vorkammer:
1. Nehmen Sie die
Abdeckung (befindlich an der Gerätefront) mit Hilfe eines
Schraubenziehers ab
(siehe Abbildung);
2. Drehen Sie den Deckel gegen den Uhrzeigersinn ab (siehe Ab-
bildung): es ist ganz
normal, wenn etwas
Wasser austritt;
3. Reinigen Sie das Innere gründlich;
4. Schrauben Sie den Deckel wieder auf;
5. Bringen Sie die Abdeckung wieder an. Stel-
len Sie hierbei sicher, dass die Haken in die
Schlitze eingreifen, bevor Sie die Abdeckung
fest andrücken.
Kontrolle des Wasserzulaufschlauchs
Kontrollieren Sie den Zulaufschlauch mindestens einmal im Jahr. Weist er Risse bzw.
Brüche auf, muss er ausgetauscht werden.
Der starke Druck während des Waschprogramms könnte zu plötzlichem Platzen führen.
! Verwenden Sie niemals bereits gebrauchte
Schläuche.
52
Page 53

Vorsichtsmaßregeln und
20
Hinweise
! Der Waschvollautomat wurde nach den strengsten interna-
tionalen Sicherheitsvorschriften entworfen und gebaut. Nachstehende Hinweise werden aus Sicherheitsgründen geliefert
und sollten aufmerksam gelesen werden.
Allgemeine Sicherheit
• Dieses Gerät wurde ausschließlich für den Einsatz im privaten Haushalt konzipiert.
• Dieses Gerät ist nicht zur Verwendung durch Personen
(einschließlich Kinder) mit eingeschränkten körperlichen,
geistigen oder sensorialen Fähigkeiten oder ohne ausreichende Erfarhung und Kenntnis geeignet, es sei denn,
sie werden durch eine für ihre Sicherheit verantwortliche
Person beaufsichtigt und eingewiesen. Kinder müssen
beaufsichtigt werden, um sicherzustellen, dass sie nicht mit
dem Gerät spielen.
• Der Waschvollautomat darf nur von Erwachsenen und
gemäß den Anleitungen dieses Handbuchs bedient werden.
• Berühren Sie das Gerät nicht, wenn Sie barfuß sind, und
auch nicht mit nassen oder feuchten Händen oder Füßen.
• Ziehen Sie den Gerätestecker nicht am Kabel aus der
Steckdose, sondern nur am Netzstecker selbst.
• Öffnen Sie die Waschmittelschublade nicht, wenn das Gerät
in Betrieb ist.
• Berühren Sie nicht das Ablaufwasser, es könnte sehr heiß
sein.
• Öffnen Sie die Gerätetür nicht mit Gewalt: Der SicherheitsSchließmechanismus könnte hierdurch beschädigt werden.
• Bei etwaigen Störungen versuchen Sie bitte nicht, Innenteile
selbst zu reparieren.
• Halten Sie Kinder stets von dem in Betrieb befindlichen
Gerät fern.
• Während des Waschgangs kann die Gerätetür sehr heiß werden.
• Muss das Gerät versetzt werden, sollten hierfür zwei oder
drei Personen verfügbar sein. Versetzen Sie es niemals
allein, das Gerät ist äußerst schwer.
• Bevor Sie die Wäsche einfüllen, stellen Sie bitte sicher, dass
die Wäschetrommel leer ist.
Entsorgung
• Entsorgung des Verpackungsmaterials: Befolgen Sie die
lokalen Vorschriften, Verpackungsmaterial kann wiederverwertet werden.
• Gemäß der Europäischen Richtlinie 2002/96/EC über
Elektro- und Elektronik-Altgeräte dürfen ElektrohaushaltsAltgeräte nicht über den herkömmlichen Haushaltsmüllkreislauf entsorgt werden. Altgeräte müssen separat gesammelt
werden, um die Wiederverwertung und das Recycling der
beinhalteten Materialien zu optimieren und die Einflüsse auf
die Umwelt und die Gesundheit zu reduzieren. Das Symbol
„durchgestrichene Mülltonne“ auf jedem Produkt erinnert
Sie an Ihre Verpflichtung, dass Elektrohaushaltsgeräte gesondert entsorgt werden müssen. Endverbraucher können
sich an Abfallämter der Gemeinden wenden, um mehr
Informationen über die korrekte Entsorgung ihrer Elektrohaushaltsgeräte zu erhalten.
Manuelles Öffnen der Gerätetür
Sollte die Gerätetür aufgrund eines Stromausfalls nicht geöffnet werden können, gehen Sie wie folgt vor, um die Wäsche
entnehmen und somit aufhängen zu können:
1. Ziehen Sie den Netzstecker
aus der Steckdose.
2. Stellen Sie sicher, dass der
Wasserstand im Innern des
Gerätes die Gerätetür nicht
übersteigt, andernfalls lassen
Sie das überschüssige Wasser, so wie auf der Abbildung
veranschaulicht, durch den
Ablaufschlauch in einen Eimer
ablaufen.
3. Nehmen Sie die Abdeckung
(befindlich an der Gerätefront)
mit Hilfe eines Schraubenziehers ab (siehe Abbildung).
4. Befreien Sie mithilfe der auf der Abbildung veranschaulichten Zunge (nach vorne ziehen) die Kunststoff-Spannvorrichtung aus der Arretierung; ziehen Sie letztere dann nach
unten und öffnen Sie gleichzeitig die Gerätetür.
5. Bringen Sie die Abdeckung wieder an. Stellen Sie hierbei
sicher, dass die Haken in die Schlitze eingreifen, bevor Sie die
Abdeckung fest andrücken.
DE
53
Page 54

Beschreibung Ihres
Waschvollautomaten
DE
Bedienblende
PROGRAMMWAHL
Waschmittelschublade
Waschmittelschublade: für Waschmittel und Zusätze
(siehe „Waschmittel und Wäsche“).
Taste ON/OFF : Drücken Sie kurz auf die Taste, um das
Gerät ein- bzw. auszuschalten. Die Kontrollleuchte START/
PAUSE, die langsam grün blinkt, zeigt an, dass das Gerät
eingeschaltet ist. Um den Waschvollautomaten während eines Waschgangs auszuschalten, muss die Taste etwas länger gedrückt werden (ca. 3 Sekunden); ein kurzer oder ein
ungewollter Druck bewirkt kein Ausschalten des Gerätes.
Das Ausschalten des Gerätes während eines laufenden
Waschprogramms löscht den gesamten Waschzyklus.
Taste ON/OFF
Tasten
SPÜLINTENSITÄT
STARTZEITVORWAHL
Taste
WASCHINTENSITÄT
DISPLAY
Taste
MY
CYCLE
Taste
Taste
Taste TEMPERATUR : Drücken Sie die Taste, um die
Temperatur herabzusetzen: Der Wert wird auf dem Display
angezeigt.
Taste TASTENSPERRE : Zur Aktivierung der Sperre
der Bedienblende halten Sie die Taste ca. 2 Sekunden lang
gedrückt. Das eingeschaltete Symbol zeigt an, dass die
Bedienblende gesperrt ist (mit Ausnahme der Taste ON/OFF).
Auf diese Weise wird verhindert, dass ein Programm aus
Versehen geändert wird, vor allem, wenn kleine Kinder im Hause
sind. Zur Deaktivierung der Sperre der Bedienblende halten Sie
die Taste ca. 2 Sekunden lang gedrückt.
Tasten
FUNKTIONEN
Taste
SCHLEUDERN
Taste mit
Kontrollleuchte
START/PAUSE
Taste
TEMPERATUR
Taste
TASTENSPERRE
Tasten PROGRAMMWAHL: zur Einstellung des gewün-
schten Programms (siehe “Programmtabelle”).
Taste MY CYCLE: Halten Sie die Taste gedrückt, um einen Waschzyklus und die gewünschten Individualisierungseinstellungen zu speichern. Um einen bereits gespeicherten Zyklus abzurufen, drücken Sie die Taste MY CYCLE.
Tasten FUNKTIONEN: Drücken Sie die Taste, um die
gewünschte Funktion auszuwählen. Auf dem Display
schaltet sich die entsprechende Kontrollleuchte ein.
Taste
WASCHINTENSITÄT
Taste, um die gewünschte Waschintensität zu wählen.
Taste
SPÜLINTENSITÄT
um die gewünschte Spülung auszuwählen.
Taste SCHLEUDERN : Drücken Sie die Taste, um
die Schleudergeschwindigkeit herabzusetzen oder das
Schleudern ganz auszuschließen. Der Wert wird auf dem
Display angezeigt.
: Drücken Sie diese
: Drücken Sie diese Taste,
Taste STARTZEITVORWAHL : Zur Vorwahl der Start-
zeit des gewählten Programms drücken Sie bitte diese
Taste. Die Zeitverzögerung wird auf dem Display angezeigt.
Taste mit Kontrollleuchte START/PAUSE: Sobald die grü-
ne Kontrollleuchte auf langsames Blinklicht schaltet, drücken Sie die Taste, um den Waschgang zu starten. Nach
Ingangsetzung des Programms schaltet die Kontrollleuchte
auf Dauerlicht. Um den Waschgang zu unterbrechen,
drücken Sie erneut die Taste; die Kontrollleuchte schaltet
auf orangefarbenes Blinklicht. Wenn das Symbol nicht
leuchtet, kann die Gerätetür geöffnet werden. Um das
Programm an der Stelle, an der es unterbrochen wurde,
wieder in Gang zu setzen, drücken Sie die Taste erneut.
Funktion Standby
Zur Erfüllung der neuen Richtlinien zum Energieverbrauch
ist diese Waschmaschine mit einem automatischen Ausschaltsystem (Standby) ausgestattet, das nach 30 Minuten
des Nichtgebrauchs in Funktion tritt. Drücken Sie kurz
die Taste ON/OFF und warten Sie, bis sich die Maschine
wieder einschaltet.
Verbrauch in Off-Betrieb: 0,5 W
Verbrauch in Left-On: 0,5 W
54
Page 55

Display
Z
B
A
DE
X
D
C
E
Y
F
Das Display dient nicht nur zur Programmierung des Gerätes, sondern liefert auch zahlreiche Informationen.
In den beiden oberen Zeilenreihen A und B werden das ausgewählte Waschprogramm, die laufende Waschphase und alle
Angaben zum Programmfortschritt angezeigt.
In der Zeilenreihe C werden die Restzeit bis zum Ende des laufenden Waschvorgangs und bei Einstellung einer STARTZEITVORWAHL die bis zum Start des ausgewählten Programms verbleibende Zeit angezeigt.
In der Zeilenreihe D wird der Höchstwert der Schleudergeschwindigkeit angezeigt, die das Gerät für das eingestellte Programm zulässt; wenn das Programm keinen Schleudervorgang vorsieht, bleibt die Zeilenreihe ausgeschaltet.
In der Zeilenreihe E wird der Höchstwert der Temperatur angezeigt, der für das eingestellte Programm ausgewählt werden
kann; wenn das Programm keine Temperatureinstellung vorsieht, bleibt die Zeilenreihe ausgeschaltet.
Die Kontrollleuchten F sind den Funktionen zugeordnet und leuchten, wenn die ausgewählte Funktion mit dem eingestellten
Programm kompatibel ist.
Symbol Gerätetür gesperrt
Durch Leuchten des Symbols meldet das Gerät, dass die Gerätetür gesperrt ist, um ein versehentliches Öffnen zu vermeiden. Zur Vermeidung einer evtl. Beschädigung warten Sie bis das Symbol erlischt, bevor Sie die Gerätetür öffnen.
NB: Wenn die Funktion STARTZEITVORWAHL aktiviert ist, kann die Gerätetür nicht geöffnet werden. Zum Öffnen schalten
Sie das Gerät mittels der Taste START/PAUSE auf Pause.
! Vor dem ersten Einschalten werden Sie zur Auswahl der Sprache aufgefordert, und das Display blendet automatisch das
Menü zur Sprachauswahl ein.
Wählen Sie die gewünschte Sprache mittels der Tasten X und Y aus und drücken Sie dann zum Bestätigen der Auswahl auf
die Taste Z.
Um die Sprache zu ändern, schalten Sie das Gerät aus und drücken gleichzeitig die in der Abbildung mit X, Y und Z
gekennzeichneten Tasten. Nach dem ertönen eines akustischen Signals wird das Menü der Sprachauswahl angezeigt
55
Page 56

Durchführung eines
Waschprogramms
DE
1. EINSCHALTEN DES GERÄTES. Drücken Sie auf die
Taste , woraufhin auf dem Display die Meldung POWER
EIN erscheint; die Kontrollleuchte START/PAUSE blinkt
langsam grün.
2. EINFÜLLEN DER WÄSCHE. Öffnen Sie die Gerätetür.
Füllen Sie die Wäsche ein. Achten Sie hierbei bitte darauf,
die in der Programmtabelle (auf der nächsten Seite)
angegebene Wäschemenge nicht zu überschreiten.
3. DOSIERUNG DES WASCHMITTELS. Ziehen Sie
die Waschmittelschublade heraus und füllen Sie das
Waschmittel in die entsprechenden Kammern (siehe
“Waschmittel und Wäsche”).
4. SCHLIESSEN SIE DIE GERÄTETÜR.
5. WAHL DES WASCHPROGRAMMS. Wählen
Sie das gewünschte Programm mittels einer der
PROGRAMMWAHL-Tasten aus; die Bezeichnung des
Programms wird auf dem Display angezeigt; dem Programm
sind eine Temperatur und eine Schleudergeschwindigkeit
zugeordnet, die jedoch geändert werden können. Auf dem
Display wird die Programmdauer angezeigt.
6. INDIVIDUALISIERUNG DES WASCHGANGS.
Verwenden Sie hierzu die entsprechenden Tasten:
Änderung der Temperatur und/oder Schleudern.
Das Gerät wählt automatisch die für das eingestellte
Programm vorgesehene maximale Temperatur sowie
die maximale Schleudergeschwindigkeit. Diese können
demnach nicht erhöht werden. Durch Drücken der
Taste kann die Temperatur bis auf Kaltwäsche “OFF”
herabgesetzt werden. Durch Drücken der Taste kann
die Schleudergeschwindigkeit herabgesetzt oder der
Schleudervorgang auf “OFF” ausgeschlossen werden. Ein
weiterer Druck auf die Tasten bewirkt die Einstellung der
möglichen Maximalwerte.
! Ausnahme: Wird das Waschprogramm
Tastendruck) eingestellt, kann die Temperatur bis auf 90°
erhöht werden.
Startzeitvorwahl.
Zur Vorwahl der Startzeit des eingestellten Programms
drücken Sie die entsprechende Taste bis die gewünschte
Zeitverschiebung angezeigt wird. Sobald diese
Zusatzfunktion aktiviert wird, leuchtet auf dem Display
das Symbol auf. Um die Startzeitvorwahl wieder zu
deaktivieren, drücken Sie die Taste bis auf dem Display der
Schriftzug “OFF” eingeblendet wird.
Einstellen der gewünschten Waschintensität.
Die Option ermöglicht Ihnen die optimale Einstellung
des Waschgangs auf Grundlage des Verschmutzungsgrades
der Kleidung und der gewünschten Waschintensität.
Wählen Sie das Spülprogramm. Der Zyklus wird
automatisch auf „Normal“ eingestellt, was optimal
für durchschnittlich verschmutzte Kleidung ist (diese
Einstellung ist nicht geeignet für den Zyklus „Wolle“, der
automatisch auf „Feines“ gestellt wird).
Für stark verschmutzte Kleidung drücken Sie die Taste
, bis Sie die Einstellung „Super Wash“ erreicht haben.
Diese Einstellung gewährleistet dank der Verwendung
einer größeren Menge Wasser zu Beginn des Zyklus
sowie dank einer größeren mechanischen Bewegung
einen leistungsstarken Waschgang und ermöglicht die
Entfernung der widerstandsfähigsten Flecken. Es ist eine
Verwendung mit oder ohne Bleichmittel möglich.
Wenn Sie Bleichmittel verwenden möchten, setzen Sie
die mitgelieferte zusätzliche Kammer 4 in Kammer 1 ein.
Bei der Dosierung des Bleichmittels darf der auf dem
Zentralstift mit „max“ gekennzeichnete Höchststand (siehe
(60 °C) (erster
Abb. auf Seite 58) nicht überschritten werden.
Für gering verschmutzte Kleidung oder für eine schonende
Behandlung der Kleidung drücken Sie die Taste , bis
Sie die Einstellung „Feines“ erreicht haben. Der Zyklus
verringert die mechanische Bewegung und sorgt somit für
einen idealen Waschgang für Feinwäsche.
Einstellen des Spülgangs.
Die Option ermöglicht die Auswahl des gewünschten
Spülgangs, um sensible Haut so gut wie möglich zu
schonen. Beim ersten Tastendruck wird die Einstellung
„Extraspülen“ ausgewählt, die die Auswahl eines
zusätzlichen Spülgangs ermöglicht, um alle Spuren des
Waschmittels zu beseitigen. Beim zweiten Tastendruck
wird die Einstellung „Empfindliche Haut“ ausgewählt, die
die Auswahl von zwei zusätzlichen Spülgängen ermöglicht.
Diese Einstellung wird für eine äußerst sensible Haut
empfohlen. Beim dritten Tastendruck wird die Einstellung
„Anti Allergie Spülen“ ausgewählt, die die Auswahl von
drei zusätzlichen Spülgängen ermöglicht, um die wichtigsten
Allergene, wie etwa Pollen, Milben oder Katzen- und
Hundehaare, zu entfernen. Drücken Sie die Taste erneut, um
zur Spülgangeinstellung „Spülen“ zurückzukehren. Wenn es
nicht möglich ist, die bestehende Einstellung zu ändern, wird
auf dem Display „Nicht Gültig“ angezeigt.
Änderung der Eigenschaften des Waschgangs.
• Drücken Sie die Taste zum Aktivieren der Funktion; die der
Taste entsprechende Kontrollleuchte schaltet sich dabei ein.
• Durch erneutes Drücken der Taste kann die Funktion
wieder ausgeschaltet werden; die Kontrollleuchte erlischt.
! Ist die gewählte Funktion nicht vereinbar mit dem
eingestellten Programm, schaltet die Kontrollleuchte auf
Blinklicht und die Funktion wird nicht aktiviert.
! Ist die gewählte Funktion mit einer anderen bereits
eingestellten nicht kompatibel, schaltet die der ersten
Funktion entsprechende Kontrollleuchte auf Blinklicht und
nur die zweite Funktion wird aktiviert, die Kontrollleuchte
der aktivierten Funktion schaltet auf Dauerlicht.
! Die Funktionen können eine Änderung der empfohlenen
Beladungsmenge und/oder der Waschzeit bewirken.
7. STARTEN DES PROGRAMMS. Drücken Sie die Taste
START/PAUSE. Die zugehörige Kontrollleuchte schaltet auf
grünes Dauerlicht und die Gerätetür wird gesperrt (Symbol
GERÄTETÜR GESPERRT leuchtet) Während des
Programmablaufs erscheint auf dem Display die Bezeichnung
der laufenden Programmphase. Um ein Programm während
eines laufenden Waschgangs zu ändern, schalten Sie den
Waschvollautomat mittels der Taste START/PAUSE auf
Pause (die Kontrollleuchte START/PAUSE blinkt nun langsam
orangefarben); wählen Sie daraufhin das gewünschte
Programm aus und drücken Sie erneut auf die Taste START/
PAUSE. Um während eines laufenden Programms die
Gerätetür zu öffnen, drücken Sie die Taste START/PAUSE;
wenn das Symbol GERÄTETÜR GESPERRT erloschen
ist, kann die Gerätetür geöffnet werden. Drücken Sie die Taste
START/PAUSE erneut, um das Programm an der Stelle an
der es unterbrochen wurde, wieder in Gang zu setzen.
8. ENDE DES PROGRAMMS. Das Programmende wird
durch die Anzeige “PROGRAMMENDE” auf dem Display
angezeigt. Wenn das Symbol GERÄTETÜR GESPERRT
erlischt, kann die Gerätetür geöffnet werden. Öffnen
Sie die Gerätetür, nehmen Sie die Wäsche heraus und
schalten Sie das Gerät aus.
! Möchten Sie ein bereits in Gang gesetztes Waschprogramm
löschen, drücken Sie die Taste etwas länger. Der Waschgang
wird unterbrochen und das Gerät schaltet sich aus.
56
Page 57

Programme und Funktionen
Programmtabelle
Max.
Beschreibung des Programms
Wasch-
programme
Flecken
Baumwolle 60° (1) (erster Tastendruck): stark verschmutzte Weiß-
und farbechte Buntwäsche.
Baumwolle 40° (2) (zweiter Tastendruck): leicht verschmutzte
Weißwäsche und empfindliche Buntwäsche.
Baumwolle 20° (dritter Tastendruck): leicht verschmutzte Weißwä-
sche und empfindliche Buntwäsche.
Synthetik Robust (erster Tastendruck): stark verschmutzte, far-
bechte Buntwäsche.
Synthetik Robust (4) (erster Tastendruck): leicht verschmutzte, far-
bechte Buntwäsche.
Synthetik Fein (zweiter Tastendruck): leicht verschmutzte farbechte
Buntwäsche.
Schnell 60' (erster Tastendruck): zum kurzen Auffrischen versch-
mutzter Wäsche (nicht geeignet für Wolle, Seide und Handwäsche).
Schnell 30' (zweiter Tastendruck): zum kurzen Auffrischen leicht ver-
schmutzter Wäsche (nicht geeignet für Wolle, Seide und Handwäsche).
MY CYCLE (Speicher): hiermit kann jede beliebige Art von Waschgang gespeichert werden
M
Bett & Bad:
WOOLMARK PLATIN (Wolle): wolle, Kaschmir usw.
Feinwäsche
Schleudern (erster Tastendruck)
Spülen (zweiter Tastendruck)
Abpumpen (dritter Tastendruck)
Die auf dem Display und in der Bedienungsanleitung genannte Zyklusdauer wird ausgehend von Standardbedingungen berechnet. Die effektiv benötigte Zeit kann aufgrund zahlreicher Faktoren wie
Temperatur und Druck des Zulaufwassers, Raumtemperatur, Waschmittelmenge, Art, Menge und Verteilung der Waschladung sowie der gewählten Zusatzfunktionen variieren.
1) Prüfprogramm gemäß 1061/2010: Wählen Sie das Programm bei 60 °C (erster Tastendruck).
Dieser Zyklus ist für den Waschvorgang von normal schmutziger Baumwollwäsche geeignet; es ist der wirksamste in Bezug auf den kombinierten Energie-Wasser-Verbrauch; für bei 60°C. zu waschende Wäsche zu verwenden. Die effektive Waschtemperatur kann von der angegebenen abweichen.
2) Prüfprogramm gemäß 1061/2010: wählen Sie das Programm bei 40 °C (zweiter Tastendruck).
Dieser Zyklus ist für den Waschvorgang von normal schmutziger Baumwollwäsche geeignet; es ist der wirksamste in Bezug auf den kombinierten Energie-Wasser-Verbrauch; für bei 40°C. zu waschende Wäsche zu verwenden. Die effektive Waschtemperatur kann von der angegebenen abweichen.
3) Die “Vorwasche” funktion kann beim Temperaturwert 60 °C nicht aktiviert werden.
Für alle Testinstitute:
2) Langes Baumwollprogramm: wählen Sie das Programm bei 40 °C (zweiter Tastendruck).
4) Langes Kunstfaserprogramm: wählen Sie das Programm bei 60 °C (erster Tastendruck); Temperatur von 40 °C (drücken Sie die Taste TEMPERATUR).
bettwäsche Bade- und Handtücher.
Max.
Temperatur
(°C)
40°
60°
(Max. 90°C)
40°
20°
60°
40°
40°
60°
30°
60°
40° 800 30° 0 -
Schleu-
derGe-
schwin-
digkeit
(U/min)
1400
1400
1400
1400
800
800
800
1400 -
800 -
1400
-
-
1400
1400
- 0 - - - -
Waschmittel
Vor-
sche
wäsche
Hauptwä-
Bleichmit-
(3)
-
-
-
-
-
-
-
-
- - - -
- - -
tel
Max.
spüler
Weich-
menge (kg)
Beladungs-
Restfeuchti-
6 - - - 190’
10 53 1,09 85 210’
10 53 1,09 92 185’
10 - - - 175’
5,5 48 0,99 57 120’
5,5 48 0,63 55 100’
5,5 - - - 80’
4 53 0,54 57 60’
4 71 0,21 41 30’
10 - - - 155’
2,5 - - - 100’
1 - - - 80’
10 - - - 16’
10 - - - 49’
10 - - - 2’
gkeit %
Energiever-
samt lt
Wasser ge-
brauch kWh
DE
dauer
Programm-
Waschfunktionen
Vorwäsche
Beim Wählen dieser Funktion wird eine Vorwäsche aktiviert,
so dass auch hartnäckige Flecken beseitigt werden.
NB: Füllen Sie das Waschpulver in die entsprechende
Kammer ein.
! Diese Funktion kann zu den Programmen ,
, , ,
Bügelleicht
Bei Einstellung dieser Funktion wird zur Vermeidung
einer Knitterbildung der Wasch- und Schleudergang
entsprechend geändert. Am Ende des Waschgangs
erfolgen langsame Umdrehungen der Trommel; die
Kontrollleuchte der Funktion BÜGELLEICHT und die der
Taste START/PAUSE blinken (orange) und auf dem Display
wird “PROGRAMMENDE” angezeigt. Um den Waschgang
abzuschließen, drücken Sie die Taste START/PAUSE oder
die Taste BÜGELLEICHT.
! Diese Funktion kann zu den Programmen
, “Schnell 30’”, , , nicht zugeschaltet werden.
(60°), (40°),
nicht zugeschaltet werden.
Eco Wash
Die Funktion Eco Wash trägt dazu bei, Energie zu sparen,
indem das Wasser für die Wäsche nicht aufgeheizt
wird - ein Vorteil sowohl für die Umwelt als auch für
die Stromrechnung. Tatsächlich sichern die verstärkte
Waschaktion und der optimierte Wasserverbrauch
hervorragende Ergebnisse bei gleicher durchschnittlicher
Dauer eines Standardzyklusses zu. Für maximale
Waschergebnisse empfehlen wir den Einsatz eines
Flüssigwaschmittels.
! Diese Funktion kann zu den Programmen , , , ,
, nicht zugeschaltet werden.
57
Page 58

Waschmittel und Wäsche
M
AX
1
2
4
3
A
B
DE
Waschmittel und Wäsche
Ein gutes Waschergebnis hängt auch von einer korrekten Waschmitteldosierung ab: Eine zu hohe Dosierung bedeutet nicht
unbedingt reinere Wäsche, sie trägt nur dazu bei, die Maschineninnenteile zu verkrusten und die Umwelt zu belasten.
! Waschmittel in Pulverform für Baumwollweißwäsche, für
die Vorwäsche und für Waschprogramme bei Temperaturen
über 60°C verwenden.
! Bitte befolgen Sie den auf der Waschmittelverpackung
angegebenen Anweisungen.
! Verwenden Sie keine Handwaschmittel, sie verursachen
eine zu hohe Schaumbildung.
Schublade herausziehen
und Waschmittel oder Zusätze wie folgt einfüllen:
Kammer 1: Waschpulver für die Vorwäsche (Waschpulver)
Vergewissern Sie sich vor Einfüllen des Waschmittels, dass
die Zusatzkammer 4 nicht eingesetzt wurde.
Kammer 2: Waschmittel für die Hauptwäsche (Waschpulver oder Flüssigwaschmittel)
Falls Sie ein Flüssigwaschmittel verwenden, wird empfohlen, die mitgelieferte Trennwand A zu benutzen, um
eine korrekte Dosierung zu gewährleisten. Wenn Sie ein
Pulverwaschmittel verwenden, geben Sie die Trennwand in
die Kammer B.
Kammer 3: Zusätze (Weichspüler usw.)
Der Weichspüler darf das Gitter nicht übersteigen.
Zusätzliche Kammer 4: Bleichmittel
Vorsortieren der Wäsche
• Sortieren Sie die Wäsche nach:
- Gewebeart / Waschetikettensymbol.
- und Farben: Buntwäsche von Weißwäsche trennen.
• Entleeren Sie alle Taschen.
• Das angegebene Gewicht, das sich auf die maximale Ladung an Trockenwäsche bezieht, sollte nicht überschritten
werden: siehe “Programmtabelle“.
Wie schwer ist Wäsche?
1 Betttuch 400-500 gr
1 Kissenbezug 150-200 gr
1 Tischdecke 400-500 gr
1 Bademantel 900-1.200 gr
1 Handtuch 150-250 gr
Sonderprogramme
Flecken: das Programm ist für die Reinigung stark
verschmutzter Kleidung mit widerstandsfähigen Farben
geeignet. Das Programm gewährleistet einen Waschgang,
der besser als der Standard (Klasse A) ist. Mischen Sie
bei diesem Programm keine Kleidungsstücke mit unterschiedlicher Farbe. Es empfiehlt sich die Verwendung von
Pulverwaschmittel. Bei hartnäckigen Flecken empfiehlt sich
die Vorbehandlung mit spezifischen Zusatzstoffen.
Baumwolle 20°C : ideal für normalverschmutze Baumwolle. Die auch mit kaltem Wasser erreichten Leistungen,
vergleichbar mit einer Wäsche bei 40°, werden mechanisch erzielt. Die Trommel arbeitet mit wiederholten, kurz
auf einander folgenden Beschleunigungen.
Bett & Bad: um Ihre Handtücher- und Bettwäsche in
einem einzigen Waschgang zu waschen, verwenden Sie
das -Programm, das die Verwendung von Weichspülern
optimiert. Dadurch sparen Sie zusätzlich Zeit und Energie.
Es empfiehlt sich die Verwendung von Pulverwaschmittel.
Wolle: das Waschprogramm „Wolle” dieser Waschmaschine Hotpoint-Ariston wurde von der Woolmark
Company für die Wäsche von mit „Handwäsche“ gekennzeichneten Wollkleidungsstücken getestet und anerkannt,
vorausgesetzt die Wäsche erfolgt gemäß der Anweisungen
auf Etikett des Kleidungsstück und den Angaben des Herstellers des Haushaltsgeräts. Hotpoint-Ariston ist die erste
Waschmaschinenmarke, die von der Woolmark Company
die Zertifizierung Woolmark Apparel Care - Platinum für
ihre Waschleistungen und den Verbrauch von Wasser und
Energie erhalten hat. (M1135)
Feinwäsche: verwenden Sie das Programm für die
Reinigung von Feinwäsche, die Applikationen wie Strass
oder Pailletten aufweist.
Wählen Sie für die Reinigung von Kleidungsstücken aus
Seide und Vorhänge den Zyklus und wählen Sie bei
der Option die Einstellung „Feines“.
Es wird empfohlen, die Kleidungsstücke vor der Reinigung
umzudrehen und kleinere Kleidungsstücke in den
entsprechenden Reinigungsbeutel für Feinwäsche zu geben.
Um bessere Ergebnisse zu erzielen, wird für die Reinigung
von Feinwäsche die Verwendung von Flüssigwaschmittel
empfohlen.
Unwuchtkontrollsystem
Um starke Vibrationen oder eine Unwucht beim Schleudern zu vermeiden, verfügt das Gerät über ein Schleuderunwuchtsystem. Die Waschladung wird durch eine erhöhte
Rotation der Trommel als die des WAschgangs ausbalanciert. Sollte die Wäscheladung nach Ablauf mehrerer Versuche immer noch nicht korrekt verteilt sein, schleudert das
Gerät die Wäsche bei einer niedrigeren Geschwindigkeit als
die der vorgesehenen Schleudergeschwindigkeit. Sollte die
Wäsche extrem ungleichmäßig verteilt sein, führt das Gerät
anstelle des Schleudergangs einen Wäscheverteilungs-Zyklus durch. Um eine optimale Verteilung der Wäscheladung
und somit eine korrekte Auswuchtung zu fördern, sollten
große und kleine Wäscheteile gemischt eingefüllt werden.
58
Page 59

Störungen und Abhilfe
Bei Funktionsstörung: Bevor Sie sich an den Technischen Kundendienst wenden (siehe „Kundendienst“), vergewissern Sie sich zuerst,
ob es sich nicht um eine Kleinigkeit handelt, die Sie selbst beheben können. Ziehen Sie hierzu nachstehendes Verzeichnis zu Rate.
Störungen:
Der Waschvollautomat schaltet sich
nicht ein.
Der Waschgang startet nicht.
Mögliche Ursachen / Lösungen:
• Der Stecker steckt nicht in der Steckdose, oder nicht so, dass der Kontakt hergestellt wird.
• Der Strom ist ausgefallen.
• Die Gerätetür wurde nicht vorschriftsmäßig geschlossen.
• Die ON/OFF-Taste wurde nicht gedrückt.
• Die Taste START/PAUSE wurde nicht gedrückt.
• Der Wasserhahn ist nicht aufgedreht.
• Es wurde ein verzögerter Start gewählt (siehe „Durchführung eines Waschpro-
gramms“).
Der Waschvollautomat lädt kein
Wasser (auf dem Display wird die
Meldung “WASSERZULAUF PRÜFEN” eingeblendet).
Der Waschvollautomat lädt laufend
Wasser und pumpt es laufend ab.
• Der Zufuhrschlauch ist nicht am Wasserhahn angeschlossen.
• Der Schlauch ist geknickt.
• Der Wasserhahn ist nicht aufgedreht.
• Es ist kein Wasser da.
• Der Druck ist unzureichend.
• Die Taste START/PAUSE wurde nicht gedrückt.
• Der Ablaufschlauch befindet sich nicht auf der vorgeschriebenen Höhe, d.h. 65 –
100 cm vom Boden (siehe „Installation“).
• Das Schlauchende liegt unter Wasser (siehe „Installation”).
• Der Abfluss der Hausinstallation wurde nicht mit einer Entlüftungsöffnung versehen.
Konnte die Störung durch diese Kontrollen nicht behoben werden, dann drehen Sie den
Wasserhahn zu, schalten das Gerät aus und fordern den Kundendienst an. Falls Sie in
einer der obersten Etagen eines Gebäudes wohnen, kann es vorkommen, dass sich
im Syphon ein Vakuum bildet, und der Waschvollautomat ständig Wasser ansaugt und
wieder abpumpt. Zur Lösung dieser Probleme bietet der Handel spezielle Syphonventile.
DE
Der Waschvollautomat pumpt nicht
ab und schleudert nicht.
Der Waschvollautomat vibriert zu
stark während des Schleuderns.
Der Waschvollautomat ist undicht.
Das Gerät ist blockiert, das Display
blinkt und zeigt einen Fehlercode
an (zum Beispiel: F-01, F-..).
Es bildet sich zu viel Schaum.
• Das Programm siehe kein Abpumpen vor: Bei einigen Programmen muss es von
Hand eingestellt werden (siehe „Programme und Funktionen“).
• Die Funktion “BÜGELLEICHT” wurde aktiviert: zur Beendung des Programms Taste
START/PAUSE drücken (siehe „Programme und Funktionen“).
• Der Ablaufschlauch ist geknickt (siehe „Installation“).
• Die Ablaufleitung ist verstopft.
• Die Trommel wurde bei der Installation nicht korrekt befreit (siehe „Installation“).
• Der Waschvollautomat steht nicht eben (siehe „Installation“).
• Der Waschvollautomat steht zu eng zwischen der Wand und einem Möbel (siehe
„Installation“).
• Der Zulaufschlauch wurde nicht ordnungsgemäß aufgeschraubt (siehe „Installation“).
• Die Waschmittelschublade ist verstopft (zur Reinigung siehe „Wartung und Pflege“).
• Der Ablaufschlauch ist nicht korrekt befestigt (siehe „Installation“).
• Schalten Sie das Gerät aus und ziehen Sie den Netzstecker; warten Sie daraufhin
ca. 1 Minute und schalten Sie es wieder ein.
Bleibt die Störung bestehen, kontaktieren Sie bitte den Kundendienst.
• Das Waschmittel ist für Waschmaschinen nicht geeignet (es muss mit der Aufschrift
„Für Waschmaschinen“, „Für Handwäsche und Waschmaschinen“ usw. versehen sein.
• Es wurde zu hoch dosiert.
59
Page 60

Kundendienst
DE
Bevor Sie sich an den Kundendienst wenden:
• Sollten einige Kontrollen vorab selbst durchgeführt werden (siehe „Störungen und Abhilfe“);
• Starten Sie daraufhin das Programm erneut, um sicherzustellen, dass die Störung auch wirklich behoben wurde;
• Ist dies nicht der Fall, dann kontaktieren Sie den autorisierten Kundendienst unter der auf dem Garantieschein befindlichen
Telefonnummer.
! Wenden Sie sich auf keinen Fall an nicht autorisierte Techniker.
Geben Sie bitte Folgendes an:
• die Art der Störung;
• das Maschinenmodell (Mod.);
• die Seriennummer (S/N).
Diese Daten entnehmen Sie bitte dem auf der Rückseite des Waschvollautomaten und auf der Vorderseite (Gerätetür öffnen)
befindlichen Typenschild.
60
Page 61

Kullanma Kılavuzu
ÇAMAŞIR MAKİNESİ
TR
Türkçe
WMD 1044
İçindekiler
Montaj, 62-63
Ambalajın çıkartılması ve seviye ayarı getirilmesi
Su ve elektrik bağlantıları
İlk yıkama
Teknik veriler
Bakım ve özen, 64
Su ve elektrik kesilmesi
Çamaşır makinesin temizlenmesi
Deterjan haznesinin temizlenmesi
Kapak ve hazne bakımı
Pompanın temizlenmesi
Su besleme hortumunun kontrol edilmesi
Önlemler ve öneriler, 65
Genel güvenlik uyarıları
Atıkların tasye edilmesi
Cam kapağın açılması
Çamaşır makinesinin tanımı, 66-67
Kontrol paneli
Ekran
TR
Bir yıkama devri nasıl yapılır, 68
Programlar ve işlevler, 69
Program tablosu
Yıkama işlevleri
Deterjan ve çamaşır, 70
Deterjan haznesi
Çamaşırın hazırlanması
Özel programlar
Yük dengeleme sistemi
Arızalar ve onarımlar, 71
Teknik Servis, 72
61
Page 62

Montaj
TR
! Bu kitapçığı gerektiği her an danışabilmeniz
için özenle saklayınız. Çamaşır makinesinin satılması, devri veya nakli durumlarında
da, yeni sahibinin faydalanabilmesi için bu
kılavuz makineyle beraber saklanmalıdır.
! Talimatları dikkatlice okuyunuz; montaj,
kullanım ve güvenliğe ilişkin önemli bilgiler
içermektedir.
Ambalajın çıkartılması ve aynı seviyeye getirilmesi
Ambalajdan çıkartılması
1. Çamaşır makinesinin ambalajdan
çıkartılması.
2. Çamaşır makinesinin taşıma esnasında
hasar görmemiş olduğunu kontrol ediniz.
Hasar görmüş ise monte etmeyiniz. Satıcıya
başvurunuz.
3. Taşıma sırasında
arka tarafta bulunan 4 adet koruyucu vidayı ve ara
parçasıyla birlikte
buradaki lastiği de
çıkartınız (bakınız
şekil).
Sağlıklı bir dengeleme, çamaşır makinesine
sağlam bir duruş kazandıracağı gibi, çalışması
esnasındaki sarsıntı, gürültü ve hareketlilikleri de önleyecektir. Zeminde moket veya
halı olması halinde, ayarı makinenin altında
havalandırma olabilecek şekilde yapınız .
Su ve elektrik bağlantıları
Su besleme hortumunun takılması
1. Tedarik borusunu 3/4 gaz vidalý
baðlantý kullanarak
bir soðuk su musluðuna baðlayýn (bkz.
þekil).
Baðlantýyý yapmadan
önce, suyu berraklaþana kadar akýtýnýz.
2. Su besleme hortumunu arka kısımının
üst sağ köşesinde
bulunan su girişine
vidalayarak makineye bağlayınız (bkz.
şekil).
4. Delikleri ambalajda bulacağınız plastik
kapaklarla kapayınız.
5. Tüm parçaları muhafaza ediniz: çamaşır
makinesinin nakli gerektiği takdirde
takılmaları gerekmektedir.
! Ambalajlar çocuk oyuncağı değildir.
Cihazın aynı seviyeye getirilmesi
1. çamaşır makinesini düz ve sert bir ze-
mine yerleştiriniz, duvar veya mobilyalara
dayamayınız.
2. Yerleştirilecek
zemin tam düz
değilse çamaşır
makinesinin vidalı
ön ayaklarını sıkarak
veya gevşeterek
dengeyi sağlayınız
(bkz. şekil); eğim
açısı, makinenin üst tezgahına
göre 2° den fazla
olmamalıdır.
3. Hortumda katlanma ve ezilme olmamasına
dikkat ediniz.
! Musluğun su basıncının Teknik Veriler
tabelasında belirtildiği gibi olması gerekir
(bkz. yan sayfa).
! Besleme hortumunun boyu yetersizse
yetkili bir satıcı mağaza veya teknisyene
başvurunuz.
! Kesinlikle daha önceden kullanılmış hortum
kullanmayınız.
! Makine ile birlikte verilen hortumları kullanınız.
62
Page 63

Tahliye hortumunun bağlanması
65 - 100 cm
; Standart Pamuklu 60°C.
; Standart Pamuklu 40°C.
Tahliye hortumunu
bükmeden zeminden 65 ila 100 cm
yukarıda yer alan pis
su borusuna veya
duvar tahliyesine
bağlayın;
! Çamaşır makinesi yerleştirildiğinde, elektrik
prizi kolay ulaşılabilir bir durumda olmalıdır.
! Uzatma kablosu veya çoklu priz kullanmayın.
! Kablo bükülmemeli veya sıkıştırılmamalıdır.
! Güç kablosu ve si sadece yetkili teknis-
yenler tarafından degistirilmelidir.
Uyarı! Bu standartlara uyulmaması durumunda sirket sorumlu tutulamaz.
TR
Buna alternatif
olarak, makine
ile birlikte verilen
pis su borusunu
musluğa (şekle
bakınız) bağlayarak
lavabo veya küvetin
kenarına yerleştirin.
Hortumun serbest
kalan ucu suya
daldırılmamalıdır.
! Hortum eklerinin kullanımı önermiyoruz; kesinlikle gerekliyse ek hortum orijinal hortum
ile aynı çapta olmalı ve uzunluğu 150 cm.
aşmamalıdır.
Elektrik bağlantıları
Cihazı elektrik prizine takmadan önce,
aşağıdakilerden emin olun:
• Prizin topraklandıgından ve ilgili mevzuata
uygun oldugundan;
• Prizin teknik veri tablosunda gösterilmekte
olan maksimum cihaz elektrik yüküne
dayanıp dayanamayacagından (teknik veri
tablosuna bakiniz);
• Güç kaynagı voltajının teknik veri tablosunda
gösterilen degerlere uygun olup olmadigindan
(teknik veri tablosuna bakiniz);
• Elektrik prizinin çamaşır makinesinin fişi
ile uyumlu olup olmadığından emin olun.
Muhafazalı değilse, priz veya şi değiştirin.
! Çamaşır makinesi kapalı alan olsa bile, evin
dışına yerleştirilmemelidir. Cihazın yağmur,
fırtına ve diğer hava koşullarına maruz
bırakılması son derece tehlikelidir.
İlk yıkama
Ilk kullanimdan önce programlar tablosundaki
“Kendi kendini temizleme” Programi kullanarak çamasir olmadan deterjanla bir yikama
yapin.
Teknik bilgiler
Model WMD 1044
genişlik 59,5 cm
Ölçüler
Kapasite 1 - 10 kg
Elektrik
bağlantıları
Su
bağlantıları
Sıkma hızı
1061/2010 ve
1015/2010
sayýlý direktiflere
göre kontrol
programlarý
yükseklik 85 cm
derinlik 60,5 cm
makine üstünde takılı olan
teknik veriler plakasına
bakınız.
max. su basıncı
1 MPa (10 bar)
min. su basıncı
0,05 MPa (0,5 bar)
tambur kapasitesi 71 litre
maksimum dakikada 1400
devire kadar
(60°)
Program
basınız)
Program (40°)
basınız)
(tuşa 1 kez
(tuşa 2 kez
Bu makina aşağıda belirtilen
AB normlarına uygundur:
- 2004/108/CE (Elektromanyetik Uyum)
- 2002/96/CE
- 2006/95/CE (Alçak gerilim)
63
Page 64

Bakım ve onarım
1
2
A
B
TR
Su ve elektrik kesilmesi
• Su musluğunu her yıkamadan sonra
kapatınız. Böylece çamaşır makinesinin su
tesisatının eskimesi engellenir, su kaçağı
tehlikesi ortadan kalkar.
• Bakım ve temizlik işlemleri esnasında
çamaşır makinesinin şini çekiniz.
Çamaşır makinesinin temizlenmesi
• Dış gövde ve plastik aksam ılık su ve
sabunla ıslatılmış bir bez vasıtasıyla temizlenebilir. Çözücü ve aşındırıcı maddeler
kullanmayınız.
• Çamaşır makinesinde tambur boşken
çalıştırılması gereken “Kendi kendini te-
mizleme” programı bulunmaktadır.
Deterjan (az kirli çamaşırlar için tavsiye
edilen miktarın %10’u kadar) veya çamaşır
makinesinin temizliği için kullanılan özel katkı
maddeleri, yıkama programında yardımcı
olarak kullanılabilir. 40 yıkamada bir “Kendi
kendini temizleme” programını çalıştırmanız
önerilir.
Programı devreye
sokmak için 5 saniye boyunca A ve B
tuşlarına aynı anda
basınız (bakınız
Şekil).
Program, otomatik
olarak başlayacak
ve yaklaşık 70 dakika sürecektir. Devreyi durdurmak için
START/PAUSE tuşuna basınız.
Deterjan haznesinin temizlenmesi
Hazneyi kaldırarak,
dışarıya doğru
çekmek suretiyle
çıkartınız (bkz. şekil).
Akar su altında
yıkayınız, bu çekmecenin temizliği sık sık
yapılmalıdır.
Pompanın temizlenmesi
Çamaşır makinesinin pompası kendini temizleyen bir özelliğe sahip olup, ayrıca
temizlik gerektirmez. Ancak, bazı küçük
cisimler (madeni para, düğme) pompanın alt
kısmındaki koruyucu bölmeye düşebilirler.
! Yıkama devresinin bitmiş olup olmadığını
kontrol ediniz ve şini çekiniz.
Pompa koruyucu bölgesine erişebilmek için:
1. çamaşır makinesinin ön kapama panelini, bir tornavida
vasıtasıyla çıkartınız
(bkz. şekil);
2. makine kapağını
saatin ters yönünde
çevirerek sökünüz
(bkz. şekil). bir miktar
su gelmesi normaldir;
3. içini dikkatlice temizleyiniz;
4. kapağı vidalayınız;
5. paneli takarken, tam yerleştirmeden evvel,
kancaların yuvalara gelip gelmediğini kontrol
ediniz.
Su besleme hortumunun kontrol
edilmesi
Su besleme hortumunu, en azından senede
bir defa kontrol ediniz. Yarık veya çatlaklar
varsa değiştiriniz: yıkama esnasındaki yüksek basınçlar ani patlamalara yol açabilirler.
Kapak ve hazne bakımı
• Kötü kokuların oluşmasını engellemek için
kapağı daima aralık bırakınız.
64
! Kesinlikle daha önceden kullanılmış hortum
kullanmayınız.
Page 65

Önlemler ve öneriler
20
! Çamaşır makinesi uluslararası güvenlik standartlarına
uygun olarak projelendirilmiş ve üretilmiştir. Bu uyarılar
güvenlik amaçlı olup dikkatlice okunmalıdır.
Genel güvenlik uyarıları
• Makine meskenlerde kullanılmak üzere tasarlanmış
olup profesyonel kullanım amaçlı değildir.
• Kullanım güvenliklerinden sorumlu bir kişinin komutları
ve denetimi altında gerçekleşmediği sürece, cihaz,
ziksel kapasitesi yetersiz (çocuklar dahil), işitsel veya
zihinsel olarak yeterli olamayan kişiler ile yetersiz bilgi ve
deneyime sahip olan kişiler tarafından kullanılmamalıdır.
Cihazla oynamamalarını garanti etmek için çocukların
kontrol altında olmaları gerekmektedir.
• Çamaşır makinesi yalnızca yetişkin kişiler tarafından
ve kullanma talimatına uygun olarak kullanılmalıdır.
• Cihaza ayaklarınız çıplakken yada elleriniz veya
ayaklarınız ıslak yada nemliyken dokunmayınız.
• Fişi prizden çekerken kablosundan değil şin kendisinden tutarak çekiniz.
• Makine çalışırken deterjan haznesini açmayınız.
• Tahliye suyuna el sürmeyiniz, yüksek ısıda olabilir.
• Kapağı, hiçbir şekilde zorlamayınız: istenmedik
açılmalara karşı olan güvenlik mekanizması arıza
yapabilir.
• Arıza halinde onarmak amacıyla iç mekanizmaları
kurcalamayınız.
• Çocukların çalışır vaziyetteki makineye yaklaşmalarına
mani olunuz.
• Çalışma esnasında kapak ısınabilir.
• Taşınması gerektiğinde, bu işlemin, iki veya üç kişi
tarafından, azami dikkatle yapılması gerekir. Kesinlikle
tek başınıza yapmayınız, çünkü makine çok ağırdır.
• Çamaşırları yerleştirmeden evvel, sepetin boş
olduğundan emin olunuz.
Cihazların tasye edilmesi konusunda daha geniş bilgi
almak için cihaz sahiplerinin mevcut müşteri hizmetine
veya satış noktalarına başvurulması gerekir.
Cam kapağın açılması
Elektrik kesildiğinde makine kapağını açamadığınız
zaman çamaşırları çıkarıp asmak istediğinizde aşağıdaki
gibi yapınız:
1. şi prizden çekiniz.
2. makinenin içindeki su seviyesinin makine kapağından
daha alçak olmasını
sağlayınız, aksi takdirde
A şeklinde gösterildiği
gibi bir kapta toplanacak
şekilde boşaltma hortumu
vasıtasıyla içindeki suyu
gideriniz.
3. çamaşır makinesinin
ön panelini, bir tornavida
vasıtasıyla, çıkartınız (bkz.
şekil).
TR
Atıkların tasye edilmesi
• Ambalaj malzemelerinin tasye edilmesi: yerel yasalara uyunuz, bu şekilde ambalajların geri dönüşümü
mümkün olur.
• Elektrik ve elektronik cihazların atıklarını değerlendirme
2002/96/CE sayılı Avrupa Konseyi direktinde; beyaz
eşyaların kentsel katı atık genel yöntemi ile tasye
edilmemesi öngörülmüştür. Kullanılmayan cihazların,
madde geri kazanım ve geri dönüşüm oranını en
yüksek seviyeye yükseltmek, çevre ve insan sağlığına
olası zararları engellemek için ayrı ayrı toplanması gerekir. Tüm ürünlerin üzerinde; ayrı toplama hükümlerini
hatırlatmak amacıyla üstünde çarpı işareti olan sepet
sembolü verilmiştir.
4. şekilde gösterilen dilciğinden tutarak blokajından
çıkıncaya kadar dışarıya doğru çekiniz; aynı anda aºağı
doğru çekerek kapıyı açınız.
5. paneli takarken, tam yerleştirmeden evvel, kancaların
yuvalara gelip gelmediğini kontrol ediniz.
65
Page 66

Çamaşır makinesinin tanımı
TR
Kontrol paneli
Deterjan Bölmesi
Deterjan Bölmesi: ve diğer katkıları koyunuz (“Deterjan-
lar bölümüne” bakınız).
ON/OFFtuşu : makineyi açmak ya da kapatmak için bu
tuşa kısa süreli basınız. Yeşil renkte yanıp sönen START/
PAUSE uyarı lambası makinenin açık olduğunu gösterir.
Makineyi çalışır vaziyetteyken kapatmak için tuşu daha
uzun, yaklaşık 3 saniye, basılı tutmanız gerekir;hafçe ya
da yanlışlıkla basıldığında makine kapanmaz. Makinenin
çalışır vaziyetteyken kapatılması devrede olan yıkama
programını iptal eder.
ON/OFF
PROGRAM
SEÇIM
tuşları
tuşu
HAFIZA
tuşu
DURULAMA
TEMİZLEME
ŞEKLİ
tuşu
Ekran
FONKSİYON
tuşları
ŞEKLİ
tuşu
GECIKMELI
BAŞLAMA
tuşu
TUŞLAR KILITLI tuşu : kontrol paneli etkin haline
getirmek için tuşu yaklaşık 2 saniye basılı tutmanız
gerekir. Sembol açık ise; kontrol panelinin kilitli
olduğunu gösterir. Böylece özellikle çocuklarınız varsa
programın yanlışlıkla değiştirilmesi engellenir. kontrol
panelini etkisiz haline getirmek için tuşu yaklaşık 2
saniye basılı tutmanız gerekir.
GECIKMELI BAŞLAMA tuşu : seçilen programı
geciktirmeli çalıştırmak için basınız. Gecikme ekranda
belirtilecektir.
SIKMA
tuşu
START/PAUSE
uyarı lambalı tuşu
SİCAKLİK AYARİ
tuşu
TUŞLAR
KILITLI
tuşu
PROGRAM SEÇIM
için (bkz. Program tablosu).
HAFIZA tuşu: bir devir ve en çok kullanılan kişisel ayarları
kaydetmek için tuşa basılı tutunuz. Daha önce kaydedilmiş
olan bir devir seçmek için HAFIZA tuşuna basınız.
FONKSİYON
tuşuna basarak ayarlayınız. Ekranda ilgili uyarı lambası
yanacaktır.
TEMİZLEME ŞEKLİ
yoğunluğunu seçmek için bu tuşa basınız
DURULAMA ŞEKLİ
tipini seçmek için bu tuşa basınız.
SIKMA tuşu : santrifüjü azaltmak ya da devre dışı
bırakmak için basınız – değeri ekranda görüntülenir.
SİCAKLİK AYARİ tuşu : sıcaklık derecesini azaltmak
için basınız: seçilen değer ekranda belirtilir.
66
tuşları
: istenilen programı ayarlamak
tuşları
: İstenilen işlevi seçmek için mode
tuşu: arzu edilen yıkama
tuşu: arzu edilen durulama
START/PAUSE uyarı lambalı tuşu: yeşil lamba yavaşça
yanıp sönünce istediğiniz yıkama programını başlatmak
için tuşa basınız. Yıkama programı başladıktan sonra
uyarı lambası yanık kalır. Seçilen bir programın beklemeye alınması için aynı tuşa tekrar basınız; uyarı lambası
turuncu renkte yanıp sönecektir. Sembol yanık
değilse makine kapağı açılabilir. Yıkama programının
kaldığı yerden devam etmesi için aynı tuşa tekrar
basınız.
Bekleme modu
Yeni enerji tasarrufu düzenlemeleri ile uyumlu bu çamaşır
makinesine herhangi bir faaliyet algılanmadığında 30
dakika içinde devreye sokulan otomatik bekleme sistemi
yerleştirilmiştir ON/OFF düğmesine bir süre basın ve
makinenin tekrar çalışmasını bekleyin.
Off-mode’da tüketim: 0,5 W
Left-on’da tüketim: 0,5 W
Page 67

Ekran
Z
B
A
TR
X
D
C
E
Y
F
Makineyi programlamak için yararlı bir gereç olmasının yanı sıra ekranda değişik bilgiler verilmektedir.
Üsteki A ve B satırlarında seçilen yıkama programı, programın hangi devrede olduğu ve program takip ile gereken tüm
bilgiler verilir.
C satırında programın bitmesine ne kadar süre kaldığı ve GECIKMELI BAŞLATMA ayarlandıysa yıkamanın başlamasına
ne kadar süre kaldığı görüntülenir.
D satırı ise ayarlanan programa göre santrifüjün maksimum hız değeri görüntüler. Eğer santrifüj seçili değilse satır sönük
kalır.
E satırı ise ayarlanan programa göre santrifüjün maksimum ısı değerini görüntülenir. Eğer ısı ayarı programda mevcut
değilse bu satır sönük kalır.
F uyarı lambaları işlevler ile ilgili olup seçili işlev ayarlanan programa uygunsa yanar.
KAPAK KILITLI sembolü
Işıklı göstergenin yanıyor olması kapağın, istenmeyen açılmalara karşı, kapalı olduğunu gösterir. Herhangi bir arızaya yol
açmamak için ışıklı göstergenin sönmesini beklemek gerekir.
Not: Makine çalışırken GECIKMELI BAŞLATMA etkin ise makine kapağı açılamaz, kapağı açabilmek için START/PAUSE
tuşuna basarak makineyi beklemeye alınız.
! İlk çalıştırıldığında dil seçimi istenecektir ve ekran otomatik olarak ‘’Dil seçimi” menüsüne girecektir.
İstenilen dili seçmek için X ve Y tuşlarına basınız. Onaylamak için Z tuşuna basınız.
Dil değiştirilmek istenir ise sesli bir sinyal duyana kadar aynı anda X, Y, Z tuşlarına basınız, yeniden dil seçim menüsü
görüntülenecektir.
67
Page 68

Bir yıkama devri nasıl yapılır
TR
1. MAKINENIN ÇALIŞTIRILMASI. tuşuna bastıktan
sonra ekranda AÇMA yazısı görüntülenecek ve
START/PAUSE uyarı lambası yeşil renkte yanıp
sönmeye başlayacaktır.
2. MAKİNANIN DOLDURULMASI. Kapağı açınız.
Sonraki sayfada bulunan program tabelasında
belirtilen yük miktarını geçmeyecek şekilde tamburu
çamaşırlarınızla doldurunuz.
3. DETERJAN KONULMASI. Deterjan haznesini
açınız ve deterjanı “Deterjan ve çamaşır” bölümünde
açıklandığı gibi koyunuz.
4. MAKINE KAPAĞININ KAPATILMASI.
5. PROGRAMIN SEÇILMESI. İstenilen programı seçmek
için PROGRAM SEÇIM tuşlarından birine basınız.
Programın ismi ekranda görüntülenecektir, seçilen
programa bağlı değiştirilemeyecek sıcaklık derecesi
ve sıkma devir hızı vardır. Ekranda program süresi
görüntülenecektir.
6. YIKAMA DEVRININ KIŞISEL AYARLARINI mevcut
olan tuşları kullanarak yapınız:
Sıcaklık derecesi ve/ya santrifüjün
değiştirilmesi. Seçilen programa göre makine
sıcaklık derecesi ve sıkma devrini otomatik olarak
ayarlar, bu yüzden bu değerler değiştirilemez.
tuşuna basıldığında OFF soğuk yıkama programındaki
sıcaklık derecesine ulaşıncaya kadar sıcaklık derecesi
düşer. düğmesine basıldığında OFF devreden
çıkıncaya kadar sıkma devri gittikçe azalır. Tuşlara bir
daha basıldığında fabrika değerlerine dönülecektir.
Gecikmeli başlatma ayarı.
Seçilmiş olan programın gecikmeli başlamasını
ayarlamak için istenilen gecikme süresi ayarlanıncaya
kadar tuşa basınız. Bu opsiyon açık olduğunda
ekranda sembolü görüntülenecektir. Gecikmeli
başlatmayı iptal etmek için ekranda OFF yazısı
görüntüleninceye kadar tuşa basınız.
! İstisna: (60°C)
seçildiğinde sıcaklık derecesi 90°C ye kadar
yükseltilebilir.
Arzu edilen yıkama yoğunluğunu ayarlayınız.
opsiyonu, çamaşırların kirlilik derecesine göre ve
arzu edilen yıkama yoğunluğunda yıkama işlemini en
uygun hale getirmemize olanak tanır.
Yıkama programını seçiniz, yıkama devri aynı
derecede kirli olan çamaşırlar için en uygun olan
“NORMAL” seviyede otomatik olarak ayarlanır,
(otomatik olarak “NARİN” seviyede ayarlanan
“Yünlüler” için geçerli olmayan ayar).
Çok kirli çamaşırlar için cihaz “SÜPER YIKAMA”
seviyeye ulaşana kadar tuşuna basınız. Bu
seviye, yıkama programının başlangıç aşamasında
daha çok su ve daha fazla mekanik hareket
kullanılması sayesinde yüksek verimde yıkama
performansı sağlamaktadır ve en inatçı lekeleri bile
ortadan kaldırmaya elverişlidir. Çamaşır suyu ile ya da
çamaşır suyu olmadan kullanılabilir.
Eğer beyazlatma işlemi gerçekleştirilmek istenir ise
makine ile birlikte verilen ilave hazneyi 4, hazne 1
içine koyunuz. Çamaşır suyu dozajını ayarlarken
orta seviyede gösterilen “max” seviyeyi geçmeyiniz
(bakınız şekil syf. 70).
(tuşa 1 kez basınız)
programı
Az kirli çamaşırlar veya en hassas kumaşlar için
“NARİN” seviyesine ulaşana kadar tuşuna
basınız. Hassas çamaşırlar için kusursuz yıkama
sonuçlarını garanti etmek için mekanik hareket
azaltılacaktır.
Durulama tipini seçiniz.
Opsiyonu , hassas ciltlere maksimum özen
için arzu edilen durulama tipini seçmemize olanak
tanır. Tuşa ilk basışta, tüm deterjan izlerini ortadan
kaldırmak için standart durulamaya ilave yeni bir
durulama seçmemize olanak tanıyan “EKSTRA
DURULAMA” seviyesi ayarlanır. Tuşa ikinci basışta,
standart durulamaya ilave iki durulama seçmemize
olanak tanıyan ve hassas ciltler için tavsiye edilen
“HASSAS CİLTLER İÇİN” seviyesi ayarlanır. Tuşa
üçüncü kez basışta polen, mayt, kedi ve köpek tüyü
gibi temel alerjenleri ortadan kaldırmak için standart
durulamaya ilave üç durulama seçmemize olanak
tanıyan “ANTİ ALERJİ DURULAMA” seviyesi
ayarlanır. “NORMAL DURULAMA” durulama
tipine geri dönmek için tuşa yeniden basınız. Eğer
ayarlamak veya mevcut olan ayarı değiştirmek
mümkün değil ise ekranın üzerinde “KİLİTLİ” yazısı
görüntülenecektir.
Yıkama özelliklerinin değiştirilmesi.
• Fonksiyonu çalıştırmak için tuşa basınız; ilgili uyarı
lambası yanacaktır.
• İşlevi kapatmak için aynı tuşa tekrar basınız; ilgili
uyarı lambası sönecektir.
! Seçilen işlem yürütülen programla uyumlu olmadığı
takdirde, uyarı lambası yanıp sönecek ve işlem
başlamayacaktır.
! Seçilen fonksiyon ayarlanmış olan programla uyumlu
olmadığı takdirde, ilk işlevle ilgili uyarı lambası yanıp
sönecek ve etkinleştirilmiş işlev yanıp sönmesi sona
erecektir.
! Fonksiyonlar önerilen yük seviyesi ve yıkama
süresini değiştirebilirler.
7. PROGRAMIN ÇALIŞTIRILMASI. BAŞLAT/BEKLE
tuşuna basınız. İlgili uyarı lambası yeşil renkte sabit
yanacak ve makinenin kapağı kilitlenecektir (MAKINE
KAPAĞI KILITLI uyarı lambası açıktır). Yıkama
süresince ekranda seçilmiş olan program safhasının
ismi görüntülenir. Devrede olan bir programı
değiştirmek için START/PAUSE tuşuna basarak
çamaşır makinesini beklemeye alınız (START/
PAUSE uyarı lambası turuncu renkte yavaşça
yanmaya başlayacaktır), istenilen programı seçiniz
ve START/PAUSE tuşuna tekrar basınız. Yıkama
esnasında makine kapağını açmak için BAŞLAT/
BEKLE düğmesine basınız; MAKINE KAPAĞI KILITLI
sembolü kapalı ise, kapak açılabilecektir. Yıkama
programının kaldığı yerden devam etmesi için START/
PAUSE tuşuna tekrar basınız.
8. PROGRAMIN BITMESI. “PROGRAM SONU”
yazısıyla belirtilir. MAKINE KAPAĞI KILITLI uyarı
lambası kapağın açılabilir hale geldiğini belirtmek için
söner. Makine kapağını açtıktan sonra çamaşırları
boşaltıp makineyi kapatınız.
! Devrede olan bir programı iptal etmek için tuşunu
uzun süre basılı tutunuz. Program bitirilecek ve makine
kapanacaktır.
68
Page 69

Programlar ve işlevler
Program tablosu
Program açıklaması
Programlar
LEKE ÇIKARMA
STANDART PAMUKLU 60°
beyaz ve renkliler.
STANDART PAMUKLU 40°
nazik renkliler.
STANDART PAMUKLU 20°
nazik renkliler.
DAYANIKLI SENTETİKLER
çamaşırlar.
DAYANIKLI SENTETİKLER (4)
renkli çamaşırlar.
HASSAS SENTETİKLER
çamaşırlar.
HIZLI YIKAMA 60’
üzere kullanılır (yünlü, ipekli, ve elde yıkanacak çamaşırlara uygun değildir).
HIZLI YIKAMA 30’
üzere kullanılır (yünlü, ipekli, ve elde yıkanacak çamaşırlara uygun değildir).
MY CYCLE (HAFIZA): herhangi bir yıkama tipini hafızaya almayı sağlar.
M
NEVRESİM TAKIMLARI
Woolmark Platinum (YÜNLÜLER): yün ve kaşmir için kullanılır.
HASSAS ÇAMAŞIRLAR
SIKMA
(tuşa 1 kez basınız)
DURULAMA
SU BOŞALTMA
Ekran veya kitapçık üzerinde gösterilen devre süresi, standart şartlara göre hesaplanmış tahmini bir süredir. Geçerli olan süre, girişteki sıcaklık derecesi ve suyun basıncı, ortam sıcaklığı, deterjan miktarı, yük miktarı ve tipi, yükün dengesi, seçilen ilave seçenekler gibi sayısız faktörlere göre değişiklik gösterebilmektedir.
1) 1061/2010 düzenlemesine uygun test yıkama çevrimi: 60°C sıcaklıkta yıkama çevrimi
Bu devre, orta kirlilikteki pamuklu çamaşırları temizlemek için uygundur ve 60°C’de yıkanabilir çamaşırlar üzerinde kullanılacak, kombine enerji ve su tüketimi
açısından en etkili devredir. Geçerli olan yıkama sıcaklık derecesi, belirtilen sıcaklık derecesinden farklı olabilir.
2) 1061/2010 düzenlemesine uygun test yıkama çevrimi: 40°C sıcaklıkta yıkama çevrimi
Bu devre, orta kirlilikteki pamuklu çamaşırları temizlemek için uygundur ve 40°C’de yıkanabilir çamaşırlar üzerinde kullanılacak, kombine enerji ve su tüketimi
açısından en etkili devredir. Geçerli olan yıkama sıcaklık derecesi, belirtilen sıcaklık derecesinden farklı olabilir.
3) 60 °C sıcaklıkta “Ön Yıkama” fonksiyonu etkinleştirilemez.
Bütün Test merkezleri için:
2) Pamuklular için kısa yıkama çevrimi: 40°C sıcaklıkta yıkama çevrimi
4) Sentetik için uzun yıkama çevrimi: programını 60°C’ye ayarlayınız (tuşa 1 kez basınız); sıcaklık derecesi 40°C (SICAKLIK tuşuna basınız).
(tuşa 1 kez basınız)
(tuşa 2 kez basınız)
(tuşa 2 kez basınız)
(tuşa 3 kez basınız)
(tuşa 1 kez basınız)
(tuşa 2 kez basınız)
(tuşa 3 kez basınız)
(tuşa 1 kez basınız)
(tuşa 1 kez basınız)
(tuşa 2 kez basınız)
: kirli çamaşırları kısa sürede yıkamak
: az kirli çamaşırları kısa sürede yıkamak
(1): çok kirli dayanıklı
(2): az kirli beyazlar ve
: az kirli beyazlar ve
: çok kirli dayanıklı renkli
: az kirli dayanıklı
: az kirli dayanıklı renkli
Maks. Isı
derecesi
(°C)
40° 1400
60°
(Max. 90°)
40° 1400 -
20° 1400 -
60° 800
40° 800
40° 800
60° 1400 -
30° 800 -
60° 1400
40° 800 -
30° 0 -
40°C
yi seçin (tuşa 2 kez basınız).
Maks
(Daki-
devir)
1400
- 1400 - - - -
- 1400 - - -
- 0 - - - -
Deterjan ve katkı
Hız
kada
maddeleri
Ön
yıkama
(3)
Yıkama
Çamaşır
-
-
-
60°C
yi seçin (tuşa 1 kez basınız).
40°C
yi seçin (tuşa 2 kez basınız).
-
-
-
(Kg)
suyu
Maks yük
şatıcı
Yumu-
6 - - - 190’
10 53 1,09 85 210’
10 53 1,09 92 185’
10 - - - 175’
5,5 48 0,99 57 120’
5,5 48 0,63 55 100’
5,5 - - - 80’
4 53 0,54 57 60’
4 71 0,21 41 30’
10 - - - 155’
2,5 - - - 100’
1 - - - 80’
10 - - - 16’
10 - - - 49’
10 - - - 2’
kWh
Kalan nem %
Toplam su lt
Enerji tüketimi
Devir süresi
TR
Yıkama işlevleri
Ön Yıkama
Bu işlev seçildiğinde en dayanıklı lekeleri çıkarmak için
kullanılan ön yıkama gerçekleştirilir
Not: Mevcut olan hazneye deterjan koyunuz.
! Sonraki programlarda uygulanamaz: , , , ,
(60°), (40°),
Kolay ütü
Bu işlev seçildiğinde kırışıkları önleyecek şekilde yıkama
ve sıkma devrinin özellikleri değiştirilecektir.
Devrin sonunda, çamaşır makinesi tamburu yavaş bir
şekilde dönecek; KOLAY ÜTÜ ve BAŞLAT/DURAKLAT
göstergesi ışıkları yanacak (turuncu) ve ekranda
“PROGRAM SONU” yazısı görünecektir. Devri bitirmek
için, START/PAUSE düğmesine veya KOLAY ÜTÜ
düğmesine basın.
! Sonraki programlarda uygulanamaz: , “Hızlı Yıkama
30’”, , , .
.
Eco wash
Eco Wash fonksiyonu, hem çevre hem de elektrikli giriş için
bir avantaj olan - çamaşırları yıkamak için kullanılan suyu
ısıtmadan enerji tasarrufuna katkıda bulunmaktadır. Aslına
bakılırsa, güçlendirilmiş etki ve en iyi şekilde kullanılan su
tüketimi ortalama standart bir devre süresinde mükemmel
sonuçların elde edilmesini garanti etmektedir. Daha iyi
yıkama sonuçları elde etmek için, sıvı deterjan kullanımı
tavsiye edilmektedir.
! Sonraki programlarda uygulanamaz: , , , , , .
69
Page 70

Deterjanlar ve çamaşır
M
AX
1
2
4
3
A
B
TR
Deterjan haznesi
Yıkamanın iyi sonuç vermesi doğru dozda deterjan
kullanılmasına da bağlıdır: aşırı deterjan kullanmak
suretiyle daha temiz çamaşırlar elde edilemeyeceği gibi
makinenin aksamına zarar verilerek, çevre kirliliğine
sebebiyet verilir.
! Beyaz pamuklu çamaşırlar, ön yıkama ve 60°C’den
yüksek sıcaklık derecesi ile yıkamalar için toz deterjan
kullanınız.
! Deterjan ambalajı üzerinde aktarılan bilgileri takip ediniz.
! Elde yıkama deterjanları kullanmayınız, çünkü aşırı
köpük yaparlar.
Deterjan haznesini açınız
ve deterjan ile katkı maddelerini aşağıdaki şekilde
koyunuz.
Bölüm 1: Ön yıkama deterjanı (toz)
Deterjanı dökmeden önce, ilave bölme 4’ün çıkarıldığından
emin olun.
Bölüm 2: Yıkama deterjanı (toz veya sıvı)
Sıvı deterjan kullanılması halinde doğru doz ayarlaması
için makinede gösterilen A kademesini kullanmanız önerilir. Toz deterjan ile yıkamalarda B kademesini kullanınız.
Bölüm 3: Katkı maddeleri (yumuşatıcı vs.)
Yumuşatıcı ızgaranın dışına taşmamalıdır.
ilave bölme 4: Çamaşır suyu
Çamaşır hazırlanması
• Çamaşırları aşağıdaki gibi ayırınız:
- kumaş tipi / etiketteki işaret.
- renkler: renkli çamaşırları beyazlardan ayırınız.
• Ceplerini boşaltınız ve düğmeleri kontrol ediniz.
• Kurulama sırasında çamaşırın ağırlığını gösteren “Pro-
gramlar Tablosu”’’daki değerleri aşmayın.
Çamaşırların ağırlığı nedir?
1 çarşaf 400-500 gr.
1 yastık kılıfı 150-200 gr.
1 masa örtüsü 400-500 gr.
1 bornoz 900-1.200 gr.
1 havlu 150-250 gr.
Özel programlar
LEKE ÇIKARMA: Program , renkleri solmayan ve
çok kirli çamaşırların yıkanması için uygundur. Program,
standart sınıftan yüksek bir yıkama sınıfını garanti eder
(A sınıfı). Farklı renkteki çamaşırları bu programda
yıkamayınız. Toz deterjan kullanılması ve inatçı lekeler
için özel katkı maddeleri ile ön yıkama yapmanız önerilir.
Standart Pamuklu 20°C : kirli pamuklu çamaşırlar
için idealdir. 40°’de bir yıkama ile mukayese edilebilen,
soğuk suda da etkili olan performanslar, yinelenen ve
karşılaştırılan en yüksek hız varyasyonu ile çalışan
mekanik bir hareket ile sağlanır.
NEVRESİM TAKIMLARI: Tek yıkama performansıyla
havlu ve yatak çarşaarını yıkamak için yumuşatıcı
kullanımını en uygun hale getiren, zaman ve enerji tasarrufu yapmanızı sağlayan programını kullanınız. Toz
deterjan kullanılması önerilir.
YÜNLÜLER: bu Hotpoint-Ariston çamaşır makinesinin
“Yünlüler” yıkama devresi, yıkama işlemi giysilerin etiketi
üzerinde aktarılan talimatlara ve elektrikli ev aletinin
üretici rması tarafından verilen talimatlara riayet ederek gerçekleştirildiği sürece, “elde yıkanabilir” olarak
sınıandırılan yünlü çamaşırların yıkanması için Woolmark Company tarafından test edilmiş ve onaylanmıştır.
Hotpoint-Ariston, yıkama performanslarından ve
su ve elektrik tüketiminden dolayı Woolmark Company tarafından Woolmark Apparel Care - Platinum
sertikasını elde eden ilk çamaşır makinesi markasıdır.
(M1135)
HASSAS ÇAMAŞIRLAR: Taşlı veya pullu giysiler gibi
çok hassas çamaşırları yıkamak için programını
kullanınız.
İpekli kumaşları ve perdeleri yıkamak için programı
seçiniz ve opsiyonunun “NARİN” seviyesini
ayarlayınız.
Çamaşırları yıkamadan önce ters çevirmeniz ve küçük
parçaları hassas çamaşırların yıkanması için kullanılan
özel torba içerisine koymanız önerilir.
Daha iyi sonuçlar elde etmek için hassas çamaşırlara
özel sıvı deterjanın kullanılması önerilir.
Yük dengeleme sistemi
Aşırı titremenin engellenmesi ve yükün düzenli dağılması
için her sıkma devrinden önce iç sepet normal yıkama
hızından biraz daha hızlı döner. Farklı şekillerde
çamaşırları makineye doldurduktan sonra yük dengeli
hale gelmediyse makine daha yavaş bir sıkma devrini
uygular. Yük çok dengesiz ise çamaşır makinesi sıkma
devrini gerçekleştirmeden çamaşırları dağıtır. Yükün
daha iyi yerleştirilmesi ve dengeli olması için küçük giysilerle büyük giysileri karıştırınız.
70
Page 71

Arızalar ve onarımlar
Çamaşır makinesi çalışmıyor olabilir. Teknik Servise başvurmadan önce (Teknik Servis bölümüne bakınız) aşağıdaki liste
yardımıyla kolay çözülebilecek bir problem olup olmadığını kontrol ediniz.
Arızalar:
Çamaşır makinesi çalışmıyor.
Yıkama işlemi başlamıyor.
Çamaşır makinesi su almıyor (Ekranda ‘’SU BAĞLANTISI YOK’’ yazısı
görüntülenecektir).
Çamaşır makinesi devamlı su alıp
veriyor.
Olası nedenler / Çözümler:
• Fiş prize takılı değil veya tam temas etmiyor.
• Evde elektrik yok.
• Makinanın kapağı tam kapanmamış.
• ON/OFFdüğmesine basılmamış.
• START/PAUSE düğmesine basılmamış.
• Su musluğu açık değil.
• Gecikmeli başlatmada bir gecikme süresi ayarlanmış.
• Su besleme hortumu musluğa takılı değil.
• Hortum bükülmüş.
• Su musluğu açık değil.
• Evde su kesik.
• Basınç yetersiz.
• START/PAUSE düğmesine basılmamış.
• Tahliye hortumu yerden 65 ile 100 cm arasında yerleştirilmemiş (bkz. “Montaj”).
• Tahliye hortumunun başı suya girmiş (bkz. “Montaj”).
• Duvardaki tahliyenin hava boşluğu yok.
Bu kontrollerden sonra olumlu sonuç alınamazsa, musluğu ve kapatıp,
çamaşır makinesini durdurarak Servise haber veriniz. Daire, binanın üst
katlarındaysa, sifon olayı meydana gelerek çamaşır makinesi devamlı su
alıp, veriyor olabilir. Bu sorunun çözümü için piyasada sifon önleyici valar
satılmaktadır.
TR
Çamaşır makinesi su boşaltmıyor
veya santrifüj yapmıyor.
Çamaşır makinesi santrifüj esnasında
aşırı sarsılıyor.
Çamaşır makinesi su kaçırıyor.
MAKINE KİLİTLİ, ekran yanıp sönerek bir
arıza oluştuğunu gösterir (ör. F-01, F-..).
Aşırı köpük oluşuyor.
• Program su boşaltmayı öngörmüyor: bazı programlarda su boşaltma
işlemini elle müdahale ederek başlatmak gerekir (bkz. “Programlar ve
işlevler”).
• KOLAY ÜTÜ işlevi devrede: programı tamamlamak için START/PAUSE
düğmesine basınız (“Programlar ve işlevler”).
• Tahliye hortumu bükülmüş (bkz. “Montaj”).
• Tahliye kanalı tıkalı.
• Hazne, çamaşır makinesinin montajı esnasında düzgün çözülmemiş (bkz.
“Montaj”).
• Çamaşır makinesinin bulunduğu zemin düz değil (bkz. “Montaj”).
• Çamaşır makinesi mobilyalarla duvar arasında sıkışmış (bkz. “Montaj”).
• Su giriş hortumu tam sıkılmamış (bkz. “Montaj”).
• Deterjan haznesi tıkanmış (temizlemek için bkz. “Bakım ve özen”).
• Tahliye hortumu düzgün takılmamıº (bkz. “Montaj”).
• Makineyi kapatınız, prizden şi çekiniz ve 1 dakika sonra tekrar açınız.
Arıza çözülmüyorsa Teknik Servisine başvurunuz.
• Deterjan çamaşır makinesi için uygun değil (“çamaşır makinesi için”, elde
yıkama ve çamaşır makinesi için” veya benzer ibareler olmalıdır).
• Aşırı doz kullanıldı.
71
Page 72

Teknik Servis
195105722.01
09/2012 - Xerox Fabriano
TR
Servise başvurmadan önce:
• Servise başvurmadan çözülebilecek bir ariza olup olmadığını kontrol ediniz (“Arızalar ve onarımlar” bölümüne bakınız);
• Programı tekrar başlatarak, sorunun çözülüp çözülmediğini görünüz;
• Aksi takdirde, garanti belgesinde belirtilen telefon numaralarından teknik servisi arayınız.
! Kesinlikle, yetkili olmayan tamircilere müracaat etmeyiniz.
Şunları bildiriniz:
• arıza tipini;
• cihazın modeli (Mod.);
• seri numarası (S/N).
Bu bilgiler, çamaşır makinesinin arkasındaki plakada bulunurlar.
Cihazın ömrü 10 yıldır.
Tüm Türkiye’de; Yetkili Teknik Servis, Orijinal Yedek Parça, Bakım Ürünlerimiz ve Garanti ile ilgili bilgi için:
0 212 444 50 10
72
 Loading...