

HOTPOINT/ARISTON THC 642 IX/HA EE User Manual

THC 642 IX/HA EE
Lietuvių k.
Naudojimo instrukcijos
HOB
Turinys
Naudojimo instrukcijos,1
Įspėjimai,4
Pagalba,6
Prietaiso aprašymas,7
Montavimas,18
Įjungimas ir naudojimas,21
Atsargumo priemonės ir patarimai,21
Techninė priežiūra,22
Gedimų šalinimas,22
English
Operating Instructions
HOB
Contents
Operating Instructions,1
Warnings,3
Assistance,6
Description of the appliance,7
Installation,9
Start-up and use,11
Precautions and tips,11
Maintenance and care,12
Troubleshooting,12
Eesti keeles
Kasutusjuhend
KEEDUPLAAT
Sisukord
Latviešu valoda
Lietošanas instrukcija
PLĪTS VIRSMA
Cuprins
Lietošanas instrukcija,1
Brīdinājumi,4
Palīdzība,6
Ierīces apraksts,7
Ierīkošana,23
Ieslēgšana un lietošana,26
Piesardzības pasākumi un ieteikumi,26
Tehniskā apkope un kopšana,27
Traucējumu novēršana,27
Română
Instrucţiuni de utilizare
PLITA
Sumar
Kasutusjuhend,1
Hoiatused,3
Klienditugi,6
Seadme kirjeldus,7
Paigaldamine,13
Käitamine ja kasutamine,16
Ettevaatusabinõud ja soovitused,16
Hooldus,17
Veaotsing,17
Instrucţiuni de utilizare,1
Avertizări,5
Asistenţă ,6
Descrierea aparatului,8
Instalarea,28
Pornirea şi folosirea,31
Precauţii şi sfaturi,31
Întreţinere,32
Anomalii şi remedii,32
Українська
Інструкція по використанню
ВАРИЛЬНА ПОВЕРХНЯ
Зміст
Інструкція по використанню,2
Запобіжні заходи,5
Допомога,6
Опис приладу,8
Установка,33
Ввімкнення і використання,36
Запобіжні заходи та поради,36
Обслуговування та догляд,37
Усунення несправностей,37
Warnings
Hoiatused
WARNING: The appliance and its accessible parts
become hot during use. Care should be taken to
avoid touching heating elements. Children less than 8
years of age shall be kept away unless continuously
supervised. This appliance can be used by children
aged from 8 years and above and persons with
reduced physical, sensory or mental capabilities or
lack of experience and knowledge if they have been
given supervision or instruction concerning use of the
appliance in a safe way and understand the hazards
involved. Children shall not play with the appliance.
Cleaning and user maintenance shall not be made
by children without supervision.
WARNING: Unattended cooking on a hob with fat or
oil can be dangerous and may result in re. NEVER
try to extinguish a re with water, but switch off the
appliance and then cover ame e.g. with a lid or a
re blanket.
WARNING: Danger of re: do not store items on the
cooking surfaces.
Never use steam cleaners or pressure cleaners on
the appliance.
Remove any liquid from the lid before opening it. Do
not close the glass cover (if present) when the gas
burners or electric hotplates are still hot.
The appliance is not intended to be operated by
means of an external timer or separate remote
control system.
CAUTION: the use of inappropriate hob guards can
cause accidents.
HOIATUS: sisselülitatud seade ja selle
juurdepääsetavad osad muutuvad kasutamise
ajal kuumaks. Olge ettevaatlik ja vältige kontakti
kütteelementidega. Alla 8-aastased lapsed tuleb
hoida seadmest eemal, v.a. juhul, kui neile on
tagatud pidev järelevalve. Vanemad kui 8-aastased
lapsed ja isikud, kellel on vähenenud füüsilised
või vaimsed võimed või vähesed kogemused ja
oskused, võivad seda seadet kasutada juhul, kui on
tagatud nende järelevalve ning neile on antud juhised
seadme ohutuks kasutamiseks ja nad mõistavad
seadme kasutamisest tulenevaid ohte. Lapsed ei
tohi seadmega mängida. Lapsed võivad seadet
puhastada ja hooldada ainult järelevalve all.
HOIATUS: rasvas või õlis küpseva toidu jätmine
keeduplaadile järelevalveta on ohtlik ja võib
põhjustada tulekahju. Tulekahju kustutamiseks
ÄRGE kasutage vett, vaid lülitage seade välja ja
seejärel katke leek näiteks kaane või tuletekiga.
HOIATUS: Tuleoht: ärge hoidke keeduplaatidel
mingeid esemeid.
Ärge kasutage seadme puhastamiseks auru- ega
survepuhastusseadmeid.
Enne kaane avamist eemaldage sellele kogunenud
vedelik. Ärge sulgege klaaskaant (kui on olemas),
kui gaasipõletid või elektrilised keeduplaadid on veel
kuumad.
Seade ei ole mõeldud kasutamiseks koos välise
taimeri ega eraldiseisva kaugjuhtimissüsteemiga.
TÄHELEPANU: valede keeduplaadipiirete
kasutamine võib põhjustada õnnetusi.
3
Įspėjimai
Brīdinājumi
ĮSPĖJIMAS! Prietaisas ir jo pasiekiamos dalys
naudojant įkaista. Būkite atsargūs, neprisilieskite
prie įkaitusių prietaiso dalių. Jaunesni nei 8 metų
vaikai gali būti prileidžiami prie prietaiso tik jei
juos prižiūri suaugusieji. Vyresni nei 8 metų vaikai
ir asmenys, turintys zinių, jutimo ar psichinių
sutrikimų arba nepakankamai žinių ar patirties, šiuo
prietaisu gali naudotis tik tuomet, jei jie prižiūrimi
arba instruktuojami, kaip saugiai naudoti prietaisą,
ir supranta kylančias grėsmes. Vaikams turi būti
draudžiama žaisti su prietaisu. Neprižiūrimi vaikai taip
pat negali valyti prietaiso ar atlikti jo priežiūros darbų.
ĮSPĖJIMAS! Ant įjungtos viryklės palikti indai su
riebalais ar aliejumi gali sukelti gaisrą. NIEKADA
nebandykite liepsnos gesinti vandeniu – išjunkite
prietaisą ir kuo nors uždenkite liepsną, pavyzdžiui,
dangčiu arba priešgaisriniu apklotu.
ĮSPĖJIMAS! Gaisro pavojus – ant viryklės nelaikykite
jokių daiktų.
Niekuomet nevalykite prietaiso gariniais ar slėginiais
valikliais.
Prieš atidarydami gaubtą nuo jo nuvalykite skysčius.
Neuždenkite stiklinio dangčio (jei sumontuotas), kol
neatvėso dujiniai degikliai arba elektrinė kaitlentė.
Prietaisas nevaldomas išoriniu laikmačiu arba atskira
nuotoline valdymo sistema.
ATSARGIAI! Netinkamų viryklės apsaugų naudojimas
gali sukelti nelaimingą atsitikimą.
BRĪDINĀJUMS! Ierīce un tās atklātās daļas
lietošanas laikā stipri sakarst. Nepieskarieties
sakarsušajām ierīces daļām. Bērni, kuri ir jaunāki par
astoņiem gadiem, drīkst atrasties ierīces tuvumā tikai
stingrā pieaugušo uzraudzībā. Ierīci drīkst lietot bērni,
kuri ir sasnieguši astoņu gadu vecumu, bet personas
ar ierobežotām ziskajām, maņu vai garīgajām
spējām un personas, kurām nav ierīces lietošanas
pieredzes vai nepieciešamo zināšanu, - tikai tad, ja
tās tiek uzraudzītas vai ir atbilstoši informētas par
ierīces drošu lietošanu un iespējamajiem riskiem.
Bērni nedrīkst rotaļāties ar ierīci. Bērni nedrīkst bez
uzraudzības tīrīt ierīci un veikt tās apkopi.
BRĪDINĀJUMS! Atstājot uz ieslēgtas plīts virsmas
pannu ar taukiem vai eļļu, varat radīt ugunsgrēka
risku. NEKĀDĀ GADĪJUMĀ nemēģiniet dzēst uguni
ar ūdeni, bet izslēdziet plīti un nosedziet liesmu ar
vāku vai nedegošu pārsegu.
BRĪDINĀJUMS! Aizdegšanās risks: neglabājiet
priekšmetus uz plīts virsmas.
Ierīci nedrīkst tīrīt ar tvaika vai augstspiediena
tīrītājiem.
Pirms pārsega atvēršanas notīriet no tā visu
šķidrumu. Ja gāzes degļi vai elektriskās sildvirsmas
joprojām ir karstas, stikla pārsegu (ja tāds ir) nedrīkst
aizvērt.
Iekārtu nav paredzēts lietot kopā ar ārējo taimeri vai
atsevišķu tālvadības ierīci.
UZMANĪBU! Neatbilstošu plīts virsmas aizsargu
lietošana var izraisīt nelaimes gadījumus.
4
Avertizări
Запобіжні заходи
ATENŢIE: Acest aparat şi părţile sale accesibile devin
foarte calde în timpul folosirii. Trebuie să ţi atenţi şi
să nu atingeţi elementele de încălzire. Îndepărtaţi
copiii sub 8 ani dacă nu sunt supravegheaţi continuu.
Acest aparat poate utilizat de copiii de peste 8 ani
şi de persoane cu capacităţi zice, senzoriale sau
mentale reduse sau fără experienţă şi cunoştinţe
dacă se aă sub o supraveghere corespunzătoare
sau dacă au fost instruiţi cu privire la folosirea
aparatului în mod sigur şi dacă îşi dau seama de
pericolele corelate. Copiii nu trebuie să se joace cu
aparatul. Operaţiunile de curăţare şi de întreţinere nu
trebuie să e efectuate de copii fără supraveghere.
ATENŢIE: Lăsarea unui aragaz nesupravegheat cu
grăsimi şi uleiuri poate periculoasă şi poate provoca
un incendiu. Nu trebuie NICIODATĂ să încercaţi
să stingeţi o acără/incendiu cu apă, ci trebuie să
stingeţi aparatul şi să acoperiţi acăra, de exemplu
cu un capac sau cu o pătură ignifugă.
ATENŢIE: Risc de incendiu: nu lăsaţi obiecte pe
suprafeţele de gătit.
Nu folosiţi niciodată aparate cu aburi sau sub
presiune pentru a curăţa aparatul.
Eliminaţi eventualele reziduuri de lichid de pe capac,
înainte de a-l deschide. Nu închideţi capacul din sticlă
(dacă este prezent) cu arzătoarele de gaz sau plita
electrică încă calde.
Aparatul nu trebuie pus în funcţiune prin intermediul
unui temporizator extern sau al unui sistem separat
de comandă la distanţă.
УВАГА: Під час роботи цей прилад, а також
його доступні частини нагріваються до високих
температур. Слід бути особливо обережними,
щоб не торкатися нагрівальних елементів. Діти
віком до 8 років мають знаходитися на небезпечній
відстані від приладу, якщо неможливо забезпечити
постійний контроль над ними. Дозволяється
користування цим приладом дітьми віком від 8
років, а також особами з обмеженими фізичними,
сенсорними або розумовими можливостями або
особами без належного досвіду і знань, якщо
вони перебувають під постійним контролем або
проінструктовані щодо правил з небезпечного
користування приладу і усвідомлюють ступені
ризику. Не дозволяйте дітям гратися з приладом.
Операції з очищення і догляду не повинні
виконуватися дітьми без належного контролю.
УВАГА: Небезпечно залишати без нагляду плити
з жиром або олією, тому що це може призвести
до пожежі. НІ В ЯКОМУ РАЗІ не слід намагатися
погасити полум’я/пожежу водою. Необхідно
вимкнути прилад і накрити полум’я, наприклад,
кришкою або вогнетривким покривалом.
УВАГА: Небезпека пожежі: не залишайте речі на
варильних поверхнях.
Забороняється використання апаратів для
очищення парою або високим тиском.
Витріть насухо всі наявні на кришці рідини, перш
ніж відкрити її. Не закривайте скляну кришку
(якщо вона наявна), якщо газові пальники або
електричні конфорки залишаються нагрітими.
ATENŢIE: folosirea unor protecţii necorespunzătoare
ale plitei poate provoca accidente.
Не передбачено увімкнення приладу за допомогою
зовнішнього таймеру або окремої системи
дистанційного керування.
УВАГА: використання невідповідних захисних
пристроїв варильної поверхні може призвести до
нещасних випадків.
5
Assistance
Communicating:
• Type of trouble
• Appliance model (Mod.)
• Serial number (S/N)
This information is found on the data plate located on the appliance and/or
on the packaging.
Klienditugi
Hoidke käepärast järgmised andmed:
• tüüpi anomaalia
• seadme mudel (Mod.)
• seerianumber (S/N)
Need andmed leiate seadme andmeplaadilt ja/või pakendilt.
Pagalba
Informacija:
• tipas anomalija
• prietaiso modelis (Mod.)
• Serijos numeris (S/N)
Šią informaciją rasite duomenų plokštelėje, kuri yra ant prietaiso ir (arba)
pakuotės.
Допомога
Повідомити:
• тип несправності;
• модель приладу (Mod.)
• cерійний номер (S/N)
Ці дані знаходяться на табличці з даними на самому приладі.
Palīdzība
Paziņojums:
• tipa anomālija
• ierīces modelis (Mod.)
• sērijas numurs (S/N)
Šī informācija ir norādīta uz tehnisko datu plāksnītes, kas piestiprināta ierīcei
un/vai tās iepakojumam.
Asistenţă
Comunicaţi:
• tipul de anomalie;
• modelul maşinii (Mod.);
• numărul de serie (S/N).
Aceste informaţii se găsesc pe plăcuţa de caracteristici din frigider, în partea
de jos, în stânga.
6
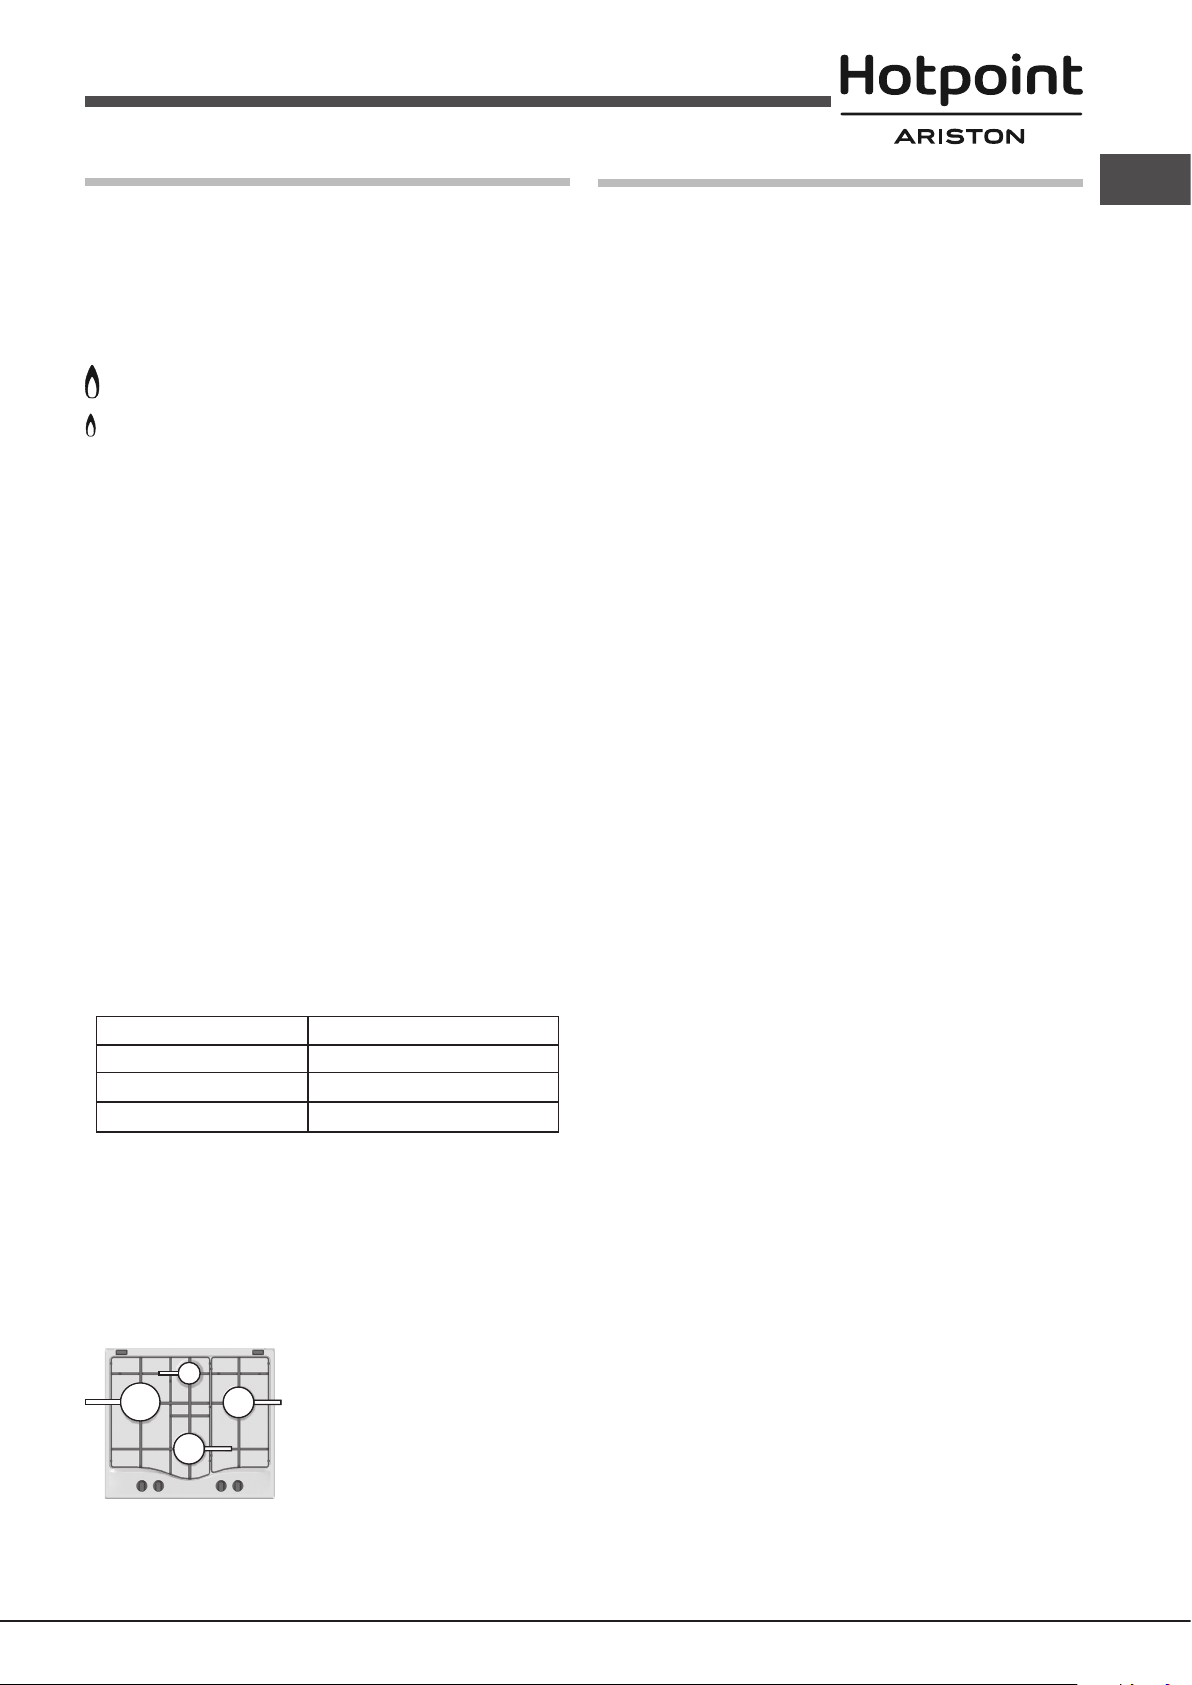
Description of the appliance
5
2
1
3
Prietaiso aprašymas
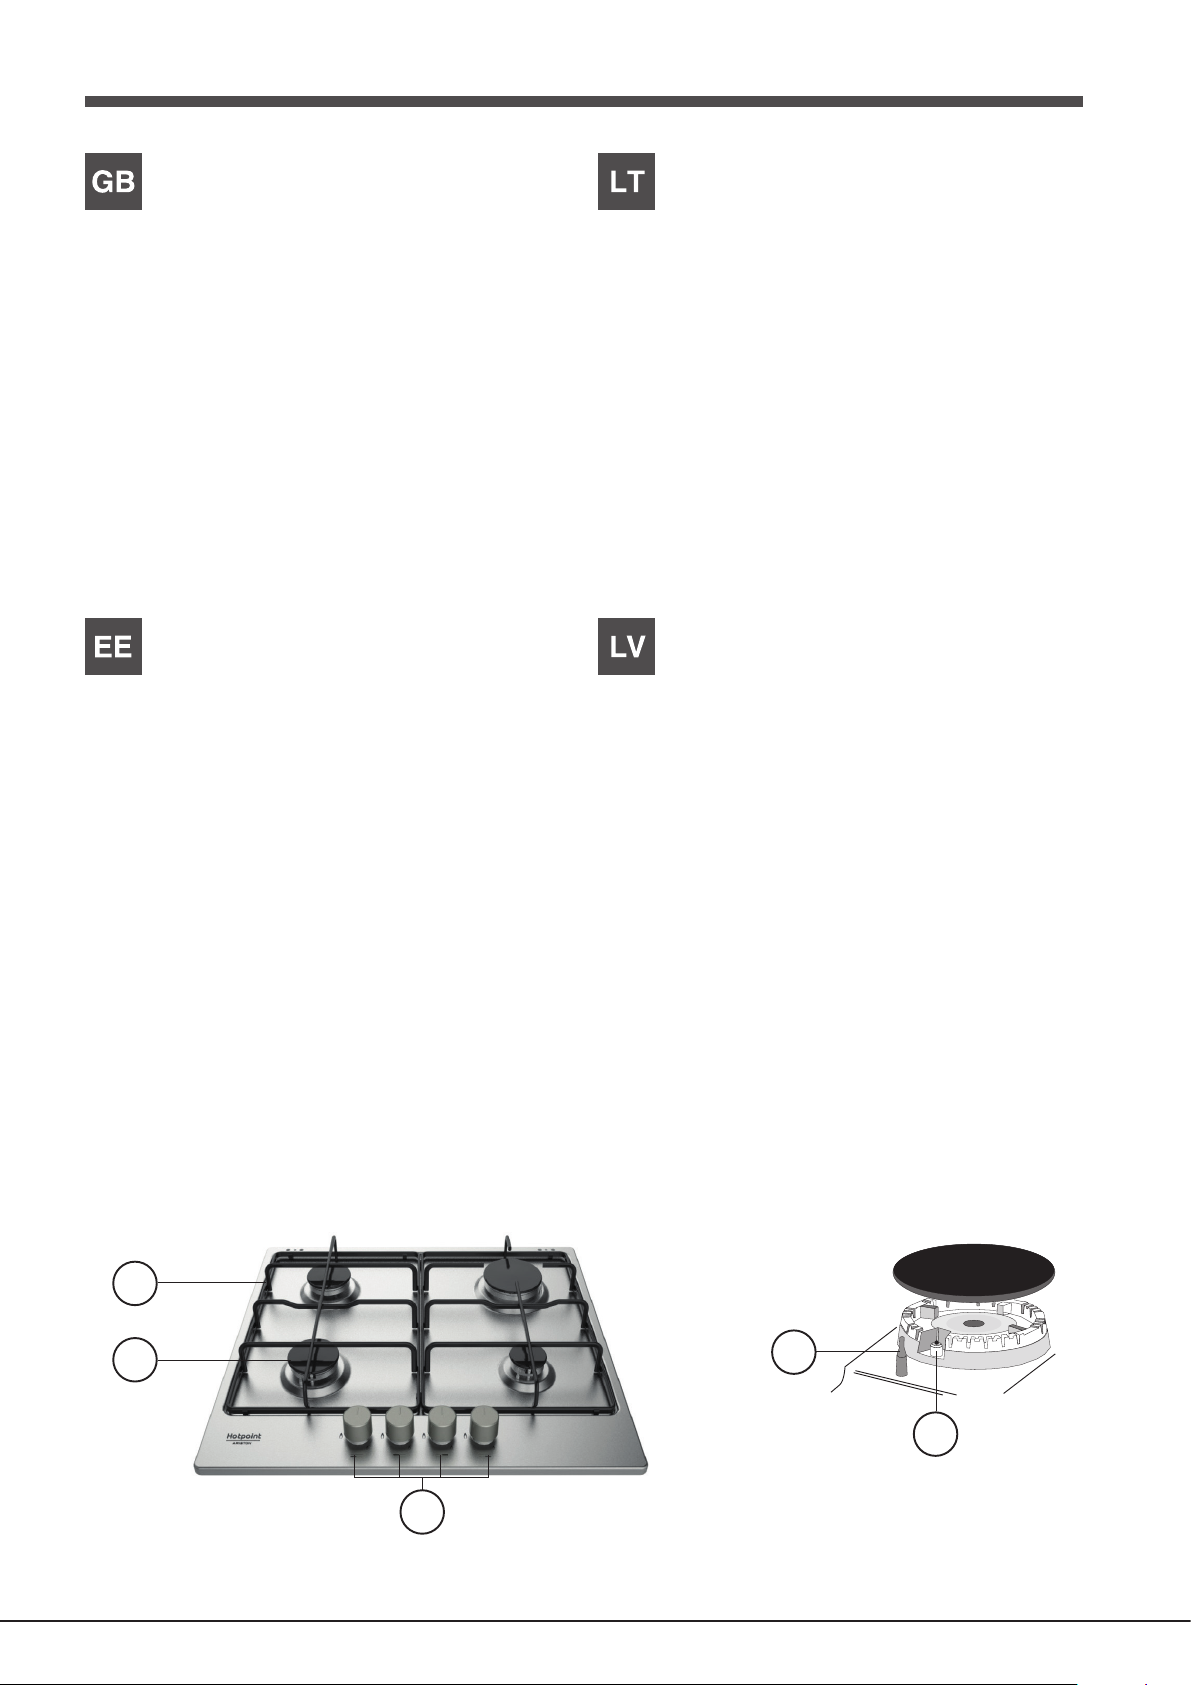
Overall view
1. Support Grid for COOKWARE
2. GAS BURNERS
3. Control Knobs for GAS BURNERS
4. Ignition for GAS BURNERS
5. SAFETY DEVICES
• GAS BURNERS differ in size and power. Use the diameter of the cookware
to choose the most appropriate burner to cook with.
• Control Knobs for GAS BURNERS for ame adjustment.
• GAS BURNER IGNITION enables a specic burner to be lit automatically.
• SAFETY DEVICE stops the gas flow if the flame is accidentally
extinguished.
Seadme kirjeldus
Ülevaade
1. Rest KEEDUNÕU JAOKS
2. GAASIPÕLETID
3. GAASIPÕLETITE REGULEERIMISE NUPUD
4. GAASIPÕLETITE SÜÜTENUPP
5. OHUTUSSEADISED
Bendras vaizdas
1. GAMINIMO INDO laikančiosios grotelės
2. DUJŲ DEGIKLIAI
3. DUJINIŲ DEGIKLIŲ valdymo rankenėlės
4. DUJINIŲ DEGIKLIŲ uždegimo funkcija
5. SAUGOS ĮTAISAI
• DUJINIAI DEGIKLIAI skiriasi dydžiu ir galia. Naudokite tokio skersmens
gaminimo indus, kurie geriausiai tinka tam tikram degikliui.
• DUJINIŲ DEGIKLIŲ valdymo rankenėlės liepsnai reguliuoti.
• DUJINIO DEGIKLIO UŽDEGIMO FUNKCIJA suteikia galimybę
automatiškai uždegti tam tikrą degiklį.
• APSAUGINIS ĮTAISAS sustabdo dujų srautą, jei liepsna netyčia užgęsta.
Ierīces apraksts
Vispārīga informācija
1. GATAVOŠANAS TRAUKU balsta režģis
2. GĀZES DEGĻI
3. GĀZES DEGĻU vadības slēdži
4. Aizdedzes GĀZES DEGĻIEM
5. DROŠĪBAS IERĪCES
• GAASIPÕLETID on erineva suuruse ja võimsusega. Kasutage põleti jaoks
kõige sobivama läbimõõduga keedunõud.
• GAASIPÕLETITE REGULEERIMISE NUPUD leegi reguleerimiseks.
• GAASIPÕLETI SÜÜTENUPP võimaldab vastava põleti automaatselt
süüdata.
• OHUTUSSEADIS seiskab gaasivoolu, kui leek peaks juhuslikult kustuma.
• GĀZES DEGĻIEM ir dažādi izmēri un jauda. Gatavojot izvēlieties
gatavošanas trauka diametram atbilstošāko degli.
• GĀZES DEGĻU vadības slēdži liesmas regulēšanai.
• GĀZES DEGĻA AIZDEDZE ļauj automātiski aizdedzināt īpašu degli.
• DROŠĪBAS IERĪCE aptur gāzes plūsmu, ja liesma tiek nejauši nodzēsta.
4
7
Descrierea aparatului
5
2
1
3
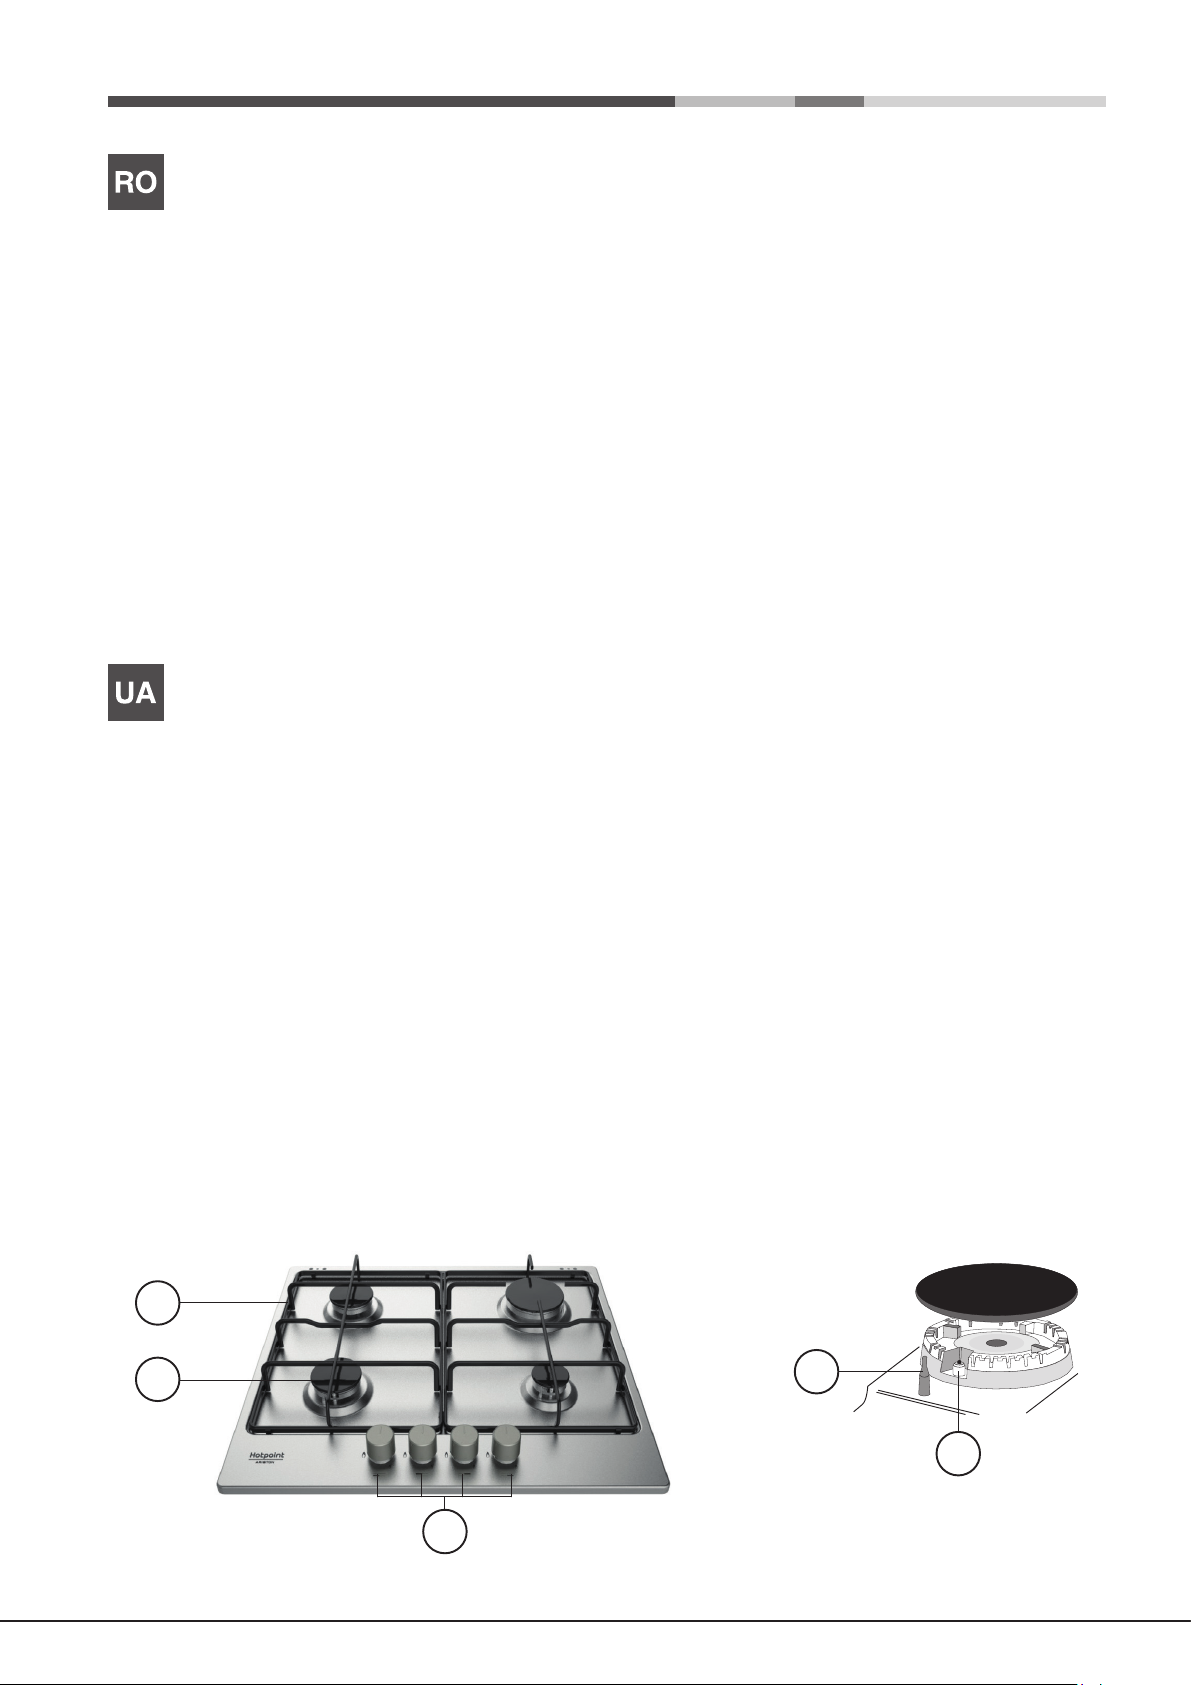
Vedere de ansamblu
1. Grătare de sprijin pentru RECIPIENTELE DE COACERE
2. ARZĂTOARE PE GAZ
3. Selectoare de comandă ale ARZĂTOARELOR PE GAZ
4. Dispozitiv de aprindere al ARZĂTOARELOR PE GAZ
5. DISPOZITIV DE SIGURANŢĂ
• ARZĂTOARELE PE GAZ sunt de diferite dimensiunişi puteri. Alegeţi-le
pe cele adecvate diametruluirecipientului utilizat.
• Selectoarele de comandă ale ARZĂTOARELOR PEGAZ şi sunt folosite
pentrureglarea ăcării.
• Dispozitivul de aprindere al ARZĂTOARELOR PEGAZ permite aprinderea
automată a arzătoaruluiprestabilit.
• DISPOZITIVUL DE SIGURANŢĂ este utilizat încazul stingerii accidentale
a ăcării, împiedicândscurgerile de gaz.
Опис приладу
Загальний вигляд
1. Підтримуюча Решітка для ПОСУДУ
2. ГАЗОВІ ПАЛЬНИКИ
3. Ручки управління ГАЗОВИХ ПАЛЬНИКІВ
4. Запалювання для ГАЗОВИХ ПАЛЬНИКІВ
5. ПРИСТРОЇ БЕЗПЕКИ
• ГАЗОВІ ПАЛЬНИКИ відрізняються за розмірами тапотужністю.
Використовуйте для приготування їжі посудз діаметром у відповідності
до розміру найбільшпідходящого пальника.
• ГАЗОВИMИ ПАЛЬНИКAMИ
полум’я
• Запалювання для ГАЗОВИХ ПАЛЬНИКІВ дозволяють, привключенні,
запалювати конкретні пальники автоматично.
• ПРИСТРІЙ БЕЗПЕКИ зупиняє потік газу, якщо полум’явипадково
гасне.
4
8
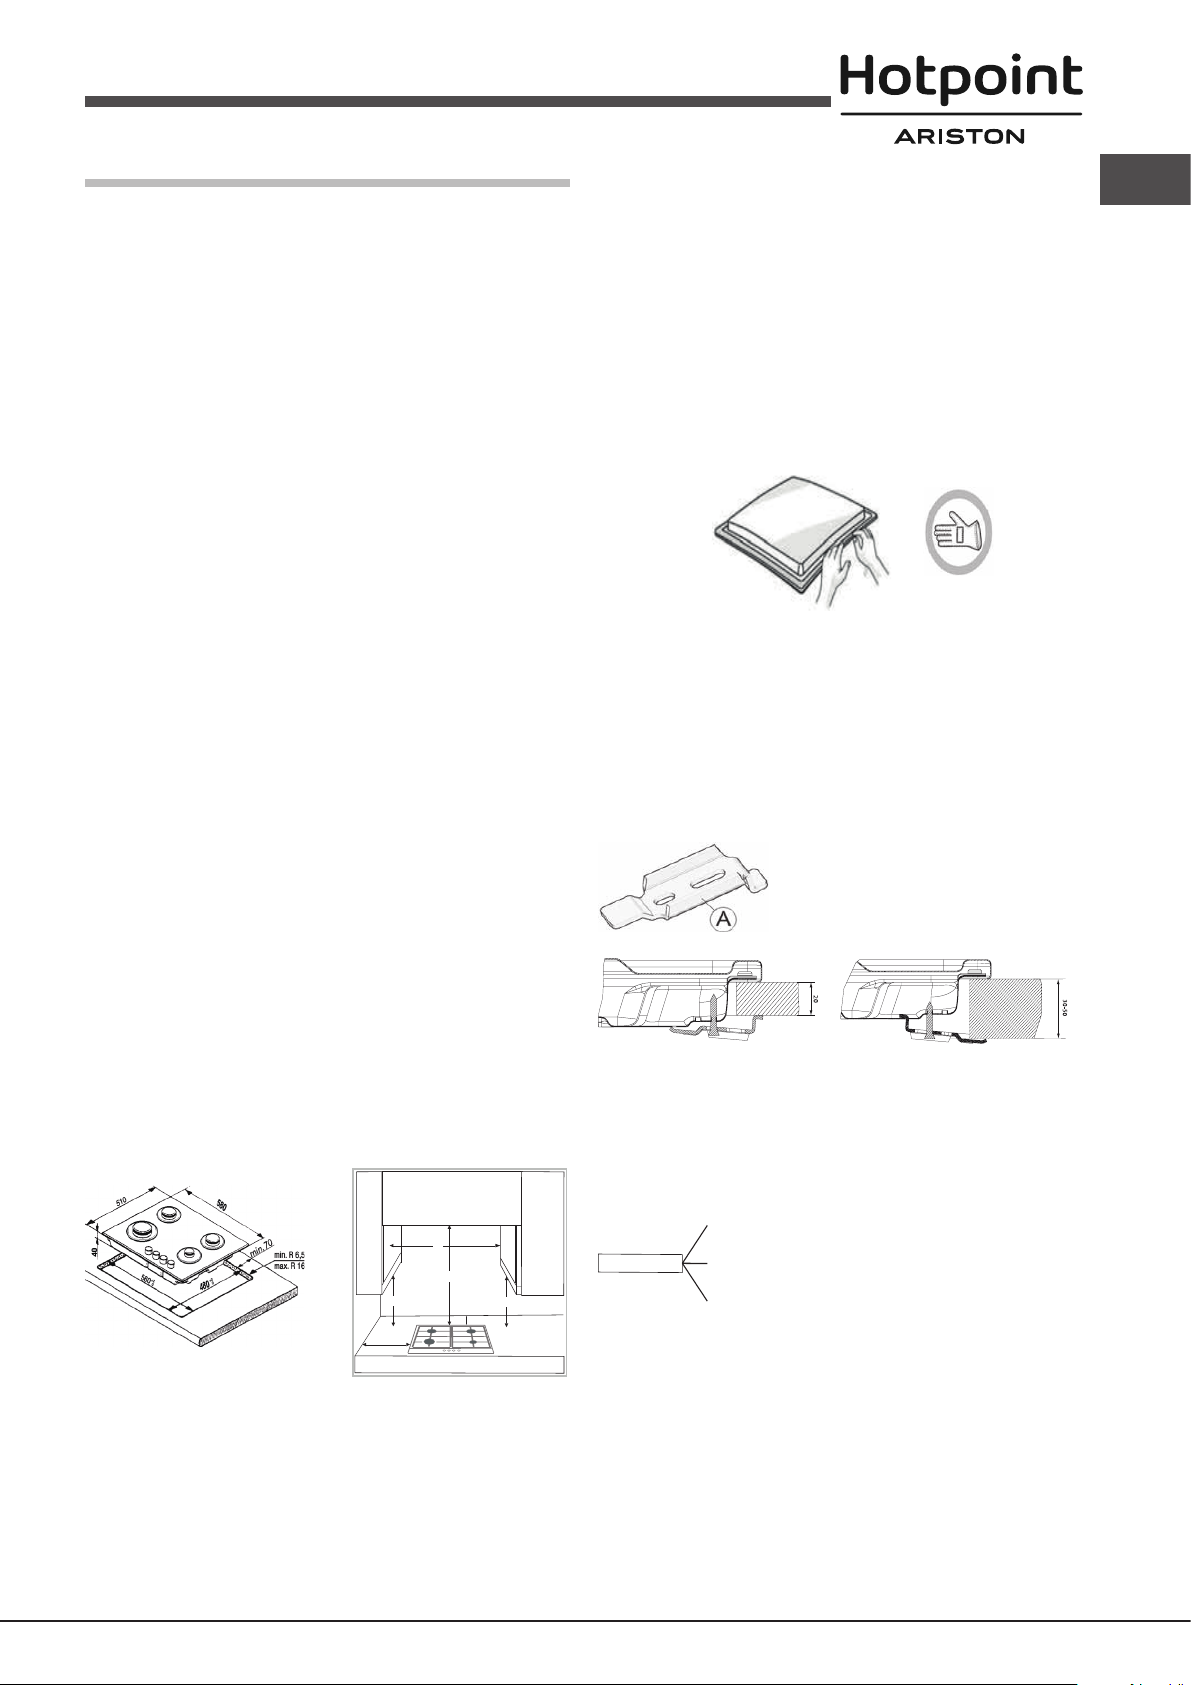
Installation
750mm
100mm
B
B
50mm
A
Top 20 mm
Top 30-50 mm
L
Earth
(yellow/green)
N
• This product can be embedded in a worktop 20 to 50 mm thick.
• If there is no oven beneath the hob, insert a separator panel that has a
! Before operating your new appliance please read this instruction booklet
carefully. It contains important information for safe use, installation and care
of the appliance.
! Please keep these operating instructions for future reference. Pass them on
to possible new owners of the appliance.
! After unpacking the hob, make sure that it has not been damaged during
transport. In the event of problems, contact the dealer or your nearest Aftersales Service.
• After having cleaned the perimeter surface, apply the supplied gasket to
! Keep packaging material out of the reach of children . Disposed it according
to the rules for separate waste collection (see Precautions and tips).
! The appliance must be installed by a qualied professional according to the
instructions provided. Incorrect installation may cause harm to people and
animals or may damage property.
GB
surface at least equal to the opening in the work surface. This panel,
that has to close completely the cutout in order to avoid any contact
with the bottom part of the hob, must be positioned at a maximum
distance of 150 mm below the upper surface of the work surface
but, in no case less than 20 mm from the bottom of the hob. In the
case that you intend to install an oven beneath the hob, make sure
that it is manufactured by Whirlpool and equipped with a cooling
system. The manufacturer declines all liability if another brand oven
is installed beneath the hob.
the hob as shown in the gure.
! The appliance must be disconnected from the power supply before carrying
out any installation work.
! These instructions are only valid for the countries whose symbols is given
on the data plate (under the hob).
• Before installation, make sure that:
- The local gas delivery conditions (nature and pressure) are
compatible with the settings of the hob (see the rating plate and
Position the hob in the worktop opening made respecting the dimensions
indicated in the Instruction.
NOTE: the power supply cable must be long enough to permit its upward
extraction.
To secure the hob, use the brackets (A) provided with it. Fit the brackets into the
relevant bores shown by the arrow and fasten them by means of their screws
in accordance with the thickness of the worktop (see the following gures).
injector table).
- The outer surfaces of the furniture or appliances adjacent to the hob are
heat resistant according to local regulations.
- This appliance is not connected to a fume exhaust device. It shall be
installed in accordance with current installation regulations. Particular
attention shall be given to the relevant requirements regarding ventilation.
- Combustion products are discharged outdoors through specic hoods or
wall and/or window mounted electrical fans.
• Intensive and prolonged use of the appliance may necessitate
supplemental ventilation, e.g. opening a window or increasing the power
of the air intake system (if present).
Electrical connection
! This operation must be performed by a qualied technician.
Fitting the appliance
The following precautions must be taken when installing the hob:
Hobs equipped with a three-pole power supply cable are designed to operate
with alternating current at the voltage and frequency indicated on the data
plate (this is located on the lower part of the appliance).
purposes and to make extracting the oven easier.
The earth wire in the cable has a green and
yellow cover. If the appliance is to be installed
above a built-in electric oven, the electrical
connection of the hob and the oven must be
carried out separately, both for electrical safety
NOTE: If the distance “A” between the wall cabinets is between 600 mm and
730 mm, the height “B” must be a minimum of 530 mm. If the distance “A”
between the wall cabinets is greater than the width of the hob, the height “B”
must be a minimum of 400 mm.
In case of installation of a hood above the hob, please refer to the hood
instructions fot the correct distance.
Connecting the supply cable to the mains
Install a standardised plug corresponding to the load indicated on the data
plate.
The appliance must be directly connected to the mains using an omnipolar
circuit-breaker with a minimum contact opening of 3 mm installed between
the appliance and the mains.
The circuit-breaker must be suitable for the charge indicated and must comply
with current electrical regulations (the earthing wire must not be interrupted
9

by the circuit-breaker). The supply cable must not come into contact with
GB
surfaces with temperatures higher than 50°C.
Adapting to different types of gas
! This operation must be performed by a qualied technician.
! The installer must ensure that the correct electrical connection has been
made and that it is compliant with safety regulations.
Before connecting to the power supply, make sure that:
• the appliance is earthed and the plug is compliant with the law.
• the socket can withstand the maximum power of the appliance, which is
indicated on the data plate.
• the voltage is in the range between the values indicated on the data plate.
• the socket is compatible with the plug of the appliance. If the socket is
incompatible with the plug, ask an authorised technician to replace it. Do
not use extension cords or multiple sockets.
! Once the appliance has been installed, the power supply cable and the
electrical socket must be easily accessible.
! The cable must not be bent or compressed.
! The cable must be checked regularly and replaced by authorised technicians
only (see Assistance).
! The manufacturer declines any liability should these safety measures not
be observed.
To adapt the hob to a different type of gas other than default type (indicated
on the rating plate at the base of the hob or on the packaging), the burner
nozzles should be replaced as follows:
1. Remove the hob grids and slide the burners off their seats.
2. Unscrew the nozzles using a socket spanner of the appropriate size, and
replace them with nozzles for the new type of gas (see table 1 “Burner
and nozzle characteristics”).
3. Reassemble the parts following the above procedure in the reverse order.
4. Once this procedure is nished, replace the old rating sticker with one
indicating the new type of gas used. Sticker are available from any of our
Service Centres.
• Adjusting the burners’ primary air
Does not require adjusting.
• Setting the burners to minimum
To ensure that the minimum setting is correctly adjusted, remove the knob
and proceed as follows:
Gas connection
! This operation must be performed by a qualied technician.
1. Adjust the adjustment screw, which is
positioned in or next to the tap pin, until the
ame is small but steady:
• tighten screw to reduce the ame height;
• loosen screw to increase the ame height;
The adjustment must be performed with the
tap in minimum gas setting position.
The appliance should be connected to the main gas supply or to a gas
cylinder in compliance with current national regulations. Before carrying out
the connection, make sure the cooker is compatible with the gas supply you
wish to use. If this is not the case, follow the instructions indicated in the
paragraph “Adapting to different types of gas.”
When using liquid gas from a cylinder, install a pressure regulator which
complies with current national regulations.
! Check that the pressure of the gas supply is consistent with the values
indicated in Table 1 (“Burner and nozzle specications”). This will ensure the
safe operation and longevity of your appliance while maintaining efcient
energy consumption.
• The connection of the hob to the
gas pipe network or gas cylinder
must be made by means of a rigid
copper or steel pipe with ttings
complying with local regulations, or
by means of a continuous-surface stainless steel hose complying with local
regulations. Interpose gasket (B) in the elbow connection.The maximum
length of the hose is 2 m.
• FOR BELGIUM ONLY: It is necessary to replace the elbow connection
(A) on the appliance, with the one supplied (if present).
IMPORTANT: if a stainless steel hose is used, it must be installed so as
not to touch any mobile part of the furniture. It must pass through an
area where there are no obstructions and where it is possible to inspect
it on all its length.
2. Having adjusted the ame to the required low setting, while the burner is
alight, quickly change the position of the knob from minimum to maximum
and vice versa several times, checking that the ame does not go out.
3. Some appliances have a safety device (thermocouple) tted. If the device
fails to work when the burners are set to the low ame setting, increase
this low ame setting using the adjusting screw.
4. Once the adjustment has been made, replace the seals on the by-passes
using sealing wax or a similar substance.
! If the appliance is connected to liquid gas, the regulation screw must be
fastened as tightly as possible.
! Once this procedure is nished, replace the old rating sticker with one
indicating the new type of gas used. Stickers are available from any of our
Service Centres.
! Should the gas pressure used be different (or vary slightly) from the
recommended pressure, a suitable pressure regulator must be tted to the
inlet pipe (in order to comply with current national regulations).
DATA PLATE
Electrical
connections
see data plate
ECODESIGN
This appliance conforms to the EU Regulation no. 66/2014
implementing Directive 2009/125/EC.
standard EN 30-2-1
• After connection to the gas supply, check for leaks with soapy water.
Light up the burners and turn the knobs from max position to minimum
position to check ame stability.
10
Burner and nozzle specications
Refer to the injector table of you Country
Start-up and use
Rapid (R)
Semi Rapid (S)
Auxiliary (A)
Ø Cookware Diameter (cm)
24 - 26
16 - 22
8 - 14
Burner
Precautions and tips
GB
! The position of the corresponding gas burner is shown on every knob.
Gas burners
Each burner can be adjusted to one of the following settings using the
corresponding control knob:
● Off
To light one of the burners, hold a lit match or lighter near the burner and, at
the same time, press down and turn the corresponding knob anti-clockwise
to the maximum setting.
Since the burner is tted with a safety device, the knob should be pressed
for approximately 2-3 seconds to allow the automatic device keeping the
ame alight to heat up.
Models are equipped with an ignition button incorporated into the control
knob. If this is the case, the ignitor is present, but not the button. To light a
burner, simply press the corresponding knob all the way in and then turn it
in the counter-clockwise direction to the “High” setting, keeping it pressed
in until the burner lights.
! If a ame is accidentally extinguished, turn off the control knob and wait for
at least 1 minute before trying to relight it.
To switch off the burner, turn the knob in a clockwise direction until it stops
(when reaches the “●” position).
Practical advice on using the burners
To ensure the burners operate efciently:
• Use appropriate cookware for each burner (see table) so that the ames
• Always use cookware with a at base and a cover.
• When the contents of the pan reach boiling point, turn the knob to minimum.
To identify the type of burner, refer to the designs in the section entitled, “Burner
and Nozzle Specications”.
• For maximum stability, always make sure that the pan supports are
• Pan handles should be positioned in line with one of the support bars on
• Pan handle should be positioned so not to protrude beyond the front edge
greatest stability.
Maximum
Minimum
do not extend beyond the bottom of the cookware.
correctly tted and that each pan is placed centrally over the burner.
the pan support grid.
of the hob.
The more variable aspect in terms of pan
stability can often be the pan itself, (or
the positioning of that pan during use).
Well balanced pans, with at bases that
are placed centrally over the burner,
with the pan handles aligned with one
of the support ngers obviously offer the
! This appliance has been designed and manufactured in compliance with
international safety standards. The following warnings are provided for safety
reasons and must be read carefully.
General safety
• This is a class 3 built-in appliance.
• Gas appliances require regular air exchange to maintain efcient
operation. When installing the hob, follow the instructions provided
in the paragraph on “Positioning” the appliance.
• These instructions are only valid for the countries whose symbols
appear in the manual and on the serial number plate.
• The appliance was designed for domestic use inside the home and is not
intended for commercial or industrial use.
• The appliance must not be installed outdoors, even in covered areas. It is
extremely dangerous to leave the appliance exposed to rain and storms.
• Do not touch the appliance with bare feet or with wet or damp hands and
feet.
• The appliance must be used by adults only for the preparation of food,
in accordance with the instructions outlined in this booklet. Any other
use of the appliance (e.g. for heating the room) constitutes improper
use and is dangerous. The manufacturer may not be held liable for
any damage resulting from improper, incorrect and unreasonable
use of the appliance.
• Ensure that the power supply cables of other electrical appliances do not
come into contact with the hot parts of the oven.
• The openings used for ventilation and dispersion of heat must never be
covered.
• Always make sure the knobs are in the “●”/“○” position when the appliance
is not in use.
• When unplugging the appliance always pull the plug from the mains socket,
do not pull on the cable.
• Never carry out any cleaning or maintenance work without having detached
the plug from the mains.
• In case of malfunction, under no circumstances should you attempt to repair
the appliance yourself. Repairs carried out by inexperienced persons may
cause injury or further malfunctioning of the appliance. Contact a Service
Centre (see Assistance).
• Do not close the glass cover (if present) when the gas burners or electric
hotplates are still hot.
• The appliance should not be operated by people (including children)
with reduced physical, sensory or mental capacities, by inexperienced
individuals or by anyone who is not familiar with the product. These
individuals should, at the very least, be supervised by someone who
assumes responsibility for their safety or receive preliminary instructions
relating to the operation of the appliance.
• Do not let children play with the appliance.
• The appliance is not intended to be operated by means of an external
timer or separate remote-control system.
Disposal
• When disposing of packaging material: observe local legislation so that
the packaging may be reused.
• The European Directive 2012/19/EU on Waste Electrical and Electronic
Equipment (WEEE), requires that old household electrical appliances must
not be disposed of in the normal unsorted municipal waste stream. Old
appliances must be collected separately in order to optimise the recovery
and recycling of the materials they contain and reduce the impact on
human health and the environment.The crossed out “wheeled bin” symbol
on the product reminds you of your obligation, that when you dispose of
the appliance it must be separately collected.
11
Consumers should contact their local authority or retailer for information
GB
concerning the correct disposal of their old appliance.
Troubleshooting
Respecting and conserving the environment
• Cook your food in closed pots or pans with well-tting lids and use as little
water as possible. Cooking with the lid off will greatly increase energy
consumption.
• Use purely at pots and pans.
• If you are cooking something that takes a long time, it’s worth using a
pressure cooker, which is twice as fast and saves a third of the energy.
Maintenance and care
Switching the appliance off
Disconnect your appliance from the electricity supply before carrying out
any work on it.
Cleaning the hob surface
• All the enamelled and glass parts should be cleaned with warm water and
neutral solution.
• Stainless steel surfaces may be stained by calcareous water or aggressive
detergents if left in contact for too long. Any food spills (water, sauce, coffee,
etc.) should be wiped away before they dry.
• Clean with warm water and neutral detergent, and then dry with a soft
cloth or chamois. Remove baked-on dirt with specic cleaners for stainless
steel surfaces.
• Clean stainless steel only with soft cloth or sponge.
• Do not use abrasive or corrosive products, chlorine-based cleaners or pan
scourers.
• Do not use steam cleaning appliances.
• Do not use ammable products.
• Do not leave acid or alkaline substances, such as vinegar, mustard, salt,
sugar or lemon juice on the hob.
It may happen that the appliance does not function properly or at all. Before
calling the service centre for assistance, check if anything can be done. First,
check to see that there are no interruptions in the gas and electrical supplies,
and, in particular, that the gas valves for the mains are open.
The burner does not light or the ame is not even around the burner.
Check whether:
• The gas holes on the burner are clogged.
• All the movable parts that make up the burner are mounted correctly.
• There are draughts near the appliance.
The ame dies in models with a safety device.
Check to make sure that:
• You pressed the knob all the way in.
• You keep the knob pressed in long enough to activate the safety device.
• The gas holes are not blocked in the area corresponding to the safety
device.
The burner does not remain lit when set to minimum.
Check to make sure that:
• The gas holes are not blocked.
• There are no draughts near the appliance.
• The minimum setting has been adjusted properly.
The cookware is unstable.
Check to make sure that:
• The bottom of the cookware is perfectly at.
• The cookware is positioned correctly at the centre of the burner.
• The pan support grids have been positioned correctly.
Cleaning the hob parts
• Clean the enamelled and glass parts only with soft cloth or sponge.
• Grids, burner caps and burners can be removed to be cleaned.
• Clean them by hand with warm water and non-abrasive detergent,
removing any food residues and checking that none of the burner openings
is clogged.
• Rinse and dry.
• Ret burners and burner caps correctly in the respective housings.
• When replacing the grids, make sure that the panstand area is aligned
with the burner.
• Models equipped with electrical ignition plugs and safety device require
thorough cleaning of the plug end in order to ensure correct operation.
Check these items frequently, and if necessary, clean them with a damp
cloth. Any baked-on food should be removed with a toothpick or needle.
! To avoid damaging the electric ignition device, do not use it when the
burners are not in their housing.
Gas tap maintenance
Over time, the taps may become jammed or difcult to turn. If this happens,
the tap must be replaced.
! This procedure must be performed by a qualied technician authorised
by the manufacturer.
12
 Loading...