


Use and Care Guide

ENGLISH . . . . . . . . . . . . . . . . . . . . . . . . . . . . . . . . . . . . . . . . . . . . . . . . . . . . 4
2

EN
ENGLISH
HEALTH & SAFETY, USE & CARE and INSTALLATION
GUIDE
THANK YOU FOR PURCHASING A HOTPOINT ARISTON PRODUCT
To receive more comprehensive help and support, please
register your product at
www.hotpoint-ariston.com/register
Table of contents
Health and Safety guide
SAFETY INSTRUCTIONS ................................................................................4
SAFEGUARDING THE ENVIRONMENT ..................................................................5
DECLARATION OF CONFORMITY .......................................................................5
Use and Care guide
PRODUCT DESCRIPTION ...............................................................................6
WIRE SHELF LEVEL .......................................................................................6
CONTROL PANEL ........................................................................................7
DESCRIPTION OF DISPLAY ...............................................................................7
ACCESSORIES ...........................................................................................8
INSERTING THE WIRE SHELF AND OTHER ACCESSORIES .................................................10
REMOVING AND REFITTING THE SHELF GUIDES .........................................................10
FUNCTIONS ............................................................................................11
HOW TO USE THE OVEN ...............................................................................13
USING THE APPLIANCE FOR THE FIRST TIME ............................................................13
DAILY USE ..............................................................................................14
USEFUL TIPS ............................................................................................18
COOKING TABLE ........................................................................................19
TESTED RECIPES ........................................................................................25
MAINTENANCE AND CLEANING ........................................................................26
TROUBLESHOOTING ....................................................................................28
TECHNICAL SPECIFICATION .............................................................................29
AFTERSALES SERVICE ..................................................................................29
Installation guide ......................................................................................30
3

SAFETY INSTRUCTIONS
IMPORTANT TO BE READ
AND OBSERVED
Before using the appliance
carefully read these safety
instructions.
Keep them close at hand for
future reference.
These instructions and the
appliance itself provide
important safety warnings, to be
observed at all times.
The manufacturer declines any
liability for failure to observe
these safety instructions, for
inapropriate use of the appliance
or incorrect setting of controls.
SAFETY WARNINGS
Very young (0-3 years) and
young children (3-8 years) shall
be kept away from the appliance
unless continuously supervised.
Children from 8 years old and
above and persons with reduced
physical, sensory or mental
capabilities or lack of experience
and knowledge can use this
appliance only if they are
supervised or have been given
instructions on safe use and
understand the hazards
involved. Children must not play
with the appliance. Cleaning and
user maintenance must not be
carried out by children without
supervision.
WARNING: The appliance and
its accessible parts become hot
during use, children less than 8
years of age shall be kept away
unless continuously supervised.
WARNING: Avoid touching
heating elements or interior
surface - risk of burns.
Keep clothes or other ammable
materials away from the
appliance, until all the
components have cooled down
completely.
Never leave the appliance
unattended during food drying.
Overheated oils and fats catch
re easily. Always be vigilant
when cooking foods rich in fat,
oil or when adding alcohol (e.g.
rum, cognac, wine) - risk of re.
Use oven gloves to remove pans
and accessories, taking care not
to touch the heating elements.
At the end of cooking, exercise
caution when opening the door,
by letting the hot air or steam
exit gradually before accessing
the appliance.
Do not obstruct hot air vents at
the front of the oven.
If the appliance is suitable for
probe usage, only use a
temperature probe
recommended for this oven.
PERMITTED USE
This appliance is solely for
domestic, not professional use.
Do not use the appliance
outdoors.
Do not store explosive or
ammable substances such as
aerosol cans and do not place
or use gasoline or other ammable materials in or near the
appliance: a re may break out
if the appliance is inadvertently
switched on.
CAUTION: The appliance is
not intended to be operated
by means of an external timer
or separate remote controlled
system.
No other use is permitted (e.g.
heating rooms).
INSTALLATION
Installation and repairs must be
carried out by a qualied
technician, in compliance with
the manufacturer’s instructions
and local safety regulations. Do
not repair or replace any part of
the appliance unless specically
stated in the user manual.
Children should not perform
installation operations. Keep
children away during
installation. Keep the packaging
materials (plastic bags,
polystyrene parts, etc.) out of
reach of children, during and
after the installation.
The appliance must be handled
and installed by two or more
persons. Use protective gloves
to unpack and install the
appliance.
After unpacking the appliance,
make sure that it has not been
damaged during transport. In
the event of problems, contact
the dealer or your nearest Aftersales Service.
The appliance must be
disconnected from the power
supply before any installation
operation.
During installation, make sure
the appliance does not damage
the power cable.
Only activate the appliance
when the installation has been
completed.
Carry out all cabinet cutting
works before tting the
appliance in the furniture and
carefully remove all wood chips
and sawdust.
After installation, the bottom of
the appliance must no longer be
accessible.
Do not obstruct the minimum
gap between the worktop and
the upper edge of the oven.
Only remove the oven from its
polystyrene foam base at the
time of installation.
ELECTRICAL WARNINGS
For installation to comply with
current safety regulations, an
omnipolar switch with minimum
contact gap of 3mm is required
and the appliance must be
earthed.
If the tted plug is not suitable
for your socket outlet, contact a
qualied technician.
The power cable must be long
enough to connect the
appliance, once tted in its
housing, to the main power
supply. Do not pull the power
supply cable.
If the power cable is damaged,
replace with an identical one.
The power cable must only be
replaced by a qualied
technician in compliance with
the manufacturer instruction
and current safety regulations.
4

Contact an authorized service
center.
For appliances with tted plug, if
the plug is not suitable for you
socket outlet, contact a qualied
technician.
Do not use extension leads,
multiple sockets or adapters.
Do not operate this appliance if
it has a damaged mains cord or
plug, if it is not working properly,
or if it has been damaged or
dropped. Keep the cord away
from hot surfaces.
The electrical components must
not be accessible to the user
after installation.
Do not touch the appliance with
any wet part of the body and do
not operate it when barefoot.
The rating plate is on the front
edge of the oven (visible when
the door is open).
In case of replacement of power
cable, use only following type(s):
H05 RR-F 3 x 1.5 mm2.
It must be possible to
disconnect the appliance from
the power supply by unplugging
it if plug is accessible, or by an
accessible multi-pole switch
installed upstream of the socket
in conformity with national
electrical safety standards.
CLEANING AND
MAINTENANCE
Wear protective gloves for
cleaning and maintenance.
The appliance must be disconnected from the power supply
EN
before any maintenance operation.
Never use steam cleaning
equipment.
WARNING: Ensure that the
appliance is switched o before
replacing the lamp to avoid
electric shock.
Do not use harsh abrasive
cleaners or sharp metal scrapers
to clean the door glass since
they can scratch the surface,
which may result in shattering
of the glass.
Ensure the appliance is cooled
down before carrying out any
cleaning or maintenance.
SAFEGUARDING THE ENVIRONMENT
DISPOSAL OF PACKAGING
MATERIALS
The packaging material is 100%
recyclable and is marked with the
recycle symbol.
The various parts of the packaging
must therefore be disposed of
responsibility and in full compliance
with local authority regulations
governing waste disposal.
SCRAPPING OF HOUSEHOLD
APPLIANCES
When scrapping the appliance, make
it unusable by cutting o the power
cable and removing the doors and
shelves (if present) so that children
cannot easily climb inside and become
trapped.
This appliance is manufactured with
recyclable
or reusable materials.
Dispose of it in accordance with local
waste disposal regulations.
For further information on the
treatment, recovery and recycling of
household electrical appliances,
contact your competent local
authority, the collection service for
household waste or the store where
you purchase the appliance.
This appliance is marked in
compliance with European Directive
2012/19/EU, Waste Electrical and
Electronic Equipment (WEEE).
By ensuring this product is disposed
of correctly, you will help prevent
potential negative consequences for
the environment and human health,
which could otherwise be caused by
inappropriate waste handling of this
product.
The symbol
on the product or on the
accompanying documentation
indicates that it should not be treated
as domestic waste but must be taken
to an appropriate collection center for
the recycling of electrical and
electronic equipment.
ENERGY SAVING TIPS
Make sure the oven door is closed
completely when the appliance is
turned on and keep it closed as much
as possible while baking.
Cut the food into small, equally-sized
pieces to reduce cooking time and
save energy.
When the cooking time is long, over
30 minutes, reduce the oven
temperature to the lowest setting
during the last phase (3-10 minutes),
based on the overall cooking time.
The residual heat inside the oven will
continue cooking the food.
DECLARATION OF CONFORMITY
This appliance has been designed,
constructed and distributed in
compliance with the safety
requirements of EC Directives:
2006/95/EC, 2004/108/EC, 93/68/EEC
and 2011/65/EU (RoHS Directive).
This appliance, which is intended to
come into contact with foodstus,
complies with European Regulation n.
1935/2004/EC.
This appliance meets the Eco Design
requirements of European Regulations
n. 65/2014, and n. 66/2014 in
conformity to the European standard
EN 60350-1.
5
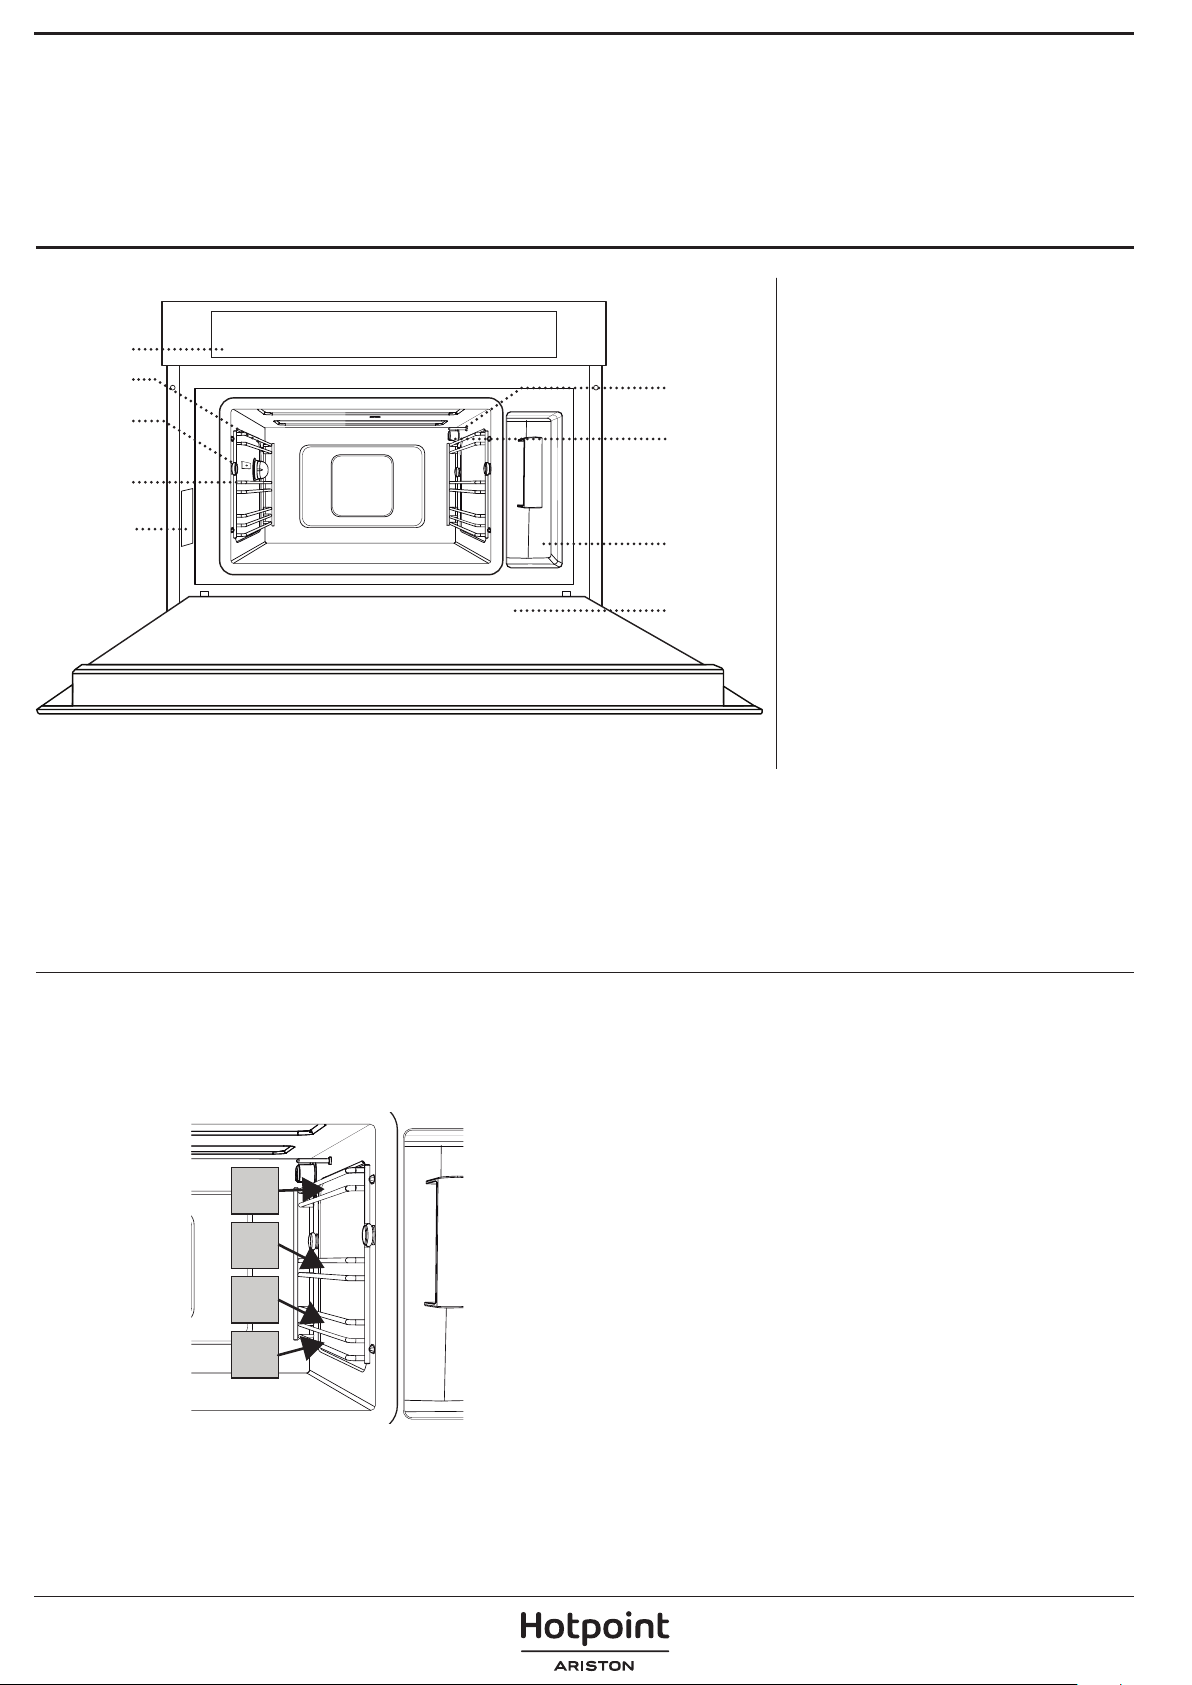
Use and Care Guide
PRODUCT
DESCRIPTION
1
2
3
1. Control panel
2. Light
6
7
3. Connection for food probe
4. Shelf guides
4
5
Please note:
The cooling fan may switch itself on every so often during cooking in order to reduce energy consumption.
Once cooking is complete and the oven has been switched off, the cooling fan may continue to run for a certain period
of time.
8
9
5. Identification plate
(do not remove)
6. Temperature sensor
7. Steam inlet valve
8. Water reservoir
9. Door
WIRE SHELF LEVEL
The levels (shelf guides) on which the wire shelf and other accessories can be placed are numbered, with 1
being the lowest and 4 being the highest.
4
3
2
1
6
CONTROL PANEL
1 432 5 76 8
EN
1. ON / OFF / PAUSE
For switching the oven on or off
and for pausing or stopping a
function.
2. MENU
For gaining quick access to the
main menu.
3. FAVOURITES
4. BACK
For returning to the previous
menu.
5. DIS PLAY
6. NAVIGATION BUTTONS
For navigating through menus,
moving the cursor and changing
settings.
For accessing the 10 most used
functions.
DESCRIPTION OF DISPLAY
MENU DISPLAY
Settings
1
Manual cooking functions
Manual
Steam Defrost
7. OK / SELECT
For selecting functions and
confirming settings.
8. STAR T
For starting the function that has
been selected.
1. Symbol for the function
selected
2. Function selected
2
3
4
3. Other available functions
that can be selected
4. Description of the function
highlighted
SETTINGS DISPLAY
180 °C
TEMPERATURE
1
High
STEAM LEVEL
Forced Air + Steam
2
00:20
COOK TIME
3
1. Setting for the function
(temperature, amount of steam)
2. Cursor
(highlights the setting selected)
3. Duration
18:30
END TIME
5
4
4. Time at which the function will
finish
5. Name of the function
7
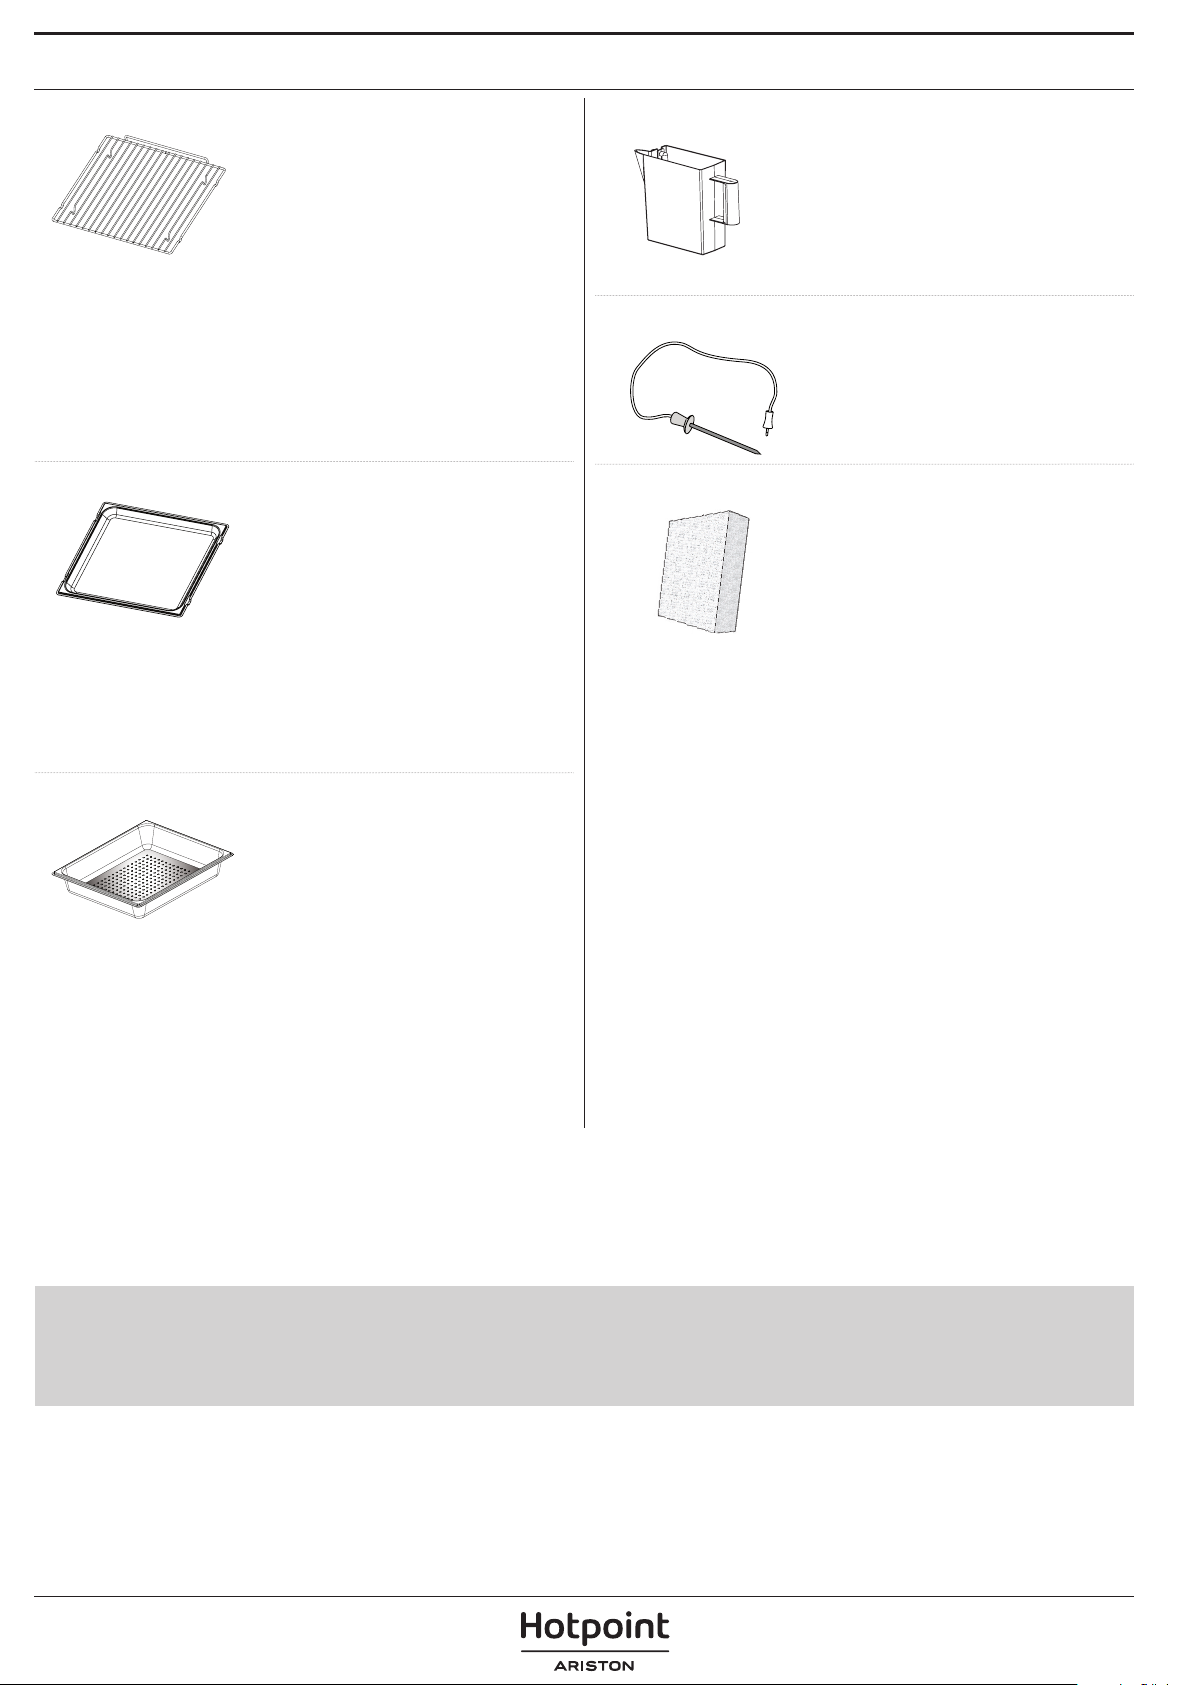
ACCESSORIES
WIRE SHELF
This allows the hot air to
circulate effectively. Place food
directly on the wire shelf or use
it to support baking trays and
tins or other heat-resistant
ovenware. When cooking food directly on the
wire shelf, place the dripping pan on the level
below it.
It can also be placed on top of either the
dripping pan or the steamer tray on the same
level.
DRIPPING PAN
This is used as a baking tray
with the “Convection Bake”
function to cook meat, fish,
vegetables, or different types
of bread and pastries.
It is also useful for supporting heat-resistant
ovenware as it means you do not have to place
items on the bottom of the oven. It collects the
cooking juices when placed below the wire shelf or
the steamer tray.
WATER RESERVOIR
FOOD PROBE
SPONGE
Fill with drinking water every
time you use one of the steam
functions.
For measuring the core
temperature of food during
cooking.
For removing any
condensation that forms
during
cooking
STEAMER TRAY
This makes it easier for steam
to circulate, which helps cook
the food evenly. Place the
dripping pan on the level below
to collect the cooking juices.
The number of accessories may vary depending on which model is purchased.
ADDITIONAL ACCESSORIES: Other accessories that are not supplied can be purchased separately from the After-sales
Service.
Before purchasing other accessories that are
available on the market, make sure that they are
heat-resistant and suitable for steaming.
Make sure that there is a gap of at least 30 mm
between the top of any container and the walls of
the cooking compartment in order to allow steam
to ow suciently.
8
EN
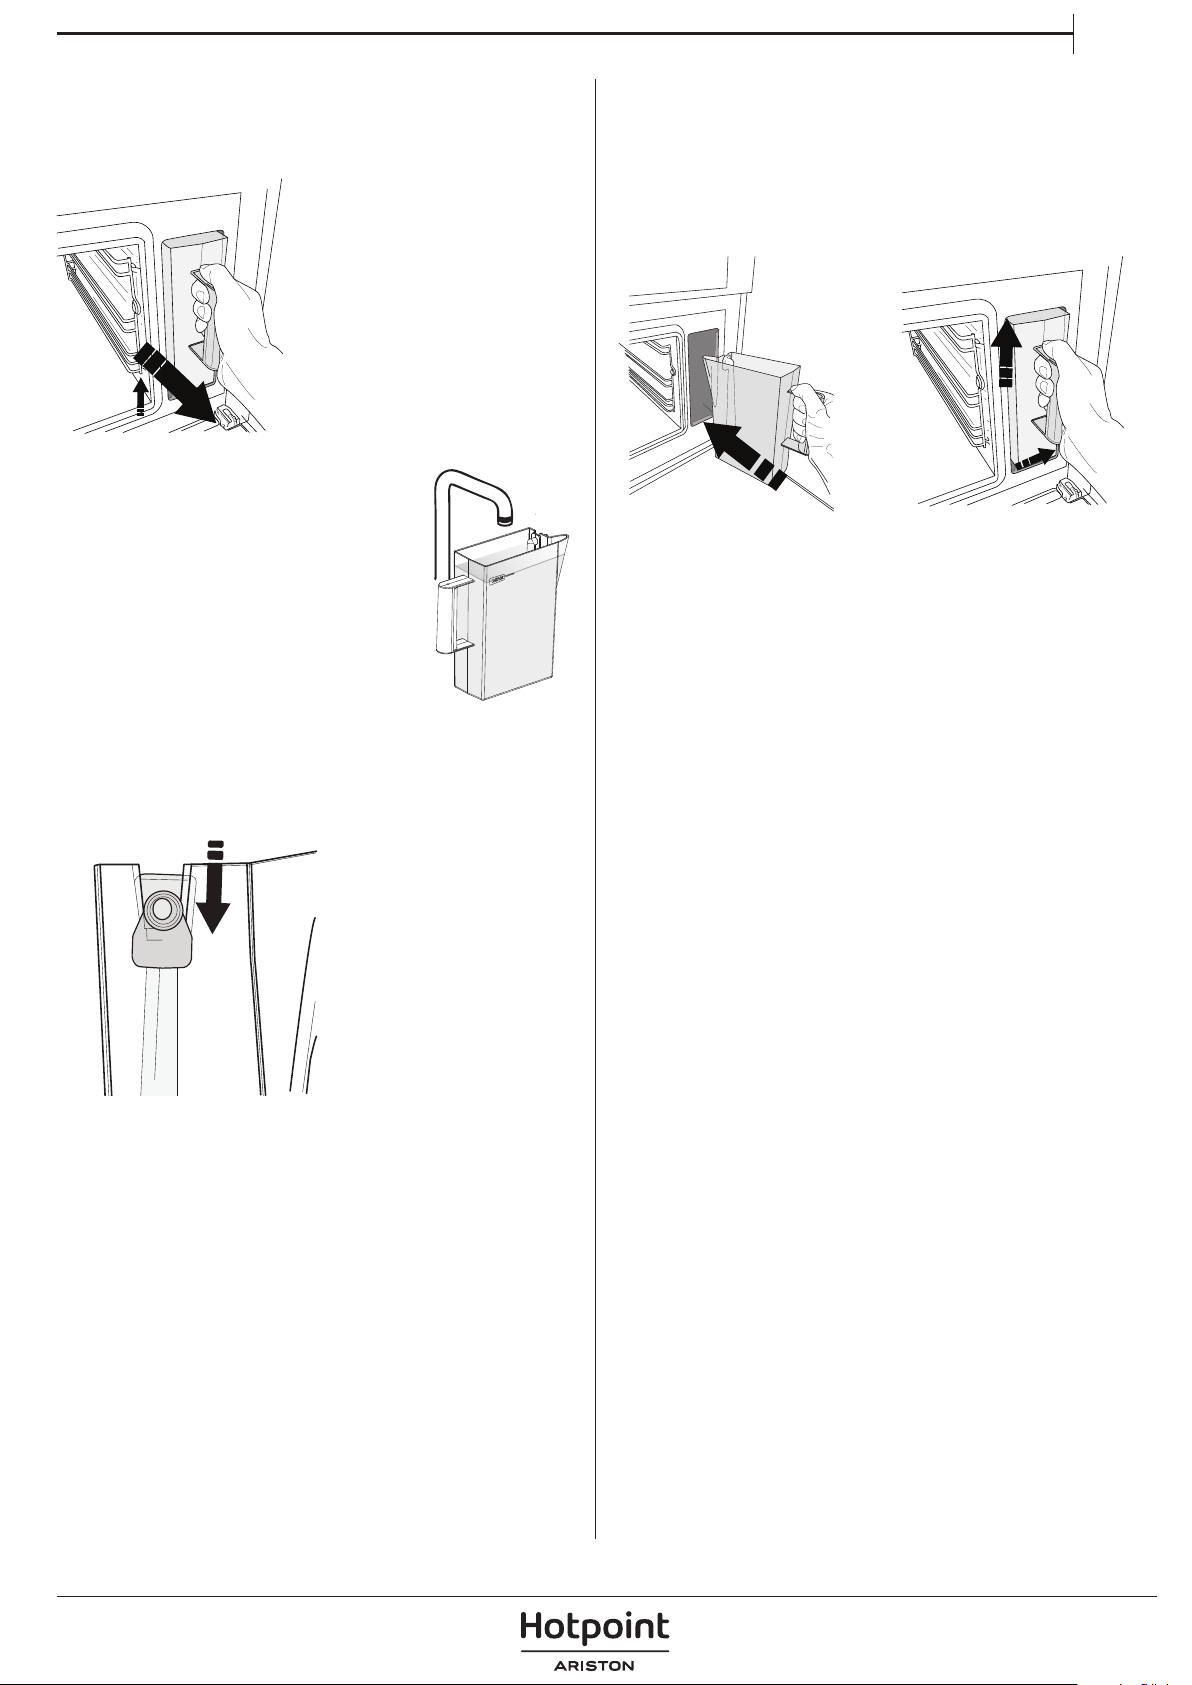
USING THE WATER RESERVOIR
The water reservoir can be easily accessed by
opening the door. Remove it by lifting it slightly
upwards and then pulling it towards you.
The water reservoir
must be filled before activating
any of the cooking functions: Fill
it with drinking water up to the
“MAX” mark.
Fill the water reservoir up to the “MAX” mark and
place it in its holder: Make sure that it is positioned
correctly: The top and the right-hand side of the
water reservoir should be touching the sides of the
holder.
Insert the water reservoir fully and then push it
downwards until it clicks into place.
Carefully remove the water reservoir and empty it
after every use. Take care to pour water out of the
tube as well.
Before placing the water reservoir in its holder,
make sure that the water tube is correctly
positioned in the hollow at the top edge of the
water reservoir.
9
INSERTING THE WIRE SHELF AND OTHER ACCESSORIES
Insert the wire shelf horizontally by sliding it across
the shelf guides, making sure that the side with the
raised edge is facing upwards.
REMOVING AND REFITTING
THE SHELF GUIDES
Other accessories, such as the dripping pan and
the steamer tray, are inserted horizontally in the
same way as the wire shelf.
1. To remove the shelf guides, slide them forwards
and pull them towards you to unhook them from the
brackets.
2. To refit the shelf guides, hook them into the
brackets by pushing down on them gently until
they click into place.
10

FUNCTIONS
EN
TRADITIONAL FUNCTIONS
STEAM
For cooking natural and healthy dishes using
steam to preserve the food's natural nutritional
value. This function is particularly suited to
cooking vegetables, fish and fruit, and also for
blanching.
Unless otherwise indicated, remove all packaging
and protective film before placing the food in the
oven.
The temperature of the oven must be lower than
100 °C before using this function. If it is not, allow
the oven to cool before starting.
CONVECTION
BAKE
For cooking dishes in a way that achieves
similar results to using a conventional oven.
This function is especially useful for cooking
meringues, pastries, tarts, soufflés, poultry and
meat.
We recommend using the wire shelf with this
function as it allows the air to circulate effectively.
Alternatively, the baking tray or other cookware
that is suitable for oven use can be used to cook
certain foods, such as biscuits or bread rolls.
FORCED AIR + STEAM
This function combines the features of oven
cooking with the properties of steam to cook food
efficiently and effectively, producing dishes that
are crispy on the outside but tender and succulent
on the inside.
It is especially suited to cooking roasting joints
of meat or poultry, fish, potatoes, frozen ready
meals, cakes and desserts.
REHEATING
For reheating ready-made food that is either
frozen, chilled or at room temperature. This
function uses steam to gently reheat food without
drying it out, thus enabling it to retain its original
flavour.
Standing time improves the result.
We recommend placing smaller or thinner pieces
of food in the middle and larger or thicker pieces
around the outside.
If using the steamer tray, place the dripping pan
below it to collect any liquid running out of the
food.
FINISHING
For optimising the cooking of read-made food
while keeping it soft and juicy. This function
enables ready-made or partially pre-cooked
meals, such as roasting joints, fish and gratins, to
be reheated evenly. We recommend placing food
on the baking tray and steaming it on level 3 with
the dripping pan on the level below. You should
set the temperature of the oven at the final
temperature you would like the food to have.
STEAM DEFROST
For defrosting meat, poultry, fish, vegetables,
bread and fruit.
For best results, do not defrost the food
completely but allow the process to finish during
standing time.
We recommend keeping bread wrapped up to
prevent it from becoming too soft.
For meat and fish: Remove all packaging and
place on the steamer tray on level 3. Place the
dripping pan on the level below to collect the
melt water. For best results, turn the food halfway
through the process and separate any parts that
have already defrosted.
11

SPECIALS
ASSISTED MODE
PROVING
For optimal proving of sweet or savoury
dough. To maintain the quality of proving, do
not activate the function if the oven is still hot
following a cooking cycle.
PRESERVATION
For making preserves out of fruit and
vegetables.
YOGHURT
For making yoghurt.
DISINFECTION
For disinfecting baby bottles or jars using
steam.
DRAINING BOILER
For draining the boiler automatically to
prevent residual water remaining in there when
the appliance will not be used for a certain period
of time. The function will only activate if the
temperature of the oven is below 60 °C.
For selecting one of the numerous preset recipes
that enable you to cook pasta, rice, vegetarian meals,
meat, fish, poultry, side dishes, pizzas, pies, bread,
cakes, eggs and desserts more effectively. The oven
automatically applies the recommended settings for
each type of dish and sometimes offers instructions
for you to follow in order to achieve optimal results.
SETTINGS
For accessing a menu that allows you to change
the settings for the oven and the display (language,
time, brightness, volume of the audible signal, Eco
mode, calibration).
Please note: When Eco mode is active, the brightness
of the display will be reduced after a few seconds to
save energy. The display is reactivated automatically
whenever any of the buttons are pressed, etc.
DESCALE
For removing limescale deposits from the
boiler. We recommend using this function at
regular intervals.
If yo do not, a message will appear on the display
reminding you to clean the oven.
STEAM CLEANING
For making it easier to clean the cooking
compartment. Regular use prevents deposits from
forming, which could damage the surface.
12

EN
Please select language
Italiano
Türkçe
English
HH MM
12:00
HOW TO USE
THE OVEN
Read the safety instructions carefully before using the
appliance.
USING THE APPLIANCE FOR THE FIRST TIME
1. SELECT THE LANGUAGE
You will need to set the language and the time when
you switch on the appliance for the rst time: The
display will show you a list of available languages.
Use or to select the language you require and
press
Please note: The language can also be changed later from
the “Settings” menu item.
to confirm.
2. SET THE TIME
After selecting the language, you will need to set
the current time: 12:00 will flash on the display.
4. CALIBRATING
To enable the oven to produce steam eciently, it
needs to be calibrated before being used for cooking.
Once you have lled the water reservoir and put it in
place, press to switch on the oven, then use or
to select the “Settings” menu item and press .
Select “Calibrate” and press again to conrm.
Press to start calibrating, making sure that the
oven door remains closed until the process has ended.
Once calibration is complete, leave the oven to cool
down and dry the cooking compartment with a cloth.
Please note: A large amount of steam may be generated
during this process: This is perfectly normal.
5. REHEAT THE OVEN
Before starting to cook food, we recommend that
you reheat the oven with it empty in order to
remove any odours that may have been left behind
during manufacturing.
Press to set time, OK when done
Use or to set the time and press to
confirm.
Please note: You may need to set the time again following
lengthy power outages.
3. RINSE AND FILL THE WATER RESERVOIR
Remove the sponge, then rinse and ll the water
reservoir with drinking water up to the “MAX” mark.
Heat the oven to 200 °C for around one hour
using the “Convection Bake” function. Follow the
instructions for setting the function correctly.
Please note: It is advisable to air the room after using the
appliance for the rst time.
13

200 °C
HH:MM
18:40
00:20
180 °C
18:30
00:20
180 °C
18:30
00:20
DAILY USE
1. SELECT A FUNCTION
Press the button to switch on the oven: The
display will show the main menu and a list of
available functions.
Use or to scroll through the list.
Settings
Manual
Steam Defrost
Manual cooking functions
Once the item you would like to select is
highlighted on the display, press to confirm the
selection and go to the settings menu (see below)
or to the list of functions.
Press or to navigate through the list on
screen. Press to confirm and go to the settings
menu: The display will show the basic settings for
the function.
FUNCTIONS USING STEAM
When you select a function that requires the use of
steam, the display will always remind you to fill the
water reservoir completely.
3. SET THE TEMPERATURE/
STEAM LEVEL
Use
or to move the cursor to the setting that
you would like to change.
Once the cursor is in position, change the setting
by pressing
: The setting you have selected will
start to flash.
TEMPERATURE
High
STEAM LEVEL
Forced Air + Steam
COOK TIME
END TIME
Use or to change the setting and press to
conrm.
Please note: You can change the settings later, even while
cooking is in progress, by following these steps again.
4. PREHEATING
The “Convection Bake” function (and automatically
for certain recipes in “Assisted Mode”) allows you to
preheat the oven before cooking.
Once you have conrmed that you have lled it with
drinking water up to the “MAX” mark, press
to go
to the settings menu for the function.
2. SET THE LENGTH
Use
and press OK to confirm: The time will flash on the
display.
Use or to change the setting: The display will
update the time at which cooking is expected to be
complete.
Press OK to confirm and apply the settings.
Please note: You can change the time you have set, even
while cooking is in progress, by following these steps
again. You can also choose not to set a cooking time: If
you do this, you will need to switch the oven off manually
once cooking is complete.
or to move the cursor to COOK TIME
TEMPERATURE
High
STEAM LEVEL
Forced Air + Steam
END TIME
TEMPERATURE
No
PREHEAT.
Convection Bake
COOK TIME
END TIME
Selecting “Yes” will activate preheating. Once the
function has been activated, the display will show
how preheating is progressing.
160°C
TEMPERATURE INSERT IN
Preheating
-00:10
Once preheating has finished, an audible signal will
sound and the display will indicate that the oven
has reached the set temperature: At this point you
can add the food and press to start cooking.
Please note: The food probe cannot be used during the
preheating phase.
Selecting “No” will reduce the overall cooking time (including
preheating) and energy consumption by up to 25%.
Placing the food in the oven before preheating has nished
may have an adverse eect on the nal cooking result.
14

5. SET THE COOKING END TIME/DELAYED
180 °C
HH:MM
18:36
00:20
180 °C
-00:36
00:20
100 °C
18:20
57°C
200°C
55°C
START
Many functions allow you to program the cooking
end time by delaying the time at which the function
starts. When setting the duration of the function,
the display will show what time cooking is expected
to be complete.
Use
press : The time will flash.
or to move the cursor to END TIME and
TEMPERATURE
High
STEAM LEVEL
Forced Air + Steam
COOK TIME
EN
. USING THE FOOD PROBE
Using the food probe enables you to measure the
core temperature of the food during cooking.
Insert the food probe deep
into the meat, avoiding bones
or fatty areas:
Poultry: Insert the tip into the
centre of the breast, avoiding
hollow areas.
Joints or legs of meat: Insert
the tip into the thickest part.
Fish (whole): Position the tip in
the thickest part, avoiding the
spine.
Use or to select the time you require cooking
to end and press .
Press and place the food in the oven, then press
again to activate the function: The oven will
switch on automatically after the period of time that
has been calculated in order for cooking to end at
the time you have set.
TEMPERATURE
High
STEAM LEVEL
Note: You can activate this function immediately and cancel
the waiting time by pressing .
Forced Air + Steam
COOK TIME
START IN
6. ACTIVATE THE FUNCTION
Once you have applied the settings you require,
press the button to activate the function.
Once the function has been activated, you can pause
it by pressing
.
Please note: If preheating has been selected, the display
will prompt you to place the food in the oven once it has
reached the required temperature.
once. To resume the function, press
USING THE MANUAL
FUNCTION
Place the food in the oven. We recommend placing
the food on the wire shelf and positioning the
dripping pan below it to collect any cooking juices.
Remove the cap covering the handle of the food
probe and connect the plug. Make sure that the cable
is to free to move before closing the oven door.
Select a manual function: The settings menu for the
function allows you to change the temperature of the
oven or the steam and the temperature required for
the food probe.
TEMPERATURE
Steam
FOOD PROBE
START TIME
Once you have applied all the settings you require,
press START to activate the function: An audible
signal will sound and the display will indicate when
the food probe has reached the set temperature.
Please note: You cannot connect the food probe once the
function has been activated.
IN ASSISTED MODE
The probe can be used with some of the
automatic functions: Select the FOOD PROBE option
and then follow the instructions given on the
display.
When prompted to do so, place the dishes in
the oven and connect the food probe to the
appropriate plug.
TEMPERATURE
Roast beef
FOOD PROBE
Note: If preheating has been selected, you will not be
able to add food or connect the food probe until this has
nished.
15

. USING THE SPECIAL FUNCTIONS
20 %
1/3
18:20
00:32
PRESERVATION
We recommend using only fresh, high-quality
fruit or vegetables to make jams and preserves.
Fill the jars with fruit or vegetables (precooked, if
possible) and top them up with preserving liquid
or canning syrup, leaving approx. 2 cm at the top.
Then put the lids on loosely without tightening
them.
Place the wire shelf on level 2 with the dripping
pan on the level below and place the jars on the
wire shelf. Alternatively, you can place the jars
directly on the dripping pan.
Activate the function.
Once finished, tighten the lids on the jars fully
(wearing oven gloves or protecting you hands with
a heat-resistant cloth when doing so) and then
leave them to cool down to room temperature.
Please note: We recommend using the “Disinfection” function
to clean the jars eectively.
YOGHURT
Before activating the function, add approx.
100 g of commercially available fresh whole
yoghurt to one litre of whole milk at room
temperature.
Please note: If using unpasteurised milk, heat it to a simmer
before leaving it to cool down to room temperature.
Pour the mixture into heat-resistant jars, cover them
with heat-resistant lids or film and then place them
on the wire shelf, inserted at level 2.
Select the function and set the duration to five
hours (the temperature cannot be changed).
Once the function has finished, leave the yoghurt
to cool in the refrigerator for several hours before
serving. It will keep for 1-2 weeks. You can use
some of this yoghurt to make another batch within
5-7 days.
Please note: We recommend using the “Disinfection” function
to thoroughly clean the utensils and jars you need to make
yoghurt.
DRAIN
To prevent residual water from remaining
inside the boiler, it is advisable to activate this
function every time the oven will not be used for a
certain period of time.
Please note: If the boiler is too hot, the function will not
be activated until the temperature in the oven is below 60
°C. The function will be activated automatically once the
compartment has reached this temperature.
Activate the function and follow the steps given on
the display. Once nished, drain and rinse the water
reservoir with drinking water.
DRAINING BOILER
DESCALE
When used at regular intervals, this special
function keeps the boiler in optimum condition.
Activate the function and follow the steps given on
the display, pressing
to proceed.
For best results, we recommend filling the water
reservoir with 250 ml of white vinegar and then
topping it up with drinking water until the “MAX”
mark.
Descaling takes around 30 minutes: Do not switch
off the oven during this time. Cooking functions
cannot be activated during the cleaning cycle.
PHASE
Descaling
PHASE TIME
END TIME
Once finished, to prevent any residue from forming,
rinse the water reservoir with drinking water and
then activate the “Steam Cleaning” function with
the oven empty.
16

STEAM CLEANING
00 : 01 : 00
(HH) (MM) (SS)
This function softens deposits and food
residues, which makes it easier to clean the oven.
When used regularly, it enables you to easily
remove any food residues or deposits in the
compartment.
Please note: We recommend removing any accessories from
the oven before activating this function.
EN
. TIMER
When the oven is switched off, the display can be
used as a timer. To activate the function, make sure
that the oven is switched off and then press
The timer will flash on the display.
Press to set timer, OK to start
:
Steam Cleaning
END TIME
Once nished, wait for the oven to cool down and
then nish cleaning by drying the surfaces with a
sponge or cloth.
. FAVOURITES
The oven will automatically compile a list of the
functions that you use the most.
Press the
press
frequently.
Use or to select the function you require, press
to conrm and then modify – if necessary – the
settings according to your needs (those suggested are
basic settings).
Once nished, press
button to switch on the oven, then
to display the list of functions you use most
Lasagna
Steam
Muns
Your most used cooking functions
to activate the function.
Use or to set the length of time you require and
then press to activate the timer. An audible signal
will sound once the timer has nished counting down
the selected time.
Please note: You can stop the timer at any time by pressing
.
. KEYPAD LOCK
To lock the keypad, press and hold
the same time for at least five seconds.
Key lock has been
activated
Do this again to unlock the keypad.
Please note: This function can also be activated during
cooking.
For safety reasons, the oven can be switched o at any time
by pressing the button.
and at
17

USEFUL TIPS
HOW TO READ THE COOKING TABLE
The table lists the best function, accessories and
level to use to cook various different types of
food. Cooking times start from the moment food
is placed in the oven, excluding preheating (where
required).
Cooking temperatures and times are approximate
and depend on the amount of food and the type of
accessory used.
Use the lowest recommended values to begin with
and, if the food is not cooked enough, then move
on to higher values.
We recommend using the accessories supplied and
preferably dark-coloured metal cake tins and baking
trays that are heat- and steam-resistant. You can
also use Pyrex or stoneware pans and accessories,
but bear in mind that cooking times will be slightly
longer.
CAKES AND BREAD
We recommend using the “Convection Bake”
function for cakes and “Forced Air + Steam” for
bread products.
Use dark-coloured metal cake tins and always place
them on the wire shelf supplied.
Alternatively, the dripping pan or other cookware
that is suitable for oven use can be used to bake
certain foods, such as biscuits or bread rolls.
To check whether the item you are baking is done,
insert a skewer into the centre: If it comes out clean,
the cake or bread is cooked.
If using non-stick cake tins, do not butter the edges
as the cake may not rise evenly around the edges.
PROVING
Cover the tin containing the dough with a damp
cloth and place it on the dripping pan. Place this in
the oven on level 1 or 2.
We recommend proving dough in the oven because
it provides a more constant temperature than
ambient air. It is nevertheless advisable to check
the dough early (roughly after a third of the total
proving time has elapsed), otherwise it could rise
too much.
You can also prove stretched or cut dough that
has already partially risen: Cover the dripping pan
with a cloth and place it on level 2 or 3. The time
required for this will be approximately half the
normal proving time.
The proving time for pizza starts at around one
hour for 1 kg of dough.
SAVING ENERGY
Make sure that the oven door is closed when the
oven is in operation and keep it closed as much as
possible during cooking.
If possible, place food directly on the accessories
supplied and do not use additional cookware.
Do not preheat the oven before cooking if this is
not necessary.
Cutting food into small, equally sized pieces will
allow you to reduce cooking times and save energy
as a result.
When cooking for long periods of time (i.e. more
than 30 minutes), we recommend lowering the
temperature during the final stage: The residual
heat inside the oven will be sufficient to continue
cooking.
Use this residual heat to heat up other food.
If the item “swells” during baking, use a lower
temperature next time and consider reducing the
amount of liquid you add or stirring the mixture
more gently.
If the base of the cake is soggy, lower the shelf and
sprinkle the bottom of the cake with breadcrumbs
or biscuit crumbs before adding the filling.
PIZZA
Lightly grease the trays to ensure the pizza has a
crispy base.
18

COOKING TABLE
EN
FOOD FUNCTION PR EHEAT
Gateaux (cakes) Yes 160 - 35-40
Cookies Yes 165 - 175 - 12 - 15
Choux buns Yes 190 -200 - 25 - 30
Bread Yes 180-190 Low - medium 35 - 40
Swiss rolls Yes 230 - 7 - 8
Quiche Yes 180-190 - 35 - 40
Pu pastry Yes 180 -19 0 - 15-20
Gnocchi - 90 - 100 - 10 - 15
Frozen Bualo
wings
Turkey breast Yes 200 - 210 Medium 50-60
Ribs Yes 160 –170 Low 80 - 90
Yes 190 -200 - 15 - 18
TEMPERATURE
(°C)
STEAM
LEVEL
DURATION LEVEL AND ACCESSORIES
2
2
2
2
2
2
2
3
2
2 1
2 1
1
Fish gratin Yes 190 -200 Low 15- 25
Fish terrine - 75 - 80 - 60 - 90
Boiled eggs - 90 - 20 - 25
Roasted vegetables Yes 200 - 210 Medium - high 20-30
Beetroot - 10 0 - 50 - 60
Red cabbage - 10 0 - 30 - 35
White cabbage - 10 0 - 25 - 30
White beans - 10 0 - 75 - 90
Ready meal
Soup / broth
Vegetables
- 100 - 18 - 25
- 100 - 20 - 25
- 100 - 20 - 25
2 1
3
3
2 1
3 1
3 1
3 1
3
2/1
3 2/1
3
3 2/1
Steam Forced Air Forced Air + Steam Finishing
Wire shelf Ovenware on the wire shelf Dripping pan Steamer tray Food probe (optional)
Please note: Other accessories can be purchased separately from the After-sales Service.
19
FOOD FUNCTION PREHEAT
Rice / pasta
TEMPERATURE
(°C)
STEAM
LEVEL
DURATION LEVEL AND ACCESSORIES
- 100 - 15 - 20
3
2/1
Potatoes
Meat in slices
Meat in sauce
Fish llets
MEAT
POULTRY
FISH
FOOD
- 100 - 20 - 25
- 100 - 15 - 20
- 100 - 25 - 30
- 100 - 10 - 15
STEAM DEFROST
WEIGHT
(g)
Minced
500 25 -30
Sliced 20 - 25 60
Bratwurst 450 10 - 15 10 - 15 60
Whole 1000 60 - 70 40 - 50 60
Fillets
500
Legs 30 - 35 25 - 30 60
Whole 600 30 - 40 25 - 30 60
Fillets 300 10 - 15 10 - 15 60
Portion 400 20 - 25 20 - 25 60
DURATION
25 - 30 20 - 25 60
RESTING
TIME
30 - 35 60
TEMPERATURE
(°C)
3 2/1
3
3
2/1
3 2/1
LEVEL AND ACCESSO-
RIES
3 1
3 1
3 1
3 1
3 1
3 1
3 1
3 1
3 1
Portion 300 25 - 30 20 - 25 60
VEGETABLES
Pieces 400 10 - 15 5 - 10 60
Bread loaf 500 15 - 20 25 - 30 60
BREAD
Slices
250
Rolls / buns 10 - 12 5 - 10 60
Cake 400 8 - 10 15 - 20 60
Mixed 400 10 - 15 5 - 10 60
8 - 12 5 - 10 60
FRUIT
Berries 250 5 - 8 3 - 5 60
Steam Forced Air Forced Air + Steam Finishing
Wire shelf Ovenware on the wire shelf Dripping pan Steamer tray Food probe (optional)
20

ASSISTED FUNCTIONS
EN
RECIPE
Lasagna 25 - 35
Frozen Lasagna 40 - 50
Brown rice 20 - 60
Basmati rice 25 - 30
Long White Rice 35 - 40
RICE AND PASTA
Bulgur 10 - 40
Couscous 10 -15
Potato gratin 40 - 50
Baked potatoes 45 - 55
Frozen gratin 20 - 30
DURA-
TION
LEVEL
AND ACCESSORIES
2
2
3
3
3
3
3
2
2
2
Notes
Add 450 ml of water to 300 g of rice
Add 450 ml of water to 300 g of rice
Add 450 ml of water to 300 g of rice
Add 600 ml of water to 300 g of rice
Add 300 ml of water to 300 g of couscous
Slice raw potatoes and interlace with onion. Season
with salt, pepper and oil, and pour on the cream.
Sprinkle cheese on top.
Place in an ovenproof dish or directly on the wire
shelf
Prepare a lling of cooked ham, minced meat,
breadcrumbs, oil and spices. Cut the tops o the
tomatoes and remove the seeds and the esh.
Stued tomatoes 30 - 35
VEGETARIAN MEALS
Stued peppers 35 - 40
Stued Squash 20-30
2
2
2
Sprinkle the insides of the tomatoes with salt and
turn them over so that the water drains out. Dice the
esh and add it to the lling. Stu the tomatoes with
the mixture and put the tops back on. Place them in
an ovenproof dish and drizzle with oil.
Cut the peppers in half horizontally and remove
the seeds and the white parts. Mix minced meat
together with onion, eggs, breadcrumbs, water or
milk and spices. Stu the peppers and place them
on an oven tray. Sprinkle with bread crumbs and
cubes of butter.
Cut the squash in half lengthways and scoop out the
esh to remove the seeds. Fry the mushrooms and
leek and mix with chopped tomatoes and a little
crème fraiche.
(Add pepper for a touch a spiciness.) Season. Stu
the squash and sprinkle cheese on top.
Wire shelf Ovenware on the wire shelf Dripping pan Steamer tray Food probe (optional)
21

RECIPE
Stued egg plant 35 - 40
VEGETARIAN MEALS
DURA-
TION
LEVEL AND ACCESSO-
RIES
2
Notes
Cut the aubergines in half lengthways and scoop
out most of the esh. Dice some of the esh and fry
together with onion and mushrooms. Add minced
meat, chopped tomatoes, spices and herbs and
simmer.
Place the aubergines in an ovenproof dish and stu
with the mixture. Sprinkle cheese on top.
Hot dog, boiled 10-15
Meat loaf 35-45
MEAT
POULT RY
Roast lamb 60 - 90
Roast beef 40-60
Roast veal 50 - 70
Steamed llets 25 - 30
Roast chicken 50-60
Chicken pieces 25 - 30
Roast duck 60 - 90
Steamed cutlets
Fish llets
Steamed whole sh
12 - 18
15-20
35 - 55
3 1
2
2 1
2 1
2 1
3 1
2 1
2 1
2 1
3
3 1
3 1
Spread out in a single layer
Mix the ingredients together and shape the mixture
before placing it in an ovenproof dish
Season rst
Season rst
Season rst
Season rst
Season and cook breast-side up
Season and cook skin-side up
Season and cook breast-side up
Season rst
Season rst and sprinkle aromatic herbs inside
Baked Whole Fish
FISH
Frozen gratin 35 - 45
Mussels 8 - 12
Shrimps 8 - 12
Frozen vegetables 12 - 20
Whole potato 30-40
Potato pieces 20-30
SIDE DISHES
Broccoli 15 - 25
Wire shelf Ovenware on the wire shelf Dripping pan Steamer tray Food probe (optional)
25 - 40
2 1
2
3 1
3 1
3 1
3 1
3 1
3 1
Make a few small incisions in the skin and place the
sh in an ovenproof dish. Season and brush with
butter or egg. Sprinkle with breadcrumbs
Spread out in an even layer
Spread out in an even layer
Spread out in an even layer
Use potatoes of a similar size
Cut into pieces of a similar size
Cut into pieces
22

RECIPE
Carrots 20-30
DURA-
TION
LEVEL AND ACCESSO-
RIES
3 1
EN
Notes
Cauliower 20-30
Corn on cob 20 - 30
Green beans 20 - 30
Steamed peppers 8 - 12
Steamed squash 5 - 10
SIDE DISHES
Asparagus 20 - 30
Artichokes 40 - 55
Brussels sprouts 20 - 35
Potato wedges 30 - 40
Frozen French fries 15 - 25
Frozen pan pizza 12 - 20
Frozen thin pizza
8 - 12
3 1
3 1
3 1
3 1
2
3 1
3 1
3 1
2
2
2
2
Cut into pieces
Cut into pieces
Move around when prompted. Season with salt
Place in the oven when prompted
Place in the oven when prompted
before serving
Chilled pizza
Home Made Pizza
PIZZA & SALTY CAKES
Quiche Lorraine
Frozen Quiche 20-30
7 - 12
12 - 18
30 - 45
2
Make a dough using 150 ml water, 15 g fresh yeast,
2
2
200 - 225 g our, salt and oil. Leave the dough to rise.
Roll it out onto a greased baking tray. Add topping
like tomatoes, mozzarella cheese and ham. Place in
Make the pastry base (250 g our, 150 g butter + 2
and 1/2 teaspoons of water) or use a ready-made
pastry base (400 - 450 g). Line a an dish with the
pastry base. Add a lling of 200 g ham and 175 g
whisked together with 300 ml cream. Place in the
2
Place in the oven when prompted
the oven when prompted.
cheese and then pour over a mixture of 3 eggs
oven when prompted.
Place in the oven when prompted
Wire shelf Ovenware on the wire shelf Dripping pan Steamer tray Food probe (optional)
23

RECIPE
Bread loaf 30-40
DURA-
TION
LEVEL AND ACCESSO-
RIES
2
Notes
Make a dough, place it in a loaf tin and leave to rise. Place
in the oven when prompted.
Rolls 10 -15
Frozen rolls 10 - 13
Prebaked rolls 8 - 10
Canned rolls 10 - 14
Cookies 10-15
BREAD / CAKES
Meringues 50-60
Muns 15 -20
Sponge cake 35 - 50
Scones 9 - 13
Hard
15 - 18
2
2
2
2
2
2
2
2
Make dough, place it on a baking tray and leave to rise:
We recommend using 150 ml water and 200 - 225 g our.
Place in the oven when prompted.
Place in the oven when prompted.
Place in the oven when prompted.
Makes 4 - 6. Place in the oven when prompted.
Place in the oven when prompted.
Mix together 2 egg whites, 80 g sugar and 100 g
desiccated coconut. Add vanilla and almond essence.
Make 20 - 24 rounds on baking parchment or a greased
baking tray. Place in the oven when prompted.
Prepare a batter for 16 - 18 muns and pour into paper
cases. Place in the oven when prompted.
Prepare a batter weighing 700 - 800 g in total. Place in the
oven when prompted.
2
3
1
EGGS
Medium
Sof t-boiled
Fruit compote 10 - 20
Pre-baked frozen fruit
pie
Fruit pie 20-30
Soué 35 - 50
DESSERT
Baked Apples 20-30
Crème brûlée 20-30
12 - 15
9 - 12
15 - 20
3
3
3
1
1
1
If you wish to eat the eggs cold, place them in cold water
before serving.
Cut the fruit into pieces.
2
Make the pastry base using 180 g our, 125 g butter and 1
2
2
2
2
1
egg. Line the crisp plate with the pastry base and ll with
700 - 800 g of apples that have been cut into slices and
sprinkled with sugar and cinnamon
Make a batter avoured with lemon, chocolate or fruit and
pour into a dish with tall sides.
Remove the cores and ll with marzipan or a mixture of
cinnamon, sugar and butter.
For four portions: Mix 2 egg yolks and 2 whole eggs with
3 tablespoons of sugar and vanilla. Heat 100 ml of cream
+ 200 ml of milk and add this to the eggs (or use your
own favourite recipe). Pour the mixture into individual
moulds and cover with lm.
24
Wire shelf Ovenware on the wire shelf Dripping pan Steamer tray Food probe (optional)

PR ESERVATI ON
EN
FOOD QUANTITY TIME
(MIN)
1 l 40 - 120
VEGETABLES
500 ml 25 - 105
1 l 30 - 50
FRUIT
500 ml 15 - 35
LEVEL AND ACCESSO-
RIES
3 2/1
3 2/1
3 2/1
3 2/1
TESTED RECIPES
Compiled for the certification authorities in accordance with the standard IEC 60350-1
Recipe Function
Shortbread 30 - 35 150 No
Small cakes 18 - 20 170 Yes
Cooking time
(mins)
Temperature (°C) Preheat. Accessories
Fatless sponge cake 33 - 35 160 No
Apple pie 65 - 70 16 0–170 Yes
Broccoli (500 g) 15 - 18 100 -
Broccoli (300 g) 12 - 15 100 -
Frozen peas (2 kg) 25 - 30 100 -
2
2
2
Steam Forced Air Forced Air + Steam Finishing
Wire shelf Ovenware on the wire shelf Dripping pan Steamer tray Food probe (optional)
25

MAINTENANCE AND CLEANING
Failure to carry out regular
cleaning may cause the
surfaces of the appliance
to deteriorate. This in turn
may shorten the service life
of the appliance and cause
dangerous situations to arise.
Make sure that the appliance
EXTERIOR SURFACES
• Clean the surfaces with a damp microfibre cloth.
If they are very dirty, add a few drops of pH-neutral
detergent. Finish off with a dry cloth.
• Clean the door glass with a suitable liquid
detergent.
INTERIOR SURFACES
• After every use, leave the oven to cool and then
clean it, preferably while it is still warm, to remove
any deposits or stains caused by food residues.
• To remove the moisture generated by steaming,
leave the oven to cool and then wipe the
compartment with a cloth or the sponge provided.
We recommend using the “Steam Cleaning”
function regularly.
ACCESSORIES
has cooled down before
carrying out any maintenance
or cleaning.
Do not use wire wool, abrasive
scourers or abrasive/corrosive
cleaning agents, as these
could damage the surfaces of
the appliance.
The appliance must be
disconnected from the mains
before carrying out any kind of
maintenance work.
Wear protective gloves.
Do not use steam cleaners.
• The majority of accessories can be washed in the
dishwasher, including the shelf guides.
• The water reservoir and the food probe, however,
are not dishwasher safe. Clean the water reservoir
carefully using a sponge and a little pH-neutral
detergent. Rinse with drinking water.
• The food probe can be cleaned using a damp
cloth or kitchen towel.
BOILER
To ensure that the oven always works at optimum
performance and to help prevent the build-up of
limescale deposits over time, we recommend using
the “Drain” and “Descale” functions regularly.
26

REPLACING THE LIGHT
EN
1. Disconnect the oven from the power supply.
2. Unscrew the cover from the light and carefully
remove the seals and the washer.
3. Replace the light and screw the cover back
on, taking care to refit the seals and the washer
correctly.
4. Reconnect the oven to the power supply.
Please note: Use 10 W/12 V type G4, T300 °C halogen lamps.
The bulb used in the appliance is specically designed for
domestic appliances and is not suitable for general room
lighting within the home (EC Regulation 244/2009). Lamps are
available from our After-sales Service.
- Do not handle bulbs with your bare hands as your
ngerprints could damage them.
Do not use the oven until the lamp cover has been retted.
27

TROUBLESHOOTING
Any problems that arise or faults that occur can often be resolved easily.
Before contacting the After-sales Service, check the following table to see whether you can resolve the
problem yourself.
If the problem persists, contact your nearest After-sales Service Centre.
Read the safety instructions carefully
before carrying out any of the following work
Problem Possible cause Solution
Power cut.
The oven is not working.
The oven is not producing
steam.
The function will not start.
The time is ashing. Power cut.
The display shows the letter “F”
followed by a number.
Disconnection from the mains.
Fault.
Water reservoir not inserted
correctly.
Water reservoir empty.
Door not closed correctly.
Function not compatible with food
probe.
Software fault.
Check for the presence of mains
electrical power and whether the oven
is connected to the electricity supply.
Turn off the oven and restart it to see if
the fault persists.
Check whether the water reservoir has
been placed in the correct position and
whether it is lled with drinking water
up to the “MAX” mark, then start the
function you require again.
Open and close the door, then try to
start the function again.
Select a different function or remove
the food probe.
You need to reset the time: Follow the
instructions given in the “Using the
appliance for the rst time” section.
Contact you nearest Client After-sales
Service Centre and state the number
following the letter “F”.
Cooking will not start or an
audible signal sounds.
The light is not working. The bulb needs replacing.
The brightness of the display is
reduced.
Nothing is happening when the
buttons are pressed.
The selected function is not
compatible with the action you
wish to perform.
Eco mode is activated.
Oven switched off.
Keypad lock activated.
Control panel dirty.
Select the function again. Perform the
necessary actions.
Remove and then reinsert the food
probe.
Follow the instructions for replacing
the bulb given in the “Maintenance and
cleaning” section.
Select “O” in the settings for “Eco
mode”.
Press
see whether the problem persists.
Deactivate the keypad lock by
pressing the and buttons at
the same time.
Clean the surface of the control panel
with a microfibre cloth (see “Cleaning”
section).
to switch on the oven and
28

TECHNICAL SPECIFICATION
WWW
and downloaded from our website www.hotpoint.eu
A complete product specication, including the energy eciency ratings for this oven, can be consulted at
AFTERSALES
SERVICE
EN
BEFORE CONTACTING OUR
AFTER-SALES SERVICE
IF THE FAULT PERSISTS AFTER HAVING
PERFORMED ALL OF THE NECESSARY
CHECKS, CONTACT YOUR NEAREST AFTER
SALES SERVICE CENTRE.
1. Check whether you can resolve the problem
yourself using any of the measures described in the
“Troubleshooting” section.
2. Turn off the oven and restart it to see if the fault
persists.
To receive assistance, call the number given on the
warranty leaflet enclosed with the product or follow
the instructions on our website. Be prepared to
provide:
• A brief description of the fault
• The exact type of model of your product
• The assistance code (the number following the
word SERVICE on the identification plate attached to
the product; this can be seen on the left-hand inside
edge when the oven door is open).
The assistance code is also provided in your
warranty leaflet.
• Your full address
• A contact telephone number
XXX/XXX
Service:
Please note: If repairs are required, contact an
authorised service centre that is guaranteed to use
original spare parts and perform repairs correctly.
Please refer to the enclosed warranty leaflet for more
information on the warranty.
29

A
GUIDA INSTALLAZIONE
B
C
x 2
x 2
90°C
30

EN
455 mm
497 mm
595 mm
551 mm
20 mm
447 mm
8 mm
min 450 mm
600 mm
min 550 mm
B
X2
A
31

C
X2
001
400010849298
 Loading...