

HOTPOINT/ARISTON MS 767 IX HA Use & Care

Use and Care Guide
www.www.hotpoint.eu/register

ENGLISH . . . . . . . . . . . . . . . . . . . . . . . . . . . . . . . . . . . . . . . . . . . . . . . . . . . . 3
2

EN
ENGLISH
HEALTH & SAFETY, USE & CARE AND INSTALLATION GUIDE
THANK YOU FOR PURCHASING A HOTPOINT - ARISTON PRODUCT
To receive more comprehensive help and support, please register your
product at
www.hotpoint.eu/register
Table of contents
Health and Safety guide
SAFETY INSTRUCTIONS .................................................................................4
SAFEGUARDING THE ENVIRONMENT ...................................................................6
DECLARATION OF CONFORMITY ........................................................................6
Use and Care Guide
PRODUCT DESCRIPTION ................................................................................7
WIRE SHELF LEVEL .......................................................................................7
CONTROL PANEL ........................................................................................8
DESCRIPTION OF DISPLAY ...............................................................................8
ACCESSORIES ...........................................................................................9
INSERTING THE WIRE SHELF AND OTHER ACCESSORIES .................................................11
REMOVING AND REFITTING THE SHELF GUIDES .........................................................11
FUNCTIONS ............................................................................................12
HOW TO USE THE OVEN ................................................................................13
USING THE APPLIANCE FOR THE FIRST TIME ............................................................13
DAILY USE ..............................................................................................14
USEFUL TIPS ............................................................................................16
COOKING TABLES .......................................................................................17
TESTED RECIPES ........................................................................................18
MAINTENANCE AND CLEANING ........................................................................20
TROUBLESHOOTING ....................................................................................21
PRODUCT FICHE ........................................................................................22
AFTERSALES SERVICE ..................................................................................22
Installation guide ......................................................................................24
3

Health and Safety guide
SAFETY INSTRUCTIONS
IMPORTANT: READ
AND FOLLOW THESE
INSTRUCTIONS
Read the safety instructions
carefully before using the
appliance.
Keep these instructions in a safe
place for future reference.
These instructions and the
appliance itself provide
important safety warnings that
must be read and heeded at all
times.
The manufacturer does not
accept any liability for failure to
observe these safety
instructions, for inappropriate
use of the appliance or for
incorrect setting of the controls.
SAFETY WARNINGS
Children under eight years old
must be kept away unless they
are continuously supervised.
Children over eight years old
and persons who have reduced
physical, sensory or mental
capabilities, or persons who lack
experience with or knowledge
of this appliance, should only
use it if they are supervised or
have been given instructions on
how to use it safely and are
aware of the hazards involved.
Children must not play with the
appliance. Cleaning and
maintenance of the appliance
must not be carried out by
children without adult
supervision.
ATTENTION: The appliance and
its accessible parts will become
very hot during use: Children
under eight years old must be
kept away unless they are
continuously supervised.
ATTENTION: Avoid touching the
heating elements and the
interior surfaces – risk of burns.
Keep clothes and other
ammable materials away from
the appliance until all its
components have cooled down
completely.
Never leave the appliance
unattended when dehydrating
food.
Overheated oils and fats catch
re easily. Always be vigilant
when cooking foods that are
high in fat or oil or when adding
alcohol (e.g. rum, cognac, wine)
– risk of re.
Use oven gloves to remove pans
and accessories, taking care not
to touch the heating elements.
Once cooking is complete,
exercise caution when opening
the door and let the hot air or
steam escape gradually.
Do not obstruct the hot air vents
on the front of the oven.
If the appliance is designed to
be used with a temperature
probe, only use the types of
temperature probe that have
been recommended for this
oven.
PERMITTED USE
This appliance is designed for
domestic use only.
Do not use the appliance
Outdoors.
Do not store explosive or
ammable substances such as
aerosol cans inside the appliance
and do not place or use petrol or
other ammable materials in or
near the appliance: There could
be a risk of re if the appliance
were to be switched on
inadvertently.
ATTENTION: The appliance is
not designed to be operated
using an external timer or a
separate remote control system.
No other use is permitted (e.g.
heating rooms).
INSTALLATION
Installation and repairs must be
carried out by a qualied
technician, in compliance with
the manufacturer’s instructions
and local safety regulations. Do
not repair or replace any part of
the appliance unless specically
stated in the user manual.
Children must not carry out
installation work. Keep children
away during installation. Keep
packaging materials (plastic
bags, polystyrene parts, etc.) out
of reach of children, both during
and after installation.
The appliance must be handled
and installed by two or more
persons. Use protective gloves
to unpack and install the
appliance.
After unpacking the appliance,
make sure that it has not been
damaged during transport. In
case of problems, contact the
dealer or the After-Sales Service.
The appliance must be
disconnected from the mains
before starting installation.
During installation, make sure
the appliance does not damage
the power cable.
Do not switch on the appliance
until installation is complete.
Carry out all cabinet cutting
work before tting the oven in
the housing and carefully
remove all wood chips and
sawdust.
After installation, the bottom of
the appliance must no longer be
accessible.
Do not obstruct the minimum
gap between the worktop and
the upper edge of the oven.
Only remove the oven from its
polystyrene foam base at the
time of installation.
ELECTRICAL WARNINGS
For installation to comply with
current safety regulations, the
appliance must be earthed and
tted with an all-pole
disconnect switch with a
minimum gap of 3 mm between
the contacts.
If the tted plug is not suitable
for your socket outlet, contact a
qualied technician.
The power cable must be long
enough to connect the
appliance, once tted in its
housing, to the mains power
supply. Do not pull the power
cable.
If the power cable is damaged
4

EN
replace it with an identical one.
The power cable must only be
replaced by a qualied
technician in compliance with
the manufacturer’s instructions
and current safety regulations.
Contact an authorized AfterSales Service.
For appliances with tted plug, if
the plug is not suitable for you
socket outlet, contact a qualied
technician.
Do not use extension leads,
multiple sockets or adapters.
Do not operate the appliance if
it has a damaged power cable or
plug, if it is not working properly,
or if it has been damaged or
dropped. Keep the cable away
from hot surfaces.
The electrical parts must not be
accessible to the user after
installation.
Do not touch the appliance with
wet hands and do not operate it
when barefoot.
The rating plate is on the front
edge of the oven (visible when
the door is open).
If you need to replace the power
cable, contact an authorised
Technical After-sales Service
Centre.
It must be possible to
disconnect the appliance from
the mains by unplugging it (if
the plug is accessible) or by
using a multi-pole switch that
has been installed in an
accessible place upstream of the
socket in compliance with
national electrical safety
standards.
CLEANING AND
MAINTENANCE
Wear protective gloves when
carrying out cleaning and
maintenance.
The appliance must be
disconnected from the mains
before performing maintenance
work.
Never use steam cleaning
equipment.
ATTENTION: Make sure that the
appliance is switched o before
replacing the lamp to avoid the
possibility of electric shock.
Do not use harsh abrasive
cleaners or sharp metal scrapers
to clean the oven door glass
since they can scratch the
surface, which may result in
shattering of the glass.
Make sure that the appliance has
cooled down before carrying
out any maintenance or
cleaning.
5
SAFEGUARDING THE ENVIRONMENT
DISPOSAL OF PACKAGING
MATERIALS
The packaging material is 100%
recyclable and is marked with the
recycle symbol.
The various parts of the packing must
therefore be disposed of responsibly
and in full compliance with local
authority regulations governing waste
disposal.
SCRAPPING OF HOUSEHOLD
APPLIANCES
When scrapping the appliance, make
it unusable by cutting o the power
cable and removing the doors and
shelves (if tted) so that children
cannot easily climb inside and
become trapped.
This appliance has been
manufactured using materials that are
recyclable
in accordance with local waste
or reusable. Dispose of it
disposal regulations.
For more information on the
treatment, recovery and recycling of
domestic appliances, contact your
local authorities, the household waste
collection service or the shop where
you purchase the product.
This appliance is marked in
compliance with European Directive
2012/19/EU, Waste Electrical and
Electronic Equipment (WEEE).
By ensuring that this product is
disposed of correctly, you will help to
prevent any negative consequences
for the environment and human
health which could otherwise arise.
The symbol
on the product or accompanying
documentation indicates that this
product should not be treated as
domestic waste but must be taken to
a suitable centre for collection and
recycling of electrical and electronic
equipment.
switching on the appliance and keep
it closed as much as possible while
cooking is in progress.
To reduce cooking times and energy
consumption, cut food into small
pieces of equal size.
If the cooking time is longer than 30
minutes, lower the temperature of the
oven during the nal stage (the last
3-10 minutes), adjusting it according
to the overall cooking temperature.
The residual heat inside the oven will
be sucient to continue cooking until
the end.
ENERGYSAVING TIPS
Check to make sure that the oven
door is properly closed before
DECLARATION OF CONFORMITY
This appliance, which is intended to
come into contact with food products,
complies with European Regulation n.
1935/2004/EC.
This appliance meets the ecodesign
and energy labelling requirements of
European Regulations n. 65/2014 and
n. 66/2014 in conformity to the
European standard EN 60350-1.
6
Use and Care Guide
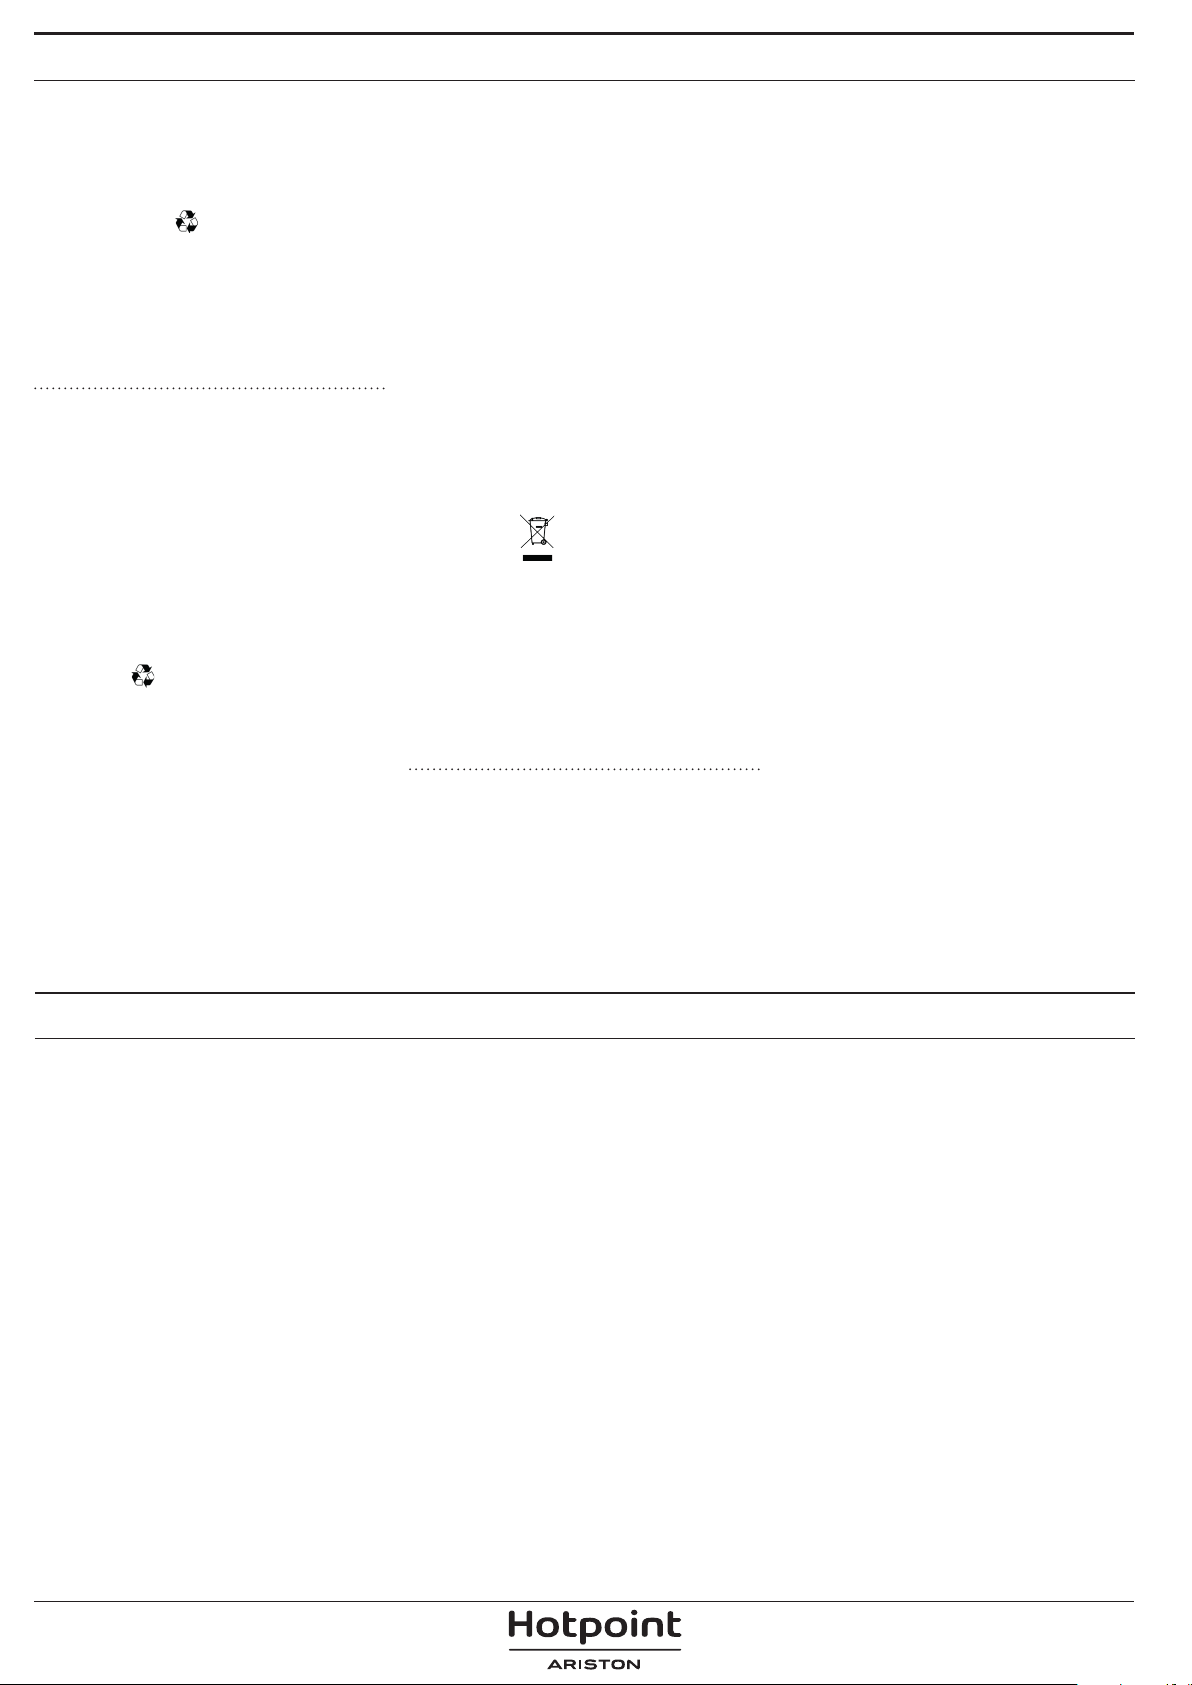
PRODUCT
DESCRIPTION
1
2
3
4
EN
1. Control panel
2. Light
5
6
7
3. Side grids
4. Identification plate
(do not remove)
5. Temperature sensor
6. Steam inlet valve
7. Water reservoir
8
Please note:
The cooling fan may switch itself on every so often during cooking in order to reduce energy consumption.
Once cooking is complete and the oven has been switched off, the cooling fan may continue to run for a certain period
of time.
8. Door
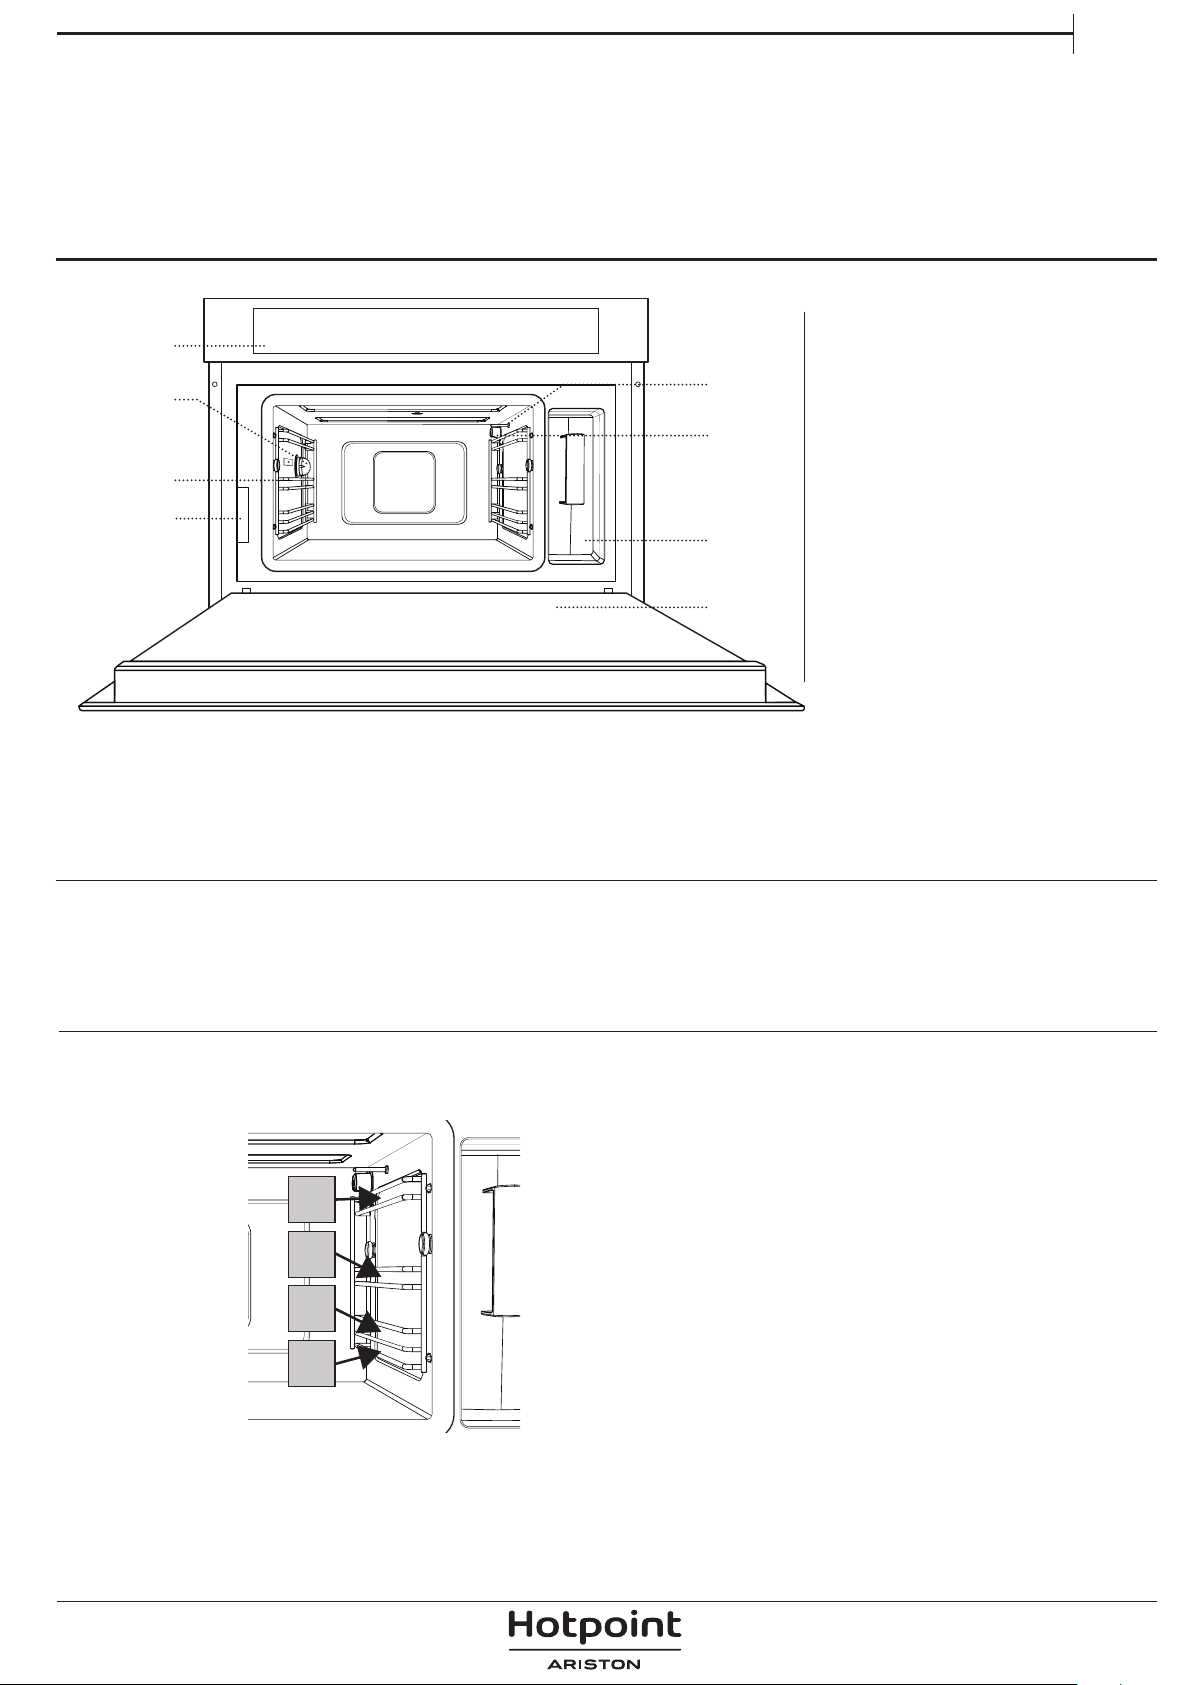
WIRE SHELF LEVEL
The levels (shelf guides) on which the wire shelf and other accessories can be placed are numbered, with
1 being the lowest and 4 being the highest.
4
3
2
1
7
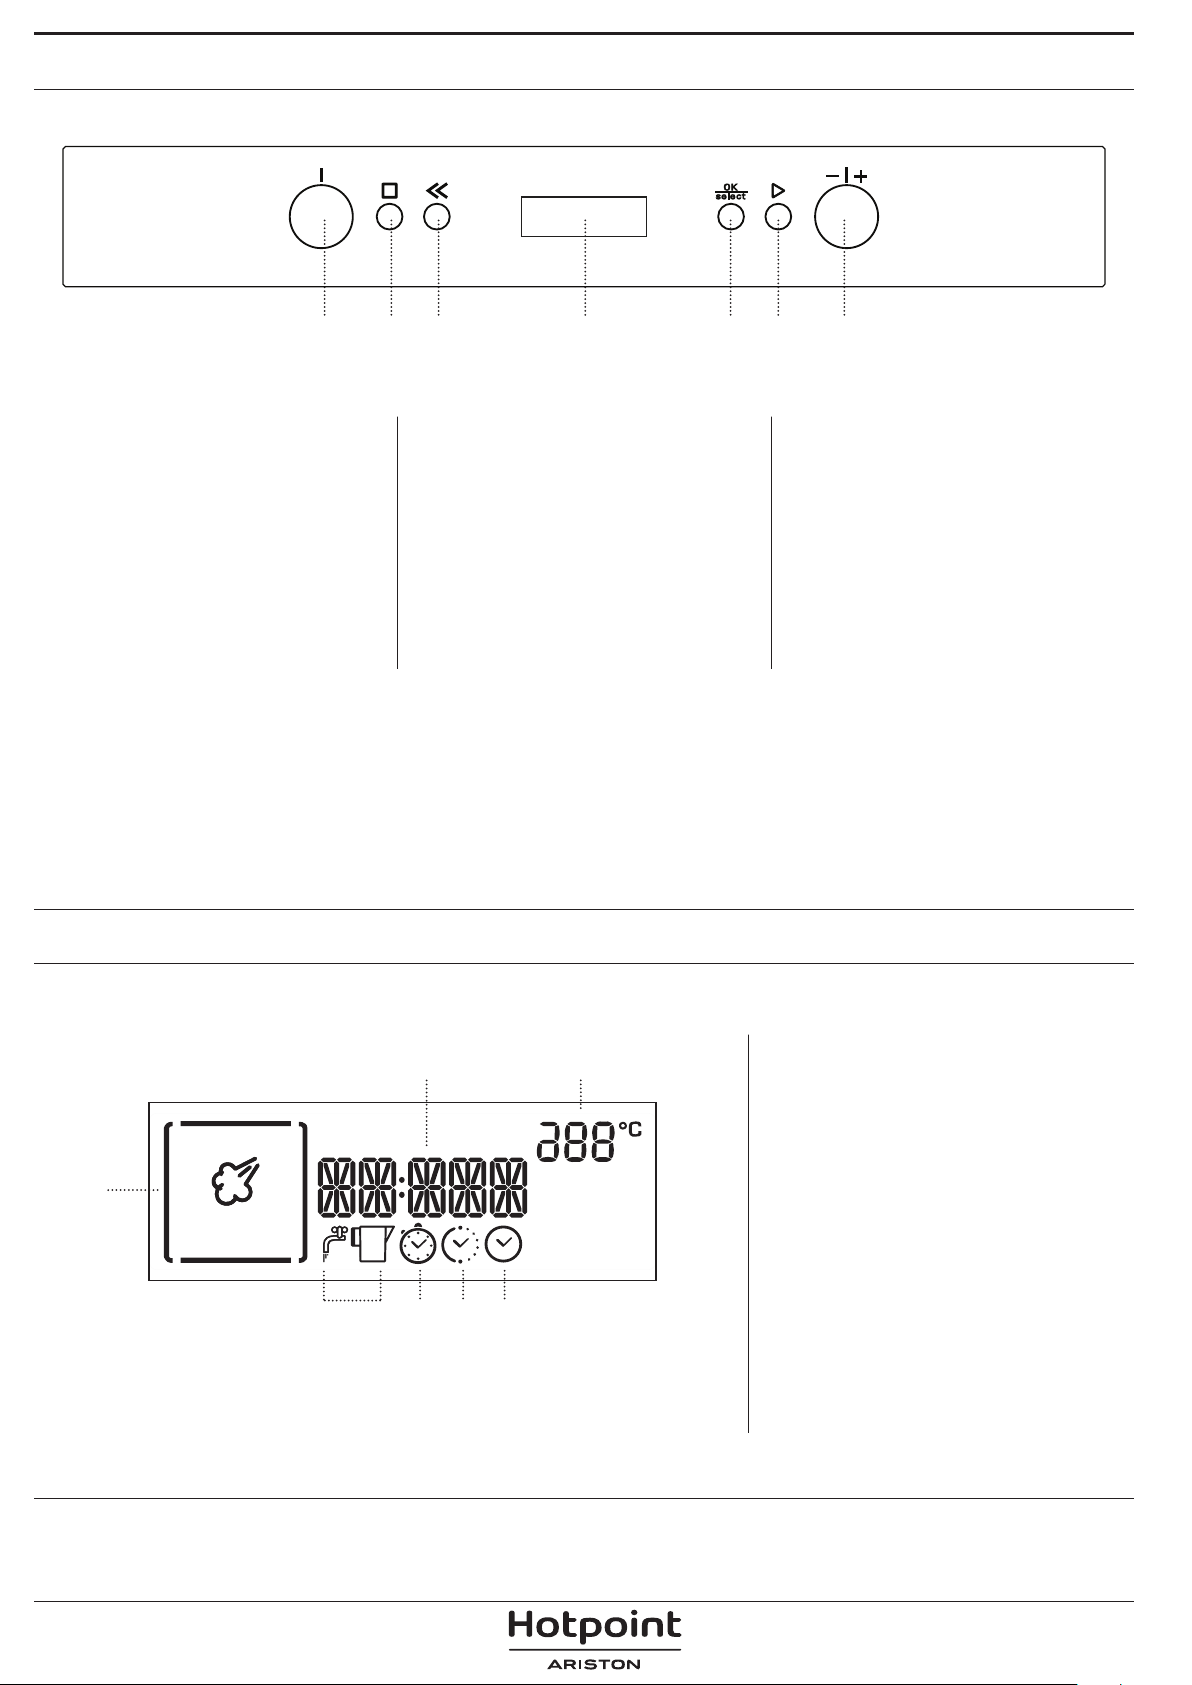
CONTROL PANEL
1 2 3 4 5 6 7
1. SELECTION KNOB
For switching the oven on by
selecting a function.
Turn to the “0” position to switch
the oven o.
2. STOP
For stopping the function that is
currently active at any time and
putting the oven into standby
mode.
3. BACK
For returning to the previous menu.
4. DISPLAY
5. CONFIRMATION BUTTON
For conrming a selected function
or a set value.
DESCRIPTION OF DISPLAY
6. START
For starting a function.
7. ADJUSTMENT KNOB
For scrolling through the menus and
applying or changing settings.
Please note: All knobs are pushactivated knobs. Push down on the
centre of the knob to release it from
its seating.
2 3
1
7
8
456
1. Symbol for the function
selected
2. Clock; information and
function duration
3. Temperature
4. Setting the time
5. Duration
6. Timer
7. Information on water reservoir
and
cooking compartment
 Loading...