


Ýþletim Talimatlarý
BULAÞIK MAKÝNESÝ
TR
Türkçe, 1
LKF 710
EN
English,13
Ýçindekiler
Kurulum, 2-3
Yerleþtirme ve Seviyelendirme
Su ve elektrik kaynaklarýnýn baðlanmasý
Ýlk yýkama devri hakkýnda öneri
Teknik bilgi
Cihazýn tanýmý, 4
Genel görünüm
Kontrol paneli
Raflarýn yüklenmesi, 5
Alt raf
Çatal ve Býçak Sepeti
Üst Raf
Baþlangýç ve kullaným, 6-7
Bulaþýk makinesinin çalýþtýrýlmasý
Deterjanýn ölçülmesi
Yýkama seçenekleri
Yýkama devirleri, 8
Yýkama devirleri tablosu
Parlatýcý ve iþlenmiþ tuz, 9
Parlatýcýnýn ölçülmesi
Ýþlenmiþ tuzun ölçülmesi
Bakým ve onarým, 10
Su ve elektrik kaynaklarýnýn kapatýlmasý
Bulaþýk makinesinin temizlenmesi
Ýstenmeyen kokularýn engellenmesi
Püskürtücü kollarýn temizlenmesi
Su Giriþ Filtresinin Temizlenmesi
Filtrelerin temizlenmesi
Uzun bir süre boyunca makinenin kullanýlmadan
býrakýlmasý
Önlemler ve öneri ve Destek, 11
Genel güvenlik
Tasfiye
Enerji tasarrufu yapmak ve çevreye karþý duyarlý olmak
Desteðe baþvurmadan önce
Sorun giderme, 12
Kurulum
64
Ýleride kullanýlmasý açýsýndan bu talimat kitabýný
güvenli bir yerde muhafaza edin. Cihaz satýldý, baþka
birine verildi ya da hareket ettirildiyse yeni kullanýcýnýn da
bu manüelde belirtilen önerilerden yararlanabilmesi için
manüelin de makine ile birlikte muhafaza edildiðinden
emin olun.
Lütfen bu talimat kitabýný dikkatle okuyun: Cihazýn
güvenli bir þekilde kurulumuna, kullanýmýna ve bakýmýna
dair önemli bilgiler içermektedir.
Makinenin yeri deðiþtirilmek istenirse makineyi dik
konumda tutun; kesinlikle gerekiyor ise makine arka
kýsmý üzerine eðilebilir.
Yerleþtirme ve Seviyelendirme
1. Cihazý, ambalajýndan tamamýyla çýkarýn ve taþýma
sýrasýnda hasar görmediðinden emin olmak için kontrol
edin.
Hasar görmüþ ise perakende satýcýnýz ile görüþün ve
kurulum iþlemini devam ettirmeyin.
2. Yanlarýnýn ve arka panelinin bitiþiðinde bulunan
dolaplar ya da duvar ile temas edebilmesi için bulaþýk
makinesini yerine yerleþtirerek kontrol edin. Bu cihaz,
ayný zamanda tek bir tezgah altýna da yerleþtirilebilir
*(Kurulum bilgileri sayfasýna bakýnýz).
3. Bulaþýk makinesini, düz ve dayanýklý bir yüzey üzerine
yerleþtirin. Yüzey düz deðil ise cihazýn ön ayaðý, makine
yatay bir pozisyona gelene kadar ayarlanabilir. Cihaz
doðru bir þekilde seviyelendirildiyse daha saðlam
olacak ve çalýþmasý sýrasýnda titreþim ya da gürültü
yaratmayacak veya hareket etmeyecektir.
4*. Arka ayaðýn yüksekliðinin ayarlanmasý için 8 mm
açýklýklý bir altýgen anahtar kullanmak suretiyle bulaþýk
makinesinin önünde alt kýsmýn merkezinde bulunan
kýrmýzý altýgen burç yataðýný döndürün. Yüksekliði
arttýrmak için anahtarý saat yönünde, yüksekliði azaltmak
için saat yönünün tersine döndürün. (dokümana
eklenen Yapým talimatlarý sayfasýna bakýnýz)
Su ve elektrik kaynaklarýnýn baðlanmasý
Su ve elektrik kaynaklarýnýn baðlanmasý, nitelikli bir
teknisyen tarafýndan gerçekleþtirilmelidir.
Bulaþýk makinesi, su hortumlarýnýn ya da elektrik
kaynaðý kablolarýnýn üstüne yerleþtirilmemelidir.
Cihaz, su tesisatýna yeni hortumlar kullanýlarak
baðlanmalýdýr.
Eski hortumlarý kullanmayýn.
Su giriþ hortumunun baðlanmasý
Uygun bir soðuk su baðlantý noktasýna: Hortumu
baðlamadan önce, su içinde bulunmasý mümkün
olan partiküllerin cihazý týkamamasý için hortum
tamamýyla temizlenene kadar su akýtýn; Bu iþlemi
gerçekleþtirdikten sonra giriþ hortumunu, musluða
¾lük bir gaz vidasý diþli baðlantýsýyla vidalayýn.
Uygun bir sýcak su baðlantý noktasýna: Bulaþýk
makineniz, sýcaklýðý 60°Cyi geçmeyecek þekilde
elektrik kaynaðýndan gelen sýcak su ile beslenebilir
(radyatörlü bir merkezi ýsýtma sisteminiz varsa).
Soðuk su kaynaðýnýn baðlanmasý konusunda
belirtilen þekilde hortumu musluða vidalayýn.
Giriþ hortumu yeteri kadar uzun deðil ise konusunda
uzman bir maðazaya ya da yetkili bir teknisyene
baþvurun. (bknz Destek)
Su basýncý, Teknik bilgi tablosunda verilen deðer
aralýðýnda olmalýdýr. (bknz bitiþik bilgi)
Hortum kývrýlmamalý ya da ezilmemelidir.
Su basmalarýna karþý koruma
Su basmasý olaylarýnýn ortaya çýkmayacaðýndan emin
olmak için bulaþýk makinesi:
- Cihazýn içinde oluþabilecek arýza veya sýzýntýlar
halinde su beslemesini bloke eden özel bir sistem
ile yapýlandýrýlmalýdýr.
Bazý modellerde, New Aqua Stop* (Yeni Su Durdurma)
olarak bilinen ve besleme hortumunun yýrtýlmasý
durumunda bile su basmalarýna karþý koruma saðlayan
destek güvenlik cihazlarý da bulunmaktadýr.
UYARI: TEHLÝKELÝ VOLTAJ!
Su giriþ borusu iletken elektriksel parçalar içerdiði
için her ne þart altýnda olursa olsun kesilmemelidir.
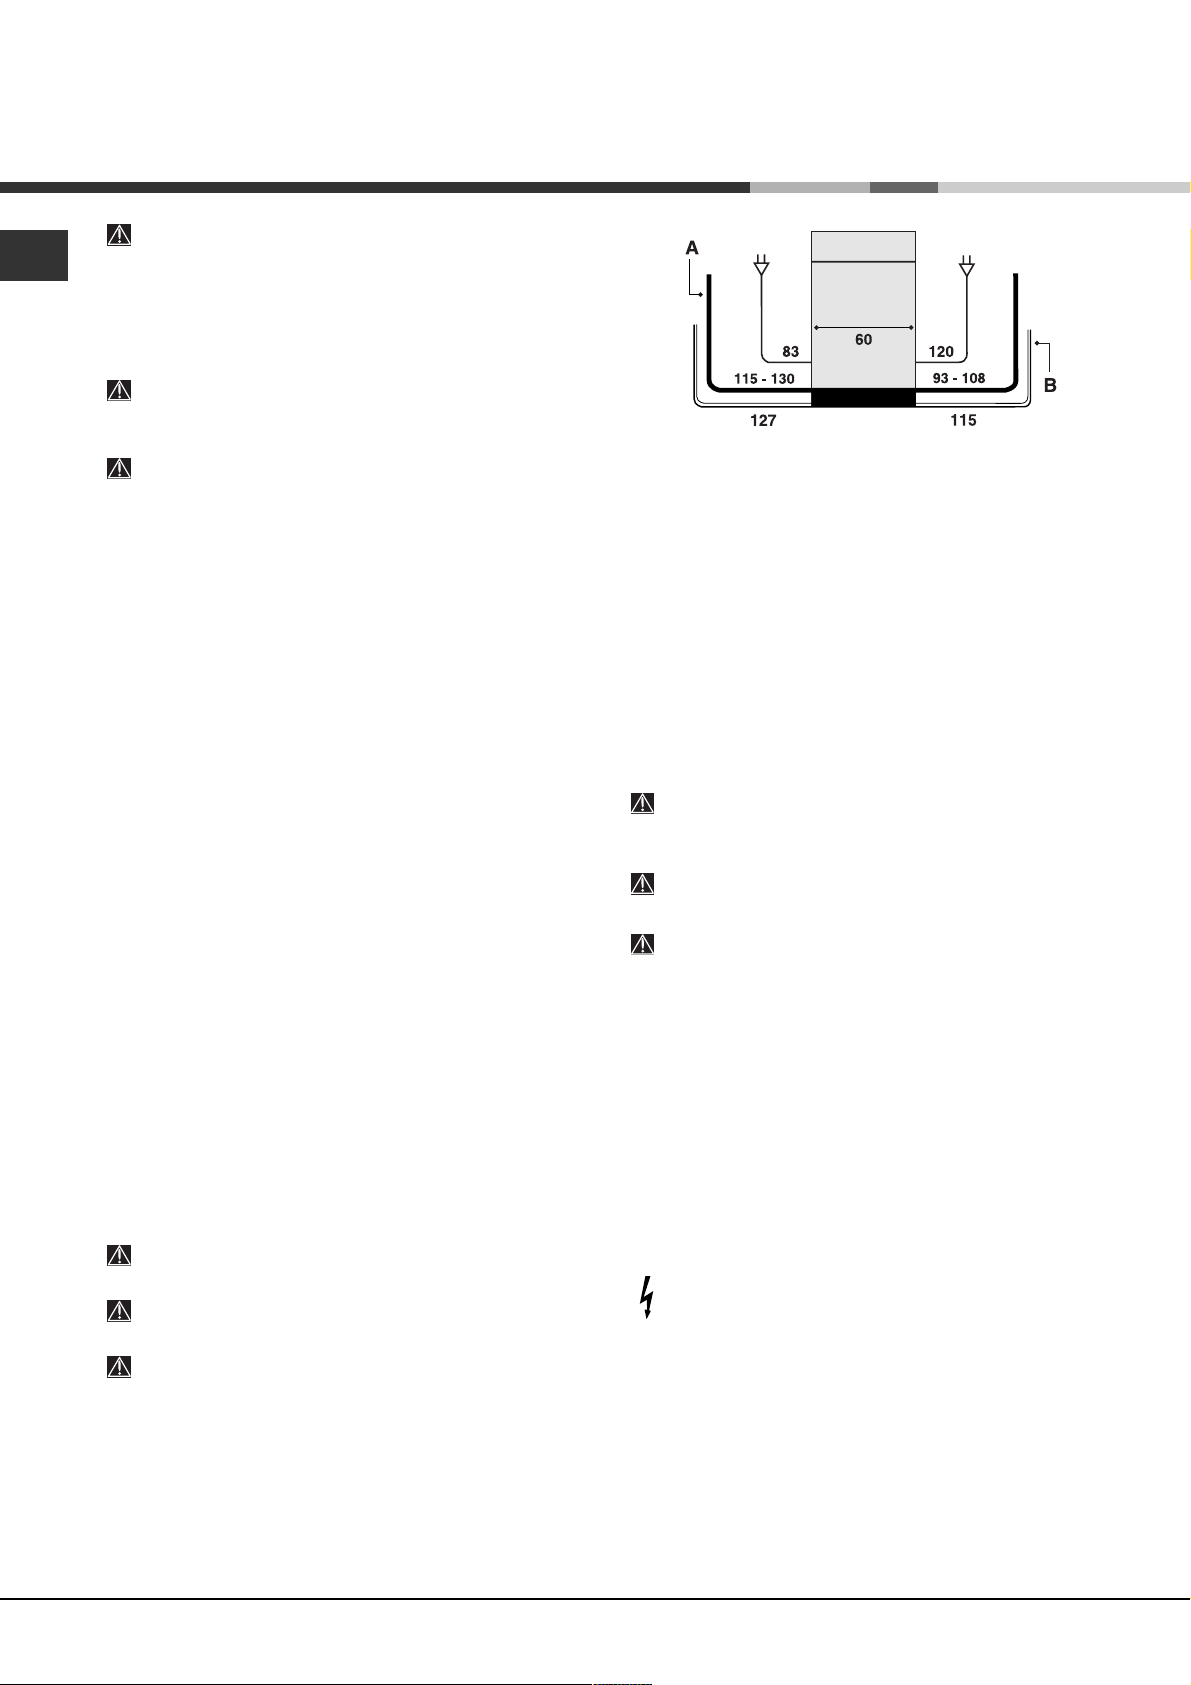
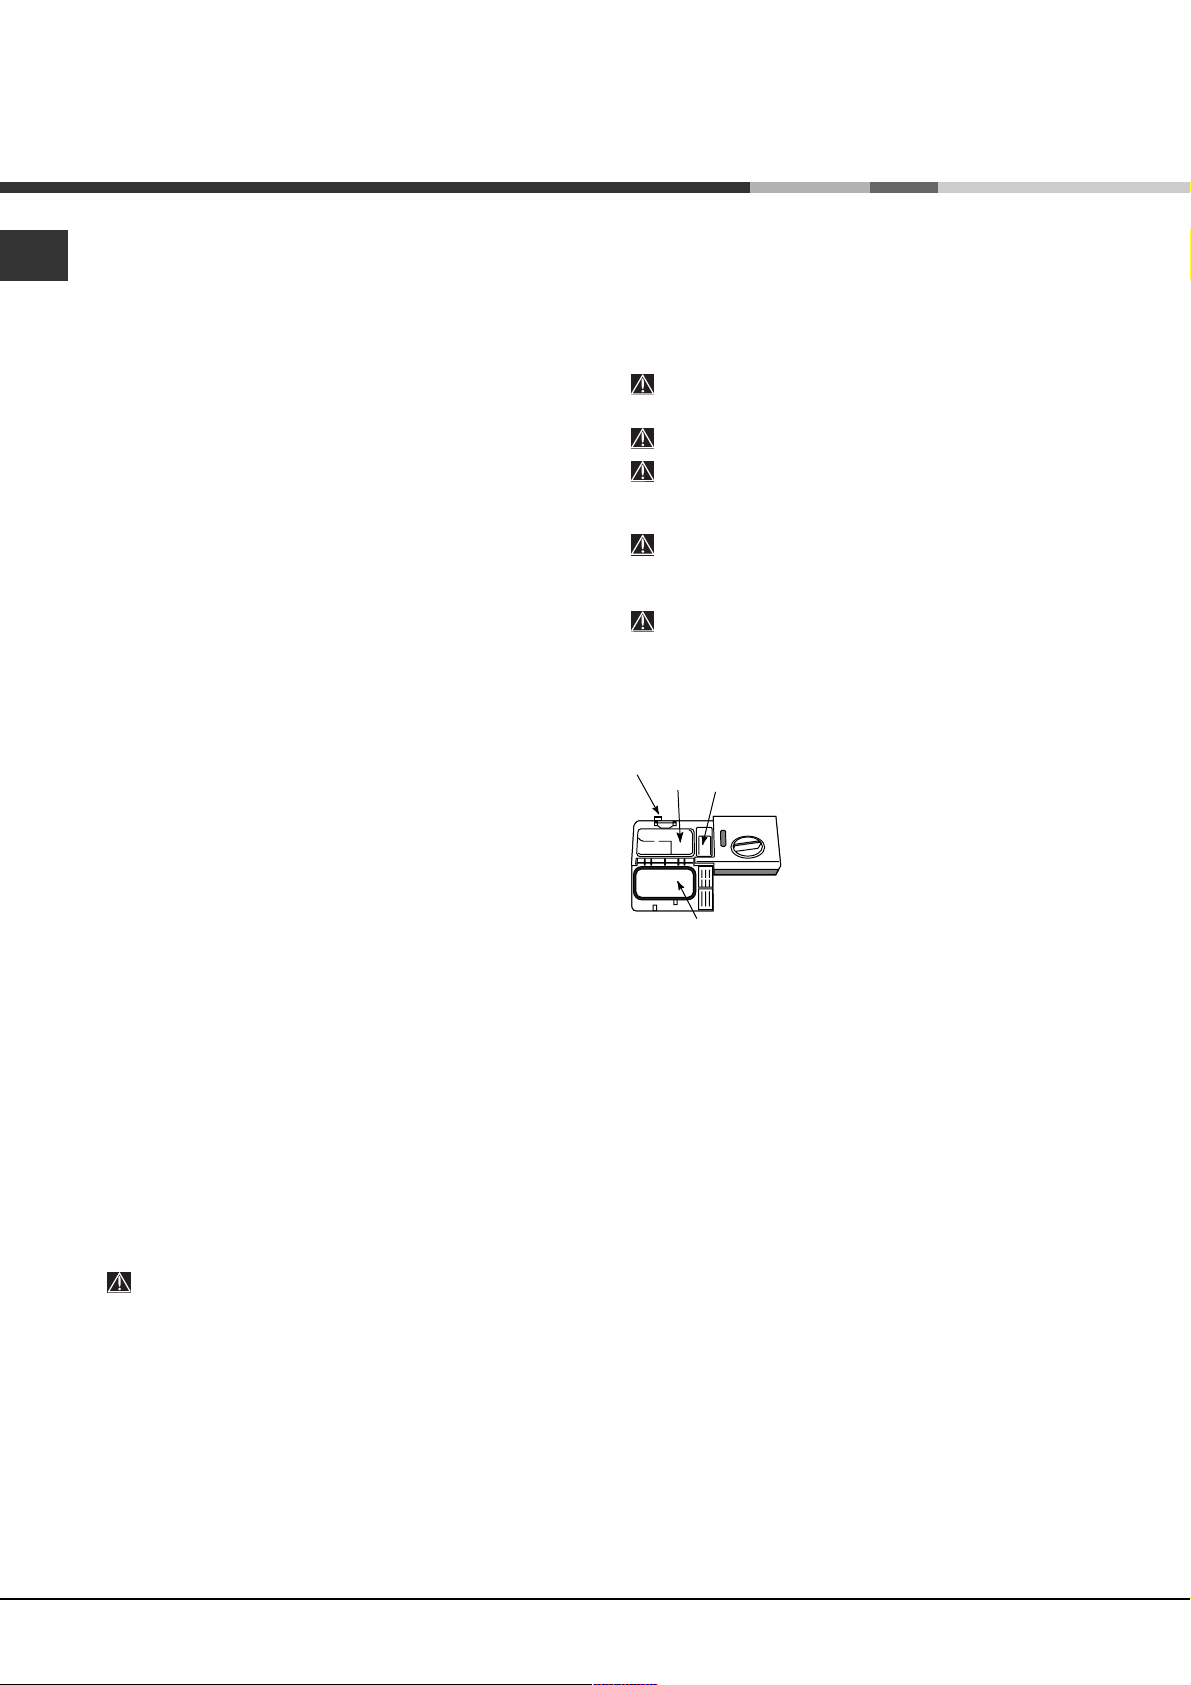
Su giriþ (A) ve çýkýþ (B) hortumlarý ve elektrik kaynaðý
kablosu, mümkün olan en iyi kurulumun elde edilmesi
amacýyla saða ya da sola doðru yerleþtirilebilir. (bknz
þekil)
* Sadece seçilen modellerde mevcuttur.
Su çýkýþ hortumunun baðlanmasý
Çýkýþ borusunu (boruyu bükmeden) minimum çapý 4 cm
olan bir drenaj borusuna baðlayýn. Alternatif olarak bir
küvet ya da lavabo içine yatýrýn; hortumun boþta kalan
ucu suya batýrýlmýþ durumda olmamalýdýr.
Özel plastik dirsek*, en iyi
A
düzenin bulunmasýný daha
kolay bir hale getirir. Çýkýþ
borusunun hareket etmesini
ve kirli suyu dýþarý vermesini
engellemek için dirseði
duvara saðlam bir þekilde
sabitleyin.
Hortumun A harfi ile
iþaretlenmiþ kýsmý, yerden
yaklaþýk 40 ila 100 cm yukarýda olmalýdýr (bknz þekil)
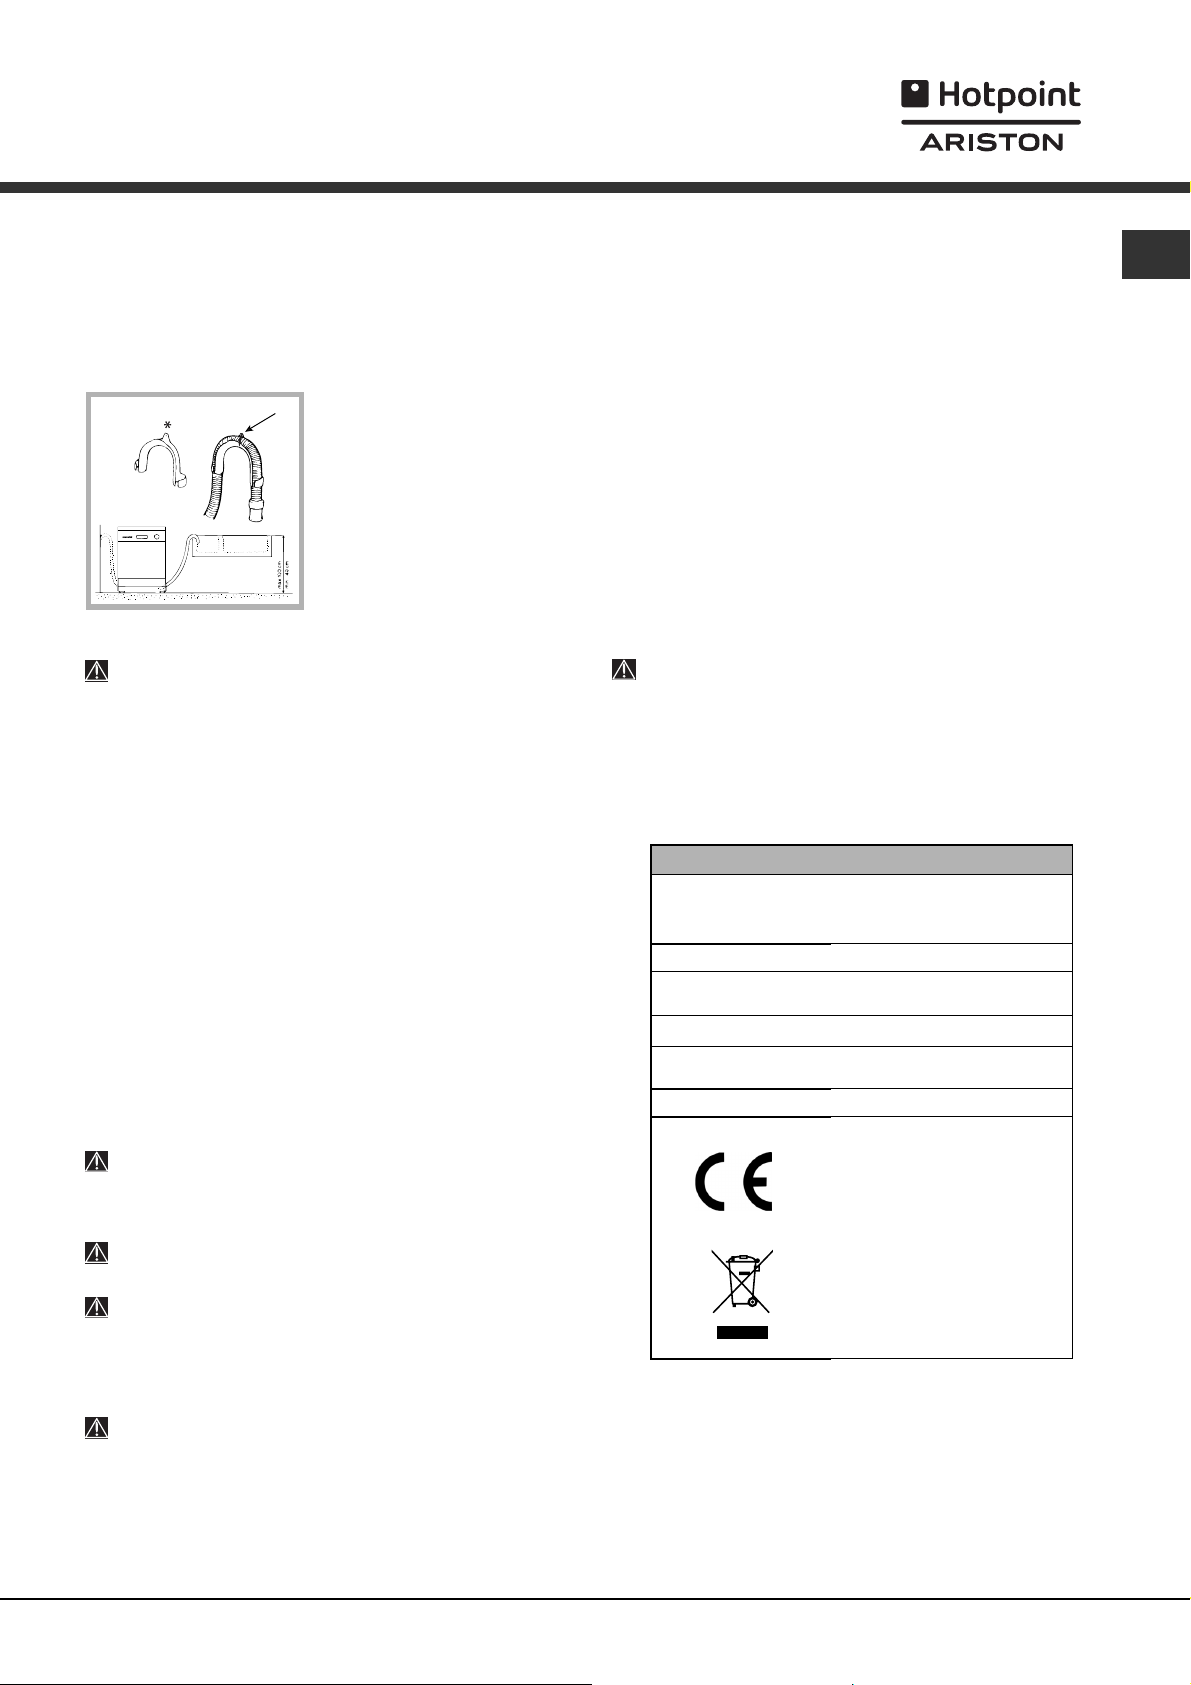
Yoðuþma önleyici bant*
Bulaþýk makinesini kurduktan sonra kapaðý açýn ve
bulaþýk makinenizi yoðuþma nedeniyle oluþan
muhtemel sorunlardan korumak için yapýþkanlý bandý
ahþap rafýn altýna yapýþtýrýn.
Ýlk yýkama devri hakkýnda öneri
Cihazýn kurulumu tamamlandýktan sonra ve ilk yýkama
devrini baþlatmadan hemen önce tuz daðýtýcýsýný
tamamýyla su ile doldurun ve ancak bundan sonra
yaklaþýk 1 kg kadar tuz ekleyin (Duruluma maddesi ve
iþlenmiþ tuz baþlýklý bölümü inceleyiniz). Su dýþarýya
taþabilir: Bu normal bir durum olup sorun olarak
deðerlendirilmemelidir. Su sertliði deðerini seçin
(Durulama maddesi ve iþlenmiþ tuz baðlýklý bölümü
inceleyiniz). Tuz, makinenin içine döküldükten sonra,
YETERSÝZ TUZ (LOW SALT)
* göstergesi sönecektir.
64
Boru eklentilerinin kullanýlmamasýný tavsiye ediyoruz.
Elektrik baðlantýsý
Fiþi elektrik prizine takmadan önce aþaðýdaki hususlarýn
saðlandýðýndan emin olun:
Priz topraklanmýþ olup uygulanan tüm yönetmeliklere
uygundur.
Priz, kapaðýn iç kýsmýnda bulunan bilgi plakasý
üzerinde belirtilen cihazýn maksimum yüküne
dayanacak güçtedir. (Cihazýn Tanýmý baþlýklý bölümü
inceleyiniz)
Güç kaynaðý voltajý, kapaðýn iç kýsmýnda bulunan bilgi
plakasýnýn üzerinde belirtilen deðerler içerisinde
deðiþir.
Priz, cihazýn fiþi ile uyumludur. Yukarýdaki þartlar
saðlanmýyorsa prizin deðiþtirilmesi için yetkili bir
teknisyene baþvurun (bknz Destek); uzatma kablolarý
ya da çoklu priz kullanmayýn.
Cihazýn kurulumu tamamlandýktan sonra güç
kaynaðý kablosu ve elektrik prizi kolaylýkla ulaþýlabilir bir
yerde olmalýdýr.
Kablo kývrýlmamalý ya da ezilmemelidir.
Güç kaynaðý kablosu zarar görmüþ ise tüm
potansiyel tehlikelerin önlenmesi için kablo,
imalatçý ya da Teknik Destek Servisi tarafýndan
deðiþtirilmelidir. (Bknz Destek)
Tuz bölmesi doldurulmazsa, sonuç olarak su
yumuþatýcýsý ve ýsýtma bileþeni zarar görebilir.
Teknik bilgiler
Boyutlar
Kapasite 12 standart yer ayarı
Su şebeke basıncı
Güç kaynağı voltajı Bilgi levhasına bakınız
Toplam absorbe
edilen güç
Sigorta Bilgi levhasına bakınız
Genişlik 60 cm.
Yükseklik 85 cm.
Derinlik 60 cm.
0.05 ÷ 1MPa (0.5 ÷ 10 bar)
4.3 psi - 145 psi
Bilgi levhasına bakınız
Bu bulaşık makinesi aşağıdak
i Avrupa Birliği Yönergelerine
uygundur:
-19/02/73 tarihli 73/23/EEC
(Düşük Voltaj) ve sonraki
değişiklikler
-89/336/EEC of 03/05/89
(Elektromanyetik Uygunluk)
ve sonraki değişiklikler;
-97/17/CE (Etiketleme)
-2002/96/EC
Bu kurallara uyulmamasý durumunda ortaya
çýkabilecek olaylardan Þirketimiz sorumlu
tutulamayacaktýr.
*Sadece seçilen modellerde mevcuttur.
!
Cihazýn tanýmý
64
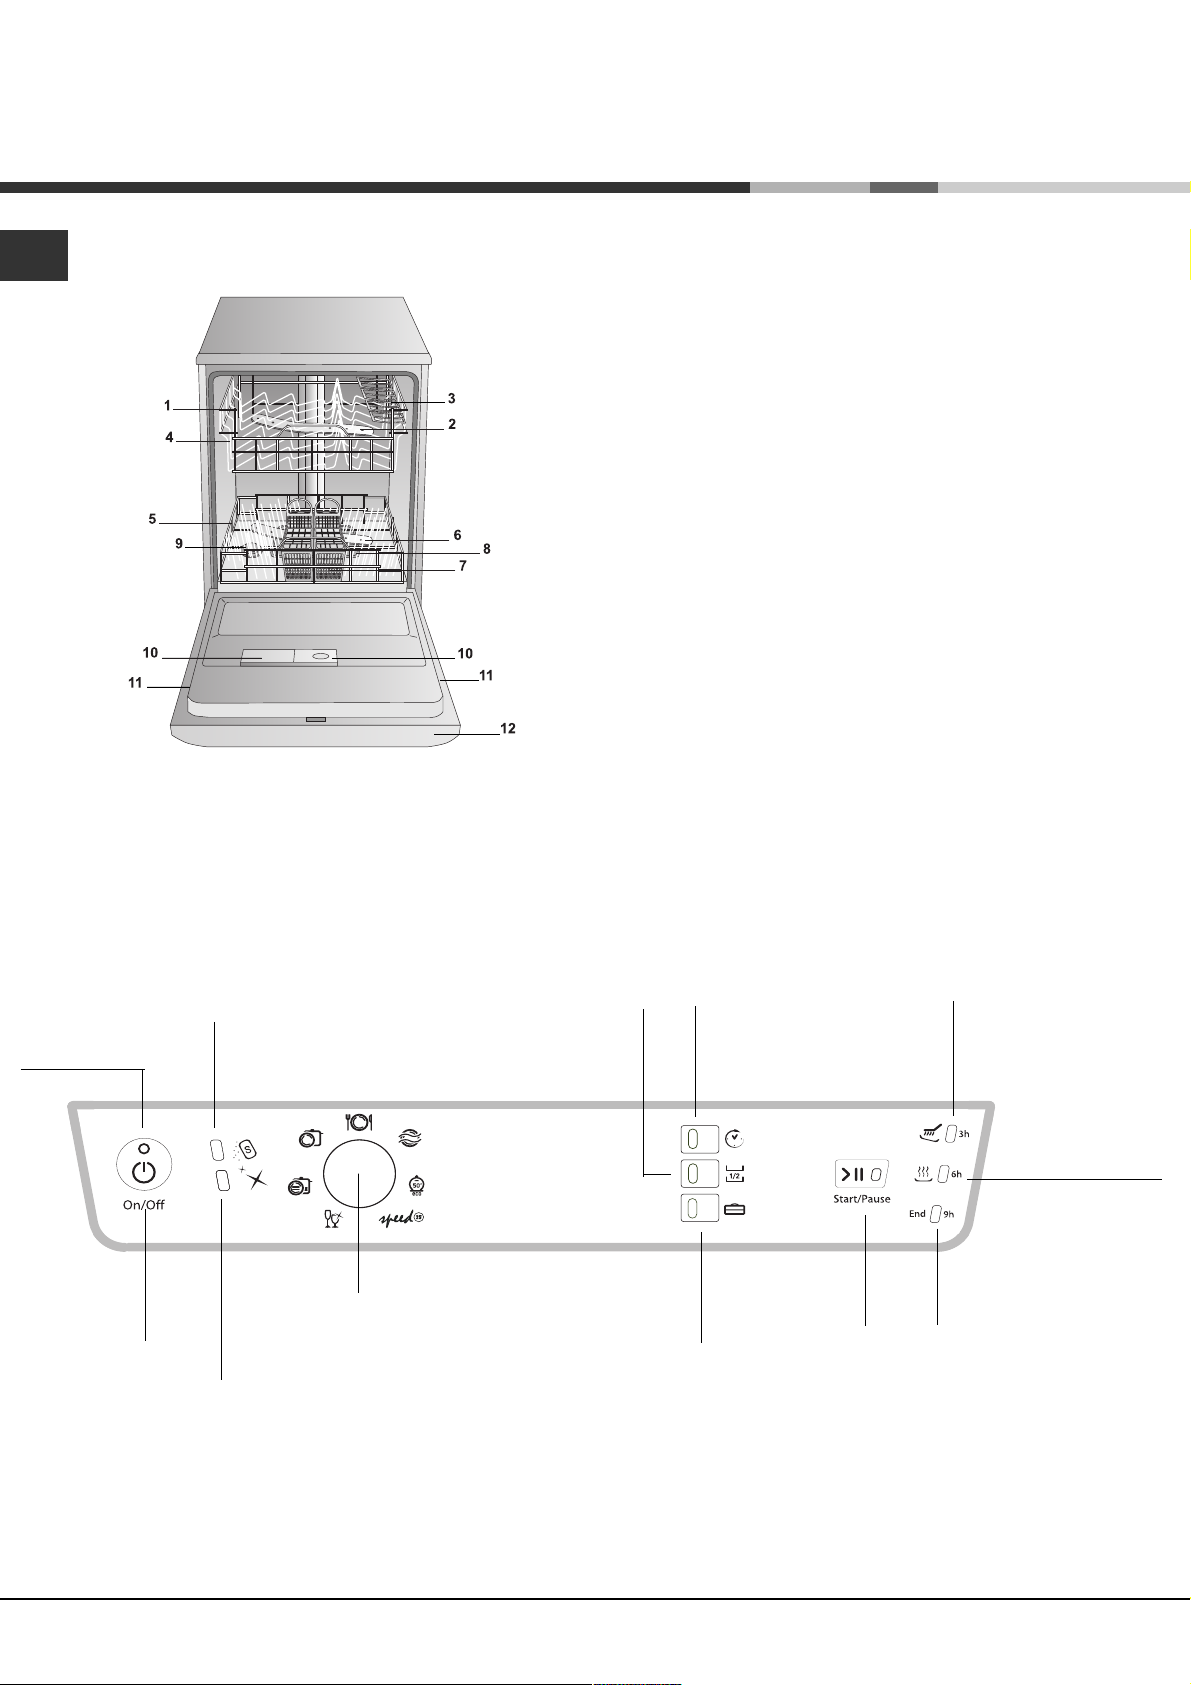
Genel görünüm
1. Üst Raf
2. Üst püskürtücü kol
3. Eðimli bölümler
4. Raf yüksekliði ayarlayýcýsý
5. Alt raf
6. Alt püskürtücü kol
7. Çatal ve Býçak Sepeti
8. Yýkama filtresi
9. Tuz daðýtýcý
10. Deterjan ve durulama maddesi daðýtýcýlarý
11. Bilgi plakasý
12. Kontrol paneli
***
Kontrol paneli
AÇMA/
KAPATMA
gцsterge эюэрэ
AÇMA/
KAPAMA/
Sýfýrlama
düðmesi
Yetersiz tuz
gцsterge эюэрэ
Parlatici az
gцsterge эюэрэ*
*
Devir seçim
düðmesi
Yarým yükleme
düðmesi ve
gцsterge эюэрэ
Çok fonksiyonlu tablet
dьрmesi ve gцsterge эюэрэ*
*
Gecikmeli
baþlatma
düðmesi ve
gцsterge эюэрэ
Baþlat/Durdur
düðmesi ve
gцsterge эюэрэ
Yýkama devri ve 3
saat gecikmeli
baþlatma gösterge
*
*
эюэрэ
Kurutma ve 6 saat
gecikmeli baюlatma
gцsterge эюэрэ*
Kapatma ve 9 saat
gecikmeli baþlatma
gцsterge эюэрэ
*
*** Sadece tamamýyla geliþtirilmiþ modellerde.
* Sadece seçilen modellerde mevcuttur.
"
Raflarýn yüklenmesi
Raflarý yüklemeden önce, çatal ve býçaklar üzerinde kalan
yemek artýklarýný ve bardaklarda ve kupalarda kalan sývýlarý
temizleyin.
Cihazý yükledikten sonra püskürtücü kollarýn rahat bir þekilde
dönebileceðinden emin olun.
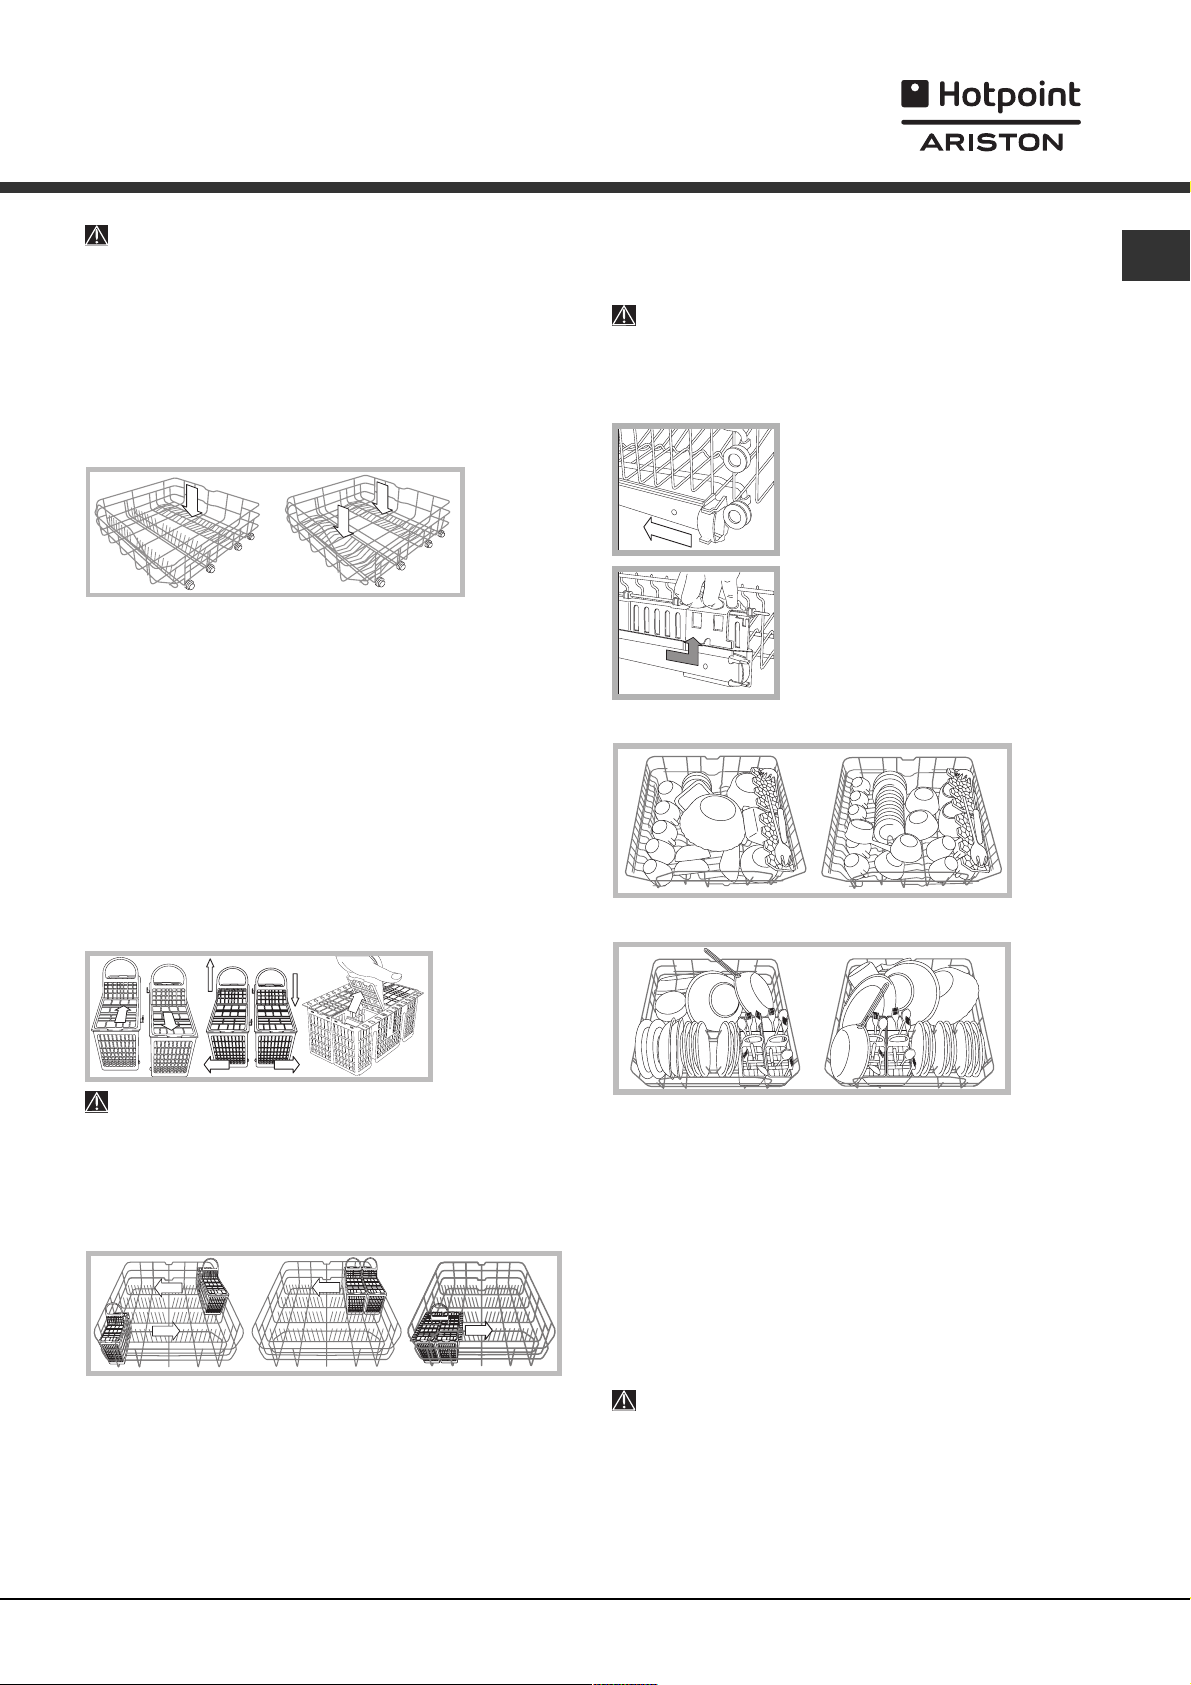
Alt raf
Tavalar, kapaklar, tabaklar, salata kaplarý, çatal ve býçaklar, vb
Yükleme örneklerinde gösterildiði þekilde alt rafa yerleþtirilebilir.
Tabaklar ve geniþ kaplar, üst püskürtücü kolun dönüþ hareketini
engellemeden rafýn yan kýsýmlarýna yerleþtirilmelidir.
Bazý bulaþýk makinesi modellerinde, tabaklar yerleþtirilirken dikey
pozisyona ve tavalar ve salata kaseleri yerleþtirilirken yatay
pozisyona getirilebilen eðimli bölümler
Çatal ve Býçak Sepeti
Çatal ve býçak sepetinin þekli, bulaþýk makinesi modeline göre
deðiþebilmektedir: Modüler, bütünsel ya da kaydýrýlabilir
modellerden biri olabilir. Bütünsel sepetler, sadece alt rafýn ön
kýsmýna yerleþtirilmelidir.
Modüler sepet, daha çok yarým yýkama yapýlýrken önerilen bir
çözüm olarak (bu opsiyonun mevcut olduðu modellerde) iki ayrý
parçaya ayrýlabilir ve kaydýrýlabilir modellerde de mevcuttur (sabit
ya da eðimli raflarýn arasýnda kaydýrma suretiyle alt raf üzerinde
istenen yere yerleþtirilebilir).
- Her iki tip de, çatal ve býçak sepetinin mümkün olan en iyi þekilde
yerleþtirilmesi için sökülebilir bir kayma sistemi ile donatýlmýþtýr.
* bulunmaktadýr.
Üst rafýn yüksekliðinin ayarlanmasý
Çatal ve býçak sepetinin yerleþtirilmesini kolaylaþtýrmak için üst
raf, aþaðýya ya da yukarý doðru hareket ettirilebilir.
Üst rafýn yüksekliði, tercihen RAF BOÞKEN
ayarlanmalýdýr.
Rafý, ASLA sadece bir kenarýndan kaldýrýp
alçaltmayýn.
Sað ve sol kýlavuz ray kilitlerini açýn ve
rafý dýþarý çekin; ihtiyacýnýza göre aþaðý ya
da yukarýya yerleþtirin, ön tekerlekler
yerine yerleþene kadar kýlavuz raylarý
boyunca itin ve kilitleri kapatýn (bknz
þekil).
Þayet raf, Dual Space tutacaklarý
þekil) ile donatýlmýþ ise üst rafý durma
noktasýna kadar çekin, rafýn yanlarýndaki
tutacaklarý kavrayýn ve isteðe göre yukarýya
ya da aþaðý doðru hareket ettirin ve
yavaþça yerine girmesine yardýmcý olun.
* (bknz
Üst rafýn yüklenmesi hakkýnda örnekler
Alt rafýn yüklenmesi hakkýnda örnekler
64
Býçaklar ve keskin kenarlý diðer bulaþýklar, çatak ve býçak
sepetinin içine keskin kýsýmlarý alta gelecek þekilde ya da üst
rafta bulunan eðimli kýsýmlar üzerine yatay olarak
yerleþtirilmelidir.
Çatal ve býçak sepetinin yerleþtirilmesi hakkýnda
örnekler
Üst Raf
Kýrýlgan ve hafif bulaþýklarý bu rafa yerleþtirin: Bardaklar, çay ve
kahve bardaklarý, çay tabaklarý, küçük salata kaseleri, çok kirli
olmayan küçük tencereler ve saplý tavalar, Yükleme örnekleri göz
önünde bulundurularak yerleþtirilmelidir.
Kupalar ve kaplar: Bunlarý, eðimli bölmelere yerleþtirin
Uzun keskin býçaklar ve servis takýmý: Bunlarý, eðimli bölmelere
yerleþtirin
**.
**.
Bulaþýk makinesinde yýkanmamasý gereken
bulaþýklar
Ahþap parçalar, kulplarý ahþap ya da boynuz þeklinde olan
veya parçalarý yapýþtýrýlarak birleþtirilmiþ nesneler
Alüminyum, bakýr, pirinç, kalay ya da kurþundan yapýlmýþ
parçalar
Isýya dayanýklý olmayan plastik materyallerden yapýlmýþ
parçalar
Antik ya da elle boyanmýþ poselenler
Antik gümüþler Diðer bir yandan, antik olmayan gümüþler de
diðer metallere temas etmeyeceðinden emin olunduktan sonra
hassas bir yýkama devri ile bulaþýk makinesinde yýkanabilir.
Bulaþýk makinenizin güvenliði için çatal ve býçak sepetini
kullanmanýzý tavsiye ederiz.
* Sadece seçilen modellerde mevcuttur.
** Sayýsý ve yeri deðiþiklik gösterebilir.
#
Baþlangýç ve kullaným
64
Bulaþýk makinesinin çalýþtýrýlmasý
1. Su musluðunu açýn.
2. AÇMA/KAPAMA düðmesine basýn: Birkaç saniye
boyunca kontrol paneli üzerinde bulunan tüm gösterge
ýþýklarý yanacaktýr.
3. Kapaðý açýn ve yeterli miktarda deterjan dökün
(aþaðýya bakýnýz).
4. Raflarý yükleyin (Raflarýn yüklenmesi baþlýklý bölümü
inceleyiniz) ve kapaðý kapatýn.
5. YIKAMA DEVRЭ SEЗЭMЭ dьрmesini saat yцnьnde
dцndьrerek yэkama devrini seзin: Dьрme ьzerinde
bulunan зizgiyi, istenilen yэkama devrini temsil eden sayэ
ya da sembol ile aynэ hizaya getirin. BAЮLAT/DURDUR
gцsterge эюэрэ yanэp sцnecektir.
6. Yýkama opsiyonlarýný seçin* (bitiþikteki bilgiyi
inceleyin).
7. BAЮLAT dьрmesine basarak yэkama devrini baюlatэn;
gцsterge эюэрэ yeюile dцnьюecek ve sabit bir юekilde
yanmaya devam edecektir. Yэkama devrinin baюladэрэnэ
bildirir yэkama fazэna iliюkin gцsterge эюэрэ yanacaktэr.
8. Yэkama devrinin sonunda BЭTTЭ (END) gцsterge эюэрэ
yanacaktэr (sabit yeюil эюэk). AЗMA/KAPATMA dьрmesine
basarak cihazэ kapatэn, su vanasэnэ kapatэn ve
makinenin fiюini elektrik prizinden зekin.
9. Yanýklarýn oluþmasýný engellemek için çatal ve býçak
sepetini çýkarmadan önce birkaç dakika bekleyin. Alt
raftan baþlamak üzere raflarý sýrasýyla boþaltýn.
Çalýþmakta olan bir yýkama devrini
deðiþtirmek
Yýkama devri seçim iþlemi sýrasýnda herhangi bir hata
yapýldýysa yeni baþlatýlmýþ olmasý kaydýyla devrin
deðiþtirilmesi mümkündür: Yýkama devri baþladýktan
sonra AÇMA/KAPATMA/Sýfýrlama düðmesine basarak
makineyi kapatýn. Ayný düðmeyi kullanarak tekrar açýn ve
istenilen yýkama devrini ve opsiyonlarý seçin.
Deterjanýn ölçülmesi
Yýkama sonunda iyi bir sonucun elde edilmesi,
kullanýlan deterjan miktarýnýn doðruluðuna da baðlýdýr;
belirtilen miktardan daha fazla deterjan kullanýmý
yýkamayý daha verimli hale getirmezken ayný zamanda
çevresel kirlilik yaratýr.
Sadece bulaþýk makineleri için özel olarak üretilen
deterjanlarý kullanýn.
Sývý bulaþýk deterjaný KULLANMAYIN.
Fazla miktarda deterjanýn kýllanýlmasý, devir sona
erdikten sonra makinenin içinde sabun artýklarýnýn
kalmasýna neden olabilir.
Tabletlerin kullanýmý, sadece ÇOK FONKSÝYONLU
TABLETLER opsiyonunu sunan modeller için tavsiye
edilmektedir.
Her yýkama ve kurutma devrinden en iyi sonuçlarý
almak için toz deterjan, durulama sývýsý ve tuz
kullanýlmalýdýr.
A Bölmesi:Yýkama deterjaný
B Bölmesi: Ön yýkama deterjaný
D
A
B
C
yerleþtirin ve kapaðý kapatýn; 2 tablet gerekiyorsa ikinci
tableti cihazýn en altýna yerleþtirin.
3. Bölmenin kenarlarýndan deterjan kalýntýlarýný
temizleyin ve klik sesini duyana kadar kapaðý kapatýn.
1. D düðmesine basarak C
kapaðýný açýn.
2. Yýkama devirleri tablosuna göre
deterjaný dökün:
Toz deterjan için A ve B
bölmelerini kullanýn.
Tablet þeklindeki deterjanlar için:
Devir için 1 tablet gerekiyorsa söz
konusu tableti A bölmesine
Ekstra çatal ve býçak eklemek
Baюlat/Durdur dьрmesine basэn (ilgili gцsterge эюэрэ
yanэp sцnecektir). Elektrik kaзaklarэna dikkat ederek
kapэyэ aзэn ve зatal ve bэзaklarэ makinenin iзine
yerleюtirin. Kapaрэ kapatэn ve Baюlat/Durdur dьрmesine
basэn (sabit эюэk): Devir, durdurulduрu noktadan devam
eder.
Makinenin durdurulmasý için Baþlat/Durdur
düðmesine basýldýysa yýkama devri ya da Gecikmeli
Baþlama fonksiyonu (seçildiyse) kesintiye uðratýlýr.
Bu aþamada yýkama devrinin deðiþtirilmesi mümkün
deðildir.
Rastlantýsal kesintiler
Yýkama devri sýrasýnda kapak açýlýrsa ya da elektrik
kesintisi yaþanýrsa devir duracaktýr. Kapak kapatýldýktan
ya da elektrik geldikten sonra yýkama devri, yine durduðu
noktadan devam eder.
$
Yýkama seçenekleri*
OPSÝYONLAR, ancak yýkama devri seçildikten sonra ve
Baþlat/Durdur düðmesine basýlmadan önce
ayarlanabilir, deðiþtirilebilir ya da sýfýrlanabilir.
Sadece yýkama devri tipine uygun olan opsiyonlar
seçilebilir. Herhangi bir opsiyon, seçilen yýkama devrine
uygun deðilse (bakýnýz Yýkama devirleri tablosu) ilgili
LED ardý ardýna 3 defa yanýp söner.
Diрer bir opsiyona ya da daha цnceden seзilen yэkama
devrine uygun olmayan bir opsiyon seзilirse en son
seзilen ayarlarэn эюэklarэ yanmaya devam ederken sцz
konusu uygun olmayan opsiyonun эюэрэ 3 defa yanэp
sцnecek ve ardэndan kapanacaktэr.
Yanlýþlýkla seçilen bir opsiyonun seçimini iptal etmek
için ilgili düðmeye tekrar basýn.
*Sadece seçilen modellerde mevcuttur.
Yarým yükleme*
Yэkanacak зok fazla bulaюэk yoksa su, elektrik ve
deterjan tasarrufu yapmak iзin yarэm yьkleme devri
kullanэlabilir. Yэkama devrini seзin ve YARIM YЬKLEME
(HALF LOAD) dьрmesine basэn: Gцsterge эюэрэ
yanacaktэr.
Deterjan miktarýný yarýya indirmeyi unutmayýn.
Bu durumda toz deterjan kullanýlmasý daha iyidir.
Bu opsiyon aþaðýdaki yýkama devrine uygun deðildir:
Speed 25.
Gecikmeli baþlatma*
Çok Fonksiyonlu Tabletler*
Bu opsiyon, yэkama ve kurutma sonuзlarэnэ optimize
eder.
Зok fonksiyonlu tabletler kullanэlэrken ЗOK
FONKSЭYONLU TABLETLER dьрmesine basэn: Эlgili
gцsterge эюэрэ yanacaktэr. Çok fonksiyonlu tabletler
opsiyonu, yýkama devrinin uzamasýna neden olur.
ÇOK FONKSÝYONLU TABLETLER opsiyonu, seçimi
iptal edilmemiþ ise sonraki yýkama devirlerinde de
kullanýlacaktýr.
Tabletlerin kullanýmý, sadece ÇOK FONKSÝYONLU
TABLETLER opsiyonunun seçili olmasý halinde
önerilmektedir.
64
Yэkama devrinin baюlama zamanэnэ 3, 6 ya da 9 saat
ertelemek mьmkьndьr.
1: Эstenen yэkama devri ve diрer opsiyonlar seзildikten
sonra GECЭKMELЭ BAЮLATMA dьрmesine basэn. Gцsterge
эюэрэ yanacaktэr.
2: Gecikmeli Baюlatma dьрmesine ьst ьste basmak
suretiyle istenilen gecikme zamanэnэ seзin; yэkama
fazэ (3 saat), kuruma fazэ (6 saat) ve son (9 saat)
gцsterge эюэklarэ, seзimin doрru yapэlmasэ durumunda
yanacaktэr.
Gecikmeli Baюlatma dьрmesine yeniden basэlmasэ
durumunda opsiyon seзimi iptal edilir ve gцsterge
эюэрэ sцner.
3. Seзim iюleminin ardэndan Baюlat/Durdur
dьрmesine basэlэrsa geri sayэm baюlayacaktэr. Seзilen
gecikme sьresinin ilgili эюэрэ yanэp sцnecek ve Baюlat/
Durdur dьрmesi yanэp sцnmeyi kesecektir (sabit эюэk).
3. Seзilen sьre dolduktan sonra GECЭKMELЭ BAЮLATMA
gцstergesi эюэрэ sцnecek ve yэkama devri baюlayacaktэr.
Gecikmeli Baþlatma fonksiyonu, yýkama iþlemi
baþladýktan sonra ayarlanamaz.
Bu opsiyonun, çok fonksiyonlu tabletlerin
kullanýmýna uygun olmayan yýkama devirlerinde
kullanýlmamasý tavsiye edilmektedir. (bakýnýz
Seçenekler Tablosu).
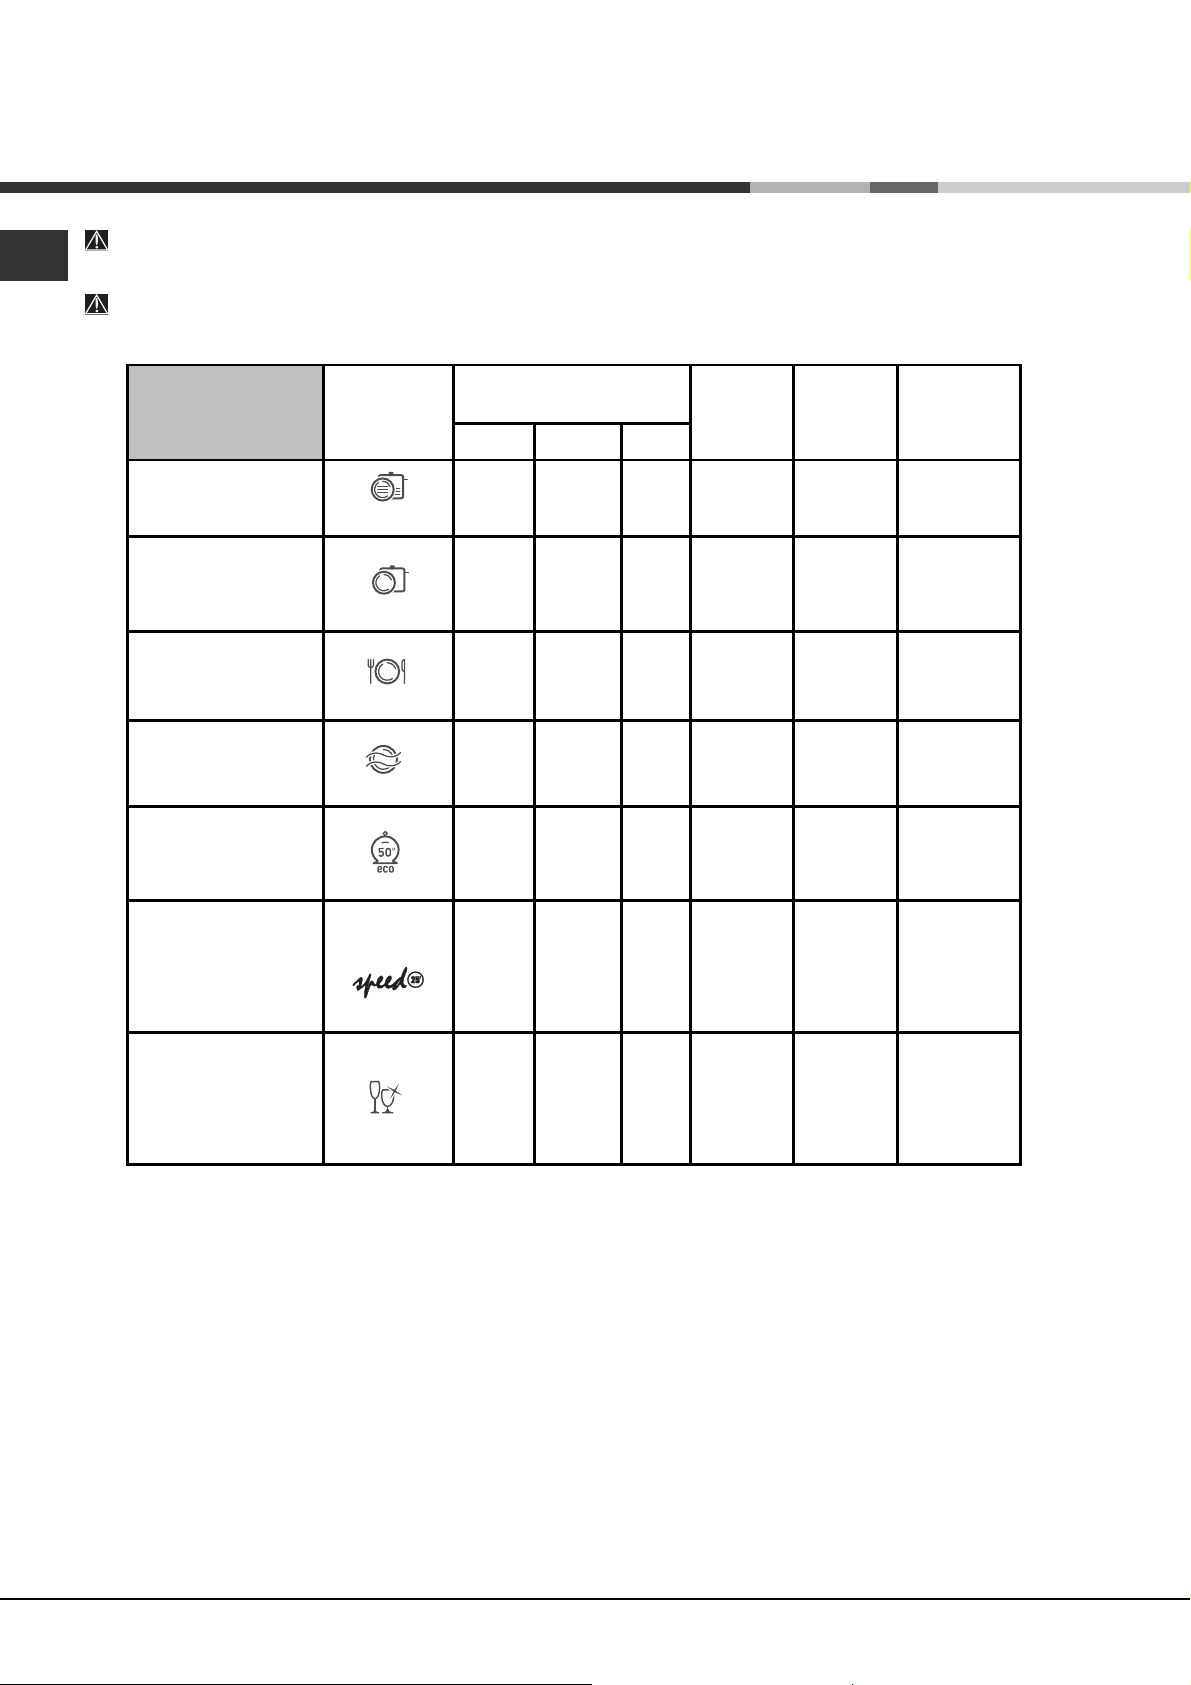
Seçenekler
tablosu
Yoğun
Normal
Günlük A 60
Sudan Geçirme
Ekonomik
Speed 25'
Camların yıkanması
A B C
Gecikmeli
-başlatma
EVET
EVET
EVET
EVET
EVET
Yarım
yükleme
EVET
EVET
EVET
EVET
EVET
EVET HAYIR
EVET
EVET
Çok
Fonksiyonlu
Tabletler
EVET
EVET
EVET
HAYIR
EVET
EVET
EVET
* Sadece seçilen modellerde mevcuttur.
%
Yýkama devirleri
64
doðrultuda kullanýlan deterjan miktarýný azaltýn.
Yýkama devrilerinin ve seçeneklerin sayýsý ve tipi, bulaþýk makinesi modeline baðlý olarak deðiþiklik göstermektedir.
Çatak, kaþýk ve býçaklar az kirli ise ya da bulaþýk makinesine yerleþtirilmeden önce sudan geçirilmiþler ise bu
Yıkama devri seçimi
hakkında talimatlar
Çok kirli bulaşıklar ve
tavalar (kırılgan parçalar
için kullanılmamalıdır)
Normal kirli tavalar ve
bulaşıklar için Standart
günlük yıkama devri
Sınırlı günlük kir miktarı
(4 yer ayarı + 1 tava +
1 tencere)
Bir sonraki yemeğin bula
şıklarının da konulmasını
bekleyen bulaşıklar için
ön yıkama Sudan Geçirme
Düşük enerji kullanımı sa
ğlayan çevreye duyarlı yı
kama devri, tavalar ve ta
baklar için uygundur
Az kirli bulaşıklar için
ekonomik ve hızlı yıkama
(kullanımdan hemen
sonra çalıştırın) (2 tabak
+ 2 bardak + 4 çatal
kaşık + 1 tava + 1 küçük
tencere)
Yüksek ısıya dayanıklı
olmayan hassas parçalari
çin ekonomik ve hızlı
yıkama (kullanımdan
hemen sonra çalıştırın)
(12 bardak + hassas
tabaklar)
Yıkama devri
Normal
Günlük A 60
Ekonomik
Camların
yıkanması
Yoğun
Hızlı
Deterjan
(A) = bölme A
(B) = bölme B
Toz Sıvı Tablet
30 g (A) 30 ml (A) 1 (A) Evet A – B – C 2:15’
25 g (A)
5 g (B)
25 g (A) 25 ml (A) 1 (A) Hayır A – B – C 1:00’
Hayır Hayır Hayır Hayır A – B 0:08’
25 g (A)
5 g (B)
*
25 g (A) 25 ml (A) 1 (A) Hayır A - C 0:25’
30 g (A) 30 ml (A) 1 (A) Evet A – B – C 1:30’
25 ml (A)
5 ml (B)
25 ml (A)
5 ml (B)
1 (A) Evet A – B – C 1:45’
1 (A) Evet A – B – C 2:20’
Kurutmalı
yıkama
devirleri
Seçenekler
Yıkama Devri
Süresi
(Tolerans
± %10)
Saat Dakika
Notlar: Günlük A 60 yýkamasý ve Hýzlý yýkama devirleri kullanýlýrken optimum performans düzeyleri, belirtilen maksimum
çatak, kaþýk ve býçak miktarýna sadýk kalýnarak elde edilebilir.
* Ekonomik yýkama devri, EN-50242 yönetmeliklerine uygundur. Diðer yýkama devirlerinden daha uzun sürmesine raðmen
daha az enerji kullanýr ve çevreye daha az zararlýdýr.
Test Laboratuarlarý için Not: Ýlgili EN test koþullarýna iliþkin bilgi almak için lütfen aþaðýdaki adrese bir e-posta gönderin:
ASSISTENZA_EN_LVS@indesitcompany.com
Deterjanýn ölçülmesini daha kolay hale getirmek için aþaðýdaki bilgileri inceleyin:
1 çorba kaþýðý = 15 g toz = yaklaþýk 15 ml sývý 1 çay kaþýðý = 5 g toz = yaklaþýk 5 ml sývý
&

Parlatýcý ve iþlenmiþ tuz
Sadece bulaþýk makineleri için özel olarak üretilen
ürünleri kullanýn. Tablet tuz ya da endüstriyel tuz veya
sývý bulaþýk deterjaný kullanmayýn.
Paket üzerinde verilen talimatlarý izleyin.
Çok fonksiyonlu bir ürün kullanýlýyorsa parlatýcý eklemenize
gerek yoktur; fakat özellikle de suyun sert ya da çok sert
olduðu yerlerde yaþýyorsanýz tuz eklemenizi önemle
tavsiye ederiz. Paket üzerinde verilen talimatlarý izleyin.
Tuz ya da parlatýcý eklemezseniz YETERSÝZ TUZ
YETERSÝZ PARLATICI
kalacaktýr.
* gösterge ýþýklarý yanýp öyle
* ve
Parlatýcýnýn ölçülmesi
Parlatýcý, su, yüzeylerin üzerinden devamlý akar ve herhangi bir
çizik veya iz býrakmadan parlatma iþlemini gerçekleþtirirken
bulaþýklarýn kurumasýný kolaylaþtýrýr.
Parlatýcý daðýtýcýsý doldurulmalýdýr:
Kontrol paneli üzerindeki YETERSÝZ PARLATICI
эюэрэ yandэрэ zaman;
1. (G) kapaðýný saat yönünün
tersine döndürerek daðýtýcýyý
açýn.
2. Daðýtýcýdan taþmamasýna
dikkat ederek parlatýcýyý
F
daðýtýcýya dökün. Parlatýcý
daðýtýcýdan taþarsa, kuru bir bez
G
ile dökülen miktarý silin.
3. Kapaðý tekrar yerine takýn.
Parlatýcýyý ASLA makinenin içine direkt olarak dökmeyin.
Parlatýcý miktarýnýn ayarlanmasý
Kurutma sonuçlarýndan tam anlamýyla memnun deðilseniz
parlatýcý miktarýný ayarlayabilirsiniz. Dozaj ayarlayýcýsýný (F) bir
tornavida kullanmak suretiyle daha önceden belirlenen 6
pozisyondan birine getirin (öntanýmlý pozisyon 4tür):
Bulaþýklarýn üzerinde çizgiler oluþuyorsa, ayarlayýcýyý daha
küçük bir sayýya getirin (1-3).
Bulaþýklar üzerinde su damlalarý bulunuyorsa ya da devir
bittikten sonra kireç izleri görülüyorsa ayarlayýcýyý daha büyük
bir sayýya getirin (4-6).
Su sertliðinin ayarlanmasý
Her bulaþýk makinesinde özellikle bu tür cihazlar için tasarlanan
iþlenmiþ tuz kullanarak daha sonra bulaþýklarý yýkamak için
kullanýlan suyun içindeki kireci alan bir su yumuþatýcýsý
bulunmaktadýr.
Bulaþýk makinesi, kirliliði azaltacak ve bölgenizdeki su sertliðine
göre yýkama performansýný optimize edecek seçenekler
sunmaktadýr. Bu bilgi, konutunuza su tedarik eden
organizasyondan öðrenilebilir.
- AÇMA/KAPATMA düðmesini kullanarak makineyi kapatýn ve
kapaðý açýn.
- YIKAMA DEVRÝNÝ SEÇÝN düðmesini ilk önce 5 numaralý yýkama
devrine, ardýndan 1 numaralý yýkama devrine ve ardýndan yine 5
numaralý yýkama devrine getirin.
- AЗMA/KAPATMA dьрmesine basэn; yэkama devri faz
gцstergesinin эюэрэ yanэp sцnecektir. Artэk su sertliрi seviyesinin
* gösterge
seçilmesi mümkündür. Her yýkama devri için bir su sertliði
seviyesi vardýr:
Örn: Yýkama devri 1, su sertliði seviyesi 1
Yýkama devri 2, su sertliði seviyesi 2,vb, vb maksimum (5
seviyeye kadar.
(Ön tanýmlý su yumuþatýcý ayarý seviyesi 3tür)
- Fonksiyondan çýkmak için yaklaþýk 30 saniye bekleyin ya da
AÇMA/KAPATMA düðmesini kullanarak makineyi kapatýn.
Çok fonksiyonlu tabletler kullanýlýrken bile su daðýtýcý
doldurulmalýdýr.
°dH °fH mmol/l Seviye:
0 6 0 10 0 1 1
6 11 11 20 1,1 2 2
12 17 21 30 2,1 3 3
17 34 31 60 3,1 6 4
34 50 61 90 6,1 9 5*
0°f ile 10°f arasındaki değerlerde, tuz kullanımını
tavsiye etmiyoruz.
* Bu ayar, çevrim süresinde bir miktar artışa
neden olabilir.
(°dH = Alman derecesi ile hesaplanmýþ sertlik - °f = Fransýz
derecesi ile hesaplanmýþ sertlik mmol/l = litre baþýna milimol)
Su Sertliği Tablosu
*) beþ
Ýþlenmiþ tuzun ölçülmesi
Bir yýkama devrinden mümkün olan en iyi sonuçlarý almak için
daðýtýcýnýn devamlý olarak dolu olduðundan emin olun. Ýþlenmiþ tuz,
sudan kireci alýr ve buna baðlý olarak bulaþýklar üzerinde kireç
oluþumunu engeller.
Tuz daðýtýcý, bulaþýk makinesinin alt kýsmýnda bulunmakta olup
(bknz Taným) doldurulmalýdýr:
Tuz daðýtýcýsýnýn kapaðýna gözle bakarak yeþil ibre
görülmediði zaman
Kontrol paneli üzerindeki YETERSÝZ PARLATICI
yandýðý zaman.
1. Alt kremayeri sökün ve konteynýr
kapaðýnýn vidalarýný açýn (saat yönünün
tersine).
2. Ýlk defa yapýyorsanýz: su tankýný tam
aðzýna kadar doldurun.
3. Huniyi
tuz konteynýrýný tam aðzýna kadar
doldurun (Bu konteynýr yaklaþýk 1 kg kaldýrabilmelidir); az
miktarda suyun dýþarý sýzmasý olaðandýr.
4. Huniyi
temizleyin; akan suyun altýnda kapaðý durulayýn ve ardýndan
kapaðýn alt kýsmýnda yýldýz þeklinde düzenlenmiþ olarak
bulunan dört yarýktan suyun dýþarý çýkmasýný saðlamak için
aþaðýya doðru bakan baþlýða tekrar vidalayýn. (Yeþil ibreli
kapak*)
Konteynýra her tuz ekleyiþinizde bu iþlemleri
gerçekleþtirmenizi tavsiye ederiz.
Kapaðýn yerine sýkýca vidalanmýþ olduðundan emin olun; böylece
yýkama döngüsü süresince daðýtýcýnýn içine herhangi bir deterjan
madde giremeyecektir (Bu durum su yumuþatýcýsýna tamir
edilemez bir þekilde zarar verebilirdi.).
çözeltisinin temizlendiðinden emin olmak için yýkama devrinden
önce tuzu ölçün.
* çýkartýn ve açýklýk üzerinde kalan tüm tuz artýklarýný
Gerekli olduðu zaman tuz daðýtýcýsýndan dýþarýya sýzan tuz
* yerleþtirin (bakýnýz figür) ve
*
* gцsterge эюэрэ
64
* Sadece seçilen modellerde mevcuttur.
'

Bakým ve onarým
Su ve elektrik kaynaklarýnýn kapatýlmasý
64
Sýzýntýlarý engellemek amacýyla su musluðunu her
yýkama devrinden sonra kapatýn.
Makine temizlenirken ya da bakýmý yapýlýrken
makinenin fiþini çekin.
Bulaþýk makinesinin temizlenmesi
Makinenin dýþ yüzeyleri ve kontrol paneli, iplikçik
býrakmayan hafif nemli bir bez parçasý ile
temizlenebilir. Deterjan ya da aþýndýrýcý ürünler
kullanmayýn.
Cihaz içinde oluþan leke ya da izler nemli bir bez ile
ve az bir sirke ile temizlenebilir.
Ýstenmeyen kokularýn engellenmesi
Nem oluþmamasý ve oluþan nemin makine içine
hapsedilmemesi için makinenin kapaðýný devamlý
olarak aralýk tutun.
Kapak çevresindeki su sýzdýrmaz bantlarý ve
deterjan daðýtýcýlarýný düzenli aralýklarla nemli bir
sünger ile temizleyin. Bu, yiyecek artýklarýnýn bantlar
üzerinde kalmasýný engelleyecek ve bu artýklarýn
neden olduðu istenmeyen kokularýn oluþumunu
önleyecektir.
Püskürtücü kollarýn temizlenmesi
Yiyecek artýklarý, püskürtücü kollar üzerine yapýþýp suyun
püskürtüldüðü delikleri týkayabilir. Bu nedenle
püskürtücülerin düzenli aralýklarla kontrol edilmesi ve
metal içermeyen bir fýrça ile temizlenmesi
önerilmektedir.
Her iki püskürtücü kol da çýkartýlabilir.
Üst püskürtücü kolu çýkarmak
için kilit halkasýný saat
yönünün tersine döndürün.
Üst püskürtücü kol, daha fazla
sayýda delik bulunan yüzün
yukarýya doðru geldiðinden
emin olunmasý için
deðiþtirilmelidir.
Musluk çýkýþýndaki su giriþ filtresini düzenli olarak
temizleyin;
- Su musluðunu kapatýn.
- Su giriþ hortumunun ucunun vidalarýný sökün, filtreyi çýkartýn
ve akan suyun altýnda dikkatlice temizleyin.
- Filtreyi yenisi ile deðiþtirin ve su hortumunu eski
pozisyonunda vidalayýn.
Filtrelerin temizlenmesi
Filtre grubu, yýkama suyundan yiyecek kalýntýlarýný temizleyen
ve suyu tekrar döndüren üç ayrý filtreden oluþmaktadýr. Her
yýkamada en iyi sonuçlarý elde etmek için temizlenmelidirler.
Filtreleri düzenli aralýklarla temizleyin.
Bulaþýk makinesi filtreler bulunmadan ya da filtreler
gevþek durumdayken kullanýlmamalýdýr.
Bir çok yýkamadan sonra filtre grubunu kontrol edin ve gerekli
olmasý durumunda üzerinden su akýtarak metal içermeyen bir
fýrça vasýtasýyla aþaðýdaki talimatlarý izleyerek temizleyin:
1. C silindirik filtresini saat yönünün tersine döndürün ve dýþarý
çekin (þkl 1).
2. Kapak filtresi Byi yan kanatlara hafif basýnç uygulayarak
çýkartýn (þkl 2).
3. Paslanmaz çelik plaka filtresi Ayý dýþarý doðru kaydýrýn (þkl 3).
4.Týkacý kontrol edin ve yiyecek artýklarýný temizleyin. Yýkama
devri pompasýný (siyah kenarlý) ASLA SÖKMEYÝN (þkl 4).
+
)
*
+
Alt püskürtücü kol, yandaki
sekmelere basarak ve
yukarýya doðru çekerek
çýkartýlabilir.
Su Giriþ Filtresinin Temizlenmesi*
Eðer su hortumlarý yeni ya da uzun bir süre boyunca
kullanýlmamýþlarsa gerekli baðlantýlarý yapmadan önce
hortumlarýn temiz ve artýklardan arýndýrýlmýþ olduðundan
emin olmak için su hortumlarýndan su geçisine izin verin.
Eðer söz konusu önlem alýnmaz ise su giriþi týkanabilir
ve bulaþýk makinesi hasar görebilir.
!
Filtreleri temizledikten sonra filtre grubunu yeniden yerine
takýn ve sabitleyin; bu durum bulaþýk makinesinin verimli
kullanýmýnýn elde edilmesi için gereklidir.
"
Uzun bir süre boyunca makinenin
kullanýlmadan býrakýlmasý
Makineyi elektrik kaynaðýndan çýkarýn ve su musluðunu
kapatýn.
Makinenin kapaðýný aralýk býrakýn.
Döndüðünüz zaman bulaþýk makinesi boþ iken bir yýkama
devri çalýþtýrýn.
* Sadece seçilen modellerde mevcuttur.

Önlemler, öneri ve
Destek
Bu makine, mevcut uluslar arasý güvenlik standartlarýna
uygun olarak tasarlanmýþ ve üretilmiþtir. Aþaðýdaki bilgi
güvenliðiniz için hazýrlanmýþtýr, bu nedenle dikkatle okunmalýdýr.
Genel güvenlik
Cihaz, ev içinde konut kullanýmý için tasarlanmýþ olup ticari
ya da endüstriyel kullanýmý amaçlanmamýþtýr.
Ev bulaþýklarýnýn bu kullaným kýlavuzunda belirtilen þekilde
yýkanmasý için makine sadece yetiþkinler tarafýndan
kullanýlmalýdýr.
Makine, dýþ mekanlarda ya da sadece üstü kapalý alanlarda
kurulmamalýdýr. Makinenin yaðmur ya da fýrtýna altýnda
býrakýlmasý çok tehlikelidir.
Çýplak ayakla makineye dokunmayýn.
Makine prizden çekilirken kabloyu deðil fiþi, elektrik
prizinden çekin.
Makine temizlenmeden ya da bakým iþlemleri baþlatýlmadan
önce su besleme musluðu kapatýlmalý ve makinenin fiþi,
elektrik prizinden çýkarýlmalýdýr.
Makine arýzalanýrsa her ne þart altýnda olursa olsun
makineyi kendiniz tamir etmeye çalýþmayýn ve makinenin iç
kýsýmlarýna dokunmayýn.
Isýtýcý bileþene asla dokunmayýn.
Makinenin açýk olan kapaðý üzerine yaslanmayýn ya da
oturmayýn Bu, makinenin devrilmesine neden olabilir.
Önemli bir engel teþkil edeceði için kapak açýk
býrakýlmamalýdýr.
Deterjanlarý ve durulama maddelerini çocuklarýn
ulaþamayacaðý yerlerde muhafaza edin.
Paketleme malzemesi oyuncak olarak kullanýlmamalýdýr.
Tasfiye
Paketleme malzemesinin tasfiyesi: Paketlerin yeniden
kullanýlabilir olup olmadýðýna dair yerel yasalarý inceleyin.
Atýk Elektrikli ve Elektronik Donanýmlar (WEEE) konulu ve
2002/96/EC sayýlý Avrupa Direktiflerinde konutlarda
kullanýlan elektrikli cihazlarýn normal katý atýk döngüsü
içinde tasfiye edilmemesi gerektiði belirtilmektedir. Eskimiþ
cihazlar, toplum saðlýðýna ve atmosfere verilebilecek
potansiyel zarar engellenerek makine içinde bulunan
malzemelerin yeniden kullaným ve geri dönüþüm
masraflarýnýn optimize edilmesi için ayrý olarak
toplanmalýdýr. Üzerinde çarpý iþareti bulunan çöp kutusu,
elektrikli ve elektronik alet sahiplerine ayrý atýk toplanmasý
hususundaki sorumluluklarýný hatýrlatmak için tüm ürünler
üzerinde bulunmaktadýr.
Konutlarda kullanýlan elektrikli cihazlarýn doðru bir þekilde
tasfiye edilmesi hususunda ayrýntýlý bilgi edinmek için ilgili
toplum yetkilisine ya da yerel bayiinize baþvurabilirsiniz.
Enerji tasarrufu yapmak ve çevreye
karþý duyarlý olmak
Su ve enerji tasarrufu yapmak
Sadece bulaþýk makinesi dolu olduðu zaman yýkama devrini
baþlatýn. Bulaþýk makinesinin dolmasýný beklerken Sudan
Geçirme devrini kullanarak istenmeyen kokularýn kullanýmýný
engelleyebilirsiniz. (bknz Yýkama devirleri)
Yýkama devirleri tablosunu kullanarak bulaþýklarýn kirlilik
seviyesine ve bulaþýk tipine uygun olan yýkama devrini
seçin:
- Normal derecede kirli bulaþýklar için daha düþük enerji ve
su kullanan Ekonomik yýkama devrini kullanýn.
- Bulaþýk miktarý normalden daha az ise Yarým yükleme
opsiyonunu kullanýn
Elektrik tedarikçiniz, elektrik tasarrufu saatleri hakkýnda
bilgi veriyorsa yýkama devirlerini daha düþük ücretlendirme
uygulandýðý saatler arasýnda çalýþtýrýn. Gecikmeli baþlatma
*(bknz Baþlangýç ve kullaným)
*düðmesi (bknz Baþlangýç ve kullaným) yýkama devirlerini
istediðiniz þekilde organize etmenize yardýmcý olur.
Enzim içeren fosfatsýz ve klorsuz deterjanlar
Çevreye zararlý olmalarý nedeniyle fosfat ya da klor içeren
deterjanlarý kullanmamanýzý önemle tavsiye ederiz.
Enzimler, 50°C sýcaklýk altýnda özellikle etkilidir ve bu
nedenle enzim içeren deterjanlar, normalde 65°C sýcaklýk
altýnda elde edilen sonuçlarýn daha düþük yýkama devri
sýcaklýklarýnda elde edilmesi açýsýndan kullanýlabilir.
Deterjanýn sarf edilmesinin önlenmesi açýsýndan, ürünü
imalatçýnýn talimatlarý, su sertliði, kirlilik seviyesi ve bulaþýk
miktarýna göre uygun miktarlarda kullanýn. Biyolojik olarak
geri dönüþtürülebilir olsalar da deterjanlar doðanýn
dengesini deðiþtirebilen malzemeler içerir.
Destek
Desteðe baþvurmadan önce
Problemin Sorun Giderme rehberi kullanýlarak
çözülüp çözülmeyeceðini kontrol edin (bknz Sorun
Giderme).
Karþýlaþtýðýnýz problemin devam edip etmediðini
görmek için yýkama devrini baþtan baþlatýn.
Problem devam ediyorsa Yetkili Teknik Destek
Servisine baþvurun.
Yetkisiz teknisyenlerin verdiði hizmetleri
kullanmayýn.
Lütfen aþaðýda belirtilen bilgileri hazýr edin:
Arýza tipi
Cihaz Modeli (Mod)
Seri Numarasý (S/N)
Bu bilgiler, cihazýn bilgi plakasý üzerinde bulunur
(bknz Cihazýn tanýmý).
* Sadece seçilen modellerde mevcuttur.
64

Sorun giderme
Cihazýn çalýþmasýnda problem olmasý durumunda Destek talebinde bulunmadan önce aþaðýdaki listede bulunan
64
çözüm yollarýný kontrol edin:
Problem: Muhtemel nedenler /Çözümler:
Bulaşık makinesi çalışmıyor.
Bulaşık makinesinden dışarı su
tahliye edilmiyor.
Bulaşık makinesi aşırı gürültü
yapıyor.
Bulaşıklar ve bardaklar beyaz bir
tabaka ile ya da kireç ile
kaplanıyor.
Bulaşıklar ve bardaklar çiziliyor
ya da bulanık görünüyor.
Bulaşıklar tamamıyla kurumuyor.
Bulaşıklar temiz değil.
Bulaşık makinesi su almıyor/
musluk kapalı alarmı
(Tuz, Parlatıcı, Kurutma ve Son göste
rge ışıkları yanıp söner)
Su yükleme solenoit vanasında
arıza alarmı
(Tuz, Parlatıcı ve Kurutma gösterge
ışıkları yanıp söner)
Su giriş hortumu alarmı/Su giriş
filtresi tıkanmış.
(Tuz, Parlatıcı, Yıkama Devri Kurutma
ve Son gösterge ışıkları yanıp söner)
• Fiş, elektrik prizine doğru bir şekilde yerleştirilmemiş ya da evin genelinde
elektrik yok.
• Bulaşık makinesinin kapağı tam olarak kapatılmamış.
• Gecikmeli başlatma, programlanmış (bknz Başlangıç ve kullanım)
• Bulaşık makinesi devri henüz bitmemiş.
• Su giriş hortumu bükülmüş (bknz Kurulum).
• Drenaj borusu tıkanmış.
• Filtre, yiyecek artıkları nedeniyle tıkanmış.
• Bulaşıklar birbirine ya da püskürtücü kollara çarpıyor
• Aşırı köpük oluşuyor. Deterjan doğru olarak ölçülmemiş ya da bulaşık makine
lerinde kullanımı uygun değil (bknz Başlangıç ve kullanım).
• İşlenmiş tuzun seviyesi yeterli değil ya da dozaj ayarı su sertliğine uygun
değil (bknz Durulama maddesi ve tuz).
• Tuz dağıtıcı üzerindeki kapak tamamıyla kapanmamış.
• Parlatıcı bitmiş ya da dozajı yetersiz.
• Bulaşıklar dayanıklı bir malzemeden yapılmamış.
• Parlatıcı malzemesinin dozajı çok fazla.
• Kurutma programı olmayan bir yıkama programı seçilmiş.
• Parlatıcı bitmiş ya da dozajı yetersiz (bknz Parlatıcı ve tuz)
• Parlatıcı dağıtıcısının ayarı yeterli değil.
• Raflar aşırı yüklenmiş (bknz Rafların yüklenmesi)
• Bulaşıklar doğru bir şekilde düzenlenmemiş.
• Püskürtücü kollar rahatça hareket edemiyor.
• Yıkama devri çok hassas (bknz Yıkama devirleri)
• Aşırı miktarda köpük oluşuyor. Deterjan doğru olarak ölçülmemiş ya da bulaş
ıkmakinelerinde kullanımı uygun değil (bknz Başlangıç ve kullanım).
• Parlatıcı bölmesi üzerindeki kapak tam olarak kapatılmamış.
• Filtre kirli ya da tıkanmış (bknz Bakım ve onarım)
• İşlenmiş tuz seviyesi yetersiz (bknz Parlatıcı ve tuz)
• Su tesisatında su yok.
• Su giriş hortumu bükülmüş (bknz Kurulum).
• Musluğu açın ve cihaz birkaç dakika sonra çalışmaya başlayacaktır.
• Tuz ve Parlatıcı gösterge ışıkları yanıp sönerken herhangi bir
işlem gerçekleştirilmediğinden dolayı cihaz kilitlenmiş. AÇMA/KAPATMA
düğmesini kullanarak makineyi kapatın, musluğu açın ve 20 saniye sonra
aynı düğmey e basarak makineyi tekrar açın. Makineyi yeniden programlayın
ve yıkama devrini baştan başlatın.
• AÇMA/KAPATMA düğmesine basarak cihazı kapatın ve bir dakika sonra ciha
zı yeniden açın. Alarm devam ediyorsa su basması riskini ortadan kaldırmak
için su musluğunu kapatın, fişi elektrik prizinden çekin ve Desteğe başvurun.
• ON (AÇ) / OFF (KAPAT) butonuna basarak uygulamayı durdurun. Su basmas
ı riskini engellemek için su musluğunu kapatın ve fişi elektrik prizinden çekin.
Su giriş filtresinin çeşitli pisliklerle tıkanmamış olduğundan emin olun.
(Bakınız “Bakım ve Onarım” Bölümü).

Operating instructions
DISHWASHER
EN
English,13
LKF 710
Contents
Installation, 14-15
Positioning and levelling
Connecting the water and electricity supplies
Advice regarding the first wash cycle
Technical data
Description of the appliance, 16
Overall view
Control panel
Loading the racks, 17
Lower rack
Cutlery basket
Upper rack
Start-up and use, 18-19
Starting the dishwasher
Measuring out the detergent
Wash options
Wash cycles, 20
Table of wash cycles
Rinse aid and refined salt, 21
Measuring out the rinse aid
Measuring out the refined salt
Care and maintenance, 22
Shutting off the water and electricity supplies
Cleaning the dishwasher
Preventing unpleasant odours
Cleaning the sprayer arms
Cleaning the water inlet filter
Cleaning the filters
Leaving the machine unused for extended periods
Precautions, advice and Assistance, 23
General safety
Disposal
Saving energy and respecting the environment
Before contacting Assistance
Troubleshooting, 24

Installation
EN
Keep this instruction manual in a safe place for future
reference. If the appliance is sold, given away or moved,
please ensure the manual is kept with the machine, so that the
new owner may benefit from the advice contained within it.
Please read this instruction manual carefully: it contains
important information regarding the safe installation, use and
maintenance of the appliance.
If the appliance must be moved at any time, keep it in an
upright position; if absolutely necessary, it may be tilted onto
its back.
Positioning and levelling
1. Remove the appliance from all packaging and check that it
has not been damaged during transportation.
If it has been damaged, contact the retailer and do not
proceed any further with the installation process.
2. Check the dishwasher by placing it so that its sides or back
panel are in contact with the adjacent cabinets or even with the
wall. This appliance can also be recessed under a single
worktop
3. Position the dishwasher on a level and sturdy floor. If the
floor is uneven, the front feet of the appliance may be adjusted
until it reaches a horizontal position. If the appliance is levelled
correctly, it will be more stable and much less likely to move or
cause vibrations and noise while it is operating.
4
appliance
a hexagonal spanner (red color) with an opening of 8 mm in a
clockwise direction to increase the height or in an
anticlockwise direction to decrease the height.
* (see the Assembly instruction sheet).
*. Adjust the height of the rear foot from the front of the
* on the central lower part of the dishwasher, turning
Connecting the water inlet hose
To a suitable cold water connection point: before attaching
the hose, run the water until it is perfectly clear so that any
impurities that may be present in the water do not clog the
appliance; after performing this operation, screw the inlet
hose tightly onto a tap with a ¾ gas threaded connection.
To a suitable hot water connection point: your dishwasher
may be supplied with hot water from the mains supply (if
you have a central heating system with radiators) provided
that it does not exceed a temperature of 60°C.
Screw the hose to the tap as described for connection to a
cold water supply.
If the inlet hose is not long enough, contact a specialist
store or an authorised technician (see Assistance).
The water pressure must be within the values indicated in
the Technical data table (see adjacent information).
The hose should not be bent or compressed.
Anti-flooding protection
To ensure floods do not occur, the dishwasher:
- is provided with a special system which blocks the water
supply in the event of anomalies or leaks from inside the
appliance.
Some models are also equipped with the supplementary
safety device New Acqua Stop
flooding protection even in the event of a supply hose rupture.
*, which guarantees anti-
Connecting the water and electricity
supplies
Connection to the water and electricity supplies should
only be performed by a qualified technician.
The dishwasher should not stand on top of the water
hoses or the electricity supply cable.
The appliance must be connected to the water supply
network using new hoses.
Do not use old hoses.
The water inlet (A) and outlet (B) hoses and the electricity
supply cable may be positioned towards the right or the left in
order to achieve the best possible installation (see figure).
WARNING: HAZARDOUS VOLTAGE!
Under no circumstance should the water inlet hose be cut as it
contains live electrical parts.
* Only available in selected models.
14

Connecting the water outlet hose
Connect the outlet hose (without bending it) to a drain duct
with a minimum diameter of 4 cm. Alternatively, rest it over a
sink or tub; the free end of the hose should not remain
immersed in water.
The special plastic elbow
A
makes it easier to find the best
layout: fix the elbow to the wall
securely in order to prevent the
outlet hose from moving and
spilling the dirty water.
The part of the hose marked
with the letter A should be
between 40 and 100 cm above
the ground (see figure).
We advise against the use of hose extensions.
*
Electrical connection
Before inserting the plug into the electrical socket, make sure
that:
The socket is earthed and complies with current
regulations.
The socket can withstand the maximum load of the
appliance, which is indicated on the data plate located on
the inside of the door (see chapter entitled Description of
the appliance).
The power supply voltage falls within the values indicated
on the data plate on the inside of the door.
The socket is compatible with the plug of the appliance. If
this is not the case, ask an authorised technician to replace
the plug (see Assistance); do not use extension cables or
multiple sockets.
Once the appliance has been installed, the power supply
cable and the electrical socket should be easily accessible.
Anti-condensation strip*
After installing the dishwasher, open the door and stick the
adhesive transparent strip under the wooden shelf in order to
protect it from any condensation which may form.
Advice regarding the first wash cycle
After the appliance has been installed, immediately before
running the first wash cycle, completely fill the salt dispenser
with water and add only then approximately 1 kg of salt (see
chapter entitled Rinse aid and refined salt). The water may
overflow: this is normal and is not a cause for concern. Select
the water hardness value (see chapter entitled Rinse aid and
refined salt).
machine, the LOW SALT indicator light
If the salt container is not filled, the water softener and the
heating element may be damaged as a result.
Technical data
Dimensions
Capacity 12 standard place-settings
Water supply
pressure
Power supply
voltage
Total absorbed
power
Fuse See appliance data plate
- After the salt has been poured into the
* switches off.
width 60 cm
height 85 cm
depth 60 cm
0,05 ÷ 1MPa (0.5 ÷ 10 bar)
4.3 psi – 145 psi
See appliance data plate
See appliance data plate
EN
The cable should not be bent or compressed.
If the power supply cable is damaged, it must be replaced
by the manufacturer or its Technical Assistance Service in order
to prevent all potential hazards. (See Assistance)
The Company shall not be held responsible for any
incidents that occur if these regulations are not observed.
This dishwasher conforms to
the following European
Community Directives:
-73/23/EEC dated 19/02/73
(Low Voltage) and subsequent
modifications
-89/336/EEC dated 03/05/89
(Electromagnetic Compatibility)
and subsequent modifications
-97/17/EC (Labelling)
-2002/96/ CE Waste Electrical
and Electronic Equipment
(WEEE)
* Only available in selected models.
15

Description of the
appliance
EN
Overall view
1. Upper rack
2. Upper sprayer arm
3. Tip-up compartments
4. Rack height adjuster
5. Lower rack
6. Lower sprayer arm
7. Cutlery basket
8. Washing filter
9. Salt dispenser
10. Detergent and rinse aid dispensers
11. Data plate
12. Control Panel
***
Control panel
ON/OFF
indicator light
ON/OFF/RESET
button
Low Salt
indicator light*
Low Rinse aid
indicator light*
Select wash
cycle knob
Half load
button and
indicator light*
Multi-functional tablets
button and indicator light*
***Only in completely built-in models.
* Only available in selected models.
Delayed start
button and
indicator light*
Washing and 3h.
Delayed start
indicator light*
Drying and
6h.Delayed start
indicator light*
End and 9h.
Delayed start
indicator light*
Start/Pause button
and indicator light*
16

Loading the racks
Before loading the racks, remove all food residues from
the crockery and empty liquids from glasses and cups.
After loading the appliance, check that the sprayer arms
can rotate freely.
Lower rack
The lower rack can hold pans, lids, plates, salad bowls,
cutlery, etc. as seen in the Loading examples.
Plates and large covers should be placed at the sides of the
rack, ensuring that they do not block the rotation of the upper
sprayer arm.
Some dishwasher models are fitted with tip-up sections
which can be used in a vertical position when arranging
plates or in a horizontal position when arranging pans and
salad bowls.
*,
Cutlery basket
The type of cutlery basket may vary according to the
dishwasher model: it may be modular, non-modular or a sliding
version. The non-modular basket must only be positioned at
the front of the lower rack.
The modular basket may be separated into two parts, a solution
which is recommended when performing a half load wash (only
in models offering this option), is available in a sliding version
(positioned at any point on the lower rack by sliding it between
the fixed or tip-up inserts.
- Both versions are fitted with a collapsible sliding system which
means the cutlery can be arranged in the best possible way.
Adjusting the height of the upper rack
In order to make it easier to arrange the crockery, the upper
rack may be moved to a higher or lower level. (in models which
The height of the upper rack should ideally be adjusted
WHEN THE RACK IS EMPTY.
Never lift or lower the rack on one side only.
Open the left and right guide rail stops
and pull out the rack; position it higher or
lower as required, slide it along the guide
rails until the front wheels are in place
and close the stops (see figure).
If the rack is fitted with Dual Space
handles
rack until it reaches its stop point, grip the
handles at the sides of the rack and move
it upwards or downwards, then slowly let it
fall back into place.
* (see figure), pull out the upper
Loading examples for the upper rack
Loading examples for the lower rack
EN
Knives and other utensils with sharp edges must be
placed in the cutlery basket with the points facing
downwards, or they must be positioned horizontally in the tipup compartments on the upper rack.
Cutlery basket positioning examples
Upper rack
Load this rack with delicate and lightweight crockery:
glasses, tea and coffee cups, saucers, small salad bowls,
saucepans and small saucepans which are not too soiled,
using the Loading examples as a guide.
Mugs and cups: place these on the tip-up
compartments
Long sharp knives and serving utensils: place these on the
tip-up compartments
**.
**.
Items which should not be washed in the
dishwasher
Wooden items, objects with wooden or horn handles or
glued-on parts.
Items made from aluminium, copper, brass, pewter or tin.
Items made from plastic material which is not heat-resistant.
Antique or hand-painted porcelain.
Antique silver. Silver which is not antique may, however, be
washed in the dishwasher using a delicate wash cycle,
provided that it does not come into contact with other metals.
We recommend the use of crockery which is dishwasher
safe.
*Only available in selected models.
** The number and position may vary.
17

Start-up and use
EN
Starting the dishwasher
1. Turn the water tap on.
2. Press the ON/OFF button: all the indicator lights on
the control panel will light up for a few seconds.
3. Open the door and pour in a suitable amount of
detergent (see below).
4. Load the racks (see Loading the racks) and shut the
door.
5. Select the wash cycle by turning the WASH CYCLE
SELECT knob in a clockwise direction: align the notch
on the knob with the number or symbol representing
the desired wash cycle. The START/PAUSE indicator
light will flash.
6. Select the wash options
information).
7. Start the cycle by pressing the START button; the
indicator light will become green and remain lit in a
fixed manner. The indicator light corresponding to the
wash phase will switch on, signalling that the wash
cycle has begun.
8. At the end of the wash cycle the END indicator light
will switch on (fixed green light). Switch off the
appliance by pressing the ON/OFF button, shut off the
water valve and unplug the appliance from the
electricity socket.
9. Wait for a few minutes before removing the
crockery, in order to avoid burns. Unload the racks,
beginning with the lower level.
Modifying a wash cycle in progress
If a mistake was made during the wash cycle selection
process it is possible to change the cycle, provided that
it has only just begun: once the wash cycle has started,
switch off the machine by pressing and holding the ON/
OFF/Reset button. Switch it back on using the same
button and select the desired wash cycle and options.
* (see adjacent
Measuring out the detergent
A good wash result also depends on the correct
amount of detergent being used; exceeding the stated
amount does not result in a more effective wash and
increases environmental pollution.
Only use detergent which has been
specifically designed for dishwashers.
DO NOT USE washing up liquid.
Using excessive detergent may result in foam
residue remaining in the machine after the cycle
has ended.
The use of tablets is only recommended for
models which offer the MULTI-FUNCTIONAL
TABLETS option.
To achieve the best results from each washing and
drying cycle, powder detergent, rinse aid liquid and
salt should be used.
Compartment A: Washing detergent
Compartment B: Pre-wash detergent
D
A
B
C
when the cycle requires 1 tablet, place it in compartment
A and close the cover; when it requires 2, place the
second tablet at the bottom of the appliance.
3. Remove detergent residues from the edges of the
compartment and close the cover until it clicks.
1. Open cover C by pressing
button D.
2. Pour in the detergent after
consulting the Table of wash
cycles:
For powder detergent use
compartments A and B.
For detergent in tablet form:
Adding extra crockery
Press the Start/Pause button (the corresponding
indicator light will flash). Open the door, taking care to
avoid the escaping steam, and place the crockery inside
the appliance. Press the Start/Pause button (fixed light):
the cycle starts from the point at which it was interrupted.
If the Start/Pause button is pressed so as to pause the
machine, the wash cycle or the Delayed Start function
(if selected) is interrupted.
At this stage it is not possible to change the wash cycle.
Accidental interruptions
If the door is opened during the wash cycle, or if there is
a power cut, the cycle stops. It starts again from the point
at which it was interrupted once the door has been shut
or once the electricity supply is restored.
18
Wash options*
The OPTIONS may only be set, modified or reset
after the wash cycle has been selected and before
the Start/Pause button has been pressed.
Only the options which are compatible with the type of
wash cycle set may be selected. If an option is not compatible with the selected was cycle (see Table of wash
cycles), the corresponding LED flashes rapidly 3 times.
If an option is selected which is incompatible with another option or wash cycle selected previously, the incompatible option light will flash 3 times and switches
off, while the most recently selected setting remains lit.
To deselect an option which has been set by mistake, press the corresponding button again.
* Only available in selected models.
Half load*
If there are not many dishes to be washed, a half load
cycle may be used in order to save water, electricity
and detergent. Select the wash cycle and press the
HALF LOAD button: the indicator light will illuminate.
Remember to halve the amount of detergent.
It is better to use powder detergent in this case.
This option is incompatible with the following
wash cycle: Speed wash.
Delayed start*
It is possible to delay the start time of the wash cycle by
3, 6 or 9 hours.
1: After selecting the desired wash cycle and any other
options, press the DELAYED START button. the indicator
light will illuminate.
2: Select the desired delay time by pressing the Delayed Start button repeatedly; the wash phase (3 hours),
the drying phase (6 hours) and end (9 hours) indicator
lights will illuminate in succession.
If the Delayed Start button is pressed again, the option is
deselected and the indicator light switches off.
3. The countdown will begin once the Start/Pause button has been pressed. The selected delay period indicator light flashes and the Start/Pause button stops flashing (the light becomes fixed instead).
3. Once this time has elapsed, the DELAYED START
indicator light switches off and the wash cycle
begins.
The Delayed Start function cannot be set once a
wash cycle has been started.
Multi-functional tablets*
This option optimises washing and drying results.
When using multi-functional tablets, press the MULTIFUNCTIONAL TABLETS button. The corresponding
indicator light will illuminate. The Multi-functional
tablets option results in the lengthening of the wash
cycle.
The MULTI-FUNCTIONAL TABLETS option remains
set for subsequent wash cycles if it is not deselected.
The use of tablets is only recommended when the
MULTI-FUNCTIONAL TABLETS option is available.
This option is not recommended for use with wash
cycles which do not specify the use of multi-functional
tablets (see Table of options).
Table of options
Intensive
Normal
Daily A 60’
Soak
Eco
Speed 25’
Crystal
A B C
Delayed
Start
Yes
Yes
Yes
Yes
Yes
Yes
Yes
Half
Load
Yes
Yes
Yes
Yes
Yes
No
Yes
Multi-
functional
Tablets
Yes
Yes
Yes
No
Yes
Yes
Yes
EN
* Only available in selected models.
19

Wash cycles
EN
If the crockery is only lightly soiled or if it has been rinsed with water before being placed in the
dishwasher, reduce the amount of detergent used accordingly.
The number and type of wash cycles and options may vary depending on the dishwasher model.
For available OPTIONS please refer to the Table of options on the Start-up and use page.
Wash cycle selection
instructions
Heavily soiled dishes and
pans (not to be used for
delicate items).
Normally soiled pans and
dishes. Standard daily
wash cycle.
Limited quantity of daily
soiling.
(4 place settings + 1
saucepan +1 frying pan).
Pre-wash for dishes while
awaiting completion of the
load with the dishes from
the next meal.
Environmentally-friendly
wash cycle with low energy
consumption levels,
suitable for pans and
dishes.
Economic and fast wash to
be used for lightly soiled
dishes. (Run cycle
immediately after use) (2
plates + 2 glasses + 4
pieces of cutlery + 1
saucepan + 1 small frying
pan).
Economic and fast wash for
delicate items which are
sensitive to high
temperatures. (Run cycle
immediately after use) (12
glasses + delicate plates). Crystal
Wash cycle
Intensive
Normal
Daily A 60
Soak
Eco
*
(A) = compartment A
(B) = compartment B
Powder Liquid Tablets
30 g (A)
25 g (A)
5 g (B)
25 g (A) 25 ml (A) 1 (A)
No
25 g (A)
5 g (B)
25 g (A) 25 ml (A) 1 (A)
30 g (A) 30 ml (A) 1 (A)
30 ml (A)
25 ml (A)
5 ml (B)
25 ml (A)
5 ml (B)
Detergent
No
1 (A)
1 (A)
No
1 (A)
Wash
cycles
which
include
drying
Yes A-B-C 2:15’
Yes
No
No
Yes
No
Yes
Options
A-B-C
A-B-C
A-B
A-B-C
A-C
A-B-C
Wash cycle
duration
(tolerance
±10%)
Hrs. Min.
1:45’
1:00’
0:08’
2:20’
0:25’
1:30’
Notes:
Optimum performance levels when using the "Daily A 60 wash" and Speed wash" cycles can be achieved by observing the
maximum amounts of crockery specified.
To make it easier to measure out the detergent, it is worth remembering that:
1 tablespoon = 15 gr. of powder = approximately 15 ml of liquid - 1 teaspoon = 5 gr. of powder = approximately 5 ml of liquid
* The Eco wash cycle adheres to the regulation EN-50242. Although it has a longer duration than other wash cycles it uses less
energy and is les harmful to the environment.
Note for Test Laboratories: for information relating to comparative EN testing conditions, please send an email to the following
address: ASSISTENZA_EN_LVS@indesitcompany.com
20

Rinse aid and refined salt
Only use products which have been
specifically designed for dishwashers.
Do not use table salt or industrial salt, or
washing up liquid.
Follow the instructions given on the packaging.
If using a multi-functional product it is not necessary to
add rinse aid; however, we recommend that you add salt,
especially if you live in an area where the water is hard
or very hard. Follow the instructions given on the
packaging.
If you do not add salt or rinse aid, the LOW SALT*
and LOW RINSE AID* indicator lights remain lit.
Measuring out the rinse aid
Rinse aid makes it easier for the crockery to dry, as water
runs off surfaces more readily and therefore does not leave
streaks or marks.
The rinse aid dispenser should be filled:
When the LOW RINSE AID* indicator light on the control
panel is illuminated;
1. Open the dispenser by turning the
lid (G) in an anticlockwise direction.
2. Pour in the rinse aid, making sure
it does not overflow from the
dispenser. If this happens, clean the
spill immediately with a dry cloth.
F
3. Screw the lid back on.
NEVER pour the rinse aid directly
G
into the appliance tub.
Adjusting the amount of rinse aid
If you are not completely satisfied with the drying results,
you may adjust the quantity of rinse aid used. Use a
screwdriver to turn the dosage adjuster (F) to one of the 6
pre-set positions (the default position is set to 4):
If there are streaks on the crockery, set the adjustment
device to a lower number (1-3).
If drops of water remain on the crockery or if there are
limescale marks present after the cycle has finished, set
the adjuster to a higher number (4-6).
Setting the water hardness
Every dishwasher is equipped with a water softener which, by
using refined salt designed especially for this type of
appliance, supplies water without limescale which is then used
to wash the crockery.
This dishwasher offers a setting which helps to reduce
pollution and optimises washing performance in accordance
with the water hardness level in your area. This information can
be obtained from the organisation which supplies your
household with water.
- Switch the machine off using the ON/OFF button and open
the door.
- Set the SELECT WASH CYCLE knob first to wash cycle 5,
then to wash cycle 1, then to wash cycle 5 again.
- Press the ON/OFF button; the wash cycle phase indicator
lights will flash. It is now possible to select the water hardness
level. There is a water hardness level for every wash cycle:
E.g.: wash cycle 1, water hardness level 1
wash cycle 2, water hardness level 2, etc. etc., up to a maximum of five
(The default water softener setting is level 3).
- To exit the function, wait approximately 30 seconds or switch
off the machine using the ON/OFF button.
Even if using multi-functional tablets, the salt dispenser should
still be filled.
(°dH = hardness measured in German degrees - °f =
hardness measured in French degrees - mmol/l = millimoles
per litre)
* levels.
Water Hardness Table
°dH °fH mmol/l level
0 6 0 10 0 1 1
6 11 11 20 1.1 2 2
12 17 21 30 2.1 3 3
17 34 31 60 3.1 6 4
34 50 61 90 6.1 9
For values between 0°f and 10°f, we do not
recommend the use of salt.
* this setting may cause a slight increase in the
duration of the cycle.
5
*
Measuring out the refined salt
In order to achieve the best possible results using a wash
cycle, make sure that the dispenser is never empty.
Refined salt removes limescale from the water, thus
avoiding the formation of deposits on crockery.
The salt dispenser is located in the lower part of the
dishwasher (see Description) and should be filled:
When the green float
the cap of the salt dispenser.
When the LOW SALT
illuminated;
leak out.
4. Remove the funnel
the opening; rinse the cap under running water and then
screw it on, the head facing downwards so as to let the water
flow out of the four cracks which are arranged in a star shape
on the lower part of the cap. (Salt cap with green float
It is advisable to perform this procedure every time you
add salt to the container.
Make sure the cap is screwed on tightly, so that no detergent
can get into the container during the wash cycle (this could
damage the water softener beyond repair).
When necessary, measure out the salt before a wash
cycle so that any saline solution which has leaked out of the
salt dispenser is removed.
* cannot be seen by simply looking at
* indicator light on the control panel is
1. Remove the lower rack and
unscrew the container cap
(anticlockwise).
2. The first time you do this: fill the
water tank right up to its edge.
3. Position the funnel
and fill the salt container right up to its
edge (this should hold approximately
1 kg); it is not unusual for a little water to
* (see figure)
* and wipe any salt residue away from
*)
EN
* Only available in selected models.
21

Care and maintenance
Shutting off the water and electricity
EN
supplies
Turn off the water tap after every wash cycle to avoid
leaks.
Always unplug the appliance when cleaning it and
when performing maintenance work.
Cleaning the dishwasher
The external surfaces of the machine and the control
panel may be cleaned using a non-abrasive cloth
which has been dampened with water. Do not use
solvents or abrasive products.
Any marks on the inside of the appliance may be
removed using a cloth dampened with water and a
little vinegar.
Preventing unpleasant odours
Always keep the door of the appliance ajar in order to
avoid moisture from forming and being trapped inside
the machine.
Clean the seals around the door and detergent
dispensers regularly using a damp sponge. This will
avoid food becoming trapped in the seals, which is
the main cause behind the formation of unpleasant
odours.
Clean the water inlet filter at the tap outlet regularly.
- Turn off the water tap.
- Unscrew the end of the water inlet hose, remove the filter and
clean it carefully under running water.
- Replace the filter and screw the water hose back into
position.
Cleaning the filters
The filter assembly consists of three filters which remove food
residues from the washing water and then recirculate the
water. They should be cleaned if you wish to achieve the best
results in every wash.
Clean the filters regularly.
The dishwasher should not be used without filters, or if the
filter is loose.
After several washes, check the filter assembly and if
necessary clean it thoroughly under running water, using a
non-metallic brush and following the instructions below:
1. Turn the cylindrical filter C in an anti-clockwise direction
and pull it out (fig. 1).
2. Remove the cup filter B by exerting a slight pressure on the
side flaps (fig. 2).
3. Slide out the stainless steel plate filter A (fig. 3).
4. Inspect the trap and remove any food residue. NEVER
REMOVE the wash cycle pump (black detail) (fig. 4).
Cleaning the sprayer arms
Food residue may become encrusted onto the sprayer
arms and block the holes used to spray the water. It is
therefore recommended that the arms are checked from
time to time and cleaned with a small non-metallic
brush.
The two sprayer arms may both be removed.
To remove the upper sprayer
arm, rotate the locking ring in
an anti-clockwise direction.
The upper sprayer arm should
be replaced with the holes
facing upwards.
The lower sprayer arm can be
removed by pressing on the
side tabs and pulling it
upwards.
Cleaning the water inlet filter*
If the water hoses are new or have not been used for an
extended period of time, let the water run to make sure it
is clear and free of impurities before performing the
necessary connections. If this precaution is not taken,
the water inlet could become blocked and damage the
dishwasher.
B
C
C
1
2
A
3
After cleaning the filters, replace the filter assembly and fix it in
position correctly; this is essential for maintaining the efficient
operation of the dishwasher.
4
Leaving the machine unused for extended
periods
Disconnect the appliance from the electricity supply and
shut off the water tap.
Leave the door of the appliance ajar.
When you return, run a wash cycle when the dishwasher is
empty.
22
* Only available in selected models.

Precautions, advice
and Assistance
This appliance was designed and manufactured in
compliance with current international safety standards. The
following information has been provided for safety reasons
and should therefore be read carefully.
General safety
The appliance was designed for domestic use inside the
home and is not intended for commercial or industrial use.
The appliance must be used by adults only, to wash
domestic crockery in accordance with the instructions in
this manual.
The appliance must not be installed outdoors, even in
covered areas. It is extremely dangerous to leave the
machine exposed to rain and storms.
Do not touch the appliance when barefoot.
When unplugging the appliance always pull the plug from
the mains socket, do not pull on the cable.
The water supply tap must be shut off and the plug should
be removed from the electrical socket before cleaning the
appliance or carrying out any maintenance work.
If the appliance breaks down, do not under any
circumstances touch the internal parts in an attempt to
perform the repair work yourself.
Never touch the heating element.
Do not lean or sit on the open door of the appliance: this
may cause the appliance to overturn.
The door should not be left open as it may create a
dangerous obstacle.
Keep detergent and rinse aid out of reach of children.
The packaging material should not be used as a toy.
Disposal
Disposal of packaging materials: observe local legislation
so that the packaging may be reused.
The European Directive 2002/96/EC relating to Waste
Electrical and Electronic Equipment (WEEE) states that
household appliances should not be disposed of using the
normal solid urban waste cycle. Exhausted appliances
should be collected separately in order to optimise the cost
of re-using and recycling the materials inside the machine,
while preventing potential damage to the atmosphere and
to public health. The crossed-out dustbin is marked on all
products to remind the owner of their obligations regarding
separated waste collection.
Select a wash cycle which is suited to the type of crockery
and to the soil level of the crockery using the Table of wash
cycles:
- For dishes with a normal soil level, use the Eco wash
cycle, which guarantees low energy and water
consumption levels.
- If the load is smaller than usual activate the Half load
option
* (see Start-up and use).
If your electricity supply contract gives details of electricity
saving time bands, run wash cycles during the periods
when a lower tariff is applied. The Delayed start
(see Start-up and use) helps you organise the wash cycles
accordingly.
* button
Phosphate-free and chlorine-free detergents
containing enzymes
We strongly recommend that you use detergents that do
not contain phosphates or chlorine, as these products are
harmful to the environment.
Enzymes provide a particularly effective action at
temperatures around 50°C, and as a result detergents
containing enzymes can be used in conjunction with lowtemperature wash cycles in order to achieve the same
results as a normal 65°C wash cycle.
To avoid wasting detergent, use the product in appropriate
quantities based on the manufacturers recommendations,
the hardness of the water and the soil level and quantity of
crockery to be washed. Even if they are biodegradable,
detergents contain substances which may alter the balance
of nature.
Assistance
Before contacting Assistance:
Check whether the problem can be resolved using
the Troubleshooting guide (see Troubleshooting).
Restart the programme to check whether the problem
has ceased to exist.
If the problem persists, contact the Authorised
Technical Assistance Service.
EN
For further information relating to the correct disposal of
household appliances, owners may contact the relevant
public authority or the local appliance dealer.
Saving energy and respecting the
environment
Saving water and energy
Only begin a wash cycle when the dishwasher is full. While
waiting for the dishwasher to be filled, prevent unpleasant
odours using the Soak cycle (see Wash cycles).
Never use the services of unauthorised technicians.
Please have the following information to hand:
The type of malfunction.
The appliance model (Mod.).
The serial number (S/N).
This information can be found on the appliance data
plate (see Description of the appliance).
* Only available in selected models.
23

Troubleshooting
195069602.01
03/2008- Xerox Business Services
Whenever the appliance fails to work, check for a solution from the following list before calling for
EN
Assistance.
Problem : Possible causes / Solutions :
The dishw asher does not start.
No water drains out from the
dishw asher.
The dishwasher makes
excessive noise.
The dishes and glasses are
cove red in a w hite film or
limescale deposits.
The dishes and glasses are
streaked or have a bluish tinge.
The crockery has not been
dried properly.
The dishes are not clean.
The dishw asher does not take
any w ater in/Tap shut-off alarm
(the Salt, Rinse Aid, Drying and
End indicator lights flash).
Wate r lo ading so le no id valve
m alfunction alarm
(the Salt, Rinse Aid and Drying
indicator lig hts flas hes).
• The p lug has not been inserted into the electrica l socket properly,
or there is no pow er in the house.
• The d ishw asher door has not been shut properly.
• A delayed start has been progra mme d (
• Th e dishw asher cycle has not yet finished.
• The w ater inlet hose is be nt (
• The dra in duct is b locked.
• The filter is clogged up w ith food res idues.
• The d ishes are rattling against eac h other or against the spray er
arms.
• An excessive amount of f oam has been prod uced: the deterg ent has
not been measure d out correc tly or it is n ot suitable for use in
dishw ashers
• The level of the refined salt is low or the dos age setting is not
suited to the h ardness of the w ater (
• The lid on th e salt disp enser is not closed properly.
• The rinse aid has been used up or the d osage is too low .
• The crockery is made from non-stick material.
• The rinse aid dosage is too high.
• A w ash cycle w ithout a drying pro gramme has been selected.
• The rinse aid has been used up or the d osage is too low (
aid and salt
• The rinse aid dispenser setting is n ot h igh enough.
• The racks are overloade d (
• The crockery has n ot been arranged w ell.
• Th e spray er ar ms can not move f reely.
• Th e w ash cycle is too gentle (
• An excessive amount of f oam has been prod uced: the deterg ent has
not been measure d out correc tly or it is n ot suitable for use in
dishw ashers
• The lid on th e rinse aid co mpartment has not bee n shut c orrectly.
• The filter is dirty or blocked (
• The ref ined salt le ve l is low (
• Th ere is no w ater in the mains sup ply.
• Th e w ater inlet hos e is bent (s ee Installation).
• Turn on the tap a nd the appliance w ill start after a few minutes.
• The appliance is locked because no action w as taken w hen the
Salt and Rinse Aid indicator lights w ere f lashing. Sw itch off the
machine us ing the O N/OFF button, turn on the tap and sw itch the
machine b ack on after 20 seconds by pressing the same button. Reprogramme the machine and restart the w ash cycle.
• Sw itch off the applia nce by pressing the ON/O FF button an d sw itch
it bac k o n after a minute. If th e alar m contin ues, shut off the w ater
tap to eliminate the ris k of flooding, remov e the plug f rom the
electrical socket and cont act As sistance.
(see Start-up and us e).
).
(see Start-up and us e).
see Start-u p and use
see Installation
see Rinse aid and salt
see L oading the rack s
see Wash cycles
see Care and maintenance
see Rinse aid and salt).
).
).
).
).
).
see Rinse
).
Wat er inle t h ose
alar m /Wat er inlet filter
blocke d.
Aid, Washing, Drying and
End ind icator lig hts
flashes).
(the Salt, Rinse
24
• Sw itch off the appliance by pressing the ON/OFF button. Shut off
the w ater tap to eliminate the risk of flooding and re move t he plug
from the elec trical soc ket.
Make sure the w ater inlet filter has not become bloc ked by various
impurities. (see “ Care and maintenance” c ha pter) .
 Loading...