

Page 1

Instructions for
installation and use
WASHING MACHINE
EN
English,1
SK
Slovensky,37
HU
Magyar,13
PL
Polski,49
UA
Українська,73
AQUALTIS
AQS73D 29
RO
Română,25
CZ
Česky,61
Contents
Installation, 2-3
Unpacking and levelling
Connecting the electricity and water supplies
Technical data
Care and maintenance, 4
Cutting off the water and electricity supplies
Cleaning the machine
Cleaning the detergent dispenser drawer
Caring for your appliance drum
Cleaning the pump
Checking the water inlet hose
Precautions and advice, 5
General safety
Disposal
Opening the porthole door manually
Description of the machine, 6-7
Touch control panel
Running a wash cycle, 8
Wash cycles and options, 9
Table of wash cycles
Wash options
EN
Detergents and laundry, 10
Detergent
Preparing the laundry
Washing recommendations
Load balancing system
Trouble shooting, 11
Assistance, 12
1
Page 2
Installation
EN
! This instruction manual should be kept in a
safe place for future reference. If the washing
machine is sold, given away or moved, please
ensure the manual is kept with the machine,
so that the new owner may benefit from the
advice contained within it.
! Read these instructions carefully: they
contain vital information relating to the safe
installation and operation of the appliance.
! Inside the pack containing this manual, you
will also find the guarantee and all the details
necessary for installation.
Unpacking and levelling
Unpacking
1. Once you have removed all the packaging
from the washing machine, make sure it has
not been damaged during transportation.
If it has been damaged, contact the retailer
and do not proceed any further with the
installation process.
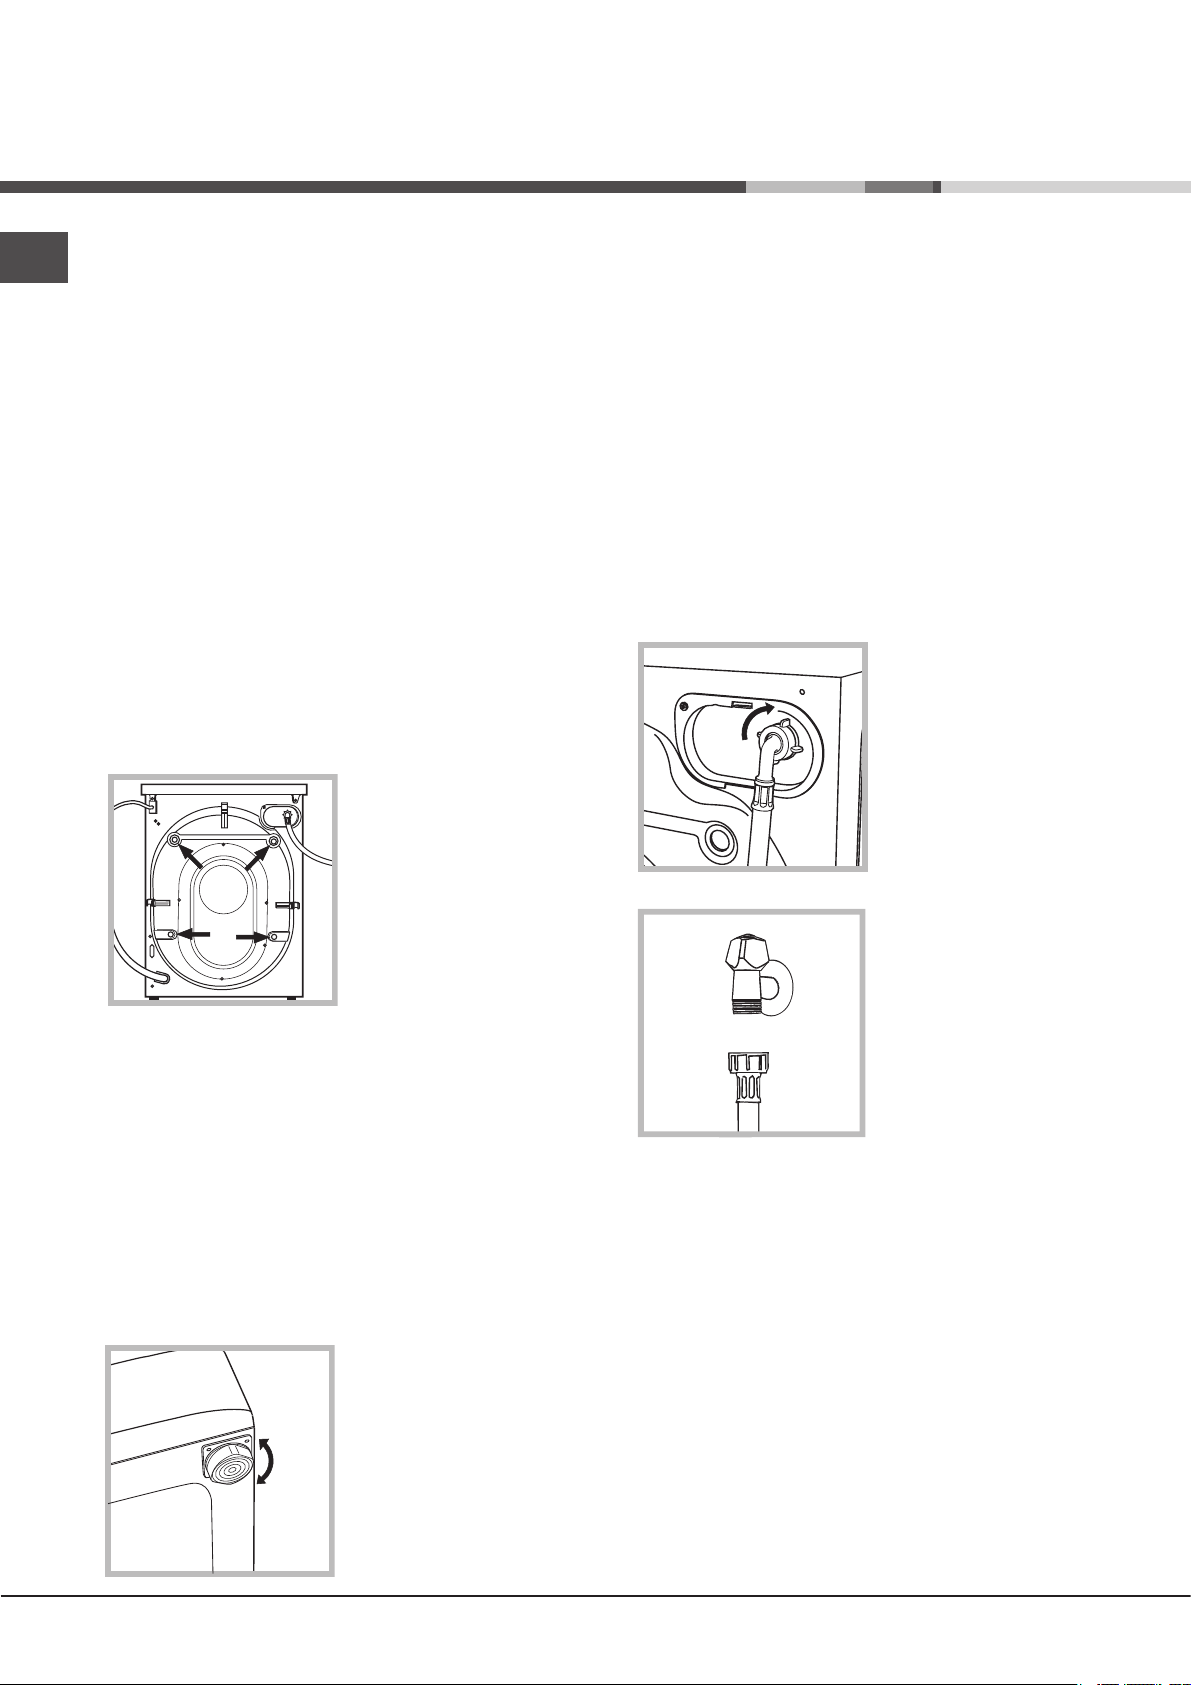
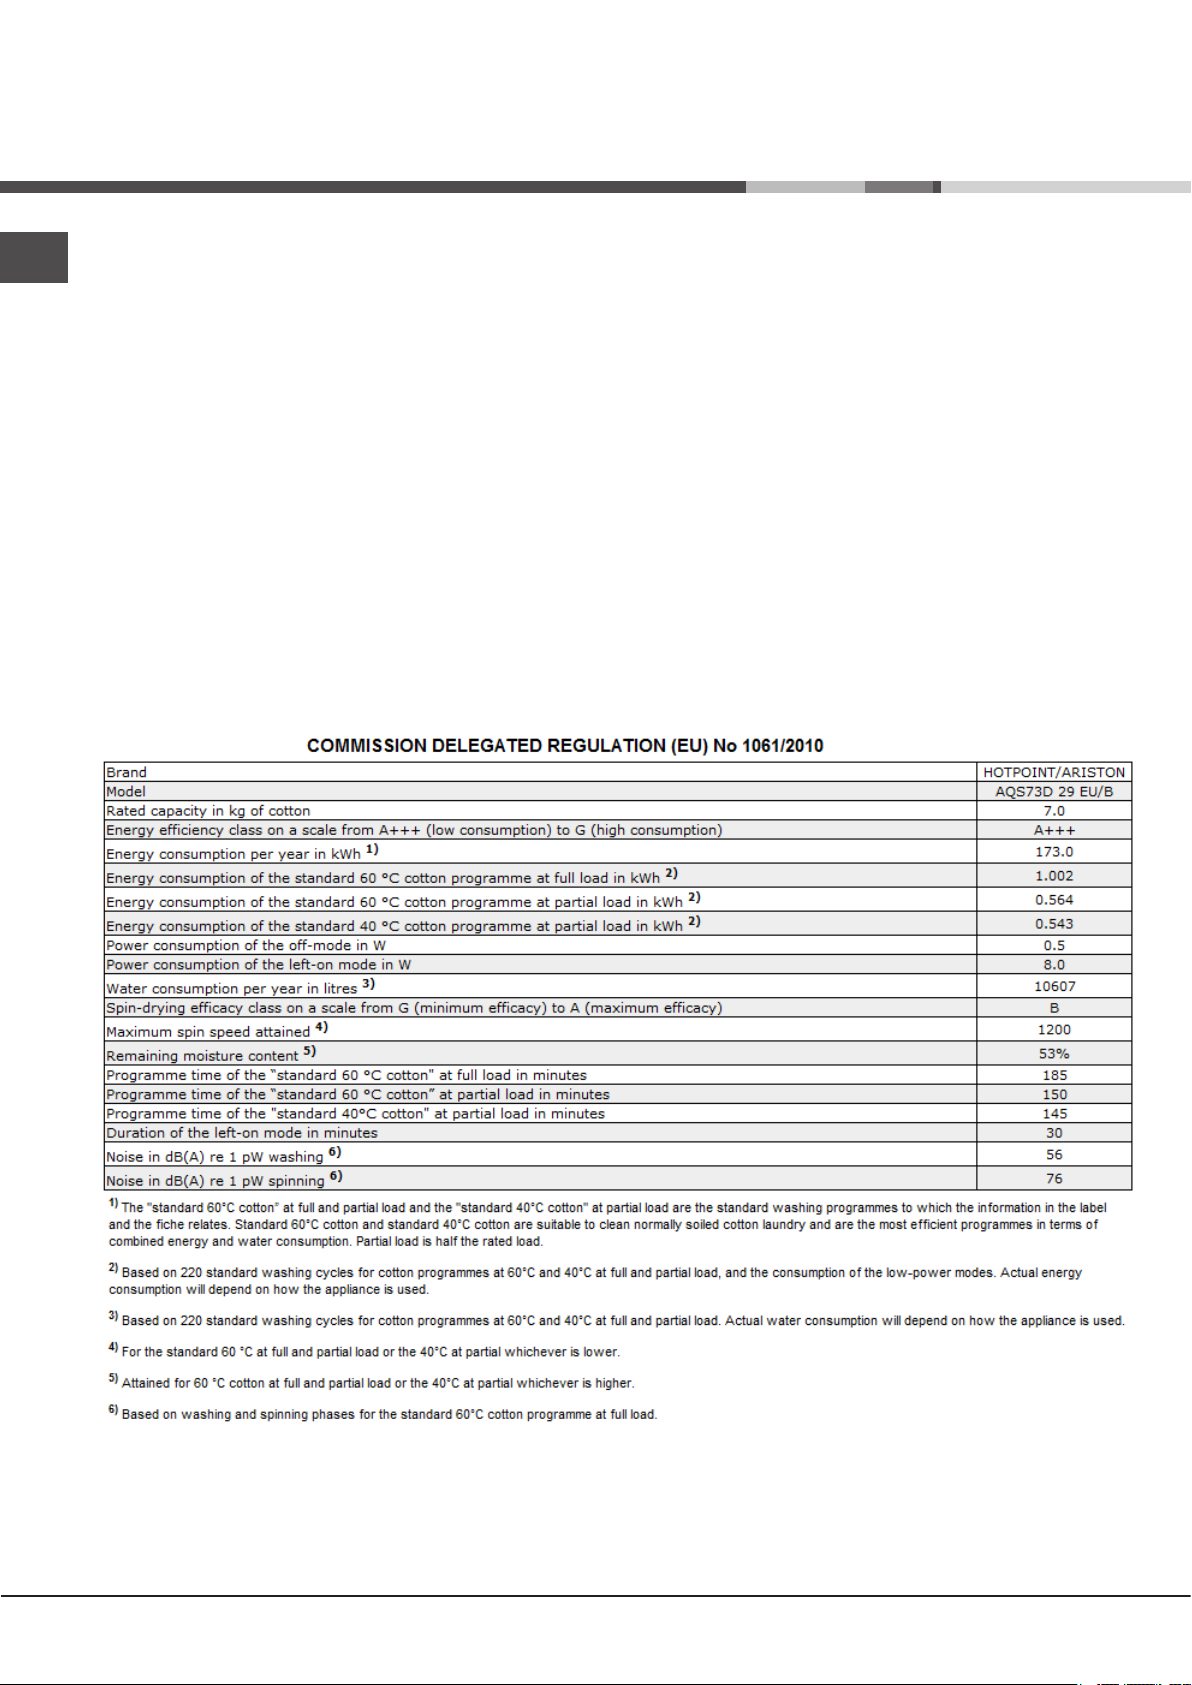
2. Remove the 4
protective screws
(used during
transportation) and
the corresponding
spacer, located on
the rear part of the
appliance (see figure).
3. Close off the holes using the plastic plugs
supplied in the pack.
4. Keep all the parts in a safe place; they will
be needed again if the washing machine is
moved to another location, to prevent the
inside of the appliance being damaged.
! Packaging materials should not be used as
toys for children.
! If the appliance is levelled correctly, it will
be more stable and much less likely to cause
vibrations and noise while it is operating,
particularly during the spin cycle.
! If it is placed on carpet or a rug, adjust the
feet in such a way as to allow a sufficient
ventilation space underneath the washing
machine.
Connecting the electricity and
water supplies
Connecting the water inlet hose
! Before connecting the inlet hose to the water
supply, run the water until it is perfectly clear.
1. Connect the inlet
hose to the machine
by screwing it onto
the cold water inlet of
the appliance, which
is situated on the top
right-hand side of
the rear part of the
appliance (see figure).
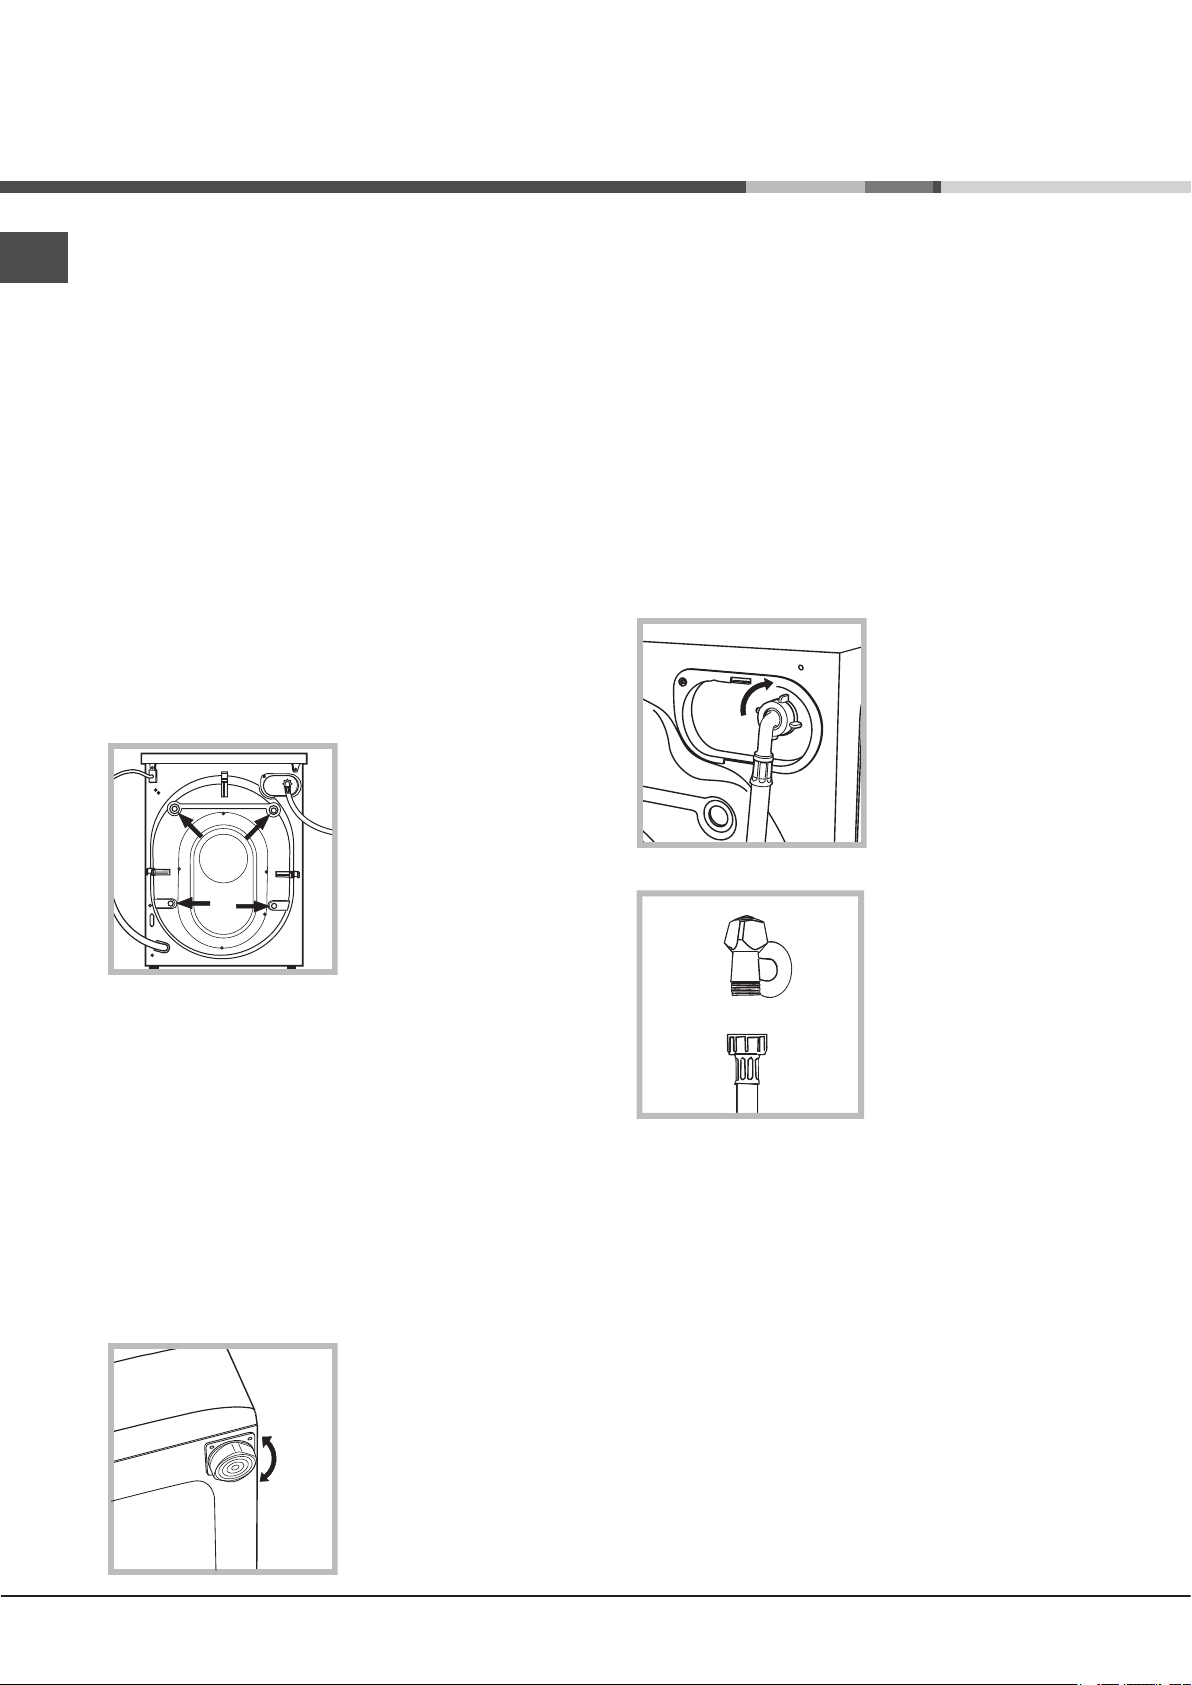
2. Connect the inlet
hose by screwing it to
a cold water tap using
a 3/4 gas threaded
connection (see
figure).
3. Make sure that the hose is not folded over
or bent.
Levelling
1. Place the washing machine on a flat sturdy
floor, without resting it up against walls or
cabinets.
2. If the floor is
uneven, the front feet
of the machine may
be adjusted until it
reaches a horizontal
position (the angle of
inclination must not
exceed 2 degrees).
2
! The water pressure at the tap must fall within
the values indicated in the Technical data table
(see next page).
! If the inlet hose is not long enough, contact a
specialised shop or an authorised technician.
! Never use second-hand or old inlet hoses;
use the products supplied with the machine.
Page 3
Connecting the drain hose
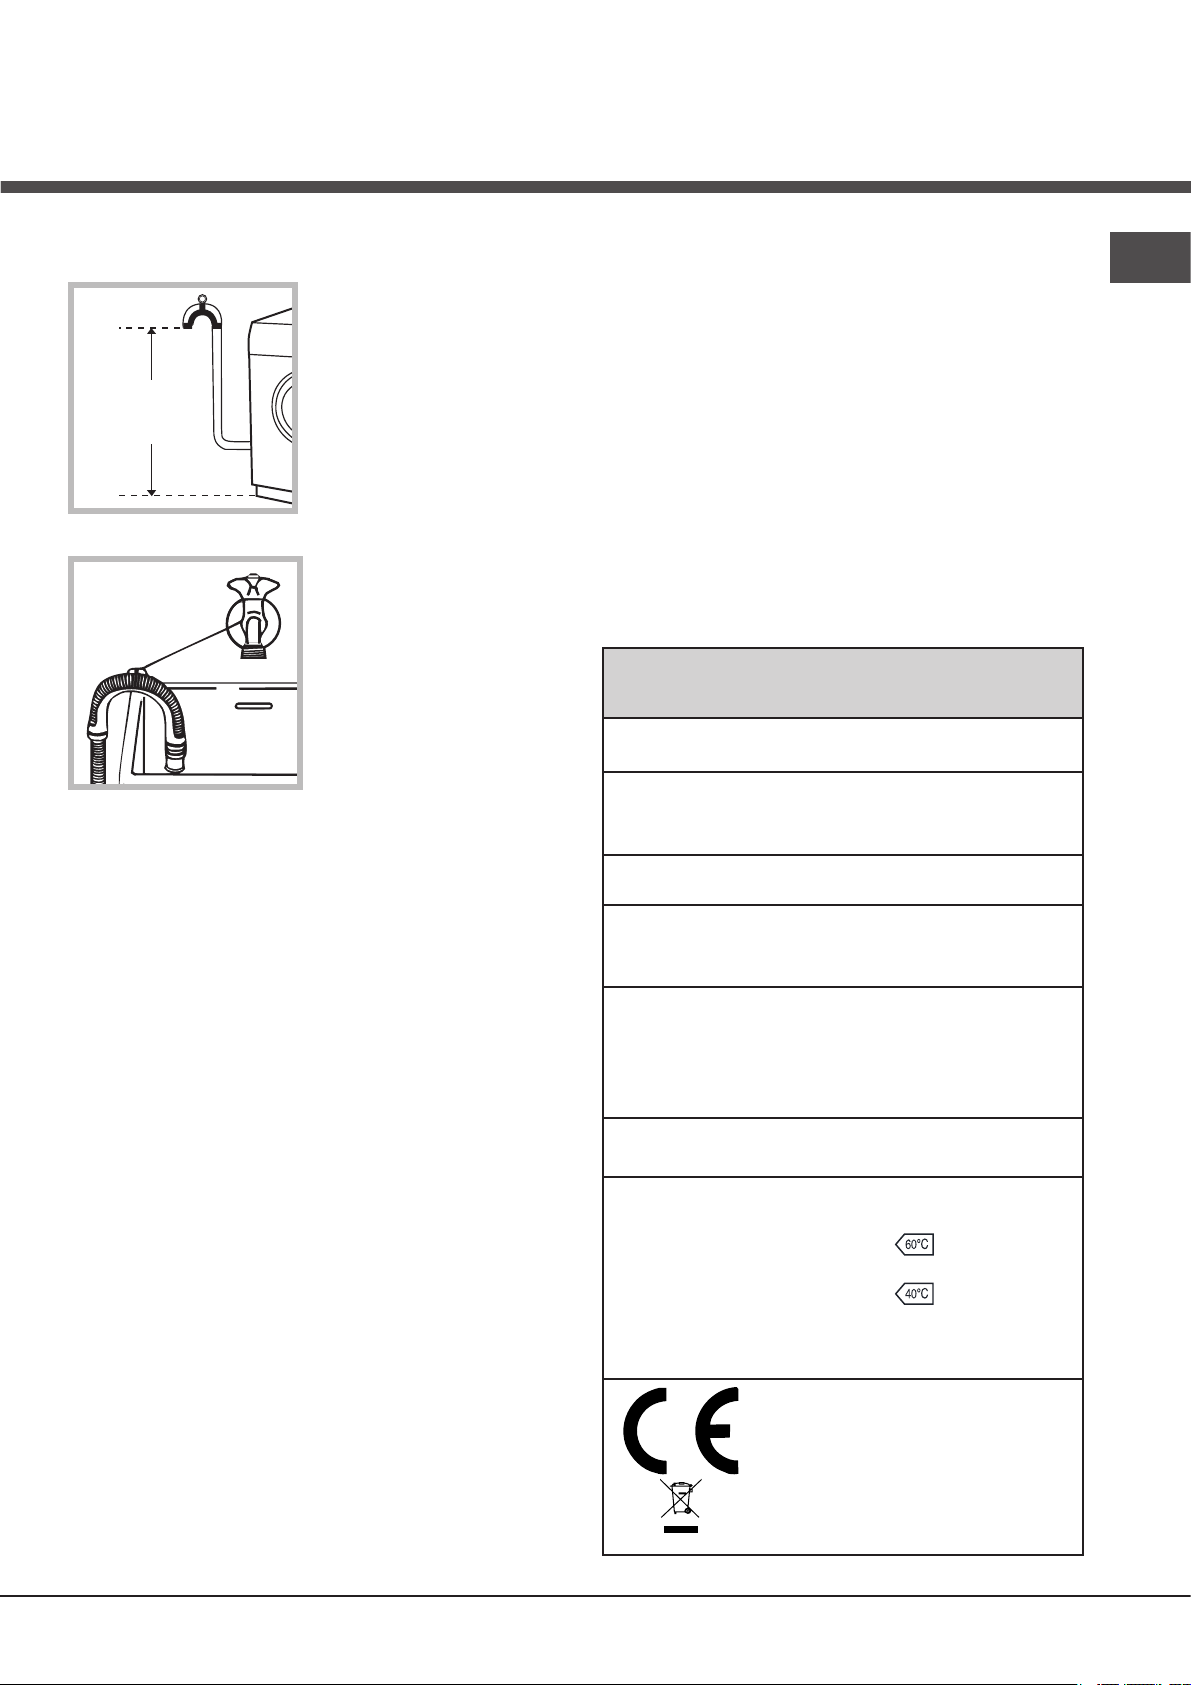
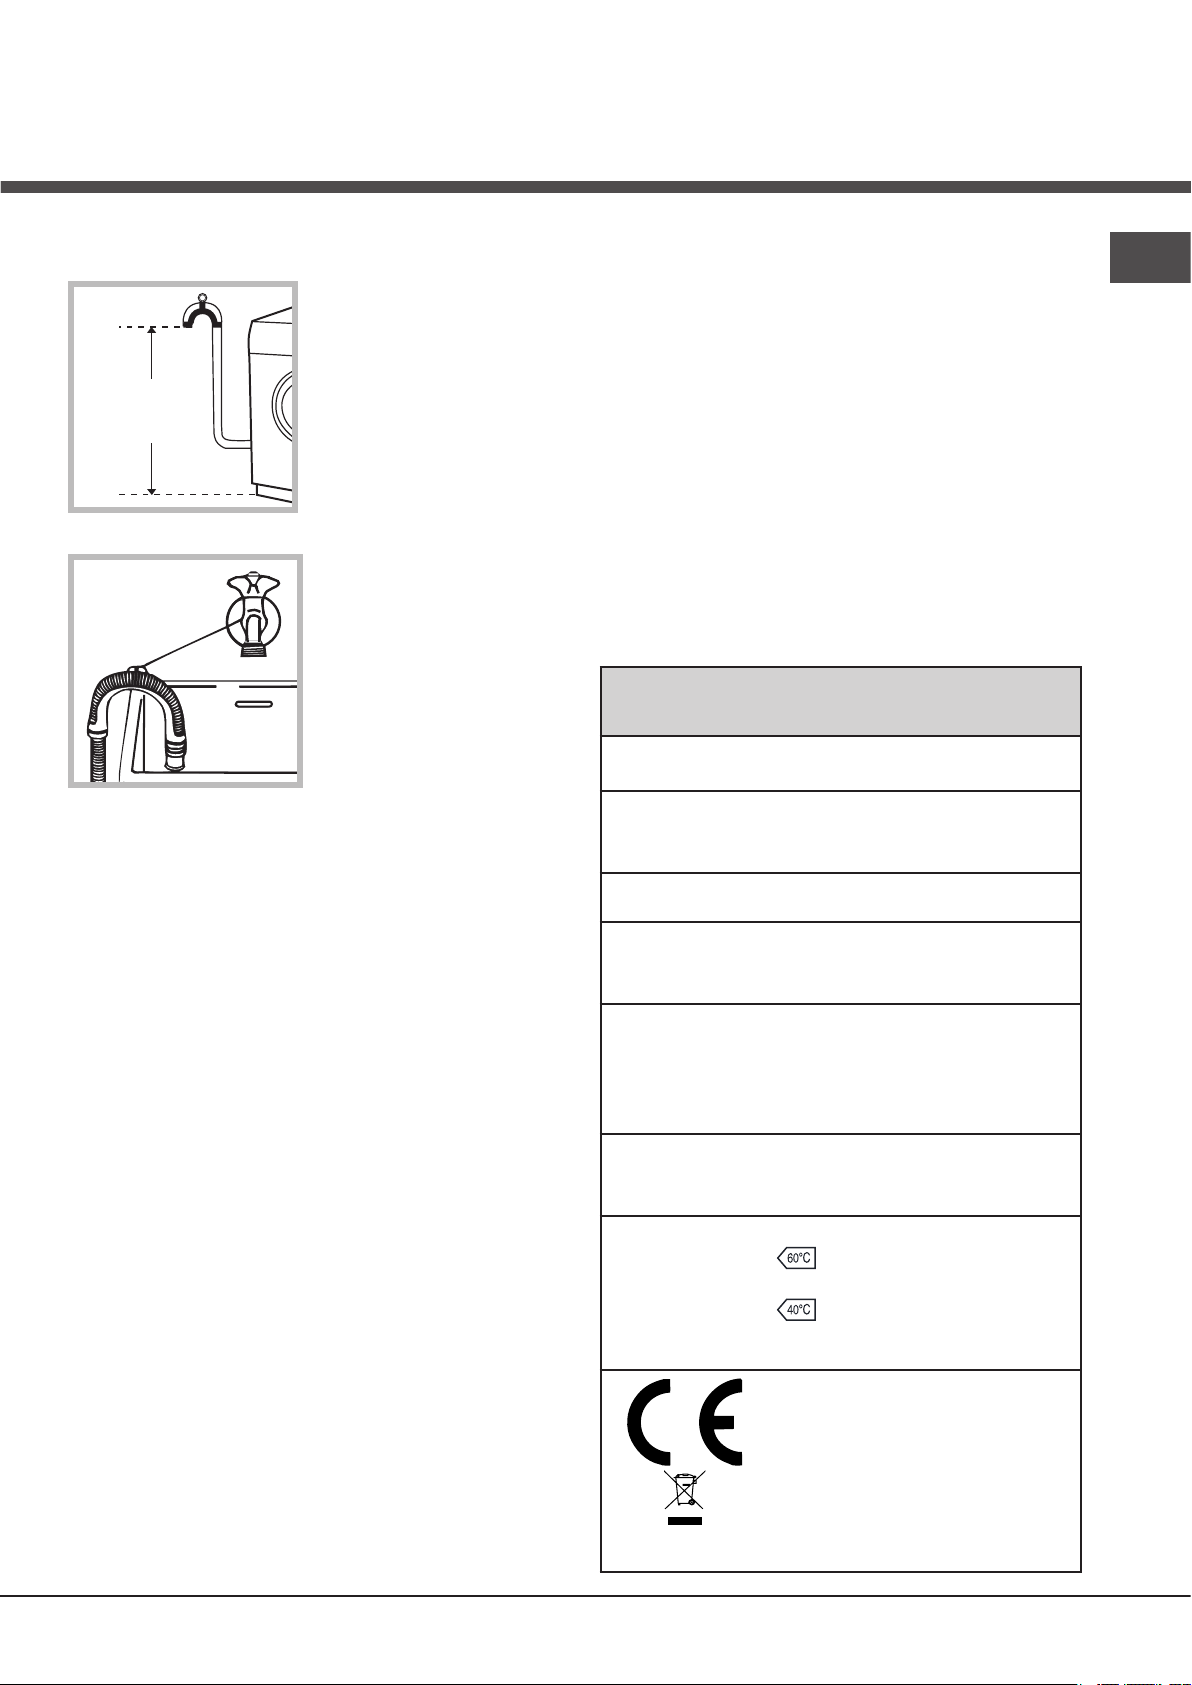
65 - 100 cm
Connect the drain
hose to drain duct
piping or a wall drain
located between 65
and 100 cm above
the floor, making sure
it is not bent at all.
Alternatively, rest the
drain hose on the
side of a washbasin
or bathtub, fastening
the duct supplied to
the tap (see figure).
The free end of the
hose should not be
underwater.
! We advise against the use of hose
extensions; if it is absolutely necessary, the
extension must have the same diameter as the
original hose and must not exceed 150 cm in
length.
Electrical connections
Before plugging the appliance into the
electricity socket, make sure that:
• the socket is earthed and complies with all
applicable laws;
• the socket is able to withstand the maximum
power load of the appliance as indicated in
the Technical data table (see opposite);
• the power supply voltage falls within the
values indicated in the Technical data table
(see opposite);
• the socket is compatible with the plug of the
appliance. If this is not the case, have the
socket or the plug replaced.
! The machine must not be installed outdoors,
even in covered areas. It is extremely
dangerous to leave the appliance exposed to
rain, storms and other weather conditions.
! The mains socket must remain within easy
reach after the washing machine has been
installed.
! Do not use extension cords or multiple
sockets.
! The cable should not be bent or compressed.
! The power supply cable and plug must only
be replaced by authorised technicians.
Warning! The company shall not be held
responsible in the event that these regulations
are not respected.
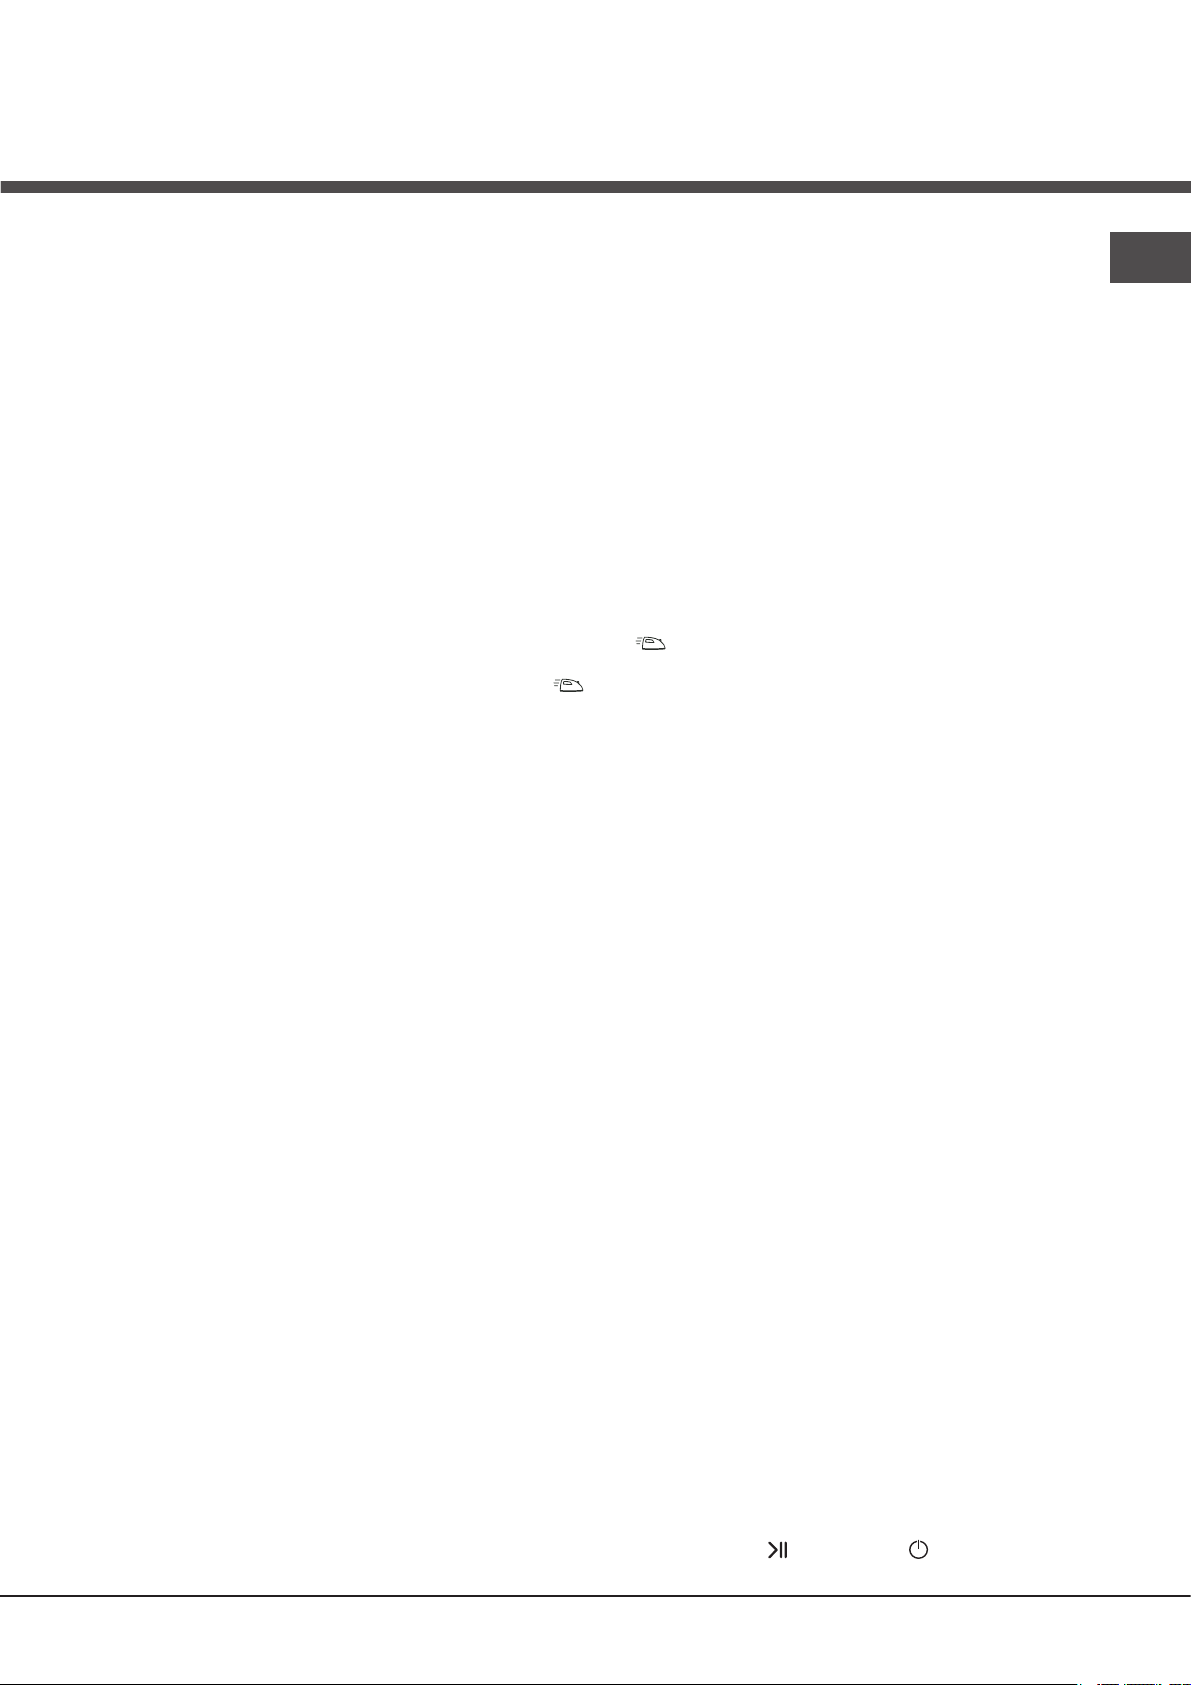
Technical data
Model
Dimensions
Capacity
Electrical
connections
Water connections
Spin speed
Test wash
cycles in
accordance with
directives
1061/2010
and
1015/2010
AQS73D 29
width 59.5 cm
height 85 cm
depth 44,5 cm
from 1 to 7 kg
please refer to the technical
data plate fixed to the machine
maximum pressure
1 MPa (10 bar)
minimum pressure
0.05 MPa (0.5 bar)
drum capacity 48 litres
up to 1200 rotations per
minute
Programme
;
Cotton standard 60°C.
Programme ;
Cotton standard 40°C.
This appliance conforms to
the following EC Directives:
- 2004/108/EC (Electromagnetic Compatibility)
- 2006/95/EC (Low Voltage)
- 2012/19/EU
EN
3
Page 4

Care and maintenance
1
2
1
2
2
EN
Cutting off the water and
electricity supplies
• Turn off the water tap after every wash cycle.
This will limit wear on the hydraulic system in
the machine and help to prevent leaks.
• Unplug the appliance when cleaning it and
during all maintenance work.
Cleaning the machine
The outer parts and rubber components of the
appliance can be cleaned using a soft cloth
soaked in lukewarm soapy water. Do not use
solvents or abrasives.
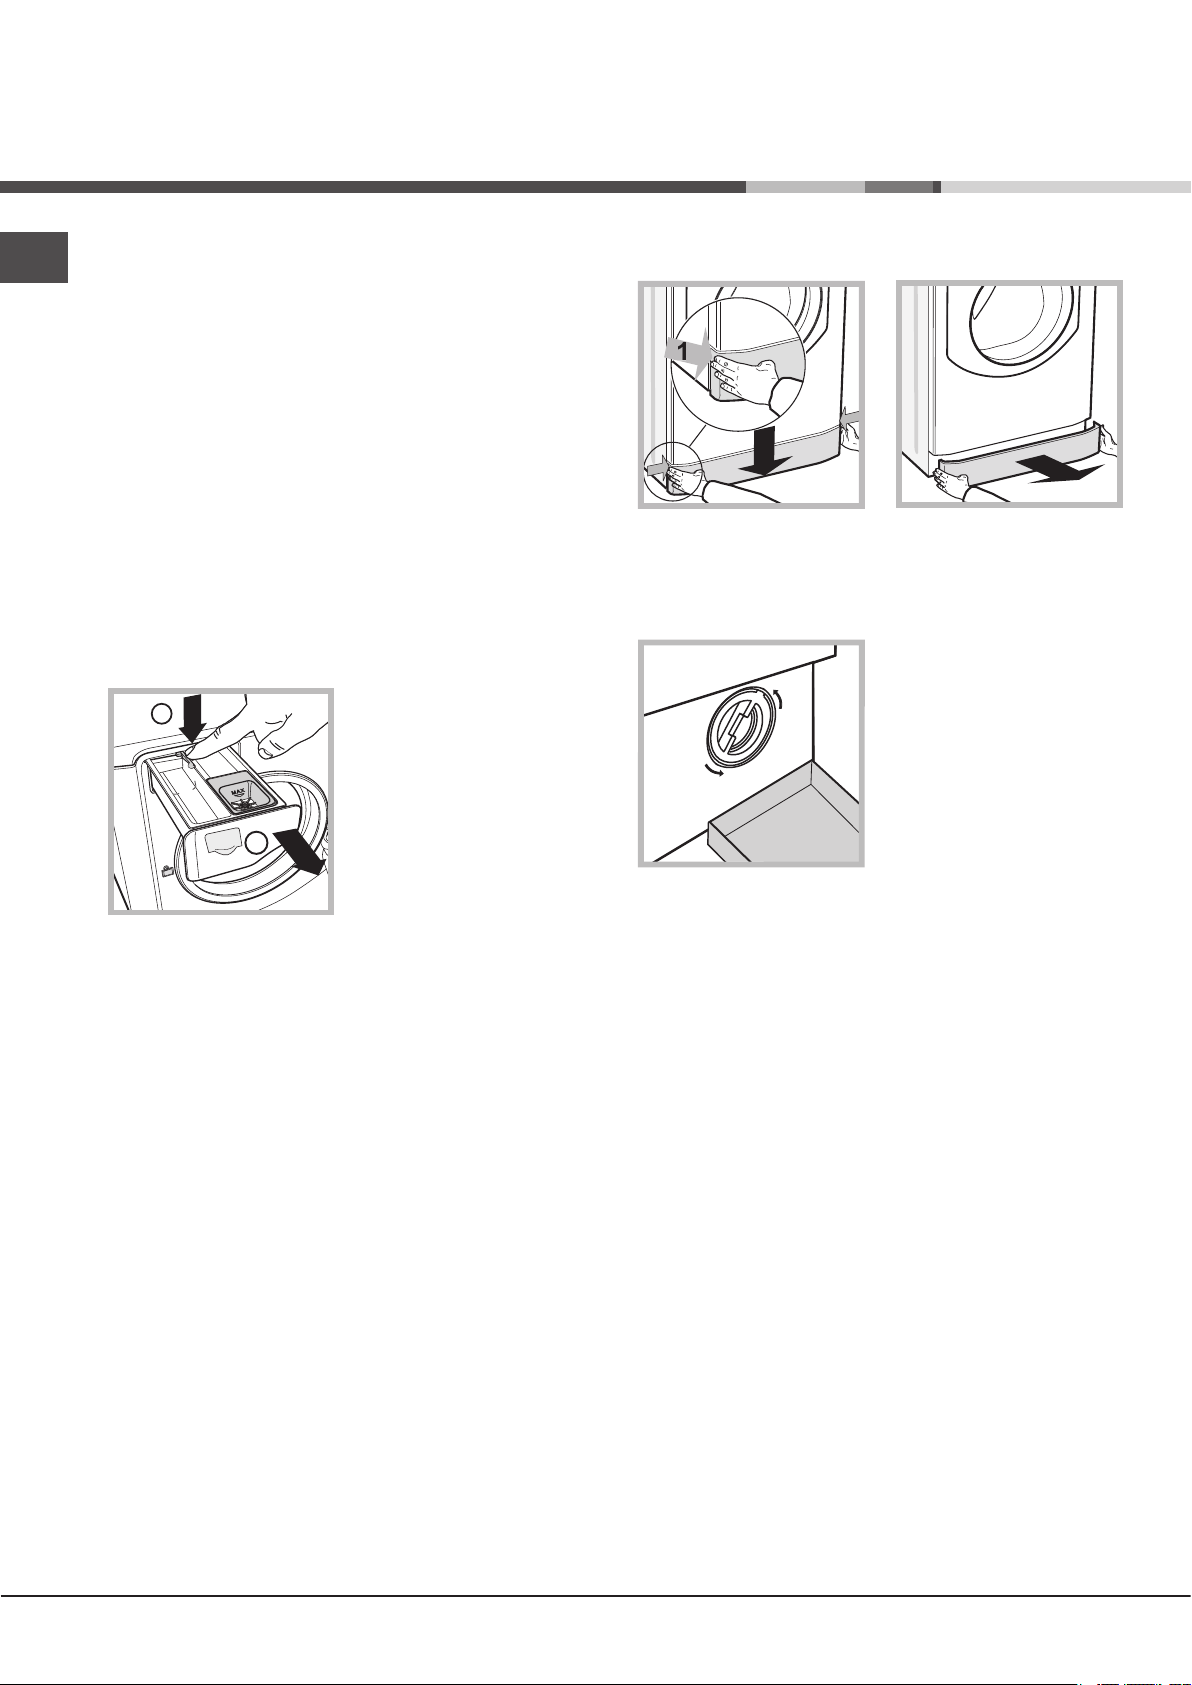
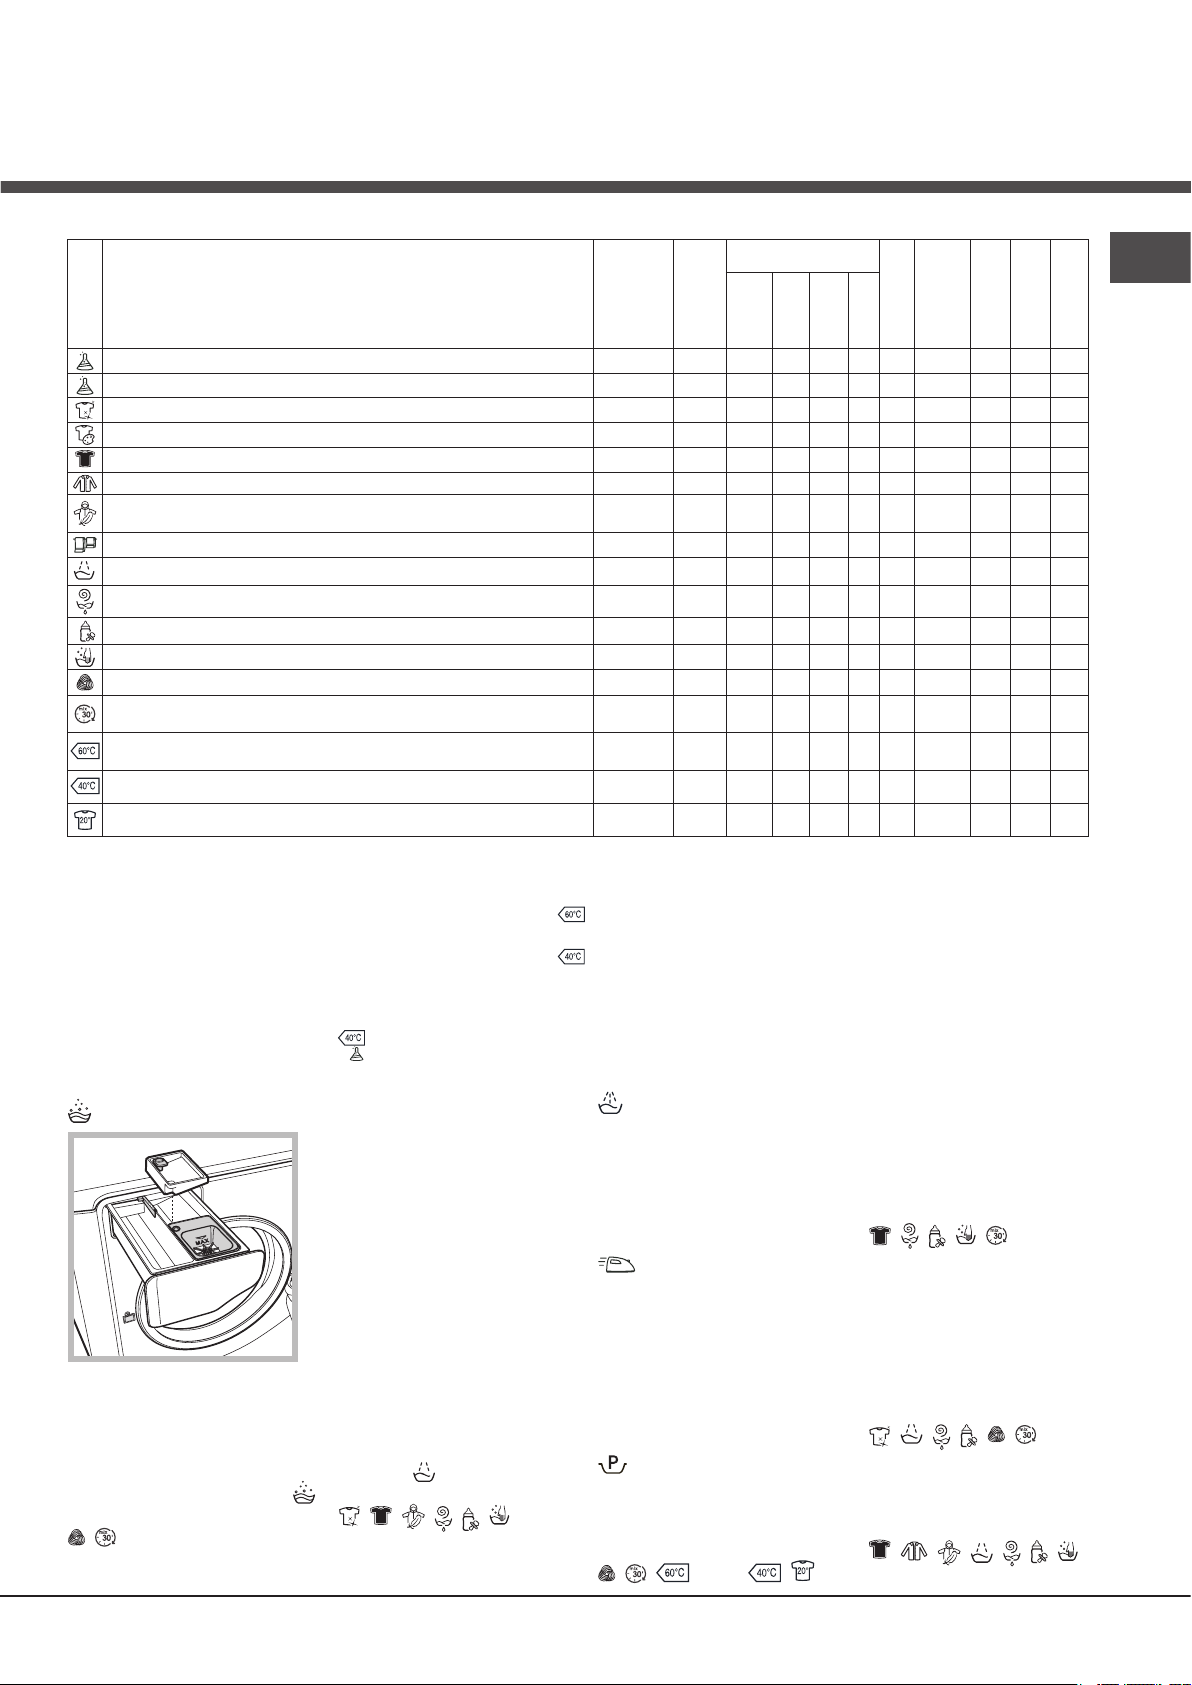
Cleaning the detergent dispenser
drawer
To remove the drawer,
press lever (1) and pull
the drawer outwards (2)
(see figure).
Wash it under running
water; this procedure
should be repeated
frequently.
Caring for your appliance drum
• Always leave the door ajar to prevent
unpleasant odours from forming.
Cleaning the pump
The washing machine is fitted with a selfcleaning pump which does not require any
maintenance. Sometimes, small items (such
as coins or buttons) may fall into the protective
pre-chamber at the base of the pump.
To access the pre-chamber:
1. take off the cover panel on the front of the
machine by first pressing it in the centre and
then pushing downwards on both sides until
you can remove it (see figures);
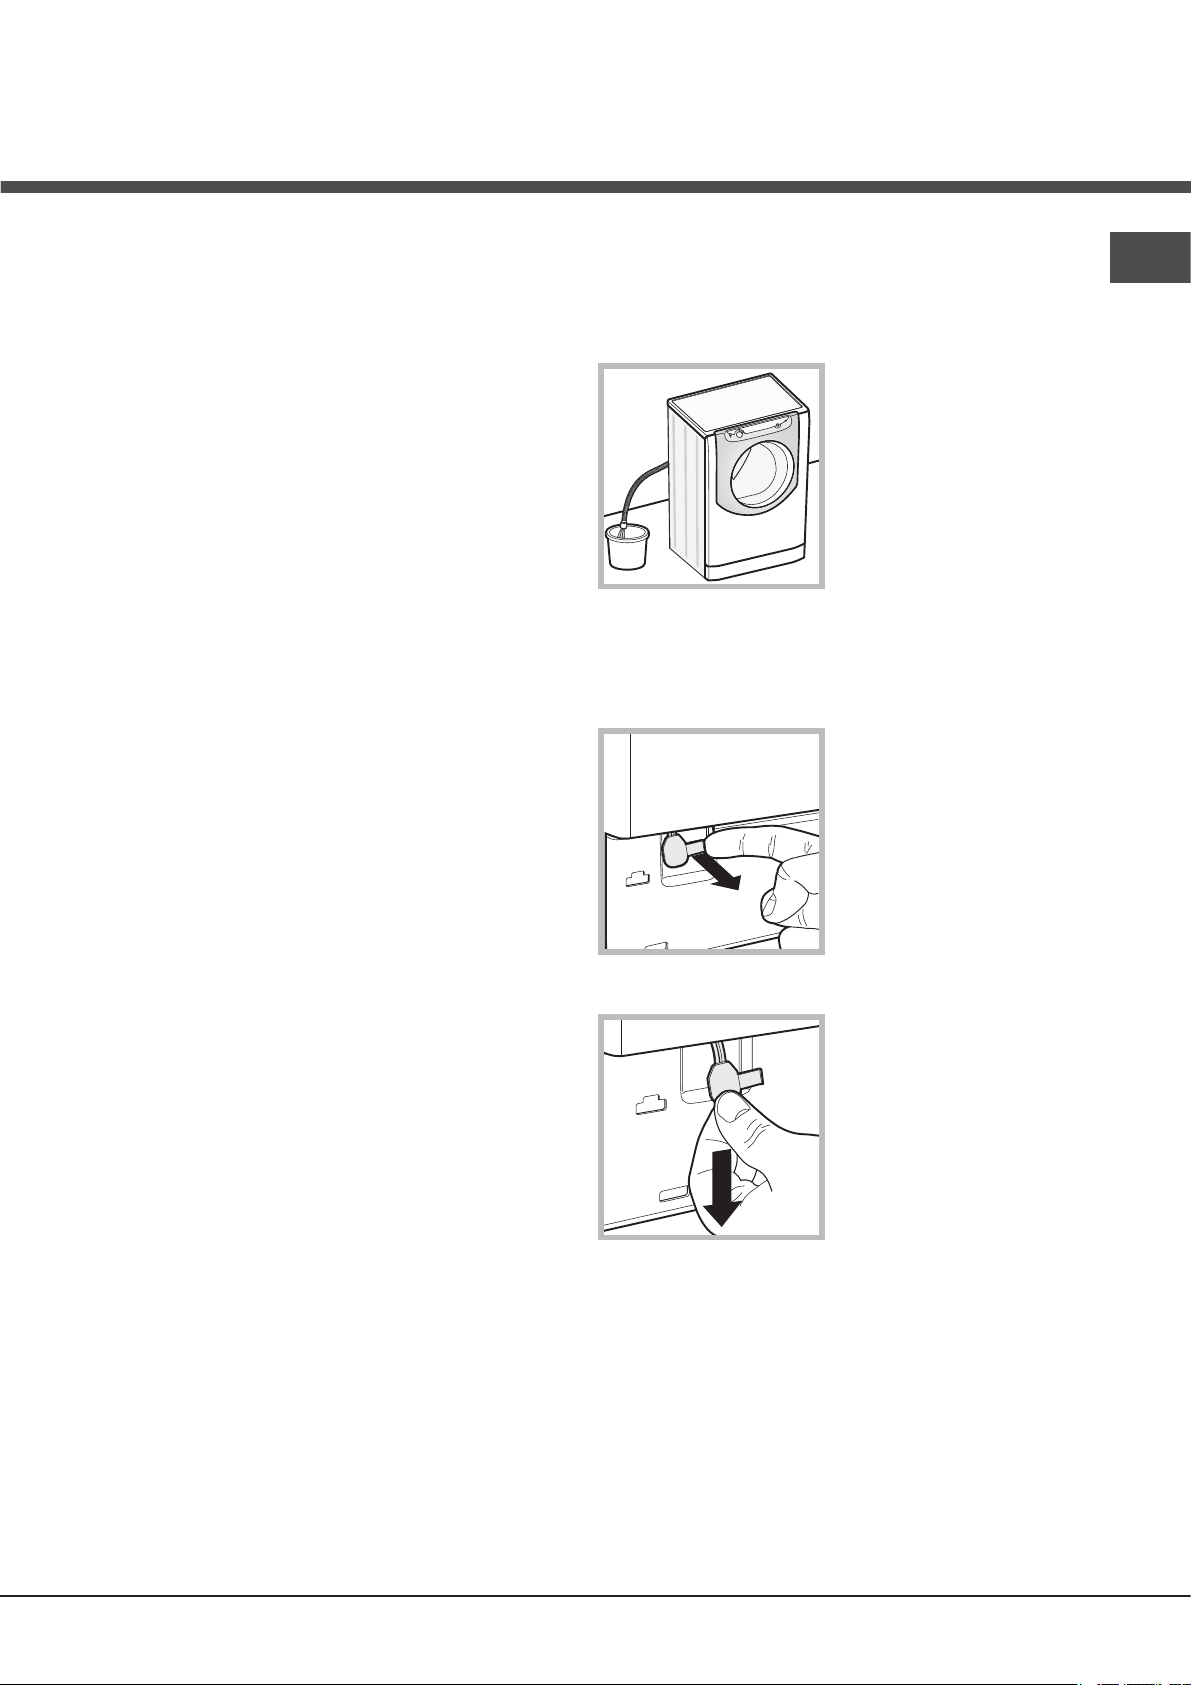
2. position a container
so that it will collect the
water which flows out
(approximately 1.5 l)
(see figure);
3. unscrew the lid by
rotating it in an anticlockwise direction (see
figure);
4. clean the inside thoroughly;
5. screw the lid back on;
6. reposition the panel, making sure the hooks
are securely in place before you push it onto
the appliance.
Checking the water inlet hose
Check the inlet hose at least once a year. If
there are any cracks, it should be replaced
immediately: during the wash cycles, water
pressure is very strong and a cracked hose
could easily split open.
! Make sure the wash cycle has finished and
unplug the appliance.
4
Page 5
Precautions and tips
! The machine was designed and constructed in
accordance with international safety regulations. The
following information is provided for safety reasons and
must therefore be read carefully.
General safety
• This appliance was designed for domestic use only.
• This appliance can be used by children
aged from 8 years and above and
persons with reduced physical, sensory or
mental capabilities or lack of experience
and knowledge if they have been given
supervision or instruction concerning use of
the appliance in a safe way and understand
the hazards involved. Children shall not
play with the appliance. Cleaning and user
maintenance shall not be made by children
without supervision.
• Do not touch the machine when barefoot or with wet or
damp hands or feet.
• Do not pull on the power supply cable when unplugging
the appliance from the electricity socket. Hold the plug
and pull.
• Do not touch the drained water as it may reach
extremely high temperatures.
• Never force the porthole door. This could damage the
safety lock mechanism designed to prevent accidental
opening.
• If the appliance breaks down, do not under any
circumstances access the internal mechanisms in an
attempt to repair it yourself.
• Always keep children well away from the appliance while
it is operating.
• If it must be moved, proceed with the help of two or
three people and handle it with the utmost care. Never
try to do this alone, because the appliance is very heavy.
• Before loading laundry into the washing machine, make
sure the drum is empty.
Opening the porthole door manually
In the event that it is not possible to open the porthole door
due to a powercut, and if you wish to remove the laundry,
proceed as follows:
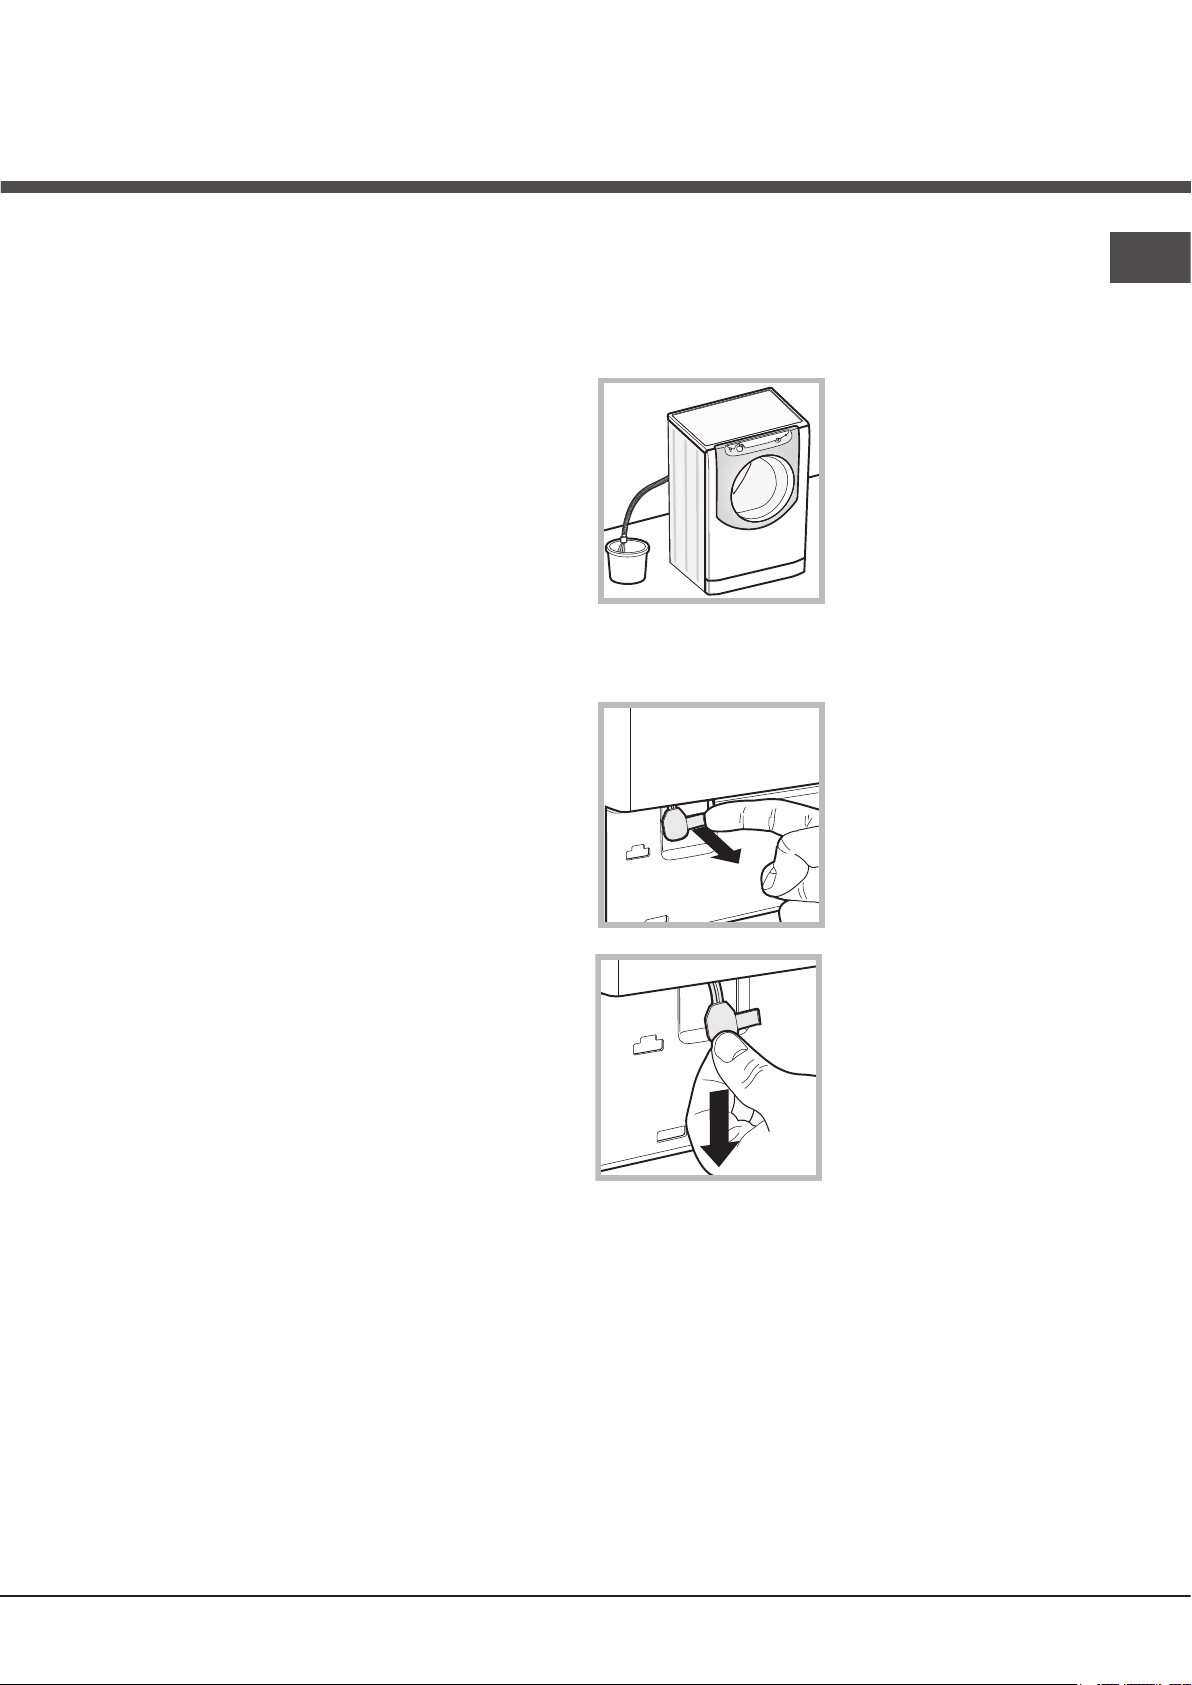
1. remove the plug from the
electrical socket.
2. make sure the water level
inside the machine is lower
than the door opening; if
it is not, remove excess
water using the drain hose,
collecting it in a bucket as
indicated in the figure.
3. remove the cover panel on the lower front part of the
washing machine (see overleaf).
4. pull outwards using the
tab as indicated in the figure,
until the plastic tie-rod is freed
from its stop position; pull
downwards until you hear a
“click”, which indicates that
the door is now unlocked.
5. open the door; if this is
still not possible repeat the
procedure.
EN
Disposal
• Disposing of the packaging materials: observe local
regulations so that the packaging may be re-used.
• The European Directive 2012/19/EU relating to Waste
Electrical and Electronic Equipment (WEEE) states
that household appliances should not be disposed of
using the normal solid urban waste cycle. Exhausted
appliances should be collected separately in order to
optimise the cost of re-using and recycling the materials
inside the machine, while preventing potential damage
to the atmosphere and to public health.
The crossed-out dustbin is marked on all products
to remind the owner of their obligations regarding
separated waste collection.
For more information relating to the correct disposal of
household appliances, owners should contact their local
authorities or appliance dealer.
6. reposition the panel, making sure the hooks are securely
in place before you push it onto the appliance.
5
Page 6
3
1
2
1
8
0
2
1
0
1
5
0
1
2
0
9
0
6
0
B
A
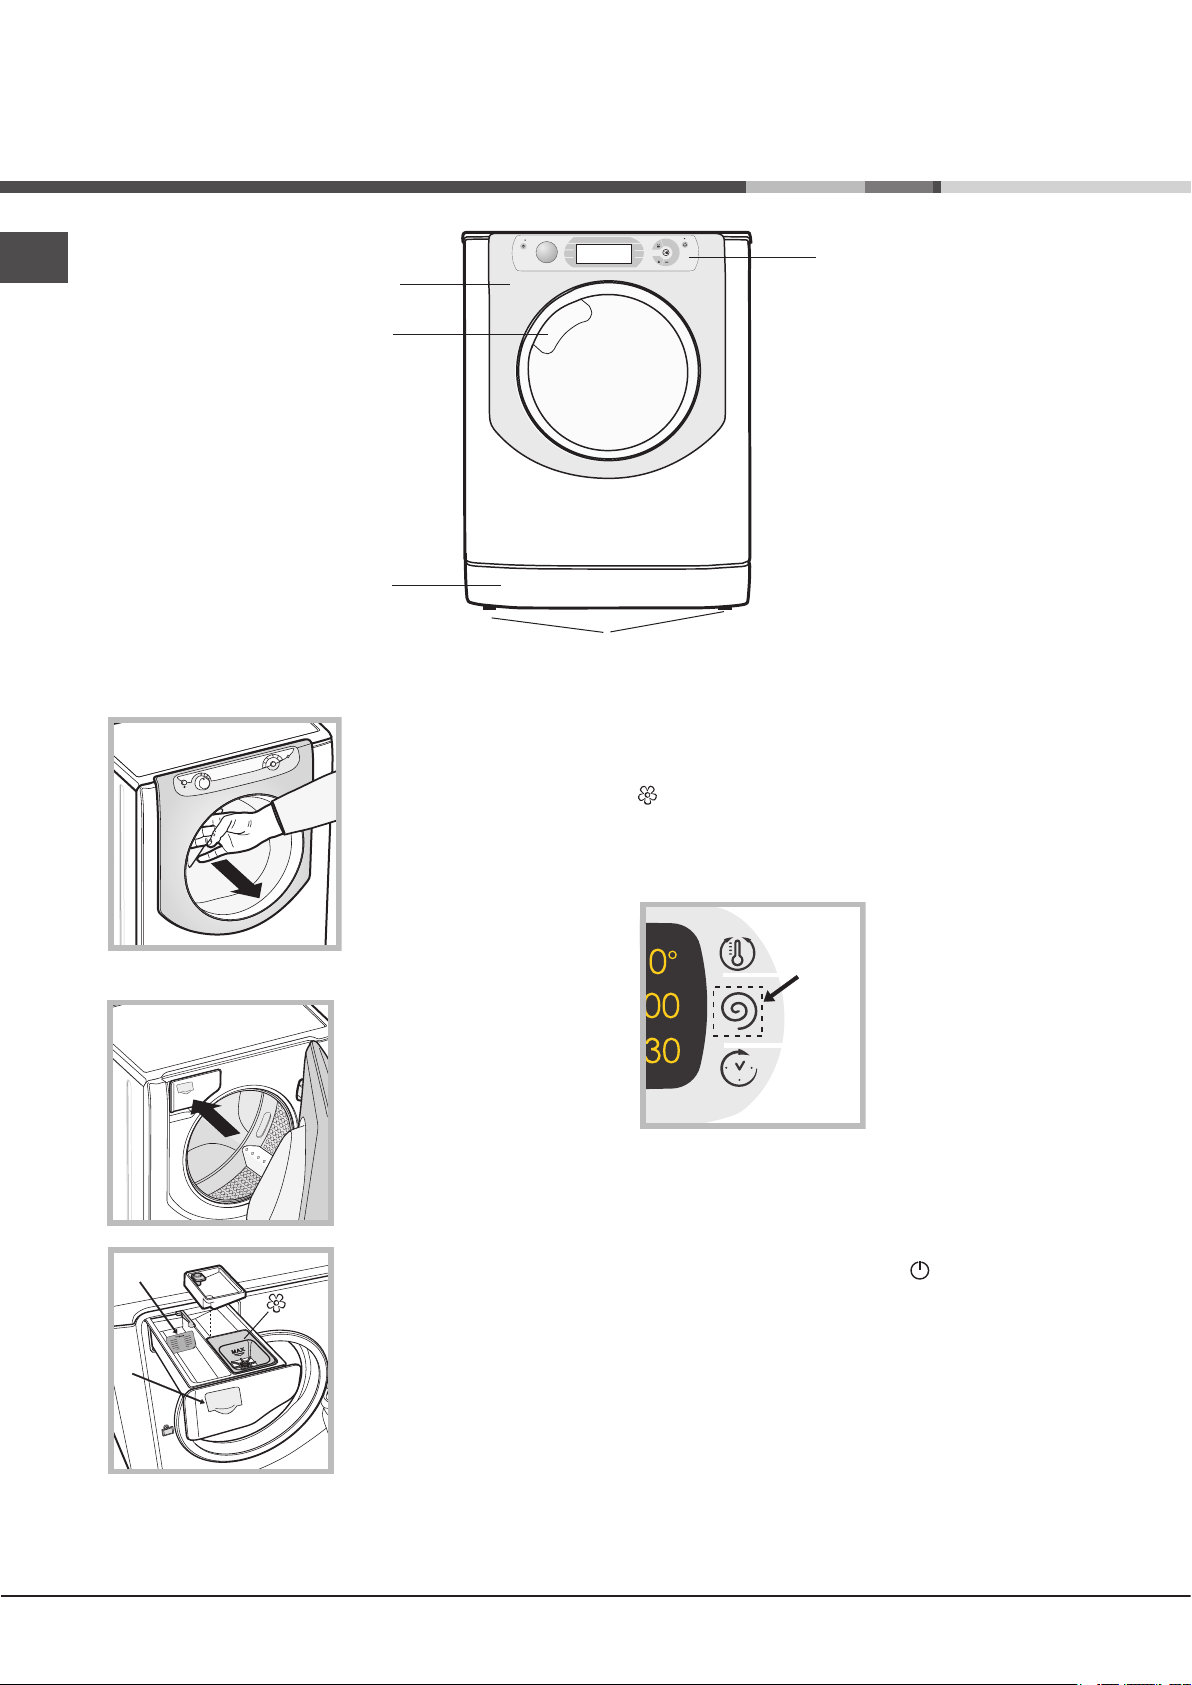
Description of the machine
EN
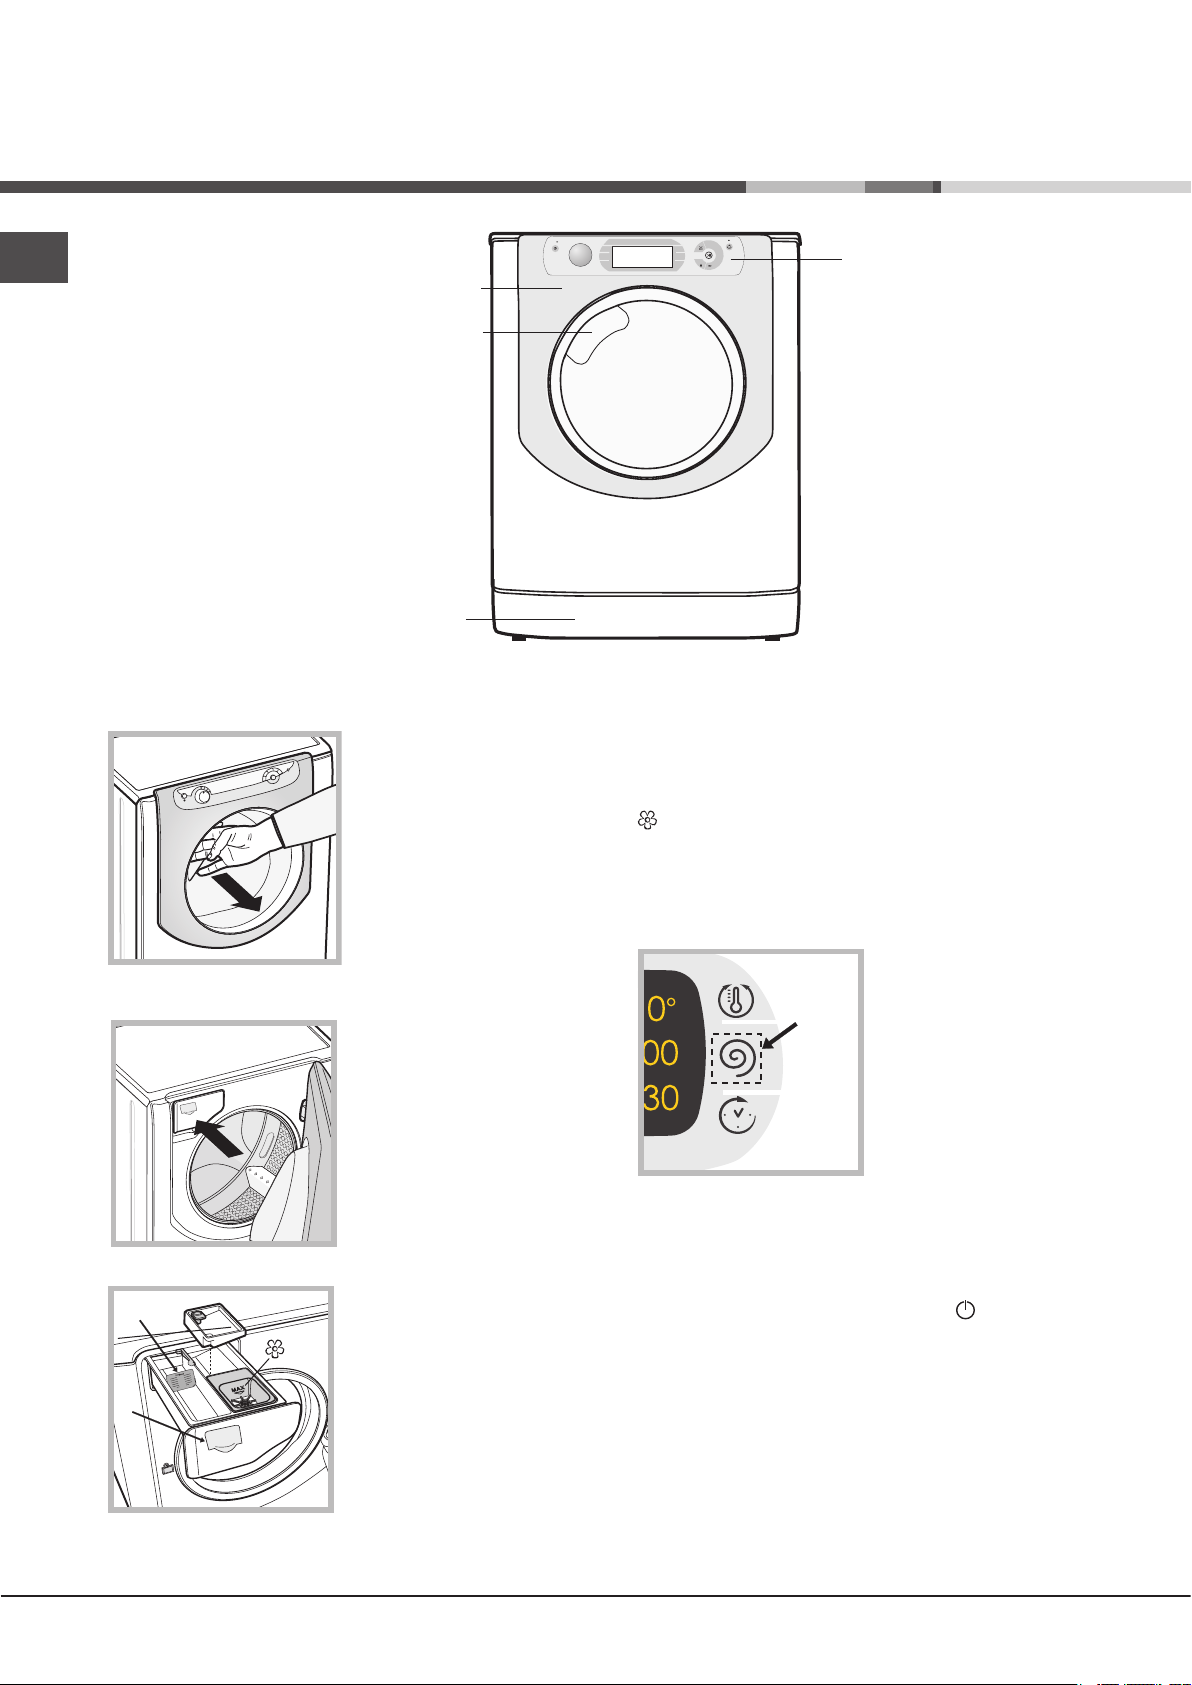
PORTHOLE DOOR
PORTHOLE DOOR
PORTHOLE DOOR
HANDLE
KICK STRIP
Always use the handle to
open the porthole door (see
figure).
CONTROL
PANEL
3. extra compartment: Bleach
! The use of extra compartment 3 excludes the prewash function.
washing additives compartment: for fabric softener
or liquid additives. We recommend that the maximum
level indicated by the grille is not exceeded, and that
concentrated fabric softeners are diluted.
TOUCH CONTROL PANEL
To adjust the settings, gently
press the icon inside the
DETERGENT DISPENSER DRAWER
The detergent dispenser
sensitive (touch control) area
as illustrated in the figure.
drawer is located inside
the machine and can be
accessed by opening the
door.
For more information on
detergent measures, please
refer to the chapter entitled
“Detergents and laundry”.
Standby mode
This washing machine, in compliance with new energy
1. pre-wash compartment:
use powder detergent.
! Before pouring in the
saving regulations, is fitted with an automatic standby
system which is enabled after about 30 minutes if no
activity is detected. Press the ON-OFF button briefly and
wait for the machine to start up again.
detergent, make sure that
extra compartment 3 has
been removed.
2. main wash compartment:
If liquid detergent is used,
it is recommended that the
removable plastic partition A
(supplied) be used for proper dosage.If powder detergent is
used, place the partition into slot B.
6
Page 7
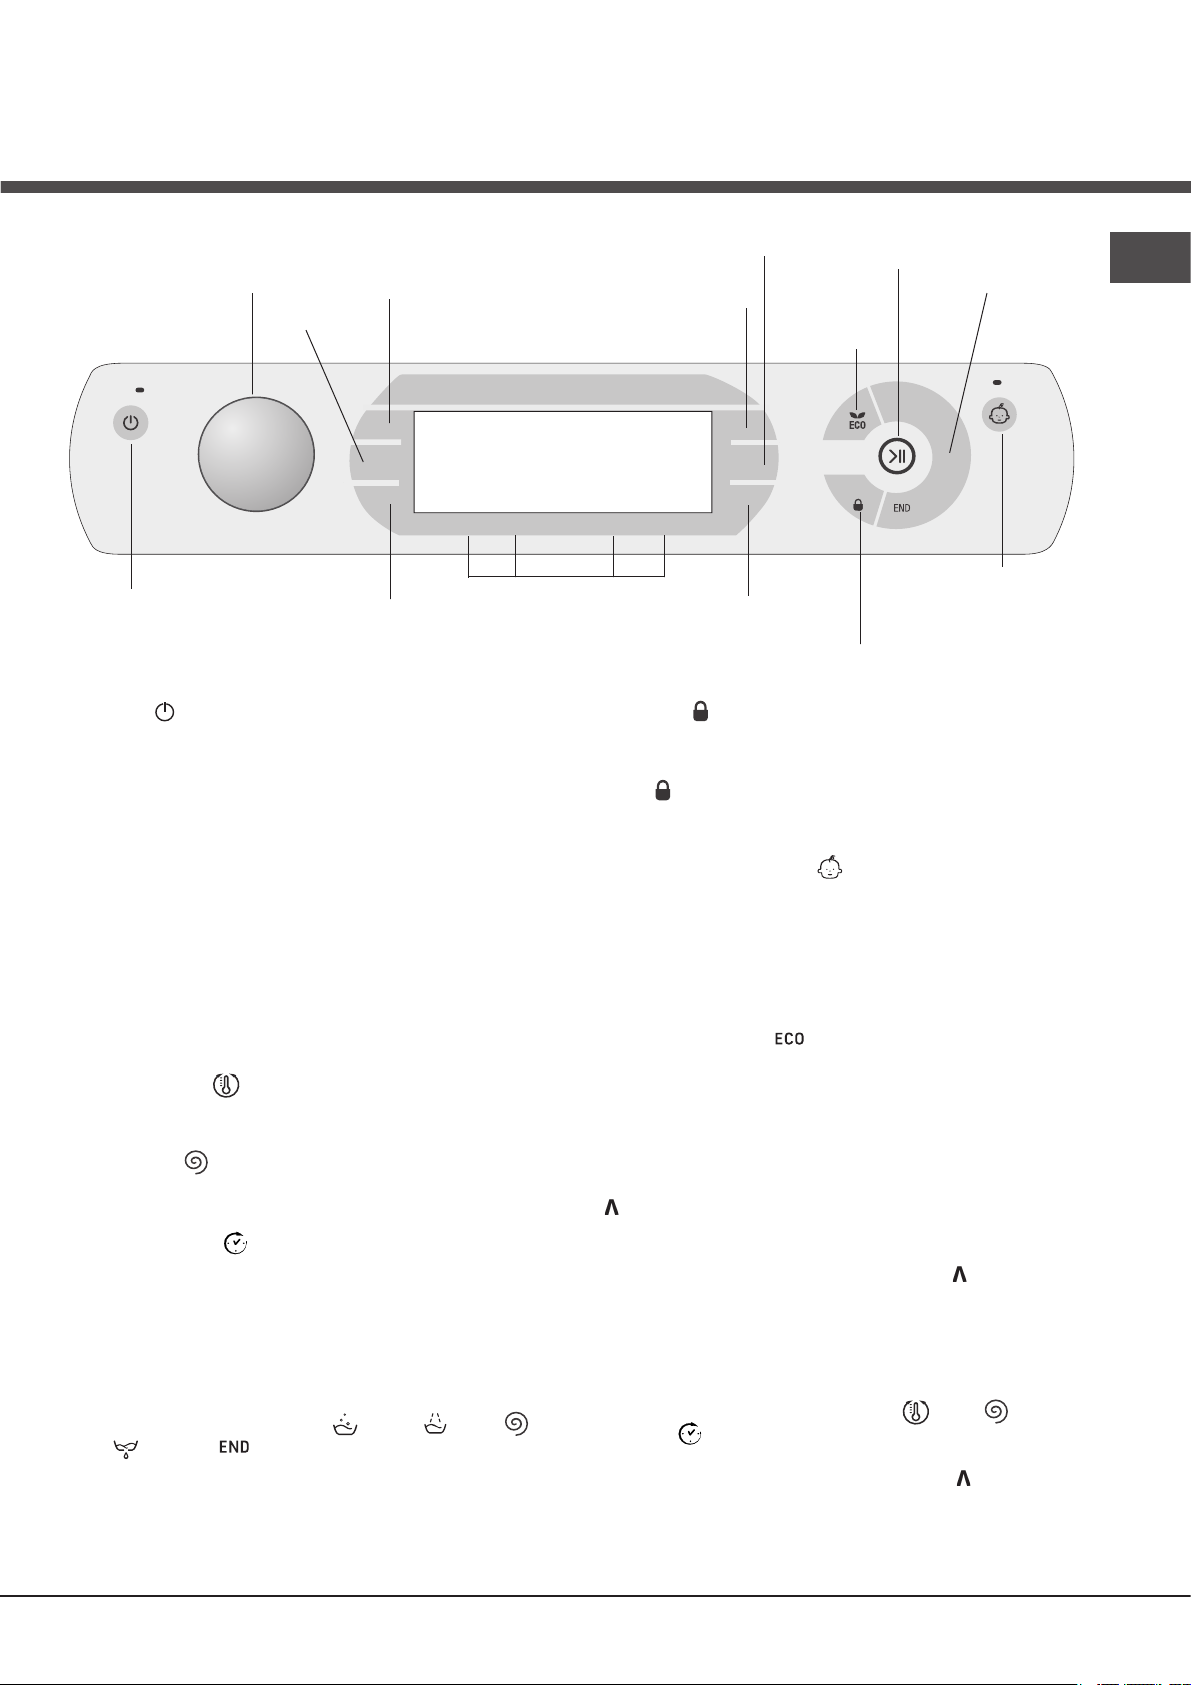
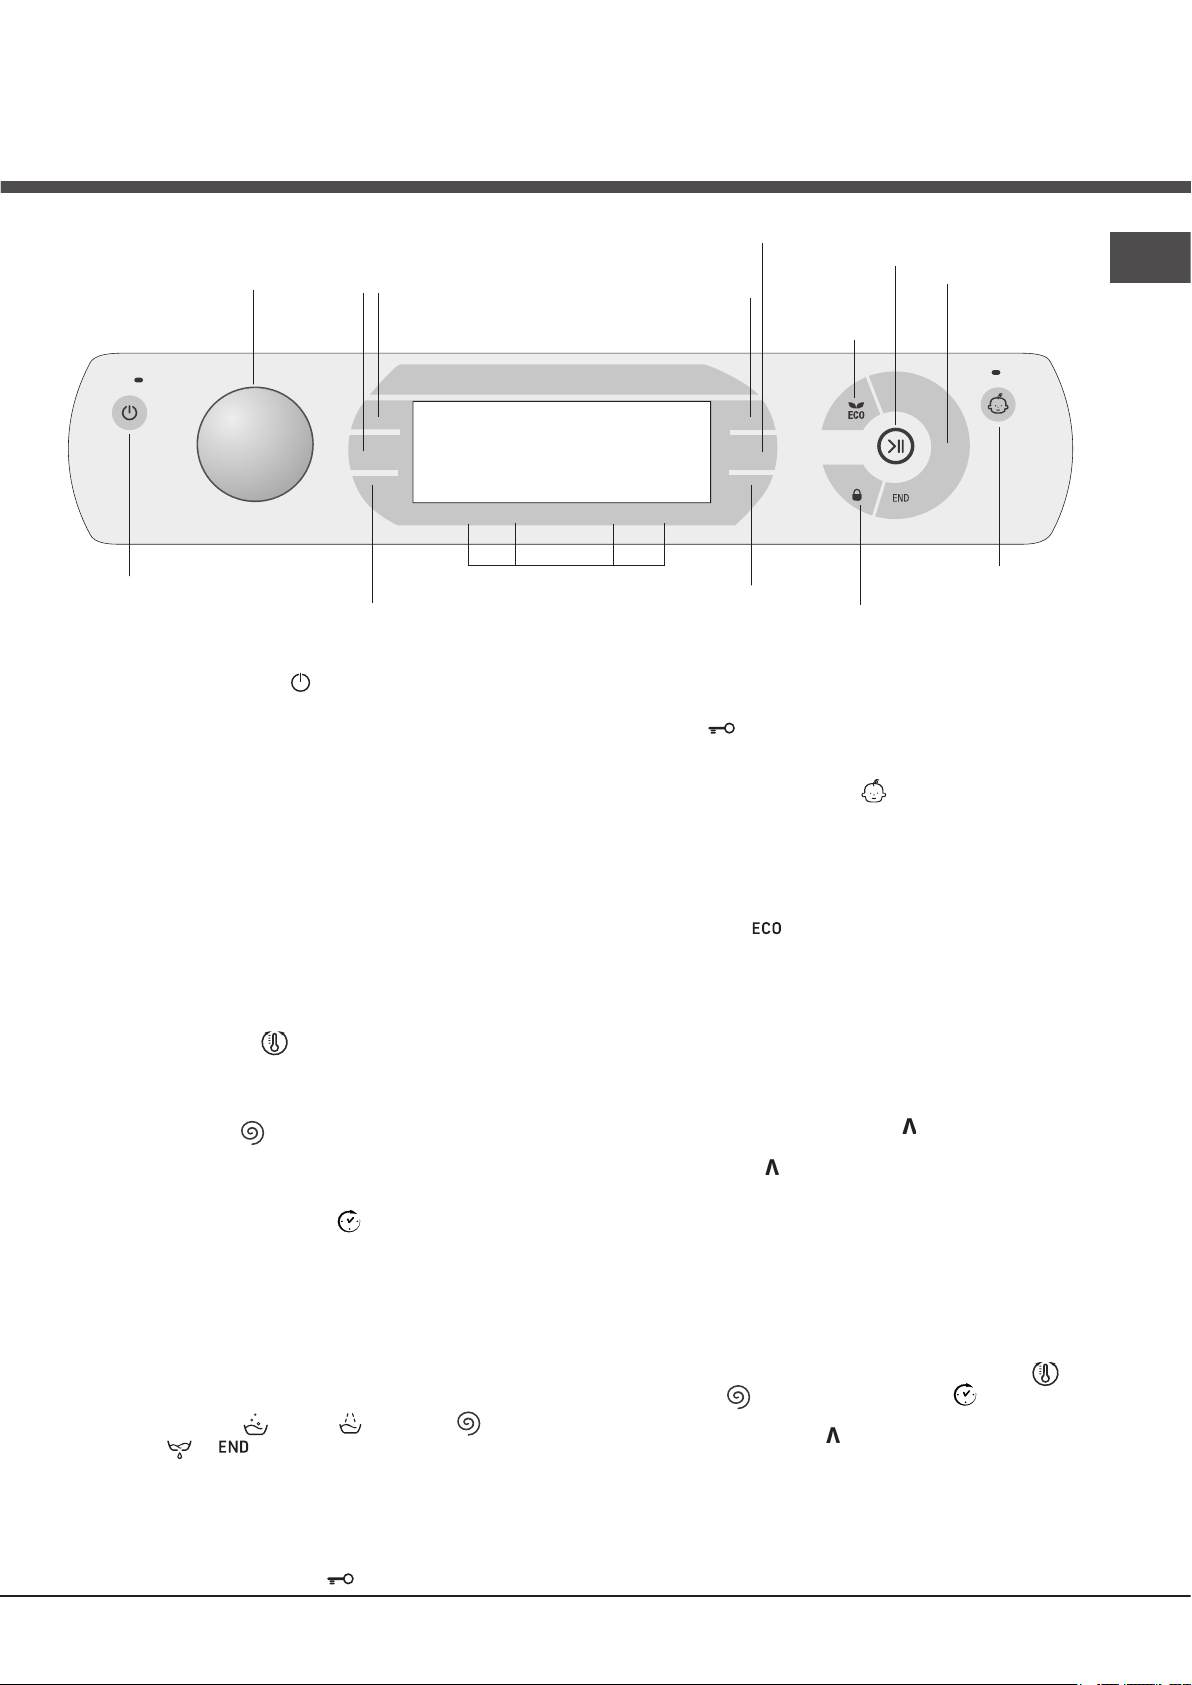
Touch control panel
WASH CYCLE
SELECTOR knob
M2
M1
TEMPERATURE
DISPLAY
SPIN
button
button
START/PAUSE button
with indicator light
ECO
indicator light
WASH
CYCLE
PHASE
icons
EN
Button with ON/OFF
indicator light
Button with ON/OFF indicator light: press this briefly to switch
the machine on or off. The green indicator light indicates that the
machine is switched on. To switch off the washing machine during
the wash cycle, press and hold the button for approximately 3
seconds; if the button is pressed briefly or accidentally the machine
will not switch off. If the machine is switched off during a wash
cycle, this wash cycle will be cancelled.
WASH CYCLE SELECTOR knob: may be turned in either
direction. To select the most suitable wash cycle, please refer
to the “Table of wash cycles”.
The knob will not move during the wash cycle.
M1-M2-M3 buttons: press and hold one of the buttons to
store a cycle with your own set preferences in the memory
of the machine. To recall a previously-stored cycle, press the
corresponding button.
TEMPERATURE button: press to modify or exclude the
temperature setting; the value selected will appear on the
display above (see “Running a wash cycle”).
SPIN CYCLE button: press to modify or exclude the spin
cycle; the value selected will appear on the display above (see
“Running a wash cycle”).
DELAYED START button: press to set a delayed start for
the selected wash cycle; the set delay time will appear on the
display above (see “Running a wash cycle”).
OPTION buttons: press to select the available options. The
indicator light corresponding to the selected option will remain
lit (see “Running a wash cycle”).
WASH CYCLE PHASE icons: these illuminate to indicate the
progress of the wash cycle (Wash – Rinse – Spin –
Drain ). The text lights up when the cycle is complete.
START/PAUSE button with indicator light: when the green
indicator light flashes slowly, press the button to start a wash
cycle. Once the cycle has begun the indicator light will remain
lit in a fixed manner. To pause the wash cycle, press the
button again; the indicator light will flash in an orange colour. If
M3
OPTION
buttons
CONTROL PANEL LOCK
DELAYED START
button
button with indicator light
LOCK indicator light
the “LOCK” indicator light is switched off, the door may be
opened. To start the wash cycle from the point at which it was
interrupted, press the button again.
LOCK indicator light: indicates that the porthole door is
locked. To open the door, pause the wash cycle (see “Running
a wash cycle”).
CONTROL PANEL LOCK button with indicator light: to
activate or deactivate the control panel lock, press and hold
the button for approximately 2 seconds. when the indicator
light is illuminated, the control panel is locked (apart from the
ON/OFF button). This means it is possible to prevent wash
cycles from being modified accidentally, especially where there
are children in the home.
ECO indicator light: the icon lights up when, after altering the
washing parameters, an energy saving of at least 10% is made.
Furthermore, before the machine enters “Standby” mode, the
icon will light up for a few seconds; when the machine is switched
off the estimated energy saving will be around the 80% mark.
CHANGE LANGUAGEsThe first time the machine is
switched on, the first language will flash on the display. The
“ “, “OK” and “V” symbols will appear on the display, in line
with the 3 buttons on the right-hand side. The languages
change automatically every 3”; alternatively, they can be
changed by pressing the buttons next to the “ “ and “V”
symbols. Use the “OK” button to confirm the language, which
will be set after 2”. If no buttons are pressed, the automatic
language change will begin again after 30”.
To change the language, switch the machine on and off
again; in the 30” time period after it has been switched
off, press and hold the temperature +spin
+delayed start buttons simultaneously for 5’’. A short
sound alert will be emitted and the set language will flash
on the display. Press the buttons next to the “ “ and “V”
symbols to change the language. Use the button next to the
“OK” symbol to confirm the language, which will be set after
2”. If no buttons are pressed, the language set previously will
be displayed after 30”. Switch on the machine.
77
Page 8
Running a wash cycle
EN
WARNING: before you use the washing machine for the
first time, run a wash cycle with detergent and no laundry,
using the 90° cottons cycle without pre-wash.
1. SWITCH THE MACHINE ON. Press the button. All
the indicator lights will illuminate for 1 second and the
text AQUALTIS will appear on the display; the indicator
light corresponding to the button will then remain lit in
a constant manner and the START/PAUSE indicator light
will flash.
2. SELECT THE PROGRAMME. Turn the PROGRAMME
KNOB left or right, until the required programme has
been selected; the name of the programme will appear
on the display. A temperature and spin speed is set for
each programme; these may be adjusted. The cycle
duration will also appear on the display.
3. LOAD THE LAUNDRY. Open the porthole door.
Load the laundry, making sure you do not exceed the
maximum load value indicated in the table of wash
cycles on the following page.
4. MEASURE OUT THE DETERGENT. Pull out the
detergent dispenser drawer and pour the detergent into
the relevant compartments as described in “Description
of the machine”.
5. CLOSE THE PORTHOLE DOOR.
6. CUSTOMISE THE WASH CYCLE. Use the relevant
buttons on the control panel:
Modify the temperature and/or spin
speed.
The machine automatically displays the maximum
temperature and spin speed values set for the selected
cycle, or the most recently-used settings if they are
compatible with the selected cycle. The temperature can
be decreased by pressing the button, until the cold
wash “OFF” setting is reached. The spin speed may be
progressively reduced by pressing the button, until
it is completely excluded “OFF”. If these buttons are
pressed again, the maximum values are restored.
! Exception: if the
temperature can be increased up to a value of 90°C.
Setting a delayed start.
To set a delayed start for the selected cycle, press the
corresponding button repeatedly until the required delay
period has been reached. During the setting procedure,
the delay period and the text “Starts in:” will be
displayed, along with the flashing symbol. After the
delayed start has been set, the symbol will remain
fixed on the display, which will also indicate the duration
of the selected cycle with the text “Ends in:” and the
cycle duration. Press the DELAYED START button just
once to display the delay time set previously.
After the countdown has begun, the display will show
the text “Starts in:” and the delay period. Once the
set delay time has elapsed, the machine will begin its
cycle and the display will show “Ends in:” and the time
remaining until the end of the cycle.
programme is selected, the
To remove the delayed start option, press the button
until the display shows the text OFF; the symbol will
disappear.
Modify the cycle settings.
• Press the button to activate the option; the name
of the option will then appear on the display and
the corresponding indicator light will illuminate.
• Press the button again to deactivate the option; the
name of the option will then appear on the display
followed by the text OFF, and the corresponding
indicator light will switch off.
! If the selected option is not compatible with the
selected wash cycle, this incompatibility will be signalled
by the flashing of the indicator light and a sound alert
(3 beeps); the option will not be activated.
! If the selected option is not compatible with another
option that has been selected previously, the indicator
light corresponding to the first option selected will
flash and only the second option will be activated; the
indicator light corresponding to the button will remain lit
in a constant manner.
! The options may affect the recommended load value and/
or the duration of the cycle.
7. START THE PROGRAMME. Press the START/PAUSE
button. The corresponding indicator light remains lit in a
fixed manner and the porthole door locks (the LOCK
indicator light illuminates). The icons corresponding to
the wash cycle phases will light up during the cycle to
indicate which phase is currently in progress.
To change a wash cycle once it has already started,
pause the washing machine by pressing the START/
PAUSE button; then select the desired cycle and press
the START/PAUSE button again.
To open the door during a wash cycle, press the START/
PAUSE button; if the LOCK indicator light is switched
off you may open the door. Press the START/PAUSE
button again to restart the wash cycle from the point at
which it was interrupted.
8. THE END OF THE WASH CYCLE. This is indicated
by the illuminated text END. The porthole door may be
opened immediately. If the START/PAUSE indicator light
is flashing, press the button to end the cycle. Open the
door, unload the laundry and switch off the machine.
! If you wish to cancel a cycle which has already begun,
press and hold the button until the cycle stops and the
machine switches off.
8
Page 9
Wash cycles and options
3
1
2
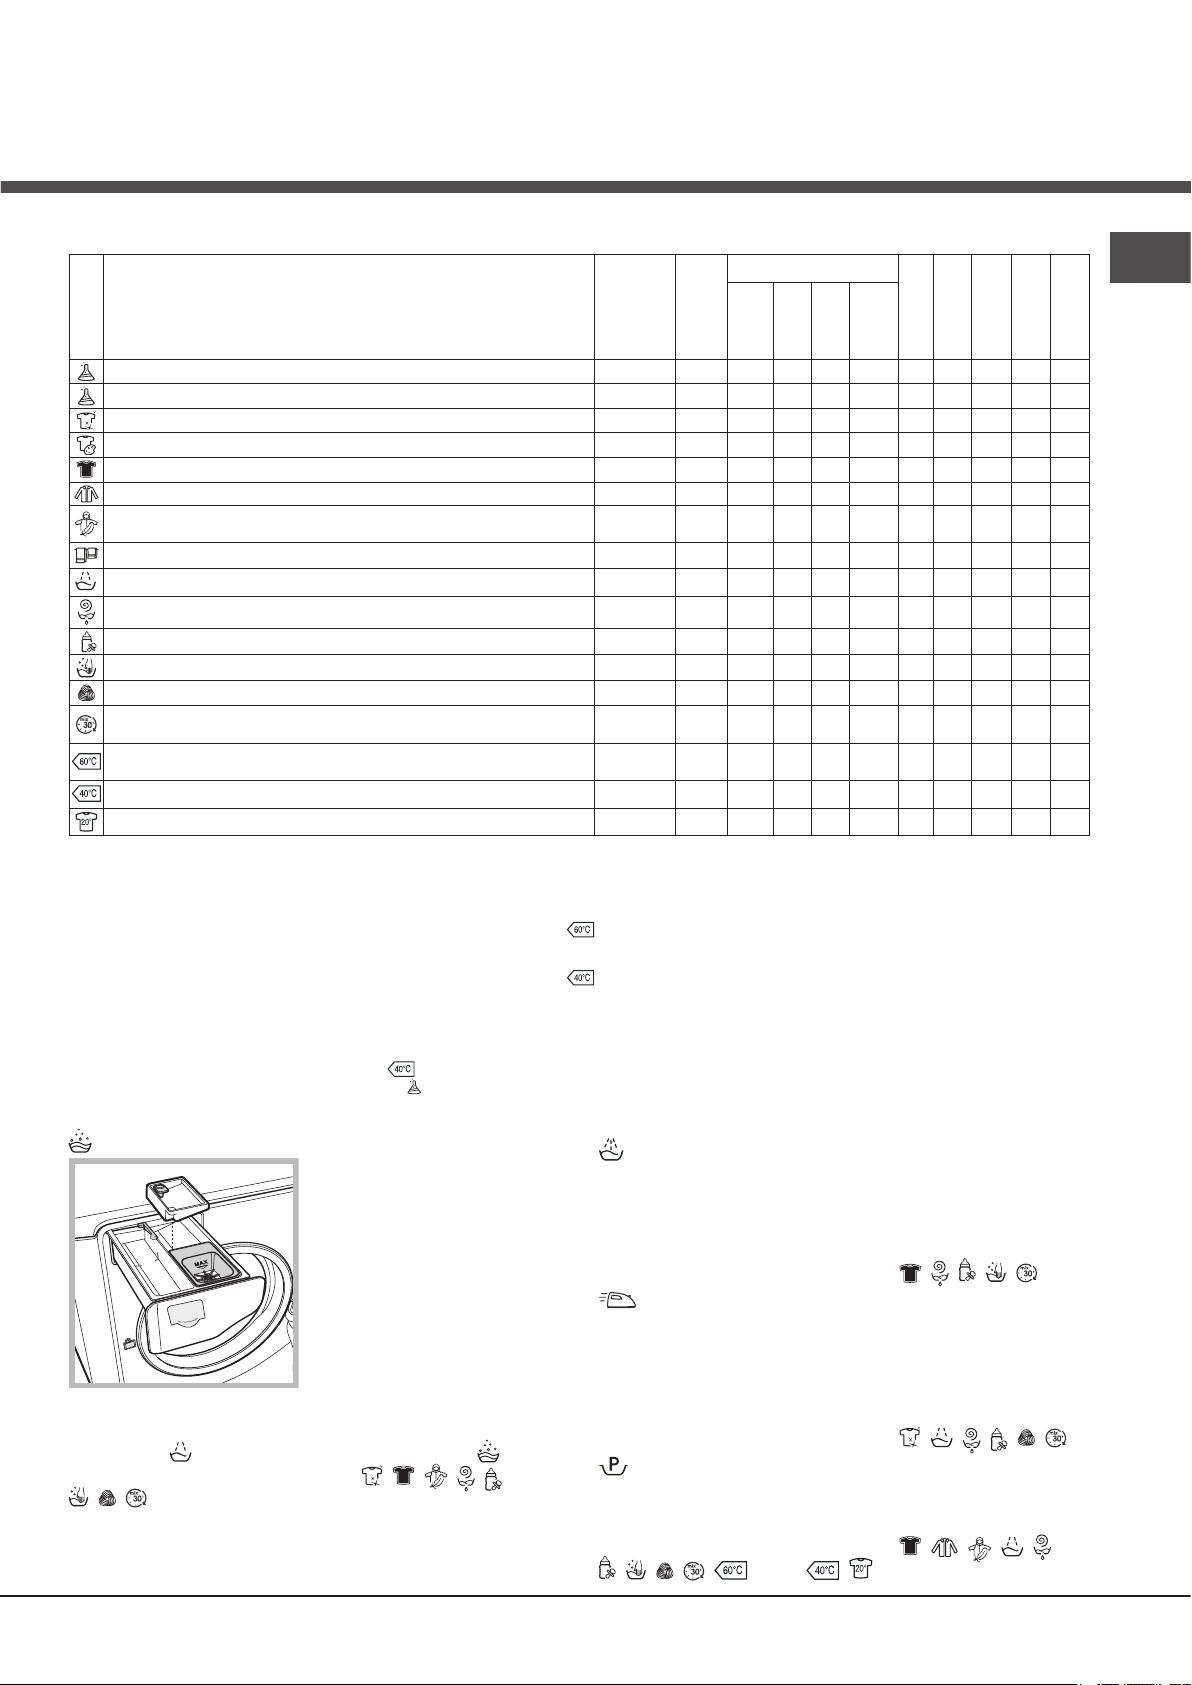
Table of wash cycles
Detergent and additives
Description of the wash cycle
Icon
Synthetics Resistant 60° 800
Synthetics Resistant (4) 40° 800
Whites
Coloureds
Darks
Shirts
Quilted Jacket: to wash clothes padded with goose down (such as
puffa jackets) or cushions.
Bed&Bath for bedlinen and towels. 60° 1200
Rinse
Spin and Pump out - 1200 - - - - 7 - - - 16’
Anti Allergy
Ultradelicates
Wool: for wool, cashmere, etc. 40° 800 -
Mix 30': to refresh lightly soiled garments quickly (not suitable for
wool, silk and clothes which require washing by hand).
Cotton Standard 60°C (1): heavily soiled whites and resistant colours.
Cotton Standard 40°C (2): lightly soiled whites and delicate colours. 40° 1200 -
Cotton Standard 20°C: lightly soiled whites and delicate colours. 20° 1200 -
The length of cycle shown on the display or in this booklet is an estimation only and is calculated assuming standard working conditions. The actual duration can vary according to factors such as water temperature and pressure, the amount of detergent used, the amount and type of load inserted, load balancing and any wash options selected.
Note: 10 minutes after the START, the machine will recalculate the time remaining until the end of the wash cycle on the basis of the load inside it; this value
will then be shown on the display.
1) Test wash cycle in compliance with directive 1061/2010: set wash cycle with a temperature of 60°C.
This cycle is designed for cotton loads with a normal soil level and is the most efficient in terms of both electricity and water consumption; it should be used for
garments which can be washed at 60°C. The actual washing temperature may differ from the indicated value.
2) Test wash cycle in compliance with directive 1061/2010: set wash cycle with a temperature of 40°C.
This cycle is designed for cotton loads with a normal soil level and is the most efficient in terms of both electricity and water consumption; it should be used for
garments which can be washed at 40°C. The actual washing temperature may differ from the indicated value.
3) At 60 °C the “Prewash” function cannot be selected.
For all Test Institutes:
2) Long wash cycle for cottons: set wash cycle with a temperature of 40°C.
4) Long wash cycle for synthetics: set wash cycle with a temperature of 40°C.
Max.
temp.
(Max. 90°)
Max.
speed
(°C)
(rpm)
Prewash
60° 1200
40° 1200
30° 800 -
40° 600 -
30° 1000 -
- 1200 - -
60° 1200 -
30° 0 -
30° 800 -
60°
1200
(3)
Wash
Bleach
-
-
-
-
-
-
-
Fabric
softener
Residual
Energy con-
dampness %
Max. load (kg)
3,5 49 0,87 42 90’
3,5 49 0,56 42 85’
4 - - - 190’
4 53 0,90 73 95’
4 - - - 80’
2 - - - 85’
1,5 - - - 130’
7 - - - 135’
7 - - - 49’
4 - - - 200’
1 - - - 75’
1,5 - - - 80’
3 71 0,19 39 30’
7 53 1,00 52,5 185’
7 53 1,09 92 170’
7 - - - 175’
Total water lt
sumption kWh
Cycle dura-
EN
tion
Wash options
Super Wash
figure). To bleach laundry without carrying out a full wash
cycle, pour the bleach into the extra compartment 3, select the
“Rinse” cycle and activate the “Super Wash” option .
! It cannot be used in conjunction with , , , , ,
, , .
This option offers a highperformance wash due to the
greater quantity of water used in
the initial phase of the cycle, and
due to the increased wash cycle
duration, is particularly useful for
the removal of stubborn stains.
It can be used with or without
bleach. If you desire bleaching,
insert the extra tray compartment
(3) into compartment 1. When
pouring in the bleach, be careful
not to exceed the “max” level
marked on the central pivot (see
Extra rinse
By selecting this option, the efficiency of the rinse is increased
and optimal residual detergent removal is guaranteed. It is
particularly useful for skin which is sensitive to detergents. We
recommend this option is used with a full load of washing, or
when a large amount of detergent is required.
! It cannot be used in conjunction with , , , , .
Easy Iron
By selecting this option, the wash and spin cycles will be
modified in order to reduce the formation of creases.
At the end of the cycle the washing machine drum will
rotate slowly; the “Easy Iron” and START/PAUSE indicator
lights will flash. To end the cycle press the START/PAUSE
button or the “Easy Iron” button.
! It cannot be used in conjunction with , , , , , .
Prewash
If this function is selected, the pre-wash cycle will run; this is
useful for removing stubborn stains.
N.B.: put the detergent in the relevant compartment.
! It cannot be used in conjunction with , , , , ,
, , , , (60°), , .
99
Page 10
Detergents and laundry
EN
Detergent
The type and quantity of detergent required depend on
the type of fabric you are washing (cotton, wool, silk,
etc.), as well as its colour, the washing temperature, the
level of soiling and the hardness of the water in the area.
Measuring out the detergent carefully will avoid wastage
and help to protect the environment: although they are
biodegradable, detergents still contain ingredients which
alter the balance of nature.
We recommend the following:
• use powder detergents for white cotton garments and
pre-washing.
• use liquid detergents for delicate cotton garments and
for all low-temperature wash cycles.
• use gentle liquid detergents for wool and silk
garments.
The detergent should be poured into the relevant
compartment - or the dispenser placed directly inside the
drum - before the wash cycle begins. In the latter case, it will
not be possible to select the Cottons with pre-wash cycle.
! Use powder detergent for white cotton garments, for
pre-washing, and for washing at temperatures over 60°C
! Follow the instructions given on the detergent packaging.
! Do not use hand washing detergents because these
create too much foam.
Preparing the laundry
• Shake out the garments before loading them into the
machine.
• Divide the laundry according fabric type (symbol on the
washing instruction label) and colour, making sure you
separate the coloured garments from the white ones;
• Empty all pockets and check the buttons;
• Do not exceed the values listed in the “Table of wash cycles”,
which refer to the weight of the laundry when dry.
How much does your laundry weigh?
1 sheet 400-500 g
1 pillowcase 150-200 g
1 tablecloth 400-500 g
1 bathrobe 900-1200 g
1 towel 150-250 g
1 pair of jeans 400-500 g
1 shirt 150-200 g
Washing recommendations
Whites: use this cycle to wash white clothes. The
programme is designed to maintain the brightness of
white clothes over time.
Coloureds: use this cycle to wash bright coloured
clothes. The programme is designed to maintain bright
colours over time.
Darks: Use cycle to wash dark-coloured garments.
This programme is designed to maintain dark colours
over time. We recommend using a liquid detergent for the
best results when washing dark-coloured garments.
Shirts: use the special wash cycle to wash shirts in
different fabrics and colours to guarantee they receive the
best possible care.
Quilted Jacket: to wash quilted jacket, cushions or
clothes padded with goose down (the weight of which
should not exceed 1,5 kg), use the special wash cycle.
Bedlinen and towels: use programme to wash bed
linen and towels in one single cycle: it optimises softener
performance and helps you save time and energy. We
recommend the use of powder detergent
Anti Allergy: use programme to remove major allergens
such as pollen, mites, cat’s and dog’s hair.
Ultradelicates: use programme to wash very delicate
garments having strasses or sequins.
We recommend turning the garments inside out before
washing and placing small items into the special bag
for washing delicates. Use liquid detergent on delicate
garments for best results.
To wash Silk garments and Curtains select cycle and
then option (in this case it will also be possible to
enable the “Extra Rinse” option); the machine will end the
cycle while the laundry is soaking and the indicator
light will flash. To drain the water so that the laundry may
be removed, press the START/PAUSE button or the
button.
Wool: the wool wash cycle on this Hotpoint-Ariston
machine has been tested and approved by The Woolmark
Company for washing wool garments labelled as hand
washable provided that the garments are washed
according to the instructions on the garment label and
those issued by the manufacturer of this washing machine.
Hotpoint-Ariston is the first washing machine brand to be
approved by The Woolmark Company for Apparel CarePlatinum for its washing performance and consumption of
energy and water. (M1253)
In UK, Eire, Hong Kong and India the Woolmark trade mark
is a Certification trade mark.
Cotton Standard 20°C: ideal for lightly soiled cotton
loads. The effective performance levels achieved at cold
temperatures, which are comparable to washing at 40°,
are guaranteed by a mechanical action which operates at
varying speed, with repeated and frequent peaks.
Load balancing system
Before every spin cycle, to avoid excessive vibrations
before every spin and to distribute the load in a uniform
manner, the drum rotates continuously at a speed which
is slightly greater than the washing rotation speed. If,
after several attempts, the load is not balanced correctly,
the machine spins at a reduced spin speed. If the load is
excessively unbalanced, the washing machine performs
the distribution process instead of spinning. To encourage
improved load distribution and balance, we recommend
small and large garments are mixed in the load.
10
Page 11
Trouble shooting
Your washing machine could occasionally fail to work. Before contacting the Technical Assistance Centre (see “Assistance”),
make sure that the problem cannot be solved easily using the following list.
Problem:
The washing machine does not
switch on.
The wash cycle does not start.
The washing machine does not fill
with water.
The washing machine door
remains locked.
The machine continuously fills
with water and drains.
The washing machine does not
drain or spin.
The machine vibrates a lot during
the spin cycle.
The washing machine leaks.
The icons corresponding to the
“Phase in progress” flash rapidly
at the same time as the ON/OFF
Possible causes / Solutions:
• The appliance is not plugged into the socket fully, or not enough to make
contact.
• There is no power in the house.
• The door is not closed properly.
• The START/PAUSE button has not been pressed.
• The water tap has not been opened.
• A delayed start has been set.
• The water inlet hose is not connected to the tap.
• The hose is bent.
• The water tap has not been opened.
• There is no water supply in the house.
• The pressure is too low.
• The START/PAUSE button has not been pressed.
• If you have selected the function, at the end of the cycle the washing
machine drum will rotate slowly; to end the cycle press the START/PAUSE
button or the button.
• The drain hose is not fitted at a height between 65 and 100 cm from the floor
(see “Installation”).
• The free end of the hose is under water (see “Installation”).
• If the dwelling is on one of the upper floors of a building, there may be
problems relating to water drainage, causing the washing machine to fill with
water and drain continuously. Special anti-draining valves are available in shops
and help to prevent this inconvenience.
• The wall drainage system is not fitted with a breather pipe.
• The wash cycle does not include draining: Some wash cycles require the drain
phase to be started manually (see “Wash cycles and options”).
• The “Easy iron” option is enabled: to complete the wash cycle, press the
START/PAUSE button (“Wash cycles and options”).
• The drain hose is bent (see Installation).
• The drainage duct is clogged.
• The drum was not unlocked correctly during installation (see “Installation”).
• The machine is not level (see “Installation” ).
• The machine is trapped between cabinets and walls (see “Installation”).
• The load is unbalanced (see “Detergents and laundry”).
• The water inlet hose is not screwed on properly (see “Installation”).
• The detergent dispenser is blocked (to clean it, see “Care and maintenance”).
• The drain hose is not fixed in place properly (see “Installation”).
• Switch off the machine and unplug it, wait for approximately 1 minute and
then switch it back on again. If the problem persists, contact the Technical
Assistance Service.
indicator light.
There is too much foam.
The washing machine door
• The detergent is not suitable for machine washing (it should display the text
“for washing machines” or “hand and machine wash”, or the like).
• Too much detergent was used.
• Perform the manual unlocking procedure (see “Precautions and tips”).
remains locked.
EN
! Note: to exit “Demo mode”, switch machine off, press and hold the two “START/PAUSE” and “ON/OFF” buttons
simultaneously for 3 seconds.
11
Page 12
Assistance
EN
Before calling for Assistance:
• Check whether you can solve the problem by yourself (see “Trouble shooting”);
• Restart the wash cycle to check whether the problem has been solved;
• If it has not, contact the Authorised Technical Assistance Service.
! If the washing machine has been installed or used incorrectly, you will have to pay for the call-out service.
! Always request the assistance of authorised technicians.
Please have the following information to hand:
• the type of problem;
• the appliance model (Mod.);
• the serial number (S/N).
The above information can be found on the data plate located on the appliance itself.
12
Page 13

Beépítési és használati
utasítás
MOSÓGÉP
HU
Magyar
AQUALTIS
AQS73D 29
Összefoglalás
Üzembe helyezés, 14–15
Kicsomagolás és vízszintbe állítás
Víz- és elektromos csatlakozás
Műszaki adatok
Karbantartás és ápolás, 16
A víz elzárása és az elektromos áram kikapcsolása
A készülék tisztítása
A mosószer-adagoló ók tisztítása
A dob tisztítása
A szivattyú tisztítása
A vízbevezető cső ellenőrzése
Óvintézkedések és tanácsok, 17
Általános biztonság
Hulladékelhelyezés
Az ajtó kézi nyitása
A készülék leírása, 18–19
Érintőgombos kezelőpanel
A mosási ciklusok végrehajtása, 20
HU
Programok és opciók, 21
Programtáblázat
Opciók
Mosószerek és mosandók, 22
Mosószer
A mosandó ruhák előkészítése
Mosási tanácsok
A bepakolt ruhák kiegyensúlyozására szolgáló rendszer
Rendellenességek és elhárításuk, 23
Szerviz, 24
13
Page 14
Üzembe helyezés
HU
! E kézikönyv megőrzése azért fontos, hogy
bármikor elővehesse, és megnézhesse.
A készülék eladása, továbbadása, vagy
költöztetése esetén gyeljen arra, hogy a
kézikönyv a mosógéppel maradjon.
! Figyelmesen olvassa el az utasításokat:
fontos információkat tartalmaznak az üzembe
helyezésről, a használatról és a biztonságról.
! A garancia mellett az üzembehelyezéshez
szükséges eszközök is a kézikönyvet
tartalmazó csomagban találhatók.
Kicsomagolás és vízszintbe állítás
Kicsomagolás
1. A mosógép kicsomagolása után
ellenőrizze, hogy az nem szenvedett-e
sérülést a szállítás során.
Ha a készüléken sérülést talál,
ne csatlakoztassa, és forduljon a
viszonteladóhoz.
2. A készülék hátsó
részén csavarozza
ki a szállításhoz
szükséges 4
védőcsavart és
távolítsa el a
hozzájuk tartozó
távtartót (lásd ábra).
3. A furatokat zárja le a csomagban található
műanyag dugókkal!
4. Őrizzen meg minden darabot, mert
a mosógép esetleges elszállításakor
a készülék belső károsodásának
megelőzése érdekében szükség lesz azok
visszaszerelésére.
! A csomagolóanyag nem gyermekjáték!
! A pontos szintezés stabilitást nyújt és
megakadályozza a főképp a centrifugálási
fázisban jelentkező rezgések és zaj
keletkezését.
! Amennyiben a készüléket szőnyegpadlón
vagy szőnyegen helyezi el, a lábakat úgy
állítsa be, hogy a mosógép alatt elegendő
hely maradjon a szellőzésre!
Víz- és elektromos csatlakozás
A vízbevezető cső csatlakoztatása
! A vízbevezető cső hálózatba való bekötése
előtt folyassa ki a vizet, míg az áttetszővé
nem válik.
1. A vízbevezető cső
csatlakoztatásához
csavarozza a csövet
a készülék hátoldalán
jobbra fent található
vízbemeneti csonkra
(lásd ábra).
2. A vízbevezető cső
csatlakoztatásához
csavarozza fel a
csövet egy 3/4”os külső menettel
rendelkező hidegvízcsapra (lásd ábra).
3. Ügyeljen arra, hogy a csövön ne legyen
törés vagy szűkület.
Vízszintbe állítás
1. A mosógépet sík és kemény padlóra
állítsa, úgy, hogy ne érjen falhoz, vagy
bútorhoz!
2. Az
egyenetlenségeket
a talpak ki-, illetve
becsavarásával
kompenzálhatja.
Állítsa vízszintbe
a készüléket (a
lejtésnek 2 foknál
kisebbnek kell lenni).
14
! A csap víznyomásának a műszaki adatok
táblázatában szereplő határértékek között
kell lennie (lásd a szemben lévő oldalt).
! Amennyiben a vízbevezető cső nem
elég hosszú, forduljon szaküzlethez vagy
engedéllyel rendelkező szakemberhez.
! Sohase szereljen fel használt, vagy öreg
vízbevezető csövet, hanem a készülékhez
mellékelt csöveket használja.
Page 15
65 - 100 cm
A leeresztőcső csatlakoztatása
következõ Uniós Elõírásoknak:
A leeresztőcsövet
csatlakoztassa
lefolyóhoz vagy
a padlótól 65 és
100 cm közötti
magasságban lévő
fali lefolyószifonhoz,
vigyázva arra,
nehogy megtörje!
! A csatlakozódugónak a készülék helyére
állítása után is könnyen hozzáférhetőnek kell
maradnia.
! Ne használjon hosszabbítót vagy elosztót.
! A kábel ne legyen se megtörve, se
összenyomva.
! A hálózati kábelt, valamint a
csatlakozódugót csak engedéllyel rendelkező
szakember cserélheti.
HU
A leeresztőcsövet
a mosdó vagy
a kád szélére is
akaszthatja úgy,
hogy a tartozékok
között lévő vezetőt a
csaphoz erősíti (lásd
ábra).
A leeresztőcső
szabad végének
nem szabad vízbe
merülnie.
! Toldások használata nem javasolt.
Amennyiben feltétlenül szükséges, a toldás
átmérője egyezzen meg az eredeti csőével, és
semmiképpen se legyen 150 cm-nél hosszabb.
Elektromos csatlakoztatás
Mielőtt a csatlakozódugót az aljzatba dugná,
bizonyosodjon meg az alábbiakról:
• Az aljzat földelése megfelel a törvény által
előírtnak.
• Az aljzat képes elviselni a készülék műszaki
adatait tartalmazó táblázatban megadott
maximális teljesítményfelvételt (lásd szemben).
• A hálózat feszültsége a műszaki adatokat
tartalmazó táblázatban szereplő értékek
közé esik (lásd szemben).
• Az aljzat kompatíbilis a készülék
csatlakozódugójával. Ellenkező esetben
cseréltesse ki az aljzatot vagy a
csatlakozódugót.
! A készülék nem állítható fel nyílt téren,
még akkor sem, ha a tér tetővel van fedve,
mert nagyon a készüléket esőnek vagy
zivataroknak kitenni nagyon veszélyes.
Figyelem! A fenti előírások gyelmen kívül
hagyása esetén a gyártó elhárít minden
felelősséget.
Mûszaki adatok
Modell AQS73D 29
szélesség 59,5 cm
Méretek
Ruhatöltet: 1-tõl 7 kg-ig
Elektromos
csatlakozás
Vízcsatlakozások
Centrifuga
fordulatszám
Az 1061/2010
és 1015/2010
rendeletek
szerinti vizsgálati programok
magasság 85 cm
mélység 44,5 cm
lásd a készüléken található, muszaki jellemzoket
tartalmazó adattáblát!
maximális nyomás
1 MPa (10 bar)
minimális nyomás
0,05 MPa (0,5 bar)
dob ûrtartalma 48 lite
1200 fordulat/perc-ig
program;
pamut normál 60°C.
program;
pamut normál 40°C.
Ez a berendezés megfelel a
- 2004/108/CE elõírás
(Elektromágneses összeférhetõség)
- 2012/19/EU
- 2006/95/CE (Alacsony
feszültség
15
Page 16
1
2
1
2
2
Karbantartás és ápolás
HU
A víz elzárása és az elektromos
áram kikapcsolása
• Minden mosás után zárja el a vízcsapot.
Így kíméli a készülék vízrendszerét, és
megszünteti a vízszivárgás kockázatát.
• A készülék tisztítása vagy karbantartása
esetén húzza ki a hálózati csatlakozódugót
az aljzatból!
A készülék tisztítása
A külső részeket és a gumi részeket langyos
szappanos vizes ronggyal tisztíthatja. Ne
használjon oldószert vagy súrolószert!
A mosószer-adagoló ók tisztítása
A ók kiszedéséhez
nyomja meg a kart (1)
és húzza ki a ókot (2)
(lásd ábra).
Mossa ki folyó víz alatt!
Ezt a tisztítást gyakran
el kell végezni.
Az előkamra eléréséhez tegye a
következőket:
1. távolítsa el a burkolópanelt a készülék
elejéről úgy, hogy középre nyomja, majd
a két oldalról lefelé húzza, és kiveszi (lásd
ábrák).
2. A kifolyó víz
összegyűjtéséhez
toljon egy edényt
(körülbelül 1,5 literes)
a készülékhez (lásd
ábra).
3. Órairánnyal
ellentétesen forgatva
csavarja le a fedelet
(lásd ábra).
A dob tisztítása
• Az ajtót a kellemetlen szagok
keletkezésének megakadályozása
érdekében mindig hagyja résnyire nyitva!
A szivattyú tisztítása
A készülék öntisztító szivattyúval van
felszerelve, melynek nincs szüksége tisztítási
és karbantartási műveletekre. Előfordulhat
azonban, hogy apró tárgyak (aprópénz,
gomb) esnek a szivattyú alsó részén található
szivattyúvédő előkamrába.
! Győződjön meg róla, hogy a mosási ciklus
véget ért, és húzza ki a csatlakozódugót.
4. Gondosan tisztítsa ki az üreg belsejét.
5. Csavarja vissza a fedelet.
6. Szerelje vissza a panelt – mielőtt a gép
felé nyomná, győződjön meg arról, hogy
a horgok a hozzájuk tartozó furatokba
illeszkednek.
A vízbevezető cső ellenőrzése
Évente legalább egyszer ellenőrizze a
gumicsövet! Ha repedezett vagy hasadozott,
ki kell cserélni – a mosás során a nagy
nyomás hirtelen szakadást okozhat.
16
Page 17
Óvintézkedések és
tanácsok
! A készüléket a nemzetközi biztonsági szabványoknak
megfelelően tervezték és gyártották. Ezeket a
gyelmeztetéseket biztonsági okokból írjuk le, és
gyelmesen el kell olvasni őket
Általános biztonság
• Ez a készülék háztartási használatra lett tervezve.
• Ezt a készüléket a 8 éves kort betöltött
gyermekek, valamint a testileg,
érzékszervileg vagy szellemileg korlátozott,
nem hozzáértő, illetve a terméket nem
ismerő személyek csak megfelelő
felügyelet mellett, vagy a készülék
biztonságos használatával kapcsolatos
alapvető utasítások és a kapcsolódó
veszélyek ismeretében használhatják. A
gyerekek nem játszhatnak a készülékkel.
A karbantartási és tisztítási munkálatokat
felügyelet nélkül hagyott gyerekek nem
végezhetik.
• Ne érjen a géphez mezítláb, illetve vizes vagy nedves
kézzel vagy lábbal!
• A dugót sohase a tápkábel, hanem a dugó
meghúzásával húzza ki az aljzatból!
• Ne nyúljon a leeresztett vízbe, mert forró lehet!
• Semmiképpen ne feszegesse az ajtót: megsérülhet a
véletlen nyitást megakadályozó biztonsági retesz.
• Hiba esetén semmiképpen se nyúljon a gép belső
részeihez, és ne próbálja megjavítani!
• Mindig ügyeljen arra, hogy gyermekek ne mehessenek
a működő gép közelébe.
• Amennyiben a készüléket át kell helyezni, azt két vagy
három személy végezze, maximális odagyeléssel!
Soha ne próbálja meg a készüléket egyedül
elmozdítani, mert az nagyon nehéz.
• A mosandó berakása előtt ellenőrizze, hogy a
forgódob üres-e.
Az ajtó kézi nyitása
Amennyiben ki akarja teregetni a mosott ruhaneműt, de
áramhiány miatt nem tudja kinyitni a mosógép ajtaját,
tegye a következőket:
1. Húzza ki a dugót az
aljzatból.
2. Győződjön meg arról,
hogy a készülékben maradt
víz szintje az ajtószint alatt
van – ellenkező esetben a
leeresztőcsövön keresztül
eressze le a fölösleges vizet
egy vödörbe, ahogy azt az
ábra is mutatja.
3. Távolítsa el a burkolópanelt a mosógép elejéről (lásd
következő oldal).
4. Az ábrán látható fülecske
kihúzásával szabadítsa ki
a műanyag húzókát; húzza
lefelé egészen addig, míg
meg nem hallja az ajtó
kinyitását jelző kattanást.
5. Nyissa ki az ajtót;
amennyiben ez nem
sikerülne, ismételje meg a
fenti lépéseket.
HU
Hulladékelhelyezés
• A csomagolóanyag megsemmisítése: tartsa be a helyi
előírásokat, így a csomagolás újrahasznosítható.
• Az Európai Parlament és Tanács, elektromos és
elektronikus berendezések hulladékairól (WEEE) szóló
2012/19/EU irányelve előírja, hogy e hulladékok nem
kezelhetők háztartási hulladékként. A forgalomból
kivont berendezéseket, az azokat alkotó anyagok
hatékonyabb visszanyerése, illetve újrahasznosítása,
valamint az emberi egészség és a környezet védelme
érdekében szelektíven kell gyűjteni. Az összes
terméken megtalálható áthúzott szemetes szimbólum
a szelektív gyűjtési kötelezettségre emlékeztet.
A tulajdonosok, háztartási készülékük forgalomból
történő helyes kivonásával kapcsolatban, további
információért a megfelelő közszolgálathoz, illetve a
forgalmazóhoz is fordulhatnak.
6. Szerelje vissza a panelt – mielőtt a gép felé nyomná,
győződjön meg arról, hogy a horgok a hozzájuk tartozó
furatokba illeszkednek.
17
Page 18
A készülék leírása
3
1
2
1
8
0
2
1
0
1
5
0
1
2
0
9
0
6
0
B
A
HU
AJTÓ
AJTÓ
AJTÓFOGANTYÚ
LÁBAZAT
Az ajtó kinyitásához mindig
a megfelelő fogantyút
használja (lásd ábra).
KEZELŐPANEL
ÁLLÍTHATÓ LÁBAK
3. Berakható rekesz: Fehérítőszer
! A 3-as berakható rekesz használata kizárja az
előmosást.
Adalékanyagos rekesz: öblítőhöz és folyékony
adalékokhoz. Kérjük, sohase töltse túl a rácson jelzett
szintet, és az öblítőkoncentrátumokat mindig hígítsa föl!
Érintőgombos kezelőpanel
A beállítások módosításához
az ábra szerint enyhén
nyomja meg az érintőgomb
MOSÓSZER-ADAGOLÓ FIÓK
A mosószer-adagoló ók
területén található
szimbólumot.
a készülék belsejében
található, és az ajtó
kinyitásával érhető el.
A mosószerek adagolásához
lásd a „Mosószerek és
mosandók” fejezetet.
Készenléti üzemmód
Ez a mosógép – az energiatakarékosságra vonatkozó
legújabb előírásoknak megfelelően – automatikus
kikapcsolási (készenléti) rendszerrel van ellátva, mely a
1. Mosószeres rekesz
előmosáshoz: használjon
mosóport!
használat 30 percnyi szüneteltetése esetén bekapcsol.
Nyomja meg röviden a ON/OFF gombot, és várjon,
amíg a készülék újrabekapcsol.
! A mosószer betöltése előtt
győződjön meg arról, hogy a
3-as berakható rekesz nincs
ebben a rekeszben.
2. Mosószeres rekesz
mosáshoz: Ha folyékony
mosószert használ, a
érdekében tanácsos az A elválasztólapot használni. Ha
mosóport használ, tegye az elválasztólapot a B térbe.
megfelelő adagolás
18
Page 19
Érintőgombos kezelőpanel
PROGRAMOK
tekerőgomb
M2
M1
CENTRIFUGA gomb
HŐMÉRSÉKLET gomb
Kijelző
START/PAUSE
jelzőlámpás gomb
ECO
jelzőlámpá
HU
MOSÁSI FÁZIS
szimbólumok
ON/OFF jelzőlámpás
gomb
ON/OFF jelzőlámpás gomb : a készülék be- vagy
kikapcsolásához nyomja meg röviden ezt a gombot. A
készülék bekapcsolását zöld jelzőlámpa jelzi. A mosógép
mosás közben történő leállításához hosszan, kb. 3
másodpercig tartsa lenyomva a nyomógombot – a gomb
rövid, vagy véletlen megnyomása nem kapcsolja le a
készüléket. A mosógép mosás közben történő leállítása
magát a mosást is nullázza.
PROGRAMOK tekerőgomb: a tekerőgomb mindkét
irányban elforgatható. A helyes program beállításához lásd
„Programtáblázat”. A mosás során a tekerőgomb nem mozdul.
M1-M2-M3 nyomógombok: az egyéni igényeknek
megfelelően beállított program memorizálásához tartsa
lenyomva a gombok egyikét! A korábban memorizált
programokat a hozzájuk tartozó nyomógombok,
megnyomásával lehet előhívni.
HŐMÉRSÉKLET gomb : a hőmérséklet-beállítások
megváltoztatásához nyomja meg ezt a gombot – a
kiválasztott érték megjelenik a fenti kijelzőn (lásd „A mosási
ciklusok végrehajtása”).
CENTRIFUGA gomb : a centrifugabeállítások
megváltoztatásához nyomja meg a gombot – a kiválasztott
érték megjelenik a fenti kijelzőn (lásd „A mosási ciklusok
végrehajtása”).
KÉSLELTETETT INDÍTÁS gomb : a kiválasztott program
késleltetett indításának beállításához nyomja meg ezt a
gombot – a kiválasztott érték megjelenik a fenti kijelzőn (lásd
„A mosási ciklusok végrehajtása”).
OPCIÓK jelzőlámpás gombok: az alkalmazható opciók
kiválasztásához nyomja meg ezt a gombot. A kiválasztott
opcióhoz tartozó jelzőlámpa kigyullad (lásd „A mosási
ciklusok végrehajtása”).
MOSÁSI FÁZIS ikonok: kigyulladásukkal jelzik, hogy éppen
hol tart a ciklus (Mosás - Öblítés - Centrifugá Szivattyúzás ). A felirat a ciklus legvégén gyullad csak ki.
START/PAUSE jelzőlámpás gomb: ha a zöld jelzőlámpa
lassan villog, a mosás indításához nyomja meg a gombot.
A ciklus elindításával a jelzőlámpa állandó fénnyel kezd
világítani. A mosás szüneteltetéséhez ismételten nyomja
meg a gombot; a jelzőlámpa narancssárga fénnyel kezd el
villogni. Amennyiben az „LOCK” lámpa világít, kinyithatja
M3
OPCIÓK
gombok
az ajtót. Hogy a mosást a készülék onnan folytassa, ahol azt
ön korábban megszakította, nyomja meg ismét a gombot.
LOCK lámpa : jelzi, hogy az ajtó zárva van. Az ajtó
kinyitásához a ciklust szüneteltetni kell (lásd
„A mosási ciklusok végrehajtása”).
GYEREKZÁR jelzőlámpás gomb : a kezelőpanel
gombjainak lezárásához, illetve aktiválásához tartsa a gombot
kb. 2 másodpercig lenyomva. Ha a lámpa világít, az azt
jelenti, hogy a gyerekzár be van kapcsolva (a ON/OFF gomb
kivételével). Ez a funkció megakadályozza a programok
véletlen átállítását, főképp, ha gyerekek is vannak a lakásban.
ECO jelzőlámpa: a szimbólum akkor gyullad ki, ha a
mosási paraméterek megváltoztatásával 10%-nál nagyobb
az elektromosenergia-megtakarítás; Ezenkívül, mielőtt a
készülék készenléti üzemmódra kapcsolna, a szimbólum
néhány másodpercre bekapcsol; kikapcsolt készüléknél a
becsült energiamegtakarítás nagyjából 80%-os.
NYELV MÓDOSÍTÁSA
A készülék első bekapcsolásakor a kijelzőn az első nyelv jelenik
meg villogva. A kijelzőtől jobbra található 3 nyomógombnak
megfelelően a kijelzőn megjelenik az „ ”, „OK” és a „V”
szimbólum. A nyelv 3 másodpercenként automatikusan
átkapcsol, illetve az „ ” és „V” szimbólumok melletti gombok
megnyomásával kézileg is átkapcsolható. Az „OK” gombbal
a nyelvválasztás jóváhagyható, mely 2 másodperc után
folyamatos fénnyel jelenik meg. Amennyiben 30 másodpercen
keresztül nem nyom meg semmilyen gombot, a nyelvek
automatikus léptetése újrakezdődik.
A nyelvválasztást csak a készülék kikapcsolt
állapotában lehet módosítani.
A nyelv módosításához be- és ki kell kapcsolni
a berendezést, a kikapcsolás utáni 30 mp alatt 5
másodpercig egyszerre nyomja le a hőmérséklet ,
a centrifugálás és a késleltetett indítás gombokat;
a hangjelzésen kívül a kijelzőn villogva megjelenik a
beállított nyelv neve is. Az „ ” és „V” szimbólumok melletti
nyomógombok megnyomásával a nyelv átkapcsolható. Az
„OK” szimbólum melletti nyomógombbal a nyelvválasztás
jóváhagyható, mely 2 másodperc után folyamatos fénnyel
jelenik meg. Amennyiben 30 másodpercen keresztül nem
nyom meg semmilyen gombot, a korábban beállított nyelv
jelenik meg. Kapcsoljuk be a gépet.
KÉSLELTETETT
INDÍTÁS gomb
LOCK
lámpa
GYEREKZÁR
jelzőlámpás gomb
19
Page 20

A mosási ciklusok végrehajtása
HU
MEGJEGYZÉS: a mosógép első használatakor végezzen
el egy üres mosást 90°C-os pamutprogrammal, előmosás
nélkül, mosószer használatával.
1. A KÉSZÜLÉK BEKAPCSOLÁSA. Nyomja meg a
gombot! Az összes lámpa felvillan 1 másodpercre
és a kijelzőn az AQUALTIS felirat jelenik meg; a
nyomógomb lámpája égve marad, míg az START/
PAUSE lámpa villogni kezd.
2. VÁLASSZA KI A PROGRAMOT. A kívánt program
kiválasztásához forgassa a PROGRAMOK
tekerőgombot jobbra vagy balra; minden programhoz
tartozik egy hőmérséklet-, egy centrifugasebesség-,
valamint egy mosásiintenzitás-érték, melyek mind
megváltoztathatók. A kijelzőn megjelenik a ciklusidő.
3. PAKOLJA BE A MOSANDÓ RUHÁKAT. Nyissa
ki az ajtót! Tegye be a mosandó ruhákat, ügyelve
arra, hogy ne lépje túl a következő oldalon található
programtáblázatban feltüntetett, illetve a kijelzőn
megjelenő ruhatöltet-mennyiséget.
4. ADAGOLJA BE A MOSÓSZERT. Vegye ki a ókot és
az „A készülék leírása” című fejezet szerint öntse a
mosószert a megfelelő rekeszekbe.
5. ZÁRJA BE AZ AJTÓT.
6. VÉGEZZE EL A MOSÁSI CIKLUS EGYÉNI
BEÁLLÍTÁSÁT. A beállítást a kezelőpanel megfelelő
gombjaival végezheti el.
A hőmérséklet és/vagy a
centrifugasebesség megváltoztatása.
A készülék automatikusan kijelzi az elindított
programhoz tartozó legmagasabb hőmérsékletet és
centrifugasebességet, vagy a legutóbb kiválasztottakat,
amennyiben azok kompatíbilisek a kiválasztott
programmal. A gomb nyomogatásával a
hőmérséklet fokozatosan csökkenthető egészen a
hideg mosásig (OFF). A gomb nyomogatásával a
centrifugasebesség fokozatosan csökkenthető egészen
annak megállításáig (OFF). A gomb legalsó értéken
történő megnyomásával visszatérhet a maximális
értékekhez.
! Kivétel: a
hőmérséklet egészen 90°C-ig növelhető.
Késleltetett indítás beállítása.
A kiválasztott program késleltetett indításához
nyomogassa a vonatkozó gombot, míg a késleltetés
kívánt értéke meg nem jelenik! A beállítás közben
a kijelző a késleltetés idejét, a „Késleltet:” és a
villogó szimbólumot fogja mutatni. A késleltetett
indítás beállítását követően a kijelzőn állandó fénnyel
megjelenik a szimbólum, majd a kijelző visszatér
a „Prg vége:” felirat és azt követő, beállított ciklusidő
feltüntetéséhez. A KÉSLELTETETT INDÍTÁS gomb
megnyomását követően a kijelzőn megjelenik a
korábban beállított becsült maradékidő.
Az indítást követően a kijelzőn megjelenik a
„Késleltet:” felirat és a késleltetés értéke. A beállított
késleltetési idő leteltekor a készülék elindul, és a
program kiválasztása esetén a
kijelzőn megjelenik a „Prg vége:” felirat és a ciklus
végéig hátra lévő maradékidő.
A késleltetett indítás törléséhez nyomogassa a gombot
mindaddig, míg a kijelzőn meg nem jelenik az OFF felirat;
a szimbólum eltűnik.
A program tulajdonságainak
módosítása.
• Az opció aktiválásához nyomja meg a gombot; a
kijelzőn megjelenik az opció neve, a nyomógombhoz
tartozó lámpa pedig kigyullad.
• Az opció kikapcsolásához ismét nyomja meg a
gombot; a kijelzőn megjelenik az opció neve, majd az
OFF felirat, a lámpa pedig kikapcsol.
! Ha a kiválasztott opció a beállított programmal
nem fér össze, a lámpa villogni kezd, a készülék
hangjelzést bocsát ki (3 sípszó), az opció pedig nem
lesz bekapcsolva.
! Ha a kiválasztott opció egy korábban beállított
programmal nem fér össze, az elsőként kiválasztott
opció lámpája villogni kezd, és csak a második opció
lesz bekapcsolva, az ennek gombjához tartozó lámpa
folyamatosan világít.
! Az opciók megváltoztathatják az ajánlott ruhatöltetmennyiséget és/vagy a programidőt.
7. INDÍTSA EL A PROGRAMOT. Nyomja meg
az START/PAUSE gombot. A vonatkozó lámpa
folyamatosan ég és az ajtó bezár (az LOCK lámpa
ég). A ciklus során az aktuális fázis jelzésére mindig
az éppen folyamatban lévő mosási fázis szimbóluma
világít.
A programok menet közbeni módosításához az
START/PAUSE gombbal állítsa a mosógépet
szüneteltetésre; majd válassza ki a kívánt ciklust, és
ismét nyomja meg az START/PAUSE gombot.
Az ajtó menet közbeni kinyitásához nyomja meg az
START/PAUSE gombot.
Amennyiben az LOCK lámpa kialudt, kinyithatja az
ajtót. Hogy a mosást a készülék onnan folytassa, ahol
azt ön korábban megszakította, ismét nyomja meg az
START/PAUSE gombot.
8. A PROGRAM VÉGE.Ezt a világító END felirat jelzi.
Az ajtó azonnal kinyitható. Amennyiben villogna az
START/PAUSE gomb lámpája, a ciklus befejezéséhez
nyomja meg a gombot. Nyissa ki az ajtót, szedje ki a
mosott holmit, és kapcsolja ki a készüléket.
! Amennyiben nullázni szeretne egy már elindított
programot, tartsa mindaddig lenyomva a gombot,
míg a program meg nem szakad, és a készülék ki nem
kapcsol.
20
Page 21
3
1
2
Programok és opciók
Programtáblázat
Max.
Szimbólum Programleírás
Szimbólum
MŰSZÁLAS Makacs foltok
MŰSZÁLAS Makacs foltok (4)
FEHÉR
SZÍNES
SÖTÉT
ING PROGRAM
ANORÁK
ÁGYNEMŰ: ágyneműkhöz és törölközőkhöz
ÖBLÍTÉS
CENTRIFUGA és SZIVATTYÚZÁS
ANTIALLERGÉN
ULTRA KÉNYES
GYAPJÚ Platinum Care: gyapjú, kasmír stb. ruhaneműk mosásához.
MIX 30': az erősen szennyezett ruhadarabok gyors átöblítésére (nem
javasolt gyapjú, selyem és kézzel mosandó ruhaneműkhöz).
PAMUT NORMÁL 60°C (1): erősen szennyezett fehér és magasabb
hőmérsékleten mosható színes ruhák.
PAMUT NORMÁL 40°C (2): erősen szennyezett fehér és magasabb
hőmérsékleten mosható színes ruhák.
PAMUT NORMÁL 20°C: erősen szennyezett fehér és magasabb
hőmérsékleten mosható színes ruhák.
A kijelzőn megjelenő vagy a kézikönyben feltüntetett ciklusidők szokásos körülmények alapján becsült értékek. A tényleges időt számos tényező befolyásolhatja – pl. a bemeneti víznyomás, a
környezeti hőmérséklet, a mosószer mennyisége, a ruhatöltet mennyisége és típusa, a ruhatöltet kiegyensúlyozása, a kiválasztott további opciók.
Megjegyzés: Nagyjából 10 perccel az indítás után a készülék a ruhatöltet-mennyiség alapján újraszámítja, és megjeleníti a program végéig hátralévő időt.
1) Az 1061/2010/EU rendelet szerinti vizsgálati programok: állítsa be a -os programot 60 °C-ra.
Ez a ciklus egy adag, nem különösebben koszos pamut ruhadarabok mosására alkalmas, és ez a leghatékonyabb a víz- és energiafogyasztás
szempontjából is. 60 °C-on mosható termékekhez. A mosás tényleges hőmérséklete eltérhet a megjelölt értéktől.
2) Az 1061/2010/EU rendelet szerinti vizsgálati programok: állítsa be a -os programot 40 °C-ra.
Ez a ciklus egy adag, nem különösebben koszos pamut ruhadarabok mosására alkalmas, és ez a leghatékonyabb a víz- és energiafogyasztás
szempontjából is. 40 °C-on mosható termékekhez. A mosás tényleges hőmérséklete eltérhet a megjelölt értéktől.
3) 60°C-os hőmérsékleten az “Előmosás” funkció nem elérhető.
A viszgálószervek számára:
2) Hosszú pamut program: állítsa be a -os programot 40 °C-ra.
4) Hosszú műszálas program:
állítsa be a -es programot 40 °C-ra.
Max. hőm
(°C)
60° 800
40° 800
60° 1200
40° 1200
30° 800 -
40° 600 -
30° 1000 -
60° 1200
60° 1200 -
30° 0 -
40° 800 -
30° 800 -
60°
(Max. 90°)
40° 1200 -
20° 1200 -
se-
bes-
ség
(ford./
perc)
- 1200 - -
- 1200 - - - - 7 - - - 16’
1200
Opciók
Szuper Mosás
A ciklus kezdetén felhasznált
nagy mennyiségű víznek,
valamint a hosszabb
mosásidőnek köszönhetően
a szupermosás opció nagy
mosóhatást biztosít.
Használható fehérítőszerrel
vagy anélkül. Amennyiben
fehéríteni is szeretne, tegye
be a 3-as berakható tartályt az
1-es rekeszbe. A fehérítőszer
betöltése közben vigyázzon
arra, hogy az a központi csapon jelzett „max” szintet ne lépje
túl (lásd ábra).
Amennyiben csak fehérítést szeretne végezni, teljes
mosást nem, töltse be a fehérítőt a 3-as berakható
rekeszbe, állítsa be az “Öblítés” programot , és kapcsolja
be a “Szuper Mosás” opciót .
! Ez a funkció nem használható a , , , , , ,
, .
Extra Öblítés
Ezen opció alkalmazásával nő az öblítés, valamint a
mosószermaradvány-eltávolítás hatékonysága. Használata
a mosószerekre különösen érzékeny bőrű embereknél
ajánlott. Tanácsos ezt az opciót maximális ruhatöltetmennyiséggel, illetve emelt mosószeradaggal használni.
! Ez a funkció nem használható a , , , , .
Vasaláskönnyítés
Ez az opció a gyűrődések keletkezésének csökkentése
érdekében a megfelelő időben módosítja a mosási
beállításokat és a centrifugasebességet. A ciklus
végén a mosott holmik lassan forognak a dobban; a
„Vasaláskönnyítés” lámpa, valamint az START/PAUSE
lámpa villog. A ciklus leállításához nyomja meg az START/
PAUSE gombot, vagy a „Vasaláskönnyítés” gombot!
! Ez a funkció nem használható a , , , , , .
Előmosás
Ha ezt a funkciót kiválasztja, a készülék előmosást is fog
végezni, mely makacs foltok eltávolítása esetén hasznos.
Megjegyzés: Töltse a mosószert a megfelelő rekeszbe.
! Ez a funkció nem használható a , , , , , , ,
, , (60°), , .
Mosószerek és
adalékok
sás
Előmo-
(3)
Fehér-
Mosás
-
-
-
-
-
-
-
(kg)
talom %
Maradék
Max. töltet
Öblítő
ítőszer
3,5 49 0,87 42 90’
3,5 49 0,56 42 85’
1,5 - - - 130’
1,5 - - - 80’
nedvességtar-
4 - - - 190’
4 53 0,90 73 95’
4 - - - 80’
2 - - - 85’
7 - - - 135’
7 - - - 49’
4 - - - 200’
1 - - - 75’
3 71 0,19 39 30’
7 53 1,00 52,5 185’
7 53 1,09 92 170’
7 - - - 175’
sztás kWh
Összes víz lt
Energiafogya-
Programidő
HU
21
Page 22
Mosószerek és mosandók
HU
Mosószer
A mosószer kiválasztása és adagolt mennyisége a szövet
típusának (pamut, gyapjú, selyem...), színének, a mosási
hőmérsékletnek, a szennyezettség mértékének, valamint
a víz keménységének a függvénye.
A mosószer megfelelő adagolása megakadályozza a
pazarlást és kíméli a környezetet: még, ha biológiailag
lebomló fajtájúk is, a mosószerek olyan összetevőket
tartalmaznak, amelyek megváltoztatják a természet
egyensúlyát.
A következőket tanácsoljuk:
• A pamutból készült ruhaneműkhöz, valamint az
előmosáshoz használjon mosóport.
• A kényesebb pamut ruhadarabokhoz, valamint az
összes alacsony hőmérsékletű programhoz használjon
folyékony mosószert.
• A gyapjú és selyem ruhadarabokhoz használjon
kímélő folyékony mosószert.
A mosószert a mosás elindítása előtt be kell tölteni a
megfelelő rekeszbe, vagy az adagolótégelybe, melyet
utána közvetlenül be kell helyezni a dobba. Ebben az
esetben viszont ne válassza ki a Pamut előmosással
programot!
! Fehér színű pamut ruhadarabokhoz, előmosáshoz és
60 °C-nál magasabb hőmérsékleten történő mosásokhoz
mosóport használjon.
! Kövesse a mosópor csomagolásán feltüntetett
utasításokat.
! Ne használjon kézi mosószert, mert túlzottan sok hab
képződik.
A mosandó ruhák előkészítése
• A berámolás hajtsa jól ki a ruhadarabokat.
• A mosandót szövettípusuk (a ruhanemű címkéjén
található szimbólum), illetve színük szerint válogassa
szét, különösen odagyelve arra, hogy a színes
holmikat elválassza a fehérektől.
• Ürítse ki a zsebeket, és vizsgálja meg a gombokat.
• Ne lépje túl a mosandók száraz tömegére
vonatkozóan a “Programtáblázat” megadott értékeket.
Milyen nehezek a mosandó ruhák?
1 lepedő 400–500 g
1 párnahuzat 150–200 g
1 asztalterítő 400–500 g
1 fürdőköpeny 900–1200 g
1 törölköző 150–250 g
1 farmernadrág 400–500 g
1 ing 150–200 g
Mosási tanácsok
FEHÉR: ezt a ciklust fehér anyagok mosásához
használja. A program a fehér szín.
SZÍNES: a ciklust világos színű anyagok mosásához
használja. A program a színek élénkségének
megtartására lett kifejlesztve.
SÖTÉT: a sötét anyagok mosásához használja a
programot. A program sötét színű ruhadarabok
színének megtartására lett kifejlesztve. A jobb mosási
eredmény érdekében – lehetőleg sötét ruhadarabok
mosásához való – folyékony mosószer használatát
javasoljuk.
ING PROGRAM: a különböző szövetű és színű ingek
mosásához, maximális védelmük érdekében használja a
megfelelő programot.
ANORÁK: libatollal bélelt holmik, mint például (1,5 kgnál könnyebb) széldzsekik, illetve párnák mosásához
használja a megfelelő programot.
ÁGYNEMŰ: Az ágyneműk és törölközők egyetlen
ciklus alatti mosásához használja a programot. Ez a
program optimalizálja az öblítőszer adagolását, valamint
időt és energiát takarít meg önnek. Folyékony mosószer
használatát javasoljuk.
ANTIALLERGÉN: használja a programot, hogy az
elsődleges allergének (pl. pollenek, atkák, macska- és
kutyaszőr) el legyenek távolítva.
ULTRA KÉNYES: A nagyon kényes – pl. itterekkel,
csillogókkal ellátott – anyagok mosásához használja a
programot.
A mosás előtt tanácsos kifordítani a ruhadarabokat, és
a kisebb holmikat a kényes anyagok mosására szolgáló
megfelelő mosózsákba rakni.
A jobb mosási eredmény érdekében kényes anyagokhoz
való folyékony mosószer használatát javasoljuk.
A selyem ruhadarabokhoz és függönyökhöz válassza
a ciklust, és kapcsolja be a opciót (ebben az
esetben az „Extra öblítés” opció is bekapcsolható);
a ciklus a mosandó ruhák öblítésével végződik, a
jelzőlámpa pedig villogni kezd. Az öblítővíz
leeresztéséhez és a mosott holmik kiszedéséhez meg
kell nyomni az START/PAUSE gombot, vagy a
gombot.
Gyapjú: ezen Hotpoint-Ariston mosógép gyapjú” mosási
ciklusát a Woolmark Company tesztelte és engedélyezte
“kézzel mosható” gyapjú ruhaneműk mosásához,
amennyiben a mosást a ruhanemű címkéjén feltűntetett
és a háztartási gép gyártója által előírt útmutatásoknak
megfelelően hajtja végre. Hotpoint-Ariston az első
mosógép márka, mely megszerezte a Woolmark
Company Woolmark Apparel Care - Platinum igazolását
a mosási teljesítményéért és a gazdaságos víz- és
energiafogyasztásáért. (M1253)
Pamut Normál 20°C – Ideális a szennyezett pamut
töltetekhez. A 40 C-os mosáséhoz mérhető, akár
hideg mosás mellett is elérhető jó teljesítményt egy
rendszeres időközönként ismétlődő sebességcsúcsokkal
jellemezhető, változó sebességű mechanikus mozgás
biztosítja.
A bepakolt ruhák kiegyensúlyozására
szolgáló rendszer
A túlzott zajhatás megelőzésére, valamint a mosandók egyenletes eloszlása érdekében a forgódob a
centrifugafázis előtt a mosási centrifugasebességnél
kicsit nagyobb sebességre kapcsol. Amennyiben a
töltet kiegyensúlyozására irányuló próbálkozások nem
vezetnek eredményre, a készülék az elméleti centrifugasebességnél lassabb centrifugálásra kapcsol. Jelentős
kiegyensúlyozatlanság esetén a mosógép, centrifugálás
előtt megpróbálja a töltetet megfelelően eloszlatni. A töltet
megfelelő eloszlásának biztosítása érdekében ajánlatos
a nagy ruhaneműket a kicsikkel összekeverni.
22
Page 23

Rendellenességek és
elhárításuk
Előfordulhat, hogy a készülék nem működik. Mielőtt felhívná a szervizt (lásd „Szerviz”), ellenőrizze, hogy nem olyan
problémáról van-e szó, amely a következő lista segítségével egyszerűen megoldható.
Rendellenességek:
A készülék nem kapcsol be.
A mosási ciklus nem indul el.
A készülék nem kap vizet.
A készülék ajtaja zárva marad.
A készülék folyamatosan szívja,
és leereszti a vizet.
A készülék nem ereszti le a vizet
vagy nem centrifugál.
A készülék nagyon rázkódik a
centrifugálás alatt.
A készülékből elfolyik a víz.
A „Folyamatban lévő mosási fázis”
szimbólumai, valamint a ON/OFF
gomb lámpája gyorsan villognak.
Sok hab képződik.
A készülék ajtaja zárva marad.
Lehetséges okok / megoldás:
• A hálózati csatlakozódugó nincs bedugva az aljzatba, vagy nem eléggé
ahhoz, hogy jól érintkezzen.
• Nincs áram a lakásban.
• Az ajtó nincs jól becsukva.
• Nem nyomta meg az START/PAUSE gombot.
• A vízcsap nincs kinyitva.
• Az indítás időjelzőjén késletetés lett beállítva.
• A vízbevezető cső nincs csatlakoztatva a csaphoz.
• A cső meg van törve.
• A vízcsap nincs kinyitva.
• A lakásban nincs víz.
• Nincs elegendő nyomás.
• Nem nyomta meg az START/PAUSE gombot.
• A opció kiválasztása esetén a program végeztével a mosógép lassan
forgatja a dobot. A ciklus leállításához nyomja meg az START/PAUSE
gombot, vagy a gombot.
• A leeresztőcső nem a padlószinttől 65 és 100 cm közötti magasságban van
felszerelve (lásd „Üzembe helyezés”).
• A leeresztőcső vége vízbe merül (lásd „Üzembe helyezés”).
• Ha a lakás egy épület legfelsőbb emeleteinek egyikén található, lehetséges,
hogy a csatornaszellőző eltömődésének jelensége (szivornyahatás) lépett
fel, ezért a készülék folytonosan szívja és leereszti a vizet. E kellemetlenség
elkerülésére a kereskedelmi forgalomban rendelkezésre állnak
csatornaszellőző-szelepek.
• A fali szifonnak nincs szellőzése.
• A program nem ereszti le a vizet: néhány programnál a vizet kézileg kell
leereszteni (lásd „Programok és opciók”).
• Be van kapcsolva a opciók: a program befejezéséhez nyomja meg az
START/PAUSE gombot (lásd „Programok és opciók”).
• A leeresztőcső meg van törve (lásd „Üzembe helyezés”).
• A lefolyó el van dugulva.
• Az üzembe helyezéskor a forgódob rögzítése nem lett eltávolítva (lásd
„Üzembe helyezés”).
• A készülék nincs vízszintben (lásd „Üzembe helyezés”).
• A készülék bútorok és falak közé van szorítva (lásd „Üzembe helyezés”).
• A ruhatöltet nincs kiegyensúlyozva (lásd „Mosószerek és mosandók”).
• A vízbevezető cső nincs jól felcsavarva (lásd „Üzembe helyezés”).
• A mosószer-adagoló ók eltömődött (tisztításához lásd „Karbantartás és ápolás”).
• A leeresztőcső nincs szorosan rögzítve (lásd „Üzembe helyezés”).
• Kapcsolja ki a készüléket, és húzza ki a dugót az aljzatból, várjon körülbelül 1
percet, majd indítsa újra! Ha a hiba továbbra is fennáll, forduljon a szervizhez.
• A mosószer nem mosógépekhez való (kell, hogy szerepeljen rajta, hogy
„gépi”, „kézi vagy gépi mosáshoz”, vagy hasonló).
• Túl sok mosószert használt.
• Hajtsa végre a kézi kioldást (lásd „Óvintézkedések és tanácsok”.)
HU
! Megjegyzés: a demó módból való kilépéshez, állítsa le a gép, 3 másodpercig nyomja meg egyidejűleg az „START/PAUSE”
gombot és az „ON/OFF” gombot .
23
Page 24

Szerviz
HU
Mielőtt a szervizhez fordulna, tegye a következőket:
• Győződjön meg arról, hogy a hibát nem tudja saját maga is elhárítani (lásd „Rendellenességek és elhárításuk”);
• Indítsa el újból a programot, hogy lássa, elhárította-e a hibát;
• Amennyiben nem sikerült, forduljon a hivatalos szakszervizhez.
! A mosógép hibás beszerelése vagy nem megfelelő használata esetén a szerviz beavatkozása pénzbe kerülhet.
! Soha ne forduljon engedéllyel nem rendelkező szerelőhöz!
Közölje az alábbiakat:
• A meghibásodás jellege;
• A mosógép típusa (Mod.);
• Gyártási szám (S/N).
Az utóbbi információk a készüléken elhelyezett adattáblán találhatók.
24
Page 25

Instrucţiuni de instalare
MAŞINĂ DE SPĂLAT RUFE
şi folosire
RO
Română
AQUALTIS
AQS73D 29
Sumar
Instalare, 26-27
Despachetare şi punere la nivel
Racorduri hidraulice şi electrice
Date tehnice
Întreţinere şi curăţire, 28
Întreruperea alimentării cu apă şi curent electric
Curăţarea maşinii de spălat
Curăţarea sertarului pentru detergenţi
Curăţarea cuvei
Curăţarea pompei
Controlarea furtunului de alimentare cu apă
Precauţii şi sfaturi, 29
Norme de protecţie şi siguranţă generale
Scoaterea aparatului din uz
Deschiderea manuală a uşii
Descrierea maşinii de spălat, 30-31
Panoul de comenzi “touch control”
Cum se desfăşoară un ciclu de spălare, 32
RO
Programe şi opţiuni, 33
Tabel programe
Opţiuni
Detergenţi şi rufe, 34
Detergent
Pregătirea rufelor
Recomandări pentru spălare
Sistemul de echilibrare a sarcinii
Anomalii şi remedii, 35
Asistenţă, 36
25
Page 26

Instalare
RO
! Este important să păstraţi acest manual
pentru a-l putea consulta în orice moment.
În caz de vânzare, cedare sau mutare,
asiguraţi-vă că acesta rămâne cu maşina de
spălat rufe.
! Citiţi cu atenţie instrucţiunile: veţi găsi
informaţii importante cu privire la instalare, la
folosire şi la siguranţă.
! În plicul unde se aă manualul veţi găsi, în
afara garanţiei, şi câteva piese care vă vor
servi la instalare.
Despachetare şi punere la nivel
Scoaterea din ambalaj
1. După scoaterea maşinii de spălat din
ambalaj, controlaţi că aceasta nu a suferit
nici o daună în timpul transportului.
Dacă este deteriorată, nu o conectaţi şi
contactaţi agentul de vânzare.
2. Scoateţi cele patru
şuruburi de protecţie
pentru transport şi
distanţierul respectiv,
toate situate în partea
posterioară (a se
vedea gura).
3. Închideţi oriciile cu dopurile din plastic din
pungă.
4. Păstraţi toate piesele; în cazul în care
maşina de spălat va transportată, este
necesar să le montaţi din nou pentru a evita
deteriorarea ei internă.
! Ambalajele nu sunt jucării pentru copii!
Punere la nivel
! Punerea la nivel a maşinii îi oferă acesteia
stabilitate şi elimină vibraţiile şi zgomotul, mai
ales în faza de stoarcere a rufelor.
! În cazul în care maşina este instalată pe
mochetă sau covor, reglaţi picioruşele la o
înălţime care să asigure maşinii de spălat un
spaţiu sucient pentru ventilare.
Racorduri hidraulice şi electrice
Racordarea furtunului de alimentare cu apă
! Înainte de a racorda furtunul de alimentare
la reţeaua de apă, lăsaţi apa să curgă până
când aceasta este limpede.
1. Racordaţi furtunul
de alimentare la
maşina de spălat,
înşurubândul la priza
de apă, în partea
posterioară, sus în
dreapta (a se vedea
gura).
2. Conectaţi tubul
de alimentare,
înşurubându-l la un
robinet de apă rece
cu gura letată de ľ
gaz
(a se vedea gura).
3. Fiţi atenţi ca furtunul să nu e nici pliat, nici
îndoit.
1. Instalaţi maşina de spălat pe o suprafaţă
plană şi rigidă, fără a o sprijini de ziduri sau
mobilă.
2. Echilibraţi maşina
deşurubând sau
înşurubând, după
caz, picioarele
letate, până când
maşina va perfect
orizontală (ea poate
înclinată nu mai mult
de 2 grade).
26
! Presiunea apei de la robinet trebuie să
e cuprinsă în valorile din tabelul cu Date
tehnice (a se vedea pagina alăturată).
! Dacă lungimea furtunului de alimentare
nu este sucientă, adresaţivă unui magazin
specializat sau unui instalator autorizat.
! Nu folosiţi niciodată un furtun uzat sau
vechi, ci doar cel din dotare.
Page 27

Conectarea furtunului de golire
65 - 100 cm
- 2004/108/CE (Compatibi-
Conectaţi furtunul
de golire a apei la
canalizare sau la
un robinet de golire
pus pe perete, la o
distanţă de 65-100
cm de la pământ,
evitând îndoirea sa.;
! După instalarea maşinii de spălat, priza de
curent trebuie să e uşor accesibilă.
! Nu folosiţi prelungitoare şi prize multiple.
! Cablul nu trebuie să e îndoit sau
comprimat.
! Cablul de alimentare sau ştecherul trebuie
să e înlocuite doar de tehnicieni autorizati
ai retelei de service indicata de producator in
certicatul de garantie.
RO
Ca alternativă,
sprijiniţi furtunul de
golire pe marginea
unei chiuvete sau
a unei căzi, legând
cotul din dotare la
robinet (vezi gura).
Extremitatea
liberă a tubului
de descărcare nu
trebuie să rămână
cufundată în apă.
! Nu se recomandă folosirea furtunurilor
prelungitoare; dacă este indispensabil,
acestea trebuie să aibă acelaşi diametru ca şi
furtunul original şi nu trebuie să depăşească
150 cm lungime.
Racordarea electrică
Înainte de a introduce ştecherul în priza de
curent, asiguraţi-vă că:
• priza să e cu împământare şi conformă
prevederilor legale;
• priza să poată suporta sarcina maximă de
putere a maşinii, indicată în tabelul cu Date
tehnice (a se vedea alături);
• tensiunea de alimentare să e cuprinsă în
valorile indicate în tabelul cu Date tehnice
(a se vedea alături);
Atenţie! Firma îşi declină orice
responsabilitate în cazul în care aceste
norme nu se respectă.
Date tehnice
Model AQS73D 29
lãrgime 59,5 cm
Dimensiuni
Capacitate de la 1 la 7 kg
Legãturi
electrice
Legãturi hidrice
Viteza de
centrifugare
Programe
de control
conform
directivelor
1061/2010
şi
1015/2010
înãlþime 85 cm
profunzime 44,5 cm
Vezi placuta cu caracteristicile tehnice, aplicata pe
masina.
presiune maximã
1 MPa (10 bari)
presiune minimã
0,05 MPa (0,5 bari)
capacitatea cuvei 48 litri
pânã la 1200 de rotaþii pe
minut
Programul
;
Bumbac Standard 60°C.
Programul
;
Bumbac Standard 40°C.
Acest aparat este conform cu urmãtoarele
Directive Comunitare:
• priza să e compatibilă cu ştecherul maşinii
de spălat. În caz contrar, înlocuiţi priza sau
ştecherul.
! Maşina de spălat nu trebuie instalată
afară, nici chiar în cazul în care spaţiul este
adăpostit, deoarece expunerea maşinii la ploi
şi furtuni este foarte periculoasă.
litate Electromagneticã)
- 2006/95/CE (Tensiuni
Joase)
- 2012/19/EU
27
Page 28

1
2
1
2
2
Întreţinere şi curăţire
RO
Întreruperea alimentării cu apă şi
curent electric
• Închideţi robinetul de apă după ecare
spălare. Se limitează astfel uzura instalaţiei
hidraulice a maşinii de spălat şi se elimină
pericolul scurgerilor.
• Scoateţi ştecărul din priza de curent atunci
când curăţaţi maşina de spălat şi când se
efectuează lucrări de întreţinere..
Curăţarea maşinii de spălat
Partea externă şi părţile din cauciuc pot
curăţate cu o lavetă înmuiată în apă călduţă
şi săpun. Nu folosiţi solvenţi sau substanţe
abrazive.
Curăţarea sertarului pentru
detergenţi
Pentru a scoate
sertarul, apăsaţi pe
levierul (1) şi trageţi-l
spre exterior (2) (vezi
gura).
Spălaţi-l sub un jet de
apă; această operaţie
trebuie efectuată cât
mai des posibil.
Pentru a avea acces la anticameră:
1. îndepărtaţi panoul de acoperire de pe
latura anterioară a maşinii, apăsând spre
centru, apoi împingeţi în jos de pe ambele
laturi şi scoateţi-l (a se vedea gurile).
2. amplasaţi sub
partea anterioară a
maşinii un vas pentru
colectarea apei (circa
1,5 l ) (a se vedea
gura).
3. deşurubaţi capacul
rotindu-l în sens
antiorar
(a se vedea gura).
4. curăţaţi cu grijă interiorul;
5. înşurubaţi la loc capacul;
6. montaţi din nou panoul vericând, înainte
de a-l împinge spre maşină, de a introdus
cârligele în oriciile respective.
Curăţarea cuvei
• Lăsaţi mereu uşa întredeschisă pentru a
evita formarea unui miros urât.
Curăţarea pompei
Maşina de spălat este dotată cu o pompă
de auto-curăţare, care nu necesită nici o
întreţinere. Se poate întâmpla însă ca unele
obiecte mici (monede, nasturi) să cadă în
anticamera care protejează pompa, situată în
partea inferioară a acesteia.
! Vericaţi ca ciclul de spălare să e încheiat
şi scoateţi ştecărul din priză.
28
Controlarea furtunului de alimentare
cu apă
Controlaţi furtunul de alimentare cel puţin
o dată pe an. Dacă prezintă crăpături sau
suri trebuie înlocuit: pe parcursul spălărilor,
presiunea puternică ar putea provoca
crăpături neaşteptate.
Page 29

Precauţii şi sfaturi
! Maşina de spălat a fost proiectată şi construită conform
normelor internaţionale de siguranţă. Aceste avertizări
sunt furnizate din motive de siguranţă şi trebuie să e
citite cu atenţie.
Norme de protecţie şi siguranţă generale
• Acest aparat a fost conceput exclusiv pentru utilizarea
în locuinţe.
• Aparatul nu trebuie utilizat de către persoane
(inclusiv Aparat aparat poate folosit de copii
începând cu vârsta de 8 ani şi de persoane
cu capacităţi zice, senzoriale sau mentale
reduse sau cu experienţă şi cunoştinţe
insuciente dacă sunt supravegheate sau
dacă au primit o pregătire adecvată privind
folosirea aparatului în mod sigur şi înţelegând
pericolele respective. Copiii nu trebuie să se
joace cu aparatul. Întreţinerea şi curăţarea
nu trebuie să e efectuate de copii fără
supraveghere.
• Nu atingeţi maşina când sunteţi desculţi sau cu mâinile
sau picioarele ude sau umede.
• Nu scoateţi ştecherul din priză trăgând de cablu, ci
apucând ştecherul.
• Nu atingeţi apa golită din maşină, care poate avea o
temperatură ridicată.
• Nu forţaţi în nici un caz uşa: s-ar putea deteriora
mecanismul de siguranţă care evită deschiderea
accidentală.
• În caz de defecţiune, nu umblaţi în niciun caz la
mecanismele din interior şi nu încercaţi să o reparaţi
singuri.
• Controlaţi mereu ca în apropierea maşinii aate în
funcţiune, să nu se ae copii.
• Dacă trebuie să deplasaţi maşina, apelaţi la alte două
sau trei persoane şi procedaţi cu cea mai mare atenţie.
Niciodată nu deplasaţi maşina singuri deoarece
aceasta este foarte grea.
• Înainte de a introduce rufele, controlaţi ca şi cuva să
e goală.
Deschiderea manuală a uşii
Dacă nu este posibil să deschideţi uşa din cauza
întreruperii curentului electric şi doriţi totuşi să întindeţi
rufele, procedaţi după cum urmează:
1. scoateţi ştecherul din
priză..
2. vericaţi ca nivelul de
apă din maşină să e sub
marginea uşii; în caz contrar,
scoateţi apa în exces cu
ajutorul furtunului de golire,
punând-o într-un vas, după
indicaţiile din gură.
3. îndepărtaţi panoul de acoperire de pe latura anterioară
a maşinii de spălat (a se vedea pagina următoare).
4. utilizând tija din gură,
trageţi spre voi până când
cârligul de plastic iese din
opritor; împingeţi-l apoi în
jos, până când veţi auzi un
clic care vă semnalează că
uşa este deblocată.
5. deschideţi uşa; dacă nu
aţi reuşit, repetaţi operaţiile.
RO
Scoaterea aparatului din uz
• Eliminarea ambalajelor: respectaţi reglementările
locale, în acest fel ambalajele vor putea refolosite.
• Directiva Europeană 2012/19/EU cu privire la deşeurile
care provin de la aparatura electrică sau electronică
prevede ca aparatele electrocasnice să nu e colectate
împreună cu deşeurile urbane solide, obişnuite.
Aparatele scoase din uz trebuie să e colectate
separat atât pentru a optimiza recuperarea şi reciclarea
materialelor componente cât şi pentru a evita pericolele
care pot duce la dăunarea sănătăţii omului sau
poluarea mediului înconjurător. Simbolul tomberonului
tăiat care apare pe toate produsele vă aminteşte tocmai
obligaţia de a le colecta separat.
Pentru informaţii suplimentare cu privire la scoaterea
din uz a electrocasnicelor, deţinătorii acestora pot apela
la centrele de colectare a deşeurilor sau la vânzătorii de
la care au achiziţionat produsele respective.
6. montaţi din nou panoul vericând, înainte de a-l
împinge spre maşină, de a introdus cârligele în oriciile
respective.
29
Page 30

Descrierea maşinii de spălat
3
1
2
1
8
0
2
1
0
1
5
0
1
2
0
9
0
6
0
B
A
RO
UŞA
UŞA
MÂNER UŞĂ
PICIOR
Pentru a deschide uşa
maşinii utilizaţi întotdeauna
mânerul respectiv (vezi
gura).
PANOUL DE
COMANDĂ
PICIOARE REGLABILE
recomandat să folosiţi peretele despărţitor A prevăzut
pentru dozarea corectă. Pentru utilizarea de detergent
praf puneţi peretele despărţitor în cavitatea B.
3. sertar adiţional: Decolorant
! Folosirea sertarului adiţional 3 exclude prespălarea.
compartimentul pentru aditivi: pentru balsam sau alte
aditive lichide. Se recomandă să nu depăşiţi niciodată
nivelul maxim indicat de grătar şi să diluaţi balsamul
concentrat.
Panoul de comenzi “touch control”
SERTARUL PENTRU DETERGENŢI
Sertarul pentru detergenţi
se aă în interiorul maşinii; îl
puteţi folosi deschizând uşa
maşinii de spălat.
Pentru a modica setările
apăsaţi uşor pe pictograma
din interiorul zonei sensibile
(touch control) aşa cum este
indicat în gură.
Pentru dozarea
detergentului, citiţi capitolul
“Detergenţi şi rufe”.
Modalitatea de stand by
1. compartimentul pentru
prespălare: se recomandă
utilizarea unui detergent
praf.
! Înainte de a adăuga
detergentul vericaţi ca
sertarul adiţional 3 să nu e
introdus.
2. compartimentul pentru
spălare: Când utilizaţi
detergent lichid este
Această maşină de spălat rufe, conform noilor norme
legate de economia de curent electric, este dotată cu
un sistem de oprire automat (stand-by) care intră în
funcţiune după 30 minute de neutilizare. Apăsaţi scurt
tasta ON/OFF şi aşteptaţi repunerea în funcţiune a
maşinii.
30
Page 31

Panoul de comenzi “touch control”
Selector
PROGRAME
M2
M1
DISPLAY
Tasta
CENTRIFUGARE
Tasta
TEMPERATURĂ
Tastă cu indicator luminos
START/PAUSE
Indicator
luminos
ECO
RO
Icoane ETAPE
DE SPĂLARE
Buton cu led
ON/OFF
M3
OPŢIUNI
Buton cu led ON/OFF: apăsaţi scurt butonul pentru
a porni sau opri maşina de spălat. Ledul verde vă arată
că maşina este în funcţiune. Pentru a opri funcţionarea
maşinii de spălat în timpul spălării, este necesar să ţineţi
apăsată tasta circa 3 secunde; o apăsare de scurtă
durată sau accidentală nu va opri maşina.
Oprirea maşinii de spălat în timpul executării unui ciclu va
anula programul în curs de desfăşurare.
Selector PROGRAME: poate rotit în ambele sensuri.
Pentru seta programul adecvat, consultaţi “Tabel
Programe”. Pe durata desfăşurării programului selectorul
nu se mişcă.
Tasta M1-M2-M3: ţineţi apăsată una din taste pentru a
memora un program şi opţiunile preferate de dvs. Pentru
a activa un program memorat anterior, apăsaţi tasta
respectivă.
Tasta TEMPERATURĂ: apăsaţi pentru a modica
sau exclude temperatura; valoarea aleasă este indicată
de display-ul de deasupra (a se vedea “Cum se
desfăşoară un ciclu de spălare”).
Tasta CENTRIFUGARE: apăsaţi pentru a modica
sau exclude centrifuga; valoarea aleasă este indicată de
display-ul de deasupra (a se vedea “Cum se desfăşoară
un ciclu de spălare”).
Tasta PORNIRE ÎNTÂRZIATĂ: apăsaţi pentru a regla
pornirea întârziată a programului ales; valoarea întârzierii
este indicată de display-ul de deasupra (a se vedea
“Cum se desfăşoară un ciclu de spălare”).
Taste PŢIUNI:apăsaţi pentru a selecta opţiunile
disponibile. Ledul corespunzător opţiunii selectate va
rămâne aprins (a se vedea “Cum se desfăşoară un ciclu
de spălare”).
Icoane ETAPE DE SPĂLARE: se aprind pentru a indica
stadiul de avansare a unui ciclu (Spălare - Clătire
- Centrifugare - Evacuare apă ).
Mesajul se aprinde la terminarea ciclului.
Taste
Tasta PORNIRE
ÎNTÂRZIATĂ
Led
LOCK
Buton cu led
BLOCARE
BUTOANE
Tastă cu indicator luminos START/PAUSE când ledul
verde emite un semnal intermitent, apăsaţi tasta pentru
a porni ciclul de spălare. După activarea ciclului, ledul
rămâne aprins. Pentru a introduce o pauză în timpul
spălării, apăsaţi din nou butonul: ledul va emite o lumină
intermitentă, de culoare portocalie. Dacă ledul “LOCK”
este stins, puteţi deschide uşa maşinii de spălat.
Pentru a continua spălarea, de unde a fost întreruptă,
apăsaţi din nou tasta.
Led LOCK: vă arată că uşa este blocată. Pentru a
deschide uşa, ciclul de spălare trebuie pus în pauză (vezi
“Cum se desfăşoară un ciclu de spălare”).
Buton cu led BLOCARE BUTOANE: pentru a bloca
sau debloca panoul de comenzi, ţineţi apăsată tasta timp
de 2 secunde circa. Dacă ledul se aprinde, atunci panoul
de comenzi este blocat (cu excepţia buton ON/OFF). În
acest fel, se evită modicarea accidentală a unui program,
în special de către copii.
Indicator luminos ECO icoana se va aprinde atunci
când, modicând parametrii de spălare, se va obţine o
economie de energie de cel puţin 10%; în timp ce maşina
intră în Standby se va aprinde şi se va stinge încet,
indicând o economie de energie de până la 80%.
MODIFICARE LIMBĂ
La prima pornire a maşinii apare pe display prima limbă
luminând intermitent. În corespondenţă cu cele 3 taste din
dreapta display-ului apar simbolurile “ ” , “OK” şi “V” Limbile
se schimbă automat la ecare 3’’ sau apăsînd tastele de la
simbolurile “ “ e “V”. Cu tasta “OK” se conrmă limba care
se xează după 2’’. Dacă nu se apasă nicio tastă, după 30’’
schimbarea automată a limbilor reîncepe.
Pentru a modica limba trebuie să porniţi şi să opriţi
maşina, în primele 30” după oprire apăsaţi simultan
butoanele temperatură + centrifugă + pornire
întârziată pentru 5’’, pe lângă un scurt semnal acustic,
pe display apare limba setată aprinzându-se intermitent.
Apăsînd tastele din dreptul simbolurilor “ “ şi “V” se schimbă
limba. Cu tasta din dreptul simbolului “OK” se conrmă limba
care se xează după 2’’. Dacă nu se apasă nicio tastă, după
30’’ se va aşa limba xată anterior. Porniţi maşina.
31
Page 32

Cum se desfăşoară un ciclu de
spălare
RO
NOTĂ: la prima folosire a maşinii de spălat, efectuaţi un
ciclu de spălare fără rufe, dar cu detergent, cu programul
pentru bumbac, la 90°, fără prespălare.
1. PUNEREA ÎN FUNCŢIUNE A MAŞINII. Apăsaţi tasta
. Toate ledurile se vor aprinde timp de 1 secundă
iar pe display va apărea mesajul AQUALTIS; ledul
corespunzător tastei va rămâne aprins iar ledul de
START/PAUSE va lumina intermitent.
2. ALEGEREA PROGRAMULUI. Rotiţi SELECTORUL
DE PROGRAME spre dreapta sau spre stânga pentru
a alege programul dorit; numele programului va
aşat pe display, împreună cu temperatura şi turaţia
centrifugei, acestea din urmă putând modicate. Pe
ecran va apărea şi durata ciclului.
3. INTRODUCEREA RUFELOR.Deschideţi uşa.
Introduceţi rufele în maşină, ind atenţi să nu depăşiţi
cantitatea indicată în tabelul de programe de la pagina
următoare (sau nivelul de greutate indicat pe display).
4. DOZAREA DETERGENTULUI Extrageţi sertarul şi
turnaţi detergent în compartimentele respective, după
indicaţiile din cap. „Descrierea maşinii de spălat”.
5. ÎNCHIDEŢI UŞA.
6. PERSONALIZAREA CICLULUI DE SPĂLARE.
Apăsaţi butoanele respective de pe panoul de comenzi:
Modicare temperaturii şi/sau a vitezei de
stoarcere
Maşina aşează automat temperatura şi centrifuga
maxime prevăzute pentru programul ales, sau ultimele
selectate, dacă sunt compatibile cu programul. Apăsând
butonul puteţi micşora treptat temperatura până la
cea corespunzătoare spălării la rece (OFF). Apăsând
butonul puteţi micşora treptat viteza de stoarcere,
până la excluderea centrifugei (OFF). Din acest moment,
apăsarea ulterioară a butoanelor va aduce valorile la cele
maxime prevăzute.
! Excepţie: dacă selectaţi programul
crescută până la 90°.
Setaţi pornirea întârziată.
Pentru a programa pornirea întârziată a maşinii, apăsaţi
tasta respectivă pentru a alege timpul de întârziere
dorit. Pentru a seta pornirea întîrziată a programului
ales, apăsaţi tasta respectivă pînă se ajunge la timpul
de întîrziere dorit. În timpul setării se aşează timpul
de întîrziere odată cu textul “Start în:” iar simbolul
luminează intermitent. După setarea pornirii întîrziate
display-ul va aşa simbolul x şi va reveni la aşarea
duratei ciclului setat cu textul “Stop în:” şi durata
ciclului. Apăsînd tasta PORNIRE ÎNTÎRZIATĂ o
singură dată se aşează timpul de întîrziere setat
anterior.
După pornire display-ul va aşa textul “Start în:”
şi timpul de întîrziere. După trecerea timpului de
întîrziere setat, maşina va porni şi display-ul va aşa
“Stop în:” şi timpul rămas pentru terminarea ciclului.
temperatura poate
Pentru a anula pornirea întârziată, apăsaţi tasta
corespunzătoare până când pe display apare mesajul
OFF; în acel moment se va stinge şi ledul .
Modicarea caracteristicilor unui
ciclu.
• Apăsaţi tasta corespunzătoare pentru a activa
această opţiune; pe display va apărea numele
opţiunii iar ledul tastei se va aprinde.
• Apăsaţi din nou tasta corespunzătoare pentru a
dezactiva opţiunea; pe display va apărea numele
opţiunii plus OFF iar ledul tastei se va stinge.
! Dacă opţiunea selectată nu este compatibilă cu
programul setat, incompatibilitatea va semnalată prin
aprinderea intermitentă a ledului şi printr-un semnal
acustic (3 bip), iar opţiunea nu va activată.
! Dacă opţiunea selectată nu este compatibilă cu o altă
opţiune, reglată anterior, ledul corespunzător primei
opţiuni va emite un semnal intermitent şi va activată
numai a doua opţiune (ledul corespunzător acesteia se
va aprinde).
! Cantitatea de rufe admisă precum şi durata ciclului
pot varia în funcţie de opţiunea aleasă.
7. ACTIVAREA UNUI PROGRAMApăsaţi tasta START/
PAUSE. Ledul corespunzător se va aprinde x, iar
uşa maşinii se va bloca (ledul LOCK va aprins).
Icoanele corespunzătoare diferitelor etape de spălare
se vor aprinde în timpul spălării, pentru a indica stadiul
de avansare a ciclului.
Pentru a modica un program în timpul executării
unui ciclu, puneţi maşina de spălat în pauză apăsând
butonul START/PAUSE; apoi selectaţi ciclul dorit şi
apăsaţi din nou butonul START/PAUSE.
Pentru a deschide uşa în timpul executării unui ciclu,
apăsaţi butonul START/PAUSE; dacă ledul
LOCK este stins, se va putea deschide uşa. Apăsaţi
din nou tasta START/PAUSE pentru a continua
programul de unde era oprit.
8. TERMINAREA PROGRAMULUIEste indicată de
mesajul END aprins. Uşa va putea deschisă
imediat. Dacă ledul START/PAUSE emite un semnal
intermitent, apăsaţi butonul pentru a termina ciclul.
Deschideţi uşa, scoateţi rufele şi opriţi maşina de
spălat.
! Dacă doriţi să anulaţi un ciclu deja pornit, ţineţi apăsat
butonul până când ciclul va înceta denitiv, iar maşina
se va opri.
32
Page 33

3
1
2
Programe şi opţiuni
Tabel programe
Detergenþi
RO
Consum
Apă totală
energie kWh
lt
Durata
ciclului de
Descrierea Programului
Icoana
SINTETICE Rezistente
SINTETICE Rezistente (4)
RUFE ALBE
RUFE COLORATE
RUFE NEGRE
CĂMĂŞI
GECI CĂPTUŞITE
LENJERIE: pentru prosoape şi cearceafuri.
CLĂTIRE
CENTRIFUGARE şi EVACUARE APĂ
ANTIALERGIE
ULTRA DELICATE
LÂNĂ Platinum care: pentru lână, caşmir, etc.
MIX 30’: pentru a împrospăta rapid articolele puţin murdare (nu
este indicat pentru lână, mătase şi articole de spălat cu mâna).
Bumbac Standard 60°C (1): albe şi colorate rezistente foarte
murdare.
Bumbac Standard 40°C (2): albe şi colorate delicate foarte
murdare.
Bumbac Standard 20°C: albe şi colorate delicate foarte
murdare.
Durata ciclului indicată pe display sau în carte este calculată în baza unor condiţii standard. Timpul efectiv poate varia în baza a numeroşi factori, precum temperatura şi presiunea apei la intrare, temperatura mediului, cantitatea de detergent, cantitatea şi tipul încărcăturii, echilibrarea încărcăturii, opţiunile suplimentare selectate.
Notă: după aprox. 10 minute de la START, pe baza sarcinii efectuate, maşina va recalcula şi va aşa timpul rămas până la sfârşitul programului.
1) Programe de probă conform directivei 1061/2010: selectaţi programul şi temperatura de 60°C.
Acest ciclu este potrivit pentru curăţarea unei încărcături de bumbac cu grad de murdărie normal şi este cel mai ecient din punct de vedere al consumului combinat de energie şi
apă; se foloseşte pentru articole de îmbrăcăminte care pot spălate la 60°C. Temperatura efectivă de spălare poate diferi de cea indicată.
2) Programe de probă conform directivei 1061/2010: selectaţi programul şi temperatura de 40°C.
Acest ciclu este potrivit pentru curăţarea unei încărcături de bumbac cu grad de murdărie normal şi este cel mai ecient din punct de vedere al consumului combinat de energie şi
apă; se foloseşte pentru articole de îmbrăcăminte care pot spălate la 40°C. Temperatura efectivă de spălare poate diferi de cea indicată.
3) La temperatura de 60 °C funcţia de “Prespălare” nu poate activată.
Pentru toate Instituţiile de Testare:
2) Program pentru bumbac, prelungit: selectaţi programul şi temperatura de 40°C.
4) Program sintetic lung:
selectaţi programul şi temperatura de 40°C.
(°C)
Temp. max.
60° 800
40° 800
60° 1200
40° 1200
30° 800 -
40° 600 -
30° 1000 -
60° 1200
- 1200 - -
- 1200 - - - - 7 - - - 16’
60° 1200 -
30° 0 -
40° 800 -
30° 800 -
60°
(Max. 90°)
40° 1200 -
20° 1200 -
minut)
(rotaþii pe
Viteza max.
Prespã-
(3)
1200
lare
Spãlare
rant
Decolo-
-
-
-
-
-
-
-
Sarcina
rufe
Max. (Kg)
Balsam
Umiditate
reziduală %
3,5 49 0,87 42 90’
3,5 49 0,56 42 85’
4 - - - 190’
4 53 0,90 73 95’
4 - - - 80’
2 - - - 85’
1,5 - - - 130’
7 - - - 135’
7 - - - 49’
4 - - - 200’
1 - - - 75’
1,5 - - - 80’
3 71 0,19 39 30’
7 53 1,00 52,5 185’
7 53 1,09 92 170’
7 - - - 175’
spalare
Opţiuni
Super Wash
Datorită utilizării unei
cantităţi mai mari de apă
în faza iniţială a ciclului
şi duratei îndelungate a
programului, această opţiune
garantează o spălare de
mare performanţă. Această
funcţie este utilă pentru a
elimina petele rezistente.
Poate utilizată cu sau fără
decolorant. Dacă se doreşte
şi efectuarea înălbirii introduceţi recipientul auxiliar 3, din
dotare, în recipientul 1. La dozarea decolorantului, nu
depăşiţi nivelul “max” indicat pe pivotul central (a se vedea
gura). Dacă se doreşte numai înălbire fără spălare
completă, vărsaţi decolorantul în recipientul auxiliar 3,
setaţi programul “Clătire” şi activaţi opţiunea “Super
Wash” .
! Nu poate activată cu programele , , , , ,
, , .
Extra Clătire
Selectând această opţiune, clătirea va mai ecientă,
ceea ce asigură eliminarea totală a reziduurilor de
detergent. Este utilă pentru persoanele cu pielea
sensibilă la detergent. Se recomandă selectarea acestei
opţiuni dacă maşina de spălat este plină sau dacă aţi
folosit mult detergent.
! Nu poate activată cu programele , , , , .
Clăcare Uşoară
Selectând această opţiune, spălarea şi centrifuga vor
modicate în mod oportun, pentru a reduce plierea rufelor.
La terminarea ciclului, maşina de spălat va efectua turaţii
lente ale cuvei; indicatoarele luminoase corespunzătoare
tastelor “Călcare Uşoară” şi START/PAUSE vor emite un
semnal intermitent. Pentru a termina ciclul de spălare,
apăsaţi butonul START/PAUSE sau “Călcare Uşoară”.
! Nu poate activată cu programele , , , , , .
Prespălare
Această funcţie este utilă pentru prespălarea rufelor, mai
ales în scopul de a îndepărta petele rezistente.
N.B.: Adăugaţi detergent în sertarul respectiv.
! Nu poate activată cu programele , , , , ,
, , , , (60°), , .
33
Page 34

Detergenţi şi rufe
RO
Detergent
Alegerea detergentului precum şi cantitatea acestuia
depind de tipul de material (bumbac, lână, mătase,...), de
culoarea rufelor, de temperatura de spălare, de gradul
de mizerie şi de conţinutul de calcar al apei (de duritatea
ei). Dozarea corectă a detergentului evită consumul
excesiv şi protejează mediul înconjurător: deşi sunt
biodegradabili, detergenţii conţin elemente care alterează
echilibrul naturii.
Se recomandă să:
• utilizaţi detergenţi praf pentru rufele albe, de bumbac,
precum şi pentru prespălare.
• utilizaţi detergenţi lichizi pentru articolele delicate din
bumbac şi pentru toate programele care funcţionează
la temperatură scăzută.
• utilizaţi detergenţi lichizi delicaţi pentru lână şi mătase.
Detergentul trebuie să e turnat în sertar înainte de a
începe spălarea, sau în dozatorul de introdus în cuva
maşinii de spălat. În acest caz nu puteţi selecta ciclul
Bumbac cu prespălare.
! Utilizaţi detergenţi praf pentru rufele albe de bumbac,
pentru prespălare şi pentru spălarea la temperaturi mai
mari de 60°C.
! Respectaţi indicaţiile de pe ambalajul detergentului.
! Nu folosiţi detergenţi pentru spălarea manuală: aceştia
formează prea multă spumă.
Pregătirea rufelor
• Deschideţi bine rufele înainte de a le introduce.
• Separaţi rufele în funcţie de tipul de material (a se
vedea simbolul de pe eticheta rufelor) şi culoare, ind
atenţi să nu amestecaţi rufele colorate şi cele albe;
• Goliţi buzunarele şi controlaţi nasturii;
• Nu depăşiţi valorile indicate în “Tabel Programe”
referitoare la greutatea rufelor uscate:
Cât cântăresc rufele?
1 cearceaf 400-500 gr.
1 faţă de pernă 150-200 gr.
1 faţă de masă 400-500 gr.
1 halat de baie 900-1200 gr.
1 prosop 150-250 gr.
1 jeans 400-500 gr.
1 cămaşă 150-200 gr.
Recomandări pentru spălare
Rufe Albe: folosiţi acest ciclu pentru spălarea
rufelor albe. Programul este conceput pentru a păstra
strălucirea culorii albe în timp. Pentru rezultate mai
bune, se recomandă folosirea unui detergent praf.
Rufe Colorate: folosiţi ciclul pentru spălarea rufelor
de culori deschise. Programul este conceput pentru a
păstra strălucirea vie a culorilor în timp.
Rufe Negre: folosiţi programul pentru spălarea
rufelor de culoare închisă. Programul este conceput
pentru întreţinerea culorilor închise în decursul timpului.
Pentru cele mai bune rezultate, vă recomandăm
utilizarea unui detergent lichid pentru rufe de culori
închise.
Cămăşi: folosiţi programul special “Cămăşi” pentru
spălarea cămăşilor din diferite materiale şi culori,
garantând îngrijirea maximă a acestora.
Geci căptuşite: pentru a spăla rufe avînd puf de gîscă
precum canadiene sau perne (nu mai mari de 1,5 kg),
folosiţi programul .
Lenjerie: pentru spălarea tuturor prosoapelor de baie
şi cearceafurilor de pat într-un singur ciclu, folosiţi
programul , care optimizează utilizarea balsamului şi
vă permite să realizaţi o mare economie de timp şi de
energie. Se recomandă folosirea unui detergent praf.
Antialergie: folosiţi programul pentru îndepărtarea
principalilor alergeni, cum ar polenul, acarienii din praf,
părul de pisică şi de câine.
Ultra Delicate: folosiţi programul pentru spălarea rufelor
foarte delicate, care au aplicaţii, cum ar strass sau paiete.
Se recomandă să întoarceţi pe dos rufele înainte de
spălare şi să introduceţi articolele mici într-un sac special
pentru spălarea rufelor delicate.
Pentru cele mai bune rezultate, vă recomandăm
utilizarea unui detergent lichid pentru rufe delicate.
Pentru a spăla articole din mătase şi perdele selectaţi ciclul
şi activaţi opţiunea (în acest caz, se va putea activa
şi opţiunea „Extra Clătire“); maşina de spălat va termina
ciclul cu rufele la înmuiat, iar ledul se va aprinde
intermitent. Pentru a goli apa din maşină şi a scoate
rufele, este necesar să apăsaţi butonul START/PAUSE
sau butonul .
Lână: ciclul de spălare “Lână” al acestei maşini de spălat
Hotpoint-Ariston a fost testat şi aprobat de Woolmark
Company pentru spălarea articolelor de lână clasicate
ca ind lavabile de mână, cu condiţia ca spălarea să se
efectueze în conformitate cu instrucţiunile specicate
pe eticheta articolului şi cu indicaţiile furnizate de
producătorul aparatului. Hotpoint-Ariston este prima
marcă de maşini de spălat care a obţinut de la Woolmark
Company certicarea Woolmark Apparel Care - Platinum
pentru performanţele sale de spălare şi consumul de apă
şi energie. (M1253)
Bumbac Standard 20°C: ideal pentru rufe de bumbac
murdare. Performanţele bune şi la rece, comparabile cu
o spălare la 40°, sunt garantate de o acţiune mecanică
care lucrează prin varierea vitezei la intervale repetate şi
apropiate.
Sistemul de echilibrare a sarcinii
Pentru a evita trepidaţiile excesive, înainte de stoarcere,
cuva maşinii va distribui cantitatea de rufe în mod uniform,
centrifuga efectuând câteva rotaţii la o viteză mai mare
decât viteza de spălare. Dacă, după numeroase încercări,
maşina nu reuşeşte să echilibreze greutatea, stoarcerea
rufelor se va face la o viteză mai mică decât cea prevăzută
în program. Dacă instabilitatea este prea mare, maşina
va distribui greutatea în locul centrifugei. Pentru a favoriza
o mai bună repartizare a rufelor şi echilibrarea corectă a
maşinii, se recomandă să introduceţi în maşină atât articole
mari cât şi mici.
34
Page 35

Anomalii şi remedii
Se poate întâmpla ca maşina de spălat să nu funcţioneze. Înainte de a apela serviciul de Asistenţă (a se vedea
“Asistenţa”), vericaţi dacă nu este vorba de o problemă uşor de rezolvat:
Anomalii:
Maşina nu porneşte.
Ciclul de spălare nu porneşte.
Maşina nu se umple cu apă.
Uşa maşinii rămâne blocată.
Maşina de spălat încarcă şi
descarcă apă în mod continuu.
Maşina de spălat nu evacuează
apa sau nu stoarce.
Maşina de spălat vibrează foarte
mult în timpul stoarcerii.
Maşina de spălat pierde apă.
Icoanele referitoare la “Etapa
în curs” emit un semnal rapid
intermitent, concomitent cu ledul
Cauze posibile / Rezolvare:
• Ştecărul nu este introdus în priza de curent, sau nu face contact.
• Aveţi o pană de curent la domiciliu.
• Uşa nu este bine închisă.
• Butonul START/PAUSE nu a fost apăsat.
• Robinetul de apă nu este deschis.
• A fost setată o întârziere faţă de ora pornirii.
• Furtunul de alimentare cu apă nu este racordat la robinet.
• Furtunul este îndoit.
• Robinetul de apă nu este deschis.
• Apa la domiciliul dvs. este oprită.
• Apa nu are presiune sucientă.
• Butonul START/PAUSE nu a fost apăsat.
• Prin selectarea opţiunii , la sfârşitul ciclului, maşina de spălat va efectua
rotaţii lente ale cuvei; pentru a termina ciclul, apăsaţi butonul START/PAUSE
sau butonul .
• Furtunul de evacuare nu a fost instalat la o distanţă cuprinsă între 65 şi 100 cm
de pământ (a se vedea “Instalare”).
• Capătul furtunului de evacuare este cufundat în apă (a se vedea “Instalare”).
• Dacă locuinţa se aă la ultimele etaje ale unui ediciu, este posibil să aibă loc
fenomene de sifonare, motiv pentru care maşina de spălat încarcă şi descarcă
apă continuu. Pentru a elimina acest inconvenient, se găsesc în comerţ supape
anti-sifonare.
• Evacuarea din perete nu are răsuare pentru aer.
• Programul nu prevede golirea apei: cu unele programe este necesar să-l porniţi
manual (a se vedea “Programe şi opţiuni”).
• Este activă opţiunea . pentru a completa programul apăsaţi pe START/
PAUSE (a se vedea “Programe şi opţiuni”).
• Furtunul de evacuare este îndoit (a se vedea “Instalare”).
• Conducta de descărcare este înfundată.
• Cuva, în momentul instalării, nu a fost deblocată în mod corespunzător (a se
vedea “Instalare”).
• Maşina de spălat este înclinată (a se vedea “Instalare”).
• Maşina de spălat este înghesuită între mobilă şi zid (a se vedea “Instalare”).
• Greutatea rufelor nu este echilibrată (a se vedea “Detergenţi şi rufe”).
• Furtunul de alimentare cu apă nu este bine înşurubat (a se vedea “Instalare”).
• Sertarul detergenţilor este înfundat (pentru a-l curăţa a se vedea “Întreţinere şi
curăţare”).
• Furtunul de evacuare nu este xat bine (a se vedea “Instalare”).
• Opriţi maşina şi scoateţi ştecărul din priză; aşteptaţi aprox. 1 minut înainte de
a o reaprinde. Dacă nu obţineţi nici un rezultat, apelaţi la Centrul de Service
pentru asistenţă.
ON/OFF.
RO
Se formează prea multă spumă.
Uşa maşinii rămâne blocată.
! Notă: pentru a ieşi din “Demo Mode”, opriţi maşina, apăsaţi în acelaşi timp, pentru 3 sec., cele două butoane “START/
PAUSE” şi “ON/OFF” .
• Detergentul nu este compatibil cu maşina de spălat (trebuie să e scris „pentru
maşina de spălat”, „de mână şi în maşina de spălat”, sau ceva asemănător).
• Dozajul a fost excesiv.
• Executaţi procedeul de deblocare manuală (a se vedea “Precauţii şi sfaturi”).
35
Page 36

Asistenţă
RO
Înainte de a lua legătura cu Asistenţa:
• Vericaţi dacă puteţi remedia singuri anomalia (vezi Anomalii şi remedii);
• Porniţi din nou programul pentru a controla dacă inconvenientul a fost eliminat;
• În caz contrar, apelaţi Serviciul de Asistenţă Tehnică Autorizat.
! În cazul instalării greşite sau al folosirii incorecte a maşinii de spălat, intervenţia serviciului de asistenţă se va face cu
plată.
! Nu apelaţi niciodată la persoane neautorizate.
Comunicaţi:
• tipul de anomalie;
• modelul maşinii (Mod.);
• numărul de serie (S/N).
Aceste informaţii se găsesc pe eticheta de caracteristici lipită de aparat.
36
Page 37

Návod na inštaláciu a použitie
PRÁČKA
SK
Slovensky
AQUALTIS
AQS73D 29
Obsah
Inštalácia, 38-39
Rozbalenie a vyrovnanie do vodorovnej polohy
Pripojenie k elektrickej a k vodovodnej sieti
Technické údaje
Údržba a starostlivosť, 40
Uzavretie prívodu vody a vypnutie elektrického napájania
Čistenie zariadenia
Čistenie dávkovača pracích prostriedkov
Starostlivosť o bubon
Čistenie čerpadla
Kontrola prítokovej hadice na vodu
Opatrenia a rady, 41
Základné bezpečnostné pokyny
Likvidácia
Manuálne otvorenie dvierok s priezorom
Popis zariadenia, 42-43
Ovládací panel „touch control“
Ako vykonať prací cyklus, 44
SK
Programy a voliteľné funkcie, 45
Tabuľka programov
Voliteľné funkcie prania
Pracie prostriedky a prádlo, 46
Prací prostriedok
Príprava prádla
Rady pre pranie
Systém automatického vyváženia náplne
Poruchy a spôsob ich odstránenia, 47
Servisná služba, 48
37
Page 38

Inštalácia
SK
! Je veľmi dôležité uschovať tento návod za
účelom jeho ďalšej konzultácie. V prípade
predaja, darovania alebo presťahovania práčky
zabezpečte, aby zostal uložený v jej blízkosti.
! Pozorne si prečítajte uvedené pokyny:
obsahujú dôležité informácie, týkajúce sa
inštalácie, použitia a bezpečnosti pri práci.
! V obálke s týmto návodom môžete nájst
okrem záruky aj súciastky potrebné na
inštaláciu.
Rozbalenie a vyrovnanie do
vodorovnej polohy
Rozbalenie
1. Po rozbalení práčky skontroluje, či počas
prepravy nedošlo k jej poškodeniu.
V prípade, že je poškodená, nezapájajte ju a
obráťte sa na predajcu.
2. Odstránte 4
skrutky chrániace
pred poškodením
počas prepravy a
príslušný dištančný
clen, ktoré sa
nachádzajú v zadnej
časti (vid obrázok).
3. Uzatvorte otvory po skrutkách plastovými
krytkami, nachádzajúcimi sa v obálke.
4. Odložte si všetky diely. V prípade prepravy
práčky bude potrebné vykonat jej opätovnú
montáž, aby ste tak predišli jej vnútornému
poškodeniu.
! Obaly nie sú hračky pre deti! Všetky obaly
uschovajte mimo dosahu dietata, hrozí jeho
udusenie!
Vyrovnanie do vodorovnej polohy
1. Práčku je potrebné umiestnit na rovnú
a pevnú podlahu tak, aby nebola opretá o
stenu alebo nábytok.
2. Vykompenzujte
nerovnosti
odkrútením alebo
zakrútením nožičiek,
až kým sa zariadenie
nebude nachádzat
vo vodorovnej
polohe (nesmie byt
naklonená o viac ako
2 stupne).
! Dôsledné vyrovnanie do vodorovnej
polohy zaistí stabilitu a zabráni vibráciám a
hlučnosti, hlavne vo fáze odstreďovania.
! V prípade inštalácie na podlahovú krytinu
alebo na koberec, nastavte nožičky tak, aby
pod práčkou zostal dostatočný volný priestor
na ventiláciu.
Pripojenie k elektrickej
a k vodovodnej sieti
Pripojenie prítokovej hadice vody
! Pred pripojením prítokovej hadice k rozvodu
vody nechajte odtiecť vodu, až kým nebude
číra.
1. Pripojte prítokovú
hadicu k zariadeniu
prostredníctvom
príslušnej prípojky na
vodu, umiestnenej
v zadnej časti, vpravo
hore (viď obrázok).
2. Pripojte
prívodnú hadicu jej
zaskrutkovaním ku
kohútiku so studenou
vodou, s hrdlom so
závitom 3/4“ (vid
obrázok).
3. Zabezpečte, aby hadica nebola príliš
ohnutá alebo stlačená.
! Tlak v rozvode vody sa musí pohybovať
v rozmedzí hodnôt uvedených v tabuľke s
technickými údajmi (viď vedľajšia strana).
! V prípade, že dĺžka prítokovej hadice
nebude dostatočná, obráťte sa na
špecializovanú predajňu alebo na
autorizovaný technický personál.
! Nikdy nepoužívajte použité alebo staré
prítokové hadice, ale hadice, ktoré sú
súčastou príslušenstva zariadenia.
38
Page 39

Pripojenie vypúšťacej hadice
65 - 100 cm
Pripojte
vypúštaciu hadicu
k odpadovému
potrubiu alebo
k odpadu v stene,
nachádzajúcom sa
od 65 do 100 cm nad
zemou; jednoznačne
zamedzte jej ohybu.
! Po denitívnom umiestnení práčky musí
zásuvka zostať ľahko prístupná.
! Nepoužívajte predlžovacie káble a
rozvodky.
! Kábel nesmie byť ohnutý alebo pritlačený.
! Výmena kábla a zástrčky musí byť zverená
výhradne autorizovanému technickému
personálu.
SK
Alebo ju zachyťte
na okraj umývadla
či vane a pripevnite
ju ku kohútiku
priviazaním držiaka
z príslušenstva (viď
obrázok).
Voľný koniec
vypúšťacej hadice
nesmie zostať
ponorený do vody.
! Použitie predlžovacích hadíc sa neodporúča;
ak je však nevyhnutné, predlžovacia hadica
musí mat rovnaký priemer ako originálna
hadica a jej dlžka nesmie presiahnut 150 cm.
Pripojenie k elektrickej sieti
Pred zasunutím zástrčky do zásuvky sa
uistite, že:
• zásuvka je uzemnená a že vyhovuje normám;
• zásuvka je schopná uniesť maximálnu
záťaž odpovedajúcu menovitému príkonu
zariadenia, uvedenému v tabuľke s
technickými údajmi (viď vedľa);
• hodnota napájacieho napätia odpovedá
údajom uvedeným v tabulke s technickými
údajmi (vid vedla);
• sa zásuvka zhoduje so zástrčkou
napájacieho kábla zariadenia. V opačnom
prípade je potrebné dať vymeniť zásuvku
alebo zástrčku.
! Práčka nesmie byť umiestnená vonku – pod
holým nebom, a to ani v prípade, keby sa
jednalo o miesto chránené pred nepriazňou
počasia, pretože je veľmi nebezpečné
vystaviť ju pôsobeniu dažďa a búrok.
Upozornenie! Výrobca neponesie žiadnu
zodpovednost za následky spôsobené
nerešpektovaním týchto pokynov.
Technické údaje
Model AQS73D 29
šírka 59,5 cm
Rozmery
Kapacita od 1 do 7 kg
Elektrické
zapojeni
Pripojenie k
rozvodu vody
Rýchlos±z
odstreïovania
Kontrolné programy podľa
smerníc
1061/2010 a
1015/2010
výška 85 cm
håbka 44,5 cm
Vid štítok s technickými
údajmi, aplikovaný na zariadení.
maximálny tlak
1 MPa (10 bar)
maximálny tlak
0,05 MPa (0.5 bar)
kapacita bubna 48 litrov
a±z do 1200 otáèok za
minútu
Program
; bavlna
štandard 60°C.
Program
; bavlna
štandard 40°C.
Toto zariadenie je v zhode
s nasledujúcimi smernicami Európskej únie:
- 2004/108/CE (Elektromagnetická kompatibilita)
- 2006/95/CE (Nízke
napätie)
- 2012/19/EU
39
Page 40

1
2
1
2
2
Údržba a starostlivosť
SK
Uzavretie prívodu vody a vypnutie
elektrického napájania
• Po každom praní uzatvorte prívod vody.
Týmto spôsobom dochádza k obmedzeniu
opotrebenia rozvodu vody zariadenia a ku
zníženiu nebezpečenstva úniku vody.
• Pred zahájením čistenia práčky a počas
operácií údržby je potrebné vytiahnuť
zástrčku prívodného kábla zo zásuvky.
Čistenie zariadenia
Vonkajšie časti a časti z gumy môžu byť
čistené utierkou navlhčenou vo vlažnej vode
a saponáte. Nepoužívajte rozpúšťadlá alebo
abrazívne prostriedky.
Čistenie dávkovača pracích
prostriedkov
Dávkovač vytiahnete
tak, že stlačíte páčku
(1) a potiahnete ho
smerom von (2) (viď
obrázok).
Dávkovač umyte pod
prúdom vody; toto
čistenie je potrebné
vykonávať pravidelne.
Prístup k vstupnej časti čerpadla:
1. Odložte krycí panel na prednej strane
zariadenia zatlačením na jeho stred
a následným zatlačením smerom nadol
z obidvoch strán a potom ho vytiahnite
(viď obrázky).
2. pripravte nádobu na
zachytenie vody, ktorá
vyjde von (približne 1,5
l) (vid obrázok);
3. odskrutkujte veko
otáčaním proti smeru
hodinových ručičiek
(vid obrázok);
4. dokonale vyčistite vnútro;
5. nasaďte naspäť veko;
6. namontujte naspät krycí panel, pričom
sa pred jeho prisunutím k práčke uistite, že
došlo k správnemu zachyteniu háčikov do
príslušných otvorov.
Starostlivosť o bubon
• Dvierka s priezorom ponechajte zakaždým
pootvorené, aby sa zabránilo tvorbe
nepríjemných zápachov.
Čistenie čerpadla
Súcastou práčky je samočistiace čerpadlo,
ktoré nevyžaduje údržbu. Môže sa však
stat, že sa v jeho vstupnej ochrannej časti,
nachádzajúcej na spodku, zachytia drobné
predmety (mince, gombíky).
! Uistite sa, že prací cyklus bol ukončený a
vytiahnite zástrčku zo zásuvky.
40
Kontrola prítokovej hadice na vodu
Stav prítokovej hadice je potrebné
skontrolovať aspoň raz ročne. Ak sú na nej
viditeľné praskliny alebo trhliny, je potrebné
ju vymeniť: silný tlak v hadici počas pracieho
cyklu by mohol spôsobiť jej náhle roztrhnutie.
Page 41

Opatrenia a rady
! Práčka bola navrhnutá a vyrobená v súlade s platnými
medzinárodnými bezpečnostnými predpismi. Tieto
upozornenia sú uvádzané z bezpečnostných dôvodov a
je potrebné si ich pozorne prečítať.
Základné bezpečnostné pokyny
• Toto zariadenie bolo navrhnuté výhradne na použitie
ako spotrebič.
• Toto zariadenie smú používať deti od 8
rokov, osoby náležite vyškolené ohľadne
bezpečného použitia zariadenia, ktoré
si uvedomujú súvisiace nebezpečenstvo
a v prípade dozoru aj osoby so
zníženými fyzickými, senzorickými alebo
duševnými schopnosťami alebo osoby
s nedostatočnými skúsenosťami a
znalosťami. Deti sa so zariadením nesmú
hrať. Operácie údržby a čistenia nesmú
vykonávať deti bez dohľadu.
• Nedotýkajte sa zariadenia bosí, alebo v prípade, keď
máte mokré ruky alebo nohy.
• Nevyťahujte zástrčku zo zásuvky ťahaním za kábel,
ale uchopením za zástrčku.
• Nedotýkajte sa odčerpávanej vody, pretože môže mať
veľmi vysokú teplotu.
• Nepokúšajte sa o násilné otvorenie dvierok
s priezorom: mohlo by dôjsť k poškodeniu
bezpečnostného uzáveru, ktorý zabraňuje náhodnému
otvoreniu.
• Pri výskyte poruchy sa v žiadnom prípade nepokúšajte
o opravu vnútorných častí zariadenia.
• Vždy majte pod kontrolou deti a zabráňte tomu, aby sa
približovali k zariadeniu počas pracieho cyklu.
• V prípade potreby premiestnite zariadenie vo dvojici
alebo v trojici a venujte celej operácii zvláštnu
pozornosť. Nikdy sa nepokúšajte zariadenie
premiestňovať sami, pretože je veľmi ťažké.
• Pred vkladaním prádla skontroluj, ci je prací bubon
prázdny.
Manuálne otvorenie dvierok s priezorom
V prípade, ak nie je možné otvoriť dvierka s priezorom
z dôvodu výpadku elektrickej energie a chceli by ste
vybrať prádlo, postupujte nasledovne:
1. vytiahnite zástrčku zo
zásuvky elektrickej siete.
2. Skontrolujte, či je hladina
vody vo vnútri zariadenia
nižšia ako je úroven
otvorenia dvierok; ak nie
je, vypustte prebytočnú
vodu vypúštacou hadicou a
zachytte ju do vedra, ako je
znázornené na obrázku.
3. Odložte krycí panel na prednej strane práčky (vid
nasledujúca strana).
4. S použitím jazýčka
znázorneného na obrázku
potiahnite smerom von
plastové tiahlo, čím ho
uvoľníte z dorazu; súčasne
ho potiahnite smerom von,
až kým nebudete počuť
„cvaknutie“ poukazujúce na
odblokovanie dvierok.
5. Otvorte dvierka; v prípade,
keď to nie je možné,
zopakujte uvedený postup
znovu.
SK
Likvidácia
• Likvidácia obalových materiálov: pri ich odstránení
postupujte v súlade s miestnymi predpismi a dbajte na
možnú recykláciu.
• Európska smernica 2012/19/EU o odpade tvorenom
elektrickými a elektronickými zariadeniami
predpokladá, že elektrospotrebiče nesmú byť
likvidované v rámci bežného pevného komunálneho
odpadu. Vyradené zariadenia musia byť zozbierané
osobitne za účelom zvýšenia počtu recyklovaných
a znovu použitých materiálov, z ktorých sa skladajú
a zabráneniu možných ublížení na zdraví a škôd na
životnom prostredí. Symbolom je preškrtnutý kôš
uvedený na všetkých výrobkoch, s cieľom pripomenúť
povinnosti spojené so separovaným zberom.
Podrobnejšie informácie týkajúce sa správneho
spôsobu vyradenia elektrospotrebičov z prevádzky
môžu ich držitelia získať od poverenej verejnej
inštitúcie alebo na predajcu.
6. namontujte naspät krycí panel, pricom sa pred jeho
prisunutím k práčke uistite, že došlo k správnemu
zachyteniu háčikov do príslušných otvorov.
41
Page 42

3
1
2
1
8
0
2
1
0
1
5
0
1
2
0
9
0
6
0
B
A
Popis zariadenia
SK
DVIERKA S
PRIEZOROM
DRŽADLO DVIEROK
S PRIEZOROM
PODSTAVEC
DVIERKA S PRIEZOROM
Na otvorenie dvierok
s priezorom používajte
vždy príslušné držadlo (vid
obrázok).
DÁVKOVAČ PRACÍCH PROSTRIEDKOV
Nachádza sa vo vnútri
zariadenia a je k nemu
umožnený prístup po
otvorení dvierok.
Informácie týkajúce sa
dávkovania pracích
prostriedkov sú uvedené v
kapitole “Pracie prostriedky a
prádlo”.
OVLÁDACÍ
PANEL
NASTAVITEĽNÉ
NOŽIČKY
2. priehradka na pranie: V prípade použitia tekutého
pracieho prostriedku sa odporúča použiť pre správne
dávkovanie malú prepážku A z príslušenstva. Pre
použitie práškového pracieho prostriedku vložte malú
prepážku do priehlbiny B.
3. prídavná nádobka: Bieliaci prostriedok
! Použitie prídavnej nádobky 3 vylučuje možnosť
predpierania.
priehradka pre prídavné pracie prostriedky: pre tekutú
aviváž alebo iné tekuté prídavné prostriedky. Odporúča
sa neprekročiť maximálnu úroveň vyznačenú mriežkou a
rozriediť koncentrovanú aviváž.
Ovládací panel „touch control“
Nastavenie zmeníte jemným
stlačením symbolu vo vnútri
citlivej plochy (touch control)
podľa obrázku.
1. priehradka na
predpieranie: použite
práškový prací prostriedok.
! Pred naplnením priehradky
pracím prostriedkom sa
uistite, že v dávkovači nie je
vložená prídavná priehradka
3.
Pohotovostný režim
Kvôli zhode s novými predpismi súvisiacimi s
energetickou úsporou, je táto práčka vybavená systémom
automatického vypnutia (prechodu do pohotovostného
režimu – standby), ktorý je aktivovaný po uplynutí 30
minút, ak práčka nie je používaná. Krátko stlačte tlačidlo
ON/OFF a vyčkajte na obnovenie činnosti zariadenia.
42
Page 43

Ovládací panel „touch control“
Otočný ovládač
VOĽBA
PROGRAMOV
M1
M2
Tlačidlo ODSTREĎOVANIE
Tlačidlo TEPLOTA
DISPLEJ
Tlačidlo s kontrolkou
START/PAUSE
Kontrolka
EKO
SK
Ikony FÁZY
PRANIA
Tlačidlo s kontrolkou
ON/OFF
Tlačidlo s kontrolkou ON/OFF: krátke stlačenie
tohto tlačidla slúži na zapnutie alebo vypnutie práčky. Zelená
kontrolka signalizuje, že zariadenie je zapnuté. Ak chcete
vypnúť práčku počas prania, je potrebné držať tlačidlo
stlačené dlhšie, približne 3 sek.; krátkym alebo náhodným
stlačením práčku nevypnete. Vypnutie zariadenia počas
prania spôsobí zrušenie prebiehajúceho pracieho programu.
Otočný ovládač pre VOĽBU PROGRAMOV: je možné ním
otáčať v obidvoch smeroch. Aby ste nastavili najvhodnejší
program, pozrite si “Tabuľka programov”. Počas prania
zostane otočný ovládač bez pohybu.
Tlačidlá M1-M2-M3: držte stlačené jedno z tlačidiel, aby
ste cyklus uložili do pamäte spolu s vlastnými osobnými
nastaveniami. Pre vyvolanie predtým uloženého cyklu do
pamäte, stlačte príslušné tlačidlo.
Tlačidlo TEPLOTA: Jeho stlačenie slúži na zmenu teploty
alebo vylúčenie ohrevu; zvolená hodnota bude zobrazená na
displeji nad tlacidlom (vid “Ako vykonat prací cyklus”).
Tlačidlo ODSTREĎOVANIE: Jeho stlačenie slúži na
zmenu rýchlosti alebo vylúčenie odstreďovania; zvolená
hodnota bude zobrazená na displeji nad tlačidlom (viď “Ako
vykonať prací cyklus”).
Tlačidlo ONESKORENÝ START: Jeho stlačenie slúži na
nastavenie oneskorenia štartu zvoleného programu; hodnota
nastaveného oneskorenia bude zobrazená na displeji nad
tlačidlom (viď “Ako vykonať prací cyklus”).
Tlačidlá s kontrolkami VOLITEĽNÉ FUNKCIE: Slúži
na voľbu jednotlivých ponúknutých voliteľných funkcií.
Príslušná kontrolka zvolenej voliteľnej funkcie zostane
rozsvietená (viď “Ako vykonať prací cyklus”).
Ikony FÁZY PRANIA: Ich rozsvietenie signalizuje priebeh
cyklu (Pranie - Plákanie - Odstreďovanie –
Vypúšťanie ). Nápis sa rozsvieti po ukončení cyklu.
Tlačidlo s kontrolkou START/PAUSE: Keď zelená kontrolka
začne pomaly blikať, stlačte tlačidlo, aby ste spustili pranie.
Po zahájení cyklu sa kontrolka rozsvieti stálym svetlom. Ak
M3
VOLITEĽNÉ FUNKCIE
Tlačidlá
Tlačidlo
ONESKORENÝ
START
Kontrolka
Tlačidlo s kontrolkou
ZABLOKOVANIE
TLAČIDIEL
LOCK
si želáte prerušiť pranie, opätovne stlačte tlačidlo; kontrolka
bude blikať oranžovým svetlom. Keď je kontrolka „LOCK“
zhasnutá, je možné otvoriť dvierka s priezorom. Aby ste
opätovne spustili cyklus z miesta kde bol prerušený, opätovne
stlačte tlačidlo.
Kontrolka LOCK: signalizuje, že dvierka s priezorom sú
zablokované. Na otvorenie dvierok je potrebné prerušiť
cyklus (viď “Ako vykonať prací cyklus”).
Tlačidlo s kontrolkou ZABLOKOVANIE TLAČIDIEL: Aby
ste aktivovali alebo zrušili zablokovanie ovládacieho panelu,
držte stlačené tlačidlo približne 2 sekundy. Rozsvietená
kontrolka signalizuje, že ovládací panel je zablokovaný
(s výnimkou tlačidlo ON/OFF). Týmto spôsobom sa
zamedzí náhodným zmenám programov, obzvlášť, keď sú
v domácnosti deti.
Kontrolka EKO: K rozsvieteniu ikony dôjde v prípade, ked
sa pri zmene parametrov prania dosiahne energetická úspora
najmenej 10%. Okrem toho, ešte pred aktiváciou režimu
„Stand by“, sa ikona rozsvieti na pár sekúnd; pri vypnutom
zariadení je odhad energetickej úspory približne 80%.
ZMENA JAZYKA
Pri prvom zapnutí zariadenia začne na displeji blikať prvý
jazyk v poradí. V mieste 3 tlačidiel v pravej časti displeja
sa zobrazia symboly „ “ , „OK“ a „V“. Jazyk sa bude
meniť automaticky každé 3’’ alebo stlačením tlačidiel vedľa
symbolov „ “ a „V“. Tlačidlom „OK“ sa potvrdzuje výber
jazyka, ktorý bude nastavený po 2’’. Keď nestlačíte žiadne
tlačidlo, po uplynutí 30” sa bude procedúra pre zmenu jazyka
opakovať. Pre zmenu jazyka je potrebné zapnúť a vypnúť
zariadenie a v priebehu nasledujúcich 30 sekúnd po
vypnutí stlačiť súčasne tlačidlá teploty + odstreďovania
+ oneskoreného štartu na dobu 5 sekúnd a okrem
zaznenia krátkeho akustického signálu sa na displeji zobrazí
nastavený jazyk, ktorý bude blikať . Stlačením tlačidiel
vedľa symbolov „ “ a „V“ je možné zmeniť nastavený jazyk.
Tlačidlom „OK“ sa potvrdzuje zvolený jazyk, ktorý bude
nastavený po 2’’. Keď nedôjde k stlačeniu žiadneho tlačidla,
po uplynutí 30” bude znovu zobrazený pôvodne zvolený
jazyk. Zapnutíe pračku.
43
Page 44

Ako vykonať prací cyklus
SK
POZNÁMKA: pri prvom použití práčky vykonajte prací
cyklus bez prádla, s pracím prostriedkom a nastaveným
pracím programom pre vlnu 90 °C, bez predpierania.
1. ZAPNUTIE ZARIADENIA. Stlačte tlačidlo . Všetky
kontrolky sa rozsvietia na dobu 1 sekundy a na displeji
sa zobrazí nápis AQUALTIS; Kontrolka tlačidla
zostane rozsvietená stálym svetlom a kontrolka START/
PAUSE bude blikať.
2. ZVOĽTE PRACÍ PROGRAM. Pootočte OTOČNÝM
GOMBÍKOM PRE VOĽBA PROGRAMOV smerom
doprava alebo doľava, aby ste zvolili požadovaný
program; názov programu bude zobrazený na displeji;
k zvolenému programu je priradená teplota a rýchlosť
odstreďovania, ktoré môžu byť menené. Na displeji sa
zobrazí doba trvania cyklu.
3. NAPLŇTE PRÁČKU PRÁDLOM. Otvorte dvierka s
priezorom. Naplňte práčku prádlom, pričom dbajte, aby
nedošlo k prekročeniu množstva náplne, uvedeného
v tabuľke programov na nasledujúcej strane.
4. NAPLNTE DÁVKOVAC PRACÍCH PROSTRIEDKOV.
Vytiahnite dávkovač pracích prostriedkov a naplnte
príslušné priehradky pracím prostriedkom, spôsobom
vysvetleným v časti „Popis zariadenia“.
5. ZATVORTE DVIERKA S PRIEZOROM.
6. NASTAVTE PRACÍ PROGRAM PODĽA VAŠICH
POTRIEB. Použite k tomu príslušné tlačidlá
ovládacieho panelu:
Zmena teploty a/alebo rýchlosti
odstredovania.
Zariadenie automaticky zobrazuje maximálnu teplotu a
rýchlosť odstreďovania pre nastavený program alebo
posledné zvolené hodnoty, ak sú vhodné pre zvolený
program. Stlačením tlačidla je možné postupne
znížiť teplotu až po pranie v studenej vode (OFF).
Stlačením tlačidla je možné postupne znížiť rýchlosť
odstreďovania až po jeho úplné vylúčenie (OFF). Ďalšie
stlačenie tlačidiel obnoví nastavenie maximálnych
prednastavených hodnôt.
! Výnimka: pri volbe programu bude možné zvýšit
teplotu až na 90°C.
Nastavenie oneskoreného štartu.
Aby ste nastavili oneskorený štart pre zvolený program,
stláčajte príslušné tlačidlo, až kým sa nezobrazí
požadovaná doba oneskorenia. Počas nastavovania bude
zobrazená doba oneskorenia spolu s nápisom „Začne
za”: a blikajúci symbol . Po nastavení oneskoreného
štartu bude na displeji zobrazený symbol a na
displeji bude opäť zobrazená doba trvania nastaveného
cyklu s nápisom „Skončí za”: a doba trvania cyklu. Pri
jednom stlačení tlačidla ONESKORENÝ START bude
zobrazená predtým nastavená doba oneskorenia.
Po uvedení do činnosti bude na displeji zobrazený
nápis „Začne za”: a doba oneskorenia. Po uplynutí
nastavenej doby oneskorenia sa spustí nastavený
program a na displeji bude zobrazený nápis „Skončí
za”: a doba zostávajúca do konca cyklu. Oneskorený štart
zrušíte stláčaním tlačidla, až kým sa na displeji nezobrazí
nápis OFF; symbol bude blikať.
Zmeňte vlastnosti cyklu.
• Stlačením tlačidla aktivujte voliteľnú funkciu; na
displeji sa zobrazí názov voliteľnej funkcie a dôjde
k rozsvieteniu kontrolky odpovedajúcej danému
tlačidlu.
• Opätovným stlačením tlačidla môžete zrušiť voľbu
použitia voliteľnej funkcie; na displeji sa objaví názov
voliteľnej funkcie a nápis OFF, a príslušná kontrolka
zhasne.
! Ak zvolená funkcia nie je vhodná pre nastavený
program, bude to signalizované blikaním kontrolky
a akustickým signálom (3 pípnutia) a funkcia nebude
aktivovaná.
! V prípade, že zvolená volitelná funkcia nie je
kompatibilná s inou predtým zvolenou funkciou,
kontrolka prvej volitelnej funkcie bude blikat a bude
aktivovaná len druhá, pricom kontrolka zvolenej funkcie
sa rozsvieti stálym svetlom.
! Voliteľné funkcie môžu zmeniť doporučenú náplň a/
alebo dobu trvania cyklu.
7. SPUSTTE PROGRAM. Stlačte tlačidlo START/PAUSE.
Príslušná kontrolka sa rozsvieti stálym svetlom a
dvierka s priezorom sa zablokujú (rozsvietená kontrolka
LOCK ). Počas pracieho cyklu sa postupne rozsvietia
príslušné ikony, odpovedajúce jednotlivým fázam
prania, informujúce o jeho priebehu. Ak chcete zmeniť
program počas pracieho cyklu, prerušte činnosť práčky
stlačením tlačidla START/PAUSE; následne zvoľte
požadovaný cyklus a opätovne stlačte tlačidlo START/
PAUSE. Aby bolo možné otvoriť dvierka počas pracieho
cyklu, je potrebné stlačiť tlačidlo START/PAUSE; ak
je kontrolka LOCK zhasnutá, bude možné dvierka
otvorit. Opätovným stlacením tlacidla START/PAUSE
opätovne uvedte do činnosti prací program z bodu, v
ktorom bol prerušený.
8. UKONČENIE PROGRAMU. Je signalizované
rozsvietením nápisu END. Dvierka s priezorom bude
možné okamžite otvorit. Ked kontrolka START/PAUSE
bliká, ukončite cyklus stlačením tlačidla. Otvorte
dvierka, vyložte prádlo a vypnite zariadenie.
! Ak si prajete zrušit už zahájený cyklus, držte stlačené
tlačidlo , až kým nedôjde k prerušeniu cyklu a k vypnutiu
zariadenia.
44
Page 45

3
1
2
Programy a voliteľné
funkcie
Tabuľka programov
Popis programu
Ikona
SYNTETIKA Silne znečistené
SYNTETIKA Silne znečistené (4)
BIELE
FAREBNÉ
TMAVÉ
KOŠELE
BUNDY
BED&BATH: pre postel’né a kúpel’ové prádlo.
PLÁKANIE
ODSTREĎOVANIE a VYPÚŠŤANIE
ANTIALEGÉNNE
JEMNÉ
VLNA Platinum Care: Pre vlnu, kašmír, atď.
MIX 30': k rýchlemu oživeniu ľahko znečisteného prádla (nedoporučuje
sa pre vlnu, hodváb a prádlo určené na pranie v rukách).
BAVLNA ŠTANDARD 60°C (1): Značne znečistené biele a farebné
prádlo z odolných tkanín.
BAVLNA ŠTANDARD 40°C (2): Značne znečistené biele a farebné
prádlo z chúlostivých tkanín.
BAVLNA ŠTANDARD 20°C: Značne znečistené biele a farebné prádlo
z chúlostivých tkanín.
Doba trvania cyklu, uvedená na displeji alebo v návode, je stanovená na základe štandardných podmienok. Skutočná doba sa môže meniť v závislosti na mnohých faktoroch, ako sú napr.
teplota a tlak vody na vstupe, teplota prostredia, množstvo pracieho prostriedku, množstvo a druh náplne, vyváženie náplne a zvolené funkcie.
Poznámka: Približne po 10 minútach od START zariadenie na základe naplnenia prepočíta a zobrazí dobu zostávajúcu do ukončenia programu.
1) Skúšobný program podľa smernice 1061/2010: nastavte program s teplotou 60°C.
Tento cyklus je vhodný pre pranie bežne znečisteného bavlneného prádla a jedná sa o najúčinnejší cyklus z hľadiska kombinovanej spotreby energie a vody,
určený pre prádlo, ktoré je možné prať pri teplote do 60°C. Skutočná teplota prania sa môže líšiť od uvedenej.
2) Skúšobný program podľa smernice 1061/2010: nastavte program s teplotou 40°C.
Tento cyklus je vhodný pre pranie bežne znečisteného bavlneného prádla a jedná sa o najúčinnejší cyklus z hľadiska kombinovanej spotreby energie a vody,
určený pre prádlo, ktoré je možné prať pri teplote do 40°C. Skutočná teplota prania sa môže líšiť od uvedenej.
3) Pri teplote 60 °C funkcia “Predpieranie” nemôže byť aktivovaná.
Pre všetky Test Institutes:
2) Dlhý program na pranie bavlny: nastavte program s teplotou 40°C.
4) Dlhý program na pranie syntetika: nastavte program s teplotou 40°C.
Max.
teplota
(°C)
60° 800
40° 800
60° 1200
40° 1200
30° 800 -
40° 600 -
30° 1000 -
60° 1200
- 1200 - -
- 1200 - - - - 7 - - - 16’
60° 1200 -
30° 0 -
40° 800 -
30° 800 -
60°
(Max. 90°)
40° 1200 -
20° 1200 -
Max.
rýchlosť
(otáčky
minútu)
1200
Pracie prostriedky a
prídavné prostriedky
za
Predpie-
(3)
ranie
Pranie
Bieliaci
dok
prostrie-
-
-
-
-
-
-
-
(kg)
Spotreba
Zvyšková
vlhkosť %
Max. náplň
Aviváž
3,5 49 0,87 42 90’
3,5 49 0,56 42 85’
4 - - - 190’
4 53 0,90 73 95’
4 - - - 80’
2 - - - 85’
1,5 - - - 130’
7 - - - 135’
7 - - - 49’
4 - - - 200’
1 - - - 75’
1,5 - - - 80’
3 71 0,19 39 30’
7 53 1,00 52,5 185’
7 53 1,09 92 170’
7 - - - 175’
energie kWh
lt
Voda celkom
SK
cyklu
Doba trvania
Voliteľné funkcie prania
Super Wash
Vdaka použitiu väčšieho
množstva vody v počiatočnej
fáze cyklu a vdaka použitiu
dlhšej doby, táto volitelná
funkcia zarucuje pranie s
vysokou kvalitou.
Môže sa používať s bieliacim
prostriedkom alebo bez neho.
Ak si prajete vykonať takéto
bielenie, vložte prídavnú
nádobku 3 z príslušenstva
do nádobky 1. Pri dávkovaní
bieliaceho prostriedku neprekračujte úroveň „max“
vyznačenú na stredovom čape(viď obrázok). Ak si prajete
vykonať samostatné bielenie, nalejte bieliaci prostriedok
do prídavnej nádobky 3, nastavte program „Extra Plákanie“
a aktivujte voliteľnú funkciu “Super Wash“ .
! Nie je možné ju aktivovať pri programoch , , , ,
, , , .
Extra Plákanie
Volbou tejto volitelnej funkcie sa zvýši účinnost plákania
a zaistí sa maximálny stupen odstránenia pracieho
prostriedku. Je užitočné hlavne pre pokožky so zvýšenou
citlivostou na pracie prostriedky. Odporúca sa použit túto
funkciu pri plne naloženej práčke alebo pri použití vysokých
dávok pracieho prostriedku.
! Nie je možné ju aktivovat pri programoch , , , ,
Ľahké Žehlenie
Voľbou tejto voliteľnej funkcie bude pranie a odstreďovanie
náležite zmenené, aby sa predišlo tvorbe záhybov.
Po ukončení cyklu práčka vykoná pomalé otáčanie bubna
sprevádzané blikaním kontroliek „Ľahké žehlenie“ a „START/
PAUSE. Ukončenie cyklu sa vykonáva stlačením tlačidla
START/PAUSE alebo tlačidla „Ľahké žehlenie“.
! Nie je možné ju aktivovať pri programoch , , , ,
, .
Predpieranie
Voľbou tejto funkcie aktivujete predpieranie, užitočné na
odstránenie odolných škvŕn.
POZN.: Pridajte prací prostriedok do príslušnej
priehradky.
! Nie je možné ju aktivovať pri programoch , , , ,
, , , , , (60°), , .
45
Page 46

Pracie prostriedky a prádlo
SK
Prací prostriedok
Voľba druhu a množstva pracieho prostriedku závisí
od druhu tkaniny (bavlna, vlna, hodváb…), od farby, od
teploty prania, od stupňa znečistenia a od tvrdosti vody.
Správne dávkovanie pracieho prostriedku zabranuje
plytvaniu a šetrí životné prostredie: aj ked sa jedná
o biodegradabilné látky, pracie prostriedky narušujú
prirodzenú rovnováhu v prírode.
Odporúča sa:
• používať práškové pracie prostriedky pre prádlo
z bielej bavlny a na predpieranie.
• používať tekuté pracie prostriedky pre chúlostivé
bavlnené prádlo a pre všetky programy pri nízkej
teplote.
• používať tekuté pracie prostriedky pre chúlostivé
tkaniny na pranie vlny a hodvábu.
Prací prostriedok musí byť naliaty pred zahájením prania
do príslušnej priehradky alebo do dávkovača, ktorý sa
vkladá priamo do bubna. V tomto prípade nie je možné
zvoliť cyklus Bavlna s predpieraním.
! Používajte práškové pracie prostriedky pre biele
bavlnené prádlo a pre predpieranie a pre pranie pri
teplote vyššej ako 60 °C.
! Dodržujte pokyny uvedené na obale pracieho
prostriedku.
! Nepoužívajte pracie prostriedky určené na pranie v
rukách, pretože spôsobujú tvorbu nadmerného množstva
peny.
Príprava prádla
• Pred naložením prádlo riadne rozprestrite.
• Rozdeľte prádlo podľa druhu tkaniny (symbol na
visačke prádla) a farby, pričom dbajte na oddelenie
farebného prádla od bieleho;
• Vyprázdnite vrecká a skontrolujte gombíky;
• Neprekračujte hodnoty povolenej náplne uvedenej
v “Tabuľka programov”, vzťahujúce sa na hmotnosť
suchého prádla:
Koľko váži prádlo?
1 prestieradlo 400-500 g
1 obliečka 150-200 g
1 obrus 400-500 g
1 župan 900-1200 g
1 uterák 150-250 g
1 džínsy 400-500 g
1 košela 150-200 g
Rady pre pranie
Biele: použite cyklus pre pranie bieleho prádla.
Program je navrhnutý pre dlhodobé zachovanie žiarivej
bielej farby. Pre dosiahnutie najlepších výsledkov sa
odporúča použiť práškový prací prostriedok.
Farebné: použite program pre pranie prádla svetlej
farby. Program je navrhnutý pre dlhodobé zachovanie
živých farieb.
Tmavé: použite program pre pranie prádla tmavej
farby. Program je navrhnutý pre dlhodobé zachovanie
tmavých farieb. Pre dosiahnutie čo najlepších výsledkov
sa odporúča použiť tekutý prací prostriedok pre pranie
tmavého prádla.
Košele: použite príslušný program na pranie košiel
z rôznych druhov látok a farby aby ste zabezpečili
maximálnu starostlivost o ne.
Bundy: pri praní prádla plneného husacím perím,
ako napríklad vetrovky alebo hlavnice (nepresahujúce
hmotnosť 1,5 kg), používajte príslušný program .
Bed&Bath: Táto práčka umožňuje prať prádlo celej
domácnosti v jedinom cykle , ktorý optimalizuje
použitie aviváže a umožňuje usporiť čas a energiu.
Odporúča sa použitie práškového pracieho prostriedku.
Antialergénne: použite program pre odstránenie
hlavných alergénov, ako je peľ, roztoče a mačacie a psie
chlpy.
Jemné: pre pranie veľmi jemného prádla, ktoré obsahuje
aplikácie ako je štras alebo pajetky, použite program .
Odporúča sa prádlo pred praním prevrátiť naruby a vložiť
malé kusy prádla do príslušného vrecúška pre pranie
jemného prádla.
Pre dosiahnutie najlepších výsledkov sa odporúča použiť
tekutý prací prostriedok pre jemné prádlo.
Pre pranie hodvábneho prádla a záclon zvoľte cyklus
a a aktivujte funkciu (v tomto prípade bude
možné aktivovať aj voliteľnú funkciu „Extra plákanie“);
zariadenie ukončí cyklus s prádlom namočeným vo vode
a blikajúcou kontrolkou . Za účelom odčerpania vody
a vyloženia prádla z práčky je potrebné stlačiť tlačidlo
START/PAUSE alebo tlačidlo .
Vlna: prací cyklus „Vlna“ práčky Hotpoint-Ariston bol
testovaný a schválený spoločnosťou Woolmark Company
pre pranie prádla z vlny, klasikovaného ako „prádlo pre
ručné pranie“, za podmienky, že pranie bude vykonané
v súlade s pokynmi uvedenými na visačke oblečenia a
pokynmi dodanými výrobcom elektrického spotrebiča.
Hotpoint-Ariston je prvý typ práčky, ktorá získala od
spoločnosti Woolmark Company certikát Woolmark
Apparel Care - Platinum za svoju výkonnosť a za
spotrebu vody a energie. (M1253)
Bavlna Štandard 20°C ideálny pre náplne zo nečistenej
bavlny. Účinné pranie i za studena, porovnateľné s raním
pri 40 °C, dosiahnuté mechanickým pôsobením, ktoré
je založené na zmene rýchlosti v krátkych alebo dlhých
intervaloch.
Systém automatického vyváženia náplne
Pred každým odstreďovaním bubon vykoná otáčanie
rýchlosťou o málo prevyšujúcou rýchlosť prania, aby
sa tak odstránili vibrácie a aby sa náplň rovnomerne
rozložila. V prípade, že po niekoľko násobných pokusoch
o vyváženie prádlo ešte nebude správne vyvážené,
zariadenie vykoná odstreďovanie nižšou rýchlosťou,
ako je prednastavená rýchlosť. Ak je práčka nadmerne
nevyvážená, vykoná namiesto odstreďovania vyváženie.
Za účelom dosiahnutia rovnomernejšieho rozloženia
náplne a jej správneho vyváženia, odporúča sa pomiešať
veľké a malé kusy prádla.
46
Page 47

Poruchy a spôsob ich
odstránenia
Môže sa stat, že zariadenie nebude fungovat. Skôr, ako zatelefonujete na Servisnú službu (vid „Servisná služba“)
skontrolujte, či sa nejedná o problém lahko odstránitelný pomocou nasledujúceho zoznamu.
Poruchy:
Zariadenie nie je možné zapnúť.
Nedochádza k zahájeniu pracieho
cyklu.
Zariadenie nenapúšta vodu.
Dvierka zariadenia zostávajú
zablokované.
Zariadenie nepretržito napúšťa a
odčerpáva vodu.
Zariadenie neodčerpáva vodu alebo
neodstreďuje.
Zariadenie vo fáze odstreďovania
veľmi vibruje.
Zo zariadenia uniká voda.
Ikony týkajúce sa „Prebiehajúcich
fáz“ rýchlo blikajú súčasne
s kontrolkou ON/OFF.
Možné príčiny / Spôsob ich odstránenia:
• Zástrčka nie je zasunutá v elektrickej zásuvke, alebo nie je zasunutá
dostatočne, aby došlo k spojeniu kontaktov.
• V celom dome je vypnutý prúd.
• Dvierka s priezorom nie sú dostatočne zatvorené.
• Nebolo stlačené tlačidlo START/PAUSE.
• Nebol otvorený kohútik prívodu vody.
• Bol nastavený oneskorený štart.
• Prítoková hadica nie je pripojená k vodovodnému kohútiku.
• Hadica je príliš ohnutá.
• Nebol otvorený kohútik prívodu vody.
• V celom dome je uzatvorený prívod vody.
• V rozvode vody nie je dostatočný tlak.
• Nebolo stlačené tlačidlo START/PAUSE.
• Po zvolení funkcie pračka vykoná na konci cyklu pomalé otáčania
bubna; na ukončenie cyklu je potrebné stlačiť tlačidlo START/PAUSE alebo
tlačidlo .
• Vypúštacia hadica sa nachádza mimo urceného rozmedzia od 65 do 100 cm
nad zemou(vid “Inštalácia”).
• Koncová časť vypúšťacej hadice je ponorená vo vode (viď “Inštalácia”).
• V prípade, že sa byt nachádza na jednom z najvyšších poschodí, je možné,
že dochádza k sifónovému efektu, následkom ktorého práčka nepretržite
napúšta a odčerpáva vodu. Na odstránenie uvedeného efektu sú v predaji
bežne dostupné špeciálne „protisifónové“ ventily.
• Odpadové potrubie v stene nie je vybavené odvzdušňovacím otvorom.
• Odčerpanie vody netvorí súčast nastaveného programu: pri niektorých
programoch je potrebné aktivovat ho manuálne (vid “Programy a volitelné
funkcie”).
• Bola aktivovaná volitelná funkcia „Lahké žehlenie“: aby ste ukončili program,
stlačte tlačidlo START/PAUSE(vid “Programy a volitelné funkcie”).
• Vypúšťacia hadica je ohnutá (viď „Inštalácia“).
• Odpadové potrubie je upchaté.
• Počas inštalácie nebol bubon odistený predpísaným spôsobom (viď „Inštalácia“).
• Zariadenie nie je dokonale vyrovnané do vodorovnej polohy (vid „Inštalácia“).
• Zariadenie je stlačené medzi nábytkom a stenou (vid „Inštalácia“).
• Náplň je nevyvážená (viď “Pracie prostriedky a prádlo”).
• Prítoková hadica nie je správne pripojená (vid „Inštalácia“).
• Dávkovač pracích prostriedkov je upchatý (spôsob jeho vycistenia vid
“Údržba a starostlivost”).
• Vypúšťacia hadica nie je upevnená predpísaným spôsobom (viď „Inštalácia“).
• Vypnite zariadenie a vytiahnite zástrčku zo zásuvky, vyčkajte 1 minútu a
opätovne ho zapnite. Ak porucha pretrváva, obrátte sa na Servisnú službu.
SK
Dochádza k tvorbe nadmerného
množstva peny.
Dvierka zariadenia zostávajú
zablokované.
! Poznámka: na ukončenie „Demo Mode“, vypnúť počítač, stlačte súčasne na 3 sek. dve tlačidlá „START/PAUSE“ a
„ON/OFF“ .
• Použitý prací prostriedok nie je vhodný na použitie v automatickej práčke
(musí obsahovať označenie „pre pranie v práčke“, „pre pranie v rukách alebo
v práčke“ alebo podobné označenie).
• Bolo použité jeho nadmerné množstvo.
• Vykonajte manuálne odblokovanie (vid „Opatrenia a rady“).
47
Page 48

Servisná služba
SK
Pred obrátením sa na Servisnú službu:
• Skontrolujte, či nie ste schopní poruchu odstrániť sami (viď „Poruchy a spôsob ich odstránenia);
• Opätovne uveďte do chodu prací program, s cieľom overiť, či bola porucha odstránená;
• V prípade negatívneho výsledku sa obráťte na Servisnú službu alebo na špecializovaný technický personál.
! V prípade chybnej inštalácie alebo nesprávneho použitia práčky bude potrebné za servisný zásah zaplatiť.
! Nikdy sa neobracajte so žiadosťou o pomoc na technikov, ktorí nie sú na vykonávanie tejto činnosti oprávnení.
Pri hlásení poruchy uvedte:
• druh poruchy;
• model zariadenia (Mod.);
• výrobné číslo (S/N).
Tieto informácie sú uvedené na štítku s údajmi, umiestnenom na zariadení.
48
Page 49

Instrukcja instalacji i obsługi
PRALKA
PL
Polski
AQUALTIS
AQS73D 29
Spis treści
Instalacja, 50-51
Rozpakowanie i wypoziomowanie
Podłączenia hydrauliczne i elektryczne
Dane techniczne
Utrzymanie i konserwacja, 52
Odłączenie wody i prądu elektrycznego
Czyszczenie maszyny
Czyszczenie szuadki na środki piorące
Czyszczenie bębna
Czyszczenie pompy
Kontrola przewodu doprowadzającego wodę
Zalecenia i środki ostrożności, 53
Ogólne zasady bezpieczeństwa
System równoważenia ładunku
Utylizacja
Opis urządzenia, 54-55
Panel sterowania “touch control”
Jak wykonać cykl prania, 56
PL
Programy i opcje, 57
Tabela programów
Opcje
Środki piorące i bielizna, 58
Środek piorący
Przygotowanie bielizny
Zalecenia dotyczące prania
Ręczne otwieranie drzwiczek
Nieprawidłowości w działaniu i sposoby
ich usuwania, 59
Serwis Techniczny, 60
49
Page 50

Instalacja
PL
! Należy zachować niniejszą książeczkę,
aby móc z niej skorzystać w każdej chwili.
W przypadku sprzedaży, odstąpienia lub
przeprowadzki należy upewnić się, że
pozostanie razem z pralką.
! Należy uważnie przeczytać instrukcję
obsługi: zawiera ona ważne informacje
dotyczące instalacji oraz właściwego i
bezpiecznego użytkowania pralki.
!W kopercie zawierającej niniejszą instrukcję,
oprócz gwarancji, znajdują się detale
pomagające przy instalacji.
Rozpakowanie i wypoziomowanie
Rozpakowanie
1. Po wypakowaniu pralki upewnić się, że nie
doznała uszkodzeń podczas transportu.
W przypadku stwierdzenia uszkodzeń
nie podłączać jej i skontaktować się ze
sprzedawcą.
2. Odkręcić 4
śruby ochronne
umocowane na
czas transportu
oraz odpowiednią
rozpórkę, znajdujące
się w części tylnej
(patrz rysunek).
3. Zatkać otwory przy pomocy plastikowych
korków znajdujących się w kopercie.
4. Przechowywać wszystkie części; jeśli
pralka będzie przenoszona, powinny zostać
ponownie zamontowane uszkodzeń celu
uniknięcia uszkodzeń wewnętrznych.
! Części opakowania nie są zabawkami dla
dzieci.
Poziomowanie
! Dokładne wypoziomowanie powoduje,
że urządzenie jest stabilne i umożliwia
wyeliminowanie drgań i hałasów, zwłaszcza
podczas fazy wirowania.
! W razie ustawienia na dywanie lub
wykładzinie dywanowej należy tak
wyregulować nóżki, aby pod pralką
pozostawała wolna przestrzeń niezbędna dla
wentylacji.
Podłączenia hydrauliczne i elektryczne
Podłączenie rury pobierania wody
! Przed podłączeniem przewodu zasilającego
do sieci wodociągowej spuścić wodę aż do
pojawienia się przejrzystej wody.
1. Podłączyć do
urządzenia przewód
doprowadzający
wodę, przykręcając
go do odpowiedniego
otworu dopływowego,
znajdującego się w
tylnej części pralki, z
prawej strony u góry
(patrz rysunek)..
2. Podłączyć przewód
zasilający poprzez
przykręcenie go
do zaworu wody
zimnej z otworem z
gwintem rurowym
drobnozwojowym ¾
(patrz rysunek).
3. Zwrócić uwagę, aby na przewodzie nie
było zagięć ani zwężeń.
1. Ustawić pralkę na płaskiej i twardej
podłodze; nie opierać jej o ściany lub meble.
2. Skompensować
nierówności
odkręcając lub
przykręcając nóżki aż
urządzenie znajdzie
się w położeniu
poziomym (jego
nachylenie nie
powinno przekraczać
2 stopnii).
50
! Ciśnienie wody w kurku powinno mieścić
się w przedziale podanym w tabeli Danych
technicznych (patrz strona obok).
! Jeśli długość przewodu doprowadzającego
wodę jest niewystarczająca, należy zwrócić
się do specjalistycznego sklepu lub do
autoryzowanego technika.
! Nigdy nie należy stosować używanych
lub starych przewodów zasilających, lecz
tych, które znajdują się na wyposażeniu
urządzenia.
Page 51

Podłączenie przewodu odpływowego
65 - 100 cm
następującymi przepisami CE:
Podłączyć rurę
odpływową wody do
kanalizacji lub otworu
spustowego w ścianie
umieszczonego na
wysokości od 65
cm do 1 m od ziemi,
unikając zginania jej.
! Po zainstalowaniu urządzenia gniazdko
elektryczne powinno być łatwo dostępne.
! Nie używać przedłużaczy ani wtyczek
wielokrotnych.
! Kabel nie powinien być zgięty ani
zgnieciony.
! Kabel zasilania elektrycznego oraz wtyczka
mogą być wymieniane wyłącznie przez
upoważnionych techników.
PL
Alternatywnie można
oprzeć ją na brzegu
zlewu lub wanny,
przymocowując do
kranu załączony
do pralki prowadnik
(zobacz rysunek).
Wolny koniec rury
odpływowej nie
powinien pozostawać
zanurzony w wodzie.
! Odradza się używanie rur-przedłużaczy; jeśli
przedłużacz jest jednak konieczny, powinien
mieć on ten sam przekrój, co rura oryginalna, i
nie powinien przekraczać 150 cm długości.
Podłączenie elektryczne
Przed włożeniem wtyczki do gniazdka
elektrycznego należy się upewnić, czy:
• gniazdko posiada uziemienie i jest zgodne
z obowiązującymi przepisami;
• gniazdko jest w stanie wytrzymać
maksymalne obciążenie mocy urządzenia,
wskazane w tabeli Danych technicznych
(patrz obok);
• napięcie zasilania mieści się w wartościach
wskazanych w tabeli Danych technicznych
(patrz obok);
• gniazdko jest kompatybilne z wtyczką
urządzenia. W przeciwnym razie należy
wymienić gniazdko lub wtyczkę.
! Nie należy instalować pralki na otwartym
powietrzu, nawet jeśli miejsce to jest
chronione daszkiem, gdyż wystawienie
urządzenia na działanie deszczu i burz jest
bardzo niebezpieczne.
Uwaga! Producent nie ponosi żadnej
odpowiedzialności, jeśli powyższe normy nie
będą przestrzegane.
Dane techniczne
Model AQS73D 29
szerokość cm 59,5
Wymiary
Pojemność od 1 do 7 kg
Dane prądu
elektrycznego
Dane sieci
wodociągowej
Szybkość
wirowania
Programy testowe zgodnie
z dyrektywami
1061/2010 i
1015/2010
wysokość cm 85
głêbokość cm 44,8
dane techniczne umieszczone są na tabliczce na
maszynie
Maksymalne ciśnienie
1 MPa (10 barów)
ciśnienie minimalne
0,05 MPa (0,5 barów)
pojemność bębna 48 litrów
do 1200 obrotów na minutę
Program
;
Bawełna Standardowy 60°C.
Program ;
Bawełna Standardowy 40°C.
Urządzenie to zostało wyprodukowane zgodnie z
- 2004/108/CE (o
Kompatybilności Elektromagnetycznej)
- 2012/19/EU
- 2006/95/CE (o Niskim
Napięciu)
51
Page 52

1
2
1
2
2
Utrzymanie i konserwacja
PL
Odłączenie wody i prądu
elektrycznego
• Zamknąć kurek dopływu wody po każdym
praniu. Zmniejsza się w ten sposób zużycie
instalacji hydraulicznej pralki oraz eliminuje
się niebezpieczeństwo przecieków.
• Wyjąć wtyczkę z kontaktu przed
przystąpieniem do czyszczenia pralki
oraz podczas wykonywania czynności
konserwacyjnych.
Czyszczenie maszyny
Obudowę zewnętrzną i gumowe części pralki
należy myć wilgotną ściereczką zmoczoną
w letniej wodzie z mydłem. Nie stosować
rozpuszczalników ani ściernych środków
czyszczących.
Czyszczenie szuadki na środki
piorące
W celu wyjęcia
szuadki nacisnąć
dźwignię (1) i
pociągnąć ją na
zewnątrz (2)(patrz
rysunek).
Wypłukać szuadkę
pod bieżącą wodą.
Czynność tę
należy wykonywać
stosunkowo często.
Czyszczenie bębna
• Należy zawsze pozostawiać uchylone
drzwiczki pralki, aby zapobiec tworzeniu
się nieprzyjemnych zapachów.
Czyszczenie pompy
Aby dostać się do komory wstępnej:
1. zdjąć płytę przykrywającą, znajdującą się
z tyłu rządzenie naciskając ją ku środkowi,
następnie popchnąć ku dołowi z dwóch stron
i wyjąć ją (zobacz rysunki).
2. ustawić pojemnik do
zbierania wypływającej
wody (ok. 1,5 l) (patrz
rysunek);
3. odkręcić pokrywę,
obracając ją w
kierunku przeciwnym
do ruchu wskazówek
zegara (patrz rysunek);
4. dokładnie wyczyścić wnętrze;
5. ponownie przykręcić pokrywę;
6. ponownie założyć panel upewniwszy
się, przed dociśnięciem go do urządzenia,
czy zatrzaski zostały umieszczone w
odpowiednich otworach.
Kontrola przewodu
doprowadzającego wodę
Przynajmniej raz do roku należy
skontrolować rurę doprowadzania wody. Jeśli
widoczne są na nim pęknięcia i rysy, należy
go wymienić: w trakcie prania duże ciśnienie
może bowiem spowodować jego nagłe
rozerwanie.
Pralka wyposażona jest w pompę
samoczyszczącą, która nie wymaga
zabiegów konserwacyjnych. Może się
jednak zdarzyć, że drobne przedmioty
(monety, guziki) wpadną do komory wstępnej
zabezpieczającej pompę, która znajduje się
w jej dolnej części.
! Należy się upewnić, że cykl prania został
zakończony i wyjąć wtyczkę z gniazdka.
52
Page 53

Zalecenia i środki
ostrożności
! Pralka została zaprojektowana i wyprodukowana
zgodnie z międzynarodowymi przepisami
bezpieczeństwa. Niniejsze ostrzeżenia zostały tu
zamieszczone ze względów bezpieczeństwa i należy je
uważnie przeczytać.
Ogólne zasady bezpieczeństwa
• Urządzenie to zostało zaprojektowane wyłącznie do
użytkowania w warunkach domowych.
• Z niniejszego urządzenia mogą korzystać
dzieci powyżej 8 roku życia i osoby o
ograniczonych zdolnościach zycznych,
zmysłowych bądź umysłowych, jak również
osoby nieposiadające doświadczenia lub
znajomości urządzenia, jeśli znajdują się one
pod nadzorem innych osób lub jeśli zostały
pouczone na temat bezpiecznego sposobu
użycia urządzenia oraz zdają sobie sprawę
ze związanych z nim zagrożeń. Dzieci nie
powinny bawić się urządzeniem. Prace
związane z czyszczeniem i konserwacją nie
mogą być wykonywane przez dzieci, jeśli nie
są one nadzorowane.
• Urządzenie powinno być używane wyłącznie przez
osoby dorosłe i w sposób zgodny z instrukcjami
zawartymi w niniejszej książeczce.
• Nie dotykać pralki stojąc przy niej boso lub mając
mokre lub wilgotne ręce albo stopy.
• Nie wyjmować wtyczki z gniazdka ciągnąc za kabel,
lecz trzymając za wtyczkę.
• Nie dotykać usuwanej wody, gdyż może ona osiągać
wysokie temperatury.
• W żadnym wypadku nie otwierać drzwiczek pralki
na siłę: grozi to uszkodzeniem mechanizmu
zabezpieczającego drzwiczki przed przypadkowym
otwarciem.
• W razie wystąpienia usterki nie należy w żadnym wypadku
próbować dostać się do wewnętrznych części pralki z
zamiarem samodzielnego dokonania naprawy.
• Zawsze uważać, aby dzieci nie zbliżały się do
pracującej pralki.
• Jeśli trzeba maszynę przestawić muszą to zrobić
dwie lub trzy osoby przy zachowaniu jak największej
ostrożności. Nigdy nie należy tego robić samemu,
gdyż urządzenie jest bardzo ciężkie.
• Przed włożeniem bielizny sprawdzić, czy bęben jest
pusty.
Utylizacja
• Utylizacja opakowania: przestrzegać lokalnych
przepisów, dzięki temu opakowanie będzie mogło
zostać ponownie wykorzystane.
• Dyrektywa europejska 2012/19/EU dotycząca
odpadów urządzeń elektrycznych i elektronicznych
przewiduje, że elektryczne urządzenia gospodarstwa
domowego nie powinny być utylizowane w normalnym
ciągu utylizacji stałych odpadów miejskich. Stare
urządzenia powinny być zbierane oddzielnie w celu
optymalizowania stopnia odzysku i recyrkulacji
materiałów, z których są zbudowane i aby zapobiec
potencjalnemu zagrożeniu dla zdrowia i środowiska.
Symbol przekreślonego koszyka podany jest na
wszystkich produktach w celu przypominania o
obowiązku ich oddzielnego zbierania.
Właściciele urządzeń gospodarstwa domowego
mogą uzyskać dodatkowe informacje dotyczące ich
prawidłowej utylizacji zwracając się do odpowiednich
służb publicznych lub do sprzedawców tych urządzeń.
Ręczne otwarcie drzwiczek
W przypadku, gdy otwarcie drzwiczek nie jest możliwe
z powodu braku energii elektrycznej a pranie ma być
rozwieszone, należy postępować w następujący sposób:
1. wyjąć wtyczkę z gniazdka
elektrycznego.
2. sprawdzić, czy poziom
wody wewnątrz maszyny jest
niższy od poziomu otwarcia
drzwiczek, w przeciwnym
przypadku usunąć
nadmiar wody poprzez
rurę odpływową zbierając
ją do wiaderka w sposób
wskazany na rysunku.
3. usunąć płytę znajdującą
się z tyłu pralki (zobacz
następną stronę).
4. przy pomocy uchwytu
pokazanego na rysunku
pociągnąć na zewnątrz aż
do zwolnienia plastikowego
zatrzasku z gniazda;
następnie pociągnąć go ku
dołowi aż da się usłyszeć
kliknięcie, wskazujące,
że drzwiczki zostały
odblokowane.
5. Otworzyć drzwiczki; w
przypadku, gdy nie jest to
jeszcze możliwe, powtórzyć
czynność
6. ponownie założyć
panel upewniwszy się,
przed dociśnięciem go
do maszyny, że zatrzaski
zostały umieszczone w
odpowiednich otworach.
PL
53
Page 54

Opis urządzenia
3
1
2
1
8
0
2
1
0
1
5
0
1
2
0
9
0
6
0
B
A
PL
DRZWICZKI
DRZWICZKI
UCHWYT
DRZWICZEK
PODEST
W celu otwarcia drzwiczek
posługiwać się zawsze
odpowiednim uchwytem
(patrz rysunek).
PULPIT
STEROWANIA
REGULOWANE NÓŻKI
celu użycia środka piorącego w proszku, należy wsunąć
ściankę w zgłębienie B.
3. dodatkowy pojemnik: Wybielacz
! Użycie dodatkowego pojemniczka 3 wyklucza
pranie wstępne.
pojemnik na dodatkowe środki: zmiękczające lub
dodatki płynne. Zaleca się nigdy nie przekraczać
maksymalnego poziomu podanego na siatce i
rozcieńczać skoncentrowane środki zmiękczające.
Panel sterowania “touch control”
SZUFLADKA NA ŚRODKI PIORĄCE
Znajduje się wewnątrz
maszyny, aby uzyskać do
niej dostęp należy otworzyć
Aby zmienić ustawienia
przycisnąć lekko ikonę
wewnątrz czułego pola
(touch control) jak wskazano
na rysunku.
drzwiczki.
Informacje dotyczące
dozowania środków
piorących znajdują się w
rozdziale „Środki piorące i
bielizna”.
Funkcja stand by
1. pojemnik do prania
wstępnego: stosować środek
piorący w proszku.
! Przed wsypaniem środka
piorącego należy sprawdzić,
Pralka ta, w myśl nowych norm europejskich związanych
z oszczędnością elektryczną, posiada system auto
wyłączenia (stand by), który włącza się po 30 minutach
nie użytkowania. Ponownie lekko wcisnąć przycisk
ON-OFF i poczekać, aż pralka ponownie włączy się.
czy nie jest włożona
dodatkowa przegródka 3.
płynie, zaleca się użycie ścianki A dostarczonej na
wyposażeniu, która ułatwia prawidłowe dozowanie. W
2. pojemnik do prania:
W przypadku stosowania
środka piorącego w
54
Page 55

Panel sterowania “touch control”
Przycisk WIROWANIE
Przycisk z kontrolką
START / PAUSE
Pokrętło
PROGRAMÓW
M2
M1
Przycisk TEMPERATURY
Ekran
Przycisk z kontrolką
ON/OFF
Przycisk z kontrolką ON/OFF: nacisnąć na chwilę
przycisk w celu włączenia lub wyłączenia maszyny. Zielona
kontrolka wskazuje, że maszyna jest włączona. W celu
wyłączenia pralki podczas prania konieczne jest dłuższe
przytrzymanie naciśniętego przycisku, przez około 3
sek.; krótkie lub przypadkowe naciśnięcie nie wystarczy
do wyłączenia maszyny. Wyłączenie maszyny podczas
trwającego prania anuluje program prania.
Pokrętło PROGRAMÓW: może być obracane w obydwu
kierunkach. W celu wybrania najlepszego programu należy
sprawdzić „Tabela programów”. W czasie trwania programu
pokrętło pozostaje nieruchome.
Przyciski M1-M2-M3: przytrzymać wciśnięty jeden z
przycisków w celu zapisania w pamięci cyklu oraz własnych
preferowanych ustawień. W celu przywołania cyklu
zapisanego uprzednio wcisnąć odpowiedni przycisk.
Przycisk TEMPERATURY: nacisnąć w celu dokonania
zmiany lub wykluczenia temperatury, wartość wskazywana
jest na umieszczonym wyżej ekranie (patrz „Jak wykonać
cykl prania”).
Przycisk WIROWANIE: nacisnąć w celu dokonania
zmiany lub wykluczenia wirówki, wartość wskazywana jest na
umieszczonym wyżej ekranie (patrz „Jak wykonać cykl prania”).
Przycisk OPÓŹNIONE URUCHOMIENIE: nacisnąć w
celu ustawienia opóźnionego uruchomienia wybranego
programu, wartość ustawionego opóźnienia widoczna jest na
umieszczonym wyżej ekranie (patrz ”Jak wykonać cykl prania”).
Przyciski OPCJI: nacisnąć w celu wybrania dostępnych
opcji. Kontrolka odpowiadająca wybranej opcji pozostanie
włączona (patrz „Jak wykonać cykl prania”).
Ikony FAZY PRANIA: włączają się wskazując
zaawansowanie cyklu (Pranie – Płukanie –
Wirowanie – Wypompowanie ). Napis zapala się,
kiedy cykl zostaje zakończony.
Przycisk z kontrolką START/PAUSE: kiedy zielona kontrolka
pulsuje powoli należy nacisnąć przycisk w celu uruchomienia
prania. Po uruchomieniu cyklu kontrolka świeci w sposób
ciągły. W celu wybrania trybu pauzy podczas prania
nacisnąć ponownie przycisk, kontrolka zacznie pulsować
M3
Przyciski
OPCJI
Kontrolka
EKO
Przycisk
OPÓŹNIONE
Kontrolka
LOCK
URUCHOMIENIE
w kolorze pomarańczowym. Jeśli kontrolka „LOCK”
jest wyłączona, można otworzyć drzwiczki pralki. W celu
ponownego uruchomienia prania od miejsca, w którym
zostało przerwane, należy ponownie nacisnąć przycisk.
Kontrolka LOCK: wskazuje, że drzwiczki są zablokowane.
W celu otwarcia drzwiczek konieczne jest włączenie pauzy
cyklu (patrz „Jak wykonać cykl prania”).
Przycisk oraz kontrolka BLOKADA PRZYCISKÓW: w
celu uruchomienia lub wyłączenia blokady panelu sterowania
przytrzymać naciśnięty przycisk przez około 2 sekundy.
Włączona kontrolka wskazuje, że panel sterowania został
zablokowany (z wyjątkiem przycisk ON/OFF). W ten sposób
uniemożliwia się dokonywanie przypadkowych zmian w
programach, zwłaszcza, jeśli w domu obecne są dzieci.
Kontrolka ECO: Ikona włączy się, gdy, podczas zmiany
parametrów prania, zostanie zaoszczędzone co najmniej
10% energii. Przed wejściem maszyny w tryb „Stand by”,
ikona zaświeci się przez kilka sekund; gdy maszyna jest
wyłączona, odzysk energii elektrycznej określony jest na
około 80%.
ZMIANA JĘZYKA
Jeśli maszyna zostanie włączona po raz pierwszy na
wyświetlaczu ukaże się migająca ikona pierwszego
języka. Odpowiednio do 3 przycisków, po prawej stronie
wyświetlacza ukażą się symbole “ ” , “OK” i “V”. Języki
zmieniają się automatycznie co 3’’ lub poprzez przyciśnięcie
przycisków obok symboli ‘’ ” i “V”. Przyciskiem “OK”
potwierdza się język, który ustala się po 2’’. Jeśli nie
zostanie przyciśnięty żaden przycisk, po 30’’ zmiana
automatyczna języka ponownie zacznie się.
W celu zmiany języka należy włączyć i wyłączyć
urządzanie, a następnie w ciągu 30 sekund wcisnąć
równocześnie przyciski temperatury +wirowanie
+start z opóźnieniem przez 5 sekund. Rozlegnie się
krótki sygnał dźwiękowy, a na wyświetlaczu będzie migał
wybrany język. Po przyciśnięciu przycisków obok symboli
„ ” i „V” zmienia się język. Przyciskiem obok symbolu
“OK” potwierdza się język, który ustala się po 2’’. Jeśli
nie zostanie przyciśnięty żaden przycisk, po 30’’ zostanie
wyświetlony język wcześniej ustalony.
Ikony FAZY
PRANIA
Przycisk oraz kontrolka
BLOKADA
PRZYCISKÓW
55PL55
Page 56

Jak wykonać cykl prania
PL
UWAGA: kiedy po raz pierwszy używa się pralki należy
wykonać cykl prania bez wsadu, ale z użyciem środka
piorącego nastawiając program bawełny 90° bez prania
wstępnego.
1. WŁĄCZENIE MASZYNY. Wcisnąć przycisk .
Wszystkie kontrolki zaświeca się przez 1 sekundę a
na ekranie pojawi się napis AQUALTIS, a następnie
pozostanie świecąc się stałym światłem kontrolka
przycisku oraz pulsować będzie kontrolka START/
PAUSE.
2. WYBÓR PROGRAMU. Obracać Pokrętło
PROGRAMÓW w prawo lub w lewo aż do
odnalezienia potrzebnego programu, nazwa programu
pojawi się na ekranie; teraz powiązana jest z
temperaturą oraz prędkością wirowania, które mogą
zostać zmienione. Na wyświetlaczu pojawi się czas
trwania cyklu.
3. ZAŁADUNEK BIELIZNY. Otworzyć drzwiczki. Włożyć
bieliznę uważając, aby nie przekroczyć wielkości
ładunku wskazanej w tabeli programów na następnej
stronie.
4. DOZOWANIE ŚRODKA PIORĄCEGO. Wysunąć
szuadkę i wsypać środek piorący do odpowiednich
pojemników, tak jak wyjaśniono to w „Opis
urządzenia”.
5. ZAMKNIĘCIE DRZWICZEK.
6. PERSONALIZACJA CYKLU PRANIA Posługiwać się
odpowiednimi przyciskami panelu sterowania:
Zmienić temperaturę i/lub wirowanie.
Maszyna automatycznie wyświetla temperaturę i
przewidziane maksymalne wartości dla ustawionego
programu lub ostatnie wartości, jeśli są zgodne z
wybranym programem. Poprzez naciśnięcie przycisku
zmniejsza się stopniowo temperaturę aż do prania
w zimnej wodzie (OFF). Poprzez naciśnięcie przycisku
zmniejsza się stopniowo wirowanie aż do jego
wyłączenia (OFF). Dodatkowe naciśnięcie przycisków
przywróci maksymalne przewidywane wartości.
! Wyjątek: wybierając program temperaturę można
podnieść aż do 90°.
Nastawić opóźniony start.
W celu ustawienia opóźnionego startu wybranego
programu należy wduszać odpowiedni przycisk aż
do osiągnięcia żądanego czasu opóźnienia. Podczas
ustawiania wyświetlony zostanie czas opóźnienia
wraz z pulsującym napisem „Start za:” i migającym
symbolem . Po nastawieniu opóźnionego startu na
wyświetlaczu zostanie wyświetlony nieruchomy symbol
i następnie wyświetlony zostanie ustawiony czas
trwania cyklu z napisem „ Koniec za:” i czas trwania
cyklu. Po jednorazowym naciśnięciu przycisku START
OPÓŹNIONY wyświetlony zostaje tylko jeden raz czas
ustawionego opóźnienia.
Wyświetlacz pokaże napis “Start za:”. I czas
opóźnienia. Po zakończeniu ustawionego czasu
opóźnienia, maszyna włączy się i na wyświetlaczu
ukaże się napis: „Koniec za:” i pozostały czas do
zakończenia cyklu. W celu usunięcia opóźnionego
uruchomienia wciskać przycisk aż do pojawienia się
napisu OFF; symbol zgaśnie.
Zmiana charakterystyki cyklu.
• Wcisnąć przycisk w celu uruchomienia opcji, na
ekranie pojawi się nazwa a odpowiednie
zacienienie przycisku włączy się.
• Wcisnąć ponownie przycisk w celu wyłączenia
opcji; na ekranie pojawi się nazwa opcji plus OFF i
podcieniowanie wyłączy się.
!Jeśli wybrana opcja nie jest zgodna z nastawionym
programem, niezgodność zostanie zasygnalizowana
przez pulsowanie kontrolki i sygnał akustyczny
(3 sygnały) a opcja nie będzie aktywowana.
! Jeśli wybrana opcja nie jest zgodna z inną, ustawioną
uprzednio, kontrolka odpowiadająca pierwszej opcji
będzie pulsować i uruchomiona zostanie jedynie opcja
druga, kontrolka uruchomionej opcji będzie świecić
stale.
! Opcje mogą zmieniać zalecane obciążenie i/lub czas
trwania cyklu.
7. URUCHOMIENIE PROGRAMU. Nacisnąć przycisk
START/PAUSE. Odpowiednia kontrolka zaświeci
stałym światłem a drzwiczki zostaną zablokowane
(kontrolka LOCK świeci się). Ikony odpowiadające
fazom prania zaświecą się podczas cyklu wskazując
bieżącą fazę.
W celu dokonania zmiany programu w czasie trwania
cyklu należy wybrać funkcję pauzy naciskając na
przycisk START/PAUSE a następnie wybrać żądany
cykl i nacisnąć ponownie przycisk START/PAUSE.
W celu otworzenia drzwi, gdy cykl prania jest włączony
należy nacisnąć przycisk START/PAUSE; jeśli
kontrolka LOCK jest zgaszona otwarcie drzwi będzie
możliwe. Nacisnąć ponownie przycisk START/PAUSE,
aby uruchomić program od momentu, w którym został
przerwany.
8. KONIEC PROGRAMU. Wskazywany jest przez
zaświecenie napisu END. Drzwiczki pralki można
otworzyć natychmiast. Jeśli kontrolka START/PAUSE
pulsuje, nacisnąć przycisk w celu zakończenia
cyklu. Otworzyć drzwiczki, wyjąć bieliznę i wyłączyć
urządzenie.
! Jeśli uruchomiony już cykl ma być anulowany należy
przytrzymać dłużej naciśnięty przycisk , aż cykl
zostanie przerwany i urządzenie wyłączy się.
56
Page 57

Programy i opcje
3
1
2
Tabela programów
Środki piorące i
Opis programu
Ikona
Syntetyczne Odporne
Syntetyczne Odporne (4)
Białe
Kolorowe
Ciemne
Koszule
Do Puchu
Bed&Bath: do bielizny poœcielowej i k¹pielowej.
Płukanie
Wirowanie i Wypompowanie
Antyalergiczne
Delikatne
Wełna: do wełny, kaszmiru, itp.
Mix 30’: W celu szybkiego odświeżenia lekko zabrudzonych tkanin (niew-
skazany dla wełny, jedwabiu i tkanin przeznaczonych do prania ręcznego).
Bawełna Standardowy 60°C (1): tkaniny białe i kolorowe, wytrzymałe,
mocno zabrudzone.
Bawełna Standardowy 40°C (2): tkaniny białe lekko zabrudzone i delikatne kolorowe.
Bawełna Standardowy 20°C: tkaniny białe lekko zabrudzone i delikatne
kolorowe.
Czas trwania cyklu wskazany na wyświetlaczu lub w instrukcji jest czasem oszacowanym dla standardowych warunków. Rzeczywisty czas trwania cyklu może się
zmieniać w zależności od wielu czynników, takich jak temperatura i ciśnienie wody na wlocie, temperatura otoczenia, ilość detergentu, ilość i rodzaj pranej odzieży,
wyważenie ładunku, wybrane opcje dodatkowe.
Uwaga: po około 10 minutach od START, urządzenie na podstawie wsadu obliczy i pokaże czas pozostały do zakończenia programu.
1) Program kontrolny zgodny z normą 1061/2010: ustawić program , wybierając temperaturę 60°C.
Ten cykl jest odpowiedni do prania średnio zabrudzonej odzieży bawełnianej i jest najbardziej wydajnym cyklem pod względem łącznego zużycia energii
elektrycznej i wody; należy go używać do odzieży przeznaczonej do prania w 60 °C. Rzeczywista temperatura prania może się różnić od podanej.
2) Program kontrolny zgodny z normą 1061/2010: ustawić program , wybierając temperaturę 40°C.
Ten cykl jest odpowiedni do prania średnio zabrudzonej odzieży bawełnianej i jest najbardziej wydajnym cyklem pod względem łącznego zużycia energii
elektrycznej i wody; należy go używać do odzieży przeznaczonej do prania w 40 °C. Rzeczywista temperatura prania może się różnić od podanej.
3) W temperaturze 60 °C nie można włączyć funkcji “Pranie wstępne”.
Dla wszystkich Instytucji homologacyjnych:
2) Program bawełna, długi: ustawić program , wybierając temperaturę 40°C.
4) Program syntetyczne, długi: ustawić program , wybierając temperaturę 40°C.
Temp.
maks.
(°C)
60° 800
40° 800
60° 1200
40° 1200
30° 800 -
40° 600 -
30° 1000 -
60° 1200
60° 1200 -
30° 0 -
40° 800 -
30° 800 -
60°
(Max. 90°)
40° 1200 -
20° 1200 -
Prędkość
maks. (obroty
- 1200 - -
- 1200 - - - -
1200
dodatki
na minutę)
Pranie
wstępne
(3)
lacz
Pranie
Wybie-
-
-
-
-
-
-
-
(kg)
zający
Środek
zmiękc-
Wilgotność
resztkowa %
£adunek max
3,5 49 0,87 42 90’
3,5 49 0,56 42 85’
4 - - - 190’
4 53 0,90 73 95’
4 - - - 80’
2 - - - 85’
1,5 - - - 130’
7 - - - 135’
7 - - - 49’
7 - - - 16’
4 - - - 200’
1 - - - 75’
1,5 - - - 80’
3 71 0,19 39 30’
7 53 1,00 52,5 185’
7 53 1,09 92 170’
7 - - - 175’
lt
gii kWh
Czas trwania
Woda łącznie
Zużycie ener-
cyklu
Opcje
Super Wash
Dzięki zastosowaniu
większej ilości wody
podczas fazy początkowej
cyklu i zastosowaniu
dłuższego czasu, opcja
ta gwarantuje pranie o
wysokiej skuteczności.
Funkcja ta przydatna jest
w celu usuwania bardziej
opornych plam. Może być
używana z i bez wybielacza.
Jeśli zamierza się wykonać
cykl wybielania należy wstawić dodatkowy pojemniczek
3, na wyposażeniu, do przegródki 1. Nie przekraczać
maksymalnej ilości wybielacza w płynie, podanej na
głównym wskaźniku (zobacz rysunek). Aby wykonać
tylko wybielanie bez kompletnego cyklu prania, należy
wlać wybielacz do dodatkowego pojemnika 3 i nastawić
program „Płukanie” oraz uruchomić opcję „Super
Wash” .
! Nie można jej zastosować przy programach , , ,
, , , , .
Extra Płukanie
Wybierając tę opcję zwiększa się skuteczność płukania i
zapewnia się maksymalne usuwanie środka piorącego.
Jest przydatne dla włókna szczególnie wrażliwego na
środki piorące. Radzimy używać tej opcji z pralką o
pełnym wsadzie i z większą ilością środka piorącego.
! Nie można jej zastosować przy programach , , , , .
Łatwe Prasowanie
Wybierając tę opcję pranie oraz wirowanie zostaną
odpowiednio zmienione w celu ograniczenia powstawania
zgnieceń. Po zakończeniu cyklu pralka wykona powolne
obroty bębna, kontrolki „Łatwe Prasowanie” oraz START/
PAUSE będą pulsowały. W celu zakończenia cyklu nacisnąć
przycisk START/PAUSE lub przycisk „Łatwe Prasowanie”.
! Nie można jej zastosować przy programach , , ,
, , .
Pranie wstępne
W przypadku wyboru tej funkcji zostanie wykonane pranie
wstępne, które ułatwia usunięcie uporczywych plam.
N.B.: Należy umieścić środek piorący w odpowiedniej
przegródce.
! Nie można jej zastosować przy programach , , ,
, , , , , , (60°), , .
57PL57
Page 58

Środki piorące i bielizna
PL
Środek piorący
Wybór oraz ilość środka piorącego zależne są od
rodzaju tkaniny (bawełna, wełna, jedwab...), od koloru,
od temperatury prania, od stopnia zabrudzenia oraz od
twardości wody.
Dokładne dozowanie środka piorącego zapobiega
marnotrawstwu i przyczynia się do ochrony środowiska:
środki piorące, mimo że ulegają biodegradacji, zawsze
zawierają składniki, które zakłócają równowagę
środowiska naturalnego.
Zaleca się:
• stosowanie środków piorących w proszku dla tkanin z
białej bawełny i do prania wstępnego.
• stosowanie środków piorących w płynie dla delikatnych
tkanin z bawełny oraz dla wszystkich programów z
niską temperaturą.
• stosowanie płynnych środków piorących do wełny i
jedwabiu.
Środek piorący powinien być włożony przed
rozpoczęciem prania do odpowiedniej komory lub do
dozownika wkładanego bezpośrednio do bębna. W takim
przypadku nie można wybrać cyklu Bawełna z praniem
wstępnym.
! Środki piorące w proszku należy stosować do tkanin z
białej bawełny i do prania wstępnego oraz do prania w
temperaturze przekraczającej 60°C.
! Należy stosować się do zaleceń podanych na
opakowaniu środka piorącego.
! Nie używać środków do prania ręcznego, ponieważ
tworzą za dużo piany.
Przygotowanie bielizny
• Rozprostować dobrze ubrania przed włożeniem ich do
pralki.
• Podzielić bieliznę według rodzajów tkaniny (symbol na
etykiecie ubrania) oraz koloru uważając na oddzielenie
odzieży kolorowej od białej;
• Opróżnić kieszenie i sprawdzić guziki;
• Nie przekraczać wartości wskazanych w „Tabela
programów” odnoszących się do ciężaru bielizny suchej.
Ile waży bielizna?
1 prześcieradło 400 – 500 gr
1 poszewka 150 – 200 gr
1 obrus 400 – 500 gr
1 szlafrok 900 – 1200 gr
1 ręcznik do rąk 150 – 250 gr
1 spodnie jeansowe 400 – 500 gr
1 koszula 150 – 200 gr
Zalecenia dotyczące prania
Białe: z cyklu należy korzystać do prania białych
tkanin. Program został opracowany tak, aby chronił przed
szarzeniem białych tkanin.
W celu osiągnięcia najlepszych wyników zaleca się
stosowanie detergentu w proszku.
Kolorowe: z cyklu należy korzystać do prania tkanin
o jasnych kolorach. Program został opracowany tak, aby
chronił kolory przed blaknięciem.
Ciemne: cyklu należy używać do prania ciemnej odzieży.
Program został opracowany w celu ochrony ciemnych
kolorów przed blaknięciem. Dla osiągnięcia najlepszych
efektów, zalecamy stosowanie środka piorącego w płynie,
najlepiej przeznaczonego do prania ciemnej odzieży.
Koszule: Należy używać odpowiedniego cyklu
do prania koszul z różnego materiału i koloru w celu
zagwarantowania jak najlepszej ochrony ubrań.
Do Puchu: aby wyprać produkty pikowane z puchem
gęsim takie kurtki czy poduszki ( nie ważące więcej jak
1,5 kg), należy zastosować właściwy program .
Bielizna kąpielowa i pościelowa: w celu wyprania
bielizny kąpielowej i pościelowej w jednym cyklu, należy
użyć programu , który optymalizuje zużycie środka
piorącego i pozwala oszczędzać czas i pieniądze.
Zalecamy stosowanie środka piorącego w proszku.
Antyalergiczne: programu należy używać do usuwania
głównych alergenów, takich jak pyłki, roztocza, sierść kotów i psów.
Delikatne: używać programu do prania bardzo
delikatnej odzieży, ozdobionej cekinami lub koralikami.
Zalecamy wywrócenie ubrań na lewą stronę i włożenie
małych części odzieży do woreczka przeznaczonego
specjalnie do prania delikatnych ubrań.
Dla osiągnięcia najlepszych efektów, zalecamy stosowanie
środka piorącego w płynie do tkanin delikatnych.
Do prania jedwabiu i zasłon należy wybrać cykl i
włączyć opcję (w tym przypadku możliwe będzie
również włączenie opcji „Extra Płukanie”); urządzenie
zakończy cykl z zamoczoną bielizną, a kontrolka
będzie migać. W celu odprowadzenia wody i wyjęcia
prania, należy nacisnąć przycisk START/PAUSE lub
przycisk .
Wełna: cykl prania „Wełna” niniejszej pralki HotpointAriston został przetestowany i zatwierdzony przez
Woolmark Company jako odpowiedni do prania odzieży
wełnianej przeznaczonej wyłącznie do prania ręcznego,
pod warunkiem, że pranie jest przeprowadzane zgodnie
z instrukcjami podanymi na etykiecie ubrania oraz
ze wskazówkami dostarczonymi przez producenta
urządzenia. Hotpoint-Ariston to pierwsza marka pralek,
która uzyskała od Woolmark Company certykat
Woolmark Apparel Care - Platinum ze względu na
osiągane rezultaty prania oraz zużycie wody i energii.
(M1253)
Bawełna Standardowy 20°C: idealny do zabrudzonej
bielizny bawełnianej. Dobre wyniki prania w zimnej wodzie,
porównywalne z praniem w 40°, są gwarantowane dzięki
działaniu mechanicznemu, wykonywanemu ze zmienną
prędkością, której maksymalne wartości powtarzają się w
krótkich odstępach czasu.
System równoważenia ładunku
Aby uniknąć nadmiernych drgań i jednorodnie rozłożyć
wsad, przed każdym wirowaniem bęben wykonuje nieco
szybsze obroty niż podczas prania. Jeśli po zakończeniu
kolejnych prób wsad nie zostanie rozłożony w sposób
wyważony, urządzenie dokona wirowania z szybkością
mniejszą od przewidywanej. W przypadku wystąpienia
nadmiernego niezrównoważenia pralka dokona rozłożenia
wsadu zamiast odwirowania. Aby zapewnić lepsze
rozłożenie wsadu oraz jego właściwe zrównoważenie,
zaleca się wymieszanie dużych i małych sztuk bielizny.
58
Page 59

Nieprawidłowości w działaniu i
sposoby ich usuwania
Może się zdarzyć, że pralka nie działa. Przed wezwaniem Serwisu Technicznego (patrz „Serwis Techniczny”) należy
sprawdzić, czy problemu nie da się łatwo rozwiązać przy pomocy poniższego wykazu.
Nieprawidłowości w działaniu:
Pralka nie włącza się.
Cykl prania nie rozpoczyna się.
Pralka nie pobiera wody.
Drzwiczki maszyny pozostają
zablokowane.
Pralka pobiera i usuwa wodę bez
przerwy.
Pralka nie odprowadza wody i nie
odwirowuje.
Pralka mocno wibruje w fazie
odwirowywania.
Z pralki wycieka woda.
Ikony dotyczące „bieżącej fazy”
pulsują szybko jednocześnie z
kontrolką ON/OFF.
Tworzy się zbyt duża ilość piany.
Drzwiczki maszyny pozostają
zablokowane.
Możliwe przyczyny/Porady:
• Wtyczka nie jest włączona do gniazdka lub jest wsunięta za słabo, w taki
sposób, że nie ma styku.
• W domu nie ma prądu.
• Drzwiczki nie są dokładnie zamknięte.
• Nie został przyciśnięty przycisk START/PAUSE.
• Kurek dopływu wody jest zamknięty.
• Ustawione zostało opróżnienie startu.
• Rura pobierania wody nie jest podłączona do zaworu.
• Rura jest zgięta.
• Kurek dopływu wody jest zamknięty.
• W domu nastąpiła przerwa w dostawie wody.
• Ciśnienie wody nie jest wystarczające.
• Nie został przyciśnięty przycisk START/PAUSE
• Gdy wybrany zostanie cykl opcja , pod koniec cyklu pralka wykona
powolne obroty bębna. Aby zakończyć cykl, należy nacisnąć przycisk
START/PAUSE lub kontrolkę .
• Rura usuwania wody nie została zainstalowana na wysokości od 65 d0 100
cm od podłogi (patrz „Instalacja”).
• Końcówka rury usuwania wody jest zanurzona w wodzie (patrz „Instalacja”).
• Jeśli mieszkanie znajduje się na najwyższych piętrach budynku, możliwe, że
zaistniał efekt „syfonu”, w wyniku czego pralka nieustannie pobiera i usuwa
wodę. W celu wyeliminowania tej niedogodności należy zakupić specjalny
zawór, zapobiegający powstawaniu efektu syfonu.
• Otwór odpływowy w ścianie nie posiada odpowietrznika.
• Program nie przewiduje odprowadzania wody: w przypadku niektórych
programów należy uruchomić go ręcznie (patrz „Programy i opcje”).
• Została uruchomiona opcja : aby zakończyć program, należy wcisnąć
przycisk START / PAUSE (patrz „Programy i opcje”).
• Przewód odprowadzający wodę jest zgięty (patrz „Instalacja”).
• Instalacja ściekowa jest zatkana.
• Bęben, w chwili instalacji pralki, nie został odpowiednio odblokowany
(zobacz „Instalacja”).
• Pralka nie jest właściwie wypoziomowana (patrz „Instalacja”).
• Pralka jest zbyt ściśnięta pomiędzy meblami i ścianą (patrz „Instalacja”).
• Wsad jest niewyważony (patrz „Środki piorące i bielizna”).
• Przewód doprowadzający wodę nie jest dobrze przykręcony (patrz „Instalacja”).
• Szuadka na środki piorące jest zatkana (w celu oczyszczenia jej patrz
„Konserwacja i czyszczenie”).
• Rura odpływowa nie jest dobrze zamocowana (patrz „Instalacja”).
• Wyłączyć urządzenie i wyjąć wtyczkę z gniazdka, odczekać około 1 minuty,
następnie włączyć ją ponownie. Jeśli niedogodność nie ustępuje wezwać
Serwis.
• Środek piorący nie jest odpowiedni do pralek automatycznych (na opakowaniu
musi być napisane: „do pralek”, „do prania ręcznego i pralek” lub podobne).
• Użyto za dużo środka piorącego.
• Wykonać procedurę ręcznego odblokowania (patrz „Środki ostrożności i
zalecenia”).
PL
! Uwaga: aby wyjść z „trybu demo”, należy wyłączyć pralkę, należy nacisnąć równocześnie przez 3 sek. dwa przyciski i .
59
Page 60

Serwis techniczny
PL
Przed skontaktowaniem się z Serwisem Technicznym:
• Sprawdzić, czy problemu nie można rozwiązać samodzielnie (patrz „Anomalie i środki zaradcze”);
• Ponownie uruchomić program i sprawdzić, czy problem nie zniknął;
• W przeciwnym razie wezwać Autoryzowany Serwis Techniczny.
! W przypadku błędnego zainstalowania i nieprawidłowego używania pralki interwencja serwisu będzie płatna.
! Nigdy nie wzywać nieautoryzowanych techników.
Należy podać:
• rodzaj nieprawidłowości;
• model maszyny (Mod.);
• numer seryjny (S/N).
Te ostatnie informacje znajdują się na tabliczce znamionowej umieszczonej na urządzeniu.
60
Page 61

Návod k instalaci a použití
PRAČKA
CZ
Česky
AQUALTIS
AQS73D 29
Obsah
Instalace, 62-63
Rozbalení a vyrovnání do vodorovné polohy
Připojení k elektrické a k vodovodní síti
Technické údaje
Údržba a péče, 64
Uzavření přívodu vody a vypnutí elektrického napájení
Čištění zařízení
Čištění dávkovače pracích prostředků
Péče o buben
Čištění čerpadla
Kontrola přítokové hadice na vodu
Opatření a rady, 65
Základní bezpečnostní pokyny
Likvidace
Manuální otevření dvířek s průzorem
Popis zařízení, 66-67
Ovládací panel “touch control”
Spuštení pracího cyklu, 68
CZ
Programy a volitelné funkce, 69
Tabulka programů
Možnosti
Prací prostředky a prádlo, 70
Prací prostředek
Příprava prádla
Rady pro praní
Systém automatického vyvážení náplně
Poruchy a způsob jejich odstranění, 71
Servisní služba, 72
61
Page 62

Instalace
CZ
! Je velmi důležité uschovat tento návod
za účelem jeho další konzultace. V případě
prodeje, darování nebo přestěhování pračky
se ujistěte, že zůstane uložen v její blízkosti.
! Pozorně si přečtěte uvedené pokyny:
Obsahují důležité informace týkající se
instalace, použití a bezpečnosti při práci.
! V obálce s tímto návodem mužete najít
kromě záruky také součástky potřebné k
instalaci.
Rozbalení a vyrovnání do vodorovné
polohy
Rozbalení
1. Po rozbalení pračky zkontrolujte, zda
během přepravy nedošlo k jejímu poškození.
V případě, že je poškozena, ji nezapojujte a
obraťte se na prodejce.
2. Odstraňte 4
šrouby chránící
před poškozením
během přepravy a
příslušnou rozpěrku;
tyto komponenty se
nacházejí v zadní
části (viz obrázek).
3. Uzavřete otvory po šroubech plastovými
krytkami, které se nacházejí v obálce.
4. Uschovejte všechny díly; v prípadě
přepravy pračky bude třeba provést jejich
opětovnou montáž, aby se zamezilo vnitřním
poškozením.
! Obaly nejsou hračky pro děti!
! Důsledné vyrovnání do vodorovné polohy
zajistí stabilitu a zabrání vibracím a hlučnosti,
a to zejména ve fázi odstřed’ování.
! V případě instalace na podlahovou krytinu
nebo na koberec nastavte nožky tak, aby pod
pračkou zůstal dostatečný volný prostor pro
ventilaci.
Připojení k elektrické a k vodovodní
síti
Připojení přítokové hadice vody
! Před připojením přítokové hadice k rozvodu
vody nechte odtékat vodu, dokud nebude
průzračná.
1. Připojte přítokovou
hadici k zařízení
prostřednictvím
příslušné přípojky
na vodu, umístěné
v zadní části
vpravo nahoře (viz
obrázek).
2. Připojte přívodní
hadici jejím
zašroubováním ke
kohoutku studené
vody s hrdlem se
závitem 3/4 (viz
obrázek).
Vyrovnání do vodorovné polohy
1. Pračku je třeba umístit na rovnou a pevnou
podlahu, aniž by byla opřena o stěnu nebo
nábytek.
2. Vykompenzujte
nerovnosti
odšroubováním
nebo zašroubováním
nožek, dokud se
zařízení nebude
nacházet ve
vodorovné poloze
(nesmí být nakloněno
o více než 2 stupně).
62
3. Dbejte na to, aby hadice nebyla příliš
ohnutá ani stlačená.
! Tlak v rozvodu vody se musí pohybovat
v rozmezí hodnot uvedených v tabulce s
technickými údaji
(viz vedlejší strana).
! V případě, že délka přítokové hadice
nebude dostatečná, obraťte se na
specializovanou prodejnu nebo na
autorizovaný technický personál.
! Nikdy nepoužívejte použité nebo staré
přítokové hadice, ale hadice, které jsou
součástí příslušenství zařízení.
Page 63

65 - 100 cm
Připojení vypouštěcí hadice
Technické údaje
Model AQS73D 29
Rozmìry
šíøka 59,5 cm
výška 85 cm
hloubka 44,5 cm
Kapacita od 1 do 7 kg
Napájení
Viz štítek s technickými údaji, aplikovaný na zarízení.
Pøipojení k
rozvodu vody
maximální tlak
1 MPa (10 bar)
minimální tlak
0.05 MPa (0.5 bar)
kapacita bubnu 48 litrù
Rychlost
odstøeïování
a¡z do 1200 otáèek za
minutu
Kontrolní programy podle
směrnic
1061/2010
1015/2010
Program
; BAVLNA
STANDARD 60°.
program
; BAVLNA
STANDARD 40°.
Toto zaøízení odpovídá
následujícím normám
Evropské unie:
- 2004/108/CE (Elektromagnetická kompatibilita)
- 2006/95/CE (Nízké
napìtí)
- 2012/19/EU
Připojte vypouštěcí
hadici k odpadovému
potrubí nebo
k odpadu ve stěně,
který se nachází od
65 do 100 cm nad
zemí; jednoznačně
zamezte jejímu
ohybu.
! Po denitivním umístění zařízení musí
zásuvka zůstat snadno přístupná.
! Nepoužívejte prodlužovací kabely a
rozvodky.
! Kabel nesmí být ohnutý ani stlačený.
! Výměna kabelu a zástrčky musí být svěřena
výhradně autorizovanému technickému
personálu.
CZ
Nebo ji zachyťte na
okraj umyvadla či
vany a připevněte
ji ke kohoutku
přivázáním držáku
z příslušenství (viz
obrázek).
Volný konec
vypouštěcí hadice
nesmí zůstat
ponořený ve vodě.
! Použití prodlužovacích hadic se
nedoporučuje; je-li to však nezbytné,
prodlužovací hadice musí mít stejný průměr
jako originální hadice a její délka nesmí
přesáhnout 150 cm.
Připojení k elektrické síti
Před zasunutím zástrčky do zásuvky se
ujistěte, že:
• Je zásuvka uzemněna a že vyhovuje normám;
• Je zásuvka schopna snést maximální zátěž
odpovídající jmenovitému příkonu zařízení,
uvedenému v tabulce s technickými údaji
(viz vedle);
• Hodnota napájecího napětí odpovídá
údajům uvedených v tabulce s technickými
údaji (viz vedle);
• Se zásuvka shoduje se zástrčkou napájecího
kabelu zařízení. V opačném případě je třeba
dát vyměnit zásuvku nebo zástrčku.
! Zařízení nesmí být umístěno venku – pod
širým nebem, a to ani v případě, že by se
jednalo o místo chráněné před nepřízní
počasí, protože je velmi nebezpečné vystavit
jej působení deště a bouří.
Upozornění! Výrobce neponese žádnou
odpovědnost za následky nerespektování
uvedených předpisů.
63
Page 64

1
2
1
2
2
Údržba a péče
CZ
Uzavření přívodu vody a vypnutí
elektrického napájení
• Po každém praní uzavřete přívod vody.
Tímto způsobem dochází k omezení
opotřebení rozvodu vody zařízení a ke
snížení nebezpečí úniku vody.
• Před zahájením čištění zařízení a během
operací údržby je třeba vytáhnout zástrčku
přívodního kabelu ze zásuvky.
Čištění zařízení
Vnější části a části z gumy mohou být
čištěny hadrem navlhčeným ve vlažné vodě
a saponátu. Nepoužívejte rozpouštědla ani
abrazivní látky.
Čištění dávkovače pracích
prostředků
Za účelem vytažení
dávkovače stiskněte
páčku (1) a táhněte ji
směrem ven (2) (viz
obrázek).
Umyjte jej pod
proudem vody; tento
druh vyčištění je třeba
provádět pravidelně.
Přístup ke vstupní části čerpadla:
1. Sejměte krycí panel na přední straně
zařízení zatlačením na jeho střed a
následným zatlačením směrem dolů z obou
stran a poté jej vytázněte (viz obrázky).
2. Připravte nádobu na
zachycení vody, která
vyteče ven (približne
1,5 l) (viz obrázek);
3. Odšroubujte víko
otáčením proti směru
hodinových ručiček
(viz obrázek);
4. Dokonale vyčistěte vnitřek;
5. Zašroubujte zpět víko;
6. Namontujte zpět panel, přičemž se
před jeho přisunutím k zařízení ujistěte, že
došlo ke správnému zachycení háčků do
příslušných podélných otvorů.
Péče o buben
• Dvířka nechte pokaždé pootevřená, aby se
zabránilo tvorbě nepříjemných zápachů.
Čištění čerpadla
Součástí pračky je samočisticí čerpadlo,
které nevyžaduje údržbu. Může se však stát,
že se v jeho vstupní části, určené k jeho
ochraně a nacházející se v jeho spodní části,
zachytí drobné předměty (mince, knoíky).
! Ujistěte se, že byl prací cyklus ukončen, a
vytáhněte zástrčku ze zásuvky.
64
Kontrola přítokové hadice na vodu
Stav přítokové hadice je třeba zkontrolovat
alespoň jednou ročně. Jsou-li na ní viditelné
praskliny nebo trhliny, je třeba ji vyměnit: silný
tlak působící na hadici během pracího cyklu
by mohl způsobit její náhlé roztržení.
Page 65

Opatření a rady
! Pračka byla navržena a vyrobena v souladu s platnými
mezinárodními bezpečnostními předpisy. Tato upozornění
jsou uváděna z bezpečnostních důvodů a je třeba si je
pozorně přečíst.
Základní bezpečnostní pokyny
• Toto zařízení bylo navrženo výhradně pro použití v
domácnosti.
• Toto zařízení mohou používat děti od 8 let a
osoby se sníženými fyzickými, senzorickými
nebo duševními schopnostmi nebo osoby s
nedostatečnými zkušenostmi a znalostmi,
když se nacházejí pod náležitým dohledem
nebo když byly náležitě vyškoleny ohledně
bezpečného použití zařízení a uvědomují
si související nebezpečí. Děti si nesmí hrát
se zařízením. Děti nesmí provádět operace
údržby a čištění bez dohledu.
• Nedotýkejte se zařízení bosí nebo v případě, že máte
mokré nebo vlhké ruce či nohy.
• Nevytahujte zástrčku ze zásuvky tahem za kabel, ale
uchopením za zástrčku.
• Nedotýkejte se odčerpávané vody, protože může mít
velmi vysokou teplotu.
• Nepokoušejte se o násilné otevření dvířek s průzorem:
mohlo by dojít k poškození bezpečnostního uzávěru,
který zabraňuje náhodnému otevření.
• Při výskytu poruchy se v žádném případě
nepokoušejte o opravu vnitřních částí zařízení.
• Vždy mějte pod kontrolou děti a zabraňte tomu, aby se
přibližovaly k zařízení během pracího cyklu.
• V případě potřeby přemísťujte zařízení ve dvou nebo
ve třech a věnujte celé operaci zvláštní pozornost.
Nikdy se nepokoušejte zařízení přemísťovat sami, je
totiž velmi těžké.
• Před zahájením vkládání prádla zkontrolujte, zda je
buben prázdný.
Manuální otevření dvířek s průzorem
V případě, že není možné otevřít dvířka s průzorem
z důvodu výpadku elektrické energie a přejete si prádlo
pověsit, postupujte následovně:
1. Vytáhněte zástrčku ze
zásuvky elektrické sítě.
2. Zkontrolujte, zda je
hladina vody uvnitř zařízení
nižší, než je úroveň otevření
dvíře; v opačném případě
vypusťte přebytečnou vodu a
vypouštěcí hadicí a zachyťte
ji do vědra, jak je znázorněno
na obrázku.
3. Sejměte kdycí panel na přední straně pračky (viz
následující strana).
4. S použitím jazýčku
znázorněného na obrázku
potáhněte směrem ven
plastové táhlo, aby se
uvolnilo z dorazu; současně
jej táhněte směrem ven,
dokud neuslyšíte „cvaknutí“
poukazující na odblokování
dvířek.
5. Otevřete dvířka; v případě,
že to ješte není možné,
zopakuje operaci znovu.
CZ
Likvidace
• Likvidace obalových materiálů: při jejich odstranění
postupujte v souladu s místními předpisy a dbejte na
možnou recyklaci.
• Evropská směrnice 2012/19/EU o odpadu tvořeném
elektrickými a elektronickými zařízeními nařizuje,
že elektrospotřebiče nesmí být likvidovány v rámci
běžného pevného městského odpadu. Vyřazená
zařízení musí být sesbírána zvlášť, aby se zvýšilo
množství recyklovaných a znovupoužitých materiálů,
ze kterých jsou tato zařízení složena, a aby se
zabránilo možným ublížením na zdraví a škodám na
životním prostředí. Symbolem je přeškrtnutý koš,
uvedený na všech výrobcích s cílem připomenout
povinnosti spojené se separovaným sběrem.
Podrobnější informace týkající se správného způsobu
vyřazení elektrospotřebičů z provozu mohou jejich
držitelé získat tak, že se obrátí na navrženou veřejnou
instituci nebo na prodejce.
6. namontujte zpět panel, přičemž se před jeho
přisunutím k zařízení ujistěte, že došlo ke správnému
zachycení háčků do příslušných podélných otvorů.
65
Page 66

Popis zařízení
3
1
2
1
8
0
2
1
0
1
5
0
1
2
0
9
0
6
0
B
A
CZ
DVÍŘKA S
PRŮZOREM
MADLO DVÍŘEK
S PRŮZOREM
PODSTAVEC
DVÍŘKA S PRŮZOREM
NASTAVITELNÉ NOŽKY
K otevření dvířek
s průzorem používejte
vždy příslušné madlo (viz
obrázek).
OVLÁDACÍ
PANEL
3. přídavná nádobka: Bělicí prostředek
! Použití přídavné nádobky 3 vylučuje možnost
předpírky.
přihrádka pro přídavné prací prostředky: pro tekutou
aviváž nebo jiné tekuté přídavné prostředky.
Doporučujeme, abyste nikdy nepřekračovali maximální
úroveň, která je vyznačena mřížkou, a rozředili
koncentrovanou aviváž.
Ovládací panel “touch control”
Za účelem změny nastavení
mírně stiskněte ikonu uvnitř
DÁVKOVAČ PRACÍCH PROSTŘEDKŮ
Nachází se uvnitř zařízení a
citlivé plochy (touch control)
podle obrázku.
je k němu umožněn přístup
po otevření dvířek. Informace
týkající se dávkování pracích
prostředků jsou uvedeny
v kapitole „Prací prostředky
a prádlo“.
Pohotovostní režim
Za účelem shody s novými předpisy souvisejícími s
1. přihrádka pro předpírku:
použijte práškový prací
prostředek.
! Před naplněním přihrádky
pracím prostředkem se
ujistěte, že v dávkovači není
energetickou úsporou je tato pračka vybavena systémem
automatického vypnutí (přechodu do pohotovostního
režimu – standby), který je aktivován po uplynutí 30
minut, když se pračka nepoužívá. Krátce stiskněte
tlačítko ON/OFF a vyčkejte na obnovení činnosti
zařízení.
vložena přídavná přihrádka 3.
2. přihrádka pro praní: V
případě použití tekutého
pracího prostředku se
doporučuje použít pro
správné dávkování malou přepážku A z příslušenství.
Pro použití práškového pracího prostředku vložte malou
přepážku do prohloubeniny B.
66
Page 67

Ovládací panel “touch control”
Otočný ovladač
PROGRAMŮ
M2
M1
Tlačítko ODSTŘEĎOVÁNÍ
Tlačítko TEPLOTA
DISPLEJ
Tlačítko s kontrolkou
START/PAUSE
Kontrolka
EKO
CZ
Ikony
FÁZE PRANÍ
Tlačítko s kontrolkou
ON/OFF
M3
VOLITELNÉ
FUNKCE
Tlačítko skontrolkou ON/OFF: Krátké stisknutí tohoto
tlačítka slouží k zapnutí nebo vypnutí zařízení. Zelená
kontrolka poukazuje na to, že je zařízení zapnuté. Pro
vypnutí pračky během praní je třeba držet tlačítko stisknuté
déle, přibližně 3 sek.; krátké nebo náhodné stisknutí
neumožní vypnutí pračky. Vypnutí zařízení během praní
způsobí zrušení probíhajícího pracího programu.
Otočný ovladač VOLBY PROGRAMŮ: je možné
jím otáčet v obou směrech. Za účelem nastavení
nejvhodnějšího programu si prohlédněte “Tabulka
programů”. Během pracího programu zůstane otočný
knoík bez pohybu.
Tlačítka M1-M2-M3: držte stisknuté jedno z tlačítek
za účelem uložení cyklu do paměti spolu s vlastními
osobními nastaveními. Pro vyvolání cyklu, který byl
předem uložen do paměti, stiskněte příslušné tlačítko.
Tlačítko TEPLOTA: Jeho stisknutí slouží ke změně
teploty nebo vyloučení ohřevu; zvolená hodnota bude
zobrazena na displeji nad tlačítkem (viz Spuštění pracího
cyklu).
Tlačítko ODSTŘEĎOVÁNÍ: Jeho stisknutí slouží ke
změně rychlosti nebo k úplnému vyloučení odstřeďování;
zvolená hodnota nad tlačítkem (viz Spuštění pracího
cyklu).
Tlačítko ODLOŽENÝ START: Jeho stisknutí slouží
k nastavení odloženého startu zvoleného programu;
hodnota nastaveného odložení bude zobrazena na
displeji nad tlačítkem (viz Spuštění pracího cyklu).
Tlačítka s kontrolkami VOLITELNÉ FUNKCE: Slouží
k volbě jednotlivých nabízených volitelných funkcí.
Příslušná kontrolka zvolené volitelné funkce zůstane
rozsvícena (viz Spuštění pracího cyklu).
Ikony FÁZE PRANÍ: se rozsvítí za účelem zobrazování
průběhu cyklu (Praní - Extra Máchání Odstřeďování - Vypouštění ). Nápis se rozsvítí
po ukončení cyklu.
Tlačítko s kontrolkou START/PAUSE: když zelená
kontrolka začne pomalu blikat, stiskněte toto tlačítko za
účelem zahájení praní. Po zahájení cyklu se kontrolka
rozsvítí stálým světlem. Přejete-li si přerušit praní, znovu
Tlačítka
Tlačítko
ODLOŽENÝ
START
Tlačítko s kontrolkou
ZABLOKOVÁNÍ TLAČÍTEK
Kontrolka
LOCK
stiskněte tlačítko; kontrolka bude blikat oranžovým
světlem. Když je kontrolka „LOCK“ zhasnutá, je možné
otevřít dvířka s průzorem. Pro opětovné zahájení cyklu
z místa, ve kterém byl přerušen, znovu stiskněte tlačítko.
Kontrolka LOCK: poukazuje na to, že dvířka
s průzorem jsou zablokována. Pro otevření dvířek je
třeba přerušit prací cyklus (viz Spuštění pracího cyklu).
Tlačítko s kontrolkou ZABLOKOVÁNÍ TLAČÍTEK: za
úcelem aktivace nebo zrušení zablokování ovládacího
panelu držte stisknuté tlačítko přibližně 2 sekundy.
Rozsvícená kontrolka poukazuje na to, že ovládací
panel je zablokován (s výjimkou tlačítko ON/OFF). Tímto
způsobem se zamezí náhodným změnám programu,
zejména v případě, že jsou v domácnosti děti.
Kontrolka EKO: K rozsvícení ikony dojde v případě,
že se při změně parametru praní dosáhne energetické
úspory nejméne 10%. Kromě toho se ještě před aktivací
režimu „Stand by“ na zařízení ikona rozsvítí na několik
málo sekund; při vypnutém zařízení je odhad energetické
úspory přibližně 80%.
ZMĚNA JAZYKA
Při prvním zapnutí zařízení se na displeji zobrazí blikající
první jazyk. V místě 3 tlačítek v pravé části displeje se zobrazí
symboly „ “, „OK“ a „V“. Jazyky se budou měnit automaticky
každé 3’’ nebo stisknutím tlačítek vedle symbolů „ “ a „V“.
Tlačítkem „OK“ se potvrzuje jazyk zvolený po 2’’. Když
nebude stisknuto žádné tlačítko, po uplynutí 30” bude znovu
zahájena automatická změna jazyka.
Pro změnu jazyka je třeba zapnout a vypnout zařízení,
v průběhu následujících 30 sekund po vypnutí stisknout
současně tlačítka teploty + odstřeďování +
odloženého startu na dobu 5 sekund a kromě zaznění
krátkého akustického signálu se na displeji zobrazí
blikající nastavený jazyk. Stisknutím tlačítek vedle
symbolů „ “ a „V“ se provádí změna jazyka. Tlačítkem
„OK“ se potvrzuje zvolený jazyk, který bude nastaven po
2’’. Když nebude stisknuto žádné tlačítko, po uplynutí 30”
bude znovu zobrazen předtím nastavený jazyk. ZAPNUTÍ
ZAŘÍZENÍ.
67
Page 68

Spuštění pracího cyklu
CZ
POZNÁMKA: při prvním použití pračky spusťte prací
cyklus bez prádla, s pracím práškem a nastaveným
pracím programem pro vlnu 90°C, bez předpírky.
1. ZAPNUTÍ ZAŘÍZENÍ. Stisknete tlacítko . Všechny
kontrolky se rozsvítí na dobu 1 sekundy a na displeji
se zobrazí nápis AQUALTIS; kontrolka tlacítka
zustane rozsvícena stálým svetlem a kontrolka
START/PAUSE bude blikat.
2. ZVOLTE PRACÍ PROGRAM. Pootočte OTOČNÝM
KNOFLÍKEM PROGRAMŮ směrem doprava nebo
doleva za účelem volby požadovaného programu; název
programu bude zobrazen na displeji; ke zvolenému
programu je přiřazena teplota a rychlost odstřeďování,
které se dají měnit. Na displeji bude zobrazena
doporučená hladina naplnění bubnu a doba trvání cyklu.
Na displeji bude zobrazena doba trvání cyklu.
3. NAPLŇTE PRAČKU PRÁDLEM. Otevřete dvířka.
Naplňte práčku prádlem a dbejte přitom, aby nedošlo
k překročení množství náplně, které je uvedeno
v tabulce programů na následující straně nebo na
displeji.
4. NADÁVKUJTE PRACÍ PROSTŘEDEK. Vytáhněte
dávkovač pracích prostředků a naplňte prací
prostředek do příslušných přihrádek způsobem
vysvětleným v části „Popis zařízení“.
5. ZAVŘETE DVÍŘKA S PRŮZOREM.
6. NASTAVTE PRACÍ PROGRAM DLE VAŠICH
POTŘEB. Použijte k tomu příslušná tlačítka
ovládacího panelu:
Změňte teplotu a/nebo odstřeďování.
Zařízení automaticky zobrazuje maximální teplotu a
rychlost odstřeďování pro nastavený program nebo
poslední zvolené hodnoty, jsou-li kompatibilní se
zvoleným programem. Stisknutím tlačítka je možné
postupně snížit teplotu až po praní ve studené vodě
(OFF). Stisknutím tlačítka je možné postupně snížit
rychlost odstřeďování až po jeho úplné vyloučení
(OFF). Další stisknutí tlačítek obnoví nastavení
maximálních přednastavených hodnot.
! Výjimka: při volbě programu bude možné zvýšit
teplotu až na 90°C.
Nastavení odloženého startu.
Pro nastavení odloženého startu zvoleného programu
stiskněte příslušné tlačítko až do dosažení požadované
doby. Během nastavování bude zobrazena doba
odložení spolu s nápisem „Začne za:“ a blikající
symbol . Po nastavení odloženého startu bude
na displeji zobrazen symbol a displej se vrátí na
zobrazování doby trvání nastaveného cyklu s nápisem
„Skončí za:“ a doba trvání cyklu. Při jednom stisknutí
tlačítka ODLOŽENÝ START bude zobrazena předtím
nastavená doba odložení.
Po uvedení do činnosti bude na displeji zobrazen
nápis „Začne za:“ a doba odložení. Po uplynutí
nastavené doby odložení dojde k zahájení
nastaveného programu a na displeji bude zobrazen
nápis “Skončí za:“ a doba zbývající do konce cyklu.
Zrušení odloženého startu se provádí stisknutím
tlačítka až do zobrazení nápisu OFF na displeji;
symbol bude blikat.
Změňte vlastnosti cyklu.
• Stisknutím tlačítka aktivujte volitelnou funkci; na
displeji se zobrazí název volitelné funkce a rozsvítí se
kontrolka odpovídající danému tlačítku.
• Opětovným stisknutím tlačítka můžete zrušit volbu
použití volitelné funkce; na displeji se objeví název
volitelné funkce a nápis OFF a příslušná kontrolka
zhasne.
! Když zvolená volitelná funkce není kompatibilní
s nastaveným programem, tato nekompatibilita bude
signalizována blikáním kontrolky a akustickým signálem
(3 pípnutí) a volitelná funkce nebude aktivována.
! V případě, že zvolená volitelná funkce není
kompatibilní s jinou předem zvolenou funkcí, kontrolka
první volitelné funkce bude blikat a bude aktivována
pouze druhá, přičemž kontrolka zvolené funkce se
rozsvítí stálým světlem.
! Volitelné funkce mohou změnit doporučenou náplň a/
nebo dobu trvání cyklu.
7. SPUSŤTE PROGRAM. Stiskněte tlačítko START/
PAUSE. Příslušná kontrolka se rozsvítí stálým světlem
a dvířka se zablokují (kontrolka LOCK se rozsvítí).
Během pracího cyklu se postupně rozsvítí příslušné
ikony, odpovídající jednotlivým fázím praní, informující
o jeho průběhu. Za účelem změny programu během
pracího cyklu přerušte činnost pračky stisknutím
tlačítka START/PAUSE; poté zvolte požadovaný cyklus
a opětovně stiskněte tlačítko START/PAUSE.
Aby bylo možné otevrít dvírka behem pracího cyklu,
je treba stisknout tlacítko START/PAUSE; když je
kontrolka LOCK zhasnutá, je možné otevřít dvířka.
Opětovným stisknutím tlačítka START/PAUSE
opětovně uveďte do činnosti prací program z bodu, ve
kterém byl přerušen.
8. UKONČENÍ PROGRAMU. Je oznámeno rozsvícením
nápisu END. Dvířka s průzorem bude možné okamžitě
otevřít. Když kontrolka START/PAUSE bliká, ukončete
cyklus stisknutím tlačítka. Otevřete dvířka, vyložte
prádlo a vypněte zařízení.
! Přejete-li si zrušit již zahájený cyklus, znovu dlouze
stiskněte tlačítko . Cyklus bude přerušen a dojde k
automatickému vypnutí zařízení.
68
Page 69

3
1
2
Programy a volitelné
funkce
Tabulka programů
za
Prací prostředky
Praní
Předpírka
(3)
Bělicí
-
-
-
-
-
-
-
(kg)
Aviváž
prostředek
3,5 49 0,87 42 90’
3,5 49 0,56 42 85’
4 - - - 190’
4 53 0,90 73 95’
4 - - - 80’
2 - - - 85’
1,5 - - - 130’
7 - - - 135’
7 - - - 49’
4 - - - 200’
1 - - - 75’
1,5 - - - 80’
3 71 0,19 39 30’
7 53 1,00 52,5 185’
7 53 1,09 92 170’
7 - - - 175’
pness %
Max. náplň
Residual dam-
Energy con-
Total water lt
sumption kWh
cyklu
Doba trvání
Popis programu
Ikona
SYNTETIKA Silně znečištěné
SYNTETIKA Silně znečištěné (4) 40° 800
BÍLÉ PRÁDLO
BAREVNÉ
TMAVÉ PRÁDLO
KOŠILE
BUNDY
BED&BATH: pro povlečení a koupelnové prádlo. 60° 1200
MÁCHÁNÍ
ODSTŘEĎOVÁNÍ a VYPOUŠTĚNÍ
ANTIALERGENNÍ
JEMNÉ PRÁDLO
VLNA Platinum Care: pro vlnu, kašmír apod.
MIX 30’: k rychlému oživení mírně znečištěného prádla (nedoporučuje
se pro vlnu, hedvábí a prádlo určené pro ruční praní).
Bavlna Standard 60° (1): Silně znečištěné bílé a barevné prádlo z
odolných tkanin.
Bavlna Standard 40° (2): Málo znečištěné bílé a barevné prádlo z
odolných tkanin.
Bavlna Standard 20°: Málo znečištěné bílé a barevné prádlo z odolných tkanin.
Doba trvání cyklu uvedená na displeji nebo v návodu představuje odhad vypočítaný na základě standardních podmínek. Skutečná doba se může měnit v závislosti na četných faktorech, jako je
např. teplota a tlak vody na vstupu, teplota prostředí, množství pracího prostředku, množství a druh náplně, vyvážení náplně a zvolené volitelné funkce.
Poznámka: Přibližně po 10 minutách od START zařízení na základě naplnění přepočítá a zobrazí dobu, která zbývá do ukončení programu.
1) Kontrolní program podle normy 1061/2010: nastavte program s teplotou 60°C.
Tento cyklus je vhodný pro praní běžně znečištěné bavlny a jedná se o nejúčinnější cyklus z hlediska kombinované spotřeby energie a vody určený pro prádlo, které
lze prát při teplotě do 60 °C. Skutečná teplota praní se může lišit od uvedené.
2) Kontrolní program podle normy 1061/2010: nastavte program s teplotou 40°C.
Tento cyklus je vhodný pro praní běžně znečištěné bavlny a jedná se o nejúčinnější cyklus z hlediska kombinované spotřeby energie a vody určený pro prádlo, které
lze prát při teplotě do 40 °C. Skutečná teplota praní se může lišit od uvedené.
3) Při teplotě 60 °C nelze funkci “Předpírká” aktivovat.
Pro všechny Test Institutes:
2) Dlouhý program pro praní bavlny: nastavte program s teplotou 40°C.
4) Dlouhý program pro syntetiku: nastavte program s teplotou 40°C.
Max.
teplot
(°C)
60° 800
60° 1200
40° 1200
30° 800 -
40° 600 -
30° 1000 -
- 1200 - -
- 1200 - - - - 7 - - - 16’
60° 1200 -
30° 0 -
40° 800 -
30° 800 -
60°
(Max. 90°)
40° 1200 -
20° 1200 -
Max.
rychlost
(otácky
minutu)
1200
CZ
Možnosti
Super Wash
Díky použití většího množství
vody v počáteční fázi
cyklu a díky použití delší
doby tato volitelná funkce
zaručuje praní vysoké
kvality. Může se používat
s bělicím prostředkem nebo
bez něj. Když si přejete
provést také bělení, vložte
přídavnou nádobku 3
z příslušenství do nádobky
1. Při dávkování bělícího
prostředku nepřekračujte úroveň „max“ vyznačenou na
středové přihrádce (viz obrázek). Pokud si přejete provést
samostatné bělení, nalijte bělicí prostředek do přídavné
nádobky 3, nastavte program „Extra Máchání“ a aktivujte
volitelnou funkci „Super Wash“ .
! Tuto volitelnou funkci není možné aktivovat u programu
, , , , , , , .
Extra Máchání
Volbou této volitelné funkce se zvýší účinnost máchání
a zajistí se maximální stupeň odstranění pracího
prostředku. Je užitečná zejména pro pokožky se
zvýšenou citlivostí na prací prostředky. Tuto volitelnou
funkci doporučujeme používat na zcela naplněnou pračku
nebo při použití vysokých dávek pracího prostředku.
! Tuto volitelnou funkci není možné aktivovat u programu
, , , , .
Snadné žehlení
Volbou této volitelné funkce se praní a odstřeďování
náležitě změní za účelem snížení tvorby záhybů. Po
ukončení cyklu pračka provede pomalé otáčení bubnu,
provázené blikáním kontrolek „Snadné žehlení“ a
„START/PAUSE. Ukončení cyklu se provádí stisknutím
tlačítka START/PAUSE nebo tlačítka „Snadné žehlení“.
! Tuto volitelnou funkci není možné aktivovat u programu
, , , , , .
Předpírka
Volbou této funkce dojde k provedení předpírky, užitečné
pro odstranění odolných skvrn.
POZN.: Přidejte prací prostředek do příslušné přihrádky.
! Tuto volitelnou funkci není možné aktivovat u programu
, , , , , , , , , (60°), , .
69
Page 70

Prací prostředky a prádlo
CZ
Prací prostředek
Volba druhu a množství pracího prostředku závisí na
druhu tkaniny (bavlna, vlna, hedvábí…), na barvě, teplotě
praní, stupni znečištění a na tvrdosti vody.
Správné dávkování pracího prostředku zabraňuje plýtvání
a šetří životní prostředí: i když se jedná o biodegradabilní
látky, prací prostředky narušují přirozenou rovnováhu
v přírodě.
Doporučuje se:
• používat práškové prací prostředky pro prádlo z bílé
bavlny a pro předpírku.
• používat tekuté prací prostředky pro choulostivé bavlněné
prádlo a pro všechny programy při nízké teplotě.
• Používat tekuté prací prostředky pro choulostivé
tkaniny pro praní vlny a hedvábí.
Prací prostředek se musí nalít před zahájením praní do
příslušné přihrádky nebo do dávkovače, který se vkládá
přímo do bubnu. V tomto případě není možné zvolit
cyklus Bavlna s předpírkou.
! Pro předpírku a praní při teplotě vyšší než 60 °C
používejte práškové prací prostředky pro bílé bavlněné
prádlo.
! Dodržujte pokyny uvedené na obalu pracího prostředku.
! Nepoužívejte prací prostředky určené pro praní v ruce,
protože způsobují tvorbu nadměrného množství pěny.
Příprava prádla
• Před vložením prádlo řádně rozprostřete.
• Rozdělte prádlo podle druhu tkaniny (symbol na
visačce prádla) a barvy a dbejte přitom na oddělení
barevného prádla od bílého;
• Vyprázdněte kapsy a zkontrolujte knoíky;
• Nepřekračujte hodnoty povolené náplně, uvedené
v „Tabulka programů“, vztahující se na hmotnost
suchého prádla.
Kolik váží prádlo?
1 prostěradlo 400-500 g
1 povlak 150-200 g
1 ubrus 400-500 g
1 župan 900-1200 g
1 ručník 150-250 g
1 džíny 400-500 g
1 košile 150-200 g
Rady pro praní
Bílé prádlo: použijte cyklus pro praní bílého prádla.
Program je navržen pro dlouhodobé zachování zářivosti
bílé barvy. Pro dosažení nejlepších výsledků se
doporučuje použít práškový prací prostředek.
Barevné : použijte program pro praní prádla světlé
barvy. Program je navržen pro dlouhodobé zachování
živosti barev.
Tmavé prádlo: použijte program pro praní prádla
tmavé barvy. Program je navržen pro dlouhodobé
zachování tmavých barev. Pro dosažení co nejlepších
výsledků se doporučuje použít tekutý prací prostředek
pro praní tmavého prádla.
Košile: Pro praní košil z ruzných druhu látek a barvy
použijte příslušný program , abyste zabezpečili
maximální péči o ně.
Bundy: při praní prádla plněného husím peřím, jako jsou
například větrovky nebo polštáře (nepřesahující hmotnost
1,5 kg), používejte příslušný program .
Povlečení a Ručníky: pro praní ložního a koupelnového
prádla v jediném cyklu použijte program , který
optimalizuje použití aviváže a umožňuje uspořit čas
a energii. Doporučuje se použití práškového pracího
prostředku.
Antialergenní: použijte program pro odstranění hlavních
alargenů, jako jsou pyl, roztoči a kočičí a psí chlupy.
Jemné Prádlo: pro praní velmi choulostivého prádla,
které obsahuje aplikace, jako je štras nebo pajetky,
použijte program .
Doporučuje se prádlo před praním převrátit naruby a
vložit malé kusy prádla do příslušného sáčku pro praní
choulostivého prádla. Pro dosažení nejlepších výsledků
se doporučuje použít tekutý prací prostředek pro
choulostivé prádlo.
Pro praní hedvábného prádla a záclon zvolte cyklus
a aktivujte volitelnou funkci (v tomto případě bude
možné aktivovat také volitelnou funkci „Extra máchání“);
zařízení ukončí cyklus s prádlem namočeným ve vodě a
s blikající kontrolkou . Za účelem odčerpání vody a
vyjmutí prádla z pračky je třeba stisknout tlačítko START/
PAUSE nebo tlačítko .
Vlna: prací cyklus „Vlna“ této pračky Hotpoint-Ariston
byl testován a schválen společností Woolmark Company
pro praní prádla z vlny, které je klasikováno jako „prádlo
určené pro ruční praní“, za podmínky, že bude praní
provedeno v souladu s pokyny uvedenými na visačce
oblečení a s pokyny dodanými výrobcem elektrického
spotřebiče. Hotpoint-Ariston je první značkou praček,
která získala od společnosti Woolmark Company
certikát Woolmark Apparel Care - Platinum za svou
výkonnost při praní a spotřebu vody a energie. (M1253)
Bavlna Standard 20°
bavlny. Dobrá výkonnost i za studena, srovnatelná s
praním při 40 °C, je zaručena mechanickým působením,
které je založeno na změně rychlosti v krátkých nebo
dlouhých intervalech.
ideální pro náplně ze znečištěné
Systém automatického vyvážení náplně
Před každým odstřeďováním buben provede otáčení
rychlostí, která mírně převyšuje rychlost praní, aby se
odstranily vibrace a aby se náplň rovnoměrně rozložila.
V případě, že po několikanásobných pokusech o
vyvážení prádlo ještě nebude správně vyváženo,
zařízení provede odstřeďování nižší rychlostí, než je
přednastavená rychlost. Při nadměrném nevyvážení
pračka provede namísto odstřeďování vyvážení. Pro
dosažení rovnoměrnějšího rozložení náplně a jejího
správného vyvážení se doporučuje míchat velké a malé
kusy prádla.
70
Page 71

Poruchy a způsob jejich
odstranění
Může se stát, že zařízení nebude fungovat. Dříve než zatelefonujete na servisní službu (viz “Servisní služba”),
zkontrolujte, zda se nejedná o problém, který lze snadno vyřešit s pomocí následujícího seznamu.
Poruchy:
Zařízení nelze zapnout.
Nedochází k zahájení pracího
cyklu.
Zařízení nenapouští vodu.
Dvířka zařízení zůstávají
zablokovaná.
Zařízení nepřetržitě napouští a
odčerpává vodu.
Zařízení neodčerpává vodu nebo
neodstřeďuje.
Během odstřeďování je možné
pozorovat silné vibrace zařízení.
Ze zařízení uniká voda.
Ikony týkající se „Probíhajících
fází“ rychle blikají současně
s kontrolkou ON/OFF.
Možné příčiny / Způsob jejich odstranění:
• Zástrčka není zasunuta v zásuvce nebo není zasunuta natolik, aby došlo ke
spojení kontaktů.
• V celém dome je vypnutý proud.
• Dvířka s průzorem nejsou řádně zavřená.
• Nebylo stisknuto tlačítko START/PAUSE.
• Nebyl otevřen kohout přívodu vody.
• Byl nastaven odložený start.
• Přívodní hadice není připojena k vodovodnímu kohoutu.
• Hadice je příliš ohnutá.
• Nebyl otevřen kohout přívodu vody.
• V celém domě je uzavřený přívod vody.
• V rozvodu vody není dostatečný tlak.
• Nebylo stisknuto tlačítko START/PAUSE.
• Při volbě volitelné funkce pračka po ukončení cyklu provede několik
otočení bubnu; pro ukončení cyklu je treba stisknout tlačítko START/PAUSE
nebo tlačítko .
• Vypouštěcí hadice se nachází mimo určené rozmezí od 65 do 100 cm nad
zemí (viz “Instalace”).
• Koncová část vypouštěcí hadice je ponořená ve vodě (viz “Instalace”).
• V případě, že se byt nachází na jednom z nejvyšších poschodí, je možné, že
dochází k sifonovému efektu, jehož následkem zařízení nepřetržitě napouští
a odčerpává vodu. Pro odstranění uvedeného efektu jsou v prodeji běžně
dostupné speciální protisifonové ventily.
• Odpad ve stěně není vybaven odvzdušňovacím otvorem.
• Odčerpání vody netvoří součást nastaveného programu: u některých programů
je třeba jej aktivovat manuálně (viz “Programy a volitelné funkce”).
• Byla aktivována volitelná funkce : za účelem ukončení programu stiskněte
tlačítko START/PAUSE (viz “Programy a volitelné funkce”).
• Vypouštěcí hadice je ohnutá (viz „Instalace“).
• Odpadové potrubí je ucpané.
• Během instalace nebyl buben odjištěn předepsaným způsobem (viz „Instalace“).
• Zařízení není dokonale vyrovnáno do vodorovné polohy (viz „Instalace“).
• Zařízení je stlačeno mezi nábytkem a stěnou (viz „Instalace“).
• Náplň je nevyvážená (viz “Prací prostředky a prádlo”).
• Přítoková hadice není správně připojena (viz „Instalace“).
• Dávkovač pracích prostředků je ucpaný (způsob jeho vyčištěný viz “Údržba a péce”).
• Vypouštěcí hadice není upevněna předepsaným způsobem (viz „Instalace“).
• Vypněte zařízení a vytáhněte zástrčku ze zásuvky, vyčkejte přibližně 1 minutu
a zařízení znovu zapněte. Když porucha přetrvává, obraťte se na Servisní
službu.
CZ
Dochází k tvorbě nadměrného
množství pěny.
Dvířka zařízení zůstávají
zablokovaná
! Poznámka: pro ukončení „Demo Mode“, vypněte pračku, stiskněte současně na 3 sek. obě tlačítka „START/PAUSE“
a „ON/OFF“ .
• Použitý prací prostředek není vhodný pro použití v automatické pračce (musí
obsahovat označení „pro praní v pračce“, „pro ruční praní nebo pro praní v
pračce“ nebo podobné označení).
• Bylo použito nadměrné množství pracího prostředku.
• Proveďte manuální odblokování (viz „Opatření a rady“).
71
Page 72

Servisní služba
CZ
Před přivoláním Servisní služby:
• Zkontrolujte, zda nejste schopni poruchu odstranit sami (viz „Poruchy a způsob jejich odstranění);
• Znovu uved’te do chodu prací program, abyste ověřili, zda byla porucha odstraněna;
• V případě negativního výsledku se obrat’te na Servisní službu nebo na specializovaný technický personál.
! V případě chybné instalace nebo nesprávného použití pračky bude třeba za servisní zásah zaplatit.
! Nikdy se neobracejte s žádostí o pomoc na techniky, kteří nejsou k výkonu této činnosti oprávněni.
Při hlášení poruchy uveďte:
• druh poruchy;
• model zařízení (Mod.);
• výrobní číslo (S/N).
Tyto informace jsou uvedeny na štítku s údaji, umístěném na zařízení.
72
Page 73

Інструкція з монтажу та
експлуатації
UA
Українська
AQUALTIS
ПРАЛЬНА МАШИНА
Зміст
Встановлення, 74-75
Розпакування і вирівнювання
Підключення води й електроенергії
Технiчнi данi
Технічне обслуговування та догляд, 76
Відключення води й електричного живлення
Миття машини
Чистка касети для миючих засобів
Догляд за барабаном для білизни
Чищення насосу
Стеження за шлангом для подачі води
Запобіжні заходи та поради, 77
Загальна безпека
Система балансування завантаження
Утилізація
Ручне відкривання дверцят люку
UA
AQS73D 29
Опис машини, 78-79
Панель команд “з сенсорним керуванням”
Як здійснювати цикл прання, 80
Програми й опції, 81
Таблиця програм
Опції прання
Пральні засоби і білизна, 82
Засіб для прання
Підготовка білизни
Поради з прання
Несправності та засоби їх усунення, 83
Допомога, 84
73
Page 74

Встановлення
UA
! Необхідно зберігати дану брошуру, щоб
мати можливість проконсультуватися з нею
у будь-який момент. У випадку продажу,
передачі або переїзду, переконайтеся
у тому, що вона залишається разом із
пральною машиною
! Уважно вивчіть інструкцію: в ній міститься
важлива інформація про встановлення,
використання та безпеку.
! У пакеті з інструкцією ви знайдете,
окрім гарантії, докладну інформацію для
встановлення.
Розпакування і вирівнювання
Розпакування
1. Розпакувавши пральну машину,
перевірте її на наявність пошкоджень під
час транспортування.
Якщо такі є, не виконуйте нiяких
пiдключень та негайно зверніться до
постачальника.
2. Видаліть
4 запобіжних
гвинти для
транспортування
і відповідну
розпірну деталь,
розташовану ззаду (
див. малюнок).
3. Закрийте отвір пробками з пластмаси,
що містяться у пакеті.
4. Зберігайте всі деталі; якщо пральна
машина має перевозиться, вони знову
можуть бути потрібними, щоб уникнути
внутрішніх пошкоджень.
! Забороняйте дiтям гратися з упаковками.
Вирівнювання
! Правильне вирівнювання надасть
стабільність й усуне вібрацію, а також
знизить рівень шуму, особливо під час
роботи центрифуги.
! У випадку встановлення машини на
килимовому покритті або килимах, ніжки
необхідно відрегулювати таким чином,
щоб гарантувати під пральною машиною
необхідний простір для вентиляції.
Підключення води й
електроенергії
Контроль шланга для подачі води
! До підключення шланга подачі води до
водопроводу, злийте деяку кількість води,
доки вона не йтиме чистою.
1. Підключіть
шланг подачі
води до машини,
під’єднавши його до
виходу на задньому
боці угорі праворуч
(див. малюнок).
2. Підключити
живлячий
трубопровід,
прикрутивши його
до крану холодної
води за допомогою
штуцеру з газовою
різьбою 3/4 (див.
малюнок). Перед
пiдключенням
спустiть воду, доки
вона не стане прозорою.
1. Встановіть пральну машину на плоскій
та твердій підлозі, не притуляючи її до стін
або меблів.
2. Компенсуйте
нерівності,
відкручуючи або
вкручуючи ніжки,
доки машина не
стане горизонтально
(вона не повинна
відхилятися більш
ніж на 2 градуси).
74
3. Зверніть увагу, щоб шланг не мав згинів
та утисків.
! Тиск води в крані має відповідати
значенням у таблиці Технічних даних (див.
сторінку поруч).
! Якщо довжини шланга для води не
вистачає, зверніться у спеціалізовану
крамницю або до уповноваженого фахівця.
! Ніколи не використовуйте уживані або
старі шланги для роботи під тиском, а
тільки шланги, що поставляються разом із
машиною.
Page 75

Підключення шланга для зливу води
65 - 100 cm
Підключіть зливний
шланг до каналізації
або до зливного
отвору у стіні на
висоті від 65 до 100
см від підлоги, не
допускаючи його
згинання.
Або ж встановіть
вихід зливного
шланга на край
рукомийника
або ванни,
використавши
дугу, що спрямовує
кінець шланга (див.
малюнок).
Не залишайте
вільний кінець
зливного шланга зануреним у воду.
! Використання подовжувача шланга
не рекомендоване. В разi необхiдностi
використання подовжувача шланга,
переконайтеся у тому, що він має той
самий діаметр та його довжина не
перевищує 150 см.
Електричні підключення
Перш нiж увiмкнути вилку в електричну
розетку, переконайтеся, що:
• розетка має заземлення у відповідності
до встановлених норм;
• розетка розрахована на максимальне
навантаження у межах потужності
машини, зазначене у таблиці Технічних
даних (див. малюнок поруч);
• напруга живлення перебуває у межах,
зазначених у таблиці Технічних даних
(див. малюнок поруч);
• розетка підходить до вилки машини. В
іншому випадку замініть розетку або
вилку.
! Машину не можна встановлювати поза
приміщенням, навіть, під час його ремонту,
тому що дуже небезпечно піддавати її
впливу дощу і грози.
! Коли машина вже встановлена, має
забезпечуватися вільний доступ до її
розетки.
! Не використовуйте подовжувачі й трійники.
! Кабель не повинен мати згинів або утисків.
! Заміна кабелю живлення й вилки мають
виконуватися тільки фахівцями.
Увага! Підприємство знімає з себе
відповідальність, якщо вказані норми не
дотримуватимуться.
Технiчнi данi
Модель AQS73D 29
ширина 59,5 см
Розмiри
Кiлькiсть
бiлизни
Електричні
підключення
Водопровднi
пiдключення
Швидкiсть
центрифуги
Програми
контролю
згiдно з
нормою
1061/2010
1015/2010
висота 85 см
глибина 44,5 см
вiд 1 до 7 кг
див. шильдік з технiчними
даними на машинi
максимальний тиск
1 мПа (10 бар)
мiнiмальний тиск
0,05 мПа (0,5 бар)
об’єм баку – 48 лiтри
до 1200 обертiв на
хвилину
програма
;
Стандартний Бавовна 60°C.
програма ;
Стандартний Бавовна 40°C.
Цей прилад вiдповiдає
таким європейським
директивам:
- 2004/108/CE
(Електромагнітна
сумiснiсть)
- 2012/19/EU
- 2006/95/CE (Низька
напруга)
UA
75
Page 76

Технічне обслуговування та
1
2
1
2
2
догляд
UA
Відключення води й електричного
живлення
• Закривайте водопровідний кран
після кожного прання. У такий спосіб
зменшується знос гідравлічної частини
машини й усувається небезпека витоку.
• Виймайте штепсель з розетки під час
миття машини і під час робіт з технічного
обслуговування.
Миття машини
Зовнішня частина і гумові деталі можуть
бути вимиті тканиною, змоченою у теплій
воді й милі. Не використовуйте розчинники
або абразиви.
Чистка касети для миючих засобів
Щоб витягти касету,
натисніть на важіль
(1) і потягніть касету
назовні (2) ( див.
малюнок).
Промийте під
проточною водою;
ця процедура
має проводитися
регулярно.
Щоб потрапити до форкамери:
1. знiмiть захисну панель з передньої
частини машини шляхом натискання у
центрi, потiм натиснiть униз з обох бокiв та
витягнiть її (див.малюнки).
2. встановіть
контеинер, щоб
зібрати воду, яка
виходить (приблизно
1.5 л) (див. малюнок).
3. відкрутіть кришку,
обертаючи іі проти
годинниковоі стрілки
(див. малюнок);
Догляд за барабаном для білизни
• Завжди залишайте відкритими дверцята
люку, тоді не утворюватимуться
неприємні запахи.
Чищення насосу
Машина обладнана насосом з
автоматичною чисткою, що не вимагає
технічного обслуговування. Може
трапитися так, що малі предмети (монети,
ґудзики) потраплять до форкамери, що
захищає насос, розташований у її нижній
частині.
! Переконайтеся у тому, що цикл прання
закінчено, і витягніть штепсель з розетки.
4. акуратно очистіть внутрішню частину;
5. накрутіть кришку;
6. встановіть панель на місце,
пересвідчіться у тому, що крюки були
вставлені у спеціальні петлі, пiсля чого
притиснiть її до машини.
Стеження за шлангом для подачі
води
Перевіряйте шланг для подачі води не
менше одного разу на рік. Якщо на ньому
є тріщини, він підлягає заміні: під час
прання високий тиск може призвести до
розірвання.
76
Page 77

Запобіжні заходи та
поради
! Машина була спроектована і вироблена у відповідності
з міжнародними нормами безпеки. Дані попередження
складені для забезпечення безпеки і тому їх треба
уважно прочитати.
Загальна безпека
• Дане обладнання було розроблене виключно для
побутового використання.
• Дозволяється користування цим
приладом дітьми віком від 8 років,
а також особами з обмеженими
фізичними, сенсорними або розумовими
можливостями або особами без
належного досвіду і знань, якщо вони
перебувають під постійним контролем
або проінструктовані щодо правил з
небезпечного використання приладу
і усвідомлюють ступені ризику. Не
дозволяйте дітям гратися з приладом.
Операції з очищення і догляду не повинні
виконуватися дітьми без належного
контролю.
• Не торкайтеся до машини голими ногами або мокрими
чи вологими руками й ногами.
• Не виймайте штепсель з електричної розетки,
витягуючи його за провід, тримайтеся тільки за самий
штепсель.
• Будьте обережні: вода, що зливається, може мати
високу температуру.
• У жодному випадку не застосовуйте силу до дверцят
люку: це може ушкодити запобiжний механiзм проти
випадкових вiдкривань.
• Якщо машина не працює у разi поломки, у жодному
випадку не намагайтеся дiстатися внутрiшнiх
механiзмiв з метою самостійного ремонту.
• Слiдкуйте, щоб дiти не наближалися до працюючої
машини.
• Якщо необхідно перенести машину, такі дії мають
виконуватися двома або трьома вантажниками (а не
одним!) за умови максимальної уваги, Нi в якому разi однiєю особою, тому що машина дуже важка.
• Перш ніж завантажити білизну, перевірте, щоб
барабан був порожній.
побутові електроприлади не можуть перероблятися
у звичайному порядку для твердих міських відходів.
Зняті з експлуатації побутові прилади мають бути
зібрані окремо для оптимізації ступеню відновлення й
рециклу матеріалів, що входять до їхнього складу, та
з метою усунення потенційної шкоди для здоров’я та
довкілля. Символ закресленої корзини, зображений
на всіх виробах, нагадує про необхідність окремої
утилізації.
Щодо подальшої iнформацiї стосовно правильної
утилiзацiї електропобутових приладiв, власники
можуть звернутися до вiдповiдних мiських служб або
до продавцiв.
Ручне відкривання дверцят люку
У випадку, якщо неможливо відкрити дверцята люку із-за
відсутності електроенергії і ви хотіли б відкласти прання,
треба діяти таким чином:
1. витягніть штепсель з
електричної розетки.
2. Перевірте, щоб рівень
води усередині машини був
нижче рівня дверцят люку;
якщо це не так, злиите
надлишок води через
зливнии шланг, збираючи
іі у відрі, як показано на
малюнку.
3. знiмiть з пральної машини
передню захисну панель
(див.наступну сторiнку).
4. Потягніть за язичок,
показаний на малюнку,
назовні до звільнення
пластмасової тяги зі стопора;
тягніть послідовно вниз доки
не відчуєте що усередині
клацнуло, це означає, що
дверцята розблоковано.
UA
Система балансування завантаження
Перед кожним віджимом, для запобігання надмірній
вібрації і для рівномірного розподілу навантаження,
барабан здійснює оберти на дещо більшій швидкості, ніж
швидкість прання. Якщо по закінченні декількох спроб
завантажені речі ще не були правильно відбалансовані,
машина здійснює віджим на швидкості, нижчій від
передбаченої. У випадку надмірної незбалансованості
пральна машина здійснює розподіл замість віджиму. З
метою оптимального розподілу завантаження та його
правильного балансування рекомендується одночасне
прання великих і малих речей.
Утилізація
• Утилізація пакувального матеріалу: додержуйтесь
місцевих норм, так як пакування може бути
використане повторно.
• Європейська директива 2012/19/EU з відходів від
електричної й електронної апаратури передбачає, що
5. відкрийте дверцята; у
випадку, якщо це досі ще
неможливо – повторіть
процедуру.
6. встановіть панель на
місце, пересвідчіться у тому,
що крюки були вставлені у
спеціальні петлі, пiсля чого
притиснiть її до машини.
77
Page 78

Опис машини
3
1
2
1
8
0
2
1
0
1
5
0
1
2
0
9
0
6
0
B
A
UA
ДВЕРЦЯТА
ЛЮКУ
РУЧКА
ДВЕРЦЯТ
ЛЮКУ
ДЕКОРАТИВНА
НИЖНЯ ПАНЕЛЬ
ДВЕРЦЯТА ЛЮКУ
Для відкриття
дверцят люку завжди
використовуйте
спеціальну ручку (див.
малюнок).
КАСЕТА ДЛЯ ПРАЛЬНИХ ЗАСОБIВ
Касета для пральних
засобiв знаходиться
всередині машини; щоб
її дiстатися, відкрийте
дверцята.
Про дозування пральних
засобів йдеться у розділі
“Пральні засоби і білизна”.
ПАНЕЛЬ
КОМАНД
НІЖКИ, ЩО РЕГУЛЮЮТЬСЯ
вимірювальний компонент A з комплекту постачання
для правильного дозування. При використанні
порошкового прального засобу вставьте цей
компонент у нішу B.
3. додаткова ванночка: Відбілювач
! Використання додатковоі ванночки 3 виключає
попереднє прання.
ванночка для додаткових засобів: для
пом’якшувачів або додаткових рідин. Рекомендується
ніколи не перевищувати максимальний рівень,
відмічений сіткою, і розбавляти концентровані
пом’якшувачі.
Панель команд “з сенсорним керуванням”
Для змiни параметрiв
злегка натиснiть на значок
на сенсорному екранi
(touch control), як вказано
на малюнку.
1. ванночка для
попереднього прання:
використовуйте миючий
засіб у порошку.
! Перш нiж додати миючии
засіб, перевірте, щоб не
була вставлена додаткова
ванночка 3.
Режим очiкування
Вiдповiдно до норм, пов’язаних з заощадження
енергiї, цю пральну машину оснащено системою
автовимкнення (stand by), яка активується через
декiлька (30) секунд вiдсутностi роботи з боку
машини. Швидко натиснiть кнопку ON/OFF та
зачекайте вiдновлення роботи машини.
2. ванночка для прання:
рідкий пральний засіб, рекомендується застосовувати
Якщо використовується
78
Page 79

Панель команд “з сенсорним керуванням”
Ручка
ПРОГРАМИ
M2
M1
ДИСПЛЕЙ
Кнопка
ВІДЖИМ
Кнопка
ТЕМПЕРАТУРА
Кнопка з індикаторною
лампою START/PAUSE
Індикаторна
лампа EКO
Піктограми
ФАЗИ
ПРАННЯ
UA
Кнопка з індикаторною
M3
лампою ON/OFF
Кнопка з індикаторною лампою ON/OFF: швидко
натисніть і відпустіть кнопку для вмикання або
вимикання машини. Зелена індикаторна лампа означає,
що машина ввімкнена. Для вимикання пральної машини
під час прання необхідно утримувати кнопку натиснутою
приблизно більш ніж 3 сек.; короткочасне або випадкове
натискання не дозволить вимкнути машину. Вимикання
машини під час циклу прання вiдмiнює це прання.
Ручка ПРОГРАМИ: може обертатися в обох напрямках.
Щоб встановити найбільш придатну програму див.
“Таблицю програм”. Під час прання ручка залишається
нерухомою.
Кнопки M1-M2-M3: тримайте натиснутою одну з кнопок,
щоб запам’ятати цикл і відповідні персоналізовані опції.
Для виклику попередньо внесеного у пам’ять циклу
натисніть відповідну кнопку.
Кнопка ТЕМПЕРАТУРА: натисніть для внесення змін
або виключення температури; значення відображається
на дисплеї, який знаходиться вище (див. “Як
здійснювати цикл прання”).
Кнопка ВIДЖИМУ: натисніть для внесення змін або
виключення центрифуги; значення відображається на
дисплеї, який знаходиться вище (див. “Як здійснювати
цикл прання”).
Кнопка ВIДКЛАДЕНЕ ПРАННЯ: натиснiть для
використання машини в режимі відкладеного прання;
значення часу затримки відображається на дисплеї,
який знаходиться вище (див. “Як здійснювати цикл
прання”).
Кнопки ОПЦІЇ: натиснiть для вибору наявних опцій.
Горить індикаторна лампа, що відноситься до вибраної
опції прання (див. “Як здійснювати цикл прання”).
Піктограми ФАЗИ ПРАННЯ: загораються при
проходженні відповідних фаз циклу (Прання Полоскання - Віджим – Злив ).
Надпис спалахує після закінчення циклу.
Кнопка з індикаторною лампою START/PAUSE: коли
зелена індикаторна лампа блимає з повільними
інтервалами, натисніть на кнопку для запуску прання.
Якщо цикл розпочався, індикаторна лампа горить
постійно. Щоб війти в режим паузи під час прання, знову
Кнопки
ОПЦІЇ
Кнопка
ВIДКЛАДЕНЕ
ПРАННЯ
натисніть на кнопку; індикаторна лампа почне горіти
оранжевим кольором. Якщо індикаторна лампа “LOCK”
погасне, можна відкривати люк для завантаження
білизни. Щоб продовжити прання з місця, де воно було
перервано, знову натисніть на кнопку.
Iндикаторна лампа LOCK: показує, що люк для
завантаження заблокований. Щоб вiдкрити дверцята,
встановiть цикл у режим паузи (див. “Як здійснювати
цикл прання”).
Кнопка з індикаторною лампою БЛОКУВАННЯ
КОМАНД: щоб активувати або дезактивувати
блок панелі команд, натисніть і утримуйте кнопку
приблизно 2 секунди. Увімкнена індикаторна лампа
вказує, що панелькоманд заблоковано. У цей спосіб
перешкоджають випадковій зміні програм, передусім,
якщо у домі є діти.
Індикаторна лампа ЕКО: Пiктограма спалахує,
якщо пiд час змiни параметрiв миття, вiдбувається
заожадження енергiї не менше за 10%. Крiм того, перш
нiж машина увiйде у режим очiкування “Stand by”,
позначка спалахне на декiлька секунд; у вимкненiй машинi
оцiнюване енергозбереження складатиме приблизно 80%.
ЗМIНА МОВИ
При першому увiмкненнi машини на екранi почне
блимати перша мова. Навпроти 3 кнопок праворуч
екрану з’являться позначки “ ”, “OK” та “V”. Змiна
мов вiдбувається автоматично кожнi 3 секунди. Або ж
можна натиснути кнопки поруз з позначками “ “ та “V”.
Через 2 секунди можна обрати мову та пiдтвердити
її за допомогою кнопки “OK”. Якщо не натиснути нi на
яку кнопку, через 30 секунд мови знову розпочнуть
змiнюватися автоматично.
Щоб змінити мову, необхідно увімкнути і вимкнути
машину, потім протягом 30 секунд після вимкнення
машини одночасно натиснути на кнопки температури
+віджиму +відстроченого пуску і утримати
їх 5 секунд. На дисплеї почне блимати нова обрана
мова, про що сповіщає короткочасний звуковий сигнал.
При натисканнi на кнопки поруч з позначками “ “ та
“V” вiдбувається змiна мови. Через 2 секунди можна
обрати мову та пiдтвердити її за допомогою кнопки
поруч з “OK”. Якщо не натиснути нi на яку кнопку, через
30 секунд з’явиться остання задана мова.
Кнопка з індикаторною лампою
БЛОКУВАННЯ КОМАНД
Iндикаторна лампа LOCK
79
79
Page 80

Як здійснювати цикл прання
UA
ПРИМІТКА: при першому використанні пральної
машини, здійсніть цикл прання без білизни, але з
миючим засобом, в режимі прання бавовняних виробів
при температурі 90 градусів без попереднього прання.
1. УВІМКНЕННЯ МАШИНИ. Натисніть кнопку . Всі
індикаторні лампи загоряться на 1 секунду і на
дисплеї з’явиться напис AQUALTIS; залишиться
горіти індикаторна лампа кнопки , а індикаторна
лампа START/PAUSE блиматиме.
2. ВИБІР ПРОГРАМИ. Обертайте РУЧКУ ПРОГРАМ
ліворуч або праворуч, щоб вибрати бажану
програму; назва програми відобразиться
на дисплеї; кожна програма має відповідну
температуру та швидкість віджиму, які можуть бути
змінені. На дисплеї з’явиться тривалiсть циклу.
3. ЗАВАНТАЖЕННЯ БІЛИЗНИ. Відкрийте дверцята
люку. Завантажте білизну, звертаючи увагу, щоб не
перевищити кількість білизни, зазначену в таблиці
програм на наступній сторінці або вказану на екранi.
4. додавання засобу для прання. Витягніть касету
і додайте миючий засіб у відповідні ванночки як
вказано в “Описі машини”.
5. ЗАКРИЙТЕ ЛЮК.
6. ПЕРСОНАЛИЗАЦІЯ ЦИКЛУ ПРАННЯ.
Використовуйте спеціальні кнопки на панелі команд:
Зміна температури та/або швидкостi
віджиму.
На дисплеї автоматично вiдображається
максимальна температура i швидкiсть центрифуги,
передбаченi для заданої програми. Або останнi
заданi параметри, якщо вони є сумiсними з
вибраною програмою. Натискаючи на кнопку
, зменшують температуру прання до прання у
холодній воді “OFF”. Натискаючи на кнопку
, поступово зменшують швидкість віджиму, аж
до його відключення взагалi “OFF”. Наступне
натискання на кнопки призводить до повернення у
верхню позицію – до максимальних значень.
! Виключення: при виборі програмиl ,
температура може збільшитися до 90 градусів.
Задати вiдстрочене прання.
Для встановлення вiдстроченого прання обраної
програми натискайте на вiдповiдну кнопку, доки
не з’явиться необхiдний час вiдстрочення. Пiд
час встановлення з’являється час вiдстрочення
разом з написом “Starts in:” (Початок через) та
блимаючою позначкою . Пiсля встановлення
вiдстроченого прання позначка на дисплеї
горiтиме постiйним свiтлом та з’явиться
тривалiсть заданного циклу з написом “Ends
in:” (Завершення через). При одноразовому
натисканнi на кнопку ВIДСТРОЧЕНОГО ПРАННЯ
з’явиться попередньо заданий час вiдстрочення.
Пiсля пуску на дисплеї з’явиться напис “Starts
in:” (Початок через) та час вiдстрочення. Пiсля
вичерпання заданого часу вiдстрочення машина
розпочне роботу, та на дисплеї з’явиться напис
“Ends in:” (Завершення через) та час, якого
бракує до кiнця циклу. Щоб скасувати вiдстрочене
прання, натискайте на кнопку, доки на дисплеї не
з’явиться напис OFF; позначка згасне.
Модифiкацiя характеристик циклу.
• Натисніть кнопку, щоб активувати опцію; на
дисплеї відобразиться назва опції і загориться
індикаторна лампа, що відповідає кнопці.
• Знову натисніть на кнопку, щоб дезактивувати
дану опцію; на дисплеї з’явиться назва опції
плюс OFF, а індикаторна лампа згасне.
! Якщо вибрано опцiю, несумiсною з заданою
програмою, надається сигнализацiя через
блимання iндикаторної лампи та звуковий сигнал
(тричi); опцiя не активується.
! Якщо вибрана опція несумісна з іншою раніше
вибраною, індикаторна лампа, що відповідає
первинній опції почне блимати, при цьому буде
активована тільки друга опція, індикаторна лампа
кнопки горітиме постійно.
! За допомогою опцiй можна змiнювати
рекомендоване завантаження та/або тривалiсть
циклу.
7. ЗАПУСК ПРОГРАМИ. Натисніть кнопку START/
PAUSE. Загориться відповідна індикаторна лампа,
і люк заблокується (ввімкнена індикаторна лампа
LOCK ). Піктограми, що відносяться до фаз прання,
загоряться під час циклу, показуючи зміну фаз. Для
зміни програми, під час виконання циклу, переведіть
пральну машину в режим паузи, натиснувши на
кнопку START/PAUSE; виберіть бажаний цикл і
знову натисніть кнопку START/PAUSE. Щоб вiдкрити
дверцята пiд час циклу, натиснiть кнопку START/
PAUSE; згасла iндикаторна лампа LOCK дозволяє
вiдкрити люк. Знову натисніть на кнопку START/
PAUSE, щоб запустити програму з того моменту, на
якому вона була перервана.
8. ЗАВЕРШЕННЯ ПРОГРАМИ. Відображається
вмиканням надпису END. Дверцята люку можна
відкрити відразу. Якщо індикаторна лампа START/
PAUSE блимає, натисніть на кнопку, щоб завершити
цикл. Відкрийте дверцята люку, витягніть білизну й
вимкнiть машину.
! Для вiдмiни вже працюючого циклу натиснiть
кнопку , утримуючи її, й цикл буде перервано,
пiсля чого машина вимкнеться.
80
Page 81

Програми й опції
3
1
2
Таблиця програм
Пральнi засоби та
Макс.
Опис програми
Програми
Синтетичнi мiцнi тканини
Синтетичнi мiцнi тканини (4)
Білі речі
Кольорові речі
Темні речі
Сорочки
Пухові речі
Бiлизна “7 днiв”: для постільної білизни і банного приладдя.
Полоскання
Вiджим і Злив
Протиалергійне прання
Делікатне
Вовна: для речей з вовни, кашемiру, тощо.
Mix 30’: Для швидого освiження злегка забруднених речей (не
рекомендоване для вовняних, шовкових речей або речей для
ручного прання)
Стандартний Бавовна (1): дуже забрудненi стiйкi бiлi та
кольоровi тканини.
Стандартний Бавовна (2): дуже забрудненi делiкатнi бiлi та
кольоровi тканини.
Стандартний Бавовна: дуже забрудненi делiкатнi бiлi та
кольоровi тканини.
Тривалість циклу, вказана на дисплеї або в керівництві, разрахована на основі стандартних умов роботи. Фактичний час може залежати від чисельних факторів, таких як температура і
тиск подаваної води, температура у приміщенні, кількість миючого засобу, кількість і тип завантаженої білизни, зрівноваження завантаженої білизни, додаткові обрані опції.
1) Програма керування згiдно до норми 1061/2010: встановити програму з температурою 60°C.
Цей цикл призначений для прання бавовняних речей із звичайним ступенем забруднення. Ефективність циклу підвищується завдяки комбінованому споживанню енергії та води. Він
має використовуватися для речей, які придатні для прання при температурі 60°C. Фактична температура прання може дещо відрізнятися від заявленої.
2) Довга програма бавовна: встановити програму з температурою 40°C.
Цей цикл призначений для прання бавовняних речей із звичайним ступенем забруднення. Ефективність циклу підвищується завдяки комбінованому споживанню енергії та води. Він
має використовуватися для речей, які придатні для прання при температурі 40°C. Фактична температура прання може дещо відрізнятися від заявленої.
3) При температурі 60 °C функцію “Попереднє прання” не можна буде активувати.
Для всiх Установ з проведення випробувань:
2) Програма тривалого прання речей з бавовни: встановити програму з температурою 40°C.
4) Програма тривалого прання синтетичних речей: встановити програму з температурою 40°C.
темп.
(°C)
60° 800
40° 800
60° 1200
40° 1200
30° 800 -
40° 600 -
30° 1000 -
60° 1200
- 1200 - -
- 1200 - - - - 7 - - - 16’
60° 1200 -
30° 0 -
40° 800 -
30° 800 -
60°
(Max. 90°)
40° 1200 -
20° 1200 -
Макс.
швидкiсть
(обертiв
хвилину)
1200
додатковi засоби
за
(3)
Прання
пранням
Попереднiм
Відбілювач
-
-
-
-
-
-
-
Пом’
якшувач
3,5 49 0,87 42 90’
3,5 49 0,56 42 85’
1,5 - - - 130’
1,5 - - - 80’
%)
Остаточна
аження (кг)
Макс.завант-
4 - - - 190’
4 53 0,90 73 95’
4 - - - 80’
2 - - - 85’
7 - - - 135’
7 - - - 49’
4 - - - 200’
1 - - - 75’
3 71 0,19 39 30’
7 53 1,00 52,5 185’
7 53 1,09 92 170’
7 - - - 175’
Споживання
вологість (
kWh)
(
електроенергії
lt)
Загальна
Тривалiсть
кількість води (
UA
циклу
Опції прання
Super Wash
Завдяки використанню
більшої кількості води на
початку циклу та бiльшiй
тривалостi програми, така
опція гарантує високоякісне
прання.
Може використовуватися з
або без відбілювача.
При необхiдностi виконати
також відбілювання вставте
додаткову ванночку 3, що
входить до комплекту постачання, у ванночку 1.
Пiд час дозування вiдбiлювача не перевищуйте
максимальний рiвень “max” на центральному стрижнi
(див.малюнок). Якщо ви бажаєте тільки відбілювати
без виконання повного прання, заповнiть вiдбiлювачем
додаткову ванночку 3, задайте програму “Полоскання”
та активуйте опцiю “Super Wash” .
! Не активується на програмах , , , , , , , .
Додаткове полоскання
При виборі даної опції збільшується ефективність
полоскання й гарантується максимальне
видаленняпральногозасобу. Він зручний для людей
зі шкірою, особливо чутливою до миючих засобів.
Рекомендується її використання із пральною машиною
при повному завантаженні або з використанням
підвищених доз пральних засобів.
! Не працює з програмами , , , , .
Полегшене прасування
При виборі даної опції, режими прання і віджиму будуть
відповідно змінені для зменшення утворення складок.
Після закінчення циклу пральна машина почне виконувати
повільне обертання барабана; індикаторні лампи “
Полегшене прасування” і START/PAUSE блимають. Щоб
закінчити цикл, натисніть на кнопку START/PAUSE або
кнопку “Подовжений цикл”.
! Цикл неможливо активувати на програмах , , ,
, , .
Попереднє прання
Вибiр цiєї функцiї вмикає попереднє прання, яке є корисним
для видалення стiйких плям.
Увага: Додайте миючий засiб у вiдповiдне вiддiлення.
! Не активується у програмах , , , , , , ,
, , (60°), , .
81
81
Page 82

Миючі засоби і білизна
UA
Засіб для прання
Вибір і кількість миючого засобу залежать від типу
тканини (бавовна, вовна, шовк...), кольорів, температури
прання, ступеню забруднення і жорсткості води.
Правильне дозування миючих засобів дозволяє
уникнути зайвих витрат й захищає довкілля: миючі
засоби, які здатні біологічно руйнуватися, містять
елементи, що змінюють рівновагу навкiлля.
Рекомендується:
• використовувати миючі засоби в порошку для
білизни з білої бавовни і для попереднього прання.
• використовувати рідкі миючі засоби для тонких
речей з бавовни і для всіх програм при низькій
температурі.
• використовувати рідкі делікатні миючі засоби для
вовни і шовку.
Миючий засіб необхідно додати ще до початку прання
у спеціальну ванночку, або у дозатор, який потрібно
покласти прямо у бак. У цьому випадку не можна
вибирати цикл Бавовна з попереднім пранням.
! Використовуйте порошкові пральні засоби для білих
бавовняних речей, а також для попереднього прання
або прання при температурі вище 60°C.
! Слiдуйте вказiвкам на упаковках пральних засобiв.
! Не використовуйте засоби для ручного прання, тому
що вони утворюють надто багато піни.
Підготовка білизни
• Перш нiж завантажувати речi, добре розкрийте їх.
• Розсортуйте білизну згідно типу тканини (символ на
етикетці) і кольору, звернувши увагу на розділення
білої і кольорової білизни;
• Перевірте кишені й ґудзики;
• Не перевищуйте значення, вказані у “Таблиці
програм” , що відносяться до ваги сухої білизни.
Скільки важить білизна?
1 простирадло 400-500 гр.
1 наволочка 150-200 гр.
1 скатертина 400-500 гр.
1 халат 900-1200 гр.
1 рушник 150-250 гр.
1 джинси 400-500 гр.
1 сорочка 150-200 гр.
Поради з прання
Білі речі: цей програму використовується для прання
білих речей. Завдяки цій програмі забезпечується
тривале зберігання сяючого білого кольору.
Кращі результати отримуються при використанні
порошкового миючого засобу.
Кольорові речі: цей програму використовується
для прання світлих речей. Завдяки цій програмі
забезпечується тривале зберігання насичених
кольорів.
Темні речі: використовуйте програму для прання
речей темного кольору. программа розроблена з
метою збереження темного кольору з часом. Кращі
результати досягаються при використанні рідкого
прального засобу для речей темного кольору.
Сорочки: для забезпечення максимального догляду
використовуйте спецiальну програму для прання
сорочок з рiзноманiтних тканин та рiзних кольорiв.
Пухові речі: Для прання виробів із наповненням
гусячим пухом, таких як подушки, легкi куртки (які
не перевищують за вагою 1,5 кг), використовуйте
спеціальну програму .
Білизна для ванної і постільна білизна: ця пральна
машина дозволяє випрати білизну з усього дому за
один єдиний цикл , що оптимізує використання
пом’якшувача й заощаджує час і енергію.
Рекомендується використання миючих засобів у
порошку.
Протиалергійне прання: використовуйте програму
для видалення основних алергенів, таких як пилок,
кліщі, котяча і собача шерсть.
Делікатне: використовуйте програму для прання
дуже делікатних речей, наприклад, зі стразами або
іншими оздобленнями.
Перш ніж запускати прання, рекомендується
вивернути речі навиворіт і вкласти дрібні речі в
спеціальний мішечок для прання делікатних речей.
Кращі результати досягаються при використанні
рідкого прального засобу для делікатних речей
Для прання шовкових речей або портьєр виберіть
цикл і активуйте опцію (В цьому випадку можна
буде активувати також опцію “Додаткове полоскання”);
машина закінчить цикл із замоченою білизною й
блиманням відповідної індикаторної лампи . Щоб
злити воду й отримати можливість витягнути білизну,
натисніть на кнопку START/PAUSE або кнопку .
Вовна: Цикл прання “Вовна” цієї пральної машини
Hotpoint-Ariston протестований і затверджений компанією
Woolmark у відношенні до прання вовняних речей,
класифікованих як для “ручного прання”, за умови
виконання прання згідно до інструкцій, наведених на
етикетці виробу, і вказівок виробника електропобутового
приладу. Hotpoint-Ariston - перша марка пральних машин,
яка отримала від компанії Woolmark сертифікацію
Woolmark Apparel Care - Platinum за власні показники
прання і витрати води й електроенергії. (M1253)
Стандартний Бавовна 20°: ідеальна для бавовняних
забруднених речей. Добре прання, в тому числі у
холодній воді, яке можна порівняти з пранням при 40°,
гарантується механічною роботою, яка здійснюється на
змінній швидкості із частими повторюваними піками..
82
Page 83

Несправності та засоби їх
ліквідації
Може трапитися так, що машина не буде працювати. До того як зателефонувати у Сервiсний центр (див. “Допомога”),
перевірте, чи не є дана несправність проблемою, що легко вирішується, звернувшись до списку нижче.
Несправності:
Пральна машина не вмикається.
Цикл прання не розпочинається.
У машину не надходить вода.
Дверцята люку машини
залишаються заблокованими.
Машина безперервно заливає і
зливає воду.
Пральна машина не зливає воду
чи не вiджимає.
Пральна машина дуже вiбрує пiд
час вiджиму.
Машина пропускає воду.
Піктограми, що відносяться
до “Поточної фази” швидко
блимають одночасно з
індикаторною лампою ON/OFF.
Можливі причини/Рішення:
• Штепсель не вставлений в електричну розетку або вставлений не до кiнця.
• У будинку немає електроенергії.
• Дверцята люку погано закриті.
• Кнопка START/PAUSE не була натиснута.
• Водопровідний кран закритий.
• Якщо вiдстрочення задане на час запуску.
• Шланг подачі води не підключено до водопровiдного крану.
• Перегин у шлангу.
• Водопровідний кран закритий.
• У водопроводі немає води.
• Недостатній тиск.
• Кнопка START/PAUSE не була натиснута.
• Вибір опції наприкінці циклу прання призведе до повільного
обертання барабану; для завершення циклу натиснiть кнопку START/
PAUSE або кнопку .
• Зливний шланг не знаходиться на відстані від 65 до 100 см від підлоги
(див. див. “Встановлення”).
• Кінець зливного шланга занурений у воду (див. див. “Встановлення”).
• Якщо квартира знаходиться на верхніх поверхах будинку, можливо,
відбувається сифонний ефект, при якому машина безперервно заливає
й зливає воду. Щоб його ліквідувати, існують спеціальні антисифонні
клапани, які можна придбати у торговельній мережі.
• Стiнний каналiзацiйний злив не має віддушини для виходу повiтря.
• Програма не передбачає зливання: у деяких програмах його потрібно
вмикати вручну (див. “Програми і опції”).
• Активована опція : для завершення програми, натисніть кнопку
START/PAUSE (див. “Програми і опції”).
• Перегин зливного шланга (див. див. “Встановлення”).
• Засмітився зливний шланг.
• Барабан, у момент встановлення, не був правильно розблокований
(див. “Встановлення”).
• Машина стоїть не на плоскій поверхні (див. “Встановлення”).
• Машина затиснута між меблями і стіною (див. див. “Встановлення”).
• Дисбаланс завантаження (див. “Миючі засоби і білизна”).
• Погано пригвинчений шланг подачі води (див. “Встановлення”).
• Забруднена касета для миючих засобів (як вимитидив. “Технічне
обслуговування і догляд”).
• Погано закріплений зливний шланг (див. “Встановлення”).
• Вимкніть машину й витягніть штепсель з розетки, зачекайте близько
1 хвилини й увімкніть її повторно. Якщо несправність не усунено,
зателефонуйте у Сервiсний центр.
UA
Утворюється занадто багато піни.
Дверцята люку машини
залишаються заблокованими.
! Примiтка: для виходу з “Режим демо”, закрити машину, натискайте одночасно протягом 3 секунд кнопки та .
• Миючий засіб не підходить для пральної машини (має бути напис “для
машинного прання”, “для ручного й машинного прання”, або подібний).
• Перевищена доза миючого засобу.
• Виконайте процедуру ручного розблокування (див. “Запобіжні заходи й
поради”).
83
Page 84

Допомога
195104753.02
10/2013 - Xerox Fabriano
UA
Перш ніж телефонувати у Сервiсний центр:
• Перевірте, чи можна самостійно вирішити проблему (див. “Несправності і засоби їх усунення”);
• Запустіть програму повторно, щоб перевірити чи усунено несправність;
• При негативному результаті, зверніться у Авторизований сервiсний центр.
! В разi помилкового встановлення обо неправильного використання пральної машини операцiї, якi
проводитимуть фахiвцi Сервiсного центру, будуть платними.
! Звертайтеся виключно до уповноважених фахівців.
Повідомити:
• тип несправності;
• модель машини (Мод.);
• серійний номер (С/Н).
Ці дані знаходяться на інформаційній пластині на самій машині.
84
ТОВ «Індезіт Україна»
Україна, 01001, м. Київ,
пров. Музейний, 4
 Loading...