

Page 1
Instrucciones para el uso
LAVASECADORA
ES
Espanol,1
CSI
РУССКИЙ, 37
AML 105
GB
English, 13
F
Français,25
Sumario
ES
Instalación, 2-3
Desembalaje y nivelación, 2
Conexiones hidráulicas y eléctricas, 2-3
Primer ciclo de lavado, 3
Datos técnicos, 3
Descripción de la Lavasecadora, 4-5
Panel de control, 4
Luces testigo, 5
Puesta en marcha y Programas, 6
En la práctica: poner en marcha un programa, 6
Tabla de programas, 6
Personalizaciones, 7
Seleccione la temperatura, 7
Seleccione el secado, 7
Funciones, 7
Detergentes y ropa, 8
Cajón de detergentes, 8
Preparar la ropa, 8
Prendas especiales, 8
Woolmark Platinum Care, 8
Precauciones y consejos, 9
Seguridad general, 9
Eliminaciones, 9
Ahorrar y respetar el ambiente, 9
Mantenimiento y cuidados, 10
Excluir el agua y la corriente eléctrica, 10
Limpiar la Lavasecadora, 10
Limpiar el contenedor de detergentes, 10
Cuidar la puerta y el cesto, 10
Limpiar la bomba, 10
Controlar el tubo de alimentación de agua, 10
Anomalías y soluciones, 11
Asistencia, 12
Antes de llamar a la Asistencia Técnica, 12
1
Page 2
Instalación
ES
Es importante conservar este manual para poder
consultarlo en cualquier momento. En caso de venta,
de cesión o de traslado, verifique que permanezca
junto con la Lavasecadora para informar al nuevo
propietario sobre el funcionamiento y brindar las
correspondientes advertencias.
Lea atentamente las instrucciones: ellas contienen
importante información sobre la instalación, el uso y la
seguridad.
Desembalaje y nivelación
Desembalaje
1. Desembale la Lavasecadora.
2. Controle que la Lavasecadora no haya sufrido
daños durante el transporte. Si estuviera dañada no
la conecte y llame al revendedor.
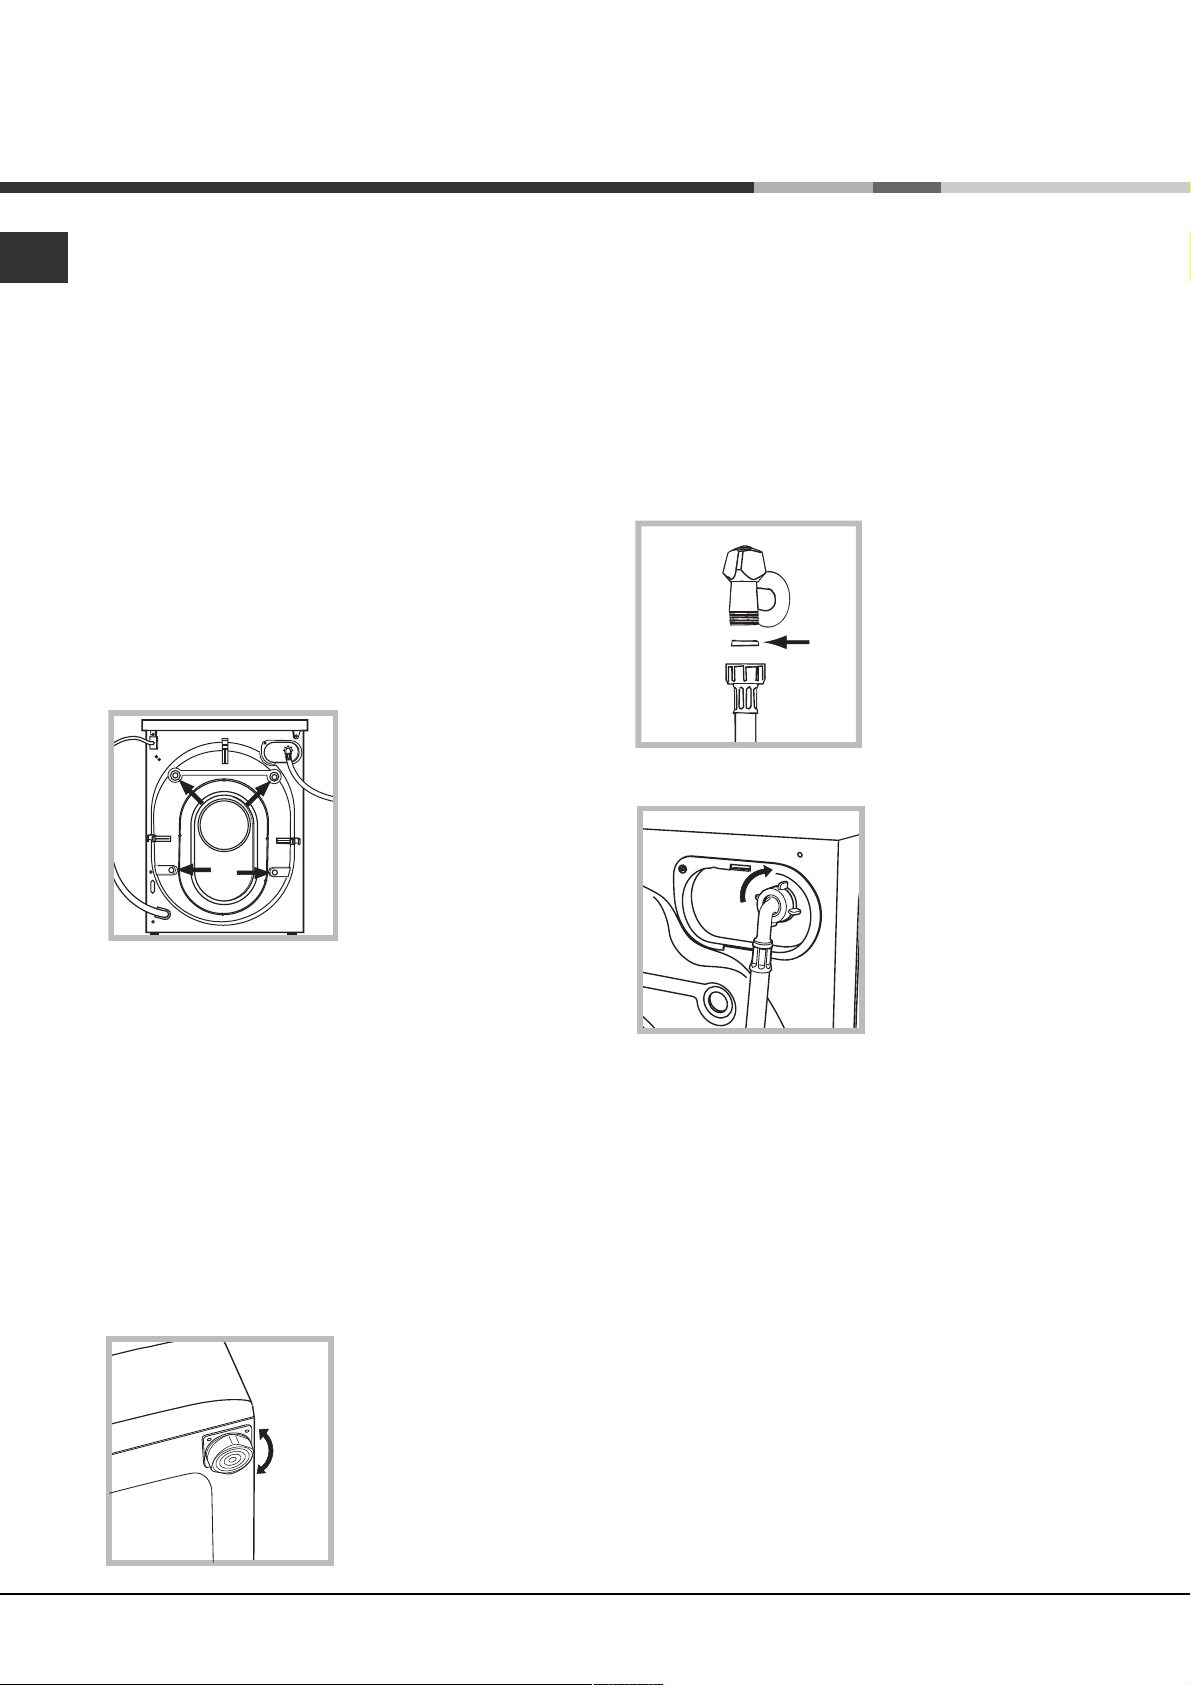
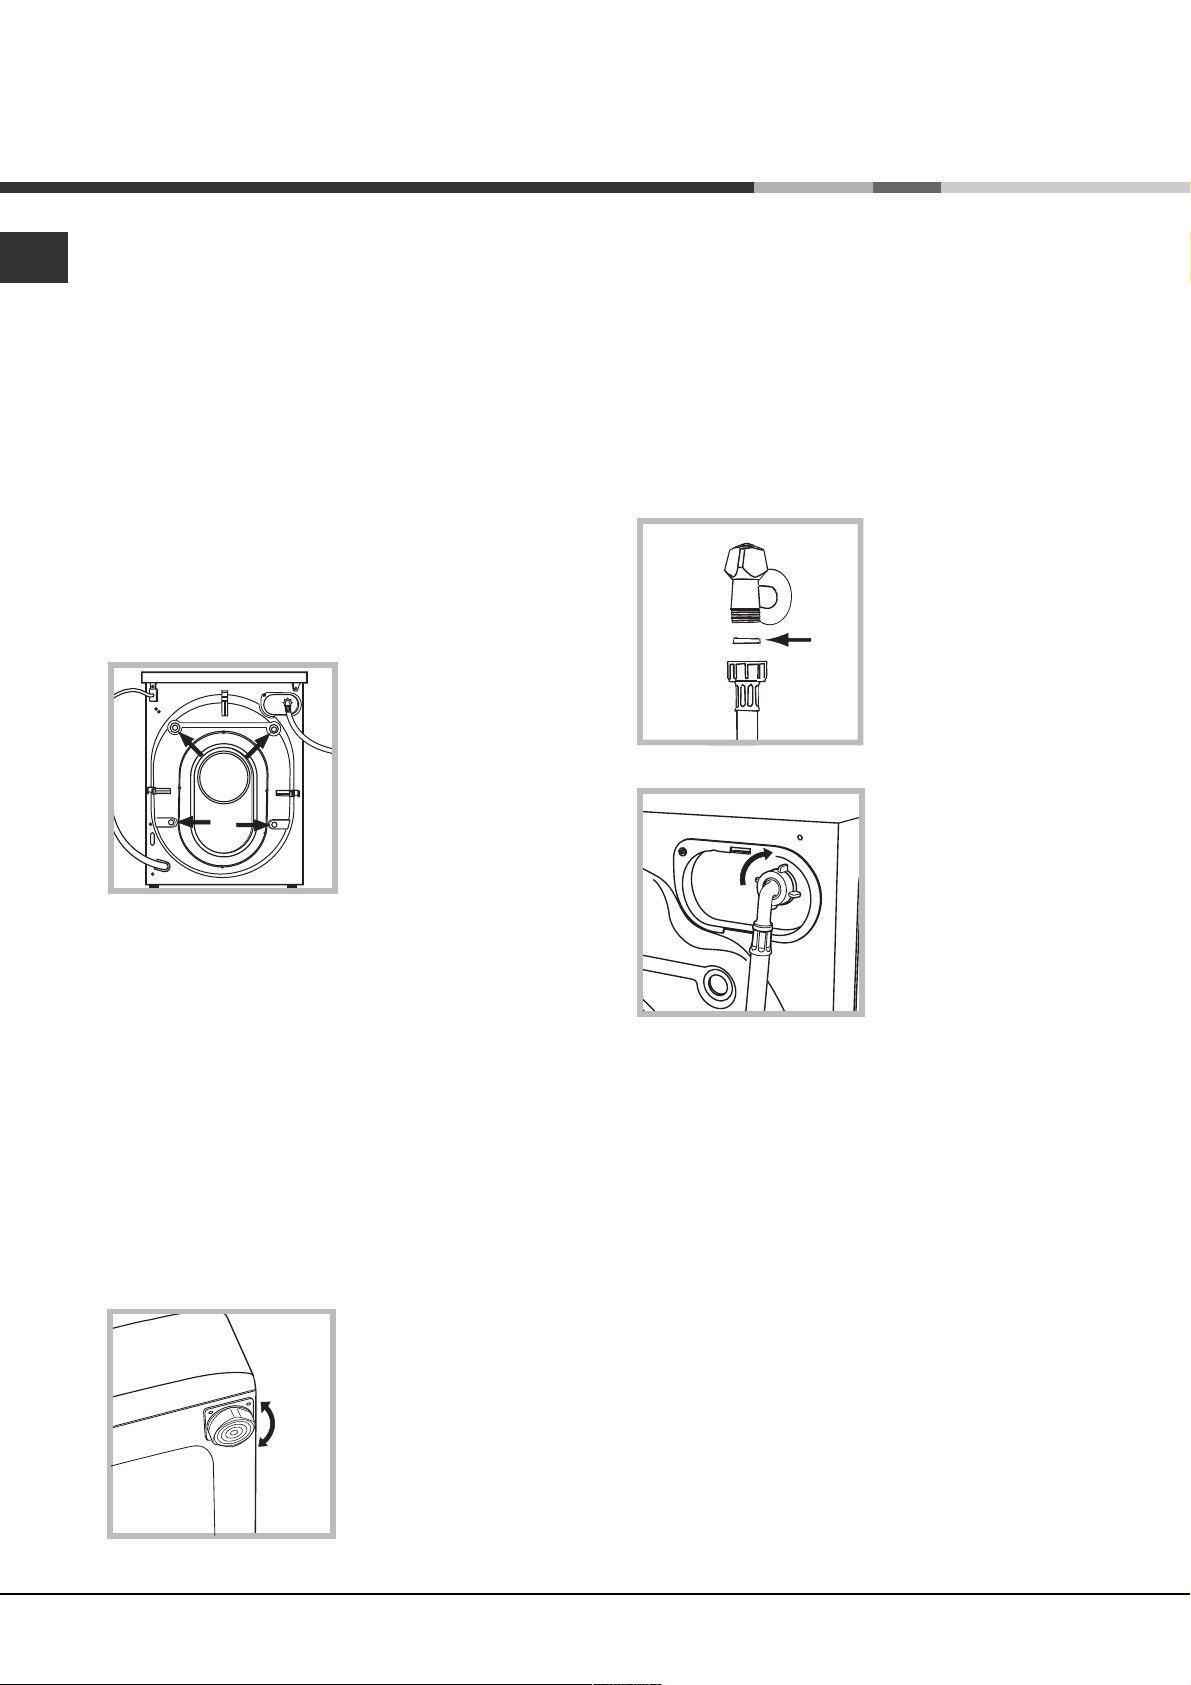
3. Quite los cuatro
tornillos de protección
para el transporte y la
arandela de goma con
el correspondiente
distanciador, ubicados
en la parte posterior
(ver la figura).
4. Cierre los orificios con los tapones de plástico
suministrados con el aparato.
5. Cierre los tres orificios donde se alojaba el enchufe
situados en la parte posterior, abajo y a la derecha,
con el tapón suministrado con el aparato.
6. Conserve todas las piezas: cuando la Lavasecadora deba
ser transportada nuevamente, deberán volver a colocarse.
Los embalajes no son juguetes para los niños.
Nivelación
1. Instale la Lavasecadora sobre un piso plano y rígido, sin
apoyarla en las paredes, muebles ni en ningún otro aparato.
2. Si el piso no está
perfectamente horizontal,
compense las irregularidades desenroscando o
enroscando los pies
delanteros (véase la
figura); el ángulo de
inclinación medido sobre
la superficie de trabajo,
no debe superar los 2º.
Una cuidadosa nivelación brinda estabilidad a la
máquina y evita vibraciones, ruidos y desplazamientos durante el funcionamiento. Cuando se instala
sobre moquetas o alfombras, regule los pies para
conservar debajo de la Lavasecadora un espacio
suficiente para la ventilación.
Conexiones hidráulicas y eléctricas
Conexión del tubo de alimentación de agua
1. Introduzca la junta A
en el extremo del tubo
de alimentación y
enrósquelo a un grifo de
A
3. Verifique que el tubo no tenga pliegues ni estrangulaciones.
La presión de agua del grifo debe estar comprendi-
da dentro de los valores contenidos en la tabla de
Datos técnicos (ver la página del costado).
Si la longitud del tubo de alimentación no fuera
suficiente, diríjase a una tienda especializada o a un
técnico autorizado.
agua fría con boca
roscada de 3/4 gas
(véase la figura).
Antes de conectarlo,
haga correr el agua
hasta que salga limpia.
2. Conecte el tubo de
alimentación a la
Lavasecadora enroscándolo en la toma de
agua correspondiente
ubicada en la parte
posterior arriba y a la
derecha (véase la
figura).
2
Page 3
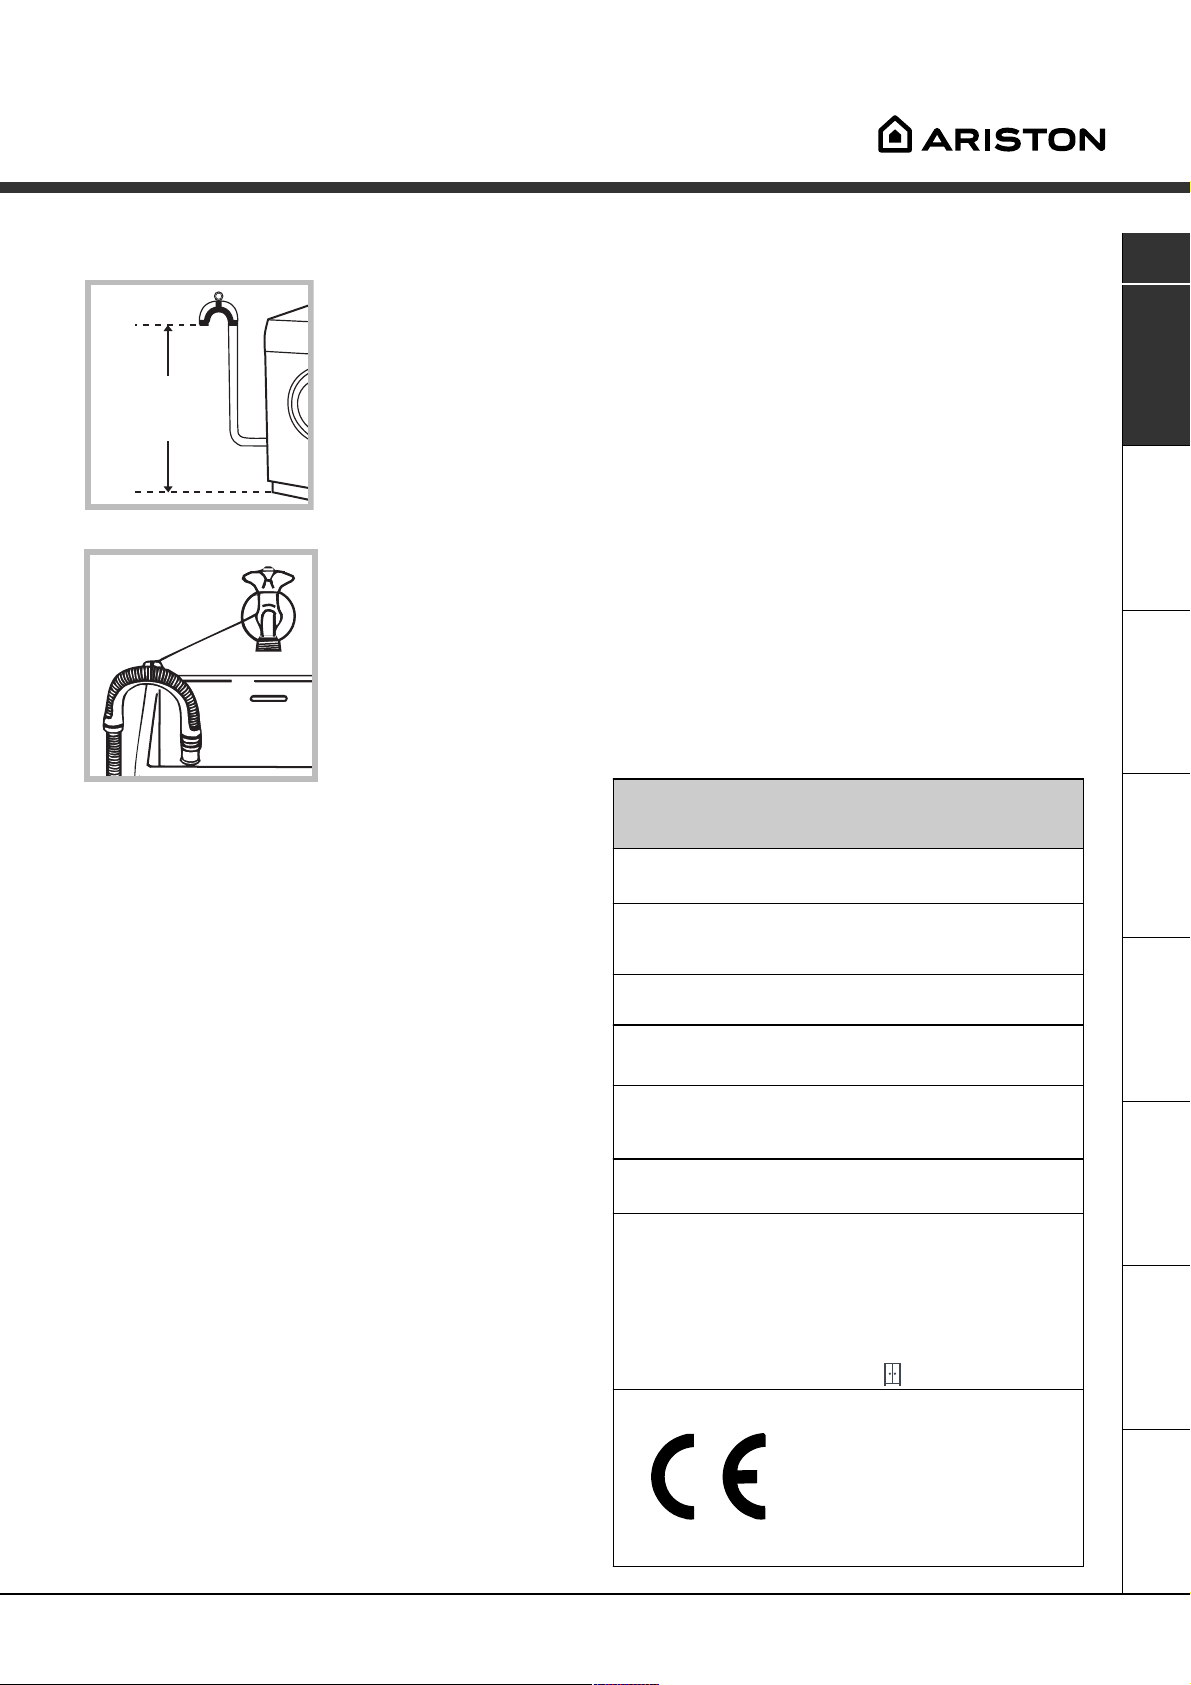
Conexión del tubo de descarga
Conecte el tubo de
descarga, sin plegarlo, a
un desagüe de pared
ubicado a una distancia
del piso comprendida
65 - 100 cm
entre 65 y 100 cm;
No utilice alargadores ni conexiones múltiples.
ES
El cable no debe estar plegado ni sufrir compresio-
nes.
El cable de alimentación debe ser sustituido sólo por
técnicos autorizados.
¡Atención! La empresa fabricante declina toda responsabilidad en caso de que estas normas no sean
respetadas.
o apóyelo al borde de
un lavabo o de una
bañera, uniendo la guía
suministrada con el
aparato, al grifo (véase
la figura). El extremo
libre del tubo de descarga no debe permanecer sumergido en el
agua.
No se aconseja utilizar tubos de prolongación, de
todos modos, si es indispensable, la prolongación
debe tener el mismo diámetro del tubo original y no
superar los 150 cm.
Conexión eléctrica
Antes de enchufar el aparato, verifique que:
la toma tenga la conexión a tierra y haya sido hecha
según las normas legales;
la toma sea capaz de soportar la carga máxima de
potencia de la máquina indicada en la tabla de
Datos técnicos (ver al costado);
la tensión de alimentación esté comprendida dentro
de los valores indicados en la tabla de Datos
técnicos (ver al costado);
la toma sea compatible con el enchufe de la
Lavasecadora. Si no es así, sustituya la toma o el
enchufe.
La Lavasecadora no debe ser instalada al aire libre,
ni siquiera si el lugar está preparado, ya que es muy
peligroso dejarla expuesta a la lluvia o a las tormentas.
Una vez instalada la Lavasecadora, la toma de
corriente debe ser fácilmente accesible.
Primer ciclo de lavado
Después de la instalación y antes del uso, realice un
ciclo de lavado con detergente y sin ropa, seleccionando el programa a 90ºC sin prelavado.
Datos técnicos
Modelo
Dimensiones
Capacidad
Conexiones
eléctricas
Conexiones
hídricas
Velocidad de
centrifugado
Programas de
control según la
norma IEC456
AML 105
ancho 59,5 cm.
altura 85 cm.
profundidad 53,5 cm.
de 1 a 5 kg para el lavado;
de 1 a 4 kg para el secado.
Voltaje de 220/230 voltios 50 Hz
potencia máxima consumida 1850 W
presión máxima 1 MPa (10 bar)
presión mínima 0,05 MPa (0,5 bar)
capacidad del cesto 46 litros
máxima 1000 r.p.m.
lavado: programa 3; temperatura
60ºC; efectuado con 5 kg. de carga.
secado: primer secado realizado
con 1 kg de carga seleccionando un
tiempo de 40 min;
segundo secado realizado con 4 kg
de carga y el mando de SECADO en
la posición .
Esta máquina cumple con lo
establecido por las siguientes
Directivas de la Comunidad:
- 73/23/CEE del 19/02/73 (Baja
Tensión) y sucesivas modificaciones
- 89/336/CEE del 03/05/89
(Compatibilidad Electromagnética) y
sucesivas modificaciones
AsistenciaAnomalíasPrecauciones MantenimientoProgramas DetergentesInstalación Descripción
3
Page 4
Descripción de la
Lavasecadora
ES
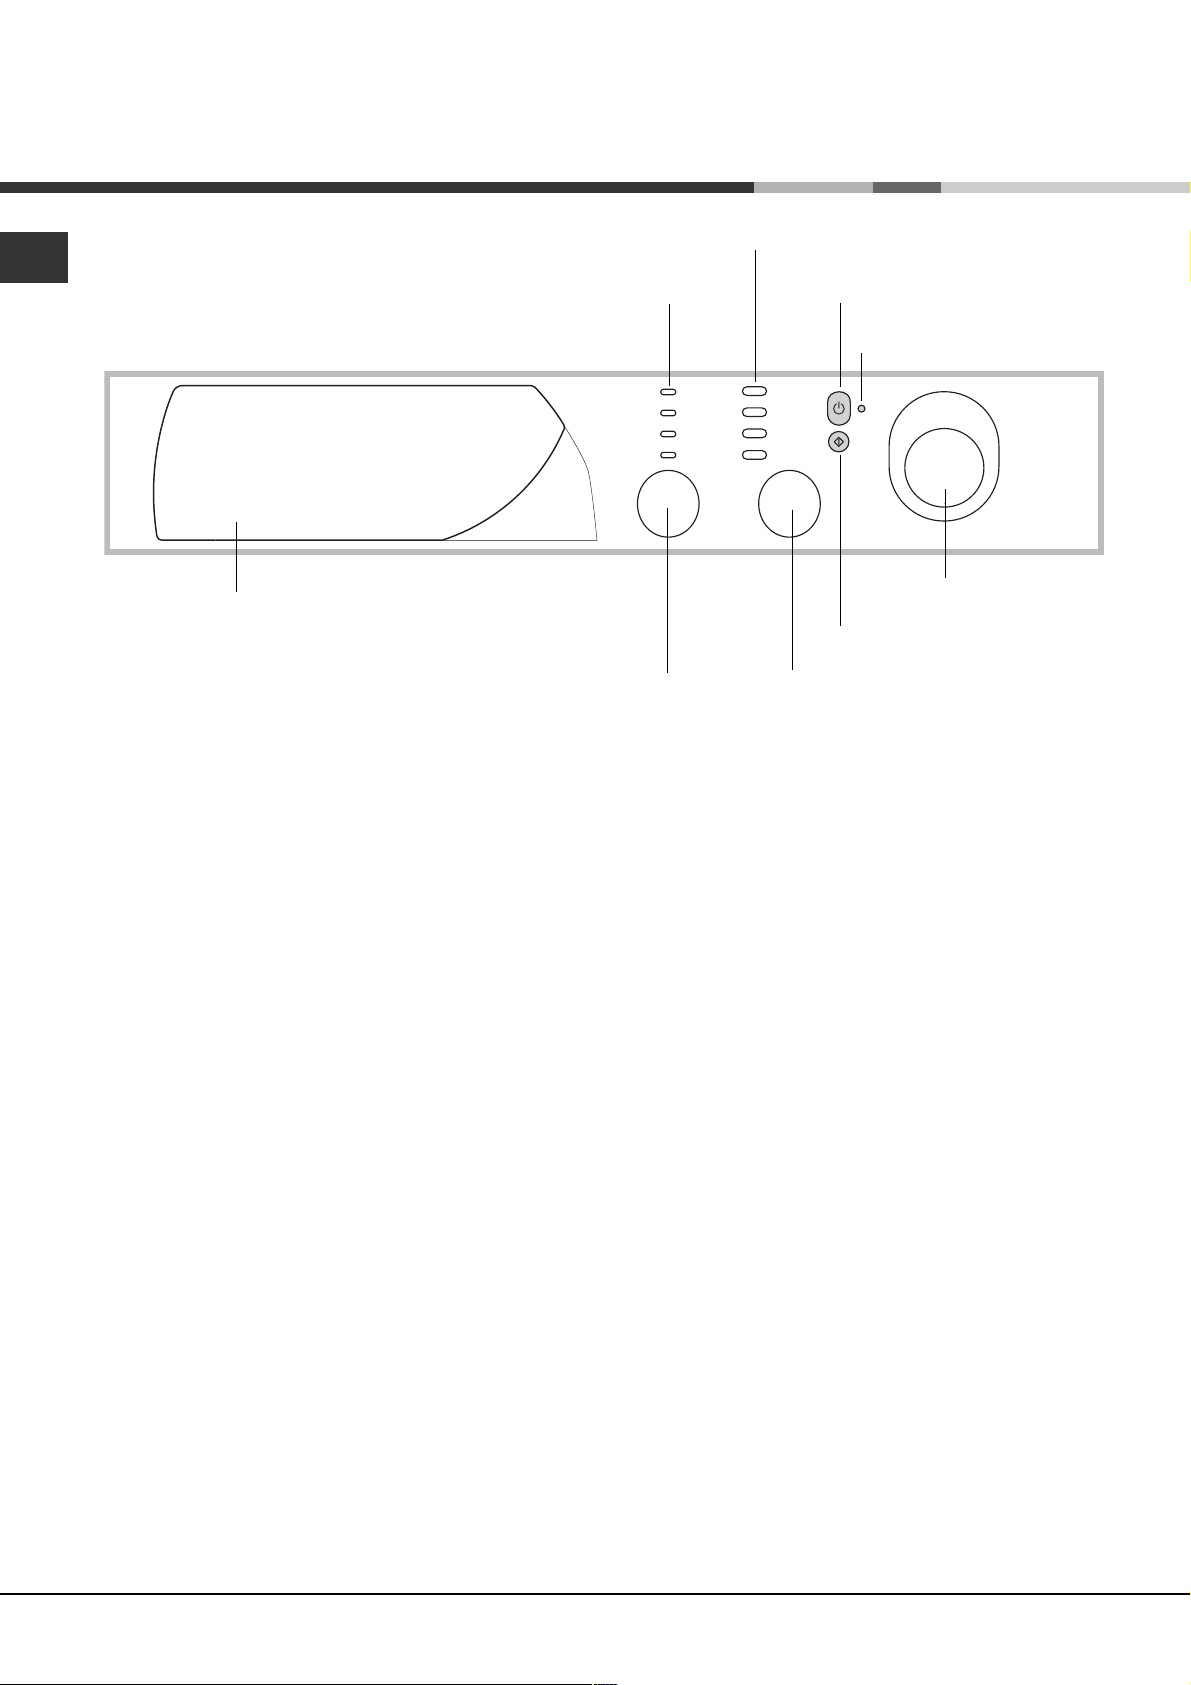
Panel de control
Cajón de detergentes
Cajón de detergentes: para cargar detergentes y
aditivos (véase la pág. 8).
Botones de
FUNCIÓN
Luces testigo
Mando de
SECADO
Botón de ENCENDIDO/APAGADO: para encender
y apagar la Lavasecadora.
Botón de
ENCENDIDO/APAGADO
Luz indicadora de
ENCENDIDO/PUERTA
BLOQUEADA
Mando de
PROGRAMAS
Botón de
START/RESET
Mando de
TEMPERATURA
Luces testigo: para seguir el estado de avance del
programa de lavado.
Si se seleccionó la función Delay Timer, indicarán el
tiempo que falta para la puesta en marcha del
programa (ver la pág. 5).
Mando de SECADO: para seleccionar el secado
deseado (ver la pág. 7).
Botones de FUNCIÓN: para seleccionar las funciones disponibles. El botón correspondiente a la
función seleccionada permanecerá encendido.
Mando de TEMPERATURA: para seleccionar la
temperatura o el lavado en frío (ver la pág. 7).
Botón de START/RESET: para poner en marcha
los programas o anular las selecciones incorrectas.
Luz indicadora de ENCENDIDO/PUERTA BLO-
QUEADA: para saber si la Lavasecadora está
encendida y si la puerta se puede abrir (ver la pág. 5).
Mando de PROGRAMAS: para elegir los programas. El mando es del tipo retráctil: para extraerla
presiónela ligeramente en el centro. Durante el
programa el mando no se mueve.
4
Page 5
Luces testigo
Las luces testigo suministran información importante.
He aquí lo que nos dicen:
Fase en curso:
Durante el ciclo de lavado, las luces testigo se
encenderán progresivamente para indicar su estado
de avance.
ES
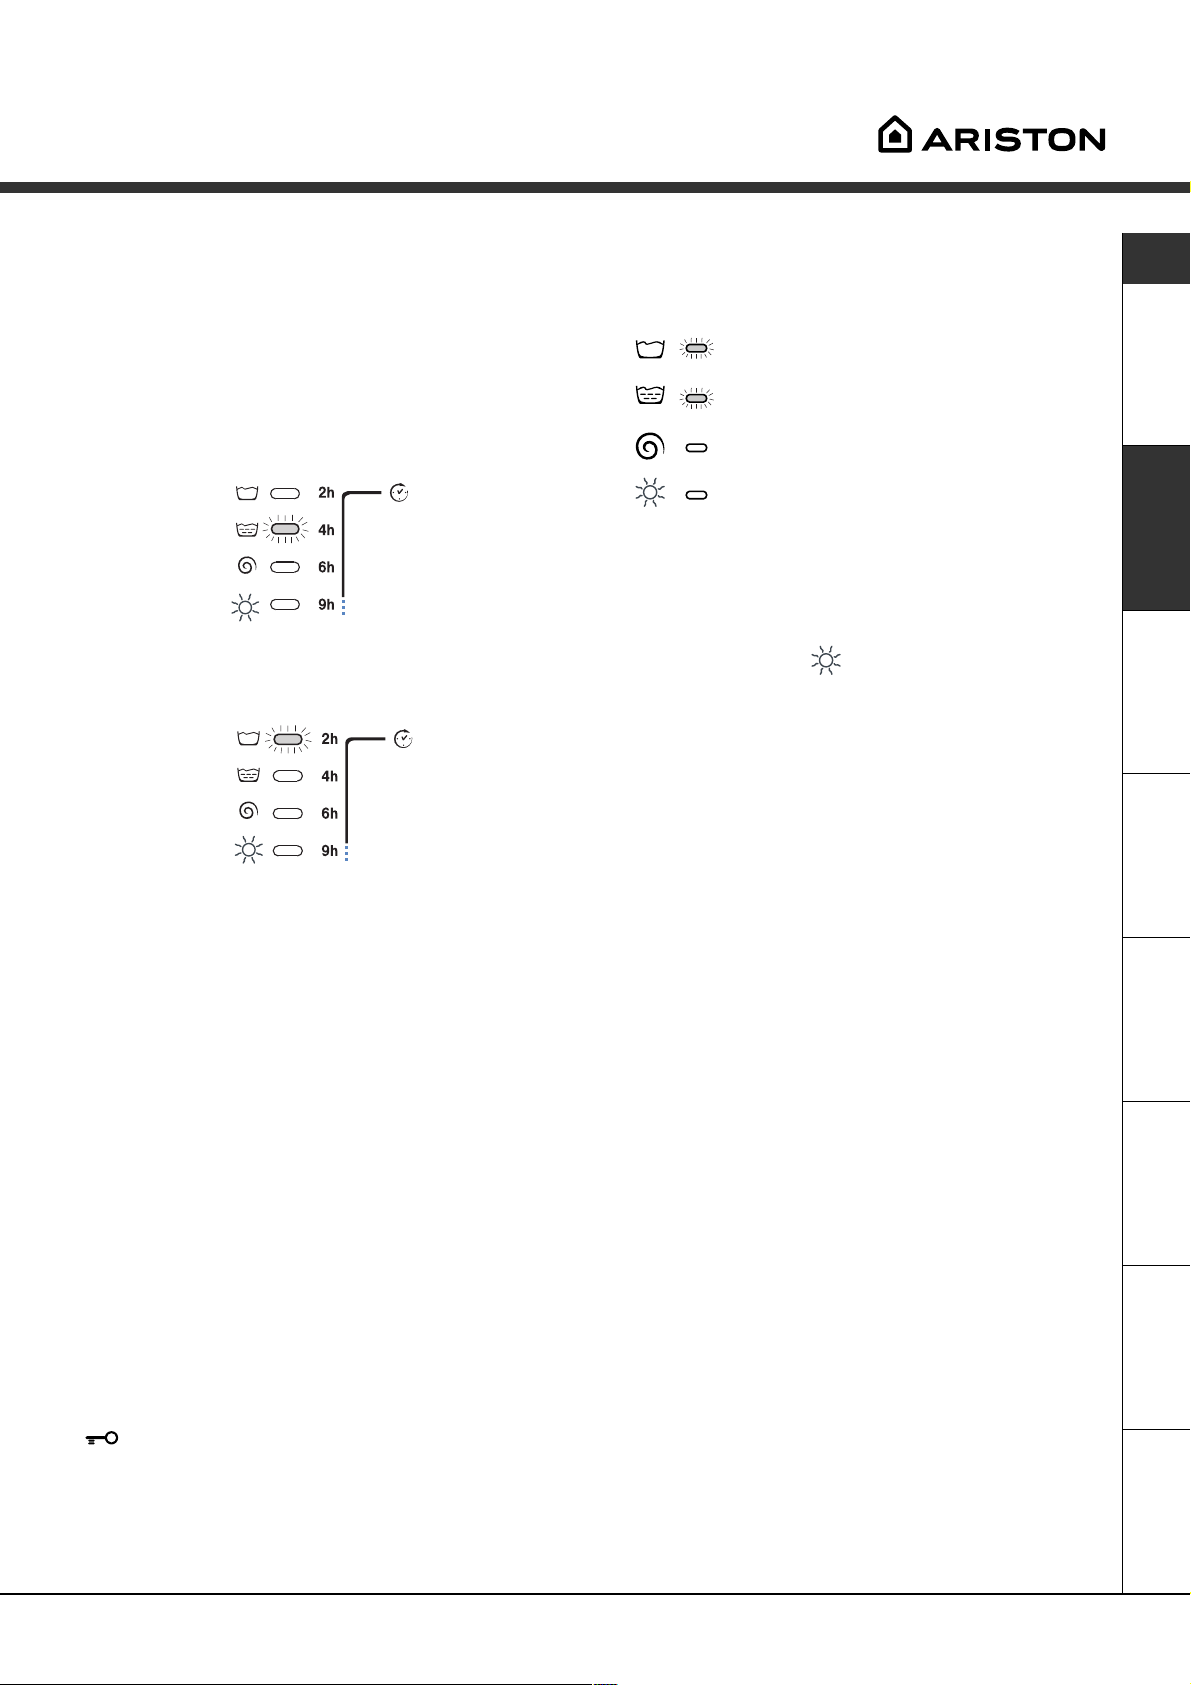
Retraso seleccionado:
Si fue activada la función Delay Timer (ver la pág. 7),
después de haber puesto en marcha el programa,
comenzará a centellear la luz testigo correspondiente al retraso fijado:
Con el transcurrir del tiempo se visualizará el retraso
residual y el centelleo de la luz testigo correspondiente:
Una vez transcurrido el tiempo de retraso fijado, la
luz testigo centelleante se apagará y comenzará el
programa seleccionado.
Prelavado / Lavado
Aclarado
Centrifugado
Secado
Nota:
- durante la fase de descarga se iluminará la luz
testigo correspondiente a la fase de Centrifugado.
- al finalizar el ciclo de secado, la luz testigo correspondiente a la fase
es necesario llevar el mando de SECADO a la
posición 0.
Botones de FUNCIÓN
Los BOTONES DE FUNCIÓN también actúan como
luces testigo.
Al seleccionar una función, el botón correspondiente
se iluminará.
Si la función seleccionada no es compatible con el
programa elegido, el botón centelleará y la función
no se activará.
Cuando se seleccione una función incompatible con
otra seleccionada precedentemente, permanecerá
activa sólo la última selección realizada.
centelleará para indicar que
Luz indicadora de ENCENDIDO/PUERTA BLOQUEADA:
La luz testigo encendida indica que la puerta está bloqueada para impedir aperturas accidentales; para evitar
daños es necesario esperar que la luz testigo centellee antes de abrir la puerta.
El centelleo rápido de la luz indicadora de ENCENDIDO/PUERTA BLOQUEADA simultáneamente con, al
menos, el de otra luz testigo, indica una anomalía. Llame a la Asistencia Técnica.
AsistenciaAnomalíasPrecauciones MantenimientoProgramas DetergentesInstalación Descripción
5
Page 6
Puesta en marcha y Programas
ES
En la práctica: poner en marcha un
programa
1. Encienda la Lavasecadora pulsando el botón .
Todas las luces testigo se encenderán durante
algunos segundos, luego se apagarán y la luz
indicadora de ENCENDIDO/PUERTA BLOQUEADA
comenzará a centellear.
2. Cargue la ropa y cierre la puerta.
3. Seleccione el programa deseado con el mando de
PROGRAMAS.
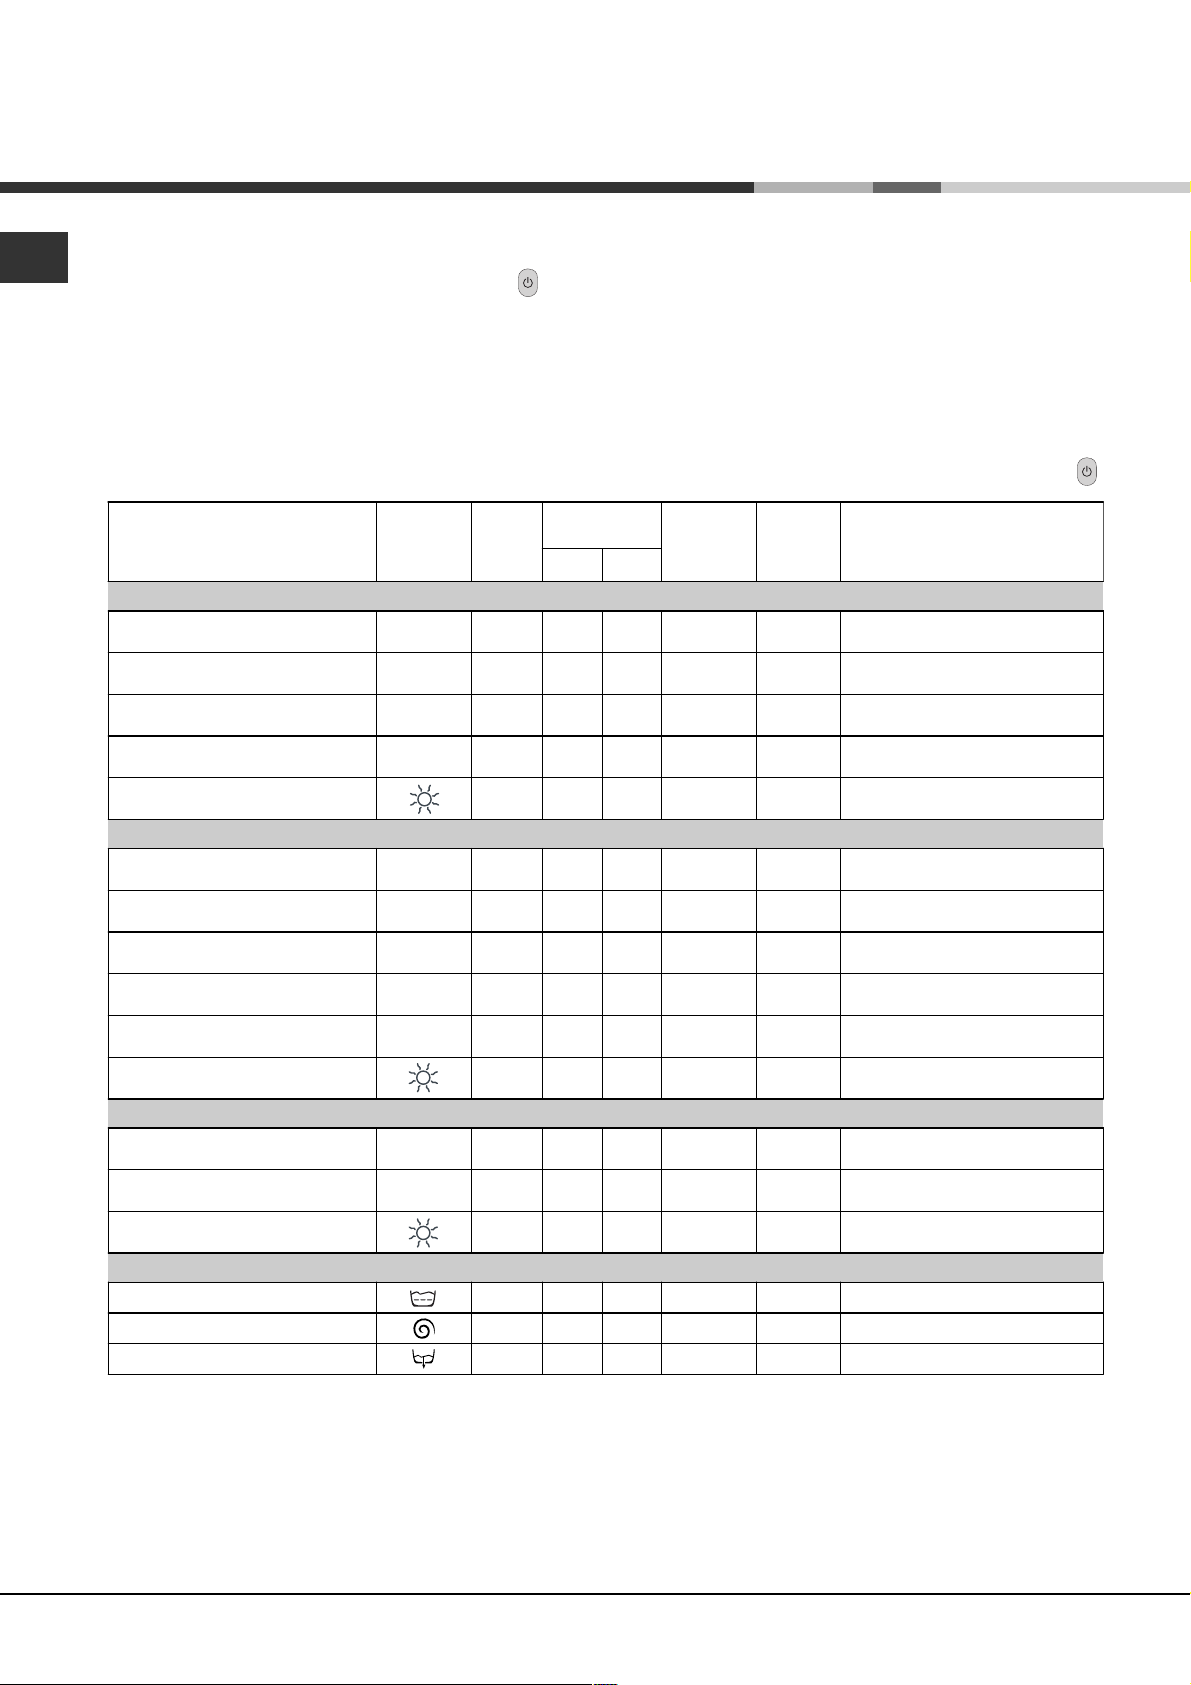
Tabla de programas
Tipos de tejidos y de suciedad Programas
Algodón
Blancos extremadamente sucios
(sábanas, manteles, etc.)
Blancos extremadamente sucios
(sábanas, manteles, etc.)
Blancos y de color resistentes muy
sucios
Blancos poco sucios y colores
delicados (camisas, camisetas, etc.)
Secado para telas de algodón
Te m p e ratura
1
2
3
4
90°C 137
90°C 120
60°C 105
40°C 72
Detergente
Prelav.
4. Fije la temperatura de lavado (ver la pág. 7).
5. Seleccione el secado si es necesario (ver la pág. 7).
6. Vierta el detergente y los aditivos (véase la pág. 8).
7. Ponga en marcha el programa pulsando el botón
START/RESET.
Para anular, mantenga presionado el botón
START/RESET durante 2 segundos como mínimo.
8. Al finalizar el programa, la luz indicadora de ENCENDIDO/PUERTA BLOQUEADA centelleará indicando que
la puerta se puede abrir. Extraiga la ropa y deje la
puerta semicerrada para permitir que el cesto se
seque. Apague la Lavasecadora pulsando el botón
Duración
del ciclo
(minutos)
Descripción del ciclo de lavado
Prelavado, lavado, a
centrifugados intermedios y final
Lavado, a
intermedios y final
Lavado, a
intermedios y final
Lavado, a
intermedios y final
clarados
clarados
clarados
clarados
, centrifugados
, centrifugados
, centrifugados
Lava-
do
Suavizante
.
,
Sintéticos
Colores resistentes muy sucios
(ropa para recién nacidos, etc.)
Colores resistentes (ropa de todo
tipo poco sucia)
Colores resistentes muy sucios
(ropa para recién nacidos, etc.)
Colores delicados (ropa de todo
tipo poco sucia)
Colores delicados (ropa de todo
tipo poco sucia)
Secado para telas sintéticas
5
5
6
7
8
60°C 77
40°C 62
50°C 73
40°C 58
30°C 30
Lavado, a
centrifugado delicado
Lavado, a
centrifugado delicado
Lavado, a
centrifugado delicado
Lavado, a
centrifugado delicado
Lavado, a
delicada
clarados
clarados
clarados
clarados
clarados
, antiarrugas o
, antiarrugas o
, antiarrugas o
, antiarrugas o
y centrifugación
Delicados
Lana
Tejidos muy delicados (cortinas,
seda, viscosa, etc.)
Secado para tejidos delicados
PROGRAMAS PARCIALES
Aclarado
Centrifugado delicado
Desagüe
delicado
10
9
40°C 50
30°C 45
Lavado, a
delicada
Lavado, a
esagüe
d
Aclarados
esagüe y centrifugación delicada
D
esagüe
D
y centrifugación
clarados
, antiarrugas o
clarados
, antiarrugas o desagüe
Notas
Para la descripción de la función Antiarrugas consulte la pág. 8. Los datos contenidos en la tabla tienen un
valor indicativo.
Programa especial
Diario 30' (programa 8 para Sintéticos) fue estudiado para lavar prendas ligeramente sucias y en poco tiempo:
dura sólo 30 minutos y de esa manera hace ahorrar energía y tiempo. Seleccionando el programa (8 a 30ºC) es
posible lavar conjuntamente tejidos de distinto tipo (excluidas lana y seda), con una carga máxima de 3 kg.
Se aconseja el uso de detergente líquido.
6
Page 7
Personalizaciones
Seleccione la temperatura
Girando el mando de la TEMPERATURA se selecciona la temperatura de lavado (ver la Tabla de programas en la pág. 6).
La temperatura se puede disminuir hasta el lavado en frío (
Seleccione el secado
Girando el mando de SECADO se selecciona el tipo de
secado deseado. Se han previsto dos posibilidades:
A - En base al tiempo: De 40 a 150 minutos.
B - En base al nivel de humedad de las prendas secadas:
Planchado
planchar.
Ropero
Extra seco
batas.
Al finalizar el secado continúa un período de enfriamiento.
Si excepcionalmente la carga de ropa para lavar y secar es
superior al máximo previsto (ver la tabla ubicada al costado), realice el lavado, y una vez finalizado el programa,
divida la carga y vuelva a colocar una parte en el cesto. A partir de ese momento, siga las instrucciones para efectuar sólo el secado. Repita las mismas operaciones para la carga restante.
: prendas ligera-mente húmedas, fáciles de
: prendas secas, listas para guardar.
: prendas muy secas, aconsejado para toallas y
).
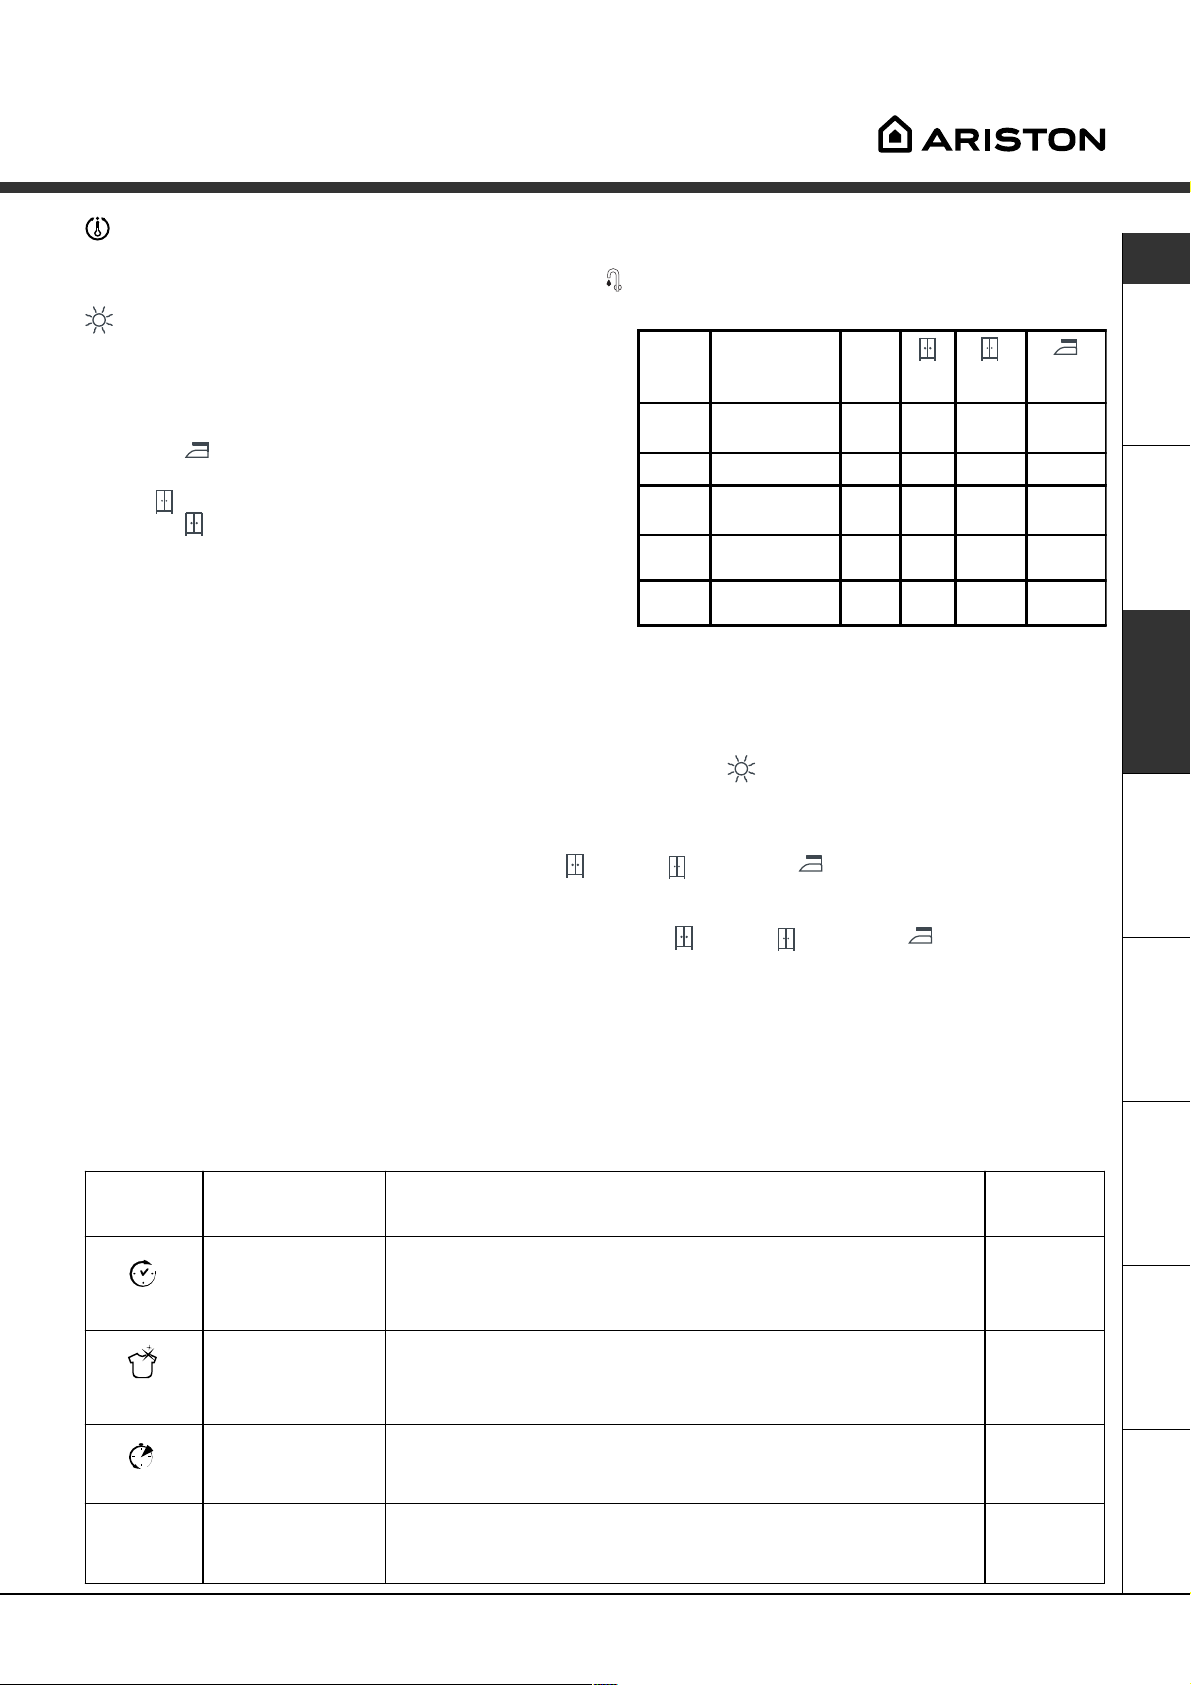
Tabla de tiempos de secado
Tipo de
tela
Algodón,
Lino
Algodón Toallas
Te ri le n e,
Algodón
Acrílicos P ijamas,
Nylon Combinaciones,
Tipo de carga Carga
Ropa de distintas
dimensiones
Sábanas, Camisas
calcetines, etc.
medias, etc.
máx.
(kg) Extra
Los datos contenidos en la tabla
tienen un valor indicativo.
Ropero Planchado
seco
4 130 120 110
4 130 120 110
2,5 90 80 70
165 60 60
165 60 60
ES
Sólo secado
Gire el mando de PROGRAMAS hasta una de las posiciones de secado
de acuerdo al tipo de tejido, luego
seleccione el tipo de secado deseado con el mando de SECADO.
Importante: - Durante el secado se efectuará un centrifugado si Ud. ha seleccionado uno de los programas de
algodón y uno de los niveles de secado (Extra seco
, Ropero , Planchado ).
- El secado de las prendas de lana se debe efectuar exclusivamente seleccionando los tiempos (150-100-60-40
minutos). Para un carga de 1 kg se aconsejan 60 minutos de secado.
Si erróneamente se selecciona uno de los tres niveles (Extra seco
, Ropero , Planchado ) la máquina
realizará un secado que durará un tiempo igual al MAX previsto (150 minutos).
- Para cargas de telas de algodón inferiores a 1 Kg, utilice el programa de secado correspondiente a los tejidos sintéticos.
Funciones
Las distintas funciones de lavado previstas por la Lavasecadora permiten obtener la limpieza y el blanco deseados.
Para activar las funciones:
1. pulse el botón correspondiente a la función deseada de acuerdo con la tabla que se encuentra debajo;
2. el encendido del botón correspondiente indica que la función está activa.
Nota: El centelleo rápido del botón indica que la función correspondiente no se puede seleccionar para el programa elegido.
Funciones Efecto Notas para el uso
Pulse varias veces el botón hasta encender la luz testigo
correspondiente al retraso deseado.
La quinta vez que se presione el botón, la función se desactivará.
Nota: Una vez pulsado el botón Start/Reset, se puede modificar el
valor del retraso sólo disminuyéndolo.
No es compatible con la función RÁPIDO.
No es compatible con la función SUPER W ASH.
D e l a y t im e r
S u p er
W a s h
R á p i d o
1000 - 500
Retrasa la puesta
en marcha de la
máquina hasta 9
horas.
Permite una
limpieza impecable,
visiblemente más
blanco del estándar
en Clase A.
Disminuye en un 30%
aproximadamente la
duración del ciclo de
lavado.
Disminuye la
velocidad de
centrifugado.
Activa con
los
programas:
Tod os
1, 2, 3, 4,
5, 6, 7
1, 2, 3, 4,
5, 6, 7
Tod os
excepto el
10 y la
descarga.
AsistenciaAnomalíasPrecauciones MantenimientoProgramas DetergentesInstalación Descripción
7
Page 8
Detergentes y ropa
ES
Cajón de detergentes
El buen resultado del lavado depende también de la
correcta dosificación del detergente: si se excede la
cantidad, no se lava de manera más eficaz, sino que
se contribuye a encostrar las partes internas de la
Lavasecadora y a contaminar el ambiente.
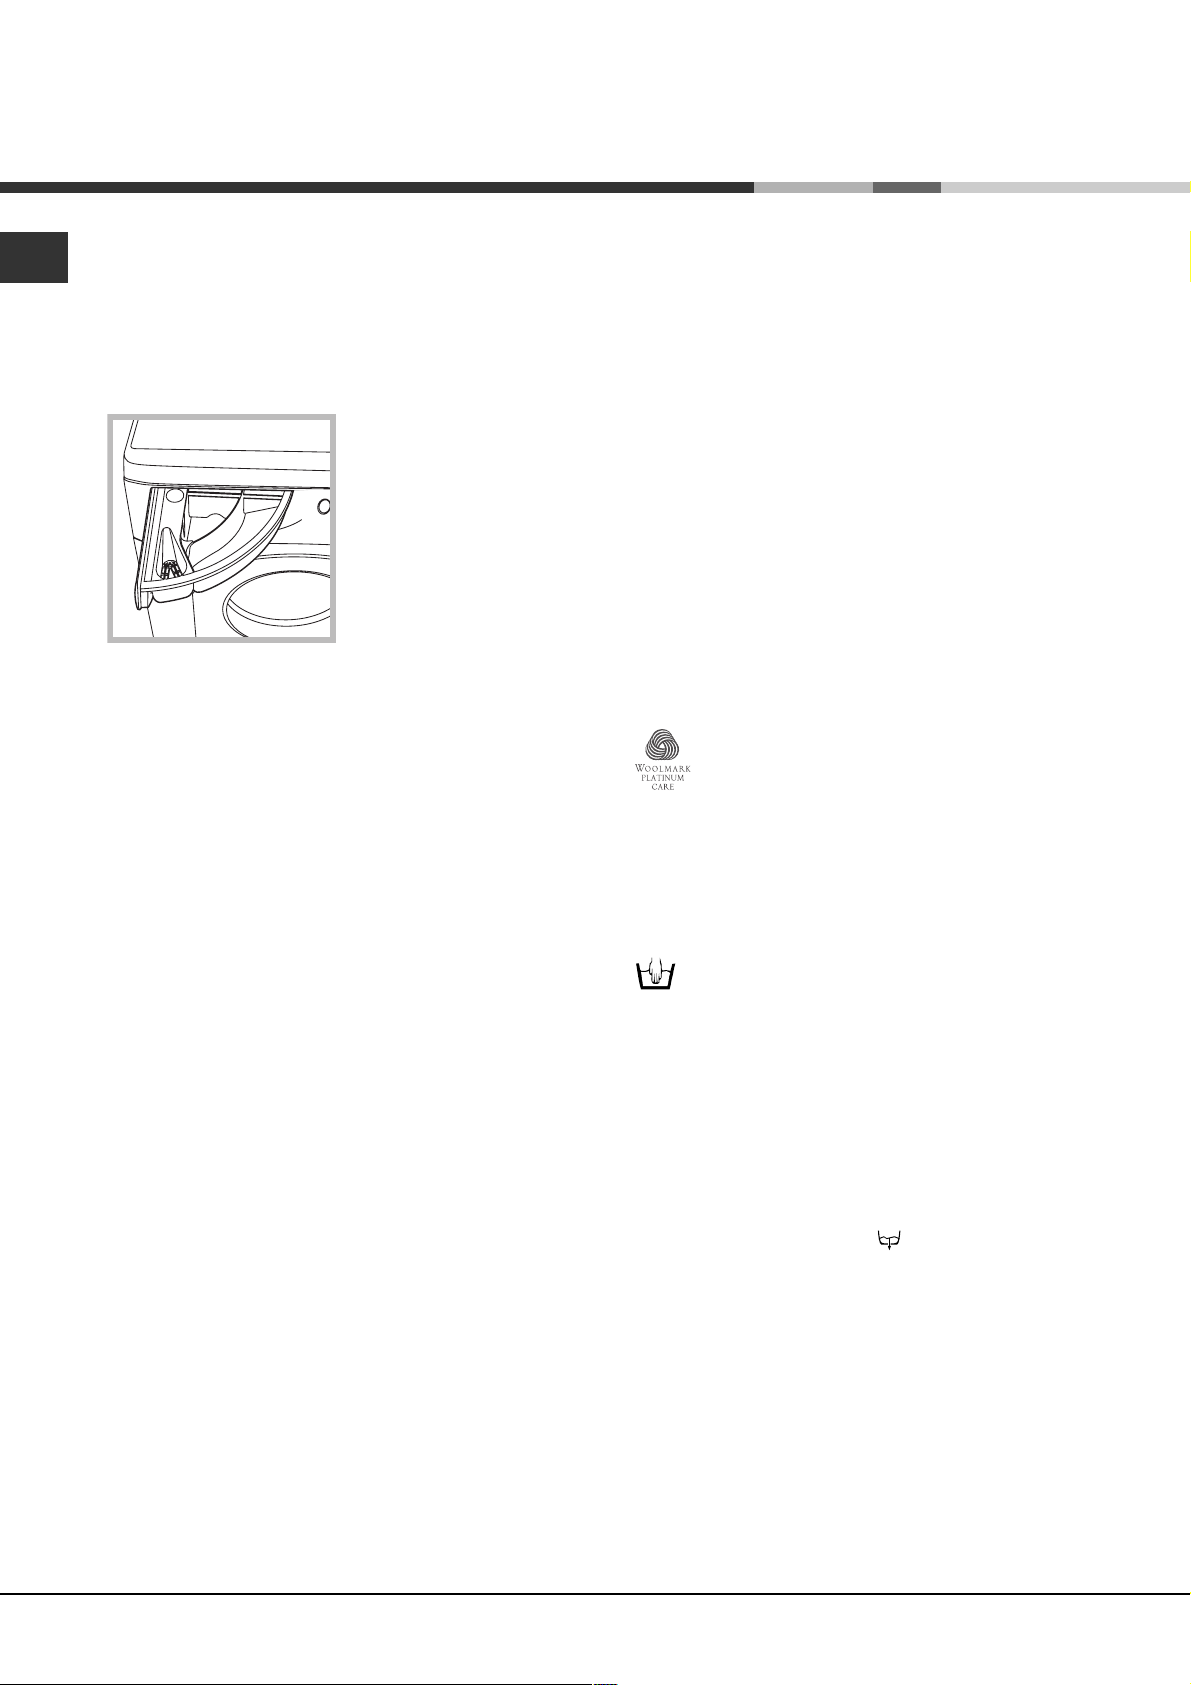
Extraiga el cajón de
detergentes e introduzca el detergente o el
aditivo de la siguiente
1
3
cubeta 1: Detergente para prelavado (en polvo)
cubeta 2: Detergente para lavado
(en polvo o líquido)
El detergente líquido se debe verter sólo antes de la
puesta en marcha.
cubeta 3: Aditivos (suavizante, etc.)
El suavizante no se debe volcar fuera de la rejilla.
2
manera:
No use detergentes para el lavado a mano ya que
producen demasiada espuma.
Preparar la ropa
Subdivida la ropa según:
- el tipo de tejido / el símbolo en la etiqueta.
- los colores: separe las prendas de color y las blancas.
Vacíe los bolsillos y controle los botones.
No supere los valores indicados, referidos al peso
de la ropa seca:
Tejidos resistentes: max 5 kg.
Tejidos sintéticos: max 2,5 kg.
Tejidos delicados: max 2 kg.
Lana: max 1 kg.
¿Cuánto pesa la ropa?
1 sábana 400/500 g
1 funda 150/200 g
1 mantel 400/500 g
1 albornoz 900/1.200 g
1 toalla 150/250 g
Prendas especiales
Cortinas: pliéguelas y colóquelas dentro de una
funda o de una bolsa de red. Lávelas solas sin superar
la media carga. Utilice el programa 10 que excluye
automáticamente el centrifugado.
Cazadoras acolchadas con plumas y
anoraks: si el relleno es de pluma de ganso o de
pato, se pueden lavar en la Lavasecadora. Poner las
prendas del revés y realizar una carga máxima de 2-3
kg. repitiendo el enjuague una o dos veces y utilizando
el centrifugado delicado.
Zapatillas de tenis: quíteles el lodo. Se pueden
lavar con los jeans y con prendas resistentes pero no
con prendas blancas.
Lana: para obtener los mejores resultados, utilice un
detergente específico y no supere 1 kg. de carga.
Woolmark Platinum Care
Delicado como el lavado a mano.
Ariston introdujo un nuevo estándar de
prestaciones superiores reconocido por The
Woolmark Company con la prestigiosa marca
Woolmark Platinum Care. Si en la Lavasecadora
está el logo Woolmark Platinum Care, se pueden
lavar las prendas de lana que posean la etiqueta
"Lavar a mano" (M.00221) obteniendo excelentes
resultados:
Seleccione el programa 9 para todas las
prendas con "Lavar a mano", utilizando
detergentes específicos.
Antiarrugas
Esta función interrumpe el programa de lavado
manteniendo la ropa en remojo en el agua antes de
la descarga. Se puede utilizar con los programas
5 - 6 - 7 - 10 y Aclarado delicado.
Para completar el ciclo pulse el botón START/RESET.
Para efectuar sólo la descarga coloque la perilla en
el símbolo correspondiente
START/RESET.
y pulse el botón
8
Page 9

Precauciones y consejos
La Lavasecadora fue proyectada y fabricada en
conformidad con las normas internacionales de seguridad. Estas advertencias se suministran por razones de
seguridad y deben ser leídas atentamente.
Seguridad general
Este aparato fue fabricado para uso doméstico.
La Lavasecadora debe ser utilizada sólo por
personas adultas y siguiendo las instrucciones
contenidas en este manual.
No toque la máquina con los pies desnudos ni
con las manos o los pies mojados o húmedos.
No desenchufe la máquina tirando del cable, sino
tomando el enchufe.
No abra el contenedor de detergentes mientras la
máquina está en funcionamiento.
No toque el agua de desagüe ya que puede
alcanzar temperaturas elevadas.
En ningún caso fuerce la puerta: podría dañarse
el mecanismo de seguridad que la protege de
aperturas accidentales.
En caso de avería, no acceda nunca a los meca-
nismos internos para intentar una reparación.
Controle siempre que los niños no se acerquen a
la máquina cuando está en funcionamiento.
Durante el lavado, la puerta tiende a calentarse.
Eliminaciones
ES
Eliminación del material de embalaje:
respete las normas locales, de ese modo, los
embalajes podrán volver a ser utilizados.
Eliminación de la vieja Lavasecadora:
antes de desguazarla, inutilícela cortando el cable
de alimentación eléctrica y quitando la puerta.
Ahorrar y respetar el medio ambiente
Tecnología a servicio del medio ambiente
Si en la puerta se ve poca agua es porque con la
nueva tecnología Ariston basta menos de la mitad
del agua para alcanzar la mayor limpieza: un objetivo alcanzado para respetar el medio ambiente.
Ahorrar detergente, agua, energía y tiempo
Para no derrochar recursos es necesario utilizar la
Lavasecadora con la máxima carga. Una carga
completa en lugar de dos medias cargas permite
ahorrar hasta el 50% de energía.
El prelavado es necesario sólo para ropa muy
sucia. Evitarlo permite ahorrar detergente, tiempo,
agua y entre el 5 y el 15% de energía.
Tratar las manchas con un quitamanchas o dejarlas
en remojo antes del lavado, disminuye la necesidad
de lavar a altas temperaturas. Un programa a 60ºC
en vez de 90ºC o uno a 40ºC en vez de 60ºC,
permite ahorrar hasta un 50% de energía.
Si debe ser trasladada, deberán intervenir dos o
más personas, procediendo con el máximo
cuidado. La máquina no debe ser desplazada
nunca por una persona sola ya que es muy
pesada.
Antes de introducir la ropa controle que el cesto
esté vacío.
Durante el secado la puerta tiende a calentarse.
No seque ropa lavada con solventes inflamables
(por ej. tricloroetileno).
No seque gomaespuma o elastómeros análogos.
Verifique que, durante las fases de secado, el grifo
de agua esté abierto.
Esta lavasecadora se puede utilizar solamente
para secar ropa prelavada con agua.
Dosificar bien el detergente en base a la dureza del
agua, al grado de suciedad y a la cantidad de ropa
evita derroches y protege el ambiente: aún siendo
biodegradables, los detergentes contienen elementos que alteran el equilibrio de la naturaleza. Además, si es posible, evite utilizar el suavizante.
Realizando los lavados desde el atardecer hasta las
primeras horas de la mañana se colabora para
reducir la carga de absorción de las empresas
eléctricas.
La opción Delay Timer (ver la pág. 7) ayuda
mucho a organizar los lavados en ese sentido.
Si el lavado debe ser secado en una secadora,
seleccione una velocidad de centrifugado alta.
Poca agua en el lavado, permite ahorrar tiempo y
energía en el programa de secado.
AsistenciaAnomalíasPrecauciones MantenimientoProgramas DetergentesInstalación Descripción
9
Page 10
Mantenimiento y cuidados
ES
Excluir agua y corriente eléctrica
Cierre el grifo de agua después de cada lavado. De
este modo se limita el desgaste de la instalación
hidráulica de la Lavasecadora y se elimina el
peligro de pérdidas.
Desenchufe la máquina cuando la deba limpiar y
durante los trabajos de mantenimiento.
Limpiar la Lavasecadora
La parte externa y las partes de goma se pueden
limpiar con un paño embebido en agua tibia y jabón.
No use solventes ni productos abrasivos.
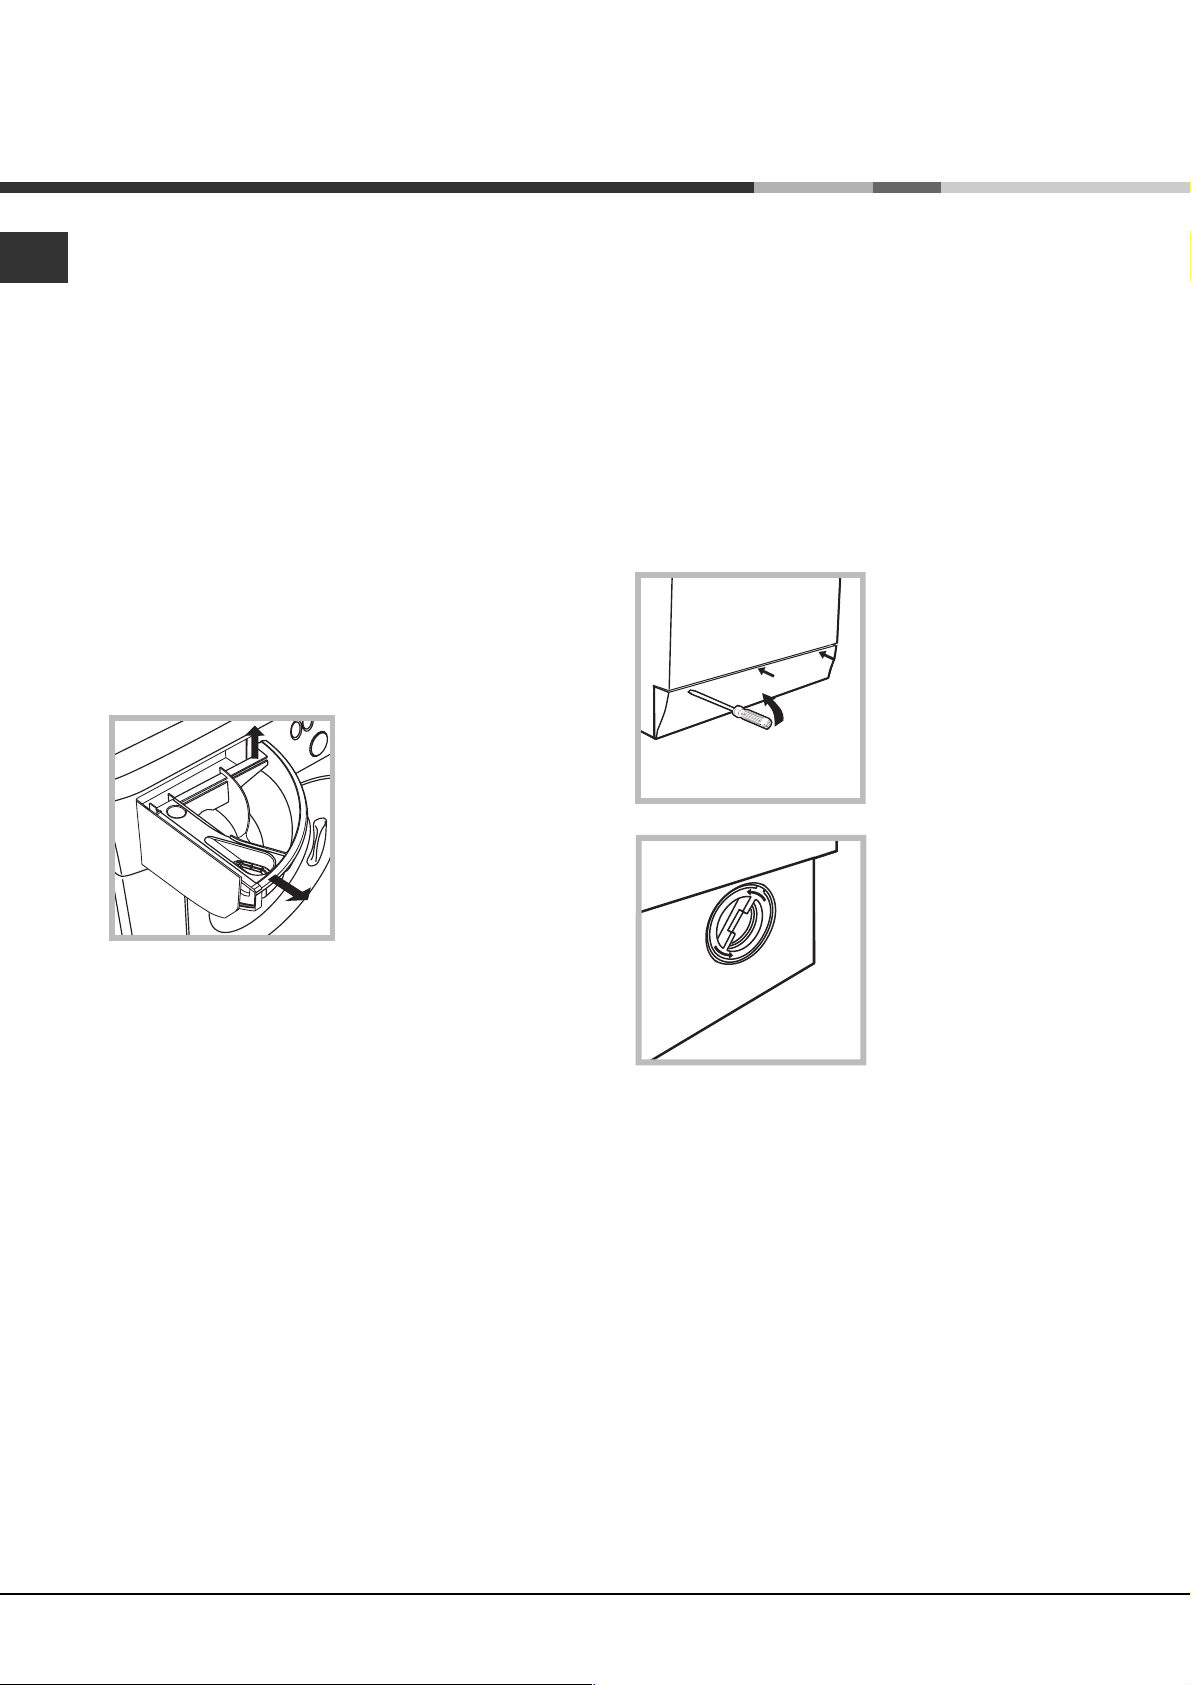
Limpiar el cajón de los detergentes
1
Extraiga el contenedor
levantándolo y tirando
hacia fuera (ver la
figura).
Lávelo debajo del agua
corriente, esta limpieza
se debe realizar frecuentemente.
2
Limpiar la bomba
La Lavasecadora posee una bomba autolimpiante
que no necesita mantenimiento. Pero puede suceder que objetos pequeños (monedas, botones)
caigan en la precámara que protege la bomba,
situada en la parte inferior de la misma.
Verifique que el ciclo de lavado haya terminado y
desenchufe la máquina.
Para acceder a la precámara:
1. quite el panel de
cobertura delantero de
la Lavasecadora con la
ayuda de un destornillador (ver la figura);
2. desenrosque la tapa
girándola en sentido
antihorario (ver la figura);
es normal que se
vuelque un poco de
agua;
Cuidar la puerta y el cesto
Deje siempre semicerrada la puerta para evitar
que se formen malos olores.
3. limpie con cuidado el interior;
4. vuelva a enroscar la tapa;
5. vuelva a montar el panel verificando, antes de
empujarlo hacia la máquina, que los ganchos se
hayan introducido en las correspondientes ranuras.
Controle el tubo de alimentación
de agua
Controle el tubo de alimentación al menos una vez al
año. Si presenta grietas o rozaduras se debe sustituir: durante los lavados, las fuertes presiones
podrían provocar roturas imprevistas.
No utilice nunca tubos ya usados.
10
Page 11

Anomalías y soluciones
Puede suceder que la Lavasecadora no funcione. Antes de llamar a la Asistencia Técnica (ver la pág. 12), controle
que no se trate de un problema de fácil solución ayudándose con la siguiente lista.
Anomalías:
Posibles causas / Solución:
ES
La Lavasecadora
no se enciende.
El ciclo de lavado
no comienza.
La Lavasecadora no carga agua.
La Lavasecadora carga y descarga agua continuamente.
El enchufe no está introducido en la toma de corriente, o no hace contacto.
En la casa no hay corriente.
La puerta no está bien cerrada.
El botón
El botón START/RESET no fue pulsado.
El grifo del agua no está abierto.
Se fijó un retraso de la hora de puesta en funcionamiento (Delay
Timer, ver la pág. 7).
El tubo de alimentación de agua no está conectado al grifo.
El tubo está plegado.
El grifo de agua no está abierto.
En la casa falta el agua.
No hay suficiente presión.
El botón START/RESET no fue pulsado.
El tubo de desagüe no está instalado entre los 65 y 100 cm. del suelo (ver la pág. 3).
El extremo del tubo de descarga está sumergido en el agua (ver la pág. 3).
La descarga de pared no posee un respiradero.
Si después de estas verificaciones el problema no se resuelve, cierre el grifo
de agua, apague la Lavasecadora y llame a la Asistencia. Si la vivienda se
encuentra en uno de los últimos pisos de un edificio, es posible que se
verifiquen fenómenos de sifonaje, por ello la Lavasecadora carga y descarga
agua de modo continuo. Para eliminar este inconveniente se encuentran
disponibles en el comercio válvulas especiales que permiten evitar el sifonaje.
no fue pulsado.
La Lavasecadora no descarga o
no centrifuga.
La Lavasecadora vibra mucho
durante la centrifugación.
La Lavasecadora pierde agua.
La luz indicadora de ENCENDIDO/
PUERTA BLOQUEADA centellea
de modo rápido simultáneamente
con, al menos, otra luz testigo.
Se forma demasiada espuma.
La Lavasecadora no seca.
El programa no prevé la descarga: con algunos programas es necesa-
rio activarlo manualmente (ver la pág. 6).
La opción Antiarrugas está activa: para completar el programa, pulse
el botón START/RESET (ver la pág. 7).
El tubo de descarga está plegado (ver la pág. 3).
El conducto de descarga está obstruido.
El cesto, en el momento de la instalación, no fue desbloqueado
correctamente (ver la pág. 2).
La Lavasecadora no está instalada en un lugar plano (ver la pág. 2).
Existe muy poco espacio entre la Lavasecadora, los muebles y la pared (ver la pág. 2).
El tubo de alimentación de agua no está bien enroscado (ver la pág. 2).
El cajón de detergentes está obstruido (para limpiarlo ver la pág. 10).
El tubo de descarga no está bien fijado (ver la pág. 3).
Llame a la Asistencia Técnica porque está indicando una anomalía.
El detergente no es específico para la Lavasecadora (debe contener algunas
de las frases "para Lavadora", "a mano o en Lavadora" o similares).
La dosificación fue excesiva.
El enchufe no está introducido en la toma de corriente, o no hace contacto.
En la casa no hay corriente.
La puerta no está bien cerrada.
Se fijó un retraso de la hora de puesta en funcionamiento (Delay
Timer, ver la pág. 7).
el mando de SECADO está en la posición 0.
AsistenciaAnomalíasPrecauciones MantenimientoProgramas DetergentesInstalación Descripción
11
Page 12

Asistencia
ES
Antes de llamar a la Asistencia Técnica:
Verifique si la anomalía la puede resolver solo (ver la pág. 11);
Vuelva a poner en marcha el programa para controlar si el inconveniente fue resuelto;
Si no es así, llame a la Asistencia técnica autorizada, al número de teléfono indicado en el certificado
de garantía.
No recurra nunca a técnicos no autorizados.
Comunicar:
el tipo de anomalía;
el modelo de la máquina (Mod.);
el número de serie (S/N ).
Estas informaciones se encuentran en la placa que está fijada en la parte posterior de la Lavasecadora.
Asistencia
12
Page 13

Instructions for use
WASHER-DRYER
GB
English
AML 105
Contents
GB
Installation, 14-15
Unpacking and levelling, 14
Electric and water connections, 14-15
The first wash cycle, 15
Technical details, 15
Washer-dryer description, 16-17
Control panel, 16
Leds, 17
Starting and Programmes, 18
Briefly: how to start a programme, 18
Programme table, 18
Personalisations, 19
Setting the temperature, 19
Set the drying cycle, 19
Functions, 19
Detergents and laundry, 20
Detergent dispenser, 20
Preparing your laundry, 20
Special items, 20
Woolmark Platinum Care, 20
Precautions and advice, 21
General safety, 21
Disposal, 21
Saving energy and respecting the environment, 21
Care and maintenance, 22
Cutting off the water or electricity supply, 22
Cleaning your appliance, 22
Cleaning the detergent dispenser, 22
Caring for your appliance door and drum, 22
Cleaning the pump, 22
Checking the water inlet hose, 22
Troubleshooting, 23
Service, 24
Before calling for Assistance, 24
13
Page 14
Installation
GB
Keep this instruction manual in a safe place for
future reference. Should the appliance be sold,
transferred or moved, make sure the instruction
manual accompanies the Washer-dryer to inform the
new owner as to its operation and features.
Read these instructions carefully: they contain vital
information on installation, use and safety.
Unpacking and levelling
Unpacking
1. Unpack the Washer-dryer.
2. Check whether the Washer-dryer has been
damaged during transport. If this is the case, do not
install it and contact your retailer.
3. Remove the four
protective screws and
the rubber washer with
the respective spacer,
situated on the rear of
the appliance (see
figure).
4. Seal the gaps using the plastic plugs provided.
5. Use the plug provided to seal the three holes
where the plug was housed, situated on the lower
right-hand side on the rear of your appliance.
6. Keep all the parts: you will need them again if the
Washer-dryer needs to be moved to another
location.
Packaging materials are not children's toys.
Levelling your appliance correctly will provide it with
stability and avoid any vibrations, noise and shifting
during operation. If it is placed on a fitted or loose
carpet, adjust the feet in such a way as to allow
enough room for ventilation beneath the Washerdryer.
Electric and water connections
Connecting the water inlet hose
1. Insert seal A into the
end of the inlet hose
and screw the latter
onto a cold water tap
A
3. Make sure there are no kinks or bends in the hose.
The water pressure at the tap must be within the
values indicated in the Technical details table
(on the next page).
with a 3/4 gas threaded
mouth (see figure).
Before making the
connection, allow the
water to run freely until
it is perfectly clear.
2. Connect the other end
of the water inlet hose to
the Washer-dryer,
screwing it onto the
appliance's cold water
inlet, situated on the top
right-hand side on the
rear of the appliance
(see figure).
Levelling
1. Install the Washer-dryer on a flat sturdy floor,
without resting it up against walls, furniture cabinets
or other.
2. If the floor is not
perfectly level, compensate for any unevenness
by tightening or
loosening the adjustable
front feet (see figure);
the angle of inclination,
measured according to
the worktop, must not
exceed 2°.
14
If the water inlet hose is not long enough, contact
a specialist store or an authorised serviceman.
Page 15

Connecting the drain hose
65 - 100 cm
Connect the drain hose,
without bending it, to a
draining duct or a wall
drain situated between
65 and 100 cm from the
floor;
Do not use extensions or multiple sockets.
GB
The power supply cable must never be bent or
dangerously compressed.
The power supply cable must only be replaced by
an authorised serviceman.
Warning! The company denies all liability if and when
these norms are not respected.
The first wash cycle
alternatively, place it
over the edge of a
basin, sink or tub,
fastening the duct
supplied to the tap (see
figure). The free end of
the hose should not be
underwater.
We advise against the use of hose extensions; in
case of absolute need, the extension must have the
same diameter as the original hose and must not
exceed 150 cm in length.
Electric connection
Before plugging the appliance into the mains socket,
make sure that:
the socket is earthed and in compliance with the
applicable law;
the socket is able to sustain the appliance's
maximum power load indicated in the Technical
details table (on the right);
Once the appliance has been installed, and before
you use it for the first time, run a wash cycle with
detergent and no laundry, setting the 90°C
programme without a pre-wash cycle.
Technical details
Model
Dimensions
Capacity
Electric
connections
Wat er
connections
Spin speed
AML 105
59.5 cm wide
85 cm high
53.5 cm deep
from 1 to 5 kg for the wash programme;
from 1 to 4 kg for the drying programme
voltage 220/230 Volts 50 Hz
maximum absorbed power 1850 W
maximum pressure 1 MPa (10 bar)
minimum pressure 0.05 MPa (0.5 bar)
drum capacity 46 litres
up to 1000 rpm
the supply voltage is included within the values i
ndicated on the Technical details table
(on the right);
the socket is compatible with the washer
dryer's plug. If this is not the case, replace the
socket or the plug.
The Washer-dryer should not be installed in an
outdoor environment, not even when the area is
sheltered, because it may be very dangerous to
leave it exposed to rain and thunderstorms.
When the Washer-dryer is installed, the mains
socket must be within easy reach.
Control
programmes
according to
IEC456 directive
Wash:
programme 3; temperature
60°C; run with a load of 5 kg.
Dryin g: first drying cycle performed
with a 1 kg load, by selecting a
drying time of 40 min;
Second drying cycle performed with
a 4 kg load and the DRYING knob
on the setting.
This appliance is compliant with the
following European Community
Directives:
- 73/23/CEE of 19/02/73 (Low
Voltage) and subsequent amendments
- 89/336/CEE of 03/05/89
(Electromagnetic Compatibility) and
subsequent amendments
ServiceTroubleshootingPrecautions CareProgrammes DetergentsInstallation Description
15
Page 16

Washer-dryer description
GB
Control panel
Detergent dispenser
Detergent dispenser: to add detergent and fabric
softener (see page 20).
FUNCTION
Buttons
Leds
DRYING
Knob
START/STOP button: to turn the Washer-dryer on
and off.
START/STOP
Button
ON-OFF/DOOR LOCK
Led
PROGRAMME
Knob
START/RESET
Button
TEMPERATURE
Knob
l
LEDS: to find out which wash cycle phase is under
way.
If the Delay Timer function has been set, the time
left until the programme starts will be indicated (see
page 17).
DRYING knob: to set the desired drying cycle
(see page 19).
FUNCTION buttons: to select the functions
available. The button corresponding to the function
selected will remain on.
TEMPERATURE knob: to set the temperature or
the cold wash cycle (see page 19).
START/RESET button: to start the programmes or
cancel any incorrect settings.
ON-OFF/DOOR LOCK Led: to find out whether the
Washer-dryer is on and if the appliance door can be
opened (see page 17).
PROGRAMME knob: to select the wash
programmes. The retractable control knob: press
the centre of the knob for it to pop out. The knob
stays still during the cycle.
16
Page 17

Leds
The LEDS provide important information.
This is what they can tell you:
Delay set:
If the Delay Timer function has been enabled (see
page. 19), once you have started the programme,
the LED corresponding to the delay set will begin to
flash:
As time passes, the remaining delay will be
displayed, and the corresponding LED will flash:
Once the set delay is complete, the flashing LED will
turn off and the programme set will start.
Cycle phase under way:
During the wash cycle, the LEDs gradually illuminate
on to indicate the cycle phase under way:
Prewash / Wash
Rinse
Spin cycle
Drying
Note:
- during draining, the LED corresponding to the Spin
cycle phase will be turned on.
- when the drying cycle is complete, the indicator light
relative to phase
DRYING knob needs to be set back to the 0 setting.
Function buttons
The FUNCTION BUTTONS also act like LEDS.
When a function is selected, the corresponding
button is illuminated.
If the function selected is incompatible with the
programme set, the button will flash and the
function will not be enabled.
If you set a function that is incompatible with
another function you selected previously, only the
last one selected will be enabled.
will flash, to indicate that the
GB
ON-OFF/DOOR LOCK led:
If this LED is on, the appliance door is locked to prevent it from being opened accidentally; to avoid any damages,
wait for the LED to flash before you open the appliance door.
The rapid flashing of the ON-OFF/DOOR LOCK Led together with the flashing of at least one other LED indicates
there is an abnormality. Call for Technical Assistance.
17
ServiceTroubleshootingPrecautions CareProgrammes DetergentsInstallation Description
Page 18

Starting and Programmes
GB
Briefly: starting a programme
1. Switch the Washer-dryer on by pressing button .
All the LEDS will light up for a few seconds and
the ON-OFF/DOOR LOCK Led will begin to flash.
2. Load your laundry into the Washer-dryer and
shut the appliance door.
3. Set the PROGRAMME knob to the programme
required.
4. Set the wash temperature (see page 19).
5. Set the drying cycle if necessary (see page 19).
Programme table
Type of fabric and degree of soil
Cottons
Extremely soiled whites
(sheets, tablecloths, etc.)
Extremely soiled whites
(sheets, tablecloths, etc.)
Heavily soiled whites and fast
colours
Slightly soiled whites and delicate
colours (shirts, jumpers, etc.)
Drying cycle for cotton fabrics
Programmes
1
2
3
4
Wash
temp.
90°C 137
90°C 120
60°C 105
40°C 72
Detergent
Pre-
wash
6. Add the detergent and any fabric softener
(see page 20).
7. Start he programme by pressing the START/RESET
button.
To cancel it, keep the START/RESET button pressed
for at least 2 seconds.
8. When the programme is finished, the ON-OFF/
DOOR LOCK Led will flash to indicate that the
appliance door can be opened. Take out your
laundry and leave the appliance door ajar to allow
the drum to dry thoroughly. Turn the Washer-dryer
.
Wash
off by pressing button
Fabric
softener
Cycle
length
(minutes)
Description of wash cycle
Pre-wash, wash cycle, rinse cycles,
intermediate and final spin cycles
Wash cycle, rinse cycles, intermediate
and final spin cycles
Wash cycle, rinse cycles, intermediate
and final spin cycles
Wash cycle, rinse cycles, intermediate
and final spin cycles
Synthetics
Heavily soiled fast colours
(baby linen, etc.)
Fast colours (all types of slightly
soiled garments)
Heavily soiled fast colours
(baby linen, etc.)
Delicate colours (all types of
slightly soiled garments)
Delicate colours (all types of
slightly soiled garments)
Drying cycle for synthetic fabrics
5
5
6
7
8
60°C 77
40°C 62
50°C 73
40°C 58
30°C 30
Wash cycle, rinse cycles, anti-crease or
delicate spin cycle
Wash cycle, rinse cycles, anti-crease or
delicate spin cycle
Wash cycle, rinse cycles, anti-crease or
delicate spin cycle
Wash cycle, rinse cycles, anti-crease or
delicate spin cycle
Wash cycle, rinse cycles and delicate
spin cycl
Delicates
Wash cycle, rinse cycles and delicate
spin cycle
Wash cycle, rinse cycles, anti-crease or
draining cycle
10
9
40°C 50
30°C 45
Wool
Very delicate fabrics
(curtains, silk, viscose, etc.)
Drying cycle for delicate fabrics
PARTIAL PROGRAMMES
Delicate rinse cycle Rinse cycles, anti-crease or draining
Delicate spin cycle Draining and delicate spin cycle
Draining Draining
Notes
For the anti-crease function, please see page 20. The information contained in the table is purely indicative.
Special programme
Daily 30' (programme 8 for Synthetics) is designed to wash lightly soiled garments in a short amount of time: it only
lasts 30 minutes and allows you to save on both time and energy. By setting this programme (8 at 30°C), you can
wash different fabrics together (except for woollen and silk items), with a maximum load of 3 kg.
We recommend the use of liquid detergent.
18
Page 19

Personalisations
Setting the temperature
Turn the TEMPERATURE knob to set the wash temperature (see Programme table on page 18).
The temperature can be lowered, or even set to a cold wash (
Set the drying cycle
Turn the DRYING knob to set the desired drying type.
Two options are available:
A - Based on time: From 40 minutes to 150.
B - Based on the damp level of the dry clothes:
Iron
Wardrobe
Extra dry
and bathrobes.
A cooling stage is foreseen at the end of the drying cycle.
If your laundry load to wash and dry is exceptionally in excess
of the maximum load foreseen (see table opposite), perform
the wash cycle, and when the programme is complete, divide up the garments and put part of them back in the
drum. Now follow the instructions provided for a dry only cycle. Repeat this procedure for the remainder of the load.
Dry only
Turn the PROGRAMME knob to one of the drying settings
desired drying type using the DRYING knob.
: slightly damp clothes, easy to iron.
: ry clothes to put away.
: very dry clothes, recommended for towelling
).
The data contained in the
Table of drying times
Fabric
type
Cotton,
Linen
Cotton Terry towels
Ter i t al ,
Cotton
Acrylics Pyjamas, socks, etc.
Nylon Slips, tights, stockings, etc.
Load type Max.
Clothing of different sizes
Sheets, Shirts
table are purely indicative.
load
(kg) Extra
4 130 120 110
4 130 120 110
2,5 90 80 70
1656060
1656060
dry
War d-
robe
depending on the type of fabric, then select the
Iron
GB
Important: - A spin cycle is carried out during the drying if you have set a cotton programme and a level of
dryness (Extra dry
, Wardrobe , Iron ).
- The woollen garments drying cycle should only and exclusively be run together with the selection of a specific
cycle time (150 - 100 - 60 - 40 minutes). We recommend a 60 minute drying cycle for a 1 kg load.
If one of the three levels (Extra dry
, Wardrobe , Iron ) is selected by mistake, the appliance will run a
drying cycle lasting the MAX time foreseen (150 minutes).
- For cotton loads of less than 1 Kg, use the drying programme designed for synthetic fabrics.
Functions
To enable a function:
1. press the button corresponding to the desired function, according to the table below;
2. the function is enabled when the corresponding button is illuminated.
Note: The rapid flashing of the button indicates that the corresponding function cannot be selected for the programme set.
Function Effect Comments
Press the button repeatedly until the LED corresponding to the
Delays the start
of the wash by
up to 9 hours.
Delay T imer
desired delay is turned on.
The fifth time the button is pressed, the function will be disabled.
N.B.: Once you have pressed the Start/Reset button, the delay
can only be decreased if you wish to modify it.
Allows for an
impeccable wash,
Su per
Was h
visibly whiter
than a standard
Class A
wash.
This function is incompatible with the RAPID function.
Enabled with
programmes:
All
1, 2, 3, 4,
5, 6, 7
Rapid
1000-5 00
Cuts the duration
of the wash cycle
by 30%.
Reduces the spin
speed.
This function is incompatible with the SUPER WASH function.
1, 2, 3, 4,
5, 6, 7
ServiceTroubleshootingPrecautions CareProgrammes DetergentsInstallation Description
All
programmes
except for 10
and draining.
19
Page 20

Detergents and laundry
GB
Detergent dispenser
Good washing results also depend on the correct
dose of detergent: adding too much detergent won't
necessarily make for a more efficient wash, and may
in fact cause build up on the interior of your
appliance and even pollute the environment.
Open up the detergent
dispenser and pour in
the detergent and fabric
softener, as follows.
1
3
compartment 1: Detergent for pre-wash
(powder)
compartment 2: Detergent for the wash cycle
(powder or liquid)
Liquid detergent should only be poured in
immediately prior to the wash cycle start.
compartment 3: Additives (fabric softeners, etc.)
The fabric softener should not overflow from the grid.
Do not use hand wash detergent because it may
form too much foam.
2
Special items
Curtains: fold curtains and place them in a pillow
case or mesh bag. Wash them separately without
exceeding half the appliance load. Use programme
10 which excludes the spin cycle automatically.
Quilted coats and windbreakers: if they are
padded with goose or duck down, they can be
machine-washed. Turn the garments inside out and
load a maximum of 2-3 kg, repeating the rinse cycle
once or twice and using the delicate spin cycle.
Trainers: remove any mud. They can be washed
together with jeans and other tough garments, but
not with whites.
Wool: for best results, use a specific detergent,
taking care not to exceed a load of 1 kg.
Woolmark Platinum Care
As gentle as a hand wash.
Ariston sets a new standard of superior
performance that has been endorsed by
The Woolmark Company with the prestigious
Woolmark Platinum Care brand. Look for the
Woolmark Platinum Care logo on the Washer-dryer
to ensure you can safely and effectively wash wool
garments labelled as "hand wash" (M.00221):
Set programme 9 for all "Hand wash"
garments, using the appropriate detergent.
Preparing your laundry
Divide your laundry according to:
- the type of fabric/the symbol on the label.
- the colours: separate coloured garments from
whites.
Empty all pockets and check for loose buttons.
Do not exceed the weight limits stated below,
which refer to the weight when dry:
Sturdy fabrics: max 5 kg
Synthetic fabrics: max 2.5 kg
Delicate fabrics: max 2 kg
Wool: max 1 kg
How much does your laundry weigh?
1 sheet 400-500 g
1 pillow case 150-200 g
1 tablecloth 400-500 g
1 bathrobe 900-1,200 g
1 towel 150-250 g
Anti-crease
This function interrupts the wash programme, and
the washing is left to soak in water before the
appliance is drained. It is enabled in programmes
5 - 6 - 7 - 10 and Delicate rinse cycle.
To conclude the cycle, press the START/RESET
button.
To run the draining cycle alone, set the knob to the
relative symbol
button.
and press the START/RESET
20
Page 21

Precautions and advice
The Washer-dryer was designed and built in
compliance with the applicable international safety
regulations. The following information is provided for
your safety and should consequently be read carefully.
General safety
This appliance has been designed for non-
professional, household use and its functions must
not be changed.
This Washer-dryer should only be used by
adults and in accordance with the instructions
provided in this manual.
Never touch the Washer-dryer when barefoot
or with wet or damp hands or feet.
Do not pull on the power supply cable to unplug
the appliance from the electricity socket. Pull the
plug out yourself.
Do not open the detergent dispenser while the
appliance is in operation.
Do not touch the drain water as it could reach
very high temperatures.
Never force the Washer-dryer door: this could
damage the safety lock mechanism designed to
prevent any accidental openings.
In the event of a malfunction, do not under any
circumstances touch internal parts in order to
attempt repairs.
Always keep children well away from the
appliance while in operation.
The appliance door tends to get quite hot during
the wash cycle.
Should it have to be moved, proceed with the
help of two or three people and handle it with the
utmost care. Never try to do this alone, because
the appliance is very heavy.
Before loading your laundry into the washing
machine, make sure the drum is empty.
During the drying phase, the door tends to get
quite hot.
Do not use the appliance to dry clothes that have
been washed with flammable solvents (e.g.
trichlorethylene).
Do not use the appliance to dry foam rubber or
similar elastomers.
Make sure that the water tap is turned on during
the drying cycles.
This washer-dryer can only be used to dry clothes
which have been pre-washed in water.
Disposal
Disposing of the packaging material:
observe local regulations, so the packaging can
be re-used.
Disposing of an old Washer-dryer:
before scrapping your appliance, cut the power
supply cable and remove the appliance door.
Saving energy and respecting the
environment
Environmentally-friendly technology
If you only see a little water through your appliance
door, this is because thanks to the latest Ariston
technology, your Washer-dryer only needs less than
half the amount of water to get the best results: an
objective reached to respect the environment.
Saving on detergent, water,
energy and time
To avoid wasting resources, the Washer-dryer
should be used with a full load. A full load instead
of two half loads allows you to save up to 50% on
energy.
The pre-wash cycle is only necessary on
extremely soiled garments. Avoiding it will save on
detergent, time, water and between 5 and 15%
energy.
Treating stains with a stain remover or leaving
them to soak before washing will cut down the
need to wash them at high temperatures. A
programme at 60°C instead of 90°C or one at
40°C instead of 60°C will save up to 50% on
energy.
Use the correct quantity of detergent depending
on the water hardness, how soiled the garments
are and the amount of laundry you have, to avoid
wastage and to protect the environment: despite
being biodegradable, detergents do contain
ingredients that alter the natural balance of the
environment. In addition, avoid using fabric
softener as much as possible.
If you use your Washer-dryer from late in the
afternoon until the early hours of the morning, you
will help reduce the electricity board's peak load.
The Delay Timer option (see page 19) helps to
organise your wash cycles accordingly.
If your laundry has to be dried in a tumble dryer,
select a high spin speed. Having the least water
possible in your laundry will save you time and
energy in the drying process.
GB
ServiceTroubleshootingPrecautions CareProgrammes DetergentsInstallation Description
21
Page 22

Care and maintenance
GB
Cutting off the water or electricity
supply
Turn off the water tap after every wash. This will
limit the wear of your appliance's water system
and also prevent leaks.
Unplug your appliance when cleaning it and
during all maintenance operations.
Cleaning your appliance
The exterior and rubber parts of your appliance can
be cleaned with a soft cloth soaked in lukewarm
soapy water. Do not use solvents or abrasives.
Cleaning the detergent dispenser
1
Remove the dispenser
by raising it and pulling it
out (see figure).
Wash it under running
water; this operation
should be repeated
frequently.
2
Cleaning the pump
The Washer-dryer is fitted with a self-cleaning pump
that does not require any maintenance. Sometimes,
small items (such as coins or buttons) may fall into
the pre-chamber that protects the pump, situated in
the lower part of the same.
Make sure the wash cycle has ended and unplug
the appliance.
To access the pre-chamber:
1. using a screwdriver,
remove the cover panel
on the lower front of the
Washer-dryer (see
figure);
2. unscrew the lid
rotating it anticlockwise (see figure): a
little water may trickle
out. This is perfectly
normal;
Caring for your appliance door and
drum
Always leave the appliance door ajar to prevent
unpleasant odours from forming.
3. clean the interior thoroughly;
4. screw the lid back on;
5. reposition the panel, making sure the hooks are
securely in place before you push it onto the
appliance.
Checking the water inlet hose
Check the water inlet hose at least once a year. If
you see any cracks, replace it immediately: during
the wash cycles, water pressure is very strong and
a cracked hose could easily split open.
Never use hoses that have already been used.
22
Page 23

Troubleshooting
Your Washer-dryer could fail to work. Before calling for Assistance (see page 24), make sure the problem can't
easily be solved by consulting the following list.
Problem
The Washer-dryer won't start.
The wash cycle won't start.
The Washer-dryer fails to load
water.
The Washer-dryer continuously
loads and unloads water.
Possible causes/Solution:
The appliance is not plugged into the socket, or not enough to make contact.
There has been a power failure.
The appliance door is not shut properly.
The
The START/RESET button has not been pressed.
The water tap is not turned on.
A delayed start has been set (using the Delay Timer, see page 19).
The water inlet hose is not connected to the tap.
The hose is bent.
The water tap is not turned on.
There is a water shortage.
The water pressure is insufficient.
The START/RESET button has not been pressed.
The drain hose is not fitted between 65 and 100 cm from the floor
(see page 15).
The free end of the hose is underwater (see page 15).
The wall drainage system doesn't have a breather pipe.
If the problem persists even after these checks, turn off the water tap,
switch the appliance off and call for Assistance. If the dwelling is on one of
the upper floors of a building, there may be drain trap problems causing the
Washer-dryer to load and unload water continuously. In order to avoid such
an inconvenience, special anti-drain trap valves are available in shops.
button has not been pressed.
GB
The Washer-dryer does not
drain or spin.
The Washer-dryer vibrates too
much during the spin cycle.
The Washer-dryer leaks.
The ON-OFF/DOOR LOCK Led
flashes rapidly at the same
time as at least one other LED.
There is too much foam.
The washer-dryer does not dry.
The programme does not foresee the draining: some programmes
require enabling the draining manually (see page 18).
The Anti-crease option is enabled: to complete the programme,
press the START/RESET button (see page 19).
The drain hose is bent (see page 15).
The drain duct is clogged.
The drum was not unblocked correctly during installation (see page 14).
The Washer-dryer is not level (see page 14).
The Washer-dryer is closed in between furniture cabinets and
the wall (see page 14).
The water inlet hose is not screwed on correctly (see page 14).
The detergent dispenser is obstructed (to clean it, see page 22).
The drain hose is not secured properly (see page 15).
Call for Assistance because this means there is an abnormality.
The detergent is not suitable for machine washing (it should bear the
definition "for Washing-machine" or "hand and machine wash", or the like).
You used too much detergent.
The appliance is not plugged into the socket, or not enough to make contact.
There has been a power failure.
The appliance door is not shut properly.
A delayed start has been set (using the Delay Timer, see page 19).
the DRYING knob is on the 0 setting.
ServiceTroubleshootingPrecautions CareProgrammes DetergentsInstallation Description
23
Page 24

Service
GB
Before calling for Assistance:
Check whether you can solve the problem on your own (see page 23);
Restart the programme to check whether the problem has been solved;
If this is not the case, contact an authorised Technical Service Centre on the telephone number
provided on the guarantee certificate.
Always request the assistance of authorised servicemen.
Notify the operator of:
the type of problem;
the appliance model (Mod.);
the serial number (S/N);
This information can be found on the data plate situated on the rear of the Washer-dryer.
Service
24
Page 25

Mode d'emploi
LAVANTE-SÉCHANTE
F
Français
AML 105
Sommaire
F
Installation, 26-27
Déballage et mise à niveau, 26
Raccordements hydrauliques et électriques, 26-27
Premier cycle de lavage, 27
Caractéristiques techniques, 27
Description du lavante-séchante, 28-29
Bandeau de commandes, 28
Voyants, 29
Mise en marche et Programmes, 30
En bref: démarrage d'un programme, 30
Tableau des programmes, 30
Personnalisations, 31
Sélection de la température, 31
Sélectionnez le séchage, 31
Fonctions, 31
Produits lessiviels et linge, 32
Tiroir à produits lessiviels, 32
Triage du linge, 32
Pièces de linge particulières, 32
Woolmark Platinum Care, 32
Précautions et conseils, 33
Sécurité générale, 33
Mise au rebut, 33
Economies et respect de l'environnement, 33
Entretien et soin, 34
Coupure de l'arrivée d'eau et de courant, 34
Nettoyage du lavante-séchante, 34
Nettoyage du tiroir à produits lessiviels, 34
Entretien du hublot et du tambour, 34
Nettoyage de la pompe, 34
Contrôle du tuyau d'arrivée de l'eau, 34
Anomalies et remèdes, 35
Assistance, 36
Consultation à tout moment, 36
25
Page 26

Installation
Conservez ce mode d'emploi pour pouvoir le consulter
F
à tout moment. En cas de vente, de cession ou de
déménagement, veillez à ce qu'il suive toujours le
lavante-séchante pour que son nouveau propriétaire soit
informé sur son mode de fonctionnement et puisse
profiter des conseils correspondants.
Lisez attentivement les instructions: elles fournissent
d'importantes informations sur l'installation, l'utilisation
et la sécurité.
Déballage et mise à niveau
Déballage
1. Déballez le lavante-séchante.
2. Contrôlez que le lavante-séchante n'a pas été
endommagé pendant le transport. S'il est abîmé, ne
le raccordez pas et contactez votre revendeur.
3. Enlevez les quatre vis
de protection pour le
transport, le
caoutchouc et la cale,
placés dans la partie
arrière (voir figure).
4. Bouchez les trous à l'aide des bouchons plastique
fournis.
5. Bouchez à l'aide du bouchon fourni les trois trous
où était logée la prise, situés sur la partie arrière, en
bas à droite.
6. Conservez bien toutes ces pièces: il faudra les
remonter en cas de transport du lavante-séchante.
Les emballages ne sont pas des jouets pour enfants.
Une bonne mise à niveau garantit la stabilité de la
machine et évite qu'il y ait des vibrations, du bruit et
des déplacements en cours de fonctionnement. Si la
machine est posée sur de la moquette ou un tapis,
réglez les petits pieds de manière à ce qu'il y ait
suffisamment d'espace pour assurer une bonne
ventilation.
Raccordements hydrauliques et
électriques
Raccordement du tuyau d'arrivée de l'eau
1. Montez le joint A sur
l'extrémité du tuyau
d'alimentation et vissezle à un robinet d'eau
A
3. Faites attention à ce que le tuyau ne soit ni plié ni
écrasé.
froide à embout fileté 3/4
gaz (voir figure).
Faites couler l'eau
jusqu'à ce qu'elle soit
limpide et sans
impuretés avant de
raccorder.
2. Raccordez le tuyau
d'alimentation au lavante-séchante en le
vissant à la prise d'eau
prévue, dans la partie
arrière en haut à droite
(voir figure).
Mise à niveau
1. Installez le lavante-séchante sur un sol plat et
rigide, sans l'appuyer contre des murs, des meubles
ou autre.
2. Si le sol n'est pas
parfaitement horizontal,
vissez ou dévissez les
petits pieds avant (voir
figure) pour niveler
l'appareil; son angle
d'inclinaison, mesuré
sur le plan de travail, ne
doit pas dépasser 2°.
26
La pression de l'eau doit être comprise entre les
valeurs indiquées dans le tableau des Caractéristiques
techniques (voir page ci-contre).
Si la longueur du tuyau d'alimentation ne suffit pas,
adressez-vous à un magasin spécialisé ou à un
technicien agréé.
Page 27

Raccordement du tuyau de vidange
Raccordez le tuyau
d'évacuation, sans le
plier, à un conduit
d'évacuation ou à une
évacuation murale
65 - 100 cm
placés à une distance
du sol comprise entre
65 et 100 cm;
Après installation du lavante-séchante, la prise de
courant doit être facilement accessible.
N'utilisez ni rallonges ni prises multiples.
Le câble ne doit être ni plié ni écrasé.
Le câble d'alimentation ne doit être remplacé que
par des techniciens agréés.
Attention! Nous déclinons toute responsabilité en cas
de non respect des normes énumérées ci-dessus.
F
ou bien accrochez-le à
un évier ou à une
baignoire, dans ce cas,
fixez le support en
plastique fourni avec
l'appareil au robinet
(voir figure). L'extrémité
libre du tuyau
d'évacuation ne doit
pas être plongée dans
l'eau.
L'utilisation de tuyaux de rallonge est absolument
déconseillée, si vous ne pouvez vraiment pas faire
autrement vous devrez utiliser un tuyau de même
diamètre et de longueur maximum de 150 cm.
Branchement électrique
Avant de brancher la fiche dans la prise de courant,
contrôlez que:
la prise dispose de mise à la terre et est conforme
aux normes;
la prise est bien apte à supporter la puissance
maximale de la machine indiquée dans le tableau
des Carcatéristiques techniques (voir ci-contre);
la tension d'alimentation est bien comprise entre les
valeurs figurant dans le tableau des
Caractéristiques techniques (voir ci-contre);
la prise est bien compatible avec la fiche du
lavante-séchante. Autrement, remplacez la prise
ou la fiche.
Votre lavante-séchante ne doit pas être installé
dehors, même à l'abri, car il est très dangereux de
le laisser exposé à la pluie et aux orages.
Premier cycle de lavage
Avant la première utilisation de la machine, effectuez
un cycle de lavage avec un produit lessiviel mais
sans linge et sélectionnez le programme à 90°C
sans prélavage.
Caractéristiques techniques
Modèle
Dimensions
Capacité
Raccordements
électriques
Raccordements
hydrauliques
Vitesse
d'essorage
Programmes de
contrôle selon la
norme IEC456
AML 105
largeur 59,5 cm
hauteur 85 cm
profondeur 53,5 cm
de 1 à 5 kg pour le lavage;
de 1 à 4 kg pour le séchage
tension 220/230 Volt 50 Hz
puissance maximale absorbée 1850 W
pression maximale 1 MPa (10 bar)
pression minimale 0,05 MPa (0,5 bar)
capacité du tambour 46 litres
jusqu'à 1000 tours minute
lavage: programme 3; température 60°C;
effectué avec une charge de 5 kg.
séchage: premier séchage effectué
avec 1 kg de charge et avec sélection
d'une durée de 40 min.;
deuxième séchage effectué avec 4 kg
de charge et bouton SECHAGE amené
sur position
Cet appareil est conforme aux
Directives Communautaires suivantes:
- 73/23/CEE du 19/02/73 (Basse
Tension) et modifications suivantes
- 89/336/CEE du 03/05/89
(Compatibilité électromagnétique) et
modifications suivantes
Bac produits
AssistanceAnomaliesPrécautions EntretienProgrammesInstallation Description
27
Page 28

Description du lavanteséchante
Bandeau de commandes
F
Tiroir à produits lessiviels
Tiroir à produits lessiviels: chargement des
produits lessiviels et additifs (voir page 32).
Touches
FONCTION
Voyants
Bouton
SÉCHAGE
Touche MISE EN MARCHE/ARRET: mise en
marche ou arrêt du lavante-séchante.
Touche
MISE EN MARCHE/
ARRET
Voyant
ALLUMAGE/
HUBLOT VERROUILLE
Touche
START/RESET
Bouton
TEMPÉRATURE
Bouton
PROGRAMMES
Voyants: suivi du stade d'avancement du
programme de lavage.
Si la fonction Départ différé a été sélectionnée,
indiquent le temps résiduel avant le démarrage du
programme (voir page 29).
Bouton SÉCHAGE pour sélectionner le séchage
voulu (voir page 31).
Touches FONCTION: sélection des fonctions
disponibles. La touche correspondant à la fonction
sélectionnée restera allumée.
Bouton TEMPÉRATURE: sélection de la
température ou lavage à froid (voir page 31).
Touche START/RESET: démarrage des
programmes ou annulation (en cas d'erreur).
Voyant ALLUMAGE/HUBLOT VERROUILLE: pour
comprendre si le lavante-séchante est branché et si
le hublot peut être ouvert (voir page 29).
Bouton PROGRAMMES: choix des programmes
(voir page 30). Le bouton est escamotable: pour le
faire sortir, pressez légèrement au centre.
En cours de lavage, le bouton ne bouge pas.
28
Page 29

Voyants
Les voyants fournissent des informations importantes.
Voilà ce qu'ils signalent:
Phases en cours:
Pendant le cycle de lavage, les voyants s'allument
progressivement pour indiquer son stade
d'avancement:
F
Retard programmé:
Si la fonction Départ différé a été activée (voir page
31) et après avoir sélectionné le programme, le
voyant correspondant au retard programmé
commence à clignoter:
Au fur et à mesure que le temps passe, le retard
résiduel est affiché avec clignotement du voyant
correspondant:
Une fois que le retard sélectionné touche à sa fin, le
voyant clignotant s'éteint et le programme
sélectionné démarre.
Prélavage / Lavage
Rinçage
Essorage
Séchage
Remarque:
- pendant la phase de vidange, le voyant
correspondant à la phase Essorage s'allume.
- Une fois le cycle de séchage terminé, le voyant
correspondant à la phase
clignoter pour indiquer qu'il faut ramener le bouton
SECHAGE sur 0.
Touches fonction
Les TOUCHES FONCTION servent aussi de voyants.
La sélection d'une fonction entraîne l'allumage du
voyant correspondant.
Si la fonction sélectionnée est incompatible avec le
programme sélectionné, la touche clignote et la
fonction n'est pas activée.
En cas de sélection d'une fonction incompatible
avec une autre précédemment sélectionnée, la
seule à être activée sera la dernière validée.
commencera à
Bac produits
Voyant ALLUMAGE/HUBLOT VERROUILLE:
Le voyant allumé indique que le hublot est verrouillé pour empêcher toute ouverture accidentelle; attendez que
le voyant cesse de clignoter avant d'ouvrir le hublot, vous risqueriez d'endommager l'appareil.
Le clignotement rapide du voyant ALLUMAGE/HUBLOT VERROUILLE en même temps qu'un autre signale
une anomalie. Appelez Service-après-vente.
AssistanceAnomaliesPrécautions EntretienProgrammesInstallation Description
29
Page 30

Mise en marche et Programmes
En bref: démarrage d'un programme
F
1. Pour allumer le lavante-séchante appuyez sur la
touche
. Tous les voyants s'allument pendant
quelques secondes puis s'éteignent et le voyant
ALLUMAGE/HUBLOT VERROUILLE commence à
clignoter.
2. Chargez le lavante-séchante et fermez le hublot.
3. Sélectionnez à l'aide du bouton PROGRAMMES
le programme désiré.
Tableau des programmes
Nature des tissus et degré de
salissure
Coton
Blancs extrêmement sales (draps,
nappes, etc.)
Blancs extrêmement sales (draps,
nappes, etc.)
Blancs et couleurs résistantes très
sales
Blancs peu sales et couleurs
délicates (chemises, pulls, etc.)
Séchage tissus coton
Synthétiques
Couleurs résistantes très sales
(linge de bébé, etc.)
Couleurs résistantes (linge en tout
genre légèrement sale)
Couleurs résistantes très sales
(linge de bébé, etc.)
Couleurs délicates (linge en tout
genre légèrement sale)
Couleurs délicates (linge en tout
genre légèrement sale)
Séchage tissus synthétique
Délicats
Programmes
1
2
3
4
5
5
6
7
8
4. Sélectionnez la température de lavage (voir page 31).
5. Sélectionnez le séchage si nécessaire (voir page 31).
6. Versez le produit lessiviel et les additifs (voir page 32).
7. Appuyez sur la touche START/RESET pour lancer
le programme. Pour annuler, poussez sur la touche
START/RESET pendant 2 secondes au moins.
8. A la fin du programme de lavage, le voyant ALLUMAGE/
HUBLOT VERROUILLE clignote pour indiquer que le
hublot peut être ouvert. Sortez le linge et laissez le hublot
entrouvert pour faire sécher le tambour. Eteignez le lavelinge en appuyant sur la touche
Te m p .
lavage
90°C 137
90°C 120
60°C 105
40°C 72
60°C 77
40°C 62
50°C 73
40°C 58
30°C 30 Lavage, rinçages et essorage délicat
Lessive
prélav. lavage.
Assouplis-
sant
Durée du
cycle
(minutes)
Description du cycle de lavage
Prélavage, lavage, rinçages, essorages
intermédiaires et finaux
Lavage, rinçages, essorages
intermédiaires et finaux
Lavage, rinçages, essorages
intermédiaires et finaux
Lavage, rinçages, essorages
intermédiaires et finaux
Lavage, rinçages, anti-froissement ou
essorage délicat
Lavage, rinçages, anti-froissement ou
essorage délicat
Lavage, rinçages, anti-froissement ou
essorage délicat
Lavage, rinçages, anti-froissement ou
essorage délicat
.
10
9
40°C 50 Lavage, rinçages et essorage délicat
30°C 45
Lavage, rinçages, anti-froissement ou
vidange
Laine
Tissus particulièrement délicats
(rideaux, soie, viscose, etc.)
Séchage tissus delicats
PROGRAMMES PARTIAUX
Rinçage délicat Rinçages, anti-froissement ou vidange
Essorage délicat Vidange et essorage délicat
Vidange Vidange
Remarque
Pour la description de la fonction Anti-froissement voir page 32. Les données reportées dans le tableau sont à titre
indicatif.
Programme spécial
Quotidien 30' (programme 8 pour Synthétiques) spécialement conçu pour laver du linge peu sale en un rien de temps:
il ne dure que 30 minutes et permet ainsi de faire des économies d'énergie et de temps. Choisissez le programme (8 à
30°C), vous pourrez laver ensemble des textiles différents (sauf laine et soie) en ne dépassant pas 3 kg de charge.
Nous vous conseillons d'utiliser des lessives liquides.
30
Page 31

Personnalisations
Sélection de la température
Tournez le bouton TEMPERATURE pour sélectionner la température de lavage (voir Tableau des programmes page 30).
Vous pouvez réduire la température jusqu'au lavage à froid (
Sélectionnez le séchage
Tournez le bouton SECHAGE pour sélectionner le type de
séchage souhaité. Deux possibilités sont prévues:
A - En fonction du temps: De 40 à 150 minutes.
B - En fonction du niveau de séchage:
Repassage
Armoire
Extra sec
et peignoirs.
Un cycle de refroidissement est prévu quand le séchage est
terminé.
Si, exceptionnellement, la charge de linge à laver et faire sécher
dépasse la charge maximum prévue (voir tableau ci-contre),
procédez au lavage et une fois le programme terminé, séparez
votre linge et placez-en une partie dans le tambour. Suivez à présent les instructions pour procéder au séchage
seulement. Procédez de même pour le linge restant.
Séchage seulement
Tournez le bouton PROGRAMMES jusqu'à une position de séchage
type de séchage souhaité à l'aide du bouton SECHAGE.
: linge légèrement humide, facile à repasser.
: linge sec à ranger.
: linge très sec, conseillé pour serviettes éponge
).
Tableau temps de séchage
Ty p e d e
tissu
Coton, lin Linge de différentes
Coton Serviettes éponge
Térital,
coton
Acryliques Pyjamas, chaussettes
Nylon Lingerie, etc.
Type de charge Charge
dimensions
Draps, chemises
etc.
selon le type de textile puis sélectionnez le
Les données indiquées dans
le tableau ont une valeur
purement indicative.
max.
(kg) Extra
4 130 120 110
4 130 120 110
2,5 90 80 70
16560 60
16560 60
sec
Armoire Repas-
sage
F
Bac produits
Important: - Pendant le séchage, la machine procède à un essorage si vous avez programmé un des
programmes coton et un des niveaux de séchage (Extra sec
, Armoire , Repassage ).
- Le séchage des tissus en laine ne doit être effectué que si vous sélectionnez une durée de cycle (150-100-60-40
minutes). Pour un 1 kg de charge, nous conseillons un séchage de 60 minutes.
Si par erreur vous sélectionnez un des trois niveaux (Extra sec
, Armoire , Repassage ), la machine
effectuera un séchage d'une durée correspondant au temps MAX prévu (150 minutes).
- Pour des chargements de textiles coton inférieurs à 1 Kg, utilisez le programme de séchage pour textiles synthétiques.
Fonctions
Les différentes fonctions de lavage prévues par le lavante-séchante permettent d'obtenir la propreté et le blanc
souhaités. Pour activer les fonctions:
1. appuyez sur la touche correspondant à la fonction désirée, d'après le tableau ci-dessous;
2. l'allumage de la touche correspondante signale que la fonction est activée.
Remarque: Le clignotement rapide de la touche signale que la fonction correspondante n'est pas disponible pour
le programme sélectionné.
Fonctions Effet Mode d'emploi
Appuyez plusieurs fois de suite sur la touche jusqu'à ce que le
voyant correspondant au retard souhaité s'allume.
A la cin quièm e press ion s ur la touch e, la fon ctio n s e désactive.
N.B: Après avoir appuyé sur la touche Start/Reset, vous ne
pouvez modifier le retard programmé que pour le diminuer.
D é p ar t
d if f é ré
S u p e r
L av a g e
Pour différer la m ise
en marche de votre
machine jusqu'à 9
heures.
Pour obtenir un
linge d'une propreté
impeccable,
visiblement plus
blanc par rapport au
standard de lavage
de la
Classe A
.
Activée avec les
programmes:
To u s
1, 2, 3, 4,
5, 6, 7
R a pi d e
1000 -500
Pour réduire de 30%
environ la durée du
cycle de lavage.
Pour réduire la
vitesse d'essorage.
Elle est incompatible avec la fonction SUPER LAVAGE.
1, 2, 3, 4,
5, 6, 7
To u s s a uf l e
10 et la
vidan ge.
AssistanceAnomaliesPrécautions EntretienProgrammesInstallation Description
31
Page 32

Produits lessiviels et linge
Tiroir à produits lessiviels
F
Un bon résultat de lavage dépend aussi d'un bon
dosage de produit lessiviel: un excès de lessive ne
lave pas mieux, il incruste l'intérieur de votre
lavante-séchante et pollue l'environnement.
Sortez le tiroir à produits
lessiviels et versez la
lessive ou l'additif
comme suit.
1
3
bac 1: Lessive prélavage
(en poudre)
bac 2: Lessive lavage
(en poudre ou liquide)
Versez la lessive liquide juste avant la mise en marche.
bac 3: Additifs (adoucissant, etc.)
L'assouplissant ne doit pas déborder de la grille.
2
N'utilisez pas de lessives pour lavage à la main,
elles génèrent trop de mousse.
Triage du linge
Triez correctement votre linge d'après:
- le type de textile / le symbole sur l'étiquette.
- les couleurs: séparez le linge coloré du blanc.
Videz les poches et contrôlez les boutons.
Ne dépassez pas les valeurs indiquées correspon-
dant au poids de linge sec:
Textiles résistants: 5 kg max.
Textiles synthétiques: 2,5 kg max.
Textiles délicats: 2 kg max.
Laine: 1 kg max.
Combien pèse le linge ?
1 drap 400-500 g
1 taie d'oreiller 150-200 g
1 nappe 400-500 g
1 peignoir 900-1.200 g
1 serviette éponge 150-250 g
Pièces de linge particulières
Rideaux: pliez-les bien et glissez-les dans une taie
d'oreiller ou dans un sac genre filet. Lavez-les seuls
sans dépasser la demi-charge. Sélectionnez le programme 10 qui supprime automatiquement l'essorage.
Doudounes et anoraks: s'ils sont en duvet d'oie ou
de canard, ils peuvent être lavés à la machine. Lavez
les vêtements sur lenvers. La charge ne doit pas
excéder 2-3 kg. Prévoyez 2, voire 3 rinçages et un
essorage léger.
Chaussures de tennis: débarrassez-les de la
boue. Lavez-les en même temps que jeans et
vêtements résistants, jamais avec du linge blanc.
Laine: pour obtenir d'excellents résultats utilisez un
produit lessiviel spécial et ne dépassez pas une
charge de 1kg.
Woolmark Platinum Care
Délicat comme le lavage à la main.
Ariston a introduit un nouveau standard de
performances supérieures, reconnu par The
Woolmark Company qui lui a attribué le prestigieux
label Woolmark Platinum Care. Si le logo Woolmark
Platinum Care est appliqué sur votre lavanteséchante, vous pouvez laver avec d'excellents
résultats vos vêtements en laine portant l'étiquette
"laver à la main" (M.00221):
Sélectionnez le programme 9 pour tous les
vêtements portant l'étiquette "Laver à la
main" et utilisez un produit lessiviel spécial.
Anti-froissement
Cette fonction interrompt le programme de lavage
en laissant le linge tremper dans l'eau avant la
vidange. Elle est disponible avec les programmes
5 - 6 - 7 - 10 et le Rinçage délicat.
Pour compléter le cycle appuyez sur la touche
START/RESET.
Pour n'effectuer que la vidange amenez le bouton
sur le symbole correspondant
touche START/RESET.
et appuyez sur la
32
Page 33

Précautions et conseils
Ce lavante-séchante a été conçu et fabriqué
conformément aux normes internationales de sécurité. Ces avertissements sont fournis pour des
raisons de sécurité, lisez-les attentivement.
Sécurité générale
Cet appareil a été conçu pour une utilisation
domestique, non professionnelle et ses fonctions
ne doivent pas être altérées.
Ce lavante-séchante ne doit être utilisé que par
des adultes en suivant les instructions reportées
dans ce mode d'emploi.
Nutilisez pas lappareil si vous êtes pieds nus.
ne touchez jamais lappareil si vous avez les pieds
ou les mains humides.
Ne tirez jamais sur le câble pour débrancher la
fiche de la prise de courant.
N'ouvrez pas le tiroir à produits lessiviels si la
machine est en marche.
Ne touchez pas à l'eau de vidange, elle peut
atteindre des températures très élevées.
Ne forcez pas pour ouvrir le hublot: le verrouillage
de sécurité qui protège contre les ouvertures
accidentelles pourrait s'endommager.
En cas de panne, n'essayez en aucun cas d'accéder
aux mécanismes internes pour tenter de la réparer.
Veillez à ce que les enfants ne s'approchent pas
de la machine pendant son fonctionnement.
Pendant le lavage, le hublot a tendance à se réchauffer.
Deux ou trois personnes sont nécessaires pour la
déplacer en faisant très attention. Ne jamais la
déplacer seul car la machine est très lourde.
Avant d'introduire votre linge, contrôlez si le
tambour est bien vide.
Pendant le séchage, le hublot a tendance à chauffer.
Ne mettez pas à sécher du linge lavé avec des
solvants inflammables (trichloréthylène par ex.).
Ne mettez pas à sécher du caoutchouc-mousse
ou des élastomères du même genre.
Vérifiez qu'au cours du séchage, le robinet de
l'eau soit bien ouvert.
Ce lavante-séchante séchant ne peut être utilisé
que pour sécher du linge ayant été lavé à l'eau.
Mise au rebut
Mise au rebut du matériel d'emballage:
se conformer aux réglementations locales de manière
à ce que les emballages puissent être recyclés.
Mise au rebut de votre vieux lavante-séchante:
avant de le mettre à la déchetterie, rendez-le
inutilisable en coupant le cordon d'alimentation
électrique et en démontant le hublot.
Economies et respect de l'environnement
La technologie au service de l'environnement
Si vous voyez peu d'eau à travers le hublot c'est
parce que grâce à la nouvelle technologie Ariston, il
suffit de moins de la moitié d'eau pour obtenir une
propreté impeccable: un but atteint pour protéger
l'environnement.
Economie de produit lessiviel, d'eau, d'électricité et de temps
Pour ne pas gaspiller de ressources, utilisez le
lavante-séchante à sa charge maximale. Mieux
vaut une pleine charge que deux demies, vous
économiserez jusqu'à 50% d'électricité.
Un prélavage n'est nécessaire qu'en cas de linge
très sale. S'en passer permet de faire des économies de produit lessiviel, de temps, d'eau et entre
5 et 15% d'électricité.
Si vous traitez les taches avec un produit détachant
ou si vous les laissez tremper avant de les laver, vous
éviterez d'avoir à laver à de hautes températures. Un
programme à 60°C au lieu de 90°C ou un à 40°C au
lieu de 60°C, fait économiser jusqu'à 50% d'électricité.
Bien doser la quantité de produit lessiviel en
fonction de la dureté de l'eau, du degré de
salissure et de la quantité de linge à laver évite les
gaspillages et protège l'environnement: bien que
biodégradables, les produits lessiviels contiennent
des éléments qui altèrent l'équilibre de la nature.
Evitez le plus possible l'utilisation d'assouplissant.
Effectuer ses lavages tard dans l'après-midi et
jusqu'aux premières heures du matin permet de
réduire la charge d'absorption des opérateurs
énergétiques. L'option Départ différé (voir page
31) aide à mieux organiser les lavages en ce sens.
Si le linge doit être séché dans un sèche-linge,
sélectionnez une haute vitesse d'essorage. Du linge
qui contient moins d'eau fait écomiser du temps et
de l'électricité dans le programme de séchage.
F
Installation Description
Bac produits
AssistanceAnomaliesPrécautions EntretienProgrammes
33
Page 34

Entretien et soin
Coupure de l'arrivée d'eau et de courant
F
Fermez le robinet de l'eau après chaque
lavage: vous limiterez ainsi l'usure de l'installation
hydraulique de votre lavante-séchante et
éliminerez le danger de fuites.
Débranchez la fiche de la prise de courant quand
vous nettoyez votre lavante-séchante et pendant
tous vos travaux d'entretien.
Nettoyage du lavante-séchante
Pour nettoyer l'extérieur et les parties en caoutchouc,
utilisez un chiffon imbibé d'eau tiède et de savon.
N'utilisez ni solvants ni abrasifs.
Nettoyage du tiroir à produits
lessiviels
1
Pour sortir le tiroir,
soulevez-le et tirez-le
vers vous (voir figure).
Lavez-le à l'eau
courante, effectuez
cette opération assez
souvent.
2
Nettoyage de la pompe
Le lavante-séchante est équipé d'une pompe
autonettoyante qui n'exige aucune opération
d'entretien. Il peut toutefois arriver que de menus
objets (pièces de monnaie, boutons) tombent dans
la préchambre qui protège la pompe, placée en bas
de cette dernière.
Contrôlez que le cycle de lavage est bien terminé
et débranchez la fiche.
Pour accéder à cette préchambre:
1. démontez le panneau
situé à l'avant du lavante-séchante à l'aide d'un
tournevis (voir figure);
2. dévissez le couvercle
en le faisant tourner dans
le sens inverse des
aiguilles d'une montre (voir
figure): il est normal qu'un
peu d'eau s'écoule;
Entretien du hublot et du tambour
Quand vous nutilisez pas votre lavante-séchante,
laissez toujours le hublot entrouvert pour éviter la
formation de mauvaises odeurs.
34
3. nettoyez soigneusement à l'intérieur;
4. revissez le couvercle;
5. remontez le panneau en veillant à bien enfiler les
crochets dans les fentes prévues avant de le pousser
contre la machine.
Contrôle du tuyau d'arrivée de l'eau
Contrôlez le tuyau d'alimentation au moins une fois
par an. Remplacez-le dès que vous remarquez des
craquèlements et des fissures: les fortes pressions
subies pendant le lavage pourraient provoquer des
cassures.
N'utilisez jamais de tuyaux usés.
Page 35

Anomalies et remèdes
Il peut arriver que le lavante-séchante ne fonctionne pas bien. Avant de appelez le Service après-vente
(voir page 36), contrôlez s'il ne s'agit pas d'un problème facile à résoudre grâce à la liste suivante.
Anomalies:
Le lavante-séchante ne s'allume pas.
Le cycle de lavage ne démarre
pas.
Il n'y a pas d'arrivée d'eau.
Le lavante-séchante prend
l'eau et vidange
continuellement.
Votre lavante-séchante ne
vidange pas et n'essore pas.
Votre lavante-séchante vibre
beaucoup pendant l'essorage.
Le lavante-séchante a des fuites.
Le voyant ALLUMAGE/HUBLOT
VERROUILLE clignote
rapidement en même temps
qu'un autre voyant.
Il y a un excès de mousse.
Le lavante-séchante ne sèche
pas.
Causes / Solutions possibles:
La fiche n'est pas branchée dans la prise de courant ou mal branchée.
Il y a une panne de courant.
Le hublot n'est pas bien fermé.
La touche
La touche START/RESET n'a pas été actionnée.
Le robinet de l'eau n'est pas ouvert.
Un départ différé a été sélectionné (Départ différé, voir page 31).
Le tuyau d'arrivée de l'eau n'est pas raccordé au robinet.
Le tuyau est plié.
Le robinet de l'eau n'est pas ouvert.
Il y a une coupure d'eau.
La pression n'est pas suffisante.
La touche START/RESET n'a pas été actionnée.
le tuyau de vidange n'est pas installé à une distance du sol
comprise entre 65 et 100 cm (voir page 27).
L'extrémité du tuyau de vidange est plongée dans l'eau (voir page 27).
L'évacuation murale n'a pas d'évent.
Si après ces vérifications, le problème persiste, fermez le robinet de l'eau, éteignez la
machine et appelez le service Assistance. Si vous habitez en étage dans un immeuble,
il peut y avoir des phénomènes de siphonnement qui font que votre lavante-séchante
prend et évacue l'eau continuellement. Pour supprimer cet inconvénient, vous pouvez
trouver dans le commerce des valves spéciales anti-siphonnement.
Le programme ne prévoit pas de vidange: pour certains
programmes, il faut intervenir pour la faire démarrer (voir page 30).
L'option Anti-froissement est activée: pour compléter le
programme, appuyez sur la touche START/RESET (voir page 31).
Le tuyau de vidange est plié (voir page 27).
La conduite de l'installation de vidage est bouchée.
Le tambour n'a pas été débloqué (comme indiqué page 26) lors de
l'installation du lavante-séchante.
Le lavante-séchante n'est pas posé à plat (voir page 26).
Le lavante-séchante est coincé entre des meubles et le mur (voir page 26).
Le tuyau d'arrivée de l'eau n'est pas bien vissé (voir figure page 26).
Le tiroir à produits lessiviels est bouché (pour le nettoyer voir pag. 34).
Le tuyau de vidange n'est pas bien fixé (voir page 27).
Appelez le Service-après-vente car une anomalie est signalée.
Le produit de lavage utilisé n'est pas une lessive spéciale machine
(il faut qu'il y ait l'inscription "pour lavante-séchante", "main et machine", ou
autre semblable).
La quantité utilisée est excessive.
La fiche n'est pas branchée dans la prise de courant ou mal branchée.
Il y a une panne de courant.
Le hublot n'est pas bien fermé.
Un départ différé a été sélectionné (Départ différé, voir page 31).
le bouton SÉCHAGE est sur la position 0.
n'a pas été actionnée.
F
Bac produits
AssistanceAnomaliesPrécautions EntretienProgrammesInstallation Description
35
Page 36

Assistance
F
Avant d'appeler le service après-vente:
Vérifiez si vous ne pouvez pas résoudre vous-même le problème (voir page 35);
Remettez le programme en marche pour contrôler si dysfonctionnement a disparu;
Autrement, appelez le Service après-vente de votre revendeur;
Ne vous adressez jamais à des techniciens non agréés.
Communiquez:
le type de panne;
le modèle de la machine (Référence);
le numéro de série (S/N);
Vous trouverez tous ces renseignements sur la plaquette signalétique située sur le panneau arrière de
votre lavante-séchante.
Assistance
36
Page 37

Руководство по экпуатации
СТИРАЛЬНАЯ МАШИНА C CУШKOЙ
CIS
РУССКИЙ, 1
AML 105
Содержание
CIS
Установка, 38-39
Распаковка и выравнивание, 38
Подключение к водопроводной и электрической
сети, 38-39
Пробный цикл стирки, 39
Технические характеристики, 39
Описание Стиральная машина с
сушкой, 40-41
Панель управления, 40
Индикаторы, 41
Запуск машины. Программы, 42
Краткие инструкции: Порядок запуска программы, 42
Таблица программ, 42
Персонализация стирки, 43
Выбор температуры, 43
Программирование цикла сушки, 43
Функции, 43
Моющие средства и белье, 44
Распределитель моющих средств, 44
Подготовка белья, 44
Особенности стирки отдельных изделий, 44
Woolmark Platinum Care (Программа «Золотой
кашемир»), 44
Предупреждения и рекомендации, 45
Общие правила безопасности, 45
Утилизация, 45
Экономия и охрана окружающей среды, 45
Обслуживание и уход, 46
Отключение воды и электричества, 46
Уход за Стиральная машина с сушкой, 46
Уход за распределителем моющих средств, 46
Уход за дверцей машины и барабаном, 46
Чистка насоса, 46
Проверка заливного шланга, 46
Устранение неисправностей, 47
Сервисное обслуживание, 48
!%
Page 38

Установка
+15
Сохраните данное руководство. Оно должно быть
в комплекте со Стиральная машина с сушкой в
случае продажи, передачи оборудования или при
переезде на новую квартиру, чтобы новый
владелец оборудования мог ознакомиться с
правилами его функционирования и обслуживания.
Внимательно прочитайте руководство: в нем со-
держатся важные сведения по установке и безопасной эксплуатации стиральной машины.
Распаковка и выравнивание
Распаковка
1. Распакуйте Стиральная машина с сушкой.
2. Убедитесь, что оборудование не было повреждено
во время транспортировки. При обнаружении повреждений не подключайте машину свяжитесь с поставщиком немедленно.
3. Удалите четыре
транспортировочных
винта и резиновые
пробки с прокладками,
расположенные в задней части стиральной
машины (ñì. ðèñ.).
4. Закройте отверстия
прилагающимися пластиковыми заглушками.
5. Закройте прилагающейся заглушкой три отверстия
для вилки оборудования (во время его транспортировки), расположенные в задней нижней правой части оборудования
6. Сохраняйте все детали: они Вам понадобятся при
последующей транспортировке Стиральная
машина с сушкой.
Правильное выравнивание оборудования поможет
избежать шума, вибраций и смещений во время работы машины.
Если Стиральная машина с сушкой стоит на полу,
покрытом ковром, убедитесь, что ее основание возвышается над ковром. В противном случае
вентиляция будет затруднена или вовсе
невозможна.
Подключение к водопроводной и
электрической сети
Подсоединение заливного шланга
1. Вставьте прокладку А в
конец заливного шланга
и наверните его на вывод водопровода холодной воды с резьбовым от-
A
верстием 3/4 дюйма (ñì.
ðèñ.).
Перед подсоединением
откройте водопроводный
кран и дайте стечь грязной воде.
2. Подсоедините заливной шланг к Стиральная
машина с сушкой,
навинтив åãî на
водоприемник, расположенный в задней
верхней части справа
(ñì. ðèñ.).
Не разрешайте детям играть с упаковочными
материалами.
Выравнивание
1. Установите Стиральная машина с сушкой на ровном и
прочном полу, так чтобы она не касалась стен, мебели
и прочих предметов .
2. После установки машины на место отрегулируй-
те ее устойчивое положение путем вращения пе-
редних ножек (ñì.
ðèñ.). Для этого сначала ослабьте контргайку,
после завершения регулировки контргайку
затяните.
После установки машины
на место проверьте по
уровню горизонтальность
верхней крышки корпуса,
отклонение горизонтали
должно быть не более 2°.
!&
3. Убедитесь, что шланг не перекручен и не пережат.
Давление воды должно быть в пределах значе-
ний, указанных в таблице Технических характеристик (ñì. ñ. 3).
Если длина водопроводного шланга окажется
недостаточной, обратитесь в Авторизованный
Сервисный центр.
Page 39

Подсоединение сливного шланга
Повесьте загнутый ко-
нец сливного шланга на
край раковины, ванны,
или поместите в
специальный вывод
65 - 100 cm
канализации. Шланг не
должен перегибаться.
Верхняя точка сливного шланга должна находиться на высоте 65100 см от пола. Распо-
ложение сливного
шланга должно обеспечивать разрыв струи
при сливе (конец шланга не должен быть
опущен в воду).
В случае крепления на
край ванной или раковины, шланг вешается
с помощью направляющей (входит в комплект поставки), которая
крепится к крану (ðèñ.).
Не рекомендуется применение удлинителей для
сливного шланга, при необходимости допускается его наращивание шлангом такого же диаметра
и длиной не более 150 см.
l розетка заземлена в соответствии с нормами безо-
пасности, описанными в данном разделе инструкции
допускается организация заземления рабочим ну-
лем, при условии, что защитная линия не имеет разрыва и подключена напрямую в обвод каких-либо
приборов (например, электрического счетчика).
Если вилка не подходит к розетке, ее следует заменить на новую, соответствующую розетке, или заменить
питающий кабель. Замена кабеля должна производиться только квалифицированным персоналом.
Запрещается использование переходников, двойных
и более розеток и удлинителей (они создают опасность
возгорания). Если Вы считаете их использование необходимым, применяйте один единственный удлинитель, удовлетворяющий требованиям безопасности.
Оборудование, подключенное с нарушением требований безопасности бытовых приборов большой
мощности, изложенных в данной инструкции, является потенциально опасным.
Производитель не несет ответственности за
ущерб здоровью и собственности, если он вызван
несоблюдением указанных норм установки.
Первый цикл стирки
По завершении установки, перед началом эксплуатации необходимо произвести один цикл стирки со стиральным порошком, но без белья, по программе 90°C без предварительной стирки.
CIS
Установка Описание
Программы
средства
Моющие
Подсоединение к электросети
Внимание! Оборудование обязательно должно
быть заземлено!
1. Машина подключается к электрической сети при помощи двухполюсной розетки с заземляющим контактом (розетка не поставляется с машиной). Фазный
провод должен быть подключен через автомат защиты сети, рассчитанный на максимальный ток (ток срабатывания) 16 А, и имеющий время срабатывания не
более 0,1 с.
2. При наличии вблизи от предполагаемого места установки машины розетки с заземляющим контактом,
имеющей трехпроводную подводку кабеля с медными
жилами сечением не менее 1,5 кв. мм (или алюминиевыми жилами сечением не менее 2,5 кв. мм), доработка электросети не производится. При отсутствии
указанной розетки и проводки следует провести их монтаж.
3. Прокладка заземления отдельным проводом не
допускается.
4. Для доработки электрической сети рекомендуется
применять провод типа ППВ 3х1,5 380 ГОСТ 6223-79.
Допускается применение других марок кабеля, обеспечивающих пожаро- и электробезопасность при эксплуатации машины.
Перед включением машины в сеть убедитесь, что:
l розетка и проводка соответствуют требованиям, из-
ложенным в данном разделе инструкции;
l напряжение и частота тока сети соответствуют дан-
ным машины;
l розетка и вилка одного типа;
Тех ничес кие характер истики
Ìîä åë ü
Размеры
Загрузка
Электрические
параметры
Гидравлические
параметры
Скорость
отжима
Kонтро льны е
программы
согласно
нормативу IEC
456
AML 105
ширина 59,5 см
высота 85 см
глубина 53,5 см
от 1 до 5 кг на цикл стирки;
от 1 до 4 кг на цикл сушки
напряжение 22 0/2 30 В 50 ГЦ
max мощность 1850 Ватт
max дав л ение 1 Мпа (10 бар)
min давление 0,05 Мпа (0,5 бар)
объем барабана 46 л
äî 1000 îá/ìèí
стирки:
60°С; при загрузке до 5 кг.
сушка:
кг белья, продолжительность цикла
сушки 40 мин.;
вторая сушка с загрузкой 4 кг белья,
рукоятка СУШKА стоит в по ложении
Машина соответствует следующим
Директивам Европейского
Экономического сообщества:
- 73/223/ ЕЕС от 19.02.73 (низкого
напряжения) и последующие модификации
- 89/336 /ЕЕС от 03.05.89 (электромагнитной совместимости) и
последующие модификации
программа 3; температура
первая сушка с загрузкой 1
безопасности
Ìåðû
Обслуживание
è óõîä
СервисНеисправности
!'
Page 40

Описание Стиральная машина
с сушкой
+15
Панель управления
Распределитель
моющих средств
Распределитель моющих средств для загруз-
ки стирального порошка и смягчителей (ñì. ñ. 44).
Индикаторы: служат для контроля за
выполнением программы стирки.
Если была включена функция Таймер отсрочки,
индикаторы показывают время, остающееся до
запуска программы (ñì. ñòð. 41).
Рукоятка СУШКА: для программирования нужного
вам цикла сушки (ñì. ñòð. 43).
Кнопки выбора
ФУНКЦИИ
Индикаторы
Рукоятка
СУШКА
Кнопка ВКЛЮЧЕНИЕ/ВЫКЛЮЧЕНИЕ служит для
включения и выключения Стиральная машина с
сушкой.
Кнопка ПУСК/СБРОС используется для запуска
программ или для отмены ошибочного
программирования.
Индикатор ВКЛЮЧЕНИЕ/ЛЮК ЗАБЛОКИРОВАН:
показывает, включена ли Стиральная машина с
сушкой и можно ли открыть люк (ñì. ñòð. 41).
Кнопка ВКЛЮЧЕНИЕ/
ВЫКЛЮЧЕНИЕ
Индикатор ВКЛЮЧЕНИЕ/
ЛЮК ЗАБЛОКИРОВАН
Рукоятка выбора
ПРОГРАММ
Кнопка ПУСК/СБРОС
(Start/Reset)
Рукоятка выбора
ТЕМПЕРАТУРЫ
Кнопки выбора ФУНКЦИИ: служат для выбора
доступных функций. Кнопка выбранной функции
останется включенной.
Рукоятка выбора ТЕМПЕРАТУРЫ: служит для
установки необходимой температуры или для
стирки в холодной воде (ñì. ñòð. 43).
"
Рукоятка выбора ПРОГРАММ служит для выбора
программ. Рукоятка может быть утоплена в панель
управления: для ее использования слегка нажмите
на нее в центре рукоятка выдвинется наружу.
В процессе выполнения программы рукоятка
остается неподвижной.
Page 41

Индикаторы
Индикаторы сообщают пользователю важные
сведения.
Значение индикаторов:
Отложенный старт:
Если была включена функция Delay Timer (Таймер
задержки) (смотри стр. 43), после запуска
программы замигает светодиод, соответствующий
выбранной задержке:
По мере отсчета времени будет показываться
остающееся время вместе с миганием
соответствующего индикатора:
По прошествии заданной задержки мигающий
светодиод погаснет,и запустится выбранная
программа.
Текущая фаза цикла:
В процессе цикла стирки индикаторы будут
загораться один за другим, показывая фазу
выполнения программы:
Предварительная стирка / Стирка
Полоскание
Отжим
Сушка
Примечание:
- в процессе слива загорится индикатор,
соответствующий циклу Отжима.
- По завершении цикла сушки индикатор,
соответствующий фазе
мигает, напоминая вам
о необходимости вернуть рукоятку СУШКА в
положение 0.
Кнопки выбора функции
КНОПКИ ВЫБОРА ФУНКЦИИ также являются
индикаторами.
При выборе функции загорается соответствующая
кнопка.
Если выбранная функция является несовместимой
с заданной программой, кнопка будет мигать, и
такая функция не будет активирована.
Если будет выбрана функция, несовместимая с
другой, ранее выбранной функцией, останется
включенной только последняя выбранная
функция.
CIS
ПрограммыУстановка Описание
средства
Моющие
безопасности
Ìåðû
Индикатор ВКЛЮЧЕНИЕ/ЛЮК ЗАБЛОКИРОВАН:
Горящий индикатор означает, что люк заблокирован во избежание его случайного открывания.
Во избежание его повреждения необходимо дождаться, когда индиактор начнет мигать, перед тем как
открыть люк.
Частое мигание индиактора ВКЛЮЧЕНИЕ/БЛОКИРОВКА ЛЮКА вместе с любой другим индикатором
означает неисправность. Обратитесь в Авторизованный Сервисный Центр (см. гарантийные документы).
"
Обслуживание
è óõîä
СервисНеисправности
Page 42

Запуск машины. Программы
+15
Краткие инструкции: Порядок
запуска программы
1. Включите Стиральная машина с сушкой, нажав на
кнопку
секунд, затем погаснут, и индиактор ВКЛЮЧЕНИЕ/
ЛЮК ЗАБЛОКИРОВАН начнет мигать.
2. Загрузите белье и закройте дверцу машины.
3. Выбрать при помощи рукоятки выбора ПРОГРАММ
нужную программу.
4. Выбрать температуру стирки (ñì. ñòð. 43 ).
. Все индикаторы загорятся на несколько
5. При необходимости запрограммируйте цикл сушки
(ñì. ñòð. 43).
6. Добавьте в распределитель моющее средство,
ополаскиватель, отбеливатель (ñì. ñ. 44).
7. Запустите программу, нажав кнопку ПУСК/СБРОС
(Start/Reset).
Для отмены запуска держите нажатой кнопку ПУСК/
СБРОС (Start/Reset) в течение 2-х секунд.
8. По завершении программы индикатор ВКЛЮЧЕНИЕ/
ЛЮК ЗАБЛОКИРОВАН замигает, сигнализируя, что
можно открыть люк. Вынуть белье и оставить люк
полуоткрытым для сушки барабана. Выключить
Таблица программ
Ткань и с тепень загрязнения Ïð îã-
Хлопок
сильным загрязнением
Очень сильно загрязненное белое
белье (простыни, скатерти и т.д.)
Очень сильно загрязненное белое
белье (простыни, скатерти и т.д.)
Сильно загрязненное белое и
прочно окрашенное цветное белье
Слабо загрязненное белое и
линяющее цветное белье
(рубашки, маки и пр.)
Сушка белья из х/ б тканей
Синтетика
Сильно загрязненная, прочно
окрашенная цветная (детская
одежда и пр.)
Сильно загрязненная, прочно
окрашенная цветная цветная
(любая оде жда)
Сильно загрязненная, прочно
окрашенная цветная (детская
одежда и пр.)
Слабо загрязненная, деликатная
цветн ая (любая оде жда)
Слабо загрязненная, деликатная
цветн ая (любая оде жда)
Сушка белья из синтетических
тканей
Деликатн ы е ткани
Шерсть 9 40°C
Особо дел икатные ткани и оде жда
(занавес и, шелк, вискоза и пр.)
Сушка деликатного белья
ЧАСТИЧНЫЕ ПРОГРАММЫ
Деликатное полоскание
Деликатный отжим Слив и деликатный отжим
Ñëèâ Ñëèâ
ðàììa
Температура
1 90°C
2 90° C
3 60°C
4 40° C
5 60° C
5 40°C
6 50° C
7 40° C
8 30°C
10 30°C
Моющее средс тво
предв .
стирка
Стиральная машина с сушкой, нажав кнопку
Длите-
льность
цикла,
ìèí
137
120
105
72
77
62
73
58
30
50
45
Описание цикла с тирки
Предварительная стирка, стирка при
высокой температуре, полоскание,
про межуточный и окон чате ль ны й отж им
Стирка при выс окой температуре,
полоскание, промежуточный и
окончательный отжим
Стирка при 60° C, пол ос кание,
про межуточный и окон чате ль ны й отж им
Стирка при 40° C, полоскание ,
про межуточный и окон чате ль ны й отж им
Стирка при 60°C, полоскание,
остановка с водой или деликатный
отжим
Стирка при 40°C, полоскание,
остановка с водой или деликатный
отжим
Стирка при 50°C, полоскание,
остановка с водой или деликатный
отжим
Стирка при 40°C, полоскание,
остановка с водой или деликатный
отжим
Стирка при 30°C, полоскание и
деликатный отжим
Стирка при 40°C, полоскание и
деликатный отжим
Стирка при 30°C, полоскание,
остановка с водой или слив
Пполоскание, остановка с водой
или слив
Ñìÿã-
основная
стирка
читель
.
Примечание
«Остановка с водой»: на с. 44. Данные в таблице, являются справочными и могут меняться в зависимости от конкретных
условий стирки (объем стирки, температура воды в водопроводной системе, температура в помещении и др.).
Специальная программа
Повседневная стирка 30' мин (программа 8 для Синтетических тканей) предназначена для быстрой стирки слабозагрязненного белья: цикл длится всего 30 минут, что позволяет сэкономить время и электроэнергию. Установив эту
программу (8 при температуре 30°С), Вы можете стирать различные виды тканей вместе (за исключением шерсти и
шелка) при максимальной загрузке белья 3 кг. Мы рекомендуем использовать жидкое моющее средство.
"
Page 43

Персонализация стирки
Выбор температуры
Выбор температуры стирки производится при помощи рукоятки ТЕМПЕРАТУРА (см. Таблицу программ на стр. 42).
Значение температуры может быть уменьшено вплоть до стирки в холодной воде (
).
CIS
Программирование цикла сушки
При помощи рукоятки СУШКА вы можете выбрать нужный
вам режим сушки. Машина предусматривает два режима:
) - Установите необходимое время: От 40 до 150 минут.
* - Выберите в зависимости от типа белья степень сушки:
Глажение
гладить.
Гардероб
можно убрать.
Экстра-сушка
рекомендуется для вещей, которые не нужно гладить
(например, банные халаты, полотенца).
Программа сушки завершается охлаждением.
: результат - увлажненные ткани, вещи легко
: результат - хорошо высушенные ткани, вещи
: результат - очень сухие ткани,
Таблица циклов сушки
Тип
ткани
Хлопок,
лен
Хлопок Махровые
Хлопок Простыни, рубашки 2 ,5 90 80 70
Акрил Ïèæ àìû , í îñ êè 1 65 60 6 0
Нейло н Нижние юбки , бе лье 1 6 5 60 6 0
Çàêð óçêà Макси-
Разнообразные
изделия
полотенца и т.п.
мальная
загр у зка
(kg)
4 130 120 110
4 130 120 110
Экстрасушка
Гардероб Глаж-
åíèå
В случае, если вес белья, предназначенного для стирки и сушки, превышает максимальную допустимую загрузку
(смотрите таблицу сбоку), выполните цикл стирки, и по его завершении, разделите белье на части и производите его
сушку частями. Следуйте инструкциям касательно только сушки. Выполните сушку оставшегося белья таким же образом.
Только сушка
Поверните рукоятку ПРОГРАММЫ в одно из положений сушки
в зависимости от типа белья, затем выберите
нужный вам режим сушки при помощи рукоятки СУШКА.
Важно: - Если установлена программа сушки хлопковых тканей è уровень сушки (Экстра-сушка
Гардероб
, Глажение ), то во время сушки будет включаться отжим.
- Цикл сушки шерстяных изделий следует использовать только совместно с выбором ограниченного времени
(150 - 100 - 60 - 40). Мы рекомендуем 60 минутный цикл сушки для 1 кг белья.
Если один из трех уровней выбран по ошибке (Экстра-сушка
, Гардероб , Глажение ), машина
автоматически запустит максимально продолжительный цикл сушки (150 минут).
- При загрузке менее 1 кг хлопковых тканей используйте программу сушки синтетических тканей.
ПрограммыУстановка Описание
средства
Моющие
,
безопасности
Функции
Различные функции стирки машины позволяют достичь желаемой чистоты и белизны вашего белья. Порядок
выбора функций:
1. нажать кнопку нужной функции в соответствии с приведенной ниже таблицей;
2. включение соответствующей кнопки означает, что функция активирована.
Примечание: Частое мигание кнопки означает, что данная функция не может быть активирована для заданной программы.
Функции Назначение
Отс рочка запуска
Таймер
отсрочки
Супер
стирка
Быстр ая
стирка
1000-500
программы вплоть
до 9 ч.
Поз в ол я е т получ ить
безупречно чистое
белье, заметно
более белое по
сравнению со
стандартом ласса А.
Сокращает
продолжительнос ть цикла стирки
примерно на 30%.
Сокращает
скорость отжима.
Использование Доступна с
Нажать кнопку несколько раз вплоть до включения индикатора,
соответствующего требуемого отложенного старта.
При пятом нажатии кнопки функция отключается.
ПРИМЕЧАНИЕ: После нажатия кнопки Пуск/Обнуление можно изменить
значение отложенного старта только в сторону уменьшения.
Опция не используется с функцией «БЫСТРАЯ СТИРKА».
Опция не используется с функцией «СУПЕР СТИРKА».
программами:
Со всеми
программами
1, 2, 3, 4 ,
5, 6, 7
1, 2, 3, 4 ,
5, 6, 7
Все
программы
кроме 10ой и слива.
Ìåðû
Обслуживание
è óõîä
СервисНеисправности
"!
Page 44

Моющие средства и белье
+15
Распределитель моющих средств
Хороший результат стирки зависит также от правильной дозировки моющего средства: его избыток не
гарантирует более эффективную стирку, напротив может привести к образованию налетов внутри машины и загрязнению окружающей среды.
Выдвиньте распределитель и заполните его
отделения моющим
средством и смягчите-
1
3
Отделение 1: моющее средство для предварительной стирки (порошок)
Отделение 2: моющее средство для стирки
(порошок или жидкое)
Жидкое средство для стирки заливается непосредственно перед запуском машины.
Отделение 3: Добавки (смягчители, ароматизаторы и пр.)
Не заполняйте отделение 3 для ополаскивателей
выше решетки.
2
ëåì:
Не используйте моющие средства, предназначен-
ные для ручной стирки образующаяся обильная
пена ухудшает результат стирки и может вывести
из строя стиральную машину.
Подготовка белья
Разберите белье:
- в соответствии с типом ткани / обозначения на
этикетке
- по цвету: отделите цветное белье от белого.
Выньте из карманов все предметы и проверьте
хорошо ли держатся пуговицы.
Не превышайте максимальное нормы загрузки
барабана, указанные для сухого белья:
Прочные ткани: макс. 5 кг
Синтетические ткани: макс. 2,5 кг
Деликатные ткани: макс. 2 кг
Шерсть: макс. 1 кг
Особенности стирки
отдельных изделий
Занавески: сверните и положите в наволочку или в
сетчатый мешочек. Стирайте отдельно, не превышая
половины загрузки барабана. Выберите программу
10, автоматически исключающую отжим.
Стеганные куртки и пуховики: если пуховик на утином или гусином пуху, его можно стирать в стиральной машине. Выверните куртку наизнанку, загрузите
в барабан не более 2-3 кг изделий. Повторите полоскание 1-2 раза, используйте деликатный отжим.
Парусиновые туфли: Парусиновые туфли
предварительно очистите от грязи и стирайте с
прочными тканями или джинсами, если позволяет цвет.
Не стирайте с белыми вещами.
Шерсть: Для достижения наилучших результатов
стирки загружайте не более 1 кг белья и используйте специальные жидкие средства, предназначенные для стирки шерстянных изделий.
Woolmark Platinum Care
(Платиновый кашемир
деликатность ручной стирки)
Ariston установил новый стандарт высокоэффективаной стирки, признанный Компанией Woolmark с престижной маркой Woolmark
Platinum Care. Если на вашей стиральной
машине имеется логотип Woolmark Platinum Care, в
ней можно стирать с отличным результатом шерстяные изделия на этикетке которых написано «только
ручная стирка» (M.00221).
Выберите программу 9 для всех изделий с этикеткой
«Ручная стирка»(
средства для стирки шерсти.
) и используйте специальные
Остановка с водой
Данная функция прерывает программу стирки,
оставляя белье замоченным в воде перед сливом.
Подключается в программах 5 6 7 10 и
Деликатное полоскание.
Чтобы завершить цикл, нажмите кнопку ПУСK/
СБРОС (Start/Resert).
Чтобы закончить программу сливом установите
рукоятку программатора на соответствующий
символ
Resert).
и нажмите кнопку ПУСK/СБРОС (Start/
Вес белья
1 простыня 400 500 г
1 наволочка 150 -200 г
1 скатерть 400 500 г
1 халат 900 1,200 г
1 полотенце 150 -250 г
""
Page 45

Предупреждения и
рекомендации
Стиральная машина с сушкой спроектирована и
изготовлена в соответствии с международными
нормами безопасности. Внимательно прочитайте
настоящие предупреждения, составленные в целях
вашей безопасности.
Общие правила безопасности
Для домашнего использования. Данное изделие является
бытовым электроприбором, не предназначенным для
профессионального использования. Запрещается
модифицировать его функции.
Стиральная машина должна использоваться
только взрослыми лицами, соблюдающими
инструкции, приведенные в данном руководстве.
Не касайтесь работающей машины, если ваши
руки или ноги сырые; не пользуйтесь
оборудованием босиком.
Не тяните за питающий кабель, чтобы вынуть вилку
из розетки: беритесь за вилку.
Не открывайте распределитель моющих средств
во время работы машины.
Не касайтесь сливаемой воды, ее температура
может быть очень высокой.
При остановке машины разблокировка замка
дверцы срабатывает с трехминутной задержкой.
Не пытайтесь открыть дверцу в этом промежутке
времени (а тем более во время работы оборудования!): это может повредить механизм блокировки.
В случае неисправности при любых обстоятель-
ствах не касайтесь внутренних частей машины,
пытаясь починить ее.
Следите, чтобы дети не приближались к
работающей стиральной машине.
В процессе стирки дверца стиральной машины
может нагреваться.
Если необходимо переместить стиральную маши-
ну, выполняйте эту операцию вдвоем или втроем
с предельной осторожностью. Никогда не
пытайтесь поднять машину в одиночку
оборудование чрезвычайно тяжелое.
Перед помещением в стиральную машину белья
убедитесь, чтобы барабан был пуст.
Сушить можно тольк белье, выстиранное в воде.
Не сушите белье, которое было обработано
воспламеняющимися растворителями
(например, трихлорэтилен).
Не сушите изделия, имеющие отделку из
вспененной резины и аналогичных эластомеров.
Убедитесь, что в машину поступает вода,
которая необходима для конденсации влаги по
время сушки.
Утилизация
Уничтожение упаковочного материала: соблю-
дайте действующие требования по утилизации
упаковочных материалов.
Утилизация старой Стиральная машина с
сушкой: перед сдачей машины в утиль обрежьте
питающий кабель и снимите дверцу.
Экономия энергии и охрана
окружающей среды
Экологичная технология
С новой технологией Ariston вы затратите воды в
два раза меньше, а эффект от стирки будет в два
раза выше! Вот почему вы не можете видеть воду
через дверцу: ее очень мало. Это забота об окружающей среде без отказа от максимальной чистоты.
И вдобавок ко всему, вы экономите электричество.
Экономия моющих средств, воды, электроэнергии и времени
Для экономии ресурсов следует максимально заг-
ружать стиральную машину. Один цикл стирки при
полной загрузке вместо двух циклов с наполовину
загруженным барабаном позволяет сэкономить до
50% электроэнергии.
Цикл предварительной стирки необходим только
для очень грязного белья. При цикле
предварительной стирки расходуется больше
стирального порошка, времени, воды и на 5 15%
больше электроэнергии.
Если вы обработаете пятна пятновыводителем или
замочите белье перед стиркой, это поможет избежать стирки при высоких температурах. Использование программы стирки при 60°C вместо 90°C,
или 40°C вместо 60°C позволяет сэкономить до
50% электроэнергии.
Правильная дозировка стирального порошка в за-
висимости от жесткости воды, степени
загрязнения и объема загружаемого белья
помогает избежать нерационального расхода
моющего средства и загрязнения окружающей
среды: хотя стиральные порошки и являются биоразлагаемыми, они содержат вещества, отрицательно влияющие на экологию. Кроме того, по возможности избегайте использовать ополаскиватели.
Использование стиральной машины утром или
вечером уменьшит пиковую нагрузку на электросеть. С помощью функции «Таймер»(ñì. ñ. 43)
можно запрограммировать начало стирки с вышеуказанной целью.
Если белье должно сушиться в автоматической
сушке, необходимо выбрать большую скорость
отжима. Интенсивный отжим сэкономит время и
электроэнергию при автоматической сушке.
CIS
ПрограммыУстановка Описание
средства
Моющие
безопасности
Ìåðû
Обслуживание
è óõîä
СервисНеисправности
"#
Page 46

Обслуживание и уход
+15
Отключение воды и электричества
Перекрывайте водопроводный кран после каж-
дой стирки. Таким образом сокращается износ
водопроводной системы Стиральная машина с
сушкой и устраняется вероятность протечек.
Всегда вынимайте вилку из розетки перед мой-
кой и обслуживанием машины.
Уход за Стиральная машина с
сушкой
Внешние и резиновые части машины очищайте
мягкой тканью с теплой мыльной водой. Не используйте растворители или абразивные чистящие
средства.
Уход за распределителем моющих
средств
1
Периодически промывайте распределитель
моющих средств
Выньте распределитель, приподняв и потянув его на себя (ñì.
ðèñ.), и промойте под
струей воды.
2
Чистка насоса
Стиральная машина с сушкой имеет сливной
насос самоочищающегося типа, который не
требует очистки или особого обслуживания.
Однако мелкие предметы (монеты, пуговицы и др.)
могут случайно попасть в насос. Для их
извлечения насос оборудован «уловителем»
фильтром, доступ к которому закрыт нижней
передней панелью.
Убедитесь, что цикл стирки закончился, и отклю-
чите оборудование от сети.
Для доступа к «уловителю»:
1. снимите переднюю
панель Стиральная
машина с сушкой при
помощи отвертки (ñì.
ðèñ.);
2. выверните крышку
фильтра, вращая ее
против часовой стрелки (ñì. ðèñ.): из насоса
может вылиться немного воды это нормальное явление.
Уход за дверцей машины
и барабаном
После каждой стирки оставляйте дверцу маши-
ны полуоткрытой во избежание образования в
барабане неприятных запахов и плесени.
"$
3. тщательно прочистите фильтр изнутри;
4. заверните крышку обратно;
5. установите на место переднюю панель, пред-
варительно убедившись, что крюки вошли в
соответствующие петли.
Проверка заливного шланга
Проверяйте шланг не реже одного раза в год. При
любых признаках течи или повреждения немедленно замените шланг. Во время работы машины
неисправный шланг, находящийся под давлением воды, может внезапно лопнуть.
Никогда не используйте шланги, бывшие в упот-
реблении.
Page 47

Неисправности
и методы их устранения
В случае неудовлетворительных результатов стирки или возникновения неисправностей, прежде чем обратиться в Авторизованный Сервисный центр (ñì. ñ. 48), прочитайте этот раздел. В большинстве случаев Вы
можете решить возникшие проблемы сами.
Обнаруженная
неисправность:
Стиральная машина с сушкой
не включается.
Цикл стирки не запускается.
Стиральная машина с сушкой не
заливает воду.
Стиральная машина с сушкой
непрерывно заливает и сливает
воду.
Стиральная машина с сушкой не
производит слив и отжим.
Сильная вибрация при отжиме.
Протечки воды из стиральной
машины.
Индикатор ВКЛЮЧЕНИЕ/ЛЮК
ЗАБЛОКИРОВАН часто мигает
одновременно
с любым другим индикатором.
Избыточное пенообразование.
Машина не производит сушку.
Возможные причины / Методы устранения:
Вилка не вставлена в розетку или вставлена плохо, не обеспечивая контакта.
В доме отключено электричество.
Дверца машины плохо закрыта.
Не была нажата кнопка
Не была нажата кнопка ПУСК/СБРОС (Start/Reset).
Закрыт кран подачи воды.
Была запрограммирована отсрочка запуска программы (об использо-
вании таймера ñì. íà ñ. 43).
Заливной шланг не подсоединен к крану.
Шланг пережат.
Закрыт кран подачи воды.
В доме нет воды.
Недостаточное водопроводное давление.
Не была нажата кнопка ПУСК/СБРОС (Start/Reset).
Сливной шланг расположен ниже 65 или выше 100 см. от пола (ñì. ñ. 39).
Конец сливного шланга погружен в воду (ñì. ñ. 39).
Настенный слив не имеет сливной трубы.
Если сливной шланг встроен в к анализацию, имейте ввиду, что на верхних
этажах может создаваться «сифонный эффект» машина одновременно
сливает и заливает воду. Для предотвращения подобного эффекта устанавливается специальный клапан (антисифон).
Выбранная программа не предусматривает слив воды для некоторых
программ необходимо включить слив вручную (ñì ñ. 42).
Активизирована дополнительная функция Легкая глажка: для заверше-
ния программы нажмите кнопку ПУСК/СБРОС (Start/Reset) (ñì. ñ. 43).
Сливной шланг пережат (ñì. ñ. 39 ) или засорен.
Засор в канализации.
При установке стиральной машины барабан был разблокирован непра-
вильно (ñì. ñ. 38 ).
Стиральная машина с сушкой плохо выровнена (ñì. ñ. 38).
Зазор между машиной и стеной/мебелью недостаточен (ñì. ñ. 3 8).
Плохо закреплен заливной шланг (гайка на конце шланга неплотно
затянута и неправильно установлена прокладка (ñì. ñ. 38).
Распределитель моющих средств забит остатками моющих средств
(о чистке распределителя ñì. ñ. 46).
Плохо закреплен сливной шланг (ñì. ñ. 39).
Обратитесь в Авторизованный Сервисный Центр, так как это означает
неисправность.
Используется моющее средство, неподходящее для автоматических
стиральных машин с фронтальной загрузкой.
Передозировка моющего средства.
Вилка не вставлена в розетку или вставлена плохо, не обеспечивая контакта.
В доме отключено электричество.
Дверца машины плохо закрыта.
Была запрограммирована отсрочка запуска программы (об использо-
вании таймера ñì. íà ñ. 43).
рукоятка СУШКА находится в положении 0.
.
CIS
ПрограммыУстановка Описание
средства
Моющие
безопасности
Ìåðû
Обслуживание
è óõîä
СервисНеисправности
Если после проверки машина продолжает работать не должным образом,
обратитесь в Авторизованный Сервисный центр за помощью. (см. с. 48)
"%
Page 48

+15
Сервисное
обслуживание
Перед тем как обратиться в Авторизованный Сервисный центр:
Убедитесь, что вы не можете устранить неисправность самостоятельно (ñì. ñ. 47).
Запустите программу повторно для проверки исправности машины.
В противном случае обратитесь в Авторизованный Сервисный центр по телефону, указанному в
гарантийном документе.
Не пользуйтесь услугами лиц, не уполномоченных Производителем.
При ремонте требуйте использования оригинальных запасных частей.
При обращении в Авторизованный Сервисный центр сообщите:
тип неисправности;
номер гарантийного документа (сервисной книжки, сервисного сертификата и т.п.);
модель машины (Мод.) и серийный номер (S/N), указанные в информационной табличке, распо-
ложенной на задней панели стиральной машины.
195042862.00
01/2004 - Xerox Business Services
Сервис
"&
 Loading...