

Page 1

Instructions for use
WASHING MACHINE
GB
English,1
RO
Română,37
WMSG 622
I
Italiano,13
CZ
Česky,49
PL
Polski,25
SK
Slovensky,61
Contents
Installation, 2-3
Unpacking and levelling
Connecting the electricity and water supplies
The first wash cycle
Technical data
Description of the washing machine, 4-5
Control panel
Display
Running a wash cycle, 6
Wash cycles and options, 7
Table of programmes and wash cycles
Wash options
Detergents and laundry, 8
Detergent dispenser drawer
Preparing the laundry
Special wash cycles
Precautions and advice, 9
General safety
Disposal
Opening the porthole door manually
GB
Care and maintenance, 10
Cutting off the water and electricity supplies
Cleaning the washing machine
Cleaning the detergent dispenser drawer
Caring for the door and drum of your appliance
Cleaning the pump
Checking the water inlet hose
Troubleshooting, 11
Service, 12
1
Page 2

Installation
GB
! This instruction manual should be kept in a safe place for
future reference. If the washing machine is sold, transferred
or moved, make sure that the instruction manual remains
with the machine so that the new owner is able to
familiarise himself/herself with its operation and features.
! Read these instructions carefully: they contain vital
information relating to the safe installation and operation of
the appliance.
Unpacking and levelling
Unpacking
1. Remove the washing machine from its packaging.
2. Make sure that the washing machine has not been
damaged during the transportation process. If it has been
damaged, contact the retailer and do not proceed any
further with the installation process.
3. Remove the 4 protective
screws (used during
transportation) and the
rubber washer with the
corresponding spacer,
located on the rear part of
the appliance (see figure).
Levelling the machine correctly will provide it with stability,
help to avoid vibrations and excessive noise and prevent it
from shifting while it is operating. If it is placed on carpet or
a rug, adjust the feet in such a way as to allow a sufficient
ventilation space underneath the washing machine.
Connecting the electricity and water
supplies
Connecting the water inlet hose
1. Connect the inlet hose
by screwing it to a cold
water tap using a 3/4 gas
threaded connection (see
figure).
Before performing the
connection, allow the
water to run freely until it is
perfectly clear.
2. Connect the inlet hose
to the washing machine
by screwing it onto the
corresponding water inlet
of the appliance, which is
situated on the top righthand side of the rear part of
the appliance (see figure).
4. Close off the holes using the plastic plugs provided.
5. Keep all the parts in a safe place: you will need them
again if the washing machine needs to be moved to
another location.
! Packaging materials should not be used as toys for
children.
Levelling
1. Install the washing machine on a flat sturdy floor, without
resting it up against walls, furniture cabinets or anything
else.
2. If the floor is not perfectly
level, compensate for any
unevenness by tightening or
loosening the adjustable front
feet (see figure); the angle
of inclination, measured in
relation to the worktop, must
not exceed 2°.
3. Make sure that the hose is not folded over or bent.
! The water pressure at the tap must fall within the range
of values indicated in the Technical data table (see next
page).
! If the inlet hose is not long enough, contact a specialised
shop or an authorised technician.
! Never use second-hand hoses.
! Use the ones supplied with the machine.
2
Page 3
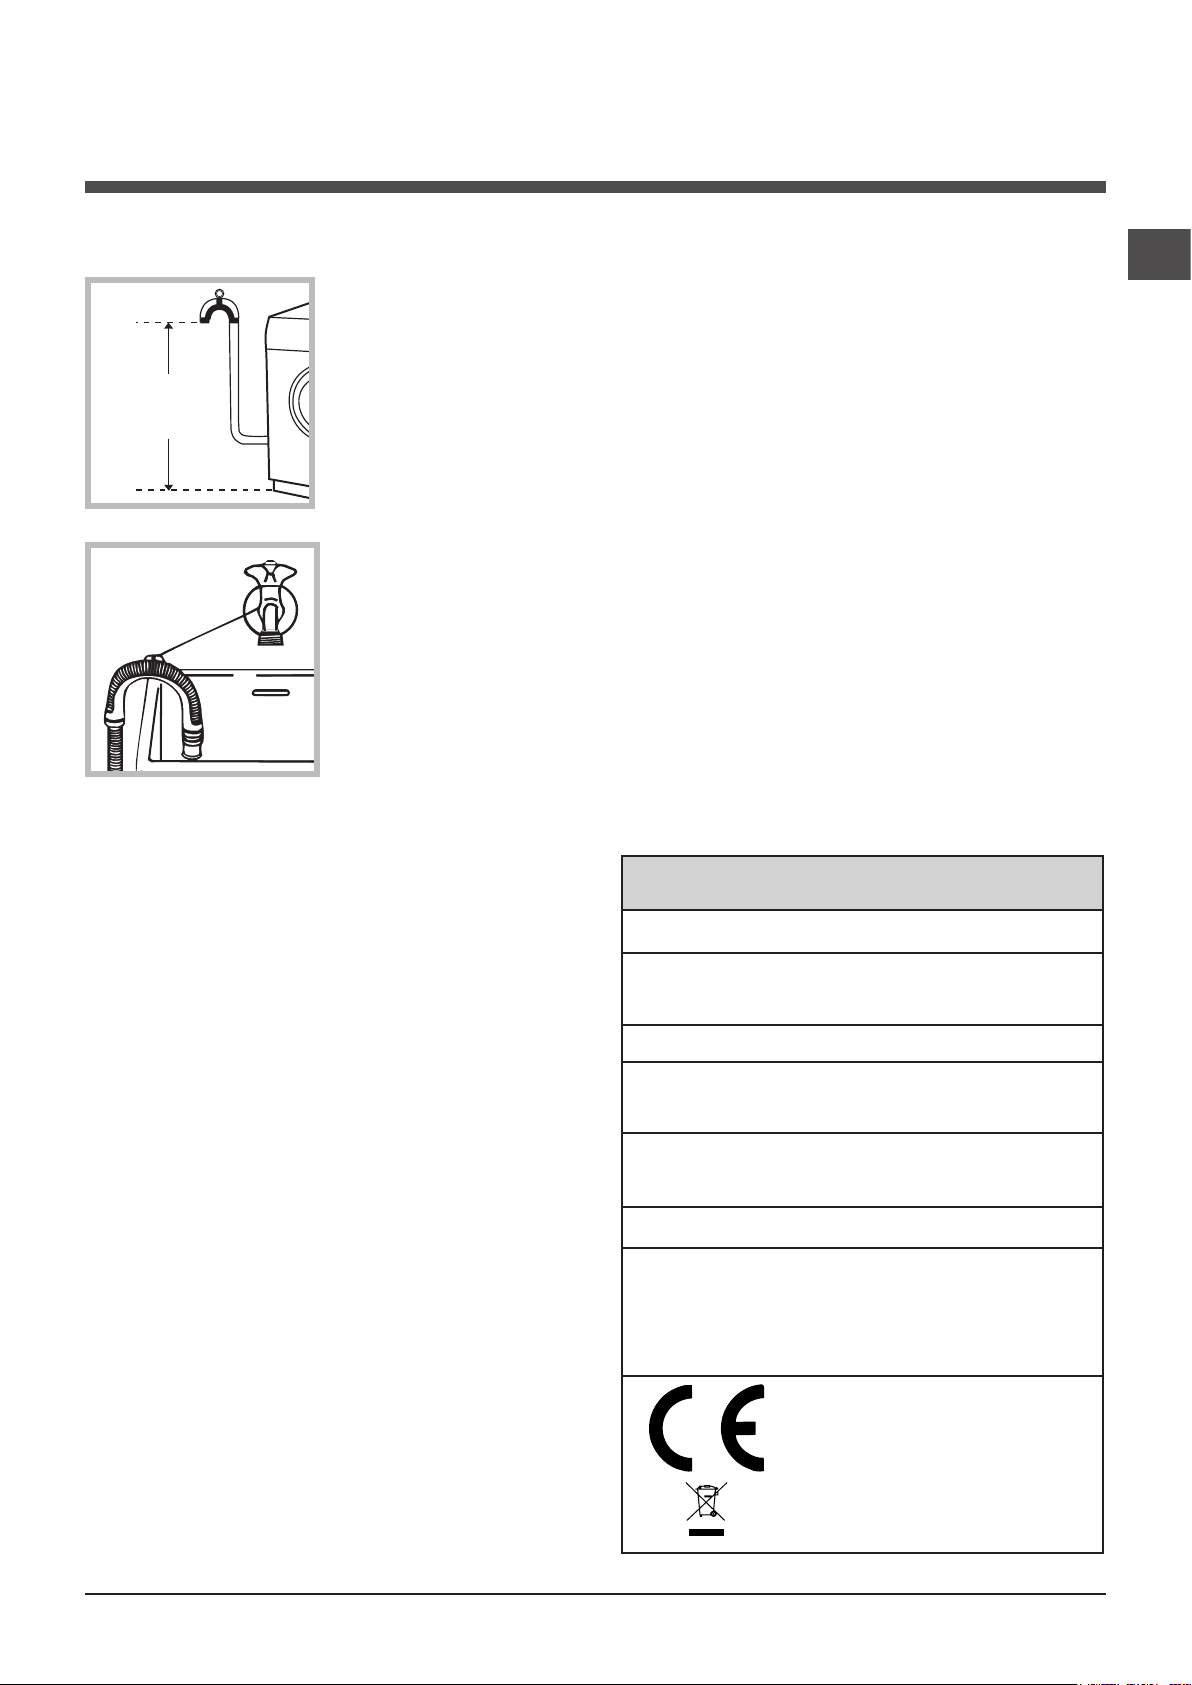
Connecting the drain hose
65 - 100 cm
Connect the drain hose,
without bending it, to a
drain duct or a wall drain
situated between 65 and
100 cm from the floor;
alternatively, placed it over
the edge of a basin, sink
or tub, fastening the duct
supplied to the tap (see
figure). The free end of
the hose should not be
underwater.
! We advise against the use of hose extensions; if it is
absolutely necessary, the extension must have the same
diameter as the original hose and must not exceed 150 cm
in length.
! The cable should not be bent or compressed.
! The power supply cable must only be replaced by
authorised technicians.
Warning! The company shall not be held responsible in the
event that these standards are not observed.
The first wash cycle
Once the appliance has been installed, and before you use
it for the first time, run a wash cycle with detergent and no
laundry, using wash cycle number 2.
Technical data
GB
Electrical connections
Before plugging the appliance into the electricity socket,
make sure that:
• thesocketisearthedandcomplieswithallapplicable
laws;
• thesocketisabletowithstandthemaximumpower
load of the appliance as indicated in the Technical data
table (see opposite);
• thepowersupplyvoltagefallswithinthevalues
indicated in the Technical data table (see opposite);
• thesocketiscompatiblewiththeplugofthewashing
machine. If this is not the case, replace the socket or the
plug.
! The washing machine must not be installed outdoors,
even in covered areas. It is extremely dangerous to leave
the appliance exposed to rain, storms and other weather
conditions.
! When the washing machine has been installed, the
electricity socket must remain within easy reach.
Model
Dimensions
Capacity
Electrical
connections
Water connections
Spin speed
Test wash cycles
in accordance
with directives
1061/2010 and
1015/2010
WMSG 662
width 59.5 cm
height 85 cm
depth 43,5 cm
from 1 to 6 kg
please refer to the technical data plate
fixed to the machine
maximum pressure 1 MPa (10 bar)
minimum pressure 0.05 MPa (0.5 bar)
drum capacity 48 litres
up to 1200 rotations per minute
programme 4; temperature 60°C;
programme 5; temperature 40°C.
This appliance conforms to the following
EC Directives:
- 2004/108/EC (Electromagnetic Compatibility)
- 2006/95/EC (Low Voltage)
- 2002/96/EC
! Do not use extension cords or multiple sockets.
3
Page 4

Description of the washing
machine
GB
Control panel
Detergent dispenser drawer
ON/OFF
button
SELECTOR
TEMPERATURE
button
WASH
CYCLE
KNOB
DISPLAY
SPIN
button
OPTION
button s and
indicator lights
CHILD
LOCK
button
DELAY
TIMER
button
CLEANING
ACTION
button
START/PAUSE
button and indicator
light
Detergent dispenser drawer: used to dispense
detergents and washing additives (see “Detergents and
laundry”).
ON/OFF button: press this briefly to switch the
machine on or off. The START/PAUSE indicator light which
flashes slowly in a green colour shows that the machine is
switched on. To switch off the washing machine during the
wash cycle, press and hold the button for approximately 3
seconds; if the button is pressed briefly or accidentally the
machine will not switch off.
If the machine is switched off during a wash cycle, this
wash cycle will be cancelled.
WASH CYCLE SELECTOR KNOB: used to set the
desired wash cycle (see “Table of programmes and wash
cycles”).
OPTION buttons and indicator lights: press to select the
available options. The indicator light corresponding to the
selected option will remain lit.
CLEANING ACTION
wash intensity.
TEMPERATURE button: press to reduce or
completely exclude the temperature; the value appears on
the display.
SPIN button: press to reduce or completely exclude
the spin cycle; the value appears on the display.
button : to select the desired
DELAYED START button: press to set a delayed start
for the selected wash cycle; the delay period appears on
the display.
START/PAUSE button and indicator light: when the green
indicator light flashes slowly, press the button to start a
wash cycle. Once the cycle has begun the indicator light
will remain lit in a fixed manner. To pause the wash cycle,
press the button again; the indicator light will flash in an
amber colour. If the symbol is not illuminated, the door
may be opened. To start the wash cycle from the point at
which it was interrupted, press the button again.
CHILD LOCK button : to activate the control panel
lock, press and hold the button for approximately 2
seconds. When the symbol is illuminated, the control
panel is locked. This means it is possible to prevent wash
cycles from being modified accidentally, especially where
there are children in the home. To deactivate the control
panel lock, press and hold the button for approximately 2
seconds.
Standby mode
This washing machine, in compliance with new energy
saving regulations, is fitted with an automatic standby
system which is enabled after about 30 minutes if no
activity is detected. Press the ON-OFF button briefly and
wait for the machine to start up again.
Consumption in off-mode: 1 W
Consumption in Left-on: 1 W
4
Page 5
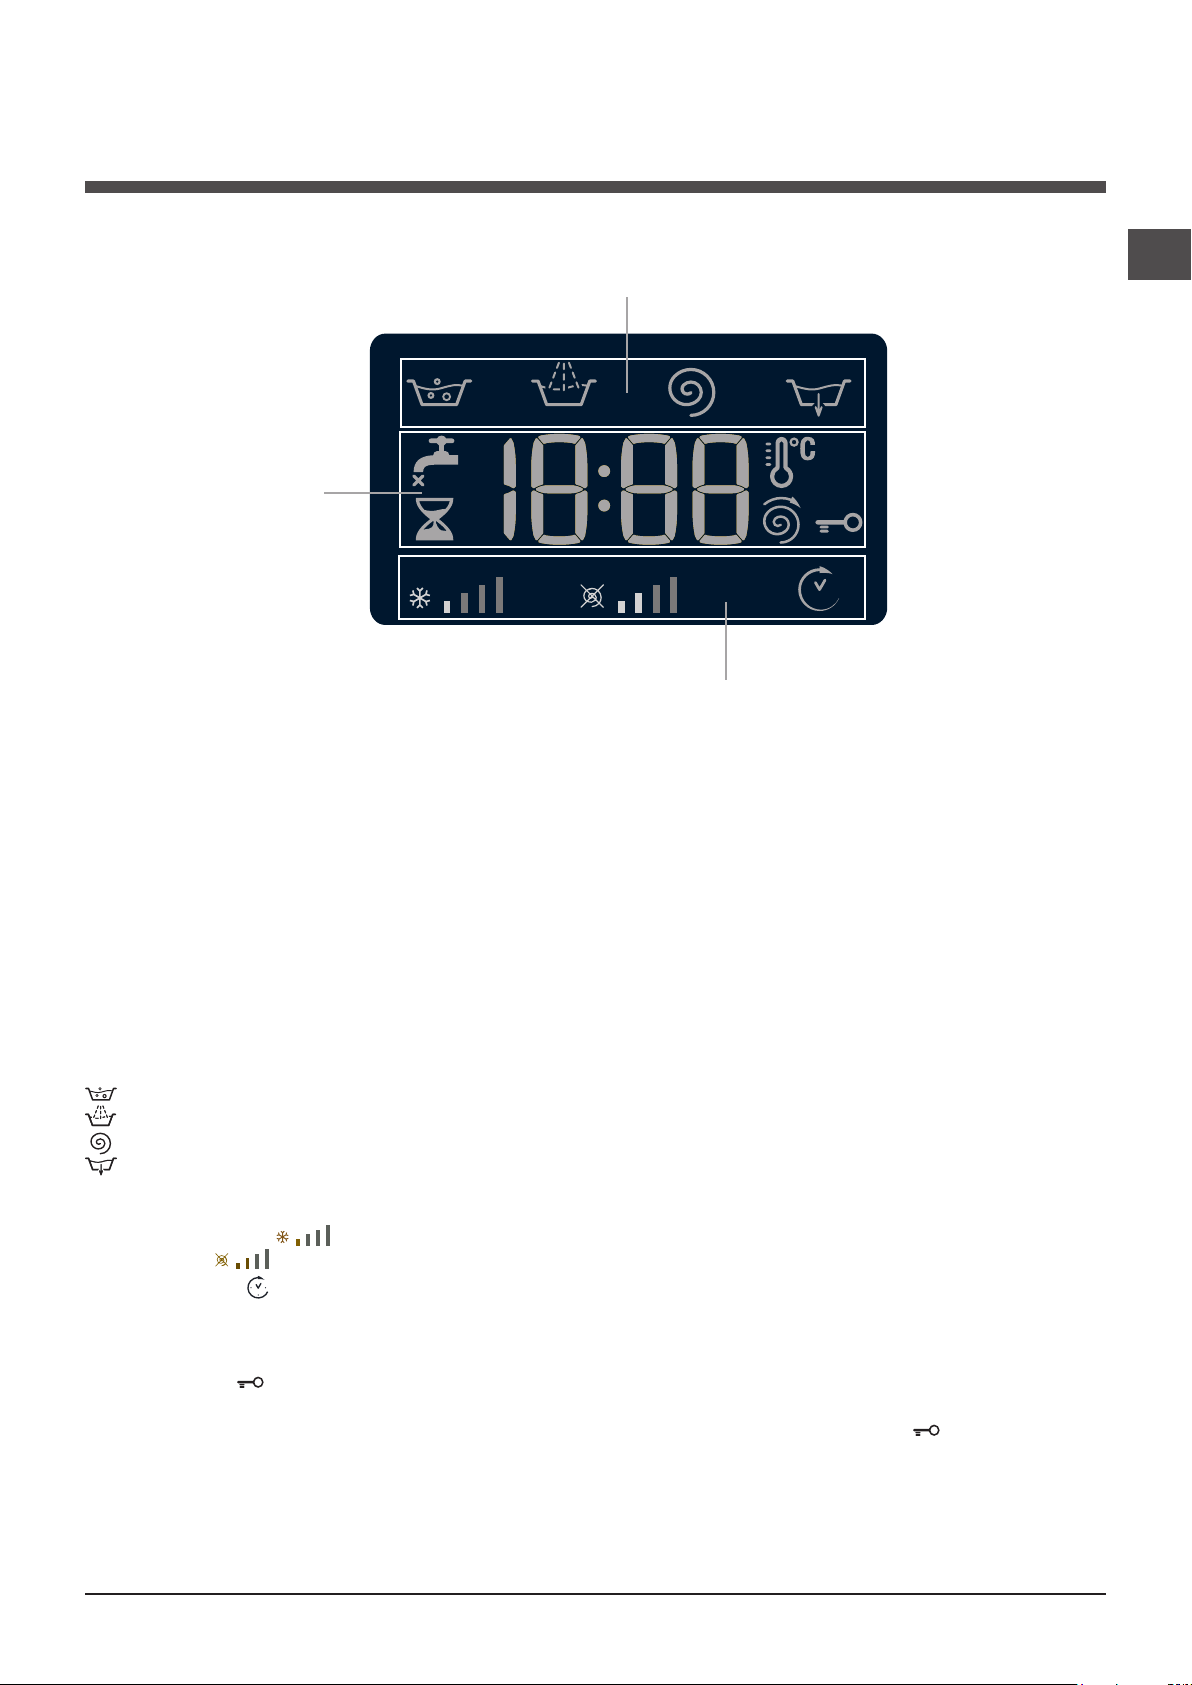
Display
GB
B
A
C
The display is useful when programming the machine and provides a great deal of information.
The duration of the available wash cycles and the remaining time of a running cycle appear in section A; if the DELAYED
START option has been set, the countdown to the start of the selected wash cycle will appear.
Pressing the corresponding button allows you to view the maximum spin speed and temperature values attained by the
machine during the set wash cycle, or the values selected most recently, if these are compatible with the set wash cycle.
The “wash cycle phases” corresponding to the selected wash cycle and the “wash cycle phase” of the running wash cycle
appear in section B:
Main wash
Rinse
Spin
Pump out
The icons corresponding to “temperature”, “spin” and “delayed start” (working from the left) are displayed in section C.
The “temperature” bars indicate the maximum temperature level which may be selected for the set cycle.
The “spin” bars indicate the maximum spin level which may be selected for the set cycle.
The “delay” symbol , when lit, indicates that the set “delayed start” value has appeared on the display.
DOOR LOCKED indicator light:
The lit symbol indicates that the door is locked. To prevent any damage, wait until the symbol turns off before opening the door.
To open the door while a cycle is in progress, press the START/PAUSE button; if the DOOR LOCKED symbol is switched
off the door may be opened.
5
Page 6
Running a wash cycle
GB
1. SWITCH THE MACHINE ON. Press the button;
the START/PAUSE indicator light will flash slowly in a
green colour.
2. LOAD THE LAUNDRY. Open the porthole door.
Load the laundry, making sure you do not exceed
the maximum load value indicated in the table of
programmes and wash cycles on the following page.
3. MEASURE OUT THE DETERGENT. Pull out the
detergent dispenser drawer and pour the detergent into
the relevant compartments as described in “Detergents
and laundry”.
4. CLOSE THE DOOR.
5. SELECT THE WASH CYCLE. Use the WASH CYCLE
SELECTOR knob to select the desired wash cycle. A
temperature and spin speed is set for each wash cycle;
these values may be adjusted. The duration of the cycle
will appear on the display.
6. CUSTOMISE THE WASH CYCLE. Use the relevant
buttons:
Modify the temperature and/or spin
speed. The machine automatically displays the
maximum temperature and spin speed values set for
the selected cycle, or the most recently-used settings
if they are compatible with the selected cycle. The
temperature can be decreased by pressing the
button, until the cold wash “OFF” setting is reached.
The spin speed may be progressively reduced by
pressing the button, until it is completely excluded
(the “OFF” setting). If these buttons are pressed again,
the maximum values are restored.
! Exception: if the 4 programme is selected, the
temperature can be increased up to a value of 90°C
Setting a delayed start.
To set a delayed start for the selected cycle, press the
corresponding button repeatedly until the required delay
period has been reached. When this option has been
activated, the symbol lights up on the display. To
remove the delayed start setting, press the button until
the text “OFF” appears on the display.
Set the desired wash intensity.
Option makes it possible to optimise washing based
on the level of soil in the fabrics and on desired wash
cycle intensity.
Select the wash programme: the cycle will be
automatically set to “Normal” as optimised for garments
with an average level of soil (this setting is not applicable
to the “Wool” cycle, which is automatically set to
“Delicate”).
For heavily-soiled garments press button until
the “Intensive” level is reached. This level ensures
a high-performance wash due to a larger quantity of
water used in the initial phase of the cycle and due to
increased drum rotation. It is useful when removing the
most stubborn stains.
It can be used with or without bleach. If you desire
bleaching, insert the extra tray compartment (4) into
compartment 1. When pouring in the bleach, be careful
not to exceed the “max” level marked on the central
pivot (see figure pag. 8).
For lightly-soiled garments or a more delicate treatment
of the fabrics, press button until the “Delicate”
level is reached. The cycle will reduce drum rotation
to ensure washing results that are perfect for delicate
garments.
Modify the cycle settings.
• Pressthebuttontoenabletheoption;theindicator
light corresponding to the button will switch on.
• Pressthebuttonagaintodisabletheoption;the
indicator light will switch off.
! If the selected option is not compatible with the set
wash cycle, the indicator light will flash and the option
will not be activated.
! If the selected option is not compatible with a previously
selected one, the indicator light corresponding to the first
function selected will flash and only the second option will
be activated; the indicator light for the option which has
been activated will be illuminated.
! The options may affect the recommended load value
and/or the duration of the cycle.
7. START THE WASH CYCLE. Press the START/
PAUSE button. The corresponding indicator light will
turn green, remaining lit in a fixed manner, and the door
will be locked (the DOOR LOCKED symbol will
be lit). To change a wash cycle while it is in progress,
pause the washing machine using the START/PAUSE
button (the START/PAUSE indicator light will flash
slowly in an amber colour); then select the desired cycle
and press the START/PAUSE button again.
To open the door while a cycle is in progress, press
the START/PAUSE button; if the DOOR LOCKED
symbol is switched off the door may be opened. Press
the START/PAUSE button again to restart the wash
cycle from the point at which it was interrupted.
8. THE END OF THE WASH CYCLE. This will be
indicated by the text “END” on the display; when the
DOOR LOCKED symbol switches off the door may
be opened. Open the door, unload the laundry and
switch off the machine.
! If you wish to cancel a cycle which has already begun,
press and hold the button. The cycle will be stopped
and the machine will switch off.
6
Page 7

Wash cycles and options
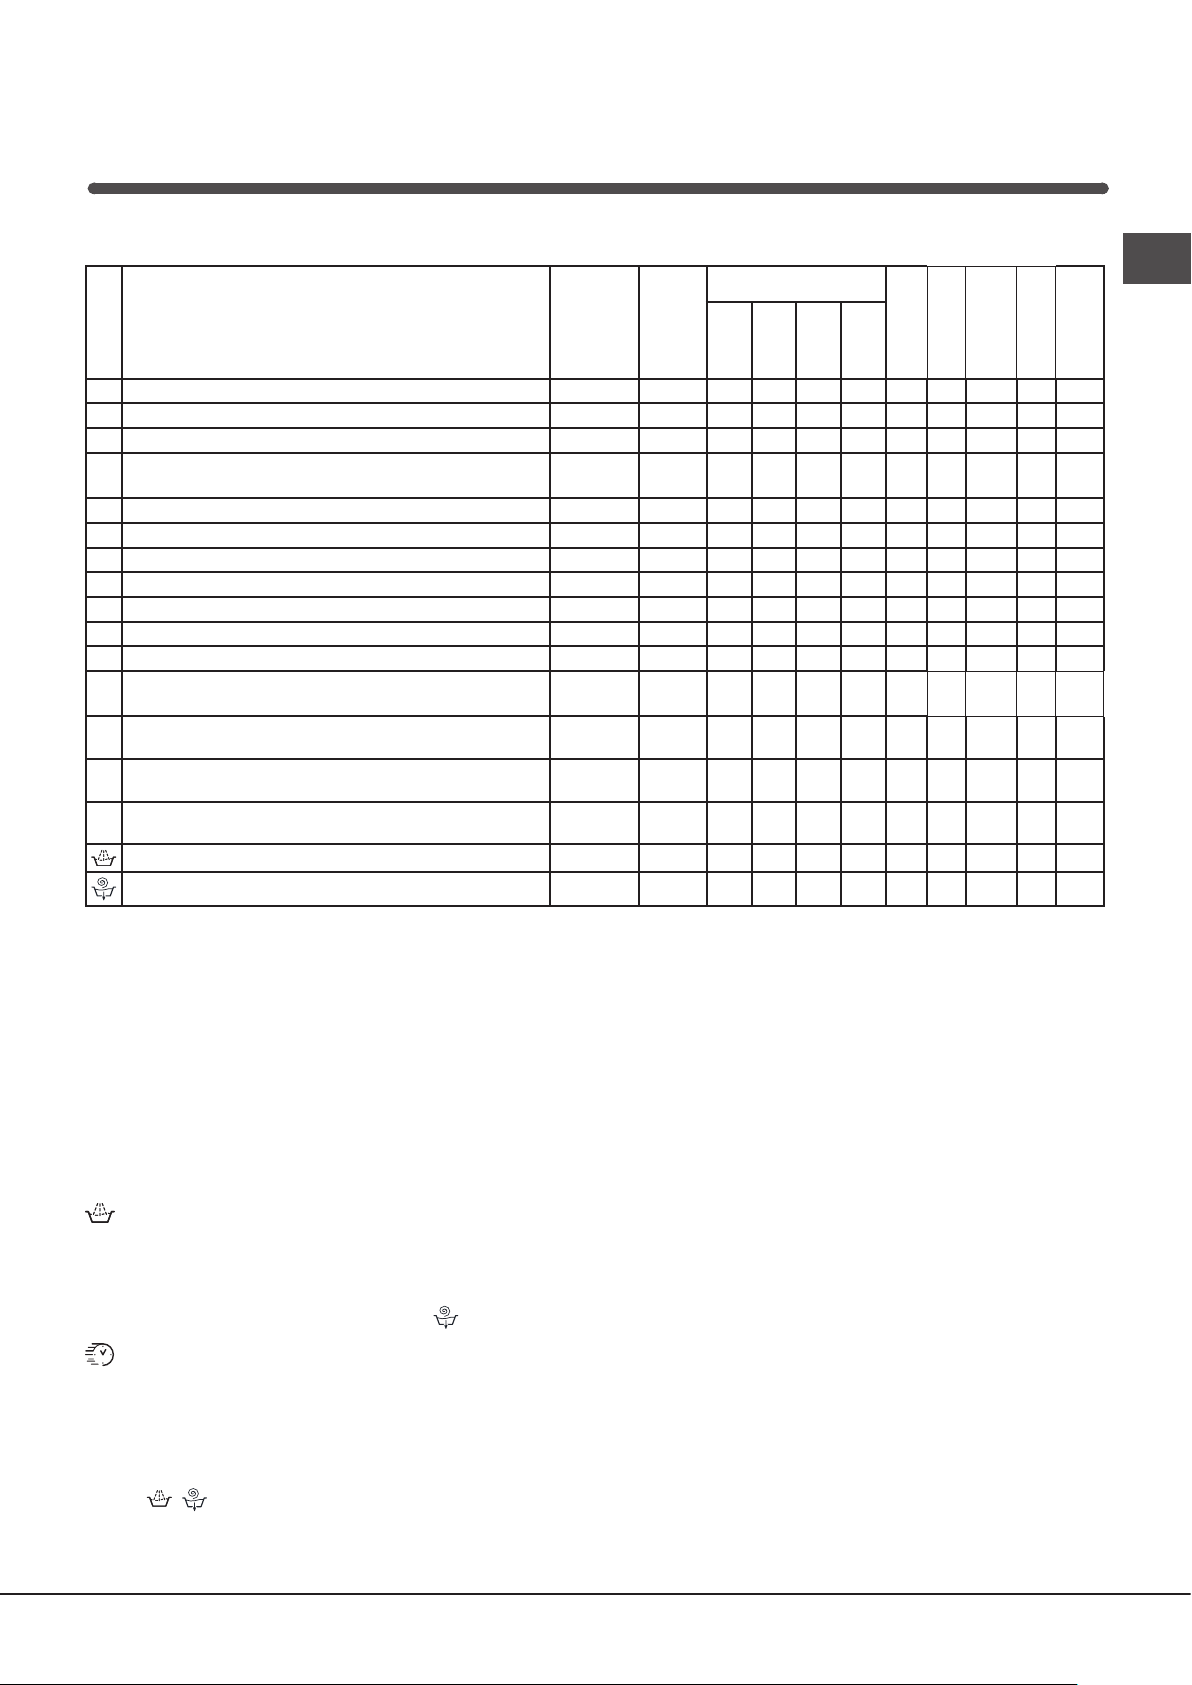
Table of programmes and wash cycles
Detergents
Description of the wash cycle
Wash cycles
Anti Stain
1
Whites
2
Cotton + Prewash: extremely soiled whites.
3
Cotton (1): heavily soiled whites and resistant colours.
4
Cotton (2-3): lightly soiled resistant colours.
5
Synthetics: heavily soiled resistant colours.
6
Synthetics (4): heavily soiled resistant colours.
6
Anti allergy
7
Baby
8
Wool: for wool, cashmere, etc.
9
Delicates
10
Fast Wash 60’: to refresh normal soiled garments quickly (not suitable
11
for wool, silk and clothes which require washing by hand).
Cottons
12
Synthetics
13
Fast 30’
14
Rinse
Spin and Pump out
The length of cycle shown on the display or in this booklet is an estimation only and is calculated assuming standard working conditions. The actual duration can vary according to factors such as water temperature and pressure, the amount of detergent used, the amount and type of load inserted, load balancing and any wash options selected.
For all Test Institutes:
1) Test wash cycle in compliance with directive 1061/2010: set wash cycle 4 with a temperature of 60°C.
This cycle is designed for cotton loads with a normal soil level and is the most efficient in terms of both electricity and water consumption; it should be used for garments which can be
washed at 60°C. The actual washing temperature may differ from the indicated value.
2) Test wash cycle in compliance with directive 1061/2010: set wash cycle 5 with a temperature of 40°C.
This cycle is designed for cotton loads with a normal soil level and is the most efficient in terms of both electricity and water consumption; it should be used for garments which can be
washed at 40°C. The actual washing temperature may differ from the indicated value.
3) Long wash cycle for cottons: set wash cycle 5 with a temperature of 40°C.
4) Long wash cycle for synthetics: set wash cycle 6 with a temperature of 40°C.
Max.
temp. (°C)
40° 1200
60° 1200
90° 1200
60°
(Max. 90°)
40° 1200
60° 800
40° 800
60° 1200
40° 1000
40° 800
30° 0
60° 1200
Cold
Water
Cold
Water
Cold
Water
Max.
speed
(rpm)
1200
1200
800
800
- 1200
- 1200
Wash
Prewash
-
-
-
-
-
-
-
-
-
-
-
-
-
-
- - -
- - - -
Bleach
-
-
-
-
-
-
-
-
-
(kg)
Residual
Max. load
Fabric
softener
4 - - - 180’
4 - - - 190’
6 53 2,21 93 180’
Energy con-
dampness %
6 53 0,92 54 160’
6 53 0,86 63 150’
2,5 44 0,87 42 90’
2,5 44 0,56 42 80’
4 - - - 200’
4 - - - 165’
1,5 - - - 80’
1 - - - 75’
3,5 53 0,81 36 60’
3 53 0,15 58 95’
3 49 0,08 51 70’
3 71 0,05 57 30’
6 - - - 49’
6 - - - 16’
Cycle dura-
Total water lt
sumption kWh
GB
tion
Wash options
Extra Rinse
By selecting this option, the efficiency of the rinse is
increased and optimal detergent removal is guaranteed. It
is particularly useful for sensitive skin.
! It cannot be used in conjunction with wash cycles 7, 10,
14, .
Timer Saver
If you select this option, the wash cycle duration will be
reduced by up to 50%, depending on the selected cycle,
thereby guaranteeing simultaneous water and energy
saving. Use this cycle for lightly soiled garments.
! It cannot be used in conjunction with wash cycles 1, 2, 7,
8, 9, 10, 11, 12, 13, 14, , .
7
Page 8

Detergents and laundry
M
AX
1
2
4
3
A
B
GB
Detergent dispenser drawer
Successful washing results also depend on the correct
dose of detergent: adding too much detergent will not
necessarily result in a more efficient wash, and may in
fact cause build up on the inside of your appliance and
contribute to environmental pollution.
! Use powder detergent for white cotton garments, for
pre-washing, and for washing at temperatures over 60°C.
! Follow the instructions given on the detergent packaging.
! Do not use hand washing detergents because these
create too much foam.
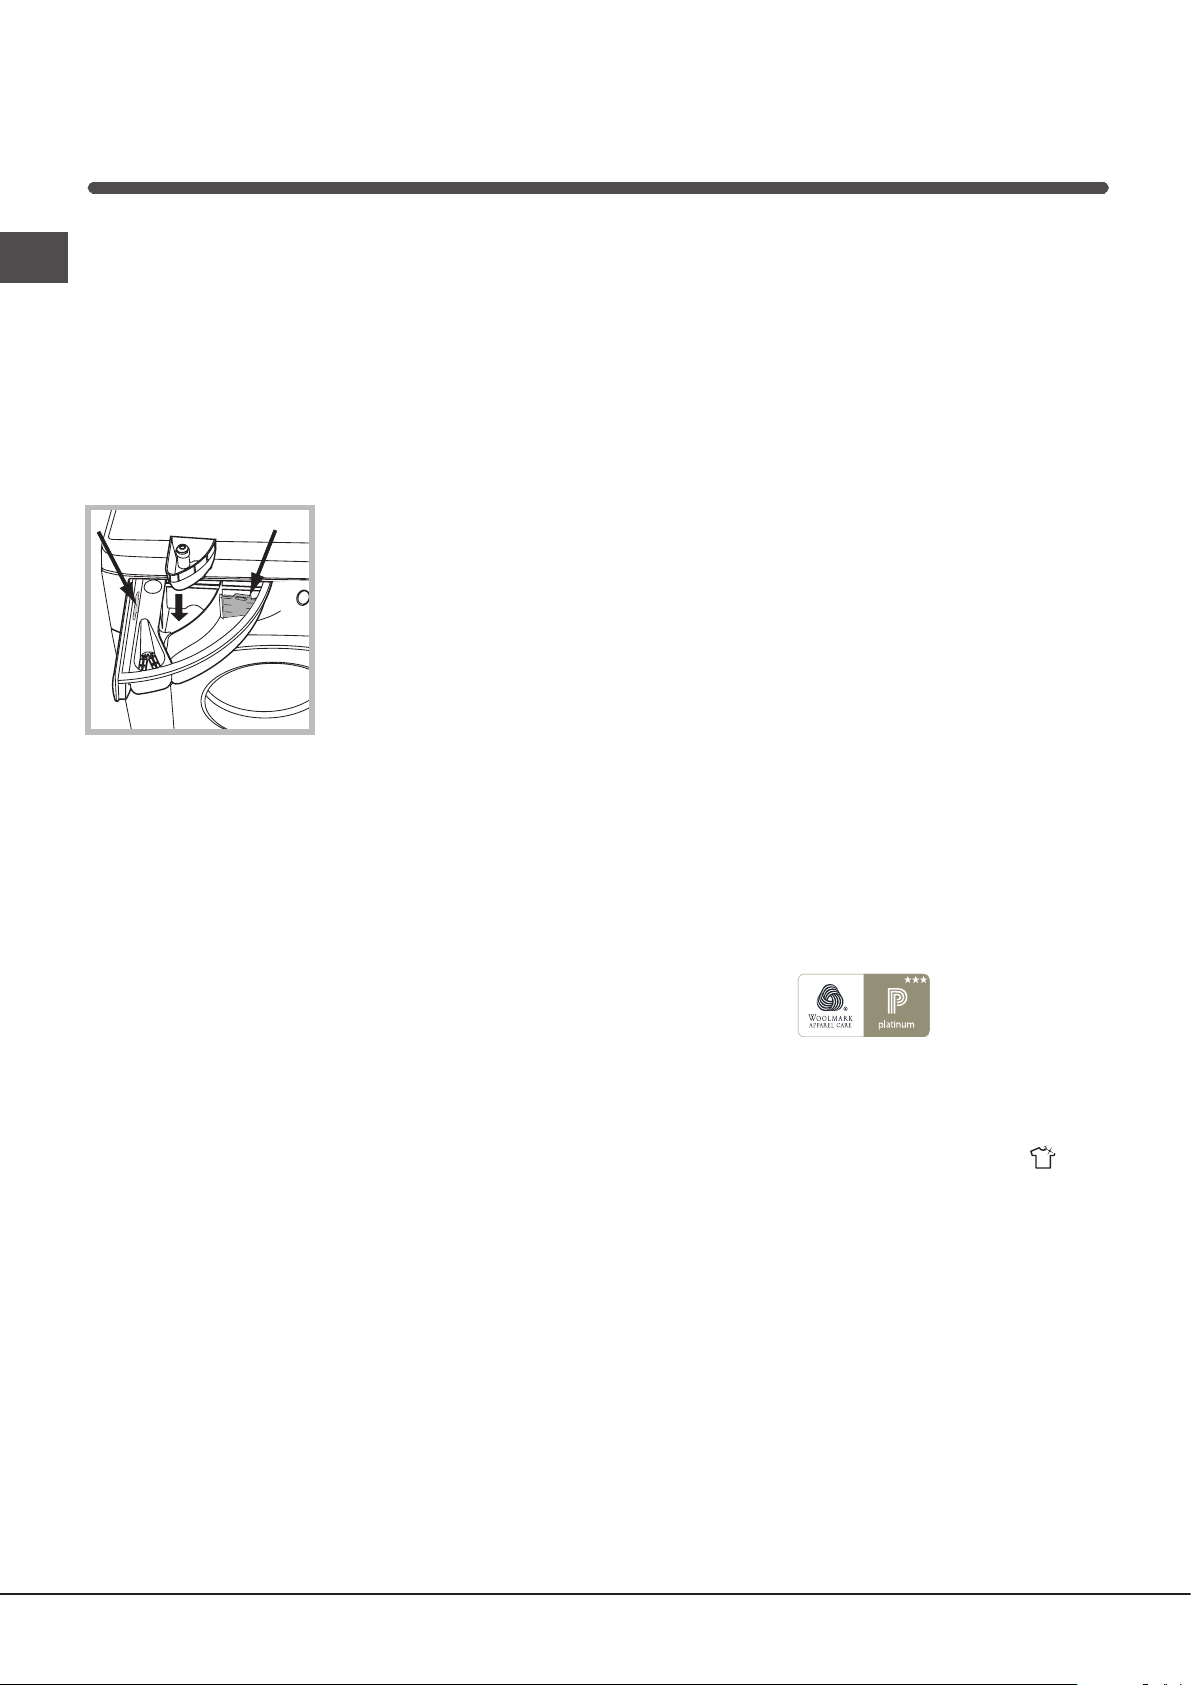
Open the detergent
dispenser drawer and pour
in the detergent or washing
additive, as follows.
compartment 1: Pre-wash detergent (powder)
Before pouring in the detergent, make sure that extra
compartment 4 has been removed.
compartment 2: Detergent for the wash cycle
(powder or liquid)
If liquid detergent is used, it is recommended that the
removable plastic partition A (supplied) be used for proper
dosage.
If powder detergent is used, place the partition into slot B.
compartment 3: Additives (fabric softeners, etc.)
The fabric softener should not overflow the grid.
extra compartment 4: Bleach
Preparing the laundry
• Dividethelaundryaccordingto:
- the type of fabric/the symbol on the label
- the colours: separate coloured garments from whites.
• Emptyallgarmentpocketsandcheckthebuttons.
• Donotexceedthelistedvalues,whichrefertothe
weight of the laundry when dry:
Durable fabrics: max. 6 kg
Synthetic fabrics: max. 2,5 kg
Delicate fabrics: max. 2 kg
Wool: max. 1,5 kg
Silk: max. 1 kg
How much does your laundry weigh?
1 sheet 400-500 g
1 pillow case 150-200 g
1 tablecloth 400-500 g
1 bathrobe 900-1,200 g
1 towel 150-250 g
Special wash cycles
Anti Stain: the programme 1 is suitable to heavily-soiled
garments with resistant colours. It ensures a washing class
that is higher than the standard class (A class).
When running the programme, do not mix garments of
different colours. We recommend the use of powder
detergent. Pre-treatment with special additives is
recommended if there are obstinate stains.
Whites: use this cycle 2 to wash white clothes. The
programme is designed to maintain the brightness of white
clothes over time. Use powder detergent for best results.
Anti allergy: use programme 7 to remove major allergens
such as pollen, mites, cat’s and dog’s hair.
Baby: use the special wash cycle 8 to remove the remove
the soiling typically caused by babies, while removing all
traces of detergent from nappies in order to prevent the
delicate skin of babies from suffering allergic reactions. The
cycle has been designed to reduce the amount of bacteria by
using a greater quantity of water and optimising the effect of
special disinfecting additives added to the detergent.
Wool: the wool wash cycle on this Hotpoint-Ariston
machine has been tested and approved by The Woolmark
Company for washing wool garments labelled as hand
washable provided that the garments are washed
according to the instructions on the garment label and
those issued by the manufacturer of this washing machine.
Hotpoint-Ariston is the first washing machine brand to be
approved by The Woolmark Company for Apparel CarePlatinum for its washing performance and consumption of
energy and water.
Delicates: use programme 10 to wash very delicate
garments having strasses or sequins.
To wash silk garments and curtains select the cycle 10 and
set the “Delicate” level from option .
We recommend turning the garments inside out before
washing and placing small items into the special bag
for washing delicates. Use liquid detergent on delicate
garments for best results.
Eco cycles
The Eco Cycles assure energy saving by eliminating
the need of heating water and it’s an advantage
both to your energy bill and the environment! These
innovative Eco programmes (
and
14
Fast Wash) are available for various fabrics
and different quantity of garment; they have been
designed to guarantee a high cleaning action even at
low temperature and can be used for lightly to medium
soiled loads.
Eco Cycles give the best results thanks to an intensified
wash action, water optimization and are carried out in
the same average time of a standard cycle.
For the best washing results with Eco Cycles we
recommend the usage of a liquid detergent.
12
Cottons,
13
Synthetics
8
Page 9

Precautions and tips
20
! This washing machine was designed and constructed
in accordance with international safety regulations. The
following information is provided for safety reasons and
must therefore be read carefully.
General safety
• Thisappliancewasdesignedfordomesticuseonly.
• Thisapplianceisnotintendedforusebypersons
(including children) with reduced physical, sensory or
mental capabilities, or lack of experience and knowledge,
unless they have been given supervision or instruction
concerning use of the appliance by a person responsible
for their safety. Children should be supervised to ensure
that they do not play with the appliance.
• Donottouchthemachinewhenbarefootorwithwetor
damp hands or feet.
• Donotpullonthepowersupplycablewhenunplugging
the appliance from the electricity socket. Hold the plug
and pull.
• Donotopenthedetergentdispenserdrawerwhilethe
machine is in operation.
• Donottouchthedrainedwaterasitmayreach
extremely high temperatures.
• Neverforcetheportholedoor.Thiscoulddamagethesafety
lock mechanism designed to prevent accidental opening.
• Iftheappliancebreaksdown,donotunderany
circumstances access the internal mechanisms in an
attempt to repair it yourself.
• Alwayskeepchildrenwellawayfromtheappliancewhile
it is operating.
• Thedoorcanbecomequitehotduringthewashcycle.
• Iftheappliancehastobemoved,workinagroupoftwo
or three people and handle it with the utmost care. Never
try to do this alone, because the appliance is very heavy.
• Beforeloadinglaundryintothewashingmachine,make
sure the drum is empty.
must be collected separately in order to optimise the
recovery and recycling of the materials they contain and
reduce the impact on human health and the environment.
The crossed out “wheeled bin” symbol on the product
reminds you of your obligation, that when you dispose of
the appliance it must be separately collected. Consumers
should contact their local authority or retailer for information
concerning the correct disposal of their old appliance.
Opening the porthole door manually
In the event that it is not possible to open the porthole
door due to a powercut, and if you wish to remove the
laundry, proceed as follows:
1. remove the plug from the
electrical socket.
2. make sure the water level
inside the machine is lower
than the door opening; if
it is not, remove excess
water using the drain hose,
collecting it in a bucket as
indicated in the figure.
3. using a screwdriver,
remove the cover panel on
the lower front part of the
washing machine (see figure).
GB
Load balancing system
Before every spin cycle, to avoid excessive vibrations
before every spin and to distribute the load in a uniform
manner, the drum rotates continuously at a speed which
is slightly greater than the washing rotation speed. If,
after several attempts, the load is not balanced correctly,
the machine spins at a reduced spin speed. If the load is
excessively unbalanced, the washing machine performs
the distribution process instead of spinning. To encourage
improved load distribution and balance, we recommend
small and large garments are mixed in the load.
Disposal
•Disposingofthepackagingmaterials:observelocal
regulations so that the packaging may be re-used.
•TheEuropeanDirective2002/96/EConWasteElectrical
and Electronic Equipment, requires that old household
electrical appliances must not be disposed of in the
normal unsorted municipal waste stream. Old appliances
4. pull outwards using the tab as indicated in the figure,
until the plastic tie-rod is freed from its stop position; pull
downwards and open the door at the same time.
5. reposition the panel, making sure the hooks are securely
in place before you push it onto the appliance.
9
Page 10

Care and maintenance
1
2
GB
Cutting off the water and electricity
supplies
• Turnoffthewatertapaftereverywashcycle.Thiswilllimit
wear on the hydraulic system inside the washing machine
and help to prevent leaks.
• Unplugthewashingmachinewhencleaningitand
during all maintenance work.
Cleaning the washing machine
•Theouterpartsandrubbercomponentsofthe
appliance can be cleaned using a soft cloth soaked in
lukewarm soapy water. Do not use solvents or abrasives.
•Thewashingmachinehasa“AutoClean”programme
for its internal parts that must be run with no load in the
drum.
To help the wash cycle you may want to use either the
detergent (i.e. a quantity 10% the quantity specified for
lightly-soiled garments) or special additives to clean the
washing machine. We recommend running a cleaning
programme every 40 wash cycles.
To start the programme press buttons A and B
simultaneously for 5 seconds (see figure).
The programme will start automatically and will run for
about 70 minutes. To stop the cycle press the START/
PAUSE button.
Caring for the door and drum of your
appliance
• Alwaysleavetheportholedoorajarinordertoprevent
unpleasant odours from forming.
Cleaning the pump
The washing machine is fitted with a self-cleaning pump
which does not require any maintenance. Sometimes,
small items (such as coins or buttons) may fall into the prechamber which protects the pump, situated in its bottom
part.
! Make sure the wash cycle has finished and unplug the
appliance.
To access the pre-chamber:
1. using a screwdriver,
remove the cover panel
on the lower front part of
the washing machine (see
figure);
B
A
Cleaning the detergent dispenser drawer
Remove the dispenser by
raising it and pulling it out
(see figure).
Wash it under running
water; this operation should
be repeated frequently.
2. unscrew the lid by
rotating it anti-clockwise
(see figure): a little water
may trickle out. This is
perfectly normal;
3. clean the inside thoroughly;
4. screw the lid back on;
5. reposition the panel, making sure the hooks are securely
in place before you push it onto the appliance.
Checking the water inlet hose
Check the inlet hose at least once a year. If there are any
cracks, it should be replaced immediately: during the wash
cycles, water pressure is very strong and a cracked hose
could easily split open.
10
! Never use second-hand hoses.
Page 11

Troubleshooting
Your washing machine could occasionally fail to work. Before contacting the Technical Assistance Service (see “ Service”),
make sure that the problem cannot be not solved easily using the following list.
Problem:
The washing machine does not
switch on.
The wash cycle does not start.
The washing machine does not fill
with water (the text “H2O” flashes
on the display).
The washing machine continuously
takes in and drains water.
The washing machine does not
drain or spin.
Possible causes / Solutions:
• Theapplianceisnotpluggedintothesocketfully,ornotenoughtomake
contact.
• Thereisnopowerinthehouse.
• Thewashingmachinedoorisnotclosedproperly.
• TheON/OFFbuttonhasnotbeenpressed.
• TheSTART/PAUSEbuttonhasnotbeenpressed.
• Thewatertaphasnotbeenopened.
• Adelayedstarthasbeenset.
• Thewaterinlethoseisnotconnectedtothetap.
• Thehoseisbent.
• Thewatertaphasnotbeenopened.
• Thereisnowatersupplyinthehouse.
• Thepressureistoolow.
• TheSTART/PAUSEbuttonhasnotbeenpressed.
• Thedrainhoseisnotfittedataheightbetween65and100cmfromthefloor
(see “Installation”).
• Thefreeendofthehoseisunderwater(see “Installation”).
• Thewalldrainagesystemisnotfittedwithabreatherpipe.
If the problem persists even after these checks, turn off the water tap, switch the
appliance off and contact the Technical Assistance Service. If the dwelling is on one
of the upper floors of a building, there may be problems relating to water drainage,
causing the washing machine to fill with water and drain continuously. Special antidraining valves are available in shops and help to prevent this inconvenience.
• Thewashcycledoesnotincludedraining:somecyclesrequirethedraining
process to be enabled manually.
• Thedrainhoseisbent(see “Installation”).
• Thedrainageductisclogged.
GB
The washing machine vibrates a
lot during the spin cycle.
The washing machine leaks.
The “option” and START/PAUSE
indicator lights flash rapidly and an
error code appears on the display (e.g.:
F-01, F-..).
There is too much foam.
• Thedrumwasnotunlockedcorrectlyduringinstallation(see “Installation”).
• Thewashingmachineisnotlevel(see “Installation”).
• Thewashingmachineistrappedbetweencabinetsandwalls(see “Installation”).
• Thewaterinlethoseisnotscrewedonproperly(see “Installation”).
• Thedetergentdispenserdrawerisblocked(forcleaninginstructions,see “Care
and maintenance”).
• Thedrainhoseisnotfixedproperly(see “Installation”).
• Switchoffthemachineandunplugit,waitforapproximately1minuteandthen
switch it back on again.
If the problem persists, contact the Technical Assistance Service.
• Thedetergentisnotsuitableformachinewashing(itshoulddisplaythetext“for
washing machines” or “hand and machine wash”, or the like).
• Toomuchdetergentwasused.
11
Page 12

Service
GB
Before contacting the Technical Assistance Service:
• Checkwhetheryoucansolvetheproblemalone(see “Troubleshooting”);
• Restartthewashcycletocheckwhethertheproblemhasbeensolved;
• Ifthisisnotthecase,contactanauthorisedTechnicalAssistanceCentre.
! Always request the assistance of authorised technicians.
Have the following information to hand:
• thetypeofproblem;
• theappliancemodel(Mod.);
• theserialnumber(S/N).
This information can be found on the data plate applied to the rear of the washing machine, and can also be found on the
front of the appliance by opening the door.
12
Page 13

Istruzioni per l’uso
LAVABIANCHERIA
I
Italiano
WMSG 622
Sommario
Installazione, 14-15
Disimballo e livellamento
Collegamenti idraulici ed elettrici
Primo ciclo di lavaggio
Dati tecnici
Descrizione della lavabiancheria, 16-17
Pannello di controllo
Display
Come effettuare un ciclo di lavaggio, 18
Programmi e opzioni, 19
Tabella dei programmi
Opzioni di lavaggio
Detersivi e biancheria, 20
Cassetto dei detersivi
Preparare la biancheria
Programmi particolari
Precauzioni e consigli, 21
Sicurezza generale
Smaltimento
Apertura manuale della porta oblò
I
Manutenzione e cura, 22
Escludere acqua e corrente elettrica
Pulire la lavabiancheria
Pulire il cassetto dei detersivi
Curare oblò e cestello
Pulire la pompa
Controllare il tubo di alimentazione dell’acqua
Anomalie e rimedi, 23
Assistenza, 24
Assistenza Attiva 7 giorni su 7
13
Page 14

Installazione
! È importante conservare questo libretto per poterlo con-
I
sultare in ogni momento. In caso di vendita, di cessione o
di trasloco, assicurarsi che resti insieme alla lavabiancheria
per informare il nuovo proprietario sul funzionamento e sui
relativi avvertimenti.
! Leggere attentamente le istruzioni: ci sono
importanti informazioni sull’installazione, sull’uso
e sulla sicurezza.
Disimballo e livellamento
Disimballo
1. Disimballare la lavabiancheria.
2. Controllare che la lavabiancheria non abbia
subìto danni nel trasporto. Se fosse danneggiata
non collegarla e contattare il rivenditore.
3. Rimuovere le 4 viti di
protezione per il trasporto
e il gommino con il relativo
distanziale, posti nella parte
posteriore (vedi figura).
Un accurato livellamento dà stabilità alla macchina ed
evita vibrazioni, rumori e spostamenti durante il funzionamento. In caso di moquette o di un tappeto, regolare i
piedini in modo da conservare sotto la lavabiancheria uno
spazio sufficiente per la ventilazione.
Collegamenti idraulici ed elettrici
Collegamento del tubo di alimentazione dell’acqua
1. Collegare il tubo di
alimentazione avvitandolo
a un rubinetto d’acqua
fredda con bocca filettata
da 3/4 gas (vedi figura).
Prima di allacciare, far
scorrere l’acqua finché
non sia limpida.
2. Collegare il tubo di alimentazione alla lavabiancheria avvitandolo all’apposita presa d’acqua,
nella parte posteriore in
alto a destra (vedi figura).
4. Chiudere i fori con i tappi di plastica in dotazione.
5. Conservare tutti i pezzi: qualora la lavabiancheria debba
essere trasportata, dovranno essere
rimontati.
! Gli imballaggi non sono giocattoli per bambini.
Livellamento
1. Installare la lavabiancheria su un pavimento piano e rigido, senza appoggiarla a muri, mobili o altro.
2. Se il pavimento non fosse
perfettamente orizzontale,
compensare le irregolarità
svitando o avvitando i piedini
anteriori (vedi figura); l’angolo
di inclinazione, misurato sul
piano di lavoro, non deve
superare i 2°.
3. Fare attenzione che nel tubo non ci siano né pieghe né
strozzature.
! La pressione idrica del rubinetto deve essere compresa
nei valori della tabella Dati tecnici (vedi pagina a fianco).
! Se la lunghezza del tubo di alimentazione non fosse
sufficiente, rivolgersi a un negozio specializzato o a un
tecnico autorizzato.
! Non utilizzare mai tubi già usati.
! Utilizzare quelli in dotazione alla macchina.
14
Page 15

Collegamento del tubo di scarico
65 - 100 cm
Collegare il tubo di scarico, senza piegarlo, a una
conduttura di scarico o a
uno scarico a muro posti
tra 65 e 100 cm da terra;
oppure appoggiarlo al
bordo di un lavandino o
di una vasca, legando la
guida in dotazione al
rubinetto (vedi figura).
L’estremità libera del tubo
di scarico non deve rimanere immersa nell’acqua.
! Il cavo non deve subire piegature o compressioni.
! Il cavo di alimentazione deve essere sostituito solo da
tecnici autorizzati.
Attenzione! L’azienda declina ogni responsabilità qualora
queste norme non vengano rispettate.
Primo ciclo di lavaggio
Dopo l’installazione, prima dell’uso, effettuare un ciclo di
lavaggio con detersivo e senza biancheria impostando il
programma 2.
I
! È sconsigliato usare tubi di prolunga; se indispensabile,
la prolunga deve avere lo stesso diametro del tubo originale e non superare i 150 cm.
Collegamento elettrico
Prima di inserire la spina nella presa della corrente, accertarsi che:
• la presa abbia la messa a terra e sia a norma
di legge;
• la presa sia in grado di sopportare il carico
massimo di potenza della macchina, indicato nella
tabella Dati tecnici (vedi a fianco);
• la tensione di alimentazione sia compresa nei
valori indicati nella tabella Dati tecnici (vedi a
fianco);
• la presa sia compatibile con la spina della
lavabiancheria. In caso contrario sostituire la
presa o la spina.
! La lavabiancheria non va installata all’aperto, nemmeno
se lo spazio è riparato, perché è molto pericoloso lasciarla esposta a pioggia e temporali.
! A lavabiancheria installata, la presa della corrente deve
essere facilmente raggiungibile.
! Non usare prolunghe e multiple.
Dati tecnici
Modello
Dimensioni
Capacità
Collegamenti
elettrici
Collegamenti
idrici
Velocità di centrifuga
Programmi di
controllo secondo la direttive
1061/2010 e
1015/2010
WMSG 622
larghezza cm 59,5
altezza cm 85
profondità cm 43,5
da 1 a 6 kg
Vedi targhetta caratteristiche tecniche
applicata sulla macchina
pressione massima 1 MPa (10 bar)
pressione minima 0,05 MPa (0,5 bar)
capacità del cesto 48 litri
sino a 1200 giri al minuto
programma 4; temperatura 60°C;
programma 5; temperatura 40°C.
Questa apparecchiatura è conforme
alle seguenti Direttive Comunitarie:
- 2004/108/CE (Compatibilità
Elettromagnetica)
- 2006/95/CE (Bassa Tensione)
- 2002/96/CE
15
Page 16

Descrizione della lavabiancheria
Pannello di controllo
I
Cassetto dei detersivi
Tasto
ON/OFF
MANOPOLA
PROGRAMMI
Tasto
TEMPERATURA
CENTRIFUGA
Tasti e spie
OPZIONE
DISPLAY
Tasto
Tasto
TIPO DI
LAVAGGIO
Tasto
BLOCCO
TASTI
Tasto e spia
START/PAUSE
Tasto
PARTENZA
RITARDATA
Cassetto dei detersivi: per caricare detersivi e additivi
(vedi “Detersivi e biancheria”).
Tasto ON/OFF : premere brevemente il tasto per accendere o spegnere la macchina. La spia START/PAUSE che
lampeggia lentamente di colore verde indica che la macchina è accesa. Per spegnere la lavabiancheria durante il lavaggio è necessario tenere premuto il tasto più a lungo, circa 3
sec.; una pressione breve o accidentale non permetterà lo
spegnimento della macchina. Lo spegnimento della macchina durante un lavaggio in corso annulla il lavaggio stesso.
MANOPOLA PROGRAMMI: per impostare il programma
desiderato (vedi “Tabella dei programmi”).
Tasti e spie OPZIONE: per selezionare le opzioni disponibili.
La spia relativa all’opzione selezionata rimarrà accesa.
Tasto
TIPO DI LAVAGGIO
l’intensità di lavaggio desiderata.
Tasto TEMPERATURA : premere per ridurre o esclude-
re la temperatura; il valore viene indicato nel display.
Tasto CENTRIFUGA : premere per ridurre o escludere
del tutto la centrifuga; il valore viene indicato nel display.
Tasto PARTENZA RITARDATA : premere per imposta-
re una partenza ritardata del programma prescelto; il ritardo
viene indicato nel display.
: premere per selezionare
Tasto e spia START/PAUSE: quando la spia verde
lampeggia lentamente, premere il tasto per avviare un
lavaggio. A ciclo avviato la spia diventa fissa. Per mettere
in pausa il lavaggio, premere nuovamente il tasto; la spia
lampeggerà con colore ambra. Se il simbolo non è
illuminato, si potrà aprire l’oblò. Per far ripartire il lavaggio
dal punto in cui è stato interrotto, premere nuovamente i
tasto.
Tasto BLOCCO TASTI : per attivare il blocco del
pannello di controllo, tenere premuto il tasto per circa
2 secondi. Il simbolo acceso indica che il pannello
di controllo è bloccato. In questo modo si impediscono
modifiche accidentali dei programmi, soprattutto se in
casa ci sono dei bambini.
Per disattivare il blocco del pannello di controllo, tenere
premuto il tasto per circa 2 secondi.
Modalità stand by
Questa lavatrice, in conformità alle nuove normative
legate al risparmio energetico, è dotata di un sistema
di autospegnimento (stand by) che entra in funzione
dopo circa 30 minuti nel caso di non utilizzo. Premere
brevemente il tasto ON-OFF e attendere che la macchina
si riattivi.
Consumo in off-mode: 1 W
Consumo in Left-on: 1 W
16
Page 17

Display
A
B
I
C
Il display è utile per programmare la macchina e fornisce molteplici informazioni.
Nella sezione A viene visualizzata la durata dei vari programmi a disposizione e a ciclo avviato il tempo residuo alla fine dello
stesso; nel caso fosse stata impostata una PARTENZA RITARDATA, viene visualizzato il tempo mancante all’avvio del programma selezionato.
Inoltre, premendo il relativo tasto, vengono visualizzati i valori massimi della velocità di centrifuga e di temperatura che la
macchina può effettuare in base al programma impostato o gli ultimi valori selezionati se compatibili con il programma scelto.
Nella sezione B vengono visualizzate le “fasi di lavaggio” previste per il ciclo selezionato e a programma avviato la “fase di
lavaggio” in corso:
Lavaggio
Risciacquo
Centrifuga
Scarico
Nella sezione C sono presenti, partendo da sinistra, le icone relative alla “temperatura”, alla “centrifuga” e alla “Partenza
ritardata”.
Le barre “temperatura” indicano il livello di temperatura relativo al massimo selezionabile per il ciclo impostato.
Le barre “centrifuga” indicano il livello di centrifuga relativo al massimo selezionabile per il ciclo impostato.
Il simbolo “delay” illuminato indica che nel display viene visualizzato il valore della “Partenza ritardata” impostato.
Spia Oblò bloccato
Il simbolo acceso indica che l’oblò è bloccato. Per evitare danni è necessario attendere che il simbolo si spenga prima di
aprire l’oblò.
Per aprire la porta mentre un ciclo è in corso premere il tasto START/PAUSE; se il simbolo OBLO’ BLOCCATO è spento
sarà possibile aprire l’oblò.
17
Page 18
Come effettuare un ciclo di
lavaggio
1. ACCENDERE LA MACCHINA. Premere il tasto ; la
I
spia START/PAUSE lampeggerà lentamente di colore verde.
2. CARICARE LA BIANCHERIA. Aprire la porta oblò.
Caricare la biancheria facendo attenzione a non superare
la quantità di carico indicata nella tabella programmi della
pagina seguente.
3. DOSARE IL DETERSIVO. Estrarre il cassetto e versare
il detersivo nelle apposite vaschette come spiegato in
“Detersivi e biancheria”.
4. CHIUDERE L’OBLO’.
5. SCEGLIERE IL PROGRAMMA. Selezionare con la
manopola PROGRAMMI il programma desiderato; ad
esso è associata una temperatura e una velocità di
centrifuga che possono essere modificate. Sul display
comparirà la durata del ciclo.
6. PERSONALIZZARE IL CICLO DI LAVAGGIO. Agire
sugli appositi tasti:
Modificare la temperatura e/o la
centrifuga. La macchina visualizza automaticamente
la temperatura e la centrifuga massime previste per
il programma impostato o le ultime selezionate se
compatibili con il programma scelto. Premendo il tasto
si riduce progressivamente la temperatura sino al
lavaggio a freddo “OFF”. Premendo il tasto si riduce
progressivamente la centrifuga sino alla sua esclusione
“OFF”. Un’ulteriore pressione dei tasti riporterà i valori al
massimo consentito per il ciclo selezionato.
! Eccezione: selezionando il programma 4 la temperatura
può essere portata sino a 90°.
Impostare una partenza ritardata.
Per impostare la partenza ritardata del programma
prescelto, premere il tasto relativo fino a raggiungere
il tempo di ritardo desiderato. Quando tale opzione è
attiva, sul display si illumina il simbolo . Per rimuovere
la partenza ritardata premere il tasto fino a che sul display
compare la scritta “OFF”.
Impostare l’intensità di lavaggio desiderata.
L’opzione permette di ottimizzare il lavaggio in base
al grado di sporco dei tessuti e all’intensità di lavaggio
desiderata.
Selezionare il programma di lavaggio, il ciclo viene
impostato automaticamente sul livello “Normal”,
ottimizzato per capi mediamente sporchi, (impostazione
non valida per il ciclo “Lana”, che si imposta
automaticamente sul livello “Delicate”).
Per capi molto sporchi premere il tasto fino al
raggiungimento del livello “Intensive”. Questo livello
garantisce un lavaggio di alte prestazioni grazie all’utilizzo
di una maggiore quantità di acqua nella fase iniziale del
ciclo ed una maggiore movimentazione meccanica, ed è
utile per eliminare le macchie più resistenti. Può essere
utilizzato con o senza candeggina.
Se si desidera effettuare il candeggio inserire la
vaschetta aggiuntiva 4, in dotazione, nella vaschetta 1.
Nel dosare la candeggina non superare il livello “max”
indicato sul perno centrale (vedi figura a pag. 20).
Per capi poco sporchi o per un trattamento più
delicato dei tessuti, premere il tasto fino al
raggiungimento del livello “Delicate”. Il ciclo ridurrà la
movimentazione meccanica per garantire risultati di
lavaggio perfetti per i capi delicati.
Modificare le caratteristiche del ciclo.
• Premere il tasto per attivare l’opzione; la spia
corrispondente al pulsante si accenderà.
• Premere nuovamente il tasto per disattivare
l’opzione; la spia si spegnerà.
! Se l’opzione selezionata non è compatibile con il
programma impostato, la spia lampeggerà e l’opzione
non verrà attivata.
! Se l’opzione selezionata non è compatibile con
un’altra precedentemente impostata, la spia relativa
alla prima funzione selezionata lampeggerà e verrà
attivata solo la seconda, la spia dell’opzione attivata si
illuminerà.
! Le opzioni possono variare il carico raccomandato
e/o la durata del ciclo.
7. AVVIARE IL PROGRAMMA. Premere il tasto
START/PAUSE. La spia relativa si illuminerà di colore
verde fisso e l’oblò si bloccherà (simbolo OBLO’
BLOCCATO acceso). Per cambiare un programma
mentre un ciclo è in corso, mettere la lavabiancheria
in pausa premendo il tasto START/PAUSE (la spia
START/PAUSE lampeggerà lentamente di colore
ambra); selezionare quindi il ciclo desiderato e premere
nuovamente il tasto START/PAUSE.
Per aprire la porta mentre un ciclo è in corso premere il
tasto START/PAUSE; se il simbolo OBLO’ BLOCCATO
è spento sarà possibile aprire l’oblò. Premere
nuovamente il tasto START/PAUSE per far ripartire il
programma dal punto in cui era stato interrotto.
8. FINE DEL PROGRAMMA. Viene indicata dalla
scritta “END” sul display, quando il simbolo OBLO’
BLOCCATO si spegnerà sarà possibile aprire
l’oblò. Aprire l’oblò, scaricare la biancheria e spegnere
la macchina.
! Se si desidera annullare un ciclo già avviato, premere a
lungo il tasto . Il ciclo verrà interrotto e la macchina si
spegnerà.
18
Page 19
Programmi e opzioni
Tabella dei programmi
Prela-
vaggio
Detersivi
gio
gina
Lavag-
Candeg-
-
(Kg)
dua %
Umidità resi-
Consumo
Carico max.
bidente
Ammor-
4 - - - 180’
4 - - - 190’
6 53 2,21 93 180’
6 53 0,92 54 160’
6 53 0,86 63 150’
2,5 44 0,87 42 90’
2,5 44 0,56 42 80’
4 - - - 200’
4 - - - 165’
1,5 - - - 80’
1 - - - 75’
3,5 53 0,81 36 60’
6 53 0,15 58 95’
3 49 0,08 51 70’
3 71 0,05 57 30’
6 - - - 49’
Acqua
totale lt
energia kWh
Descrizione del Programma
Programmi
Antimacchia
1
Bianchi
2
3
Cotone + Prelavaggio: Bianchi estremamente sporchi. 90° 1200
4
Cotone (1): Bianchi e colorati resistenti molto sporchi.
5
Cotone (2-3): Bianchi poco sporchi e colori delicati. 40° 1200 -
6
Sintetici: Colori resistenti molto sporchi. 60° 800 -
6
Sintetici (4): Colori resistenti molto sporchi. 40° 800 -
Anti Allergy
7
Baby
8
9
Lana: Per lana, cachemire, ecc. 40° 800 - -
Delicati
10
Rapido 60': Per rinfrescare rapidamente capi sporchi
11
(non indicato per lana, seta e capi da lavare a mano).
12 Cotone
13 Sintetici
14 Rapido 30'
Risciacquo - 1200 - - Centrifuga + Scarico - 1200 - - - - 6 - - - 16’
La durata del ciclo indicata sul display o sul libretto è una stima calcolata in base a condizioni standard. Il tempo effettivo può variare in base a numerosi fattori
quali la temperatura e la pressione dell’acqua in ingresso, la temperatura ambiente, la quantità di detersivo, la quantità ed il tipo di carico, il bilanciamento del
carico, le opzioni aggiuntive selezionate.
Per tutti Test Institutes:
1) Programma di controllo secondo la direttiva 1061/2010: impostare il programma 4 con una temperaura di 60°C.
Questo ciclo è adatto per pulire un carico di cotone normalmente sporco ed è il più efficiente in termini di consumo combinato di energia e di acqua, da usare su
capi lavabili a 60 °C. La temperatura effettiva di lavaggio può differire da quella indicata.
2) Programma di controllo secondo la direttiva 1061/2010: impostare il programma 5 con una temperatura di 40°C.
Questo ciclo è adatto per pulire un carico di cotone normalmente sporco ed è il più efficiente in termini di consumo combinato di energia e di acqua, da usare su
capi lavabili a 40 °C. La temperatura effettiva di lavaggio può differire da quella indicata.
3) Programma cotone lungo: impostare il programma 5 con una temperatura di 40°C.
4) Programma sintetico lungo: impostare il programma 6 con una temperatura di 40°C.
Temp.
max.
(°C)
40° 1200 - 60° 1200 - -
60°
(Max. 90°)
60° 1200 40° 1000 -
30° 0 - -
60° 1200 - -
Acqua
fredda
Acqua
fredda
Acqua
fredda
Velocità
max.
(giri al
minuto)
1200 -
1200 - -
800 - -
800 - -
I
Durata ciclo
Opzioni di lavaggio
Extra Risciacquo
Selezionando questa opzione si aumenta l’efficacia del
risciacquo, e si assicura la massima rimozione del detersivo.
E’ utile per pelli particolarmente sensibili.
! Non è attivabile sui programmi 7, 10, 14, .
Risparmio Tempo
Selezionando questa opzione si riduce la durata del
programma fino al 50% in base al ciclo scelto, garantendo
al contempo un risparmio di acqua ed energia. Utilizzare
questo ciclo per capi non eccessivamente sporchi.
! Non è attivabile sui programmi 1, 2, 7, 8, 9, 10, 11, 12,
13, 14, , .
19
Page 20
Detersivi e biancheria
M
AX
1
2
4
3
A
B
Cassetto dei detersivi
I
Il buon risultato del lavaggio dipende anche dal corretto
dosaggio del detersivo: eccedendo non si lava in modo più
efficace e si contribuisce a incrostare le parti interne della
lavabiancheria e a inquinare l’ambiente.
! Usare detersivi in polvere per capi in cotone bianchi e per il
prelavaggio e per lavaggi con temperatura superiore a 60°C.
! Seguire le indicazioni riportate sulla confezione di detersivo.
! Non usare detersivi per il lavaggio a mano, perché formano
troppa schiuma.
Estrarre il cassetto dei detersivi e inserire il detersivo o
l’additivo come segue.
vaschetta 1: Detersivo per prelavaggio (in polvere)
Prima di versare il detersivo verificare che non sia inserita la
veschetta aggiuntiva 4.
vaschetta 2: Detersivo per lavaggio
(in polvere o liquido)
Nel caso di utilizzo di detersivo liquido si consiglia di utilizzare la paretina A in dotazione per un corretto dosaggio.
Per l’utilizzo del detersivo in polvere riporre la paretina nella
cavità B.
vaschetta 3: Additivi (ammorbidente, ecc.)
L’ammorbidente non deve fuoriuscire dalla griglia.
vaschetta aggiuntiva 4: Candeggina
Programmi particolari
Antimacchia: il programma 1 è adatto al lavaggio di
capi molto sporchi, con colori resistenti. Il programma
garantisce una classe di lavaggio superiore alla classe
standard (classe A). Non eseguire il programma mescolando capi di colore diverso. Si consiglia l’utilizzo di
detersivo in polvere. Per macchie ostinate è consigliato il
pretrattamento con additivi specifici.
Bianchi: utilizzare il ciclo 2 per il lavaggio dei capi
bianchi. Il programma è studiato per il mantenimento
della brillantezza del bianco nel tempo. Per risultati
migliori si raccomanda l’utilizzo del detersivo in polvere.
Anti Allergy: utilizzare il programma 7 per la rimozione dei
principali allergeni come polline, acari, peli del gatto e cane.
Baby: utilizzare il programma 8 per asportare lo sporco
tipico dei bambini e rimuovere il detersivo dai panni
onde evitare reazioni allergiche alla pelle delicata dei
bambini. Questo ciclo è stato studiato per ridurre la
carica batterica utilizzando una maggior quantità di acqua
e ottimizzando l’effetto di additivi specifici igenizzanti
aggiunti al detersivo.
Lana: il ciclo di lavaggio “Lana” di questa lavatrice
Hotpoint-Ariston è stato testato e approvato dalla
Woolmark Company per il lavaggio di capi in lana
classificati come “lavabili a mano”, purché il lavaggio
venga eseguito nel rispetto delle istruzioni riportate
sull’etichetta dell’indumento e delle indicazioni fornite dal
produttore dell’elettrodomestico. Hotpoint-Ariston è la
prima marca di lavatrici ad aver ottenuto dalla Woolmark
Company la certificazione Woolmark Apparel Care Platinum per le sue prestazioni di lavaggio e il consumo di
acqua ed energia.
Preparare la biancheria
• Suddividere la biancheria secondo:
- il tipo di tessuto / il simbolo sull’etichetta.
- i colori: separare i capi colorati da quelli bianchi.
• Vuotare le tasche e controllare i bottoni.
• Non superare i valori indicati, riferiti al peso della
biancheria asciutta:
Tessuti resistenti: max 6 kg
Tessuti sintetici: max 2,5 kg
Tessuti delicati: max 2 kg
Lana: max 1,5 kg
Seta: max 1 kg
Quanto pesa la biancheria?
1 lenzuolo 400-500 gr.
1 federa 150-200 gr.
1 tovaglia 400-500 gr.
1 accappatoio 900-1200 gr.
1 asciugamano 150-250 gr.
20
Delicati: utilizzare il programma 10 per il lavaggio dei
capi molto delicati, che presentano applicazioni quali
strass o paillettes.
Per il lavaggio dei capi in seta e tende, selezionare il ciclo
10
ed impostare il livello “Delicate” dell’opzione .
Si raccomanda di rovesciare i capi prima del lavaggio e
di inserire gli indumenti piccoli nell’apposito sacchetto
per il lavaggio dei capi delicati. Per risultati migliori si
raccomanda l’utilizzo del detersivo liquido per capi
delicati.
Programmi Eco
I programmi Eco offrono buone performance di lavaggio
a basse temperature consentendo un minore utilizzo di
energia elettrica con un beneficio per l’ambiente e un
risparmio economico. I programmi Eco (
Sintetici e
tipi di tessuto e per capi poco sporchi. Per garantire un
risultato ottimale raccomandiamo l’uso di un detergente
liquido; si consiglia di pretrattare polsini, colli e macchie.
14
Rapido 30’) sono stati creati per diversi
12
Cotone,
13
Page 21

Precauzioni e consigli
20
! La lavabiancheria è stata progettata e costruita in
conformità alle norme internazionali di sicurezza. Queste
avvertenze sono fornite per ragioni di
sicurezza e devono essere lette attentamente.
Sicurezza generale
• L’apparecchio non deve essere utilizzato da persone
(bambini compresi) con capacità fisiche, sensoriali o mentali ridotte e con esperienze e conoscenze insufficienti, a
meno che tale utilizzo non avvenga sotto la supervisione
o le istruzioni di una persona responsabile della loro sicurezza. I bambini devono essere sorvegliati per garantire
che non giochino con l’apparecchio.
• Questo apparecchio è stato concepito esclusivamente
per un uso di tipo domestico.
• Non toccare la macchina a piedi nudi o con le mani o i
piedi bagnati o umidi.
• Non staccare la spina dalla presa della corrente tirando il
cavo, bensì afferrando la spina.
• Non aprire il cassetto dei detersivi mentre la macchina è
in funzione.
• Non toccare l’acqua di scarico, che può raggiungere
temperature elevate.
• Non forzare in nessun caso l’oblò: potrebbe danneggiarsi
il meccanismo di sicurezza che protegge da aperture
accidentali.
• In caso di guasto, in nessun caso accedere ai meccanismi
interni per tentare una riparazione.
• Controllare sempre che i bambini non si avvicinino alla
macchina in funzione.
• Durante il lavaggio l’oblò tende a scaldarsi.
• Se dev’essere spostata, lavorare in due o tre persone con
la massima attenzione. Mai da soli perché la macchina è
molto pesante.
• Prima di introdurre la biancheria controlla che il cestello
sia vuoto.
elettrodomestici non debbano essere smaltiti nel normale
flusso dei rifiuti solidi urbani. Gli apparecchi dismessi devono essere raccolti separatamente per ottimizzare il tasso
di recupero e riciclaggio dei materiali che li compongono
ed impedire potenziali danni per la salute e l’ambiente.
Il simbolo del cestino barrato è riportato su tutti i prodotti per
ricordare gli obblighi di raccolta separata.
Per ulteriori informazioni, sulla corretta dismissione degli
elettrodomestici, i detentori potranno rivolgersi al servizio
pubblico preposto o ai rivenditori.
Apertura manuale della porta oblò
Nel caso non sia possibile aprire la porta oblò a causa della
mancanza di energia elettrica e volete stendere il bucato,
procedere come segue:
1. togliere la spina dalla presa
di corrente.
2. verificate che il livello
dell’acqua all’interno della
macchina sia inferiore rispetto
all’apertura dell’oblò; in caso
contrario togliere l’acqua in
eccedenza attraverso il tubo
di scarico raccogliendola in un
secchio come indicato in figura.
3. rimuovere il pannello di
copertura sul lato anteriore della
lavabiancheria con l’ausilio di un
giravite (vedi figura).
I
Sistema bilanciamento del carico
Prima di ogni centrifuga, per evitare vibrazioni eccessive e
per distribuire il carico in modo uniforme, il cestello effettua
delle rotazioni ad una velocità leggermente superiore a quella del lavaggio. Se al termine di ripetuti tentativi il carico non
fosse ancora correttamente bilanciato la macchina effettua
la centrifuga ad una velocità inferiore a quella prevista. In
presenza di eccessivo sbilanciamento la lavabiancheria
effettua la distribuzione anzichè la centrifuga. Per favorire
una migliore distribuzione del carico e il suo corretto bilanciamento si consiglia di mescolare capi grandi e piccoli.
Smaltimento
• Smaltimento del materiale di imballaggio:
attenersi alle norme locali, così gli imballaggi potranno
essere riutilizzati.
• La direttiva Europea 2002/96/CE sui rifiuti di apparecchiature elettriche ed elettroniche, prevede che gli
4. utilizzando la linguetta indicata in figura tirare verso
l’esterno fino a liberare il tirante in plastica dal fermo; tirarlo
successivamente verso il basso e contemporaneamente
aprire la porta.
5. rimontare il pannello assicurandosi, prima di spingerlo
verso la macchina, di aver inserito i ganci nelle apposite asole.
21
Page 22

Manutenzione e cura
1
2
Escludere acqua e corrente elettrica
I
• Chiudere il rubinetto dell’acqua dopo ogni lavaggio. Si
limita così l’usura dell’impianto idraulico della lavabian cheria e si elimina il pericolo di perdite.
• Staccare la spina della corrente quando si
pulisce la lavabiancheria e durante i lavori di
manutenzione.
Pulire la lavabiancheria
• La parte esterna e le parti in gomma possono essere puliti
con un panno imbevuto di acqua tiepida e sapone. Non
usare solventi o abrasivi.
• La lavabiancheria è dotata di un programma di “Auto
Pulizia” delle parti interne che deve essere effettuato senza
alcun tipo di carico nel cesto.
Il detersivo (nella quantità pari al 10% di quella consigliata
per capi poco sporchi) o additivi specifici per la pulizia della
lavabiancheria, potranno essere utilizzati come coadiuvanti
nel programma di lavaggio. Si consiglia di effettuare il programma di pulizia ogni 40 cicli di lavaggio.
Per attivare il programma premere contemporaneamente i
tasti A e B per 5 sec. (vedi figura).
Il programma partirà automaticamente ed avrà una durata di circa 70 minuti. Per fermare il ciclo premere il tasto START/PAUSE.
B
A
Pulire la pompa
La macchina è dotata di una pompa autopulente che non
ha bisogno di manutenzione. Può però succedere che
piccoli oggetti (monete, bottoni) cadano nella precamera
che protegge la pompa, situata nella parte inferiore di
essa.
! Assicurarsi che il ciclo di lavaggio sia terminato e stac-
care la spina.
Per accedere alla precamera:
1. rimuovere il pannello di
copertura sul lato anteriore della lavasciuga con
l’ausilio di un giravite (vedi
figura);
2. svitare il coperchio
ruotandolo in senso
antiorario (vedi figura): è
normale che fuoriesca un
po’ d’acqua;
Pulire il cassetto dei detersivi
Sfilare il cassetto sollevandolo
e tirandolo verso l’esterno
(vedi figura).
Lavarlo sotto l’acqua corrente; questa pulizia va effettuata
frequentemente.
Curare oblò e cestello
• Lasciare sempre socchiuso l’oblò per evitare che
si formino cattivi odori.
22
3. pulire accuratamente l’interno;
4. riavvitare il coperchio;
5. rimontare il pannello assicurandosi, prima di spingerlo
verso la macchina, di aver inserito i ganci nelle apposite
asole.
Controllare il tubo di alimentazione
dell’acqua
Controllare il tubo di alimentazione almeno una volta
all’anno. Se presenta screpolature e fessure va sostituito:
durante i lavaggi le forti pressioni potrebbero provocare
improvvise spaccature.
! Non utilizzare mai tubi già usati.
Page 23

Anomalie e rimedi
Può accadere che la lavabiancheria non funzioni. Prima di telefonare all’Assistenza (vedi “Assistenza”), controllare che non si
tratti di un problema facilmente risolvibile aiutandosi con il seguente elenco.
Anomalie:
Possibili cause / Soluzione:
La lavabiancheria
non si accende.
Il ciclo di lavaggio
non inizia.
La lavabiancheria non carica acqua
(Sul display viene visualizzata la
scritta “H2O” lampeggiante).
La lavabiancheria carica e scarica
acqua di continuo.
• La spina non è inserita nella presa della corrente, o non abbastanza
da fare contatto.
• In casa non c’è corrente.
• L’oblò non è ben chiuso.
• Il tasto ON/OFF non è stato premuto.
• Il tasto START/PAUSE non è stato premuto.
• Il rubinetto dell’acqua non è aperto.
• Si è impostato un ritardo sull’ora di avvio (PARTENZA RITARDATA,
vedi “Come effettuare un ciclo di lavaggio”).
• Il tubo di alimentazione dell’acqua non è collegato al rubinetto.
• Il tubo è piegato.
• Il rubinetto dell’acqua non è aperto.
• In casa manca l’acqua.
• Non c’è sufficiente pressione.
• Il tasto START/PAUSE non è stato premuto.
• Il tubo di scarico non è installato fra 65 e 100 cm da terra (vedi “Installazione”).
• L’estremità del tubo di scarico è immersa nell’acqua (vedi “Installazione”).
• Lo scarico a muro non ha lo sfiato d’aria.
Se dopo queste verifiche il problema non si risolve, chiudere il rubinetto dell’acqua, spegnere la lavabiancheria e chiamare l’Assistenza. Se l’abitazione si trova
agli ultimi piani di un edificio, è possibile che si verifichino fenomeni di sifonaggio, per cui la lavabiancheria carica e scarica acqua di continuo. Per eliminare
l’inconveniente sono disponibili in commercio apposite valvole anti-sifonaggio.
I
La lavabiancheria non scarica
o non centrifuga.
La lavabiancheria vibra
molto durante la centrifuga.
La lavabiancheria perde acqua.
Le spie delle “Opzioni” e
dell’START/PAUSE lampeggiano velocemente e il display visualizza un
codice di anomalia (es.: F-01, F-..).
Si forma troppa schiuma.
• Il programma non prevede lo scarico: con alcuni programmi occorre
avviarlo manualmente.
• Il tubo di scarico è piegato (vedi “Installazione”).
• La conduttura di scarico è ostruita.
• Il cestello, al momento dell’installazione, non è stato sbloccato
correttamente (vedi “Installazione”).
• La lavabiancheria non è in piano (vedi “Installazione”).
• La lavabiancheria è stretta tra mobili e muro (vedi “Installazione”).
• Il tubo di alimentazione dell’acqua non è ben avvitato (vedi “Installazione”).
• Il cassetto dei detersivi è intasato (per pulirlo vedi “Manutenzione e cura”).
• Il tubo di scarico non è fissato bene (vedi “Installazione”).
• Spegnere la macchina e togliere la spina dalla presa, attendere circa 1 minu-
to quindi riaccenderla.
Se l’anomalia persiste, chiamare l’Assistenza.
• Il detersivo non è specifico per lavabiancheria (deve esserci la
dicitura “per lavatrice”, “a mano e in lavatrice”, o simili).
• Il dosaggio è stato eccessivo.
23
Page 24

Assistenza
Prima di contattare l’Assistenza:
I
• Verificare se l’anomalia può essere risolta da soli (vedi “Anomalie e rimedi”);
• Riavviare il programma per controllare se l’inconveniente è stato ovviato;
• In caso negativo, contattare il Numero Unico 199.199.199*.
! Non ricorrere mai a tecnici non autorizzati.
Comunicare:
• il tipo di anomalia;
• il modello della macchina (Mod.);
• il numero di serie (S/N).
Queste informazioni si trovano sulla targhetta applicata nella parte posteriore della lavabiancheria e nella parte anteriore
aprendo l’oblò.
Assistenza Attiva 7 giorni su 7
In caso di necessità d’intervento chiamare il Numero Unico Nazionale 199.199.199*.
Un operatore sarà a completa disposizione per fissare un appuntamento con il Centro Assistenza Tecnico
Autorizzato più vicino al luogo da cui si chiama.
È attivo 7 giorni su 7, sabato e domenica compresi, e non lascia mai inascoltata una richiesta.
*
* Al costo di 14,25 centesimi di Euro al minuto (iva inclusa) dal Lun. al Ven. dalle 08:00 alle 18:30, il Sab. dalle 08:00 alle 13:00 e di 5,58 centesimi di
Euro al minuto (iva inclusa) dal Lun. al Ven. dalle 18:30 alle 08:00, il Sab. dalle 13:00 alle 08:00 e i giorni festivi, per chi chiama da telefono fisso.
Per chi chiama da radiomobile le tariffe sono legate al piano tariffario dell’operatore telefonico utilizzato.
Le suddette tariffe potrebbero essere soggette a variazione da parte dell’operatore telefonico; per maggiori informazioni consultare il sito
www.hotpoint-ariston.it.
24
Page 25

Instrukcja obsługi
PRALKA
PL
Polski
WMSG 622
Spis treści
Instalacja, 26-27
Rozpakowanie i wypoziomowanie
Podłączenia hydrauliczne i elektryczne
Pierwszy cykl prania
Dane techniczne
Opis pralki, 28-29
Panel sterowania
Wyświetlacz
Jak wykonać cykl prania, 30
Programy i opcje, 31
Tabela programów
Opcje prania
Środki piorące i bielizna, 32
Szuadka na środki piorące
Przygotowanie bielizny
Programy specjalne
Zalecenia i środki ostrożności, 33
Ogólne zasady bezpieczeństwa
Utylizacja
Ręczne otwieranie okrągłych drzwiczek
PL
Utrzymanie i konserwacja, 34
Odłączenie wody i prądu elektrycznego
Czyszczenie pralki
Czyszczenie szuadki na środki piorące
Konserwacja okrągłych drzwiczek i bębna
Czyszczenie pompy
Kontrola przewodu doprowadzającego wodę
Nieprawidłowości w
działaniu i sposoby ich usuwania, 35
Serwis Techniczny, 36
25
Page 26

Instalacja
PL
! Należy zachować niniejszą książeczkę, aby móc z niej
skorzystać w każdej chwili. W przypadku sprzedaży,
odstąpienia lub przeniesienia pralki w inne miejsce
należy zadbać o przekazanie instrukcji wraz z nią,
aby nowy właściciel mógł się zapoznać z działaniem
urządzenia i z dotyczącymi go ostrzeżeniami.
! Należy uważnie przeczytać instrukcję obsługi:
zawiera ona ważne informacje dotyczące instalacji oraz
właściwego i bezpiecznego użytkowania pralki.
Rozpakowanie i wypoziomowanie
Rozpakowanie
1. Rozpakować pralkę.
2. Sprawdzić, czy nie doznała ona uszkodzeń w czasie
transportu. W przypadku stwierdzenia uszkodzeń, nie
podłączać pralki i skontaktować się ze sprzedawcą.
3. Odkręcić 4 śruby
zabezpieczające
urządzenie na czas
transportu oraz zdjąć
gumowy element z
podkładką, znajdujący się
w tylnej części pralki (patrz
rysunek).
4. Zatkać otwory przy pomocy plastikowych zaślepek,
znajdujących się w wyposażeniu urządzenia.
5. Zachować wszystkie części: w razie konieczności
przewiezienia pralki w inne miejsce, powinny one zostać
ponownie zamontowane.
! Części opakowania nie są zabawkami dla dzieci.
Poziomowanie
1. Ustawić pralkę na płaskiej i twardej podłodze, nie
opierając jej o ściany, meble itp.
2. Jeśli podłoga nie
jest idealnie pozioma,
należy skompensować
nierówności, odkręcając
lub dokręcając przednie
nóżki (patrz rysunek); kąt
nachylenia, zmierzony na
górnym blacie pralki, nie
powinien przekraczać 2°.
Staranne wypoziomowanie pralki zapewnia jej stabilność
i zapobiega wibracjom, hałasowi oraz przesuwaniu się
urządzenia w czasie pracy. W przypadku ustawienia
na dywanie lub wykładzinie dywanowej, należy tak
wyregulować nóżki, aby pod pralką pozostawała wolna
przestrzeń niezbędna dla wentylacji.
Podłączenia hydrauliczne i elektryczne
Podłączenie przewodu doprowadzającego wodę
1. Podlacz przewód
zasilajacy poprzez
przykrecenie go do
zaworu zimnej wody z
koncówka gwintowana
(patrz rysunek): Przed
podłączeniem spuszczać
wodę do momentu, aż
stanie się ona całkowicie
przezroczysta.
2. Podłączyć do
urządzenia przewód
doprowadzający wodę,
przykręcając go do
odpowiedniego przyłącza
wody, znajdującego się
w tylnej części pralki, z
prawej strony u góry (patrz
rysunek).
3. Zwrócić uwagę, aby przewód nie był pozaginany ani
przygnieciony.
! Ciśnienie wody w kurku powinno mieścić się w
przedziale podanym w tabeli Danych technicznych (patrz
strona obok).
! Jeśli długość przewodu doprowadzającego
wodę jest niewystarczająca, należy zwrócić się do
specjalistycznego sklepu lub do autoryzowanego
technika.
! Nigdy nie instalować przewodów, które były już
używane.
! Stosować przewody znajdujące się w wyposażeniu
urządzenia.
26
Page 27

Podłączenie przewodu odpływowego
65 - 100 cm
Podłączyć przewód
odpływowy, nie zginając
go, do rury ściekowej lub
do otworu odpływowego w
ścianie, które powinny się
znajdować na wysokości
od 65 do 100 cm od
podłogi;
albo oprzeć go na
brzegu zlewu lub wanny,
przymocowując do kranu
prowadnik, znajdujący
się w wyposażeniu
pralki (patrz rysunek).
Wolny koniec przewodu
odpływowego nie
powinien być zanurzony w
wodzie.
! Odradza się używanie rur przedłużających; jednak jeśli
jest to konieczne, przedłużacz powinien mieć taki sam
przekrój, jak oryginalna rura, a jego długość nie powinna
przekraczać 150 cm.
! Kabel nie powinien być pozginany ani przygnieciony.
! Przewód zasilania elektrycznego może być wymieniany
wyłącznie przez autoryzowanych techników.
Uwaga! Producent nie ponosi żadnej odpowiedzialności,
jeśli powyższe zasady nie będą przestrzegane.
Pierwszy cykl prania
Po zainstalowaniu pralki, przed przystąpieniem do jej
użytkowania, należy wykonać jeden cykl prania ze środkiem
piorącym, ale bez wsadu, nastawiając program 2.
Dane techniczne
PL
Podłączenie elektryczne
Przed włożeniem wtyczki do gniazdka elektrycznego
należy się upewnić, czy:
• gniazdko posiada uziemienie i jest zgodne z
obowiązującymi przepisami;
• gniazdko jest w stanie wytrzymać maksymalne
obciążenie mocy urządzenia, wskazane w tabeli
Danych technicznych (patrz obok);
• napięcie zasilania mieści się w wartościach
wskazanych w tabeli Danych technicznych (patrz
obok);
• gniazdko pasuje do wtyczki pralki. W przeciwnym
razie należy wymienić gniazdko lub wtyczkę.
! Nie należy instalować pralki na otwartym powietrzu,
nawet w osłoniętym miejscu, gdyż wystawienie
urządzenia na działanie deszczu i burz jest bardzo
niebezpieczne.
! Po zainstalowaniu pralki gniazdko elektryczne powinno
być łatwo dostępne.
! Nie używać przedłużaczy ani rozgałęźników.
Model WMSG 622
szerokość cm 59,5
Wymiary
Pojemność od 1 do 6 kg
Dane prądu
elektrycznego
Dane sieci
wodociągowej
Szybkość
wirowania
Programy testowe
zgodnie z dyrektywami 1061/2010 i
1015/2010
wysokość cm 85
głębokość cm 43,5
dane techniczne umieszczone są na
tabliczce na maszynie
Maksymalne ciśnienie 1 MPa (10 barów)
ciśnienie minimalne 0,05 MPa (0,5 barów)
pojemność bębna 48 litrów
do 1200 obrotów na minutę
Program 4; temperatura 60°C;
Program 5; temperatura 40°C.
Urządzenie to zostało wyprodukowane
zgodnie z następującymi przepisami CE:
- 2004/108/CE (o Kompatybilności
Elektromagnetycznej)
- 2002/96/CE
- 2006/95/CE (o Niskim Napięciu)
27
Page 28

Opis pralki
PL
Panel sterowania
Przycisk ON/OFF
POKRĘTŁO
Szuadka na środki piorące
Szuadka na środki piorące: do dozowania środków
piorących i dodatków (patrz “Środki piorące i bielizna”).
Przycisk ON/OFF : nacisnąć krótko przycisk w
celu włączenia lub wyłączenia maszyny. Kontrolka
START/PAUSE, która pulsuje powoli w kolorze
zielonym wskazuje, że maszyna jest włączona. W celu
wyłączenia pralki podczas prania konieczne jest dłuższe
przytrzymanie naciśniętego przycisku, przez około 3
sek.; krótkie lub przypadkowe naciśnięcie wystarczy
do wyłączenia maszyny. Wyłączenie maszyny podczas
trwającego prania anuluje program prania.
POKRĘTŁO PROGRAMÓW: w celu ustawienia
żądanego programu (patrz “Tabela programów”).
Przyciski i kontrolki OPCJI: służą do wybierania
dostępnych funkcji. Kontrolka wybranej opcji pozostanie
włączona.
PROGRAMÓW
Przycisk
Przycisk
TEMPERATURA
Przycisk
WIROWANIE
Przycisk z kontrolką START/PAUSE: kiedy zielona
kontrolka pulsuje powoli, nacisnąć przycisk w celu
uruchomienia prania. Po uruchomieniu cyklu kontrolka
świeci w sposób ciągły. W celu wybrania pauzy w praniu
należy nacisnąć ponownie przycisk, kontrolka zacznie
pulsować w kolorze pomarańczowym. Jeśli symbol
nie świeci się, można otworzyć drzwiczki. W celu
ponownego uruchomienia prania od miejsca, w którym
zostało przerwane, należy ponownie nacisnąć przycisk.
Przycisk
lub wyłączenia blokady panelu sterowania należy
przytrzymać naciśnięty przycisk przez około 2 sekundy.
Podświetlony symbol wskazuje, że panel sterowania
został zablokowany. W ten sposób uniemożliwia się
dokonywanie przypadkowych zmian w programach,
zwłaszcza, jeśli w domu obecne są dzieci.
W celu wyłączenia blokady panelu sterowania należy
przytrzymać naciśnięty przycisk przez około 2 sekundy.
CHILD LOCK
Przyciski i
kontrolki OPCJI
WYŚWIETLACZ
Przycisk
CHILD
LOCK
Przycisk
OPÓŹNIENIE
STARTU
: w celu uruchomienia
OPCJE
PRANIA
Przycisk i kontrolka
START/PAUSE
Przycisk
żądanego stopnia intensywności prania.
Przycisk TEMPERATURA : naciskać w celu
zmniejszenia lub całkowitego wyłączenia temperatury;
ustawiona wartość zostanie wskazana na wyświetlaczu.
Przycisk WIROWANIE : naciskać w celu zmniejszenia
liczby obrotów lub całkowitego wyłączenia wirówki;
ustawiona wartość zostanie wskazana na wyświetlaczu.
Przycisk OPÓŹNIENIE STARTU : naciskać w celu
ustawienia opóźnionego startu wybranego programu;
opóźnienie zostanie wskazane na wyświetlaczu.
28
OPCJE PRANIA
: nacisnąć w celu wybrania
Funkcja stand by
Pralka ta, w myśl nowych norm europejskich związanych
z oszczędnością elektryczną, posiada system auto
wyłączenia (stand by), który włącza się po 30 minutach
nie użytkowania. Ponownie lekko wcisnąć przycisk
ON-OFF i poczekać, aż pralka ponownie włączy się.
Zużycie w trybie wyłączenia: 1 W
Zużycie w trybie czuwania: 1 W
Page 29

Wyświetlacz
B
A
C
Wyświetlacz pomaga zaprogramować urządzenie i dostarcza wielu informacji.
W sekcji A wyświetla się czas trwania dostępnych programów, a po rozpoczęciu cyklu czas, jaki pozostaje do jego
zakończenia; natomiast jeśli została ustawiona funkcja OPÓŹNIENIE STARTU, wyświetla się czas pozostający do
momentu rozpoczęcia wybranego programu.
Ponadto, po naciśnięciu odpowiednich przycisków wyświetlają się maksymalne wartości szybkości wirowania i
temperatury dla ustawionego programu lub ostatnie zaprogramowane wartości, jeśli są one odpowiednie dla wybranego
programu.
PL
W sekcji B wyświetlane są “fazy prania” przewidziane dla wybranego cyklu, a po rozpoczęciu programu aktualna “faza
prania”:
Pranie
Płukanie
Wirowanie
Odprowadzanie wody
W sekcji C są umieszczone, kolejno od lewej do prawej strony, ikony “temperatury”, “wirowania” i “Startu z opóźnieniem”.
Kreski “temperatura” wskazują poziom temperatury w odniesieniu do maksymalnego poziomu, jaki może być
ustawiony dla wybranego cyklu.
Kreski “wirowanie” wskazują poziom wirowania w odniesieniu do maksymalnego poziomu, jaki może być
ustawiony dla wybranego cyklu.
Świecący symbol “Startu z opóźnieniem” wskazuje, że na wyświetlaczu można odczytać ustawioną wartość “Startu z
opóźnieniem”.
Kontrolka BLOKADY DRZWICZEK
Jeśli symbol się świeci, oznacza to, że drzwiczki są zablokowane. Aby uniknąć uszkodzenia pralki, przed przystąpieniem
do otwierania drzwiczek należy odczekać, aż symbol ten zgaśnie. Aby otworzyć drzwiczki w trakcie trwania cyklu, należy
nacisnąć przycisk START/PAUSE; kiedy symbol BLOKADY DRZWICZEK zgaśnie, można otworzyć drzwiczki.
29
Page 30

Jak wykonać cykl prania
PL
1. WŁĄCZENIE MASZYNY. Nacisnąć przycisk ,
kontrolka START/PAUSE zacznie powoli pulsować w
kolorze zielonym.
2. ZAŁADOWAĆ BIELIZNĘ. Otworzyć drzwiczki.
Włożyć bieliznę, uważając, aby nie przekroczyć
wielkości wsadu wskazanej w tabeli programów
znajdującej się na następnej stronie.
3. WSYPAĆ ŚRODEK PIORĄCY. Wysunąć szuadkę
i umieścić środek piorący w odpowiednich komorach
zgodnie ze wskazówkami zawartymi w rozdziale
“Środki piorące i bielizna”.
4. ZAMKNĄĆ DRZWICZKI.
5. WYBRAĆ PROGRAM. Przy pomocy pokrętła
PROGRAMY wybrać żądany program; ma on
wstępnie ustawioną temperaturę i prędkość
wirowania, jednak wartości te można zmienić. Na
wyświetlaczu pojawi się czas trwania cyklu.
6. SPERSONALIZOWAĆ CYKL PRANIA. Naciskać
odpowiednie przyciski:
Zmienić temperaturę i/lub prędkość
wirowania. Urządzenie automatycznie wyświetla
maksymalne wartości temperatury i prędkości
wirowania dla ustawionego programu lub ostatnie
wybrane wartości, jeśli są one zgodne z ustawionym
programem. Naciskając przycisk stopniowo
zmniejsza się temperaturę, aż do prania na zimno
“OFF”. Naciskając przycisk stopniowo zmniejsza
się prędkość wirowania, aż do jego wyłączenia
“OFF”. Dodatkowe naciśnięcie przycisków przywróci
maksymalne dostępne wartości.
! Wyjątek: wybierając program 4 temperaturę można
podnieść aż do 90°.
Ustawić start z opóźnieniem.
W celu ustawienia opóźnionego rozpoczęcia
wybranego programu należy naciskać odpowiedni
przycisk aż do osiągnięcia żądanego czasu
opóźnienia. Kiedy ta opcja jest aktywna, na
wyświetlaczu zaświeca się symbol . Aby anulować
opóźnienie startu, należy naciskać przycisk do
momentu pojawienia się na wyświetlaczu napisu
“OFF”.
Ustawić żądany stopień intensywności prania.
Opcja umożliwia optymalizację prania w
zależności od stopnia zabrudzenia tkanin oraz
żądanej intensywności prania.
Wybrać program prania, cykl zostanie automatycznie
ustawiony na poziomie „Normal”, przeznaczonym
dla średnio zabrudzonej odzieży, (ustawienie to
nie stosuje się dla cyklu „Wełna”, który ustawia się
automatycznie na poziomie „Delicate”).
W przypadku silnie zabrudzonej odzieży, należy
nacisnąć przycisk aż do przejścia do poziomu
„Intensive”. Poziom ten gwarantuje wysokiej
jakości pranie, dzięki użyciu większej ilości wody w
początkowej fazie cyklu i intensywniejszym ruchom
mechanicznym służy do usuwania najoporniejszych
plam. Może być używany z wybielaczem i bez niego.
Jeśli chce się przeprowadzić wybielanie, należy
włożyć dodatkową szuadkę 4, znajdującą się
w wyposażeniu, do szuadki 1. Nie przekraczać
poziomu „max” wybielacza w płynie, podanej na
środkowym wskaźniku (zobacz rysunek na str. 32).
W przypadku lekko zabrudzonej odzieży lub w celu
delikatnego obchodzenia się z tkaninami, należy
nacisnąć przycisk aż do przejścia do poziomu
„Delicate”. Cykl zredukuje ruchy mechaniczne, aby
zagwarantować doskonały efekt prania delikatnej
odzieży.
Zmiana charakterystyki cyklu.
• Naciskać przycisk w celu włączenia opcji; zaświeci
się kontrolka odpowiadająca przyciskowi.
• Ponownie nacisnąć przycisk w celu wyłączenia
opcji; kontrolka zgaśnie.
! Jeśli wybrana opcja jest niezgodna z ustawionym
programem, kontrolka będzie pulsować i opcja nie
zostanie włączona.
! Jeśli wybrana opcja nie może być łączona z inną,
ustawioną wcześniej, kontrolka pierwszej wybranej
opcji będzie migać i włączona zostanie tylko druga
opcja, której kontrolka zaświeci się.
! W zależności od opcji może się zmieniać zalecana
objętość wsadu i/lub czas trwania cyklu.
7. URUCHOMIĆ PROGRAM. Nacisnąć przycisk START/
PAUSE. Odpowiednia kontrolka zaświeci się kolorem
zielonym i drzwiczki zostaną zablokowane (włączy się
symbol BLOKADY DRZWICZEK ). W celu zmiany
programu w czasie trwania cyklu należy ustawić
pralkę w trybie pauzy, naciskając przycisk START/
PAUSE (kontrolka START/PAUSE zacznie powoli
pulsować bursztynowym światłem); następnie wybrać
żądany cykl i ponownie nacisnąć przycisk START/
PAUSE. W celu otwarcia drzwiczek w trakcie trwania
cyklu należy nacisnąć przycisk START/PAUSE; kiedy
symbol BLOKADY DRZWICZEK zgaśnie, można
otworzyć drzwiczki. Nacisnąć ponownie przycisk
START/PAUSE, aby uruchomić program od momentu,
w którym został on przerwany.
8. KONIEC PROGRAMU. Wskazywany jest przez
napis “END” na wyświetlaczu, kiedy symbol BLOKADY
DRZWICZEK zgaśnie, można otworzyć drzwiczki.
Otworzyć drzwiczki, wyjąć bieliznę i wyłączyć
urządzenie.
! Aby anulować już rozpoczęty cykl, należy długo
przytrzymać wciśnięty przycisk . Cykl zostanie
przerwany i urządzenie wyłączy się.
30
Page 31

Programy i opcje
Tabela programów
Opis programu
Programy
Odplamianie
1
Białe
2
Bawełna + Praniem wstępnym: tkaniny białe bardzo mocno
3
zabrudzone.
Bawełna (1): tkaniny białe i kolorowe, wytrzymałe, mocno
4
zabrudzone.
Bawełna (2-3): tkaniny białe lekko zabrudzone i delikatne
5
kolorowe.
Syntetyczne: tkaniny kolorowe, wytrzymałe, mocno zabrudzone.
6
Syntetyczne (4): tkaniny kolorowe, wytrzymałe, mocno zabru-
6
dzone.
Antyalergiczny
7
Baby
8
Wełna: do wełny, kaszmiru, itp.
9
Delikatne
10
Szybkie Pranie 60’: W celu szybkiego odświeżenia zabrudzonych tkanin (niewskazany dla wełny, jedwabiu i tkanin przez-
11
naczonych do prania ręcznego).
Bawełna
12
Prędkość
Temp.
maks. (°C)
maks.
(obroty
na
minutę)
40° 1200 - 60° 1200 - -
90° 1200
60°
(Max. 90°)
1200 -
40° 1200 -
60° 800 -
40° 800 -
60° 1200 40° 1000 40° 800 - 30° 0 - -
60° 1200 - -
zimna woda
1200 - -
Środki piorące i
dodatki
Pranie
wstępne
Pranie
Wybielacz
-
kWh
Środek
zmiękczający
sztkowa %
Wilgotność re-
Wsad maks. (kg)
Zużycie energii
4 - - - 180’
4 - - - 190’
6 53 2,21 93 180’
6 53 0,92 54 160’
6 53 0,86 63 150’
2,5 44 0,87 42 90’
2,5 44 0,56 42 80’
4 - - - 200’
4 - - - 165’
1,5 - - - 80’
1 - - - 75’
3,5 53 0,81 36 60’
3 53 0,15 58 95’
cyklu
Czas trwania
Woda łącznie lt
PL
Syntetyczne
13
Szybki 30’
14
Płukanie
Wirowanie + Odprowadzanie Wody
Czas trwania cyklu wskazany na wyświetlaczu lub w instrukcji jest czasem oszacowanym dla standardowych warunków. Rzeczywisty czas trwania cyklu może się
zmieniać w zależności od wielu czynników, takich jak temperatura i ciśnienie wody na wlocie, temperatura otoczenia, ilość detergentu, ilość i rodzaj pranej odzieży,
wyważenie ładunku, wybrane opcje dodatkowe.
Dla wszystkich Test Institutes:
1) Program sterowania zgodny z normą 2010/1061:
Ten cykl jest odpowiedni do prania średnio zabrudzonej odzieży bawełnianej i jest najbardziej wydajnym cyklem pod względem łącznego zużycia energii elektrycznej
i wody; należy go używać do odzieży przeznaczonej do prania w 60°C. Rzeczywista temperatura prania może się różnić od podanej.
2) Program sterowania zgodny z normą 2010/1061:
Ten cykl jest odpowiedni do prania średnio zabrudzonej odzieży bawełnianej i jest najbardziej wydajnym cyklem pod względem łącznego zużycia energii elektrycznej
i wody; należy go używać do odzieży przeznaczonej do prania w 40°C. Rzeczywista temperatura prania może się różnić od podanej.
3) Program bawełna, długi:
4)
Program tkaniny syntetyczne długi: ustawić
ustawić
program 5 z temperaturą 40°C.
ustawić
program 4 z temperaturą 60°C.
ustawić
program 5 z temperaturą 40°C.
program 6 z temperaturą 40°C.
zimna woda
zimna woda
800 - -
800 - -
- 1200 - - -
3 49 0,08 51 70’
3 71 0,05 57 30’
6 - - - 49’
- 1200 - - - - 6 - - - 16’
Opcje prania
Extra Płukanie
Wybierając tę opcję zwiększa się skuteczność płukania i
zapewnia się maksymalne usunięcie środka piorącego.
Opcja ta jest przydatna dla osób o szczególnie wrażliwej
skórze.
! Nie jest dostępna w przypadku programów 7, 10, 14, .
Time Saver
Wybierając tę opcję, skraca się czas trwania programu nawet
do 50%, w zależności od wybranego cyklu, gwarantując
równocześnie oszczędność wody i energii. Z cyklu należy
korzystać do prania niezbyt zabrudzonej odzieży.
! Funkcja ta nie jest dostępna w przypadku programów
1, 2, 7, 8, 9, 10, 11, 12, 13, 14, , .
31
Page 32

Środki piorące i bielizna
M
AX
1
2
4
3
A
B
PL
Szuadka na środki piorące
Dobry rezultat prania zależy również od prawidłowego
dozowania środka piorącego: użycie jego nadmiernej
ilości nie poprawia skuteczności prania, lecz przyczynia
się do powstawania nalotów na wewnętrznych częściach
pralki i do zanieczyszczania środowiska.
! Środki piorące w proszku należy stosować do tkanin z
białej bawełny i do prania wstępnego oraz do prania w
temperaturze przekraczającej 60°C.
! Należy stosować się do zaleceń podanych na
opakowaniu środka piorącego.
! Nie stosować środków do prania ręcznego, ponieważ
tworzą one za dużo piany.
Wysunąć szuadkę i
umieścić w niej środek
piorący lub dodatkowy w
następujący sposób.
Przegródka 1: Środek
piorący do prania
wstępnego
(w proszku)
Przed wsypaniem środka
piorącego należy sprawdzić, czy nie jest włożony
dodatkowy pojemnik 4.
Przegródka 2: Środek piorący do prania
zasadniczego (w proszku lub w płynie)
W przypadku stosowania środka piorącego w
płynie, zaleca się użycie ścianki A dostarczonej na
wyposażeniu, która ułatwia prawidłowe dozowanie. W
celu użycia środka piorącego w proszku, należy wsunąć
ściankę w zgłębienie B.
Przegródka 3: Środki dodatkowe (zmiękczające, itp.)
Środek zmiękczający nie powinien wypływać poza kratkę.
Dodatkowy pojemnik 4: Wybielacz
Przygotowanie bielizny
• Podzielić bieliznę do prania według:
- rodzaju tkaniny / symbolu na etykiecie.
- kolorów: oddzielić tkaniny kolorowe od białych.
• Opróżnić kieszenie i sprawdzić guziki.
• Nie przekraczać wskazanego ciężaru suchej bielizny:
Tkaniny wytrzymałe: maks. 6 kg
Tkaniny syntetyczne: maks. 2,5 kg
Tkaniny delikatne: maks. 2 kg
Wełna: maks. 1,5 kg
Jedwab: maks. 1 kg
Ile waży bielizna?
1 prześcieradło 400-500 gr.
1 poszewka 150-200 gr.
1 obrus 400-500 gr.
1 szlafrok 900-1.200 gr.
1 ręcznik 150-250 gr.
Programy specjalne
Odplamianie: program 1 odpowiedni do prania silnie
zabrudzonej odzieży o trwałych kolorach. Program
gwarantuje klasę prania wyższą od standardowej
(klasa A). Nie używać programu, gdy miesza się
odzież w różnych kolorach. Zalecamy stosowanie
środka piorącego w proszku. W przypadku szczególnie
opornych plam, zalecamy wcześniej zastosowanie
specjalnych dodatków.
Białe: z cyklu 2 należy korzystać do prania białych
tkanin. Program został opracowany tak, aby chronił
przed szarzeniem białych tkanin.
W celu osiągnięcia najlepszych wyników zaleca się
stosowanie detergentu w proszku
Antyalergiczny: programu 7 należy używać do
usuwania głównych alergenów, takich jak pyłki, roztocza,
sierść kotów i psów.
Baby: Program 8 ten umożliwia usunięcie z odzieży
zabrudzeń typowych dla dzieci, zapewniając przy
tym całkowite wypłukanie środka piorącego z tkanin,
aby uniknąć reakcji alergicznych, jakie mógłby on
wywołać na delikatnej skórze dziecka. Cykl ten został
opracowany w celu ograniczenia liczby bakterii poprzez
wykorzystanie większej ilości wody i optymalizację
działania specjalnych dodatków higienizujących, którymi
uzupełniany jest środek piorący.
Wełna: cykl prania „Wełna” niniejszej pralki HotpointAriston został przetestowany i zatwierdzony przez
Woolmark Company jako odpowiedni do prania odzieży
wełnianej przeznaczonej wyłącznie do prania ręcznego,
pod warunkiem, że pranie jest przeprowadzane zgodnie
z instrukcjami podanymi na etykiecie ubrania oraz ze
wskazówkami dostarczonymi przez producenta urządzenia.
Hotpoint-Ariston to pierwsza marka pralek, która uzyskała
od Woolmark Company certykat Woolmark Apparel Care
- Platinum ze względu na osiągane rezultaty prania oraz
zużycie wody i energii.
Delikatne: używać programu 10 do prania bardzo
delikatnej odzieży, ozdobionej cekinami lub koralikami.
Do prania jedwabiu i zasłon, należy wybrać cykl
ustawić poziom „Delicate” opcji .
Zalecamy wywrócenie ubrań na lewą stronę i włożenie
małych części odzieży do woreczka przeznaczonego
specjalnie do prania delikatnych ubrań. Dla osiągnięcia
najlepszych efektów, zalecamy stosowanie środka
piorącego w płynie do tkanin delikatnych.
Programy Eco
Programy Eco dają dobre wyniki prania w niskich
temperaturach, umożliwiając mniejsze zużycie
energii elektrycznej, co przekłada się na korzyści dla
środowiska naturalnego oraz oszczędności pieniężne.
Programy Eco (12 Bawełna, 13 Syntetyczne i 14
Szybki 30’) zostały utworzone dla różnych rodzajów
tkanin i dla odzieży mało zabrudzonej. Dla osiągnięcia
najlepszych rezultatów zalecamy stosowanie
środka piorącego w płynie; przed praniem użyć
odpowiedniego środka do czyszczenia kołnierzyków,
mankietów i usuwania plam.
10
i
32
Page 33

Zalecenia i środki
20
ostrożności
! Pralka została zaprojektowana i wyprodukowana
zgodnie z międzynarodowymi normami bezpieczeństwa.
Niniejsze ostrzeżenia zostały tu zamieszczone ze
względów bezpieczeństwa i należy je uważnie przeczytać.
Ogólne zasady bezpieczeństwa
• Urządzenie to zostało zaprojektowane wyłącznie do
użytkowania w warunkach domowych.
• Urządzenie to nie jest przeznaczone do użytkowania
przez osoby (w tym dzieci) o ograniczonej sprawności
zycznej, zmysłowej lub umysłowej oraz nieposiadające
odpowiedniego doświadczenia i wiedzy, chyba że używają
go pod nadzorem lub po otrzymaniu wskazówek od osoby
odpowiedzialnej za ich bezpieczeństwo. Należy pilnować,
aby dzieci nie bawiły się urządzeniem.
• Nie dotykać pralki stojąc przy niej boso lub mając
mokre lub wilgotne ręce albo stopy.
• Nie wyjmować wtyczki z gniazdka ciągnąc za kabel,
należy trzymać za wtyczkę.
• W trakcie pracy maszyny nie otwierać szuadki na
środki piorące.
• Nie dotykać odprowadzanej wody, gdyż może ona być
bardzo gorąca.
• W żadnym wypadku nie otwierać na siłę drzwiczek pralki:
grozi to uszkodzeniem mechanizmu zabezpieczającego
drzwiczki przed przypadkowym otwarciem.
• W razie wystąpienia usterki nie należy w żadnym
wypadku ingerować w wewnętrzne części pralki z
zamiarem samodzielnego dokonania naprawy.
• Zawsze uważać, aby dzieci nie zbliżały się do
pracującej pralki.
• W czasie prania drzwiczki pralki nagrzewają się.
• Jeśli trzeba przenieść pralkę w inne miejsce, należy to
robić bardzo ostrożnie, w dwie lub trzy osoby. Nigdy
nie należy samodzielnie przenosić urządzenia, gdyż
jest ono bardzo ciężkie.
• Przed włożeniem bielizny sprawdzić, czy bęben jest
pusty.
domowego nie powinny być utylizowane w normalnym
ciągu utylizacji stałych odpadów miejskich. Stare
urządzenia powinny być zbierane oddzielnie, aby
zoptymalizować stopień odzysku i recyrkulacji
materiałów, z których są one zbudowane, oraz
aby zapobiec potencjalnym szkodom dla zdrowia
i środowiska. Symbol przekreślonego kosza jest
umieszczony na wszystkich produktach w celu
przypominania o obowiązku ich segregacji.
Właściciele urządzeń gospodarstwa domowego
mogą uzyskać dodatkowe informacje dotyczące ich
prawidłowej utylizacji, zwracając się do odpowiednich
służb publicznych lub do sprzedawców tych urządzeń.
Ręczne otwieranie okrągłych drzwiczek
Jeśli z powodu przerwy w dostawie energii elektrycznej
nie jest możliwe otwarcie okrągłych drzwiczek, w
celu wyjęcia i rozwieszenia prania należy wykonać
następujące czynności:
1. wyjąć wtyczkę z gniazdka
elektrycznego.
2. sprawdzić, czy poziom
wody wewnątrz maszyny
znajduje się poniżej poziomu
otwarcia drzwiczek; w
przeciwnym wypadku usunąć
nadmiar wody przez przewód
odpływowy, zbierając ją
do wiaderka w sposób
wskazany na rysunku.
3. zdjąć panel pokrywy z
przedniej strony pralki przy
pomocy śrubokrętu (patrz
rysunek).
PL
System równoważenia wsadu
Przed każdym wirowaniem, aby uniknąć nadmiernych
drgań oraz jednorodnie rozłożyć wsad, bęben wykonuje
obroty z prędkością nieco większą niż podczas prania.
Jeśli po kilku próbach wsad nie zostanie prawidłowo
zrównoważony, urządzenie wykona wirowanie z prędkością
mniejszą od przewidywanej. W przypadku wystąpienia
nadmiernego niezrównoważenia wsadu pralka dokona
jego rozłożenia zamiast odwirowania. Aby zapewnić lepsze
rozłożenie wsadu oraz jego właściwe zrównoważenie
zaleca się mieszanie dużych i małych sztuk bielizny.
Utylizacja
• Utylizacja opakowania:
stosować się do lokalnych przepisów, dzięki temu
opakowanie będzie mogło zostać ponownie wykorzystane.
• Dyrektywa europejska 2002/96/WE dotycząca
odpadów urządzeń elektrycznych i elektronicznych
przewiduje, że elektryczne urządzenia gospodarstwa
4. pociągnąć na zewnątrz klapkę wskazaną na rysunku, aż
do wyzwolenia się z zacisku plastikowego zaczepu; następnie
pociągnąć go w dół i równocześnie otworzyć drzwiczki.
5. ponownie założyć panel upewniwszy się, przed
dociśnięciem go do maszyny, czy zatrzaski zostały
umieszczone w odpowiednich otworach.
33
Page 34

Utrzymanie i konserwacja
1
2
A
B
PL
Odłączenie wody i prądu elektrycznego
• Zamknąć kurek dopływu wody po każdym
praniu. W ten sposób zmniejsza się zużycie
instalacji hydraulicznej pralki oraz eliminuje się
niebezpieczeństwo wycieków.
• Przed przystąpieniem do czyszczenia pralki oraz do
czynności konserwacyjnych wyjąć wtyczkę z gniazdka.
Czyszczenie pralki
• Obudowę zewnętrzną i gumowe części pralki można
myć ściereczką zmoczoną w letniej wodzie z mydłem.
Nie stosować rozpuszczalników ani ściernych środków
czyszczących.
• Pralka jest wyposażona w program “OPCJA
CZYSZCZENIA PRALKI” części wewnętrznych, który
należy przeprowadzać nie wprowadzając niczego do
kosza pralki.
Środek piorący (w ilości równej 10% ilości zalecanej dla
lekko zabrudzonej odzieży) lub dodatki przeznaczone
specjalnie do czyszczenia pralek, mogą zostać użyte
jako środki pomocnicze podczas programu czyszczenia.
Zaleca się przeprowadzanie programu czyszczenia co
40 cykli prania.
W celu uruchomienia programu należy nacisnąć
równocześnie przyciski A i B przez 5 sek. (zob. rysunek).
Program rozpocznie się automatycznie i będzie trwał
około 70 minut. W celu zakończenia cyklu, należy
nacisnąć przycisk START/PAUSE.
Konserwacja okrągłych drzwiczek i bębna
• Drzwiczki pralki należy zawsze pozostawiać uchylone,
aby zapobiec tworzeniu się nieprzyjemnych zapachów.
Czyszczenie pompy
Pralka wyposażona jest w pompę samoczyszczącą,
która nie wymaga zabiegów konserwacyjnych. Może się
jednak zdarzyć, że drobne przedmioty (monety, guziki)
wpadną do komory wstępnej zabezpieczającej pompę,
która znajduje się w jej dolnej części.
! Należy się upewnić, że cykl prania został zakończony i
wyjąć wtyczkę z gniazdka.
Aby dostać się do komory wstępnej:
1. zdjąć panel pokrywy z
przedniej strony pralki przy
pomocy śrubokrętu (patrz
rysunek);
2. odkręcić pokrywę,
obracając ją w kierunku
przeciwnym do ruchu
wskazówek zegara (patrz
rysunek): wypłynięcie
niewielkiej ilości wody jest
normalnym zjawiskiem;
Czyszczenie szuadki na środki piorące
Wysunąć szuadkę,
unosząc ją lekko ku górze
i wyciągając na zewnątrz
(patrz rysunek).
Wypłukać szuadkę pod
bieżącą wodą. Czynność
tę należy wykonywać
stosunkowo często.
34
3. dokładnie wyczyścić wnętrze;
4. ponownie przykręcić pokrywę;
5. ponownie założyć panel upewniwszy się, przed
dociśnięciem go do maszyny, czy zatrzaski zostały
umieszczone w odpowiednich otworach.
Kontrola przewodu doprowadzającego wodę
Przynajmniej raz w roku należy sprawdzić przewód
doprowadzający wodę. Jeśli widoczne są na nim
pęknięcia i rysy, należy go wymienić: w trakcie prania
duże ciśnienie może bowiem spowodować jego nagłe
rozerwanie.
! Nigdy nie instalować już używanych przewodów.
Page 35

Nieprawidłowości w działaniu
i sposoby ich usuwania
Może się zdarzyć, że pralka nie działa. Przed wezwaniem Serwisu Technicznego (patrz „Serwis Techniczny”) należy
sprawdzić, czy problemu nie da się łatwo rozwiązać korzystając z poniższego wykazu.
Nieprawidłowości w działaniu:
Pralka nie włącza się.
Cykl prania nie rozpoczyna się.
Pralka nie pobiera wody (Na
wyświetlaczu pulsuje napis H2O).
Pralka cały czas pobiera i
odprowadza wodę.
Pralka nie odprowadza wody i nie
odwirowuje prania.
Możliwe przyczyny / Rozwiązania:
• Wtyczka nie jest włączona do gniazdka lub jest wsunięta za słabo, w taki
sposób, że nie ma styku.
• W domu nie ma prądu.
• Drzwiczki nie są dokładnie zamknięte.
• Nie został wciśnięty przycisk ON/OFF.
• Nie został wciśnięty przycisk START/PAUSE.
• Kurek dopływu wody jest zamknięty.
• Zostało ustawione opóźnienie godziny rozpoczęcia prania.
• Przewód doprowadzający wodę nie jest podłączony do zaworu.
• Przewód jest pozaginany.
• Kurek dopływu wody jest zamknięty.
• W domu nastąpiła przerwa w dostawie wody.
• Ciśnienie wody nie jest wystarczające.
• Nie został wciśnięty przycisk START/PAUSE.
• Przewód odpływowy nie został zainstalowany na wysokości między 65 a 100
cm od podłogi (patrz “Instalacja”).
• Końcówka przewodu odpływowego jest zanurzona w wodzie (patrz “Instalacja”).
• Otwór odpływowy w ścianie nie posiada odpowietrznika.
Jeśli po sprawdzeniu tych możliwości problem nie zostanie rozwiązany, należy
zamknąć kurek dopływu wody, wyłączyć pralkę i wezwać Serwis Techniczny.
Jeśli mieszkanie znajduje się na najwyższych piętrach budynku, może wystąpić
efekt syfonu, w wyniku którego pralka cały czas pobiera i odprowadza wodę.
W celu wyeliminowania tej niedogodności należy zakupić specjalny zawór,
zapobiegający powstawaniu efektu syfonu.
• Program nie przewiduje odprowadzania wody: w przypadku niektórych
programów należy uruchomić je ręcznie.
• Przewód odpływowy jest pozaginany (patrz “Instalacja”).
• Instalacja ściekowa jest zatkana.
PL
Pralka mocno wibruje w fazie
wirowania.
Z pralki wycieka woda.
Kontrolki “Opcje” oraz START/
PAUSE szybko pulsują, a na
wyświetlaczu pojawia się kod
nieprawidłowości (np.: F-01, F-..).
Tworzy się zbyt duża ilość piany.
• Podczas instalacji pralki bęben nie został prawidłowo odblokowany (patrz
“Instalacja”).
• Pralka nie jest właściwie wypoziomowana (patrz “Instalacja”).
• Pralka, zainstalowana pomiędzy meblami a ścianą, ma za mało miejsca (patrz
“Instalacja”).
• Przewód doprowadzający wodę nie jest dobrze przykręcony (patrz “Instalacja”).
• Szuadka na środki piorące jest zatkana (w celu jej oczyszczenia patrz
“Utrzymanie i konserwacja”).
• Przewód odpływowy nie jest dobrze zamocowany(patrz “Instalacja”).
• Wyłączyć urządzenie i wyjąć wtyczkę z gniazdka, odczekać około 1 minuty,
następnie włączyć je ponownie.
Jeśli problem nie ustępuje, należy wezwać Serwis Techniczny.
• Środek piorący nie jest odpowiedni do pralek automatycznych (na opakowaniu
musi być napisane: “do pralek”, “do prania ręcznego i w pralce” itp.).
• Użyto za dużo środka piorącego.
35
Page 36

Serwis Techniczny
PL
Przed skontaktowaniem się z Serwisem Technicznym:
• Sprawdzić, czy problemu nie można rozwiązać samodzielnie (patrz “Nieprawidłowości w działaniu i sposoby ich
usuwania”);
• Ponownie uruchomić program i sprawdzić, czy problem nie zniknął;
• W przeciwnym wypadku skontaktować się z Serwisem Technicznym.
! Nigdy nie wzywać nieautoryzowanych techników.
Należy podać:
• rodzaj nieprawidłowości;
• model urządzenia (Mod.);
• numer seryjny (S/N).
Informacje te znajdują się na tabliczce umieszczonej w tylnej części pralki oraz widocznej z przodu po otwarciu
drzwiczek.
36
Page 37

Instrucţiuni de folosire
MAŞINĂ DE SPĂLAT RUFE
RO
Română
WMSG 622
Sumar
Instalare, 38-39
Despachetare şi punere la nivel
Racorduri hidraulice şi electrice
Primul ciclu de spălare
Date tehnice
Descrierea maşinii de spălat, 40-41
Panoul de control
Display
Cum se desfăşoară un ciclu de spălare, 42
Programe şi opţiuni, 43
Tabel de programe
Opţiuni de spălare
Detergenţi şi rufe, 44
Sertarul detergenţilor
Pregătirea rufelor
Programe particulare
Precauţii şi sfaturi, 45
Siguranţa generală
Scoaterea aparatului din uz
Deschiderea manuală a uşii
RO
Întreţinere şi curăţire, 46
Întreruperea alimentării cu apă şi curent electric
Curăţarea maşinii de spălat
Curăţarea compartimentului pentru detergent
Îngrijirea uşii şi a tamburului
Curăţarea pompei
Controlarea furtunului de alimentare cu apă
Anomalii şi remedii, 47
Asistenţă, 48
37
Page 38

Instalare
RO
! Este important să păstraţi acest manual pentru a-l
putea consulta în orice moment. În caz de vânzare, de
cesiune sau de schimbare a locuinţei, acesta trebuie să
rămână împreună cu maşina de spălat pentru a informa
noul proprietar cu privire la funcţionare şi la respectivele
avertismente.
! Citiţi cu atenţie instrucţiunile: veţi găsi informaţii
importante cu privire la instalare, la folosire şi la
siguranţă.
Despachetare şi punere la nivel
Despachetare
1. Scoaterea din ambalaj a maşinii de spălat.
2. Controlaţi ca maşina de spălat să nu fost deteriorată
în timpul transportului. Dacă este deteriorată, nu o
conectaţi şi contactaţi agentul de vânzare.
3. Scoateţi cele 4
şuruburi de protecţie
pentru transport şi
cauciucul cu distanţierul
respectiv, situate în partea
posterioară (a se vedea
gura).
O nivelare precisă conferă stabilitate maşinii şi evită
vibraţii, zgomote şi deplasări pe timpul funcţionării. În
cazul mochetelor sau a unui covor, reglaţi picioruşele
astfel încât să menţineţi sub maşina de spălat un spaţiu
sucient pentru ventilare.
Racorduri hidraulice şi electrice
Racordarea furtunului de alimentare cu apă
1. Conectaţi furtunul de
alimentare, înşurubându-l
la un robinet de apă rece
cu gura letată de 3/4 gaz
(a se vedea gura).
Înainte de conectare, lăsaţi
apa să curgă până când nu
a devenit limpede.
2. Conectaţi tubul de
alimentare la maşina de
spălat, înşurubândul la
priza de apă respectivă,
amplasată în partea
posterioară, sus în dreapta
(a se vedea gura).
4. Închideţi oriciile cu dopurile din plastic aate în
dotaţie.
5. Păstraţi toate piesele: pentru cazul în care maşina
de spălat va trebui să e transportată, piesele vor trebui
montante din nou.
! Ambalajele nu sunt jucării pentru copii!
Punere la nivel
1. Instalaţi maşina de spălat pe un paviment plan şi rigid,
fără a o sprijini de ziduri, mobilă sau altceva.
2. Dacă podeaua nu
este perfect orizontală,
compensaţi neregularităţile
deşurubând sau
înşurubând picioruşele
anterioare (a se vedea
gura); unghiul de
înclinare, măsurat pe
planul de lucru, nu trebuie
să depăşească 2°.
3. Fiţi atenţi ca furtunul să nu e nici pliat, nici îndoit.
! Presiunea apei de la robinet trebuie să e cuprinsă în
valorile din tabelul cu Date tehnice (a se vedea pagina
alăturată).
! Dacă lungimea furtunului de alimentare nu este
sucientă, adresaţivă unui magazin specializat sau unui
instalator autorizat.
! Nu folosiţi niciodată tuburi folosite deja.
! Utilizaţi tuburile furnizate cu maşina.
38
Page 39

Conectarea furtunului de golire
65 - 100 cm
Conectaţi furtunul de
evacuare, fără al îndoi, la
o conductă sau la o gură
de evacuare în zid, situate
între 65 şi 100 cm de
pământ;
sau sprijiniţil pe marginea
unei chiuvete sau a unei
căzi, legând elementul
de ghidare la robinet (a
se vedea gura). Capătul
liber al furtunului de golire
nu trebuie să rămână
cufundat în apă.
! Cablul nu trebuie să e îndoit sau comprimat.
! Cablul de alimentare trebuie să e înlocuit doar de
instalatorii autorizaţi.
Atenţie! Firma îşi declină orice responsabilitate în cazul
în care aceste norme nu se respectă.
Primul ciclu de spălare
După instalare, înainte de folosire, efectuaţi un ciclu de
spălare cu detergent şi fără rufe, selectând programul 2.
RO
! Nu se recomandă folosirea furtunurilor prelungitoare;
dacă este indispensabil, acestea trebuie să aibă
acelaşi diametru ca şi furtunul original şi nu trebuie să
depăşească 150 cm lungime.
Racordarea electrică
Înainte de a introduce ştecherul în priza de curent,
asiguraţi-vă că:
• priza să e cu împământare şi conformă prevederilor
legale;
• priza să poată suporta sarcina maximă de putere a
maşinii, indicată în tabelul cu Date tehnice (a se vedea
alături);
• tensiunea de alimentare să e cuprinsă în valorile
indicate în tabelul cu Date tehnice (a se vedea alături);
• priza să e compatibilă cu ştecărul maşinii de spălat.
În caz contrar înlocuiţi priza sau ştecărul.
! Maşina de spălat nu trebuie instalată afară, nici chiar în
cazul în care spaţiul este adăpostit, deoarece este foarte
periculoasă expunerea maşinii la ploi şi furtuni.
! După instalarea maşinii de spălat, priza de curent
trebuie să e uşor accesibilă.
! Nu folosiţi prelungitoare şi prize multiple.
Date tehnice
Model WMSG 622
lãrgime 59,5 cm
Dimensiuni
Capacitate de la 1 la 6 kg
Legãturi electrice
Legãturi hidrice
Viteza de centrifugare
Programe de control conform directivelor 1061/2010
şi 1015/2010
Zgomot
(dB(A) re 1 pW
înãlþime 85 cm
profunzime 43,5 cm
Vezi placuta cu caracteristicile tehnice,
aplicata pe masina.
presiune maximã 1 MPa (10 bari)
presiune minimã 0,05 MPa (0,5 bari)
capacitatea cuvei 48 litri
pânã la 1200 de rotaþii pe minut
programul 4; temperatura 60°C;
programul 5; temperatura 40°C.
Acest aparat este conform cu urmãtoarele Directive Comunitare:
- 2004/108/CE (Compatibilitate Electromagneticã)
- 2006/95/CE (Tensiuni Joase)
- 2002/96/CE
Spãlare: 51
Centrifugare:75
39
Page 40

Descrierea maşinii de spălat
RO
Panoul de control
Butonul ON/OFF
SELECTOR
PROGRAME
Sertarul detergenţilor
Sertarul detergenţilor: pentru a introduce detergenţii
sau aditivele (a se vedea “Detergenţi şi rufe”).
Buton ON/OFF : apăsaţi scurt tasta pentru a porni
sau opri maşina de spălat. Indicatorul START/PAUSE
emite un semnal intermitent de culoare verde, ceea ce
vă conrmă pornirea maşinii. Pentru a opri funcţionarea
maşinii de spălat în timpul spălării, este necesar să
ţineţi apăsată tasta circa 3 secunde; o apăsare de
scurtă durată sau accidentală nu va opri maşina. Oprirea
maşinii de spălat în timpul executării unui ciclu va anula
programul în curs de desfăşurare.
SELECTOR PROGRAME: pentru a alege programul
dorit (a se vedea “Tabel programe”).
Butoane şi indicatoare OPŢIUNE: pentru a selecta
opţiunile disponibile. Indicatorul privind opţiunea
selectată va rămîne aprins.
Buton
TIP CLĂTIRE
dorit de clătire.
Buton TEMPERATURA : apăsaţi butonul pentru a
diminua sau exclude temperatura; valoarea acesteia va
aşată pe display.
Buton CENTRIFUGA : apăsaţi butonul pentru a reduce
numărul de rotaţii sau a bloca storcătorul; numărul de
turaţii se poate vedea pe display.
: apăsaţi pentru a selecta tipul
Buton
TEMPERATURĂ
DISPLAY
Buton
CENTRIFUGĂ
PORNIRE
ÎNTÂRZIATĂ
Buton şi indicator START/PAUSE: când ledul verde
emite un semnal intermitent, apăsaţi tasta pentru a
porni ciclul de spălare. După activarea ciclului, ledul
rămâne aprins. Pentru a introduce o pauză în timpul
spălării, apăsaţi din nou tasta: ledul va emite o lumină
intermitentă, de culoare portocalie. După stingerea
indicatorului luminos , puteţi deschide uşa. Pentru a
continua spălarea, de unde a fost întreruptă, apăsaţi din
nou tasta.
Buton BLOCARE TASTE : pentru a bloca panoul de
comandă, ţineţi apăsată tasta timp de 2 secunde. Dacă
ledul corespunzător este aprins, atunci panoul de
comenzi este blocat. În acest fel, se evită modicarea
accidentală a unui program, în special de către copii.
Pentru a debloca panoul de comandă, ţineţi apăsată
tasta timp de 2 secunde.
Modalitatea de stand by
Această maşină de spălat rufe, conform noilor norme
legate de economia de curent electric, este dotată cu
un sistem de oprire automat (stand-by) care intră în
funcţiune după 30 minute de neutilizare. Apăsaţi scurt
tasta ON/OFF şi aşteptaţi repunerea în funcţiune a
maşinii.
Consum în off-mode: 1 W
Consum în Left-on: 1 W
Butoaneşi
indicatoare OPŢIUNI
Buton
BLOCARE
Buton
TASTE
Buton
TIP
CLĂTIRE
Buton şi indicator
START/PAUSE
Buton PORNIRE ÎNTÂRZIATĂ : apăsaţi pentru a
seta sau pornire întârziată a programului preselectat;
întârzierea este indicată pe display.
40
Page 41

Display
B
A
C
Ecranul este util pentru a programa maşina şi a furniza numeroase informaţii.
În secţiunea A este aşată durata diferitelor programe la dispoziţie şi a celui rămas, în cazul unui ciclu de spălare deja în
desfăşurare; dacă a fost programat un interval de PORNIRE ÎNTÂRZIATĂ, este aşat intervalul rămas până la pornirea
programului selectat.
De asemenea, apăsând butonul corespunzător, se vizualizează valorile maxime ale vitezei centrifugii şi ale temperaturii
pe care maşina le poate efectua în baza programului setat sau ultimele valori selectate dacă sunt compatibile cu
programul ales.
RO
În secţiunea B sunt aşate „fazele de spălare” prevăzute pentru ciclul selecţionat şi cele în curs de desfăşurare, în cazul
unui program deja pornit:
Spălare
Clătire
Centrifugă
Golire
În secţiunea C sunt prezente, începând de la stînga, iconiţele pentru “temperatură”, “centrifugă” şi “Pornire întîrziată”.
Barele “temperatură” indică nivelul maxim de temperatură care poate selectat pentru ciclul setat.
Barele “centrifugă” indică nivelul maxim de centrifugare care poate selectat pentru ciclul setat.
Simbolul “Pornire întîrziată” iluminat indică faptul că pe display este aşată valoarea “Pornirii întîrziate” setate.
Indicator UŞĂ BLOCATĂ
Iluminarea simbolului indică blocarea hubloului. Pentru a evita daune este necesar să se aştepte ca simbolul să se stingă
înainte de a deschide uşa.
Pentru a deschide uşa în timpul executării unui ciclu, apăsaţi butonul START/PAUSE; când simbolul UŞĂ BLOCATĂ
se stinge, puteţi deschide uşa.
41
Page 42

Cum se desfăşoară un ciclu de
spălare
RO
1. PUNEREA ÎN FUNCŢIUNE A MAŞINII Apăsaţi
butonul ; indicatorul START/PAUSE va lumina
intermitent lent cu culoarea verde.
2. INTRODUCEREA RUFELOR Deschideţi uşa.
Introduceţi rufele în maşină, ind atenţi să nu depăşiţi
cantitatea indicată în tabelul de programe - a se vedea
pagina următoare.
3. DOZAREA DETERGENTULUIExtrageţi sertarul şi
turnaţi detergent în compartimentele respective, după
indicaţiile din capitolul “Detergenţi şi rufe”.
4. ÎNCHIDEŢI UŞA.
5. ALEGEREA PROGRAMULUI Selectaţi cu butonul
PROGRAME programul dorit; acestuia îi sunt asociate
o temperatură şi o viteză de centrifugă care pot
modicate. Pe ecran va apărea şi durata ciclului.
6. PERSONALIZAREA CICLULUI DE SPĂLARE.
Apăsaţi butoanele: respective.
Modicarea temperaturii şi/sau a centrifugei.
Maşina aşează automat temperatura şi centrifuga
maxime prevăzute pentru programul ales, sau ultimele
selectate, dacă sunt compatibile cu programul.
Apăsând butonul se reduce progresiv temperatura
pînă spălarea rece “OFF”. Apăsând butonul se
reduce progresiv centrifuga pînă la excluderea sa
“OFF”. Din acest moment, apăsarea ulterioară a
butonelor va aduce valorile la cele maxime prevăzute.
! Excepţie: dacă selectaţi programul 4 temperatura poate
crescută până la 90°.
Setaţi pornirea întârziată.
Pentru a programa pornirea întârziată a maşinii,
apăsaţi butonul respectiv pentru a alege timpul de
întârziere dorit. Când această opţiune este activată,
pe display se aprinde simbolul . Pentru a şterge
pornirea întârziată, apăsaţi butonul până când pe
ecran vedeţi inscripţia “OFF”.
Reglaţi intensitatea dorită de spălare.
Opţiunea permite optimizarea spălării în funcţie
de gradul de murdarie al ţesăturilor şi de intensitatea
dorită a spălării.
Selectaţi programul de spălare, ciclul este reglat
automat la nivelul „Normal”, optimizat pentru rufe cu
grad normal de murdărie (această reglare nu este
valabilă pentru ciclul „Lână”, care se reglează automat
la nivelul „Delicate”).
Pentru rufe foarte murdare apăsaţi butonul până
se ajunge la nivelul „Intensive”. Datorită utilizării unei
cantităţi mai mari de apă în faza iniţială a ciclului şi
a unei mişcări mecanice mai mari, această opţiune
garantează o spălare de mare performanţă şi este
utilă pentru eliminarea petelor rezistente. Poate
utilizată cu sau fără înălbitor.
Dacă doriţi să efectuaţi albirea, introduceţi tăviţa
suplimentară 4, din dotare, în tăviţa 1. Când dozaţi
înălbitorul, nu depăşiţi nivelul „max” indicat pe pivotul
central (a se vedea gura de la pag. 44).
Pentru rufe puţin murdare sau pentru un tratament
mai delicat al ţesăturilor, apăsaţi butonul până se
ajunge la nivelul “Delicate”. Ciclul va reduce mişcarea
mecanică pentru a asigura rezultate perfecte de
spălare pentru rufele delicate.
Modicarea caracteristicilor ciclului.
• Apăsaţi butonul pentru a activa opţiunea; indicatorul
corespunzător butonului se va aprinde.
• Apăsaţi din nou butonul pentru a dezactiva această
opţiune; indicatorul luminos respectiv se va stinge.
! Dacă opţiunea selectată nu este compatibilă cu
programul ales, ledul corespunzător va semnaliza iar
funcţia nu se va activa.
! Dacă opţiunea selectată nu este compatibilă cu
o altă opţiune, reglată anterior, ledul corespunzător
primei opţiuni va emite un semnal intermitent şi va
activată numai a doua opţiune (ledul corespunzător
acesteia se va aprinde).
! Cantitatea de rufe admisă precum şi durata ciclului
pot varia în funcţie de funcţia aleasă.
7. ACTIVAREA UNUI PROGRAM. Apăsaţi butonul
START/PAUSE. Indicatorul luminos se va aprinde
- culoare albastră şi uşa se va bloca (simbolul UŞĂ
BLOCATĂ se va aprinde). Pentru a modica
un program în timpul executării unui ciclu, apăsaţi
butonul START/PAUSE pentru a întrerupe momentan
ciclul); indicatorul corespunzător butonul START/
PAUSE se va aprinde intermitent culoarea aurie)
şi alegeţi noul ciclul dorit şi apăsaţi din nou butonul
START/PAUSE.
Pentru a deschide uşa în timpul executării unui
ciclu, apăsaţi butonul START/PAUSE; când simbolul
UŞĂ BLOCATĂ se stinge, puteţi deschide uşa.
Apăsaţi din nou butonul START/PAUSE pentru a relua
programul de unde era oprit.
8. TERMINAREA PROGRAMULUI La încheierea
ciclului, pe ecran va apărea mesajul “END” ; când
simbolul UŞĂ BLOCATĂ se stinge, puteţi deschide
uşa. Deschideţi uşa, scoateţi rufele şi opriţi maşina de
spălat.
! Dacă doriţi să anulaţi un ciclu deja activat, apăsaţi
îndelung butonul . Ciclul se va întrerupe iar maşina se
va opri.
42
Page 43

Programe şi opţiuni
Tabel de programe
Descrierea Programului
Programe
Antitipată
1
Albituri
2
Bumbac cu prespălare: rufe albe foarte murdare.
3
Bumbac (1): albe şi colorate rezistente foarte murdare.
4
Bumbac (2-3): albe şi colorate delicate foarte murdare.
5
Sintetice: colorate rezistente foarte murdare.
6
Sintetice (4): colorate rezistente foarte murdare.
6
Antialergic
7
Baby
8
Lână: pentru lână, caşmir, etc.
9
Ultra Delicate
10
SPĂLARE RAPIDĂ 60’: pentru a împrospăta rapid articolele puţin murdare (nu este indicat pentru lână, mătase şi
11
articole de spălat cu mâna).
Bumbac Apă rece
12
Sintetice Apă rece
13
Temp. max.
(°C)
40° 1200
60° 1200
90° 1200
60°
(Max. 90°)
40° 1200
60° 800
40° 800
60° 1200
40° 1000
40° 800
30° 0
60° 1200
Viteza
max.
(ro-
taþii pe
minut)
1200
1200
800
Detergenþi
Prespãlare
-
-
-
-
-
-
-
-
-
-
-
-
-
RO
kWh
Umiditate
Spãlare
Decolorant
Balsam rufe
-
-
-
reziduală %
Sarcina Max. (Kg)
Consum energie
4 - - - 180’
4 - - - 190’
6 53 2,21 93 180’
6 53 0,92 54 160’
6 53 0,86 63 150’
2,5 44 0,87 42 90’
2,5 44 0,56 42 80’
4 - - - 200’
4 - - - 165’
-
-
-
-
-
1,5 - - - 80’
1 - - - 75’
3,5 53 0,81 36 60’
3 53 0,15 58 95’
3 49 0,08 51 70’
spalare
Apă totală lt
Durata ciclului de
Rapid 30’ Apă rece
14
Clătire
Centrifugă + Golire
Durata ciclului indicată pe display sau în carte este calculată în baza unor condiţii standard. Timpul efectiv poate varia în baza a numeroşi factori, precum temperatura şi presiunea apei la intrare, temperatura mediului, cantitatea de detergent, cantitatea şi tipul încărcăturii, echilibrarea încărcăturii, opţiunile suplimentare selectate.
Pentru toate Instituţiile de Testare:
1) Programul de control conform directivelor 1061/2010: setaţi programul 4 cu o temperatură de 60°C.
Acest ciclu este potrivit pentru curăţarea unei încărcături de bumbac cu grad de murdărie normal şi este cel mai ecient din punct de vedere al consumului combinat
de energie şi apă; se foloseşte pentru articole de îmbrăcăminte care pot spălate la 60°C. Temperatura efectivă de spălare poate diferi de cea indicată.
2) Programul de control conform directivelor 1061/2010: setaţi programul 5 cu o temperatură de 40°C.
Acest ciclu este potrivit pentru curăţarea unei încărcături de bumbac cu grad de murdărie normal şi este cel mai ecient din punct de vedere al consumului combinat
de energie şi apă; se foloseşte pentru articole de îmbrăcăminte care pot spălate la 40°C. Temperatura efectivă de spălare poate diferi de cea indicată.
3) Program pentru bumbac, prelungit: setaţi programul 5 cu o temperatură de 40°C.
4) Program sintetic lung: setaţi programul 6 cu o temperatură de 40°C.
- 1200
- 1200
800
-
- - -
- - - -
-
3 71 0,05 57 30’
6 - - - 49’
6 - - - 16’
Opţiuni de spălare
Clătire Suplimentară
Selectând această opţiune, clătirea va mai ecientă,
ceea ce asigură eliminarea totală a detergentului din
rufe. Este recomandată cu precădere persoanelor cu
pielea sensibilă.
! Nu se poate activa la programele 7, 10, 14, .
Rapid
Prin selectarea acestei opţiuni, se reduce durata
programului cu până la 50% în funcţie de ciclul ales,
asigurând în acelaşi timp o economie de apă şi de
energie. Folosiţi acest ciclu pentru rufe care nu sunt
excesiv de murdare.
! Nu poate activată pe programele 1, 2, 7, 8, 9, 10, 11,
12, 13, 14, , .
43
Page 44

Detergenţi şi rufe
M
AX
1
2
4
3
A
B
RO
Sertarul detergenţilor
Un rezultat bun la spălare depinde şi de dozarea corectă
a detergentului: excesul de detergent nu garantează o
spălare mai ecientă, ci contribuie la încrustarea părţilor
interne ale maşinii de spălat şi la poluarea mediului
înconjurător.
! Utilizaţi detergenţi praf pentru rufele albe de bumbac,
pentru prespălare şi pentru spălarea la temperaturi mai
mari de 60°C.
! Respectaţi indicaţiile de pe ambalajul detergentului.
! Nu introduceţi în maşină detergenţii pentru spălarea
manuală deoarece formează prea multă spumă.
Extrageţi sertarul pentru
detergenţi şi introduceţi
detergentul sau aditivul după
cum urmează:
compartiment 1: Detergent
pentru prespălare (sub
formă de praf)
Înainte de a adăuga
detergentul vericaţi ca
sertarul adiţional 4 să nu e
introdus.
compartiment 2: Detergent pentru spălare
(sub formă de praf sau lichid)
Când utilizaţi detergent lichid este recomandat să folosiţi
peretele despărţitor A prevăzut pentru dozarea corectă.
Pentru utilizarea de detergent praf puneţi peretele
despărţitor în cavitatea B.
compartiment 3: Aditivi (soluţie de înmuiat, balsam
rufe etc.)
Soluţia de înmuiat nu trebuie să iasă deasupra grătarului.
compartiment adiþional 4: Decolorant (Inãlbitor)
Pregătirea rufelor
• Subdivizaţi rufele în funcţie de:
- tipul de ţesătură / simbolul de pe etichetă.
- culori: separaţi rufele colorate de cele albe.
• Goliţi buzunarele şi controlaţi nasturii.
• Nu depăşiţi valorile indicate, referite la greutatea
rufelor uscate:
Ţesături rezistente: max 6 kg
Materiale sintetice: max 2,5 kg
Ţesături delicate: max 2 kg
Lână: max 1,5 kg
Mătase: max 1 kg
Cât cântăresc rufele?
1 cearceaf 400-500 g.
1 faţă de pernă 150-200 g.
1 faţă de masă 400-500 g.
1 halat de baie 900-1.200 g.
1 prosop 150-250 g.
Programe particulare
Antipată: programul 1 este potrivit pentru rufe foarte
murdare, cu culori rezistente. Programul asigură o clasă
de spălare superioară faţă de clasa standard (clasa
A). Nu efectuaţi programul amestecând rufe de culori
diferite. Se recomandă folosirea unui detergent praf.
Pentru petele dicile se recomandă pre-tratamentul cu
aditivi specici.
Albituri: folosiţi acest ciclu 2 pentru spălarea rufelor
albe. Programul este conceput pentru a păstra
strălucirea culorii albe în timp. Pentru rezultate mai bune,
se recomandă folosirea unui detergent praf.
Antialergic: folosiţi programul 7 pentru îndepărtarea
principalilor alergeni, cum ar polenul, acarienii din praf,
părul de pisică şi de câine.
Baby: folosiţi programul special 8 pentru a înlătura
murdăria tipică a copiilor şi pentru a elimina detergentul
din rufe, evitând astfel reacţiile alergice pentru pielea
delicată a copiilor. Ciclul a fost conceput pentru a
diminua încărcarea bacteriană prin folosirea unei cantităţi
de apă mai mari şi prin optimizarea aditivelor speciale de
igienizare, adăugate la detergent.
Lână: ciclul de spălare “Lână” al acestei maşini de spălat
Hotpoint-Ariston a fost testat şi aprobat de Woolmark
Company pentru spălarea articolelor de lână clasicate
ca ind lavabile de mână, cu condiţia ca spălarea să se
efectueze în conformitate cu instrucţiunile specicate
pe eticheta articolului şi cu indicaţiile furnizate de
producătorul aparatului. Hotpoint-Ariston este prima
marcă de maşini de spălat care a obţinut de la Woolmark
Company certicarea Woolmark Apparel Care - Platinum
pentru performanţele sale de spălare şi consumul de apă
şi energie.
Ultra Delicate: folosiţi programul 10 pentru spălarea
rufelor foarte delicate, care au aplicaţii, cum ar strass
sau paiete.
Pentru a spăla articole din mătase şi perdele, selectaţi
ciclul 10 şi reglaţi nivelul „Delicate” al opţiunii .
Se recomandă să întoarceţi pe dos rufele înainte de
spălare şi să introduceţi articolele mici într-un sac special
pentru spălarea rufelor delicate.
Pentru cele mai bune rezultate, vă recomandăm
utilizarea unui detergent lichid pentru rufe delicate.
Programele Eco
Programele Eco oferă performanţe bune de spălare
la temperaturi scăzute, permiţând o folosire redusă a
energiei electrice, ceea ce înseamnă un beneciu pentru
mediul înconjurător şi o economie de bani.
Programele Eco (Bumbac 12, Sintetice 13 şi Rapid 30’
14) au fost create pentru diferite tipuri de ţesături şi
pentru rufe puţin murdare.
Pentru a garanta un rezultat optim, recomandăm
folosirea unui detergent lichid; se recomandă pretratarea manşetelor, gulerelor şi petelor.
44
Page 45

Precauţii şi sfaturi
20
! Maşina de spălat a fost proiectată şi construită conform
normelor internaţionale de protecţie. Aceste avertizări sunt
furnizate din motive de siguranţă şi trebuie să e citite cu atenţie.
Siguranţa generală
• Acest aparat a fost conceput exclusiv pentru utilizarea
în locuinţe.
• Aparatul nu trebuie utilizat de către persoane (inclusiv
copii) cu capacităţi zice, senzoriale sau mentale reduse
şi cu experienţă sau cunoştinţe insuciente, exceptînd
cazul în care această utilizare are loc sub supravegherea
sau instrucţiunile unei persoane responsabile cu
securitatea lor. Copiii trebuie supravegheaţi pentru a vă
asigura că nu se joacă cu aparatul.
• Maşina de spălat trebuie să e folosită doar de persoane
adulte care respectă instrucţiunile din acest manual.
• Nu atingeţi maşina când sunteţi desculţi sau cu
mâinile sau picioarele ude sau umede.
• Nu scoateţi ştecherul din priză trăgând de cablu, ci
apucând ştecherul.
• Nu deschideţi sertarul detergenţilor în timp ce maşina
se aă în funcţiune.
• Nu atingeţi apa de evacuare: poate avea o
temperatură ridicată.
• Nu forţaţi în nici un caz uşa: s-ar putea deteriora
mecanismul de siguranţă care evită deschiderea
accidentală.
• În caz de defecţiune, nu umblaţi în niciun caz la
mecanismele din interior şi nu încercaţi să o reparaţi
singuri.
• Controlaţi mereu ca în apropierea maşinii aate în
funcţiune, să nu se ae copii.
• Pe durata spălării uşa se poate încălzi.
• Dacă trebuie să deplasaţi maşina, cereţi ajutor unei alte
(sau 2) persoane şi ţi foarte atenţi. Niciodată nu deplasaţi
maşina singuri deoarece aceasta este foarte grea.
• Înainte de a introduce rufele, controlaţi ca şi cuva să
e goală.
Sistemul de echilibrare a sarcinii
Pentru a evita trepidaţiile excesive, înainte de stoarcere,
cuva maşinii va distribui cantitatea de rufe în mod
uniform, centrifuga efectuând câteva rotaţii la o
viteză mai mare decât viteza de spălare. Dacă, după
numeroase încercări, maşina nu reuşeşte să echilibreze
greutatea, stoarcerea rufelor se va face la o viteză mai
mică decât cea prevăzută în program. Dacă instabilitatea
este prea mare, maşina va distribui greutatea în locul
centrifugei. Pentru a favoriza o mai bună repartizare a
rufelor şi echilibrarea corectă a maşinii, se recomandă să
introduceţi în maşină atât articole mari cât şi mici.
Scoaterea din uz
• Eliminarea ambalajelor:
respectaţi reglementările locale, în acest fel
ambalajele vor putea refolosite.
• Directiva Europeană 2002/96/CE cu privire la deşeurile
care provin de la aparatura electrică sau electronică
prevede ca aparatele electrocasnice să nu e colectate
împreună cu deşeurile urbane solide, obişnuite.
Aparatele scoase din uz trebuie să e colectate separat
atât pentru a optimiza rata de recuperare şi de reciclare
a materialelor componente cât şi pentru a evita
pericolele care pot afecta sănătatea omului sau polua
mediul înconjurător. Simbolul tomberonului tăiat care
apare pe toate produsele vă aminteşte tocmai obligaţia
de a le colecta separat. Pentru informaţii suplimentare
cu privire la scoaterea sin uz a electrocasnicelor,
deţinătorii acestora pot apela la centrele de colectare
a deşeurilor sau la vânzătorii de la care au achiziţionat
produsele respective.
Deschiderea manuală a uşii
Dacă nu este posibil să deschideţi uşa din cauza
întreruperii curentului electric şi doriţi totuşi să întindeţi
rufele, procedaţi după cum urmează:
1. scoateţi stecherul din
priză.
2. vericaţi ca nivelul de
apă din maşină să e sub
marginea uşii; în caz contrar,
scoateţi apa în exces cu
ajutorul furtunului de golire,
punând-o într-un vas, după
indicaţiile din gura.
3. scoateţi panoul de
acoperire din partea din faţă
a maşinii de spălat folosind o
şurubelniţă
(a se vedea gura).
4. utilizând dispozitivul indicat în gură, trageţi spre
dumneavoastră până când eliberaţi tirantul de plastic din
opritor; trageţi apoi în jos şi, în acelaşi timp, deschideţi uşa.
5. montaţi din nou panoul vericând, înainte de a-l împinge
spre maşină, de a introdus cârligele în oriciile respective.
RO
45
Page 46

Întreţinere şi curăţire
1
2
A
B
RO
Întreruperea alimentării cu apă şi curent
electric
• Închideţi robinetul de apă după ecare spălare. Se
limitează astfel uzura instalaţiei hidraulice a maşinii de
spălat şi se elimină pericolul scurgerilor.
• Scoateţi stecherul din priza de curent atunci când
curăţaţi maşina de spălat şi când se efectuează lucrări
de întreţinere.
Curăţarea maşinii de spălat
• Partea externă şi părţile din cauciuc pot curăţate cu
o lavetă înmuiată în apă călduţă şi săpun. Nu folosiţi
solvenţi sau substanţe abrazive.
• Maşina de spălat este prevăzută cu un program de
„AUTOCURĂŢARE” a pieselor interne care trebuie
realizat fără niciun fel de încărcătură în cuvă.
Detergentul (în cantitate de 10% din cea recomandată
pentru rufe puţin murdare) sau aditivii specici pentru
curăţarea maşinii de spălat pot folosite ca mijloace
auxiliare în programul de spălare. Se recomandă
efectuarea programului de curăţare la ecare 40 de
cicluri de spălare.
Pentru a activa programul, apăsaţi butoanele A şi B în
acelaşi timp pentru 5 secunde (a se vedea gura).
Programul porneşte automat şi durează aproximativ
70 de minute. Pentru a termina ciclul, apăsaţi butonul
START/PAUSE.
Îngrijirea uşii şi a tamburului
• Lăsaţi mereu uşa întredeschisă pentru a evita
formarea de mirosuri neplăcute.
Curăţarea pompei
Maşina de spălat este dotată cu o pompă de
autocurăţare care nu are nevoie de întreţinere. Se poate
întâmpla însă ca unele obiecte mici (monede, nasturi)
să cadă în anticamera care protejează pompa, situată în
partea inferioară a acesteia.
! Vericaţi ca ciclul de spălare să e încheiat şi scoateţi
stecherul din priză.
Pentru a avea acces la anticameră:
1. scoateţi panoul de
acoperire din partea din
faţă a maşinii de spălat
folosind o şurubelniţă
(a se vedea gura);
2. deşurubaţi capacul
rotindu-l în sens invers
acelor de ceasornic (a se
vedea gura). Este normal
să iasă puţină apă;
Curăţarea compartimentului pentru detergent
Trageti afara
compatimentul ridicându-l
si tragându-l spre exterior
(a se vedea gura).
Spălaţi-l sub un jet de apă;
această operaţie trebuie
efectuată cât mai des
posibil.
46
3. curăţaţi cu grijă interiorul;
4. înşurubaţi la loc capacul;
5. montaţi din nou panoul vericând, înainte de a-l
împinge spre maşină, de a introdus cârligele în oriciile
respective.
Controlarea furtunului de alimentare cu apă
Controlaţi tubul de alimentare cel puţin o dată pe an.
Dacă prezintă crăpături sau suri trebuie înlocuit: pe
parcursul spălărilor, presiunea puternică ar putea
provoca crăpături neaşteptate.
! Nu folosiţi niciodată tuburi folosite deja.
Page 47

Anomalii şi remedii
Se poate întâmpla ca maşina de spălat să nu funcţioneze. Înainte de a apela serviciul de Asistenţă (a se vedea
Asistenţa), vericaţi dacă nu este vorba de o problemă uşor de rezolvat:
Anomalii:
Maşina de spălat nu porneşte.
Ciclul de spălare nu porneşte.
Maşina de spălat nu încarcă apă (Pe
display este vizualizat scris “H2O”).
Maşina de spălat încarcă şi
descarcă apă încontinuu.
Maşina de spălat nu se goleşte sau
nu stoarce.
Cauze posibile / Rezolvare:
• Ştecărul nu este introdus în priza de curent, sau nu face contact.
• Aveţi o pană de curent la domiciliu.
• Uşa nu este bine închisă.
• Butonul ON/OFF nu a fost apăsată.
• Butonul START/PAUSE nu a fost apăsat.
• Robinetul de apă nu este deschis.
• A fost setată o întârziere faţă de ora pornirii.
• Furtunul de alimentare cu apă nu este racordat la robinet.
• Furtunul este îndoit.
• Robinetul de apă nu este deschis.
• Apa la domiciliul dvs. este oprită.
• Apa nu are presiune sucientă.
• Butonul START/PAUSE nu a fost apăsat.
• Furtunul de golire nu a fost instalat la o înălţime cuprinsă între 65 şi 100 cm
de pământ (a se vedea “Instalare”).
• Capătul furtunului de evacuare este cufundat în apă (a se vedea “Instalare”).
• Evacuarea din perete nu are răsuare pentru aer.
Dacă după aceste vericări problema nu se rezolvă, închideţi robinetul de apă,
stingeţi maşina de spălat şi chemaţi Asistenţa. Dacă locuinţa se aă la ultimele
etaje ale unui ediciu, este posibil să aibă loc fenomene de sifonare, motiv
pentru care maşina de spălat încarcă şi descarcă apă încontinuu. Pentru a
elimina acest inconvenient, se găsesc în comerţ supape anti-sifonare.
• Programul nu prevede golirea apei: cu unele programe trebuie pornit manual.
• Furtunul de golire este îndoit (a se vedea “Instalare”).
• Conducta de descărcare este înfundată.
RO
Maşina de spălat vibrează foarte
mult în timpul stoarcerii.
Maşina de spălat pierde apă.
Indicatoarele Opţiunilor şi ale START/
PAUSE luminează intermitent repede şi
display-ul aşează un cod de anomalie
(ex.: F-01, F-..).
Se formează prea multă spumă.
• Cuva, în momentul instalării, nu a fost deblocată în mod corespunzător (a se
vedea “Instalare”).
• Maşina de spălat este în pantă (a se vedea “Instalare”).
• Maşina de spălat este prea aproape de pereţi şi mobilier (a se vedea “Instalare”).
• Furtunul de alimentare cu apă nu este bine înşurubat (a se vedea “Instalare”).
• Sertarul detergenţilor este înfundat (pentru a-l curăţa a se vedea “Întreţinere şi
curăţare”).
• Furtunul de golire nu este bine xat (a se vedea “Instalare”).
• Opriţi maşina şi scoateţi ştecărul din priză; aşteptaţi aprox. 1 minut înainte de
a o reaprinde.
Dacă nu obţineţi nici un rezultat, apelaţi Centrul de Service pentru asistenţă.
• Detergentul nu este compatibil cu maşina de spălat (trebuie să e scris
“pentru maşina de spălat”, “de mână şi în maşina de spălat”, sau ceva
asemănător).
• Dozajul a fost excesiv.
47
Page 48

Asistenţă
RO
Înainte de a lua legătura cu Asistenţa:
• Vericaţi dacă puteţi rezolva singuri problema (a se vedea “Anomalii şi remedii”);
• Porniţi din nou programul pentru a controla dacă inconvenientul a fost eliminat;
• În caz negativ, contactaţi un Centru de Asistenţă Tehnică.
! Nu apelaţi niciodată la persoane neautorizate.
Comunicaţi:
• tipul de anomalie;
• modelul maşinii (Mod.);
• numărul de serie (S/N).
Aceste informaţii sunt specicate pe plăcuţa cu date tehnice, lipită în partea din spate a maşinii de spălat precum şi în
partea anterioară, după ce deschideţi uşa.
Atenţionãri în conformitate cu legislaţia în vigoare
• Conform prevederilor legislaţiei privind gestionarea deşeurilor, este interzisã eliminarea deşeurilor de echipamente
electrice şi electronice (DEEE) alãturi de deşeurile municipale nesortate. Ele trebuie predate la punctele municipale de
colectare, societãţile autorizate de colectare/reciclare sau distribuitori (în cazul în care se achiziţioneazã echipamente noi
de acelaşi tip).
• Autoritãţile locale trebuie sã asigure spaţiile necesare pentru colectarea selectivã a deşeurilor precum şi funcţionalitatea
acestora. Contactaţi societatea de salubrizare sau compartimentul specializat din cadrul primãriei pentru informaţii detaliate.
• Deşeurile de echipamente electrice şi electronice pot predate şi distribuitorilor, la achiziţionarea de echipamente noi
de acelaşi tip (schimb 1 la 1).
• Predarea, de cãtre utilizatori, a deşeurilor de echipamente electrice şi electronice, la punctele de colectare municipale, societãţile autorizate de colectare/reciclare sau distribuitori (în cazul în care se achiziţioneazã echipamente noi de
acelaşi tip) faciliteazã refolosirea, reciclarea sau alte forme de valoricare a acestora.
• Deşeurile de echipamente electrice şi electronice pot conţine substanţe periculoase care pot avea un impact negativ
asupra mediului şi sãnãtãţii umane în cazul în care DEEE nu sunt colectate selectiv şi gestionate conform prevederilor
legale.
• Simbolul alãturat (o pubela cu roţi, barata cu douã linii în forma de X), aplicat pe un echipament electric sau
electronic, semnicã faptul cã acesta face obiectul unei colectãri separate şi nu poate eliminat împreunã cu
deşeurile municipale nesortate.
48
Page 49

Návod k použití
PRAČKA
CZ
Česky
WMSG 622
Obsah
Instalace, 50-51
Rozbalení a vyrovnání do vodorovné polohy
Připojení k elektrické a k vodovodní síti
První prací cyklus
Technické údaje
Popis pračky, 52-53
Ovládací panel
Displej
Jak provést prací cyklus, 54
Programy a volitelné funkce, 55
Tabulka programů
Volitelné funkce praní
Prací prostředky a prádlo, 56
Dávkovač pracích prostředků
Příprava prádla
Speciální programy
Opatření a rady, 57
Základní bezpečnostní pokyny
Likvidace
Manuální otevření dvířek
CZ
Údržba a péče, 58
Uzavření přívodu vody a vypnutí elektrického napájení
Čištění pračky
Čištění dávkovače pracích prostředků
Péče o dvířka a buben
Čištění čerpadla
Kontrola přítokové hadice na vodu
Poruchy a způsob jejich odstranění, 59
Servisní služba, 60
49
Page 50

Instalace
CZ
! Je důležité uschovat tento návod tak, abyste jej mohli
kdykoli konzultovat. V případě prodeje, darování nebo
přestěhování pračky se ujistěte, že zůstane uložen
v blízkosti pračky, aby mohl posloužit novému majiteli při
seznámení s její činností a s příslušnými upozorněními.
! Pozorně si přečtěte uvedené pokyny: Obsahují důležité
informace týkající se instalace, použití a bezpečnosti při
práci.
Rozbalení a vyrovnání do vodorovné
polohy
Rozbalení
1. Rozbalte pračku.
2. Zkontrolujte, zda během přepravy nedošlo k jejímu
poškození. V případě, že je poškozena, ji nezapojujte a
obraťte se na prodejce.
3. Odstraňte 4 šrouby
chránící před poškozením
během přepravy a
gumovou podložku s
příslušnou rozpěrkou,
které se nacházejí v zadní
části (viz obrázek).
Dokonalé vyrovnání do vodorovné polohy zabezpečí
stabilitu zařízení a zamezí vzniku vibrací a hluku během
činnosti. V případě instalace na podlahovou krytinu nebo
na koberec nastavte nožky tak, aby pod pračkou zůstal
dostatečný volný prostor pro ventilaci.
Připojení k elektrické a k vodovodní síti
Připojení přítokové hadice vody
1. Připojte přívodní hadici
jejím zašroubováním ke
kohoutku studené vody
s hrdlem se závitem 3/4”
(viz obrázek).
Před připojením hadice
nechte vodu odtékat,
dokud nebude čirá.
2. Připojte přítokovou
hadici k pračce
prostřednictvím příslušné
přípojky na vodu, umístěné
vpravo nahoře (viz
obrázek).
4. Uzavřete otvory po šroubech plastovými krytkami z
příslušenství.
5. Uschovejte všechny díly: v případě opětovné přepravy
pračky je bude třeba namontovat zpět.
! Obaly nejsou hračky pro děti!
Vyrovnání do vodorovné polohy
1. Pračku je třeba umístit na rovnou a pevnou podlahu,
aniž by se opírala o stěnu, nábytek či něco jiného.
2. V případě, že podlaha
není dokonale vodorovná,
mohou být případné
rozdíly vykompenzovány
šroubováním předních
nožek (viz obrázek); Úhel
sklonu, naměřený na
pracovní ploše, nesmí
přesáhnout 2°.
3. Dbejte na to, aby hadice nebyla příliš ohnutá ani
stlačená.
! Tlak v rozvodu vody se musí pohybovat v rozmezí
hodnot uvedených v tabulce s technickými údaji (viz
vedlejší strana).
! V případě, že délka přítokové hadice nebude
dostatečná, se obraťte na specializovanou prodejnu
nebo na autorizovaný technický personál.
! Nikdy nepoužívejte již použité hadice.
! Používejte hadice z příslušenství zařízení.
50
Page 51

Připojení vypouštěcí hadice
65 - 100 cm
Připojte vypouštěcí hadici
k odpadovému potrubí
nebo k odpadu ve stěně,
který se nachází od 65 do
100 cm nad zemí; zamezte
jejímu ohybu
nebo ji uchyťte k okraji
umývadla či vany a
připevněte ji ke kohoutu
prostřednictvím držáku
z příslušenství (viz
obrázek). Volný konec
vypouštěcí hadice nesmí
zůstat ponořený do vody.
! Použití prodlužovacích hadic se nedoporučuje; je-li
však nezbytné, prodlužovací hadice musí mít stejný
průměr jako originální hadice a její délka nesmí
přesáhnout 150 cm.
! Výměna kabelu musí být svěřena výhradně
autorizovanému technickému personálu.
Upozornění! Výrobce neponese žádnou odpovědnost za
následky nerespektování uvedených předpisů.
První prací cyklus
Po instalaci zařízení je třeba ještě předtím, než je
použijete na praní prádla, provést jeden zkušební cyklus
s pracím prostředkem a bez náplně prádla nastavením
pracího programu 2.
Technické údaje
CZ
Připojení k elektrické síti
Před zasunutím zástrčky do zásuvky se ujistěte, že:
• Je zásuvka uzemněna a že vyhovuje normám;
• je zásuvka schopna snést maximální zátěž odpovídající
jmenovitému příkonu zařízení, uvedenému v tabulce s
technickými údaji (viz vedle);
• hodnota napájecího napětí odpovídá údajům uvedeným
v tabulce s technickými údaji (viz vedle);
• je zásuvka kompatibilní se zástrčkou pračky. V opačném
případě je třeba vyměnit zásuvku nebo zástrčku.
! Pračka nesmí být umístěna venku – pod širým nebem,
a to ani v případě, že by se jednalo o místo chráněné
před nepřízní počasí, protože je velmi nebezpečné
vystavit ji působení deště a bouří.
! Po denitivní instalaci pračky musí zásuvka zůstat
snadno přístupná.
! Nepoužívejte prodlužovací kabely a rozvodky.
! Kabel nesmí být ohnutý ani stlačený.
Model WMSG 622
šíøka 59,5 cm
Rozmìry
Kapacita od 1 do 6 kg
Napájení
Pøipojení k
rozvodu vody
Rychlost
odstøeïování
Kontrolní programy
podle směrnic
1061/2010 a
1015/2010
Hluènost
(dB(A) re 1 pW)
výška 85 cm
hloubka 43,5 cm
Viz štítek s technickými údaji, aplikovaný na zarízení.
maximální tlak 1 MPa (10 bar)
minimální tlak 0.05 MPa (0.5 bar)
kapacita bubnu 48 litrù
a¡z do 1200 otáèek za minutu
program 4; teplota 60°;
program 5; teplota 40°.
Toto zaøízení odpovídá následujícím
normám Evropské unie:
- 2004/108/CE (Elektromagnetická
kompatibilita)
- 2006/95/CE (Nízké napìtí)
- 2002/96/CE
Praní: 51
Odstøeïování: 75
51
Page 52

Popis pračky
CZ
Ovládací panel
Tlačítko ON/OFF
OTOČNÝ
OVLADAČ
Dávkovač pracích prostředků
Dávkovač pracích prostředků: slouží k dávkování pracích
prostředků a přídavných prostředků (viz “Prací prostředky
a prádlo”).
Tlačítko ON/OFF : Zapněte nebo vypněte pračku
krátkým stisknutím tlačítka. Kontrolka START/PAUSE
pomalu blikající zeleným světlem poukazuje na to, že
je zařízené zapnuté. Za účelem vypnutí pračky během
praní je třeba držet tlačítko stisknuté déle, přibližně 3
sek.; krátké nebo náhodné stisknutí neumožní vypnutí
pračky. Vypnutí zařízení během praní způsobí zrušení
probíhajícího pracího programu.
OTOČNÝ OVLADAČ PROGRAMŮ: Slouží k nastavení
požadovaného programu (viz “Tabulka programů“).
Tlačítka a kontrolky VOLITELNÝCH FUNKCÍ: slouží
k volbě jednotlivých nabízených volitelných funkcí.
Kontrolka zvolené volitelné funkce zůstane rozsvícena.
Tlačítko
volbu požadované intenzity praní.
Tlačítko TEPLOTA : Stiskněte za účelem snížení
nebo úplného vyloučení teploty; hodnota bude uvedena
na displeji.
Tlačítko ODSTŘEĎOVÁNÍ : Stiskněte za účelem
snížení nebo úplného vyloučení odstřeďování - hodnota
bude uvedena na displeji.
TYP PRANÍ
: jeho stisknutím můžete provést
PROGRAMŮ
Tlačítka a kontrolky
VOLITELNÝCH
Tlačítko
FUNKCÍ
Tlačítko
ZABLOKOVÁNÍ
TLAČÍTEK
Tlačítko TEPLOTA
DISPLEJ
Tlačítko
ODSTŘEĎOVÁNÍ
ODLOŽENÝ
START
Tlačítko a kontrolka START/PAUSE: když zelená
kontrolka začne pomalu blikat, stiskněte toto tlačítko pro
zahájení praní. Po zahájení cyklu se kontrolka rozsvítí
stálým světlem. Přejete-li si přerušit praní, opětovně
stiskněte tlačítko; kontrolka bude blikat oranžovým
světlem. Když symbol není rozsvícen, je možné
otevřít dvířka. Za účelem opětovného zahájení cyklu
z místa, v němž byl přerušen, opětovně stiskněte tlačítko.
Tlačítko ZABLOKOVÁNÍ TLAČÍTEK : aktivace
zablokování ovládacího panelu se provádí tak, že
podržíte stisknuté tlačítko přibližně na 2 sekundy.
Rozsvícená kontrolka poukazuje na to, že je
ovládací panel zablokován. Tímto způsobem se zamezí
náhodným změnám programů, zejména když jsou
v domácnosti děti. Zrušení zablokování ovládacího
panelu se provádí tak, že podržíte stisknuté tlačítko
přibližně na 2 sekundy.
Pohotovostní režim
Za účelem shody s novými předpisy souvisejícími s
energetickou úsporou je tato pračka vybavena systémem
automatického vypnutí (přechodu do pohotovostního
režimu – standby), který je aktivován po uplynutí
přibližně 30 minut, když se pračka nepoužívá. Krátce
stiskněte tlačítko ON/OFF a vyčkejte na obnovení
činnosti zařízení.
Spotřeba v off-mode: 1 W
Spotřeba v Left-on: 1 W
Tlačítko
TYP PRANÍ
Tlačítko a kontrolka
START/PAUSE
Tlačítko ODLOŽENÝ START : Jeho stisknutím
můžete nastavit odložený start zvoleného programu;
doba odložení bude zobrazena na displeji.
52
Page 53

Displej
B
A
Displej slouží k naprogramování zařízení a poskytuje četné informace.
CZ
C
V části A je zobrazována doba trvání různých programů, které jsou k dispozici, a po zahájení cyklu i zbývající doby
do jeho ukončení; v případě nastavení ODLOŽENÝ START bude zobrazena doba chybějící do zahájení zvoleného
programu.
Kromě toho budou při stisknutí příslušného tlačítka zobrazeny maximální hodnoty rychlosti odstřeďování a teploty,
kterých zařízení může dosáhnout v závislosti na nastaveném programu.
V části B jsou zobrazovány “fáze praní”, které jsou součástí zvoleného cyklu, a po zahájení programu také probíhající
“fáze praní”:
Praní
Máchání
Odstřeďování
Odčerpání vody
V části C jsou přítomné ikony - zleva – “teplota”, “odstřeďování” a “Odložený start”.
Pruhy “odstřeďování” znázorňují úroveň odstřeďování vzhledem k maximální nastavitelné hodnotě pro nastavený
cyklus.
Pruhy “odstřeďování” znázorňují úroveň odstřeďování vzhledem k maximální nastavitelné hodnotě pro nastavený
cyklus.
Rozsvícený symbol “odložení start” informuje o tom, že na displeji je zobrazena nastavená hodnota “Odloženého startu”.
Kontrolka Zablokovaná dvířka
Rozsvícený symbol poukazuje na zajištění dvířek. Aby se předešlo poškození, před otevřením dvířek je třeba vyčkat na
zhasnutí uvedeného symbolu.
Za účelem otevření dvířek v průběhu pracího cyklu stiskněte tlačítko START/PAUSE; když bude symbol ZABLOKOVANÁ
DVÍŘKA zhasnutý, bude možné otevřít dvířka.
53
Page 54

Jak provést prací cyklus
CZ
1. ZAPNUTÍ ZAŘÍZENÍ. Stiskněte tlačítko ; kontrolka
START/PAUSE bude pomalu blikat zeleným světlem.
2. NAPLŇTE PRAČKU PRÁDLEM. Otevřete dvířka
s průzorem. Naplňte pračku prádlem a dbejte
přitom, aby nedošlo k překročení množství náplně,
uvedeného v tabulce programů na následující straně.
3. NADÁVKUJTE PRACÍ PROSTŘEDEK. Vytáhněte
dávkovač pracích prostředků a naplňte prací
prostředek do příslušných přihrádek způsobem
vysvětleným v části “Prací prostředky a prádlo”.
4. ZAVŘETE DVÍŘKA.
5. ZVOLTE PRACÍ PROGRAM. Otočným ovladačem
PROGRAMŮ zvolte požadovaný program; teplotu
a rychlost odstřeďování, které jsou k programu
přiřazeny, je možné měnit. Na displeji se zobrazí doba
trvání cyklu.
6. NASTAVTE PRACÍ PROGRAM DLE VAŠICH
POTŘEB. Použijte příslušná tlačítka:
Změňte teplotu a/nebo odstřeďování.
Zařízení automaticky zobrazuje maximální teplotu a
rychlost odstřeďování pro nastavený program nebo
poslední zvolené hodnoty, jsou-li kompatibilní se
zvoleným programem. Stisknutím tlačítka je možné
postupně snížit teplotu až po praní ve studené vodě
“OFF”. Stisknutím tlačítka je možné postupně snížit
rychlost odstřeďování až po jeho úplné vyloučení
“OFF”. Další stisknutí tlačítek obnoví nastavení
maximálních přednastavených hodnot.
! Výjimka: při volbě programu 4 bude možné zvýšit
teplotu až na 90°C.
Nastavení odloženého startu.
Pro nastavení odloženého startu zvoleného
programu stiskněte příslušné tlačítko až do dosažení
požadované doby odložení. Když je tato volitelná
funkce aktivní, na displeji se rozsvítí symbol . Pro
zrušení odloženého startu je třeba tisknout tlačítko,
dokud se na displeji nezobrazí nápis “OFF”.
Nastavte požadovanou intenzitu praní.
Tlačítko umožňuje provést optimalizaci praní
na základě stupně znečištění tkanin a požadované
intenzity praní.
Zvolte program praní; cyklus bude automaticky
nastaven na úroveň “Normal” (Normální) a bude
provedena jeho optimalizace pro středně znečištěné
prádlo (toto nastavení neplatí pro cyklus „Vlna“, který se
automaticky nastaví na úroveň “Delicate” [Jemné]).
Pro značně znečištěné prádlo stiskněte tlačítko
, dokud nebude nastavena úroveň “Intensive”
(Intenzivní). Tato úroveň zaručuje dokonalé praní
díky použití většího množství vody v počáteční fázi
cyklu a větší mechanický pohyb a je užitečná pro
odstranění nejodolnějších skvrn. Může se používat
s bělicím prostředkem nebo bez něj. Když si přejete
provést bělení, vložte přídavnou nádobku 4 z
příslušenství do přihrádky 1. Při dávkovaní bělicího
prostředku nepřekračujte úroveň „max“, vyznačenou
na středovém čepu (viz obrázek na str. 56).
Pro mírně znečištěné prádlo nebo pro choulostivější
zacházení s látkami stiskněte tlačítko až po
dosažení úrovně “Delicate” (Jemné). Cyklus omezí
mechanický pohyb pro zajištění dokonalých výsledků
praní u choulostivého prádla.
Změna vlastností cyklu.
• Stiskněte tlačítka aktivace volitelné funkce; dojde k
rozsvícení odpovídající kontrolky tlačítka.
• Opětovným stisknutím můžete zvolenou volitelnou
funkci zrušit; příslušná kontrola zhasne.
! V případě, že zvolená volitelná funkce není
kompatibilní s nastaveným pracím programem,
kontrolka začne blikat a volitelná funkce nebude
aktivována.
! Když zvolená volitelná funkce není kompatibilní
s některou z již nastavených volitelných funkcí,
kontrolka první zvolené funkce bude blikat a bude
aktivována pouze druhá; kontrolka aktivovanévolitelné
funkce se rozsvítí.
! Volitelné funkce mohou změnit doporučenou náplň
a/nebo dobu trvání cyklu.
7. SPUSŤTE PROGRAM. Stiskněte tlačítko START/
PAUSE. Příslušná kontrolka se rozsvítí stálým
modrým světlem a dojde k zablokování dvířek
(rozsvícený symbol ZABLOKOVANÁ DVÍŘKA ). Za
účelem změny programu během probíhajícího cyklu
přerušte činnost pračky stisknutím tlačítka START/
PAUSE (kontrolka START/PAUSE bude pomalu blikat
oranžovým světlem); zvolte požadovaný cyklus a
znovu stiskněte tlačítko START/PAUSE.
Za účelem otevření dvířek v průběhu pracího cyklu
stiskněte tlačítko START/PAUSE; když bude symbol
ZABLOKOVANÁ DVÍŘKA zhasnutý, bude možné
otevřít dvířka. Opětovným stisknutím tlačítka START/
PAUSE znovu uveďte do činnosti prací program
z bodu, ve kterém byl přerušen.
8. UKONČENÍ PROGRAMU. Bude oznámeno
zobrazením nápisu “END” na displeji. Po zhasnutí
symbolu ZABLOKOVANÁ DVÍŘKA bude možné
otevřít dvířka. Otevřete dvířka, vyložte prádlo a
vypněte zařízení.
! Přejete-li si zrušit již zahájený cyklus, stiskněte déle
tlačítko . Cyklus bude přerušena a dojde k vypnutí
zařízení.
54
Page 55

Programy a volitelné
funkce
Tabulka programů
Prací prostředky a
Popis programu
Programy
Odstraòování Skvrn
1
Bílé prádlo
2
Bavlna s předpírkou: Mimořádně znečištěné bílé prádlo.
3
Bílá bavlna (1): Silně znečištěné bílé a barevné prádlo z odol-
4
ných tkanin.
Bílá bavlna (2-3): Silně znečištěné bílé a barevné choulostivé
5
prádlo.
Syntetické: Velmi znečištěné barevné prádlo z odolných tkanin.
6
Syntetické (4): Velmi znečištěné barevné prádlo z odolných tkanin.
6
Protialergické
7
Dìtské Prádlo
8
Vlna: Pro vlnu, kašmír apod.
9
Choulostivé prádlo
10
Rychlé Praní 60’: K rychlému oživení mírně znečištěného prádla
11
(nedoporučuje se pro vlnu, hedvábí a prádlo určené pro ruční praní).
Bavlna
12
Syntetické
13
Rychlé Praní 30’
14
Máchání
Odstřeďování + Odčerpání vody
Doba trvání cyklu uvedená na displeji nebo v návodu představuje odhad vypočítaný na základě standardních podmínek. Skutečná doba se může měnit v závislosti
na četných faktorech, jako je např. teplota a tlak vody na vstupu, teplota prostředí, množství pracího prostředku, množství a druh náplně, vyvážení náplně a zvolené
volitelné funkce.
Max. teplo-
ta (°C)
40° 1200
60° 1200
90° 1200
60°
(Max. 90°)
40° 1200
60° 800
40° 800
60° 1200
40° 1000
40° 800
30° 0
60° 1200
Studená
voda
Studená
voda
Studená
voda
- 1200
- 1200
Max.
rychlost
(otáčky za
minutu)
1200
1200
800
800
přídavné prostředky
pírka
Praní
Před-
-
-
-
-
-
-
-
-
-
-
-
-
-
-
- - -
- - - -
Bělicí
prostř-edek
-
-
-
-
-
-
-
-
-
%
Aviváž
Max. náplň (kg)
4 - - - 180’
4 - - - 190’
6 53 2,21 93 180’
Spotřeba ener-
Zbytková vlhkost
6 53 0,92 54 160’
6 53 0,86 63 150’
2,5 44 0,87 42 90’
2,5 44 0,56 42 80’
4 - - - 200’
4 - - - 165’
1,5 - - - 80’
1 - - - 75’
3,5 53 0,81 36 60’
3 53 0,15 58 95’
3 49 0,08 51 70’
3 71 0,05 57 30’
6 - - - 49’
6 - - - 16’
vody lt
gie kWh
Celkové množství
Doba
CZ
trvání cyklu
Pro všechny Test Institutes:
1) Kontrolní program podle směrnic 1061/2010: nastavte program 4 s teplotou 60°C.
Tento cyklus je vhodný pro praní běžně znečištěné bavlny a jedná se o nejúčinnější cyklus z hlediska kombinované spotřeby energie a vody určený pro prádlo, které
lze prát při teplotě do 60°C. Skutečná teplota praní se může lišit od uvedené.
2) Kontrolní program podle směrnic 1061/2010: nastavte program 5 s teplotou 40°C.
Tento cyklus je vhodný pro praní běžně znečištěné bavlny a jedná se o nejúčinnější cyklus z hlediska kombinované spotřeby energie a vody určený pro prádlo, které
lze prát při teplotě do 40°C. Skutečná teplota praní se může lišit od uvedené.
3) Dlouhý program pro praní bavlny: nastavte program 5 s teplotou 40°C.
4) Dlouhý program pro syntetiku: nastavte program 6 s teplotou 40°C.
Volitelné funkce praní
Extra Máchání
Volbou této volitelné funkce se zvýši účinnost máchání a
zajistí se maximální stupeň odstranění pracího prostředku.
Je užitečná zejména pro mimořádně citlivé pokožky.
! Nelze ji aktivovat u programů 7, 10, 14, .
Rychlé praní
Při volbě této volitelné funkce dojde ke zkrácení doby
trvání programu až o 50% v závislosti na zvoleném cyklu
a současně bude zaručena úspora vody a energie. Tento
cyklus použijte na nepříliš znečištěné kusy prádla.
! Nelze ji aktivovat u programů 1, 2, 7, 8, 9, 10, 11, 12, 13,
14, , .
55
Page 56

Prací prostředky a prádlo
M
AX
1
2
4
3
A
B
CZ
Dávkovač pracích prostředků
Dobrý výsledek praní závisí také na správném dávkování
pracího prostředku: použití jeho nadměrného množství
snižuje efektivitu praní a napomáhá tvorbě vodního
kamene na vnitřních částech pračky a zvyšuje znečištění
životního prostředí.
! Pro předpírku a praní při teplotě vyšší než 60 °C
používejte práškové prací prostředky pro bílé bavlněné
prádlo.
! Dodržujte pokyny uvedené na obalu pracího prostředku
! Nepoužívejte prací prostředky určené pro ruční praní,
protože způsobují tvorbu nadměrného množství pěny.
Při vytahování dávkovače
pracích prostředků a při
jeho plnění pracími nebo
přídavnými prostředky
postupujte následovně.
Přihrádka 1: Prací prostředek (práškový) pro
předpírku
Před naplněním přihrádky pracím prostředkem se ujistěte,
že v dávkovači není vložena přídavná přihrádka 4.
Přihrádka 2: Prací prostředek (v prášku nebo tekutý)
V případě použití tekutého pracího prostředku se
doporučuje použít pro správné dávkování malou
přepážku A z příslušenství. Pro použití práškového
pracího prostředku vložte malou přepážku do
prohloubeniny B.
Přihrádka 3: Přídavné prostředky (aviváž atd.)
Aviváž nesmí vytékat z mřížky.
přídavná přihrádka 4: Bělicí prostředek
Příprava prádla
• Roztřiďte prádlo podle:
- druhu tkaniny / symbolu na visačce.
- barvy: oddělte barevné prádlo od bílého.
• Vyprázdněte kapsy a zkontrolujte knoíky.
• Nepřekračujte povolenou náplň, vztahující se na
hmotnost suchého prádla:
Odolné tkaniny: max. 6 kg
Syntetické tkaniny: max. 2,5 kg
Choulostivé tkaniny: max. 2 kg
Vlna: max. 1,5 kg
Hedvábí: max. 1 kg
Kolik váží prádlo?
1 prostěradlo 400-500 g
1 povlak na polštář 150-200 g
1 ubrus 400-500 g
1 župan 900-1.200 g
1 ručník 150-250 g
Speciální programy
Odstraňování Skvrn: cyklus 1 vhodný pro praní
značně znečištěného prádla s odolnými barvami. Tento
program zaručuje vyšší třídu praní než standardní třída
(třída A). Při použití tohoto programu nemíchejte spolu
prádlo různých barev. Doporučuje se použití práškového
pracího prostředku. Pro odolné skvrny se doporučuje
provést předošetření specickými přídavnými prostředky.
Bílé prádlo: použijte cyklus 2 pro praní bílého prádla.
Program je navržen pro dlouhodobé zachování zářivosti
bílé barvy.
Pro dosažení nejlepších výsledků se doporučuje použít
práškový prací prostředek.
Protialergické: použijte program 7 pro odstranění hlavních
alargenů, jako jsou pyl, roztoči a kočičí a psí chlupy.
Dìtské Prádlo: na odstranění typické špíny dětského
oblečení použijte příslušný program 8 a řádně odstraňte
prací prostředek z prádla, abyste předešli alergickým
reakcím jemné dětské pokožky. Tento prací cyklus byl
navržen pro snížení množství bakterií s použitím vyššího
množství vody a pro optimalizaci účunku specických
hygienických přísad, přidaných k pracímu prostředku.
Vlna: prací cyklus „Vlna“ této pračky Hotpoint-Ariston
byl testován a schválen společností Woolmark Company
pro praní prádla z vlny, které je klasikováno jako
„prádlo určené pro ruční praní“, za podmínky, že bude
praní provedeno v souladu s pokyny uvedenými na
visačce oblečení a s pokyny dodanými výrobcem
elektrického spotřebiče. Hotpoint-Ariston je první
značkou praček, která získala od společnosti Woolmark
Company certikát Woolmark Apparel Care - Platinum
za svou výkonnost při praní a spotřebu vody a energie.
Choulostivé prádlo: pro praní velmi choulostivého
prádla, které obsahuje aplikace, jako je štras nebo
pajetky, použijte program 10.
Pro praní hedvábného prádla a záclon zvolte cyklus 10 a
nastavte úroveň “Delicate” (Jemné) volitelné funkce .
Doporučuje se prádlo před praním převrátit naruby a
vložit malé kusy prádla do příslušného sáčku pro praní
choulostivého prádla.
Pro dosažení nejlepších výsledků se doporučuje použít
tekutý prací prostředek pro choulostivé prádlo.
Eko programy
Programy Eko nabízejí dobrou výkonnost praní při
nízkých teplotách, přičemž umožňují nižší použití
elektrické energie s výhodami pro životní prostředí i
pro nanční úsporu.
Programy Eco (12 Bavlna, 13 Syntetické prádlo a
14 Rychlé praní 30’) byly vytvořeny pro různé druhy
tkanin a pro mírně znečištěné prádlo. Pro zajištění
optimálního výsledku doporučujeme použít tekutý
prací prostředek; doporučuje se předběžně ošetřit
manžety, límce a skvrny.
56
Page 57

Opatření a rady
20
! Pračka byla navržena a vyrobena v souladu s platnými
mezinárodními bezpečnostním předpisy. Tato upozornění
jsou uváděna z bezpečnostních důvodů a je třeba si je
pozorně přečíst.
Základní bezpečnostní pokyny
• Toto zařízení bylo navrženo výhradně pro použití v
domácnosti.
• Zařízení nesmí být používáno osobami (včetně dětí)
se sníženými fyzickými, senzorickými nebo mentálními
schopnostmi a s nedostatečnými zkušenostmi a
znalostmi, s výjimkou případu, kdy toto použití probíhá
pod dozorem nebo na základě pokynů osoby zodpovědné
za jejich bezpečnost. Děti musí být pod dohledem, aby
se zajistilo, že si nebudou se zařízením hrát.
• Pračku mohou používat pouze dospělé osoby podle
pokynů uvedených v tomto návodu.
• Nedotýkejte se zařízení bosí nebo v případě, že máte
mokré nebo vlhké ruce či nohy.
• Nevytahujte zástrčku ze zásuvky tahem za kabel, ale
uchopením za zástrčku.
• Neotvírejte dávkovač pracích prostředků během
činnosti zařízení.
• Nedotýkejte se odčerpávané vody, protože může mít
velmi vysokou teplotu.
• Nepokoušejte se o násilné otevření dvířek: mohlo by dojít
k poškození bezpečnostního uzávěru, který zabraňuje
náhodnému otevření.
• Při výskytu poruchy se v žádném případě
nepokoušejte o opravu vnitřních částí zařízení.
• Vždy mějte pod kontrolou děti a zabraňte tomu, aby se
přibližovaly k zařízení během pracího cyklu.
• Během pracího cyklu mají dvířka tendenci ohřát se.
• V případě potřeby přemísťujte pračku ve dvou nebo
ve třech a věnujte celé operaci maximální pozornost.
Nikdy se nepokoušejte zařízení přemísťovat sami, je
totiž velmi těžké.
• Před zahájením vkládání prádla zkontrolujte, zda je
buben prázdný.
• Evropská směrnice 2002/96/ES o odpadu tvořeném
elektrickými a elektronickými zařízeními nařizuje, že
elektrospotřebiče nesmí být likvidovány v rámci běžného
pevného městského odpadu. Vyřazená zařízení musí být
shromážděna zvlášť za účelem zvýšení počtu recyklovaných
a znovupoužitých materiálů, z nichž jsou složena, a z důvodu
zabránění možných ublížení na zdraví a škod na životním
prostředí. Symbolem je přeškrtnutý koš, uvedený na všech
výrobcích s cílem připomenout povinnosti spojené se
separovaným sběrem. Podrobnější informace týkající se
správného způsobu vyřazení elektrospotřebičů z provozu
mohou jejich držitelé získat tak, že se obrátí na navrženou
veřejnou instituci nebo na prodejce.
Manuální otevření dvířek
V případě, že není možné otevřít dvířka s průzorem
z důvodu výpadku elektrické energie a hodláte pověsit
prádlo, postupujte následovně:
1. vytáhněte zástrčku ze
zásuvky elektrické sítě.
2. Zkontrolujte, zda je
hladina vody uvnitř zařízení
nižší, než je úroveň otevření
dvířek; v opačném případě
vypusťte přebytečnou
vodu vypouštěcí hadicí a
zachyťte ji do vědra, jak je
znázorněno na obrázku.
3. pomocí šroubováku
odstraňte krycí panel
nacházející se v přední části
pračky (viz obrázek).
CZ
Systém automatického vyvážení náplně
Před každým odstřeďováním buben provede otáčení
rychlostí lehce převyšující rychlost praní, aby se
odstranily vibrace a aby se náplň rovnoměrně rozložila.
V případě, že po několikanásobných pokusech o
vyvážení prádlo ještě nebude správně vyváženo,
zařízení provede odstřeďování nižší rychlostí, než je
přednastavená rychlost. Při nadměrném nevyvážení
pračka provede namísto odstřeďování vyvážení. Pro
dosažení rovnoměrnějšího rozložení náplně a jejího
správného vyvážení se doporučuje míchat velké a malé
kusy prádla.
Likvidace
• Likvidace obalových materiálů:
při jejich odstranění postupujte v souladu s místním
předpisy a dbejte na možnou recyklaci.
4. s použitím jazýčku označeného na obrázku potáhněte
směrem ven z dorazu plastové táhlo až do jeho uvolnění;
následně jej potáhněte směrem dolů a současně
otevřete dvířka.
5. namontujte zpět panel, přičemž se před jeho
přisunutím k zařízení ujistěte, že došlo ke správnému
zachycení háčků do příslušných podélných otvorů.
57
Page 58

Údržba a péče
1
2
CZ
Uzavření přívodu vody a vypnutí
elektrického napájení
• Po každém praní uzavřete přívod vody. Tímto
způsobem dochází k omezení opotřebení pračky a ke
snížení nebezpečí úniku vody.
• Před zahájením čištění pračky a během operací údržby
vytáhněte zástrčku napájecího kabelu z elektrické
zásuvky.
Čištění pračky
• Vnější části a části z gumy se mohou čistit hadrem
navlhčeným ve vlažné vodě a saponátu. Nepoužívejte
rozpouštědla ani abrazivní látky.
• Pračka je vybavena programem „Samočištění“
vnitřních částí, který musí být proveden bez jakéhokoli
druhu náplně v bubnu.
Prací prostředek (množství rovnající se 10% množství
doporučeného pro částečně znečištěné prádlo) nebo
specické přídavné prostředky pro čištění pračky budou
moci být použity jako pomocné prostředky v pracím
programu. Doporučuje se provést samočisticí program
každých 40 cyklů praní.
Pro aktivaci programu stiskněte současně tlačítka A a B
na dobu 5 sekund (viz obrázek).
Program bude zahájen automaticky a bude trvat přibližně
70 minut. Cyklus je možné ukončit stisknutím tlačítka
START/PAUSE.
Čištění čerpadla
Součástí pračky je samočisticí čerpadlo, které
nevyžaduje údržbu. Může se však stát, že se v jeho
vstupní části, určené k jeho ochraně a nacházející se
v jeho spodní části, zachytí drobné předměty (mince,
knoíky).
! Ujistěte se, že byl prací cyklus ukončen, a vytáhněte
zástrčku ze zásuvky.
Přístup ke vstupní části čerpadla:
1. pomocí šroubováku
odstraňte krycí panel
nacházející se v přední
části pračky (viz obrázek);
2. Odšroubujte víko jeho
otáčením proti směru
hodinových ručiček (viz
obrázek): vytečení malého
množství vody je zcela
běžným jevem;
B
A
Čištění dávkovače pracích prostředků
Vytáhněte dávkovač jeho
nadzvednutím a vytažením
směrem ven (viz obrázek).
Umyjte jej pod proudem
vody; tento druh vyčištění
je třeba provádět
pravidelně.
Péče o dvířka a buben
• Dvířka ponechte pokaždé pootevřená, aby se zabránilo
tvorbě nepříjemných zápachů.
3. dokonale vyčistěte vnitřek;
4. zašroubujte zpět víko;
5. namontujte zpět panel, přičemž se před jeho
přisunutím k zařízení ujistěte, že došlo ke správnému
zachycení háčků do příslušných podélných otvorů.
Kontrola přítokové hadice na vodu
Stav přítokové hadice je třeba zkontrolovat alespoň
jednou ročně. Jsou-li na ní viditelné praskliny nebo
trhliny, je třeba ji vyměnit: silný tlak působící na hadici
během pracího cyklu by mohl způsobit její náhlé
roztržení.
! Nikdy nepoužívejte již použité hadice.
58
Page 59

Poruchy a způsob jejich
odstranění
Může se stát, že pračka nebude fungovat. Dříve, než zatelefonujete na Servisní službu (viz “Servisní služba”),
zkontrolujte, zda se nejedná o problém, který lze snadno vyřešit s pomocí následujícího seznamu.
Poruchy:
Pračku nelze zapnout.
Nedochází k zahájení pracího cyklu.
Nedochází k napouštění vody do
pračky (na displeji je zobrazen
blikající nápis “H2O”).
Dochází k nepřetržitému napouštění
a odčerpávání vody.
Nedochází k vyčerpání vody nebo
k odstřeďování.
Možné příčiny / Způsob jejich odstranění:
• Zástrčka není zasunuta v zásuvce nebo není zasunuta natolik, aby došlo ke
spojení kontaktů.
• V celém domě je vypnutý proud.
• Nejsou řádně zavřená dvířka.
• Nebylo stisknuto tlačítko ON/OFF.
• Nebylo stisknuto tlačítko START/PAUSE.
• Nebyl otevřen kohout přívodu vody.
• Byla nastavena doba opoždění startu.
• Přívodní hadice není připojena k vodovodnímu kohoutu.
• Hadice je příliš ohnutá.
• Nebyl otevřen kohout přívodu vody.
• V celém domě je uzavřený přívod vody.
• V rozvodu vody není dostatečný tlak.
• Nebylo stisknuto tlačítko START/PAUSE.
• Vypouštěcí hadice se nachází mimo určené rozmezí od 65 do 100 cm nad
zemí (viz “Instalace”).
• Koncová část vypouštěcí hadice je ponořena ve vodě (viz “Instalace”).
• Odpad ve stěně není vybaven odvzdušňovacím otvorem.
Když ani po uvedených kontrolách nedojde k odstranění problému, uzavřete
přívod vody, vypněte pračku a přivolejte Servisní službu. V případě, že se byt
nachází na jednom z nejvyšších poschodí, je možné, že dochází k sifonovému
efektu, jehož následkem pračka nepřetržitě napouští a odčerpává vodu.
Pro odstranění uvedeného efektu jsou v prodeji běžně dostupné speciální
protisifonové ventily.
• Odčerpání vody netvoří součást nastaveného programu: u některých
programů je potřebné jejich manuální uvedené do činnosti.
• Vypouštěcí hadice je ohnutá (viz “Instalace”).
• Odpadové potrubí je ucpané.
CZ
Během odstřeďování je možné
pozorovat silné vibrace pračky.
Dochází k úniku vody z pračky.
Kontrolky “Volitelné funkce” a
kontrolka “START/PAUSE” blikají a
na disleji je zobrazen kód poruchy
(např.: F-01, F-..).
Dochází k tvorbě nadměrného
množství pěny.
• Během instalace nebyl buben odjištěn předepsaným způsobem (viz
“Instalace”).
• Pračka není dokonale vyrovnána do vodorovné polohy (viz “Instalace”).
• Pračka je stlačena mezi nábytkem a stěnou (viz “Instalace”).
• Přítoková hadice není správně zašroubována (viz “Instalace”).
• Dávkovač pracích prostředků je ucpán (způsob jeho vyčištění je uveden v
části “Údržba a péče”).
• Vypouštěcí hadice není upevněna předepsaným způsobem (viz “Instalace”).
• Vypněte zařízení a vytáhněte zástrčku ze zásuvky, vyčkejte přibližně 1 minutu
a zařízení znovu zapněte.
Když porucha přetrvává, obraťte se na servisní službu.
• Použitý prací prostředek není vhodný pro použití v automatické pračce (musí
obsahovat označení “pro praní v pračce“, “pro ruční praní nebo pro praní v
pračce“ nebo podobné označení).
• Bylo použito nadměrné množství pracího prostředku.
59
Page 60

Servisní služba
CZ
Před přivoláním Servisní služby:
• Zkontrolujte, zda nejste schopni poruchu odstranit sami (viz “Poruchy a způsob jejich odstranění”);
• Znovu uveďte do chodu prací program, abyste ověřili, zda byla porucha odstraněna;
• V záporném případě se obraťte na středisko servisní služby.
! Nikdy se neobracejte s žádostí o pomoc na techniky, kteří nejsou k výkonu této činnosti oprávněni.
Při hlášení poruchy uveďte:
• druh poruchy;
• model zařízení (Mod.);
• výrobní číslo (S/N).
Tyto informace jsou uvedeny na štítku aplikovaném na zadní částí pračky a v její přední části, dostupné po otevření dvířek.
60
Page 61

Návod na použitie
PRÁČKA
SK
Slovensky
WMSG 622
Obsah
Inštalácia, 62-63
Rozbalenie a vyrovnanie do vodorovnej polohy
Pripojenie k elektrickej a k vodovodnej sieti
Prvý prací cyklus
Technické údaje
Popis práčky, 64-65
Ovládací panel
Displej
Ako vykonať prací cyklus, 66
Programy a voliteľné funkcie, 67
Tabuľka pracích programov
Voliteľné funkcie prania
Pracie prostriedky a prádlo, 68
Dávkovač pracích prostriedkov
Príprava prádla
Špeciálne programy
Opatrenia a rady, 69
Základné bezpečnostné pokyny
Likvidácia
Manuálne otvorenie dvierok
SK
Údržba a starostlivosť, 70
Uzavretie prívodu vody a vypnutie elektrického napájania
Čistenie práčky
Čistenie dávkovača pracích prostriedkov
Starostlivosť o dvierka a bubon
Čistenie čerpadla
Kontrola prítokovej hadice na vodu
Poruchy a spôsob ich odstránenia, 71
Servisná služba, 72
61
Page 62

Inštalácia
SK
! Je veľmi dôležité uschovať tento návod kvôli
prípadnému ďalšiemu použitiu. V prípade predaja,
darovania alebo presťahovania práčky sa uistite, že
zostane uložený v jej blízkosti, aby mohol poslúžiť
novému majiteľovi pri oboznámení sa s činnosťou a
s príslušnými upozorneniami.
! Pozorne si prečítajte uvedené pokyny: obsahujú
dôležité informácie, týkajúce sa inštalácie, použitia a
bezpečnosti pri práci.
Rozbalenie a vyrovnanie do vodorovnej
polohy
Rozbalenie
1. Rozbaľte práčku.
2. Skontrolujte, či počas prepravy nedošlo k jej
poškodeniu. V prípade, že je poškodená, nezapájajte ju
a obráťte sa na predajcu.
3. Odstráňte 4 skrutky
slúžiace na ochranu
počas prepravy a gumovú
podložku s príslušným
dištančným členom, ktoré
sa nachádzajú v zadnej
časti (viď obrázok).
Dokonalé vyrovnanie do vodorovnej polohy zabezpečí
stabilitu zariadenia a zamedzí vzniku vibrácií a hluku
počas činnosti. V prípade inštalácie na podlahovú krytinu
alebo na koberec, nastavte nožičky tak, aby pod práčkou
zostal dostatočný voľný priestor na ventiláciu.
Pripojenie k elektrickej a k vodovodnej sieti
Pripojenie prítokovej hadice vody
1. Pripojte prívodnú hadicu
jej zaskrutkovaním ku
kohútiku so studenou
vodou, s hrdlom so
závitom 3/4” (viď obrázok).
Pred pripojením hadice
nechajte vodu odtiecť, až
kým nebude číra.
2. Pripojte prítokovú
hadicu k pračke, jej
zaskrutkovaním k
príslušnej prípojke na
vodu, umiestnenej vpravo
hore (viď obrázok).
4. Uzatvorte otvory po skrutkách plastovými krytkami z
príslušenstva.
5. Uschovajte všetky diely: v prípade opätovnej prepravy
práčky ich bude potrebné opätovne namontovať.
! Obaly nie sú hračky pre deti!
Vyrovnanie do vodorovnej polohy
1. Práčku je potrebné umiestniť na rovnú a pevnú
podlahu tak, aby nebola opretá o stenu, nábytok alebo
o niečo iné.
2. V prípade, že podlaha
nie je dokonale vodorovná,
môžu byť prípadné
rozdiely vykompenzované
odskrutkovaním alebo
zaskrutkovaním predných
nožičiek (viď obrázok);
Uhol sklonu, nameraný na
pracovnej ploche, nesmie
presiahnuť 2°.
3. Zabezpečte, aby hadica nebola príliš ohnutá alebo
stlačená.
! Tlak v rozvode vody sa musí pohybovať v rozmedzí
hodnôt uvedených v tabuľke s technickými údajmi (viď
vedľajšia strana).
! V prípade, že dĺžka prítokovej hadice nebude
dostatočná, obráťte sa na špecializovanú predajňu alebo
na autorizovaný technický personál.
! Nikdy nepoužívajte už použité hadice.
! Používajte hadice z príslušenstva zariadenia.
62
Page 63

Pripojenie vypúšťacej hadice
65 - 100 cm
Pripojte vypúšťaciu hadicu
k odpadovému potrubiu
alebo k odpadu v stene,
nachádzajúcom sa od 65
do 100 cm nad zemou;
jednoznačne zamedzte jej
ohybu.
! Nepoužívajte predlžovacie káble a rozvodky.
! Kábel nesmie byť ohnutý alebo pritlačený.
! Výmena kábla musí byť zverená výhradne
autorizovanému technickému personálu.
Upozornenie! Výrobca neponesie žiadnu zodpovednosť
za následky spôsobené nerešpektovaním týchto
pokynov.
Prvý prací cyklus
SK
alebo ju uchyťte k okraju
umývadla či vane, a
pripevnite vodiaci držiak
z príslušenstva ku kohútu
(viď obrázok). Voľný
koniec vypúšťacej hadice
nesmie zostať ponorený
do vody.
! Použitie predlžovacích hadíc sa neodporúča; ak
je však nevyhnutné, predlžovacia hadica musí mať
rovnaký priemer ako originálna hadica a jej dĺžka nesmie
presiahnuť 150 cm.
Pripojenie k elektrickej sieti
Pred zasunutím zástrčky do zásuvky sa uistite, že:
• zásuvka je uzemnená a že vyhovuje normám;
• zásuvka je schopná uniesť maximálnu záťaž
odpovedajúcu menovitému príkonu zariadenia,
uvedenému v tabuľke s technickými údajmi (viď
vedľa);
• hodnota napájacieho napätia odpovedá údajom
uvedeným v tabuľke s technickými údajmi (viď vedľa);
• zásuvka je kompatibilná so zástrčkou práčky.
V opačnom prípade je potrebné vymeniť zásuvku
alebo zástrčku.
! Práčka nesmie byť umiestnená vonku – pod holým
nebom, a to ani v prípade, keby sa jednalo o miesto
chránené pred nepriazňou počasia, pretože je veľmi
nebezpečné vystaviť ju dažďu a búrkam.
Po inštalácii zariadenia je potrebné ešte pred jeho
použitím vykonať jeden skúšobný cyklus s pracím
prostriedkom a bez náplne prádla, nastavením pracieho
programu 2.
Technické údaje
Model WMSG 622
šírka 59,5 cm
Rozmery
Kapacita od 1 do 6 kg
Elektrické zapojeni
Pripojenie k rozvodu vody
Rýchlos±z odstreïovania
Kontrolné pro-
gramy podľa smer-
níc 1061/2010 a
1015/2010
výška 85 cm
håbka 43,5 cm
Vid štítok s technickými údajmi, aplikovaný na zariadení.
maximálny tlak 1 MPa (10 bar)
maximálny tlak 0,05 MPa (0.5 bar)
kapacita bubna 48 litrov
a±z do 1200 otáèok za minútu
program 4; teplota 60°C;
program 5; teplota 40°C.
Toto zariadenie je v zhode s nasledujúcimi smernicami Európskej únie:
- 2004/108/CE (Elektromagnetická
kompatibilita)
- 2006/95/CE (Nízke napätie)
- 2002/96/CE
! Po ukončení inštalácie musí zásuvka zostať ľahko
prístupná.
Hluènost¡
(dB(A) re 1 pW
Pranie: 51
Odstreïovanie: 75
63
Page 64

Popis práčky
SK
Ovládací panel
Tlačidlo ON/OFF
OTOČNÝ OVLÁDAČ
Dávkovač pracích prostriedkov
Dávkovač pracích prostriedkov: slúži na dávkovanie
pracích prostriedkov a prídavných prostriedkov (viď
“Pracie prostriedky a prádlo”).
PROGRAMOV
Tlačidlá a kontrolky
VOLITEĽNÝCH
Tlačidlo TEPLOTA
ODSTREĎOVANIE
Tlačidlo ONESKORENÝ ŠTART : Stlačte kvôli
nastaveniu oneskoreného štartu zvoleného programu;
nastavené oneskorenie bude zobrazené na displeji.
FUNKCIÍ
DISPLEJ
Tlačidlo
Tlačidlo
ZABLOKOVANIE
TLAČIDIEL
Tlačidlo
ONESKORENÝ ŠTART
Tlačidlo
TYP PRANIA
Tlačidlo a kontrolka
START/PAUSE
Tlačidlo ON/OFF : zapnite alebo vypnite práčku
krátkym stlačením tlačidla. Kontrolka START/PAUSE
pomaly blikajúca zeleným svetlom signalizuje, že
zariadenie je zapnuté. Ak chcete vypnúť práčku počas
prania, je potrebné držať tlačidlo stlačené dlhšie,
približne 3 sek.; krátkym alebo náhodným stlačením
práčku nevypnete. Vypnutie zariadenia počas prania
spôsobí zrušenie prebiehajúceho pracieho programu.
OTOČNÝ OVLÁDAČ PROGRAMOV: Slúži na
nastavenie požadovaného programu (viď “Tabuľka
programov”).
Tlačidlá a kontrolky VOLITEĽNÝCH FUNKCIÍ: Slúžia
na voľbu jednotlivých ponúknutých voliteľných funkcií.
Kontrolka zvolenej funkcie zostane rozsvietená.
Tlačidlo
požadovanú intenzitu prania.
Tlačidlo TEPLOTA : Stlačte pre zníženie alebo úplné
vyradenie ohrevu; hodnota bude uvedená na displeji.
Tlačidlo ODSTREĎOVANIE : Stlačte pre zníženie
alebo úplné vyradenie odstreďovania; hodnota bude
uvedená na displeji.
TYP PRANIA
: jeho stlačením môžete zvoliť
Tlačidlo s kontrolkou START/PAUSE: keď zelená
kontrolka začne pomaly blikať, stlačte tlačidlo, aby ste
zahájili pranie. Po zahájení cyklu sa kontrolka rozsvieti
stálym svetlom. Ak si želáte prerušiť pranie, opätovne
stlačte tlačidlo; kontrolka bude blikať oranžovým svetlom.
Ak symbol nie je podsvietený bude možné otvoriť
dvierka. Aby ste opätovne spustili cyklus od doby, kedy
bol prerušený, opätovne stlačte tlačidlo.
Tlačidlo ZABLOKOVANIE TLAČIDIEL : slúži na
aktiváciu zablokovania ovládacieho panelu; aktivácia
sa vykonáva tak, že podržíte stlačené tlačidlo približne
na 2 sekundy. Rozsvietený symbol signalizuje, že
ovládací panel je zablokovaný. Týmto spôsobom sa
zamedzí náhodným zmenám programov, obzvlášť, keď
sú v domácnosti deti. Zrušenie zablokovania ovládacieho
panelu sa vykonáva tak, že podržíte stlačené tlačidlo
približne na 2 sekundy.
Pohotovostný režim
Po skoncení cyklu alebo v case, ked nie je spustený
žiaden cyklus, po 30 minútach dôjde k vypnutiu
zariadenia kvôli energetickej úspore. Na obnovenie
cinnosti zariadenia, nachádzajúceho sa v pohotovostnom
režime, stací stlacit tlacidlo ON/OFF.
Spotreba v off-mode: 1 W
Spotreba v Left-on: 1 W
64
Page 65

Displej
B
A
C
Displej slúži na programovanie zariadenia a na poskytovanie mnohých informácií.
SK
V časti A je zobrazovaná doba trvania rôznych programov a po zahájení činnosti aj doby zostávajúcej do jeho ukončenia;
v prípade nastavenia ONESKORENÝ ŠTART bude zobrazená doba zostávajúca do zahájenia zvoleného programu.
Okrem toho, pri stlačení príslušného tlačidla budú zobrazené maximálne hodnoty rýchlosti odstreďovania a teploty, ktoré
zariadenie môže dosiahnuť, v závislosti od nastaveného programu.
V časti B sú zobrazované “fázy prania”, ktoré sú súčasťou zvoleného cyklu a po zahájení programu aj prebiehajúce “fázy
prania”:
Pranie
Plákanie
Odstreďovanie
Odčerpanie vody
V časti C sa nachádzajú ikony – zľava doprava – “teplota”, “odstreďovanie” a “Oneskorený štart”.
Pruhy “teplota” znázorňujú úroveň teploty vzhľadom k maximálnej nastaviteľnej hodnote pre daný cyklus.
Pruhy “odstreďovanie” znázorňujú úroveň odstreďovania vzhľadom k maximálnej nastaviteľnej hodnote pre daný
cyklus.
Rozsvietený symbol “Oneskorený štart” signalizuje , že na zariadení bola zvolená funkcia “Oneskoreného štartu”.
Kontrolka ZABLOKOVANÉ DVIERKA :
Rozsvietený symbol signalizuje, že dvierka sú zaistené. Aby sa dvierka nepoškodili, pred ich otvorením je potrebné
vyčkať, kým uvedený symbolu nezhasne.
Ak chcete otvoriť dvierka počas pracieho cyklu, stlačte tlačidlo START/PAUSE; keď bude kontrolka ZABLOKOVANÉ
DVIERKA zhasnutá, bude možné dvierka otvoriť.
65
Page 66

Ako vykonať prací cyklus
SK
1. ZAPNUTIE ZARIADENIA. Stlačte tlačidlo ;
kontrolka START/PAUSE bude pomaly blikať zelenou
svetlom.
2. NAPLŇTE PRÁČKU PRÁDLOM. Otvorte dvierka.
Naplňte práčku prádlom pričom dbajte, aby nedošlo
k prekročeniu množstva náplne, uvedeného v tabuľke
programov na nasledujúcej strane.
3. NAPLŇTE DÁVKOVAČ PRACÍCH PROSTRIEDKOV.
Vytiahnite dávkovač pracích prostriedkov a naplňte
prací prostriedok do príslušných priehradiek,
spôsobom vysvetleným v časti “Pracie prostriedky a
prádlo”.
4. ZATVORTE DVIERKA.
5. ZVOĽTE PRACÍ PROGRAM. Otočným ovládačom
PROGRAMOV zvoľte požadovaný program; teplotu
a rýchlosť odstreďovania pre zvolený je možné meniť.
Na displeji sa zobrazí doba trvania cyklu.
6. NASTAVTE PRACÍ PROGRAM PODĽA VAŠICH
POTRIEB. Použite príslušné tlačidlá:
Zmeňte teplotu a/alebo rýchlosť
odstreďovania. Zariadenie automaticky zobrazuje
maximálnu teplotu a rýchlosť odstreďovania pre
nastavený program alebo posledné zvolené hodnoty,
ak sú vhodné pre zvolený program. Stlačením tlačidla
je možné postupne znížiť teplotu prania až po
pranie v studenej vode “OFF”. Stlačením tlačidla je
možné postupne znížiť rýchlosť odstreďovania až po
jeho úplné vylúčenie “OFF”. Ďalšie stlačenie tlačidiel
obnoví nastavenie maximálnych prednastavených
hodnôt.
! Výnimka: pri volbe programu 4 bude možné zvýšit
teplotu až na 90°C.
Nastavenie oneskoreného štartu.
Pre nastavenie oneskoreného štartu zvoleného
programu stláčajte príslušné tlačidlo, až kým
nenastavíte požadovanú dobu oneskorenia. Keď je
táto funkcia zvolená, na displeji sa rozsvieti symbol
. Na zrušenie oneskoreného štartu je potrebné
stláčať tlačidlo, až kým sa na displeji nezobrazí
symbol “OFF”.
Nastavte požadovanú intenzitu prania.
Tlačidlo umožňuje vykonať optimalizáciu prania
na základe stupňa znečistenia tkanín a požadovanej
intenzity prania.
Zvoľte program prania; cyklus bude automaticky
nastavený na úroveň “Normal” (Normálne) a bude
optimalizovaný pre stredne znečistené prádlo
(toto nastavenie neplatí pre cyklus „Vlna“, ktorý sa
automaticky nastaví na úroveň “Delicate” [Jemné]).
Pre značne znečistené prádlo stlačte tlačidlo , až kým
nebude nastavená úroveň “Intensive” (Intenzívne).
Táto úroveň zaručuje dokonalé pranie vďaka použitiu
väčšieho množstva vody v počiatočnej fáze cyklu a
väčšieho mechanického pohybu, a je užitočná pre
odstránenie najodolnejších škvŕn. Môže sa používať
s bieliacim prostriedkom alebo bez neho. Ak si
prajete vykonať bielenie, vložte prídavnú nádobku 4 z
príslušenstva do priehradky 1. Pri dávkovaní bieliaceho
prostriedku neprekračujte úroveň „max“, vyznačenú na
stredovom čape (viď obrázok na str. 68).
Pre mierne znečistené prádlo alebo pre jemné
zaobchádzanie s látkami stláčajte tlačidlo , až
po dosiahnutie úrovne “Delicate” (Jemné). Cyklus
obmedzí mechanický pohyb pre zaistenie dokonalých
výsledkov prania jemného prádla.
Zmena vlastností cyklu.
• Stlačte tlačidlo za účelom aktivácie voliteľnej
funkcie; rozsvieti sa príslušná kontrolka.
• Opätovným stlačením môžete zvolenú voliteľnú
funkciu zrušiť; príslušná kontrolka zhasne.
! V prípade, že zvolená voliteľná funkcia nie je
kompatibilná s nastaveným pracím programom,
kontrolka začne blikať a voliteľná funkcia nebude
aktivovaná.
! Ak zvolená funkcia nie je kompatibilná s niektorou
už nastavenou voliteľnou funkciou, kontrolka prvej
zvolenej funkcie bude blikať a bude aktivovaná len
druhá; kontrolka zvolenejfunkcie sa rozsvieti.
! Voliteľné funkcie môžu zmeniť uvedenú náplň a/
alebo dobu trvania daného cyklu.
7. SPUSŤTE PROGRAM. Stlačte tlačidlo START/PAUSE.
Príslušná kontrolka sa rozsvieti stálym modrým svetlom
a dôjde k zablokovaniu dvierok (rozsvieti sa symbol
ZABLOKOVANÉ DVIERKA ). Ak chcete zmeniť
program počas prebiehajúceho cyklu, aktivujte
prerušenie cyklu práčky stlačením tlačidla START/
PAUSE (kontrolka START/PAUSE bude blikať
jantárovým svetlom); potom zvoľte požadovaný
program a znovu stlačte tlačidlo START/PAUSE.
Ak chcete otvoriť dvierka počas pracieho cyklu,
stlačte tlačidlo START/PAUSE; keď bude kontrolka
ZABLOKOVANÉ DVIERKA zhasnutá, bude možné
otvoriť dvierka. Opätovným stlačením tlačidla START/
PAUSE opätovne uveďte do činnosti prací program
z bodu, v ktorom bol prerušený.
8. UKONČENIE PROGRAMU. Bude signalizované
zobrazením nápisu “END” na displeji a po zhasnutí
symbolu ZABLOKOVANÉ DVIERKA bude možné
otvoriť dvierka. Otvorte dvierka, vyložte prádlo a
vypnite zariadenie.
! Ak si želáte zrušiť už zahájený cyklus, stlačte dlhšie
tlačidlo . Cyklus bude prerušený a dôjde k vypnutiu
zariadenia.
66
Page 67

Programy a voliteľné
funkcie
Tabuľka pracích programov
Max.
Popis programu
Pracie
programy
Odstraòovanie Škvrn
1
Bavlna Biela
2
Bavlna s predpieraním: Mimoriadne znečistené biele prádlo.
3
Bavlna (1): Značne znečistené biele a farebné prádlo z odolných
4
tkanín.
Bavlna (2-3): Značne znečistené biele a farebné prádlo z chúlosti-
5
vých tkanín.
Syntetické: Vel‘mi znečistené farebné prádlo z odolných tkanín.
6
Syntetické (4): Vel‘mi znečistené farebné prádlo z odolných
6
tkanín.
Protialergické
7
Detský program
8
Vlna: Pre vlnu, kašmír, atď.
9
Jemné prádlo
10
Rýchle Pranie 60’: K rýchlemu oživeniu ľahko znečisteného
prádla (nedoporučuje sa pre vlnu, hodváb a prádlo určené na
11
pranie v rukách).
Bavlna
12
Syntetické
13
Rýchle Pranie 30’
14
Plákanie
Odstreďovanie + Odčerpanie vody
Doba trvania cyklu, uvedená na displeji alebo v návode, je stanovená na základe štandardných podmienok. Skutočná doba sa môže meniť v závislosti na mnohých
faktoroch, ako sú napr. teplota a tlak vody na vstupe, teplota prostredia, množstvo pracieho prostriedku, množstvo a druh náplne, vyváženie náplne a zvolené funkcie.
Max. teplo-
ta (°C)
(Max. 90°)
Studenej
vode
Studenej
vode
Studenej
vode
rýchlosť
(otáčky
minútu)
40° 1200
60° 1200
90° 1200
60°
1200
40° 1200
60° 800
40° 800
60° 1200
40° 1000
40° 800
30° 0
60° 1200
1200
800
800
- 1200
- 1200
Pracie prostriedky a
za
Predpiera-
-
-
-
-
-
-
-
-
-
-
-
-
-
-
- - -
- - - -
prídavné
nie
Pranie
Bieliaci
dok
prostrie-
-
-
-
-
-
-
-
-
-
Zvyšková
Spotreba
Aviváž
vlhkosť %
Max. náplň (kg)
4 - - - 180’
4 - - - 190’
6 53 2,21 93 180’
6 53 0,92 54 160’
6 53 0,86 63 150’
2,5 44 0,87 42 90’
2,5 44 0,56 42 80’
4 - - - 200’
4 - - - 165’
1,5 - - - 80’
1 - - - 75’
3,5 53 0,81 36 60’
3 53 0,15 58 95’
3 49 0,08 51 70’
3 71 0,05 57 30’
6 - - - 49’
6 - - - 16’
energie kWh
Voda celkom lt
SK
cyklu
Doba trvania
Pre všetky Test Institutes:
1) Kontrolný program podľa smerníc 1061/2010: nastavte program 4 s teplotou 60°.
Tento cyklus je vhodný pre pranie bežne znečisteného bavlneného prádla a jedná sa o najúčinnejší cyklus z hľadiska kombinovanej spotreby energie a vody, určený
pre prádlo, ktoré je možné prať pri teplote do 60°C. Skutočná teplota prania sa môže líšiť od uvedenej.
2) Kontrolný program podľa smerníc 1061/2010: nastavte program 5 s teplotou 40°.
Tento cyklus je vhodný pre pranie bežne znečisteného bavlneného prádla a jedná sa o najúčinnejší cyklus z hľadiska kombinovanej spotreby energie a vody, určený
pre prádlo, ktoré je možné prať pri teplote do 40°C. Skutočná teplota prania sa môže líšiť od uvedenej.
3) Dlhý program na pranie bavlny: nastavte program 5 s teplotou 40°C.
4) Dlhý program pre syntetické prádlo: nastavte program 6 s teplotou 40°C.
Voliteľné funkcie prania
Extra Plákanie
Voľbou tejto voliteľnej funkcie sa zvýši účinnosť plákania a
zaistí sa maximálny stupeň odstránenia pracieho prostriedku.
Je užitočná hlavne pre mimoriadne citlivé pokožky.
! Nie je aktivovateľná v programoch 7, 10, 14, .
Rýchle pranie
Po zvolení tejto funkcie dôjde k skráteniu doby trvania
programu až o 50%, v závislosti od zvoleného cyklu, pri
súčasnej úspore vody a energie. Použite tento cyklus pre
nie príliš znečistené prádlo.
! Nie je možné ju aktivovať pri programoch 1, 2, 7, 8, 9,
10, 11, 12, 13, 14, , .
67
Page 68

Pracie prostriedky a prádlo
M
AX
1
2
4
3
A
B
SK
Dávkovač pracích prostriedkov
Dobrý výsledok prania závisí aj od správneho
dávkovania pracieho prostriedku: použitie nadmerného
množstva znižuje efektivitu prania a napomáha tvorbe
vodného kameňa na vnútorných častiach práčky a
zvyšuje znečistenie životného prostredia.
! Používajte práškové pracie prostriedky pre biele
bavlnené prádlo a pre predpieranie a pre pranie pri
teplote vyššej ako 60°C.
! Dodržujte pokyny uvedené na obale pracieho prostriedku.
! Nepoužívajte pracie prostriedky určené na pranie v rukách,
pretože spôsobujú tvorbu nadmerného množstva peny.
Pri vyťahovaní dávkovača
pracích prostriedkov a pri
jeho plnení pracími alebo
prídavnými prostriedkami
postupujte nasledovne.
Priehradka 1: Prací prostriedok na predpieranie
(práškový)
Pred naplnením priehradky pracím prostriedkom sa uistite,
že v dávkovači nie je vložená prídavná priehradka 4.
Priehradka 2: Prací prostriedok na pranie (práškový
alebo tekutý)
V prípade použitia tekutého pracieho prostriedku sa
odporúča použiť pre správne dávkovanie malú prepážku
A z príslušenstva. Pre použitie práškového pracieho
prostriedku vložte malú prepážku do priehlbiny B.
Priehradka 3: Prídavné prostriedky (aviváž, atď.)
Aviváž nesmie vytekať z mriežky.
prídavná priehradka 4: Bieliaci prostriedok
Príprava prádla
• Roztrieďte prádlo podľa:
- druhu tkaniny / symbolu na visačke.
- farby: oddeľte farebné prádlo od bieleho.
• Vyprázdnite vrecká a skontrolujte gombíky.
• Neprekračujte povolenú náplň, vzťahujúcu sa na
hmotnosť suchého prádla:
Odolné tkaniny: max. 6 kg
Syntetické tkaniny: max. 2,5 kg
Chúlostivé tkaniny: max. 2 kg
Vlna: max. 1,5 kg
Hodváb: max. 1 kg
Koľko váži prádlo?
1 plachta 400-500 g
1 obliečka 150-200 g
1 obrus 400-500 g
1 župan 900-1.200 g
1 uterák 150-250 g
Špeciálne programy
Odstraòovanie Škvrn: cyklus 1 vhodný pre pranie
značne znečisteného prádla s odolnými farbami. Tento
program zaručuje vyššiu triedu prania ako štandardná
trieda (trieda A). Pri použití tohto programu nemiešajte
spolu prádlo rôznych farieb. Odporúča sa použitie
práškového pracieho prostriedku. Pre odolné škvrny sa
odporúča vykonať predošetrenie špecickými prídavnými
prostriedkami.
Bavlna Biela: použite cyklus 2 pre pranie bieleho prádla.
Program je navrhnutý pre dlhodobé zachovanie žiarivej
bielej farby. Pre dosiahnutie najlepších výsledkov sa
odporúča použiť práškový prací prostriedok.
Protialergické: použite program 7 pre odstránenie hlavných
alergénov, ako je peľ, roztoče a mačacie a psie chlpy.
Detský program: prací program schopný odstrániť
znečistenie typické pre malé deti, pričom je zaručené,
že prací prostriedok bude z prádla odstráný, aby sa
zabránilo alergiám na chúlostivej pleti malých detí. Tento
prací cyklus 8 bol navrhnutý na zníženie množstva
baktérií s použitím vyššieho množstva vody, čím sa
optimalizuje účinok špecických hygienizačných prísad,
pridaných k praciemu prostriedku.
Vlna: prací cyklus „Vlna“ práčky Hotpoint-Ariston
bol testovaný a schválený spoločnosťou Woolmark
Company pre pranie prádla z vlny, klasikovaného ako
„prádlo pre ručné pranie“, za podmienky, že pranie bude
vykonané v súlade s pokynmi uvedenými na visačke
oblečenia a pokynmi dodanými výrobcom elektrického
spotrebiča. Hotpoint-Ariston je prvý typ práčky, ktorá
získala od spoločnosti Woolmark Company certikát
Woolmark Apparel Care - Platinum za svoju výkonnosť a
za spotrebu vody a energie.
Jemné prádlo: pre pranie veľmi jemného prádla, ktoré
obsahuje aplikácie ako je štras alebo pajetky, použite
program 10.
Pre pranie hodvábneho prádla a záclon zvoľte cyklus 10 a
nastavte úroveň “Delicate” (Jemné) voliteľnej funkcie .
Odporúča sa prádlo pred praním prevrátiť naruby a vložiť
malé kusy prádla do príslušného vrecúška pre pranie
jemného prádla.
Pre dosiahnutie najlepších výsledkov sa odporúča použiť
tekutý prací prostriedok pre jemné prádlo.
Programy Eko
Programy Eko ponúkajú účinné pranie pri nízkych teplotách,
čím umožňujú štrenie elektrickej energie, čo je výhodné ako
pre životné prostredie, tak aj pre úsporu peňazí.
Programy Eco (12 Bavlna, 13 Syntetické prádlo a 14
Rýchle pranie 30’) sú vhodné pre rôzne druhy tkanín
a pre mierne znečistené prádlo. Pre zabezpečenie
optimálneho výsledku odporúčame použiť tekutý prací
prostriedok; odporúča sa predbežne ošetriť manžety,
goliere a škvrny.
68
Page 69

Opatrenia a rady
20
! Práčka bola navrhnutá a vyrobená v súlade s platnými
medzinárodnými bezpečnostnými predpismi. Tieto
upozornenia sú uvádzané z bezpečnostných dôvodov a
je potrebné si ich pozorne prečítať.
Základné bezpečnostné pokyny
• Toto zariadenie bolo navrhnuté výhradne na použitie
ako spotrebič.
• Zariadenie nesmú používať osoby (vrátane detí) so
zníženými fyzickými, senzorickými alebo mentálnymi
schopnosťami a s nedostatočnými skúsenosťami
a znalosťami, s výnimkou prípadu, keď je zariadenie
používané pod dozorom alebo na základe pokynov
osoby, zodpovednej za ich bezpečnosť. Deti musia
byť pod dozorom, aby bolo zabezpečené, že sa so
zariadením nehrajú.
• Práčku môžu používať len dospelé osoby, podľa
pokynov uvedených v tomto návode.
• Nedotýkajte sa zariadenia bosí, alebo v prípade, keď
máte mokré ruky alebo nohy.
• Nevyťahujte zástrčku zo zásuvky ťahaním za kábel,
ale uchopením za zástrčku.
• Neotvárajte dávkovač pracích prostriedkov počas
činnosti zariadenia.
• Nedotýkajte sa odčerpávanej vody, pretože môže mať
veľmi vysokú teplotu.
• V žiadnom prípade sa nepokúšajte o násilné otvorenie
dvierok: mohlo by dôjsť k poškodeniu bezpečnostného
uzáveru, ktorý zabraňuje náhodnému otvoreniu.
• Pri výskyte poruchy sa v žiadnom prípade nepokúšajte
o opravu vnútorných častí zariadenia.
• Vždy majte pod kontrolou deti a zabráňte tomu, aby sa
približovali k zariadeniu počas pracieho cyklu.
• Počas pracieho cyklu majú dvierka tendenciu zohrievať sa.
• Ak je potrebné ju presunúť, je dobré poveriť dve alebo
tri osoby a vykonať to s maximálnou pozornosťou.
Nikdy sa nepokúšajte zariadenie premiestňovať sami,
pretože je veľmi ťažké.
• Pred zahájením vkladania prádla skontrolujte, či je
bubon prázdny.
predpokladá, že elektrospotrebiče nesmú byť
likvidované v rámci bežného pevného komunálneho
odpadu. Vyradené zariadenia musia byť zozbierané
osobitne za účelom zvýšenia počtu recyklovaných
a znovu použitých materiálov, z ktorých sa skladajú
a zabráneniu možných ublížení na zdraví a škôd na
životnom prostredí.
Symbolom je preškrtnutý kôš uvedený na všetkých
výrobkoch, s cieľom pripomenúť povinnosti spojené so
separovaným zberom.
Podrobnejšie informácie týkajúce sa správneho
spôsobu vyradenia elektrospotrebičov z prevádzky
môžu ich držitelia získať od poverenej verejnej
inštitúcie alebo na predajcu.
Manuálne otvorenie dvierok
V prípade, ak nie je možné otvoriť dvierka z dôvodu
výpadku elektrickej energie a chceli by ste vybrať prádlo,
postupujte nasledovne:
1. vytiahnite zástrčku zo
zásuvky elektrickej siete.
2. Skontrolujte, či je hladina
vody vo vnútri zariadenia
nižšia ako je úroveň
otvorenia dvierok; ak nie
je, vypusťte prebytočnú
vodu vypúšťacou hadicou a
zachyťte ju do vedra, ako je
znázornené na obrázku.
3. pomocou skrutkovača
odstráňte krycí panel
nachádzajúci sa v prednej
časti práčky (viď obrázok).
SK
Systém automatického vyváženia náplne
Pred každým odstreďovaním bubon vykoná otáčanie
rýchlosťou o málo prevyšujúcou rýchlosť prania, aby
sa tak odstránili vibrácie a aby sa náplň rovnomerne
rozložila. V prípade, že po niekoľko násobných pokusoch
o vyváženie prádlo ešte nebude správne vyvážené,
zariadenie vykoná odstreďovanie nižšou rýchlosťou,
ako je prednastavená rýchlosť. Ak je práčka nadmerne
nevyvážená, vykoná namiesto odstreďovania vyváženie.
Za účelom dosiahnutia rovnomernejšieho rozloženia
náplne a jej správneho vyváženia, odporúča sa pomiešať
veľké a malé kusy prádla.
Likvidácia
• Likvidácia obalových materiálov:
pri ich odstránení postupujte v súlade s miestnymi
predpismi a dbajte na možnú recykláciu.
• Európska smernica 2002/96/ES o odpade tvorenom
elektrickými a elektronickými zariadeniami
4. pomocou jazýčka, označeného na obrázku, potiahnite
plastové tiahlo smerom von z dorazu, až kým sa
neuvolní; následne ho potiahnite smerom dolu a súčasne
otvorte dvierka.
5. namontujte naspäť krycí panel, pričom sa pred jeho
prisunutím k práčke uistite, že došlo k správnemu
zachyteniu háčikov do príslušných otvorov.
69
Page 70

Údržba a starostlivosť
1
2
SK
Uzavretie prívodu vody a vypnutie
elektrického napájania
• Po každom praní uzatvorte prívod vody. Týmto
spôsobom sa znižuje opotrebenie rozvodu vody
zariadenia a znížuje sa nebezpečenstvo úniku vody.
• Pred zahájením čistenia práčky a počas údržby je
potrebné vytiahnuť zástrčku prívodného kábla zo zásuvky.
Čistenie práčky
• Vonkajšie časti a časti z gumy môžu byť čistené
utierkou navlhčenou vo vlažnej vode a saponáte.
Nepoužívajte rozpúšťadlá alebo abrazívne prostriedky.
• Práčka je vybavená programom „Samočistenie“ pre
vyčistenie vnútorných častí, ktorý musí byť vykonaný bez
akéhokoľvek druhu náplne v bubne.
Prací prostriedok (množstvo rovnajúce sa 10% množstva
odporúčaného pre čiastočne znečistené prádlo) alebo
špecické prídavné prostriedky pre čistenie práčky budú
môcť byť použité ako pomocné prostriedky v pracom
programe. Odporúča sa vykonať samočistiaci program
každých 40 cyklov prania.
Pre aktiváciu programu stlačte súčasne tlačidlá A a B na
dobu 5 sekúnd (viď obrázok).
Program bude zahájený automaticky a bude trvať
približne 70 minút. Cyklus je možné ukončiť stlačením
tlačidla START/PAUSE.
B
A
Čistenie čerpadla
Súčasťou práčky je samočistiace čerpadlo, ktoré
nevyžaduje údržbu. Môže sa však stať, že sa v jeho
vstupnej ochrannej časti, nachádzajúcej na spodku,
zachytia drobné predmety (mince, gombíky).
! Uistite sa, že prací cyklus bol ukončený a vytiahnite
zástrčku zo zásuvky.
Prístup k vstupnej časti čerpadla:
1. pomocou skrutkovača
odstráňte krycí panel,
nachádzajúci sa v prednej
časti práčky
(viď obrázok);
2. odskrutkujte veko
otáčaním proti smeru
hodinových ručičiek
(viď obrázok): vytečenie
malého množstva vody je
úplne bežným javom;
Čistenie dávkovača pracích prostriedkov
Vytiahnite dávkovač jeho
nadvihnutím a vytiahnutím
smerom von (viď obrázok).
Dávkovač umyte pod
prúdom vody; toto čistenie
je potrebné vykonávať
pravidelne.
Starostlivosť o dvierka a bubon
• Dvierka ponechajte zakaždým pootvorené, aby sa
zabránilo tvorbe nepríjemných zápachov.
70
3. dokonale vyčistite vnútro;
4. nasaďte naspäť veko;
5. namontujte naspäť krycí panel, pričom sa pred jeho
prisunutím k práčke uistite, že došlo k správnemu
zachyteniu háčikov do príslušných otvorov.
Skontrolujte prítokovú hadicu vodu
Stav prítokovej hadice je potrebné skontrolovať aspoň
raz ročne. Ak sú na nej viditeľné praskliny alebo trhliny,
je potrebné ju vymeniť: silný tlak v hadici počas pracieho
cyklu by mohol spôsobiť jej náhle roztrhnutie.
! Nikdy nepoužívajte už použité hadice.
Page 71

Poruchy a spôsob ich
odstránenia
Môže sa stať, že práčka nebude fungovať. Skôr, ako zatelefonujete na Servisnú službu viď “Servisná služba”)
skontrolujte, či sa nejedná o problém ľahko odstrániteľný pomocou nasledujúceho zoznamu.
Poruchy:
Pračku nie je možné zapnúť.
Nedochádza k zahájeniu pracieho
cyklu.
Do práčky nie je napúšťaná voda
(Na displeji je zobrazený blikajúci
nápis “H2O”).
Práčka nepretržite napúšťa
a odčerpáva vodu.
Práčka neodčerpáva vodu alebo
neodstreďuje.
Možné príčiny / Spôsob ich odstránenia:
• Zástrčka nie je zasunutá v elektrickej zásuvke, alebo nie je zasunutá
dostatočne, aby došlo k spojeniu kontaktov.
• V celom dome je vypnutý prúd.
• Nie sú riadne zatvorené dvierka.
• Nebolo stlačené tlačidlo ON/OFF.
• Nebolo stlačené tlačidlo START/PAUSE.
• Nebol otvorený kohútik prívodu vody.
• Bol nastavený oneskorený hodiny spustenia.
• Prítoková hadica nie je pripojená k vodovodnému kohútiku.
• Hadica je príliš ohnutá.
• Nebol otvorený kohútik prívodu vody.
• V celom dome je uzatvorený prívod vody.
• V rozvode vody nie je dostatočný tlak.
• Nebolo stlačené tlačidlo START/PAUSE.
• Vypúšťacia hadica sa nachádza mimo určeného rozmedzia od 65 do 100 cm
nad zemou (viď “Inštalácia”).
• Koncová časť vypúšťacej hadice je ponorená vo vode (viď “Inštalácia”).
• Odpadové potrubie v stene nie je vybavené odvzdušňovacím otvorom.
Ak po týchto kontrolách nedôjde k odstráneniu problému, zatvorte vodovodný
kohútik, vypnite práčku a zavolajte Servisnú službu. V prípade, že sa
byt nachádza na jednom z najvyšších poschodí je možné, že dochádza
k sifónovému efektu, následkom ktorého práčka nepretržite napúšťa a
odčerpáva vodu. Na odstránenie uvedeného efektu sú v predaji bežne dostupné
špeciálne “protisifónové” ventily.
• Odčerpanie vody netvorí súčasť nastaveného programu: Pri niektorých
programoch je potrebné aktivovať ho manuálne.
• Vypúšťacia hadica je ohnutá (viď “Inštalácia”).
• Odpadové potrubie je upchaté.
SK
Práčka vo fáze odstreďovania veľmi
vibruje.
Z práčky uniká voda.
Kontrolky “Voliteľné funkcie” a
kontrolka “START/PAUSE” blikajú
a na displeji je zobrazený kód
poruchy (napr.: F-01, F-..).
Dochádza k tvorbe nadmerného
množstva peny.
• Počas inštalácie nebol bubon odistený predpísaným spôsobom (viď
“Inštalácia”).
• Práčka nie je dokonale vyrovnaná do vodorovnej polohy (viď “Inštalácia”).
• Práčka je stlačená medzi nábytkom a stenou (viď “Inštalácia”).
• Prítoková hadica nie je správne zaskrutkovaná (viď “Inštalácia”).
• Dávkovač pracích prostriedkov je upchatý (spôsob jeho vyčistenia je uvedený
v časti “Údržba a starostlivosť”).
• Vypúšťacia hadica nie je dobre pripevnená (viď “Inštalácia”).
• Vypnite zariadenie a vytiahnite zástrčku zo zásuvky, vyčkajte 1 minútu a
opätovne ho zapnite.
Ak porucha pretrváva, obráťte sa na Servisnú službu.
• Použitý prací prostriedok nie je vhodný na použitie v automatickej práčke
(musí obsahovať označenie “pre pranie v práčke”, “pre pranie v rukách alebo
v práčke” alebo podobné označenie).
• Bolo použité jeho nadmerné množstvo.
71
Page 72

Servisná služba
195097603.01
12/2011 - Xerox Fabriano
SK
Pred obrátením sa na Servisnú službu:
• Skontrolujte, či nie ste schopní poruchu odstrániť sami (viď “Poruchy a spôsob ich odstránenia”);
• Opätovne uveďte do chodu prací program, s cieľom overiť, či bola porucha odstránená;
• Ak to nie je možné, obráťte sa na Stredisko servisnej služby.
! Nikdy sa neobracajte so žiadosťou o pomoc na technikov, ktorí nie sú na vykonávanie tejto činnosti oprávnení.
Pri hlásení poruchy uveďte:
• druh poruchy;
• model zariadenia (Mod.);
• výrobné číslo (S/N).
Tieto informácie sú uvedené na štítku aplikovanom na zadnej časti práčky a v jej prednej časti, dostupnej po otvorení
dvierok.
72
 Loading...